

Page 1
User’s Guide and Technical Reference
Page 2

ii Data Protector Express User's Guide and Technical Reference
Copyright
Copyright © 2007 by Hewlett-Packard Development Company, L.P. May 2007
Part Number BB116-90040
Hewlett-Packard Company makes no warranty of any kind with regard to this material, including, but not limited to, the implied warranties of
merchantability and fitness for a particular purpose. Hewlett-Packard shall not be liable for errors contained herein or for incidental or consequential
damages in connection with the furnishing, performance, or use of this material.
This document contains proprietary information, which is protected by copyright. No part of this document may be photocopied, reproduced, or translated to
another language without the prior written consent of Hewlett-Packard. The information contained in this document is subject to change without notice.
Windows®, Windows NT® and MS-DOS® are registered trademarks of Microsoft Corporation. NetWare® is a registered trademark of Novell, Inc. Btrieve
is a registered trademark of Pervasive Software Inc. Linux® is a registered trademark of Linus Torvalds. Red Hat® is a registered trademark of Red Hat, Inc.
Mandrake® is a registered trademark of MandrakeSoft S.A. SuSE® is a registered trademark of SuSE Linux. Debian® is a registered trademark of Software
in the Public Interest, Inc. Slackware® is a registered trademark of Slackware Linux, Inc. SCO® is a registered trademark of Caldera International, Inc.
UNIX® is a registered trademark of The Open Group. Solaris™ is a trademark of Sun Microsystems, Inc. SPARC® is a registered trademark of SPARC
International, Inc. Products bearing SPARC trademarks are based on an architecture developed by Sun Microsystems, Inc. FreeBSD® is a registered
trademark of FreeBSD Inc. and Walnut Creek CDROM. Netscape® is a registered trademark of Netscape Communications Corporation. Java™ is a
trademark of Sun Microsystems, Inc. Adobe®, Acrobat® and Acrobat® Reader® are registered trademarks of Adobe Systems Incorporated. WinZip® is a
registered trademark of WinZip Computing, Inc. Pentium® and Celeron® are registered trademarks of Intel Corporation. AMD-K6®, AMD Athlon™ and
AMD Duron™ are trademarks or registered trademarks of Advanced Micro Devices, Inc.
Hewlett-Packard Company shall not be liable for technical or editorial errors or omissions contained herein. The information is provided ”as is” without
warranty of any kind and is subject to change without notice. The warranties for Hewlett-Packard Company products are set forth in the express limited
warranty statements for such products. Nothing herein should be construed as constituting an additional warranty.
www.hp.com
Trademarks
Windows® and Windows NT® are registered trademarks of Microsoft Corporation.
NetWare® is a registered trademark of Novell, Inc.
Linux® is a registered trademark of Linus Torvalds. Red Hat® is a registered trademark of Red Hat, Inc. SuSE® is a registered trademark of SuSE Linux
Products GmbH, a Novell business.
Trademarks
Windows® and Windows NT® are registered trademarks of Microsoft Corporation.
NetWare® is a registered trademark of Novell, Inc.
Linux® is a registered trademark of Linus Torvalds. Red Hat® is a registered trademark of Red Hat, Inc. SuSE® is a registered trademark of SuSE Linux
Products GmbH, a Novell business
Page 3

Table of Contents
Before You Begin ....................................................................................................................... xvi
Documentation ..............................................................................................................................xvi
Printable documentation ..........................................................................................................................................xvi
Release notes .........................................................................................................................................................xvii
Online Help..............................................................................................................................................................xvii
Windows ........................................................................................................................................................... xvii
Non-Windows ................................................................................................................................................... xvii
Screen Shots........................................................................................................................................................... xvii
Features ..................................................................................................................................................................xvii
Customer Support ........................................................................................................................ xvii
Chapter 1: About Data Protector Express ................................................................................... 1
Backup basics ................................................................................................................................. 1
Typical backup and recovery operations ................................................................................................................... 1
Backup environment........................................................................................................................ 2
Backup devices.................................................................................................................................................... 2
Storage management catalog ............................................................................................................................. 3
Backup management program ............................................................................................................................ 4
Managing the Storage Management Catalog ............................................................................................................ 4
Objects................................................................................................................................................................. 4
Properties ............................................................................................................................................................ 4
Data Protector Express management domains................................................................................................... 4
Data Protector Express management domains and security .............................................................................. 5
Creating and running jobs ................................................................................................................................... 6
Chapter 2: Data Protector Express Workplace ........................................................................... 7
Starting Data Protector Express ...................................................................................................... 7
Logon Window................................................................................................................................. 8
Logging on the first time............................................................................................................................................. 8
Grace logons ....................................................................................................................................................... 9
Selecting a Data Protector Express management domain ........................................................................................ 9
User name and password ........................................................................................................................................ 10
Changing your password ......................................................................................................................................... 10
Logging out .............................................................................................................................................................. 11
Logging out and running scheduled jobs........................................................................................................... 11
Main Data Protector Express Window ........................................................................................... 12
Menu bar............................................................................................................................................................ 12
Desk bar ............................................................................................................................................................ 13
Toolbar............................................................................................................................................................... 14
Task and information panes .............................................................................................................................. 15
Detail viewing area ............................................................................................................................................ 15
Status bar .......................................................................................................................................................... 16
Customizing the main Data Protector Express window ................................................................. 17
Creating a custom desk bar ..................................................................................................................................... 17
Changing the icon associated with an object........................................................................................................... 17
Adding custom descriptions to objects..................................................................................................................... 18
Customizing profiles................................................................................................................................................. 18
Working with Objects in the Main Data Protector Express Window............................................... 19
Arranging objects ..................................................................................................................................................... 19
iii
Page 4

iv Data Protector Express User's Guide and Technical Reference
Keyboard shortcuts .................................................................................................................................................. 19
Shortcut menus ........................................................................................................................................................ 20
Find button ............................................................................................................................................................... 20
Property pages .............................................................................................................................. 20
Opening property pages........................................................................................................................................... 21
Reports.......................................................................................................................................... 22
Types of reports ....................................................................................................................................................... 22
Additional reporting capabilities ............................................................................................................................... 22
Printing reports ......................................................................................................................................................... 23
Saving reports .......................................................................................................................................................... 23
Working with Data Protector Express wizards ............................................................................... 24
Available wizards ..................................................................................................................................................... 25
Backup job wizards............................................................................................................................................ 25
Restore job wizards ........................................................................................................................................... 25
Verify job wizards............................................................................................................................................... 25
Media job wizards .............................................................................................................................................. 26
D2D device wizards ........................................................................................................................................... 27
Disaster recovery wizards ................................................................................................................................. 27
Custom wizards........................................................................................................................................................ 27
Viewing optional features............................................................................................................... 28
Chapter 3: Creating Jobs with Data Protector Express ........................................................... 29
Overview........................................................................................................................................ 29
Backup jobs.............................................................................................................................................................. 29
Restore jobs ............................................................................................................................................................. 30
Verify jobs................................................................................................................................................................. 30
Media jobs ................................................................................................................................................................ 30
Disaster recovery jobs.............................................................................................................................................. 30
Job Group................................................................................................................................................................. 30
Jobs and Media view and the Job Status view .............................................................................. 31
Creating New Jobs ........................................................................................................................ 32
Creating jobs with wizards ....................................................................................................................................... 32
Creating new jobs from the Jobs and Media view ................................................................................................... 33
Creating new jobs by copying .................................................................................................................................. 35
Renaming, deleting, copying and moving jobs .............................................................................. 35
Creating job groups ....................................................................................................................... 36
Organizing jobs with folders........................................................................................................... 36
Types of folders........................................................................................................................................................ 37
Folders and job views .............................................................................................................................................. 37
Home, Admin, and Everyone folders ....................................................................................................................... 37
Everyone folder and permissions ...................................................................................................................... 38
Creating job folders .................................................................................................................................................. 38
Moving, renaming and deleting folders .................................................................................................................... 39
Modifying folders................................................................................................................................................ 39
Chapter 4: Permissions............................................................................................................... 41
Overview........................................................................................................................................ 41
Users and Groups ......................................................................................................................... 41
Everyone group ........................................................................................................................................................ 42
Effective Permissions .................................................................................................................... 43
Determining effective permissions ........................................................................................................................... 43
Examples of determining effective permissions....................................................................................................... 43
Page 5

Table of Contents v
Effective permissions example #1 ..................................................................................................................... 43
Effective permissions example #2 ..................................................................................................................... 44
How moving objects affects permissions ................................................................................................................. 45
Types of Permission ...................................................................................................................... 46
Supervisor ................................................................................................................................................................ 47
Access...................................................................................................................................................................... 47
Create....................................................................................................................................................................... 47
Modify....................................................................................................................................................................... 48
Delete, Read and Write............................................................................................................................................ 48
Examples of Permissions .............................................................................................................. 48
Granting Permissions to Other Data Protector Express Users ...................................................... 50
Restricting user permissions .................................................................................................................................... 51
Chapter 5: Selecting Files and File Versions ............................................................................ 53
Backup Selection Concepts........................................................................................................... 53
Marking files for backup ........................................................................................................................................... 54
Selecting folders or selecting files ..................................................................................................................... 54
Selecting files with filters .......................................................................................................................................... 56
How selection filters work .................................................................................................................................. 56
Filters and shaded folders ................................................................................................................................. 56
Selecting changed files only..................................................................................................................................... 57
Automatically selecting new files for backup............................................................................................................ 57
Working with mapped drives .................................................................................................................................... 58
Working with VSS snapshots ................................................................................................................................... 59
Selecting Files for Backup Jobs..................................................................................................... 60
Applying filter criteria................................................................................................................................................ 60
Filter selection criteria .............................................................................................................................................. 61
Backup Range ................................................................................................................................................... 62
Modify Range..................................................................................................................................................... 62
Create Range .................................................................................................................................................... 62
Access Range.................................................................................................................................................... 62
Size Range ........................................................................................................................................................ 63
Version Range ................................................................................................................................................... 63
Wildcard Type.................................................................................................................................................... 64
Must Match ........................................................................................................................................................ 64
Cannot Match .................................................................................................................................................... 64
Required Attributes ............................................................................................................................................ 64
Exclude Attributes.............................................................................................................................................. 65
Allow Parents..................................................................................................................................................... 65
Allow Children.................................................................................................................................................... 65
Media ................................................................................................................................................................. 65
Restore Selection Concepts .......................................................................................................... 66
Selecting files for restoring....................................................................................................................................... 66
Selecting versions of files .................................................................................................................................. 68
Selecting versions of folders.............................................................................................................................. 69
Selecting folders compared to selecting files .................................................................................................... 71
Versions and filters ............................................................................................................................................ 71
Selecting files with filters .......................................................................................................................................... 71
How selection filters work .................................................................................................................................. 71
Changing the name and location of restored files ................................................................................................... 71
Selecting Versions of Files for Restore Jobs ................................................................................. 72
Applying filter criteria................................................................................................................................................ 72
Filter selection criteria .............................................................................................................................................. 73
Page 6

vi Data Protector Express User's Guide and Technical Reference
Backup Range ................................................................................................................................................... 73
Modify Range..................................................................................................................................................... 74
Create Range .................................................................................................................................................... 74
Delete Range..................................................................................................................................................... 74
Access Range.................................................................................................................................................... 75
Size Range ........................................................................................................................................................ 75
Version Range ................................................................................................................................................... 75
Wildcard Type.................................................................................................................................................... 76
Must Match ........................................................................................................................................................ 76
Cannot Match .................................................................................................................................................... 76
Required Attributes ............................................................................................................................................ 77
Exclude Attributes.............................................................................................................................................. 77
Allow Parents..................................................................................................................................................... 77
Allow Children.................................................................................................................................................... 77
Media ................................................................................................................................................................. 77
Restoring Files with New Names and Locations............................................................................ 78
Restoring a file with a new name ............................................................................................................................. 78
Restoring files to a different folder ........................................................................................................................... 78
Restoring files to a new folder.................................................................................................................................. 79
Verify Selection Concepts.............................................................................................................. 80
Selecting files for verifying ....................................................................................................................................... 80
Selecting versions of files .................................................................................................................................. 82
Selecting folders compared to selecting files .................................................................................................... 83
Selecting files with filters .......................................................................................................................................... 84
How selection filters work .................................................................................................................................. 84
Selecting Versions of Files for Verify Jobs..................................................................................... 84
Applying filter criteria................................................................................................................................................ 85
Filter selection criteria .............................................................................................................................................. 85
Backup Range ................................................................................................................................................... 86
Modify Range..................................................................................................................................................... 86
Create Range .................................................................................................................................................... 87
Access Range.................................................................................................................................................... 87
Size Range ........................................................................................................................................................ 87
Version Range ................................................................................................................................................... 87
Wildcard Type.................................................................................................................................................... 88
Must Match ........................................................................................................................................................ 88
Cannot Match .................................................................................................................................................... 88
Required Attributes ............................................................................................................................................ 88
Exclude Attributes.............................................................................................................................................. 89
Allow Parents..................................................................................................................................................... 89
Allow Children.................................................................................................................................................... 89
Media ................................................................................................................................................................. 89
Chapter 6: Scheduling Jobs ....................................................................................................... 90
Overview........................................................................................................................................ 90
Choosing a Schedule Type............................................................................................................ 90
Non-scheduled backup jobs..................................................................................................................................... 92
Scheduled backup jobs ............................................................................................................................................ 92
Customizing Schedules ................................................................................................................. 92
Scheduling Restore Jobs............................................................................................................... 94
Scheduling Verify Jobs .................................................................................................................. 94
Backup Job Schedule Type Descriptions ...................................................................................... 94
Tips for Working with Scheduled Jobs........................................................................................... 94
Page 7

Table of Contents vii
Running a failed rotation job again .......................................................................................................................... 94
Scheduling a job to run once only ............................................................................................................................ 95
Scheduling simple backup jobs................................................................................................................................ 95
Simple daily backup........................................................................................................................................... 96
Simple five-day rotation ..................................................................................................................................... 96
Chapter 7: Planning for Media Rotation .................................................................................... 98
Media Rotation Concepts .............................................................................................................. 98
A Sample Media Rotation ........................................................................................................................................ 99
Media Sets..................................................................................................................................... 99
Fixed Rotation Type Descriptions ............................................................................................................................ 99
Which Rotation Type to Select .................................................................................................... 100
Full data recovery period ................................................................................................................................. 100
Access to historical files .................................................................................................................................. 100
Minimum number of tapes or media................................................................................................................ 101
Deciding how frequently to overwrite media.................................................................................................... 101
Comparing rotation types ....................................................................................................................................... 101
Adding Media Rotation to a Backup Job...................................................................................... 103
Modifying Rotation Types ............................................................................................................ 104
Changing the tape set count............................................................................................................................ 105
Managing Backups with or Without Media Rotation .................................................................... 105
Determining the length of the full data recovery period................................................................................... 106
Incremental jobs and full data recovery........................................................................................................... 106
Chapter 8: Job Options ............................................................................................................. 107
Overview...................................................................................................................................... 107
Backup Job Options .................................................................................................................... 107
Log options ...................................................................................................................................................... 108
Span mode ...................................................................................................................................................... 110
Backup mode................................................................................................................................................... 110
Change mode .................................................................................................................................................. 110
Write mode ...................................................................................................................................................... 111
Auto Verify Mode ............................................................................................................................................. 111
Encryption/Compression ................................................................................................................................. 112
Backup options automatically updated ............................................................................................................ 113
Advanced options for backup jobs ......................................................................................................................... 113
Settings for all platforms .................................................................................................................................. 114
Settings for NetWare ....................................................................................................................................... 115
Settings for Windows ....................................................................................................................................... 116
Restore Job Options.................................................................................................................... 116
Restore files in use .......................................................................................................................................... 117
Log options ...................................................................................................................................................... 117
Advanced Options for Restore Jobs ............................................................................................ 118
All Platforms..................................................................................................................................................... 118
Settings for Windows ....................................................................................................................................... 118
Verify Job Options ....................................................................................................................... 118
Log Options ..................................................................................................................................................... 119
Verify Mode...................................................................................................................................................... 119
Advanced options for verify jobs...................................................................................................................... 120
Media Job Options....................................................................................................................... 120
Log options ...................................................................................................................................................... 120
Additional settings for media jobs .................................................................................................................... 120
Page 8

viii Data Protector Express User's Guide and Technical Reference
Chapter 9: Running Jobs .......................................................................................................... 122
Overview...................................................................................................................................... 122
Job Status View........................................................................................................................... 123
Job Status details view........................................................................................................................................... 123
Running Scheduled Jobs............................................................................................................. 124
Automatically running scheduled jobs.................................................................................................................... 124
Security and scheduled jobs .................................................................................................................................. 125
Forcing scheduled jobs to run ................................................................................................................................ 126
How forcing jobs to run affects job settings ..................................................................................................... 126
How forcing jobs to run affects permissions.................................................................................................... 127
Viewing and printing scheduled job instructions .................................................................................................... 127
Running Unscheduled Jobs......................................................................................................... 128
Unscheduled job settings and permissions............................................................................................................ 128
Status property page ................................................................................................................... 128
Job status messages ............................................................................................................................................. 129
Job Logs ...................................................................................................................................... 130
Viewing job logs ..................................................................................................................................................... 131
Automatically printing job logs................................................................................................................................ 131
Emailing job logs .................................................................................................................................................... 132
Audit Logs.................................................................................................................................... 132
Chapter 10: Managing Devices and Media .............................................................................. 134
Backup Concepts ........................................................................................................................ 134
Disk-to-Disk Backups................................................................................................................... 135
Disk-to-Disk-to-Any Backups ....................................................................................................... 135
Creating a Virtual Library ............................................................................................................. 135
Moving Backups From a Virtual Library....................................................................................... 136
Devices view and Catalog view ................................................................................................... 139
Managing Devices with the Devices view.................................................................................... 141
Restarting failed devices ........................................................................................................................................ 141
Configuring physical devices ................................................................................................................................. 142
Viewing diagnostic information............................................................................................................................... 142
Restoring data from a virtual library ....................................................................................................................... 142
Devices view commands........................................................................................................................................ 142
Eject Media or Loader Magazine command.................................................................................................... 143
Rewind Media command ................................................................................................................................. 143
Retension Media command ............................................................................................................................. 143
Erase Media command.................................................................................................................................... 143
Format Media command.................................................................................................................................. 143
Import Media (into the catalog) command....................................................................................................... 144
Restore Catalog command .............................................................................................................................. 145
Clean Device command .................................................................................................................................. 146
Identify Media command ................................................................................................................................. 146
Sort Media command ...................................................................................................................................... 146
Testing a library or a device ................................................................................................................................... 146
Test results............................................................................................................................................................. 146
Element status ................................................................................................................................................. 146
Managing Media with the Jobs and Media View.................................................................................................... 147
Creating media folders .................................................................................................................................... 148
Deleting media folders ..................................................................................................................................... 148
Creating new media......................................................................................................................................... 149
Media passwords............................................................................................................................................. 150
Page 9

Table of Contents ix
Deleting media................................................................................................................................................. 150
Media content .................................................................................................................................................. 151
Catalog View .......................................................................................................................................................... 151
Chapter 11: Working With Tape Libraries ............................................................................... 153
Overview...................................................................................................................................... 153
Installation Configuration and Licensing ...................................................................................... 153
Adding the Data Protector Express Drive Expansion License............................................................................... 154
How does Data Protector Express allocate licenses? ........................................................................................... 154
Viewing a Tape Library................................................................................................................ 154
Devices................................................................................................................................................................... 155
Import/Export Slots................................................................................................................................................. 155
Storage Slots.......................................................................................................................................................... 155
Barcodes and Cartridge Memory ........................................................................................................................... 156
Inventory Process .................................................................................................................................................. 156
Media Management..................................................................................................................... 157
Import Media .......................................................................................................................................................... 157
Sort Media .............................................................................................................................................................. 157
Insert Media ........................................................................................................................................................... 157
Remove Media ....................................................................................................................................................... 158
Reserving Slots ...................................................................................................................................................... 158
Backups and Rotation Types....................................................................................................... 158
Media guidelines .................................................................................................................................................... 159
A Note About Streaming ........................................................................................................................................ 159
Chapter 12: Tips, Techniques and Strategies ......................................................................... 160
Tips for Managing the Catalog..................................................................................................... 160
Where to locate the catalog ................................................................................................................................... 160
Accounting for catalog size .................................................................................................................................... 163
Backup server and machine platforms................................................................................................................... 163
Strategies for Faster Jobs............................................................................................................ 163
Organizing machines into workgroups................................................................................................................... 164
What Slows Down Tape Drives? ........................................................................................................................... 164
Maintaining the flow of data ................................................................................................................................... 164
Other factors that affect job speed ......................................................................................................................... 166
Working with Permissions............................................................................................................ 166
Checking the effective permissions of a user ........................................................................................................ 166
Using groups to handle complex security needs ................................................................................................... 167
Selecting Files for Jobs................................................................................................................ 167
Selecting files not previously backed up ................................................................................................................ 167
Selecting deleted files for restoring ........................................................................................................................ 168
Selecting versions from a specific job .................................................................................................................... 168
Selecting versions from specific media .................................................................................................................. 168
Restoring Tips ............................................................................................................................. 168
Restoring volumes for the latest date .................................................................................................................... 168
Restoring volumes for a specific date .................................................................................................................... 169
Copying a directory structure ................................................................................................................................. 170
Restoring files to a new or different folder ............................................................................................................. 170
Restoring files with new names.............................................................................................................................. 171
Other Tips.................................................................................................................................... 171
Moving data between operating systems............................................................................................................... 171
Setting up a library for automatic cleaning............................................................................................................. 172
Page 10

x Data Protector Express User's Guide and Technical Reference
Chapter 13: Advanced Permissions and Security .................................................................. 174
Overview...................................................................................................................................... 174
About administrator permissions............................................................................................................................ 175
Adding New Users and Groups ................................................................................................... 176
New user or group folders...................................................................................................................................... 176
Setting up users ..................................................................................................................................................... 176
Logon Control page for users .......................................................................................................................... 176
Groups page for users ..................................................................................................................................... 178
Equivalencies................................................................................................................................................... 179
Permissions page for users ............................................................................................................................. 180
Setting up groups ................................................................................................................................................... 181
Members page................................................................................................................................................. 182
Permissions page for groups ........................................................................................................................... 182
Effective Permissions .................................................................................................................. 183
Calculating effective permissions........................................................................................................................... 183
Effective permissions algorithm ....................................................................................................................... 183
Permissions from multiple sources .................................................................................................................. 184
Examples of effective permissions......................................................................................................................... 184
Checking effective permissions.............................................................................................................................. 186
Permissions Reference................................................................................................................ 186
Read permission .................................................................................................................................................... 186
Write permission .................................................................................................................................................... 186
Delete permission .................................................................................................................................................. 187
Modify permission .................................................................................................................................................. 187
Create permission .................................................................................................................................................. 188
Access permission ................................................................................................................................................. 188
Supervisor permission............................................................................................................................................ 188
Chapter 14: Objects and Properties Reference ...................................................................... 190
Address page .............................................................................................................................. 191
Audit page ................................................................................................................................... 192
Command page ........................................................................................................................... 193
Communication page................................................................................................................... 194
Ping test........................................................................................................................................................... 194
Data Transfer test ............................................................................................................................................ 194
Status............................................................................................................................................................... 195
Configuration page ...................................................................................................................... 196
Device configuration .................................................................................................................... 196
Virtual library configuration .......................................................................................................... 197
Storage slot configuration ............................................................................................................ 198
Email settings .............................................................................................................................. 199
File system stream configuration ................................................................................................. 200
Microsoft Exchange Server configuration .................................................................................... 201
Microsoft SQL Server configuration............................................................................................. 202
Certificate services configuration page........................................................................................ 203
Connections page........................................................................................................................ 204
Control page ................................................................................................................................ 205
Device/Media page...................................................................................................................... 206
Device to be used ............................................................................................................................................ 206
Types of devices to use ................................................................................................................................... 207
Page 11

Table of Contents xi
Media to be used ............................................................................................................................................. 207
Auto format information ................................................................................................................................... 207
Media options automatically updated..................................................................................................................... 208
Diagnostics page ......................................................................................................................... 209
Driver control page ...................................................................................................................... 210
Equivalencies page ..................................................................................................................... 211
Execution page............................................................................................................................ 213
General page............................................................................................................................... 215
Groups page or Members page................................................................................................... 219
Fields on the Groups page .............................................................................................................................. 219
Fields on the Members page ........................................................................................................................... 220
Logon Control page ..................................................................................................................... 221
Expiration......................................................................................................................................................... 221
Grace logons ................................................................................................................................................... 222
Password ......................................................................................................................................................... 222
Connection....................................................................................................................................................... 222
Logs page.................................................................................................................................... 224
Options page ............................................................................................................................... 226
Backup Mode................................................................................................................................................... 226
Auto Verify Mode ............................................................................................................................................. 227
Write Mode ...................................................................................................................................................... 227
Span Mode ...................................................................................................................................................... 227
Change Mode .................................................................................................................................................. 228
Encryption/Compression ................................................................................................................................. 228
Logging options ............................................................................................................................................... 230
Advanced options ............................................................................................................................................ 231
Job Group options ....................................................................................................................... 232
Modes .............................................................................................................................................................. 232
List of jobs to be executed ............................................................................................................................... 232
Log options ...................................................................................................................................................... 232
Media job options ........................................................................................................................ 233
Move Options page ..................................................................................................................... 235
Permissions page ........................................................................................................................ 236
Preferences page ........................................................................................................................ 238
Disable visual animations ................................................................................................................................ 238
Web browser.................................................................................................................................................... 238
Do not display watermark in views .................................................................................................................. 238
Single-click to open an item in views............................................................................................................... 238
Color palette .................................................................................................................................................... 239
Printer page ................................................................................................................................. 240
Query window and Selection Filters window................................................................................241
Schedule page............................................................................................................................. 244
Schedule settings ............................................................................................................................................ 244
Start Time ........................................................................................................................................................ 245
Rotation Settings ............................................................................................................................................. 245
End of Week .................................................................................................................................................... 246
End of Quarter ................................................................................................................................................. 246
Rotation Details ............................................................................................................................................... 246
View a sample rotation .................................................................................................................................... 246
Selection page............................................................................................................................. 247
File Selection Page ................................................................................................................................................ 247
Page 12

xii Data Protector Express User's Guide and Technical Reference
Device or Media Selection Page ............................................................................................................................ 247
Status page ................................................................................................................................. 249
Stream Control page ................................................................................................................... 250
Storage page ............................................................................................................................... 252
Backup Stream ................................................................................................................................................ 252
Versions window.......................................................................................................................... 254
Available Versions ........................................................................................................................................... 254
Details.............................................................................................................................................................. 254
Appendix A - Using the Quick Access Application ................................................................ 256
Installing and running the Quick Access application.................................................................... 256
Viewing Data Protector Express status ....................................................................................... 256
Accessing Data Protector Express functions ............................................................................... 257
Jobs........................................................................................................................................................................ 257
Creating jobs.................................................................................................................................................... 258
Monitoring jobs ................................................................................................................................................ 258
Media...................................................................................................................................................................... 258
Alerts ...................................................................................................................................................................... 259
Logs........................................................................................................................................................................ 260
Settings .................................................................................................................................................................. 261
Login information ............................................................................................................................................. 261
Icon appearance .............................................................................................................................................. 261
Automatically start this application when the operating system starts ............................................................ 261
Automatically log in on startup......................................................................................................................... 261
Maximum number of menu items for Jobs, Alerts, or Logs submenus ........................................................... 262
Service settings ............................................................................................................................................... 262
Open Administrator ................................................................................................................................................ 262
Logout .................................................................................................................................................................... 262
Exit ......................................................................................................................................................................... 262
Appendix B - Configuring Email............................................................................................... 263
Configuring Email for the Data Protector Express management domain..................................... 263
Configuring Email for a Job ......................................................................................................... 263
Appendix C - About the Data Protector Express Service....................................................... 264
Microsoft Windows and the Data Protector Express Service ................................................................................ 264
Data Protector Express Service Controls ........................................................................................................ 264
NetWare and the Data Protector Express Agent ................................................................................................... 265
Running the Data Protector Express Agent .................................................................................................... 265
Stopping the Data Protector Express Agent.................................................................................................... 265
Linux and the Data Protector Express Daemon..................................................................................................... 265
Appendix D - Disaster Recovery .............................................................................................. 267
Disaster Recovery Concepts.................................................................................................................................. 267
Licensing ..................................................................................................................................... 268
What is OBDR? ...................................................................................................................................................... 268
Important guidelines .................................................................................................................... 268
Media...................................................................................................................................................................... 268
Replacing hardware ............................................................................................................................................... 269
Running recovery ................................................................................................................................................... 269
You should perform the disaster recovery operation on the failed computer after replacing the faulty hardware
that caused the system failure. ........................................................................................................................ 269
Page 13

Table of Contents xiii
Windows only................................................................................................................................................... 269
Create the Disaster Recovery Backup......................................................................................... 270
Create full backup .................................................................................................................................................. 270
Create bootable media........................................................................................................................................... 271
From the GUI ................................................................................................................................................... 272
Troubleshooting disaster recovery backups .......................................................................................................... 272
When to create new bootable media ..................................................................................................................... 273
Testing Disaster Recovery Media................................................................................................ 273
Recovering From a Disaster ........................................................................................................ 275
Disaster recovery from CD or DVD ........................................................................................................................ 275
Disaster recovery from bootable media ................................................................................................................. 276
Recover System State (Windows only).................................................................................................................. 278
Troubleshooting recovering from a disaster........................................................................................................... 278
Using Disaster Recovery with Libraries ....................................................................................... 279
Using Disaster Recovery with Windows Active Directory ............................................................ 279
Appendix E - Troubleshooting Guide ...................................................................................... 280
Troubleshooting Backup Jobs ..................................................................................................... 280
When I run a backup job, it uses the backup device on my local machine instead of the one on the server. 280
My scheduled job is not running. ..................................................................................................................... 281
I have two tape drives, but it is only using one to run a job............................................................................. 281
How do I replace media in a rotation group?................................................................................................... 281
How can I tell when the next job will run and which media is required? ......................................................... 282
How can I determine which files were not backed up? ................................................................................... 282
Troubleshooting Restore Jobs..................................................................................................... 282
I can’t restore a backup to a different operating system. ................................................................................ 282
How can I restore data to a different file name?.............................................................................................. 282
How can I restore data to another location?.................................................................................................... 282
How can I restore all the files from a single version? ...................................................................................... 283
How can I determine which files are on particular media? .............................................................................. 283
When restoring, I get many alerts. What is wrong?......................................................................................... 283
Does Data Protector Express back up files as compressed? ......................................................................... 283
Troubleshooting Verify Jobs ........................................................................................................ 283
I occasionally get a ‘stream sync error’ when verifying media. ....................................................................... 283
Troubleshooting the Catalog........................................................................................................ 284
How do I select the location of the catalog in a network installation? ............................................................. 284
How do I create a Data Protector Express management domain? ................................................................. 284
When recovering from a backup server failure, does Data Protector Express recover all of the catalog
information? ..................................................................................................................................................... 284
Troubleshooting Error Messages................................................................................................. 284
Catalog corrupt appears during a backup or when adding a new object. ....................................................... 285
Unknown error appears when I restore files on Microsoft Windows. .............................................................. 286
Unable to create a directory appears when I restore files on Microsoft Windows. ......................................... 286
Appendix F - Navigation keys in the text user interface ........................................................ 287
Appendix G - Working with Microsoft Exchange Server........................................................ 289
Supported platforms .................................................................................................................... 289
Installing the Data Protector Express Agent for Microsoft Exchange........................................... 289
Activating the license ............................................................................................................................................. 289
Configuring a Microsoft Exchange Server ................................................................................... 290
Force Modes.................................................................................................................................................... 290
Page 14

xiv Data Protector Express User's Guide and Technical Reference
About Working with Microsoft Exchange Server.......................................................................... 291
Microsoft Exchange and Windows NT ................................................................................................................... 291
Backup modes ....................................................................................................................................................... 291
Backup modes and circular logging................................................................................................................. 292
Restoring Microsoft Exchange Databases................................................................................... 292
Disaster Recovery with Microsoft Exchange Server .................................................................... 293
Appendix H - Working with Microsoft SQL Server.................................................................. 296
Overview...................................................................................................................................... 296
Supported platforms .................................................................................................................... 296
Installing the Data Protector Express Agent for Microsoft SQL Server........................................ 296
Activating the license ............................................................................................................................................. 297
Configuring the Microsoft SQL Server ......................................................................................... 297
Notes for Backup Jobs with Microsoft SQL Server ...................................................................... 298
Microsoft SQL Server Databases and the backup mode....................................................................................... 299
Backup modes ................................................................................................................................................. 299
Additional Conditions ....................................................................................................................................... 299
Using Data Protector Express with SQL Server’s Backup Routine ....................................................................... 299
Notes for Restore Jobs with Microsoft SQL Server ..................................................................... 299
Restoring Microsoft SQL Server databases and transaction logs ......................................................................... 300
Restoring Microsoft SQL Server databases with a new name .............................................................................. 300
Restoring Microsoft SQL Server 2000 and SQL Server 7 user databases .................................. 300
Restoring Microsoft SQL Server 2000 master databases............................................................ 301
Restoring Microsoft SQL Server 7 master databases.................................................................. 305
Appendix I - Working with Microsoft Data Protection Manager (DPM) ................................. 310
Overview...................................................................................................................................... 310
Installing the Data Protector Express Agent for Microsoft DPM................................................... 310
Activating the license................................................................................................................... 311
Backing up the DPM Application ................................................................................................. 311
Protecting Production Servers ..................................................................................................... 313
Restoring DPM files..................................................................................................................... 313
Using Disaster Recovery with the DPM server ............................................................................ 314
Appendix J - Protecting Microsoft Windows SharePoint Services Databases .................... 316
Overview...................................................................................................................................... 316
Installing the Data Protector Express Agent for Windows Component SQL Databases.............. 316
Protecting the Windows SharePoint Services Databases ........................................................... 317
Restoring Windows Component SQL Databases ........................................................................ 319
Using Disaster Recovery with the Windows SharePoint Services ...............................................320
Appendix K - Windows Component SQL Database Agent..................................................... 322
Overview...................................................................................................................................... 322
Installing the Data Protector Express Agent for Windows Component SQL Databases.............. 322
Protecting the Windows Component Database ........................................................................... 322
Restoring Windows Component SQL Databases ........................................................................ 324
Using Disaster Recovery with the Windows Component SQL Database Agent .......................... 325
Page 15

Table of Contents xv
Appendix L - Data Protector Express Virtual Library Recovery ............................................328
Overview...................................................................................................................................... 328
Definitions.................................................................................................................................... 328
General Use ................................................................................................................................ 329
Known Limitations ....................................................................................................................... 331
Appendix M - Encryption .......................................................................................................... 332
Overview...................................................................................................................................... 332
Installation ................................................................................................................................... 333
Default encryption state ......................................................................................................................................... 333
Definitions.................................................................................................................................... 333
Cryptographic Algorithms ............................................................................................................ 333
Software ................................................................................................................................................................. 333
Hardware................................................................................................................................................................ 334
Passphrase.................................................................................................................................. 334
Passphrases and Data Protector Express catalog ................................................................................................ 334
Passphrase management ...................................................................................................................................... 334
General use ................................................................................................................................. 335
Encryption Options................................................................................................................................................. 335
Off .................................................................................................................................................................... 335
Automatic......................................................................................................................................................... 335
Software........................................................................................................................................................... 335
Hardware ......................................................................................................................................................... 335
Software Strength ............................................................................................................................................ 335
Encryption and Compression .......................................................................................................................... 336
Media Properties .................................................................................................................................................... 336
Media Import .......................................................................................................................................................... 337
Disaster Recovery ....................................................................................................................... 337
Recovering a system with an encrypted backup.................................................................................................... 337
Index ........................................................................................................................................... 338
Page 16

Before You Begin
This User’s Guide and Technical Reference provides all of the information necessary to effectively
implement and use all of the advanced features found in Data Protector Express. Information about
installing Data Protector Express is available in the Installation Guide.
In this section
• Documentation
• Customer Support
Documentation
The following documentation is included with Data Protector Express to help you install and use all of
Data Protector Express features and options.
NOTE: In the following sections:
<Lang> represents the language in which the document is written: eng (English), fre (French), ger
(German), ita (Italian), jpn (Japanese) , spa (Spanish), kor (Korean), chs (Simplified Chinese), and cht
(Traditional Chinese).
Printable documentation
The /doc directory on the Data Protector Express CD-ROM contains the following printable
documentation:
• Tutorial 1 – Registering and Installing Data Protector Express (Tutorial1.pdf): Contains basic
information to help you install and run Data Protector Express
• Installation Guide (dpins<Lang>.pdf): Contains installation information for each supported platform.
• User’s Guide and Technical Reference (dpusr<Lang>.pdf): Contains information for configuring
and using Data Protector Express.
• Addendum (dpadd.pdf): Contains information on additional features (English only): This manual is
provided only when necessary.
NOTE: You can also download these documents from the Data Protector Express website
www.hp.com/go/dataprotectorexpress.
If you require printed copies of these manuals, you can print the PDF files. They were designed to be
printed two-sided and new chapters always begin on an odd-numbered page.
xvi
Page 17

Before You Begin xvii
To view or print this documentation, Adobe Acrobat Reader (version 4.0 or higher) must be installed on
your Windows or X Window (Linux) computer. If not currently installed, you can install it from the
Adobe Acrobat Reader website at www.adobe.com/.
NOTE: Adobe Acrobat Reader does not offer versions for NetWare systems. Therefore, you can only view
or print the Data Protector Express documentation on Windows or X Window (Linux) systems.
To print the documentation, open the appropriate file into Adobe Acrobat Reader. Choose Print Setup…
from the File menu and set the proper options for your printer. Then choose Print… from the File menu
and print the document.
Release notes
Release notes are included with every service pack. Before using Data Protector Express, please read and
print the release notes for additional information. The release notes are available in both HTML
(readme.htm) and text (readme.txt) formats in the root directory of the Data Protector Express CDROM.
Online Help
Windows
To view online help while using Data Protector Express, select Contents from the Help menu. The online
help is displayed in a pop-up window.
For task-related or context-sensitive help while using Data Protector Express, select a topic in the
Dynamic Help list.
Non-Windows
You can view online help from most Data Protector Express screens by pressing F1.
Screen Shots
The screen shots in this manual may not be identical to the interface you see when you use Data Protector
Express. Any differences will be small and will not prevent you from using this documentation. Note that
because of the customizable nature of the Data Protector Express graphical user interface that the
components of the GUI may be in different locations and colors in the documentation compared to the
product in use.
Features
If you have a Proliant Edition or Single Server Edition of Data Protector Express software, not all of the
features described in this document will be available to you. This document describes all the features in
Data Protector Express. Both Data Protector Express Single Server Edition and Data Protector Express
Proliant Edition can be upgraded to Data Protector Express with the appropriate license key. Please
contact your HP partner to purchase this upgrade.
Customer Support
Customers under a support contract may receive their support by phone or by submitting an email.
Country specific details on both options can be found at welcome.hp.com/country/us/en/wwcontact.html.
Page 18

xviii Data Protector Express User's Guide and Technical Reference
If you require support and your support contract has expired, please contact your HP Partner or sales
representative for information on obtaining a new HP Data Protector Express support contract
Page 19

Chapter 1: About Data Protector Express
A backup and recovery system is an integral part of a company's data security. The ability to back up and
restore business-critical data quickly and efficiently can mean the difference between survival and failure.
Maintaining backups is often considered a tedious task, and many companies fail to protect their
corporate data at all. Data Protector Express provides users with the capacity to back up and restore data
across a network and the ability to administer a comprehensive backup plan. This section describes basic
concepts of a backup and recovery system and presents how Data Protector Express provides a powerful,
yet cost-effective and easy-to-use, management tool for protecting data on network file or application
servers and PC desktops.
In this section
• Backup basics
• Backup environment
Backup basics
Whether your work environment consists of a single computer in a home or small office, several
computers connected to a network server, or hundreds of computers connected to multiple network
servers, a typical data protection plan involves at least the ability to back up and restore business files.
At a minimum, data that cannot be reloaded onto the system from installation disks, network-based
security settings, company-generated databases should all be backed up for easy retrieval in the event of a
data disaster. The important data might be a word processing file, e-commerce transactions, network user
account and password information, and so on.
The data you protect and how long it remains available on storage media might depend on legal
requirements for your industry or your own company policies. Whatever your data storage requirements
might be, you should have a basic understanding of the types of backup operations and your own
computer environment.
Typical backup and recovery operations
Backup: A backup is the process of copying a file or folder from its current location to a new location,
typically media loaded in a backup device. The original data remains intact in its current location. During
the backup process, an attribute associated with each file, known as an archive attribute, is altered within
the Data Protector Express Selection tree to indicate that the file was backed up. Archive attributes may
function differently on different operating systems, so the Data Protector Express catalog also tracks file
changes.
Data Protector Express runs backups in one of four backup modes:
1
Page 20

2 Data Protector Express User's Guide and Technical Reference
• Full: In full backup mode, the backup job copies all selected files in the job whether or not they have
changed. During a full backup, the archive attribute and Data Protector Express catalog record for
each selected file is updated to indicate that it has been backed up during a full backup.
• Differential: In differential mode, the backup job copies only those selected files that have changed
since the last full backup. The Data Protector Express catalog record for these files is updated but the
archive attribute is not reset by this backup.
• Incremental: In incremental mode, the backup job copies all selected files that have changed since the
last backup regardless of backup mode. The Data Protector Express catalog record and archive
attribute for these files is updated to reflect this backup.
• Copy: In copy mode, the backup job backs up all selected files, but has no effect on any future
scheduled backups. The archive attribute is not changed during this backup.
Restore: A restore is the process of copying data from backup media to its original location or to a new
location in the event that the original location is damaged or unavailable. Restore operations can also
retrieve data to a file or folder other than the original one.
Disaster recovery: Often defined as the ability to recover information systems quickly, disaster recovery is
the process of automatically partitioning and formatting the hard drive, and restoring operating system
data that allows a computer or network to restart normally. Disaster recovery and general restore
operations can be combined to quickly restore both the operating system and business-critical data.
Backup environment
A complete network backup system consists of three parts: backup devices, a catalog, and a backup
management program.
Backup devices
Data Protector Express works with your existing computer network. A network connects file or
application servers and PC desktops together in order to allow various users to work together on projects
and with common files. Networks also allow users to share peripheral devices, such as disk drives,
printers, fax machines, and modems. Sharing devices across a network makes economic sense, since
several systems can use a single device. Backup devices, such as tape drives, hard disks, NAS appliances,
and CD or DVD recordable devices, which back up or copy files onto tape, disk, or other media, may also
be shared. For more information about using backup devices in network environments, see Strategies for
Faster Jobs on page 163.
Sharing a backup device makes operational as well as economic sense. Sharing devices lowers costs and
makes it possible to centralize backup operations across the network. Further, a single user, such as the
network administrator, can have primary responsibility for backing up all the file or application servers
and PC desktops on the network.
Sharing a backup device or tape drive across a network also poses problems.
• Security: Most networks have elaborate security systems that prevent access by unauthorized users to
sensitive or confidential data. However, unless you take protective measures, once these files are
backed up onto tape or other media, any user in physical possession of the media can gain access to
these files. Data Protector Express offers the ability to encrypt the information written to media. Data
Protector Express uses a strong key to encrypt the data on the media, which provides an excellent
protection of media outside the storage management domain. Although it is possible to physically
Page 21
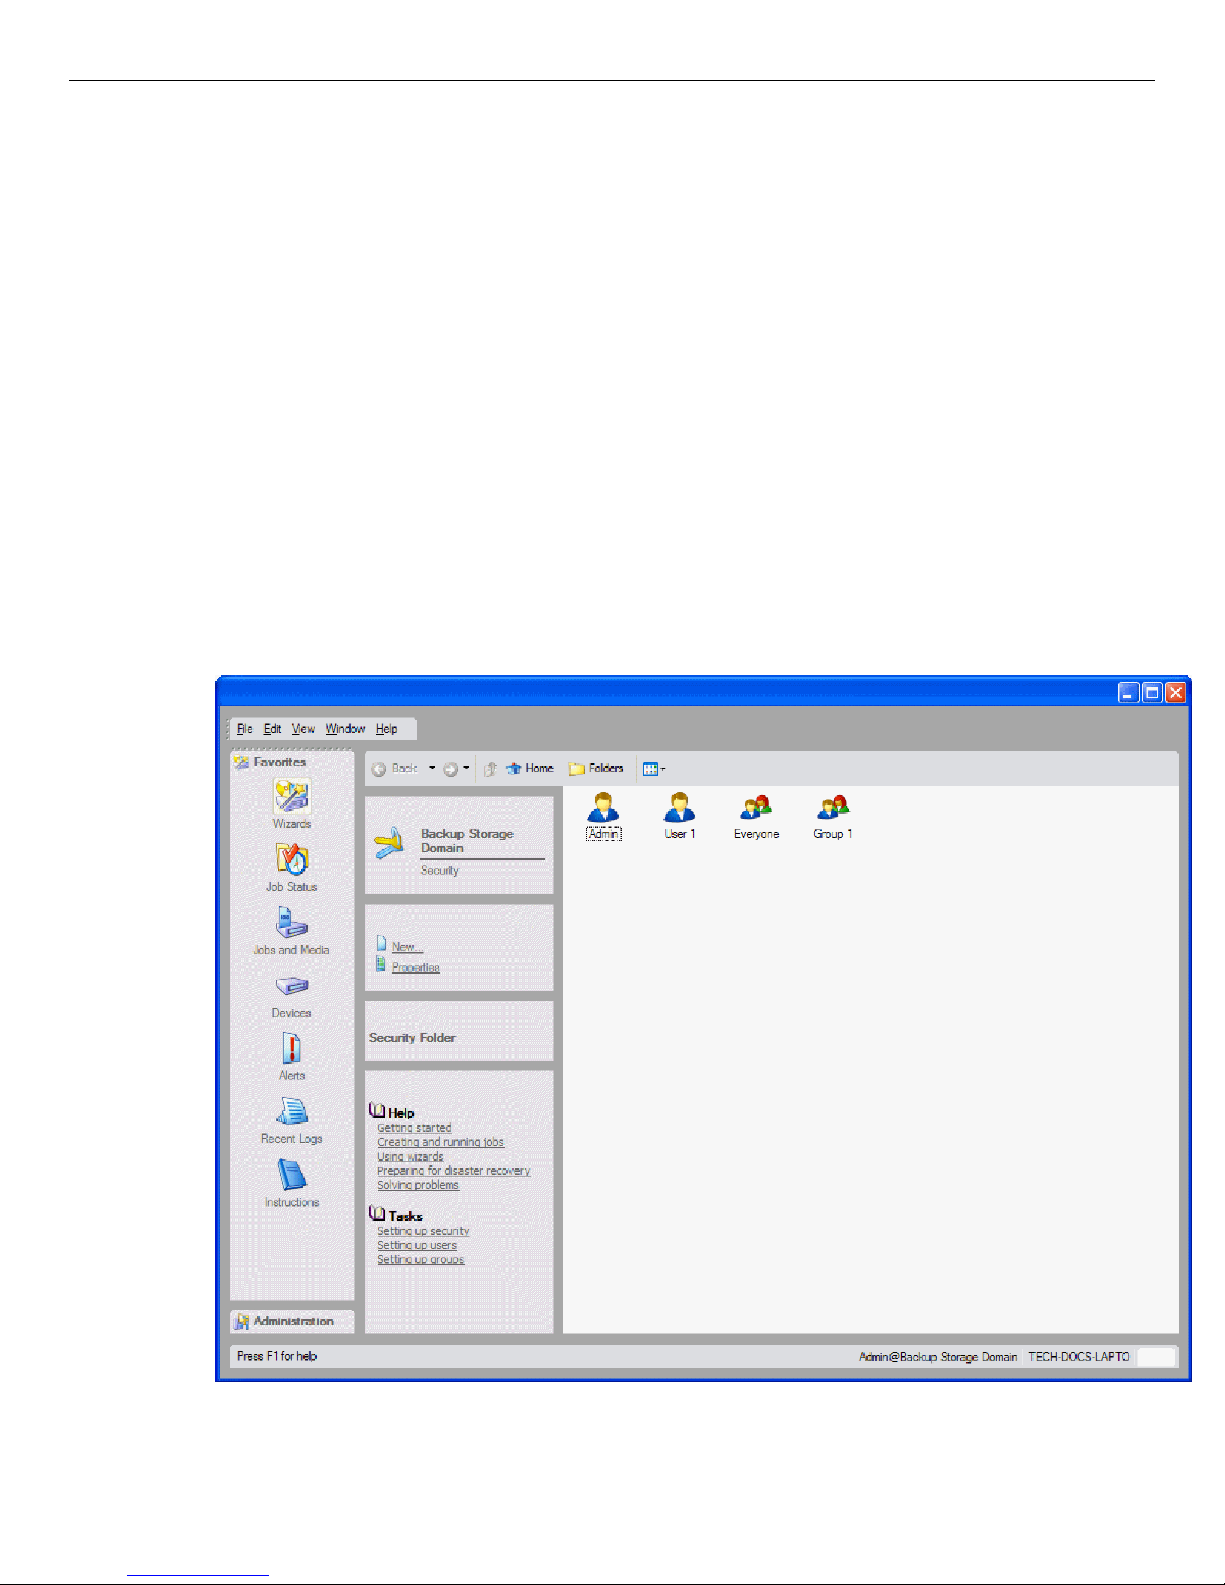
Chapter 1: About Data Protector Express
store the media in a secure location, a complete network backup system will help prevent
unauthorized users from accessing confidential or classified information.
• Tracking backed up files: While a single user may be able to find a file copied onto a CD or floppy
disk by manually searching through a stack of disks, this approach is unworkable for large networks.
Without the appropriate software, locating a given occurrence of a file may be impossible, since there
may be hundreds of thousands of files backed up on hundreds of media created over weeks or months.
Storage management catalog
To solve the problems of security and tracking files, Data Protector Express creates and manages a
storage management catalog commonly referred to as the Data Protector Express catalog. The Data
Protector Express catalog keeps track of used and available backup media and each file that is stored on
that media. For each media, the catalog contains detailed information about the media, such as when it
was created and who created it and about the files on the media, such as when they were backed up and
on which media files are stored. For more information, see Tips for Managing the Catalog on page 160.
The Data Protector Express catalog also addresses issues surrounding security. Included in the catalog is
information about which users can use or view which files. The catalog prevents unauthorized users from
accessing files for which they have insufficient security rights. It tracks each user and ensures that only
approved users have access to backup devices and files stored on the backup media. The following
illustration shows the Security view of the Data Protector Express catalog.
Page 22

4 Data Protector Express User's Guide and Technical Reference
Backup management program
Writing files to the backup media and managing the catalog requires an application program, such as Data
Protector Express. Two of the most important functions of Data Protector Express are managing the
catalog and creating and running jobs. Data Protector Express manages the catalog to keep track of files
and to ensure security. Data Protector Express also creates and runs jobs, such as backup and restore jobs,
which transfer files back and forth between backup devices (such as tape drives) and file or application
servers or PC desktops.
Managing the Storage Management Catalog
Much of the power and usefulness of Data Protector Express comes from its extensive capabilities to
manage the storage management catalog. There are three important concepts associated with the catalog:
objects, properties and Data Protector Express management domains.
Objects
The catalog collects and organizes information about objects. An object is any file, machine, device,
backup media or user about which Data Protector Express needs to store data. Examples of objects which
Data Protector Express tracks in its catalog include backup media, tape drives, network servers, versions
of files, backup jobs, custom templates, users, and so on.
Some objects can contain other objects within them. A simple example is a folder. It contains other
objects within it, such as jobs, files, templates, user information, and so on. Data Protector Express also
displays information about the contents of objects other than folders. When you view a list of the contents
of the Data Protector Express management domain, you might see machines, networks, devices, libraries,
and so on. Although not folders, these objects can contain other objects in them. For example, a library
can contain storage slots, import/export slots, and so on. A network might contain file systems, network
drives, printers, and attached backup devices.
Properties
The information about each object that Data Protector Express stores in its catalog are called properties.
The properties of each object include important information about that object, such as what kind of object
it is, who has security permissions to use it and its relationship to other objects. For more information on
property pages, see Chapter 13 – Objects and Properties Reference on page 190.
For example, an individual backup media is an object in the Data Protector Express catalog. Some of the
properties of that media stored in the catalog include its name, when it was created, who has security
permissions to use the media and whether or not it can be erased.
Working with Data Protector Express objects and properties is easy. If you know how to use Windows
Explorer, you already know most of what you need to use Data Protector Express.
Data Protector Express management domains
Data Protector Express may be licensed to support several catalogs. On a large network, it may be useful
to have multiple catalogs, each addressing different data protection needs. For example, there may be a
separate catalog for each work group or department, even though they are all on the same network.
If your network has several Data Protector Express catalogs, then you choose which catalog you wish to
use by selecting a Data Protector Express management domain when you log on to Data Protector
Page 23

Chapter 1: About Data Protector Express
Express. Choosing a Data Protector Express management domain is simply a way to select which catalog
you wish to use.
Each Data Protector Express management domain is overseen by a Data Protector Express
administrator. It is the Data Protector Express administrator’s job to manage the security and integrity of
the files in his or her Data Protector Express management domain.
You can switch to a different domain each time you log on to Data Protector Express. You can also set
up domains from the Data Protector Express Login screen.
In the Host Name field, enter the hostname or IP address of the machine on which the Data Protector
Express management master server is located, then select OK.
NOTE: When you edit a domain, you cannot edit the master server name.
Data Protector Express management domains and security
Data Protector Express management domains also help ensure network security. Data Protector Express
uses Data Protector Express management domains to promote security in two ways: first, by preventing
users from working with more than one Data Protector Express management domain at a time and,
second, by allowing file or application servers and PC desktops to be the member of only one Data
Protector Express management domain. For more information, see Chapter 12 – Advanced Permissions
and Security on page 174.
Note the following about machines, users, and Data Protector Express management domains:
• File or application servers and PC desktops can only be the member of one—and only one—Data
Protector Express management domain. Because these machines belong to only one catalog, their
peripherals, such as disk drives and backup devices, can belong to only one catalog.
• Backup media created in one Data Protector Express management domain cannot be used in another
Data Protector Express management domain without following special procedures (e.g., importing
media created on one Data Protector Express management domain into the Data Protector Express
catalog of another Data Protector Express management domain). This ensures that there is no
improper access to secure files and data.
• Each Data Protector Express management domain must have at least one backup device , such as a
virtual library, tape library or CD device. This backup device can belong to only one Data Protector
Express management domain; it cannot be shared among multiple storage domains. However, a Data
Protector Express management domain could have multiple backup devices.
• From one PC desktop, users can work in other Data Protector Express management domains besides
the storage domain to which their PC desktop belongs. This means they can administer jobs remotely
for other Data Protector Express management domains besides the storage domain to which their PC
desktop belongs. They cannot, however, work in more than one Data Protector Express management
domain at the same time.
• Users can work from other machines with other Data Protector Express management domains besides
the one to which their machine belongs. Their machine, along with its drives, peripherals and
accompanying data, however, always remain in a single Data Protector Express management domain.
That is, the data on their machine is always backed up and restored within a single Data Protector
Express management domain. This helps to prevent the unauthorized sharing of data between Data
Protector Express management domains that would occur if someone in a different storage domain
were able to restore your data to their machine. Thus while users can work outside of their storage
domain, the PC desktops and file or application servers they use always remain a part of the Data
Page 24

6 Data Protector Express User's Guide and Technical Reference
Protector Express management domain that was selected when Data Protector Express was installed
on the machine.
Creating and running jobs
Data Protector Express creates backup media and restores files with jobs. Working with backup devices
and a network, Data Protector Express jobs either back up network file or application servers and PC
desktops onto physical or virtual media or restore files from media onto file or application servers or PC
desktops. When you want Data Protector Express to back up or restore a file, you create and run a job.
There are several kinds of jobs: backup, restore, verify, media, and disaster recovery. Every kind of job
you create and run has six components: creating the job, permissions, selection, options, scheduling and
running. Setting up media rotation is an additional feature that you may include in your backup jobs.
Creating the job: You begin by creating a job, either a backup, restore, verify, media, and disaster recovery
job. Refer to Chapter 3 – Creating Jobs with Data Protector Express on page 29 for more information.
Permissions: In order to create a job, you must have permissions to the objects that job will work with.
For example, to create a backup job, you must have permissions to the tape drive, the tape, and the files
you will back up. If you wish to back up files on another PC desktop, you must have permissions to that
PC desktop and to the files on that PC desktop. Individual users are assigned permissions by the Data
Protector Express administrator, who is responsible for ensuring the security and integrity of the backup
system. Refer to Chapter 4 - Permissions on page 41 for more information.
Selection: Once you have permissions to a file, you must select it to be included in your job. You might
select all files, only a few files, or perhaps only a single file. You select files first by selecting them in the
selection window and second by having Data Protector Express ‘sort’ them with filters, which apply
additional selection criteria, such as date modified, type of file, and so on. Refer to Chapter 5 – Selecting
Files and File Versions on page 53 for more information.
Options: After scheduling the job, you specify the job’s option settings. Some of the options you can
specify include what backup device to use, what media to use, whether to automatically format the media,
and so on. Refer to Chapter 8 – Job Options on page 107 for more information.
Scheduling: After selecting files, the job is scheduled to be run. A job may be scheduled to run later or to
run immediately. It can be scheduled to run regularly or only once. Refer to Chapter 6 – Scheduling Jobs
on page 90 and Chapter 7 – Planning for Media Rotation on page 98 for more information.
Media rotation: After selecting a schedule for a job, you must decide how to manage your media. Data
Protector Express can manage your media automatically with default media rotation plans, or you can
manage your media manually. Refer to Chapter 7 – Planning for Media Rotation on page 98 for more
information.
Running the job: Finally, the job is run. Many scheduled jobs are run automatically by Data Protector
Express, but you can manually run a job at any time. Refer to Chapter 9 – Running Jobs on page 122 for
more information.
NOTE: When you recover the storage management catalog, jobs are placed on hold. To restart the jobs,
select the jobs and select Continue from the command list.
Page 25

Chapter 2: Data Protector Express Workplace
Data Protector Express is designed to be easy to use. This section will familiarize you with most Data
Protector Express features, including keyboard shortcuts and mouse conventions.
NOTE: This manual documents the graphical user interface available on Windows and Linux systems
running X Window. The console interface operates similarly on Windows, NetWare, and Linux systems.
In this section
• Starting Data Protector Express
• Starting Data Protector Express
• Main Data Protector Express Window
• Customizing the main Data Protector Express window
• Working with Objects in the Main Data Protector Express Window
Starting Data Protector Express
After you have installed Data Protector Express, you start it like any other program.
Windows
To start Data Protector Express in Windows, double-click the Data Protector Express shortcut on the
desktop.
You can also click the Start button and select Hewlett-Packard Company from the Programs (or All
Programs) submenu. Then select Data Protector Express.
NetWare
To start Data Protector Express on a NetWare machine, access the server console. Then type dpAdmin. It
is not necessary to specify a search path. For example, you can launch Data Protector Express on a
NetWare computer by typing the following at a console prompt:
:
SERVER: dpAdmin
Linux
To start Data Protector Express on a Linux machine, open a terminal window. Then access the directory
where you installed Data Protector Express. Type ./ dpadmin. For example:
7
Page 26
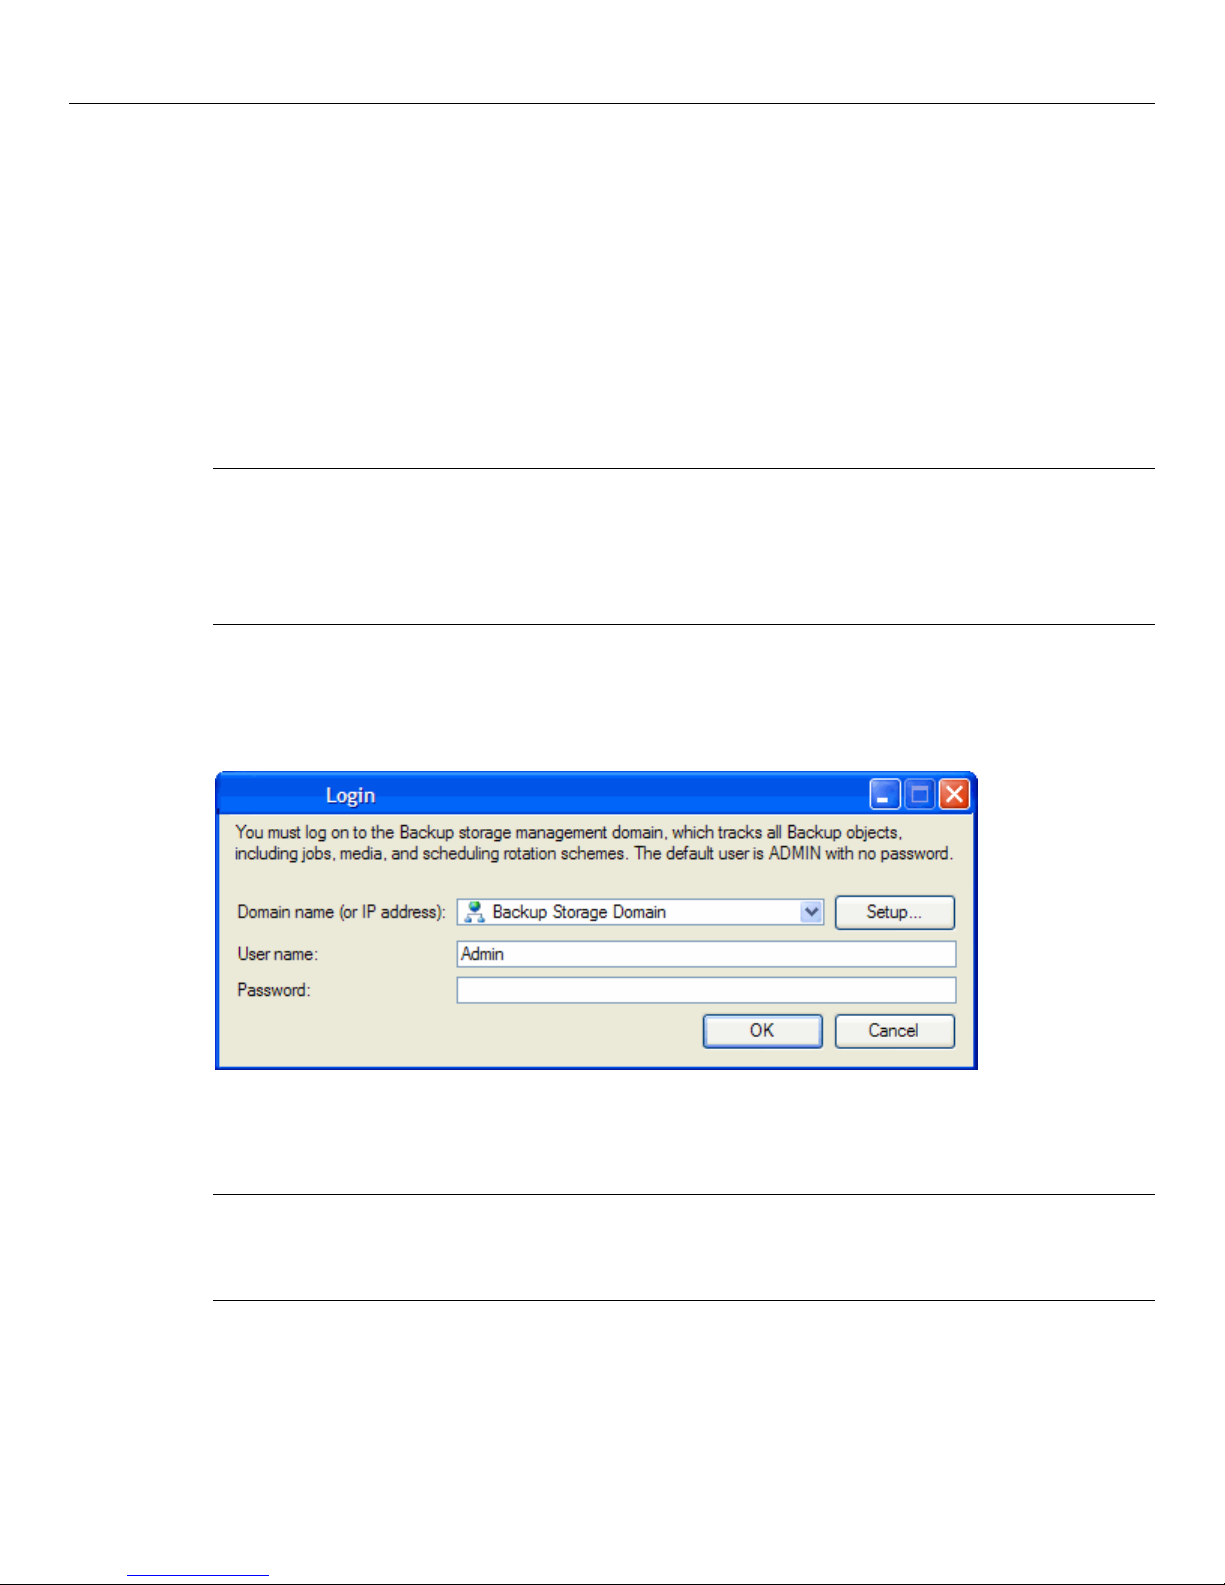
8 Data Protector Express User's Guide and Technical Reference
[/usr/local/hp/dpx]# ./ dpadmin
To launch the CUI, type ./ dpadmin -c. For example:
[/usr/local/hp/dpx]# ./ dpadmin -c
Linux (X Window)
To start Data Protector Express on a Linux machine running X Window, open a terminal window. Then
access the directory where you installed Data Protector Express. Type ./ dpadmin. For example:
[/usr/local/hp/dpx]# ./ dpadmin
On Linux systems, you can create a shortcut on your KDE or GNOME desktop. (See the Data Protector
Express Installation Guide for more information.)
NOTE: If you are running Red Hat Enterprise Linux 4, you may see an error message (such as
“libstdc++.so.5 could not be found”) when you start Data Protector Express. This is because the C++
library version that the application was built with is not present on these systems, and the latest version
“libstdc++.so.6” is not backwards compatible. If you are using Red Hat Enterprise Linux 4, you can use
an RPM package called "compat-libstdc++.rpm" to install the necessary library. This can also be achieved
by installing the “Developer’s Tools” package from the Red Hat Enterprise Linux 4 installation CDs.
Logon Window
Each time you start Data Protector Express, you are shown the Data Protector Express Logon window.
To log on, you must select a Data Protector Express management domain and enter your user name and
your password.
Logging on the first time
CAUTION: Data Protector Express administrators have unlimited access to all of the objects in the storage
management catalog. Any user who logs on as the Data Protector Express administrator will have
complete access to all of the files and machines contained in the Data Protector Express management
domain.
The default user name for the Data Protector Express administrator is Admin. There is no default
password required for this user to log on.
Page 27
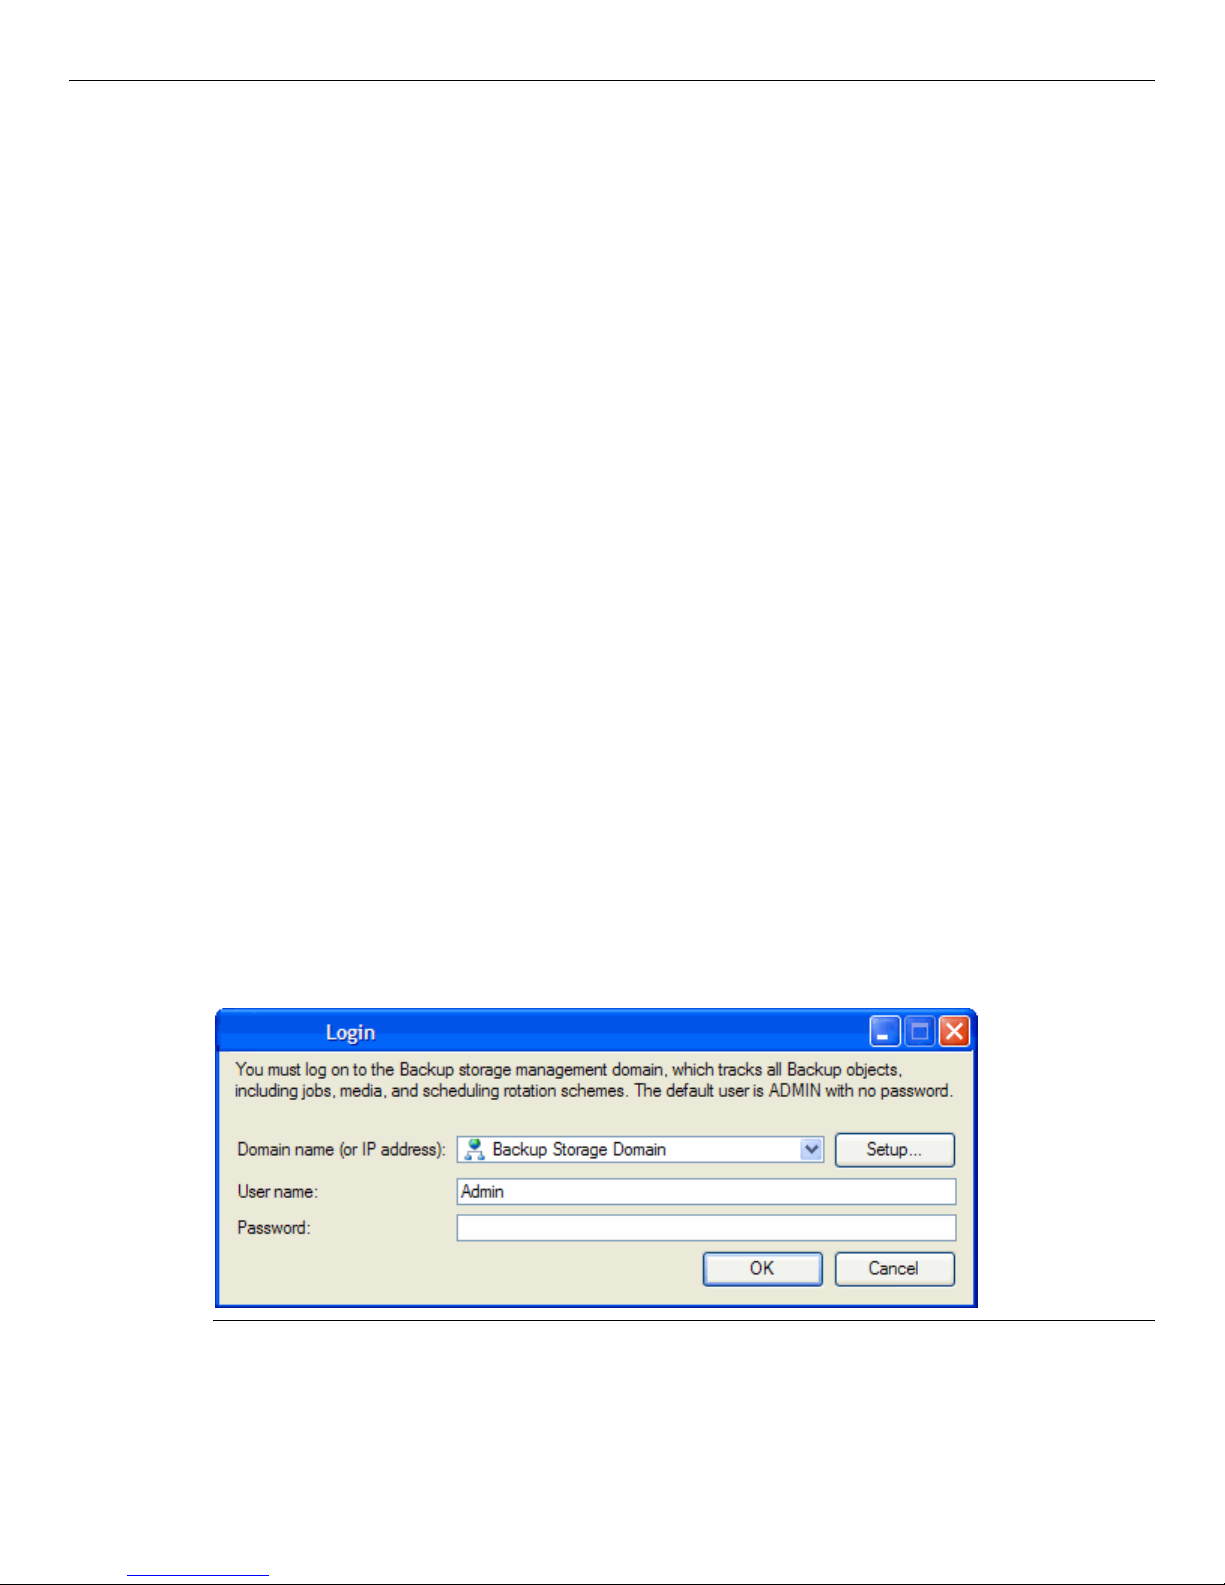
Chapter 2: Creating Jobs with Data Protector Express 9
Your first security step should be to change the Data Protector Express administrator’s password. Refer to
Changing your password on page 10 for instructions on changing your password.
Grace logons
Your Data Protector Express administrator may have set up your password to expire after a set period of
time. For example, your password may expire after 60 days. This forces you to change your password
regularly.
If your password has expired, Data Protector Express will prompt you to change your password. If you
choose not to change your password, Data Protector Express may still let you log on, even with an
expired password. Logging on with an expired password is called a grace logon. Your Data Protector
Express administrator will determine how many grace logons you are allowed.
When your password has expired and you have used all of your grace logons, Data Protector Express will
ask you to change your password when you log on.
Selecting a Data Protector Express management domain
When your Data Protector Express administrator set up Data Protector Express to run on your network,
your PC desktop was assigned to a Data Protector Express management domain. Your PC desktop, along
with its drives and peripherals, can only be a member of one Data Protector Express management
domain. The name of this storage domain is the default name that appears in the Domain list on the
Logon window.
Normally, you should leave the default name in the list unchanged. This is because you will typically
want to work with the Data Protector Express management domain to which your PC desktop belongs.
Occasionally, however, you may wish to work in a different storage domain. You might be asked by a coworker or your Data Protector Express administrator, for example, to run a Data Protector Express job in
a different Data Protector Express management domain.
To select a different Data Protector Express management domain
1. Use the drop-down menu to choose a Data Protector Express management domain from the Domain
name list. (A list of possible Data Protector Express management domains will appear.)
2. Select the Data Protector Express management domain you wish to use and click OK.
NOTE: Although you can log on to different Data Protector Express management domains, you can only
create and run jobs within a single Data Protector Express management domain. Further, you can only
access files and devices in a single Data Protector Express management domain. This means, for example,
Page 28
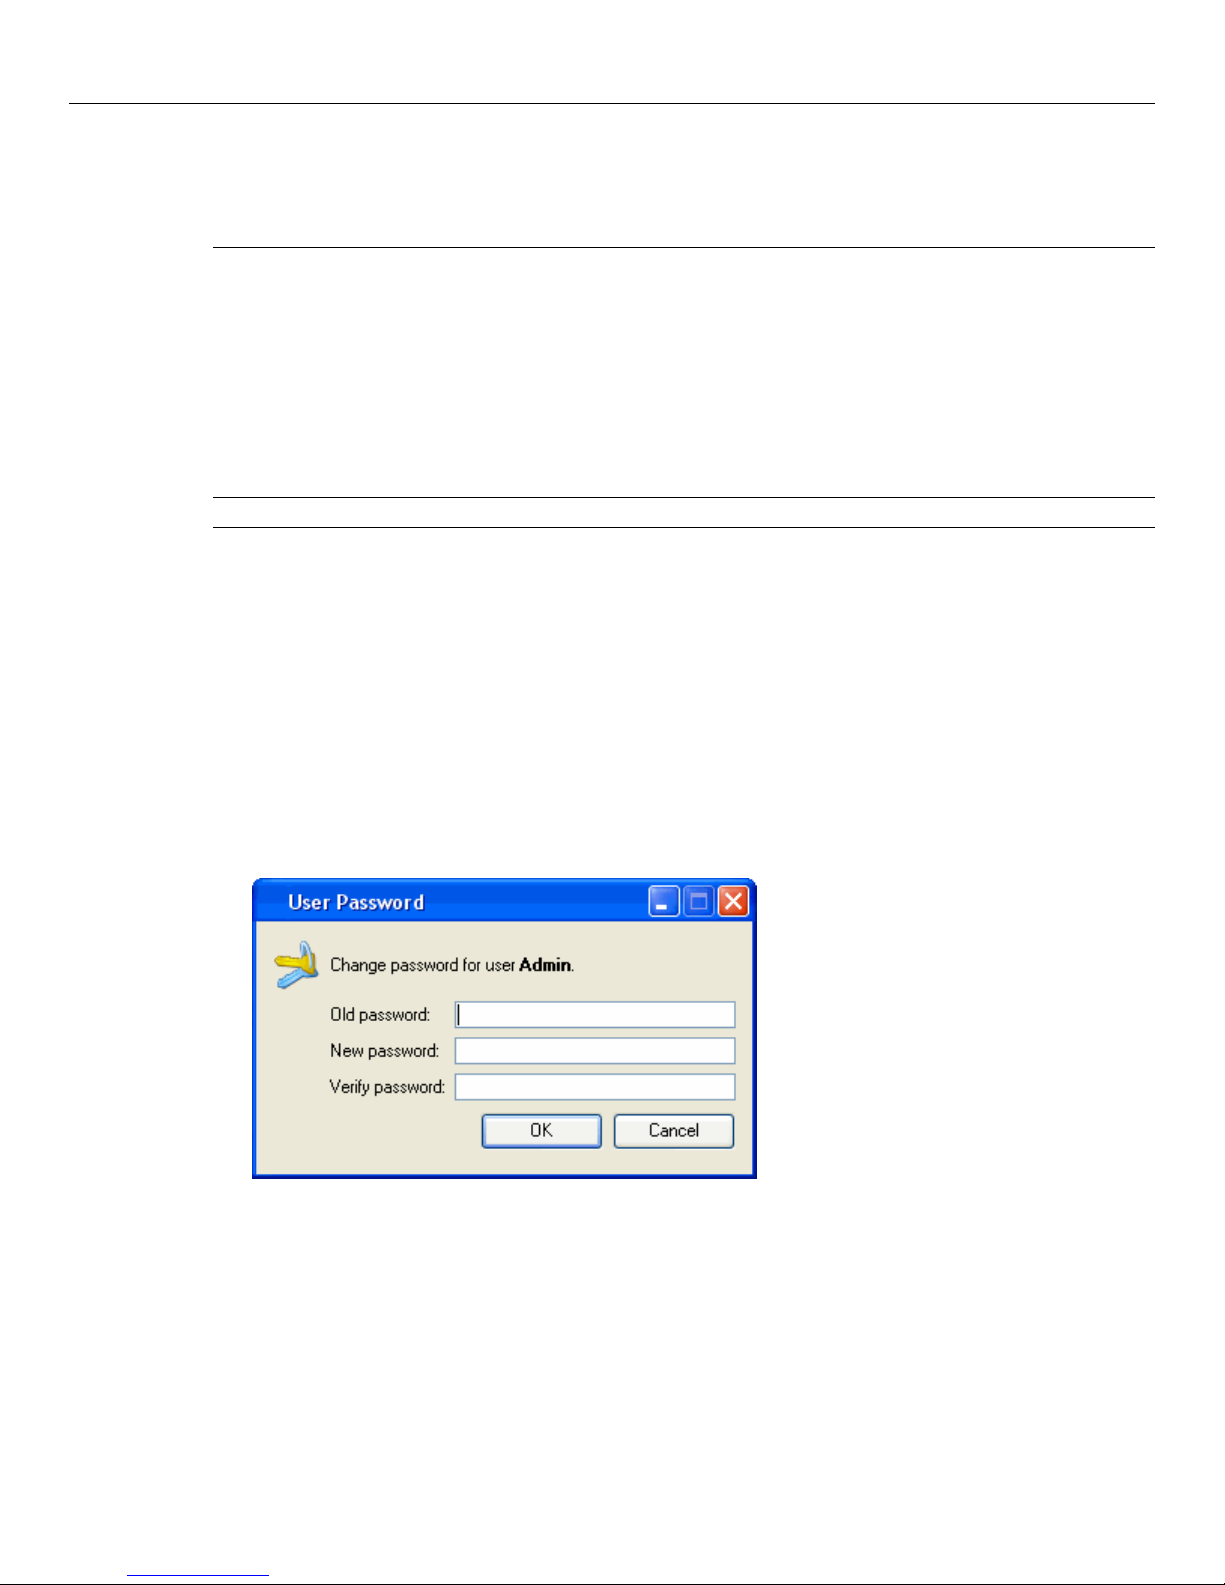
10 Data Protector Express User's Guide and Technical Reference
that you will be unable to restore files backed up from PC desktops in one Data Protector Express
management domain to PC desktops in another Data Protector Express management domain. (If you need
to share data from one Data Protector Express management domain to a different Data Protector Express
management domain, see Import Media on page 144.)
User name and password
After selecting a Data Protector Express management domain, type in your User name and Password.
If you type your name or password incorrectly, you will be asked to re-enter your user name and
password.
In order to log on, your Data Protector Express administrator must first assign you a user name and a
password. If you are having difficulty logging on, ask your system administrator to specify again the
exact spelling of the user name and password assigned to you.
NOTE: Passwords are case-sensitive; that is, the password USER1 is not the same as the password user1.
Changing your password
It is a good idea to regularly change your password, particularly if you are working with sensitive and
important data.
To change your password
1. Open the Administration desk bar.
2. Select Security, and then click your User icon.
3. Open the User Password screen by either
• Selecting Change Password… from the Commands task pane
• Right-clicking the user and selecting Change Password… from the shortcut menu.
1. Type in your old password and then your new password.
2. Confirm your new password and then click OK.
When selecting a password, remember that some passwords are notoriously easy to break. For example,
because many people use their birth date or the name of their spouse, these are not good choices for
passwords.
Page 29
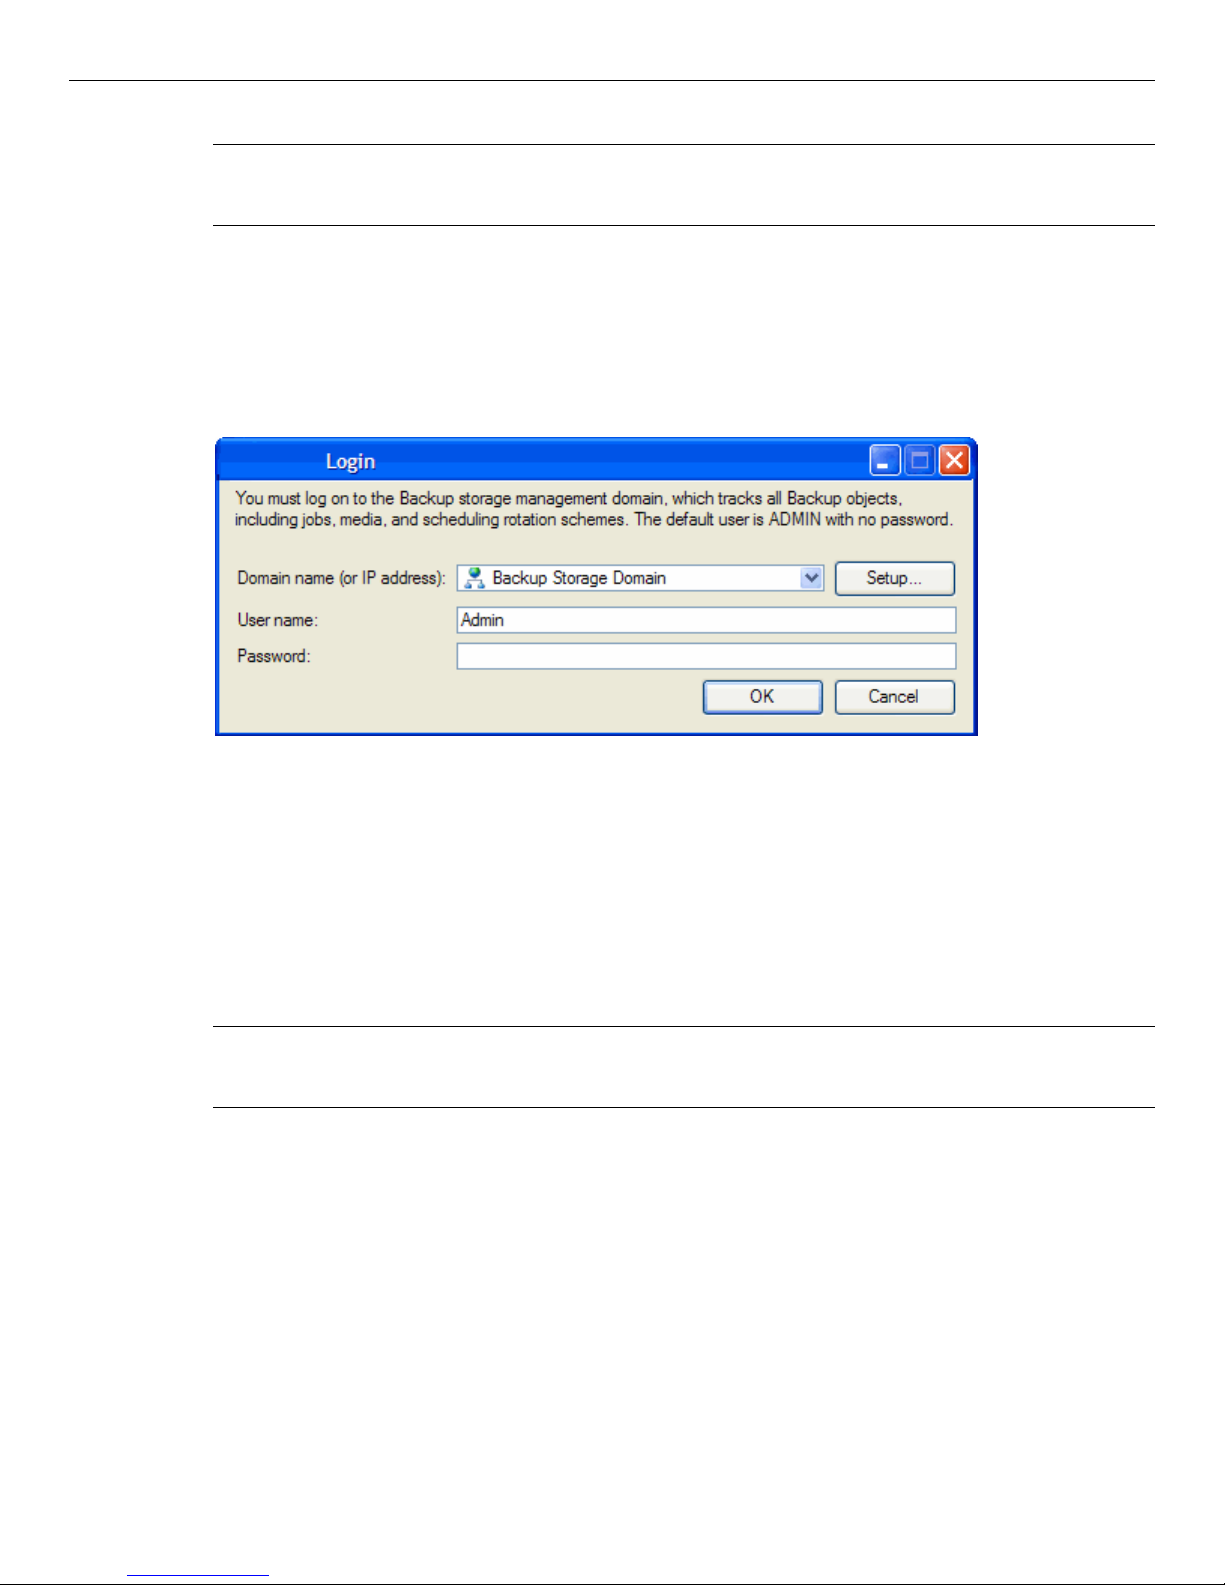
Chapter 2: Creating Jobs with Data Protector Express 11
TIP: The Data Protector Express administrator can change a user’s password without knowing the user’s
current password. Data Protector Express does not even ask you to enter the old password. This is useful
when the user has forgotten his or her password.
Logging out
On occasions you may want to change the Data Protector Express management domain you are using or
want to log on as a different user. Although you could quit Data Protector Express and restart the
program, it is quicker and faster to log on again without quitting Data Protector Express.
To log on again, choose Logout from the File menu. You will be presented with the Data Protector
Express Logon window and asked to log on again.
Logging out and running scheduled jobs
Data Protector Express can run scheduled jobs even when no one is logged on. (Only scheduled jobs can
be performed when no one is logged on to Data Protector Express.) For more information, see Running
Scheduled Jobs on page 124.
When you leave your PC desktop, you may need to leave Data Protector Express open. In order to prevent
unauthorized access to the network, log out of Data Protector Express before leaving your PC desktop.
Any scheduled jobs will still run, but no unauthorized users will be able to work with Data Protector
Express unless they can log on. (This requires that the Data Protector Express Service be installed and
running).
NOTE: If the Data Protector Express service is installed and running, you can close Data Protector Express
and your scheduled jobs will still run (see Appendix C - About the Data Protector Express Service on page
264 for more information).
Page 30
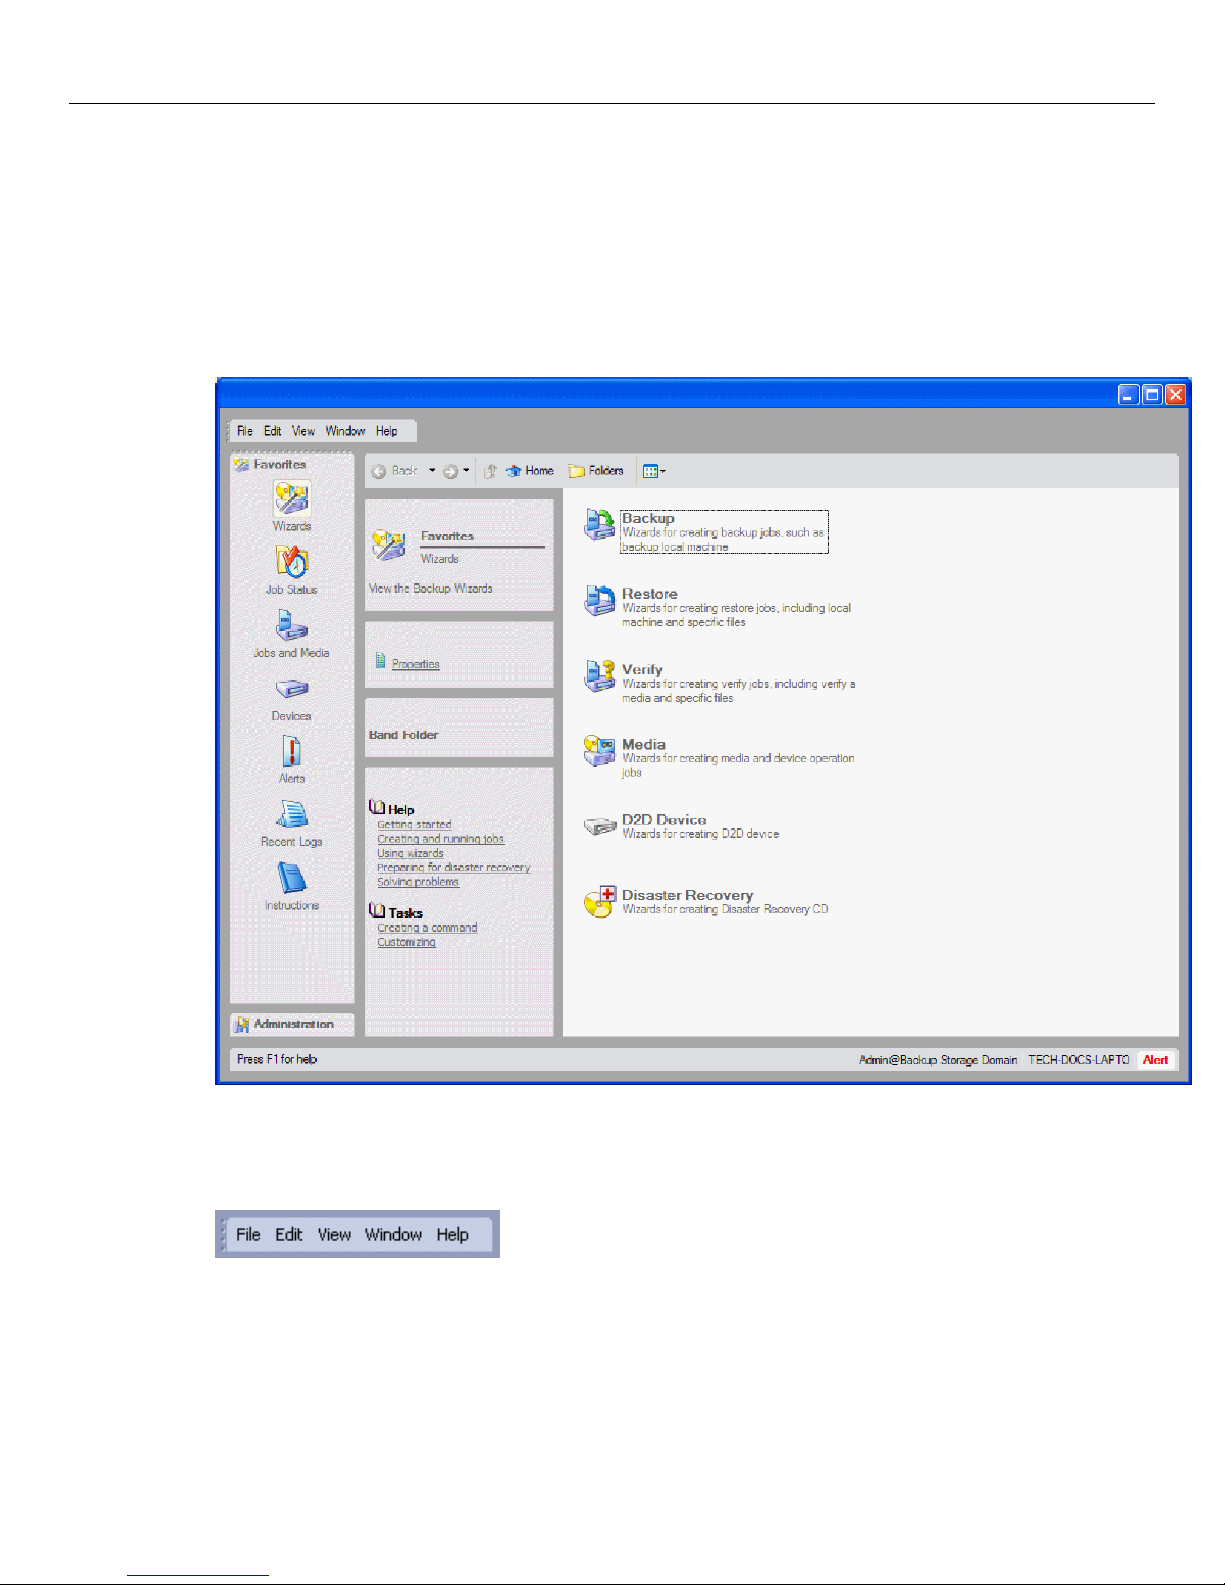
12 Data Protector Express User's Guide and Technical Reference
Main Data Protector Express Window
You use the main Data Protector Express window to view, create and manipulate Data Protector Express
objects, such as jobs and tapes.
In addition to the menu bar, the Data Protector Express window has the following parts: menu bar, desk
bar, toolbar, task and information panes, the object detail area and the status bar.
Menu bar
Located at the top of the screen, the menu bar contains several menus that group together similar
commands.
To invoke a command from a menu, open the menu and then select a command. The available menus are
File, Edit, View, Window, and Help. For example, to locate and update your Data Protector Express
license, select Licenses from the Help menu.
You will find the menus easy to use and intuitive. Most of the menu commands are discussed in detail
later in this manual. Commands on these menus are often related to the current active object in the object
Page 31

Chapter 2: Creating Jobs with Data Protector Express 13
detail area. For example, select File Properties to display the General property page for the current
object. Other commands display menus related to general operation in Data Protector Express, like the
Preferences page.
Desk bar
Along the left side of the screen is the main Data Protector Express desk bar.
Data Protector Express provides two desk bars to organize similar sets of tasks and commands. For
example, you open the Favorites desk bar to display the Wizards view, which contains the wizards that
Data Protector Express provides to help you quickly create jobs. The Favorites views also contains the
Job Status view that lets you view the status of jobs that are scheduled, running or completed. The Jobs
and Media view lets you work with backup, restore, verify and media jobs, and so on. To display a
different view, click on the category heading along the desk bar. For information about creating a custom
desk bar, see Creating a custom desk bar on page 17.
TIP: To organize long lists of jobs or objects in any view, sort the list by any column heading.
The Favorites desk bar contains the following views:
• Wizards: The Wizards view contains groups of pre-defined wizards that you can use to create backup,
restore or verify jobs, work with media, create a virtual library, or create bootable CDs or DVDs for
disaster recovery. For more information about these wizards, see Working with Data Protector
Express wizards on page 24.
• Job Status: The Job Status view contains a list of jobs that are scheduled to run, have completed
running, or that are currently running. To sort the list, click on any column heading.
• Jobs and Media: The Jobs and Media view contains a list of all of the jobs or media in Data Protector
Express that you have created or for which you have permissions.
• Devices: The Devices view contains a list of any devices contained in the Data Protector Express
management domain to which you have access. You might have access to a D2D device, a CD or
DVD device, a library or one of many types of tape devices. Use this view to quickly locate a device
and view its property information.
Page 32

14 Data Protector Express User's Guide and Technical Reference
• Alerts: The Alerts view displays a list of alerts that Data Protector Express generates while jobs are
running. You can view any alert displayed on this view. Also available from this view are evaluation
alerts. An evaluation version of optional features in Data Protector Express is automatically installed
when you originally install Data Protector Express. Each time you access an optional feature that is
running as an evaluation, Data Protector Express displays an evaluation alert for 60 days. Use the
Clear Evaluation Alerts command to clear all of these alerts at once, or you view each alert and
clear them individually.
• Recent Logs: The Recent Logs view contains a list of logs that Data Protector Express has created as
each job has completed.
• Instructions: The Instructions view contains a set of instructions for jobs that are scheduled to run on
the current day. These instructions provide details about each job schedule to run that day including
the job name, the time the job will run, who has set up the job, and the media required for the job. Use
this information to prepare for jobs each day.
The Administration desk bar contains the following views:
• Catalog: The Catalog view contains a list of every object contained in the Data Protector Express
management domain. These objects are organized in a hierarchical tree view similar to how data on a
computer is organized. For example, expand Job Status to see a list of completed, running or
scheduled jobs. Use the Catalog view to display property information about any job, device, media,
user, or machine in the Data Protector Express management domain.
• Security: The Security view contains information about every user or group in the Data Protector
Express management domain. Use this view to display, edit, or create user information including
permissions and passwords.
Toolbar
• Preferences: Select Preferences from the Administration desk bar to display the Preferences
property page for the current user. Use this page to set up general user preferences for the color
scheme, animations, a web browser, and so on. For more information about the settings on this page,
refer to Preferences on page 238.
• Configure Domain Server: Select Configure Domain Server to set up email settings for the Data
Protector Express management domain. For more information about configuring email settings, refer
to Configuration page on page 196.
• Messages: Select Messages to see the contents of the trace files that Data Protector Express creates
while it is running. In contrast to job logs, information is displayed here if you enable logging for
things like the network, the Data Protector Express catalog, specific devices, and so on. You can track
information about these objects by enabling auditing on the General property page for the selected
object. For example, to enable auditing for a device, open the Devices view from the Favorites desk
bar, select a device and view its properties. Then select Enable Auditing.
• Reports: Select Reports to create a report on any object or group of objects in the catalog. For
instructions on running reports, refer to Reports.
The toolbar contains several command buttons related to the main viewing area of the screen.
Page 33

Chapter 2: Creating Jobs with Data Protector Express 15
• Similar to clicking Back in a web browser, the Back button redisplays the most recent Data Protector
Express menu or submenu. Click this button to return to that view quickly.
• Similar to clicking Forward in a web browser, the Forward button redisplays the previous menu or
view since you pressed the Back button.
• The Up button changes the currently displayed folder (or container) to the next higher folder in the
hierarchy, that is, the folder that contains (is the parent of) the current folder.
• The Folders button shows or hides a hierarchical tree view of the Data Protector Express
management domain.
• The Home button takes you quickly to your Home folder which contains all jobs that you have
defined and all media that is used by your jobs.
• The Views button lets you change how objects are displayed in the object detail area (e.g., Tiles,
Icons, List or Details, etc.).
Task and information panes
Task and information panes are located to the left of the main object detail area. These areas are updated
as you work in Data Protector Express and always contain shortcuts to commands or tasks related to the
active object. Tasks and information are organized together into different panes.
• General: Presents basic information about the current object, such as a job title and location in the
• Commands: Contains shortcuts to tasks that are related to the selected object, such as New, Run,
• Details: Describes the current active object, such as type of object
• Dynamic Help: Contains links to task-related help and other topics of interest to the current object
Click the Expand arrow in the right corner of a pane to expand or collapse the information.
Detail viewing area
The remainder of the screen is the detail area. When you select the Folders command, the detail view
area is split vertically into a hierarchical tree view of the current view on the left and a detail area on the
right. The contents of this view change as you navigate within Data Protector Express. Selecting a view
from the desk bar or the hierarchical tree updates the detail area to show the objects contained in that view
or folder.
storage management server
Rename, etc.
Page 34

16 Data Protector Express User's Guide and Technical Reference
Status bar
When working with objects presented in the object detail area, keep the following in mind:
• The hierarchical tree view displays folders, machines, and other devices that contain more files or
folders. If an entry in the tree does not contain other files or folders, it is displayed only in the main
detail area of the screen.
• To display the files in a folder, machine or other device, open it by clicking on it in the tree view area.
• To view the folders within a folder, expand the tree view by clicking on the Expand tree icon next to
the folder. You can also double-click the folder and it will both expand and display its contents in the
main detail area.
• To close a folder, click the Collapse tree icon next to the folder. You can also double-click the open
folder and it will close.
There are numerous keyboard shortcuts available that make it easier to work with files, folders and other
items in Data Protector Express. For more information, see Keyboard shortcuts on page 19.
The Status bar displays short descriptive messages about the menu commands on its left side. The Status
bar displays the current user’s name, the storage domain to which the user is logged in, and the name of
the machine at which the user is working.
An Alert button appears in the lower right corner of the status bar. This button flashes when there is an
issue that requires your attention. For example, Data Protector Express might not be able to locate a
backup device you specified for a job and will send a message to the Alert window to notify you of the
problem. When you click on the Alert button, Data Protector Express displays the Alert window so you
can view any pending alerts.
Page 35

Chapter 2: Creating Jobs with Data Protector Express 17
You can also resize the Data Protector Express window. Point to the lower right corner of the Status bar
and drag the window to the desired shape. To show or hide the Status bar, open the View menu and select
Status bar.
Customizing the main Data Protector Express window
Several elements of the main Data Protector Express window can be rearranged or their appearance
modified. Changes to settings are retained for future work sessions.
• Move the Menu bar and Desk bar to a new location on the screen. To move them, cursor over the area
with the dots. The cursor changes to double arrows. Drag the bar to the new location. You can place
them at the top or bottom of the screen, along the right or left side of the screen, or you can let them
“float” anywhere on the screen.
• Show or hide the Status Bar. Click the View menu and select Status Bar to show or hide it.
• Change the appearance of the detail area. Click the Views button and select Tile, Icons, List or
Details.
• Change the color scheme and animation settings for Data Protector Express. From the File menu,
select Preferences.
• Organize jobs, commands, and other objects by creating a custom desk bar. See Creating a custom
desk bar, below.
• Change an icon associated with an object. See Changing the icon associated with an object on page
17.
• Add custom descriptions for objects. See Adding custom descriptions to objects on page 18.
• Create a custom profile that contains only those settings and features that you want to use while
running Data Protector Express. See Customizing profiles on page 18.
Creating a custom desk bar
A desk bar groups together similar objects and commands. You can create a custom desk bar and add jobs
and tasks to it that you perform frequently or that you want to find easily. A custom desk bar can contain
backup jobs, media jobs, job groups, custom folders or user information, and more. You create a custom
desk bar or other menus by adding them to a profile folder. A profile folder contains all of the possible
menus and commands that you might use in Data Protector Express. Alternatively, you can create a
template that contains only a few of the menus and commands available in Data Protector Express.
To create a custom desk bar
1. Right-click the area in which you want to place the desk bar and select New.
2. Select Band Folder and type a name for the desk bar.
3. Click OK.
4. Right-click the new desk bar.
5. Add commands or jobs as needed.
Changing the icon associated with an object
You can change the icon associated with any object in Data Protector Express.
Page 36

18 Data Protector Express User's Guide and Technical Reference
1. Select an object from the detail area on the screen then select the Properties command. You can also
right-click the file, machine, task or other object and choose Properties from the Shortcut menu.
The General property page appears.
2. Click the Change Icon button.
3. Select an icon from the Icon browser and click OK.
4. Save the new icon by clicking Apply or OK to closes the Properties screen.
TIP: To keep the existing icon associated with this object, click Cancel to close the properties page
without saving your changes.
Adding custom descriptions to objects
You can add custom descriptions for any object in Data Protector Express. These descriptions appear
under and object in the main detail area or in the Status bar at the bottom of the screen.
1. Select an object and display the General property page.
2. Enter a new description in any of the following fields:
• Description: Enter a message here that will appear below the object icon in the main detail area.
• Tooltip: If you have created a custom menu, enter a message here that will appear when you roll
over the object.
• Status help: If you have created a custom menu, enter a message here that will appear in the
Status bar when you select the object.
3. Click Apply or OK to save your changes.
Customizing profiles
You can customize your profile in Data Protector Express so that it contains only those settings and
features that you want to see when you run Data Protector Express. When you customize your profile,
you enable any menu, view, job, or task that you want to see and you disable any menu, view, job, or task
that you do not want to see. You can include or exclude any desk bar or only a few commands within a
desk bar, any menu or only a few commands within a menu, any job type (backup, restore, etc.), and so
on. Your custom profile could contain only custom menus with custom commands.
When a user starts Data Protector Express with a custom profile, he sees only those features that have
been enabled. All other features are hidden from view. You might create a custom profile if you have
users who need only a limited set of Data Protector Express features.
To customize a profile
1. Select View Administration Catalog.
2. In the Folders view, expand the tree under Home until you see the user name for which you want to
modify the profile.
3. Expand the tree under the user name until you see the .Default profile.
4. Make a copy of the .Default profile to save the original settings.
a. Right-click the .Default profile and click Copy.
b. Right-click the user name and click Paste.
Page 37

Chapter 2: Creating Jobs with Data Protector Express 19
Data Protector Express adds a new profile named Copy of .Default to the tree under the user name.
c. Rename the new profile.
5. Expand the tree under the Default profile.
6. Modify the menus and job types that you want to include in the profile.
7. The next time a user starts Data Protector Express, he will use this profile.
Working with Objects in the Main Data Protector Express Window
You can easily change how objects are displayed in the object detail area. This will assist you in working
more effectively and quickly.
Arranging objects
In the object detail area, you can arrange the objects in several different ways using either buttons on the
toolbar or the Arrange Icons by submenu. Depending on the view, you can sort the objects by name,
size, type or one of several other settings. You can also use the column head at the top of the object detail
area to change how the objects are sorted when working in Details view.
Keyboard shortcuts
Besides using the mouse to work with objects in the main Data Protector Express window, there are
several keyboard shortcuts that will speed up your work. The next time you work with Data Protector
Express, try these keyboard shortcuts. These shortcuts are available in the graphical user interface and in
the character user interface.
• The TAB key will move the active or highlighted area to a different area of the window.
Page 38

20 Data Protector Express User's Guide and Technical Reference
• The PLUS SIGN (+) on the numeric keypad or the RIGHT ARROW key expands the tree in the tree
view area.
• The MINUS SIGN(-) on the numeric keypad or the LEFT ARROW key collapses the tree in the tree
view area.
• The ARROW keys also select objects in the tree view area and in the object detail area, as well as
change the active page.
Shortcut menus
When you right-click in most windows, the shortcut menu appears. The shortcut menu list commands that
pertain to the active portion of the screen or to the currently-selected object. This is often the fastest and
easiest way to create new objects and modify existing objects.
Find button
The Find button lets you locate objects in the storage management catalog quickly without searching
through multiple volumes and directories.
To use the Find command, click on the Find button, select Find... from the Edit menu or press F3. In the
Find window, type the name of the object you want to find. Data Protector Express will search through
the catalog, attempting to locate that object. When the object is found, it will be displayed and
highlighted.
Note that the Find command is not case-sensitive and you can use the wildcard characters ? (question
mark) and *(asterisk) .
Property pages
Every object in the Data Protector Express catalog has a set of property pages associated with it. Use
these property pages to modify settings for an object and to view logs, messages, diagnostics or other
reporting information that Data Protector Express generates.
Page 39

Chapter 2: Creating Jobs with Data Protector Express 21
Opening property pages
You display the property page of an object in one of several ways:
• Select the object with the mouse or keyboard, and then click Properties on the Command task pane.
• Right-click the object to display a shortcut menu, then select Properties.
• Select the object, and then select Properties from the File menu.
Open a property page in one of several ways
NOTE: You can leave open property pages when you return to working in the main Data Protector Express
window and you can have several property pages open at once.
Page 40

22 Data Protector Express User's Guide and Technical Reference
Reports
Data Protector Express has a series of helpful diagnostic and summary reports available. These predefined
reports are designed to gather specific information that is stored in the Data Protector Express catalog.
Reports can contain summary information or detailed information.
Types of reports
Generating reports with wizards ensures that you have the reports you need whenever you need them.
Data Protector Express provides the following report generation wizards. You can choose to produce
either a summary report or a detail report from each wizard.
Objects at Risk wizard
Summary view: Generate a report that summarizes the objects in the Data Protector Express catalog that
are at risk.
Detail view: Generate a report that contains a detailed account of the objects in the Data Protector Express
catalog that are at risk.
Media Information wizard
Summary view: Generate a report that summarizes information about the contents of media that are part of
the Data Protector Express catalog.
Detail view: Generate a report that contains detailed information about the contents of media that are part
of the Data Protector Express catalog.
Catalog Listing wizard
Summary view: Generate a report that summarizes the contents of the Data Protector Express catalog.
Detail view: Generate a report that contains detailed information about the contents of the Data Protector
Express catalog.
Additional reporting capabilities
Besides its reporting capabilities, Data Protector Express has several advanced features to help you track
and compile information that Data Protector Express generates.
• Select Alerts on the Favorites desk bar to view Data Protector Express alerts. You can also open
alerts by clicking the Alerts button in the lower right corner of the screen.
• Select Recent logs on the Favorites desk bar to view recent logs that Data Protector Express has
generated. Use this command to print or save the log. You can also set up Data Protector Express to
send the logs automatically to a specified email address. For more information about emailing logs,
see Emailing job logs on page 132.
• Select Instructions on the Favorites desk bar to see which media and devices are required for the
scheduled jobs. See Viewing and printing scheduled job instructions on page 127 for more details.
• Select Messages on the Administration desk bar to view or print information about the general
operating state of the machine that do not require attention in order for Data Protector Express to
continue running. Sometimes referred to as trace messages, this information is updated each time
Data Protector Express performs an operation on an object for which you have enabled auditing. See
Audit Logs on page 132 for additional information.
Page 41

Chapter 2: Creating Jobs with Data Protector Express 23
Printing reports
1. Select Reports from the Administration desk bar.
2. Select the Base object from which to generate the report. Predefined reports gather information for
the entire storage domain. The report will generate information for all of the objects in the Data
Protector Express hierarchy that are below the object specified as the base object. Click the Browse
button to select a new object.
NOTE: Media information reports do not require a base object.
3. Double-click an available report type in the main object detail area, for example, Media Information.
The Report screen appears.
4. Choose the Report type that you want to run: Summary or Details.
5. Select a printer and font for the report.
6. Update the Printer settings and other information.
7. Click Print.
The report is printed on the selected printer.
NOTE: These reports can output many hundreds of pages. Therefore, we recommend that you save the
reports as a file. For instructions on saving a report as a file, follow the instructions below in the Saving
reports section.
Saving reports
By default, reports are printed directly to a printer. If you want to save a report as a file, you can set up a
printer that prints files to a filename. Depending on the type of printer you set up, you can save reports as
PDF files, postscript files or plain text files. To create PDF files requires that you have access to Adobe®
Acrobat® Distiller® or another product capable of creating PDF files. The following instructions describe
how to create a generic text printer on a Microsoft Windows PC desktop.
To create a generic text printer
Add a new printer from the Windows Start menu. For example, in Windows XP, select Printers and Faxes
on the Start menu, then select Add a printer.
1. Working through the printer wizard, create a local printer.
2. On the Select a Printer Port screen, select FILE (Print to File).
3. On the Install Printer Software screen, select Generic for the manufacturer and Generic/Text Only for
4. On the Name Your Printer screen, select a unique name for this printer so that it is easy to identify
the printer.
in Data Protector Express.
5. Do not use this printer as your default printer.
6. Continue through the wizard until the printer is created and accept any remaining default settings.
7. The printer is ready for use in Data Protector Express.
Page 42

24 Data Protector Express User's Guide and Technical Reference
To save a report as a file
The next time you create a report in Data Protector Express, follow these steps to save the report as a file.
1. From the Administration desk bar, select Reports and choose the report you want to generate.
2. On the Report screen, select the printer you created above as the destination for your report.
3. As the report is generated, Data Protector Express will prompt you to name the file.
4. Enter the path and filename for the report (e.g., C:\ObjectReport.txt).
You can print this report or view it in a compatible editor. Generic text files can be viewed with most text
editors like Notepad or Microsoft Word.
Working with Data Protector Express wizards
Data Protector Express wizards give you a fast and quick way to perform most tasks. You can use
wizards to create and schedule backup jobs, restore jobs, verify jobs, and media jobs. You can also create
a virtual library, test a library or device, or clean a device from the Wizards view or perform operations
related to disaster recovery. Data Protector Express wizards will guide you through each step necessary to
create and run the job or task you select.
The name of each Data Protector Express wizard option indicates what task that wizard helps you
perform. The descriptions are self-explanatory. The Backup, Restore, and Verify wizards create jobs.
For additional information about creating these jobs without the Data Protector Express wizards or about
the jobs the Data Protector Express wizards created, review the rest of this manual. Media wizards help
you format or erase media, organize media in a library, import the contents of media into the Data
Protector Express catalog, and so on. The Disaster Recovery wizard helps you create a bootable CD or
DVD for use during a disaster recovery operation. The D2D Device wizard helps you create a virtual
library.
Page 43

Chapter 2: Creating Jobs with Data Protector Express 25
Data Protector Express walks you through the task that you have selected. You are prompted to name the
job, select files or devices to include in the job, select media as appropriate, and set up a schedule to use
when running the job. By the time Data Protector Express finishes the wizard, you have a job that is ready
to run. You can also create custom wizards or edit existing wizards. To create a custom wizard, see
Custom wizards on page 27. To edit a job created with a wizard, select the job, and view the job’s
property pages.
Available wizards
Data Protector Express contains over twenty wizards grouped into logical categories. Use the Wizards
view to select a category from which to create jobs and tasks efficiently. Wizards are grouped into the
following categories.
Backup job wizards
Backup wizards help you create backup jobs that fit the most common backup situations. These wizards
walk you through the process of setting up a job including selecting backup mode, backup devices, files
to include in the job, scheduling information and media rotation. For more information about selecting
files for backups, see Backup Selection Concepts on page 53. Data Protector Express provides the
following backup job wizards:
Backup Local Machine: Use this wizard to back up the contents or a portion of the local machine.
Backup all Servers: Use this wizard to back up the contents or a portion of the contents of all servers in the
Data Protector Express management domain.
Backup all Workstations: Use this wizard to create a backup job that backs up all or a portion of the data
stored on all PC desktops included in the Data Protector Express management domain.
Backup all Machines: Use this wizard to create a backup job that backs up the data or a portion of the data
on all machines included in the Data Protector Express management domain whether they are individual
PC desktops or servers.
Backup Specific: Use this wizard to create a backup job that backs up only specific files stored on the
local hard disk or on other PC desktops in the Data Protector Express management domain. Use this
wizard to back up only a few selected files on a regular basis.
Restore job wizards
Restore wizards help you create restore jobs that fit the most common data restore situations. These
wizards walk you through the process of setting up a job including selecting the correct versions of files
to be restored, the media location of these versions, and the network destination for the restored files. For
more information about restoring files, see Restore Selection Concepts on page 66. Data Protector
Express provides the following restore job wizards:
Restore Specific: Use this wizard to restore certain files. This wizard will guide you through the process
of locating a version of a particular file or files no matter where the file versions are located.
Verify job wizards
Verify wizards help you create verify jobs that fit the most common data verification situations. For more
information about verify jobs, see Verify Selection Concepts on page 80. Data Protector Express provides
the following verify job wizards:
Page 44

26 Data Protector Express User's Guide and Technical Reference
Verify Media: Use this wizard to compare the contents of a particular media with the data that exists on a
local PC desktop or file or application server. This wizard is useful when you need to verify the integrity
of the backup data on a specific backup media.
Verify Specific: Use this wizard to compare a file on a local PC desktop or file or application server with
its backup versions available on backup media. This wizard is useful when you need to verify the integrity
of backup data for certain files.
Media job wizards
Media wizards help you create jobs to perform several common tasks related to backup media. Some
backup devices do not support all of these tasks. If your backup device does not support a task, the wizard
will not be available. If a wizard you want to use is not available, review the manufacturer’s
documentation for your backup device to see if you can perform the tasks manually. Data Protector
Express provides the following media wizards:
Format Media: Create a job that formats media and assigns a name to it. You might use this wizard to
schedule media formatting remotely or after normal business hours or to initialize virtual media.
Import Media (into the catalog): Create a job that imports media into the Data Protector Express catalog
from another server. This wizard is useful if you want to import media without an administrator being
present to monitor the job.
NOTE: This wizard is unavailable when working with virtual media.
Erase Media: Create a job to erase media whose data is no longer needed. You might use this wizard to
schedule a job that erases the contents of several media outside of normal business hours.
Sort Media: Create a job that reorganizes the media in a library. Use this wizard to schedule a sorting task
for a time when it will have the least impact on users attached to the Data Protector Express management
domain.
Eject Media: Create a job that ejects media from the selected device. If this wizard not available, either
your device does not support this command or no device is selected. You might use this wizard to eject
media after a backup job is completed as a visual cue to your support staff that the job is done.
Move Media: Create a job that moves media from one storage slot in a library, drive, or mail slot to
another. You might use this wizard to move media automatically at the end of a series of backups to help
you manage media rotation more effectively.
Copy Media: Create a job that copies the contents of a selected media to another media. You might use this
wizard to create redundant copies of media that you can store offsite for safekeeping.
Media Content: Create a job that determines the contents of the selected media. You might use this wizard
to determine which files or file versions are available on a piece of media that is unidentifiable. You
might then use the Import Media wizard to import the contents of the media into the Data Protector
Express Catalog.
Test Device: Create a job that tests a backup device. You might use this wizard to ensure that Data
Protector Express and a backup device are communicating properly.
Test Library: Create a job that tests a library. You might use this wizard to ensure that Data Protector
Express and a library are communicating properly.
Insert Media: Create a job that inserts media into a library storage slot from an import/export slot.
Page 45

Chapter 2: Creating Jobs with Data Protector Express 27
Remove Media: Create a job that removes media from a library. You might use this wizard to schedule a
job that removes several media from a library outside the normal business hours.
Clean Device: Create a job that inserts a cleaning cartridge into a library device and runs it through a
cleaning cycle. You might use this wizard to schedule a cleaning cycle on a library device outside the
normal business hours. This wizard is available only for devices that support automatic cleaning.
Identify Media: Create a job that identifies the media currently loaded in a device. You might use this
wizard to routinely identify media in a library so that the latest information is available to Data Protector
Express.
Retension Media: Create a job that rewinds the selected media to improve its tension. Media that has been
wound and rewound several times loses its tension and is not as efficient during backup jobs.
Retensioning media improves its overall life as well as the accuracy of backups.
Restore Catalog: Create a job that restores the catalog for the Data Protector Express management domain
from any available media.
D2D device wizards
Create Virtual Library: Create a virtual library device and assign a storage folder to it. If you intend to
make use of D2D2Any backups you must create a virtual device.
Disaster recovery wizards
Disaster recovery wizards help you perform disaster recovery preparation tasks that fit the most common
situations. For more information about disaster recovery operations, see Disaster Recovery on page 267.
Data Protector Express provides the following disaster recovery wizard:
Make Bootable CD: Use this wizard to create a bootable compact disk that you can use to start your system
in the event of a data disaster. Each machine should have a bootable CD, and bootable media should be
recreated when a PC desktop configuration is altered; that is when the operating system is modified or
hardware changes occur on the PC desktop.
Custom wizards
To create a custom wizard, follow these steps.
1. Open the Administration desk bar, select Catalog and locate Templates.
2. Open the .default template and select either Character Based UI or Graphical Based UI.
3. Double-click Desk Bar, Favorites, and then Wizards.
4. Right-click in the details area and select New ….
The New Object screen appears.
5. Enter a name for the wizard, select Command for the object type and click OK.
6. Set up the new wizard as follows:
• On the General property page, enter a description and other information
• On the Command property page, select the command that this wizard will run; if desired, select a
specific on which to run the command
• On the Permissions property page, select the users and groups that may run the wizard
7. Click Apply or OK to save your changes.
Page 46

28 Data Protector Express User's Guide and Technical Reference
The wizard will be available to all users with permissions to the object.
Viewing optional features
If an option is not listed on a screen, e.g., Disaster Recovery on the Wizards view or SQL Agent on the
Catalog view, it may be for one of the following reasons:
• The evaluation license for the option has expired. Optional features are installed automatically when
you install Data Protector Express. Once the license expires, you can no longer use an optional
feature without purchasing a license.
• The option is not available due to your license agreement. For example, you might be using a
Standard edition of Data Protector Express and are looking for features that are available only in the
Advanced edition.
• An error occurred when starting Data Protector Express. Review the alerts to see if an option failed to
start properly when you started the application.
Page 47

Chapter 3: Creating Jobs with Data Protector Express
To transfer files back and forth from backup devices to PC desktops and file or application servers
attached to a network, you create and run jobs. You organize and store these jobs in folders you create on
job pages in the main Data Protector Express administrator window.
In this section
• Jobs and Media view and the Job Status view
• Creating New Jobs
• Renaming, deleting, copying and moving jobs
Overview
You use backup jobs in order to protect against loss of data due to disasters or equipment malfunction, to
archive important files and to create permanent historical records. Restore jobs allow you to transfer
stored files on media back to file or application servers and PC desktops. Verify jobs compare the version
of a file stored on media, such as tapes, with current versions of the file stored on machines on a network.
You can create folders to store these jobs on one of the job pages. These folders and the jobs stored within
them can be renamed, deleted and moved to new locations.
Data Protector Express can create and run several types of jobs: backup jobs, restore jobs, verify jobs,
media jobs, and disaster recovery jobs. You can also create several types of jobs and add them to a Job
Group so that they will run together unattended.
Backup jobs
Backup jobs copy selected files from file or application servers and PC desktops to various storage media,
such as tapes, writable CD or DVD media, or virtual media. These backups can be stored, preserving a
copy of the file for future use. You might create and run a backup job for one of the following reasons:
• To ensure the integrity of data should a disk drive on a PC desktop or file or application server fail.
This is perhaps the most common type of backup job. Its purpose is to protect valuable information in
case of a disastrous data loss. This type of backup allows a company or organization to return to work
quickly, even after the failure of a main file or application server. To be effective, these backup jobs
must be run regularly (usually daily) without exception to ensure that recent changes to files can be
safely restored. This type of backup job is for disaster protection.
• To remove files—from a PC desktop or file or application server—that are infrequently used.
29
Page 48

30 Data Protector Express User's Guide and Technical Reference
Some files are important to keep, but are never or rarely used. For example, you may wish to keep a
copy of correspondence from last year for legal reasons, but have no regular need to access these files
under normal circumstances. By backing up the files onto a tape or other media, you safely store the
media, preserving a copy of the file and then delete the file from the PC desktop or file or application
server. Data Protector Express will keep track of which files you have backed up and which media
they are located on. As long as the media is undamaged and safely stored, you will be able to retrieve
the file if necessary. Test the archive tape before you assume that it can be relied upon. This type of
backup job is called an archive job.
• To store a copy of a particular historical version of a file.
Sometimes you may wish to keep a permanent record of a particular version of a file. For example,
you may need to preserve a copy of company records as they exist on a certain date or before they are
converted for use in a new program. You can store a copy of the file as it exists on a certain date and
instruct Data Protector Express to make certain that this file and the media it is on are not overwritten
with other data. Data Protector Express will keep track of the file and the media in its catalog and you
will be able to retrieve it if necessary. Unlike an archive job, the file that was backed up is not deleted
from the file or application server or PC desktop. This type of backup job is sometimes called a
historical backup.
You can also create several backup jobs and add them to a Job Group so that they will run unattended.
Restore jobs
Restore jobs copy files from backup devices to PC desktops and file or application servers. You might
create and run a restore job when files on a PC desktop or file or application server have been lost because
of a disk crash, when you need to view a file that has been archived (backed up onto media and then
deleted) or when you need data from a particular historical version of a file. You can also create restore
jobs and add them to a Job Group so that they will run unattended.
Verify jobs
Verify jobs compare a file on some media, such as a tape, with a file on a PC desktop or file or
application server. These jobs verify that the two files are in fact the same file. A verify job is useful when
you wish to make sure a particular file, such as a program file, has not been corrupted or modified. You
can also create several verify jobs and add them to a Job Group so that they will run unattended.
Media jobs
Media jobs perform routine tasks on physical or virtual media such as formatting or erasing media,
moving media from one storage slot to another in a library, or identifying the contents of the media. A
media job is useful when you want to manage the media contained in your backup devices. You can also
create several types of media jobs and add them to a Job Group so that they will run unattended.
Disaster recovery jobs
Disaster recovery jobs create bootable media which you use to recover your system configuration,
software and data following a system or disk failure. You can use this media to boot your system and
initiate the recovery process.
Job Group
A Job Group is a collection of jobs that will be run together either sequentially or simultaneously.
Running jobs together from a single job group can streamline your data management procedures. You can
Page 49

Chapter 9: Running Jobs 133
include any type of job in a job group. With the exception of scheduling, each job retains all of its job
settings including file selections, backup mode, media or device destination. The jobs use the schedule
setting for the job group.
Jobs and Media view and the Job Status view
You can view your jobs by selecting Jobs and Media from the Favorites desk bar. You create, modify
and run backup, restore, verify or media jobs with the Jobs and Media view. Within this view, jobs are
organized by owner or access rights. Select the Jobs and Media view and notice that each user or group
in the storage domain is listed. Expand your user name and you will see a list of all jobs that you created
or to which you have access rights. For additional information about working with media on this view,
refer to Managing Media with the Jobs and Media View on page 147.
The Job Status view on the Favorites desk bar displays a list of all jobs and all occurrences of a job.
That is, for any job that runs repeatedly, an entry appears in this list each time it is scheduled to run. You
can sort this view by status to organize the jobs more clearly. Doing so groups them together as
completed, running or scheduled.
You can also view jobs in the Catalog view. Accessible from the Administration desk bar, the Catalog
view keeps track of all of the objects in the Data Protector Express catalog, and it may appear very
cluttered. Normally, when working with jobs, make the appropriate view active. In the following
illustration, the Catalog view displays all jobs and objects created by the Admin user. For more
information about the Catalog view, refer to Catalog View on page 151.
Page 50

32 Data Protector Express User's Guide and Technical Reference
Creating New Jobs
There are three ways to create new jobs: with the wizard, from a job view and by copying old jobs.
Creating jobs with wizards
The Data Protector Express wizards will help guide you through all of the steps necessary to create and
run a backup, restore or verify job. This is often the fastest way to create a new job, especially when you
are inexperienced using Data Protector Express. After you answer a few questions, the Data Protector
Express wizard will create the job for you. You can then work with this job in the catalog just like any
other job.
The fastest way to activate the Data Protector Express wizard is to click on the Wizards view from the
Favorites desk bar. Then click on the appropriate button to create either a new backup, restore or verify
job.
Page 51

Chapter 9: Running Jobs 133
You can also create a new job with a Data Protector Express wizard by either
• Selecting the Wizards view and selecting the appropriate category,
• Selecting Wizards from the View menu
Creating new jobs from the Jobs and Media view
Commonly, you will create jobs while working with the Jobs and Media view in the main Data Protector
Express window. When you create a job this way, Data Protector Express opens the property page of the
new job so you can name the job, select files and devices, set up logging and other options, and schedule
it to run. Selecting files and scheduling a job to run are covered in detail in Chapter 5 - Selecting Files and
Versions, Chapter 7 - Planning for Media Rotation, and Chapter 8 - Job Options.
Page 52

34 Data Protector Express User's Guide and Technical Reference
To Create a New Job from the Jobs and Media view
1. Select Jobs and Media from the Favorites desk bar and open your Home folder.
2. To store the job in a specific folder, create or select a folder before you create the job. The contents of
that folder are displayed in the object detail area. Data Protector Express will store your new job here.
3. Create the new job in one of these ways:
• Select New… from the File menu and then select the appropriate job type in the New Object
window
• Right-click in the Data Protector Express object detail area and select New… from the shortcut
menu
• Click the New… button on the Commands pane and select the appropriate job from the New
Object window.
4. Enter a name for the new job and select a type in the Available Types list.
5. Click OK.
Page 53

Chapter 9: Running Jobs 133
Creating new jobs by copying
Creating a new job by copying an existing job is sometimes a useful method of creating a job. In
particular, copying an existing job is appropriate when you want your new job to be like the old job in
every way except for a few minor changes.
To Create a New Job by Copying an Existing Job
1. Copy the existing job you wish to duplicate in one of these ways:
• Press the CTRL key as you drag the existing job to a new location, then skip to step 4 below
• Select the existing job (with the mouse or keyboard) and press CTRL+C
• Right-click the existing job and selecting Copy from the shortcut menu
• Select Copy from the Edit menu.
2. Open the folder you want the new job to be stored in by selecting it in the tree view area. (To store the
job in the same folder as the existing job, skip this step.)
3. Right-click the folder where you want the new job to be pasted and select Paste from the shortcut
menu. Alternatively, highlight the location where you want the job pasted; then select Paste from the
Edit menu or press CTRL+V.
4. Change the name of the new job.
NOTE: Data Protector Express copies all job properties, including job logs, to the new job.
Renaming, deleting, copying and moving jobs
You can change the names of jobs or move them to new folders. Or, if you do not plan to use a job again
in the future, you can delete it.
You rename, delete, copy and move jobs in one of these ways:
• Select the appropriate command from the Edit menu
• Right-click the job and selecting the appropriate command from the shortcut menu.
Page 54

36 Data Protector Express User's Guide and Technical Reference
To move a job, drag it to a new location. You can also use the Delete key and the Delete command to
delete jobs.
NOTE: When you run a backup job, Data Protector Express uses its catalog to keep track of the files you
have backed up and the name of the media on which they are stored. Deleting a job does not affect how
the catalog tracks files and media. Data Protector Express continues to track these files and media even
after the job that created them has been deleted. However, the jobs associated with this job will also be
deleted.
Creating job groups
Data Protector Express provides a special job type called a Job Group. Use this job to set up a list of jobs
that you want to run together. As you select jobs to include in job group, they appear on the Jobs view.
Scheduling options for job groups are similar to scheduling options for any other job type. You can select
a Schedule Type, Start Time and Start Date; however, you cannot select or modify a Rotation Type or Job
Mode. Each job retains its rotation type and job mode.
To create a job group
From the Jobs and Media view, select New… and select Job Group in the Available Types list.
2. Enter a name for the job group and click OK.
3. Set up the job group as follows:
• On the General page enter description information, and check the Enable Audit box if you want
Data Protector Express to keep a log for the job
• On the Options page, select the jobs to include in the job group
• On the Schedule page, select the days and times to run the jobs
• On the Permissions page, select the users and groups that can run this job group
4. Click Apply or OK to save your changes.
Data Protector Express will run the job group based on the schedule. The job will be stored in your Home
folder.
Organizing jobs with folders
Every backup, restore, verify and media job is stored by Data Protector Express inside a folder. By
default, Data Protector Express stores all jobs in the Home folder of the user who creates the jobs.
However, you can create new folders to help organize your jobs or you can use existing folders.
Page 55

Chapter 9: Running Jobs 133
When the Data Protector Express administrator added you as a user, Data Protector Express created a
personal folder for your use. Generally, because there may be many users in your Data Protector Express
management domain, it is a good idea to store your personal jobs in your personal folder. Alternatively,
you can store group jobs in the appropriate group folder.
Types of folders
Data Protector Express provides many types of folders: User/Group folders, Job folders, Media
folders, and folders for any other type of object you might want to create. Each of these folders is a
container, that is, they store other objects within them. They differ from each other according to the type
of object that can be stored within them.
User/Group folders can only be stored in a special folder, called the Home folder. These folders can have
either Job folders or Media folders within them; additionally, you can store jobs or media “loose” in these
folders.
Job folders can only be stored in User/Group folders or in other Job folders. These folders usually have
jobs stored within them, although you can also store additional job folders within them.
Media folders can only be stored in User/Group folders or in other Media folders. These folders usually
have media stored within them, although you can also store additional Media folders within them. Media
folders are discussed further in
Page 56

Managing Devices and Media on page 134.
Data Protector Express organizes other objects and resources that you create in folders designated for
those objects. For example, if you set up a secondary printer, you will find it in a printers folder in the
Catalog view. Create a new user or group and Data Protector Express will store them in a Security
folder.
Folders and job views
Job folders appear only on the Jobs and Media view for the users or groups that access to them and in
the Catalog view. That is, a job folder appears only in the Jobs and Media view (and on the Catalog
view) for the person who created the job or for users or groups who have access rights to it.
Similarly, User/Group folders appear only in the Security view as well as the Catalog view.
Media folders appear in the Jobs and Media and Catalog views.
Home, Admin, and Everyone folders
Three folders play a special role in every catalog: the Home folder, the Admin folder and the Everyone
folder.
The Home folder is the folder that stores all of the User/Group folders within it. It is always at the top of
the hierarchy in the tree view area of the Jobs and Media view. You are not allowed to store jobs “loose”
in the Home folder, only inside other folders. You can, however, create a job folder in which to store
other jobs. This folder would be available to any user with access rights to it.
The Admin folder is a special folder used by the Data Protector Express administrator. Normally, only
the Data Protector Express administrator has permissions to the Admin folder. If you don’t see it inside
your Home folder, this is because the Data Protector Express administrator has not given you permission
to view it.
The Everyone folder is a folder to which every Data Protector Express user has permission. Your Data
Protector Express administrator may place jobs in this folder to which he wants everyone to have access.
38
Page 57

Chapter 3: Creating Jobs with Data Protector Express 39
Everyone folder and permissions
Because of the way Data Protector Express assigns permissions to new objects, if you create a new object
inside the Everyone folder, normally everyone will have at least some permissions to it. For example, if
you create a new backup job and store it in the Everyone folder, it is likely that every Data Protector
Express user will have permissions to that folder and thus to the job.
To restrict the permissions of other Data Protector Express users to a job or folder, you should create a
folder to which only you or your group have permission. Granting permissions is covered in detail in
Permissions on page 41.
Creating job folders
Usually, the best strategy for organizing your personal jobs or the jobs of your group is to create a special
folder in which to store them. Managing permissions to these jobs is much easier and quicker if you
create a special folder for them.
When the Data Protector Express administrator adds a user or group, Data Protector Express creates a
personal folder for that user or group. If you have the proper permissions, you can also create as many
additional new job folders as you need and organize them in a convenient way. You can create additional
job folders either inside your personal or group folder or inside the Everyone folder.
To create a new folder
1. From the Jobs and Media view on the Favorites desk bar select the existing folder in which you
want to store the new job folder. (It cannot be the Home folder.)
2. Create the new folder one of these ways:
• Select New Object… from the File menu and then select Folder from the New Object window
• Right-click in either the tree view or object detail area and select Folder from the shortcut menu
• Click the New Object button and select Folder from the New Object window.
Data Protector Express creates the new folder inside the selected folder.
3. Type in the name of the new folder on its property page.
TIP: After creating a new folder, be certain to specify which users have permissions to it. This is the
simplest and fastest way to assign permissions to multiple objects stored in the folder.
Page 58

40 Data Protector Express User's Guide and Technical Reference
Moving, renaming and deleting folders
You can move, rename or delete a folder just like you can any other Data Protector Express objects, such
as jobs; however, you cannot copy folders. When moving, deleting or renaming folders, keep the
following in mind:
Moving Folders: Contents of a folder move with the folder to the new location. This may change the
permissions of the objects stored in that folder.
Renaming Folders: Only the name of the folder is changed. Data Protector Express still treats that folder
and any objects associated with it in the same manner.
Deleting Folders: Deleting folders also deletes their contents, including any other folders or jobs contained
in that folder. Before deleting a folder, be certain that you intended to delete all of its contents.
WARNING: Once a folder has been deleted, its contents cannot be recovered. Be certain either that the
folder is empty or that you no longer need the contents of the folder before deleting it.
Modifying folders
You can rename, delete and move folders using one of these methods:
• Select the appropriate command from the Edit menu
• Right-click the folder and select the appropriate command from the shortcut menu
Page 59

Chapter 4: Permissions
Security is an important issue when managing a network. One of the most important functions of the Data
Protector Express catalog is to handle security. The catalog prevents unauthorized users from working
with objects to which they have not been granted sufficient security permissions. To ensure only
authorized users can access sensitive data, Data Protector Express tracks the permissions of each user.
The Data Protector Express administrator can grant different types of permissions to various users to
ensure the security and integrity of the network data while efficiently implementing a productive backup
program.
In this section
Overview
• Users and Groups
• Effective Permissions
• Types of Permission
• Examples of Permissions
• Granting Permissions to Other Data Protector Express Users
Before you can work with any object (directory, file, user, etc.) in the Data Protector Express catalog, you
must have effective permissions to that object.
Different types of permissions restrict what type of operations can be performed on an object. For
example, some permissions allow users to write to an object (such as a file, a storage media or a PC
desktop) or create new objects (such as folders or jobs). Sometimes a user is granted unlimited
permissions to an object or all objects. Usually, however, to protect the integrity of the data and for
security reasons, most users have only limited effective permissions to some (not all) of the objects in the
Data Protector Express catalog.
Maintaining the security of data on a network is the primary responsibility of the Data Protector Express
administrator. Because of this, the following section is only an overview of security and permissions. This
section will help the typical user understand how Data Protector Express handles security and permissions
so that you can work efficiently with your Data Protector Express administrator.
Users and Groups
The Data Protector Express administrator grants permissions to objects in the Data Protector Express
catalog to either a user or to a group. Individual Data Protector Express users have effective permission
41
Page 60

42 Data Protector Express User's Guide and Technical Reference
to an object either as a user or as the member of a group. A group is a set of users that are all granted
permissions in the same way and at the same time. For example, the Data Protector Express administrator
may grant permission to read the files on specific media to users individually, to a group of users or both
to users and groups.
Individual Data Protector Express users can be a member of more than one group or in every group,
depending on how the Data Protector Express administrator arranges the catalog security. The number of
groups the Data Protector Express administrator creates and the assignment of members to those groups
depends on the security needs of your particular network. For more information on setting up users and
groups, see Adding New Users and Groups on page 176.
Everyone group
Normally most Data Protector Express users are a member of a special group, the Everyone group.
Whenever a new user is added to a Data Protector Express management domain, Data Protector Express
automatically assigns that user to the Everyone group. Typically, only limited permissions are granted to
the Everyone group, although users can be granted more extensive permissions either individually or as
members of other groups.
Page 61

Chapter 4: Permissions 43
Effective Permissions
The permissions you have to an object in the Data Protector Express catalog are called your Effective
permissions. You can view your effective permissions to an object on the General page of that object.
Determining effective permissions
A user is assigned effective permissions to an object through by direct permissions or inherited
permissions.
A user has direct permissions to an object if they are listed on the Permissions page of the object, if they
are equivalent to a user who has direct permissions to the object or if they are a member of a group that is
listed on the Permissions page of that object.
A user has inherited permissions to an object if they do not have direct permission when they have
effective permissions to the container that contains the object. If you do not have direct permissions to an
object, you must have effective permissions to the container in which the object is stored.
NOTE: Your effective permissions to a container object can be either direct or inherited. All that matters is
that you have effective permissions to the container.
When determining a user’s effective permissions to an object, Data Protector Express checks if the user
has direct permission; if not, Data Protector Express checks if they have inherited permission.
For example, if a user has the Read direct permission, but the group has the Access permission, the user’s
effective permission is Access.
Examples of determining effective permissions
The following two examples illustrate how Data Protector Express determines the effective permissions a
user has to an object.
Effective permissions example #1
In this example, a user has direct permissions only to the User/Group folder named My Folder.
Page 62

44 Data Protector Express User's Guide and Technical Reference
When determining the effective permissions the user has to My Folder, Data Protector Express first looks
to see if he has direct permissions to the folder. Because the user is listed as a user on the Permissions
page of the folder’s property page, he has direct permissions to the folder. Data Protector Express uses
this information to determine the user's effective permissions. Data Protector Express does NOT look to
see if there are any inherited permissions to the folder.
When determining the effective permissions the user has to the backup job named My Personal Backup
Job stored in My Folder, Data Protector Express first looks to see if he has inherited permissions to the
job. Because the user does not have direct permissions, Data Protector Express checks to see if the user
has inherited permissions to the folder that contains the job. In this case, Data Protector Express checks to
see if he has direct permissions to My Folder, and because this user has direct permissions to this folder,
Data Protector Express uses this information to calculate the effective permissions this user has to the job.
Effective permissions example #2
In this example, a user (User One) has direct permission to the media folder named My Media Folder as
a member of a group named Group One and to any folders or jobs that he creates as a user.
When determining the effective permissions that User One has to these folders, Data Protector Express
first looks to see if he has direct permission to the folder. Because he is a member of Group One which
has direct permissions to the folder, User One also has direct permissions to the folder. Data Protector
Express uses this information to determine the user's effective permissions. Data Protector Express does
NOT look to see if there are any inherited permissions to the folder.
Page 63

Chapter 4: Permissions 45
When determining the effective permissions a user has to anything stored in the folder, Data Protector
Express first looks to see if a user has direct permission to the object. If no users or groups have direct
permissions to the object, Data Protector Express checks to see if the user has direct permissions to the
folder. In this example, Data Protector Express checks to see if User One has direct permissions to My
Media Folder; because User One has direct permissions to this folder, Data Protector Express uses this
information to calculate his effective permissions to anything contained in the folder.
Similarly, Data Protector Express determines the effective permissions a user has to a folder by the direct
permissions he or she has to that folder. Note that when determining the effective permissions to a folder,
it makes no difference that a user also has effective permissions to the folder which contains this folder.
When determining the effective permissions a user has to a job contained in his or her personal folder,
Data Protector Express checks to see if the user has direct permissions to the job. If he does not, Data
Protector Express checks to see if the user has direct permissions to the folder that contains the job. If a
user has direct permissions to the folder, Data Protector Express uses these direct permissions to
determine his effective permissions to the job that is stored in the folder.
Note especially that the effective permissions a user has to a job or task are determined ONLY by the
user's effective permissions to the folder—and NOT by his effective permissions to the group folder.
How moving objects affects permissions
When an object is moved from one container to another, Data Protector Express determines the effective
permissions of the object based on its new location.
For example, suppose a user has effective permissions to a job because that job is stored in his or her
User/Group folder, a container to which the user has been granted direct permission. If the job is moved
from that folder to a new folder, the user’s effective permissions to the job may change. If the job were
moved to the Admin folder, the user would lose permission to it because he or she does not have direct
Page 64

46 Data Protector Express User's Guide and Technical Reference
permissions to the Admin folder. On the other hand, if the job were moved to the Everyone folder, the
user would still be able to access the job, even though the effective permissions might be different.
Types of Permission
Data Protector Express controls access to objects in its catalog with seven different types of permission.
The type of permission determines what actions a user can perform on an object. Users and groups can be
granted all seven types of permission, only some of the permissions or none of the permissions.
The seven types of permission are Supervisor, Access, Create, Modify, Delete, Read and Write.
Page 65

Chapter 4: Permissions 47
Supervisor
This is the most powerful permission. Supervisor permission grants the user three specific abilities:
• First, a user with Supervisor permission to an object is automatically granted the other six
permissions to that object;
• Second, a user with Supervisor permission to an object automatically has effective permission to all
the objects in the catalog below that object; and
Access
• Third, a user with Supervisor permission to an object cannot be denied any of the seven permissions
to any object in the catalog below that object.
The Data Protector Express administrator is automatically granted Supervisor permission to the highest
container in the Data Protector Express catalog hierarchy (called the System Container). This means that
the Data Protector Express administrator has full permissions to all the objects in the Data Protector
Express catalog and that none of these permissions can be denied.
Often, only the Data Protector Express administrator will be assigned Supervisor permission.
A user with Access permission to an object can grant other users and groups permissions to that object.
For example, if you wish to grant a co-worker permissions to a tape you have created, you must have
Access permission to that tape.
Access permission can be very powerful, since it allows a single user the ability to grant all other users in
the Data Protector Express catalog extensive permissions to an object. For this reason, your Data
Protector Express administrator may not grant you Access permission to objects even though you have
other permissions to them. For example, your Data Protector Express administrator may grant you
permission to read and write from a particular tape. Without Access permission however, you will not be
able to grant other users or groups that same ability.
You can only grant permissions to other users or groups if you have Access permission. If you want other
users to have permissions to an object, such as a job or tape, and do not have Access permission to that
object, ask your Data Protector Express administrator to grant these users permissions for you.
Create
This permission allows a user to create new objects within a container object. For example, to create a
new job within a folder, a user must have Create permission to the folder. Note that the Create
Page 66

48 Data Protector Express User's Guide and Technical Reference
]
permission applies to the folder, not to the job: it grants the user permission to create new objects within
that folder.
If you want to create new folders or jobs, your Data Protector Express administrator must grant you
Create permission. Your permission to create new jobs or folders might be limited to a single folder. For
example, you may have Create permission only to the Everyone folder or to a personal folder that your
Data Protector Express administrator has created for you or your group.
If you can’t create a new job or folder, first make sure you have selected a folder in the tree view area to
which you have Create rights. If you still cannot create a new job or folder, ask your Data Protector
Express administrator to grant you Create permission to that folder.
Modify
This permission allows a user to change the name and location of an object, such as a job, in the Data
Protector Express catalog. Modify permission also allows a user to change or modify the property pages
of an object. If you have this permission, you will be able to move, rename and change the property pages
of objects. For example, to change the name of job, a user must have Modify permission to that job. You
must also have Modify permission to move a job from one folder to another.
Delete, Read and Write
These three permissions control user access to objects, such as tapes, devices and files, which are read,
deleted or written to. These permissions are necessary in order to run backup, restore, and verify jobs as
specified below.
• To complete a backup job, a user must be granted Read permission to the files to be backed up and
Write permission to both the media and the backup device. If the backup job will overwrite the media
with the new data (as opposed to merely appending the new data), the user must also have Delete
permission to the media.
• To complete a restore job, a user must be granted Write permission to the volumes (disk drives) on
which the files are going to restored and Read permission to the media and backup device. If the
restore job will overwrite or replace old files, the user must have Delete permission to those files.
• To complete a verify job, a user must be granted Read permission to the files on the PC desktop or
file or application server to be verified, to the media and to the backup device.
Examples of Permissions
The following two examples illustrate how the permissions work with each other.
Permissions example #1
In this example, a user has effective permissions to a folder named My Backup Jobs, to a drive (or
volume) named File System and to a media set named Media:1.
Catalog Object Effective Permissions
My Backup Jobs (Job folder)
File System (Volume)
[––
[–––––R-
Page 67

Chapter 4: Permissions 49
]
Media:1 (Media)
[–––––R-
These permissions allow the user to do the following:
• Because the user has Create permission to the My Backup Jobs folder, he will be able to create new
job folders within that folder and to create backup, restore and verify jobs inside that folder. The
Modify permission allows him to move these jobs between folders, to change the name of the job and
to change the property pages of these jobs. The Delete permission allows him to delete any jobs or
folders inside this folder. The user also has Read and Write permissions to the My Backup Jobs
folder and will have these same permissions to any object stored in that folder.
• Because the user also has Read permission to the volume named File System, he will be able to
select files from that drive for backup. He will also be able to select files for restoring.
• Because the user has Read permission to both the media and to the volume, he will be able to create
and run verify jobs—if he also has Read permission to the backup device.
These permissions do NOT allow the user to do the following:
• Although the user will be able to create a backup job, he will not be able to run the backup job
because he does not have Write permission to the media. The job must be run by the Data Protector
Express administrator or some other user to whom the Data Protector Express administrator grants
Write permission to the media.
• Similarly, although the user will be able to create a restore job, he will not be able to run the restore
job because he does not have Write permission to the disk drive. If the user wants to run the restore
job, he must ask the Data Protector Express administrator to run it for him or to grant him the
permissions necessary to run it.
• The user is prevented from granting permission to other users to his folder, to his drive and to his
media because he lacks Access permission to these objects.
Permissions example #2
In this example, a user has effective permissions to a drive named My Drive and to a media set named
Media:2. He is also a member of a group that has effective permissions to a folder named Group Jobs.
Catalog Object Effective Permissions
My Drive (Volume)
Media:2 (Media)
Group Jobs (Folder)
These permissions allow the user to do the following:
• Because he is a member of the group, the user will be able to create jobs and folders within the
Group Jobs folder. He will also be able to modify and delete any jobs or folders in that folder.
User: [–––––R–]
User: [–––––RW]
Group: [––CMDRW]
Page 68

50 Data Protector Express User's Guide and Technical Reference
• Because the user has Modify permission to the folder and Read permission to the drive named My
Drive, he will be able to select files from that drive to back up. Similarly, the user will be able to
select files for restoring because he has Read permission to the media named Media:2.
• Unlike the user in example 1, this user will be able to run backup jobs because he has Write
permission to the media. (This assumes he also has Write permission to a backup drive.)
• The user will also be able to create and run Verify jobs.
These permissions do NOT allow the user to do the following:
• Although the user will be able to create and run backup jobs, he will not be allowed to restore files
from those tapes onto his drive because he has not been granted Write permission to his disk drive.
• When the user runs a backup job, he will be prevented from overwriting old files on the media with
new files because he does not have Delete permissions to the tape. Thus the backup jobs he creates
and runs must all be append jobs.
• This user, like the user in example 1, is prevented from granting permission to other users to either his
drive or his tape because he lacks Access permission.
Other members of the group also have some permissions to the jobs and folders inside the Group Folder,
including those created by this user. This affects them in the following ways:
• They will be able to view the folders and jobs each group member creates in the Group Jobs folder.
Because they have Modify permission, members of the group will be able to modify the properties of
any jobs or folders the group members create inside the Group Jobs folder.
• Because members of this group lack Read permission to this user's drive and media, they will be
unable to change the files this user selected for backing up or restoring—even if they have Modify
permission to a job this user created.
• No other members of this group can run one of this user’s jobs unless the Data Protector Express
administrator grants them the appropriate Read and Write permissions.
Granting Permissions to Other Data Protector Express Users
If your Data Protector Express administrator has given you Access permission to an object, you will be
able to grant other users and groups permissions to that object. Generally your Data Protector Express
administrator will only grant you Access permission to objects in the Data Protector Express catalog
when he or she wants you to be able to share this data with other users.
For example, if your Data Protector Express administrator has given you Access permission to an archive
tape, you will be able to grant other users Read permission to the tape. This would allow other users to
restore files from this tape to any drive they have Write permission to.
Page 69

Chapter 4: Permissions 51
To grant permission to other Data Protector Express users
1. Display the properties for the object to which you wish to grant users or groups permission.
2. Select the Permissions page. (If you do not have Access permission to an object, you cannot modify
permissions.)
3. Click the Add… button.
4. Select a user or group to add in the Browse window and then click OK.
5. With the user or group selected, check the appropriate permissions in the list at the right of the screen.
6. Click Apply or OK to save the permissions.
Restricting user permissions
In most cases you can restrict the permissions a user has to an object in the same way you grant
permissions—by clearing the appropriate check boxes on the Permissions page of that object. If the user
or group is not listed on the Permissions page of the object, you must first add that user or group to the
list of users or groups that have direct permissions to that object.
To restrict permissions of other Data Protector Express users
1. Open the properties of the object to which you wish to restrict user or group permissions.
Page 70

52 Data Protector Express User's Guide and Technical Reference
2. Select the Permissions page. (If you do not have Access permission to an object, you cannot modify
permissions.)
3. If the user is not listed, first add the user or group by clicking the Add… button and then selecting a
user or group to add in the Browse window.
4. With the user or group selected, clear the check boxes from the permissions list at the right of the
screen.
5. Click Apply or OK to save the permissions.
When you restrict a user’s direct permissions to a container, you also change that user’s effective
permissions to objects within that container—but only when the user’s effective permissions to those
objects are inherited from that container’s effective permissions. For example, if you deny a user direct
Modify permission to a job folder by clearing the Modify check box under that user’s name, you also
deny that user effective Modify permission to jobs stored in that folder—unless that user has direct
permissions to those jobs.
Normally, your Data Protector Express administrator will have arranged the security of your Data
Protector Express management domain to prevent unauthorized access to files and tapes. However, if you
believe another user’s permissions to an object should be restricted and you cannot restrict it yourself,
notify your Data Protector Express administrator.
Page 71

Chapter 5: Selecting Files and File Versions
You use the Selection property page of a job to select files for backing up, restoring and verifying. Data
Protector Express’s powerful selection filters allow you to select exactly the files you want and to
automatically update your selection before the job is run.
In this section
• Backup Selection Concepts
• Selecting Files for Backup Jobs
• Restore Selection Concepts
• Selecting Versions of Files for Restore Jobs
• Restoring Files with New Names and Locations
• Verify Selection Concepts
• Selecting Versions of Files for Verify Jobs
Backup Selection Concepts
When you select files for a job, you want to select only those files which are necessary for your job and
not any others. However, you also want your selection criteria to be flexible enough to automatically
select new files that meet your criteria.
Data Protector Express allows files to be selected in several ways: by directly selecting volumes, folders
and files; by using filters to sort through selected files; and by additional automated filters used by Data
Protector Express when your job is run. For restore jobs, you can also specify which version of a file you
wish to restore, what name that new file will have and what folder or directory the file will be restored to.
By specifying your selection criteria carefully, when Data Protector Express automatically updates the
selected file list each time your job is run, you can be certain that the job will work with those files you
intended to select.
This section discusses how to select files separately for each type of job: backup jobs, restore jobs and
verify jobs. For each type of job, there is a discussion of concepts you’ll need to be able to correctly and
carefully select files. Be certain to read this section before proceeding.
You use the Selection page of a job to select files for that job.
Files are selected for backup in three steps. In the first step, the appropriate files are selected by marking
them with a check. In the second step, these marked files are sorted through using filter selection criteria.
This step is optional. In the last step, as the job is run, Data Protector Express checks to see if it will back
up all the files or only those files that have changed since the last backup job.
53
Page 72

54 Data Protector Express User's Guide and Technical Reference
Marking files for backup
A file is selected for backup when the selection box next to the file is checked.
When the box next to a folder or other container is shaded, it means that this folder or container contains
some selected files, even though it is not selected itself. When the box next to a folder or other container
is checked, the folder itself is selected and may also contain selected files within it.
You can select or deselect a file for backup by checking or clearing the selection box next to the file.
When you select a folder or volume, you automatically select all files contained in it.
Selecting folders or selecting files
You can select the contents of the folder in one of two ways: either by individually checking each object
in that folder one-by-one or by checking the folder itself. Which method you choose is important because
it affects which files Data Protector Express includes in the selection list after changes have been made to
that folder.
If you select each file in the folder individually, when new files are added to the folder, Data Protector
Express does not select them for backup. However, if you select the folder itself, when new items are
created in that folder, Data Protector Express also includes these files in the backup job.
TIP: To speed up file selection on machines, consider organizing machines into workgroups. When you
select a workgroup, Data Protector Express will back up selected files on all of the machines. This way,
file selection is quicker and data for distinct groups within your organization is protected with a single
backup job.
Page 73

Chapter 5: Selecting Files and Versions 55
In general, when selecting files for backup, especially for jobs designed for disaster protection, begin by
selecting containers at the top of the Data Protector Express management domain hierarchy. Then
deselect containers or files lower in the hierarchy that you do not need to back up.
For example, you could begin by selecting the network icon at the top of the hierarchy. This will
automatically select all of the machines on the network and all of the volumes on those machines. If there
are machines, volumes or folders you do not want backed up, clear their check boxes. When new
machines or volumes are added to the network (that is to the current Data Protector Express management
domain), Data Protector Express will automatically select these machines and volumes.
There is an additional reason to select containers such as folders or volumes rather than the objects in the
containers: to ensure that you do not miss any files stored loose in the container.
For example, suppose you want to back up a folder named Annual Reports and the folder named
Current Records that is in it, but not the folder named Archive Records. If you check only the Current
Records folder, your job will not back up any files in the Annual Reports folder that are not in the
Current Records folder. Instead, check the Annual Reports folder and then clear the check box for the
Archive Records folder. This selects all files in both the Annual Reports and Current Records
folders—but not the files in the Archive Records folder.
Page 74

56 Data Protector Express User's Guide and Technical Reference
Selecting files with filters
Selection filters let you identify specific volumes, folders and files to exclude from the backup, restore or
verify job. Click the Selection Filters button on the toolbar. Then specify the filter criteria for the job.
NOTE: The selection filters you specify are applied to all of the volumes, folders and files that have been
marked for the job. You cannot apply different filters to different folders or volumes in the same job.
How selection filters work
By default, Data Protector Express backs up all volumes, folders and files that have been marked for the
job. Selection filters let you identify specific criteria for excluding one or more of these marked objects.
Data Protector Express applies these filter criteria at runtime, in effect unmarking any objects that do not
meet the criteria.
For example, suppose you want to exclude all files that were created before 2004. Access the Date Range
window for the Create range field. Select On or after for the Range type. Enter 1-Jan-2004 for the
Starting date. When you run the job, Data Protector Express temporarily deselects all files with a
creation date before 2004. They will be excluded from the backup.
You can change the filter criteria at any time. You can also mark or unmark objects before running the
job. Data Protector Express does not apply the filter criteria to any marked object until it runs the job.
The use of filters can cause unexpected behavior. It’s recommended that you test any filters that you want
to use before using them for backup.
NOTE: You cannot use selection filters to add unmarked objects to the job set. Selection filters are only
used to exclude marked objects from the job set.
Filters and shaded folders
When you apply a filter to a marked folder, this may result in no files from that folder being selected.
Although no files in that folder are selected, the folder will still appear with a shaded check box next to it.
Page 75

Chapter 5: Selecting Files and Versions 57
The shaded check box indicates that if any new files that pass the filter criteria are created in that folder,
they will be selected for the job.
Selecting changed files only
When you run a job repeatedly, particularly backup jobs designed for disaster protection, many times you
only want to back up files that have changed since the last time you ran a backup job. Data Protector
Express handles this with the backup mode setting.
If you want to back up all selected files, use the Full backup mode setting; Data Protector Express does
not deselect any selected files.
If you only want to back up files that have changed since the last full backup, use the Differential backup
mode setting; Data Protector Express automatically deselects all the files that have not changed since the
last full backup.
If you only want to back up files that have changed since the last backup, use the Incremental backup
mode setting; Data Protector Express automatically deselects all the files that have not changed since the
last backup.
The job then runs with this updated selected file list.
Automatically selecting new files for backup
When you set up a job to run repeatedly, you want that job to adjust to changes made to any of the
directories on your computer or any machine in your Data Protector Express management domain.
Sometimes these changes include the addition of new files and directories that were not originally
selected when the job was created. It may even include the addition of new machines on the network or
any volumes on these machines that were not previously selected for backup.
Page 76

58 Data Protector Express User's Guide and Technical Reference
If your selection criteria was carefully specified, Data Protector Express will also select these new files,
folders, volumes and machines for backup. In general, a new file or container is selected for backup if (1)
it is in a container selected for backup and (2) it meets the selection filter criteria.
For example, a new folder will be included in the backup selection list if it is in a selected container. If
you create a new folder at the root level on a volume, that folder will be selected for backup if the volume
was marked for backup. The files in that folder that pass through the selection filter criteria will be
included in the backup job. However, if the volume itself was not selected, the new folder will not be
selected.
If you want to see what files will be backed up, open up the Selection property page for the job.
Whenever this page is opened, Data Protector Express recalculates which files should be selected for
backup. Check the display to see that the files you intended to be backed up are selected.
NOTE: The Selection page shows all files that will be backed up by a full backup job. It does NOT
indicate which files will not be backed up by a differential or incremental backup.
Working with mapped drives
Data Protector Express can be configured to include or exclude mapped drives during file selection. Once
configured, these drives will appear on the Selection page of a job.
Page 77

Chapter 5: Selecting Files and Versions 59
You must use the Data Protector Express Administrator, rather than the Data Protector Express service, to
back up mapped drives because of the way that Windows implements mapped drives. The service must be
stopped for the backup of the mapped drives to work.
NOTE: The HP Data Protector Express service must be stopped to allow the proper backup of mapped
drives. The service cannot be running when you select mapped drives for backup because of the method
Microsoft uses to authenticate mapped drive access. If the HP Data Protector Express service is not
stopped when you select mapped drives for backup, the service will fail to authenticate to the selected
mapped drives, and they will not be backed up. Because the HP Data Protector Express service must be
stopped, you need to run Data Protector Express in application mode (the program must be open when the
backup job is scheduled to occur), or the backup will not launch.
To enable or disable mapped drives
1. Open the Catalog view from the Administration desk bar.
2. In the main object detail area, select Network.
3. Select the machine whose mapped drives are being configured.
4. Select System Drivers.
5. Locate and select File System Stream and display its properties.
6. Select the Configuration page.
7. Enter a list of mapped drives in the appropriate list (e.g., JKLMQRSZX).
You can enable or disable as many drives as you need. The list does not need to be listed in
alphabetical order and Data Protector Express does not distinguish between capital and lower-cased
letters for this purpose.
For information about other options on this page, see File system stream.
Working with VSS snapshots
Backup jobs can create snapshots using Microsoft Volume Shadow Services (VSS) on platforms that
support VSS.
VSS freezes the volume data at the point in time of the snapshot creation by creating a temporary
snapshot. Any changes after that point in time will not be backed up until the next backup job. The
snapshots are deleted after the job has finished. If VSS cannot create a snapshot the backup will proceed
and the error will be noted in the job log.
Snapshots will affect an entire volume, not just the selected files. So jobs logs may indicate more space
was snapped than you expect.
To turn off VSS for a job
1. Open the Property page for the job.
2. Select the Options page.
3. Click the Advanced Options… button
4. Deselect the Enable Snapshots checkbox
Page 78

60 Data Protector Express User's Guide and Technical Reference
To turn off VSS for a specific machine
1. Open the Catalog view from the Administration desk bar.
2. In the main object detail area, select Network.
3. Select the machine for which VSS is being configured.
4. Select System Drivers.
5. Locate and select Microsoft Volume Shadow Copy Services Agent.
6. Right click and select Stop.
To re-enable the service, repeat the steps above and select Run.
Selecting Files for Backup Jobs
To select files for backup jobs
1. View the properties of the backup job and click on the Selection page.
2. Check the selection boxes next to the files, folders or other containers you wish to include in the job.
3. Click the Selection filters button on the toolbar and specify filter selection criteria. (You can skip this
step if you don’t wish to apply any selection filters.)
4. Examine the tree view and object detail areas on the Selection page to ensure that the files you
intended to select are marked for backup.
Applying filter criteria
When you click on the Selection filters button, the Selection filters window appears. This window has
multiple selection filters you can apply to the files you have selected.
Page 79

Chapter 5: Selecting Files and Versions 61
NOTE: Each filter criterion works independently. To be selected for backup, each file must pass every
filter criterion specified. For example, if you specify that every file selected must have been created after
January 1, 2004 and must have .doc as its extension, Data Protector Express will only select files which
meet both selection criteria.
Filter selection criteria
This section contains a brief description of each selection filter Data Protector Express applies to the files
and folders marked for backup.
Note that some of the selection criteria are operating system-specific. Your Data Protector Express
management domain may include multiple machines working with files created by different operating
systems. If you select a filter criterion that is operating system-specific, files from other operating systems
will be automatically excluded from the backup. This affects, in particular, the Required attributes and
Exclude attributes filters.
NOTE: Data Protector Express calculates the century dates using the following process: if the year is 70 or
smaller, the century is set to 20 (21st century); if the year is 71 or greater, the century is set to 19 (20th
century). For example, if you set the date to 01-Jun-33, Data Protector Express calculates the date as June
1, 2033. If the date is set to 05-Apr-81, Data Protector Express calculates the date as April 5, 1981.
Page 80

62 Data Protector Express User's Guide and Technical Reference
Backup Range
When a file is backed up, Data Protector Express stores the backup date in the catalog. This is called the
backup date. Each time you back up a file, Data Protector Express changes the backup date to match this
newer backup date. You can view information for all available backup versions file in the Versions of…
window. You can use this information to filter files for verify jobs. You can use this filter for files that
have been backed up on specific dates. More often, however, you would use this filter to filter out files
that have been recently backed up.
To select files that have specific backup dates, click on the Browse button next to the Backup range
field. In the Date Range window that appears, select the appropriate range type and the starting and
ending dates and times.
Modify Range
Create Range
Access Range
Each time a file is modified, its modified date is updated. You can use this filter to back up files whose
modified date matches your criteria. Data Protector Express checks the directory information on the
volume to see if the file should be included for backup. For example, you can select only those files that
were modified after a certain date and time or, alternatively, those that were modified before a certain
date and time.
To select files that have specific modify dates, click on the Browse button next to the Modify range field.
In the Date Range window that appears, select the appropriate range type and the starting and ending
dates and times.
When a file is first created, it is assigned a create date. You can use this filter to select only those files that
match your criteria. Data Protector Express checks the created date for each file stored in the directory of
the volume and uses this to select files for backing up.
To select files that have specific creation dates, click on the Browse button next to the Create range
field. In the Date Range window that appears, select the appropriate range type and the starting and
ending dates and times.
Each time a file is read, whether or not it is modified, its access date is updated. You can use this
information to select files for backup. For example, you might want to back up only those files which
Page 81

Chapter 5: Selecting Files and Versions 63
have been accessed (opened or read) in the past two months. Alternatively, you could back up only those
files which have not been accessed in the past two months.
To select files that have specific access dates, click on the Browse button next to the Access range field.
In the Date Range window that appears, select the appropriate range type and the starting and ending
dates and times.
Size Range
This filter lets you select files for backup according to their sizes. You might want to select only smaller
files, larger files or files between two sizes.
To specify a filter that sorts files according to their sizes, click on the Browse button next to the Size
range field and then select the appropriate criteria in the Size Range window that appears.
Version Range
Each time Data Protector Express backs up a file, it creates a new version of that file. For example, a file
named Expense Account Reporting Form may have been backed up several times during the previous
months and years. Typically, each version of the file is stored on the different media of a backup job. Data
Protector Express tracks each version of a file separately in its catalog.
You can use this filter to instruct Data Protector Express to not back up files for which you already have
multiple versions. For example, you may not want any more than three versions of a particular file backed
up. When you set the Range type to At most and Maximum versions to 3, Data Protector Express only
backs up those files with less than three versions.
Note, however, that having several versions of a file does not ensure that the versions you have reflect the
latest changes to the file. It may have been modified after the last time you backed it up. If so, your latest
version may not match the file’s current form.
To specify a filter that selects files according to their number of versions, click on the Browse button next
to the Version range field and then select the appropriate criteria in the Versions Range window that
appears.
Page 82

64 Data Protector Express User's Guide and Technical Reference
Wildcard Type
Select which wildcard format you wish to use from the list box. You can use any of the following
formats:
• Default: Uses the default wildcard format for your operating system.
• DOS: Uses the 11-character name format with the eight-character primary name and the three-
character extension, e.g., filename.txt.
• Macintosh: Uses the Macintosh native format.
• NFS: Network File System
• FTAM: File Transfer Access and Management
• Long: Uses the 256-character name format with a long primary name and an extension with multiple
Must Match
Data Protector Express lets you use wildcard matches to include files. Only files that match the wildcard
indicated in the Must match field are included in the backup set. For example, if you enter *.exe, Data
Protector Express will only back up those files with the .exe file extension.
You can specify multiple wildcards by separating each with a semicolon (no spaces). For example, if you
enter *.exe;*.doc in the Must match field, Data Protector Express selects all files that have either the
.exe extension or the .doc extension.
Cannot Match
This wildcard field works just like the Must match field except that it excludes any files that match the
wildcards. You can specify multiple wildcards by separating them with a semicolon (no spaces); if you
specify multiple wildcards, Data Protector Express excludes any file that matches any one of the
wildcards you specify.
Required Attributes
characters, e.g., Monday_backup.txt.
Operating systems track certain features of files called attributes that they use to manage these files. You
can use these same attributes as a selection filter. In the Required attributes field, if an attribute is
checked, Data Protector Express only selects those files which have these attributes. For example, if you
check Hidden, Data Protector Express only selects those files which the operating system has assigned
the Hidden attribute.
Page 83

Chapter 5: Selecting Files and Versions 65
You can select multiple attributes. With this filter applied, Data Protector Express only selects those files
that meet all of the required attributes.
Note that some of these attributes are only supported by certain operating systems. If you specify an
attribute that is specific to a particular operating system, then only files created under that operating
system will be selected for backup.
Exclude Attributes
This field works like the Required attributes field except that Data Protector Express excludes files that
match these attributes. For example, if you have checked the Execute Only box, Data Protector Express
will exclude from the backup job any files with the Execute Only attribute.
You can select multiple attributes. A file that has any one of these attributes will be excluded. For
example, if you mark the Hidden and System attributes, any file that has either attribute will be excluded.
Allow Parents
When this option is checked, Data Protector Express backs up the directory information for the parent
along with the file. This option must be checked in order for folders and other directory data to be backed
up. When this ption is not checked, Data Protector Express will not back up any parent information for
any file backed up.
Allow Children
Media
When this option is checked, Data Protector Express backs up any files in the selected folders. If you
want to back up only the marked directories, however, you can clear this option. When the Allow
Children box is unchecked and the Allow Parents box is checked, Data Protector Express backs up the
directory structure, but not the files stored in the directories (that is, in the folders).
This option can be useful for replicating a complex directory structure. Begin by marking the directory
structure you wish to duplicate. Then clear the Allow Children option. Data Protector Express will back
up only the directory structure. You can then replicate that directory structure to any volume by restoring
the directory to that volume.
Data Protector Express tracks versions of files and the media on which those versions are stored. You can
use this information to sort files according to the media on which they appear. Only files with versions on
the media in the Media field will be selected for the backup job. For example, if you select media named
“Daily Set:1,” Data Protector Express will only include files in the backup job which have a valid version
on the media named “Daily Set:1.”
To sort files according to the media on which they appear, click the Add... button and select the media
from the Browse window. Note that you must select a Media object, not a Media folder or User/Group
folder. If there are multiple media shown in the Media filter field, only files which have a valid version
on all the media listed will be selected.
This filter has limited applications for backup jobs. One way to use it, however, would be in the case of
media you know is corrupt or damaged. To back up a new version of every file on that damaged media,
begin by creating a new job and then selecting the appropriate Network or Machine object on the
Selection page. Then open the Selection Filters window by clicking on the Selection Filters button. Add
the damaged media to the Media field. Then set the Backup mode on the job’s Options page to Copy.
Page 84

66 Data Protector Express User's Guide and Technical Reference
When Data Protector Express runs the job, it will only back up files which had a version on the damaged
media shown in the Media field.
Restore Selection Concepts
You select files for restoring the same way you select files for backing up; however besides selecting
which files you wish to restore, you can also change the name of the restored file, restore it to a new
location and create a new folder in which to restore the file. Additionally, when you select a file for
restoring, you must specify which version of the file you wish to restore. (The most recent version is
selected by default.)
Files are selected for restoring in four steps. In the first step, you modify the file tree to look the way you
want it to appear when you restore the files. For example, you might make a new folder to store the
restored files in. Second, the appropriate files are selected by marking them with a check and selecting the
appropriate version. In the third step, these files are filtered using multiple selection criteria. In the last
step, you can specify new names and locations for the restored files.
Selecting files for restoring
A file is selected for restoring when a check mark appears in the selection box next to the file.
When the box next to a folder or other container is shaded, it means that this container or folder contains
selected files, even though it is not selected itself. When the box next to a folder or other container is
checked, the folder itself is selected and may also contain selected files within it.
Page 85

Chapter 5: Selecting Files and Versions 67
You can select or deselect a file for restoring by checking or clearing the selection box next to the file.
You can also select the folder that contains the file and not the file itself. Notice that when you mark a
container, such as a folder or volume, all of its contents, including all of the folders and containers in it,
are also marked.
Page 86

68 Data Protector Express User's Guide and Technical Reference
NOTE: The tree view and object detail areas are different for restore jobs than for backup jobs. For restore
jobs, the files displayed in the tree view and object detail areas are the files for which Data Protector
Express has versions in its catalog. For backup jobs, on the other hand, the files displayed are those
currently present on the servers and PC desktops in the current storage domain.
Selecting versions of files
Each time a file is backed up, a version of that file is created. There may be several versions of files
stored on different media created by different backup jobs. Data Protector Express keeps track of all the
versions of each file in its catalog and the media on which each version is stored. When media is
overwritten or deleted, Data Protector Express deletes those versions from its catalog as well.
When you select a file for restoring, Data Protector Express automatically selects the latest version. If you
want to select a version other than the latest version of a backed up file, you must select that version in the
Versions of... window. When you open the Versions of... window, the Available versions field shows a
list of the versions of the file and the media on which those versions are stored. Select which version you
want to restore by highlighting it. To display more information about a particular version of a file, click
on the Details button. Data Protector Express displays various details it uses to manage the file in its
catalog, including the file’s backup date and its modify date.
Page 87

Chapter 5: Selecting Files and Versions 69
If you select the latest version, Data Protector Express will restore the most recent version of that file or
folder.
In general, if you want to restore a specific version of the file, you must select that file directly and
specify which version you wish to restore in the Versions of… window.
Selecting versions of folders
When you select a folder, Data Protector Express automatically selects the latest version for that folder
and for every file within that folder. If you wish to specify another version, open the Versions of…
window and highlight the version date to select it.
Data Protector Express uses the version you specified when you selected the folder to also select files
contained within that folder. Specifically, a file is selected for restoring only if a version matches the
folder version.
NOTE: When you specify a version date for a folder, volume or other container, files stored in that
container are only selected when they have a version date that matches the version date of the container.
Many times, files will not have version dates that match the dates of the containers they are stored in, for
example, when you select a version date from an incremental or differential backup job. To be sure you
select all of the files inside a container, select the latest version for that container.
Consider these two examples:
In the first example, by selecting the latest version of the folder, all of the files contained within the folder
are selected because each of these files has a latest version. Note that these versions may be from different
Page 88

70 Data Protector Express User's Guide and Technical Reference
dates and different backup jobs, and consequently reside on different media. However, because each file
has a latest version, each one will be restored.
In the second example, another version besides the latest version was selected. In order for the files within
the folder to be selected for restoring, they must have a version date that matches that selected for the
folder. In this example, some files are not selected for restoring because they do not have an available
version which matches the version date selected for the folder.
In general, if you want to restore a specific version of the file, you must select that file directly and
specify which version you wish to restore in the Versions of… window.
Page 89

Chapter 5: Selecting Files and Versions 71
Selecting folders compared to selecting files
You can select the contents of the folder in one of two ways: either by individually marking the selection
box of each object in that folder one-by-one or by marking the selection box of the folder itself. Which
method you choose is important because it affects which files Data Protector Express includes in the
selection list after changes have been made to that folder.
For example, if you select a folder for restoring by marking its selection box, all of the contents of that
folder are restored. If a new backup job is run before the restore job is run, Data Protector Express selects
files for restoring using the new folder’s contents. So, for example, if a new file is created in that folder,
Data Protector Express will also restore that file. Additionally, if you have selected a latest version of the
folder, Data Protector Express will use the latest version of each file in its catalog. These files may be
newer than the files you originally selected.
Versions and filters
You cannot use filters for selecting versions. The Selection Filters window can be used to sort through
the versions you have otherwise specified in the Versions of... window, but filters will not change the
selected version date.
Selecting files with filters
Selection filters let you identify specific volumes, folders and files to exclude from the restore job. Click
the Selection Filters button on the toolbar. Then specify the filter criteria for the restore job.
NOTE: The selection filters you specify are applied to all of the volumes, folders and files that have been
marked for restore. You cannot apply different filters to different folders or volumes in the same job.
How selection filters work
By default, Data Protector Express restores all volumes, folders and files that have been marked for
restore. Selection filters let you identify specific criteria for excluding one or more of these marked
objects. Data Protector Express applies these filter criteria at runtime, in effect unmarking any objects that
do not fit the criteria.
For example, suppose you want to exclude all files that were created before 2002. Access the Date Range
window for the Create range field. Select On or after for the Range type. Enter 1-Jan-2002 for the
Starting date. When you run the job, Data Protector Express temporarily deselects all files with a
creation date before 2002. They will be excluded from the restore.
You can change the filter criteria at any time. You can also mark or unmark objects before running the
job. Data Protector Express does not apply the filter criteria to any marked object until it runs the job.
NOTE: You cannot use selection filters to add unmarked objects to the restore set. Selection filters are
only used to exclude marked objects from the restore set.
Changing the name and location of restored files
When you restore a file, you may wish to restore the file with a new name or in a new location. If you
restore a file to its original location using its original name, and that file currently exists there, Data
Protector Express overwrites the current file with the restored file.
You can avoid overwriting current files by giving the file a new name or by restoring the file to a new
directory. For example, to avoid replacing the current file named Project List with a previous, older
version of the file, you can rename the file before restoring it or restore it to a different folder.
Page 90

72 Data Protector Express User's Guide and Technical Reference
You can either select a different folder or, alternatively, Data Protector Express lets you create a new
folder in which to restore the files.
Selecting Versions of Files for Restore Jobs
Each time you mark a selection box of a file or folder for restoring, Data Protector Express automatically
selects the latest version. If you want to specify a different version, use the Versions of… window to
select which version of the file you wish to restore.
You can also specify a particular version of a file or folder by highlighting it in the tree view or object
detail areas and then clicking the Select Version button on the toolbar. Data Protector Express will show
you the Versions of… window with a list of the available versions for that file.
Be certain to specify carefully which version of a file you wish to restore. A single Data Protector Express
restore job can restore files backed up over a period of months or years on media created by many
different backup jobs. You can easily restore all of the latest versions of the files by selecting the latest
version in the Versions of… window. However, if you want versions of files that were created on
different dates, you must select each version of each file individually.
Note that you cannot restore multiple versions of the same file in a single restore job. If you want to
restore more than one version of a file, you must create and run a separate job for each version.
To select versions of files for restore jobs
1. Open the Properties page of the restore job and click on the Selection page.
2. Check the selection boxes next to the files, folders or other containers you wish to include in the job.
3. To select a specific version of the objects you selected, highlight the folder or file and click the Select
Version button. In the Versions of… window that appears, select the appropriate date of the version
you wish to restore. If you want to include all of the files in a folder or on a volume, select the latest
version.
4. Click the Selection Filters button on the toolbar and specify filter selection criteria. (You can skip
this step if you don’t wish to apply any selection filters.)
5. Examine the tree view and object detail areas on the Selection page to check that the files you
intended are marked for restoring.
6. Additionally, you can change the names of the files and store them in new locations. This is discussed
in Restoring Files with New Names and Locations on page 78.
Applying filter criteria
When you click on the Selection Filters button, the Selection Filters window appears. This window has
multiple selection filters you can use to sort through the files you have selected for restoring.
Page 91

Chapter 5: Selecting Files and Versions 73
NOTE: Each filter criterion works independently. To be selected for restoring, each file must pass every
filter criterion specified. For example, if you specify that every file selected for restoring must have been
created after January 1, 2002 and must have .doc as its extension, Data Protector Express will only select
files which meet both selection criteria.
Filter selection criteria
This section contains a brief description of each selection filter Data Protector Express applies to the files
and folders marked for restoring.
Note that the Selection Filters window for restore jobs is similar to the Selection Filters window for
backup jobs. This allows you to use the same filters to select the files for restoring that you used for
selecting files for backing up previously. This allows you to create a restore job that selects the same files
as a backup job, no matter how widely distributed over the network these files may be.
NOTE: Data Protector Express figures the century dates using the following algorithm: if the year is 70 or
smaller, the century is set to 20 (21st century); if the year is 71 or greater, the century is set to 19 (20th
century). For example, if you set the date to 01-Jun-33, Data Protector Express calculates the date as June
1, 2033. If the date is set to 05-Apr-81, Data Protector Express calculates the date as April 5, 1981.
Backup Range
When a file is backed up, Data Protector Express stores the date the file was backed up in the Data
Protector Express catalog. This is called the backup date. Each time you back up a file, Data Protector
Page 92

74 Data Protector Express User's Guide and Technical Reference
Express changes the backup date to the date of the backup. (You can view this information for all of the
available versions in the Versions of… window in the Backed up field list.) You can use this information
to filter files for restore jobs.
To select files that have specific backup dates, click on the Browse button next to the Backup range
field. In the Date Range window that appears, select the appropriate range type, and the starting and
ending dates and times.
Modify Range
Create Range
Delete Range
Each time a file is modified, its modified date is updated. You can use this filter to restore files whose
modified date matches your criteria. Data Protector Express checks the directory information on the
volume to see if the file should be included in the restore job. For example, you can select only those files
that were modified after a certain date and time or, alternatively, those that were modified before a certain
date and time.
To select files that have specific modify dates, click on the Browse button next to the Modify range field.
In the Date Range window that appears, select the appropriate range type and the starting and ending
dates and times.
When a file is first created, it is assigned a create date. You can use this filter to select only those files that
match your criteria. Data Protector Express checks the created date for each file stored in the directory of
the volume and uses this to select files for restoring.
To select files that have specific creation dates, click on the Browse button next to the Create range
field. In the Date Range window that appears, select the appropriate range type, and the starting and
ending dates and times.
This filter gives you an easy way to select files to restore that have been deleted from the volume, but for
which Data Protector Express has valid versions stored in its catalog and on valid media.
When files that have once been backed up are later deleted, Data Protector Express marks these files with
a special icon, indicating that they have been deleted. In addition, Data Protector Express assigns the file a
delete date, which you can view on the General page of that file’s property page.
Page 93

Chapter 5: Selecting Files and Versions 75
This filter instructs Data Protector Express to only restore files which have a delete date that matches the
criteria you have set. Note that if a file has not been deleted from the volume, it will be excluded by this
filter and thus will not be selected for restoring.
You can easily select every file deleted for restoring by first marking the selection box of the volume and
selecting the latest version. This will cause all of the files to be selected initially. Then, click on the
Browse button next to the Delete range field and then select On or before from the Range type list box.
Next select a random future date, for example, February 6, 2106. Data Protector Express will exclude all
of the files that have not been deleted from the set of files to be restored. When you return to the
Selection page, only those files that have been deleted will be checked.
On the other hand, you can also not restore files that have been deleted. In this case, set the Delete range
filter to On or before some random early date, such as January 1, 1980. Any file that has been deleted
will be filtered out by this filter, so that no deleted files will be restored. This can be useful if you don’t
want to unnecessarily restore files that were properly deleted in the first place.
Access Range
Each time a file is read, whether or not it is modified, its access date is updated. You can use this
information to select files for restoring. For example, you might want to restore only those files which
have been accessed (opened or read) in the past two months. Alternatively, you could restore only those
files which have not been accessed in the past two months.
Size Range
Version Range
To select files that have specific access dates, click on the Browse button next to the Access range field.
In the Date Range window that appears, select the appropriate range type and the starting and ending
dates and times.
This filter lets you select files to restore according to their sizes. You might want to select only smaller
files, larger files or files between two sizes.
To specify a filter that sorts files according to their sizes, click on the Browse button next to the Size
range field and then select the appropriate criteria in the Size Range window that appears.
Each time Data Protector Express backs up a file, it creates a new version of that file. For example, a file
named Expense Account Reporting Form may have been backed up several times during the previous
months and years. Typically, each version of the file is stored on the backup media of a different job. Data
Protector Express tracks each version of a file separately in its catalog.
Page 94

76 Data Protector Express User's Guide and Technical Reference
You can use this filter to instruct Data Protector Express to select files according to the number of
versions that exist in the catalog. You might, for example, instruct Data Protector Express to restore all of
the files for which there is only one version. When you set Range type to At most and Maximum
versions to 1, Data Protector Express only restores those files with a single version.
Note, however, that having multiple versions of a file does not ensure that the selected versions reflect the
latest changes to the file. If it was modified after the last time you backed it up, your latest version may
not match the file’s current form.
To specify a filter that sorts files according to their number of versions, click on the Browse button next
to the Version range field and then select the appropriate criteria in the Versions Range window that
appears.
Wildcard Type
Must Match
Select which wildcard format you wish to use from the list box. You can use any of the following
formats:
• Default: Uses the default wildcard format for your operating system.
• DOS: Uses the 11-character name format with the eight-character primary name and the three-
character extension, e.g., filename.txt.
• Macintosh: Use the Macintosh native format.
• NFS: Network File System
• FTAM: File Transfer Access and Management
• Long: Uses the 256-character name format with a long primary name and an extension with multiple
characters, e.g., Monday_backup.txt.
Data Protector Express lets you use wildcard matches to include files. Only files that match the wildcard
indicated in the Must match field are included in the restore set. For example, if you enter *.exe, Data
Protector Express will only restore those files with the .exe file extension.
You can specify multiple wildcards by separating each with a semicolon (no spaces). For example, if you
enter *.exe;*.doc in the Must match field, Data Protector Express selects all files that have either the
.exe extension or the .doc extension.
Cannot Match
This wildcard field works just like the Must match field except that it excludes any files that match the
wildcards. You can specify multiple wildcards by separating them with a semicolon (no spaces); if you
Page 95

Chapter 5: Selecting Files and Versions 77
specify multiple wildcards, Data Protector Express excludes any file that matches any one of the
wildcards you specify.
Required Attributes
Operating systems track certain features of files called attributes that they use to manage these files. You
can use these same attributes as a selection filter. In the Required attributes field, if an attribute is
checked, Data Protector Express only selects those files which have these attributes. For example, if you
check Hidden, Data Protector Express only selects those files which the operating system has assigned
the Hidden attribute.
You can select multiple attributes. In this case, Data Protector Express only selects those files that meet
all of the required attributes.
NOTE: Some attributes are only supported by certain operating systems. If you specify an attribute that is
specific to a particular operating system, then only files created under that operating system will be
selected for restore.
Exclude Attributes
This field works like the Required attributes field except that Data Protector Express excludes files that
match these attributes. For example, if you have checked the Execute Only box, Data Protector Express
will exclude from the restore job any files with the Execute Only attribute.
Allow Parents
Allow Children
Media
You can select multiple attributes. A file that has any one of these attributes will be excluded. For
example, if you mark the Hidden and System attributes, any file that has either attribute will be excluded.
When this option is checked, Data Protector Express restores directory information for any selected folder
or volume. For example, if you have marked a folder, Data Protector Express will restore that folder only
if this option is checked. When this option is not checked, directory information about folders and
volumes is not restored.
When this option is checked, Data Protector Express restores files. When this option is unchecked, Data
Protector Express does not restore files. This is useful if you want to restore a complex directory
structure, but not the files in that directory. To restore a directory structure, but not the files (children)
stored in the directories, begin by marking the directory for restoring. Then clear the Allow Children
option. Data Protector Express will restore only the directory structure to the volume you specify.
Data Protector Express tracks versions of files and the media on which those versions are stored. You can
use this information to sort files according to the media on which they appear. Only files with versions on
the media in the Media field will be selected for the restore job. For example, if you select media named
“Daily Set:1,” Data Protector Express will only include files in the restore job which have a valid version
on the media named “Daily Set:1.”
To sort files according to the media on which they appear, click the Add... button and select the media
from the Browse window. Note that you must select a Media object, not a Media folder or User/Group
folder. If there are multiple media shown in the Media filter field, only files which have a valid version
on all the media listed will be selected.
Page 96

78 Data Protector Express User's Guide and Technical Reference
This filter can be useful for restore jobs if you want to restore files only from a particular media. For
example, you may have imported media from another Data Protector Express management domain and
may wish to limit the files restored to those on that particular media. In this case, you can ensure that only
files on that media are selected by adding that media to the Media field.
Note, however, that under ordinary circumstances, you should let Data Protector Express track the
versions of particular files and restore files not according to the media on which they appear, but rather
according to their version date. For example, if you want to restore the most recent version of a file,
simply select the file. Data Protector Express will automatically select that file and identify the proper
media on which that version is stored. Data Protector Express will then prompt you for the correct media
when the job is run.
Restoring Files with New Names and Locations
You can change the name and location (folder) of a file when it is restored. Often referred to as a
redirected restore operation, you can also create a new folder in which to store the file.
Restoring a file with a new name
After a file has been selected for restoring, you can rename the file. When you rename the file, Data
Protector Express restores the file with the new name. This can be useful for not overwriting versions of
the file that currently exist on disk.
To rename a file, right-click the file name on the Selection page of the restore job, select Rename from
the shortcut menu and type the new name. Once you run the job the renamed file will be restored to the
directory in which the original file was located.
Note that when you rename a version, you are only renaming that file for the purposes of restoring it with
this particular restore job. Only the current restore job will assign the new name to that file. When you
create a new restore job, you will see the file displayed with its original name. Similarly, the Catalog
view always displays files with the names they had when they were backed up.
Restoring files to a different folder
You can also restore files to different folders. When Data Protector Express restores the file, it creates a
new file in the new location. Similarly, you can restore folders in new locations as well. This is useful in
order to prevent overwriting files and folders that currently exist on disk.
To restore a file to a different folder, right-click the file name on the Selection page of the restore job and
select Move… from the shortcut menu. (Move is not displayed in the list of commands.) In the Select
destination for move operation window, select a target location. Data Protector Express will move the
file to the destination you select.
Page 97

Chapter 5: Selecting Files and Versions 79
You can also restore folders and volumes in new locations. The contents of these containers move with
them and are restored, along with the folder or volume, in the new location.
Note that when you move a version on the Selection page of a restore job, the changes you make are only
recorded for that restore job. Only the current restore job will assign the file or folder the new location.
When you create a new restore job, you will see the files and folders in their original locations. Likewise,
the Catalog view will continue to display files in their original locations.
Restoring files to a new folder
You can create a new folder and restore files to that new folder. When Data Protector Express restores the
files, it creates the new folder and restores the files you specified to that new location. Similarly, you can
restore folders and their contents in new folders you create.
To create a new folder during a restore job
1. Create a restore job and select the file to be restored in a new folder.
2. Right-click the file and select the Move command from the shortcut list.
3. Select the location you want to create the new folder in the tree view area.
Page 98

80 Data Protector Express User's Guide and Technical Reference
4. Select the New command from the Commands task pane. The New command is available only when
you select a location for which it is appropriate for the operating system to create a directory.
5. Enter a name for the folder.
Data Protector Express creates the new folder in the specified location and restores the selected file
files to this new folder once you run the job.
Note that any new folder you create on the Selection page of the restore job is only created in the current
restore job. Only the current job will show this new folder. When you create a new restore job or open
another restore job, the new folder you created in the current job will not be displayed. Likewise, the new
folder you created will not be displayed on the Catalog view either.
Verify Selection Concepts
You select files for verifying the same way you select files for backing up or restoring, including selecting
which version to verify.
Files are selected for verifying in two steps. In the first step, the appropriate files are selected by marking
them with a check and selecting the appropriate version. In the second step, these files are filtered using
multiple selection criteria.
TIP: You can quickly check to see if a file was verified when it was backed up by opening the Versions
of… window for that file. The Status field will show either Backed up and verified; Backed up but
verify failed; Backed up, possibly corrupted; Backed up, probably corrupted; or Backed up, not
verified depending on whether or not that file was successfully verified or not when the job was run.
Selecting files for verifying
A file is selected for verifying when a check mark appears in the selection box next to the file.
When the box next to a folder or other container is gray, it means that this container or folder contains
selected files, even though it is not selected itself. When the box next to a folder or other container is
shaded and checked, the folder itself is selected and may also contain selected files within it.
Page 99

Chapter 5: Selecting Files and Versions 81
You can select or deselect a file for verifying by checking or clearing the selection box next to the file.
You can also select the folder that contains the file and not the file itself. Notice that when you mark a
container, such as a folder or volume, all of its contents, including all the containers and folders that it
contains, are also marked.
Page 100

82 Data Protector Express User's Guide and Technical Reference
NOTE: The tree view and object detail areas are different for verify jobs than for backup jobs. For verify
jobs, the files displayed in the tree view and object detail areas are the files for which Data Protector
Express has versions in its catalog. For backup jobs, on the other hand, the files displayed are those
currently present on servers and PC desktops in the current storage domain.
Selecting versions of files
Each time a file is backed up, a version of that file is created. There may be multiple versions of files
stored on different media created by different backup jobs. Data Protector Express keeps track of all the
versions of each file in its catalog and the media on which each version is stored. When media is
overwritten or deleted, Data Protector Express deletes those versions from its catalog as well.
When you select a file for verifying, Data Protector Express automatically selects the latest version. If you
want to select a version other than the latest version of a backed up file, you must select that version in the
Versions of... window. When you open the Versions of... window, the Available versions field shows a
list of the versions of the file and the media on which those versions are stored. Select which version you
want to verify by highlighting it. To display more information about a particular version of a file, click on
the Details button. Data Protector Express displays various details it uses to manage the file in its catalog,
including the file’s backup date and its modify date.
 Loading...