

Page 1
Network Player
AV8003
ENGLISHFRANÇAIS
NETWORK
Page 2

ENGLISH
CONTENTS
CONNECTION .............................................................................................................. 2
BEFORE CONNECTING ...............................................................................................................................................................2
CONNECTING THE UNIT AND SERVER TO THE NETWORK ...................................................................................................2
BASIC SETTINGS ........................................................................................................ 3
CHECKING THE NETWORK ADDRESS ......................................................................................................................................3
STARTING THE NETWORK PLAYER ...........................................................................................................................................4
NETWORK ADDRESS SETTINGS ...............................................................................................................................................5
AUTHENTICATING THE UNIT FROM THE SERVER ..................................................................................................................6
SCREEN MENUS .........................................................................................................7
TOP MENU ..................................................................................................................................................................................... 7
ITEM MENU ....................................................................................................................................................................................7
ICONS .............................................................................................................................................................................................7
BASIC OPERATIONS ..................................................................................................8
NETWORK PLAYER BASIC OPERATIONS .................................................................................................................................8
PLAYING MUSIC ............................................................................................................................................................................9
DISPLAYING PHOTOS ................................................................................................................................................................ 11
PLAYING VIDEO ..........................................................................................................................................................................13
PLAYING FILES BY SPECIFYING A SERVER ...........................................................................................................................15
ADVANCED OPERATIONS ....................................................................................... 16
REMOTE CONTROLLER OPERATIONS ...................................................................................................................................16
ADVANCED PHOTO FILE OPERATIONS ..................................................................................................................................18
OPERATING VIDEO FILES ......................................................................................................................................................... 19
USING PLAYLISTS ......................................................................................................................................................................20
VIEWING DETAILED FILE INFORMATION ................................................................................................................................21
MULTI ZONE PLAYBACK ............................................................................................................................................................21
ADVANCED SETTINGS .............................................................................................23
NETWORK PLAYER INITIALIZATION.........................................................................................................................................23
SOFTWARE UPDATES ...............................................................................................................................................................23
CHECKING THE SYSTEM INFORMATION ................................................................................................................................24
SETTING THE NETWORK SCREEN ..........................................................................................................................................24
PLAYABLE FILES .........................................................................................................................................................................26
TROUBLESHOOTING ...............................................................................................28
OTHERS .....................................................................................................................29
NETWORK PLAYER NOTIFICATIONS .......................................................................................................................................29
GLOSSARY ..................................................................................................................................................................................30
TRADEMARKS .............................................................................................................................................................................30
TECHNICAL INFORMATION .......................................................................................................................................................31
ABOUT THIS USER GUIDE
This unit is equipped with a network player for playing music, photo and video fi les.
You can connect the unit's network connector to a network device and play music, photo or video fi les that are
stored on the device.
This User Guide describes the settings and procedures that are required to use these functions.
NETWORK PLAYER FEATURES
The unit has the following functions.
● Playback of music, photo or video fi les that are stored on a device connected to the network
● Supports Windows Media DRM
● Supports DTCP-IP
SETTING PROCEDURE FOR USING THE NETWORK PLAYER
Connecting the unit to the network (See page 2)
1.
Setting up the network (See page 3)
2.
If there is no DHCP server on the network to which the unit is connected, the network settings must be
performed manually.
Authenticating the unit on the server side. (See page 6)
3.
It may be necessary to authenticate the unit on each server.
Operating the unit; playback. (See page 8)
4.
BASIC SETTINGSSCREEN MENUS
BASIC
OPERATION
ADVANCED
OPERATION
SETTINGS
ADVANCED
TROUBLESHOOTING
OTHERS CONNECTION
1
Page 3
ENGLISH
SL
R
SBLSWSWCC
SBR
BALANCED
SPEAKER C
OFF
PRE OUT
MODEL NOO. . AA
V8003
WORK
CONNECTION
BEFORE CONNECTING
Prepare the following equipment before performing the connection.
BASIC SETTINGSCONNECTION SCREEN MENUS
● LAN cable
This cable connects the unit's network connector to a network device such as a computer.
Notes:
• The unit's network connector supports 10BASE-T/100BASE-TX. Use a 100BASE-TX connection to ensure
smooth playback.
• Use a straight LAN cable that is category 5 or higher.
● Router, Hub
These devices are for connecting multiple devices on a single network.
If a router has a DHCP server function, the unit's network settings are set automatically.
● Server (in this User Guide, the following devices are referred to as a “server”)
• Hard disk with a built-in DLNA server function (LAN connection type)
OPERATION
• HDD recorder or audio system that supports DLNA
BASIC
• A computer can be used when either of the following server software programs is installed.
– Windows Media Player 11
– Server software that supports DLNA
● Internet
• Required when using the unit's network connection to perform a system update.
OPERATION
ADVANCED
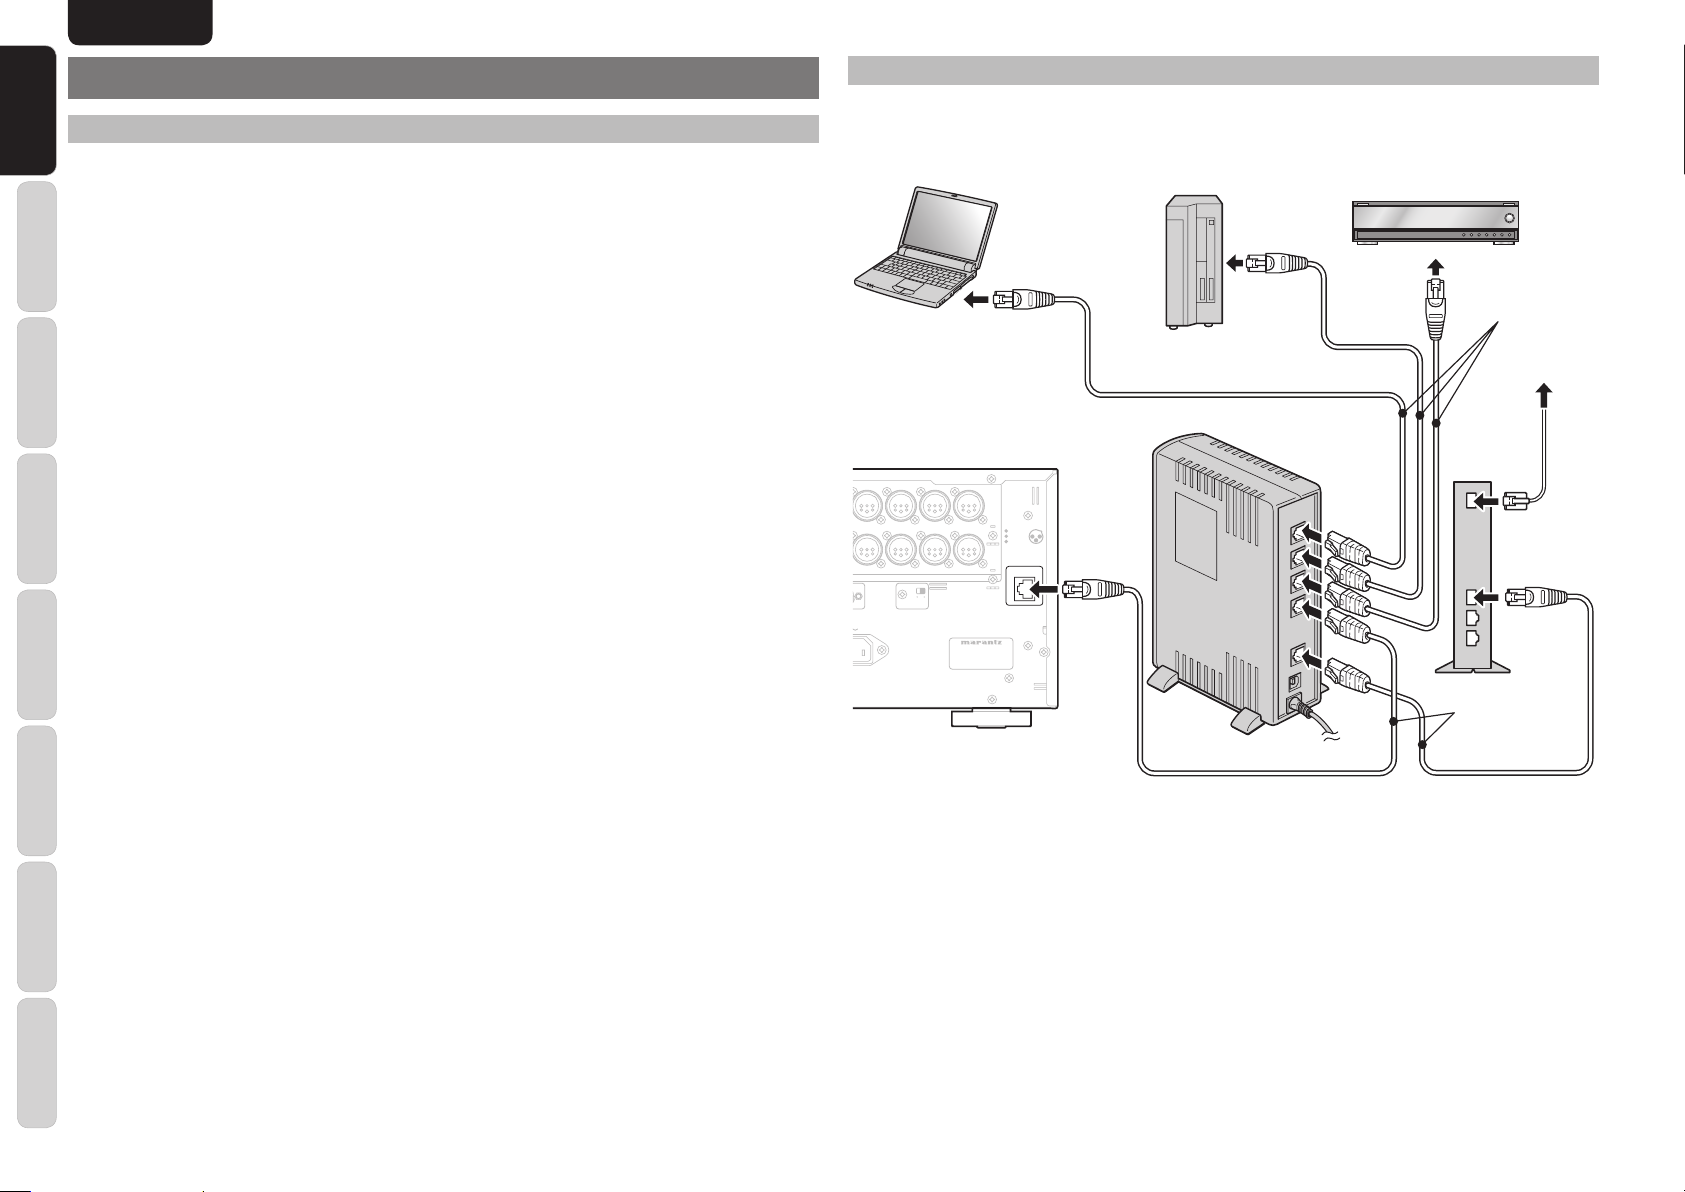
CONNECTING THE UNIT AND SERVER TO THE NETWORK
As shown below, connect the unit and a server such as a computer or hard disk to the LAN connector of a
router or modem.
Computer
Windows Media
Player 11 or server
software that
supports DLNA
12
LLSRSRSL
SBL
BALANCED
PRE OUT
SPEAKER C
ONONOFF
3
12
12
12
MODEL N
3123
R
3123123123
SBR
IN
3
AV8003
CONNECTION
1
GND
(+)
2
HOT
1
3
(
)
-
3
COLD
NNEETTWORK
V8003
Network HDD that
supports DLNA
Router
2
LAN
WAN
HDD recorder that
supports DLNA
Straight LAN
cable (purchase
separately)
Modem
To the Internet
connection
ADVANCED
SETTINGS
TROUBLESHOOTING
OTHERS
2
Straight LAN
cable (purchase
separately)
Note:
If there are not enough LAN connectors, add a hub (purchase separately) to the router.
Page 4
ENGLISH
BASIC SETTINGS
Network settings may be required when performing
the connection, depending on the connection type as
described below.
● If there is a router (DHCP server) on the
network
The network address settings are performed
automatically.
● If there is no router (DHCP server) on the
network
The network address settings must be performed
manually.
Check your network and perform the settings if
required.
To confi rm your network type, check the network
address.
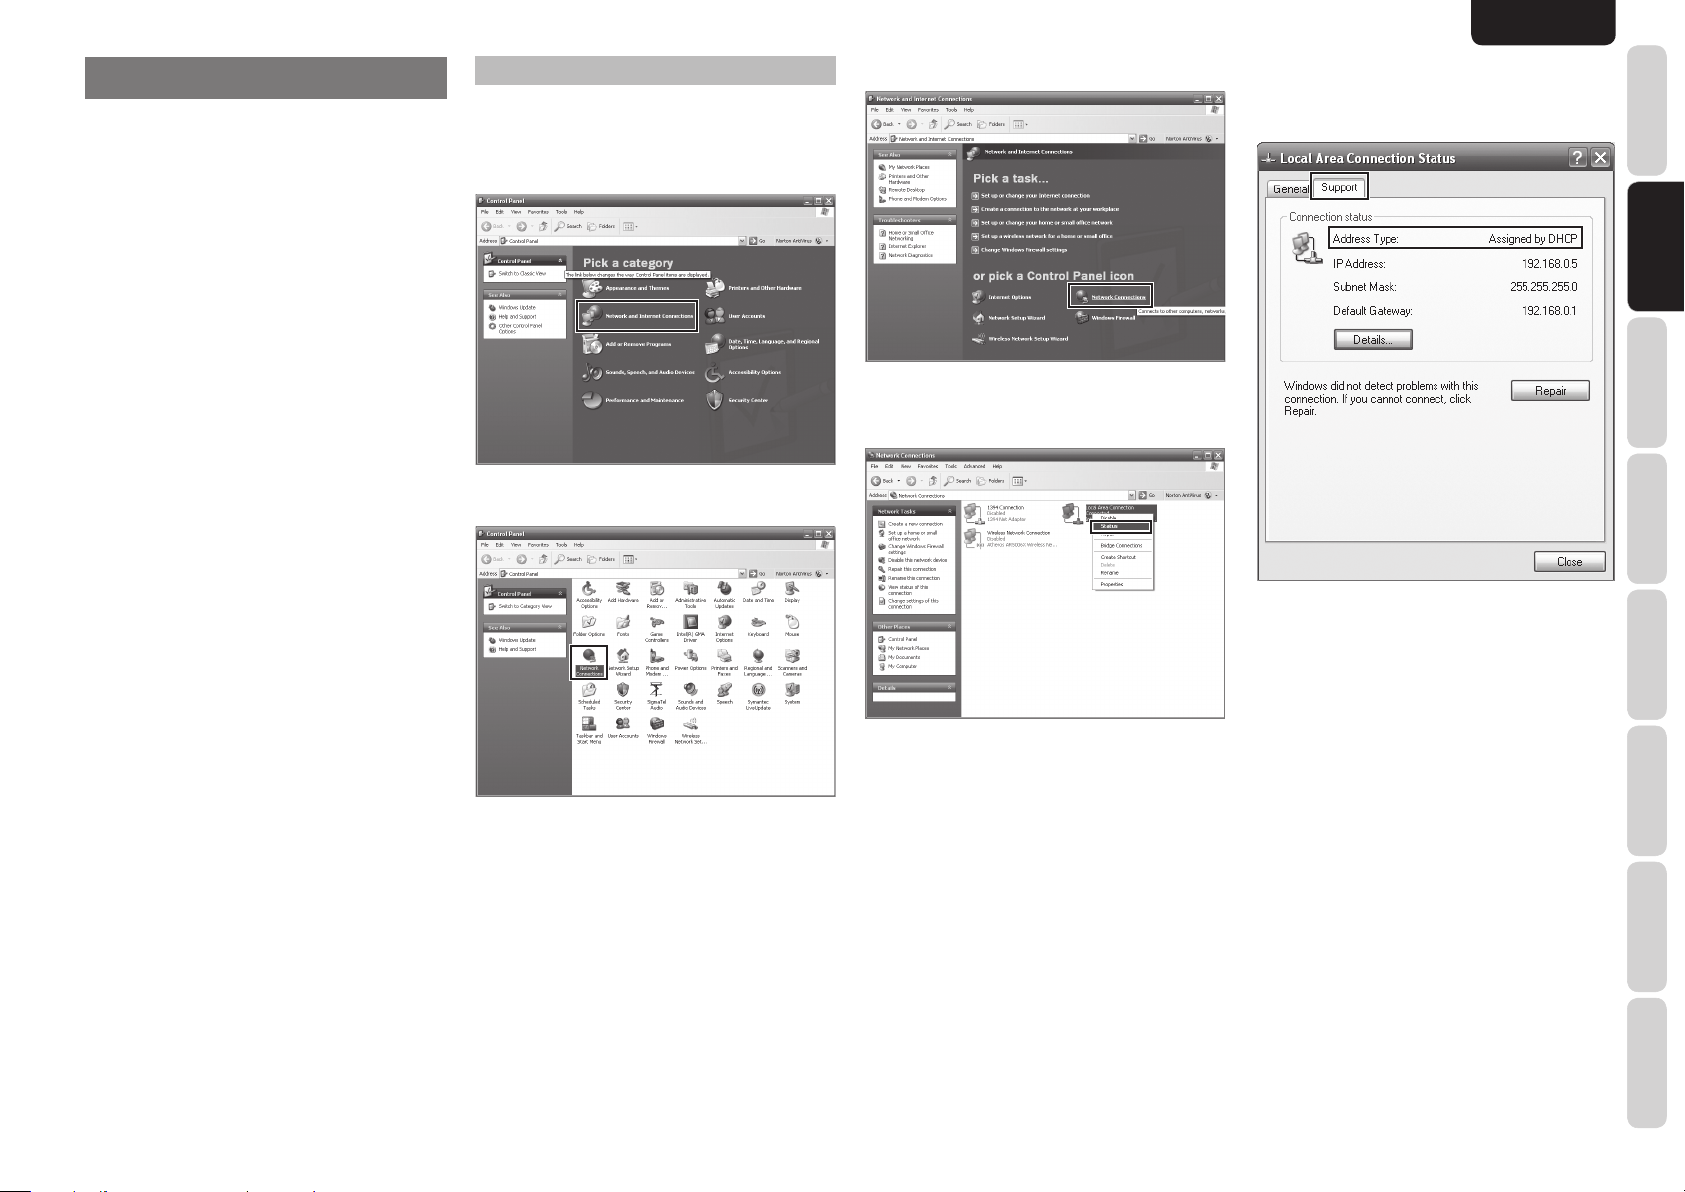
CHECKING THE NETWORK ADDRESS
Example: Windows XP
Select “Control Panel” on the Start menu and
1.
click “Network and Internet Connections” on
the menu.
When using Classic View, click “Network
Connections” and go to step
.
3
2. Click “Network Connections” on the menu.
3. Right-click “Local Area Connection” and select
“Status” on the pull-down menu.
4. Click the “Support” tab.
Check the “Address Type” item.
5.
Assigned by DHCP:
A DHCP server is running on the network. The
network address settings for the unit are performed
automatically.
You do not need to perform connection settings
because the default setting is for automatically
obtaining the address.
SCREEN MENUS
BASIC
OPERATION
ADVANCED
OPERATION
Manually Confi gured:
You must set the network address manually
because there is no DHCP server on the network.
Start the network player and perform the network
address settings.
SETTINGS
ADVANCED
TROUBLESHOOTING
OTHERS CONNECTIONBASIC SETTINGS
3
Page 5
ENGLISH
TOP
MULTI
SPEAKER
DISPLAY
INPUT
7.1CH
DIRECT
PURE
PHONES
THX M-DAX
MODE
SURROUND
CLEARMEMORYT-MODEBANDEXITMENU
ZONE
ENTER
DOWN
VOLUME
UP
INPUT
SELECTOR
AUTO
SETUP MIC
HDMI
M-DAX
PURE DIRECT
POWER ON/OFF
STANDBY
AV PRE TUNER AV8003
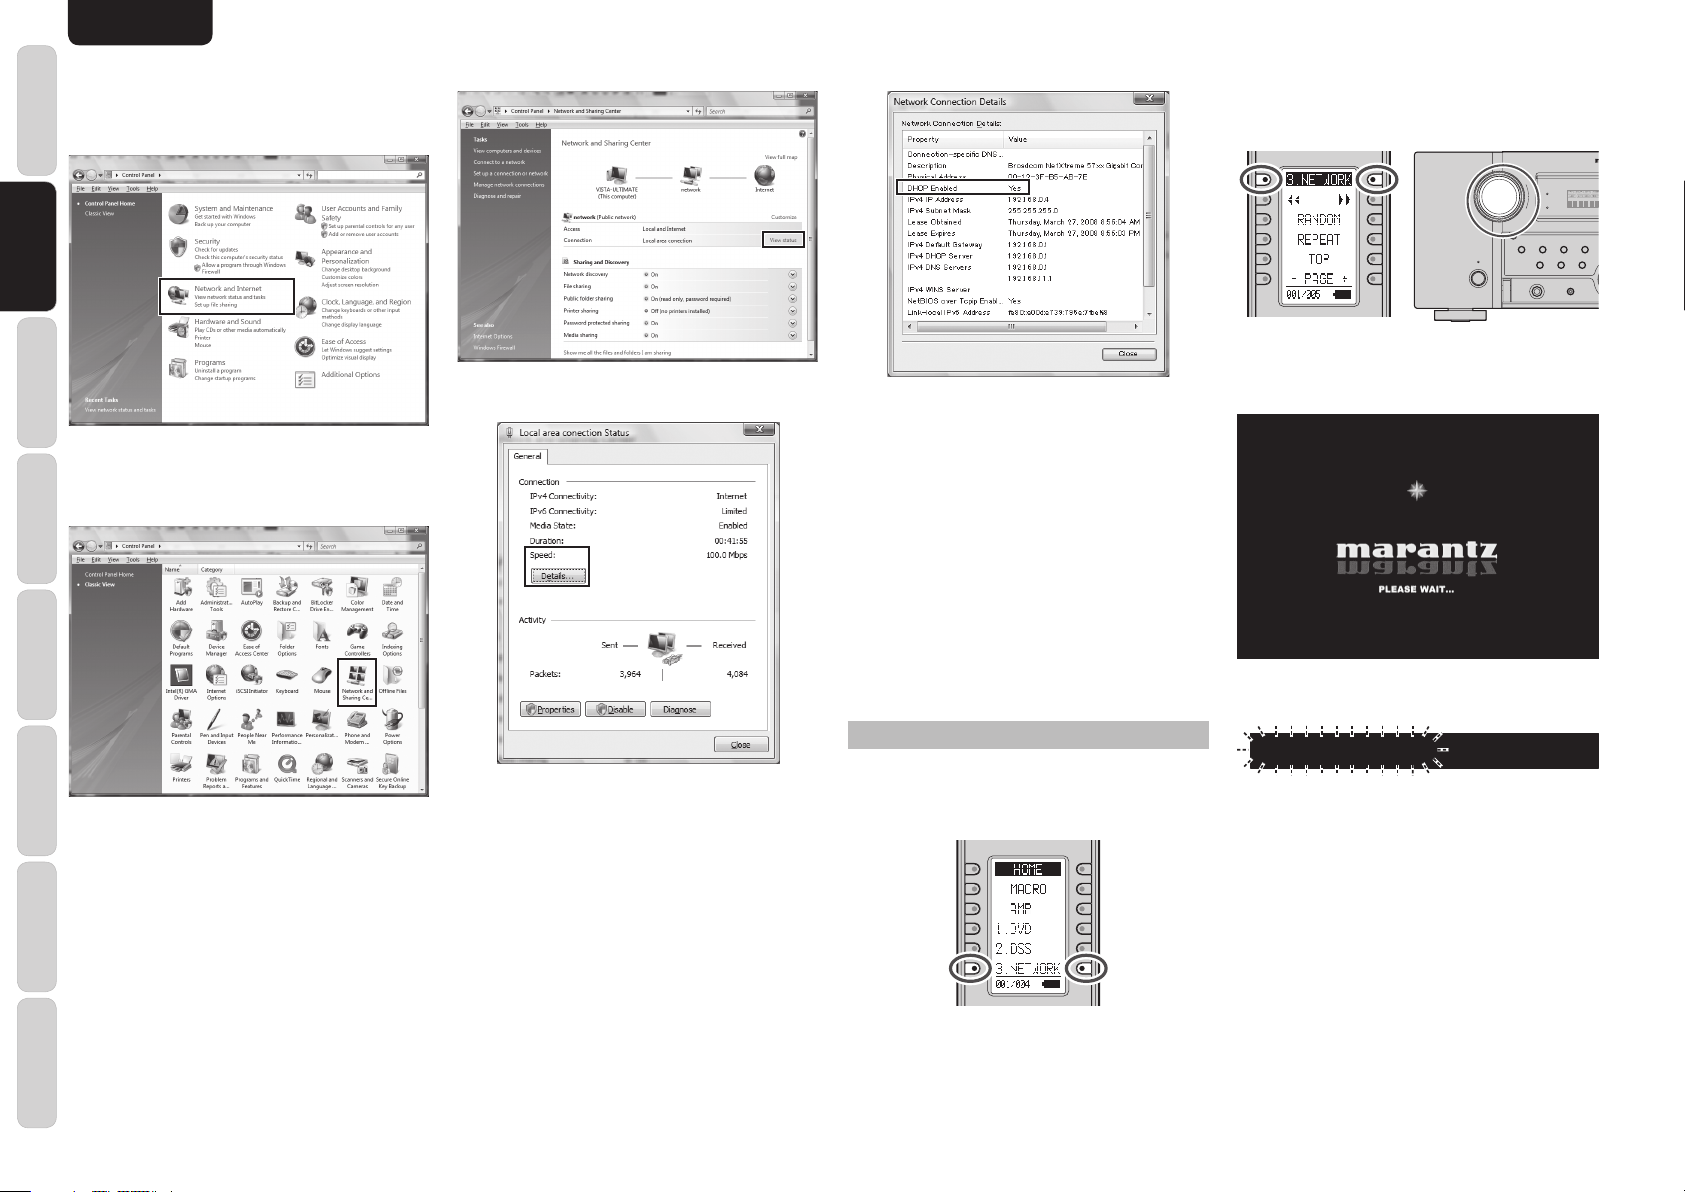
Example: Windows Vista
Select “Control Panel” on the Start menu.
1.
When using the Control Panel Home view, click
“View network status and tasks”.
SCREEN MENUS
When using Classic View, the following window
OPERATION
BASIC
is displayed. Double-click “Network and Sharing
Center”.
OPERATION
ADVANCED
2. Click “View status”.
3. Click “Details”.
4. Check the “DHCP Enabled” item.
Yes:
A DHCP server is running on the network.
The network address settings for the unit are
performed automatically.
You do not need to perform connection settings
for the unit because the default setting is for
automatically obtaining the address.
No:
You must set the network address manually
because there is no DHCP server on the
network.
Start the network player and perform the
network address settings.
3. Set the unit's input mode to NETWORK.
To select NETWORK mode, turn the input
selector on the unit or press the 3. NETWORK
button on the remote controller.
PURE DIRECT
M-DAX
INPUT
SELECTOR
SURROUND
MODE
STANDBY
POWER ON/OFF
MULTI
ZONE
AUTO
SPEAKER
7.1CH
PURE
THX
INPUT
DIRECT
PHONES
SETUP MIC
4. The startup screen is displayed.
<Monitor>
ADVANCED
SETTINGS
TROUBLESHOOTING
OTHERSCONNECTION BASIC SETTINGS
4
<Unit Display>
STARTING THE NETWORK PLAYER
NETWORK
1. Turn on the unit.
After pressing the HOME button on the remote
2.
controllerler, press the 3. NETWORK button.
It takes the network player about 30 seconds to
start after turning on the unit.
After start-up is completed, the top menu of the
network player is displayed.
Note:
The screen resolution at start-up is 480i/576i.
The remote controller enters NETWORK
operation mode.
Page 6
ENGLISH
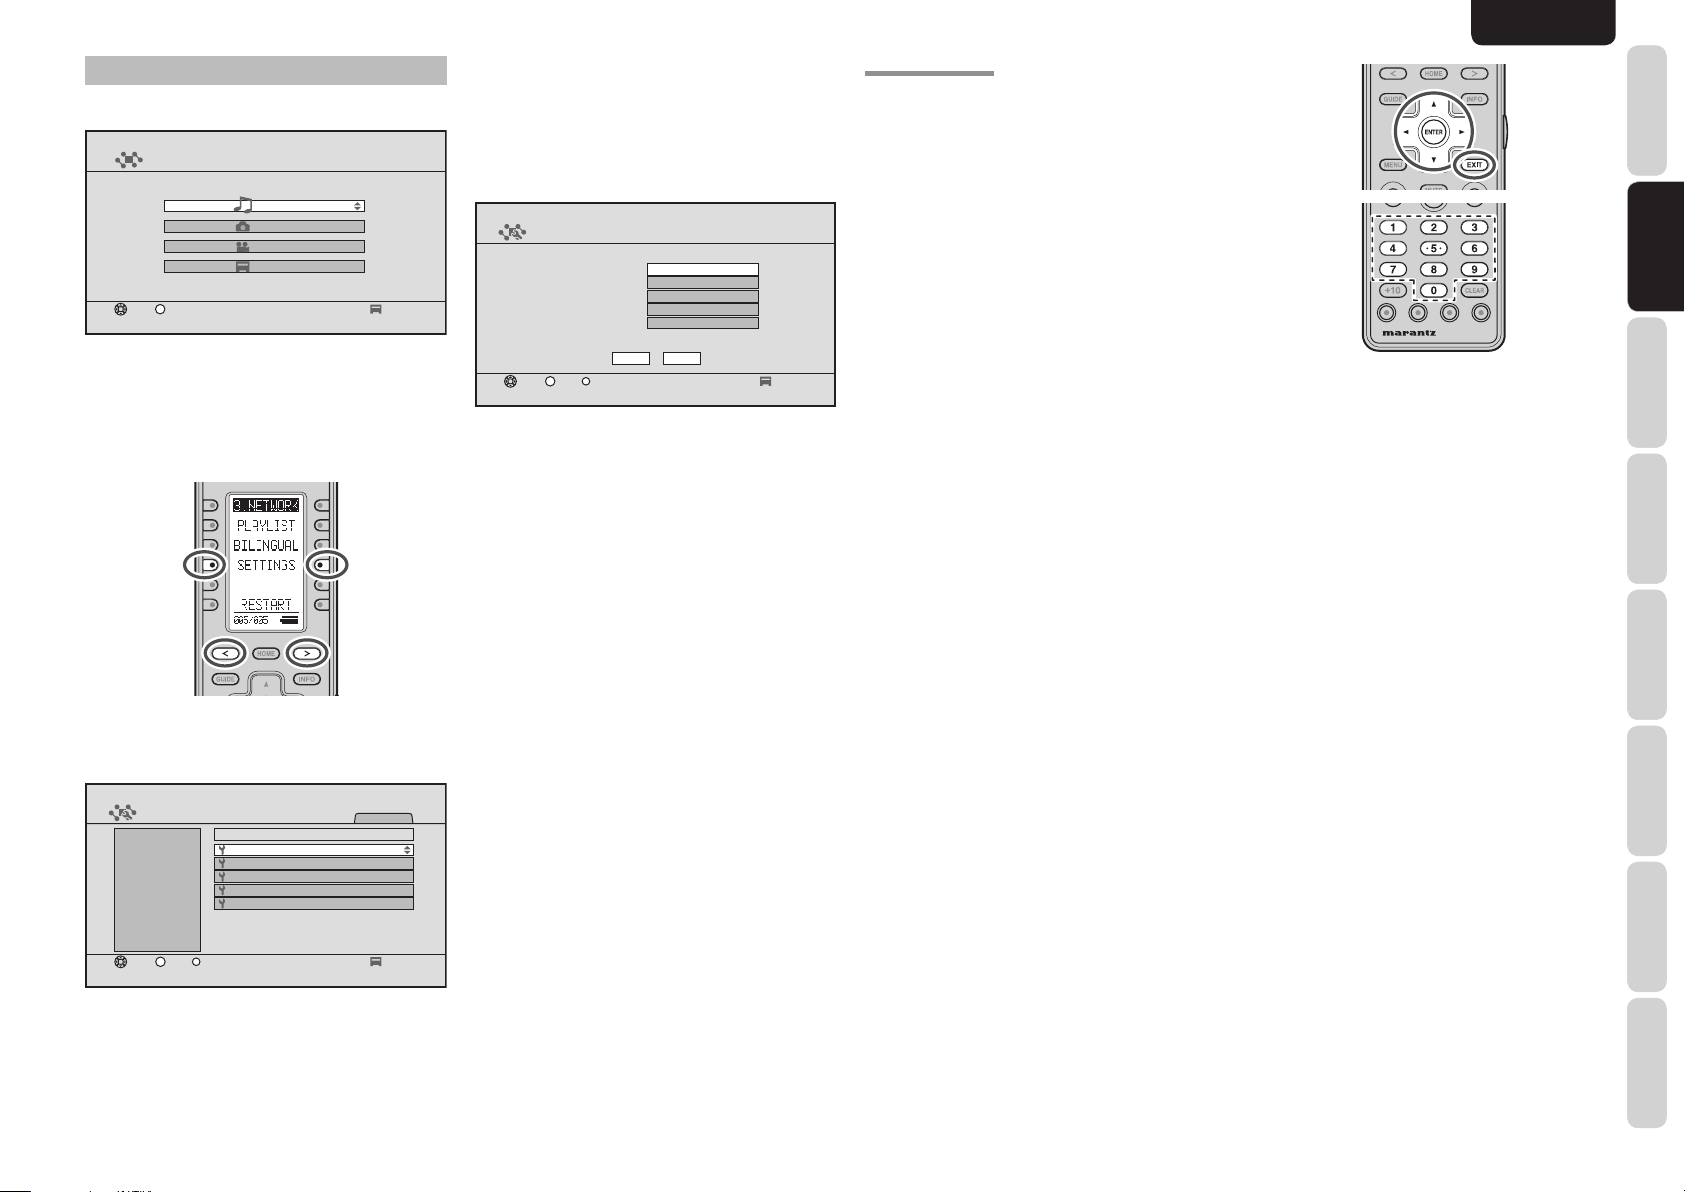
NETWORK ADDRESS SETTINGS
1. Start the network player.
NETWORK
Music
Photo
Video
Server
ENTER
Enter
Select
Set the remote controllerler to NETWORK
2.
mode.
Press the < and > buttons on the remote
3.
controllerler to move the remote controllerler
window to 005/005, and press the SETTINGS
button.
The SETTINGS window is displayed.
4.
Select Network Settings with the cursor and
press the ENTER button.
SETTINGS
TITLE
Network Settings
Network Settings
Preferences
System Reset
Software Update
System Information
ENTER
Enter
Settings
1
1/5
1ExitSelect
The Network Settings screen is displayed.
5.
The fi gures displayed in this screen are the
settings for the current network address.
We recommend that you make a copy of these
settings, because they may be required when
authenticating the unit from the server.
SETTINGS
Notwork Settings
ENTER
Obtain IP Address
IP Address
Subnet Mask
Default Gateway
DNS Server
MAC Address 00 : 06 : 78 : xx : xx : xx
OK CANCEL
ExitSelect
Enter
Automatic
192 . 168 . 0 . 80
255 . 255 . 255 . 0
...
...
1
● Obtain IP Address :
The default setting is Automatic.
To change the setting, press the ENTER button to
enable setting selections. Press the 3 / 4 buttons to
select an item and confi rm by pressing the ENTER
button.
• Automatic :
The address is obtained automatically from the
DHCP server.
If there is no DHCP server, the address is assigned
using Auto-IP.
If the address has been obtained automatically,
select “OK” to complete the setting.
Press the GUIDE button on the remote controller
to return to the top menu.
• Manual :
For manual input, see “Manual Setting”.
MANUAL SETTING
If you selected Manual, input is possible for the
following items.
Note:
Knowledge about the network is required for manual
input. See the user guide for your router or modem.
● IP Address:
Set the IP address. For manual input, enter an IP
address that is based on another device connected
to the same network.
Example:
IP address of another device: 192. 168. 1. 2
IP address of the unit: 192. 168. 1. xxx
Use a number for xxx that does not duplicate another
device.
● Subnet Mask :
Set the subnet mask address. Enter the same
number as the subnet mask of another network
device, such as a router or computer.
Example: 255. 255. 255. 0
● Default Gateway :
Set the gateway address. If a router is used, this is
usually the IP address of the router.
Example: 192. 168. 1. 1
● DNS Server :
Set the DNS server address. This is the address
that is specifi ed by the provider, or the IP address
of the router.
Example: 192. 168. 1. 1
● MAC Address :
This is the MAC address of the unit. This number
cannot be changed.
Note:
Playback is possible even if the gateway and DNS are
left blank, but value inputs are required to perform
network updates.
1. Select the item that you want to set with the 3
/ 4 buttons and press the ENTER button.
Select the position for entering the number with
2.
the 1 / 2 buttons, and enter the number using
the number keys.
If a number does not have three digits, move to
the next value using the 1 / 2 buttons.
Press EXIT to return the entered number to its
original value.
Note:
Enter a number from 0 to 255.
If 256 or a higher number is entered, a warning is
displayed
After finishing the setting input, press the
3.
ENTER button and select the next item using
the 3 / 4 buttons.
Repeat steps 2 and 3, and after fi nishing all
4.
the inputs, select “OK” using the 4 button and
press the ENTER button.
The settings completed dialog box is displayed.
5.
Press the ENTER button to restart.
Notes:
•
If the EXIT button is pressed or “CANCEL” is
selected with the 4 button partway through the setting
procedure, the screen returns to the SETTINGS
screen and the entered settings are canceled.
• The unit cannot be set to standby while it is
restarting.
Do not turn the power of this unit off while it is
restarting.
SCREEN MENUS
BASIC
OPERATION
ADVANCED
OPERATION
SETTINGS
ADVANCED
TROUBLESHOOTING
OTHERS CONNECTIONBASIC SETTINGS
5
Page 7
ENGLISH
AUTHENTICATING THE UNIT FROM THE
SERVER
With some server types, the unit must be authenticated
on the server. If authentication is not performed, it
will either not be possible to obtain fi les even if the
unit is connected to the server, or a warning will be
displayed and access will not be possible.
Information such as the IP address of the unit, the
MAC address and the unit device name (marantz
DMP) is required for authentication.
See the server user guide for details on the
authentication method.
As a reference, this section describes the procedure
SCREEN MENUS
for authentication from Windows Media Player 11 on
a computer.
Notes:
• If your computer's operating system is Windows XP
SP2, you can download Windows Media Player 11
from Microsoft Corporation's website.
OPERATION
OPERATION
• If you are using Windows Vista, it is already
BASIC
installed.
Start Windows Media Player 11.
1.
If you have already completed the settings for
the fi les that you want to share, go to step
ADVANCED
Set sharing for the fi les that you want to play
2.
with the unit.
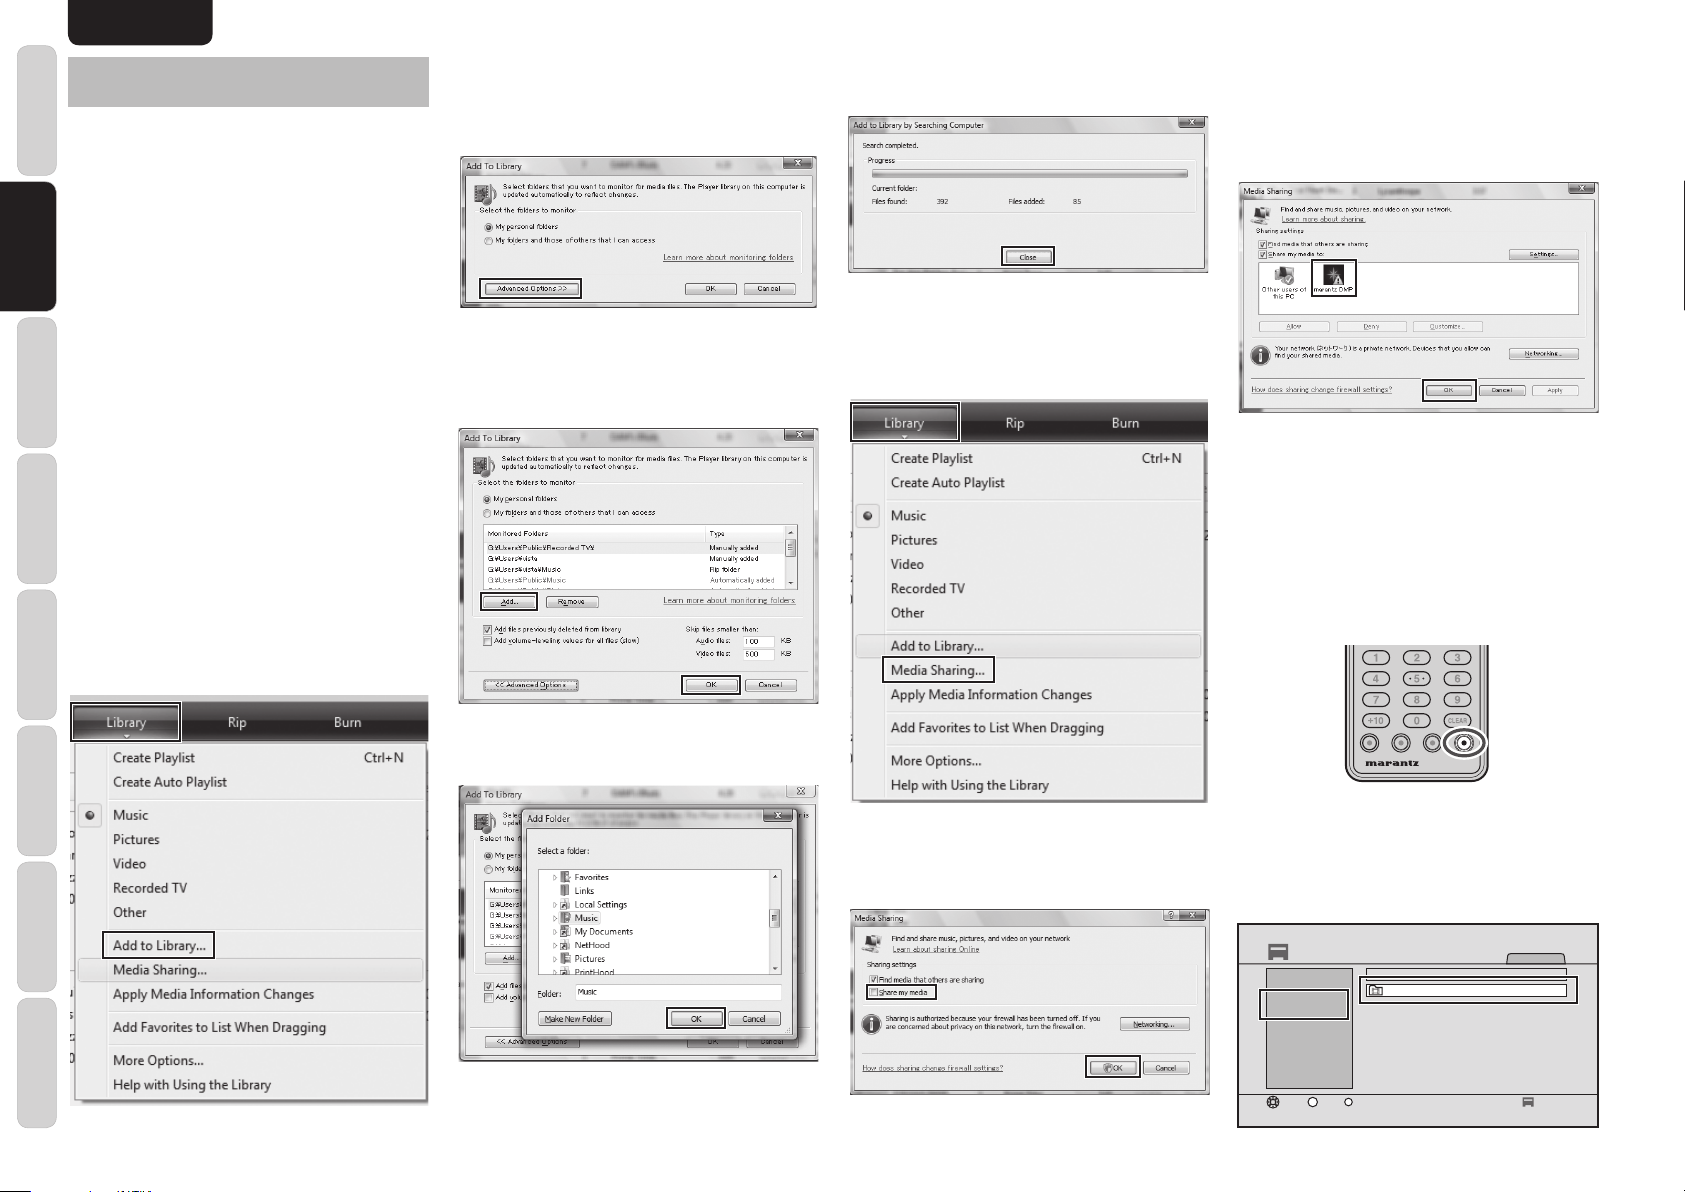
Select “Add to Library” from Library on the
menu bar.
3. A list of the folders that are currently being
shared is displayed.
If the following window is displayed, click
“Advanced Options”.
4. Select the folder that you want to share and
click “OK”.
If you want to share another folder, click “Add”.
The folder selection dialog box is displayed.
.
7
6. A list of the shared fi les is created.
After the list is created, click “Close”.
7. Next, perform the setting for authenticating the
unit from Windows Media Player 11.
Select “Media Sharing” from Library on the
menu bar.
9. The window below is displayed.
If the network settings are completed and the
unit is connected to the network, “marantz
DMP” is displayed in the device list.
Select “marantz DMP” and click “Allow”.
Click “OK” to close the window and complete
10.
the authentication of the unit from the Windows
Media Player.
Next, check from the unit that it is registered in
11.
Windows Media Player 11.
Check that the unit is in NETWORK mode,
and press the SERVER button on the remote
controller.
ADVANCED
SETTINGS
TROUBLESHOOTING
OTHERSCONNECTION BASIC SETTINGS
6
5. After fi nishing the fi le sharing operations, click
“OK” to complete the settings.
If Windows Media Player is already set for
sharing with a different device, go to step 9.
Select “Share my media” and click “OK”.
8.
Check that the computer name (name of the
12.
computer that performed the settings) and
user name (name of the logged-in user) are
displayed on the screen list. This means that
authentication is complete.
SERVER
SERVER
Computer:User
MODEL NAME
Windows Media
Player Sharing
Computer:User
ENTER
Enter
Server
1/1
1ExitSelect
Page 8
SCREEN MENUS
ENGLISH
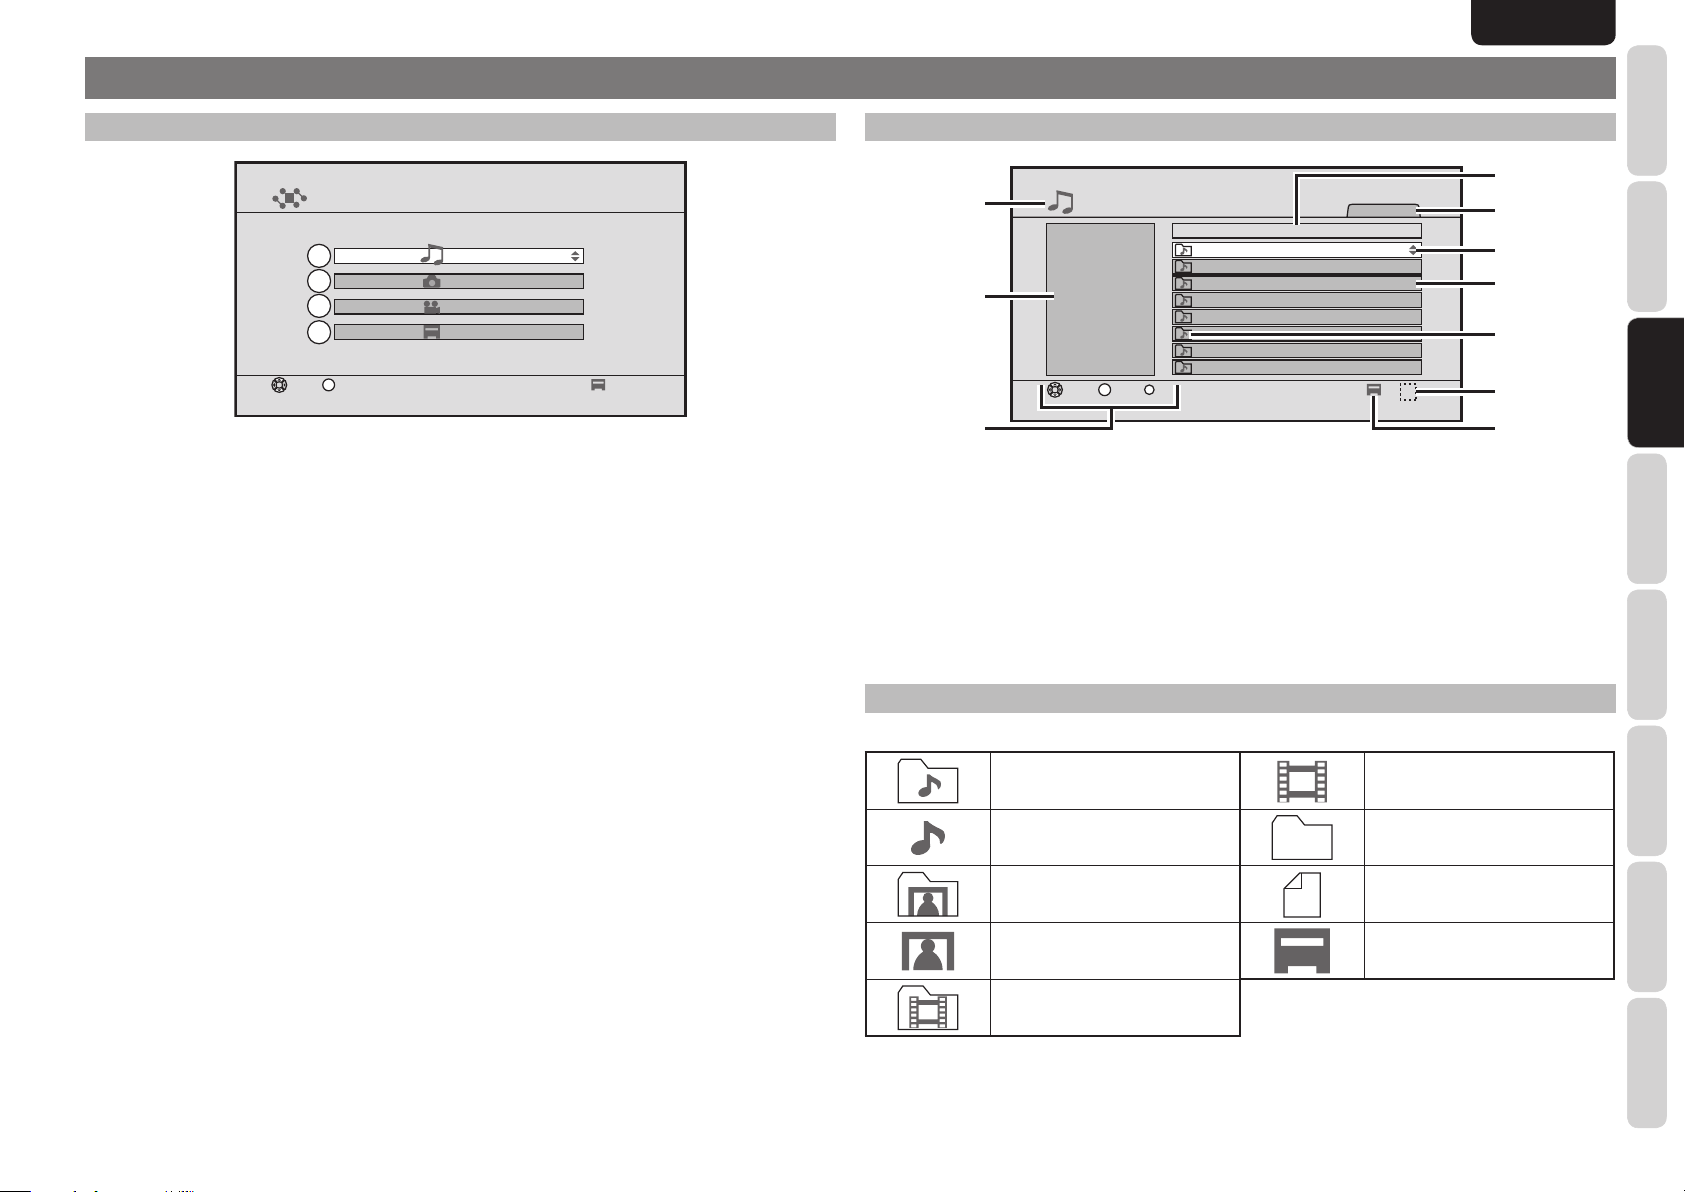
TOP MENU
NETWORK
1
2
3
4
ENTER
Enter
Select
q Music
Play music from all the connected servers. (See page 9)
w Photo
Display photos from all the connected servers. (See page 11)
e Video
Play videos from all the connected servers. (See page 13)
r Server
Play fi les from a specifi ed server. This can also be used if you want to check which servers are currently
connected. (See page 15)
Music
Photo
Video
Server
1
ITEM MENU
q
MUSIC
w
ENTER
Enter
e
q Mode that is currently displayed
w Information display panel
e Main button operation guidance
r Category display
t List number of the selected fi le/Total number
of fi les in the list
ICONS
The icons displayed on the screen are as follows.
r
1/3
Music
t
y
u
i
1ExitSelect
o
!0
y Directions in which the cursor can be moved
u File list
i File and category type
o Icons of currently executing processes
!0 Number of servers currently recognized by the
unit
BASIC SETTINGS
BASIC
OPERATION
ADVANCED
OPERATION
MUSIC (Music) category VIDEO (Video) fi le
MUSIC (Music) fi le Other category
PHOTO (Photo) category Other fi le
PHOTO (Photo)fi le Server
VIDEO (Video) category
• The category specifi es information such as the folder, album or genre.
• Press the PLAY, REPEAT or RANDOM button under a music, photo or video hierarchy to play all the fi les
in that category.
SETTINGS
ADVANCED
TROUBLESHOOTING
OTHERS CONNECTIONSCREEN MENUS
7
Page 9
ENGLISH
BASIC OPERATIONS
NETWORK PLAYER BASIC OPERATIONS
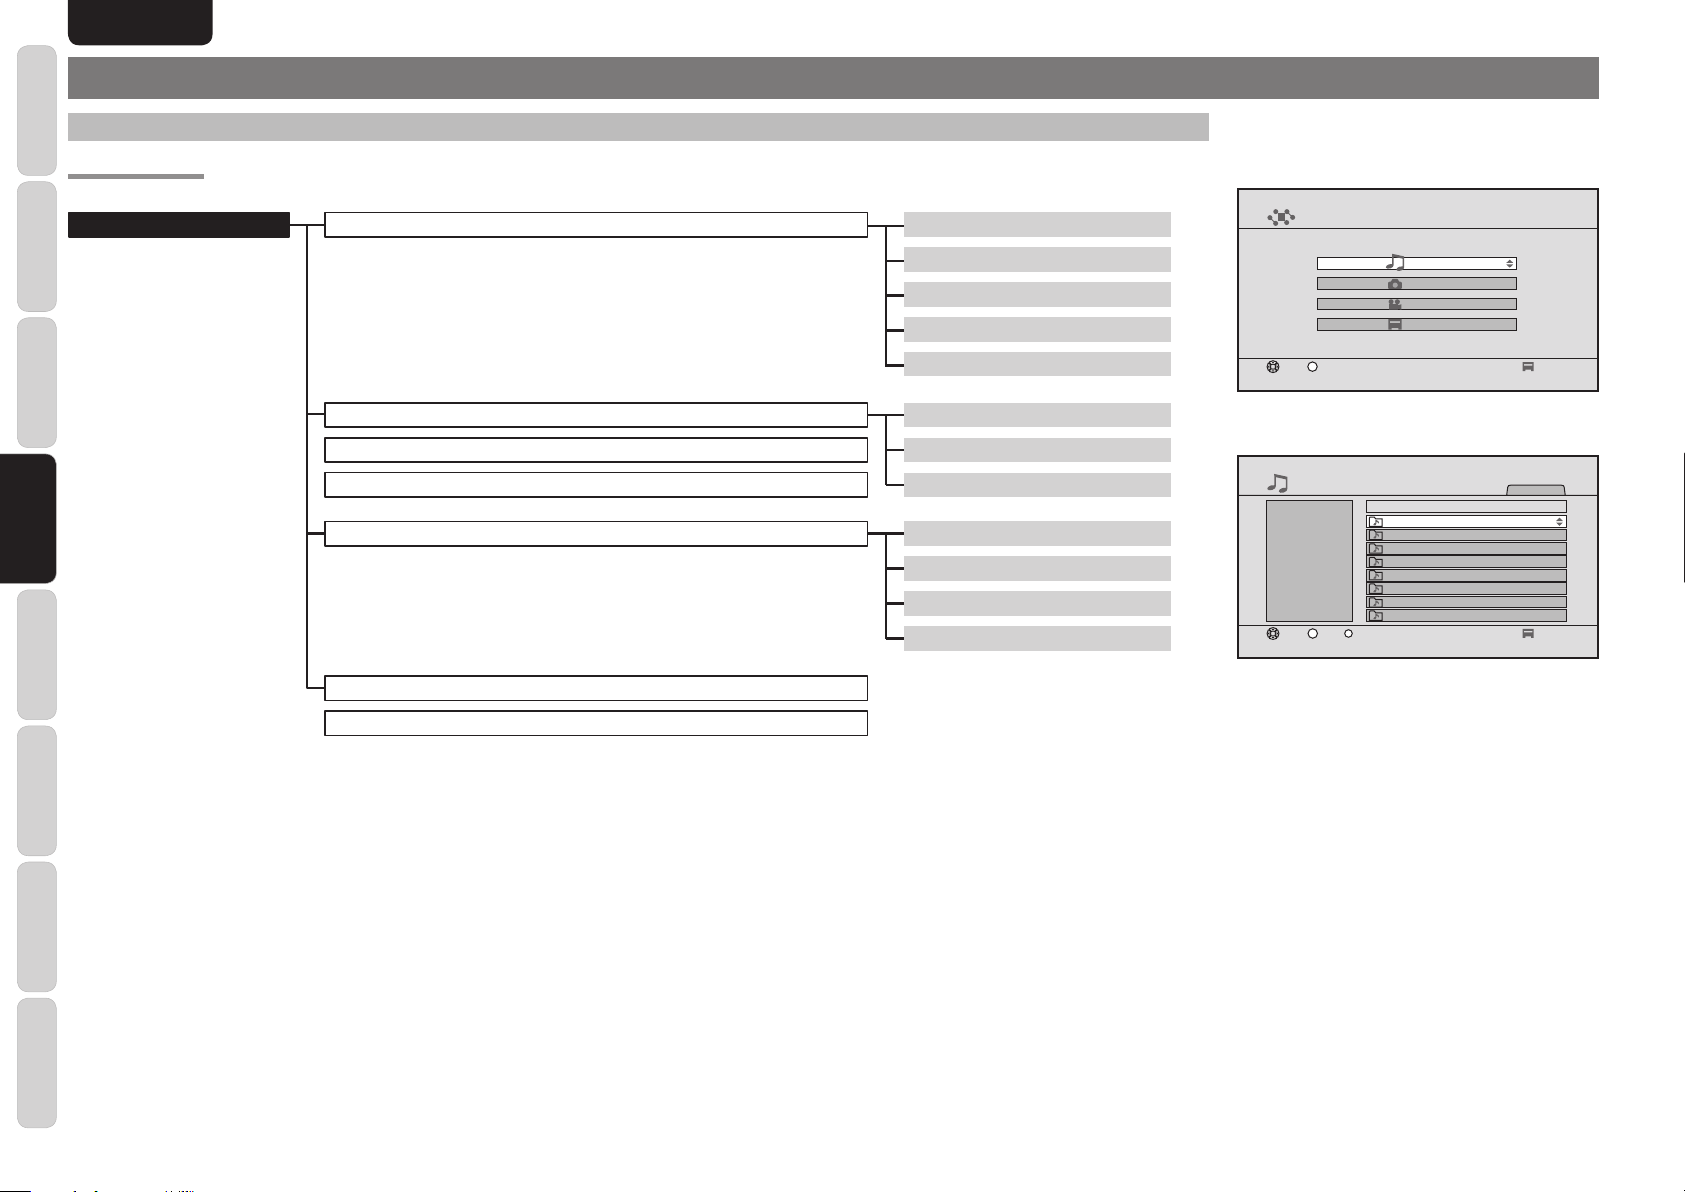
MENU STRUCTURE
BASIC SETTINGS SCREEN MENUS
NETWORK (GUIDE, TOP)
OPERATION
BASIC
OPERATION
ADVANCED
ADVANCED
SETTINGS
( ) The text in parenthesis is displayed on the remote controller.
TROUBLESHOOTING
OTHERSCONNECTION
Music (MUSIC)
Photo (When PHOTO is set to Category)
Photo Date (All server) (When PHOTO is set to Date (All Servers))
Photo Date (Selected Server) (When PHOTO is set to Date (Selected Server))
Video (VIDEO)
Server (SERVER)
Settings (SETTINGS)
Music - Artists (M ARTIST)
Music - Albums (M ALBUM)
Music - Genres (M GENRE)
Music - All Songs (MUSIC ALL)
Music - Playlists (M P-LIST)
Photo - Albums (P ALBUM)
Photo - All Photos (PHOTO ALL)
Photo - Playlists (P P-LIST)
Video - Albums (V ALBUM)
Video - Genres (V GENRE)
Video - All Videos (VIDEO ALL)
Video - Playlists (V P-LIST)
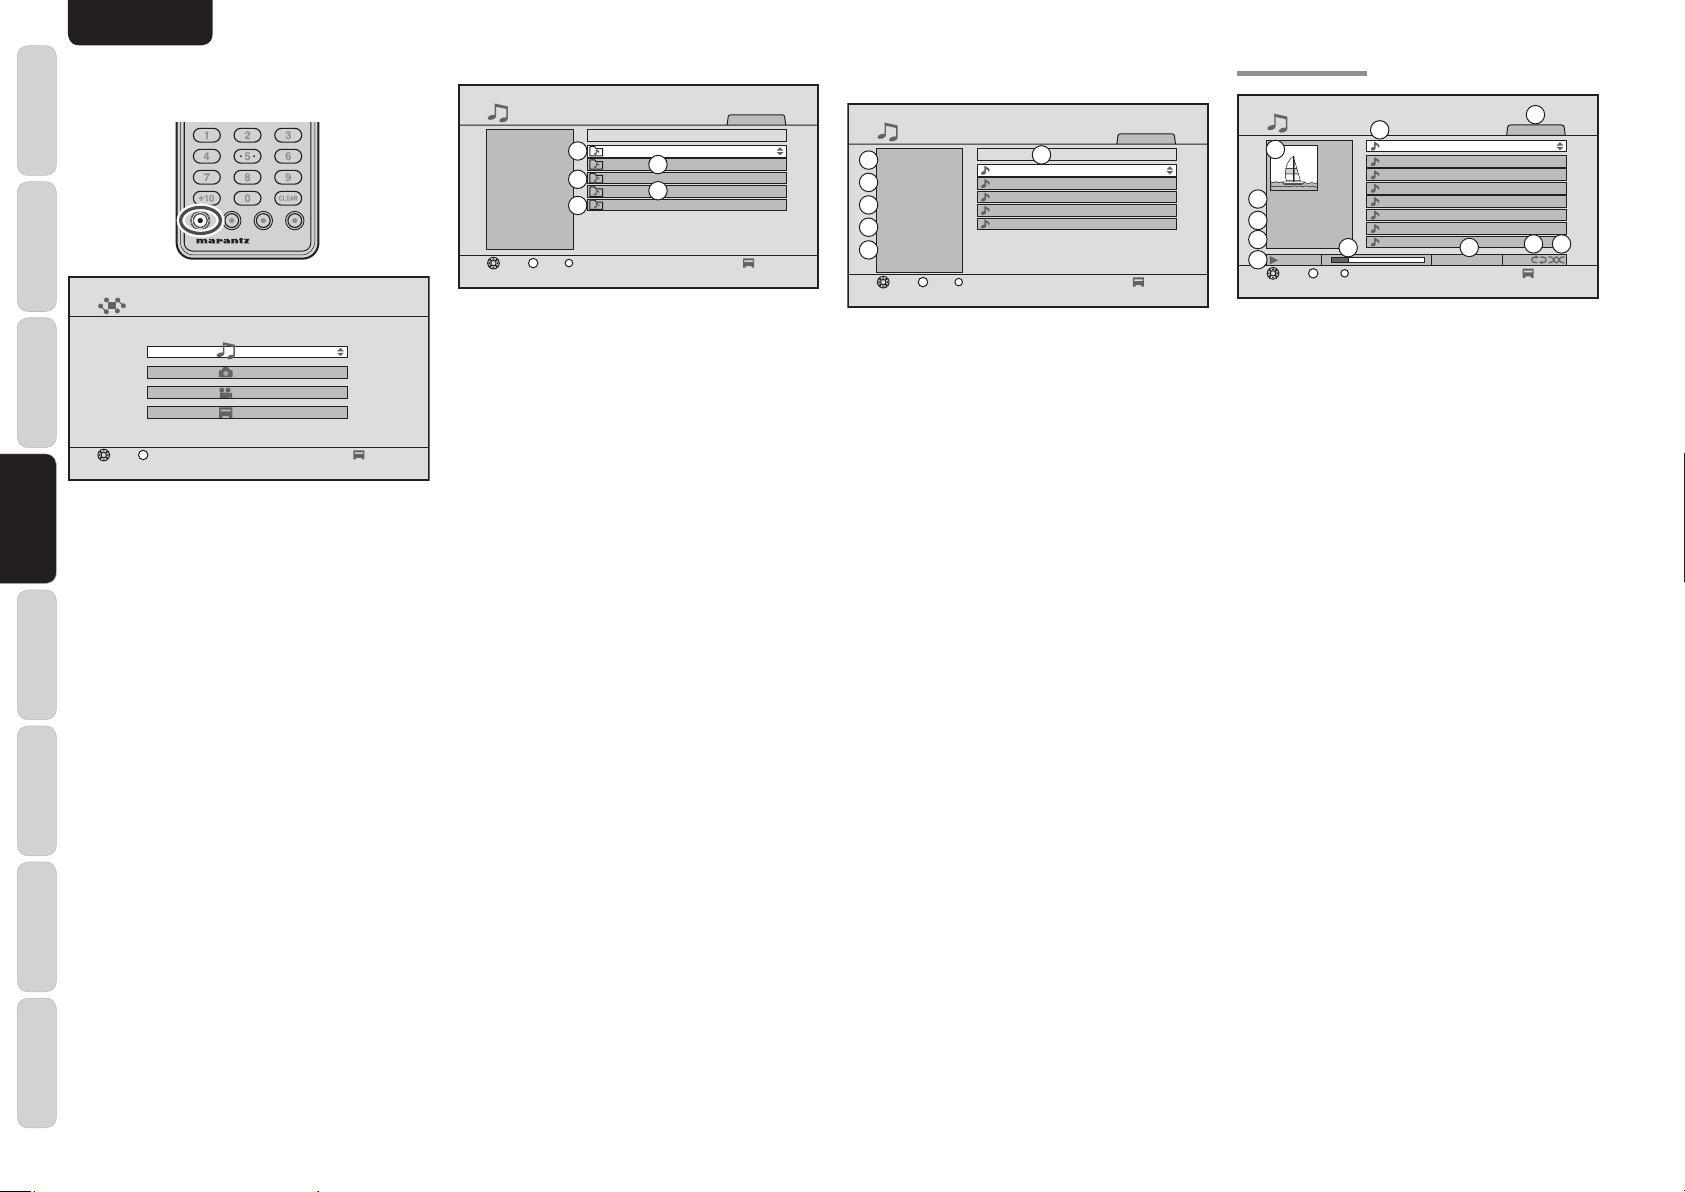
1. Select the item that you want to play on the top
menu using the 3 / 4 buttons and press the
ENTER button.
NETWORK
Music
Photo
Video
Server
ENTER
Select
Enter
1
2. The menu for the corresponding item is
displayed.
MUSIC
Music
ENTER
Enter
1/3
1ExitSelect
Note:
With some server specifi cations, the fi le list may not
be displayed for items other than Server menu.
Play the fi le.
3.
• Select the fi le that you want to play from
the fi le list and press the ENTER or PLAY
button to play.
• Select a category from the fi le list and press
the PLAY button to play all the fi les in the
category.
• To change the page if there is more than one
fi le list page, press the 3 button on the top of
the fi le list or the 4 button on the bottom of
the fi le list, or press the Ch +/– buttons.
• Press the EXIT button to return to the
previous screen.
• To see the photo thumbnail list, press the 3
/ 4 / 1 / 2 buttons.
8
Page 10
TOP
MULTI
SPEAKER
DISPLAY
INPUT
7.1CH
THX
M-DAX
CLEAR
MEMORY
T-MODE
BAND
EXIT
MENU
ZONE
ODO WN
VOLUME
UP
T
SETUP MIC
HDMI
M-DAX
AV PRE TUNER AV8 003
ENTER
PLAYING MUSIC
RC2001
ENGLISH
RC101
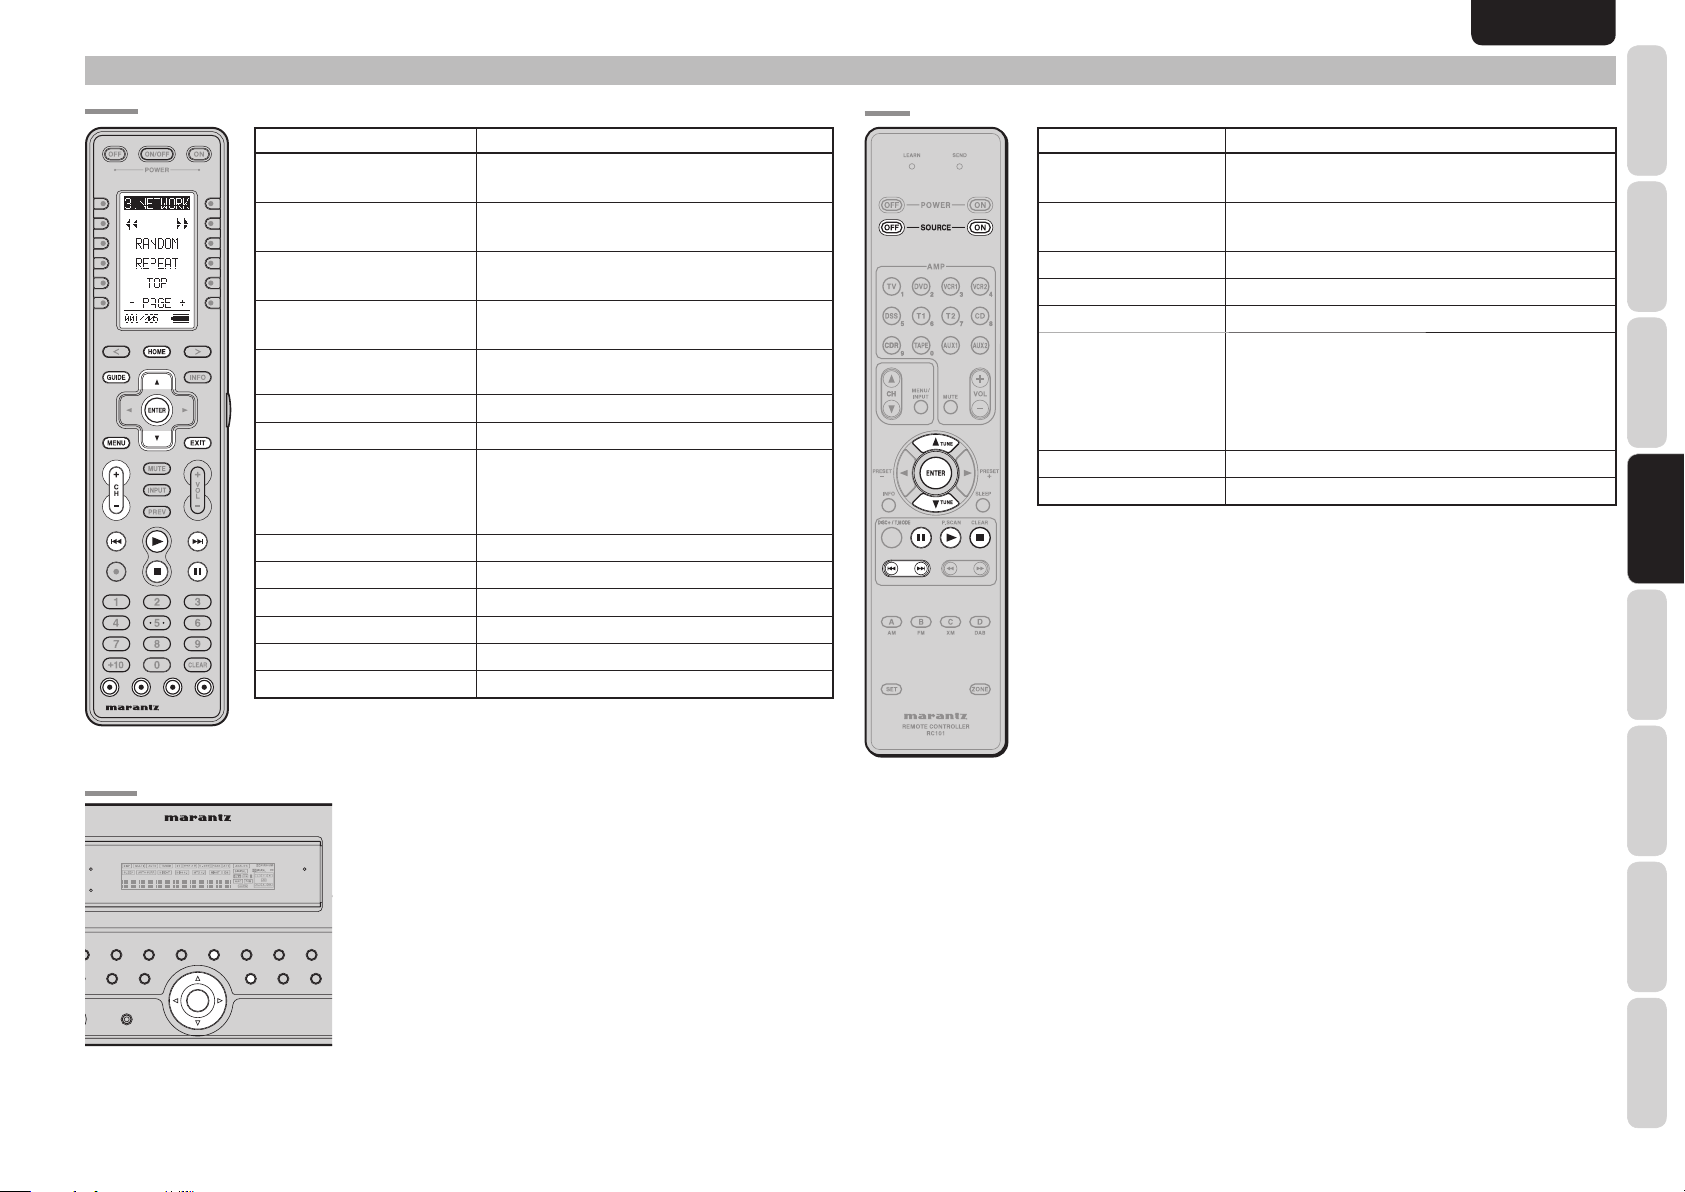
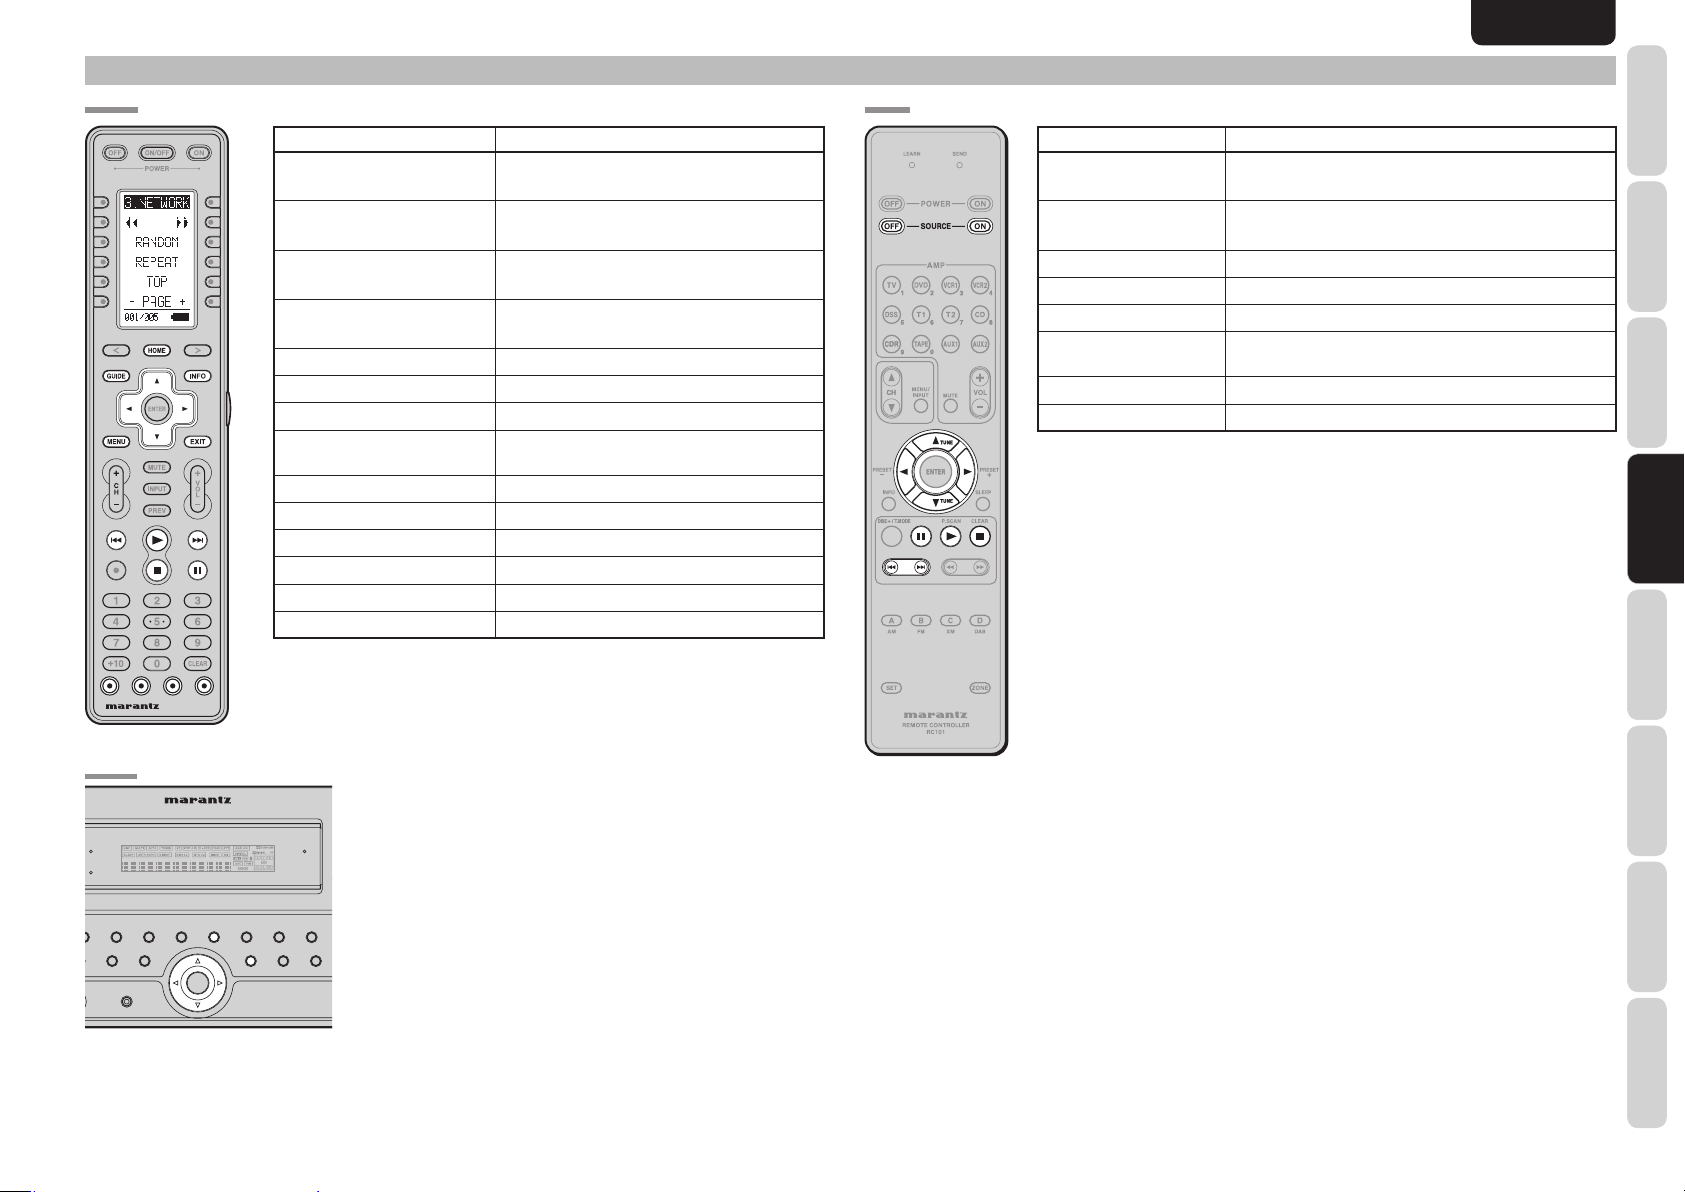
Button Music Playback
3, 4
(Remote controller, unit)
ENTER
(Remote controller, unit)
GUIDE
TOP (Unit)
EXIT
(Remote controller, unit)
CH±
Move between items
Play the track selected with the cursor
Move to the top menu
Stop
(+) Next page
(–) Previous page
MENU TOOL menu
2 (PLAY)
Play
(¢) Play the next track
4 / ¢
(4) Play the previous track (if one second or more has
elapsed from the start of the track, play from the start
of the same track)
9 (STOP)
; (PAUSE)
Stop
Pause/cancel
(Blue) MUSIC Move to top of MUSIC page
(Red) PHOTO Move to the set PHOTO screen
(Green) VIDEO Move to top of VIDEO page
(Yellow) SERVER Move to top of SERVER page
Button Music Playback
3, 4
(Remote controller, unit)
ENTER
(Remote controller, unit)
Move between items
Play the track selected with the cursor
SOURCE OFF Stop
SOURCE ON Change the Screen resolution
2 (PLAY)
Play
(¢)
Play the next track
4 / ¢
(4)
Play the previous track (if one second or more has elapsed from the
start of the track, play from the start of the same track)
9 (STOP)
; (PAUSE)
Stop
Pause/cancel
BASIC SETTINGSSCREEN MENUS
BASIC
OPERATION
ADVANCED
OPERATION
AV8003
AV PRE TUNER AV8003
RE DIRECT
M-DAX
MULTI
ZONE
O
SPEAKER
7.1CH
THX
INPUT
SETUP MIC
EXIT
MENU
ENTER
HDMI
D
MEMORY
T-MODE
BAND
TOP
DISPLAY
M-DAX
SETTINGS
ADVANCED
TROUBLESHOOTING
OTHERS CONNECTION
9
Page 11
ENGLISH
Select Music on the top menu using the cursor and
press the ENTER button, or press the blue (MUSIC)
button on any screen.
BASIC SETTINGS SCREEN MENUS
NETWORK
Music
Photo
Video
Server
ENTER
Enter
Select
OPERATION
BASIC
OPERATION
ADVANCED
ADVANCED
SETTINGS
TROUBLESHOOTING
The music top menu is displayed.
When the sorting is completed, the file list is
MUSIC PLAYBACK
displayed.
MUSIC
TITLE
Artists
Artiste
1
Albums
Genres
3
All Songs
Playlists
5
ENTER
Enter
Music
2
4
q Artists :
Sort the music fi les by artist.
w Albums :
Sort the music fi les by album.
e Genres :
Sort the music fi les by genre.
1
r All songs :
Display all the music fi les.
t Playlists :
Display the music playlists. (See page 20)
You can also sort in more detail by narrowing the
1/5
1ExitSelect
MUSIC
TITLE
xxxxxx
1
ARTIST
xxxxxx
2
ALBUM
xxxxxx
3
DURATION
00 : 03 : 29
4
SERVER
5
xxxxxx
ENTER
Enter
M06 xxxxxx
M07 xxxxxx
M08 xxxxxx
MO9 xxxxxx
M10 xxxxxx
6
Greatest Hits
1/5
1ExitSelect
q Track title
w Artist name
e Album name
r Track length
t Server on which the fi le is saved
y Sort item
Select the fi le that you want to play and press the
ENTER or PLAY button to play.
MUSIC
5
TITLE
xxxxxx
1
ARTIST
xxxxxx
2
ALBUM
xxxxxx
3
PLAY
7
ENTER
4
xxxxxx
xxxxxx
xxxxxx
xxxxxx
xxxxxx
xxxxxx
xxxxxx
xxxxxx
8
Play ExitSelect
9
00 : 00 : 47/00 : 04 : 52
q Title of the track that is playing
w Artist for the track that is playing
e Album name
r List of the playback tracks
t Album jacket photo
y Selected track number/Total number of tracks
u Playback status
i Progress bar
o Elapsed time/Total time
!0 Repeat status display
!1 Random status display
6
1/57
10 11
1
conditions within each category.
• The music is played in the fi le list sequence.
Example: Artists → Albums → Tracks
• If you want to play a different track during playback,
move the cursor to the track and press the ENTER
Note:
Sorting by specifying categories may not be possible
when connected to some server types. In such cases,
select the server directly and connect. (See page 15)
button.
• If you want to stop playback, press the STOP or
EXIT button to stop the playback and return to the
previous screen.
• During random playback, the tracks in the fi le list
are played in a random sequence.
Note:
With some file configurations, a photo that is not
related to the track may be displayed.
OTHERSCONNECTION
10
Page 12
TOP
MULTI
SPEAKER
DISPLAY
INPUT
7.1CH
THX
M-DAX
CLEAR
MEMORY
T-MODE
BAND
EXIT
MENU
ZONE
DOWN
VOLUME
UP
T
SETUP MIC
HDMI
M-DAX
AV PRE TUNER AV8 003
ENTER
DISPLAYING PHOTOS
RC2001
ENGLISH
RC101
Button Photo Display
3, 4
(Remote controller, unit)
1, 2
(Remote controller, unit)
GUIDE
TOP (Unit)
EXIT
(Remote controller, unit)
(3) Display the previous photo
(4) Display the next photo
(1) Display the previous photo
(2) Display the next photo
Move to the top menu
Stop
MENU TOOL menu
INFO Select the panel display
2 (PLAY)
4 / ¢
9 (STOP)
; (PAUSE)
Start the slideshow
(¢) Display the next photo
(4) Display the previous photo
Stop
Pause the slideshow
(Blue) MUSIC Move to top of MUSIC page
(Red) PHOTO Move to the set PHOTO screen
(Green) VIDEO Move to top of VIDEO page
(Yellow) SERVER Move to top of SERVER page
Button Photo Display
3, 4
(Remote controller, unit)
1, 2
(Remote controller, unit)
(3) Display the previous photo
(4) Display the next photo
(1) Display the previous photo
(2) Display the next photo
SOURCE OFF Stop
SOURCE ON Change the screen resolution
2 (PLAY)
4 / ¢
9 (STOP)
; (PAUSE)
Start the slideshow
(¢) Display the next photo
(4) Display the previous photo
Stop
Pause the slideshow
BASIC SETTINGSSCREEN MENUS
BASIC
OPERATION
ADVANCED
OPERATION
AV8003
AV PRE TUNER AV8003
RE DIRECT
M-DAX
MULTI
ZONE
O
SPEAKER
7.1CH
THX
INPUT
SETUP MIC
EXIT
MENU
ENTER
HDMI
D
MEMORY
T-MOD E
BAND
TOP
DISPLAY
M-DAX
SETTINGS
ADVANCED
TROUBLESHOOTING
OTHERS CONNECTION
11
Page 13

ENGLISH
Select Photo on the top menu with the cursor and
press the ENTER button, or press the red (PHOTO )
button on any screen.
(When the red (PHOTO ) button setting is Category
(see page 18))
BASIC SETTINGS SCREEN MENUS
NETWORK
Music
Photo
Video
OPERATION
Server
BASIC
ENTER
Enter
Select
OPERATION
ADVANCED
ADVANCED
SETTINGS
The photo top menu is displayed.
When the sorting is completed, the photo thumbnail
PHOTO DISPLAY
list is displayed.
TITLE
Albums
PHOTO
1
Albums
All Photos
2
Favorite
3
ENTER
Enter
Photo
1/3
1ExitSelect
1
2
3
4
PHOTO
TITLE
Sunset
ALBUM
Sample Pictures
DATE
2003/04/03
SERVER
Dix_AAA
5
All Photos
1/63
6
ENTER
Enter
1ExitSelect
q Albums :
Sort the photo fi les by album.
w All Photos :
Display all the photo fi les.
e Playlists :
Display the photo playlists. (See page 20)
q Photo title
w Album name
e Date of shooting or creation
r Server on which the fi le is saved
t Sort item
y Photo thumbnails
Select the photo that you want to display and press
1
the ENTER or PLAY button.
• Press the ENTER button to display the selected
photo.
• Press the PLAY button to start the slideshow from
the selected photo.
IMG_0048
1
4
Slideshow
5
ExitPrev Hext
1/63
6 7 8
q Title
w Album name
e Date display
r Status display
t Progress bar
y Photo number/Total number of photos
u Repeat status display
i Random status display
• Select the photo that you want to display, and
press the ENTER button to display the selected
photo.
• Press the 4 , 2 or § button to go to the next
photo.
3
2
20050326
2005/03/26
1
• Press the 3, 1 or ∞ button to go to the previous
photo.
• Select the photo that you want to display, and
press the PLAY button to start the slideshow from
the selected photo.
• If you want to stop the slideshow, press the STOP
button or EXIT button to stop the playback and
return to the previous screen.
• The display changes as follows each time the
INFO button is pressed.
TROUBLESHOOTING
OTHERSCONNECTION
12
No panel display
Player panel display
Information panel display
Note:
If you skip to the previous or next photo during the
slideshow playback, the slideshow pauses.
Page 14

TOP
MULTI
SPEAKER
DISPLAY
INPUT
7.1CH
THX
M-DAX
CLEAR
MEMORY
T-MODE
BAND
EXIT
MENU
ZONE
ODO WN
VOLUME
UP
T
SETUP MIC
HDMI
M-DAX
AV PRE TUNER AV8 003
ENTER
PLAYING VIDEO
RC2001
Button Video Playback
3, 4 (Remote controller, unit)
(3) Skip back 15 seconds
(4) Skip forward 15 seconds
1, 2 (Remote controller, unit) Change slow speed during slow playback
GUIDE
TOP (Unit)
Move to top menu
EXIT (Remote controller, unit) Stop
MENU TOOL menu
INFO Select panel display
2 (PLAY)
Play
(¢) During continuous playback, play next video
(4) During continuous playback, play the previous video (if
4 / ¢
one second or more has elapsed from the start of the
video or only one video is selected, play from the start
of the same video)
9 (STOP)
; (PAUSE)
Stop
Pause/cancel
(Blue) MUSIC Move to top of MUSIC page
(Red) PHOTO Move to the set PHOTO screen
(Green) VIDEO Move to top of VIDEO page
(Yellow) SERVER Move to top of SERVER page
RC101
Button Video Playback
3, 4
(Remote controller, unit)
1, 2
(Remote controller, unit)
(3) Skip back 15 seconds
(4) Skip forward 15 seconds
Change slow speed during slow playback
SOURCE OFF Stop
SOURCE ON Change screen resolution
2 (PLAY)
Play
(¢) During continuous playback, play next video
4 / ¢
(4) During continuous playback, play the previous video (if one
second or more has elapsed from the start of the video or only
one video is selected, play from the start of the same video)
9 (STOP)
; (PAUSE)
Stop
Pause/cancel
ENGLISH
BASIC SETTINGSSCREEN MENUS
BASIC
OPERATION
ADVANCED
OPERATION
AV8003
AV PRE TUNER AV8003
RE DIRECT
M-DAX
MULTI
ZONE
O
SPEAKER
7.1CH
THX
INPUT
SETUP MIC
EXIT
MENU
ENTER
HDMI
D
MEMORY
T-MODE
BAND
TOP
DISPLAY
M-DAX
SETTINGS
ADVANCED
TROUBLESHOOTING
OTHERS CONNECTION
13
Page 15

ENGLISH
Select Video on the top menu with the cursor and
press the ENTER button, or press the green (VIDEO)
button on any screen.
BASIC SETTINGS SCREEN MENUS
NETWORK
Music
Photo
Video
Server
ENTER
Enter
Select
OPERATION
BASIC
OPERATION
ADVANCED
The video top menu is displayed.
After the sorting by conditions is completed, the fi le
VIDEO PLAYBACK
list is displayed.
TITLE
Albums
VIDEO
Albums
1
Genres
All Videos
3
Playlists
ENTER
Enter
Video
2
4
1/4
1ExitSelect
VIDEO
TITLE
xxx
1
ALBUM
xxx
2
DATE
2005/03/17
3
DURATION
00 : 00 : 50
4
SERVER
Dix_AAA
5
ENTER
Enter
xxxxxx
xxxxxx
xxxxxx
xxxxxx
xxxxxx
xxxxxx
xxxxxx
xxxxxx
6
All Videos
1/27
1ExitSelect
q Albums :
Sort the video fi les by album.
w Genres :
Sort the video fi les by genre.
e All Videos :
Display all the video fi les.
1
r Playlists :
q Video title
w Album name
e Date of creation
r Duration
t Server on which the fi le is saved
y Sort item
Display the video playlists. (See page 20)
Note:
With some fi les, an accurate time cannot be obtained
for Duration.
Select the fi le that you want to play and press the
ENTER or PLAY button.
Only the selected fi le is played.
If you want to play other files from the file list
continuously, press the MENU button and select
“Continuous Playback”.
xxxxxx xxxxxx
1
PLAY
ExitSkip
00 : 00 : 48/00 : 03 : 13
q Title
w Album name
e Date display
r Status display
t Progress bar
y Elapsed time/Total time
u Audio mode display
i Repeat status display
o Random status display
• If you want to stop video playback, press the
STOP or EXIT button to stop playback and return
to the previous screen.
• The display changes as follows each time the
INFO button is pressed.
No panel display
Player panel display
3
2
2006/08/25
987654
1
Information panel display
ADVANCED
SETTINGS
TROUBLESHOOTING
OTHERSCONNECTION
14
Page 16

ENGLISH
PLAYING FILES BY SPECIFYING A SERVER
SPECIFYING A SERVER
In the following cases, you can use “Server” in the top
menu to play fi les and obtain a fi le list.
• When you want to specify one server from multiple
connected servers and play fi les from this server
• When you cannot obtain a fi le list from the Music,
Photo or Video menu on the connected server
Select “Server” using the cursor on the top
1.
menu and press the ENTER button, or press
the yellow (SERVER) button on any screen.
NETWORK
Music
Photo
Video
Server
ENTER
Enter
Select
2. The SERVER menu is displayed.
1
All servers from which fi le lists have been obtained in
the past are registered on the server list.
• White text:
Servers that are currently connected
• Gray text:
Servers that were connected in the past but are
not currently connected
Select a server from the server list, and press
3.
the ENTER button to display the fi le list of the
selected server on the screen.
Notes:
• The unit can register a maximum of 50 servers. If the
number of servers exceeds 50, delete servers that are
no longer required.
• The contents of the displayed server list vary
depending on the server.
• It may not be possible to play some fi les on the
server using this unit.
When the Server Supports WakeOnLAN
If a server displayed with gray text on the server list
supports WakeOnLAN, you can press the ENTER
button to start the server and display the fi les.
The dialog box below is displayed while the server
is starting.
Press the ENTER button again to abort the
connection.
Starting Server
Establishing Server connections
ABORT
REFRESHING THE SERVER LIST
In the following cases, you can display the list
correctly by refreshing the server list.
• When a newly connected server is not automatically
registered on the server list
• When a server whose connection was canceled
remains on the server list
Press the MENU button on the server list.
1.
When you select “Refresh” and press the
2.
ENTER button, the unit obtains the server
information from the network again and
refreshes the server list.
DELETING UNNECESSARY SERVERS FROM THE
SERVER LIST
All servers that were recognized by the unit in the
past are registered on the server list.
If the history has grown larger than is necessary or
the list is full with 50 items, you can delete servers
that are no longer required from the server list.
Select a server that is not currently connected
1.
and press the MENU button.
Select “Remove server” and press the ENTER
2.
button.
When the following dialog box appears, select
3.
“OK” and press the ENTER button.
Remove Server
BASIC SETTINGSSCREEN MENUS
BASIC
OPERATION
ADVANCED
OPERATION
1
2
SERVER
SERVER
xxxxxx
MODEL NAME
xxxxxx
xxxxxx
3
ENTER
Enter
Server
1/1
1ExitSelect
4
q Name of the server selected in e
w Type of the server selected in e
e Server list
r Number of servers that are currently detected
After the server has started, you can display the
server fi les.
TITLE
Video
SERVER
xxxxxx
SERVER
ENTER
Enter
Video
Music
Photos
User Files
xxxxxx
1/4
1ExitSelect
Push[OK]to remove this server from list
OK CANCEL
SETTINGS
ADVANCED
TROUBLESHOOTING
OTHERS CONNECTION
15
Page 17

ENGLISH
ADVANCED OPERATIONS
REMOTE CONTROLLER OPERATIONS
RC2001
BASIC SETTINGS SCREEN MENUS
OPERATION
BASIC
OPERATION
ADVANCED
ADVANCED
SETTINGS
TROUBLESHOOTING
OTHERSCONNECTION
Command File List
3
(Remote controller, unit)
4
(Remote controller, unit)
1
(Remote controller, unit)
2
(Remote controller, unit)
ENTER
(Remote controller, unit)
GUIDE
TOP (Unit)
EXIT
(Remote controller, unit)
CH±
MENU TOOL menu
INFO
2 (PLAY)
∞ / §
7 (STOP)
8 (PAUSE)
(Blue) MUSIC Move to MUSIC Top
(Red) PHOTO Move to the set PHOTO screen
(Green) VIDEO Move to VIDEO Top
(Yellow) SERVER Move to SERVER TOP
Move between items (List)
Display the previous photo (Photo)
Skip back 15 seconds (Video)
During detailed information display, move to previous fi le
Move between items (List)
Display the next photo (Photo)
Skip forward 15 seconds (Video)
During detailed information display, move to next fi le
Move between items (Photo list)
Display the previous photo (Photo)
Adjust slow playback speed (Video)
During detailed information display, change the information
Move between items (Photo list)
Display the next photo (Photo)
Adjust slow playback speed (Video)
During detailed information display, change the information
Select/play item
Move to the top menu
Previous screen (List)
Stop
(+) Next page
(–) Previous page
Display the fi le details (List)
Select the panel display (Photo, video)
Play
Start the slideshow (Photo)
(§) Play the next fi le
(∞) Play the previous fi le
Stop
Pause/cancel
RC2001 PROGRAMMABLE SOFT BUTTONS
Page Command Note
3.NETWORK Select NETWORK function
5 / 6
1
RANDOM RANDOM playback w
REPEAT REPEAT playback e
TOP Move to the top menu
– PAGE +
3.NETWORK Select NETWORK function
M ARTIST Move to Music Artists
M ALBUM Move to Music Albums
2
M GENRE Move to Music Genres
MUSIC ALL Move to All Songs
M P-LIST Move to Music Playlists
3.NETWORK Select NETWORK function
P ALBUM Move to Albums
3
PHOTO ALL Move to All Photos
P P-LIST Move to Photo Playlists
3.NETWORK Select NETWORK function
V ALBUM Move to Albums
4
V GENRE Move to Video Genres
VIDEO ALL Move to All Videos
V P-LIST Move to Video Playlists
3.NETWORK Select NETWORK function
PLAYLIST Register in a playlist
5
BILINGUAL Select the audio of the video that is playing
SETTINGS Move to SETTINGS menu
RESTART Restart NETWORK
q
Track fast forward/rewind
The speed changes in the sequence below each
time the 6 (fast forward) or 5 (rewind) button is
pressed.
×2 ×4 ×8
×100 ×50 ×20
Press the PLAY button to return to normal playback.
Note:
The playback speed of DRM-protected fi les cannot
be changed.
w
Random playback
Press the RANDOM button to perform the random
playback of all the fi les in the category.
If the RANDOM button is pressed during playback,
the mode changes as follows.
Random off
Random on
(Left) REWIND (Music, Photo) q
Turn the photo 90 degrees to the left. (Photo)
(Right) FAST FORWARD (Music, Photo) q
Turn the photo 90 degrees to the right. (Photo)
(Left) Move to the previous page
(Right) Move to the next page
Note:
A separate RANDOM setting is available for music,
photo and video fi les.
e
Repeat playback
Press the REPEAT button to repeat the playback of
all the fi les in the category.
If the REPEAT button is pressed during playback, the
mode changes as follows.
Repeat off
Single fi le repeat
Note:
A separate REPEAT setting is available for music,
photo and video fi les.
File list repeat
16
Page 18

ENGLISH
TOP
MULTI
SPEAKER
DISPLAY
INPUT
7.1CH
THX
M-DAX
CLEAR
MEMORY
T-MODE
BAND
EXIT
MENU
ZONE
ODO WN
VOLUME
UP
T
SETUP MIC
HDMI
M-DAX
AV PRE TUNER AV8 003
ENTER
RC101
Command File List
Move between items (List)
3
(Remote controller, unit)
Display the previous photo (Photo)
Skip back 15 seconds (Video)
During a display of detailed information, move to previous fi le
Move between items (List)
4
(Remote controller, unit)
Display the next photo (Photo)
Skip forward 15 seconds (Video)
During a display of detailed information, move to next fi le
Move between items (Photo list)
1
(Remote controller, unit)
Display the previous photo (Photo)
Adjust slow playback speed (Video)
During a display of detailed information, change the information
Move between items (Photo list)
2
(Remote controller, unit)
Display the next photo (Photo)
Adjust slow playback speed (Video)
During a display of detailed information, change the information
ENTER
(Remote controller, unit)
SOURCE OFF
Select/play item
Previous screen (List)
Stop
SOURCE ON Change the screen resolution
2 (PLAY)
∞ / §
7 (STOP)
8 (PAUSE)
Play
Start the slideshow (Photo)
(§) Play the next fi le
(∞) Play the previous fi le
Stop
Pause/cancel
BASIC SETTINGSSCREEN MENUS
BASIC
OPERATION
ADVANCED
OPERATION
SETTINGS
ADVANCED
AV8003
AV PRE TUNER AV8003
RE DIRECT
M-DAX
MULTI
ZONE
O
SPEAKER
7.1CH
THX
INPUT
SETUP MIC
EXIT
MENU
ENTER
HDMI
BAND
TOP
D
MEMORY
T-MODE
DISPLAY
M-DAX
TROUBLESHOOTING
OTHERS CONNECTION
17
Page 19

ENGLISH
ADVANCED PHOTO FILE OPERATIONS
RED (PHOTO) BUTTON SETTINGS
Set the destination for when the red (PHOTO) button
is pressed as follows.
BASIC SETTINGS SCREEN MENUS
1. Press the SETTINGS button on the remote
controller.
2. Select “Preferences” using the cursor and
OPERATION
BASIC
OPERATION
ADVANCED
ADVANCED
SETTINGS
TROUBLESHOOTING
OTHERSCONNECTION
press the ENTER button.
SETTINGS
TITLE
Network Settings
Network Settings
Preferences
System Reset
Software Update
System Information
ENTER
Enter
Settings
The screen below is displayed.
SETTINGS
Preference
Browse Photos by
ENTER
ExitSelect
Enter
Date (All Servers)
OK CANCEL
Press the ENTER button on the “Browse
Photos by” item.
• Date (All servers):
Sort photos from all the connected servers
by date. (Default setting)
• Date (Selected server):
Select the server from which to obtain the
photos and sort by date.
• Category:
DISPLAYING PHOTOS BY DATE
When the red (PHOTO ) button setting is “Date
server”, the photos on the server are sorted by year/
month/date.
Note:
The save date of a bmp fi le is used as its shooting
date.
Select a month from the year/month list to move to
the month/date list.
Thumbnails are displayed in date sequence.
DATE
2005/03/26
PHOTO
Mar 2005
2005
03/26
1/2
2005
03/27
The same as when PHOTO is selected
from the top menu.
Select the setting item using the 3 / 4 buttons
ENTER
Enter
1ExitSelect
and press the ENTER button again.
Press “OK” to complete the setting.
When the setting is “All servers,” the following screen
Select the date that you want to display and press
the ENTER button.
is displayed and photos in all the servers are divided
into groups based on year/month.
PHOTO
DATE
1/5
Apr 2003
Apr
Nov
ENTER
Enter
Mar Jun
All Servers
1/7
2003
2004
2005
1ExitSelect
PHOTO
TITLE
Sunset
ALBUM
Sample Pictures
DATE
2003/04/03
SERVER
Dix_AAA
2005/03/25
ENTER
Enter
1/6
1ExitSelect
A list of the photos from the selected date is displayed
1ExitSelect
When the setting is “Selected server,” the following
screen is displayed. Select the server on which the
photos are saved.
After a server is selected, a year/month list is
displayed.
as thumbnails.
Select the photo that you want to display and press
the ENTER or PLAY button.
• Press the ENTER button to display the selected
photo.
• Press the PLAY button to start the slideshow from
the selected photo.
PHOTO
SERVER
All Servers
MODEL NAME
1
ENTER
Enter
Servers
All Servers
xxxxxx
xxxxxx
xxxxxx
xxxxxx
xxxxxx
ExitSelect
1/7
Note:
Press the PLAY, REPEAT or RANDOM button over
a thumbnail on the selected date to start a slideshow of
the photos in the thumbnail.
1
18
Page 20

ENGLISH
SLIDESHOW SETTINGS
You can perform settings for the slideshow.
Press the MENU button during photo display or
1.
while the photo content list is displayed.
Select “Slideshow Settings” on the Tool menu
2.
and press the ENTER button. The following
window is displayed.
Slideshow Settings
Effects
Interval
BGM List
Effects :
Select the effects when changing photos.
• None (No effects when changing.)
• Fade To White (Fades out to white.)
• Fade To Black (Fades out to black.)
• Random (Fades out to either white or black.)
Interval :
Set the time interval at which the photos are
changed.
• 3seconds • 15seconds
• 5seconds • 30seconds
• 10seconds • 60seconds
BGM List :
Select the BGM during slideshow playback from a
music playlist of 1 to 5.
BGM :
Select whether or not to play BGM during slideshow
playback.
• Disable (Do not play BGM.)
• Enable (Play BGM.)
Press “OK” to complete the setting.
3.
BGM
Fade to White
3Sec.
Playlist1
Disable
OK CANCEL
PHOTO ROTATION (PHOTO)
• Press the 6 button while a photo is displayed to
turn it 90 degrees to the right.
• Press the 5 button while a photo is displayed to
turn it 90 degrees to the left.
• Press the MENU button, select “Turn” and press
the right button.
Select the rotation direction and press ENTER
to turn the photo 90 degrees to the selected
direction.
Note:
If you turn a photo during slideshow playback, the
slideshow is paused after the rotation.
OPERATING VIDEO FILES
SKIP PLAY
You can skip the video playback forward or back by
15 seconds.
• Press the 3 button during video playback to skip
back by 15 seconds from that moment.
• Press the 4 button during video playback to skip
forward by 15 seconds from that moment.
If this skipping fi nishes at the beginning or the end of
the fi le, the video playback is paused.
Note:
Skip play is not possible with some video fi les.
SLOW PLAY
You can play the video slowly in the playback
direction.
1. Press the MENU button during video
playback.
Select “Slow Play” and press the ENTER
2.
button.
Press the 2 button to make the slow playback
3.
speed faster.
Press the 1 button to make the slow playback
speed slower.
1/16 1/8 1/4 1/2
4. Press the PLAY button or the PA US E button to
cancel the slow playback.
Note:
Slow play is not possible with some video fi les.
AUDIO SELECTION
Press the BILINGUAL button during video playback
to change the output audio channel.
The audio changes as follows each time the
BILINGUAL button is pressed.
L+R L component only
Icon display on the lower right of the screen
L+R
L only
R only
L/R Selection Audio Format
L/R selection is possible LPCM
L/R selection is not possible AC3
R component only
MPEG-1/2 LayerMPEG-1/2 Layer-III
WMA 2ch
AAC LC 2ch
AAC LC Multichannel
WMA9 Professional
II
RESUME PLAY
When playback is resumed for a video that was
stopped partway, the playback starts from the
stopped location.
If a different fi le is played after stopping the video,
resume play is not possible.
Note:
Resume play is not possible with some video fi les.
BASIC SETTINGSSCREEN MENUS
BASIC
OPERATION
ADVANCED
OPERATION
SETTINGS
ADVANCED
TROUBLESHOOTING
OTHERS CONNECTION
19
Page 21

ENGLISH
USING PLAYLISTS
You can arrange your favorite music, photo and
video fi les in a single group as a playlist.
• You can create five playlists each for music,
photos and videos.
BASIC SETTINGS SCREEN MENUS
• You can register a maximum of 100 fi les in each
playlist.
REGISTERING A PLAYLIST
1. Select the file or category that you want
to register using the cursor and press the
PLAYLIST button, or press the MENU button
and select “Add Playlist” on the TOOL menu.
Alternatively, press the PLAYLIST button while
the fi le that you want to register is playing,
or press the MENU button and select “Add
Playlist” on the TOOL menu.
OPERATION
BASIC
OPERATION
ADVANCED
ADVANCED
SETTINGS
TROUBLESHOOTING
MUSIC
TITLE
Brooks & Dunn
ENTER
Enter
Select Playlist
Add to which Playlist group ?
Favorite1
Playlist1
Favorite2
Playlist2
Favorite3
Playlist3
Playlist4
Playlist5
OK CANCEL
Favorite
5
0
0
0
0
2. Use the 3 / 4 buttons to select the registration
destination playlist and press the ENTER
button. The 9 mark is displayed next to the
selected playlist.
Press “OK” to complete the registration. To
3.
cancel the registration, press “CANCEL.”
Note:
When performing the batch registration of multiple
fi les, if the number of fi les exceeds 100 during the
registration process, files after the 100th are not
registered.
PLAYING A PLAYLIST
1. Select “Playlists” on the Music, Photo or Video
top menu and press the ENTER button.
Alternatively, press the “M P-LIST”, “P P-LIST”
or “V P-LIST” button on the remote controller.
CHANGING THE PLAYLIST SEQUENCE
You can change the playlist sequence.
Press the MENU button on the playlist screen.
1.
Select “Move” on the TOOL menu.
2.
REMOVING PLAYLIST REGISTRATIONS
You can remove fi le registrations from the playlist if
they are no longer required.
Removing Registered Files
1. Open a playlist, select the fi le that you want to
The playlist screen is displayed.
2.
Select the playlist that you want to play using
Select the fi le that you want to move and press
3.
the ENTER button.
remove from the playlist and press the MENU
button.
the 3 / 4 buttons and press the ENTER
Select the file destination and press the
button.
Press the PLAY button on the selected
playlist to play the fi les that are in the selected
playlist.
MUSIC
TITLE
Playlist1
2/3
ENTER
Enter
Playlist1
Playlist
Playlist3
Playlist4
Playlist5
Playlist
2
1/5
1ExitSelect
3. Select the fi le that you want to play from the
1ExitSelect
list using the 3 / 4 buttons and press the
ENTER or PLAY button to perform continuous
playback of the fi les in the playlist starting from
the selected fi le.
TITLE
xxxxxx
ARTIST
xxxxxx
ALBUM
xxxxxx
DURATION
00 : 03 : 29
SERVER
xxxxxx
MUSIC
xxxxxx
xxxxxx
xxxxxx
xxxxxx
xxxxxx
ENTER
Enter
Playlist1
1/5
1ExitSelect
4.
ENTER button.
Repeat steps 3. and 4. until you have fi nished
5.
the sequence change.
When you have fi nished the sequence change,
6.
press the EXIT button. The following dialog box
is displayed.
Playlist
Select[OK] to update Playlist
OK CANCEL
7. Press “OK” to complete the move. To cancel
the registration, press “CANCEL”.
Select “Remove from Playlists” on the TOOL
2.
menu and press the ENTER button. The
following dialog box is displayed.
Remove from
Push [OK] to delete these items from
Playlist
Playlists
OK CANCEL
3. Press “OK” to complete the registration
removal.
Removing Registered Files
(All fi les in a playlist)
You can remove all the fi les that are registered in a
playlist at the same time.
On the playlist screen, select the playlist whose
1.
fi le registrations you want to remove and press
the MENU button.
Select “Remove from Playlists” on the TOOL
2.
menu and press the ENTER button. The
following dialog box is displayed.
Remove from Playlists
Push [OK] to delete selected group
OK CANCEL
OTHERSCONNECTION
20
3. Press “OK” to complete the registration
removal.
Page 22

ENGLISH
VIEWING DETAILED FILE INFORMATION
You can view detailed information about the fi les in
the fi le list.
Select the fi le that you want to display and press the
INFO button, or press the MENU button and then
select “Detailed Information” on the TOOL menu.
MUSIC
04 xxxxxx
xxxxxx
xxxxxx
TITLE
xxxxxx
CREATOR
xxxxxx
ALBUM
xxxxxx
Select
Page
ENTER
Play
GENRE
xxxxxx
DATE
01/23/2008 09:34:45
DURATION
00:02:59
Exit
• 1 / 2 buttons:
Change the page
• 3 / 4 buttons:
Change the fi le
• PLAY buttons:
Play the fi le that is currently displayed
• INFO buttons, EXIT buttons:
Return to the list screen
Notes:
• The displayed items vary depending on the server.
• When the server transcodes a file for playback,
information such as the bit rate and resolution may
be different from the actual values.
11/11
2
MULTI ZONE PLAYBACK
You can perform network playback in multi zones.
See the main unit user guide for the method of assigning the network to ZONE A and B.
Notes:
• In ZONE B, only audio is output.
• Only 2ch is available for audio output. Multi channel fi les are down mixed to 2ch.
OPERATION USING RC2001
Button File List Music Playback Screen Photo Display Screen Video Playback Screen
VOLUME±
MUTE Mute on/mute off
3 / 4
1 / 2
ENTER Select/play item
EXIT Previous screen Stop Stop Stop
2 (PLAY)
∞ / § ––
9 (STOP)
; (PAUSE)
Raise the volume
Lower the volume
Move between items
During detailed information
display, move between the
Move between items
previous and next fi les
Move between items (Photo)
During detailed information
display, change the information
Play the track selected using
the cursor
Play Play Start the slideshow Play
(§)
Play the next track
(∞)
Play the previous track (If 1
second or more has elapsed from
the start of the track, play from
the start of the same track.)
–– Stop Stop Stop
–– Pause/cancel Pause the slideshow Pause/cancel
BASIC SETTINGSSCREEN MENUS
(3)
Display the previous photo
(4)
Display the next photo
(3)
Skip back 15 seconds
(4)
Skip forward 15 seconds
(1)
––
Display the previous photo
(2)
Display the next photo
Adjust slow playback speed
BASIC
OPERATION
–– ––
(§)
ADVANCED
OPERATION
During continuous playback, play
(§)
Display the next photo
(∞)
Display the previous photo
the next video
(∞)
During continuous playback, play
the previous video (If 1 second or
more has elapsed from the start
SETTINGS
ADVANCED
of the video or only one video is
selected, play from the start of the
same video.)
TROUBLESHOOTING
OTHERS CONNECTION
21
Page 23

ENGLISH
<Playback in ZONE A>
Press the HOME button on the remote
1.
controller and press the < / > buttons to select
the 003/004 page.
Press the ZONE-A button to set the RC2001 to
2.
BASIC SETTINGS SCREEN MENUS
OPERATION
BASIC
OPERATION
ADVANCED
ADVANCED
SETTINGS
the ZONE A operation mode.
Press the < / > buttons to select the 005/005
3.
page. The RC2001 display is set to the zone A
network operation mode.
Press the PLAY button to play the fi le.
4.
ZONE-A 005/005
ALL-M RND
Move to ALL Songs. Random playback
ALL-P RPT
Move to ALL Photos. Repeat playback
ALL-V RES
Move to ALL Videos. Change the screen resolution.
PAGE– PAGE+
Move to the previous list page. Move to the next list page.
56
Rewind. (Music, videos)
Turn the photo 90 degrees to
the left. (Photo)
Fast forward. (Music, videos)
Turn the photo 90 degrees to
the right. (Photo)
When the RES button is pressed, the screen returns
to the NETWORK top menu and the resolution is
changed. The screen resolution changes in the
following sequence each time the RES button is
pressed.
480i/576i
Notes:
• When viewing in ZONE A, set an appropriate
resolution for your monitor, other than AUTO.
When the resolution setting is AUTO, operations in
the main zone are prioritized.
• If a dialog box or the TOOL menu is displayed, the
resolution cannot be changed. In such cases, fi rst
close the dialog box or menu.
<Playback in ZONE B>
Press the HOME button on the remote controller
1.
and press the < / > buttons to select the 003/004
page.
Press the ZONE-B button to set the RC2001 to
2.
ZONE B operation mode.
Press the < / > buttons to select the 005/005
3.
page. The RC2001 display is set to zone B
network operation mode.
After pressing the All MUSIC button, press the
4.
PLAY button to play all the music fi les in the
server.
480p/576p 720p
Auto
1080i
OPERATION USING RC101
<ZONE A Screen Settings>
When the SOURCE ON button is pressed, the
screen returns to the NETWORK top menu and the
resolution is changed.
The screen resolution changes in the following
sequence each time the SOURCE ON button is
pressed.
480i/576i
Note:
If a dialog box or the TOOL menu is displayed, the
resolution cannot be changed. In such cases, fi rst close
the dialog box or menu.
<Playback in ZONE A/B>
Set the RC101 to zone A or B. (See page 67 of
1.
the main unit user guide)
Press the AUX2 button to set the RC101 to
2.
network operation mode.
Press the AUX2 button twice in succession
3.
to change the unit ZONE A or B input to
NETWORK.
Press the PLAY button to play the fi le.
4.
480p/576p 720p
Auto
1080i
<ZONE A Screen Settings>
If you set component output 2 in ZONE A to ZONE
A, you can output video from component output 2 in
all resolutions.
TROUBLESHOOTING
Video can only be output from the ZONE OUT
connector at a resolution of 480i/576i.
You can change the resolution of the network player
screen from ZONE A.
Press the < / > buttons on the RC2001 to open the
LCD's 005/005 page, and press the RES button.
OTHERSCONNECTION
22
ZONE-B 005/005
RANDOM Random playback
REPEAT Repeat playback
ALL MUSIC Move to All songs.
5
6
Rewind.
Fast forward.
Page 24

ENGLISH
ADVANCED SETTINGS
When you want to perform operations such as
network settings or system updates, press the
SETTINGS button in any screen to display the
SETTINGS menu.
SETTINGS
TITLE
Network Settings
Network Settings
Preferences
System Reset
Software Updates
System Information
ENTER
Enter
Settings
q Network Settings :
Perform the network settings. (See page 5)
w Preferences :
Select the destination for when the button is
pressed. (See page 18)
e System Reset :
Return to the default network player settings.
r Software Updates :
Connect to the Internet and update the network
player fi rmware.
t System Information :
Display the unit's network device name, MAC
address and fi rmware version.
1/5
1ExitSelect
NETWORK PLAYER INITIALIZATION
You can return the network player to its default
settings.
Select “System Reset” on the SETTINGS menu and
press the ENTER button.
When initialization is performed, the registered
server lists and playlists are erased.
SETTINGS
System Reset
Press[RESET]to restore factory defaults.
All current settings will be permanently discarded.
RESET CANCEL
ENTER
ExitSelect
Enter
1. Select “RESET” and press the ENTER button.
The following dialog box is displayed.
System Reset
System will restart
OK
2. Press “OK” to restart the unit and complete the
initialization.
1
SOFTWARE UPDATES
You can connect to the Internet to update the network
player fi rmware.
Select “Software Updates” on the SETTINGS
1.
menu and press the ENTER button.
On the screen below, select “NEXT” and press
the ENTER button. The unit checks whether an
update fi le is available on the Internet.
Note:
Updating via the Internet is not possible if a special
setting, such as a proxy, is required for the Internet
connection.
SETTINGS
Software Updates
Would you like to check if a software Update is available?
VERSION:xxxxxxxxx
NEXT CANCEL
ENTER
ExitSelect
Enter
● If the current version is the latest
SETTINGS
Software Updates
No. update is available at this time
OK
ENTER
Exit
Enter
Press the ENTER button to return to the SETTINGS
menu.
1
1
● If the server connection failed
SETTINGS
Software Updates
Could not contact update server, please check internet connection.
OK
ENTER
Exit
Enter
1
Press the ENTER button to return to the SETTINGS
menu.
● If an update fi le is available
SETTINGS
Software Updates
Update Software is available
Push [START]to initiate update process
>>Do NOT turn the power off while updating.
>>The screen may flicker while the software is updating.
>>Software update will be usually completed with in 5 minutes.
ENTER
Enter
START CANCEL
ExitSelect
1
2. Select either of the following and press the
ENTER button.
• START: Download the update fi le
• CANCEL: Do not download the update fi le
BASIC SETTINGSSCREEN MENUS
BASIC
OPERATION
ADVANCED
OPERATION
SETTINGS
ADVANCED
TROUBLESHOOTING
OTHERS CONNECTION
23
Page 25

ENGLISH
TOP
MULTI
SPEAKER
DISPLAY
INPUT
7.1CH
DIRECT
PURE
PHONES
THX
M-DAX
MODE
SURROUND
CLEAR
MEMORY
T-MODE
BAND
EXIT
MENU
ZONE
DOWN
VOLUME
UP
INPUT
SELECTOR
AUTO
SETUP MIC
HDMI
M-DAX
PURE DIREC T
AV PRE TUNER AV8 003
ENTER
3. The following screen is displayed when the
update fi le starts to download.
SETTINGS
Software Updates
BASIC SETTINGS SCREEN MENUS
Updated Software is available.
Downloading Software. . .
>>Do NOT turn the power off while updating.
>>The screen may flicker while the software is updating.
ENTER
Exit
Enter
18%
ABORT
If you want to stop the download partway, press
the ENTER or EXIT button.
After the download finishes successfully,
writing and verifi cation is performed for the
downloaded fi le.
Key operations are disabled until the update is
OPERATION
fi nished.
BASIC
SETTINGS
Software Updates
Your Update has been installed
OPERATION
ADVANCED
OK
ENTER
Enter
4. Press the ENTER button.
The following dialog box is displayed.
Software Updates
System will restart
OK
1
5. Press ENTER button to restart the network
player and complete the software update.
CHECKING THE SYSTEM INFORMATION
You can display the system information for the
network player.
Select “System Information” on the SETTINGS
menu and press the ENTER button.
SETTINGS
System Information
Device Name:
DMP S/W Version:
MAC Address:
ENTER
Exit
Enter
• Device name :
Name of the unit recognized by the server
• DMP S/W Version :
Version of the network player fi rmware
marantz DMP
xxxxxxxxx
00 : 06 : 78 : xx : xx : xx
OK
1
SETTING THE NETWORK SCREEN
You can set the output for the unit's NETWORK
screen.
Press the GUIDE button on the remote controller
1.
to move to the top menu.
<AV8003>
2.
Press the MENU button on the unit to display
the OSD menu.
AV PRE TUNER AV8003
UP
HDMI
DOWN
VOLUME
CLEAR
MEMORY
T-MOD E
BAND
TOP
DISPLAY
M-DAX
SELECTOR
SURROUND
PURE DIRECT
M-DAX
INPUT
AUTO
MODE
PURE
DIRECT
PHONES
SPEAKER
7.1CH
THX
INPUT
SETUP MIC
MULTI
ZONE
EXIT
MENU
ENTER
• MAC Address :
This is the MAC address of the unit.
Press the ENTER or EXIT button to return to the
SETTINGS menu screen.
<RC2001>
After pressing the HOME button on the remote
controller, press the MENU button to display
the OSD menu.
1
ADVANCED
SETTINGS
Never turn off the unit before an update is
fi nished. It could cause a malfunction.
TROUBLESHOOTING
OTHERSCONNECTION
24
Page 26

ENGLISH
3. The following screen is displayed on the monitor
that is connected to the unit.
MAIN MENU
1.INPUT SETUP
2.SPKR SETUP
3.SURR SETUP LOCKED
4.VIDEO SETUP
5.PREFERENCE UNLOCK
6.ACOUSTIC EQ.
7.NETWORK
EXIT
Press the 3 / 4 buttons to select 7. NETWORK
and press the ENTER button.
The NETWORK SETUP screen opens.
4.
Select the item that you want to set using the 3
/ 4 buttons, and change the selection using the
1 / 2 buttons.
7.NETWORK SETUP
VIDEO :NTSC
RESOLUTION :480/576i
SCREEN SAVER:ON
RETURN EXIT
Note:
Settings cannot be changed if the top menu of the
NETWORK screen is not displayed.
In such cases, a warning message is displayed on the
bottom of the screen. Return the NETWORK screen
to the top menu.
Close the OSD menu and press the GUIDE button to
return the NETWORK screen to the top menu.
7.NETWORK SETUP
VIDEO :NTSC
RESOLUTION :480/576i
SCREEN SAVER:ON
TOP PAGE OF [NETWORK]
HAS TO BE SELECTED.
RETURN EXIT
VIDEO
The color system of this unit is NTSC.
RESOLUTION
Use the 1 / 2 cursor buttons to select video signal
resolution (pixel count) on the NETWORK PLAYER
from the following options.
“480/576i” Ô “480/576p” Ô “720p” Ô “1080i” Ô
“AUTO” Ô “480/576i”
• AUTO (default) :
Sets an appropriate resolution for a television that
is connected using HDMI.
(If the unit is not connected to the television using
HDMI, the output is 480i/576i)
(If connected by converting to DVI, the output is
480p/576p)
• 480/576i :
The output is 480i/576i.
• 480/576p :
The output is 480p/576p.
• 720p :
The output is 720p.
• 1080i :
The output is 1080i.
Notes:
• If a monitor connected using HDMI is changed during
the AUTO setting, the screen returns automatically to
the top menu and the resolution is changed to one that
is appropriate for the monitor. If a dialog box or the
TOOL menu is displayed at this time, the resolution
is changed after the dialog box or TOOL menu is
closed.
• Set 480i/576i if you are using VIDEO/S-VIDEO
output.
• If you are using a monitor connected using HDMI,
and the signal is being input from the network, the
video signal is output in the resolution that was set
in RESOLUTION.
SCREEN SAVER
Use the 1 / 2 cursor buttons to select “ON” or “OFF”
for the screen saver from the video signal that is
output from the unit.
• ON (default) :
If no operation is made for 10 minutes on the
NETWORK screen or SETTING screen, the
screen saver is activated on the monitor. (The
screen goes dark)
• OFF :
The screen saver is not activated even if no
operation is made for 10 minutes.
Note:
The screen saver is not activated during photo display
or video playback.
BASIC SETTINGSSCREEN MENUS
BASIC
OPERATION
ADVANCED
OPERATION
SETTINGS
ADVANCED
TROUBLESHOOTING
OTHERS CONNECTION
25
Page 27

ENGLISH
PLAYABLE FILES
MUSIC FILES
MUSIC Codec Extension Restrictions
MP3
BASIC SETTINGS SCREEN MENUS
LPCM LPCM –
WAV PCM wav
WMA WMA8 asf
OPERATION
BASIC
AAC MPEG-2/4 AAC
* WMA Lossless is not supported.
** In the case of multi channels, WMA and AAC are down mixed to 2ch.
OPERATION
ADVANCED
MPEG-1/2 Layer-III
WMA9
WMA9 Professional
(AAC LC)
mp3 Sampling frequency Max. 48 kHz
wma
asf
wma
m4a Sampling frequency Max. 48 kHz
Number of channels Max. 2ch
Bit rate VBR/CBR Max. 320 kbps
Sampling frequency
Quantization bit rate Max. 16 bit
Number of channels Max. 2ch
Sampling frequency
Quantization bit rate Max. 16 bit
Number of channels Max. 2ch
Sampling frequency Max. 48 kHz
Number of channels Max. 2ch
Bit rate Max. 320 kbps
Sampling frequency Max. 48 kHz
Number of channels Max. 6ch**
Bit rate VBR/CBR Max. 768 kbps
Number of channels Max. 5.1ch**
Bit rate VBR/CBR Max. 640 kbps
Min. 32 kHz
Max. 64 kHz
Min. 32 kHz
Max. 64 kHz
PHOTO FILES
PHOTO Extension Resolution
JPEG jpg
jpeg
BMP bmp No restrictions
✽
When the following conditions are satisfi ed.
– Color space is YCbCr
– Not in progressive mode
– The format is YUV420, YUV422 or YUV444
✽ For JPEG photos that do not satisfy the conditions above, the maximum is 983040 pixels (example: 1280
× 768).
✽
Max. 67108864 pixels
(Example: 8192 × 8192)
ADVANCED
SETTINGS
TROUBLESHOOTING
OTHERSCONNECTION
26
Page 28

ENGLISH
VIDEO FILES
VIDEO
MPEG PS mpg
MPEG-2 TS/TTS
Windows Media
Video
MPEG-4 mp4 Video section MPEG-4 Profi le level ASP
Extension
mpeg
mpe
M2p
–
asf
wmv
Codec Restrictions
Video section MPEG-1
MPEG-2
Audio section
Video section MPEG-2 Profi le level Up to MP@HL
Audio section
Video section WMV9 Profi le level No DRM, up to MP@HL
Audio section WMA8 Sampling frequency Max. 48 kHz
Audio section MPEG-4 AAC LC Sampling frequency Max. 48 kHz
MPEG-1/2 Layer-
LPCM Sampling frequency Max. 48 kHz 16 bit
AC3 Sampling frequency Max. 48 kHz
MPEG-1/2 Layer-
AC3 Sampling frequency Max. 48 kHz
MPEG-2/4 AAC LC Sampling frequency Max. 48 kHz
WMA9
WMA9 Professional
Profi le level Up to MP@HL
Bit rate VBR/CBR Max. 15 Mbps
Sampling frequency Max. 48 kHz
II
Number of channels Max. 2ch
Bit rate VBR/CBR Max. 384 kbps
Quantization bit rate Max. 16 bit
Number of channels Max. 2ch
Number of channels Max. 5.1ch
Bit rate Max. 640 kbps
Bit rate VBR/CBR Max. 23.1 Mbps
Sampling frequency Max. 48 kHz
II
Number of channels Max. 2ch
Bit rate VBR/CBR Max. 448 kbps
Number of channels Max. 5.1ch
Bit rate Max. 448 kbps
Number of channels Max. 5.1ch
Bit rate Max. 384 kbps
Bit rate VBR/CBR No DRM, max. 10 Mbps
Number of channels Max. 2ch
Bit rate Max. 320 kbps
Sampling frequency Max. 48 kHz
Number of channels Max. 6ch
Bit rate VBR/CBR Max. 768 kbps
Bit rate VBR/CBR Max. 5 Mbps
Number of channels Max. 5.1ch
Bit rate Max. 448 kbps
With DRM, up to MP@ML
With DRM, max. 4 Mbps
Notes:
• This unit does not support MPEG4-AVC, AVCHD.
• Depending on the encoding system, playback may not be possible even if the file is within the above
specifi cations.
• Depending on the server, it may not be possible to play a fi le that is supported by the unit.
• It may be possible to play fi les that are not supported by this unit by converting them to a supported format.
For details, see your server's user guide.
• License authentication must be performed in advance on Windows Media Player 11 to play fi les with copyright
protection (Windows Media DRM).
• This unit supports DTCP-IP. This unit can play video recorded on a home HDD recorder that is connected to the
network.
See your recorder's user guide for the playable video types.
• Surround playback is possible for videos with Dolby AC3 multichannel sound.
• In the case of multi-channels, WMA and AAC are down-mixed to 2ch.
BASIC SETTINGSSCREEN MENUS
BASIC
OPERATION
ADVANCED
OPERATION
SETTINGS
ADVANCED
TROUBLESHOOTING
OTHERS CONNECTION
27
Page 29

ENGLISH
TROUBLESHOOTING
If you experience any problems, check the following before calling for service:
1. Are the connections made properly?
2. Are you operating the unit properly by following the user’s guide?
BASIC SETTINGS SCREEN MENUS
If the unit does not operate properly, check the items shown in the following table.
If the problem cannot be resolved using the actions listed in the following table, the internal circuitry may be
malfunctioning. Unplug the power cable immediately and contact your dealer, nearest Marantz authorized
dealer, or the Marantz Service Center in your country.
Symptom Cause Action
Cannot connect to the network • The LAN cable is not connected
Cannot fi nd the server The server is not running
OPERATION
BASIC
Takes time to play or change to
the next fi le
OPERATION
ADVANCED
Takes time for the file list to
display
Cannot obtain the fi le list The server is creating the fi le list
ADVANCED
SETTINGS
TROUBLESHOOTING
Cannot play even though the
file format is supported for
playback
Playback breaks up • There is not enough network bandwidth
• The IP address is incorrect
• The connection has been blocked by the
firewall
The server has not authenticated the unit
The unit does not recognize the server
The number of registrations on the server
list has reached 50
• The fi le size is large
• DRM-protected content is being played
There is a large number of fi les in the list
• The number of fi les that can be registered
by the server has been exceeded
• Characters that are not supported by the
server are used in areas such as the fi le
name
The server does not support this file
format
• The fi le bit rate is too high
OTHERSCONNECTION
Correct the network connections.
Allow communication with the unit.
Start the server.
Authenticate the unit on the server side. (See page 6)
Obtain the server list again. (See page 15)
Delete servers that you no longer require from the list.
(See page 15)
This is not a malfunction.
During random play, the larger the number of fi les in
the server, the longer it takes to display the fi le list.
Reduce the number of connected servers (to about
four) or reduce the number of fi les registered on the
server (to about 5,000).
It may take some time for the server to create the
fi le list.
If that is the case, wait until the list creation has
fi nished.
Limit the number of fi les and fi le formats to the range
that can be registered by the server.
For details, see the server's user guide.
Only fi les whose formats are supported by both the
unit and the server can be played.
See the server's user guide.
Communication in a network may become congested.
Stop the communication of the other devices, or
redesign your network environment.
If you use wireless communication, then the required
bandwidth is larger than that required for the actual
communication.
Symptom Cause Action
Cannot play DRM-protected
fi l e s
The network player does not
respond
The server does not support DRM
The server has not obtained the DRM
license
• There is a large number of fi les in the list
and processing takes time
• Multiple servers are starting or updating
information
The network player no longer responds
to operations
Connect to a server that does support DRM.
Obtain the DRM license on the server side in
advance.
Wait until the process fi nishes.
Press the RESTART button on the remote
controller to restart the network player.
28
Page 30

ENGLISH
OTHERS
NETWORK PLAYER NOTIFICATIONS
A popup message or dialog box may appear from the network player to give notifi cation about an operation.
In such cases, refer to the following.
POPUP MESSAGES
These messages disappear a few seconds after they are displayed.
Message Action
Browsing authorization denied
Invalid Operation
Preparing to Playback
Can not resume playback
No media Contents
Unable to retrieve the list
Restarting
DIALOG BOX MESSAGE
Dialog boxes are closed by selecting “OK” or “ABORT,” and depending on the case, the screen may return to
the top menu or the previous screen.
Dialog Box Title Message Status
Starting Server Establishing Server Connection...
Starting Server Failed to connect to server
Starting Server Can not connect to server
Authorization Error Not authorized to browse this server
Retrieving List Unable to retrieve the list
Detailed Information Can not fi nd the requested information
Playback Error Failed to play media content
List Update Updating the List
Playback Error No media Contents under one hierarchy
Playback Error Unsupported media type
Authorization Error Verify authorization of selected media
on server
Windows Media Player canceled the unit's authentication.
An invalid operation was performed.
It takes 4 or more seconds from the key input to the start of playback.
Resume play was attempted on a server that does not support resume. After
the message is displayed, playback starts from the beginning.
There is nothing within the hierarchy
Failed to obtain the list.
Restarting is in progress.
The server is starting.
The server that was starting did not start after 5 minutes.
Failed to start the server with WakeOnLAN.
An unauthenticated server was selected.
While browsing a server, communication with all servers or
the target server was lost.
Could not obtain information even though the server was
browsed.
Attempted to display detailed information from the list, but
could not obtain the related information.
Playback of the playing content could not proceed, or could
not play at all after moving to the playback screen.
The server playback list was updated.
There is no playable content in the hierarchy.
Content in an unsupported format was played
DTCP-IP authentication failed
Dialog Box Title Message Status
Authorization Error Verify that your network equipment,
Authorization Error Copyright information of this fi le may
DRM Error DRM denied authorization to selected
DRM Network Error Verify that your network equipment,
DRM Connection Limit Number of devices connected to this
DRM Error The media license is invalid. Revalidate
Network settings Invalid Entry
Network settings System will restart to apply network
System Reset System will restart
Software Updates System will restart
Select Playlist Your Playlist is full
Select Playlist Could not add some items _ Playlist
such as routers and hubs, are properly
setup.
be invalid.
media
such as routers and hubs, are properly
setup.
server has reached the authorized
limit.
this license on the server.
changes
full
DTCP-IP authentication failed
DTCP-IP authentication failed
WM-DRM authentication failed
WM-DRM authentication failed
WM-DRM authentication failed
WM-DRM authentication failed
When network values were entered, the entered values
were invalid
The system will be restarted to apply the settings.
The system will be restarted after resetting the settings.
The system will be restarted after performing the system
setup.
The number of playlist registrations has already reached
100.
Some content could not be registered because the number of
playlist registrations has reached the limit. (When registering
playlists with specifi ed categories)
CONNECTIONOTHERS
BASIC SETTINGSSCREEN MENUS
BASIC
OPERATION
ADVANCED
OPERATION
SETTINGS
ADVANCED
TROUBLESHOOTING
29
Page 31

ENGLISH
CONNECTION OTHERS
GLOSSARY
Default Gateway:
This device is the entry and exit point between an internal network and an external network (Internet, etc.).
DHCP:
BASIC SETTINGS SCREEN MENUS
An abbreviation of Dynamic Host Confi guration Protocol. This function assigns IP addresses automatically
to network devices.
DLNA:
An abbreviation of Digital Living Network Alliance. An industry group that was established to decide
specifi cations for the mutual connection of audio visual devices and computers in a home network and the
mutual utilization of music, photo and video data. This unit is based on DLNA Home Networked Device
Interoperability Guidelines v1.0.
DNS:
An abbreviation of Domain Name System. A system that matches host names on the Internet to IP
addresses.
DTCP-IP:
OPERATION
OPERATION
This system transmits content in a copyright protected-status on an IP network such as a home LAN. When
BASIC
devices that support DTCP-IP are connected together, copyright-protected fi les can be transmitted over a
network and played.
IP Address:
An identifi cation number that is assigned to each network device.
ADVANCED
LAN:
An abbreviation of Local Area Network. A wired or wireless network that connects devices together.
MAC Address:
A unique identifi cation number for network devices such as LAN cards.
TRADEMARKS
Windows Vista, Windows XP and Windows Media™ are trademarks of Microsoft Corporation in the United
States.
Windows Media DRM
This product is protected by certain intellectual property rights of Microsoft. Use or distribution of such
technology outside of this product is prohibited without a license from Microsoft.
Content owners use Windows medeia digital rights management technology (WMDRM) to protect their
intellectual property, including copyrights. This device uses WMDRM software to access WMDRM-protected
content, If the WMDRM software fails to protect the content, content owners may ask Microsoft to revoke the
software's ability to use WMDRM to play or copy protected content. Revocation does not affect unprotected
content. When you download licenses for protected content, you agree that Microsoft may include a revocation
list with the licenses. Content owners may require you to upgrade WMDRM to access theri content. If you
decline an upgrade, you will not be able to access content that requires the upgrade.
DLNA CERTIFIEDTM Audio/Video/Image Player
DLNA®, the DLNA Logo and DLNA CERTIFIED™ are trademarks, service marks, or certifi cation marks of the
Digital Living Network Alliance.
This product uses DynaFont. DynaFont is a registered trademark of DynaComware Taiwan Inc.
This product contains software that is licensed under GNU General Public License (GPL) or GNU Lesser
General Public License (LGPL).
NAS:
ADVANCED
SETTINGS
An abbreviation of Network Attached Storage. A single-function server that integrates elements such as a
hard disk, network interface and OS.
Subnet Mask:
A 32-bit value that defi nes which bits in an IP address are reserved for a network address for identifying
TROUBLESHOOTING
the network.
Windows Media Player 11:
Media playback and sharing software that can be downloaded from the Microsoft Corporation website. You
can use this software if your computer's operating system is Windows Vista or Windows XP SP2.
30
Page 32

TECHNICAL INFORMATION
License information for the software used in the unit
ENGLISH
This product uses GPL/LGPL software and software made by other companies.
After you purchase this product, you may procure, modify or distribute the source code of the GPL/LGPL
software that is used in the product.
If you contact the Marantz Support Center, we will provide you with a CD-ROM of the source code that is
used, charging only the actual expenses involved. However, note that we make no guarantees concerning the
source code. Please also understand that we do not offer support for the contents of the source code.
End user license agreements for the software used in the unit
Software Reference
Linux
uCLinux
busybox
ccahe
binutils
gcc-lib
ext2root
libiconv
elf2fl t
GDB
genext2fs
genromfs
mtd
madwifi
uClibc
iconv
expat Exhibit C
FreeType Exhibit D
libjpeg Exhibit E
libpng Exhibit F
Zlib Exhibit G
Libtiff Exhibit H
libtremor Exhibit I
STLport Exhibit J
Exhibit A
Exhibit B
CONNECTIONOTHERS
BASIC SETTINGSSCREEN MENUS
BASIC
OPERATION
ADVANCED
OPERATION
SETTINGS
ADVANCED
TROUBLESHOOTING
31
Page 33

Exhibit A
GPL
GNU GENERAL PUBLIC LICENSE
Version 2, June 1991
Copyright (C) 1989, 1991 Free Software Foundation, Inc., 51 Franklin Street, Fifth Floor, Boston, MA 02110-1301 USA
Everyone is permitted to copy and distribute verbatim copies of this license document, but changing it is not allowed.
Preamble
The licenses for most software are designed to take away your freedom to share and change it. By contrast, the GNU General
Public License is intended to guarantee your freedom to share and change free software--to make sure the software is free for
all its users. This General Public License applies to most of the Free Software Foundation's software and to any other program
whose authors commit to using it. (Some other Free Software Foundation software is covered by the GNU Lesser General
Public License instead.) You can apply it to your programs, too.
When we speak of free software, we are referring to freedom, not price. Our General Public Licenses are designed to make
sure that you have the freedom to distribute copies of free software (and charge for this service if you wish), that you receive
source code or can get it if you want it, that you can change the software or use pieces of it in new free programs; and that
you know you can do these things.
To protect your rights, we need to make restrictions that forbid anyone to deny you these rights or to ask you to surrender the
rights. These restrictions translate to certain responsibilities for you if you distribute copies of the software, or if you modify it.
For example, if you distribute copies of such a program, whether gratis or for a fee, you must give the recipients all the rights
that you have. You must make sure that they, too, receive or can get the source code. And you must show them these terms
so they know their rights.
We protect your rights with two steps: (1) copyright the software, and (2) offer you this license which gives you legal permission
to copy, distribute and/or modify the software.
Also, for each author's protection and ours, we want to make certain that everyone understands that there is no warranty for
this free software. If the software is modifi ed by someone else and passed on, we want its recipients to know that what they
have is not the original, so that any problems introduced by others will not refl ect on the original authors' reputations.
Finally, any free program is threatened constantly by software patents. We wish to avoid the danger that redistributors of a
free program will individually obtain patent licenses, in effect making the program proprietary. To prevent this, we have made
it clear that any patent must be licensed for everyone's free use or not licensed at all.
The precise terms and conditions for copying, distribution and modifi cation follow.
GNU GENERAL PUBLIC LICENSE
TERMS AND CONDITIONS FOR COPYING, DISTRIBUTION AND MODIFICATION
0. This License applies to any program or other work which contains a notice placed by the copyright holder saying it may
be distributed under the terms of this General Public License. The “Program”, below, refers to any such program or work,
and a “work based on the Program” means either the Program or any derivative work under copyright law: that is to say, a
work containing the Program or a portion of it, either verbatim or with modifi cations and/or translated into another language.
(Hereinafter, translation is included without limitation in the term “modifi cation”.) Each licensee is addressed as “you”.
Activities other than copying, distribution and modifi cation are not covered by this License; they are outside its scope. The
act of running the Program is not restricted, and the output from the Program is covered only if its contents constitute a work
based on the Program (independent of having been made by running the Program). Whether that is true depends on what
the Program does.
1. You may copy and distribute verbatim copies of the Program's source code as you receive it, in any medium, provided that
you conspicuously and appropriately publish on each copy an appropriate copyright notice and disclaimer of warranty; keep
intact all the notices that refer to this License and to the absence of any warranty; and give any other recipients of the Program
a copy of this License along with the Program.
You may charge a fee for the physical act of transferring a copy, and you may at your option offer warranty protection in
exchange for a fee.
2. You may modify your copy or copies of the Program or any portion of it, thus forming a work based on the Program, and
copy and distribute such modifi cations or work under the terms of Section 1 above, provided that you also meet all of these
conditions:
a) You must cause the modifi ed fi les to carry prominent notices stating that you changed the fi les and the date of any
change.
b) You must cause any work that you distribute or publish, that in whole or in part contains or is derived from the Program or
any part thereof, to be licensed as a whole at no charge to all third parties under the terms of this License.
c) If the modifi ed program normally reads commands interactively when run, you must cause it, when started running for such
interactive use in the most ordinary way, to print or display an announcement including an appropriate copyright notice and a
notice that there is no warranty (or else, saying that you provide a warranty) and that users may redistribute the program under
these conditions, and telling the user how to view a copy of this License. (Exception: if the Program itself is interactive but does
not normally print such an announcement, your work based on the Program is not required to print an announcement.) These
requirements apply to the modifi ed work as a whole. If identifi able sections of that work are not derived from the Program, and
can be reasonably considered independent and separate works in themselves, then this License, and its terms, do not apply
to those sections when you distribute them as separate works. But when you distribute the same sections as part of a whole
which is a work based on the Program, the distribution of the whole must be on the terms of this License, whose permissions
for other licensees extend to the entire whole, and thus to each and every part regardless of who wrote it.
Thus, it is not the intent of this section to claim rights or contest your rights to work written entirely by you; rather, the intent is
to exercise the right to control the distribution of derivative or collective works based on the Program.
In addition, mere aggregation of another work not based on the Program with the Program (or with a work based on the
Program) on a volume of a storage or distribution medium does not bring the other work under the scope of this License.
3. You may copy and distribute the Program (or a work based on it, under Section 2) in object code or executable form under
the terms of Sections 1 and 2 above provided that you also do one of the following:
a) Accompany it with the complete corresponding machine-readable source code, which must be distributed under the terms
of Sections 1 and 2 above on a medium customarily used for software interchange; or,
b) Accompany it with a written offer, valid for at least three years, to give any third party, for a charge no more than your cost
of physically performing source distribution, a complete machine-readable copy of the corresponding source code, to be
distributed under the terms of Sections 1 and 2 above on a medium customarily used for software interchange; or,
c) Accompany it with the information you received as to the offer to distribute corresponding source code. (This alternative is
allowed only for noncommercial distribution and only if you received the program in object code or executable form with such
an offer, in accord with Subsection b above.)
The source code for a work means the preferred form of the work for making modifi cations to it. For an executable work,
complete source code means all the source code for all modules it contains, plus any associated interface defi nition fi les, plus
the scripts used to control compilation and installation of the executable. However, as a special exception, the source code
distributed need not include anything that is normally distributed (in either source or binary form) with the major components
(compiler, kernel, and so on) of the operating system on which the executable runs, unless that component itself accompanies
the executable.
If distribution of executable or object code is made by offering access to copy from a designated place, then offering equivalent
access to copy the source code from the same place counts as distribution of the source code, even though third parties are
not compelled to copy the source along with the object code.
4. You may not copy, modify, sublicense, or distribute the Program except as expressly provided under this License. Any
attempt otherwise to copy, modify, sublicense or distribute the Program is void, and will automatically terminate your rights
under this License. However, parties who have received copies, or rights, from you under this License will not have their
licenses terminated so long as such parties remain in full compliance.
i
Page 34

5. You are not required to accept this License, since you have not signed it. However, nothing else grants you permission to
modify or distribute the Program or its derivative works. These actions are prohibited by law if you do not accept this License.
Therefore, by modifying or distributing the Program (or any work based on the Program), you indicate your acceptance of this
License to do so, and all its terms and conditions for copying, distributing or modifying the Program or works based on it.
6. Each time you redistribute the Program (or any work based on the Program), the recipient automatically receives a license
from the original licensor to copy, distribute or modify the Program subject to these terms and conditions. You may not impose
any further restrictions on the recipients' exercise of the rights granted herein. You are not responsible for enforcing compliance
by third parties to this License.
7. If, as a consequence of a court judgment or allegation of patent infringement or for any other reason (not limited to patent
issues), conditions are imposed on you (whether by court order, agreement or otherwise) that contradict the conditions of this
License, they do not excuse you from the conditions of this License. If you cannot distribute so as to satisfy simultaneously
your obligations under this License and any other pertinent obligations, then as a consequence you may not distribute the
Program at all. For example, if a patent license would not permit royalty-free redistribution of the Program by all those who
receive copies directly or indirectly through you, then the only way you could satisfy both it and this License would be to refrain
entirely from distribution of the Program.
If any portion of this section is held invalid or unenforceable under any particular circumstance, the balance of the section is
intended to apply and the section as a whole is intended to apply in other circumstances.
It is not the purpose of this section to induce you to infringe any patents or other property right claims or to contest validity of
any such claims; this section has the sole purpose of protecting the integrity of the free software distribution system, which
is implemented by public license practices. Many people have made generous contributions to the wide range of software
distributed through that system in reliance on consistent application of that system; it is up to the author/donor to decide if he
or she is willing to distribute software through any other system and a licensee cannot impose that choice.
This section is intended to make thoroughly clear what is believed to be a consequence of the rest of this License.
8. If the distribution and/or use of the Program is restricted in certain countries either by patents or by copyrighted interfaces,
the original copyright holder who places the Program under this License may add an explicit geographical distribution limitation
excluding those countries, so that distribution is permitted only in or among countries not thus excluded. In such case, this
License incorporates the limitation as if written in the body of this License.
9. The Free Software Foundation may publish revised and/or new versions of the General Public License from time to
time. Such new versions will be similar in spirit to the present version, but may differ in detail to address new problems or
concerns.
Each version is given a distinguishing version number. If the Program specifi es a version number of this License which applies
to it and “any later version”, you have the option of following the terms and conditions either of that version or of any later
version published by the Free Software Foundation. If the Program does not specify a version number of this License, you
may choose any version ever published by the Free Software Foundation.
10. If you wish to incorporate parts of the Program into other free programs whose distribution conditions are different, write to
the author to ask for permission. For software which is copyrighted by the Free Software Foundation, write to the Free Software
Foundation; we sometimes make exceptions for this. Our decision will be guided by the two goals of preserving the free status
of all derivatives of our free software and of promoting the sharing and reuse of software generally.
NO WARRANTY
END OF TERMS AND CONDITIONS
How to Apply These Terms to Your New Programs If you develop a new program, and you want it to be of the greatest possible
use to the public, the best way to achieve this is to make it free software which everyone can redistribute and change under
these terms.
To do so, attach the following notices to the program. It is safest to attach them to the start of each source fi le to most effectively
convey the exclusion of warranty; and each fi le should have at least the “copyright” line and a pointer to where the full notice
is found.
<one line to give the program's name and a brief idea of what it does.> Copyright (C) <year> <name of author>
This program is free software; you can redistribute it and/or modify it under the terms of the GNU General Public License as
published by the Free Software Foundation; either version 2 of the License, or (at your option) any later version.
This program is distributed in the hope that it will be useful, but WITHOUT ANY WARRANTY; without even the implied
warranty of MERCHANTABILITY or FITNESS FOR A PARTICULAR PURPOSE. See the GNU General Public License for
more details.
You should have received a copy of the GNU General Public License along with this program; if not, write to the Free Software
Foundation, Inc., 51 Franklin Street, Fifth Floor, Boston, MA 02110-1301 USA.
Also add information on how to contact you by electronic and paper mail.
If the program is interactive, make it output a short notice like this when it starts in an interactive mode:
Gnomovision version 69, Copyright (C) year name of author Gnomovision comes with ABSOLUTELY NO WARRANTY; for
details type `show w'. This is free software, and you are welcome to redistribute it under certain conditions; type `show c' for
details.
The hypothetical commands `show w' and `show c' should show the appropriate parts of the General Public License. Of
course, the commands you use may be called something other than `show w' and `show c'; they could even be mouse-clicks
or menu items--whatever suits your program.
You should also get your employer (if you work as a programmer) or your school, if any, to sign a “copyright disclaimer” for the
program, if necessary. Here is a sample; alter the names:
Yoyodyne, Inc., hereby disclaims all copyright interest in the program `Gnomovision' (which makes passes at compilers)
written by James Hacker. <signature of Ty Coon>, 1 April 1989 Ty Coon, President of Vice This General Public License does
not permit incorporating your program into proprietary programs. If your program is a subroutine library, you may consider it
more useful to permit linking proprietary applications with the library. If this is what you want to do, use the GNU Lesser General
Public License instead of this License.
11. BECAUSE THE PROGRAM IS LICENSED FREE OF CHARGE, THERE IS NO WARRANTY FOR THE PROGRAM, TO
THE EXTENT PERMITTED BY APPLICABLE LAW. EXCEPT WHEN OTHERWISE STATED IN WRITING THE COPYRIGHT
HOLDERS AND/OR OTHER PARTIES PROVIDE THE PROGRAM “AS IS” WITHOUT WARRANTY OF ANY KIND, EITHER
EXPRESSED OR IMPLIED, INCLUDING, BUT NOT LIMITED TO, THE IMPLIED WARRANTIES OF MERCHANTABILITY
AND FITNESS FOR A PARTICULAR PURPOSE. THE ENTIRE RISK AS TO THE QUALITY AND PERFORMANCE OF
THE PROGRAM IS WITH YOU. SHOULD THE PROGRAM PROVE DEFECTIVE, YOU ASSUME THE COST OF ALL
NECESSARY SERVICING, REPAIR OR CORRECTION.
12. IN NO EVENT UNLESS REQUIRED BY APPLICABLE LAW OR AGREED TO IN WRITING WILL ANY COPYRIGHT
HOLDER, OR ANY OTHER PARTY WHO MAY MODIFY AND/OR REDISTRIBUTE THE PROGRAM AS PERMITTED
ABOVE, BE LIABLE TO YOU FOR DAMAGES, INCLUDING ANY GENERAL, SPECIAL, INCIDENTAL OR CONSEQUENTIAL
DAMAGES ARISING OUT OF THE USE OR INABILITY TO USE THE PROGRAM (INCLUDING BUT NOT LIMITED TO
LOSS OF DATA OR DATA BEING RENDERED INACCURATE OR LOSSES SUSTAINED BY YOU OR THIRD PARTIES OR
A FAILURE OF THE PROGRAM TO OPERATE WITH ANY OTHER PROGRAMS), EVEN IF SUCH HOLDER OR OTHER
PARTY HAS BEEN ADVISED OF THE POSSIBILITY OF SUCH DAMAGES.
ii
Page 35

Exhibit B
LGPL
GNU LIBRARY GENERAL PUBLIC LICENSE
Version 2, June 1991
Copyright (C) 1991 Free Software Foundation, Inc. 51 Franklin Street, Fifth Floor, Boston, MA 02110-1301 USA Everyone
is permitted to copy and distribute verbatim copies of this license document, but changing it is not allowed. [This is the fi rst
released version of the library GPL. It is numbered 2 because it goes with version 2 of the ordinary GPL.]
Preamble
The licenses for most software are designed to take away your freedom to share and change it. By contrast, the GNU General
Public Licenses are intended to guarantee your freedom to share and change free software--to make sure the software is
free for all its users.
This license, the Library General Public License, applies to some specially designated Free Software Foundation software,
and to any other libraries whose authors decide to use it. You can use it for your libraries, too.
When we speak of free software, we are referring to freedom, not price. Our General Public Licenses are designed to make
sure that you have the freedom to distribute copies of free software (and charge for this service if you wish), that you receive
source code or can get it if you want it, that you can change the software or use pieces of it in new free programs; and that
you know you can do these things.
To protect your rights, we need to make restrictions that forbid anyone to deny you these rights or to ask you to surrender the
rights. These restrictions translate to certain responsibilities for you if you distribute copies of the library, or if you modify it.
For example, if you distribute copies of the library, whether gratis or for a fee, you must give the recipients all the rights that
we gave you. You must make sure that they, too, receive or can get the source code. If you link a program with the library, you
must provide complete object fi les to the recipients so that they can relink them with the library, after making changes to the
library and recompiling it. And you must show them these terms so they know their rights.
Our method of protecting your rights has two steps: (1) copyright the library, and (2) offer you this license which gives you legal
permission to copy, distribute and/or modify the library.
Also, for each distributor's protection, we want to make certain that everyone understands that there is no warranty for this free
library. If the library is modifi ed by someone else and passed on, we want its recipients to know that what they have is not the
original version, so that any problems introduced by others will not refl ect on the original authors' reputations.
Finally, any free program is threatened constantly by software patents. We wish to avoid the danger that companies distributing
free software will individually obtain patent licenses, thus in effect transforming the program into proprietary software. To
prevent this, we have made it clear that any patent must be licensed for everyone's free use or not licensed at all.
Most GNU software, including some libraries, is covered by the ordinary GNU General Public License, which was designed
for utility programs. This license, the GNU Library General Public License, applies to certain designated libraries. This license
is quite different from the ordinary one; be sure to read it in full, and don't assume that anything in it is the same as in the
ordinary license.
The reason we have a separate public license for some libraries is that they blur the distinction we usually make between
modifying or adding to a program and simply using it. Linking a program with a library, without changing the library, is in some
sense simply using the library, and is analogous to running a utility program or application program. However, in a textual
and legal sense, the linked executable is a combined work, a derivative of the original library, and the ordinary General Public
License treats it as such.
Because of this blurred distinction, using the ordinary General Public License for libraries did not effectively promote software
sharing, because most developers did not use the libraries. We concluded that weaker conditions might promote sharing
better.
However, unrestricted linking of non-free programs would deprive the users of those programs of all benefi t from the free status
of the libraries themselves. This Library General Public License is intended to permit developers of non-free programs to use
free libraries, while preserving your freedom as a user of such programs to change the free libraries that are incorporated in
them. (We have not seen how to achieve this as regards changes in header fi les, but we have achieved it as regards changes
in the actual functions of the Library.) The hope is that this will lead to faster development of free libraries.
The precise terms and conditions for copying, distribution and modifi cation follow. Pay close attention to the difference
between a “work based on the library” and a “work that uses the library”. The former contains code derived from the library,
while the latter only works together with the library.
Note that it is possible for a library to be covered by the ordinary General Public License rather than by this special one.
GNU LIBRARY GENERAL PUBLIC LICENSE TERMS AND CONDITIONS FOR COPYING, DISTRIBUTION AND
MODIFICATION
0. This License Agreement applies to any software library which contains a notice placed by the copyright holder or other
authorized party saying it may be distributed under the terms of this Library General Public License (also called “this License”).
Each licensee is addressed as “you”.
A “library” means a collection of software functions and/or data prepared so as to be conveniently linked with application
programs (which use some of those functions and data) to form executables.
The “Library”, below, refers to any such software library or work which has been distributed under these terms. A “work based
on the Library” means either the Library or any derivative work under copyright law: that is to say, a work containing the Library
or a portion of it, either verbatim or with modifi cations and/or translated straightforwardly into another language. (Hereinafter,
translation is included without limitation in the term “modifi cation”.)
”Source code” for a work means the preferred form of the work for making modifi cations to it. For a library, complete source
code means all the source code for all modules it contains, plus any associated interface defi nition fi les, plus the scripts used to
control compilation and installation of the library. Activities other than copying, distribution and modifi cation are not covered by
this License; they are outside its scope. The act of running a program using the Library is not restricted, and output from such
a program is covered only if its contents constitute a work based on the Library (independent of the use of the Library in a tool
for writing it). Whether that is true depends on what the Library does and what the program that uses the Library does.
1. You may copy and distribute verbatim copies of the Library's complete source code as you receive it, in any medium,
provided that you conspicuously and appropriately publish on each copy an appropriate copyright notice and disclaimer of
warranty; keep intact all the notices that refer to this License and to the absence of any warranty; and distribute a copy of this
License along with the Library. You may charge a fee for the physical act of transferring a copy, and you may at your option
offer warranty protection in exchange for a fee.
2. You may modify your copy or copies of the Library or any portion of it, thus forming a work based on the Library, and copy and
distribute such modifi cations or work under the terms of Section 1 above, provided that you also meet all of these conditions:
a) The modifi ed work must itself be a software library. b) You must cause the fi les modifi ed to carry prominent notices stating
that you changed the fi les and the date of any change. c) You must cause the whole of the work to be licensed at no charge to
all third parties under the terms of this License. d) If a facility in the modifi ed Library refers to a function or a table of data to be
supplied by an application program that uses the facility, other than as an argument passed when the facility is invoked, then
you must make a good faith effort to ensure that, in the event an application does not supply such function or table, the facility
still operates, and performs whatever part of its purpose remains meaningful. (For example, a function in a library to compute
square roots has a purpose that is entirely well-defi ned independent of the application. Therefore, Subsection 2d requires
that any application-supplied function or table used by this function must be optional: if the application does not supply it, the
square root function must still compute square roots.) These requirements apply to the modifi ed work as a whole. If identifi able
sections of that work are not derived from the Library, and can be reasonably considered independent and separate works in
themselves, then this License, and its terms, do not apply to those sections when you distribute them as separate works. But
when you distribute the same sections as part of a whole which is a work based on the Library, the distribution of the whole
must be on the terms of this License, whose permissions for other licensees extend to the entire whole, and thus to each and
every part regardless of who wrote it. Thus, it is not the intent of this section to claim rights or contest your rights to work written
entirely by you; rather, the intent is to exercise the right to control the distribution of derivative or collective works based on the
Library. In addition, mere aggregation of another work not based on the Library with the Library (or with a work based on the
Library) on a volume of a storage or distribution medium does not bring the other work under the scope of this License.
3. You may opt to apply the terms of the ordinary GNU General Public License instead of this License to a given copy of the
Library. To do this, you must alter all the notices that refer to this License, so that they refer to the ordinary GNU General Public
License, version 2, instead of to this License. (If a newer version than version 2 of the ordinary GNU General Public License
has appeared, then you can specify that version instead if you wish.) Do not make any other change in these notices. Once
this change is made in a given copy, it is irreversible for that copy, so the ordinary GNU General Public License applies to all
subsequent copies and derivative works made from that copy. This option is useful when you wish to copy part of the code of
the Library into a program that is not a library.
4. You may copy and distribute the Library (or a portion or derivative of it, under Section 2) in object code or executable form
under the terms of Sections 1 and 2 above provided that you accompany it with the complete corresponding machine-readable
source code, which must be distributed under the terms of Sections 1 and 2 above on a medium customarily used for software
interchange. If distribution of object code is made by offering access to copy from a designated place, then offering equivalent
access to copy the source code from the same place satisfi es the requirement to distribute the source code, even though third
parties are not compelled to copy the source along with the object code.
iii
Page 36

5. A program that contains no derivative of any portion of the Library, but is designed to work with the Library by being compiled
or linked with it, is called a “work that uses the Library”. Such a work, in isolation, is not a derivative work of the Library, and
therefore falls outside the scope of this License. However, linking a “work that uses the Library” with the Library creates an
executable that is a derivative of the Library (because it contains portions of the Library), rather than a “work that uses the
library”. The executable is therefore covered by this License. Section 6 states terms for distribution of such executables. When
a “work that uses the Library” uses material from a header fi le that is part of the Library, the object code for the work may be a
derivative work of the Library even though the source code is not. Whether this is true is especially signifi cant if the work can
be linked without the Library, or if the work is itself a library. The threshold for this to be true is not precisely defi ned by law. If
such an object fi le uses only numerical parameters, data structure layouts and accessors, and small macros and small inline
functions (ten lines or less in length), then the use of the object fi le is unrestricted, regardless of whether it is legally a derivative
work. (Executables containing this object code plus portions of the Library will still fall under Section 6.) Otherwise, if the work
is a derivative of the Library, you may distribute the object code for the work under the terms of Section 6. Any executables
containing that work also fall under Section 6, whether or not they are linked directly with the Library itself.
6. As an exception to the Sections above, you may also compile or link a “work that uses the Library” with the Library to produce
a work containing portions of the Library, and distribute that work under terms of your choice, provided that the terms permit
modifi cation of the work for the customer's own use and reverse engineering for debugging such modifi cations. You must give
prominent notice with each copy of the work that the Library is used in it and that the Library and its use are covered by this
License. You must supply a copy of this License. If the work during execution displays copyright notices, you must include the
copyright notice for the Library among them, as well as a reference directing the user to the copy of this License. Also, you
must do one of these things:
a) Accompany the work with the complete corresponding machine-readable source code for the Library including whatever
changes were used in the work (which must be distributed under Sections 1 and 2 above); and, if the work is an executable
linked with the Library, with the complete machine-readable “work that uses the Library”, as object code and/or source code,
so that the user can modify the Library and then relink to produce a modifi ed executable containing the modifi ed Library. (It is
understood that the user who changes the contents of defi nitions fi les in the Library will not necessarily be able to recompile
the application to use the modifi ed defi nitions.)
b) Accompany the work with a written offer, valid for at least three years, to give the same user the materials specifi ed in
Subsection 6a, above, for a charge no more than the cost of performing this distribution.
c) If distribution of the work is made by offering access to copy from a designated place, offer equivalent access to copy the
above specifi ed materials from the same place.
d) Verify that the user has already received a copy of these materials or that you have already sent this user a copy. For
an executable, the required form of the “work that uses the Library” must include any data and utility programs needed for
reproducing the executable from it. However, as a special exception, the source code distributed need not include anything
that is normally distributed (in either source or binary form) with the major components (compiler, kernel, and so on) of the
operating system on which the executable runs, unless that component itself accompanies the executable.
It may happen that this requirement contradicts the license restrictions of other proprietary libraries that do not normally
accompany the operating system. Such a contradiction means you cannot use both them and the Library together in an
executable that you distribute.
7. You may place library facilities that are a work based on the Library side-by-side in a single library together with other library
facilities not covered by this License, and distribute such a combined library, provided that the separate distribution of the work
based on the Library and of the other library facilities is otherwise permitted, and provided that you do these two things:
a) Accompany the combined library with a copy of the same work based on the Library, uncombined with any other library
facilities. This must be distributed under the terms of the Sections above.
b) Give prominent notice with the combined library of the fact that part of it is a work based on the Library, and explaining where
to fi nd the accompanying uncombined form of the same work.
8. You may not copy, modify, sublicense, link with, or distribute the Library except as expressly provided under this License.
Any attempt otherwise to copy, modify, sublicense, link with, or distribute the Library is void, and will automatically terminate
your rights under this License. However, parties who have received copies, or rights, from you under this License will not have
their licenses terminated so long as such parties remain in full compliance.
9. You are not required to accept this License, since you have not signed it. However, nothing else grants you permission to
modify or distribute the Library or its derivative works. These actions are prohibited by law if you do not accept this License.
Therefore, by modifying or distributing the Library (or any work based on the Library), you indicate your acceptance of this
License to do so, and all its terms and conditions for copying, distributing or modifying the Library or works based on it.
10. Each time you redistribute the Library (or any work based on the Library), the recipient automatically receives a license
from the original licensor to copy, distribute, link with or modify the Library subject to these terms and conditions. You may not
impose any further restrictions on the recipients' exercise of the rights granted herein. You are not responsible for enforcing
compliance by third parties to this License.
11. If, as a consequence of a court judgment or allegation of patent infringement or for any other reason (not limited to patent
issues), conditions are imposed on you (whether by court order, agreement or otherwise) that contradict the conditions of this
License, they do not excuse you from the conditions of this License. If you cannot distribute so as to satisfy simultaneously
your obligations under this License and any other pertinent obligations, then as a consequence you may not distribute the
Library at all. For example, if a patent license would not permit royalty-free redistribution of the Library by all those who receive
copies directly or indirectly through you, then the only way you could satisfy both it and this License would be to refrain entirely
from distribution of the Library.
If any portion of this section is held invalid or unenforceable under any particular circumstance, the balance of the section is
intended to apply, and the section as a whole is intended to apply in other circumstances.
It is not the purpose of this section to induce you to infringe any patents or other property right claims or to contest validity of
any such claims; this section has the sole purpose of protecting the integrity of the free software distribution system which
is implemented by public license practices. Many people have made generous contributions to the wide range of software
distributed through that system in reliance on consistent application of that system; it is up to the author/donor to decide if he
or she is willing to distribute software through any other system and a licensee cannot impose that choice.
This section is intended to make thoroughly clear what is believed to be a consequence of the rest of this License.
12. If the distribution and/or use of the Library is restricted in certain countries either by patents or by copyrighted interfaces,
the original copyright holder who places the Library under this License may add an explicit geographical distribution limitation
excluding those countries, so that distribution is permitted only in or among countries not thus excluded. In such case, this
License incorporates the limitation as if written in the body of this License.
13. The Free Software Foundation may publish revised and/or new versions of the Library General Public License from time
to time. Such new versions will be similar in spirit to the present version, but may differ in detail to address new problems or
concerns.
Each version is given a distinguishing version number. If the Library specifi
to it and “any later version”, you have the option of following the terms and conditions either of that version or of any later
version published by the Free Software Foundation. If the Library does not specify a license version number, you may choose
any version ever published by the Free Software Foundation.
14. If you wish to incorporate parts of the Library into other free programs whose distribution conditions are incompatible with
these, write to the author to ask for permission. For software which is copyrighted by the Free Software Foundation, write to the
Free Software Foundation; we sometimes make exceptions for this. Our decision will be guided by the two goals of preserving
the free status of all derivatives of our free software and of promoting the sharing and reuse of software generally.
NO WARRANTY
15. BECAUSE THE LIBRARY IS LICENSED FREE OF CHARGE, THERE IS NO WARRANTY FOR THE LIBRARY, TO THE
EXTENT PERMITTED BY APPLICABLE LAW. EXCEPT WHEN OTHERWISE STATED IN WRITING THE COPYRIGHT
HOLDERS AND/OR OTHER PARTIES PROVIDE THE LIBRARY “AS IS” WITHOUT WARRANTY OF ANY KIND, EITHER
EXPRESSED OR IMPLIED, INCLUDING, BUT NOT LIMITED TO, THE IMPLIED WARRANTIES OF MERCHANTABILITY
AND FITNESS FOR A PARTICULAR PURPOSE. THE ENTIRE RISK AS TO THE QUALITY AND PERFORMANCE OF THE
LIBRARY IS WITH YOU. SHOULD THE LIBRARY PROVE DEFECTIVE, YOU ASSUME THE COST OF ALL NECESSARY
SERVICING, REPAIR OR CORRECTION.
16. IN NO EVENT UNLESS REQUIRED BY APPLICABLE LAW OR AGREED TO IN WRITING WILL ANY COPYRIGHT
HOLDER, OR ANY OTHER PARTY WHO MAY MODIFY AND/OR REDISTRIBUTE THE LIBRARY AS PERMITTED ABOVE,
BE LIABLE TO YOU FOR DAMAGES, INCLUDING ANY GENERAL, SPECIAL, INCIDENTAL OR CONSEQUENTIAL
DAMAGES ARISING OUT OF THE USE OR INABILITY TO USE THE LIBRARY (INCLUDING BUT NOT LIMITED TO LOSS
OF DATA OR DATA BEING RENDERED INACCURATE OR LOSSES SUSTAINED BY YOU OR THIRD PARTIES OR A
FAILURE OF THE LIBRARY TO OPERATE WITH ANY OTHER SOFTWARE), EVEN IF SUCH HOLDER OR OTHER PARTY
HAS BEEN ADVISED OF THE POSSIBILITY OF SUCH DAMAGES.
END OF TERMS AND CONDITIONS
How to Apply These Terms to Your New Libraries If you develop a new library, and you want it to be of the greatest possible use
to the public, we recommend making it free software that everyone can redistribute and change. You can do so by permitting
redistribution under these terms (or, alternatively, under the terms of the ordinary General Public License).
es a version number of this License which applies
iv
Page 37

To apply these terms, attach the following notices to the library. It is safest to attach them to the start of each source fi le to
most effectively convey the exclusion of warranty; and each fi le should have at least the “copyright” line and a pointer to where
the full notice is found.
<one line to give the library's name and a brief idea of what it does.> Copyright (C) <year> <name of author>
This library is free software; you can redistribute it and/or modify it under the terms of the GNU Library General Public License
as published by the Free Software Foundation; either version 2 of the License, or (at your option) any later version.
This library is distributed in the hope that it will be useful, but WITHOUT ANY WARRANTY; without even the implied warranty
of MERCHANTABILITY or FITNESS FOR A PARTICULAR PURPOSE. See the GNU Library General Public License for
more details.
You should have received a copy of the GNU Library General Public License along with this library; if not, write to the Free
Foundation, Inc., 51 Franklin Street, Fifth Floor, Boston, MA 02110-1301 USA
Also add information on how to contact you by electronic and paper mail.
You should also get your employer (if you work as a programmer) or your school, if any, to sign a “copyright disclaimer” for the
library, if necessary. Here is a sample; alter the names:
Yoyodyne, Inc., hereby disclaims all copyright interest in the library `Frob' (a library for tweaking knobs) written by James
Random Hacker.
<signature of Ty Coon>, 1 April 1990 Ty Coon, President of Vice That's all there is to it!
EXHIBIT C
expat
Copyright (c) 1998, 1999, 2000 Thai Open Source Software Center Ltd
THE SOFTWARE IS PROVIDED “AS IS", WITHOUT WARRANTY OF ANY KIND, EXPRESS OR IMPLIED, INCLUDING
BUT NOT LIMITED TO THE WARRANTIES OF MERCHANTABILITY, FITNESS FOR A PARTICULAR PURPOSE AND
NONINFRINGEMENT.
IN NO EVENT SHALL THE AUTHORS OR COPYRIGHT HOLDERS BE LIABLE FOR ANY CLAIM, DAMAGES OR
OTHER LIABILITY, WHETHER IN AN ACTION OF CONTRACT, TORT OR OTHERWISE, ARISING FROM, OUT OF OR IN
CONNECTION WITH THE SOFTWARE OR THE USE OR OTHER DEALINGS IN THE SOFTWARE.
EXHIBIT D
FreeType
Portions of this software are copyright
© 1996-2002 The FreeType Project (www.freetype.org). All rights reserved.
EXHIBIT E
libjpeg
This software is based in part on the work of the Independent JPEG Group.
v
Page 38

EXHIBIT F
libpng
COPYRIGHT NOTICE, DISCLAIMER, and LICENSE:
If you modify libpng you may insert additional notices immediately following this sentence.
libpng versions 1.2.6, August 15, 2004, through 1.2.18, May 15, 2007, are Copyright (c) 2004, 2006-2007 Glenn RandersPehrson, and are distributed according to the same disclaimer and license as libpng-1.2.5 with the following individual added
to the list of Contributing Authors
Cosmin Truta
libpng versions 1.0.7, July 1, 2000, through 1.2.5 - October 3, 2002, are Copyright (c) 2000-2002 Glenn Randers-Pehrson,
and are distributed according to the same disclaimer and license as libpng-1.0.6 with the following individuals added to the
list of Contributing Authors
Simon-Pierre Cadieux
Eric S. Raymond
Gilles Vollant
and with the following additions to the disclaimer:
There is no warranty against interference with your enjoyment of the library or against infringement. There is no warranty
that our efforts or the library will fulfi ll any of your particular purposes or needs. This library is provided with all faults, and the
entire risk of satisfactory quality, performance, accuracy, and effort is with the user.
libpng versions 0.97, January 1998, through 1.0.6, March 20, 2000, are Copyright (c) 1998, 1999 Glenn Randers-Pehrson,
and are distributed according to the same disclaimer and license as libpng-0.96, with the following individuals added to the
list of Contributing Authors:
Tom Lane
Glenn Randers-Pehrson
Willem van Schaik
libpng versions 0.89, June 1996, through 0.96, May 1997, are Copyright (c) 1996, 1997 Andreas Dilger Distributed according
to the same disclaimer and license as libpng-0.88, with the following individuals added to the list of Contributing Authors:
John Bowler
Kevin Bracey
Sam Bushell
Magnus Holmgren
Greg Roelofs
Tom Tanner
libpng versions 0.5, May 1995, through 0.88, January 1996, are Copyright (c) 1995, 1996 Guy Eric Schalnat, Group 42, Inc.
For the purposes of this copyright and license, “”Contributing Authors” is defi ned as the following set of individuals:
Andreas Dilger
Dave Martindale
Guy Eric Schalnat
Paul Schmidt
Tim Wegner
The PNG Reference Library is supplied “AS IS". The Contributing Authors and Group 42, Inc. disclaim all warranties,
expressed or implied, including, without limitation, the warranties of merchantability and of fi tness for any purpose.
The Contributing Authors and Group 42, Inc. assume no liability for direct, indirect, incidental, special, exemplary, or
consequential damages, which may result from the use of the PNG Reference Library, even if advised of the possibility of
such damage.
Permission is hereby granted to use, copy, modify, and distribute this source code, or portions hereof, for any purpose, without
fee, subject to the following restrictions:
1. The origin of this source code must not be misrepresented.
2. Altered versions must be plainly marked as such and must not be misrepresented as being the original source.
3. This Copyright notice may not be removed or altered from any source or altered source distribution.
The Contributing Authors and Group 42, Inc. specifi cally permit, without fee, and encourage the use of this source code as a
component to supporting the PNG fi le format in commercial products.
If you use this source code in a product, acknowledgment is not required but would be appreciated.
A “png_get_copyright” function is available, for convenient use in “about” boxes and the like:
printf("%s",png_get_copyright(NULL));
Also, the PNG logo (in PNG format, of course) is supplied in the fi les “pngbar.png” and “pngbar.jpg (88x31) and “pngnow.
png” (98x31).
Libpng is OSI Certifi ed Open Source Software. OSI Certifi ed Open Source is a certifi cation mark of the Open Source
Initiative.
Glenn Randers-Pehrson
glennrp at users.sourceforge.net
May 15, 2007
vi
Page 39

EXHIBIT G
zlib
Copyright (C) 1995-2004 Jean-loup Gailly and Mark Adler
EXHIBIT H
libtiff
Copyright (c) 1988-1997 Sam Leffl er
Copyright (c) 1991-1997 Silicon Graphics, Inc.
Permission to use, copy, modify, distribute, and sell this software and its documentation for any purpose is hereby granted
without fee, provided that (i) the above copyright notices and this permission notice appear in all copies of the software and
related documentation, and (ii) the names of Sam Leffl er and Silicon Graphics may not be used in any advertising or publicity
relating to the software without the specifi c, prior written permission of Sam Leffl er and Silicon Graphics.
THE SOFTWARE IS PROVIDED “AS-IS” AND WITHOUT WARRANTY OF ANY KIND, EXPRESS, IMPLIED OR
OTHERWISE, INCLUDING WITHOUT LIMITATION, ANY WARRANTY OF MERCHANTABILITY OR FITNESS FOR A
PARTICULAR PURPOSE.
IN NO EVENT SHALL SAM LEFFLER OR SILICON GRAPHICS BE LIABLE FOR ANY SPECIAL, INCIDENTAL, INDIRECT
OR CONSEQUENTIAL DAMAGES OF ANY KIND,OR ANY DAMAGES WHATSOEVER RESULTING FROM LOSS OF
USE, DATA OR PROFITS, WHETHER OR NOT ADVISED OF THE POSSIBILITY OF DAMAGE, AND ON ANY THEORY OF
LIABILITY, ARISING OUT OF OR IN CONNECTION WITH THE USE OR PERFORMANCE OF THIS SOFTWARE.
EXHIBIT I
libtremor
Copyright (c) 2002-2004 Xiph.org Foundation
Redistribution and use in source and binary forms, with or without modifi cation, are permitted provided that the following
conditions are met:
- Redistributions of source code must retain the above copyright notice, this list of conditions and the following disclaimer.
- Redistributions in binary form must reproduce the above copyright notice, this list of conditions and the following disclaimer
in the documentation and/or other materials provided with the distribution.
- Neither the name of the Xiph.org Foundation nor the names of its contributors may be used to endorse or promote products
derived from this software without specifi c prior written permission.
THIS SOFTWARE IS PROVIDED BY THE COPYRIGHT HOLDERS AND CONTRIBUTORS ``AS IS'' AND ANY EXPRESS
OR IMPLIED WARRANTIES, INCLUDING, BUT NOT LIMITED TO, THE IMPLIED WARRANTIES OF MERCHANTABILITY
AND FITNESS FOR A PARTICULAR PURPOSE ARE DISCLAIMED. IN NO EVENT SHALL THE FOUNDATION OR
CONTRIBUTORS BE LIABLE FOR ANY DIRECT, INDIRECT, INCIDENTAL, SPECIAL, EXEMPLARY, OR CONSEQUENTIAL
DAMAGES (INCLUDING, BUT NOT LIMITED TO, PROCUREMENT OF SUBSTITUTE GOODS OR SERVICES; LOSS OF
USE, DATA, OR PROFITS; OR BUSINESS INTERRUPTION) HOWEVER CAUSED AND ON ANY THEORY OF LIABILITY,
WHETHER IN CONTRACT, STRICT LIABILITY, OR TORT (INCLUDING NEGLIGENCE OR OTHERWISE) ARISING IN ANY
WAY OUT OF THE USE OF THIS SOFTWARE, EVEN IF ADVISED OF THE POSSIBILITY OF SUCH DAMAGE.
EXHIBIT J
STLport
Copyright (c) 1994
Hewlett-Packard Company
Copyright (c) 1996-1999
Silicon Graphics Computer Systems, Inc.
Copyright (c) 1997
Moscow Center for SPARC Technology
Copyright (c) 1999-2003
Boris Fomitchev
This material is provided "as is", with absolutely no warranty expressed or implied. Any use is at your own risk.
Permission to use or copy this software for any purpose is hereby granted without fee, provided the above notices are retained
on all copies.
Permission to modify the code and to distribute modifi ed code is granted, provided the above notices are retained, and a notice
that the code was modifi ed is included with the above copyright notice.
vii
Page 40

www.marantz.com
You can find your nearest authorized distributor or dealer on our website.
is a registered trademark.
Printed in China 04/2008 541110097020M mzh-d
 Loading...