

Page 1

HP A4800A PCI FWD SCSI Host Bus
Adapter
Service and User Guide
Edition 6
Customer Order Number: A3725-90007
Manufacturing Part Number: A3725-96031
E0201
U.S.A.
© Copyright 2001, Hewlett-Packard Company.
Page 2

Legal Notices
The information in this document is subject to change without notice.
Hewlett-Packard makes no warranty of any kind with regard to this
manual, including, but not limited to, the implied warranties of
merchantability and fitness for a particular purpose. Hewlett-Packard
shall not be held liable for errors contained herein or direct, indirect,
special, incidental or consequential damages in connection with the
furnishing, performance, or use of this material.
Warranty. A copy of the specific warranty terms applicable to your
Hewlett-Packard product and replacement parts can be obtained from
your local Sales and Service Office.
Restricted Rights Legend. Use, duplication or disclosure by the U.S.
Government is subject to restrictions as set forth insubparagraph (c) (1)
(ii) of the Rights in Technical Data and Computer Software clause at
DFARS 252.227-7013 for DOD agencies, and subparagraphs (c) (1) and
(c) (2) of the Commercial Computer Software Restricted Rights clause at
FAR 52.227-19 for other agencies.
HEWLETT-PACKARD COMPANY
3000 Hanover Street
Palo Alto, California 94304
U.S.A.
Use of this manual and flexible disk(s) or tape cartridge(s) supplied for
this pack is restricted to this product only. Additional copies of the
programs may be made for security and back-up purposes only. Resale of
the programs in their present form or with alterations, is expressly
prohibited.
Copyright Notices. ©copyright 1983-2001 Hewlett-Packard Company,
all rights reserved.
Reproduction, adaptation, or translation of this document without prior
written permission is prohibited, except as allowed under the copyright
laws.
©copyright 1979, 1980, 1983, 1985-93 Regents of the University of
California
2
Page 3

This software is based in part on the Fourth Berkeley Software
Distribution under license from the Regents of the University of
California.
©copyright 1980, 1984, 1986 Novell, Inc.
©copyright 1986-1992 Sun Microsystems, Inc.
©copyright 1985-86, 1988 Massachusetts Institute of Technology.
©copyright 1989-93 The Open Software Foundation, Inc.
©copyright 1986 Digital Equipment Corporation.
©copyright 1990 Motorola, Inc.
©copyright 1990, 1991, 1992 Cornell University
©copyright 1989-1991 The University of Maryland
©copyright 1988 Carnegie Mellon University
Trademark Notices UNIX is a registered trademark of The Open
Group.
X Window System is a trademark of the Massachusetts Institute of
Technology.
MS-DOS and Microsoft are U.S. registered trademarks of Microsoft
Corporation.
OSF/Motif is a trademark of the Open Software Foundation, Inc. in the
U.S. and other countries.
3
Page 4

4
Page 5

1 HP A4800A Adapter Overview
This chapter contains the following sections that describe the
HP A4800A PCI FWD SCSI host bus adapter (HBA):
• “About the A4800A Adapter” on page 7.
Chapter 1 5
Page 6

HPA4800A Adapter Overview
• “Features” on page 9.
• “Supported HP 9000 Servers” on page 10.
• “Cable Specifications” on page 11.
Chapter 16
Page 7

HPA4800A Adapter Overview
About the A4800A Adapter
About the A4800A Adapter
The HP A4800A PCI Fast/Wide/Differential (FWD) SCSI Host Bus
Adapter is an intelligent, high-performance, direct memory access
(DMA) bus master SCSI host bus adapter for HP 9000 and HP e3000
servers. The adapter combines a SCSI executive processor and a PCI
Local Bus interface in a single chip. This adapter supports bootable
devices and can be used with hard drives, tape drives, and other
differential SCSI devices. The adapter is High Voltage Differential
(HVD) SCSI only.
Consult with your Hewlett-Packard representative for more information
on specific system configurations.
Chapter 1 7
Page 8
HPA4800A Adapter Overview
About the A4800A Adapter
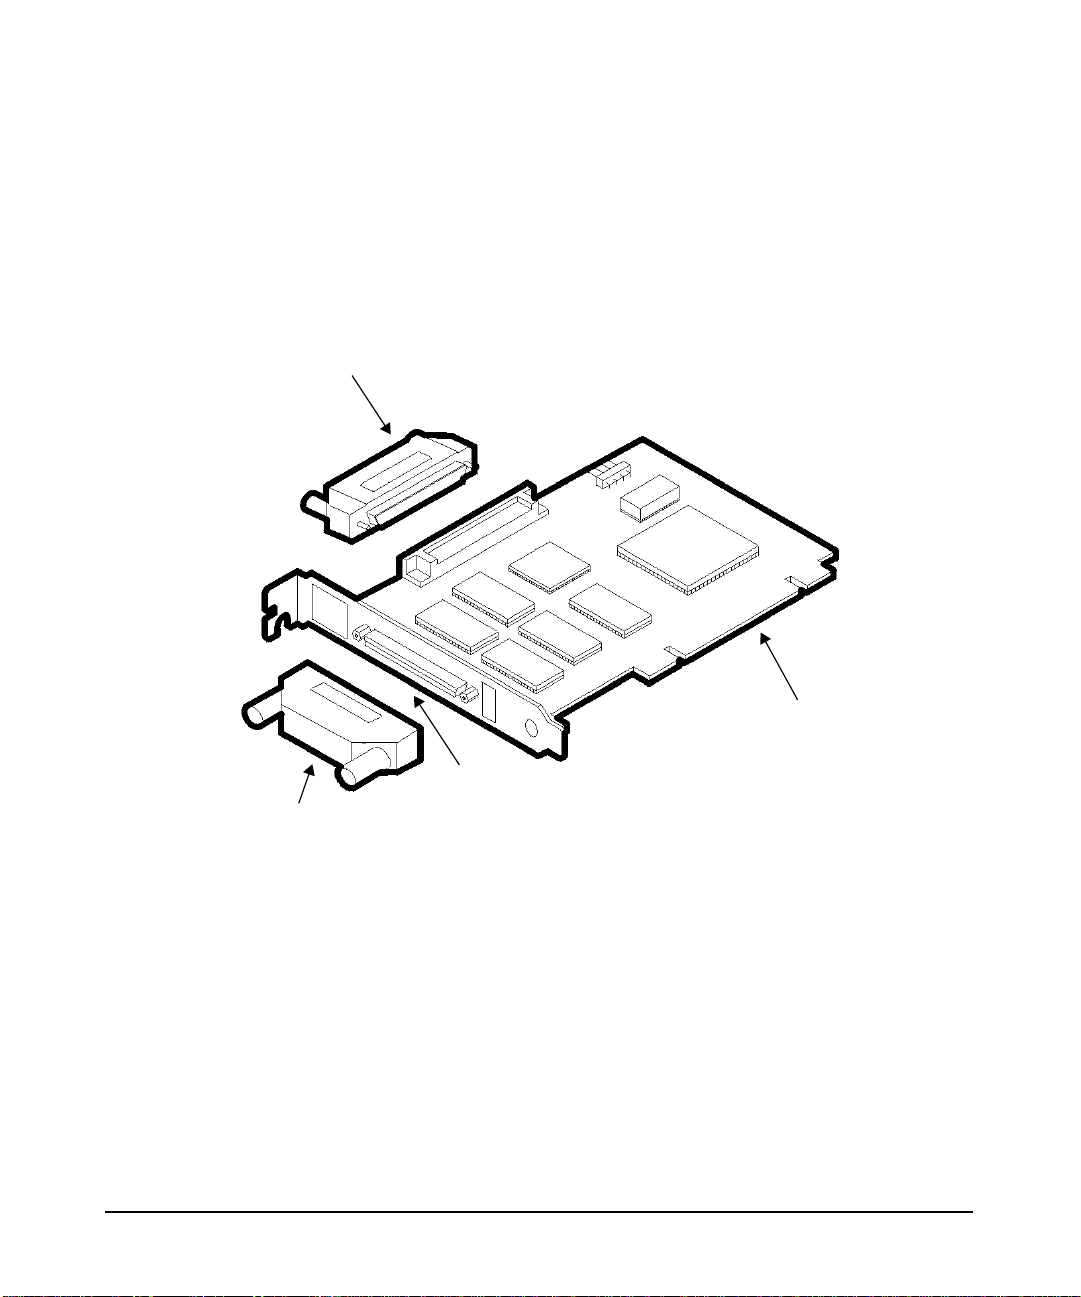
Figure 1-1 below is a drawing of the A4800A adapter.
Figure 1-1 The A4800A PCI Ultra HVD SCSI Host Bus Adapter
Internal terminator
External
Terminator
J1 to PCI
Bus connector
J3
68-pin External SCSI interface
Chapter 18
Page 9

HPA4800A Adapter Overview
Features
The A4800A adapter has the following features:
• Compliance with Intel PCI Local Bus Rev. 2.1 specification.
• Compliance with ANSI X3.131-1994 SCSI-2 standard.
• Support for asynchronous and synchronous transfer modes.
• Synchronous SCSI data transfer rates:
— Wide and Ultra SCSI (40 Mbytes/sec).
— Ultra SCSI (20 Mbytes/sec).
— Wide and Fast SCSI (20 Mbytes/sec) differential.
— Fast SCSI (10 Mbytes/sec) differential.
— Narrow (5 Mbytes/sec) differential.
• Support for differential mode.
Features
• Support for up to 15 SCSI, SCSI-2, or Ultra devices.
• Support for logical unit numbers (LUNs) 0-7.
• Support for bus master DMA.
• 68-pin, High-Density (HD) SCSI external connector.
• Supports HVD SCSI, SCSI-2, or Ultra devices only.
Chapter 1 9
Page 10

HPA4800A Adapter Overview
Supported HP 9000 Servers
Supported HP 9000 Servers
Table 1-1 below shows which HP 9000 servers support the A4800A
adapter.
Table 1-1 A4800A Supported HP 9000 Servers
HP 9000 Server
A-Class 10.20 (for the A180
L-Class 11.0 or 11i
N-Class 11.0 or 11i MPE/iX 7.0 or later
V-Class 11.0 or 11i
Note that the maximum number of SCSI HBAs you can install in any
HP 9000 or HP e3000 server is equal to the maximum number of
corresponding card slots in the server. For example, if you are installing
SCSI PCI HBAs and the server has four PCI card slots, you can install
four SCSI PCI HBAs in that server.
HP-UX Operating
System
and A180C servers
only) & 11.0 or 11i
HP e3000 Operating
System
MPE/iX 7.0 or later
Chapter 110
Page 11

Cable Specifications
The A4800A adapter supports High Voltage Differential (HVD) SCSI
connections only. Internal cables for interconnection with the embedded
CD-ROM drive and DAT tape drive are provided in the system.
The A5068A SCSI cable kit is required when connecting the A4800A
adapter to internal, non-embedded SCSI devices. Table 1-2 below shows
the parts that make up the A5068A kit.
Table 1-2 A5068A SCSI Cable Kit
HPA4800A Adapter Overview
Cable Specifications
Description
10-inch SCSI shielded cable with back
shell
68-pin HD SCSI terminator A4700-67098
For more information on connecting the adapter to internal disk and
tape devices, refer to the appropriate disk drive or tape drive product
manual.
Part
Number
A4700-67086
For V-Class Systems
If you are connecting external SCSI devices to an A4800A adapter
installed in a V-Class system, you must use one of the cables shown in
Table 1-3 below. Note that cables are normally supplied with the
peripheral device.
Table 1-3 Cables for Connecting External SCSI Devices to the A4800A
Adapter in V-Class Systems
Description
5-meter 68-pin HD/68-pin HD Male
inline terminator SCSI cable for
V-Class
Product
Number
A3401A 875
Option
Chapter 1 11
Page 12

HPA4800A Adapter Overview
Cable Specifications
Table 1-3 Cables for Connecting External SCSI Devices to the A4800A
Adapter in V-Class Systems (Continued) (Continued)
Description
10-meter 68-pin HD/68-pin HD Male
inline terminator SCSI cable for
V-Class
2/5-meter 68-pin HD Male inline
terminator SCSI cable for V-Class
2/3-meter 68-pin HD Male inline
terminator SCSI cable for V-Class
Product
Number
A3401A 851
A3401A 871
A3401A 873
Option
Chapter 112
Page 13

2 Installing the A4800A Adapter
This chapter contains the following sections that describe how to install
the A4800A adapter:
• “Preparing for Installation” on page 15.
Chapter 2 13
Page 14

Installing the A4800A Adapter
• “Connecting to External SCSI Devices” on page 16.
• “Handling the A4800A Adapter” on page 17.
• “Looking at Adapter Installation” on page 18.
• “Connecting SCSI Peripheral Devices” on page 25.
• “Terminating the A4800A Adapter” on page 28
• “Setting SCSI IDs” on page 29
• “Verifying Installation” on page 31.
Chapter 214
Page 15

Installing the A4800A Adapter
Preparing for Installation
Preparing for Installation
Installing the host bus adapter requires disassembly of some server
components. Before beginning installation, see the HP 9000 system
manual for detailed instructions about how to install host bus adapters
in the PCI slots.
You will need the following things:
✓ One HP A4800A SCSI adapter.
✓ One grounding (ESD) wrist strap.
✓ Any other tools needed for installing components in the HP 9000 or
HP e3000 system (for example, screwdrivers); see the system’s
documentation.
Chapter 2 15
Page 16

Installing the A4800A Adapter
Connecting to External SCSI Devices
Connecting to External SCSI Devices
If you intend to connect the PCI Ultra SCSI adapter to an external SCSI
device, you need to supply a differential SCSI cable that is long enough
to reach the device. Part numbers for several different cable lengths are
listed in the section titled “Cable Specifications” on page 11.
Chapter 216
Page 17

Installing the A4800A Adapter
Handling the A4800A Adapter
Handling the A4800A Adapter
The host bus adapter is packaged with an ESD kit, which contains
materials to prevent damage from static electricity during installation.
CAUTION The adapter is highly susceptible to damage by electrostatic discharge
during installation and routine maintenance procedures. Do not handle
circuit boards without wearing a wrist strap fastened to a good earth
ground or to the system chassis.
While you are installing the A4800A adapter, please follow these
precautions:
✓ Keep the adapter in its shielded antistatic bag until you are ready to
install it.
✓ Use a wrist strap or other ESD protection. Wrap the strap around
your wrist and attach the copper end to a metal portion of the
computer frame.
✓ Avoid working in carpeted areas.
✓ Gently place the adapter, printed circuit board (PCB) side down, on
an antistatic work surface pad.
✓ Hold the adapter only by its sides or cover plate. Do not touch any
components on the printed circuit board assembly (PCBA).
✓ Do not use any test equipment to check the components on the PCB.
✓ Do not bump, jar, or drop the adapter. Do not place other objects on
top of the adapter.
✓ Transport the adapter in its shielded bag in an appropriate shipping
container. Do not put other materials in the bag with the adapter.
Chapter 2 17
Page 18

Installing the A4800A Adapter
Looking at Adapter Installation
Looking at Adapter Installation
NOTE The host bus adapter card is supported on the HP N4000 N-class system.
Refer to the Hewlett-Packard eproducts web site
(http://www.eproducts.hp.com) to disassemble the system, install the
adapter in an available PCI slot, and reassemble the system.
Installation can be performed in one of two ways:
• Use the OLAR (On Line Add/Replace) capability (HP-UX 11i)
• Power down the system and then add or replace the HBA
The method you choose will depend on your situation and requirements.
Install Using OLAR (HP-UX 11i)
The letters O, L, A and R stand for On Line Addition [and] Replacement.
This refers to the ability of a PCI I/O card to be installed (replaced or
added) in an HP-UX computer system designed to support this feature
without the need for completely shutting down, then re-booting the
system or adversely affecting other system components. The system
hardware uses the per-slot power control combined with operating
system support in HP-UX 11i to enable this feature.
IMPORTANT Certain “Classes” of hardware are not intended for access by users. At
this time this includes V-Class and SuperDome systems. HP
recommends that these systems only be opened by a qualified HP
Engineer. Failureto observe this requirement can invalidate any support
agreement or warranty to which the owner might otherwise be entitled.
Important Terms and Concepts
The addition or replacement of an OLAR-compatible card may be done in
either one of two ways:
1. Using the SAM utility.
Chapter 218
Page 19

2. Issuing command-line commands using rad.
For detailed information about the use of either of these two procedures,
please refer to the following document:
Configuring HP-UX For Peripherals, HP Part Number B2355-90698
This document may be ordered from HP, or you may view, download and
print it from the following website: www.docs.hp.com
Table 2-1 Important Terms
Term Meaning
OLAR All aspects of the OLAR feature
Power Domain A grouping of 1 or more
Installing the A4800A Adapter
Looking at Adapter Installation
including On-line Addition
(OLA) and On-line Replacement
(OLR).
interface card slots that can be
powered on or off as a unit.
(NOTE: Multi-slot power
domains are not currently
supported)
target card / target card slot The interface card which will be
added or replaced using OLAR,
and the card slot in which it
resides.
affected card / affected card
slot
IMPORTANT In many cases, other interface cards and slots within the system are
dependent upon the target card. For example:
If the target card is a multiple-port card, suspending or deleting drivers
for the target card slot also suspends individual drivers for the multiple
hardware paths on that card).
Chapter 2 19
Interface cards and the card
slots in which they reside, and
which are in the same power
domain as the target slot.
Page 20

Installing the A4800A Adapter
Looking at Adapter Installation
During a card replacement operation, SAM performs a Critical Resource
Analysis, which checks all ports on the target card for critical resources
that would be temporarily unavailable while the card is shut down.
Planning and Preparation
SAM will, generally, prevent you from performing OLAR procedures that
would adversely affect other areas of the server. Refer to Configuring
HP-UX For Peripherals, HP Part Number B2355-90698 for detailed
information.
Critical Resources Because power to the slot must be off when the old
card is removed and the new card is inserted, the effects of shutting
down the card’s functions must be carefully considered.
This is particularly important if there is no on-line failover or backup
card to pick up those functions. For example:
• Which mass storage devices will be temporarily disconnected when
the card is shut down?
• Will a critical networking connection be lost?
A critical resource is one that would cause a system crash or prevent the
operation from successfully completing if the resource were temporarily
suspended or disconnected. For example, if the SCSI adapter to be
replaced connects to the unmirrored root disk or swap space, the system
will crash when the card is shut down.
During an OLAR procedure, it is essential to check the targeted card for
critical resources, as well as the effects of existing disk mirrors and other
situations where a card’s functions can be taken over by another card
that will not be affected.
Fortunately SAM performs a thorough critical resource analysis
automatically, and presents options to you based on its findings. If you
determine that critical resources will be affected by the procedure, you
should replace the card when the server is off-line.
If you must take action immediately, you can use rad to attempt an
on-line addition of a backup card and deletion of the target card.
Chapter 220
Page 21

Installing the A4800A Adapter
Looking at Adapter Installation
Card Compatibility
On-Line Addition (OLA). When on-line adding an interface card, the
first issue that must be resolved is whether the new card is compatible
with the system. Each PCI slot provides a set amount of power. The
replacement card cannot require more power than is available.
The card must also operate at the slot’s bus frequency. A PCI card must
run at any frequency lower than its maximum capability; however, a
card that operated at a maximum of 33 MHz would not work on a bus
running at 66 MHz. rad provides information about the bus frequency
and power available at a slot, as well as other slot-related data.
On-Line Replacement (OLR) When on-line replacing an interface
card, the replacement card must be identical to the card being replaced
or at least be able to operate using the same driver as the replaced card.
This is referred to as like-for-like replacement and should be adhered to
because using a similar but not identical card may cause unpredictable
results. For example, a newer version of the target card which is
identical in terms of hardware may contain an updated firmware version
that could potentially conflict with the current driver.
The PCI specification allows a single physical card to contain more than
one port. A single-port SCSI bus adapter can not be replaced by a
dual-port adapter, even if the additional port(s) on the card are identical
to the original SCSI bus adapter.
When the replacement card is added to the system, the appropriate
driver for that card must be configured in the kernel before beginning
the operation. SAM ensures the correct driver is present. (In most cases,
the replacement card will be the same type as a card already in the
system, and this requirement will be automatically met.) If you have any
question about the driver’s presence, or if you are not certain that the
replacement card is identical to the existing card, you can use ioscan
together with rad to investigate.
• If the necessary driver is not present and the driver is a dynamically
loadable kernel module (DLKM), you can load it manually. Refer to
the section “Dynamically Loadable Kernel Modules” in Chapter 2 of
the document: Configuring HP-UX ForPeripherals,HP Part Number
B2355-90698 for more information.
• If the driver is static and not configured in the kernel, then the card
cannot be On-line Added. The card could be physically inserted
on-line, but no driver would claim it.
Chapter 2 21
Page 22

Installing the A4800A Adapter
Looking at Adapter Installation
OLA/R Restrictions for the A4800A
The HBA has some restrictions in the OLA/R procedure. These
restrictions are explained below.
The restrictions are necessary because the SCSI attributes of initiator
ID, and speed cannot be changed online for this HBA.
OLA of A4800-60001 The HBA can be online added only if the SCSI
attribute values of initiator ID and speed are usable in your
configuration. These values will be set to the current PDC (Processor
Dependent Code) values (if any) or default to the new HBA’s values (see
Table 2-2).
Table 2-2 A4800-60001 - Default SCSI Attribute Values
Attribute Default Value
Initiator ID 7
Speed Fast
If these attributes are not acceptable, you must reboot the system to
access the Boot Console Handler (BCH) prompt and then change the
values in the PDC.
OLR of A4800-60001 the A4800-60001 can be Online Replaced without
special considerations. See the Configuring HP-UX Peripherals manual
for the steps that are necessary to OLR this HBA.
Install/Replace With System Powered Down
Check the manual supplied with the server to perform the following
installation:
Step 1. Shut down the operating system.
Step 2. Power off the system and disconnect the power cord and cables.
Step 3. Access the back of the server cabinet following the instructions in the
server documentation. Refer to the server documentation for instructions
on disassembling the server and installing host bus adapters.
Chapter 222
Page 23

Installing the A4800A Adapter
Looking at Adapter Installation
Step 4. Locate the card separator/extractor slot where you intend to install the
adapter.
Step 5. Remove the blank panel aligned with the PCI slot you intend to use. If
the blank panel has a bracket screw, save it for reuse during the
installation.
Step 6. Following the instructions in the server manual, insert the adapter into
an available PCI slot.
The adapter is keyed to be inserted in only one way. The components on
the adapter may face the opposite way from other boards on the system.
NOTE If the internal bus is not connected to any peripherals it MUST be
terminated using the supplied low profile, internal terminator.
Step 7. Verify that the connectors on the adapter and the bus converter are
aligned properly and firmly seated. The card’s bracket should fit where
the blank panel was removed. Secure the bracket with the bracket screw
from the blank panel, if there is one. Note that, for N-Class systems, a
screw is not used to secure the card.
NOTE If the adapter will only be used with internal SCSI devices, install the
A4700-67098 (1252-6520) differential terminator into the external port.
Step 8. Connect peripheral devices and terminate the SCSI bus.
NOTE A cable for connecting the PCI Ultra SCSI Host Bus Adapter to a disk
tray A or B port connector is supplied with the A5068A product. Cables
for connecting external devices are not supplied with the controller and
must be purchased separately.
Step 9. Set the SCSI ID, if needed.
The default SCSI ID is 7. To change this to a different value for
High-Availability (HA) applications, you must use the Boot Console
Handler (BCH). There are no SCSI address switches or jumpers. You
Chapter 2 23
Page 24

Installing the A4800A Adapter
Looking at Adapter Installation
must invoke the appropriate commands in the SCSI section of the BCH
and change the address electronically to whatever is required for the HA
configuration being used. Refer to “Checking SCSI Bus Compatibility” on
page 36.
NOTE Do not change for MPE/iX. You may need to change "rate" setting.
Step 10. Reassemble the server.
Step 11. Power on the system and reboot the operating system.
Step 12. The A4800A adapter runs an automatic self test. Error messages, if any
are generated, appear on the system console.
Chapter 224
Page 25

Connecting SCSI Peripheral Devices
Connect multiple SCSI devices by chaining them together with shielded,
68-pin, High-Density (HD) cables. The connectors on these cables are
keyed to ensure proper pin-1 to pin-1 registration. Refer to the
peripheral manual for instructions on attaching SCSI cables. Peripheral
storage devices are normally shipped with the required SCSI cables.
Table 2-3 below shows the SCSI bus widths and speeds that have been
established by the SCSI Trade Association (STA).
Table 2-3 SCSI Bus Widths and Speeds
(1)
Type
SCSI-1 8 5
SCSI Bus
Width (in Bits)
Installing the A4800A Adapter
Connecting SCSI Peripheral Devices
SCSI Bus Speed
Maximum Data
Rate (in
MBytes/Second)
Fast SCSI 8 10
Fast Wide SCSI 16 20
Ultra SCSI 8 20
Wide Ultra SCSI 16 40
Ultra2 SCSI 8 40
Wide Ultra2
SCSI
(1)
Absence of the word “Wide” means an 8-bit bus width;
using the term “Narrow” to avoid ambiguity is acceptable,
too.
You can connect up to eight SCSI, Fast SCSI, and Ultra SCSI devices on
a single-ended Ultra SCSI bus if they are evenly spaced on a 1.5 m Ultra
2 SCSI cable (0.19 m between devices).
Chapter 2 25
16 80
Page 26

Installing the A4800A Adapter
Connecting SCSI Peripheral Devices
You can connect up to four devices if they are evenly spaced on a 3 m
Ultra SCSI cable (0.75 m between devices). The single-ended SCSI bus
must not exceed 3 m (total internal and external cable lengths) even with
fewer than four devices.
Table 2-4 below shows the maximum bus length for each of the SCSI
types.
Table 2-4 Maximum SCSI Bus Lengths
(1)
High
Voltage
l (HVD)
Maximum
Devices
Type
Maximum Bus Length (in Meters)
Low
Single-ende
d (SE)
Voltage
Differentia
Differentia
l (LVD)
SCSI-1 6 12.5 25 8
Fast SCSI 3 12.5 25 8
Fast Wide
3 12.5 25 16
SCSI
Ultra SCSI 1.5 12.5 25 8
Ultra SCSI 3 - - 4
Wide Ultra
- 12.5 25 16
SCSI
Wide Ultra
1.5 - - 8
SCSI
Wide Ultra
3--4
SCSI
Ultra2 SCSI
WideUltra2
SCSI
(2)
(2)
12.5
12.5
(2)
(2)
8
16
Chapter 226
Page 27

Installing the A4800A Adapter
Connecting SCSI Peripheral Devices
Table 2-4 Maximum SCSI Bus Lengths (Continued) (Continued)
Maximum Bus Length (in Meters)
Type
Single-ende
d (SE)
Low
Voltage
Differentia
Differentia
l (LVD)
(1)
This parameter can be exceeded in point-to-point and engineered
(1)
High
Voltage
l (HVD)
Maximum
Devices
applications.
(2)
Single-ended and High Voltage Differential are not defined at Ultra2
speeds.
Chapter 2 27
Page 28

Installing the A4800A Adapter
Terminating the A4800A Adapter
Terminating the A4800A Adapter
The A4800A has no auto-termination setting. Termination must be
provided by a physical terminator. When the HBA is at the end of the
SCSI bus, the terminator should be installed and secured at either the
internal or external connector (whichever does not have a cable attached)
as shown in Figure 1-1 on page 8.
When the adapter is used in High-Availability (HA) applications (such as
MC/ServiceGuard) and it is required to be in the middle of the bus, the
adapter’s terminator must be removed.
The SCSI bus must be properly terminated. Terminatorsmay be ordered
separately if needed (When ordered with the HBA, the part number is
A4800A option 2. When ordered separately, the part number is C2905A).
The first and last physical SCSI devices connected on the ends of the
SCSI bus must have terminators attached. All other SCSI devices on the
SCSI bus must have their terminators removed or disabled. Note that
the host bus adapter is also on the bus.
IMPORTANT The A4800A does not provide automatic termination.
NOTE When the adapter is used in HA applications that use two SCSI host bus
adapters (such as MC/ServiceGuard) and it is required to be in the
middle of the bus, the adapter’s SCSI ID will need to be changed (for
example, from 7 to 6). Each device on the bus must have a unique ID.
Refer to “The SCSI Command” on page 37.
To disable the adapter’s termination, you need to physically remove the
terminator from the HBA connector. Termination for this bus must now
be provided by some other SCSI device (e.g. disk, disk array, or other
HBA, as required).
Chapter 228
Page 29

Installing the A4800A Adapter
Setting SCSI IDs
Setting SCSI IDs
You must assign a separate SCSI ID (0 through 15 for a 16-bit SCSI bus)
to the SCSI host bus adapter and each SCSI device. The priority of the
device on the SCSI bus is determined by the SCSI ID of the device. The
order of SCSI ID priorities (from highest to lowest) is 7, 6, 5, 4, 3, 2, 1, 0,
15, 14, 13, 12, 11, 10, 9, and 8. A device with SCSI ID 7 has the highest
priority, and one with SCSI ID 8 has the lowest.
When you are assigning SCSI IDs, we recommend you to give the SCSI
host bus adapter higher priority than the other SCSI devices on the bus.
SCSI ID 7 is the preset SCSI ID for the A4800A SCSI host bus adapter
(giving it the highest priority on the SCSI bus). Set each of the other
SCSI devices on the bus to one of the remaining SCSI IDs.
For a multi-initiator (High Availability [HA]) configuration, where
multiple SCSI host bus adapters are connected to the same SCSI bus,the
SCSI host bus adapter that carries most of the traffic must be assigned a
SCSI ID of 7 (giving it the highest priority). Later, you must change the
SCSI ID of each of the remaining SCSI host bus adapters on the bus from
the preset setting (7) to the next highest priority remaining SCSI IDs (for
example, 6, 5, 4, and so on).
If you plan to boot your system from a hard disk drive on the SCSI bus,
you must assign that drive the next highest priority unassigned SCSI ID.
If there is only one SCSI host bus adapter (SCSI ID = 7), the hard disk
drive would be assigned a SCSI ID of 6. If there are multiple SCSI host
bus adapters, the hard disk drive would be assigned the next highest
priority SCSI ID available after all of the SCSI host bus adapters have
been assigned higher priority SCSI IDs.
To change the SCSI ID of the A4800A host bus adapter, refer to
“Checking SCSI Bus Compatibility” on page 36.
The peripheral device SCSI IDs are usually set with jumpers or a switch
on the peripheral. Refer to the peripheral manufacturer’s instructions to
determine the ID of each device and how to change it.
IMPORTANT You must not have duplicate SCSI IDs on a SCSI bus; the system will
hang or crash if you have duplicate SCSI IDs on the bus.
Chapter 2 29
Page 30

Installing the A4800A Adapter
Setting SCSI IDs
Make necessary changes, if any, to the SCSI IDs and record the IDs for
future reference. To keep a record of the IDs, you can use Table 2-5.
Table 2-5 Record of SCSI IDs
SCSI ID SCSI Device
15
14
13
12
11
10
9
8
7 Adapter (default)
6
5
4
3
2
1
0
Chapter 230
Page 31

HP 9000
Installing the A4800A Adapter
Verifying Installation
Verifying Installation
After installing the adapter and attaching peripheral devices, verify that
all components are working. Refer to your system documentation for
information on verifying operation.
Step 1. To verify that the adapter is correctly installed, execute the following
command:
ioscan -f
The ioscan output could look like this:
ext_bus 0 0/0/0 c720 CLAIMED INTERFACE Ultra wide SCSI
The third column represents the hardware path of the slot the adapter is
installed in. For information about the ioscan command, refer to your
operating system reference manual or the ioscan man page.
Step 2. Verify that the adapter and driver display.
Step 3. Verify that the devices you attached to the adapter display.
Chapter 2 31
Page 32

Installing the A4800A Adapter
Verifying Installation
HP e3000 Assuming an N-Class system with an I/O card being added to slot #12,
we will expect path 1/0/0/0 to be returned for our card.
Step 1. From BCH menus:
------------------------------------------------------
-Command Description
------- ----------ALL Display all system information
...
IO Display I/O interface information
...
-------------------------------------------------Information Menu: Enter command > io
I/O MODULE INFORMATION
Path Slot IODC
Type (dec) Number HVERSION SVERSION Vers
---- ----- ------ -------- -------- ---System bus adapter 0 0x8030 0xc10 0x0
Local bus adapter 0/0 Built_In 0x7820 0xa00 0x0
Local bus adapter
...
Local bus adapter 1/0 12 0x7820 0xa00 0x0
...
PCI DEVICE INFORMATION
Path Vendor Device Bus Slot
Description (dec) Id Id # #
----------- ----- ---- ---- --- --Ethernet cntlr 0/0/0/0 0x1011 0x19 0 Built_In
SCSI bus cntlr 0/0/1/0 0x1000 0xc 0 Built_In
SCSI bus cntlr 0/0/2/0 0x1000 0xf 0 Built_In
SCSI bus cntlr 0/0/2/1 0x1000 0xf 0 Built_In
Comp. ser cntlr 0/0/4/0 0x103c 0x1048 0 Built_In
Comp. ser cntlr 0/0/5/0 0x103c 0x1048 0 Built_In
SCSI bus cntlr 1/0/0/0 0x1000 0xf 128 12
Information Menu: Enter command >main
Main Menu: Enter command or menu > sea 1/0/0/0
Searching for potential boot device(s) - on Path 1/0/0/0
This may take several minutes.
To discontinue search, press any key (termination may not be immediate).
Path# Device Path (dec) Device Path (mnem) Device Type
----- ----------------- ------------------ ---------- P0 1/0/0/0.6 intscsia.6 Random access media
Main Menu: Enter command or menu >
Chapter 232
Page 33

3 Troubleshooting
This chapter contains the following sections that describe how to
troubleshooting the A4800A adapter:
• “General Procedure” on page 35.
Chapter 3 33
Page 34

Troubleshooting
• “Checking SCSI Bus Compatibility” on page 36.
• “Using Support Tools Manager (STM)” on page 41
• “Contacting Your Hewlett-Packard Representative” on page 42.
Chapter 334
Page 35

General Procedure
The A4800A adapter is a single field-replaceable unit (FRU) and does not
contain any field-serviceable parts. Troubleshooting procedures
described in this section are limited to verifying that the adapter is
operational and a valid connection is established.
In general, follow these steps to troubleshoot the A4800A adapter:
Step 1. Check the connection.
Make sure that the correct cable is used, connected, and operating
properly and that there are no bent pins in any of the connectors.
Step 2. Check SCSI bus compatibility.
Ensure transfer rate compatibility with the attached devices using the
SCSI boot menu command.
Step 3. Check the adapter.
Troubleshooting
General Procedure
Inspect the adapter to make sure it is seated properly in the PCI bus slot.
If necessary, power down the system, reseat the adapter, and restart the
system.
Step 4. Run diagnostics.
If a visual inspection of the adapter and cable(s) does not reveal any
problems, or if an action taken as a result of the inspection does not
produce a working adapter, you may want to run diagnostics to
determine whether the adapter can communicate and respond to PCI
bus instructions. Diagnostics are described in the next section.
If diagnostics determine that the controller is defective, you must replace
it. Contact your local Hewlett-Packard customer representative or call
the HP Response Center.
Chapter 3 35
Page 36

Troubleshooting
Checking SCSI Bus Compatibility
Checking SCSI Bus Compatibility
You can ensure SCSI controller and SCSI device compatibility by using
the SCSI command to display and select SCSI bus parameters.
The SCSI command is available from the boot menu displayed after the
test station has booted (if autoboot is disabled). The boot menu looks like
this (for highlighting reasons, the SCSI command is in bold here):
Command Description
------- ----------AUto [BOot|SEArch ON|OFF] Display or set the specified flag
BOot [PRI|ALT|<path> <args>] Boot from a specified path
BootTimer [time] Display or set boot delay time
CLEARPIM Clear PIM storage
CPUconfig [<proc>] [ON|OFF] Configure/Deconfigure Processor
DEfault Set the sytem to defined values
DIsplay Display this menu
ForthMode Switch to the Forth OBP interface
IO List the I/O devices in the system
LS [<path>|flash] List the boot or flash volume
OS [hpux|sppux] Display/Select Operating System
PASSword Set the Forth password
PAth [PRI|ALT|CON] [<path>] Display or modify a path
PDT [CLEAR|DEBUG] Display/clear Non-Volatile PDT state
PIM_info [cpu#] [HPMC|TOC|LPMC] Display PIM of current or any CPU
RESET [hard|debug] Force a reset of the system
RESTrict [ON|OFF] Display/Select restricted access to Forth
SCSI [INIT|RATE] [bus slot val] List/Set SCSI controller parms
SEArch [<path>] Search for boot devices
SECure [ON|OFF] Display or set secure boot mode
TIme [cn:yr:mo:dy:hr:mn[:ss]] Display or set the real-time clock
VErsion Display the firmware versions
Chapter 336
Page 37

Troubleshooting
Checking SCSI Bus Compatibility
The SCSI Command
As explained above, you can use the SCSI command to check the
compatibility of the SCSI adapter and the SCSI device(s), by displaying
and setting SCSI bus parameters.
NOTE See “HP e3000 Communicator for MPE/iX release 7.0” for MPE/iX
guidelines on rate. http://docs.hp.com/mpeix/pdf/30216-90312.pdf
Displaying Transfer Rates
To use the SCSI command to display the SCSI transfer rate for an
adapter, follow this syntax:
SCSI rate
bus_number slot_number
where
bus_number
Specifies the number of the bus the adapter is installed
on.
slot_number
Specifies the number of the slot the adapter is in.
For example:
• To display the SCSI transfer rate for the adapter installed on bus 5
slot 2, issue this command:
SCSI rate 5 2
The output could look something like this:
PCI device /5.2 = no limit
• To list transfer rates for all bus and slot numbers, issue this
command:
SCSI rate
Chapter 3 37
Page 38

Troubleshooting
Checking SCSI Bus Compatibility
Setting Transfer Rates
To use the SCSI command to set the SCSI transfer rate for an adapter,
follow this syntax:
SCSI rate
bus_number slot_number rate
where
bus_number
Specifies the number of the bus the adapter is installed
on.
slot_number
rate
Specifies the number of the slot the adapter is in.
Specifies the adapter’s transfer rate:
• 0 (no limit)
• 10 (Fast SCSI)
• 20 (Ultra SCSI)
For example, to set the SCSI transfer rate for the adapter installed on
bus 5 slot 2 to Fast SCSI and then display the results, issue these
commands:
SCSI rate 5 2 10
SCSI rate 5 2
The output (of the second command) could look something like this:
PCI device /5.2 = fast SCSI
Chapter 338
Page 39

Troubleshooting
Checking SCSI Bus Compatibility
Displaying SCSI IDs
To use the SCSI command to display the initiator (SCSI) IDs for an
adapter, follow this syntax:
SCSI init
bus_number slot_number
where
bus_number
Specifies the number of the bus the adapter is installed
on.
slot_number
Specifies the number of the slot the adapter is in.
For example:
• To display the SCSI ID for the adapter on bus 5 slot 2, issue this
command:
SCSI init 5 2
The output could look something like this:
PCI device /5.2 = 7
• To list the SCSI IDs for all bus and slot numbers, issue this
command:
SCSI init
Chapter 3 39
Page 40

Troubleshooting
Checking SCSI Bus Compatibility
Setting SCSI IDs
To use the SCSI command to set the initiator (SCSI) ID for an adapter,
follow this syntax:
SCSI init
bus_number slot_number ID_number
where
bus_number
Specifies the number of the bus the adapter is installed
on.
slot_number
ID_num
Specifies the number of the slot the adapter is in.
Specifies the adapter’s SCSI ID number.
For example, to set the SCSI ID for the adapter installed on bus 5 slot 2
to 6 and then display the results, issue these commands:
SCSI init 5 2 6
SCSI init 5 2
The output (of the second command) could look something like this:
PCI device /5.2 = 6
Chapter 340
Page 41

Troubleshooting
Using Support Tools Manager (STM)
Using Support Tools Manager (STM)
STM is a software application that can be run from the console to obtain
status and descriptive information about the A4800A adapter, diagnose
problems, and update firmware. See the Support Tools Manager User’s
Guide for more details about STM.
Chapter 3 41
Page 42

Troubleshooting
Contacting Your Hewlett-Packard Representative
Contacting Your Hewlett-Packard
Representative
If the equipment is covered by an HP service contract, document the
problem as a service request and forward it to your HP representative.
Include the following information where applicable:
• Describe the problem, including the events and symptoms leading up
to the problem. Attempt to describe the source of the problem.
Include HP-UX or MPE/iX commands, communication subsystem
commands, functionality of user programs, result codes and
messages, and data that can reproduce the problem.
• Obtain the version, update, and fix information for all software.
1. To check the version of the kernel, enter this command:
uname -r
To check patches, enter:
what /stand/vmunix | grep scsi
2. To check the version of MPE/iX enter: SHOWME
To check patches, enter: PRINT HPSWINFO.PUB.SYS
This allows HP to determine if the problem is already known and the
correct software is installed at your site.
• Illustrate as clearly as possible the context of any messages. Record
all error messages and numbers that appear at the user terminal
and the system console.
• Prepare the formatted output and a copy of the log file for the HP
representative to analyze.
• Prepare a listing of the HP-UX or MPE/iX I/O configuration being
used for the HP representative to analyze.
• Try to determine the general area within the software where the
problem may exist. Refer to the appropriate reference manual and
follow the guidelines on gathering information for that product.
Chapter 342
Page 43

Troubleshooting
Contacting Your Hewlett-Packard Representative
• Document your interim (workaround) solution. The cause of the
problem can sometimes be found by comparing the circumstances in
which the problem occurs with the circumstances in which the
problem does not occur.
• In the event of a system failure, obtain a full memory dump.
• For HP-UX: If the directory /var/adm/crash exists, the HP-UX
utility /sbin/savecore automatically executes during reboot to save
the memory dump. HP recommends that you create the
/tmp/syscore directory after successfully installing this product.
Send the output of the system failure memory dump to the HP
representative.
• For MPE/iX: If you use AUTORESTART and DUMPTODISK
products follow your normal system recovery steps. Otherwise take a
memory dump and save the resulting tape. Contact HP Support for
analysis of your failure.
If the equipment is not covered by an HP service contract, there may be a
charge for time and materials.
Chapter 3 43
Page 44

Troubleshooting
Contacting Your Hewlett-Packard Representative
Chapter 344
Page 45

A SCSI Sense Codes
This appendix shows the possible codes that appear in SCSI error
messages.
Appendix A 45
Page 46

SCSI Sense Codes
HP 9000 The following example shows a typical SCSI error message:
[+6708 72410001 002a9858 0:7] scsi disk: CHECK CONDITION on disk 0:6:5:0
Read of logical block 509856, count 128
disk sd45a, block 254920, 65536 bytes
Valid = 1, Error code = 0x70
Segment number = 0x00, Filemark = 0, EOM = 0, ILI = 0
Sense key = 0x1, "RECOVERED ERROR"
Information = 0x00 0x07 0xc7 0xe4
[+6709 72410001 002a9a10 0:7] scsi disk: Additional sense length = 0x0a
Command-specific information = 0x00 0x00 0x00 0x00
Additional sense = 0x18, Qualifier = 0x01
Field replaceable unit code = 0xea
SKSV = 1, C/D = 0, BPV = 0, Bit pointer = 0
Field pointer = 0x0003
The status (CHECK CONDITION) and sense key (RECOVERED
ERROR)—shown in bold in the example above—are interpreted for you
in the error message text. Each Additional sense and its corresponding
Qualifier code—shown in bold in the example above—require
interpretation on your part. Use the two codes together to determine the
meaning. In the example above, the Additional sense (0x18) and
Qualifier (0x01) codes together mean “recovered data with error
correction and retries applied.” You can look up the various codes and
keys in the tables on the next pages.
MPE/iX Use the CSTM tool to look at hardware error information. Information
about CSTM can be found in the article “TERMDSM: User Interface
Change undre System Diagnostics” in the “Communicator 3000 MPE/iX
Release 6.5”. http://docs.hp.com/mpeix/pdf/30216-90291.pdf
Appendix A46
Page 47

SCSI Sense Codes
Table A-1 below lists all possible SCSI status codes and their meanings.
Table A-1 SCSI Status Codes
SCSI
Status
Code
0x00 Good
0x02 Check condition
0x04 Condition met
0x08 Busy
0x10 Intermediate
0x14 Intermediate—condition met
0x18 Reservation conflict
0x22 Command terminated
Meaning
0x28 Queue full
Appendix A 47
Page 48

SCSI Sense Codes
Table A-2 below lists all possible SCSI sense keys and their meanings.
Table A-2 SCSI Sense Keys
SCSI
Sense
Key
0 No sense
0x1 Recovered error
0x2 Not ready
0x3 Medium error
0x4 Hardware error
0x5 Illegal request
0x6 Unit attention
0x7 Data protect
Meaning
0x8 Blank check
0x9 Vendor-specific
0xa Copy aborted
0xb Aborted command
0xc Equal
0xd Volume overflow
0xe Miscompare
0xf Reserved
Appendix A48
Page 49

Table A-3 below lists the Additional sense codes and Qualifier codes and
their meanings. Remember that you must use the combined codes—an
Additional sense code/Qualifier code pair—to find the correct meaning.
Table A-3 SCSI Additional Sense Code/Qualifier Code Pairs
SCSI Sense Codes
SCSI
Addition
al Sense
Code
0x00 0x00 No additional sense information
SCSI
Qualifier
Code
0x01 Filemark detected
0x02 End-of-partitions/medium detected
0x03 Setmark detected
0x04 Beginning of partition/medium detected
0x05 End-of-data detected
0x06 I/O process terminated
0x11 Audio play operation in progress
0x12 Audio play operation paused
0x13 Audio play operation successfully
completed
0x14 Audio play operation stopped due to
error
Meaning
0x15 No current audio status to return
0x01 0x00 No index/sector signal
0x02 0x00 No seek complete
0x03 0x00 Peripheral device write fault
0x01 No write current
0x02 Excessive write errors
Appendix A 49
Page 50

SCSI Sense Codes
Table A-3 SCSI Additional Sense Code/Qualifier Code Pairs (Continued)
SCSI
Addition
al Sense
Code
0x04 0x00 Logical unit not ready, cause not
0x05 0x00 Logical unit does not respond to selection
0x06 0x00 Reference position found
0x07 0x00 Multiple peripheral devices selected
0x08 0x00 Logical unit communication failure
SCSI
Qualifier
Code
reportable
0x01 Logical unit in process of becoming ready
0x02 Logical unit not ready, initializing
command required
0x03 Logical unit not ready, manual
intervention required
0x04 Logical unit not ready, format in progress
0x01 Logical unit communication time-out
Meaning
0x02 Logical unit communication parity error
0x09 0x00 Track following error
0x01 Tracking servo failure
0x02 Focus servo failure
0x03 Spindle servo failure
0x0a 0x00 Error log overflow
0x0c 0x00 Write error
0x01 Write error recovered with auto
reallocation
0x02 Write error—auto reallocation failed
Appendix A50
Page 51

SCSI Sense Codes
Table A-3 SCSI Additional Sense Code/Qualifier Code Pairs (Continued)
SCSI
Addition
al Sense
Code
0x10 0x00 ID crc or ecc error
0x11 0x00 Unrecovered read error
SCSI
Qualifier
Code
0x01 Read retries exhausted
0x02 Error too long to correct
0x03 Multiple read errors
0x04 Unrecovered read error—auto reallocate
failed
0x05 l-ec uncorrectable error
0x06 circ unrecovered error
0x07 Data resynchronization error
0x08 Incomplete block read
0x09 No gap found
0x0a Miscorrected error
Meaning
0x0b Unrecovered read error—recommend
reassignment
0x0c Unrecovered read error—recommend
rewrite the data
0x12 0x00 Address mark not found for ID field
0x13 0x00 Address mark not found for data field
Appendix A 51
Page 52

SCSI Sense Codes
Table A-3 SCSI Additional Sense Code/Qualifier Code Pairs (Continued)
SCSI
Addition
al Sense
Code
0x14 0x00 Recorded entity not found
0x15 0x00 Random positioning error
0x16 0x00 Data synchronization mark error
0x17 0x00 Recovered data with no error correction
SCSI
Qualifier
Code
0x01 Record not found
0x02 Filemark or setmark not found
0x03 End-of-data not found
0x04 Block sequence error
0x01 Mechanical positioning error
0x02 Positioning error detected by read of
medium
applied
0x01 Recovered data with retries
Meaning
0x02 Recovered data with positive head offset
0x03 Recovered data with negative head offset
0x04 Recovered data with retries and/or circ
applied
0x05 Recovered data using previous sector ID
0x06 Recovered data without ecc—data
auto-reallocated
0x07 Recovered data without ecc—recommend
reassignment
0x08 Recovered data without ecc—recommend
rewrite
Appendix A52
Page 53

SCSI Sense Codes
Table A-3 SCSI Additional Sense Code/Qualifier Code Pairs (Continued)
SCSI
Addition
al Sense
Code
0x18 0x00 Recovered data with error correction
0x19 0x00 Defect list error
SCSI
Qualifier
Code
applied
0x01 Recovered data with error correction and
retries applied
0x02 Recovered data—data auto-reallocated
0x03 Recovered data with circ
0x04 Recovered data with lec
0x05 Recovered data—recommend
reassignment
0x06 Recovered data—recommend rewrite
0x01 Defect list not available
0x02 Defect list error in primary list
Meaning
0x03 Defect list error in grown list
0x1a 0x00 Parameter list length error
0x1b 0x00 Synchronous data transfer error
0x1c 0x00 Defect list not found
0x01 Primary defect list not found
0x02 Grown defect list not found
0x1d 0x00 Miscompare during verify operation
0x1e 0x00 Recovered ID with ecc
0x20 0x00 Invalid command operation code
Appendix A 53
Page 54

SCSI Sense Codes
Table A-3 SCSI Additional Sense Code/Qualifier Code Pairs (Continued)
SCSI
Addition
al Sense
Code
0x21 0x00 Logical block address out of range
0x22 0x00 Illegal function
0x24 0x00 Invalid field in cdb
0x25 0x00 Logical unit not supported
0x26 0x00 Invalid field in parameter list
0x27 0x00 Write protected
0x28 0x00 Not ready to ready transition (medium
SCSI
Qualifier
Code
0x01 Invalid element address
0x01 Parameter not supported
0x02 Parameter value invalid
0x03 Threshold parameters not supported
may have changed)
0x01 Import or export element assessed
Meaning
0x29 0x00 Power on, reset, or bus device reset
occurred
0x2a 0x00 Parameters changed
0x01 Mode parameters changed
0x02 Log parameters changed
0x2b 0x00 Copy cannot execute since host cannot
disconnect
0x2c 0x00 Command sequence error
0x01 Too many windows specified
Appendix A54
Page 55

SCSI Sense Codes
Table A-3 SCSI Additional Sense Code/Qualifier Code Pairs (Continued)
SCSI
Addition
al Sense
Code
0x2f 0x00 Commands cleared by another initiator
0x30 0x00 Incompatible medium installed
0x31 0x00 Medium format corrupted
0x32 0x00 No defect spare location available
0x33 0x00 Tape length error
0x36 0x00 Ribbon, ink, or tower failure
0x37 0x00 Rounded parameter
0x39 0x00 Saving parameters not supported
SCSI
Qualifier
Code
0x01 Cannot read medium—unknown format
0x02 Cannot read medium—incompatible
format
0x03 Cleaning cartridge installed
0x01 Defect list update failure
Meaning
0x3a 0x00 Medium not present
Appendix A 55
Page 56

SCSI Sense Codes
Table A-3 SCSI Additional Sense Code/Qualifier Code Pairs (Continued)
SCSI
Addition
al Sense
Code
0x3b 0x00 Sequential positioning error
SCSI
Qualifier
Code
0x01 Tape position error at
beginning-of-medium
0x02 Tape position error at end-of-medium
0x03 Tape or electronic vertical forms unit not
ready
0x04 Slew failure
0x05 Paper jam
0x06 Failed to sense top-of-form
0x07 Failed to sense bottom-of-form
0x08 Reposition error
0x09 Read past end of medium
0x0a Read past beginning of medium
Meaning
0x0b Position past end of medium
0x0c Position past beginning of medium
0x0d Medium destination element full
0x0e Medium source element empty
0x3d 0x00 Invalid bits in identify message
0x3e 0x00 Logical unit has not self-configured yet
Appendix A56
Page 57

SCSI Sense Codes
Table A-3 SCSI Additional Sense Code/Qualifier Code Pairs (Continued)
SCSI
Addition
al Sense
Code
0x3f 0x00 Target operation conditions have
0x40 0x00 RAM failure
0x41 0x00 Data path failure
0x42 0x00 Power-on or self-test failure
0x43 0x00 Message error
0x44 0x00 Internal target failure
0x45 0x00 Select or reselect failure
0x46 0x00 Unsuccessful soft reset
SCSI
Qualifier
Code
changed
0x01 Microcode has been changed
0x02 Changed operating definition
0x03 Inquiry data has changed
nn
Diagnostic failure on component
Meaning
nn
0x47 0x00 SCSI parity error
0x48 0x00 Initiator detected error message received
0x49 0x00 Invalid message error
0x4a 0x00 Command phase error
0x4b 0x00 Data phase error
0x4c 0x00 Logical unit failed self-configuration
0x4e 0x00 Overlapped commands attempted
Appendix A 57
Page 58

SCSI Sense Codes
Table A-3 SCSI Additional Sense Code/Qualifier Code Pairs (Continued)
SCSI
Addition
al Sense
Code
0x50 0x00 Write append error
0x51 0x00 Erase failure
0x52 0x00 Cartridge fault
0x53 0x00 Media load or eject failed
0x54 0x00 SCSI to host system interface failure
0x55 0x00 System resource failure
0x56 0x00 Reserved
0x57 0x00 Unable to recover table of contents
SCSI
Qualifier
Code
0x01 Write append position error
0x02 Position error related to timing
0x01 Unload tape failure
0x02 Medium removal prevented
Meaning
0x58 0x00 Generation does not exist
0x59 0x00 Updated block read
0x5A 0x00 Operator request or state change input
(unspecified)
0x01 Operator medium removal request
0x02 Operator selected write protect
0x02 Operator selected write permit
Appendix A58
Page 59

SCSI Sense Codes
Table A-3 SCSI Additional Sense Code/Qualifier Code Pairs (Continued)
SCSI
Addition
al Sense
Code
0x5B 0x00 Log exception
0x5C 0x00 RPL status change
0x5D 0x00 Reserved
0x5E 0x00 Reserved
0x5F 0x00 Reserved
0x60 0x00 Lamp failure
0x61 0x00 Video acquisition error
SCSI
Qualifier
Code
0x01 Threshold condition met
0x02 Log counter at maximum
0x03 Log list codes exhausted
0x01 Spindles synchronized
0x02 Spindles not synchronized
Meaning
0x01 Unable to acquire video
0x02 Out of focus
0x62 0x00 Scan head positioning error
0x63 0x00 End of user area encountered on this
track
0x64 0x00 Illegal mode for this track
0x65 0x00 Reserved
0x66 0x00 Reserved
0x67 0x00 Reserved
0x68 0x00 Reserved
Appendix A 59
Page 60

SCSI Sense Codes
Table A-3 SCSI Additional Sense Code/Qualifier Code Pairs (Continued)
SCSI
Addition
al Sense
Code
0x69 0x00 Reserved
0x6A 0x00 Reserved
0x6B 0x00 Reserved
0x6C 0x00 Reserved
0x6D 0x00 Reserved
0x6E 0x00 Reserved
0x6F 0x00 Reserved
SCSI
Qualifier
Code
Meaning
Appendix A60
Page 61

B Regulatory Information
This appendix contains all of the regulatory-related information for the
A4800A adapter.
Appendix B 61
Page 62

Regulatory Information
Regulatory Statements
Regulatory Statements
This section contains all of the regulatory statements for the A4800A
adapter.
FCC Statement (For U.S.A. Only)
The Federal Communications Commission (in 47 CFR 15.105) has
specified that the following notice be brought to the attention of the users
of this product.
This equipment has been tested and found to comply with the limits for a
Class A digital device, pursuant to Part 15 of the FCC Rules. These
limits are designed to provide reasonable protection against harmful
interference when the equipment is operated in a commercial
environment. This equipment generates, uses, and can radiate radio
frequency energy and, if not installed and used in accordance with the
instruction manual, may cause harmful interference to radio
communications. Operation of this equipment in a residential area is
likely to cause harmful interference in which case the user will be
required to correct the interference at his own expense. The end user of
this product should be aware that any changes or modifications made to
this equipment without the approval of Hewlett-Packard could result in
the product not meeting the Class A limits, in which case the FCC could
void the user's authority to operate the equipment.
IEC Statement (Worldwide)
This is a Class A product. In a domestic environment this product may
cause radio interference in which case the user may be required to take
adequate measures.
DOC Statement (Canada)
This Class A digital apparatus meets all requirements of the Canadian
interference-Causing Equipment Regulations.
Cet appareil numerique do la classe A respecte toutes les exigences du
Reglement sur le materiel brouilleur du Canada.
Appendix B62
Page 63

Regulatory Information
Regulatory Statements
Spécification ATI Classe A (France
DECLARATION D’INSTALLATION ET DE MISE EN EXPLOITATION
d’un matériel de traitement de l’information (ATI), classé A en fonction
des niveaux de perturbations radioélectriques émis, définis dans la
norme européenne EN 55022 concernant la Compatibilité
Electromagnétique.
Cher Client,
Conformément à la Réglementation Française en vigueur l’installation
ou le transfert d’installation, et l’exploitation de cet appareil de classe A,
doivent faire l’objet d’une déclaration (en deux exemplaires)
simultanément auprès des services suivants:
• Comité de Coordination des Télécommunications 20, avenue de
Ségur - 75700 PARIS
• Préfecture du département du lieu d’exploitation
Le formulaire à utiliser est disponible auprès des préfectures.
La déclaration doit être faite dans les 30 jours suivant la mise en
exploitation.
Le non respect de cette obligation peut être sanctionné par les peines
prévues au code des Postes et Télécommunications et celles indiquées
dans la loi du 31 mai 1993 susvisée.
Arrêté du 27 Mars 1993, publié au J.O. du 28 Mars - ATI
VCCI Statement (Japan)
Appendix B 63
Page 64

Regulatory Information
Regulatory Statements
Declaration of Conformity
Appendix B64
 Loading...