

HP 9000/K100, 9000/K200, 3000/959KS, 9000/K400, 9000/K210 Upgrade Manual
...
System Memory Upgrade Guide
HP 3000/9x 9K S and H P 90 00/ Kxx0
Part No. A2375-90009
Printed in USA, January, 1998
Edition 6, E0198

Legal Notices
The information containe d in this document is subject to change without notic e.
Hewlett-Packard makes no warranty of any kind with regard to this material, including, but not limited
to, the implied warranties of merchantability and fitness for a particul ar purpose. Hewlett-Packard sha ll
not be liable for errors cont ai ned herein or direct, indirect, special, incidental or consequential damages
in connection with the furni shing, performance, or use of this material.
Restricted Rights Legend.
restrictio ns as set forth in subparagraph (c) (1) (ii) of the Rights in Technic al Data and Computer
Software clause at DFARS 252.227- 7013 for DOD agencies, a nd subparagra phs (c) (1) and (c) (2) of the
Commercial Computer Software Restricted Rights clause at FAR 52.227-19 for other agencies.
HEWLETT-PACKARD COMPANY
3000 Hanover Street
Palo Alto, California 94304 U.S.A.
Reproduction, adaptation, or translation of this document without prior written per mission is prohibited,
except as allowed under the copyright laws.
Trademark Notices.
exclusively through X/Open Company Limited.
© Copyright 1983-1997 Hewlett-Packard Company, all rights reserved.
Use, duplication or disclosure by the U.S. Government is subject to
UNIX is a registered trademark in the United States and other countries, licensed
ii

Printing History
New editions of this manual incorporate all material updated since the previous edition. The manual
printing date and part number indicate its current edition. The printing date changes when a new edition
is printed. (Minor corrections and updates which are incorporated at repr int do not cause the date to
change.) The manual part number changes when extensive technical changes are incorporated.
February 1995...............................................................................................................................Edition 1
September 1995 .......... .. ........... .. ........... .......... .............................................................................Edition 2
January 1996............................. .. ........... .......... .............................................................................Edition 3
June 1996......................................................................................................................................Edition 4
July 1997 .................... .......... ........................................................................................................Edition 5
January 1998 .......... ..................................................................................... .......... ............... ........Edition 6
Change Narrative
• Edition 6 technical chan ges include the addition of HP9000/K380/K580 information throughout the
manual.
• Minor changes and updates were also incorpor ated.
Reader Comments
Reader Comments. We welcome your comments about our documentation. If you have editorial
suggestions or recommend improvements for this document, please write to us. You can reach us
through e-mail at: hardwaredocs@cup.hp.com or by sending your letter to: Documentat ion Manager,
M/S 5657, Hewlett-Packard Company, 8000 Foothills Blvd., Roseville, CA 95747-5657 USA. Please
include the following infor mation in your message:
• Title of the ma nua l yo u are referencing.
• Manual part number (from the title page).
• Edition number or publicat ion dat e (from the title page).
• Your name.
• Your company’s name.
SERIOUS ERRORS, such as technical inaccuracies that may render a program or a hardware device
inoperative, should be reported to your HP Response Center or directly to a Support Engineer.
iii

Preface
This edition of the HP 3000/9x9KS and HP 9000/Kxx0 System Memory Upgrade Guide contains
technical infor mation about the following models:
Model 939KS Model K100
Model 959KS Model K200
Model 969KS Model K400
Model 979KS Model K210
Model K210
Model K410
Model K220
Model K250
Model K260
Model K370
Model K380
Model K420
Model K450
Model K460
Model K570
Model K580
iv

v

Contents
1 HP 3000/9x9KS and HP 9000/K2x0/K4x0/Kx70/Kx80
Memory Upgrade Installation
Introduction . . . . . . . . . . . . . . . . . . . . . . . . . . . . . . . . . . . . . . . . . . . . . . . . . . . . . . . . . . . . . . . . . . . . . . . . .1-1
Contents of This Chapter . . . . . . . . . . . . . . . . . . . . . . . . . . . . . . . . . . . . . . . . . . . . . . . . . . . . . . . . . . . . .1-1
Required Tools . . . . . . . . . . . . . . . . . . . . . . . . . . . . . . . . . . . . . . . . . . . . . . . . . . . . . . . . . . . . . . . . . . . . .1-2
Installa tion Procedure (HP 3000/9x9KS and HP 9000/K2x0/K4x0/Kx70/Kx80). . . . . . . . . . . . . . . . . . . .1-3
Verifying the Current PDC Firmware . . . . . . . . . . . . . . . . . . . . . . . . . . . . . . . . . . . . . . . . . . . . . . . . . . .1-3
Obtaining the Correct Firmware Patch . . . . . . . . . . . . . . . . . . . . . . . . . . . . . . . . . . . . . . . . . . . . . . . . .1-4
Downloading the Firmware Patch via the World Wide Web . . . . . . . . . . . . . . . . . . . . . . . . . . . . .1-4
Downloading the Firmware Patch using FTP . . . . . . . . . . . . . . . . . . . . . . . . . . . . . . . . . . . . . . . . .1-4
Checking Existing System Memory . . . . . . . . . . . . . . . . . . . . . . . . . . . . . . . . . . . . . . . . . . . . . . . . . . . . .1-6
After Rebooting Your Sys tem, Type "ma" to Get the Main Menu . . . . . . . . . . . . . . . . . . . . . . . . . . .1-7
System Shutdown . . . . . . . . . . . . . . . . . . . . . . . . . . . . . . . . . . . . . . . . . . . . . . . . . . . . . . . . . . . . . . . . . . .1-8
Gaining Access to Memory . . . . . . . . . . . . . . . . . . . . . . . . . . . . . . . . . . . . . . . . . . . . . . . . . . . . . . . . . . .1-9
Memory Location on HP 3000/9x9KS and HP 9000/K2x0/K4x0/Kx70/Kx80 Servers . . . . . . . . . . .1-9
Removing the Front Bezel and Memory Bulkhead . . . . . . . . . . . . . . . . . . . . . . . . . . . . . . . . . . . . . . .1-9
Removing Memory Extenders . . . . . . . . . . . . . . . . . . . . . . . . . . . . . . . . . . . . . . . . . . . . . . . . . . . . . .1-10
Memory Configuration and SIMM Installation . . . . . . . . . . . . . . . . . . . . . . . . . . . . . . . . . . . . . . . . . . .1-12
Before You Begin . . . . . . . . . . . . . . . . . . . . . . . . . . . . . . . . . . . . . . . . . . . . . . . . . . . . . . . . . . . . . . . .1-12
Configuring Memory for Optimum Performance. . . . . . . . . . . . . . . . . . . . . . . . . . . . . . . . . . . . . . . .1-13
Memory Optimization Procedure for Single Memory Extenders — Overview. . . . . . . . . . . . . . . . .1-14
Procedure for Single Memory Extenders — Detailed . . . . . . . . . . . . . . . . . . . . . . . . . . . . . . . . . . . .1-15
Memory Optimization Procedure for Dual Memory Extenders — Overview . . . . . . . . . . . . . . . . . .1-18
Procedure for Dual Memory Extenders — Detailed . . . . . . . . . . . . . . . . . . . . . . . . . . . . . . . . . . . . .1-19
If You Still Get Warning Messages.... . . . . . . . . . . . . . . . . . . . . . . . . . . . . . . . . . . . . . . . . . . . . . . . .1-22
SIMM Removal and Installation . . . . . . . . . . . . . . . . . . . . . . . . . . . . . . . . . . . . . . . . . . . . . . . . . . . . . . . .1-25
Removing SIMMs. . . . . . . . . . . . . . . . . . . . . . . . . . . . . . . . . . . . . . . . . . . . . . . . . . . . . . . . . . . . . . . . . .1-25
Installing SIMMs . . . . . . . . . . . . . . . . . . . . . . . . . . . . . . . . . . . . . . . . . . . . . . . . . . . . . . . . . . . . . . . . . .1-25
After All SIMMs Are Installed. . . . . . . . . . . . . . . . . . . . . . . . . . . . . . . . . . . . . . . . . . . . . . . . . . . . . . . .1-27
System Reassembly . . . . . . . . . . . . . . . . . . . . . . . . . . . . . . . . . . . . . . . . . . . . . . . . . . . . . . . . . . . . . . . . . .1-28
Reinstalling Memory Extender(s). . . . . . . . . . . . . . . . . . . . . . . . . . . . . . . . . . . . . . . . . . . . . . . . . . . . . .1-28
Reattaching the Memory Bulkhead and Front Bezel . . . . . . . . . . . . . . . . . . . . . . . . . . . . . . . . . . . . . . .1-29
2 HP 9000/K100 Memory Upgrade Inst allation
Introduction . . . . . . . . . . . . . . . . . . . . . . . . . . . . . . . . . . . . . . . . . . . . . . . . . . . . . . . . . . . . . . . . . . . . . . . . .2-1
Contents of This Chapter . . . . . . . . . . . . . . . . . . . . . . . . . . . . . . . . . . . . . . . . . . . . . . . . . . . . . . . . . . . . .2-1
Electrostatic Discharge (ESD) Precautions . . . . . . . . . . . . . . . . . . . . . . . . . . . . . . . . . . . . . . . . . . . . . . .2-2
Required Tools . . . . . . . . . . . . . . . . . . . . . . . . . . . . . . . . . . . . . . . . . . . . . . . . . . . . . . . . . . . . . . . . . . . . .2-2
Installa tion Procedure (HP 9000/K100). . . . . . . . . . . . . . . . . . . . . . . . . . . . . . . . . . . . . . . . . . . . . . . . . . . .2-2
Checking Existing System Memory . . . . . . . . . . . . . . . . . . . . . . . . . . . . . . . . . . . . . . . . . . . . . . . . . . . . .2-2
Gaining Access to System Memory . . . . . . . . . . . . . . . . . . . . . . . . . . . . . . . . . . . . . . . . . . . . . . . . . . . . .2-5
Memory Location in HP 9000/K100 Servers. . . . . . . . . . . . . . . . . . . . . . . . . . . . . . . . . . . . . . . . . . . .2-5
Removing the Memory Bulkhead. . . . . . . . . . . . . . . . . . . . . . . . . . . . . . . . . . . . . . . . . . . . . . . . . . . . .2-5
Memory Configuration and SIMM Installation . . . . . . . . . . . . . . . . . . . . . . . . . . . . . . . . . . . . . . . . . . . .2-6
Configuring Memory . . . . . . . . . . . . . . . . . . . . . . . . . . . . . . . . . . . . . . . . . . . . . . . . . . . . . . . . . . . . . .2-6
Memory SIMM Rules . . . . . . . . . . . . . . . . . . . . . . . . . . . . . . . . . . . . . . . . . . . . . . . . . . . . . . . . . . . . . . . .2-6
Removing SIMMs. . . . . . . . . . . . . . . . . . . . . . . . . . . . . . . . . . . . . . . . . . . . . . . . . . . . . . . . . . . . . . . . .2-7
Installing SIMMs (HP 9000/K100) . . . . . . . . . . . . . . . . . . . . . . . . . . . . . . . . . . . . . . . . . . . . . . . . . . . . .2-8
Orient the SIMMs Correctly. . . . . . . . . . . . . . . . . . . . . . . . . . . . . . . . . . . . . . . . . . . . . . . . . . . . . . . . .2-8
v

Contents
After All SIMMs Are Ins talled. . . . . . . . . . . . . . . . . . . . . . . . . . . . . . . . . . . . . . . . . . . . . . . . . . . . . . . .2-10
Reattach the Memory Bulkhead . . . . . . . . . . . . . . . . . . . . . . . . . . . . . . . . . . . . . . . . . . . . . . . . . . . . .2-10
3 Power On and Verification
Power On . . . . . . . . . . . . . . . . . . . . . . . . . . . . . . . . . . . . . . . . . . . . . . . . . . . . . . . . . . . . . . . . . . . . . . . . . . .3-1
If There Is a Problem at Power On . . . . . . . . . . . . . . . . . . . . . . . . . . . . . . . . . . . . . . . . . . . . . . . . . . . . . .3-1
Installa tion Verification . . . . . . . . . . . . . . . . . . . . . . . . . . . . . . . . . . . . . . . . . . . . . . . . . . . . . . . . . . . . . . . .3-2
If There Is a Problem Verifying the Installat ion. . . . . . . . . . . . . . . . . . . . . . . . . . . . . . . . . . . . . . . . . . . .3-2
Possible Causes. . . . . . . . . . . . . . . . . . . . . . . . . . . . . . . . . . . . . . . . . . . . . . . . . . . . . . . . . . . . . . . . . . .3-3
Memory Error Codes and Warning Messages . . . . . . . . . . . . . . . . . . . . . . . . . . . . . . . . . . . . . . . . . . . . .3-3
Memory Error Codes . . . . . . . . . . . . . . . . . . . . . . . . . . . . . . . . . . . . . . . . . . . . . . . . . . . . . . . . . . . . . .3-3
Consol e W arn i n g M essages . . . . . . . . . . . . . . . . . . . . . . . . . . . . . . . . . . . . . . . . . . . . . . . . . . . . . . . . .3-5
Appendix A: OS Requirements and Diagnostic Support for Memory Modules
OS Requirements for 64MB, 256MB, and 512 MB Modules . . . . . . . . . . . . . . . . . . . . . . . . . . . . . . . . . . A-1
Obtaining Software Patches for HP-UX Operating Systems. . . . . . . . . . . . . . . . . . . . . . . . . . . . . . . . . . . A-2
How to subscribe to HP Support Line Patch notifications: . . . . . . . . . . . . . . . . . . . . . . . . . . . . . . . . . . . A-2
Electronic Mail. . . . . . . . . . . . . . . . . . . . . . . . . . . . . . . . . . . . . . . . . . . . . . . . . . . . . . . . . . . . . . . . . . A-2
World Wide Web . . . . . . . . . . . . . . . . . . . . . . . . . . . . . . . . . . . . . . . . . . . . . . . . . . . . . . . . . . . . . . . . A-2
vi

Contents
vii

1
HP 3000/9x9KS and HP 9000/K2x0/K4x0/Kx70/Kx80
Memory Upgrade Installation
Introduction
This guide contains memory upgrade inst al lation procedures for HP 3000/9x9KS and HP 9000/Kxx0
computers. The guide is organized as follows:
• Chapter 1: HP 3000/9x9KS and HP 9000/K2x0/K4x0/Kx70 /Kx80 Memory Upgrade Installation
• Chapter 2: HP 9000/K100 Memory Upgrade Installation
• Chapter 3: Power On and Verification
If you have an HP 9000/K100 server, refer to Chapter 2 of this guide for memory upgrade installation
procedures appropriate to that server.
Contents of This Chapter
This chapter describes memory upgrade installation on HP 3000/K9x9KS and HP
9000/K2x0/K4x0/Kx70/Kx80 comput ers:
• Verifying the current PDC
• Checking Existing System Memory
• System Shutdown
• Gaining Access to Memory
• Memory Configuration
• Memory SIMM Installation
• System Reassembly
1-1

HP 3000/9x9KS and HP 9000/K2x0/K4x0/Kx70/Kx80 Memory Upgrade Installation
Introduction
Electrostatic Discharge (ESD) Precautions. When performing the upgrade procedures in this guide,
you must observe the following antistatic precautions to prevent da mage to memory boards and system
components from electrostatic discharge. An ESD kit (HP P/N A3024-80004) is supplied with your
memory upgrade kit. This ESD kit contains one wrist strap, one conductive sheet, and one anti-static
foam pad.
• Always wear a grounded wrist strap when working on or around the system, and when handling
printed circuit boards.
• Treat all assemblie s, components, and interface connections as static-sensitive.
• Perform all rem ov al and in stal lat i on in a wo rk area wh ere potential static sources are minimized
(preferably an anti-static work station).
• Avoid working in carpete d areas, and keep body movement to a minimum while removing and
installing boards to minimiz e buil dup of static charge.
Required Tools
• One #10 Torx driver (preferred tool)
• One small flat-blade screwdriver (if Torx driver is not available)
1-2 Chapter 1

HP 3000/9x9KS and HP 9000/K2x0/K4x0/Kx70/K x80 Memory Upgrade Installation
Installation Procedure (HP 3000/9x9KS and HP 9000/K2x0 /K4x 0/Kx70/Kx80)
Installation Procedure (HP 3000/9x9KS and HP
9000/K2x0/K4x0/Kx70/Kx80)
Verifying the Current PDC Firmware
If you are planning to install 64MB, 128MB, 256MB, or 512 MB Memory Modules, you may need to
verify your system’s PDC firmware version to see if it supports that type of memory (see “OS
Requirements and Diagnostic Supp ort for 64 MB and 256 MB Modules” on page A-1). If you need to
upgrade your PDC, see the section entitle d "Obtaining the Correct Firmware Patch."
Using On-Line Diagnostics: (If on-line diagnostics are not present on your system, use the Boot
Console Handler procedure to verify the current version.)
1. At the system prompt, enter sysdiag.
2. At the sysdiag prompt, enter sysmap.
3. At the sysmap prompt, enter cpumap.
The output of cpumap will display the current PDC revision (See Table A-1, Appendix A).
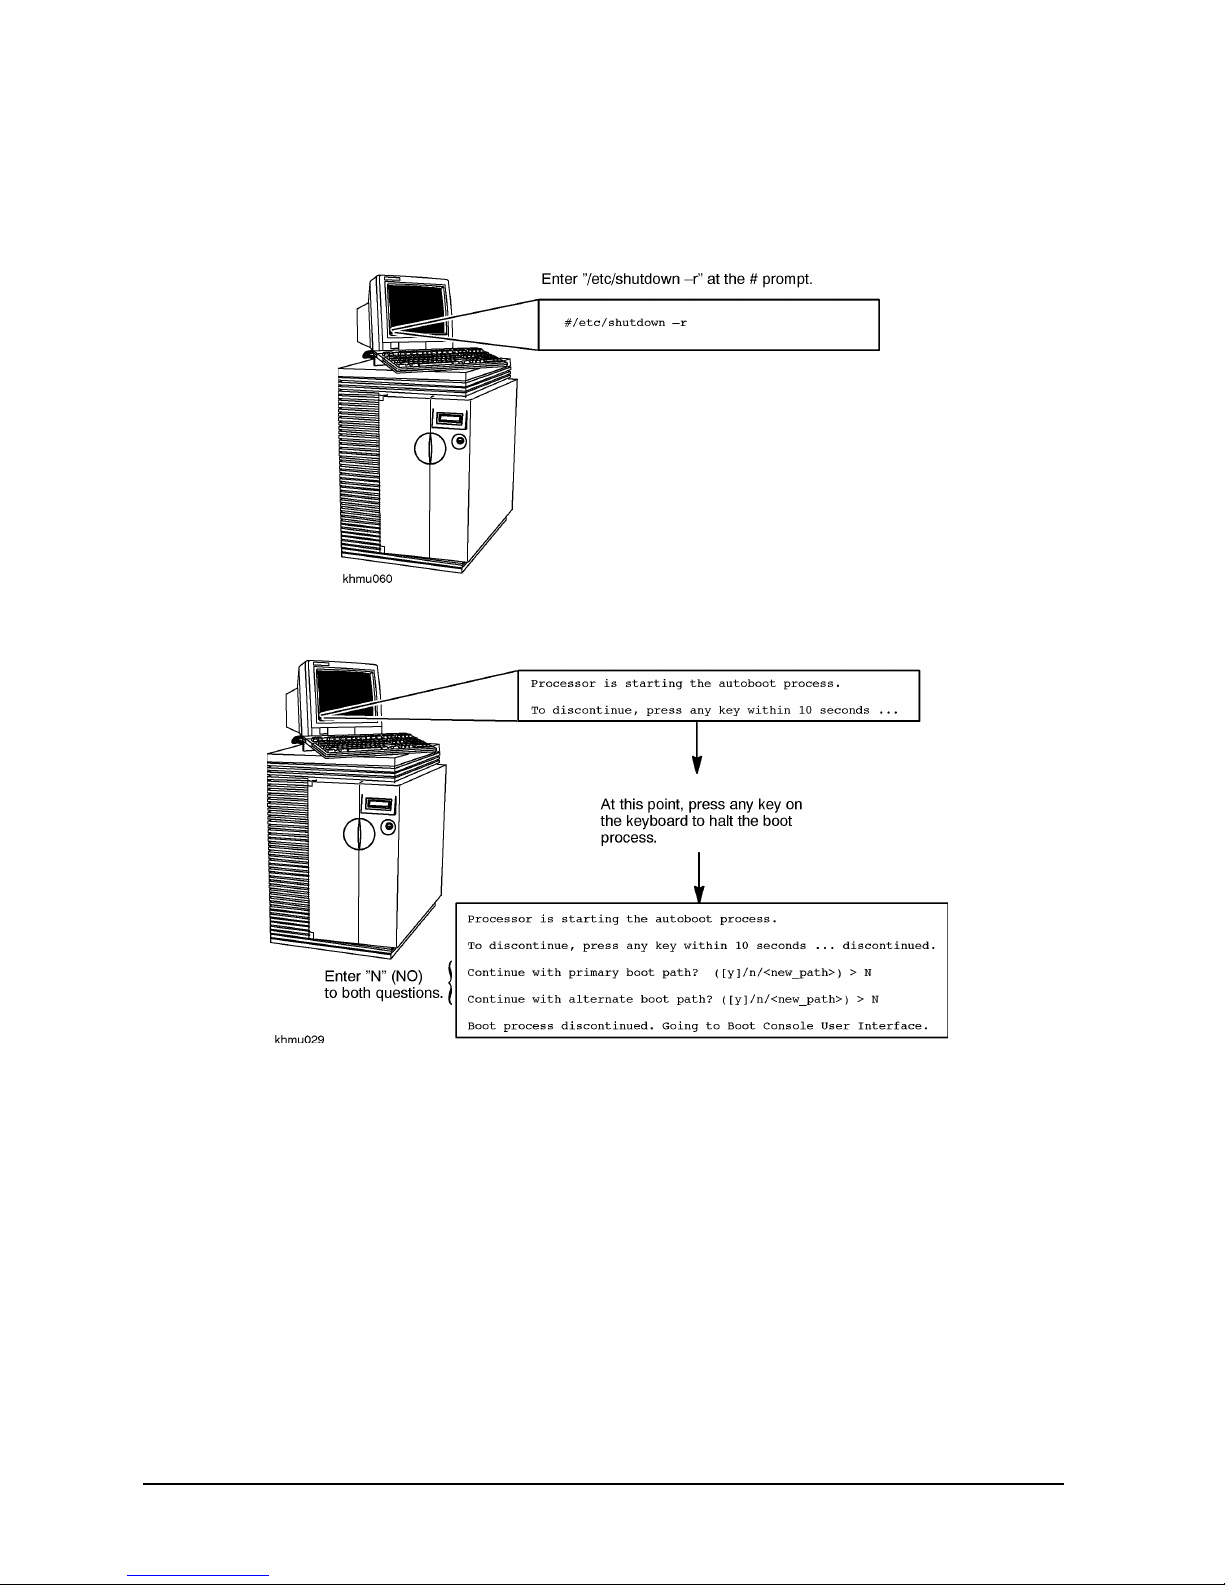
Using the Boot Console Handler:
1. Log on as root, and enter reboot -r. This command will shut down the operating system and reboot
the system.
2. If AUTOBOOT is on, you will receive the following message:
Process is starting autoboot process.
To discontinue, press any key within 10 seconds.
3. At this point, press any key within 10 seconds to interrupt the booting proc ess .
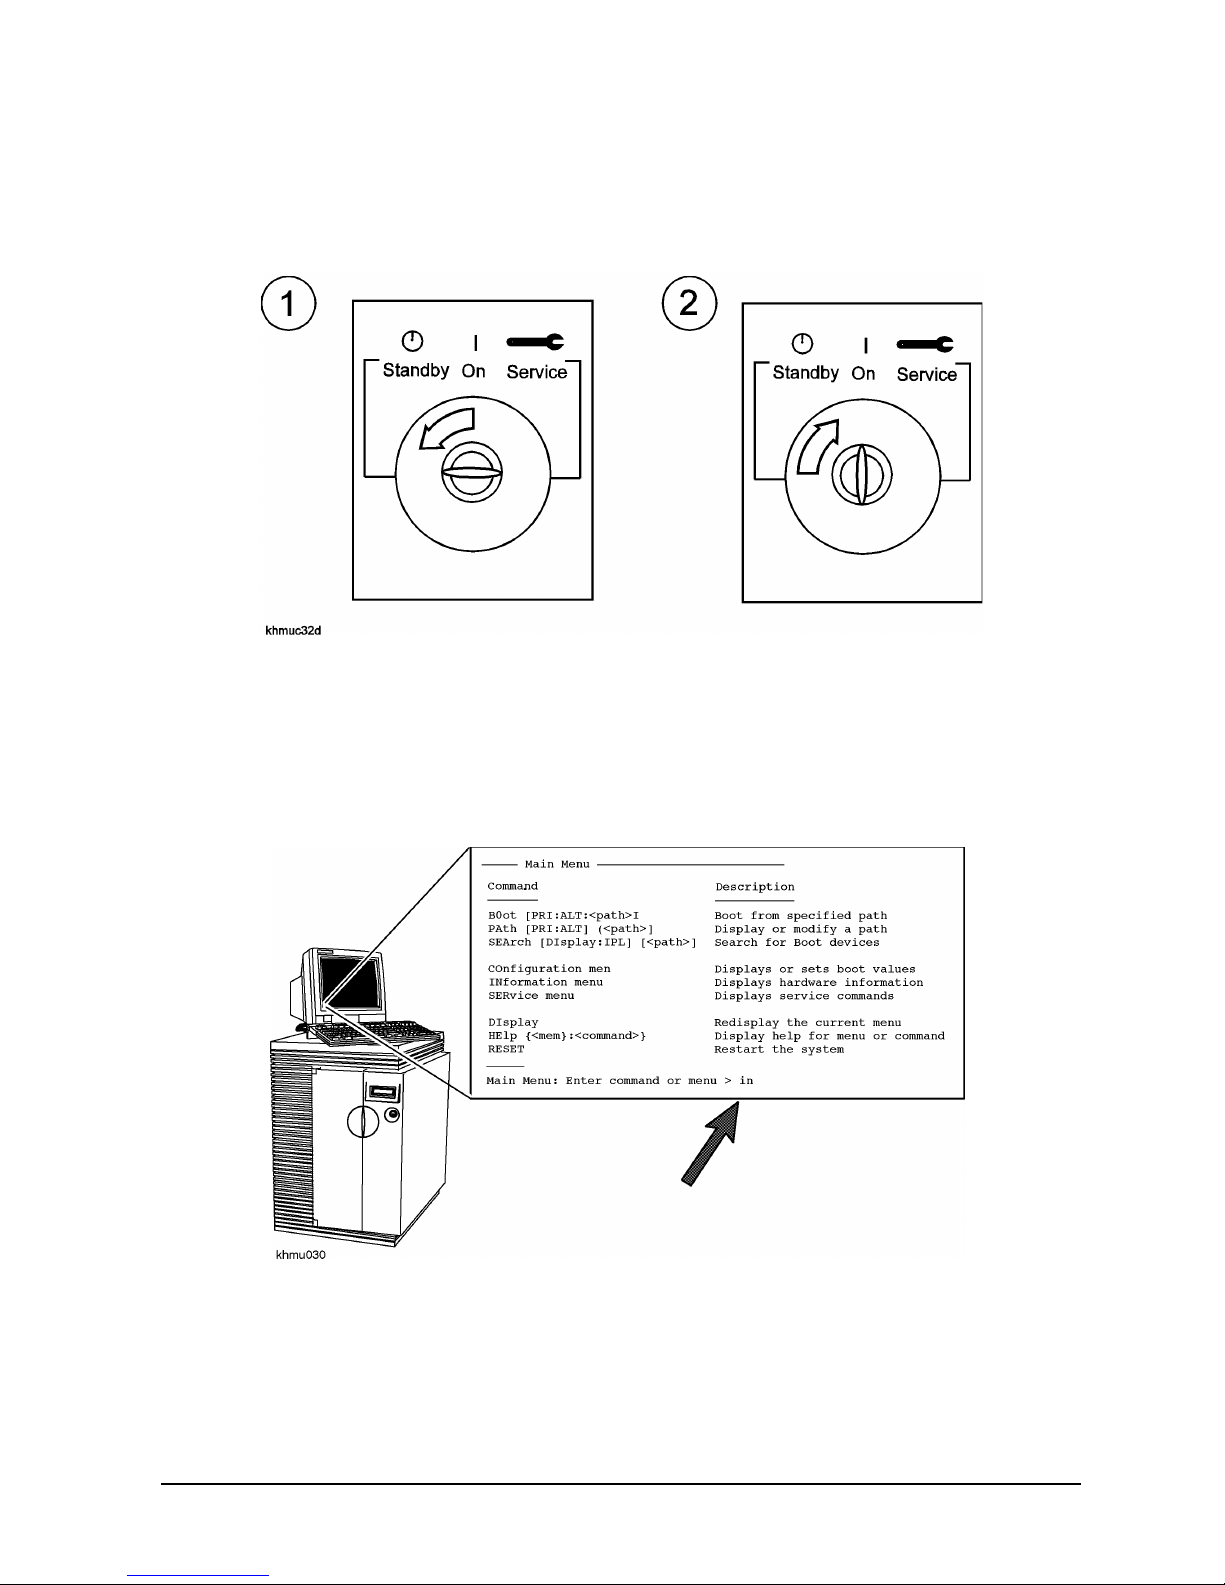
4. The Main Menu is displayed. A prompt will appear as
MAIN MENU: Enter command or menu>
5. Enter the command in.
Chapter 1 1-3

HP 3000/9x9KS and HP 9000/K2x0/K4x0/Kx70/Kx80 Memory Upgrade Installation
Installation Procedure (HP 3000/9x9KS and HP 9000/K2x0/K4x0/Kx70/ Kx80)
6. A prompt will appear as:
Information Menu: Enter Command>
7. Enter the command fv.
The system will respond with the current firmware revision (See Table A-1, Appendix A).
Obtaining the Correct Firmware Patch
The firmware patches for all K-Class and HP3000 9x9/KS systems can obtained from the HPESC (HP
Electronic Support Center) via the World Wide Web or via FTP.
Downloading the Firmware Patch via the World Wide Web
To access and download the appropriate patch, perform the following steps:
1. Connect to the HPESC World Wide Web servi ce home page a t their URL by entering the following:
http://us-support.external.hp.com
2. Under Support Line , select the Patch Database option.
3. If you are a previously registered user:
a. Click on “Enter as a Registered User” and select your region.
b. Login, entering your User ID and password. This will take you to the Patch Database Main
screen.
If you are a first-t ime user:
a. Click on your geographic region under “Register Now”.
b. Review the “Terms and Conditions” page. At the bottom of the page you may accept the terms
and conditions and proceed to the registr ation page.
c. Complete the registration information requested.
d. Once the registr ation information has be en successfully transmitted, the User ID Assigned screen
will appear. Write down the User ID (or print the scree n) for later reference.
e. Click on “Begin Using Patch Database Now” to proceed to the Patch Database Main screen.
4. Select the Firmware Patches option.
5. Select the CPU Patches option and click on “Show Patches”.
6. Choose the a ppropriate patch (for example, ( PF_CKHK0022). A patch description will appear. Click
on “download” to copy the patch to your system.
NOTE
The selected patch must be downloaded from HP SupportLine onto a system that has
HP-UX as the operating system.
7. Follow the instructions in the
Downloading the Firmware Patch using FTP
1. Connect to HPESC via ftp. You must initiate downloading from an open subnet system as:
1-4 Chapter 1
Readme
file to create a bootable tape and to update PDC.

HP 3000/9x9KS and HP 9000/K2x0/K4x0/Kx70/K x80 Memory Upgrade Installation
Installation Procedure (HP 3000/9x9KS and HP 9000/K2x0 /K4x 0/Kx70/Kx80)
>ftp us-support.external.hp.com
(If you do not have an open subnet system, try using rftp instead of ftp.)
2. Login as “anonymous”.
3. At the
Password prompt, enter your e-mail address as the passwor d.
4. Change to the directory conta ining the firmware patches:
> cd firmware_patches/hp/cpu
If desired, review the contents of the dire ct ory by using the ls command. For each patch, there is an
accompanying text file (patchfilename.txt). The text file contains the patch description and the
instructions for creating the patch tape.
5. Download the appropriate patch file and text file:
get <patc hf il en am e>
get <patc hf il en am e> .t xt
Chapter 1 1-5
HP 3000/9x9KS and HP 9000/K2x0/K4x0/Kx70/Kx80 Memory Upgrade Installation
Installation Procedure (HP 3000/9x9KS and HP 9000/K2x0/K4x0/Kx70/ Kx80)
Checking Existing System Memory
If You Have an HP 9000/K2x0/K4x0/Kx70/Kx80, Reboot the System
Then, Halt the Boot Process
1-6 Chapter 1
HP 3000/9x9KS and HP 9000/K2x0/K4x0/Kx70/Kx80 Memory Upgrade Installation
Installation Procedure (HP 3000/9x9KS and HP 9000/K2x0 /K4x 0/Kx70/Kx 80)
If You Have an HP 3000/9x9KS, First Shut Down the Operating
System. Then, After "DA00" Appears on the LCD Display, Turn key to
Standby and Back On
After Rebooting Your System, Type "ma" to Get the Main Menu
After rebooting your HP 9000/K2x0/K4x0/Kx70/Kx80 or HP 3000/9x9KS system, the Boot Console
Interface prompt (PDC>) should appear on your conso le dis play. Type ma at the prompt to get to the
Main menu, then proceed to the steps on the following page to check existing system memory.
Type "in" at the Main Menu to Get to the Information Menu
Chapter 1 1-7

HP 3000/9x9KS and HP 9000/K2x0/K4x0/Kx70/Kx80 Memory Upgrade Installation
Installation Procedure (HP 3000/9x9KS and HP 9000/K2x0/K4x0/Kx70/Kx80)
Type "me" at the Information Menu to Check Memory
System Shutdown
Turn the system key switch to “Standby” (fully counterclockwise)
1-8 Chapter 1
HP 3000/9x9KS and HP 9000/K2x0/K4x0/Kx70/Kx80 Memory Upgrade Installation
Installation Procedure (HP 3000/9x9KS and HP 9000/K2x0 /K4x 0/Kx70/Kx 80)
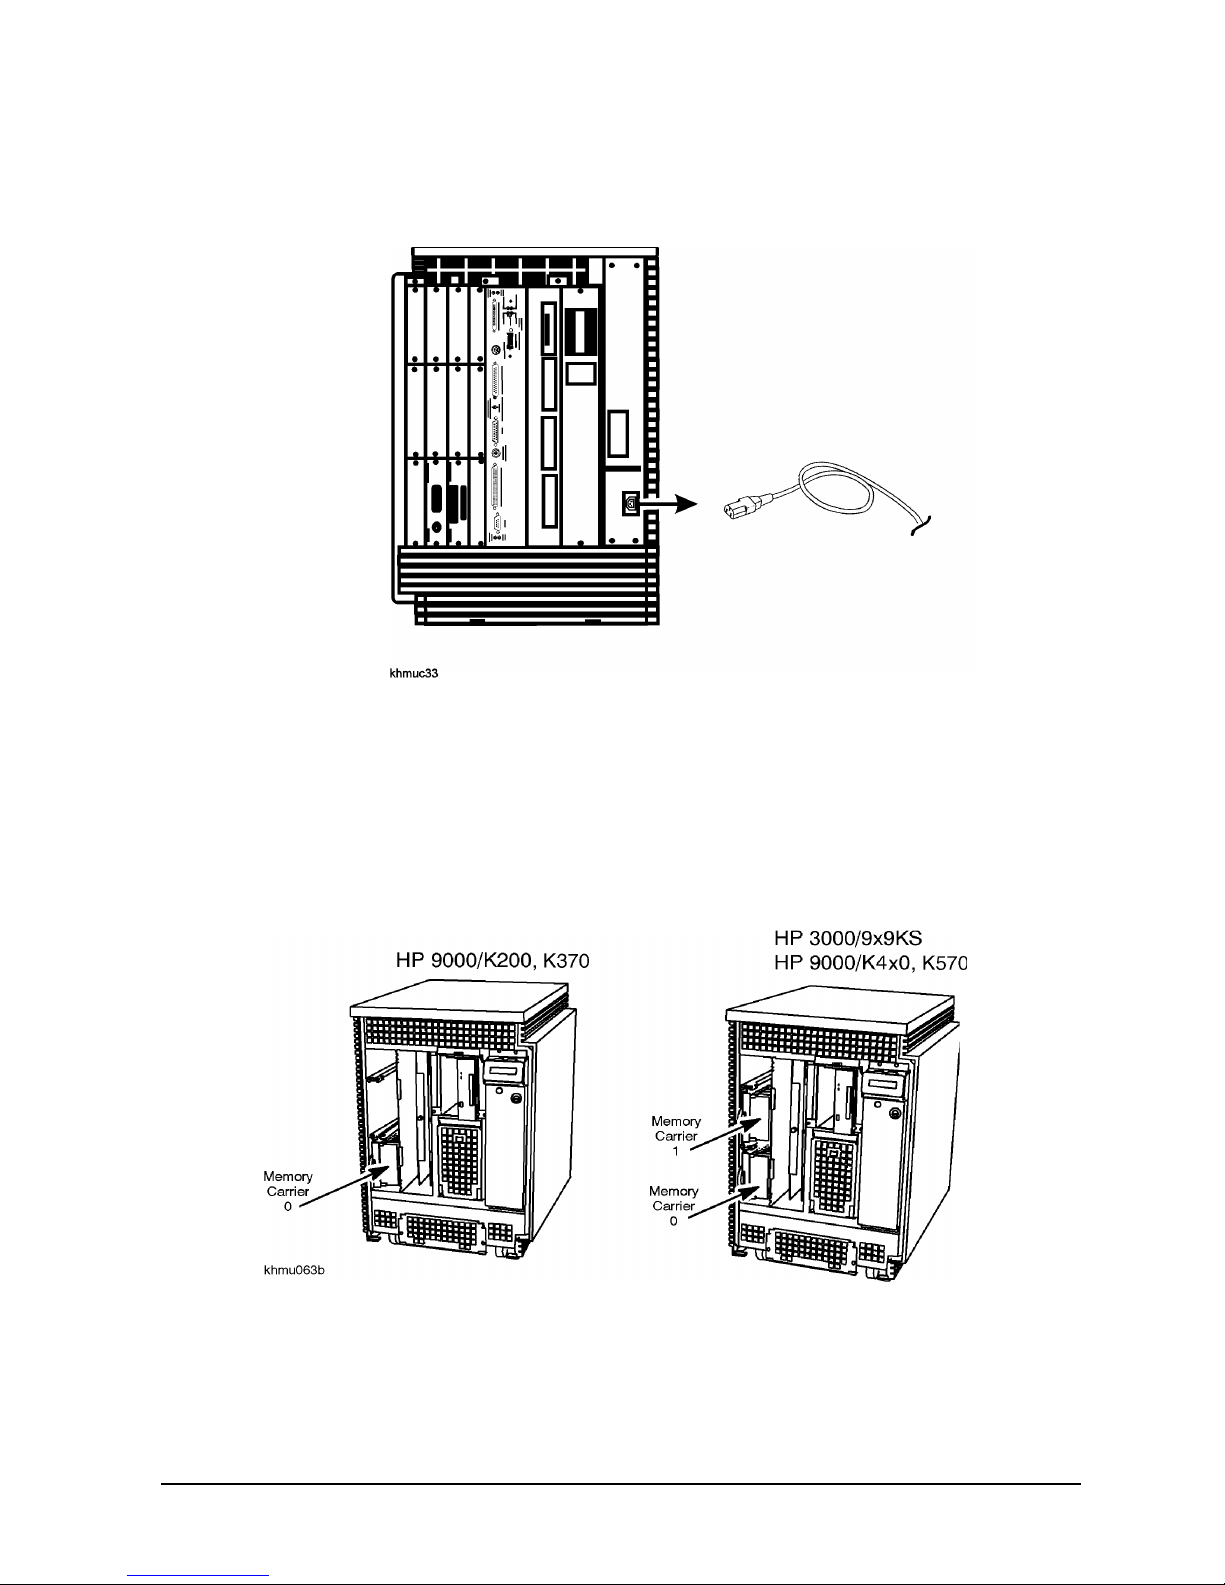
Disconnect the syste m power cable from the back of the system
cabinet
Gaining Access to Memory
Memory Location on HP 3000/9x9KS and HP 9000/K2x0/K4x0/Kx70/Kx80 Servers
In these models, the SIMMs are inserted into memory extenders (also called carriers) that attach to the
front of the system board, and are accessible from the front of the system. The HP 3000/9x9KS and HP
9000/K4x0 each have two memory extenders, and the HP 9000/K2x0 has one (see figure below).
Removing the Front B ezel and Memo ry Bulkhead
1. Remove the front bezel by gently pulling the bottom of the bezel forward and lifting upward, then
disengaging the top of the bezel from a hidden hinge. The front of the SPU is now accessible.
Chapter 1 1-9
 Loading...