

Page 1
8550MFP
System
Ready
Reference
Guide
English
Page 2

Page 3

System
Ready Reference
Guide
HP Color LaserJet
8550MFP
Page 4

© Copyright Hewlett-Packard
Company 2000
All Rights Reserved.
Reproduction, adaptation, or
translation without prior written
permission is prohibited, except
as allowed under the copyright
laws.
Publication number
C7835-90901
First edition, April 2000
Warranty
The information contained in
this document is subject to
change without notice.
Hewlett-Packard makes no
warranty of any kind with
respect to this information.
HEWLETT-PACKARD
SPECIFICALLY DISCLAIMS
THE IMPLIED WARRANTY OF
MERCHANTABILITY AND
FITNESS FOR A PARTICULAR
PURPOSE.
Hewlett-Packard shall not be
liable for any direct, indirect,
incidental, consequential, or
other damage alleged in
connection with the furnishing or
use of this information.
Page 5

Contents
Overview Section
Loading media. . . . . . . . . . . . . . . . . . . . . . . . . . . . . . . . . . . 5
Media specifications. . . . . . . . . . . . . . . . . . . . . . . . . . . . 5
Loading the input trays . . . . . . . . . . . . . . . . . . . . . . . . . 7
Configuring the media type in the printer unit
control panel . . . . . . . . . . . . . . . . . . . . . . . . . . . . . . . . 13
Media jams. . . . . . . . . . . . . . . . . . . . . . . . . . . . . . . . . . . . . 15
Removing jammed media . . . . . . . . . . . . . . . . . . . . . . 15
Printing Section
Common messages . . . . . . . . . . . . . . . . . . . . . . . . . . . . . 27
Printer unit control panel messages. . . . . . . . . . . . . . . 27
Job retention features . . . . . . . . . . . . . . . . . . . . . . . . . . . 31
Proof and hold feature . . . . . . . . . . . . . . . . . . . . . . . . . 31
Stored job feature . . . . . . . . . . . . . . . . . . . . . . . . . . . . 32
Private job feature . . . . . . . . . . . . . . . . . . . . . . . . . . . . 33
Quick copy jobs . . . . . . . . . . . . . . . . . . . . . . . . . . . . . . 34
Copying Section
Introduction. . . . . . . . . . . . . . . . . . . . . . . . . . . . . . . . . . . . 35
Copy module control panel features. . . . . . . . . . . . . . . . 36
Touch panel display. . . . . . . . . . . . . . . . . . . . . . . . . . . 40
Control panel menu map . . . . . . . . . . . . . . . . . . . . . . . 42
Making copies . . . . . . . . . . . . . . . . . . . . . . . . . . . . . . . . . . 43
Other features . . . . . . . . . . . . . . . . . . . . . . . . . . . . . . . 44
How to make simple copies. . . . . . . . . . . . . . . . . . . . . 45
EN
Contents 3
Page 6

How to copy the entire original onto the available
media. . . . . . . . . . . . . . . . . . . . . . . . . . . . . . . . . . . . . . 47
How to make double-sided copies. . . . . . . . . . . . . . . . 49
How to make copies from a book or magazine . . . . . . 50
How to enhance the image quality. . . . . . . . . . . . . . . . 56
For more information . . . . . . . . . . . . . . . . . . . . . . . . . . . . 60
4 Contents
EN
Page 7

Overview Section
Loading media
Media specifications
The following types and sizes of media can be used in the
HP Color LaserJet 8550MFP system.
Media types
• paper
• pre-punched media
• transparencies (0.1 to 0.13 mm or 4 to 5 mils thick)
• envelopes
• labels
Media sizes
• Executive
• Letter
• Legal
• Ledger
• A5
• A4
• A3
• Minimum (custom sizes): 99 by 190.5 mm (3.9 in by 7.5 in)
• Maximum (custom sizes): 305 by 470 mm (12 by 18.5 in)
EN
Loading media 5
Page 8

Media weight
• Tray 1: 60 to 216 g/m2 (16 to 58 lb)
• Other input trays: 60 to 105 g/m
For complete information on media specifications for this
product, see the
HP Color LaserJet 8550, 8550N, 8550DN,
8550GN, 8550MFP Printer User Guide
Note
Use Tray 1 (the stack bypass or multipurpose tray) whenever
you are copying rotated media. Rotated media are originals that
are loaded short-edge first on the glass or in the optional
automatic document feeder (ADF). Media must be loaded in
Tray 1
short edge first
for rotated copying.
2
(16 to 28 lb)
on CD-ROM.
6 Loading media
EN
Page 9

Loading the input trays
To load the input trays, first adjust the media-width guides and
then load the media. When you have finished loading the
media, configure the input tray in the printer unit control panel.
For complete instructions on loading and configuring input
trays and the media that can be used, see the
LaserJet 8550, 8550N, 8550DN, 8550GN, 8550MFP Printer
User Guide
CAUTION
To avoid media jams, never add or remove media while the
printer unit is printing. Never overload an input tray.
on CD-ROM.
HP Color
Overview
EN
Loading media 7
Page 10
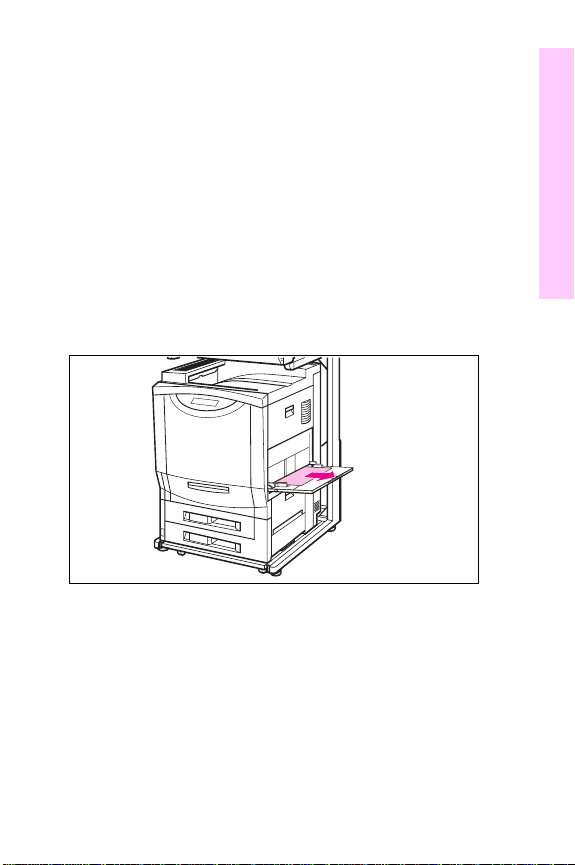
Loading media into Tray 1 (the multipurpose or
stack bypass tray)
Open Tray 1. (Use the tray extension if the media is longer
1
than the tray.)
Slide the media-width guides to the size that matches the
2
media.
Place the media in the tray and slide it into the printer unit
3
until the leading edge rests lightly against the printer unit.
Configure the media type and size in the
4
in the printer unit control panel (see instructions
MENU
beginning on page 13 or see the
8550N, 8550DN, 8550GN, 8550MFP Printer User Guide
PAPER HANDLING
HP Color LaserJet 8550,
).
8 Loading media
EN
Page 11
Note
Filling the tray abov e the media-fill mark may cause paper jams.
.
The default mode for Tray 1 is Cassette
Cassette mode, the printer unit will pull media from this tray if
the appropriate media is found. Other modes for Tray 1 are
MANUAL
Configure Tray 1 in the
unit control panel. For more information on configuring the
T ra y 1 mode, see the
and
FIRST
.
PAPER HANDLING MENU
HP Color LaserJet 8550, 8550N, 8550DN,
8550GN, 8550MFP Printer User Guide
When Tray 1 is in
on the printer
on CD-ROM.
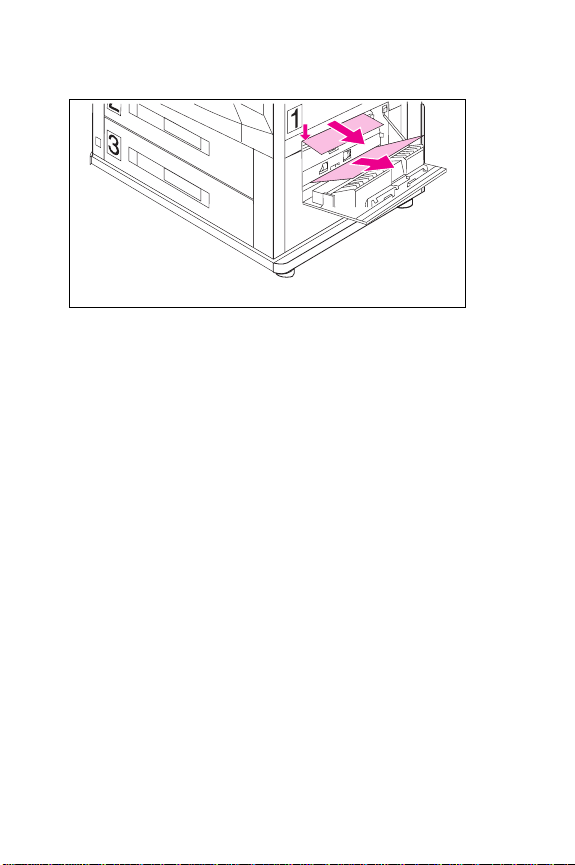
Loading media into Trays 2 and 3
1
Open Tray 2 or Tray 3.
2
To load media that are a different size from the media
previously loaded in the tray, move the two media-width
guides to the correct positions.
Overview
EN
Loading media 9
Page 12
3 Load media up to the media-fill marks. Five hundred
sheets of 75 g/m
2
(20 lb) bond media will fit into either tray.
Note
Filling the tray abov e the media-fill mark may cause paper jams.
4 Push the tray into the printer unit.
5 Configure the media type in the
PAPER HANDLING MENU
in
the printer unit control panel (see instructions beginning on
page 13).
10 Loading media
EN
Page 13
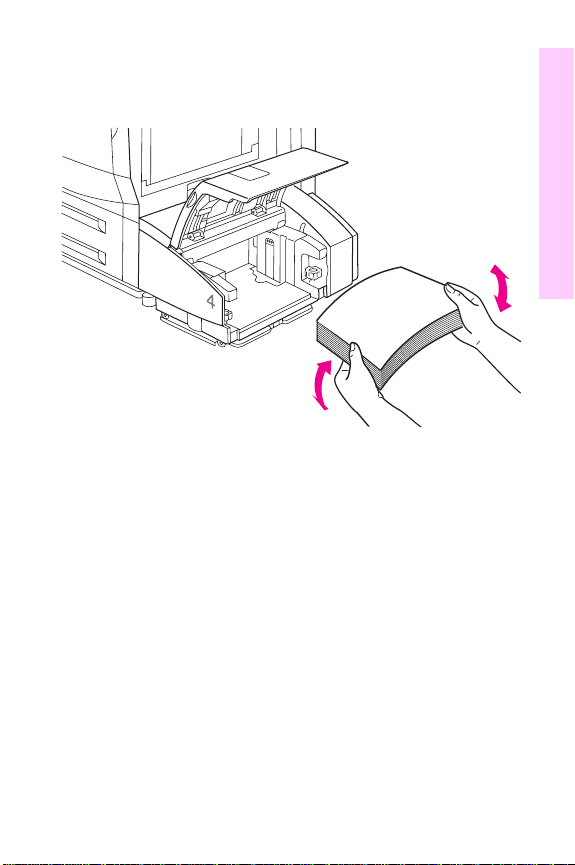
Loading media into the optional 1,000-sheet side
input tray (Tray 4)
1
Lift the tray cover.
2
Adjust the left and right media-width guides as necessary.
3
Place the media into the tray.
Note
Always bend the stack of paper before placing it into the tray,
as shown above . Doing so will help prevent misfeeds or paper
jams. Never fan a stack of paper before placing it into the tray.
Overview
EN
Loading media 11
Page 14
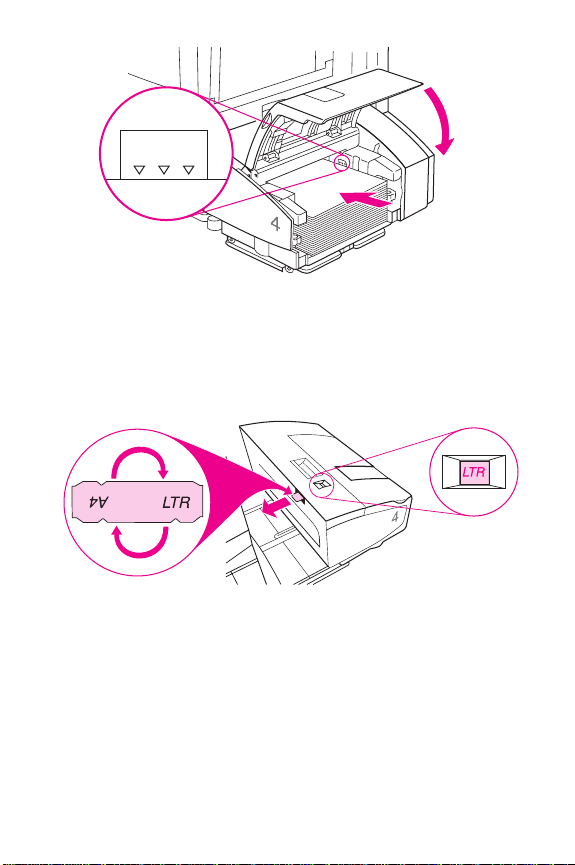
Note
Filling the tray abov e the media-fill mark may cause paper jams.
4 Close the cover.
5 The default media size for the optional 1,000-sheet side
input tray is A4. To change the default from A4 to Letter , set
the tab on top of the input tray cov er to read LTR. This must
be done before the side input tray is pushed back against
the printer unit. Slide the tab out towards the back of the
side input tray, rotate it, and then slide it back in so that LTR
appears in the window.
12 Loading media
EN
Page 15

Configuring the media type in the printer unit control panel
To configure the input trays
1
Press M
printer unit control panel display.
2
Press I
display.
Note
ENU
TEM
TRAY 1 TYPE =
3
Press -V
display.
4
Press S
appears next to the selection.
Note
Tray 2, Tray 3, and the optional Tray 4 automatically detect the
media size. T o configure media siz e for T ra y 1 in Cassette mode,
continue with step 5. Otherwise, proceed to step 8.
ALUE
ELECT
PAPER HANDLING MENU
until
TRAY <NUMBER> TYPE =
until
will appear only if Tray 1 is in Cassette mode.
+ until the correct media type appears on the
to save the selection. An asterisk (*)
appears on the
appears on the
Overview
EN
Loading media 13
Page 16

5 Press I
6 Press -V
until TRAY 1 SIZE = appears on the display.
TEM
+ until the correct media size appears on the
ALUE
display.
7 Press S
to save the selection. An asterisk (*)
ELECT
appears to the right of the selection.
8 Repeat steps 2 through 4 to configure media type in all
trays.
- Or Press G
to bring the printer unit online.
O
For more information about First and Cassette modes for
Tray 1 and about input tray configuration, see the
HP Color
LaserJet 8550, 8550N, 8550DN, 8550GN, 8550MFP Printer
User Guide
on CD-ROM.
14 Loading media
EN
Page 17
Media jams
Removing jammed media
The procedures on the following pages explain how to clear
the most commonly occurring jams. After all jammed media
have been removed, the system will warm up and resume
printing.
The printer unit and copy module control panels display
messages and graphics that indicate where a jam has
occurred and which doors to open to clear the jam.
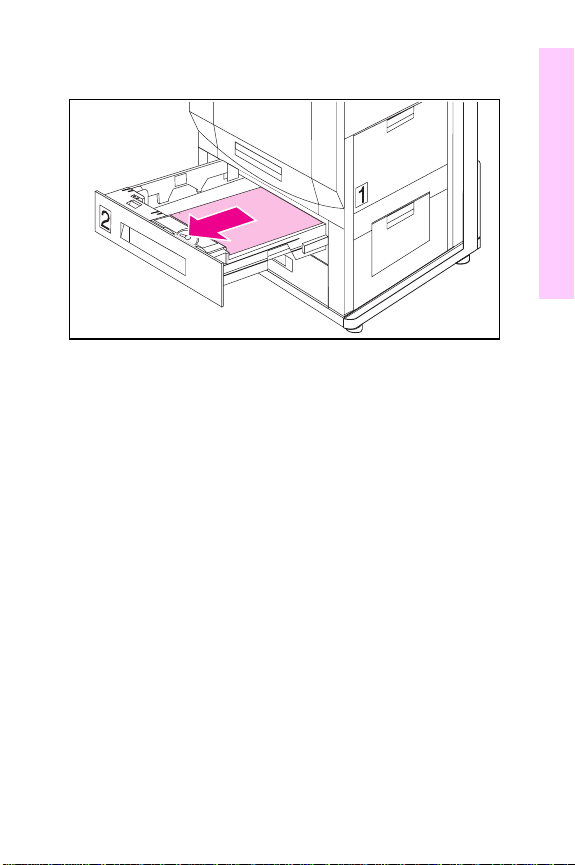
To clear jams in Tray 1
1
Remove media from Tray 1.
2
Gently remove any jammed media.
3
Load media back into Tray 1 and resume printing. The
printer unit may prompt you for the media size and type.
Overview
Note
If the jammed media does not come out easily, see “To clear
jams from the lower right door” on page 16.
EN
Media jams 15
Page 18
To clear jams from the lower right door
Open the lower right door. If you are using the optional
1
1,000-sheet side input tray, it must first be moved away
from the printer unit.
Remove any jammed media.
2
At the left side of the opening, pull the green tab down to
3
lower the bar, remove any jammed media, and release the
tab.
Close the lower right door. If necessary, reposition the
4
optional 1,000-sheet side input tray.
16 Media jams
EN
Page 19
To clear jams in Trays 2 and 3
1
Make sure there is no media jammed in the lower right
door.
2
Open Tray 2 or Tray 3.
3
Remove any jammed media. You might hav e to remov e the
tray by lifting it slightly and pulling it out. Look into the
opening to locate the jammed media.
4
Close the tray(s).
Overview
EN
Media jams 17
Page 20
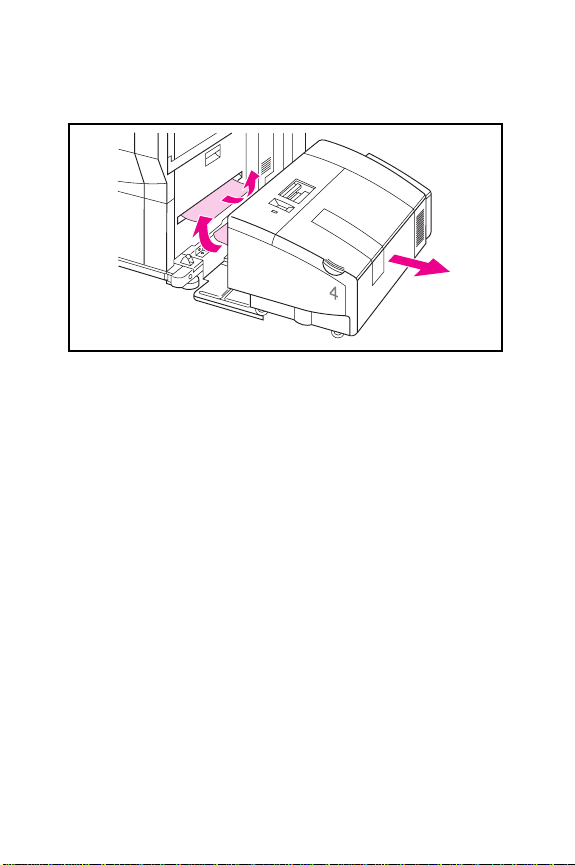
To clear jams in the optional 1,000-sheet side input
tray (Tray 4)
Lift the release handle on the top of the tray.
1
Pull the tray away from the printer unit to reveal the media
2
feed slots on the printer unit and on the tray.
Remove jammed media from either slot.
3
Push the tray back against the printer unit until it loc ks into
4
place.
18 Media jams
EN
Page 21

5
Lift the cover and remov e jammed media from the f eed slot
in the tray.
6
Close the cover.
Overview
EN
Media jams 19
Page 22

To clear jams from the fuser area and duplexer
WARNING!
Do not touch the fuser; it might be very hot and could cause
burns.
Remove the output tray on the left side of the printer unit.
1
Open the lower left door.
2
Gently remove any jammed media from the duplexer, from
3
the inside of the door, or from between the rollers near the
top of the opening.
Press the green tab on the right side of the duplexer and
4
pull the duplexer out of the printer unit.
20 Media jams
EN
Page 23

5
Remove any jammed media from the duple x er b y lifting the
green guide. Remov e any media and lower the green
guide.
6
On the left side of the fuser, pull down on the green tab,
carefully remove any media, and release the tab.
Note
Repeated jams in the fuser area indicate that the fuser might
not be installed properly. Complete steps 7 through 9 if you
experience repeated jams in the fuser area; otherwise, proceed
to step 10.
7
Press down the large green lever on the right side of the
fuser to ensure that it is in its proper position.
8
On each side of the fuser, rotate the blue levers down
slightly.
9
Rotate the blue levers back up until they snap into place.
10
Slide the duplexer back into the printer unit until it clicks
into place.
11
Close the lower left door.
12
Reinstall the left output tray.
Overview
EN
Media jams 21
Page 24

To clear jams from the transfer drum and
registration area
Open the front door, press the white button on the lower
1
green lever, and swing the lever to the right.
Open the upper right door.
2
Using the handles, gently pull out the transfer drum from
3
the right side until it stops.
From the front of the printer unit, remove any jammed
4
media.
Lift the transfer drum out of the printer unit and remove an y
5
media wrapped around the drum.
Remove jammed media from inside the opening.
6
If the entire page cannot be removed easily, continue to
step 7. Otherwise, continue with step 9.
22 Media jams
EN
Page 25

7
In the front of the printer unit, turn the blue knob
counterclockwise to feed the jammed media into the printer
unit.
8
From the front of the printer unit, remove the jammed
media.
9
On the right side, align the arrows on the ends of the
transfer drum with the matching arrows on the trac ks inside
the printer unit.
10
Push the transfer drum into the printer unit.
11
Close the upper right door.
Overview
EN
Media jams 23
Page 26

Note
If the upper right door does not close, the transfer drum might
not be all the way in the printer unit. Repeat steps 9 and 10.
12 In the front of the printer unit, swing the lower (green) lev er
back to the left, making sure it clicks into place.
Note
If the lever does not return to its original position, the transfer
drum might not be all the way in the printer unit. Repeat steps 9
and 10.
13 Close the front door.
24 Media jams
EN
Page 27

T o c lear jams fr om the left output tra y and upper left
door
1
Remove the output tray on the left side of the printer unit.
2
Slowly remove any jammed media that are visible.
3
Open the upper left door.
4
Gently remove any jammed media.
5
Close the upper left door.
6
Replace the output tray
Overview
EN
Media jams 25
Page 28

Solving repetitive media jams
If the system continues to jam, try the following:
• Check to see if you are using media that meet the media
specifications detailed in the “Loading Media” section of
this manual.
• Make sure that the media are correctly loaded in the input
trays and that all media-width guides are correctly set.
• Make sure that the tray is not overloaded with media.
• Do not use media that is torn, worn, or irregular.
• Turn over the stack of media in the tray.
• Print heavy media from Tray 1.
For more information on solving repetitive jams, see the
HP Color LaserJet 8550, 8550N, 8550DN, 8550GN,
8550MFP Printer User Guide
continues to jam, contact your reseller or a local authorized
HP service provider.
on CD-ROM. If the printer unit
26 Media jams
EN
Page 29

Printing Section
Common messages
Printer unit control panel messages
The following messages are common printer unit control panel
messages for conditions that can cause the printer unit to stop
working. For a more complete list of messages, see the
HP Color LaserJet 8550, 8550N, 8550DN, 8550GN,
8550MFP Printer User Guide
system administrator.
Note
For easy reference , the numeric messages are listed first, and
the remaining messages are listed alphabetically.
Printer unit control panel messages
Control panel message Recommended action
41.3 UNEXPECTED
PAPER SIZE
LOAD TRAY 1
<TYPE> <SIZE>
41.5 UNEXPECTED
PAPER TYPE
LOAD TRAY <X>
<TYPE> <SIZE>
CLEAR DUPLEX JAM LOWER
LEFT DOOR
on CD-ROM, or contact the
Load the correct size of media in Tray 1 or
reconfigure Tray 1 for the media size it
contains.
Open and close the front door of the printer
unit to remove the media. Verify that the
printer unit control panel is configured
correctly and that the correct media is loaded
in the input tray.
See “Removing jammed media” on page 15.
EN
Common messages 27
Page 30

Printer unit control panel messages (continued)
Control panel message Recommended action
CLEAR FUSER JAM
LOWER LEFT DOOR
CLEAR INPUT JAM
CLEAR OUTPUT JAM
UPPER LEFT DOOR
CLEAR PAPER JAM
CLEAR TRANSFER
JAM
CLEAR TRAY 4 JAM
CLEAR UNEXPECTED
PAPER SIZE JAM
THEN LOAD TRAY 1
<TYPE> <SIZE>
CLEARING PAPER
FROM PRINTER
CLOSE
<LOCATION> DOOR
DRUM ERROR
REPLACE DRUM KIT
DRUM LIFE LOW
REPLACE DRUM KIT
DRUM LIFE OUT
REPLACE DRUM KIT
DUPLEX ERROR
CHECK DUPLEXER
FACE UP
OUTPUT BIN FULL
See “Removing jammed media” on page 15.
See “Removing jammed media” on page 15.
See “Removing jammed media” on page 15.
See “Removing jammed media” on page 15.
See “Removing jammed media” on page 15.
See “Removing jammed media” on page 15.
See “Removing jammed media” on page 15.
No action is required.
Close the door indicated in the message.
Printing cannot continue until the drum kit has
been replaced.
Although printing can continue, the drum kit
should be replaced for optimum printer unit
operation.
Printing cannot continue until the drum kit has
been replaced.
Remove the duplexer. Check for and remove
any jammed media from the duplexer and
reinstall the duplexer.
Remove all media from the left output tray.
28 Common messages
EN
Page 31

Printer unit control panel messages (continued)
Control panel message Recommended action
FUSER LIFE LOW
REPLACE KIT
FUSER LIFE OUT
REPLACE KIT
INPUT DEVICE
PAPER PATH OPEN
INSTALL <COLOR> TONER
INSTALL FUSER
LOWER LEFT DOOR
INSTALL IMAGING DRUM
OPEN FRONT DOOR
INSTALLTRANSFER DRUM
OPEN RIGHT DOOR
LOCK TONER LEVER
MANUALLY FEED
<TYPE> <SIZE>
OFFLINE
POWERSAVE ON
PROCESSING
COPY <X> OF <Y>
PROCESSING JOB
TONER LOW
REPLACE <COLOR>
Although printing can continue, the fuser
should be replaced for optimum printer unit
operation.
Replace the fuser kit and reset the fuser
counter before attempting to print.
Close the media transfer door.
Insert the cartridge or make sure the installed
cartridge is fully seated in the printer unit.
Install the fuser and verify that it is properly
seated in the printer unit before attempting to
print.
Install the imaging drum before attempting to
print.
Install the transfer drum before attempting to
print.
Open the front door of the printer unit, open
the clear door, swing the blue lever to the left
to lock it. Close the clear door and the front
door.
Load the correct type and size media into
Tray 1.
Press GO to bring the printer unit online.
Clear this message by pressing any key or by
sending a print job to the printer unit.
No action is required.
No action is required.
Although printing can continue, the toner
cartridge should be replaced for optimum
printer unit operation.
Printing
EN
Common messages 29
Page 32

Printer unit control panel messages (continued)
Control panel message Recommended action
TONER OUT
REPLACE <COLOR>
TOP
OUTPUT BIN FULL
TRANSFER KIT LOW
REPLACE KIT
TRANSFER KIT OUT
REPLACE KIT
TRAY 1 CONTAINS
UNKNOWN MEDIA
TRAY 1 LOAD
<TYPE> <SIZE>
TRAY X EMPTY
<TYPE> <SIZE>
TRAY X LOAD
<TYPE> <SIZE>
CHECK CONTROL
PANEL SETTING
Printing cannot continue until the specified
toner cartridge has been replaced.
Remove all media from the top output bin.
Although printing can continue, the transfer kit
should be replaced for optimum printer unit
operation.
Replace the transfer kit and reset the transfer
counter before attempting to print.
Configure the media type for Tray 1 or remove
the remaining media.
Load the media type and size specified on the
display.
Load the media type and size specified on the
display.
Load the media specified on the display, and
configure the input tray in the printer unit
control panel.
Pressing G
attempt to print the page on the default size
media.
will cause the printer unit to
O
Note
For more information on the control panel messages and their
recommended actions, see the
8550N, 8550DN, 8550GN, 8550MFP Printer User Guide
HP Color LaserJet 8550,
on
CD-ROM.
30 Common messages
EN
Page 33

Job retention features
Note
The following printer unit features in this manual are all set up
and controlled by the driver. The user must select the desired
feature at their computer in order for it to be available at the
printer unit. Refer to the
8550DN, 8550GN, 8550MFP Printer User Guide
for complete instructions on the driver.
Proof and hold feature
The proof and hold feature provides a quick and easy way to
print and proof one copy of a job and then print the additional
copies.
Printing the remaining copies of a held job
The user can print the remaining copies of a job held on the
printer unit’s hard disk from the printer unit control panel.
1
Press M
printer unit control panel display.
2
Press I
the display.
3
Press -V
to be printed.
4
Press S
5
Press G
until
ENU
until the job owner and job name appears on
TEM
+ if you want to change the number of copies
ALUE
ELECT
to bring the printer unit online.
O
HP Color LaserJet 8550, 8550N,
on CD-ROM
QUICK COPY JOBS MENU
to print the remaining copies of the print job.
appears on the
Printing
EN
Job retention features 31
Page 34

Stored job feature
The user can download a print job to the printer unit’s hard
disk without printing it. The user can then print the job at any
time through the printer unit control panel. For example, a user
may want to download a personnel f orm, calendar , time sheet,
or accounting form that other users can access and print from
the printer unit control panel.
Printing a stored job
The user can print a job stored on the printer unit’s hard disk
from the printer unit control panel.
1 Press M
appears.
2 Press I
3 Press S
4 Press -V
5 Press S
repeatedly until QUICK COPY JOBS MENU
ENU
until the desired job name appears.
TEM
to select the job name. COPIES=1 appears.
ELECT
+ until the desired number of copies appears.
ALUE
to print the job.
ELECT
32 Job retention features
EN
Page 35

Private job feature
The private printing feature lets a user specify that a job is not
printed until that user releases it using a four-digit personal
identification number (PIN) through the printer unit control
panel.
Specifying a private job
The user specifies the PIN in the driver and it is sent to the
printer unit as part of the print job. To specify from the driver
that a job is private, select the
four-digit PIN.
Releasing a private job
The user can print a private job from the printer unit control
panel.
1
Press M
appears.
2
Press I
3
Press S
4
Press -V
then press S
Repeat this step to change the remaining three numbers of
the PIN.
5
Press -V
6
Press S
repeatedly until
ENU
until the desired job name appears.
TEM
PIN:0000
.
ELECT
+ to change the first number of the PIN, and
ALUE
. An * appears in place of the number.
ELECT
COPIES=1
ALUE
ELECT
appears.
+ until the desired number of copies appears.
to print the job.
Private Job
option and type a
QUICK COPY JOBS MENU
appears.
Printing
EN
Job retention features 33
Page 36

Quick copy jobs
The quick copy feature prints the requested number of copies
of a job and temporarily stores the job on the printer unit’s
hard disk. Additional copies of the job can be printed using the
printer unit control panel.
Printing a quick copy job
The user can print a job stored on the printer unit’s hard disk
from the printer unit control panel.
1 Press M
2 Press I
3 Press S
4 Press - V
appears.
5 Press S
until QUICK COPY JOBS MENU appears.
ENU
until the desired job name appears.
TEM
.
ELECT
+ until the desired number of copies
ALUE
to print the job.
ELECT
34 Job retention features
EN
Page 37

Copying Section
Introduction
This section explains the various f eatures and functions of the
HP Color LaserJet 8550MFP copy module. Topics include:
• Copy module control panel features
• Making copies
• How to access additional information
EN
Introduction 35
Page 38

Copy module control panel features
4
2
3
5
1
1 Touch panel display
COPY key Press to switch to the copy f eature or to
2
SYSTEM key Press to display system and printer
3
Adjust the copy module’s features
using the touch panel display.
take the copy module out of Energy
saver mode.
unit information on the touch panel
display.
36 Copy module control panel features
6
7
8
9
EN
Page 39

4 Status lights
5 Display contrast dial
key Press to return the copy module to its
6
7
8
9
R
ESET
key Press to display explanations of the
H
ELP
A
DMINISTRATION
F
UNCTIONS
I
NTERRUPT
COPY JOB
key
key
These four lights use colors and
blinking patterns to indicate the status
of the system.
Turn to adjust the contrast on the touch
panel display.
default setting (Default mode).
system keys and features.
Press to select or cancel out of the
Administration Functions (also called
Additional Functions).
Press to interrupt the current copy job
to copy a job that has a higher priority.
EN
Copying
Copy module control panel features 37
Page 40

2
1
3
1 Numerical key pad
C
2
3
LEAR NUMERIC
key
VALUE
ID
(identification)
key
Press to enter the desired number of
copies or to enter other numerical
values when setting a copy mode.
Press to reset the copy quantity to one,
or to clear the last numeric value that
was entered while setting a copy
mode.
Enter an identification number, then
press ID to access the system. Return
the system to a locked mode by
pressing ID when the job is complete.
Note
The ID key is used only when identification numbers are
assigned to departments or users. Identification numbers are
assigned in the Administration (Additional) Functions setting.
38 Copy module control panel features
EN
Page 41

2
1
3
4
5
6
ACS (Automatic Color
1
Selection) key
F
2
ULL COLOR
key Press to select the Black Monochrome
B
3
LACK
4
5
6
EN
E
NERGY SAVER
key
S
TOP
S
TART
Press to allow the system to
automatically select between the Black
Monochrome and Full Color modes.
key Press to select the Full Color mode
key Press to cancel a copy job.
key Press to begin making copies.
(copies are made in black, cyan,
magenta, and yellow).
mode.
Press to select the Energy sav er mode
and reduce energy consumption. Press
the key again to cancel the Energ y
saver mode. (This mode is similar to the
Pow erSave mode on the printer unit.)
Copy module control panel features 39
Copying
Page 42

Touch panel display
1 6
2
3
135
8
7
4
9
10
11
12
Note
This screen appears when all optional accessories are
installed. This screen will differ depending on the optional
accessories installed on your system.
1 Message display
2 Copy ratio display
3 Reduce, Direct,
Enlarge
4Zoom
5 Media quantity
indicator
Displays the system status and
operator instructions.
Displays the copy ratio setting.
Press to select the most suitable
setting for reducing or enlarging the
image using preset ratios or to perform
a direct copy (resets the copy module
to 1:1 copying).
Press to enlarge or reduce images in
1% increments.
Displays the remaining quantity of
media in the selected tray.
40 Copy module control panel features
EN
Page 43

6 Media size display
7 Paper select
8 Copy quantity
indicator
9 Exposure control
10 Two-sided copying
(duplexing)
11 Original type
12 Special Features
13 Setting confirmation
Displays the media size in the selected
tray.
Press to select automatic Paper
Selection or a specific tray.
Displays the number of copies to be
made.
Press the left-facing arrow (왗) for
lighter copies or press the right-facing
arrow (왘) for darker copies. Press A
(automatic) to select automatic
exposure control.
Press to select or cancel duplexing.
(See page 49 for more information.)
Press to select the setting most
suitable for the type of original to be
copied: text, photograph, or map.
Press to display the Special Features
screen on the touch panel display. Use
the Special Features mode to select
the desired copy image quality or the
desired layout settings.
Press to check and confirm the
selected programmed job settings.
This button is only visible when job
settings have been programmed.
EN
Copying
Copy module control panel features 41
Page 44

Control panel menu map
1
2
3
4
1Menu map
2 Paper clip tray
3 Power button
4 Pilot light
Provides brief descriptions and
translations of control panel keys.
Store removed paper clips here.
Press to turn the power on or off.
(There is also a power switch, which is
located on the right side of the copy
module.)
A green light indicates that the copy
module is turned on.
42 Copy module control panel features
EN
Page 45

Making copies
The copy module makes it easy for you to produce multiple
copies of almost any printed original. You can copy pages
manually, or stack your unbound originals into the optional
automatic document feeder (ADF) and let it automatically copy
the pages for you.
The following pages describe these copy module tasks and
features:
• How to make simple copies
• Making copies on the glass
• Making copies with the ADF
• How to copy the entire image from an original onto the
available media
• Enlarging or reducing copies
• Making full-page copies
• How to make double-sided copies
• Single-sided originals to double-sided copies
• Double-sided originals to single-sided copies
• Double-sided originals to double-sided copies
• How to make copies from a book or magazine
• Facing pages (book style) to double-sided copies
• Facing pages (book style) to single-sided copies
(this feature is also called two-page separation)
• Book frame erase
• Second-side elimination
Copying
EN
Making copies 43
Page 46

• How to enhance the image quality
• One-touch color adjustment
• Using the original-type feature
Other features
Numerous other features are available on the copy module.
See the
Guide
and instructions for using them. Some of the additional special
copying features include:
• Shift: Create margins or move images to different parts of
• Sharpness: Vary the clarity of the original images to
• Image creation: Create repeated images, negatives,
• Color adjustment: Manually adjust the color tones, select
• Mode memory: Store or recall copying jobs by assigning
• Security: Create user identification numbers and
HP Color LaserJet 8550MFP Copy Module User
on CD-ROM for detailed descriptions of these features
the page.
produce copies with an artistic flair.
mirror images, or slanted images.
pre-set color settings (tranquil, vivid, darkened, or
lightened), or make single-color copies.
specific features to a display key.
passwords to prevent anyone except designated users
from making copies.
44 Making copies
EN
Page 47

How to make simple copies
Making copies on the glass
You can place individual pages or books directly on the glass
to make copies. Keep in mind that if you place the media on
the glass horizontally, you must load “rotated” media in Tray 1
(the multipurpose tray or stack bypass). “Rotated” means that
media is loaded into the tray with the short-edge first.
1
1
2
3
Lift the cover.
2
Place the original face-down on
the glass.
Note
Align the corner of the original with
the “arrow” mark in the upper-left
corner of the glass.
3
Lower the cover and press
S
without changing any
TART
settings on the copy module
display panel.
CAUTION
When copying thick items, such as
books, do not press down hard on
the copy module cov er. Doing so may
damage the glass and result in
personal injury.
EN
Copying
Making copies 45
Page 48

Making copies with the optional ADF
When you place several originals in the optional ADF and
press S
copying. Double-sided originals are automatically flipped
inside the optional ADF to make copies of both sides.
1
2
3
, they are automatically fed to the glass for
TART
Adjust the media-width guides
1
on the optional ADF to fit the
size of your originals.
Load originals into the ADF tray
2
face up.
Flip up the tray extension on the
3
optional ADF for copying rotated
or long originals (such as Legalsize or A3 paper).
Note
Remember to load rotated media
short-edge first into T ray 1 (the stac k
bypass or multipurpose tray) when
copying from rotated originals or
when reducing from A3-, Legal- or
Ledger-size media.
4
Press S
TART
.
4
46 Making copies
EN
Page 49

How to copy the entire original onto the available media
Reducing or enlarging copies
You can enlarge or reduce copies using preset copy ratios,
automatic zoom settings, or manual zoom settings (for
example, reducing from Ledger [11 x 17 in] to Letter or
enlarging from A4 to A3).
1
1
2
Place the original on the glass or
in the optional ADF. Then press
R
(reduce) or E (enlarge) on the
touch panel display.
Note
Remember to load rotated media
into Tray 1 short-edge first when
copying from rotated originals or
when reducing from Legal-, A3-, or
Ledger-size media.
2
Select a preset copy ratio, press
DONE
on the touch panel display,
and then press S
TART
.
EN
Copying
Making copies 47
Page 50

Copying a full page
You can select the Entire Image mode to copy a full page
original without trimming the original.
In the Entire Image mode, the copied image is automatically
reduced depending on the copy media size and copy image
size. Thus, you can take an original image that covers the
entire sheet and create a copy that does not crop the edge of
the original image.
1
2
48 Making copies
To copy a full-page image
Place the original on the glass or
1
in the optional ADF and press
ZOOM on the touch panel display.
Press
2
ENTIRE IMAGE on the
touch panel display, press
on the touch panel display, and
then press S
TART
.
DONE
EN
Page 51

How to make double-sided copies
The copy module has several options for using both sides of
the originals to make copies on one or both sides of the
copies.
All of the following options are available by pressing
TWO-SIDED
instructions on the screen:
• 1→2:
originals.
• 2→2:
original. (Requires optional ADF.)
• 2→1:
original.
on the touch panel display and following the
Make a double-sided copy from single-sided
Make a double-sided copy from a double-sided
Make single-sided copies from a double-sided
Note
For detailed instructions on each double-sided cop ying feature,
see the “Common Copying Tasks” chapter in the
LaserJet 8550MFP Copy Module User Guide
EN
HP Color
on CD-ROM.
Making copies 49
Copying
Page 52

How to make copies from a book or magazine
The following functions allow you to easily copy facing or
individual pages of a book or magazine to create high-quality
copies.
Book to double-sided copying
Using the
touch panel display, as described
above, you can make a doublesided copy of facing pages in a
book. Choose the Book→2-SIDED
option.
TWO-SIDED
button on the
50 Making copies
EN
Page 53

1
2
Book to single-sided copying
Use this feature to copy facing
pages in a book to two single-sided
pages.
1
2
SPECIAL FEATURES
Press
the touch panel display.
TWO-PAGE SEPARATION
Press
DONE
Press
S
TART
and then press
to make copies
on
.
EN
Copying
Making copies 51
Page 54

Book Frame Erase
Use Book Frame Erase to remove the dark border, center
lines, and contour lines (between pages) from copies of bound
documents like books or magazines.
To erase shadows from copies
Place your original face down on the glass so that its top
1
edge rests against the back of the glass, away from the
control panel. Press
Press
2
3
4
FRAME ERASE.
Press
BOOK FRAME ERASE, then press OK.
Select the size of your original (i.e. the size of the book
when opened), then press
SPECIAL FEATURES
OK.
.
Note
Select
A/B SIZE to select an ISO original size.
52 Making copies
EN
Page 55

5
Specify the width of the center of the book to be erased by
using the
Note
Press
6
Press
7
Press
+
and - buttons.
MM
to enter values in millimeters.
OK
when the correct center width has been selected.
DONE
, and then press S
to make copies.
TART
EN
Copying
Making copies 53
Page 56

Second Side Elimination
Use Second Side Elimination mode to keep an image from the
back side of a lightweight original from appearing on the copy.
Place your original on the glass, and then press
1
(automatic exposure control).
Press
2
3
SPECIAL FEATURES.
Press
IMAGE QUALITY ADJ
.
A
54 Making copies
EN
Page 57

4
2ND SIDE ELIMINATION
Press
.
5
6
EN
Press
Press
OK
.
DONE
, and then press S
to make copies.
TART
Copying
Making copies 55
Page 58

How to enhance the image quality
One Touch Color
One Touch Color allows you to quickly and easily apply six
commonly used image adjustments to modify the color
characteristics of the original.
• Vivid colors: Makes copies with more vivid hues.
• Tranquil colors: Makes copies with subdued hues.
• Lighten image: Makes copies with lighter colors.
Decreases the strength of the color in the low-exposure
range while maintaining a good color balance throughout.
• Darken image: Makes copies with darker colors.
Increases the strength of the color in the low-exposure
range while maintaining a good color balance throughout.
• Highlight reproduction: Clearly reproduces highlights
that normally appear on a copy of the original as white.
• Old-fashioned photo image: Makes copies that look like
old-fashioned (sepia-tinted) photographs.
56 Making copies
EN
Page 59

Using One Touch Color
1
Place your original on the glass.
2
3
SPECIAL FEATURES
Press
ONE TOUCH COLOR
Press
.
.
EN
Copying
Making copies 57
Page 60

4 Select the desired image quality.
Note
Multiple image qualities can be simultaneously selected, with
the exception of the following combinations:
Vivid Colors and Tranquil Colors
Lighten Image and Darken Image
Lighten Image or Darken Image and Highlight Reproduction
5 Press
6 Press
7 Press S
OK.
.
DONE
to make copies.
TART
58 Making copies
EN
Page 61

Selecting Original Type
You can improve the quality of copies by using Original Type
mode to accurately reflect the type of text, photo, or map
originals.
1
2
3
Place the original on the glass or
in the optional ADF.
2
Press the original-type icon
on the touch panel display.
3
Select one of the following
options:
TEXT/PHOTO/MAP
•
setting for copying originals
containing a mixture of text and
photo images.
PRINTED IMAGE
•
setting for copying photog raphs
printed in a magazine.
PHOTO
: Use this setting for
copying a photo printed on
photographic paper.
BLACK TEXT
for copying originals that
contain only black text without
illustrations or photos.
DONE
TART
4
5
•
•
Press
Press S
: Use this
: Use this
: Use this setting
.
to make copies.
EN
Copying
Making copies 59
Page 62

For more information
The following sources provide additional inf ormation about the
system. Refer to them for procedures and details not covered
in this document.
• HP Color LaserJet 8550MFP Copy Module User Guide
on CD-ROM
HP Color LaserJet 8550, 8550N, 8550DN, 8550GN,
•
8550MFP Printer User Guide
• Installation guides for the optional accessories
• Printer unit software
• Driver help files
• Copy module touch panel display
on CD-ROM
60 For more information
EN
Page 63

Page 64

Copyright 2000
Hewlett-Packard Co.
Printed in USA
©
Printed on at least
50% Total Recycled Fiber with
at least 10% Post-Consumer Paper
Manual Part No.
C7835-90901
*C7835-90901*
*C7835-90901*
C7835-90901
 Loading...