Page 1
User’s Guide
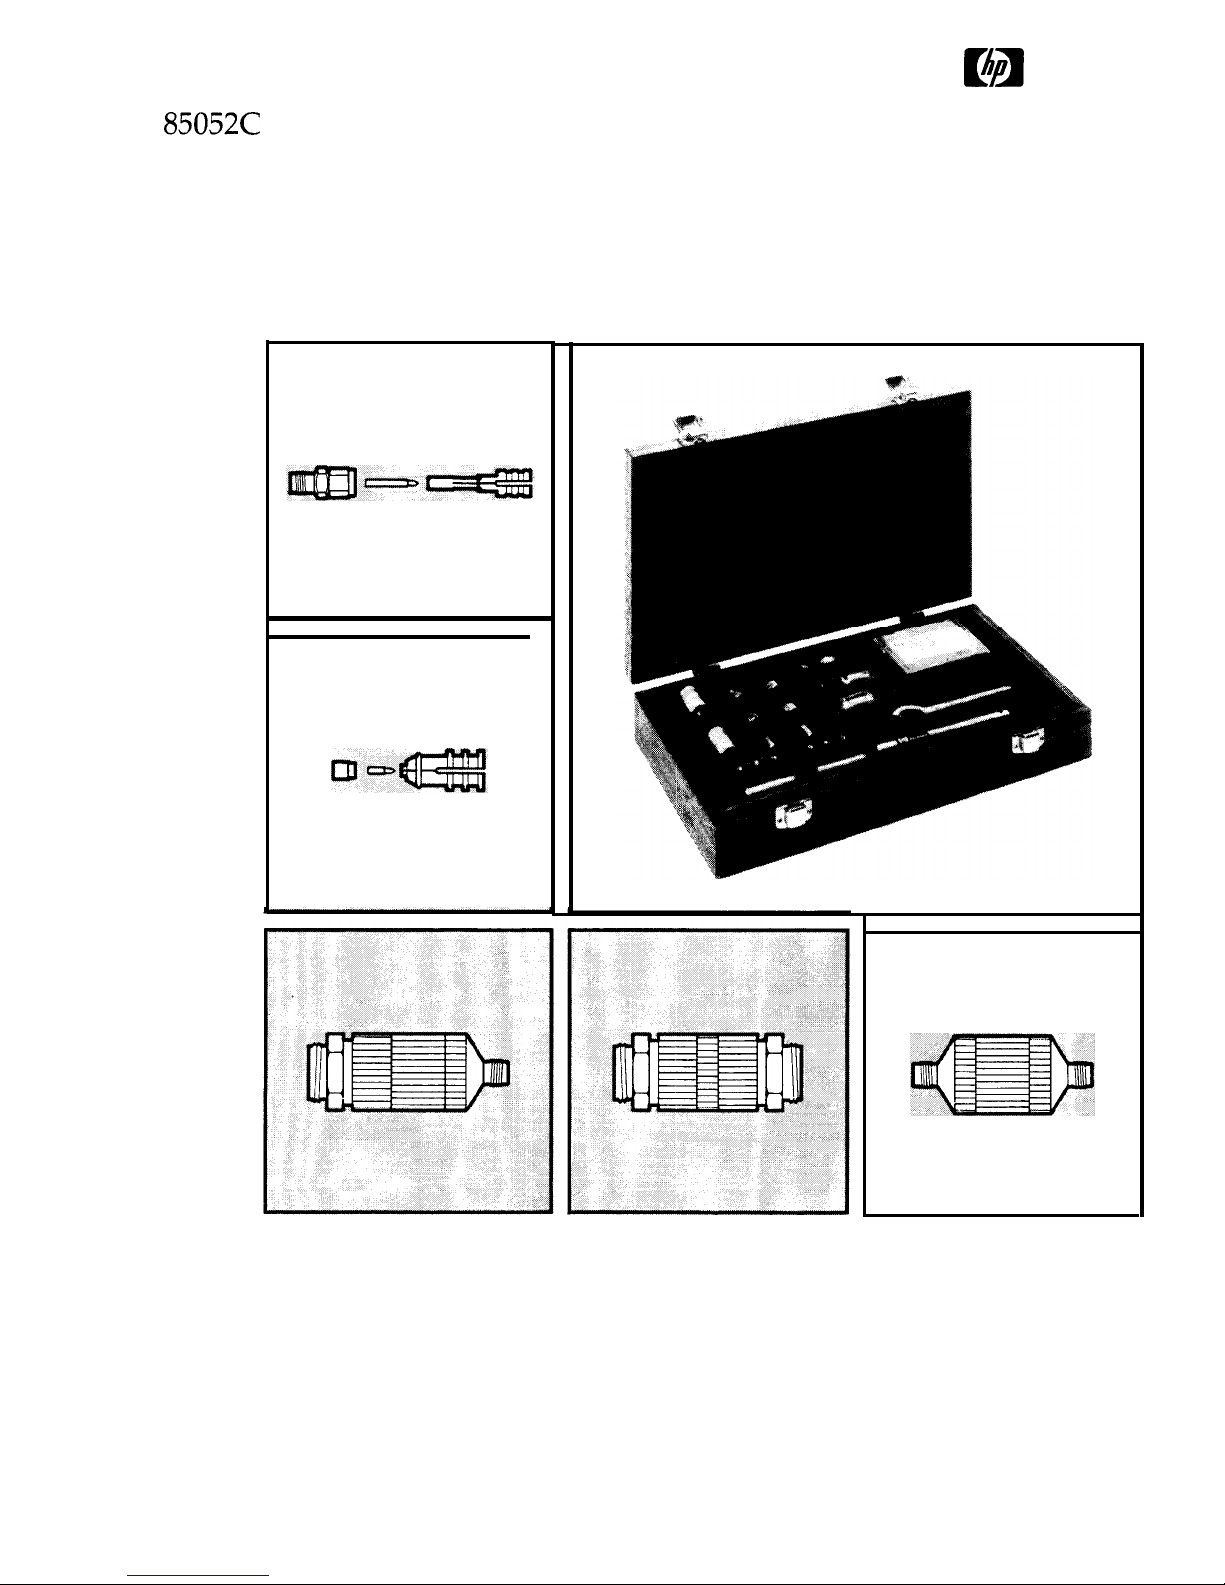
HP 85052C Precision Calibration Kit
HEWLETT
PACKARD
Page 2
TRAINING
VIDEOTAPE
USER’S
PRODUCT NOTE
PRODUCT NOTE
CONNECTOR
SERVICE
GUIDE
a510-5A
851 O-8A
CARE CARD
MANUAL
Using the
HP
85052C
HP
85052c
Operating and
Precision
Service Manual
Calibration Kit
HP
85052C
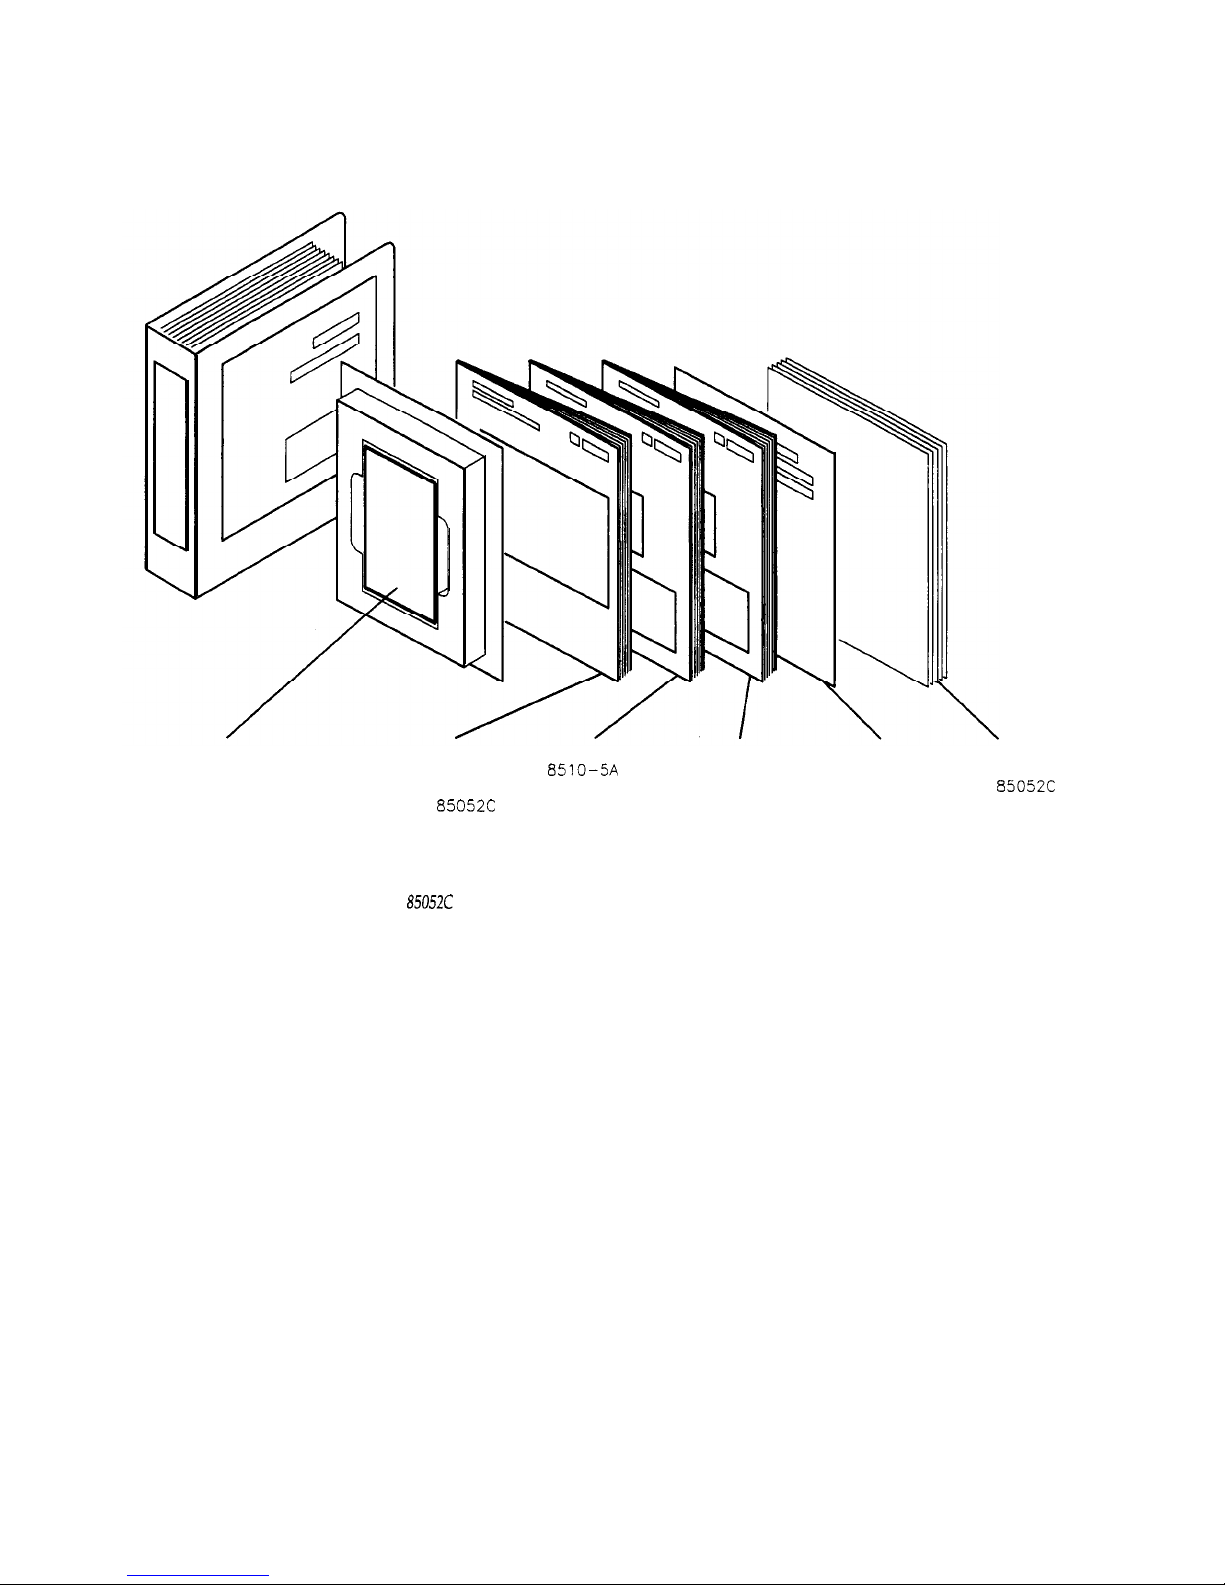
Precision Calibration Kit Operating and Service Package
Page 3

TABLE OF
CONTENTS
Chapter
1
Introduction to the Calibration Kit
Calibration Kit Components
Air Lines
O-2
GHz
Loads
Reflect Standards
Isolation Standards
Precision Adapters
Tools
5
Chapter 2
Performing a TRL 2-Port Measurement Calibration
Electrostatic Discharge
Clean and Inspect
Cleaning
Using Connector Gages
Configure Port 1 and Port 2
Install Test Port Return Cables
Install Precision Adapters
Air Line Frequency Coverage
Load Calibration Kit Definition
Measure Standards
When Stop Frequency is Greater than 7
GHz
When Start Frequency is Less than 7
GHz
When Start Frequency is Less than 2
GHz
Check the Calibration
11
Chapter 3
Noninsertable Calibrations
General Theory
Noninsertable Device Configurations
Adapter Removal Calibration Procedure
Chapter 4
Other Calibrations
Changing Air Line Frequency Range
Lowband
Reflection Instead of
0 to 2 Loads or 2 to 7 Line
Lowband
Reflection Procedure
26
28
3
Page 4

I
N
T
R
0
D
U
C
T
I
0 N
What’s in this Guide
Th*
IS
guide describes how to use the HP 85052C calibration
Chapter 1
Chapter 2
Chapter 3
Chapter 4
User’s Video
Application Note
Service Manual
Before Proceeding.
.
.
kit
with
the HP 8510 vector network analyzer to perform
the TRL 2-Port measurement calibration technique, and
how to evaluate the results of the calibration.
This chapter introduces the components of the kit, and
describes important connection techniques.
In this chapter, detailed sequences describe how to set up
the network analyzer system, and use the kit to perform
the 3.5 mm TRL
~-POX?
Calibration procedure.
Since many applications require measurement of devices
that are not insertable, this chapter describes the theory of
and how to use the kit to perform the Adapter Removal
procedure for measurement of noninsertable devices.
This chapter, entitled “Other Calibrations,” describes use
of the network analyzer Modify Cal Kit function to redefine
the calibration kit and how to use the Lowband Reflection
option.
This guide is supplemented by a video presentation that
shows how an experienced operator uses the calibration kit
parts. If you have access to this tape, view it along with this
manual first.
Another supplement,
Application Note 326, Microwave
Connector Care, gives
general principles of microwave
connector care. With the exception of changing the
recommended connector cleaning fluid from the previously
recommended liquid freon (a CFC) to isopropyl alcohol, this
connector care manual will serve as an excellent starting
point to become familiar with general requirements for
achieving optimum results using this calibration kit.
Refer to the Service Manual for specifications, replaceable
parts, and other pertinent information. Inside the
calibration kit box a quick reference card illustrates
procedures for connecting and disconnecting the air line.
This memory aid is helpful to the operator who is familiar
with the kit and TRL 2-Port calibration theory.
The parts in this kit are delicate and must be handled with
care to avoid damage that would affect the accuracy of the
calibration. Check all test device connectors carefully
before connecting to the TRL adapters.
Page 5

HP
85052C
Precision Calibration Kit
CHAPTER ON
E
Introduction to the Calibration Kit
The HP 85052C 3.5 mm Precision Calibration Kit is
designed to be used in TRL 2-Port measurement calibration as implemented in vector network analyzers. TRL
stands for Thru-Reflect-Line, naming the main standards
used in the accuracy enhancement procedure.
TRL represents a family of calibration techniques that
measure various combinations of transmission lines and
reflection standards to determine the 2-Port 12-term error
coefficients. The specific calibration technique described
here uses measurements of the zero-length thru connection, identical reflection standards at each port, and one or
more transmission lines of appropriate impedance and
length for the frequency range. Both the TRL 2-PORT and
the Full 2-Port calibration types use the same accuracy
enhancement mathematics to correct the measured data.
TRL, as implemented with this calibration kit, brings convenience, accuracy, and repeatability to the error
correction process because the typical TRL calibration
requires fewer parts that are simpler to connect and
-
disconnect.
The 3.5 mm geometry connector is the most frequently
used connector when frequency coverage up to 26.5
GHz,
reasonable commonality, and durability is desired.
Well constructed connectors and transmission lines can
work up to 34
GHz.
Metrology grade versions of this connector are used for high performance test ports and for
calibration standards. Whether the device uses SMA,
SMA-compatible, or 3.5 mm, the HP 3.5 mm connectors
used on the HP test ports, adapters, cables, and calibration
standards provide the most accurate and repeatable
-
solution.
All male connectors in this kit are HP precision with care-
fully controlled dimensions. All female connectors are of
the HP precision slotless (PSC-3.5) type. These connectors
are designed for long repeatability when used with appropriate technique. This means careful inspection of the kit
parts, familiarity with their use, and careful inspection of
the Device Under Test (DUT) connectors. Refer to the
“Specifications” chapter in the HP
85052C
Service Manual, and the Technical Note included with this manual for
specific information about precision slotless connectors.
5
Page 6
Calibration
Kit Components
Air Lines
The HP
85052C
3.5 mm Precision Calibration Kit contains
components useful for several different calibration techniques. The parts used for the TRL 2-Port calibration are:
l
Longer precision air line for 2 to 7 GHz
l
Shorter precision air line for 7 to 32 GHz
l
Male and female short circuits
l
Male and female fixed loads
Other parts included are:
l
Three precision TRL adapters
. Two adapter anti-rotation clamps
l
Calibration kit definition tape
l
Male and female open circuits
l
Tools
Note the reference card in the box and the material list on
the bottom of the box.
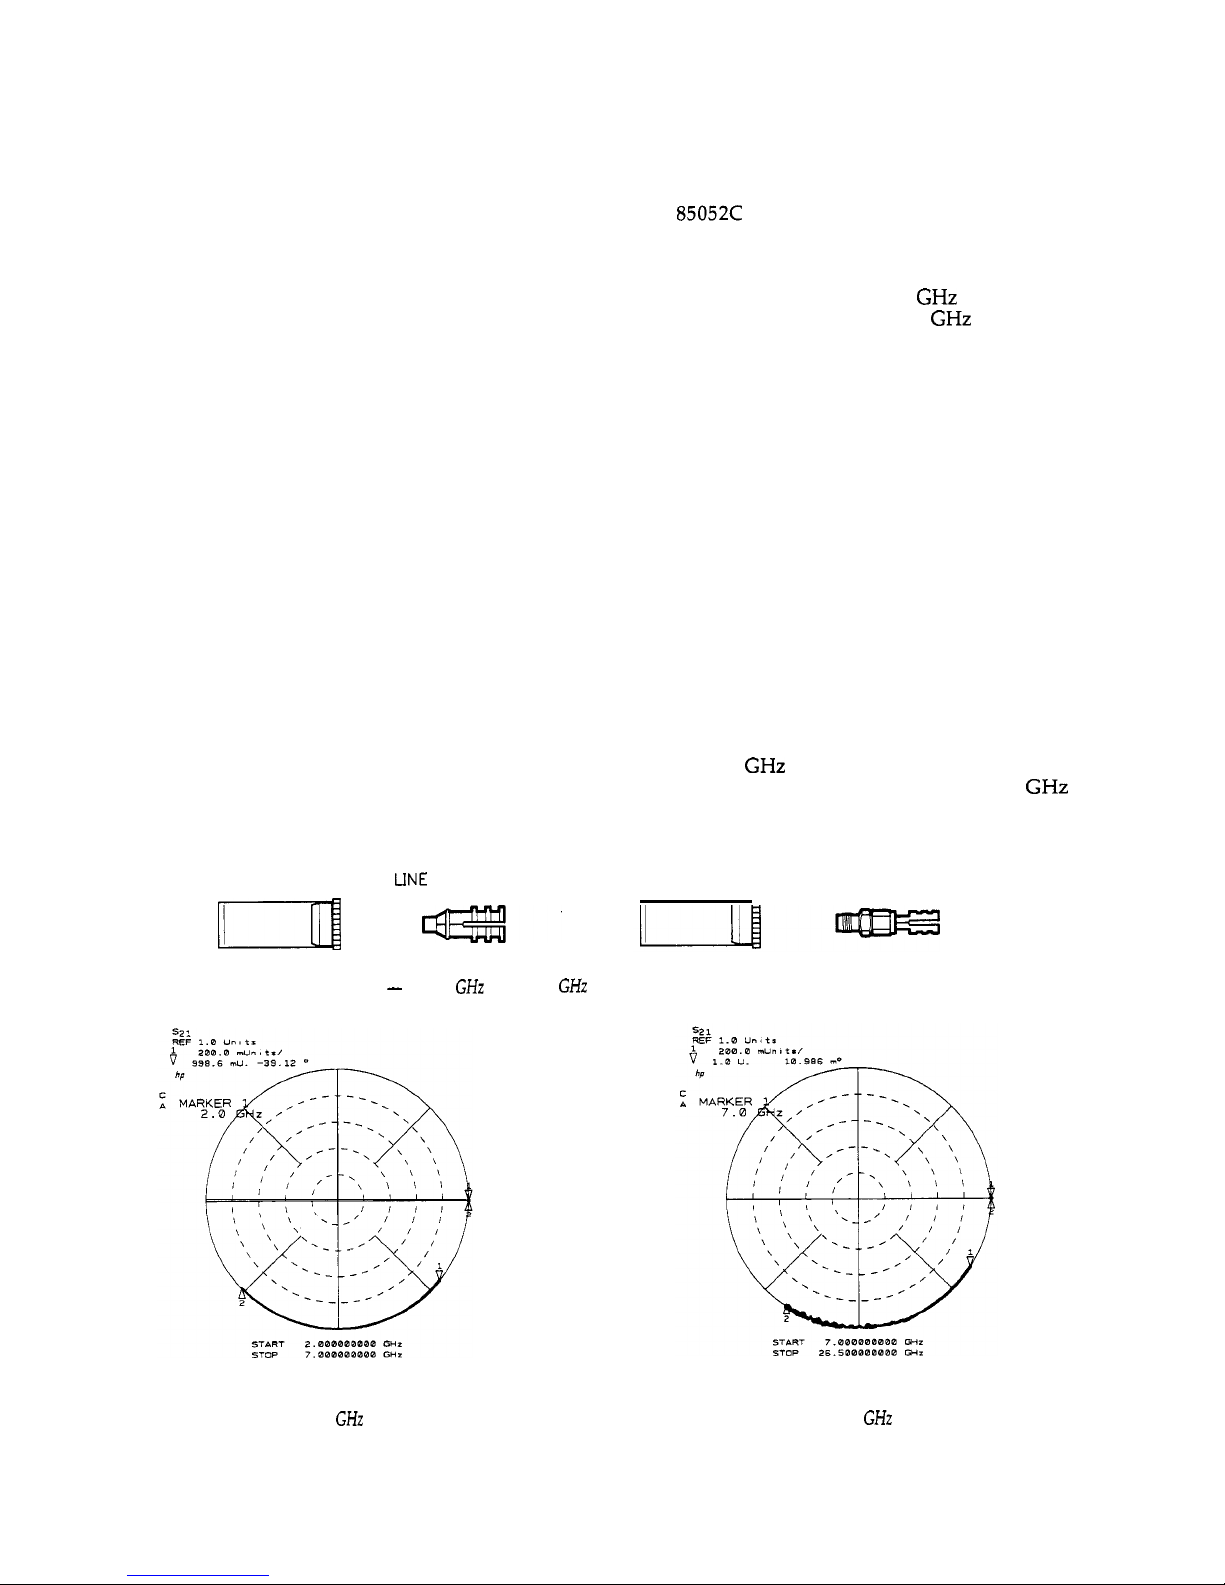
These are precision air lines. Each one is always stored in
its installation tool to help prevent damage and preserve
cleanliness.
The shorter air line is used for measurement calibration
over the 7 to 32 GHz frequency range. The longer air line is
used for measurement calibration over the 2 to 7
GHz
range. Each air line is fully specified at all frequencies
within its stated range.
7-32
LINE
II
a’
2-7 LINE
Line Standards - 7 to 32
GHz
and 2 to 7
GHz
Air
Lines Installed in Tools with Storage Bottles
Polar Display Showing Phase Response
of
Longer
Air Line Over 2
to
7
GHz
Frequency Range
Polar Display Showing Phase Response of Shorter
Air Line over 7 to 26.5
GHz
Frequency Range
Page 7

Air Lines Removed From
installation
Tools
Each air line consists of a separate outer conductor and
center conductor and includes its own tool used for
installing and removing the parts from the test port. Both
are insertable. Each has a male end and a female end. The
male end of the air line fits into the installation tool.
The parts may be removed for inspection, if necessary, but
the tool is always used to install the parts for calibration.
Use extreme care in handling these parts. Use static dissipative finger sheaths, or “finger cots” to prevent contamination. Liquid or solid residue on the connector parts will
degrade performance. In particular, the inner conductors
can be easily deformed by squeezing. Do not use
metallic
tweezers or other devices to pick up or hold the parts.
installing
the
Air
Lines in
installation
Tools
0 to 2
GHz
Loads
Th’
IS
implementation of the TRL 2-Port calibration allows
measurement of the loads to determine the error coefficients up to 2
GHz.
Technically, the measurement is
treated as an infinite-length transmission line whose input
reflection is the reference impedance, Z,.
Note:
The male and female broadband loads are
manufactured to tolerances that assure equivalent responses,
at least below 2
GHz.
If one is damaged or otherwise
becomes defective, calibration
erroriwill
result.
0
to 2
GHz
Loads -Male and Female Fixed Broadband Loads
Page 8
Reflect Standards
Reflect Standards -Male and Female Short Circuits
Isolation Standards
isolation
Standards -Male and Female Broadband Loads
Precision Adapters
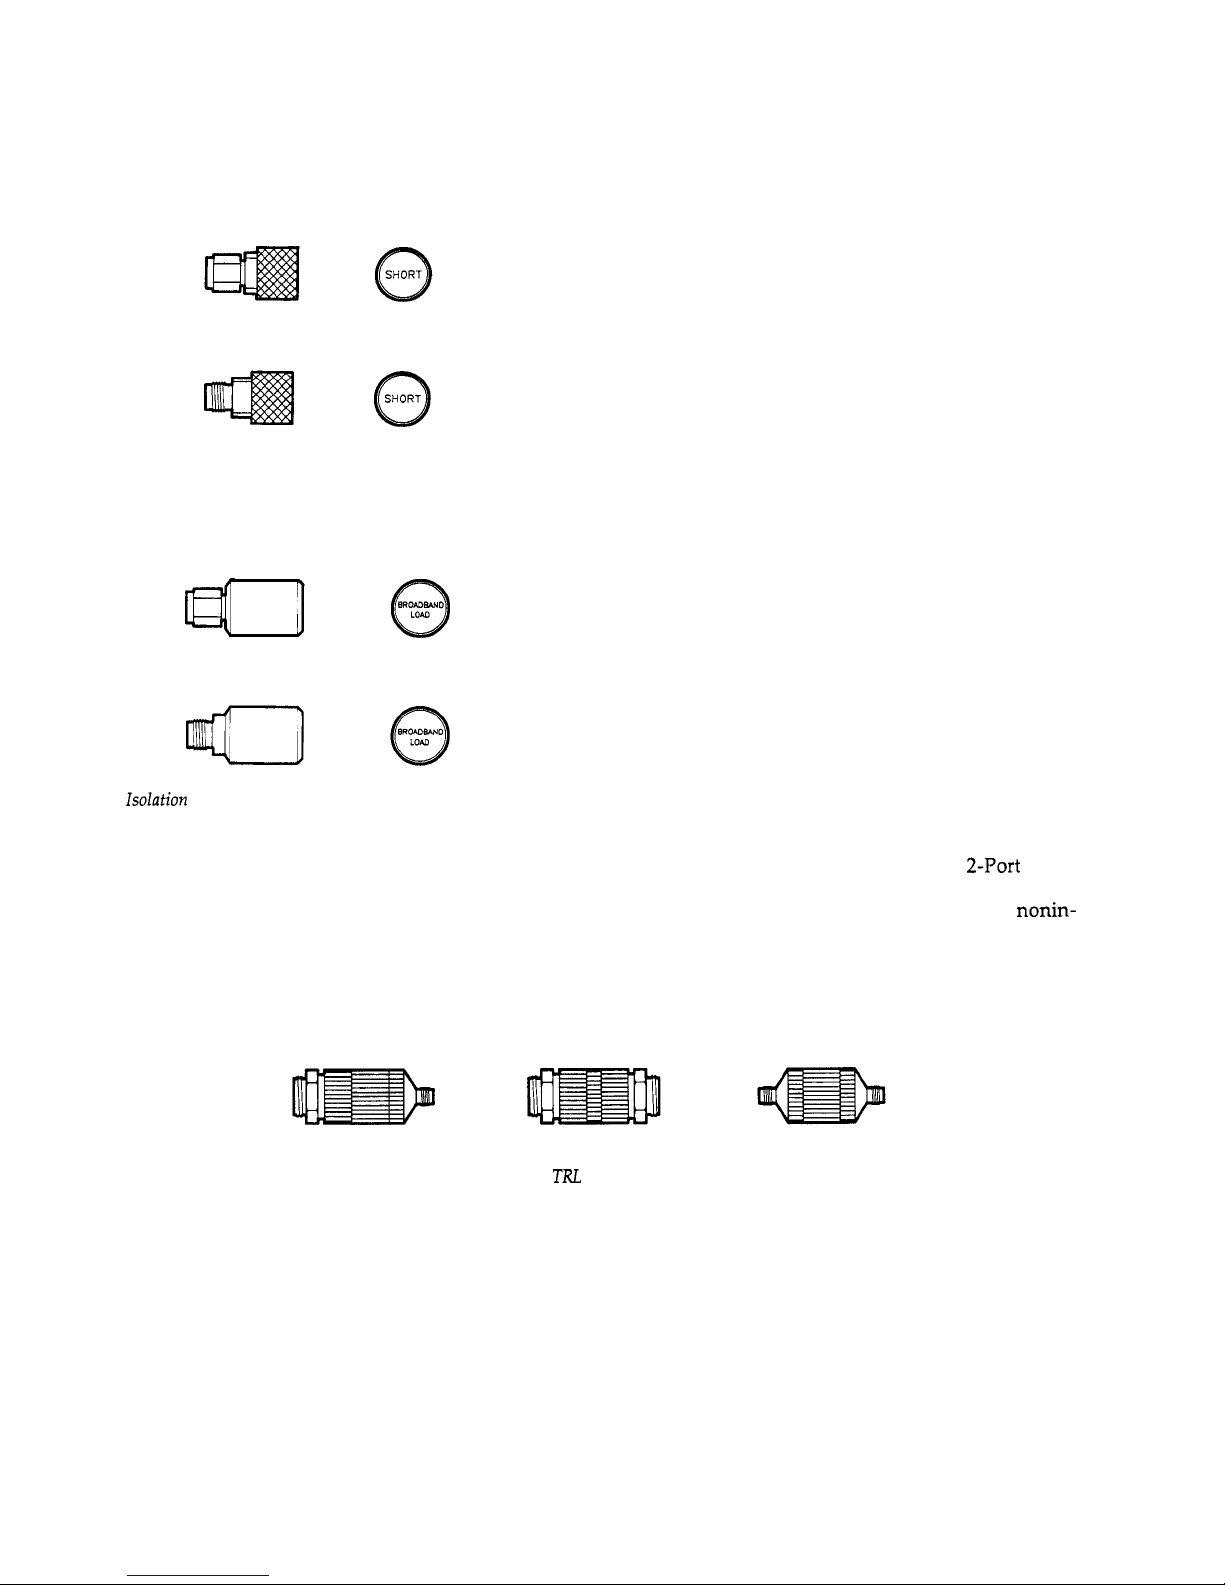
In this TRL 2-Port calibration, the reflect standards are
identical short circuits with one connected to Port 1 and
one to Port 2.
The male short circuit and the female short circuit are
manufactured to tolerances that assure equivalent
responses. If one is damaged or otherwise becomes
defective, calibration errors will result. Errors will also
result if the open circuits are used in the procedure instead
of the short circuits (unless the calibration kit standard
assignment definition is changed).
The fixed loads used for the isolation part of the calibration
are the same broadband loads as used for the O-2 loads
measurement. Exact equivalent responses are not required
for this step.
Three precision adapters are included in this kit. Two are
always recommended for the 3.5 mm TRL 2-Port
measurement calibration. All three can be used in the
adapter removal calibration for measurement of nonin-
sertable devices. Complete performance verification
assumes use of the precision adapters in this kit as the test
ports.
MALE to FEMALE
MALE to MALE
FEMALE to FEMALE
Precision
TRL
test port adapters
Page 9
Recession Limits
The female receptacle recession and the male pin
recession, along with other mechanical specifications of
Port 1 and Port 2, must be within limits to meet complete
measurement specifications. The precision adapters
supplied in this kit are manufactured to metrology
standards in order to obtain the best measurement
accuracy specifications. If other connectors than these
precision adapters are used as the test ports, they must be
fully inspected. Using other than the highest quality
connectors as the test ports will reduce accuracy and
repeatability as well as possibly damaging the calibration
standards.
Precision Connectors
For general use, any 3.5 mm precision
slotless
female connector can be used for the female test port. The 3.5 mm
precision male connector used on the male end of these
adapters is always required for measurements between
7-32 GHz in order to connect the 7-32 GHz air line in this
kit. Any 3.5 mm precision male connector can be used at
frequencies less than 7
GHz.
hstdation
Feature
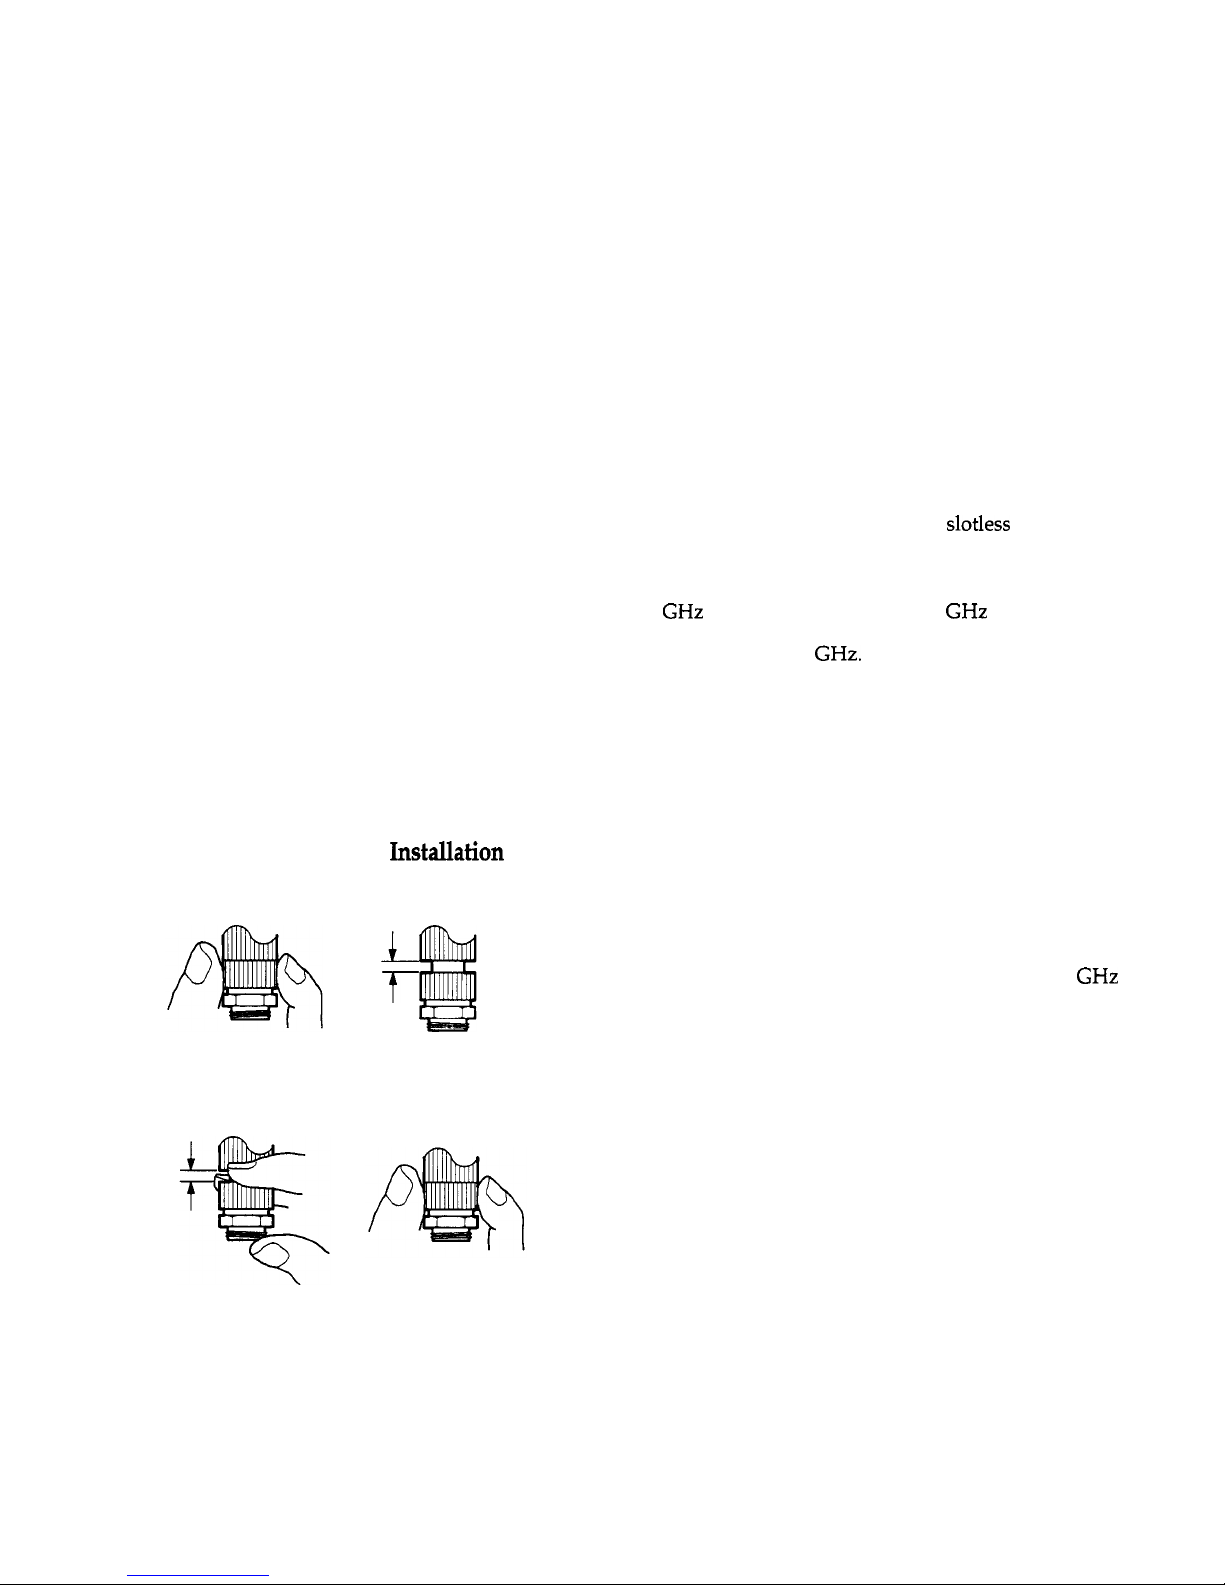
The precision adapter male connector has a special feature
to allow installation of the 7-32 air line.
GAP
_L
t
l
Grasp the knurled sleeve and move the nut to its
extended position by pulling on it.
This is the position used for measurement of the 7-32 GHz
air line.
Extended Position
GAP
. Now move the sleeve forward and push the nut back
into its standard position.
This position is used to install the short air line, for
connecting the other calibration standards, and for
connecting the device under test.
Standard Position
9
Page 10
/o
I
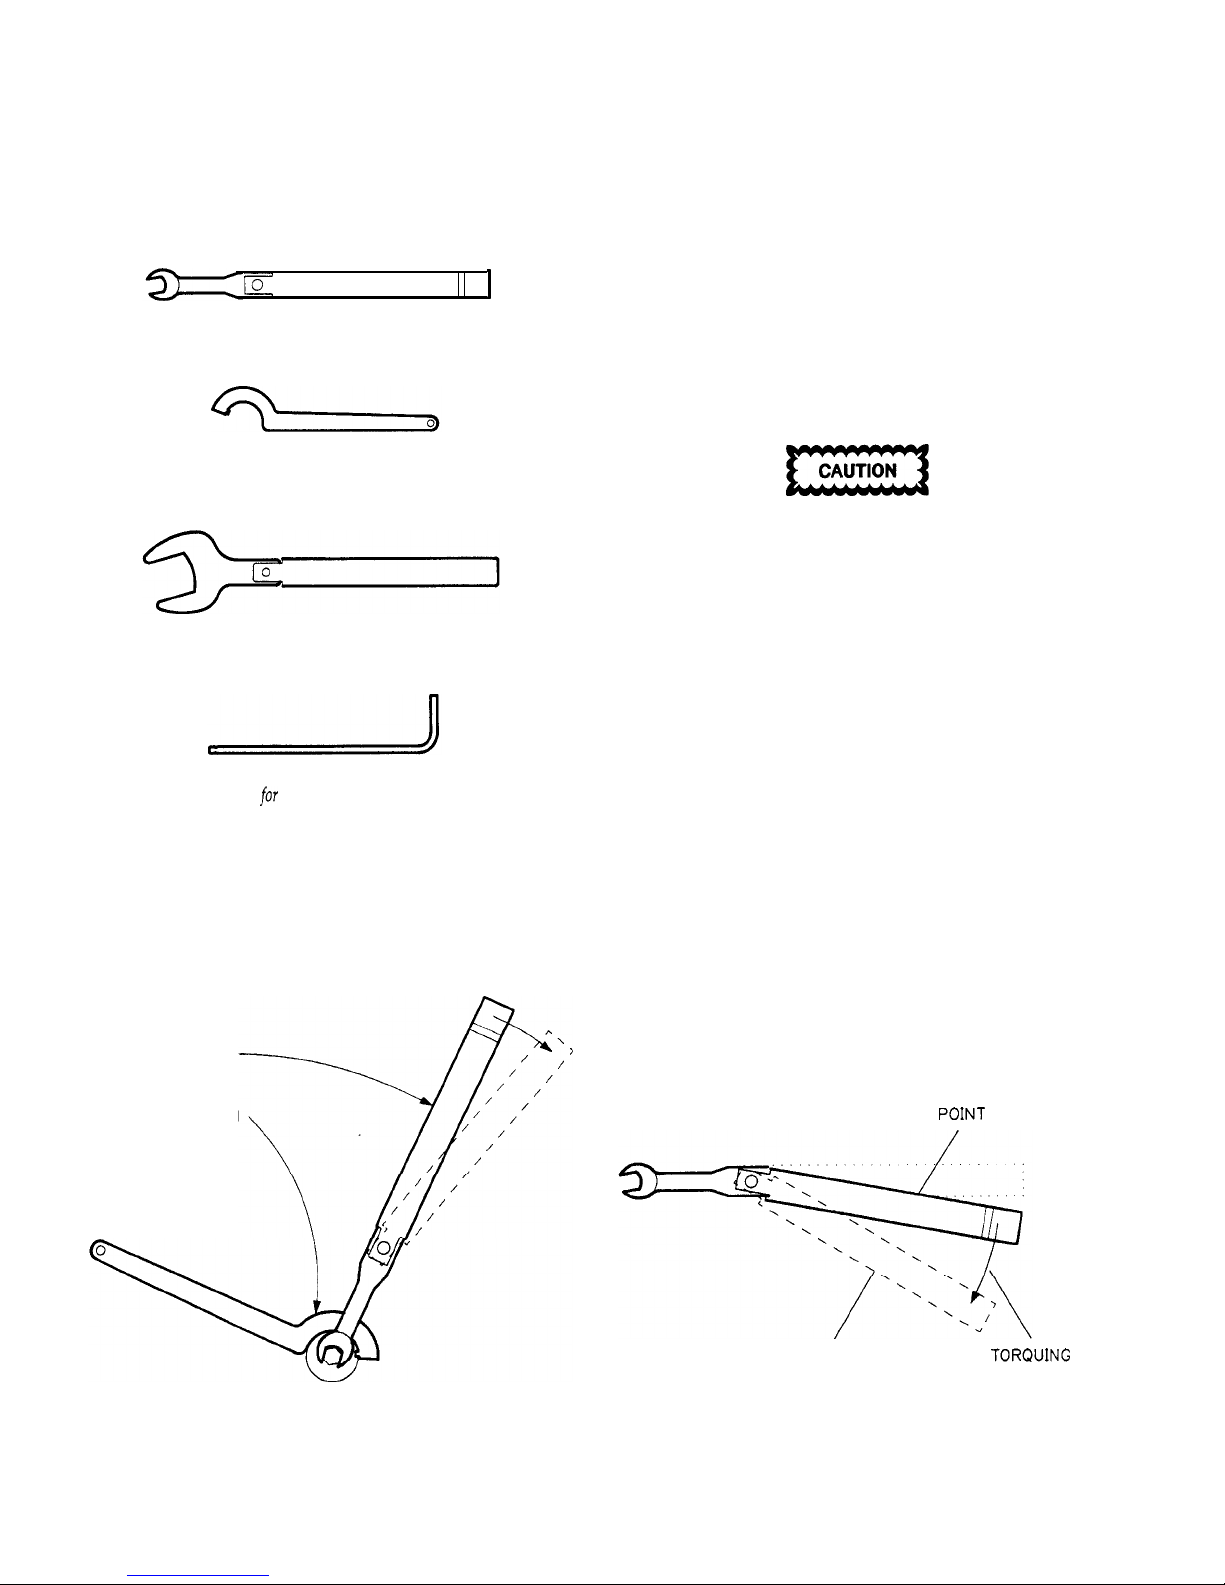
Torque Wrench
Tools
At q
or
ue wrench and spanner wrench are included in the
kit to loosen and tighten the connectors. The small torque
wrench is used for the 3.5 mm nuts. The large torque
wrench is used for the 20 mm nuts on the precision
adapters. It is included with the test set. The spanner
wrench is used to hold the precision adapter while using
the appropriate torque wrench to tighten the connection.
Also included is the hex wrench for tightening and
loosening the adapter anti-rotation clamp securing screws.
Spanner Wrench
When making connections, turn the nut on the device,
never turn the device itself. Turning the device will cause
excessive wear of both connector mating surfaces and
cause debris to collect in the female receptacle.
Torque Wrench (not included)
When making a connection:
Hex Wrench
for
AdapterAnti-Rotation Clamp
1.
Carefully engage the male and female contacts, and
then tighten the nut by hand.
2.
If necessary, use the spanner to hold one device
stationary against the direction of torque.
3.
Hold the torque wrench with your thumb and index
finger near the end of the handle.
4.
Tighten the connection until the ball in the handle
crests on the cam (as the handle begins to “break”,
releasing tension).
TIGHTEN WITH
TORQUE WRENCH
HOLD WITH
SPANNER WRENCH
It is not recommended or necessary to fully “break” the
handle of the torque wrench to reach the fully-specified
torque. As soon as the handle moves out of alignment, the
connection is properly torqued.
Reverse the above procedure to disconnect the connectors.
HANDLE BEGINS TO BREAK
(
CORRECT
POINT
TO STOP
)
HANDLE FULLY BROKEN
TORQUING
(NOT RECOMMENDED)
DIRECTION
Using the Spanner and Torque Wrench
Correct Torque Value
10
Page 11

C
H
A
I?
T
E R
T
W
0
Performing a TRL Z-Port
Measurement Calibration
This example describes use of the HP 3.5 mm precision
calibration kit to measure an insertable device. When the
test device is insertable, the test ports can be connected
together to establish the Thru connection during
calibration.
The procedure used for performing any measurement
calibration is as follows:
.
1.
Clean and inspect all connectors.
2.
Initiate measurement calibration procedure and
measure standards.
3.
Verify the calibration.
4. Connect the device under test.
The rest of this section explains the above steps.
Electrostatic Discharge
wheny
ou make connections to the network analyzer,
either directly to the test set port or indirectly through a
cable that is connected to the test set port, protect the
instrument against electrostatic discharge (ESD). Always
wear a grounding wrist strap connected to a conductive
bench mat when working near sensitive equipment.
The human body almost always has some static charge.
You are not usually aware of this charge because the
human threshold for the perception of a static discharge
shock is about 30
kV.
ESD as low as 60 volts can damage
sensitive microcircuits.
Clean and Inspect
The accuracy of error-corrected measurements using the
network analyzer depends upon the quality of the
measurement calibration. In turn, the quality of the
calibration depends on the condition and cleanliness of the
test ports and calibration standards, and the operator’s skill
in making connections. Repeatability and accuracy are
improved by removing contaminants from mating surfaces
during cleaning.
Carefully inspect the following for cleanliness and
damage. Look for deformation of the male pin or the
female receptacle, and for metallic and organic residue on
the mating surfaces.
l
Test set test ports
l
Test port cables
l
Precision adapters
l
Calibration standards
l
DUT Connectors
11
Page 12

A low power magnifier, less than 6x, is adequate to inspect
the parts. Do not be concerned with minor defects such as
scratches visible only with the magnifier; these will
probably not affect performance. If inspection shows
moisture, oil, or other residue, clean the parts.
When examining the female connector, look at the inner
contact to see that the gripping fingers are not bent.
The greatest variable in the accuracy and repeatability for
these demanding measurements is the experience and
attention to detail of the person actually making the
connections. Before going on, examine all parts carefully.
SPRING FORCES INNER
INSERTED MALE PIN
Detail of Precision
Slotless
Female Connector
Cleaning
The parts must be clean in order to achieve best results.
Use isopropyl alcohol, dry air or nitrogen, and lint-free
swabs to remove contaminants.
In general, do not force cleaning materials into connector
parts and do not immerse the part in cleaning fluids. Just
moisten the swab and wipe the surface lightly. To dry the
part, use a dry swab or light pressure from a dry air or
nitrogen source.
Do not leave lint or particles of the swab in the connector.
If there is doubt about the condition of the connector, use
the connector gages to check the connector dimensions.
The same care should be used for all connectors, especially
the device under test.
12
Page 13

Using Connector Gages
Before Connecting
Gaging is optional for the precision connectors in this
calibration kit if the male and female center conductors are
concentric and do not show physical damage.
However, due to the large range of dimensions found on
most DUT connectors, the DUT connectors must always be
inspected and gaged before connecting them to the
precision adapters. This is not usually a problem for the
DUT female connectors, but may be a problem for DUT
male connectors, especially the economical SMA and
SMA-compatible types.
BLACK
%G
(
RECESSION
)
RED PLUS SIGN
(NOT
USED)
LIMIT POINTER
DIAL
INDICATOR
FEMALE 3.5 mm
CONNECTOR
GAGE
BLACK PLUS
SIGN
(
PROTRUSION
)
RED MINUS
SIGN
(
NOT USED
)
GAGE INCREMENT
0.0001 INCH
,r
’
ZERO SET KNOB
Connector
Gage
13
Page 14

Measurement Errors
The gage measures the pin depth (recession) of the
connectors. If the pin depth to too far negative, errors will
result from excessive air gap in the connection.
Connector Damage
If the pin depth is positive (protrusion), both mating
connectors will almost certainly be damaged.
Also, if the male pin diameter is greater than the maximum
3.5 mm specification, it will cause permanent damage to
the female receptacle. If you try to measure the pin depth
and the gage will not fit over the pin, it is an immediate
indication that the pin is too large and must not be
connected to the precision adapters. The male pin of the
DUT connector may fit into the gage and give a correct
measurement, but still be slightly too large for the
precision adapter female receptacle.
Repair and Replacement
In general, bent or deformed parts cannot be repaired in
the field. It is necessary to return the part to an HP service
center for repair or replacement. The air line center and
outer conductors must be replaced as a set. Refer to the
replaceable parts chapter in the service manual supplied
with the calibration kit for replacement part numbers and
ordering information.
--A-
RECESSION
Cross Section
of
Female Connector Showing Recession limits
RECESSION
_)
j_
Cross Section
of
Male Connector Showing Recession Limits
14
Page 15

Configure Port 1 and Port 2
s
everal
configurations are possible, depending upon the
frequency range, available cables, operator convenience,
and DUT requirements. Following is an example hookup
using the two-cable set and two examples using a single
cable. The appropriate precision adapters are installed on
the ends of the cables and become Port 1 and Port 2.
TEST SET
PORT 1
TEST PORT
ANTI-ROTATION
TEST SET
PORT 2
I
81
!~,
!il
ADAPTER
ANTI-ROTATION
PORT 1
PORT 1
PORT
PORT
1
2
Dual Cable Setup
PORT 2
Single Cable,
Port 1
Female
PORT 2
Single Cable, Port 1 Male
15
Page 16
Install Test
Port
Return Cables
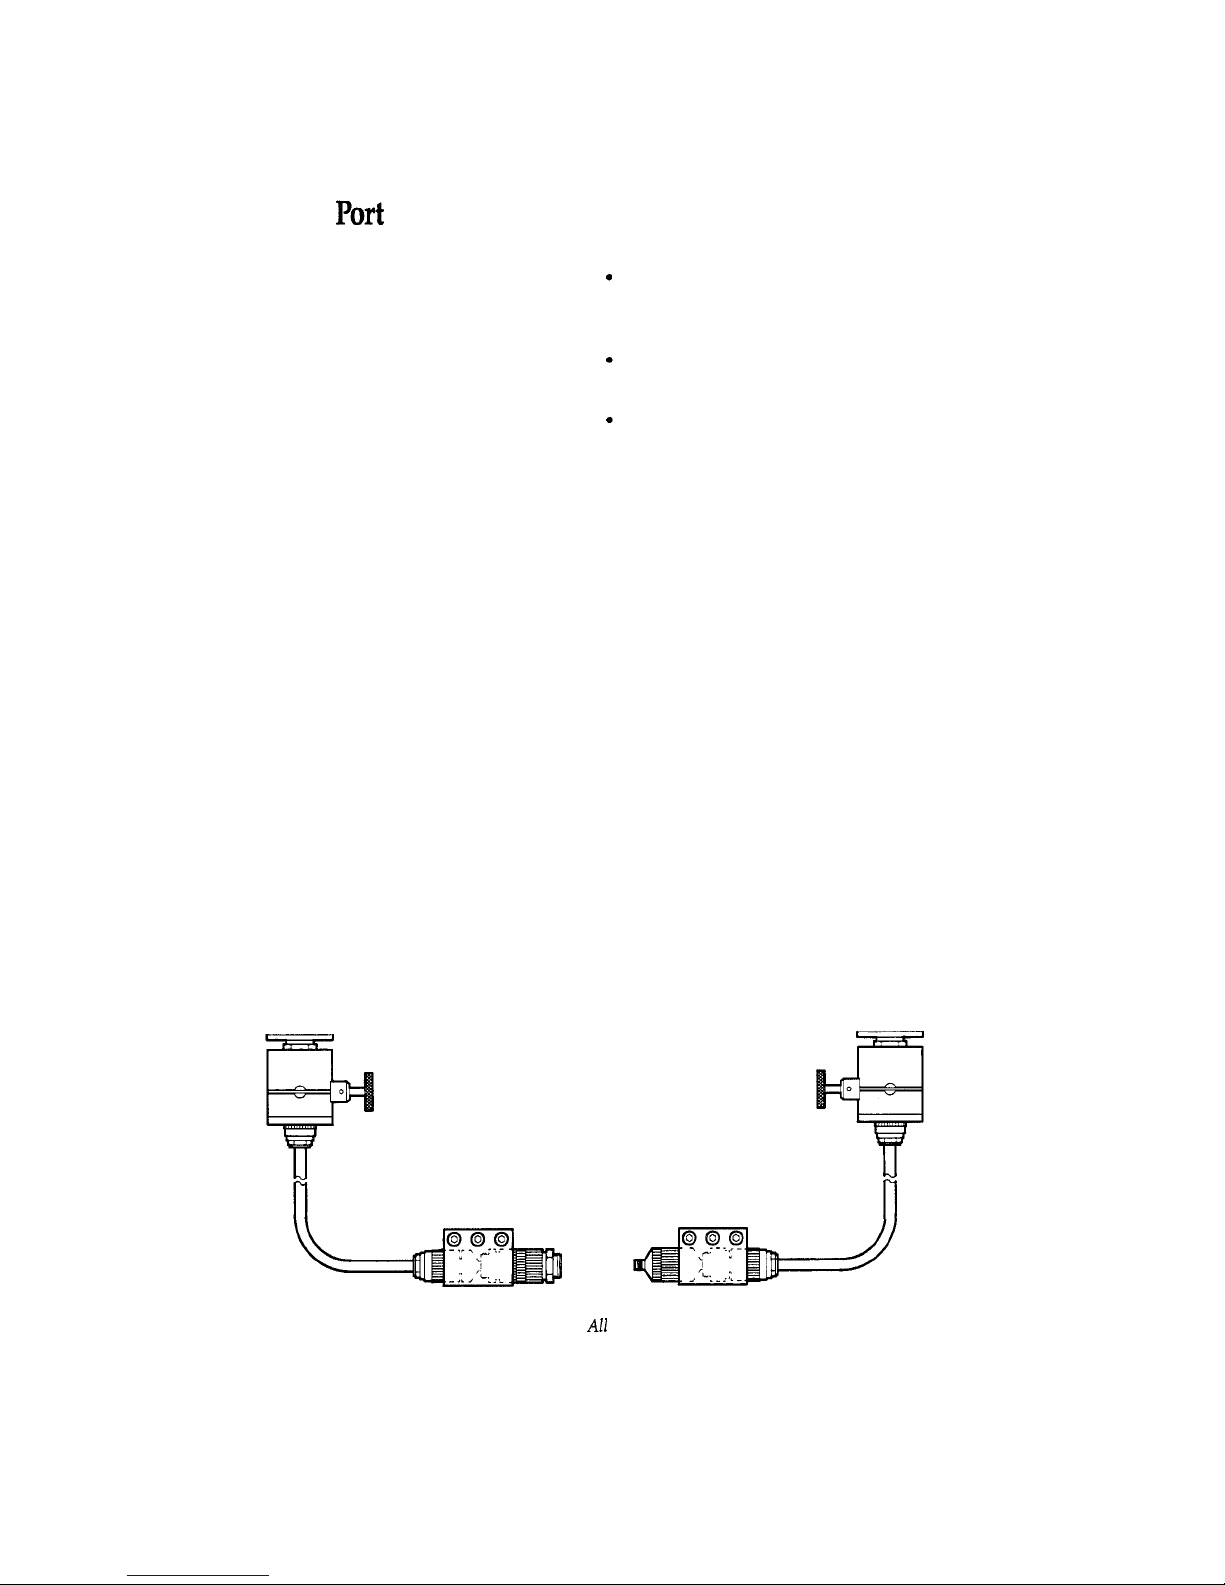
When all parts are ready for use, connect the test port
extension cables. To connect a cable to the test set:
Loosen the test port anti-rotation clamp securing screw
and slide the clamp over the cable far enough to provide
access to the cable connector.
Connect the cable to the test port and tighten using the
torque wrench.
Slide the clamp toward the port, aligning it so that the
flats on the clamp mate with flats around the test port.
Tighten the clamp securing screw. This clamp keeps the
cable from becoming loose from the test set connector.
Install Precision Adapters
T
o install the precision adapters and adapter anti-rotation
clamp:
.
Connect the adapter to the cable, tighten finger tight, and
then use the spanner and the torque wrench to achieve
the final torque.
l
Loosen the adapter anti-rotation clamp securing screws
and slide the clamp over the adapter. Align the clamp so
that it can grip both the cable connector body and the
adapter body. Tighten the clamp securing screws. The
screw tightening order is not important.
The adapter anti-rotation clamp assures that the TRL
adapter does not become loose during calibration and
measurement.
l
Connect the second TRL adapter and its anti-rotation
clamp to serve as Port 2.
PORT 1
PORT 2
Two Cable Setup with
AZ1
Components Connected
16
Page 17
Air Line Frequency
COVerage
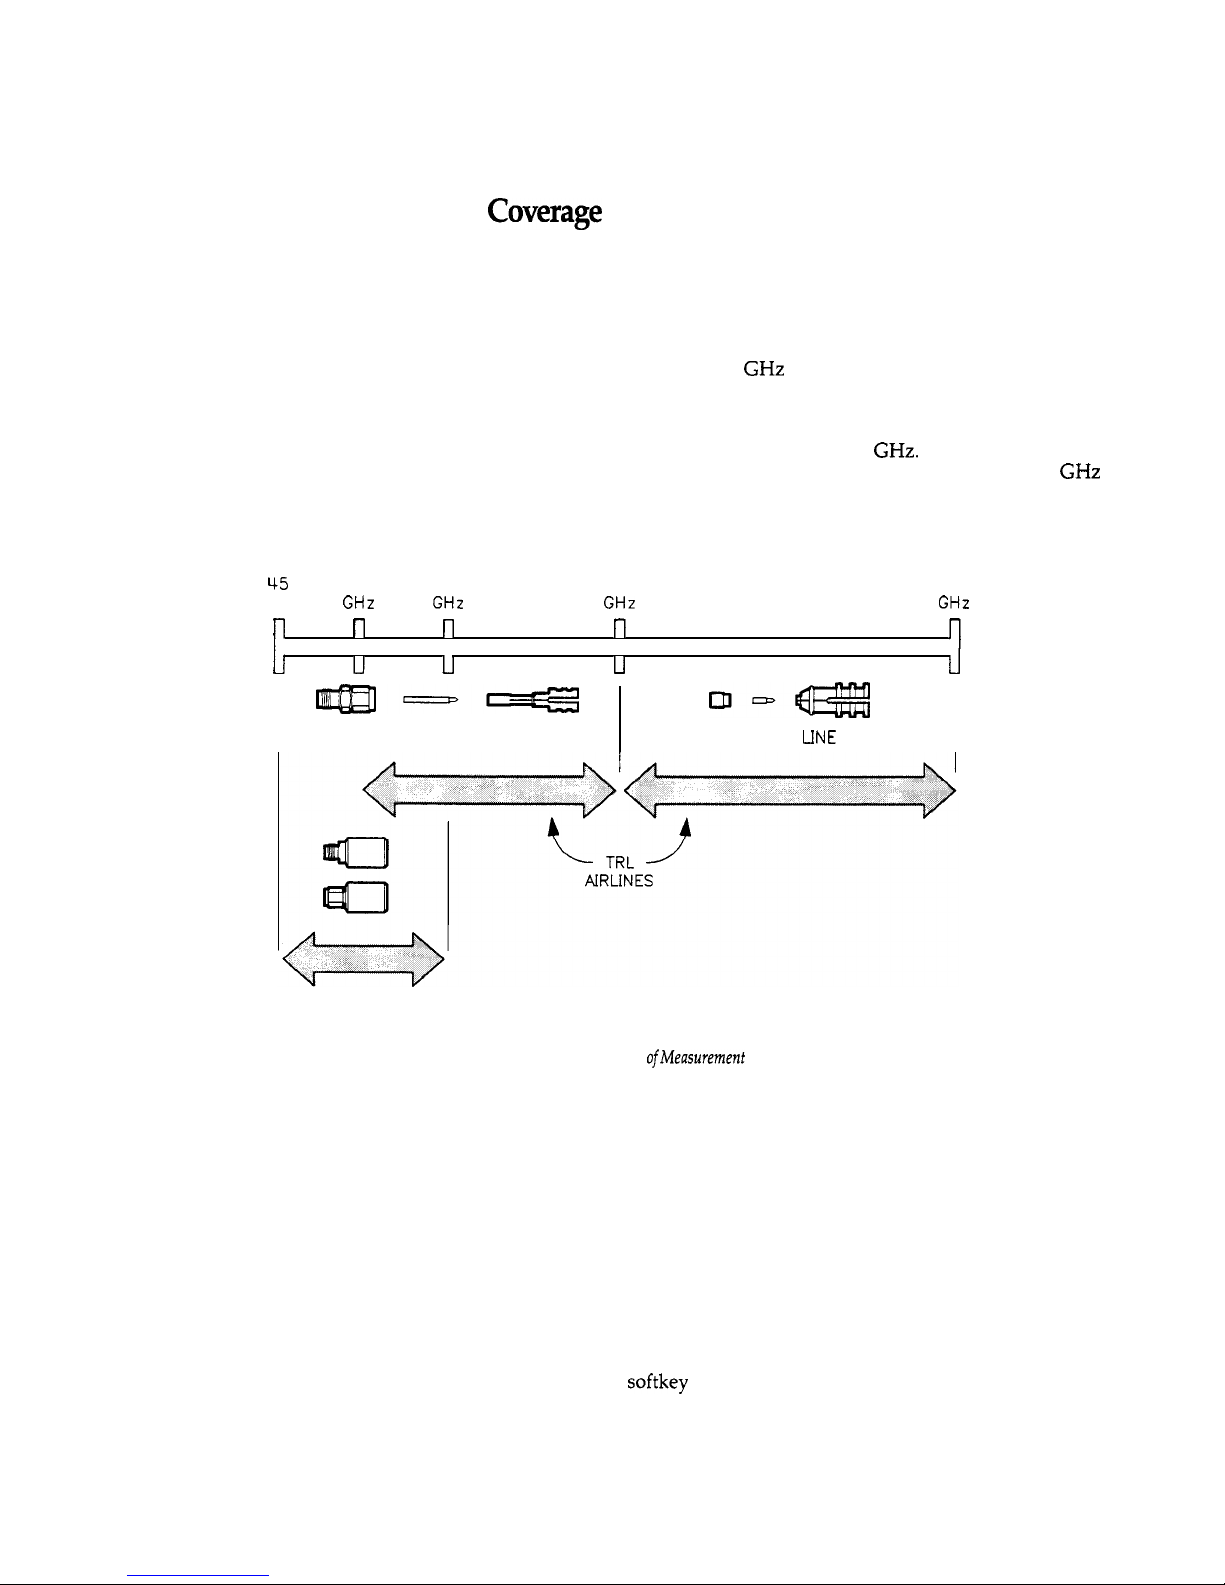
This illustration shows the frequency range covered by the
air line and fixed loads for the Lines part of the TRL 2-Port
calibration procedure. If measuring over the entire
frequency range, measure the 7-32 Line first, then the 2-7
Line, then the O-2 Loads. If measuring over a reduced
frequency range, only those standards for that frequency
range need to be measured. For example, if you are testing
over the 3-22 GHz range, only the 7-32 Line and the 2-7
Line must be measured.
The standard label for the 2-7 Line would indicate that its
data is valid only from 2 to 7
GHz.
However, you may
choose to use data from the 2-7 Line down to the 1 GHz by
simply not measuring the O-2 Loads. If the O-2 Loads are
measured after the 2-7 Line, the O-2 Loads data will replace
data from the 2-7 Line.
45
1
2
7
32
MHZ
GHz
GHz GHz GHz
F1
l-l
i-l
l-l
Ir
Jl
Ll
u
u
II
aEl-I
2-7 LINE
m-m
7-32
LINE
O-2 LOADS
Frequency Coverage for Line Part
ofMeasurement
Calibration
Load Calibration Kit Definition
To begin measurement calibration, first load the calibration
kit definition from tape or disk.
Press:
TAPE/DISC
STORAGE is TAPE
LOAD
CAL KIT 1-2
CAL KIT 1
FILE 1
When the calibration kit definition is loaded, the CAL 1
softkey label will read 3.5 mm C. 1.
17
Page 18
Measure Standards
N
ow
perform the TRL 2-Port measurement calibration
procedure using the HP
85052C
3.5 mm Precision
Calibration Kit.
Note:
The standards are measured in the order: Thru,
Reflect, Line, Isolation in order to connect the load
standards just once.
Press:
CAL
CAL 1
TRL 2-PORT
l
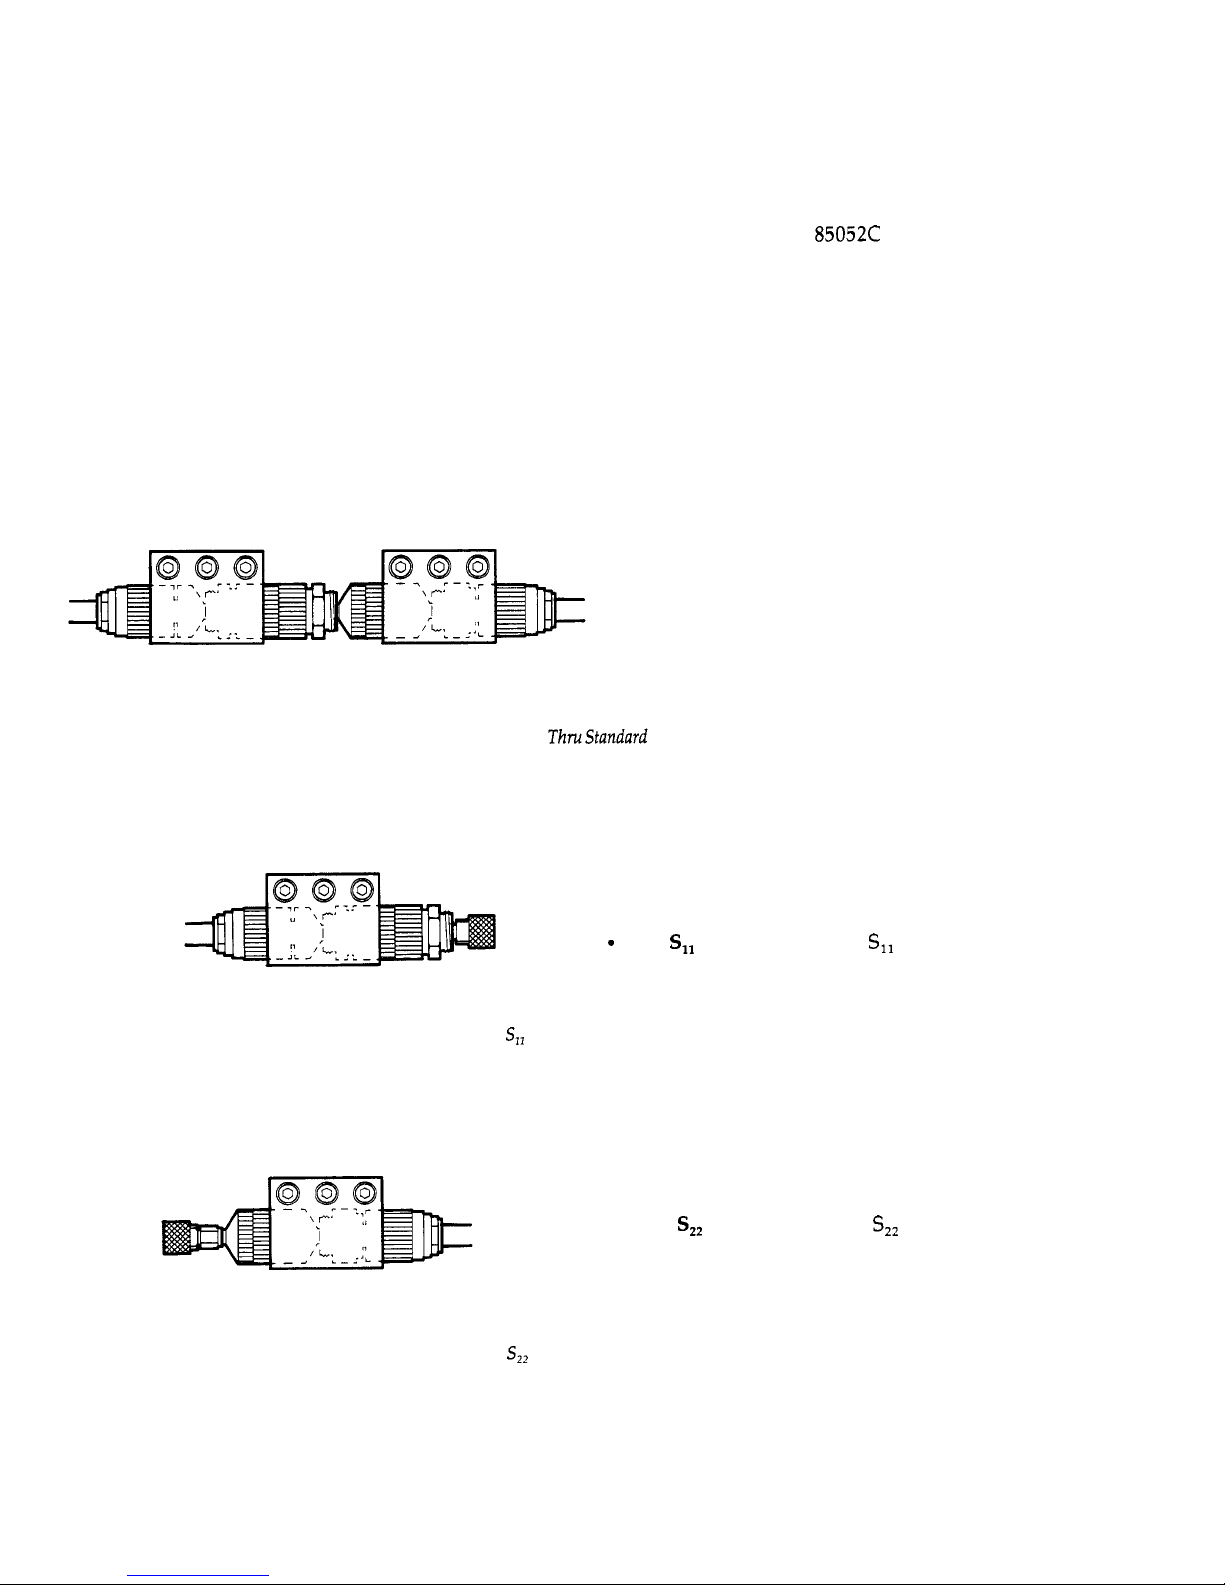
Connect the TRL male adapter (Port 1) to the TRL female
adapter (Port 2).
l
Press THRU. The HP 8510 makes six measurements; they
are S,,, S,,, S,,, S,,, and two specially redefined user
parameters.
l
Connect the Short circuit to Port 1.
.
Press
S,,
REFLECT SHORT.
S,,
is measured.
S,,
Reflect Short Standard
l
Connect the Short circuit to Port 2.
l
Press
S,,
REFLECT SHORT.
S,,
is measured.
l
Press LINES.
S,, Reflect Short Standard
18
Page 19

When Stop Frequency is Greater than 7
GHz
If the stop frequency is greater than 7 GHz, install the 7-32
GHz
air line as follows:
l
Move the Port 1 nut to its standard position and carefully
insert the air line into the male connector using the
installation tool.
Insert Air Line
l
Squeeze the installation tool (closing the slot) to release
the center conductor. Then pull the tool away from the
connector, leaving the outer and the center conductors in
place.
Sqeeze
Tool to Release, then Pull
GOOD
BAD
-IL-
GAP
l
Examine the outer and center conductors to see that they
are in place and concentric. If the center conductor is not
centered, use the installation tool to align it.
Check Concentricity
l
Move the adapter nut to its extended position.
Extended Position with Air Line Installed
19
Page 20
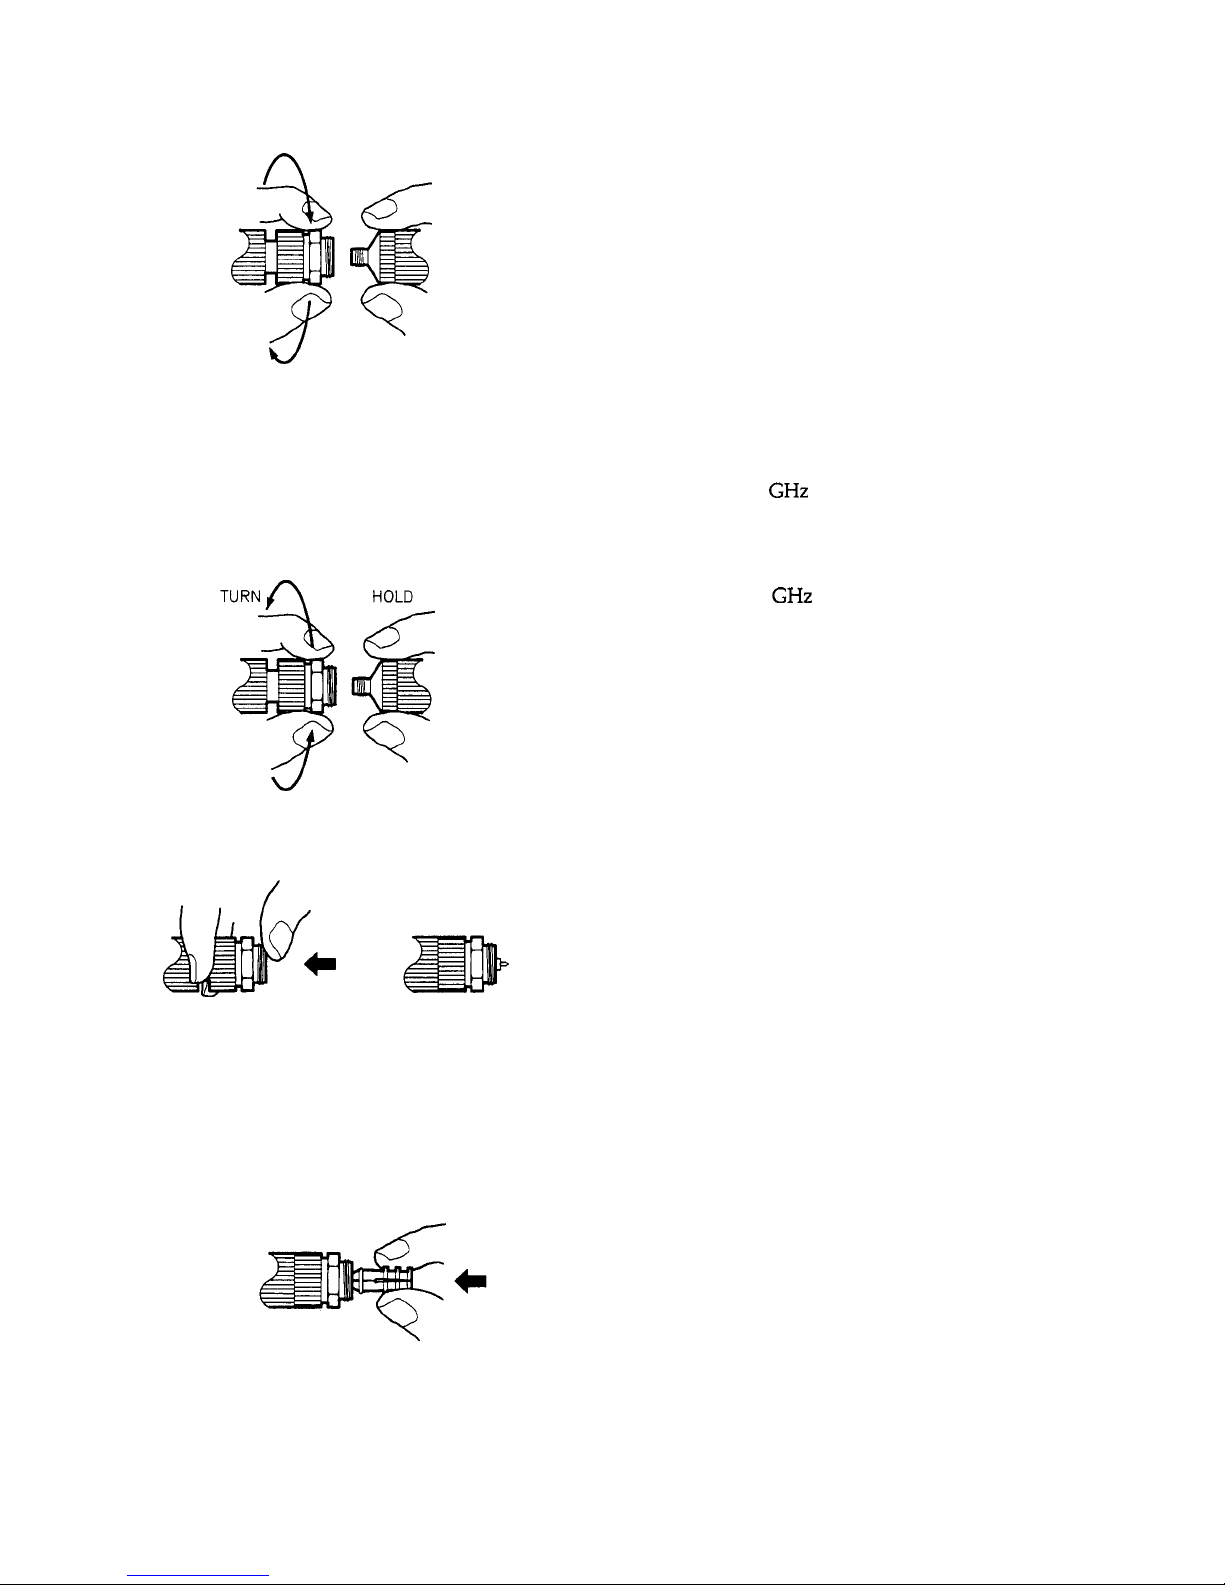
TURN
n
HOLD
.
Carefully align and engage the Port 2 female contact
with the Port 1 male contact.
l
Tighten finger tight, then use the spanner and torque
wrenches to achieve the final torque.
Connect Port
2
l
Press 7-32 LINE. The HP 8510 makes six measurements.
All frequencies of the current range are measured, but only
data from 7 to 32
GHz
is used to compute error coefficients.
To remove the 7-32
GHz
air line:
l
Loosen the Port 1 nut, and then carefully move the Port 2
adapter away.
Disconnect Port 2
l
Move the adapter nut to its standard position.
Standard Position with Air Line Installed
l
Examine the outer and center conductors to see that they
are in place.
l
Carefully press the insertion tool onto the connector.
Connect the Insertion Tool
20
Page 21

Hold the tool close to the connector without squeezing
the tool. Carefully pull the assembly away from the
connector.
Remove the 7-32 Line
. Check to see that both the inner and the outer conductors
have been removed and are secure in the installation
tool.
If any part of the air line remains attached to the male port,
first press the tool back onto the connector. Then, try to
withdraw the tool and the air line parts again without
closing the slot.
If the air line center conductor remains with the female
port, use the installation tool to remove it as follows:
Squeeze the tool and push it to engage the center
conductor.
Hold the tool close to the connector, squeeze the tool
without closing the slot, and pull the assembly away.
Use your fingers to remove the center conductor from the
tool.
Remove Center
Conductorfrom
Port 2
(if
necessary)
l
Carefully insert the center conductor back into the
installation tool, male end first.
21
Page 22
When Start Frequency is Less Than 7
GHz
If the start frequency is less than 7 GHz, install the 2-7 GHz
air line as follows:
TURN
f\
HOLD
.
.
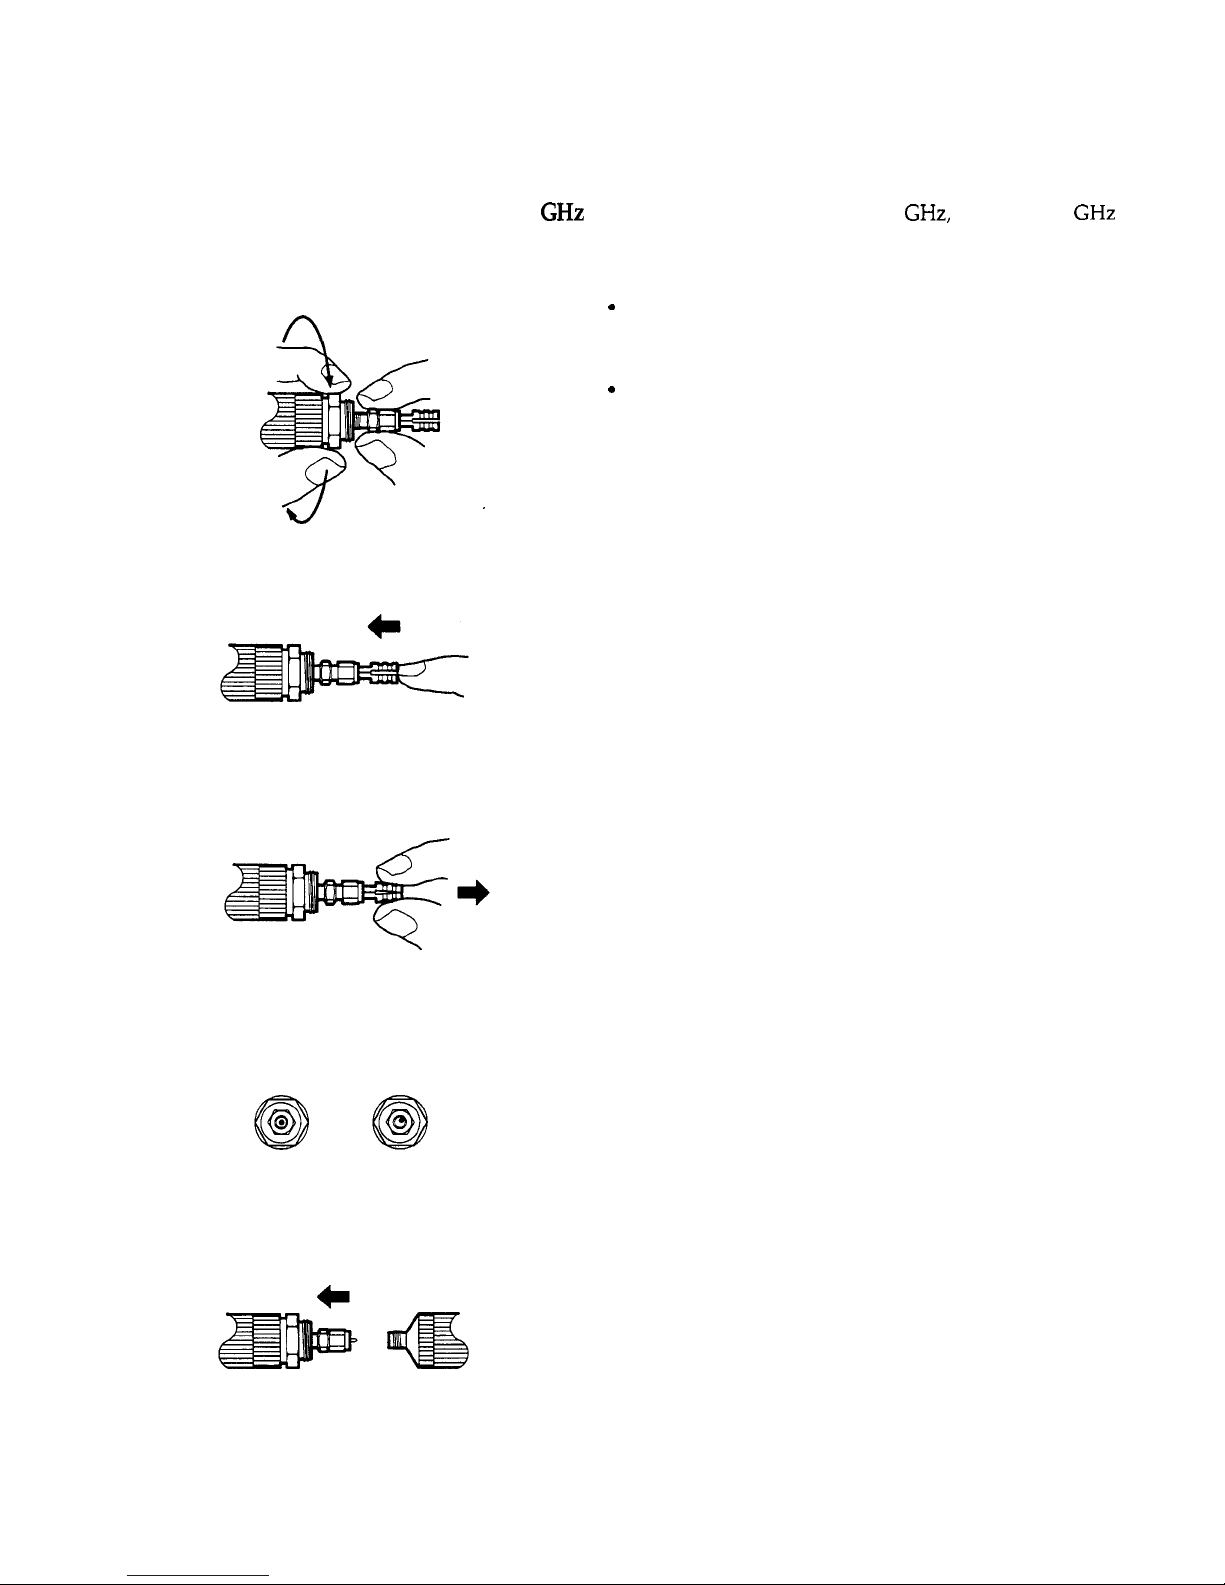
Move the Port 1 nut to its standard position. Carefully
insert the air line outer conductor and center pin into the
male connector using the installation tool.
Hold the air line outer conductor and tighten the Port 1
nut finger tight. Use the torque wrench to achieve the
final torque.
Connect the 2-7 Line
l
Press the tool lightly to engage the center conductor.
Engage the Center Conductor
l
Squeeze the tool to close the slot, then pull the tool away
from the connector, leaving the center conductor.
Remove the Tool
l
Examine the outer and center conductors to see that they
are in place and concentric. If the center conductor is not
centered, use the tip of the installation tool to align it.
GOOD BAD
Check the Concentricity
l
Move the air line nut back to expose the center
conductor. Carefully engage the Port 2 female contact
with the Port 1 male contact. Be patient making this
connection because it is easy to move the center
conductor off center.
Move the Nut Back
22
Page 23

l
Move the nut forward to engage the threads, tighten
finger tight, then use the spanner and the torque wrench
to achieve the final torque.
Connect Port 2
.
Press 2-7 LINE. The HP 8510 makes six measurements.
All frequencies of the current range are measured, but only
data from 1
GHz
to 7
GHz
is used to compute error
coefficients.
To remove the 2-7
GHz
air line:
l
Loosen the air line nut and carefully move Port 2 away
from Port 1.
Disconnect Port 2
Engage
the Tool
TURN
f\
HOLD
l
Insert the tool and lightly press it to engage the center
conductor.
l
Loosen the adapter nut and then disconnect the outer
conductor from the adapter. The center conductor will be
removed with the outer conductor.
Remove 2-7
Line
Note: It is important to be very careful to move Port 2 away
in a straight motion because the center conductor may stay in
Port 2. If the center conductor remains with the female port,
use the installation tool to remove it. Carefully insert the
center conductor back into the insertion tool, male end first.
Remove the Center Conductorfrom Port 2
(if
necessary)
23
Page 24
When Start Frequency is Less than 2
GHz
If the start frequency is less than 2 GHz, measure the O-2
Loads as follows:
-
,r .- -..- -
l
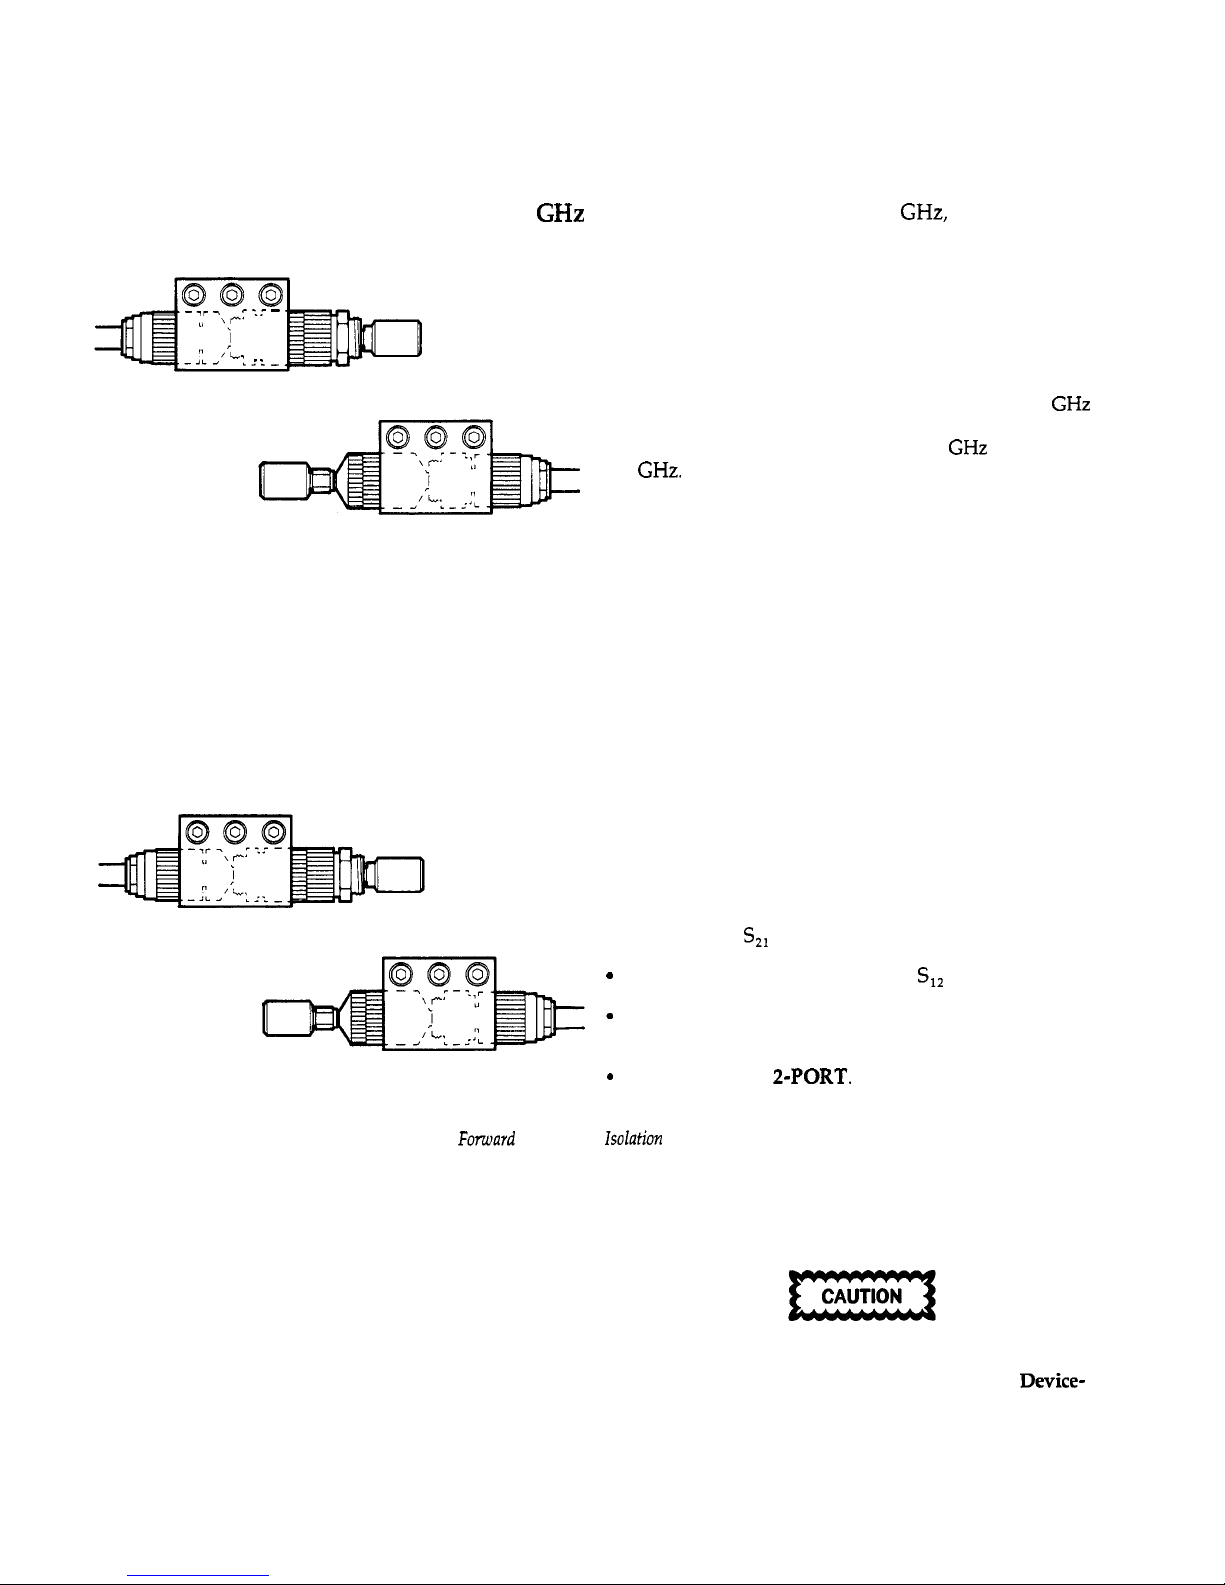
Connect a fixed load to Port 1 and a fixed load to Port 2.
’ ..
l
Press O-2 LOADS. The HP 8510 makes six measurements.
All frequencies are measured, but only data up to 2
GHz
are used. These measurements replace error coefficients
obtained from measurement of the 2-7
GHz
air line below
2
GHz.
Leave the loads connected for the Isolation step.
Connect the
O-2
Loads
l
Press LINES DONE.
l
Press ISOLATION.
If maximum transmission dynamic range is not required, skip
the isolation part of the calibration by pressing OMIT
ISOLATION and then ISOLATION DONE.
Or, to obtain maximum transmission dynamic range,
perform the isolation part of the calibration as follows:
.
Connect a fixed load to Port 1 and a fixed load to Port 2.
.
Increase the AVERAGING FACTOR for the isolation
measurement to at least 128. Then press FWD. ISOL’N
ISOL’N STD.
S,,
is measured.
.
.
.
Press REV. ISOL’N ISOL’N STD.
S,,
is measured.
Press ISOLATION DONE. You may wish to reduce the
averaging factor for measurement of the device under test.
Press SAVE TRL
2-PORT.
Fomard
and Reverse isolation Standards
When the computation of error coefficients is complete, press
CAL SET 1 (or any other cal set). Error coefficients derived
from measurement of the TRL standards are computed and
saved, and then 2-Port correction is turned on.
Carefully
inspect
the
connectors
on the device under test
and measure their center conductor pin depth before
connecting the device under test to the system.
Device-
under-test connectors with incorrect pin size, pin depth,
or pin alignment can damage the test port adapters.
24
Page 25
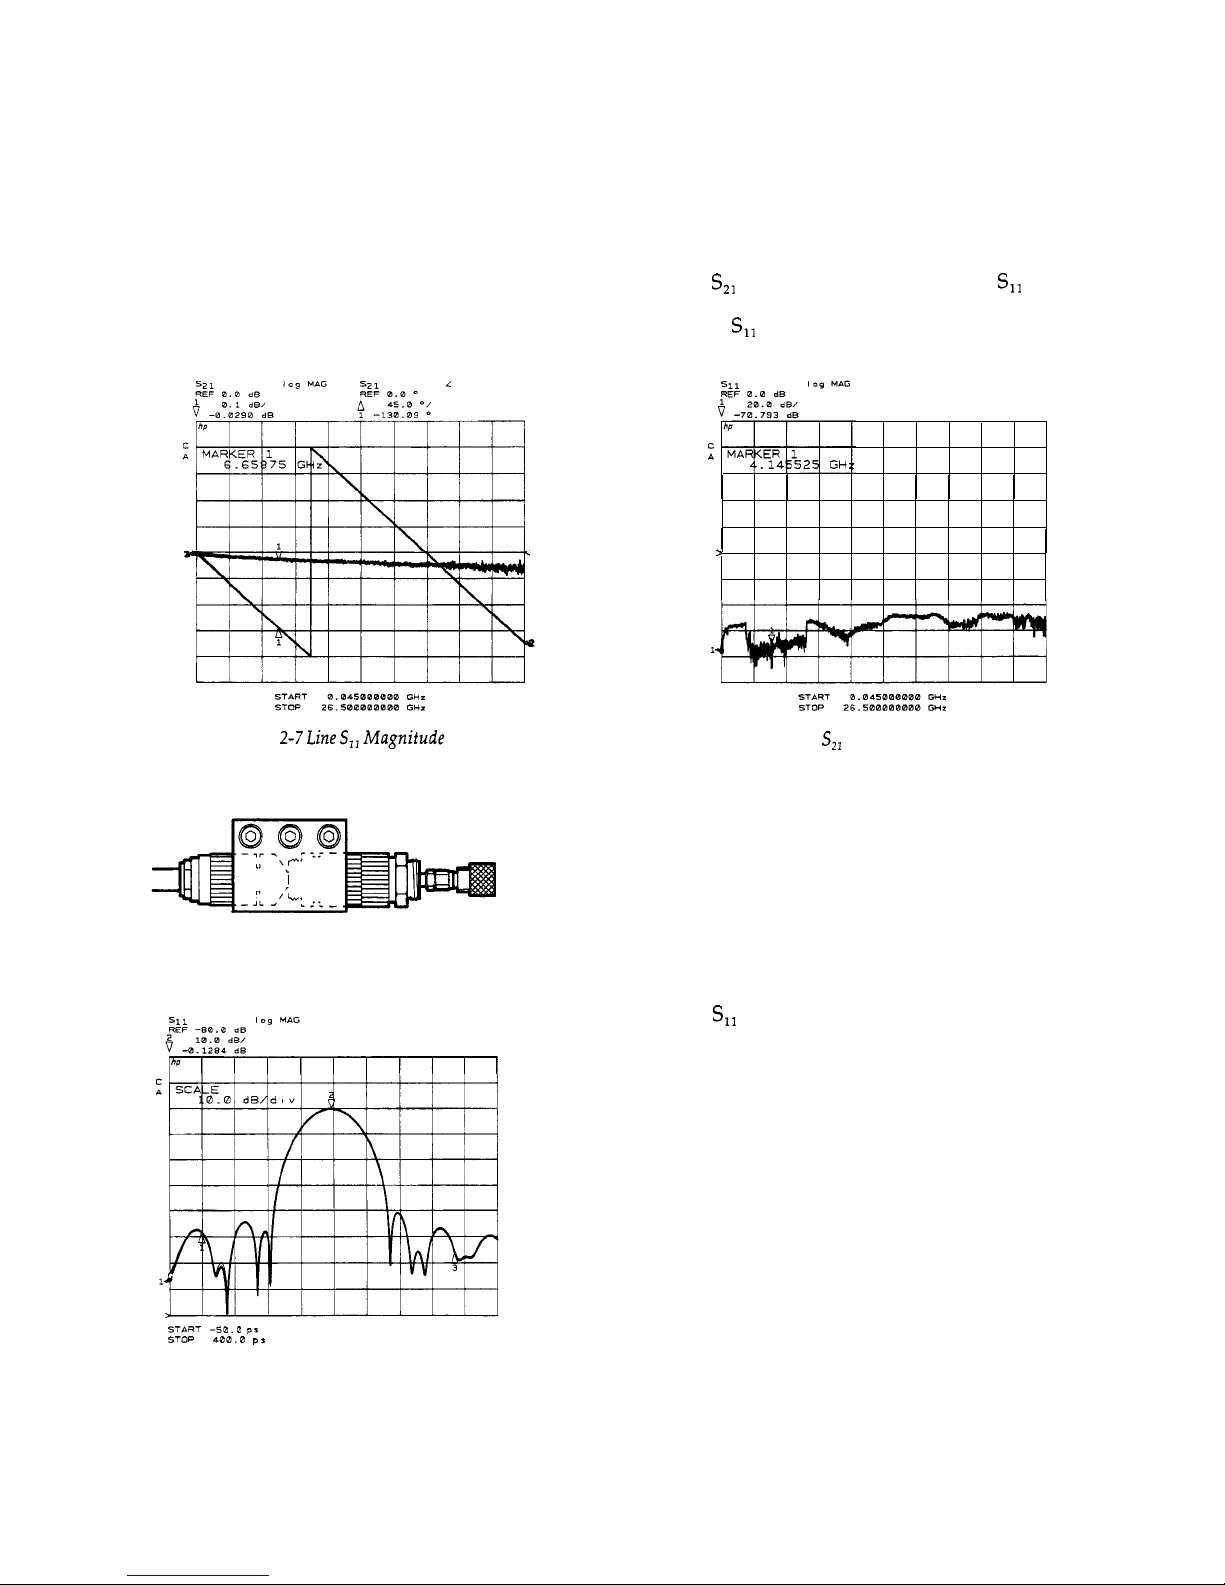
Check the Calibration
A good first check of the calibration is to measure the
transmission and reflection characteristics of the longer air
line. Connect the air line between Port 1 and Port 2 and
view the
Szl
magnitude and phase and the S,, magnitude.
The air line should exhibit low insertion loss and linear
phase. The S,, should be constant over the entire
frequency range.
2-7 Line with Short Circuit
>
2-7 Line
S,,
Magnitude and Phase
For a second check, connect the 2-7 Line to Port 1, then
connect the Short circuit to the end of the air line, and view
the reflection response.
Select:
S
D
OMAIN
TIME BAND PASS
View the
S,,
response. Use the marker to measure the
responses at 0 seconds (a rough measure of effective
directivity) and the mismatch at twice the length of the air
line (a rough measure of effective source match). The trace
should appear as shown below. If not, the calibration has
not been performed correctly or the calibration devices are
defective.
START -50.0
PI
*TOP
400.0
PI
Plot of Time Band Pass with Shorted Air Line
25
Page 26
CHAPTER
T H R E E
Noninsertable Devices
Noninsertable Device Configurations
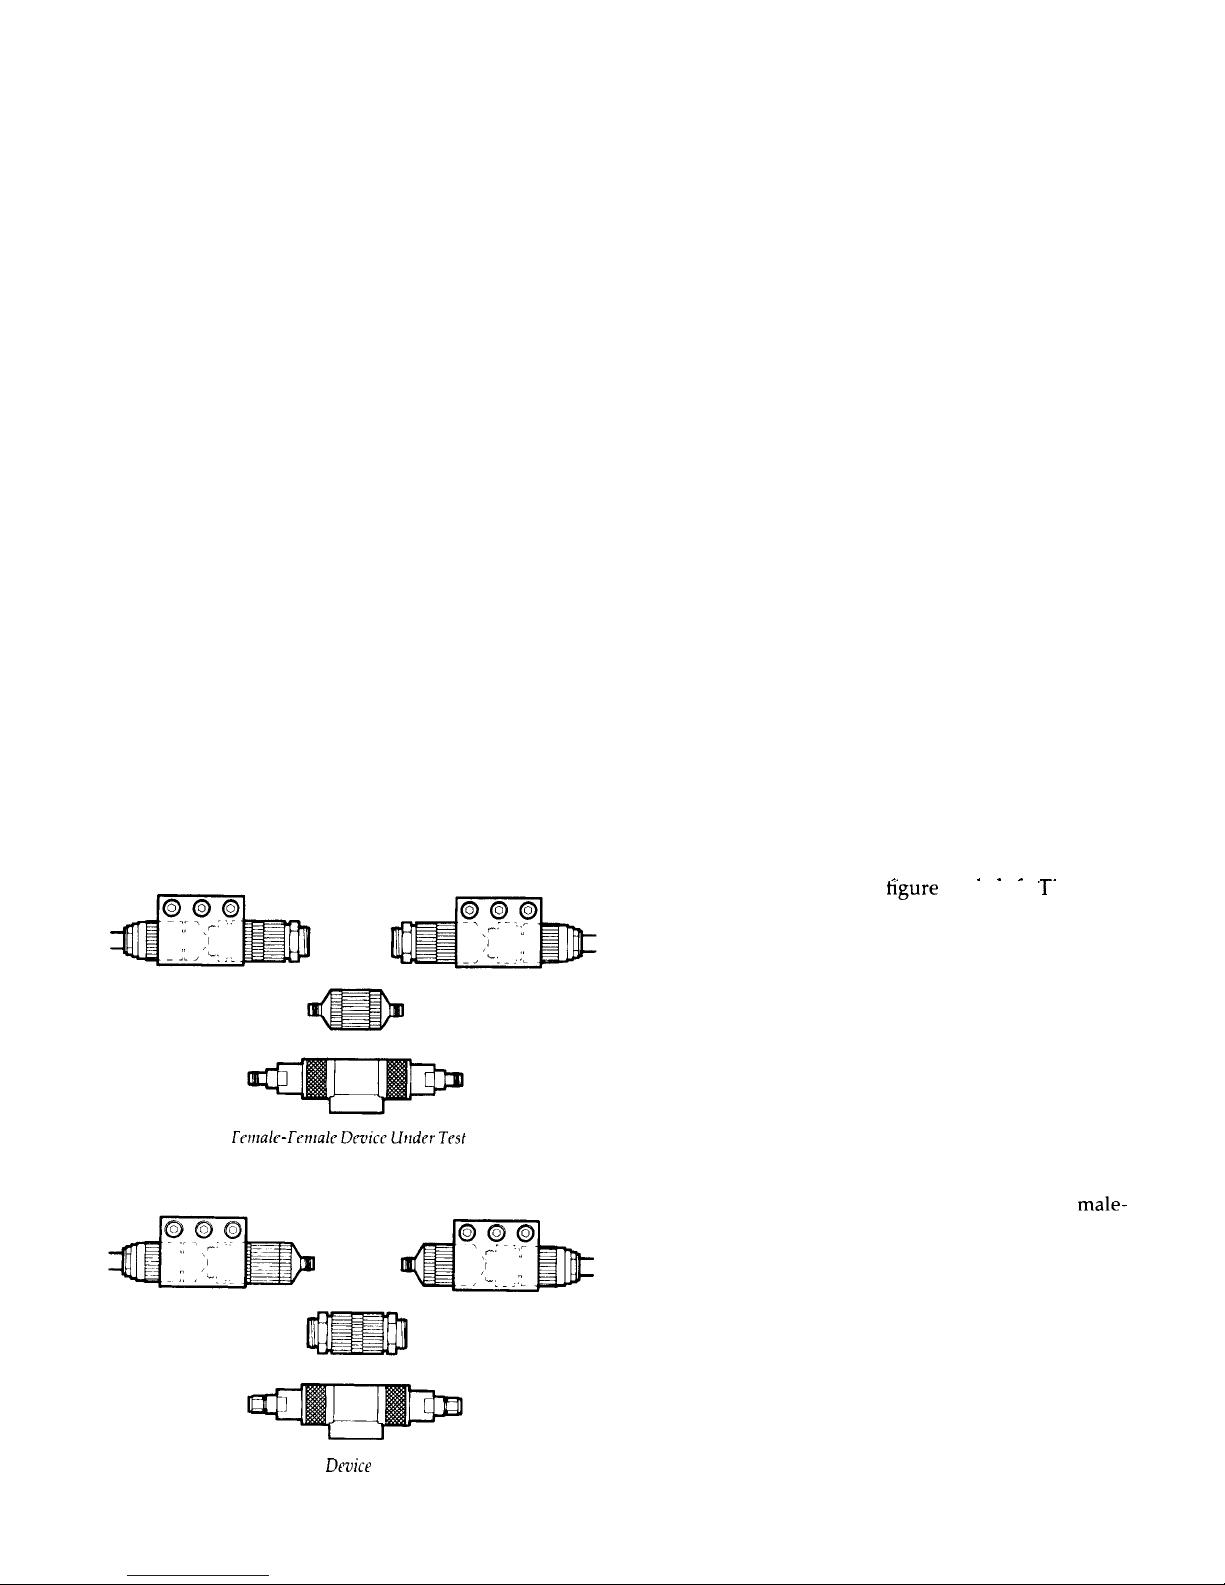
General Theory
Th
e o owing sequence describes the adapter removal
f 11
method of calibration for measurement of a noninsertable
device. This procedure is the most complete and effective
calibration procedure for measurement of noninsertable
devices. Although this technique does require two separate
2-Port calibrations, it remains the only traceable method
for minimizing the uncertainty in this measurement. The
three precision adapters in this calibration kit provide the
parts required to make the process relatively easy.
Detailed information about the adapter removal
calibration is contained in HP Product Note 8510-13,
available from your local HP Sales Office.
The previous calibration sequence assumed that the device
under test is insertable; it has a male connector on one port
and a female connector on the other port. Thus, the
measurement system can be calibrated and then the test
device inserted without changing the system test port
connectors.
However, the majority of devices used in microwave
systems are noninsertable. Of interest here are devices
having either both male or both female 3.5 mm connectors
on Port 1 and Port 2.
Female to Female
If the device you are measuring has two female connectors,
_.
. . _ -.
your setup would look like the
hgure
on the left. ‘1 he
female-to-female precision adapter is substituted for the
device under test to accomplish this calibration.
Male to Male
If the device you are measuring has two male connectors,
your setup would look like the figure on the left. The
male-
to-male precision adapter is substituted for the device
under test to accomplish this calibration.
Male-Male Dmice Under Test
Page 27

Adapter Removal
Calibration Procedure
Create Cal Set for Port
1
Port
2
Cal
Srt
Create Cal Set for Port 2
Port
2 Cal
Set
Adapter Removal Mathematics
Renmr the
Adapter and
Cormect
the
DUT
First create the Port 1 calibration set by performing the TRL
2-Port calibration between Port 1 and the adapter. Keep
the adapter connected to Port 2 during the entire
procedure. Save the calibration in Cal Set
1.
Next create the Port 2 calibration set by performing the
TRL 2-Port calibration between Port 2 and the adapter.
Keep the adapter connected to Port 1 during the entire
procedure. Save the calibration in Cal Set 2.
The Adapter Removal function mathematically combines
the Port 1 cal set with the Port 2 cal set to produce a third
cal set having the effects of the adapter removed. The
resulting cal set is as if Port 1 and Port 2 could be connected
together.
When the two calibrations have been saved, proceed with
the adapter removal sequence as follows:
Press:
CAL
MORE
MODIFY CAL SET
ADAPTER REMOVAL
Press
CAL SET for PORT 1,
then
CAL SET 1.
Press
CAL SET for PORT 2,
then
CAL SET 2.
Press
ADAPTER 3.5 mm C.l.
This specifies the
calibration kit that includes the length specification for the
precision adapter.
Press
MODIFY & SAVE,
then
CAL SET 3.
The new calibration set is computed and stored. 2-Port
correction is turned on.
Now remove the third adapter and connect the device under
test.
The display should now show an accurate S-parameter
measurement of the device.
27
Page 28

28
C
H
A
P
T
E R
Other Calibrations
F
0
U
R
Changing the Air Line
of
your application requires a frequency range slightly
Frequency Range
beyond the standard frequency range of one of the
precision air lines, you may extend the frequency range of
one of the air lines in order to accomplish the calibration by
connecting only one of the air lines.
The error coefficients are determined with best accuracy
when the Thru and the Line phase response is separated by
t
90 degrees at corresponding frequencies. When the
transmission phase response of a line standard is the same
or gets very close to zero or 180 degrees of the Thru
standard at the same frequency, the result becomes less
certain. The correct result cannot be determined when the
phase response is exactly equal or 180 degrees apart. This
is why a particular length air line covers a specific
frequency range.
To evaluate the phase response, first do a simple transmission frequency response calibration using the Thru
standard (Port 1 connected directly to Port
2),
then
measure the S,, phase of the air line. The standard air line
frequency specifications provide for greater than 20
degrees separation.
Experiment with this by using the Modify Cal Kit function
to change the Minimum Frequency or Maximum
Frequency specification for the air line, and then
performing the TRL 2-Port calibration procedure. With
correction on, trace noise on the error-corrected trace may
increase at the points where the phase of the air line used
for calibration approaches the phase of the thru, often
showing large discontinuities at the point where the phase
of both standards is identical or separated by 180 degrees.
If this error is acceptable in your measurement, change the
standard label for the air line and save the redefined cal kit
on tape for later use. If the error is not acceptable, reload
the standard cal kit definition.
Lowband
Reflection instead Of
The
Lowband
Reflection part of the
TRL
2-Port
procedure
O-2 Loads or 2-7 Line
is optional. If used, error coefficients obtained by this
procedure replaces measurements of the O-2 loads.
For this calibration kit, the
lowband
reflection part of the
calibration is typically not used because measurement of
the O-2 Loads provides better accuracy (given that the
loads are in good condition and repeatable).
If you do not select
LOWBAND
REFLECTION, the error
coefficients obtained from measurement of the TRL
standards are used over the complete current frequency
range. If you do select
LOWBAND
REFLECTION, error
coefficients obtained from these additional calibration steps
will be used up to 2 GHz.
In actual measurement applications, the
Lowband
Reflection
option will not produce greater accuracy than using the O-2
Loads. If you are uncertain, it is relatively simple to compare
measurement results using the different techniques.
Page 29

Lowband
Reflection Procedure
Selecting the Lowband Reflection part of the procedure
guides you through these additional steps to measure an
open circuit, short circuit, and fixed load at Port 1 and an
open circuit, short circuit, and fixed load at Port 2. So, if the
start frequency is less than 2
GHz
and you wish to use the
open/short/load technique for calibration below 2
GHz,
then after measuring the Thru, Reflect, Isolation and
Line
standards and before pressing SAVE TRL 2-PORT, perform
the following lowband reflection sequence.
Measure Thru, Reflect, Isolation, and Line standards. If the
start frequency is less
than 2
GHz,
press
LOWBAND
REFLECTION.
l
Press LOWBAND REFLECT’N
l
Connect the Short circuit to Port 1 and then press
(S,,):
SHORT.
. Connect the Open circuit to Port 1 and then press
(S,,):
OPEN.
l
Connect the Fixed Load to Port 1 and then press
(S,,):
LOAD.
l
Connect the Short circuit to Port 2 and then press
(S,,):
SHORT.
l
Connect the Open circuit to Port 2 and then press
(S,,):
OPEN.
.
Connect the fixed load to Port 2 and then press
(S,,):
LOAD.
l
Press REFLECT’N DONE.
l
Press SAVE TRL
2-PORT,
and then
CAL SET 1,
(or any
other cal set).
When SAVE is pressed, error coefficients from measurement
of the Open, Short, and Load are used for frequencies below 2
GHz;
and coefficients from measurement of the Thru, Reflect
and Line are used for frequencies above 2
GHz.
29
Page 30

u!!
HEWLETT
PACKARD
Customer Order Number
85052-90059
Printed in USA April 1995
 Loading...