

Page 1

User Guide
Intelliprint 8008N
Color Laser Printer
Page 2

Page 3

Table of Contents
Chapter 1 Introduction
1.1 About This Manual . . . . . . . . . . . . . . . . . . . . . . . . . . . . . . . . . . . . 1-2
1.1.1 Warnings, Cautions and Notes . . . . . . . . . . . . . . . . . . . . . . 1-2
1.2 Safety Summary . . . . . . . . . . . . . . . . . . . . . . . . . . . . . . . . . . . . . . 1-3
1.2.1 General Safety Guidelines . . . . . . . . . . . . . . . . . . . . . . . . . 1-3
1.3 Outline of Product . . . . . . . . . . . . . . . . . . . . . . . . . . . . . . . . . . . . 1-6
1.3.1 Name and Function of Each Part . . . . . . . . . . . . . . . . . . . . 1-6
1.4 Specifications of Product . . . . . . . . . . . . . . . . . . . . . . . . . . . . . . 1-8
1.4.1 General Specification Printer . . . . . . . . . . . . . . . . . . . . . . . 1-8
1.4.2 Paper Feeder (Optional) . . . . . . . . . . . . . . . . . . . . . . . . . . . 1-9
1.4.3 Duplex Unit (Optional). . . . . . . . . . . . . . . . . . . . . . . . . . . . . 1-9
1.4.4 Characteristics of Recommended Paper . . . . . . . . . . . . . . 1-9
1.5 Environmental Condition. . . . . . . . . . . . . . . . . . . . . . . . . . . . . . 1-10
Chapter 2 Installation
2.1 Checking Your Package . . . . . . . . . . . . . . . . . . . . . . . . . . . . . . . 2-3
2.1.1 Accessories and Consumables. . . . . . . . . . . . . . . . . . . . . . 2-4
2.2 Procedure for Installation . . . . . . . . . . . . . . . . . . . . . . . . . . . . . . 2-5
2.3 Checking where to Install the Printer. . . . . . . . . . . . . . . . . . . . . 2-6
2.3.1 Installation Environment . . . . . . . . . . . . . . . . . . . . . . . . . . . 2-6
2.3.2 Installation Space . . . . . . . . . . . . . . . . . . . . . . . . . . . . . . . . 2-7
2.4 Checking the Power Source . . . . . . . . . . . . . . . . . . . . . . . . . . . . 2-8
2.4.1 Input Power Requirements . . . . . . . . . . . . . . . . . . . . . . . . . 2-8
2.4.2 Power Consumption . . . . . . . . . . . . . . . . . . . . . . . . . . . . . . 2-8
2.4.3 Precautions . . . . . . . . . . . . . . . . . . . . . . . . . . . . . . . . . . . . . 2-8
2.5 Installing the Printer. . . . . . . . . . . . . . . . . . . . . . . . . . . . . . . . . . 2-10
2.6 Preparing the Printer . . . . . . . . . . . . . . . . . . . . . . . . . . . . . . . . . 2-11
2.6.1 Toner Cartridges . . . . . . . . . . . . . . . . . . . . . . . . . . . . . . . . 2-11
2.6.2 Belt Cartridge . . . . . . . . . . . . . . . . . . . . . . . . . . . . . . . . . . 2-14
2.6.3 Fuser unit shipping parts. . . . . . . . . . . . . . . . . . . . . . . . . . 2-16
2.7 Connecting the Power Cord . . . . . . . . . . . . . . . . . . . . . . . . . . . 2-17
Page 4

TallyGenicom Intelliprint 8008N Color Laser Printer User Guide
2.8 Ensuring reliable Printer Operation . . . . . . . . . . . . . . . . . . . . . 2-18
2.8.1 Adding Paper . . . . . . . . . . . . . . . . . . . . . . . . . . . . . . . . . . 2-18
2.8.2 Turning On the Printer. . . . . . . . . . . . . . . . . . . . . . . . . . . . 2-20
2.8.3 Printing a Demo Page. . . . . . . . . . . . . . . . . . . . . . . . . . . . 2-21
2.8.4 Turning Off the Printer. . . . . . . . . . . . . . . . . . . . . . . . . . . . 2-22
2.9 Interface Cable . . . . . . . . . . . . . . . . . . . . . . . . . . . . . . . . . . . . . . 2-23
2.9.1 Connecting the Interface Cable . . . . . . . . . . . . . . . . . . . . 2-23
2.10 Selecting a Display Language. . . . . . . . . . . . . . . . . . . . . . . . . . 2-24
2.11 Adjusting Color Alignment . . . . . . . . . . . . . . . . . . . . . . . . . . . . 2-25
2.11.1 Printing the Alignment Page . . . . . . . . . . . . . . . . . . . . . . . 2-25
2.11.2 Perform the Adjustments. . . . . . . . . . . . . . . . . . . . . . . . . . 2-26
2.12 Installing Printer Drivers and Locating User Documentation 2-27
2.12.1 Installing Printer Drivers and other Software for Windows 2-27
2.12.2 Installing Printer Drivers for MacOS . . . . . . . . . . . . . . . . . 2-27
2.12.3 Locating User Documentation. . . . . . . . . . . . . . . . . . . . . . 2-27
2.13 Printing a Configuration Summary. . . . . . . . . . . . . . . . . . . . . . 2-28
2.14 Printing PCL and PostScript Font Lists. . . . . . . . . . . . . . . . . . 2-31
2.15 Notes on Moving the Printer . . . . . . . . . . . . . . . . . . . . . . . . . . . 2-32
Chapter 3 Basic Printer Operations
3.1 Turning On and Off. . . . . . . . . . . . . . . . . . . . . . . . . . . . . . . . . . . . 3-2
3.1.1 Turning On the Printer. . . . . . . . . . . . . . . . . . . . . . . . . . . . . 3-2
3.1.2 Turning Off the Printer. . . . . . . . . . . . . . . . . . . . . . . . . . . . . 3-3
3.2 Loading Paper Trays with Print Media . . . . . . . . . . . . . . . . . . . . 3-4
3.2.1 Print Media Guidelines . . . . . . . . . . . . . . . . . . . . . . . . . . . . 3-4
3.2.2 Selection of Feeder and Duplexer . . . . . . . . . . . . . . . . . . . 3-7
3.2.3 Duplex Printing . . . . . . . . . . . . . . . . . . . . . . . . . . . . . . . . . . 3-9
Chapter 4 Control Panel Functions
4.1 Functions of LCD and Lamps . . . . . . . . . . . . . . . . . . . . . . . . . . . 4-2
4.1.1 LCD Display and LED Indicators . . . . . . . . . . . . . . . . . . . . 4-2
4.2 Functions of Control Panel Keys . . . . . . . . . . . . . . . . . . . . . . . . 4-3
4.3 Navigating the Control Panel Menus . . . . . . . . . . . . . . . . . . . . . 4-4
4.4 Menu Structure . . . . . . . . . . . . . . . . . . . . . . . . . . . . . . . . . . . . . . . 4-6
4.5 Status Menu . . . . . . . . . . . . . . . . . . . . . . . . . . . . . . . . . . . . . . . . . 4-7
4.6 Job Library . . . . . . . . . . . . . . . . . . . . . . . . . . . . . . . . . . . . . . . . . . 4-8
4.6.1 Job Library Errors . . . . . . . . . . . . . . . . . . . . . . . . . . . . . . . . 4-9
4.7 Job Accounting . . . . . . . . . . . . . . . . . . . . . . . . . . . . . . . . . . . . . 4-10
4.8 Paper Menu . . . . . . . . . . . . . . . . . . . . . . . . . . . . . . . . . . . . . . . . . 4-11
II
Page 5

4.9 Interface Menu . . . . . . . . . . . . . . . . . . . . . . . . . . . . . . . . . . . . . . 4-16
4.10 PS Menu . . . . . . . . . . . . . . . . . . . . . . . . . . . . . . . . . . . . . . . . . . . 4-19
4.11 PCL Menu . . . . . . . . . . . . . . . . . . . . . . . . . . . . . . . . . . . . . . . . . . 4-20
4.12 System Menu . . . . . . . . . . . . . . . . . . . . . . . . . . . . . . . . . . . . . . . 4-25
4.13 Quality Menu . . . . . . . . . . . . . . . . . . . . . . . . . . . . . . . . . . . . . . . . 4-27
4.14 Color Menu . . . . . . . . . . . . . . . . . . . . . . . . . . . . . . . . . . . . . . . . . 4-28
4.15 Date/Time Menu (option) . . . . . . . . . . . . . . . . . . . . . . . . . . . . . . 4-30
4.16 Functions Menu . . . . . . . . . . . . . . . . . . . . . . . . . . . . . . . . . . . . . 4-32
4.17 FLASH Menu . . . . . . . . . . . . . . . . . . . . . . . . . . . . . . . . . . . . . . . . 4-33
4.18 DISK Menu. . . . . . . . . . . . . . . . . . . . . . . . . . . . . . . . . . . . . . . . . . 4-34
Chapter 5 Extended Features
5.1 About this Chapter . . . . . . . . . . . . . . . . . . . . . . . . . . . . . . . . . . . . 5-2
5.2 Installing DRAM Memory DIMMS . . . . . . . . . . . . . . . . . . . . . . . . 5-3
5.3 User Flash, Compact Flash and Hard Disk Options . . . . . . . . . 5-5
5.3.1 Using the Hard Disk Option and User Flash DIMM Module 5-7
5.3.2 Using the Power-On Files Feature . . . . . . . . . . . . . . . . . . 5-12
5.4 Collating, Saved Jobs and Job Accounting . . . . . . . . . . . . . . 5-13
5.4.1 Job Accounting Feature . . . . . . . . . . . . . . . . . . . . . . . . . . 5-20
5.5 Using the Custom Paper Size Feature . . . . . . . . . . . . . . . . . . . 5-21
5.5.1 Operator Panel Access. . . . . . . . . . . . . . . . . . . . . . . . . . . 5-21
5.5.2 Printer Driver Access . . . . . . . . . . . . . . . . . . . . . . . . . . . . 5-22
5.6 Custom Page size and Microsoft Word, Word 2000, and
Word 2003 . . . . . . . . . . . . . . . . . . . . . . . . . . . . . . . . . . . . . . . . . . 5-23
5.6.1 Resolution . . . . . . . . . . . . . . . . . . . . . . . . . . . . . . . . . . . . . 5-23
5.7 Accessing the Printer Web Page . . . . . . . . . . . . . . . . . . . . . . . 5-25
Table of Contents
Chapter 6 Troubleshooting and Maintenance
6.1 Control Panel LCD Messages . . . . . . . . . . . . . . . . . . . . . . . . . . . 6-3
6.2 Media Jams . . . . . . . . . . . . . . . . . . . . . . . . . . . . . . . . . . . . . . . . . . 6-6
6.2.1 Media Jam Locations . . . . . . . . . . . . . . . . . . . . . . . . . . . . . 6-7
6.2.2 Determining Media Jam Locations by LCD Messages. . . . 6-7
6.2.3 Removing Jams from the Printer . . . . . . . . . . . . . . . . . . . . 6-8
6.3 Actions on Print Quality Problems. . . . . . . . . . . . . . . . . . . . . . 6-21
6.4 Cleaning the printer to ensure good print quality and reliable
media feed. . . . . . . . . . . . . . . . . . . . . . . . . . . . . . . . . . . . . . . . . . 6-28
6.5 Checking for new printer drivers . . . . . . . . . . . . . . . . . . . . . . . 6-39
6.6 Actions on Abnormal Printer Operation . . . . . . . . . . . . . . . . . 6-41
III
Page 6

TallyGenicom Intelliprint 8008N Color Laser Printer User Guide
Chapter 7 Replacing Consumables and Replacable
Parts
7.1 Consumables . . . . . . . . . . . . . . . . . . . . . . . . . . . . . . . . . . . . . . . . 7-2
7.2 Replacing Consumables . . . . . . . . . . . . . . . . . . . . . . . . . . . . . . . 7-4
7.2.1 Replacing the Toner Cartridge . . . . . . . . . . . . . . . . . . . . . . 7-4
7.2.2 Replacing the Belt Cartridge . . . . . . . . . . . . . . . . . . . . . . . . 7-6
7.2.3 Replacing the Waste Toner Pack . . . . . . . . . . . . . . . . . . . . 7-9
7.2.4 Replacing the Fuser Unit. . . . . . . . . . . . . . . . . . . . . . . . . . 7-11
7.2.5 Notes on discarding the Consumables . . . . . . . . . . . . . . . 7-13
7.3 Periodical Replacement Parts. . . . . . . . . . . . . . . . . . . . . . . . . . 7-14
Chapter 8 Options
8.1 Paper feeder . . . . . . . . . . . . . . . . . . . . . . . . . . . . . . . . . . . . . . . . . 8-2
8.1.1 Packed Supplies . . . . . . . . . . . . . . . . . . . . . . . . . . . . . . . . . 8-2
8.1.2 Before Installing to the Printer. . . . . . . . . . . . . . . . . . . . . . . 8-3
8.1.3 Installation . . . . . . . . . . . . . . . . . . . . . . . . . . . . . . . . . . . . . . 8-4
8.1.4 After Installation . . . . . . . . . . . . . . . . . . . . . . . . . . . . . . . . . 8-6
8.2 Duplex unit . . . . . . . . . . . . . . . . . . . . . . . . . . . . . . . . . . . . . . . . . . 8-7
8.2.1 Packed Supplies . . . . . . . . . . . . . . . . . . . . . . . . . . . . . . . . . 8-7
8.2.2 Before Installing to the Printer. . . . . . . . . . . . . . . . . . . . . . . 8-8
8.2.3 Installation . . . . . . . . . . . . . . . . . . . . . . . . . . . . . . . . . . . . . . 8-9
8.2.4 After installation. . . . . . . . . . . . . . . . . . . . . . . . . . . . . . . . . 8-11
Index
IV
Page 7

Chapter 1
Introduction
1.1 About This Manual 1-2
1.2 Safety Summary 1-3
1.3 Outline of Product 1-6
1.4 Specifications of Product 1-8
1.5 Environmental Condition 1-10
1-1
Page 8

TallyGenicom Intelliprint 8008N Color Laser Printer User Guide
1.1 About This Manual
This manual is intended to provide guidance for the proper installation,
operation, and maintenance of your printer. Please read this manual carefully to
ensure proper use of the printer. Keep the CD-ROM in a safe place, where it
can be retrieved readily when needed.
The following documentation conventions are used in this manual for ease in
understanding and use.
1.1.1 Warnings, Cautions and Notes
Warnings, cautions and notes provide important safety information
throughout this manual. Carefully follow all the warnings, cautions and notes
as you read through the instructions in this manual before you operate the
printer.
Information in the warnings and cautions describe potential hazards.
If you don’t understand the safety information, contact your Technical
Services.
Here are the warning, caution, and note definitions:
Warning! If a specific action or procedure in a Warning is not followed,
equipment damage or personal injury can occur.
Caution! If a specific action or procedure in a Caution is not followed, damage to
equipment can occur.
Note: Notes offer additional information to help you more fully understand a
concept or subject. If a note is not followed, a task or procedure may not be properly
accomplished.
1-2
Page 9

1.2 Safety Summary
1.2.1 General Safety Guidelines
Before operating the printer, read the following instructions carefully:
z Follow all the operating procedures provided in this manual.
z Pay special attention to and follow all the hazard warnings on the printer and
in the manual. Failure to do so can cause injury to yourself or damage to the
printer.
z Do not make perform any operation or action in any way other than pro-
vided in this manual. When in doubt, contact your dealer or your customer
support.
z Keep in mind that hazard warnings in this manual or on the printer cannot
cover every possible case, as it is impossible to predict and evaluate all circumstances beforehand. Be alert and use your common sense.
Chapter 1 Introduction
WARNING!
z If trouble occurs, disconnect the power plug.
– If there is any trouble such as overheat, smoke, strange noise or offensive
odors, immediately turn off the printer, and disconnect the power plug.
Otherwise, it may cause fire or an electric shock.
– Keep objects away from the wall socket to disconnect the power plug
immediately.
z No impact.
– If the printer is dropped or damaged, turn off the printer and disconnect
the power plug. Otherwise, it may cause fire or an electric shock.
z No modifications.
– Do not modify the printer. Otherwise, it may cause fire, an electric shock
or laser radiation.
– If you look directly at or are exposed to laser radiation, your eyes or skin
may be injured.
z Do not remove the case enclosure.
– Do not remove the printer case or touch the inside. It may cause burns or
an electric shock. Ask for any inspection, adjustment or repair of the
printer to to be undertaken by your dealer or service representative.
z Do not put anything on the printer.
– Do not put metals such as paper clips and pins, or vessels containing
water such as vases on the printer. If a piece of metal or water gets into
the printer, it may cause fire or an electric shock.
1-3
Page 10
TallyGenicom Intelliprint 8008N Color Laser Printer User Guide
z No foreign material get into the printer.
– Do not spill any liquid into the ventilation slits of the printer. Do not get
foreign material such as a metal or flammable article into the printer. Otherwise, it may cause fire or an electric shock.
z Touch with dry hands.
– Do not touch the printer or the power plug with wet hands. Otherwise,
you may suffer an electric shock, or the printer may malfunction.
z No excessive moisture or dust.
– Do not place the printer at a place subject to excessive moisture or dust.
Otherwise, it may cause fire or an electric shock.
z Do not cover any of the ventilation slits.
– Do not cover the printer’s ventilation slits. Otherwise, the inside of the
printer may become overheated, causing fire.
z Lifespan
– The lifespan of the printer and its options is 300,000 images (printed
75,000 color pages) or five years (12,000 hours of the energized application), whichever comes first.
– Using the printer beyond the lifespan needs replacement of the compo-
nents which have exceeded their lifespans. Consult your dealer or your
customer support. Keeping on using those components beyond their
lifespans may cause fire or an electric shock.
z Temperature differences
– When you move the printer to a place with a temperature, significantly
different condensation may form on its surface or inside. Under such circumstances, it may cause fire or an electric shock. Allow the printer to
adjust the ambience of its new location for several hours before using it.
CAUTION!
z Do not stand on or lean. Do not place heavy articles on the printer.
– Do not lean on the opened cover or the drawn paper tray. Otherwise, the
printer may fall over, causing injury.
– Do not place heavy articles on the printer. Otherwise, the printer may
become imbalance, or fall over, causing injury.
1-4
Page 11

Chapter 1 Introduction
z Install the printer in a stable place.
– Do not place the printer in an imbalance position or on a slope, or in
other unstable places. Otherwise, the printer may fall over, causing injury.
z Do not install the printer where subjected to high temperatures.
– If you place the printer where subjected to direct sunshine, or near a heat
source such as a stove, the printer may become overheated, causing trouble.
z Keep the printer away from a radio or TV set.
– If you install the printer near a radio or TV set, the printer and the radio
or TV set may adversely affect each other. If you find a lot of noise on the
radio or TV set, take the following actions.
• Install the printer as far from the radio or TV set as possible.
• Change the direction of the antenna for the radio or TV set.
• Use a power circuit or wall socket that is different from the one used by
the radio or TV set.
1-5
Page 12

TallyGenicom Intelliprint 8008N Color Laser Printer User Guide
1.3 Outline of Product
1.3.1 Name and Function of Each Part
1-6
Page 13

No. Name of Parts Outline of Functions
Chapter 1 Introduction
1 Top Cover Assy
2 Operator Panel
3 Front Cover
4 Rear Cover Assy
5Top cover
6Power Switch
7 AC Input Inlet
8Interface Control Box
Stores the printed output. If required the additional
2 paper supports can be also used to support the
paper. The plate at the top can be raised and
secured.The paper stopper on the front can be
pulled out, the upright support raised and then
adjusted back to the required paper size.
To configure and advise the status of the printer.
To gain access to the toner cartridges and waste
toner pack.
Transfers images onto the page and transports the
paper. May be required to be opened when clearing
internal jam or trouble shooting and when replacing the fuser unit
Allows access to the OPC Belt Cartridge and transfer belt cleaner.
To power on or off the printer.
To connect a power supply cable.
Controller board with USB and Ethernet connectors.
9/10Upper/Lower Duplex
Cover
To be removed only when installing the duplex
unit.
1-7
Page 14
TallyGenicom Intelliprint 8008N Color Laser Printer User Guide
1.4 Specifications of Product
1.4.1 General Specification Printer
No. Name of Parts Outline of Functions
1 Printing Method Semiconductor laser and electrophotography
2Print Speed
a) Monochrome
b) 4 Colors
3 Warming-Up Time
Cassette feed and simplex continuous print:
31 sheets per minute (A4 size)
8 sheets per minute (A4 size)
50 to 80 seconds.
(ambient temperature
of 20°C)
4 Resolution 600 × 600 dpi, 1200 × 600 dpi
5 Feeding Method Cassette feed
6 Cassette Capacity Ordinary paper: 250 sheets, Thick stock: 120
sheets, Label: 80 sheets, Transparency 50 sheets,
Envelope: 15 sheets.
7 Printable Media
1
A4, Letter, Executive, A5, Custom, B5, Transpar-
ency, Label, Envelope
8 Paper Exit System
2
Face down, 250 sheets (capacity)
9 External Dimension 480 (W) × 420 (D) × 385 (H) (mm)
18.9 (W) × 16.5 (D) × 15.2 (H) (inches)
10 Weight of Printer
Approximately 31.5 kg/69,4 lb)
(including the consumables)
1-8
1 Print media other than plain paper, such as Thick Stock, Label, Transparency and Envelope
must be fed from the standard feeder only and cannot be used with the optional duplex unit.
2 Output capacity is determined by the output tray sensor.
Note: Paper and other media can be highly variable and should be tested in the
printer prior to purchase.
Page 15

1.4.2 Paper Feeder (Optional)
No. Name of Parts Outline of Functions
1 Cassette Capacity Paper: 500 sheets
2 Printable Media A4, Letter, B5 and Executive
3 External Dimension 460 (W) × 467 (D) × 185 (H) (mm)
18.1 (W) × 18.4 (D) × 7.3 (H) (inches)
4 Weight Approximately 6 kg/13.2 lb
1.4.3 Duplex Unit (Optional)
No. Name of Parts Outline of Functions
1 Printable Media Letter, A4
2 Rated Voltage 24 V DC
supplied from the printer engine.
Chapter 1 Introduction
3 External Dimension Duplex Unit: 345 (W) × 185 (D) × 406.2 (H)
13.6 (W) × 7.3 (D) × 16.0 (H)
Printer with duplex unit:
480 (W) × 522 (D) × 440 (H)
18.9 (W) × 20.6 (D) × 17.3 (H)
4 Weight Approximately 5 kg/11 lb
1.4.4 Characteristics of Recommended Paper
Item Description
Basis Weight 82 g/m2 ±5
Thickness (µm) 95±6
Stiffness (Clark) 100±15
Brightness (%)85±2
Surface Resistance (Ω)10
10
Grain Direction Long
to 10
11
Measurement Condition: 17.5 to 27×C, 50 to 70%RH
Note: Paper should be kept in packaged condition, unopened, until ready for use.
Paper and other media can be highly variable and should be tested in the printer prior
to purchase.
1-9
Page 16
TallyGenicom Intelliprint 8008N Color Laser Printer User Guide
1.5 Environmental Condition
(a) Under Operation: 10.0 to 32.5°C, 20 to 80%Relative Humidity with No
Condensation, 0 to 2,500 metres (8200 feet).
(b) Under Non-Operation: 5 to 35°C, 10 to 80% RH with No Condensation.
(c) Storage and Transportation Environment of Printer
The following defines the storage and transportation environment of the printers that have been packed according to the manufacturers specification.
In particular, since consumables such as toner etc. are packaged, the following
environmental conditions should be respected.
During transportation, strictly refrain from leaving the goods on the ground or
under the blazing sun.
Temper a t u r e
Humidity
Period of Storage
Other
Atmosphere
The period under the severe condition should not be continuous, but is assumed to be the total of intermittent time.
However, the total of intermittent time should never exceed 48 hours at
maximum.
Normal condition should occupy more than 90% of the total storage period.
Severe condition should be less than 10% of the total storage period.
Normal Condition 0°C to 35°C (32°F to 95°F)
Severe Condition High Temperature: 35°C to
40°C (95°F to 104°F)
Low Temperature: -10°C to
0°C (14°F to 32°F)
10% to 90% RH
1 Year after Ex-works
No Condensation
613 to 1,067 hpa (460 to 800 mm Hg)
1-10
Page 17

Chapter 2
Installation
2.1 Checking Your Package 2-3
2.2 Procedure for Installation 2-5
2.3 Checking where to Install the Printer 2-6
2.4 Checking the Power Source 2-8
2.5 Installing the Printer 2-10
2.6 Preparing the Printer 2-11
2.7 Connecting the Power Cord 2-17
2.8 Ensuring reliable Printer Operation 2-18
2.9 Interface Cable 2-23
2.10 Selecting a Display Language 2-24
2.11 Adjusting Color Alignment 2-25
2.12 Installing Printer Drivers and Locating User Documentation 2-27
2.13 Printing a Configuration Summary 2-28
2.14 Printing PCL and PostScript Font Lists 2-31
2.15 Notes on Moving the Printer 2-32
2-1
Page 18

TallyGenicom Intelliprint 8008N Color Laser Printer User Guide
I don’t know what to do?
For situations like this, please read on…
Installing Belt
cartridge 2-14
Installing
Toner
cartridges
2-11
Replacing Fusing
unit 7-11
Paper jam
6-13
Paper jam
6-10
2-2
Loading Paper
3-4
Paper jam
6-8
Replacing Waste toner
pack 7-9
Page 19
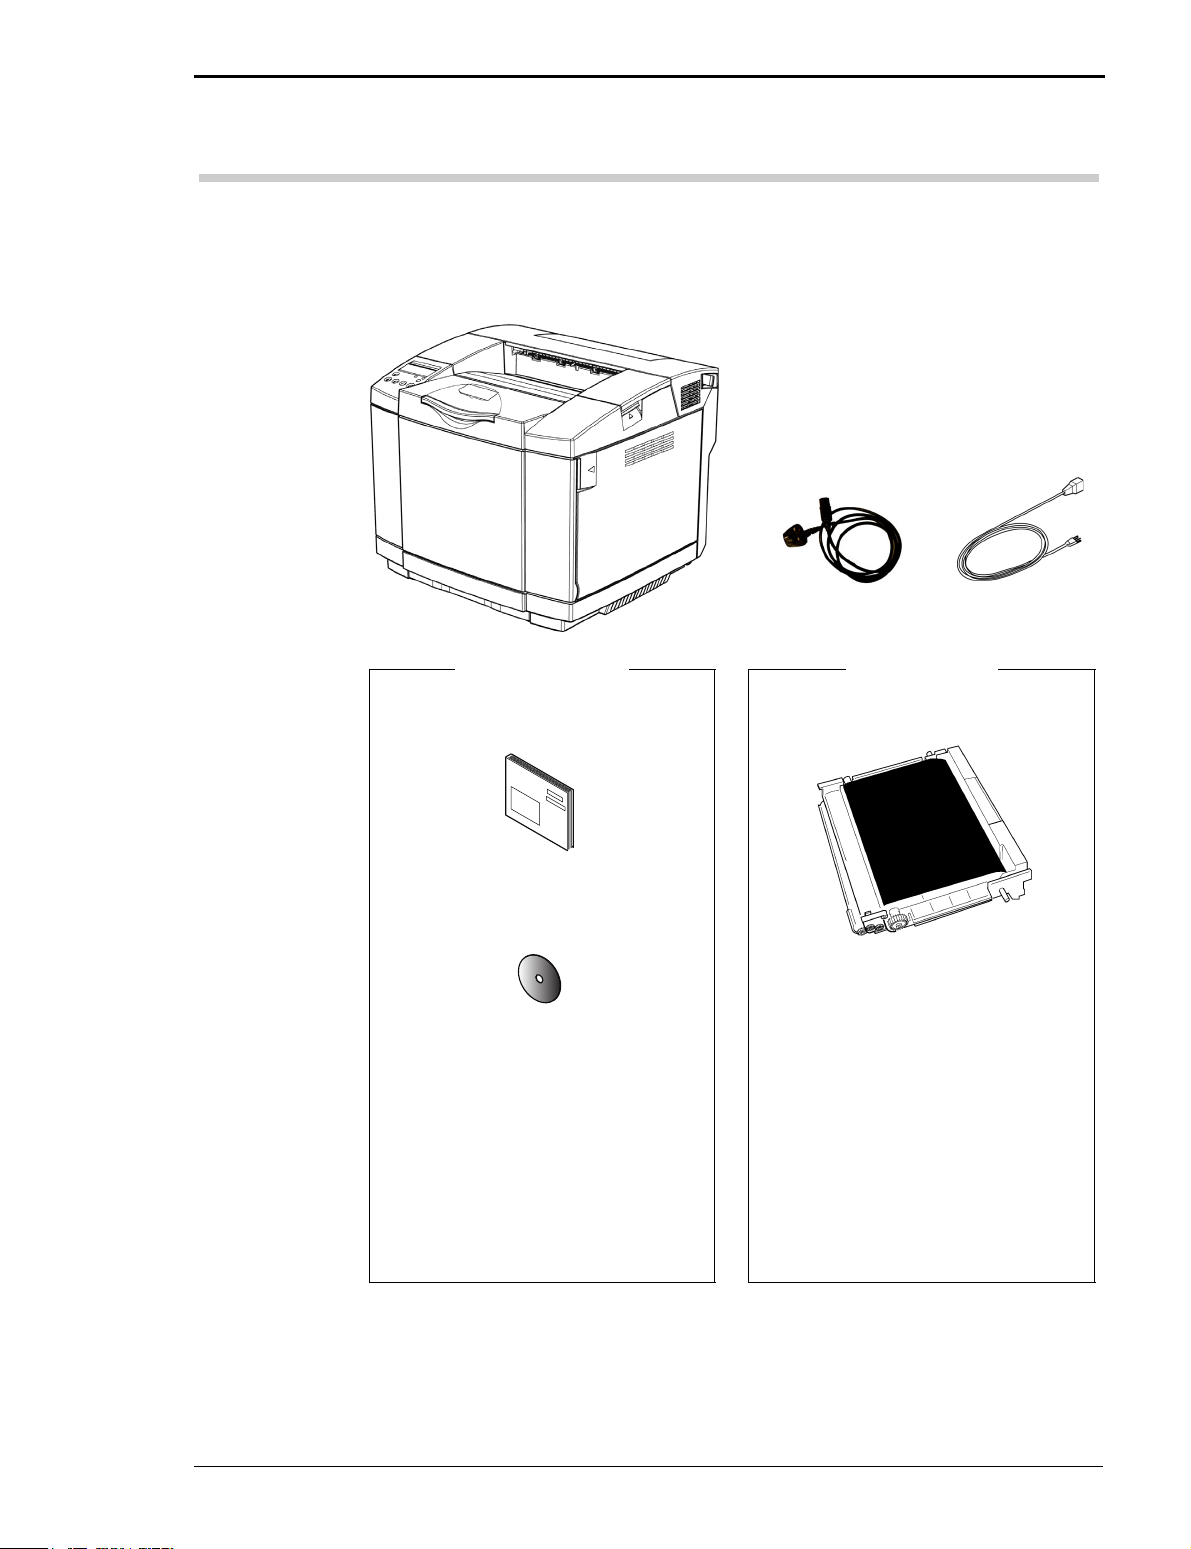
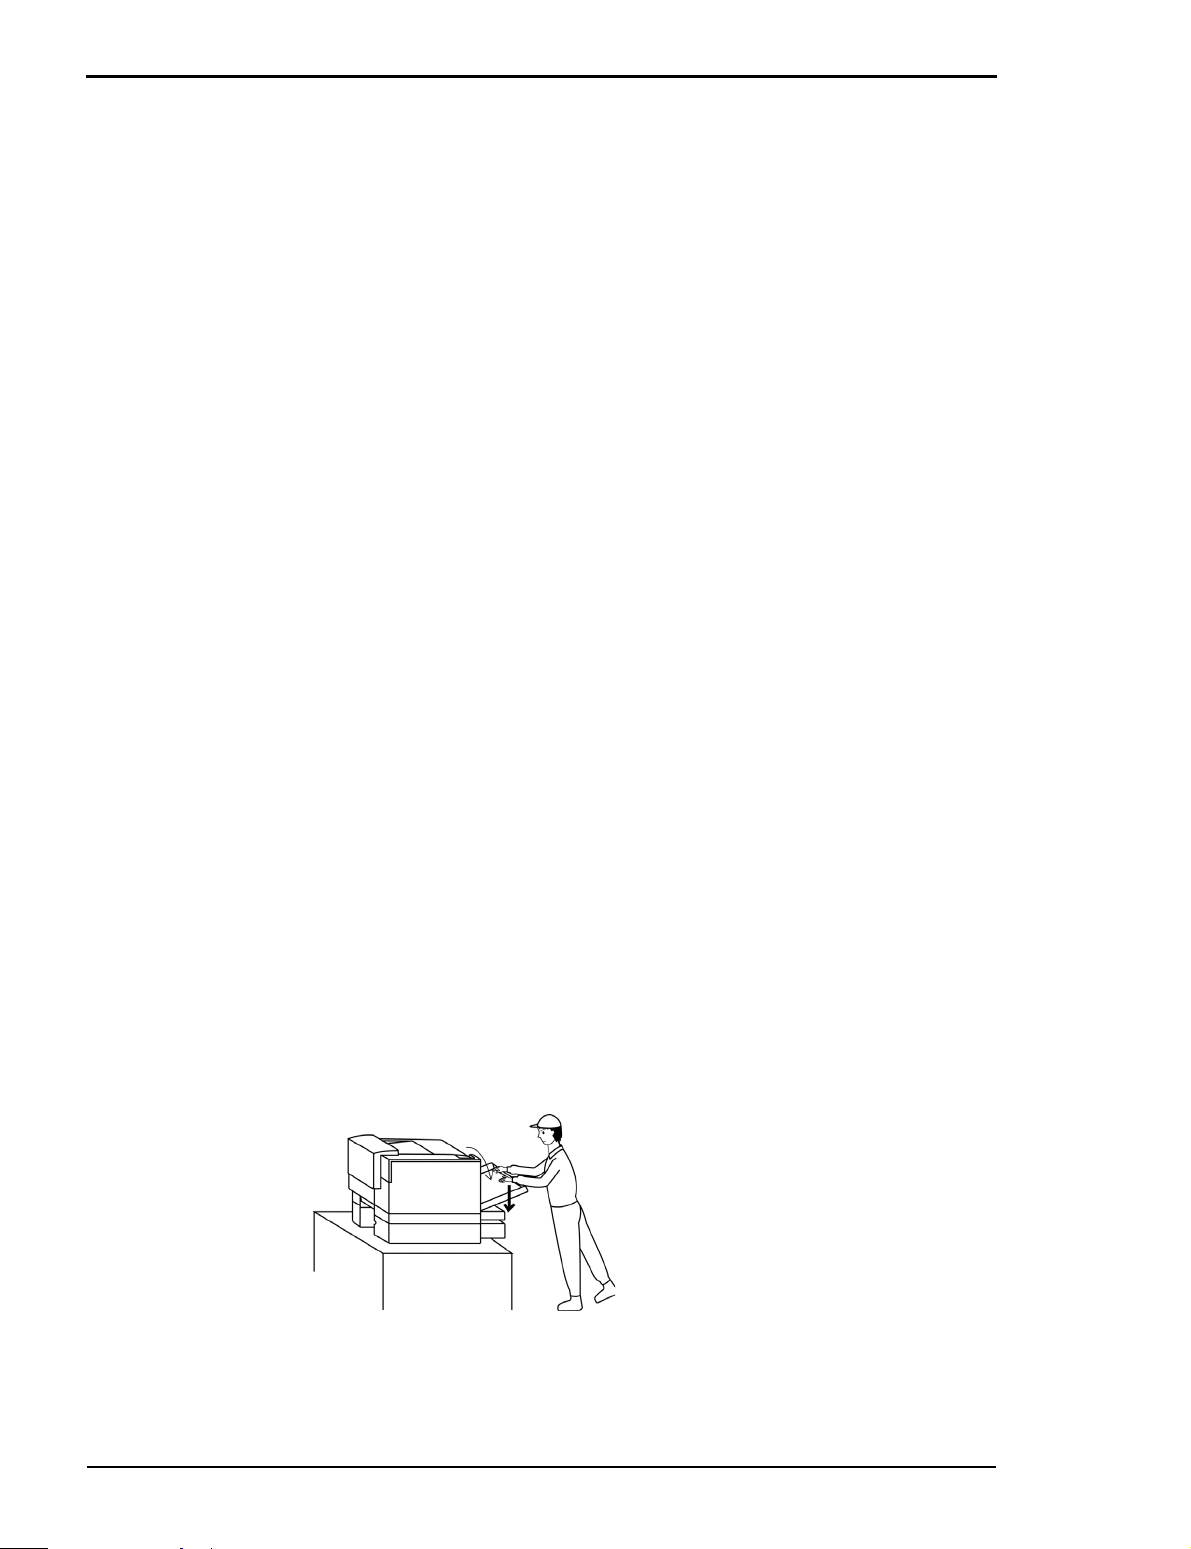
2.1 Checking Your Package
Before installing the printer, check that all the items are contained in the package. Should any components be missing or damaged, contact your dealer.
Printer
Power cord
Type is dependent on country.
Chapter 2 Installation
Accessory kit
Quick Start Guide
Software set (CD-ROM)
Starter kit
Belt cartridge
The printer includes toner cartridges K, Y, M and C (one of
each), a waste toner pack and a
fuser unit, all are consumables. The
lives of the initial supplied toner
cartridges are reduced when compared to the standard replacements giving up to 1500 images at
5% coverage. All the other consumables supplied with the printer
have the same lives as the standard
replacements.
2-3
Page 20

TallyGenicom Intelliprint 8008N Color Laser Printer User Guide
2.1.1 Accessories and Consumables
z The software (CD-ROM) contains the printer drivers, user manual and other
utilities.
z The printer includes a multi language Quick Start Guide
2-4
Page 21
2.2 Procedure for Installation
CAUTION! Have two or more persons carry the printer. Pay attention not to hurt
your back or drop the printer; otherwise, you may suffer from injury. The printer
weighs about 29 kg/63.9 lb excluding consumables and options.
X Check where to install the printer. (page 2-6)
X Check the power source. (page 2-8)
X Install the printer. (page 2-10)
Chapter 2 Installation
X Preparing the printer. (page 2-11)
X Connect the power cord. (page 2-17)
X Ensure the printer operation. (page 2-18)
X Connect the printer to a PC. (page 2-23)
X Notes on moving the printer. (page 2-32)
2-5
Page 22

TallyGenicom Intelliprint 8008N Color Laser Printer User Guide
2.3 Checking where to Install
the Printer
Before installing the printer, check the environment and space for the
installation.
2.3.1 Installation Environment
Install the printer on a stand or desk in a suitable environment as shown below.
The following gives the ranges of temperature and humidity acceptable for
printer operation.
z Acceptable environment
– Temperature: 10°C to 32.5°C
– Humidity: 20% to 80%
z Recommended environment
– Temperature: 17.5°C to 27°C
– Humidity: 50% to 70%
Do not install the printer in the following places:
z In a location subject to direct sunlight.
z Near an air conditioner, or where it is subject to direct cool or warm drafts,
or radiated heat.
z Where it is subject to exhaust discharged directly from a PC or printer.
z Where the temperature or humidity changes significantly. (Take care so that
the printer is not subject to condensation.)
z Where it is subject to excessive dust or corrosive gases.
z In a location such as a laboratory where chemical reactions occur.
z Where an ultrasonic humidifier is being used.
z In a poorly ventilated location.
z Near equipment which generates electrical noise and strong magnetic fields.
z Where it is subject to vibration or shocks.
z Anywhere that cannot withstand the weight of the printer (about 29 kg/
63.9 lb for the printer with consumables, and about 42 kg/92.6 for the maximum printer configuration including the options).
2-6
z In an uneven place or mounting location that is not level.
z Where it may slide or where it is sloped.
z On more than one stand.
Page 23

2.3.2 Installation Space
Secure enough space around the printer as illustrated below (top view) to ensure
printer reliability, safety and ease of operation.
Duplex unit
Chapter 2 Installation
118 cm/46.5“
35 cm/13.8“ with Duplex Unit
25 cm/9.8“ without Duplex Unit
(from printer’s rear edge)
122 cm/48“
20 cm/
7.9“
50 cm/19.7“
35 cm/13.8“
Mounting stand
2-7
Page 24

TallyGenicom Intelliprint 8008N Color Laser Printer User Guide
2.4 Checking the Power Source
Check the power source for the printer.
2.4.1 Input Power Requirements
Printer model EU:
z Supply voltage: 220 – 240 VAC
z Frequency: 50 Hz ±2 Hz
Printer model US:
z Supply voltage: 120 VAC ±10%
z Frequency: 60 Hz ±2 Hz
WARNING! Connect the printer to a dedicated wall outlet in compliance with the
specifications of the printer. Connecting the printer to a non-compliant wall outlet may
cause fire or electric shock.
Use a grounded wall socket to prevent an electric shock. Never use a converter plug.
2.4.2 Power Consumption
The printer’s maximum power consumption is 1,300 W.
When determining the power source for the printer, consider its electric power
capacity as well. Should the rated power capacity be exceeded, the ring mains’
circuit breaker may activate.
2.4.3 Precautions
z Ensure that the plug connection is clean. In a damp environment, a contam-
inated connector can draw sufficient amount of current to generate heat and
may, over an extended period of time, cause a fire.
z Always use the power cable provided with your printer. Normally do not use
a power extension, however If it use cannot be avoided then only use only a
correctly rated power extension
z Do not attempt to modify, pull, bend, chafe, or otherwise damage the power
cable.
z Do not place a heavy object on the cable. A damaged cable can cause fire or
electric shocks.
2-8
z Never touch a power cable with wet hands. This constitutes an electric shock
hazard.
Page 25

Chapter 2 Installation
z Stop operation immediately if your printer emits smoke, excessive heat,
unusual noise or smell, or if water or any fluid is spilt onto the printer. These
conditions can cause fire.
z Immediately turn off and unplug the printer, and contact your Customer
Support centre.
z If the power cable is broken or insulated wires are exposed, ask your Cus-
tomer Support Center for a replacement. Using a damaged cord can cause
fire or electric shocks.
z Do not unplug or replug the printer while it is on. Unplugging a live connec-
tor can deform the plug and cause fire.
z When unplugging the printer, grasp the plug instead of the cable. Forcibly
pulling on a cable can damage it and cause fire or electric shocks.
z Be sure to switch off and unplug the printer before accessing the interior of
the printer for cleaning, maintenance, or fault clearance. Access to a live
printer‘s interior can cause electric shocks.
z Once a month, unplug the printer and check the power cable for the follow-
ing:
– The power cable is plugged firmly into a receptacle.
– The plug is not excessively heated, rusted, or bent.
– The plug and receptacle are free of dust.
– The cable is not cracked or frayed.
If you notice any unusual conditions, contact your Customer Support centre.
z When the printer is not used over an extended period of time, switch it off
and unplug it. If an unused printer is left connected to a power source for a
long period, degraded insulation can cause electric shocks, current leakages,
or fire.
z Switch off the printer before connecting the interface cable or options. Con-
necting the cable or card with a live printer can cause electric shocks.
2-9
Page 26
TallyGenicom Intelliprint 8008N Color Laser Printer User Guide
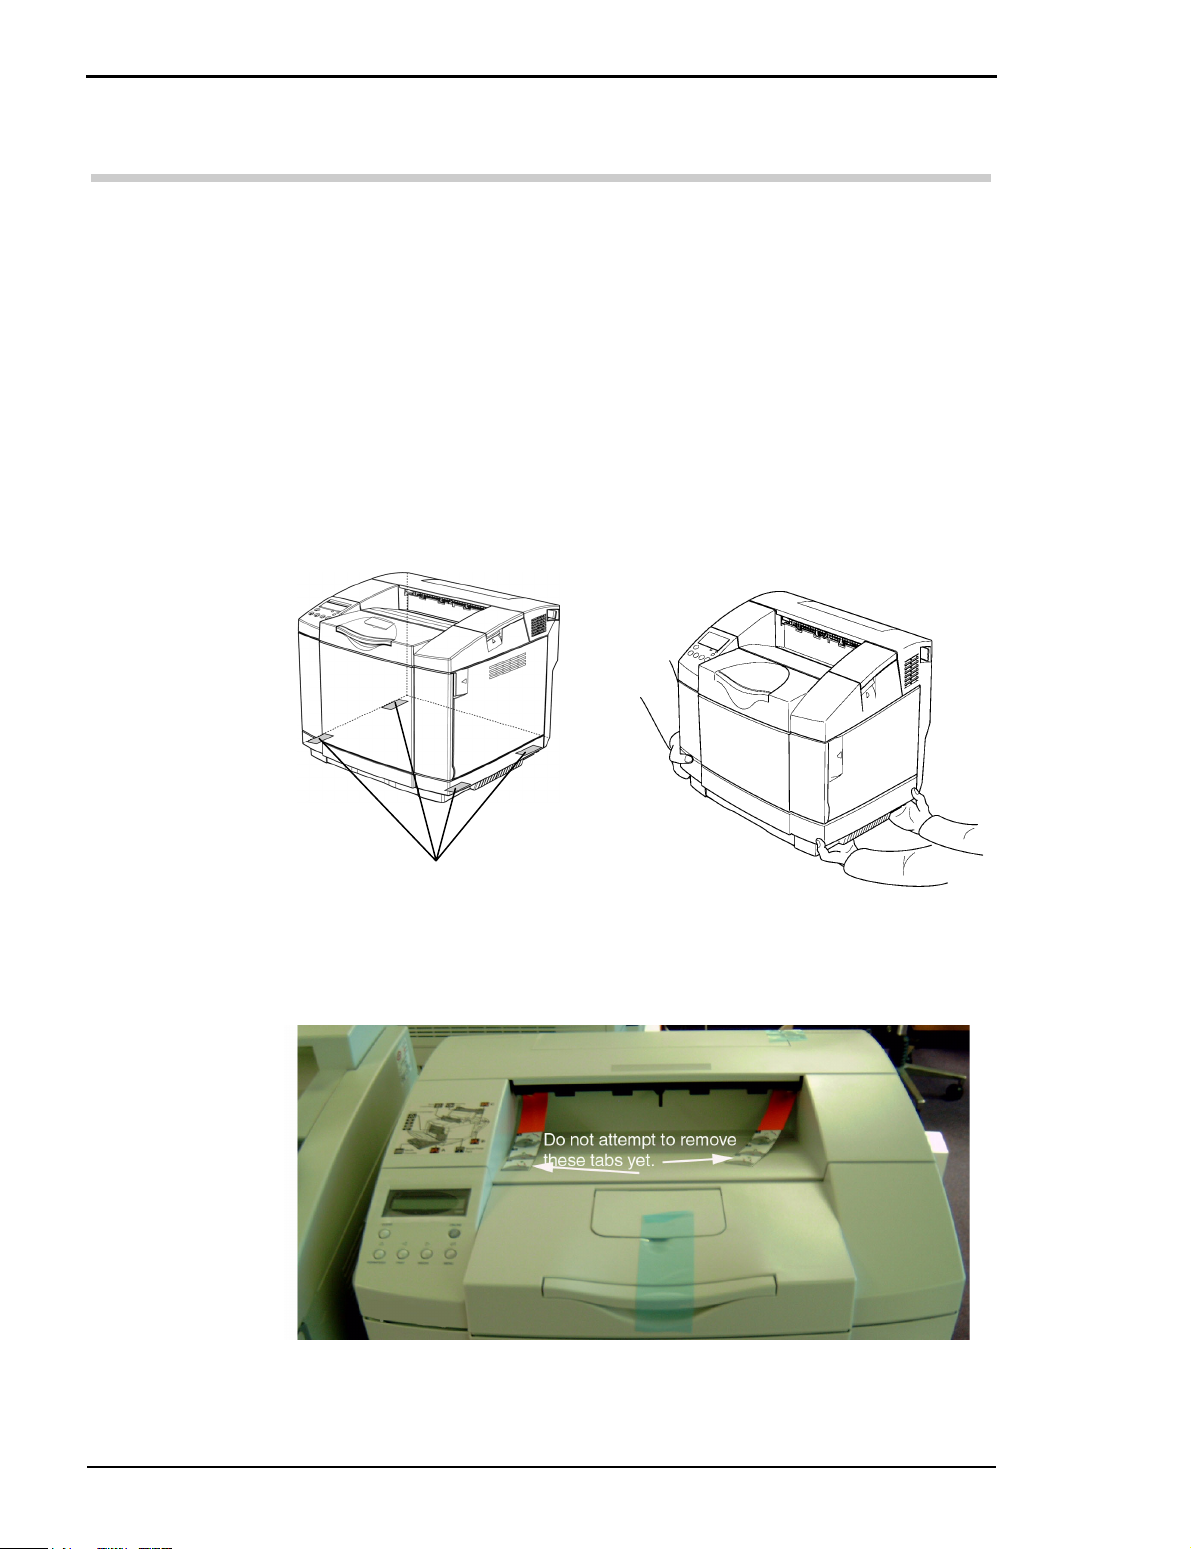
2.5 Installing the Printer
CAUTION! Have two or more persons carry the printer. Pay attention not to hurt
your back or drop the printer; otherwise, you may suffer from injury. The printer
weighs about 29 kg/63.9 lb excluding its consumables and options.
Do not grasp the polyethylene bag that covers the printer to take it out of its packing
box. Otherwise, you may loose your grip and drop the printer, causing injury.
When carrying the printer, always grasp it by the provided gripping places. Otherwise,
you may injure your hands.
It is recommended to store all the original packaging and shipping parts together.
1. Take the printer out from its packing box as detailed in the Quick Start
Guide. You will find four grips at the bottom of the printer. Have two or
more persons grasp these firmly to carry the printer.
Four grips
2. Install the printer in a suitable place.
3. Remove all the tape securing covers on the outside of the printer and any
tape in the paper tray.
Note: Do not attempt to remove yet the orange tags.
2-10
Page 27

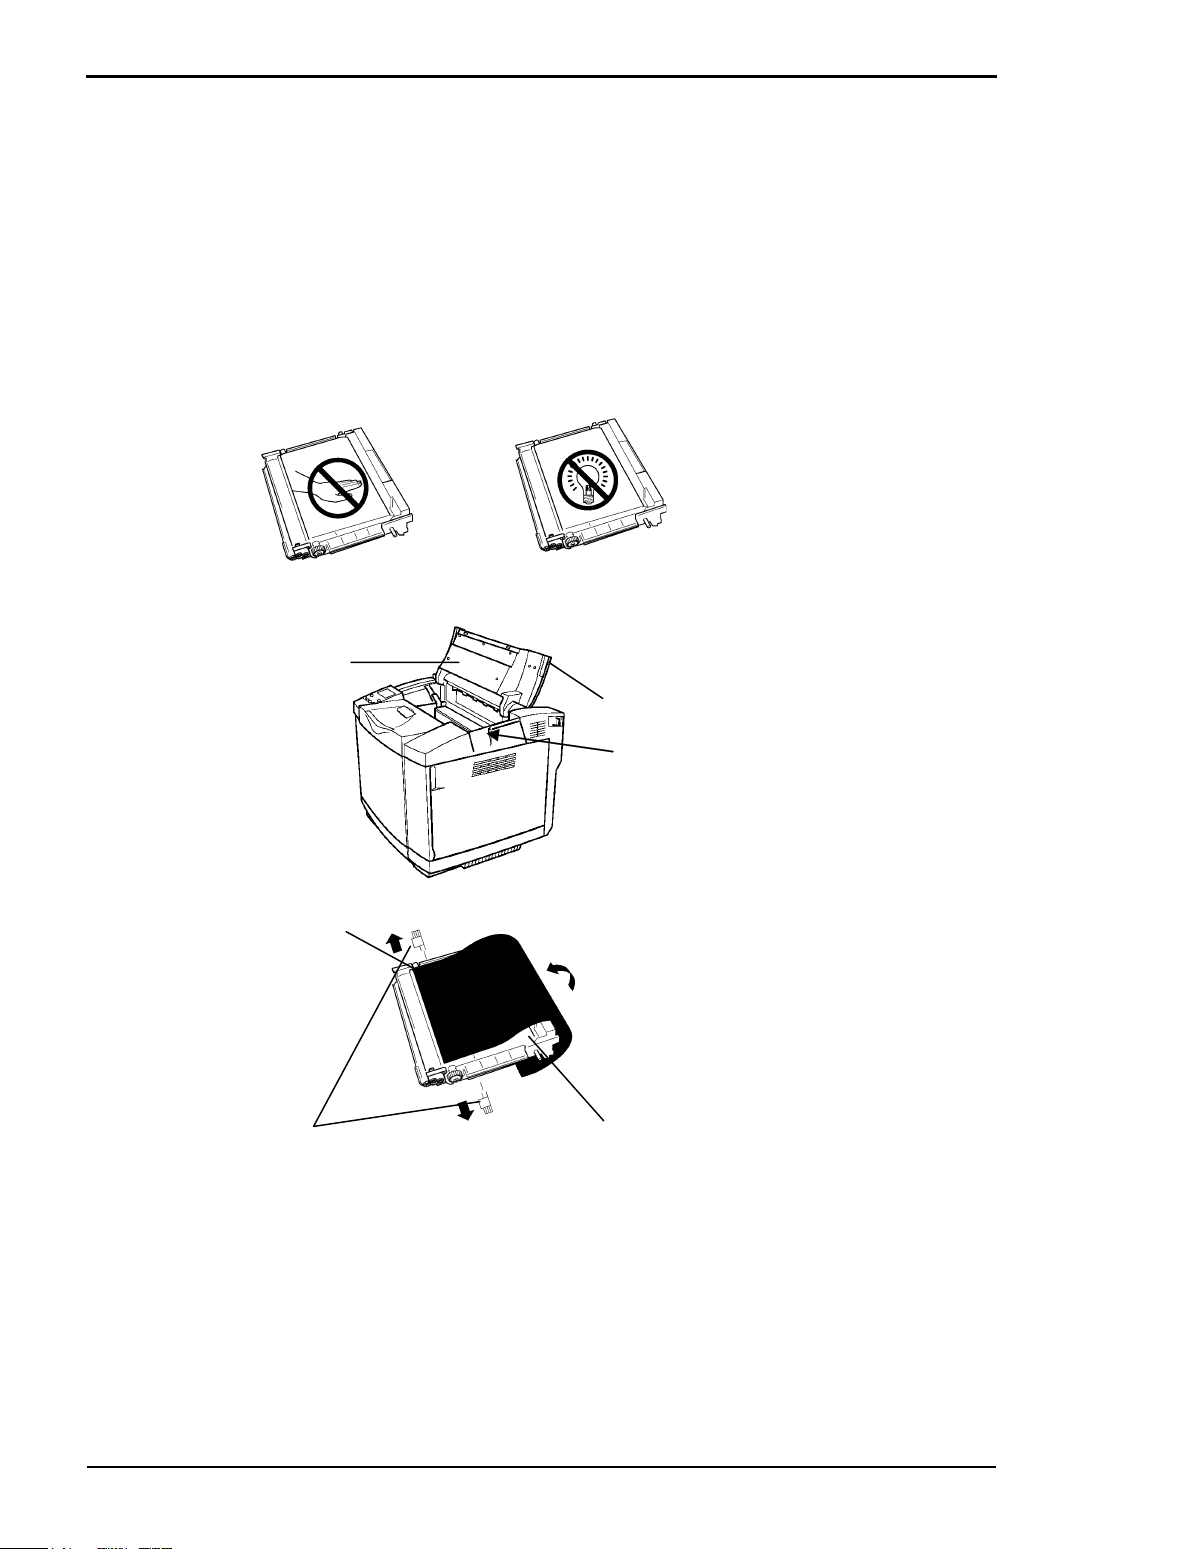
2.6 Preparing the Printer
Install the consumables into the printer.
2.6.1 Toner Cartridges
The symbol for these parts is .
Remove the shipping cover.
Note: Handle the toner cartridge with its label facing upward. Do not install the
cartridge upside-down or reverse it.
Install the cyan (C), magenta (M), yellow (Y) and black (K) toner cartridges as
shown below.
Chapter 2 Installation
Front cover Lever
Shipping support
Toner cartridge
1. Unlock the lever on the front cover
and open the front cover.
2. Remove the shipping support and
four toner cartridges. Note that
each toner cartridge has a label with
a letter on. For each cartridge the
letter is in line with the same letter
label on the printer Store the shipping support with the printer packaging
2-11
Page 28

TallyGenicom Intelliprint 8008N Color Laser Printer User Guide
Toner cartridge
3. Pull the tape to completely remove
the white shipping cover from the
printer. Store the cover and tape
with the printer packaging. Ensure
that the cover immediately in front
of the yellow label, held down by
tape, is not dislodged.
4. Take the cyan toner cartridge (C)
and shake it three or four times in
the direction of arrows to level out
the toner inside the cartridge.
Protector
5. Peel off the tape, and remove the
protector for the toner cartridge
from the right. Store the cover with
the printer packaging
6. Place the cyan toner cartridge along
the bottom set of guides in the
printer. It should slide in freely. If
not check that you are installing it
into the correct slot. The cartridges
are keyed so that they cannot be
fully installed into an incorrect slot.
X Repeat steps 4–6 to install the
magenta (M), yellow (Y) and black
(K) toner cartridges in that order.
7. Close the front cover securely by
pushing it until it locks to ensure
that the toners are installed correctly.
2-12
Page 29

Chapter 2 Installation
8. To prepare for the installation of
the OPC belt, open the door again
and pull each toner cartridge out
about an inch.
2-13
Page 30
TallyGenicom Intelliprint 8008N Color Laser Printer User Guide
2.6.2 Belt Cartridge
Install the belt cartridge in the printer as illustrated below. Pay attention to the
following notes:
Note: Do not touch the photosensitive belt or place it down where it can be
scratched.
The photosensitive belt is very sensitive to light. If this belt is exposed to light of 800
lux or more for 2 minutes or more, it deteriorates, causing troubles in the images
printed. Pay attention not to expose the belt cartridge to light wherever possible.
Top cover
Protective
sheet
Shipping
pins
Hold
here
Photosensitive belt
1. Open the top cover by raising
it. On the right hand side of the
printer there is a recess to allow
this. Raise the cover until it
stays open.
X Keep the top cover fully open
during the replacement work.
2. Hold the unit by the exposed
black plastic part at the top of
the unit. Remove and store the
two shipping pins from the
new belt cartridge.
3. Remove the protective sheet
for the belt cartridge and store
it. Pay attention to the following:
X Do not touch the photosensi-
tive belt.
2-14
X Do not wipe off any of the
white powder adhering to the
photosensitive belt.
Page 31

Chapter 2 Installation
4. With the photosensitive belt
facing front, hold the black
handle at the top of the unit,
slide the belt cartridge down
into the printer along the guide
until it stops. Once the unit is
down, push down on both ends
of the handle to ensure the belt
is fully down.
5. Pull the lock levers back to lock
the unit into place.
6. Hold the top cover and bring it
down until it locks into place.
X Do not allow the cover to drop
down.
7. Push the Toner cartridges back
into the printer and close the
front door.
2-15
Page 32

TallyGenicom Intelliprint 8008N Color Laser Printer User Guide
2.6.3 Fuser unit shipping parts
Remove the Fuser shipping parts as illstrated below.
Fuser unit
Back cover
Lever
1. Pull the lever on the back cover to
unlock the back cover, and open
the back cover until it stops.
X Keep the back cover fully open
during the replacement work.
2. Pull the shipping release tabs
(orange colored) provided on the
left and right side of fuser unit
Each tab has a clip at the end which
was installed in the fuser for shipping.
3. Close the back cover and push it
until it locks.
X Keep supporting the back cover as
you close it.
2-16
Page 33

2.7 Connecting the Power Cord
WARNING! Should the printer generate abnormal heat, smoke, strange noises or
offensive odor, immediately disconnect the power plug from the wall outlet. Continuing
to use the printer may cause fire or electric shock.
Only use the power cord supplied with the printer. Using another power cord may
cause fire or electric shock.
Check that no dust adheres to the power plug. Fully insert the power plug into the
wall outlet making sure it has no play. If there is dust on the power plug or if the
power plug is not securely inserted, fire may occur, or you may suffer an electric shock.
Chapter 2 Installation
Main power switch
Connector
Power cord
1. Before connecting the power
cord, check that the mains
power switch for the printer is
in the OFF position. Have you
removed the toner and fuser
shipping parts?
2. Insert the connector of the
power cord into the printer
socket.
Power
connector
socket
3. Insert the plug of the power
cord into a grounded wall
socket.
2-17
Page 34

TallyGenicom Intelliprint 8008N Color Laser Printer User Guide
2.8 Ensuring reliable Printer Operation
Ensure that the printer is at room temperature. This is particular
important in winter. Operating the printer when it is colder than the
room temperature can cause paper jam or bad images.
2.8.1 Adding Paper
Before turning on the printer, add paper into the paper tray as shown below.
Paper tray
End plate
Side plate
1. Pull out the paper tray from the
printer.
2. On the left hand side plate press
together the green plastic parts
which have the spring between
them. Slide to adjust the position of
the side plates so they fit the width
of the paper. There is a green arrow
on the left side plate which can be
lined with various standard paper
sizes markers shown on the metal
work in the base of the tray.
3. On the end plate press together the
green plastic parts which have
arrows on. Slide to adjust the position of the end plate so it fits the
length of the paper. There is a
green arrow on the end plate which
can be lined with various paper
sizes markers shown in the base of
the tray.
2-18
Page 35

Chapter 2 Installation
Height limit by
media type
4. Fan the paper and add it into the
paper tray. Pay attention to the following:
X Check that the four corners of the
paper stack is at the same level in
the paper tray.
X Supply an appropriate amount of
paper so that it does not exceed its
Paper
height limit.
5. Re-insert the paper tray into the
printer (see Chapter 3.2.1, “Print
Media Guidelines”).
2-19
Page 36

TallyGenicom Intelliprint 8008N Color Laser Printer User Guide
2.8.2 Turning On the Printer
WARNING! Should the printer generate abnormal heat, smoke, strange noise or
offensive odors, immediately turn off the printer, and disconnect the power plug from
the wall socket. Continuing to use the printer may cause fire or electric shock.
1. Press the printer mains power to
turn the printer power on.
Main power
switch
Loading
Loading
**************************************
2. If the printer power does not turn
on, see Chapter 6.6, “Actions on
Abnormal Printer Operation”.
3. When you turn on the printer,
ensure that the LCD in the control
panel displays the information as
shown on the left.
If a printer error is detected:
If a printer error is detected, the
ERROR lamp in the control panel stays
on, and an error message is shown. For
details of error messages and error
messages and actions to be taken see
Chapter 6.1, “Control Panel LCD Messages”.
2-20
**************************************
**************************************
Initializing
Ready
Page 37

2.8.3 Printing a Demo Page
Print a Demo Page according to the procedure below.
Chapter 2 Installation
1. Ensure that the control panel is dis-
playing Ready.
2. Press MENU key.
3. Press PREVIOUS until the display
shows Functions.
4. Press SELECT key.
5. Press NEXT until the display
shows Print Demo.
6. Press SELECT key.
7. The Demo Page will print and the
printer returns to Ready Mode.
Ready
Menu
Job Library
Menu
Functions
Functions
Print Demo
Printing
Demo Page
Ready
If a printing error occurs
If you find an error in the printed test pattern, see Chapter 6.3, “Actions on
Print Quality Problems”.
2-21
Page 38

TallyGenicom Intelliprint 8008N Color Laser Printer User Guide
2.8.4 Turning Off the Printer
Main power
switch
1. Check that the printer is not print-
ing The panel should only be showing either ready or not ready.
2. Turn off the mains power switch.
2-22
Page 39

2.9 Interface Cable
2.9.1 Connecting the Interface Cable
Turn off the printer, and connect an appropriate interface cable to the correct
connector on the rear of the printer.
Parallel interface connector
This connector is used for parallel connection of the printer.
LAN interface connector
This connector is used for 10BASE-T or
100BASE-TX LAN connection of
the printer.
USB interface connector
This connector is used for USB cable
connection of the printer.
Chapter 2 Installation
Turning the printer on
The top line of the LCD display reads:
Loading
followed by asterisks progressing across the bottom line:
**************
Following an LED self test, asterisks progress across both lines of the display
**************
**************
and the Power On Self Test ends with the top line of the display reading:
Ready
Note: While turned on, the printer will go into the standby state if it remains idle
for a period of time. If an error message appears, see “Functions of LCD and
Lamps” on page 4-2.
2-23
Page 40

TallyGenicom Intelliprint 8008N Color Laser Printer User Guide
2.10 Selecting a Display Language
The default language for all LCD display messages and the Configuration
Summary and Test Page is English. You can change the language to Espanol,
Italiano, Deutsch or Francais. Additional entries included are Portugal, Dutch,
Danish, Norwegian, Swedish, Greek, Polish, Russian, Turkish and Brazilian.
Note: The language that you select will be reflected on all LCD display messages,
and also the content of the Configuration Summary and Test Page.
To change the default language from English to one of the other available
selections:
1. From the Ready status, press MENU, the control panel display will read:
Menu
Paper
2. Press PREVIOUS or NEXT until the display reads:
Menu
System Menu
3. Press SELECT, the display will read:
System Menu
Factory Defaults
4. Press NEXT or PREVIOUS until the display reads:
System Menu
Display Language
5. Press SELECT, the display will read:
System Menu
English
6. Press NEXT or PREVIOUS until the desired default language appears on
the bottom line of the display:
7. Press SELECT. You have now changed the default language.
2-24
Page 41

2.11 Adjusting Color Alignment
This allows adjustment of the horizontal (K-H) and vertical (K-V) images on an
A4 or letter based page. The horizontal adjustment is for the default source tray
currently selected in the paper menu. It allows centering of printed images for
this tray to be set.
There will also be an extra entry when an optional duplex unit is fitted and duplex is enabled in the paper menu. This entry allows the image on both sides of
the duplexed paper to also be centered. The alignment procedure can also be
run using test pages generated from your application and the printer drivers.
These pages must have equal top, bottom left and right margins set and have
ideally a box equally spaced from these margins as a reference.
2.11.1 Printing the Alignment Page
1. Press MENU.
Chapter 2 Installation
2. Press NEXT until the display shows COLOR MENU.
3. Press SELECT.
4. Press NEXT until the display shows ALIGNMENT MENU.
5. Press SELECT - the display shows ALIGNMENT PAGE.
6. Press SELECT - the Alignment Page prints.
2-25
Page 42

TallyGenicom Intelliprint 8008N Color Laser Printer User Guide
2.11.2 Perform the Adjustments
Adjustments
The K (black) plane must be aligned to the edge of the page.
1. Select the desired tray (press MENU >> PAPER MENU >> DEFAULT
SOURCE).
2. Select the resolution to 600 DPI (press MENU >> QUALITY MENU >>
RESOLUTION = 600).
3. Print the Alignment Page (press MENU >> COLOR MENU >>
ALIGNMENT >> ALIGNMENT PAGE).
Set the K-V Adjustment
1. Press MENU >> COLOR MENU >> ALIGNMENT >> K-V Adj.
2. The vertical distance shown as K-V Adjust should be equal at the top and
bottom of the page.
3. The adjustment for K-V is 1 to 15. Decreasing the number will move the
grid image towards the top of the page.
4. The K-V adjustment applies to all paper sources.
Set the K-H Adjustment
1. Press MENU >> COLOR MENU >> ALIGNMENT >> K-H Adj.
TRAY X where X is the number of the current default tray.
2. The horizontal distance shown as K-H Adjust should be equal at the left
and right sides of the page.
3. The adjustment for K-H is 1 to 15. Decreasing the number will move the
grid image towards the left edge of the page.
4. The K-H adjustment should be performed for each paper source.
Print the Alignment Page as needed to verify the adjustment.
2-26
Page 43

Chapter 2 Installation
2.12 Installing Printer Drivers and Locating User Documentation
2.12.1 Installing Printer Drivers and other Software for Windows
Follow the installation wizards on the CD. If using a plug and play port follow
the Local port Installation Instructions on the CD.
2.12.2 Installing Printer Drivers for MacOS
To install printer drivers for MacOS, refer to the following folder on the
Electronic Library CD-ROM:
z Printer Driver folder
The Printer Driver folder contains the AdobePS driver installation kit, which
can be used on OS9.x systems. There is also a PPD file for the printer which
should be used with both os9.X and osX.X. These items are available in
English, German, French, Italian, and Spanish.
To install on MAC OSX copy the TG8008.ppd to the appropriate language
directory. For english this is at library/printers/ppds/contents/resources/
en.lproj directory. Ensure the printer is powered on and connected to the
Mac.
Restart the Mac, find the printer using the Printer Setup utility, select the
TallyGenicom folder and Intelliprint 8008 for the print using section. For
Mac os9.x copy the TG8008.ppd to
systemfolder\extensions\printerdescriptions directory.
2.12.3 Locating User Documentation
To locate other documentation that will assist you in operating and maintaining
your printer, go to the DOCUMENTATION folder on the Electronic Library
CD-ROM. You can open and read these manuals directly from the CD-ROM,
save the manuals to the hard drive of your computer, or print the manuals. The
Documentation folder includes the following documents in Adobe PDF
format:
z User Guide
z Printer Quick Start Guide (English, French, German, Italian, Spanish)
z Other installation and user guides for printer options
2-27
Page 44

TallyGenicom Intelliprint 8008N Color Laser Printer User Guide
2.13 Printing a Configuration Summary
Your printer can print a configuration summary that lists the currently selected
status of menu options, media selections in trays, options installed and other
relevant information about your printer. To print a Configuration Summary,
follow these steps:
1. From the Ready status, press MENU, the control panel display will read:
Menu
Job Library
2. Press PREVIOUS or NEXT until the display reads:
Menu
Functions
3. Press SELECT, the display will read:
Functions
Reset Printer
4. Press NEXT or PREVIOUS until the display reads:
Functions
Print Summary
5. Press SELECT. A two page Configuration Summary will print. An example
of a Configuration Summary appears on the following page.
Note: Depending upon the options installed and menu settings, your Configuration
Summary may vary.
2-28
Page 45

Chapter 2 Installation
2-29
Page 46

TallyGenicom Intelliprint 8008N Color Laser Printer User Guide
2-30
Page 47

Chapter 2 Installation
2.14 Printing PCL and PostScript Font Lists
Your printer has the capability of printing lists of all installed PCL or PostScript
fonts. To print a Font List, follow these steps:
1. From the Ready status, press MENU, the control panel display will read:
Menu
Job Library
2. Press PREVIOUS or NEXT until the display reads:
Menu
Functions
3. Press SELECT, the display will read:
Functions
Reset Printer
4. Press NEXT or PREVIOUS until the display reads:
Functions
Print Fonts
5. Press SELECT, the display will read:
Print Fonts
PCL Fonts
Note: You may toggle between PCL Fonts and Postscript Fonts using the
PREVIOUS or NEXT push-buttons.
6. Press SELECT. A multi page resident Font List will print.
2-31
Page 48

TallyGenicom Intelliprint 8008N Color Laser Printer User Guide
2.15 Notes on Moving the Printer
CAUTION! Have two or more persons carry the printer. Pay attention not to hurt
your back or drop the printer; otherwise, you may suffer from injury. The printer itself
weighs about 29 kg/63.9 lb.
z When carrying the printer:
– Remove the Paper Feeder option and the Duplex Unit option, if any, from
the printer before carrying it.
– When carrying the printer, keep it horizontal. If you tilt the printer, con-
sumables may spill in the printer, causing trouble.
– Subjecting the printer to shocks or strong vibration may cause it not to
work. When carrying the printer on a trolley, push it slowly and carefully.
z When transporting the printer:
When transporting the printer, the consumables need to be removed and the
inside of the printer need to be cleaned for repacking. These actions must be
conducted by a qualified service engineer on a chargeable basis.
2-32
Page 49

Chapter 3
Basic Printer
Operations
3.1 Turning On and Off 3-2
3.2 Loading Paper Trays with Print Media 3-4
3-1
Page 50

TallyGenicom Intelliprint 8008N Color Laser Printer User Guide
3.1 Turning On and Off
WARNING! If the printer generates abnormal heat, smoke, strange noises or
offensive odors, immediately turn off the printer, and disconnect the power plug from
the wall outlet. Continuing to use the printer may cause fire or electric shock.
3.1.1 Turning On the Printer
When you turn off the printer, wait 20 seconds or more before turning it
back on.
Main power
switch
Loading
Loading
************************************
1. Press the printer mains power to
turn the printer power on.
2. If the printer power does not turn
on, see Chapter 6.6, “Actions on
Abnormal Printer Operation”.
3. When you turn on the printer,
ensure that the LCD in the control
panel displays the information as
shown on the left.
If a printer error is detected:
If a printer error is detected, the
ERROR lamp in the control panel stays
on, and an error message is shown. For
details of error messages and error
messages and actions to be taken, see
Chapter 6.1, “Control Panel LCD Messages”.
3-2
************************************
************************************
Page 51

Initializing
Ready
3.1.2 Turning Off the Printer
Chapter 3 Basic Printer Operations
Main power
switch
1. Check that the printer is not print-
ing The panel should only be showing either ready or not ready.
2. Turn off the mains power switch.
3-3
Page 52

TallyGenicom Intelliprint 8008N Color Laser Printer User Guide
3.2 Loading Paper Trays with Print Media
3.2.1 Print Media Guidelines
Print Media Specifications
The tables below show the specifications for print media based on feeder and
print mode.
Inbuilt feeder in Simplex Print
Media type Media specifications Tray capacity Media size (W x L in mm)
Plain paper For laser printer.
Weight: 60 to 90 g/m
Thick paper For laser printer.
Label For laser printer.
OHP film
(transparency)
Envelope
1 Requires optional paper tray capable of loading up to legal size media.
2 Certain types of OHP films (transparencies) are not designed for laser printers. Use of such
transparencies sometimes causes severe damage to the printer, necessitating repair.
3 Max. length of custom media size is 297 mm for standard paper tray and 355.6 mm for op-
tional paper tray capable of loading up to legal size media.
Weight: 90 to 210 g/m
Thick 1 typically 90 to
105 g/m
Thick 2 typically 106 to
163 g/m
Thick 3 setting typically
164 to 210 g/m
55 lbs).
Capable of continuous
formfeed.
For laser printer.
4
Non-flap side only. About 15 sheets
2
. (24 to 28 lbs).
2
(29 to 43 lbs).
2
(43 to
2
About 250 sheets A4 (210 x 297)
2
.
About 120 sheets
2
.
About 80 sheets
About 50 sheets A4 (210 x 297)
(excluding H/H
condition)
A5(148.5 x 210)
B5 (ISO) (176 x 250)
B5 (JIS) (182 x 257)
Letter (215.9 x 279.4)
Half Letter (139.7 x 215.9)
Executive (184.2 x 266.7)
Legal
Custom (100 to 215.9 x 210 to
297 or 355.6
Letter (215.9 x 279.4)
Commercial #10
(104.8 x 241.3)
International DL (110 x 220)
1
(215.9 x 355.6)
3
)
3-4
4 When using envelopes only the central area of the envelope can be guaranteed to be crease
free after printing. This restriction is due to the envelope construction.
All media should be tested prior to purchase of the printer.
Page 53

Chapter 3 Basic Printer Operations
Optional feeder in Simplex Print
Media type Media specifications Tray capacity Media size (W x L in mm)
Plain paper For laser printer.
Weight: 60 to 90 g/m
(16 to 24 lbs).
Thick paper For laser printer.
Weight: 90 to 105 g/m
(24 to 28 lbs).
All media should be tested prior to purchase of the printer.
About 500 sheets A4 (210 x 297)
2
2
B5 (ISO) (176 x 250)
B5 (JIS) (182 x 257)
Letter (215.9 x 279.4)
Executive (184.2 x 266.7)
Duplex Print
Media type Media specifications Media size (W x L in mm)
Plain paper For laser printer.
Weig ht : 60 to 90 g/m2 (16
to 24 lbs)
.
Thick paper For laser printer.
Weig ht : 90 to 105 g/m2
(24 to 28 lbs)
1 Applicable only to optional paper tray capable of loading up to legal size media in Tray 1.
2 Custom paper size is only supported using the in built feeder, it is not supported in the op-
tional feeder.
All media should be tested prior to purchase of the printer.
.
A4 (210 x 297)
B5 (ISO) (176 x 250)
B5 (JIS) (182 x 257)
Letter (215.9 x 279.4)
Executive (184.2 x 266.7)
1
(215.9 x 355.6)
Legal
Custom (100 to 215.9 x 210 to
2
297)
Not Usable Print Media
Print Media which is not usable in the Intelliprint 8008N includes:
z Thick or thin sheet out of the specifications
z Media other than those for the laser printer
z Thermally sensitive paper or films, e.g., thin OHP films (transparencies)
z Processed media, e.g., perforated media or media with holes for a binder
z Media with staples, paperclip or tape attached to it
z Preprinted forms, printed media, and media printed by a copier (Using
media previously output from a printer or copier may cause jams or other
trouble.)
z Media that is creased, wrinkled, warped, blotched, or torn
z Moist or wet media
z Media left out for a long period after it has been taken out of their package
z Media with adhesive such as paste
3-5
Page 54

TallyGenicom Intelliprint 8008N Color Laser Printer User Guide
z Label media where there is no label material being used to fill in between the
labels.
z Slippery media
z Rough media, e.g., low-grade paper and traditional Japanese paper
z Poorly cut media
z Carbon and coated media
z Media covered with a lot of powder or containing a high proportion of cal-
cium carbonate
z Previously used labels
Notes on print media
z Do not use media for ink jet printer.
z Difference between the grain (orientation of paper fiber) and the printer’s
paper feed direction may cause frequent jams. It is advisable to use media
having portrait grain i.e. grain which is parallel to the paper feed direction.
z Some types of media may result in frequent jams or poor printing quality.
When determining the media to use, fully check the printing quality and
make sure jams do not occur.
z Some types of media may shorten the lifespan of the printer’s components
and consumables. In particular, printing a large amount of recycled paper,
thick paper, envelopes, or labels shortens the lifespan.
3-6
Page 55

Chapter 3 Basic Printer Operations
3.2.2 Selection of Feeder and Duplexer
If you have installed an optional duplexer or feeder you will have to add these
options within your printer driver. .
Select the options on the left side of the screen and click the Add button to
add this as an installed option within the printer driver.
3-7
Page 56

TallyGenicom Intelliprint 8008N Color Laser Printer User Guide
Select one of the Paper Source settings on the printer driver according to your
required input tray. An example is shown below. You may also specify the input
tray from within some application programmes.
1. Open the printer
properties and
click the Page
Setup tab.
2. Specify the cor-
rect paper size
3. Select Paper
Source according
to your requirement.
X Auto Select:
Automatically
selects the input
tray containing
media of the
specified size.
X Tray 1 or tray 2:
Selects the specified input tray.
4. Click the
OK but-
ton to confirm
your settings.
Notes on paper feeder
z A5, Half Letter, Commercial #10, International DL, or Custom size media
are only fed from cassette 1. Legal size media can only be fed from tray 1
using the USA only available optional input tray for sizes up to Legal media
sizes.
z If the Media Type setting on the printer driver is Label, Transparency,
Thick3, Thick2 or Envelope, the print media can only be fed from tray 1.
3-8
Page 57

3.2.3 Duplex Printing
To print with the Duplex Unit option on both sides of the sheet, it is necessary
to specify the duplex print on the printer driver according to the procedure
below.
See the printer driver help of Windows or Macintosh installation chapter for
further information.
Chapter 3 Basic Printer Operations
1. Open the
printer properties and click
the Page Setup
tab.
2. Check the
Duplex Print
checkbox.
3. Click the OK
button to validate your settings.
Notes on duplex printing
In any of the following cases, the printer performs simplex print regardless of
the above setting.
z When the Media Type setting is Label, Transparency, Thick2, Thick3, Special
or Envelope.
z When the Paper Size setting is A5, Half Letter, Commercial #10, Interna-
tional DL, or Custom.
3-9
Page 58

Page 59

Chapter 4
Control Panel Functions
4.1 Functions of LCD and Lamps 4-2
4.2 Functions of Control Panel Keys 4-3
4.3 Navigating the Control Panel Menus 4-4
4.4 Menu Structure 4-6
4.5 Status Menu 4-7
4.6 Job Library 4-8
4.7 Job Accounting 4-10
4.8 Paper Menu 4-11
4.9 Interface Menu 4-14
4.10 PS Menu 4-17
4.11 PCL Menu 4-18
4.12 System Menu 4-22
4.13 Quality Menu 4-24
4.14 Color Menu 4-25
4.15 Date/Time Menu (option) 4-27
4.16 Functions Menu 4-29
4.17 FLASH Menu 4-30
4.18 DISK Menu 4-31
4-1
Page 60

TallyGenicom Intelliprint 8008N Color Laser Printer User Guide
4.1 Functions of LCD and Lamps
This chapter explains the control panel and its functions, and also
demonstrates how to navigate through the control panel menus and submenus
that allow you to view and change the printer settings. Web access to the
printer is also discussed.
4.1.1 LCD Display and LED Indicators
The LCD display shows status and error messages that inform you of the
current status of the printer, and also displays menus, submenus and printer
settings when you are in the menu system. The display contains two lines of
text, each with a maximum of sixteen characters.
The LED indicators also indicate printer status. The three indicators can each
be on, off, or blinking, indicating different phases of printer operation. The
table below explains the LED indicators.
LCD (16 characters x 2 rows):
Displays messages relating to the
state of the printer.
ERROR lamp (Red):
Lit when there is an error that
requires user intervention, such as a
paper jam, a service call required,
etc.
START/STOP lamp (Green):
Lit when printer is ready to receive
and print jobs and turned off when
printer is not. If no error condition
exists pressing the “Start/Stop” key
which the led is part of toggles the
status.
Error
4-2
Page 61

Chapter 4 Control Panel Functions
4.2 Functions of Control Panel Keys
The control panel buttons allow you to access and navigate menus, and also assist you in recovering from printer errors. The table below explains the functions of the eight pushbuttons.
START/STOP key
Push this button to start or
stop the printer, or to
exit the menu system.
MENU key
Push this button to enter
the menu system..
NEXT key
Push this button to move to the next
menu, submenu, or setting within
the same level of menu structure..
Error
SELECT key
Push this button to select the menu
or submenu that is shown on the sec-
ond line of the display or to choose
and save the setting shown on the
second line of the display.
PREVIOUS key
Push this button to return to the previ-
ous menu, submenu, or option within
the same level of menu structure.
Push this button to move up one level
in the menu structure to the menu
shown on the first line of the display.
RETURN key
STATUS key
Push this button to
view the current status
of the paper trays..
CANCEL key
Push this button to
cancel an action.
4-3
Page 62

TallyGenicom Intelliprint 8008N Color Laser Printer User Guide
4.3 Navigating the Control Panel Menus
When you press the MENU button on the control panel, you enter the
printer’s menu system. At that point, the first line of the display contains the
text “Menu”, indicating that you are in the menu system. The second line of
the display lists the active menu, which you can change by pressing the NEXT
or PREVIOUS button.
Menu
Job Library
If you press the NEXT button repeatedly, the second line of the display cycles
through the main menus in the following order:
z Job Library
z Job Accounting
z E-Forms
z Paper Menu
z Interface Menu
z PS Menu
z PCL Menu
z System Menu
z Quality Menu
z Color Menu
z Date/Time Menu (option)
z Functions
z Flash Menu
Note: Additional menus and submenus may appear in the printer menu system
when other options are installed.
4-4
Page 63

Chapter 4 Control Panel Functions
The following figure shows the sequence of pushbuttons and display messages
that would allow you to change the number of copies printed. This example
illustrates the basic relationship between menus and submenus and
demonstrates how the NEXT, PREVIOUS, SELECT and RETURN
buttons help you to navigate through the menus.
Menu
Menu
Paper Menu
Copies
2
Copies
3
Menu
Interface Menu
Copies
1
Paper Menu
Copies
Menu
Paper Menu
Paper Menu
Copies
Menu
Paper Menu
1. Press the MENU button on the control panel.
2. Press the NEXT button until the text “Paper Menu” is shown on the sec-
ond line of the display.
3. Press the SELECT button to enter the paper menu.
4. Press the NEXT button until the text “Copies” is shown on the second
line of the display.
5. Press the SELECT button to enter the copies submenu.
6. Press the NEXT or PREVIOUS button to increase or decrease the num-
ber of copies printed.
7. Press the SELECT button to save this setting.
8. Press the START/STOP button to exit the menu system.
4-5
Page 64

TallyGenicom Intelliprint 8008N Color Laser Printer User Guide
4.4 Menu Structure
The following figure shows the structure of the control panel main menus and
submenus.
Job Library
Print & Delete
Print
Delete
PS Menu
Print PS Errors
Job Accounting
Enabled
Print Info
Reset Info
PCL Menu
Orientation
Font Source
Font Number
Pitch
Symbol Set
Macro Filter
Lines Per Page
CR Mode
LF Mode
FF Mode
Print Area
Parameter Values
Paper Source
Paper Size
Paper Menu
Copies
Duplex (option)
Duplex Bind
Default Source
Media Size/Type
Tray 1
Tray 2 (optional)
Tray Lin king
Blank Pages
Auto Resize
Separator Page
Custom Size Unit
System Menu
Factory Defaults
Display Language
Power Saver
Wait Timeout
Job Timeout
Jam Recovery
Hex Print
Page Compression
Intellifilter
Reset Belt Life
Reset Fuser Life
Reset Toner K Life
Reset Toner C Life
Reset Toner M Life
Reset Toner Y Life
Interface Menu
Port
Parallel
Network Card 1
USB
Parallel Setup
Interpreter
Format
Mode
Delay Out Close
Binary PS
Network 1Setup
Interpreter
Format
Network Address
IP Address
Subnet Mask
Default Gateway
LPD Banner
DHCP
Delay Out Close
mDNS
Local Link
Multi-Session
AppleTalk
Binary PS
Factory Defaults
Connection Speed
Spooling
USB Setup
Interpreter
Format
Delay Out Close
Binary PS
Quality Menu
Resolution
Toner Saver
Color Menu
Rendering Intent
Color Matching
Alignment
Date/Time Menu
(option)
Month
Day
Year
Hour
Minute
Second
Offset from GMT
Hours
Minutes
Functions
Reset Printer
Print Summary
Print Demo
Print Fonts
Flash
Print
Delete
Format Flash
Flash Summary
Note: Additional menus and submenus may appear in the printer menu system when other options are
installed.
4-6
Page 65

4.5 Status Menu
In addition to the main menus listed above, the printer also provides a status
menu that allows you to view the current printer settings. Push the STATUS
button to enter the Status Menu.
Status Menu
Chapter 4 Control Panel Functions
Tray 1
Media Size
Media Type
Level
Tray 2 (Optional)
Media Size
Media Type
Level
Face Down Tray
Cyan Toner
Magenta Toner
Yellow Toner
Black Toner
4-7
Page 66

TallyGenicom Intelliprint 8008N Color Laser Printer User Guide
4.6 Job Library
1. Press the MENU button on the control panel.
2. Press the NEXT button until the text “Job Library” is shown on the sec-
ond line of the display.
3. Press the SELECT button to enter the Job Library menu.
4. Press the NEXT button to move through the submenus: Print or Delete.
5. Press the SELECT button to enter a submenu.
6. Use the procedures in the following table to access and change the system
settings.
Submenu Default Setting Available Settings Procedure for Changing Setting
Print Print
User Folder 1
Print Print
Job1
Job Name
PIN
Print Job Name
Copies – Select
1– 99
Print Job Name
Copies
This step is necessary if
the job is a PRIVATE job.
1. Press NEXT or PREVIOUS to scroll
through the User Folder Names.
2. Press SELECT to choose the
desired User Folder.
1. Press NEXT or PREVIOUS to scroll
through the Print Job Names.
2. Press SELECT to choose the
desired Print Job.
1. Press NEXT or PREVIOUS to
increase or decrease each digit of
the four-digit number.
2. Press SELECT to set one digit and
move to the next digit.
3. Press SELECT after changing the
last digit to save this setting.
1. Press NEXT or PREVIOUS to
increase or decrease each digit of
the two-digit number.
2. Press SELECT set one digit and
move to the next digit.
3. Press SELECT after changing the
last digit to save this setting.
1. Press SELECT to print the job.
Print Printing
Playback
Delete Delete
(To delete a
saved job)
Delete
User Folder 1
4-8
1. The printer will display PRINTING on
Line 1 and PLAYBACK on Line 2 of
the display while printing the job.
1. Press NEXT or PREVIOUS to scroll
through Print or Delete options.
2. Press SELECT to choose Delete.
1. Press NEXT or PREVIOUS to scroll
through the User Folder Names.
2. Press SELECT to choose the
desired User Folder.
Page 67

Chapter 4 Control Panel Functions
Submenu Default Setting Available Settings Procedure for Changing Setting
Delete
Job1
Job Name
PIN
This step is necessary if
the job is a PRIVATE job.
4.6.1 Job Library Errors
When a Job Library error occurs, the following message will be displayed:
JOBLIB Error XX
Press Start
This is a continuable-fault, which means the START key must be pressed to
allow operations to continue. If the current job is aborted as a result of the
error, the message"Canceling Job" may be displayed after START is pressed.
"XX" in the error display above is an error code. The error codes for this
message are:
1. Press NEXT or PREVIOUS to scroll
through the Print Job Names.
2. Press SELECT to choose the
desired Print Job to Delete.
1. Press NEXT or PREVIOUS to
increase or decrease each digit of
the four-digit number.
2. Press SELECT to set one digit and
move to the next digit.
3. Press SELECT after changing the
last digit to save this setting.
z 01 – Data stream was missing a Job Name specification. (Job will be
aborted.)
z 02 – Data stream was missing a User Name specification. (Job will be
aborted.)
z 03 – Data stream was missing a PIN specification. (Job will be aborted.)
z 04 – Attempted to overwrite a PRIVATE job, but PIN did not match. (Job
will be aborted.)
z 05 – Insufficient storage. (Job will be aborted only if it is a PRIVATE job.)
4-9
Page 68

TallyGenicom Intelliprint 8008N Color Laser Printer User Guide
4.7 Job Accounting
The Job Accounting Menu provides access to functions and settings related to
this feature. Use the following procedure to enter the Job Accounting Menu to
change the settings or access the functions:
1. Press the MENU button on the control panel.
2. Press the NEXT button until the text “Job Accounting” is shown on the
second line of the display.
3. Press the SELECT button to enter the Job Accounting menu.
4. Press the NEXT button to move through the submenus: Enabled, Print
Info, Reset Info.
5. Press the SELECT button to enter a submenu.
6. Use the procedures in the following table to access and change the system
settings.
SubMenu Default Settings Available Settings Procedure for Changing Setting
Enabled No Yes
No
Print Info 1. Press SELECT to begin printing the Job
Reset Info 1. Press SELECT to reset the Job Accounting
1. Press NEXT or PREVIOUS to scroll through
Yes or No options.
2. Press SELECT to choose Yes to turn on this
function.
Accounting Summary Report.
Information. This will delete all stored
information related to jobs received by the
printer.
4-10
Page 69

4.8 Paper Menu
Note: It is important in order to maximize the life and reliability of both the
printer and consumables that the media type setings in the menu matches the type of
media which is present in the tray. In addition some media types cannot be fed from
the optional tray 2 or be used with the optional duplex unit.
The Paper Menu provides access to the printer settings for various paper-handling functions. Use the following procedure to enter the paper menu:
1. Press the MENU button on the control panel.
2. Press the NEXT button until the text “Paper Menu” is shown on the sec-
ond line of the display.
3. Press the SELECT button to enter the Paper menu.
4. Press the NEXT button to move through the submenus.
5. Use the procedures in the following table to access and change the printer
paper-handling settings:
Chapter 4 Control Panel Functions
Submenus Default Setting Available Settings Procedure for Changing Setting
Copies
This submenu allows you to
change the number of
copies printed.
Duplex
This submenu allows you to
turn the duplex on or off.
Duplex Bind
This submenu allows you to
choose between LEF (Long
Edge Feed) and SEF (Short
Edge Feed).
Default Source
This submenu allows you to
choose a default paper
source from a list of all
installed sources.
1 Numbers 1 – 999 1. Press NEXT or PREVIOUS to
increase or decrease the
number of copies printed.
2. Press SELECT to save this
setting.
Off On/Off 1. Press NEXT or PREVIOUS to
toggle between ON and OFF.
2. Press SELECT to save this
setting.
Long Edge feed Long Edge/Short Edge 1. Press NEXT or PREVIOUS to
toggle between Long Edge
and Short Edge.
2. Press SELECT to save this
setting.
Tray 1 Tray 1
Tray 2 (optional)
1. Press NEXT or PREVIOUS to
scroll through the list of
available sources of paper.
2. Press SELECT to set a source
as the default.
4-11
Page 70

TallyGenicom Intelliprint 8008N Color Laser Printer User Guide
Submenus Default
Setting
Media Size/
Type
This submenu
allows you to
set the media
type, media
size, and set
auto-sensing
on or off for all
the trays.
Tray 1
Ty p e:
Plain
Tray 2
(optional)
Ty p e:
Plain
Available Settings Procedure for
Changing
Setting
Media Type
Thick 1,
Plain,
Tr an s parency,
Prepunched,
Letterhead,
Colored,
Pre-printed,
Bond,
Label,
Thick 2,
Thick 3,
Card stock,
Postscard,
Envelope
Thick 2,
Thick 3,
transparency, label
and
envelopes
cannot be
fed from
tray 2 or
duplexed.
Media Size
Tray 1
A4 , letter,
Custom
(simplex
width 100 to
215.9 mm
length 210 to
297 mm;
duplex width
176 to 215.9
mm length
250 to 297
mm), B5,
A5,
Statement,
Executive,
C5 Envelope
DL
Envelope,
Com10
Envelope,
Monarch
Envelope,
Legal,
Folio
Tray 2
Legal, Folio,
Letter, A4,
Executive,
B5
Auto-Sense
Off,
Cassette
Ty p e A ,
Cassette
Ty p e B ,
Cassette
Ty p e C
This feature
allows the
tray to
automaticall
y detect the
size of the
paper in the
tray. The
only sizes
that are
automaticall
y detected
are:
Letter, A4,
Legal
When set
type A the
following
additional
sizes can be
detected
commercial
# 10 and
ISO B5.
Ty p e B
detects DL
and ISO B5.
Ty p e C
should not
be selected
in this printer
as it requires
additional
paper
supports.
Custom size
Valid
settings for
use with tray
1 only are
(simplex
width 100 to
215.9 mm
length 210 to
297 mm
duplex width
176 to 215.9
mm length
250 to 297
mm)
Use Custom
Paper
Select either
on or off.
Auto-Sense
must be set
to off to see
and use this
setting.
1. Press NEXT
or
PREVIOUS to
scroll through
the list of
available
sources of
paper.
2. Press
SELECT to
choose a tray.
3. Press NEXT
or
PREVIOUS to
toggle
between
MEDIA
TYPE,
MEDIA SIZE
and AUTOSENSE.
4. Press
SELECT to
choose either.
5. Press NEXT
or
PREVIOUS to
scroll through
the available
sizes or
types.
6. Press
SELECT to
set a size or
type.
4-12
Page 71

Chapter 4 Control Panel Functions
Submenus Default Setting Available Settings Procedure for Changing
Setting
Tray Linking
This submenu allows you to
turn the tray linking function
on or off.
Blank Pages
This submenu allows you to
choose to either print or not
print blank pages of a
document.
Auto Resize
This menu will scale the
output of a Postscript job to
the size selected. It does not
scale a PCL job.
Separator Page
Prints a blank page between
print jobs.
Custom Size Unit
This menu is used to set the
unit of measurement for the
Custom Paper Size feature.
On On
Off
Print Print
Do Not Print
Off On
Off
Off Tray 1, Tray 2 (optional)
Off
Inches Inches
Millimitre
1. Press NEXT or PREVIOUS to
toggle between ON and OFF.
2. Press SELECT to save this
setting.
1. Press NEXT or PREVIOUS to
toggle between PRINT and
DO NOT PRINT.
2. Press SELECT to save this
setting.
1. Press NEXT or PREVIOUS to
toggle between ON and OFF.
2. Press SELECT to save this
setting.
1. Press NEXT or PREVIOUS to
toggle between ON and OFF.
2. Press SELECT to save this
setting.
1. Press NEXT or PREVIOUS to
toggle between INCHES and
MILLI-MITRE.
2. Press SELECT to save this
setting.
4-13
Page 72

TallyGenicom Intelliprint 8008N Color Laser Printer User Guide
4.9 Interface Menu
The Interface Menu provides access to the printer interface settings. Use the
following procedure to enter the interface menu:
1. Press the MENU button on the control panel.
2. Press the NEXT button until the text “Interface Menu” is shown on the
second line of the display.
3. Press the SELECT button to enter the Interface menu.
4. Press the NEXT button to move through the submenus: Port, Parallel
Setup, Network 1 Setup, Spooling and USB Setup.
5. Use the procedures in the following table to access and change the printer
interface settings:
Submenus Default Setting Available Settings Procedure for Changing Setting
Port
This submenu allows
you to enable the type
of interface.
Parallel Setup
This submenu allows
you to set up the
parallel interface.
Parallel:
On
Network Card 1:
On
USB:
On
Interpreter:
Auto Switch
Format:
Raw
Mode:
Bidirectional
Delay Out Close:
Off
Binary PS:
Off
Parallel:
On, Off
Network Card 1:
On, Off
USB:
On, Off
Interpreter:
Auto Switch
PCL
PostScript 3
Format:
Raw
Normal
Binary
Mode:
Bidirectional
Standard
Delay Out Close:
Off
On
Binary PS:
Off
On
1. Press NEXT or PREVIOUS to toggle
between PARALLEL, NETWORK
CARD 1 and USB.
2. Press SELECT to save this setting.
1. Press NEXT or PREVIOUS to scroll
through the INTERPRETER, FORMAT,
MODE, DELAY OUT CLOSE and
BINARY PS submenus.
2. Press SELECT to choose a submenu.
3. Press NEXT or PREVIOUS to scroll
through the settings.
4. Press SELECT to choose and save a
setting.
4-14
Page 73

Chapter 4 Control Panel Functions
Submenus Default Setting Available Settings Procedure for Changing Setting
Network 1 Setup
This submenu allows
you to set up the
Network interface.
Interpreter:
Auto Switch
Format:
Raw
Network Address:
cannot be changed
IP Address:
(user-specified)
Subnet Mask:
(user-specified)
Default Gateway:
(user-specified)
LPD Banner:
On
DHCP:
Off
Delay Out Close:
Off
mDNS:
On
Local Link:
automatically set by
host, cannot be
changed
Mulit-Session:
On
AppleTalk:
On
Binary PS:
Off
Factory Defaults:
On
Connection Speed:
Auto-Sense
Interpreter:
Auto Switch
PCL
PostScript 3
Format:
Raw
Normal
Binary
Network Address:
IP Address:
(user-specified)
Subnet Mask:
(user-specified)
Default Gateway:
(user-specified)
LPD Banner:
On, Off
DHCP:
Off, On
Delay Out Close:
Off, On
mDNS:
On, Off
Local Link:
Mulit-Session:
On, Off
AppleTalk:
On, Off
Binary PS:
Off, On
Factory Defaults:
On, Off
Connection Speed:
Auto-Sense, 10Mbit
Full, 10Mbit Half,
100Mbit Full,
100Mbit Half
1. Press NEXT or PREVIOUS to move
among the submenus.
2. Press SELECT to choose a submenu.
3. Press NEXT or PREVIOUS to scroll
through the settings.
4. Press SELECT to save this setting.
4-15
Page 74

TallyGenicom Intelliprint 8008N Color Laser Printer User Guide
Submenus Default Setting Available Settings Procedure for Changing Setting
Spooling
The spool ing feature
allows print jobs to be
automatically spooled
to the Hard Disk or
Flash memory. This is
a diagnostic tool.
USB Setup
This submenu allows
you to set up the USB
interface.
Start Spooling:
Spool and Print
Spool Only
Stop Spooling:
Disables spooling
Playback:
Used to read a file
from the user Flash
Delete:
Use to delete a
spool file from the
User Flash.
Destination:
User Flash
Disk
Interpreter:
Auto Switch
Format:
Raw
Delay Out Close:
Off
Binary PS:
Off
Interpreter:
Auto Switch
PCL
PostScript 3
Format:
Raw
Normal
Binard
Delay Out Close:
Off
On
Binary PS:
Off
On
1. Press NEXT or PREVIOUS to scroll
through the SPOOLING submenus.
2. Press SELECT to choose a submenu.
3. Press NEXT or PREVIOUS to scroll
through the settings.
4. Press SELECT to save this setting.
1. Press NEXT or PREVIOUS to scroll
through the INTERPRETER, FORMAT,
DELAY OUT CLOSE and BINARY PS
submenus.
2. Press SELECT to choose a submenu.
3. Press NEXT or PREVIOUS to scroll
through the settings.
4. Press SELECT to save this setting.
4-16
Page 75

Chapter 4 Control Panel Functions
4.10 PS Menu
The PS Menu provides access to the PostScript settings. Use the following
procedure to enter the PS Menu:
1. Press the MENU button on the control panel.
2. Press the NEXT button until the text “PS Menu” is shown on the second
line of the display.
3. Press the SELECT button to enter the PS menu.
4. Press the NEXT button to move through the submenu: Print PS Errors.
5. Press the SELECT button to enter a submenu.
6. Use the procedures in the following table to access and change the Post-
Script settings:
Submenus Default Setting Available Settings Procedure for Changing Settings
Print PS Errors
This submenu allows
you to choose to either
print or not print PS
errors.
Off On
Off
1. Press NEXT or PREVIOUS to toggle
between ON (print) and OFF (do not
print).
2. Press SELECT to save this setting.
4-17
Page 76

TallyGenicom Intelliprint 8008N Color Laser Printer User Guide
4.11 PCL Menu
The PCL Menu provides access to the PCL settings. Use the following
procedure to enter the PCL menu:
1. Press the MENU button on the control panel.
2. Press the NEXT button until the text “PCL Menu” is shown on the sec-
ond line of the display.
3. Press the SELECT button to enter the PCL menu.
4. Press the NEXT button to move through the submenus: Orientation,
Font Source, Font Number, Pitch, Symbol Set, Macro Filter, Lines
Per Page, CR Mode, LF Mode, FF Mode and Print Area.
5. Press the SELECT button to enter a submenu.
6. Use the procedures in the following table to access and change the PCL
settings:
Submenus Default
Setting
Orientation
This submenu
allows you to
choose the
orientation of the
page.
Font Source
This submenu
allows you to
choose a font
source.
Font Number
This submenu
allows you to set
the font number.
Por trait Por trait
Internal Internal 1. Press NEXT or
12 Numbers 0 – XX 1. Press NEXT or
Available Settings Procedure for
Changing Setting
1. Press NEXT or
Landscape
PREVIOUS to
toggle between
PORTRAIT and
LANDSCAPE.
2. Press SELECT to
choose and save an
orientation.
PREVIOUS to scroll
through the
available font
sources.
2. Press SELECT to
choose and set a
source.
PREVIOUS to
increase or
decrease the font
number.
2. Press SELECT to
save this setting.
4-18
Page 77

Chapter 4 Control Panel Functions
Submenus Default
Setting
Pitch
10.00 0.08 – 100.00 1. Press NEXT or
This submenu
allows you to
change the pitch
of text.
This item
changes based
on whether a
fixed pitch or
scalable font is
selected.
Symbol Set
This submenu
10U:PC-8
CP437
allows you to
choose a symbol
set.
Available Settings Procedure for
Changing Setting
PREVIOUS to
increase or
decrease the pitch.
2. Press SELECT to
save this setting.
8U:Roman-8
0N:ISO-8859/1 Latin1
2N:ISO-8859/2 Latin2
5N:ISO-8859/5 Latin5
10U:PC-8
11U:PC-8 Danish/Norwegian
12U:PC-850
17U:PC-852
9T:Turkish PC-8
19U:Win 3.1 Latin 1
9E:Win 3.1 Latin 2
5T:Win 3.1 Latin 5
7J:Desk Top
10J:PS Text
13J:Ventura International
14J:Ventura US
6J:Microsoft Publishing
8M:Math-8
5M:PS Math
6M:Ventura Math
15U:Pi Font
1U:Legal
1E:ISO-4 United Kingdom
0U:ISO-6 US ASCII
0S:ISO-11 Swedish Names
0I:ISO-17 Spanish
2S:ISO-15 Italian
1G:ISO-21 German
0D:ISO-60 Norwegian v1
1F:ISO-69 French
9U:Win 3.0 Latin 1
19M:Symbol
579L:Wingdings
15Y:HP ZIP Code
2U:ISO-2 IRV
3S:ISO-10 Swedish/Finnish
0K:ISO-14 JIS ASCII
4S:ISO-16 Portuguese
0F:ISO-25 French
2K:ISO-57 Chinese
1D:ISO-61 Norwegian v2
5S:ISO-84 Portuguese
6S:ISO-85 Spanish
0G:HP German
1S:HP Spanish
90D:ISO Dutch
0E:Roman Extensions
91S:ISO Swedish 1
92S:ISO Swedish 2
93S:ISO Swedish 3
2001Z:IBM Code Page 437
2002Z:IBM Code Page 850
20U:IBM Code Page 860
23U:IBM Code Page 863
25U:IBM Code Page 865
8Q:PC Set 1
9Q:PC Extension US
2003Z:PC Extension D/N
2004Z:PC Set2 US
2005Z:PC Set2 D/N
12J:MC Text
2006Z:CWI Hungarian
16U:Turkish Code Page 857
2007Z:Kamenicky (MJK)
15H:Hebrew NC (862)
2015Z:Hebrew OC
24Q:Polska Mazovia
6N:ISO-8859/10 Latin6
2009Z:Hebrew Win 3.1
9R:Cyrillic Win 3.1
3R:PC-866 (Cyrillic 2)
9G:Greek Win 3.1
11G:PC-869 (Greek)
10R:PC-855 (Cyrillic)
12G:Greek 437
2010Z:Greek
437 Cyprus
2011Z:Greek 928
2012Z:Serbo Croat II
14R:Ukrainian
13R:Bulgarian
0O:OCR-A
1O:OCR-B
10L:PS ITC Zapf Dingbats
9J:PC1004
19L:Windows Baltic
26U:PC775
2013Z:Serbo Croat 1
9N:ISO-8859-15
2014Z:Greek 737
10V:Arabic 864
1. Press NEXT or
PREVIOUS to scroll
through the
available symbol
sets.
2. Press SELECT to
choose and set a
symbol set.
4-19
Page 78

TallyGenicom Intelliprint 8008N Color Laser Printer User Guide
Submenus Default
Setting
Macro Filter
This submenu
allows you to turn
the macro filter
on or off.
Lines Per Page
This submenu
allows you to
change the
number of lines
per page.
CR Mode
This submenu
allows you top
define the action
prompted by a
carriage return –
a carriage return
equals either a
carriage return
alone, or a
carriage return
and a line feed
together.
Off On
60 5 – 128 1. Press NEXT or
CR = CR CR = CR
Available Settings Procedure for
Changing Setting
1. Press NEXT or
Off
CR = CR/LF
PREVIOUS to
toggle between ON
and OFF.
2. Press SELECT to
save this setting.
PREVIOUS to
increase or
decrease the lines
per page.
2. Press SELECT to
save this setting.
1. Press NEXT or
PREVIOUS to
choose from
CR=CR or CR=CR/
LF.
2. Press SELECT to
save this setting.
LF Mode
This submenu
allows you to
define the action
prompted by a
line feed – a line
feed equals
either a line feed
alone or a
carriage return
and a line feed
together.
FF Mode
This submenu
allows you to
define the action
prompted by a
form feed—a
form feed equals
either a form feed
alone or a
carriage return
and a form feed
together.
LF = LF LF = LF
LF = CR/LF
FF = FF FF = FF
FF = CR/FF
1. Press NEXT or
PREVIOUS to
choose from LF=LF
or LF=CR/LF.
2. Press SELECT to
save this setting.
1. Press NEXT or
PREVIOUS to
choose from FF=FF
or
FF=CR/FF.
2. Press SELECT to
save this setting.
4-20
Page 79

Chapter 4 Control Panel Functions
Submenus Default
Setting
Print Area
This submenu
allows you to set
the print area.
Parameter
Val ue s
Normal Normal
Paper
Source:
Paper
Size:
Executive
Available Settings Procedure for
Changing Setting
1. Press NEXT or
Expanded
Paper Source:
Tray 1 (=0001)
Tray 2 (=0004 – optional
tray)
Auto-select (=0007)
Paper Size:
Letter (=0002)
Legal (=0003)
A6 (=0024)
A5 (=0025)
A4 (=0026)
B5 (=0045)
Com10 Envelope (=0081)
DL Envelope (=0090)
PREVIOUS to
toggle between the
NORMAL and
EXPANDED
settings.
2. Press SELECT to
save this setting.
1. Press NEXT or
PREVIOUS to
toggle between the
PAPER SOURCE
and PAPER SIZE
submenus.
2. Press SELECT to
choose a submenu.
3. Press NEXT or
PREVIOUS to scroll
through the
settings.
4. Press SELECT to
save this setting.
4-21
Page 80

TallyGenicom Intelliprint 8008N Color Laser Printer User Guide
4.12 System Menu
The system menu provides access to system settings. Use the following
procedure to enter the system menu:
1. Press the MENU button on the control panel.
2. Press the NEXT button until the text “System Menu” is shown on the
second line of the display.
3. Press the SELECT button to enter the System menu.
4. Press the NEXT button to move through the submenus: Factory
Defaults, Display Language, Power Saver, Wait Timeout, Job Timeout, Jam Recovery, Hex Print and Intellifilter.
5. Press the SELECT button to enter a submenu.
6. Use the procedures in the following table to access and change the system
settings:
Submenus Default Setting Available Settings Procedure for Changing
Setting
Factory Defaults
This submenu allows you to
reset the printer to U.S. or NonU.S. factory defaults.
Display Language
This submenu allows you to
change the language of the
display messages.
Power Saver 15 (Minutes) 1 – 999 1. Press NEXT or PREVIOUS to
U.S. U.S.
Non-U.S.
English
English
French (Francais)
German (Deutsch)
Italian (Italiano)
Spanish (Espanol)
Portuguese
Dutch
Danish
Norweigan
Swedish
Greek
Polish
Russian
Tu r ki s h
Brazilian portuguese
1. Press NEXT or PREVIOUS to
toggle between U.S. and NONU.S.
2. Press SELECT to choose and
set the factory defaults.
1. Press NEXT or PREVIOUS to
scroll through the available
languages.
2. Press SELECT to choose and
set the language.
increase or decrease the time.
2. Press SELECT to save this
setting.
4-22
Page 81

Chapter 4 Control Panel Functions
Submenus Default Setting Available Settings Procedure for Changing
Setting
Wait Timeout
This submenu allows you to
increase or decrease the length
of time (in seconds) that the
printer will remain in the waiting
state – a job is being processed,
no end-of-file has been detected
and there is no more data to
process. This setting applies to
both PCL and PostScript print
jobs.
Job Timeout
This submenu allows you to
increase or decrease the time
limit (in seconds) for PostScript
jobs. A 0 setting indicates no
timeout. This setting applies
only to PostScript jobs.
Jam Recovery
This submenu allows you to turn
jam recovery on or off.
Hex Print
This submenu allows you to
print hexadecimal characters.
00020 0 – 99999 1. Press NEXT or PREVIOUS to
increase or decrease each
digit of the five-digit number.
2. Press SELECT set one digit
and move to the next digit.
3. Press SELECT after changing
the last digit to save this
setting.
00000 0 – 99999 1. Press NEXT or PREVIOUS to
increase or decrease each
digit of the five-digit number.
2. Press SELECT set one digit
and move to the next digit.
3. Press SELECT after changing
the last digit to save this
setting.
On On
Off
Off On
Off
1. Press NEXT or PREVIOUS to
toggle between ON and OFF.
2. Press SELECT to save this
setting.
1. Press NEXT or PREVIOUS to
toggle between ON and OFF.
2. Press SELECT to save this
setting.
Intellifilter
This submenu allows you to turn
the Intellifilter feature on or off.
Reset Belt Life Press SELECT to action.
Reset Fuser Life Press SELECT to action.
Reset Toner Life Reset Toner K Life
On On
Off
Reset Toner C Life
Reset Toner M Life
Reset Toner Y Life
1. Press NEXT or PREVIOUS to
toggle between ON and OFF.
2. Press SELECT to save this
setting.
Press SELECT to action.
4-23
Page 82

TallyGenicom Intelliprint 8008N Color Laser Printer User Guide
4.13 Quality Menu
The Quality Menu provides access to the printer settings that are related to
print quality. Use the following procedure to enter the Quality Menu:
1. Press the MENU button on the control panel.
2. Press the NEXT button until the text “Quality Menu” is shown on the
second line of the display.
3. Press the SELECT button to enter the Quality menu.
4. Press the NEXT button to move through the submenus: Resolution and
Toner S a ver. Press the SELECT button to enter a submenu.
5. Use the procedures in the following table to access and change the system
settings:
Submenus Default Setting Available Settings Procedure for Changing Setting
Resolution
This submenu allows you to
set the resolution (dpi).
Toner Saver Off On
600 dpi 600 dpi
1200 x 600 dpi
Off
1. Press NEXT or PREVIOUS to
scroll through the available
resolutions.
2. Press SELECT to choose and
set the dpi.
1. Press NEXT or PREVIOUS to
toggle between ON and OFF.
2. Press SELECT to save this
setting.
4-24
Page 83

Chapter 4 Control Panel Functions
4.14 Color Menu
The Color Menu contains the settings related to the quality of printed color.
Use the following procedure to enter the Color Menu:
1. Press the MENU button on the control panel.
2. Press the NEXT button until the text “Color Menu” is shown on the sec-
ond line of the display.
3. Press the SELECT button to enter the Color menu.
4. Press the NEXT button to move through the submenus: Rendering
Intent, Color Matching and Alignment.
5. Press the SELECT button to enter a submenu.
6. Use the procedures in the following table to access and change the system
settings:
Submenus Default Setting Available Settings Procedure for Changing
Setting
Rendering Intent
This submenu allows you to
choose from several color
settings. Depending on the
type of printing you do, this
setting should be set to an
appropriate value
Photographic Photographic: This setting will
print the most realistic
photographic images.
Presentation: This setting is
best suited when printing
Business Graphics,
Presentations, etc. This setting
places emphasis on bold,
saturated colors.
Logo Art: When absolute color
fidelity is important, as when
corporate logos and the like are
being printed, this setting will
yield the greatest color fidelity.
Colors that not possible to
accurately produce will be
remapped to the closest possible
color.
Proofing: This setting is very
similar to the Logo Art setting,
but the colors will be shifted by
the color of the media on which
you are printing.
1. Press NEXT or
PREVIOUS to scroll
through the available
color rendering settings.
2. Press SELECT to
choose and save this
setting.
4-25
Page 84

TallyGenicom Intelliprint 8008N Color Laser Printer User Guide
Submenus Default Setting Available Settings Procedure for Changing
Setting
Color Matching
This submenu allows you to
enable automatic color
correction when printing
color documents in RGB
format.
Alignment
This submenu allows you to
align the printed image
using the default tray and
optional duplex unit.
On Off
With this setting set to Off, RGB
colors are internally converted to
their CMYK equivalent and are
then placed on the paper. It is
possible that the colors that print
will be different than what you
see on your screen.
On
With this setting set to On, the
RGB colors are processed by the
printer's internal Color
Management system before
being placed on the page. The
Color Rendering menu setting is
used to determine the exact color
translations performed. This
setting will yield printed colors
that are as true as possible to
what you see on your screen.
Alignment Page Alignment Page:
Tray K- H K - V
Duplex K-H K-V
1. Press NEXT or
PREVIOUS to scroll
through the available
settings.
2. Press SELECT to
choose and save this
setting.
Note: see Chapter 2.11,
“Adjusting Color
Alignment” for more
information.
4-26
Page 85

Chapter 4 Control Panel Functions
4.15 Date/Time Menu (option)
Note: This menu selection will only appear if the Real Time Clock Option has
been installed. Please contact your dealer for more information on this feature.
The Date/Time Menu provides access to the printer settings that are related to
print quality. Use the following procedure to enter the Date/Time Menu:
1. Press the MENU button on the control panel.
2. Press the NEXT button until the text “Date/Time Menu” is shown on
the second line of the display.
3. Press the SELECT button to enter the Date/Time menu.
4. Press the NEXT button to move through the submenus: Month, Day,
Year, Hour, Minute, Second and Offset from GMT. Press the SELECT
button to enter a submenu.
5. Use the procedures in the following table to access and change the system
settings:
Submenus Available Settings Procedure for Changing Setting
Month
This submenu allows you to set
the current month.
Day
This submenu allows you to set
the current day.
Year
This submenu allows you to set
the current year.
Hour
This submenu allows you to set
the current hour.
Minute
This submenu allows you to set
the current minute.
January – December 1. Press NEXT or PREVIOUS to scroll
through the months.
2. Press SELECT to choose and set the
month.
Monday – Sunday 1. Press NEXT or PREVIOUS to scroll
through the days.
2. Press SELECT to choose and set the
day.
2000 – 2099 1. Press NEXT or PREVIOUS to scroll
through the years.
2. Press SELECT to choose and set the
year.
1 – 12 am/pm 1. Press NEXT or PREVIOUS to scroll
through the hours.
2. Press SELECT to choose and set the
hour.
1 – 59 1. Press NEXT or PREVIOUS to scroll
through the minutes.
2. Press SELECT to choose and set the
minute.
4-27
Page 86

TallyGenicom Intelliprint 8008N Color Laser Printer User Guide
Submenus Available Settings Procedure for Changing Setting
Second
This submenu allows you to set
the time in seconds.
Offset from GMT
This submenu allows you to set
time for a different time zone in
hours, minutes and seconds.
1 – 59 1. Press NEXT or PREVIOUS to scroll
through the seconds.
2. Press SELECT to choose and set the
second.
-12 through + 12 1. Press NEXT or PREVIOUS to scroll
through the submenus.
2. Press SELECT to choose and set the
hours, minutes or seconds.
4-28
Page 87

4.16 Functions Menu
The Functions Menu provides access to several printer functions that can
supply you with information about the printer and its settings. Use the
following procedure to enter the Functions Menu:
1. Press the MENU button on the control panel.
2. Press the NEXT button until the text “Functions Menu” is shown on
the second line of the display.
3. Press the SELECT button to enter the Functions menu.
4. Press the NEXT button to move through the available functions: Reset
Printer, Print Summary, Print Demo and Print Fonts.
5. Use the procedures in the following table to execute the functions:
Functions Procedure for Executing Function
Chapter 4 Control Panel Functions
Reset Printer
This function resets the printer.
Print Summary
This function prints a list of all printer
settings:
Print Demo
This function allows you to print a demo
page.
Print Fonts
This function allows you to print
Postscript or PCL font lists.
Press SELECT to reset the printer.
Press SELECT to print a summary of the printer
settings.
Press SELECT to print a Demo Page.
1. Press SELECT then NEXT or PREVIOUS to
toggle between POSTSCRIPT and PCL.
2. Press SELECT to select and print the specific
fonts list.
4-29
Page 88

TallyGenicom Intelliprint 8008N Color Laser Printer User Guide
4.17 FLASH Menu
Note: This menu selection will only appear if an optional hard disk drive or Flash
DIMM has been installed. See “Installing DRAM Memory DIMMS” for more
details.
The FLASH Menu provides access to the printer settings that are related to the
FLASH DIMM. This menu appears when a User Flash is installed in the
printer. Use the following procedure to enter the FLASH Menu:
1. Press the MENU button on the control panel.
2. Press the NEXT button until the text “FLASH Menu” is shown on the
second line of the display.
3. Press the SELECT button to enter the FLASH menu.
4. Press the NEXT button to move through the submenus: Print, Delete,
Format FLASH and FLASH summary.
5. Press the SELECT button to enter a submenu.
6. Use the procedures in the following table to access and change the system
settings:
Submenus Procedure for Changing Setting
Print
This selection will read the selected file
from FLASH and print it as if it were being
received from one of the input ports.
Delete
This selection will delete the selected disk
file or directory from the FLASH DIMM. To
delete an entire directory, you must first
delete all the files within that directory.
Format USR Flash
This selection will reformat the FLASH
DIMM.
Flash Summary
This selection will print a page containing
information about the installed FLASH
DIMM including a list of all the current
existing files and directories.
1. Press NEXT or PREVIOUS to scroll
through the files.
2. Press SELECT to choose and print the file.
1. Press NEXT or PREVIOUS to scroll
through the files.
2. Press SELECT to choose and delete the
file.
1. Press SELECT to reformat the FLASH
DIMM.
1. Press SELECT to print the FLASH
summary.
WARNING! All files on the FLASH DIMM will be deleted if the Format
FLASH function is selected.
.
4-30
Page 89

4.18 DISK Menu
Note: This menu selection will only appear if an optional hard disk drive or
compact flash has been installed. See “User Flash, Compact Flash and Hard Disk
Options” for more details.
The Disk Menu provides access to the printer settings that are related to the
optional Hard Disk. Use the following procedure to enter the Disk Menu:
1. Press the MENU button on the control panel.
2. Press the NEXT button until the text “Disk Menu” is shown on the sec-
ond line of the display.
3. Press the SELECT button to enter the DISK menu.
4. Press the NEXT button to move through the submenus: Print, Delete,
Format Disk and Disk Summary.
5. Press the SELECT button to enter a submenu.
Chapter 4 Control Panel Functions
6. Use the procedures in the following table to access and change the system
settings:
Submenus Procedure for Changing Setting
Print
This selection will read the selected file from
Disk and print it as if it were being received from
one of the input ports.
Delete
This selection will delete the selected disk file or
directory from the hard disk. To delete an entire
directory, you must first delete all the files within
that directory.
Format Disk
This selection will reformat the hard disk.
Disk Summary
This selection will print a page containing
information about the installed hard disk,
including a list of all the current existing files and
directories.
1. Press NEXT or PREVIOUS to scroll
through the files.
2. Press SELECT to choose and print
the file.
1. Press NEXT or PREVIOUS to scroll
through the files.
2. Press SELECT to choose and delete
the file.
1. Press SELECT to reformat the hard
disk.
1. Press SELECT to print the Disk
summary.
WARNING! All files on the Disk will be deleted if the Format Disk function is
selected.
4-31
Page 90

Page 91

Chapter 5
Extended Features
5.1 About this Chapter 5-2
5.2 Installing DRAM Memory DIMMS 5-3
5.3 User Flash, Compact Flash and Hard Disk Options 5-5
5.4 Collating, Saved Jobs and Job Accounting 5-13
5.5 Using the Custom Paper Size Feature 5-21
5.6 Custom Page size and Microsoft Word, Word 2000, and Word 2003 5-23
5.7 Accessing the Printer Web Page 5-25
5-1
Page 92

TallyGenicom Intelliprint 8008N Color Laser Printer User Guide
5.1 About this Chapter
This chapter describes the procedures for installation of DRAM Memory
DIMMs, Flash, Compact Flash and the Hard Disk Options and describes how
to use the extended features associated with these options. Instructions to
access the Printer Web Site and Printer Drivers are described in this chapter.
5-2
Page 93

Chapter 5 Extended Features
5.2 Installing DRAM Memory DIMMS
1.
Ensure that the printer power switch is set to the OFF [O] position.
2.
Disconnect the power cord from the wall outlet.
3.
Remove 2 screws from the top and bottom edge of the controller bracket
and gently pull bracket towards you to remove from printer.
4.
Carefully insert a DRAM DIMM which is compatible with your printer
into DRAM DIMM slot as shown below. When properly seated, gently
push down on the DIMM until the side braces close onto the ends of the
DIMM.
5-3
Page 94

TallyGenicom Intelliprint 8008N Color Laser Printer User Guide
5.
Reinstall the controller, being sure to insert into the black plastic guide rails
and gentley push the controller into position until flush with the printer
chasis. Reinsert screws removed in Step 3 procedure.
6.
Connect the power cord to the wall outlet.Turn the printer power switch to
the ON [ I ] position.
5-4
Page 95

Chapter 5 Extended Features
5.3 User Flash, Compact Flash and Hard Disk Options
1.
Carefully review the safety precautions in the front of this guide before
starting this installation procedure.
2.
Ensure that the printer power switch is set to the OFF [ O ] position. Dis-
connect the power cord from the wall outlet.
3.
Remove 2 screws from the top and bottom edge of the controller bracket
and gently pull bracket towards you to remove from printer.
5-5
Page 96

TallyGenicom Intelliprint 8008N Color Laser Printer User Guide
4.
Hard Disk/Compact Flash Installation: Locate the area of the controller
identified as “Hard Disk/Compact Flash”. Align the hard disk/compact
flash within the designated connector opening and gently push in to ensure
the hard disk is connected securely within the connector on the controller
assembly.
User Flash Installation: Align the key on the connector with the socket as
shown below.
5.
Reinstall the controller, being sure to insert into the black plastic guide rails
and gentley push the controller into position until flush with the printer
chasis. Reinsert screws removed in Step 3 procedure.
6.
Connect the power cord to the wall outlet. Turn the printer power switch
to the ON [ I ] position.
5-6
The installation of your option in your printer is now complete.
Page 97

Chapter 5 Extended Features
5.3.1 Using the Hard Disk Option and User Flash DIMM Module
This section discusses the available control panel menus when the Hard Disk or
User Flash option is installed. Power-on files and the storage of files on the
Hard Disk and User Flash option are also discussed.
5-7
Page 98

TallyGenicom Intelliprint 8008N Color Laser Printer User Guide
Operator Panel MENU Structure
When the Hard Disk/Compact Flash or User Flash option is installed, the
printer control panel menu structure is enhanced as shown in the following
table. The shaded areas denote additional features and settings relevant to the
Hard Disk or Flash option.
Menu
Job Library
Job Accounting
Paper Menu
Interface Menu
PS Menu
PCL Menu
System Menu
Display
Language
Alarm Control
Power Save r
Wait Timeout
Job Timeout
Jam Recovery
Hex Print
Intellifilter
Power-On Files
Quality Menu
Functions
Disk Menu
Print
Delete
Format Disk
Disk Summary
Flash Menu
Print
Delete
Format Disk
Disk Summary
Playback FILE01.POR
FILE02.POR
FILE03.POR
. . .
. . .
Delete FILE01.POR
FILE02.POR
FILE03.POR
. . .
. . .
5-8
Note: 1. The Disk Menu will only appear when the respective Hard Disk option
is installed.
2. Power-On Files menu will only appear if power-on files exist.
Page 99

Using the Disk Menu
Manipulation of files stored on the hard disk option can be accomplished using
the Disk Menu.
Disk Menu
Print
Delete
Format Disk
Disk Summary
This selection will read the selected file from the Hard Disk and print it as if it
were being received from one of the input ports.
Delete
This selection will delete the selected disk file or directory from the hard drive.
To delete an entire directory, you must first delete all the files within that
directory.
Format Disk
This selection will reformat the hard drive. All files on the hard drive will be
deleted if this function is selected.
Chapter 5 Extended Features
Disk Summary
This selection will print a page containing information about the hard disk
drive including a list of all the current existing files and directories.
Using the Flash Menu
Manipulation of files stored in the FLASH SIMM can be accomplished using
the Flash Menu.
Flash Menu
Print
Delete
Format USR Flash
Flash Summary
This selection will read the selected file from the FLASH SIMM and print it as
if it were being received from one of the input ports.
Delete
This selection will delete the selected file or directory from the FLASH SIMM.
To delete an entire directory, you must first delete all the files within that
directory.
Format Flash
This selection will reformat the FLASH SIMM. All files on the FLASH SIMM
will be deleted if this function is selected.
5-9
Page 100

TallyGenicom Intelliprint 8008N Color Laser Printer User Guide
Flash Summary
This selection will print a page containing information about the FLASH
SIMM including a list of all the current existing files and directories.
Using the FLASH SIMM or Hard Disk Option as a
PostScript Device
In order to allow PostScript programs to access the FLASH SIMM and/or
hard disk options, a full implementation of a PostScript storage device is
provided. This section discusses an overview of the PostScript operators and
parameter sets that are included in the support.
For detailed information on using the operators/parameter sets, please refer to
the following publications:
z PostScript Language Reference Manual
z Adobe PostScript 3 Version 3010 Product Supplement
Device Names and Priority
The device names assigned to the FLASH SIMM and hard disk options are as
follows:
%flash% device name for the FLASH SIMM
%disk0% device name for the hard disk
If both devices are installed, both devices can be referenced uniquely by name.
If no device name is specified in the PostScript operation, the SearchOrder
parameter in the device parameter set establishes the priority for file
operations. When both devices are installed, the SearchOrder value for the hard
disk is set to 1, while the SearchOrder value for the FLASH SIMM is set to 2.
This gives priority to the hard disk.
PostScript Operators
All of the standard file-object related operators (file, read, write, etc.) are
supported. In addition, following is a list of device-related PostScript
Compatibility operators that are supported for use with the FLASH
SIMM(%flash%) or hard disk (%disk0%) options:
z devdismount
z devforall
z devformat
z devmount
5-10
z devstatus
z diskonline
z diskstatus
 Loading...