

Page 1

HP 620LX/660LX PALMTOP USER GUIDE
HP Part Number F1270-90004
Printed in Singapore
Edition 1
HP Palmtop PC User Guide - i
Page 2

Notice
This manual and any examples contained herein are provided “as is” and are
subject to change without notice. Hewlett-Packard Company makes no warranty
of any kind with regard to this manual, including, but not limited to, the implied
warranties of merchantability and fitness for a particular purpose. Hewlett-Packard
Co. shall not be liable for any errors or for incidental or consequential damages
in connection with the furnishing, performance, or use of this manual or the
examples herein.
The above disclaimers and limitations shall not apply to consumer transactions
in Australia and the United Kingdom and shall not affect the statutory rights
of consumers.
© Hewlett-Packard Co. 1998. All rights reserved. Reproduction, adaptation, or
translation of this manual is prohibited without prior written permission of HewlettPackard Company, except as allowed under the copyright laws.
The programs that control this product are copyrighted and all rights are reserved.
Reproduction, adaptation, or translation of those programs without prior written
permission of Hewlett-Packard Co. is also prohibited.
Microsoft, MS-DOS, MS, Windows, Windows NT, and Win32 are either registered trademarks or trademarks of Microsoft, Corporation in the U.S.A. and/or
other countries. All other brands or product names are trademarks or registered
trademarks of their respective companies.
Hewlett-Packard Singapore (Pte) Ltd.
Asia Pacific Personal Computer Division
452 Alexandra Road
Singapore 119961
Edition History
Edition 1 . . . . . . . . . . . . . . . . . . . . . . . . . . . . . . May 1998
ii - HP Palmtop PC User Guide
Page 3

HP Software Product License Agreement
Important: Please carefully read this License Agreement before operating the equipment. Rights in
the software are offered only on the condition that the Customer agrees to all terms and conditions of
the License Agreement. Operating the equipment indicates your acceptance of these terms and
conditions. If you do not agree to the License Agreement, you may return the unopened package for
a full refund. In return for payment of the applicable fee, HP grants the Customer a license in the
software, until terminated, subject to the following:
Use:
• Customer may use the software on any one computer.
• Customer may not reverse assemble or decompile the software.
Copies and Adaptations:
• Customer may make copies or adaptations of the software:
• For archival purposes, or
• When copying or adaptation is an essential step in the use of the software with a computer so long
as the copies and adaptations are used in no other manner.
• Customer has no other rights to copy unless they acquire an appropriate license to reproduce which
is available from HP for some software.
• Customer agrees that no warranty, free installation, or free training is provided by HP for any copies
or adaptations made by Customer.
• All copies and adaptations of the software must bear the copyright notice(s) contained in or on
the original.
Ownership:
• Customer agrees that they do not have any title or ownership of the software, other than
ownership of the physical media.
• Customer acknowledges and agrees that the software is copyrighted and protected under the copy
right laws.
• Customer acknowledges and agrees that the software may have been developed by a third party
software supplier named in the copyright notice(s) included with the software, who shall be
authorized to hold the Customer responsible for any copyright infringement or violation of this
License Agreement.
Transfer of Rights in Software:
• Customer may transfer rights in the software to a third party only as part of the transfer of all their
rights and only if Customer obtains the prior agreement of the third party to be bound by the terms
of this License Agreement.
• Upon such a transfer, Customer agrees that their rights in the software are terminated and that they
will either destroy their copies and adaptations or deliver them to the third party.
• Transfer to a U.S. government department or agency or to a prime or lower tier contractor in
connection with a U.S. government contract shall be made only upon their prior written agreement
to terms required by HP.
HP Palmtop PC User Guide - iii
Page 4

Sublicensing and Distribution: Customer may not sublicense the software or distribute copies or
adaptations of the software to the public in physical media or by telecommunication without the prior
written consent of HP.
Termination: HP may terminate this software license for failure to comply with any of these terms
provided HP has requested Customer to cure the failure and Customer has failed to do so within thirty
(30) days of such notice.
Updates and Upgrades: Customer agrees that the software does not include updates and upgrades
which may be available from HP under a separate support agreement.
Export Clause: Customer agrees not to export or re-export the software or any copy or adaptation in
violation of the U.S. Export Administration regulations or other applicable regulations.
iv - HP Palmtop PC User Guide
Page 5

HP Shrinkwrap License Terms
The following License Terms govern your use of the accompanying Software unless you have a separate signed agreement with HP.
License Grant: HP grants you a license to use one copy of the Software. “Use” means storing, loading, installing, executing or displaying the Software. You may not modify the Software or disable any
licensing or control features of the Software. If the Software is licensed for “concurrent use”, you may
not allow more than the maximum number of authorized users to Use the software concurrently.
Ownership: The Software is owned and copyrighted by HP or its third party suppliers. Your license
confers no title to, or ownership in, the Software and is not a sale of any rights in the Software. HP’s
third party suppliers may protect their rights in the event of any violation of these License Terms.
Copies and Adaptations: You may only make copies or adaptations of the Software for archival
purposes or when copying or adaptation is an essential step in the authorized Use of the Software. You
must reproduce all copyright notices in the original Software on all copies or adaptations. You may not
copy the Software onto any public network.
No Disassembly or Decryption: You may not disassemble or decompile the Software unless HP’s
prior written consent is obtained. In some jurisdictions, HP’s consent may not be required for limited
disassembly or decompilation. Upon request, you will provide HP with reasonably detailed information regarding any disassembly or decompilation. You may not decrypt the Software unless decryption
is a necessary part of the operation of the Software.
Transfer: Your license will automatically terminate upon any transfer of the Software. Upon transfer,
you must deliver the Software, including any copies and related documentation, to the transferee.
The transferee must accept these License Terms as a condition to the transfer.
Termination: HP may terminate your license upon notice for failure to comply with any of these
License Terms. Upon termination, you must immediately destroy the Software, together with all
copies, adaptations and merged portions in any form.
Export Requirements: You may not export or re-export the Software or any copy or
adaptation in violation of any applicable laws or regulations.
U.S. Government Restricted Rights: The Software and Documentation have been developed
entirely at private expense. They are delivered and licensed as “commercial computer software” as
defined in DFARS 252.227-7013 (Oct 1988), DFARS 252.211-7015 (May 1991) or DFARS 252.2277014 (Jun 1995), as “commercial item” as defined in FAR 2.101 (a), or as “Restricted computer
software” as defined in FAR 52.227-19 (Jun 1987) (or any equivalent agency regulation or contract
clause), whichever is applicable. You have only those rights provided for such Software and
Documentation by the applicable FAR or DFARS clause or the HP standard software agreement for
the product involved.
HP Palmtop PC User Guide - v
Page 6

vi - HP Palmtop PC User Guide
Page 7

CONTENTS
Contents vii
Introduction 1
A Note on Models 1
About This Guide 1
1. A Closer Look at the HP Palmtop PC 3
2. Using the HP Palmtop PC for the First Time 7
Installing the Batteries 7
Getting Started 8
The Welcome Wizard 9
Partnering with Your Desktop Computer 12
3. Working with the HP Palmtop PC 15
Getting Started with Windows CE 15
Getting Help On-line 16
Using AC Power 17
Managing Battery Power 17
Customizing Your HP Palmtop PC 19
Printing 25
Resetting 26
Transferring Files 27
Using a PC Card 29
Using a PC Card Modem 30
Using a CompactFlash Card 31
Synchronizing Data 31
Backing Up and Restoring Data 34
HP Palmtop PC User Guide - vii
Contents
Page 8

4. Translating HP PIM Data Files 41
Installing the HP PIM Translation Utility 41
Starting the Translation 42
Translating Appointment Data 42
Translating Phone Book Data 43
Reviewing Translation Status 47
5. Working with Pre-Installed Applications 49
Overview of HP Palmtop PC Pre-installed Applications 49
Information Manager for Windows CE – 52
Calendar, Contacts, and Tasks
Microsoft Pocket Word 66
Microsoft Pocket Excel 75
Microsoft Pocket Powerpoint 84
Quicken® ExpensAble
Fiscal Pro
TM
TM
86
100
Microsoft Voice Recorder 101
bFAXTM Pro Fax Send/Receive Application 102
Inbox 110
Microsoft Pocket Internet Explorer 122
bFIND
TM
Global Find Utility 130
World Clock 133
Calculator 136
Synchronization with the desktop PC (Mobile Devices) 137
Connection to an ISP (Internet Service Provider) 142
viii - HP Palmtop PC User Guide
Page 9

6. Reference 149
Safety, Care, and Maintenance 149
Tips and Troubleshooting 149
Electrostatic Discharge Warning 153
Warranty, Support, and Service 153
Index 157
HP Palmtop PC User Guide - ix
Contents
Page 10

x - HP Palmtop PC User Guide
Page 11

INTRODUCTION
Congratulations and thank you for purchasing the HP Palmtop PC.
This guide introduces you to your new palmtop PC and shows you how you can
quickly begin to use it either on its own or as an effective desktop PC companion.
A NOTE ON MODELS
The HP Palmtop PC (600 Series) is available in two models, the HP 620LX and
the HP 660LX. Both models are described in the guide. The HP 660LX includes
all the features of the 620LX plus the following enhancements:
• 32MB RAM (the HP 620LX has 16MB RAM)
• a 56kbps Fax/Modem Card
• the Microsoft Windows CE Services 2.1 with ActiveSync CD-ROM (the HP
620LX uses Services 2.0)
Please note that on the 660LX a maximum of 16MB RAM can be used for storage
memory. The remaining 16MB is program memory.
ABOUT THIS GUIDE
The HP Palmtop PC uses the Microsoft Windows CE operating system, which is
very similar to the Microsoft Windows™ 95 and Windows NT 4.0 operating systems. This guide assumes that you are already familiar with one of these desktop
operating systems.
HP Palmtop PC User Guide - 1
Introduction
Page 12

Chapter 1: A Closer Look at the HP Palmtop PC
This chapter describes the physical features of the HP Palmtop PC.
Chapter 2: Using the HP Palmtop PC the First Time
This chapter describes how to start the HP Palmtop PC for the first time, how to
calibrate the touch screen with the stylus, and how to establish the partnership
between your palmtop PC and your desktop computer using the Synch Cable or
the Docking Cradle. It also covers installing batteries and using AC power.
Chapter 3: Working with the HP Palmtop PC
This chapter describes the common features of Windows CE and the HP Palmtop
PC that you need to get started quickly and to make the transition from desktop
PC to palmtop PC easier. The chapter also includes tips on how you can take
advantage of the portability of your palmtop PC along with the power and storage
of your desktop PC.
Chapter 4: Translating HP PIM Data Files
This chapter describes the HP PIM translation utility, which enables users of the
HP 100LX/200LX palmtop PCs and HP OmniGo 100/120 organizers to transfer
their Appointment Book and Phone Book data to Windows CE Information Manager applications.
Chapter 5: Working with Pre-installed Applications
This chapter gives you instructions on the use of Windows CE applications to
keep appointments, manage phone book data and tasks, perform word processing
and spreadsheet tasks, dial up to the Internet, etc.
Chapter 6: Reference
This chapter includes tips on how to take care of your palmtop PC, troubleshooing
information, and warranty, support, and service information.
2 - HP Palmtop PC User Guide
Page 13
Chapter 1 – A CLOSER
LOOK AT THE HP PALMTOP PC
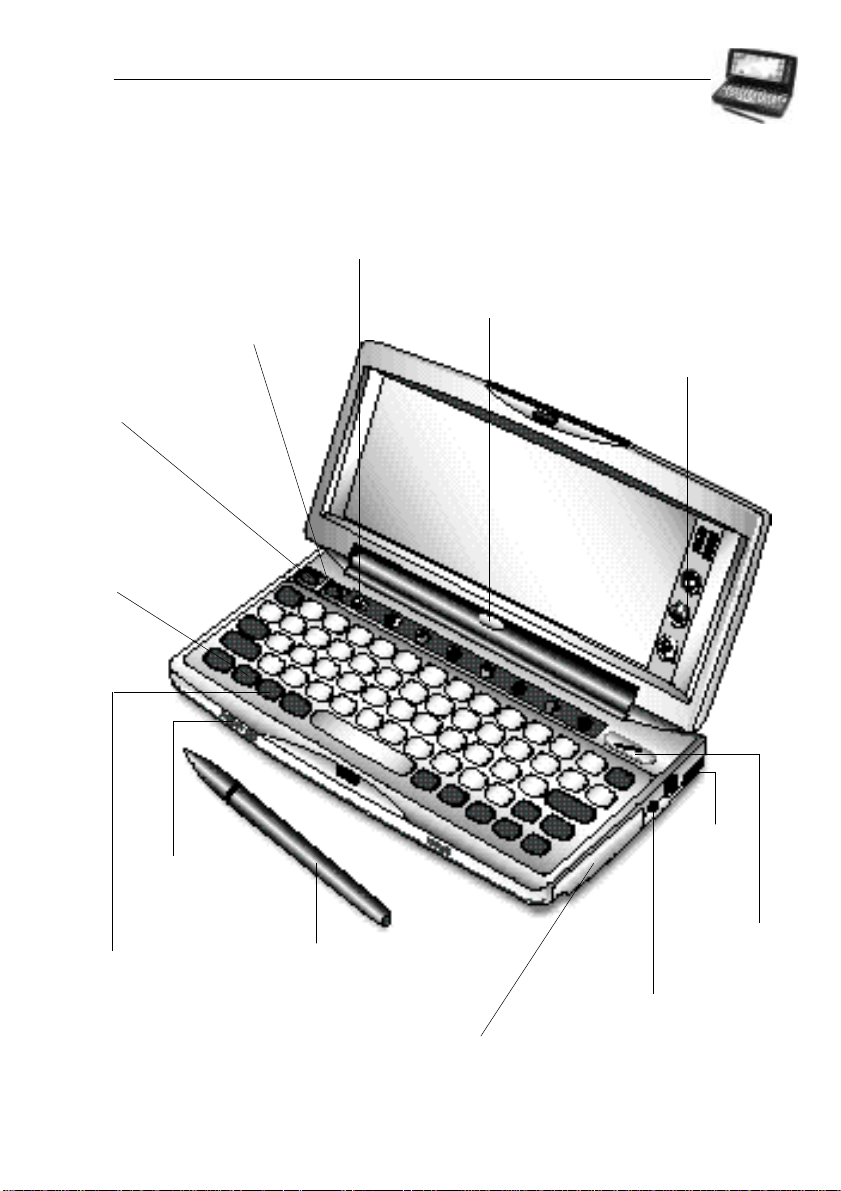
External Features - Front view
Quick Application
Launch Pad
Record Key
On/Off Switch
Microsoft
Windows Key
LED Multifunction
Record Key
Hard Icon Panel
Microphone
Number Lock Key
Stylus
Compact Flash
Memory Card Drawer
A Closer Look at the HP Palmtop PC
HP Palmtop PC User Guide - 3
Serial Port
Stylus Ejection
Button
AC Adapter Port
Page 14

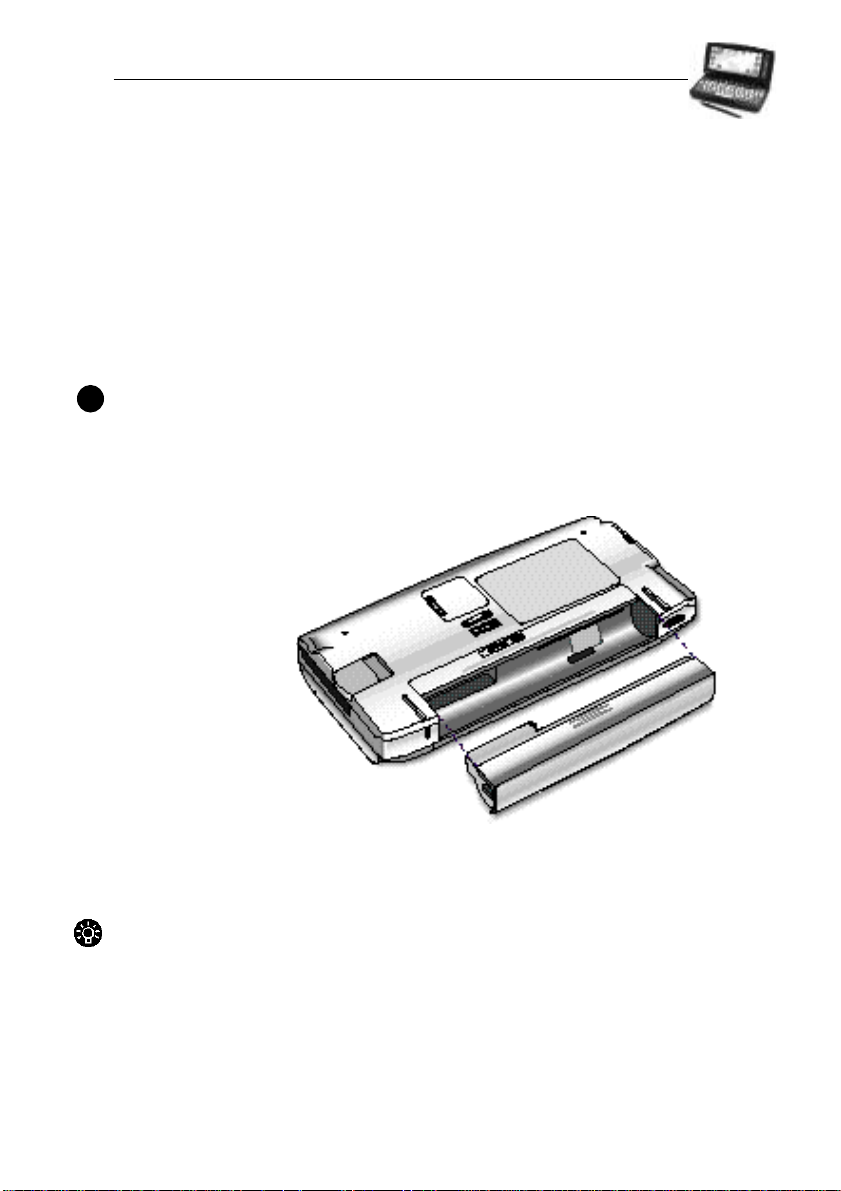
External Features - Back view
Back-up Battery
Red Reset Button
Back-up Battery
Compartment
IR (Infrared) Port
Main Battery
Compartment
Battery Release
Catch
PC Card
Eject Button
PC Card Slot
4 - HP Palmtop PC User Guide
Docking Cradle
Connector
Lithium-Ion Main
Battery Pack
Page 15
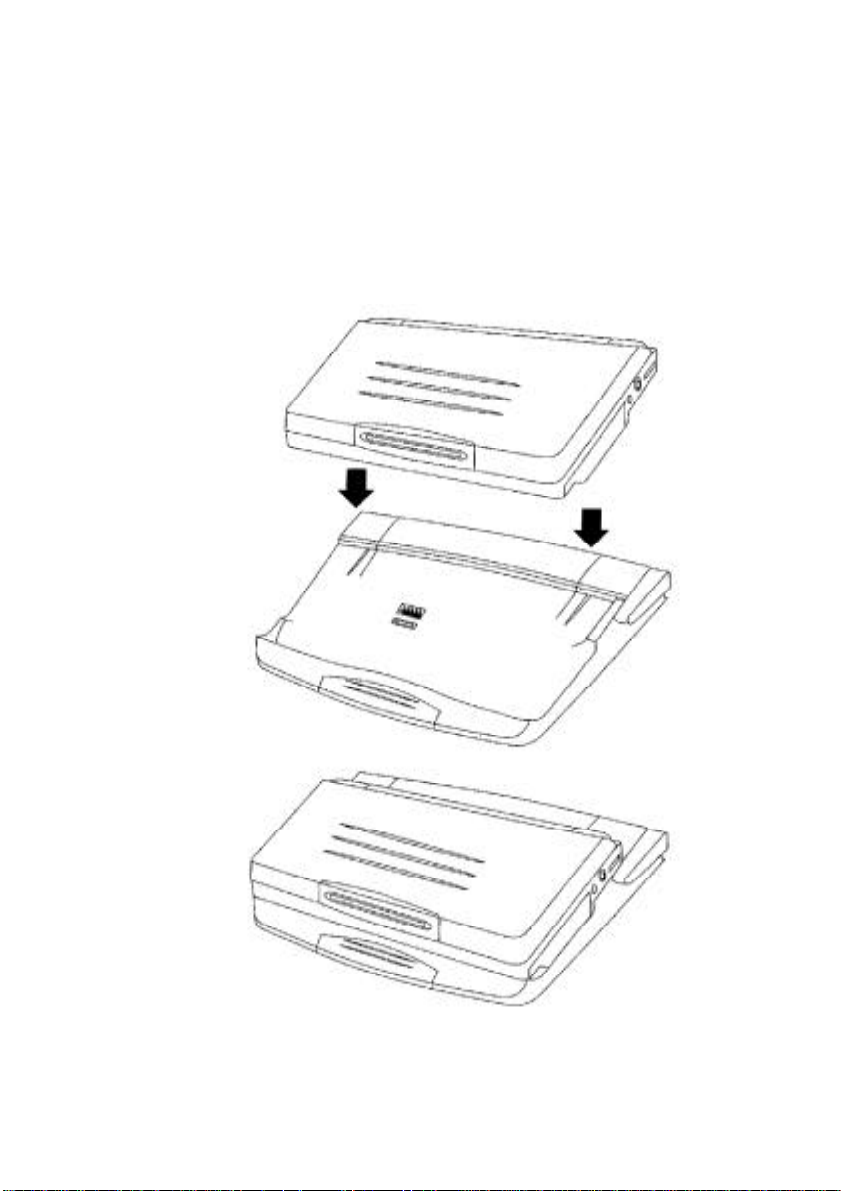
The HP Palmtop PC comes with a Docking Cradle. Use the Docking Cradle to
connect the HP Palmtop PC to a desktop PC, as described in Chapter 2, “Using
the HP Palmtop PC for the First Time.”
A Closer Look at the HP Palmtop PC
HP Palmtop PC User Guide - 5
Page 16

6 - HP Palmtop PC User Guide
Page 17
Chapter 2 – USING THE HP
PALMTOP PC FOR THE FIRST TIME
INSTALLING THE BATTERIES
The HP Palmtop PC requires two types of batteries to operate as a portable unit:
• Rechargeable Lithium-Ion main battery pack
• 1 CR2032 3-volt coin cell backup battery
To install the batteries:
Important
!
Install the main battery pack before installing the backup battery.
1. First, install the Lithium-Ion main battery pack by sliding the battery pack into
the battery compartment and snap it in place.
2. Charge the Lithium-Ion main battery pack by connecting the AC adapter to a
power source and to the AC adapter port on the palmtop PC.
Tips
• The orange LED Multifunction Record Key light on top of the palmtop PC
indicates that the main battery pack is being charged.
• You can use the palmtop PC while charging.
• The LED light turns green when the battery pack is fully charged, 5 hours.
• Do not press the LED Multifunction Record Key before completing the
Welcome Wizard.
Using the HP Palmtop PC for the First Time
HP Palmtop PC User Guide - 7
Page 18

3. Remove the backup battery cover and install the 3-volt CR2032 coin cell
battery with the positive side up.
Warning
!
Do not mutilate, puncture, or dispose of batteries in fire. The batteries can burst
or explode, releasing hazardous chemicals. Discard used batteries according to
the manufacturer’s instructions. The backup (lithium) battery can explode if it is
inserted incorrectly.
GETTING STARTED
To begin using your HP Palmtop PC for the first time, do the following:
1. Power on the palmtop PC by pressing the / key.
2. Adjust the contrast and volume by launching the QuickSettings Application.
To turn off the HP Palmtop PC, press the / key again.
8 - HP Palmtop PC User Guide
ON OFF
ON OFF
Page 19
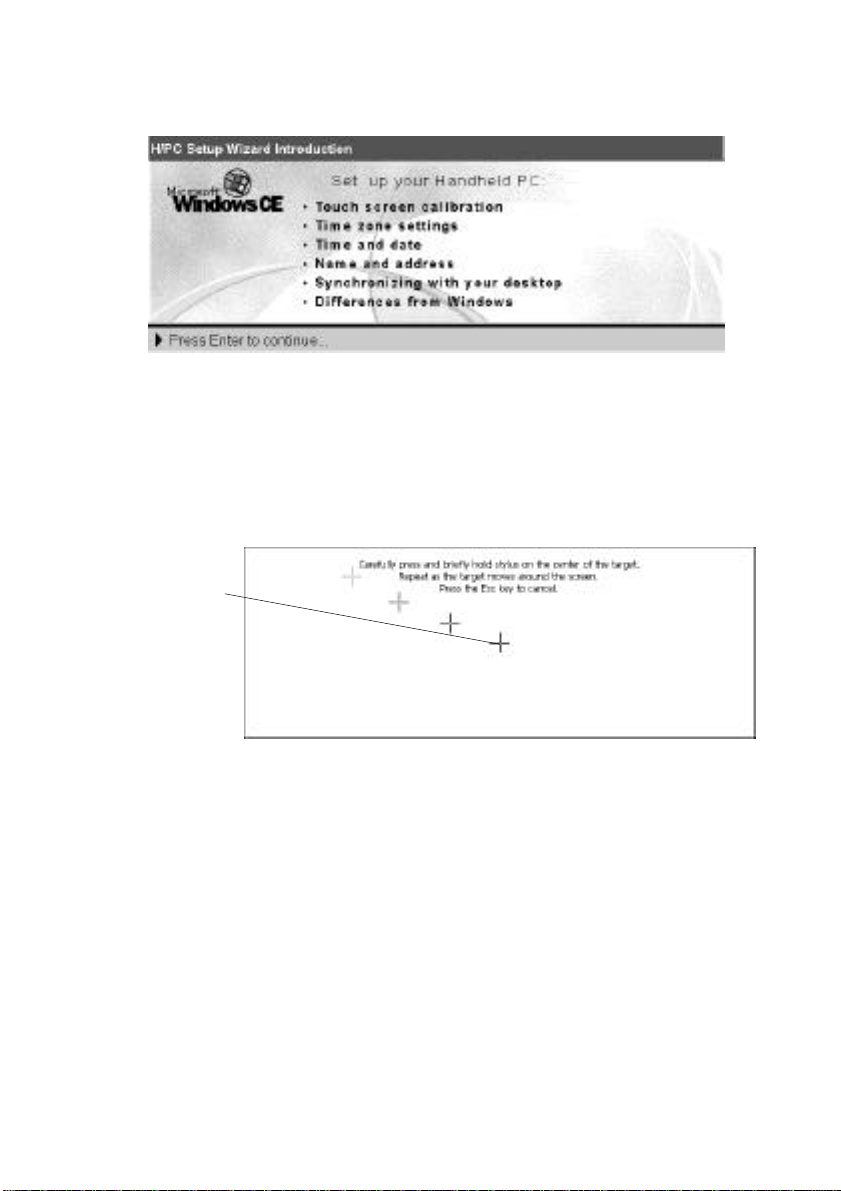
THE WELCOME WIZARD
Calibrating the Screen and Stylus
You need to first calibrate the screen and the stylus so the screen responds correctly to a stylus tap. To calibrate the stylus, do the following:
1. Press the Stylus Ejection Button and take out the stylus.
2. Press and
briefly hold the
stylus at the
center of each
cross or target
that appears on
the calibration
screen.
Once the screen and stylus are calibrated, you can use the stylus as a
mouse substitute to perform the following operations:
• Tap to select a button or menu item
• Double-tap an icon to open an application
• Drag the stylus across words or items to select them
• Drag-and-drop a selection to another part of the screen
Using the HP Palmtop PC for the First Time
HP Palmtop PC User Guide - 9
Page 20
Important
!
Do not use any stylus other than the one that comes with your HP Palmtop PC to
tap or write on screen. Using a different stylus or an ordinary pen is likely to
damage the screen.
Tips
If you make a mistake while calibrating the touch screen, or if screen accuracy
diminishes over time, you may not be able to use the stylus. If this happens, you
can open the stylus calibration screen without the stylus by pressing
+ + .
CTRL
ALT
=
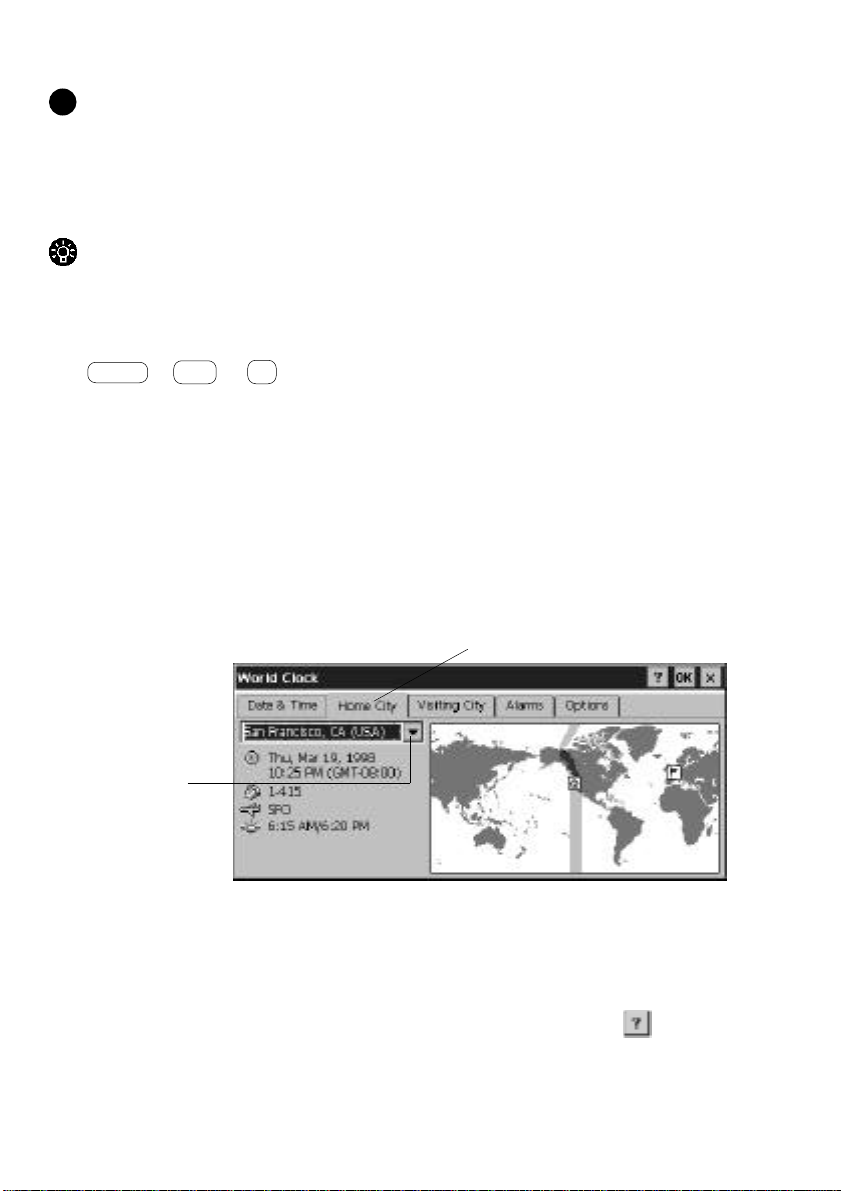
Setting the World Clock
You can set the time zone you are in and, if you wish, an additional time zone
(such as one you may be travelling to). These settings keep track of any reminders
and alarms that you set later on.
Setting the Time Zone
On the World Clock screen that appears, do the following:
1. Tap the Home City tab.
2. Select your
home city (or
one nearby)
from the drop down list.
3. When you
have finished,
tap Next.
To specify the time zone for a place you are visiting, follow the steps shown above,
but tap the Visiting City tab.
If the city you want (or one near it) does not appear in the list, you can
add it following the instructions in the online Help by pressing the button.
10 - HP Palmtop PC User Guide
Page 21

Setting Time and Date
To set time and date for your home or visiting location, do the following:
1. Tap Date & Time.
2. Tap the forward or back arrows to locate the month and year.
3. Tap the date.
4. Select the time and tap and drag the hands to adjust the setting.
5. When you have finished, tap Next.
Using the World Clock control panel, you can change time zone, date, and time
information whenever you want. You can also set alarms, apply daylight savings
time, and display travel information.
Using the HP Palmtop PC for the First Time
HP Palmtop PC User Guide - 11
Page 22
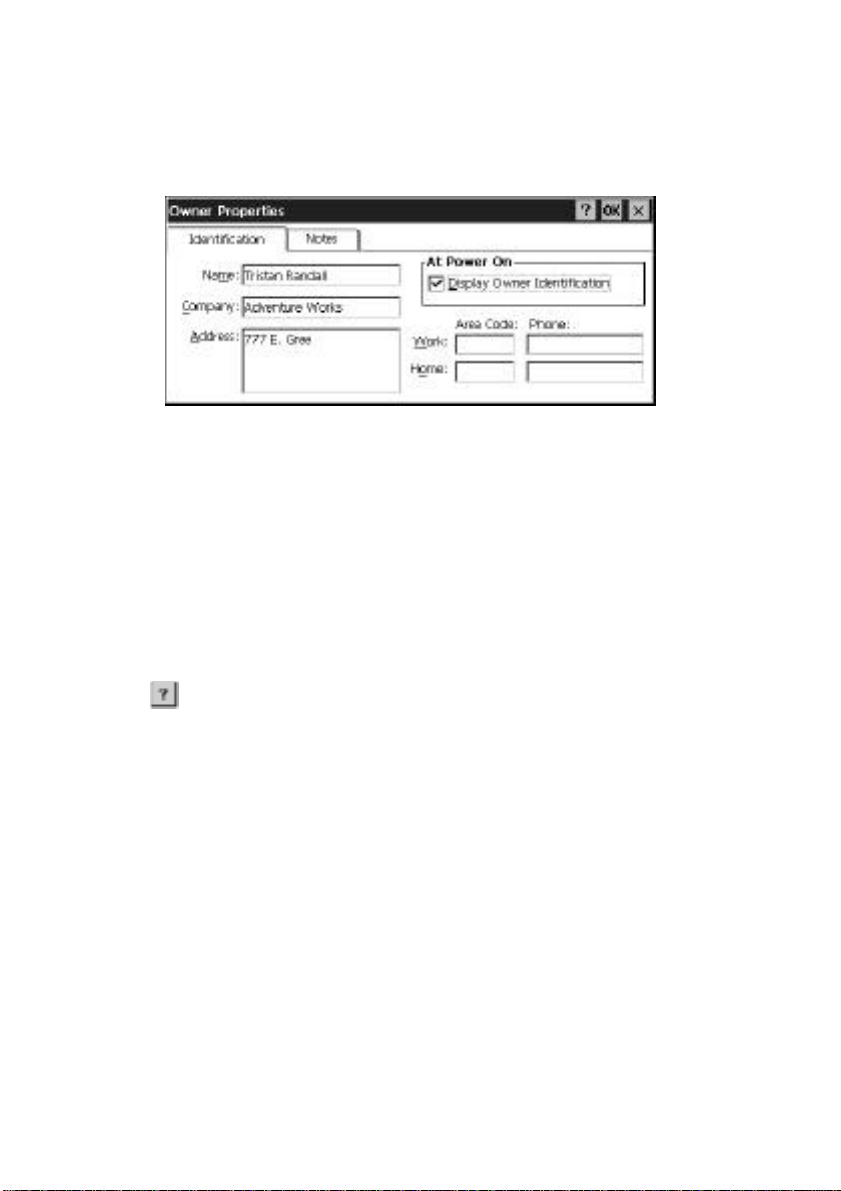
Entering Personal Identification Information
The last step in the Welcome Wizard is entering your name, address, and other
personal information.
See the section “Changing Owner Information” on page 25 for information on
adding a password and notes about where to return your HP Palmtop PC if
it is found.
Set up is now complete.
You can learn more about Windows CE in the User’s Guide or online Help. To
access Help:
Tab Help on the Start menu
Tap the button in the upper right corner of a program window
PARTNERING WITH YOUR DESKTOP COMPUTER
One of the most useful features of the HP Palmtop PC is the ease of connecting it
to your desktop PC and transferring data back and forth between the two. You can
also use your desktop PC to back up data from your HP Palmtop PC. In order for
your desktop PC to communicate with the HP Palmtop PC, you must do
two things:
• install Microsoft Windows CE Services 2.0 software that comes with the HP
Palmtop PC on the desktop computer
• establish a physical connection between the two computers
12 - HP Palmtop PC User Guide
Page 23

Installing Microsoft Windows CE Services 2.0
Before you can install Microsoft Windows CE Services 2.0 on your PC you
need to:
• be running Windows 95 or Windows NT 4.0 on the desktop computer
• have your Windows 95 or Windows NT 4.0 installation CD available
• have the Microsoft Windows CE Services 2.0 CD-ROM that comes with the
HP Palmtop PC ready
1. Insert the Microsoft Windows CE Services 2.0 CD-ROM into the CD-ROM
drive on your PC. Setup should launch automatically.
If Setup does not launch, Click Run, then type d:setup where d is the letter
assigned to your CD-ROM drive.
2. The screen should prompt you to set up 3 applications/utilities if they are not
already installed:
1. Microsoft Exchange update for Windows®95
2. Microsoft Schedule+ 7.0a
3. Microsoft Windows CE Services 2.0
4. Optional Components
* Your computer will be restarted several times during the installation process
Using the HP Palmtop PC for the First Time
HP Palmtop PC User Guide - 13
Page 24

3. Start Windows CE Services 2.0 if it is not already running on your desktop/
notebook PC and turn on your HP Palmtop PC.
4. Prepare the docking cradle for connecting to the desktop PC. Insert the 9-pin
end of the synch cable into the serial port of the desktop PC. Insert fully
the flat end of the synch cable, arrow side up, to the serial port at the back of
the cradle. Connect the AC to a power source and to back of the cradle.
Be sure never to have serial or power cable connected directly to the palmtop
!
when using the cradle. Doing so will permanently damage the unit.
5. Close the palmtop, carefully center it on the cradle. Press down on the
palmtop until the unit clicks into place. Partnership should automatically
establish between your HP Palmtop PC and the desktop/notebook PC.
After you have established the partnership, you are ready to transfer Microsoft
Word, Excel and other files between your desktop computer and the HP
Palmtop PC. You can also synchronize calendar, contact and task information
from your desktop Information Manager data files with data from your Infor mation Manager applications on your desktop computer. If you need further
guidance, refer to the “Communications” portion in our website (http://
www.hp.com/handheld/palmtops/hp600lxmanual/index.html).
Note
!
If you are using Windows 95 on your desktop you can also establish partnership
and synchronize data by using an infrared connection. Please refer to “Synchronizing Data” in Chapter 3, for details.
14 - HP Palmtop PC User Guide
Page 25
Chapter 3 – WORKING WITH
THE HP PALMTOP PC
This chapter discusses basic information you should be familiar with in order to
use your HP Palmtop PC effectively. There are brief introductions to Windows
CE, tips on power management, and information on customizing your palmtop
PC and on printing.
GETTING STARTED WITH WINDOWS CE
Microsoft Windows CE on the HP Palmtop PC is very much like Microsoft
Windows 95 or Windows NT 4.0 on a desktop PC. Windows CE screens include
familiar elements like the Start button, desktop, taskbar, menu bars, toolbars,
and shortcuts.
The Start Button and Start Menu
Tap the Start button in the lower left corner of the screen or press the
(Windows) key on the keyboard to bring up the Start menu. The Start menu is
your gateway to the programs, documents, and utilities on the HP Palmtop PC.
Tap on an item in the Start menu to launch an application, open the Control Panel
to adjust custom settings, get on-line help, or explore the contents of your HP
Palmtop PC.
HP Palmtop PC User Guide - 15
Working with the HP Palmtop PC
Page 26

Buttons on a Typical Title Bar
The title bar of a typical Windows CE screen or display includes two
or more of the following buttons in the upper right corner:
Tap OK to confirm the operation in the display and to close the window.
Tap X to close the display without saving any changes.
Tap ? to see context-sensitive on-line help related to the display.
Manipulating Windows
In Windows CE, most windows and dialog boxes take up the entire screen; you
cannot have multiple windows displayed simultaneously. While you cannot move
or resize application or document windows, you can maximize and minimize them
by tapping the appropriate buttons on the taskbar.
Tap here to maximize an
inactive window (Control Panel).
Tap here to minimize the
active window (Power Properties).
Emulating the Right Mouse Button
To access right-mouse click functions, hold down the key while tapping
ALT
with the stylus.
GETTING HELP ON-LINE
On-line help is available in Windows CE by:
• tapping the button on a display’s title bar or toolbar for context sensitive help
• tapping the Help option on the Start menu
• pressing + to get window-specific help while an application
ALT
is running
16 - HP Palmtop PC User Guide
H
Page 27

USING AC POWER
An AC adapter for stationary use is available for the HP Palmtop PC.
If You are Using the Docking Cradle…
Plug the AC adapter into the port on the back of the Docking Cradle
and plug the other end into a wall socket.
If You Are Not Using the Docking Cradle…
Plug the AC adapter into the adapter port at the side of your HP Palmtop PC and
plug the other end into a wall socket.
Important
!
Do not connect the palmtop PC to two AC power sources at the same time. Doing
so will damage the unit.
MANAGING BATTERY POWER
You can operate your HP Palmtop PC on battery power or on AC current with the
AC adapter. Built-in software helps you manage power on your HP Palmtop PC,
by letting you check battery type and use time on the main and backup batteries,
reporting status when you charge batteries using the AC adapter, and setting when
you want the power to time-out and turn off.
To access the power management features:
1. On the Start menu, tap Settings, then Control Panel
2. Double-tap the Power icon.
The Power Properties window that appears has two tabs: Power Off
and Dimming Control .
The Power Properties window shows the power source (for example, Main Batteries), how much power remains in the main batteries, backup battery status, and
recharging status if you are recharging.
Working with the HP Palmtop PC
HP Palmtop PC User Guide - 17
Page 28
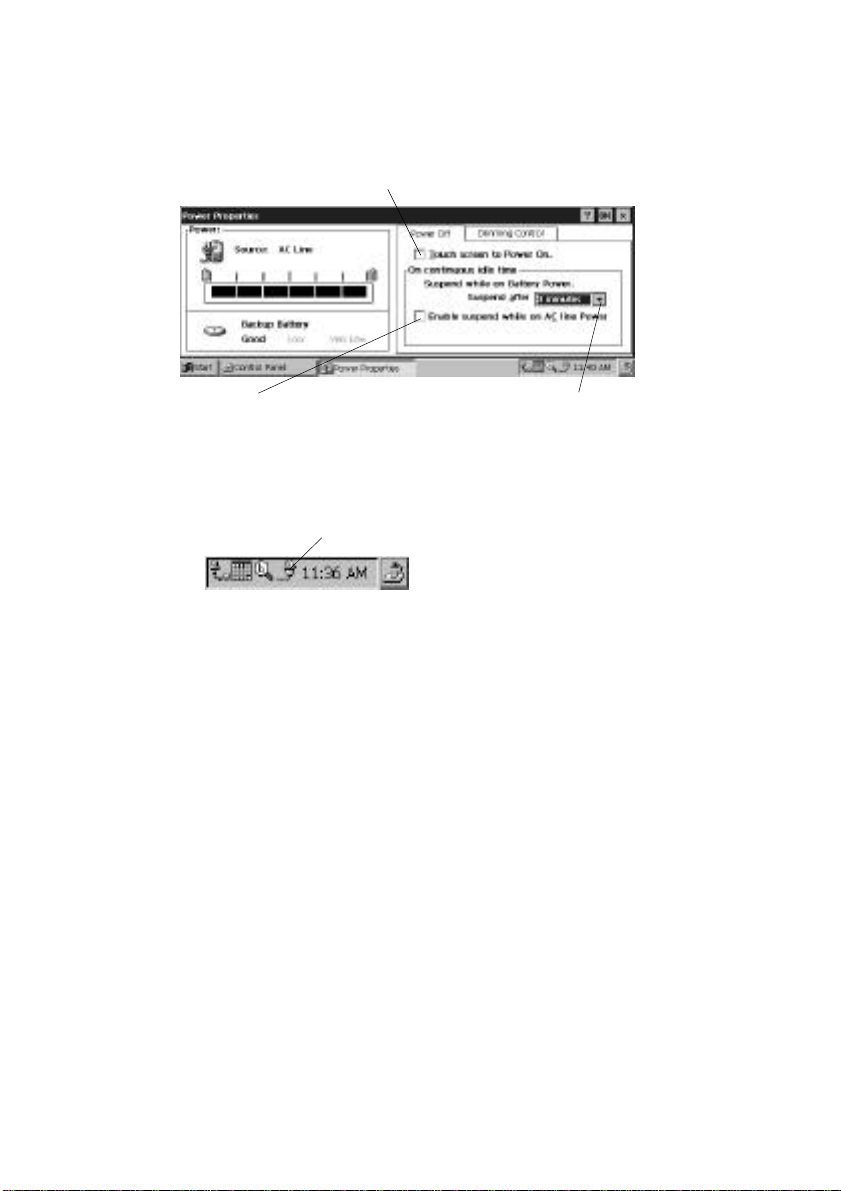
Power Off
Tap the Power Off tab to set the automatic power time-out for both battery and AC
power operation.
Tap here to enable the palmtop PC’s “touch on” feature.
Tap here to set the automatic power
time-out for AC power operation.
Select the length of idle time
before your palmtop PC times out.
Power Status Icons
An icon appears on the taskbar next to the current time, when the AC power is
connected.
Power status icon.
You can double-tap on the power icon in the taskbar to open the Power Properties
window and get more information about power status.
Other Warnings about Power
Dialog boxes also appear to warn you when your backup battery or main batteries
are running low or very low. If your battery is running down, the dialog appears at
each power-on or start up, and every 30 minutes while the device is being used.
Recharging Batteries
You can recharge the batteries within the palmtop PC.
1. Attach the AC adapter to the palmtop PC or to the Docking Cradle
holding the palmtop PC.
2. Plug the adapter into a wall socket.
Tips for Using Batteries Efficiently
To get the longest possible use out of your batteries and to minimize the possibility of data loss, keep the following tips in mind:
18 - HP Palmtop PC User Guide
Page 29

• Charge the main batteries as soon as possible after a low battery warning
appears.
• Whenever possible, switch to AC power when you use high-power PC Cards
(such as modem cards). Using these cards when the main batteries are low
can cause data corruption or loss.
• Use the AC adapter while the palmtop PC is connected to a desktop PC.
Don’t leave the Synch Cable attached while on battery power if you’re not
actually exchanging data with the desktop PC.
• Avoid using sounds when your main batteries are low. Playing .wav files
when the batteries are low can cause the unit to shut down, hence losing
unsaved data.
• Don’t use battery power for dial-up connections. PC Card modems and other
PC Cards require considerable power to operate. Always use AC power when
making dial-up connections with a PC Card modem.
Note
!
The HP Palmtop PC will not power on if the main batteries are very low.
CUSTOMIZING YOUR HP PALMTOP PC
You can personalize and customize your Palmtop PC by adjusting settings,
adding ID and password, and loading new software. Most customizations are
done using the Control Panel.
To open the Control Panel, tap Settings on the Start menu.
Double-tap on an icon in the Control Panel
to open the associated Properties window.
Working with the HP Palmtop PC
HP Palmtop PC User Guide - 19
Page 30
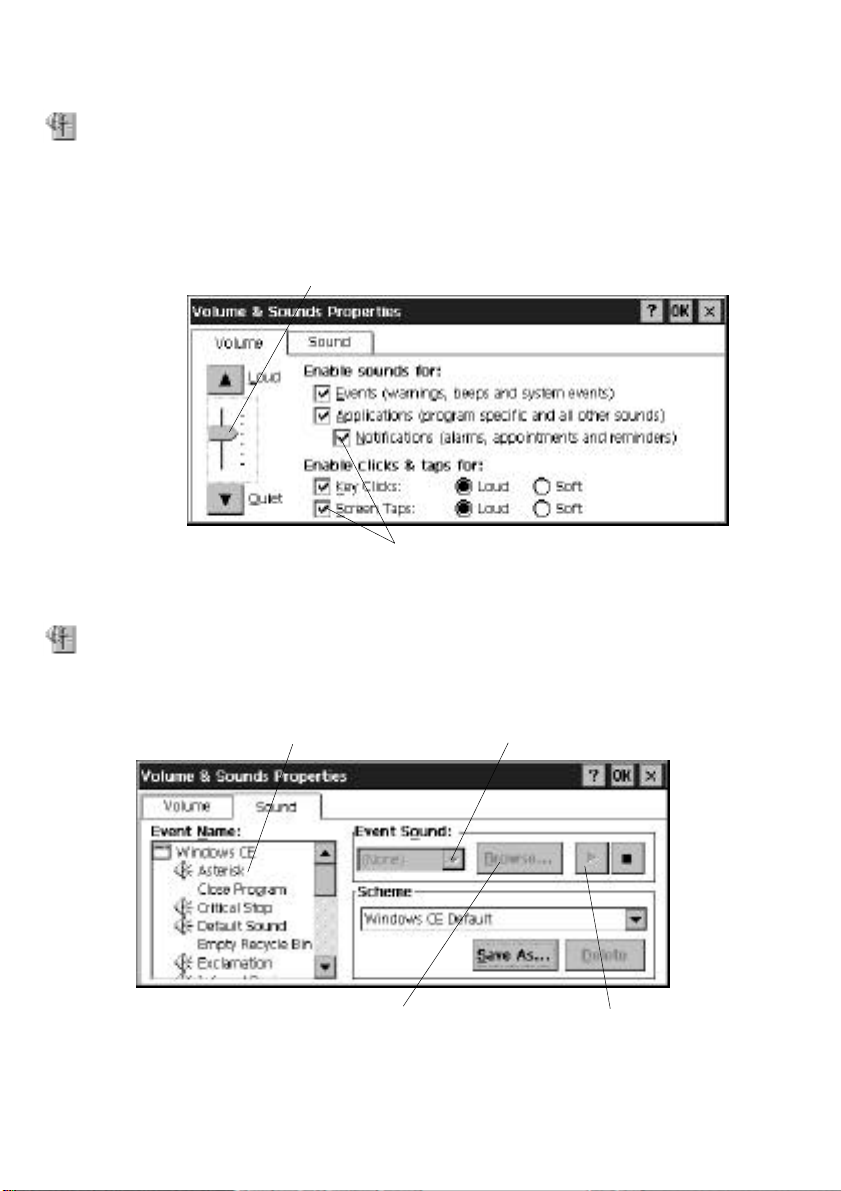
Adjusting Volume
You can turn event, notice, and applications sounds on and off and adjust volume.
Double-tap the Volume & Sounds icon in the Control Panel, or tap the Quick
Settings Hard Icon panel.
In the Volume & Sounds Properties Window Volume tab,
use the volume slider to raise or lower volume.
Clear or check boxes to turn the sounds
associated with different kinds of events on or off.
Changing Sounds
Double-tap the Volume & Sounds icon in the Control Panel, then tap the Sound
tab in the Volume & Sounds Properties window.
Select the event with which
you want to associate a sound.
Tap Browse to locate the
sound you want to use.
Select a sound from the
Event Sound drop-down list.
To remove a sound, select None from the Event Sound list.
20 - HP Palmtop PC User Guide
Preview the select sound
by tapping this button.
Page 31
To add a sound to the Event Sound list, copy a .wav file from your desktop PC, PC
Card, or CompactFlash Card to the Windows folder on the palmtop PC.
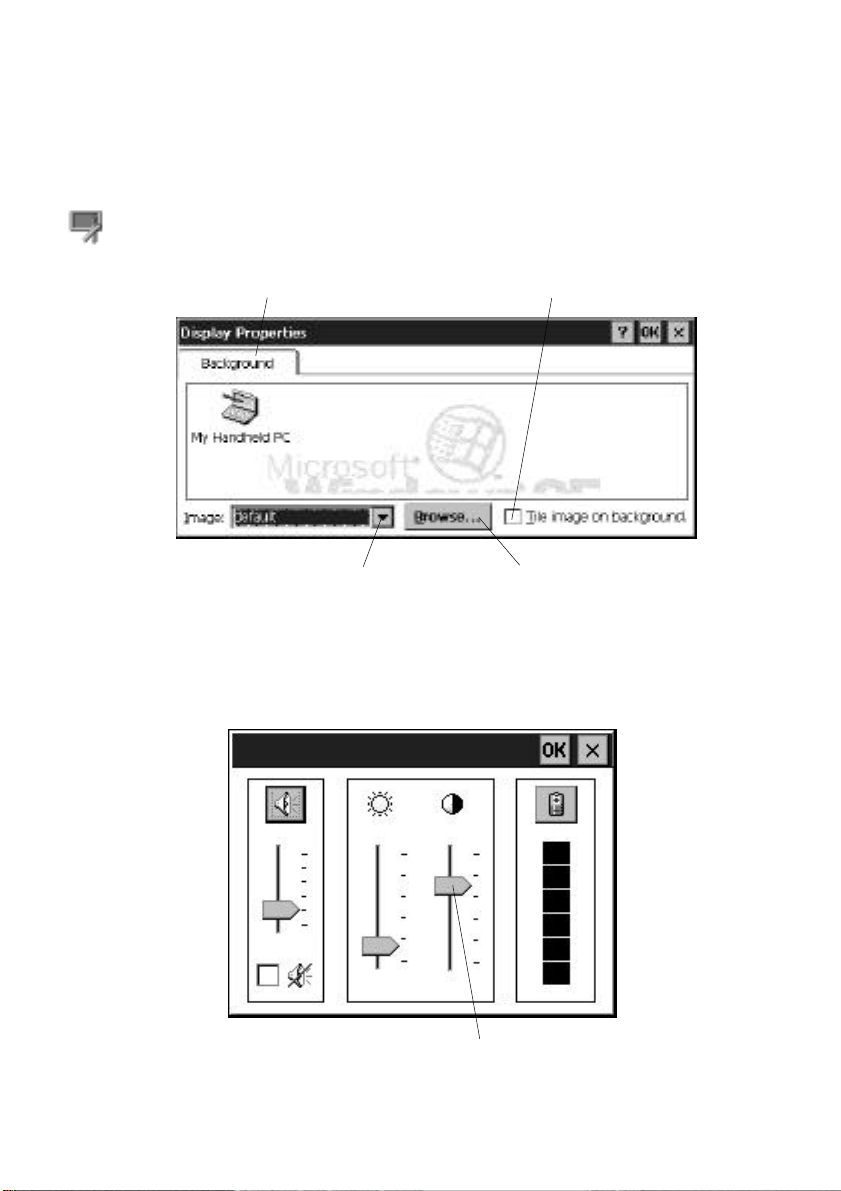
Changing the Background of the Windows CE Desktop
Double-tap the Display icon in the Control Panel.
Tap the Background tab.
Select a bitmap to use from
the Image drop-down list.
Adjusting Brightness and Contrast
Tap the Quick Settings Hard Icon Panel
Tap here to use the bitmap
to tile the entire display.
Tap Browse to locate the
bitmap you want to use.
Use the sliders to adjust sound,
brightness and contrast.
Working with the HP Palmtop PC
HP Palmtop PC User Guide - 21
Page 32

You can also adjust the screen contrast at any time without going to the Control
Panel by:
• pressing + to lighten the screen
• pressing + to darken the screen
ALT
ALT
<
>
Adjusting the Double-Tap Rate
Double-tap the Stylus icon in the Control Panel.
Tap the Double-Tap tab and follow the instructions in
the window to set your tap rate.
Adjusting the Keyboard
Double-tap the Keyboard icon on the Control Panel.
Use this slider to set the delay before
the first repeat of a character.
22 - HP Palmtop PC User Guide
Use this slider to set the repeat rate.
Page 33

Changing Owner Information
Double-tap the Owner icon in the Control Panel.
Make the desired changes in the fields
of the Owner Properties window.
Tap here to cause your ID screen to display
when the palmtop PC is powered on.
Tap the Notes tab to add a note.
Tap here to display the note when
your palmtop PC is powered on.
Working with the HP Palmtop PC
HP Palmtop PC User Guide - 23
Page 34
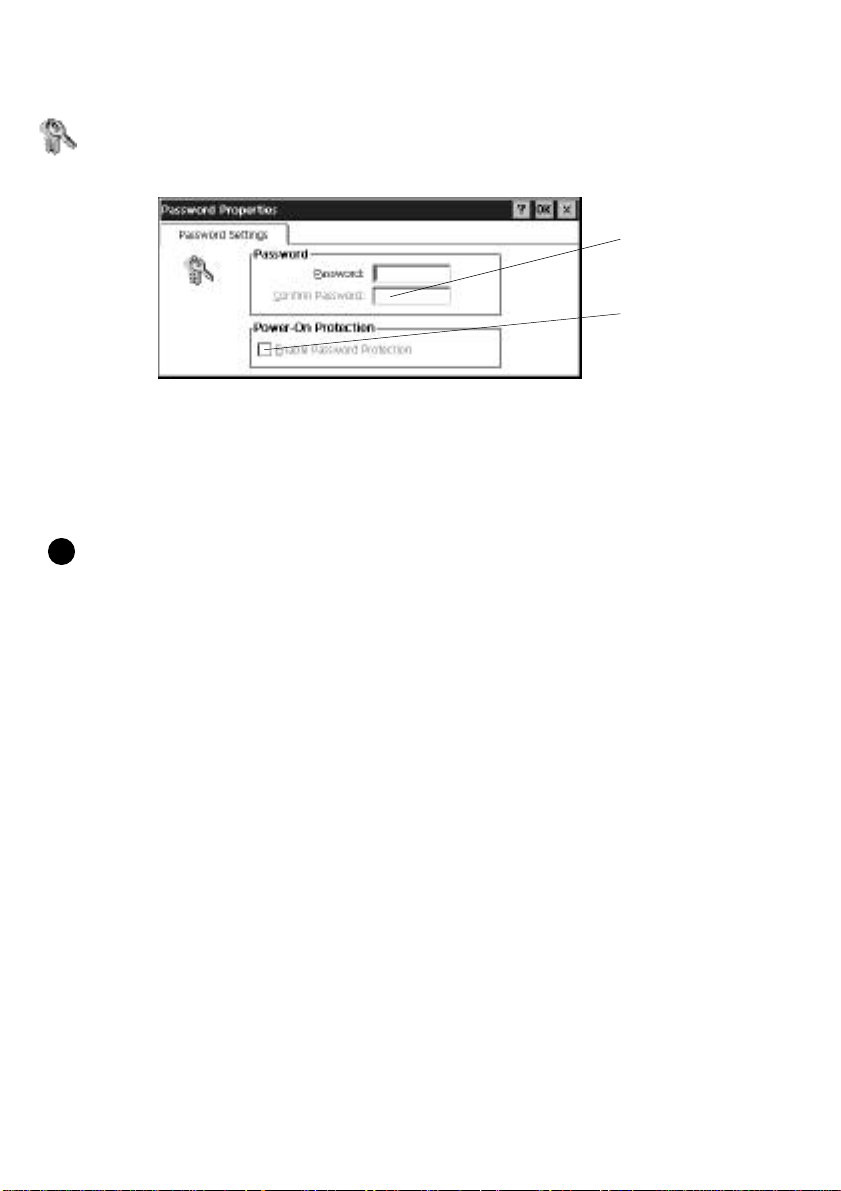
Setting a Password
To set a password, double-tap the Password icon in the Control Panel.
1. Enter a password of up to eight characters.
2. Confirm your
password by typing
it again.
3. Tap here to cause
your password to
take effect.
When your password is enabled, you will be prompted for it whenever you turn
on you HP Palmtop PC or try to change your password information. Passwords
are not case sensitive.
Important
!
Record your password and put it in a safe place. If you forget your password, you
will have to perform a full reset on your HP Palmtop PC. To do this, first turn the
palmtop PC off, then remove the main batteries, then the backup battery.
This destroys all data. You must then reinitialize and recalibrate the palmtop PC
and restore its data from a backup.
Any data saved or changed since your last backup is permanently lost.
Adding and Removing Software
You easily can add new software to your HP Palmtop PC using your partnership
with the desktop PC. To install new software:
1. Connect your palmtop PC to your desktop PC and start Windows CE Services
2.0 Mobile Devices.
2. Run the Installation Application File on your desktop PC.
3. Any files required on your desktop PC or palmtop PC are installed on the
appropriate device.
If you want to add fonts, move the font files from your desktop PC to
your palmtop PC by using Mobile Devices.
24 - HP Palmtop PC User Guide
Page 35

To remove software from your palmtop PC, double-tap the Remove Programs
icon in your palmtop PC’s Control Panel.
1. Select the application to remove
from the Programs list.
2. Tap Remove.
PRINTING
There are two ways to print from your HP Palmtop PC: using Mobile Devices on
the desktop PC or directly from the palmtop PC.
Printing from the Desktop PC
The Windows CE Services 2.0 Mobile Devices lets you print files from your HP
Palmtop PC via a desktop computer. Windows CE Services 2.0 converts palmtop
PC files and prints them according to defaults for the desktop application to which
the palmtop PC file is converted.
To print a file:
1. Connect your HP Palmtop PC to your desktop PC. Your desktop PC must
already be connected to a printer.
2. Open Mobile Devices
3. In your desktop Mobile Devices, select the file you want to print.
4. Select Print from the File menu.
Working with the HP Palmtop PC
HP Palmtop PC User Guide - 25
Page 36

Printing from the HP Palmtop PC
You can print listings from the Calendar, Tasks, and Contacts applications and
Pocket Word documents directly from the palmtop PC using an infrared printer.
Printing Pocket Word Files
1. Open the document that you want to print.
2. On the application’s File menu, tap Print.
3. In the list that appears in the Print dialog box, tap IR Port, then tap OK. (IR
Port is selected by default.)
4. Point the palmtop PC’s infrared window towards the printer’s infrared port.
Printing Calendar, Tasks, and Contact Information
1. Open the item that you want to print.
2. On the application’s File menu, tap Print.
3. To print tasks or calendar items, enter a range of dates, then tap OK. For
other items, skip to step 4.
4. In the list that appears in the Print dialog box, tap IR Port, then tap OK. (IR
Port is selected by default.)
5. Point the palmtop PC’s infrared window towards the printer’s infrared port.
RESETTING
If your palmtop PC freezes up during operation, you may find it necessary to reset
the device. The two ways to reset the palmtop PC are the soft reset and hard reset.
Warning
!
A soft reset causes any UNSAVED data to be lost.
A hard reset causes ALL data to be lost.
Soft Reset
Remove the backup battery door and press the red reset button inside the
compartment, hold for 5 seconds Or alternatively press <CTRL>+
<ON/ OFF>+<BACKSPACE>. The palmtop PC will restart automatically.
26 - HP Palmtop PC User Guide
Page 37

Hard Reset
Remove the main battery and the backup battery, wait for approximately 3 minutes, then reinsert them. Insert main battery before back-up battery. Remember,
leaving the palmtop PC with no power causes ALL DATA TO BE LOST.
TRANSFERRING FILES
Sharing data
■ Between HP 620LX and the desktop PC
After establishing a connection between the HP Palmtop PC and the desktop computer, the Mobile Devices window on the desktop displays the files and folders
located on the palmtop PC. This means that you can simply drag and drop or copy
files in the Mobile Devices to transfer date between the two machines. Refer to
the Microsoft Handheld PC Companion guide for details.
■ Among Windows CE devices, for example a HP 320LX and HP 620LX
Be sure both machines are powered on.
Sending Files
Sending palmtop Receiving palmtop
1. Open Windows Explorer and select 1. Open Windows Explorer, go to File and
you the file wish to send, do not select Receive.
open the file.
2. Go to File Menu and select Send To, 2. Position the two palmtop PCs so that
Infrared Recipient. IR ports are aligned.
3. The file will be placed in My Handheld PC
regardless of where it was in
Windows Explorer.
Sending Contact records
1. Open the Contacts application on both palmtops
2. Select the records to be sent, up to 25 records can be selected
3. From the File menu select Send
4. On the receiving palmtop, from the File menu select Receive
5. Position the two palmtop PCs so that their IR ports are aligned
• Record notes and category information will not be transferred.
Working with the HP Palmtop PC
HP Palmtop PC User Guide - 27
Page 38

Sending Voice Recorder notes
1. Open the Voice Recorder application on both palmtops, if the receiving
palmtop does not have Voice Recorder application, start Windows Explorer
2. Select the voice note to be sent
3. From the File menu select Send
4. On the receiving palmtop, from the File menu select Receive
5. Position the two palmtop PCs so that their IR ports are aligned
Migrating data
■ From Windows CE 1.0 to Windows CE 2.0
1. Connect the HP Windows CE 1.0 Palmtop PC and the desktop computer and
establish partnership between the two.
2. Synchronize the palmtop PC with the desktop computer using H/PC
Explorer 1.0.
3. Perform a full backup of your data:
To back up data to the hard disk of your desktop computer:
* Select Backup/Restore from your desktop computer’s H/PC Explorer
1.0 Tools menu.
* In the window that appears, in the Backup tab, select your
preferred options.
* Click Backup Now to initiate the process.
Take note of the directory in which your data has been saved.
4. Take note of the Communications, Owner, and World Clock alarm settings on
your palmtop PC. Also note Options and User Preferences settings for third party programs. (These settings are not automatically restored.)
5. Disconnect the Windows CE 1.0 Palmtop PC.
6. Uninstall H/PC Explorer version 1.0.
7. Insert the Microsoft CD-ROM that came with your HP 620LX to install
Windows CE Services 2.0.
8. Connect the HP 620LX to the desktop PC. Establish partnership between the
HP 620LX and the desktop PC.
9. Restore the data which you have backed up in step 2 into the HP 620LX.
* Select Backup/Restore from the Tools menu in Mobile Devices.
* Click the Restore tab and click Restore Now.
28 - HP Palmtop PC User Guide
Page 39

10. Perform a soft reset on the HP 620LX to complete the restoration operation.
* Remove the backup battery cover.
* Use a pen or tip of a straightened paper clip to press the red reset
button and hold for approximately 5 seconds. Alternatively, press
<CTRL> + <ON/OFF> + <BACKSPACE>
11. Synchronize again the HP 620LX with the Windows CE Services 2.0, to
complete the migrating data operation.
■ From other HP Handheld products to 620LX Palmtop PC (HP PIM
Translation Utility)
The HP PIM Translating Utility allows you to transfer your existing Phone Book
and Appointment Book data from HP 100LX/200LX Palmtop PCs and HP OmniGo
100/120 organizers to your HP 620LX Palmtop PC. See Translating HP PIM
Files for full details.
USING A PC CARD
You can use a PC Card to store files from your palmtop PC.
Warning
!
It is recommended that you use only memory and modem cards which have been
tested with the HP Palmtop PCs. Use of other cards is not recommended. For a
list of recommended PC Card Modems and PC Memory Cards, refer to the Readme
file in the HP Web Site (http://www.hp.com/handheld/palmtops/hp600lx/manual/
index.html).
Copying or Moving Files to a PC Card
To copy or move files from your palmtop PC to a PC Card, do the following:
1. Turn off the HP Palmtop PC and insert the PC Card.
2. Turn the palmtop PC on again.
3. Select the file to move.
4. In the Edit menu, tap Copy (or press + ) if you want to keep
the file on your palmtop PC and put a copy on the card.
CTRL
C
Working with the HP Palmtop PC
HP Palmtop PC User Guide - 29
Page 40

or
Tap Cut (or press + ) to remove the file from your palmtop PC to the
CTRL
X
PC Card.
5. Open the Start menu, tap My Handheld PC, and open the PC Card folder.
6. Tap Paste in the Edit menu (or press + ). Removing a PC Card
CTRL V
It’s important to follow the steps below when removing a PC Card to prevent
possible data loss:
1. Close all applications on your palmtop PC that have open files on the card.
2. Shut down your HP Palmtop PC.
3. Press the button to the left of the card slot to eject the card.
Formatting a New PC Card
If you insert a new, unformatted card, you will be prompted to format it. (It is not
possible to reformat an already formatted card.)
USING A PC CARD MODEM
You can also use a PC Card modem in the PC Card slot. For detailed instructions
on how to make a dial-up connection between your palmtop PC and a remote
computer, refer to ‘Communicating Remotely’ of the Microsoft Handheld PC
Companion Guide.
For a list of PC Card modems that are supported on the HP Palmtop PC, refer to
the HP web site at: http://www.hp.com/handheld/index.html.
Note
!
• PC Card modems that draw more than 150mA on battery power are not
supported. Check with your PC Card modem manufacturer on
power requirements.
• It is recommended that you use an AC adapter when using PC Card modems
as they drain battery power.
• To avoid overheating, the palmtop PC should be placed on a hard surface
when you are using a PC Card modem and AC adapter simultaneously.
• Using PC Card modems when the batteries are low can cause data
corruption or loss.
30 - HP Palmtop PC User Guide
Page 41
USING A COMPACTFLASH CARD
You can use a CompactFlash card much like a PC Card, to backup and store data
that you don’t want to keep on the HP Palmtop PC permanently.
To change the CompactFlash card that you are using:
1. Save all data and close all files on the HP Palmtop PC.
2. Turn off the palmtop PC.
3. Remove the first card.
4. Insert the second card.
5. Power on the palmtop PC again to use the new card.
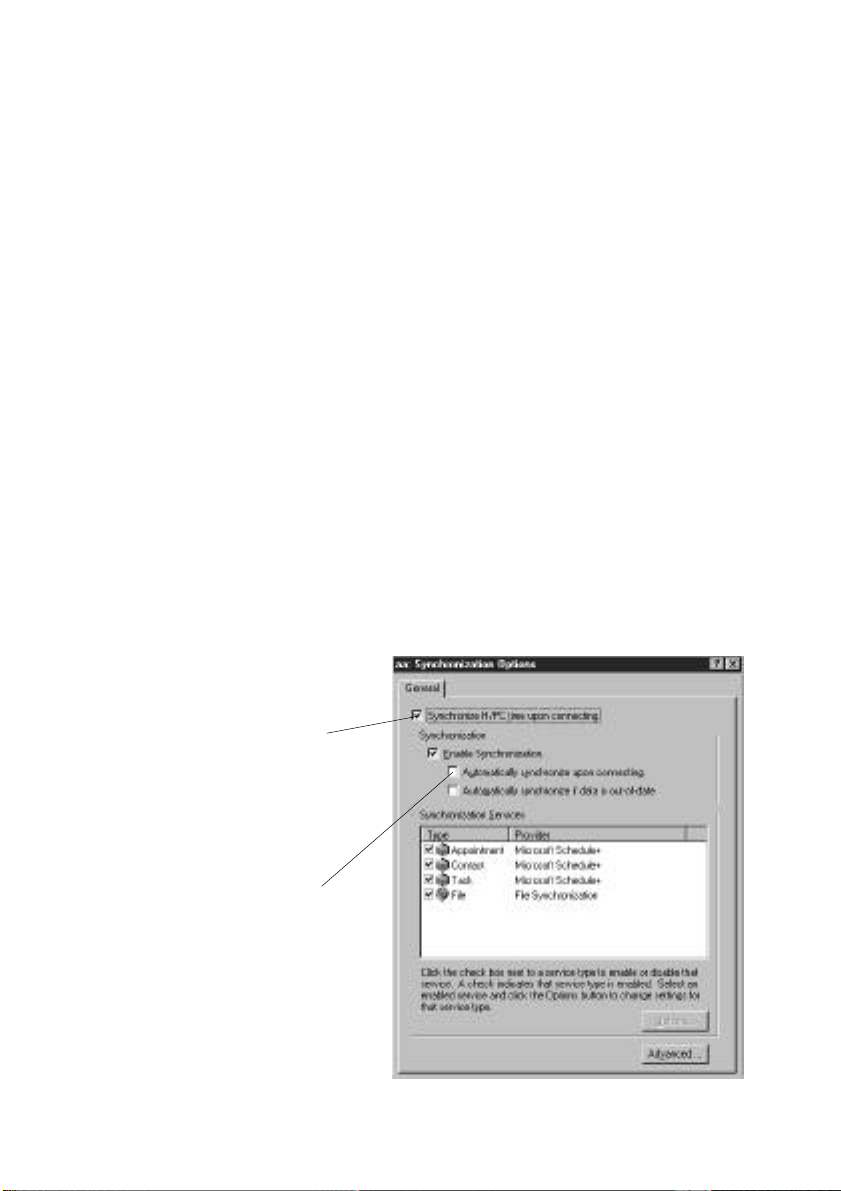
SYNCHRONIZING DATA
The Synchronization Manager lets you automatically or manually synchronize
data between the Information Manager (such as Schedule+ or Outlook) on your
desktop and the Information Manager (Calendar, Contacts, and Tasks) applications on your HP Palmtop PC. To synchronize automatically, select ActiveSynch
Options from the Mobile Devices Tools menu on your desktop PC. In the window
that appears, under the General tab, choose the following:
Click here for automatic
time synchronization
whenever you connect
the palmtop PC with
your desktop computer.
If you select this option,
select the database to
synchronize in the
Synchronization Services
window below.
Working with the HP Palmtop PC
HP Palmtop PC User Guide - 31
Page 42

Files that have been moved or copied between Microsoft Word and Excel on the
desktop PC, and Pocket Word and Pocket Excel on the HP Palmtop PC need to be
synchronized manually.
To synchronize from the desktop, select your mobile device in the Mobile
Devices window, and click Synchronize Now. Or you can press F9 on your desktop computer.
To synchronize from your mobile device, tap Start, select Programs, then
Communications, and then tap ActiveSync. Choose the connection to use:
• Serial Port @<speed> for cable connections.
• Infrared Port for infrared connections.
• Network Connection for network connections. If you do not have this
connection option, the network is not properly configured.
• Your own connection, if you created one for modem or RAS server connection.
Finally select the computer name to synchronize with, and click Connect.
Syncronizing data using an infrared connection.
If you have not set up your desktop PC and your HP Palmtop PC for an infrared
connection yet, you will need to do that first.
1. Install and configure an infrared port on your desktop computer following the
manufacturer’s instructions.
2. Install the Windows 95 infrared driver as follows:
• From the Windows CE Services CD-ROM, run Setup.exe.
• From the Windows CE Services Setup dialog box, select Optional Components.
• From the Setup Windows 95 Infrared Communications Driver v2.0 directory,
run Setup.exe. When asked to specify a virtual port, choose a port that does
not exist on your desktop computer (eg. COM3).
3. On your desktop computer, Open the Mobile Devices folder and, on the File
menu, click Communications.
4. For Port, select the virtual COM port you set up in step 2. Click Install New
Port to add the infrared port if neccessary. If you install a new port, you may
need to reinstall Windows CE Services.
32 - HP Palmtop PC User Guide
Page 43

5. On your mobile device, set up a new connection, choosing Infrared port as the
connection method.
6. In Control Panel double-click the Infrared icon. In the Infrared Monitor dialog
box, on the Options tab, make sure Enable infrared communications on is
checked. Test your connection by sending a file from your mobile device and
check for your mobile device to appear in the Infrared dialog box.
Establishing partnership:
Line up the infrared port on your mobile device with the desktop computer’s
infrared port. To synchronize from your mobile device, tap Start, select Programs,
then Communications, and then tap ActiveSync. Choose the connection to use:
• Serial Port @ <speed> for cable connections.
• Infrared Port for infrared connections.
• Network Connection for network connections. If you do not have this
connection option, the network is not properly configured.
• Your own connection, if you created one for modem or RAS server
connection.
Finally select the computer name to synchronize with, and click Connect.
Resolving conflicts
A conflict occurs when the same item has been modified both on the desktop
computer and the Handheld PC. If conflicting items are found during synchronization, one of two things will happen, depending on the option you have chosen
in the Synchronization Manager:
• Mobile Devices automatically resolves the conflicts for you.
• Mobile Devices prompts you to resolve the conflicts manually (as described in
the following procedure).
To manually resolve conflicting items
1. For each item listed in the Resolve Conflict dialog box, tap the button under the
Action column to indicate which data you want to keep.
Working with the HP Palmtop PC
HP Palmtop PC User Guide - 33
Page 44

2. Tap Synchronize to carry out the actions you specified. (If you tap Cancel, all
items listed remain in conflict the next time you synchronize.) Online Help
in Mobile Devices (on your desktop) provides more information about
resolving conflicts.
BACKING UP AND RESTORING DATA
Although unlikely, it is possible to lose data on your palmtop PC. It is, therefore,
always good practice to save a backup copy of your data. You can backup and
restore Calendar, Contacts, and Tasks data and your Inbox messages quickly with
HP Data Backup Utility. You can also perform a full system backup from the
Mobile Devices tool menu. The differences between the two are:
HP Data Backup Mobile Devices Backup
• Backup data to internal memory of the
palmtop PC or a storage card
• Will only backup Calendar, Contacts,
Inbox and Task records
• Backup will take less than 1 minute
Note: Inbox settings and services informa tion will not be backed up.
• Must be performed when connected to
the desktop PC
• Will make a full backup of all information
on the palmtop
• The desktop backup will take approx.
30-45 minutes depending on storage
Note: Security password setting will not be
saved, so use a safe storage location for this.
■ HP Data Backup
1. Close all open programs on the palmtop
2. Select Data Backup from the Control Panel
3. Tap the Back up Data button
4. Select the location for the data backup internal memory or storage card folder
5. Tap OK, you will see the status of the backup
34 - HP Palmtop PC User Guide
Page 45

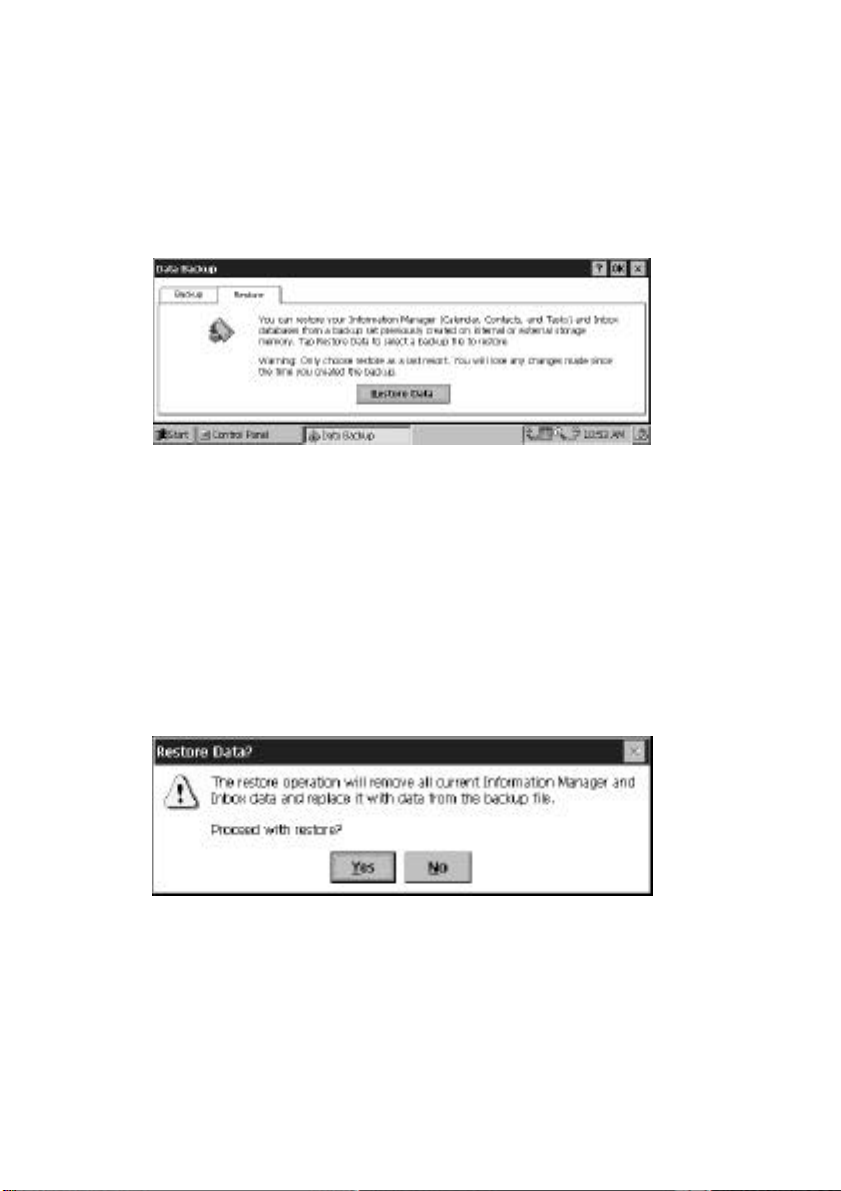
Restoring Data using HP Data Backup
1. Close all open programs on the palmtop
2. Select Data Backup from the Control Panel
3. Select Restore Tab
4. Tap the Restore Data button
5. Select the backup file you want to restore
6. Tap OK, you will see the status of the restoration
Warning
!
It is recommended that you use only PC cards which have been tested with your
model of HP Palmtop PC. Use of other cards is not recommended. For a list of
recommended PC memory cards, refer to our website at “http://www.hp.com/
handheld/thirdparty_soln/product_info/620lx_hw.html”.
Backup Tips:
• It is strongly suggested that you use an external memory card for data
backup files in order to ensure the integrity of your files in the event of a
hard reset of the palmtop PC. (Refer to ‘Resetting’)
• Back up files can later be transferred to a desktop PC for safe storage
• Disconnect the palmtop PC from the desktop PC when performing the HP
Data Backup
■ Mobile Devices Backup
The process of backing up or restoring data on the desktop computer is driven
by the Windows CE Services 2.0 software on the desktop computer.
To back up data to the hard disk of your desktop computer
1. Connect the HP Palmtop PC and the desktop computer and establish partner
ship between the two
2. Select Backup/Restore from your desktop computer’s Windows CE Services
2.0 Tools menu
3. In the window that appears, select your preferred options in the Backup tab.
HP Palmtop PC User Guide - 35
Page 46

4. Click Backup Now to initiate the process
If you select “Automatically Back Up Upon Connecting”, the Windows CE
Services 2.0 will automatically back up any changes on the data on your
palmtop PC whenever you connect to the desktop PC.
Note
!
• Do not back up files from your palmtop PC to a temporary directory on your
desktop PC. If you do, the backup procedure will not work correctly and the
integrity of your data will be compromised.
• Restoring data to your palmtop PC from your desktop computer replaces the
existing data and, there-fore, overwrites any changes you’ve made to the
palmtop PC data since the last backup.
• After a restoration operation, you must disconnect and reset your palmtop
PC. If you don’t, your palmtop PC will not function properly and you will
not be able to reconnect to your desktop computer until the reset
is completed.
To restore data from your desktop computer
1. Select Backup/Restore from the Tools menu
2. Click the Restore tab and click Restore Now
3. Restart your palmtop PC to complete the restoration operation
Using a PC Card
The process of backing up or restoring data on a PC Card is driven by the Database Backup option on the HP Palmtop PC’s Control Panel.
Warning
!
It is recommended that you use only PC Cards that have been tested with the HP
Palmtop PCs. Use of other cards is not recommended. For a list of recommended
PC Memory Cards, refer to the Readme file in the HP Web Site (http://
www.hp.com/handheld/palmtops/hp600lx/manual/index.html).
Before backing up or restoring data on a PC card, be sure that:
• All applications are closed on the HP Palmtop PC
36 - HP Palmtop PC User Guide
Page 47

• The HP Palmtop PC is not connected to a desktop PC, or other serial device
Open the Control Panel and double-tap on the Data Backup icon. The
Data Backup window appears.
Backing Up Data to a PC Card
1. Be sure that a PC Card with sufficient storage is in the PC Card slot on the HP
Palmtop PC.
2. Select the Backup tab on the Data Backup window.
3. Tap Back Up Data.
4. When asked to specify a file name to save to, specify the PC Card folder and a
file name. The database backup file should have the extension *.DBB. If you
specify a file whose name is already in use or a location that does not have
sufficient memory, you will get an error message and be asked to provide a
different file name or location.
5. Once you confirm the backup file name and location, the Database Backup In
Progress dialog appears, providing status on the backup operation as
it proceeds.
6. The Backup Complete message appears when the backup operation
has completed.
7. Tap OK to return to the Data Backup screen.
Working with the HP Palmtop PC
HP Palmtop PC User Guide - 37
Page 48
Restoring Data from a PC Card
You can restore database data stored on a PC memory card to the HP Palmtop PC
using the same Data Backup utility.
1. Select the Restore tab on the Data Backup window.
2. Tap Restore Data.
3. In the Restore dialog that appears, specify the name of the database backup file
to restore to the palmtop PC, then tap OK. The default directory for this dialog
is My Handheld PC (root); the default file type is “Database Backup (*.DBB).”
If a PC card or Compact Flash card is in the palmtop PC, the default directory
is PC Card.
4. After you confirm a backup storage file from which to restore the data, the
Restore Data? message appears.
Tap Yes to proceed or No to cancel the operation and return to the Data
Backup screen.
5. The Data Restore In Progress dialog appears next, providing status on the
operation as it proceeds.
38 - HP Palmtop PC User Guide
Page 49

6. When the restoration is successfully done, the final message appears, reminding you that there may be some database cleanup to do the next time you synchronize with the desktop PC.
Using a CompactFlash Card
The procedures for backing up and restore using a CompactFlash Card are the
same as described in “Using a PC Card” on page 29.
Working with the HP Palmtop PC
HP Palmtop PC User Guide - 39
Page 50

40 - HP Palmtop PC User Guide
Page 51

Chapter 4 – TRANSLATING
HP PIM DATA FILES
The HP PIM Translation Utility allows you to seamlessly transfer your existing
Phone Book and Appointment Book data from HP 100LX/200LX palmtop PCs
and HP OmniGo 100/120 organizers to your HP Palmtop PC. The translation
process involves the following:
1. Transfer the data from the HP 100LX/200LX palmtop PC or HP OmniGo
100/ 120 organizer to the desktop PC’s hard drive or a floppy disk using an
HP connectivity solution. (Refer to your existing HP handheld device
manual for more information.)
2. The HP PIM Translation Utility installed on the desktop PC translates the
PIM data files into Schedule+ 7.0a application records.
3. You can then synchronize the updated Microsoft Schedule+ 7.0a records to
the HP Palmtop PC using the Windows CE Services 2.0 Mobile Devices.
This chapter describes the second step, using the HP PIM Translation
Utility to convert data files.
Important
!
You must install the version of Schedule+ 7.0a that is provided on the HP
Palmtop PC CD on your desktop PC before trying to translate PIM data files.
INSTALLING THE HP PIM TRANSLATION UTILITY
To install the HP PIM Translation Utility onto the desktop PC:
1. Insert the HP CD-ROM into the CD drive.
2. Click on the “Trial Software” button on the main menu of the HP Palmtop
PC CD-ROM. The Solutions and Resource Guide for Hewlett-Packard
Palmtop PC’s will appear. Select By Product on the left. Select PIM
Translator and then click Free Software! icon on the top right corner to
download the HP PIM Translation Utility.
Translating HP PIM Data Files
HP Palmtop PC User Guide - 41
Page 52

STARTING THE TRANSLATION
When you launch the HP PIM Translation Utility application on your desktop
PC, you first see the Welcome screen:
Click Appointments to begin
translating Appoint Book data.
Note
!
Click Phone Book to begin
translating Phone Book data.
Click Status to see the
Status screen.
Click Help to see help
for the Welcome screen.
Click Close to exit the
application.
To translate multiple PIM data files, you need to repeat the Translation operation for each file separately.
TRANSLATING APPOINTMENT DATA
To translate an appointment data file:
1. Click on Appointments in the Welcome screen.
2. Specify the appointments data file to translate in the Open File dialog box
that appears, then click OK. If the file you specify is not a PIM database file
of the appropriate type, you’ll get an error message.
3. The Appointment Book Translation Note screen appears.
42 - HP Palmtop PC User Guide
Read the translation information then...
...click Translate
to proceed.
...click Cancel to return
to the Welcome screen.
...click Help for help
about this screen.
Page 53

4. The data translation progress screen appears, showing the progress of
current translation activity.
Click Stop to
terminate the
translation
operation in
progress.
5. When the translation has successfully completed, a message appears. Click
OK to return to Welcome screen.
An Appointment Translation Limitation
Although the Appointment Book applications on the HP 100LX/ 200LX palmtop
PCs and HP OmniGo 100/120 organizers and the Calendar application on the HP
Palmtop PC support daily, weekly, monthly, and yearly repeated events, the
Schedule+ application supports only daily and yearly repeated events. Since all
translation goes through Schedule+, there is no direct mapping from earlier HP
Palmtop products to Schedule+ for repeating weekly and monthly events.
As long as you do not edit imported repeating weekly or monthly events in
Schedule+ before you synchronize them with the HP Palmtop PC, they will
translate correctly into repeating events on the palmtop PC. If, however, you edit
them in Schedule+, they lose their weekly/monthly attribute and are treated as
single events.
TRANSLATING PHONE BOOK DATA
To translate a phone book data file:
1. Click on Phone Book in the Welcome screen.
2. Specify the phone book data file to translate in the Open File dialog box,
then click OK. If the file you specify is not a PIM database file of the
appropriate type, you’ll get an error message.
Translating HP PIM Data Files
HP Palmtop PC User Guide - 43
Page 54

3. The Phone Book Translation Field Map screen appears.
Modify the suggested field
mappings if necessary, then...
...click Cancel to return
to the Welcome screen
...click Translate to proceed
...click Help for help
about this window
See “Mapping Field Names,” below, for more information on mapping phone
book fields.
4. Next the data translation progress screen appears, showing the progress of the
current translation activity. Click the Stop button to terminate the translation
operation in progress.
5. When the translation has successfully completed, a message appears. Click
OK to return to Welcome screen.
Mapping Field Names
The HP PIM Translation Utility attempts to map the fields in your Phone Book
data file to standard fields in a Schedule+ record. As long as your Phone Book
fields have standard names (that is, you have not modified the Phone Book
database field structure), the translation is straightforward. The suggested
mapping appears in a table in the Phone Book Translation Field Map screen:
44 - HP Palmtop PC User Guide
Page 55

• The left column shows the names of fields extracted from thePhone Book data
file. (Only the fields that have data are included.)
• The right column shows the names of Schedule+ fields.
• An arrow in the center column indicates that the data in a Phone Book field in
the left column will be copied to the corresponding Schedule+ field in the right
column. Note that multiple Phone Book fields (for example, Address1 and Ad
dress2) can be mapped to the same Schedule+ field (for example, Business ad
dress).
No arrow in the center column indicates that there is no mapping and,
therefore, the data will not be copied.
You can add or modify the suggested mappings before translating the data. For
example, if you have customized the name of a Phone Book field so that the HP
PIM Translation Utility did not know how to map it, you can define a mapping for
it yourself.
Mapping a Name
The Name field in the Phone Book data file can be mapped in three ways in
Schedule+:
• If the name in the Phone Book data file is entered as Name1, Name2 [Name3]
(that is, with a comma after the first word), it is always mapped to the two
name fields in Schedule+ with Name1 = Last Name and Name2 [Name3] =
First Name.
Translating HP PIM Data Files
HP Palmtop PC User Guide - 45
Page 56

• If the name in the Phone Book data file does not have a comma after the first
word, you can choose one of two options for its mapping:
• Last name/First name - (default) Name1 [Name3] Name2 maps to Name1 =
= Last Name and [Name3] Name2 = First Name.
• First name/Last name - Name1 [Name3] Name2 maps to Name1 [Name3] =
First Name and Name2 = Last Name.
(Note that in all cases Last name is mapped to a single word, with any additional
words such as [Name3] becoming part of First name.)
Adding a Mapping
If a field appears in the left column with no mapping (that is, no arrow in the
center column) select a field name from the drop down list box of the Schedule+
field immediately to the right of the field whose mapping you want to define.
When you complete the selection, the field name appears in the appropriate cell
in the right column and a mapping arrow appears in the center column.
Changing a Mapping
If a field in the left column is mapped to the wrong field in the right column,
change the mapping by selecting a different Schedule+ field name from the drop
down list box for the corresponding cell in the right column.
46 - HP Palmtop PC User Guide
Page 57

Deleting a Mapping
If a field in the left column should not be mapped to anything, select (none) from
the drop down list box for the corresponding cell in the right column. The (none)
option is not available for the Name field.
REVIEWING TRANSLATION STATUS
After each translation is finished, whether it completed successfully or was interrupted, the results are written onto the Status screen. Click the Status button on
Welcome screen to see the history of any translations begun during the current
execution of the HP PIM Translation Utility application.
Click OK to return to the Welcome screen
Translating HP PIM Data Files
HP Palmtop PC User Guide - 47
Page 58

48 - HP Palmtop PC User Guide
Page 59

Chapter 5 – WORKING WITH
PRE-INSTALLED APPLICATIONS
OVERVIEW OF HP PALMTOP PC PRE-INSTALLED APPLICATIONS
The software programs on your palmtop PC have been specifically developed for
this computer. Many of them are similar, “pocket-sized” versions of those
running on your desktop computer. Information can be exchanged between the
software programs running on your palmtop PC and those running on your desktop computer. In this way you can take advantage of both the portability of your
Handheld PC and the power and storage capacity of your desktop computer.
Information Manager for Windows CE
Track contacts, manage your schedule, and organize tasks with the three components of Information Manager: Contacts, for keeping phone numbers and addresses; Calendar, for scheduling appointments and events; and Tasks, for keeping track of your to-do list. If you are using a Microsoft desktop Information
Manager like Outlook, you can update the information in Information Manager
by synchronizing contacts, appointments, and tasks with your palmtop PC.
Microsoft Pocket Word
Take notes, compose memos, and review reports anytime, anywhere. You can
create and edit files in Pocket Word, and then print them via infrared or transfer
them to Microsoft Word on your desktop computer for printing. You can also take
Microsoft Word documents on the road, then convert and copy your documents
back to your desktop computer.
Microsoft Pocket Excel
Calculate expenses, create reports, or manage data using this application. You can
do spreadsheet computing while you’re away from your desktop computer.
Microsoft Pocket PowerPoint
Carry your slides and even make full-color PowerPoint presentations from your
palmtop PC if you have a VGA-out card which is available for seperate purchase
as an accessory.
Working with Pre-Installed Applications
HP Palmtop PC User Guide - 49
Page 60

Quicken®ExpensAble
TM
Completing an expense report is easier, more convenient and more cost-effective
with Quicken ExpensAble for Windows CE (QE/CE) from On the Go Software.
QE/CE replicates the look and feel of its award-winning desktop companion,
Quicken ExpensAble (QE) in a fully featured expense reporting application.
Fiscal Pro
TM
Fiscal Pro is a financial application software designed specifically for real estate,
retailing and business professionals who need to use their palmtop PCs to make
financial decisions quickly and accurately. Fiscal Pro employs a “form filling”
metaphor to provide you with a rich problem solving environment that is unparalleled in its ease of use, power and flexibility.
Microsoft Voice Recorder
Record voice memos and notes to yourself without having to contend with paper
and pen. The Voice Recorder allows you to record messages to yourself quickly
and conveniently.
bFAX ProTMFax Send/Receive Application
Send, receive and manage faxes quickly and conveniently. Attach Pocket Word
documents (pwd), plain text files (txt), received-faxes (tif), bitmap images (bmp),
even your own handwritten notes to your faxes.
Inbox
Send and receive Internet mail, and send faxes. If you have an account with an
Internet Service Provider (ISP), you can use Inbox to send and receive messages
via a dial-up connection using a PC card modem.
Microsoft Pocket Internet Explorer
Find information on the Internet. The Pocket Internet Explorer toolbar makes it
easy to enter an address, return to your start page, and store favorite addresses in
a folder.
50 - HP Palmtop PC User Guide
Page 61

bFIND Global Find Utility
Search the contents of your palmtop. With bFIND you can search databases, files,
filenames, and e-mail messages.
World Clock
Keep track of the current date and time whether you are at home or away. You can
set the clock to keep time for your home city and for a place you’re visiting.
World Clock stores information on time zones, airports, dialing codes, and distances, and even calculates sunrise and sunset for any city in the world.
Calculator
Perform calculations using on-screen buttons and keep track of your calculations
with an on-screen “paper tape”. In addition, you can copy data and paste it into
documents and spreadsheets.
Other Possibilities: Sending and receiving information
Your palmtop PC provides you with several methods of transferring information
and communicating with other computers.
• Using a serial cable and the Mobile Devices utility on your desktop computer,
you can synchronize Calendar, Contact and Task information between these
programs on your palmtop PC and the Microsoft Information Manager on
your desktop computer.
• Using a serial cable and the Mobile Devices, you can transfer files, such as
Microsoft Excel, Microsoft Word, and Microsoft PowerPoint files between
your palmtop PC and your desktop computer.
• Using infrared communications, you can transfer information between two
palmtop PCs.
• Using a PC card and modem and a communications program, you can
connect to the Internet (or use a RAS connection to connect to your
company network).
Working with Pre-Installed Applications
HP Palmtop PC User Guide - 51
Page 62

INFORMATION MANAGER FOR WINDOWS CE
Information Manager includes three components:
• Calendar: for scheduling appointments and events
• Contacts: for keeping phone numbers and addresses
• Tasks: for keeping track of your to-do lists
If you are using a Microsoft Information Manager such as Schedule+ or Outlook
on your desktop computer, you can transfer information between the above programs on your palmtop PC with the desktop Information Manager. This allows
you to have the most up-to-date, accurate information on both computers.
Creating the initial database
If you already have calendar, contact, and task information stored on another
computer, you have the following options for transferring the information to your
palmtop PC:
• If you have calendar, contact, and task information stored in a Microsoft
Information Manager (e.g. Schedule+ 7.0a or Outlook) in your desktop
computer, you can synchronize your palmtop PC using the Mobile Devices.
• If the information is stored in another palmtop PC, you can transfer individual
contact cards using infrared communication.
• If the information is stored in HP100LX/200LX palmtop PCs or HP OmniGo
100/120 organizers, you can transfer your Appointment Book and Phone
Book data to your palmtop PC using the appropriate HP connectivity solution
together with the HP PIM Translation Utility which is included in the
HP CD-ROM.
Working in the software programs
The Calendar, Contacts, and Tasks programs share a similar structure: each has
both a list view and individual card views.
• List views. Each program has one or more list views. Each list view displays
one row of the most important information for each entry. In some cases, you
can make changes in the list view.
52 - HP Palmtop PC User Guide
Page 63

• Card views. Each entry in a list has a card that contains detailed information
about that entry. From the list, double-tap or press Enter on an entry to see its
card. To create a new entry, tap the New option from the File menu.
Important
!
Whenever you add or make changes to a card, be sure to tap OK to save your
changes before you close the card.
CALENDAR
To start Calendar:
• Press on the Calendar icon on the Quick Application Launch Pad OR
• Double-tap the Calendar icon on the desktop OR
• Tap the Start button, then Programs, followed by Pocket Outlook to choose the
Calendar icon
Viewing your calendar
Calendar has three views: Day, Week, and Agenda. You can also have a month
view of your appointments and a 6-month calendar using the HP-exclusive utility,
Month-at-a-Glance-Plus. To switch views, tap on the appropriate button on the
toolbar or double-tap on the Month-at-a-Glance-Plus icon on the taskbar.
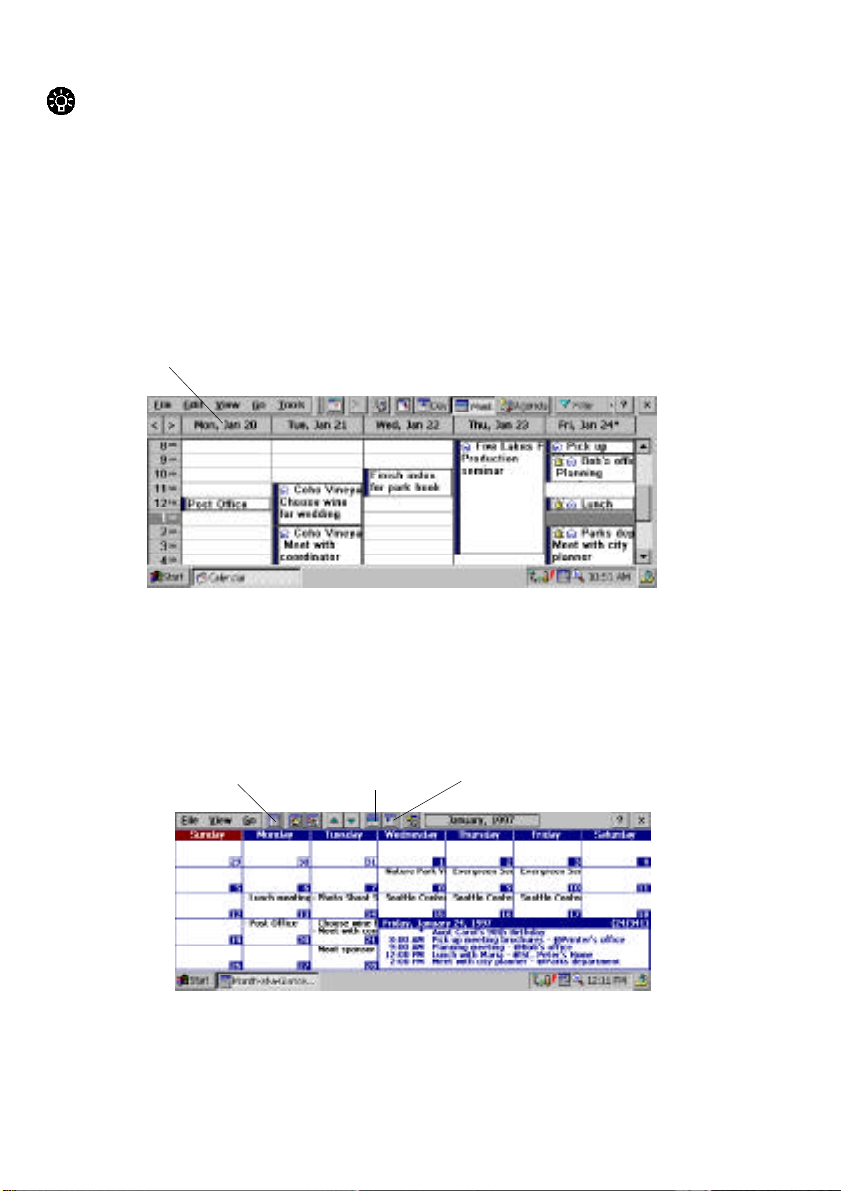
Day view
In Day view, tap the date that you want to see on the calendar. Full-day events
appear in the box above the day’s schedule. Active tasks entered in the Tasks
program appear in the box above the calendar. To edit any task information, just
tap on the task to get the task card.
Working with Pre-Installed Applications
HP Palmtop PC User Guide - 53
Page 64
Tip
To quickly change the date, tap the month or year on the calendar, and then select
the month or year you want.
Week view
In Week view, you can see a week’s appointments all at once. Tap the arrows to
the left of the date headings to move forward and backward a week at a time. Use
the commands on the View menu to set the number of days displayed and to
switch between hour and half-hour time slots.
Tapping a date button takes you to that day in Agenda view.
Month view
To get a Month view, double-tap on the Month-at-a-Glance Plus icon on the taskbar.
You can also view your appointments for the day in the Month view by first tapping on the date, and then pressing the spacebar.
6-Month Calendar
54 - HP Palmtop PC User Guide
Week View
Day View
Page 65

Agenda View
Agenda view shows you a summary of your appointments, events, and tasks for
the day. To add new appointments, events, or meetings, use the File menu. To edit
them, highlight the item and choose Edit Item from the Edit menu or simply
double-tap on the item to evoke a card. You cannot add a new task from the
Agenda view.
6-month Calendar
From the Month view, you can obtain a 6-month calendar by choosing the 6month calendar from the View menu on the toolbar.
Adding appointments and events to your schedule
In Calendar, you use an appointment card to add appointments and full-day events.
You can even set additional information, like reminders and notes. In both Day
and Week views, symbols appearing in an appointment’s description indicate that
additional information has been entered.
Working with Pre-Installed Applications
HP Palmtop PC User Guide - 55
Page 66

To add an appointment
1. In Day or Week view, tap the appointment date on the calendar. In the Month at-a-Glance view, double-tap on the appointment date.
2. Double-tap the appointment time or tap the New Appointment button.
Type a description of the appointment and a location. If the appointment will
last longer than the default time slot, drag the stylus over the necessary time
slots to select them. Type in your notes pertaining to the appointment in the
Notes area. You may also choose to put in the category of the appointment and
participants of a meeting by tapping on the appropriate button above the
Notes area.
3. If you want, change the date and time by either typing over the information
displayed, or tapping the down arrow in the date and time boxes.
4. Add any of the following information about the appointment:
• For a reminder, tap the Reminder check box, and then specify when you
want to be reminded about an appointment; for example, 15 minutes before
the start. Tap the Options in the Tool menu to specify the kind of reminder
you want.
• Tap the down arrow in the Recur box to make this into a recurring appointment.
5. When finished, tap OK.
Tip
To set an appointment with no duration, specify the same start and end time.
You’ll see a small triangle icon next to an appointment with no duration.
To add a full-day event
1. In Day view, select the date of the event you want to add.
2. Tap File and then tap New All Day Event. Alternatively, you can tap the All
Day Events box near the top of the window and then tap New All Day Event.
You can also add new annual all day events from the pull-down menu.
3. Complete the information in the appointment card. Make sure that the All day
Event check box is selected.
4. When finished, tap OK.
56 - HP Palmtop PC User Guide
Page 67
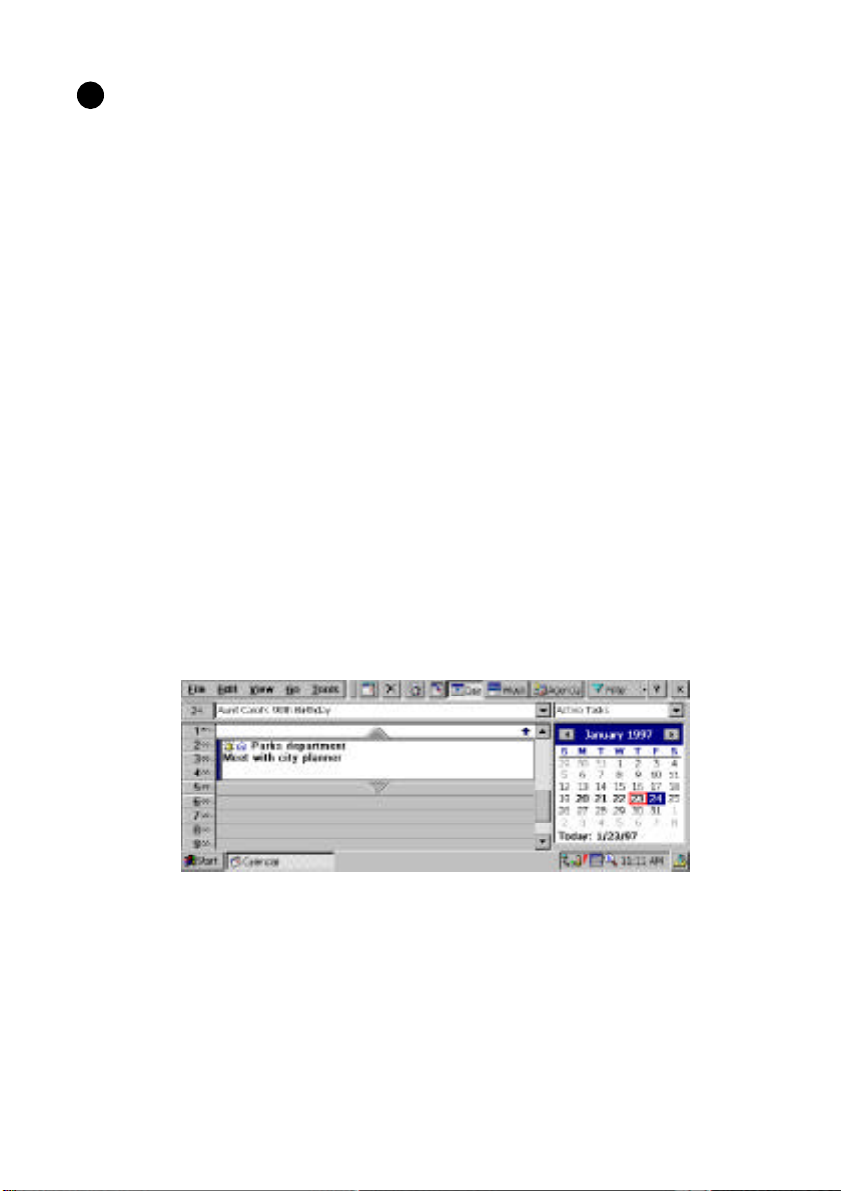
Note
!
In Week view, an asterisk (*) in the date button indicates that you have entered an
event for that date. Events also appear in Agenda view.
Changing or deleting appointments and events
To change appointment information
1. Double-tap the appointment that you want to change.
2. Make the changes, and then tap OK.
If you want to change only the time or duration of an appointment, you can do so
without opening the appointment card.
To move an appointment to a different day or time
• In Day view, drag the appointment up or down to the new time slot.
• In Week view, drag the appointment up or down within that day or from one
day to another within the week.
To change the time duration of an appointment
1. Tap the appointment.
2. Drag the upper or lower triangular resize handle up or down.
To change a full-day event
1. Tap the event in the All Day Events drop-down list.
2. Make the changes you want, and then tap OK.
To delete an appointment
• Tap the appointment, and then tap the Delete button on the toolbar or the
DEL key.
Working with Pre-Installed Applications
HP Palmtop PC User Guide - 57
Page 68

Important
!
Appointments and events are deleted immediately and cannot be retrieved; they
are not moved to the Recycle Bin.
Appointments and events you delete on your Handheld PC will be deleted from
your information manager on your desktop computer the next time you synchronize.
Printing appointments, events, and tasks
You can print appointments, events, and tasks stored in your Calendar program
directly from your palmtop PC. They are printed in plain text format.
To print appointments, events, and tasks
1. Connect your palmtop PC to a printer using a serial cable or an
infrared connection.
2. On the File menu, tap Print.
3. Select the range of dates for which you want to print your appointments, events,
and tasks.
4. In the list, tap the port to which you want to print, and then tap OK.
58 - HP Palmtop PC User Guide
Page 69

CONTACTS
You can use the Contacts program to keep track of your personal and business
contacts at home and on the road. You will no longer need to save a stack of
business cards until you get back to your office(you can enter the information in
your palmtop PC. When you connect your palmtop PC to your desktop computer,
your new and updated contacts are synchronized with your existing contacts.
To start Contacts
• Press on the Contacts icon on the Quick Application Launch Pad OR
• Double-tap the Contacts icon on the desktop OR
• Tap the Start button, then Programs, followed by Pocket Outlook to
choose Contacts
Viewing contact information in the contact list
Contacts maintains a list of contacts that you create, as shown in the following
illustration.
To move around in your contact list
• To quickly move to a name in the list, tap the tab containing the first letter of
the name you want to see.
• To move up or down one line at a time, tap the scrollbar arrows.
• To move up or down by one page, tap the scrollbar above or below the slider.
To sort the contact list based on a different column
Tap the column heading. The list will be sorted by this column. By default, the list
is sorted alphabetically by last name. You can choose to sort the list by first name
or by any of the columns in the contact list. A triangular icon in the column heading indicates the column by which the list is sorted.
Working with Pre-Installed Applications
HP Palmtop PC User Guide - 59
Page 70

Note
!
You can resize the columns to see more information by dragging the bar between
column headers to the left or right.
To change the information that appears in the contact list
1. On the Tools menu, tap Customize Columns.
2. Select the item that you want to appear in a column by tapping the down arrow
in the column box and then tapping Add & Remove as necessary.
3. When finished, tap OK.
Adding and changing contact information
You add and maintain contact information for an individual on a contact card.
Each card contains three tabs which are accessed via the icons, Business, Home
or Notes. Touch the icons to go to the appropriate tab.
To create a new contact card
1. Tap File, then New on the toolbar.
2. Type the information you want in the appropriate fields.
3. When finished, tap OK.
60 - HP Palmtop PC User Guide
Page 71

Tips for adding information
• Although names and addresses appear as a single block of text in the contact
card, the Contacts program stores the information in separate fields to make
searches and synchronization easier. To make sure a name is stored correctly,
in the contact card, tap the name, and then tap the Confirm Address button to
the right of the name to display the Confirm Name dialog box. Do likewise for
the address.
• If a field that you want is not displayed, tap Other to select from a list of fields.
To modify a contact card
1. In the contact list, double-tap the entry that you want to change.
2. Make the changes you want on the contact card. To change a field that is not
currently displayed, tap Other.
3. When finished, tap OK.
To create a copy of a contact card
1. In the contact list, tap the name of the person whose card you want to copy.
2. On the Edit menu, tap Create Copy.
Tip
Copy contact cards to quickly create cards for several people who share information for example, several contacts from the same company. First make the copy
and then double-tap the copy and make any changes.
To delete a contact card
1. In the contact list, tap the contact card(s) that you want to delete.
2. Tap the Delete button or DEL key.
Important
!
Contact cards are deleted immediately and cannot be retrieved; they are not moved
to the Recycle Bin.
Cards you delete on your palmtop PC will be deleted from your information
manager on your desktop computer the next time you synchronize.
Working with Pre-Installed Applications
HP Palmtop PC User Guide - 61
Page 72

Finding contact information
Contacts gives you simple methods to quickly search for a contact in your contact
list, and to search for specific information anywhere in the Contacts database.
To find a contact
1. In the contact list, tap a column heading to indicate the type of information you
want to search on. The column heading appears in the Quick find box on
the toolbar.
2. Type a few characters of the information you’re trying to find. These characters
are displayed in the Quick find box as you type. The contact list scrolls to the
first entry that matches the character(s) you type. For example, if you select
Last Name and type “smi”, the list might scroll to the first person in your list
named Smith.
To find specific information on a contact card
1. On the Tools menu, tap Find.
2. Type the information you want to find, and then tap OK. Contacts opens
the first contact card on which the information is found, and highlights
the information.
Printing contact information
You can print your contact information directly from your palmtop PC. The information is printed in plain text format.
To print contact information
1. Connect your palmtop PC to a printer using a serial cable or an
infrared connection.
62 - HP Palmtop PC User Guide
Page 73

2. Select the names of the contacts for which you want to print information. To
select more than one name, hold down the SHIFT key while tapping.
3. On the File menu, tap Print.
4. In the list, tap the port to which you want to print, and then tap OK.
TASKS
Take your Handheld PC with you as your portable electronic to-do list. You can
keep track of your tasks and check them off as you complete them, plus you can
set priority, reminder, and recurrence options for each task.
Viewing tasks
In your task list, you can quickly view all tasks or a specific task category. You
can choose between All Tasks, Active Tasks, Completed Tasks, or tasks associated with a particular project.
Note
!
You can also view active tasks from the Active Tasks list in the Day view of the
Calendar program.
To start Tasks
Press on the Tasks icon on the Quick Application Launch Pad OR Double-tap the
Tasks icon on the desktop OR Tap the Start button, then Programs, followed by
Pocket Outlook to choose Tasks
To view a task category
1. Tap the Filter box on the toolbar to see the list of task categories.
2. Tap the task category that you want to view. Tasks included in that category are
displayed in the window.
Working with Pre-Installed Applications
HP Palmtop PC User Guide - 63
Page 74
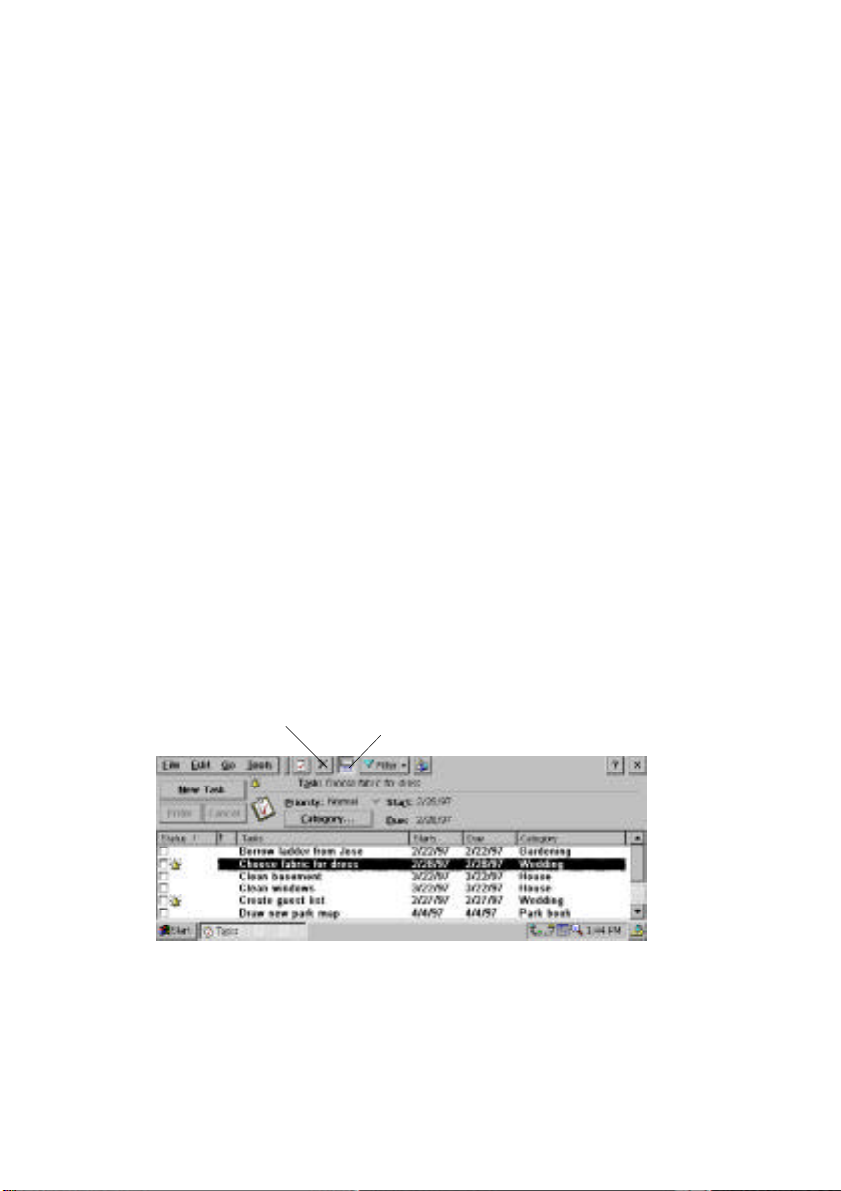
Sorting Tasks
You can sort the task list by any of its columns. Simply tap the column heading,
and the information is sorted in alphabetic or numeric order. If you sort by Status,
uncompleted tasks appear before completed tasks.
Adding and changing task information
To create a new task
1. Tap the New Task button on the toolbar.
2. Type the task description, and then enter other information.
3. If you want a reminder, select the Reminder check box, and then set the
reminder options you want. (You can only set a reminder for a task that
has both a start and due date.)
4. If it is recurring, tap the down arrow in the Recur box and specify
the recurrences.
5. To add task notes, tap on the Notes area and type your information.
6. When finished, tap OK.
To edit tasks in the task list
1. Tap on the Task, then tap Edit Task from the Edit menu on the toolbar to display
the Task card. You can also double-tap on the task to display the Task card.
2. Alternatively, you can also use the Edit panel by tapping on its icon.
Delete button
Go to the edit panel by tapping this icon.
3. Make the changes you want, and then tap Enter.
To quickly make changes to a number of tasks, work in the task list with the edit
panel displayed. If you are making changes to reminders, setting recurrence
options, or adding notes, edit the task card directly.
64 - HP Palmtop PC User Guide
Page 75

To mark a task complete
In the task list, select the check box for the completed task or on the task card,
select the Completed check box. When you mark a task complete it moves into
the Completed Tasks category.
To permanently remove a task from the list
1. Tap the task in the task list.
2. Tap the Delete button on the toolbar.
Tasks are deleted immediately and cannot be retrieved; they are not moved to the
Recycle Bin.
To permanently remove all completed tasks from the list
On the Edit menu, tap Delete Completed Tasks.
Tasks you delete on your palmtop PC will be deleted from your information manager on your desktop computer the next time you synchronize.
Working with reminders
You can set reminders for appointments, events, and tasks, which consist of one
or more of the following: a message box, a flashing light, or a sound.
The reminder will be activated before the appointment, event or task occurs by
the period of time you specify. Reminders are activated, even when your palmtop
PC is powered off. The message box is displayed on your screen when you power
the Handheld PC on.
You can set up default reminder options by tapping Tools, then Options, and then
tapping the alarm icon. When you specify reminder options for a specific item,
they override the defaults. In Calendar, appointments for which reminders have
been set are identified by the alarm symbol.
• If a reminder appears in a message box, tap OK to close the box or tap Snooze
to see it again after five minutes.
Printing a list of tasks
You can print a list of tasks directly from your Handheld PC. Tasks are printed in
plain text format.
Working with Pre-Installed Applications
HP Palmtop PC User Guide - 65
Page 76

To print a list of tasks
1. Connect your Handheld PC to a printer using a serial cable or an infrared
connection.
2. From the Task list, select the tasks that you want to print.
3. On the File menu, tap Print.
4. In the list, tap the port to which you want to print, and then tap OK.
Synchronizing information with your desktop
You can synchronize calendar, contact and task information between your desktop computer and your palmtop PC, so that you can easily maintain up-to-date,
accurate information in both locations. Data can be synchronized manually or
automatically, whenever you connect the two computers. See ‘Synchronizing Data’
on Page 31 for details.
MICROSOFT POCKET WORD
Wherever you go, your Handheld PC gives you the word processing and
spreadsheet tools you need:
• Use Microsoft Pocket Word to create everything from notes and memos
to reports.
• Use Microsoft Pocket Excel to create spreadsheets for everything from
expense reports to investment tracking to mileage logs.
You can create these documents and spreadsheets yourself or use one of the sample documents.
Pocket Word and Pocket Excel work much like their desktop counterparts,
Microsoft Word and Microsoft Excel. You can even use Pocket Word and Pocket
Excel to view Microsoft Word and Microsoft Excel files, vice versa.
In this chapter, you will learn how to use Pocket Word and Pocket Excel to create
documents and spreadsheets. This chapter also describes how to print Pocket Word
files directly from your Handheld PC. For information on how to print PocketWord
and Pocket Excel files from H/PC Explorer, as well as convert them to Microsoft
Word and Microsoft Excel, see Chapter 3, “Working with the HP Palmtop PC”.
66 - HP Palmtop PC User Guide
Page 77

Working with documents and workbooks
Pocket Word and Pocket Excel share many common functions. Regardless of
which program you are using, the process of opening, saving, and searching through
a file is almost identical. The following section describes how to do these basic
operations in either program.
Opening a document or workbook
You can open as many documents or workbooks as you want, limited only by
available memory. Each open document or workbook appears as a button on the
taskbar. To quickly switch to another document or workbook, tap the corresponding button on the taskbar.
To open Pocket Word or Pocket Excel
Double-tap the Pocket Word or Pocket Excel icon on the desktop. This both opens
the chosen program and a file.
To open an existing document or workbook
1. On the File menu, tap Open.
2. Browse to the location of the document, and then double-tap the
document icon.
Tip
To easily open the most recently used file, tap the File menu and then tap the
file’s name.
To create a new document or workbook
On the File menu, tap New, and then tap Document or Workbook.
Working with Pre-Installed Applications
HP Palmtop PC User Guide - 67
Page 78

To create a document or workbook from a sample
1. On the File menu, tap New, and then tap Document/Workbook from Template.
2. Double-tap the sample file that you want.
Sample Type
Document
File Name
Estimate
Letter
meeting Notes
Memo
Workbook
Amortize
Conversions
Expense Report
Golfcard
Mileage Log
3. On the File menu, tap Save As, enter a new name for the file, and then tap OK.
4. Begin working in the new file:
• In a document, select the text to replace and begin typing.
• In a workbook, select a cell and begin typing.
Saving a document or workbook
By default, Pocket Word and Pocket Excel save their files to the My Documents
folder. If you rename the My Documents folder, these programs will save their
files to the root folder (My Handheld PC).
Pocket Word gives you two ways to save documents:
• .pwd (Pocket Word) saves the document in Pocket Word format. Choose this
file type when using files on your palmtop PC or transferring files to Microsoft
Word on your desktop computer.
• .txt (Text Only) saves text without formatting. Choose this file type if you are
going to use this file with a program that cannot read a .pwd file.
Pocket Excel automatically assigns a .pxl extension to the workbook you save.
To save a document or worksheet
1. On the File menu, tap Save.
68 - HP Palmtop PC User Guide
Page 79

2. If this is the first time you have saved the file, type a name for it in the Name
box, and then open the location in which you want to store it.
3. If you are saving a Pocket Word document, go to the Type list and select the
file type.
4. Tap OK.
To close a document or workbook
• Tap the Close button on the toolbar.
If only one document or workbook is open, closing it also closes Pocket Word or
Pocket Excel, respectively.
Finding and replacing text or data
Use the commands on the Edit menu to quickly locate or revise information in a
file. In Pocket Word, use Find (CTRL+F) to locate information and Replace
(CTRL+H) to revise information. In Pocket Excel, use Find/Replace (CTRL+F)
to do either.
Note
!
Pocket Word searches the whole document regardless of where the insertion point
is located when you start the search.
When finding or replacing information, you can specify not only the text or data
to locate or replace, but also how to conduct the search. Set your search options in
the Find and Replace dialog boxes that appear after choosing a command from
the Edit menu.
Choose this search option
Match whole words
Match case
Match entire cell
Look in
If you want to
Search for the whole word only (Pocket
Word only)
Search for the word or phrase exactly
as typed
Search for an exact and complete match
of characters in a cell (Pocket Excel only)
Search for a particular workbook
attribute, either a value or formula
(Pocket Excel only)
Working with Pre-Installed Applications
HP Palmtop PC User Guide - 69
Page 80

When finding information, tap the Edit menu and then tap Find Next (CTRL+4)
to find the next instance of the search.
When replacing information, you can choose which instances in the file get replaced. Make these choices in the Find dialog box that appears after the first
instance has been located.
Choose this replace option
Find (Pocket Word)
Find Next (Pocket Excel)
Replace
Replace All
If you want to
Find the next match without replacing
the current one
Replace the current selection
Replace all occurrences of the word,
phrase, or data in the file
Moving and copying information
Before you can move or copy information in your file, you first need to select it.
The easiest way to select information is with your stylus.
To move or copy a selection
1. Select the text you want to move or copy.
2. On the Edit menu, tap Cut to move the selection or tap Copy to copy
the selection.
3. Tap the location where you want to move or copy the selection.
4. On the Edit menu, tap Paste.
Fixing a mistake
If you make a mistake, use the Undo command to undo the most recent action.
You cannot undo more than one action.
To undo the most recent action
• On the Edit menu, tap Undo.
To undo the last Undo command
• On the Edit menu, tap Redo.
Using Pocket Word
This section teaches you how to select and format text in Pocket Word. It also tells
you how to use Outline view to organize your document.
70 - HP Palmtop PC User Guide
Page 81

Once you have created your Pocket Word document, you can either print it using
Mobile Devices on your desktop computer or transfer it to Microsoft Word for
further revision. See Chapter 2, “Sharing Information”, to find out how to print
and transfer documents.
Selecting text
As outlined in the following table, Pocket Word offers some easy ways to select a
specific portion of your document.
To select
• Any item or amount of text
• A picture
• A word
• A single paragraph
• An entire document
Do this
Drag the stylus over the text.
Tap the picture.
Double-tap the word.
Trip-tap within the paragraph.
On the Edit menu, tap Select All.
Formatting text
Unlike Microsoft Word, Pocket Word has no Format menu and does not use styles.
You can format text alignment by either tapping a toolbar button or use the Format menu. To find out what a button does, look at its ToolTip (press and hold
down the button with the stylus).
To create a bulleted list
1. Tap the Bullets button on the toolbar and type the first item.
2. Press ENTER, type the next item, and repeat as needed.
3. Press ENTER, and then tap the Bullets button again to end list formatting.
Setting tabs
Pocket Word sets tabs to 0.5-inch intervals; however, if you set custom tabs in a
Microsoft Word document on your desktop computer, the tabs are preserved when
you convert the document to Pocket Word.
To set paragraph indentation
1. Transfer a Microsoft Word document with the desired paragraph indentation
from your desktop computer to your Handheld PC.
2. Open the transferred document in Pocket Word.
Working with Pre-Installed Applications
HP Palmtop PC User Guide - 71
Page 82

3. Copy the paragraph with the desired indentation from the transferred document
and paste it into a new Pocket Word document.
4. Edit the copied text. (Pocket Word retains the paragraph formatting).
Working with fonts
Your palmtop PC comes with several fonts installed on it. To see which fonts,
look in the Windows folder in My Handheld PC or under Font in the Format
menu. You can also install additional fonts by using the Windows CE Mobile
Devices. The fonts and font sizes you can add are available in Pocket Word and
Pocket Excel. TrueType fonts are generally the best fonts to convert to your palmtop
PC, however, other font types can be converted as well.
Note
!
Because fonts take up valuable program and storage memory on the palmtop PC,
add only the fonts and font sizes that you need.
To add a font
• Connect your palmtop PC to your desktop computer and run Mobile Devices.
On your desktop computer, drag the font file(s) to the Windows/fonts folder in
the Mobile Devices window.
• Select the font sizes that you want to download to the palmtop PC. To view the
font files on your palmtop PC, look in the Windows/fonts folder. If you
transfer a document from your desktop computer that uses a font not installed
on your palmtop PC, Pocket Word uses the closest matching font. It also uses
this font for any new text that you type. Transferring the document back to
your desktop computer restores the original font.
To set or change the default font in a document
1. Open a new document.
2. Before you begin typing, tap Select All on the Edit menu to select the first
blank paragraph.
3. Select a font from the list on the toolbar.
72 - HP Palmtop PC User Guide
Page 83

4. Begin entering your information and save your finished file.
Using Outline view
Outline view is a handy way to take notes, organize a document, or view portions
of long documents on your palmtop PC. Outline view makes it easy to restructure
your document by promoting, demoting, or moving headings and paragraphs with
the tap of a button.
Note
!
The indentations and symbols in Outline view do not appear in Normal view.
To switch to Outline view
On the View menu, tap Outline.
Working with headings and body text
Outline view provides nine heading levels and one body text level. The formats
for these levels correspond to heading styles in Microsoft Word. You can display
all of the text in the document or only headings, without any body text.
Working with Pre-Installed Applications
HP Palmtop PC User Guide - 73
Page 84

To display all headings and body text
Tap the list box on the toolbar and tap All Levels from the list.
To display only headings
Tap the list box on the toolbar, and then tap the heading level you want to display.
Using the toolbar to move, expand, or collapse text
To format, move, hide, or display selected text, tap the appropriate button on the
Outline view toolbar. Tap the button as many times as necessary to achieve the
desired result.
Tap
To
Promote the heading one level.
Demote the heading one level.
Style a paragraph as body text.
Move the selection up one paragraph in the outline.
Move the selection down one paragraph in the outline.
Display (expand) a heading’s subheadings and body text.
Hide (collapse) a heading’s subheadings and body text.
Using symbols to expand or collapse text
The symbols that appear next to paragraphs in Outline view indicate whether
there is subtext and whether it is expanded or collapsed.
This symbol
Means
A heading with no body text or subheadings
A heading with body text or subheadings expanded
A heading with body text or subheadings collapsed
Body text
You can use these symbols to expand or collapse text. To expand a heading or
subheading, double-tap next to the heading. To collapse a heading and its body
text, double-tap next to the heading.
74 - HP Palmtop PC User Guide
Page 85

Printing Pocket Word documents from your palmtop PC
You can print Pocket Word documents directly from your palmtop PC. The palmtop
PC prints these files in plain text format, without graphics, paragraph formatting,
or character formatting.
To print a Pocket Word document
1. Connect your palmtop PC to a printer using a serial cable or an
infrared connection.
2. Open the document that you want to print.
3. On the File menu, tap Print.
4. In the list, tap the port to which you want to print, and then tap OK.
MICROSOFT POCKET EXCEL
In this section, you’ll find information about how to edit cells, enter data, managing worksheets, and work with formulas.
Editing cells and data
The following table lists information on how to complete various tasks in Pocket
Excel.
To select
Go to a specific cell
Create functions
Define names
Insert, delete, rename, or move
sheets
On the Tools menu
Tap Go To, and then type the column
letter and row number of the cell.
Tap Insert Function
Tap Define Name
Tap Modify Sheets
To
Format cells
Resize, hide or reveal rows
Resize, hide or reveal columns
Insert cells, rows, or columns
Delete cells, rows, or columns
On the Format menu
Tap Cells
Tap Row Height
Tap Column Width
Tap Insert
Tap Delete
Entering data using the Fill command
You can use the Fill command to enter data automatically. For example, you can
enter the same information in several cells or enter an incremental series. When
you use the Fill command, formatting from the active cell is applied to all cells in
the selection.
Working with Pre-Installed Applications
HP Palmtop PC User Guide - 75
Page 86

To automatically copy data
1. Select the cell or cells that contain the data you want to copy. The source cells
can occupy only one row or column.
2. On the Edit menu, tap Fill.
3. Under Fill Type, select Copy, and then tap a direction in the Direction list.
4. Tap OK.
To automatically enter a series
1. Select a cell, and then type the beginning of the series – a number, date, or text
followed by a number (for example, Qtr1).
2. Select the cell again and extend the selection to cover the cells you want to fill.
3. On the Edit menu, tap Fill.
4. Under Fill Type, select Series, and then tap a direction from the Direction list.
5. Select a Series Type and any additional options you need.
• Tap Number to specify the amount by which the number should be incremented
in the Step value box.
• Tap Autofill to automatically fill the series based on the data in the first cell.
This data must be: a day (either its three-letter abbreviation or spelled out), a
month (either abbreviated or spelled out), or numbered text (for example, Qtr1).
If it does not, Pocket Excel will simply copy the data in the first cell.
• Tap Date to select an option from the Date list. Then specify an increment in
the Step value box.
6. Tap OK.
76 - HP Palmtop PC User Guide
Page 87

Entering values
Pocket Excel recognizes two types of data: values (constant text and numbers)
and formulas (a sequence of values, cell references, names, functions, or operators, that produces a new value from existing values). This section deals with
values. For information on formulas, see the next section, “Using functions and
formulas.”
When you enter a value, Pocket Excel determines its data type based on what you
type. Then, Pocket Excel applies the default format for that type of entry: text,
date, time, currency value, or percentage.
Note
!
Although Pocket Excel automatically formats your entries, you can change the
formats as needed.
Formatting text
A cell formatted as text can have up to 255 characters and is left-aligned by default. You can include in this cell any combination of nonnumeric characters,
numbers, and spaces, such as:
A-Z a-z< > ? ‘“ ; { } [ ] | \ _ * & ^ # @ ! ‘ ~ % ,
Sometimes you may want to treat a number as text (for example, you want the
leading zero in a postal code to be displayed). If you format a cell as text, Pocket
Excel will not alter any number you enter into it.
To format a cell as text
1. Select the cell.
2. On the Format menu, tap Cells.
3. On the Number tab, select Text from the Category list.
4. Tap OK.
Formatting numbers
Numbers are entered as constant values and are right-aligned in the cell by
default. Numbers can include numeric characters (0 through 9) and any of the
following special characters:
+ / $ , % . E e - ( )
Working with Pre-Installed Applications
HP Palmtop PC User Guide - 77
Page 88

Pocket Excel stores values with 15 digits of precision, regardless of displayed
format. To indicate a negative value, either type a minus sign in front of the value
or enclose the value in parentheses.
If a number includes an internal space (for example, 98 123) or any other character not shown in the preceding list, it is entered and displayed as text; however, a
number followed by a space (for example, 98123 ) is formatted as a number.
To format a cell as a number
1. Select the cell.
2. On the Format menu, tap Cells.
3. Select one of the number types from the Category list.
4. Tap OK.
Working with various number types
Pocket Excel lets you choose from eight different number types: Number, Currency, Accounting, Date, Time, Percentage, Fraction, and Scientific. Here are some
guidelines for working with a few of them.
Currency guidelines
• If you enter a number with the currency symbol, the symbol must precede
the number.
• The default number of decimal places is 2 and the maximum is 15. Pocket
Excel will round a number if it has more decimal places than that specified for
the cell.
• Values are right-aligned in the cell by default. If you use parentheses to
indicate a negative value, Pocket Excel adds a space after positive values, so
that decimal points for both positive and negative numbers align correctly
within a column.
Dates and times guidelines
• Pocket Excel ignores capitalization.
• If you want to display time using the 12-hour clock, type am or pm (for
example, type 3:00 pm). Otherwise, Pocket Excel automatically displays time
using the 24-hour clock (for example, 15:00).
78 - HP Palmtop PC User Guide
Page 89

• To enter dates, use either a slash (/) or a hyphen (-), and specify months using
either the full name or the three-letter abbreviation. When entering a year,
Pocket Excel recognizes numbers between 1900 and 2078. See the following
table for date and time examples.
Date
8/3/96
Aug-96
31-Aug-96
Times
3:00
3:00:00 pm
8/31/96 3:00 pm
• Enter a date and time in the same cell by typing a space between them.
• A date may appear differently from what you typed because Pocket Excel
matches your entry to the closest default format. You can change the format.
Percentages guidelines
• To enter a percentage, type one of the following: the number followed by the
percent sign (for example, type 5%), the number as a decimal (for example,
0.05), or the value as a formula (for example, =1/20). For the first method,
Pocket Excel will automatically format the cell as a percentage. In the latter
two cases, you must format the cell as a percentage.
Custom number guidelines
• If the Microsoft Excel file that youíve transferred to your Handheld PC
contains a custom number format, that format may be displayed correctly in
Pocket Excel even if there is not an exact format match. You will see Custom
selected on the Number tab in the Format Cells dialog box.
Using functions and formulas
Pocket Excel supports about 100 commonly used Microsoft Excel functions. Pocket
Excel Help provides specific details on working with functions, which often have
several associated arguments. To see function descriptions, tap Insert Function on
the Tools menu, and then tap the Help button.
To quickly calculate averages, sums, or maximum/minimum values
1. Select a range of cells.
2. Tap the AutoCalc menu on the status bar at the bottom of the screen.
Working with Pre-Installed Applications
HP Palmtop PC User Guide - 79
Page 90

3. Tap the desired function. The result appears in the status bar.
In addition to functions, Pocket Excel supports formulas, so that you can calculate values and analyze worksheets. Specifically, you can perform operations on
worksheet values by using one of three operators on elements of a formula:
• Arithmetic operators, such as addition, subtraction, division, multiplication,
percent, and exponentiation, perform basic mathematical operations and
produce numeric results.
• Comparison operators compare two values and produce the logical value
TRUE or FALSE. Examples include =, >, < , >= , <=, < >.
• Text operators join two or more text values into a single combined text value.
For example, if First Quarter 1996 is the text in cell A1, the formula, =”Total
sales for “&A1, produces the text, Total Sales for First Quarter 1996.
Once you have entered a formula, the formula’s resulting value appears in the
corresponding cell on the worksheet. When you select a cell containing a formula, the formula always appears in the formula bar.
To enter a formula
1. Tap the cell you into which you want to enter the formula.
2. Type an equal sign (=) to activate the formula bar. (A formula must begin
with an equal sign.)
3. Enter the formula using the following guidelines:
• Use parentheses to enclose ranges (which are part of formulas) and other
function arguments. For example, (A1:B3) represents the cell references
and (1,2,3) represents constant values in the formula,
=AVERAGE(SUM(A1:B3),SUM(1,2,3)).
80 - HP Palmtop PC User Guide
Page 91

• Insert references into your formula by selecting cells on your worksheet.
When you select cells, Pocket Excel inserts relative references in
your formula.
4. After you have completed the formula, press ENTER.
Using references
A reference identifies a cell or a group of cells on a worksheet. It tells Pocket
Excel where to look to find the values used in a formula.
A cell’s reference is the set of coordinates that a cell occupies on a worksheet. For
example, B3 to the cell at the intersection of column B and row 3. To see a cell’s
reference, tap the cell and look in the Name box (which is directly below File and
Edit on the toolbar).
A cell range is a reference that covers two or more adjacent cells on a sheet. For
example, the cell range, A1:B5, includes cells in rows 1 through 5 and in column
A and column B.
Tip
To quickly go to another cell or range, type the cell or range reference in the
Name box and then press ENTER.
You can reference only those worksheets that are within a workbook. If the
worksheet’s name includes spaces, such as January Sales, enclose the entire sheet
reference in single quotation marks, ‘January Sales’.
To reference another sheet in a formula
Select a cell, and then type an equal sign (=) followed by the worksheet’s name,
an exclamation point (!), and the cell or cell range. For example, =Sheet2!$A$1
refers to cell A1 on Sheet2.
Setting up a 3-D reference
There are times that you may want to refer to a range of sheets in a workbook.
This is called 3-D referencing.
A 3-D reference needs to specify the starting and ending worksheet, as well as the
Working with Pre-Installed Applications
HP Palmtop PC User Guide - 81
Page 92

cells being referenced. For instance, a 3-D reference that goes from Sheet2 through
Sheet6 and refers to the cells A2:A5 would look like: ‘Sheet2:Sheet6’!A2:A5.
To create a 3-D reference in a formula
1. Select the cell into which you want to enter the reference.
2. Start the formula by typing an equal sign. If you are not starting the formula
with the reference, type the operator that you want to precede the reference.
3. Type the reference or name of the cells.
4. When you finish entering the formula, press ENTER.
Naming cells
When using references, you can work more efficiently in Pocket Excel by taking
advantage of the Define Name command. This feature allows you to refer to a
cell, a group of cells, a value, or a formula with a name that’s easy to remember.
Cell naming guidelines
• The first character must be a letter or an underscore character. The rest can be
letters, numbers, periods, and underscore characters. The name cannot look
like a reference, such as A$1 or R1C1.
• Spaces are not allowed. An underscore character or a period works well as a
word separator. For example, use Interest.Rate or Interest_Rate.
• A name can contain up to 255 characters.
To name a cell or range
1. Select the cell or range you want to define.
2. On the Tools menu, tap Define Name.
3. In the Names in Workbook box, type the name.
Managing worksheets
A workbook can contain several pages, or worksheets, making it easy to access
all your important data. You can switch quickly from one worksheet to another, or
arrange the worksheets to best meet your needs.
82 - HP Palmtop PC User Guide
Page 93
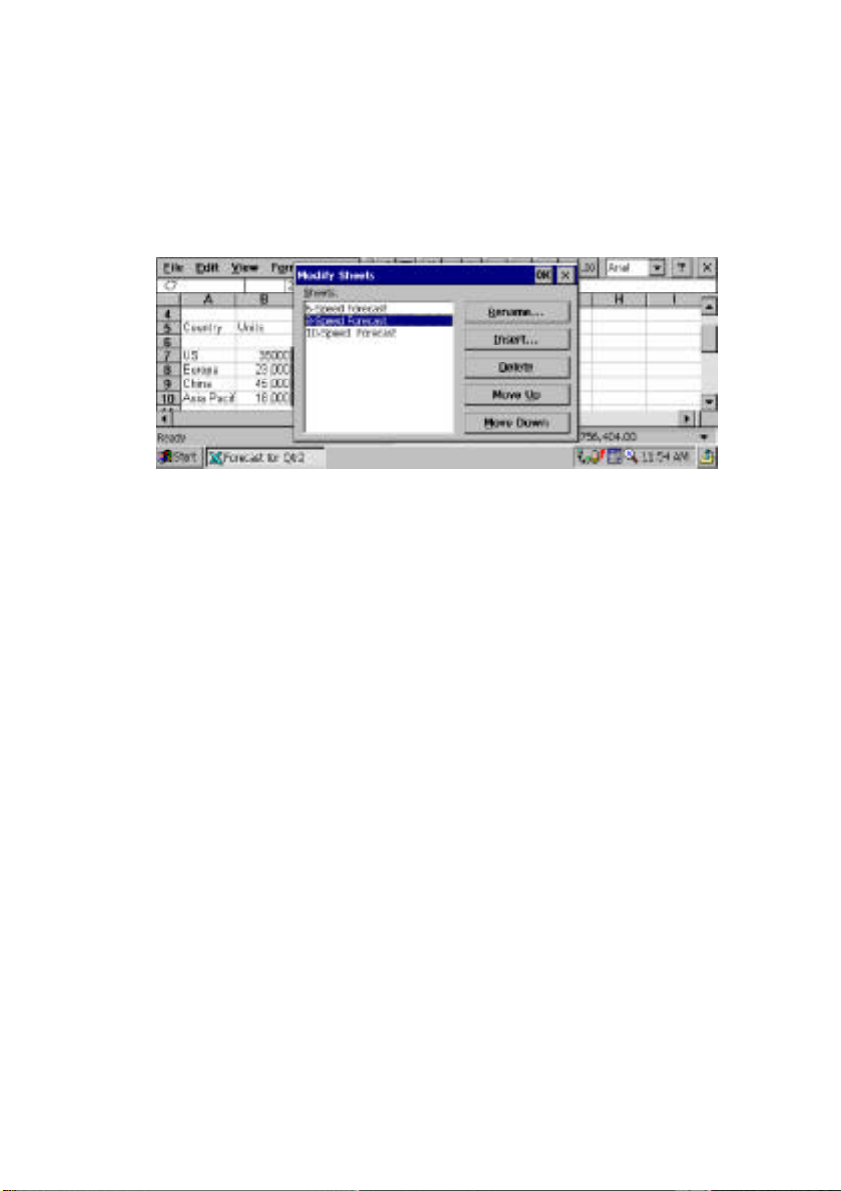
To switch to another worksheet
1. On the Format menu, tap Sheet, then Modify Sheets.
2. Select the worksheet to open, and then tap OK. Or tap the sheet shortcut menu
on the status bar at the bottom of the screen, and tap the name of the worksheet
you want to open.
To rename a worksheet
1. On the Tools menu, tap Sheet, then Modify Sheets.
2. Tap the sheet to be renamed and then tap Rename.
3. Type a new name and then tap OK.
To add a worksheet
1. On the Tools menu, tap Sheet, then Modify Sheets.
2. Tap the name of the worksheet before which you want to add a new worksheet.
3. Tap Insert, and then type a new name or tap OK.
To remove a worksheet
1. On the Tools menu, tap Sheet, then Modify Sheets
2. Tap the sheet to be removed and then tap Delete.
3. Tap OK.
To change the order of worksheets
1. On the Tools menu, tap Sheet, then Modify Sheets
2. Select the sheet you want to move, and then tap either Move Up or
Move Down.
3. Tap OK.
Working with Pre-Installed Applications
HP Palmtop PC User Guide - 83
Page 94

MICROSOFT POCKET POWERPOINT
With Pocket PowerPoint, you can sort and view your full-color PowerPoint presentations while on the go. Pocket PowerPoint allows you to drag and drop your
existing slides into the palmtop PC. With a VGA-out card (available for separate
purchase) in the PCMCIA slot, presentations can be performed straight from
the palmtop. Also, the Pocket PowerPoint allows creation of annotations on
the palmtop.
Note
!
• Pocket PowerPoint is not an editor and hence is not capable of slide creation. It
is a viewer that allows the user to arrange and hide/unhide slides in a presenta tion. It can also display speaker notes on the screen alongside the slides.
• Note that Pocket PowerPoint can only work with slides created in
PowerPoint ’97.
To start Pocket PowerPoint
• Press on the Microsoft Pocket PowerPoint icon on the Quick Application
Launch Pad OR
• Double-tap the Microsoft Pocket PowerPoint icon on the desktop OR
• Double-tap an existing Pocket PowerPoint document in the Windows
CE Explorer OR
• Tap the Start button, then Programs, followed by Office to choose Microsoft
Pocket PowerPoint
To copy Microsoft PowerPoint presentations to your palmtop PC
1. Connect your palmtop PC to your desktop computer and run Mobile Devices.
2. On your desktop computer, drag the PowerPoint 97 presentation file(s) to the
palmtop PC folder in the Mobile Devices window.
3. The PowerPoint 97 presentation will be converted to Pocket PowerPoint
format, with the content and layout preserved.
To open an existing PowerPoint presentation in your palmtop PC
1. The Open Presentation dialog box opens with the application.
2. Browse to the location of the document, and then double-tap the
document icon.
84 - HP Palmtop PC User Guide
Page 95

Note
!
To open a presentation when the PowerPoint application has already been opened,
tap File, then Open and double-tap on the document icon.
Tip
To easily open the most recently used file, tap the File menu, then Recent Files
and then tap the file’s name.
To create a custom title slide for your presentation
1. Tap Tools, then Title Slide, and type in the information for the title slide.
2. Tap OK.
To sort your slides
1. Tap Tools, then Slide Sorter, followed by the Up or Down arrows to change
the sequence of the slides.
2. Check off Hide Slide to hide slides.
3. Tap OK.
To view your presentation notes
1. Tap View, then Notes Page View
To set show
1. Tap Tools, then Set Up Show. You can choose to view the show on the palmtop
screen (built-in LCD) or on an external screen in which case you would need
a VGA-out card which is an accessory available for seperate purchase.
2. Choose Manually if you want to advace the slides manually or type in the
desired time intervals for the slides to advance automatically.
3. Type OK.
To do presentations
• Tap View, then View Show OR
• Tap the Screen Show icon on the toolbar
You can also use the stylus to draw annotations while presenting by tapping on
the stylus icon on the Screen Show.
Working with Pre-Installed Applications
HP Palmtop PC User Guide - 85
Page 96

QUICKEN EXPENSABLE FOR WINDOWS CE
Completing an expense report has never been easier, more convenient and more
cost-effective than now with Quicken ExpensAble for Windows CE (QE/CE) from
On the Go Software. QE/CE replicates the look and feel of its award-winning
desktop companion, Quicken ExpensAble (QE) – the best-selling, fully featured
expense reporting application.
While traveling with your handheld PC (and nearest the point where expenses are
incurred), start with an empty envelope and then simply fill it with information
about your travel expenses receipts. QE/CE is essentially a very portable and
ideal way to capture, group, preview and store expense information. Once you
return to your desktop or notebook PC, use QE, the optional desktop version of
ExpensAble, to add scanned receipts, process expenses, print reports and more.
Installing Quicken ExpensAble file converters
In order to transfer data to and from your desktop computer and your mobile
device, you will need to install Quicken ExpensAble file converters. For more
information on transferring files, see Transferring ExpensAble Data.
You can download Quicken Expens Able file converters from
http://www.onthegosoftware.com.
Important
!
After you have installed the Quicken ExpensAble file converters onto your desktop computer, you will need to perform the following steps to register them with
Microsoft Windows CE Services:
1. Disconnect your H/PC device from the desktop computer.
2. On the desktop computer, start the Mobile Devices program from the Microsoft
Windows CE Services folder.
3. If there is an icon corresponding to your H/PC device, select it and delete it.
4. Reconnect your H/PC to the desktop computer and set up the Partnership in
Mobile Devices.
86 - HP Palmtop PC User Guide
Page 97

Starting ExpensAble for the first time
The first time you start ExpensAble, you’ll spend a few minutes setting up your
file. After that, you’re ready to create your first expense report envelope. An
ExpensAble envelope contains all the expense information you need for a single
expense report. Every time you have a new expense report to do, you create a new
envelope in your file.
Most people keep all their expense report envelopes in one or two files. Within a
file, you can create folders to organize envelopes into meaningful groups and
eliminate clutter on your screen.
• A file contains a collection of expense report envelopes and folders. Most
people keep all their envelopes and folders in one file.
• Folders help you organize your expense reports and reduce the clutter on your
screen. Folders can contain envelopes, but cannot contain other folders.
• Expense report envelopes contain information about a single expense report.
Customizing how you work with ExpensAble
You can change how some parts of the ExpensAble program work by changing
the ExpensAble program options. For example, you can choose whether you want
the cursor to move to the next field in the expense record, or enter the expense
when you press the Enter key.
1. In the iconbar, tap the Options icon.
2. Adjust the individual options, and then tap OK to save the settings.
Working with Pre-Installed Applications
HP Palmtop PC User Guide - 87
Page 98

Entering Expenses
Starting a new expense report
ExpensAble uses envelopes to “collect” receipts and other expense information
just like many people stuff receipts into a wallet or envelope until they’re ready to
fill out an expense report. Each ExpensAble envelope represents one expense re-
port, so every time you start a new expense report, you create a new envelope.
Use these steps to create an expense report envelope and enter the information for
your expenses. The steps are explained in the following sections.
• Create a new envelope and fill in the New Expense Report Envelope window
with information about this expense report.
• Enter expense transactions to record regular expenses, cash advances, and split
transactions. Enter details for mileage, meals and entertainment, and billing.
The Envelopes window is where you create and manage expense report
envelopes.
• To start entering expenses, double-tap the envelope.
• Tap an envelope to select it. Or, use the arrow keys to move the highlight to
another envelope.
• View total reimbursable amount for this file.
• Group envelopes in folders.
• The lower right corner displays the total reimbursable amount for this folder.
Creating a new envelope
Each ExpensAble envelope represents one expense report. When you’re ready to
fill out a new expense report, you start by creating an envelope and filling in the
New Expense Report Envelope window.
1. Tap the New icon in the iconbar.
• Information put in the “Envelope Name:” field is for reference only. If you
don’t enter a name, ExpensAble calls the new envelope “Untitled1.”
• Select the “Show Currency” checkbox if you want to enter currency and
exchange rate information with each transaction.
88 - HP Palmtop PC User Guide
Page 99

• Select the “Show Bill To” checkbox to show a Billables field when you
enter your expenses. Use this if you need to charge expenses in the same
report to more than one customer or department.
2. Enter a name for the envelope, and then fill in the rest of the fields.
3. Tap OK.
4. Choose whether to enter a cash advance at this time.
• Tap Yes, and ExpensAble displays the Expenses window. You fill in the
amount of the cash advance in the Expense record and tap Enter.
• Tap No to return to the Envelope window.
Editing envelope information
You can edit the information in the Envelope Info window at any time. The changes
are effective immediately.
1. Tap the Info icon in the iconbar.
The Envelope Info window has the same fields as the New Expense Report
Envelope window.
2. Make the changes you want, and then tap OK.
Editing user information
The desktop version of ExpensAble uses the information from the User Info window in the header of your printed expense report. Each envelope has its own user
information, so you can have different headers for different expense reports in the
same file. To enter or change the information in the User Info window, use these steps.
1. From the Edit menu, choose User Info. ExpensAble prefills this window with
information from the default settings.
2. Enter information in the User Info window, and then tap OK.
Entering expense transactions
You use the Expenses window to enter or edit your expense information. Each
expense, or transaction, is displayed in the Expense Log.
• The Expense Log reviews and selects transactions you’ve already entered.
You can’t type into the Expense Log, but use the stylus, arrow keys, or
scroll arrows to move through the log, and then tap a transaction to select or
edit it.
Working with Pre-Installed Applications
HP Palmtop PC User Guide - 89
Page 100

• To enter an expense transaction, tap New Line.
• Enter your expense information in the fields of the Expense Record.
• The “Enter” button enters the expense in the log.
• The “Split” button lets you itemize expenses from a single bill.
• The “Details” button provides a field for adding a personal memo.
• The “Restore” button undoes any changes you’ve made to the
current expense.
• The “Done” button returns you to the Envelopes window.
• The “Delete” button deletes the current expense.
You can enter receipt information in any order. There’s no need to group receipts
by date or category. ExpensAble automatically sorts and organizes the expenses
for you!
Tip
If you don’t have complete information for an expense, insert a placeholder in the
Expense Log. Just choose an expense type from the list, set the date and then tap
Enter. You can come back and edit the entry later.
1. In the Expenses window, tap New Line.
2. Enter information about the new transaction. Type the information you want in
each field, and then press Tab. The insertion point moves forward to the
next field.
3. Tap Enter to record the transaction in the Expense Log.
Entering data in the Expense Record
The fields that appear in the Expense Record vary according to:
• Which expense type your transaction uses.
• Whether you decided to show the Currency and Bill To fields.
Adding a memo
You may want to enter a personal memo for an expense. You can add a personal
memo for any transaction by taping the Details button in the Expense Record.
1. In the Expense Record, tap the Details button.
90 - HP Palmtop PC User Guide
 Loading...