

Page 1

p
p
How to Use 802.1X on HP Jetdirect Print Servers
er
May 2008
a
Table of Contents:
Introduction ..................................................................................................................................... 2
What is 802.1X?............................................................................................................................. 6
Public Key Infrastructure and Public Key Certificate Basics .................................................................... 7
What Equipment is Required for 802.1X?......................................................................................... 15
Installing the Internet Authentication Service (IAS) .............................................................................. 16
Installing a Certificate Authority (CA)................................................................................................ 18
Creating a Certificate Template ....................................................................................................... 24
Issuing a Certificate........................................................................................................................ 30
Creating a User for HP Jetdirect....................................................................................................... 37
Switch Configuration...................................................................................................................... 40
HP Jetdirect Certificate Configuration ............................................................................................... 41
IAS Configuration .......................................................................................................................... 48
HP Jetdirect 802.1X Configuration................................................................................................... 57
Understanding Certificate Chains..................................................................................................... 61
Utilizing the Server ID Field on Jetdirect ............................................................................................ 66
Wireless and 802.1X..................................................................................................................... 72
ProCurve Switches and Identity Driven Management .......................................................................... 74
Summary ...................................................................................................................................... 74
Appendix A: Troubleshooting 802.1X ..............................................................................................75
Appendix B: Importing a Certificate ................................................................................................. 88
white
1
Page 2
Introduction
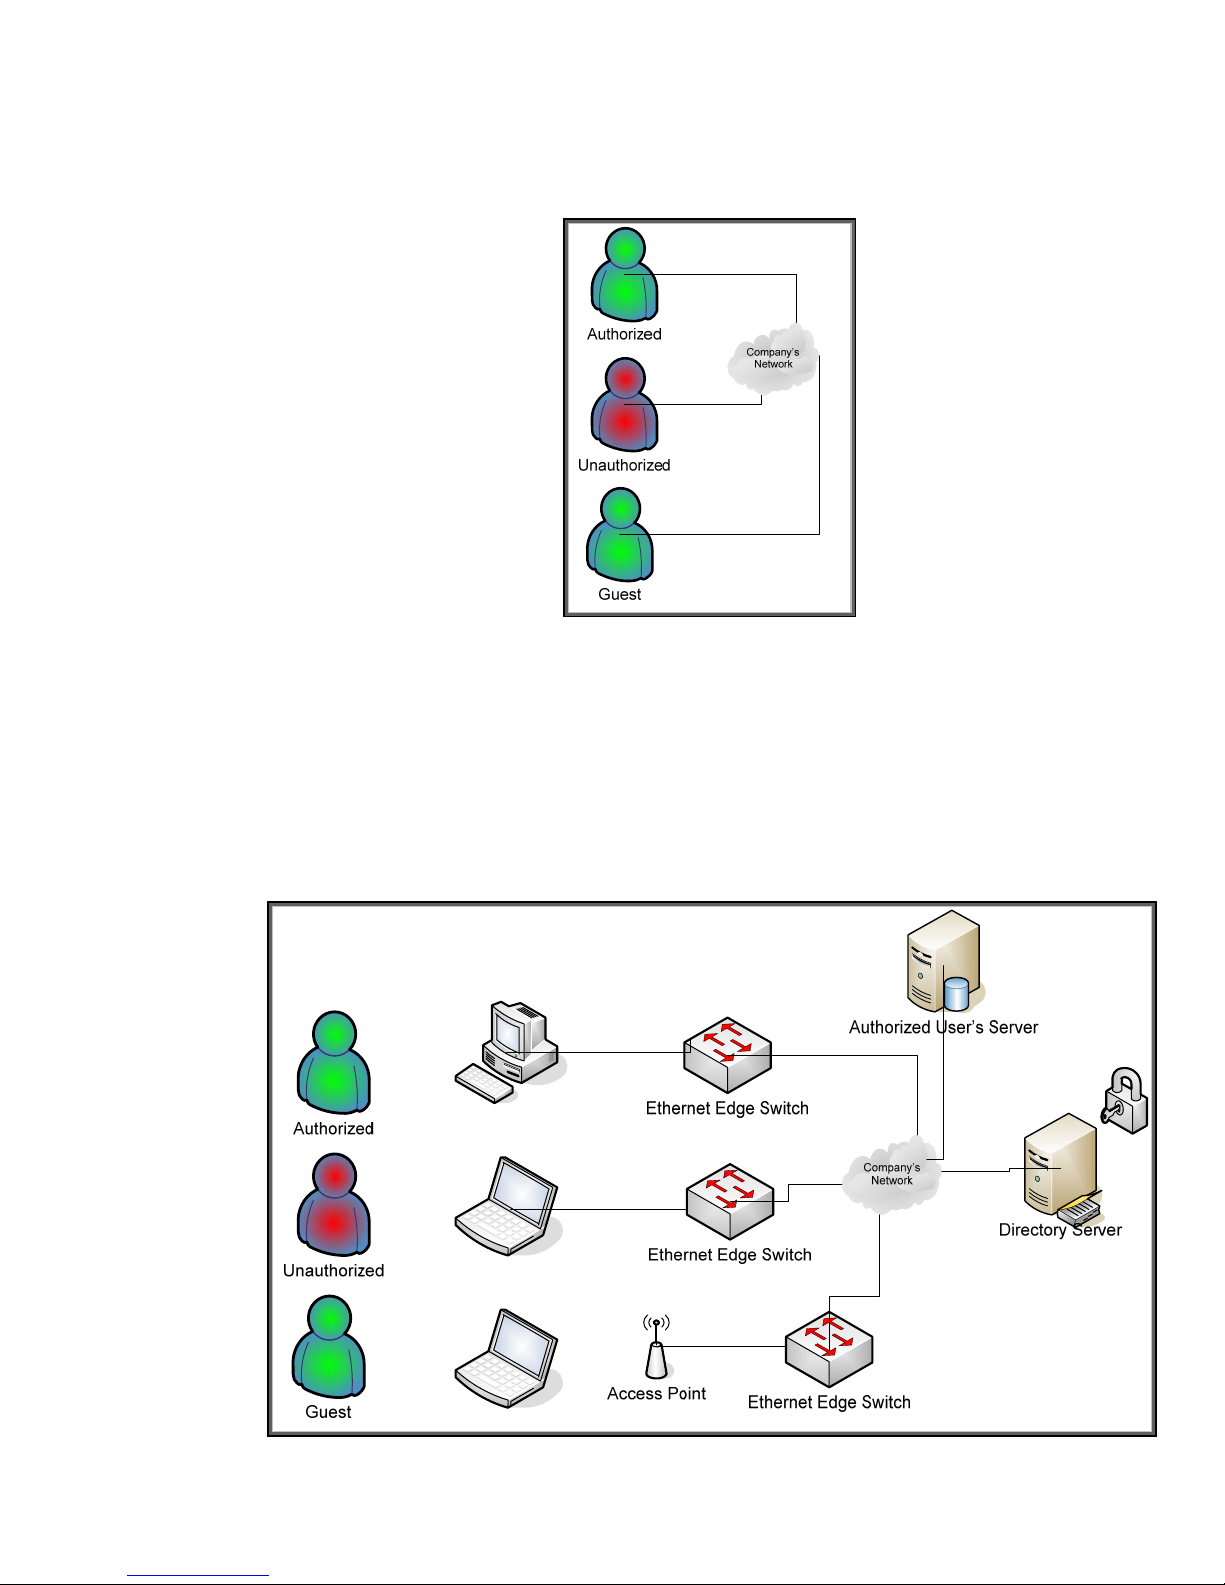
In many organizations, the properties assigned to a user determine the rights they have on the
network. For example, some generic user types are shown in Figure 1 – User Types:
Figure 1 - User Types
An Authorized User is a user that has authenticated to the network and been given authorization to
access certain resources. An Unauthorized User is a user that was unable to be authenticated and is
placed in a network where they can do no harm. A Guest is a user that has been authenticated and
given restricted privileges. These users can connect in a variety of ways: dial-in, VPN using
broadband, wireless in a conference room, and through a direct connection to a switch as shown in
Figure 2 – Connection Types.
Figure 2 - Connection Types
2
Page 3
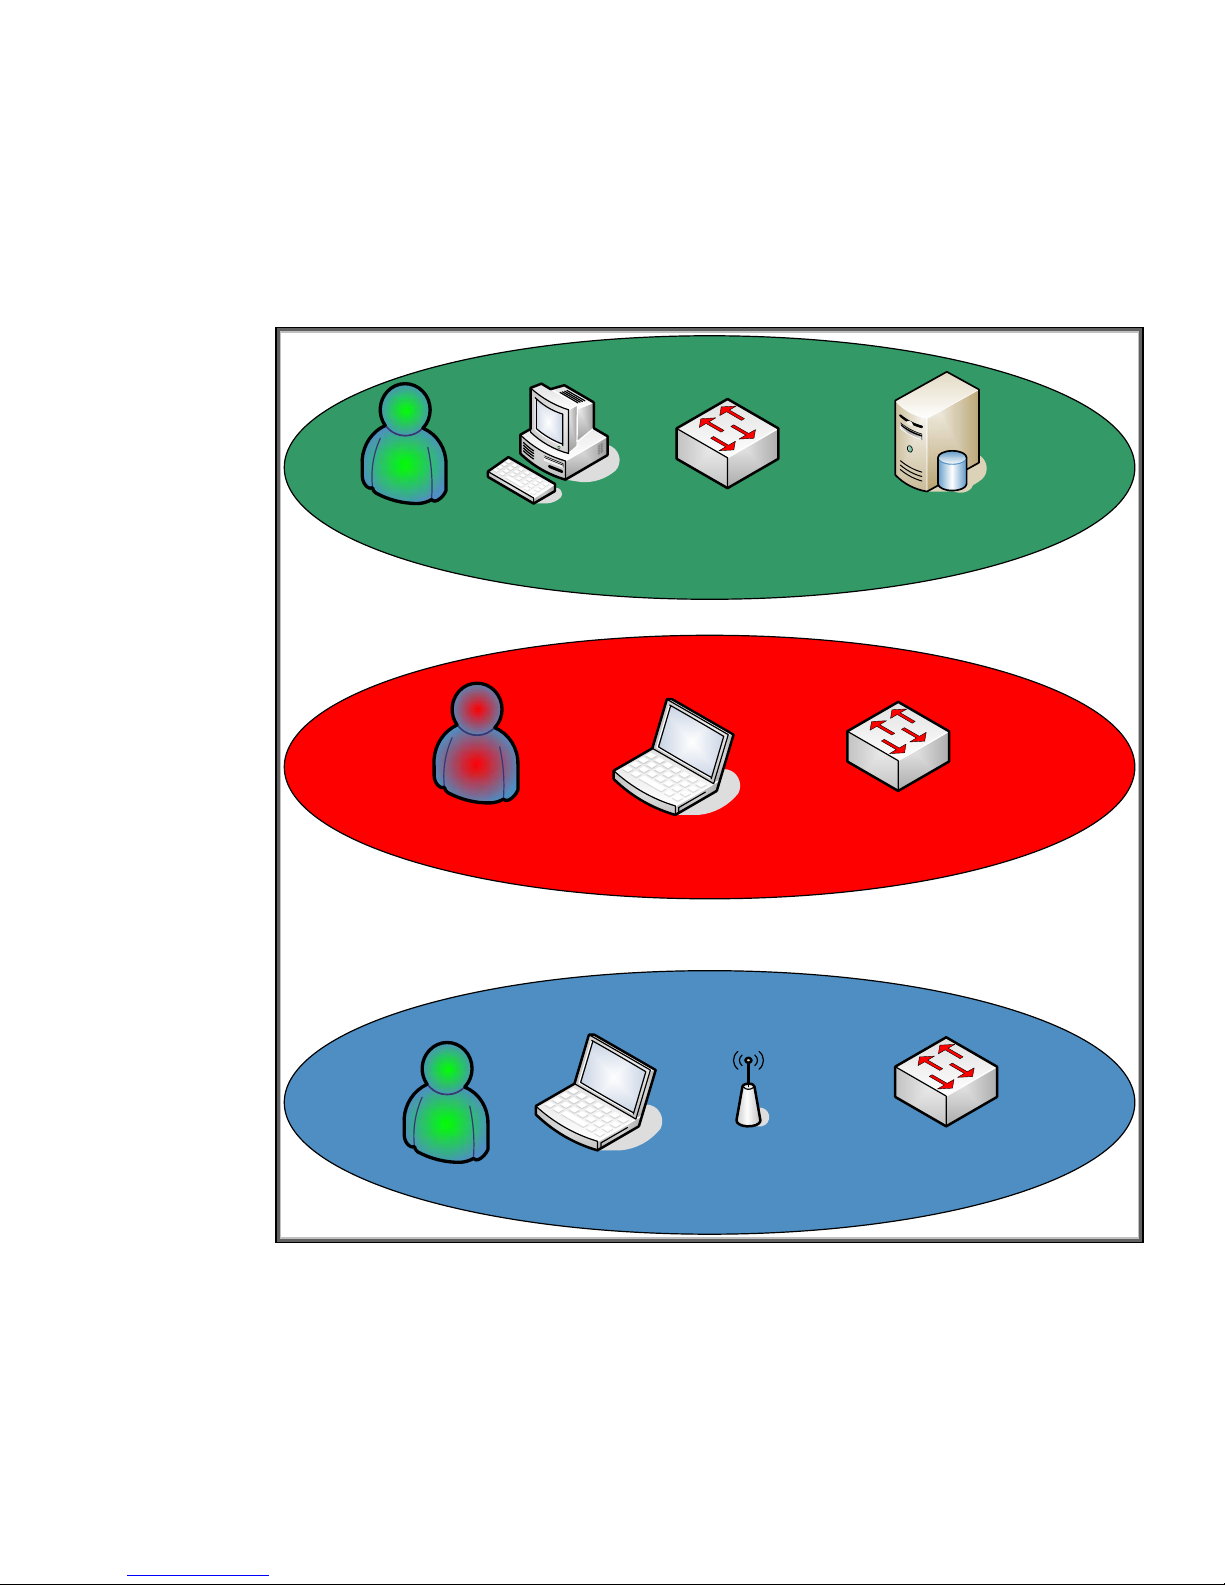
In many cases, the connection type determines what attempts are made to authenticate and authorize
users. For example, a wireless connection or dial-in connection may require more stringent
credentials than a wired connection. For wired networks, unfortunately, Authorized Users,
Unauthorized Users, and Guests may have network access to the same equipment because no
authentication and authorization is being done. Uncontrolled access can cause problems – for
example, an Authorized Server with a security vulnerability can be exploited by an Unauthorized
User. Instead, we would like the wired network architecture to help us isolate equipment to those
users that require access to it. Virtual LANs are a common way to accomplish this isolation. See
Figure 3 – Virtual LANs.
`
Authorized
Unauthorized
Ethernet Edge Switch
Ethernet Edge Switch
Authorized User’s Server
In Figure 3, independent switches that are each responsible for a single VLAN are used. Each VLAN
is for a particular type of user. There is typically a one-to-one correspondence between a VLAN and
an IP Subnet. Inter-VLAN communication is routed.
There are a couple of problems with this approach: (1) it doesn’t really make sense to have an
Unauthorized User VLAN for wired connection and (2) an Unauthorized User can simply plug their
computer into the Authorized VLAN switch to circumvent security. It is also very inefficient to dedicate
one switch to one VLAN. We could use a single switch and create Port-Based VLANs – for example,
Access Point Ethernet Edge Switch
Guest
Figure 3 - Virtual LANs
3
Page 4
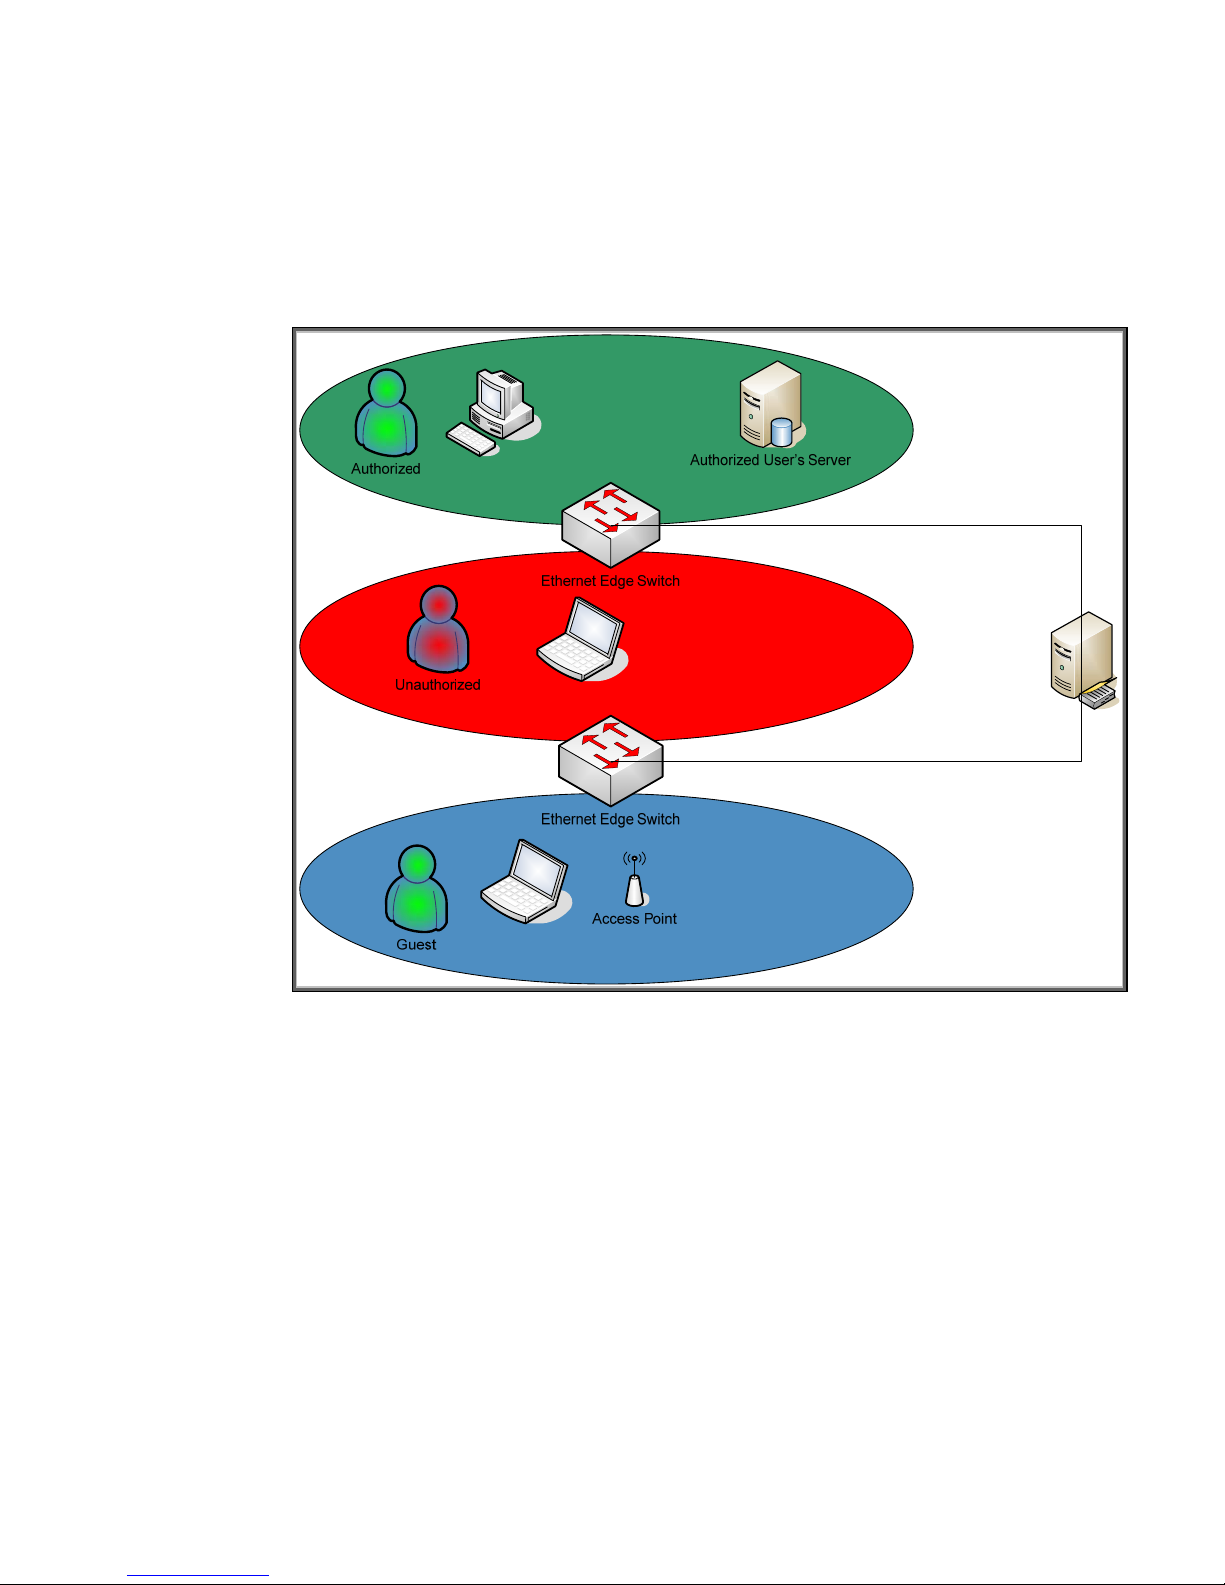
ports 1 through 8 are always assigned to a specific VLAN – but as before, security can be
circumvented simply by attaching a computer to the desired port.
For Port-Based VLANS, what we really need are three separate solutions: (1) A way to authenticate
users, (2) A way to grant authenticated users access to the network, and (3) A way to assign
authenticated users to specific VLANs with network access restrictions, bandwidth constraints, and
other controls. A Port-Based VLAN solution with dynamic authentication is shown in Figure 4 –
Dynamic VLANs.
Here, users are dynamically authenticated and assigned to specific VLANs regardless of what switch
port they use. A user that cannot be authenticated is assigned a VLAN where they can do no
damage. This behavior is fine for users, but what about printers and MFPs? Well, the nice part
about 802.1X is that wired HP Jetdirect print servers support it. All we need to do is create users in
Active Directory that correspond to Jetdirect-based printers and printer management servers, and we
can do what is shown in Figure 5 – Printing and Imaging VLANs.
Figure 4 - Dynamic VLANs
4
Page 5

Figure 5 – Printing and Imaging VLANs
As shown in Figure 5, printers and MFPs become full-fledged authenticated users of the network and
are assigned parameters that help them participate in the security and protection of the network and
its resources. This whitepaper will discuss IEEE 802.1X Port Access Control, in relation to printing and
imaging environments.
5
Page 6
What is 802.1X?
IEEE 802.1X Port Access Control is a generic framework that allows infrastructure devices to control
an end-node’s access to the network. From an Ethernet perspective, we can refer to Figure 6 –
802.1X Switch Port, and see the breakdown of the Ethernet switch.
Local Intranet
Ethernet Switch
Switch Port 1
Switch Port 2
Switch Port 3
Switch Port N….
Switch Port Detail
To Switch
Bus
802.1X
LAN PORT
Figure 6 - 802.1X Switch Port
The end-node device must authenticate itself to the network before the local switch will grant it access
to the network. The end-node device has a valid link to the switch, but the only frames the switch will
forward from the end-node to the network are 802.1X Extensible Authentication Protocol (EAP)
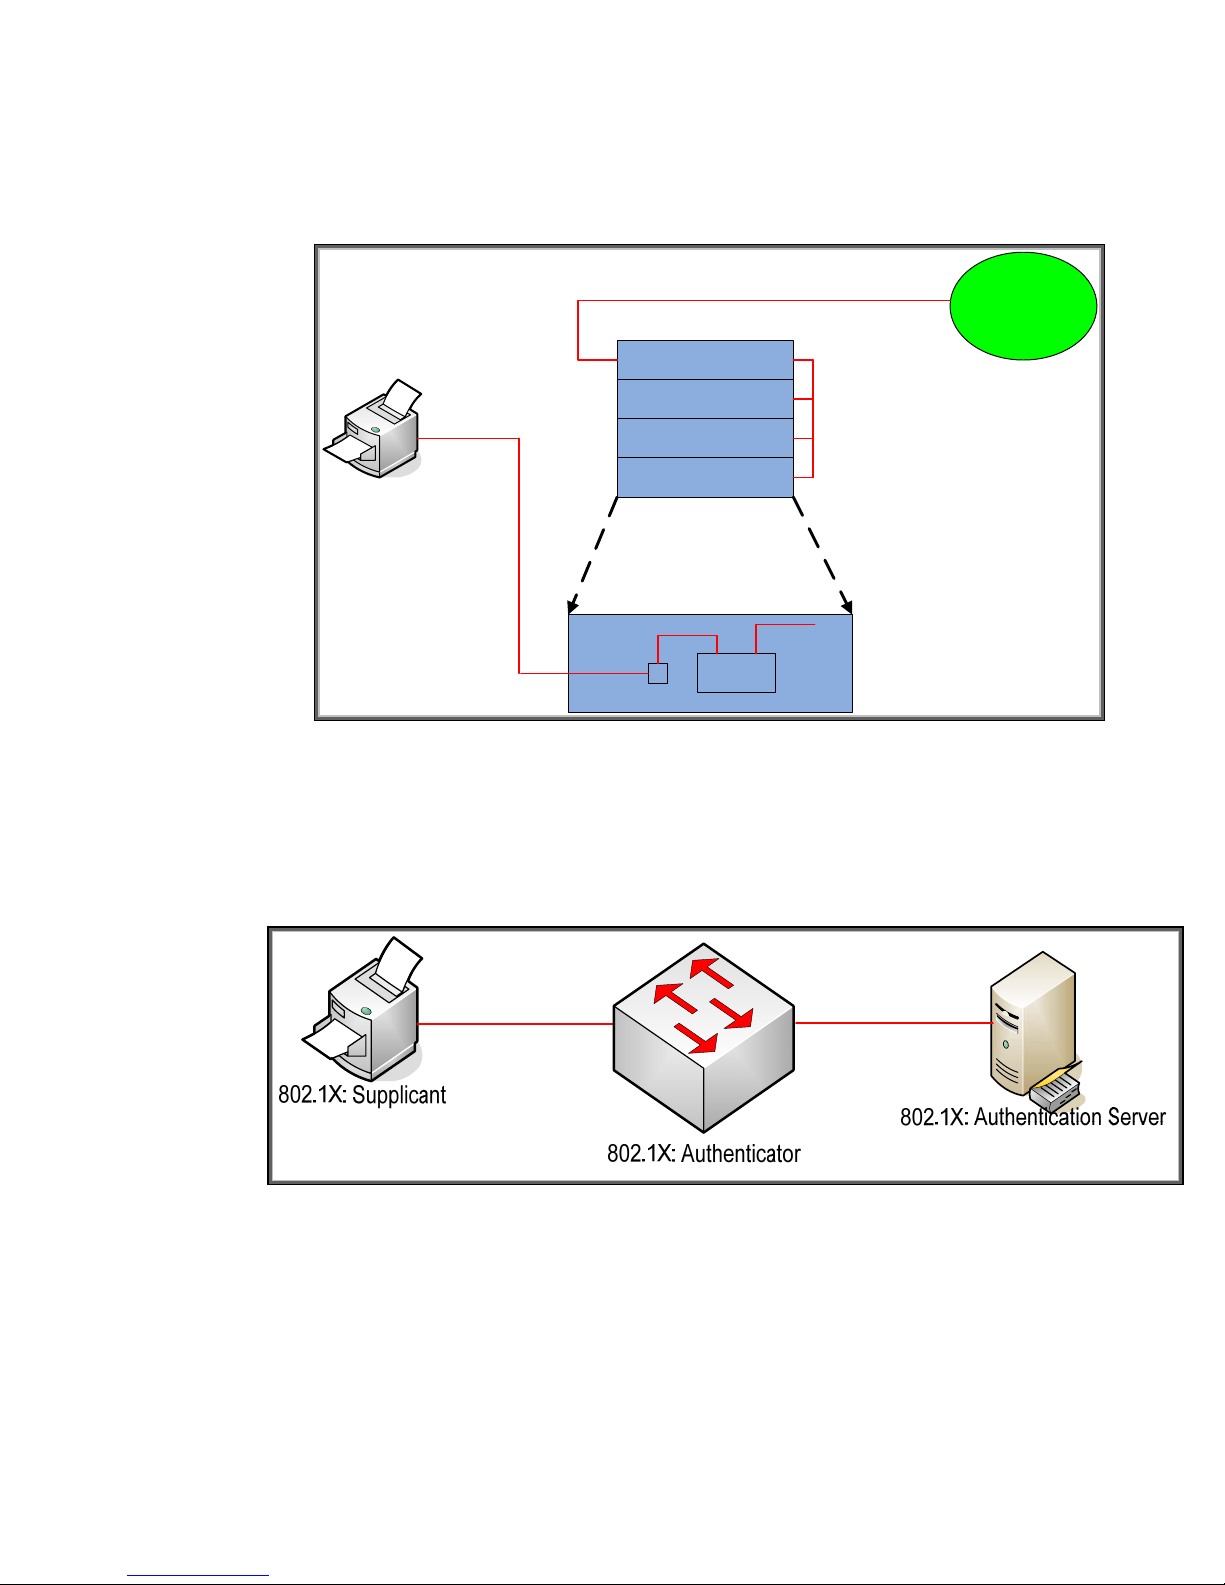
frames. The technical terminology for the devices involved is shown in Figure 7 – 802.1X Terms.
Figure 7 - 802.1X Terms
In reality, the authenticator (switch) repackages 802.1X EAP frames from the Supplicant and sends
them to an Authentication Server. Based upon the configuration in the Authentication Server and the
information supplied by the Supplicant, the Supplicant is authenticated (or not). The result of this
authentication determines whether the switch port is “opened up” to the network for the Supplicant to
send/receive non-EAP frames for normal network operation. With HP ProCurve switches, the
Authentication Server can return much more information, such as the VLAN the Supplicant should be
assigned, bandwidth restrictions on the Supplicant, etc., and the switch dynamically configures itself
to support those parameters.
6
Page 7
Because Extensible is part of the name of EAP, there are multiple protocols that have been developed
under the EAP framework. All HP Jetdirect products supporting 802.1X also support Protected EAP or
PEAP. Many HP Jetdirect products also support EAP-Transport Layer Security or EAP-TLS. These two
EAP flavors are the most popular for wired 802.1X deployments. Both protocols utilize SSL/TLS
running under EAP to authenticate the Authentication Server which sets up a secure tunnel. When
shopping on the Internet, SSL/TLS is often used to protect the transaction over the network and to
establish trust that the web site being contacted is really that web site and not an imposter’s web site.
A cornerstone of trust in SSL/TLS is the digital certificate. For PEAP and EAP-TLS, the Authentication
Server sends over a digital certificate which the supplicant will attempt to validate. After a series of
checks are performed, the supplicant will need to establish that the digital certificate was created by a
trusted authority. If it passes that test, an SSL/TLS tunnel can be established. At this point, PEAP and
EAP-TLS diverge. PEAP uses the tunnel to securely pass credentials via another protocol, typically a
username and password, to the Authentication Server while EAP-TLS uses a client digital certificate for
authentication. Because how digital certificates are created and validated, we will need to cover them
in depth.
Public Key Infrastructure and Public Key Certificate Basics
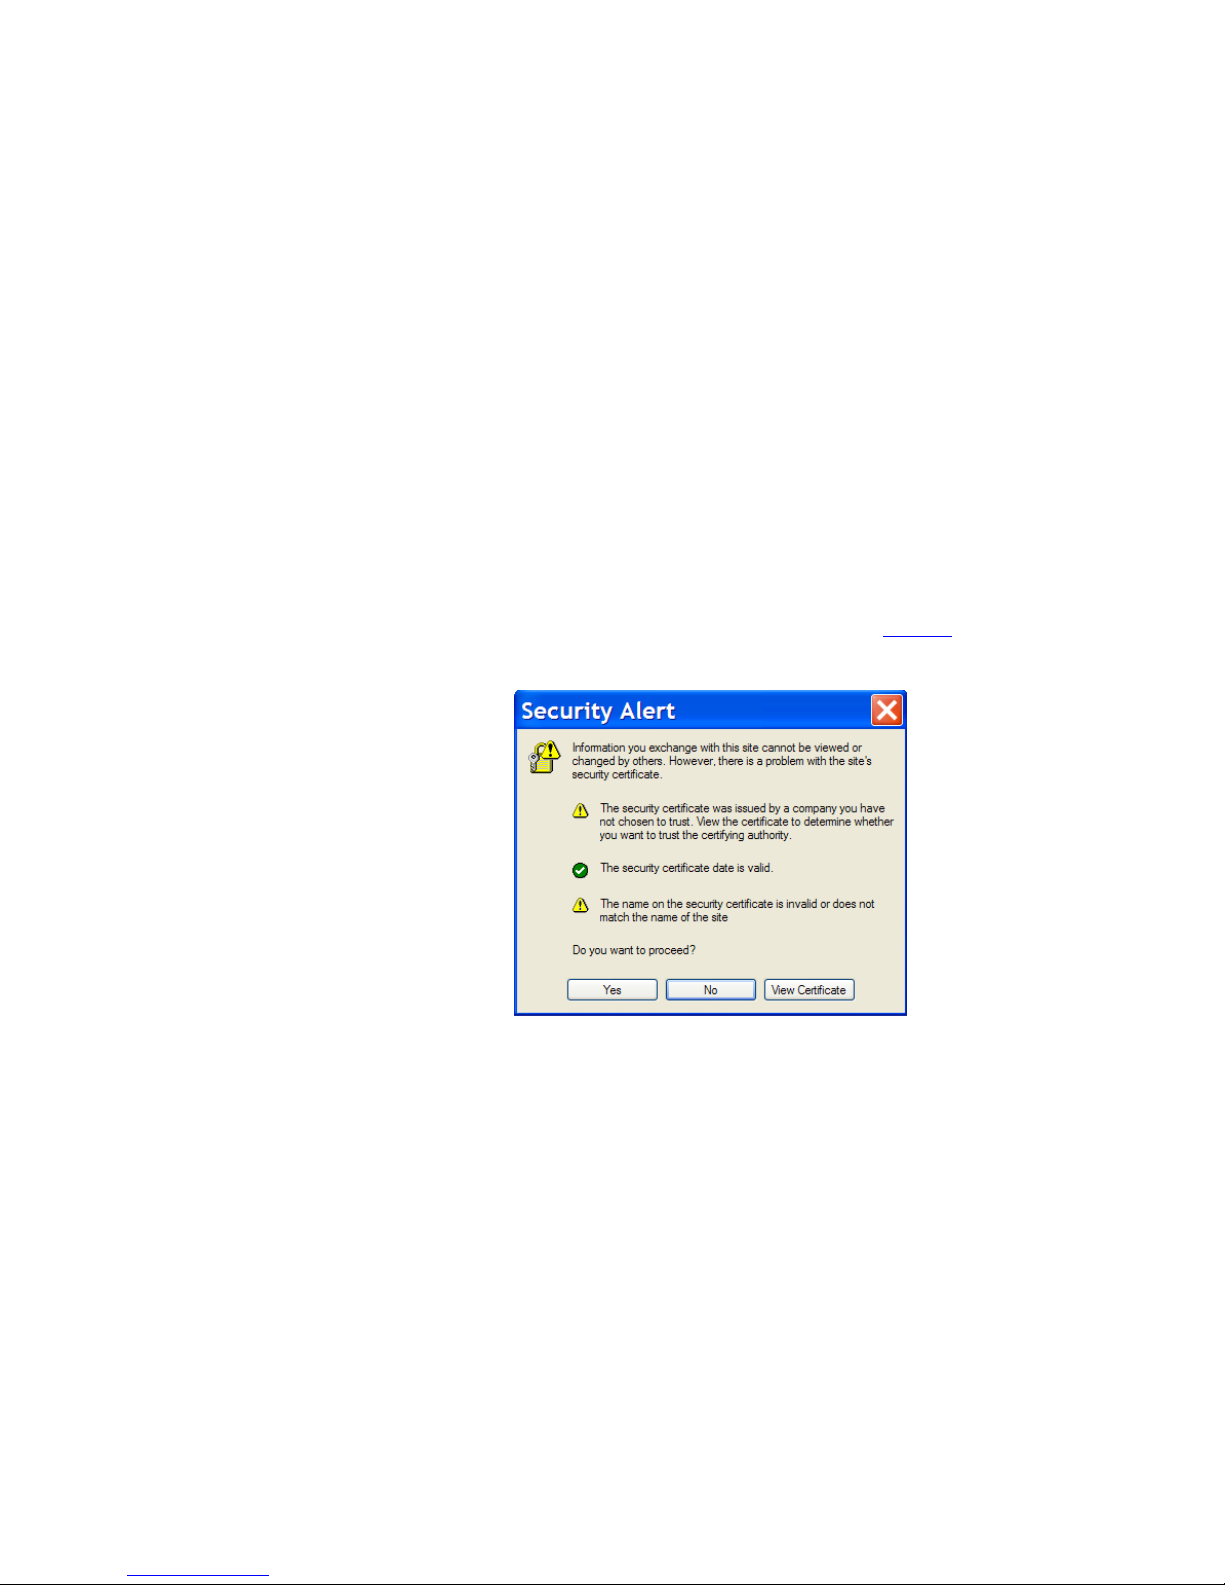
Have you ever seen the warning dialog shown in Figure 8 when using https://
secure web site, such as a login or shopping cart) in a web browser?
(e.g., going to any
This dialog is entitled “Security Alert” and it talks about something called a “security certificate”.
What is a security certificate?
NOTE: A security certificate, digital certificate, public key certificate, and identity certificate are
different terms which all refer to the same thing in this whitepaper.
Well, a security certificate is there to help identify the web site as one that can be trusted. However,
the Security Alert dialog is telling us that we may not want to trust this security certificate – which
indirectly means that this web site may not be the web site we think it is. There are two warning
icons associated with this dialog. The help text by the first warning icon prompts us to view the
certificate. Let’s click on “View Certificate”.
Figure 8 – Security Alert
7
Page 8
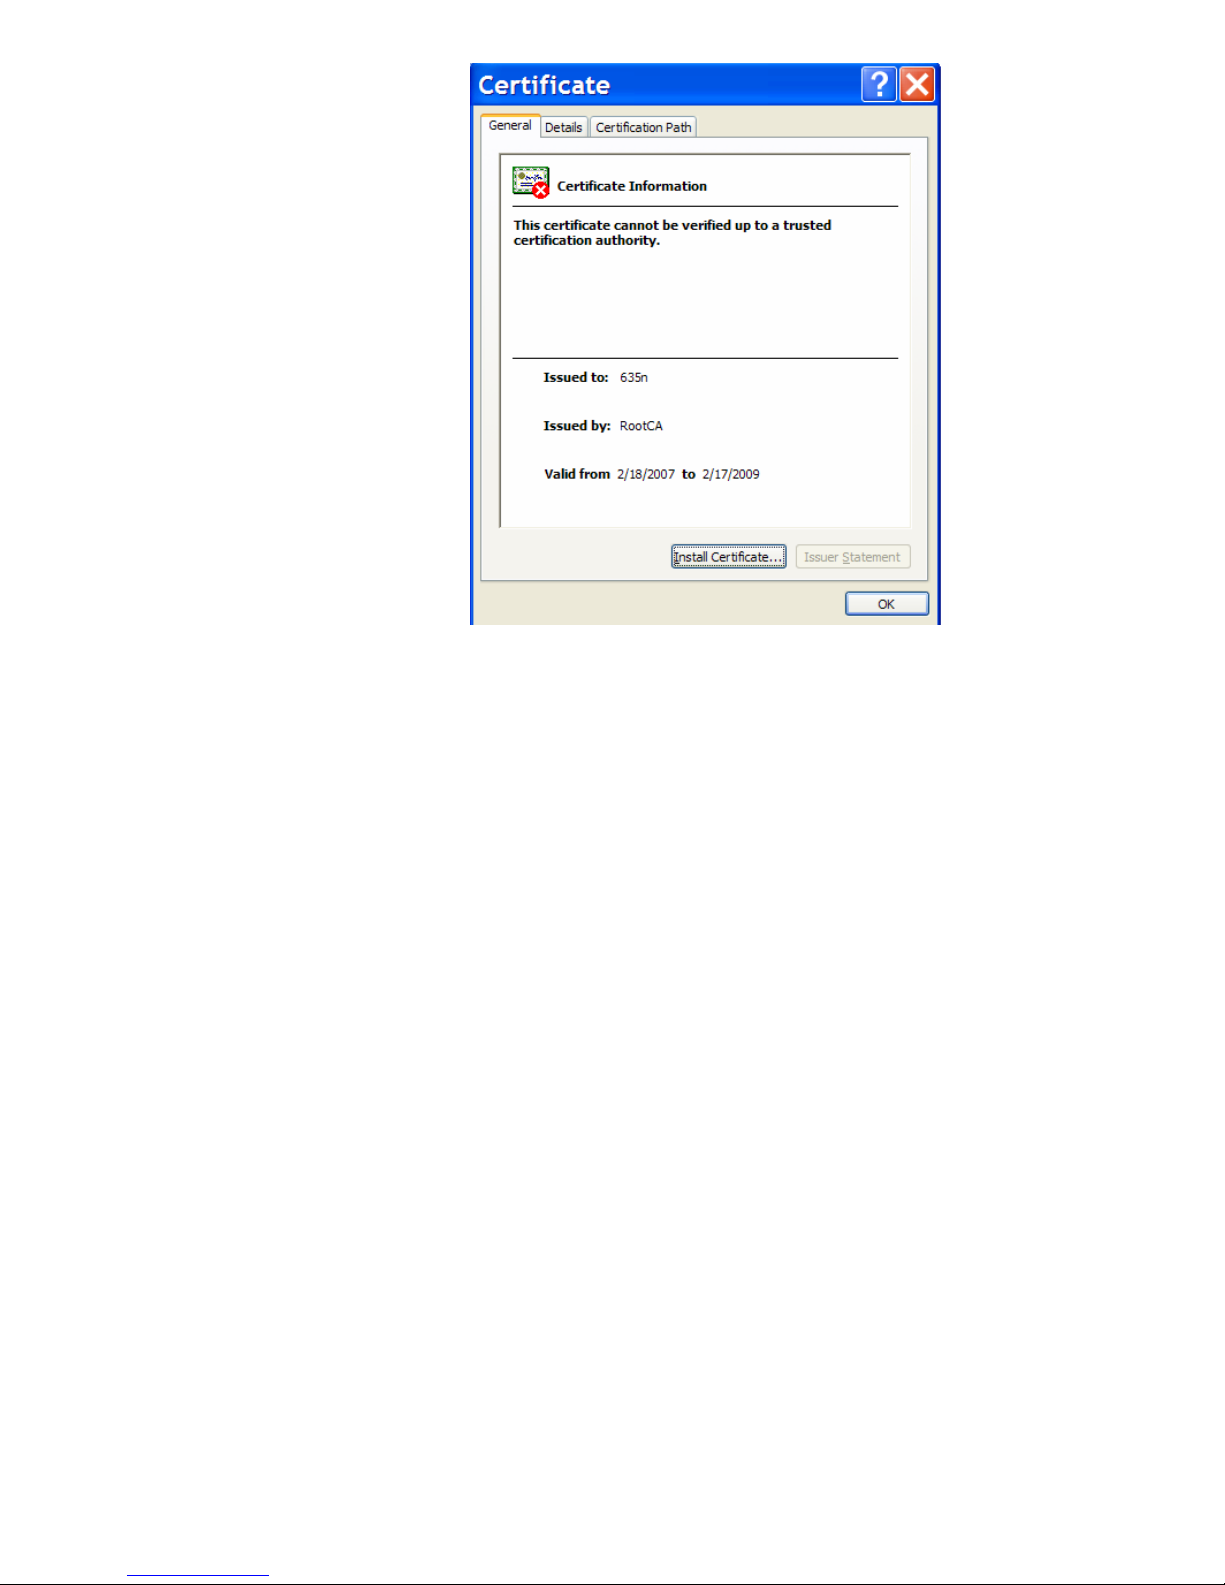
Figure 9 – Certificate Details
In Figure 9, we see there is a red X on the certificate, indicative of a security problem. In addition,
there is a very specific error message: “This certificate cannot be verified up to a trusted certification
authority.” Here we see that the “Issued By” is entitled “RootCA”. What the message is trying to say
is that “RootCA”, who issued the certificate “635n”, is not trusted.
A useful analogy is to think of the certificate issuer like a Department of Motor Vehicles (DMV). Each
state in the United States has a DMV run by the state’s government. The DMV issues driver’s licenses
which grant the privilege to drive in a given state. A person that goes to the DMV to get a driver’s
license must pass a series of tests that helps the DMV determine if they are fit to drive on the state’s
roads. The state’s Highway Patrol, a group which enforces the rules of the road, recognizes the
validity of the DMV to issue driver’s licenses. Therefore, if one violates one of the rules of the road
and is pulled over by a Highway Patrol officer, showing a driver’s license issued by the DMV is a
requirement. The Highway Patrol will not recognize a driver’s license issued by an institution other
than the DMV as being valid. In short, the DMV is a trusted third party that issues “certificates”
(driver’s licenses) to individuals. These “certificates”, issued by the DMV, are trusted by the Highway
Patrol.
The Security Alert dialog is troubling because it is indicative of a trust problem. In the terms of our
analogy, it would be like a driver, who has been pulled over by the Highway Patrol, handing the
officer a driver’s license that the driver’s mother wrote for him indicating that her son had been
granted the privilege to drive in the state. While a note from mom may be trusted by her sister, it isn’t
trusted by the Highway Patrol.
In essence, a digital certificate, one used by computers, binds an identity to a key and needs to be
issued by a trusted third party. What is a key? A key is a secret that is used in cryptographic
algorithms. There are public keys and private keys used for asymmetric cryptography and symmetric
keys used for symmetric cryptography. Let’s look at symmetric cryptography first.
8
Page 9
Unencrypted Message
User
Encryption Performed
Message Delivery
Decryption Performed
User
Unencrypted Message
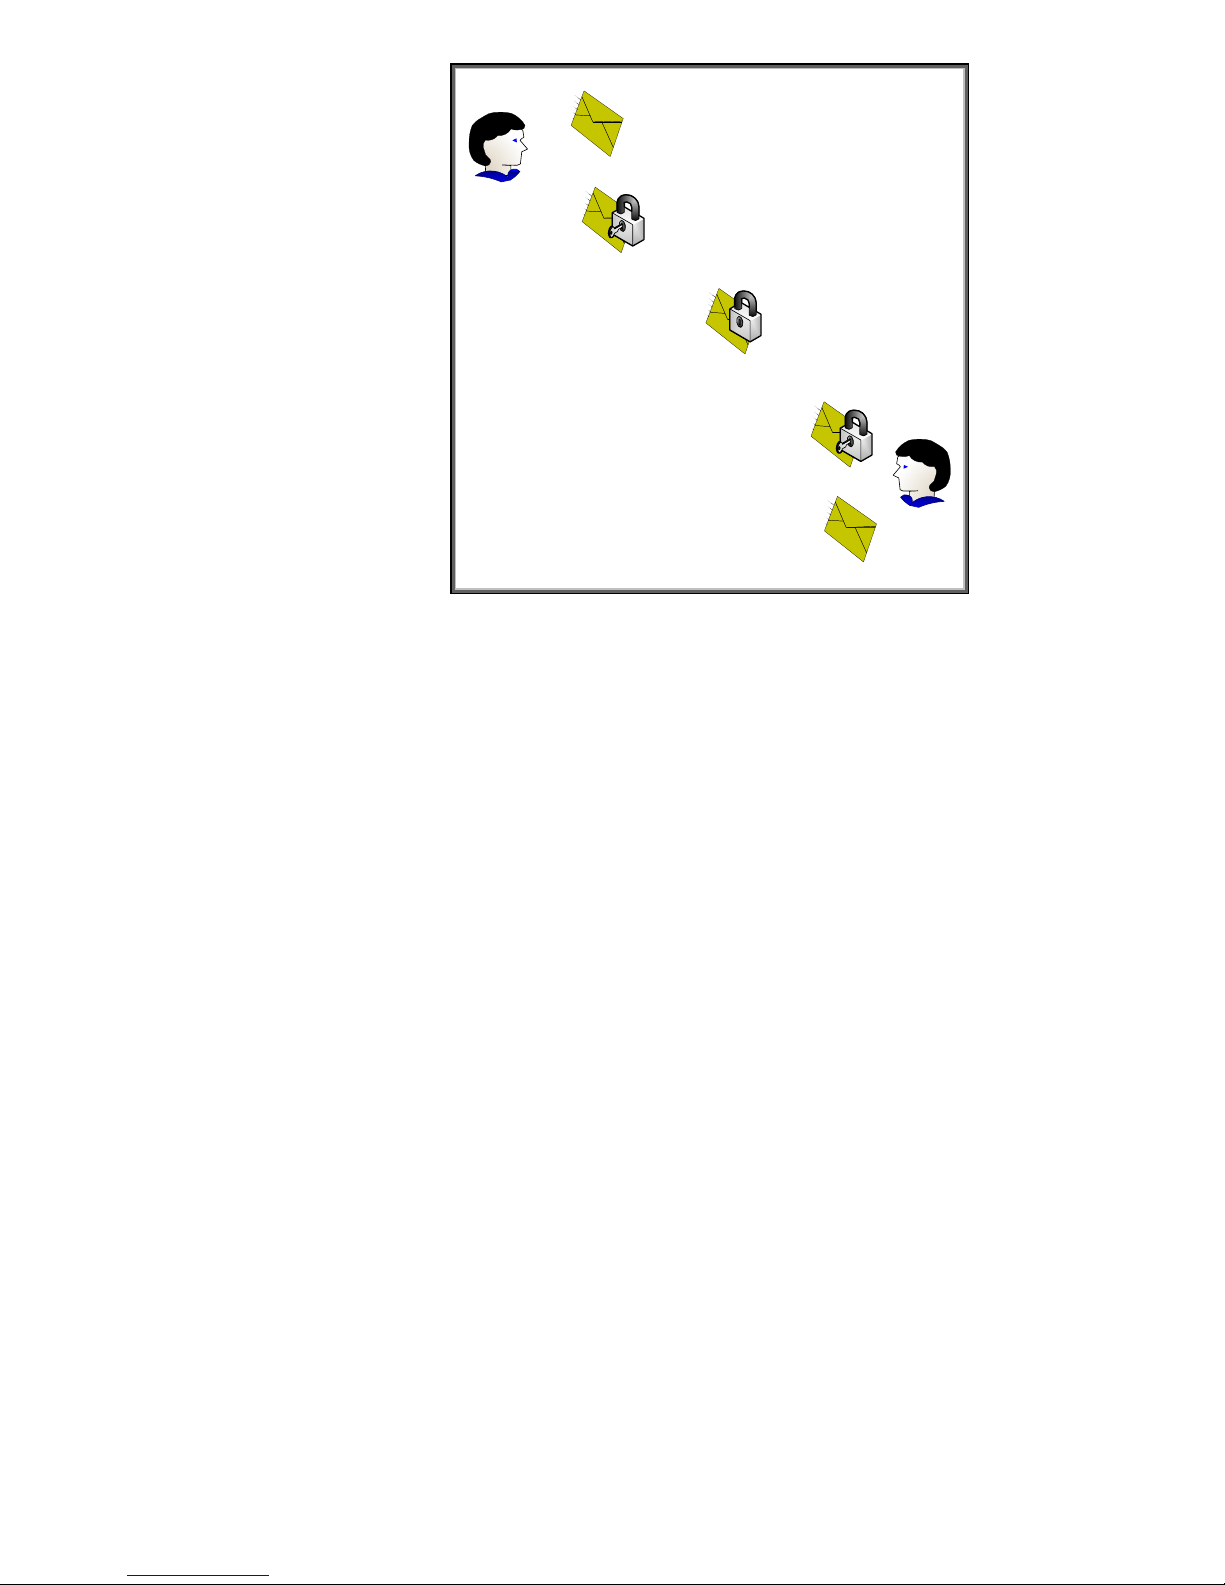
Figure 10 – Symmetric Cryptography
In Figure 10, the confidentiality provided to the message is done via a single key. Because the same
key is used for encryption and decryption, this process is known as symmetric cryptography.
Symmetric cryptography commonly has two attributes associated with it:
• It performs well – it is fast and easy to implement
• It has a key distribution problem – how do you get the symmetric key to everyone that needs
it in a secure way?
Asymmetric cryptography is also available and functions very different than symmetric cryptography.
It has two keys – one Public and one Private. The private key is not shared with anyone. The Public
key is like a public telephone number. You can share it with everyone. Let’s look at Figure 11 –
Asymmetric Cryptography.
9
Page 10

Figure 11 – Asymmetric Cryptography
Here we can see the difference between asymmetric and symmetric cryptography. One key can be
used for encryption and then the corresponding key can be used for decryption. It appears that
asymmetric cryptography has solved the key distribution issue; however there are two new attributes
usually associated with asymmetric cryptography
• It is slow
• It has a trust problem. How do I know that this is John’s public key and not someone
pretending to be John?
To solve the first problem, asymmetric cryptography is usually used to securely distribute symmetric
keys and sign hash codes. In short, what is actually being encrypted and decrypted is usually much
smaller than actual messages. This has the nice benefit of solving the key distribution issue with
symmetrical cryptography. So, in essence, symmetric keys are sent securely using asymmetric
cryptography and the actual messages themselves are protected using symmetric cryptography.
Cool! We get the flexibility of asymmetric cryptography and the speed of symmetric cryptography.
Now we only have to solve the trust problem.
In order to solve the trust problem, five things will need to be discussed:
• A certificate authority – a trusted third party that creates digital certificates from certificate
requests
• A certificate request – a public key associated with identity information that will serve as the
basic building block for a digital certificate that the certificate authority will create and sign.
• A digital certificate – a public key associated with identity information that is digitally signed
by the certificate authority.
• A digital signature – the hash of the digital certificate encrypted by the private key of the
certificate authority.
10
Page 11
• A hash – also known as a message digest. A hash is the output of a one way function that
attempts to ensure the integrity of the message (i.e., that the message has not been altered).
It is usually combined with authentication information to ensure that the message originator
can be authenticated and that the integrity of the message has not been disrupted. You can
think of a hash like an advanced checksum or an advanced cyclic redundancy check (CRC).
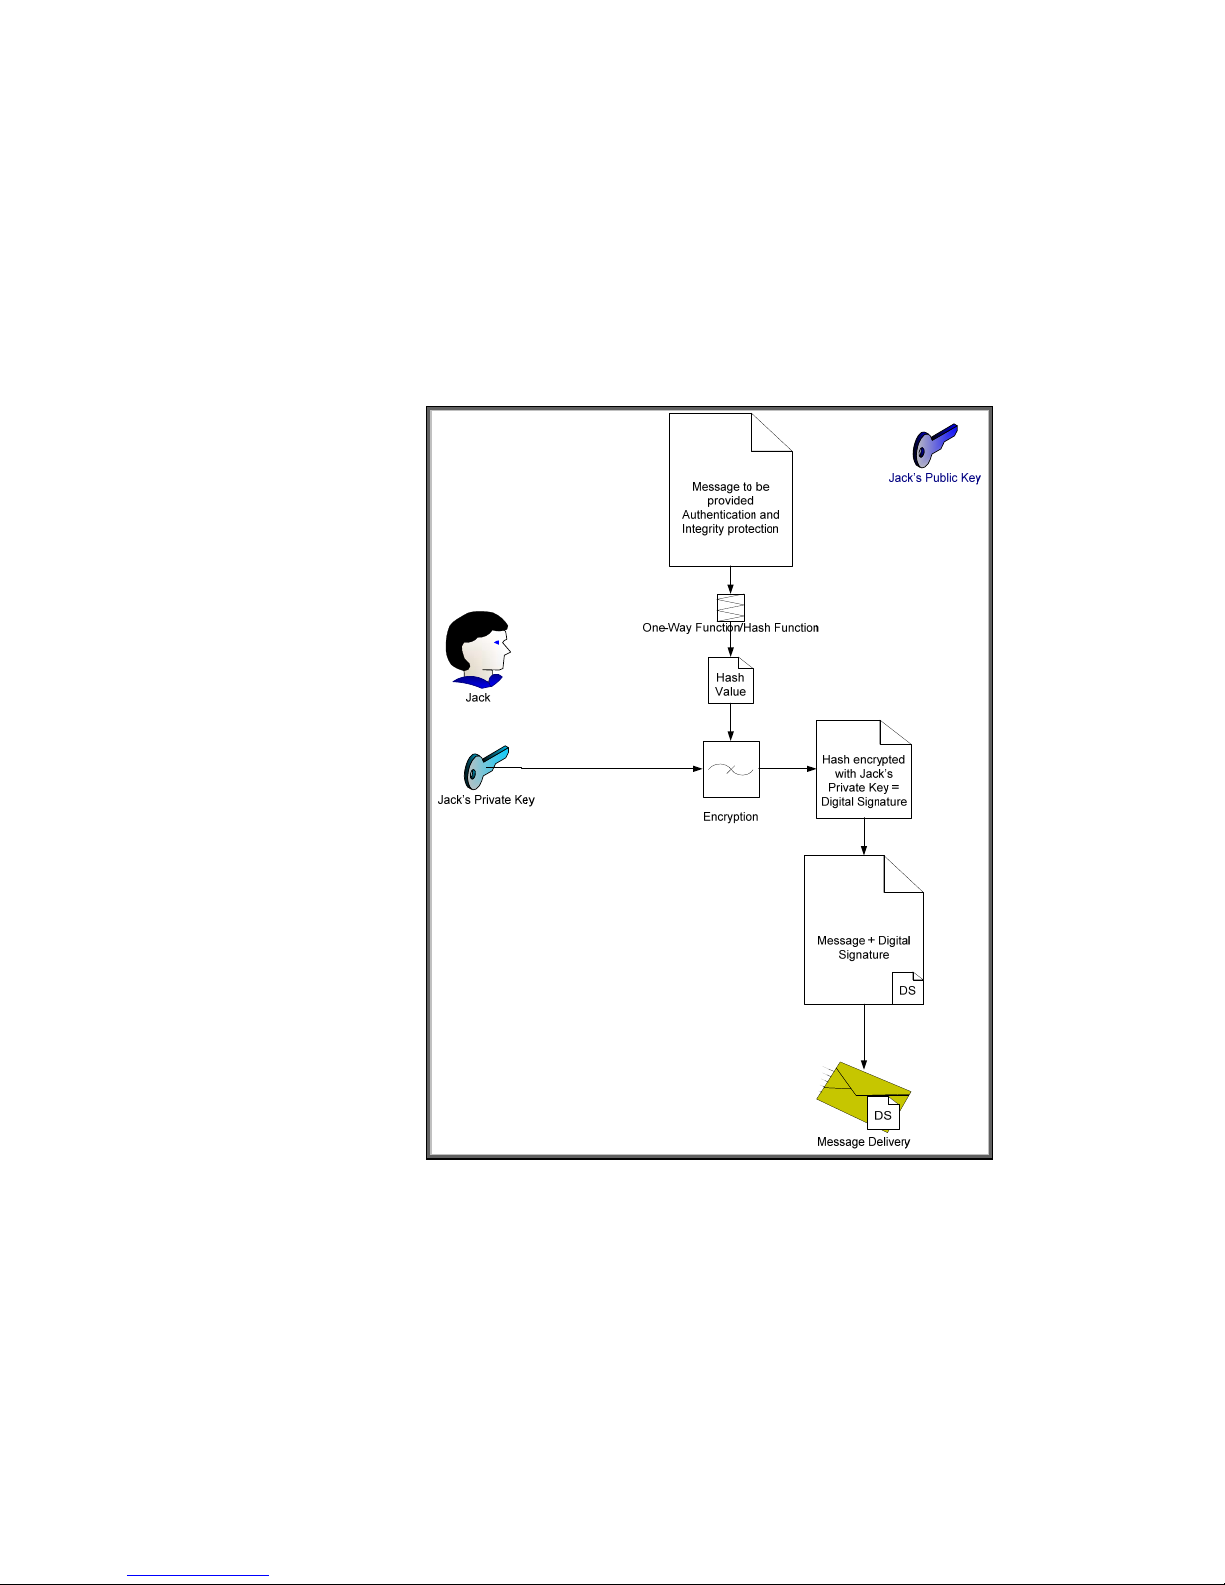
Let’s cover hashes and digital signatures first. We’ll assume that Jack wants to send John a message.
Jack wants to make sure that John knows the message came from him and that the message was not
altered in transit. However, Jack doesn’t care about confidentiality – in other words, the actual
message can be sent “in the clear” – but does care about authentication and integrity. We can
accomplish this through hashes and digital signatures as shown in Figure 12.
In Figure 12, Jack has sent John a message with a digital signature. Let’s see how John would
validate this message to make sure it came from Jack and was not altered. Refer to Figure 13.
Figure 12 – Digital Signature
11
Page 12
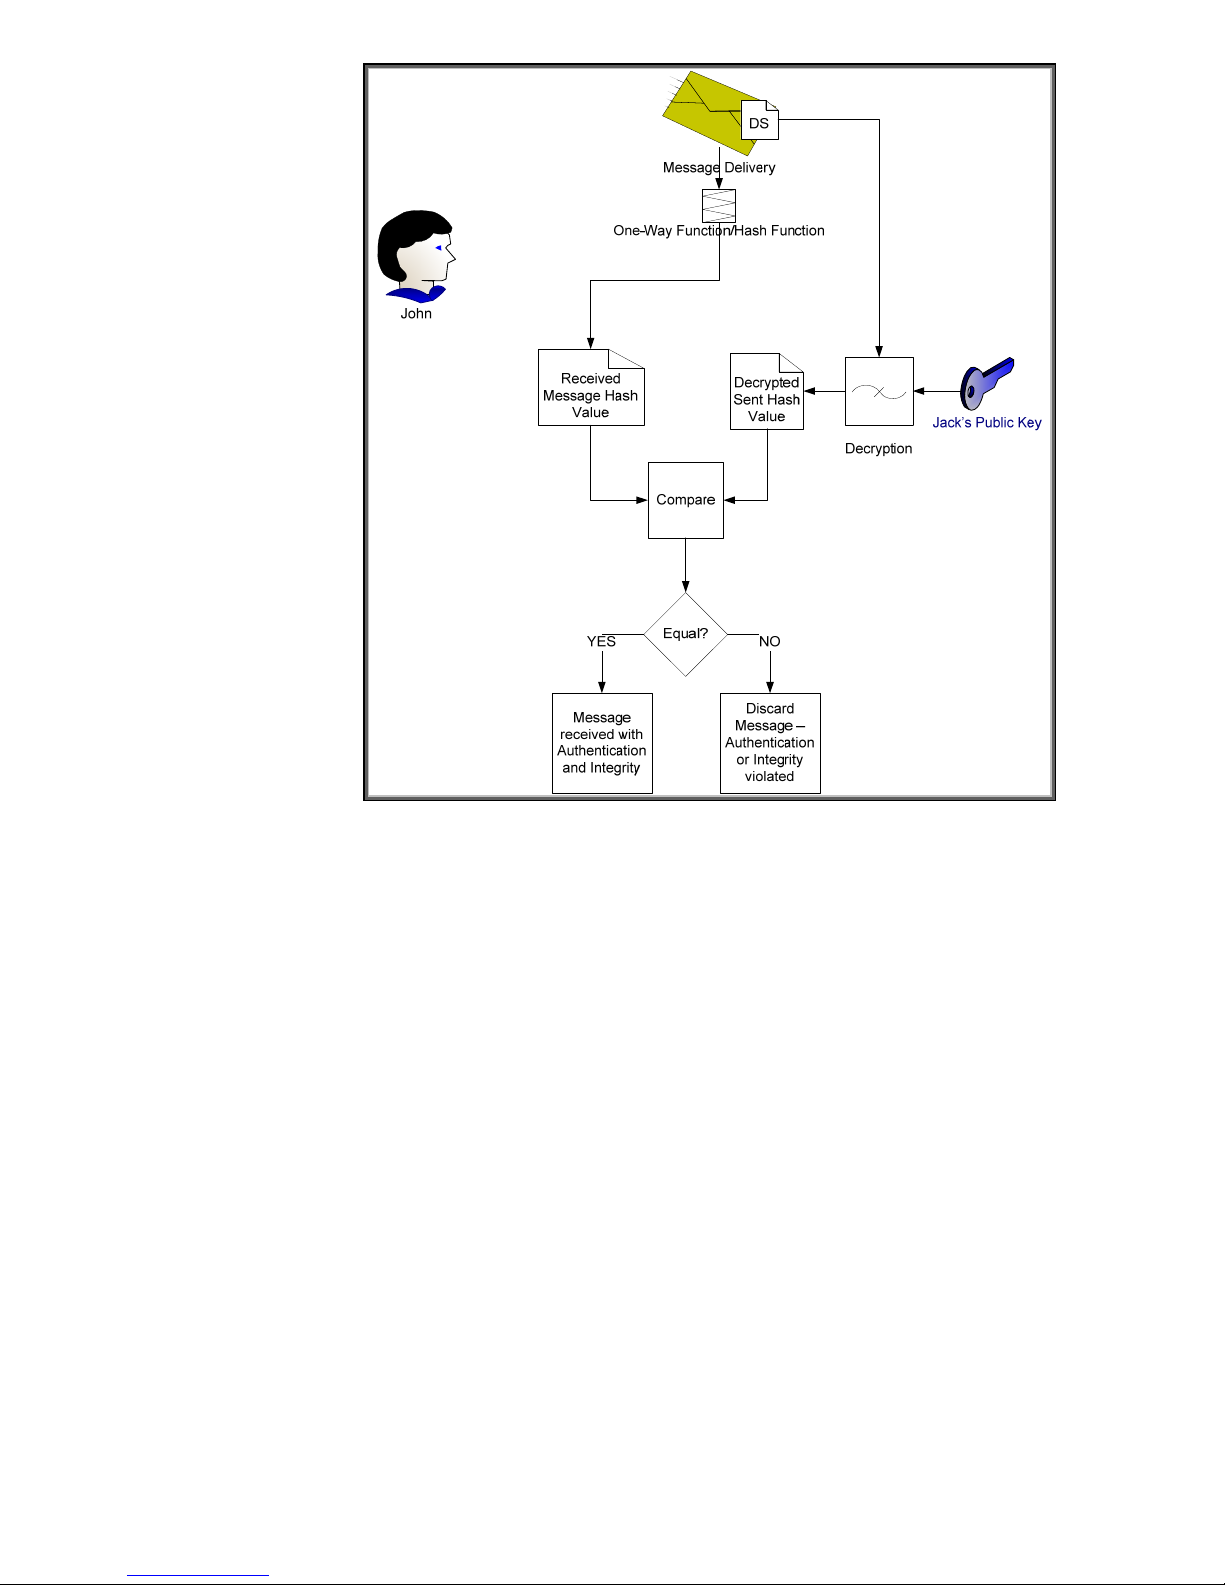
Figure 13 – Digital Signature Verification
Here we see how John uses Jack’s public key to verify the message. Jack’s public key is the only key
that can decrypt the digital signature and obtain the hash value of the message that Jack calculated
before sending the message. Because the hash was encrypted with Jack’s private key, which no one
should know but Jack, John can be sure that Jack was the one that sent it.
We still have a problem – How does John know that Jack’s public key really belongs to the person
that he knows as “Jack”? There are many people in the world named “Jack” – how does John know
it isn’t one of them? We still need a trusted third party to provide Jack’s public key in a format John
can trust and we probably need Jack to provide a little more identity information too. Here is where
the Certificate Authority comes into play. Refer to Figure 14 – Certificate Authority.
12
Page 13
Jack
Create
Key Pair
Identity Info +
Jack’s Public Key
Jack’s Private Key
CA’s Public Key
Jack
Jack’s Private Key
(Stays Private)
Jack’s Public Key
Certificate Request
Identity Info +
CA Info +
Jack’s Public Key
CA’s Digital
Signature
Jack’s Public Key
Certificate
(Also performs Identity Verification on Jack)
Figure 14 – Certificate Authority
Certificate Authority
Identity Info +
CA Info +
Jack’s Public Key
Preliminary Certificate
One-Way Function/Hash Function
Encryption
CA’s Private Key
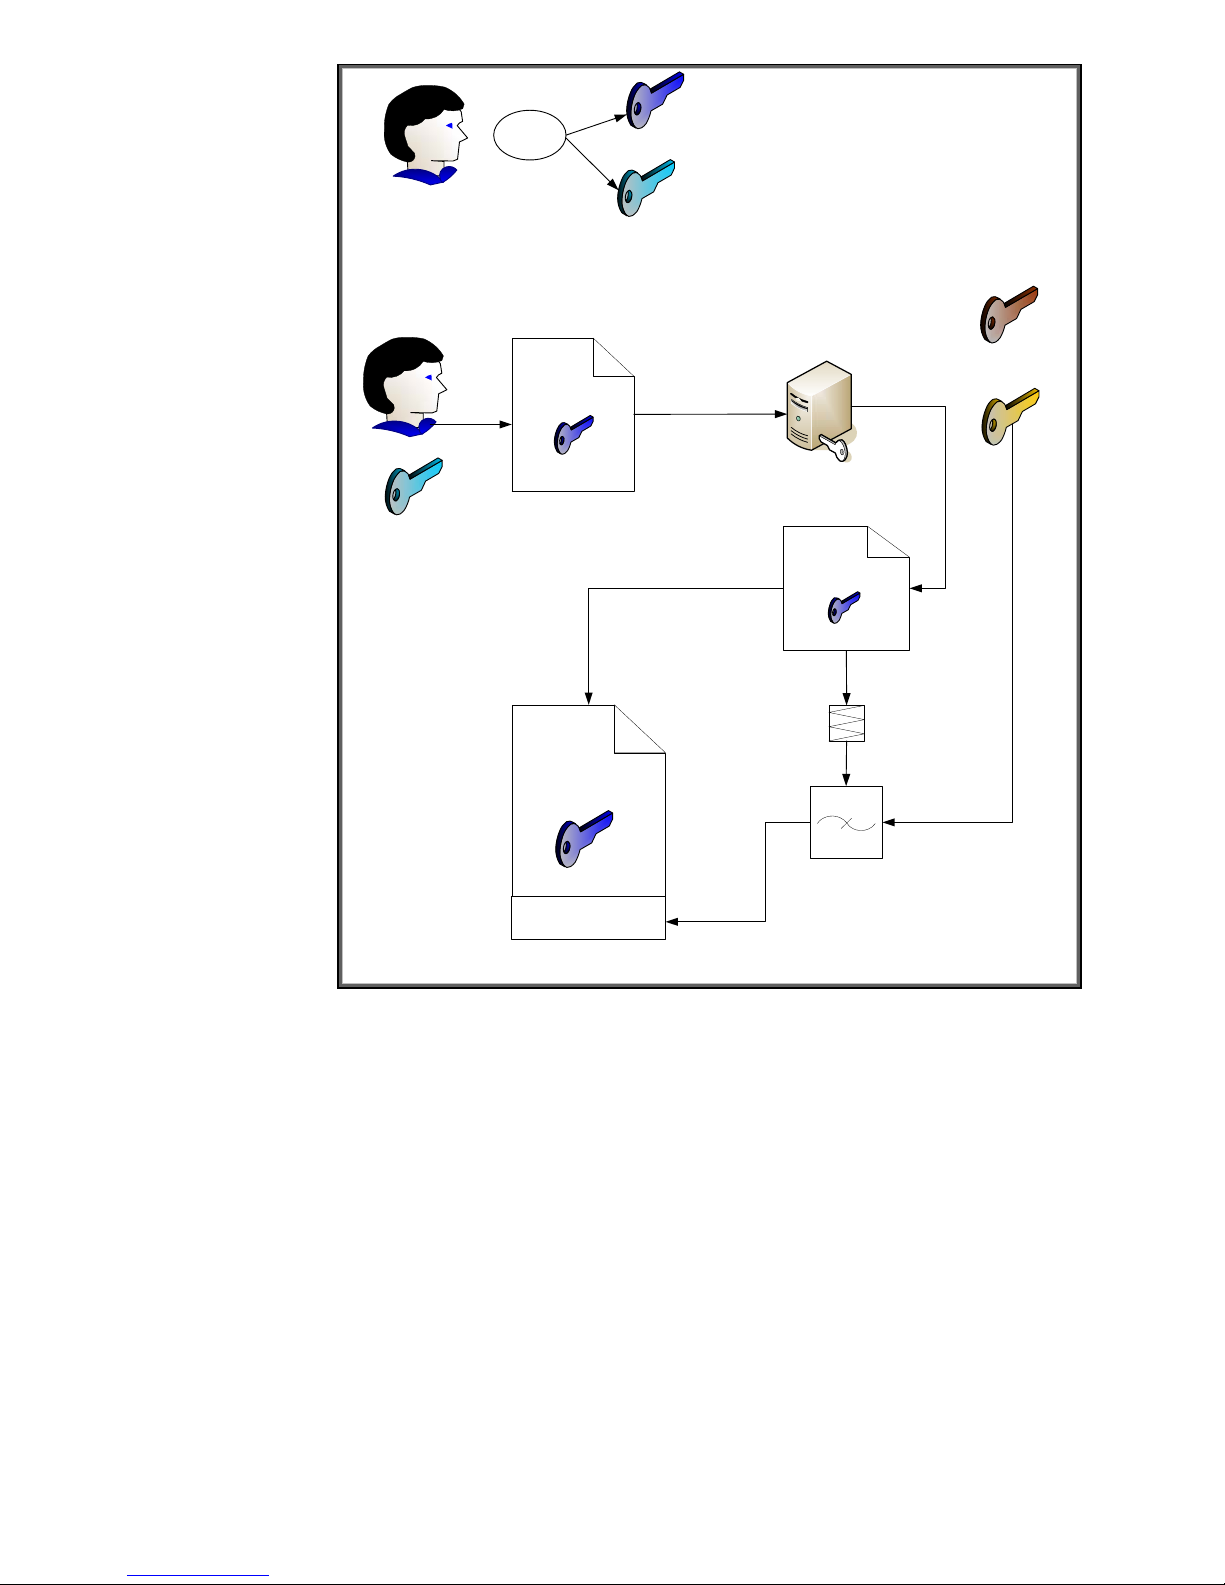
Jack goes through a key pair generation process and creates a public and private key pair. The
private key is kept secret. The public key is associated with some identity information and is given to
a Certificate Authority. The certificate authority generates a certificate, usually specific to a purpose
such as email, and signs the certificate with its digital signature. Assuming there is a place where
these digital certificates are publicly available, as long as Jack and John can agree to trust a specific
certificate authority, they’ll be fine trusting certificates signed by that authority. Refer to Figure 15.
13
Page 14
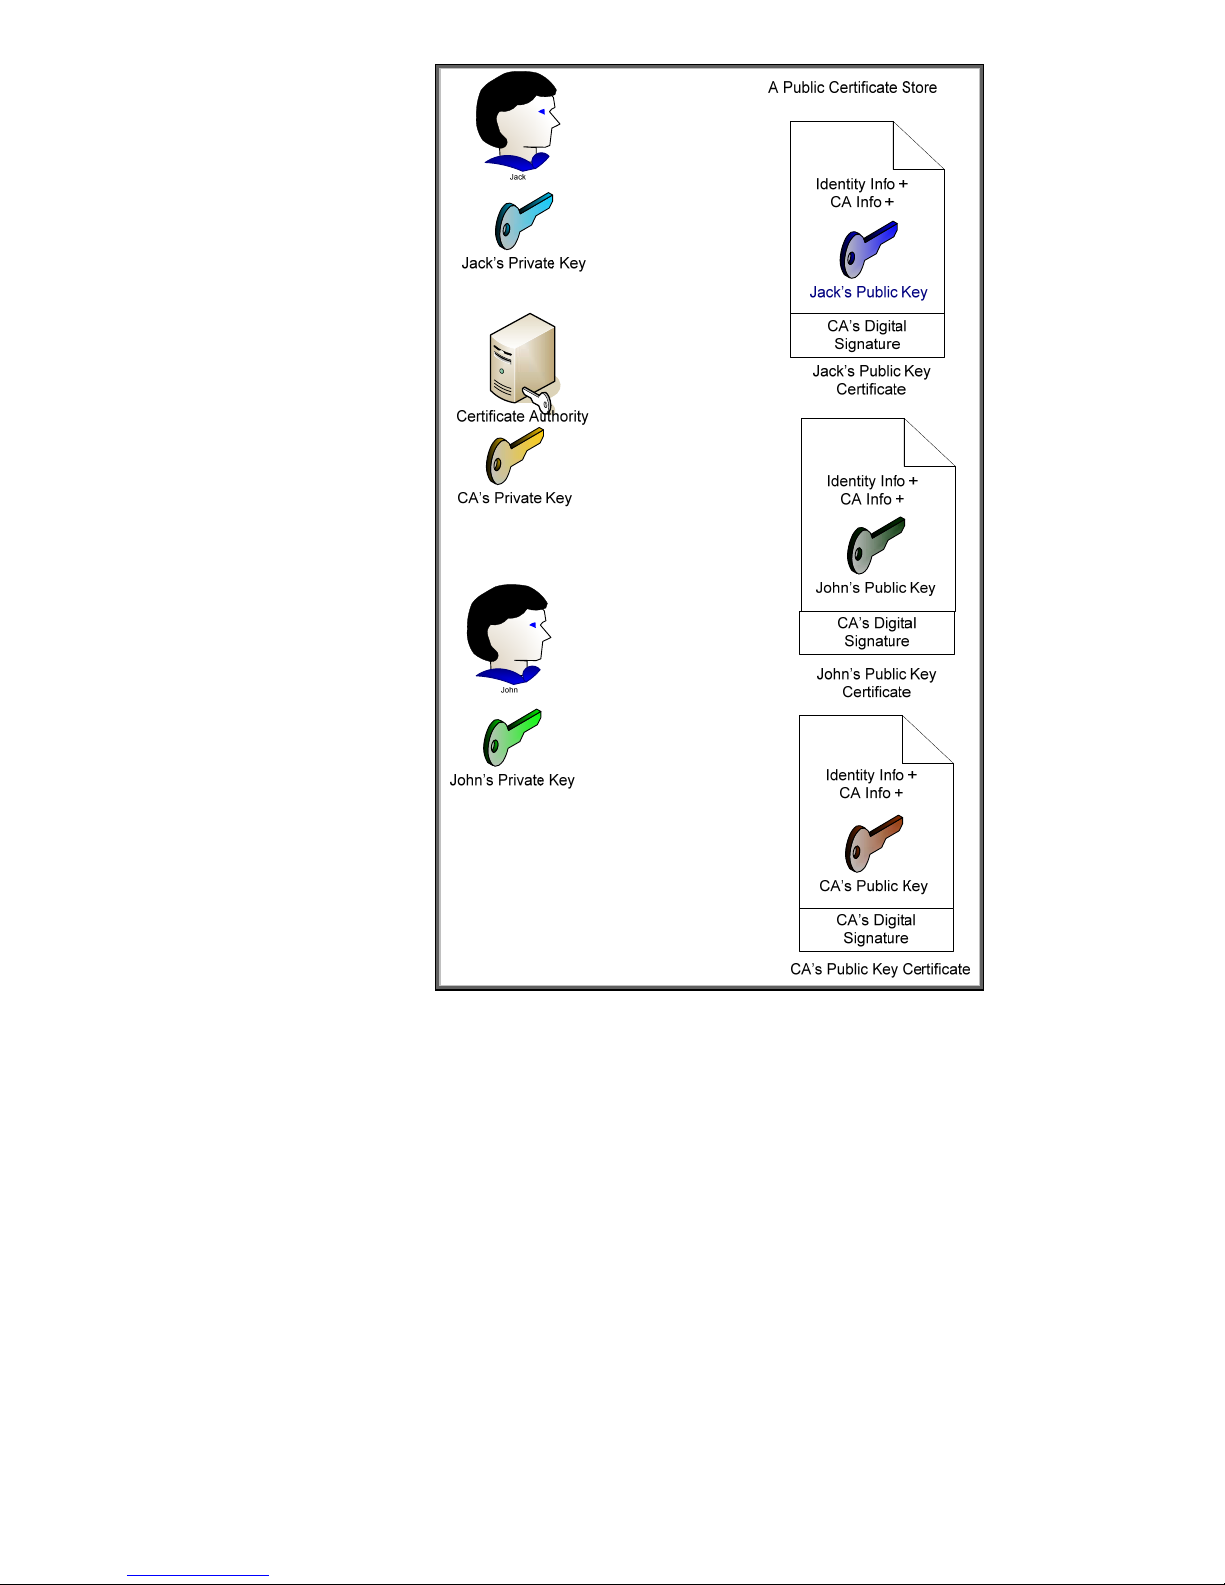
Here we can see that everyone’s public key certificate is, well – um, public. The important thing to
note is that the certificate authority also has a public key certificate that identifies itself. This certificate
is signed with its own private key and is a “self-signed” certificate. There is no “higher” level of trust
then the top level certificate authority. Therefore, John and Jack must choose a particular certificate
authority that they both trust. In most cases, there is a hierarchy of certificate authorities at customer
sites. This forms what is known as a certificate chain and there is a top level CA or Root CA where
the ultimate trust resides.
Also, we should take care to point out that there is usually a difference between Internet trust using
certificates and Intranet trust using certificates. Internet trust will involve well-known certificate
authorities like Verisign and Entrust. However, Intranet models usually revolve around Microsoft’s
certificate authority that comes with Windows 2003 server. Each company establishes their own
Public Key Infrastructure (PKI) that includes an entire policy around certificates.
Now that we have covered some basics around certificates, we can talk specifically about Jetdirect.
Jetdirect is an embedded system and as a result, has limited storage space for certificates. Jetdirect
Figure 15 – Public Key Certificates
14
Page 15

can store one Identity certificate and one CA certificate. The CA certificate tells Jetdirect which
identity certificates should be trusted (i.e., must be signed by that CA) when Jetdirect is receiving a
certificate from another entity. Jetdirect’s Identity certificate is the certificate that is sent out when
another entity requests it. It is important to note that the CA certificate on Jetdirect is configured strictly
to provide the trust point for identity certificates that are sent to Jetdirect – the identity certificates
received from other entities must be signed by that CA or be part of a chain which ends in that CA.
Since Jetdirect only has one Identity certificate that can be configured, it must be capable of being
used in a variety of situations. Jetdirect can act as a client or a server, depending on the protocol
being used. For instance, if a web browser is using HTTPS to communicate to Jetdirect, Jetdirect will
return its Identity certificate as part of the SSL/TLS negotiation process, which will identify Jetdirect as
a server. In other cases, like EAP-TLS, Jetdirect will send its Identity certificate for client authentication.
By default, Jetdirect will create a “self-signed” certificate the first time it is powered on. This certificate
is not secure because it has not been signed by a trusted CA. An important step in the security of a
Jetdirect product is to replace the default self-signed Identity certificate with one that has been signed
by a trusted CA.
What Equipment is Required for 802.1X?
Essentially, we need the following:
• A printer or Jetdirect device (Supplicant) that supports 802.1X
• A switch (Authenticator) that supports port-based authentication via 802.1X
• A RADIUS server (Authentication Server), such as the Internet Authentication Service (IAS)
from Microsoft
Many HP Jetdirect devices can be upgraded for free to support 802.1X. Refer to
http://www.hp.com/go/webjetadmin_firmware
that support 802.1X are as follows:
• J7934A/J7934G 620n EIO 10/100TX Print Server with the latest firmware available – PEAP
Support
• J7960A/J7960G 625n EIO 10/100/1000T Print Server with the latest firmware available –
PEAP support
• J7997G 630n EIO 10/100/1000T Print Server with the latest firmware available – PEAP &
EAP-TLS support
• J7961A/J7961G 635n EIO IPv6 & IPsec Print Server with the latest firmware available –
PEAP & EAP-TLS support
• J8007G 690n EIO Wireless 802.11b/g Print Server – PEAP & EAP-TLS & LEAP support
• Embedded Jetdirect products with the latest firmware available – PEAP & EAP-TLS support
• J7942A/J7942G en3700 USB External Print Server with the latest firmware available – PEAP
support.
Microsoft’s IAS comes with Windows Server 2003. This means that two of the three items needed for
802.1X authentication are potentially free! All that is needed is the switch (Authenticator).
Ethernet switches have long supported 802.1X. Check your switch documentation for information on
whether or not it is supported. The HP ProCurve line of edge devices support 802.1X with higher-end
edge switches supporting rich methods of assigning VLANs, bandwidth constraints, access control
lists, etc. Refer to http://www.hp.com/go/procurve
Rather than generically explain what is necessary to setup and configure 802.1X for HP Jetdirect, this
whitepaper will go through a step-by-step tutorial of sample installations and configurations of the
802.1X components.
for the latest firmware updates. HP Jetdirect products
15
Page 16
NOTE: The following sections describe in detail the various steps to use 802.1X.
Various software programs are installed and configured. The installation and
configuration of these programs, such as Microsoft’s Certificate Authority, are done
for learning purposes and should not be considered as HP’s recommended
configurations or installations for production networks.
Installing the Internet Authentication Service (IAS)
Where are we?
Step 1 Installing Internet Authentication Service
Step 2 Installing a Certificate Authority
Step 3 Creating a Certificate Template
Step 4 Issuing a Certificate
Step 5 Creating a User for HP Jetdirect
Step 6 Switch Configuration
Step 7 HP Jetdirect Certificate Configuration
Step 8 IAS Configuration
Step 9 HP Jetdirect 802.1X Configuration
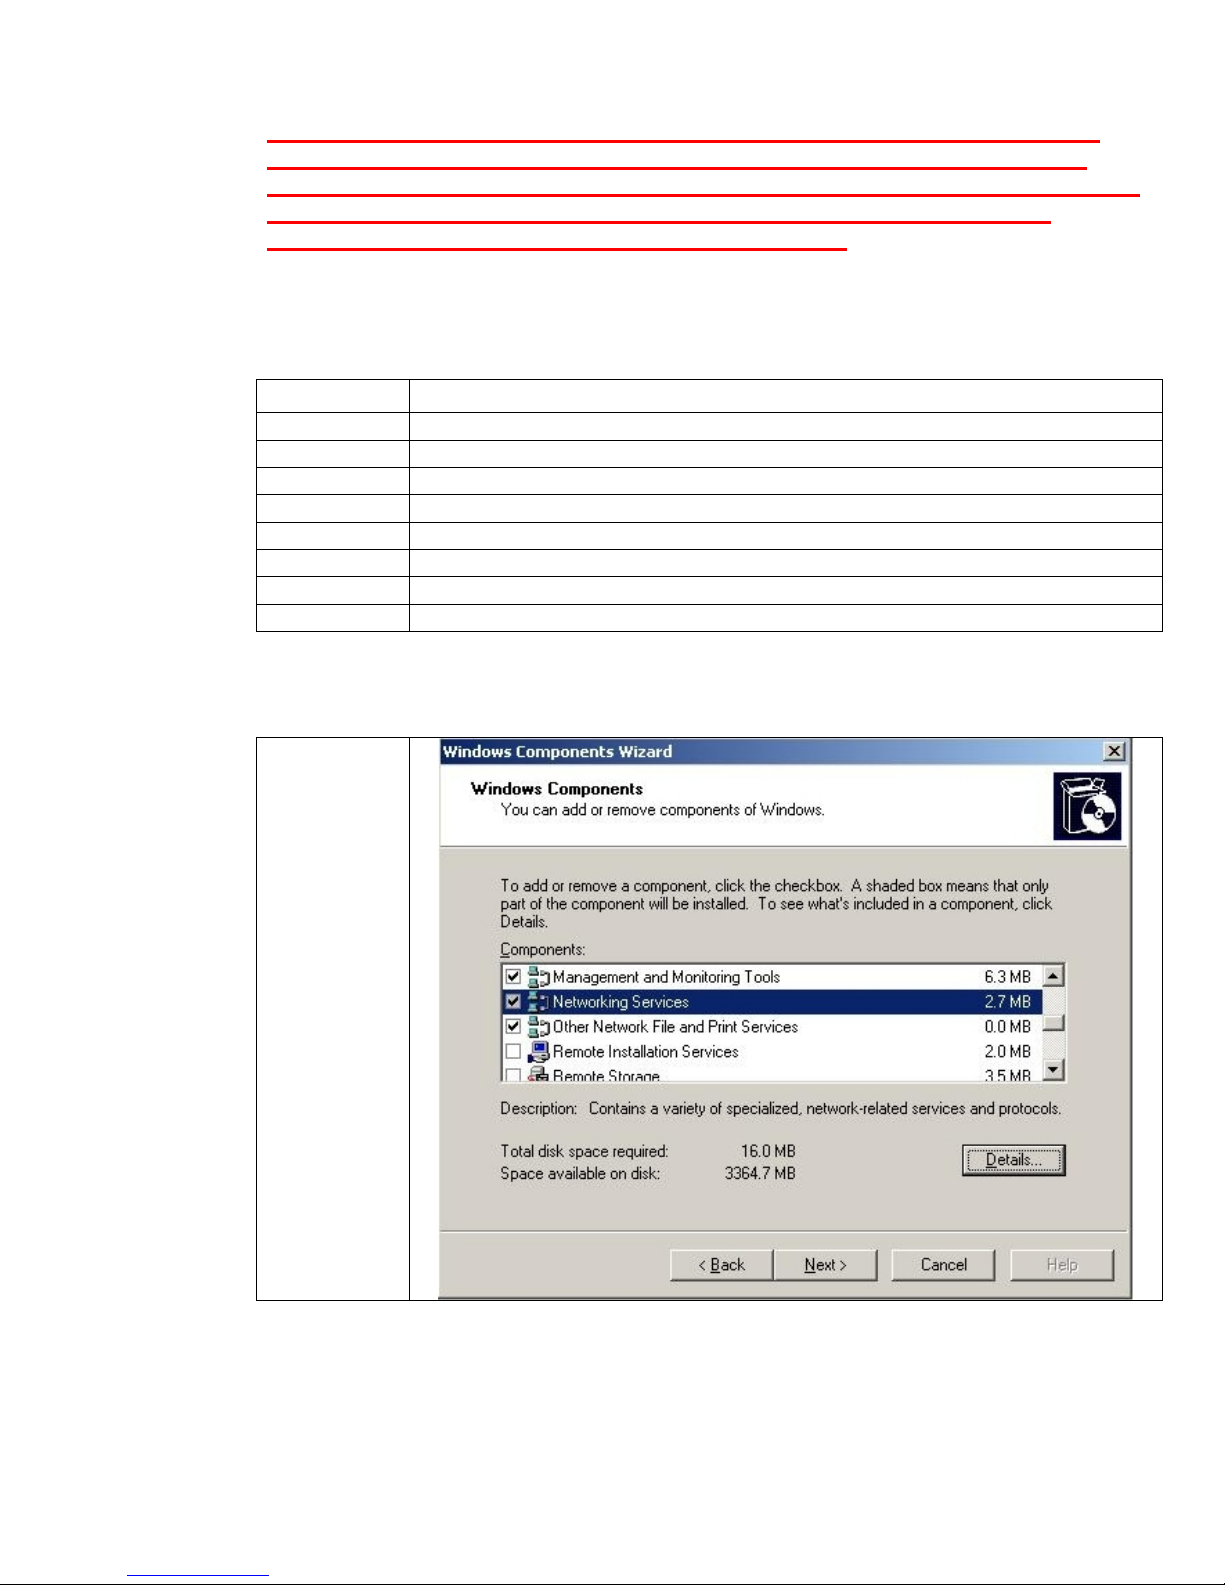
Microsoft ships a RADIUS server by default. This RADIUS server must be installed from the
Add/Remove Windows component wizard.
Using
Windows
2003, we can
simply go to
the Control
Panel and
select
“Add/Remove
Programs” and
then select
Windows
Components.
16
Page 17
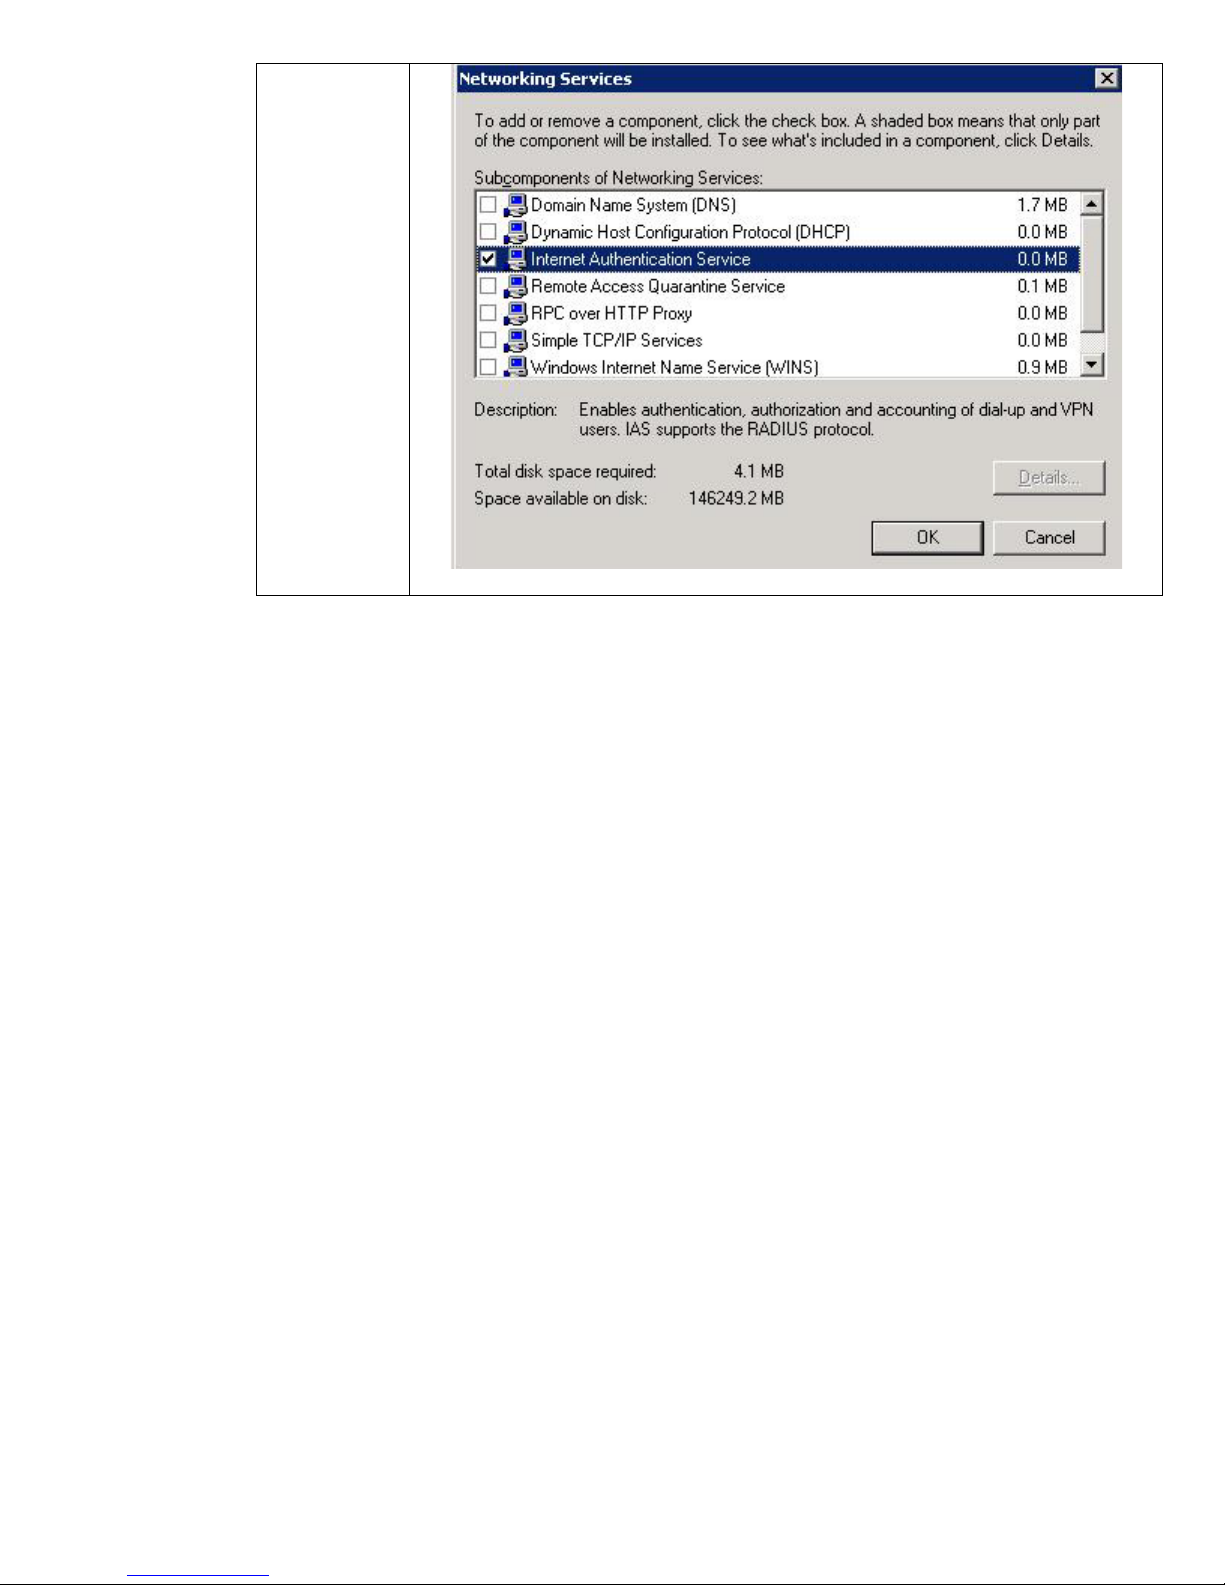
Select
Networking
Services and
press Details.
Then select
Internet
Authentication
Service and
press OK.
Complete the
wizard and
allow the
installation to
complete.
17
Page 18
Installing a Certificate Authority (CA)
Where are we?
Step 1 Installing Internet Authentication Service
Step 2 Installing a Certificate Authority
Step 3 Creating a Certificate Template
Step 4 Issuing a Certificate
Step 5 Creating a User for HP Jetdirect
Step 6 Switch Configuration
Step 7 HP Jetdirect Certificate Configuration
Step 8 IAS Configuration
Step 9 HP Jetdirect 802.1X Configuration
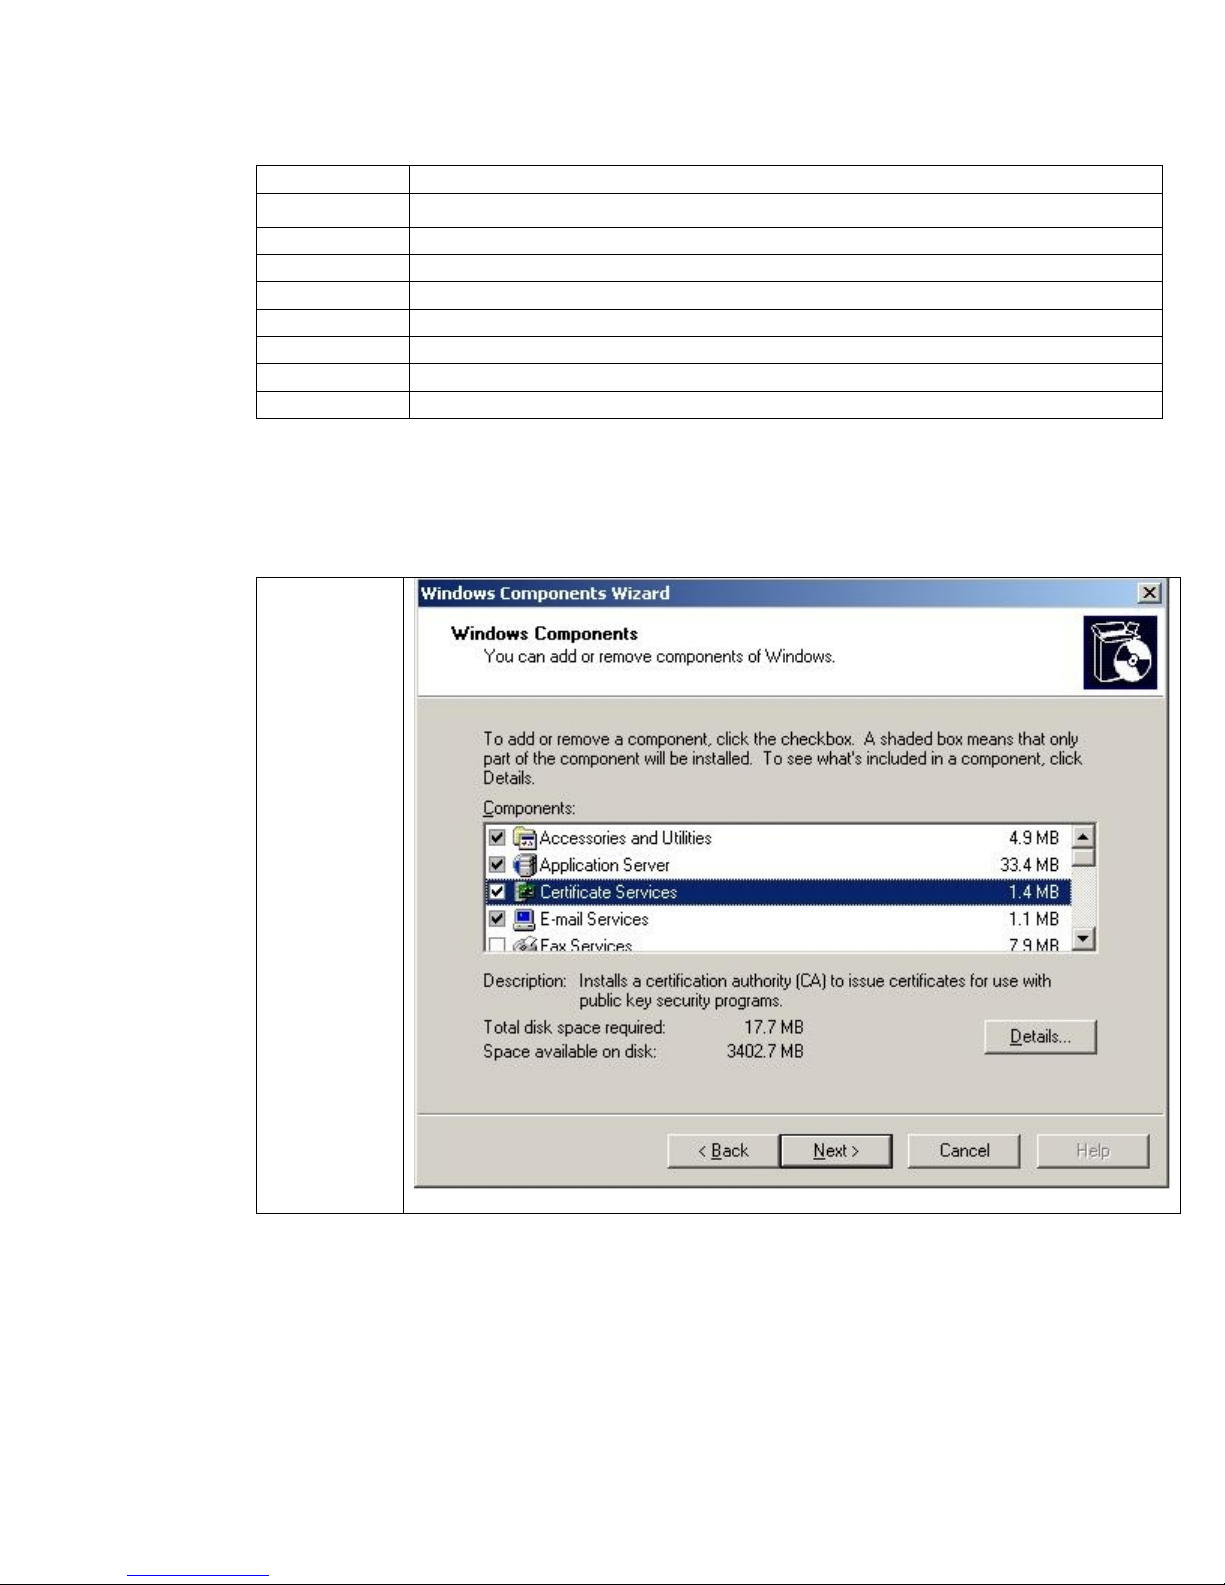
Using Windows 2003 Enterprise Edition or Windows Server 2003 Datacenter Edition, we can simply
go to the Control Panel and select “Add/Remove Programs” and then select Windows Components.
Select
“Certificate
Services”,
then click
Next.
18
Page 19
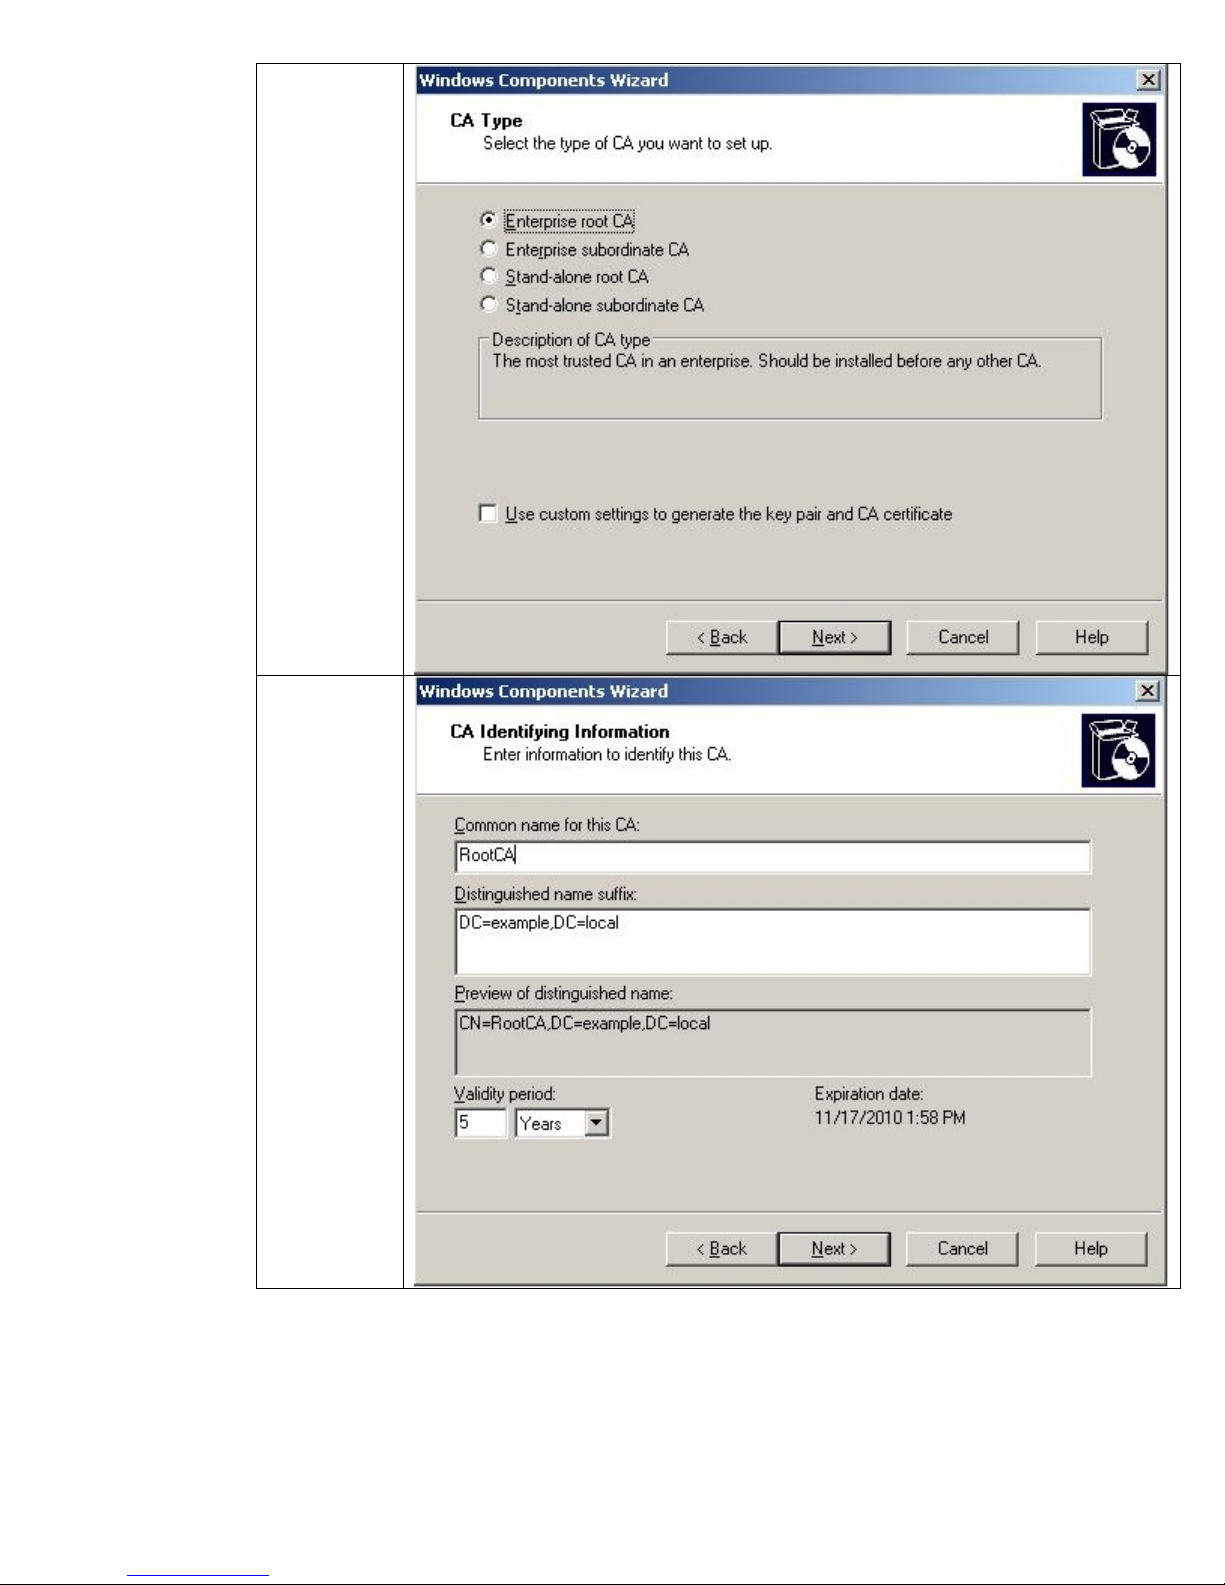
In this
example, we
are installing
an Enterprise
Root CA.
Click Next.
NOTE:
If you select
any other kind
of CA, the
certificate
template
functionality
described
below will not
be available.
Here is our
CA identity
information.
Click Next
and complete
the
installation.
Once the installation has completed, we can go to Start -> Run -> mmc
19
Page 20

The Microsoft
Management
Console is a
framework that
allows various
“Snap-Ins” to
be loaded.
Each “Snap-In”
manages a
specific service.
For example,
there is a
“Snap-In” to
manage the
Certificate
Authority (or
Certification
Authority as
Microsoft
sometimes calls
it).
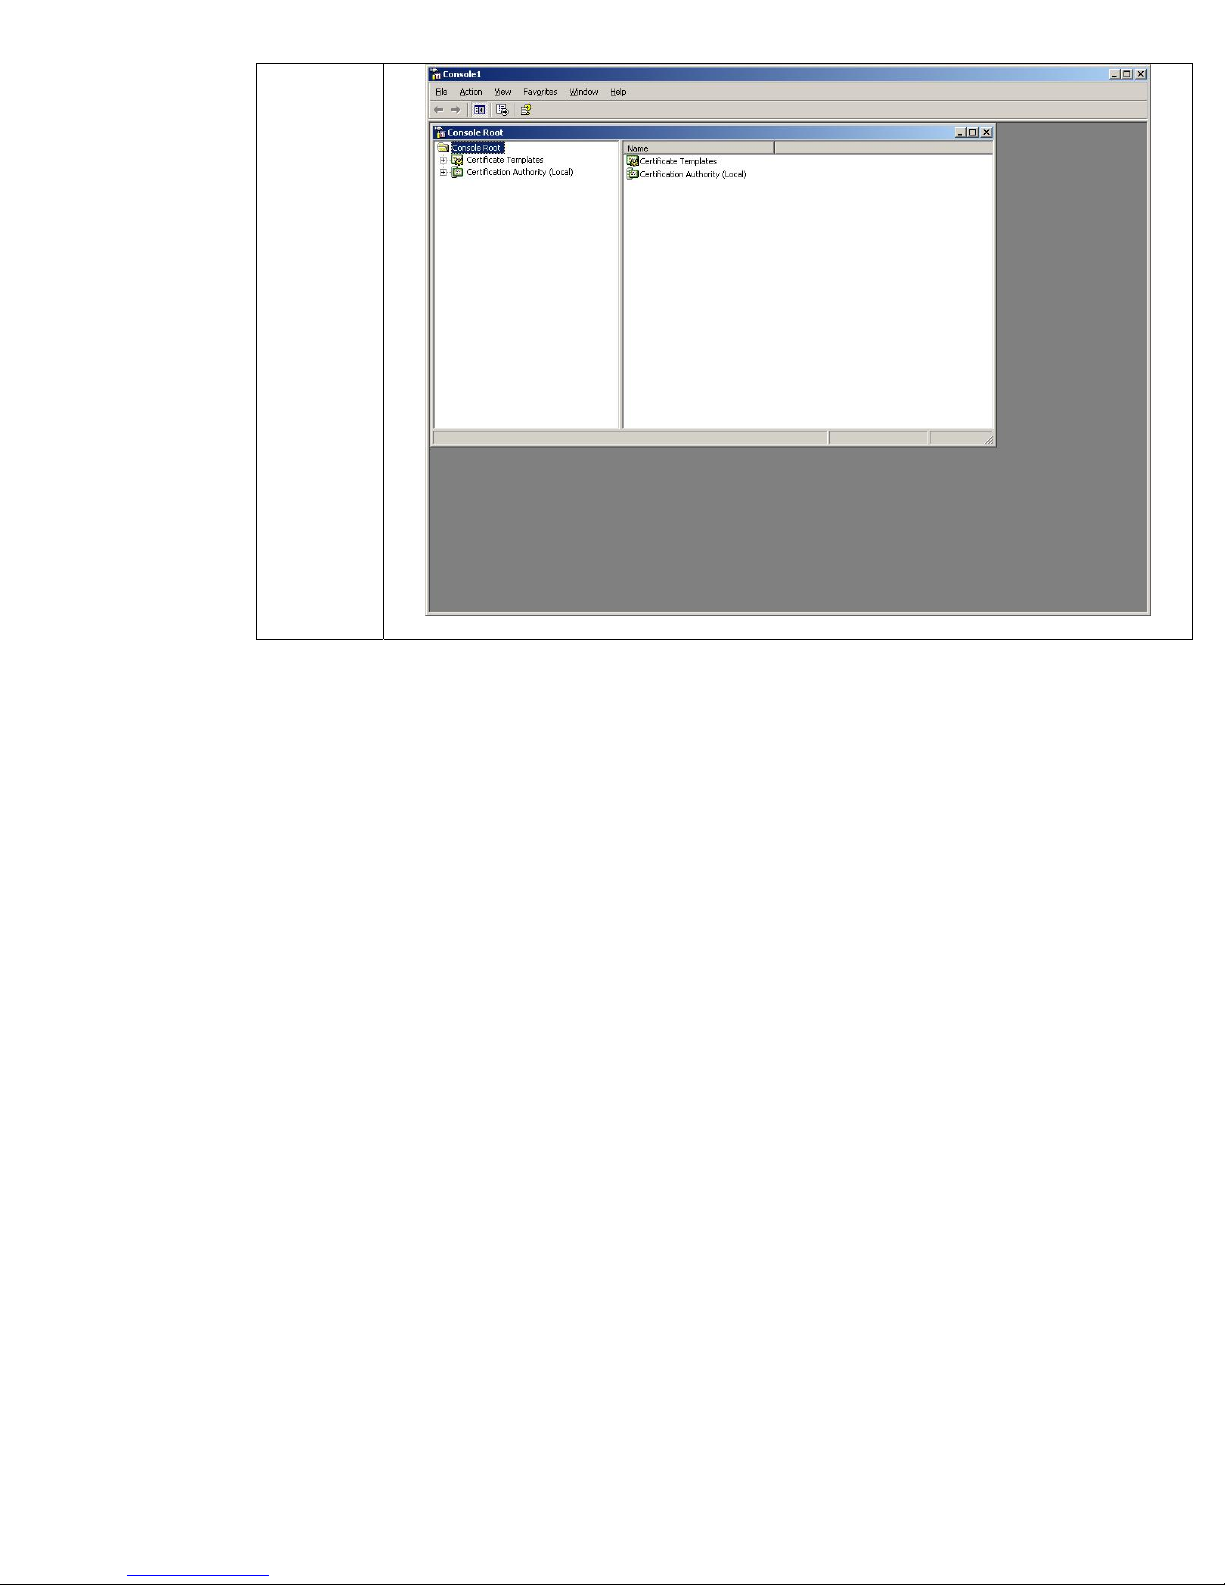
At this point, we want to load in separate Snap-Ins into the Microsoft Management Console (MMC).
Snap-Ins are modules that provide specific management functionality to the MMC. Go to the File
menu and select “Add/Remove Snap-In”.
20
Page 21
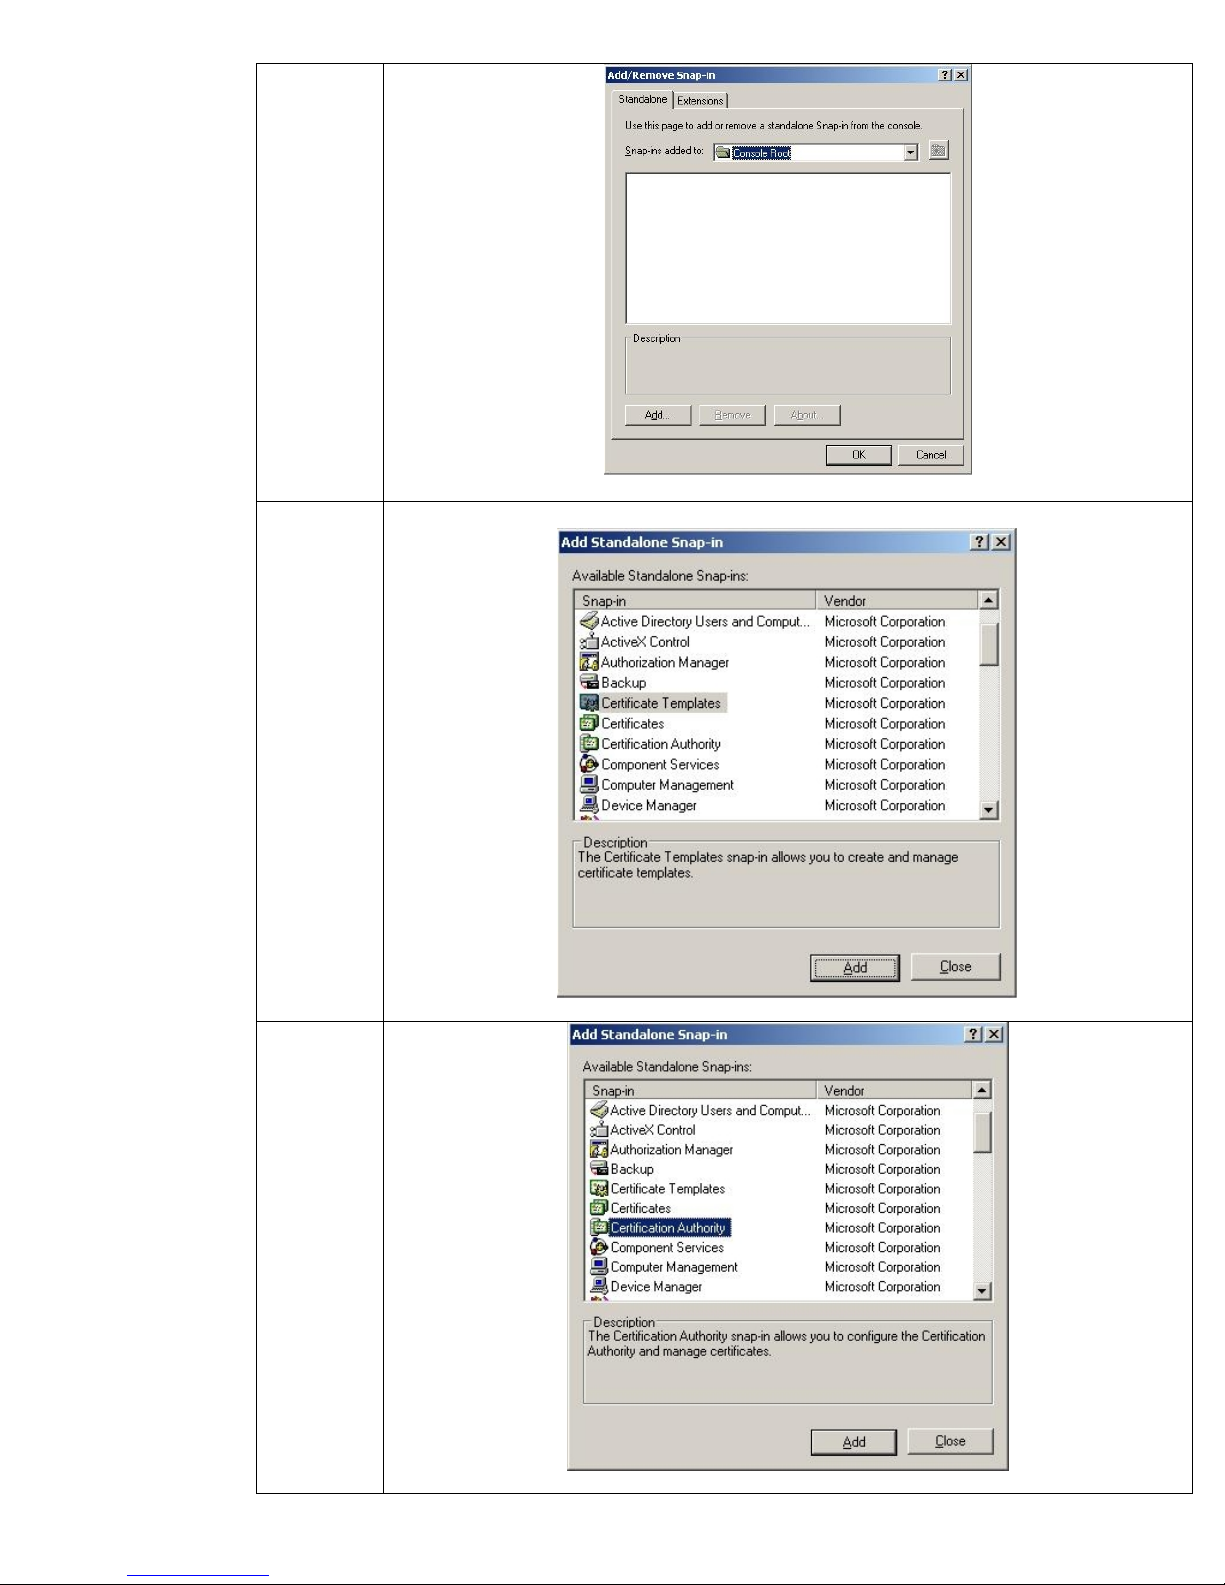
Click Add.
Select
Certificate
Templates,
then press
“Add”.
Select
Certification
Authority,
then press
“Add”.
Then press
Close.
21
Page 22
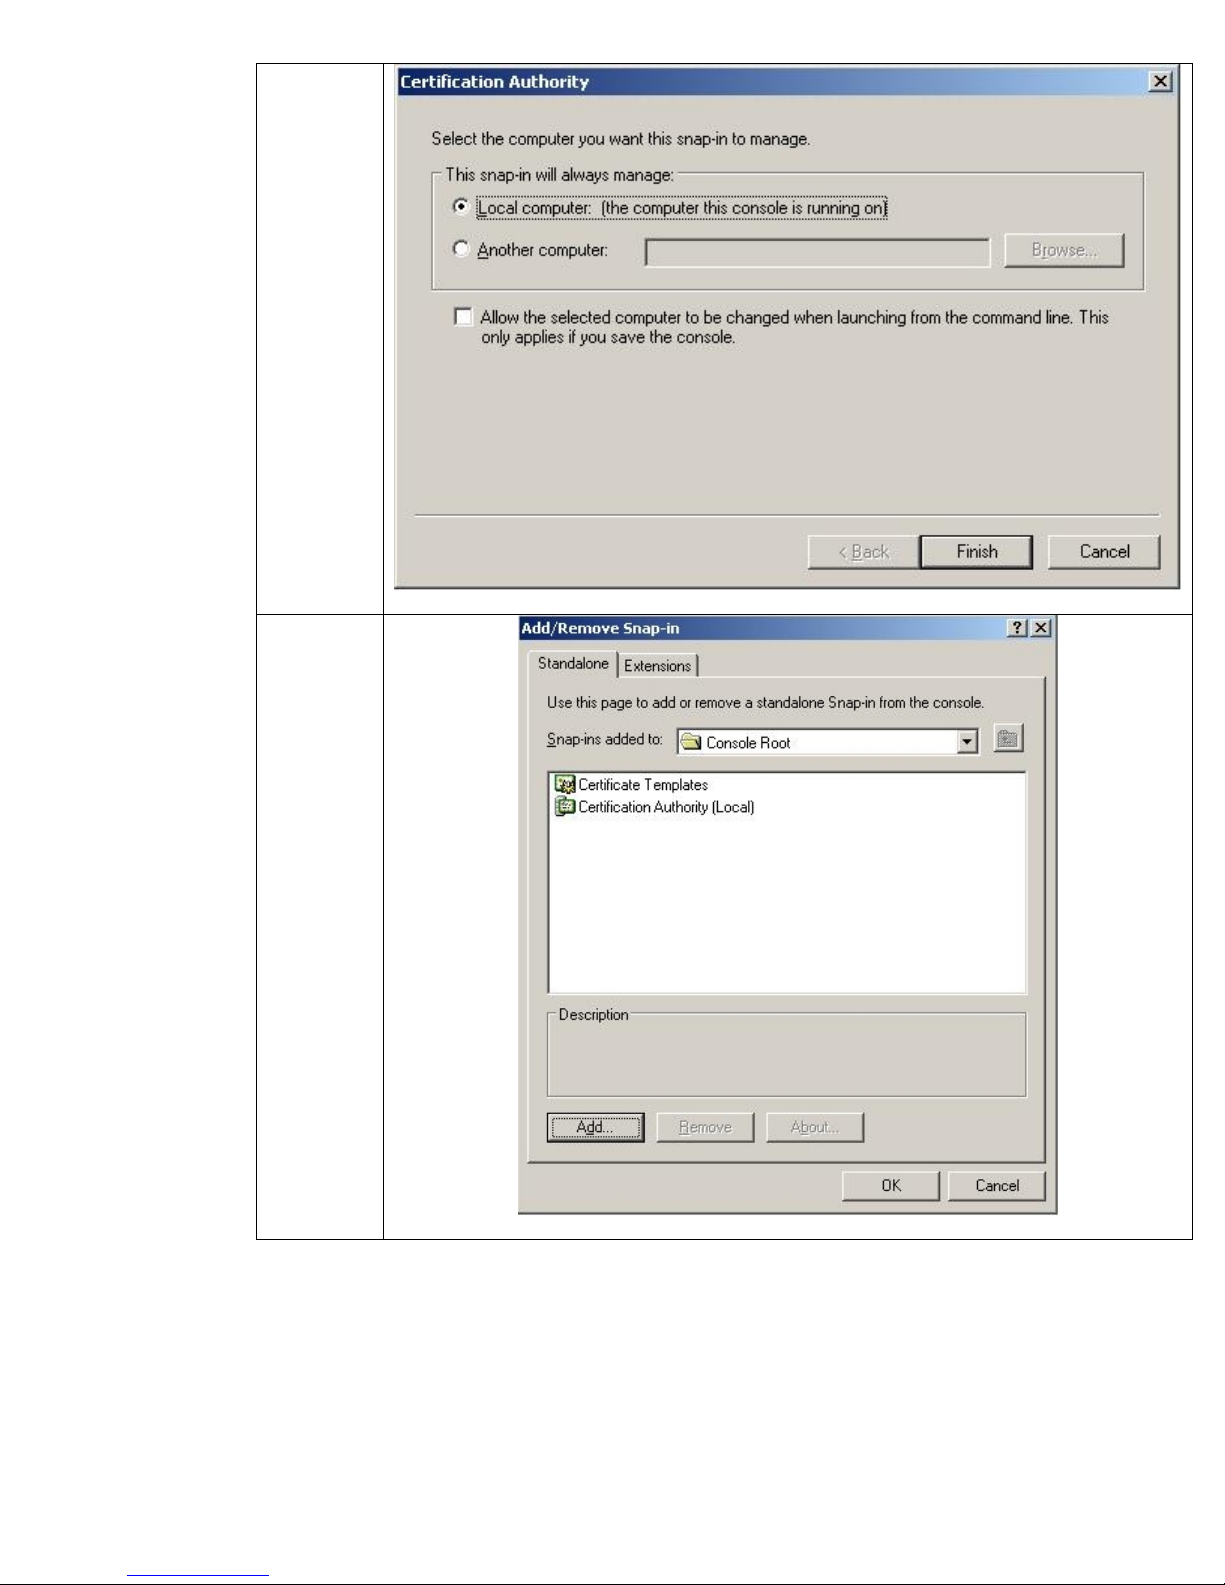
Select
“Local
Computer”.
Then click
Finish.
Select OK.
22
Page 23
Done.
23
Page 24
Creating a Certificate Template
Where are we?
Step 1 Installing Internet Authentication Service
Step 2 Installing a Certificate Authority
Step 3 Creating a Certificate Template
Step 4 Issuing a Certificate
Step 5 Creating a User for HP Jetdirect
Step 6 Switch Configuration
Step 7 HP Jetdirect Certificate Configuration
Step 8 IAS Configuration
Step 9 HP Jetdirect 802.1X Configuration
The Certificate Authority needs to have a template from which certificates can be created for services.
The Microsoft CA has some predefined templates to help the administrator. Microsoft also allows you
to create new templates. We will illustrate a process of creating a certificate template specifically for
an HP Jetdirect print server.
Note: The certificate template functionality described below is only available for Windows 2003
Enterprise Edition and Windows 2003 Datacenter Edition.
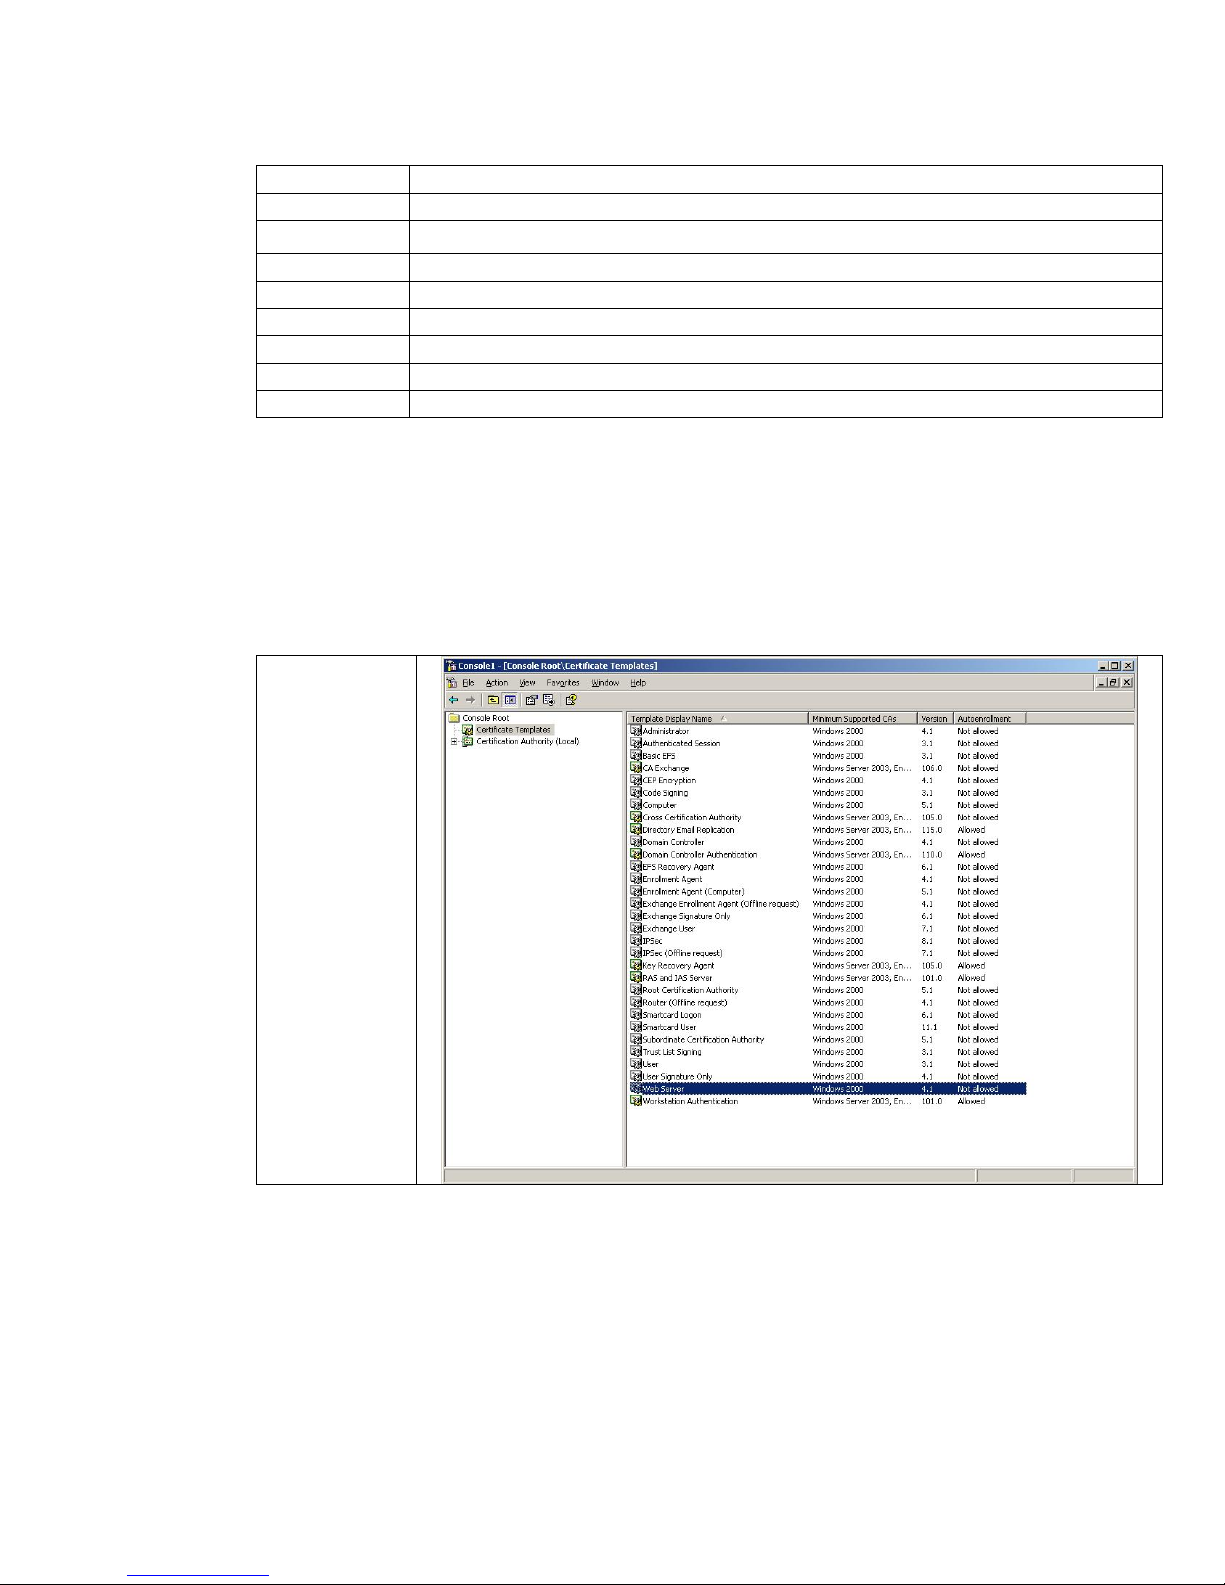
Select
Certificate
Templates.
Highlight the
“Web Server”
template. Right
click and copy
the certificate
template, and
name it “HP
Jetdirect”.
Now right click
on “HP
Jetdirect” and
select
properties.
24
Page 25
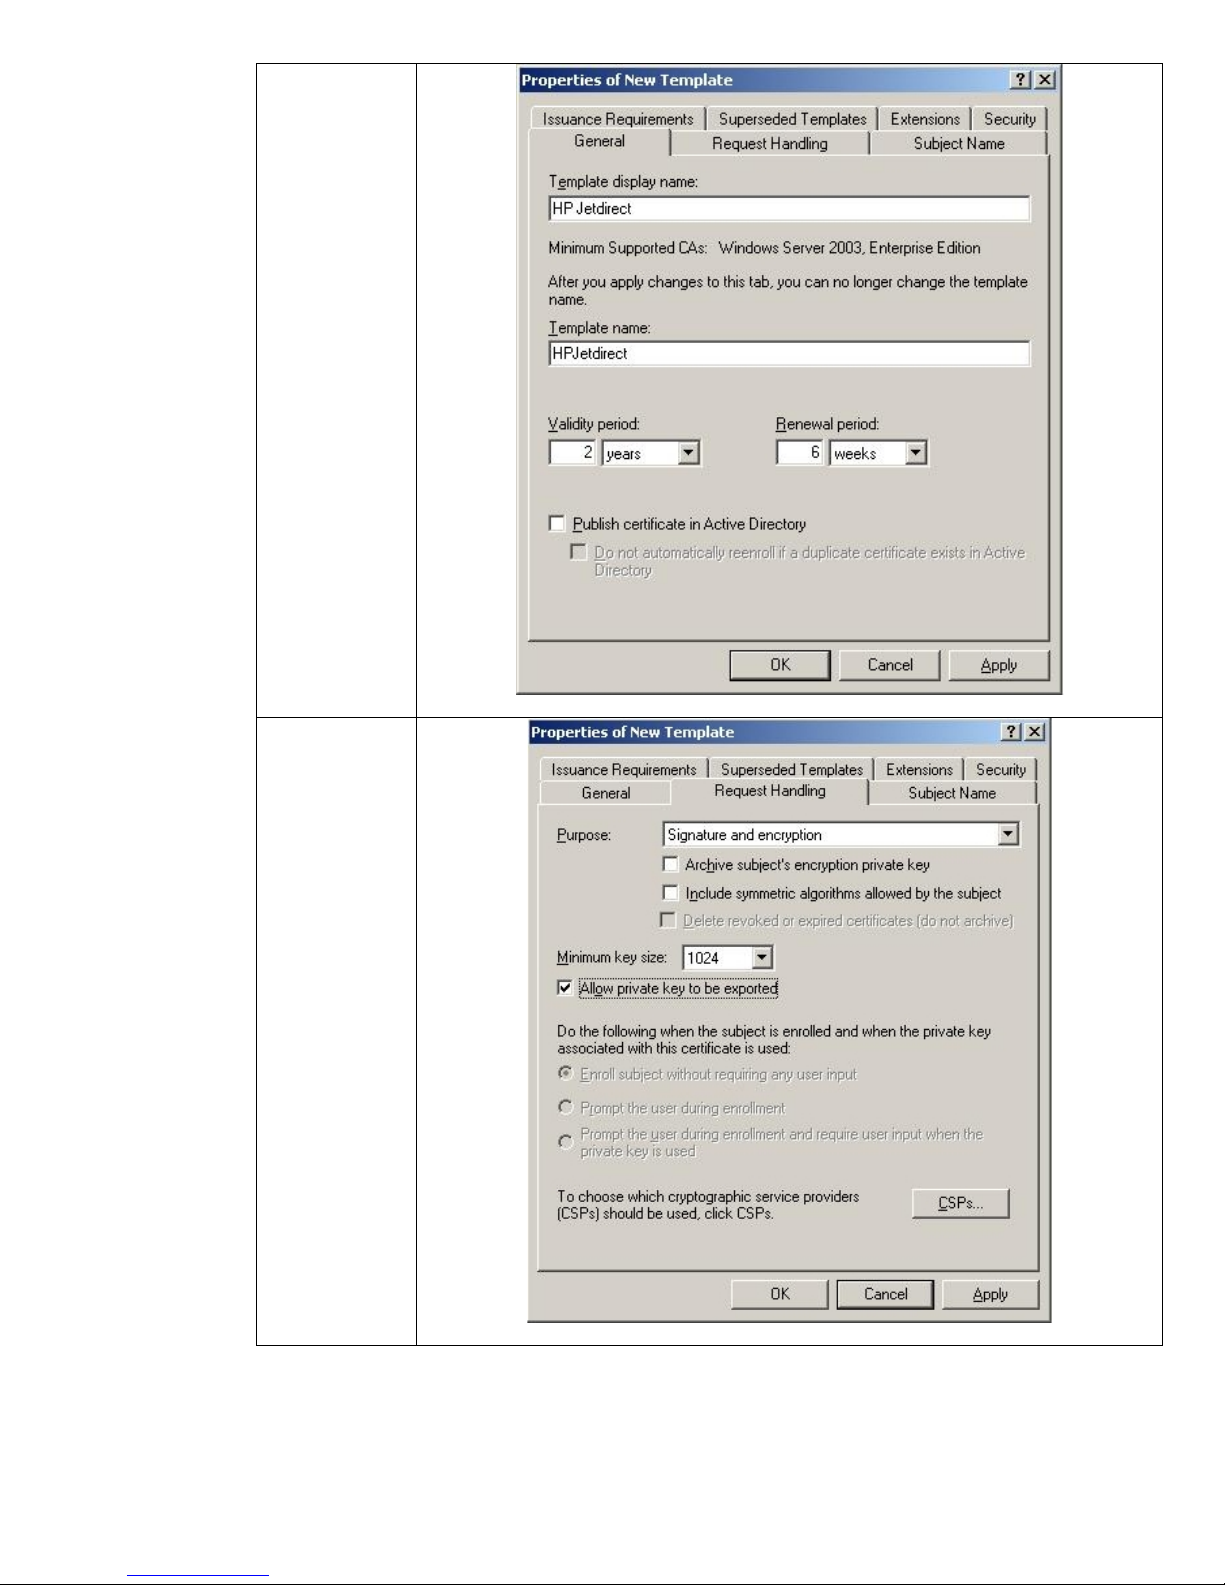
Provide the
names you
would like the
certificate
template to
have.
Select the
“Allow private
key to be
exported”
checkbox in the
Request
Handling tab.
25
Page 26
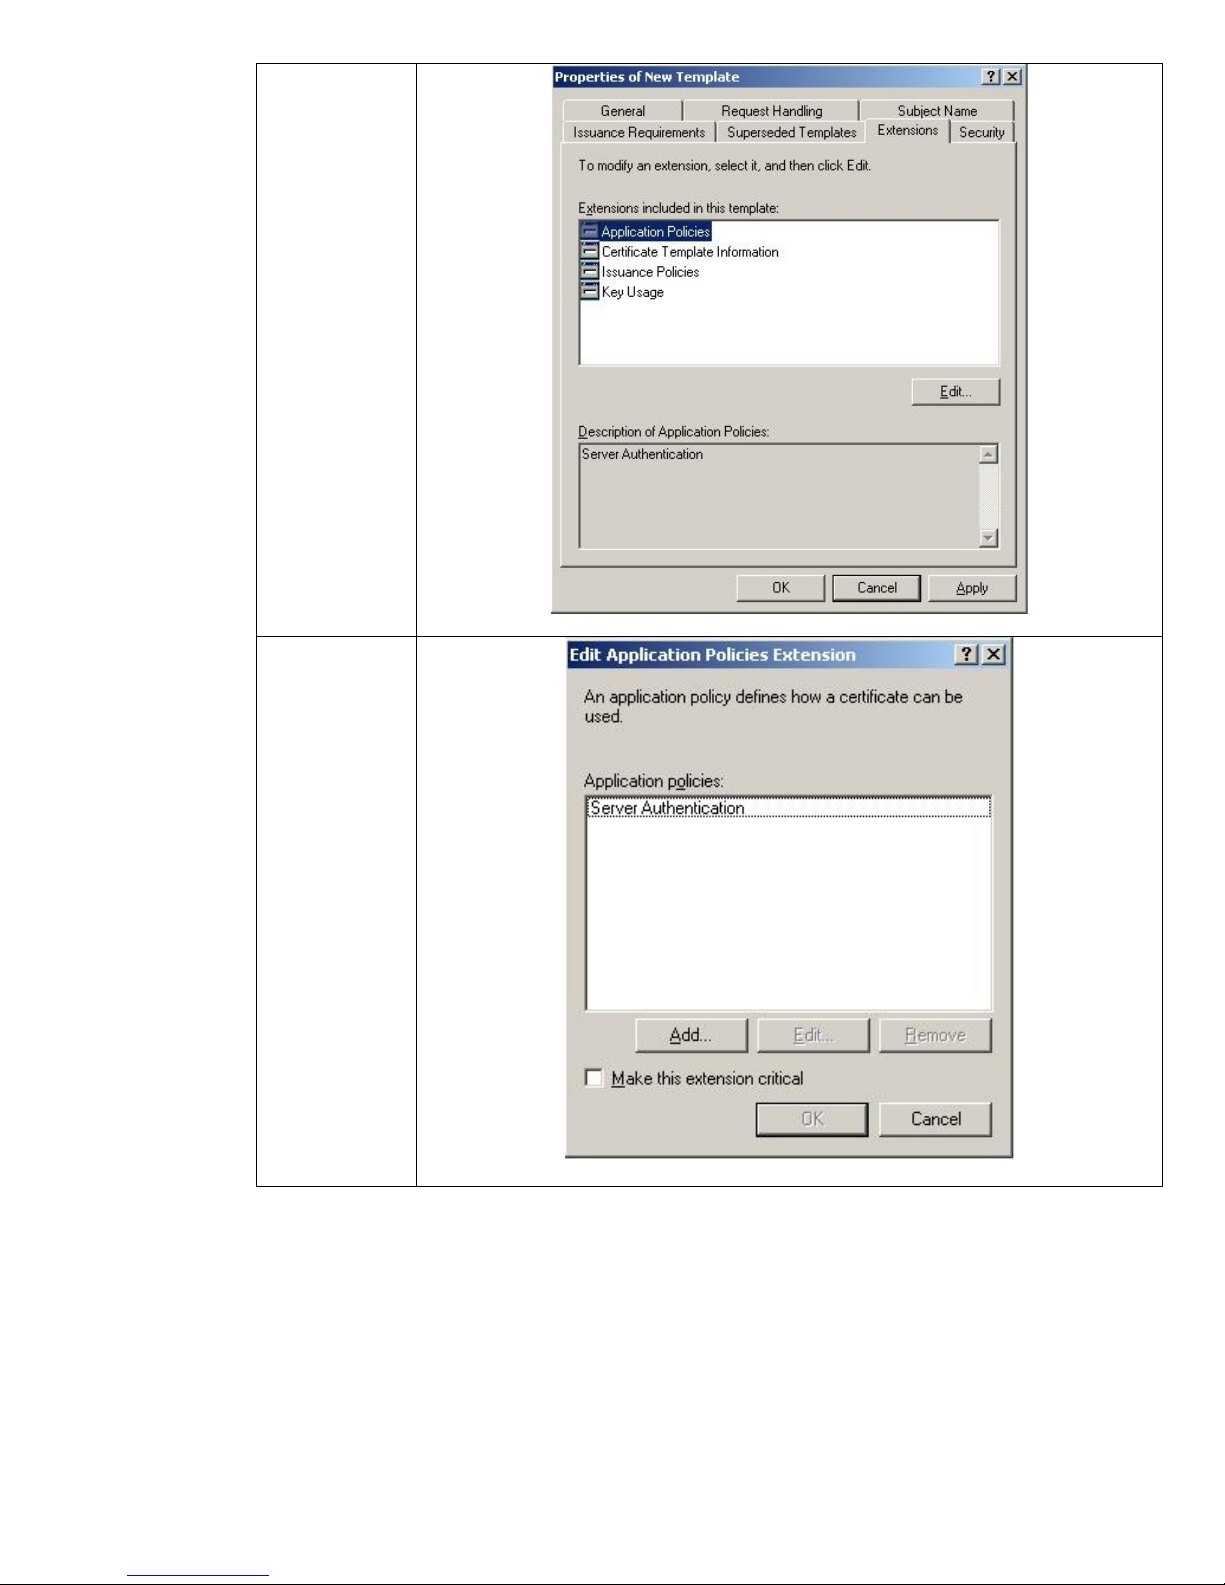
Select the
Application
Policies
extension in the
Extensions tab.
Click Edit.
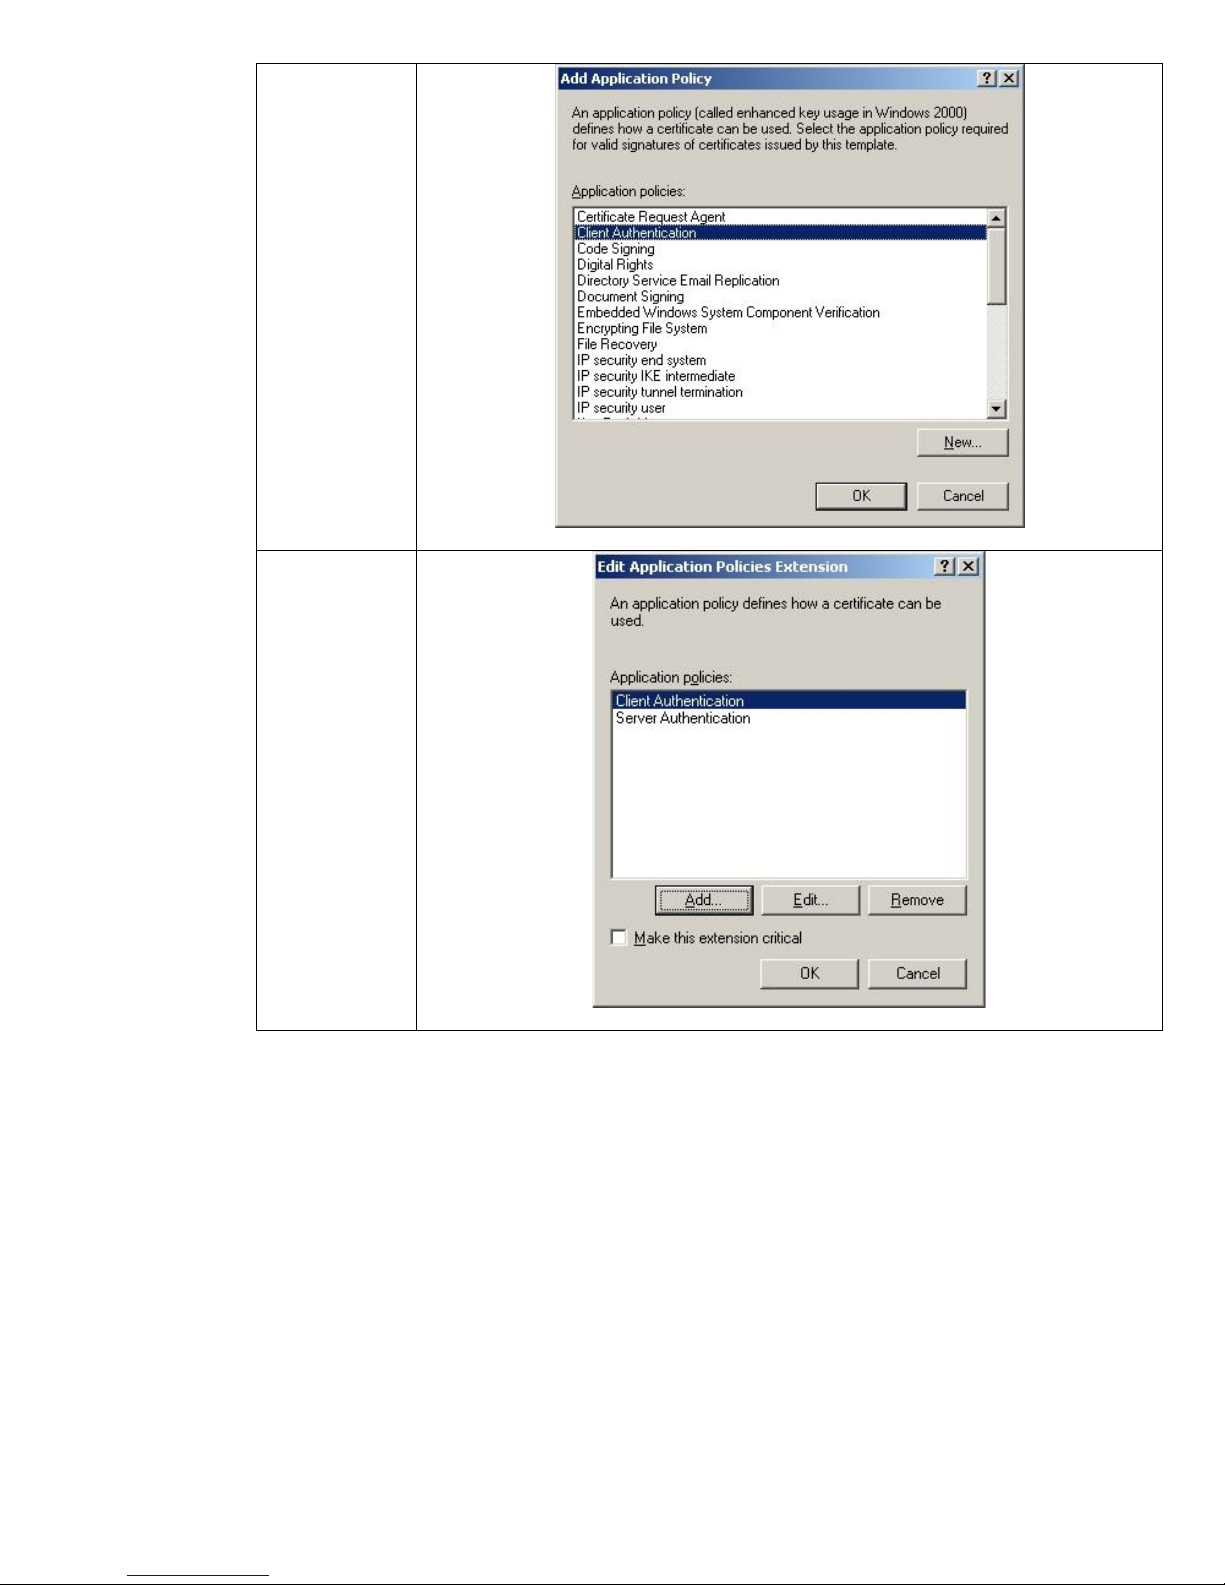
Click Add…
26
Page 27
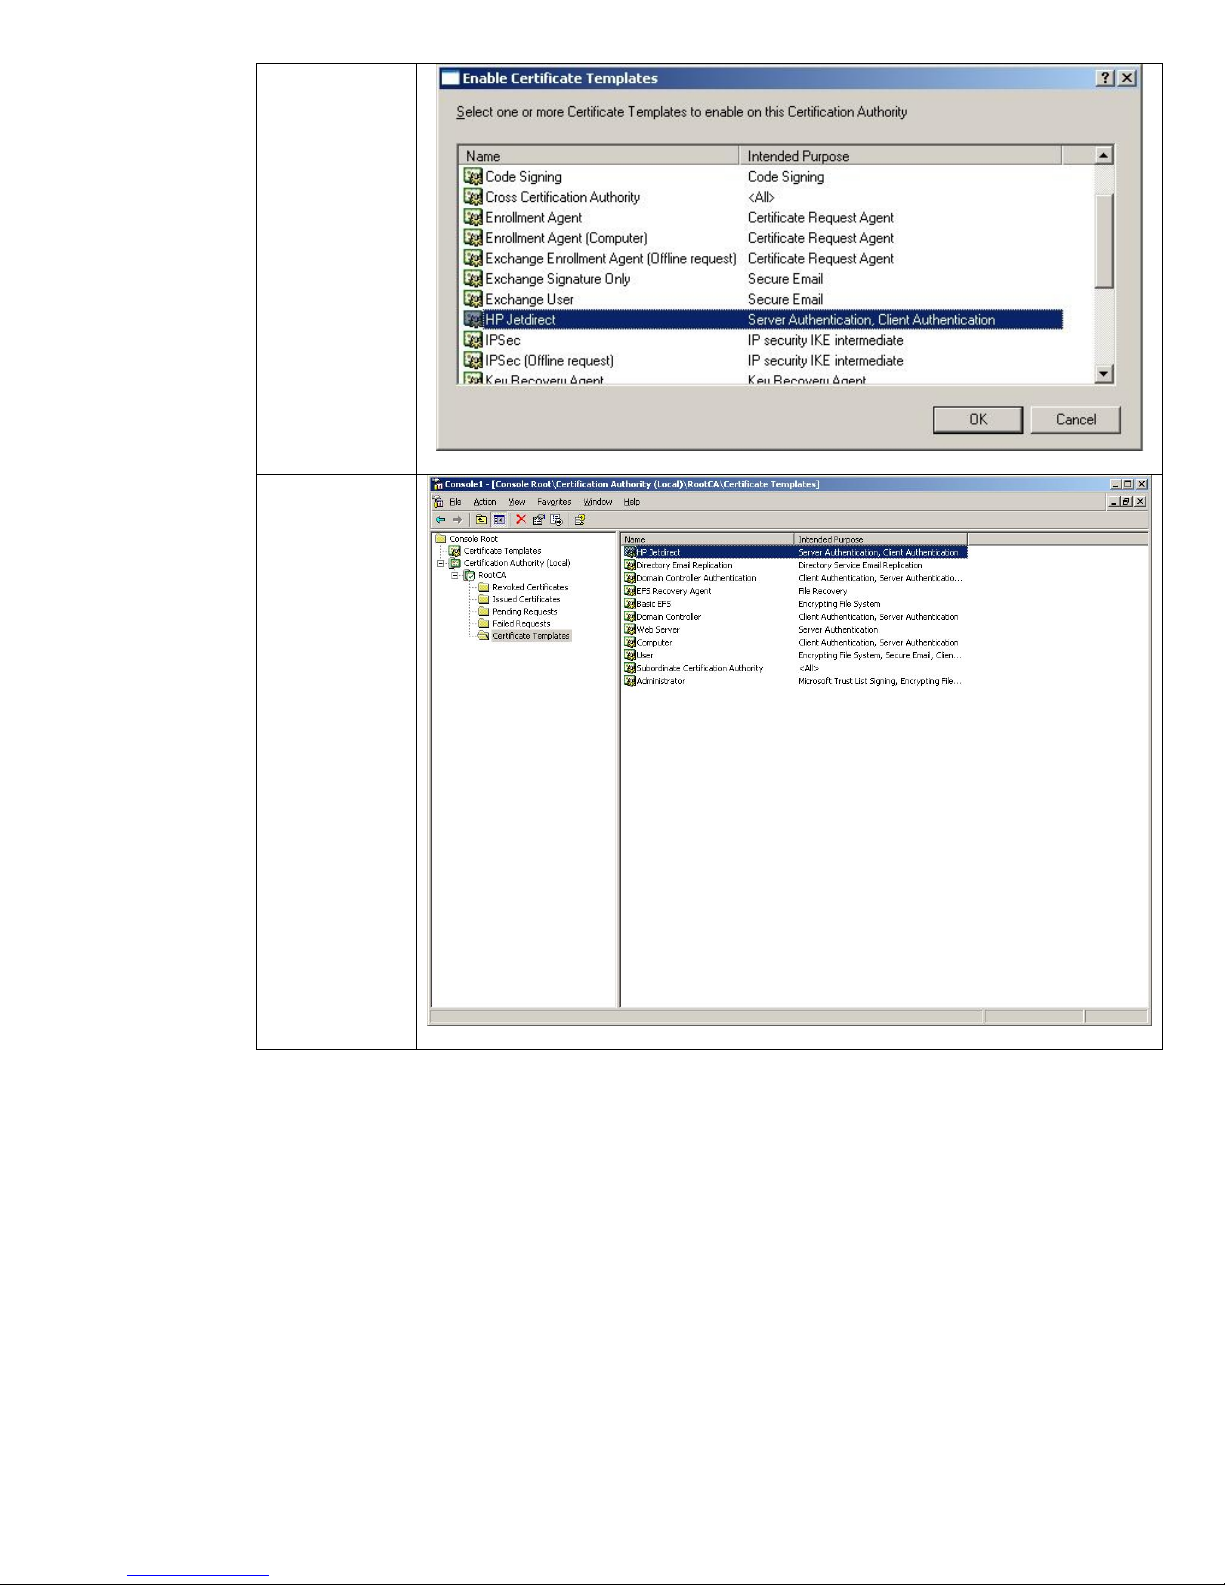
Select Client
Authentication,
then click OK.
Click OK.
27
Page 28

Click OK.
Now we have created a new certificate template, we need to enable it to be used by the Certification
Authority.
Select
Certificate
Templates
under
Certification
Authority.
Now right click
and select New
and then
“Certificate
Template to
Issue”.
28
Page 29
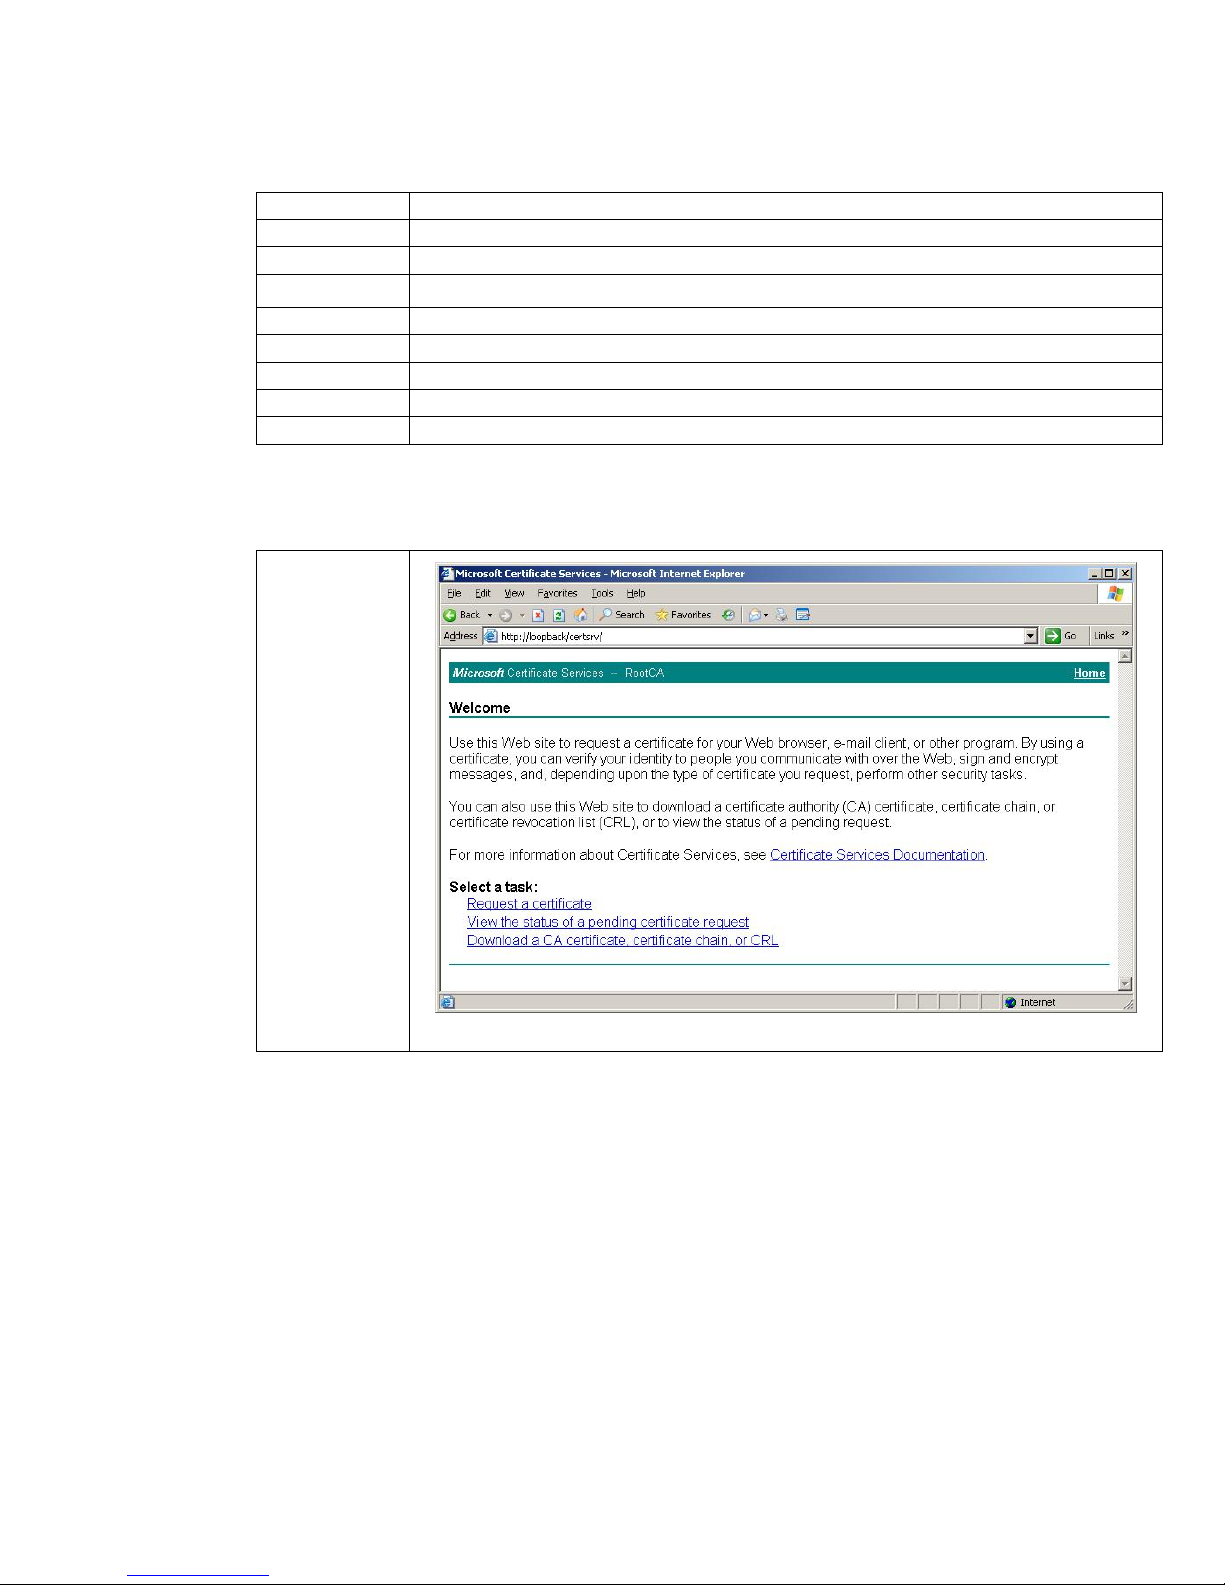
Select HP
Jetdirect and
click OK.
View the
Certificate
Templates
folder in the
Certification
Authority snapin MMC, and
make sure that
the HP Jetdirect
template is
present.
Done.
29
Page 30
Issuing a Certificate
Where are we?
Step 1 Installing Internet Authentication Service
Step 2 Installing a Certificate Authority
Step 3 Creating a Certificate Template
Step 4 Issuing a Certificate
Step 5 Creating a User for HP Jetdirect
Step 6 Switch Configuration
Step 7 HP Jetdirect Certificate Configuration
Step 8 IAS Configuration
Step 9 HP Jetdirect 802.1X Configuration
We need to download the CA certificate for Jetdirect and make sure our client know about the CA
chain as well.
From the main
web interface,
click
“Download a
CA
certificate…”
30
Page 31

Select “Current
[RootCA]”,
then DER (or
Base 64 if you
are using an
older Jetdirect
product), then
click
“Download
CA
certificate”,
Click Save.
31
Page 32

Name the file
“cacert.cer”.
We’ll use this
file later when
we are
configuring
Jetdirect.
We also want to install the CA certificate chain on the local computer. This will allow the browser to
recognize certificates issued by the CA as trusted.
Click “Install
this CA
certificate
chain”.
Click Yes.
32
Page 33

Done
Now we can begin creating an Identity Certificate for Jetdirect. Starting with Jetdirect firmware
version V.36.11 and later, certificates created from CSRs and issued by the Enterprise CA can be
installed. This method is a more secure way (and preferred way) of installing a certificate. If your HP
Jetdirect firmware is earlier than V.36.11 (e.g., V.29.20, V.31.08), please refer to Appendix B for
instructions on how to import a certificate. First, we need to create a CSR on Jetdirect.
Click on the
“Networking”
tab and go to
“Authorization”
and then
“Certificates”.
Click
“Configure”
under the
Jetdirect
Certificate
section.
33
Page 34

Select “Create
Certificate
Request” and
then click
“Next”.
Enter in the
fields that
describe the
devices. Click
“Next”.
Jetdirect
generates the
public/private
key pair, which
can take a little
while.
34
Page 35

You can save
the file, or you
can simply
copy the text
starting and
including “----BEGIN
CERTIFICAT
REQUEST-----“
up to and
including the
last five dashes
of the “END
CERTIFICATE
REQUEST-----“
Moving back to the
web interface of
the Enterprise CA.
We have skipped a
couple of screen
shots and are at the
Advanced
Certificate Request.
Instead of clicking
“Create and submit
a request to this
CA” as we did
when we were
Importing a
certificate, we are
going to click the
second link “Submit
a certificate
request…”
35
Page 36

Here we paste
in our
Certificate
Request and
select the HP
Jetdirect
certificate
template. Then
click “Submit”.
Now we have
our certificate.
Most Jetdirect
cards support
both DER and
Base64, but all
support
Base64.
Simply click
“Download
Certificate”.
36
Page 37

Save the
certificate.
We are going to use this file to Import into Jetdirect as well as associated a certificate with an Active
Directory user.
Creating a User for HP Jetdirect
Where are we?
Step 1 Installing Internet Authentication Service
Step 2 Installing a Certificate Authority
Step 3 Creating a Certificate Template
Step 4 Issuing a Certificate
Step 5 Creating a User for HP Jetdirect
Step 6 Switch Configuration
Step 7 HP Jetdirect Certificate Configuration
Step 8 IAS Configuration
Step 9 HP Jetdirect 802.1X Configuration
Using Windows 2003, we can simply go to the Start Menu, Select Administrator Tools, then select
“Active Directory Users and Computers”. Highlight the Users folder and create a generic user. If we
are going to use PEAP, we simply want to specify a password that never expires for the user. This
password will be used in the Jetdirect configuration for 802.1X, so it is important to remember it and
use strong passwords. If we are going to use EAP-TLS, we need to associate this user with the Identity
Certificate configured on Jetdirect.
37
Page 38

In Active
Directory Users
and
computers, we
want to go to
the view menu
and make sure
“Advanced
Features” is
checked.
Click on the
Account tab
and make sure
that the
Account
Options has
“Password
never expires”
selected. Enter
the Logon
name,
typically the
hostname, of
the HP
Jetdirect card.
38
Page 39

Click the DialIn tab and
select “Allow
access”. Then
Click OK.
At this point, we will want to associate the public key certificate of the Jetdirect print server with the
HP Jetdirect account.
Select the HP
Jetdirect user
account. Right
click and
select Name
Mappings.
39
Page 40

Select “X.509
Certificates”
and “Add…”
Now using the
certificate that
the CA issued
to Jetdirect –
“finance.cer”
was the file,
you can map it
here. Click
“OK”.
Switch Configuration
Where are we?
Step 1 Installing Internet Authentication Service
Step 2 Installing a Certificate Authority
Step 3 Creating a Certificate Template
Step 4 Issuing a Certificate
Step 5 Creating a User for HP Jetdirect
Step 6 Switch Configuration
Step 7 HP Jetdirect Certificate Configuration
Step 8 IAS Configuration
Step 9 HP Jetdirect 802.1X Configuration
Each Switch (Authenticator) configuration will vary. For this example, we are using an HP J4902A
6108 ProCurve Switch. Essentially, we enable 802.1X for port 8 of the switch and tell the switch
where the Radius server is. We haven’t installed the Radius server, but we will soon. The switch will
relay the EAP messages from Jetdirect to the Radius Server. The Radius server will work with Active
Directory to determine if the user can be authenticated. If so, the switch will open up the port and
allow Jetdirect access to the network.
Based upon this configuration, the Jetdirect device needs to be installed in Port 8. That is the only
port that is enabled for 802.1X. Refer to Figure 16 for an example configuration file.
40
Page 41

Figure 16 - Example Switch Configuration
HP Jetdirect Certificate Configuration
Where are we?
Step 1 Installing Internet Authentication Service
Step 2 Installing a Certificate Authority
Step 3 Creating a Certificate Template
Step 4 Issuing a Certificate
Step 5 Creating a User for HP Jetdirect
Step 6 Switch Configuration
Step 7 HP Jetdirect Certificate Configuration
Step 8 IAS Configuration
Step 9 HP Jetdirect 802.1X Configuration
Now we can discuss the HP Jetdirect configuration for 802.1X. First, we will install the HP Jetdirect
Certificate and the CA Certificate on the HP Jetdirect device. The HP Jetdirect certificates are used by
SSL, IPsec, as well as 802.1X EAP authentication. Because multiple authentication methods use these
certificates, we created the certificates using the certificate template to act as both a client and server.
One of the challenges of 802.1X configuration on HP Jetdirect print server is that there is no out-ofband mechanism to configure 802.1X. As a result, we must connect the HP Jetdirect print server to a
non-802.1X port first, then configure the 802.1X settings, then move the HP Jetdirect to an 802.1X
port on the switch.
41
Page 42

In order to install HP Jetdirect certificates, the CA certificate, and configure 802.1X, we need to use
the Embedded Web Server (EWS).
Point IE at the
IP Address of
the HP
Jetdirect
device.
With the 635n print server, the browser is automatically redirected to use SSL (https://) For other HP
Jetdirect products, change the URL to use https:// rather than http:// to ensure that EWS
communication is secure. The redirection to SSL requires the HP Jedirect print server to send its
default certificate to Internet Explorer. Because each HP Jetdirect print server is shipped with a selfsigned certificate, a security alert is issued because the browser cannot determine if the certificate is
valid and shows a Security Alert dialog as in Figure 17.
Figure 17 – Security Alert Dialog
42
Page 43

Click “Yes” to continue. Once we replace the Jetdirect certificate, the above dialog will change.
Here we have
our home page
of the HP
Jetdirect device.
Click the
“Networking”
Tab.
This screen
allows
anonymous post
sales
information to
be gathered
about the HP
Jetdirect
configuration.
This initiative is
completely
voluntary.
Click Yes or
No, depending
on your
preference.
43
Page 44

At this point,
you’ll be on the
“TCP/IP
Settings” link
for Jetdirect.
On the left
hand
navigation
menu, select
“Authorization”.
Click the
“Certificates”
tab.
There are two certificates on HP Jetdirect. One is the HP Jetdirect Identity certificate used for SSL,
certain EAP protocols, IPsec, etc… The other is the Certificate Authority (CA) public key certificate
which tells HP Jetdirect what CA it is supposed to trust. This CA certificate becomes very important for
certain 802.1X EAP methods. Certificates may be exchanged and HP Jetdirect needs to be able to
verify the received certificate was signed by the trusted CA. We’ll install the CA certificate first.
44
Page 45

Click
“Configure…”
under the “CA
Certificate”
heading.
Install is our
only option.
Click “Next”.
45
Page 46

Point the web
browser to the
“cacert.cer”
file that was
created
earlier. Click
“Finish”.
Done!
Now we want to install the Identity Certificate.
46
Page 47

Going back to
the Jetdirect
Certificate
Wizard, we
select the
“Install
Certificate”
option. Click
“Next”.
Select the
certificate file
saved
previously.
Click “Finish”
We are done!
Now we have the files that represent Jetdirect’s identity certificate and the public key certificate of the
CA we trust. We can setup the IAS server.
NOTE: In later HP Jetdirect firmware versions, when a certificate is installed, you are able to protect
the private key by restricting how a certificate can be exported.
47
Page 48

IAS Configuration
Where are we?
Step 1 Installing Internet Authentication Service
Step 2 Installing a Certificate Authority
Step 3 Creating a Certificate Template
Step 4 Issuing a Certificate
Step 5 Creating a User for HP Jetdirect
Step 6 Switch Configuration
Step 7 HP Jetdirect Certificate Configuration
Step 8 IAS Configuration
Step 9 HP Jetdirect 802.1X Configuration
We have installed IAS, but we have not configured it yet. Run the administrator tool for IAS as shown
in Figure 18.
Figure 18 – IAS Administration
48
Page 49

Here is the
main screen
for IAS. What
we need to do
is define the
switch as a
RADIUS Client.
We know the
switch that will
be acting as
the
Authenticator.
Input a friendly
name and the
IP address of
the switch.
Click “Next”.
49
Page 50

Select “Radius
Standard”
from the drop
down list for
“ClientVendor”.
To
communicate
with the radius
server, a
shared secret
needs to be
established.
Use the same
value as
configured on
the switch.
Click “Finish”.
Now that we have a client defined, we can define a Remote Access Policy. Don’t let the “Remote
Access” terminology confuse you. RADIUS was originally designed to Authenticate Dial-In users –
However it has been adapted into a variety of functions – one of these is 802.1X Authentication.
Let’s go ahead and define a Remote Access Policy for Printing and Imaging Devices. We’ll call it PID.
Back to the
main screen of
IAS, highlight
“Remote
Access
Policies”.
50
Page 51

Create a new
policy.
A wizard
starts. Click
“Next”.
51
Page 52

Select “Use the
wizard…” and
give the policy
a name. Since
we are
defining a
policy for
Printing and
Imaging
Devices, we’ll
call it PID.
Click “Next”.
Select
“Ethernet”.
Click “Next”.
52
Page 53

Select “User”.
Click “Next”.
Select “Smart
Card or other
certificate”.
Click “Next”.
53
Page 54

Click “Finish”.
Highlight the
PID policy and
right click and
bring up the
Properties.
Select “Grant
remote access
permission”.
Press “Edit
Profile…”.
54
Page 55

Uncheck all
check boxes.
Press “EAP
Methods”.
Select “Smart
Card or other
certificate”
and then click
“Edit…”
55
Page 56

Select the
certificate for
the machine.
Click OK.
Highlight the
“Connection
Request
Policies” and
make sure it
has “Use
Windows
authentication
for all users”.
56
Page 57

HP Jetdirect 802.1X Configuration
Where are we?
Step 1 Installing Internet Authentication Service
Step 2 Installing a Certificate Authority
Step 3 Creating a Certificate Template
Step 4 Issuing a Certificate
Step 5 Creating a User for HP Jetdirect
Step 6 Switch Configuration
Step 7 HP Jetdirect Certificate Configuration
Step 8 IAS Configuration
Step 9 HP Jetdirect 802.1X Configuration
Up to this point, we have been interfacing with Jetdirect using a non-802.1X port. Once we setup
802.1X on Jetdirect, we will have to move it to an 802.1X port. Based upon our configuration, this is
port 8 on the switch. However, once we have specified an 802.1X configuration, it has to be right,
otherwise, we will have to Reset the 802.1X configuration from the control panel menu or cold-reset
and start over again. Luckily there are only a few fields we need to worry about getting right. Let’s
look at Jetdirect’s 802.1X page in Figure 19 and discuss each field.
• Enable Protocols – Select the EAP method you would like to use. Multiple EAP methods
may be selected. When multiple EAP methods are selected, the priority is determined by the
Authentication Server when it responds to Jetdirect’s EAP Start packet.
• User Name – This field needs to be the user name of Jetdirect that was configured in Active
Directory. Depending on the IAS configuration, you may need to add the realm as well.
Adding the realm usually doesn’t hurt.
• Password/Confirm Password: This is the password for the Jetdirect’s user account.
These two fields are only needed for PEAP and are not used for EAP-TLS.
• Server ID: This field is very important. It relates to the Common Name that is returned in
the Subject of the Authentication Server Certificate and determines whether Jetdirect should
Figure 19 – HP Jetdirect 802.1X Configuration
57
Page 58

accept it. As a good first step in getting 802.1X working, leave this field blank
which
instructs Jetdirect to match any name that is returned, provided the certificate is trusted.
• Encryption Strength: This field determines the minimum strength of the SSL tunnel by
determining what ciphers are advertised by the Jetdirect card in the TLS Client Hello packet.
By default, it is set to accept Low, Medium, High encryption strengths which correspond to
various ciphers and key sizes and allows all of them to be advertised by Jetdirect. A good
first step in getting 802.1X working is to leave this field at the default setting.
• Jetdirect Certificate: This field simply shows the status of the HP Jetdirect Identity
Certificate. It is used only in EAP-TLS.
• CA Certificate: This field is used in both PEAP and EAP-TLS. It is extremely important that
the Root Certificate Authority is configured so that Jetdirect can determine whether the
certificate received from the Authentication Server can be trusted. If this field is not set
properly, 802.1X will not work on Jetdirect.
Based upon our example we’ve been going through so far, let’s look at what our 802.1X
configuration would be.
Select “802.1x
Authentication”
from the left
hand
navigation
menu. Enter
the Jetdirect
logon
information.
It’s extremely
important for
the User Name
format to be
correct, and it
needs to match
what Active
Directory has
for the Jetdirect
account. Click
“Apply”. Now
we need to
move the
Jetdirect device
to port 8 of the
switch, the port
configured for
802.1X.
58
Page 59

At this point, we want to move our HP Jetdirect to port 8 of the switch. This will force 802.1X
gg
authentication to happen. We can review the event log on the system that is running our IAS server
to determine whether authentication has been successful or not.
In the Event
Viewer, under
System,
802.1X events
will be lo
ed.
Double click
on an event for
IAS.
Here is a
successful
logon
recorded by
the event view
for our HP
Jetdirect
device.
59
Page 60

Here we see that the printer was granted access! You can see a Jetdirect configuration page in
Figure 20 where EAP-TLS was successful:
If there were any issues with authentication, you won’t be able to access HP Jetdirect over the
network. You can see the failure in the event log. Refer to Microsoft documentation on IAS to
troubleshoot any issues with IAS. The configuration of HP Jetdirect, the Switch, and the IAS server
must be correct for 802.1X to work properly. It is sometimes useful to get the configuration working
with a Windows XP client and test out the infrastructure to make sure all problems are resolved before
working with HP Jetdirect. Windows XP can be configured and manipulated without having to use the
network. This capability makes troubleshooting easier. With HP Jetdirect, the network must be used
to configure 802.1X, which is difficult to troubleshoot when problems arise.
Once HP Jetdirect is configured for 802.1X authentication, 802.1X authentication MUST be successful
for any non-802.1X networking activity to occur. If 802.1X authentication is not successful for
whatever reason (e.g., switch port doesn’t support 802.1X, the 802.1X configuration is wrong,
etc…), the networking protocol stacks on HP Jetdirect remain in the initializing state and are not
functional. In Figure 21, a Jetdirect configuration page can be seen showing such a state:
Figure 20 – HP Jetdirect 802.1X Success
60
Page 61

Figure 21 – HP Jetdirect 802.1X Failure
In other words, once 802.1X is configured and then fails on an 802.1X port, moving the Jetdirect
device to a non-802.1X port is not sufficient to restore network connectivity. Depending on the
product, you will either have to “cold-reset” the Jetdirect device or go into the “Security” menu in the
Jetdirect control panel menu and select “802.1X”, then “Reset”, then power down and then power-up.
In order for connectivity to be established, Jetdirect will need to be on a non-802.1X port when
performing either of those two reset methods.
In Appendix A: Troubleshooting 802.1X, we will cover network trace analysis for HP Jetdirect and
some common errors that can be seen and diagnosed through these traces.
Understanding Certificate Chains
The previous example was using a single Certificate Authority that was issuing certificates directly to
devices like IAS and Jetdirect. That configuration is uncommon in most customer environments. What
is more common is using a hierarchy of Certificate Authorities. This hierarchy can cause some
configuration headaches on Jetdirect because of Intermediate Certificate Authorities or Subordinate
Certificate Authorities. Let’s look at a new example shown in Figure 22.
61
Page 62

Figure 22 – CA Hierarchy
In this example, RootCA is the top level CA, which is also called the Root. What usually happens at
customer sites is that the Root CA is created and it issues one or more certificates to Subordinate CAs,
also known as Intermediate CAs, and they do the dirty work of issuing certificates to various entities
in the customer’s network. The Root CA is then shutdown and locked up in a secure room with this
information backed up in several places. The Root CA establishes the trust of the whole environment
and is very well protected.
We can see that RootCA issues a certificate to R2, which grants R2 the capability to issue certificates
to other entities. R2’s certificate is signed by the Root CA. R2 then can issue certificates to other
devices, such as IAS. If we take a look at IAS’ certificate, the issuing “chain” or path looks like Figure
23:
62
Page 63

Figure 23 – Certification Path
In the certificate itself, there is only one issuer which refers back to R2. We can see that in Figure 24:
What does R2’s certificate look like? We can see it in Figure 25:
Figure 24 – Issued By
63
Page 64

Figure 25 – Issued By
Notice that R2’s certificate is issued by RootCA. What does RootCA’s certificate look like? Let’s look
at Figure 26.
Figure 26 – Issued By
64
Page 65

Notice the RootCA is “self-signed”. All Root CAs will be self-signed – these CAs represent the single
point of trust. A logical question would be: “Which CA do I configure on Jetdirect?” Let’s look at
some diagrams. First, we have an incorrect configuration, as shown in Figure 27 –
Incorrect HP Jetdirect CA Configuration.
RootCA’s Info +
RootCA.example.internal
RootCA’s
Public Key
RootCA’s Digital
Signature
RootCA’s Certificate
R2’s Info +
R2’s Public Key
RootCA’s Digital
Signature
R2’s Certificate
R2’s Info +
R2’s Public Key
RootCA’s Digital
Signature
hpprinter’s configured
CA Certificate
INCORRECT!
Root Certificate Authority: RootCA
R2.example.internal
Subordinate Certificate Authority: R2
What Certificates should be configured on
Jetdirect so that 802.1X will be successful?
hpprinter’s Info +
hpprinter.example.internal
hpprinter’s Identity
hpprinter’s
Public Key
R2’s Digital
Signature
Certificate
Figure 27 – Incorrect HP Jetdirect CA Configuration.
The Subordinate CA cannot be used as the CA certificate on Jetdirect!
Now we can look at a correct configuration in Figure 28 – Correct HP Jetdirect CA
Configuration.
65
Page 66

RootCA.example.internal
RootCA’s Info +
RootCA’s
Public Key
RootCA’s Digital
Signature
RootCA’s Certificate
R2’s Info +
R2’s Public Key
RootCA’s Digital
Signature
R2’s Certificate
RootCA’s Info +
RootCA’s
Public Key
RootCA’s Digital
Signature
RootCA’s Certificate
CORRECT!
Root Certificate Authority: RootCA
R2.example.internal
Subordinate Certificate Authority: R2
What Certificates should be configured on
Jetdirect so that 802.1X will be successful?
hpprinter’s Info +
hpprinter.example.internal
hpprinter’s Identity
hpprinter’s
Public Key
R2’s Digital
Signature
Certificate
Figure 28 – Correct HP Jetdirect CA Configuration
Be sure the Root CA of your CA Hierarchy has its public key certificate configured on Jetdirect!
Utilizing the Server ID Field on Jetdirect
In our first example, we left the Server ID field on Jetdirect blank so that any name in the certificate
would match and we could get 802.1X up and running. Once we have succeeded in getting 802.1X
up and running, we may want to provide more security by specifying a Server ID. The first thing we
need to do is to look at the Authentication Server’s certificate that is going to be returned to Jetdirect.
In our new example, it is the ias.example.internal certificate shown in Figure 29:
66
Page 67

Figure 29 – IAS Certificate
Click on the “Details” tab and go to the “Subject” line as shown in Figure 30.
67
Page 68

Figure 30 – IAS Subject
Here we can see the Common Name (CN) in the subject field is ias.example.internal. This becomes
the value that the server ID field must be configured to match. Before we get into that configuration, it
is important to understand another practical deployment procedure used by customers to supply
redundancy to their IAS infrastructure. This practice greatly affects the value used in the Server ID
field. Refer to Figure 31 for an example of this deployment.
68
Page 69

Figure 31 – IAS Redundancy
Usually, the switches are configured to point to both IAS servers in case one is unavailable.
Assuming that ias2.example.internal is the Common Name for the second IAS server (in the
certificate’s Subject field), Jetdirect now can receive one of two names for the Authentication Server
• ias.example.internal
• ias2.example.internal
Jetdirect’s Server ID field handles these situations via the following algorithm in Figure 32:
69
Page 70

Figure 32 – Server ID Matching
Let’s look at some examples that show the behavior of the Server ID field with two IAS servers
configured as 802.1X Authentication Servers as shown previously:
• Example 1
: Jetdirect Server ID: Blank. Result: If the Authentication Server’s certificate is
trusted, accept all Common Names returned in the Subject field of the Authentication Server
certificate
• Example 2
: Jetdirect Server ID: “example.internal”, Require Exact Match not checked.
Result: If the Authentication Server’s certificate is trusted, accept all Common Names returned
in the Subject field of the Authentication Server certificate that have “example.internal” as a
rightmost subset. “ias.example.internal
because “example.internal
• Example 3
: Jetdirect Server ID: “ias”, Require Exact Match not checked. Result: If the
” is a rightmost match for both.
” and “ias2.example.internal” will both be accepted
Authentication Server’s certificate is trusted, accept all Common Names where “ias” is a
rightmost subset of the name. Here, both servers “ias.example.internal” and
“ias2.example.internal” will be REJECTED because it is not a rightmost subset of the name.
“ias” is a LEFTMOST match, it is NOT a rightmost match.
• Example 4
: Jetdirect Server ID: “ias.example.internal”, Require Exact Match is checked.
Result: If the Authentication Server’s certificate is trusted, accept all Common Names where
ias.example.internal is the EXACT name. Here, the server ias2.example.internal will be
REJECTED because it does NOT match EXACTLY “ias.example.internal”
• Example 5
: Jetdirect Server ID: “ias.example.internal”, Require Exact Match not checked.
Result: If the Authentication Server’s certificate is trusted, accept all Common Names where
ias.example.internal is a rightmost subset of the name. Here, the server
ias2.example.internal will be REJECTED because it is not a rightmost subset of the name.
As we can see, Jetdirect’s Server ID field allows for fine grained use of which certificate will be
accepted and can be configured to support multiple Authentication Servers without accepting all
common names.
70
Page 71

In Figure 33, we see a proper configuration for this setup (Matching Example 2).
Figure 33 – Correct Server ID For Example 2
In Figure 34, we see an improper setup.
71
Page 72

Figure 34 – Incorrect Server ID
In Figure 34, the user is trying to match the name IAS. However, this value will result in no matches
based upon the Server ID field and the algorithm it uses.
Wireless and 802.1X
The new HP Jetdirect 690n Wireless 802.11b/g EIO card has 802.1X technology too. It also has a
wired interface as you can see:
The wired interface makes setting up the wireless interface much easier. In many cases where
wireless is used for network printers and MFPs, it is because no wired connection is available. Using
a laptop and a direct connection with a LAN cable to the 690n card allows wireless settings and
802.1X to be setup very easy. There are some considerations when setting up a 690n in this way
72
Page 73

• Only one network connection can be active at a time. Therefore, once the wireless settings
have been configured, unplugging the LAN cable is required so that the wireless interface
will be used instead
• When switching from wired to wireless (or vice versa), a reboot is required and is done
automatically.
• If you make a mistake on the wireless 802.1X settings and want to use a wired connection to
diagnose the problem, you’ll need to go into the control panel menu and Reset the 802.1X
configuration before plugging in a LAN cable.
Here is the first
screen of the
wireless setting
– it continues
in the next
screen shot
Here WPAEnterprise is
selected and
the 802.1X
configuration
is about the
same as what
we have been
covering for
wired.
73
Page 74

ProCurve Switches and Identity Driven Management
This whitepaper has covered the configuration of 802.1X using an HP Jetdirect, and HP ProCurve
6108 switch, and Microsoft’s IAS. There are other tools that can supplement this configuration and
make it much easier on the Administrator. Three of these tools are: ProCurve Manager, IDM Server,
and IDM Agent. IDM stands for Identity Driven Management and is an initiative by HP ProCurve to
allow the network to dynamically change its configuration based upon the authentication of the user.
A screen shot of IDM is shown in Figure 35 – IDM.
One of the great benefits of this approach is that it allows the administrator to dynamically assign a
“networking infrastructure configuration” for the user. Some examples include: VLANs, QoS
parameters, network resource restrictions, etc… The wonderful part of this approach is that printing
and imaging devices can be integrated into an overall security strategy. Building on the techniques
described here, IDM allows printing and imaging devices to be assigned dynamically their own
VLAN and QoS parameters as well as restrictions on which resources they can access. It is incredibly
powerful.
Summary
HP believes 802.1X is a cornerstone of a powerful security strategy. Using the HP ProCurve initiative
of Identity Driven Management, powerful security techniques can be utilized by the administrator to
protect their Printing and Imaging assets. While Identity Driven Management techniques are
powerful, they are not required. Using bundled software such as IAS and any switch that supports
RADIUS and 802.1X port-based authentication, we can use HP Jetdirect to participate in almost any
customer 802.1X environment.
Figure 35 – IDM
74
Page 75

Appendix A: Troubleshooting 802.1X
Starting with V.38.05 and later firmware, HP Jetdirect has a new capability to log 802.1X
information to the Security Page. In the control panel menu for Jetdirect, which starts as “Embedded
Jetdirect” or “EIO Jetdirect”, enter the menu structure and then go to “Information”, then “Print Security
Page”. A security page will be printed similar to the ones shown in this section. If your HP Jetdirect
firmware doesn’t support the 802.1X logging or is installed in a Digital Sender only product, we’ll
need to get a network trace to troubleshoot. Network switches that support 802.1X are fairly
sophisticated and they often support the ability to “mirror” a port for network tracing.
We are going to go through a series of 802.1X conditions and show both the 802.1X log and the
network trace, which has been filtered to look for only “EAP” packets.
EAP-TLS Success
We need to see what a successful 802.1X session looks like first. Here is the 802.1X log:
At the bottom of the page we can see the log that shows the activity of the 802.1X supplicant on
Jetdirect. However, this security page provides a great snapshot of the configuration of HP Jetdirect
for 802.1X and Certificates.
Next, we can see what a network trace looks like for an EAP-TLS success.
75
Page 76

Some important packets to look at:
• Packet 1 – start of the EAP process, requested by the Authenticator (switch).
• Packet 3 – start of the EAP-TLS process
• Packet 4 – Jetdirect sends it SSL/TLS Client Hello
• Packet 11 – Packets 5, 7, 9, 11 are actually fragmented packets that comprise the Server
Hello packet. Packet 11 is what it will look like when it is fully assembled. It is fragmented in
this way because the server is sending back certificates which are about 3k octets each in
length.
• Packet 14 – EAP-TLS requires the client (Jetdirect) to send back a client certificate – that is this
packet.
• Packet 17 – the Authenticator indicates “Success” to Jetdirect and EAP-TLS has been
negotiated successfully.
Now we know what a good trace is supposed to look like!
EAP Unknown User Name
Let’s look at a common failure, which is when the username that HP Jetdirect is sending is unknown by
the Authentication Server. Although we are using EAP-TLS, this information is also valid for PEAP.
76
Page 77

Here, a simple mistake was made in the name: “wireles” was used instead of “wireless”. Here is
what a network trace would look like.
77
Page 78

Here we see that an EAP request for identity is made via the Authenticator (packet 6). Jetdirect
returns a response (packet 7) and then the Authenticator returns an EAP failure (packet 8). The first
thing to check in this failure mode is the 802.1X User Name on Jetdirect. The Authentication Server
does not recognize the user name that Jetdirect is sending back.
That one was easy.
Server Authentication Problem
Once the EAP identity has been verified, the next step for both EAP-TLS and PEAP is to verify that the
authentication server is valid. This validation is done through checking the Server Certificate. Two
fields are vitally important in Jetdirect’s configuration: The server ID field in the 802.1X configuration
and the CA Certificate installed on Jetdirect.
Here we can see that the server authentication failed. We see clearly from the log that the server ID
field of JD does not match the subject name of the certificate. Let’s look at different failure, but still a
server authentication issue:
78
Page 79

Here we can see that we have an “unknown CA” error. In the log, the certificate issuer is RootCA but
SSL is complaining that it cannot get the certificate for the local issuer. In other words, the certificate
for RootCA is unavailable which points to the wrong CA certificate being installed on Jetdirect.
Let’s look at a network trace.
79
Page 80

Here are the important packets in this trace:
• Packet 210 – Server Hello where the Authentication Server’s certificate is sent to Jetdirect.
• Packet 211 – Jetdirect sends a NAK.
What has happened here is that Jetdirect does not accept the Authentication Server’s certificate and
refuses to continue. Things to check:
• The CA certificate configured on Jetdirect. This field must be configured to be a Root CA of
the chain in use.
• The 802.1X Server ID field on Jetdirect – be sure that it is configured correctly. You may try
just to set it to blank until you can get 802.1X up and running.
• Be sure that the certificate being returned by the Authentication Server is the one you believe
is being returned. All of these things are easy to check. Let’s look at packet 210 in depth.
80
Page 81

Here we can see that there are 2 certificates being returned by the Authentication Server:
• “ias.example.internal” issued by R2, an intermediate certificate authority
• “R2.example.internal” issued by RootCA, the root certificate authority.
The first certificate is the IAS server’s certificate that Jetdirect will check the Server ID field against.
Therefore, the server ID field needs to be configured correctly based upon the common name of
“ias.example.internal”. The next certificate is part of the chain that is sent back to the client. This is
R2’s certificate. Let’s look at these more closely.
81
Page 82

By looking at each certificate’s “Issuer” and “Subject” fields, we can determine what is Jetdirect is
seeing. Since “ias.example.internal” is the Authentication Server certificate and its common name is
shown as “ias.example.internal”, we know that the Server ID needs to be configured correctly to
handle that value. The “Issuer” of this certificate is R2.example.internal. Jetdirect needs to have the
public key certificate of R2 in order to verify the signature on ias.example.internal. The
Authentication Server also sends back the R2.example.internal certificate. This certificate is issued by
RootCA. Jetdirect also needs the RootCA public key certificate. This certificate, RootCA must be
configured on Jetdirect as the CA Certificate in order for the certificate chain to be verified.
These two situations are the most common type of issues that affect 802.1X configurations.
Client Authentication Problem
Assuming that everything went ok with Server Authentication, then client authentication is the next
area where there could be problems. For EAP-TLS, the client sends a certificate to authenticate while
in PEAP, a username/password is sent using a different protocol to authenticate the client. In both
cases, the certificate or the username/password must be mapped to an account that is granted
access. Let’s look at an EAP-TLS client authentication problem.
82
Page 83

Notice that “TLS Server Authentication finished successfully”. Based upon that message, we’ve
eliminated a lot of things that could have gone wrong. However, the message “Alert Received:
access denied” tells us that the client authentication failed. Let’s look at a trace and then we’ll talk
about some of the things to check.
83
Page 84

Here we can see that the Server Hello was sent (packet 68) and it must have been accepted
because Jetdirect sends the client certificate (packet 69) and did not send a NAK. However, after
the client certificate is sent, the Authenticator returns a TLS Alert indicating “Access Denied”. There
are a few of things to check:
• The Jetdirect Identity Certificate must be configured
• The Jetdirect Identity Certificate must be one the Authentication Server Trusts
• The Jetdirect user in Active Directory must have Jetdirect’s certificate mapped to the
account that represents Jetdirect.
PEAP
Almost everything we’ve covered with EAP-TLS is also valid for PEAP. Let’s look at a successful
PEAP negotiation.
84
Page 85

Here is the log output from a successful PEAP negotiation. An important thing to notice is the EAPMSCHAPv2 client authentication method. There are a variety of ways that are used to send the
username/password to the authentication server, this is one of them.
85
Page 86

Packets 17-24 are where the User Name / Password are sent over and verified. Packet 25 shows
an EAP Success, which indicates that everything went fine. Note that in packet 14, it appears that
the client certificate is sent over, but it is not. When using EAP-TLS, it is sent, but when using PEAP,
the TLS connection is established without sending over the client certificate.
There is one case where a wrong password can be configured on Jetdirect and get a failure.
86
Page 87

The log shows password errors in PEAP very clearly! The network trace isn’t as clear.
87
Page 88

Here we can see the failure is reported at packet 223 (after a delay of 30 seconds). This type of
trace would indicate that there is a password mismatch between Jetdirect and the Active Directory
account that represents Jetdirect.
Appendix B: Importing a Certificate
Bring up the web server for the CA.
Using the URL for
the certsrv, we
get to the web
interface of the
Certification
Authority. Since
we want to
create a
certificate for
Jetdirect, click the
“Request a
certificate” link.
Click “advanced
certificate
request”
88
Page 89

Click “Create
and submit a
request to this
CA”.
89
Page 90

Be sure to
select the
Certificate
Template “HP
Jetdirect” and
to check the
checkbox
entitled “Mark
keys as
exportable”.
Click Yes.
90
Page 91

Click “Install
this certificate”
to install it on
your local
computer. We
will export it
and then
delete it from
this computer
later.
Click Yes.
91
Page 92

Done.
At this point, we want to export the certificate so that it can be loaded with its private key into
Jetdirect. We need to bring up MMC again and load the Certificates snap-in.
92
Page 93

Go to the File
Menu and
select
Add/Remove
Snap-In.
Click “Add…”
93
Page 94

Click
“Certificates”
Click “My user
account”
94
Page 95

Click “Local
Computer”
Select the
folder
“Certificates”
under
“Personal”.
Highlight the
Jetdirect
certificate
issued. Right
Click and
select
“Export…”
95
Page 96

The
“Certificate
Export
Wizard”
launches –
Press “Next”
Since we are
going to
import this
certificate into
Jetdirect, we
need to export
the private key
as well. Select
“Yes, export
the private
key” and then
click “Next”.
96
Page 97

Type a
password to
protect the
private key.
Click “Next”.
Name the file
“jdcert.pfx”
and click
“Next”
97
Page 98

Click Finish
Click Ok.
If you did not use the certificate request method of generating a certificate, we’ll want to “Import the
Certificate and Private Key” into Jetdirect.
98
Page 99

Now we’ll
import the
Jetdirect
Certificate –
click
“Configure…”
under the
“Jetdirect
Certificate”
heading.
Select “Import
Certificate and
Private Key”.
Click “Next”.
99
Page 100

Select the
“jdcert.pfx”
file that
contains the
private key of
Jetdirect and
the password
that was used
to protect the
private key.
Click “Finish”.
100
 Loading...