

Page 1
HP DeskJet 610C
Series Printer
8VHU¨V*XLGH
*XLDGR8VXiULR
0DQXDOLQVWUXFWLYR
GHRSHUDFLyQ
Page 2

HP DeskJet 610C Series Printer
User’s Guide
English
Acknowledgments
Univers™ is a trademark of Linotype AG and its subsidiaries in
the U.S. and other countries.
CG Times is a product of Agfa Corporation based on Times
New Roman under license from The Monotype Corporation
plc. and scalable outlines are licensed from Agfa Division of
Miles Inc.
Microsoft®, Windows®, Windows NT®, and MS Windows® are
U.S. registered trademarks of Microsoft Corporation.
Screenshot(s) reprinted by permission from Microsoft
Corporation.
Notice
The information contained in this document is subject to
change without notice.
Hewlett-Packard makes no warranty of any kind with regard to
this material, including, but not limited to, the implied warranties
of merchantability and fitness for a particular purpose.
Hewlett-Packard shall not be liable for errors contained herein
or for incidental or consequential damages in connection with
the furnishing, performance, or use of this material.
No part of this document may be photocopied, reproduced, or
translated to another language without the prior written
consent of Hewlett-Packard Company.
Printing History
Edition 1, March 1999
© Copyright 1999 by Hewlett-Packard Company
Table of Contents
How to Print
While You’re Printing . . . . . . . . . . . . . . . . . . . . . . . . 3
Printing on Different Kinds of Paper. . . . . . . . . . 4
HP Print Settings Box. . . . . . . . . . . . . . . . . . . . . . . . 5
Getting Help When Things Go Wrong
The HP Toolbox. . . . . . . . . . . . . . . . . . . . . . . . . . . . . 8
Solving Common Problems . . . . . . . . . . . . . . . . . 8
What the Buttons and Lights Do . . . . . . . . . . . . 10
HP Customer Support . . . . . . . . . . . . . . . . . . . . . . 10
More About Your Printer
Printing from MS-DOS . . . . . . . . . . . . . . . . . . . . . .13
Uninstalling the Printer Software. . . . . . . . . . . . 14
Print Cartridges . . . . . . . . . . . . . . . . . . . . . . . . . . . . 14
Product Specifications. . . . . . . . . . . . . . . . . . . . . . 14
Limited Warranty Statement . . . . . . . . . . . . . . . . 16
. . . . . . . . . . . . . . . . . . . . . . . . . . . . . . 2
. . . . . . . . . . . . . . . .13
. 8
Page 3
How to Print
1.
English
Lay out the page and choose the text, pictures,
fonts, and colors from your software program
(such as a word processor or drawing program).
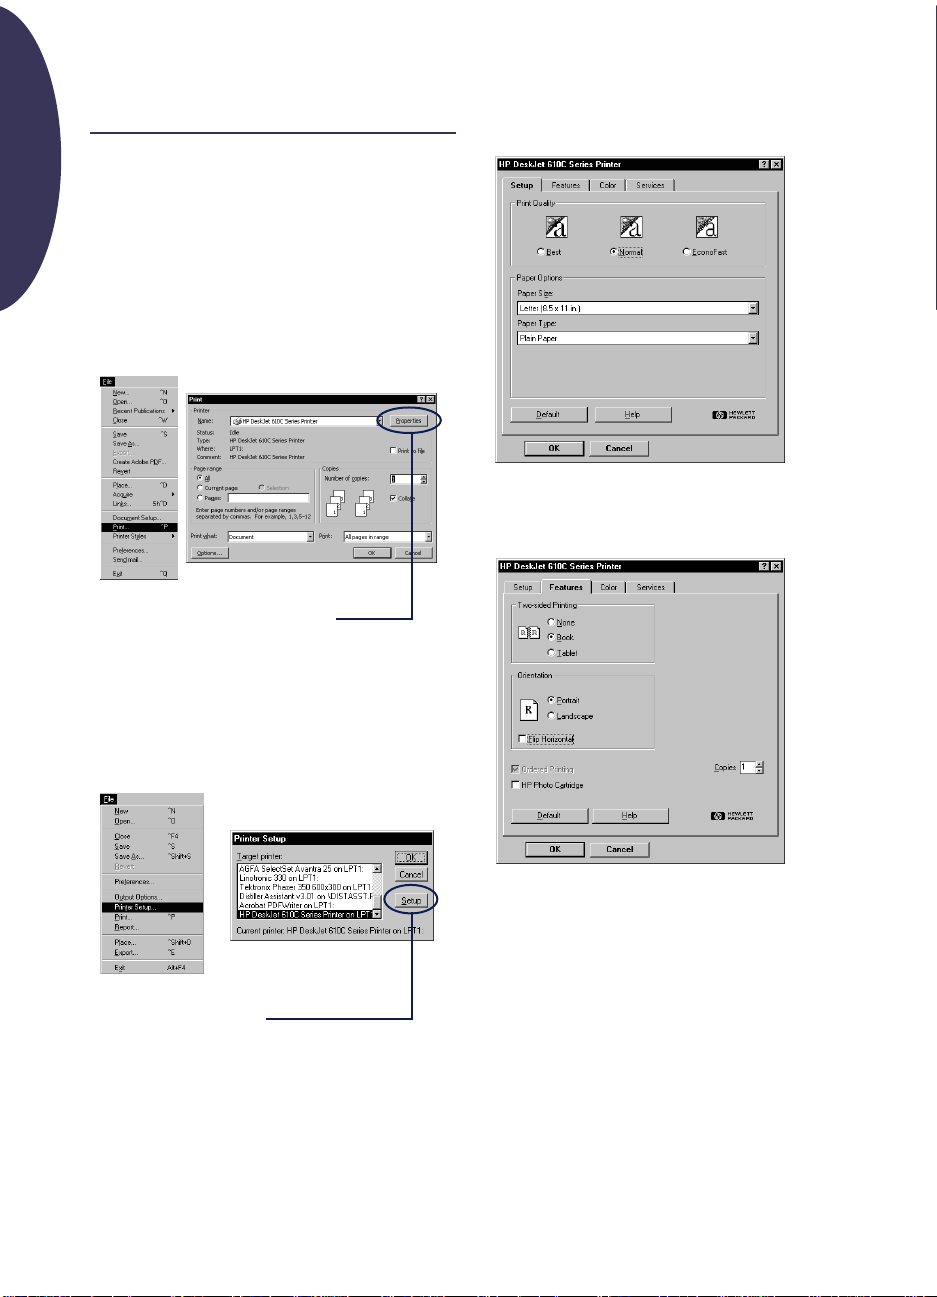
2.
Choose your print settings in the HP print
settings box. To find the HP print settings box:
Try This...
a. Click
b. Then click whichever button you see—
Properties, Setup
c. If you still don’t see the box, click
Options
File
and then click
, or
Properties
, or
Printer
.
Print
.
Once you’re there, Choose print quality, paper
size, and paper type on the
.
Choose two-sided printing, orientation, and flip
horizontal options on the
Setup
,
Setup
Features
tab.
tab.
...Or Try This
a. If Print isn’t there, click
Print Setup
b. Then click whichever button you see—
Setup
2
or
.
Options
Printer Setup
.
or
Page 4

Choose color options on the
in black and white, check
3.
Click OK in the Print box of your software
program to start printing.
The next time you want to print this document,
you can use the Print button at the top of the
screen in your software program—simply click
it to print one copy using the same print
settings.
It takes a few moments for the printing to start,
because the printer is receiving information from
the computer.
Color
tab. To print
Print in Grayscale
.
While You’re Printing
Your printer will print at different speeds,
depending on the complexity of the job and the
print quality you have chosen. If you have lots of
graphics and color in your document, it will take
longer to print.
If something goes wrong
Sometimes, in spite of your best efforts,
something goes wrong during printing. Maybe a
sheet of paper jams in the printer or nothing
happens at all.
• If the printer detects a problem, it displays a
message on your screen.
• If you notice that something is wrong, click the
Troubleshooting
follow the instructions on the screen. (See
page 8 to find out how to get to the
HP Toolbox.)
tab in the HP Toolbox and
English
• If your printer lights are blinking, see page 10.
3
Page 5
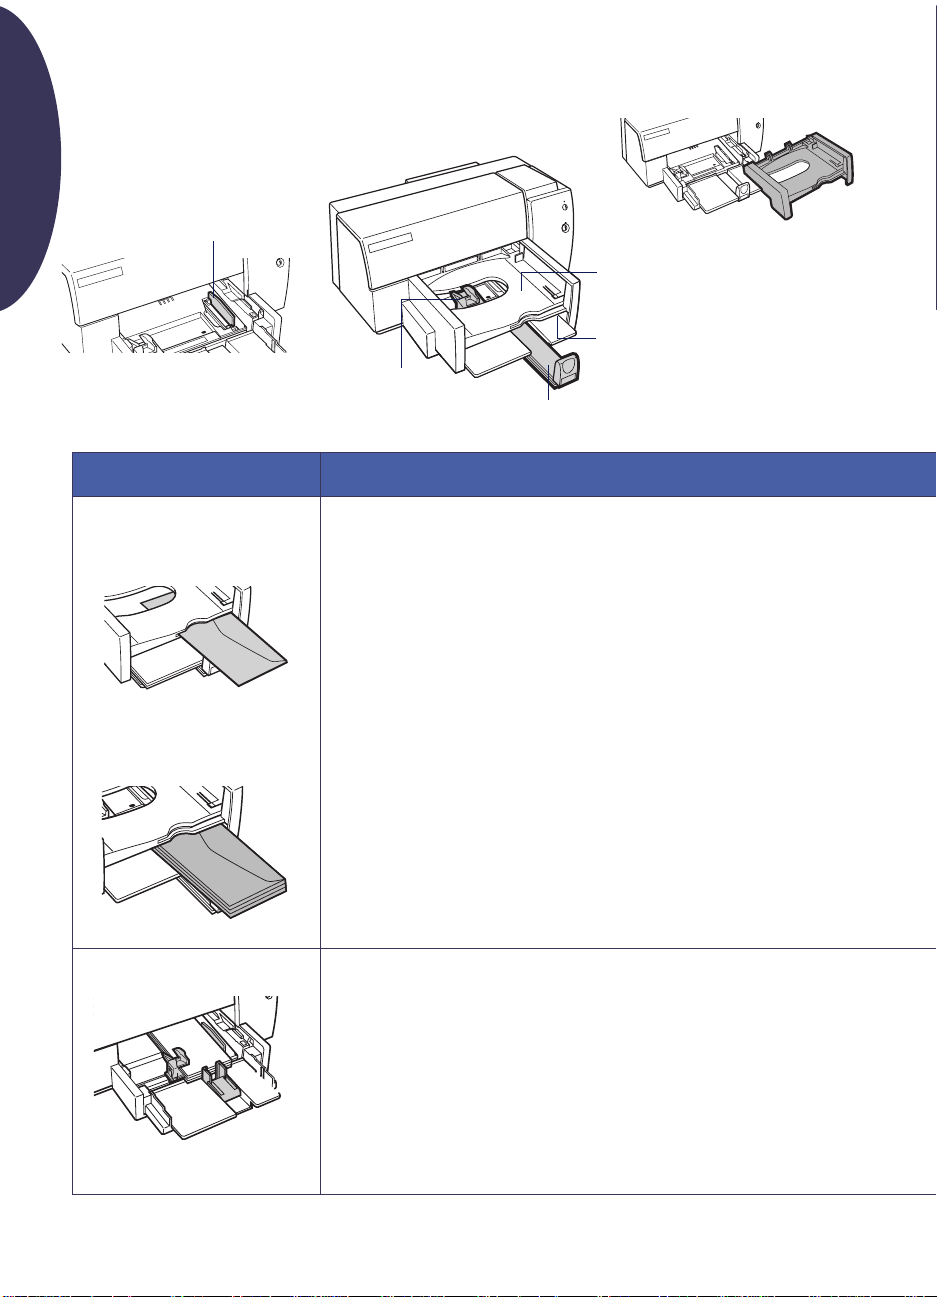
Printing on Different Kinds of Paper
English
Card guide in up position
Paper-width Adjuster
What do you want to print What you need to do
OUT tray removed for loading cards, etc.
OUT Tray
Single envelope slot
Paper-length Adjuster
Envelopes
Single envelope
1. Slide the envelope, with its flap up and on the right, evenly into the single envelope
slot until it stops.
2. Choose print settings that match the type and size of the envelope.
3. Print the envelope.
4. Reset the software for the paper in the IN tray after printing completes.
Stack of up to 20 envelopes 1. Slide out both of the paper adjusters.
2. Remove any paper from the IN tray.
3. Slide the envelopes, with the flap side up and on the right, evenly into the IN tray.
4. Slide paper adjusters snugly against the edges of the envelopes.
5. Choose print settings that match the type and size of the envelopes.
6. Print the envelopes.
7. Reset the software for the paper in the IN tray after printing is completed.
Index cards and postcards
1. Remove the OUT tray.
2. Raise the card guide.
3. Insert up to 1/4 inch (1/2 cm) stack of cards into the IN tray. Align the right edge of
the stack with the card guide.
4. Slide the paper adjusters snugly against the edges of the cards.
5. Replace the OUT tray.
6. Choose print settings that match the type and size of the cards.
7. Print the cards.
8. Reset the software for the paper in the IN tray after printing is completed.
4
Page 6

HP Print Settings Box
Setup Tab
HP print settings to choose Guidelines to remember
English
Features Tab
•
Setup Tab
-
-
-
• Features Tab
-
-
•
Setup Tab
-
-
-
• Features Tab
-
-
•
Setup Tab
-
-
-
• Features Tab
-
-
Print Quality
Paper size
Paper Type
Two-sided Printing
Orientation
Print Quality
Paper size
Paper Type
Two-sided Printing
Orientation
Print Quality
Paper size
Paper Type
Two-sided Printing
Orientation
: Normal
: choose appropriate envelope size
: Plain paper
: None
: Portrait
: Normal
: choose appropriate envelope size
: Plain paper
: None
: Portrait
: Normal
: choose appropriate card size
: Plain paper
: None
: Portrait
• The envelope slot supports only No. 10 or DL size envelopes.
• Make sure paper is loaded in the IN tray.
• Make sure the card guide is in the down position.
• Avoid shiny or embossed envelopes, or those that have clasps
or windows.
• Avoid envelopes with thick, irregular, or curled edges or with
areas that are wrinkled, torn, or otherwise damaged.
• Never load more than 20 envelopes at one time.
• Even up the envelopes before inserting them by tapping the
short edge on a flat surface.
• Make sure the card guide is in the down position
• Avoid shiny or embossed envelopes, or those that have clasps
or windows.
• Avoid envelopes with thick, irregular, or curled edges or with
areas that are wrinkled, torn, or otherwise damaged.
• Even up the cards before inserting them by tapping the short
edge on a flat surface.
• Move the paper length adjuster by pressing the inside of the
handle to release and lower it, then pushing it toward the card
stack until it stops.
• If you encounter difficulty replacing the OUT tray, lift the top
cover, wait a few moments for the print cartridge cradles to
move to the center position, then replace the OUT tray, and
lower the top cover.
5
Page 7

Printing on Different Kinds of Paper
English
Card guide in up position
Paper-width Adjuster
What do you want to print What you need to do
OUT tray removed for loading cards, etc.
OUT Tray
Single envelope slot
Paper-length Adjuster
Labels
1. Slide out both of the paper adjusters.
2. Fan the edges of the label sheets to separate them, then even the edges.
3. Insert up to 25 label sheets (label side down) on top of about 5 sheets of plain
paper of the same size.
4. Slide the paper adjusters snugly against the sheets.
5. Choose print settings that match the type, size, and orientation of the labels.
6. Print the labels.
7. Reset the software for the paper in the IN tray after printing is completed.
Transparencies
1. Slide out both of the paper adjusters.
2. Fan the edges of the transparency sheets to separate them, then even the edges.
3. Insert up to 1/2 inch (1 cm) stack of transparency sheets. Load the rough side down
with the adhesive strip forward.
4. Slide the paper adjusters snugly against the transparencies.
5. Choose print settings that match the type and size of the transparencies.
6. Print the transparency.
7. Reset the software for the paper in the IN tray after printing is completed.
Note: You can also access HP’s convenient online manual from the HP Software CD. At any time while using your computer,
you can insert the CD and find a wealth of information at your fingertips.
6
Page 8

HP Print Settings Box
Setup Tab
HP print settings to choose Guidelines to remember
English
Features Tab
•
Setup Tab
-
-
-
• Features Tab
-
-
•
Setup Tab
-
-
-
• Features Tab
-
-
Print Quality
Paper size
Paper Type
Two-sided Printing
Orientation
Print Quality
Paper size
Paper Type
Two-sided Printing
Orientation
: Normal
: Letter or A4
: Plain paper
: None
: Portrait
: Best
: Letter or A4
: HP Premium Transparency Film
: None
: Portrait
• Use only paper labels that are designed specifically for use
with HP InkJet printers.
• Never load more than 25 sheets at one time.
• Use only full sheets of paper labels.
• Make sure the sheets are not sticky, wrinkled, or pulling away
from their protective backing.
• Do not use plastic or clear labels. The ink will not dry when
used with plastic or clear labels.
• Make sure the card guide is in the down position.
• For best results, use HP Premium Transparency film, which was
designed specifically for use with HP InkJet printers.
7
Page 9

Getting Help When Things Go Wrong
English
When problems occur, the quickest way to find a
solution is to use the troubleshooting feature in
the HP Toolbox. With a few clicks of the mouse
button, you’ll find your specific problem and
details on how to fix it.
The HP Toolbox
For each Windows system, here are a couple of
places to find it.
Windows 95, Windows 98, and
Windows NT 4.0
• Double-click the HP Toolbox shortcut icon.
This shortcut is always on your desktop.
–OR–
• Click the HP Toolbox icon in the taskbar. The
icon is displayed in the taskbar when the
HP Toolbox is open and you’re printing.
Windows 3.1
• Double-click the HP Toolbox icon in the
HP DeskJet Utilities group in the Program
Manager.
x
• Double-click the HP Toolbox icon. It’s on your
desktop when you start your computer.
Once you’re in the HP Toolbox…
1.
Click the
2.
Click the appropriate category.
3.
Click on the description of the problem.
4.
Click to further explore possible solutions.
Troubleshooting
tab.
Solving Common Problems
The text or graphics are in the
wrong place
Paper orientation
incorrectly on the page, make sure you’ve
selected the correct orientation (Portrait or
Landscape) on the Features tab of the HP print
settings box.
Alignment.
line up on the printed page, align the print
cartridges. In the HP Toolbox, click the
Services
tab, and then click
cartridges
Paper Loading.
skewed, try reloading the paper.
Margin settings.
the page:
• Make sure the margins are set correctly in your
software program.
• Make sure the elements in your document fit
within the printable area of the page.
• Make sure you’ve selected the right paper size
on the
. If the printing is positioned
If the color ink and black ink don’t
Printer
Align the print
.
If the printing is slanted or
If text is running off the edge of
Setup
tab of the HP print settings box.
8
–OR–
Page 10

The print quality is poor
Something on the page is wrong or
missing
English
Cartridges.
splotchy:
• You might need to clean the print cartridges.
See the HP Toolbox for instructions.
• You might need to replace the print cartridges.
See the HP Toolbox for instructions.
Paper. If the printing is faded or the colors are
dull or bleeding into each other, make sure you’re
using paper intended for inkjet printers and that
you’ve loaded the paper print side down.
Ink. You can control the amount of ink on the
page by changing the Print Quality (on the
tab of the HP print settings box).
If ink is smearing, streaking, or is
Setup
A blank page came out of the
printer
Tape.
Make sure you’ve removed the protective
pieces of tape on the print cartridges.
Default printer.
HP DeskJet 610C Series printer as the default
printer. To check your default printer, click the
Troubleshooting
click
A blank page came out
instructions under
sure your printer is selected as the current or
default printer.
Ink.
You might have run out of ink. Replace the
cartridges.
Make sure you’ve selected the
tab in the HP Toolbox, and then
. Follow the
Wrong printer selected
to make
Margin settings.
the edges, check your software application:
• The correct margins are set.
• The elements are scaled correctly.
Colors.
If the colors are wrong or missing
• Clean your tri-color print cartridge. In the
HP Toolbox, click the
then click
• Replace the tri-color print cartridge.See the
online help for instructions.
• Clear the
tab of the HP print settings box.
Communications.
printing on your page, the computer might have
lost communication with your printer. Try turning
your computer and printer off and then turn them
on again. If the problem persists, make sure all
cables are plugged in tightly.
If the printing is cut off around
Printer Services
Clean the print cartridges
Print in Grayscale
If meaningless characters are
option on the
tab, and
.
No page came out of the printer
Be patient.
photographs, take a while to print. Check the
power light; if it’s blinking, the printer is
processing information.
Power. Make sure the printer is on (the power light
on the front of your printer should be on) and
that all connections are firm.
Cover. Make sure the top cover of the printer is
closed.
Paper. Make sure you put the paper in the lower
(IN) tray correctly.
Print cartridges. Make sure both print cartridge
cradles contain properly installed cartridges with
the correct HP part number.
Complex documents, such as color
Color
9
Page 11

What the Buttons and Lights Do
The Resume and Power buttons and lights are on the front of the printer. In general, the lights
indicate when the printer is operating correctly and when it needs attention from you. The buttons are
used to control the printer.
English
When these lights are... You need to...
Turned off and Turned off Press Power to turn on the printer.
Steadily lit and Turned off Send a document to the printer. The printer is in the
ready-to-print state.
Steadily lit and Blinking If you just installed a print cartridge, make sure the cartridge is
securely snapped into the printer with the arrow aligned with
the dots on the top of the print cartridge cradle.
Close the top cover of the printer if it is open.
Check the lower (IN) tray to make sure it contains paper and
that the paper is correctly loaded in the tray.
Press Resume
computer screen for any reported error message and
corrective action instructions.
to clear the error condition. Then check your
Blinking and Turned off No action required. This indicates that either the computer is
sending a document to the printer or that the printer is
currently busy printing a document.
Blinking and Blinking Press Power to turn off the printer. At the computer, cancel
any documents awaiting printing. Press Power
turn on the printer.
again to
Steadily lit and Steadily lit See the Troubleshooting tab in the HP Toolbox. A problem
exists with your printer.
HP Customer Support
Windows 98, and Windows NT 4.0. For MS-DOS
printer software, contact the manufacturer of your
HP Customer Support Online
Click your way to a quick solution! A
great place to go for answers to
questions about HP products is HP Customer
Support Online at http://www.hp.com/support/
home_products. You’ll get instant access to
everything from helpful printing tips to the latest
product and software updates—24 hours a day,
seven days a week.
Printer software
Printer software (also referred to as a printer
driver) allows your printer to talk with your
computer. HP provides printer software and
software upgrades for Windows 3.1x, Windows 95,
software program.
You have several options for getting printer
software:
• Download the printer software by accessing
HP Customer Support Online, CompuServe, or
America Online.
• If you do not have a CD drive, you can copy
the printer software to floppy disks by taking
your printer software CD to your HP dealer or
a friend that has a CD drive. Be sure to take
along at least 6 blank diskettes. To create the
floppy disks, insert the printer software CD and
select Make diskettes of your printer software
when the opening screen appears and follow
the instructions on the screen.
10
Page 12

• If you are in the U.S., and do not have a CD
drive, you can order the software on 3.5 inch
disks by calling (661) 257-5565.
• If you are in the U. S. and need software, you
can order it by calling (661) 257-5565. Software
upgrades are available for a nominal fee.
• If you are outside the U.S. and cannot
download the driver from HP Customer
Online, call your nearest HP Customer
Support Center.
HP Customer Support User
Forums
They’re friendly. They’re informative.
Check out our online community user forums.
Simply review existing messages left by other HP
users to find the answers you’re looking for. You
can also post your questions, then check back
later for ideas and suggestions from
knowledgeable users and system operators.
Access the user forums directly from
http://www.hp.com/support/home_products.
HP Customer Support by Fax
When you want the facts—and you
want them fast—call HP FIRST, our
automated faxback service. Dial (800) 333-1917
(U.S. only) from any touch-tone phone, listen to
your choices, then select the support document
that matches your specific need. You may request
up to three documents per call, and we’ll fax them
to you right away. HP FIRST is a free service, so
call anytime—24 hours a day, seven days a
week.
HP Customer Support Repair
If your printer is ever in need of repair,
simply call the HP Customer Support
Center. A trained service technician will diagnose
the problem and coordinate the repair process for
you. This service is free of charge during the
printer’s standard warranty period. Beyond the
warranty period, you will be quoted a repair cost.
HP Customer Support by
Phone
HP Customer Support Technical Assistance
To speak with someone for online technical
assistance, call one of the following numbers.
• Africa/Middle East 41 22/780 41 11
• Argentina 541781-4061/69
• Australia 61 3 92728000
• Austria 43 (0)660 6386
• Belgium (Dutch) 32 (0)2 62688 06
• Belgium (French) 32 (0)2 6268807
• Brazil 55 11 709-1444
• Canada (877) 621-4722 (Toll free)
• China 86 10 6505 3888-5959
• Czech Republic 42 (2) 471 7321
• Denmark 45 (0)39 294099
• Finland 358 (9) 2034 7288
• France 33 (0) 143623434
• Germany 49 (0) 180 5258 143
• Greece 30 1 689 64 11
• Hong Kong (800) 96 7729
• Hungary 36 (1) 252 4505
• India 91 11 682 60 35
• Indonesia 6221 350 3408
• Ireland 353 (0) 1662 5525
• Israel 972-9-9524848
• Italy 39 (0)2 264 10350
• Japan, Tokyo 81 3 3335-8333
• Japan, Osaka 81 6 838 1155
• Korea 82 2 3270 0700
• Malaysia 03 2952566
• Mexico D.F. 326 46 00
• Mexico, Guadalajara 669 95 00
• Mexico, Monterey 378 42 40
• Middle East/Africa 41 22/780 41 11
• Netherlands 31 (0)20 606 8751
• New Zealand (09) 356-6640
English
11
Page 13

• Norway 47 (0)22 116299
• Philippines 65 272 5300
• Poland 48 22 37 50 65
• Portugal 351 (0) 144 17 199
English
• Russia 7095 923 50 01
• Singapore 65 272 5300
• Spain 34 (9) 02321 123
• Sweden 46 (0)8 6192170
• Switzerland 41 (0)84 8801111
• Taiwan 886 2-2717-0055
• Thailand (66-2) 661 4011
• Turkey 90 1 224 59 25
• United Kingdom 44 (0) 171 512 5202
• U.S. (900) 555-1500
• Venezuela 58 2 239 5664
Before placing a call for help, please make sure
that:
• You have checked the setup poster and the
HP Toolbox for installation troubleshooting
tips.
• You are seated in front of your computer with
your printer nearby.
• You have the following information available:
- The printer’s serial number (the label is on
the back of the printer).
- The printer’s model number (the label is on
the front of the printer).
- The model of the computer.
- The version of the printer driver and
software program (if applicable).
After the warranty
• You can still get help from HP for a fee. Prices
are subject to change without notice. (Online
help is always available for free!)
• For quick questions in the United States only,
call (900) 555-1500. The charges are $2.50 per
minute and begin when you connect with a
support technician.
• For calls from Canada, or for calls in the U.S.
that you anticipate might be longer than ten
minutes in length, call (800) 999-1148. The fee
is US $25 per call, charged to your Visa or
MasterCard.
• If during your phone call, it is determined that
your printer requires repair, and you are within
your printer’s hardware warranty period, HP
will pay for your phone charges.
Extended Warranty Options
If you would like to extend your printer coverage
beyond the factory warranty period, you have the
following options.
• Consult your HP dealer to get extended
coverage.
• If your HP dealer does not offer service
contracts, please call Hewlett-Packard directly
and ask about our service agreement offering.
In the U.S. call (800) 446-0522; in Canada call
(800) 268-1221. For service agreements outside
the U.S. and Canada, contact your local
HP Sales Office.
A note about letters
If you need help from a technical support person,
we recommend that you call us while you’re in
front of your computer and printer, rather than
writing a letter to us. That way we can help you
with your questions immediately!
12
Page 14

More About Your Printer
Printing from MS-DOS
A printer driver is a program that allows you to
control print settings from within your word
processor, spreadsheet, or other software
program.
Using the right MS-DOS printer driver
Printer drivers are supplied by the manufacturers
of MS-DOS software programs. Whenever
possible, use the one designed specifically for the
HP DeskJet 610C Series printers. However, if one
isn’t available, you can get satisfactory results
using one of the drivers listed below. If you are
using a program that’s not listed, contact the
manufacturer of the software program to get a
printer driver that is compatible with your new
printer.
Recommended
MS-DOS Program Version Printer Driver
Word Perfect 5.1, 5.1+, 6.x HP DeskJet 600,
660C, or 850C
Harvard Graphics 3.0 HP DeskJet 540
Lotus 1-2-3 2.x, 3.x, 4.0 HP DeskJet 540
Microsoft Word 5.5, 6.0 HP DeskJet 560C
Installing a MS-DOS printer driver
Follow the instructions supplied by the software
manufacturer. Contact them if you have any
questions or concerns about the performance of
your printer when using one of their drivers.
Using the HP DeskJet Control Panel for
MS-DOS
Use the HP DeskJet Control Panel to choose print
settings that might not be available from some
MS-DOS programs, or if you can’t get a printer
driver that works with your software program.
Installing the HP DeskJet Control Panel
English
Before you install the HP DeskJet Control Panel,
make sure you have followed all the steps in the
setup poster.
1. Turn on your computer and your printer.
2. Put the CD into your computer’s disk drive.
If you do not have a CD-ROM drive see
page 10 for instructions on how to get floppy
disks.
3. At the MS-DOS command line (C:\>), type
D:\DJCPINST and press ENTER.
If your disk drive is different than “D”,
substitute the correct letter for “D”.
4. Follow the instructions on the screen.
Note If a message indicates that the installation of the
Control Panel was unsuccessful, try the installation
again. If it’s still unsuccessful, or if the Control Panel
software is damaged or missing, contact your
authorized HP dealer.
Cleaning the print cartridges
Clean the print cartridges when you notice that
lines or dots are missing from your printed text
and graphics.
1. At the MS-DOS command line, type DJCP and
press ENTER.
The Control Panel appears.
2. Click Clean Print Cartridge, then follow the
instructions on the screen.
Aligning the print cartridges
Align the print cartridges when you notice that
color ink does not properly line up with black ink.
1. At the MS-DOS command line, type DJCP and
press ENTER.
The Control Panel appears.
2. Click Align Print Cartridge, then follow the
instructions on the screen.
13
Page 15

Uninstalling the Printer Software
Product Specifications
If you need to uninstall the printer driver for your
HP DeskJet printer for any reason, perform one of
the steps listed for your operating system. If
English
something unexpected happened during
installation, it is safest to run the uninstall utility
directly from the CD rather than from the
uninstall program that was placed on your hard
drive.
For Windows 3.1x, do one of the
following:
• In Program Manager, locate your HP DeskJet
Series group. Double-click the Uninstall icon
to uninstall your printer software.
–OR–
• Insert the CD into your computer and run
Setup.exe. Select Remove HP DeskJet 610C
Series software.
For Windows 95, Windows 98, and
Windows NT 4.0 do one of the following:
• From the Start menu, click Programs, click
HP DeskJet 610C Series, and then click
HP DeskJet 610C Series Uninstall.
–OR–
• From the Start menu, click Settings, click
Control Panel, and then click Add/Remove
Programs. Select HP DeskJet 610C Series
(Remove only).
–OR–
• Insert the CD into your computer and run
Setup.exe. Select Remove HP DeskJet 610C
Series software.
Print Cartridges
Black Tri-Color Photo Cartridge
HP C6614 HP 51649 HP C1816
Series Series Series
Print technology
Drop-on-demand thermal inkjet printing
Black print speed
Best mode: 1 page per minute
Normal mode: 3 pages per minute
EconoFast: 5 pages per minute
Black Text / Color Highlights print speed
Best mode: 0.3 pages per minute
Normal mode: 0.7 pages per minute
EconoFast: 2 pages per minute
Mixed text / Color Graphics print speed
Best mode: 0.3 pages per minute
Normal mode: 0.85 pages per minute
EconoFast: 2.5 pages per minute
5 x 7 Photo
Photo Cartridge Speed: 0.25 pages per minute
✳
✳
✳
✳
Black True Type text resolution
Microsoft Windows (text and graphics), MS-DOS (text)
Best mode: 600 x 600 dpi
Normal mode: 600 x 300 dpi
EconoFast: 300 x 300 dpi
MS-DOS (graphics) Full-page: 75, 150, 300 dpi
Color resolution for Standard Pen Set
300 x 300 dpi on plain paper
600 x 300 dpi black and color (on glossy paper, premium
paper, and transparency film)
75, 150, 300 dpi for MS-DOS (graphics) Full-page
Color resolution for Photo Pen Set
600 x 300 dpi with 6 inks, using HP Photo-REt Technology and
all paper types (Best and Normal modes)
Printer command language
HP PCL Level 3
Standard Character Sets
United Kingdom (ISO 4), German (ISO 21), French (ISO 69),
Italian (ISO 15), Danish/Norwegian (ISO 60), Swedish (ISO 11),
Spanish (ISO 17), ANSI ASCII (ISO 6), Legal, PC-8, Roman-8,
Roman-9, PC-850, PC-8 Danish/Norwegian, ECMA-94, Latin 1
(ISO 8859/1), PC-852, Latin 2 (ISO 8859/2), Latin 5 (ISO 8859/
9), Latin 9 (ISO 8859/15), PC-8 Turkish, and PC-858
Software compatibility
MS Windows 3.1x, 95, 98, and NT 4.0
MS-DOS applications
Buttons/lights
Resume and Power
✳Approximate figures. Exact speed varies depending on the system configuration,
software program, and document complexity.
14
Page 16

Built-in (internal) fonts
Courier (portrait and landscape orientations)
Pitch: 5, 10, 16.67, 20 cpi
Point size: 6, 12, 24 pt
Style: Upright (Italic: 5, 10, 20 cpi)
Stroke weight: Normal, Bold
CG Times (portrait and landscape orientations)
Pitch: Proportional
Point size: 5, 6, 7, 8, 10, 12, 14 pt
Style: Upright, Italic
Stroke weight: Normal, Bold
Letter Gothic (portrait and landscape orientations)
Point and pitch: 6, 12, and 24 pt for 6, 12 and 24 cpi
Upright only: 4.75, 9.5, and 19 pt
for 16.67 cpi
Style: Upright, Italic
Stroke weight: Normal, Bold
Univers (portrait and landscape orientations)
Pitch: Proportional
Point size: 5, 6, 7, 8, 10, 12, 14 pt
Style: Upright (Italic: 5, 6, 10, 12 pt)
Stroke weight: Normal, Bold
Recommended printable weight
Paper: 60 to 135 g/m2 (16 to 36 lb)
Envelopes: 75 to 90 g/m2 (20 to 24 lb)
Cards: 110 to 200 g/m2 (110 lb index
max.; 8.5 pt max. thickness)
Paper Handling (Built-In Feeders)
Sheets: up to 100 sheets
Multiple envelopes: up to 20 envelopes
Single envelope: only 1 envelope
Cards: up to 30 cards
Transparencies: up to 50 sheets
Labels: up to 25 sheets
Use only U.S. letter- or A4-sized
sheets specifically designed for
use with inkJet printers.
OUT tray capacity: up to 50 sheets
Printer memory
512 KB built-in RAM
32 KB receive buffer
Dimensions
Width: 436 mm (17.2 in)
Height: 199 mm (7.9 in)
Depth: 405 mm (16 in)
Weight
5.3 kg (11.6 lb)
I/O Interface
Centronics parallel, IEEE-1284-compliant with 1284-B
receptacle (Bi-Tronics, ECP, bi-directional)
Printable Paper Sizes
U.S. letter 8.5 x 11 in
U.S. legal 8.5 x 14 in
Executive 7.25 x 10.5 in
European A4 210 x 297 mm
European A5 148.5 x 210 mm
B5-JIS 182 x 257 mm
Custom size: Width: 5.0 to 8.5 in
Length: 5.83 to 14 in
U.S. No. 10 envelope 4.12 x 9.5 in
Invitation A2 envelope 4.37 x 5.75 in
European DL envelope 220 x 110 mm
European C6 envelope 114 x 162 mm
Index card 101.6 x 152.4 mm
Index card 127 x 203.2 mm
European A6 card 105 x 148 mm
Japanese Hagaki Postcard 100 x 148 mm
127 to 215 mm
148 to 356 mm
216 x 279 mm
4 x 6 in
5 x 8 in
Power Requirements
Power modules:
Input Voltage (depends on power module ordered): 100, 120,
127, 220, 230, or 240 VAC (+10%, -10%)
Frequency:
100 VAC 50/60 Hz (+3 Hz, -3 Hz)
120 VAC 60 Hz (+3 Hz, -3 Hz)
127 VAC 60 Hz (+3 Hz, -3 Hz)
220 VAC 50 Hz (+3 Hz, -3 Hz)
230 VAC 50 Hz (+3 Hz, -3 Hz)
240 VAC 50 Hz (+3 Hz, -3 Hz)
Power consumption
2 watts maximum when off
4.5 watts maximum nonprinting
12 watts maximum printing
Operating environment
Maximum operating temperature: 5° C (41° F) to 40° C (104° F)
Humidity: 10-80% RH non-condensing
Recommended operating conditions for best print quality:
15° C (59° F) to 35° C (95° F), 20 to 80% RH non-condensing
Storage temperature: -40° C (-40° F) to 60° C (140° F)
Noise Levels per ISO 9296:
Normal
Mode
Sound Power, L
*
Sound Pressure, L
: 6.4 B (A)
wAd
(Bystander position): 50 dB (A)
pAm
English
15
Page 17

Limited Warranty Statement
HP Product Duration of Limited Warranty
Software 90 Days
Print cartridges 90 Days
Printer 1 Year
English
A. Extent of Limited Warranty
1. Hewlett-Packard (HP) warrants to the end-user customer
that the HP products specified above will be free from
defects in materials and workmanship for the duration
specified above, which duration begins on the date of
purchase by the customer. Customer is responsible for
maintaining proof of date of purchase.
2. For software products, HP’s limited warranty applies only
to a failure to execute programming instructions. HP does
not warrant that the operation of any product will be
uninterrupted or error free.
3. HP’s limited warranty covers only those defects which arise
as a result of normal use of the product, and do not apply
to any:
a. Improper or inadequate maintenance or modification;
b. Software, interfacing, media, parts, or supplies not
provided or supported by HP; or
c. Operation outside the product’s specifications.
4. For HP printer products, the use of a non-HP ink cartridge
or a refilled ink cartridge does not affect either the
warranty to the customer or any HP support contract with
the customer. However, if printer failure or damage is
attributable to the use of a non-HP or refilled ink cartridge,
HP will charge its standard time and materials charges to
service the printer for the particular failure or damage.
5. If HP receives, during the applicable warranty period,
notice of a defect in any software, media, or ink cartridge
product which is covered by HP’s warranty, HP shall
replace the defective product. If HP receives, during the
applicable warranty period, notice of a defect in any
hardware product which is covered by HP’s warranty, HP
shall either repair or replace the defective product, at HP’s
option.
6. If HP is unable to repair or replace, as applicable, a
defective product which is covered by HP’s warranty, HP
shall, within a reasonable time after being notified of the
defect, refund the purchase price for the product.
7. HP shall have no obligation to repair, replace, or refund
until the customer returns the defective product to HP.
8. Any replacement product may be either new or like-new,
provided that it has functionality at least equal to that of
the product being replaced.
9. HP’s limited warranty is valid in any country where the
covered HP product is distributed by HP except for the
Middle-East, Africa, Argentina, Brazil, Mexico, Venezuela,
and France’s “Departments d’Outre-Mer”; for those
excepted areas, the warranty is valid only in the country of
purchase. Contracts for additional warranty services, such
as on-site service, may be available from any authorized
HP service facility in countries where the product is
distributed by HP or by an authorized importer.
B. Limitations of Warranty
1. TO THE EXTENT ALLOWED BY LOCAL LAW, NEITHER HP
NOR ITS THIRD PARTY SUPPLIERS MAKE ANY OTHER
WARRANTY OR CONDITION OF ANY KIND, WHETHER
EXPRESS OR IMPLIED, WITH RESPECT TO THE HP
PRODUCTS, AND SPECIFICALLY DISCLAIM THE IMPLIED
WARRANTIES OR CONDITIONS OF MERCHANTABILITY,
SATISFACTORY QUALITY, AND FITNESS FOR A
PARTICULAR PURPOSE.
C. Limitations of Liability
1. To the extent allowed by local law, the remedies provided
in this Warranty Statement are the customer’s sole and
exclusive remedies.
2. TO THE EXTENT ALLOWED BY LOCAL LAW, EXCEPT FOR
THE OBLIGATIONS SPECIFICALLY SET FORTH IN THIS
WARRANTY STATEMENT, IN NO EVENT SHALL HP OR ITS
THIRD PARTY SUPPLIERS BE LIABLE FOR DIRECT,
INDIRECT, SPECIAL, INCIDENTAL, OR CONSEQUENTIAL
DAMAGES, WHETHER BASED ON CONTRACT, TORT, OR
ANY OTHER LEGAL THEORY AND WHETHER ADVISED OF
THE POSSIBILITY OF SUCH DAMAGES.
D. Local Law
1. This Warranty Statement gives the customer specific legal
rights. The customer may also have other rights which vary
from state to state in the United States, from province to
province in Canada, and from country to country
elsewhere in the world.
2. To the extent that this Warranty Statement is inconsistent
with local law, this Warranty Statement shall be deemed
modified to be consistent with such local law. Under such
local law, certain disclaimers and limitations of this
Warranty Statement may not apply to the customer. For
example, some states in the United States, as well as some
governments outside the United States (including
provinces in Canada), may:
a. Preclude the disclaimers and limitations in this Warranty
Statement from limiting the statutory rights of a
consumer (e.g., the United Kingdom);
b. Otherwise restrict the ability of a manufacturer to enforce
such disclaimers or limitations; or
c. Grant the customer additional warranty rights, specify the
duration of implied warranties which the manufacturer
cannot disclaim, or not allow limitations on the duration
of implied warranties.
3. FOR CONSUMER TRANSACTIONS IN AUSTRALIA AND
NEW ZEALAND, THE TERMS IN THIS WARRANTY
STATEMENT, EXCEPT TO THE EXTENT LAWFULLY
PERMITTED, DO NOT EXCLUDE, RESTRICT, OR MODIFY,
AND ARE IN ADDITION TO, THE MANDATORY STATUTORY
RIGHTS APPLICABLE TO THE SALE OF HP PRODUCTS TO
SUCH CUSTOMERS.
HP Year 2000 Warranty
Subject to all of the terms and limitations of the HP Limited
Warranty Statement stated above, HP warrants that this
HP Product will be able to accurately process date data
(including, but not limited to, calculating, comparing, and
sequencing) from, into, and between the twentieth and
twenty-first centuries, and the years 1999 and 2000, including
leap year calculations, when used in accordance with the
Product documentation provided by HP (including any
instructions for installing patches or upgrades), provided that
all other products (e.g., hardware, software, firmware) used in
combination with such HP Product(s) properly exchange date
data with it. The duration of the Year 2000 warranty extends
through January 31, 2001.
16
Page 18

KWWSZZZKSFRPVXSSRUWKRPHBSURGXFWV
&RS\ULJKW
+HZOHWW3DFNDUG&RPSDQ\
3ULQWHGLQ86$
 Loading...