

Page 1

Errata
Title & Document Type: 428B Clip-On DC Milliammeter
Manual Part Number: 00428-90003
Serial Prefixes: 995
Revision Date: Circa November 1970
HP References in this Manual
This manual may contain references to HP or Hewlett-Packard. Please note that
Hewlett-Packard's former test and measurement, semiconductor products and chemical analysis
businesses are now part of Agilent Technologies.
Changes to this Manual
No changes have been made to this manual, with the exception of correcting the odd spelling and
grammatical errors. In some places original photographs may be replaced or augmented with
modern digital photographs. All pages are scan at 600 DPI and in some cases (schematics)
scaled down to fit an 8½x11 page with no loss in resolution (I just change the DPI to 1200 or
above).
If you wish to print on 11x17 or larger just print the page and scale it to fit the paper size.
About this Manual
This manual is reproduced from scans of an original document, which is then converted using my
®
own custom designed OCR software, and then edited in Microsoft
Word 2003.
This means that what you see here is NOT a scan of a scan/copy with text overlays. The only
images in this document are the pictures, schematics and front cover.
OCR errors may exist and as such the user of this document should take care and use common
sense when referencing this documentation.
Copyright Notice
This documentation is copyrighted by Hewlett Packard and Jack Hudler, hpdocs@hudler.org.
Permission to use and redistribute this documentation for non-commercial and internal corporate
purposes is hereby granted, free of charge.
Any redistribution of this documentation or its derivates must include this copyright notice.
You may not sell this documentation or its derivations without written consent.
You may modify this documentation as necessary, but you may not sell derivative works based on
it.
You may include this documentation with the equipment/hardware on which it is used for the
purposes of selling the equipment/hardware. If you advertise that a copy of this documentation is
included in the sale, you must state that is for “Free”.
Meaning if you want to gratuitously toss in a copy of the manual on an eBay sale, it’s ok with me as
long as you state it’s for free. No you can’t sell a digital archive of manuals and say it includes a
free copy of this documentation. You must give it away with equipment.
I think you get the spirit of the copyright; it takes a lot of hours to scan and replicate a manual. I just
want this used in the spirit in which is it given.
Agilent if you have questions or wish to include this in your archive, please contact me.
Page 2

Page intentionally left blank.
Page 3

Page 4

Page 5

OPERATING AND SERVICE MANUAL
-hp- Part No. 00428-90003
MODEL 428B
CLIP-ON DC MILLIAMMETER
Serials Prefixed: 995- and above
Appendix A, Manual Backdating Changes
adapts this manual to instruments with
earlier serial prefixes.
Copyright Hewlett-Packard
Company 1970 P.O. Box 301,
Loveland, Colorado, 80537 U.S.A.
Printed: NOV 1970
Page 6

Model 428B
TABLE OF CONTENTS
1-1. INTRODUCTION 2
1-7. INSTRUMENT AND MANUAL IDENTIFICATION.
2
INSTALLATION 3
2-1. UNPACKING AND MECHANICAL INSPECTION.
3
2-4. OPERATION CHECK. 3
2-6. INSTALLATION. 3
2-8. POWER REQUIREMENTS. 3
2-10. OPERATION ON 115 OR 230 VOLTS. 3
2-13. THREE CONDUCTOR POWER CABLE. 3
2-15. RACK MOUNT MODEL. 3
2-17. PREPARATION FOR STORAGE AND SHIPMENT.
3
2·20. STORAGE. 3
OPERATING INSTRUCTIONS 5
3-1. INTRODUCTION. 5
3-3 OPERATING PRECAUTIONS. 5
3-4. OPERATING CONSIDERATIONS. 5
3-5. INTERCHANGING PROBE HEADS. 5
3-7. EFFECT OF MEASUREMENT ON CIRCUIT. 5
3-12. EFFECT OF CIRCUIT ON MEASUREMENT. 5
3-19. Magnetic Fields. 6
3-26. OPERATING PRACTICES. 6
3-27. MECHANICAL OPERATION OF PROBE. 6
3-29. DEGAUSSING OF PROBE HEAD. 6
3-33. ELECTRICAL ZERO SET. 6
3-37. POLARITY OF CURRENT. 6
3-39. INCREASING THE ABSOLUTE SENSITIVITY 7
3-41. CURRENT CHECK LOOPS.
3-44. NULLING CURRENTS.
3-46. USE OF OUTPUT JACK.
3-48. With Oscilloscope.
3-50. With Recorder.
THEORY OF OPERATION
4-1. INTRODUCTION.
4-3. THEORY OF OPERATION.
4-9. CURRENT PROBE.
4-19. 20 kHz OSCILLATOR.
4-23. HEAD-DRIVE AMPLIFIER.
4-25. DETECTOR GATE AMPLIFIER.
4-28. 40 kHz INPUT/AMPLIFIER CIRCUIT. 11
4-30. SYNCHRONOUS DETECTOR AND FILTER (C24).
4-36. DC AMPLIFIER. 12
4-43. NEGATIVE FEEDBACK CURRENT CIRCUIT. 12
4-45. 40 kHz PHASE SHIFTER. 12
4-48. POWER SUPPLY. 12
7
7
7
7
7
9
9
9
9
11
11
11
11
MAINTENANCE 14 GENERAL INFORMATION 2
5-1. INTRODUCTION. 14
5-3. TEST EQUIPMENT REQUIRED. 14
5-5. IN-CABINET PERFORMANCE CHECKS. 14
5-7. CLEANING OF PROBE JAWS. 14
5-10. ELECTRICAL ZERO SET. 14
5-13. RANGE CHECK. 15
5-15. METER TRACKING. 15
5-17. OUTPUT CALIBRATION. 15
5-19. FREQUENCY RESPONSE. 15
5-21. AC OVERLOAD. 16
5-23. NOISE CHECK. 16
5-25. ADJUSTMENT PROCEDURE. 16
5-27. POWER SUPPLY. 16
5-29. MECHANICAL ZERO SET. 16
5-31. DC AMPLIFIER BALANCE. 16
5-34. ALIGNMENT. 17
5-35. OSCILLATOR BALANCE. 17
5-37. OSCILLATOR FREQUENCY. 17
5-39. OSCILLATOR LEVEL. 17
5-41. DETECTOR GATE. 17
5-43. TUNED AMPLIFIER. 17
5-44. Equipment Setup. 17
5-46. Input Alignment. 17
5-48. Interstage Alignment. 17
5-50. DETECTOR PHASE ADJUSTMENT. 17
5-53. Preliminary Adjustment. 18
5-54. Preset the controls as follows: 18
5-55. Drive Balance Adjustment. 18
5-59. TROUBLESHOOTING. 19
5-60. FRONT PANEL TROUBLESHOOTING. 19
5-63. DETAILED TROUBLESHOOTING. 19
5-64. Probe Check. 19
5-66. Power Supply Check. 19
5-71. Oscillator - Buffer Amp. Check. 21
5-80. Synchronous Detector. 21
REPLACEABLE PARTS 23
6-1. INTRODUCTION. 23
6-4. ORDERING INFORMATION. 23
6-6. NON-LISTED PARTS. 23
CIRCUIT DIAGRAMS 29
7-1. INTRODUCTION. 29
7-3. BLOCK DIAGRAM. 29
7-5. SCHEMATIC DIAGRAMS. 29
7-7. COMPONENT LOCATION DIAGRAMS. 29
MANUAL BACKDATING CHANGES 36
Page 7

Model 428B
LIST OF TABLES
Table 1-1 Specifications 1
Table 5-1. Recommended Test Equipment. 13
LIST OF ILLUSTRATIONS
Figure 1-1. Model 428B Clip- On Milliammeter 2
Figure 3-1. Measurement Procedures 4
Figure 3-2. Polarity of Current. 6
Figure 3-3. Increasing The Absol ute Sensitivity. 7
Figure 4-1. Block Diagram 8
Figure 4-2. Simplified Block. 9
Figure 4-3. Magnetic Mechanical Analogy. 10
Figure 4-5. 428B Flux Gate. 10
Figure 4-4. Basic Flux Gate. 10
Figure 4-6. Waveforms. 10
Figure 4-7. Detector Bridge. 11
Figure 4-8. Negative Feedback 12
Figure 4-9. 90° Phase Shift 12
Figure 5-1. Cleaning Probe Jaws. 14
Figure 5-2. Electrical Zero Set. 14
Figure 5-3. Range Check. 15
Figure 5-4. AC Overload. 16
Figure 5-5. Oscillator Balance Probe. 17
Figure 5-6. Detector Phase Adjustment. 17
Table 6-1. Replaceable Parts 24
Figure 5-7. Detector Phase Display. 18
Figure 5-9. Detailed Troubleshooting Tree. 20
Figure 6-1. Parts Breakdown, current probe. 28
Figure 7-1. Block Diagram. 30
Figure 7-2. Component Locator For Circuit Board Part
No. 00428-66501 31
Figure 7-3. Front Panel Component Locator. 31
Figure 7-4 Rear Panel Component Locator. 31
Figure 7-5. Power Supply. 32
Figure 7-6. Block Diagram. 33
Figure 7-7. Component Locator for Circuit Board Part
No. 00428-66501 34
Figure 7-8. Front Panel Component Locator. 34
Figure 7-9 Rear Panel Component Locator. 34
Figure 7-10. Metering Circuit 35
Figure A-1. 428B Side Views. 37
Figure A-2 Backdating Schematics for 428B 38
Figure A-3 Backdating Schematics for 428B 39
Page 8

Model 428B
428B SPECIFICATIONS
Table 1-1 Specifications
Current Range:
1 mA to 10 A full-scale, nine ranges.
Accuracy:
± 3% of full-scale ± 0.15 mA, from 0°C to 55°C.
(When instrument is calibrated to probe).
Probe Inductance:
Less than 0.5 µH.
Probe Induced Voltage:
Less than 15 mV peak (worst case at 20 kHz and
harmonics).
Output:
Variable linear output level with switch position
for calibrated 1 V into open circuit (corresponds
to full-scale deflection). 1.5 V Max. into open
circuit in uncalibrated position.
0.73 ± .01 V into 1 kΩin calibrated position.
Noise:
1 mA Range, < 15 mV rms across 1 kΩ.
3 mA Range, < 5 mV rms across 1 kΩ.
10 mA thru 10 A Ranges, <2 mV rms across 1
kΩ.
Frequency Range:
DC to 400 Hz (3 dB point).
AC Rejection:
Signals above 5 Hz with peak value less than
full-scale affect meter accuracy less than 2%.
(Except at 40 kHz carrier frequency and its
harmonics). On the 10 A range, ac peak value is
limited to 4 A.
Probe Insulation:
300 V Max.
AC Power:
115 or 230 V ±10%, 50 to 60 Hz, 71 W.
Operating Temperature:
- 20°C to + 55°C.
Cabinet Mount:
7½" wide, 11½" high, 14½" deep (190,5 x 292,1
x 368,3 mm).
Weight:
Cabinet Mount: Net 19 lbs (8,6 kg);
shipping 24 lbs (10,9 kg).
Rack Mount: Net 24 lbs (10,9 kg); shipping
35 lbs 15,9 kg).
Accessories Available:
-hp- Model 3528A Large Aperture Probe
-hp- Model 3529A Magnetometer Probe
-hp- Model 11035A Output Cable
-hp- Model 10110A Output Adapter
Dimensions:
Rack Mount
1
Page 9

Model 428B
SECTION I
GENERAL INFORMATION
1-1. INTRODUCTION
1-2. The -hp- Model 428B Clip-On Milliammeter measures
the magnetic field, which exists around the wire carrying dc
current. Operating the instrument is simple. After zero
setting, the two jaws of the probe are clamped around wire
(arrow on probe head indicates direction of conventional
current flow) and the meter will indicate the current.
1-3. There are nine current ranges starting from 1 mA to 10
amp full-scale deflection. The sensitivity can be increased
even further by looping the wire several times through the
opening in the probe. The current indication is virtually
insensitive to superimposed ac signals and the series
loading of the circuit is less than 0.5 pH. A large amount of
feedback provides great stability.
1-4. OTHER PROBE HEADS.
1-5. Other probe heads are available to extend the
usefulness of your Clip-On DC Milliammeter. Write to the
nearest Sales and Service Office (listed in Appendix C) for
further information. At the time of publication of this manual,
the following accessory probe heads were available:
a. -hp-Model 3528A Large Aperture (2-1/2
inch probe head).
b. -hp- Model 3529A Magnetometer (1
gauss = 1 amp).
c. -hp- Model C11-3529A Magnetometer
(1 gauss = 1 mA).
1-6. Write to the nearest Sales and Service Office
(listed in Appendix C) stating your complete
requirements for information concerning special
applications.
1-7. INSTRUMENT AND MANUAL
IDENTIFICATION.
1-8. Hewlett-Packard uses a two-section serial
number. If the first section (serial prefix) of the serial
number on your instrument does not agree with
those on the title page of this manual, change
sheets supplied with the manual will define the
differences between your instrument and the Model
428B described in this manual. Some serial
numbers may have a letter separating the two
sections of the number. This letter indicates the
country in which the instrument was manufactured.
2
Figure 1-1. Model 428B Clip-On Milliammeter
Page 10

Model 428B
SECTION II
INSTALLATION
2-1. UNPACKING AND MECHANICAL INSPECTION.
2-2. Inspect instrument for signs of damage incurred in
shipment. This instrument should be tested as soon as
it is received. If it fails to operate properly, or is
damaged in any way, a claim should be filed with the
carrier. A full report of the damage should be obtained
by the claim agent, and this report should be forwarded
to us. We will then advise you of the disposition to be
made of the equipment and arrange for repair or
replacement. Include model number and serial number
when referring to this instrument for any reason.
2-3. Hewlett-Packard Company warrants each
instrument manufactured by them to be free from
defects in material and workmanship. Our liability under
this warranty is limited to servicing or adjusting any
instrument returned to the factory for that purpose and
to replace any defective parts thereof. Any damage to
the instrument upon receipt is due to the carrier. File a
claim with the carrier as instructed in the preceding
paragraph.
2-4. OPERATION CHECK.
2-5. This instrument should be checked as soon as it is
received to determine that its electrical characteristics
have not been damaged in shipment. Refer to the
In-Cabinet Performance Checks of Section V of this
manual.
2-6. INSTALLATION.
2-7. See Paragraph 3-3 before operating this
instrument.
2-8. POWER REQUIREMENTS.
2-9. Power requirements are given in Specifications
table at t he front of this manual.
2-10. OPERATION ON 115 OR 230 VOLTS.
2-11. This instrument may be used with either a 115
volt or 230 volt supply with a frequency of 50 to 60 cps,
single phase. This instrument is shipped from the
factory ready for operation from a 115 volt source
unless otherwise indicated.
2-12. To operate from a 230 volt source, the 115-230
switch on the rear apron must be flipped to 230. First
turn the instrument off and pull the power cable from the
socket. Place a pointed tool, such as the sharpened end
of a pencil, in the slot of the switch and pull down.
Replace the fuse with the one given in Table 6-1 for 230
volt operation.
2-13. THREE CONDUCTOR POWER CABLE.
2-14. The three-conductor power cable supplied with
the instrument is terminated in a polarized, three-prong
male connector recommended by the National Electrical
Manufacturers' Association (NEMA). The third
conductor grounds the instrument chassis for the
PROTECTION OF THE OPERATING PERSONNEL.
When using a three-prong to two-prong adapter ground
third lead (green wire) externally.
2-15. RACK MOUNT MODEL.
2-16. This instrument is available in a rack mount
version in addition to the cabinet model shown in this
manual. The rack mount version is identical electrically
and similar physically except that the degausser has
been moved to the front panel for greater convenience.
2-17. PREPARATION FOR STORAGE AND SHIPMENT.
2-18. The best method for packing this instrument is in
the original shipping carton with the original fillers
packed in the same manner as when received from the
factory. Therefore, when unpacking, note carefully the
method of packing and save the original packing
material for possible future reuse.
2-19. If the original packing material is not available, and
it is desired to package the instrument for storage or
shipment, first wrap the instrument in heavy kraft paper
to avoid scratching the paint. Then pack in a cardboard
carton with a bursting strength of at least 150 lb per
square inch. Pad the instrument on all sides with at least
2 inches of rubberized hair or at least 4 inches of tightly
packed excelsior.
2·20. STORAGE.
2-21. No special precautions are necessary in storage
except the usual protection against mechanical damage,
salt air, etc.
3
Page 11
Model 428B
4
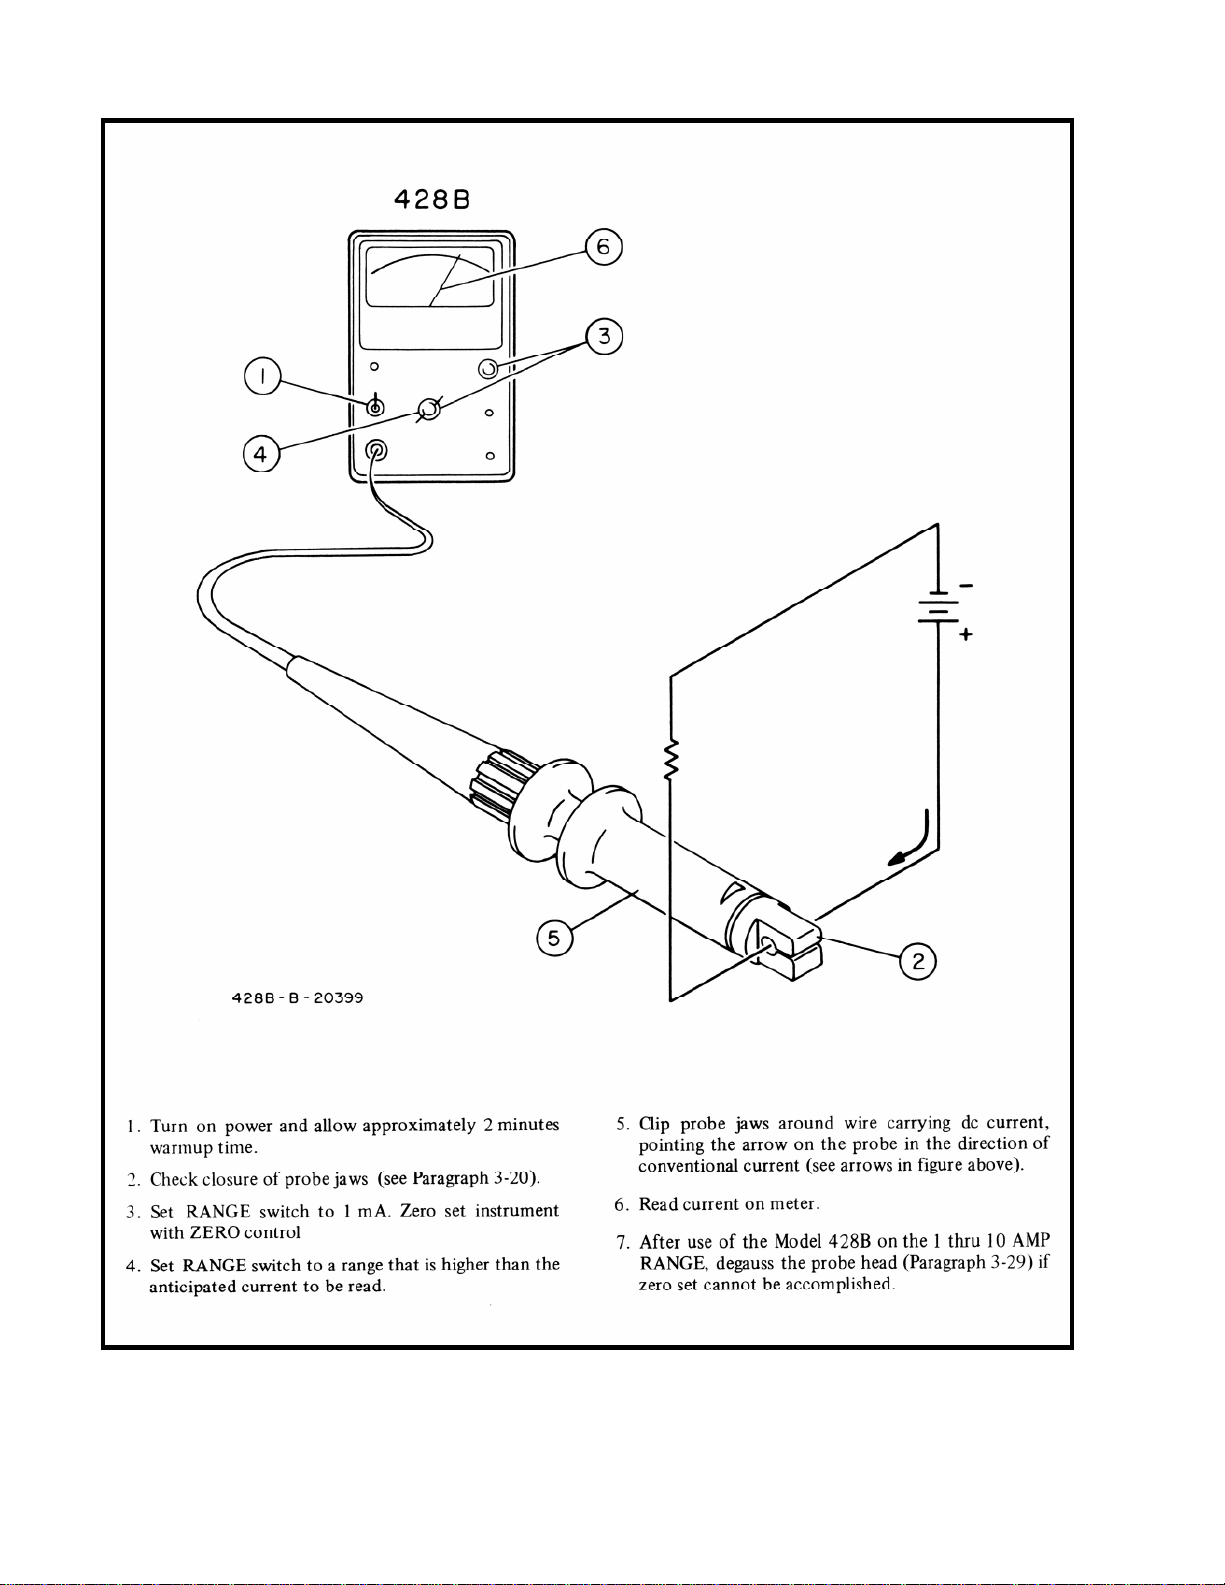
Figure 3-1. Measurement Procedures
Page 12

Model 428B
SECTION III
OPERATING INSTRUCTIONS
3-1. INTRODUCTION.
3-2. This section contains instructions and information
necessary for operation of the Model 428B clip-on
milliammeter.
3-3 OPERATING PRECAUTIONS.
CAUTION
a. BEFORE APPLYING OPERATING POWER TO
THE 428B, VERIFY THAT THE LINE VOLTAGE
SWITCH ON THE REAR PANEL INDICATES THE
LINE VOLTAGE TO BE USED AND THAT THE
INSTRUMENT IS PROPER L Y FUSED.
b. THE PROBE IS INSULATED TO WITHSTAND 300
VOLTS MAXIMUM. DO NOT USE THIS PROBE ON
A BARE WIRE WHICH IS MORE THAN 300 VOLTS
PEAK ABOVE GROUND.
c. DO NOT USE THE 428B PROBE IN THE
PRESENCE OF STRONG RF FIELDS.
d. DO NOT EXPOSE THE 428B PROBE TO
TEMPERATURES EXCEEDING 130° F (55°C). DO
NOT LAY THE PROBE ON TOP OF THE 428B
CABINET (OR ANY OTHER HOT SURFACE).
PROBE UNBALANCE AND EVENTUAL DAMAGE
WILL RESULT.
e. DO NOT DROP THE PROBE OR RELEASE THE
FLANGES ABRUPTLY SO THAT THE JAWS SNAP
TOGETHER.
f. DO NOT OPERATE THE DEGAUSSER FOR MORE
THAN THREE MINUTES CONTINUOUSLY.
g. BECAUSE THE 428B IS COOLED BY
CONVECTION" PLACE THE 428B WHERE AIR
CAN CIRCULATE FREELY THROUGH THE
INSTRUMENT.
h. DO NOT USE THE 428B TO MEASURE DC IN A
WIRE WHICH CARRIES MORE AC THAN
FULL-SCALE READING ON THE METER.
3-4. OPERATING CONSIDERATIONS.
3-5. INTERCHANGING PROBE HEADS.
3-6. Each probe is calibrated at the factory with a
particular instrument and carries the serial number of that
instrument (serial number appears on probe
connector) (NOTE: if your buying one with the probe,
make sure you verify this. The numbers are scribed
with a vibrating pen. Not very HP). If a probe has to be
replaced, a realignment and recalibration of the
instrument is necessary (see also Section V
Maintenance).
3-7. EFFECT OF MEASUREMENT ON CIRCUIT.
3-8. Reflected Impedance.
3-9. The probe will add a small inductance to the
circuit of less than 0.5 microhenries due to the
magnetic core and magnetic shield. This makes it
ideal for measuring current in very low impedance
paths such as ground loops where other instruments
would disturb the circuit.
3-10. Induced Voltage.
3-11. The gating signal, driving the core in and out of
saturation, will induce a voltage in the wire carrying
the dc current. This induced voltage is less than 15
millivolts peak. If more than one loop is passed
through the probe the induced voltage will be
multiplied by the number of loops.
3-12. EFFECT OF CIRCUIT ON MEASUREMENT.
3-13. Circuit Impedance.
3-14. The impedance of the circuit being measured
has practically no effect on the dc current
measurement. A shorted loop inserted along with a
wire carrying dc current will decrease the reading by
only 0.2% of full scale.
3-15. AC Fields & Superimposed AC Current.
3 -16. The instrument is designed to allow a high
amount of ac ripple in the dc being measured. The
presence of ac whose peak value equals full-scale
reading (limited to 4 amperes peak on 10-ampere
range) will cause less than 2% error in the dc reading.
Examples of such high ac currents are found in the
input of dc filter sections of power supplies.
3-17. Ac currents having frequency components of 40
kHz or harmonics thereof will cause error, as such
signals will interfere with the 40 kHz output signal of
the probe. The meter will indicate a beat reading if the
interfering frequency is within approximately 15 cycles
of 40 kHz or its harmonics. Although this situation is
very improbable, accurate dc current readings can be
obtained by shifting the frequency of the external ac
signal slightly.
3-18. The instrument as well as the pro be
head .should not be used in strong ac stray fields.
Such fields may exist in the vicinity of open core
power transformers, or large dc filter chokes, etc.
5
Page 13

Model 428B
3-19. Magnetic Fields.
3-20. If the jaws of the probe are incompletely closed,
the magnetic shielding and the magnetic circuit will have
an air gap. The result is that dc fields, not associated with
the dc current being measured, will cause a shift in the
meter reading.
3-21. However, there will be an indication of a strong
external dc field even with the jaws perfectly closed.
Usually zero setting with the ZERO control compensates
such residual readings for a particular probe location.
3-22. EARTH'S MAGNETIC FIELD. The earth's magnetic
field will affect the reading if the jaws of the probe are not
completely shielded (jaws partially open). The effect of this
field is relatively strong - comparable to deflection due to
about 500 mA of current. Complete closure of the jaws
can be checked by switching to the 1 mA range with no dc
current input. If the jaws mate properly, the zero set
should stay within 0.1 mA while rotating the probe head
with respect to the earth's magnetic field.
3-23. If the zero shift is greater, the mating surfaces of the
jaws need to be cleaned or the probe wiring may be open
(see Section V).
3-24. FIELDS OF PERMANENT MAGNETS. Meter
magnets have strong stray fields, which can cause shift in
the current indication. Such fields are detected by bringing
the closed probe in the area where the measurement is to
be made and observing the zero shift (1 mA range).
3-25. FERROUS WIRE. Wires made out of magnetic
materials can cause a current reading of 2-3 mA without
any connection to the wire. This fact is important as leads
of most transistors are made out of magnetic material.
may be necessary after measuring current on the
1 thru 10 AMP RANGE.
3-32. Normally, it takes about 10 seconds to degauss
the probe when using the above method (see
Caution, Paragraph 3-3f).
3-33. ELECTRICAL ZERO SET.
3-34. If the instrument cannot be zero set electrically
(with ZERO control) there are two probable causes:
1) Incomplete closure of probe jaws, 2)
Magnetization of probe head.
3-35. Dust deposits on the lapped surfaces of the
probe jaws create an air gap. If the jaws are not
completely closed, the earth's magnetic field will
affect the reading. With the RANGE switch at 1 mA,
rotation of the closed probe should not vary the zero
set more than 0.1 mA. Cleaning of the jaws will
restore proper operation conditions (see Section V,
Cleaning of Probe Jaws).
3-36. Magnetic shields protect the probe head from
stray magnetic fields. However, excessive dc
currents (such as short circuit discharge currents
from electrolytic capacitors, etc.) will magnetize the
probe. For demagnetization of probe head, see
Paragraph 3-29, Degaussing of Probe Head.
3-37. POLARITY OF CURRENT.
3-38. The arrow on the probe head indicates the
direction of the conventional current flow for upscale
reading. Reversal of the current flow direction will
reverse the indication on the meter (see Figure 3-2).
3-26. OPERATING PRACTICES.
3-27. MECHANICAL OPERATION OF PROBE.
3-28. The probe jaws are opened by simply squeezing
together the two flanges on the probe body. An internal
spring returns the jaws to their proper position when the
flanges are released. (See Paragraph 3-3e.).
3-29. DEGAUSSING OF PROBE HEAD.
3-30. To demagnetize the probe, proceed as follows:
a. Insert probe into degausser at the rear of the
instrument (located on front panel of rackmount
models) with arrow on probe in same position as
arrow marked on chassis.
b. Depress degausser switch S3 to energize degausser.
c. Withdraw probe very slowly for the first few inches
while depressing the degausser switch until probe is
removed approximately one foot.
d. Zero instrument on 1 mA range with ZERO control
3-31. Under normal operating conditions, degaussing
Figure 3-2. Polarity of Current.
6
Page 14

Model 428B
3-39. INCREASING THE ABSOLUTE SENSITIVITY
3-40. The sensitivity of the instrument can be increased by
looping the wire (carrying the dc current) several time
through the opening of the probe (see Figure 3-3). For
example, three turns increase the sensitivity three times.
With an increased sensitivity, however, the induced voltage
between the probe and the circuit under measurement will
increase also.
Figure 3-3. Increasing The Absolute Sensitivity.
3-41. CURRENT CHECK LOOPS.
3-42. In restricted situations such as printed circuit boards,
wire loops for the probe can be built into the circuit to allow
convenient current measurements with the Model 428B.
Here, currents can then be measured under operating
conditions with the same ease as voltage measurement.
3-43. Circuits can also be modified to accept an impromptu
loop for testing. As an example, to measure the collector
current of a transistor for troubleshooting purposes, the
collector lead can be removed from the board and a loop of
fine wire soldered between the collector lead and the board.
To measure current through a resistor, lift one lead and
install a series loop, clip the 428B probe around the loop and
measure current through the resistor. As an alternative, an
equivalent resistor with long leads can be installed to replace
the resistor in question.
3-44. NULLING CURRENTS.
3-45. The resolution of the 428B can be increased by nulling
one current against another and measuring the difference
between the two. To null the reading, clip the probe over
both wires at once with the wires so arranged that the
currents are going in opposite directions. The considerations
mentioned in Paragraph 3-39 also apply to current nulling.
For example, assume that a 0.6 A current source is to be
tested against a 0.4 A standard. The 0.6 A supply should be
looped twice through the probe jaws and the 0.4 A supply
should be looped three times through the jaws such that the
7
two currents oppose each other. It should be
remembered when making such a measurement,
that the absolute value of any deviations observed
have been multiplied. If, in the above example, the
0.6 A supply wavered by .01 A, the change would
be read as .02 A on the meter.
3-46. USE OF OUTPUT JACK.
3-47. The OUTPUT jack enables the 428B to be
used as a dc coupled: amplifier/I-E transducer
/isolator. The basic action of the 4 28B (considered
as an input/output device) is to sense the magnetic
field around a current carrying wire and deliver a
proportional voltage at the OUTPUT jack. The
value of the output can be varied by using the
OUTPUT LEVEL control to produce as much as 1
1/2 volts at 1 mA. While the 428B meter registers
average dc (ignoring ac), the output at the
OUTPUT jack contains both the dc and ac
components of the signal being measured.
3-48. With Oscilloscope.
3-49. To display the output of the 428B on an
oscilloscope:
a. If the oscilloscope is dc coupled, it can be
calibrated as in Paragraph 3-51.
b. Clip the probe around the wire which varies the
signal to be displayed.
c. Connect the oscilloscope input to the 428B
OUTPUT jack.
d. Adjust the 428B RANGE switch to the
appropriate range.
3-50. With Recorder.
3-51. To record the output of the 428B on a graphic
recorder:
a. Insure that the recorder's input impedance
exceeds 1400 ohms.
b. Connect the recorder input to the 428B
OUTPUT jack.
c. Zero the 428B on the 1 mA Range, turn
OUTPUT LEVEL to minimum output.
d. Zero the recorder.
e. Adjust the 428B ZERO control for full-scale on
the 428B meter.
f. Adjust the 428B OUTPUT LEVEL control for
full scale on the recorder.
g. Zero the 428B, switch to the appropriate range
and clamp the 428B probe around the wire
which carries the signal to be measured.
3-52. When recording current variations with the
428B, it should be borne in mind that the 428B
displays some long term zero drift. The 428B zero
drift normally amounts to about 300 µA (indicated)
per clay so periodic checks should be made to
determine whether or not the ZERO controls need
adjustment.
Page 15

Model 428B
8
Figure 4-1. Block Diagram
Page 16
Model 428B
SECTION IV
THEORY OF OPERATION
4-1. INTRODUCTION.
4-2. This section describes the overall operation of the Model 428B, the operating principle of the current probe and
the function of the different circuits of the instrument.
4-3. THEORY OF OPERATION.
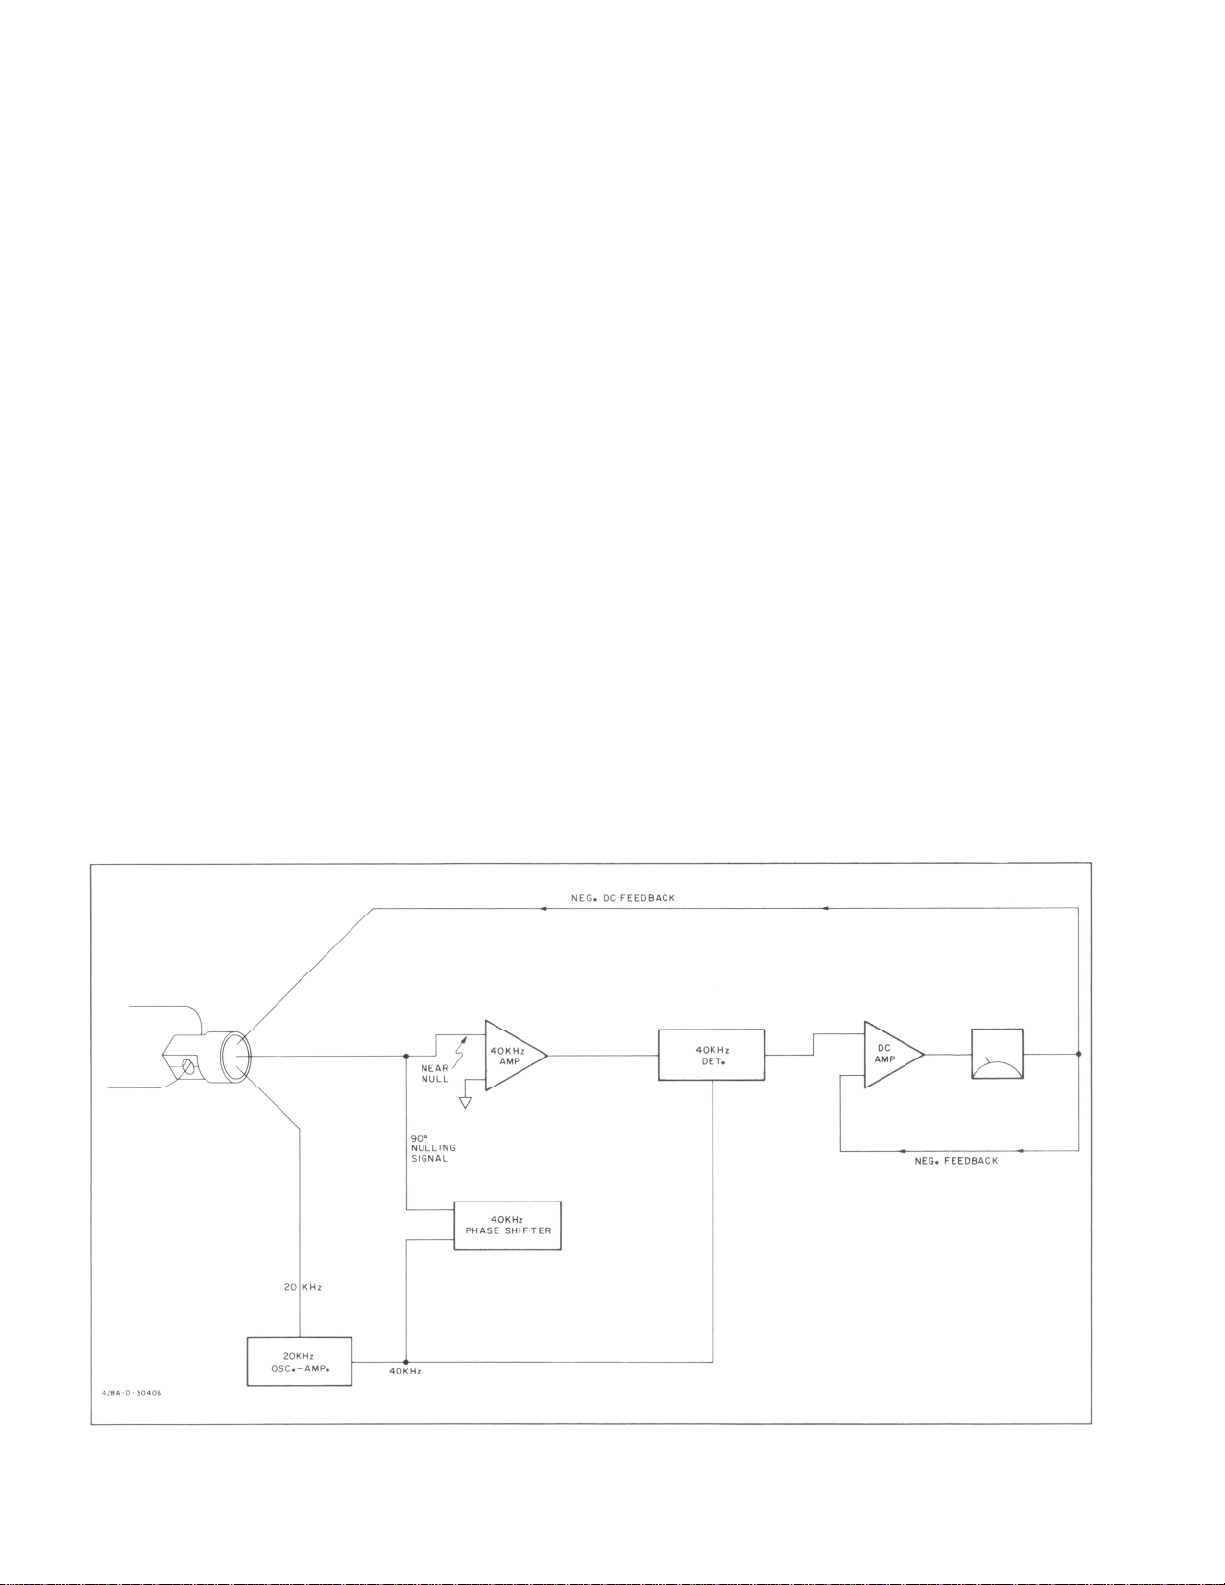
4-4. The simplified block diagram of Figure 4-2 shows the basic operation of the Model 428B Clip-ON Milliammeter.
4-5. The probe clips around a wire carrying dc current and delivers a 40 kHz output signal which is proportional to the
dc current. For transducing the dc current into a 40 kHz signal, the probe requires a 20 kHz gating signal, as described
in detail under Paragraph 4-9, Current probe.
4-6. The 40 kHz output signal of the probe is amplified, detected and fed back as negative feedback current to the
probe head cancelling the effect of the measured dc current and thus reducing the 40 kHz output signal almost to zero.
The negative feedback current, being proportional to and magnetically almost equal to the dc current of the inserted
wire, is used to indicate the measured dc current.
4-7. The 20 kHz oscillator has two functions: First, it supplies a 20 kHz signal for driving the probe head, and also
provides a 40 kHz (second harmonic) signal for gating the 40 kHz Synchronous Detector.
4-8. Due- to slight unbalances, the probe head output contains a small 40 kHz signal, even with no dc current being
measured. A 40 kHz phase-shifter output cancels such residual 40 kHz signal (zero-set controls).
4-9. CURRENT PROBE.
4-10. The probe head is a specially designed second harmonic flux gate type of a magnetometer used to measure the
magnetic field around a wire carrying direct current.
4-11. The flux gate principle is easily understood by referring to the mechanical model shown in Figure 4-3.
4-12. Coil A (representing wire through probe), is energized with dc, producing a dc flux in the core. Armature is
rotating at a constant rate (F), gating the flux 2F times per second inducing a voltage of 2 F frequency in coil B. The
amplitude is determined by the dc in coil A.
9
Figure 4-2. Simplified Block.
Page 17

Model 428B
Figure 4-3. Magnetic Mechanical Analogy.
4-13. The Model 428B head uses this principle in a
similar way. Figure 4-4 shows the basic concept of a
saturable flux gate.
4-14. A magnetic core in saturation loses permeability
and, therefore, is comparable to a core that has been
mechanically opened (low permeability due to air gap).
4-15. Coil C saturates the core periodically with a 20 kHz
signal, driving the small cores in and out of saturation
twice per cycle or once for each peak (positive or
negative) of the input current.(See Figure 4-6) The only
function of the 20 kHz signal is to gate the dc flux in the
core of the current probe.
Figure 4-4. Basic Flux Gate.
4-16. The 428B probe head is actually analogous to the
flux gate shown in Figure 4-5. The energizing dc current
produces flux path "A". Flux path "A" is periodically
interrupted by saturation of the (transformer type) core, a
result of the two flux paths "C". Note that the current
enters L3 and L4 from the same end and that the coils are
wound in opposite directions causing opposite magnetic
polarities and the consequent circular flux path (c).
4-17. The four coils in the 428B probe head serve 3
purposes: (a) To saturate the cores, a result of the 20 kHz
current that flows between pins 1 and 2. This current is
generated by the 20 kHz oscillator-amplifier circuits. (b)
To act as a secondary, picking up a chopped signal from
the
10
Figure 4-5. 428B Flux Gate.
Figure 4-6. Waveforms.
Page 18

Model 428B
wire that is clamped in the probe jaws. (c) To conduct the
dc feedback current that tends to annul the energizing dc
current from the wire being measured.
4-18. Because the coils are electrically arranged in a
balanced bridge circuit, the 20 kHz signal is balanced at
the output of the bridge (pins 3 and 4); and there is no 20
kHz differential signal at this point. The 40 kHz signal and
the dc feedback current are also nulled out by the
balanced bridge so that these signals do not appear as a
differential voltage across pins 1 and 2. The dc feedback
current is isolated from the 40 kHz amplifier by capacitor
C11. The 40 kHz is kept out of the dc circuitry by RF
choke L6.
4-19. 20 kHz OSCILLATOR.
4-20. The function of the 20 kHz oscillator is to generate a
balanced 20 kHz signal which, after amplification, is used
for driving the probe head in and out of saturation.
4-21. The circuit of the 20 kHz oscillator is shown in
Figure 7-10. The oscillator V7 is operating in push-pull
having a plate circuit tuned to 20 kHz. Transformer
coupling provides positive feedback through resistor R94
and R95 to the oscillator control grids. The control grids of
oscillator V7 supply the drive signal for the push-pull head
drive amplifier V8. The oscillator level is adjusted by
controlling the cathode current of V7.
4-22. The common cathodes of oscillator V7 supply the
40 kHz signal (2 pulses per 20 kHz cycle) needed for the
synchronous detector gate amplifier V5 and the 40 kHz
phase shifter.
4-23. HEAD-DRIVE AMPLIFIER.
4-24. The head-drive amplifier V8 supplies the balanced
20 kHz signal for the probe head. Drive balance
adjustment R98 controls the current ratio of the two triode
sections, and hence the second harmonic output. The dc
bias voltage for the oscillator and the head-drive amplifier
is obtained from reference tube V11.
signal passes through a voltage divider SI B, which
keeps the loop gain constant for all current ranges by
maintaining a constant input level range to stage VI. The
output of the 40 kHz amplifier VI is band-pass coupled to
the 40 detector driver stage V2. The output signal of V2
is isolated from ground by transformer T2, and fed to the
40 synchronous detector.
4-30. SYNCHRONOUS DETECTOR AND FILTER (C24).
4-31. The Synchronous Detector detects the amplitude
and the phase of the 40 kHz signal. Phase detection is
necessary to preserve negative feedback at all times.
Since the probe may be clipped over the wire in either of
two ways the phase of the signal may vary by 1800. If
phase detection were not present this 1800 phase
reversal would cause positive feedback and the
instrument would oscillate. With phase detection the
polarity of the feedback will change also, maintaining the
feedback negative around the system at all times.
4-32. The synchronous detector requires a large 40 kHz
gating signal, having the frequency of the desired signal.
Figure 4-7 shows the synchronous detector drawn as a
bridge circuit.
4-33. On one half-cycle, with A much more positive than
E and with B equally more negative that E, the balanced
circuit ACB conducts hard, and C becomes effectively
equal to point E. Circuit BDA is opened at this time by its
back-biased diodes, and only the signal that appears
across the conducting half of the T2(FC) will charge C24.
4-34. On the next half-cycle BDA conducts, ACB
becomes open, and the signal across FD will charge C24.
If signal F is positive with respect to C on the first
half-cycle, signal F will be positive with respect to D on
the second half-cycle, and the top of C24 will consistently
be charged positive. If the signal at F changes phase by
1800 with respect to the gating signal at T3, the top of
C24 will consistently be charged negative.
4-25. DETECTOR GATE AMPLIFIER.
4-26. The 40 kHz resonant circuit C1, C2, and L5
increases the level of the gate signal and filters out all
signals except 40 kHz. It also allows phase adjustment of
the signal to correspond to the phase of the Synchronous
Detector.
4-27. The operation of the Synchronous Detector requires
a high level 40 kHz signal. The 40 kHz output signal of
the oscillator V7 passes through a tuned circuit and drives
the gate amplifier V5. The output of V5 delivers a 40 kHz
gate signal to the Synchronous Detector.
4-28. 40 kHz INPUT/AMPLIFIER CIRCUIT.
4-29. The 40 kHz output voltage of the probe head is
resonated by a 40 kHz series resonant circuit (L5 and
C1/C2). Resistor R1 broadens the resonance response
by lowering the Q to minimize drift problems. The 40 kHz
11
Figure 4-7. Detector Bridge.
Page 19

Model 428B
4-35. In summary then, C and D are alternately grounded,
and the polarity of the signal across T2 changes as C and
D are switched to produce an output wherein the polarity
is dependent on the phase of the input. Where C is in
phase with A, F will be negative when C and D are
grounded. Where C is 180° out of phase with A, F will be
positive when C and D are grounded.
4-36. DC AMPLIFIER.
4-37. The dc amplifier supplies a negative dc feedback
current to the probe proportional to the output of the
synchronous detector. The polarity of the negative
feedback current changes if the polarity of the dc current
(measured in the probe) changes. In this way the
feedback of the system remains negative at all times thus
maintaining the stability of the instrument.
4-38. In addition, this local negative feedback loop
stabilizes the gain of the DC Amplifier.
4-39. Tube V6 is a differential amplifier in which a signal
of approximately 1 volt (for full-scale deflection) is fed to
pin 7 and compared with the signal on pin 2. The output
of V6 is fed to the base of Q3.
4-40. Transistor Q3 drives the current-amplifiers Q1 and
Q2 which are used as emitter-followers in a push-pull
NPN-PNP pair combination.
4-41. The output current from the complimentary pair, Q1
and Q2, goes through the meter circuit to the current
divider S1A which feeds a portion of this current,
appropriate for the range this instrument is working on, to
the probe head as negative current feedback.
4-42. After passing through S1A and the probe head, the
combined current goes through the parallel resistor
network R60-64. This develops a voltage at the junction
of R61 and R62 which is proportional to the feedback
current. This voltage is applied to pin 2 of V6 to complete
the local feedback loop of the DC Amplifier. This circuit
makes the output current of the DC Amplifier proportional
to the voltage applied to the input grid, pin 7, of V6.
4-43. NEGATIVE FEEDBACK CURRENT CIRCUIT.
4-44. The negative feedback current path is shown in
Figure 4-8 . Current divider S1 A divides the feedback
current in proportion to the dc current being measured*.
For a dc input of 10 A, approximately 50 mA feedback
current is fed to the probe head. Since an equal number
of ampere-turns are necessary for canceling the main dc
flux, the feedback coil inside the head requires
approximately 200 turns.
* Maintaining the current through meter M1 constant (5
mA maximum) for all current ranges. Inductance L6
isolates the 40 kHz signal from the dc current circuit.
4-45. 40 kHz PHASE SHIFTER.
The output of the 40 kHz phase shifter is fed to the head
of the probe to cancel any residual 40 kHz output signal
which exists when zero dc is being measured. The
canceling signal is obtained by adding two voltages
which are 90° out of phase and variable in amplitude.
Figure 4-9 shows the circuit and the idealized phase
relationship of the two output voltages with respect to the
signal from the oscillator.
By adding the two output voltages (vector A and B) a 40
kHz signal is obtained, having phase angle and
amplitude to cancel exactly the residual 40 kHz signal
from the probe (vector C). Once the residual 40 kHz
signal of the probe has been canceled, the ZERO control
compensates for any normal variations of zero shift. This
control is necessary only on the lower ranges.
4-48. POWER SUPPLY.
4-49. A single series-regulated power supply of the
conventional type provides 280 volts regulated for the
circuits of the instrument. Voltage reference tube V11
provides a constant cathode potential at control tube V10,
and this is the reference potential for the control grid of
V10.
12
Figure 4-8. Negative Feedback
Figure 4-9. 90° Phase Shift
Page 20

Model 428B
Input Impedance: 10 megohms
Table 5-1. Recommended Test Equipment.
EQUIPMENT REQUIRED CHARACTERISTICS USE RECOMMENDED MODEL
Meter Calibrator ± 0.2% of reading
±0.1% FS
Function Generator DC to 400 Hz
> 10 mA output
Oscilloscope DC to 40 kHz
100 mV/cm ± 3%
Resistor 50 Ohms ± 1% Frequency Response
DC Voltmeter ± .25% at 730 mV Output Calibration -hp- Model 3430A 3469B
AC Voltmeter Resolves 2 mV
Battery operated
Resistor 1 kilohm ± 1% Output Calibration
Volt-Ohmmeter Input impedance: ≥1megohm Troubleshooting -hp- Model 427 A
Oscilloscope Probe
Counter Reads 40 kHz ± 20 Hz Alignment
Capacitor .0082 µF ± 10% 300 Vdc Alignment ——————————
Resistor 390 Ohms ± 5% 1/2 W Alignment ——————————
Range Check
Meter Tracking
Output Calibration
AC Overload
Frequency Response
AC Overload
Frequency Response
AC Overload
Troubleshooting
AC Overload
Noise Check -hp- Model 4038
Noise Check
All Troubleshooting -hp- Model 10001A
Troubleshooting
-hp- Model 69208
AC/DC Meter Calibrator
-hp- Model 3310A
Function Generator
-hp- Model 130C
200µV/cm Oscilloscope
-hp- Part No. 0698-3128
0698-8155
DC Digital Voltmeter
AC Portable Voltmeter
-hp- Part No. 11034-82601
Multi-Function Meter
Resistive Divider Probes
-hp- Model 5321 B
13
Page 21

Model 428B
SECTION V
MAINTENANCE
5-1. INTRODUCTION.
5- 2. This section contains the service information which is
required to properly maintain the 428B Clip-On
Milliammeter. Included are performance checks,
adjustment and calibration procedures, and servicing and
troubleshooting information.
5-3. TEST EQUIPMENT REQUIRED.
5-4. The test equipment required to perform the operations
outlined in this section is listed in Table 5-1. This table
includes the type of equipment, critical specifications,
purpose, and recommended model. If the model
recommended is not available, equipment which meets or
exceeds the critical specifications listed may be
substituted.
5-5. IN-CABINET PERFORMANCE CHECKS.
5-6. The performance checks described in Paragraphs 5-7
through 5-24 are front panel procedures designed to
compare the Model 428B with its published specifications.
These tests may be incorporated into periodic
maintenance, post repair, and incoming quality control
checks. The performance checks should be conducted
before any attempt is made to adjust or calibrate the
instrument. During the in-cabinet performance checks, the
Model 428B should be connected to the ac line through a
variable voltage device so that line voltage may be varied
± 10% from 115 or 230 Vac to assure that the instrument
operates correctly at various ac line voltages.
5-7. CLEANING OF PROBE JAWS.
5-8. When the probe shows excessive sensitivity to the
magnetic fields around it, the probe jaws should be
cleaned (to determine excessive sensitivity, see
Paragraph 5-24 Step a). Excessive sensitivity to external
fields can be caused by foreign material between the
probe jaws or by overheating (see Paragraph 3-3 Step d).
The probe jaws should always be cleaned prior to
calibration, adjustment or repair of the 428B.
5-9. To clean the probe jaws, open the probe and brush off
the mating surfaces with the brush which is supplied with
the instrument. If the brush will not remove the
contaminant, disassemble the probe and clean it with a
pencil eraser as illustrated. When reassembling the probe,
be sure that the arrow on the body of the probe points to
the heavy red wire as shown in Figure 6 -1 .
Figure 5-1. Cleaning Probe Jaws.
5-10. ELECTRICAL ZERO SET.
5-11. In the following procedure the numbers in
parentheses refer to Figure 5-2.
a. Connect the 428B to the power line through a
variable transformer .
b. Turn on power (1) and allow about two minutes of
warmup time.
c. Place probe (2) away from any stray fields such as
meter magnets, or open core transformers.
d. Insure that the probe jaws (3) are completely
closed (Paragraph 5-24 Step a, outlines a way to
do so).
e. Set RANGE switch (4) to 1 mA.
f. Zero-set the 428B with the ZERO (5) control. If the
meter cannot be zeroed, degauss the probe
(Paragraph 3-29) or clean the probe jaws
(Paragraph 5-8).
g. Change the line voltage from 103 to 127 volts (±
10%) and read zero drift on the 428B meter. Zero
drift should not exceed ± .03 mA.
14
Figure 5-2. Electrical Zero Set.
Page 22

Model 428B
5-12. Allow a 30 minute warmup and stabilization
period before conducting the following performance
checks.
5-13. RANGE CHECK.
5-14. Figure 5-3 illustrates the test arrangement
recommended. A de meter calibrator is required for
this test.
a. Zero the 428B on the 1 mA range.
b. Switch the 428B and the meter calibrator to the 10
amp range. Set the meter calibrator for 5 amps of
output (maximum output for the recommended
6920B). Connect a test lead between the output
terminals of the meter calibrator and loop the test
lead through the jaws of the 428B twice (see
Figure 3-3). The 428B should read 10 amps ± 0.3
amp.
c. Switch the meter calibrator to the 1 amp range and
adjust it for 1 amp of output. Remove the test lead
from the 428B Probe jaws. Zero the 428B, then
loop the test lead 3 times through the 428B probe
jaws. Switch the 428B to the 3 amp range. The
428B should read 3 amps ± 90 mA.
d. Remove the test lead from the 428B probe jaws
and zero set the 428B. Clamp the jaws over the
unlooped lead after switching the 428B to the 1
amp range. The 428B should read 1 amp ± 30 mA.
e. Continue to downrange the 428B and the meter
calibrator as in Steps c and d and as guided by the
Performance Check Test Card. Where possible,
keep the calibrator at full output to take advantage
of the greater accuracy; this consideration applies
to any meter calibrator which is specified at full
range (or full-scale) output. Note that there will be
a small residual magnetism induced in the probe
by the 10 amps of current that have been passed
through the probe, and that it is good practice to
degauss the probe before using the 1 mA range.
5-15. METER TRACKING.
5-16. The test arrangement and equipment required
for this test are the same as for Paragraph 5-13.
a. Zero the 428B on the 1 mA range.
b. Switch the 428B to the 100 mA range. Switch the
meter calibrator to the 10 mA range and adjust for
10 mA of output. Connect a long, thin test lead to
the output terminals of the meter" calibrator and
loop the lead ten times through the jaws of the
428B probe. Read 100 mA ± 3 mA on the 428B.
Remove the test lead from the jaws of the probe
one loop at a time and check the linearity of the
readings. Each reading should be within 3 mA of
nominal (e.g. 90 ± 3 mA, 80 ± 3 mA. etc.).
5-17. OUTPUT CALIBRATION.
5-18. A meter calibrator and a one kilohm resistor are
required for this test.
a. Switch the 428B and the meter calibrator to
the 100 mA range. Connect a test lead
between the meter calibrator output leads and
clip the 428B probe to the lead.
b. Set the meter calibrator to 100 mA output and
read full-scale on the 428B.
c. Connect a voltmeter to the output jack of the
428B. In parallel with the 1000 ohm resistor.
d. The voltmeter should read 0.73 V ± 10 mV.
5-19. FREQUENCY RESPONSE.
5-20. A 50 ohm resistor and a function generator are
required to complete this check.
a. Connect a 50 ohm resistor to the high output
jack of the function generator.
b. Turn the 428B RANGE switch to 100 mA then
clip the 428B probe around the resistor lead.
c. Set the function generator to:
Range: .0001 Function: Square
DC Offset: 0 Frequency Dial: 5
d. Upon the first up-scale alternation to the 428B,
set the function generator Output Level control
for a full-scale reading on the 428B.
e. Connect the vertical input of the oscilloscope
to the output jack of the 428B.
f. Set the coupling of the oscilloscope input to
DC. Set sensitivity and vernier to display
variations of the 428B output as a 10
centimeter peak -to-peak signal.
g. Set the function generator to the sine function.
h. Slowly raise the frequency of the function
generator output using the frequency dial and
function switch as necessary to bring the
output to 400 Hz. Watch the oscilloscope,
looking for the lowest amplitude of peak
deflection.
i. The peak-to-peak level of the waveform
should not drop below 7 centimeters (-3 dB).
15
Figure 5-3. Range Check.
Page 23

Model 428B
5-21. AC OVERLOAD.
5-22. An oscillator or function generator, a 50 ohm
resistor, an ac voltmeter or oscilloscope, and the meter
calibrator are required to complete this check (a
filament transformer and suitable current limiting
resistors can be substituted for the oscillator).
a. Set the meter calibrator for 10 mA. With the
428B on the 10 mA range clip the 428B probe
onto the lead which connects the calibrator
terminals.
b. Note the 428B reading.
c. Set the function generator to 60 Hz, its output
to generate a 10 mA peak sine wave into a 50
ohm resistor (1 volt peak-to-peak or 0.35 volt
rms across a 50 ohm resistor).
d. Clip the 428B probe onto BOTH the wire from
the meter calibrator and the resistor lead from
the function generator (see Figure 5-4).
e. The 428B should read within 2% of the
reading noted in Step b.
Figure 5-4. AC Overload.
5-23. NOISE CHECK.
5-24. A battery operated ac voltmeter and a 1 kilohm
resistor are required to complete this check.
a. Point probe East and West and rotate about its
axis.
b. Note peak-to-peak change in meter reading, if it
doesn't exceed 0.1 mA on the 1 m A range,
proceed. If the change is excessive, perform
Paragraph 5-8.
c. Zero the Model 428B on the 1 mA range.
d. Connect the output of the 428B to the input of a
battery operated 403 B with a 1 kilohm resistor in
parallel with the 403B input.
e. Section V
f. With the 428B on the 1 mA Range check for a
maximum of 15 m V reading on the AC Voltmeter.
g. Switch the 428B to the 3 mA range. Check for a
maximum of 5 m V reading on the AC Voltmeter.
h. Switch the 428B to the 10 mA range. Check for a
maximum of 2 mV reading on the AC Voltmeter.
i. Check each range from 10 mA to 10 amps using
the procedure of Step f. No ac output reading
should exceed 2 mV.
5-25. ADJUSTMENT PROCEDURE.
5-26. When the instrument shows signs of defective
components, use the troubleshooting procedure to find
and correct the problem. It is quite easy to compound
a 428B trouble by misaligning the instrument in an
attempt to adjust out the effects of a defective
component.
5-27. POWER SUPPLY.
5-28. Connect an electronic dc voltmeter to test point 5
(Pin 1, V9) of the 428B. The voltage at this point
should be 272 ± 6 V if not, adjust R109 for 272 V.
5-29. MECHANICAL ZERO SET.
5-30. When meter is properly zero set, pointer rests
over the zero calibration mark on the meter scale when
instrument is (1) at normal operating temperature, (2)
in its normal operating position, and (3) turned off.
Zero set as follows to obtain best accuracy and
mechanical stability:
a. Allow instrument to operate for at least 20 minutes;
this allows meter movement to reach normal
operating temperature.
b. Turn instrument off and allow 30 seconds for all
capacitors to discharge.
c. Rotate mechanical zero adjustment screw
clockwise until meter pointer is to left of zero and
moving upscale toward zero..
d. Continue to rotate adjustment screw clockwise;
stop when pointer is right on zero. If pointer
overshoots zero, repeat Steps c and d.
e. When pointer is exactly on zero, rotate adjustment
screw slightly counterclockwise to free adjustment
screw from the meter suspension. If pointer moves
during this step, repeat Steps c through e.
5-31. DC AMPLIFIER BALANCE.
5-32. Open the 428B and short across the brass pins
on the circuit board which are connected to the ends of
C1 0 (these pins are located on either side of C14).
Connect a 1500 ohm resistor between Pin 2 of V6 and
the 6.3 V filament supply. Disconnect the feedback
disconnect (see Figure 7-3). Zero the 428B meter with
R46.
16
Page 24

Model 428B
5-33. Remove the clip lead and resistor. Replace the
feedback disconnect jumper.
5-34. ALIGNMENT.
5-35. OSCILLATOR BALANCE.
5-36. Construct a probe as shown below:
Figure 5-5. Oscillator Balance Probe.
Connect the ends of the probe to the T5 side of R94
and R95. Connect an ac voltmeter between ground
and the junction of the two probe resistors. To adjust
oscillator balance, pad C53 or C54 for minimum
reading (on instruments with serial prefixes of 601- or
below, adjust the slug of T5). The ac reading at the
junction of the probe resistors should be 50 m V or less.
Remove the probe and meter before proceeding.
5-37. OSCILLATOR FREQUENCY.
5-38. Connect an ac coupled electronic counter to test
point 4. Adjust the slug of T5 to set the frequency
measured to 40 kHz ± 200 Hz. If T5 doesn't have
enough range, pad C52 (in instruments with serial
prefixes of 601- or below do not use T5; use C52 only).
Remove counter.
5-39. OSCILLATOR LEVEL.
5-40. Connect an ac voltmeter to Test Point 6 (Pin 7,
V7). Adjust R92 for 8 ±0.4 V. Remove meter.
5-41. DETECTOR GATE.
5-42. Connect an ac voltmeter to Test Point 4 (Pin 7 of
V5). Adjust L7 for a peak reading.
5-43. TUNED AMPLIFIER.
5-44. Equipment Setup.
5-45. Set an ac voltmeter to the 1 volt range and
connect it to Test Point 3 (Pin 7, V2) of the 428B. Clip
the 428B probe around a wire which is carrying 35 mA
rms ac. This current can be generated by a filament
transformer, as in Figure 5-6, or by an oscillator
operating into its rated load as in Paragraph 5-20. Set
the 428B RANGE switch to 100 mA. This arrangement
will be used for input, interstage, and detector phase
adjustments.
Figure 5-6. Detector Phase Adjustment.
5-46. Input Alignment.
5-47. Short TP1 and TP2 to ground, open the
feedback disconnect shown in Figure 7-3, then adjust
C2 for a maximum ac reading at Test Point 3 (Pin 7 of
V2).
5-48. Interstage Alignment.
5-49. Set up equipment as in Paragraph 5-45, then:
a. Connect a .0082 microfarad capacitor across the
brass pins which are connected to L10. Adjust L9 for
maximum ac at Test Point 3 (Pin 7 of V2).
b. Remove the capacitor. Connect the .0082
microfarad capacitor across the brass pins which are
connected to L9. Adjust L10 for maximum ac at TP3.
c. Remove the capacitor and voltmeter.
5-50. DETECTOR PHASE ADJUSTMENT.
5-51. With the bases of Q1 and Q2 (TP1 and TP2)
grounded, open the feedback disconnect jumper (see
Figure 7 -3), and install a 390 ohm resistor between
the feedback wire and the pin on the circuit board to
which it normally connects. Connect the horizontal
input of an oscilloscope to TP4 (Pin 7, V5). Connect
the vertical to TP3 (Pin 7, V2). Except for the ac
voltmeter, set up equipment as in Paragraph 5-45 (a
proper setup is shown in Figure 5-6). Turn slug of L7
until the pattern looks like one of the correct patterns
shown in Figure 5-7. If there is a diamond in the center
of the pattern, the diamond should contain no traces.
Remove the 390 ohm resistor and the voltmeter.
17
Page 25

Model 428B
Figure 5-7. Detector Phase Display.
5-53. Preliminary Adjustment.
5-54. Preset the controls as follows:
a. Ground the bases of QI and Q2 (TP1 and TP2).
Open the feedback disconnect (see Figure 7-3).
a. Switch the 428B to the 300 mA range.
b. Adjust R84 for minimum ac at the wiper
connection of R84. The reading should be less
than 0.1 volt.
c. Adjust R82 for minimum ac at the wiper
connection of R8·2. The reading should be
approximately 0.02 volt.
d. Thoroughly clean probe head jaws (see Paragraph
5-8).
e. Degauss probe head (see Paragraph 3-29).
5-55. Drive Balance Adjustment.
5-56. With the 428B set to the 1 mA range, and with no
input to the current probe, set R98 for a minimum ac
reading at Test Point 3 (Pin 7 of V2). The minimum
reading should be less than 0.5 volt.
5-57. Residual 40 kHz Cancellation.
5-58. The residual output of the probe head is
cancelled by means of the circuit discussed under
Paragraph 4-45. This procedure assumes that the
preliminary adjustments listed in Paragraph 5-54 have
been completed.
a. Reconnect the feedback disconnect which
was opened in Paragraph 5-54 Step a.
b. Remove the short between the bases of Q1
and Q2 and ground (installed in Paragraph
5-54 Step a).
c. Degauss the probe.
d. Zero the 428B meter with front panel ZERO
control.
e. Adjust R84 for a minimum ac reading at Test
Point 3 (Pin 7 of V2).
f. Continue to alternate Steps d and e until the
adjustment cannot be further refined. The
minimum reading in Step e should be
approximately 0.02 volts or less.
18
Page 26

Model 428B
5-59. TROUBLESHOOTING.
5-60. FRONT PANEL TROUBLESHOOTING.
5-61. The Front Panel Troubleshooting Tree was
designed for use as a means to guide the repairman to
a block of circuitry. This procedure, in combination with
the adjustment, calibration, and performance checks
should be adequate to repair most 428B's.
5-62. In any case where the front panel troubleshooting
does not lead to the problem, it will be necessary to
troubleshoot the instrument in detail.
5-63. DETAILED TROUBLESHOOTING.
5-64. Probe Check.
5-65. Resistance between pins 1-3, 1-4, 2-3, and 2-4 of
the probe cable connector should be nearly identical
and in the area of approximately 4 1/2 to 5 ohms. Where
a resistance measurement between any of the above
pairs of pins is significantly higher than between the other
pairs (by about 3 times), an open probe coil is indicated.
Any open circuit indicates a broken conductor between
the plug and the bridge. The broken conductor is probably
a broken wire in the cable. Either condition could indicate
a broken wire at the Probe Terminal Section (see wiring
diagram, Figure 6-1).
5-66. Power Supply Check.
5-67. To test the power supply:
a. Measure +272 ±6 Vdc between Test Point 5 and
ground.
b. Measure +12 ±1 Vdc between the cathode of CR10
and ground.
c. Measure -7 ±1 Vdc between the anode of CR9 and
ground.
5-68. Where the +272 V and the +12 V have both failed,
check the +12 first. Check CR10, Q1, C66, and C69.
19
Page 27

Model 428B
20
Figure 5-9. Detailed Troubleshooting Tree.
Page 28

Model 428B
5-69. Where the + 272 V is at fault, try replacing V9, V10,
or V11. If the tubes are not defective, check the associated
circuitry, especially CR11 (V11 in some instruments).
5-70. Where the -7 V has failed, measure -17 Vdc at
junction of R102 and C65. If less than -7 volts is measured
at this point, check F3 and C65. If the junction of R102 and
C65 measures more than - 7 Vdc, check CR9 and Q2.
5-71. Oscillator - Buffer Amp. Check.
5-72. Short Test Point 1 and Test Point 2 to ground.
5-73. Compare the waveform at pin 2 of Jl to the waveform
shown at this point of the schematic diagram. If these
waveforms are not comparable, check the waveform at
Test Point 7 and follow the Troubleshooting Tree. If the
waveform at pin 2 of J1 is acceptable, continue to the next
paragraph.
5-74. Set up equipment as described in Paragraph 5-51.
Compare the oscilloscope display to Figure 5-7.
5-75. If the display is unacceptable, clip the probe around
100 mAdc and downrange to the 1 mA range. Find a 2.5 V
pk-pk sine wave at the junction of R1 and L5. If this
waveform is unacceptable, adjust or repair the input tuning
circuit (L5, C1, C2, and R1).
5-76. If the waveform described in Paragraph 5-75 is
alright, use the same test setup to find a 2.5 V pk-pk sine
wave at pin 7 of VI. If this waveform is unacceptable, check
VI and the range switch.
5-77. If the waveform described in Paragraph 5-76 is
alright, use the same test setup to look for a 1 V pk-pk sine
wave at pin 7 of V2. Follow this branch of the
Troubleshooting Tree to its conclusion.
5-78. Detector Gate Amp. Check.
5-79. No test equipment need be set up for these checks
except an oscilloscope and a wire to ground TP1 and TP2.
5-80. Synchronous Detector.
5-81. With TP1 and TP2 still grounded and on the 100
mA range, perform the test indicated. Beyond a tedious
ohmmeter test of the circuitry between T3 and pin 7 of
V6, little can be done to check the detector circuit. It
should be noted, however, that R46 should be able to
provide the + 0.5 Vdc which is required at pin 7 of V6
during normal operation.
5-82. DC Amplifier Check.
5-83. Remove the ground wire from Test Point 1 and
Test Point 2 (installed for previous checks). Disconnect
the probe from the 428B front panel. Set the 428B to the
300 mA range. Zero the 428B with the front panel ZERO
control. Measure and note the voltages at pin 7 and pin
2 of V6. Turn the ZERO control to deliver a ± 1 Vdc
swing around the voltage noted for pin 2. The difference
between the voltages at pins 7 and 2 of V6 should not
exceed 0.05 Vdc at any point during this swing.
5-84. If the DC Amplifier tracks properly as tested in
Paragraph 5-83, proceed with the performance checks.
If the DC Amplifier has failed, continue to perform the
tests in the Troubleshooting Tree.
5-85. CALIBRATION.
5-86. Zero the 428B on, the 1 mA range using the front
panel ZERO control. Switch to the 100 mA range. Clip
the probe around an accurate 100 mA current (as in
Paragraph 5-14). Adjust Meter Cal, R69, for a meter
reading of 100 mA. Connect a 1000 ohm ± 1 % resistor
in parallel with an accurate (0.25%) voltmeter to the
output jack of the 428B. Turn the front panel Output
Level control full counterclockwise past the detent.
Adjust the Output Cal control, R63, for a reading of
exactly 0.73 V on the voltmeter.
5-87. Perform the entire In-Cabinet Performance Tests
(Paragraphs 5-5 through 5-24) to insure that the 428B
meets all of its specifications.
21
Page 29

Model 428B
22
Page 30

Model 428B
silverIDinside diameter
seconds
impregnated
throw
ampere(s)
order by description
ohms
hertz
toggle
inductor
printed circuit
logarithmic taper
amperes
faradsVvolt(s)
hertz
alternating current
ohms
position(s)
polystyrene
volts
fixed
wirewound
hertz
volts
amps
optimum value selected at
henry(ies)
mercury
no standard type number
special type
hertz (cyc1e(s) per second)
SECTION VI
REPLACEABLE PARTS
6-1. INTRODUCTION.
6-2. This section contains information for ordering
replacement parts. Table 6-1 lists parts in alphabetic
order of their reference designators and indicates the
description, -hp- part number of each part, together with
any applicable notes, and provides the following:
a. The TQ column lists the total quantity of any
part listed in the manual. The total quantity of
a part is given the first time the part number
appears.
b. Description of the part. (See list of
abbreviations below.)
c. Typical manufacturer of the part in a
five-digit code. (See Appendix B for list of
manufacturers.)
d. Manufacturer's part number
6-3. Miscellaneous parts are listed at the end of
Table 6-1.
6-4. ORDERING INFORMATION.
6-5. To obtain replacement parts, address
order or inquiry to your local Hewlett-Packard Field
Office. (See Appendix C for list of office locations.)
Identify parts by their Hewlett-Packard part
numbers. Include instrument model and serial
numbers.
6-6. NON-LISTED PARTS.
6-7. To obtain a part that is not listed, include:
a. Instrument model number.
b. Instrument serial number.
c. Description of the part.
d. Function and location of the part.
Ag
AI
A
Au
C
cer
coef
com
comp
conn
dep
DPDT double-pole doubleDPST double-pole singleelect
encap
F
FET
fxd
GaAs
GHz Gigahertz=10
gd
Ge
grd
H
Hg
Hz
impg
incd
Ins
kΩ kilohm(s) 10
kHz kilohertz= 10
L
lin
log
mA milliampere(s) = 10
MHz megahertz = 10
MΩ megohm(s) = 10
metflm
mfr
ms
mtg
mV millivolt(s)= 10
µF
µs
+9
µV microvolt(s) = 10
my
nA nanoampere(s) = 10
NC
Ne
NO
NPO
(zero temperature coefficient) Si Silicon
Symbols Multiplier Prefix Symbols Multiplier
tera T 10
giga G 10
mega M or Meg 10
kilo K or k 10
hecto h 10
deca da 10 femto f 10
deci d 10
ABBREVIATIONS
ns nanosecond(s) = 10
nsr
Ω
obd
+3
OD
+3
P
pA
pc
-3
pF picofarad(s) 10
+6
piv
+6
p/o
pos
poly
pot
p-p peak-to-
-3
ppm
prec w/o
precision (temperature coefficient,
-6
R
-9
Rh
rms root-Oleanrot
Se
sect
sl slide
long term stability, and/or
DECIMAL MULTIPLIERS
+12
+9
+6
+3
+2
-1
centi c 10
milli m 10
micro µ 10
nano n 10
Pico p 10
atto a 10
-9
SPDT single-pole doubleSPST single-pole single-
Ta
Te
Ti02
tog
tol
trim
-12
TSTR
vacw
var
vdcw
W
wi
wiv
ww
*
factory, avg value shown
**
-2
-3
-6
-9
-12
-15
-18
23
A assembly FL filter Q transistor TS terminal strip
DESIGNATORS
B motor HR heater OCR transistor-diode V vacuum tube, neon bulb,
BT battery IC integrated circuit R resistor photocell, etc.
C capacitor J jack RT thermistor W cable
CR diode K relay S switch X socket
DL delay line L inductor T transformer XDS lamp holder
DS lamp M meter TB terminal board XF fuse holder
E misc. electronic part MP mechanical part TC thermocouple Y crystal
F fuse P plug TP test point Z network
Page 31

Model 428B
Diode:
Diode:
Diode:
Table 6-1. Replaceable Parts
REFERENCE
DESIGNATOR
A1, A2
A3
Cl
C2
C3 thru Cl0
C11
C12
C13
C14
C15
C16, C17
C18
C19
C20
C21
C22, C23
C24
C25
C26
C27
C28, C29
C30
C31
C32 thru C40
C41
C42
C43 thru C50
C51
C52
C53, C54
C55
C56 thru C60
C61
C62
C63
C64
C65
C66
C67
C68
C69
C70
C71
CR1
CR2
CR3
CR4
CR5
CR6
CR7
CR8
CR9
CR10
CR11, CR12
CR13 thru CR16
CR17
DS1
-hp-
PART NO.
428B-26A
428B-268
0160-0938
0131-0004
0150-0014
0180-0050
0160-0269
0140-0179
0150-0012
0160-0269
0140-0179
0150-0012
0180-0059
0170-0078
0180-0058
0150-0012
0140-0179
0150-0012
0170-0019
0140-0223
0160-2204
0160-0269
0160-0363
0140-0164
0140-0210
0180-2336
0180-2337
0160-0134
0150 .. 0012
0180-0058
0180-0104
0160-0269
0180·0104
0160-2203
0160-0134
1901-0036
1901-0036
1901-0036
1901·0036
1902-0013
1902-0211
1901-0040
1910-0016
1902-3404
1450-0049
TQ DESCRIPTION MFR. MFR. PART NO.
2
Assembly: resistor ww
A1 includes R3 thru R6
A2 includes R7 thru R 10
1
Assembly: resistor ww, includes R2, Rll
1
C: fxd 1000 pF 5%
1
C: var mica 16-150 pF 175 vdcw
Not assigned
1
C: fxd cer .005 microfarad 500 vdcw
1
C: fxd 40 microfarads +75% -10% 50 vdcw
5
C: fxd cer .1 microfarad 20% 500 vdcw
3
C: fxd mica 1000 pF 2%
6
C: fxd cer .01 microfarad 20% 1000 vdcw
C: fxd cer .1 microfarad 20% 500 vdcw
C: fxd mica 1000 p F 2%
C: fxd cer .01 microfarad 20% 1000 vdcw
Not assigned
1
C: fxd 10 microfarads + 75% -10% 25 vdcw
Not assigned
1
C: fxd my .47 microfarad 5% 150 vdcw
2
C: fxd 50 microfarads +75% -10% 25 vdcw
C: fxd cer .01 microfarad 20% 1000 vdcw
C: fxd mica 1000 pF 2%
C: fxd cer .01 microfarad 20% 1000 vdcw
Not assigned
1
C: fxd my 0.1 microfarad 5% 200 vdcw
Not assigned
1
C: fxd mica 260 pF 1 %
1
C: fxd mica 100 pF 5%
Not assigned
C: fxd cer .1 microfarad 20% 500 vdcw
1
C: fxd mica 620 pF 5%
2
C: fxd mica 6800 pF 5%
1
C: fxd mica 270 pF 5%
Not assigned
1
C: fxd my 20 microfarads +50% -10% 450 vdcw
1
C: fxd my 20-20 microfarads +50% 10% 450 vdcw
2
C: fxd mica 220 pF 5%
C: fxd cer .01 microfarad 20% 1000 vdcw
C: fxd 50 microfarads + 75 -10% 25 vdcw
C: fxd 200 microfarads +75% -10% 15 vdcw
2
Not assigned
C: fxd cer .1 microfarad 20% 500 vdcw
C: fxd 200 microfarads +75% -10% 15 vdcw
C: fxd mica 91 pF 5%
1
C: fxd mica 220 pF 5%
Diode: si 1000 piv
4
Not assigned
Diode: si 1000 piv
Not assigned
Diode: si 1000 piv
Not assigned
Diode: si 1000 piv
Not assigned
Diode: breakdown 6.81 V 10%
1
Diode: breakdown 12.1 V 10%
1
2
4
1
1
si 30 wiv 50 mA 2 pF 2ns
germanium 60 wiv 1 microsecond Trr
breakdown 82.5 V 5%
Light Indicator: clear
-hp-
-hp14655
72136
04222
56289
56289
14655
56289
56289
14655
56289
56289
84411
56289
56289
14655
56289
56289
14655
72136
56289
72136
14655
00853
56289
56289
14655
56289
56289
56289
56289
56289
14655
14655
04713
04713
04713
04713
04713
04713
01295
08257
04713
72765
RDM15E102J1C obd
T51410-9
D1-4 obd
30D406G050DD2-DS
41C9285-CDH
RDM19F102G3C obd
29C214A3-CDH
41C9285-CDH
RDM19F102G3C obd
29C214A3-CDH
30D106G025882-DSM
663UW
30D506G025CC2-DSM
29C214A3-CDH
RDM19Fl02G3C obd
29C214A3-CDH
192P10452-PTS
RDM15F261F3C obd
RDM15F101J3C obd
41C92B5-CDH
RDM15F621 J3C obd
RDM30F682J5S obd
RDM15F271 J3C obd
68010168
68D20060
RDM15F221J3C obd
29C214A3-CDH
30D506G025CC2-DSM
30D207G015DF2-DSM
41C92B5-CDH
30D207G015DF2-DSM
RDM15F910J3C obd
RDM15F221 J3C obd
SR1358-12
SR1358-12
SR1358-12
SR1358-12
SZ1521-7
SZ1521-79
PG512
obd
SZ10939-446
599-125( clear)
24
Page 32

Model 428B
REFERENCE
DESIGNATOR
F1
F1
F2
F3
J1
J2
J3
L5
L6
L7
L8
L9, L10
M1
Q1
Q2
Q3
R1
R2 thru R11
R12
R13
R14
R15
R16
R17
R18
R19
R20
R21
R22
R23
R24
R25
R26
R27
R28
R29
R30
R31
R32
R33
R34
R35
R36
R37
R38 thru R40
R41 thru R44
R45
R46
R47
R48
R49
R50
R51
R52
R53 thru R 59
R60
-hp-
PART NO.
2110-0202
2110-0312
2110-0312
2110-0012
1251-0089
1251-2357
1250-0118
9100-1487
9100-1488
9100-1489
9110-0025
9100-1482
1120-0904
1854-0039
1853-0016
1854-0003
0684-6801
0757-0346
0757-0386
0757-0397
0698-4420
0757-0419
0698-4433
0698-4470
06984486
0698-4503
0683-1345
0698-7683
0684-1021
0684-1051
0687-1031
0684-1541
0683-7515
0684-1541
0687-5621
0757-0353
0698-4965
0698-4712
0684-4701
06874731
0686-9115
0684-4711
0757-0283
0757-0327
2100-0331
0689-3935
0684-4711
0698-4594
0684-5631
0757-0982
0698-0058
0683-2015
Table 6-1. Replaceable Parts (Cont'd)
TQ DESCRIPTION MFR. MFR. PART NO.
1
Fuse: .5 AT 250 V (for 230 V operation)
2
Fuse: 1 AT 250 V (for 115 V operation)
Fuse: 1 AT
1
Fuse: .5 A 250 V
1
Connector: female 4 pin
1
Connector: male 3 pin power
1
Connector: bulkhead, BNC female
1
Choke
1
Choke
1
Coil: gate input filter
1
Reactor: degausser
2
Coil: interstage
1
Meter: 0 - 5 microamps
1
TSTR: si NPN 2N3053
1
TSTR: si PNP 2N3638
1
TSTR: si NPN
1
R: fxd comp 68 ohms 10% 1/4 W
NSR: part of A 1, A2, and A3
1
R: fxd flm 10 ohms 1% 1/8 W
1
R: fxd flm 24.3 ohms 1% 1/2 W
1
R: fxd 68. 1 0 h ms 1 % 1/8 W
1
R: fxd flm 226 ohms 1 % 1/8 W
1
R: fxd flm 681 1% 1/8 W
1
R: fxd flm 2.26 kilohms 1 % 1/8 W
1
R: fxd flm 6.98 kilohms 1% 1/8 W
1
R: fxd flm 24.9 kilohms 1 % 1/8 W
1
R: fxd flm 66.5 kilohms 1% 1/8 W
1
R: fxd comp 130 kilohms 5% 1/4 W
1
R: fxd comp 43 megohms 5% 1/2 W
Not assigned
4
R: fxd comp 1000 ohms 10% 1/4 W
2
R: fxd comp 1 megohm 10% 1/4 W
1
R: fxd comp 10 kilohms 10% 1/2 W
2
R: fxd comp 150 kilohms 10% 1/4 W
1
R: fxd camp 750 ohms 5% 1/4 W
R: fxd comp 150 kilohms 10% 1/4 W
1
R: fxd comp 5.6 kilohms 10% 1/2 W
1
R: fxd flm 249 kilohms 1 % 1/2 W
1
R: fxd flm 324 kilohms 1 % 1/2 W
1
R: fxd flm 12.4 kilohms 1 % 1/4 W
2
R: fxd comp 47 ohms 10% 1/4 W
1
R: fxd comp 47 kilohms 10% 1/2 W
1
R: fxd comp 910 ohms 5% 1/2 W
4
R: fxd comp 470 ohms 10% '1/4 W
Not assigned
4
R: fxdflm 2 kilohms 1% 1/8W
1
R: fxd flm 499 kilohms 1 % 1/4 W
1
R: var 5 kilohms 10% ww 1.5 W
1
R: fxd comp 39 kilohms 5% 1 W
R: fxd comp 470 ohms 10% 1/4 W
1
R: fxd flm 487 ohms 1 % 1/4 W
1
R: fxd comp 56 kilohms 10% 1/4 W
1
R: fxd fl m 245 kilohms 1 % 1/2 W
1
R: fxd flm 4.02 kilohms 1% 1/4 W
Not assigned
1
R: fxd comp 200 ohms 5% 1/4 W
71400
71400
-hp-
71400
02660
-hp-
24931
-hp-
-hp-
-hp-
-hp-
-hp-
-hp-
04713
04713
01295
-hp-
91637
14674
14674
14674
14674
14674
14674
14674
01121
01121
01121
01121
01121
01121
01121
01121
01121
91637
91637
91637
01121
01121
01121
01121
14674
91637
79727
01121
01121
91637
01121
91637
91637
01121
MDL-1/12
MDL-1
AGC1/2
91-PC4F
28J R128-1
2N3053
2N3638
SM0843
obd
CMF-1/10-32 T-1 obd
C4 T-0 obd
C4 obd
C4 T-0 obd
C4 T-0 obd
C4 T-0 obd
C4 T-0 obd
C4 T-0 obd
CB1345
EB4365
CB1021
CB1051
EB1031
CB 1541
CB7515
CB1541
EB5621
MFF-1/2-10 T-1 obd
MFF-1/2-10 T-1 obd
MFF -1/8-32 T-1 obd
CB4701
EB4731
EB9115
CB4711
C4 T-O
MFF-1/8-32, T-1 obd
E-870
GB3935
CB4711
MFF-1/8-32 T-1 obd
CB5631
MFF-1/2-10 T-1 obd
MFF-1/8-32 T-1 obd
CB2015
25
Page 33

Model 428B
S1
S2
S3
S4
S5
T1
T2
T3
T4
T5
REFERENCE
DESIGNATOR
R61
R62
R63
R64
R65
R66
R67
R68
R69
R70
R71
R72
R73
R74
R75
R76
R77
R78
R79
R80
R81
R82
R83
R84
R85
R86
R87 thru R90
R91
R92
R93
R94, R95
R96
R97
R98
R99
R100, R101
R102
R103
R104
R105
R106
R107
R108
R109
R110
R111, R112
R113
R114
R115
R116
R117 thru R120
-hp-
PART NO.
0757-1039
0757-1047
2100-0328
2100-0270
0684-2711
0684-4701
0812-0015
0757-1040
2100-1560
0684-1001
0764-0028
0764-0003
0698-4746
0698-4711
0811-0007
0684-6821
0698-4953
0684-1021
0683-6225
2100-0197
2100-0282
0684-5621
0684-1531
0698-4931
2100-0094
0684-1011
0684-1021
0684-4711
0684-1011
2100-0394
0698-3647
0690-1041
0811-0041
0684-2251
0684-4711
0757-0857
0698-4153
0698-4793
2100-0094
0698-4772
0683-0475
0687-3331
0684-1041
0698-4752
0684-1051
0764-0006
00428-61901
3101-0001
3101-0018
3101-1234
9100-1481
9100-1483
9100-1484
9100-1485
Table 6-1. Replaceable Parts (Cont'd)
TQ DESCRIPTION MFR. MFR. PART NO.
1
R: fxd flm 45 ohms 1% 1/4 W
1
R: fxd flm 90 ohms 1% 1/4 W
1
R: var 500 ohms 10% ww 1.5 W
1
R: var 50 ohms 10% ww 2 W
1
R: fxd comp 270 ohms 10% 1/4 W
R: fxd comp 47 ohms 10% 1/4 W
1
R: fxd prec 8 ohms 3% ww 3 W
1
R: fxd flm 50 ohms 1% 1/4 W
1
R: var 30 ohms 10% ww 1.5 W
1
R: fxd comp 10 ohms 10% 1/4 W
1
R: fxd 100 kilohms 5% 2 W
Not assigned
1
R: fxd 3.3 kilohms 5% 2 W
1
R: fxd flm 53.6 kilohms 1 % 1/4 W
1
R: fxd flm 11.8 kilohms 1% 1/4W
1
R: fxd prec 10 kilohms 1% ww 5 W
1
R: fxd comp 6.8 kilohms 10% 1/4 W
1
R: fxd flm 124 kilohms 1 % 1/2 W
R: fxd comp 1000 ohms 10% 1/4 W
Not assigned
1
R: fxd 6.2 comp kilohms 5% 1/4 W
1
R: var 20 kilohms/2000 ohms ww
Not assigned
1
R: var 2 kilohms 20% ww 1.5 W
1
R: fxd comp 5.6 kilohms 10% 1/4 W
1
R: fxd comp 15 kilohms 10% 1/4 W
Not assigned
1
R: fxd flm 32.4 kilohms 1 % 1/2 W
2
R: var comp 50 kilohms 30%
2
R: fxd comp 100 ohms 10% 1/4 W
R: Fxd comp 1000 ohms 10% 1/4 W
R: Fxd comp 470 ohms 10% 1/4 W
R: Fxd comp 100 ohms 10% 1/4 W
1
R: var 300 ohms 20% ww 1 .5 W
1
R: fxd 15 kilohms 5% 2 W
2
R: fxd comp 100 kiloh ms 10% 1 W
1
R: fxd prec 169 ohms 1% ww 4 W
Not assigned
1
R: fxd comp 2.2 megohm 10% 1/4 W
R: fxd comp 470 ohms 10% 1/4 W
1
R: fxd 82.5 kilohms 1% 1/2 W
1
R: fxd flm 9.31 kilohms 1% 1/2 W
1
R: fxd flm 402 kilohms 1 % 1/4 W
R: var comp 50 kilohms 30%
1
R: fxd flm 178 kilohms 1% 1/4 W
2
R: fxd comp 4.7 ohms 5% 1/4 W
1
R: fxd comp 33 kilohms 10% 1/2 W
1
R: fxd comp 100 kilohms 10% 1/4 W
1
R: fxd flm 84.5 kilohms 1% 1/4 W
R: fxd comp 1 megohm 10% 1/4 W
4
R: fxd 18 kilohms 5% 2 W
1
Assembly: Range Switch (incl. resistors)
1
Switch: toggle SPST 3A 250 vdcw
1
Switch: toggle (momentary) SPST
Not assigned
1
Switch: slide DPDT
Not assigned
1
Detector: signal trans.
1
Gate transformer
1
Zero balance trans
1
Coil: osc.
14674
19701
79727
12697
01121
01121
91637
14674
11236
01121
14674
14674
91637
91637
91637
01121
91637
01121
01121
11237
79727
01121
01121
91637
11236
01121
01121
01121
01121
79727
14674
01121
91637
01121
01121
91637
75042
91637
11236
91637
01121
01121
01121
91637
01121
14674
-hp-
04009
OOLAF
82389
-hp-
-hp-
-hp-
-hp-
C5 T-0 obd
MF52C T-0
E-870 obd
obd
CB2711
CB4701
RS2B-95
C5T-0 obd
110
CB1001
C-42S obd
C-42S obd
MFF-1/8-32 T-1 obd
MFF-1/8-32 T-l obd
RS5-78
CB6821
MFF-1/2-10 T-1 obd
CB 1021
CB6225
C252-45
E-870
CB5621
CB1531
MFF-1/2-10 T-1 obd
UPM 7ORE obd
CB1011
CB1021
CB4711
CB1011
E-870 obd
FP-2 obd
GB 1041
RS2-64 obd
CB2251
CB4711
MFF-1 /2-10 T-1 obd
CEC, T-O obd
MFF-1/8-32 T-1 obd
UPM 7ORE obd
MFF-1 /8-32 T-1 obd
CB47G5
EB3331
CB1041
MF F-1 /8-32 T-1 obd
CB1051
FP-2
80994-HB
8906K499
11A-1242A
26
Page 34

Model 428B
REFERENCE
DESIGNATOR
T6
T7
-hp-
PART NO.
9100-1486
9100-3228
Table 6-1. Replaceable Parts (Cont'd)
TQ DESCRIPTION MFR. MFR. PART NO.
1
Transformer: head drive
1
Transformer: power
-hp-
-hp-
V1, V2
V3, V4
V5
V6, V7
V8
V9
V10
W1
1923-0017
1923-0017
1932-0022
5080-0041
1921-0010
1923-0021
8120-1348
428A-1C
428A-21A
428A-83A
428B-2A
428B-2R
428B-44
0403-0004
1440-0002
1490-0015
5040-0616
00428-66501
5020-0653
00428-26501
0330-0029
8520-0017
1410-0052
2110-0269
0510-0748
1205-0011
0370-0822
0370-0031
0370-0035
0370-0064
0370-0823
0370-0824
0370-0825
0370-0826
7121-0192
2950-0034
1200-0062
1200-0083
3100-0268
00428-90003
3
Tube: electron 6AH6
Not assigned
Tube: electron 6AH6
Tube: electron 6DJ8
2
Tube: electron selected 12AU7
1
Tube: electron 12B4A miniature 9 pin
1
Tube: electron 6AU6 miniature 7 pin
1
Cable: AC power
1
MISCELLANEOUS
Dust Cover (rack only)
1
Probe Assembly (see Figure 6-1 )
1
Escutcheon
1
Panel (cabinet only)
1
Panel (rack only)
1
Assembly: cabinet
1
Bumper: rubber
4
Handle: leather
1
Bail: cabinet tilt
1
Detent: cabinet bail
2
Assembly: P .C. Board
1
Bezel
1
Board: P.C.
1
Boot (rack only)
1
Brush: nylon
1
Bushing: potentiometer
1
Fuse: clip
2
Fuse: holder
1
Heat sink
1
Knob: round, brown
1
Knob: 1" dia. black conc.
1
Knob: bar 1" dia. black
1
Knob: 3/4" dia. red w/arrow
1
Knob: red (for R63)
1
Knob: orange (for R69)
1
Knob: yellow (for R46)
1
Knob: green (for R98)
1
Nameplate (cabinet only)
1
Nut: hexagonal
1
Socket: 9 pin miniature tube
4
Socket: 7 pin miniature tube
4
Switch: rotary
1
Operating and Service Manual
1
33173
33173
73445
-hp-
33173
33173
-hp-
-hp-
-hp-
-hp-
-hp-
-hp-
-hp-
OOOMM
0000Z
OOLAG
-hp-
-hp-
-hp-
-hp-
76545
OOLAH
32016
91506
75915
98978
-hp-
-hp-
-hp-
-hp-
-hp-
-hp-
-hp-
-hp91345
91961
71785
91662
76854
-hp-
6AH6
6AH6
obd
12B4A
6AU6A
obd
obd
obd
62 obd
obd
obd
6008-32CN
357002
TXBF-032-025B obd
obd
obd
121-51-11-060
05-0730-02
216481-HZ obd
27
Page 35

Model 428B
Figure 6-1. Parts Breakdown, current probe.
28
Page 36

Model 428B
SECTION VII
CIRCUIT DIAGRAMS
7-1. INTRODUCTION.
7-2. This section contains the circuit diagrams necessary
for the operation and maintenance of the Model 428B
Clip-on DC Milliammeter. Included are a block diagram,
schematics and component location diagrams.
7-3. BLOCK DIAGRAM.
7-4. The block diagram shows the relationship between
the assemblies of the instrument. Signal flow between
assemblies and significant portions of assemblies as well
as major feedback paths are shown. The block diagram Each part is identified by a reference designator.
is used to develop an understanding of the basic theory
of operation.
SCHEMATIC NOTES
7-5. SCHEMATIC DIAGRAMS.
7-6. The circuitry contained within each assembly is
shown in the schematic diagrams. These diagrams are
used to develop an understanding of the detailed theory
of operation of each assembly and as an aid in isolating
troubles within an assembly.
7-7. COMPONENT LOCATION DIAGRAMS.
7-8. The component location diagrams show the
physical location of parts mounted on an assembly.
29
MEASUREMENT CONDITIONS.
Line voltage: 115 V, 60 Hz
Range: 100 mA
Input: 100 mA
All voltages were measured with a high input impedance
electronic voltmeter. A 10 megohm oscilloscope probe was
used to measure the waveforms. The oscilloscope should be
externally synchronized from pin 2 of V7 (through a 47 µF
capacitor to avoid disturbing the circuit.
Page 37

Model 428B
30
Figure 7-1. Block Diagram.
Page 38

Model 428B
Figure 7-2. Component Locator For Circuit Board Part No. 00428-66501
Figure 7-3. Front Panel Component Locator.
Figure 7-4 Rear Panel Component Locator.
31
Page 39

Model 428B
32
Figure 7-5. Power Supply.
Page 40

Model 428B
33
Figure 7-6. Block Diagram.
Page 41

Model 428B
Figure 7-7. Component Locator for Circuit Board Part No. 00428-66501
Figure 7-8. Front Panel Component Locator.
Figure 7-9 Rear Panel Component Locator.
34
Page 42

Model 428B
Figure 7-10. Metering Circuit
(Note: This schematic has been chopped and resectioned to reduce the 11x30 page to better fit on 8½x11 paper)
35
Page 43

Model 428B
APPENDIX A
MANUAL BACKDATING CHANGES
A-1. The changes which appear in this Appendix make A-2. Schematic diagrams, photographs, and a parts
this manual applicable to those 428B Clip-on DC list for the earlier instruments have been included in
Milliammeters which bear serial number prefixes of
601- or below.
this Appendix.
36
Page 44

Model 428B
Figure A-1. 428B Side Views.
37
Page 45

Model 428B
38
Figure A-2 Backdating Schematics for 428B
Page 46

Model 428B
39
Figure A-3 Backdating Schematics for 428B
Page 47

Model 428B
Circuit
Reference
A1, 2 428B-26A Assembly: ww resistor, C65 0180-0058 fxd, elect, 50µf -10% + 100%, 25 vdcw
A3 428B-26B Assembly: ww resistor, includes R2, 11 C68 0170-0022 fxd, my, 0.1 pf +20%, 600 vdcw
C1 0140-0099 fxd, mica, 1K pf +1%, 500 vdcw C69 0180-0104 fxd, elect, 200 µf, 15 vdcw
C2 0131-0004 var, mica, 14-150 pf, 175 vdcw CR1 thru CR8 1901-0028 Diode, Si
C3 thru C10 Not Assigned CR9 1902-0013 Diode, Si
C11 0150-0014 fxd, cer, 5K pf, 500 vdcw CR10 1902-0014 Diode, Si
C12 0180-0050 fxd, elect, 40 uf -15% + 100%, 50 vdcw DS1 2140-0012 Lamp: indicating, #12, 2 pin base
C13 0170-0022 fxd, my, 0.1 uf +20%, 600 vdcw F1, 2 2110-0007 Fuse: 1 amp, s-b ( F1 115 V operation)
C14 nsr, part of T1 assembly 2110-0008 Fuse: 1/2 amp, s-b (F1 230 V operation)
C15 0150-0012 fxd, cer, 10K pf +20%, 1000 vdcw F3 2110-0012 Fuse: 1/2 amp
C16, 17 0170-0019 fxd, my, 0.1 of +5%, 200 vdcw J1 1251-0089 Connector: female, 4 pin
C18 nsr, part of T1 assembly J2 Not Assigned
C19 0150-0012 fxd, cer, 10K pf +20%, 1000 vdcw J3 1250-0118 Connector: BNC, female
C20 Not Assigned L1 thru L4 nsr; part of probe assembly (see misc.)
C21 0180-0059 fxd, elect. 10 uf -10% + 100%, 25 vdcw L5, 6 428B-60K Assembly, choke
C22, 23 0150-0015
C24 0170-0078 fxd, my, 0.47 uf +5%, 150 vdcw Ml 1120-0116 Meter: 0-5 ma, 6-10 ohms
C25 0180-0058 fxd, elect, 50 of -10% + 100%, 25 vdcw P1 1251-0090 Connector: male, 4 pin
C26 0150-0012 fxd, cer, 10K pf ±20% 1000 vdcw P2 8120-0050 Cable, power
C27 0140-0099 fxd, mica, 1K pf +1%, 500 vdcw Q1 1854-0039 Transistor: Si NPN 2N3053
C28, 29 0150-0012 fxd, cer, 10K pf +20%, 1000 vdcw Q2 1853-0016 Transistor: Si PNP 2N3638
C30 Not Assigned Q3 1854-0003 Transistor: 2N1564
C31 0170-0019 fxd, my, 0.1 of +5%, 200 vdcw R1 0687-6801 fxd, comp, 68 ohms ±10%, 1/2 W
C32 0140-0034 fxd, mica, 22 pf +5%, 500 vdcw R2 nsr; part of A3 assembly
C33 thru C40 Not Assigned R3 thru R10 nsr; part of A1, A2 assembly
C41 0140-0108 fxd, mica, 253 pf +2%, 300 vdcw R11 nsr; part of A3 assembly
C42 0140-0041 fxd, mica, 100 pf +5%, 500 vdcw R12 0727-0335 fxd, dep c, 10 ohms +10%, 1/2 W
C43 thru C50 Not Assigned R13 0757-0002 fxd, mfg, 24.3 ohms ±1% 1/2 W
C51 0170-0019 fxd, my, 0.1 of +5%, 200 vdcw R14 0727-0035 fxd, dep c, 68.4 ohms ±1/2%, 1/2 W
C52 0140-0149 fxd, mica, 470.pf +5%, 300 vdcw R15 0727-0060 fxd, dep c, 225 ohms ±1%, 1/2 W
C53, 54 0140-2102 fxd mica, 8.2K*pf +2%, 500 vdcw R16 0727-0085 fxd, dep c, 680 ohms ±1%, 1/2 W
C55 0140-0147 fxd, mica, 180 pf +5%, 500 vdcw R17 0727-0120 fxd, dep c, 2250 ohms ±1%, 1/2 W
C56 thru C60 Not Assigned R18 0727-0145 fxd, dep c, 6960 ohms ±1%, 1/2 W
C61 0180-0011 fxd, elect, 20 uf 450 vdcw R19 0727-0178 fxd, dep c, 24.7K ohms ±1%, 1/2 W
C62A/B 0180-0012 fxd elect, 2 sect, 20 of sect 450 vdcw
C63 0140-0031 fxd, mica, 220 pf +10%, 500 vdcw
Stock No. Description #
A1 includes, R3 thru R6 C66 0180-0104 fxd, elect, 200 µf 15 vdcw
A2 includes, R7 thru R10 C67 Not Assigned
fxd, TiO2 2.2 pf +10%, 500 vdcw
2
Reference
C64
L7
L8
0150-0012 fxd cer, 10K pf +20%, 1000 vdcw
9140-0049
9110-0025
Inductor: var, 16 mh
Inductor: degaussing
Circuit Stock No. Description
40
Page 48

Model 428B
Circuit
Reference-hp-
R20
R21
R22, 23 0687-2261 fxd, comp, 22M ±10%, 1/2 W R73 0764-0003 fxd, mfg, 3300 ohms ±5%, 2 W
R24 0687-1021 fxd, comp, 1K ohms ±10%, 1/2 W
R25 0687-1051 fxd, comp, 1M ±10%, 1/2 W R75 0727-0163 fxd, dep c, 11. 88K ohms ±1%, 1/2 W
R26 0687-1031 fxd, comp, 10K ohms ±10%, 1/2 W R76 0816-0008 fxd, ww, 10K ohms ±10%, 10 W
R27
R28
R29 0687-1541 fxd, comp, 150K ohms ±10%, 1/2 W R79 0687-1021 fxd, comp, 1K ohms ±10%, 1/w
R30 0687-5621 fxd, comp, 5.6K ohms ±10%, 1/2 W
R31 0727-0226 fxd, dep c, 2 50K ohms ±1%, 1/2 W R81 0686-6225 fxd, comp, 6.2K ohms ±5%, 1/2 W
R32 0727-0201 fxd, dep c, 71.56K ohms ±1%, 1/2 W R82A/B 2100-0197 var comp, dual pot, ±10%, 2 W
R33 0730-0032 fxd, dep c, 12. 3K ohms ±1%, 1 W
R34 0687-4701 fxd, comp, 47 ohms ±10%, 1/2 W R82B, 200 ohms
R35 0690-4731 fxd, comp 47K ohms ±10%, 1 W R83 Not Assigned
R36 0689-9115 fxd, comp, 910 ohms ±5%, 1 W
R37 0687-4711 fxd, comp, 470 ohms ±10%, 1/2 W R85 0687-5621 fxd, comp, 5.6K ohms ±10%, 1/2 W
R38 thru R40
R41 thru R44
R45 0727-0244 fxd, dep c, 500K ohms ±1%, 1/2 W R91 0727-0195 fxd, dep c, 50K ohms ±1%, 1/2 W
R46 2100-0006 var, ww, 5K ohms ±10%, 2 W
R47 0689-3935 fxd, comp, 39K ohms ±5%, 1 W
R48 0687-4711 fxd, c .p, 470 ohms ±10%, 1/2 W R94, 95 0687-1021 fxd, comp, 1K ohms ±10%, 1/2 W
R49
R50
R51 0730-0080 fxd, dep c, 245K ohms ±1%, 1 W R98 2100-0038 var, ww, 300 ohms
R52
R53 thru R59
R60 0687-6811 fxd, comp, 680 ohms ±10%, 1/2 W R102 0811-0041 fxd, ww, 169 ohms ±1%, 3 W
R61 0727-0021 fxd, dep c, 45 ohms ±1%, 1/2 W
R62 0727-0038 fxd, dep c, 90 ohms ±1%, 1/2 W R104 0687-2251 fxd, comp, 2.2M ±10%, 1/2 W
R63 2100-0022 var, ww, lin, 500 ohms ±20%, 1 W R105 0687-4711 fxd, comp, 470 ohms ±10%, 1/2 W
R64 2 100-0270 var, ww, lin, 50 ohms ±10%, 2 W
R65 0687-2711 fxd, comp, 270 ohms ±10%, 1/2 W R107 0727-0154 fxd, dep c, 9380 ohms ±1%, 1/2 W
R66 0687-4701 fxd, comp, 47 ohms ±10%, 1/2 W R108 0727-0240 fxd, dep c, 405K ohms ±1%, 1/2 W
R67 0812-0015 fxd, ww, 8 ohms ±3%, 2 W
R68 0727-0023 fxd, dep c, 50 ohms ±1%, 1/2 W
Stock No. Description #
0727-0198
0686-1345
0687-1541
0689-7515
0727-0184
0727-0075
0687-4721
0727-0132 fxd, dep c, 4K ohms ±1%, 1/2 W
fxd, dep c, 66K ohms ±1%, 1/2 W
fxd, comp, 130K ohms ±5%, 1/2 W
fxd, comp, 150K ohms ±10%, 1/2 W
fxd, comp, 750 ohms ±5%, 1 W
Not Assigned
fxd, dep c, 28.4K ohms ±1%, 1/2 W
fxd, dep c, 490 ohms ±1%, 1/2 W
fxd, comp, 4.7K ohms ±10%, 1/2 W
Not Assigned
R69
R70
R71
R72
R74 0727-0196 fxd, dep c, 52. 6K ohms ±1%, 1/2 W
R77
R78
R80 Not Assigned
R84 2100-0153 var, comp, 2K ohms ±20% 1/3 W
R86
R87 thru R90
R92 2100-0013 var, comp, lin, 50K ohms ±20%
R93 0687-1011 fxd, comp, 100 ohms ±10%, 1/2 W
R96
R97
R99
R100, 101
R103 0819-0011 fxd, ww, 4.5K ohms ±10%, 20 W
R106 0730-0063 fxd, dep c, 83K ohms ±1%, 1 W
R109 2100-0013 var, comp, lin, 50K ohms ±20%
2100-0002
0687-1001
0693-1041
0690-1241
0687-6821
0730-0072
0687-1531 fxd, comp, 15K ohms ±10%, 1/2 W
0687-4711
0687-1011
0767-0010
0690-1041
var, ww, 50 ohms ±10%, 2 W
fxd, comp, 10 ohms ±10%, 1/2 W
fxd, comp, 100K ohms ±10%, 2 W
fxd, comp, 120K*ohms ±10% 1 W
fxd, comp, 6.8K ohms ±10%, 1/2 W
fxd, dep c, 123K ohms ±1%, 1 W
R82A, 2K ohms
Not Assigned
fxd, comp, 470 ohms ±10%, 1/2 W
fxd, comp, 100 ohms ±10%, 1/2 W
fxd, mfg, 15K ohms ±5%, 3 W
fxd, comp, 100K ohms ±10%, 1 W
Circuit
Reference
41
L Stock No. Description#
Page 49

Model 428B
Circuit
Reference
R110 0727-0218 fxd, dep c, 180K ohms ±1%, 1/2 W 428B-75E Assembly: resistor board "E" includes
S1 428B-19A Assembly: range switch, includes, C27 thru C29 C51 R47 thru R52
S2 3101-0001 Switch: tog, SPST R94 thru R96
S3 3101-0018 Switch: tog, SPST, momentary 428B-75F Assembly: resistor board "F" includes
S4 Not Assigned C53, C54 C68 CR1 thru CR8 R106
S5 3101-0033 Switch, sl DPDT R108 R110
T1 9120-0052 Assembly: transformer, interstage, includes, G-74AW Knob: red, 3/4" w/arrow
T2 428A-60G Transformer, detector signal G-74N Knob: bar, RANGE
T3 428A-60C Transformer, gate 1200-0003 Socket, tube: 9 pin miniat
T4 428B-60J Transformer, zero balance 1200-0017 Socket, tube: 7 pin miniat
T5 9120-0051 Transformer, osc 1400-0008 Fuseholder
T6 428A-60D Transformer, head drive 1400-0084 Fuseholder
T7 9100-0104 Transformer, power 1450-0020 Jewel, pilot light
V1, 2 1923-0017 Tube, electron: 6AH6 8520-0017 Electric shaver brush
V3, 4 1930-0013 Tube, electron: 6AL5 1205-0011 Heat dissipater, semiconductor
V5 1923-0017 Tube, electron: 6AH6
V6, 7 1932-0022 Tube, electron: 6DJ8 / ECC88
V8 1932-0029 Tube, electron: 12AU7
V9 1921-0010 Tube, electron: 12B4A
V10 1923-0021 Tube, electron: 6AU6
V11 1940-0001 Tube, electron: 5651
-hp- Stock
No.
R2 thru R20, R61, R62 R72 R91
C14, C18 G-74J Knob: black, 1", concentric shaft ZERO
MISCELLANEOUS
428A-21A Assembly: probe, includes
L1 thru L4, P1
428B-65C Assembly: circuit board "C" includes
R65, R67, P68
428B-75H Assembly: circuit board "A" includes
C32, C66, C69, CR9, CR10, Q1 thru Q3, R70,
R71, R74, R75, R102
428B-75B Assembly: resistor board "B" includes
C13 R26, 27
C15 R35, 36
C21 R41, 42
C25 R45
R21 thru R23 R73
428B-75C Assembly: circuit board "C" includes
C16, C17, C24, C41, C42, R30 thru R33
R43, R44 R77 thru R79, R81, R85, R86
428B-75D Assembly: resistor board "D" includes
C1, C2 C11, C12 R1 R25
Description#
Circuit
Reference
-hp- Stock No. Description#
42
Page 50

Model 428B
MANUAL CHANGES
Manual Part No. 00428-90003
►New or Revised Item
ERRATA:
Pages 1-0 and 2-1. The power frequency should be 48
- 440 Hz.
Page 1-1. Delete Paragraph 1-5a (the 3528A is
obsolete).
►Page 3-2, Paragraph 3-22. Change last sentence to
read as follows:
10 April 1974
►Page 5-3, Paragraph 5-32. Change C10 to L10.
Change C14 to C18.
The 6.3 V filament supply is available at pin 4 or 5 of
V6.
Page 5-3, Paragraph 5-32. Replace entire paragraph
with the following:
"If the jaws mate properly, the zero set should stay
within 0.2 mA, while rotating the probe head with
respect to the earth's magnetic field (probe aligned in
an East-West direction)."
►Page 3-2, Paragraph 3-35. Change the third
sentence to read a follows: "With the RANGE switch at
1 mA, rotation of the closed probe should not vary the
zero set more than 0.2 mA."
Pages 4-0,7-2 and 7-4. Change V3, V4 to CR13
through CR16.
Page 4-3, Paragraph 4-29. Change all "40" to "40
kHz".
Page 4-4, Figure 4-9. Change R87 to R81 . Delete
C12 and return C42 directly to common.
Paragraph 4-49. Delete the words "tube V11" and
insert "Zener diodes CR10, CR17.".
Page 5-0. Change the 50 Ω resistor to 0698-8155.
Change the recommended DC voltmeter to -hp- Model
3469B.
Add: Resistors (2),10 K, 1 %, matched, for alignment,
-hp- Part No. 0757-0442.
Page 5-1, Paragraph 5-2. Add: See the Performance
Test Card at the end of this section."
►Page 5-1, Paragraph 5-11 c. Add the following
sentence: "Point probe in an East-West direction."
Page 5-2. Set the OUTPUT LEVEL control to CAL for
Paragraph 5-18.
►Page 5-3, Paragraph 5-24a. In second sentence,
change reference to 0.1 mA to read 0.2 mA
►Page 5-3, Paragraph 5-28. Replace entire
paragraph with the following:
5-28a. Connect an electronic dc voltmeter to test
point 5 (Pin 1, V9) of the 428B. The voltage at this
point should be 272 ± 6 V; if not, adjust R 109 for
272 V.
b. Measure +12 ±1 V dc between the cathode
of CR 10 and ground.
c. Measure -7 ±1 V dc between the anode of
CR9 and ground.
43
5-32. Disconnect FEEDBACK DISCONNECT (See
Figure 7-3); red wire. Place range switch in the 10 amp
position. Adjust fine and course zero controls for
center of travel. Adjust R46 for zero on front panel
meter.
►Page 5-4, Paragraph 5-33. Replace entire
paragraph with the following:
5-33. Reconnect FEEDBACK DISCONNECT.
►Page 5-4, Paragraph 5-42. Add to last sentence"
(2.5 - 3.3 V rms)."
►Page 5-4, Paragraph 5-45. Add the following to
sentence two: “.... carrying 35 mA rms ac, f ≤400 Hz."
►Page 5-4, Paragraph 5-47. Replace the feedback
disconnect before proceeding to Paragraph 5-48.
►Page 5-4, Paragraph 5-47. Add to last sentence: "(.2
V - .4 V peak)"
Para. 5-51. Replace the feedback disconnect before
proceeding to Paragraph 5-52.
►Page 5-5, Paragraph 5-54. Replace entire
paragraph with the following:
5-54. Preset the controls as follows:
a. Set RANGE switch to 100 mA
b. Adjust R84 for minimum ac at the
wiper connection of R84. The reading
should be less than 0.1 volts.
c. Adjust R82 for minimum ac out at the
wiper of R82a. The reading should be
≤0.02 volts.
d. Thoroughly clean probe head jaws
(See Paragraph 5-7),
e. Degauss probe head (See Paragraph
3-29).
►Page 5-5, Paragraph 5-58. Remove Steps a and b.
Re-letter Steps c to f to read a to d respectively. I n
newly designated Step d, Step d is now Step b; Step e
is now Step c.
►Page 5-5. The following paragraph is added
following Paragraph 5-58 to complete the adjustment
procedure:
Page 51

Model 428B
5-58.1. OUTPUT ADJUSTMENT.
5-58.2. A meter calibrator and a one kilohm resistor
are required for his test.
a. Place RANGE switch in 10 amp position
and adjust R46 for zero volts DC ± 0.2 mV at
the· Output Level jack.
b. Switch the 428B and the meter calibrator to
the 100 mA range. Connect a test lead
between the meter calibrator output leads and
clip the 428B probe to the lead.
c. Set the meter calibrator to 100 mA output
and read full-scale on the 428B. Adjust R69 if
necessary.
d. Connect a voltmeter to the output jack of the
428B in parallel with the 1000 ohm resistor.
e. The voltmeter should read 0.73 V ± 10m V.
Adjust R63 if necessary.
Page 5-8, Paragraph 5-69. Replace V11 by Zener
diodes CR10, CR17.
Page 6-2. Change CR13 through CR16 to 1906-0034,
Duo-Quad, -hp-, for all replacements.
Change C63 part no. to 0160-2025.
Pages 6-2/6-3. Change C24, C52, C55, C70, and R60
to "starred" (selected) components.
Nominal values are as follows:
►Page 6-6,Fig. 6-1. Change Part No. of Coil Spring by
probe nose section to 1460-0600 and change PIN of
Cable Clamp by connector plug to 00428-41201.
Page 7-1. Note that resistors are in ohms and
capacitors are in pF unless otherwise marked, and that
selected ("starred") components marked wit an
asterisk may not even be present.
Page 7-3, figure 7-5. TP5 is connected to pin 1 of V9.
Reverse F1 and F2.
Page 7-3, Figure 7-2; Page 7-5, Figure 7-7. Change
CR13 (near TP2) to CR11.
Interchange: R26/R30; R27/R29 and C14/C18.
Page 7-5, Figure 7-10. R8 is 40 ohms. R68 is 50
ohms.
R61 is 45 ohms.
R62 is 90 ohms.
R 12 through R20 may be any mixture of the values
shown on Pages 7-5 or A-D.
Nominal value of C52* is 560 pF.
Nominal value of C55 * is 180 pF.
C2 is 16 - 150 pF.
R91 is not a "starred" component; it is no longer a
selected value.
Page 7-5/A-0. Add another contact to S1A as shown:
C24, 0160-0138, .39 µF, 200 Vdcw.
C52, 0140-D178, 560 pF, 300 Vdcw.
C55, 0140-0197, 180 pF, 300 Vdcw.
Page 6-3. M1 is a 0 - 5 mA meter.
Pages 6-3 and 7-5. Change R 15 to 216 Ω.
Page 6-4. R82 is 2 K/200 ohms.
Page 6-5. Part Numbers in the Operating and Service
Manual are for blue instruments; part numbers for
brown instruments are listed below.
00428-00204 Dust Cover (rack only)
00428-62101 Probe Assembly
00428-00201 Panel (cabinet only)
00428-00203 Panel (rack only)
00428-64401 Assembly: cabinet
5020-6849 Bezel
.
Page A-0. R41 is 28.4 K. Change R78 (near CR11) to
R71. Add R65 between the junction of R61, R62 and
54 (as in Figure 7-10). Change R60 to R60*. Change
the LINE switch (230 V-115 V) from S3 to S5. Change
the power transformer from +7v to T7. R33 is 12.3 K.
Page A-2. Add CR11, CR12 as on page 6-2.
Pages A-2, A-3. R 12 through R20 may be individually
replaced by the parts shown on Page 6-3.
Page A-4. Add R111, R112 as on page 6-4.
CHANGE NO. 1: For Serial 0995A06603 and Greater.
Page 6-2. Add C33*, 0140-0149 C: fxd 470 pF 300 V.
Add C72* 0160-0174 C: fxd .47 µF 25 V.
Page 7-5. Add C33*, 470 pF, between base and
collector of Q3. Add C72* .47 µF between emitter and
collector of Q3
10 April 1974
44
Page 52

Model 428B
90003
U.S.A.
45
 Loading...