

Page 1
quickref.book Page i Wednesday, February 12, 2003 2:01 PM
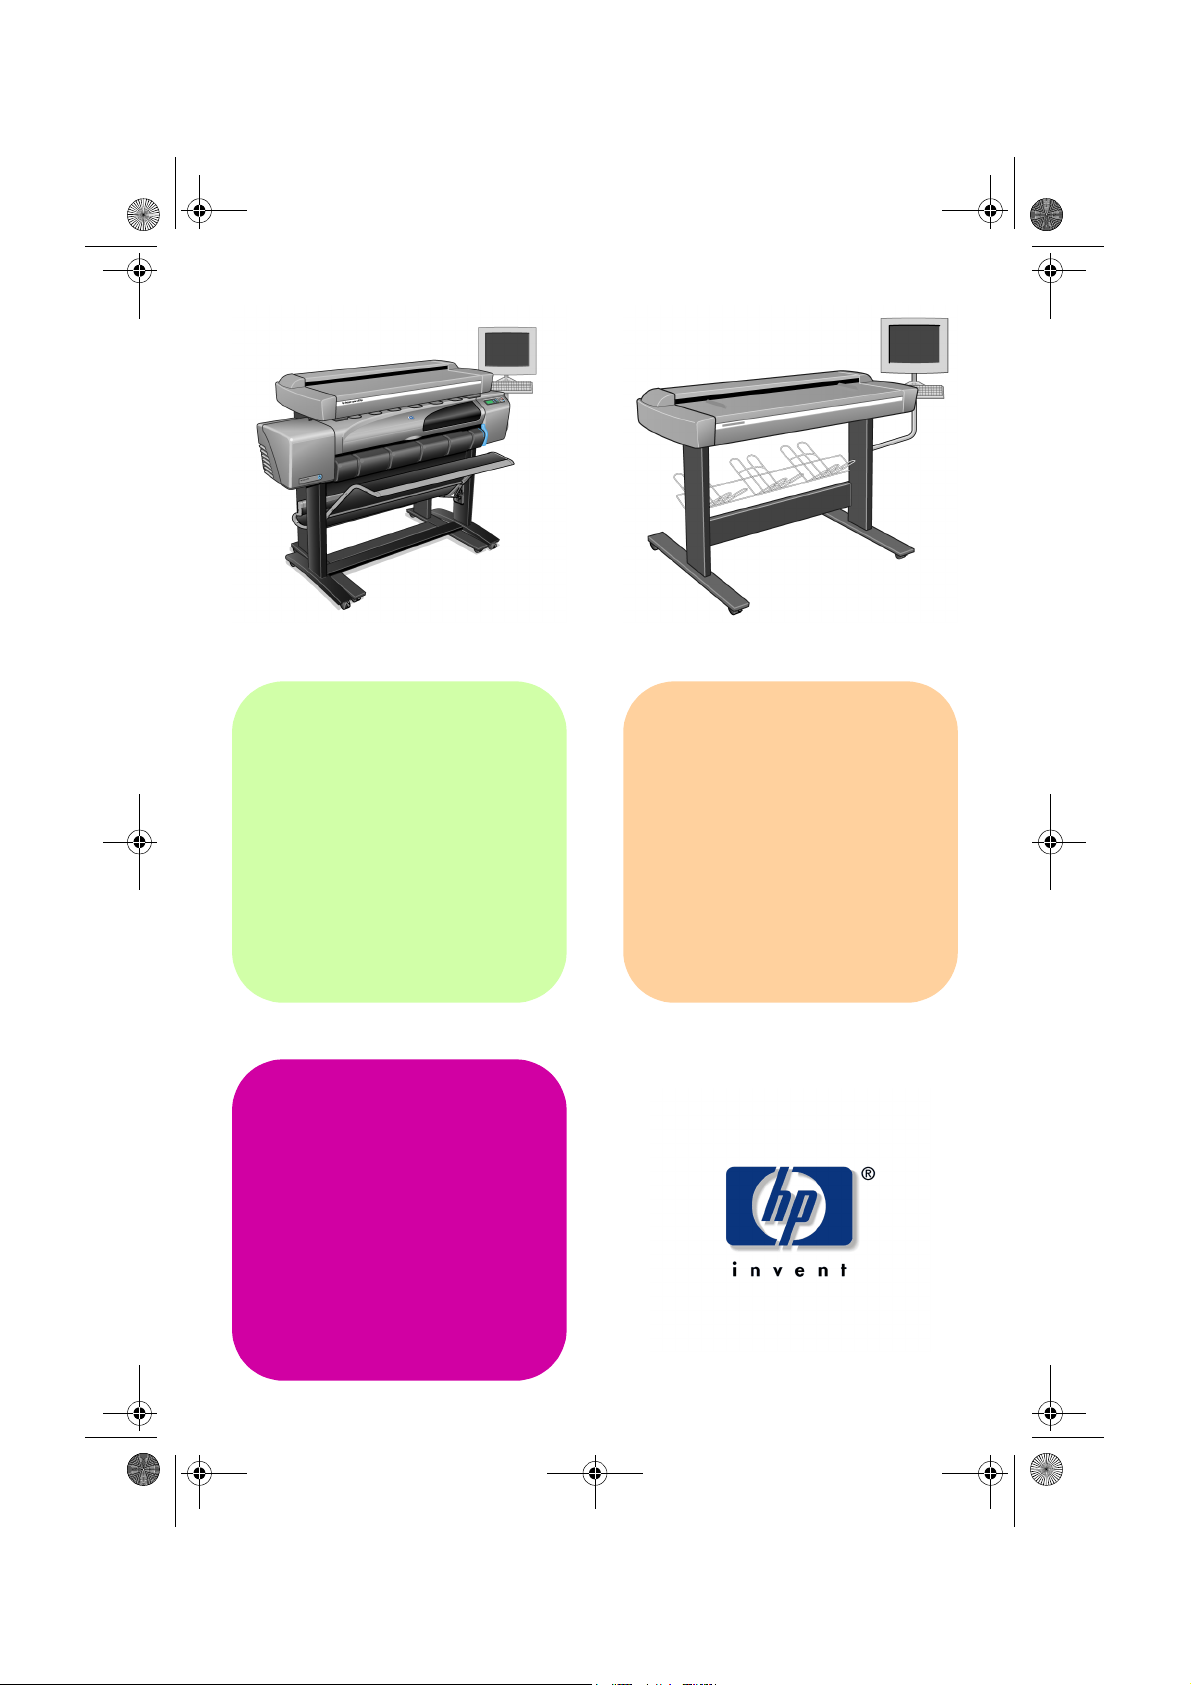
hp designjet
815mfp
quick
reference
guide
hp designjet
scanner 4200
Page 2
quickref.book Page ii Wednesday, February 12, 2003 2:01 PM
your hp designjet 815mfp
The HP Designjet 815mfp delivers large-format color copies and is as simple to
use as a conventional office copy machine. The components of the system are:
■ hp designjet 815mfp scanner
■ hp designjet 800ps printer
■ hp designjet scanner software
your hp designjet scanner 4200
The HP Designjet Scanner 4200 scans large-format prints and can file the
scanned images or send them to a networked printer. The components of the
system are:
■ hp designjet scanner 4200
■ hp designjet scanner software
where to find information...
You can get online help from the Online Help button in your HP
Designjet scanner software.
If you would like to view this information on your computer, you can find the
online help files on the ‘Using your scanner’ CD.
Further information is available from the following sources:
■ The printed Assembly Instructions and Quick Reference Guide that came
with your HP Designjet.
■ HP Designjet Online: http://www.designjet.hp.com/.
ii hp designjet 815mfp & scanner 4200
Page 3
quickref.book Page iii Wednesday, February 12, 2003 2:01 PM
contents
introduction
using your scanner software .......................................... 1
basic operations
copying (overview) ....................................................... 3
copying (step-by-step) ................................................... 5
scanning to a file ......................................................... 9
printing files .............................................................. 11
further operations
collated copies and copy sets...................................... 12
scanning thick media.................................................. 13
previewing copies ...................................................... 17
adding a new printer.................................................. 20
creating a new media profile....................................... 21
scanning and copying files to CD..................................22
troubleshooting
touch screen error messages.........................................23
scanning problems......................................................26
flashing lights on the operator panel..............................27
printing problems........................................................28
scanner software in the wrong language........................29
scanner software does not start.................................... 30
hp designjet 815mfp & scanner 4200 iii
Page 4

quickref.book Page iv Wednesday, February 12, 2003 2:01 PM
iv hp designjet 815mfp & scanner 4200
Page 5
quickref.book Page 1 Wednesday, February 12, 2003 2:01 PM
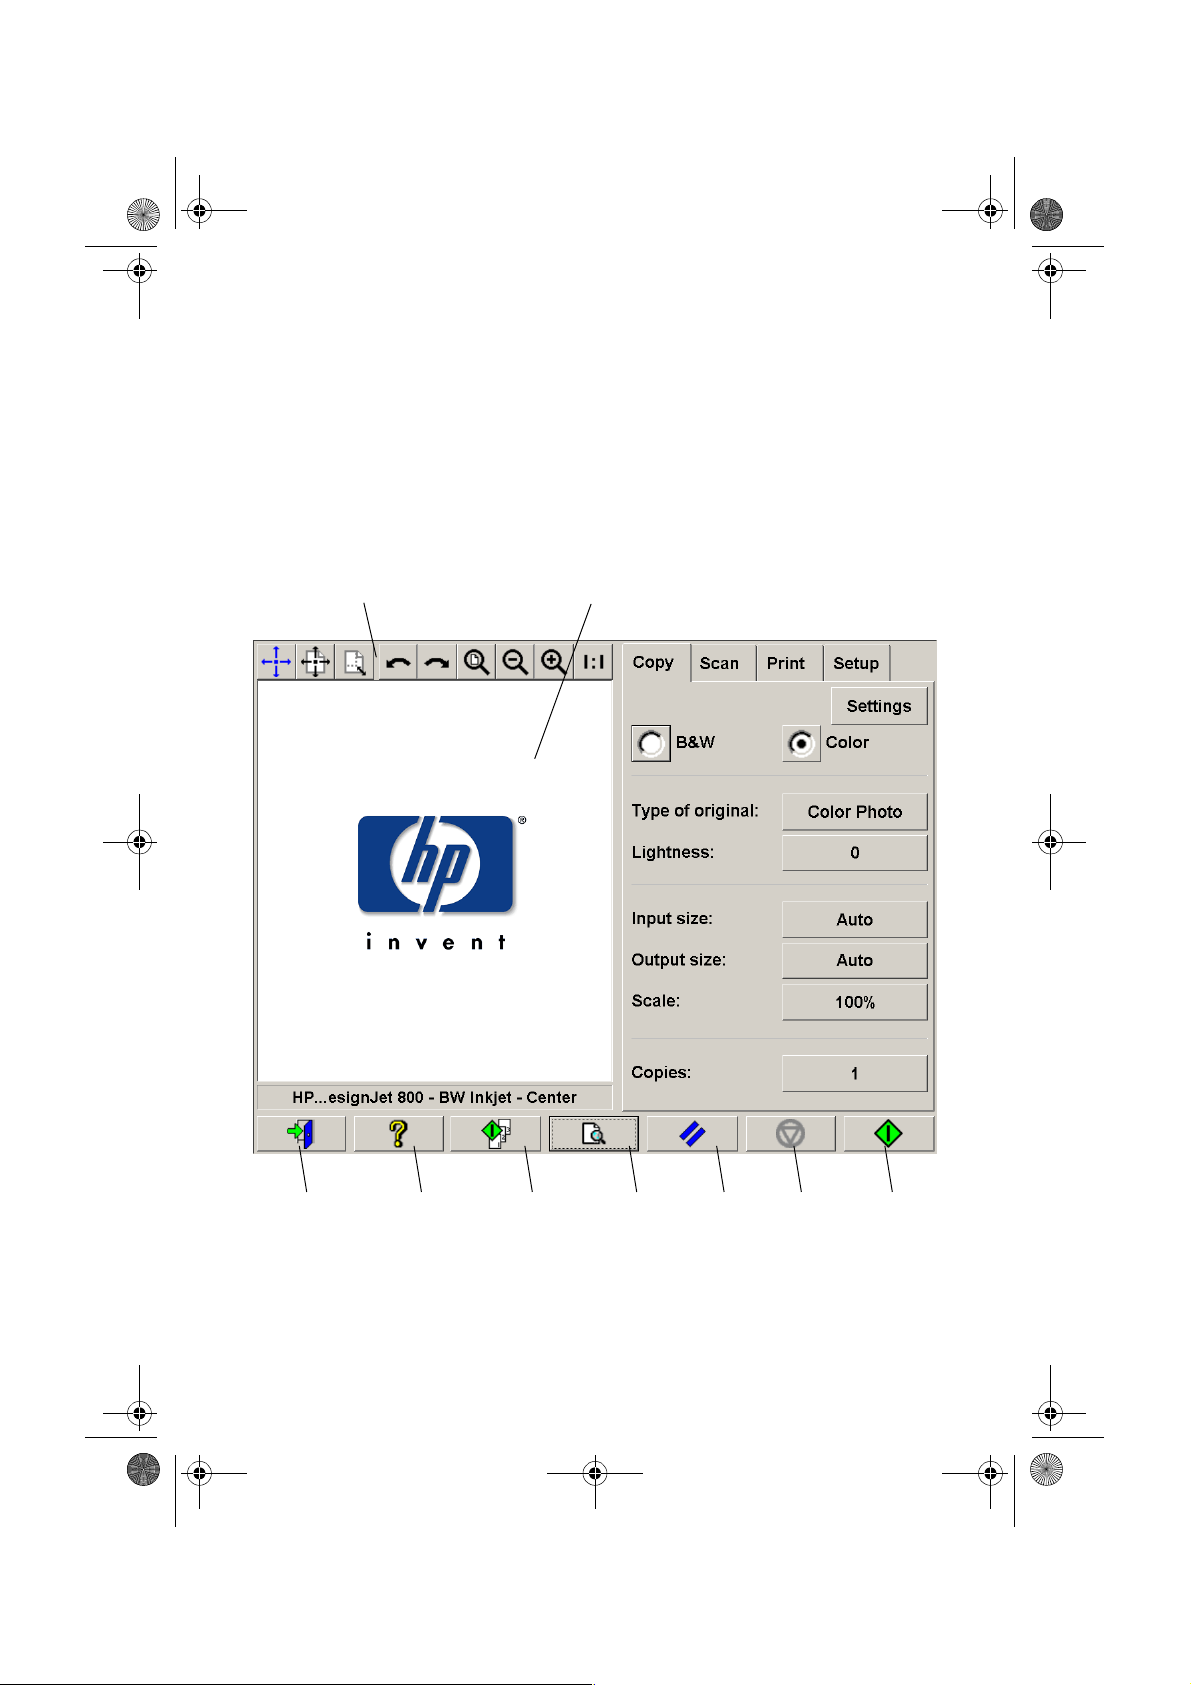
using your scanner software
using your scanner software
The user interface can be divided into two main sections:
■ the viewing section on the left
■ the control section on the right
viewing section
image toolbar preview window
control section
quit online help collate copies preview reset stop copy
copy toolbar
hp designjet 815mfp & scanner 4200 1
Page 6
quickref.book Page 2 Wednesday, February 12, 2003 2:01 PM
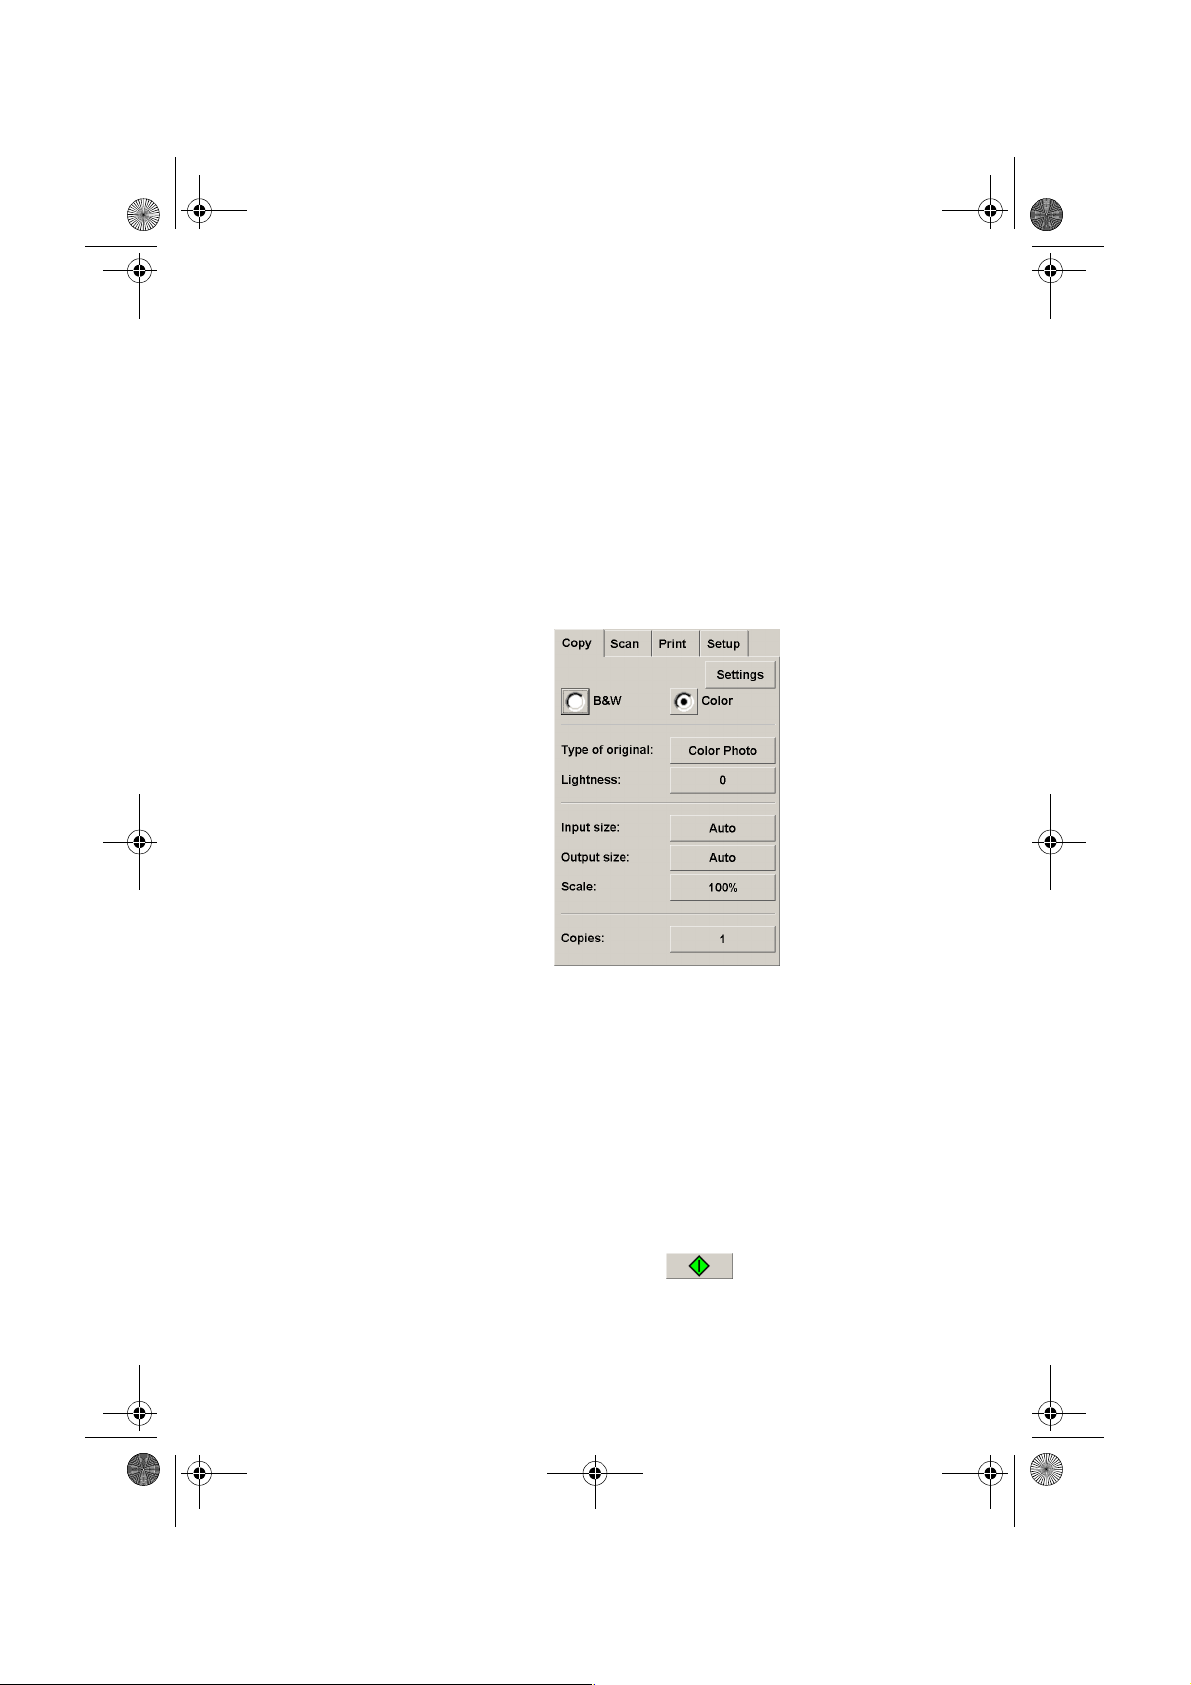
The control section consists of the following control tabs:
■ Copy: primary copy settings. The options available in the
Copy tab will be sufficient for most users and common
copy tasks.
■ Scan: scan settings used when scanning to file rather than
copying.
■ Print: settings used when printing saved image files.
■ Setup: printer, scanner, and job accounting settings that
are likely to be changed infrequently.
The viewing section consists of:
■ The image toolbar at the top with tools for moving the
image, moving and resizing the paper frame, alignment
and zooming tools.
■ The preview window for on-screen previewing and
adjustments.
The copy toolbar contains the main copy commands and the
Help button for online help.
using your scanner software
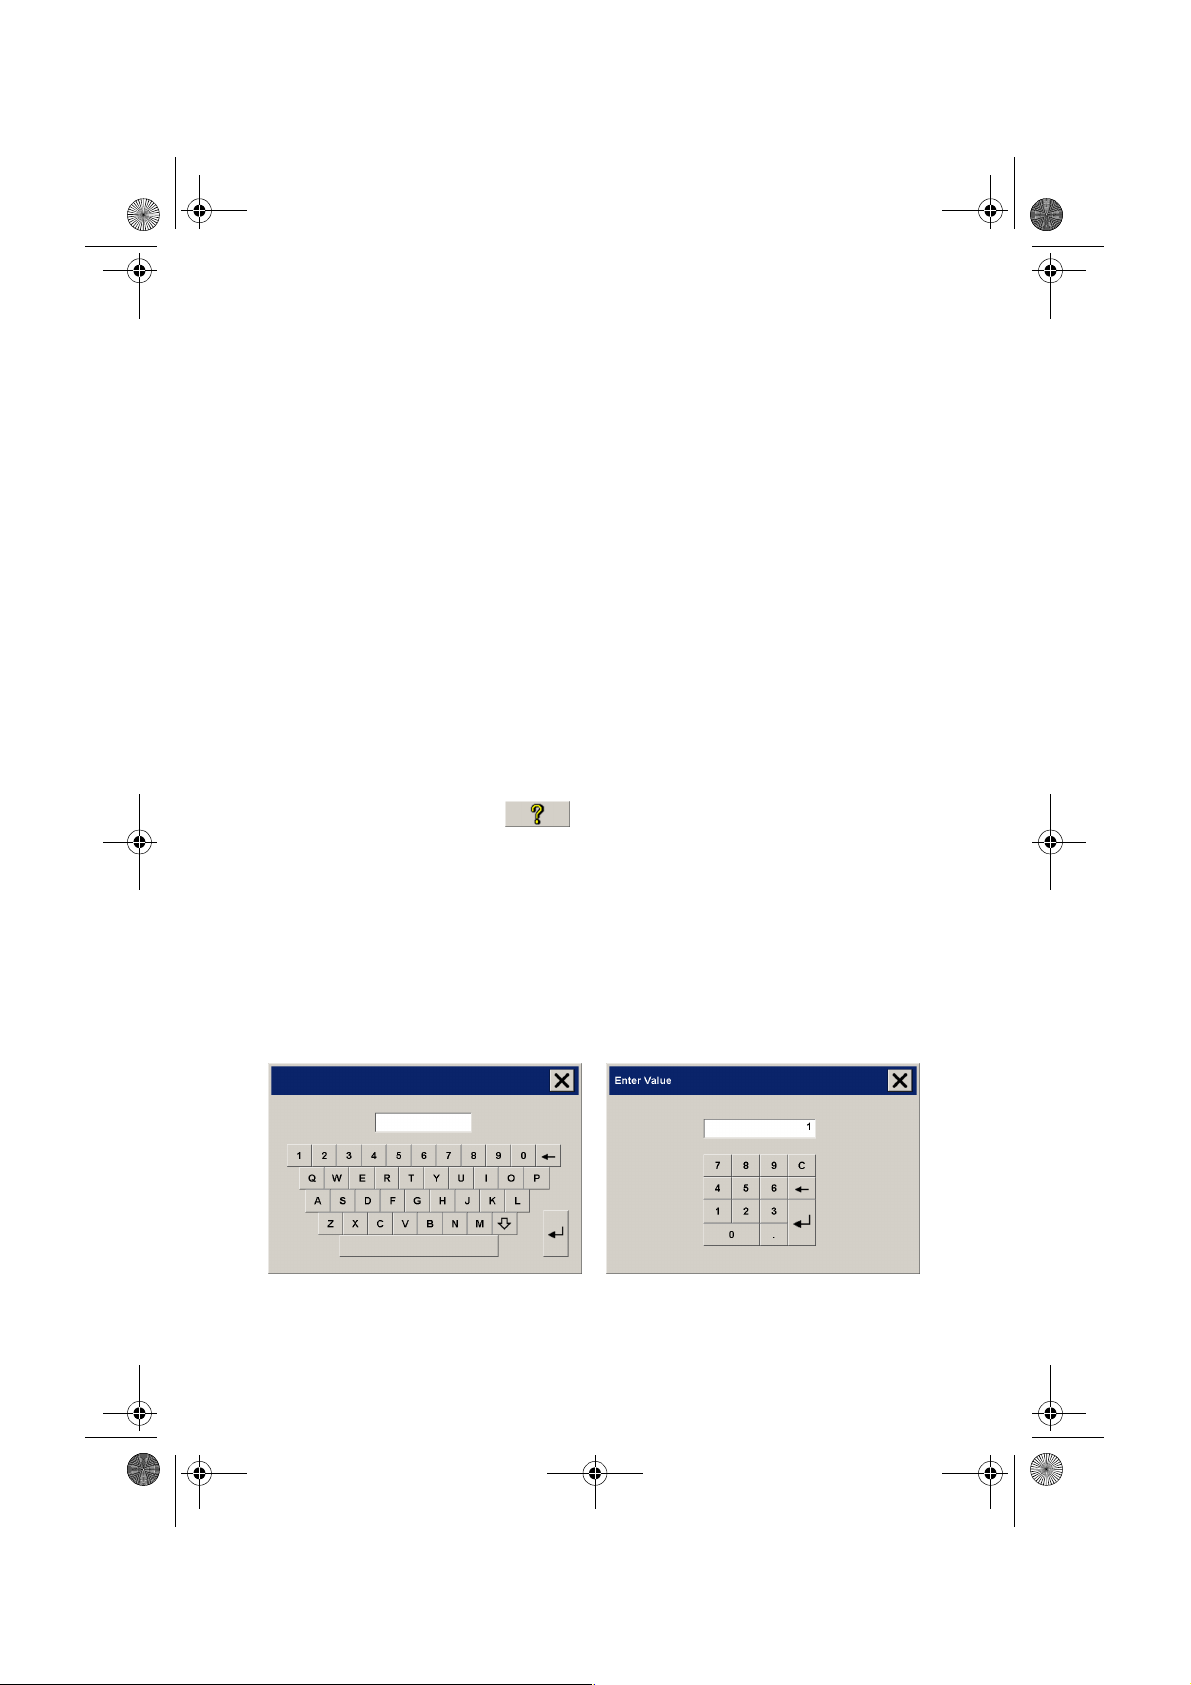
entering numbers and names
A text keyboard and a value keyboard appear in the touch
screen interface whenever written information is required by
the scanner software. You can also use the permanent
keyboard below the touch screen to enter text and numbers.
The Enter key accepts your setting and returns to the previous
dialog.
2 hp designjet 815mfp & scanner 4200
Page 7
quickref.book Page 3 Wednesday, February 12, 2003 2:01 PM
copying (overview)
copying (overview)
With your system up and ready, wide-format color copying is
easy, and most copy tasks will require only a few settings.
Remember to set your printer media width in your copy system
software (see ‘How do I set up the printer media width’ in your
online help).
Copying is controlled through the Copy tab and involves the
following steps:
a - Insert the original face down into the scanner.
b - Select Color or B&W (black and white) copying.
c - Select your Type of original template.
d - Set the input size. Usually this will be equal to the size
of your original. You can select Auto and let the
scanner detect the document’s size.
e - Set the intended output size of your copy. For making
one-to-one copies, this will be the size of your original.
You can also use Scale to determine the copy’s size.
f - Press the Copy button.
hp designjet 815mfp & scanner 4200 3
Page 8
quickref.book Page 4 Wednesday, February 12, 2003 2:01 PM
To preview the image before printing, press the Preview button
to load a preview of your copy.
You can use the Stop button to abort the current
preview or copy process.
copying (overview)
4 hp designjet 815mfp & scanner 4200
Page 9
quickref.book Page 5 Wednesday, February 12, 2003 2:01 PM
copying (step-by-step)
copying (step-by-step)
1 insert your document
You can load your original into the scanner from the
scanner’s center or side. The current loading method is
shown in the Setup tab > Scan Options > Load.
a - Place the document face down with the intended top
edge forward in the scanner insertion slot.
b - Slide the document gently into the insertion slot until
you feel it pulled into the start position.
2 select color or black-and-white copying
Your selection determines which Type of original templates
will be available in the following step.
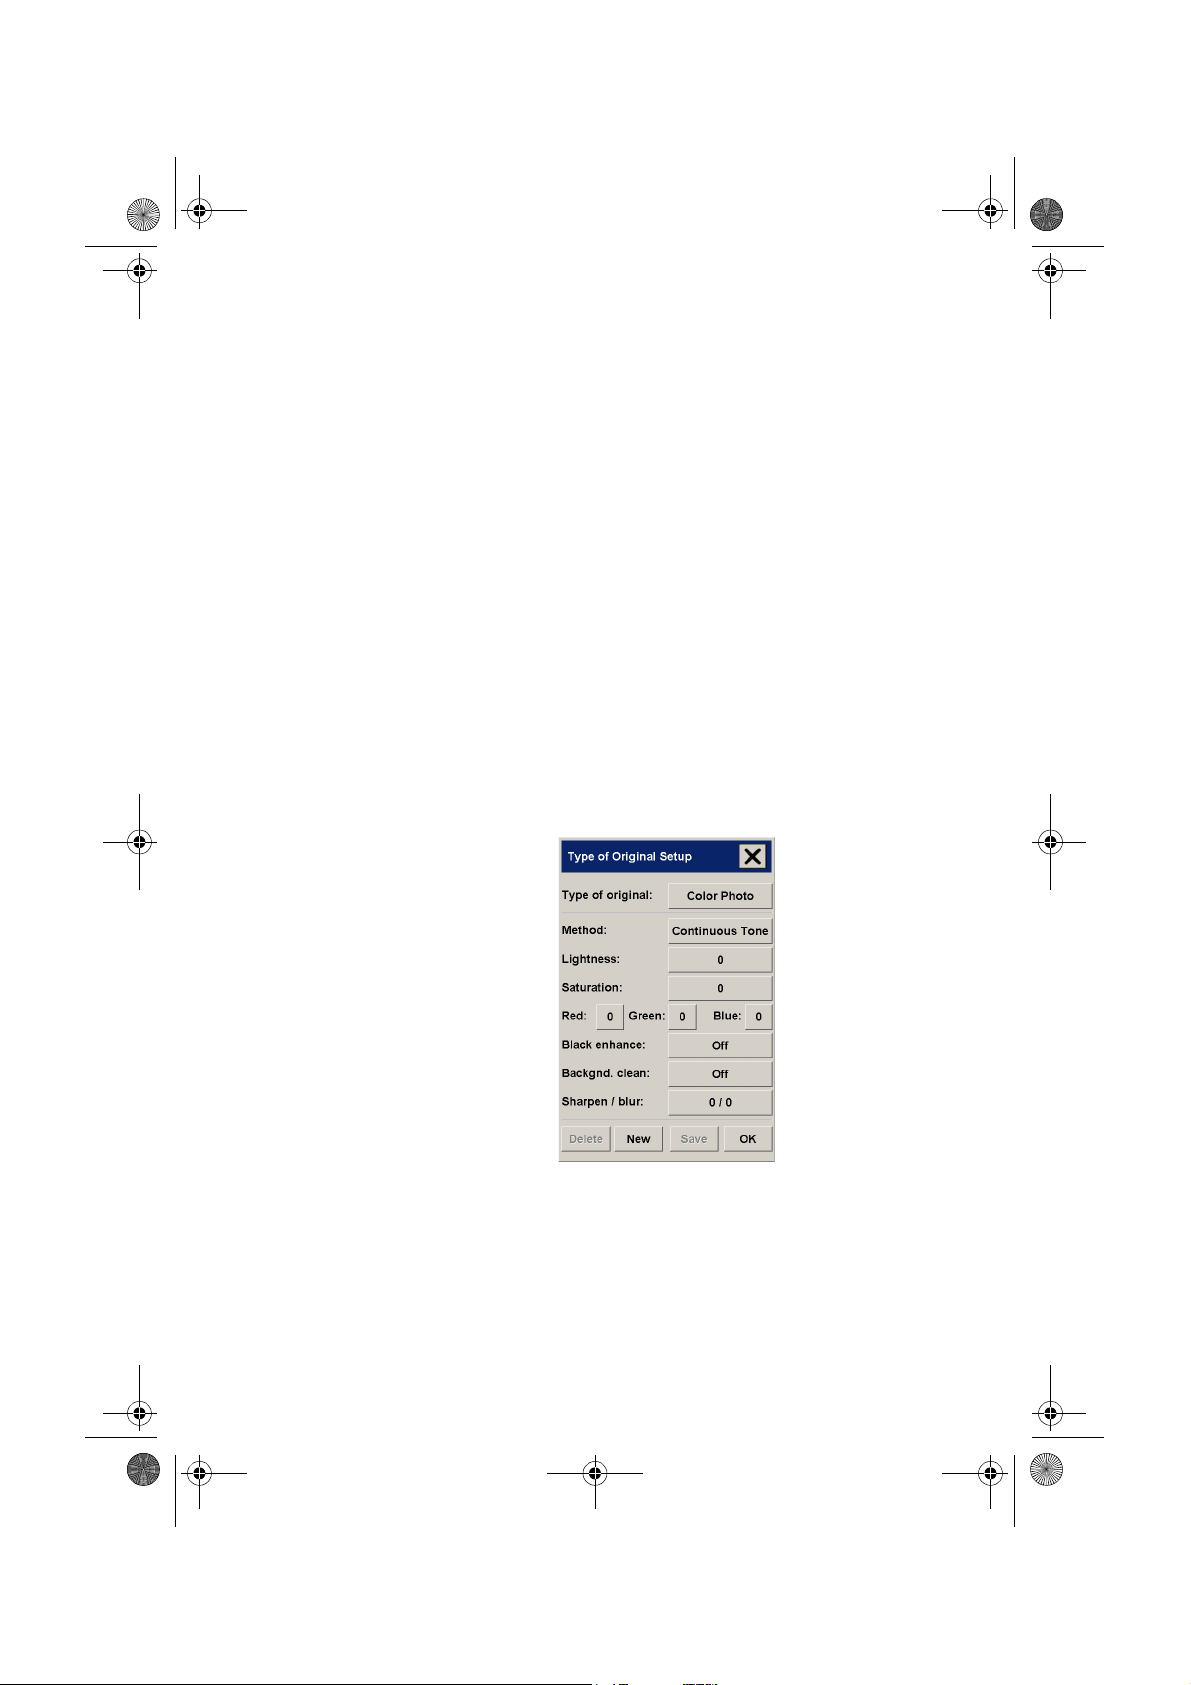
3 select the type-of-original template
a - Press the Type of original button in the Copy tab.
hp designjet 815mfp & scanner 4200 5
Page 10

quickref.book Page 6 Wednesday, February 12, 2003 2:01 PM
b - In the Type of Original (template) Setup dialog, press
the Type of original button to see the list of templates
available.
c - Select a Type of Original template that best describes
your current input.
d - Press OK to apply your choice.
copying (step-by-step)
4 select the input size
a - Press the Input size button in the Copy tab.
6 hp designjet 815mfp & scanner 4200
Page 11
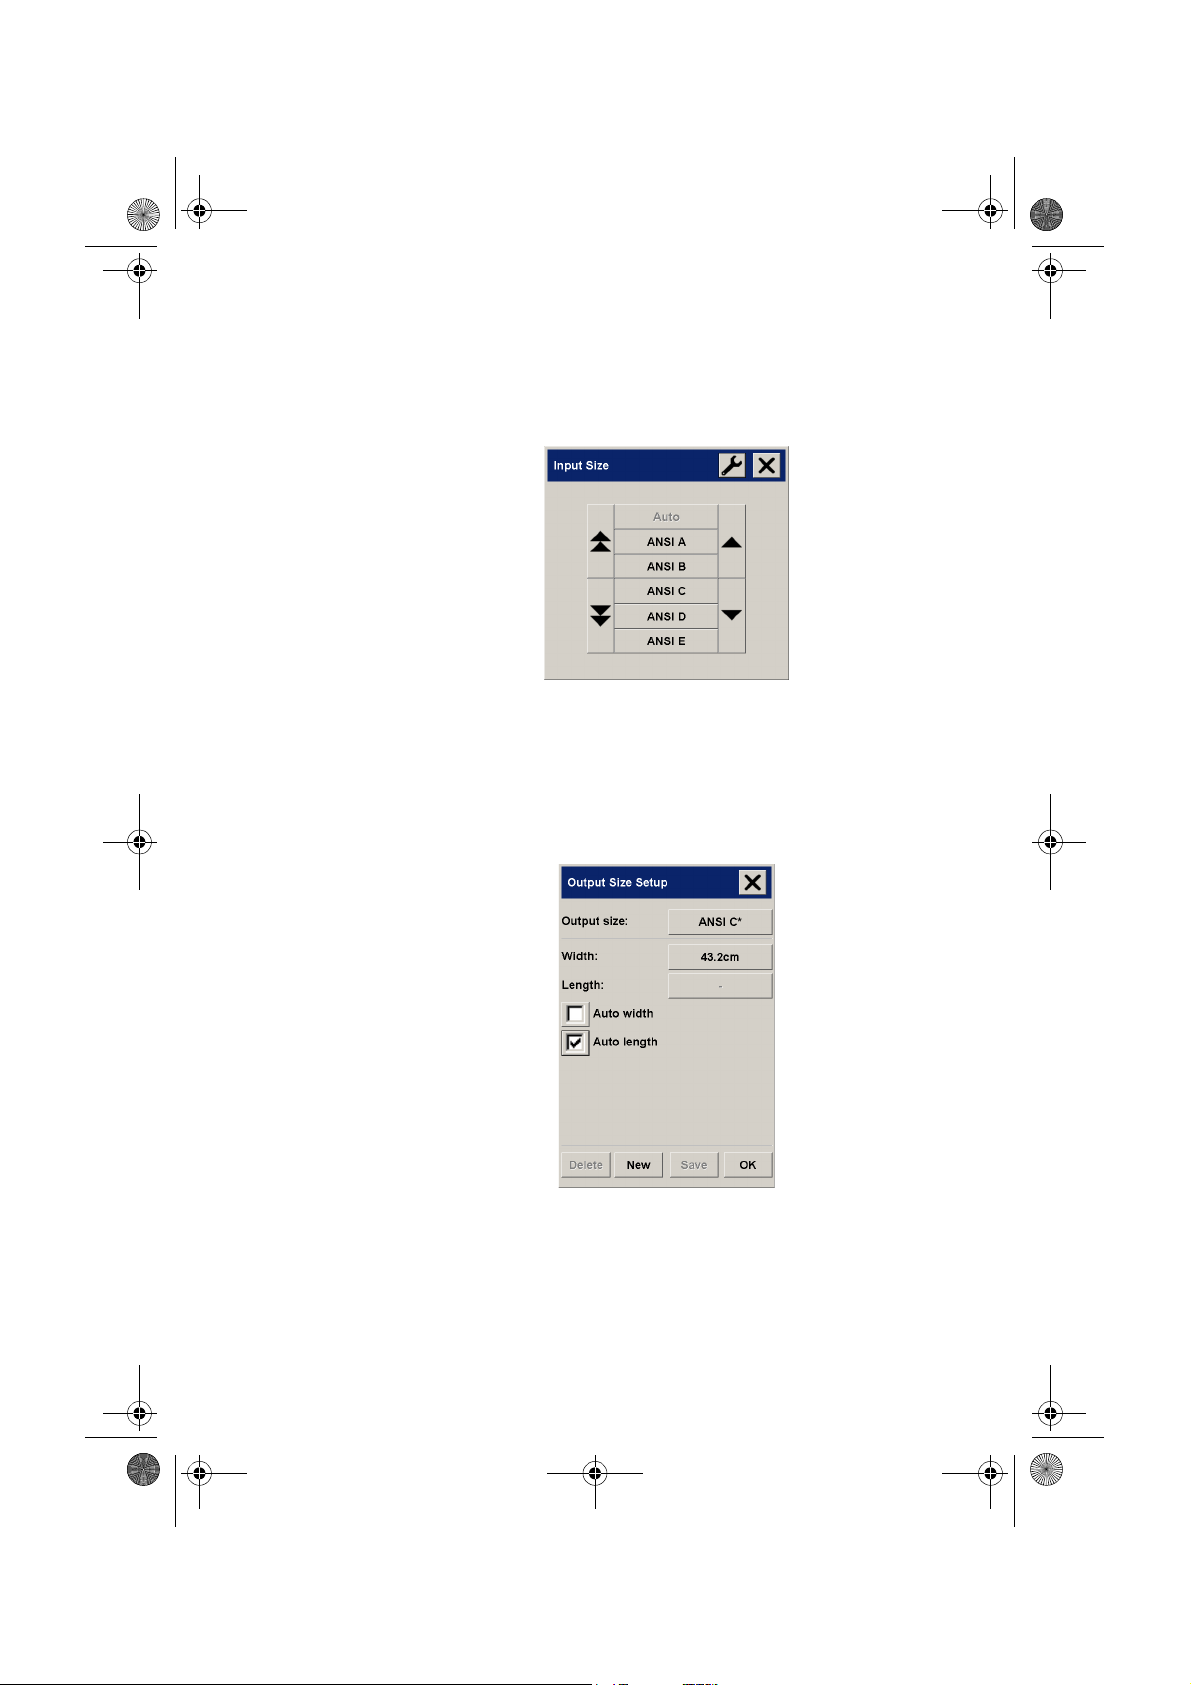
quickref.book Page 7 Wednesday, February 12, 2003 2:01 PM
copying (step-by-step)
b - In the dialog box, press the Input size button to display
the list of sizes predefined in your system.
c - Select from the list the size that fits your original. Auto
detection of width and length can also be selected.
d - Press OK to return to the Copy tab.
5 select the output size
a - Press the Output size button in the Copy tab.
hp designjet 815mfp & scanner 4200 7
Page 12

quickref.book Page 8 Wednesday, February 12, 2003 2:01 PM
b - In the Output size Setup dialog, press the Output size
button. Auto detection of width and length can be also
selected.
c - Select from the list the size you want for your output
copy.
d - Press OK to return to the Copy tab.
copying (step-by-step)
6 set the number of copies
a - Press the Copies option if you want to make more than
one copy of the loaded original.
b - Enter the number of copies in the edit field. This option
allows you to leave the system working unattended.
7start copying
The Copy button starts the copy process with the
settings you made.
You can use the Stop button to abort the current
preview or copy process.
Press the Reset button to clear your own settings and
reset the application to all of the scanner software’s default
values.
8 hp designjet 815mfp & scanner 4200
Page 13

quickref.book Page 9 Wednesday, February 12, 2003 2:01 PM
scanning to a file
scanning to a file
Scan to file stores your images as files. You can send them to
your printer using the print from file function.
a - Select the Scan tab and set your scan options: type of
original, size, filename, etc. Options such as margins,
layout, and media profile can be set later in the Setup
tab before you print from the file.
Press the File name button to enter a new name. The
default filename is the current date and time.
hp designjet 815mfp & scanner 4200 9
Page 14

quickref.book Page 10 Wednesday, February 12, 2003 2:01 PM
You can change the destination folder by pressing the File
folder button.
b - To change folder:
■ use the arrows to find the desired folder.
■ press the folder up button (marked "..") to move up to the
parent folder.
■ press a folder name to enter a folder.
■ create a new folder within the current folder with the New
Folder button.
c - Click OK to return to the Scan to file dialog.
scanning to a file
d - Press the Scan to file button to start the scan-
to-file process and save the image.
10 hp designjet 815mfp & scanner 4200
Page 15

quickref.book Page 11 Wednesday, February 12, 2003 2:01 PM
printing files
printing files
Printing your files is set up and controlled through a convenient
print list. You can set the number of copies you want by
defining the number for each file individually, by determining
the number of sets (how many times the whole list will be
printed), or by using a combination of both.
a - Press the Print tab.
Whenever you enter the Print dialog, the Copy button
changes to the Print button.
The Print list group displays the files currently selected for
printing. If the list is empty or it needs changing, you can
select files by pressing the Add to List button.
b - Check or change your Setup tab settings. The current
Setup tab settings, such as margins, layout, printer and
media profile, will apply to the whole print job.
c - Press the Print button to send the listed files to
the printer.
NOTE The Print tab is intended for printing files created with the Scan tab; it
is not recommended for printing files from other sources.
hp designjet 815mfp & scanner 4200 11
Page 16

quickref.book Page 12 Wednesday, February 12, 2003 2:01 PM
collated copies and copy sets
You can group your images into sets that are stored before
going to the printer, and then print a specified number of these
sets on your printer.
a - Insert the first document of your set into the scanner.
b - Make your copy settings in the Copy tab dialog.
c - Press the Collate Copy button.
The original will then be copied as normal, but it will be
stored inside your system instead of going to the printer.
Continue inserting originals that belong to the set and
press the Collate Copy button for each one until all the
originals in the set have been scanned.
You can adjust each copy in the set just as you can with
single document copying.
collated copies and copy sets
d - Set the number of sets by pressing the Copies button in
the Copy tab. A set contains all the input originals.
e - Press the Print button to activate the whole
copy job.
Abort the Collate session any time by pressing the Reset button.
For jobs that require a high level of control and flexibility,
consider using the Scan tab to scan to file and the Print tab to
print the files.
12 hp designjet 815mfp & scanner 4200
Page 17

quickref.book Page 13 Wednesday, February 12, 2003 2:01 PM
scanning thick media
scanning thick media
Your scanner is capable of scanning heavyweight coated
paper or cardboard. Other kinds of thick media are not
supported and could cause damage.
To scan thick media, you can change the insertion slot height
on your scanner from 0 to 15 mm (0 to 0.6 inches). You can fit
the slot to the thickness of your original.
NOTE Changing the insertion slot height can affect the scanner’s automatic
control of border lines between the cameras, which is called
‘stitching’.
To scan thick originals:
a - Open the scanner cover.
b - Press down on the platen as you pull first one slider,
and then the other (left and right), towards the
scanner’s center until the media thickness adjustment
sliders found at each side are at the same setting.
hp designjet 815mfp & scanner 4200 13
Page 18

quickref.book Page 14 Wednesday, February 12, 2003 2:01 PM
c - Close the scanner cover.
d - Load the thick original you wish to scan. Center
loading is recommended with thick originals, so that
the media transport rollers grip more evenly.
e - Make a test scan to check for errors. Bulky thick
material needs to be supported with both hands on its
way in and out of the scanner.
scanning thick media
Errors will be easier to see in an image with a clear
diagonal line. If lines seem uneven, proceed as follows:
f - In the Setup tab, select the Scan Options button.
14 hp designjet 815mfp & scanner 4200
Page 19

quickref.book Page 15 Wednesday, February 12, 2003 2:01 PM
scanning thick media
g - In the Scan Options dialog, select the Scanner Setup
button.
h - Select the Extended Thickness tab, and check the box
labeled “Use extended thickness paper handling”.
i - Change the value for each of the scanner’s cameras.
Normally, only positive values should be used.
j - Make test scans and readjust the values until you are
satisfied that the lines are stitched correctly.
k - Click OK to accept your settings.
hp designjet 815mfp & scanner 4200 15
Page 20

quickref.book Page 16 Wednesday, February 12, 2003 2:01 PM
l - Repeat steps (d) to (h) until you are satisfied with the
results.
To return the insertion slot height to its Normal position:
a - Press down on the platen as you push first one slider
and then the other (left and right) towards the sides of
the scanner.
b - When the platen is returned to its Normal position, the
message “Paper Guide in Extended Position” will be
replaced by the Load option: Center or Side.
scanning thick media
16 hp designjet 815mfp & scanner 4200
Page 21

quickref.book Page 17 Wednesday, February 12, 2003 2:01 PM
previewing copies
previewing copies
The previewing feature allows you to control your document
size and margins visually and readjust or relocate the paper
frame on the image. Its size is determined by the size settings
made in the Copy tab dialog. The paper frame’s size and
thickness in the preview window will be determined by the
Input Size, Output Size, and Margins settings.
Press the Preview button to load a fresh preview.
zoom all
Setting size and margins, you need a view of the whole image.
Resize the image so that it exactly fits in the preview window.
zoom in
The zoom in axis is in the center of the preview window.
Continue to press the Zoom In button to the required level of
detail.
zoom out
The zoom out axis is in the center of the preview window.
Continue to press the Zoom Out button to the required level of
detail.
one-to-one pixel viewing
View the image with one scanned pixel shown as one screen
pixel.
resize paper frame
The Resize Paper Frame tool is especially useful for copying
non-standard paper sizes.
When activated, the Resize Paper Frame Tool partitions the
areas around the paper frame into sections. When a section is
hp designjet 815mfp & scanner 4200 17
Page 22

quickref.book Page 18 Wednesday, February 12, 2003 2:01 PM
touched, the closest frame side or corner is resized to the new
position.
move tool
Move the image to get any part of it centered or visible in the
preview window.
previewing copies
There are two ways to move the image:
■ By dragging anywhere in the image window.
■ Touch a point on the screen, and that point will then be
centered in the preview window.
position the paper frame
You can position the paper frame directly in the preview and
visually set your copy area.
There are two ways to move the frame:
■ By dragging anywhere on the screen. Imagine you are
gripping the frame and dragging it around over the image.
■ Touch a point on the screen, and that point becomes the
new center for the Paper Frame.
This method is especially useful when you are making spot
test strips for printing. It lets you continuously and rapidly
reposition the frame on important areas that you want
tested.
■ Dragging the edges will resize the paper frame and is an
alternative to the Resize Paper Frame tool.
18 hp designjet 815mfp & scanner 4200
Page 23

quickref.book Page 19 Wednesday, February 12, 2003 2:01 PM
previewing copies
align left and align right
The original appears crooked in the Preview Window. You do
not need to reload the original. Press the align buttons to align
the image with the paper frame.
Alternatively, press the Settings button in the Copy tab or in the
Scan tab, and select the Auto-align option. This will align your
image automatically. If you’re not satisfied with the result, press
the Reset alignment button, press OK, and align the image
manually with the Align Left and Align Right buttons.
hp designjet 815mfp & scanner 4200 19
Page 24

quickref.book Page 20 Wednesday, February 12, 2003 2:01 PM
adding a new printer
To add a new HP Designjet printer to the printer list in your
scanner software, follow these steps:
a - Press the Quit button and then the Exit button
to exit the scanner software.
b - Press the System Setup button.
c - Press the Install HP Designjet button.
d - Follow the instructions on the screen.
adding a new printer
20 hp designjet 815mfp & scanner 4200
Page 25

quickref.book Page 21 Wednesday, February 12, 2003 2:01 PM
creating a new media profile
creating a new media profile
Before starting the following procedure, make sure you have
color-calibrated the scanner, and make sure that the media
profile you intend to create is not there in the list already.
a - Press the Setup tab.
b - Press the Printer button. If necessary, press the Tool
button.
c - Press the Add Media Profile button.
d - Press the Calibrate RIP button.
e - Set the ink level and the gray balance, then press OK
to return to the Media Setup menu.
f - Press the Print Color Sheet button to print a color patch
reference sheet.
g - Load the color sheet into the scanner face down,
aligning the arrow to the 10.5-inch mark (26.7 cm)
measured from the right side of the scanner.
h - Press the Name and Scan Sheet button to assign a
name to your new media profile.
i - Press the Enter key to accept the new name and begin
scanning the color sheet.
The media profile is now in the list of available media profiles.
You can use the Delete button to delete media profiles. Only
user-created profiles can be deleted.
You can use the Rename button to rename media profiles if
needed.
You can use the Validate button to check that the media profile
is valid for your combination of scanner and printer.
hp designjet 815mfp & scanner 4200 21
Page 26

quickref.book Page 22 Wednesday, February 12, 2003 2:01 PM
scanning and copying files to CD
Your HP Designjet is capable of writing to compact discs in the
same easy way as it writes to any other storage medium.
First, insert a blank CD into the touch screen’s CD drive. You
may also be able to write to a partly-used CD, if the CD has
not been ‘closed’.
Then, follow the normal steps for scanning or copying, but
send the files to drive E: (the CD drive).
When you have finished, press the eject button on the CD drive
to eject the CD. There will be a delay of about 45 seconds
before the CD is ejected.
scanning and copying files to CD
22 hp designjet 815mfp & scanner 4200
Page 27

quickref.book Page 23 Wednesday, February 12, 2003 2:01 PM
touch screen error messages
touch screen error messages
The following table lists error messages, error codes, and the
recommended course of action in each case. If the
recommendation does not solve your problem, try restarting the
system.
If you see an error code with no error message, then you must
contact HP Support.
message code recommendation
No scanner was found. none Check that the scanner is powered
on, and that the FireWire cable
between the scanner and the touch
screen is correctly connected at both
ends. Then press the Rescan button.
The printer cannot be detected. none Check that the name of the printer is
displayed on the printer button in
the Setup tab, that the printer is
powered on, and that the printer is
connected to the scanner.
When combining thick media
handling (paper guide in extended
position) with auto-size detection,
the size detection must be done
separately by running a preview
scan before the final copy or scan
operation.
The folder must be empty -11 Check that the folder is empty
The currently selected printer is not
installed on the system.
No scanner selected or selected
scanner not present
-19 Perform a preview scan, reloading
the original into the scanner.
before deleting it.
-9 Install a Windows printer driver for
the currently selected printer.
-6 Check that the scanner is turned on.
Check that the scanner is selected.
hp designjet 815mfp & scanner 4200 23
Page 28

quickref.book Page 24 Wednesday, February 12, 2003 2:01 PM
message code recommendation
touch screen error messages
No media profile selected for
current printer
No printer selected -1 Check that the printer is connected.
Invalid scan coordinates. The paper
frame was placed fully outside the
scan image.
Not enough disk space for spool
file
The scanner is currently on standby.
Please press the soft power button
on the scanner to activate it.
Error printing colorsheet 1003 Check the printer.
Error detecting index-mark 1013 Reinsert the sheet and ensure it is
Sheet bad aligned 1014 Reinsert the sheet and ensure it is
-2 OK and run operation without
media profile. Cancel and prepare
a media profile before performing
operation.
Check the printer's configuration.
2 The paper frame was placed fully
outside the scan image. You can
reposition the paper frame so it
covers some of the scannable area.
6 Make sure the environment variable
TEMP (or secondary TMP) points to
a folder with plenty of space.
8Press the button.
aligned correctly and in the right
position.
aligned correctly and in the right
position.
Error detecting left margin 1015 Reinsert the sheet.
Error detecting right margin 1016 Reinsert the sheet.
Error reading colorsheet 1017 Check that you have inserted the
correct sheet.
CLC aborted 1018 The user canceled the color map
operation.
24 hp designjet 815mfp & scanner 4200
Page 29

quickref.book Page 25 Wednesday, February 12, 2003 2:01 PM
touch screen error messages
message code recommendation
Wrong insert position? 1019 Reinsert the sheet and ensure it is
aligned correctly and in the right
position.
Can't find top of sheet 1020 Check that the sheet is inserted in
the right position.
Can't find bottom of sheet 1021 Check that the sheet is inserted in
the right position.
Does not correspond to this version
of clc.dll!
Unable to open device for reading 2004 Check that the scanner is available.
Unable to open device for writing 2005 Check that the printer is available.
Unable to read from device 2006 Try again.
Unable to write to device 2007 Try again.
Destination already exists 2013 Use another file name.
The scanner is initializing or
warming up.
1022 An incorrect version of the
language resource DLL has been
installed. Install a version of the DLL
in the correct language.
13496 Wait until the power light on the
scanner is on and the other lights
are off.
hp designjet 815mfp & scanner 4200 25
Page 30

quickref.book Page 26 Wednesday, February 12, 2003 2:01 PM
scanning problems
If you notice problems with your scanned images, such as dirt
spots, scratches, or inconsistent coloring, perform the routine
maintenance procedures explained in your online guide, which
include cleaning and calibration.
Restart the scanner when you have finished the maintenance
procedures.
scanning problems
26 hp designjet 815mfp & scanner 4200
Page 31

quickref.book Page 27 Wednesday, February 12, 2003 2:01 PM
flashing lights on the operator panel
flashing lights on the operator panel
If you notice a flashing light on your scanner’s operator panel,
it means that your scanner is reporting a problem of some
kind.
diagnostics light is flashing
The most likely explanation is that the scanning area needs
cleaning. Perform the routine maintenance procedures
explained in your online guide, which include cleaning. Restart
the scanner when you have finished the maintenance
procedures.
If the light continues to flash, there may be camera position
errors. In this case, contact HP Support.
wait light is flashing
This indicates that the scanner needs to make some
readjustment but is unable to do so. Remove any paper or
other media from the scanner, return the Original Pressure
Platen to the normal position, and wait for the light to turn off.
wait and diagnostics lights are flashing
In this case, disregard the wait light and respond to the
diagnostics light as described above.
hp designjet 815mfp & scanner 4200 27
Page 32

quickref.book Page 28 Wednesday, February 12, 2003 2:01 PM
printing problems
the image is cropped
If your image is cropped and no error message was displayed,
make sure that you have set the media width for your printer in
the scanner software.
white space with nesting
If there is space for another image on your media when using
nesting, make sure that you have set the media width for your
printer in the scanner software.
setting the media width
Follow these steps to set the media width.
a - Choose the Setup tab.
printing problems
b - Press the Printer button.
c - If you see a list of printers, press the Tool button.
d - Press the Unprintable Area button.
e - Press the Media Width button.
f - Enter the media width and press the Enter key.
28 hp designjet 815mfp & scanner 4200
Page 33

quickref.book Page 29 Wednesday, February 12, 2003 2:01 PM
scanner software in the wrong language
scanner software in the wrong language
If your scanner software is in the wrong language for any
reason, you can easily change the language as follows:
a - Press the Quit button and then the Exit button
to exit your scanner software. In case you cannot read
the buttons, the Exit button is the lower of the two
buttons displayed after you have pressed the Quit
button.
b - Press the System Setup button. This is the middle button
of the three displayed at the right-hand side of the
screen.
c - Press the Change Language button. This is the top left
button in the new window that appears.
d - Select your preferred language.
You will now have to wait a short time while the system shuts
down and restarts.
hp designjet 815mfp & scanner 4200 29
Page 34

quickref.book Page 30 Wednesday, February 12, 2003 2:01 PM
scanner software does not start
If your scanner system software does not start up when you turn
on the touch screen, you will need to reinstall the software.
Reinstalling this software will not affect your own data or
settings.
You need the ’System Recovery’ CD that came with your
scanner system.
a - With the system on, insert the System Recovery CD in
the CD-ROM drive.
b - Power off the touch screen and then power it on again.
Once recovery has started, it is automatic. Ignore any
menus. Remember to remove the CD when recovery is
finished.
scanner software does not start
c - Power off the touch screen and then power it on again.
30 hp designjet 815mfp & scanner 4200
Page 35

quickref.book Page 31 Wednesday, February 12, 2003 2:01 PM
scanner software does not start
hp designjet 815mfp & scanner 4200 31
Page 36

quickref.book Page 32 Wednesday, February 12, 2003 2:01 PM
printed on
recycled paper
© 2003 Hewlett-Packard Company
part number: Q1279-90011
first edition
printed in
Hewlett-Packard Española S.L.
Avenida Graells, 501
08190 Sant Cugat del Vallès
Barcelona
Spain
 Loading...