

Page 1
PRINTER Controller
Infotec 4151 4181 4182
Operating Instructions
Printer Reference 2 (option)
For safety, please read this manual carefully before you use this product and keep it
handy for future reference.
Page 2

Introduction
This manual contains detailed instructions on the operation and maintenance of this machine. To get
maximum versatility from this machine all operators should carefully read and follow the instructions in
this manual.
Please keep this manual in a handy place near the machine.
Please read the Safety Information in the “Copy Reference” before using this machine. It contains important information related to USER SAFETY and PREVENTING EQUIPMENT PROBLEMS.
Note:
"PS2" stands for PostScript level2 Compatible in this manual.
Important
Contents of this manual are subject to change without prior notice. In no event will the company be liable for direct, indirect, special, incidental, or consequential damages as a result of handling or operating the machine.
Trademarks
Microsoft and Windows are registered trademarks of Microsoft Corporation in the United States and/or
other countries.
Ethernet is a registered trademark of Xerox Corporation.
Adobe, PostScript, Acrobat and PageMaker are registered trademarks of Adobe System Incorporated.
PCL is a registered trademark of Hewlett-Packard Company.
Other product names used herein are for identification purposes only and might be trademarks of their
respective companies. We disclaim any and all rights in those marks.
Warning:
Use of controls or adjustment or performance of procedures other than those specified in this manual
might result in hazardous radiation exposure.
Notes:
Some illustrations in this manual might be slightly different from the machine.
Certain options might not be available in some countries. For details, please contact your local dealer.
Page 3

Manuals for This Machine
Manuals for This Machine
The following manuals separately describe the operational procedures for the
operation and maintenance of the machine.
To enhance safe and efficient operation of the machine, all users should read and
follow the instructions contained in the following manuals.
❖❖❖❖ Copy Reference
Describes the procedures and functions for using this machine as a copier.
❖❖❖❖ System Settings
Describes the system settings of this machine.
❖❖❖❖ Facsimile Reference <Basic Features>
Describes the procedures and most frequently used functions for using this
machine as a facsimile.
❖❖❖❖ Facsimile Reference <Advanced Features>
Describes the procedures and more advanced functions for using this machine as a facsimile. And also explains settings for key operators.
❖❖❖❖ Printer Reference 1
Describes the system settings, procedures and functions for using this machine as a printer.
❖❖❖❖ Printer Reference 2
Describes the procedures and provides necessary information about using
this machine as a printer. This manual is provided as a PDF file on the CDROM labeled “Operating Instructions for Printer”. (this manual)
❖❖❖❖ Network Interface Board Quick Configuration Guide
Describes the procedures and provides necessary information about setting up
and using the printer under the network environment. This manual is provided
as a PDF file on the CD-ROM labeled “Operating Instructions for Printer”.
❖❖❖❖ Type 1018 PostScript level2 Compatible Kit Operating Instructions Supplement
Describes the functions of Printer Utility for Mac. This manual is provided as
a PDF file on the CD-ROM labeled “Operating Instructions for Printer”.
❖❖❖❖ Network Interface Board Type 1018 Owner's Manual
Describes the procedures and provides necessary information about setting
up and using the printer under the network environment. This manual is provided as a PDF file on the CD-ROM labeled “Print Server Software and Documentation” which comes with optional Network Interface Board Type 1018.
Note
❒ Concerning UNIX printing information, please visit our web site or consult
your authorized reseller.
i
Page 4
ENERGY STAR Program
As an ENERGY STAR Partner, we have determined
that this machine model meets the ENERGY STAR
Guidelines for energy efficiency.
The ENERGY STAR Guidelines intend to establish an international energy-saving system for
developing and introducing energy-efficient office equipment to deal with environmental issues, such as global warming.
When a product meets the ENERGY STAR Guidelines for energy efficiency, the Partner shall
place the ENERGY STAR logo onto the machine model.
This product was designed to reduce the environmental impact associated with office equipment by means of energy-saving features, such as Low-power mode.
• Low Power mode
This product automatically lowers its power consumption 15 minutes after
the last copy or print job has finished. Printing is still possible in Low Power
mode, but if you wish to make copies press the {{{{Operation Switch}}}} key first.
For how to change the default interval that the machine waits before entering
Low Power mode, see “Energy Saver Timer” in the System Settings manual.
• Sleep mode (Printer and facsimile installed)
If the printer or facsimile features are installed, this product automatically
lowers its power consumption even further 30 minutes after the last copy or
print job has finished. Printing and facsimile reception is still possible in Sleep
mode, but if you wish to make copies press the operation switch first.
For how to change the default interval that the machine waits before entering
Sleep mode, see “Auto Off Timer” in the System Settings manual.
• Auto Off mode (Copier only)
If the neither the printer feature nor facsimile feature is installed, this product
automatically turns itself off 30 minutes after the last copy or print job has finished. If you wish to make copies when the machine is in Auto Off mode,
press the operation switch.
For how to change the default interval that the machine waits before entering
Auto Off mode, see “Auto Off Timer” in the System Settings manual.
ii
Page 5
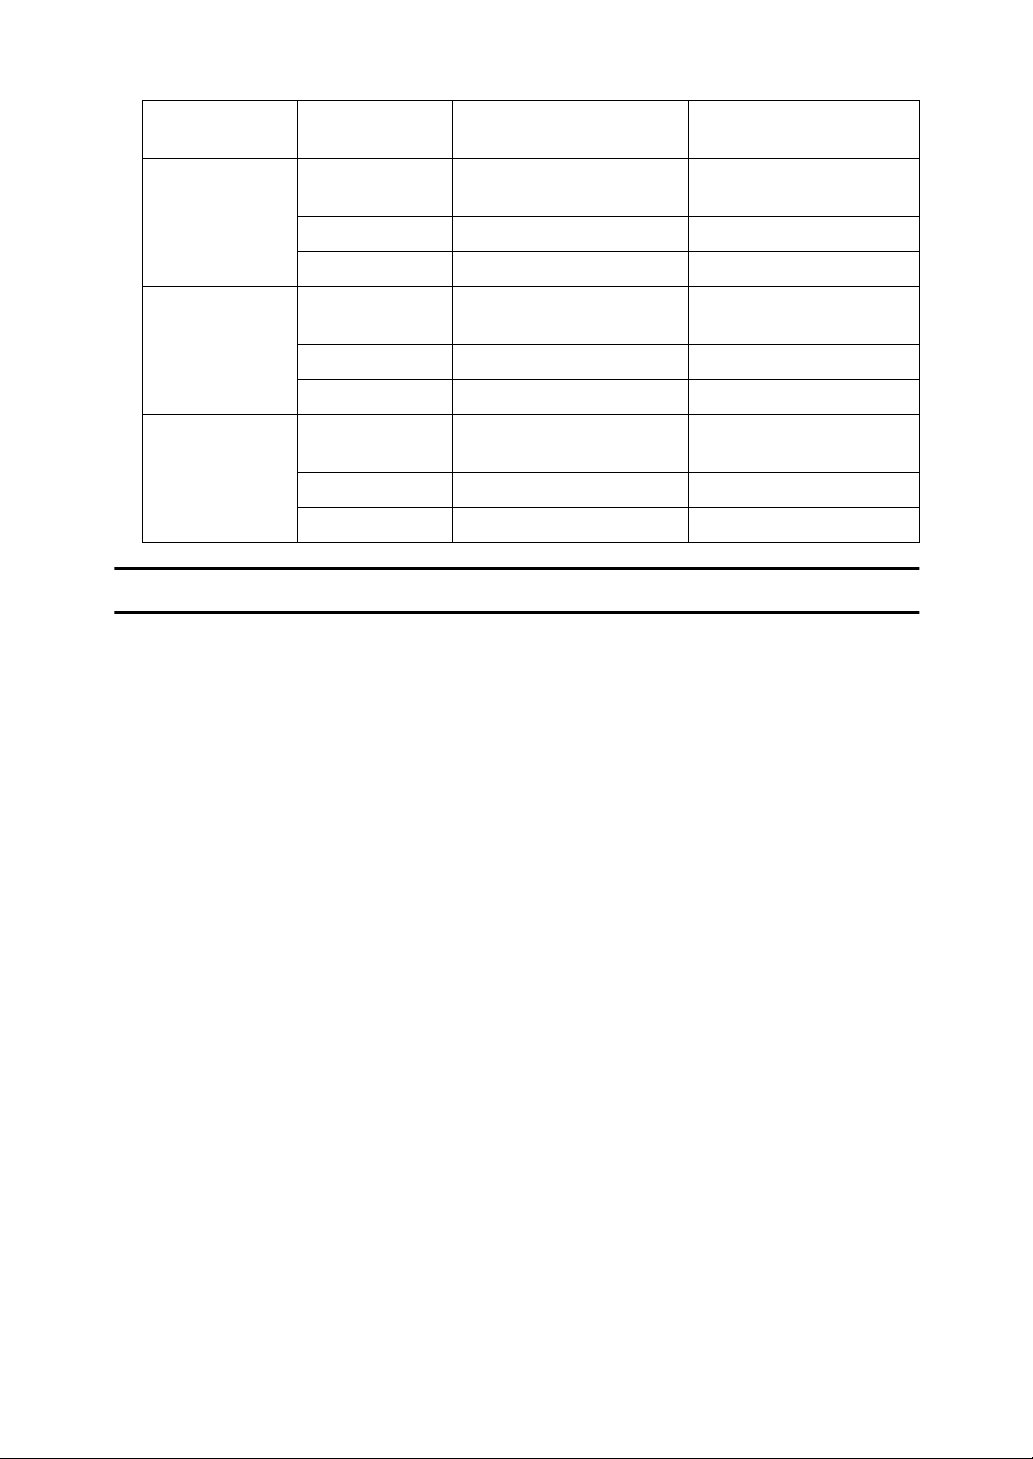
❖❖❖❖ Specification
Copy feature Printer or facsimile
installed
Low Power
mode
Sleep Mode Power
Auto Off mode Power
Power
consumption
Default Time 15 minutes 15 minutes
Recovery Time Less than 20 seconds Less than 20 seconds
consumption
Default Time - 30 minutes
Recovery Time - 20 seconds
consumption
Default Time 30 minutes -
Recovery Time 20 seconds -
70 Wh 80 Wh
- 70 Wh
Less than 1 Wh -
Recycled Paper
In accordance with the ENERGY STAR Program, we recommend use of recycled
paper which is environmentally friendly. Please contact your sales representative for recommended paper.
iii
Page 6
How to Read This Manual
R
R
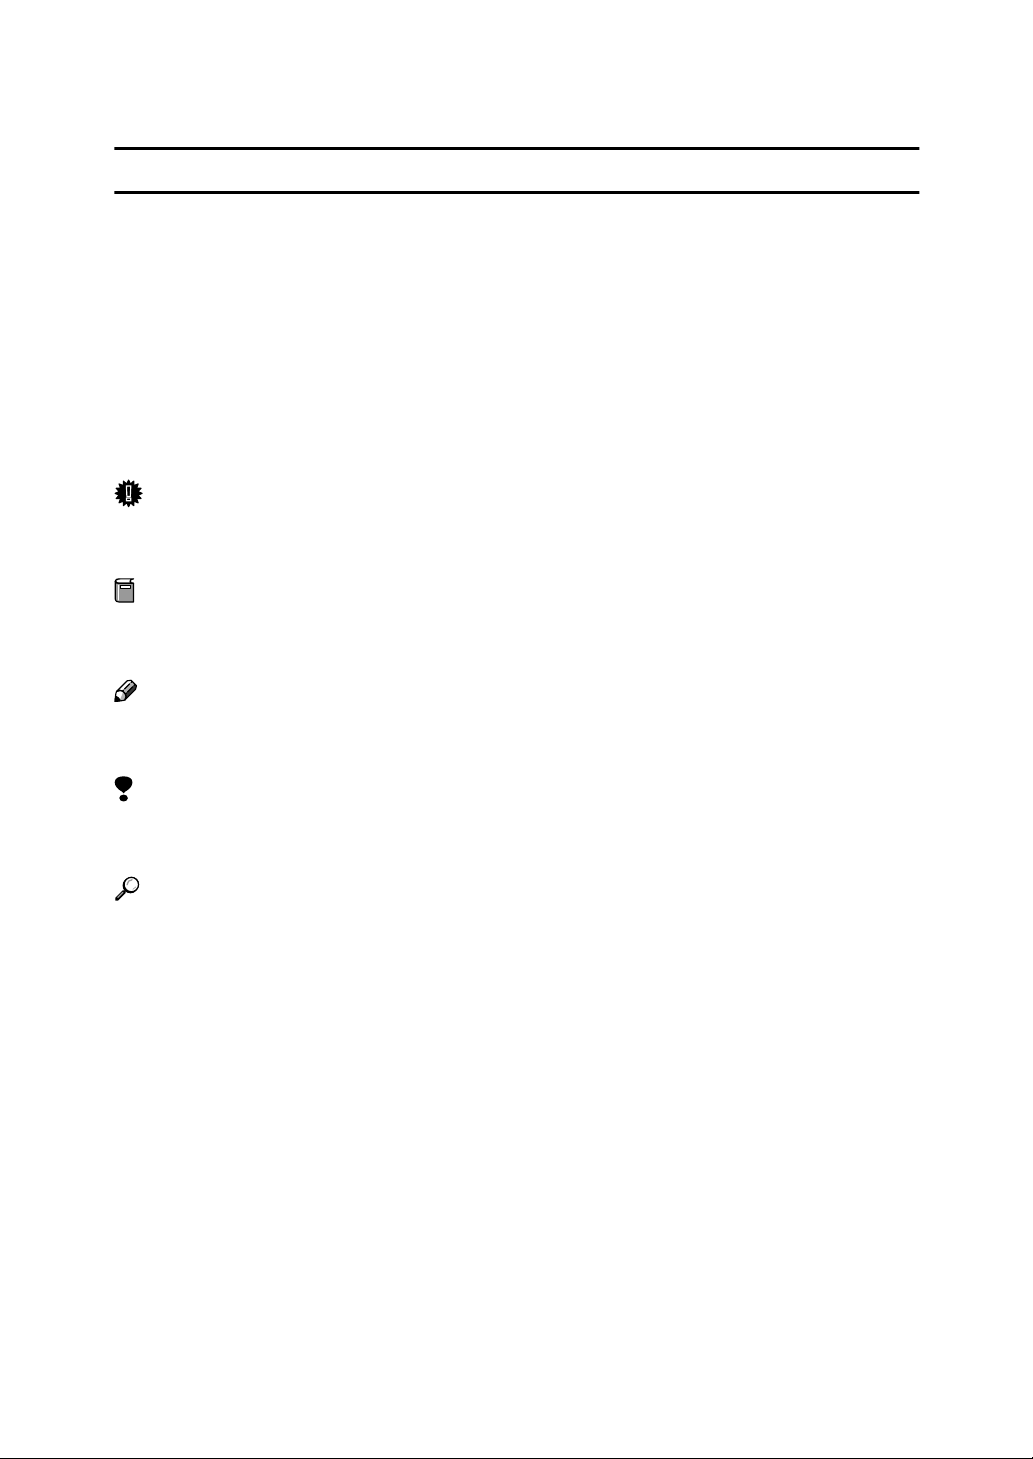
Symbols
In this manual, the following symbols are used:
WARNING:
This symbol indicates a potentially hazardous situation which, if instructions
are not followed, could result in death or serious injury.
CAUTION:
This symbol indicates a potentially hazardous situation which, if instructions
are not followed, may result in minor or moderate injury or damage to property.
* The statements above are notes for your safety.
Important
If this instruction is not followed, paper might be misfed, originals might be
damaged, or data might be lost. Be sure to read this.
Preparation
This symbol indicates the prior knowledge or preparations required before operating.
Note
This symbol indicates precautions for operation, or actions to take after misoperation.
Limitation
This symbol indicates numerical limits, functions that cannot be used together,
or conditions in which a particular function cannot be used.
Reference
This symbol indicates a reference.
[]
Keys that appear on the machine's panel display.
Keys and buttons that appear on the computer's display.
{}
Keys built into the machine's control panel.
Keys on the computer's keyboard.
iv
Page 7

TABLE OF CONTENTS
1.Setting Up the Printer Driver and Canceling a Print Job
PCL Menu 6/5e - Accessing the Printer Properties................................. 1
Windows 95/98/Me - Accessing the Printer Properties .................................. 1
Windows 2000/Windows XP- Accessing the Printer Properties..................... 2
Windows NT 4.0 - Accessing the Printer Properties ...................................... 4
PostScript - Setting Up for Printing .......................................................... 6
Windows 95/98/Me - Accessing the Printer Properties .................................. 6
Windows 2000/Windows XP- Accessing the Printer Properties..................... 7
Windows NT 4.0 - Accessing the Printer Properties ...................................... 9
Macintosh - Setting Up for Printing .............................................................. 10
Canceling a Print Job............................................................................... 12
Windows 95/98/Me, Windows 2000, Windows XP, Windows NT 4.0 -
Canceling a Print Job................................................................................. 12
Macintosh - Canceling a Print Job ............................................................... 13
2.Uninstalling the Printer Driver and Software
Uninstalling the PCL 6/5e Printer Driver ................................................ 15
Windows 95/98/Me - Uninstalling the PCL 6/5e Printer Driver..................... 15
Windows 2000/Windows XP- Uninstalling the PCL 6/5e Printer Driver ....... 15
Windows NT 4.0 - Uninstalling the PCL 6/5e Printer Driver......................... 16
Uninstalling the PostScript Printer Driver.............................................. 17
Windows 95/98/Me - Uninstalling the PostScript Printer Driver ................... 17
Windows 2000/Windows XP- Uninstalling the PostScript Printer Driver...... 17
Windows NT 4.0 - Uninstalling the PostScript Printer Driver ....................... 18
Macintosh - Uninstalling the PostScript Printer Driver ................................. 18
3.Troubleshooting
Error & Status Messages on the Control Panel..................................... 19
Machine Does Not Print ........................................................................... 21
Other Printing Problems.......................................................................... 22
v
Page 8

4.Using the Control Panel
Adjusting Printer Features ...................................................................... 23
Printer Features Menu ................................................................................. 23
Printer Features Parameters ................................................................... 27
Job Control Menu......................................................................................... 27
Network Setup Menu.................................................................................... 34
Maintenance Menu....................................................................................... 35
List Print Menu ............................................................................................. 37
Adjusting System Settings...................................................................... 40
Accessing the System Settings.................................................................... 40
System Settings Parameters........................................................................ 41
5.Appendix
Collate and Rotate Collate....................................................................... 45
Specifications ........................................................................................... 46
Options......................................................................................................... 47
INDEX......................................................................................................... 48
vi
Page 9
1. Setting Up the Printer Driver
and Canceling a Print Job
PCL Menu 6/5e - Accessing the Printer Properties
Windows 95/98/Me - Accessing the Printer Properties
Changing the default printer settings
Click [Start] on the taskbar, point to [Settings], and then click [Printers].
AAAA
The [Printers] window appears.
Click to select the icon of the printer whose default settings you want to
BBBB
change.
On the [File] menu, click [Properties].
CCCC
The Printer Properties appear.
Make any settings you require and click [Apply].
DDDD
Note
❒ With some applications, the printer driver's settings are not used, and the
application's own default settings are applied.
Click [OK].
EEEE
Making printer settings from an application
To make the printer settings for a specific application, open the Printer Properties dialog box from that application. The following example describes how to
make settings for the WordPad application that comes with Windows
95/98/Me.
Note
❒ The actual procedure you should follow to open the Printer Properties dialog
box may differ depending on the application. For more information, see the
documentation that comes with the application you are using.
❒ Any settings you make in the following procedure are valid for the current
application only.
On the [File] menu, click [Print].
AAAA
The [Print] dialog box appears.
1
Page 10
1
Setting Up the Printer Driver and Canceling a Print Job
Select the printer you want to use in the [Name] list box, and then click [Prop-
BBBB
erties].
The Printer Properties appear.
Make any settings you require and click [Apply].
CCCC
Click [OK] to start printing.
DDDD
Windows 2000/Windows XP- Accessing the Printer Properties
Changing the default printer settings - Printer Properties
Limitation
❒ Changing the setting of the printer requires Manage Printers permission.
Members of the Administrators and Power Users groups have Manage Printers permission by default. When you set up options, log on using an account
that has Manage Printers permission.
Click [Start] on the taskbar, point to [Settings], and then click [Printers].
AAAA
The [Printers] window appears.
Note
❒ Under Windows XP, click [Start] on the taskbar, and then click [Printers and
Faxes]. The [Printers and Faxes] window appears.
Click to select the icon of the printer whose default settings you want to
BBBB
change.
On the [File] menu, click [Properties].
CCCC
The Printer Properties appear.
Make any settings you require and click [Apply].
DDDD
Note
❒ Settings you make here are used as the default settings for all applications.
Click [OK].
EEEE
Changing the default printer settings - Printing Preferences Properties
Limitation
❒ Changing the setting of the printer requires Manage Printers permission.
Members of the Administrators and Power Users groups have Manage Printers permission by default. When you set up options, log on using an account
that has Manage Printers permission.
2
Page 11
PCL Menu 6/5e - Accessing the Printer Properties
Click [Start] on the taskbar, point to [Settings], and then click [Printers].
AAAA
The [Printers] window appears.
Note
❒ Under Windows XP, click [Start] on the taskbar, and then click [Printers and
Faxes]. The [Printers and Faxes] window appears.
Click to select the icon of the printer whose default settings you want to
BBBB
change.
On the [File] menu, click [Printing Preferences...].
CCCC
The Printing Preferences Properties appear.
Make any settings you require and click [Apply].
DDDD
Note
❒ Settings you make here are used as the default settings for all applications.
Click [OK].
EEEE
1
Making printer settings from an application
To make the printer settings for a specific application, open the [Print] dialog box
from that application. The following example describes how to make settings for
the WordPad application that comes with Windows 2000.
Note
❒ The actual procedures you should follow to open the [Print] dialog box may
differ depending on the application. For more information, see the documentation that comes with the application you are using.
❒ Any settings you make in the following procedure are valid for the current
application only.
On the [File] menu, click [Print...].
AAAA
The [Print] dialog box appears.
Select the printer you want to use in the [Select Printer] box.
BBBB
Note
❒ Under Windows XP, click [Preference] to open the Printer Preference win-
dow.
Make any settings you require and click [Apply].
CCCC
Note
❒ Under Windows XP, make any settings you require and then click [OK].
Click [Print] to start printing.
DDDD
3
Page 12
Setting Up the Printer Driver and Canceling a Print Job
Windows NT 4.0 - Accessing the Printer Properties
1
Changing the default printer settings - Printer Properties
Limitation
❒ Changing the setting of the printer requires Full Control access permission.
Members of Administrators, Server Operators, Print Operators, and Power
Users groups have Full Control permission by default. When you set up options, log on using an account that has Full Control permission.
Click [Start] on the taskbar, point to [Settings], and then click [Printers].
AAAA
The [Printers] window appears.
Click to select the icon of the printer whose default settings you want to
BBBB
change.
On the [File] menu, click [Properties].
CCCC
The Printer Properties appear.
Make any settings you require and click [OK].
DDDD
Note
❒ Settings you make here are used as the default settings for all applications.
Changing the default printer settings - Default Document Properties
Limitation
❒ Changing the setting of the printer requires Full Control access permission.
Members of the Administrators, Server Operators, Print Operators, and Power Users groups have Full Control permission by default. When you set up
options, log on using an account that has Full Control permission.
Click [Start] on the taskbar, point to [Settings], and then click [Printers].
AAAA
The [Printers] window appears.
Click to select the icon of the printer whose default settings you want to
BBBB
change.
On the [File] menu, click [Document Defaults...].
CCCC
The Default Document Properties appear.
Make any settings you require and click [OK].
DDDD
Note
❒ Settings you make here are used as the default settings for all applications.
4
Page 13

PCL Menu 6/5e - Accessing the Printer Properties
Making printer settings from an application
To make the printer settings for a specific application, open the Printer Properties dialog box from that application. The following example describes how to
make settings for the WordPad application that comes with Windows NT 4.0.
Note
❒ The actual procedure you should follow to open the Printer Properties dialog
box may differ depending on the application. For more information, see the
documentation that comes with the application you are using.
❒ Any settings you make in the following procedure are valid for the current
application only.
On the [File] menu, click [Print...].
AAAA
The [Print] dialog box appears.
Select the printer you want to use in the [Name] list box, and then click [Prop-
BBBB
erties].
The Printer Properties appear.
1
Make any settings you require and click [OK].
CCCC
Click [OK] to start printing.
DDDD
5
Page 14
Setting Up the Printer Driver and Canceling a Print Job
PostScript - Setting Up for Printing
1
Windows 95/98/Me - Accessing the Printer Properties
Changing the default printer settings
To make the Printer default settings, first open the Printer Properties dialog box
from the [Printers]window.
Note
❒ With some applications, the printer driver's settings are not used, and the ap-
plication's own default settings are applied.
Click [Start] on the taskbar, point to [Settings], and then click [Printers].
AAAA
The [Printers] window appears.
Click to select the icon of the printer whose default settings you want to
BBBB
change.
On the [File] menu, click [Properties].
CCCC
The Printer Properties appear.
Make any settings you require and click [Apply].
DDDD
Click [OK].
EEEE
Making printer settings from an application
To make the printer settings for a specific application, open the Printer Properties dialog box from that application. The following example describes how to
make settings for the WordPad application that comes with Windows
95/98/Me.
Note
❒ The actual procedure you should follow to open the Printer Properties dialog
box may differ depending on the application. For more information, see the
documentation that comes with the application you are using.
❒ With some applications, the printer driver's settings are not used, and the ap-
plication's own default settings are applied.
❒ Any settings you make in the following procedure are valid for the current
application only.
On the [File] menu, click [Print].
AAAA
The [Print] dialog box appears.
6
Page 15

PostScript - Setting Up for Printing
Select the printer you want to use in the [Name] list box, and then click [Prop-
BBBB
erties].
The Printer Properties appear.
Make any settings you require and click [Apply].
CCCC
Click [OK] to start printing.
DDDD
Windows 2000/Windows XP- Accessing the Printer Properties
Changing the default printer settings - Printer Properties
Limitation
❒ Changing the setting of the printer requires Manage Printers permission.
Members of the Administrators and Power Users groups have Manage Printers permission by default. When you set up options, log on using an account
that has Manage Printers permission.
1
Click [Start] on the taskbar, point to [Settings], and then click [Printers].
AAAA
The [Printers] window appears.
Note
❒ Under Windows XP, click [Start] on the taskbar, and then click [Printers and
Faxes]. The [Printers and Faxes] window appears.
Click to select the icon of the printer whose default settings you want to
BBBB
change.
On the [File] menu, click [Properties].
CCCC
The Printer Properties appear.
Make any settings you require and click [Apply].
DDDD
Note
❒ Settings you make here are used as the default settings for all applications.
Click [OK].
EEEE
Changing the default printer settings - Printing Preferences Properties
Limitation
❒ Changing the setting of the printer requires Manage Printers permission.
Members of the Administrators and Power Users groups have Manage Printers permission by default. When you set up options, log on using an account
that has Manage Printers permission.
7
Page 16
1
Setting Up the Printer Driver and Canceling a Print Job
Click [Start] on the taskbar, point to [Settings], and then click [Printers].
AAAA
The [Printers] window appears.
Note
❒ Under Windows XP, click [Start] on the taskbar, and then click [Printers and
Faxes]. The [Printers and Faxes] window appears.
Click to select the icon of the printer whose default settings you want to
BBBB
change.
On the [File] menu, click [Printing Preferences...].
CCCC
The Printing Preferences Properties appear.
Make any settings you require and click [Apply].
DDDD
Note
❒ Settings you make here are used as the default settings for all applications.
Click [OK].
EEEE
Making printer settings from an application
To make the printer settings for a specific application, open the [Print] dialog box
from that application. The following example describes how to make settings for
the WordPad application that comes with Windows 2000.
Note
❒ The actual procedures you should follow to open the [Print] dialog box may
differ depending on the application. For more information, see the documentation that comes with the application you are using.
❒ Any settings you make in the following procedure are valid for the current
application only.
On the [File] menu, click [Print...].
AAAA
The [Print] dialog box appears.
Select the printer you want to use in the [Select Printer] box.
BBBB
Note
❒ Under Windows XP, click [Preference] to open the Printer Preference win-
dow.
Make any settings you require and click [Apply].
CCCC
Note
❒ Under Windows XP, make any settings you require and then click [OK].
Click [OK] to start printing.
DDDD
8
Page 17

PostScript - Setting Up for Printing
Windows NT 4.0 - Accessing the Printer Properties
Changing the default printer settings - Printer Properties
Limitation
❒ Changing the setting of the printer requires Full Control access permission.
Members of Administrators, Server Operators, Print Operators, and Power
Users groups have Full Control permission by default. When you set up options, log on using an account that has Full Control permission.
Click [Start] on the taskbar, point to [Settings], and then click [Printers].
AAAA
The [Printers] window appears .
Click to select the icon of the printer whose default settings you want to
BBBB
change.
On the [File] menu, click [Properties].
CCCC
The Printer Properties appear.
Make any settings you require and click [OK].
DDDD
Note
❒ Settings you make here are used as the default settings for all applications.
1
Changing the default printer settings - Default Document Properties
Limitation
❒ Changing the setting of the printer requires Full Control access permission.
Members of the Administrators, Server Operators, Print Operators, and Power Users groups have Full Control permission by default. When you set up
options, log on using an account that has Full Control permission.
Click [Start] on the taskbar, point to [Settings], and then click [Printers].
AAAA
The [Printers] window appears.
Click to select the icon of the printer you want to use.
BBBB
On the [File] menu, click [Document Defaults...].
CCCC
The Default Document Properties appear.
Make any settings you require and click [OK].
DDDD
Note
❒ Settings you make here are used as the default settings for all applications.
9
Page 18
1
Setting Up the Printer Driver and Canceling a Print Job
Making printer settings from an application
To make the printer settings for a specific application, open the Printer Properties dialog box from that application. The following example describes how to
make settings for the WordPad application that comes with Windows NT 4.0.
Note
❒ The actual procedure you should follow to open the Printer Properties dialog
box may differ depending on the application. For more information, see the
documentation that comes with the application you are using.
❒ Any settings you make in the following procedure are valid for the current
application only.
On the [File] menu, click [Print].
AAAA
The [Print] dialog box appears.
Select the printer you want to use in the [Name] list box, and then click [Prop-
BBBB
erties].
The Printer Properties appear.
Make any settings you require and click [OK].
CCCC
Click [OK] to start printing.
DDDD
Macintosh - Setting Up for Printing
Making paper settings from an application
Open the file you want to print.
AAAA
On the [File] menu, click [Page Setup].
BBBB
The [LaserWriter 8 Page Setup] dialog box appears.
Confirm that the printer you want to use is shown in [Format for:] box.
CCCC
Then, use [Paper] to select the paper size you want to use.
Note
❒ If the printer is not shown in the [Format for:] box, use the pop-up menu to
display a list of available printers.
Reference
The actual appearance of the [Page Setup] dialog box depends on the application you are using. See the documentation that comes with the Macintosh for more information.
10
After configuring the settings, click [OK].
DDDD
Page 19

Setting up for printing from an application
Open the file you want to print.
AAAA
PostScript - Setting Up for Printing
On the [File] menu, click [Print].
BBBB
The [Printer] dialog box appears.
Confirm that the printer is selected in the [Printer :] box, and make the print-
CCCC
er settings.
After configuring the settings, click [Print] .
DDDD
1
11
Page 20

Setting Up the Printer Driver and Canceling a Print Job
Canceling a Print Job
1
Windows 95/98/Me, Windows 2000, Windows XP, Windows NT 4.0 Canceling a Print Job
Double-click the printer icon on the Windows taskbar.
AAAA
A window appears, showing all the print jobs that are currently queuing to
be printed. Check the current status of the job you want to cancel.
Select the name of the job you want to cancel.
BBBB
On the [Document] menu, click [Cancel].
CCCC
Note
❒ You can also open the print job queue window by double-clicking the
printer icon in the [Printers] window.
Press {{{{Job Reset}}}} on the control panel.
DDDD
12
ZENS570N
The message appears on the panel display indicating that the print job is being canceled.
Important
❒ This procedure cancels the print job that is being processed by the printer.
In some cases, the printer may already be processing data for the next print
job following the one currently being output. In this case, the next print job
is also canceled when you press {{{{Job Reset}}}}.
❒ When the printer is being shared by multiple computers, be careful not to
accidentally cancel someone else's print job.
Note
❒ You cannot stop printing data that has already been processed internally
by the printer. Because of this, printing may continue for a few pages after
you press {{{{Job Reset}}}}.
❒ A print job that contains a large volume of data may take considerable time
to stop.
Page 21

Canceling a Print Job
Macintosh - Canceling a Print Job
Double-click the printer's icon on the desktop.
AAAA
A window appears, showing all the print jobs that are currently queuing to
be printed. Check the current status of the job you want to cancel.
Select the name of the job you want to cancel.
BBBB
Click the pause icon, and then click the trash icon.
CCCC
Press {{{{Job Reset}}}} on the control panel.
DDDD
1
ZENS570N
The message appears on the panel display indicating that the print job is being canceled.
Important
❒ This procedure cancels the print job that is being processed by the printer.
In some case, the printer may already be processing data for the next print
job following the one currently being output. In this case, the next print job
is also canceled when you press {{{{Job Reset}}}}.
❒ When the printer is being shared by multiple computers, be careful not to
accidentally cancel someone else's print job.
Note
❒ You cannot stop printing data that has already been processed internally
by the printer. Because of this, printing may continue for a few pages after
you press {{{{Job Reset}}}}.
❒ A print job that contains a large volume of data may take considerable time
to stop.
13
Page 22

1
Setting Up the Printer Driver and Canceling a Print Job
14
Page 23

2. Uninstalling the Printer
Driver and Software
Uninstalling the PCL 6/5e Printer Driver
This section describes how to uninstall the printer driver. The actual procedure
may differ depending on the operating system.
Follow one of the appropriate procedures.
Windows 95/98/Me - Uninstalling the PCL 6/5e Printer Driver
Close all applications that are running.
AAAA
Click [Start] on the taskbar, point to [Settings], and then click [Printers].
BBBB
The [Printers] window appears.
Click to select the icon of the printer you want to remove.
CCCC
On the [File] menu, click [Delete].
DDDD
A confirmation dialog box appears.
Click [Yes] to uninstall the printer driver.
EEEE
Windows 2000/Windows XP- Uninstalling the PCL 6/5e Printer Driver
Limitation
❒ Uninstalling a printer driver requires Manage Printers permission. Members
of the Administrators and Power Users groups have Manage Printers permission by default. When you uninstall a printer driver, log on using an account
that has Manage Printers permission.
Close all applications that are running.
AAAA
Click [Start] on the taskbar, point to [Settings], and then click [Printers].
BBBB
The [Printers] window appears.
Note
❒ Under Windows XP, click [Start] on the taskbar, and then click [Printers and
Faxes]. The [Printers and Faxes] window appears.
Click to select the icon of the printer you want to remove.
CCCC
On the [File] menu, click [Delete].
DDDD
A confirmation dialog box appears.
15
Page 24

2
Uninstalling the Printer Driver and Software
Click [Yes] to uninstall the printer driver.
EEEE
Windows NT 4.0 - Uninstalling the PCL 6/5e Printer Driver
Limitation
❒ Uninstalling a printer driver requires Full Control access permission. Mem-
bers of the Administrators, Server Operators, Print Operators, and Power Users groups have Full Control Permission by default. When you install a
printer driver, log on using an account that has Full Control permission.
Close all applications that are running.
AAAA
Click [Start] on the taskbar, point to [Settings], and then click [Printers].
BBBB
The [Printers] window appears.
Click to select the icon of the printer you want to remove.
CCCC
On the [File] menu, click [Delete].
DDDD
A confirmation dialog box appears.
Click [Yes] to uninstall the printer driver.
EEEE
16
Page 25

Uninstalling the PostScript Printer Driver
Uninstalling the PostScript Printer Driver
This section describes how to uninstall the PostScript printer driver.
The actual procedure may differ depending on the operating system.
Follow one of the appropriate procedures.
Windows 95/98/Me - Uninstalling the PostScript Printer Driver
Close all applications that are running.
AAAA
Click [Start] on the taskbar, point to [Settings], and then click [Printers].
BBBB
The [Printers] window appears.
Click to select the icon of the printer you want to remove.
CCCC
On the [File] menu, click [Delete].
DDDD
A confirmation dialog box appears.
Click [Yes] to uninstall the printer driver.
EEEE
Windows 2000/Windows XP- Uninstalling the PostScript Printer Driver
Limitation
❒ Uninstalling a printer driver requires Manage Printers permission. Members
of the Administrators and Power Users groups have Manage Printers permission by default. When you uninstall a printer driver, log on using an account
that has Manage Printers permission.
2
Close all applications that are running.
AAAA
Click [Start] on the taskbar, point to [Settings], and then click [Printers].
BBBB
The [Printers] window appears.
Note
❒ Under Windows XP, click [Start] on the taskbar, and then click [Printers and
Faxes]. The [Printers and Faxes] window appears.
Click to select the icon of the printer you want to remove.
CCCC
On the [File] menu, click [Delete].
DDDD
A confirmation dialog box appears.
Click [Yes] to uninstall the printer driver.
EEEE
17
Page 26

2
Uninstalling the Printer Driver and Software
Windows NT 4.0 - Uninstalling the PostScript Printer Driver
Limitation
❒ Uninstalling a printer driver requires Full Control access permission. Mem-
bers of the Administrators, Server Operators, Print Operators, and Power Users groups have Full Control Permission by default. When you uninstall a
printer driver, log on using an account that has Full Control permission.
Close all applications that are running.
AAAA
Click [Start] on the taskbar, point to [Settings], and then click [Printers].
BBBB
The [Printers] window appears.
Click to select the icon of the printer you want to remove.
CCCC
On the [File] menu, click [Delete].
DDDD
A confirmation dialog box appears.
Click [Yes] to uninstall the printer driver.
EEEE
Macintosh - Uninstalling the PostScript Printer Driver
Delete the “PPD” file inside the [Printer Description] folder in the [Extensions]
AAAA
folder in [System Folder].
18
Page 27

3. Troubleshooting
Error & Status Messages on the Control Panel
Messages/Second messages Description Solution
Add Toner
Open Front Cover and
/Follow Instructions to
Replace Toner Bottle
Bypass Tray in Use Please
Wait
Clear Misfeed(s)
/Follow instructions in
Right Cover
Close Front Cover The front cover is open. Close the front cover.
Close Lower Right
Cover
Close Right Cover The right cover is open. Close the right cover.
Duplex Unit In Use Please
Wait
Form Feed... The printer is form feeding. Wait for a while.
Hardware Problem: An error has occurred in the
Toner is running out. It is time to supply toner.
Bypass tray is in use for copier
or facsimile mode.
There is misfeed at the right
cover.
The lower right cover (next to
Tray 1, Tray 2 , Tray 3 or
Tray4) is open.
Duplex unit is in use for copier or facsimile mode.
Hardware.
Wait until the job which use
the Bypass Tray will be completed.
Remove the misfed paper following the instructions inside
the right cover.
Close the lower right cover
(next to Tray 1, Tray 2 , Tray 3
or Tray4).
Wait until the duplex job will
be completed.
First, turn off the power
switch and then on. If the message appears again, call your
sales or service representative.
Load Bypass Tray
[Paper Size]
Load Paper
[Paper Size]
There is no paper left in the
Bypass Tray.
The paper size setting on the
tray differs from that of actual
paper size in the tray.
Load paper into the Bypass
Tray.
Load paper that matches the
paper size settings. Printing
will not automatically resume
if the paper size and orientation settings are incorrect. Use
the control panel and the paper size dial in the paper tray
to set the correct paper size
and orientation of the paper in
the tray.
19
Page 28

Troubleshooting
Messages/Second messages Description Solution
3
Load Tray #
[Paper Size]
Memory Overflow
Job Incomplete
Memory Full
Job Incomplete
Offline The printer is offline. The
Printing... The printer is printing. Wait for a while.
Print Overrun
Job Incomplete
There is no paper left in this
tray.
A memory overflow has occurred.
A memory full has occurred. Add memory to the printer.
printer cannot accept or print
out data.
A print overrun occurred on a
file being printed. Only a part
of the data on the page will be
printed, and the print job is
suspended, or the current
print job has been canceled.
Load paper into the tray indicated.
Add memory to the printer.
If you want to put the printer
online, press {{{{On Line}}}}.
To print the image correctly,
add memory to the printer or
simplify the actual data size.
Set "Page Protect" to "On" on
the printer driver. Be sure to
return "Page Protect" to "Auto" after the print job. With
"Page Protect" "On", the printer performance might be decreased. While using the
PostScript printer driver, lower the resolution setting.
Processing... The printer is processing in-
ternally.
Ready The printer is online and
ready to print.
Remove Paper From Duplex
Unit
Resetting Job... The print job is being reset. Wait for a while.
Reset Tray #
Correctly
Toner is Almost Empty Toner is almost running out. Replace the toner soon to pre-
Waiting... The printer is waiting for the
Warming Up... The printer is warming up or
There is still paper in duplex
unit.
The input paper tray is not set
correctly.
next print job.
toner is being supplied.
Wait for a while.
If you want to set the printer
offline, press {{{{Online}}}}.
Remove the paper from duplex unit.
Set the input paper tray correctly.
vent poor print quality.
Wait for a while.
Wait until the panel display
change to "Ready".
20
Page 29

Machine Does Not Print
Machine Does Not Print
Possible Cause Solutions
Is the power on? Turn on the machine.
Is the interface cable properly connected? Connect the interface cable properly.
If there are any connectors or screws, make
sure that they are fastened securely.
Are you using the correct interface cable? Be sure to use the correct one. If the cable is
damaged or worn, replace it with a new one.
Did you connect the interface cable after turning on the main switch?
Is the machine Online? Make it Online by touching the [Online] key.
Is the specified paper set? Set the specified paper in any of the input
Be sure to connect the interface cable before
turning on the main switch.
trays.
3
Are there any error messages on the panel display?
Does the Printer Mode key stay red? Check the error message, and take the re-
Is the Data-in Indicator blinking or lit? If not, the data does not reach the machine.
Can you print a configuration page? If you cannot, check the printer cable connec-
Can you make a "Print Test Page" from the
printer driver?
Check the error message, and take the required action.
quired action.
Check the printer cable connection.
Also confirm that the printer port settings are
correct.
tion.
Also confirm that the printer port settings are
correct.
If you cannot, the machine might be out of order. Contact your sales or service representative.
21
Page 30

Troubleshooting
Other Printing Problems
Problem Action
3
An image is printed on the reverse side of the
paper.
Multiple pages are fed through the printer at
once.
Paper misfeeds occur frequently. Check the paper size settings. Use the recom-
An control panel error message stays on after
removing the misfed paper.
It takes a long time for the printer to start
printing.
It takes too much time to complete the print
job.
Windows 95/98/Me, Windows 2000, Windows XP, Windows NT 4.0 :
The computer does not recognize the installed
printer options.
Set the paper upside down.
Remove all the paper from the tray and fan
them gently.
mended paper. Avoid using curled, folded or
wrinkled paper, perforated paper, or glossy
paper.
A paper misfeed message will remain until the
front cover is opened and then closed. Open
the front cover and close it.
The machine might be in Energy Saver mode
or Low Power mode, which requires more
time for warming up and resuming the print
job. If you can't wait, change the settings of
Low Power. Shift Time and Low Power Timer.
The data is so large or complex that it takes
time to process it.
If the Data In indicator is blinking, the data
processing is being done.
Just wait until it is finished.
If the printer is not connected to a network,
specify which options you have installed using the printer driver.
See the HELP file of the printer driver.
22
Page 31

4. Using the Control Panel
Though the factory default settings of the printer are suitable for most printing
jobs, the "Printer Features" gives you access to a number of settings that control
basic printer operations. "Printer Features" settings you make are retained even
when you turn off the printer.
Reference
For more information about the copy features and their system settings, see
the Copy Reference and the System Settings manuals.
Note
❒ Some of the settings accessed by the printer driver can be accessed by the
“Printer Features”. Settings made by the printer driver take priority over settings by the“Printer Features”.
Adjusting Printer Features
Printer Features Menu
There are four menu items in the "Printer Features" menu.
• Job Control
• Network Setup
• Maintenance
• List Print
You can select functions in the following table.
23
Page 32

Using the Control Panel
Category Function menu
4
Job Control
⇒ p.27
Paper Input Tray Priority
Tray Locking
Bypass Paper
Size
Duplex
Print Quality Edge Smoothing
Resolution PCL
Toner Saving
System Print PS Errors
I/O Timeout
I/O Buffer
Page Protect
Auto Continue
Sub Paper Size
PCL Menu Orientation
Form Lines
Standard Size
Custom Size
PS
Network Setup
⇒ p.34
Maintenance
⇒ p.35
List Print
⇒ p.37
Font Source
Font Number
Point Size
Font Pitch
Symbol Set
IP Address
Subnet Mask
Gateway Address
Restart Printer
Menu Reset
Hex Dump
Configuration Page
Menu List
PCL Font List
PS Font List
24
Page 33

Accessing the Printer Features Menu
Press {{{{User Tools/Counter}}}}.
Dial
Dial
e/
al
Adjusting Printer Features
ZENS058N
Press the 0 or 1 key to display “5.Printer Features”, and then press {{{{OK}}}}.
The following screen appears on the panel display.
Press the 0 or 1 key to display the following four items one by one.
• Job Control
• Network Setup
• Maintenance
• List Print
Note
❒ 1 key : Press to go to the next menu.
❒ 0 key : Press to go back to the previous menu
❒ After making the printer settings, be sure to return to the previous menu by
pressing {{{{Cancel}}}}.
4
ZENS600N
25
Page 34

4
Using the Control Panel
❒ After making the printer settings, press {{{{User Tools/Counter}}}} to return to the
initial display.
Dial
Dial
e/
al
ZENS058N
❒ The revised settings are not canceled even if the power switch is turned off.
26
Page 35

Printer Features Parameters
Job Control Menu
There are five menu items in the “Job Control” menu.
• Paper Input
• Duplex
• Print Quality
• System
• PCL Menu
Printer Features Parameters
Job Control Parameters
❖❖❖❖ Paper Input
Menu Description
Tray Priority When no tray or paper size is selected for a print job, the tray se-
lected here is used.
Tray 1, Tray 2, Tray 3, Tray 4
Note
❒ Default: Tray 1
❒ Only the installed trays appear on the panel display.
❒ It is recommended that you load paper having the size and di-
rection you frequently use in the tray selected with “Tray Priority”.
Tray Locking If you use different kinds of paper, you can lock a tray to prevent
printing on wrong paper such as letterhead or colored paper.
When “Auto Select” is selected in the Paper Source selections
from the printer driver, the locked tray will not be used.
You can lock multiple trays at the same time.
Tray 1, Tray 2, Tray 3, Tray 4
4
Note
❒ This menu is invalid if the optional tray is not installed.
❒ If you want to use the locked tray, you must select the tray
from the printer driver.
❒ When a locked tray is selected from the printer driver, the
printer does not search for any other tray.
27
Page 36

Using the Control Panel
Menu Description
Bypass Paper Size You can specify the paper size, standard or custom, for the Bypass
Tray.
When the bypass paper size is not specified, the paper size you set
on the control panel is used.
If you use PCL 6 or PS2 printer driver to print custom paper size,
the paper size you set in the printer driver is used.
If you use PCL 5e printer driver to print custom paper size, paper
size you set on the control panel is used.
If the Bypass Tray can hold paper of either the short-edge-feed
size or the long-edge-feed size, use the short-edge-feed size.
If you want to use a long-edge-feed size in the Bypass Tray, the
printer driver and control panel settings must be the same.
4
❖❖❖❖ Duplex
Menu Description
Duplex You can select whether you want to print on both sides of each
page.
• Off
• Long Edge Binding
• Short Edge Binding
Note
❒ Default: Off
❒ This menu appears only when the machine has duplex func-
tion. Confirm which type of machine you have.
❒ The setting in the printer driver takes priority of the setting on
control panel.
❖❖❖❖ Print Quality
Menu Description
Edge Smoothing You can set whether to enable Edge Smoothing.
• On
• Off
28
Note
❒ Default: On
❒ If “Toner Saving” is “On”, “EdgeSmoothing” is ignored even
if it is “On”.
❒ The setting in the printer driver takes priority of the setting on
control panel.
Page 37

Printer Features Parameters
Menu Description
Resolution You can set the print resolution in dots per inch.
❖❖❖❖ PCL
300 dpi, 600 dpi
❖❖❖❖ PS
300 dpi, 600 dpi
Note
❒ Default: 600 dpi
❒ The setting in the printer driver takes priority of the setting on
control panel.
Toner Saving You can select whether to enable Toner Saving.
• Off
• On
Note
❒ Default: Off
❒ If “Toner Saving” is “On”, “EdgeSmoothing” is ignored even
if it is “On”.
❒ The setting in the printer driver takes priority of the setting on
control panel.
4
❖❖❖❖ System
Menu Description
Print PS Errors You can set whether the PS error sheet should be printed out.
• Off
• On
Note
❒ Default: Off
I/O Timeout You can set how many seconds the printer should wait before
ending a print job. If data from other port often appears in the
middle of the print job, you should increase the timeout value.
15 seconds, 30 seconds, 60 seconds, 180 seconds, 300 seconds
Note
❒ Default: 30 seconds
I/O Buffer You can set the size of the I/O Buffer. Normally it is not necessary
to change this setting.
16 KB, 32 KB, 64 KB, 128 KB, 256 KB, 512 KB
Note
❒ Default: 32 KB
29
Page 38

4
Using the Control Panel
Menu Description
Page Protect When the "Print Overrun. Job Incomplete.” message appears on
the panel display, set this function to "On”.
• Auto
• On
Note
❒ Be sure to return “Page Protect”to “Auto” after the print job.
With “Page Protect” “On”, the printer performance might be
decreased.
❒ Default: Auto
❒ The setting in the printer driver takes priority of the setting on
control panel.
Auto Continue You can set whether to enable Auto Continue. When it is set to
“On”, the printing continues even if the following error messages
appear on the display.
“Print Overrun. Job Incomplete.”, “Memory Overflow. Job Incomplete.”, “Memory Full. Job Incomplete.”
• Off
• On
Note
❒ When it is “On”, and a certain type of error occurs, the current
job might be canceled, and the printer automatically resumes
the next job.
❒ Default: Off
Sub Paper Size You can enable the Auto Substitute Paper Size feature between A4
and letter size. When you select "On", the printer substitutes A4
↔ letter size if the paper currently specified is not loaded.
• Off
• On
Note
❒ Default: Off
❖❖❖❖ PCL Menu
Menu Description
Orientation You can set the page orientation.
• Portrait
• Landscape
Note
❒ Default: Portrait
30
Form Lines You can set the number of lines per page.
5-128
Note
❒ Default: 64 (Metric version), 60 (Inch version)
Page 39

Printer Features Parameters
Menu Description
Font Source You can set the location of the default font.
• Internal
• Download
Note
❒ Default: Internal
❒ When you select "Download", you can select only fonts down-
loaded to printer RAM.
Font Number You can set the ID of the default font you want to use.
• 0 to 54 (for Internal)
• 1 to 54 (for Download source)
Note
❒ Default: Internal
❒ Default: 0
Point Size You can set the point size you want to use for the default font.
4 to 999.75 by 0.25
Note
❒ Default: 12.00
❒ This setting is effective only for a variable-space font.
4
Font Pitch You can set the number of characters per inch you want to use for
the default font.
0.44 to 99.99 by 0.01
Note
❒ Default: 10.00
❒ This setting is effective only for a fixed-space font.
Symbol Set You can specify the set of print characters for the default font. The
available options are as follows.
Roman-8, ISO L1, ISO L2, ISO L5, PC-8, PC-8 D/N, PC-850, PC852, PC8-TK, Win L1, Win L2, Win L5, Desktop, VN Intl, VN US,
MS Publ, Math-8, VN Math, Pifont, Legal, ISO 4, ISO 6, ISO 11,
ISO 15, ISO 17, ISO 21, ISO 60, ISO 69, Win 3.0
Note
❒ Default: Roman-8
31
Page 40

Using the Control Panel
Changing the Paper Input Menu
The following procedure describes changing the “Tray Priority” as an example
in the “Paper Input”menu.
Press {{{{User Tools/Counter}}}}.
AAAA
Dial
Dial
4
e/
al
Press the 0000 or 1111 key until the following message appears on the panel dis-
BBBB
play.
Press {{{{OK}}}}.
CCCC
The following screen appears on the panel display.
Press {{{{OK}}}}.
DDDD
The following screen appears on the panel display.
ZENS058N
32
Press {{{{OK}}}}.
EEEE
The following screen appears on the panel display.
Page 41

Press {{{{OK}}}}.
FFFF
The following screen appears on the panel display.
Press {{{{OK}}}}.
GGGG
The following screen appears on the panel display.
Press the 0000 or 1111 key to select the tray type you want to use.
HHHH
Press {{{{OK}}}}.
IIII
“Programmed” is displayed for two seconds.
The following screen appears on the panel display.
JJJJ
Printer Features Parameters
4
Press {{{{User Tools/Counter}}}} to return to the initial display.
KKKK
Dial
Dial
e/
al
ZENS058N
33
Page 42

Using the Control Panel
Network Setup Menu
There are three menu items in the “Network Setup” menu.
• IP Address
• Subnet Mask
• Gateway Address
Note
❒ This “Network Setup” menu appears only when installing the optional Net-
work Interface Board.
Network Setup Parameters
4
Menu Description
IP Address You can set the IP Address.
Note
❒ Default: All zero
Reference
See “Configuring the Printer for the Network with the Control Panel” in Printer Reference 1.
Subnet Mask You can set the Subnet Mask.
Note
❒ Default: 255.000.000.000
Reference
See “Configuring the Printer for the Network with the Control Pan-
in Printer Reference 1.
el”
Gateway Address You can set the Gateway Address.
Note
❒ Default: All zero
Reference
See “Configuring the Printer for the Network with the Control Pan-
in Printer Reference 1.
el”
34
Page 43

Printer Features Parameters
Maintenance Menu
There are three menu items in the “Maintenance” menu.
• Restart Printer
• Menu Reset
• Hex Dump
Maintenance Parameters
Menu Description
Restart Printer You can restart the printer.
⇒ p.35 “Restarting a Printer”
Menu Reset You can reset the menu settings to the factory defaults except the
optional Network Interface Board settings.
Hex Dump You can set to isolate the source of a print job problem. With this
function “On”, all data sent to the printer is printed in hexadecimal character representation.
• On
• Off
4
Note
❒ Default: Off
Restarting a Printer
The following procedure describes selecting the “Restart Printer” as an example
in the “Maintenance” menu.
Press {{{{User Tools/Counter}}}}.
AAAA
Dial
Dial
e/
al
ZENS058N
35
Page 44

4
Using the Control Panel
Press the 0000 or 1111 key until the following message appears on the panel dis-
BBBB
play.
Press {{{{OK}}}}.
CCCC
The following screen appears on the panel display.
Press the 0000 or 1111 key until the following message appears on the panel dis-
DDDD
play.
Press {{{{OK}}}}.
EEEE
The following screen appears on the panel display.
Press {{{{OK}}}}.
FFFF
The following screen appears on the panel display.
Press {{{{OK}}}}.
GGGG
“Ready” appears on the panel display.
36
Page 45

List Print Menu
There are four menu items in the “List Print” menu.
• Configuration Page
• Menu List
• PCL Font List
• PS Font List
List Print Parameters
Menu Description
Printer Features Parameters
Configuration Page You can print a Configuration Page. ⇒ p.37 “Printing a Configu-
ration Page”
Menu List You can print the Menu List which shows the function menus of
this machine.
PCL Font List You can print a PCL Font List.
PS Font List You can print a PS Font List.
Printing a Configuration Page
The following procedure describes printing the “Configuration Page” as an example in the “List Print”menu.
Reference
For more information, see p.39 “Interpreting the Configuration Page”.
Press {{{{User Tools/Counter}}}}.
AAAA
Dial
4
Dial
e/
al
ZENS058N
37
Page 46

4
Using the Control Panel
Press the 0000 or 1111 key until the following message appears on the panel dis-
BBBB
play.
Press {{{{OK}}}}.
CCCC
The following screen appears on the panel display.
Press the 0000 or 1111 key until the following message appears on the panel dis-
DDDD
play.
Press {{{{OK}}}}.
EEEE
The following screen appears on the panel display.
Press {{{{OK}}}}.
FFFF
The following screen appears on the panel display.
Press {{{{OK}}}}.
GGGG
The following screen appears on the panel display.
In a short time, the printing of the configuration page will start.
Important
❒ If you cannot complete printing a configuration page correctly, make sure
an error message appears on the panel display. For more information
about error messages, see p.19 “Error & Status Messages on the Control
Panel”.
38
Page 47

Printer Features Parameters
Interpreting the Configuration Page
Reference
❖❖❖❖ Printer ID
Shows the serial number assigned to the board by its manufacturer.
❖❖❖❖ Firmware Version
Shows the version number of the printer firmware.
❖❖❖❖ Pages Printed
Shows the total number of pages printed by the printer to date.
❖❖❖❖ Total Memory
Shows the total amount of memory (SDRAM) installed on the printer.
❖❖❖❖ Options
Show the options that you installed.
Job Control
Shows the settings made under the “Job Control” menu.
Reference
For more information, see p.27 “Job Control Menu”.
Network Setup
Shows the settings you made under the “Network Setup” menu.
When DHCP is active on the network, the actual IP Address, Subnet Mask and
Gateway Address appear in parentheses on the configuration page.
Reference
For more information, see p.34 “Network Setup Menu”.
4
Maintenance
Shows the settings you made under the “Maintenance”.
Reference
For more information, see p.35 “Maintenance Menu”.
Error Log
Shows the log of printer errors.
39
Page 48

Using the Control Panel
Adjusting System Settings
Accessing the System Settings
Press {{{{User Tools/Counter}}}}.
AAAA
Dial
4
Dial
e/
al
Press the 0000 or 1111 key to display “2.System Settings”.
BBBB
Press {{{{OK}}}}.
CCCC
The following screen appears on the panel display.
Select the desired menu you want to change.
Change the settings by following the instructions on the panel display, and
DDDD
then press {{{{OK}}}}.
⇒ p.41 “System Settings Parameters”
Note
❒ Press the {{{{Language}}}} key to switch the display language.
ZENS058N
Exiting from the User Tools/Counter
Press {{{{User Tools/Counter}}}}.
AAAA
40
Page 49

Adjusting System Settings
System Settings Parameters
This section contains the information about the parameters used for the printer.
Reference
For more information about the other parameters in the System Settings
menu, see the “System Settings” manual.
Menu Description
1.Function Priority You can specify the mode (Copier, Fax or Printer) to be displayed
immediately after the operation switch is turned on or System Reset mode is turned on.
Note
❒ Default:
3.System Reset The machine returns to its prioritized mode automatically after
your job is finished, when you selected the time. This function is
called “System Reset”. The time can be set from 10 to 999 seconds,
or no system reset.
Note
❒ Default: On (60 seconds)
❒ You can specify the prioritized mode with the user tools. See
“1.Function Priority”.
Copier
4
6.Auto Off Timer The machine turns itself off automatically to conserve energy after
your job is finished, after the selected time. This function is called
“Auto Off ”. The time can be set from 1 to 240 minutes.
Note
❒ Default: 30 minutes
❒ Auto Off might not be effective when an error message is dis-
played.
❒ To return to the ready condition from Auto Off, the machine
requires the same warm-up time as the time for becoming
ready after power is turned on.
❒ When the machine receives a fax or printer data in Auto Off
mode, it automatically prints the fax or the printer data.
41
Page 50

Using the Control Panel
Menu Description
4
11Print Priority (setting
the multi-accessing function)
13Key Operators Tools
(13Key Op. Tools)
Sets the print priority for each mode.
•“Copier”
Print priority is given to the copy function.
•“Fax”
Print priority is given to the fax function.
•“Printer”
Print priority is given to the printer function.
•“Interleave”
Prints jobs in the order in which they are initiated regardless
of mode/function.
•“Display”
Print priority is given to the mode displayed on the display.
Note
❒ Default: Copier
Reference
See “Multi-access” in the System Settings manual.
Used to view or print counters, and set up user codes. If you have
registered the access code and set“3.Key Op. Access”to “On”, you
cannot use this function unless entering the correct code.
Reference
“4.Prog. Key Op. Code” and “3.Key Op. Access”.
1.Show Counter View counter values on the panel display.
• Total Pages
• Printer (for machines with optional printer function)
• Copier
• Fax (for machines with optional fax function)
• A3 size
• 2 Sided Prints (Type 3 only)
2.Print Counter Print counter lists.
Limitation
❒ 15 ppm model requires the optional 16MB copier memory unit
when using this function.
3 Key Operator Access
(3.Key Op. Access)
Turn the key operator access code “On” or “Off”. If you select
“On”, the registered access code is required for using all applications.
Note
❒ Default: Off
Reference
See “4.Prog. Key Op. Code”
42
Page 51

Menu Description
Adjusting System Settings
4 Registering the key operator code (4.Prog. Key
Op. Code)
5.Restricted Access Restrict user access for each mode (Copier, Fax or Printer) using
Register or change the key operator access code (8 digits).
• Register the access code
Select this function and input your desired number (8 digits)
with the number keys, and then press the {{{{OK}}}} key.
• Change the access code
When you select this function, the currently registered code is
displayed on the left.
Enter the new code (8 digits) with the number keys, and then
press the {{{{OK}}}} key.
optional key counter.
Note
❒ Default: Off
4
43
Page 52

4
Using the Control Panel
44
Page 53

5. Appendix
Collate and Rotate Collate
If you select the collate function on the printer driver, the machine will store
print data in memory and automatically collate the printouts.
The collate function can be turned on or off from the printer driver. The machine
automatically rotates the printouts under the following conditions:
• When using A4, Letter or B5 paper
• Paper with the same size and different orientations (e.g., A4 landscape loaded
in Tray 1 and A4 portrait loaded in Tray 2)
• Auto Tray Select is specified for tray setting
Limitation
❒ The optional 32MB, 64MB or 128MB memory unit is required to use this func-
tion.
❒ You cannot use the Bypass Tray with this function.
❖❖❖❖ Collate
Outputs can be assembled as sets in sequential order.
3
2
1
3
2
1
3
2
1
3
2
1
❖❖❖❖ Rotate Collate
Every other output set is rotated by 90°KL.
1
3
2
1
2
3
2
3
1
3
2
1
45
Page 54

5
Appendix
Specifications
This section contains the electrical and hardware specifications for the printer,
including the information about the options.
Component Specification
46
Resolution 300 × 300 dpi; PCL5e
600 × 600 dpi; PCL5e
*1
*1
Printing Speed 15ppm, 18ppm
(A4K, 81/2" × 11"K)
Note
❒ Printing Speed depends on the machine. Confirm which type of
machine you have.
Parallel Interface Standard 36-pin printer cable and a parallel port on the host com-
puter
IEEE1284
Note
❒ Do not use a parallel cable that is longer than 3 meters (10 feet).
Printer Language PCL5e , PCL6
PS2 (option)
Fonts PCL5e, PCL6
35 Intellifonts, 10 True Type fonts
PS2 (option)
80 PS Resident fonts
Memory Standard : 16MB
Optional SDRAM : 32MB, 64MB, 128MB
*3
Operation Systems supported by this printer
Windows 95
Windows 2000
Windows XP
Windows NT 4.0
Mac OS
*9
/98
*6
*7
*4
/Me
*8
Network Topology : Ethernet 10BASE-T/100BASE-TX
Protocol :
TCP/IP, IPX/SPX, AppleTalk
Network Cable 10BASE-T/100BASE-TX interface cable with ferrite core
*1
For PCL5e, only 600dpi is selectable from the printer driver.
*2
PostScript level2 Compatible
*3
Microsoft Windows 95 operating system
*4
Microsoft Windows 98 operating system
*5
Microsoft Windows Millennium Edition
*6
Microsoft Windows 2000 Professional
Microsoft Windows 2000 Server
*7
Microsoft Windows XP Professional
Microsoft Windows XP Home Edition
*8
Microsoft Windows NT Server operating system version 4.0, Microsoft Windows NT
Workstation operating system version 4.0 in a computer using x86 processors.
*9
Required version is 8 or 9 operating system. With Mac OS X, the machine operates in
only Classic mode.
*2
, PS2
, PCL6, PS2
*5
Page 55

Options
Network Interface Board Type 1018
❖❖❖❖ Topology:
Ethernet (10BaseT/100BaseTX)
❖❖❖❖ Protocols:
TCP/IP, IPX/SPX, AppleTalk
❖❖❖❖ Interface Connector:
RJ45
❖❖❖❖ Required Cable:
Interface cable with ferrite core
*A cable is not provided with this option.
Memory Unit
Specifications
5
❖❖❖❖ Module Type:
SO-DIMM (Small Outline Dual-in-line Memory Module)
❖❖❖❖ Memory Type:
SDRAM (Synchronous Dynamic RAM)
❖❖❖❖ Number of Pins
144 pins
❖❖❖❖ Compatible:
PC100 compatible
Type 1018 PostScript level2 Compatible Kit
PostScript level2 compatible
47
Page 56

INDEX
A
Auto Off Timer
,
C
Cancel key
Config. Page
Configuration Page
,
25
,
37
E
,
error
19
F
Function Priority
H
Hex Dump
,
35
J
Job Control
, 25,
K
Key Operators Tools
L
List Print
, 25,
37
M
,
,
,
18
, 25,
37
,
35
19
,
Macintosh
Maintenance
menu, accessing
Menu List
Menu Reset
messages
,
27
41
35
25
,
41
,
37
42
N
Network Setup
, 25,
P
panel display, messages
,
,
,
27
,
27
1
1
,
37
,
27
,
23
,
42
,
27
,
37
Paper Input
Parameters
PCL 5e
Windows 2000, uninstalling
Windows 95/98/Me, uninstalling
Windows NT 4.0, uninstalling
Windows XP, uninstalling
PCL 6
Windows 2000, uninstalling
Windows 95/98/Me, uninstalling
Windows NT 4.0, uninstalling
Windows XP, uninstalling
PCL Font List
PCL Menu
PostScript
Windows 2000, uninstalling
Windows 95/98/Me, uninstalling
Windows NT 4.0, uninstalling
Windows XP, uninstalling
PostScript Printer Driver
Macintosh, uninstalling
Printer Features
Print Priority
Print Quality
PS Font List
R
Restart Printer
,
35
S
System
System Reset
System Settings
,
27
,
41
,
40
34
,
19
,
,
,
,
18
,
,
,
15
15
17
15
,
15
,
17
,
,
16
,
16
,
18
15
15
17
48
Page 57

T
Troubleshooting
,
19
U
User Tools/Counter key
,
26
W
Windows 2000
,
12
,
,
,
,
,
,
,
15
15
16
15
15
,
15
,
16
,
15
,
,
,
,
,
,
17
2
,
17
1
,
4
,
18
4
,
17
2
,
PCL 5e, uninstalling
PCL 6, uninstalling
PostScript, uninstalling
printer properties, PCL
printer properties, PostScript
Windows 95/98/Me
PCL 5e, uninstalling
PCL 6, uninstalling
PostScript, uninstalling
printer properties, PCL
printer properties, PostScript
Windows 95/98/Me, Windows 2000,
Windows XP, Windows NT
canceling a job
Windows NT 4.0
document defaults, PCL
document defaults, PostScript
PCL 5e, uninstalling
PCL 6, uninstalling
PostScript, uninstalling
printer properties, PCL
printer properties, PostScript
Windows XP
PCL 5e, uninstalling
PCL 6, uninstalling
PostScript, uninstalling
printer properties, PCL
printer properties, PostScript
,
7
6
9
9
7
49
Page 58

50
UE USA B405
Page 59

Note to users in the United States of America
Notice:
This equipment has been tested and found to comply with the limits for a Class B digital device, pursuant to Part 15 of the FCC Rules. These limits are designed to provide reasonable protection against
harmful interference in a residential installation. This equipment generates, uses and can radiate radio
frequency energy and, if not installed and used in accordance with the instructions, may cause harmful
interference to radio communications.
However, there is no guarantee that interference will not occur in a particular installation. If this equipment does cause harmful interference to radio or television reception, which can be determined by turning the equipment off and on, the user is encouraged to try to correct the interference by one more of
the following measures:
Reorient or relocate the receiving antenna.
Increase the separation between the equipment and receiver.
Connect the equipment into an outlet on a circuit different from that to which the receiver is
connected.
Consult the dealer or an experienced radio/TV technician for help.
Warning
Changes or modifications not expressly approved by the party responsible for compliance could void
the user's authority to operate the equipment.
Caution (in case of IEEE1284 environment) :
Properly shielded and grounded cables and connectors must be used for connections to host computer
(and/or peripheral) in order to meet FCC emission limits.
Caution (in case of 100BaseTX environment) :
Interface cable with ferrite core must be used for RF interference suppression.
Declaration of Conformity
Product Name: Printer Controller
Model Number: Type 1018
Responsible party: Ricoh Corporation
Address: 5 Dedrick Place, West Caldwell, NJ 07006
Telephone number: 973-882-2000
This device complies with part 15 of FCC Rules.
Operation is subject to the following two conditions:
1. This device may not cause harmful interference, and
2. this device must accept any interference received,
including interference that may cause undesired operation.
Note to users in Canada
Note:
This Class B digital apparatus complies with Canadian ICES-003.
Remarque concernant les utilisateurs au Canada
Avertissement:
Cet appareil numérique de la classe B est conforme à la norme NMB-003 du Canada.
Copyright © 2001–2002
Page 60

PRINTER Controller Type 1018 Operating Instructions Printer Reference 2 (option)
UE USA B405-8907A
 Loading...