

Page 1

HP 4110 IP Phone
Quick Start Guide
Page 2

E
N
G
L
I
© Copyright 2015 Hewlett-Packard Development
S
Company, L.P. The information contained herein
H
is subject to change without notice. All Rights
Reserved.
This document contains proprietary
information, which is protected by
copyright. No part of this document may be
photocopied, reproduced, or translated into
another language without the prior written
consent of Hewlett-Packard.
Publication Number
5998-3707
April 2015
Applicable Products
HP 4110 IP Phone (J9765A)
Disclaimer
HEWLETT-PACKARD COMPANY MAKES NO
WARRANTY OF ANY KIND WITH REGARD
TO THIS MATERIAL, INCLUDING, BUT NOT
LIMITED TO, THE IMPLIED WARRANTIES
OF MERCHANTABILITY AND FITNESS FOR
A PARTICULAR PURPOSE. Hewlett-Packard
shall not be liable for errors contained herein
or for incidental or consequential damages in
connection with the furnishing, performance,
or use of this material.
The only warranties for HP products and
services are set forth in the express warranty
statements accompanying such products and
services. Nothing herein should be construed
as constituting an additional warranty. HP
shall not be liable for technical or editorial
errors or omissions contained herein.
Hewlett-Packard assumes no responsibility
for the use or reliability of its software on
equipment that is not furnished by HewlettPackard.
Warranty
The Hewlett-Packard Limited Warranty
Statement for this product and the HP
Software License Terms which apply to any
software accompanying this product are
available on the HP networking web site at
www.hp.com/networking warranty.
The customer warranty support and
services information are available on the
HP networking web site at www.hp.com/
networking/support. Additionally, your HP
authorized network reseller can provide you
with assistance, both with services that they
offer and with services offered by HP.
Hewlett-Packard Company
8000 Foothills Boulevard
Roseville, California 95747
http://www.hp.com/networking
Page 3

Contents
Important Information ............................................4
First Steps ...........................................................4
Signing In ...........................................................9
Customizing Your Phone ........................................ 12
At a Glance ....................................................... 13
Phone User Interface ............................................. 14
Using the Phone .................................................. 16
Cleaning ........................................................... 18
Where to Go Next ................................................ 18
Safety Instructions ............................................... 18
SELV (Safety Extra Low Voltage) Compliance ................ 20
Regulatory/Certications ........................................ 20
Declaration of Conformity ....................................... 25
HP 4110 Quick Start Guide
Delivery Contents .............................................. 4
Connecting (Desktop Use) ..................................... 5
Mounting to Wall .............................................. 6
Sign in Using a PIN ............................................ 9
Congure Your PIN to Unlock Phone ........................10
Make a Call ...................................................16
Receive a Call.................................................16
Control the Volume ...........................................17
Mute a Call ...................................................17
Access Help Topics ...........................................17
Grounding.....................................................19
Servicing ......................................................19
Power Adapter ................................................19
Magnetic Earpiece ............................................19
Miscellaneous .................................................19
U. S. A. ........................................................ 20
Canada ........................................................21
Japan ..........................................................21
Korea ..........................................................21
New Zealand ..................................................21
Russia/Belarus/Kazakhstan ...................................22
Standards Conformance ....................................24
E
N
G
L
I
S
H
Page 4
E
N
HP 4110 Quick Start Guide
G
L
I
S
H
This quick start guide describes the installation, setup, and operation of the HP 4110. For
ENGLISH
further information, please refer to the Work Smart guides on the phone or refer to the
User Guide at http://hp.com/networking. Click Support and search for J9765A.
Important Information
Please read the instructions on safety and disposal and on how to
set up and use the device before actually using it (Page 18). Also,
give these instructions to other users to read or inform those users of
their contents. Save this manual and do not give the device to third
parties without it.
First Steps
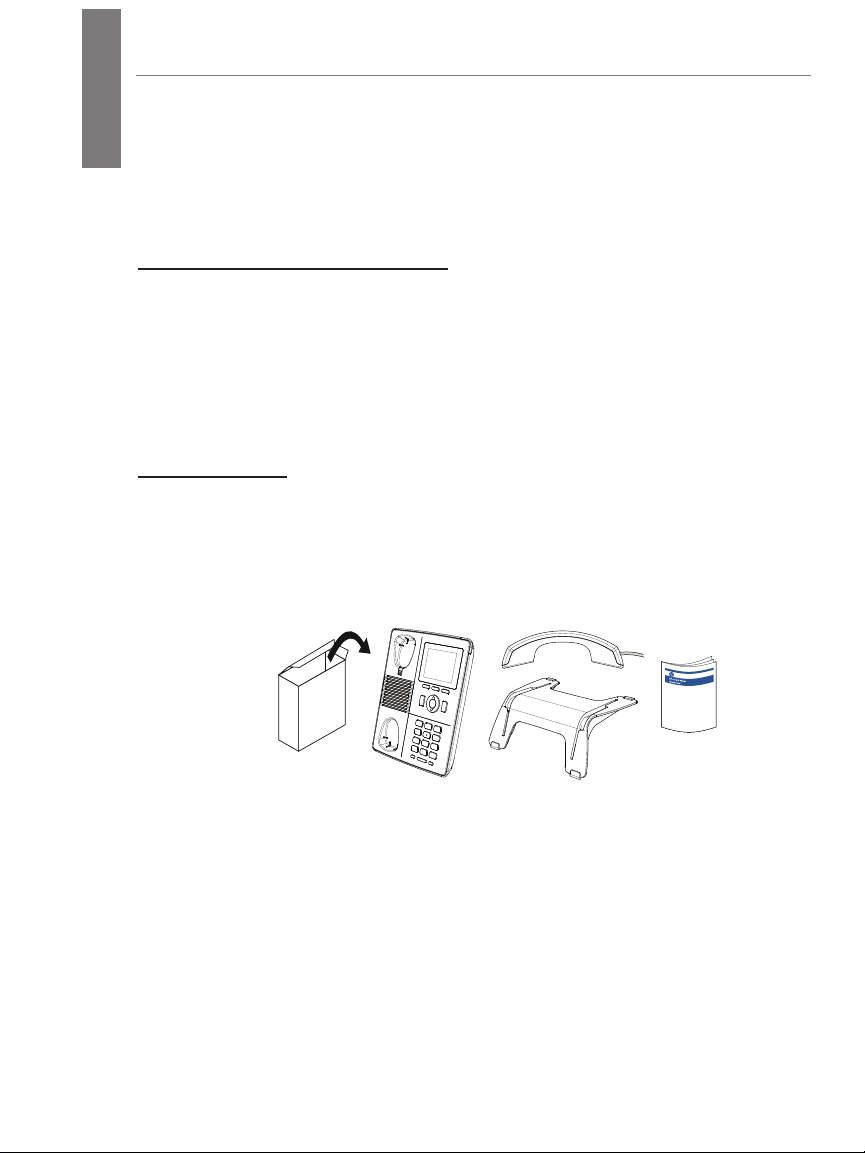
Delivery Contents
The equipment/supplies included with the HP 4110 IP Phone are
shown here.
Note: The phone is a PoE phone. If you are not using PoE in your
network configuration, an external power supply is required. The
only power supply covered under the HP warranty is the HP 5V
external power supply (J9767A). See your HP sales representative
for more details. Caution: A 48V supply, as used by other IP phone vendors,
will permanently disable this phone.
4
Page 5
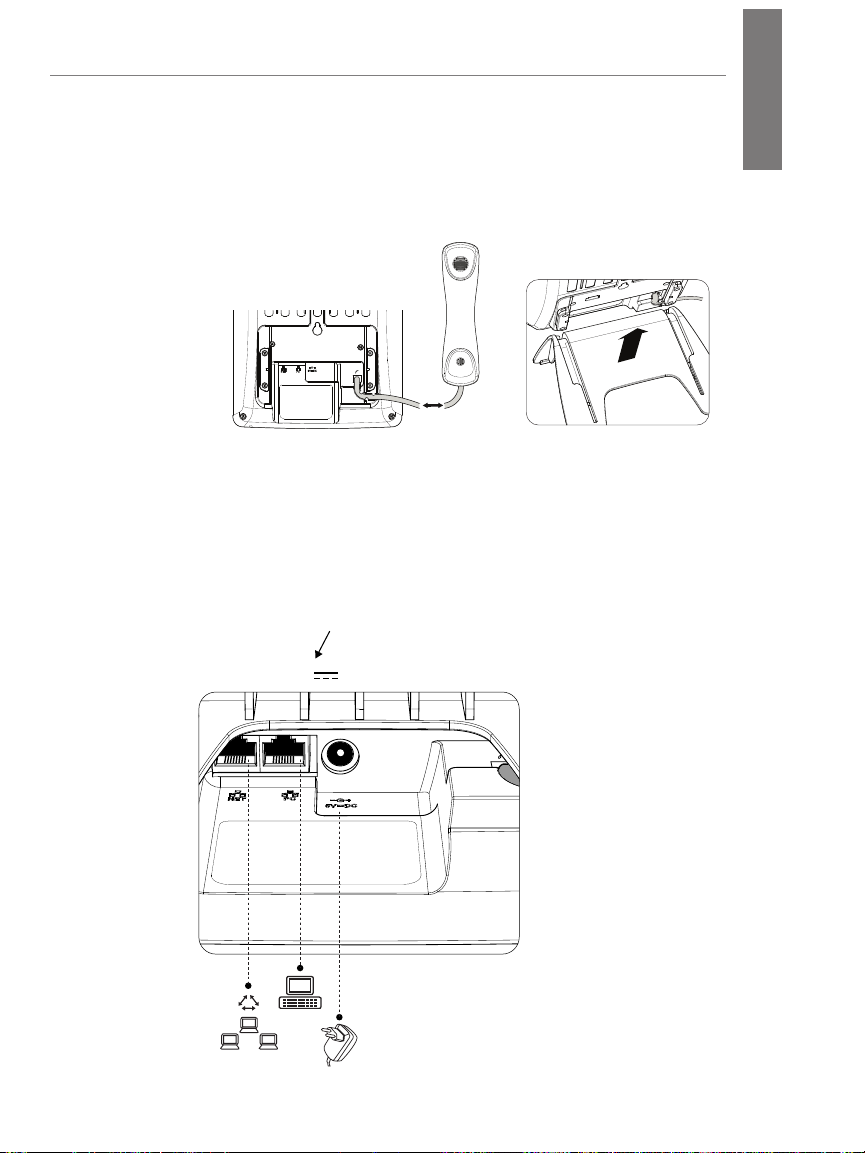
Connecting (Desktop Use)
If no PoE available
1. Attach the phone cord (Step 1), then slide the phone into the
phone stand (Step 2).
HP 4110 Quick Start Guide
E
N
G
L
I
S
H
1.
2.
2. Connect the Ethernet cable into the NET port (left-most
port).
Note: The phone is a PoE phone. If you are not using PoE,
also connect an HP 5V power supply. Caution: A 48V supply, as
used by other IP phone vendors, will permanently disable this phone.
Use only a Hewlett-Packard (HP) 5V external power supply (J9767A)..
NET PC
5V DC
5
Page 6
E
N
HP 4110 Quick Start Guide
G
L
I
S
H
Mounting to Wall
Before You Begin
The following tools are needed during this procedure:
■ Phillips head screwdriver
■ Ruler or measuring tape
If an Ethernet jack for the telephone does not currently exist in the
desired location, you must install an Ethernet jack before continuing.
This jack must be wired appropriately for an Ethernet connection. A
regular telephone jack cannot be used.
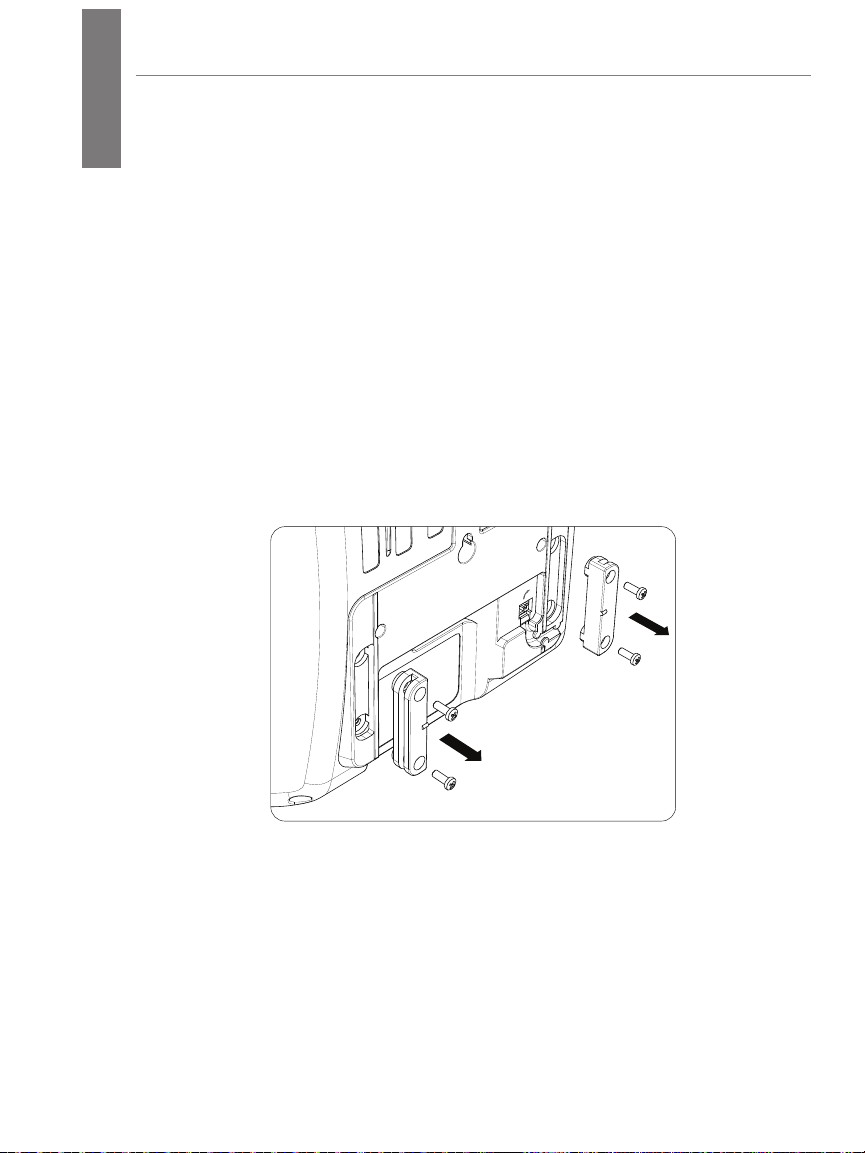
Dismount Slide Rail from Footstand
Remove screws from slide rail.
ENGLISH
Prepare the Wall and Install Screws
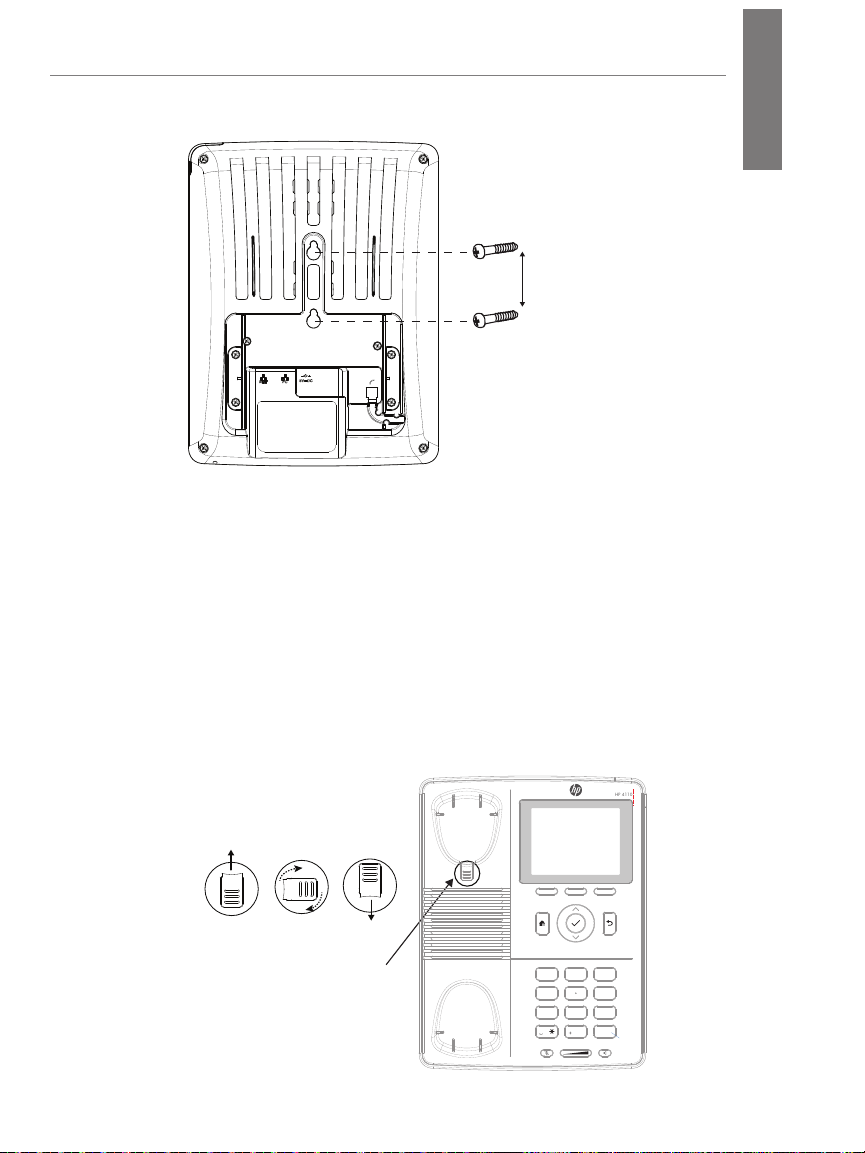
1. Using a pencil, mark the location for mounting screws on
wall. Screws should be 2 inches apart, inline with the top of
the mounting holes on back of phone.
6
Page 7
HP 4110 Quick Start Guide
HP 4110
2 inches
2. Using a Phillips head screwdriver, install two screws into
wall.
Prepare the Handset Hook
1. Remove the handset hook from the handset rest.
E
N
G
L
I
S
H
2. Rotate the hook 180 degrees.
3. Reinsert the hook.
The hook should have a lip on which the handset catches
when the phone is positioned vertically.
Remove tab
from handset
rest
Rotate
180°
Return tab
to handset
rest
Handset
Hook
1
4
PQRS WXYZTUV
7
Mute SpeakerVolume
ABC DEF
2
JKLGHI MNO
5
8
0 #
3
6
9
7
Page 8

E
If no PoE available
N
HP 4110 Quick Start Guide
G
L
I
S
H
Connect the Ethernet Cable
1. Connect the Ethernet cable to the NET port (left-most port).
ENGLISH
Note: The phone is a PoE phone. If you are not using PoE,
also connect an HP 5V power supply. Caution: A 48V supply, as
used by other IP phone vendors, will permanently disable this phone.
Use only a Hewlett-Packard (HP) 5V external power supply (J9767A)..
NET PC
5V DC
2. Attach the Ethernet cable to the wall jack.
Attach the Phone to the Wall
1. Attach the phone to the wall by placing the larger portion of
the mounting holes over the screws on the wall.
2. Once in place, pull the phone down so that the narrow area
of the mounting holes are resting against the screws.
Mounting
Holes
8
Page 9

HP 4110 Quick Start Guide
If no PoE available
Signing In
Sign in Using a PIN
You can sign in to Lync Phone Edition by using a sign-in personal
identification number (PIN).
1. Connect an Ethernet cable to the NET port on the phone.
E
N
G
L
I
S
H
NET PC
5V DC
If you are not using PoE, also connect a Hewlett-Packard (HP) 5V
external power supply (J9767A) to the phone. This is the only power
supply covered under the HP warranty. See your HP representative
for more details. Caution: A 48V supply, as used by other IP phone vendors,
will permanently disable this phone. Use only a Hewlett-Packard (HP) 5V external
power supply (J9767A)..
2. Enter your phone number or extension, then select Next.
3. Enter your PIN, then select Sign In.
9
Page 10

E
N
HP 4110 Quick Start Guide
G
L
I
S
H
Create/Reset Your Sign-in PIN
To create or reset your sign-in PIN, do one of the following:
On your computer:
1. Open Microsoft® Outlook®, and click Online Meeting from the
2. From the meeting invitation, click Online Meeting.
3. Click Forgot your dial-in PIN?
4. From the PIN settings page, click Sign In, then create or reset
From a web browser:
1. In the address bar of your web browser, type the address of
ENGLISH
Home page.
Note: In many Outlook clients, Online Meeting is listed in the
New Items dropdown.
your PIN.
the Dial-in Conferencing Settings page that was provided to
you by your support team (e.g.,
https://im.contoso.com/dialin).
2. Once the webservice has opened, reset your PIN.
If you have trouble with both options, please contact your support
team.
Configure Your PIN to Unlock Phone
The PIN auto-lock feature is enabled by default in Lync Server, so if
the administrator has not disabled it, you will be prompted to create
a PIN upon registering your phone. Once the auto-lock PIN has been
set, your phone will lock when left unattended for a specified period
of time (determined by your support team). You also have the option
to manually lock/unlock your phone.
10
Page 11

HP 4110 Quick Start Guide
To configure the auto-lock PIN:
1. On the Desk Phone Setup screen, enter a PIN.
Note: By default, common patterns are not permitted in the
PIN field; however, your administrator may have changed the
defaults.
2. Enter the PIN again.
3. Click Done.
E
N
G
L
I
S
H
To change your PIN once it has been set:
1. Click the Menu key, and select Settings.
2. Press the key.
3. Select Change PIN.
11
Page 12

E
N
HP 4110 Quick Start Guide
G
L
I
S
H
Customizing Your Phone
To complete the Desk Phone Setup process, you will be prompted to
customize your phone settings, such as the time zone, date, and time
format.
1. On the Desk Phone Setup screen, click Next.
2. Select your time zone, date, and time format, then click Next.
3. Click Done to begin using your phone, or click Settings for
more options.
ENGLISH
Note: After your phone has been set up, you can access the
Settings menu at any time by clicking the Menu button, and
then selecting Settings.
12
Page 13

At a Glance
HP 4110
Handset
Hook
Menu Key
HP 4110 Quick Start Guide
Message Waiting Indicator
– Blinking fast: Incoming call
– Steady light: In call
– Blinking slowly: Missed call
LCD Display
E
N
G
L
I
S
H
Select Key
Home Key
ABC DEF
1
2
3
JKLGHI MNO
4
5
6
PQRS WXYZTUV
7
8
Speaker
Mute SpeakerVolume
9
0 #
Space Character
Mute Key
Volume
(Down/Up)
Home key—Returns you to the home screen.
Context-Senstive
Soft Key
Navigation Keys
Up/Down/Select
Cancel/Back Key
Keypad
Speakerphone
Key
Navigation keys—For navigating within the display menus. Press
^ to go up, press ˅ to go down, and use the to confirm your
selection.
13
Page 14

E
N
HP 4110 Quick Start Guide
G
L
I
S
H
Cancel/back key—Cancels actions or input.
Mute key: Turns microphone on/off.
Speakerphone key: Turns speakerphone on/off.
Phone User Interface
The home page of the phone user interface is shown below. To see
additional options, press Menu. See next page for an expanded view.
Contacts
Call Log
Voice Mail
Search or Dial a Phone Number
Calendar
ENGLISH
14
Confirm Soft Key
(same as check mark)
Context-Sensitive
Soft Key
Page 15

Press Menu from the home page of the phone.
HP 4110 Quick Start Guide
E
N
G
L
I
S
H
Call Forwarding 5:00 PM
Call Forwarding O
Do not forward calls
Forward to Voice Mail
Forward to a contact or any phone number
Simultaneously ring a phone number
Menu
Switch User
Do you want to sign out the
current user and sign in a dierent
user?
MenuYe s No
Settings 10:20 AM
Volume
Brightness
Logging
Desk Phone Location
Make Test Call
Ringtones
Time Zone
Date Format
Time Format
Language
High Contrast
Text Telephony (TT Y)
Unit Tests
5:10 PM
System Information 4:54 PM
Version: 4.0.7577.340
MAC: 00:04:13:72:00:7F
IP Address: 192.169.0.46
Subnet Mask: 255.255.255.0
Gateway Address: 192.168.0.1
DNS Server: 192.168.0.1
VLAN ID: 1
Part Number: HP_4110_A1
Serial Number: 0M08400000
Last Update: N/A
Last Update Request: 08/12/2011, 9:58
Last Update Status: (0x0/200)
Send LogsMenu
Help Topics 4:54 PM
Sign in Using Lync 2010
Sign in Using a PIN
Congure Your Unlock PIN to Unlock Y ...
View a Contact Card
Use Search
Use Contact Groups
Check Voice Mail
Use Call Logs
Call Controls
Notications
Conferences Options
Make a Call
Forward a Call
(Additional topics continue)
Select
Select
Select Menu
15
Page 16

E
N
HP 4110 Quick Start Guide
G
L
I
S
H
Using the Phone
Make a Call
Pick up the handset and dial, or do any the following.
Use a Contacts List
1. From the Home screen, select the Contacts icon.
2. Select the contact group the user is in.
3. Select the contact’s name, then press Call.
ENGLISH
Search for a Contact
1. Press the numbers on the keypad that correspond to the
contact name or the phone extension. For example, to find
"Tony Smith," begin pressing 8669*76484, where "*" is the
space between the first and last name.
2. Select the contact’s name, then press Call.
Receive a Call
From the Incoming Call screen, do one of the following:
■ To receive the call, select Answer or pick up the handset.
■ To receive a call with a headset, press .
■ To receive a call using the speakerphone, press .
16
Page 17

HP 4110 Quick Start Guide
To send the caller directly to your voice mail, select To Voice Mail.
Control the Volume
From the phone, press .
Mute a Call
■ To mute yourself when in a call, press the Mute key on the
phone, or select Hold. To unmute, press the Mute key again.
E
N
G
L
I
S
H
■ To mute everyone except yourself during a conference call,
select Mute All But Me.
Access Help Topics
To access help topics from the phone:
1. Press Menu from the home page.
2. Select Help.
17
Page 18

E
N
HP 4110 Quick Start Guide
G
L
I
S
H
Cleaning
To clean the HP 4110 IP phone, use an anti-static cloth. Please avoid
cleaning liquids, as they might damage the surface or the internal
electronics of the phone.
Where to Go Next
■ For information to help get you started with Microsoft Lync
2010 Devices, go to technet.microsoft.com/en-us/library/gg398926.aspx.
■ For information about managing devices, go to
technet.microsoft.com/en-us/library/gg398307.aspx.
■ For the most up-to-date planning information for Microsoft
Lync 2010 Devices, go to go.microsoft.com/fwlink/?LinkId=204935.
■ For the most up-to-date deployment information for Microsoft
Lync 2010 Devices, go to go.microsoft.com/fwlink/?LinkId=204936.
ENGLISH
■ For the most up-to-date troubleshooting information for
Microsoft Lync 2010 Devices, go to
go.microsoft.com/fwlink/?LinkId=204933.
■ For the complete set of the Microsoft Lync 2010 online server
and client documentation, go to
technet.microsoft.com/en-us/library/gg398616.aspx.
Safety Instructions
Note: This device does not have a power switch. It powers on when
the external power adapter is plugged in, or alternatively, when the
LAN cable is connected to a PoE source.
Follow the instructions in this manual and other applicable
documentation of the device.
18
Page 19

HP 4110 Quick Start Guide
Grounding
If your LAN covers an area served by more than one power
distribution system, be sure the associated safety grounds are
securely interconnected.
Caution! LAN cables may occasionally be subject to hazardous
transient voltages (such as lightning or disturbances in the electrical
utilities power grid). Handle exposed metal components of the
network with caution.
Servicing
No user-serviceable parts are inside this product. Any servicing,
adjustment, maintenance, or repair must be performed by servicetrained personnel only.
Power Adapter
The phone is a PoE phone. If the phone is not supplied with power
via an Ethernet cable, an external power adapter must be used. Use
only the power adapter expressly recommended by Hewlett-Packard
(HP 5V external power supply, J9767A). Caution: A 48V supply, as used
by other IP phone vendors, will permanently disable this phone.
E
N
G
L
I
S
H
Magnetic Earpiece
Caution: The earpiece of the HP 4110 has a strong magnetic field that
can attract ferromagnetic objects, such as pins, paperclips, staples,
thumbtacks, and other metallic items. Be careful when the earpiece
is near these objects. Sharp objects that adhere to the magnets
in the earpiece may result in cuts or injury to the ear, face, and/or
hands.
Miscellaneous
■ Avoid placing the cables where people may trip over them or
where they may be exposed to mechanical pressure, as this
may damage them.
19
Page 20

E
N
HP 4110 Quick Start Guide
G
L
I
S
H
■ Caution: This device is for indoor use only! NOT FOR
OUTDOOR USE!
■ Do not install the device in rooms with high humidity (for
example, in bathrooms, laundry rooms, damp basements).
Do not immerse the device in water and do not spill or pour
liquids of any kind onto or into the device.
■ Do not install the device in surroundings at risk for explosions
(paint shops, for example). Do not use the device if you smell
gas or other potentially explosive fumes.
■ Do not use the device during thunderstorms. Lightning
striking the power grid may cause electric shocks.
SELV (Safety Extra Low Voltage) Compliance
Safety status of input/output connections comply with SELV
requirements.
Warning: DO NOT CONNECT DIRECTLY TO PHONES LINES!
This device has been designed only for connection to Ethernet
ports. LAN ports contain SELV circuits, and PSTN ports contain
TNV circuits. Some LAN and PSTN ports both use RJ-45 (8P8C)
connectors. Use caution when connecting cables.
ENGLISH
Regulatory/Certifications
U. S. A.
This equipment has been tested and found to comply with the limits
for a Class B digital device, pursuant to Part 15 of the FCC Rules.
These limits are designed to provide reasonable protection against
harmful interference in a residential installation. This equipment
generates, uses, and can radiate radio frequency energy and, if not
installed and used in accordance with the instructions, may cause
harmful interference to radio communications. However, there is no
guarantee that interference will not occur in a particular installation.
If this equipment does cause harmful interference to radio or
20
Page 21

HP 4110 Quick Start Guide
television reception, which can be determined by turning
Reorient or relocate the receiving antenna.
■ Increase the separation between the equipment and receiver.
■ Connect the equipment to an outlet on a circuit different from
that to which the receiver is connected.
■ Consult the dealer or an experienced radio/TV technician for
help.
Changes or modifications to this device that are not expressly
approved by Hewlett-Packard could void the user's authority to
operate this equipment.
Canada
This Class B digital apparatus complies with Canadian ICES-003. Cet
appareil numérique de la classe B est conforme à la norme NMB-003
du Canada.
Japan
E
N
G
L
I
S
H
この装置は、クラスB情報技術装置です。この装置は、家庭環境で使用
することを目的としていますが、この装置がラジオやテレビジョン受信
機に近接して使用されると、受信障害を引き起こすことがあります。
取扱説明書に従って正しい取り扱いをして下さい。
Korea
New Zealand
The grant of a Telepermit for any item of terminal equipment indicates
only that Telecom has accepted that the item complies with minimum
conditions for connecting to its network (the item cannot connect
directly to phone lines; the connection is made indirectly). It indicates
no endorsement of the product by Telecom, nor does it provide any
sort of warranty. Above all, it provides no assurance that any item
will work correctly in all respects with another item of Telepermitted
equipment of a different make or model, nor does it imply that any
product is compatible with all of Telecom's network services.
21
Page 22

E
N
HP 4110 Quick Start Guide
G
L
I
S
Russia/Belarus/Kazakhstan
H
Russia/Belarus/Kazakhstan/CEE Safety:
Product overview:
The HP 4110 IP Phone is a Microsoft® Lync optimized common area
telephone. HP 4110 IP Phones are standalone, cost-effective, and mainstream
phones that are ideal for deployments in common areas such as lobbies. It
provides Power over Ethernet (PoE) connectivity as well as an optional power
adapter.
ENGLISH
22
Page 23

Standards Conformance
■ Safety: UL 60950-1; CAN/CSA 22.2 No. 60950-1; EN 60950-1
■ EMC: CISPR 22 Class B; EN 55022 Class B; EN 55024; ICES-
003 Class B; VCCI Class B; FCC Part 15, Class B; KCC Class B
■ Power consumption: 2.5-7 watts (without USB peripherals)
■ Power : 5 V DC (also has PoE 802.3af support)
■ Ports: 2 RJ-45 auto-negotiating 10/100/1000 PoE ports (IEEE
802.3 Type 10BASE-T, IEEE 802.3u Type 100BASE-TX, IEEE
802.3ab Type 1000BASE-T, IEEE 802.3af PoE)
■ Power over Ethernet: IEEE 802.3af, Class 2
HP 4110 Quick Start Guide
E
N
G
L
I
S
H
23
Page 24

E
N
HP 4110 Quick Start Guide
G
L
I
S
H
Declaration of Conformity
according to ISO/IEC 17050-1 and EN 17050-1
DoC #: RSVLC-1101-01
Supplier’s Name: Hewlett-Packard Company
Manufacturer's Address: 8000 Foothills Blvd., Roseville, CA 95747 U.S.A.
declares, that the product
Product Name: HP 4110 IP Phone
Product Number(s): J9765A
Regulatory Model No: RSVLC-1101
Product Options: J9767A
conforms to the following Product Specifications:
Safety: IEC 60950-1:2005 / EN 60950-1:2006 +A11:2009
EMC: EN 55022:2006 +A1:2007, Class B
Telecom: FCC 47 CFR 68.316, Hearing Aid Compatibility for products with handsets
Energy Use: Regulation (EC) No. 1275/2008
Supplementary Information:
The product herewith complies with the requirements of the Low Voltage Directive 2006/95/EC and
the EMC Directive 2004/108/EC and carries the CE marking accordingly.
This device complies with part 15 of the FCC Rules. Operation is subject to the following two
conditions: 1) This device may not cause harmful interference, and 2) this device must accept any
interference received, including interference that may cause undesired operation.
For regulatory identification purposes, this product has been assigned a Regulatory Model Number
(RMN). The RMN is the main product identifier listed in the regulatory documentation and test reports
for this product. The RMN should not be confused with the marketing name or product number.
EN 62479:2010
EN 55024:1998 +A1:2001 +A2:2003
ENGLISH
DECLARATION OF CONFORMITY
Roseville, September 7, 2011
Local contact for regulatory information:
EU: Hewlett-Packard GmbH, HQ-TRE, Herrenberger Straße 140, D-71034 Böblingen, Germany
www.hp.eu/certificates
U.S.: Hewlett-Packard, 3000 Hanover St., Palo Alto, CA 94304, U.S.A. 650-857-1501
Michael E. Avery, Regulatory Engineering Mgr
HP Networking
24
Page 25

Technology for better business outcomes
To learn more, visit www.hp.com/networking
© Copyright 2015 Hewlett-Packard Development Company, L.P.
The information contained herein is subject to change without
notice. The only warranties for HP products and services are set
forth in the express warranty statements accompanying such
products and services. Nothing herein should be construed as
constituting an additional warranty. HP will not be liable for
technical or editorial errors or omissions contained herein.
April 2015
Manual Part Number
5998-3707
*5998-3707*
 Loading...