

Page 1
TM 11-6625-1614-15
DEPARTMENT OF THE ARMY TECHNICAL MANUAL
ORGANIZATIONAL, DS, GS,
AND DEPOT MAINTENANCE MANUAL
HEWLETT-PACKARD
ELECTRONIC VOLTMETER
MODEL 410C
This copy IS a reprint which includes current
pages from Change 1.
HEADQUARTERS, DEPARTMENT OF THE ARMY
AUGUST 1967
Page 2

TM 11-6625-1614-15
DANGEROUS VOLTAGES
EXIST IN THIS EQUIPMENT
Be careful when working on the power supplies
and their circuits, or on the 115- or 230-volt
ac line connections.
WARNING
DON’T TAKE CHANCES!
Page 3

This manual contains copyrighted material prepared by the Hewlett-Packard Co.
TM 11-6625-1614-15
TECHNICAL MANUAL
No. 11-6625-1614-15)
ORGANIZATIONAL, DS, GS, AND DEPOT MAINTENANCE MANUAL
HEWLETT–PACKARD ELECTRONIC VOLTMETER
Section
I
GENERAL
1-A.1.
1-A.2.
1-A.3.
1-A.4.
1-A.5.
1-A.6.
1-1.
1-4.
II INSTALLATION ----------------------------------------------------------------------------------------------------------
2-1.
2-3.
2-5.
2-9.
2-12.
2-14. Repackaging for Shipment ------------------------------------------------------------------------------
HEADQUARTERS
DEPARTMENT OF THE ARMY
W
ASHINGTON
, DC, 28 August 1967
MODEL 410C
(NSN 6625-00-969-4105)
Page
INFORMATION -------------------------------------------------------------------------------------------
Scope -------------------------------------------------------------------------------------------------------Index of Publications -----------------------------------------------------------------------------------Maintenance Forms, Records, and Reports --------------------------------------------------------Reporting Errors and Recommending Improvements -------------------------------------------Reporting Equipment Improvement Recommendations (EIR)--------------------------------Administrative Storage ---------------------------------------------------------------------------------Description ------------------------------------------------------------------------------------------------Accessories Available ------------------------------------------------------------------------------------
Inspection --------------------------------------------------------------------------------------------------Installation ------------------------------------------------------------------------------------------------Rack Mounting -------------------------------------------------------------------------------------------Three - Conductor Power Cable ---------------------------------------------------------------------Primary Power Requirements --------------------------------------------------------------------------
1-1
1-1
1-1
1-1
1-2
1-2
1-2
1-4
1-5
2-1
2-1
2-1
2-1
2-1
2-1
2-2
III OPERATION ---------------------------------------------------------------------------------------------------------------
IV
3-1.
3-3.
3-5.
3-7.
3-9.
3-11. DC Current Measurements (Figure 3-3)------------------------------------------------------3-13.
3-15. Precautions When Measuring AC Voltage ---------------------------------------------------3-28.
3-31. Measuring Resistance (Figure 3-7) -------------------------------------------------------------------3-33. Measuring DC Nano-Ampere Current (Figure 3-8) -----------------------------------------------
THEORY OF OPERATION --------------------------------------------------------------------------------------------4-1.
4-4.
4-5.
4-16.
4-23.
4-27.
V
MAINTENANCE ---------------------------------------------------------------------------------------------------------5-1.
5-3.
5-5.
Introduction -----------------------------------------------------------------------------------------------Adjustment of Mechanical Zero---------------------------------------------------------------------Front and Rear Panel Description ---------------------------------------------------------------------
Operating Procedures ------------------------------------------------------------------------------------
DC Voltage Measurements (Figure 3-2)-------------------------------------------------------
AC Voltage Measurements (Figure 3-4) -------------------------------------------------------
Negative Pulses --------------------------------------------------------------------------------------------
Overall Description --------------------------------------------------------------------------------------Circuit Description ---------------------------------------------------------------------------------------
Input Network ---------------------------------------------------------------------------------------
Modulator - Demodulator -----------------------------------------------------------------------The Feedback Network ---------------------------------------------------------------------------Power Supply ----------------------------------------------------------------------------------------
Introduction ----------------------------------------------------------------------------------------------Test Equipment Required ------------------------------------------------------------------------------Performance Checks -------------------------------------------------------------------------------------
3-1
3-1
3-1
3-1
3-1
3-1
3-1
3-1
3-1
3-4
3-4
3-4
4-1
4-1
4-1
4-1
4-1
4-2
4-2
5-1
5-1
5-1
5-1
Change
i
Page 4

TM 11-6625-1614-15
Section
Number
1-1.
3-1.
5-1.
5-2.
5-3.
5-4.
5-5.
5-6.
5-7.
5-8.
5-9.
5-10.
5-7.
5-9.
5-10.
5-13.
5-16.
5-17.
5-21.
5-22.
5-26.
5-28.
5-29.
5-30.
5-31.
5-33.
5-34.
5-35.
5-36.
5-45.
5-48.
Alternate Voltage Source -------------------------------------------------------------------------Mechanical Meter Zero ---------------------------------------------------------------------------DC Voltmeter OWration -------------------------------------------------------------------------DC Ammeter Operation --------------------------------------------------------------------------Ohmmeter Operation -----------------------------------------------------------------------------Amplifier Operation -------------------------------------------------------------------------------DC Amplifier Output Impedance Check ------------------------------------------------------AC Voltmeter Operation --------------------------------------------------------------------------
Adjustment and Calibration Prmedure --------------------------------------------------------------
Chopper Frequency Adjust ----------------------------------------------------------------------Power Supply Adjustment -----------------------------------------------------------------------DC Zero Adjustment and Bias ------------------------------------------------------------------DC Amplifier Output Adjust --------------------------------------------------------------------Ohms Adjust (R3)----------------------------------------------------------------------------------AC Zero Adjust ------------------------------------------------------------------------------------AC Full Scale Adjust (.5 V Range) --------------------------------------------------------------
Troubleshooting Procedure -----------------------------------------------------------------------------
Servicing Etched Circuit Boards ----------------------------------------------------------------Chopper, Assembly Installation -----------------------------------------------------------------
LIST OF TABLES
Specifications -----------------------------------------------------------------------------------------------------------Possible Eror When Measuring Voltage of Complex Waveforms ------------------------------------------Recommended Test Equipment ------------------------------------------------------------------------------------DCV Accuracy Test ---------------------------------------------------------------------------------------------------DCV Input Resistance Test ------------------------------------------------------------------------------------------DCA Accuracy Test ---------------------------------------------------------------------------------------------------Deleted
AC Accuracy Test -----------------------------------------------------------------------------------------------------Power Supply Test ----------------------------------------------------------------------------------------------------AC Full Scale Adjust -------------------------------------------------------------------------------------------------Front Panel Troubleshooting Prmedure --------------------------------------------------------------------------
Troubleshooting Prwedure ------------------------------------------------------------------------------------------
Page
5- 1
5-1
5-1
5-2
5-4
5-4
5-5
5-5
5-8
5-8
5-9
5-10
5-10
5-11
5-12
5-12
5-12
5-14
5-15
1-3
3-3
5-0
5-2
5-3
5-3
5-6
5-9
5-13
5-16
5-17
LIST OF ILLUSTRATIONS
Number
1-1.
2-1.
2-2.
2-3.
2-4.
3-1.
3-2.
3-3.
3-4.
3-5.
3-6.
3-7.
3-8.
4-1.
4-2.
4-3.
Model 410C Electronic Voltmeter
The
The Combining Case . . . . . . . . . . . . . . . . . . . . . . . . . . . . . . . . . . . . . . . . . . . . . . . . . . . . . . . . . . . . . . . . . . . . . . . . . . . . . . . . . . . . . . . . . . . . . . . . . .
Steps to Place Instrument in Combining Case--------------------------------------------------------------------
Adaptor Frame Instrument Combination . . . . . . . . . . . . . . . . . . . . . . . . . . . . . . . . . . . . . . . . . . . . . . . . . . . . . . . . . . . . . . . . . . . . . . . .
TWO Half Modules in Rack Adaptor ------------------------------------------------------------------------------Front and Rear Panel Controls --------------------------------------------------------------------------------------
DC Voltage Measurements . . . . . . . . . . . . . . . . . . . . . . . . . . . . . . . . . . . . . . . . . . . . . . . . . . . . . . . . . . . . . . . . . . . . . . . . . . . . . . . . . . . . . . . . . .
DC Current Measurements
AD Voltage Measurements
Maximum AC Voltage Chart for 11036A Probe
Graph Used in Calculation of Pulse Voltage Readings . . . . . . . . . . . . . . . . . . . . . . . . . . . . . . . . . . . . . . . . . . . . . . . . . . . . . . . .
Resistance Measurements
DC Nano-Ampere Current Measurements . . . . . . . . . . . . . . . . . . . . . . . . . . . . . . . . . . . . . . . . . . . . . . . . . . . . . . . . . . . . . . . . . . . . . . .
Block Diagram, Model 410C
Modulator - Demodulator Mechanical Analogy . . . . . . . . . . . . . . . . . . . . . . . . . . . . . . . . . . . . . . . . . . . . . . . . . . . . . . . . . . . . . . .
Simplified Schematic, DC Current Measurement ---------------------------------------------------------------
. . . . . . . . . . . . . . . . . . . . . . . . . . . . . . . . . . . . . . . . . . . . . . . . . . . . . . . . . . . . . . . . . . . . . . . . . . . . . . . . . . . . . . . . . . .
. . . . . . . . . . . . . . . . . . . . . . . . . . . . . . . . . . . . . . . . . . . . . . . . . . . . . . . . . . . . . . . . . . . . . . . . . . . . . . . . . . . . . . . . . . .
. . . . . . . . . . . . . . . . . . . . . . . . . . . . . . .
. . . . . . . . . . . . . . . . . . . . . . . . . . . . . . . . . . . . . . . . . . . . . . . . . . . . . . . . . . . . . . . . . . . . . . . . . . . . . . . . . . . . . . . . . . . . .
.
. . . . . . . . . . . . . . . . . . . . . . . . . . . . . . . . . . . . . . . . . . . . . . . . . . . . . . . . . . . . . . . . . . . . . . . . . . . . . . . . . . . . . . . .
. . . . . . . . . . . . . . . . . . . . . . . . . . . . . . . . .
.
.
.
.
.
.
Page
1-0
2-0
2-0
2-1
2-2
3-2
.
3-5
3-6
3-7
3-8
3-9
3-10
3-11
4-0
4-0
4-3
ii
Page 5

TM 11-6625-1614-15
Number
4-4.
4-5.
4-6.
5-1.
5-2.
5-3.
5-4.
5-5.
5-6.
5-6.1
5-7.
5-8.
5-9.
5-10.
5-11.
5-12.
5-13.
5-14.
Page
Simplified Schematic, DC Voltage Measurements -------------------------------------------------------------Simplified Schematic, Resistance Measurement ----------------------------------------------------------------Simplified Schematic, AC Voltage Measurement --------------------------------------------------------------Alternate Voltage Source --------------------------------------------------------------------------------------------DC Ammeter Operation ---------------------------------------------------------------------------------------------High Frequency Response Test -------------------------------------------------------------------------------------Low Frequency Response Test --------------------------------------------------------------------------------------Troubleshooting Tree -------------------------------------------------------------------------------------------------A4 Chopper Assembly Installation --------------------------------------------------------------------------------Chopper Frequency Adjust Setup ----------------------------------------------------------------------------------Power Supply Measurements ---------------------------------------------------------------------------------------Power Supply Schematic ---------------------------------------------------------------------------------------------Typical Amplifier Waveforms --------------------------------------------------------------------------------------Amplifier Schematic---------------------------------------------------------------------------------------------------
11036A
Model
Model l1036A Probe Schematic -----------------------------------------------------------------------------------RANGE and FUNCTION Switching (Pictorial) ----------------------------------------------------------------Input RANGE and FUNCTION Switching Schematic ---------------------------------------------------------
AC Probe Exploded --------------------------------------------------------------------------------
4-4
4-5
4-6
5-1
5-3
5-5
5-6
5-14
5-15
5-16.1
5-17
5-19
5-20
5-21
5-22
5-22
5-23
5-24
iii
Page 6
1-0
TM 11-6625-1614-15
Model 410C
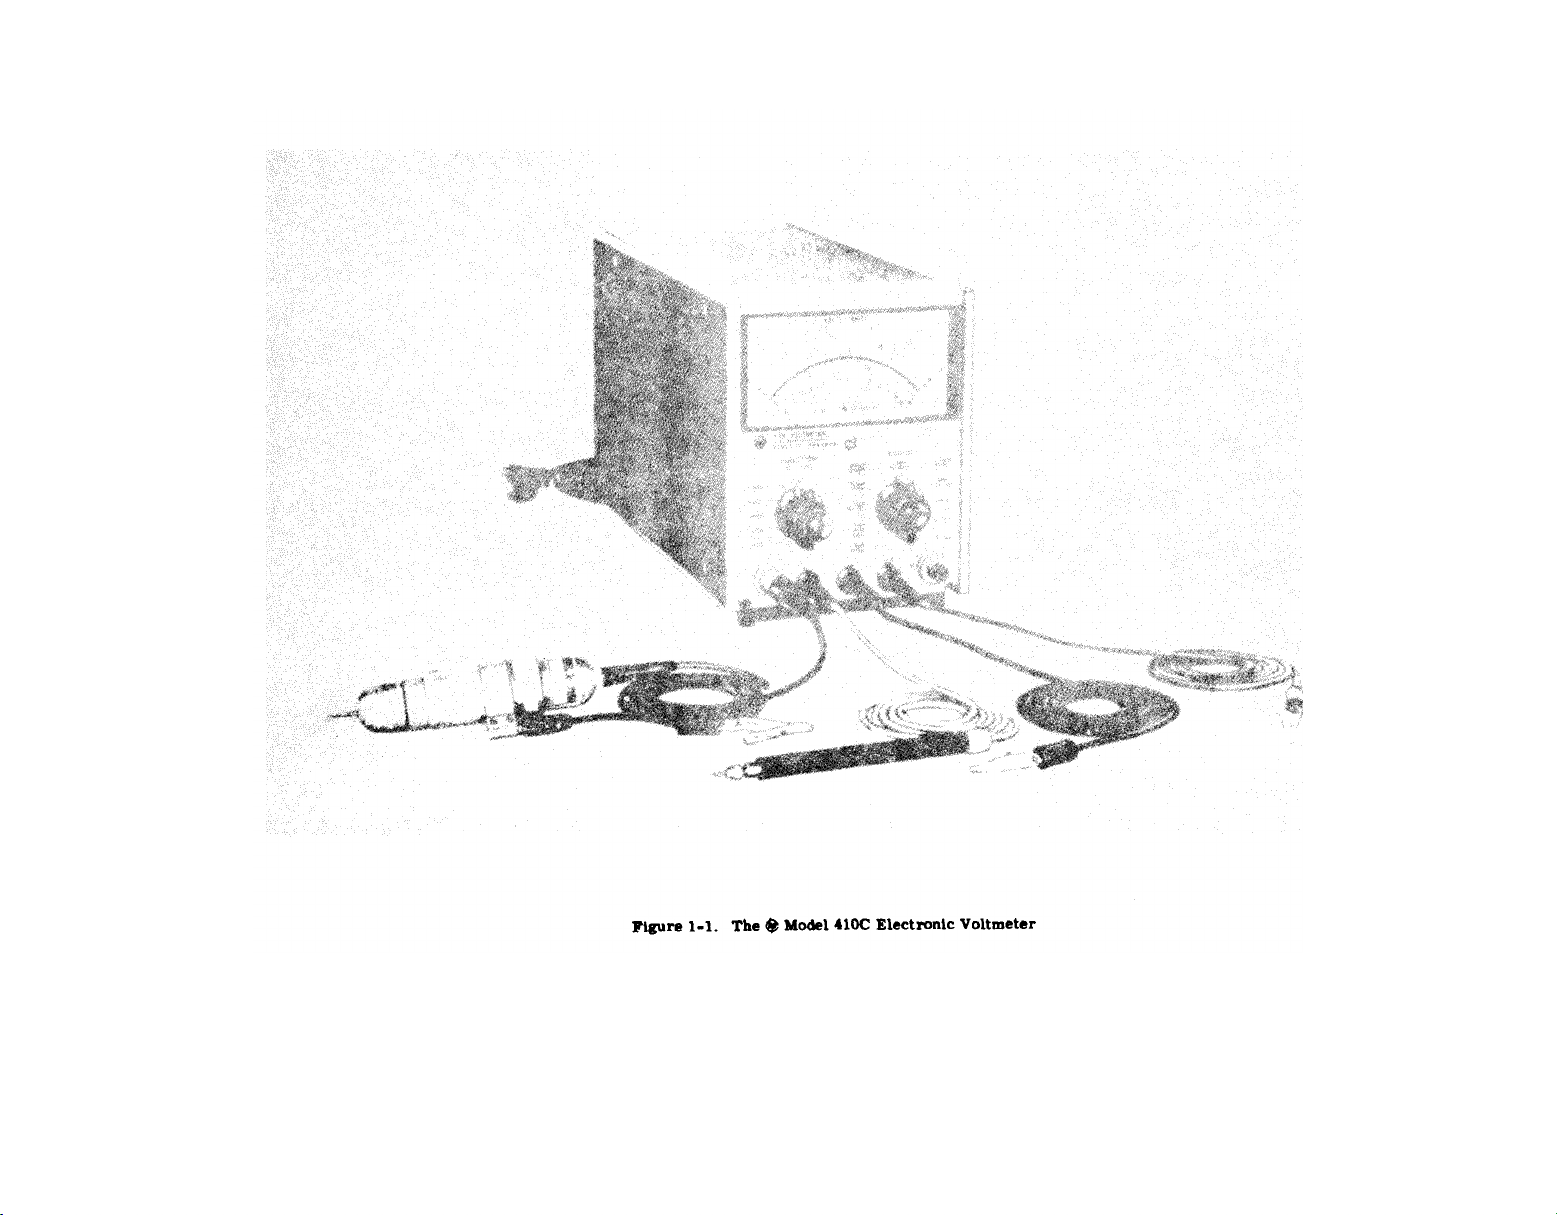
Figure 1-1.
Figure 1-1
Section I
Page 7

SECTION I
GENERAL INFORMATION
TM 11-6625-1614-15
1-A.1. Scope
a. This
instructions and covers operator’s, organizational,
direct support (DS), general support (GS), and depot
maintenance. It describes Hewlett-Packard (Federal
supply code 28480) Electronic Voltmeter Model 410C.
This manual applies to equipments with serial num-
bers prefixed by 433 and serial number 532-03701
and higher. If the first three digits on your instrument are 550, refer to figure 5-10, note 14 for the
change in equipments of this serial prefix.
b. A basic issue iterns list for this equipment is
not included as part of this manual.
manual includes installation and operation
1-A.2. Index of Publications
Refer to the latest issue of DA Pam 310-4 to determine whether there are new editions, changes, or additional publications pertaining to the equipment.
1-A.3. Maintenance Forms, Records,
and Reports
a. Reports of Maintenance and Unsatisfactory
Equipment. Department of the Army forms and
procedures used for equipment maintenance will be
those prescribed by TM 38-750, The Army Mainte-
nance Management System.
b. Report of Item and Packaging Discrepancies.
Fill out and forward SF 364 (Report of Discrepancy
(ROD) ) as prescribed in AR 735-1l-2/DLAR 4140.
55/NAVMATINST 4355.73/AFR 400.54/MCO
4430.3E.
c. Discrepancy in Shipment Report (DISREP)
(SF361). Fill out and forward Discrepancy in Ship-
ment Report (DISREP) (SF 361) as prescribed in AR
55-38/NAVSUPINST 4610.33B/AFR 75-18/MCO
P4610.19C and DLAR 4500.15.
1-A.4. Reporting Errors and Recoin.
mending Improvements
You can help improve this manual. If you find any
mistakes or if you know of a way to improve the procedures, please let us know. Mail your letter, DA
Form 2028 (Recommended Changes to Publications
and Blank Forms), direct to Commander, US Army
Communications and Electronics Materiel Readiness Command, ATTN: DRSEL-ME-MQ, Fort
Monmouth, NJ 07703. A reply will be furnished to
you.
1-A.5. Reporting Equipment Improve.
ment Recommendations (EIR)
If your Electronic Voltmeter needs improvement, let
us know. Send us and EIR. You, the user are the only
one who can tell us what you don’t like about your
equipment. Let us know why you don’t like the design. Tell us why a procedure is hard to perform. Put
it on an SF 368 (Quality Deficiency Report). Mail it
to Commander, US Army Communications and Electronics Materiel Readiness Command, ATTN: DRSEL-ME-MQ, Fort Monmouth, NJ 07703. We’ll
send you a reply.
1-A.6. Administrative Storage
Administrative storage of this equipment consists of
covering the equipment with heavy paper taped in a
way to prevent entry of dust particles. If environment
is humid, use bags of dessicant inside the paper
covering.
Change 1
1-1/ (1-2 Blank)
Page 8

Page 9
Section I
Table 1-1
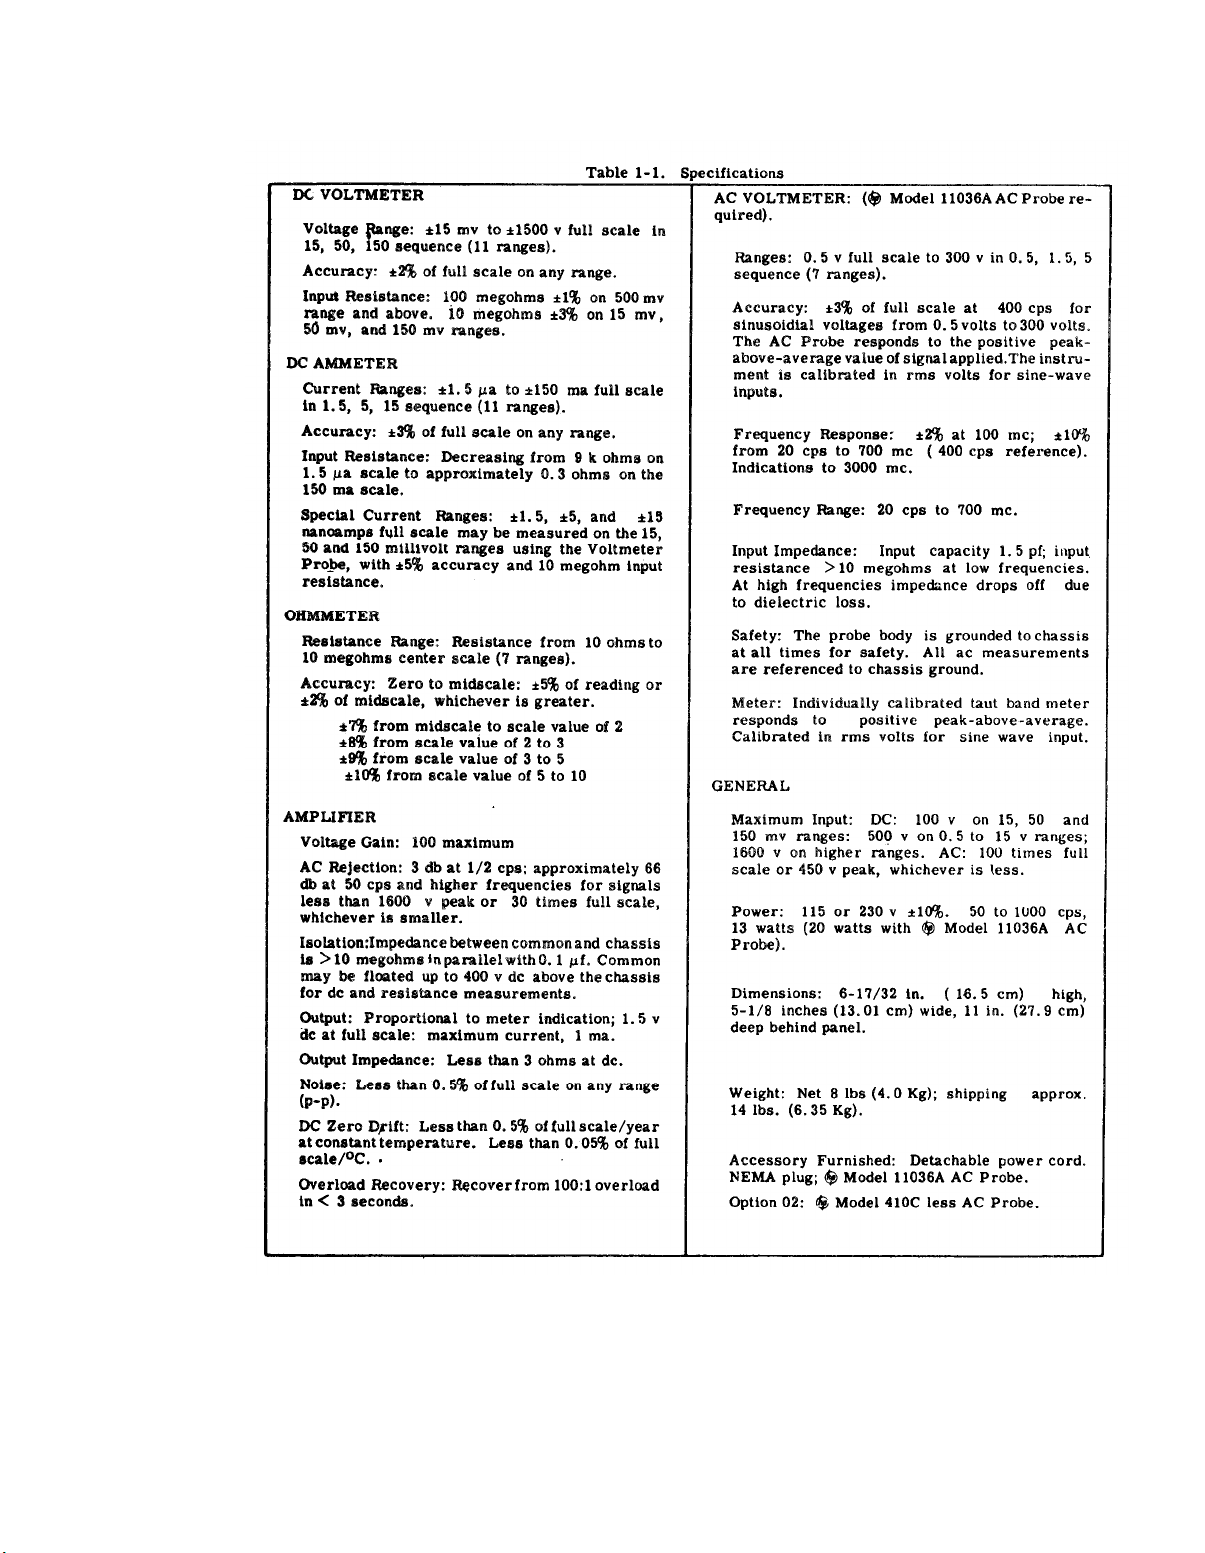
Table 1-1.
TM
11-6625-1614-15
Model 410C
1-3
01556-2
Page 10

TM
11-6625-1614-15
Model 410C
1-1. DESCRIPTION.
1-2. The Hewlett-Packard Model 4l0C Electronic Voltmeter can be
used to measure DC voltage and DC current; AC voltage and
resistance. Positive and negative DC voltages from 10 millivolts
to 1500 volts and positive and negative DC currents from 1.5
microamperes to 150 milliamperes can be measured full scale.
Resistance from 10 ohms to 10 megohms full scale can be measured
with an accuracy of ±5% of reading at midscale; resistance from
0.2 ohms to 500 megohms can be measured with reduced accuracy.
The Model 410C Electronic Voltmeter is shown in Figure 1-1; the
specifications are given in Table 1-1.
1-3. With the Model 11036A detachable AC Probe, the Voltmeter
can be used to measure AC voltage from 20 cps to 700 Mc.
20 cps to 100 M
C
AC voltage from 0.5 to 300 volts can be measured;
)
From
from 100 Mc to 700 Mc, refer to Figure 3-5 for maximum AC voltage
that can be applied to the AC Probe. For additional information
on the AC Probe, refer to Paragraph 1-8.
1-4
Page 11

Model 410C
1-4. ACCESORIES AVAILABLE .
TM 11-6625-1614-15
1-5. MODEL 11036A AC PROBE.
Model 410C, permits AC voltage measurements from 0.5 volt rms
to 300 volts rms, full scale over a frequency range of 20 cps to
700 Mc.
is ±3% of full scale.
700 Mc, with indications obtainable to 3000 Mc. Frequency
response at 100 Mc is within ±2%. The Model 110364 responds to
the positive-peak-above-average value of the signal applied. The
Model 410C is calibrated to read in RMS volts, for sine wave
inputs .
Reference calibration accuracy at 400 cps (sinusoidal)
Frequency response is ±10% from 20 cps to
This accessory, when used with the
1-5
Page 12
TM 11-6625-1614-15
Section II
Figures 2-l and 2-2
Model 410C
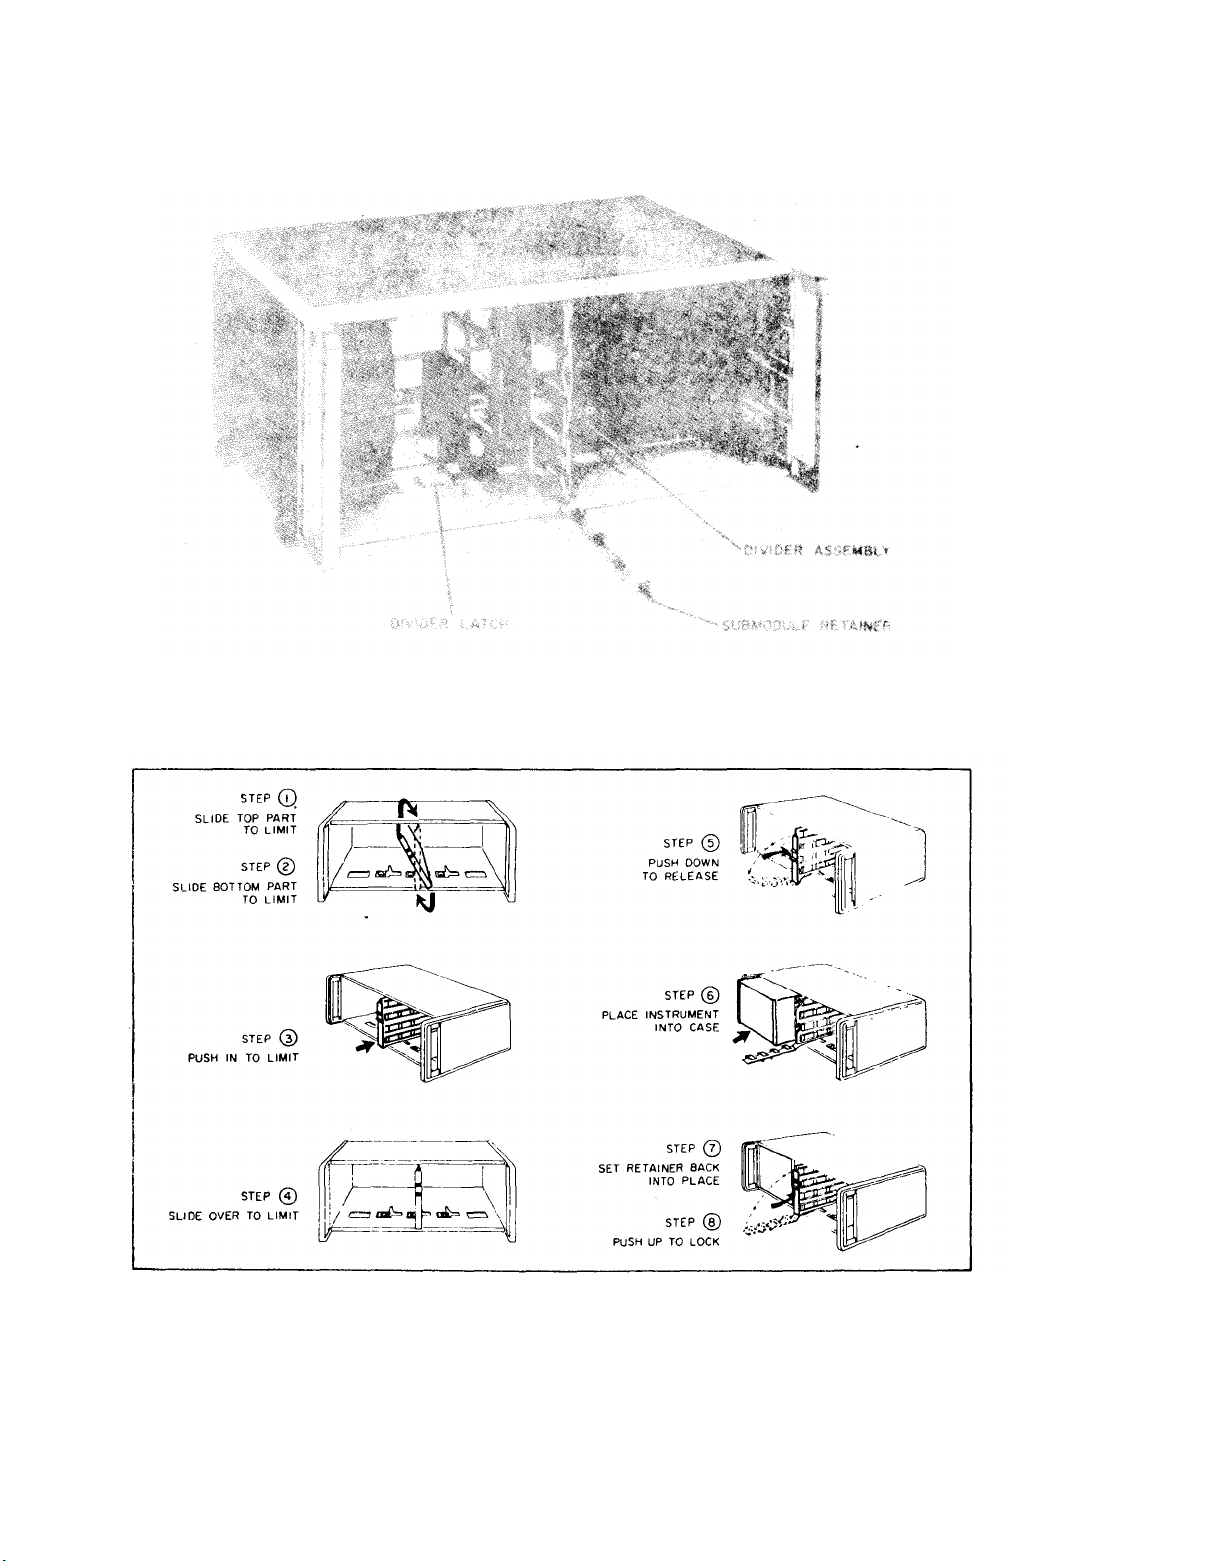
Figure 2-1. The Combining Case
2-0
Figure 2-2. Steps to Place Instrument in Combining Case
01556-1
Page 13
Model 410C
SECTION II
INSTALLATION
TM 11-6625-1614-15
Paragraphs 2-1 to 2-13
Section II
2-1. INSPECTION.
2-2. ‘This
instrument was carefully inspected both
mechanically and electrically, before shipment. It
should be physically free of mars or scratches and in
perfect electrical order upon receipt. To confirm
this, the instrument should be inspected for physical
damage in transit. Also, check for supplied accessories, and test the electrical performance of the in-
.
strument using the procedure outlined in Paragraph
2-9. THREE-CONDUCTOR POWER CABLE.
To protect operating personnel, the National
2-10.
Electrical Manufacturers’ Association (NEMA) recommends that the instrument panel and cabinet be
grounded.
equipped with a three-conductor power cable
All Hewlett-Packard instruments
are
which
grounds the instrument when plugged into an appropri-
ate receptacle.
5-5 Performance Checks. If there is any
damage or deficiency, refer to
paragraph 1-A.3.
2-3. INSTALLATION.
2-4. The Model 410C is transistorized except for
one vacuum tube and requires no special cooling.
However, the instrument should not be operated where
the ambient temperature exceeds 55° C (140° F).
2-5. RACK MOUNTING.
2-6. The Model 410C is a submodular unit designed
for bench use. However, when used in combination
with other submodular units, it can be bench and/or
rack mounted.
The Combining Cases and Adapter
Frame are designed specifically for this purpose.
2-11. To preserve the protection feature when operating
ihe instrument from a two-contact outlet, use
three - prong to two - prong adapter and connect the
green pigtail on the adapter to ground.
2-12. PRIMARY POWER REQUIREMENTS.
2-13. The Modei 410C can be operated from either
115 or 230 volts, 50 to 1000 cps. The instrument can
be easily converted from i 15- to 230- volt operation.
The LINE VOLTAGE
switch located
the mode of AC operation. The line
switch, S4 a two-position slide
at the rear of the instrument, selects
voltage from
which the instrument is set to operate appears on the
siider of the switch. A 0.25-ampere, slo-blo fuse is
used for both 115- and 230-volt operation.
2-7. MODELS 1051A AND 1052A COMBINING CASES.
The Combining Cases are full-module unita which
accept various combinations of submodular
units.
Beinga full width unit, it can either be bench or rack
mounted. An illustration of the Combining Case is
shown in Figure 2-1. Instructions for installing the
Model 410C are shown in Figure 2-2.
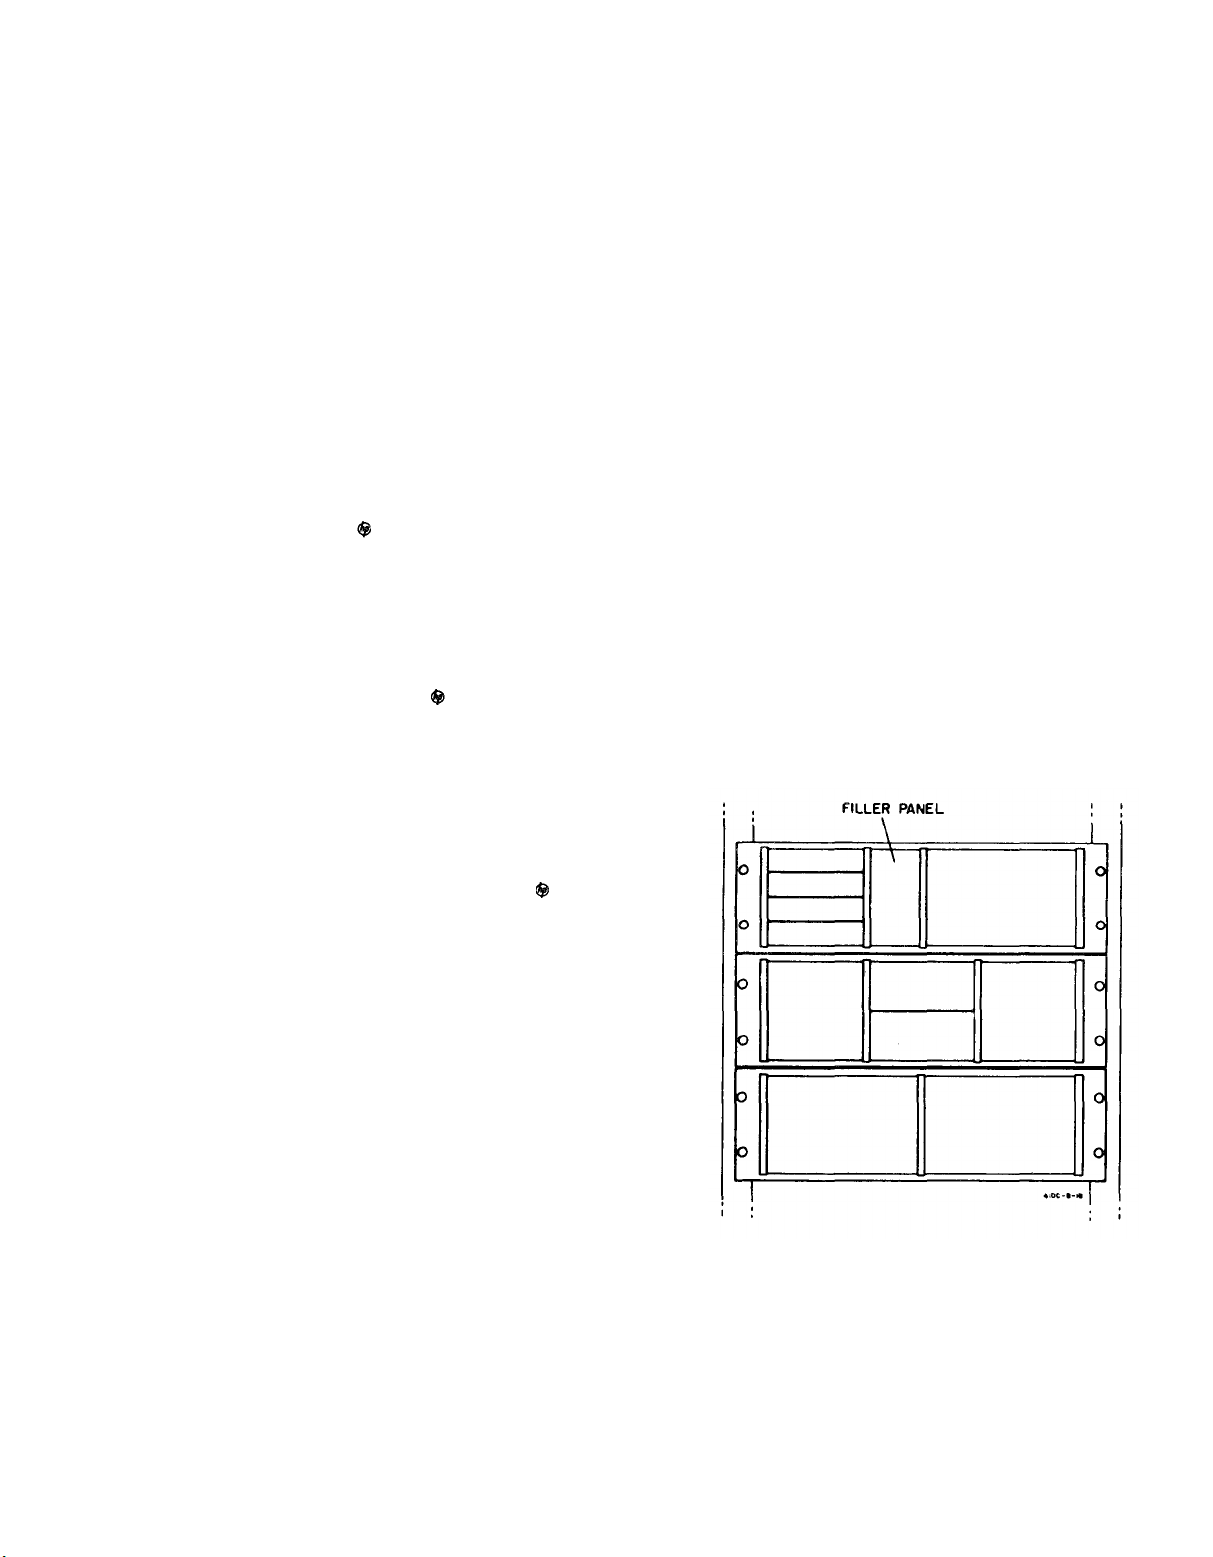
2-8. RACK ADAPTER
FRAME ( Part No. 5060-
0797). The adapter frame is a rack mounting frame
that accepts various combinations of submodular
units. It can be rack mounted only.
An illustration
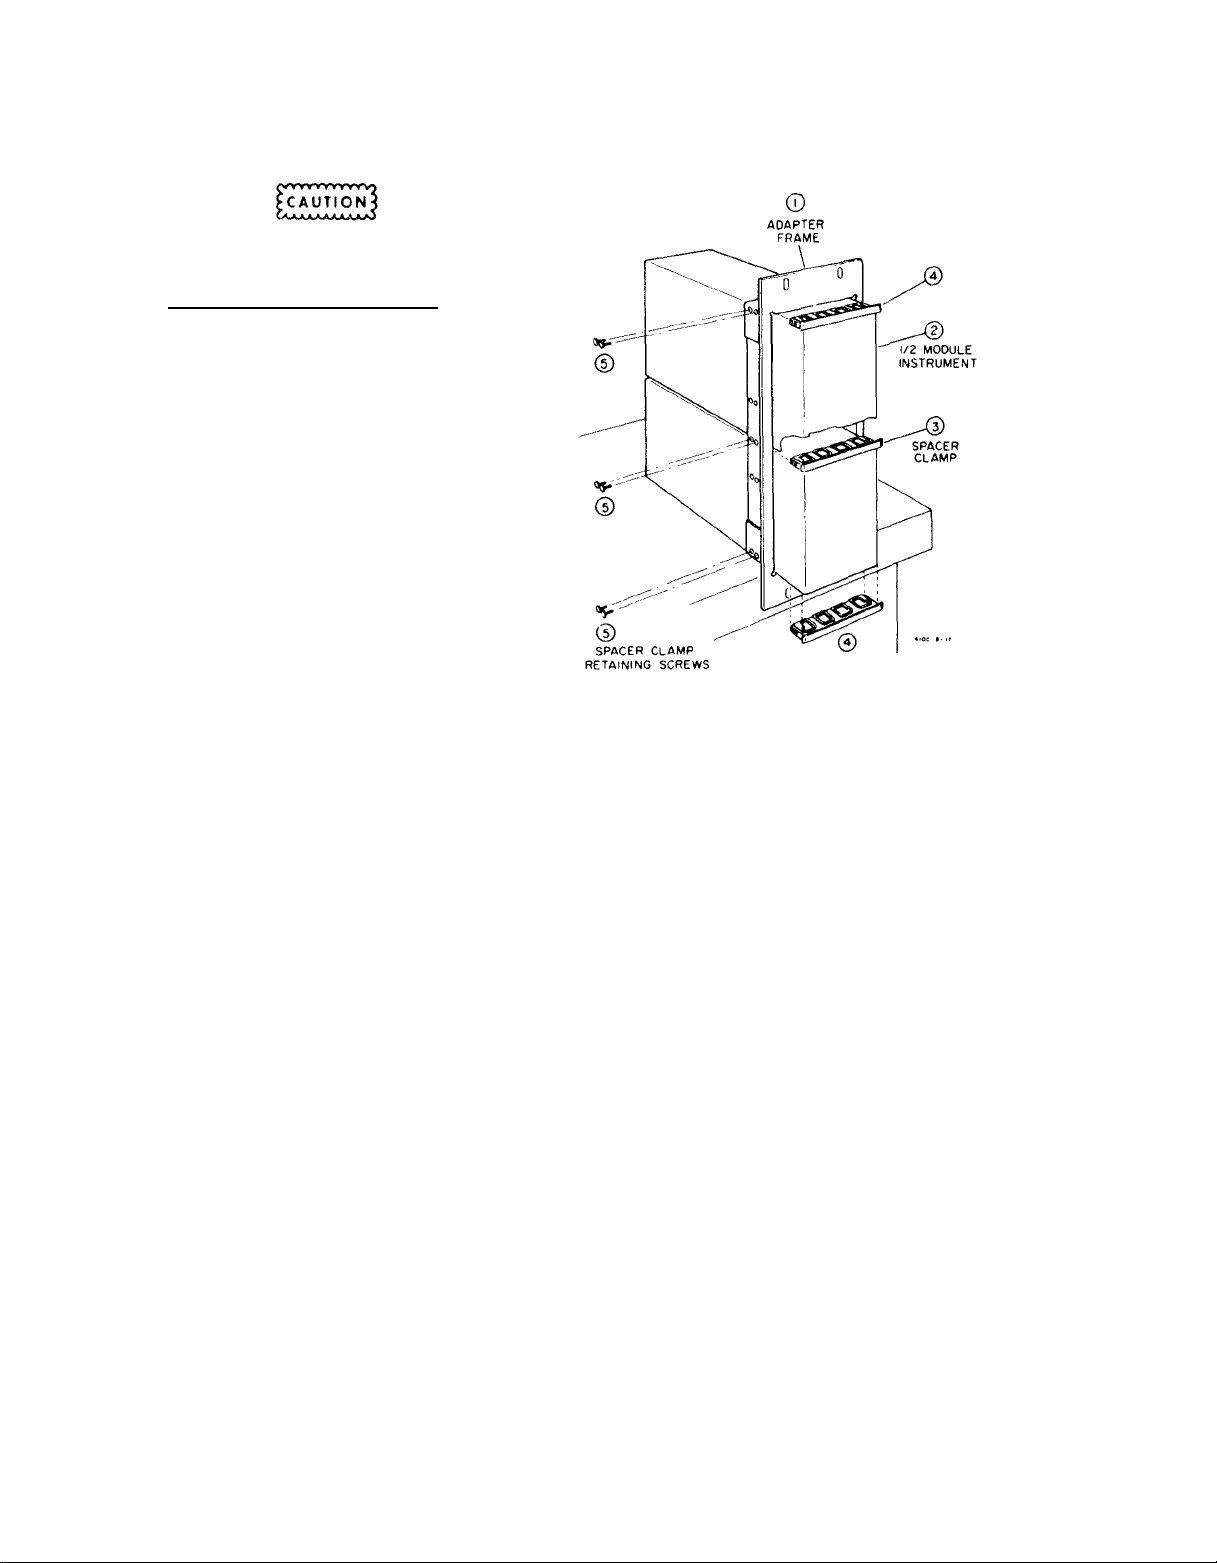
of the adapter frame is given in Figure 2-3. Instructions are given below.
a. Place the adapter frame on edge of bench as
shown in step 1, Figure 2-4.
b. Stack the submodular units in the frame as
shown instep 2, Figure 2-4. Place the spacer clamps
between instruments as shown in step 3, Figure 2-4.
c. Place spacer clamps on the two end instruments
(see step 4, Figure 2-4) and push the combination into
the frame.
d. Insert screws on either side of frame, and
tighten until submodular instruments are tight in the
frame.
e.
The compiete assembly is ready for rack
mounting.
01556-2
Figure 2-3. Adapter Frame Instrument Combination
2-1
Page 14
TM 11-6625-1614-15
Section II
Paragraph 2-14 to 2-15
DO NOT CHANGE THE SETTING OF THE
LINE VOLTAGE SWITCH WHEN THE VOLTMETER IS OPERATING.
2-14. REPACKAGING FOR SHIPMENT.
2-15. The following paragraphs contain a general
guide for repackaging of the instrument for shipment.
Refer to Paragraph 2-16 if the original container is
to be used: 2-17 if it is not.
2-16. If the original container is to be used, proceed as
follows:
a. Place instrument in original container if avai-
lable.
Model 410C
Figure 2-4. Two Half Modules in Rack Adapter
b. Ensure that container is well sealed with strong
tape or metal bands.
2-17. If original container is not to be used, proceed
as follows:
a. Wrap instrument in heavy paper or
before placing in an inner container.
b. Place packing material around all sides of
instrument and protect panel face with cardboard d. Mark shipping container with "DELICATE
strips. INSTRUMENT”, “FRAGILE”, etc.
plastic
2-2
c. Place instrument and inner container in a heavy
carton or wooden box and seal with strong tape or
metal bands.
01556-1
Page 15
TM 11-6625-1614-15
Model 410C
Paragraph 3-1 to 3-18
Section III
SECTION III
OPERATION
AC VOLTAGE MEASUREMENT (Figure 3-4).
3-1. INTRODUCTION.
3-2. The Model 410C is used to measure AC and DC
voltage, DC current, and resistance. All measure-
ment inputs are located on the front panel; a DC output connector is located on the rear panel. Front
panel controls and indicators are color coded. DC
voltage, DC current and resistance knobs and indi-
cators are in black; AC voltage controls and indicators are in red.
3-3. ADJUSTMENT OF MECHANICAL ZERO.
3-4. The procedure for adjustment of mechanical
zero is given in Section V.
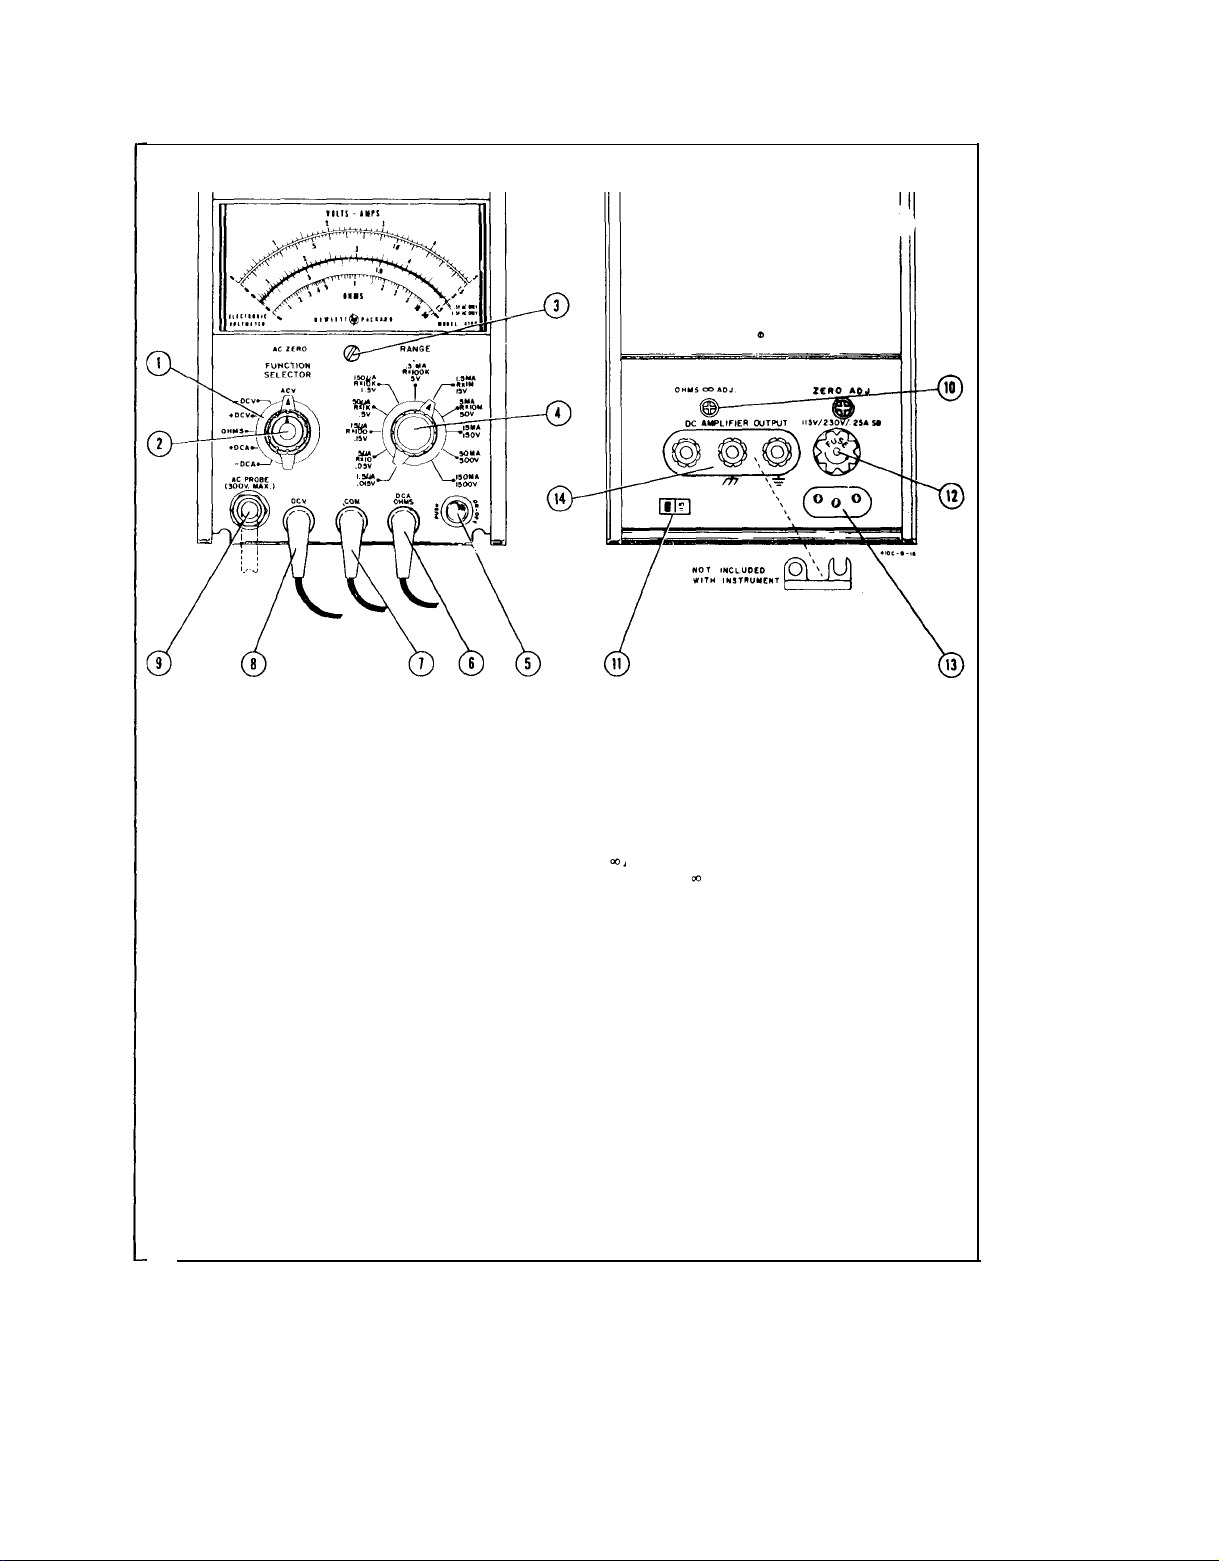
3-5. FRONT AND REAR PANEL DESCRIPTION.
3-6. Figure 3-1 describes the function of all front
and rear panel controls, connectors and indicators .
The description of each control, connector and indi-
cator is keyed to a drawing which accompanies the
figure.
3-7. OPERATING PROCEDURES.
3-8. There are five operating procedures: DC Volt-
age Measurements, Figure 3-2; DC Current Measure-
ments, Figure 3-3; AC Voltage Measurements, Fig-
ure 3-4; Resistance Measurements, Figure 3-7; and
Measuring DC Current in Nano-amperes, Figure 3-8.
Note
Ageing of the neon tamps in the chopper
assembly can cause a change in chopper
frequency which produces a slight oscillatory movement of meter pointer. If
this oscillatory movement is observed,
rotate Oac Freq Adj A3R5 (see Paragragraph 5-28) in the ccw direction until
oscillation of pointer stops.
DC VOLTAGE MEASUREMENTS (Figure 3-2).
.
3-9.
3-10. The Model 410C is normally floating; however
a shorting bar can be connected at the DC AMPLIFIER
OUTPUT connector on the rear panel. When the instru-
ment is floating, the COM Lead should not be connected
to voltages greater than 400 volts.
3-11. DC CURRENT MEASUREMENTS (Figure 3-3).
3-13.
1
ONE SIDE OF ALMOST ALL POWER
DISTRIBUTION SYSTEMS IS GROUNDED.
EXTREME CAUTION MUST BE USED IF
DIRECT MEASUREMENT OF POWER
LINE VOLTAGES IS ATTEMPTED. IF
THE GROUND CLIP LEAD IS ACCIDENTALLY CONNECTED TO THE UNGROUNDEDSIDE OF THE LINE. SEVERE
DAMAGE TO THE 410C IS POSSIBLE
BECAUSE OF THE SHORT CIRCUIT
CREATED.
CAN BE SAFELY MEASURED BY USING
THE PROBE TIP ONLY. CONTACTING
THE GROUNDED POWER CONDUCTOR
WILL GIVE A READING OF 0 VOLTS
WHILE CONTACTING
GROUNDED LEAD WILL GIVE FULL
VOLTAGE READING.
3-14.
Although the Model 410C indicates a full scale
AC range of 500 volts, the optional Model 11036A AC
Probe should not be connected to AC voltages in excess of 300 volts RMS. AC voltage referenced to a
DC voltage may be measured, but the AC Probe clip
(alligator type) must be connected to the ground
of the circuit under test.
WHEN MEASURING AC REFERENCED
TO DC, THE PEAK AC VOLTAGE PLUS
DC VOLTAGE CONNECTED TO TRE
PROBE MUST NOT EXCEED 420 VOLTS.
3-15. PRECAUTION WHEN MEASURING AC VOLT-
AGE.
3-16. Special considerations must be kept in mind
when making AC voltage measurements. These considerations are discussed in the following paragraphs.
3-17. GENERAL CONSIDERATION OF COMPLEX
WAVEFORMS.
harmonics or spurious voltages will introduce error
in the meter indication since the meter has been calibrated to read RMS values of true sine waves while
the Model 11036A Probe is a peak-above-average
responding device.. The magnitude of error that may
be expected when harmonics are present on the mea-
sured waveform is indicated in Table 3-1.
POWER LINE’ VOLTAGES
THE UN-
Waveforms containing appreciable
3-12. General instructions for the measurement of
DC current are the same as those given for DC volt-
age measurements, Paragraph 3-9.
01556-2
3-18. VOLTAGE MEASUREMENTS AT FREQUENCIES BELOW 50 CYCLES/SECOND. Voltage measurements at frequencies as low as 10 cycles per
3-1
Page 16
TM 11-6625-1614-15
Section III
Figure 3-1
Model 410C
1.
FUNCTION SELECTOR: This control is used for
selecting type of measurement to be made. They
are: ±DC Voltage, ±DC Current, AC Voltage,
and resistance measurements.
2.
AC ZERO: This control provides adjustment for
zero-setting the meter before making AC voltage measurements.
3.
MECHANICAL ZERO ADJUST: This adjustment
mechanically zero-sets the meter prior to turn-
ing on Voltmeter.
4.
RANGE:
meter range.
5.
AC POWER SWITCH: This push button - lamp
combination, when depressed, turns the instrument power on or off. The push button glows
when the Voltmeter power is on,
6.
DCA-OHMS: This lead is used in conjunction
with the COM Lead to measure DC current or
ohms. The FUNCTION SELECTOR determines
which measurement is made.
7.
COM: This lead is used with the input leads for
DC voltage current, AC voltage, and resistance
measurements. The COM Lead is normally
floating; however, a shorting bar can be connected from the floating ground terminal to the
chassis ground terminal on the DC AMPLIFIER
OUTPUT connector. If a shorting bar is not
used, the COM Lead is floating except when the
FUNCTION SELECTOR is set to ACV.
3-2
This control selects the full scale
Figure 3-1. Front and Rear Panel Controls
DCV: This lead is used in conjunction with the
8.
COM Lead to measure ±DC voltage.
9.
AC PROBE (300V MAX): Receptacle for telephone-type plug of Model 11036A
With probe connected the Voltmeter may be
used to make AC voltage measurements.
ADJUST: This control is used to set meter
10.
pointer to before resistance measurements
are made. Only periodic adjustment
screwdriver adjustment is necessary.
11.
LINE VOLTAGE: This two-position slide switch
sets the instrument to accept either 115 or 230
volt AC primary power.
FUSEHOLDER: The fuseholder contains a 0. 25
12.
ampere slow-blow fuse for both 115 vac and
230 vac modes of operation.
13.
AC POW ERCONNECTOR: Accepts power cable
supplied with the instrument.
14.
DC AMPLIFIER OUTPUT: Provides DC voltage output proportional to meter indication for
driving external recorder. 1.5 volts DC output for full scale meter deflection.
AC Probe.
this
of
01556-2
Page 17
Model 410C
second maY be made without loss of accuracy by removing the. plastic nose on the Model 11036A and using
in its place a 0.25 microfarad blocking capacitor in
series with the exposed contact of the probe.
THE GRAY INSULATING MATERIAL
AROUND THE AC PROBE IS POLY-
STYRENE, A LOW-MELTING POINT
MATERIAL. IT IS NOT POSSIBLE TO
SOLDER TO THE CONTACT WHICH IS
EXPOSED WITH THE PROBE NOSE IS
REMOVED WITHOUT
DESTROYING
THE POLYSTYRENE.
Table 3-1.
% Harmonic
o
10% 2nd
20% 2nd
50% 2nd
l0% 3rd
20% 3rd
50% 3rd
Possible Error When Measuring Voltage
of Complex Waveforms
,
True RMS Value
100
100.5
102
112
100.5
102
112
Voltmeter Indication
100
90 to 110
80 to 120
75 to 150
90 to 110
87 to 120
106 to 150
3-19. VOLTAGE MEASUREMENT AT HIGH FREQUENCIES. At frequencies above 100 megacycles
the distance between the point of voltage measurement and anode of the probe diode must be made as
short as possible. If feasible, substitute a small disc
type capacitor of approximately 50 picofarsds for the
removable tip on the probe. Solder one terminal of
the button capacitor to the measurement point in the
circuit and not to the probe contact. The probe contact ( with tip removed ) can then contact the other
terminal of the capacitor for the measurement.
3-20. At frequencies above 100 megacycles considerable voltage may be built up across ground leads
and along various part of
a grounding piane.
Consequently, to avoid erroneous readings when measuring medium and high frequency circuits, use the
ground clip lead on the shell of the probe to connect
the circuit ground. In some cases at the higher frequencies it maybe necessary to shorten the grounding
lead on the probe.
3-21. For all measurements at higher frequencies,
hold the molded nose of the probe as far from the external ground piane or from object at ground potential
as can conveniently be done. Under typical conditions,
this practice will keep the input capacitance several
tenths of a picofarad lower than otherwise.
3-22. For measurements above approximately 250
megacycles it is almost mandatory that measurements
be made on voltages which are confined to coaxial
transmission iine circuits. For applications of this
type, the Model 11036A Probe is particularly suitable
because the physical configuration of the diode and
probe is that of a concentric line, and with a few precautions it can be connected to typical coaxial transmission line circuits with little difficulty.
01556-2
TM 11-6625-1614-15
Paragraphs 3-19 to 3-27 and Table 3-1
3-23. T
O connect the probe into an existing coaxial
transmission line, cut the line away so the center conductor of the line is exposed through a hole large
enough to clear the body of the probe. The nose of the
probe should be removed for this type of measurement.
Connect one terminal of a button-type capacitor of approximately 50 picofarads to the center conductor of
the coaxial line so that the other terminal of the oapacitor will contact the anode connection of the probe.
A close-fitting metal shield or bushing should be ar-
ranged to ground the outer cylinder of the probe to the
outer conductor of the transmission line.
connection is likely to cause some increase in the
standing wave ratio of the line at higher frequencies.
The Model 11042A Probe T Connector is designed to
do this job with SWR or less than 1.1 at 500 Mc (see
Paragraph 1-11).
3-24. EFFECT OF PARASITIC ON VOLTAGE
READINGS .
At frequencies above 500 megacycles,
leads or portions of circuits often resonate at frequencies two, three, or four times the fundamental
Of the voltage being measured. These harmonics may
cause serious errors in the meter reading. Owning to
the resonant rise in the probe circuit at frequencies
above 1000 megacycles, the meter may be more sensitive to the harmonics than to the fundamental. To
make dependable measurements at these frequencies,
the circuits being measured must be free of ail parasitics.
3-25. EFFECT OF DC PRESENT WITH AC SIGNAL.
When measuring an AC signal at a point where there
is a high DC potential, such as at the plate of a vacuum
tube, the high DC potential may cause small leakage
current through the blocking capacitor in the tip of the
Model 11036A AC Probe. When the AC signal under
measurement is small, the error introduced into the
reading can bes significant. To avoid leakage, an additional capacitor with a dielectric such as mylar or
polystyrene which has high resistance to leakage is
required. (Use 5 picofarads or higher, and insert the
capacitor between the point of measurement and the
probe tip.)
3-26. PULSE MEASUREMENTS
3-27. POSITIVE PULSES. The Model 11036A AC Probe
is peak-above-average responding and clamps the
positive peak value of the applied voltage. This permits the probe to be used to measure the positivevoltage amplitude of a pulse, provided the reading obtained is multiplied by a factor determined from the
following expression:
t
is the duration of the positive portion of the
1
voltage in microseconds.
t
is the duration of the negative portion of the
2
voltage in microseconds.
K
is a factor determined from the
t
o/
1 and the graph shown as
R
where R
generator in kilohms, and t
the positive portion of the pulse in microseconds.
o is the source impedance of the pulse
l
Section III
This type of
expression
Figure 3-6,
is the duration of
3-3
Page 18
TM 11-6625-1614-15
Section III
Paragraphs 3-28 to 3-34
PRF is the pulse repetition frequency in pulses per
second (pps).
Suppose, for example:
t
10 microseconds
=
1
t
=
990 microseconds
2
K=
0.55
PRF =
To find K, assuming/= 2 kilohms and
seconds:
X axis of the graph shown as Figure 3-6, and reading
K where X and Y axes intersect the unmarked curve. If
the ratio of
X and Y axes by 10, and use the curve marked ”R
t
1 and K each X10”.
Solving the expression for the multiplying factor,
1000 pps
t
l=10micro-
Ro/tl = 2 10° = 0.2. Location 0.2 on the
Ro/tl were greater than 1, multiply the
3-28. NEGATIVE PULSES.
3-29. In the case of a 10 microsecond negative pulse
(t2) and a pulse repetition frequency (PRF) of 1000 pps,
t
l would be 990 microseconds. Thus To/t1 would be
approximately 0, and from the graph it is seen that
K is approximately 0. The expression would then
reduce to
3-30. It can be seen that in the case of negative pulses
of short duration much smaller readings will be obtained for an equivalent positive pulse. As a result,
large multiplying factors must be used and unless the
pulse voltage is large, these measurements may be
impractical.
3-31. MEASURING RESISTANCE (Figure 3-7).
/
o
3-32. Before making resistance measurements, power
must be removed f rom the circuit to be tested. Also,
make sure capacitors are discharged to eliminate any
residual voltage.
3-33. MEASURING DC NANO-AMPERE CURRENT
(Figure 3-8).
3-34. The Model 410C can be used to measure nano-
ampere leakage current in transistors and diodes. The
three most sensitive DC voltage measurement ranges
are used to measure DC nano-ampere currents.
Model 410C
3-4
.
.
Page 19
Model 410C
TM 11-6625-1614-15
Section III
Figure 3-2
01556-2
Figure 3-2. DC Voltage Measurements
3-5
Page 20

TM 11-6625-1614-15
Section III
Figure 3-3
Model 410C
3-6
Figure 3-3. DC Current Measurements
01556-3
Page 21

Model 410C
TM 11-6625-1614-15
Section III
Model 410C
01556-3
Figure 3-4. AC Voltage Measurements
3-7
Page 22

3-8
TM 11-6625-1614-15
Section III
Figure 3-5
01556-2
Figure 3-5.
Model 410C
Page 23

Model 410C
TM 11-6625-1614-15
Section III
Figure 3-6
01556-2
Figure 3-6. Graph Used in Calculation of Pulse Voltage Readings
3-9
Page 24

TM 11-6625-1614-15
Section III Model 410C
Figure 3-7
3-10
Figure 3-7.
Resistance Measurements
01556-2
Page 25

Model 410C
TM 11-6625-1614-15
Section III
Figure 3-8
01556-3
Figure 3-8.
DC Nano-Amoere Current Measurements
3-11
Page 26

TM 11-6625-1614-15
Section IV
Figure 4-1 and 4-2
Model 410C
4-0
Figure 4-1. Block Diagram, Model 410C
Figure 4-2. Modulator-Demodulator Mechanical Analogy
01556-2
Page 27

Model 410C
SECTION IV
THEORY OF OPERATION
TM 11-6625-1614-15
Paragraph 4-1 to 4-18
Section IV
4-1.
OVERALL DESCRIPTION.
4-2.
The Model 410C includes
modulator - amplifier- demodulator, and a
circuit. A block diagram of the Model 410C is shown
in Figure 4-1.
4-3. Signals to be measured are applied through the
appropriate input lead to the input network. AC volt-
ages are detected in the AC probe, and therefore all
signals to the input network are DC. The input network attenuates the DC signal to a level determined
by RANGE and FUNCTION SELECTOR settings. The
attenuated DC voltage is applied to the modulator which
converts the DC to AC for amplification. The amplified AC signal is converted back to DC voltage inthe
demodulator and coupled to cathode follower VIB. The
cathode follower output to the DC AMPLIFIER OUTPUT connector and meter circuit is a DC voltage
proportional to the amplitude of the signal applied to
the input. A portion of the voltage to the meter circuit
is returned to the modulator as feedback. When the
feedback voltage and attenuated DC voltage are nearly
equal, the meter stabilizes.
4-4. CIRCUIT DESCRIPTION.
4-5. INPUT NETWORK.
4-6. The input network includes a precision voltage
divider, which by means of the FUNCTION SELECTOR
and RANGE switches, providesa maximum of 15 millivolts at the modulator input regardless of the range
set and signal applied. The ± DCA, ±DCV, OHMS, and
ACV modes of operation are discussed below.
4-7. DC CURRENT MEASUREMENTS: Refer to Figure 4-3, throughout this explanation. The purpose of
the input network is to provide proper attenuation of
currents applied.
full scale are applied with input impedance decreasing
from 9K ohms on the 1.5 µa range to approximately
0.3 ohms on the 150 ma range.
4-6. Tbe change in input impedance is varied by using
DC current shunts in conjunction with RANGE switch
A2S2. The DC voltage developed across these shunt
resistors, when applied through the modulator-am-
plifier-demodulator network to the meter, provide a
deflection on the meter proportional to the DC current
being measured.
4-9. DC VOLTAGE MEASUREMENTS. Refer to
Figure 4-4 throughout this explanation. The purpose
of the input network is to accurately attenuate the input signal to a maximum of 15 millivolts at the modu-
01556-2
Currents from 1.5 µa to 150 ma
an input network, a
meter
later input. The network presents an input impedance
of 10 megohms on the three most sensitive ranges and
100 megohms on all other ranges.
4-10. The resistor R1 (located in the DCV probe) in
conjunction with resistors A2R10 through A2R26, provides the 10 megohm input impedance required for the
three most sensitive DCV ranges. Resistors A2R4
and A3R30 are shunted out of the circuit by the RANGE
switch on the three most sensitive DCV ranges.
4-11. When using the eight less sensitive ranges,
A2R4 and A3R30 are placed in series with Rl and
A2R10 through A2R26 to present more than 100 meg-
ohm impedance to the input.
4-12. A3R30 is used to calibrate full scale on the
1500 volt range. (See Paragraph 5-35. )
4-13. RESISTANCE MEASUREMENTS. The purpose
of the input network shown in Figure 4-5 is to place
approximately 0. 6 volt DC source in series with a
known (reference) resistance. The resistance to be
measured is ptaced in parallel with the known resistance, which changes the voltage proportionally. The
maximum changes in voltage applied to the modulator
is 15 mv because of attenuation provided by A2R4,
A3R30, and A1R2.
4-14. A DC current of approximately 60 ma is
supplied at the junction of A2R22 and A2R23 through
A7R10, R2, A2R2 and A2R1 to the input network. The
OHMS ADJ.,
Resistor A2R1 is shorted out in the XIM position of
the RANGE switch; resistors A2R1 and A2R2 are
shorted out in the X10M range. The resistors A2R2
and/or A2R1 are electrically removed from the circuit to increase the voltage at the junction of A2R22
and A2R23. This is done to compensate for tbe loading of the attenuator (A2R4, A3R30, and A1R2) on
these ranges.
4-15.
Figure 4-6 throughout this explanation. Voltage at
the AC probe is converted to DC and applied to the input network. The input signal is attenuated to produce
a maximum of about 15 millivolts at the modulator in-
AC zero adjustment of meter pointer is made
put .
with the AC ‘ZERO control.
4-16. MODULATOR-DEMODULATOR.
4-17. Refer to the Amplifier Schematic, Figure 5-10 ,
and to the Mechanical Analogy Schematic,
4-2 throughout this explanation.
4-18. The input network applies approximately 15
millivolts DC, for full scale meter deflection (posi-
tive or negative, depending on the polarity of the
R3, sets the meter for full scale
AC VOLTAGE MEASUREMENTS. Refer to
Figure
4-1
Page 28

TM 11-6625-1614-15
Section IV
Paragraphs 4-19 to 4-31
voltage or current being measured) to the neon-photoconductor chopper. Also applied to the opposite side
of the chopper is the amplifier feedback voltage, which
is of the same polarity and approximately 5 microvolts lower in amplitude than the input voltage. The
modulator-chopper consists of two photoconductors,
A4V1 and A4V2, which are alternately illuminated by
two neon lamps, A4DS1 and A4DS2, respectively. The
neon lamps are part of a relaxation oscillator, whose
frequency is controlled by A3R5. The oscillator frequency is nominally set to 100 cps for operation from
60 cps power line, or to 85 cps for 50 cps line. This
frequency is selected so that it is not harmonically
related to the power line frequency, precluding pos-
sible beat indications on the meter.
4-19. As the photoconductors are alternately illuminated by the neona, their respective resistances are
low (conductive ) when illuminated and high (non-conductive) when darkened. Therefore the input voltage
and feedback voltage are alternately applied to the
input amplifier. The amplitude of the resultant signal
to the amplifier is the voltage difference between the
input and feedback voltages.
4-20. The chopped DC signal is amplified by a three
stage RC amplifier, consisting of A3V1A, A3Q1 and
A3Q2. The amplified signal to the input of the demodulator-chopper is 180° out of phase with the output of the modulator-chopper.
4-21.
The demodulator - chopper consists of two
photoconductors, A4V3 and A4V4, which are alternately
illuminated by neon tamps A4DS1 and A4DS2, respectively. Approximately 150 millivolts square-wave is
applied to the demodulator from the amplifier. Since
the same neon lamps illuminate both the modulator
and demodulator photoconductors, operation of the two
chopper is synchronous. Therefore, when A4V1 is
sampling the input voltage, A4V3 is clamping the
amplified and inverted difference voltage to ground.
Alternately, when A4V2 is sampling the feedback vol-
tage, A4V4 is charging capacitors A3C13 and A3C14
to the peak value of the square-wave. These capacitors maintain this charge so long as the input voltage
remains constant by virtue of having no discharge
path and because they are being repetitively recharged
by the demodulator.
4-22. Therefore, a DC potential, proportional to the
difference between the input and feedback voltages, is
applied to the grid of the cathode follower and subsequently to meter circuit and DC AMPLIFIER OUTPUT
connector. A portion of the meter circuit voltage is
fed back to the modulator. The meter stabilizes when
the feedback voltage and input voltages are nearly
equal.
4-23. THE FEEDBACK NETWORK.
4-24. The feedback network drives the meter and
determines the DC gain of the amplifier. The feedback is varied depending on the position of the FUNCTION and RANGE selectors. The different feedback
configurations are discussed below.
Model 410C
4-25.
FEEDBACK NETWORK FOR ±DCA. OHMS,
AND ±DCV. Figures 4-3, 4-4 and 4-5 show the feed-
back configuration for ail positions of the FUNCTION
SELECTOR except ACV. The meter is electrically
inverted for ±DCV and ±DCA modes of operation. The
DC OUTPUT ADJ., A6R20 sets the output voltage. The
DC pot, A6R18 determines the amount of feedback to
the modulator. The resistor A2R30 is in the circuit
in the ± .015 DCV and ±1.5 µa modes of operation, to
decrease feedback and thus increase amplifier gain to
compensate for the decrease in input signal to the
modulator on these ranges.
4-26. FEEDBACK CIRCUIT FORAC VOLTAGE
SUREMENTS: Figure 4-6 shows the feedback confi-
guration for the ACV position of the FUNCTION SEL-
ECTOR switch, A2S2. The resistors that are placed
in the circuit by the RANGE switch program the amplifier gain to compensate for the non-linear response
of the AC probe. A6R16 and A6CR1 compensate the
non-linear response of the AC probe to the linear
calibration of the upper meter scale on the 5 volt
range.
4-27. POWER SUPPLY.
4-28. PRIMARY POWER. Either 115 or 230 volt ac
power is connected through fuse R1 (0.25 amp slo-blo)
and switch S3 to the primary of power transformer
T1. Switch S4 connects T1 primaries in parallel for
l15 volt operation of in series for 230 voit operation.
4-29.
UNREGULATED AND ZENER REGULATED
POWER SUPPLY. Full wave rectifier CR1 and CR2
produces unregulated +270 volts, which is used to
drive the photochopper neons. Unregulated +175 volts
and +140 volts are tapped off and are used to provide
B+ to the plates of A4V1B and A4V1A, respectively.
Zener regulators A7CR6 and CR7 provide regulated
+38 volts and -9 volts to bias A3Ql and A3Q2. Filtering
of the outputs is provided by the RC network consisting
of A7R1 through A7R3 and C5A through C5D.
4-30. SERIES REGULATED POWER SUPPLY. The
output of the full wave rectifier CR3 and CR4 is re-
gulatedbytransistor Ql, which is connected in series
with the output. Zener diode A7CR8 provides reference
voltage to the base of Q1. Regulated +6 volts is supplied
to the filaments of A3VlA/B and the AC Probe diode
+0.6 volts is provided through A7R10 to R3,
A6V1.
the OHMS ADJ, control. Filtering of the outputs is
provided by C6A and C6B.
4-31. STANDBY FILAMENT SUPPLY. The filament
tap (Tl, Pins 1 and 2) provides 6.0 volts actothe
filament of the AC probe diode, A8V1, so that the
filament remains warm when the Modei 410C is being
used in modes of operation other than ACV. When
FUNCTION selector A1S1 is switched to ACV, 6.0
volts AC is removed from the filament and 6 volts DC
is applied. Therefore, the ACV mode is ready for
imrnediate use,
warm up.
without waiting for the filament to
MEA-
4-2
01556-2
Page 29

01556-2
Model 410C
4-3
Figure 4-3.
TM 11-6625-1614-15
Figure 4-3
Section IV
Page 30

4-4
Section IV
TM 11-6625-1614-15
Figure 4-4
01556-2
Model 410C
Figure 4-4.
Page 31

01556-2
4-5
Figure 4-5.
TM 11-6625-1614-15
Figure 4-5
Section IV
Page 32

TM 11-6625-1614-15
Section IV
4-6
Figure 4-6
01556-2
Model 410C
Figure 4-6.
Page 33

Page 34

TM 11-6625-1614-15
Section V
Table 5-1
Table 5-1. Recommended Test Equipment
Instrument
Type
Voltmeter Calibrator
Required
Range: .015 to
Frequency: DC and
Accuracy:
DC
Power
Supp Iy
DC Voltmeter
Range: O to 10 v continuous
Range: 10
Accuracy:
Frequency Response Frequency: 20 cps to 10
Test
Set with
Output: 2 v into 50 ohms
Characteristics
+0. 370 AC
*O.
v
+0. 2%
external oscillator
300 v
2%0
Model 410C
Recommended Model
@
Model 738BR Volt-
meter Calibrator
400
cps
AC
and DC
Checks and
Use
Accuracy
Calibration
Adjustments
DC
DC Ammeter Accuracy
Checks supply
Accumcy Checks; Power
Supply
Measurements;
@Model
@
723A DC
Model 3440A/3442A
Digital
Voltmeter
Power
I
i
Troubleshooting
Frequency Response
Mc
Test@ Model
uency Response
739AR Freq-
Test
.
Set
Oscillator
Frequency: 20 cps to 10
output :
RF Signal
Generator
Frequency: 10 Mc to
output: 1.0
Power
Meter
Frequency: 10Mc to700
Range: 1.0
VHF Signal
AC Voltmeter
Electronic
Generator
Frequency:
Range:
Counter Frequency Range: to at
least 102
DC
Standard output:
Accuracy:
Ohmmeter Range:
Accuracy:
Thermistor Mount
Frequency: 10 Mc to 700Mc
Impedance: 50
Pr~be-T-Connector For
use with 50
mission line
10 KC Filter
High pass fi 1 ter
10 kc
Connector
Connector Adapter
Adapter
Male
Type N male to
Resistors:
10
M!l
5 MQ
4,5Mfl
500 K
56 K
10 K
9K
1.5K
56
ohms
10
ohms
Accuracy:
Accuracy:
Accuracy:
Accuracy:
Accuracy:
Accuracy:
Accuracy:
Accuracy:
Accuracy:
Accuracy: *170
2.0 v
480 Mc to
115 V
cps
1000 v
+0. 2%
100 Mf2
+5%
re]ection
BNC
to male
*1%
+1%
+1%
+1%
*1%
+1%
*I?o
*1%
+1%
v
v
ohm
capable
BNC
480 Mc
700Mc
match
ohm trans-
of
BNC
female
Frequency Response
Mc
Frequency Response
Frequency Response
Mc
Frequency Response
Power
Supply
Measure-
ments (ripple)
Chopper Frequency Adjust@ Model
DC
Adjust
Troubleshooting
Frequency Response
Frequency Response
Frequency Response
Frequency Response
Frequency
Performance
Performance
Performance
Performance
Performance
Performance
Performance
Performance
Performance
Performance Checks
Response
Checks &
Checks
Checks
Checks
Checks
Checks
Checks
Checks
Checks
Test@ Model
651A Test
Oscillator
Test@ Model
608C
RFSigmal
Generator
Test@ Model
431B
Power
Meter
Test@ Model
Signal
@
Model
612A
VHF
Generator
3400A RMS
Voltmeter
521C Electronic
Counter
@
Model
740A DC
Standard
@
Model
412A
DC VTVM
@?
Model
478A
Test
Thermistor
Test@ Model
Coaxial
Mount
11042A Probe-
T-Connector
Test@ Model K02-411A
10 KC Filter
Test@
Test@
Part No.
Part No.
Part No.
@ Part No.
1250-0216
1250-0067
0730-0168
0730-0125
@ Part No. 0730 -015’7
@ Part
No. 0721-0011
@ Part
No. 0730-0053
@ Part
No. 0727-0157
@ Part No.
0730-0026
@ Part No. 0730 -001’7
@ Part
No.
@ Part No. 0727-0335
0811-0341
5-0
01556-2
Page 35

Model 410C
TM 11-6625-1614-15
Section V
Paragraphs 5-1 to 5-11
SECTION V
MAINTENANCE
5-1. INTRODUCTION.
5-2. This section contains maintenance procedures
for the Model 410C Electronic Voltmeter.
5-3. TEST EQUIPMENT REQUIRED.
5-4. The test equipment required to maintain and
adjust the Model 410C is listed in Table 5-1. Equipment having similar characteristics may be substi-
tuted for items listed.
5-5. PERFORMANCE CHECKS.
5-6. The performance checks presented in this
section are front panel operations designed to com-
pare the Model 410C with it’s published specifications.
These operations may be incorporated in periodic
maintenance, post repair and incoming quality control
checks. These operations should be conducted before
any attempt is made at instrument calibration or
adjustment. During performance checks, periodically
vary the line voltage to the Model 410C, ± 10% on either
115v or 230 v operation. A 1/2 hour warm-up period
should be allowed before these tests are conducted.
5-7. ALTERNATE VOLTAGE SOURCE.
5-6. Should it be necessary to use the
Voltmeter Calibrator to conduct these Performance
Checks, the arrangement described in Figure 5-1 will
provide the necessary voltage values required. How-
ever; the Model 738BR Voltmeter Calibrator is the
preferred instrument for these operations.
Model 738AR
5-9. Mechanical METER ZERO.
a. Turn instrument on.
minute warm-up period.
b. Turn voltmeter off, and allow 30 seconds for
all capacitors to discharge.
c. Rotate mechanical zero-adjustment screw on
front panel clockwise until pointer reaches zero,
moving up scale.
d. If for some reason the pointer should overshoot zero, repeat step c until desired results
are obtained.
e. When pointer has been positioned at zero,
rotate zero-adjust screw slightly counterclock-
wise to free it. If meter pointer moves to the
left during this action, repeat steps c and e.
5-10. DC VOLTMETER OPERATION.
5-11. ACCURACY CHECK (DCV).
a. Set the Model 410C FUNCTION SELECTOR
to the +DCV position; RANGE switch to. 015 V .
Connect Model 410C DCV and COM cables to the
Voltmeter Calibrator
terminals.
Allow at least a 20
Model 738BR) output
01556-2
Figure 5-1. Alternate Voltage Source
5-1
Page 36

TM 11-6625-1614-15
Section V
Paragraphs 5-12 to 5-15
Table 5-2
Model 410C
Range Settings
.015V
.05V
.15V
.5V
1.5V
5V
15 V
50 V
150V
500 V
1500
Table 5-2. DCV Accuracy Test
Voltmeter Calibrator
Model 738B
Settings
Range
1. 5-5
1. 5-5
1. 5-5
1. 5-5
1. 5-5
1. 5-5
1. 5-5
1. 5-5
1.5-5
1-3
1-3
Voltage
.015
.05
.15
.5
1.5
5
15
50
150
300
300
Model 410C
Model 410C
Meter Readings
.01.47 to .0153 V
.049 to .051 V
.147 to .153 V
.49 to .51 V
1.47 to l.53 V
4.9 to 5.l V
14.7 to 15.3 V
49 to 51 V
147 to 153 V
290 to 310 V
270 to 330 V
b. Adjust Voltmeter Calibrator to provide a
+.015 v dc voltage.
c. Model 410C should read between 0. 0147 and
0.0153 v.
d. Readjust Model 410C and Voltmeter Cali-
brator (,) settings listed in Table 5-2. Note
Model 410C meter readings. If Model 410C fails
to meet pecifications, refer to Paragraph, 5-30
and
5−32 for proper adjustment procedure.
5-12
INPUT RESISTANCE CHECK (DCV).
a. Connect an external resistor, Rx, of lO M
ohms ±1% ( Part No. 0370-0168) in series
between the voltmeter calibrator and the DCV
cable of the Model 410C.
b. Set Model 410C FUNCTION selector to +DCV;
RANGE to .015 V.
c. Adjust voltmeter calibrator for +.015v DC
output.
d. Model 410C should read .0075 v, verifying
R
of 10 M ohms.
in
e. Table 5-3 provides settings required to
verify Model 410C R
on RANGES specified.
in
5-13.
5-14. ACCURACY CHECK (DCA).
a. Figure 5-2 describes the test arrangement
required for this operation.
The following
additional equipment will also be required:
DC Power Supply Model 723A)
DC Voltmeter Model 3440A/3442A)
10 K, 1%, 1 w resistor Part No. 0727-0157)
56 K, 1%, 1 w resistor Part No. 0730-0053)
10 , 1%, 1 w resistor Part No. 0727-0335)
56 , 1%, 1/2 w resistor Part No. 0811-0341)
b. Connect the Model 410C as shown in Figure
5-2; FUNCTION SELECTOR to +DCA; RANGE
to 150 MA.
c. Use 56 ohm resistor for R1 and 10 ohm
resistor for R2.
d. Adjust dc power supply to obtain 1.4v reading
on system voltmeter.
e. Model 410C should read between 135.5 and
144.5 ma.
f. Adjust dc power supply for System voltmeter
readings listed in Table 5-4. Note Model 410C
meter readings.
5-15. INPUT RESISTANCE CHECK (DCA).
a. Figure 5-2 describes the test arrangement
required for this operation.
R2 with a 10 ohm ±1% resistor Part No.
Replace R1 and
0727-0335).
b. Set Model 410C FUNCTION SELECTOR to
+DCA: RANGE to 150 MA.
5-2
Change 1
01556-2
Page 37

Model 410C
TM 11-6625-1614-15
Section V
Tables 5-3 and 5-4
Figure 5-2
Figure 5-2. DC Ammeter Operation
Table 5-3. DCV Input Resistance Test
01556-2
Table 5-4. DCA Accuracy Test
5-3
Page 38

TM 11-6625-1614-15
Section V
Paragraphs 5-16 to 5-19
Table 5-5
c. Adjust dc power supply to provide system
voltmeter reading of 1.50 v.
e. Model 410C should read approximately
150 ma.
mately 0.3 ohms, where
f. Set Model 410C RANGE to 1.5 µa.
g.
h. Adjust dc power supply to provide system
voltmeter reading of 13.5 mv.
j.
µa. This will verify R
range.
OHMMETER OPERATION.
5-16.
a. A 10 ohm ±l% resistor Part No. 0727-
0335) and a 10M resistor Part No. 0730-
0168) will be required for this test.
b. Set Model 410C FUNCTION SELECTOR to
OHMS; RANGE to RX10.
c. Set pointer to using rear panel adjust-
ment (OHMS ADJ) if required.
d. Connect COM and DCA OHMS cables across
10 ohm resistor.
e. Meter should read 1 (±5%), indicating 10
ohms.
f. Reset Model 410C RANGE to RX10M. Re-
place 10 ohm resistor with 10 M ohm resistor.
g. Meter should read 1 (+5%), indicating 10 M
ohms.
This will verify a R
RXI
-
I
410C
410C
R
410C=Etotal
Replace Rx with a 9 K ohm ±1% resistor
Part No. 0730-0026).
Model 410C should read approximately 1.5
of 9 K on 1.5 µa
in
of approxi-
in
Table 5-5. DC Voltage
Deleted
h. If both of these ranges function properly, it
can be assumed that the remainder will also .
If meter does not function properly, refer to
Paragraph 5-31 for adjustment procedure.
5-17. AMPLIFIER OPERATION.
Deleted
see paras 5-19 and 5-24
5-19. AMPLIFIER GAIN CHECK.
a. Connect Voltmeter
738BR) output to Model 410C DCV and
cables.
b. Connect DC Voltmeter Model
3442A) to DC AMPLIFIER OUTPUT on rear
panel of Model 410C. Set DC Voltmeter RANGE
to 10 v.
Output Test
Calibrator Model
Model 410C
COM
3440A/
5-4
Change
1
01556-2
Page 39

TM 11-6625-1614-15
Model 410C
Parsgraphs 5-20 to 5-23
.
Section V
Figure 5-3
Figure 5-3.
c. Set Model 410C FUNCTION SELECTOR to
+DCV ; RANGE to .015 V.
d. Adjust voltmeter calibrator for +. 015 VDC
output.
e. The dc voltmeter should read +1.5 v. This
will vertfy a gain of 100, when the gain /A/
E
equals
5-20. AMPLIFTER NOfSE CHECK.
a. Leave the dc voltmeter connected to the DC
AMPLIFIER OUTPUT as in Paragraph 5-19.
b. Set the Model 410C RANGE to 1500 V;
5-21.
DC out/E410C.
FUNCTION SELECTOR to +DCV.
c. Short the Model 410C DCV and COM cables.
Note dc voltmeter readings.
should be less than 7.5 millivolts .
d. Reset Model 410C RANGE to 1.5 V. DC
Voltmeter should read less than 7.5 mv.
DC AMPLIFTER OUTPUT
CHECK.
a. Connect an external DC Voltmeter Model
3440A/3442A) to Model 410C DC AMPLIFIER
OUTPUT terminals on rear panel.
b. Set Model 410C FUNCTION SELECTOR to
OHMS position.
High Frequency Response Test
reading
This
IMPEDANCE
c. Record voltage indicated on external dc
voltmeter for use as a reference.
d. Connect a 1.5 k ohm ±1% resistor Part
No. 0730-0017) across Model 410C DC AMPLI -
FIER OUTPUT terminals. DC voltage recorded
in step c above should not change more than
3 mv, indicating that dc amplifier output impedance is within the 3 ohm specification at dc.
5-22. AC VOLTMETER OPERATION.
5-23. 11036A
a. Figure 5-3 describes the test arrangement
Model 410C AC Probe in T-Connector at this
point.
b. Adjust signal generator for a 0.7 volt (rms)
AC PROBE ACCURACY CHECK.
required for this operation. Do not
output at 1000 cps.
c. Connect Model 11036A AC Probe to signal
generator and read output on Model 410C Volt-
meter (meter should read 0.7 volts).
d. Remove probe tip from Model 11036A and
connect the ac probe as shown in Figure 5-4.
e. Turn signal generator to 50 Mc and adjust
signal generator for a power reading of 9.8
dbm (0.7 volts) on the power meter.
f. The difference between reading on Model
410C meter and 0.7 volt reference is the ac
probe error at that frequency.
g. Repeat steps f and g every 100 Mc from 50
to 700 Mc.
place
01556-2
5-5
Page 40

TM 11-6625-1614-15
Section V
Parsgraphs 5-24 to 5-25
Figure 5-4, Table 5-6
Figure 5-4. Low Frequency Response Test
AC VOLTMETER ACCURACY CHECK.
a. A Voltmeter Calibrator Model 738BR)
will be required for this operation.
b. Adjust voltmeter calibrator for 400 cps-
rms output.
c. Set Model 410C FUNCTION SELECTOR to
ACV; RANGE to 500 V.
d. Adjust the voltmeter calibrator to settings
listed in Table 5-6. Model 410C should indicate
readings within limits specified. If not, refer
Model 410C
5-25. AC VOLTMETER FREQUENCY RESPONSE
CHECK.
a. A Frequency Response Test Set Model
739AR), a Test Oscillator Model 651A), an
RF Signal Generator Model 608 C), a Power
Meter Model 431 B), a Thermistor
Model 478A), a Probe - T - Connector
Model 11042A), a VHF Signal Generator
Model 612A) and a 10 KC Filter Model K02411A) will be required for this operation. Figure 5-3 and 5-4 describe the arrangement to be
Mount
5-6
Change 1
Table 5-6. AC Accuracy Test
01556-2
Page 41

Model 410C
b. Connect the Model 410C as shown in Figure 5-4. Set Model
410C FUNCTION SELECTOR toACV; RANGE to 1.5 V.
Set frequency response test set to EXTERNAL.
c.
Adjust test oscillator output AMPLITUDE to provide Model
d.
410C reading of 1.4 V; FREQUENCY to 400 cps.
Set frequency response test set METER SET to convenient
e.
SET LEVEL.
Vary test oscillator frequency from 20 cps to 10 Mc. Model
f.
410C should read between 1.25 and 1.55 v at all frequencies.
When checking the frequency response from 20 cps to 50 cps,
disconnect the 11042A from the test set up in figure 5-4. Replace
the probe tip on the Model 11036A and connect directly through a
50-ohm load to the output of the Frequency Response Test Set.
Connect the output of the Test Oscillator directly to the input
TM 11-6625-1614-15
of the Frequency Response Test Set.
the entire operation.
If frequency response test set deflection varies from preset
g.
SET LEVEL, adjust test oscillator output amplitude to return
pointer to original position.
To check Model 410C frequency response from 10 Mc to 480 Mc,
h.
use arrangement described in Figure 5-3.
Set Model 410C FUNCTION SELECTOR to ACV; RANGE to .5 V.
i.
Adjust RF signal generator to provide Model 410C reading
j.
of 0.45 V at 10 Mc. Note power meter reading; mark for future
reference.
Observe step g
throughout
5-7
Page 42

TM 11-6625-1614-15
k. Vary RF signal generator frequency from 10 Mc to 480 Mc.
Model 410C should read between 0.40 to 0.50 v at all frequencies.
If power meter pointer varies from reference determined in
l.
above, readjust RF signal generator OUTPUT LEVEL to return
step j
pointer to reference deflection.
To check Model 410C frequency response from 480 Mc to 700
m.
Mc, replace RF signal generator with VHF Signal Generator (H-P
Model 410C
Model 612A) and repeat steps i
should not vary more than ±10% from reference.
5-26. ADJUSTMENT AND CALIBRATION PROCEDURE.
5-27. The following is a complete adjustment and calibration
procedurE for the Model 410C.
only if it has previously been established by Performance Checks,
Paragraph 5-5, that the Model 410C is out of adjustment.
Indiscriminate adjustment of the internal controls to “refine”
settings may actually cause more difficulty.
outlined do not rectify any discrepancy that may exist, and all
connections and settings have been rechecked, refer to Paragraph
5-36, Troubleshooting, for possible cause and recommended corrective
action.
5-28. CHOPPER
a. A Voltmeter Calibrator (H-P Model 738BR) and an Electronic
FREQUENCY ADJUST.
through m above. Model 410C
These operations should be conducted
If the procedures
Counter (H-P Model 52lC) and an AC Voltmeter (H-P Model 3400A)
will be required.
5-8
Page 43

TM 11-6625-1614-15
b. Use ac voltmeter to verify Model 410C line
voltage of 115 v. Chopper frequency will vary with
line voltage variations.
c. Connect 410C, electronic counter, and
voltmeter as ahown in Figure 5-6.1.
d. Set Model 410C FUNCTION SELECTOR to
+DCV; RANGE to 1.5 V.
e. Adjust voltmeter calibrator to supply + 5 V dc
to the Model 410C (DCV and COM cables).
Table 5-7, Power Supply Test
voltage
+ 175 v
+38V
+6V
V
–9.1
Location on A7
Wht/blk and Orange
Junction of CR6 and R4
Cathode of CR8
Anode of CR7
f. Observe counter, and adjust A3R5 for a chop-
per frequency of 100 cps ( ±2 cps).
5-29. Power Supply Adjustment
a. Refer to Table 5-7 for Power Supply check
points and typical voltage values. Measure dc
voltages between common and designated location
on Al.
b. Set Model 410C FUNCTION to ACV. Short
ACV and COM cable.
Tolerance
±30V
±8.0 V
±0.6 V
+1.8V
c. Measure + 175 volt ac ripple with ac voltmeter
(H-P Model 3400A). RMS value of ripple should not
exceed 2.5 mv.
5-30. DC Zero Adjustment and Bias
a. Set Model 410C Function Selector to + DCV
and Range Switch to .5 V.
b. Short DCV Cable to COM Cable.
c. Adjust A3R21 fully counterclockwise, and
then rotate about 20° clockwise.
d. Adjust ZERO ADJ pot on rear panel for zero
meter deflection. Switch to – DCV. If any deflection
is observed, adjust ZERO ADJ pot to return meter
pointer halfway back to zero. Check zero setting on
all ranges for both + DCV and – DCV. Zero offset
should not exceed 1070 in any case.
5-31. DC Amplifier Output Adjust
a. Set the Model 410C FUNCTION SELECTOR
to ACV; RANGE to 5 V.
b. Connect a DC Voltmeter (H-P Model 3440A/
3442A) to the dc amplifier OUTPUT on the Model
410C rear panel. Set dc voltmeter RANGE to 10 v.
c. Connect Model 410C AC Probe to voltmeter
calibrator output. Adjust voltmeter calibrator to provide a 5 v, 400 cps signal.
d. Model 410C should read full scale (5 v). The
dc voltmeter should indicate 1.5 V. If it does not, adjust A6R20 for 1.5 v reading.
5-32. Full Scale DC Adjustment
a. Set Model 410C. FUNCTION SELECTOR to
+ DCV; RANGE to .015 V.
Change 1
5-9/(5-10 Blank)
Page 44

Page 45

Model 410C
b. Adjust DC Standard (H-P Model 740A) to apply .015 to Model
410C .
TM 11-6625-1614-15
Model 410C should read full scale.
c.
for proper pointer deflection.
Reset Model 410C RANGE to 1500 v. Adjust dc standard for
d.
1000 v output.
Adjust A3R30 for Model 410C reading of 985 v (1% low).
e.
If an error greater than ±2% of full scale exists on any
f.
range between 0.5 v and 1500 v Inclusive, select new setting for
A3R30 to yield best results over these ranges. If error greater
than ±2% of full scale still exists on any of the above ranges,
readjust A6R18 to reduce error.
If error greater than ±2% of full scale exists on any
g.
range between 15 mv and 150 mv inclusive, select new setting for
A6R18 to yield best results on these ranges. If error greater
than ±2% of full scale still exists on any of the above ranges,
readjust A3R30 to reduce error.
If not, adjust A6R18
If error greater than ±2% of full scale exists on both 15
h.
mv to 150 mv and 0.5 v to 1500 v ranges,
A6R18 to correct 15 mv and 150 mv range.
specification, proceed to readjust A3R30
1500 v range error.
5-33. OHMS ADJUST (R3).
Set Model 410C FUNCTION SELECTOR to ORMS; RANGE to RX10M.
a.
start by readjusting
Once they are within
to correct 0.5 v to
5-11
Page 46

TM 11-6625-1614-15
Short OHMS and COM cables. Model 410C should read zero.
b.
Vary Model 410C RANGE switch through remainder of OHMS
c.
settings. Meter should read zero, except at RX10 when meter
should read about 0.1 ohm (resistance of leads).
Disconnect OHMS and COM cables. Model 410C meter should
d.
read . If not, set OHMS ADJ (rear panel) for reading.
Checks reading on all OHMS RANGE settings.
5-34. AC ZERO ADJUST.
Set Model 410C FUNCTION SELECTOR to ACV; RANGE to .5 V.
a.
Set AC ZERO vernier on front panel to center of rotation.
b.
Short Model 410C ac Probe and ac probe common (short lead).
c.
Adjust R1 for Model 410C zero deflection.
d.
5-35. AC FULL SCALE ADJUST (.5 V RANGE).
Connect Model 410C ac probe to voltmeter calibrator output
a.
Model 410C
5-12
terminals.
500 v.
Adjust voltmeter calibrator to provide 300 v, 400 cps - rms
b.
output . Model 410C should read 300 v (±3%). If not, adjust A6R14
for proper reading.
Continue test for remainder of Model 410C ac ranges using
c.
settings provided in Table 5-8.
5-36. TROUBLESHOOTING PROCEDURE.
5-37. This section contains procedures designed to assist in the
isolation of malfunctions.
systematic analysis of the
Set Model 410C FUNCTION SELECTOR to ACV; RANGE to
These procedures are based on a
Page 47

Table 5-8.
Model 410C
TM 11-6625-1614-15
5-13
Page 48

TM 11-6625-1614-15
Model 410C
instrument circuitry in an effort to localize the pro-
blem. These operations should be undertaken only
after it has been established that the difficulty can not
be eliminated by the Adjustment and Calibration Procedures, Paragraph 5-26.
also be made to insure that the trouble is not a result
of conditions external to the Model 410C.
5-38. Conduct a visual check of the Model 410C for
possible burned or loose components, loose connections, or any other obvious conditions which
suggest a source of trouble.
5-39. Table 5-9 contains a summary of the front-
panel symptoms that may be encountered. It should
beueed in initial efforts to select a starting point for
troubleshooting operations.
5-40. Table 5-10, in conjunction with Figure 5-5,
contains procedures which may be used as a guide in
isolating malfunctions. The steps in Table 5-10 describe the normal conditions which should be encountered during the checks ( circled numbers in
Figure 5-5.
An investigation should
might
Paragraphs 5-38 to 5-46
5-41. The checks outlined in Table 5-10 are not designed to measure all circuit parameters, rather only
to localize the malfunction. .Therefore, it is quite
possible that additional measurements will be required
to completely isolate the problem. Amplifier gain may
also vary slightly between instruments; therefore it
should not be necessary to precisely duplicate waveforms or values described.
5-42. Voltage values indicated in Table 5-10 are based
on .5 vdc input, with Model 410C RANGE switch set to
.015 v.
5-43. When required, check power supply voltages
as outlined in Paragraph 5-29.
5-44. Refer to Figure 5-9 for typical waveforms
encountered in the Model 410C. Waveforms represent
signals which occur when instrument is operating
during overdriven conditions (.5 vdc input to .015 v
RANGE).
5-45. SERVICING ETCHED CIRCUIT BOARDS.
5-46. The Model 410C has three etched circuit
Section V
Figure 5-5
01566-2
5-14
Figure 5-5. Troubleshooting Tree
Page 49

Section V
paragraphs 5-47 to 5-48
Figure 5-6
boards. Use caution when removing them to avoid
damaging mounted components. The Part Number
for the assembly is silk screened on the interior of
the circuit board to identify it. Refer to Section VI
for parts replacement and Part Number information
5-47. The etched circuit boards are a plated-through
type. The electrical connection between sides of the
board is made by a layer of metal plated through the
component holes.
observe the following general rules.
a. Use a low-heat (25 to 50 watts) small-tip
soldering iron, and a small diameter rosin
core aoider.
b. Circuit components can be removed by
placing the soldering iron on the component
lead on either aide of the board, and pulling up
on lead. If a component is obviously damaged,
clip leads as close to component as possible
and then remove. Excess heat can cause the
circuit and board to separate, or cause damage
to the component.
When working on these boards,
TM 11-6625-1614-15
Model 410C
c. Component lead hole should be
before inserting new lead.
d. To replace components, shape new leads and
insert them in holes. Reheat with iron and add
solder as required to insure a good electrical
connection.
e. Clean excess flux from the connection and
adjoining area.
f. To avoid surface contamination of the printed
circuit, clean with weak solution of warm water
and mild detergent after repair. Rinse thoroughly
with clean water. When completely dry,
lightly with Krylon (#1302 or equivalent).
5-48. CHOPPER ASSEMBLY INSTALLATION.
a. Figure 5-6 describes the physical orientation of chopper assembly on printed circuit
board. Note location of chopper assembly serial
number in relation to circuit board pins.
cleaned
spray
Figure 5-6. A4 Chopper Assembly Installation
01566-2
5-15
Page 50

TM 11-6625-1614-15
Model 410C
Section V
Table 5-9
Table 5-9.
01566-2
5-16
Paragraph 5-34
Table 5-10
Page 51

Section V
Table 5-10
TM 11-6625-1614-15
Model 410C
Figure 5-7.
Table 5-10.
Paragraph 5-29
Figure 5-10
Figure 5-7
Table 5-9
Figure 5-10
Figure 5-10
Table 5-9
5-17
Page 52

TM 11-6625-1614-15
Model 410C
Figure 5-11.
Figure 5-12. Model 11036A AC Probe Schematic
Model 11036A AC Probe (Exploded View)
5-22
01556-2
Page 53

Change 1
TM 11-6626-1614-15
5-16.1
Figure 5-6.1.
Page 54

Page 55

TM 11-6625-1614-15
Section V
Figure 5-8
Figure 5-8.
Power Supply Schematic
5-19
Page 56

TM 11-6625-1614-15
5-20
Figure 5-9. Typical Amplifier Waveforms
Page 57

Page 58

Page 59

Page 60

By Order of the secretary of the Army:
Official:
KENNETH G. WICKHAM,
Major General, United States Army,
The Adjutant General.
Distribution:
Active Army;
USAMB (1)
USACDCEC (.1)
USACDCCEA (1)
USA CDCCEA Ft Huachuca (1)
NG: None.
USAR: None.
For explanation of abbreviations used, see AR 320-50.
HAROLD K. JOHNSON,
General, United States Army,
Chief of Staff.
Eighth USA (5)
SAAD (5)
TOAD (5)
LEAD (3)
Page 61

Page 62

THE METRIC SYSTEM AND EQUIVALENTS
Page 63

PIN: 016288-000
 Loading...