

Page 1
hp LaserJet 4100 mfp
use
Page 2

Page 3

hp LaserJet 4100 mfp se ries
multifunction printer
use
Page 4

© 2001-2004 Copyright Hewlett-Packard
Development Company, L.P.
Reproduction, adaptation or translation
without prior written permission is
prohibited, except as allowed under the
copyright laws.
The information contained herein is
subject to change without notice.
The only warranties for HP products and
services are set forth in the express
warranty statements accompanying such
products and services. Nothing herein
should be construed as constituting an
additional warranty. HP shall not be liable
for technical or editorial errors or
omissions contained herein.
Edition 3, 2/2004
Trademark Credits
®
Adobe
, Acrobat®, and PostScript® are
trademarks of Adobe Systems
Incorporated.
®
AutoCAD
is a U.S. trademark of
Autodesk, Inc.
HP-UX Release 10.20 and later and HP-
UX Release 11.00 and later (in both 32and 64-bit configurations) on all HP 9000
computers are Open Group UNIX
branded products.
®
Microsoft
and Windows NT
, MS Windows®, Windows®,
®
are registered
trademarks of Microsoft Corporation.
Netscape is a U.S. trademark of
Netscape Communications Corporation.
®
is a registered trademark of the
UNIX
Open Group.
E
NERGY STAR
®
is a U.S. registered
service mark of the U.S. EPA.
Page 5

Contents
About this guide
How to use this online guide. . . . . . . . . . . . . . . . . . . . . . . . . . . . . . . . . . . . . . . . . . 7
Navigational features in this guide . . . . . . . . . . . . . . . . . . . . . . . . . . . . . . . . . 7
Features of Acrobat Reader. . . . . . . . . . . . . . . . . . . . . . . . . . . . . . . . . . . . . . 8
Where to look for more information. . . . . . . . . . . . . . . . . . . . . . . . . . . . . . . . . . . . 10
1 Introduction
Overview. . . . . . . . . . . . . . . . . . . . . . . . . . . . . . . . . . . . . . . . . . . . . . . . . . . . . . . . 11
Product configurations . . . . . . . . . . . . . . . . . . . . . . . . . . . . . . . . . . . . . . . . . . . . . 12
Product benefits . . . . . . . . . . . . . . . . . . . . . . . . . . . . . . . . . . . . . . . . . . . . . . . . . . 13
Digital-sending . . . . . . . . . . . . . . . . . . . . . . . . . . . . . . . . . . . . . . . . . . . . . . . 13
Walk-up copying. . . . . . . . . . . . . . . . . . . . . . . . . . . . . . . . . . . . . . . . . . . . . . 13
Network printing . . . . . . . . . . . . . . . . . . . . . . . . . . . . . . . . . . . . . . . . . . . . . . 13
Multitasking . . . . . . . . . . . . . . . . . . . . . . . . . . . . . . . . . . . . . . . . . . . . . . . . . 13
Product features . . . . . . . . . . . . . . . . . . . . . . . . . . . . . . . . . . . . . . . . . . . . . . . . . . 14
Parts . . . . . . . . . . . . . . . . . . . . . . . . . . . . . . . . . . . . . . . . . . . . . . . . . . . . . . . . . . . 16
Embedded Web server . . . . . . . . . . . . . . . . . . . . . . . . . . . . . . . . . . . . . . . . . . . . . 18
2 Basic operations
Overview. . . . . . . . . . . . . . . . . . . . . . . . . . . . . . . . . . . . . . . . . . . . . . . . . . . . . . . . 19
Using the ADF. . . . . . . . . . . . . . . . . . . . . . . . . . . . . . . . . . . . . . . . . . . . . . . . . . . . 20
Using the scanner glass . . . . . . . . . . . . . . . . . . . . . . . . . . . . . . . . . . . . . . . . . . . . 21
Selecting the output bin . . . . . . . . . . . . . . . . . . . . . . . . . . . . . . . . . . . . . . . . . . . . 22
Printing to the top output bin . . . . . . . . . . . . . . . . . . . . . . . . . . . . . . . . . . . . 22
Printing to the rear output bin. . . . . . . . . . . . . . . . . . . . . . . . . . . . . . . . . . . . 22
Loading Tray 1 . . . . . . . . . . . . . . . . . . . . . . . . . . . . . . . . . . . . . . . . . . . . . . . . . . . 23
Loading Tray 2 and optional Trays 3 and 4 . . . . . . . . . . . . . . . . . . . . . . . . . . . . . 24
Using special media . . . . . . . . . . . . . . . . . . . . . . . . . . . . . . . . . . . . . . . . . . . . . . . 25
Using small or narrow paper . . . . . . . . . . . . . . . . . . . . . . . . . . . . . . . . . . . . 25
Using letterhead, prepunched, or preprinted paper . . . . . . . . . . . . . . . . . . . 25
Using envelopes. . . . . . . . . . . . . . . . . . . . . . . . . . . . . . . . . . . . . . . . . . . . . . 26
Using labels . . . . . . . . . . . . . . . . . . . . . . . . . . . . . . . . . . . . . . . . . . . . . . . . . 27
Using transparencies . . . . . . . . . . . . . . . . . . . . . . . . . . . . . . . . . . . . . . . . . . 27
Using cards and custom-size or heavy paper . . . . . . . . . . . . . . . . . . . . . . . 28
Duplex copying and printing . . . . . . . . . . . . . . . . . . . . . . . . . . . . . . . . . . . . . . . . . 29
Guidelines for duplexing. . . . . . . . . . . . . . . . . . . . . . . . . . . . . . . . . . . . . . . . 29
Media placement requiring specific orientation . . . . . . . . . . . . . . . . . . . . . . 30
Layout options for duplexing . . . . . . . . . . . . . . . . . . . . . . . . . . . . . . . . . . . . 31
Job-handling priorities. . . . . . . . . . . . . . . . . . . . . . . . . . . . . . . . . . . . . . . . . . . . . . 32
3 Control panel and control panel menus
Overview. . . . . . . . . . . . . . . . . . . . . . . . . . . . . . . . . . . . . . . . . . . . . . . . . . . . . . . . 33
Layout and operation . . . . . . . . . . . . . . . . . . . . . . . . . . . . . . . . . . . . . . . . . . . . . . 34
Navigation. . . . . . . . . . . . . . . . . . . . . . . . . . . . . . . . . . . . . . . . . . . . . . . . . . . . . . . 35
Status bar . . . . . . . . . . . . . . . . . . . . . . . . . . . . . . . . . . . . . . . . . . . . . . . . . . . . . . . 35
Control panel screens. . . . . . . . . . . . . . . . . . . . . . . . . . . . . . . . . . . . . . . . . . . . . . 36
Menus. . . . . . . . . . . . . . . . . . . . . . . . . . . . . . . . . . . . . . . . . . . . . . . . . . . . . . . . . . 37
Retrieve Job menu. . . . . . . . . . . . . . . . . . . . . . . . . . . . . . . . . . . . . . . . . . . . 37
Information menu . . . . . . . . . . . . . . . . . . . . . . . . . . . . . . . . . . . . . . . . . . . . . 37
Paper Handling menu . . . . . . . . . . . . . . . . . . . . . . . . . . . . . . . . . . . . . . . . . 38
3
Page 6

Configure Device menu. . . . . . . . . . . . . . . . . . . . . . . . . . . . . . . . . . . . . . . . 39
Diagnostics menu . . . . . . . . . . . . . . . . . . . . . . . . . . . . . . . . . . . . . . . . . . . . 42
Service menu. . . . . . . . . . . . . . . . . . . . . . . . . . . . . . . . . . . . . . . . . . . . . . . . 42
Online Help system . . . . . . . . . . . . . . . . . . . . . . . . . . . . . . . . . . . . . . . . . . . . . . . 42
4 Walk-up copying
Overview . . . . . . . . . . . . . . . . . . . . . . . . . . . . . . . . . . . . . . . . . . . . . . . . . . . . . . . 43
Performing basic copying. . . . . . . . . . . . . . . . . . . . . . . . . . . . . . . . . . . . . . . . . . . 44
Copy defaults. . . . . . . . . . . . . . . . . . . . . . . . . . . . . . . . . . . . . . . . . . . . . . . . 44
One-touch copying . . . . . . . . . . . . . . . . . . . . . . . . . . . . . . . . . . . . . . . . . . . 44
Multiple copies. . . . . . . . . . . . . . . . . . . . . . . . . . . . . . . . . . . . . . . . . . . . . . . 44
User-defined copy settings. . . . . . . . . . . . . . . . . . . . . . . . . . . . . . . . . . . . . . . . . . 45
Using the Describe Original screen . . . . . . . . . . . . . . . . . . . . . . . . . . . . . . 45
Using the Copy Settings screen . . . . . . . . . . . . . . . . . . . . . . . . . . . . . . . . . 46
Duplexing a copy job . . . . . . . . . . . . . . . . . . . . . . . . . . . . . . . . . . . . . . . . . . 47
Adjusting the contrast . . . . . . . . . . . . . . . . . . . . . . . . . . . . . . . . . . . . . . . . . 48
Improving copy quality . . . . . . . . . . . . . . . . . . . . . . . . . . . . . . . . . . . . . . . . 48
Reducing or enlarging copies . . . . . . . . . . . . . . . . . . . . . . . . . . . . . . . . . . . 48
5 Sending to e-mail
Overview . . . . . . . . . . . . . . . . . . . . . . . . . . . . . . . . . . . . . . . . . . . . . . . . . . . . . . . 49
Introduction . . . . . . . . . . . . . . . . . . . . . . . . . . . . . . . . . . . . . . . . . . . . . . . . . . . . . 49
Sending documents . . . . . . . . . . . . . . . . . . . . . . . . . . . . . . . . . . . . . . . . . . . . . . . 50
Describe Original screen . . . . . . . . . . . . . . . . . . . . . . . . . . . . . . . . . . . . . . . 50
Send Options screen. . . . . . . . . . . . . . . . . . . . . . . . . . . . . . . . . . . . . . . . . . 50
Basic sending procedures . . . . . . . . . . . . . . . . . . . . . . . . . . . . . . . . . . . . . . 50
Available file formats . . . . . . . . . . . . . . . . . . . . . . . . . . . . . . . . . . . . . . . . . . 52
Address books . . . . . . . . . . . . . . . . . . . . . . . . . . . . . . . . . . . . . . . . . . . . . . . . . . . 53
6 Network printing
Overview . . . . . . . . . . . . . . . . . . . . . . . . . . . . . . . . . . . . . . . . . . . . . . . . . . . . . . . 55
Installing the printer software. . . . . . . . . . . . . . . . . . . . . . . . . . . . . . . . . . . . . . . . 56
Printer drivers . . . . . . . . . . . . . . . . . . . . . . . . . . . . . . . . . . . . . . . . . . . . . . . 58
Software for Windows-based computers. . . . . . . . . . . . . . . . . . . . . . . . . . . 59
Software for Macintosh computers . . . . . . . . . . . . . . . . . . . . . . . . . . . . . . . 60
Software for networks . . . . . . . . . . . . . . . . . . . . . . . . . . . . . . . . . . . . . . . . . 60
HP Web JetAdmin. . . . . . . . . . . . . . . . . . . . . . . . . . . . . . . . . . . . . . . . . . . . 60
UNIX and Linux . . . . . . . . . . . . . . . . . . . . . . . . . . . . . . . . . . . . . . . . . . . . . . 61
Performing advanced printing tasks. . . . . . . . . . . . . . . . . . . . . . . . . . . . . . . . . . . 61
Using features in the printer driver . . . . . . . . . . . . . . . . . . . . . . . . . . . . . . . 61
Printing multiple pages on one sheet of media . . . . . . . . . . . . . . . . . . . . . . 62
Customizing trays for printing or copying . . . . . . . . . . . . . . . . . . . . . . . . . . 63
Using the job-storage features. . . . . . . . . . . . . . . . . . . . . . . . . . . . . . . . . . . . . . . 65
Reaching the job storage features. . . . . . . . . . . . . . . . . . . . . . . . . . . . . . . . 65
Printing stored jobs . . . . . . . . . . . . . . . . . . . . . . . . . . . . . . . . . . . . . . . . . . . 66
Deleting stored jobs. . . . . . . . . . . . . . . . . . . . . . . . . . . . . . . . . . . . . . . . . . . 66
Printing with the FIR port . . . . . . . . . . . . . . . . . . . . . . . . . . . . . . . . . . . . . . . . . . . 67
Preparing to print with Windows . . . . . . . . . . . . . . . . . . . . . . . . . . . . . . . . . 67
Preparing to print with Macintosh computers . . . . . . . . . . . . . . . . . . . . . . . 67
Printing a job using FIR . . . . . . . . . . . . . . . . . . . . . . . . . . . . . . . . . . . . . . . . 68
Interrupting and resuming FIR printing . . . . . . . . . . . . . . . . . . . . . . . . . . . . 68
7 Product maintenance
Overview . . . . . . . . . . . . . . . . . . . . . . . . . . . . . . . . . . . . . . . . . . . . . . . . . . . . . . . 69
Managing the toner cartridge. . . . . . . . . . . . . . . . . . . . . . . . . . . . . . . . . . . . . . . . 70
HP toner cartridges . . . . . . . . . . . . . . . . . . . . . . . . . . . . . . . . . . . . . . . . . . . 70
4 EN
Page 7

Toner cartridge authentication. . . . . . . . . . . . . . . . . . . . . . . . . . . . . . . . . . . 70
Toner cartridge life expectancy . . . . . . . . . . . . . . . . . . . . . . . . . . . . . . . . . 70
Toner cartridge storage . . . . . . . . . . . . . . . . . . . . . . . . . . . . . . . . . . . . . . . . 70
Toner low and toner out conditions . . . . . . . . . . . . . . . . . . . . . . . . . . . . . . . 71
Cleaning the product . . . . . . . . . . . . . . . . . . . . . . . . . . . . . . . . . . . . . . . . . . . . . . 71
General guidelines. . . . . . . . . . . . . . . . . . . . . . . . . . . . . . . . . . . . . . . . . . . . 71
Cleaning procedure . . . . . . . . . . . . . . . . . . . . . . . . . . . . . . . . . . . . . . . . . . . 72
Cleaning the fuser . . . . . . . . . . . . . . . . . . . . . . . . . . . . . . . . . . . . . . . . . . . . 73
Running the cleaning page automatically . . . . . . . . . . . . . . . . . . . . . . . . . . 73
Cleaning the ADF paper delivery guide. . . . . . . . . . . . . . . . . . . . . . . . . . . . 74
Cleaning the scanner glass. . . . . . . . . . . . . . . . . . . . . . . . . . . . . . . . . . . . . 75
Cleaning the calibration strip. . . . . . . . . . . . . . . . . . . . . . . . . . . . . . . . . . . . 75
Performing preventative maintenance . . . . . . . . . . . . . . . . . . . . . . . . . . . . . . . . . 76
8 Problem solving
Overview . . . . . . . . . . . . . . . . . . . . . . . . . . . . . . . . . . . . . . . . . . . . . . . . . . . . . . . 77
Clearing jams . . . . . . . . . . . . . . . . . . . . . . . . . . . . . . . . . . . . . . . . . . . . . . . . . . . . 78
Jam locations. . . . . . . . . . . . . . . . . . . . . . . . . . . . . . . . . . . . . . . . . . . . . . . . 78
Clearing jams from the top cover and toner cartridge area. . . . . . . . . . . . . 79
Clearing jams from input trays. . . . . . . . . . . . . . . . . . . . . . . . . . . . . . . . . . . 80
Clearing jams from the duplexer . . . . . . . . . . . . . . . . . . . . . . . . . . . . . . . . . 81
Clearing jams from the rear output slot . . . . . . . . . . . . . . . . . . . . . . . . . . . . 82
Clearing jams from the fuser area. . . . . . . . . . . . . . . . . . . . . . . . . . . . . . . . 83
Clearing jams from the ADF . . . . . . . . . . . . . . . . . . . . . . . . . . . . . . . . . . . . 84
Solving repeated jams. . . . . . . . . . . . . . . . . . . . . . . . . . . . . . . . . . . . . . . . . 85
Understanding control panel messages. . . . . . . . . . . . . . . . . . . . . . . . . . . . . . . . 86
Understanding mopy disk-error messages . . . . . . . . . . . . . . . . . . . . . . . . . . . . . 95
Troubleshooting the hard disk . . . . . . . . . . . . . . . . . . . . . . . . . . . . . . . . . . . . . . . 96
Correcting output quality problems . . . . . . . . . . . . . . . . . . . . . . . . . . . . . . . . . . . 97
Light print (partial page). . . . . . . . . . . . . . . . . . . . . . . . . . . . . . . . . . . . . . . . 97
Light print (entire page) . . . . . . . . . . . . . . . . . . . . . . . . . . . . . . . . . . . . . . . . 97
Specks. . . . . . . . . . . . . . . . . . . . . . . . . . . . . . . . . . . . . . . . . . . . . . . . . . . . . 97
Dropouts . . . . . . . . . . . . . . . . . . . . . . . . . . . . . . . . . . . . . . . . . . . . . . . . . . . 98
Lines . . . . . . . . . . . . . . . . . . . . . . . . . . . . . . . . . . . . . . . . . . . . . . . . . . . . . . 98
Gray background. . . . . . . . . . . . . . . . . . . . . . . . . . . . . . . . . . . . . . . . . . . . . 98
Toner smear . . . . . . . . . . . . . . . . . . . . . . . . . . . . . . . . . . . . . . . . . . . . . . . . 99
Loose toner . . . . . . . . . . . . . . . . . . . . . . . . . . . . . . . . . . . . . . . . . . . . . . . . . 99
Repeating defects . . . . . . . . . . . . . . . . . . . . . . . . . . . . . . . . . . . . . . . . . . . . 99
Repeating image . . . . . . . . . . . . . . . . . . . . . . . . . . . . . . . . . . . . . . . . . . . . 100
Misformed characters . . . . . . . . . . . . . . . . . . . . . . . . . . . . . . . . . . . . . . . . 100
Curl or wave . . . . . . . . . . . . . . . . . . . . . . . . . . . . . . . . . . . . . . . . . . . . . . . 100
Page skew. . . . . . . . . . . . . . . . . . . . . . . . . . . . . . . . . . . . . . . . . . . . . . . . . 100
Wrinkles or creases. . . . . . . . . . . . . . . . . . . . . . . . . . . . . . . . . . . . . . . . . . 101
Vertical white lines. . . . . . . . . . . . . . . . . . . . . . . . . . . . . . . . . . . . . . . . . . . 101
Tire tracks . . . . . . . . . . . . . . . . . . . . . . . . . . . . . . . . . . . . . . . . . . . . . . . . . 101
White spots on black . . . . . . . . . . . . . . . . . . . . . . . . . . . . . . . . . . . . . . . . . 101
ADF recalibration. . . . . . . . . . . . . . . . . . . . . . . . . . . . . . . . . . . . . . . . . . . . 102
Troubleshooting PostScript issues. . . . . . . . . . . . . . . . . . . . . . . . . . . . . . . . . . . 103
Troubleshooting optional HP Fast InfraRed Connect problems. . . . . . . . . . . . . 104
Troubleshooting an HP Jetdirect print server. . . . . . . . . . . . . . . . . . . . . . . . . . . 105
9 Service and support
HP customer care service and support . . . . . . . . . . . . . . . . . . . . . . . . . . . . . . . 107
Online services . . . . . . . . . . . . . . . . . . . . . . . . . . . . . . . . . . . . . . . . . . . . . 107
Customer support options . . . . . . . . . . . . . . . . . . . . . . . . . . . . . . . . . . . . . . . . . 108
HP Custom er Care Cente r and produ ct re pair as sista nc e for the U.S. and
Canada . . . . . . . . . . . . . . . . . . . . . . . . . . . . . . . . . . . . . . . . . . . . . . . . . . . 108
Warranty information . . . . . . . . . . . . . . . . . . . . . . . . . . . . . . . . . . . . . . . . . . . . . 108
5
Page 8

Hewlett-Packard limited warranty statement . . . . . . . . . . . . . . . . . . . . . . . . . . . 109
Limited warranty for toner cartridge life . . . . . . . . . . . . . . . . . . . . . . . . . . . . . . . 110
HP software license terms . . . . . . . . . . . . . . . . . . . . . . . . . . . . . . . . . . . . . . . . . 111
Appendix A Specifications
Overview . . . . . . . . . . . . . . . . . . . . . . . . . . . . . . . . . . . . . . . . . . . . . . . . . . . . . . 113
Paper specifications. . . . . . . . . . . . . . . . . . . . . . . . . . . . . . . . . . . . . . . . . . . . . . 113
Supported types of paper . . . . . . . . . . . . . . . . . . . . . . . . . . . . . . . . . . . . . 117
Guidelines for using paper. . . . . . . . . . . . . . . . . . . . . . . . . . . . . . . . . . . . . 118
Labels . . . . . . . . . . . . . . . . . . . . . . . . . . . . . . . . . . . . . . . . . . . . . . . . . . . . 119
Transparencies . . . . . . . . . . . . . . . . . . . . . . . . . . . . . . . . . . . . . . . . . . . . . 119
Envelopes . . . . . . . . . . . . . . . . . . . . . . . . . . . . . . . . . . . . . . . . . . . . . . . . . 120
Card stock and heavy paper . . . . . . . . . . . . . . . . . . . . . . . . . . . . . . . . . . . 121
Product specifications . . . . . . . . . . . . . . . . . . . . . . . . . . . . . . . . . . . . . . . . . . . . 122
Physical dimensions . . . . . . . . . . . . . . . . . . . . . . . . . . . . . . . . . . . . . . . . . 122
Product weight (without toner cartridge) . . . . . . . . . . . . . . . . . . . . . . . . . . 123
Environmental specifications. . . . . . . . . . . . . . . . . . . . . . . . . . . . . . . . . . . 123
Appendix B Ordering information
Available accessories. . . . . . . . . . . . . . . . . . . . . . . . . . . . . . . . . . . . . . . . . . . . . 125
Part numbers . . . . . . . . . . . . . . . . . . . . . . . . . . . . . . . . . . . . . . . . . . . . . . . . . . . 126
Appendix C Regulatory information
FCC regulations . . . . . . . . . . . . . . . . . . . . . . . . . . . . . . . . . . . . . . . . . . . . . . . . . 131
Environmental product stewardship program. . . . . . . . . . . . . . . . . . . . . . . . . . . 132
Protecting the environment . . . . . . . . . . . . . . . . . . . . . . . . . . . . . . . . . . . . 132
Material safety data sheets . . . . . . . . . . . . . . . . . . . . . . . . . . . . . . . . . . . . 133
Safety statements . . . . . . . . . . . . . . . . . . . . . . . . . . . . . . . . . . . . . . . . . . . . . . . 135
Laser safety statement . . . . . . . . . . . . . . . . . . . . . . . . . . . . . . . . . . . . . . . 135
Canadian DOC regulations . . . . . . . . . . . . . . . . . . . . . . . . . . . . . . . . . . . . 135
VCCI statement (Japan) . . . . . . . . . . . . . . . . . . . . . . . . . . . . . . . . . . . . . . 135
Laser statement for Finland. . . . . . . . . . . . . . . . . . . . . . . . . . . . . . . . . . . . 136
Appendix D System administrator guide
Overview . . . . . . . . . . . . . . . . . . . . . . . . . . . . . . . . . . . . . . . . . . . . . . . . . . . . . . 137
Using the embedded Web server. . . . . . . . . . . . . . . . . . . . . . . . . . . . . . . . . . . . 138
Configuring and verifying an IP address . . . . . . . . . . . . . . . . . . . . . . . . . . . . . . 139
TCP/IP assignment . . . . . . . . . . . . . . . . . . . . . . . . . . . . . . . . . . . . . . . . . . 139
Verifying the TCP/IP configuration . . . . . . . . . . . . . . . . . . . . . . . . . . . . . . 139
Changing an IP address . . . . . . . . . . . . . . . . . . . . . . . . . . . . . . . . . . . . . . 140
Configuring multitasking priorities . . . . . . . . . . . . . . . . . . . . . . . . . . . . . . . . . . . 141
Scan ahead submenu . . . . . . . . . . . . . . . . . . . . . . . . . . . . . . . . . . . . . . . . 141
Auto job interrupt submenu . . . . . . . . . . . . . . . . . . . . . . . . . . . . . . . . . . . . 141
Copy job interrupt submenu . . . . . . . . . . . . . . . . . . . . . . . . . . . . . . . . . . . 141
Hold off print job submenu. . . . . . . . . . . . . . . . . . . . . . . . . . . . . . . . . . . . . 142
Reset copy timeout submenu . . . . . . . . . . . . . . . . . . . . . . . . . . . . . . . . . . 142
Reset send timeout submenu . . . . . . . . . . . . . . . . . . . . . . . . . . . . . . . . . . 142
Using digital-sending settings . . . . . . . . . . . . . . . . . . . . . . . . . . . . . . . . . . . . . . 143
LDAP addressing settings . . . . . . . . . . . . . . . . . . . . . . . . . . . . . . . . . . . . . 143
Preferences settings . . . . . . . . . . . . . . . . . . . . . . . . . . . . . . . . . . . . . . . . . 143
Using HP Web JetAdmin with the embedded Web server. . . . . . . . . . . . . . . . . 144
Configuring product alerts . . . . . . . . . . . . . . . . . . . . . . . . . . . . . . . . . . . . . . . . . 144
Installing a DIMM . . . . . . . . . . . . . . . . . . . . . . . . . . . . . . . . . . . . . . . . . . . . . . . . 145
Understanding printer commands . . . . . . . . . . . . . . . . . . . . . . . . . . . . . . . . . . . 147
Index
6 EN
Page 9

About this guide
How to use this online guide
This guide is provided in an Adobe® Acrobat® portable document format (PDF file). This
section familiarizes you with how to use PDF documents.
The Adobe Acrobat Reader is not included in the product software, but can be
downloaded from http://www.adobe.com
Navigational features in this guide
Click the Table of Contents icon to go to the table of contents for the online
guide. The entries are linked to their related locations in this use gui de.
.
Click the Introduction icon to return to this section for tips about using this
use guide.
Click the Index icon to go to the index for the online guide. The index entries
are linked to their related topics.
Click the Up Arrow icon to go to the previous page.
Click the Down Arrow icon to go to the next page.
How to use this online guide 7
Page 10
Features of Acrobat Reader
Finding information in PDF documents
To find specific information in a PDF document, click Contents or Index in the upper-left
corner of the Acrobat Reader window, and then click the topic you want. You can also
use the Acrobat Reader Find tool.
Viewing PDF documents
For complete instructions about how to view PDF documents, see the online Help
included with Acrobat Reader.
Magnifying the page view
You can use the zoom-in tool, the magnification box on the status bar, or the toolbar
buttons to change the screen magnification. When you zoom in on a document, you can
use the hand tool to move the page around.
Acrobat Reader also offers magnification-level choices that control how the page fits on
the screen:
Fit Page scales the page to fit within the main window .
Fit Width scales the page to fit the width of the main window.
Fit Visible fills the window with the page’s content area only.
To increase magnification: Select the zoom-in tool and click on the
document page to double the current magnification.
To decrease magnification: Select the zoom-in tool while holding
down CTRL (Microsoft
(Macintosh), and click the center of the area you want to reduce.
®
Windows®, and UNIX®) or Option
Paging through a document
The following options are available for paging through a document.
To go to the next page: Click the Next Page icon on the t o ol ba r, or
click the Right Arrow or Down Arrow icon.
To return to the previous page: Click the Previous Page icon on
the toolbar, or click the Left Arrow or Up Arrow icon.
To go to the first page: Click the First Page icon on the toolbar.
To go to the last page: Click the Last Page icon on the toolbar.
To jump to a specific numbered page: Click the page number box
on the status bar at the bottom of the main window, type the page
number, and click OK.
8 About this guide EN
Page 11

Browsing with thumbnails
A thumbnail is a miniature view of each document page. You can display thumbnails in
the overview area. Use the thumbnail icons to jump quickly to a page and to adjust the
view of the current page.
Click a thumbnail to move to the page it represents.
Finding words
Use the Find tool to find part of a word, a complete word, or multiple words in the active
document.
Click the Find icon, or click Find on the Edit menu.
Printing the guide
To print selected pages: On the File menu, click Print. Click Pages. In the From and To
boxes, type the range of pages you wish to print. Then click OK.
To print the entire document: On the File menu, click Print. Click All n pages (n
represents the total number of pages in the document), and then click OK.
Note Go to http://www.adobe.com/ for the latest versions and additional languages of Adobe
Acrobat Reader.
How to use this online guide 9
Page 12

Where to look for more information
The following references are available for this product (see below). You can also see the
HP Jetdirect Print Server Administrator’s Guide. Additional information is available at
http://www.hp.com/lj4100mfp
● start guide
This guide provides information for setting up the HP LaserJet 4100 mfp series, and
is included with the product. For additional copies, contact an HP-authorized dealer.
● how-to poster
This wall poster, also included with the product, provides quick-reference information
for commonly performed tasks. For additional copies, contact an HP-authorized
dealer.
● Online Help
Online Help provides information about the options available from the printer drivers.
Several detailed, preformatted Help documents are also available through the Help
feature. Help files can be viewed and printed through the printer driver.
● HP Fast InfraRed Receiver User Guide
This guide provides information about using and troubleshooting the HP Fast
InfraRed Receiver (FIR).
.
● Accessor y gui des
These guides are included with accessories or toner cartridges, and provide
instructions for installation and use.
10 About this guide EN
Page 13

1
Introduction
Overview
Congratulations on your purchase of the HP LaserJet 4100 mfp series multifunction
printer (MFP). This product combines convenient send-to-e-mail and one-touch copying
features with high-quality laser pr inting.
See the start guide included with the product for setup instructions.
Before using the product, familiarize yourself with the following features described in this
chapter:
● product configurations
● product benefits and features
● parts and their locations
● basic features of the embedded Web server
Overview 11
Page 14
Product configurations
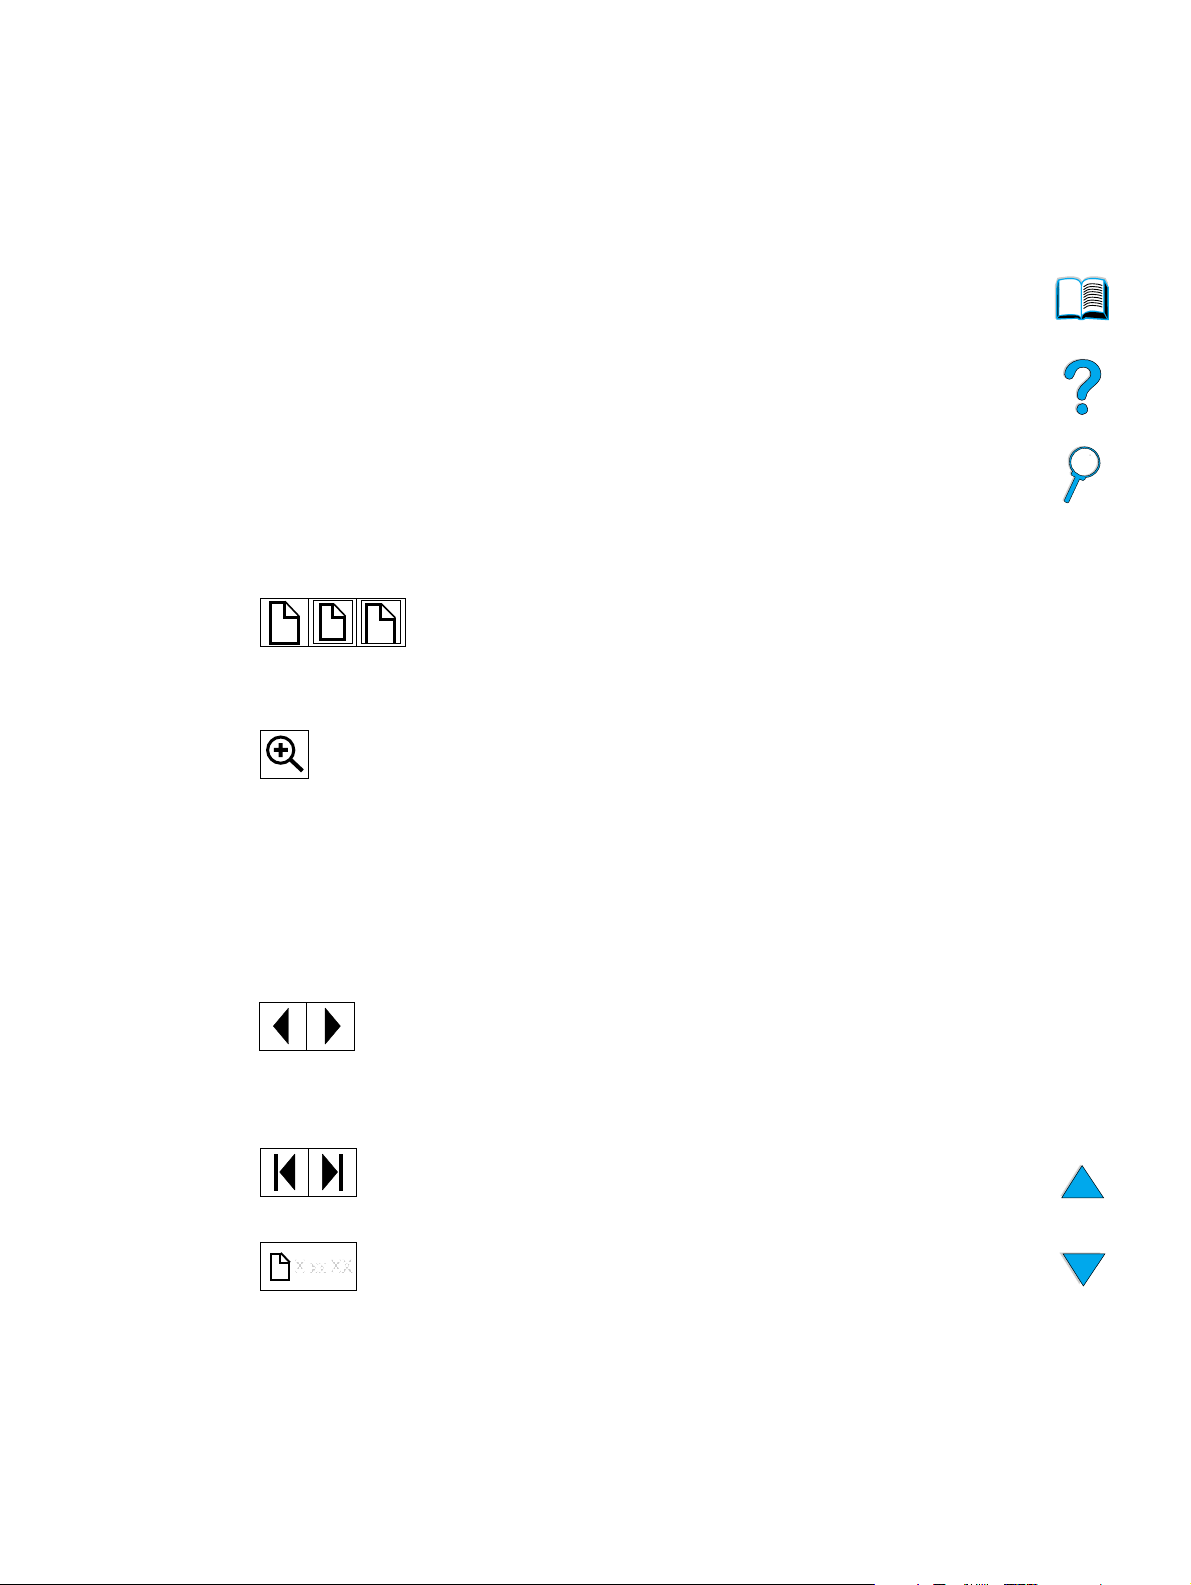
The HP LaserJet 4100 mfp series is available in two configurations:
HP LaserJet 4100 mfp (C9 148 A )
• 64 MB RAM; 5 GB (or larger) hard disk for RIP ONCE, transmit and scan once,
job retention, and font, form, and signature storage
• HP Jetdirect 10/100Base-TX print server card for network connection
• 100-sheet media input tray
• 500-sheet media input tray
• automatic document feeder (ADF) with 30-sheet capacity
HP LaserJet 4101 mfp (C9 149 A )
• 64 MB RAM; 5 GB (or larger) hard disk for RIP ONCE, transmit and scan once,
job retention, and font, form, and signature storage
• HP Jetdirect 10/100Base-TX print server card for network connection
• 100-sheet media input tray
• two 500-sheet media input trays
• duplexer for automatic duplexing (two-sided printing)
• ADF with 30-sheet capacity
12 Chapter 1 – Introduction EN
Page 15

Product benefits
The HP LaserJet 4100 mfp series is designed to be shared by a workgroup and lets you
print, make copies, and e-mail digital documents with a single device. The MFP’s
multitasking capability enables multiple functions to proceed simultaneously.
Note If the product is to be used as a network printer , the printer drivers must be installed on
all computers that will send print jobs to the MFP.
Digital-sending
Digital-sending is similar to faxing information, but offers significant advantages.
● sends e-mail to multiple e-mail addresses simultaneously, saving time and delivery
costs
● ensures privacy by sending information directly to e-mail in-boxes rather than to a fax
machine, which might have many users
● delivers files at near-original quality in black and white or in color
● sends files in PDF, JPEG, TIFF, or M-TIFF file formats, which can be modified by the
recipient as needed
Walk-up copying
The product offers efficient copying services for the workgroup. Making a copy is as easy
as pressing the S
copying functionality.
TART button to use the system defaults. The product offers full office
Network printing
The product is fully compatible with other HP LaserJet printers. When the installation
software is loaded, network printing is available through the HP Jetdirect 10/100Base-TX
print server card that is supplied with the product. Use the parallel port or the optional
Fast InfraRed receiver (FIR) port for direct printing.
Multitasking
The HP LaserJet 4100 mfp series allows full multitasking capabilities to enhance office
efficiency. System defaults can be set to define how multiple incoming jobs are managed
and how these defaults can be overridden to meet special requirements.
Product benefits 13
Page 16

Product features
Product speed and throughput
● printing and copying of letter-size media at 25 pages per minute (ppm) or A4-size
media at 24ppm
● monochrome scanning of letter-size originals at 25 ppm or A4-size originals at
24 ppm, and color scanning at 8 ppm
● instant-on fuser
● scan-once copying and transmit-once printing
● RIP ONCE print and copy capability
● scan-ahead capability to start copying or sending while the printer is busy
● monthly duty cycle of 150,000 pages
Image quality
● FastRes 1200: 1200 dpi (dots per inch) print quality for fast, high-quality printing of
business text and graphics
● ProRes 1200: 1200 dpi for printing best image quality
● copying and scanning at a resolution of 600 pixels per inch (ppi)
● up to 256 levels of gray for smooth, photo-like images
● HP UltraPrecise toner cartridge for crisp, sharp output
Paper handling
● HP LaserJet 4100 mfp: the 100-page and 500-page input trays are standard
● HP LaserJet 4101 mfp: the 100-page and two 500-page input trays are standard
● capable of printing and copying on a wide range of media sizes, types, and weights
● expandable to hold up to 1600 sheets of media
● standard 250-sheet face-down output
● duplexer is standard on HP LaserJet 4101 mfp
● scanner glass handles media sizes up to letter/A4 sizes
● ADF with 30-page capacity handles media sizes up to legal size
Printing features
● fully compatible with HP LaserJet 4100 series printers
● HP printer command language (PCL) 6, PCL 5e, and PostScript
● 80 fonts for Microsoft Windows
● additional fonts available for download from the Internet
®
(PS) 3 Emulation
Digital-sending capability
● full send-to-e-mail capability
● SMTP mail service support
● Lightweight Directory Access Protocol (LDAP) compatibility
● digital-sending service software standard with the HP LaserJet 4101 mfp
14 Chapter 1 – Introduction EN
Page 17

Copying capability
● easy-to-use copy functionality
● document collation
● multiple copies
● multiple pages per sheet (n-up)
● document reduction to 25 percent and enlargement to 400 percent in one-percent
increments
● automatic page-to-page enlargement or reduction
● image-quality improvement through background removal, best-quality mode, and
contrast adjustment
Toner cartridg e
● standard 10,000-page toner cartridge
● no-shake cartridge design
● HP smart print supplies system verifies that authentic HP toner cartridges are
installed
● supplies status page contains toner gauge, page counter, and information about
media sizes
● supplies purchasing available through embedded Web server or online
Expandable design
● stackable 500-sheet trays (up to two additional trays can be added to the basic
product)
● power envelope feeder (holds as many as 75 envelopes)
● duplexer (standard with the HP LaserJet 4101 mfp)
● Fast InfraRed printing adapter (FIR port)
● digital-sending service software standard with the HP LaserJet 4101 mfp
● memory can be expanded by installing additional dual inline memory modules
(DIMMs)
Product features 15
Page 18
Parts
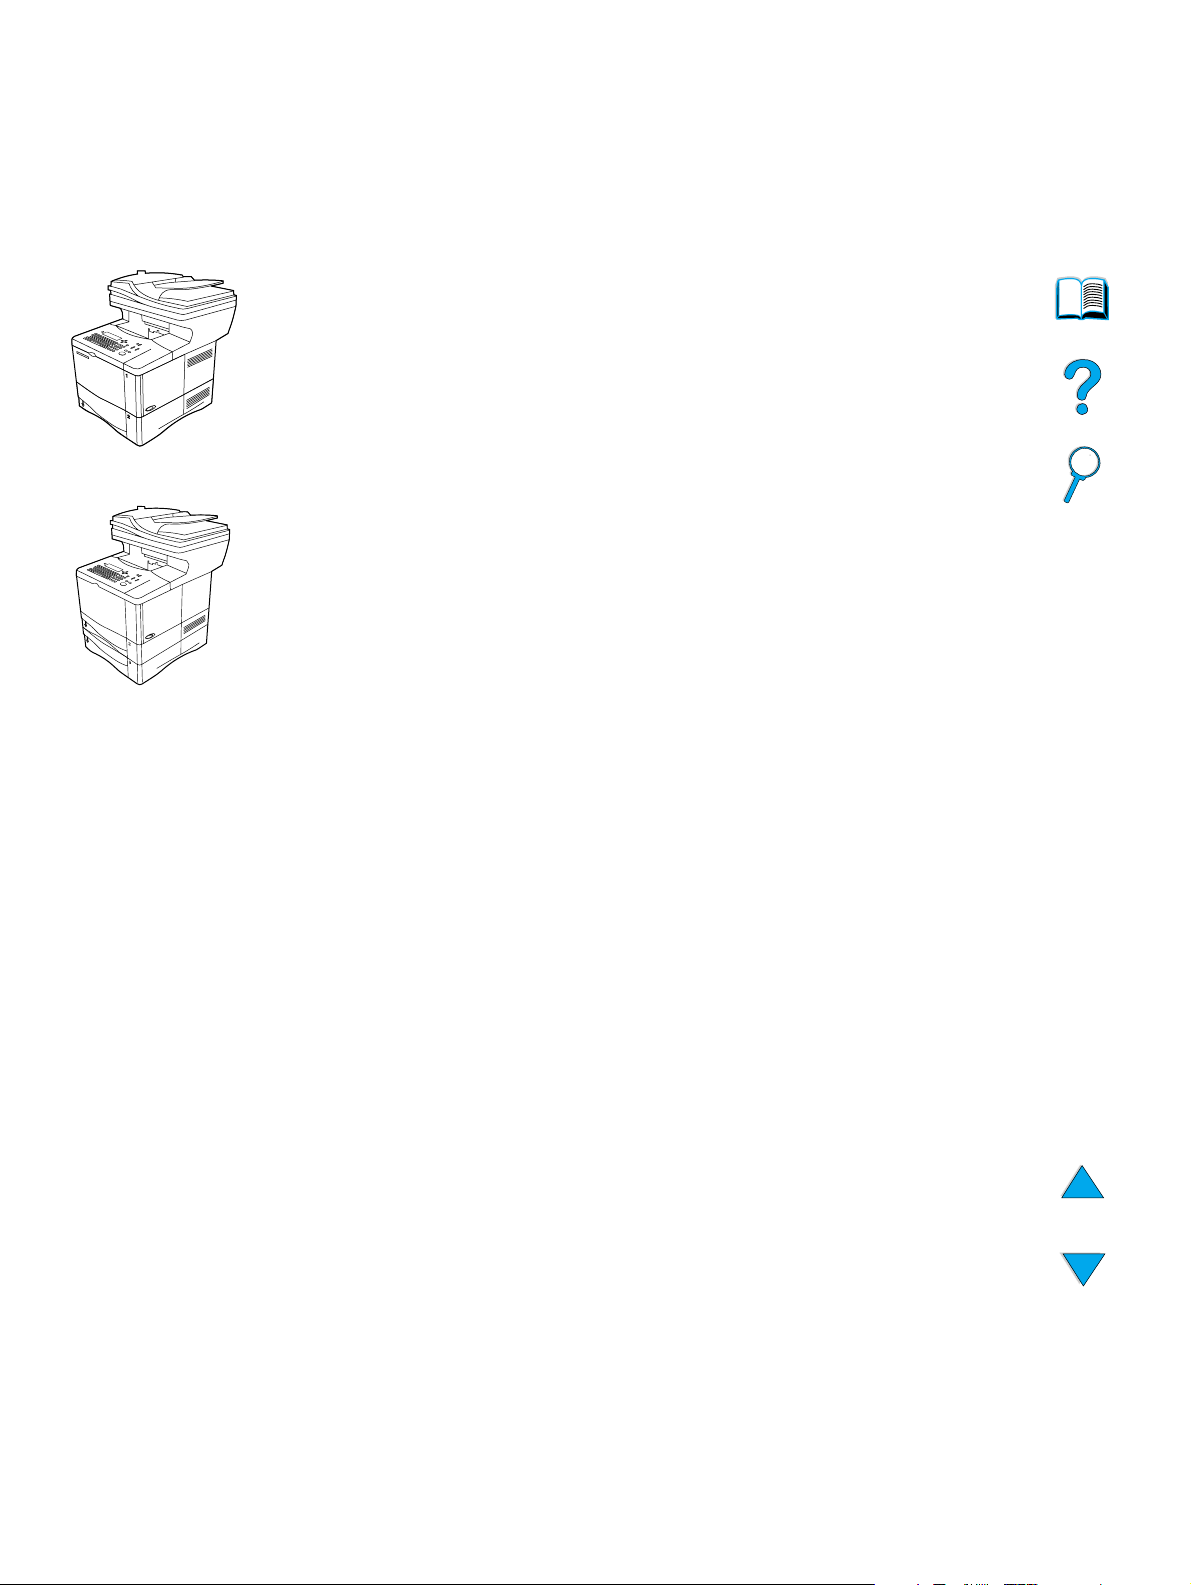
Product parts (front view)
11
10
9
8
7
7
6
1 ADF
2 ADF cover (lifts for access to scanner glass)
3 Top cover (access to toner cartridge; serial and part numbers are underneath cover)
4 Duplexer or Tray 2 dust cover (dust cover is removed if duplexer is installed)
5 Power switch
6 Tray 2 (holds 500 sheets; Trays 3 and 4 are stacked below, if installed)
7 Tray 1 (holds 100 sheets)
1
2
3
4
5
8 Access to toner cartridge
9 Control panel
10 Output bin
11 Scanner lock (located on the left side of the MFP)
16 Chapter 1 – Introduction EN
Page 19
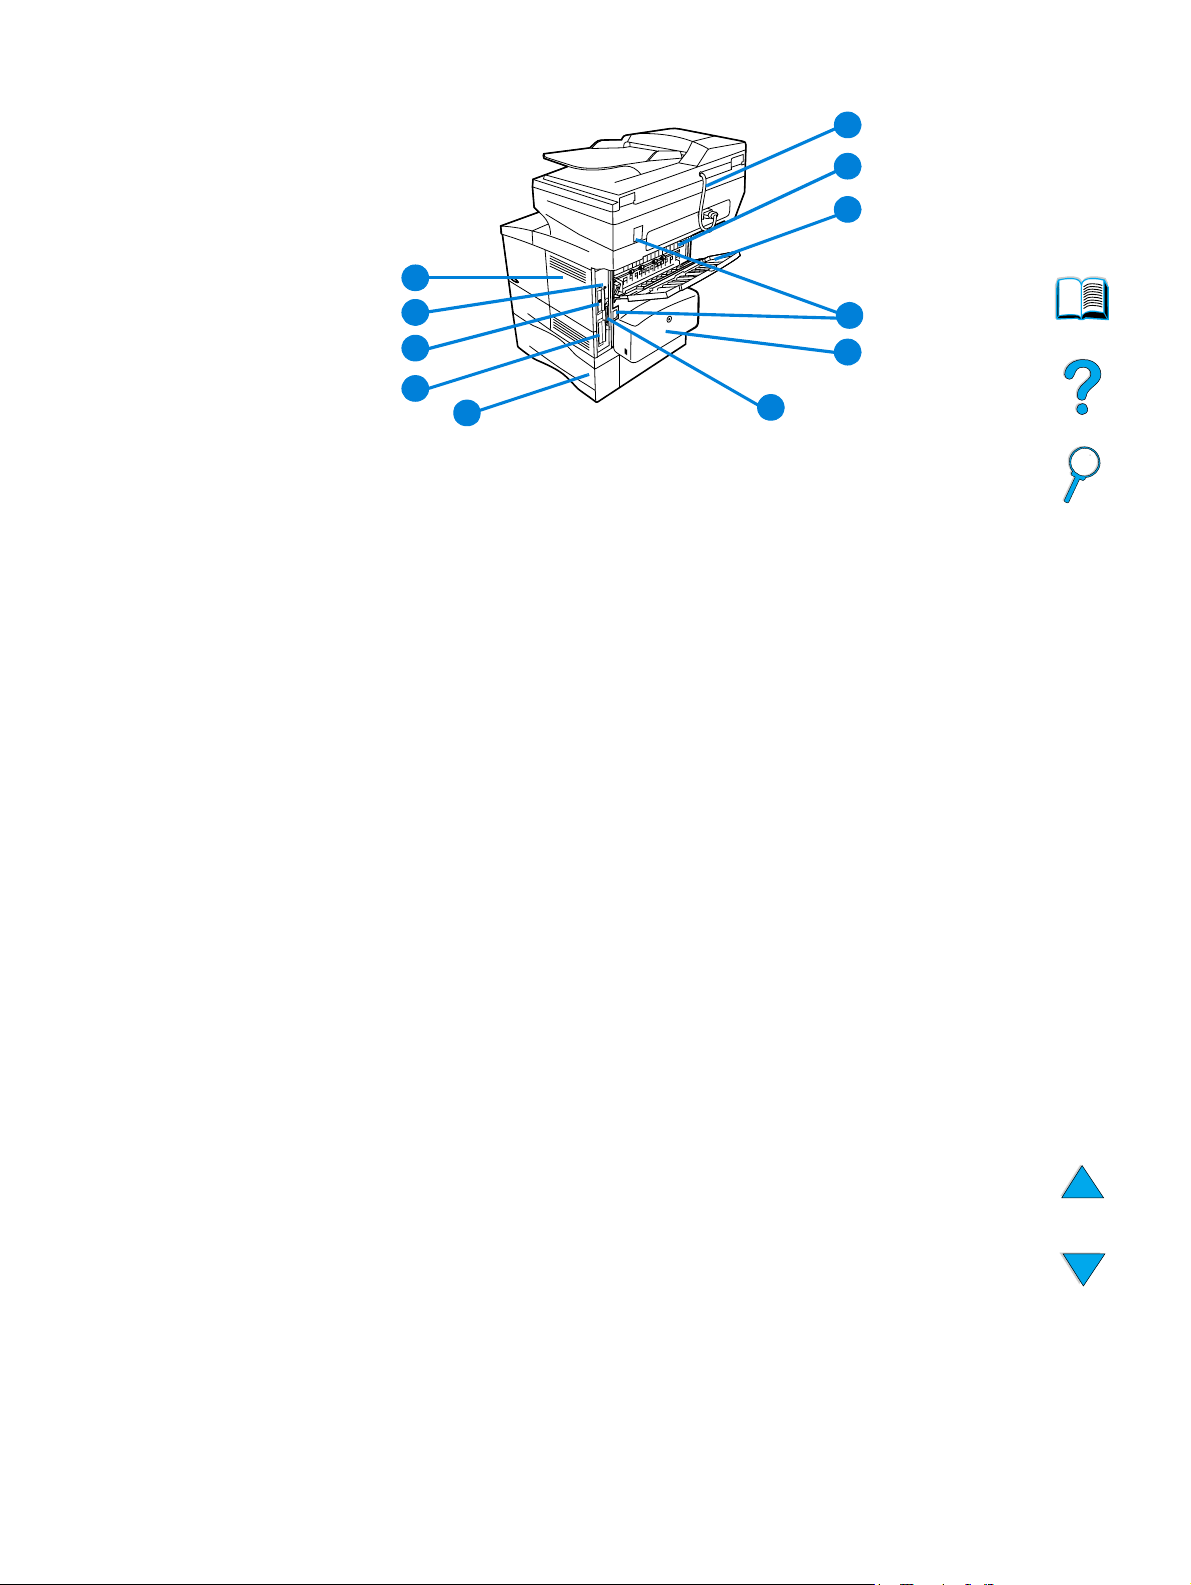
Product parts (back view)
11
1
2
3
10
9
4
5
8
7
1 ADF connector cable
2 Fuser (can be removed to clear jams)
3 Rear output slot (straight-through paper path)
4 Power/jumper cable connectors
5 Duplexer or Tray 2 dust cover (dust cover is removed if duplexer is installed)
6 Parallel interface port
7 Tray 3
8 Hard disk
9 HP Jetdirect print server card
10 Fast InfraRed Connect (FIR port)
11 Memory access door (more than one DIMM can be installed)
6
Parts 17
Page 20

Embedded Web server
The product has an embedded Web server that allows the system administrator to
configure and manage all networked HP LaserJet 4100 mfp series products remotely.
The MFP must be connected to a local area network (LAN) through the HP Jetdirect
card before the embedded Web server can be enabled.
The embedded Web server should be used only by a system administrator. See “System
administrator guide” on page 137 for details about product configuration and
management using the embedded Web server.
18 Chapter 1 – Introduction EN
Page 21

2
Basic operations
Overview
This chapter introduces the basic copying, sending, and printing operations of the
HP LaserJet 4100 mfp series. Specific information about each of these functions is
presented in later chapters. This chapter includes these topics:
● using the ADF
● using the scanner glass
● selecting the output bin
● loading Tray 1
● loading Trays 2, 3, and 4
● printing and copying on both sides of paper (duplexing)
● using special media, such as envelopes, letterhead, and transparencies
● understanding job-handling priorities
Overview 19
Page 22
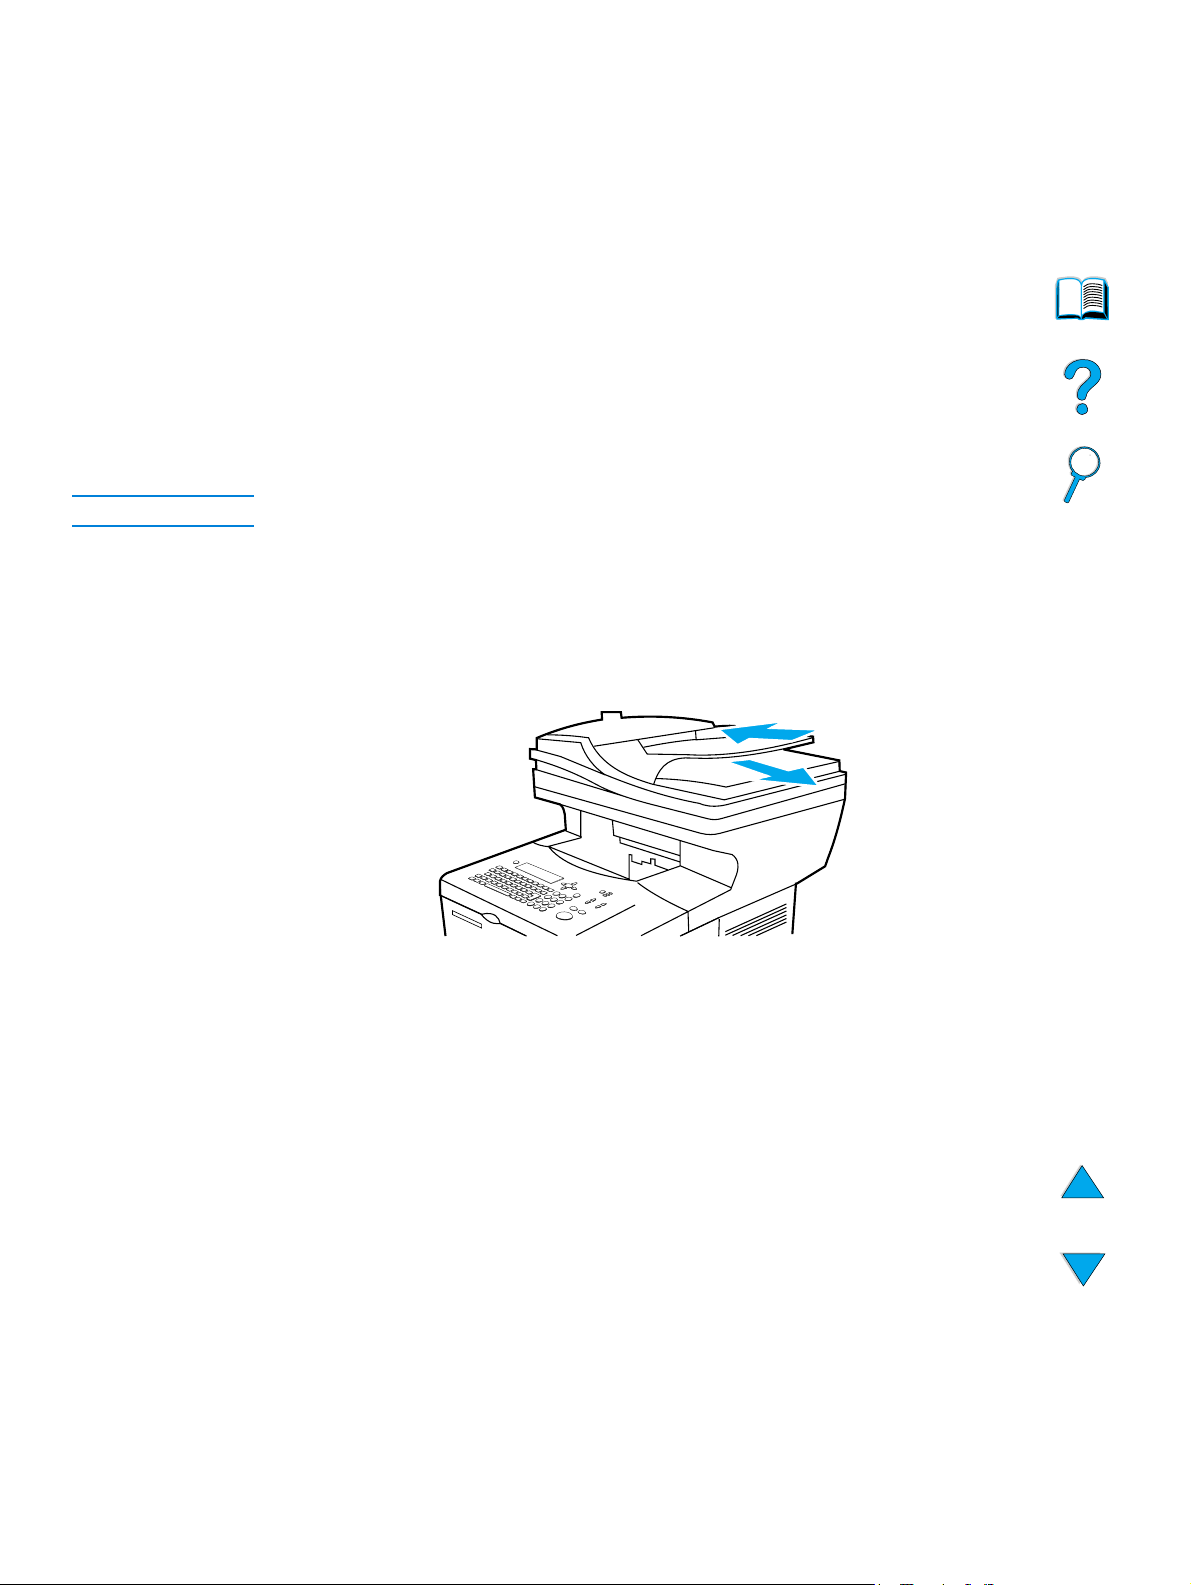
Using the ADF
Using the automatic document feeder (ADF) is a fast, convenient way to feed multipage
originals for copying or digital-sending. You can load the ADF with as many as 30 sheets
of paper. The ADF accepts documents that meet the following specifications:
● single-sided or double-sided originals
● documents on standard letter-, A4-, and legal-size paper
● documents ranging in size from 148.5 by 210.0 mm (5.9 by 8.3 inches) to 215.9 by
355.6 mm (8.5 by 14.0 inches)
● documents ranging in weight from 60 to 135 g/m
● documents that are free of tears or perforations
● documents that are square or rectangular and in good condition (not fragile or worn)
● documents that are free of glue, correction fluid, or wet ink
Note Do not use multipart forms.
The ADF passes the original document across the scanner glass, and returns it to the
upper-le v el tra y loca ted to the rig ht of the ADF. Copies made us ing the ADF ar e deliv ered
to the output bin beneath the scanner.
General guidelines for using the ADF
2
(16 to 36 lb)
Before placing documents into the ADF, prepare the documents by doing the following:
● Flatten curls or wrinkles.
● Remove staples, paper clips, sticky notes, and similar materials.
20 Chapter 2 – Basic operations EN
Page 23
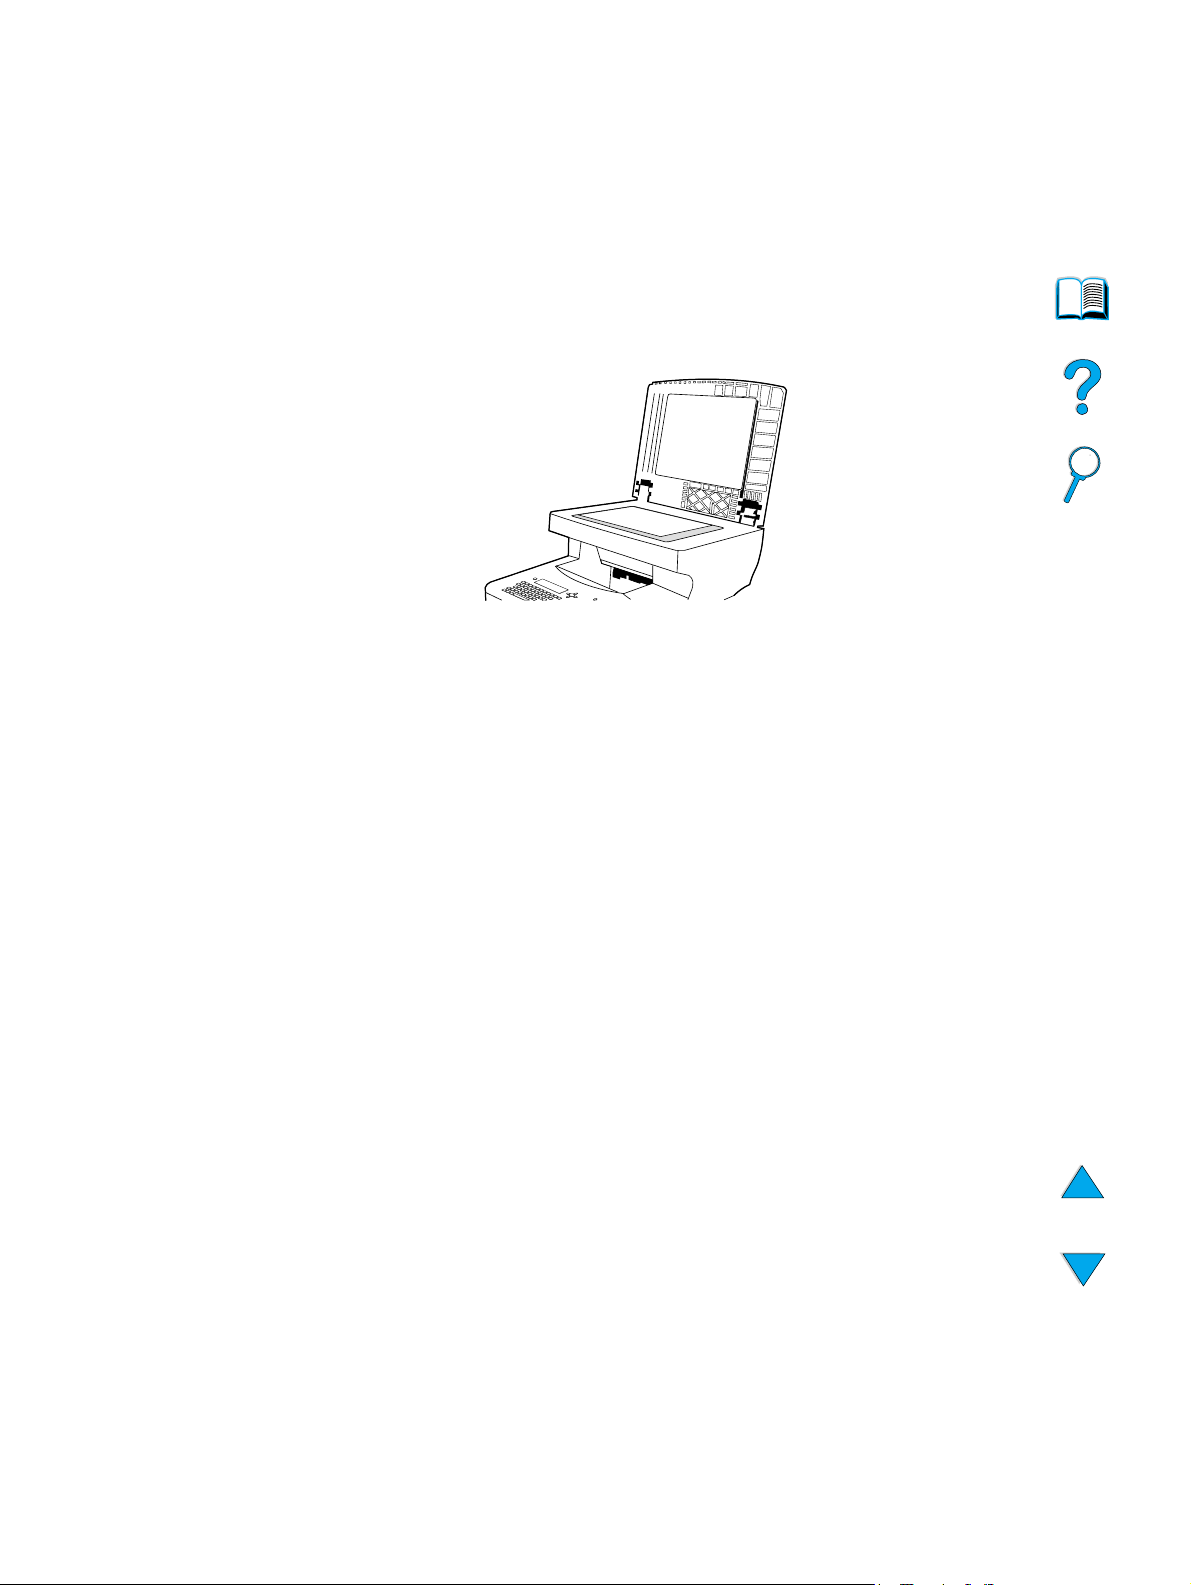
Using the scanner glass
You can also use the digital-sending and copying features by using the scanner glass,
located below the ADF. The scanner can accommodate letter- or A4-size and smaller
originals, books, manuals, receipts, and similar documents. Irregular and worn
documents, stapled documents, and photographs can also easily be sent or copied
using the scanner glass. Multiple-page, letter-size documents can be fed using the ADF.
To send or copy larger documents, see “Using the ADF” on page 20.
General guidelines for using the scanner glass
1 Open the scanner cover and place the original document face down on the scanner
glass. Lower the cover.
2 On the control panel, select the desired sending or copying options. See “Walk-up
copying” on page 43 and “Sending to e-mail” on page 49 for specific information
about using these functions.
3 After makin g your selectio ns, pr ess S
the scanner.
4 When the scan is complete, remove the original document from the scanner glass.
TART. Copies are sent to the output bin beneath
Using the scanner glass 21
Page 24
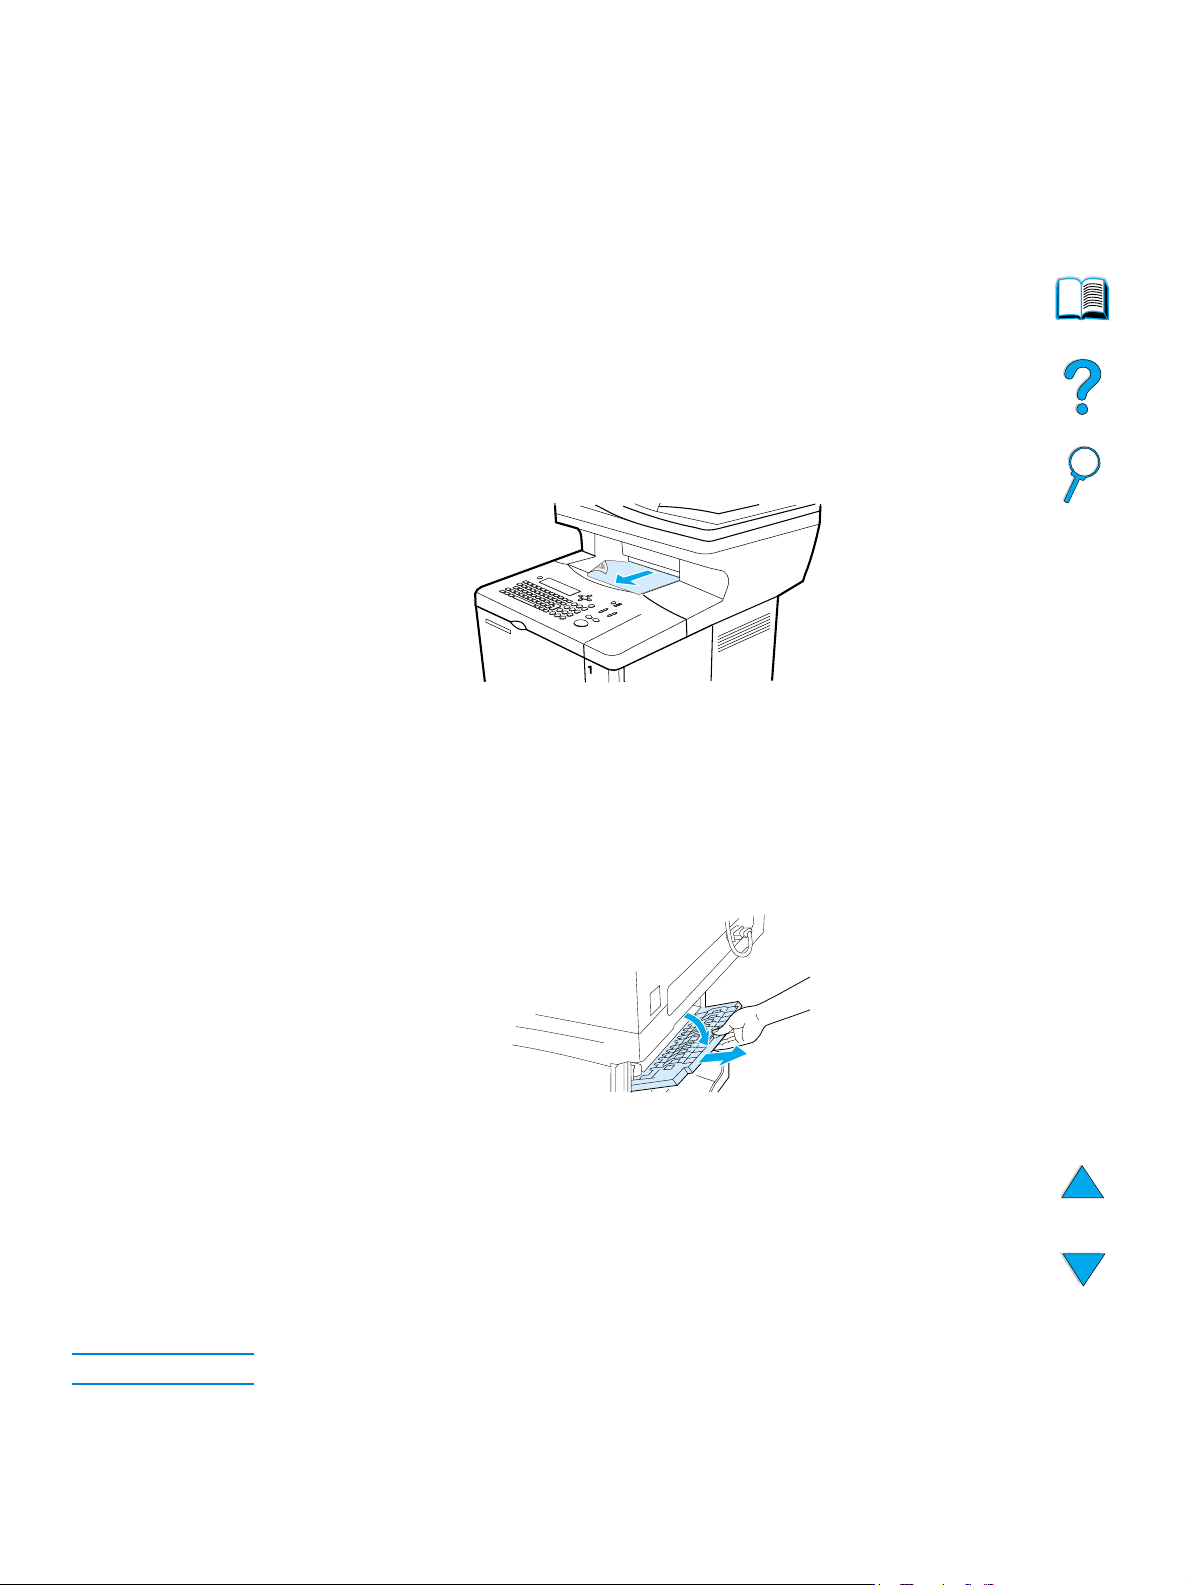
Selecting the output bin
The printer has two output locations: the rear output bin and the top output bin. To use
the top output bin, be sure the rear output bin is closed. T o use the rear output bin, open
it.
● If paper coming out of the top output bin has problems, such as excessive curl, try
printing to the rear output bin.
● To avoid paper jams, do not open or close the rear output bin while the printer is
printing.
Printing to the top output bin
The top output bin collects paper face-down, in correct order. The top output bin should
be used for most print jobs and for transparencies.
Printing to the rear output bin
The printer always prints to the rear output bin if the bin is open. Paper printed to this bin
will be face-up, with the last page on top.
To open the rear output bin, grasp the handle at the top of the bin. Pull the bin down, and
slide out the extension.
Printing from Tray 1 to the rear output bin provides the straightest paper path (which can
reduce curl). Opening the rear output bin might improve performance with the following:
● envelopes
● labels
● small custom-size paper
● postcards
● paper heavier than 105 g/m
2
(28 lb)
Note Opening the rear output bin disables the duplexer (if installed) and the top output bin.
22 Chapter 2 – Basic operations EN
Page 25

Loading Tray 1
1
3
Tray 1 is a multipurpose tray that holds as many as 100 sheets
of paper, 10 envelopes, or 20 sheets of cardstock. The default
action is to pull media from Tray 1 first. To change the default,
see “Customizing trays for printing or copying” on page 63.
Tray 1 provides a convenient way to print envelopes,
transparencies, custom-size media, or other types of special
media without unloading the other trays. It can also be used as
an additional input tray. For supported sizes of media, see
“Supported paper sizes and weights” on page 114.
1 Open Tray 1.
2 Pull out the tray extension.
3 Set the side guides to the desired width.
4 Load media in the tray.
Note
Make sure that the media fits under the tabs on the guides and
not above the load-level indicators.
Generally, load media with the side to be printed facing up, and
the top, short edge toward the product. For information about
loading special media, see “Using special media” on page 25.
5 Adjust the side guides so that they touch the medi a stack
but do not bend the media.
CAUTION
To avoid jams, do not load trays while the product is printing.
Loading Tray 1 23
Page 26
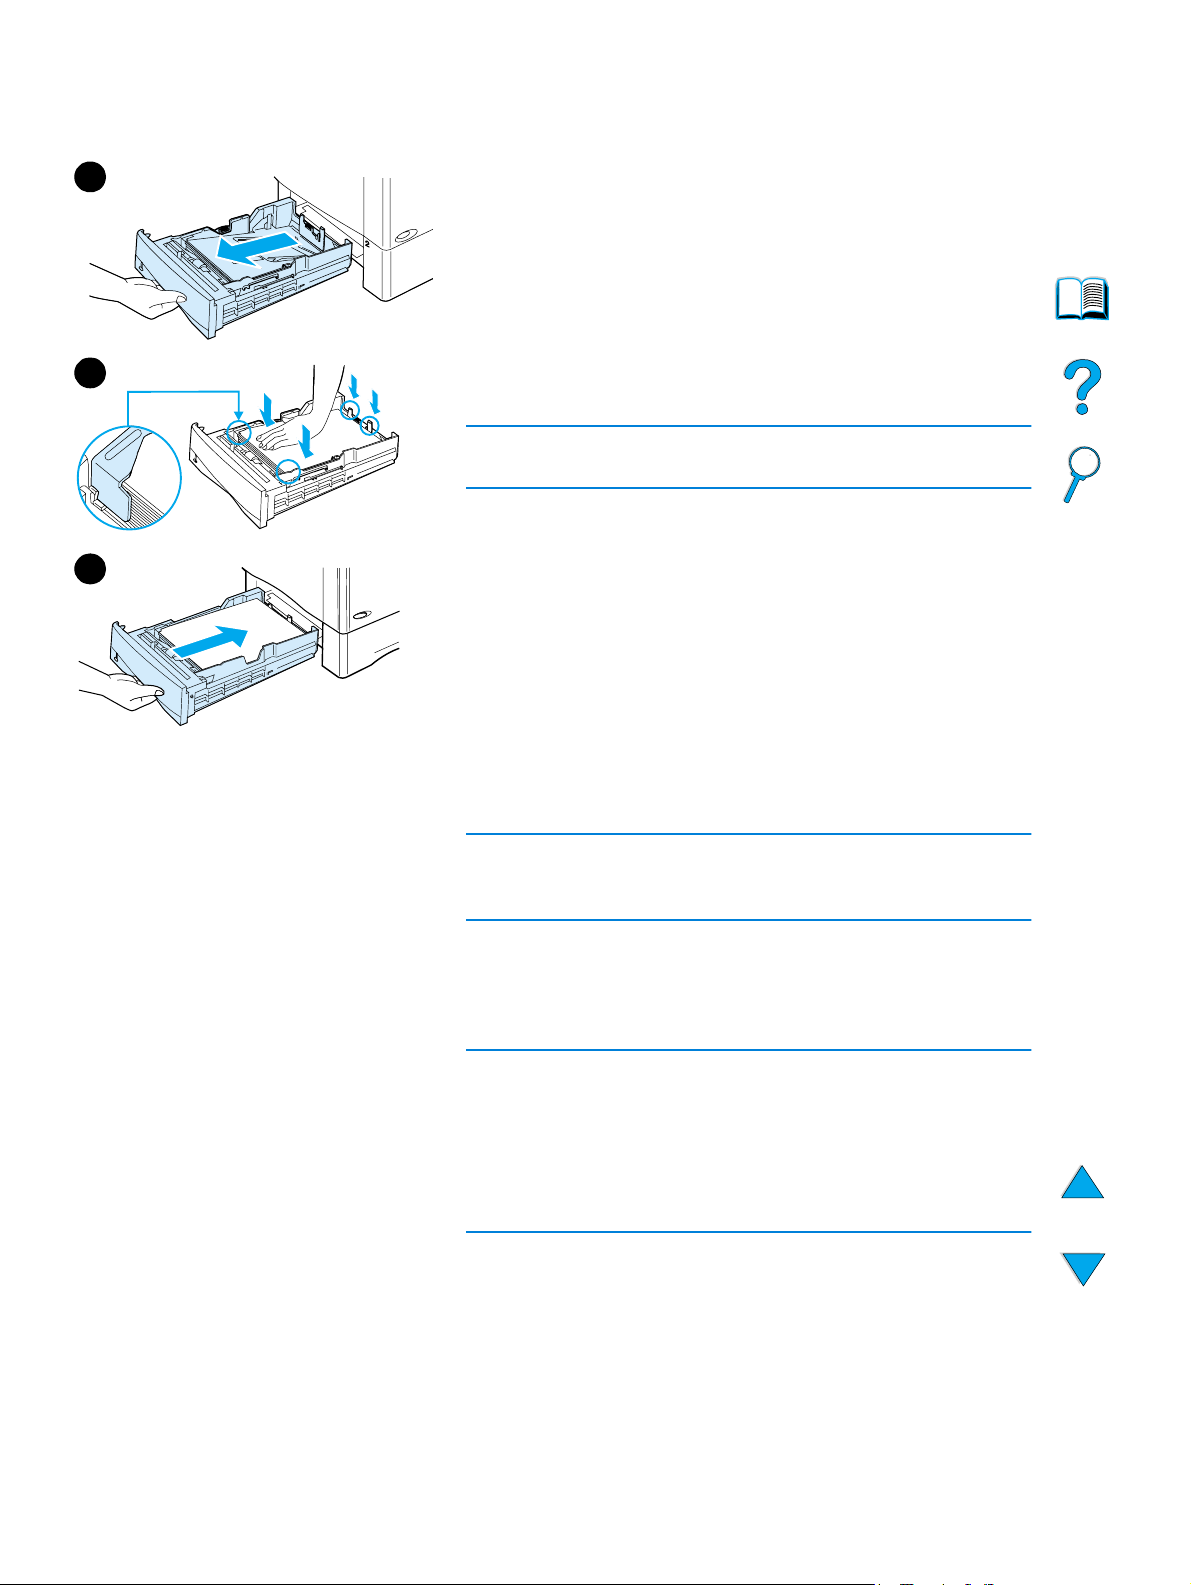
Loading Tray 2 and optional Trays 3 and 4
1
Trays 2, 3, and 4 are 500-sheet media input trays. Tray 2 is
standard on the HP LaserJet 4100 mfp. Trays 2 and 3 are
standard on the HP LaserJet 4101 mfp, and Tray 4 is an
available option. Both Trays 3 and 4 are available as options for
the HP 4100 LaserJet mfp.
The trays adjust for six standard sizes and many custom sizes
(for d eta ils , see “Supported paper sizes and weights for Trays 2,
3, and 4” on page 115). When the paper guides are adjusted
4
properly, the product automatically senses the media size that is
loaded.
CAUTION
To avoid jams, do not load trays while the product is printing.
1 Pull the tray out of the product.
5
2 Adjust paper guides as needed:
● To adjust the width, squeeze the lever on the left guide
and slide the guides into place.
● To adjust the length, squeeze the lever on the rear paper
guide and slide it to the desired media size until it clicks
into place.
● Squeeze the blue tab on the right side of the tray and
move it to the correct position for the media size.
3 Load paper into the tray.
Note
Load media with the side to be printed on face down and the top
edge of the media towards you.
4 Make sure the paper is flat in the tray at all four corners and
below the front and back tabs.
5 Slide the tray back into the product.
Note
If the tray is not properly adjusted, the control panel might show
an error message or the media might jam.
For information about duplexing, see “Media placement
requiring specific orientation” on page 30. For information about
loading special media, see “Using special media” on page 25.
24 Chapter 2 – Basic operations EN
Page 27

Using special media
This section discusses printing and copying on types of media that require special
handling:
● small or narrow paper
● letterhead, prepunched, or preprinted paper
● envelopes
● labels
● transparencies
● cards and custom-size or heavy paper
Using small or narrow paper
Follow these guidelines if you plan to print or copy primarily on small or narrow media:
● Use the 6,000-page toner cartridge (part number C8061A). The toner might leak if
large quantities of small or narrow media are printed using the 10,000-page
cartridge (part number C8061X). (See “Ordering information” on p age 125.)
● Print from Tray 1 to the rear output slot if you experience problems such as jams or
curling. Using this output slot provides a straight-through paper path.
See “Using cards and custom-size or heavy paper” on page 28 for further information
about printing on non-standard sizes.
Using letterhead, prepunched, or preprinted paper
When printing letterhead, prepunched, or preprinted paper, it is important to orient the
paper correctly.
● When using Tray 1, load the paper with the side to be printed facing up, and the top,
short edge toward the product.
● For all other trays, load paper with the side to be printed facing down, and the top
edge toward you.
Note Follow the guidelines in this section for printing on one side only. To duplex, see
“Guidelines for duplexing” on page 29.
Using special media 25
Page 28

Using envelopes
You can print many types of envelopes from Tray 1. As many as ten envelopes can be
stacked in the tray. For information abou t acceptable envelope specifications, see
“Envelopes” on page 120.
Printing performance depends on the construction of the envelope. Always test a few
sample envelopes before purchasing a large quantity. To print envelopes:
● In your software program, set the margins at least 15 mm (0.6 inch) from the edge of
the envelope.
● Before you load envelopes, make sure they are flat and not damaged or stuck
together.
● Open the rear output slot to create a straight paper path. This produces better
results if the envelopes tend to curl. If you print large quantities of envelopes
continuously, or if you alternate envelopes with wide paper, you might need to select
SMALL PAPER SPEED=SLOW in the Fuser Mode option of the Configure Device menu.
The proper setting reduces the throughput speed of narrow paper to allow the heat
generated from printing to dissipate. Although using this feature slows throughput
speed, it helps prevent product damage while ensuring excellent print quality.
CAUTION Envelopes with clasps, snaps, windows, coated linings, exposed self-stick adhesives, or
other synthetic materials can severely damage the product. To avoid jams, emission of
noxious fumes, and possible product damage, never print on both sides of an envelope.
Loading envelopes in Tray 1
● Open T ra y 1, but do not pull out the extension. Y ou might need to use the extension if
you print oversize envelopes.
● Load as many as ten envelopes in the center of Tray 1 with the side to be printed
facing up, and the postage-end toward the product. Slide the envelopes into the tray
as far as they will go without forcing them.
● Adjust the guides to touch the envelope stack without bending the envelopes. Make
sure that the envelopes fit under the tabs on the guides and the envelope feeder is
not overfilled.
● Lower the envelope weight onto the stack of envelopes.
Note Select the envelope size from the software program (if the setting is available) or the
printer driver. To print by type and size of media, see “Specifying type and size of media
(locking tr ays )” on page 63. If the envelopes curl when printing, open the rear output slot
to create a straight-through paper path.
Using an optional power envelope feeder
With the optional power envelope feeder accessory, the product can automatically feed
as many as 75 envelopes to the printer. To order a power envelope feeder , see “Ordering
information” on page 125. See the documentation included with the accessory for
instructions about operation and use.
26 Chapter 2 – Basic operations EN
Page 29

Using labels
To ensure excellent printing quality and avoid damage to the product, use only labels that
are recommended for use in laser printers. Make sure that the labels meet the correct
specifications (see “Labels” on page 119).
Do:
● Print a stack of as many as 50 sheets of labels from Tray 1.
● Load labels in Tray 1 with the side to be printed facing up, and the top, short edge
toward the product.
Do not:
● Do not use labels that are separating from the backing sheet or are wrinkled or
damaged in any way.
● Do not use labels that have the backing sheet exposed.
● Do not feed a sheet of labels through the product more than once. The adhesive
backing is designed for only one pass through the product.
● Do not print on both sides of labels.
● Do not print on sheets from which labels have been removed.
CAUTION Failure to follow these instructions can damage the product.
Using transparencies
Use only transparencies recommended for use in laser printers. For transparency
specifications, see “Transparencies” on page 119.
● Load transparencies face up in Tray 1, with the top toward the product. As many as
50 transparencies can be loaded in Tray 1.
● As many as 50 transparencies can be printed or copied from Tray 2, 3, or 4. Load
them with the side to be printed facing down, and the top edge toward you.
● Remove each transparency from the output bin before the next transparency prints.
● Do not feed transparencies through the product more than once.
● Print on only one side of a transparency.
● Place the transparencies on a flat surface to cool after removing them from the
product.
● Select the transparency media type in the printer driver so that the product uses the
low-fuser mode that is best for printing them.
● Fan the input stack if two or more transparencies feed at the same time.
Using special media 27
Page 30

Using cards and custom-size or heavy paper
Custom-size paper can be printed or copied from any tray. For acceptable paper
specifications, see “Paper specifications” on page 113.
Tray Minimum size Maximum size
Tray 1 76 by 127 mm
(3 by 5 inches)
Tray 2, 3, or 4 148 by 210 mm
(5.8 by 8.2 inches)
The maximum acceptable paper weight is 199 g/m
216 by 356 mm
(8.5 by 14.0 inches)
216 by 356 mm
(8.5 by 14.0 inches)
2
(53 lb) from Tray 1 and 105 g/m2
(28 lb) from Tray 2, 3, or 4.
Note The control panel can be set to handle only one custom media size at a time. Do not load
more than one size of custom media into the product.
Guidelines for using custom paper
● Do not attempt to print on paper smaller than 76 mm (3 inches) wide or 127 mm
(5 inches) long.
● In the software program, set the page margins at least 4.23 mm (0.17 inch) from the
edges.
● Feed the short edge of the page first.
Setting custom paper sizes
When custom paper is loaded, select the appropriate size settings in the software
program (the preferred method), the printer driver, or the control panel.
Note Settings in the software program and printer driver override control panel settings.
Software program settings generally override printer driver settings.
If the desired settings are not available in the software, set the custom paper size on the
control panel:
1 From the Paper Handling menu, select TRAY <N> CUSTOM.
2 Using the TRAY <N> CUSTOM opti on, sele ct inc he s or milli me ter s as the unit of
measurement.
3 Using the TRAY <N> CUSTOM option, set the dimension for the top edge of the media.
This dimension can be 76 to 216 mm (3.0 to 8.5 inches).
4 While in the TRAY <N> CUSTOM option, set the dimension for the side edge of the
media. This dimension can be 127 to 356 mm (5 to 14 inches). For example, if the
custom paper is 203 by 254 mm (8 by 10 inches), set the front-edge dimension to
203 mm and the side-edge dimension to 254 mm.
5 If custom media is loaded into T ray 1, set TRAY 1 MODE=CASSETTE and then set TRAY
1 SIZE=CUSTOM from the Paper Handling menu in the control panel. See
“Customizing T r a y 1 operation” on page 63. If custom media is loaded in T ra y 2, 3, or
4, be sure that the paper size slider is set to Custom (see “Loading Tray 2 and
optional T r ay s 3 and 4” on page 24). For more information see “Customizing trays for
printing or copying” on page 63.
28 Chapter 2 – Basic operations EN
Page 31

Duplex copying and printing
If a duplexer is installed, you can print or copy on both sides of the paper. The duplexer
supports the following media sizes:
● Letter
● Legal
● Executive
● A4
● B5 (JIS)
The duplexer does not support custom sizes.
Note The Tray 2 dust cover must be removed when the duplexer is installed. See the
documentation included with the duplexer for installation and usage instructions.
RemovedInstalled
Guidelines for duplexing
● Do not print or copy on both sides of labels, transparencies, envelopes, vellum, or
media heavier than 105 g/m
and damage to the product might occur with labels.
● You might need to configure the printer driver to recognize the duplexer. See the
printer driver online Help for details.
● To duplex, make the appropriate selection in your software program or printer driver.
See the printer driver Help.
● If you do not use the printer driver that came with the product, you might need to
change the Duplexing setting in the Printing menu to DUPLEXING=ON. Also in the
Printing menu, set Binding to long- edge or short-edge. For more information, see
“Layout options for duplexing” on page 31.
● Close the rear output bin when using the duplexer. Opening the rear output bin
disables the duplexer.
2
(28 lb). Jams might occur with these types of media,
Duplex copying and printing 29
Page 32

Media placement requiring specific orie ntation
Several kinds of paper require a specific orientation when you duplex—for example,
letterhead, preprinted paper, and paper with watermarks or prepunched holes. The
duplexer prints or copies on the second side of the paper first. Orient the paper in the
trays as shown below.
Tray 1 Trays 2, 3, 4
When using Tray 1, load the paper with the front side facing down and the top toward
you. For all other trays, load the paper with the front side facing up and the top toward the
front of the printer as indicated in the illustration.
30 Chapter 2 – Basic operations EN
Page 33

Layout options for duplexing
The four available duplexing orientation options are shown below. These options can be
selected in the printer driver, through the Copy Settings screen, or by selecting the
BINDING option from the Printing menu at the control panel.
1. Long-edge
portrait
2. Long-edge
landscape*
3. Short-edge
portrait*
4. Short-edge landscape
1 Long-edge portrait This is the default product setting and the most common
layout used. Every printed image is oriented right-side up.
Facing pages are read from top to bottom on the left page,
then from top to bottom on the right page.
2 Long-edge
landscape
3 Short-edge portrait This layout is often used with clipboards. Every other
4 Short-edge
landscape
Note For the binding options designated with an asterisk (*) in the diagram above:
When using Windows drivers, select Flip Pages Up.
When making copies, select the 2 - Flipped option on the Copy Settings screen.
This layout is often used in accounting, data processing,
and spreadsheet programs. Every other image is oriented
upside down. Facing pages are read continuously from
top to bottom.
printed image is oriented upside down. Facing pages are
read continuously from top to bottom.
Each printed image is oriented right-side up. Facing
pages are read from top to bottom on the left page, then
from top to bottom on the right page.
Duplex copying and printing 31
Page 34

Job-handling priorities
The HP LaserJet 4100 mfp series is designed to handle multiple jobs efficiently.
Scanning and printing functions operate independently. You can use the scanner for
digital-sending while a network printing job is underway, and printing can proceed while
the scanner is in use.
● To scan a job for sending or copying while printing is underway, place the document
in the ADF or on the scanner glass and press S
● If the MFP is printing and a copy is required, the copy job can be programmed and
scanning will continue.
● The system can also be configured to allow you to interrupt a current printing or
copying job. You are asked if you wish to interrupt the current job or wait until it has
finished. If you interrupt the job, it resumes as soon as your walk-up job is complete.
Note Job-handling priorities can be changed by the system administrator through the System
Setup menu either at the control panel or through the embedded Web server or HP Web
JetAdmin. See “Configuring multitasking priorities” on page 141.
TART.
32 Chapter 2 – Basic operations EN
Page 35

Control panel and control
3
panel menus
Overview
This chapter presents a general overview of the control panel and the control panel
menus. Specific control panel functions that pertain to copying, sending, and printing
tasks are presented in later chapters of this guide.
The HP LaserJet 4100 mfp series control panel supports the product's convenience
copying and digital-sending functionality as well as walk-up device configuration. The
control panel offers all the options and capabilities that you expect from a standard
copier, as well as full digital-sending capabilities.
The control panel provides:
● a graphical user interface.
● a numerical keypad for numeric entry such as PIN numbers and number of copies.
● a keyboard for typing e-mail addresses and other data.
● clear feedback during interaction with the control panel.
● status messages, such as information about trays and the toner cartridge.
● support for learning how to use the product's features.
● instructions and graphics to help resolve jams and other problems.
Overview 33
Page 36

Layout and operation
1
32
4
6
5
7a
7b
8
9
10
12
11
1 ? (Help): provides Help about the control panel display when problems occur.
2 Control panel display.
3 Navigation buttons: four arrow buttons that are used to move among elements on the
control panel display. Use the central button to choose an element or enter a
menu.
4 C (Clear): resets the copy count or other numeric entries.
5 M
ENU: use to choose device configuration menus on the control panel. See “Menus”
on page 37 for additional information.
6 Status lights: green Ready light, green Data light, and red Attention light.
7 a. Light and dark buttons: use to increase or decrease the copy image brightness.
b. Reduce and enlarge buttons: use to scale the copy size.
8 R
ESET: returns all current job settings to their default values.
9 S
TOP: cancels a copy, sending, or print job.
10 S
TART: use to begin or resume a job.
11 Numeric keypad: use to specify the number of copies. The keypad can also be used
to type numerical values in other modes.
12 Keyboard: use for digital-sending features and for typing other data.
34 Chapter 3 – Control panel and co ntr ol panel men us EN
Page 37

Navigation
By pressing the arrow navigation buttons, you can shift focus between objects on the
screen to describe the document to be handled and the actions to be performed. A bold
border around a graphic object or a reverse video effect in a text list indicates the current
focus. Use the central button to enter menus.
Status bar
Select
Move left
The status bar is the uppermost line of available text on the control panel display.
● The status line shows both product status messages and user prompts. When the
product is id le, this line displays READY TO COPY, ACCEPTING COPY JOBS, or READY.
During scanning, the line might read SCANNING PAGE x. During copying, you might
see DATA RECEIVED PROCESSING JOB. Error messages are not communicated on the
status line, but they appear in a text box overlay that blocks normal screen views until
the message is cleared.
● The copy count shows the number of copies selected. This selection is made using
the keypad. Acceptable values are from 1 to 99.
Move up
Move right
Move down
Navigation 35
Page 38

Control panel screens
Use the screens of the control panel display to describe the original document and to
specify the actions to be taken and their parameters. The primary screens are:
● Describe Original
● Copy Settings
● Send Options
These screens are reached through the top-level screen, shown here.
The Describe Original screen, which is used for both digital-sending and copying, is
discussed in the following section. The other screens are addressed in the chapters
“Walk-up copying” on page 43 and “Sending to e-mail” on page 49.
In the Describe Original screen, you can describe the following aspects of the original
document:
● Size (Letter, ADF only, Executive, A4, A5, or B5)
● Sides to be copied or sent (1 or 2)
● Content (Text, Mixed or Photo)
Use the navigation buttons to change a setting. Press to view available options. Select
the desired options using , and navigate to OK. Then press to return to the
Describe Original screen. The left-page icon is updated to reflect the selected settings.
Making copies without describing the original
The HP LaserJet 4100 mfp series factory defaults are set to allow you to place an
original in the ADF or on the scanner glass and press S
the original. Place the document to be copied on the scanner glass or into the ADF, type
the number of copies to be made, and press S
After you press S
TART, your copy will be processed with these characteristics:
TART.
TART without having to describe
● one page per sheet
● single-sided
● mixed text, graphic or photo content
● scaled at 100 percent
● medium contrast
The default page size is determined by locale. Letter-size is the default in North America
and A4 is the default paper size in Europe and Asia.
36 Chapter 3 – Control panel and co ntr ol panel men us EN
Page 39

Menus
The HP LaserJet 4100 mfp series uses a system of control panel menus to set job
parameters, set system defaults, and manage product performance and features. Many
of the menu options can also be configured by a system administrator through the
embedded Web server or through HP Web JetAdmin.
Menu options are reached by pressing the M
ENU button on the right side of the control
panel display and scrolling through the list to locate the option you want to use. The
following menus are available.
● Pause/Resume
● Retrieve Job
● Information
● Paper Handling
● Diagnostics
● Configure Device
● Service (password-protected)
Retrieve Jo b m e nu
The product offers several job storage features that allow you to retain printed jobs in
memory for future use. Stored jobs are listed in the menu by user name. The job-storage
features are:
● Quick Copy jobs: allows you to print the required number of copies of a job and
store a copy on the hard disk for later printing.
● Proof-and-hold jobs: allows you to print and review a single copy of a job and later
print additional copies.
● Stored jobs: stores a print job permanently on the hard disk.
● Private jobs: allows you to prevent a job from printing until the job is released at the
control panel by typing a four-digit personal identification number (PIN).
Note Stored jobs are created through the printer driver in the software program.
Information menu
The Information menu offers the following options.
1 Print menu map: generates and prints a menu map that shows the layout and
current settings of all control panel display items.
2 Print configuration: prints a page showing the current printer configuration. The
page includes usage information and shows the remaining life of printer
consumables. If an EIO card is present, EIO information is also shown on the
configuration page.
3 Print supplies status: shows the number of pages remaining for the toner
cartridges and maintenance kits. The page shows part numbers for reordering.
4 Print usage: contains information that can be used for cost accounting (available if a
hard disk is installed).
5 Print file directory: generates a directory page for all installed mass-storage
devices. This option appears only if mass storage that contains a recognized file
system is currently installed.
6 Print PCL font list: generates a typeface list of all PCL fonts available to the printer.
7 Print PS font list: generates a typeface list of all PS fonts available to the printer.
Menus 37
Page 40

Paper Handling menu
The Paper Handling menu options allow you to specify how the input trays are
configured.
1 Tray 1 mode: allows you to select the mode of operation for multipurpose Tray 1.
Choices are:
• First
• Cassette
2 Tray 1 size: allows you to select the size of the paper present in Tr a y 1. Choices are:
• Any
• Custom
• Letter
• Legal
• Executive
3 Tray 1 type: sets the media type in T ray 1 (displayed only if the Tra y 1 mode se t tin g
is Cassette). Choices are:
• Plain
• Preprinted
• Letterhead
• Transparency
• Prepunched
• Labels
4Tray <n> size: configures the media size for Trays 2, 3, and 4.
5Tray <n> type: configures the media type for Trays 2, 3, and 4.
6Tray <n> custom: sets a custom media size for Trays 2, 3, and 4. Media can be
specified by:
• unit of measure: millimeters or inches
• x and y dimensions: width and length of the custom paper in Tray <n> stated in
the selected unit of measure
7 Fuser modes: sets the type of media to be used and then establishes the fuser
mode, or fuser temperature, appropriate for the chosen media type.
38 Chapter 3 – Control panel and co ntr ol panel men us EN
Page 41

Configure Device menu
The Configure Device menu is used to establish the product’s default settings. These
settings are set by the system administrator either at the control panel display or through
the embedded Web server (see “System administrator guide” on page 137). The
selected defaults can be locked by the administrator.
You can override the default settings at the control panel display for the current job only.
The Configure Device menu includes the following options. Choices are made using .
1 Originals: sets defaults for originals.
• paper size
• duplexing: on or off
• number of sides
• content: text, mixed or photo
• contrast: range is 0 to 8
2 Copying: sets the default number of copies to be printed for a standard print job.
• number of sides: 1 or 2
• image quality: normal or best
• collation: on or off
• paper destination: output bin or rear output slot
• copies: default copy number; range is 1 to 999, default is 1
• background removal: range is 0 to 8
3 Sending
• e-mail settings
• scan preference: black and white, color
• file type: PDF, TIFF, M-TIFF, JPEG
• from, subject, body text: user enters information
• Find send gateways: the product searches for a gateway
• SMTP gateway: the user defines the SMTP gateway address
• LDAP gateway: the user defines the LDAPP gateway address
• Test send gateway: the product tests the current gateway connection
4Printing
• copies: 1 - 32,000, default is 1
• default paper size: any supported media size, including envelopes
• default custom paper size: custom media sizes
• override A4/letter: automatic switching between A4 and letter media sizes
• duplex: on or off as default
• manual feed: supports use of Tray 1
• Courier font: regular or dark
• wide A4: adjusts printable area of A4 paper
• print PS errors: determines printing of a PS error page
• PCL: sets parameters for PCL printing
Menus 39
Page 42

Print Quality menu
1 Set registration
2 Resolution: sets the default printer resolution. The system default is FastRes 1200.
Options are:
• 300 dpi resolution
• 600 dpi resolution
• FastRes 1200: 1200 dpi output at 600 dpi print speed
3 REt (Resolution Enhancement technology): allows four levels of enhancement,
including Off. Default is Medium.
4 EconoMode: economy printing mode on or off. Default is Off.
5 Toner density: sets the density of the toner. Default is 3.
6 Small paper mode: supports printing of smaller media. Default is Normal.
7 Auto cleaning: automatically generates a page that cleans excess toner off the
pressure roller in the fuser at a user set interval (default interval is every 2000
pages).
8 Create cleaning page: generates a page that cleans excess toner off the pressure
roller in the fuser.
40 Chapter 3 – Control panel and co ntr ol panel men us EN
Page 43

System Setup menu
1 Job storage limit: sets a limit of the number of jobs that can be stored.
2 Job held timeout: sets the time that Quick Copy jobs are kept before being
automatically deleted from the queue.
3 PowerSave time: sets the length of idle time before entering PowerSave mode.
4 Copy/send settings: determines product settings for copy/send timeouts, job
interrupts, and scan ahead option (the ability to send digital documents while a print
job is processing).
5 Personality: sets the default personality (PCL, PS, or Auto).
6 Clearable warnings: sets the length of time that a clearable warning appears on the
control panel display.
7 Auto continue: determines printer behavior when an auto-continue error is
generated.
8 Toner low: determines whether the product continues or stops printing during a low-
toner situation.
9 Toner out: determines whether the product continues or stops printing during a out-
of-toner situation.
10 Jam recovery: configures how the product handles pages after a jam.
11 Language: allows user to set default user language.
I/O (input/output) menu
1 I/O timeout: sets the product’s default input/output timeout (in seconds).
2 EIO 1 JetDirect Menu: configures the HP JetDirect printer options.
Menus 41
Page 44

Resets menu
1 Restore factory settings: clears the page buffer, removes all perishable personality
data, and resets parameters to factory defaults.
2PowerSave: turns PowerSave On and Off.
3 Lock carriage: sends the scanner carriage back to the home position (if not already
there) so that it can be manually locked for product transportation.
4 Clear address book: removes all user entered e-mail address in the address book.
Diagnostics menu
The system administrator uses the Diagnostics menu to identify, analyze, and correct
system problems.
1 Print event log: generates an ordered listing of the last 50 entries in the event log.
2Show event log: allows scrolling through the event log from the control panel.
3 Paper path test: generates a test page to test the paper-handling features.
4 Calibrate scanner: allows leading edge calibration of the ADF.
5 Scanner: allows testing functionality of the scanner sensors, ADF output motor,
scanner motor, pickup solenoid, and lamp.
6 Control panel: allows testing functionality of the control panel LEDs, display, and
buttons.
Service menu
The Service menu is used by HP-authorized service representatives only, and is
protected by an eight-digit PIN. Service functions include:
● Clear event log
● Total page count
● Maintenance count
● Maintenance interval
● Serial number
Online Help system
The product features an online Help system that provides instructions for resolving
common printing, copying, and sending problems. To gain access to Help, press the?
key .
42 Chapter 3 – Control panel and co ntr ol panel men us EN
Page 45

4
Walk-up copying
Overview
You can easily make black-and-white copies by using the HP LaserJet 4100 mfp series.
This chapter provides instructions for making copies and changing copy settings.
The MFP functions as a standalone walk-up copier—you do not have to have software
installed or a computer turned on to make copies. You can adjust copy settings at the
control panel. Originals can be copied using either the ADF or the scanner. Copy, print,
and send jobs can be processed simultaneously.
The topics in this section include the following:
● using the system defaults
● using one-touch copying
● using the Describe Original and Copy Settings screens
● duplexing a copy job
It is helpful to review the chapter entitled “Control panel and control panel menus” on
page 33 before using the copying functions. For information about changing the default
copy settings, see the “System administrator guide” on page 137.
Overview 43
Page 46

Perfor ming basic copying
Copy defaults
The preset default copy settings for the HP LaserJet 4100 mfp series are:
● single-copy output
● letter-sized original and letter-sized copy (in North America only; otherwise, the
default is A4)
● single-sided original and single-sided copy
● mixed text, and graphic photo document content
● normal brightness
● no reduction or enlargement (100%)
● one page per sheet (1-up) copying
One-touch copying
If you wish to make a single copy using the product’s default settings, place your
document in the ADF or on the scanner glass and press S
Multiple copies
TART.
To make multiple copies, use the numeric keypad to type the desired number of copies
(1 to 99), and then press S
TART.
44 Chapter 4 – Walk-up co py ing EN
Page 47

User-defined copy settings
T o mak e copies at settings other than the system defaults, navigate through the Describe
Original and Copy Settings screens. The use of these screens is explained in the
following sections.
Using the Describe Original screen
From the top-level screen, enter the Describe Original screen by clicking Describe
Original and then pressing the button.
To change the description of your original, use the up and down navigation buttons to
move through the Describe Original screen to the desired setting box. Confirm your
choices by pressing when the correct setting is highlighted.
1 Place the original in the ADF or on the scanner glass.
2 While in the Describe Original screen, press to view options.
Note If the original is Letter-size or A4-size and you plan to use the copier defaults, simply press
START to make a copy.
3 Review the options by using the navigation buttons and select the items that
describe your original by pressing . The options are:
• Size: select Letter, Legal, Executive, A4, A5, or B5
• Sides: select 1 or 2
• Content: select Text, Mixed or Photo
4 When you have made your selections, navigate to and click OK. This returns you to
the top-level screen.
Note Changes made are reflected in the “original” graphic.
User-defined copy settings 45
Page 48

Using the Copy Settings screen
Use the Copy Settings screen to select the options for the copies to be made if onetouch copying is not used. This screen allows you to scroll through various options,
pressing to select features. Additional copy features are available through the Copy
and Send menus.
1 Navigate to the Copy Settings screen and press . Scroll downward through the
menu options to select the characteristics of the copies to be made. Available
options include the following:
• Size: media sizes available for selection depend on the sizes of the media that is
actually loaded into the trays, since the MFP senses media sizes when the trays
are loaded. Scroll through the list to select from the following:
• Auto-Letter
• Letter-Manual Feed
• Legal - Tray 1
• Letter - Tray 2
• Legal, Executive, A4, A5, or JISB5
Note Auto means that the output size will match the size of the original. When you select Auto-
Letter, your Letter-sized original will be copied to Letter-sized media.
• Scale to Fit: source document contents are adjusted to fit the selected media
output size.
Note Other media sizes are listed, but a tray must be loaded with these media sizes for them
to be used.
• Sides: choose whether input is printed single or double-sided. For further
information, see “Duplexing a copy job” on page 47.
• 1
• 2 - Normal
• 2 - Flipped
Note If you select 2-Normal in the Sides setting option in the Copy Settings screen, the back
side of the two-sided page is printed right-side up. If you select the 2 - Flipped option,
the back-side image is printed upside down relative to the front-side image.
46 Chapter 4 – Walk-up co py ing EN
Page 49

• Quality: select output quality of an image. “Best” optimizes the output quality.
• Normal
• Best
Note If you select Best, scanning speed will be somewhat slower than when operating in
Normal mode.
• Pages per sheet: select the number of originals pages on each output sheet.
• 1 (one sheet per page, with no border)
• 2 or 2 Borders (two sheets per page, without or with borders)
• 4 or 4 Borders (four sheets per page, without or with borders)
• Background: allows removal of shading when copying an original with a colored
background, or removal of bleedthrough from the second side of a two-sided
original. Using the right or left navigation buttons, slide the slider bar to the
desired setting.
• Collate: allows printing multiple copies in sets or page number groupings. For
example, if you are making two collated copies of a three-page document, the
copies print in this order: 1,2,3; 1,2,3. Collate it the default for this MFP.
• Collate (123, 123, 123)
• Uncollate (111, 222, 333)
2 When you are finished, navigate to and click OK and press .
3 Make any necessary adjustments to the contrast using the light/dark buttons and
enlarge/reduce buttons at the right-hand side of the control panel to zoom in onedegree increments.
4 Use the numeric keypad to indicate the desired number of copies, and then press
TART.
S
Note The Copy Settings screen shows an image that represents modifications made to achieve
the desired output.
Duplexing a copy job
Any copy job can be duplexed. See “Duplex copying and printing” on page 29 for general
information. These duplexing options are available:
● One side to two sides. If a duplexer is installed and you are using the ADF, this
duplexing is done automatically. If you are using the scanner glass, you are
prompted to place the next original on the glass.
● Two sides to one side. When this option is selected, you are prompted to turn the
page over to copy the second side. Either the scanner glass or the ADF can be used.
A duplexer is not required.
● Two sides to two sides. This option requires that a duplexer be installed. When you
select this option, you are prompted to turn the originals over to copy the second
side whether you are using the ADF or the scanner glass.
Note When copying two sides to two sides, the MFP scans each page and stores the page
images on the hard disk until both sides of each original have been scanned and placed
into the correct order. For this reason, you will experience a slight delay before the copy
job starts to print. After copying begins, output will be at normal speed.
User-defined copy settings 47
Page 50

Adjusting the contrast
Press the light/dark buttons on the right side of the control panel to lighten or darken your
copies. After your copies are made, the contrast setting returns to the default setting.
Improving copy quality
When you establish your copy parameters on the Copy Settings screen, select Best from
the Quality options.
You can also modify the copy quality with the Content option on the Describe Original
screen. The default setting is Mixed. When copying a photograph or graphic, you can
select Photo to improve copy quality, or select Text for a document that contains only
text.
Reducing or enlarging copies
By using the enlarge/reduce buttons on the right side of the control panel, you can
reduce copies to 25 percent of the original size or enlarge them up to 400 percent (up to
200 percent from the ADF), in one-percent increments. Also, if you specify a standard
sized document on the Describe Original screen and a different standard size on the
Copy Settings screen, the image will be scaled automatically.
Note The HP LaserJet 4100 mfp series printer has reduce/enlarge presets for standard media
sizes. For example, if a Legal sized original is copied onto a Letter sized paper, the image
is automatically reduced to fit. Likewise, an A5 original is enlarged to fit on A4 media.
48 Chapter 4 – Walk-up co py ing EN
Page 51

Sending to e-mail
5
Overview
The HP LaserJet 4100 mfp series can scan documents to any e-mail address.
Note The MFP can send color images, although it cannot copy or print in color.
The following topics are addressed in this chapter:
● introduction
● sending documents
● available file formats
● using and managing address books
Introduction
Send to email (part of the Digital-sending suite) is similar to faxing information, but offers
these advantages:
● sends mail to multiple e-mail addresses simultaneously, saving time and delivery
costs
● ensures privacy by sending information directly to e-mail in-boxes rather than to a fax
machine, which might have many users
● delivers files at near-original quality in black and white or in color
● sends files in JPEG, PDF, and TIFF file formats, which can be modified by the
recipient in computer programs
Documents are scanned and sent as attachments to an e-mail address. Digital
documents can be sent in the formats shown above, enabling recipients to manipulate
the document in various programs to meet their specific needs. The e-mailed document
can be printed for your records.
By using HP Smart Compression technology, digital-sending keeps file sizes small,
minimizing the impact on the network. Documents arrive in near-original quality. Like
other e-mail messages, the documents can be printed, stored, or forwarded.
The HP LaserJet 4100 mfp series connects directly to the LAN, so that you can send
digital documents without a dedicated computer. E-mail processing is done entirely
within the product, from scanning through communicating with the network SMTP
gateway. E-mail addresses can be acquired from an at-device address book or an LDAP
server. The system administrator can configure e-mail parameters either over the
network using the embedded Web server or HP Web JetAdmin, or at the control panel.
Overview 49
Page 52

Sending documents
You can use the digital-sending feature with either the scanner glass or the ADF.
Note When using the scanner glass, place the original face down. When using the ADF, place
the originals face up. Irregular, worn, or previously folded documents, as well as
photographs, should be scanned using the scanner glass.
Describe Original screen
If necessary, describe your original before entering the Send Options screen.
Send Options screen
The Send Options screen on the control panel display allows you to describe parameters
for sending a document to an e-mail address.
Basic sending procedures
Using the address books
Use the control panel keyboard to type data into the From:, To:, CC:, or Subject: fields.
As you begin to type e-mail addresses, the MFP automatically searches the address
book and displays the first matching name or address. You can select that name, or
continue to type the name until auto-complete finds the correct entry. You can also scroll
through the name listings to locate the desired names.
Note If a recipient’s e-mail address is not recognized, you will be asked if you wish to add the
entry to the local address book.
50 Chapter 5 – Sending to e-mail EN
Page 53

Sending a document
To digitally send a document:
1 Place your original document face-down on the scanner glass or face-up in the ADF.
2 If your original matches the default settings (mixed text and photo, default media
size, standard resolution, single-sided), proceed to step 3. Otherwise, use the
control panel display to describe the document by using the Describe Original
screen.
3 On the control panel display, select Send Options.
4 In the main Send Options screen, select E-mail.
5 Using the keyboard, type your e-mail address in the From: field.
6 Type the addresses of the recipient(s), or select the addressees from the address
book. Press to add the names to the recipient list. Navigate to OK and press .
The main e-mail screen appears.
Note You can review and edit the recipient list using the View List option, shown below.
7 Using the same me t h od , en t er th e n ame s of a ny CC: (copy) recipients, and type the
subject of the e-mail.
8 Navigate to the Settings field. Here you can select document parameters from the
following:
• Color: Black and white (B/W) or Color
• File type: PDF, TIFF, M-TIFF, or JPEG
Note See “Available file formats” on page 52.
9 Make your selections, navigate to OK, and press . You then return to the e-mail
screen.
Sending documents 51
Page 54

10 Press START. When the file is being sent, you receive the following message:
PROCESSING DIGITAL SEND JOB
Note Press RESET at any time to cancel the e-mail settings and return to the top-level screen.
You can also press STOP to terminate the sending operation.
11 When sending is complete, remove the original document from the scanner glass or
the ADF.
Sending a two-sided document
To send a two-sided document successfully, make sure you describe the original as a
two-sided document on the Desc ribe Original screen. After scanning the page on the
scanner glass or scanning the stack of originals in the ADF, the MFP prompts you to turn
over the originals so the second side can be scanned and ordered correctly before the
file is sent.
Available file formats
Select Settings in the e-mail screen to designate color and file type options for the
document to be sent.
In the Color option, you can select:
● color
● black and white (B/W)
By using the File option, you can select any of these file formats:
● PDF: the default setting, which renders the best overall text and graphic quality.
These files are viewed through Acrobat Reader. The attached file will have a .pdf
extension.
● JPEG: best for viewing through an Internet browser. The attached file will have a
.jpeg extension.
● TIFF: a standard file type that works well with many programs. The attached file will
have a .tif extension.
● M-TIFF (multipage TIFF): this format compresses a multi-page document into a
compact, single-file format. The attached file will have a .tif extension.
Note The format for the file to be sent is selected in the Send Options screens.
Documents that are sent as JPEG or TIFF files can be brought into various software
programs and modified by the recipient. The recipient must have Acrobat Reader
installed to read PDF files.
52 Chapter 5 – Sending to e-mail EN
Page 55

Address books
The HP LaserJet 4100 mfp series can use your network e-mail server’s address lists
(LDAP), and can also develop a local address book. Your network address list is
automatically configured for use during initial product configuration. After configuration,
the list can be used to select e-mail recipients when digitally sending documents. E-mail
addresses that are not resident in the network address book can be added to the local
address book for future use.
See “System administrator guide” on page 137 for more information about address list
configuration.
Address books 53
Page 56

54 Chapter 5 – Sending to e-mail EN
Page 57

6
Network printing
Overview
When the HP LaserJet 4100 mfp series printer drivers are installed on your computer,
the product can function as a network printer, and you can send print jobs from any
software program. This chapter addresses these advanced printing tasks:
● installing the printer software
● using features in the printer driver
● customizing trays for printing or copying
● using job-storage features
● printing with the FIR port
See “Basic operations” on page 19 for additional information about printing. Other
chapters of this guide address copying and digital-sending capabilities and procedures.
Overview 55
Page 58

Installing the printer software
The HP LaserJet 4100 mfp series comes with complete printer installation software on a
CD-ROM. If you plan to use the product as a network printer, install the printer drivers on
each computer that will send documents for printing. If your computer does not have a
CD-ROM drive, but you have access to one, you can copy the software onto disks for
installation on the computer. See the start guide for software installation instructions.
The printer drivers must be installed to take full advantage of printer features. Installation
of other software programs on the CD-ROM is recommended, but is not required. See
the Readme.wri file for more information.
Note Check the Readme.txt file provided on the CD-ROM for late-breaking product information.
Windows software
Windows
client
Drivers
Network administrator:
Windows software
Drivers
Embedded Web server
Macintosh software
PPDs
Macintosh
client
* Not supported for Czech, Korean, Japanese, Russian, Simplified Chinese, Traditional
Chinese, and Turkish.
If your Windows-based computer has Internet access, the installation program
automatically checks for the availability of the latest software from the HP web site. If you
do not have access to the Internet, see “HP customer care service and support” on
page 107 for information about obtaining the most recent software.
Macintosh software
PPDs
HP LaserJet utility*
Fonts *
Embedded Web server
56 Chapter 6 – Network print ing EN
Page 59

HP LaserJet printing system
The CD-ROM contains software components and drivers for both end-users and network
administrators who are using the operating systems listed here. See the Readme.wri file
for the most current information.
● Microsoft Windows 95 and 98
● Microsoft Windows Me
● Microsoft Windows NT
● Microsoft Windows 2000
● Microsoft Windows XP
● Apple Macintosh OS, version 7.5.3 or higher
● AutoCAD™ drivers, versions 12 through 15
Drivers and documentation for Windows NT 3.51 are available on the Internet. Drivers,
the font installer, and documentation for Windows 3.1x are available on the CD-ROM that
comes with the product.
®
4.0
Installing the printer software 57
Page 60

Printer drivers
Printer drivers allow you to gain access to the printer features and allow networked
computers to communicate with the printing services using a printer language.
Note Check the Readme.wri file provided on the CD-ROM for additional software included and
languages supported.
Certain printer features are available only with the PCL 6 drivers. See the printer software
Help for availability of features.
The printer drivers listed in the following table are included with the printer. The most
recent drivers are available at http://www.hp.com/support/lj4100mfp
software is installed on some Windows-driven computers, the program automatically
checks the computer for Internet access to obtain the latest drivers.
. When the printer
Operating system PCL 5e PCL 6 PS
Windows 3.1x
Windows 95 and 98
Windows Me
Windows NT 4.0
Windows 2000
Windows XP
Macintosh OS
1. PostScript 3 emulation is referred to as PS throughout this guide.
2. Level 1 emulation only.
You can obtain the following printer drivers by downloading them from the Internet, or by
requesting them from an HP-authorized service or support provider (see “HP customer
care service and support” on page 107).
● Windows NT 3.51 PCL 5e and Windows NT 3.51 PS (available for English only)
● UNIX and Linux model scripts
OS/2 drivers are available from IBM and are packaged with OS/2. They are not available
for the Japanese, Korean, Simplified Chinese, and Traditional Chinese languages.
●●
●●●●
●●●●
●●●●
1
●
PPDs
2
●
Note If the desired printer driver is not on the CD-ROM or is not listed here, check the software
program’s installation disks or the Readme.txt files to see if the program includes support
for the printer. If it does not, contact the software manufacturer or distributor to request a
driver for the printer.
58 Chapter 6 – Network print ing EN
Page 61

Software for Windows-based computers
Note The following information is required onl y if the product is to be used as a network
printer.
Reaching the Windows printer driver
To configure the driver, reach it in one of the following ways:
Operating
system
Windows 95 and 98
Windows Me
Windows NT 4.0 On the File menu, click Print, and
Windows 2000
Windows XP
Windows 3.1x and
Windows NT 3.51
Temporarily change settings
(from a software program)
On the File menu, click Print, and
then click Properties. (The actual
steps can vary. This is the most
common method.)
then click Properties. (The actual
steps can vary. This is the most
common method.)
On the File menu, click Print, and
then click Properties. (The actual
steps can vary. This is the most
common method.)
On the File menu, click Print, click
Printers, and then click Options.
(The actual steps can vary. This is
the most common method.)
Change default settings
(across all programs)
Click the Start button, point to
Settings, and then click
Printers. Right-click the Printer
icon, and then click Properties.
Click the Start button, point to
Settings, and then click
Printers. Right-click and then
click Document Defaults or
Properties.
Click the Start button, point to
Settings, and then click
Printers. Right-click and then
click Printing Preferences or
Properties.
On the Windows control panel,
double-click Printers, highlight
the printer, and click Setup.
Note The default product settings are established or modified by the system administrator. The
user can override these defaults from the control panel or the software program for the
current job only. Software program settings override printer driver settings.
Choosing the appropriate printer driver
Choose a printer driver based on the way you plan to use the MFP’s printing features.
● Use the PCL 6 driver to take full advantage of printing features. The PCL 6 driver is
recommended unless backward compatibility with previous PCL drivers or older
printers is necessary.
● Use the PCL 5e driver if you want printed output to resemble older printers, or for
font DIMM support.
● Use the PS driver for compatibility with PS 3. Certain features are not available in
this driver.
If all drivers are installed, the printer automatically switches between PS and PCL printer
languages.
Installing the printer software 59
Page 62

Printer driver Help
Each printer driver has Help screens that can be activated from the Help button, the F1
key, or the question mark symbol on the upper-right corner of the printer driver screen
(depending on the Windows operating system used). Reach the printer driver screen by
clicking Print from your software program. These Help screens give detailed information
about the specific driver. The printer driver Help is separate from the software-program
Help.
Software for Macintosh computers
PostScript Printer Description files
The PPDs, in combination with the Apple LaserWriter 8 driver, provide access to the
product features and allow a networked computer to communicate with the printer. An
installation program for the PPDs and other software is provided on the CD-ROM. Use
the Apple LaserWriter 8 driver that came with your Macintosh computer.
HP LaserJet utility
The HP LaserJet utility allows you to control printing features that are not available in the
printer driver. The illustrated screens make selecting printer features when using the
Macintosh computer easy. Use the HP LaserJet utility to do the following:
● customize product control panel messages
● name the product, assign it to a zone on the network, download files and fonts, and
change most of the settings
● set a password for the product
● from the computer, lock out functions on the control panel to prevent unauthorized
access (see the printer software Help)
● configure and set the product for Internet protocol (IP) printing
Note The HP LaserJet utility is not supported for the Czech, Korean, Japanese, Russian,
Simplified Chinese, Traditional Chinese, or Turkish languages.
Software for networks
For a summary of available HP network installation and configuration software solutions,
see the HP Jetdirect Print Server Administrator’s Guide. You can find this guide on the
CD-ROM included with the product.
HP Web JetAdmin
The HP LaserJet 4100 mfp series is fully supported by HP Web JetAdmin, a browserbased management tool typically installed on a network to manage multiple printers.
This tool is intended for use by the system administrator. Small networked workgroups
generally do not require HP Web JetAdmin, but if you administer a large enterprise, you
can easily download this product from the Internet at http://www.hp.com/go/webjetadmin
Note For the latest list of supported host systems, visit HP Customer Care online at http://
www.hp.com/go/webjetadmin.
For additional information about using HP Web JetAdmin in a large enterprise, see
“System administrator guide” on page 137.
.
60 Chapter 6 – Network print ing EN
Page 63

UNIX and Linux
Note The HP Jetdirect printer installer for UNIX and Linux is a printer installation utility for HP-
UX and Solaris networks. It is available for download from HP Customer Care online at
http://www.hp.com/support/net_printing.
Performing adva nced printing tasks
Using features in the printer driver
When you print from a software program, many of the MFP features are available from
the printer driver. See “Printer drivers” on page 58.
Note Certain product features might not be available with all drivers. Check the drivers for
available options.
Settings in the printer driver and software program generally override control panel
settings. Software program settings generally override printer driver settings.
See the sof tware program or printer driver Help for specific steps.
Printer collation
The printer collation feature allows you to print multiple originals. This offers the following
advantages:
● reduced network traffic
● faster return to program
● all documents are originals
RIP ONCE
RIP ONCE allows a print job to be processed one time at the printer. The RIP ONCE
capability creates an image of the page and then saves a compressed image of the page
into memory. Pages are printed by decompressing page images without pausing to
process the print job again. The print job will print exactly the same every time because
the compressed image is not dependent on any other printer data.
Saving printer setup information (Quick Sets)
The Windows PCL 6 and PCL 5e printer drivers allow you to save specific printer
settings as defaults for various types of standard print jobs. For example, you might want
to create a Quick Set for printing envelopes, or for printing the first page of a document
on letterhead.
Scaling page image (ZoomSmart)
The Windows PCL 6 and PCL 5e printer drivers include a feature called ZoomSmart that
allows you to scale the page image from any page size to any other page size. You can
do this either by a numeric percentage or by specifying a different size scale.
Printing booklets
The Windows PCL 6 and PCL 5e printer drivers allow you to control booklet printing
when duplexing. You have the choice of binding on the left or right side on letter, legal, or
A4 paper.
Performing advanced printing tasks 61
Page 64

Printing with a watermark
A watermark is a notice, such as “Draft” or “Top Secret”, that can be printed in the
background of each page in a document. Watermarks are inserted into documents using
the printer driver in the software program.
Printing a different first page
If you wish to print a first page that is different from the other pages in your print job,
follow these instructions.
1 For Windows, select Use different paper for first pa ge in your printer driver.
Choose one tray (or Manual Feed) for the first page and an other tray for the
remaining pages. Place the paper for the first page in Tray 1 (or whichever tray you
selected). (For manual feed, place paper in Tray 1 after the job is sent to the printer
and the printer requests paper.) When loading Tray 1, place the paper with the side
to be printed face-up, with the top of the page toward the back of the product.
For Macintosh computers, select the First from and Remaining from options in the
Print dialog box.
Note Where and how you make these selections depends on your software program or
associated printer driver. Some options might be available only through the printer driver.
2 Load the paper for the remaining pages of the document into another tray.
You can select the first and remaining pages by specifying the type of paper. For more
information, see “Manually feeding media from Tray 1” on page 64.
Inserti ng a blank back page
This option allows you to add blank pages to the end of a print job. In Windows, click Use
different paper for first page in the Paper tab of the printer driver, and then click Back
page. You can then select the paper source for the blank pages. To turn this feature off,
click No back page in the printer driver.
Printing multiple pages on one sheet of media
You can print more than one page on a single sheet. This feature is available in the
HP LaserJet 4100 mfp printer drivers, and provides a cost-effective way to print draft
pages. This is sometimes called N-up printing.
Note The PCL and PS drivers differ slightly in performance. Please review the options available
in your printer driver.
62 Chapter 6 – Network print ing EN
Page 65

Customizing trays for printing or copying
Understanding tray order
When a print job is received, the MFP automatically selects an input tray by matching the
requested media type and size to the media already loaded in the trays. If Tray 1 is
loaded with media and set to FIRST mode in the Paper Handling menu, paper is always
pulled from Tray 1 first.
If TRAY 1 MODE=FIRST is not selected, the product searches all available input trays for
the media that satisfies the print request, starting with the bottom tray and ending with
Tray 1. The job begins printing as soon as the proper type and size are found. If the
search fails, a message appears on the control panel that asks you to load the correct
media. You can then load the media, or you can override the request by requesting a
different media type and size at the control panel. If a tray runs out of media during a
print job, the product automatically switches to any tray that contains the same type and
size of media.
Customizing Tray 1 operation
You can customize Tray 1 to meet your printing needs. The product can be set to print
from Tray 1 when it is loaded, or to print only from Tray 1 if the type of media loaded is
specifically requeste d. Set TRAY 1 MODE=FIRST or TRAY1 MODE=CASSETTE on the Paper
Handling menu at the control panel.
Setting Explanation
TRAY 1
MODE=FIRST
TRAY 1
MODE= CASSETTE
The printer will usually pull paper from T r ay 1 first unless it is empty
or locked. If you do not keep media in Tray 1 all the time, or if you
use Tray 1 only for manually feeding paper, k eep the default setting
of TRAY 1 MODE=FIRST on the Paper Handling menu.
Tray 1 operates like Trays 2, 3, and 4. Instead of looking first for
paper in Tray 1, the MFP pulls paper from the tray that matches the
selected type and size settings.
When TRAY 1 MODE=CASSETTE is set, an option appears on the
Paper Handling menu to configure size as well as type settings for
Tray 1.
Specifying type and size of media (locking trays)
You can conf igu re t he M FP to sel ect med ia b y type (suc h as pl ain or le tt erhe ad) and siz e
(such as letter or A4), as opposed to source (a paper tray). See “Supported paper sizes
and weights” on page 114.
Printing by type and size of media ensures that print jobs always print on the desired
media. If you frequently use several kinds of media, you can set up trays so that you do
not have to check which media is loaded in each tray before you print. This is especially
helpful when the product is shared and more than one person loads or removes media.
Note For networked products, the type and size settings can also be configured from the
embedded Web server or HP Web JetAdmin software. See the product software Help for
more information.
Performing advanced printing tasks 63
Page 66

To print by type and size of media
1 Load the trays correctly and adjust the paper guides.
2 Select the TRAY 1 TYPE option on the Paper Handling menu on the control panel and
specify the type of media for each tray. If you are unsure of the media type (such as
bond or recycled paper), check the package label.
3 Select the size settings on the control panel.
• Tray 1: If TRAY 1 MODE=CASSETTE is selected on the Paper Handling menu, specify
the size on the menu. If custom media is loaded, set the size of custom media on
the Printing menu to match the media loaded in Tray 1.
• Trays 2, 3, and 4: The media size is automatically detected when media is
properly loaded into the tray and the paper guides are adjusted to match the
media size. If custom media is loaded, set the size of custom media on the
Printing menu to match the media loaded in the tray. Set the media size slider in
the tray to Custom.
Note To print custom-size media, “Guidelines for using custom paper” on page 28.
• Optional power envelope feeder: Set the media size on the Paper Handling menu.
4 From the software or printer driver, select the desired type and size of media.
Note The type and size settings can also be configured from the embedded Web server or
HP Web JetAdmin software for networked products. See the printer driver Help for
information about this option.
To print by media type and size, it might be necessary to unload or close Tray 1, or to set
TRAY 1 MODE=CASSETTE on the Paper Handling menu on the control panel. For more
information, see “Customizing Tray 1 operation” on page 63.
Settings in the printer driver and software program override the control panel settings.
Software program settings generally override printer driver settings.
Manually feeding media from Tray 1
The manual feed feature is another way to print on special media. If you set this feature
to On at the control panel or the printer driver, printing stops after each job is sent,
allowing you time to load special media in Tray 1. Press S
If Tray 1 already contains media when you send the print job and the control panel shows
TRAY 1=FIRST as the default configuration, the product will not stop and wait for the
special media to be loaded. To use the manual media loading feature, set TRAY
1=CASSETTE on the Paper Handling menu (see “Customizing Tray 1 operation” on
page 63).
If you have selected MANUAL FEED=ON on the control panel, this setting will override the
printer driver, and all print jobs sent to the product will request that you manually feed
media from Tray 1 unless a specific tray is selected from the printer driver. If this feature
is to be used only occasionally, it is best to set MANUAL FEED=OFF on the control panel.
TART to resume printing.
64 Chapter 6 – Network print ing EN
Page 67

Using the job-storage features
The HP LaserJet 4100 mfp series offers several job-storage features that allow you to
retain print jobs in memory for later use. You create stored jobs through the printer driver
when you use a software program.
Use the M
ENU button on the control panel to retrieve and print jobs. All stored jobs are
stored in the RETRIEVE JOB menu, and are listed in order of user name. Quick Copy,
proof-and-hold, private, and stored jobs sent from the computer are listed on this menu.
Each job type is described below.
● Stored jobs: This feature allows you to store a print job, such as a personnel form or
report, permanently on the hard disk to be printed when it is needed. The job can be
printed at any time using the RETRIEVE JOB menu on the control panel.
● Private jobs: This feature allows you to prevent a job from printing until an assigned
PIN is typed at the control panel. Private jobs are automatically deleted from the
hard disk after they are released for printing. Y ou can also select and delete a private
job without printing it.
● Quick Copy jobs: This feature allows you to print the required number of copies and
store the job on the hard disk for later printing.
● Proof and hold jobs: This feature provides a quick and easy way to print and proof
one copy of a job and later print the additional copies.
Note If you turn the MFP off, all Quick Copy, proof and hold, and private jobs are deleted. A
Quick Copy job can also be deleted by using the product software or through HP Web
JetAdmin. To make sure that a job is not deleted when the product is turned off, save it
as a stored job.
Reaching the job storage features
For Windows
1 On the File menu within the software program, click Print.
2 Click Properties and then click the Destination tab.
3 Under Destination Features, click Options to show the Job Storage Options.
4 Select the desired job type and assign the job a unique name.
For Macintosh
In newer drivers, select Job Storage on the pull-down menu in the Print dialog box. In
older drivers, select Printer Spec ific Options.
CAUTION Make sure to assign unique names to your jobs using the printer driver before printing.
Using default names might override previous jobs with the same default name or cause
the job to be deleted.
Using the job-storage features 65
Page 68

Printing stored jobs
To print a stored job through the control panel:
1 Press M
2 Use the Up or Down navigation arrows to highlight the desired user name and press
3 Again, use the Up or Down navigation arrows to select the desired job name and
press .
Note If a Lock icon appears beside the job name, the job is private and you must enter the
correct PIN to print it.
4 Use the keypad to type the number of copies.
5 Press S
ENU and select the RETRIEVE JOB menu.
.
TART to print the job.
Deleting stored jobs
Stored jobs remain on the hard disk until they are deleted. To delete a stored job, use this
procedure.
1 Press MENU and select the RETRIEVE JOB menu.
2 Use the up and down navigation keys to select the desired user name and job name.
3 Press to select the job.
4 Select DELETE and press to delete the job.
66 Chapter 6 – Network print ing EN
Page 69

Printing with the FIR port
The optional FIR port enables wireless printing to the product from any portable device
(such as a laptop computer) that is compliant with IrDA (Infrared Data Association)
standards.
The printing connection is maintained by positioning the sending FIR port within
operating range. Note that the connection can be blocked by objects such as a hand,
media, direct sunlight, or any bright light shining into the sending or receiving FIR port.
Note For more information, see the user guide that came with the FIR port. If you do not have
infrared software installed, contact your computer manufacturer for drivers and installation
instructions.
Preparing to print with Windows
Before launching the infrared driver, complete the following steps:
1 In the Windows toolbar, select Start, click Settings, and then click Printers.
2 Select the HP LaserJet 4100 mfp as your default printer.
3 While in the Printers folder, choose Properties/Details, and specify the Virtual
Infrared LPT Port.
4 Select the file to print.
Preparing to print with Macintosh computers
The first step for setting up an infrared printer is creating a Desktop Printer icon by
using the Desktop Printer Utility. By default, the Desktop Printer Utility is located in the
Apple Extras/Apple LaserWriter folder on the hard drive.
Printer IR is not an option if the infrared control panel and extensions are not active. In
addition, the infrared print capability is possible only with HP LaserWriter version 8.6
driver or later.
1 Launch the Desktop Utility.
2 Select Printer IR (Infrared) and click OK.
3 Change PostScript Printer Description (PPD) File to match the product.
4 On the File menu, click Save.
5 Enter a name and location for the Desktop Printer icon and click OK.
Note When the icon is on the desktop (or saved elsewhere), product options need to be
manually configured. This step is similar to selecting Configure after setting up a printer
in the Chooser. T o set the options, highlight the Desktop Printer icon and select Change
Setup on the Printing menu.
Printing with the FIR port 67
Page 70

Printing a job using FIR
1 Align your laptop computer (or other portable device equipped with an IrDA-
compliant FIR window) within 1 meter (3 feet) of the FIR receiver. The FIR window
must be at an angle within ± 15 degrees relative to the product to ensure an effective
connection for printing.
2 Print the job. The status indicator on the HP FIR receiver lights up, and, after a short
delay, the control panel shows PROCESSING JOB.
If the status indicator does not light up, realign the receiver with the FIR port on the
sending device, resend the print job, and maintain the alignment of all devices. If you
have to move the equipment (for example, to add media), make sure that all devices
remain within the range of operation to maintain the connection.
If the connection is interrupted before your print job is complete, the FIR port status
indicator turns off. You have up to 40 seconds to correct the interruption and continue the
job. If the connection is resumed within this time, the status indicator lights up again.
Note The connection is permanently broken if the sending port is moved out of operating range
or if anything passing between the ports blocks transmission for more than 40 seconds.
Depending on the size of the job, printing with the FIR port might be slower than printing
with a cable connected directly to the parallel port.
Interrupting and resuming FIR printing
The job interrupt and resume feature allows you to temporarily stop the job that is
currently printing to print another job through an FIR port. When the FIR job is finished
printing, the interrupted job resumes printing.
To interrupt the job at the product control panel, connect to the FIR port on the product
and send a job to be printed. The product stops printing the current job when it reaches
the end of the copy it is printing. The product then prints the job sent through the FIR
port. When the FIR job is complete, the product resumes printing the original job where it
had stopped.
68 Chapter 6 – Network print ing EN
Page 71

Product maintenance
7
Overview
This chapter explains basic product maintenance procedures for the HP LaserJet 4100
mfp series. These include:
● managing the toner cartridge
● cleaning the product
● performing preventative maintenance
CAUTION T urn the main power-switch off and unplug the MFP before you disconnect any cables or
accessories, and before you perform preventive maintenance or cleaning. If these
activities are performed while the MFP is powered on and plugged in, serious product
damage may result.
Overview 69
Page 72

Managing the toner cartridge
HP toner cartridges
When you use an HP toner cartridge (part number C8061A or C8061X), you can obtain
the following supplies information from the embedded Web server:
● amount of toner remaining
● estimated number of pages remaining
● number of pages printed
● other supplies information
Toner cartridge authentication
HP cannot recommend use of non-HP toner cartridges, either new or remanufactured.
Because they are not HP products, HP cannot influence their design or control their
quality. Service or repair required as a result of using a non-HP cartridge is not covered
under the product warranty. When you use a non-HP toner cartridge, the printer cannot
accurately report cartridge life.
The HP LaserJet 4100 mfp series warns you if a non-HP toner cartridge is inserted into
the product. If you insert a used HP cartridge from another HP product, the MFP might
have to print as many as 20 printed pages to verify that the cartridge is a genuine
HP part.
Note If you see a message stating that your toner cartridge is not genuine and you believe that
you purchased a genuine HP cartridge, call the HP fraud hotline at (1) (887) 219-3183
(toll-free in Nor th Am erica).
Toner cartridg e li fe expectancy
The life of the toner cartridge depends on the amount of toner that printing and copying
jobs consume. When printing or copying text at 5 percent coverage, an HP toner
cartridge lasts an average of 10,000 to 6,000 pages, depending on which cartridge is
installed.
You can verify cartridge life through the:
● control panel (print the supplies status page).
● embedded Web server.
● HP Web JetAdmin.
● printer software.
Toner cartridge storage
Do not remove the toner cartridge from its package until you are ready to use it. The
shelf life of a cartridge in an unopened package is approximately 2.5 years.
CAUTION To prevent damage to the toner cartridge, do not expose it to light for more than a few
minutes.
70 Chapter 7 – Product maintena nc e EN
Page 73

Toner low and toner out conditions
When toner is low, the control panel displays a TONER LOW message and the product
continues to print. The message first appears when about 15 percent of the toner
remains in the cartridge.
When the cartridge runs out of toner, the control panel displays a TONER OUT message
and printing stops. You can continue printing the current job by pressing S
message continues to appear for every job until you replace the toner cartridge.
TART. The
Cleaning the product
General guidelines
Follow the cleaning procedure on the following page every time you change the toner
cartridge or when print-quality problems occur. To minimize problems, keep the product
free from dust and debris.
● Clean the outside of the product with a cloth dampened with water.
● Clean the inside of the product with a dry, lint-free cloth.
CAUTION While cleaning the product, be careful not to touch the transfer roller (the black rubber
roller located underneath the toner cartridge). Skin oils on the roller can affect print quality .
Cleaning the product 71
Page 74

Cleaning procedure
1
2
3
4
1 Turn the product off and unplug the power cord.
2 Open the top cover and remove the toner cartridge.
WARNING!
Avoid reaching too far into the printer. The adjacent fusing area
might be hot. Wait half an hour until the fuser cools.
CAUTION
To prevent damage to the toner cartridge, do not expose it to
light for more than a few minutes.
3 Wipe any dust or dirt off the paper-feed guides (shaded
areas) with a dry, lint-free cloth.
Note
If toner gets on your clothing, wipe it off with a dry cloth and
wash the clothing in cold water. (Hot water sets toner into fabric.
4 Using the green handle, lift the paper-access plate and wipe
off any residue with a dry, lint-free cloth.
5 Reinstall the toner cartridge, close the top cover, plug the
power cord in, and turn the product on.
5
72 Chapter 7 – Product maintena nc e EN
Page 75

Cleaning the fuser
Run the cleaning page to keep the fuser free of toner and paper particles that can
sometimes accumulate. Accumulation of toner and particles can cause specks to appear
on the front or back side of your jobs (see “Specks” on page 97).
To ensure optimal output quality, HP recommends that you use the cleaning page every
time you replace the toner cartridge or that you establish an automatic cleaning
schedule.
You can run a cleaning page in two ways:
● manually as needed from the control panel display
● automatically at an interval that you establish
Note The cleaning procedure takes about 2.5 minutes to complete. A message on the control
panel display appears while the cleaning is taking place (either PROCESSING CLEANING
PAGE or PROCESSING AUTO CLEANING PAGE).
Running the cleaning page manually
To ensure that the cleaning page works properly, print the page on copier-grade paper
(not bond, heavy, or rough paper).
To run the cleaning page manually:
1 At the control panel, press M
2 Press I
3 Press S
TEM until CREATE CLEANING PAGE appears.
ELECT to create the cleaning page. A page with a black stripe prints.
ENU until the PRINT QUALITY menu appears.
4 Follow the instructions on the cleaning page to complete the cleaning process.
Running the cleaning page automatically
Using the following procedure, you can automatically print cleaning pages at any interval
that you choose. To allow the cleaning page to run without intervention, you must keep
the selected size and the plain paper available in the printer. The product will not
interrupt a printing job in process to print a cleaning page.
Discard the output page created by the automatic cleaning process.
To set the cleaning page to run automatically:
1 At the product control panel, press M
2 Press the Down navigation button until AUTO CLEANING PAGE=OFF appears.
3 Change OFF to ON and press .
4 Press the Down navigation button until AUTO CLEANING FREQUENCY=2000 appears.
Note The default frequency is every 2000 pages. T o increase or decrease the frequency , press
the Up or Down navigation buttons until you reach the desired frequency , and then press
. The options are 1,000, 2,000, 5,000, 10,000, and 20,000 pages.
ENU until the PRINT QUALITY menu appears.
5 Once you have selected the page frequency, press to save the choice.
6 Press the navigation buttons to select CLEANING PAGE SIZE=LETTER. Y ou can choose
to run the cleaning page on either letter or A4 paper. Use the navigation buttons to
select either A4 or LETTER and then press to save your selection.
Cleaning the product 73
Page 76

Cleaning the ADF paper delivery guide
1 Turn the power off.
2 Wipe the outside of the product with a dampened cloth.
3 Raise the ADF.
4 Open the delivery guide by pressing in the small plastic handles on either side of the
delivery guide.
5 Remove the clear, plastic sheet.
6 Use a clean, soft, dry cloth to wipe the inside surface of the clear, plastic sheet.
CAUTION Do not use water, liquid detergents, or solvents. Liquids might drip down into the
mechanical parts and damage them.
7 Reinstall the clear, plastic sheet by sliding it under the gray ribbed guide, which is
located under the white padded sheet.
Note Make sure that the free end of the clear, plastic sheet is tucked behind the gray ribbed
guide and the white padded sheet.
8 Align the holes in the sheet with the small plastic spindles in the delivery guide.
Press the c lear, plastic sheet do wn onto the spindles.
9 Close the delivery guide cover. You should hear the delivery guide cover plastic
handles click into place.
10 Wipe the outside surface of the delivery guide with the cloth.
74 Chapter 7 – Product maintena nc e EN
Page 77

Cleaning the scanner glass
● Clean the glass only if dirt is visible, or if you are experiencing a decrease in copy
quality (such as streaking).
● Clean the glass surface by wiping it gently with a clean, damp, lint-free cloth. Use an
ammonia-based surface cleaner to dampen the cloth.
CAUTION Do not pour or spray liquids directly onto the glass.
CAUTION Do not press hard on the glass surface. You might break the glass.
Cleaning the calibration strip
1 Raise the ADF.
2 Locate the white, vinyl calibration strip. The calibration strip is to the left of the clear
plastic sheet.
3 Clean the ADF backing and the calibration strip by wiping them with a clean, damp,
lint-free cloth. Use an ammonia-based surface cleaner to dampen the cloth.
4 Close the ADF.
Cleaning the product 75
Page 78

Performing preventative maintenance
You should replace certain parts when the PERFORM PRINTER MAINTENANCE message
appears on the product control panel display. This helps ensure that the product
maintains optimal performance.
The maintenance message will appear every 200,000 pages. To check the number of
pages the product has printed, print either a configuration page or a supplies status page
(see “Reaching the embedded Web server” on page 139 for details).
To order the printer maintenance kit, see “Ordering information” on page 125. The kit
includes:
● fuser
● printer rollers (transfer, pickup, and feed)
● instructions
Note The printer maintenance kit is a consumable item and is not covered under warranty.
76 Chapter 7 – Product maintena nc e EN
Page 79

8
Problem solving
Overview
This chapter will help you troubleshoot and solve problems that might occur while using
the HP LaserJet 4100 mfp series.
Clearing jams Occasionally, media might jam during copying and printing. This section
helps you locate jams, properly clear them from the product, and solve
repeated jams.
Understanding
control panel error
messages
Correcting output
quality problems
Understanding
error messages for
the hard disk, FIR
port, and PS
Many of the messages that appear on the control panel are selfexplanatory. However, some messages indicate a problem that requires
intervention, or request further action. This section lists these messages
and recommends corrective actions.
The product should produce high-quality jobs. If copy or print jobs do not
look sharp and clear; if defects such as lines, specks, or smears appear
on the page; or if media is wrinkled or curled; use this section to
troubleshoot and solve the output quality problem.
Additional messages are shown on the control panel to help you
troubleshoot issues that involve the hard disk, the FIR port connection,
and PS.This s ectio n list s the se types of m essa ges a nd recom mends what
to do.
Overview 77
Page 80

Clearing jams
If the control panel display shows a jam message, look for media in the locations
indicated in the figure on the next page, and then see the procedure for clearing the jam.
You might need to look for media in locations other than those indicated in the jam
message. If the location of the jam is not obvious, look first in the top cover area
underneath the toner cartridge.
When clearing jams, be very careful not to tear the media. If a small piece of media
remains in the product, it could cause additional jams. If jams are a recurring problem,
see “Solving repeated jams” on page 85.
Note The top cover of the product must be opened and then closed to clear a jam message.
If a jam occurs in the optional power envelope feeder, see the installation and use
documentation that accompanied the product.
Jam locations
Front Back
1
5
2
3
1 Top cover and toner cartridge area
2 Optional power envelope feeder
3 Input tray areas
4 Optional duplex printing accessory
7
6
5
4
5 Output bins (top and rear)
6 Fuser area
7 ADF
Note Loose toner might remain in the product after a jam and cause output quality problems.
These should clear up within a few pages.
78 Chapter 8 – Problem solving EN
Page 81

Clearing jams from the top cover and toner cartridge area
1
2
3
4
1 Open the top cover and remove the toner cartridge.
CAUTION
To prevent damage to the toner cartridge, do not expose it to
light for more than a few minutes.
2 Use the green handle to lift the paper-access plate.
3 Slowly pull the media out of the product. Do not tear the
media.
Note
If media is difficult to remove, try clearing it from the input tray
area (see “Clearing jams from input trays” on page 80).
Avoid spilling loose toner. Using a dry, lint-free cloth, clean any
loose toner that might have fallen into the product.
If loose toner falls into the product, it might cause temporary
problems with print quality. Loose toner should clear from the
paper path after a few pages are printed.
If toner gets on your clothing, wipe it off with a dry cloth and
wash the clothing in cold water. (Hot water sets toner into
fabric.)
4 Open Tray 1 and remove the entrance cover to check for
any additional jammed media. If any is present, remove it.
5 Rotate the paper guide to check for additional jammed
media. If any is present, remove it.
Continued on the next page.
5
Clearing jams 79
Page 82

6
7
6 Replace the entrance cover and close Tray 1.
7 Reinstall the toner cartridge and close the top cover.
8 If a jam message persists, there is still media in the product.
Look for media in another location (see “Jam locations” on
page 78).
If you are using a non-HP toner cartridge, the message NON
HP TONER DETECTED might appear on the control panel
display. Press S
TART to continue printing or copying.
Clearing jams from input trays
1
2
3
Tr ay 1
Slowly pull out the paper tray. If part of the media has already
been pulled into the product, follow the steps under “Clearing
jams from the top cover and toner cartridge area” on page 79.
Trays 2, 3, and 4
1 Slide the tray out of the product, and remove any damaged
media from the tray.
2 If the edge of the media is visible in the feed area, slowly
pull the media down and out of the product. (Do not pull the
media straight out or it will tear.) If media is not visible, look
in the top cover area (see “Clearing jams from the top cover
and toner cartridge area” on page 79).
Note
Do not force the media if it does not move easily. If the media is
stuck in a tray, try removing it through the tray above or through
the top cover area.
3 Make sure the media lies flat in the tray at all four corners
and is tucked below the front and back tabs. Make sure that
all three paper size adjustments are correct (see “Loading
Tray 2 and optional Trays 3 and 4” on page 24).
5
80 Chapter 8 – Problem solving EN
4 Slide the tray back into the product.
5 Open and close the top cover to clear the jam message.
6 If the jam message persists, media remains in the product.
Look for media in another location (see “Jam locations” on
page 78).
Page 83

Clearing jams from the duplexer
1
2
3
1 Open the duplexer’s rear door.
2 Slowly pull any media out of the duplexer.
3 Remove the duplexer by lifting it slightly and pulling it out of
the product.
4 From the rear of the product, remove any media that is on
top of Tray 2. (You might need to reach inside the product.)
5 Slowly pull any media out of the duplexer.
6 Turn the duplexer over and remove any media.
Continued on the next page.
4
5
6
Clearing jams 81
Page 84

7
7 Reinsert the duplexer into the product.
8 Open and close the top cover to clear the jam message.
9 If a jam message persists, media remains in the product.
Look for media in another location (see “Jam locations” on
page 78).
Clearing jams from the rear output slot
1
4
Note
If most of the media remains inside the product, it is best to
remove it through the top cover area. (See “Clearing jams from
the top cover and toner cartridge area” on page 79.)
1 Open the rear output slot.
2 Grasp both sides of the media, and slowly pull it out of the
product. (There might be loose toner on the media. Be
careful not to spill it on yourself or into the product.)
Note
If media is difficult to remove, try opening the top cover
completely to release pressure on the media.
If the media has torn or if you still cannot remove the media, see
“Clearing jam s from the f user area” on page 83.
3 Close the rear output slot.
4 Open and close the top cover to clear the jam message.
5 If a jam message persists, media remains in the product.
Look for media in another location (see “Jam locations” on
page 78).
82 Chapter 8 – Problem solving EN
Page 85

Clearing jams from the fuser area
2
Use this procedure to remove jams from the fuser area:
● when media has jammed inside the fuser and cannot
otherwise be removed.
● when a page has torn while you were trying to clear a jam
from the fuser.
3
1 Turn the product off.
WARNING!
To avoid minor burns, wait 30 minutes for the fuser to cool
before continuing with this procedure.
2 Turn the product so its rear cover faces you and remove the
Tray 2 dust cover or optional duplexer.
4
3 Unplug the power cord from the product.
4 Open the rear output slot and pull the extension out until it
stops.
5 Remove the rear output slot and extension. To do this, bend
the middle down slightly, release tab a, and then release tab
b.
6 Unlock the fuser by rotating the blue fuser levers so that
5
they point up.
a
7 Pull the fuser out of the product. To release the fuser from
the product, hold the back of the product while pulling on
the fuser. Do not pull on the black plastic flapper.
b
Continued on the next page.
6
7
Clearing jams 83
Page 86

8
9
10
11
8 Remove the media that has jammed.
CAUTION
Do not use a sharp object to clear media from the fuser area.
You might damage the fuser.
9 Replace the fuser, left side first. Be sure to push the fuser
firmly into the product.
10 Lock the fuser in place by rotating the levers to the
horizontal position.
11 Replace the rear output slot, left side first.
12 Plug the power cord into the product.
13 Replace the Tray 2 dust cover or the optional duplexer.
14 Turn the MFP on.
15 If a jam message persists, media remains in the product.
Look for media in another location (see “Jam locations” on
page 78).
Note
Because the product has been turned off, you must restart the
copying or printing task.
Clearing jams from the ADF
If originals jam in the ADF, follow this procedure:
1 Raise the ADF cover.
2 Remove any jammed media.
3 Close the ADF and control panel unit. Press each down firmly until it clicks into
place.
4 After removing the stack of originals from the ADF, smooth the jammed page, add it
to the top of the stack, and reinsert the stack.
5 Press S
84 Chapter 8 – Problem solving EN
TART to resume sending or copying the document.
Page 87

Solving repeated jams
If jams occur frequently, try the following:
● Check al l p o ssi b l e j am lo c at i ons ( s ee “Cl ea ri ng ja m s” on page 78). A piece of media
might be stuck somewhere in the product. Even a small torn piece of media in the
paper path can cause repeated jams.
● If using a duplexer, check all areas of the MFP (including under the duplexer).
● Check that media is correctly loaded in the trays, that all three tray adjustments have
been made, and that the trays are not overfilled. Make sure that the stack is tucked
under the front and back tabs. (See the sections about loading media, starting with
“Loading Tray 1” on page 23.)
● Check that all trays and media-handling accessories are completely inserted into the
MFP. (If a tray is opened during a job, this might cause a media jam.)
● Check that all covers and doors are closed. (If a cover or door is opened during a
job, this might cause a jam.)
● Try printing or copying to a different output bin.
● The sheets might be sticking together. Try bending the stack to separate each sheet.
Do not fan the stack.
● If you are printing or copying from Tray 1, try reducing the size of the stack.
● If you are printing or copying from the optional power envelope feeder, make sure
that it is loaded correctly, and that the bottom envelopes are slightly farther in than
the top envelopes.
● If you are printing or copying small media sizes, feed the media short edge first (see
“Guidelines for using custom paper” on page 28).
● Turn over the stack of media in the tray. Also try rotating the media 180 degrees.
● Check the characteristics of the media you are using. Use only media that meets
HP specifications (see “Paper specificatio ns ” on page 113). Try using different
media to see if the problem goes away. Do not use curled, deformed, damaged, or
irregular media.
● Check that the environmental conditions for the product are met (see “Environmental
specifications” on page 123).
● Avoid using paper that has already been used in a printer or copier.
● Do not print on both sides of envelopes or transparencies (see “Using envelopes” on
page 26 or “Using transparencies” on page 27).
● Print or copy only on full sheets of labels and do not print or copy on both sides of
label sheets (see “Using labels” on page 27).
● Check that the power supplied to the product is steady and meets product
specifications (see “Electrical specifications” on page 123).
● Clean the product (see “Cleaning the product” on page 71).
● Perform preventative maintenance if maintenance is due (see “Performing
preventative maintenance” on page 76).
Clearing jams 85
Page 88

Understanding control panel messages
The tables in this section explain common messages that might appear on the control
panel display.
Within each table, the messages and their meanings are listed in alphabetical order, with
numbered messages listed at the end of the tables.
If a message persists:
● If you see persistent messages requesting that you load a tray, or if a message
indicates that a previous print job is still in the product’s memory , press S
or press S
● If a message persists after you complete all of the recommended actions, contact an
HP-authorized service or support provider (see “HP customer care service and
support” on page 107).
Not all messages are described in this guide (many are self-explanatory), but are
addressed on the product pages in the embedded Web server.
The product generates two types of errors:
● temporary errors that you can correct
● equipment errors, which are usually generated by equipment failure and require
action by service personnel
TOP to clear the job from memory.
TART to print
Control panel messages
Message Explanation or recommended action
ACCESS DENIED
MENUS LOCKED
ADF COVER OPEN The ADF cover is open and must be closed before copying can continue.
ADF MISPICK The ADF feed mechani sm was unab le to pic k the ne xt p age. Rem ov e all p ages and re stac k them
ADF OVERFILL Too many pages hav e been pl aced in the ADF. Remove some of the pages an d try the opera tion
ADF PAPER JAM A page has jammed inside the ADF and must be cleared before copying can continue. Raise the
BAD DUPLEXER
CONNECTION
BAD OPT TRAY
CONNECTION
The control panel function you are trying to use is locked to prevent unauthorized access. See
your network administrator.
in the proper order, straightening their edges. Press
again. If necessary, raise the ADF tray and remove any jammed media, and then lower the ADF
tray.
ADF tray and remove the jammed media, and then lower the ADF tray.
The duplexer is not properly connected to the product. Use only the right-angle power cord that
shipped with the product.
Try removing and reinstalling the duplexer. Then turn the product off and back on.
There is a problem with an optional 500-sheet paper tray connection with the product:
● The tray is not connected properly.
● More than two optional 500-sheet paper tra ys are in stall ed (the product ca nnot suppo rt more
than four trays).
● The electronics in the paper tray are faulty.
Try removing and reinstalling the paper tray. Then turn the product off and back on.
START to resume the copy job.
BLOCKED JOB The product is proc essing other jobs and cannot process your job at this time.
Please wait. Your job will be processed as soon as the current job is completed.
BUSY PRINTING A job is currently printing.
CANCELING
<JOBNAME>
The current job is being canceled.
86 Chapter 8 – Problem solving EN
Page 89

Control panel messages (continued)
Message Explanation or recommended action
CANNOT DUPLEX
CLOSE REAR BIN
CHECK INPUT
DEVICE
alternates with
PAPER PATH OPEN
PLEASE CLOSE IT
CHECK OUTPUT
DEVICE
alternates with
CLOSE OUTPUT
DELIVERY PATH
CHECKING PAPER
PATH
CLOSE TOP COVER The top cover is open and must be closed for printing to continue.
CLOSE TOP OR LEFT
DOOR
DISK DEVICE
FAILURE
DISK FILE
OPERATION FAILED
The product cannot duplex because the rear output slot is open. Close the rear output slot.
The optional inpu t tr ay cannot feed media to the pro duc t b ecause a door or paper guide is open.
Check the doors and paper guides and close any that are open.
The optional output device is not properly connected to the product. A proper connection must
be made for printing to continue.
The engine is checking for possible jams or media that was not cleared from the product.
Either the top cover or left door is open and must be closed to allow printing to resume.
The EIO disk had a critical failure and can no longer be used.
Remove the EIO disk and replace it with a new one.
The requested opera tion cou ld not be pe rf ormed. You might have attempte d an ille gal oper a tion,
such as trying to download a file to a non-existent directory.
DISK FILE
SYSTEM IS FULL
DISK IS
WRITE PROTECTED
EIO [N] DISK
INITIALIZING
EIO [N] DISK
NOT FUNCTIONAL
EIO [N]
INITIALIZING
ALTERNATES WITH
DO NOT POWER OFF
EIO [N] DISK
SPINNING UP
EXTERNAL DEVICE
INITIALIZING
INPUT DEVICE
CONDITION [XX.YY]
Delete files from the EIO disk and then try again. (See the software Help for more information.)
The EIO disk is protected, and no new files can be written to it. Disable the write protection.
The disk in EI O slot [n] is initializing.
The EIO disk is not working correctly. Remove the EIO disk from the slot indicated by [n].
Replace it with a new EIO disk.
Wait for the message to disappear (this might take up to 5 minutes). If the product EIO card is
operating correctly and communicating with the network, this message disappears after
approximately 1 minute and no action is requi red.
If the EIO card is unable to communicate with the network, this message remains for 5minutes
and then disappears. In this case the product is not communicating with the network (although
the message is no longer present). The problem might be a bad EIO card, a bad cable or
connection on the network, or a network problem. Contact your network administrator.
The disk accessory in EIO slot [n] is initializing.
When an external paper-handling device is connected to the printer, it must initialize after the
computer is turned on or after coming out of PowerSave mode.
An input paper-handling device requires attention before printing can resume. Turn the product
off. Disconnect the cable to the input paper handling device and then reconnect it. Turn the
product on.
See the documentation that came with the paper-handling device for assistance.
INSTALL TONER
CARTRIDGE
INSTALL TRAY [X] The specified tray is not installed and must be inserted and closed for printing to continue.
The toner cartridge has been removed and must be reinstalled for printing to continue.
Understanding control panel messages 87
Page 90

Control panel messages (continued)
Message Explanation or recommended action
INTERRUPT COPY
JOB
MANUALLY FEED
[TYPE] [SIZE]
MEMORY FULL
STORED DATA LOST
MEMORY SETTINGS
CHANGED
MEMORY SHORTAGE
JOB CLEARED
MEMORY SHORTAGE
PAGE SIMPLIFIED
NON HP TONER
CARTRIDGE
DETECTED
alternates with
PRESS START TO
CONTINUE
OFFLINE Press
Do you want to interrupt the job currently being copied? Yes/No.
If the job is interrupted, it will resume as soon as your job is completed.
Load the requested media into Tray 1. Press
Tray 1.
There is no available memory. The current job might not print correctly and some resources
(such as downloaded fonts or macros) might have been deleted.
The product changed its memory settings because it did not have enough memory to use the
previous settings for I/O Buffering and Resource Saving. This usually occurs after removing
memory from the product, ad ding a duplexer, or adding a printer language.
The product did not ha v e enou gh me mory to print the entire job. The remainder of the job wil l not
print and will be cleared from memory. Press
The product had to compress the job to fit it in available memory. Some data loss might have
occurred. P ress START to continue.
The print quality of thes e pa ges mi ght not b e ac ce ptable. Reduce the comple x ity of th ese pag es
and reprint them.
The product has detected tha t the toner ca rtridge is not an HP toner cartridge. If y ou believe you
purchased an HPtoner cartridge, call the HP fraud hotline. Any product repair req uired as a resu lt
of using non-HP toner is not covered under the product warranty.
START if the desired media is already loaded in
START to continue.
START to bring the product online.
OUTPUT BIN FULL
alternates with
CLEAR PAPER FROM
[BINNAME]
PAPER WRAPPED
AROUND FUSER
PERFORM ROUTINE
MAINTENANCE
PRINTER LANGUAGE
NOT AVAILABLE
PROCESSING AUTO
CLEANING PAGE
PROCESSING
CLEANING PAGE
SCAN AHEAD Scanning pages. Your document is being scann ed now . It w ill print when the current job i s finished.
SCANNER COVER
OPEN
The specifi ed output bin is full and must be em ptied for printing or copying to continue.
Turn the product off to prevent the media from wrapping more firm ly around the fuser. Open the
top cover a nd remove th e toner cartridge. Remov e all visible me dia. If you cannot locate the media,
leave product turned off and remove the fuser to reach the media (see “Clearing jams from the
fuser area” on page83).
To ensure optimal print quality, the product prompts you to perform routine maintenance every
200,000 pages. To order a printer maintenance kit, see “Ordering information” on page 125. For
information about maintenance, see “Performing preventative maintenance” on page 76.
A print job requested a printer language that does not exist in the printer. The job does not print
and is cleared from memory.
Print the job using a driver for a different printer language, or add the requested language to the
product (if available). Press
The auto cleaning page is in process. This can take up to 2.5 minutes.
The manual cleaning page process is underway. This can take up to 2.5 minutes.
The ADF cov er o n top of the scan ner gl ass is op en, preventing the scan fr om t aking pl ace . Close
the cover and resume the operation.
START to continue.
88 Chapter 8 – Problem solving EN
Page 91

Control panel messages (continued)
Message Explanation or recommended action
TONER LOW The message first appea rs when about 15 percent of the toner remains in the toner cartridge (at
5 percent cov erage, about 1,500 pages remain for the 10,000-p age cartridge and about 900 pages
remain for the 6,000-page cartridge). Depen ding on how the p roduct has been configured, it eit her
continues to print or s tops .You might want to ensure that y ou ha ve a replacement toner cartridge
available.
If the product has stopped, you can resume printing by pressing START for each job.
See “T oner low and toner out conditions” on page71 for information about config uring the product’s
response to toner messages.
TONER OUT The toner cartridge is now empty. Depending on how the product has been configured, it either
continues to print or stops.
If the product has stopped , yo u can re sume printin g by pressin g
toner cartridge.
See “Toner low and toner out conditions” o n page 71 for details on ho w to config ure the prod uct’s
response to toner messages.
START for each job . Repl ace the
TRAY [X] EMPTY
[TYPE] [SIZE]
Load media in the empty tray (x) to clear the message. If you do not load the specified tray, the
product continu es printing from the next tray w ith the same media size and typ e, and the mes sage
continues to appear.
TRAY [X] OPEN The specified tray is open. Close the tray to continue the job.
TRAY 1 LOAD
[TYPE] [SIZE]
This message occurs for the following reasons:
● Tray 1 was requested and the tray is empty.
● The requested media size is not found.
● If the correct media size is loaded, the tray or the control panel is not set correctly.
To adjust Tray 1 to accommodate special media, see “Loading Tray 1” on page 23. See also
“Loading Tray 2 and optional Trays 3 and 4” on page 24.
Load the requested media into Tray 1, or press STAR T to override the message and print on a
loaded media size.
If printing does not continue, press
START.
If you are trying to print letter- or A4-size media and this message appears, make sure the
default media size is set correctly from the Printing menu in the control panel and also in the
software program.
Press START to print from the next available tray.
Press the down navigation button to scroll through the available types and sizes.
Press to accept the alternative type or size.
Note
If custom siz e is be ing us ed, another line appears in the message giv in g th e x an d y dimensions
of the media.
TRAY [X] LOAD
[TYPE] [SIZE]
where x is Tray 2, 3,
or 4
This message occurs for the following reasons:
● Tray 2, 3, or 4 was requested, but the tray is empty.
● Tray 2, 3, or 4 was requested, but the adjustments are not set for the requested media type
or size.
Make sure that a ll pap er guid e a djustmen ts have been made (see ex plana tion in “Loadi ng Tray 2
and optional Trays 3 and 4” on page 24). Also make sure that the type has been set at the
control panel.
Load the requested media into the indicated tray, or press to override the message and print
on a loaded media size.
If printing does not continue, press
START.
If you are trying to print letter- or A4-size media and this message appears, make sure the
default media size is set correctly in the Printing menu at the control panel and also in the
software program.
START to print from the next available tray.
Press
Press the down navigation arrow to scroll through the available media types and sizes.
Press to accept the alternative type or size.
Understanding control panel messages 89
Page 92

Control panel messages (continued)
Message Explanation or recommended action
TRAY 1 SIZE =
[xxxx]
TRAY 1 TYPE =
[XXXX]
The product is asking what size of media has been loaded in Tray 1. In response, you can take
either of the following actions:
● Press to accept the current media size.
● Press the down navigation arrow to change the size and then press to accept the new
size.
The product will first display the TRAY 1 TYPE=xxxx message (see the description of that
message). If you do not press an y buttons in the timeout period (about 1 minute), it displa y s thi s
TRAY 1 SIZE= xxxx message.
Note
Changing the size here changes the default for Tray 1 media size in the Paper Handling menu.
The product has received a job under any of these conditions:
● The media type requested by the job is not available in the product.
● Tray 1 has been set for CASSETTE.
● Media has been placed in Tray 1 which has triggered Tray 1’s paper sensor).
If you do press any buttons, the message disappears in about 1 minute. You can take either of
the following actions:
● Press to accept the media type.
● Press the down navigation arrow to change the type and then press to accept the new
type.
Note
Changing the type here chan ges th e def a ult for T r a y 1 m edia ty pe in the Paper Handling menu. If
you do not do anything during the timeout period (about 1 minute), the product will print on the
media in Tray 1. It will also ch ang e the default for Tray 1 media type in the Pap er Ha nd lin g me n u
to the type requested by the application that sent the job.
UNABLE TO
MOPY JOB
UNSUPPORTED SIZE
IN TRAY [YY]
USE [TYPE]
[SIZE] INSTEAD?
XX.YY
PRINTER ERROR
PRESS START TO
CONTINUE
##.00.01
SCANNER I/O
FAILURE
CHECK CABLES AND
CYCLE POWER
##.00.02 SCANNER
I/O FAILURE
Memory or file system failures would not allow mopying to occur. Only one copy will be
produced.
An external paper-handling device detected an unsupported media size. The product goes
offline until the condition is corrected.
If the requested media size or type is not available, the product asks if it should use another
media size or type instead.
Press the down navigation arrow to scroll through the available types and sizes. Press to
accept the alternate type or size.
A product error has occurred that can be cleared by pressing
START on the control panel.
Communication between the printer formatter and the copy module has failed. A disconnected
cable or a failure of the copy module might have caused this communications failure.
Check the connection between the copy connect card and the IEEE-1394 cable. If the problem
persists, call for service.
The IEEE-1394 copy connect card is not detec ted, e ithe r b ec aus e initialization failed or beca us e
the card is not installed. Call for service.
90 Chapter 8 – Problem solving EN
Page 93

Control panel messages (continued)
Message Explanation or recommended action
##.XX.YY This message indicates a failure in the scanner device. This is not a communications failure.
XX specifies the reporting systems (sca nne r job con trol , copy/send application, scanner service
agent) and YY specifies the erro r condi tion. Th ese a re repres ented a s ##.XX. YY in the event log.
For example, the scanner log control can report the following errors:
● Scanner FPGA initialization error
● Scanner EEPROM error
● Scanner sensor adjustment error
● Sc anner ADF upper-light error
● Sc anner ADF lower-light error
● Scanner ADF fan motor error
● Pick sensor error
● Scanner sensor error
● Home position error
● McBSP overrun error
● CCD FIFO full error
Turn the power off and then turn it on again. If the error persists, call for service.
13.X PAPER JAM
[LOCATION]
20 INSUFFICIENT
MEMORY
alternates with
PRESS START TO
CONTINUE
21 PAGE TOO
COMPLEX
alternates with
PRESS START TO
CONTINUE
22 EIO X
BUFFER OVERFLOW
alternates with
PRESS START TO
CONTINUE
Media has either jammed in the product or been caught in a paper tray. The control panel
provides specific instructions and location information to aid in clearing the jam.
● Open the top cover or tray indicated by the message.
● Clear all media from the area. If necessar y, remove the toner cartridge, duplexer, or trays.
● If the message persists, check for media in all other areas.
CAUTION
Ensure that all jammed media is removed before closing the cover or tray. Open and close the
top cover to clear the message.
See “Clearing jams” on page 78 for more detailed information.
The product receiv e d more data than c an fit i n a v ail ab le m emory. You might hav e tried to tran sfer
too many macros, soft fonts, or complex graphics.
START to print the transferred data (some data might be lost) and then simplify the print
Press
job.
The data (dense text, rules, raster or vector graphics) sent to the product is too complex.
START to print the transferred data. (Some data might be lost.)
Press
Too much data was sent to the EIO card in the specified slot (x). An improper communications
protocol may be in use.
START to clear the message. (Data might be lost.)
Press
Check the host configuration.
22 PARALLEL I/O
BUFFER OVERFLOW
alternates with
PRESS START TO
CONTINUE
40 EIO [X] BAD
TRANSMISSION
alternates with
PRESS START TO
CONTINUE
Too much data was sent to the parallel port.
Check for a loose cable connection and make sure to use a high-quality cable (see “Ordering
information” on page 125). (Some non-HP parallel cabl es might be missing pin connections or
might otherwise not conform to the IEEE-1394 specification.)
This error can occur if the driver you are using is not IEEE-1394 compliant. F or be st re su lts, use
an HP driver that came with the product (see “Printer drivers” on page 58).
START to clear the error message. (Data might be lost.)
Press
The connection between the product and the EIO card in the specified slot has been broken.
(Data loss might occur in this situation.)
Press START to clear the error message and continue printing.
Understanding control panel messages 91
Page 94

Control panel messages (continued)
Message Explanation or recommended action
41.3 UNEXPECTED
PAPER SIZE
alternates with
EXPECTED
[TYPE] [SIZE]
41.X
PRINTER ERROR
alternates with
CYCLE POWER TO
CONTINUE
49.XX
PRINTER ERROR
alternates with
CYCLE POWER TO
CONTINUE
50.X
FUSER ERROR
50.4
PRINTER ERROR
alternates with
CYCLE POWER TO
CONTINUE
The product detected a media size other than what was specified. This is typically caused if two
or more sheets stick together in the product or if the paper tray is not properly adjusted. Reload
the tray with the correct media size and ensure that media in the tray is loaded under the front
and back tabs.
If you are printin g fro m Tray 1, verify that t he cor rec t media s iz e is selec ted in the c ontrol panel . If
you are printing from Tray 2, 3, or 4, verify that the paper guides in the tray have been adjusted
correctly (see the descri ption of adjustments in “Loading Tray 2 and optional Trays 3 and 4” on
page 24).
After performing the actions above, press
automatically be reprinted if jam recovery is enabled. Or, you can press
from memory.
A temporary printing error occurred. Press
automatically be reprinted if jam recovery is enabled.
If the error does not clear, turn the product off, and then turn the product on.
A temporary printing error occurred. Press
automatically be reprinted if jam recovery is enabled.
If the error does not clear, turn the product off, and then turn the product on.
A fusing error has occurred. Turn the product off and then on.
A problem with the power supply has occurred.
Remove the product from any uninterruptible power supply (UPS), additional power supplies, or
power strips. Plug the product into a wall outlet and see if this resolves the problem.
If the product is alrea dy pl ugged into a w all ou tlet, try anoth er po wer s ource in the b uil ding th at is
independent of the one currently being used.
The line voltage and current source at the product location might need to be inspected to make
sure that it meets the product’s electrical specifications (see “Electrical specifications” on
page 123).
START. The page containing the error will
STOP to clear the job
START. The page containing the error will
START. The page containing the error will
51.X OR 52.X
PRINTER ERROR
alternates with
CYCLE POWER TO
CONTINUE
53.XY.ZZ
PRINTER ERROR
54.1 REMOVE
SEALING TAPE
alternates with
FROM TONER
CARTRIDGE
A temporary printing error occurred.
Turn the product off, and then turn the product on.
A problem with the product ’s memory has occurred. The DIMM that caused the error will not be
used. Values of x, y, and z are as follows:
0 = ROM
1 = RAM
Y = Device location
0 = Internal memory (ROM or RAM)
1 to 3 = DIMM slots 1, 2, or 3
ZZ = Error number
You might need to replace the specifie d DIMM .
Turn the product off, and then replace the DIMM that caused the error.
The toner cartridge has been installed without removing the sealing tape.
Open the top cover and remove the to ner ca rtridge. Pul l t he se ali ng tape tab to remove the s trip.
Reinstall the toner cartridge and close the top cover.
92 Chapter 8 – Problem solving EN
Page 95

Control panel messages (continued)
Message Explanation or recommended action
55.XX
PRINTER ERROR
alternates with
CYCLE POWER TO
CONTINUE
56.X
PRINTER ERROR
alternates with
CYCLE POWER TO
CONTINUE
57.X
PRINTER ERROR
alternates with
CYCLE POWER TO
CONTINUE
58.X
PRINTER ERROR
alternates with
CYCLE POWER TO
CONTINUE
59.X
PRINTER ERROR
alternates with
CYCLE POWER TO
CONTINUE
A temporary printing error occurred.
START. The page containing the error automatically reprints if jam recovery is enabled.
Press
If the error does not clear, turn the product off, and then turn the product on.
A temporary printing error occurred.
Turn the product off, and then turn the product on.
A temporary printing error occurred.
Turn the product off, and then turn the product on.
A temporary printing error occurred.
Turn the product off, and then turn the product on.
A temporary printing error occurred.
Turn the product off, and then turn the product on.
62.X
PRINTER ERROR
64
PRINTER ERROR
alternates with
CYCLE POWER
66.XX.XX
SERVICE ERROR
alternates with
CHECK CABLES AND
CYCLE POWER
68.X PERMANENT
STORAGE ERROR
alternates with
CHECK SETTINGS
68.X PERMANENT
STORAGE FULL
A problem with the product ’s memory has occurred. The x value refers to the location of the
problem:
0 = Internal memory
1 to 3 = DIMM slots 1, 2, or 3
You might need to replace the specifie d DIMM .
A temporary printing error occurred.
Turn the product off, and then turn the product on.
An error occurred in an external paper-handling device.
Turn the product off. Disconnect the cables to all external media handling devices, and then
reconnect them. Turn the product on.
An error occurred in the product’s permanent storage and one or more product settings have
been reset to the factory default.
Print a configuration page and check the product settings to determine which values have
changed (see “Information menu” on page 37).
The product’s permanent storage is full. Some settings might have been reset to the factory
defaults.
Print a configuration page and check the product settings to determine which values have
changed (see “Information menu” on page 37).
Hold down
removing old areas that are not being used.
STOP while turning the product on. This will clean up the permanent storage by
Understanding control panel messages 93
Page 96

Control panel messages (continued)
Message Explanation or recommended action
79 SERVICE [XXXX] The product has detected an error.
STOP to clear the print job from the product memory. Turn the product off, and then tur n
Press
the product on.
Try printing a job from a different software program. If the job prints, go back to the first program
and try printing a different file. (If the message appears only with a certain software program or
print job, contact the software vendor for assistance.)
8X.YYYY
EIO [Z] ERROR
The EIO accessory in slot [z] has encountered a critical error. [z] description:
1 = EIO slot 1: The product has detected an error with the EIO accessory.
2 = EIO slot 2: The product has detected an error with the EIO accessory.
6 = EIO slot 1: The EIO accessory has detected an error. The EIO ac cessory might be
defective.
7 = EIO slot 2: The EIO accessory has detected an error. The EIO ac cessory might be
defective.
Turn the product off, and then turn the product on.
Turn the product off, reseat the EIO accessory in slot [z], and then turn the product on.
Turn the product off, remov e the EIO acc essory from slo t [z], ins tall it in a different EIO slot, and
then turn the product on.
Replace the EIO access ory in slot [z].
The e-mail gatew ay is not configured. Contact your system admin is trator.
The e-mail gateway is not responding. Contact your system administrator.
The product experienced an error while executing the digital-sending job. The job has failed.
Processing a digital send job.
The address book is full. To add an additiona l addres s, you m ust fi rst delet e an ad dress fr om the
address book.
The system has found too many addresses to display. Please refine your search.
The e-mail addressing information was rejected because the address was incorre ct or
incomplete. The job has failed. Please correct the e-mail address and send the job again.
The e-mail gateway could not accept the job because the attachment is too large.
Equipment error messages
Message Explanation or recommended action
BLOWN MOTOR FUSE
ERROR
BLOWN LAMP FUSE
ERROR
FRONT SIDE OPTICAL
SYSTEM ERROR
MECHANICAL ERROR The scanner reports this error when it detects a general mechanical
The scanner reports this error when it detects that the motor fuse has
blown.
The scanner reports this error when it detects that the lamp fuse has
blown. This fuse is common to the front and back scanning lamps.
The scanner reports this error when it detects a problem with the front
side optical system.
problem.
94 Chapter 8 – Problem solving EN
Page 97

Understanding mopy disk-error messages
The following table lists the mopy disk error numbers reported on the collation or job
storage disk error pages that are printed when an error occurs.
Mopy disk error messages
Disk
Error description Solution
error no.
1 Disk volume not present—it may
be uninitialized.
3 A requested file or directory
could not be found.
5 Invalid # of bytes given in a
read/write request.
6 Attempt to create a file or
directory that already exis ts.
15 Bad disk. Initialize the hard disk. If the problem persists,
16 No volume label. Initialize the hard disk. If the problem persists,
23 Bad seek request—the resulting
offset would be negative.
24 Unexpected internal error.
Initialize the hard disk. If the problem persists,
replace the hard drive.
Possible data corruption has occurred. Delete
the job that prompted the error.
Possible data corruption has occurred. Delete
the job that prompted the error.
You have sent a user name that is the same as
an existi ng directory. Change the user name in
the driver and resend the job.
replace the hard drive.
replace the hard drive.
Possible data corruption has occurred. Delete
the job that prompted the error.
● Possible data corruption has occurred.
Delete the job that prompted the error.
● A disk medi a problem has occurred.
Initialize the hard disk.
● If the problem persists on a hard drive,
replace the hard drive.
55 Bad file system.
● Possible data corruption has occurred.
Delete the job that prompted the error.
● Disk media problem has occurred. Initialize
the hard disk.
● If the problem persists on a hard drive,
replace the hard drive.
56 Hardware failure. Replace the hard drive.
59 Stored jobs are stored in
directories created for each
user. A limi ted n um ber of
directories can be put on a disk
● Delete all jobs stored for a user. The
firmware automatically deletes the direc tory
for a user with no stored jobs.
● Delete other dire ctories on the disk.
and the maximum number of
directories has been reached
70 Disk error Contact an HP-authorized service and support
representative.
Understanding mopy disk-error messages 95
Page 98

Troubleshooting the hard disk
Troubleshooting the hard disk
Item Explanation
The product does not
recognize the hard disk.
The disk is not
initialized.
DISK X NOT
INITIALIZED
Disk failure.
EIO X DISK
NOT FUNCTIONAL
The disk is write
protected.
DISK IS
WRITE PROTECTED
You attempted to use a
disk-resident font, but
the product substituted
a different font.
Turn the product off and verify that the hard disk is inserted correctly
and is securely f astened. Print a co nfiguration page to confirm that the
hard disk has been recognized (see “Information menu” on page 37).
Use the Windows-based embedded Web server or the Macintoshbased HP LaserJet Utility to initialize the disk.
Turn the product off and make sure that the EIO disk is inserted
correctly and securely fastened. If the message persists, the disk
drive needs to be replaced.
Fonts and forms cannot be stored on the disk when the disk is write
protected. Use the Windows-based embedded Web server or the
Macintosh-based HP LaserJet Utility to remove the write protection
from the disk.
If you are using PCL, print the PCL font page, and verify that the font
is on the disk. If you are using PS, print the PS font page and make
sure that the font is on the disk.
96 Chapter 8 – Problem solving EN
Page 99

Correcting output quality problems
This section identifies common output quality problems and recommends solutions.
Often output quality problems can be handled easily by ensuring that the product is
properly maintained, using media that meets HP specifications, or running a cleaning
page.
If you still experience problems after trying the suggested remedies, contact
HP Customer Care Service and Support (see “HP customer care service and support”
on page 107).
Note The examples below represent letter-size paper that has passed through the product
short-edge first.
Light print (partial page)
1 The toner cartridge might be low. Replace the toner cartridge.
2 Maintenance might be due. Check this by printing a copy of the supplies status page
(see “Information menu” on page 37). If maintenance is due, order and install the
printer maintenance kit (see “Performing preventative maintenance” on page 76).
Light print (entire page)
1 At the control panel display, use the Print Quality menu to increase the toner density
setting.
2 Try using a different type of paper.
3 The toner cartridge might be low. Replace the toner cartridge.
Specks
Specks might appear on a page after a jam has been cleared.
1 Print a few more pages to see if the problem corrects itself.
2 If specks occur frequently, configure the product to run a cleaning page
automatically.
3 Clean the inside of the product (see “Cleaning the product” on page 71) and run a
manual cleaning page to clean the fuser.
4 Try using a different type of paper.
5 Check for toner cartridge leaks. If the toner cartridge is leaking, replace it.
Correcting output quality problems 97
Page 100

Dropouts
1 Make sure that the environmental specifications for the product are met (see
“General specifications” on page 124).
2 If the paper is rough and the toner easily rubs off, either try changing the fuser mode
to High 1 or High 2, or try using a smoother paper.
3 Try changing to a different paper type.
Lines
1 Print a few more pages to see if the problem corrects itself.
2 Clean the inside of the product (see “Cleaning the product” on page 71) and run a
manual cleaning page to clean the fuser (see “Cleaning the fuser” on page 73).
3 Replace the toner cartridge.
4 Maintenance might be due. Check this by printing a copy of the supplies status page
(see “Information menu” on page 37). If maintenance is due, order and install the
printer maintenance kit (see “Performing preventative maintenance” on page 76).
Gray background
1 Do not use paper that has already been run through the product.
2 Print a few more pages to see if the problem corrects itself.
3 Turn over the stack of paper in the tray. Also, try rotating the paper 180
4 At the control panel, use the Print Quality menu to decrease the toner density
setting.
5 Make sure that the environmental specifications for the product are met (see
“General specifications” on page 124).
6 Replace the toner cartridge.
degrees.
98 Chapter 8 – Problem solving EN
 Loading...