

Page 1
HP
9000
Model
382
HP
9000
Owner's
for
Series
HP-UX
300
W
Guide
Users
orkstation Controllers
ABCDE
HP
Part No. A1473-90019
Printed in USA
FINAL TRIM SIZE : 7.5 in x 9.0 in
December 1992
Edition 2
E1292
Page 2
Notices
Information
Hew
lett-Packar
but
not
particular
herein
the
furnishing,
W
arran
A
gr
e
ement
soft
ware
and
conditions
Op
er
ating
If
y
ou
pro
duct
A
cop
y
product
Service
Cop
yrigh
This
do
All
righ
in
this
d
makes
limited
or
t
y.
do
for
of
purp
direct,
Please
and
are
oered
the
not
a
the
to, the
ose.
indirect,
p
erformance,
read
Limite
of
the
pr
o
duct indic
agree
full
refund.
sp
ecic
and replacemen
Oce.
c
1992
t
cument
ts
are
contains
reserv
do
cumen
no
t
warr
implied
Hewlett-P
sp
ecial,
the
enclosed
d
Warr
only
on
the
License
ates
to
the
License
w
arran
t
parts
Hewlett-P
information whic
ed.
Repro
is
sub
ject
anty
warr
anties
ac
k
ard
inciden
or
use
of
Hewlett-Packar
anty
b
efore
condition
Agreemen
your
Agreemen
t
y
terms
can
b
ac
k
ard
Compan
duction,
to
change
of
any
kind
of
mer
shall
not
tal
this
material.
op
erating
that
t.
ac
c
eptanc
applicable
e
obtained
hhas
adaptation,
or
t,
b
e
y
y
written permission is prohibited, except as allow
without notice.
ab
out this
chantability
e
liable
for
consequen
d Softwar
this
pro
the
customer
of
these
terms
ou
may
return
to
y
our
from
y
our
been
protected b
or translation
ed
under the cop
manual, including,
and
tness
errors
tial
damages
ePr
o
duct.
accepts
and
the
Hewlett-P
lo
cal
Sales
ycop
con
tained
about
duct
Lic
Righ
ts in
all
c
onditions.
un
used
ac
kard
and
yrigh
for
without
yrightla
a
ense
the
terms
t.
prior
ws.
c
Copyright
Copyright
AT&T, Inc. 1980, 1984, 1986
c
The Regen
ts
of the Univ
1985.
This softw
are and documen
tation is based in part on the F
Software Distribution under license
California.
FINAL TRIM SIZE : 7.5 in x 9.0 in
ersity of California 1979, 1980, 1983,
from the Regen
ourth
ts of the Univ
Berkeley
ersity of
Page 3
R
estricte
Use,
d
duplication
restrictions
Data
and
R
ights
L
or
as
set forth
Computer
e
gend
disclosure
in subparagraph
Soft
w
are
b
y
the
clause
United
(c) (1)
at
F
ARs
States
Go
(ii) of
52.227.7013.
v
ernment
the
Righ
is sub
ts
in
ject to
T
ec
hnical
Hewlett-P
OSSD
3404
F
Learning
East Harmon
ort
Collins,
ac
k
ard
Colorado
Compan
Pro
ducts
y Road
y
80525
FINAL TRIM SIZE : 7.5 in x 9.0 in
Page 4
Printing
History
New editions
edition.
This
man
ual's
printing
made
c
hanges
Decem
the
382
date c
at
reprin
when
b
er,
Mo
del
Owner's
1992
382
installation
Safety
The
follo
wing
Symbols
Note
Caution
of
this
man
ual
prin
ting
date
hanges when
t
without
extensiv
Edition
and
Guide
e
R/382
(P/N
c
hanging
tec
2.
information has
and
con
ven
tions
Notes
Caution
could
not
con
tain
messages indicate
result
pro
ceed
understand
incorp
and
anew
hnical
This
orate
part
n
edition
the
prin
c
hanges
Edition
Owner's Guide
A1473-90014).
b
een
added
Conv
are
in
b
and ha
used
imp
loss
ey
ond
entions
throughout
ortan
of
data
a
CA
v
e
met
all
material
umb
er sho
is
prin
ting
date.
are incorp
includes
(P/N
New
SAM,
for
HP-UX
t
information
procedures
or damage
UTION
the
conditions
up
dated
w its
current
ted.
Minor
The
man
orated.
material
whic
A1473-90011)
HP
VUE,
9.0.
this
man
ual:
set
apart
which,
to equipmen
message
unless
stated
since
edition.
c
hanges
ual
h
and
and
from
if
not
therein.
the
part
app
the
t. Do
y
ou
previous
The
ma
y
n
umb
eared
Mo
device
the
text.
observ
fully
b
del
ed,
e
er
in
Warning
iv
W
arning
not observ
beyond a W
messages
ed,
indicate
procedures
could result in personal injury
ARNING message unless y
have met the conditions stated
FINAL TRIM SIZE : 7.5 in x 9.0 in
therein.
or
practices which,
if
. Do not proceed
ou fully understand and
Page 5
Regulatory
F
CC
Statemen
The
F
ederal
20780)
the
has
users of
Information
t
(F
or
U.S.A.
Comm
sp
this pro
ecied
unications
that
duct:
Only)
Commission
the
follo
wing
(in
notice b
Subpart
e brough
J
of
tto
P
art
15,
the atten
Do
tion
c
k
et
of
This equipmen
and
if
not
ma
y
cause
found
to
Subpart J
protection
en
vironmen
cause
in
terference
to
take
whatever
T
urv
allisuusyh
L
aserturval
Luok
an
1
Klass
1
Laser
HP
9000
laitteensis
p
a
alaitteena toimiv
Kyseinen CD-R
laserlaite.
p
a
asyn
laitteen
HP
9000
laserturv
t generates,
installed
in
terference
comply
of
with
P
art
against suc
t.
Op
eration
measures
teen
lisuus
Laserlaite
Apparat
Mo
del
382
ainen
CD-R
OM-livyasema
Normaalissa
ulk
Mo
del
382
allisuuden
and
used
to
the
15
of
F
CC
hin
of
in
whic
h
v
eto
(Finland
tietok
OM-levy
a tietok
k
ayt
opuolelle.
tietok
osalta
uses, and
in
radio
limits for
rules,
can
accordance
comm
unications.
a
Class
whic
terference when
this
equipmen
case
the
user
ma
y
b
e
required
Only)
oneeseen
one k
oss
oneen on
T
y
osuo
v
oidaan
asema,
atsotaan
on k
ayttaj
a
levy
aseman suo
tyyppih
jeluhallitus,
jok
radiate
with
A
computing
h
are
designed
operated
t
in
a residen
at
his
o
to
correct
asen
a
on
laserlaite.
laserlaitteeksi.
an
k
annalta
yvaksyn
T
y
hyvaksyntanumero TSH 222/6019/90. Laitteiden
maaritetty v
825 m
ukaisesti. Tiedot CD-R
altioneuvoston p
aatoksen No: 472/1985 ja standardin SFS-IEC
OM-levyasemassa k
sateilyominaisuuksista:
radio
the
instructions
It
has
in
a
wn
exp
taa
m
uistilaitteeksi
turv
jakotelo
yt
Suomessa
frequency
b
een
device
to
pro
commercial
tial area
ense
the
in
T
all
allinen
esta
energy
man
tested
and
pursuan
vide
reasonable
is lik
ely
will
b
e
required
terference.
oin
m
y
os
luok
a lasers
ateen
osuo jeluhallituksen
turvallisuusluokkaon
aytettavan laserdio din
ual,
an
to
1
t
to
Aallonpituus
Teho 0,4 mW
Luokan 1 laser
780 nm
v
FINAL TRIM SIZE : 7.5 in x 9.0 in
Page 6
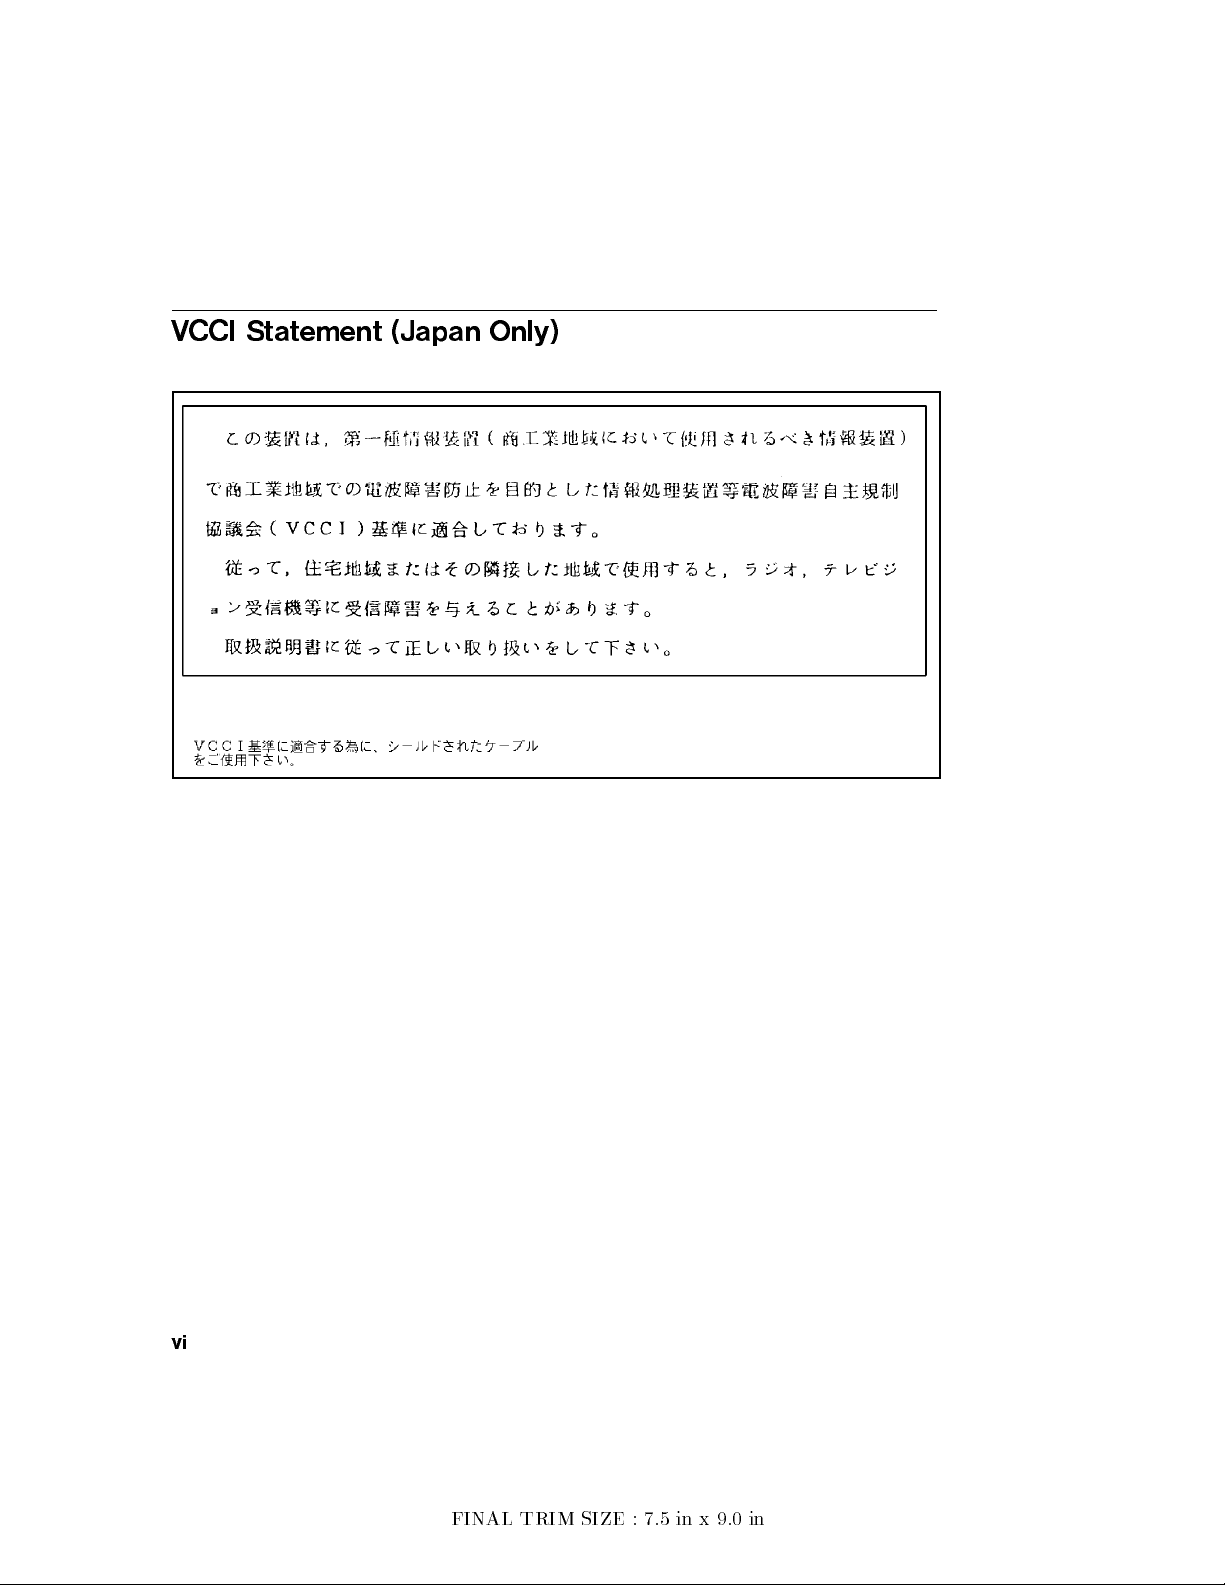
V
CCI
Statement
(Japan
Only)
vi
FINAL TRIM SIZE : 7.5 in x 9.0 in
Page 7
Laser
(F
or
The
Departmen
Standard
This
laser ligh
housings
during
W
arning
Safety
computers/controllers
CD R
OM driv
t
of
according
means
that
t emitted
and
external
an
y
phase
Statement
eis
certied as
Health
the
and
to
the
device
inside
co
of
user
Use
of controls,
those
specified
invisible
within
the
parts.
The
CD
when
disassembled.
exposure to
laser
radiation
Do
NOT
with a
Human
R
adiation
do
es
not
the
device
v
ers,
the
op
eration.
laser
radiation
CD
ROM
ROM
driv
the
could
disassemble
(For
U.S.A.
CD R
OM driv
a
Class
1
services
Contr
pro
is
laser
(DHHS)
ol
duce hazardous
completely
b
eam
adjustments,
in
this
manual ma
exposure.
driv
e
contain
e
becomes
If
the
invisible
laser
result
the
CD
Only)
e
laser
for He
cannot
or
a
Class
CD
ROM
beam
in
blindness.
ROM driv
installed.)
pro
duct
under
Radiation
alth and
laser radiation.
conned
escap
e
procedures
y result
None
of
customer
3B
laser
driv
e
and
e for
the
U.S.
P
erformance
Safety A
within
from
ct
protectiv
the
mac
different
in hazardous
the
mechanisms
or
field-replaceable
mechanism
is
disassembled,
hazardous
any
invisible
reason.
of
Since
hine
from
1968.
e
FINAL TRIM SIZE : 7.5 in x 9.0 in
vii
Page 8
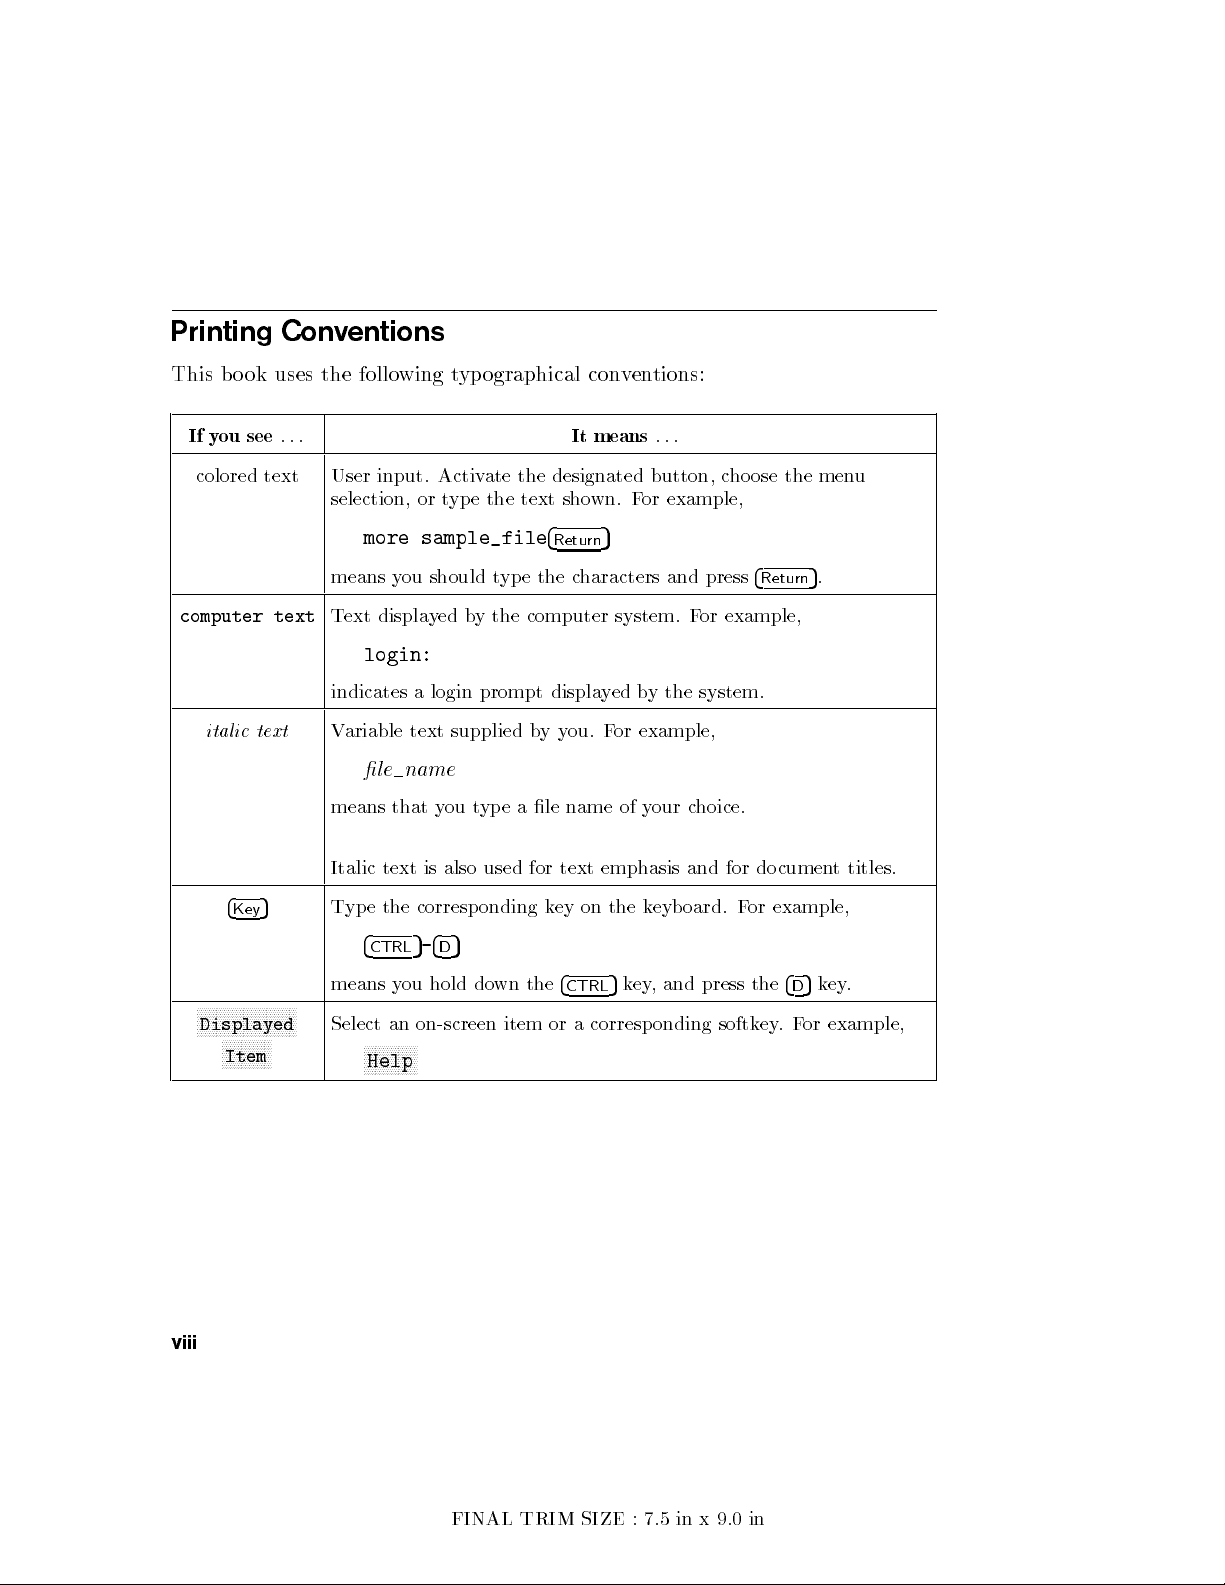
Printing
Conv
entions
This b
If
y
ou
colored
computer
italic
4
o
ok
see
text
textText
text
5
Key
uses
.
.
.
the
follo
User
input.
selection,
more
means
displa
login:
indicates a
V
ariable
le name
means
Italic
text
T
yp
e
the
4
CTRL
wing
t
yp
Activ
or
t
yp
e
sample_file
y
ou
should
y
ed
b
login prompt
text
supplied
that
y
ou
t
is
also
corresp
5
5
-
4
D
ographical
ate
the
designated
the
text
4
Return
t
yp
e
the
y
the computer
displa
b
y
you.
yp
e
a
le
used
for text
onding
k
ey
con
v
It
means
sho
wn.
5
c
haracters
system. F
y
ed
For
name
of
emphasis and
on
the
en
tions:
.
.
.
button,
F
or
example,
and
b
y
the
example,
y
our
k
eyb
c
ho
ose
press
or example,
system.
c
hoice.
for
oard.
F
or
the
4
Return
do
cumen
example,
5
.
men
t
u
titles.
N
N
N
N
N
N
N
Displayed
viii
N
N
NN
NN
N
N
N
N
N
NN
Item
or
4
CTRL
a
5
key
corresp
,and
press the
onding softk
means
NN
NN
N
N
N
N
N
N
N
N
N
NN
NN
N
N
Select
N
NN
you
an
NN
NN
NN
NN
hold do
on-screen
N
N
N
wn the
item
ey.
4
D
For
5
key
.
example,
Help
FINAL TRIM SIZE : 7.5 in x 9.0 in
Page 9
Contents
1.
Product
The
HP
F
eatures:
Memory
Graphics
Built-In
In
ternal
Hardw
Op
erating
2.
Using
Ov
Finding
Y
erview
Chapter
Hardw
Soft
w
System
Solving
Description
9000
Mo
del
.
.
.
.
.
.
.
.
.
.
.
.
Interfaces
Mass
Storage
are
Arc
hitecture
Systems
our
Man
uals
.
. .
.
Con
ten
ts
Do
cumen
are Installation
are
Op
Problems .
ts
Installation
eration
382
.
.
.
.
.
.
for
.
Con
.
.
.
.
.
.
.
.
.
.
.
.
Devices
.
.
.
.
.
.
.
.
.
.
Sp
ecic
.
.
.
.
.
.
.
.
.
.
troller
.
.
.
.
.
.
.
.
.
.
.
.
.
.
.
.
T
asks
.
.
. .
.
.
.
.
.
.
.
.
.
.
.
.
. .
.
. .
.
.
.
.
.
.
.
. .
.
.
.
.
.
.
.
.
.
.
.
.
.
.
. .
.
.
. .
.
.
.
. .
. .
.
.
. .
.
.
.
.
.
.
.
.
. .
.
.
.
.
.
.
.
.
. .
.
.
.
. .
.
.
.
.
.
.
.
.
.
.
.
.
. .
.
.
. .
.
.
.
.
.
.
. .
.
.
.
. .
.
.
.
.
.
.
.
.
.
.
.
. .
.
.
. .
.
.
.
.
.
.
. .
.
.
.
. .
.
.
.
.
.
.
.
.
.
.
.
.
.
.
.
.
.
.
. .
.
.
. .
.
.
.
.
1-1
.
.
.
1-1
.
.
.
1-3
.
.
.
1-3
.
.
.
1-4
.
.
.
1-7
.
.
.
1-7
.
.
.
1-8
.
.
.
2-1
.
.
.
2-1
. .
.
.
.
.
.
.
. .
2-2
.
2-2
.
2-3
.
2-4
2-4
3. Starting
Chapter
Initially
Using the Command Line
Setting Up a User Accoun
Selecting a New P
Running the passwd Command .
Logging Out
Exiting T
Exiting (Logging Out) for an Extended P
Exiting Using the HP VUE FrontPanel . . . . . . . . . . 3-10
Y
our
System
Conten
Conguring
ts .
. . . . . . . . . . .
emp
orarily . . . . . . . . . . . . . . . . . . . 3-10
FINAL TRIM SIZE : 7.5 in x 9.0 in
. .
. .
Y
our
System
to Log In .
t.
assword . .
. .
. .
.
.
.
.
.
.
.
.
.
.
.
. 3-1
.
.
. .
.
.
.
.
.
.
.
.
.
.
. . . . . . . . . . . . 3-3
. . . . . . . . . . . .
. . . . . . . . . . . . . . . 3-7
. . . . . . . . . . . . . 3-8
. . . . . . . . . . . . 3-9
eriod
. . . . . . . 3-10
. . . . 3-5
Contents-1
3-2
Page 10
Shutting
Options
Activ
Activating
Logging
Logging
4.
Using
Chapter
The
Command Line
Running
W
orking with
Basics
Shell
Determining
Using
Displa
F
or
Using
Creating
Mo
ving
Copying
Remo
Viewing
Prin
Editing
Starting
Selecting
P
ositioning the
Sa
ving
For More Information on vi
Networking Ov
Copying Files Using ftp
Preparing to Use
Transferring Files with ftp
Copying Files Remotely Using rcp
Logging In on Another Computer Using rlogin
Displaying Remote Graphical Programs Locally . . . . . . . 4-24
Do
wn
for
Y
ating
In
Out of
the
Command
Con
ten
Commands
of
Shells:
F
eatures
Key
ying
More
Information
Files
and
Directories
and
Files .
ving Files
and
ting
a
Files .
vi
Editing
Y
our
.
.
.
.
.
.
.
.
.
.
.
.
.
.
.
.
.
. .
our
Starting
the
XWindo
HP
VUE
and
Using
HP VUE
ts
.
Shells .
Characteristics,
.
Your
Shell:
the
Prin
File
Visual
HP-UX
Directories
Cop
ying
.
and
ting
with
.
.
. .
. .
F
Cursor
W
ork
erview . . . . . . . . . . . . . . . . . .
ftp . . . . . . . . . . . . . . . . . . 4-18
and
w System
.
.
HP
Line
.
. .
Prompt
.
.
. .
.
.
.
Login
Shell
Help
Man
.
with Command
.
.
Files
.
.
.
Directories
Files
lp
.
.
.
.
. .
unctions
.
and
Quitting
W
orking
.
.
.
VUE
. .
. .
. .
. .
.
.
.
.
.
.
.
.
.
.
.
for
ual
.
.
.
.
.
.
b
et
w
.
.
.
.
. .
.
.
.
.
.
.
. .
.
.
.
.
.
. .
. . . . . . . .
. . . . . . . . . . . . .
En
vironmen
. .
. .
.
.
.
.
.
.
.
.
.
. .
.
.
.
.
.
.
.
.
.
.
.
.
.
.
.
.
.
.
.
.
.
.
.
Cho
osing
and Using
.
.
.
.
.
.
.
.
.
.
Korn Shell
P
ages
from
the
.
.
.
.
.
Lines
.
.
.
.
. .
een
Directories
.
.
.
.
.
.
.
.
.
.
. .
. .
.
.
.
.
. .
.
.
.
.
.
.
.
.
.
.
.
.
.
.
.
.
.
.
.
.
.
. .
.
. . . . . . . . . . . . . 4-16
.
. . . . . . . . . . . 4-20
t
.
.
.
.
.
.
. .
.
.
.
.
.
.
.
.
.
.
.
.
.
.
.
. .
. .
.
.
.
. .
Command
.
.
.
.
.
.
.
.
.
.
.
.
.
.
.
.
. .
. .
.
.
.
.
.
.
.
. .
.
. .
.
.
.
. . . . . . . . . 4-18
. . . . . . . 4-23
.
.
. .
.
.
.
.
.
.
.
.
.
.
.
.
.
.
.
.
. .
. .
.
.
.
.
.
.
.
.
.
. .
.
.
.
.
.
.
.
.
.
. .
. .
.
.
. .
. 3-11
. .
. .
.
.
.
.
. .
. .
. .
.
.
.
.
.
.
.
.
.
.
.
.
.
.
.
.
.
. 4-2
.
.
.
.
. .
. .
.
.
.
.
.
.
.
.
.
.
.
Line
.
.
.
.
.
.
.
.
.
.
.
.
.
.
.
.
.
.
.
.
.
.
.
.
.
.
.
.
.
.
.
. .
. 4-14
.
.
.
.
. .
.
.
. .
. .
.
.
.
.
. 4-17
. . . 4-19
3-12
3-12
3-13
3-14
3-15
4-1
4-2
4-3
4-3
4-4
4-5
4-6
4-7
4-7
4-8
4-8
4-9
4-9
4-10
4-12
4-12
4-14
4-14
4-15
4-15
Contents-2
FINAL TRIM SIZE : 7.5 in x 9.0 in
Page 11
For
More
Information
5.
Bac
king
Up,
Restoring,
Chapter
Bac
Creating
Bac
Restoring
Restoring
F
6.
Conguring
Chapter
Preparing for
Conguring
T
Finding the
Conguring
Soft
T
Conguring
T
Arc
Retrieving
Mounting
Remo
Conguring
Installing the
T
Moun
Removing and
For More Information
Conguring for a DDS T
Conguring the Drive on HP-UX
Testing Y
DDS T
Maximum Usage of DDS Cassettes
In Case of Dicult
Conten
king
Up
king Up
or More
Con
esting
w
are
esting
esting
hiving
ving
esting
ting
ape Driv
Y
our
a
Reco
Your
Individual
Y
our
Information
HP-UX
ten
Installation .
HP-UX
the
Prin
Status
for
Installation
Y
our
for
Your
Files
Files
a New
and
for
Y
our Installation
the
our Installation .
.
.
and
Up
ts .
. .
.
.
System
v
ery
Op
erating
ts
.
ter
of
a
Hard
Installation
a
Flexible Disk
Installation .
to
from
Flexible Disk
Inserting
a
CD
CD
New
Inserting a Disc
e LED Indicators
and
System
File
Systems
Files
for
.
for
a
R
CD
y.
.
System
.
.
Prin
ters
.
.
.
a
Prin
Installation
Existing
Disk
Driv
of
the
.
Flexible
a
Flexible
a
File-System Flexible
R
OM
Driv
OM
Driv
. .
R
OM Driv
. . . . . . . . . . . . . .
ape Driv
.
. . . . . . . . . . . . . . . . . 6-30
.
.
.
.
.
.
.
.
.
.
.
.
.
.
.
. 4-25
dating
.
Soft
.
.
.
. .
ter
SCSI
Hard
.
Drive
.
Disk
e
. . . . . . .
Your
Softw
are
.
.
.
.
.
.
.
.
.
.
.
.
.
.
. 5-1
w
are
.
.
.
.
.
. .
. .
. .
. .
. .
. .
. .
.
.
.
.
.
.
.
.
.
.
.
.
.
.
.
.
.
.
.
.
.
.
.
.
.
.
.
.
.
.
.
. .
. .
. 5-7
Using the
.
.
.
and
Driv
.
.
.
.
.
.
.
.
.
Bus
e
. .
Disk
.
.
.
.
.
.
.
Disk
.
.
e
.
.
with
SAM
. .
.
e
. . . . . . . . . . . . . . 6-22
e . . . . . . . . . . . . . 6-24
. . . . . . . . . . . . . 6-25
. . . . . . . . . . . . . 6-28
Recov
ery T
ap
e
.
.
.
.
.
.
.
.
.
.
es
.
.
.
. .
. .
. .
. .
.
.
.
.
.
.
.
.
.
.
.
. .
. .
.
.
.
.
.
.
.
.
.
.
.
.
.
. .
Addresses
.
.
.
Driv
e
.
.
.
.
.
.
.
.
.
.
.
.
.
. .
. .
.
.
.
.
.
.
.
.
.
. .
.
.
.
.
.
.
.
.
.
.
. . . . . . . . . 6-27
. . . . . . . . . . .
.
.
.
.
Upgrade
.
.
.
.
.
.
.
.
.
.
.
.
.
.
.
.
.
Disk .
. .
. .
.
.
.
.
.
.
.
.
.
.
.
.
.
.
.
.
.
.
.
.
.
.
.
.
.
.
.
.
.
.
.
.
.
.
.
. .
. .
.
.
.
.
.
.
.
.
.
. . . . 6-23
.
.
.
.
.
.
.
.
.
. .
.
.
.
.
.
. 6-8
.
. 6-11
.
.
.
.
.
.
.
. 6-15
.
.
. .
.
.
.
.
.
.
. .
. 6-30
5-2
5-2
5-4
5-10
5-12
6-1
6-2
6-3
6-5
6-7
6-8
6-12
6-14
6-15
6-16
6-17
6-18
6-19
6-21
6-21
FINAL TRIM SIZE : 7.5 in x 9.0 in
Contents-3
Page 12
7. Dealing
Chapter
In
terpreting
Interpreting
Dealing
Logging
Re-Setting
Managing
Bo
Reco
Pro
Dealing
A.
Conguring
App
endix Con
Using
Mo
Conguring
F
or
Glossary
Index
with
Con
with
In With
the
a
ot Device
v
ering
from
cedures
with
the
Bo
difying
More
Problems
ten
ts
.
.
Error
Messages During
the
LED
Indicators
HP
VUE
HP VUE
VRX
Sp
Bo
ot
F
ailure
Problems .
a
System
for
Reco
v
Net
w
ork
the
Bo
ot
R
ten
ts
.
ot
R
OM
Conguration Mo
I/O
Conguration
for
Automatic
Information
.
.
.
Problems
When All
ecial
Device
.
.
. .
P
anic
ering
from
F
ailures
OM
.
.
.
Op
. .
.
.
.
. .
Boot
.
.
.
.
Files
.
.
. .
.
.
.
.
.
a
System
.
.
.
.
.
.
.
Information
erating
.
.
.
.
System
. .
.
.
.
.
Else F
with
. .
.
.
.
.
.
.
.
.
de .
.
.
. .
. .
. .
.
.
.
.
. .
ails
mkno
. .
.
.
.
.
.
.
.
P
anic
.
.
. .
.
.
.
.
.
.
.
Selection
.
.
.
. .
.
. .
.
.
.
.
.
.
.
.
.
d
.
.
.
.
.
.
.
. .
.
.
.
.
.
.
.
. .
.
.
.
.
.
.
.
.
.
.
.
.
.
.
.
.
.
.
.
. .
.
.
.
.
.
.
.
.
. .
.
.
.
.
.
. .
.
.
.
.
.
.
.
.
.
.
.
.
.
.
.
.
.
.
.
.
.
.
.
. .
.
. A-1
.
.
.
. A-4
.
.
.
.
7-1
7-2
7-4
7-7
7-8
7-9
7-10
7-12
7-14
7-16
7-20
A-2
A-6
A-9
Contents-4
FINAL TRIM SIZE : 7.5 in x 9.0 in
Page 13
1
1
Product
The
HP
The
earlier
computers
MIPS
in
terface
exible
are
and
determined
Description
9000
HP
Series
p
used.
1280
Model
9000
Mo
300
ha
v
e
b
erformance
p
orts.
Optional
disk
driv
es
Monitors
b
y
1024
b
y
the
del
382
382
con
and
Series
een
implemen
and
a
v
in
and
CD
are
also
high-resolution
system
b
Features:
MC
68040
ECC
Three graphics
1024
1280
640 b
CPU
(SIMM)
b
y
768
b
y
1024
y
480
op
erating
RAM
resolution v
at
congurable
ersions:
medium-resolution;
high-resolution;
V
GA-resolution
monitors.
25-pin
One 25-pin HP P
One HP-IB p
RS-232
serial
arallel port.
ort.
I/O
p
ort
SCSI port (optional).
HP-HIL port for HP-UX k
DIO-I and DIO-I I in
bo
xes for connecting additional cards).
DIO-I Accessory
Card slot
eyb
terface slot direct connect expanders (optional in
Controller
troller
is
ob
ject
co
de
compatible
400
computers.
ted.
ersatile
ternal
R
supp
OMs.
orted
I/O
mass
V
color
oard
t
yp
25
MHz.
from
for 16-in.
for
19-in.
graphics
(expandable
Key
GA-resolution
e
Man
features
set
including
storage
with
1024
graphics.
and
conguration.
8
MB
color monitors.
color
with
14-in.
to
y
capabilities
devices
b
to
32
include
Graphics
a
lo
serial
and
include
(640
b
y
y
768 medium-resolution
resolution
MB.
monitors.
color
or
3
p
orts).
oards and other HP-HIL devices.
with
of
w-cost
parallel
hard
480)
gra
most
p
ersonal
22
and
graphics
is
yscale
terface
FINAL TRIM SIZE : 7.5 in x 9.0 in
Product Description 1-1
Page 14
1
Ethernet
IEEE
802.3
LAN, in
ThinLAN (optional).
The
Mo
del
382
accommo
One
3.5-in
CD
The
additional
52 Mb
210
Mb
420
Mb
(The
Mo
A
t
ypical
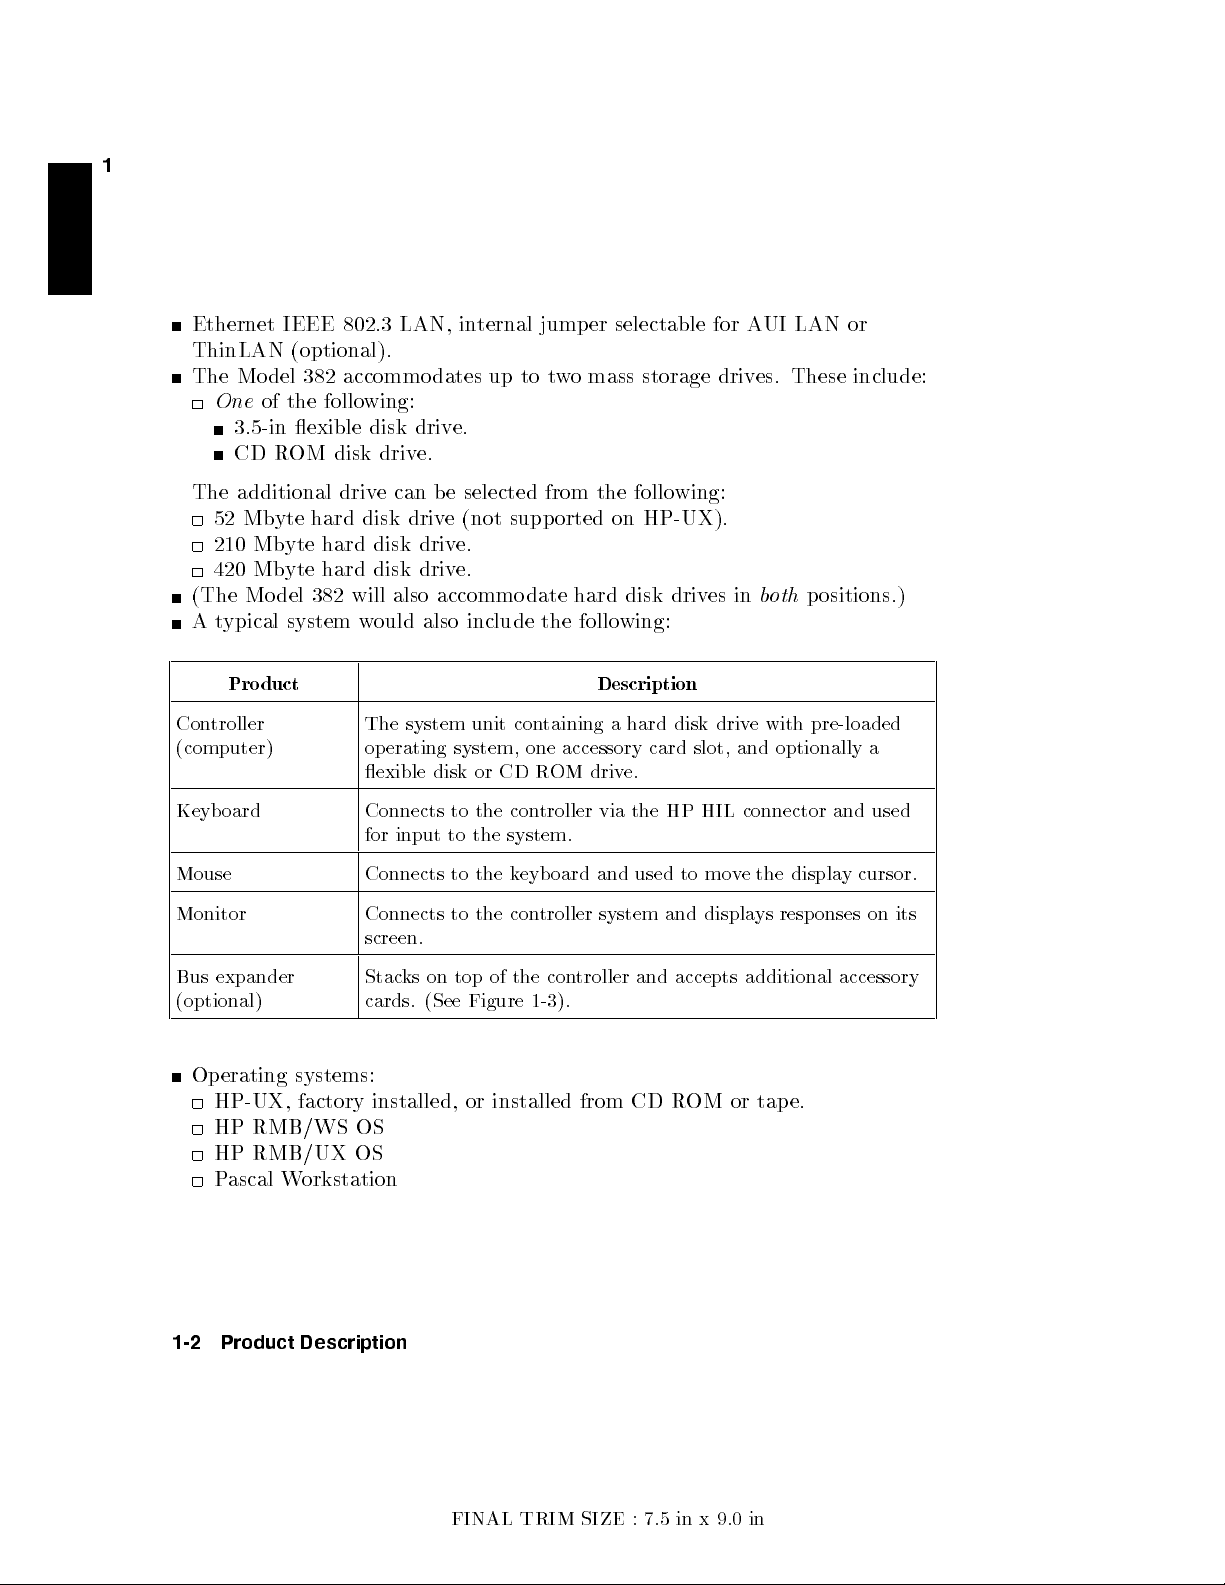
Pro
Con
troller
(computer)
of the
duct
exible
R
OM
yte
yte
yte
del
system
following:
disk
disk
driv
hard
disk
hard
disk
hard
disk
382
will also
w
The
op
drive.
e can
ould
system
erating
driv
driv
driv
driv
also
exible
Keyb
oard
Connects
for
input
Mouse Connects
ternal jump
dates
up
to
e.
be
selected from
e
(not
supp
e.
e.
accommodate
system,
disk
to
to
to
include
unit
or
the
the
the
the
containing
one
CD
R
con
troller
system.
k
eyb
er selectable
t
w
omass
the follo
orted
hard disk
follo
Description
accessory
OM driv
via
oard
and
storage driv
wing:
on
HP-UX).
drives
wing:
a hard
disk
card slot,
e.
the
HP
used
to
for
driv
HIL
mo
A
UI
es. These
in
b
oth
e
with
and
optionally
connector
v
e
the
LAN
p
ositions.)
pre-loaded
and
displa
y
or
include:
a
used
cursor.
Monitor Connects to
the con
troller
screen.
Bus
expander
(optional)
Operating
systems:
Stac
cards.
ks
on
(See
top
Figure
of the
controller
1-3
).
HP-UX, factory installed, or installed from CD R
HP RMB/WS OS
HP RMB/UX OS
Pascal W
orkstation
1-2 Product Description
system
and accepts
and
displa
additional accessory
OM or tape.
ys
resp
onses
on
its
FINAL TRIM SIZE : 7.5 in x 9.0 in
Page 15
Memory
1
User-installable
Mb
yte blo
Standard
RAM
t
wo-b
HP
memory
HP
memory
HP
memory
c
ks.
RAM
b
oards
are
oard pairs.
A2210A;
.
A2201A;
.
A2202A; t
.
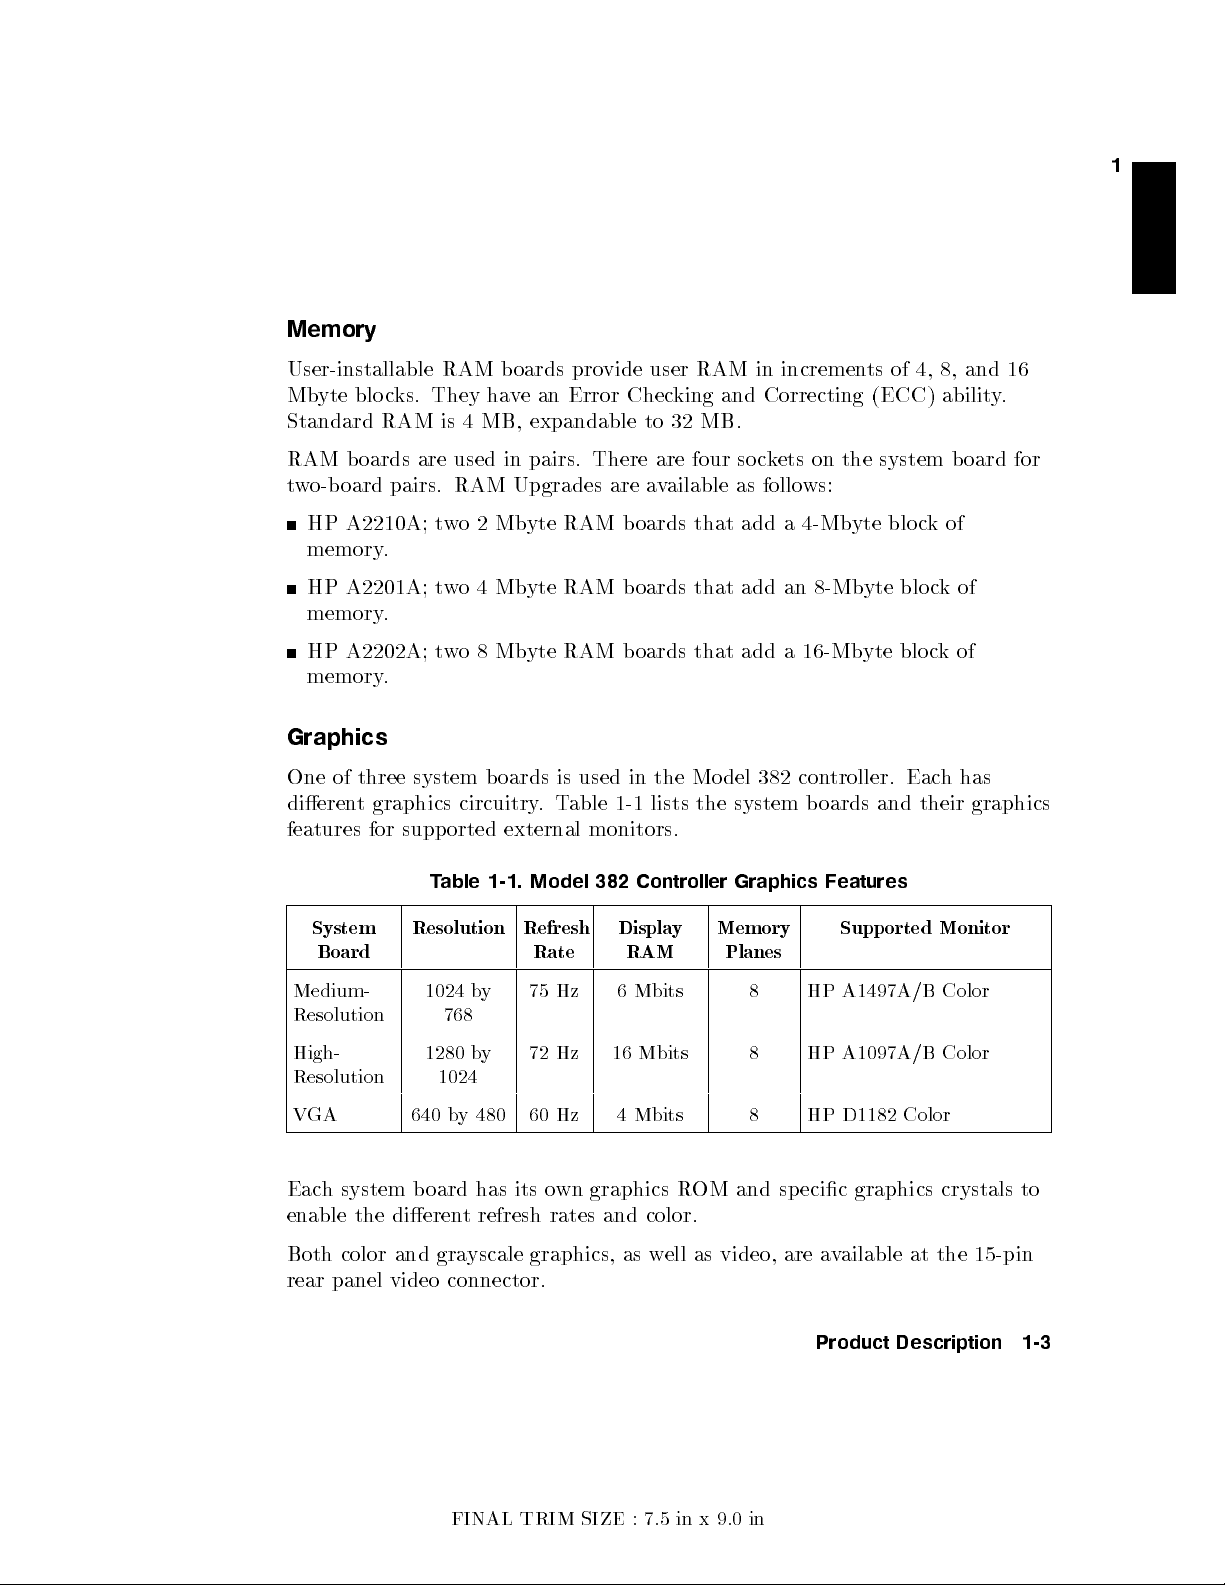
Graphics
One
of
three
system
dieren
features
t
System
graphics
for
supp
Resolution Refresh
Board
RAM
They
is
4
used
RAM
t
w
o
t
w
o4
wo
circuitry
orted
T
able
b
oards
ha
v
MB,
in
Upgrades
2
Mb
Mb
8Mb
b
oards
external
1-1.
e
yte
yte
yte
provide
an
Error
Chec
expandable
pairs. There
are
.
RAM
RAM
RAM
is
T
used
able
b
b
b
in
1-1
monitors.
Model
382
Displa
Rate
RAM
user RAM
king
to
32
MB.
are four
a
v
ailable
oards
that
oards
that
oards
that
the
Mo
lists
the
Controller
y
in incremen
and
Correcting
soc
kets
as
follo
add
add
add
del
382
system
Graphics
Memory
Planes
ws:
a
4-Mb
an
a
16-Mb
con
b
on
the
yte blo
8-Mb
yte
yte
troller.
oards
Features
Supp
ts of
(ECC)
system
blo
blo
Eac
and
orted
4,
8,
abilit
ck
of
c
k
c
k
h
their
Monitor
and
y
b
oard
of
of
has
graphics
16
.
for
Medium-
1024
Resolution
High-
Resolution
1280
1024
VGA 640 b
768
y 480
75
b
y
72
by
60 Hz 4Mbits 8 HP D1182 Color
Each system board has its o
enable the dieren
Both color and gra
t refresh rates and color.
yscale graphics, as w
rear panel video connector.
FINAL TRIM SIZE : 7.5 in x 9.0 in
Hz
Hz
6
16
Mbits
Mbits
wn graphics R
ell as video, are a
8 HP
8 HP
OM and
A1497A/B
Color
A1097A/B Color
specic graphics crystals to
vailable at the 15-pin
Product Description 1-3
Page 16
1
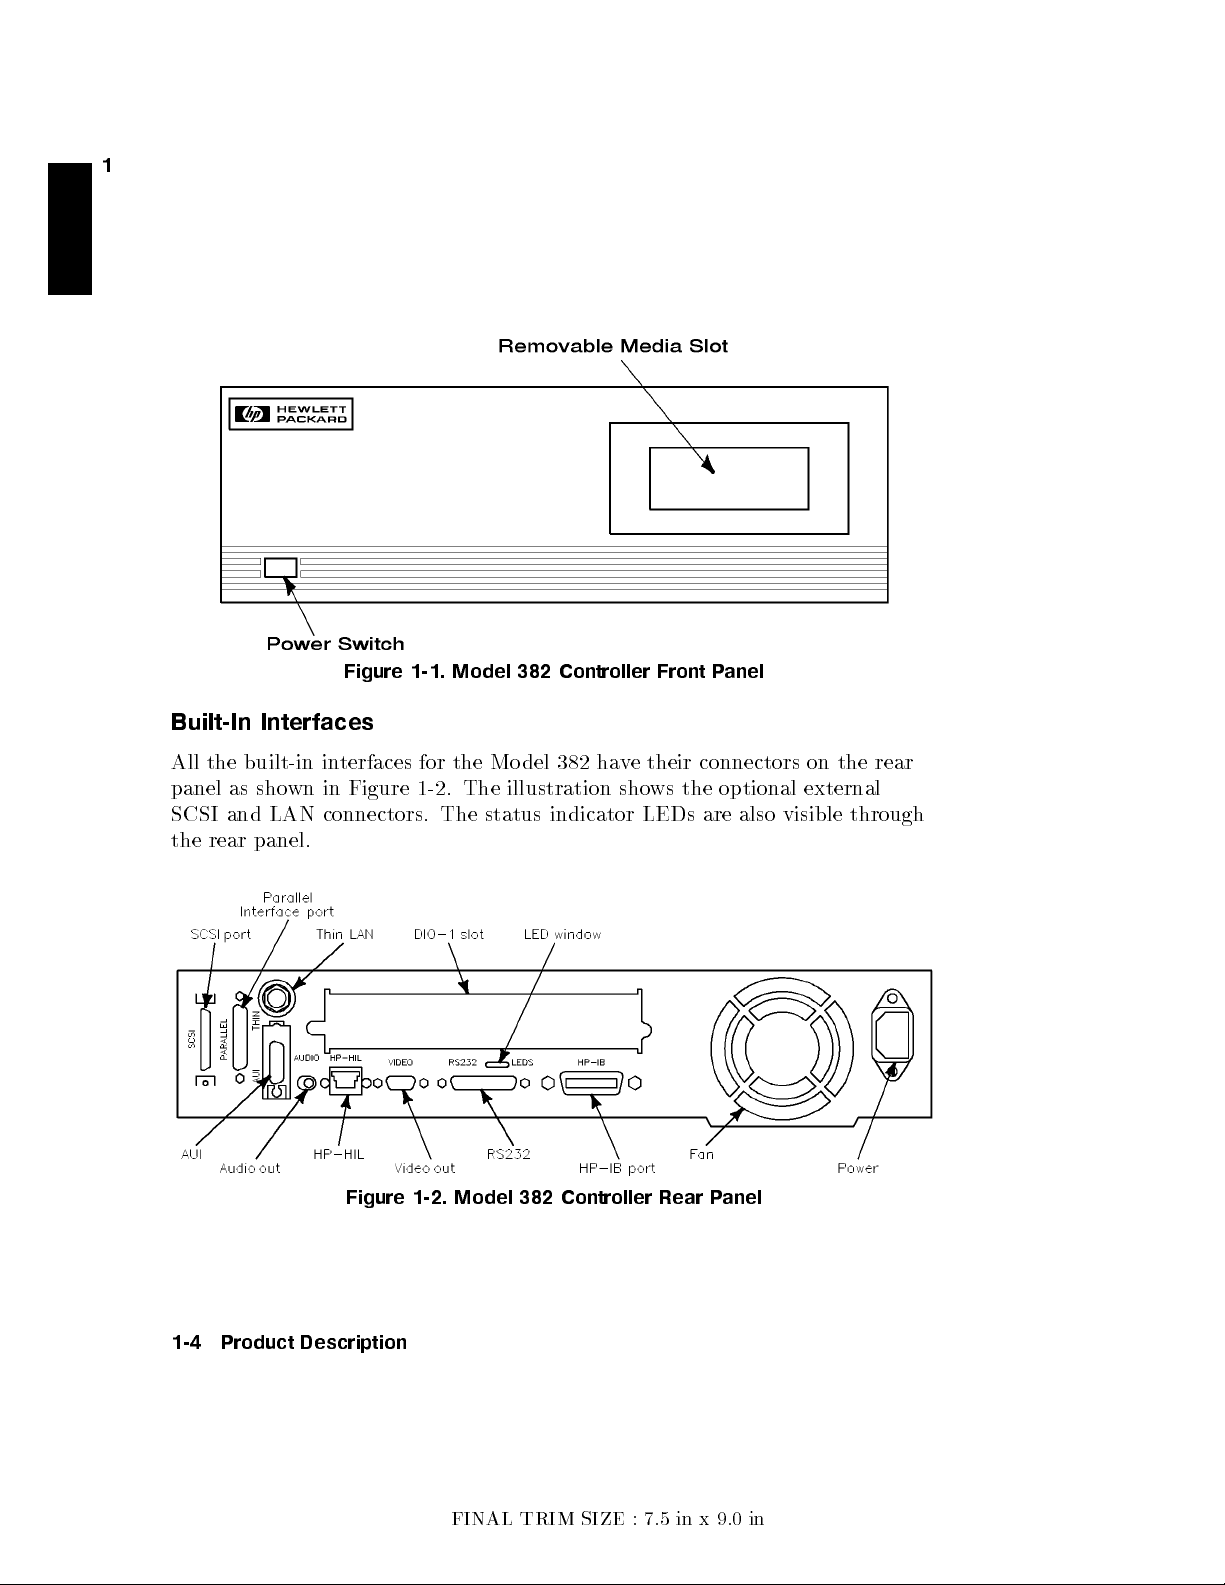
Built-In
All
the
built-in
panel
as
SCSI and
the
rear
Figure
Interfaces
in
terfaces
sho
wn
in
LAN
connectors.
panel.
1-1.
Figure
for
1-2
Model
the
.
The
Mo
The
status
382
Controller
del
382
illustration
indicator
ha
ve
sho
Front
their
ws
LEDs
connectors
the
are
Figure 1-2. Model 382 Controller Rear P
P
anel
optional
also
anel
on
external
visible
the
rear
through
1-4 Product Description
FINAL TRIM SIZE : 7.5 in x 9.0 in
Page 17
1
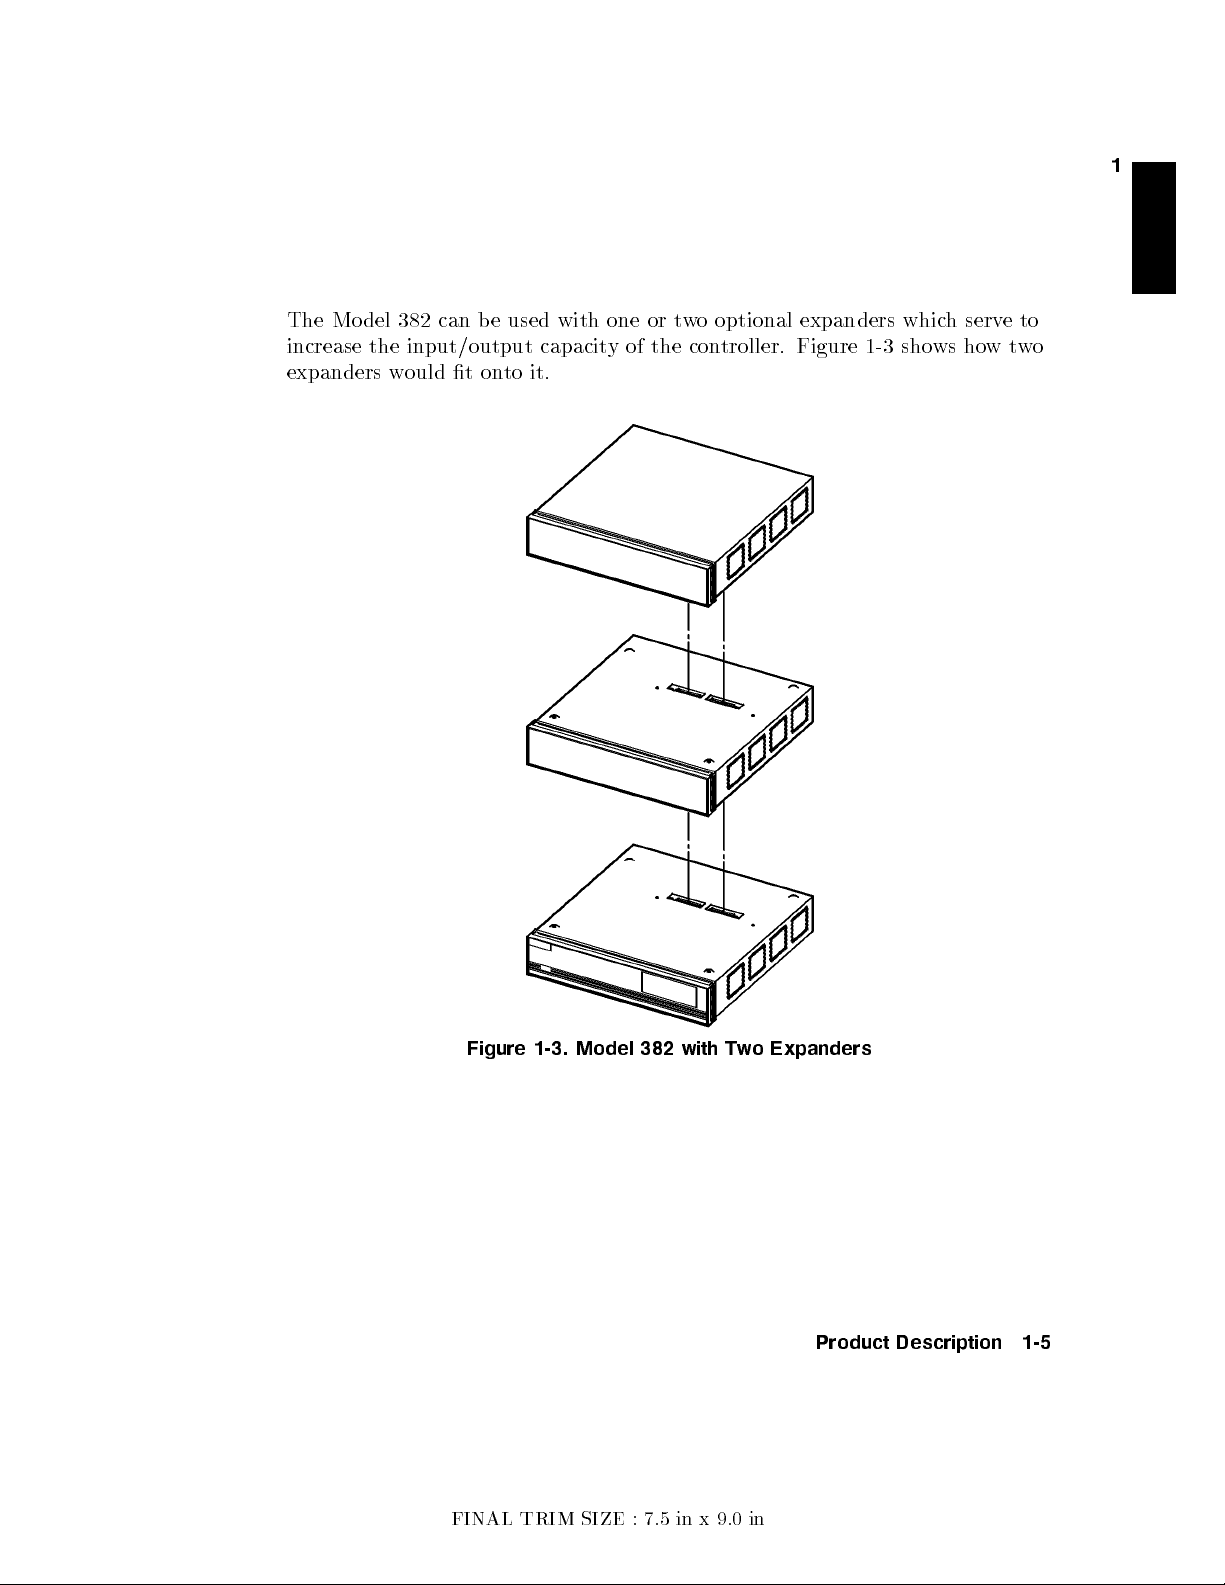
The Mo
del
increase
expanders
382
can
the
input/output
w
ould
b
t on
e
used
to it.
with
capacit
one
y
of
or
the
t
w
con
o
optional
troller.
expanders
Figure
1-3
whic
sho
h
serv
ws ho
e
wt
to
wo
Figure
1-3.
Model 382
with Tw
FINAL TRIM SIZE : 7.5 in x 9.0 in
o Expanders
Product Description 1-5
Page 18
1
Interface Descriptions
The
SCSI in
external
mass
storage
The
RS-232 serial
graphics
A
25-pin
Cen
tronics
under
The
HP-HIL
b
mass
o
terface
devices.
circuit
HP
P
TM
ot
R
OM
connector
uses
storage
interface
pro
vides
arallel
in
terface
con
a
devices.
video
p
ort
proto
trol in
(rear
high-densit
In
ternally
is expandable
for
monitors.
is
pro
vided
cols.
Some
Conguration
panel)
accepts
y
,
shielded
,
a
ribb
from one
for
use
conguration
Mo
a
external
on
with
de
for
v
ariet
cable
p
ort
to
devices
parameters
in
ternal
y
of
HP-HIL
connector
connects to
three
p
orts.
using
the
are
in
terfaces.
input
for
use
optional
The
a
vailable
devices.
with
HP 46021B
Integrated
Other HP-HIL
connector.
An
optional
t
w
o
p
orts:
ThinLAN
IEEE
uses
used.
AUI
LAN uses
is
required
Either
in
terface
p
ort
v
for
is
alues
activ
in Conguration
As
with
other
Series
pro
vided, as
well
devices
802.3
the
the
use
ated b
can
b
Mo
de.
as an
T
erminal
ma
y
Ethernet
BNC
15-pin
on
the
y the
e
congured
300
computers
internal
F
also
b
e
Local
connector.
connector.
net
work.
system b
b
speak
ormat
(ITF)
connected
Area
An
in
An
external
oard
y
k
eyb
oard en
and
con
er.
Keyb
to
the
Net
w
ternal
LAN
try under
trollers,
k
ork
attac
attac
jump
audio
oard.
eyb
oard
(LAN)
hmen
hmen
er
or
is
t
unit in
t
p
osition.
Boot
tone
HP-HIL
a
v
ailable
unit
Some
ROM
output
terface
in
terface
con
is
to
is
LAN
trol
1-6 Product Description
FINAL TRIM SIZE : 7.5 in x 9.0 in
Page 19
1
Internal
The
to
the in
Mo
Mass
del
ternal
382
congurations.
bay
tted with
option,
ba
F
actory-installed
Hardw
Most
All
circuits
so
circuits
the
the
y
can
ha
v
HP
A2258A
HP
A2259A
HP
A2252A 3.5-in.
used
with
HP
A2253A
and
multi-media
are
of
the
in
terface
are
c
kets
on the
on
a
optional
HP-UX
e
SoftPC
Architecture
functionalit
con
on
LAN
Storage
may
SCSI
Disk
either a
one
of sev
and
210
420
CD
trollers,
the
system b
PC
b
oard
b
Devices
use up
in
ed
op
to t
wo
terface.
It
is
congurations
210
or
420
erating
system
eral optional
customer-installable
Mb
yte Hard
Mb
yte
Hard
Disk
Disk
Flexible Disk
TM
,
or
used
for
R
OM
Disk
Driv
applications,
y
for
CPU
system
oard.
that
oard,
and
the Mo
b
oard.
is
as
circuits,
Either
Eac
h
part
the
fan
in
ternal
a
v
Mb
mass
ailable
for
HP-UX
yte
preformatted
ma
y
b
e
mass storage
mass
Driv
e.
Driv
e.
Drive,
le
e,
w
exc
whic
ell
h
as
whic
hange.
pro
to
del 382
memory
t
w
o
mass
storage
of the
device. Separate
and
p
o
storage
in
diskless
ha
preloaded.
devices
storage
h
can
vides
most
HP
is
con
tained
con
troller
or
four
device
w
er
supply
devices
as
w
ell
v
e
their
hard
hard
disk
A
second
installed.
devices include:
b
e
moun
access
soft
on
w
to
are.
one
and
RAM
b
oards
has
its
assemblies
assem
connected
as
disk
ed
disk driv
driv
e.
As
disk
drive
ted
on
HP-UX,
sev
eral
data
system
b
oard.
graphics/video
plug
in
to
con
troller
include
blies.
e
an
sets
FINAL TRIM SIZE : 7.5 in x 9.0 in
Product Description 1-7
Page 20
1
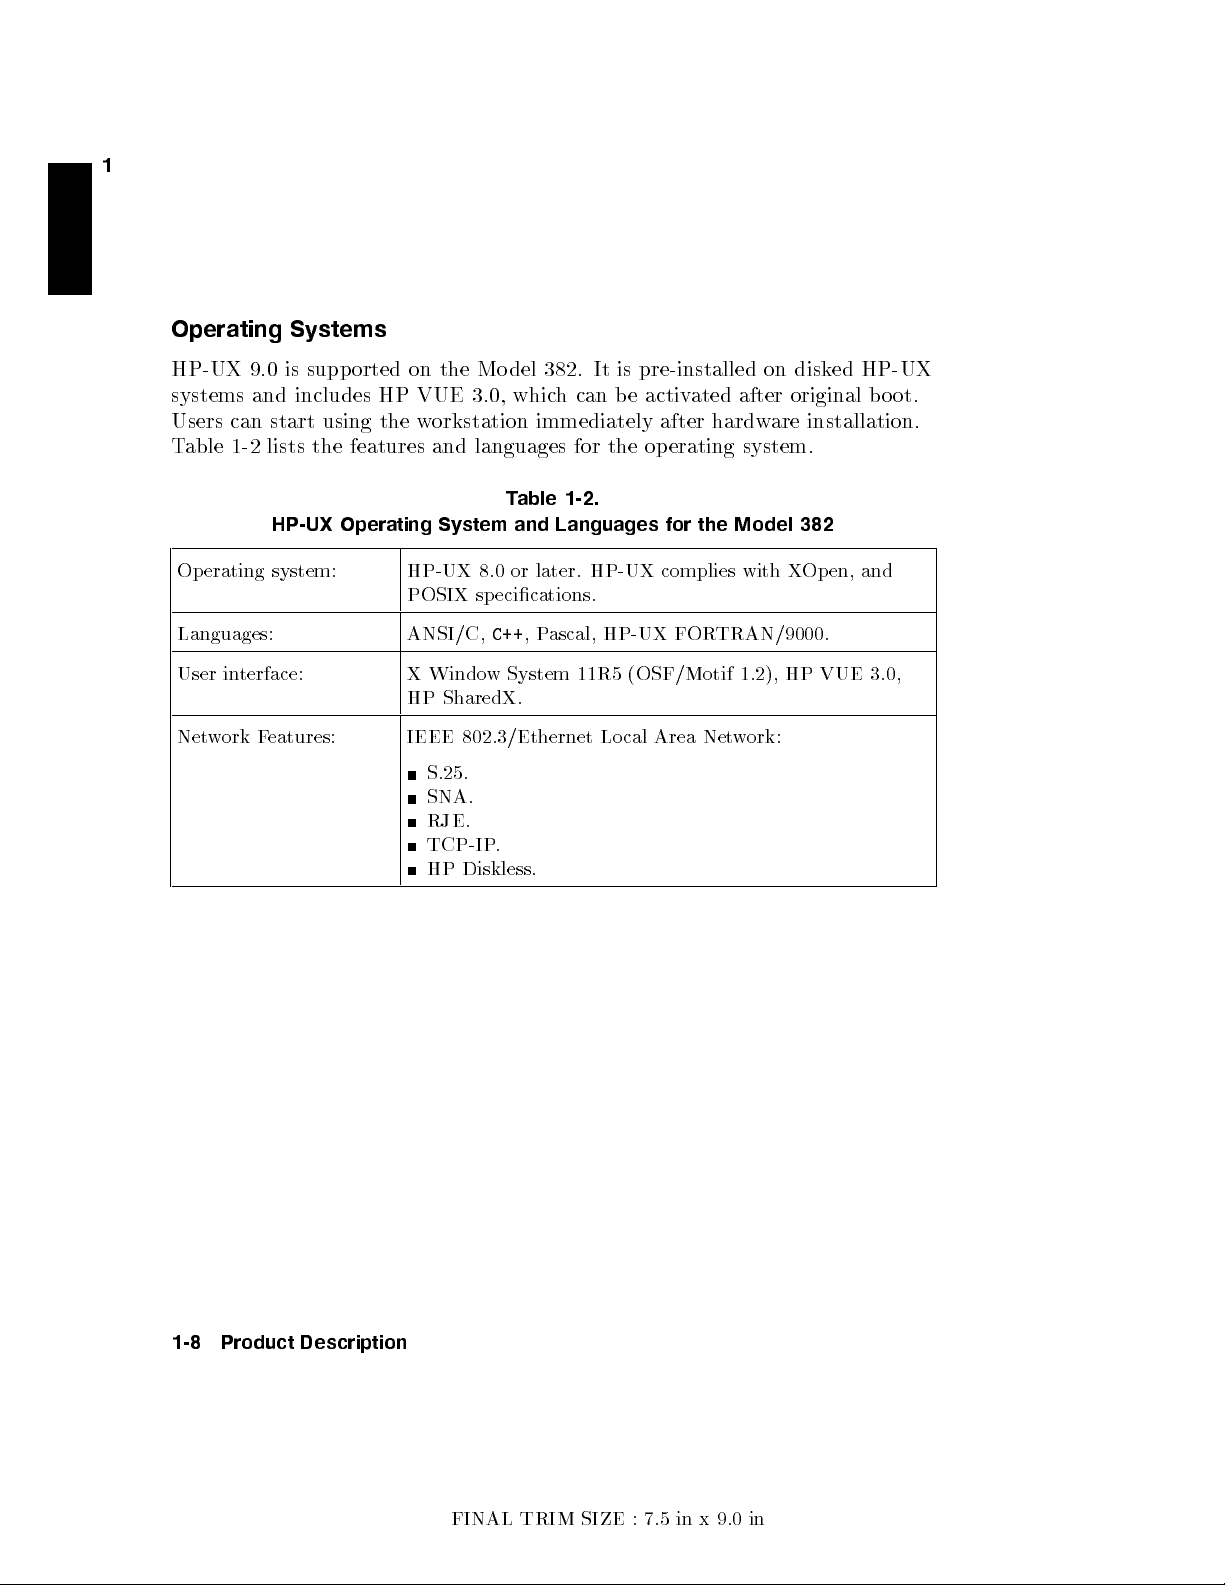
Operating
HP-UX
systems
Users
can
Table
Op
erating
Systems
9.0
is
supp
and includes
start
using
1-2 lists
the features
HP-UX Operating
system:
orted on
HP
VUE
the
w
HP-UX
the Mo
orkstation
and
System and
POSIX
Languages: ANSI/C,
User
Net
in
w
ork F
terface:
eatures:
X
Windo
HP
IEEE
SharedX.
S.25.
SNA.
RJE.
TCP-IP
HP
del 382.
3.0,
whic
h
can
immediately
languages
T
able
for
1-2.
Languages
8.0
or
later.
sp
ecications.
C++
,
P
ascal,
w
System
11R5
802.3/Ethernet
.
Diskless.
It is
pre-installed
b
e
the
HP-UX
HP-UX
(OSF/Motif
Local
activ
ated
after
op
erating
for
the
complies
F
OR
Area Net
on
disk
after
original
hardw
are
system.
Model
with
X
382
Op
TRAN/9000.
1.2),
HP
w
ork:
ed
HP-UX
b
o
ot.
installation.
en,
and
VUE
3.0,
1-8 Product Description
FINAL TRIM SIZE : 7.5 in x 9.0 in
Page 21
2
2
Using
Y
Overview
This
Owner's
with
using
and
using y
up
y
our
system
should
Chapter
need
In
this
to
installing,
asso
ciated
F
or
troublesho
If
y
ou
need
for
this system.
If
y
ou
do
y
ou
need
If
you
ha
Contents
c
hapter
v
the second
Chapter 3.
our
Manuals
Guide
HP-UX
our
le
on
system,
and les.
it.
y
ou
conguring,
devices.
oting
help
with
not
ha
ve
installation
e
installed
section of
co
v
ers
the
information
y
our
Mo
del
editing
In addition,
will
nd
references
and
operating
information,
system
hardw
a pre-installed
information,
y
our
system
Chapter 3,
382
con
troller.
les,
installing
Chapter 7
to
the
please
see
are
installation,
(Instant
see
Instal
and
w
an
\Using the
y
ou
will
need
The
topics
upgrade
co
v
ers
troublesho
man
uals
for
additional
HP
9000
Mo
Chapter
7.
see
the
Ignition) system
ling
HP-UX
t
to
get
on
with
Command Line
for
getting
include logging
devices,
and
oting,
tasks
del
382
and
Instal
lation
on
y
our
9.0
.
using
it,
to Log
started
bac
if
related
its
Guide
disk
skip
to
In" in
in
king
y
ou
and
FINAL TRIM SIZE : 7.5 in x 9.0 in
Using Your Manuals 2-1
Page 22
2
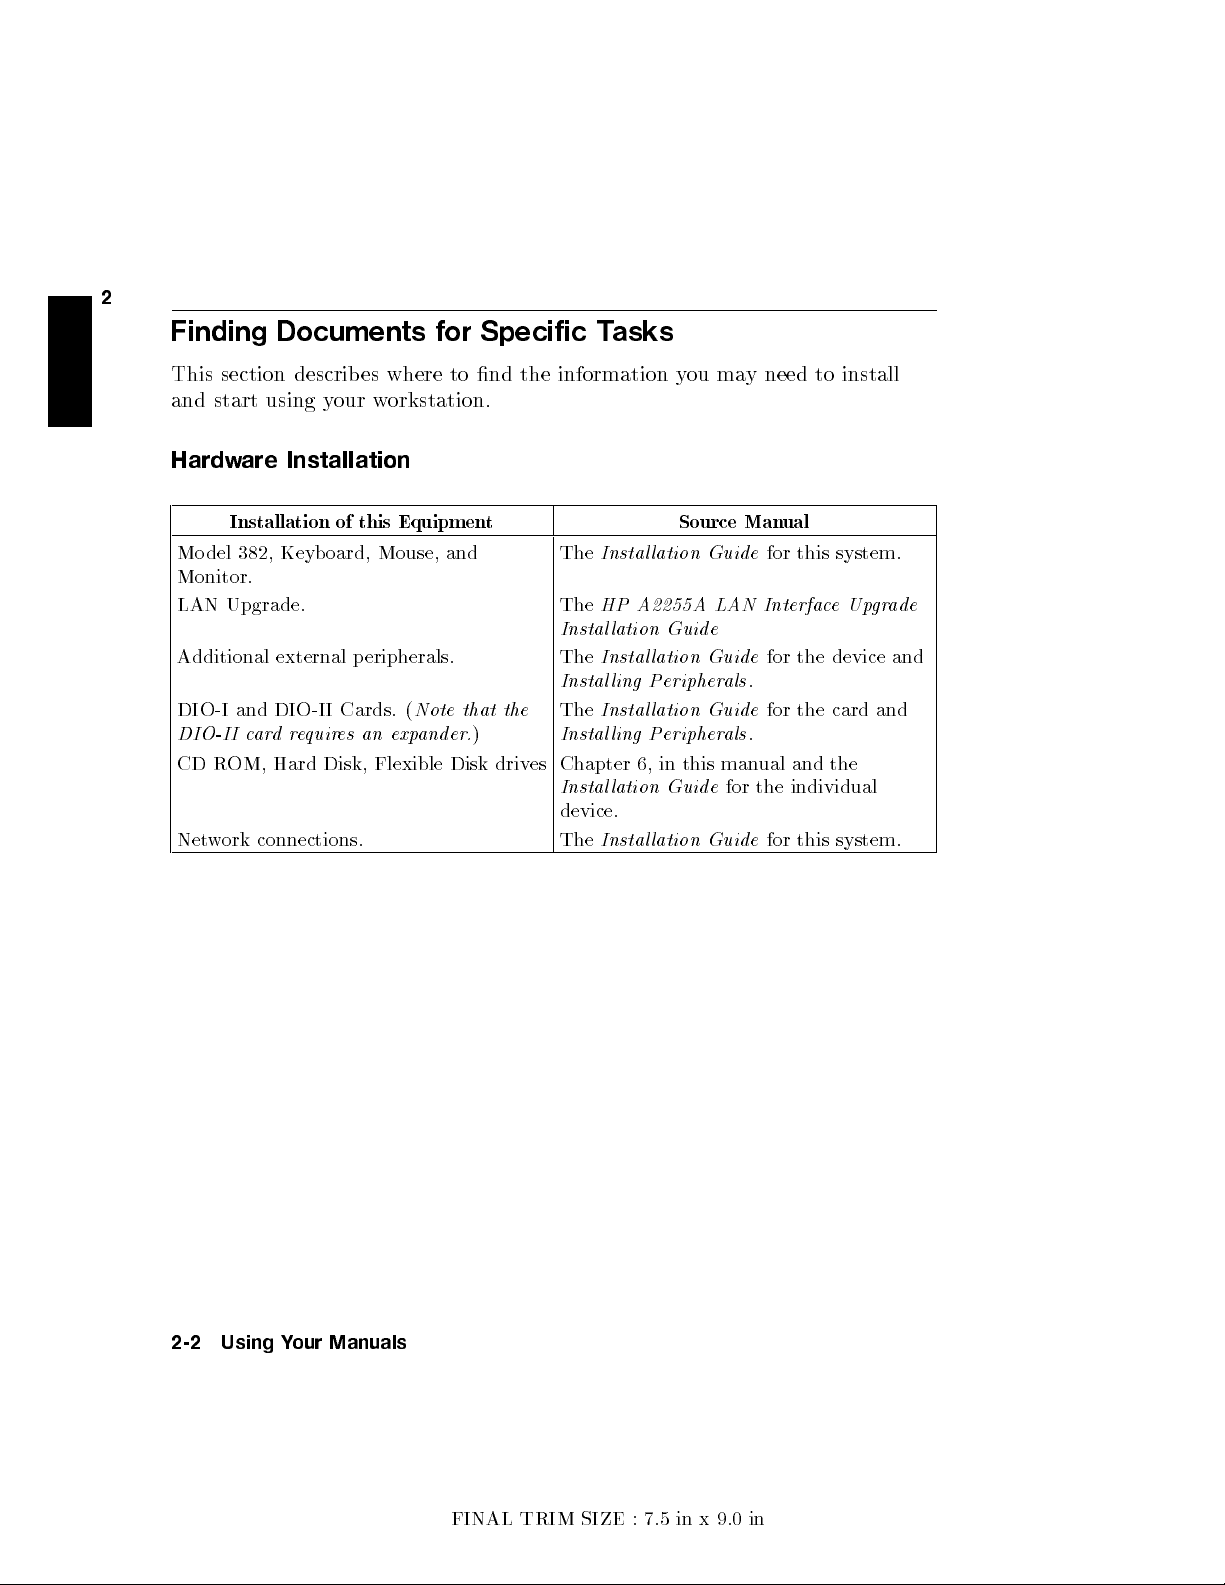
Finding
This section
and
start
Hardw
Mo
del
Documents
describ
using
y
es
our
are Installation
Installation
382,
Keyb
of
oard,
this
for
where
w
orkstation.
Equipment
Mouse,
Specific
to
nd
and
the
information
The
Monitor.
LAN Upgrade. The
Installation
Additional
external
p
eripherals.
The
Instal
DIO-I
DIO-II
CD
R
and
DIO-I
c
ar
d
r
e
OM, Hard
quir
I
Cards.
es
Disk,
an
exp
Flexible
(
Note
ander.
that
)
Disk
driv
the
es
The
Instal
Chapter
Instal
device.
Net
w
ork
connections.
The
T
asks
Instal
lation
HP
A2255A LAN
Instal
lation
ling
Peripher
Instal
lation
ling
Peripher
6,
in this
lation
Instal
lation
y
ou
Source
Guide
Guide
ma
Guide
Guide
als
Guide
als
man
for
Guide
y
need
Man
ual
for
Interface
for
.
for
.
ual
the
for
to
install
this
system.
Up
the
device
the
card
and
the
individual
this
system.
gr
and
ade
and
2-2 Using Your Manuals
FINAL TRIM SIZE : 7.5 in x 9.0 in
Page 23
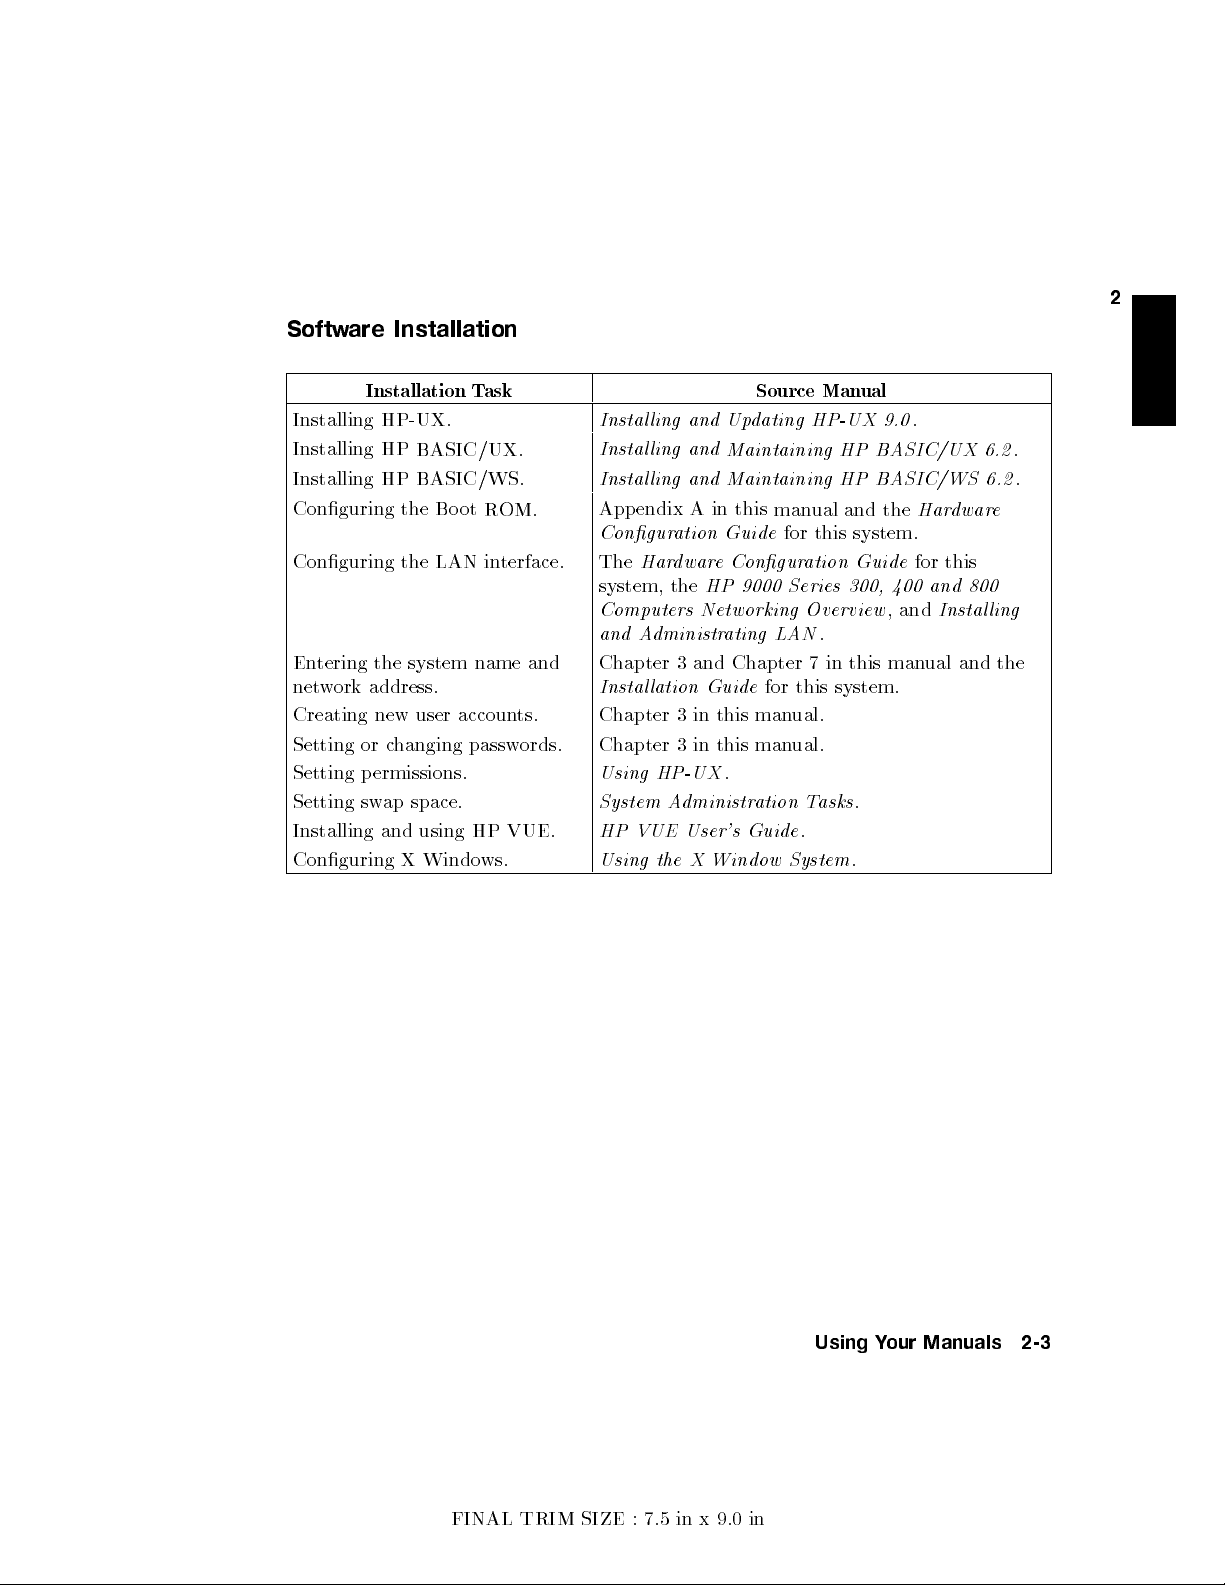
Softw
are
Installation
2
Installation
Installing
Installing
Installing
Conguring
Conguring
En
tering
the
net
w
ork
address.
Creating
Setting
Setting
Setting
new
or
p
ermissions.
sw
Installing
Conguring
HP-UX.
HP
BASIC/UX.
HP
BASIC/WS.
the
Bo
the
LAN
system
user
c
hanging
ap
space.
and
using
X
Windows.
T
ask
ot
R
OM.
in
terface.
name
accoun
passw
HP
and
ts.
ords.
VUE.
Instal
ling and
Instal
ling
Instal
ling
App
endix
Congur
The
system,
Har
ation
dwar
the
Computers
and
A
dministr
Chapter
Instal
Chapter
Chapter
Using
System
HP
Using
3
lation
3
3
HP-UX
A
VUE
the
Updating
and
Maintaining
and
Maintaining
A
in
this
Guide
e
Congur
HP
9000
Networking
ating LAN
and
Chapter
Guide
in
this
in
this
.
dministr
User's
Guide
X Window
Source
man
for
Series
for
man
ual.
man
ual.
ation
System
Man
ual
HP-UX 9.0
HP
HP
ual
and
this
system.
ation
Guide
300,
Overview
.
7
in
this
this
system.
T
asks
.
.
.
.
BASIC/UX
BASIC/WS
the
Har
dwar
for
this
400
and
,and
Installing
man
ual
and
800
6.2
6.2
e
.
.
the
FINAL TRIM SIZE : 7.5 in x 9.0 in
Using Your Manuals 2-3
Page 24
2
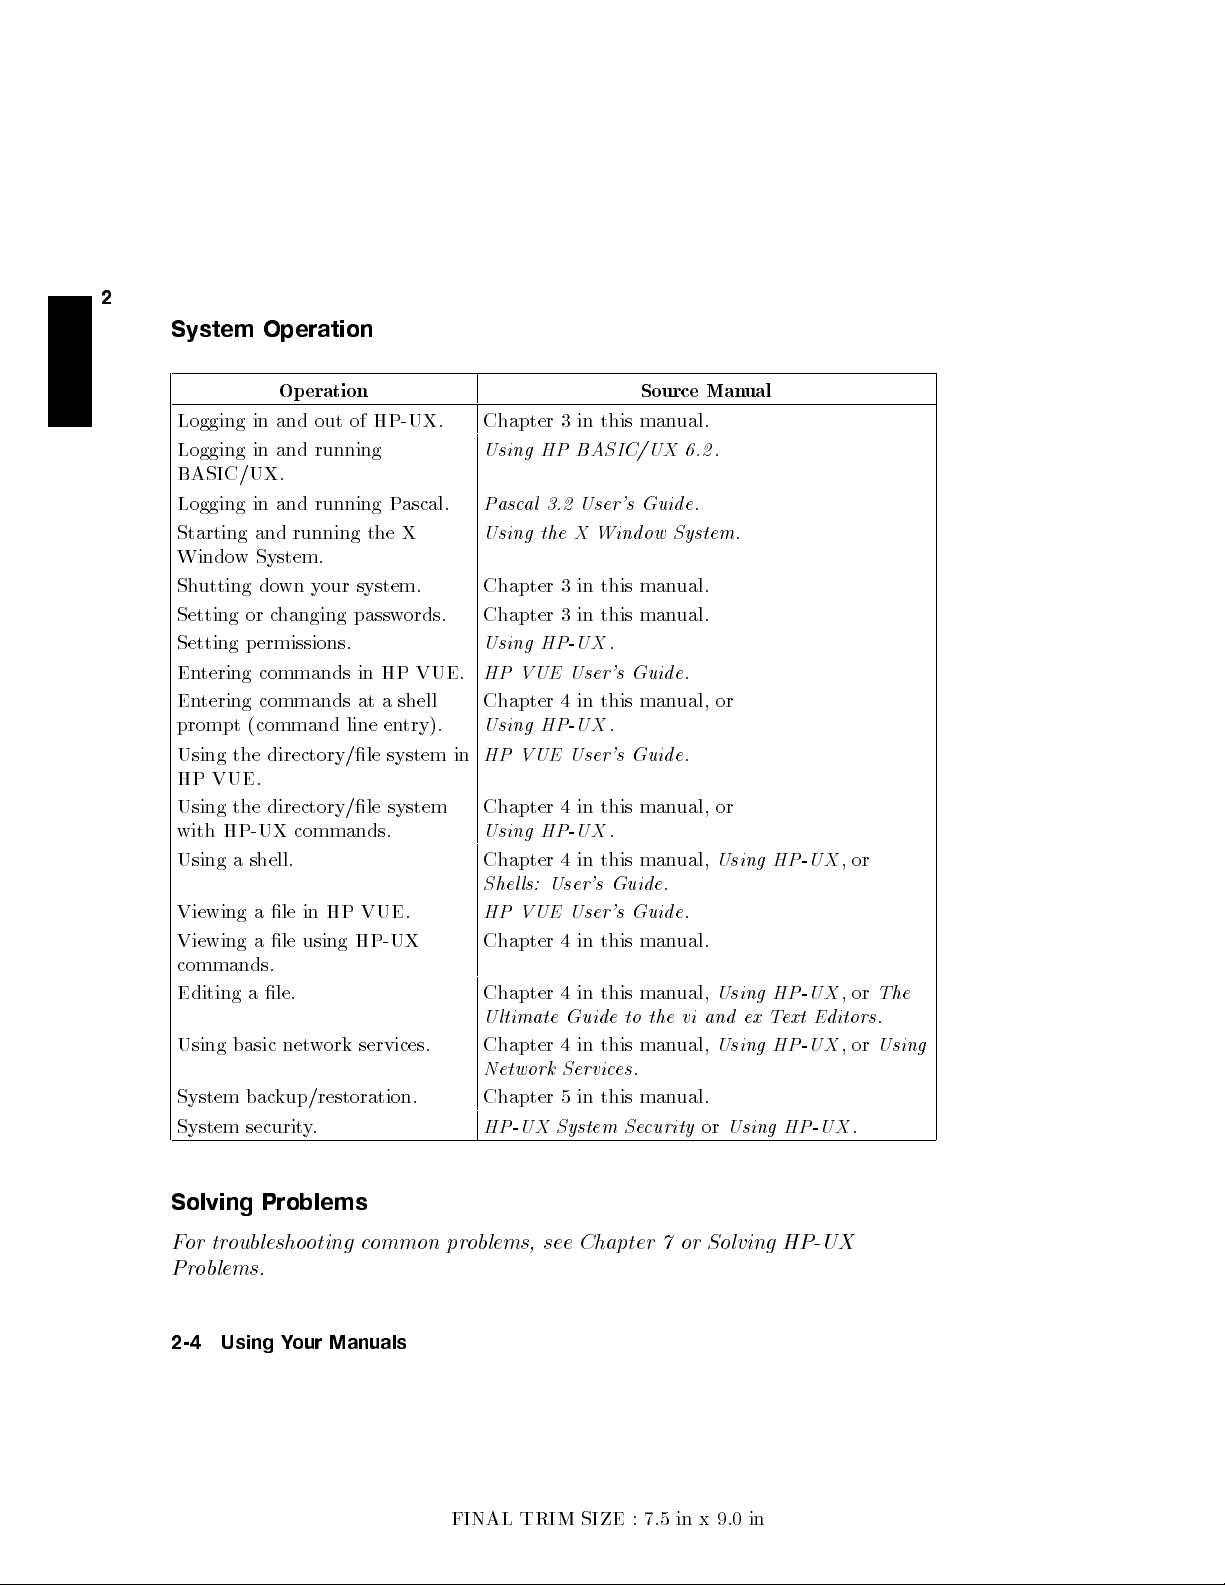
System
Operation
Op
Logging
Logging
in
and
in and
BASIC/UX.
Logging
Starting
Windo
Sh
Setting
Setting
En
En
prompt
Using
HP
Using
with
Using
Viewing
Viewing
w
utting
tering
tering
the
VUE.
the
HP-UX
a
in and
and
System.
do
wn
or
c
hanging
p
ermissions.
commands
commands
(command
directory/le
directory/le
shell.
ale
a
le
commands.
Editing
Using basic
System bac
a
le.
net
kup/restoration.
System securit
eration
out
of
HP-UX.
running
running P
running
y
our
the
system.
passw
in
at
line
commands.
in HP
VUE.
using
HP-UX
w
ork
services.
y.
ascal.
X
ords.
HP
VUE.
a
shell
en
try).
system
system
Chapter
Using
Pasc
Using
Chapter
Chapter
Using
HP
Chapter
Using
HP
in
Chapter
Using
Chapter
Shel
HP
Chapter
Chapter
Ultimate
Chapter 4
Network
3
in
this
HP BASIC/UX
al 3.2
User's Guide
the
X
Window
3
in
this
3
in
this
HP-UX
VUE
User's
4
in
this
HP-UX
VUE
User's
4
in
this
HP-UX
4
in this
ls:
User's Guide
VUE User's
4
in
this
4
in
this
Guide
in
this
Services
Chapter 5 in this man
HP-UX System Se
Source
man
ual.
6.2
Man
.
ual
.
System
man
man
.
ual.
ual.
.
Guide
.
man
ual,
or
.
Guide
.
man
ual,
or
.
manual,
Using
.
Guide
.
manual.
man
ual,
Using
to
the
vi
and
ex
man
ual,
Using
.
ual.
curityorUsing HP-UX
HP-UX
HP-UX
T
ext
HP-UX
,
or
,
or
Editors
,
or
.
The
.
Using
Solving Problems
For troubleshooting c
Problems
.
ommon pr
2-4 Using Your Manuals
oblems, se
e Chapter 7 or Solving HP-UX
FINAL TRIM SIZE : 7.5 in x 9.0 in
Page 25
3
3
Starting
Y
our
Chapter Contents
Initially
Using the
Setting
Selecting
Logging
Sh
Options
utting
Conguring
Command
Up
a
User Accoun
a
New
P
Out.
Do
wn.
for
Your
assw
Starting
System
Y
our
System.
Line
to
Log
t.
ord.
and
W
In.
orking
En
vironmen
t.
FINAL TRIM SIZE : 7.5 in x 9.0 in
Starting Your System 3-1
Page 26
Initially
Configuring
Y
our
System
If you
pr
3
If
ov
when
sev
After
information
have
alr
ompt
on
your
y
our
system
er the
The
The
single-w
The
This
eral
po
y
ou
rst
pieces
time
System
ord name
net
w
consists
wer
ork
255.32.3.10
this
information.
y
ou
ha
e
ady
scr
has
switc
turn
of
information
zone
name
address
of
.
Y
ou
ve
assem
ready
lo
ade
e
en,
HP-UX
h
on
the
where y
(host
with eigh
four
address
ma
y
bled
b
efore
d
your
go
on
preloaded
y
our
p
o
w
our
name)
n
umb
need
the
y
ou
HP-UX
to
con
er
on.
needed
con
t
or
er, also
elds
to
hardw
turn
the next
on
troller),
During
to
troller
for
y
few
er
called an
separated
consult
are
on
the
system
page.
its
disk (this
HP-UX
this
congure
is
lo
cated.
our
w
orkstation:
c
haracters.
with
for
y
p
o
wer
our
and
pro
IP
b
y
our
you
have
is indicated
will
automatically
cess,
y
y
our system
an
n
um
b
er,
y
p
erio
ds:
system
system,
to
y
our
the
\
ou will
be
appropriately:
y
alphan
for
y
our
for
example,
administrator
then
ha
v
con
troller
login:
by
a lab
load
asked
umeric,
w
orkstation.
e
the
ab
for
the
"
el
itself
for
for
o
v
rst
e
time:
1. T
urn on
2.
En
If
y
y
ou
information at
t
yping:
ter
ou
are
the
the
information
do
not
prompted
p
o
w
hav
another
er
e the
for
for
y
our
when
name, net
it,
time.
con
y
y
ou
troller
our system
w
ork
can
use
the
Y
ou
w
ould
and
i.d.,
displa
display
and
default
en
ter
y
.
requests
time
zone
values
the
information
it.
information
now
and en
later
when
ter this
b
y
/etc/set_parms
The
displa
whichy
y
will
ou ma
y need to re-en
then
systemname
prompt
ter.
y
ou
for an
y
To review the steps of the b oot pro cess in
this product.
3-2 Starting Your System
FINAL TRIM SIZE : 7.5 in x 9.0 in
information
detail, see the
whic
h
is
missing
Instal lation Guide
or
for
Page 27
Using
T
o
log in
1.
T
yp
2.
Press
Since
root
follo
a.
Set
in
b.
Set
for
acciden
\Setting
accoun
c.
Set
Note
the
Command
the first
e
root
4
Return
y
ou
), and
wing
up
this
up
time:
at
the
5
.
ha
ven't
y
ou
as
so
on
a
passw
chapter.
a
\user"
doing ordinary
tally
Up
t.
up
a
password
If
le
will
can
\
login:
yet
set a
can
b
egin
as
p
ossible:
ord
for
accoun
tasks
c
hanging
a
User
Accoun
for
y
ou
ha
v
e
systems, or
need
to
access
Line
"
prompt.
password,
using
root
.
t.
A
with
or
erasing
t",
y
our
user
additional
if
y
b
e
sure
them.
to
the
See
user
y
ou
they
our
later
Log
In
y
ou
will
system.
the
accoun
T
section \Selecting
t
pro
system,
critical op
in
this
accoun
(non-ro
ha
t.
ot)
v
e
a
DDS-F
are
congured on
get
a
a
system
o
protect
y
our
a
vides
the login
while
protecting
erating system
c
hapter
in
ternal
ormat
to
disk
(D
set
A
HP-UX b
prompt
data,
P
assw
environmen
y
ou
les.
up a
user
devices
T)
driv
efore
do
ord,"
from
See
for
e,
y
(
#
the
y
ou
for
later
our
y
ou
3
t
If
y
ou
ha
v
e
a
factory-installed
(pre-installed
devices
sw
ap
or
to
y
our
will
le
needs,
already b
systems
HP-UX), the
ein
for
and
then
Administration Manager)
in
\Conguring
the
Instal lation Guide
for
aHard
for y
SAM procedures.
ro
ot
disk
with
device
/dev
.
You
additional
moun
t
them.
to do
this, b
Disk
les
hard
Driv
for
will
disk
Use
y follo
e"
in
Instan
an
y
need
drives,
the
wing the
Chapter
other
to
congure
SAM
t Ignition
included
according
(System
6.
our device(s) for the details of the
Starting Your System 3-3
pro
Or
cedure
see
FINAL TRIM SIZE : 7.5 in x 9.0 in
Page 28
After y
y
4
Return
3
If y
to
largest
VGA
ou
ou
to
en
5
.
Is
your
[y/n]:
ou resp
determine
n
displa
log
ter
console
ond
um
in
the
rst
time
as
root
,
the
default
y
our
terminal
one
n
(or
4
the
width
b
er
you
can see
y
,
en
ter
the
of the
Return
(in
largest
t
yp
e
as
follows.
following: a
5
),
you
will
columns)
on the
n
righ
um
2392A, 2393A,
see
of
y
our
t
(\128"
b
er
y
ou
a
You
ro
can
can resp
w
of
screen.
is
see
lo
cal
2397A, or
n
um
Resp
t
ypical).
on
the
login
ond b
b
ers
ond
If
righ
script
y
700/92?
whic
by
y
ou
t
prompts
pressing
h
asks
entering
are
using
of the
y
or
y
ou
the
a
rst line
n
.
Similarly
determine
en
tering the
with
a
n
session.
T
o
Log In
Y
ou
will
when
you
TERM
Pressing
Generally
v
alues
for Hewlett-P
,
you
the
largest
um
ber
Later as
use
the
log
= (hp)
4
Return
,
this
will
ro
(such
in
5
is
w
pro
as
sets
all
see
with
n
User
cedure
user
ack
a
displa
y
the
largest
um
b
er
y
ou
as \300h")
in
the
name
the
TERM
y
ou
will
need
ard terminals.
of
n
n
see
whic
next
,y
our
en
vironmen
to
um
b
um
b
(\49"
h
indicates
section
system
do,
ered
er,
is
t
since
ro
ws.
in
the
t
ypical).
to
displa
v
ariable
\
the
hp
Y
upper
set
ys
to
"
ou
will
The
TERM
up
a
the
follo
\
hp
denes
b
e
ask
left. Resp
system
setting
user
accoun
wing
",
the default
appropriate
ed
to
ond b
resp
onds
for
t.
during
y
this
Then,
login:
value.
format
3-4 Starting Your System
FINAL TRIM SIZE : 7.5 in x 9.0 in
Page 29
Setting
Y
our
can use
accoun
If
(Y
T
o
1.
y
ou
ou
start
As
The
t.
aren't
will
root
Up
see
SAM:
SAM
a
SAM
already
the
,
t
yp
e
op
User
(System
#
/usr/bin/sam
ening
logged
shell
men
Account
Administration Manager),
prompt
u will
in
as
root
,
t
whenever
5
4
Return
appear.
yp
.
e
you
exit
are
4
Return
root
to add
5
and
).
a
new
log
in
user
as
root
.
3
T
o
k
eys
and
activ
Use
k
eys,
2.
A
follo
3.
A
displa
4.
Select
terminal,
and
N
N
N
N
Add
t
t
N
N
N
run
the
the
NN
NN
wed
Sam on
to
mo
press
ate
c
hoices in
5
4
to
T
ab
4
Backspace
op
ening
b
next
ying
N
N
N
N
N
N
N
N
Add
use the
NN
NN
N
N
N
N
N
N
N
N
N
N
a User
v
e
the
4
Return
activ
5
y
pressing
screen,
a
list
N
NN
from the
use
the
arrow
N
N
N
N
N
N
N
NN
NN
NN
Account
ac
haracter terminal
selection
5
to
the (top)
ate
,
and
men
of
logins
N
N
N
NN
f4
k
NN
N
N
N
N
N
N
N
N
u,
c
NN
eys
N
N
N
\c
N
N
highligh
ho
ose"
other
men
4
Delete
cha
cho
ose
5
4
Return
ho
ose
and
N
N
N
N
N
N
N
N
N
NN
NN
N
N
Actions
function
to
mo
N
N
N
N
.
t
a
highligh
men
u
bar,
u
areas.
5
for
correcting
r
N
N
N
N
N
N
N
N
N
N
N
N
N
N
N
Users
or selecting
N
N
N
N
N
NN
NN
N
N
N
N
N
N
N
N
N
N
N
N
real
N
N
menu
k
v
e
N
.
ey
to
After
names.
to
the
Users
N
(without a
up
and
ted
selection.
to
get
When
N
N
N
N
NN
N
N
N
N
N
N
N
N
N
N
N
N
N
N
and
on
activ
N
Groups->
N
N
N
N
N
N
N
N
N
N
Open
a
pause,
the
ate
one
y
mouse),
down
help
t
yping, use
mistak
N
N
N
N
N
N
N
N
NN
N
N
N
N
N
N
N
.
men
u
the
ou
w
the men
Use
or
for
es.
N
N
N
N
N
N
N
b
y
y
ou
bar.
men
u
an
t.
Y
use
the
us (\select"),
function
other
the
4
highligh
will
see
On
a
c
haracter
bar
selections,
ou
will
5
and
4
8
k
eys
functions.
5
and
ting
screen
4
it,
form
6
a
see a
5
4
9
to
5
7
FINAL TRIM SIZE : 7.5 in x 9.0 in
Starting Your System 3-5
Page 30
5.
Fill
in
y
dieren
our login
t from
the
name, c
defaults
hoice of
giv
en.
start-up
Supply
program
the
optional
and
en
vironmen
information
as
t,
if
needed.
On
login
N
N
N
N
N
N
N
OK
(clic
e ask
ord
requiremen
reset it
ord,
as
N
N
NN
NN
N
OK
\Task
NN
N
N
N
N
N
N
N
N
N
N
and
k
on
N
N
N
N
N
N
N
N
Exit
at
the
this form
default
k
ed
to
requested.
Completed" message
N
N
N
N
N
N
N
N
N
N
N
Groups
the
N
N
N
N
N
N
N
N
N
N
N
SAM
#
3
Note
N
6.
Activ
ate
are
nished.
7.
Y
ou
will
b
for passw
passw
ord and
the
passw
the
ate
the
N
N
N
Users
N
N
N
N
NN
8.
9.
10.
Activ
When
In
double-clic
11.
Cho
ose
the
12.
T
ype
exit
on
it,
select
later). T
NN
NN
N
N
N
N
N
N
N
N
N
N
NN
N
-
in
NN
N
N
N
N
N
function
prompt
y
ou
en
vironmen
or
press
a
ts.
If
The
N
N
N
N
N
N
N
screen,
the
to
can
passw
y
ou
ype
upp
er-left
k
log
select
t,
4
Return
ord.
wish,
the
re-en
select
ey
.
out
the
if
y
ou
5
with
(See
y
ou
passw
tered
app
ears,
N
N
N
Exit
corner),
of
root
X
Windo
so
desire.
N
N
N
N
N
N
OK
\Selecting
can
ord
passw
activ
N
N
N
NN
NN
N
N
N
N
from
if
.
w
System
N
N
illuminated)
a
select
a
temp
and
press
ord
must
N
N
N
N
OK
ate
N
N
List
the
y
ou
are
New
4
Return
match
N
N
N
N
.
N
N
N
N
NN
NN
using
as
when
P
orary
N
N
N
N
men
y
our
assw
5
. Re-en
the rst.
u
a
mouse.
y
ou
ord"
(or
ter
3-6 Starting Your System
FINAL TRIM SIZE : 7.5 in x 9.0 in
Page 31

Selecting
a
New
P
assw
ord
After y
passw
Cho
ose
ou
ords
y
The passw
A
t
least
A
t
least
Numeric
Sp
ecial
According
foo-bar
Also,
upp
foo-bar
When
y
your
ou
y
c
hose.
les.
ou
ha
v
at
our
ord m
t
w
one
(neither
to
ercase
c
ho
If
e
set
up
a
later
new
passw
ust con
o
c
haracters
c
haracter
(the
digits
these
rules,
$money$
and
Foo-Bar
ose
a
someone
a
time
ord
letters
lo
w
passw
kno
user
for
according
tain b
m
ust
m
ust
0
through
nor
the
ercase
ord,
ws
accoun
securit
et
w
een
b
e
letters
b
e either
9
n
umeric|for
follo
wing
Number_9
letters
FOO-BAR
y
ou
wan
y
our
passw
t
and
y
reasons.
to
six
).
are
are
t
of the
to
passw
ord,
these rules:
and
eigh
(upp
ercase
following:
example,
all
v
alid
@rophy
dieren
t.
ensure
ord,
that
y
ou
t
c
haracters.
or
passw
Th
us,
that
p
erson
ma
lo
w
ercase).
-
,
_
,
ords:
these are
no
one
ma
y
or
y
wan
$
can
log
).
tto
change
all dieren
guess
in and
3
t:
what
access
FINAL TRIM SIZE : 7.5 in x 9.0 in
Starting Your System 3-7
Page 32

Running
the
passwd
Command
When
$
passwd
y
ou'v
e
chosen
your
new passw
ord, set
it
b
y
running
passwd
:
3
After y
these
1.
2.
3.
No
ou've
steps:
If
y
ou
passwd
Changing
Old
When
will
not
New
Next,
Re-enter
w,
when
entered
don't
ha
prompts
password:
y
ou
see
ec
ho
password:
y
ou
need
y
ou
log
the
v
ea
password,
you
password
invisible
the
follo
what
y
ou
invisible
to
re-en
your
new
in
again,
passwd
command,
skip this
to
en
ter
it.
for
leslie
old
wing prompt,
t
yp
e.)
p
asswor
ter
the
new
password:
use
y
our new
p
asswor
enter
d
passw
the
step.
Your
d
Enter
your
ord
invisible
passw
program
If
y
ou
username
your
new
to
v
erify it:
p
asswor
ord.
leads
do
ha
passw
d
v
curr
ord.
e
y
ou
a
app
ent
through
passw
e
ars
passwor
(The
ord,
her
screen
e.
d.
3-8 Starting Your System
FINAL TRIM SIZE : 7.5 in x 9.0 in
Page 33

Logging
Caution
Out
If
your
lo
cal
op
without
pro
cedure in
p
o
w
er
in
damage
If
y
ou
y
ou
ha
p
erform
system
system has
erating
rst
system,
sh
utting
this c
without
are
v
e
the
to
data
running
a
moun
procedure
rst
ted
administrator
its o
wn disk
do
not
do
wn
its
hapter, \Sh
doing
the
on
y
our
disk.
y
our system
lo
cal
le
in \Sh
do
so.
and
y
turn
o
soft
ware
utting
sh
utdo
as
Do
wn
a
no
system
utting Do
ou
are
logged
p
o
w
er
according to
wn".
pro
cedure
de
in
a
disk,
y
ou
wn", or
to
y
our
T
urning
cluster,
m
ust
ha
v
in
ma
e
y
on
system
the
o
y
result
and
also
our
y
our
the
3
Using
to
secure
pro
cesses
The
tak
en
the
follo
on
command
y
our
screen
running),
wing
pro
the
HP
line
for
or y
cedures
VUE
F
ou
ron
(shell
temp
prompt),
orarily
can
log
explain
t
P
anel.
out
lock
lea
ving
of
and
y
ou
y
our
exit
can
use
y
our
w
orkstation
curren
.
Corresponding
either
t
w
ork
the
lock
(and
session
command
lea
en
tirely
actions
v
e
.
can
b
e
FINAL TRIM SIZE : 7.5 in x 9.0 in
Starting Your System 3-9
Page 34

Exiting
If
y
ou
en
ter the
T
emporarily
w
ant
to lea
follo
wing:
ve
your
w
orkstation
for
a
short
time
without
logging
out,
3
Y
ou
lock
will
Key:
Again:
b
e
ask
invisible
invisible p
ed
to
en
p
asswor
ter
a
d
assword
passw
ord,
whic
h will
not b
edispla
yed:
LOCKED
No
w
the
k
eyb
oard cannot
be
used un
til y
ou
en
ter
the
passw
ord
to
unlo
c
k
the
system.
Exiting (Logging
The
most
common
Out)
w
a
for
an
Extended
y
to
log
out
from
the
command
P
eriod
line
is
b
y
using
the
exit
command:
$
exit
Exiting
If
y
screen
lo
w
T
o
See
ou
er
log
HP
c
temp
left.
out
Using the
ho
ose
to
orarily
using
VUE
User's
run
HP
HP
HP
b
y clic
VUE,
Guide
VUE
VUE
king on
y
ou
for
Front
(see
\Activ
the lo
can clic
further
P
anel
ating
HP
c
k
icon
(an
kon
the \Exit"
information.
VUE"),
icon
of
icon at
y
a
ou
can
padlo
the
lo
c
k
y
our
c
k)
on
the
lo
w
er
righ
t.
3-10 Starting Your System
FINAL TRIM SIZE : 7.5 in x 9.0 in
Page 35

Shutting
Caution
T
o
sh
ut
do
1.
Log
in
the
le
2.
En
ter
the
Do
wn
T
wn
as
the
disk.
using
root
urning o
sh
the
Y
ou can
utdo
wn
Alw
a
ys
command
the p
pro
execute
run
/etc/shutdown.allow
follo
wing:
ow
er for
cedure
shutdown
line:
shutdown
.
See
System
y
our
ma
y
without
con
result
to
A
dministr
troller
in
damage
without
completion
b
eing
root
ation
to
rst.
b
y
T
asks
rst
data
b
eing
doing
on
listed
for
y
our
in
details.
3
shutdown
The
-h
option
y
our
system
sa
v
e
w
ork
system
message
to
conrms
Note
If
your
system
message
to
SYSTEM
3.
Y
ou
will
see a
Do you want to continue? (y/n)
a.
If y
ou press
b. If y
ou press
Wait for message:
-h
will
cause
will
ha
v
b
efore
the
stop
immediately). Y
that
Entering
after
one
to
your
runs
a
be
broadcast to
BEING
BROUGHT DOWN
question:
n
and
y
and
Halted, you may now cycle power.
the system
e
a
grace
system
it
is
shutdown
min
ute
disk
data
clustered
4
Return
4
Return
p
erio
halts.
ou
safe
to
with
and
to
turn
net
netw
orked
5
,y
our w
5
,thesh
to halt.
d
of one
(Use
can
do
so.
no
reb
o
w
ork,
then
ot in
o
Y
ou
minute
shutdown
turn
option
will
single user
the
p
ower
en
tering
or
an
to
-h
o
the
cause
with
shutdown
users:
IN ONE
MINUTE
orkstation will not sh
utdown process starts.
y
one
stop
0
,
state.
if
p
o
the
the
ut do
net
pro
y
ou
w
er
It
system
-h
w
ork
cesses
w
ant
when
system
is
not
also
wn.
ed
to
and
your
a
to
halt
safe
running
causes
.
a
4. Y
ou can no
w
safely turn o the p o
wer for y
FINAL TRIM SIZE : 7.5 in x 9.0 in
our con
troller.
Starting Your System 3-11
Page 36

Options
Your
VUE
3
T
o
run
HP-UX
(Visual
either
for
User
con
the
Y
our
tains
En
X
Starting
the
vironmen
Windo
lesets
t).
w
System
and
to
run
or HP
W
orking
either
VUE, y
Environment
the
X
Windo
ou will
w
need:
System
or
HP
More than
A
t
least
Activ
ating
If y
ou wish
managemen
y
ou
create
If
y
ou
w
an
en
ter
the
follo
x11start
This
will
cause
for
the curren
X
Windo
accoun
F
or
w
t.
See
information
12 MB
a
1024
the
to run
t
features,
y
our
t
to
log
wing:
tlogin
System
\Setting
new
the
on
X
b
y
just
in
of memory
768
resolution
Windo
the
y
ou
user
accoun
with
the
X
Windo
session.
at
eac
h
Up
a
using
the
w
System
X
Windo
can
select
X
w
System
T
o
login,
User
X
in y
our
monitor
w
it as
t.
Windo
c
hange
use SAM
Accoun
Windo
Mo
del
(color
System,
your
w
System for
to
run,
y
our
to mak
t",
in
w
System,
382.
or
gra
without
login default
the curren
with
system
startup
this
e
this
c
hapter.
see
en
Using
yscale).
using
the
en
vironmen
default
vironmen
c
hange
X
Windows
HP
t
session
settings,
t
to
in
y
our
VUE
t
run
user
.
when
only
the
le
,
3-12 Starting Your System
FINAL TRIM SIZE : 7.5 in x 9.0 in
Page 37

d a
c b
3
Typical
Activ
ating
Before
conditions
The system
It
has
HP
VUE
y
ou
activ
ate
HP
VUE,
in
addition
to
hostname is
a
console-based graphics
rst
those
listed in
It is able to run the X Windo
If y
our IGNITION leset is installed, y
conguration of the Instan
(if it has not been extensiv
to launc
recognized b
h HP VUE. It also registers the IGNITION to ols so that they
yHP
VUE.
t Ignition to ols. The script
ely customized) and
HP
VUE
c
heck
already
/etc/hosts
displa
w system.
ou m
W
orkspace
that y
giv
our system
en:
fullls the
.
y
(at
least
1024
b
y
768
resolution).
ust run a script to complete the
will edit
/etc/inittab
/etc/newconfig/inittab
Starting Your System 3-13
follo
are
wing
FINAL TRIM SIZE : 7.5 in x 9.0 in
Page 38

On a
diskless
VUE
and
1.
Log
in
2. T
o
3
run
the
as
the
cluster,
Instan
root
script,
.
this
t
Ignition
t
yp
e
script
:
to
m
ols.
ust
b
e
run
on
eac
h
cno
de
that
will
run
HP
/etc/newconfig/Ignition/configure.sh
The
script
go
on
If
a
failure
Chapter
V
erifying
Once
configure.sh
follo
wing
Reb
T
yp
The
HP
will
with
the
o
7.
Proper
the
installation
metho
o
ot
y
our
e
telinit
VUE login
prin
next
ccurs,
script
d:
system
t
out
section.
see
the
Operation
of
the
has
4; exit
screen should
a
success
section
IGNITION
b
een
run,
or
failure
\Dealing
leset
y
ou
can
app
ear;
message.
with
has b
start
if
it
do
If
the
HP
VUE
een completed
HP
VUE
es
not,
see
script
is
Problems"
and
b
y
using the
Chapter
successful,
in
the
7.
Logging
T
o
login:
1.
Use
2. During
screen
3. Y
time y
HP VUE
NNNNNNNNNNNNN
Welcome
In
and
Using
the
HP
VUE
login
the login
N
N
N
N
N
N
N
N
N
N
Help
N
N
N
N
button.
pro
cess,
our screen after login will ha
ou log in.
FrontP
NNNNNNNNNN
You will see a
anel, the rst time y
window will help y
perform some basic tasks.
3-14 Starting Your System
HP
VUE
screen
to
log
in
as
if
y
ou
need
help
ve a slightly dieren
NNNN
NNNNNNNNNNNNNNNNNNN
Welcome
root
logging
window displa
ou log in. The information in the
ou explore the capabilities of y
.
in,
clic
t appearance
k
on
the
login
the rst
y
ed along with the
our system and
FINAL TRIM SIZE : 7.5 in x 9.0 in
Page 39

4.
When
Panel
clic
window
5.
T
button
6. T
padlo
y
and
k
on
o
get
o temp
c
k)
ou log
the
the
N
NN
?
in to
File
NN
on
information.
a
terminal
(a
picture
orarily
on
the
lo
F
HP VUE
Manager
the
F
ron
windo
of a
monitor and
c
k
y
our
ron
t
P
t
w
with
The
screen,
anel.
for
windo
P
anel
a
HP
VUE
subsequen
w
for
y
our
to
get
help
shell
prompt,
keyb
oard) on
T
erminal
clic
k
on
the
t
sessions,
home
information
click
the
Button
Lo
c
k
y
ou
directory
on the
F
ron
icon
(a
will
see
.
Y
or
the
Terminal
t
P
anel.
picture
the
ou
can
N
NN
NN
NN
N
N
Welcome
of
F
ron
still
N
N
N
N
N
N
N
N
N
N
N
N
control
a
t
N
N
3
Logging
T
o
log
out
on
the
F
ron
Out
of
t
of
a
session,
P
anel.
HP
VUE
close y
Figure
3-1.
The
our curren
Lock
tles
The Logout Control
Button
and
1
clic
k
on
the
logout
con
trol
Starting Your System 3-15
FINAL TRIM SIZE : 7.5 in x 9.0 in
Page 40

For More
T
o nd
System,
Information
out
more
see
the
ab
HP
out
conguring
VUE
User's
and
Guide
using
and
HP
Using
VUE
and
the
X
Window System
the
X
Windo
w
3
3-16 Starting Your System
FINAL TRIM SIZE : 7.5 in x 9.0 in
Page 41

4
Using
the
Command
Chapter Contents
The
Command
Working
Using
Files
Viewing
Editing
Net
w
orking
with
and
Files.
Line
Shells.
and
Directories with
Prin
ting
Ov
erview.
Line
4
Prompt.
Command Lines.
Files.
FINAL TRIM SIZE : 7.5 in x 9.0 in
Using the Command Line 4-1
Page 42

The
Command
Line
Prompt
Whenever
If
y
ou
dep
ending on
4
Return
Running
T
o
4
4
Return
the
run
prompt
$
leslie
$
If
y
ou
up
and
(T
o
mak
k
ey
at
y
ou
are
logged
5
.
Commands
a
command,
5
.
The
reapp
whoami
mak
e
correct
e examples
the
end
see
the
in
as
your
shell. HP-UX
command
ears.
5
4
Return
a
mistak
it.
as clear
of
eac
command
user
t
yp
e the
then
F
or example,
Y
our
Then
e
when
h
command
line
,
the
command line
displays
command's
will
b
egin
user
name
the
c
ommand
t
yping
as
p
ossible,
line.)
prompt,
the
name
running.
run the
app
a
command,
this
y
ou
prompt is
prompt
after
following
e
ars
line
pr
man
can
When
her
e.
ompt
use
ual
b
egin
ev
the
the
whoami
r
e
the
will
t
yping
either
ery
time
prompt
command
app
e
ars.
4
Back
space
not
sho
commands.
$
or
%
,
y
ou
press
and
press
nishes,
command
5
k
ey
w
the
no
to
4
Return
w:
bac
k
5
4-2 Using the Command Line
FINAL TRIM SIZE : 7.5 in x 9.0 in
Page 43

W
orking
with
Shells
Whenever
whic
a
shell
When y
dieren
amoun
Korn, P
y
our
ha
v
e
Basics
HP-UX
the
Bourne,
c
haracteristics,
in
teract
features
F
or
details
Shel
ls:
h
in
terprets
.
ou log
t
ts
osix, Key
user
the
giv
with
of
User's
y
shells
of
accoun
option
of
es
the
ou
en
that
in, y
whic
in
teractiv
, and
t
of c
Shells:
y
ou
Korn,
and
HP-UX
shell
on
shell
Guide
ter
a
command
command
ou are
h
determines
b
e
eha
supp
C
Shells.
said
v
e
ort
in
whic
hanging shells
Characteristics,
y
our
c
hoice
of
P
osix,
Key
,
y
ou
can increase
inside
of
features
y
our
windo
c
hoice.
and
.
for
to
sligh
at
and
y
ou
HP-UX.
b
e
your
The
h
later.
sev
eral
C
ws
b
eha
\in"
tly
shell
the
are
making
The
a
shell
dieren
display
en
vironmen
y
ou
. These
get
Choosing
dieren
Shells.
if
Eac
sp
eed
y
ou
learn
vior, please
use
command
.
HP-UX
t
w
a
ys and
t
y
ou
when
and
t
shell-typ
h
of
and
eciency
to
use some
see the
of
a
are
select
y
these
command
interpreter
supp
orts
give
you
called
when
ou
rst
Using
es whic
shells
with
of
Using
HP-UX
the
log
h
has
whic
the
in
terpreter
is called
sev
eral
varying
Bourne,
y
ou
set
in,
y
ou
can
dieren
h
built-in
and
y
and
up
run:
ou
y
t
the
ou
4
FINAL TRIM SIZE : 7.5 in x 9.0 in
Using the Command Line 4-3
Page 44
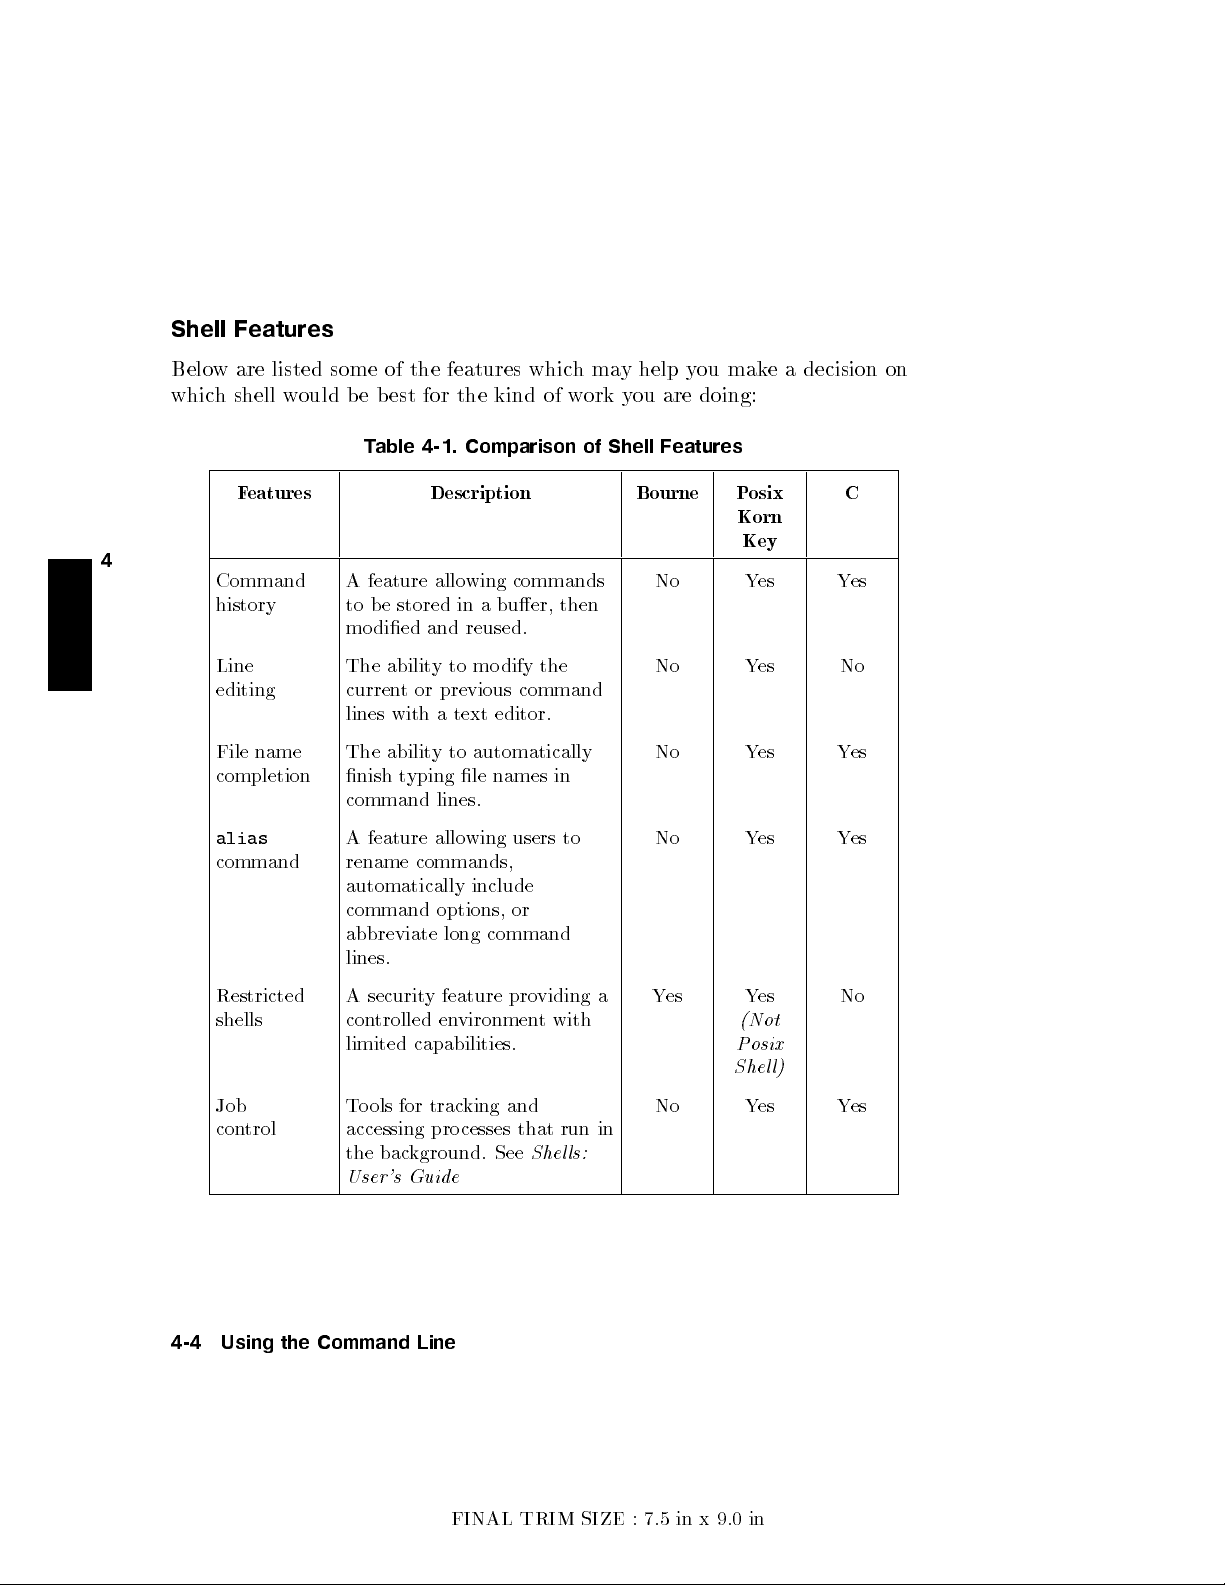
Shell
Belo
whic
Features
w
are
listed
h shell
w
ould
some of
b
e
b
Table
the features
est
for
the
4-1. Comparison
kind
which
of
may
w
ork
of Shell
y
help
ou
y
ou
are
doing:
Features
mak
e
a
decision
on
F
eatures
Description Bourne P
osix
C
Korn
Key
4
Command
history
Line
editing
File
name
completion
alias
command
A
feature
to
b
mo
died
The
curren
lines
The
nish
command
A
feature
rename
allo
e
stored
and
ability
abilit
to mo
tor
previous command
with
a
y
to
t
yping le
lines.
allo
commands,
automatically
command
abbreviate
options,
long
wing
commands
in
a
buer,
reused.
dify
text
editor.
automatically
names
wing
users
include
or
command
the
then
in
to
No Y
No Y
No Y
No Y
es
es
es
es
Y
No
Y
Y
es
es
es
lines.
Restricted
shells
A
securit
con
trolled
limited
y
feature
en
vironmen
capabilities.
pro
viding
t
with
Y
a
es
Y
es
(Not
Posix
Shel
No
l)
Job
control
Tools for trac
accessing processes that
the bac
kground. See
User's Guide
4-4 Using the Command Line
king and
No Yes Yes
run in
Shel
ls:
FINAL TRIM SIZE : 7.5 in x 9.0 in
Page 45
Determining
The
command
when
you
logged
Y
our
echo
in.
Login
$SHELL
Shell
displays
the le
name of
the shell
y
ou
en
tered
$echo
$SHELL
/bin/sh
$
T
emporarily
Unless
using
this
Changing
y
ou
are
command:
shellname
where
T
emp
orarily
the name
correct
y
our
original
P
ermanently
T
op
ermanently
in),
use
chsh
where
(e.g.,
/bin/ksh
command,
F
or
example,
name
shel
l
c
hanging
of
the
prompt
shell
Changing
the
chsh
username
username
you
if
command reads:
in
a
is
shell
is
displa
b
c
hange
ch
is
)
of
must
terry
Y
our
restricted
the
name
y
our
y
ou
w
y
ed.
y
t
yping
Your
y
our
ange
sh
p
shel
y
the
ath
l
our user
shell
log
out
c
hanges
Shell
shell,
of
shell
lets
an
t
to
After
either
Shell
lo
gin
ell)
command:
name
name and
y
ou
w
and
log
the
y
ou
can
the
shell
y
ou
run,
y
ou
experimen
exit
shel
l
(the
shell
an
t
as
in
again
default
temp
(for
example,
exp
erimen
invoke
ting
4
CTRL
5
or
default
p
ath
y
our default.
for
the
login
shell
orarily c
t
in
other
(en
ter)
in
the
5
.
-
4
D
shell
name
After y
c
hange
to the
hange
sh
,
that
new
y
ou
is
y
ksh
,
shells. By
shell,
shell,
get
the
full
ou use
to
take
Korn
our
shell
or
keysh
and
return
when
y
path name
the
eect.
Shell,
the
b
y
).
typing
the
to
ou
log
chsh
4
$ chsh terry /bin/ksh
$
FINAL TRIM SIZE : 7.5 in x 9.0 in
Using the Command Line 4-5
Page 46

Using
Key
displa
from
hav
Key
a
Y
Key
Shell
ying softk
these
e mastered
Shell giv
\men
u"
ou
will
Shell:
giv
es
ey
and
let
the commands
es y
of
basic
rst
see
you
Visual
help on
Help
most HP-UX
command-names
Key
Shell
ou
softk
ey
displa
Korn
Shell
a
status line
for Korn
and
build
y
our
and
command
ys
at
commands,
like
the follo
Shell
commands in
options
in
command
syn
the
b
ottom
along
with
wing
sequence.
lines
tax
of
of
their
Korn
Shell
Y
\in English"
HP-UX.
y
our
screen
options
ou
b
y
can
before
whic
in
sequence.
select
h
pro
you
vide
4
Y
ou
can
en
en
ter
standard
commands,
options
in
corresponds
the
softk
eys
successiv
When
y
ou'v
ely
y
ou
e
already
Key Shell
bac
k
to
the
After y
ou mak
ter
commands
HP-UX
Key
Shell
the softk
to a
softk
in
to
groups
b
y
pressing
w
an
t
to
c
hosen,
to
displa
rst,
if
e a selection b
Figure
ey lab
ey
see
y
the
y
ou
4-1. Key
from the
commands
will
often
displa
el
area
N
N
N
f1
,
of four.
the
more
press
next
press
at
N
N
N
N
N
through
You
corresp
commands,
NN
NN
--More--
the
\bank"
NN
NN
NN
NN
f8
rep
y pressing a softkey
Shell Softk
Key
Shell
as
usual.
y
an
the
b
N
N
N
N
N
N
f8
may
onding
N
N
N
N
N
N
N
N
N
N
N
N
N
N
N
of
eatedly
If
appropriate
ottom
N
N
.
The
select
softk
or
more options
N
N
NN
NN
N
softk
softk
eys
.
command line in \English," just as it appeared
correct order and spacing.
ey
Displa
y
softk
ey
men
u
or
y
ou
en
ter
standard
left-to-righ
of
y
our
N
N
N
N
N
N
N
N
NN
NN
N
y
or
.
NN
NN
N
N
f8
,
in
sequence,
our c
screen.
N
N
N
at
the cen
none
to go
N
N
.
This
hoice will
of
even
N
N
N
N
hpterm
an
ey
ey
,y
in the softkey displa
y
ou
can
HP-UX
t
set
Eac
h
lab
ter
separates
the
options
with a
will
command
cause
tually cycling
appear on the
y, with the
of
el
men
the
u
4-6 Using the Command Line
FINAL TRIM SIZE : 7.5 in x 9.0 in
Page 47

Displa
ying
the
HP-UX
Manual
Pages
from the
Command Line
T
yp
e
man
command
more
about
$man
After
a
The
message
remains.
an
y
of
Step
Scroll
Quit
T
o
prin
man
Y
ou
can
en
tering:
man
For
More Information
Y
our shell
T
o
learn
User's
the
cp
few
seconds,
-
(Some
the
following:
through
through the
viewing
t
a
man
c
ommand
use
the
manuals
has man
ab
out shells
Guide
.
cp
command
More
systems
the
le
the
reference
page
|
man
y
name
at
the
t
yp
an
information
-(11%)
le a
will
a
page
line at
means
just
at
page
for
a command
col
-b
|lp
command to
pro
ductivit
in detail,
command
e:
displa
y
ou'v
displa
y
a
time
b
a
time
b
b
y
pressing
named
get
a
complete
y-enhancing
also refer
prompt. F
y
app
e
view
-
More -
y
pressing
y
pressing
4
c
ommand
capabilities
to
Using
ears.
ed
5
.
q
listing
or example,
11%
of
). A
t
this
the
4
Return
,
en
HP-UX
the
space
5
.
ter
of
HP-UX
y
ou
and
le,
p
oin
the
ma
bar.
follo
y
to
t,
nd
to learn
and 89%
y
ou
can
wing:
man
uals
useful.
Shel
ls:
do
b
4
y
FINAL TRIM SIZE : 7.5 in x 9.0 in
Using the Command Line 4-7
Page 48

Using
Files
and
Directories
with
Command
Lines
The follo
system.
lines,
Creating
The
4
create
directories
current
To
commands
directory
wing
If
see
Using
mkdir
a
directory
working
$ mkdir
v
erify
that
names
$
ls
myfile
giv
es
y
ou
y
ou
need
more
HP-UX
Directories
(mak
e
directory)
,
y
ou
underneath
directory named
projects
it
w
ork
ed,
displa
y
the
to
dieren
projects
some
information
.
command
can
mo
it.
F
or
y
ou
new
directory,
tiate
List
It
worke
basic
information
v
e
les
example,
projects
can
use
them
les,
dir
d!
on
creates
into
to
either
but
from
e
ctories
using
a
it, and
create a
,
t
yp
the
lsf
app
le
in
on
using
les,
directories, and
new
directory
y
ou
can
sub-directory
e:
ls
or
lsf
ends
names.
your
curr
the
ev
command.
a
slash
F
or
example:
ent
HP-UX
.
After
en
create
in
(
/
)
working
directory
command
y
ou
more
y
our
Both
to
the
dire
end
ctory.
of
$ lsf
myfile
Figure
4-2
projects/
sho
ws
the
The
resulting
lsf
c
ommand
directory
app
ends
structure.
a
slash
to
dir
ectory
names.
Figure 4-2. Creating the \projects"
The general form of
mkdir
where
new dir path
new dir path
the
mkdir
is the path name of
4-8 Using the Command Line
Directory
command is as follows:
the directory y
ou w
FINAL TRIM SIZE : 7.5 in x 9.0 in
ant to create.
Page 49

Mo
ving
The
mv
from
one directory
directory
$
cd
$
mv
The
general
and
Cop
command
,
t
yp
e:
myfile
form
ying
Files betw
can
be
used to
to
another.
projects
of
the
mv
mov
F
or
example,
command
een Directories
e les
from
one
to
mo
v
e
Move
to
your
is
as
follo
ws:
lename
myfile
home
in
to
to
dire
another
or
the
projects
ctory rst.
mv
fr
where
frompath
andtop
Cop
ying
T
o
cop
y
mak
e
a
$
cp
T
o
mak
t
ype:
$
cp
The
general
cp
fr
where
fr
to path
Caution
om
p
ath
to
p
ath
is the
ath
is
the
name
Files
a
le
in
to
a
dieren
cop
y
of
myfile
myfile
e
a
new
projects/myfile2
v
ersion
projects/myfile2
form
of
the
om
om
is the
p
p
ath
ath
path
is
If y
p
to
the
name
ou cop
ath
same name
a le of the same name
le name
of the
named
of
myfile2
or
path where
t
directory
myfile2
path
,
use
named
name
you
the
in
the
myfile3
of
the
le
are mo
cp
ving
command. F
projects
in
y
y
ou
the
directory
our
curren
myfile3
cp
command
le
name
of
the
y a le to a directory
is
or
path
directory
as
name
or
follo
le
ws:
of
the
le
you
to
whic
h
y
ou are
,ev
en if the directory has the
as the le, the directory will not be destro
in
that directory w
ould be.
w
an
le.
or
wan
t
to
mo
example,
,
t
yp
e:
t
directory
tto
cop
copying.
yed. But
4
v
e,
to
,
y
,
and
As a general rule, b efore using
ensure that the target
le name to whic
copy doesn't already exist.
FINAL TRIM SIZE : 7.5 in x 9.0 in
mvorcp
,use
hy
ou w
ls
or
lsf
anttomo
to
Using the Command Line 4-9
veor
Page 50

Remo
If
y
ou
ha
Deleting
supp
ose
myfile2
$
rm myfile2
T
o
remov
ving
Files
ve
les that
and
unnecessary les
y
ou'v
e
nished
,
typ
e:
ean
empty
Directories
are no
longer needed,
lea
v
using
directory
es
more
myfile2
,
t
yp
e
the
ro
,
om
and
follo
y
ou
on
it
wing:
should
y
our
system.
is no
longer needed.
remo
v
e
(delete)
F
or
them.
example,
To
remov
e
4
If
rmdir
there
dirname
are
an
command will
not
empt
y
.
Also,
message.
cd
rm
ll
rm
rmdir
cd
rm
In
dirname
*
-a
.lenames
*
..
dirname
y
visible
not b
either
or
e executed,
if
there
case
y
A
ny
invisible
Y
ou
may
This r
T
o
get
in
visible
(\dot")
and
are an
ysub
ou
can
do
\dot"
have
to
emoves any
to the
par
les
y
ou
will
get
directories in
the
follo
wing:
lenames
r
ep
e
at
this
empty
ent dir
sub
e
ctory
still
in
a
message
the
r
emaining
c
ommand
dir
e
ctories.
again.
the
directory
that
directory
wil
for
al
the
,
y
l
b
e
ldot
,
this
directory
ou
will
displaye
les.
get
d.
is
a
4-10 Using the Command Line
FINAL TRIM SIZE : 7.5 in x 9.0 in
Page 51

To
a
v
oid
one
action,
rm
-rf
Caution
this
t
yp
dirname
pro
e
the
Use
and all
cess
and
follo
rm
remo
wing:
-rf
with
its con
v
e
great
tents,
a
directory
and
caution,
irretrievably
al
since
,
in
l
one
its
it
les
do
es
action.
and
remo
dir
ectories
v
e
a directory
in
4
FINAL TRIM SIZE : 7.5 in x 9.0 in
Using the Command Line 4-11
Page 52

Viewing
The
more
the
follo
$
This is
wing
more
and
Printing
command
line
displa
myfile
the text
Files
displa
ys
a
ys
the
of "myfile",
text
con
ten
le's
ts
which I
con
of
myfile
ten
ts
on
:
had
the
screen.
previously
F
or
example,
entered.
$
If
the
le
con
tains
more
lines
than
are
on
y
our
press
are
Files",
screen,
4
space
nished.
4
screen
additional
to
F
is
the system
or
using
full.
screens,
the
With
and
prompt.
vi
text
a
longer
editor,
press
le, y
5
when
4
q
see
ou
can
y
ou
\Editing
in
5
to
this
more
con
Then
c
hapter.
pauses
tin
ue
more
when the
lo
oking at
returns
y
ou
Printing
If
y
our
lp
(
l
ine
nd
out whether
If it
is not,
can
nd
A
dministr
If
lp
do
the prin
myfile
$
lp myfile
a
File
system
p
rin
ter)
basic
detailed
ation
es
w
ork
ter,
on
by
running the
with
lp
is
appropriately
command.
y
our
system
installation
information
T
asks
.
on
y
our
an
extensiv
lp
Before
is
information
on
system,
e
system.
command:
congured,
using
set
up
so
installing
y
ou
may
When
y
ou
can
the
lp
command
that
y
ou
is
in
Chapter
and
conguring prin
also need
y
ou
ha
prin
can
to nd
v
e
this
t
a text
y
ou
ma
use
the
lp
6,
in
this
ters in
out the
information,
le
using
y
need
command.
man
ual.
lo
cation
the
to
Y
System
prin
t
ou
of
4-12 Using the Command Line
FINAL TRIM SIZE : 7.5 in x 9.0 in
Page 53

If the
that
lp
it
sen
command
t
y
our
le
is
w
to
orking
the
prin
prop
ter.
erly
,
it
should
F
or example:
displa
y
a
message
indicating
The
y
ou
request
numb
don't
er
see
id
is
this
administrator.
username displa
on
the
n
um
b
er
T
o
displa
y
a
rep
in
the prin
$
T
o cancel
y
our
$
ter queue,
lpstat -t
a
prin
job:
cancel
r
is
lp-
an i.d.
message,
If
lp
yed
of
tasks
ort
t
job,
e
quest
w
on
on
numb
num
orks
the
the
typ
en
id
b
e:
ter
eing
er
(1
file)
ber
assigned
or
if
y
ou
get
successfully,
rst
page.
run
b
y
prin
ter
status,
the
cancel
to
the
an
you
The
time
the
system and
including
command,
prin
t
error
message,
should get
required
the
with
job
a prin
the sp
order
the
b
y
the
consult y
for
a
eed of
i.d.
lp
tout
prin
of
y
n
command.
our system
with
y
our
tout
dep
the
prin
our
prin
um
b
er
for
ter.
t
If
ends
4
job
FINAL TRIM SIZE : 7.5 in x 9.0 in
Using the Command Line 4-13
Page 54

Editing
You
can
les,
as
w
vi
.F
or detailed
Editors
.
Files
use
ell
the
in
teractiv
as
to
create
information, see
e
new
text
editor
ones.
The Ultimate
This
vi
to
enable
section in
troduces
Guide
y
ou
to
view
and
alter
text
to
the
the basics
vi
and
of using
ex
T
ext
Starting
4
Start
lename
exist,
Selecting
The
command
Y
our selection
Press
of
the
i
(the
command)
a
(the
command)
x
(the delete
command)
vi
it is
vi
4
by
exists,
editor
ESC
follo
insert
app
vi
en
tering
y
ou
created, and
Editing
has
sev
mo
de
and
determines
5
to
ensure
wing
commands
Places
preceding
mo
v
Places
end
after
is inserted
Deletes
command
the
command
will
see
the
you
will see
Functions
eral
functional
it
is
in
this
what
that
vi
is
(among
y
our
le
the
ed to
the righ
y
our
le
the
cursor.
as with
the c
haracter that
do
es not
vi
rst
mo
y
ou
in
command
in
text
cursor.
t.
in
text
The
i
lename
screen
a
blank
mo
des.
de
that
can
do
others):
mo
Ev
erything
mo
cursor
.
put y
our do
of
screen.
When
y
ou
to
mo
de
and
de
and
mo
is
highligh
at
the
that
select
the
text.
de.
en
after
enters
v
es
cument
prompt.
le.
you
all
Then
ters
to
the
ted
If
the
enter
editing
y
ou
whatev
the
cursor
whatever
righ
b
y
the
in text
If
a
le
vi
y
ou
functions.
can
er
t,
and
cursor.
mode.
le
do
es
not
are
execute
you
typ
will
b
you
typ
then
called
in
an
e
e
e
text
This
y
Each command
For example, if y
character" command), then y
in command mode allows y
ou place y
our le in text mo de b
ou ma
placed in command mode, and y
before inserting text.
4-14 Using the Command Line
FINAL TRIM SIZE : 7.5 in x 9.0 in
ou to p erform only that function.
yt
ypingr(\replace a single
y only replace one c
haracter. Y
ou can return to text mode b
ou are then
yt
ypingior
a
Page 55

P
ositioning
The
most
l
keys.
Y
(press
4
ESC
the
Cursor
commonly-used
ou
can
also
use
5
rst
for
command
metho
the
arro
mo
dto
w
k
de):
T
mov
eys.
able
ethe
These
4-2.
cursor is
k
eys
mo
v
to
e
use
the
the
h
,
j
cursor as
,
k
,
follows
and
T
Mo
v
e
the cursor
Mo
v
e
the
cursor
Mo
v
e
the
cursor
Mo
v
e
the
cursor
Sa
ving
Y
Y
ou
can
sa
in command
y
our
w
ork.
our
v
e
Press
y
mo
righ
left.
up.
do
W
our
de
ork
T
Sav
e without
Sa
v
e
and
Quit
vi
Sav
e under another le name
quitting
quit
without
vi
saving
o
wn.
w
4
ESC
o
Do
t.
ork
for
Do
vi
This
and
with
y
ou
5
to
This
changes
.
.
.
Quitting
or
without
to
b
e
able
ensure
.
.
.
that
T
to
y
able
quitting
use
our
do
4-3.
l
h
k
j
the
follo
cument
:w
:wq
:q!
:w
or
or
or
or
vi
T
.
T
yp
e
This
5
4
7
5
4
6
5
4
8
5
4
9
Y
our
wing
is in
yp
e
This
lename
Command
documen
commands
command
Command
t
m
to
mo
.
.
ust
sa
de:
.
.
.
4
b
e
v
e
.
Save in an existing le and
FINAL TRIM SIZE : 7.5 in x 9.0 in
overwrite that le
:w!
lename
Using the Command Line 4-15
Page 56

For
The
brief
ex
T
More
vi
ext
text
intro
Editors
duction.
Information
editor
comprises man
Refer
for
more
on
vi
to
Using
complete
ymore
functions than
HP-UX
information
or
The
ab
Ultimate
out
vi
are describ
Guide
.
to
ed
in
the
this
vi
and
4
4-16 Using the Command Line
FINAL TRIM SIZE : 7.5 in x 9.0 in
Page 57

Netw
Your
orking
HP-UX
transfer
also
enable y
and
pro
cesses
This
section
functions:
Cop
ying
Cop
ying
copies
les
les
Ov
system
of
les
ou to
remotely
giv
es
to and
remotely:
erview
can
to
log on
.
y
ou
basic
from
use
a
v
ariet
or
from
to remote
pro
cedures
a
remote
rcp
.
y
other
mac
of
net
w
computer
hines
on
for
using
computer:
orking
systems.
the
the
ftp
services
net
w
ork
follo
.
to
enable
These services
and
run
wing
net
w
orking
y
ou
to
can
commands
4
Logging
Displa
F
or
information
le
systems,
HP
VUE
onto
ying
User's
another computer
remote
and
on
using
exp
Guide
graphics
HP-VUE
orting
,
or
programs
le
systems
Using
on
the
on remote
to
Network
net
w
ork:
rlogin
lo
cally
.
systems, NFS-moun
remote
Servic
systems,
es
.
.
see
ting
Using
remote
HP-UX
,
FINAL TRIM SIZE : 7.5 in x 9.0 in
Using the Command Line 4-17
Page 58

Cop
ying
The
ftp
system
net
w
ork
you
to p
op
erations
remote
Files
le
Using
transfer
and remote
hosts
that
erform remote
suc
h
as
c
system
for
whic
ftp
program allo
systems
supp
ort
le
and
ARP
cop
hanging,
h
y
ou
ws y
among
A
ying
listing,
hav
ea
ou to
remote
services.
,
but
also
creating,
valid
copy
The
facilitates
and
login
les
HP-UX,
ftp
program
deleting
or
accoun
b
et
UNIX,
le
w
t.
een
y
our
lo
and
non-UNIX
not only
managemen
directories
cal
allows
t
on
a
Using
4
also
cop
the
Preparing
app
ying
one on
Mak
with
Ha
v
e
passw
the
remote
ftp
y
ou
end
a
local
can
ha
the originating
to
e
sure
that
whic
h
y
the
system
ord
and
hosts.
can
cop
ya
le
v
e
either
Use
ftp
y
our
ou
will
comm
administrators
an
accoun
local
le to
to
the
end
the
same
system.
/etc/hosts
unicate.
t, or
a
login
of
a
or
a
le con
for
a
remote
remote
dieren
tains en
the
remote
guest
le
le.
t
directory
hosts
accoun
or
The
tries
t,
vice
le
path
for
arrange
so
that
v
ersa.
to
the
Y
whic
and/or
remote
to
y
ou
can
ou
h
giv
can
y
ou
name
hosts
e
y
log
ou
are
in
as
a
on
4-18 Using the Command Line
FINAL TRIM SIZE : 7.5 in x 9.0 in
Page 59

Transferring
1.
T
o
in
v
ok
e
Files
ftp
and
with
connect
ftp
to
a
remote host
in one
step, t
ype
the
follo
wing:
This
prompts
If
name,
2.
Enter
conrm
in:
3. If
bin
Use
ftp
connects
Name
y
ou
intend
just
the passw
Password
Password
User
y
ou
are
at
the
get
A
t
the
get
r
emote
you
(
remote
this
r
emote
going
to
transfer
ftp>
r
emote
hostname
y
ou
for a
to log
press
4
ord asso
action
(
r
emote
required
lo
to
prompt,
prompt,
to
the
remote
remote login
hostname
in
with
5
.
Return
ciated
with
a
message
hostname
for
name
gin
transfer
b
efore pro
les from
t
yp
e:
lename
name:
):
the
same
with
remote
logged
binary
ceeding.
a
r
emote
host.
and
):
(as
ftp
then
remote
y
our
invisible
lo
login
remote
a
conrmation that
p
asswor
name
gin
in.
opp
osed
host
to
y
conrms the
name
as
login
name
d
to
\readable"
our
lo
c
al
dir
connection and
y
our
lo
cal
login
and
ftp
will
you
are logged
text)
les,
e
ctory
.
4
t
yp
e
The
r
emote
In
that
the same
on the remote host,
that le. The
path on y
If there is no matc
or directory
contents
When copying successfully
lename
case,
ftp
le name
ftp
our lo cal system. (F
is
the
name
copies
as the
remote
the
remote
le
to
lename
program copies the le to a le name with the same
or
hing path,
ftp
". If the destination le already exists,
with the con
tents of the remote le.
,
ftp
gives y
and the length of time it required.
FINAL TRIM SIZE : 7.5 in x 9.0 in
of
a
le
in
the
remote w
the
lo
cal
w
name
.
is the absolute
example,
gives y
ou a message, \
orking
If the
get /user/doc/
directory
le is
in another
or relative path for
No such file
ftp
ou messages conrming the cop
Using the Command Line 4-19
orking directory
and
giv
es it
directory
lename
overwrites
).
its
y
.
Page 60

Use
At
put
the
to
transfer les
ftp>
prompt,
from y
t
yp
e:
our
lo
c
al
dir
e
ctory
to
a
r
emote
host
.
put
In
this
sp
ecied
lo
cal
w
orking
in
4
r
r
emote
the remote
w
orking
General
See
File-Manipulation
Using
HP-UX
commands,
same
w
ay
as
If y
ou
need
the
ftp
prompt.
lename
lo
c
al
case,
lo
c
remote
lename
directory
emote
le
lename
host. If
directory
for
suc
h
as
cd,
the
corresp
information
r
emote
lename
al
directory
can b
ethe
.
ftp
.
can
not
on
Commands
information
mkdir,
onding
on
an
lename
is
.
name of
will
b
e
an
sp
ecied
the
remote host.
on
pwd
HP-UX
y
of
the
copied
cop
y
absolute
for
ftp
ho
w
,
and
rmdir
commands.
ftp
to
the
remote
the
lo
cal
the
le
in
or relativ
otherwise,
to
use
ftp
,
man
commands,
le
name
le
in
y
our
to
a
le
of
the
e
path
to
it
will
b
e
in
le-manipulation
y
of
whic
h
just
t
yp
e
help
in
the
curren
t
same
a
le
name
the
curren
function
(or
lo
cal
name
t
in
?
)
on
the
at
Exiting ftp
To
close
the
connection
with
the
remote
host
and
exit
ftp
,
t
yp
e:
bye
Cop
ying
Files
You can cop
rcp
. Also, using appropriate options, y
using
rcp
, if the conguration les that the
Remotely
y les bet
Using
ween HP-UX or other UNIX hosts on the net
Preparing to Use rcp
Touse
rcp
,y
ou'll need the follo
An
account (login) on the remote host.
4-20 Using the Command Line
FINAL TRIM SIZE : 7.5 in x 9.0 in
rcp
wing
prerequisites:
ou can cop
y directories b et
service uses are set up properly
work
using
ween systems
.
Page 61

A
.rhosts
y
our
lo
cal
A
.rhosts
the
systems
rcp
when
Note
A
/etc/host
communicate
line
con
le
host
le on
y
y
ou
taining
in
the
remote
system
ou
will
use
A
$HOME/.rhosts
prev
remote
and
P
ermissions
le
using
and
your
lo
cop
y
rlogin
ent
unauthorized
accoun
write
to
on
y
our
ARP
A/Berk
information
host
your
cal
system,
from.
on
the remote
t
and
a
.rhosts
need to
lo
cal
ab
out the
home
local
It
will
le
creates
users
host,
b
e
system
eley
directory
login name.
as
w
ell.
This
ensure
system.
a signican
form
only
you
le
in
y
our
set
accordingly
whic
h
lists
Services.
remote host
con
con
that
y
gaining
should
remote
hosts
F
or
eac
in
taining
tains
ou
will b
t securit
remsh
.
h
host,
the
b
e
home
with
follo
the
the
eable
y risk.
access
able
directory.
which
the
wing
names
names
to use
to
create
you
le
form:
to
has
of
To
y
of
all
our
4
can
a
internet addr
Y
ou
will
nd that
addresses
describ
Cop
T
o
cop
rcp
Note
the
(from
complete
you w
on
the
ed
in
gr
ep
ying
a
Local
y
from y
lo
lename r
c
al
that,
if
lo
c
relative
/
),
path (to
in
addition to
(absolute)
antittogoin
net
(1)
File
our system
al
For example, to cop
called
xyz
:
ess
ocial
the
/etc/hosts
w
ork.
and
to
a Remote
emote
le
is
get from
the lo
path
to a directory other than
y
myfile
in
not
for
T
o
facilitate
Using
to a
in
y
cal le
the
from y
name
alias
le
HP-UX
Host
remote
hostname
y
our
curren
our
curren
name. Y
r
emote
our curren
is
system,
rcp myfile xyz:/users/leslie/otherdir
useful
suc
ha
for
lo
lo
okup,
oking
use
.
use
the
follo
:
r
emote
t
t
lename
lename
directory
directory)
ou will
on
,
y
ou
or
the
need to
r
emote
the remote home directory
t directory to a remote system
up
names
the
grep
wing
will
need
absolute
specify
hostname
syn
and
to
tax:
to
path
the
ol
supply
only
.
if
FINAL TRIM SIZE : 7.5 in x 9.0 in
Using the Command Line 4-21
Page 62

In this
otherdir
copied
Y
system
In
leslie
ou
can also
rcp
this
case,
.
If
myfile
named
myfile
case,
.
myfile
y
include a
ou
in
xyz
will
had
to the
:
b
e
copied
only
supplied
remote home
lename in
as
myfile
the
directory,
the destination.
xyz:/users/leslie/otherfile
y
ou
ha
v
e
copied
myfile
as
in
to
remote
host
also as
otherfile
the
F
,
in
remote
name,
myfile
or
example,
the
sub
rcp
w
.
remote
directory
ould ha
to
cop
y
directory
ve
to
,
a
4
Cop
ying
a
File
on
a
Now,
host
to rev
in
to
y
erse
our
the
local
Remote
pro
directory.
cess,
Host
here
Use
to
is
Y
ho
the
our
w
follo
Local
y
ou
wing
Directory
w
ould
syn
cop
tax:
y
a
le
fr
om
a
remote
rcp
F
or
example,
y
our
rcp
The
dot
copied
do
not
new
name.
If
y
ou w
path
rcp
Or,
if
r
emote
curren
hostname
to cop
t
directory:
y
myfile
:
r
emote
xyz:/users/leslie/myfile
(
.
)
is
as
ha
ant
name,
myfile
v
e
to
to cop
absolute
shorthand
from
supply
y
the
the
myfile
or
relativ
for
remote
destination
in
xyz:/users/leslie/myfile
y
ou w
ant
to cop
y the
le to
lename
from
y
\current
directory
to
another
e,
as
sho
another le
our
accoun
.
directory". In
lename
directory
wn:
otherdir/
lo
c
al
t
in
to
if
name in
lename
in
y
our
y
ou
in
rcp xyz:/users/leslie/myfile otherdir/otherfile
Run the
ls
command to conrm what y
ou ha
ve done.
a
remote
this
curren
don't
y
our
system
case,
t
w
an
home
another
xyz
myfile
directory
t
to
cop
system,
directory:
in
will
.
You
y
use
to
b
e
it
to
a
a
4-22 Using the Command Line
FINAL TRIM SIZE : 7.5 in x 9.0 in
Page 63
Logging
If
y
ou
a
remote host
then
If
the
ha
ve
w
ork
remote
In
an accoun
on
automatically
on
Another
b
y
supplying
that
system
host
is
, without
Computer
ton
a
remote
y
our
just
congured
having
remote
as
y
to allo
to
supply
Using rlogin
host
,
then
login
ou
w
ould on
wit,
y
our
you
y
ou
name
your
can also
login
can
use
rlogin
and
passw
home system.
log
in
name
and
ord.
on
a
passw
to
log
Y
ou
remote
ord.
in
can
on
host
Logging
A
The
system.
.rhosts
En
message
If
for
remote
prompt
t
the
rlogin
r
emote
ter
some
host
In
on
shell
As
le. The
y
our
and
reason
y
ou for
a
Remote
prompt, use
r
emote
hostname
b
efore,
remote
remote
the
remote
y
ou
will
giv
e
your
Host
the
hostname
is
the
this
system
passw
ord.
host
should
y
ou
the
login,
and
host
mak
error
form:
name
The
prompt.
y
our
Login incorrect
login:
Getting the
To
get
en
vironmen
cop
ying
remote system. As with y
or
.login
the
y
Same W
remote
t,
our
you
lo
cal
orking
host
en
can set
.profile
will take precedence o
Environment
vironmen
the
.profile
or
.login
our home system, the v
ver the v
/etc/profileor/etc/csh.login
of
is
named
prompts
remote host
e
an
error
message,
passw
on
t
to
b
le.
an
appropriately
in
y
our
y
ou
for
y
logs
in
en
tering y
\
Login
congured
/etc/hosts
our
remote
y
ou
in
with
our
incorrect
le
passw
passw
",
ord:
the
eha
or
les
Remote
v
e
in
.login
to
your
Host
the
same
v
alues
home
alues in
w
a
y
to
b
e
the
directory
your
.profile
as
alues in the remote system's
remote
and
ord.
the
ord,
and
your
same
on
in
login
the
will
home
the
4
y
our
b
y
Logging Out and Exiting the Remote Host
You can log out of the remote host just as y
byt
yping:
FINAL TRIM SIZE : 7.5 in x 9.0 in
ou w
ould from y
our home
Using the Command Line 4-23
system,
Page 64

exit
T
yping
A
t
this p
to
HP-UX
prompt:
4
CTRL
oint
on
5
-
you
4
y
D
our
5
also
logs
are logged
lo
cal
you
out
system,
out on
of
the
whic
most system.
remote
h
displa
host,
ys
disconnected,
a
message
and
y
our
and
lo
returned
cal
Connection
closed.
$
4
Displa
If
using windo
done
DISPLAY
sends
F
and
y
ou
are
b
y
bitmapp
or
example,
the
xhost
rlogin
DISPLAY=
export
xwijit
ying
running
setting
sets
remote
+
Remote
ws
on
a
the
the
host,
ed
output
if
the
program
r
emote
r
emote
lo
c
al
:0.0
DISPLAY
Graphical
HP
VUE
remote
DISPLAY
display
remote
or
mac
en
for
clien
mac
is
called
This
L
o
g
in
ac
c
ount.
On
the
display
Export
R
un
the
Programs
the
X
hine
and
vironmen
num
b
er,
ts.
hine
is
xwijit
enables
on
a
r
emote
on
your
the variable
pr
o
gr
Windo
displa
t
v
and
called
,
en
your
r
emote
machine,
lo
c
am
Locally
w
System, y
y
the
ariable
screen
r
emote
ter
the
system
to
machine
set
al system.
results
on
n
um
,
y
follo
r
the
our
e
c
the
b
o
ou can
wing
on
lo
cally
remote
er
to
whic
lo
cal
on
gnize
which you
DISPLA
run a
.
system.
h
system
y
our
the
r
emote host.
Y
program
This
a
system
is
system:
have an
variable
is
lo
c
al
,
to
4-24 Using the Command Line
FINAL TRIM SIZE : 7.5 in x 9.0 in
Page 65

For
F
or
the
More
detailed
HP VUE
Information
information
User's
Guide
on running
.
HP VUE
in a
netw
ork
ed
en
vironmen
t,
see
4
FINAL TRIM SIZE : 7.5 in x 9.0 in
Using the Command Line 4-25
Page 66

FINAL TRIM SIZE : 7.5 in x 9.0 in
Page 67

5
Backing
Softw
Chapter
Bac
are
king
Contents
Up
Restoring
Restoring
Up,
Y
Restoring,
our
System
Individual Files.
Y
our
Op
erating
and
Soft
System
w
are.
Using
and
the
Updating
Recov
ery T
ape.
Y
our
5
Backing Up, Restoring, and Updating Your Software 5-1
FINAL TRIM SIZE : 7.5 in x 9.0 in
Page 68

Backing
Up
Y
our
System
and
Softw
are
The most
is
also
if
your
Y
ou
pro
cedures
Up
dating HP-UX
Mak
on
automatically
k
ernel
T
o
5
Bac
If y
ou
y
our
p
ossible
Creating a
imp
ortan
esp
ecially
imp
HP-UX has
can
protect
giv
en
y
our
in
9.0
e
sure
y
ou
create
y
our
disk
from
created
from
y
our
build
y
our
bac
Cartridge
DDS
F
ormat
tap
e
(\D
Magneto-optical
Other
k
up y
receiv
rst
hard
reco
our
ed
v
disk
le
y
ery
our
.
Recov
t
part
ortan
been
data
this
or
whic
system
kup
driv
es
AT")
disk
driv
system
w
orkstation
tap
eand
ery
of
y
our
t
to
protect
supplied as
and
op
c
hapter.
System A
and
main
h
y
ou
can
by
SAM
console.
system,
y
drives
driv
es
es
regularly
to arc
System
system
y
a
erating
For
detailed pro
dministr
tain
a
b
oot
whenev
ou
can
.
with
Instan
hiv
e
is
the
data
our op
erating system
pre-installed
bac
y
in
er
use
our
system
ation
T
kup
HP-UX
an
emergency
y
ou
recongure
the
t
Ignition,
existing
from
following
y
ou
ha
v
\Instan
loss,
t
using
cedures, see
asks
.
k
ernel
.
A
and
devices:
it
is
imp
le
system
e
accum
ulated. It
from corruption
Ignition"
Installing
(
/SYSBCKUP
/SYSBCKUP
reb
ortan
as
the
o
so
disk.
general
and
ot
a
t
to
on
as
is
new
create
)
A \reco
op
system
bo
the
rather than b
You can also
purchase from y
You should mak
v
ery
system"
erating system
failure
ot
from
the
le
system
and some
that
reco
v
on
y
prev
ery
our
y using SAM.
restore your system from a system CD R
our HP sales represen
e a system reco
Immediately after y
is
a
sp
ecial
restoration to
en
ts
system
disk.
ou set up
tap
e
con
y
ou
from
b
ooting
tap
e
and
A
recov
ery
tative.
very tap e using
your new w
taining
ols. In
or logging
use
the to
system
orkstation.
a
the
is
mkrs
subset
ev
ols on
created
OM that y
at the
5-2 Backing Up, Restoring, and Updating Your Software
FINAL TRIM SIZE : 7.5 in x 9.0 in
of
the
en
t
of
an
into
HP-UX,
the tap
b
y
using
following times:
HP-UX
op
erating
eto
repair
commands
ou can
y
ou
can
Page 69

Eac
h
time
swap
conguration.
T
o
do
this,
more
tap
es.
Using
mkrs
The
mkrs
command
hard
disk
driv
disk,
then
you
hard
disk.
pro
vides to
Some
Options
If
enough
option
this
sa
v
es
reco
free
can
directory
a
great
v
ery
medium
systems, the
you
y
ou
to
Create
e.
Once
repair
for
disk
b
e
used
before
deal
-q
update
will
If y
can
b
b
o
oted
the
mkrs
space
to
of
(cartridge
option
your
need
a
tap
a
Reco
v
constructs
our system
o
ot
y
our
on
the
corrupt
is
a
v
mak
e
mkrs
it
copies
time
due
or
is
assumed.
op
erating
e
driv
e
ery
System:
a
reco
later
b
system
ro
ailable
reco
ot
from
v
ery
disk.
in
create
it
to
the
to reduced
DDS
tap
system
(cartridge
v
ery
system
ecomes
the
system,
/usr/tmp
an
image
reco
v
ery
seeking
e).
F
or
mak
or
DDS-format)
on
un
b
o
otable
reco
v
ery
y
ou
(typically
of
medium.
on
or
DDS-format
e
a
c
a
can
tap
tap
hange
e
due
e
then
or a
to
or
use
the
in
y
our
and
one
formatted
a
corrupt
alternate
the
10-20Mb), the
the
reco
v
ery
system
This
option
non-random-access
tap
e
reco
v
disk
or
ro
tools
it
-q
in
generally
ery
ot
5
When
(8Mb
b
See
Source
By
e
placed
mkrs
default,
creating
or
less),
the
on
the
(1M)
for
Device Files
mkrs
a
/dev/update.src
/dev/rct/c0
/dev/rct
If none of the abo
becr
e
ated
or the
The reco
very device le can be either blo c
DDS-format
-s
option should
reco
v
ery
more
uses the
system.
options
following
reco
with
v
ery
b
source
ve defaults exist on y
-f
option m
ust be used to specify the device le to be used.
Backing Up, Restoring, and Updating Your Software 5-3
system
e
used
to
mkrs
.
device
our system,
korc
for
a
small
memory
sp
ecify
that
les:
one of these devic
haracter.
a
smaller
w
orkstation
set
of
e les must
les
FINAL TRIM SIZE : 7.5 in x 9.0 in
Page 70

Root Device
mkrs
,b
y
default,
/dev/dsk/0s0
/dev/root
/dev/hd
Files
uses
the
follo
wing
device
les
for
the
ro
ot
device:
If none
b
e
The
If
An error
5
Backing
created
ro
Y
ou
Ha
None
is
not
None
not
used
The
sp
ecify
of the
ot
or
device
v
e
a
abo
ve
the
-r
le
Problem
message results
of
the
default
used
to
sp
of
the
default
to
sp
ecify
mac
hine
t
ype
the
mac
hine
Up Y
our File
defaults
option
m
ust
device
ecify
device
aro
cannot
t
exist
m
b
e
ablo
if:
les
a
reco
les
ot
device
b
e
yp
e.
Systems
on
ust
b
e
used
ck
device le.
for
the reco
v
ery
device
for
the
le.
determined
the
system,
to
sp
very
le.
ro
ot
device
and
one
ecify
the
of
the
device
exist
-m
these
device
exist
and
option
device
le
and
the
-r
is
not
to b
the
option
used
les
e used.
-f
option
m
to
ust
is
Preparation:
The
follo
wing
pro
1.
If
y
our
system
softw
are,
or
T
asks
or
Installing
SAM will pro
2. Log in as
3. T
ype
/usr/bin/sam
4.
5.
Choose
Choose
or
NNNNN
Backup and Recovery
NNNNNNNNNNNNNNN
Backup Devices
NNNN
NNNNNNNNNNNNNNNNNNNNNNNNN
Automated Backups
cedure
is
y
ou
vide in
root
.
NNNNNNNNNNNNNNNNNNNNNNNNN
NNNNNNNNNNNNNNNNNNNNNNNNN
NNNNNNNNNNNNNNNNNNNNNNNN
more
ha
v
and Up
sets up
than
e
nev
asc
six
mon
er
done
dating HP-UX
teractive guidance. T
.
NNNNNNNNNNNNNNNNNNNNNNNNN
NNNN
from the opening
NNNN
(to determine what bac
.
heduled bac
ths
old,
a
bac
kup
b
9.0
o use SAM, do the
kup:
y
ou
hav
efore,
b
efore pro
e non-HP
see
System
ceeding.
supported
A
dministr
following:
menu.
kup devices are connected)
ation
Otherwise,
5-4 Backing Up, Restoring, and Updating Your Software
FINAL TRIM SIZE : 7.5 in x 9.0 in
Page 71

a.
Note
If
the
y
ou
device
op
ened
NN
N
N
N
N
Backup
is
connected
If
y
ou
N
ha
N
N
N
N
N
N
N
N
N
N
N
N
N
NN
NN
Refresh
N
N
N
N
N
N
N
N
N
N
N
N
N
N
N
NN
NN
NN
N
N
N
N
N
N
N
N
N
N
N
N
N
N
N
N
N
,
and
the
tap
a
N
N
N
N
N
N
N
N
N
N
N
Options
no
devices
e
is
inserted.
device during
N
N
N
NN
NN
NN
NN
N
men
u.
are
sho
this pro
wn,
cess, c
mak
e
sure
hoose
NN
v
NN
N
Devices
e
to
from
and
connect
the
b. Cho
c.
1.
If
remote
or
bac
2.
Before
c
3.
Load
using,
pro
accept data.
4.
F
whic
items:
a.
b.
c.
ose the
N
N
N
N
N
Cho
y
ou
Remote)
kup
hecking
ceed
rom
h
N
N
N
NN
NN
Select
N
NN
N
N
N
Select
is
N
NN
NN
NN
Select
want a full or incremen
Add
ose
go
directly
bac
kup
!
devices.
initiating
that the
atap
e
y
ou
ma
when
N
N
N
N
N
N
Add
the
will bring
NN
NN
N
N
N
N
N
N
N
N
N
N
N
N
N
to
Backup
N
N
N
N
N
N
N
N
N
N
N
N
N
NN
NN
Backup
bac
kup
NN
NN
N
N
N
N
N
N
N
N
N
N
N
NN
Backup
N
N
N
N
NN
NN
entry
N
N
N
N
NN
NN
NN
N
N
N
N
N
N
N
N
N
an
Automated
to
device
N
N
N
N
N
N
N
N
N
N
N
N
N
N
Specify
the
write-protect
in
to
the
y
see
activit
one
ligh
N
N
N
N
N
N
N
N
NN
NN
N
N
N
N
N
N
N
an
Automated
up additional
N
N
N
NN
NN
NN
NN
N
N
N
N
N
N
N
N
N
N
N
N
N
N
N
the en
NN
NN
NN
NN
N
N
N
N
N
N
N
N
N
N
N
N
N
Device
N
N
Scope
N
N
Time
NN
NN
for
the
N
N
N
N
N
N
N
Automated
NN
NN
bac
tap
N
N
N
N
N
N
N
NN
N
N
N
desired
N
N
N
N
N
N
NN
NN
NN
N
N
N
N
N
N
N
N
N
N
N
N
N
N
N
NN
N
N
N
N
N
N
N
N
N
NN
N
N
Actions
from
NN
NN
N
N
N
N
N
N
N
N
N
N
N
N
N
N
Backup
kup,
e
driv
y
ligh
t
remains
N
N
N
N
N
N
N
N
N
N
N
NN
NN
N
N
N
N
N
N
N
N
N
N
NN
NN
NN
NN
N
NN
NN
N
NN
NN
NN
N
N
N
N
N
:
N
:
time,
tal bac
(if
what
NN
tire system.
NN
N
N
N
N
N
N
N
N
N
N
N
N
N
NN
NN
Backup
N
N
N
N
N
N
N
N
N
N
N
N
N
N
N
NN
Backups
N
N
N
N
N
N
N
N
N
N
N
N
N
N
N
NN
N
N
N
NN
NN
NN
NN
N
N
N
N
N
Device
v
erify
that
device
e.
Dep
ts ashing
on,
N
N
N
N
N
N
N
N
N
N
N
N
N
N
N
N
Backup
forms for
y
ou
lesets
da
y
kup, for eac
device.
NN
N
N
N
N
N
N
from
N
N
N
N
N
N
N
N
N
N
N
N
N
N
,
y
N
NN
N
N
N
N
N
Add
!
N
N
N
N
N
N
N
N
N
.
A form
y
our
is
in
while
N
screen, y
sp
ecifying
v
e
not
to
date.
N
\writable"
Y
N
N
N
N
N
ending
indicating
N
NN
NN
ha
,
N
N
N
N
N
N
N
N
N
NN
NN
NN
N
N
N
N
N
N
N
Actions
the
ou
can
N
N
N
N
N
N
N
NN
NN
NN
NN
an
Automated
will displa
tap
e
is
what
the
that
ou can
the
select y
the
N
N
N
N
on
already
include
ou can
h time specication.
N
men
N
N
N
tap
or
also
our
N
N
N
N
N
N
N
N
N
N
N
N
N
N
NN
NN
not
write-protected
p
osition.
tap
e
driv
e
is
loading.
driv
e
select
follo
wing
sp
ecied
exclude.
set
NN
NN
N
N
Backup
yan
e
is
the
it).
whether
u.
lo
cal
or
N
N
N
N
N
N
N
N
N
N
N
N
N
N
N
N
(Lo
y
existing
y
ou
are
Y
ou
ready
to
options
required
The default
y
ou
cal
b
y
can
5
Backing Up, Restoring, and Updating Your Software 5-5
FINAL TRIM SIZE : 7.5 in x 9.0 in
Page 72

NN
N
N
N
N
N
N
N
N
N
N
N
N
N
N
N
N
N
N
N
NN
NN
NN
N
N
N
N
N
N
N
N
N
N
N
N
N
N
N
N
N
N
N
NN
NN
NN
N
N
N
N
N
N
N
N
N
N
N
N
5.
Additional
a. If
b.
If
c.
If
mailed to
6.
After
tap
e
you
y
ou
y
ou w
the
device
Parameters
w
an
t
y
our
w
an
t
the
ant
an index
a
designated
minim
um
to complete
tap
N
bac
kups
e
(cartridge
log to
user).
required
the bac
(optional)
to
cross
or
b
e
created
forms
kup according
are
allo
ws
NFS
autoc
lled
for
y
ou
to
sp
moun
t
p
oin
hanger) rew
eac
h
bac
out,
SAM will
to
y
our
ecify
the
ts.
ound.
kup.
(Results
then use
sp
ecications.
follo
wing:
can
your
b
e
5
5-6 Backing Up, Restoring, and Updating Your Software
FINAL TRIM SIZE : 7.5 in x 9.0 in
Page 73

Restoring
To
ha
restore
v
e
A
The
The
to
The
sp
the
follo
list of
les y
media
lo
cation
some other
device
Note
Individual
ecied
wing
les
information
ou need.
on
whic
h
the
on
y
our
lo
cation).
and
device
T
o
restore
system,
of
SAM.
When
frecover
write
op
erates
root
-mo
exp
orted
serv
er
command to
exp
ortfs
A
dministering
Files
from
a
and
data
system to
le
for
data
en
ter
restoring
can
p
ermission.
in
user
de. T
from
and
use
exp
(1M)
in
lo
cal
device
materials:
resides.
restore the
restoring
to
disks
NN
NN
NN
NN
Remote
the
les
that
only
restore
The
-mo
de
o
ensure
the
NFS
the
root=
ort
the
the
HP-UX R
NFS
Servic
using
les (original
the
data.
ph
ysically connected
N
N
N
N
N
N
N
N
N
N
N
N
N
N
N
N
N
NN
NN
NN
NN
N
N
Administration
are
NFS
those
frecover
when
crossing
that
frecover
serv
er,
login
option
correct
eferenc
es
man
SAM,
N
rst
N
N
N
N
N
N
N
N
N
N
N
N
N
N
NN
NN
NN
moun
les
having
command
NFS
can
as
root
to
the
/usr/etc/exportfs
p
ermissions.
e
and
ual.
y
lo
cation
NN
N
N
N
N
N
N
N
ted
normally
moun
restore
the
ou
will
or
to another
functional
to
y
our
\other
t
p
oin
the
on
the NFS
Refer
to
Instal
need
to
relativ
area
system,
user"
ts;
les
ling
and
e
5
not
le
Backing Up, Restoring, and Updating Your Software 5-7
FINAL TRIM SIZE : 7.5 in x 9.0 in
Page 74

To
Restore
1.
Ensure
2.
Run
3.
Cho
4.
Cho
5.
Highligh
6.
Cho
highligh
7.
5
Cho
Do either
Fill
should
to
a
pathnames
Or
c
use
is
Individual
that
y
ou
SAM
by
typing:
/usr/bin/sam
N
N
N
N
N
N
N
N
N
N
N
N
N
N
N
N
N
N
N
N
N
N
N
N
N
N
N
N
N
N
N
N
N
N
N
N
N
N
NN
N
N
N
N
N
N
N
N
N
N
N
N
N
Select
N
N
N
N
N
N
Selected
of the
the
lename
b
e
full
a
graph
bac
of
eac
N
N
N
N
N
NN
NN
N
N
Add
.
NN
NN
NN
N
N
N
N
N
NN
N
NN
NN
device
N
N
N
N
N
N
N
N
N
N
N
N
N
N
h
If
or
if
Backup
ose
N
N
N
Backup
ose
tthe
N
N
N
Recover
ose
t
ose
the
in
create
previous
en
ter
ho
ose
N
N
N
N
N
N
N
NN
Modify
required,
Files:
ha
v
e
root
NN
NN
NN
N
N
N
N
N
N
N
N
N
N
N
N
N
N
N
N
Recovery
N
N
N
N
N
N
N
N
N
N
N
N
N
N
in
the
N
N
N
N
N
N
N
N
N
NN
N
N
N
NN
N
N
N
N
N
N
N
N
N
N
N
N
N
N
N
N
N
N
N
N
N
N
N
N
Files
wing:
con
le.
but
les
name
ou
mak
N
N
N
N
NN
NN
NN
NN
N
N
c
ho
ose
N
NN
N
N
or
N
N
N
N
N
Y
to b
N
N
and
NN
N
N
N
N
N
Devices
N
N
N
N
N
N
N
Files
N
N
NN
NN
NN
Recovery
N
N
N
N
NN
NN
follo
pathnames.
kup,
the
le
y
N
N
N
Remove
y
ou
capabilities.
NN
NN
NN
NN
N
N
N
N
N
N
N
N
N
.
list
from
N
N
N
N
N
N
N
N
N
N
N
N
N
N
N
N
N
N
NN
N
Directories
N
N
N
N
NN
NN
NN
NN
N
N
N
N
N
N
N
N
N
Scope
N
N
N
N
N
NN
NN
N
chec
taining
ou
it m
in
e
N
to correct
a
This
can
ust b
e restored.
the
\Included"
a
mistak
this
metho
N
N
N
N
N
N
N
N
kbo
list
le
use
e
whic
N
N
N
N
N
N
N
N
N
.
Activ
x
is
the
edited
e,
the
h
the
N
N
N
N
N
N
N
N
N
N
from
ate
(it
should
of
les to
not
on-line
to
highligh
mistak
d.
data
the
N
N
N
N
N
N
N
N
OK
or
ha
restore.
a
graph
index
con
taining
and
\Excluded" b
t
the
e.
Only
is
to
b
N
N
N
N
N
N
N
N
N
N
N
NN
N
N
Actions
press
v
e
an
The
le.
This
le
only
en
try
with
the
e
restored.
N
N
N
N
N
N
N
N
men
u
5
4
asterisk
created
.
Return
lenames
le
is
the
full
oxes
the
\Included"
and
(*)
used
b
y
and
error
in
b
it.
and
o
x
Y
ou
can
use
b
oth
the
le
and
the
included/excluded
simultaneously
When
activate
5-8 Backing Up, Restoring, and Updating Your Software
y
ou
ha
N
NNNNNNN
OK
v
e
.
to sp
ecify les
completed
to b
e restored.
determining the
FINAL TRIM SIZE : 7.5 in x 9.0 in
selected
les
metho
to
b
e
d
reco
v
ered,
Page 75

8.
T
o
N
N
N
N
N
N
N
N
Set
Ov
Main
Reco
Place
T
urn
T
o
Activ
9.
Activate
If
conrmation
con
the
do
any
N
NN
NN
of the
NN
N
N
N
N
N
N
N
N
N
N
N
N
N
N
N
Additional
erwrite
tain
ver
les
les
on
the
restore
ate
les
the
the
trol
button
output
of
following
N
N
N
N
NN
NN
NN
N
N
N
N
N
N
N
N
N
N
N
N
N
Parameters
new
les.
original
o
wnership.
using
in
a
non-ro
appropriate
relativ
N
N
N
N
N
N
N
N
OK
con
trol button
N
N
N
N
N
N
N
N
OK
con
trol
messages
to
pro
the
executed
N
N
N
N
N
N
NN
full
ot
e
to
ceed
during
NN
NN
N
N
N
N
N
N
N
N
N
path
directory
c
hec
kb
a
particular
button
app
ear,
in
eac
frecover
N
N
N
:
name,
o
x(es).
to set
to
h
the
restore
or
.
directory
the additional
start
the
read
the
case.
SAM
command.
pro
cess,
,
ll
restore
message(s)
displa
activ
ate
in
the
directory
parameters.
pro
cess.
and activ
ys
a
windo
.
ate the
w
containing
N
N
OK
N
N
N
N
N
N
5
Backing Up, Restoring, and Updating Your Software 5-9
FINAL TRIM SIZE : 7.5 in x 9.0 in
Page 76
Restoring
T
ape
If
y
our
op
usable,
arc
Bo
If
y
hiv
ot
our
R
e
you
bac
OM
op
load the
Y
ou
can
from
the
F
rom the
to
c
hec
k
v
5
arious
other
Caution
If y
our
system
Y
erating
can restore
kup
to
nd
erating
leset
TOOL
b
oot
a
tap
e
cartridge
recov
ery system,
and
repair
tasks.
disk
our
Operating
system
or
the
your
tap
e(s).
Also
and b
oot
system
from
is
still usable
an
memory-based
or
DDS-format
y
ou
le
systems,
Do
not
run
fsck
This
could
in
mo
de when
than
and
the
then
c
ro
ot
remoun
(including
entire
system
see
App
from a
up
date
v
ersion
can
moun
copy
on
tro
duce
hec
king
le
system,
t
the
/SYSBCKUP
System
root
disk b
using
y
our
endix
recov
A
ery
but not
tap
e
to
of
hp-ux
reco
v
t
and
les bac
a
le
system
data
corruption.
the
ro
ot
unmoun
le
system.
)
is
Using
the
Reco
ecomes corrupted
reco
v
ery
system
for
information
tap
e.
functioning correctly
obtain
ery
un
(kno
tap
unmoun
kon
to
that
le
system.
t
b
o
otable,
diagnostic
wn
as
e
whic
h
t
le
y
our
system
is
mounted
Run
F
the le
system,
do
a
r
y
systems,
fsck
or
the
tap
on
using the
utilities,
e
c
overy
ou
ha
disk,
and activ
in
le
systems
follo
v
ery
and
not
e
and
y
our
,
y
ou
can
system
ve
made.
run
fsck
and
single-user
other
run
fsck
wing:
)
e.
,
1.
Load
the
recov
ery tap
turned
2.
W
3.
Reset y
and
ait
on.
for
our
pause
the
driv
computer
the
b
color self-test and prompts for bo ot
ein
your
tap
e
driv
e
and
b
e
sure
e
to
b
ecome ready
b
y
turning
o
ot
pro
cess
b
y pressing
(the \busy"
it
o
and
4
ESC
then
5
after
light
bac
k
the
selection.
5-10 Backing Up, Restoring, and Updating Your Software
FINAL TRIM SIZE : 7.5 in x 9.0 in
that
the
remains o
on. Bo
ot the
computer
driv
).
system
p
erforms
e
is
its
Page 77

4.
A
t
the b
oot
selection screen,
drive
as
the
one
...
1R SYSRECOVERY
...
En
ter
b
and
the
y
ou
devic
select
the
op
erating
w
an
t
to
b
o
ot
from.
sp
e
cic
e
ation
,
suc
F
or
h
as
system
example,
1R
:
for
that
the tap
is
on
the
edriv
tap
e:
e
b
5.
Y
our
reco
v
commands
(disk-based)
6.
F
rom
system
y
ou
migh
Note
a. Y
Do
b.
The
remo
i.
ii.
sp
devic
reco
ery
this p
dep
ou
migh
so
/hp-ux
v
Mounting
necessary)
Using
e
cic
e
v
ery
system
system is
to
use,
op
erating
oint,
the
end
on
t
need
to
If
y
our
hardw
b
efore
t
need
in
single-user mo
k
ernel
ed,
b
y
doing
your
in
the
cp
ation
should
up and
in
order
system.
sp
ecic
the
nature
do
are
inabilit
are,
it
will
y
ou
can
to
run
le
the
system disk
y
our
memory-based reco
command
b
egin
running y
to
help
things
of
the
outlined
y
to
b
b
e
pro
ceed
the
fsck
de only
can
b
e
follo
wing:
to
cop
y
in
o
ot
necessary
.
restored,
to
memory-based system (it is a cop
directory y
ou
used as a moun
destination le should be called
loading
ou will
ou
repair
y
ou
need
b
o
ot problem.
the
follo
your
with
the
program
an
empt
y
the
/hp-ux
yofy
t poin
tfory
hp-ux
from
the
tap
e.
ha
v
e
a
minim
um
and restore
to
do
to
reco
Some of
wing
list:
system
to
if it
hav
items
to
repair
has b
y
directory
very
our
is
caused
e
that
hardw
in
this
y
our
een corrupted
(mak
system.
le
from y
real
/hp-ux
our system disk. The
.
Once
set
your
v
er
y
the
b
y
are
list.
ro
ot
e
our
le) to the
y
our
of
primary
our
primary
things
fault
y
repaired
le
system.
or
one
if
5
that
Backing Up, Restoring, and Updating Your Software 5-11
FINAL TRIM SIZE : 7.5 in x 9.0 in
Page 78

c.
Y
/etc/rc
pro
/hp-ux
d.
Y
Note
ob
jective
then
reco
y
our
ou
migh
cedure
ou
migh
that
reb
v
er
system
is to
o
ot
lost
t
need
,
etc.
from
for doing
.
Only
the
t
also
the
memory-based
restore y
y
our
computer
les
from
to
its
normal
to
le
need
restore
y
our
memory-based
this is
names
to
mo
our
disk-based
from
bac
kup
operational
imp
ortan
almost iden
and
directories
ve,
remov
system
has
system
y
our
system
tapes,
or whatev
condition.
t
system
tical to
e, cop
limited
les
system
will
y,
or
to
disk.
er else
suc
h
as
to
y
our
system disk.
the
pro
cedure
b
e
dieren
searc
h
for
capabilities.
a
b
o
otable
F
rom
that
is
necessary
/etc/inittab
The
for
restoring
t.
other
les.
Your
primary
condition
p
oin
t, y
to
and
ou can
restore
,
For More
For
more
5
HP-UX
cpio
(1),
HP-UX
Information
information
9.0
,
System
and
tcio
(1)
Pr
oblems
on
A
dministration
in
the
.
bac
kup
man
and
pages
reco
Tasks
or
in
v
ery
,
and
HP
,
see
Instal
the
references
VUE Help.
ling
Also see
and
for
Up
mkrs
dating
(1m),
Solving
5-12 Backing Up, Restoring, and Updating Your Software
FINAL TRIM SIZE : 7.5 in x 9.0 in
Page 79

6
Configuring
HP-UX
Chapter Contents
Preparing
for
Installation.
Conguring HP-UX
Finding
Conguring
Conguring
Conguring
Conguring
the
Status
for
a
for
a
for
a
for
aDDS
of Existing
Hard
Flexible
CD
for
R
a
Disk
OM
T
ap
Prin
Disk
Driv
e
for
ter.
SCSI Bus
Driv
e.
Driv
e.
Driv
e.
Printers
Addresses.
e.
and
Driv
es
6
Configuring HP-UX for Printers and Drives 6-1
FINAL TRIM SIZE : 7.5 in x 9.0 in
Page 80

Preparing
If y
our
system
for
w
factory-installed,
device
device,
conguration
giv
For
to comm
y
ou
es y
ou general
peripherals
F
or
a
list
\In
ternal Mass
See
the
on
hardw
Instal
ling
will
for
of
device
Instal
are
Peripher
Installation
as
shipp
ed
with
y
ou
will
not
unicate with
ha
v
e
to
install
appropriate
guidance for
devices in
general:
upgrades
Storage Devices"
lation
Guide
installation.
als
.
its
need
to
HP-UX. If
it
on
data
in
these
whic
h
in
for
the device
Y
ou
can
in
ternal
do
further
you
HP-UX.
terc
hange
tasks.
are
supp
Chapter
also
get
mass
storage
installation
ha
v
e
purc
Y
ou
ma
with
orted
1.
you
are installing
installation
hased
y
also
a new
b
y
the
devices
to enable
a
new
(upgrade)
hav
eto
printer.
Mo
del
382
for
information
information
the
do some
This c
hapter
see
from
Ensure
SCSI
\Finding
y
6
ou
addresses
This
Manager)
connected
If y
HP-UX commands directly to accomplish the same tasks. F
using manual system administration pro cedures, see
Tasks
that
eac
proto
col
the
Status
can use
Hard
for
Disk
SAM
the
Driv
Flexible Disk
CD
R
OM
Driv
DDS
Driv
e:
c
hapter
sho
procedures.
devices
ou don't w
.
h
new device
has
a
unique
of
(System
upgrade
e:
6
Drive:
e:
2
you
bus
addr
Existing
SCSI
Administration
devices
0
install
ess
Bus
in
this
whic
h
.
Y
ou
Addresses")
Manager).
c
hapter
3
ws
y
ou
ho
w
to
use
basic
SAM
and
SAM will
will
p
erform
determine
man
y
the
installation
ant to use SAM, or it is not on y
comm
can
unicates
use
/etc/ioscan
to
The
are as
through
determine
factory-set
follows:
(System Administration
status
our system, y
of
an
y
tasks
for
ou
or
System A
of
y
our
you.
can also
information on
dministration
(see
this,
the
or
SCSI
6-2 Configuring HP-UX for Printers and Drives
FINAL TRIM SIZE : 7.5 in x 9.0 in
Page 81

Configuring
You
will
need
to
prin
ter
y
ou
are
to
during the
Prin
ter
P
arallel:
In
terface:
softw
HP-UX
supply
certain
installing.
are installation
for
It
a
will
Printer
items
help
process:
of
information
to
hav
e this
needed
to
information a
iden
tify
vailable
the
to
refer
Serial
Serial
Prin
ter Name
name.):
Prin
ter Mo
Procedure:
T
o
install
1.
Log
in as
2.
Run SAM
/usr/bin/sam
T
o
get
information for
In case
mo
ving the
4
Return
Using HP-UX
(RS232) P
(RS232)
(a name
del
Num
y
our
prin
root
by
help
in
y
ou
are
highlighted
N
N
with
OK
5
ort
1:
P
ort
2:
the system
b
er
(lo
cated
ter:
.
Mak
e
sure
y
ou
t
yping
the
follo
SAM,
N
N
N
NN
the ob
not
N
pressing
ject
at
using
a
areas around
mouse,
illuminated is equiv
for the details of k
uses
on
ha
wing,
the
the
to
iden
a
lab
el
v
e
a
prin
and
then
5
k
ey
4
f1
lo
cation
arro
w
the screen.
alent to clic
eyboard
tify
the
on
the
bac
ter
connected.
pressing
giv
es
y
ou
of
the
cursor.
k
eys
and
Activating
king the mouse on
equivalents.
prin
ter.
k
of
the
4
Return
con
text-sensitiv
5
also
4
T
ab
prin
5
:
are
by
It
can
b
e
ter):
e
used
pressing
N
N
N
N
N
NN
N
OK
an
y
for
.See
6
3. At the SAM opening screen, c
NNNNNNNNNNNNNNNNNN
Printers and Plotters
4.
Choose
NNNNNNNNNNNNNNNNNNNNNNNNN
NNN
NNNNNNNNNNNNNNNNNNNNNNNNN
NNNNNNNNNNNNNNNNNNNNNN
NNNNNNNNNNNNNNNNNNNNNNNNN
Printers/Plotters
.
FINAL TRIM SIZE : 7.5 in x 9.0 in
hoose (highlight and open)
from the next screen.
Configuring HP-UX for Printers and Drives 6-3
Page 82

If y
our
message.
illuminated.
5.
F
rom
Prin
ter/Plotter
w
orkstation
If y
N
NN
N
Actions
the
ou get
N
N
N
N
N
N
N
N
do
this message,
N
N
N
N
N
N
N
N
NN
N
men
Manager
esn't
u
ha
(on
windo
v
e
the
w),
an
activ
men
y
c
prin
ho
ate
u
ose
ters
bar
N
N
OK
NN
Add
connected,
N
N
N
NN
N
or press
at
the
NN
N
N
N
N
N
N
N
N
N
N
N
N
N
N
Local
y
ou
5
4
Return
top
of
N
N
N
NN
the
NN
NN
NN
N
N
N
N
N
N
N
N
N
N
N
N
N
N
N
N
N
Printer/Plotter
will
while
NN
NN
NN
see
a
N
N
N
N
N
NN
N
OK
is
NN
N
N
N
N
N
N
N
N
N
N
N
N
N
N
N
N
N
NN
NN
NN
6. Cho
7.
8.
9.
6
10.
11.
12.
13.
14.
15.
16.
ose an
P
arallel,
A
windo
in
terfaces.
If
y
ou
c
hose
one
serial
ascending
lo
w
est-n
whic
h
y
ou
Activ
ate
The
windo
Select the
new
prin
Cho
Scroll
Cho
Activ
In the
bo
to add
Activate
NN
ose
do
ose
the
ate
N
N
N
Add Local Printer/Plotter
x lab eled
the device as an
appropriate
Serial,
w
um
N
N
OK
ter
N
N
N
Printer/Model
wn
N
N
OK
N
N
N
N
N
NNNNNNNN
OK
HP-IB,
for
the
N
N
NN
NN
NN
NN
N
N
Add
in
terface
order. The
b
ered
ha
v
e
connected
N
N
N
N
N
N
.
w
op
ens
b
o
x
lab
(as
en
N
N
N
N
N
N
N
N
N
N
N
N
N
N
N
N
NN
the
next
Mo
del
N
N
N
N
N
N
.
NN
N
N
N
N
N
N
N
N
N
N
NN
N
N
N
N
NNNNNN
NNNNNNNNNNNNNNNNNNNNNNNNN
Make this the system default printer
.
selection
etc.
t
ype
selected will
N
N
N
N
N
N
N
N
N
N
N
N
N
N
N
NN
NN
NN
NN
N
N
N
N
N
N
N
N
N
N
N
N
N
N
Serial
could
b
lo
w
est-n
RS-232 connector
N
N
N
N
N
N
N
N
Add
for
N
N
N
N
N
N
N
N
N
Printer Name
eled
tered
in
NN
NN
N
N
N
N
N
N
N
N
N
N
N
N
N
N
N
N
N
N
Interface
screen
Name.
N
N
N
N
N
N
N
NN
N
N
N
N
N
N
N
N
N
N
NN
N
NNNNNNNNNNNNNNNNNNNNNNNNN
alternate
N
(RS-232)
e
listed.
um
y
our
prin
N
N
N
N
N
N
N
N
N
N
NN
N
N
N
N
N
Local
N
NN
NN
N
N
N
N
N
N
N
N
N
N
N
this
man
N
NN
NN
NN
N
N
N
N
N
N
N
N
N
N
to
nd
N
N
N
N
N
N
N
N
N
N
NN
N
N
N
N
N
on
the
sub-men
giv
e
y
ou
N
N
NN
NN
NN
NN
N
N
N
N
N
N
N
N
N
N
N
N
N
N
N
N
N
NN
Printer/Plotter
The
b
ered
on y
ter.
N
N
N
N
N
N
N
N
N
N
N
N
N
Printer/Plotter
N
N
N
N
N
N
N
N
N
N
NN
N
ual
N
N
N
N
N
N
N
N
N
the
N
N
N
N
N
NN
N
N
N
N
N
NNNNNNNNNNNNNNNNNNNNNNNNN
printer).
NN
RS-232
RS-232
our
system.
N
N
N
N
N
NN
N
N
N
N
N
N
N
N
N
N
N
and
en
earlier).
Mo
del
window whic
NNNNNNNNNNNNNNNNNNNNNNNNN
u
giving
information
NN
NN
N
N
N
N
N
N
N
N
N
N
N
N
N
N
N
N
N
NN
NN
in
terfaces
in
terface
Cho
N
N
N
N
N
N
N
N
N
N
N
N
NN
N
N
N
N
N
N
N
.
ter
y
our
printername
Name of
h reappears, c
NNN
options
on
,
more
are
corresp
ose
your
(unless
for
a
v
ailable
than
listed
onds
the
one
printer.
hoose the
you want
in
for
to
to
the
the
17. If y
6-4 Configuring HP-UX for Printers and Drives
ou are running HP VUE, y
printer
name to the VUE
ou will be ask
NNNNNNNNNNNNNNNNNNNNNNNNN
Printers
FINAL TRIM SIZE : 7.5 in x 9.0 in
N
subpanel.
ed a question about adding the
Page 83

18.
If
the
the
question:
N
N
N
N
N
N
N
N
N
N
N
Yes
19.
Y
ou
will
connected
is
ready
20.
Y
ou
will
21.
Exit
22.
En
ter
Refer
to
System
T
esting
If
y
ou
made
commands
prin
and
the
exit
the
tsp
press
see
,
and
see
task
Printer
y
our
to
test
ooler
N
N
N
N
N
N
N
N
N
NN
NN
Do
you
4
Return
a
conrmation
to y
our system,
press
the
message
and
c
to exit
A
dministration
Installation
prin
ter
it:
was
NN
N
N
N
N
N
N
5
.
4
Return
ho
ose
root
the
not
N
N
N
N
N
N
N
N
N
N
N
N
want
and online.
5
.
N
N
N
N
N
Task
N
N
N
N
N
Exit
and
default
previously
N
NN
NN
NN
N
N
N
N
N
N
N
N
N
N
N
N
N
to start
screen
N
N
N
N
N
N
N
Tasks
asking
N
N
N
N
N
N
N
N
N
N
NN
NN
NN
completed
N
N
N
N
N
N
N
N
N
NN
NN
N
N
N
SAM
return to
, for
system
running,
N
N
N
N
N
N
NN
NN
NN
the print
Check
N
N
N
N
N
N
N
N
N
N
N
N
N
.
user
additional
N
N
N
N
N
N
N
prin
N
N
N
N
N
if
N
N
N
N
.
N
N
N
N
N
N
N
N
N
N
y
our
y
our
Press
status.
ter,
a
windo
N
NN
NN
NN
prin
enter
SAM
w
N
N
N
N
N
N
N
N
N
N
N
N
N
N
N
spooler now?
ter
prin
ter
4
Return
information.
the
will
N
app
N
N
N
NN
NN
NN
N
N
N
N
N
N
N
N
is turned
to
ensure
5
.
follo
wing
ear
N
N
N
N
N
N
N
. Select
on,
with
that
it
(If
follo
The
cd
lp
.profile
y
our
wing
lp
-d
le
prin
ter
(called
command
printername
named
.profile
4
Return
to
test
.profile
5
printername
it:)
should
prin
Configuring HP-UX for Printers and Drives 6-5
)isn't
t
out
the
on y
default
our new
system
printer.
prin
ter,
en
ter
6
the
FINAL TRIM SIZE : 7.5 in x 9.0 in
Page 84

Dealing With
If
you
exp
erience
installed:
The
p
ow
The
prin
The
prin
P
ap
er is
Printer
problems
er cord
ter
is
turned
ter
selection
loaded in
Problems
for the
on.
switc
to the
in
prin
printer
hes
prin
ter
ting,
is
are
(and
ensure
plugged
set
for
it
in.
online.
isn't
that
the
jammed).
follo
wing
are
correctly
The correct
The
printer
The
cable
in
terface
cable is
is
connected
has
b
een
set
connected to
to
the
correct
up.
the correct
p
ort
on
in
terface
your
p
ort
system.
on
y
our
prin
ter.
6
6-6 Configuring HP-UX for Printers and Drives
FINAL TRIM SIZE : 7.5 in x 9.0 in
Page 85

Finding
the
Status
of
Existing
SCSI
Bus
Addresses
Before y
y
our
to
curren
The
ou
install
device
ol to
is
help determine
tly
connected
/etc/ioscan
result
will
Class
curren
b
H/W
a
-fb
e
a
Path
new
tly
which
SCSI
displa
Driver
SCSI
un
used,
bus
y
of
driv
e,
to
y
ou
can use
devices are
IDs,
en
ter
information,
H/W
Status
ensure
curren
the
suc
S/W
SAM, or
follo
=========================================================
...
disk
tape_drive
disk
2.0.1.2.0
2.0.1.3.0
scsi
scsitape
2.0.1.6.0 scsi
ok(0x5800101)
ok(0x1800202)
ok
ok
ok(0x101) ok
...
F
or
example,
fourth
column
installing
adjacen
will
help
SCSI
address
another
t
SCSI
y
ou
the
SCSI
of
its
hardw
disk,
bus
address
determine
setting,
bus
for
an
when
address
are
address
le system
in
the
\scanning"
a
v
ailable
y
ou
do
the
for
the
as
\
use, it
device
installation.
\MICR
6
"
w
le, corresp
that
tly
wing
h
as
Status
(
2.0.1.
ould
order,
the
SCSI
you
can use
connected.
command
the
follo
Description
================
TOSHIBA
HP
MICROP
OP"
disk
6
.0
).
b
est
b
e
\
5
". In
onding to
bus
T
o
line:
wing:
CD-ROM
HP35450A
1528
device
If
y
ou
accessed
any
ev
address
the
ioscan
determine
is
in
the
w
ere
at
the
en
t,
SAM
an
y
un
used
of
the
6
Configuring HP-UX for Printers and Drives 6-7
FINAL TRIM SIZE : 7.5 in x 9.0 in
Page 86

Configuring
for
a
Hard
Disk
Driv
e
Hard disk
and
Softw
After
for
this
to
exc
conguring
your
Caution
The
6
For
This SCSI
conguration
not
require
an upgrade
Instal
it
b
e
driv
e
upgrades
sw
ap
space
on
are Installation
hardw
are installation
device),
hange
data
y
ou'll
with
HP-UX
HP disk
is pre-formatted.
Although
installed
separate.
factory-set SCSI
an
upgrade
disk
address
jump
reconguring,
ma
y
b
e
lation Guide
necessary
.
y
our
w
of the
need
the
to
comm
in the
bus
driv
assumes
ers
in
shipp
for the
can
b
e
installed
orkstation.
Hard Disk
has b
een completed
to
ensure
device.
unicate
the
device
w
orkstation,
Av
oid
dropping
address
e:
SCSI
usage
the
back
it
is
p
ossible
ed
with
drive
for the
that
This
with
is
w
for
the
bus
of
the
of the
that
dieren
to
accommo
Drive
(see
y
our
op
section
a
hard disk
pro
ell-protected
it
is
or
striking
disk
driv
address:
disk
driv
t
pro
6
as
root
e
are
the
SCSI
settings.
cedure
date
lo
cal
Upgrade
the
Instal
erating
vides
v
ery
system
instructions for
driv
e
upgrade.
from
ph
ysical
easily
damaged
a device.
e:
.
Although
factory-installed
bus
address
Therefore,
for
resetting
le
lation
is
the
jumpers
please
jump
systems
Guide
prepared
Note
sho
c
k
when
and
should
see
the
ers,
should
that
when
for
The
follo
wing
list
outlines
installing
the
hard
disk
Use SAM to do the follo
Congure an un
the
soft
w
driv
are pro
e
as
a
le
cedures y
system
wing:
used device le with the select code and bus address for
your device.
Build a le system on the disk.
Mount the disk so that y
ou can access it as a le system.
6-8 Configuring HP-UX for Printers and Drives
FINAL TRIM SIZE : 7.5 in x 9.0 in
disk:
ou'll nd
in
this
section
for
Page 87

Note
SAM
do
es
not
supp
ort
the
follo
wing:
After
hardw
this device),
exc
hange
this.
1.
2.
3.
4.
5.
data
Run
SAM
/usr/bin/sam
Pressing
at
the
Cho
ose
Cho
ose
From
the
F
rom
the
are
installation
you'll
with the
b
the
lo
cation
N
N
N
N
N
N
N
N
N
N
N
Disks
N
N
N
NN
NN
N
N
N
N
CD-ROM,
N
N
N
N
N
N
Actions
screen
y
4
NN
N
N
N
N
need
t
yping
5
f1
N
N
N
N
N
N
N
N
N
N
N
N
N
N
N
N
NN
of
N
and
N
NN
Changing
the ro
ot le
Changing
Changing
softw
are disk
to
ensure
device. This
the
k
ey
giv
the
cursor.
N
N
N
N
N
N
N
N
N
N
N
N
N
N
N
N
NN
N
N
File
N
N
N
N
N
N
N
N
NN
NN
N
N
N
N
N
N
N
N
Floppy,
NN
N
N
N
N
N
men
whic
h
app
the
system.
the
the
striping.
has
b
een
follo
wing:
es
y
ou
N
N
N
N
N
N
N
N
N
N
N
N
N
N
N
N
Systems
N
N
N
N
N
N
N
N
N
N
N
N
N
NN
NN
and
u, select
ears,
hardw
are
hardw
are
hardw
are
completed
that
y
our
section pro
con
text-sensitiv
N
N
N
N
N
NN
N
N
N
N
N
.
N
N
N
N
N
N
N
N
N
N
N
N
N
N
N
N
Hard
the item
select
address
address
address
op
N
N
N
N
N
NN
NN
Disks
the
of
a
disk
of
a
disk
of
a
disk that
(see
the
Instal lation
erating
vides instructions
N
N
N
N
N
N
N
N
N
N
N
N
N
N
N
N
N
Add a
step
system
e
information for
.
N
N
N
N
N
NN
NN
NN
N
N
N
N
N
N
N
N
N
N
N
Hard Disk
N
N
N
N
NN
NN
NN
NN
N
N
N
N
Select
driv
e con
taining
arra
y
.
is part
is
prepared
for
N
N
N
N
N
N
N
N
NN
NN
NN
N
N
N
N
N
N
N
N
N
N
N
Drive
N
N
N
N
N
N
N
N
N
N
N
N
N
NN
NN
NN
NN
N
N
N
a
N
Disk
Guide
doing
the
N
N
N
N
N
N
N
N
N
N
N
N
N
N
N
N
to
ob
NN
N
N
N
N
of
to
.
N
N
NN
NN
Add
for
ject
NN
NN
.
6
6.
Y
ou
will
this list.
7. If
the
device
NNNNNNNNNNNNNNNNNNNN
Device Missing
NNNNNNNNNNNNNNNNNNNNNNNN
see
a
list
of
un
used
driv
es.
Cho
y
ou
ha
v
e
just
connected
, and y
FINAL TRIM SIZE : 7.5 in x 9.0 in
ou will be giv
Configuring HP-UX for Printers and Drives 6-9
ose
the disk
do
esn't app
en the follo
you
wan
ear,
activ
ate
wing options:
t
to
add
from
Page 88

a.
Ha
v
e
SAM rescan
the
device
activ
b.
Resp
connected
c.
Resp
driv
ers
remo
k
ernel.)
d.
Y
ou
will
device
Instal ling
8.
After
y
ou
NN
NN
N
N
N
N
N
N
N
a.
b.
6
c.
Cho
N
Select
N
N
N
N
N
N
N
N
N
N
N
NN
Set
N
N
N
NN
N
N
N
N
N
N
N
Modify
ose
after
N
N
N
N
N
N
N
N
No
ate
ond
ond
ved,
N
N
N
Disk
N
N
N
N
Set
.
to
the
and p
to
the
are
needed.
the driv
b
e
giv
still
cannot
Peripherals
c
ho
ose
N
N
N
N
N
N
N
N
N
N
N
NN
NN
N
N
a
Disk
N
N
N
N
N
N
N
N
N
N
N
N
N
N
N
N
N
Usage
N
N
N
N
N
N
N
N
N
N
N
N
N
N
NN
N
Defaults...
N
N
N
N
N
N
N
N
N
N
N
NN
NN
N
N
Disk Usage
the system
starting SAM,
conrmation
ow
ered up.
conrmation
(Unless
ers needed
en an
information screen
b
e
the device,
N
N
N
N
N
N
N
N
N
N
N
N
N
N
N
N
N
N
N
NN
NN
to
Add
N
N
N
N
N
NN
N
N
N
N
N
N
N
N
N
N
N
N
N
N
N
N
and
N
N
N
N
N
N
N
N
N
N
N
N
N
N
N
N
N
N
N
N
N
N
NN
N
N
N
N
N
N
N
N
N
N
N
N
N
N
N
N
N
N
N
NN
NN
for the
screen
screen
the
for
found.
.
N
N
N
N
N
N
N
N
N
.
N
N
N
If
you
will
N
N
N
N
.
(Y
ou
N
N
N
NN
N
N
N
N
N
N
N
N
N
N
N
N
N
N
Options
(This
N
N
N
N
N
and Options
N
task
N
N
N
N
N
N
N
N
N
N
N
N
N
NN
NN
you
should activ
regarding
regarding
k
ernel
a
hard
this
is
see
ha
v
e
N
N
.
is
N
N
N
N
N
N
N
N
N
N
N
N
N
.
device.
has,
the
a
already
optional).
If
y
ou
ate
whether
whether
for
some reason,
disk
should
suggesting things
case,
y
ou
form
giving
done
ha
v
N
N
N
N
N
N
N
N
N
NN
Yes
the
additional
curren
will
three
this).
e
connected
.
Otherwise,
device
had driv
tly
b
to try
need to
tasks:
is
device
e
in
if
consult
ers
the
the
9. On
10.
11.
12. A \Messages" Bo
13. Exit SAM. (SAM copies y
6-10 Configuring HP-UX for Printers and Drives
the
form
whic
h
app
System",
If
y
ou
step. Then
Y
ou
to exit this form.
task is nished, activ
/etc/checklist.old
w
will
an
b
\Sw
t
e
ap",
to
mo
dify
activ
ate
returned
xapp
or
ears,
select
ho
w
y
ou
N
N
N
N
N
NN
N
OK
b
oth).
Activ
ate
the
N
defaults,
N
N
N
N
N
NN
OK
.
NN
NN
NN
NN
NN
N
N
N
N
N
N
N
N
a
N
Hard
to
ate
).
Add
the
ears, reporting the progress of the task. When the
NNNNNNNN
OK
.
our original
when
complete
N
N
NN
NN
NN
NN
NN
NN
NN
N
Disk
/etc/checklist
w
an
t
to
use
y
ou
ha
the information
N
N
N
N
N
N
N
N
N
N
NN
NN
NN
NN
NN
NN
NN
N
N
N
N
Drive
the
v
e
N
form.
to
disk
nished
screen for
Activ
(\File
this
ate
step.
this
NN
NN
NN
NN
OK
FINAL TRIM SIZE : 7.5 in x 9.0 in
Page 89

T
esting
A
simple
(whether
Y
test
it is
appropriate
the follo
wing at
our
Installation
to
make
moun
c
haracter
the shell
certain that
ted
or
not)
device
prompt:
le
is
name
to
the driv
execute
as
e has
the
the
b
een
command
argumen
installed
diskinfo
t).
F
or example,
correctly
(using
the
enter
diskinfo
If the
disk is
ab
out
it,
SCSI
bytes
After
moun
directory
example:
total
drwxr-xr-x
/dev/rdsk/6s0
installed
suc
h
as
the
describe
product
per
ting
a
new
listing.
This
1024
correctly
follo
wing:
of
/dev/rdsk/6s0
vendor:
id:
type:
size:
sector:
disk
on a
should
2
root
,
diskinfo
Quantum
PD210S
direct
access
200000 Kbytes
512
directory
giv
e
y
ou
at
,
least
root
will
en
displa
ter
8192
ll
one
at
le
Aug
y
a
listing
the
or
31
of
information
shell
prompt
directory en
15:24
lost+found
try
to
get
a
.
F
or
6
Configuring HP-UX for Printers and Drives 6-11
FINAL TRIM SIZE : 7.5 in x 9.0 in
Page 90

Configuring
for
a
Flexible
Disk
Driv
e
Caution
Although
installed
separate.
Note
the
exible
It
should
The
SCSI
not
factory-set
bus address:
Note
As
it
is
p
ossible
6
Guide
necessary
dieren
tly
for
,
the
.
After hardw
op
erating
pro
vides
system
instructions
disk
b
e necessary
SCSI
On
con
trary to
al
l
thr
that
please
c
hec
device for
are installation
is
the device
in
Av
driv
e
bus
address
0
this
device,
e
e
addr
the
SCSI
k
the
the pro
prepared
for
doing
the
w
oid
jump
to c
hange
an
the
practice
ess jump
bus
jump
cedure
has
b
to
this.
is w
orkstation,
dropping
ers
are
pre-congured
jump
for
the
installed
with
ers ar
setting
ers
b
efore
for
een
completed,
exc
hange data
ell-protected from
it
is
v
ery
easily
or
striking
a
device.
correctly
er
settings.
driv
e:
address
most
e
normal
for
installation.
resetting
other
an
upgrade
y
ou'll
with the
jump
ly
instal
See
the
device,
need
device. This
physical
damaged
er
is
SCSI
le
ma
the
to
at
a
logical
devices,.
d
.
yb
e
shipp
Instal
should
ensure
sho
when
the
lation
it
that
section
c
k
when
factory.
0
,
Th
us,
ed
b
e
y
our
1. If
you
wish
to
2.
the
Run
driv
SAM
initialize
e.
b
y
t
yping
a
the
following:
new
disk,
mak
e
sure
/usr/bin/sam
5
To get help in SAM, pressing the
information for the ob ject at the lo
3.
4.
Choose
Choose
NNNNNNNNNNNNNNNNNNNN
Disks and File Systems
NNNNNNNNNNNNNNN
CD-ROM, Floppy, and Hard Disks
NNNNNNNNNNNNNNNNNNNNNNNNN
NNNNNNNNNNNNNNNNNNNNNNNNN
NNNNNNNNNNNNNNNNNNNNNNN
NNNNNNNNNNNNNNNNNNNNNNNNN
key giv
4
f1
cation of the cursor.
.
NNNNNNNNNNNNNNNNNNNNNNNNN
6-12 Configuring HP-UX for Printers and Drives
FINAL TRIM SIZE : 7.5 in x 9.0 in
es y
NN
.
y
ou
ou con
ha
v
e
the
text-sensitive
disk
loaded
in
Page 91

5.
F
see
6.
Cho
If
a.
b. Activ
rom
a
ose
the
Chec
turned
follo
i. Ha
ii.
iii.
NN
N
N
N
N
N
Actions
the
list
of
un
the
line
device
k
y
our
on
ate the
wing
options:
ve
SAM
the
device
activate
Resp
ond
connected
Resp
ond
device
N
N
N
N
N
N
N
N
N
N
N
N
N
N
NN
used
identifying
y
ou ha
hardw
.
button
rescan
after
N
N
N
N
N
N
N
N
No
.
to
and
to
driv
ers
men
u,
select
disks,
the
the
including
the mo
ve
connected do
are
connections,
N
N
N
N
N
N
NN
NN
NN
N
N
Device Missing
the
starting
conrmation
po
wered
conrmation
are
needed.
NN
N
N
Add
N
N
N
N
N
N
N
N
N
N
N
N
N
system
SAM, y
up.
N
N
N
N
N
N
N
N
N
the
del of
es not
and
N
N
N
N
NN
NN
NN
for
screen
screen
N
N
N
N
N
N
N
N
NN
NN
NN
N
N
a
N
Floppy
new
one
the new
app
mak
N
N
N
N
N
N
N
,and
the
device.
ou should
regarding
regarding
N
N
N
N
ear
N
N
N
e
y
N
N
N
N
N
Disk
y
disk.
sure
ou
N
N
N
N
NN
NN
NN
N
N
N
N
N
N
Drive...
ou
ha
ve
on
the
that
will
b
If
y
ou
activate
whether
whether
N
N
N
N
N
N
N
N
N
N
N
N
N
NN
NN
NN
connected.
list:
the
device
e
giv
en
ha
v
e
N
N
N
N
N
N
N
N
N
N
N
Yes
.
the
additional
N
N
N
.
Y
ou
will
is
the
connected
Otherwise,
device
is
iv. Y
ou
will
b
e
giv
en
the
device
7.
After
y
ou
highligh
toggled
wish
8.
Activ
9.
A
task
10. Exit SAM. (SAM copies
/etc/checklist.old
on
to
initialize
NN
N
N
N
N
OK
ate
\Messages"
is
nished,
(the
N
N
when
still
t
default).
a
disk
y
Bo
xapp
activ
cannot
the
ou
ate
).
an
information
b
e
found.
device,
(or
ha
ears, rep
N
your original
note
Activ
ate
if
the
disk
v
e
nished with
NN
OK
orting the
N
N
N
N
N
.
Configuring HP-UX for Printers and Drives 6-13
screen
N
NN
that
this
is
/etc/checklist
Initialize
the
button
preformatted).
this form.
progress
suggesting
NN
N
N
N
N
N
N
N
N
N
N
N
N
N
N
N
N
N
N
to
turn
of
the
N
N
it
N
NN
NN
to
things
N
N
N
N
N
N
N
disk
o
task.
N
N
N
N
N
N
N
N
if
you
to
N
N
button
do not
When
try
if
the
6
is
FINAL TRIM SIZE : 7.5 in x 9.0 in
Page 92

T
esting
A
simple
execute
1.
Mak
may
2.
T
yp
F
or
Y
our
Installation
test
to
make
the command
e
sure
a
exible
result).
e
the
follo
wing,
example:
certain that
diskinfo
disk
using
.
is inserted
the
everything
in the
appropriate
has b
drive
device
een
installed
(otherwise, a
le
name
as
correctly
core
dump
the
argumen
is
to
t.
diskinfo
If
the disk
information
/dev/rfloppy/0s0
is installed
ab
out
correctly,
it,
suc
h
as
diskinfo
the
following:
will
displa
y
a
listing
of
/dev/rfloppy/0s0
SCSI
describe
6
If
y
ou wish
installed,
bytes
to test
use
the
of
vendor:
product
per
sector:
the
installation
ioscan
0.rdsk:
TEAC
id:
XXXXXXX
type:
size:
direct
1400000
NNN
command.
of
access
y
our
bytes
exible
disk
driv
e
without
a
disk
6-14 Configuring HP-UX for Printers and Drives
FINAL TRIM SIZE : 7.5 in x 9.0 in
Page 93

Archiving
Data
can
of
these devices
Instead,
in an
share
See
detailed
tar
T
o
en
ter
les
DOS
archiv
data
the
man
descriptions
(1)
and
sa
v
e
les
the
reside:
tar
-cvf /dev/rfloppy/0s0
Files
b
e
stored on
e-utility
with
pages
cpio
arc
follo
wing
or
.
is
LIF
other
hiv
to
a
Flexible
exible disk
generally
le
systems
format.
HP-UX
or
HP-UX
of
the
ally to
command
to
o
small
F
or
example,
systems.
R
efer
le
systems.
a exible
line,
Disk
media in
to
are
commonly
enc
e
disk using
where
p
athname
av
ariet
hold
useful
used.
tar
and
references
For
information on
tar
p
athname
y
HP-UX
cpio
dosif
,
use
is
of
formats.
Data
are
(4)
a
formatted
the
directory
The
le
systems.
can
also b
commonly
and
lif
(4) for
tar
and
where
capacit
e stored
cpio
disk
used
,
and
the
y
to
see
Retrieving
T
o
list
to
y
our hard
les
Files
stored
tar -tvf
This lists
T
o
transfer
follo
1.
Load
2.
Using
3.
En
wing:
ter the
all
or
the source
cd
,
current directory:
tar -xvf /dev/rfloppy/0s0
from
a
Flexible
in
a
tar
arc
disk,
use
the
follo
/dev/rfloppy/0s0
the
les
on
the
exible
restore
mak
follo
disk in
e
sure
wing
les
from
to the
you
are in
command
Disk
hiv
e
on
wing
command
disk.
a
exible
exible disk
in directory
line
to
pathname
a
exible
disk
restore
disk,
line:
to
driv
you
p
without
y
our
hard disk
e.
wan
tthe
athname
transferring
les to
on
the
drive,
reside
disk
do the
to y
them
6
in.
our
Configuring HP-UX for Printers and Drives 6-15
FINAL TRIM SIZE : 7.5 in x 9.0 in
Page 94

Mounting
If
y
ou
w
ant
small
le system,
the
new
disk.
a
New
HP-UX to
y
ou
F
or
example,
Flexible
be
able to
will
need
Disk
using
address
to
moun
\
/flex
a
newly-inserted
t
it.
Execute
"
as
the moun
exible
the
follo
t directory:
wing
disk
to
as
moun
a
t
See
as a
mount
the
/dev/floppy/0s0
next
section
le system.
for
information
/flex
on
mounting
and unmoun
ting a
disk
used
6
6-16 Configuring HP-UX for Printers and Drives
FINAL TRIM SIZE : 7.5 in x 9.0 in
Page 95

Remo
ving
Caution
Y
ou
will
need
and
If
mount
unmoun
to
Inserting
y
ou
wish to
it
t
do
the
follo
a
File-System Flexible
ev
the
ery
disk
use the
time
b
efore
disk as
y
ou
insert
y
wing:
ou
amoun
it
in
to
eject
it
Disk
ted
le
the
driv
from the
system,
e,
and
drive.
y
ou
m
ust
y
ou
m
ust
Before
1. T
emp
follo
y
ou
orarily
wing.
remo
/dev/floppy/0s0
umount
2.
Remov
After
1.
Moun
example,
le
follo
e
the
y
ou
insert
t
the
y
/dev/floppy/0s0
wing:
mount
2.
(Note
path
In
remov
Now
name).
this
you
that
example,
able
can access
v
e
a disk:
unmoun
F
or
example,
t
the
le
system
if
the
disk
:
/dev/floppy/0s0
disk.
a
disk:
disk
le
ou
are
system
moun
ting
under
so that
the
disk
a
pre-existing
/dev/floppy/0s0 /flex
the
le
directory
the
system
/flex
mount
is
to
command
b
e
the exible
,
in
attac
disk as
for
the
disk
is
designated b
HP-UX
in
a
will
driv
e
directory
the example,
announces
hed
at
the
you
w
ould
b
y
executing
ythe
recognize
designated
/flex
must
be
to
the
directory
an
y
bloc
it.
b
ythe
,
given
system
/flex
other
the
k device
If,
for
device
execute
an
that
.
disk.
le
the
absolute
a
6
Configuring HP-UX for Printers and Drives 6-17
FINAL TRIM SIZE : 7.5 in x 9.0 in
Page 96

Configuring
Y
ou
can use
accommo
system
After
hardw
Guide
prepared
for
conguring
date
up
dates.
are
for this
to
exc
aCD
Note
This
section deals
for
a
ROM
read-only
installation
device), y
hange
data
HP-UX
The
no
de,
no
de's
with
CD
ROM
(\Compact Disc
use
of
a
wide
for
a
driv
ou'll need
with
the
to
comm
unicate
CD R
OM driv
although
k
ernel.
the
follo
its
wing
Driv
v
e
to
ensure
device.
e
driver
topics:
e
Read-Only
ariet
y
has b
een completed
that
This
with
the
cannot
must
of
b
soft
y
section
CD R
e
lo
be
Memory")
w
are,
including
(see the
our
op
erating
pro
vides
OM driv
cally-moun
congured in
driv
HP-UX
Installation
system
instructions
e.
ted
on
to
eac
e
to
a
diskless
h
is
cluster
Installing
T
esting
Moun
6
Remo
The
factory-set
SCSI bus
As
it
is
bus
setting, please
resetting
Inserting
Note that a rigid plastic caddy
the disc, mak
When inserted in
in the caddy
the
the
ting
ving
address:
p
ossible
it,
if
the disc
. When y
CD
R
OM
with
installation.
the
new
CD
R
OM.
and
inserting
SCSI
adisc.
address
for
2
that
the
CD
R
see the
necessary
in y
esure y
Instal
.
our
CD
ROM
ou ha
ve the disc installed in the appropriate disc caddy
to the disc port, data is
ou eject the caddy
SAM.
this
device:
OM
driv
e
ma
y
b
lation
driv
Guide
e.
e shipp
for
the
ed with
device
a dieren
for
guidance
t SCSI
on
holds and protects the disc. Before inserting
read from the disc through a sh
, the sh
utter closes to protect the disc's
utter
.
data surface.
The disc caddy for an HP upgrade driv
interc
hangeable with the HP C1707A CD R
e, suc
has
the HP A2644A, is not
OM Drive disc caddy
.Ho
wever,
6-18 Configuring HP-UX for Printers and Drives
FINAL TRIM SIZE : 7.5 in x 9.0 in
Page 97

you
can
remo
in
order
Hewlett-P
Caution
to
ac
t
k
ard.
v
e
the
disc
the
appropriate
Do
not
the
sh
damage. If
its
readabilit
reduced.
from
op
utter
one
driv
en
the
will exp
the
y
b
disc
data
y
the
caddy
e.
Disc
caddy
ose the
surface
CD
and
use
caddies
sh
utter
disc's data
gets
R
OM
the
to
driv
are
o
other,
a
man
m
e's
if
necessary
vailable
ually
.
surface to
uc
h
dust
laser
read head
from
Opening
dust
or
damage,
,
and
will b
e
Installing
It
is
a
hardware
installation.
CD
Bus
Configuring
1.
Log
2.
Run SAM
3.
Cho
4.
Cho
5.
F
rom the
window, highlight and c
6. Within the \Add a Hard Disk Driv
NNNNNNNNNNNNNNNNNNNNNNNNN
Select Disk
7.
Within the
the new driv
the
go
o
d
idea
address
R
OM
Mo
Address:
the
in
as
root
b
$
/usr/bin/sam
N
N
N
N
NN
NN
NN
Disks
ose
NN
NN
N
N
N
N
N
CD-ROM,
ose
N
N
N
NN
Actions
NNNNNNNNNNNNNNNNNNNNNNNNN
CD
ROM
to
mak
(select
del:
Driv
e
.
y
t
yping
NN
N
N
N
N
N
N
N
N
N
N
N
and
N
N
N
N
N
N
N
N
N
N
N
N
NN
NN
NN
NN
NN
NN
NN
N
to Add
NNNNNNNNNNN
NNNNNNNNNNNNNNNNNNNNNNNNN
Select a Disk to Add
ey
ou ha
e
a
co
on
HP-UX:
the
N
N
N
N
N
N
NN
NN
NN
NN
N
File
NN
NN
NN
N
N
N
N
N
N
N
N
N
Floppy,
N
N
N
N
N
menubar
NNNNNN
.
ve
Driv
e
with SAM
note
of y
de
and
bus
follo
wing:
N
N
N
N
N
N
N
N
N
N
N
N
N
N
N
N
NN
NN
NN
Systems->
N
N
N
N
N
N
N
N
NN
NN
NN
NN
N
N
N
N
N
and
in the
N
N
N
N
hoose
just connected. It will be described as, for example,
Add a Hard Disk Drive...
NNNNNNNNNNNNNNNNNNNNNNNNN
our CD
NN
N
N
N
N
N
N
N
N
N
N
N
Hard
N
N
N
N
N
N
NN
ROM
drive
mo
address),
N
N
N
N
N
N
N
N
.
N
N
N
N
N
NN
NN
NN
Disks
\Disk
N
N
N
N
N
N
N
N
N
N
e" windo
N
window, highlight the line iden
b
efore
y
ou
NN
N
N
N
N
N
N
N
N
N
N
N
N
N
.
and
File
N
N
N
N
N
N
N
N
N
hoose
System
N
N
NN
N
N
N
N
N
N
N
N
N
N
NN
N
N
NN
N
N
N
N
N
N
N
N
N
N
NN
w, c
del
and
do
the
Manager"
N
N
N
N
N
N
N
N
N
N
N
its
soft
w
are
tifying
6
Configuring HP-UX for Printers and Drives 6-19
FINAL TRIM SIZE : 7.5 in x 9.0 in
Page 98

\CD R
N
N
OK
If
a.
b.
6
8.
If
and
this
the
en
N
N
Set
9.
R
N
N
10.
Modify Defaults...
certain options, suc
p
highlight and activ
select or modify the options that apply
11.
Activate
NNNNNNNNNNNNN
Add a Hard Disk Drive
OM-SCSI",
N
N
N
NN
N
.
the
device
Check
turned
Activ
follo
iii.
iv.
y
ou
ter
NN
NN
NN
NN
OM.)
N
N
N
N
N
N
N
ermissions are set. If so, within the
your
on
ate
wing
i.
Ha
v
the
activ
ii.
Resp
connected
Resp
device
Y
ou
the
consult
need
will
ask
selection
selection
that
N
N
N
N
N
N
N
N
N
N
N
N
N
N
N
N
N
Disk
Enter
N
N
NN
N
N
N
N
N
N
N
N
N
N
N
NN
N
NNNNNNNN
OK
NNNNNNNNNNNNNNNNNNNNNNNNN
the
options:
eSAM
device
ate
ond
ond
will
device
to
whether
selection.
NN
NN
NN
Usage
N
N
N
N
N
follo
w
y
ou
ha
ve
connected do
hardw
are
and
that
there
button
N
NN
N
N
N
No
to
and
to
driv
b
e
Instal ling
add
b
y
pressing
is
designated
NN
N
N
N
N
N
N
N
N
N
the moun
N
N
N
N
NN
N
N
N
N
N
N
when you ha
NNNNNNNNNNNNNNNNNNNNNNNNN
N
rescan
after
starting
N
N
.
the
conrmation screen
p
o
the
conrmation
ers
are
giv
en
still
cannot
driv
ers to
y
ou
N
N
N
N
N
N
N
N
NN
NN
NN
NN
and
Options
t directory
N
N
N
N
N
NN
N
N
N
N
N
. (This task is optional). Y
h as when to moun
NNNNNNNNNNNNN
Modify Defaults
ate
ed
b
y
its
connections,
is
a
disc
N
N
N
N
N
N
N
N
N
NN
NN
NN
NN
N
N
N
N
N
N
N
Device
the
w
ered
needed.
an
Peripherals
wish
4
Return
b
N
N
N
N
N
N
N
N
N
ve nished with the main
NN
form.
N
Missing
system
SAM,
up.
information
b
e
found.
the k
to recreate
5
when
y
an
asterisk
N
N
N
N
N
N
N
N
NN
N
.
NNNNNNNNNNNNNNNNNNNNNNNNN
mo
del
n
um
es
not
appear
and
mak
in
it.
N
N
N
N
N
N
N
N
N
NN
NN
NN
NN
N
,
and
for
the
device.
y
ou should
regarding whether
screen
.
ernel,
(File
where y
regarding
screen
If
this
SAM
the k
y
our
selection
(*)
system
ou w
t the disk and ho
NNNNNNNNNNNNNNNNNNNNNNNN
Add
a Hard Disk Drive
NNNNNNNNN
. Then, within the dialog bo
.
b
er
and
on
e
sure
you
will b
activ
suggesting
is
the
will
prompt
ernel
in
its blank.
usage
ant
the CD
ou ma
NNNNNNNNNNNNNNNNNNNNNNNNN
bus
address.
the
list:
that
the
egiv
If
y
ou
ate
whether
case,
no
w
or
is
highligh
is
already
yw
w its access
NNNNNNNNNNNNNNNN
device
en the
ha
v
e
connected
N
N
N
N
N
N
N
N
N
N
N
Yes
.
Otherwise,
the
additional
things to
y
ou
will
y
ou
for
later.
ted.
Activate
set
R
OM
anttoc
window,
Activ
is
device
try
need
doing
Mak
Then
N
NN
NN
N
N
OK
for
to
b
e.
hange
x,
ate
is
if
to
so
e
N
to
a
CD
6-20 Configuring HP-UX for Printers and Drives
FINAL TRIM SIZE : 7.5 in x 9.0 in
Page 99

12.
A
task
13.
Exit
T
esting
A
simple
execute
1.
First
2.
Then,
argumen
\Messages"
is nished,
SAM
b
y
Y
our
Installation
test
to
the
command
mak
esure
t
yp
e
the
t).
F
Bo
xapp
activ
returning
mak
e
aCD
follo
or
example:
ears, rep
ate
4
OK
to
certain
that
diskinfo
R
OM
wing
(using
orting the
5
.
opening
ev
.
is
inserted
the
screen and
erything
in
the
appropriate
progress
activating
has
b
een
driv
device
of
installed
e.
the
le
task.
4
Exit
name
When
5
.
SAM
correctly
as
the
the
is
to
diskinfo
If
the
disk
information
/dev/rdsk/2s0
is
installed
ab
out
it,
correctly
suc
h
as the
,
diskinfo
following:
2s0
SCSI
describe
bytes
Mounting
SAM
moun
t
with a
If y
ou ha
will
mount
it
and
exible
venot
the
the new CD R
the follo
wing line to the
New CD
unmoun
disk.
already had SAM do so, in order for y
OM moun
of
vendor:
product
per
sector:
the disc
tit
/dev/rdsk/2s0
TOSHIBA
id:
CD-ROM
type:
size:
CD-ROM
nnnnnn
2048
ROM Driv
for y
ou
manually
ted, y
ou will need to edit y
e
when
,using
/etc/checklist
DRIVE:XM
Kbytes
y
ou
the
le:
/dev/dsk/2s0 /cdrom cdfs ro 0 0 # CD ROM
will
install
mount
display
the
driv
and
a
listing
e.
Y
umount
of
ou
can
commands, as
our system to bo ot with
our
/etc/checklist
6
then
.Add
If y
ou ha
ve
only made this c
hange to y
mount the new disk automatically
FINAL TRIM SIZE : 7.5 in x 9.0 in
our system, executing
, and it will sta
ymoun
mount -a
ted un
til y
ou unmoun
will
t
Configuring HP-UX for Printers and Drives 6-21
Page 100

it man
ually
.
(Note
/etc/checklist
After
moun
ting
giv
e
you
at least
that
.)
a
new
one le
using
the
disk
on
or directory
-a
a
directory
option
,
en
try
an
.
moun
ll
F
or
ts
al
l
listing
example:
unmoun
of the
ted
devices
in
directory should
See
total
drwxr-xr-x
the
next
1024
section
2
root
for
information
root
on
unmoun
ting
8192
the
Aug
disc
31
b
efore
15:24
y
lename
ou
remo
v
e
it.
Removing
You
must
y
ou
m
ust
the
driv
Note
and Inserting
mount
unmoun
e.
The
device
a Disc
a
CD
R
OM
disc
ev
ery
time
y
ou
t
the
eject
disc
is
b
button
moun
efore the
on
the
ted
or
system will
CD
R
in
use.
insert
OM
allo
driv
it
in
to
w
y
ou
to
e
is
disabled while
the
eject
driv
it
e,
and
from
the
6
6-22 Configuring HP-UX for Printers and Drives
FINAL TRIM SIZE : 7.5 in x 9.0 in
 Loading...