

Page 1
hp LaserJet 3300mfp
use
Page 2

Page 3

hp LaserJet 3300mfp
user guide
Page 4

Copyright Information
© Copyright 2002, Hewlett-Packard Company
All Rights Reserved. Reproduction,
adaptation, or translation without prior written
permission is prohibited, except as allowed
under the copyright laws.
A user of the Hewlett-Packard printer
associated with this user guide is granted a
license to: a) print hard copies of this user
guide for PERSONAL, INTERNAL or
COMP ANY use subject to the restriction not to
sell, re-sell or otherwise distribute the hard
copies; and b) place an electronic copy of this
user guide on a network server , provided
access to the electronic copy is limited to
PERSONAL, INTERNAL users of the
Hewlett-Packard printer associated with this
user guide.
The information contained in this document is
subject to change without notice.
Part number: C9124-90980
Edition 1, 4/2003
Trademark Credits
Microsoft®, Windows®, and Windows NT®
are U.S. registered trademarks of Micr osof t
Corporation.
All other products mentioned herein may be
trademarks of their respective companies.
Hewlett-Packard Company
11311 Chinden Boulevard
Boise, Idaho 83714 U.S.A.
Page 5

Contents
1 Getting to know your product
Identifying your product. . . . . . . . . . . . . . . . . . . . . . . . . . . . . . . . . . . . . . . . . . . . . . . . . . . . . 14
HP LaserJet 3300mfp . . . . . . . . . . . . . . . . . . . . . . . . . . . . . . . . . . . . . . . . . . . . . . . . . . . 14
HP LaserJet 3300se mfp. . . . . . . . . . . . . . . . . . . . . . . . . . . . . . . . . . . . . . . . . . . . . . . . . 15
HP LaserJet 3310mfp . . . . . . . . . . . . . . . . . . . . . . . . . . . . . . . . . . . . . . . . . . . . . . . . . . . 16
HP LaserJet 3320mfp . . . . . . . . . . . . . . . . . . . . . . . . . . . . . . . . . . . . . . . . . . . . . . . . . . . 17
HP LaserJet 3320n mfp . . . . . . . . . . . . . . . . . . . . . . . . . . . . . . . . . . . . . . . . . . . . . . . . . 18
HP LaserJet 3330mfp . . . . . . . . . . . . . . . . . . . . . . . . . . . . . . . . . . . . . . . . . . . . . . . . . . . 19
Identifying your product’s hardware components . . . . . . . . . . . . . . . . . . . . . . . . . . . . . . . . . 20
HP LaserJet 3300 series hardware components . . . . . . . . . . . . . . . . . . . . . . . . . . . . . . 20
Identifying your product’s control panel components . . . . . . . . . . . . . . . . . . . . . . . . . . . . . . 21
Fax controls. . . . . . . . . . . . . . . . . . . . . . . . . . . . . . . . . . . . . . . . . . . . . . . . . . . . . . . . . . . 21
Alphanumeric buttons . . . . . . . . . . . . . . . . . . . . . . . . . . . . . . . . . . . . . . . . . . . . . . . . . . . 22
Menu and cancel controls. . . . . . . . . . . . . . . . . . . . . . . . . . . . . . . . . . . . . . . . . . . . . . . . 22
Copy, scan, and start controls. . . . . . . . . . . . . . . . . . . . . . . . . . . . . . . . . . . . . . . . . . . . . 23
Identifying HP Jetdirect 310x print server components . . . . . . . . . . . . . . . . . . . . . . . . . . . . . 23
Identifying your product’s software components . . . . . . . . . . . . . . . . . . . . . . . . . . . . . . . . . . 24
2 Getting started
Finding a location for your product . . . . . . . . . . . . . . . . . . . . . . . . . . . . . . . . . . . . . . . . . . . . 26
Connecting a printer cable to your product . . . . . . . . . . . . . . . . . . . . . . . . . . . . . . . . . . . . . . 27
Installing a print cartridge . . . . . . . . . . . . . . . . . . . . . . . . . . . . . . . . . . . . . . . . . . . . . . . . . . . 28
Installing and loading the media input trays . . . . . . . . . . . . . . . . . . . . . . . . . . . . . . . . . . . . . 29
Installing the ADF input tray . . . . . . . . . . . . . . . . . . . . . . . . . . . . . . . . . . . . . . . . . . . . . . . . . 30
Connecting the power cord . . . . . . . . . . . . . . . . . . . . . . . . . . . . . . . . . . . . . . . . . . . . . . . . . . 30
Loading originals to copy or scan . . . . . . . . . . . . . . . . . . . . . . . . . . . . . . . . . . . . . . . . . . . . . 31
To load originals onto the flatbed scanner . . . . . . . . . . . . . . . . . . . . . . . . . . . . . . . . . . . 31
To load originals into the ADF input tray. . . . . . . . . . . . . . . . . . . . . . . . . . . . . . . . . . . . . 32
Verifying your work . . . . . . . . . . . . . . . . . . . . . . . . . . . . . . . . . . . . . . . . . . . . . . . . . . . . . . . . 33
To self-test the printer . . . . . . . . . . . . . . . . . . . . . . . . . . . . . . . . . . . . . . . . . . . . . . . . . . . 33
To self-test the copier using the ADF input tray . . . . . . . . . . . . . . . . . . . . . . . . . . . . . . . 33
To self-test the copier using the flatbed scanner . . . . . . . . . . . . . . . . . . . . . . . . . . . . . . 34
To print a control panel menu map . . . . . . . . . . . . . . . . . . . . . . . . . . . . . . . . . . . . . . . . . 34
3 Changing your product’s general default settings
HP LaserJet 3300 series product settings. . . . . . . . . . . . . . . . . . . . . . . . . . . . . . . . . . . . . . . 36
Printing a configuration page. . . . . . . . . . . . . . . . . . . . . . . . . . . . . . . . . . . . . . . . . . . . . . . . . 36
To print a configuration page . . . . . . . . . . . . . . . . . . . . . . . . . . . . . . . . . . . . . . . . . . . . . 36
Printing a control panel menu map . . . . . . . . . . . . . . . . . . . . . . . . . . . . . . . . . . . . . . . . . . . . 36
To print a control panel menu map . . . . . . . . . . . . . . . . . . . . . . . . . . . . . . . . . . . . . . . . . 36
Restoring the factory default settings . . . . . . . . . . . . . . . . . . . . . . . . . . . . . . . . . . . . . . . . . . 36
To restore the factory default settings. . . . . . . . . . . . . . . . . . . . . . . . . . . . . . . . . . . . . . . 36
Changing the display panel language . . . . . . . . . . . . . . . . . . . . . . . . . . . . . . . . . . . . . . . . . . 37
To change the display panel language . . . . . . . . . . . . . . . . . . . . . . . . . . . . . . . . . . . . . . 37
Changing the default paper size . . . . . . . . . . . . . . . . . . . . . . . . . . . . . . . . . . . . . . . . . . . . . . 37
To change the default paper size . . . . . . . . . . . . . . . . . . . . . . . . . . . . . . . . . . . . . . . . . . 37
Using the product’s volume controls . . . . . . . . . . . . . . . . . . . . . . . . . . . . . . . . . . . . . . . . . . . 37
To change the alarm volume. . . . . . . . . . . . . . . . . . . . . . . . . . . . . . . . . . . . . . . . . . . . . . 37
To change the volume for the fax product. . . . . . . . . . . . . . . . . . . . . . . . . . . . . . . . . . . . 38
EN 3
Page 6

To change the ring volume of the fax product. . . . . . . . . . . . . . . . . . . . . . . . . . . . . . . . . 38
To change the control panel key press volume. . . . . . . . . . . . . . . . . . . . . . . . . . . . . . . . 38
Changing settings from your computer . . . . . . . . . . . . . . . . . . . . . . . . . . . . . . . . . . . . . . . . . 38
To change default settings across all applications (Windows) . . . . . . . . . . . . . . . . . . . . 39
To change default settings across all applications (Macintosh) . . . . . . . . . . . . . . . . . . . 39
To temporarily change settings from a software application (Windows). . . . . . . . . . . . . 39
To temporarily change settings from a software application (Macintosh). . . . . . . . . . . . 39
4 Printing
Printing with manual feed . . . . . . . . . . . . . . . . . . . . . . . . . . . . . . . . . . . . . . . . . . . . . . . . . . . 42
To print using manual feed . . . . . . . . . . . . . . . . . . . . . . . . . . . . . . . . . . . . . . . . . . . . . . . 42
Stopping or canceling a print job . . . . . . . . . . . . . . . . . . . . . . . . . . . . . . . . . . . . . . . . . . . . . . 42
Printer drivers . . . . . . . . . . . . . . . . . . . . . . . . . . . . . . . . . . . . . . . . . . . . . . . . . . . . . . . . . . . . 42
Understanding print quality settings . . . . . . . . . . . . . . . . . . . . . . . . . . . . . . . . . . . . . . . . . . . 42
To temporarily change print quality settings . . . . . . . . . . . . . . . . . . . . . . . . . . . . . . . . . . 43
To change print quality settings for all future jobs. . . . . . . . . . . . . . . . . . . . . . . . . . . . . . 43
To enable EconoMode (save toner) . . . . . . . . . . . . . . . . . . . . . . . . . . . . . . . . . . . . . . . . 43
Optimizing print quality for media types. . . . . . . . . . . . . . . . . . . . . . . . . . . . . . . . . . . . . . . . . 44
To access the optimizing feature . . . . . . . . . . . . . . . . . . . . . . . . . . . . . . . . . . . . . . . . . . 44
Printing envelopes. . . . . . . . . . . . . . . . . . . . . . . . . . . . . . . . . . . . . . . . . . . . . . . . . . . . . . . . . 45
To print one envelope . . . . . . . . . . . . . . . . . . . . . . . . . . . . . . . . . . . . . . . . . . . . . . . . . . . 45
To print multiple envelopes. . . . . . . . . . . . . . . . . . . . . . . . . . . . . . . . . . . . . . . . . . . . . . . 46
Printing transparencies and labels . . . . . . . . . . . . . . . . . . . . . . . . . . . . . . . . . . . . . . . . . . . . 47
To print transparencies or labels. . . . . . . . . . . . . . . . . . . . . . . . . . . . . . . . . . . . . . . . . . . 47
Printing letterhead or preprinted forms . . . . . . . . . . . . . . . . . . . . . . . . . . . . . . . . . . . . . . . . . 48
To print letterhead or preprinted forms . . . . . . . . . . . . . . . . . . . . . . . . . . . . . . . . . . . . . . 48
Printing custom-sized media or card stock . . . . . . . . . . . . . . . . . . . . . . . . . . . . . . . . . . . . . . 49
To print custom-sized media or card stock . . . . . . . . . . . . . . . . . . . . . . . . . . . . . . . . . . . 49
Printing on both sides of the media (manual duplexing) . . . . . . . . . . . . . . . . . . . . . . . . . . . . 49
To duplex manually on lightweight media . . . . . . . . . . . . . . . . . . . . . . . . . . . . . . . . . . . . 50
To duplex manually on heavy media or card stock (straight-through output path) . . . . . 51
Printing multiple pages on a single sheet of media. . . . . . . . . . . . . . . . . . . . . . . . . . . . . . . . 52
To print multiple pages on a single sheet (Windows) . . . . . . . . . . . . . . . . . . . . . . . . . . . 52
To print multiple pages on a single sheet (Macintosh) . . . . . . . . . . . . . . . . . . . . . . . . . . 52
Printing booklets . . . . . . . . . . . . . . . . . . . . . . . . . . . . . . . . . . . . . . . . . . . . . . . . . . . . . . . . . . 53
To print booklets . . . . . . . . . . . . . . . . . . . . . . . . . . . . . . . . . . . . . . . . . . . . . . . . . . . . . . . 53
Printing watermarks. . . . . . . . . . . . . . . . . . . . . . . . . . . . . . . . . . . . . . . . . . . . . . . . . . . . . . . . 54
To access the watermark feature . . . . . . . . . . . . . . . . . . . . . . . . . . . . . . . . . . . . . . . . . . 54
5 Copying
Starting a copy job. . . . . . . . . . . . . . . . . . . . . . . . . . . . . . . . . . . . . . . . . . . . . . . . . . . . . . . . . 56
Canceling a copy job . . . . . . . . . . . . . . . . . . . . . . . . . . . . . . . . . . . . . . . . . . . . . . . . . . . . . . . 56
Adjusting copy quality for the current job. . . . . . . . . . . . . . . . . . . . . . . . . . . . . . . . . . . . . . . . 56
To adjust the copy quality for the current job . . . . . . . . . . . . . . . . . . . . . . . . . . . . . . . . . 56
Adjusting the default copy quality . . . . . . . . . . . . . . . . . . . . . . . . . . . . . . . . . . . . . . . . . . . . . 57
To adjust the copy quality . . . . . . . . . . . . . . . . . . . . . . . . . . . . . . . . . . . . . . . . . . . . . . . . 57
Adjusting the lighter/darker (contrast) setting for the current job. . . . . . . . . . . . . . . . . . . . . . 57
To adjust the lighter/darker setting for the current job. . . . . . . . . . . . . . . . . . . . . . . . . . . 57
Adjusting the default lighter/darker (contrast) setting . . . . . . . . . . . . . . . . . . . . . . . . . . . . . . 57
To adjust the default lighter/darker setting . . . . . . . . . . . . . . . . . . . . . . . . . . . . . . . . . . . 57
Reducing or enlarging copies for the current job. . . . . . . . . . . . . . . . . . . . . . . . . . . . . . . . . . 58
To reduce or enlarge copies for the current job . . . . . . . . . . . . . . . . . . . . . . . . . . . . . . . 58
Adjusting the default copy size . . . . . . . . . . . . . . . . . . . . . . . . . . . . . . . . . . . . . . . . . . . . . . . 58
To change the default copy size . . . . . . . . . . . . . . . . . . . . . . . . . . . . . . . . . . . . . . . . . . . 59
Changing the copy collation setting. . . . . . . . . . . . . . . . . . . . . . . . . . . . . . . . . . . . . . . . . . . . 59
To change the copy collation setting for the current job . . . . . . . . . . . . . . . . . . . . . . . . . 59
4 EN
Page 7

To change the default copy collation setting. . . . . . . . . . . . . . . . . . . . . . . . . . . . . . . . . . 59
Changing the number of copies. . . . . . . . . . . . . . . . . . . . . . . . . . . . . . . . . . . . . . . . . . . . . . . 60
To change the number of copies for the current job . . . . . . . . . . . . . . . . . . . . . . . . . . . . 60
To change the default number of copies. . . . . . . . . . . . . . . . . . . . . . . . . . . . . . . . . . . . . 60
Using HP LaserJet Copier software . . . . . . . . . . . . . . . . . . . . . . . . . . . . . . . . . . . . . . . . . . . 60
To access HP LaserJet Copier (Windows or Macintosh) . . . . . . . . . . . . . . . . . . . . . . . . 60
Using HP LaserJet Copy Plus software. . . . . . . . . . . . . . . . . . . . . . . . . . . . . . . . . . . . . . . . . 61
To access HP LaserJet Copy Plus (Windows) . . . . . . . . . . . . . . . . . . . . . . . . . . . . . . . . 61
To access HP LaserJet Copy Plus (Macintosh) . . . . . . . . . . . . . . . . . . . . . . . . . . . . . . . 61
Copying photos, two-sided originals, or books . . . . . . . . . . . . . . . . . . . . . . . . . . . . . . . . . . . 62
To copy or scan a photo . . . . . . . . . . . . . . . . . . . . . . . . . . . . . . . . . . . . . . . . . . . . . . . . . 62
To copy a multiple page stack of 2-sided originals . . . . . . . . . . . . . . . . . . . . . . . . . . . . . 62
To copy a book . . . . . . . . . . . . . . . . . . . . . . . . . . . . . . . . . . . . . . . . . . . . . . . . . . . . . . . . 63
6 Scanning
Understanding scanning methods. . . . . . . . . . . . . . . . . . . . . . . . . . . . . . . . . . . . . . . . . . . . . 66
Scanning from the product’s control panel . . . . . . . . . . . . . . . . . . . . . . . . . . . . . . . . . . . . . . 66
To scan from the product’s control panel using the start scan button. . . . . . . . . . . . . . . 66
To use the scan to button via USB or parallel connection . . . . . . . . . . . . . . . . . . . . . . . 67
To use the scan to button via network connection . . . . . . . . . . . . . . . . . . . . . . . . . . . . . 67
To reprogram the scan to button destinations. . . . . . . . . . . . . . . . . . . . . . . . . . . . . . . . . 67
To reprogram the start scan button. . . . . . . . . . . . . . . . . . . . . . . . . . . . . . . . . . . . . . . . . 68
Canceling a scan job . . . . . . . . . . . . . . . . . . . . . . . . . . . . . . . . . . . . . . . . . . . . . . . . . . . . . . . 68
Scanning with the product software. . . . . . . . . . . . . . . . . . . . . . . . . . . . . . . . . . . . . . . . . . . . 68
To scan using HP LaserJet Director (Windows) . . . . . . . . . . . . . . . . . . . . . . . . . . . . . . . 68
To scan using HP LaserJet Director (Macintosh) . . . . . . . . . . . . . . . . . . . . . . . . . . . . . . 69
To use page-by-page scanning (Windows). . . . . . . . . . . . . . . . . . . . . . . . . . . . . . . . . . . 69
To use page-by-page scanning (Macintosh). . . . . . . . . . . . . . . . . . . . . . . . . . . . . . . . . . 70
Scanning with TWAIN-compliant software . . . . . . . . . . . . . . . . . . . . . . . . . . . . . . . . . . . . . . 70
To use flatbed scanner preview scan . . . . . . . . . . . . . . . . . . . . . . . . . . . . . . . . . . . . . . . 70
Archiving scanned text or images . . . . . . . . . . . . . . . . . . . . . . . . . . . . . . . . . . . . . . . . . . . . . 71
To archive a scanned image. . . . . . . . . . . . . . . . . . . . . . . . . . . . . . . . . . . . . . . . . . . . . . 71
To use the archive feature (Macintosh). . . . . . . . . . . . . . . . . . . . . . . . . . . . . . . . . . . . . . 71
Scanning with OCR . . . . . . . . . . . . . . . . . . . . . . . . . . . . . . . . . . . . . . . . . . . . . . . . . . . . . . . . 72
To edit scanned text (Windows and Macintosh) . . . . . . . . . . . . . . . . . . . . . . . . . . . . . . . 72
To change the OCR word processing application. . . . . . . . . . . . . . . . . . . . . . . . . . . . . . 72
To use HP LaserJet Director’s OCR feature. . . . . . . . . . . . . . . . . . . . . . . . . . . . . . . . . . 72
Enhancing images with HP LaserJet Document Manager or HP Photo Center . . . . . . . . . . 74
To access image enhancement features (Windows) . . . . . . . . . . . . . . . . . . . . . . . . . . . 74
Adding annotations to HP documents . . . . . . . . . . . . . . . . . . . . . . . . . . . . . . . . . . . . . . . . . . 74
To access HP LaserJet Document Manager’s annotation features . . . . . . . . . . . . . . . . 75
To change the annotation settings . . . . . . . . . . . . . . . . . . . . . . . . . . . . . . . . . . . . . . . . . 75
Adding annotations to scanned image files . . . . . . . . . . . . . . . . . . . . . . . . . . . . . . . . . . . . . . 75
Sending scanned items as e-mail attachments. . . . . . . . . . . . . . . . . . . . . . . . . . . . . . . . . . . 75
To scan to e-mail (Windows). . . . . . . . . . . . . . . . . . . . . . . . . . . . . . . . . . . . . . . . . . . . . . 75
To scan to e-mail (Macintosh). . . . . . . . . . . . . . . . . . . . . . . . . . . . . . . . . . . . . . . . . . . . . 76
To e-mail scanned files in an alternative mode. . . . . . . . . . . . . . . . . . . . . . . . . . . . . . . . 76
Scanner resolution and color. . . . . . . . . . . . . . . . . . . . . . . . . . . . . . . . . . . . . . . . . . . . . . . . . 76
Resolution and color guidelines . . . . . . . . . . . . . . . . . . . . . . . . . . . . . . . . . . . . . . . . . . . 77
Color . . . . . . . . . . . . . . . . . . . . . . . . . . . . . . . . . . . . . . . . . . . . . . . . . . . . . . . . . . . . . . . . 78
7 Faxing
Setting the information in the fax header. . . . . . . . . . . . . . . . . . . . . . . . . . . . . . . . . . . . . . . . 80
To set the fax header . . . . . . . . . . . . . . . . . . . . . . . . . . . . . . . . . . . . . . . . . . . . . . . . . . . 80
Setting the answer mode. . . . . . . . . . . . . . . . . . . . . . . . . . . . . . . . . . . . . . . . . . . . . . . . . . . . 80
To set the answer mode . . . . . . . . . . . . . . . . . . . . . . . . . . . . . . . . . . . . . . . . . . . . . . . . . 80
EN 5
Page 8

Loading originals to fax . . . . . . . . . . . . . . . . . . . . . . . . . . . . . . . . . . . . . . . . . . . . . . . . . . . . . 81
To load fax documents into the ADF input tray. . . . . . . . . . . . . . . . . . . . . . . . . . . . . . . . 81
Sending faxes . . . . . . . . . . . . . . . . . . . . . . . . . . . . . . . . . . . . . . . . . . . . . . . . . . . . . . . . . . . . 81
To send a fax to one recipient. . . . . . . . . . . . . . . . . . . . . . . . . . . . . . . . . . . . . . . . . . . . . 81
To send a fax to multiple recipients. . . . . . . . . . . . . . . . . . . . . . . . . . . . . . . . . . . . . . . . . 82
To send a fax using a group-dial code . . . . . . . . . . . . . . . . . . . . . . . . . . . . . . . . . . . . . . 82
To send a fax to an ad hoc group . . . . . . . . . . . . . . . . . . . . . . . . . . . . . . . . . . . . . . . . . . 82
Canceling a fax job . . . . . . . . . . . . . . . . . . . . . . . . . . . . . . . . . . . . . . . . . . . . . . . . . . . . . . . . 83
To cancel the current fax job. . . . . . . . . . . . . . . . . . . . . . . . . . . . . . . . . . . . . . . . . . . . . . 83
To cancel a fax job using fax job status . . . . . . . . . . . . . . . . . . . . . . . . . . . . . . . . . . . . . 83
Using manual dial . . . . . . . . . . . . . . . . . . . . . . . . . . . . . . . . . . . . . . . . . . . . . . . . . . . . . . . . . 83
To use manual dial . . . . . . . . . . . . . . . . . . . . . . . . . . . . . . . . . . . . . . . . . . . . . . . . . . . . . 83
Deleting faxes from memory . . . . . . . . . . . . . . . . . . . . . . . . . . . . . . . . . . . . . . . . . . . . . . . . . 84
To delete faxes from memory . . . . . . . . . . . . . . . . . . . . . . . . . . . . . . . . . . . . . . . . . . . . . 84
Redialing manually . . . . . . . . . . . . . . . . . . . . . . . . . . . . . . . . . . . . . . . . . . . . . . . . . . . . . . . . 84
To redial manually. . . . . . . . . . . . . . . . . . . . . . . . . . . . . . . . . . . . . . . . . . . . . . . . . . . . . . 84
Sending a fax at a future time . . . . . . . . . . . . . . . . . . . . . . . . . . . . . . . . . . . . . . . . . . . . . . . . 84
To send a fax at a future time . . . . . . . . . . . . . . . . . . . . . . . . . . . . . . . . . . . . . . . . . . . . . 85
Receiving faxes . . . . . . . . . . . . . . . . . . . . . . . . . . . . . . . . . . . . . . . . . . . . . . . . . . . . . . . . . . . 85
To receive faxes when you hear fax tones . . . . . . . . . . . . . . . . . . . . . . . . . . . . . . . . . . . 85
To reprint a fax . . . . . . . . . . . . . . . . . . . . . . . . . . . . . . . . . . . . . . . . . . . . . . . . . . . . . . . . 85
To block or unblock fax numbers . . . . . . . . . . . . . . . . . . . . . . . . . . . . . . . . . . . . . . . . . . 86
Receiving faxes to your computer . . . . . . . . . . . . . . . . . . . . . . . . . . . . . . . . . . . . . . . . . . . . . 86
To turn the receive to PC setting off from the control panel . . . . . . . . . . . . . . . . . . . . . . 87
About speed-dial codes, one-touch keys, and group-dial codes. . . . . . . . . . . . . . . . . . . . . . 87
To program speed-dial codes and one-touch keys. . . . . . . . . . . . . . . . . . . . . . . . . . . . . 87
To delete speed-dial codes and one-touch keys. . . . . . . . . . . . . . . . . . . . . . . . . . . . . . . 88
To quickly program speed-dial codes or one-touch keys . . . . . . . . . . . . . . . . . . . . . . . . 88
To program a one-touch key for alternate long distance. . . . . . . . . . . . . . . . . . . . . . . . . 89
Managing group-dial codes. . . . . . . . . . . . . . . . . . . . . . . . . . . . . . . . . . . . . . . . . . . . . . . . . . 89
To program group-dial codes . . . . . . . . . . . . . . . . . . . . . . . . . . . . . . . . . . . . . . . . . . . . . 89
To delete group-dial codes . . . . . . . . . . . . . . . . . . . . . . . . . . . . . . . . . . . . . . . . . . . . . . . 90
To delete an individual from a group-dial code . . . . . . . . . . . . . . . . . . . . . . . . . . . . . . . . 90
Deleting all phone book entries . . . . . . . . . . . . . . . . . . . . . . . . . . . . . . . . . . . . . . . . . . . . . . . 91
To delete all phone book entries. . . . . . . . . . . . . . . . . . . . . . . . . . . . . . . . . . . . . . . . . . . 91
Using dialing characters . . . . . . . . . . . . . . . . . . . . . . . . . . . . . . . . . . . . . . . . . . . . . . . . . . . . 91
Dialing character table . . . . . . . . . . . . . . . . . . . . . . . . . . . . . . . . . . . . . . . . . . . . . . . . . . 91
To insert a pause or wait. . . . . . . . . . . . . . . . . . . . . . . . . . . . . . . . . . . . . . . . . . . . . . . . . 92
Inserting a dial prefix . . . . . . . . . . . . . . . . . . . . . . . . . . . . . . . . . . . . . . . . . . . . . . . . . . . . . . . 92
To set the dial prefix . . . . . . . . . . . . . . . . . . . . . . . . . . . . . . . . . . . . . . . . . . . . . . . . . . . . 92
Using fax forwarding . . . . . . . . . . . . . . . . . . . . . . . . . . . . . . . . . . . . . . . . . . . . . . . . . . . . . . . 93
To use fax forwarding . . . . . . . . . . . . . . . . . . . . . . . . . . . . . . . . . . . . . . . . . . . . . . . . . . . 93
Using fax polling . . . . . . . . . . . . . . . . . . . . . . . . . . . . . . . . . . . . . . . . . . . . . . . . . . . . . . . . . . 93
To poll (request a fax from) another fax machine . . . . . . . . . . . . . . . . . . . . . . . . . . . . . . 93
Enabling an extension phone . . . . . . . . . . . . . . . . . . . . . . . . . . . . . . . . . . . . . . . . . . . . . . . . 93
To enable an extension phone . . . . . . . . . . . . . . . . . . . . . . . . . . . . . . . . . . . . . . . . . . . . 93
Sending a fax by dialing from a telephone . . . . . . . . . . . . . . . . . . . . . . . . . . . . . . . . . . . . . . 94
To send a fax by dialing from a telephone . . . . . . . . . . . . . . . . . . . . . . . . . . . . . . . . . . . 94
Changing the HP LaserJet 3330 product’s volume settings . . . . . . . . . . . . . . . . . . . . . . . . . 94
To change the fax sounds (line monitor) volume . . . . . . . . . . . . . . . . . . . . . . . . . . . . . . 94
To change the ring volume . . . . . . . . . . . . . . . . . . . . . . . . . . . . . . . . . . . . . . . . . . . . . . . 94
Changing the default resolution. . . . . . . . . . . . . . . . . . . . . . . . . . . . . . . . . . . . . . . . . . . . . . . 95
To change the default resolution. . . . . . . . . . . . . . . . . . . . . . . . . . . . . . . . . . . . . . . . . . . 95
Changing the default contrast . . . . . . . . . . . . . . . . . . . . . . . . . . . . . . . . . . . . . . . . . . . . . . . . 95
To change the default contrast . . . . . . . . . . . . . . . . . . . . . . . . . . . . . . . . . . . . . . . . . . . . 95
Changing the detect dial tone setting . . . . . . . . . . . . . . . . . . . . . . . . . . . . . . . . . . . . . . . . . . 95
To change detect dial tone . . . . . . . . . . . . . . . . . . . . . . . . . . . . . . . . . . . . . . . . . . . . . . . 95
6 EN
Page 9

Changing how the product answers incoming faxes . . . . . . . . . . . . . . . . . . . . . . . . . . . . . . . 96
To set the answer mode to automatic or manual . . . . . . . . . . . . . . . . . . . . . . . . . . . . . . 96
Changing rings-to-answer . . . . . . . . . . . . . . . . . . . . . . . . . . . . . . . . . . . . . . . . . . . . . . . . . . . 96
To set the number of rings-to-answer. . . . . . . . . . . . . . . . . . . . . . . . . . . . . . . . . . . . . . . 96
Changing answer ring patterns . . . . . . . . . . . . . . . . . . . . . . . . . . . . . . . . . . . . . . . . . . . . . . . 97
What is ring pattern service?. . . . . . . . . . . . . . . . . . . . . . . . . . . . . . . . . . . . . . . . . . . . . . 97
How do I get the service? . . . . . . . . . . . . . . . . . . . . . . . . . . . . . . . . . . . . . . . . . . . . . . . . 97
How will I know if it is working?. . . . . . . . . . . . . . . . . . . . . . . . . . . . . . . . . . . . . . . . . . . . 97
To change answer ring patterns . . . . . . . . . . . . . . . . . . . . . . . . . . . . . . . . . . . . . . . . . . . 97
Changing the silence-detect mode . . . . . . . . . . . . . . . . . . . . . . . . . . . . . . . . . . . . . . . . . . . . 97
To change the silence detect mode . . . . . . . . . . . . . . . . . . . . . . . . . . . . . . . . . . . . . . . . 98
Changing autoreduction settings for incoming faxes. . . . . . . . . . . . . . . . . . . . . . . . . . . . . . . 98
To change autoreduction for incoming faxes . . . . . . . . . . . . . . . . . . . . . . . . . . . . . . . . . 98
Enabling stamp received faxes . . . . . . . . . . . . . . . . . . . . . . . . . . . . . . . . . . . . . . . . . . . . . . . 98
To enable stamp received faxes. . . . . . . . . . . . . . . . . . . . . . . . . . . . . . . . . . . . . . . . . . . 98
Setting the fax error correction . . . . . . . . . . . . . . . . . . . . . . . . . . . . . . . . . . . . . . . . . . . . . . . 99
To change the error correction setting . . . . . . . . . . . . . . . . . . . . . . . . . . . . . . . . . . . . . . 99
Selecting tone- or pulse-dialing mode . . . . . . . . . . . . . . . . . . . . . . . . . . . . . . . . . . . . . . . . . . 99
To select tone- or pulse-dialing. . . . . . . . . . . . . . . . . . . . . . . . . . . . . . . . . . . . . . . . . . . . 99
Changing redial settings . . . . . . . . . . . . . . . . . . . . . . . . . . . . . . . . . . . . . . . . . . . . . . . . . . . . 99
To turn the redial on busy option on or off . . . . . . . . . . . . . . . . . . . . . . . . . . . . . . . . . . 100
To turn the redial on no answer on or off . . . . . . . . . . . . . . . . . . . . . . . . . . . . . . . . . . . 100
Using billing codes. . . . . . . . . . . . . . . . . . . . . . . . . . . . . . . . . . . . . . . . . . . . . . . . . . . . . . . . 100
To turn billing codes on or off . . . . . . . . . . . . . . . . . . . . . . . . . . . . . . . . . . . . . . . . . . . . 100
Changing the V.34 setting . . . . . . . . . . . . . . . . . . . . . . . . . . . . . . . . . . . . . . . . . . . . . . . . . . 100
To turn the V.34 setting on or off. . . . . . . . . . . . . . . . . . . . . . . . . . . . . . . . . . . . . . . . . . 100
Managing fax logs and reports . . . . . . . . . . . . . . . . . . . . . . . . . . . . . . . . . . . . . . . . . . . . . . 101
Printing the fax activity log. . . . . . . . . . . . . . . . . . . . . . . . . . . . . . . . . . . . . . . . . . . . . . . . . . 101
To print the fax activity log . . . . . . . . . . . . . . . . . . . . . . . . . . . . . . . . . . . . . . . . . . . . . . 101
Setting the fax activity log to print automatically . . . . . . . . . . . . . . . . . . . . . . . . . . . . . . . . . 102
To set the fax activity log to print automatically. . . . . . . . . . . . . . . . . . . . . . . . . . . . . . . 102
Printing a fax call report. . . . . . . . . . . . . . . . . . . . . . . . . . . . . . . . . . . . . . . . . . . . . . . . . . . . 102
To print a fax call report . . . . . . . . . . . . . . . . . . . . . . . . . . . . . . . . . . . . . . . . . . . . . . . . 102
Setting fax call report print times . . . . . . . . . . . . . . . . . . . . . . . . . . . . . . . . . . . . . . . . . . . . . 102
To set fax call report print times . . . . . . . . . . . . . . . . . . . . . . . . . . . . . . . . . . . . . . . . . . 103
Including the first page of each fax on the fax call report . . . . . . . . . . . . . . . . . . . . . . . . . . 103
To include the first page of each fax on the fax call report . . . . . . . . . . . . . . . . . . . . . . 103
Printing a phone book report . . . . . . . . . . . . . . . . . . . . . . . . . . . . . . . . . . . . . . . . . . . . . . . . 103
To print a phone book report. . . . . . . . . . . . . . . . . . . . . . . . . . . . . . . . . . . . . . . . . . . . . 103
Printing the billing codes report . . . . . . . . . . . . . . . . . . . . . . . . . . . . . . . . . . . . . . . . . . . . . . 103
To print the billing codes report. . . . . . . . . . . . . . . . . . . . . . . . . . . . . . . . . . . . . . . . . . . 104
Printing a T.30 protocol trace report . . . . . . . . . . . . . . . . . . . . . . . . . . . . . . . . . . . . . . . . . . 104
To print a T.30 protocol trace report . . . . . . . . . . . . . . . . . . . . . . . . . . . . . . . . . . . . . . . 104
To set T.30 protocol trace report print times . . . . . . . . . . . . . . . . . . . . . . . . . . . . . . . . . 104
Printing the block fax list . . . . . . . . . . . . . . . . . . . . . . . . . . . . . . . . . . . . . . . . . . . . . . . . . . . 104
To print the block fax list . . . . . . . . . . . . . . . . . . . . . . . . . . . . . . . . . . . . . . . . . . . . . . . . 104
Printing all fax reports . . . . . . . . . . . . . . . . . . . . . . . . . . . . . . . . . . . . . . . . . . . . . . . . . . . . . 105
To print all fax reports . . . . . . . . . . . . . . . . . . . . . . . . . . . . . . . . . . . . . . . . . . . . . . . . . . 105
8 Networking
Understanding the print server’s features and benefits . . . . . . . . . . . . . . . . . . . . . . . . . . . . 108
Using network protocols . . . . . . . . . . . . . . . . . . . . . . . . . . . . . . . . . . . . . . . . . . . . . . . . . . . 108
Software installation . . . . . . . . . . . . . . . . . . . . . . . . . . . . . . . . . . . . . . . . . . . . . . . . . . . . . . 108
Network connection requirements. . . . . . . . . . . . . . . . . . . . . . . . . . . . . . . . . . . . . . . . . . . . 109
Installing the 310x print server. . . . . . . . . . . . . . . . . . . . . . . . . . . . . . . . . . . . . . . . . . . . . . . 111
To connect the product to a network. . . . . . . . . . . . . . . . . . . . . . . . . . . . . . . . . . . . . . . 111
Installing the network software . . . . . . . . . . . . . . . . . . . . . . . . . . . . . . . . . . . . . . . . . . . . . . 113
EN 7
Page 10

Using the embedded web server. . . . . . . . . . . . . . . . . . . . . . . . . . . . . . . . . . . . . . . . . . . . . 113
Prerequisites . . . . . . . . . . . . . . . . . . . . . . . . . . . . . . . . . . . . . . . . . . . . . . . . . . . . . . . . . 113
Compatible web browsers. . . . . . . . . . . . . . . . . . . . . . . . . . . . . . . . . . . . . . . . . . . . . . . 113
To start the embedded web server . . . . . . . . . . . . . . . . . . . . . . . . . . . . . . . . . . . . . . . . 114
Using HP Web JetAdmin. . . . . . . . . . . . . . . . . . . . . . . . . . . . . . . . . . . . . . . . . . . . . . . . . . . 114
Using BOOTP . . . . . . . . . . . . . . . . . . . . . . . . . . . . . . . . . . . . . . . . . . . . . . . . . . . . . . . . . . . 114
Setting up the BOOTP server . . . . . . . . . . . . . . . . . . . . . . . . . . . . . . . . . . . . . . . . . . . . 115
Bootptab file entries . . . . . . . . . . . . . . . . . . . . . . . . . . . . . . . . . . . . . . . . . . . . . . . . . . . 115
Using DHCP . . . . . . . . . . . . . . . . . . . . . . . . . . . . . . . . . . . . . . . . . . . . . . . . . . . . . . . . . . . . 118
UNIX servers: . . . . . . . . . . . . . . . . . . . . . . . . . . . . . . . . . . . . . . . . . . . . . . . . . . . . . . . . 118
Windows NT 4.0 servers: . . . . . . . . . . . . . . . . . . . . . . . . . . . . . . . . . . . . . . . . . . . . . . . 118
Windows 2000 servers:. . . . . . . . . . . . . . . . . . . . . . . . . . . . . . . . . . . . . . . . . . . . . . . . . 119
Configuring the print server for DHCP configuration. . . . . . . . . . . . . . . . . . . . . . . . . . . 121
Moving to another network . . . . . . . . . . . . . . . . . . . . . . . . . . . . . . . . . . . . . . . . . . . . . . . . . 122
Printing a print server configuration page . . . . . . . . . . . . . . . . . . . . . . . . . . . . . . . . . . . . . . 122
To print a Jetdirect configuration page . . . . . . . . . . . . . . . . . . . . . . . . . . . . . . . . . . . . . 122
For more information . . . . . . . . . . . . . . . . . . . . . . . . . . . . . . . . . . . . . . . . . . . . . . . . . . . . . . 122
9 Cleaning and maintenance
Cleaning the outside of the product. . . . . . . . . . . . . . . . . . . . . . . . . . . . . . . . . . . . . . . . . . . 124
To clean the exterior . . . . . . . . . . . . . . . . . . . . . . . . . . . . . . . . . . . . . . . . . . . . . . . . . . . 124
To clean the glass. . . . . . . . . . . . . . . . . . . . . . . . . . . . . . . . . . . . . . . . . . . . . . . . . . . . . 124
To clean the lid backing . . . . . . . . . . . . . . . . . . . . . . . . . . . . . . . . . . . . . . . . . . . . . . . . 124
Cleaning the print cartridge area . . . . . . . . . . . . . . . . . . . . . . . . . . . . . . . . . . . . . . . . . . . . . 125
To clean the print cartridge area. . . . . . . . . . . . . . . . . . . . . . . . . . . . . . . . . . . . . . . . . . 125
Cleaning the printer media path . . . . . . . . . . . . . . . . . . . . . . . . . . . . . . . . . . . . . . . . . . . . . 126
To clean the printer media path . . . . . . . . . . . . . . . . . . . . . . . . . . . . . . . . . . . . . . . . . . 126
Cleaning the pickup roller . . . . . . . . . . . . . . . . . . . . . . . . . . . . . . . . . . . . . . . . . . . . . . . . . . 126
To clean the pickup roller . . . . . . . . . . . . . . . . . . . . . . . . . . . . . . . . . . . . . . . . . . . . . . . 126
Changing the pickup roller. . . . . . . . . . . . . . . . . . . . . . . . . . . . . . . . . . . . . . . . . . . . . . . . . . 127
To change the pickup roller. . . . . . . . . . . . . . . . . . . . . . . . . . . . . . . . . . . . . . . . . . . . . . 127
Changing the printer separation pad . . . . . . . . . . . . . . . . . . . . . . . . . . . . . . . . . . . . . . . . . . 129
To change the printer separation pad. . . . . . . . . . . . . . . . . . . . . . . . . . . . . . . . . . . . . . 129
Installing a new ADF . . . . . . . . . . . . . . . . . . . . . . . . . . . . . . . . . . . . . . . . . . . . . . . . . . . . . . 131
To install a new or replacement ADF . . . . . . . . . . . . . . . . . . . . . . . . . . . . . . . . . . . . . . 131
Changing an ADF pickup roller assembly . . . . . . . . . . . . . . . . . . . . . . . . . . . . . . . . . . . . . . 133
Removing and replacing the control panel bezel. . . . . . . . . . . . . . . . . . . . . . . . . . . . . . . . . 135
10 Media
Product media specifications. . . . . . . . . . . . . . . . . . . . . . . . . . . . . . . . . . . . . . . . . . . . . . . . 138
Supported media sizes (printer) . . . . . . . . . . . . . . . . . . . . . . . . . . . . . . . . . . . . . . . . . . 138
Guidelines for using media . . . . . . . . . . . . . . . . . . . . . . . . . . . . . . . . . . . . . . . . . . . . . . . . . 138
Paper . . . . . . . . . . . . . . . . . . . . . . . . . . . . . . . . . . . . . . . . . . . . . . . . . . . . . . . . . . . . . . 138
Common media problems table . . . . . . . . . . . . . . . . . . . . . . . . . . . . . . . . . . . . . . . . . . 139
Labels . . . . . . . . . . . . . . . . . . . . . . . . . . . . . . . . . . . . . . . . . . . . . . . . . . . . . . . . . . . . . . 139
Transparencies . . . . . . . . . . . . . . . . . . . . . . . . . . . . . . . . . . . . . . . . . . . . . . . . . . . . . . . 139
Envelopes . . . . . . . . . . . . . . . . . . . . . . . . . . . . . . . . . . . . . . . . . . . . . . . . . . . . . . . . . . . 140
Card stock and heavy media. . . . . . . . . . . . . . . . . . . . . . . . . . . . . . . . . . . . . . . . . . . . . 140
Selecting media for the ADF . . . . . . . . . . . . . . . . . . . . . . . . . . . . . . . . . . . . . . . . . . . . . . . . 141
11 HP parts and accessories
Ordering HP parts and accessories. . . . . . . . . . . . . . . . . . . . . . . . . . . . . . . . . . . . . . . . . . . 144
HP parts and accessories chart . . . . . . . . . . . . . . . . . . . . . . . . . . . . . . . . . . . . . . . . . . 144
Power modules (network model only). . . . . . . . . . . . . . . . . . . . . . . . . . . . . . . . . . . . . . 145
HP LaserJet print cartridges . . . . . . . . . . . . . . . . . . . . . . . . . . . . . . . . . . . . . . . . . . . . . . . . 146
8 EN
Page 11

HP policy on non-HP print cartridges . . . . . . . . . . . . . . . . . . . . . . . . . . . . . . . . . . . . . . 146
To install a print cartridge . . . . . . . . . . . . . . . . . . . . . . . . . . . . . . . . . . . . . . . . . . . . . . . 147
Storing print cartridges . . . . . . . . . . . . . . . . . . . . . . . . . . . . . . . . . . . . . . . . . . . . . . . . . 147
Print cartridge life expectancy. . . . . . . . . . . . . . . . . . . . . . . . . . . . . . . . . . . . . . . . . . . . 148
Recycling print cartridges . . . . . . . . . . . . . . . . . . . . . . . . . . . . . . . . . . . . . . . . . . . . . . . 148
Saving toner . . . . . . . . . . . . . . . . . . . . . . . . . . . . . . . . . . . . . . . . . . . . . . . . . . . . . . . . . 148
DIMMs (memory or font) . . . . . . . . . . . . . . . . . . . . . . . . . . . . . . . . . . . . . . . . . . . . . . . . . . . 148
To test a DIMM installation or removal . . . . . . . . . . . . . . . . . . . . . . . . . . . . . . . . . . . . . 148
To install a DIMM . . . . . . . . . . . . . . . . . . . . . . . . . . . . . . . . . . . . . . . . . . . . . . . . . . . . . 149
To remove a DIMM . . . . . . . . . . . . . . . . . . . . . . . . . . . . . . . . . . . . . . . . . . . . . . . . . 151
12 Troubleshooting printing problems
Product will not turn on or print . . . . . . . . . . . . . . . . . . . . . . . . . . . . . . . . . . . . . . . . . . . . . . 154
Pages print but are totally blank . . . . . . . . . . . . . . . . . . . . . . . . . . . . . . . . . . . . . . . . . . . . . 154
Pages did not print. . . . . . . . . . . . . . . . . . . . . . . . . . . . . . . . . . . . . . . . . . . . . . . . . . . . . . . . 155
Pages printed, but there was a problem . . . . . . . . . . . . . . . . . . . . . . . . . . . . . . . . . . . . . . . 155
Onscreen error messages . . . . . . . . . . . . . . . . . . . . . . . . . . . . . . . . . . . . . . . . . . . . . . . . . . 155
Paper handling problems. . . . . . . . . . . . . . . . . . . . . . . . . . . . . . . . . . . . . . . . . . . . . . . . . . . 156
Print is skewed (crooked) . . . . . . . . . . . . . . . . . . . . . . . . . . . . . . . . . . . . . . . . . . . . . . . 156
More than one sheet feeds at one time. . . . . . . . . . . . . . . . . . . . . . . . . . . . . . . . . . . . . 156
Product does not pull media from the media input tray. . . . . . . . . . . . . . . . . . . . . . . . . 156
Media curls when fed through product . . . . . . . . . . . . . . . . . . . . . . . . . . . . . . . . . . . . . 156
Printed page is different from what appeared onscreen . . . . . . . . . . . . . . . . . . . . . . . . . . . 156
Clearing media jams . . . . . . . . . . . . . . . . . . . . . . . . . . . . . . . . . . . . . . . . . . . . . . . . . . . . . . 158
To clear a media jam. . . . . . . . . . . . . . . . . . . . . . . . . . . . . . . . . . . . . . . . . . . . . . . . . . . 158
To clear other media jams. . . . . . . . . . . . . . . . . . . . . . . . . . . . . . . . . . . . . . . . . . . . . . . 159
Tips to avoid media jams . . . . . . . . . . . . . . . . . . . . . . . . . . . . . . . . . . . . . . . . . . . . . . . 159
Improving print quality . . . . . . . . . . . . . . . . . . . . . . . . . . . . . . . . . . . . . . . . . . . . . . . . . . . . . 160
Light print or fade . . . . . . . . . . . . . . . . . . . . . . . . . . . . . . . . . . . . . . . . . . . . . . . . . . . . . 160
Toner specks. . . . . . . . . . . . . . . . . . . . . . . . . . . . . . . . . . . . . . . . . . . . . . . . . . . . . . . . . 160
Dropouts . . . . . . . . . . . . . . . . . . . . . . . . . . . . . . . . . . . . . . . . . . . . . . . . . . . . . . . . . . . . 160
Vertical lines . . . . . . . . . . . . . . . . . . . . . . . . . . . . . . . . . . . . . . . . . . . . . . . . . . . . . . . . . 161
Gray background. . . . . . . . . . . . . . . . . . . . . . . . . . . . . . . . . . . . . . . . . . . . . . . . . . . . . . 161
Toner smear . . . . . . . . . . . . . . . . . . . . . . . . . . . . . . . . . . . . . . . . . . . . . . . . . . . . . . . . . 162
Loose toner . . . . . . . . . . . . . . . . . . . . . . . . . . . . . . . . . . . . . . . . . . . . . . . . . . . . . . . . . . 162
Vertical repetitive defects . . . . . . . . . . . . . . . . . . . . . . . . . . . . . . . . . . . . . . . . . . . . . . . 162
Misformed characters . . . . . . . . . . . . . . . . . . . . . . . . . . . . . . . . . . . . . . . . . . . . . . . . . . 163
Page skew. . . . . . . . . . . . . . . . . . . . . . . . . . . . . . . . . . . . . . . . . . . . . . . . . . . . . . . . . . . 163
Curl or wave . . . . . . . . . . . . . . . . . . . . . . . . . . . . . . . . . . . . . . . . . . . . . . . . . . . . . . . . . 164
Wrinkles or creases. . . . . . . . . . . . . . . . . . . . . . . . . . . . . . . . . . . . . . . . . . . . . . . . . . . . 164
Toner scatter outline . . . . . . . . . . . . . . . . . . . . . . . . . . . . . . . . . . . . . . . . . . . . . . . . . . . 165
Control panel error messages . . . . . . . . . . . . . . . . . . . . . . . . . . . . . . . . . . . . . . . . . . . . . . . 165
Critical error messages . . . . . . . . . . . . . . . . . . . . . . . . . . . . . . . . . . . . . . . . . . . . . . . . . 165
Alert messages . . . . . . . . . . . . . . . . . . . . . . . . . . . . . . . . . . . . . . . . . . . . . . . . . . . . . . . 166
Warning messages . . . . . . . . . . . . . . . . . . . . . . . . . . . . . . . . . . . . . . . . . . . . . . . . . . . . 166
13 Troubleshooting copy problems
No copy came out . . . . . . . . . . . . . . . . . . . . . . . . . . . . . . . . . . . . . . . . . . . . . . . . . . . . . . . . 168
Copies are blank, or images are missing or faded . . . . . . . . . . . . . . . . . . . . . . . . . . . . . . . 168
Improving copy quality. . . . . . . . . . . . . . . . . . . . . . . . . . . . . . . . . . . . . . . . . . . . . . . . . . . . . 168
Preventing problems . . . . . . . . . . . . . . . . . . . . . . . . . . . . . . . . . . . . . . . . . . . . . . . . . . . 168
Clearing ADF media jams . . . . . . . . . . . . . . . . . . . . . . . . . . . . . . . . . . . . . . . . . . . . . . . . . . 169
To clear a media jam from the ADF . . . . . . . . . . . . . . . . . . . . . . . . . . . . . . . . . . . . . . . 169
Removing a jammed ADF page . . . . . . . . . . . . . . . . . . . . . . . . . . . . . . . . . . . . . . . . . . 170
Identifying and correcting copy defects . . . . . . . . . . . . . . . . . . . . . . . . . . . . . . . . . . . . . . . . 171
Vertical white or faded stripes. . . . . . . . . . . . . . . . . . . . . . . . . . . . . . . . . . . . . . . . . . . . 171
EN 9
Page 12

Blank pages . . . . . . . . . . . . . . . . . . . . . . . . . . . . . . . . . . . . . . . . . . . . . . . . . . . . . . . . . 172
Too light or dark . . . . . . . . . . . . . . . . . . . . . . . . . . . . . . . . . . . . . . . . . . . . . . . . . . . . . . 172
Unwanted lines . . . . . . . . . . . . . . . . . . . . . . . . . . . . . . . . . . . . . . . . . . . . . . . . . . . . . . . 172
Black dots or streaks. . . . . . . . . . . . . . . . . . . . . . . . . . . . . . . . . . . . . . . . . . . . . . . . . . . 172
Unclear text. . . . . . . . . . . . . . . . . . . . . . . . . . . . . . . . . . . . . . . . . . . . . . . . . . . . . . . . . . 172
Reduced size . . . . . . . . . . . . . . . . . . . . . . . . . . . . . . . . . . . . . . . . . . . . . . . . . . . . . . . . 173
14 Troubleshooting scanning problems
Scanned image is of poor quality . . . . . . . . . . . . . . . . . . . . . . . . . . . . . . . . . . . . . . . . . . . . 176
Part of the image did not scan or text is missing . . . . . . . . . . . . . . . . . . . . . . . . . . . . . . . . 176
The text cannot be edited . . . . . . . . . . . . . . . . . . . . . . . . . . . . . . . . . . . . . . . . . . . . . . . . . . 177
The scan takes too long . . . . . . . . . . . . . . . . . . . . . . . . . . . . . . . . . . . . . . . . . . . . . . . . . . . 178
Error messages appear on the screen . . . . . . . . . . . . . . . . . . . . . . . . . . . . . . . . . . . . . . . . 178
The scanner did nothing . . . . . . . . . . . . . . . . . . . . . . . . . . . . . . . . . . . . . . . . . . . . . . . . . . . 179
Improving scan quality. . . . . . . . . . . . . . . . . . . . . . . . . . . . . . . . . . . . . . . . . . . . . . . . . . . . . 179
Preventing problems . . . . . . . . . . . . . . . . . . . . . . . . . . . . . . . . . . . . . . . . . . . . . . . . . . . 179
Identifying and correcting scan defects . . . . . . . . . . . . . . . . . . . . . . . . . . . . . . . . . . . . . . . . 180
Blank pages . . . . . . . . . . . . . . . . . . . . . . . . . . . . . . . . . . . . . . . . . . . . . . . . . . . . . . . . . 180
Too light or dark . . . . . . . . . . . . . . . . . . . . . . . . . . . . . . . . . . . . . . . . . . . . . . . . . . . . . . 180
Unwanted lines . . . . . . . . . . . . . . . . . . . . . . . . . . . . . . . . . . . . . . . . . . . . . . . . . . . . . . . 180
Black dots or streaks. . . . . . . . . . . . . . . . . . . . . . . . . . . . . . . . . . . . . . . . . . . . . . . . . . . 180
Unclear text. . . . . . . . . . . . . . . . . . . . . . . . . . . . . . . . . . . . . . . . . . . . . . . . . . . . . . . . . . 180
Reduced size . . . . . . . . . . . . . . . . . . . . . . . . . . . . . . . . . . . . . . . . . . . . . . . . . . . . . . . . 180
15 Troubleshooting faxing problems
Fax phone problems . . . . . . . . . . . . . . . . . . . . . . . . . . . . . . . . . . . . . . . . . . . . . . . . . . . . . . 182
The document stops feeding during faxing . . . . . . . . . . . . . . . . . . . . . . . . . . . . . . . . . . . . . 183
Is the document too large or too small for the ADF?. . . . . . . . . . . . . . . . . . . . . . . . . . . 183
Are there problems with the fax machine you are sending to? . . . . . . . . . . . . . . . . . . . 184
Are there problems with the phone line?. . . . . . . . . . . . . . . . . . . . . . . . . . . . . . . . . . . . 184
The product is receiving faxes but not sending them . . . . . . . . . . . . . . . . . . . . . . . . . . . . . 184
Is your product on a PBX system? . . . . . . . . . . . . . . . . . . . . . . . . . . . . . . . . . . . . . . . . 184
Is there a poor phone connection? . . . . . . . . . . . . . . . . . . . . . . . . . . . . . . . . . . . . . . . . 184
Outgoing fax calls keep dialing . . . . . . . . . . . . . . . . . . . . . . . . . . . . . . . . . . . . . . . . . . . . . . 184
Faxes you send are not arriving . . . . . . . . . . . . . . . . . . . . . . . . . . . . . . . . . . . . . . . . . . . . . 184
Is the receiving fax machine off or does it have an error condition?. . . . . . . . . . . . . . . 184
Is the fax still waiting in memory? . . . . . . . . . . . . . . . . . . . . . . . . . . . . . . . . . . . . . . . . . 184
All of the numbers in a long fax number cannot be dialed. . . . . . . . . . . . . . . . . . . . . . . . . . 185
Unable to start receiving faxes from an extension phone . . . . . . . . . . . . . . . . . . . . . . . . . . 185
Is the extension phone setting disabled? . . . . . . . . . . . . . . . . . . . . . . . . . . . . . . . . . . . 185
Is the telephone cord securely connected?. . . . . . . . . . . . . . . . . . . . . . . . . . . . . . . . . . 185
Voice calls are not being received
by the phone or answering machine connected to the line. . . . . . . . . . . . . . . . . . . . . . 185
Is the phone cord connected properly?. . . . . . . . . . . . . . . . . . . . . . . . . . . . . . . . . . . . . 185
Are the answer mode and rings-to-answer settings set properly? . . . . . . . . . . . . . . . . 185
Is the answering machine or phone functioning? . . . . . . . . . . . . . . . . . . . . . . . . . . . . . 185
Incoming fax calls are not being answered . . . . . . . . . . . . . . . . . . . . . . . . . . . . . . . . . . . . . 185
Is the answer mode set to manual? . . . . . . . . . . . . . . . . . . . . . . . . . . . . . . . . . . . . . . . 185
Is the rings-to-answer setting set correctly? . . . . . . . . . . . . . . . . . . . . . . . . . . . . . . . . . 185
Is the answer ring pattern feature turned on? . . . . . . . . . . . . . . . . . . . . . . . . . . . . . . . . 186
Is the phone cord connected properly?. . . . . . . . . . . . . . . . . . . . . . . . . . . . . . . . . . . . . 186
Is there a voice message being played by an answering machine?. . . . . . . . . . . . . . . 186
Are there too many devices connected to the phone line?. . . . . . . . . . . . . . . . . . . . . . 186
Is the phone line working? . . . . . . . . . . . . . . . . . . . . . . . . . . . . . . . . . . . . . . . . . . . . . . 186
Is a voice messaging service interfering with the product answering calls?. . . . . . . . . 186
Is the product out of paper? . . . . . . . . . . . . . . . . . . . . . . . . . . . . . . . . . . . . . . . . . . . . . 186
10 EN
Page 13

Faxes are transmitting or being received very slowly . . . . . . . . . . . . . . . . . . . . . . . . . . . . . 187
Are you sending or receiving a very complex fax? . . . . . . . . . . . . . . . . . . . . . . . . . . . . 187
Does the receiving fax machine have a slow modem speed? . . . . . . . . . . . . . . . . . . . 187
Is the resolution at which the fax was sent or received very high? . . . . . . . . . . . . . . . . 187
Is there a poor phone line connection?. . . . . . . . . . . . . . . . . . . . . . . . . . . . . . . . . . . . . 187
Faxes are not printing or are printing incorrectly . . . . . . . . . . . . . . . . . . . . . . . . . . . . . . . . . 187
Is there media in the media input tray?. . . . . . . . . . . . . . . . . . . . . . . . . . . . . . . . . . . . . 187
Is the receive to PC option selected? . . . . . . . . . . . . . . . . . . . . . . . . . . . . . . . . . . . . . . 187
Faxes are printing on two pages instead of one . . . . . . . . . . . . . . . . . . . . . . . . . . . . . . . . . 187
Is the autoreduction setting set correctly?. . . . . . . . . . . . . . . . . . . . . . . . . . . . . . . . . . . 187
Received faxes are too light or are printing only on half of the page. . . . . . . . . . . . . . . . . . 187
Did the product run out of toner while printing a fax? . . . . . . . . . . . . . . . . . . . . . . . . . . 187
Fax activity logs or call reports are not printing correctly. . . . . . . . . . . . . . . . . . . . . . . . . . . 188
Are the activity log and call report settings correct? . . . . . . . . . . . . . . . . . . . . . . . . . . . 188
The volume is too high or low . . . . . . . . . . . . . . . . . . . . . . . . . . . . . . . . . . . . . . . . . . . . . . . 188
Do the volume settings need to be adjusted?. . . . . . . . . . . . . . . . . . . . . . . . . . . . . . . . 188
16 Troubleshooting network problems
Troubleshooting overview . . . . . . . . . . . . . . . . . . . . . . . . . . . . . . . . . . . . . . . . . . . . . . . . . . 190
ON and READY . . . . . . . . . . . . . . . . . . . . . . . . . . . . . . . . . . . . . . . . . . . . . . . . . . . . . . 190
Is your printer ON and READY? . . . . . . . . . . . . . . . . . . . . . . . . . . . . . . . . . . . . . . . . . . 190
USB OK? (USB light ON solid green?) . . . . . . . . . . . . . . . . . . . . . . . . . . . . . . . . . . . . . 190
What is the state of the USB light? . . . . . . . . . . . . . . . . . . . . . . . . . . . . . . . . . . . . . . . . 191
Power/Status OK? (Power/Status light ON solid green?). . . . . . . . . . . . . . . . . . . . . . . 192
10/100 link OK? (10 light or 100 light ON solid green?) . . . . . . . . . . . . . . . . . . . . . . . . 193
Check the print server’s I/O status . . . . . . . . . . . . . . . . . . . . . . . . . . . . . . . . . . . . . . . . 194
Configuration page does not print . . . . . . . . . . . . . . . . . . . . . . . . . . . . . . . . . . . . . . . . . . . . 195
Error messages . . . . . . . . . . . . . . . . . . . . . . . . . . . . . . . . . . . . . . . . . . . . . . . . . . . . . . . . . . 195
03 LAN Error: EXTERNAL LOOPBACK . . . . . . . . . . . . . . . . . . . . . . . . . . . . . . . . . . . . 196
08 LAN Error: INFINITE DEFERRAL . . . . . . . . . . . . . . . . . . . . . . . . . . . . . . . . . . . . . . 196
11 LAN Error: RETRY FAULTS . . . . . . . . . . . . . . . . . . . . . . . . . . . . . . . . . . . . . . . . . . 196
12 LAN Error: NO LINKBEAT . . . . . . . . . . . . . . . . . . . . . . . . . . . . . . . . . . . . . . . . . . . . 196
Resetting the 310x print server to factory defaults (cold reset) . . . . . . . . . . . . . . . . . . . . . . 196
Interpreting the configuration page . . . . . . . . . . . . . . . . . . . . . . . . . . . . . . . . . . . . . . . . . . . 197
General information. . . . . . . . . . . . . . . . . . . . . . . . . . . . . . . . . . . . . . . . . . . . . . . . . . . . 198
USB port information. . . . . . . . . . . . . . . . . . . . . . . . . . . . . . . . . . . . . . . . . . . . . . . . . . . 199
Network statistics . . . . . . . . . . . . . . . . . . . . . . . . . . . . . . . . . . . . . . . . . . . . . . . . . . . . . 199
TCP/IP protocol information . . . . . . . . . . . . . . . . . . . . . . . . . . . . . . . . . . . . . . . . . . . . . 200
IPX/SPX protocol information . . . . . . . . . . . . . . . . . . . . . . . . . . . . . . . . . . . . . . . . . . . . 203
Novell/NetWare protocol information . . . . . . . . . . . . . . . . . . . . . . . . . . . . . . . . . . . . . . 204
AppleTalk protocol information . . . . . . . . . . . . . . . . . . . . . . . . . . . . . . . . . . . . . . . . . . . 205
DLC/LLC protocol information. . . . . . . . . . . . . . . . . . . . . . . . . . . . . . . . . . . . . . . . . . . . 205
Error messages. . . . . . . . . . . . . . . . . . . . . . . . . . . . . . . . . . . . . . . . . . . . . . . . . . . . . . . 206
Browse hp.com . . . . . . . . . . . . . . . . . . . . . . . . . . . . . . . . . . . . . . . . . . . . . . . . . . . . . . . . . . 214
Glossary
Appendix A
Specifications and regulatory information
HP LaserJet 3300 series product . . . . . . . . . . . . . . . . . . . . . . . . . . . . . . . . . . . . . . . . . . . . 224
HP LaserJet 3300 series product specifications . . . . . . . . . . . . . . . . . . . . . . . . . . . . . . 224
Laser safety statement . . . . . . . . . . . . . . . . . . . . . . . . . . . . . . . . . . . . . . . . . . . . . . . . . 226
FCC regulations . . . . . . . . . . . . . . . . . . . . . . . . . . . . . . . . . . . . . . . . . . . . . . . . . . . . . . 227
Declaration of Conformity . . . . . . . . . . . . . . . . . . . . . . . . . . . . . . . . . . . . . . . . . . . . . . . 228
Canada DOC regulations . . . . . . . . . . . . . . . . . . . . . . . . . . . . . . . . . . . . . . . . . . . . . . . 229
Laser statement for Finland . . . . . . . . . . . . . . . . . . . . . . . . . . . . . . . . . . . . . . . . . . . . . 229
EN 11
Page 14

Korean EMI statement . . . . . . . . . . . . . . . . . . . . . . . . . . . . . . . . . . . . . . . . . . . . . . . . . 230
Japan VCCI Class B regulations. . . . . . . . . . . . . . . . . . . . . . . . . . . . . . . . . . . . . . . . . . 230
HP LaserJet 3330 fax . . . . . . . . . . . . . . . . . . . . . . . . . . . . . . . . . . . . . . . . . . . . . . . . . . . . . 230
HP LaserJet 3330 product fax specifications . . . . . . . . . . . . . . . . . . . . . . . . . . . . . . . . 230
FCC Part 68 Requirements (US) . . . . . . . . . . . . . . . . . . . . . . . . . . . . . . . . . . . . . . . . . 231
Telephone consumer protection act (US) . . . . . . . . . . . . . . . . . . . . . . . . . . . . . . . . . . . 231
IC CS-03 requirements . . . . . . . . . . . . . . . . . . . . . . . . . . . . . . . . . . . . . . . . . . . . . . . . . 232
Regulatory information for EU countries . . . . . . . . . . . . . . . . . . . . . . . . . . . . . . . . . . . . 232
HP Jetdirect 310x print server. . . . . . . . . . . . . . . . . . . . . . . . . . . . . . . . . . . . . . . . . . . . . . . 232
HP Jetdirect 310x print server specifications . . . . . . . . . . . . . . . . . . . . . . . . . . . . . . . . 233
FCC compliance . . . . . . . . . . . . . . . . . . . . . . . . . . . . . . . . . . . . . . . . . . . . . . . . . . . . . . 235
Declaration of Conformity . . . . . . . . . . . . . . . . . . . . . . . . . . . . . . . . . . . . . . . . . . . . . . . 236
Australia . . . . . . . . . . . . . . . . . . . . . . . . . . . . . . . . . . . . . . . . . . . . . . . . . . . . . . . . . . . . 237
Canada . . . . . . . . . . . . . . . . . . . . . . . . . . . . . . . . . . . . . . . . . . . . . . . . . . . . . . . . . . . . . 237
Japan VCCI Class 1 regulations. . . . . . . . . . . . . . . . . . . . . . . . . . . . . . . . . . . . . . . . . . 237
Korean EMI statement . . . . . . . . . . . . . . . . . . . . . . . . . . . . . . . . . . . . . . . . . . . . . . . . . 237
Chinese safety statement . . . . . . . . . . . . . . . . . . . . . . . . . . . . . . . . . . . . . . . . . . . . . . . 238
Environmental product stewardship program . . . . . . . . . . . . . . . . . . . . . . . . . . . . . . . . . . . 239
Protecting the environment. . . . . . . . . . . . . . . . . . . . . . . . . . . . . . . . . . . . . . . . . . . . . . 239
Ozone production . . . . . . . . . . . . . . . . . . . . . . . . . . . . . . . . . . . . . . . . . . . . . . . . . . . . . 239
Energy consumption . . . . . . . . . . . . . . . . . . . . . . . . . . . . . . . . . . . . . . . . . . . . . . . . . . . 239
Toner consumption . . . . . . . . . . . . . . . . . . . . . . . . . . . . . . . . . . . . . . . . . . . . . . . . . . . . 239
Paper use . . . . . . . . . . . . . . . . . . . . . . . . . . . . . . . . . . . . . . . . . . . . . . . . . . . . . . . . . . . 239
Plastics . . . . . . . . . . . . . . . . . . . . . . . . . . . . . . . . . . . . . . . . . . . . . . . . . . . . . . . . . . . . . 239
HP LaserJet printing supplies . . . . . . . . . . . . . . . . . . . . . . . . . . . . . . . . . . . . . . . . . . . . 239
HP printing supplies returns and recycling program information. . . . . . . . . . . . . . . . . . 240
US returns. . . . . . . . . . . . . . . . . . . . . . . . . . . . . . . . . . . . . . . . . . . . . . . . . . . . . . . . . . . 240
Non-US returns . . . . . . . . . . . . . . . . . . . . . . . . . . . . . . . . . . . . . . . . . . . . . . . . . . . . . . . 240
Paper . . . . . . . . . . . . . . . . . . . . . . . . . . . . . . . . . . . . . . . . . . . . . . . . . . . . . . . . . . . . . . 240
Material restrictions. . . . . . . . . . . . . . . . . . . . . . . . . . . . . . . . . . . . . . . . . . . . . . . . . . . . 240
Material safety data sheets. . . . . . . . . . . . . . . . . . . . . . . . . . . . . . . . . . . . . . . . . . . . . . 240
Extended warranty . . . . . . . . . . . . . . . . . . . . . . . . . . . . . . . . . . . . . . . . . . . . . . . . . . . . 241
Spare parts and consumables availability. . . . . . . . . . . . . . . . . . . . . . . . . . . . . . . . . . . 241
For more information. . . . . . . . . . . . . . . . . . . . . . . . . . . . . . . . . . . . . . . . . . . . . . . . . . . 241
HP LaserJet 3300 series product battery . . . . . . . . . . . . . . . . . . . . . . . . . . . . . . . . . . . . . . 241
Appendix B
Warranties and licensing
HP software license agreement. . . . . . . . . . . . . . . . . . . . . . . . . . . . . . . . . . . . . . . . . . . . . . 243
HP limited warranty statement. . . . . . . . . . . . . . . . . . . . . . . . . . . . . . . . . . . . . . . . . . . . . . . 244
Appendix C
Service and support
Obtaining hardware service. . . . . . . . . . . . . . . . . . . . . . . . . . . . . . . . . . . . . . . . . . . . . . . . . 247
To obtain hardware service. . . . . . . . . . . . . . . . . . . . . . . . . . . . . . . . . . . . . . . . . . . . . . 247
Extended warranty. . . . . . . . . . . . . . . . . . . . . . . . . . . . . . . . . . . . . . . . . . . . . . . . . . . . . . . . 248
Service information form . . . . . . . . . . . . . . . . . . . . . . . . . . . . . . . . . . . . . . . . . . . . . . . . . . . 248
Index
12 EN
Page 15

1
Getting to know your product
Use these topics to acquaint yourself with your new HP LaserJet 3300 series product:
● Identifying your product
● Identifying your product’s hardware components
● Identifying your product’s control panel components
● Identifying HP Jetdirect 310x print server components
● Identifying your product’s software components
EN 13
Page 16
Identifying your product
Use these topics to learn about your product’s features and to make sure your package contents
are complete:
● HP LaserJet 3300mfp
● HP LaserJet 3300se mfp
● HP LaserJet 3310mfp
● HP LaserJet 3320mfp
● HP LaserJet 3320n mfp
● HP LaserJet 3330mfp
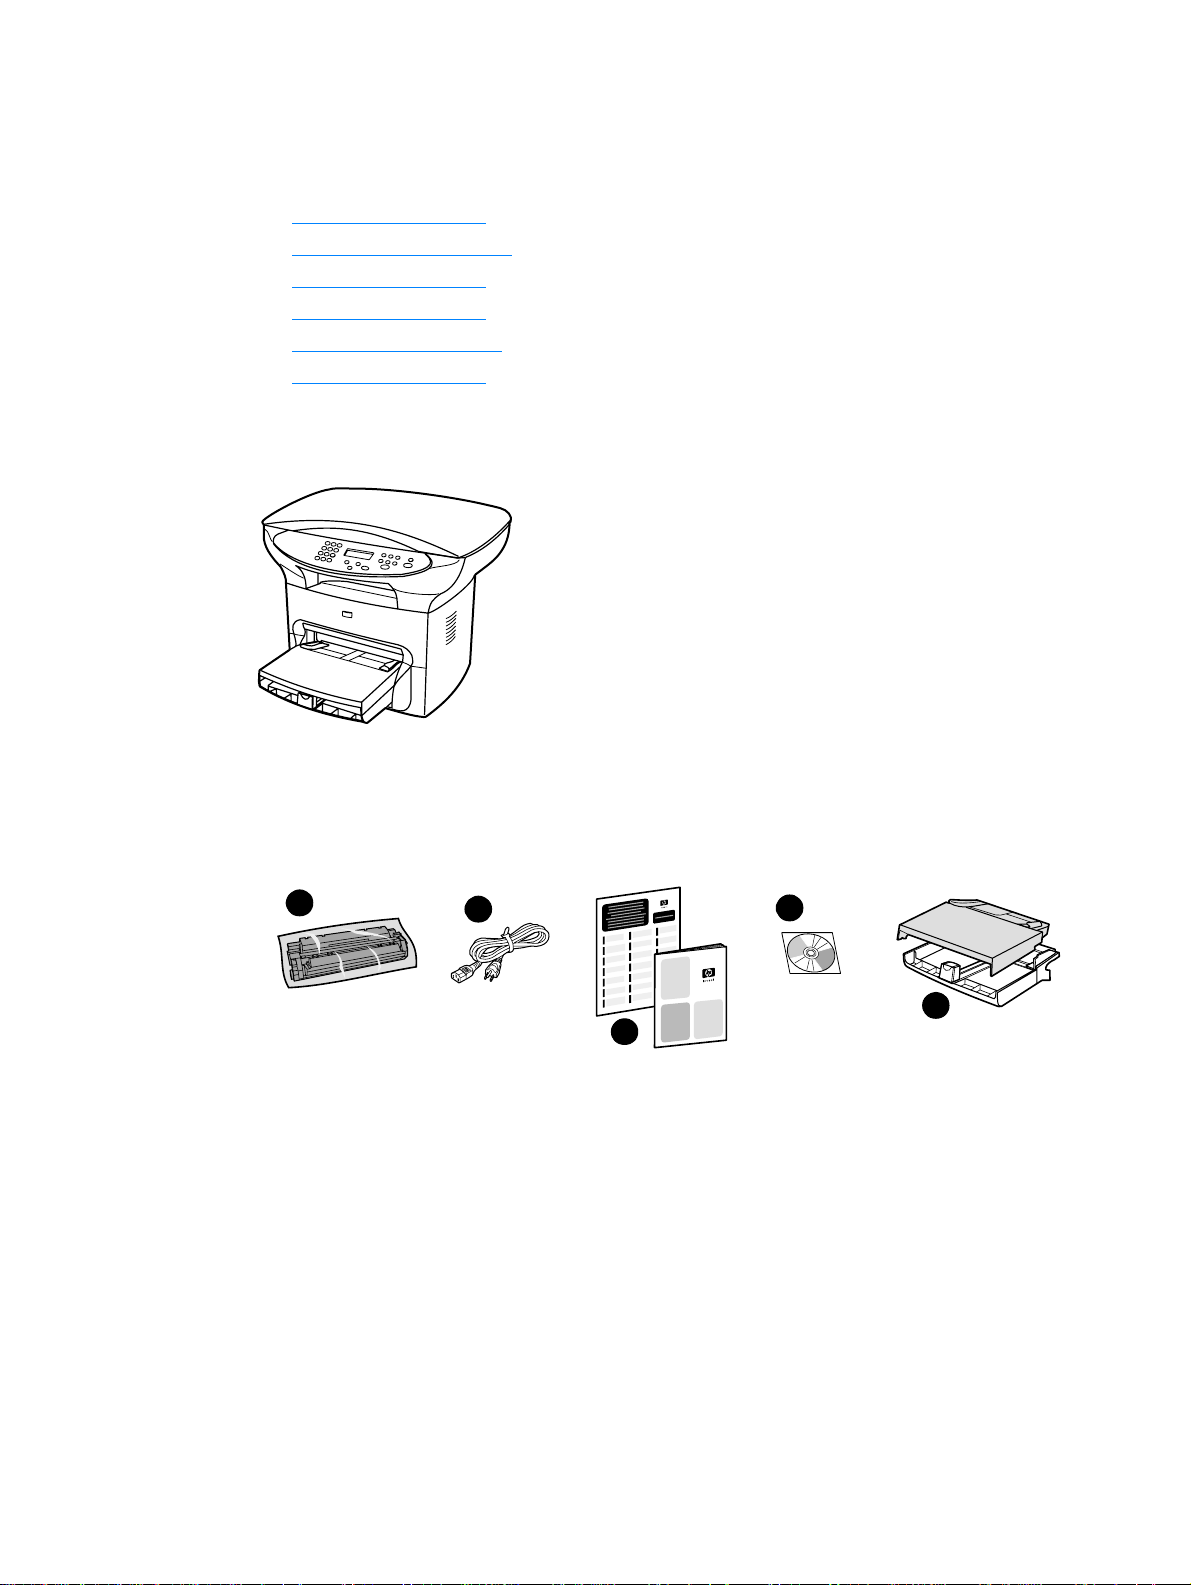
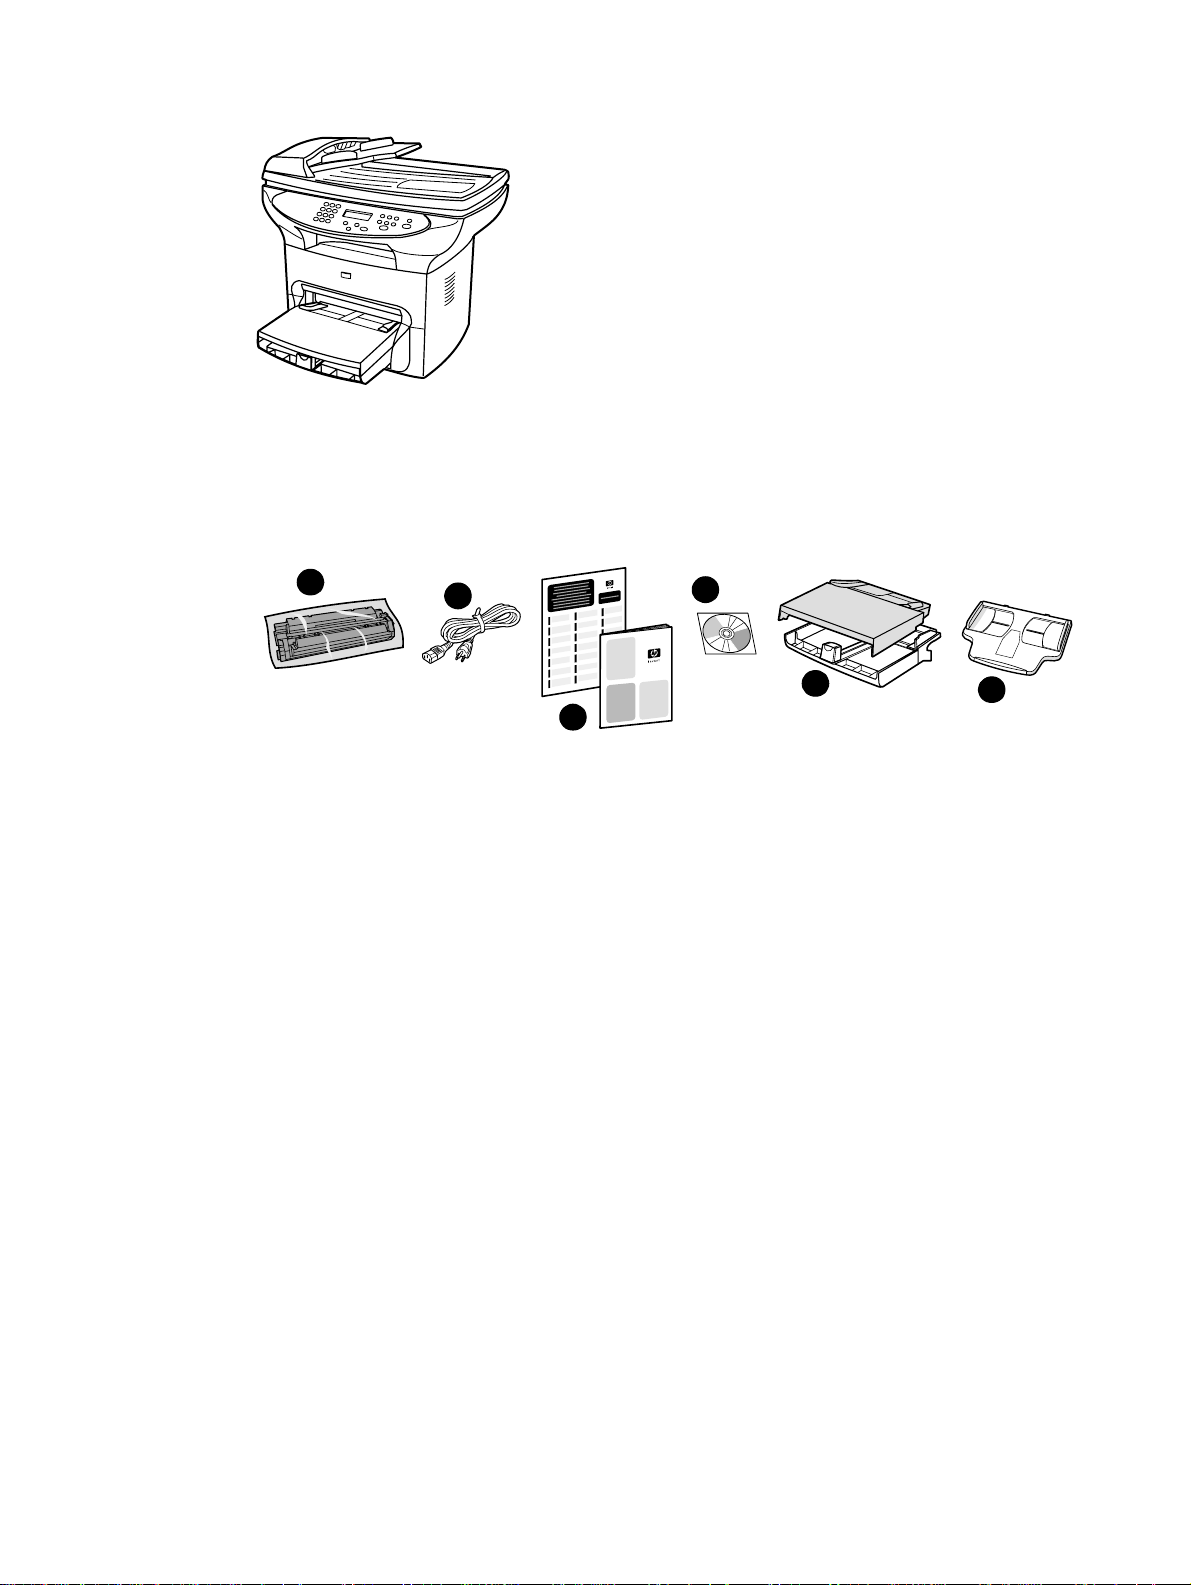
HP LaserJet 3300mfp
The HP LaserJet 3300mfp prints and copies up to 15 pages per minute (ppm) and comes
standard with a flatbed copier/scanner, 32 MB of RAM, a dual in-line memory module (DIMM)
slot for adding fonts and memory, a USB 1.1 certified port, and an IEEE 1284-B parallel port.
1
2
4
5
3
Package contents: 1) Print cartridge; 2) power cord; 3) getting started guide and support flyer;
4) CD-ROM containing product software and electronic user guide; 5) 250-sheet media input tray
and priority input tray.
14 1 Getting to know your product EN
Page 17
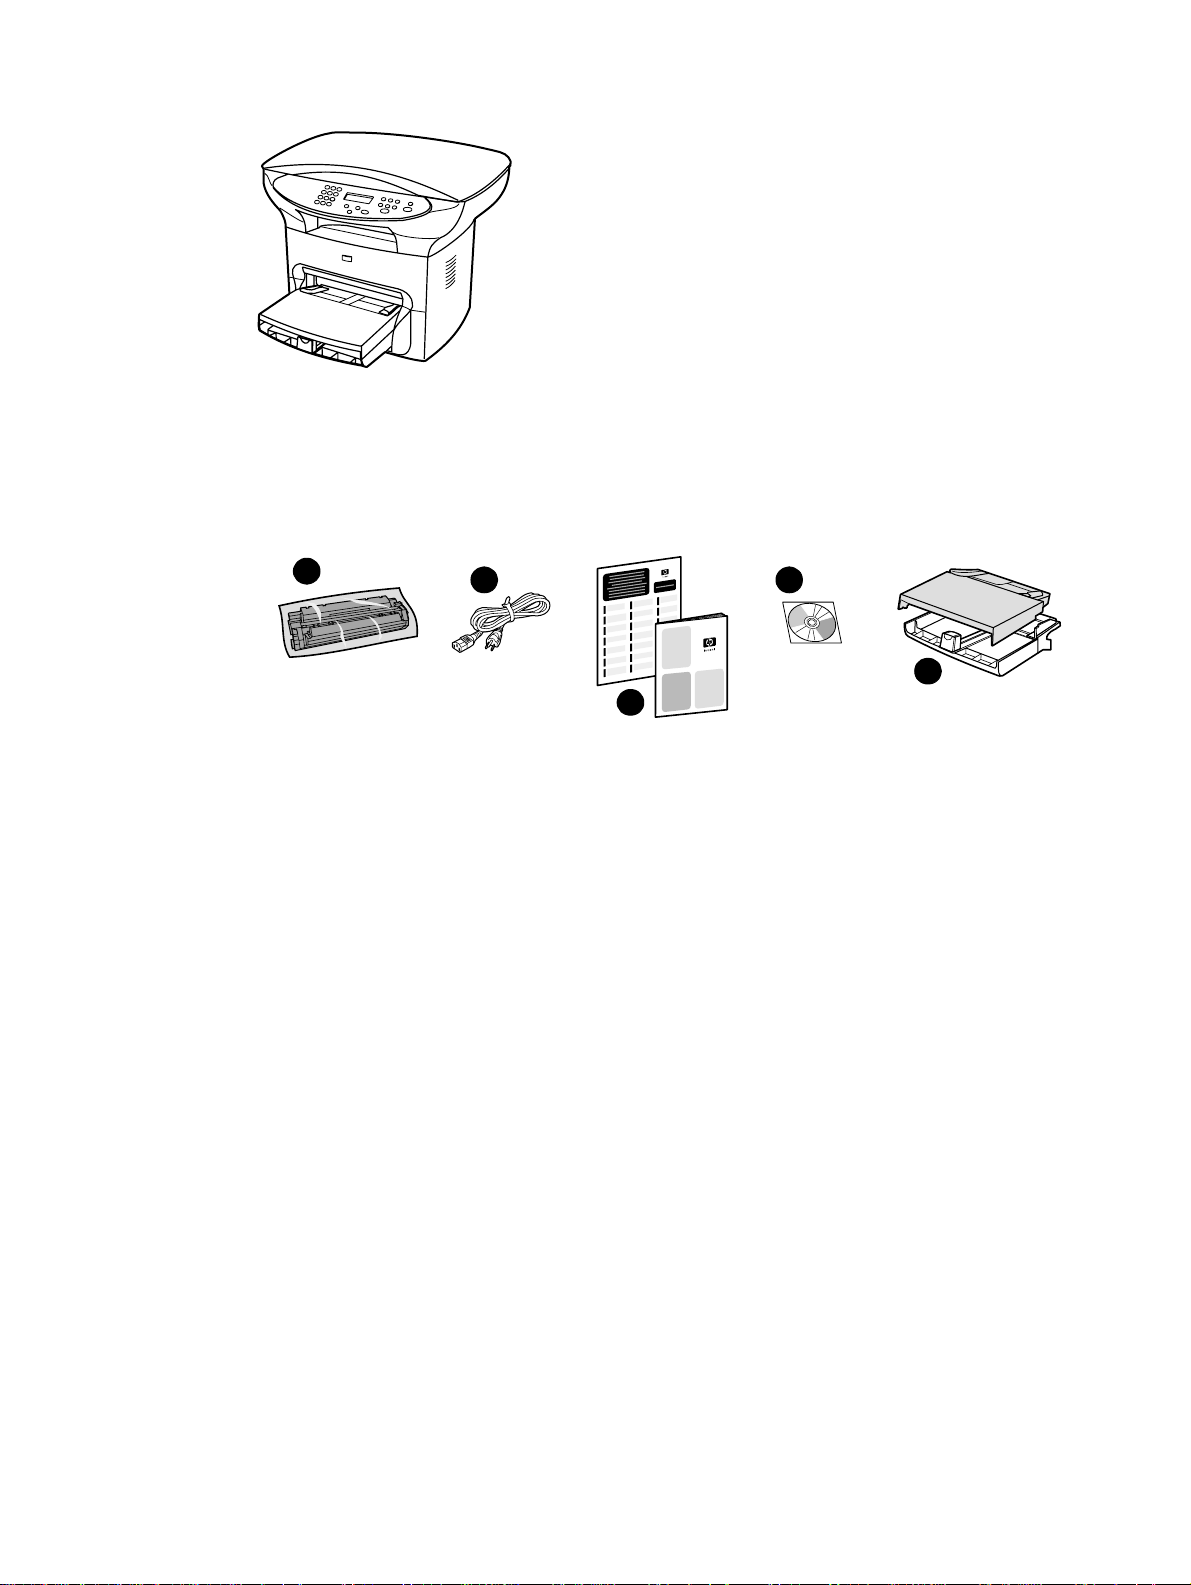
HP LaserJet 3300se mfp
The HP LaserJet 3300se mfp prints and copies up to 15 pages per minute (ppm) and comes
standard with a flatbed copier/scanner, 32 MB of RAM ,, a dual in-line memory module (DIMM)
slot for adding fonts and memory, a USB 1.1 certified port, an IEEE 1284-B parallel port,
and specialized software. This product is available only in the U.S.
1
Package contents: 1) Print cartridge; 2) power cord; 3) getting started guide and support flyer;
4) CD-ROM containing product software and electronic user guide; 5) 250-sheet media input tray
and priority input tray.
2
3
4
5
EN Identifying your product 15
Page 18
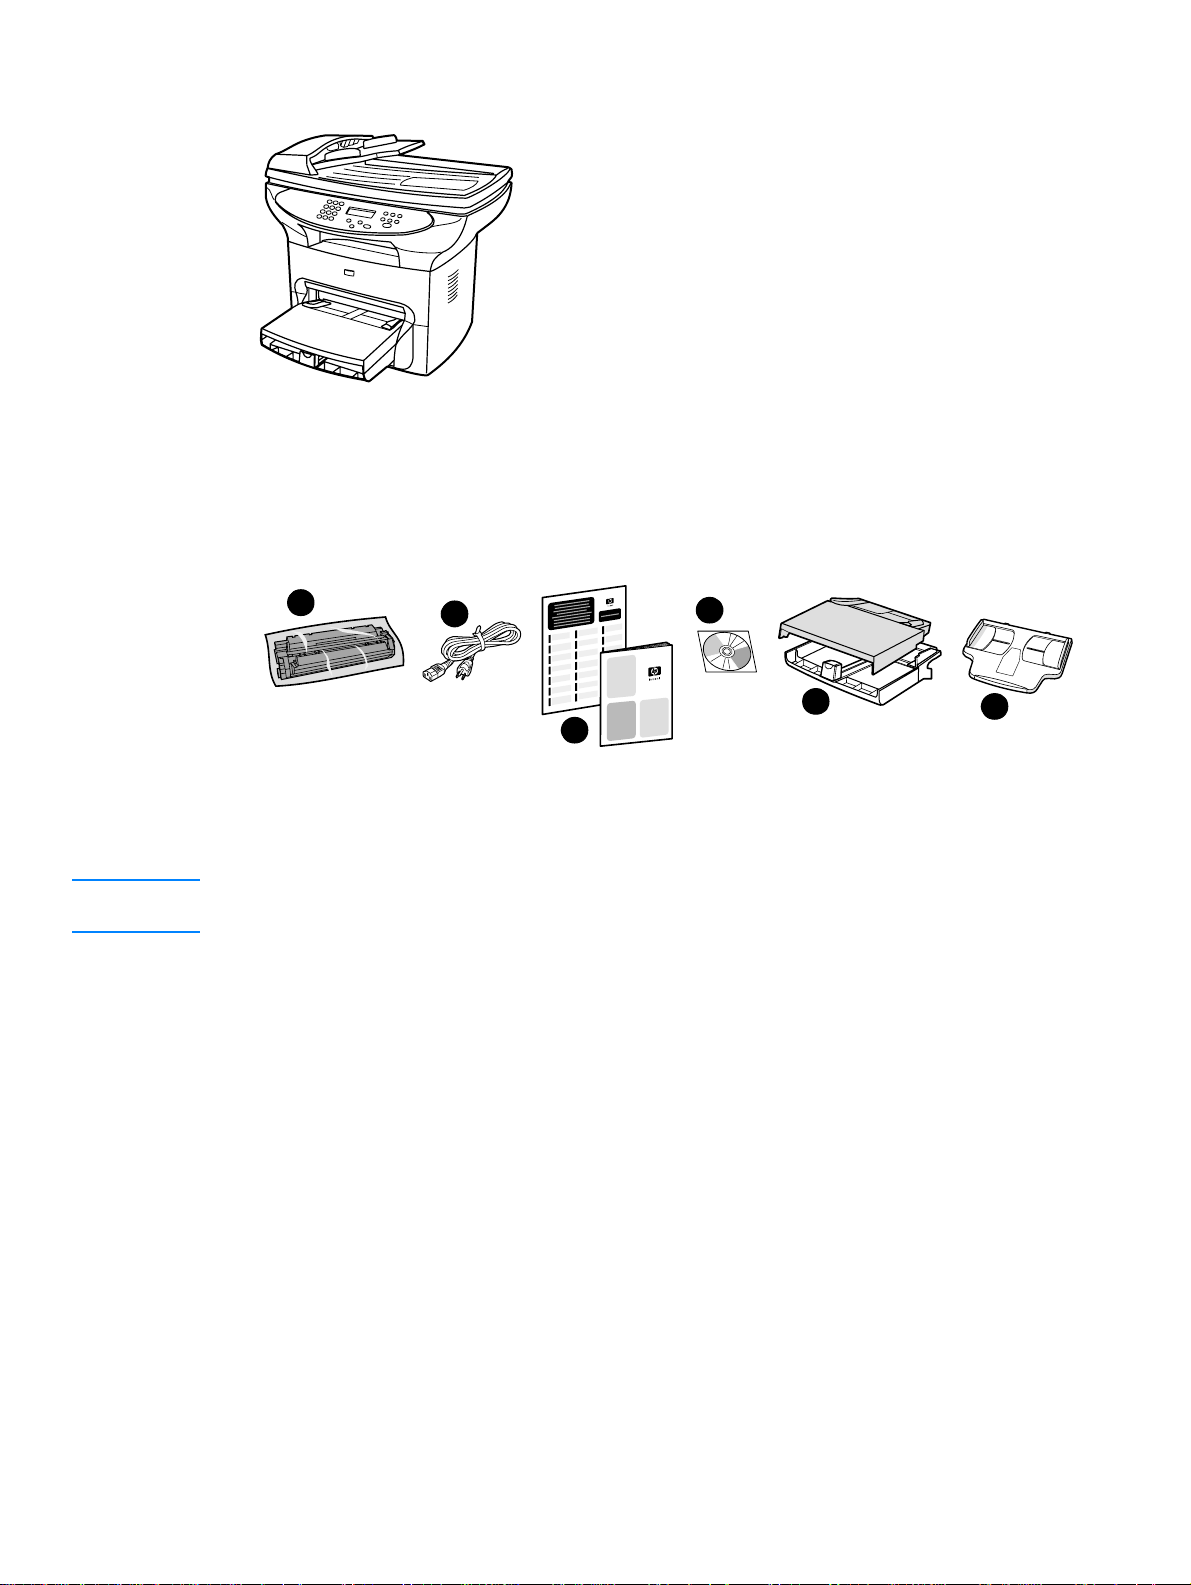
HP LaserJet 3310mfp
The HP LaserJet 3310mfp is a copier-centric product that prints and copies up to 15 pages per
minute (ppm) and comes standard with a flatbed copier/scanner, a 50-page automatic document
feeder (ADF), 32 MB of RAM , a dual in-line memory module (DIMM) slot for adding fonts and memory,
a USB 1.1 certified port, and an IEEE 1284-B parallel port. The HP LaserJet 3310 product has
no control panel scan buttons.
1
Package contents: 1) Print cartridge; 2) power cord; 3) getting started guide and support flyer;
4) CD-ROM containing product software and electronic user guide; 5) 250-sheet media input tray
and priority input tray; 6) ADF input tray.
Note Scanning with the HP LaserJet 3310 product can be done from your computer with the product
software.
2
3
4
5
6
16 1 Getting to know your product EN
Page 19
HP LaserJet 3320mfp
The HP LaserJet 3320mfp is a copier-centric product that prints and copies up to 15 pages per
minute (ppm) and comes standard with a flatbed copier/scanner, a 50-page automatic document
feeder (ADF), 32 MB of RAM , a dual in-line memory module (DIMM) slot for adding fonts and memory,
a USB 1.1 certified port, and an IEEE 1284-B parallel port.
1
Package contents: 1) Print cartridge; 2) power cord; 3) getting started guide and support flyer;
4) CD-ROM containing product software and electronic user guide; 5) 250-sheet media input tray
and priority input tray; 6) ADF input tray.
2
3
4
5
6
EN Identifying your product 17
Page 20
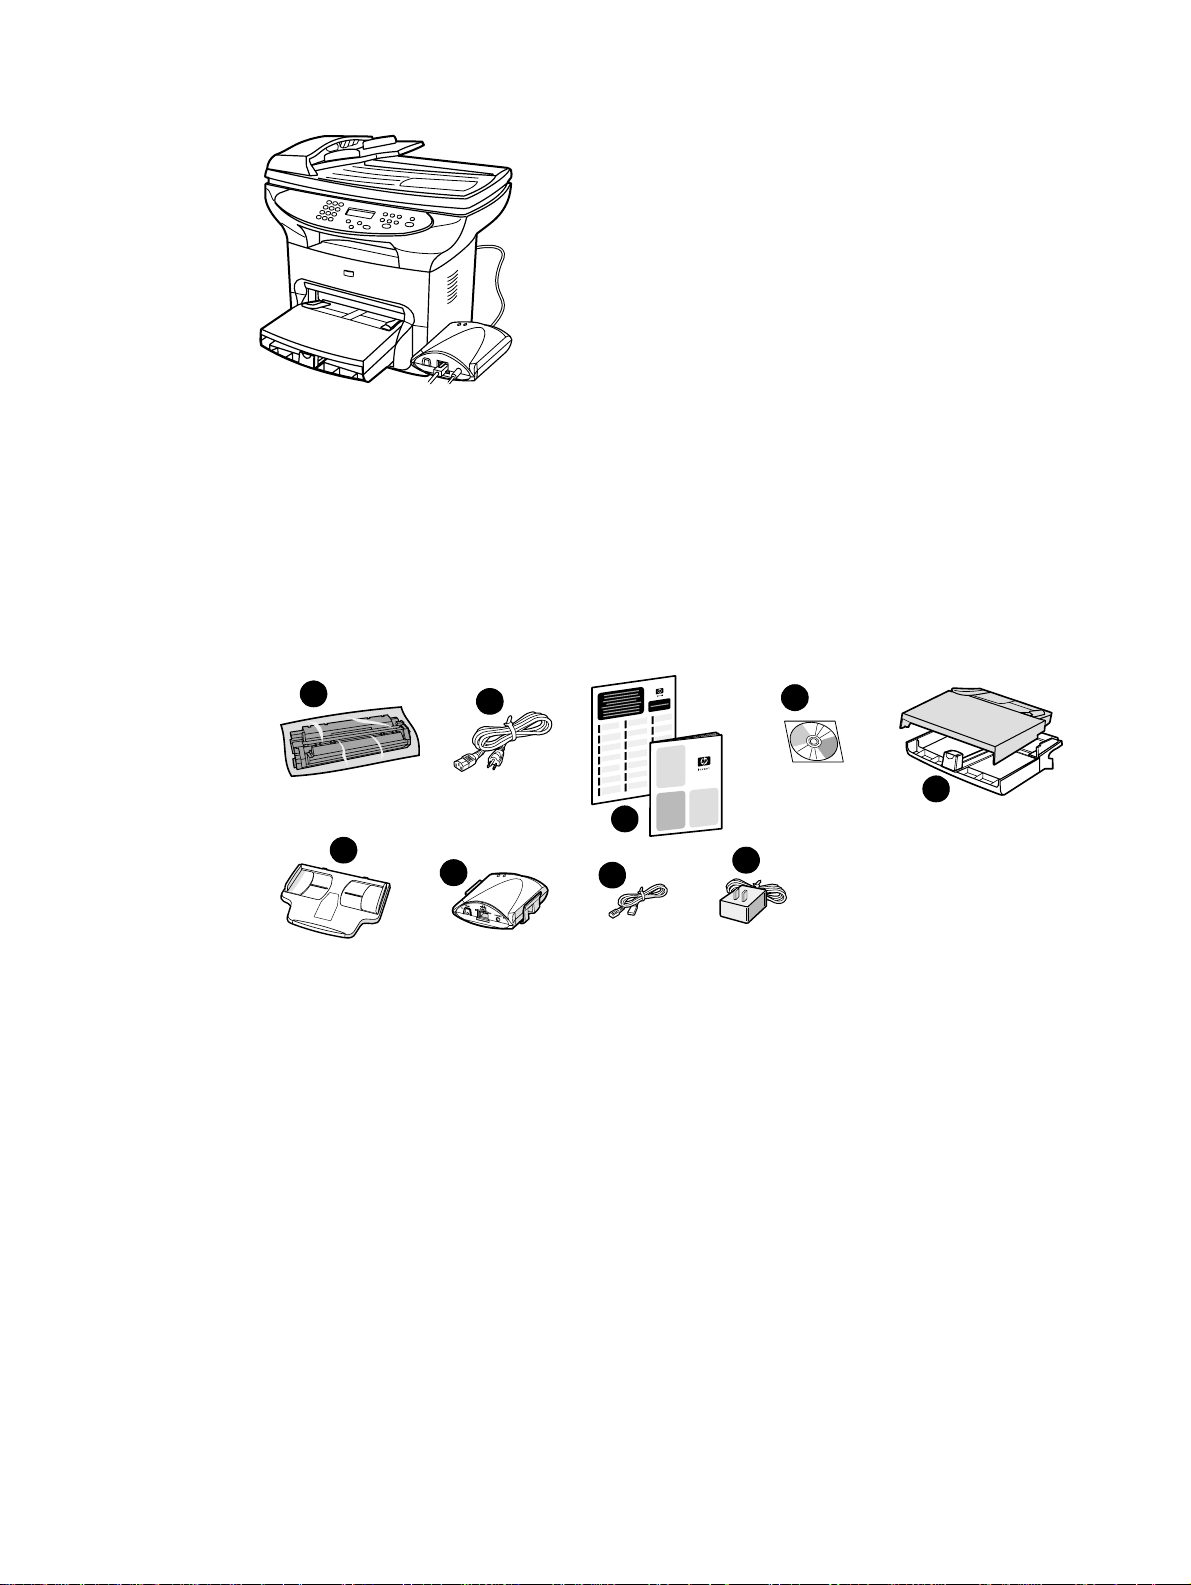
HP LaserJet 3320n mfp
The HP LaserJet 3320n mfp is a copier-centric product that prints and copies up to 15 pages per
minute (ppm) and comes standard with a flatbed copier/scanner, a 50-page automatic document
feeder (ADF), 32 MB of RAM , a dual in-line memory module (DIMM) slot for adding fonts and memory,
Ia USB 1.1 certified port, and an IEEE 1284-B parallel port.
This product also includes networking capabilities and includes an HP Jetdirect 310x print server
for connecting to a 10Base-T or 100Base-Tx network (sometimes called Ethernet and Fast
Ethernet, respectively). The print server provides network solutions for communicating over
TCP/IP, IPX/SPX, Novell Netware, and AppleTalk protoc ols.
1
6
Package contents: 1) Print cartridge; 2) power cord; 3) getting started guide and support flyer;
4) CD-ROM containing product software, print server software, and electronic user guide;
5) 250-sheet media input tray and priority input tray; 6) ADF input tray; 7) HP Jetdirect 310x print
server with mounting clip; 8) USB 2.0 certified cable; 9) print server power adapter.
2
3
7
8
4
5
9
18 1 Getting to know your product EN
Page 21
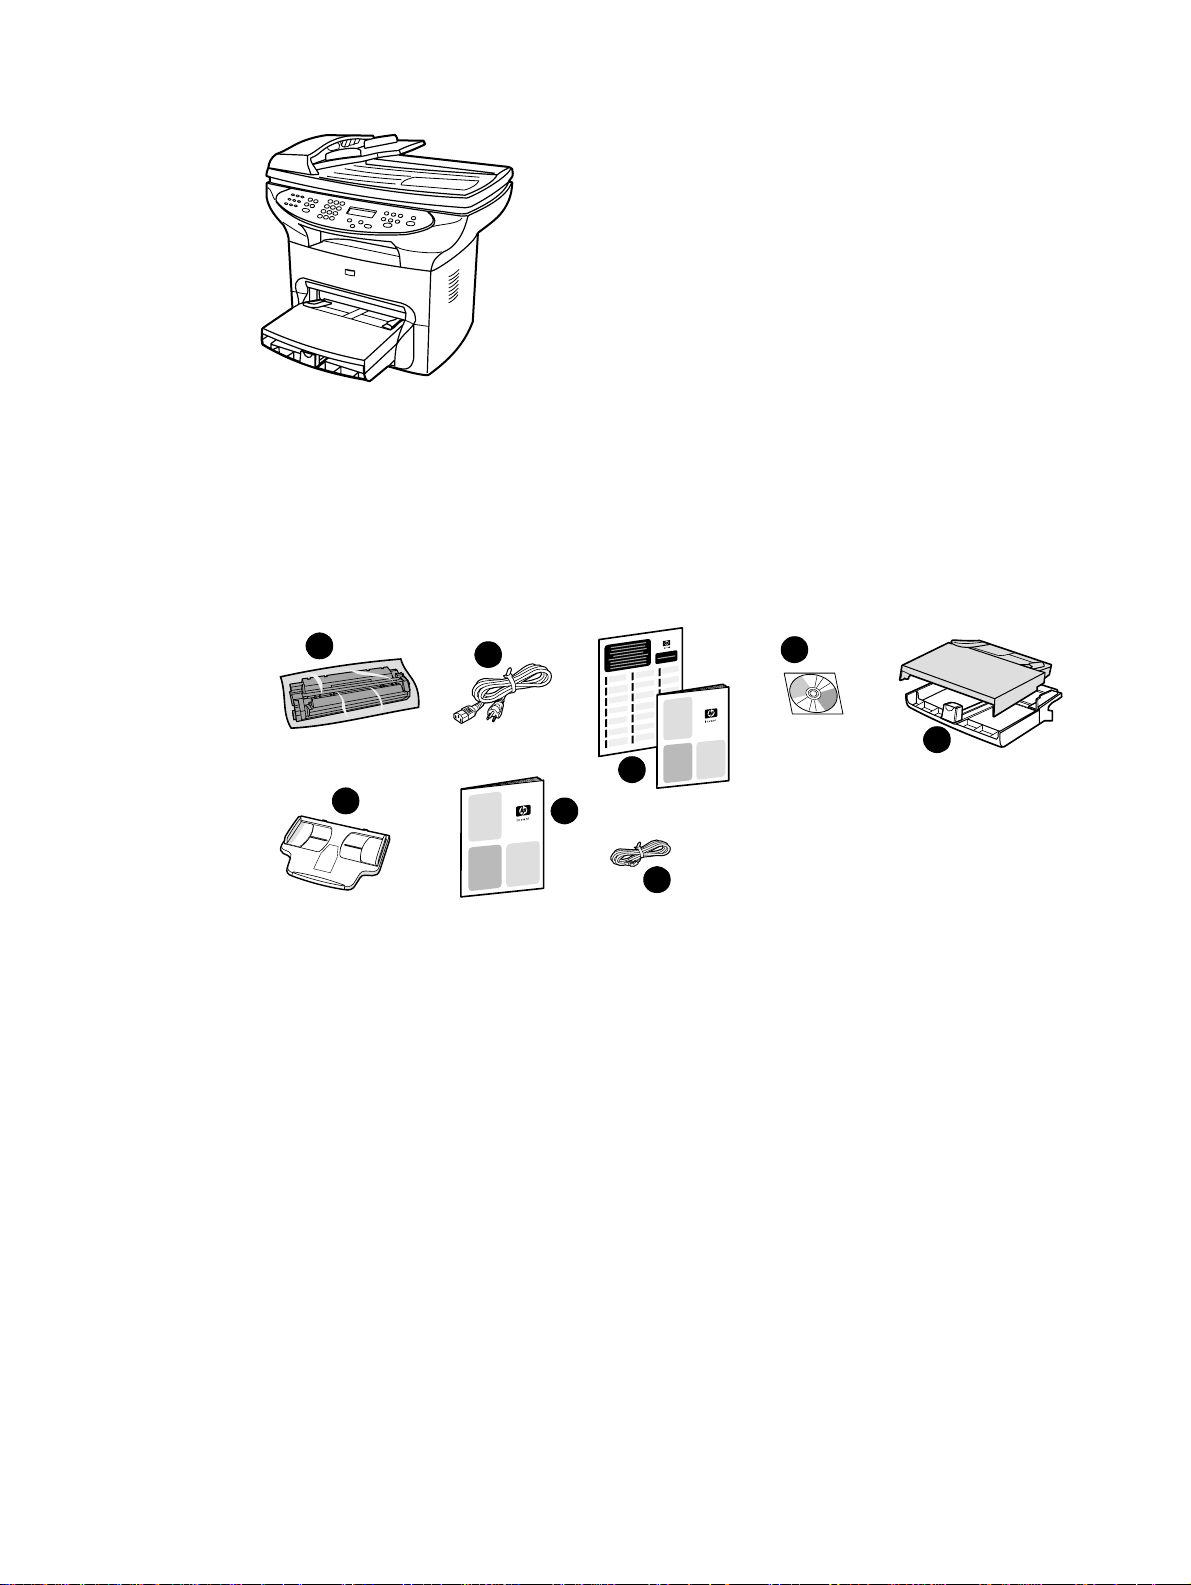
HP LaserJet 3330mfp
The HP LaserJet 3330mfp is a copier-centric product that prints and copies up to 15 pages per
minute (ppm) and comes standard with a flatbed copier/scanner, a 50-page automatic document
feeder (ADF), 32 MB of RAM , a dual in-line memory module (DIMM) slot for adding fonts and memory,
a USB 1.1 certified port, and an IEEE 1284-B parallel port.
The 3330 also includes full-functionality fax capabilities with V.34 fax, including phone book, fax
polling, and delayed fax features.
1
6
Package contents: 1) Print cartridge; 2) power cord; 3) getting started guide and support flyer;
4) CD-ROM containing product software, fax software, and electronic user guide; 5) 250-sheet
media input tray and priority input tray; 6) ADF input tray; 7) fax guide; 8) phone cord.
2
3
7
8
4
5
EN Identifying your product 19
Page 22
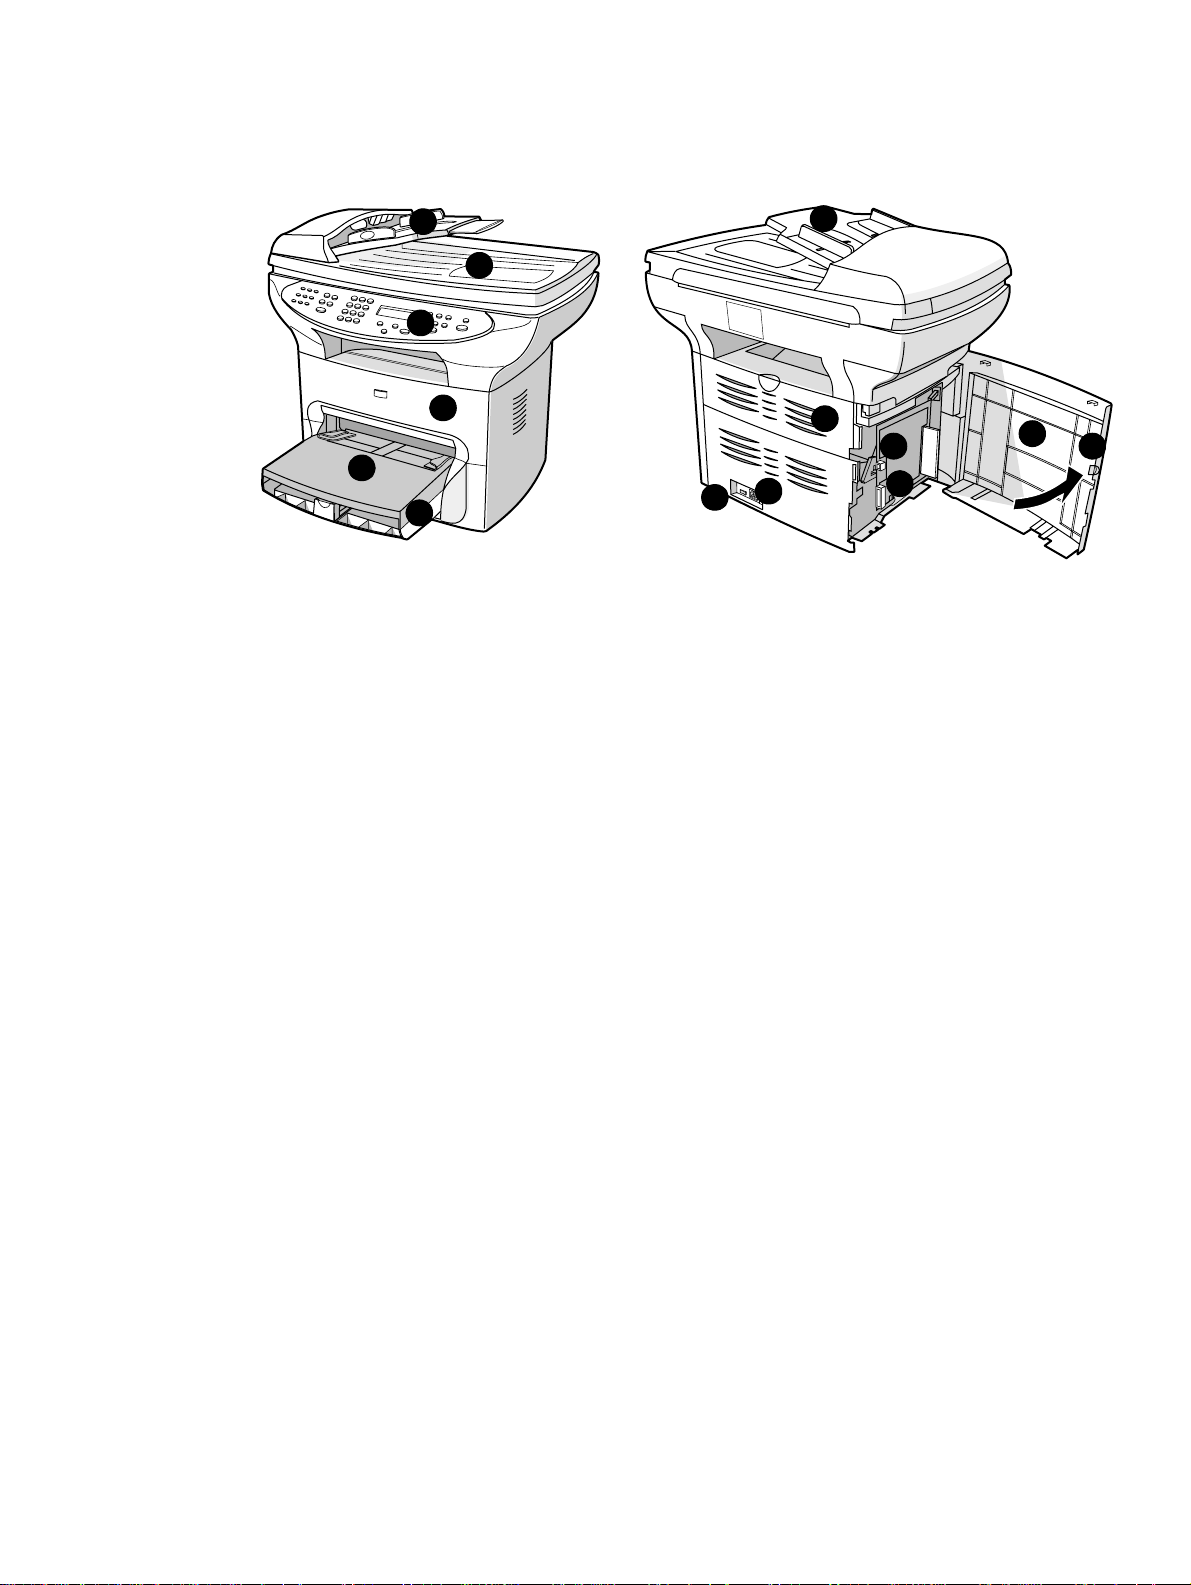
Identifying your product’s ha rdware components
HP LaserJet 3300 series hardware components
3
1
2
5
4
1 Printer control panel
2 Print cartridge door
3 ADF input tray
4 Media input tray
5 Priority input tray
6 Flatbed scanner lid
3
6
12
11
13
9
10
7
8
7 Left side panel
8 Left side panel latch
9 USB port
10 Parallel port
11 Power receptacle
12 Power switch (220V product)
13 Straight-through output door
20 1 Getting to know your product EN
Page 23
Identifying your product’s control panel components
Choose a section of the HP LaserJet 3300 control panel to display.
1 Fax controls
2 Alphanumeric buttons
3 Menu and cancel controls
4 Copy, scan, and start controls
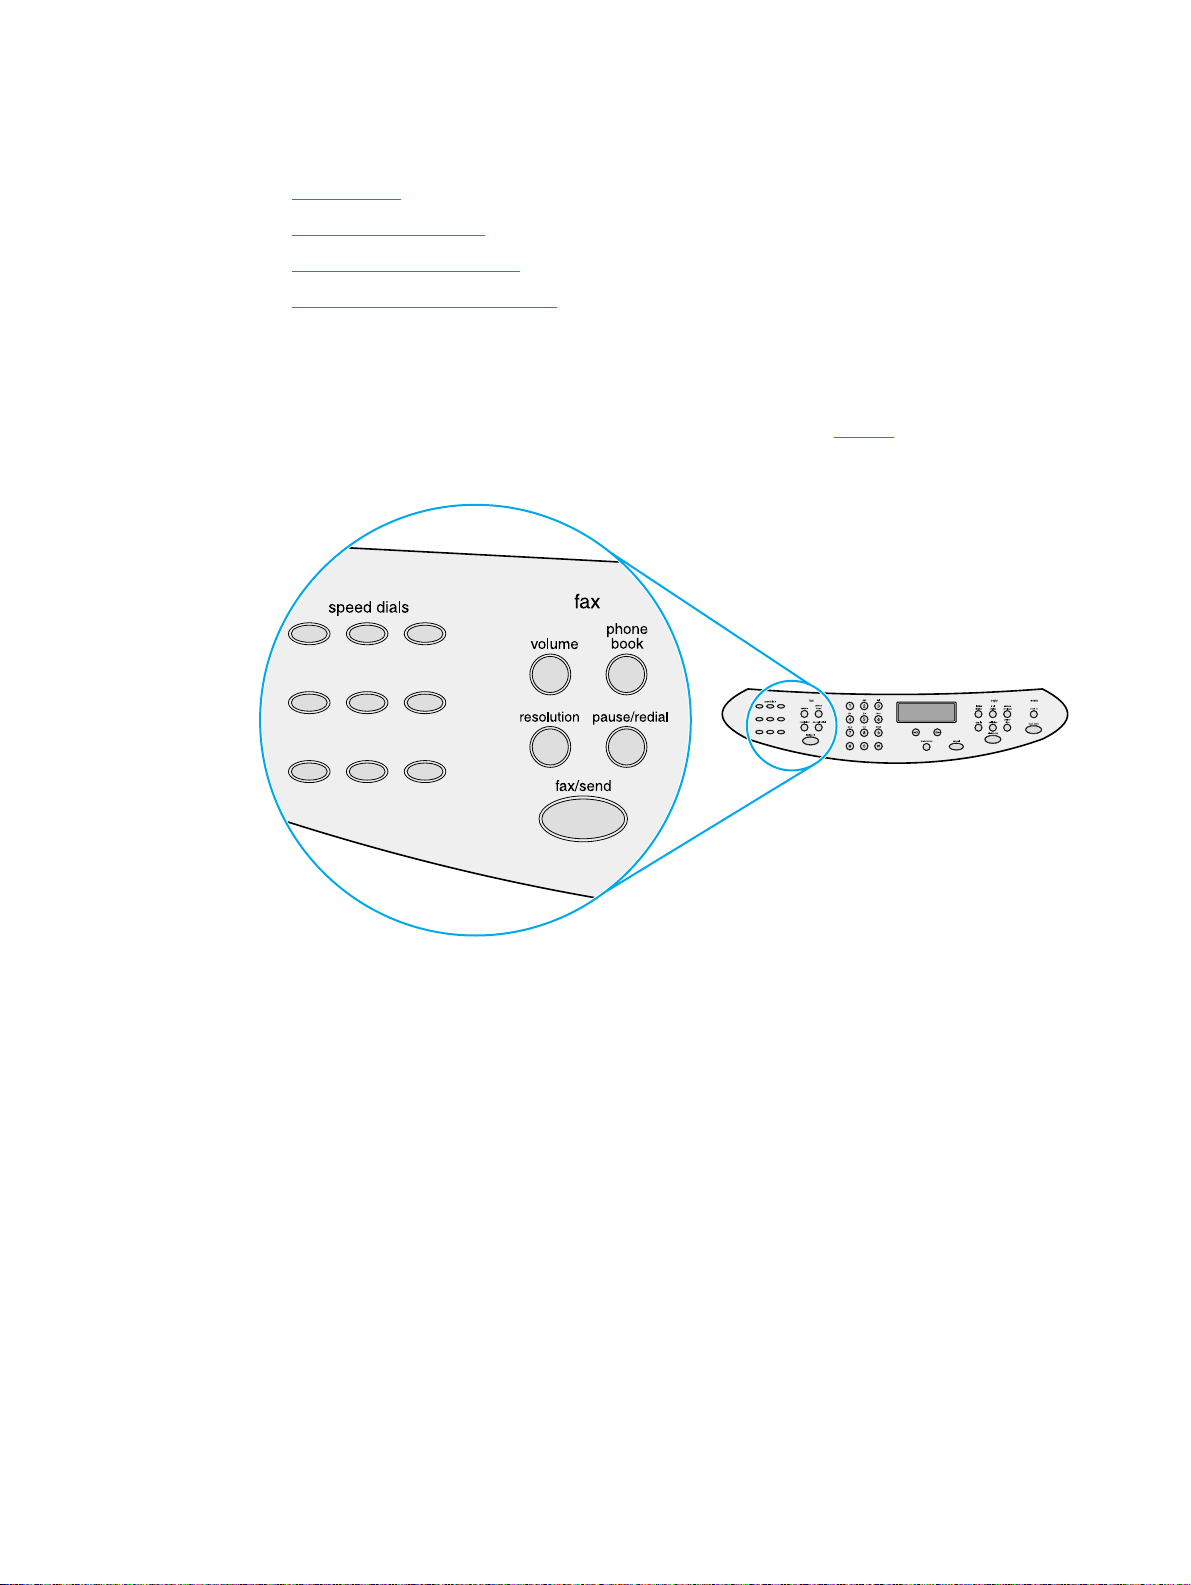
Fax controls
Use the fax controls to send and receive faxes and to change commonly used fax settings. Fax
capability is available on the HP LaserJet 3330 product only. See Faxing
the fax controls.
for instructions on using
EN Identifying your product’s control panel components 21
Page 24
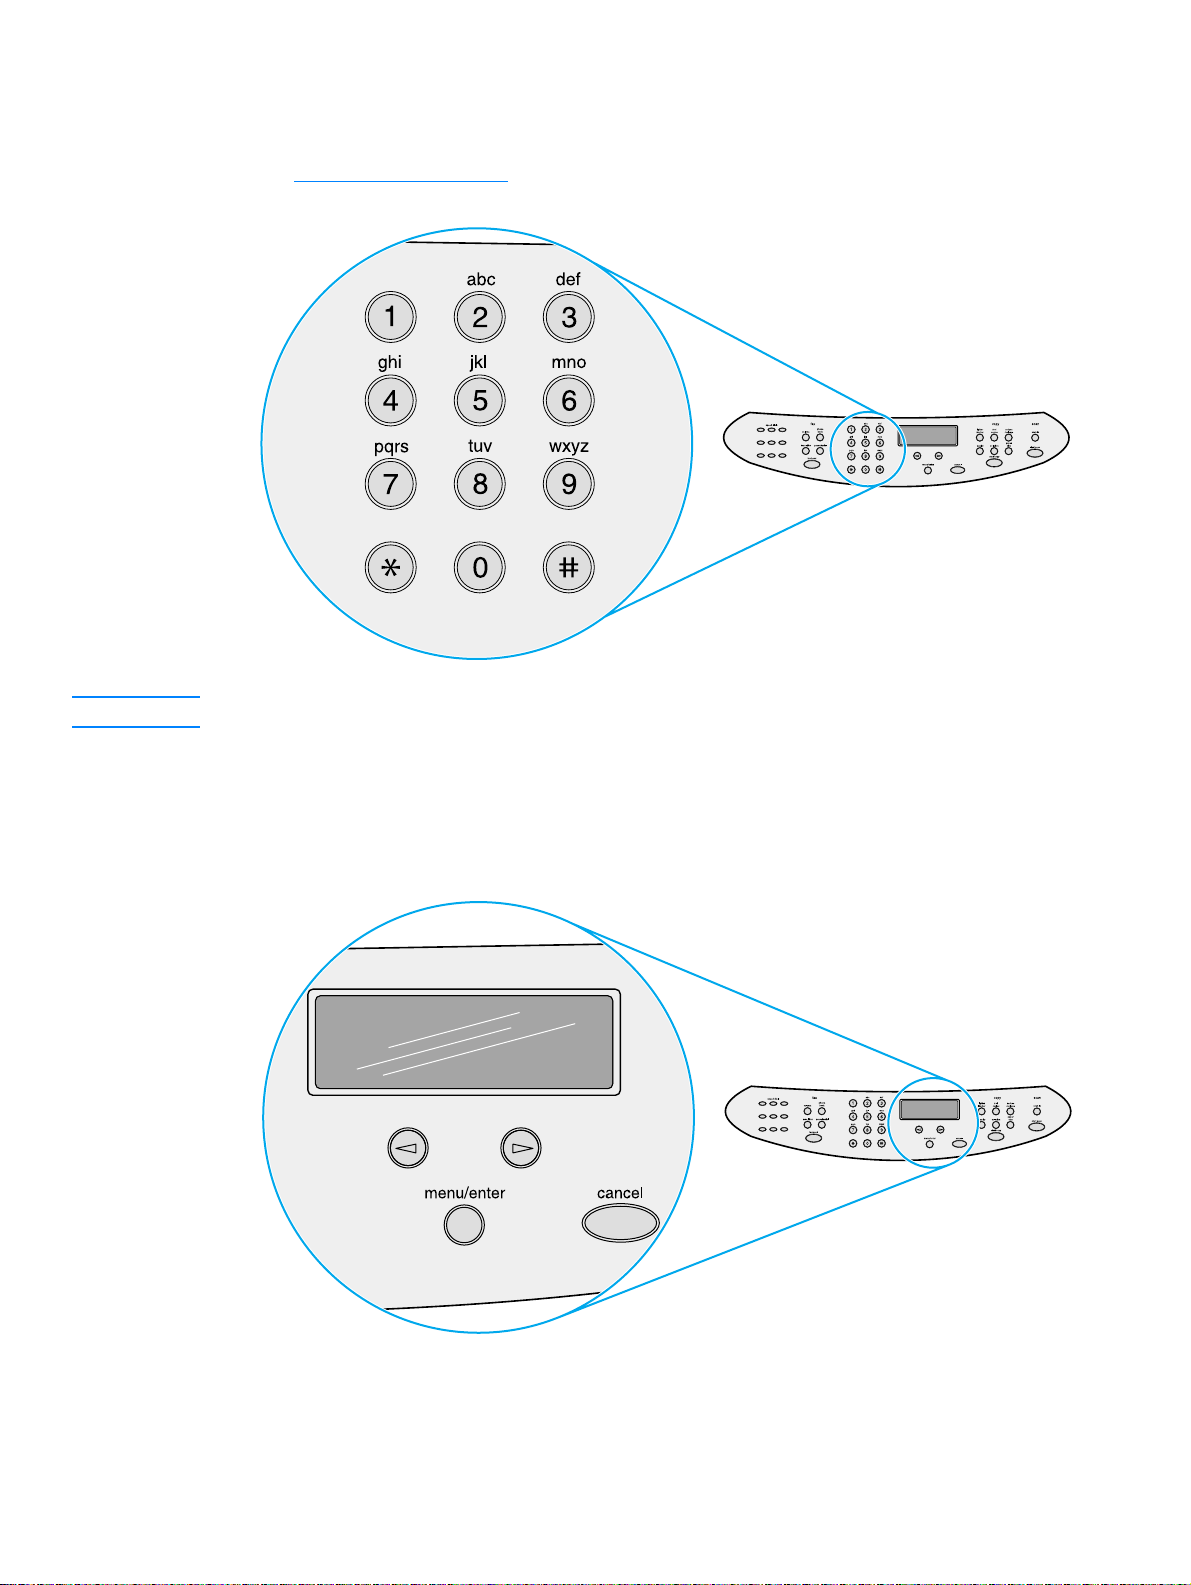
Alphanumeric buttons
If you have a fax model, use the alphanumeric buttons to enter data into the product’s display
screen and dial phone numbers for faxing. For information on using alphanumeric key characters
see Using dialing characters
.
Note Keypad buttons are numeric on non-fax models.
Menu and cancel controls
Use these controls to choose menu options, determine the product’s status, and cancel the
current job.
22 1 Getting to know your product EN
Page 25
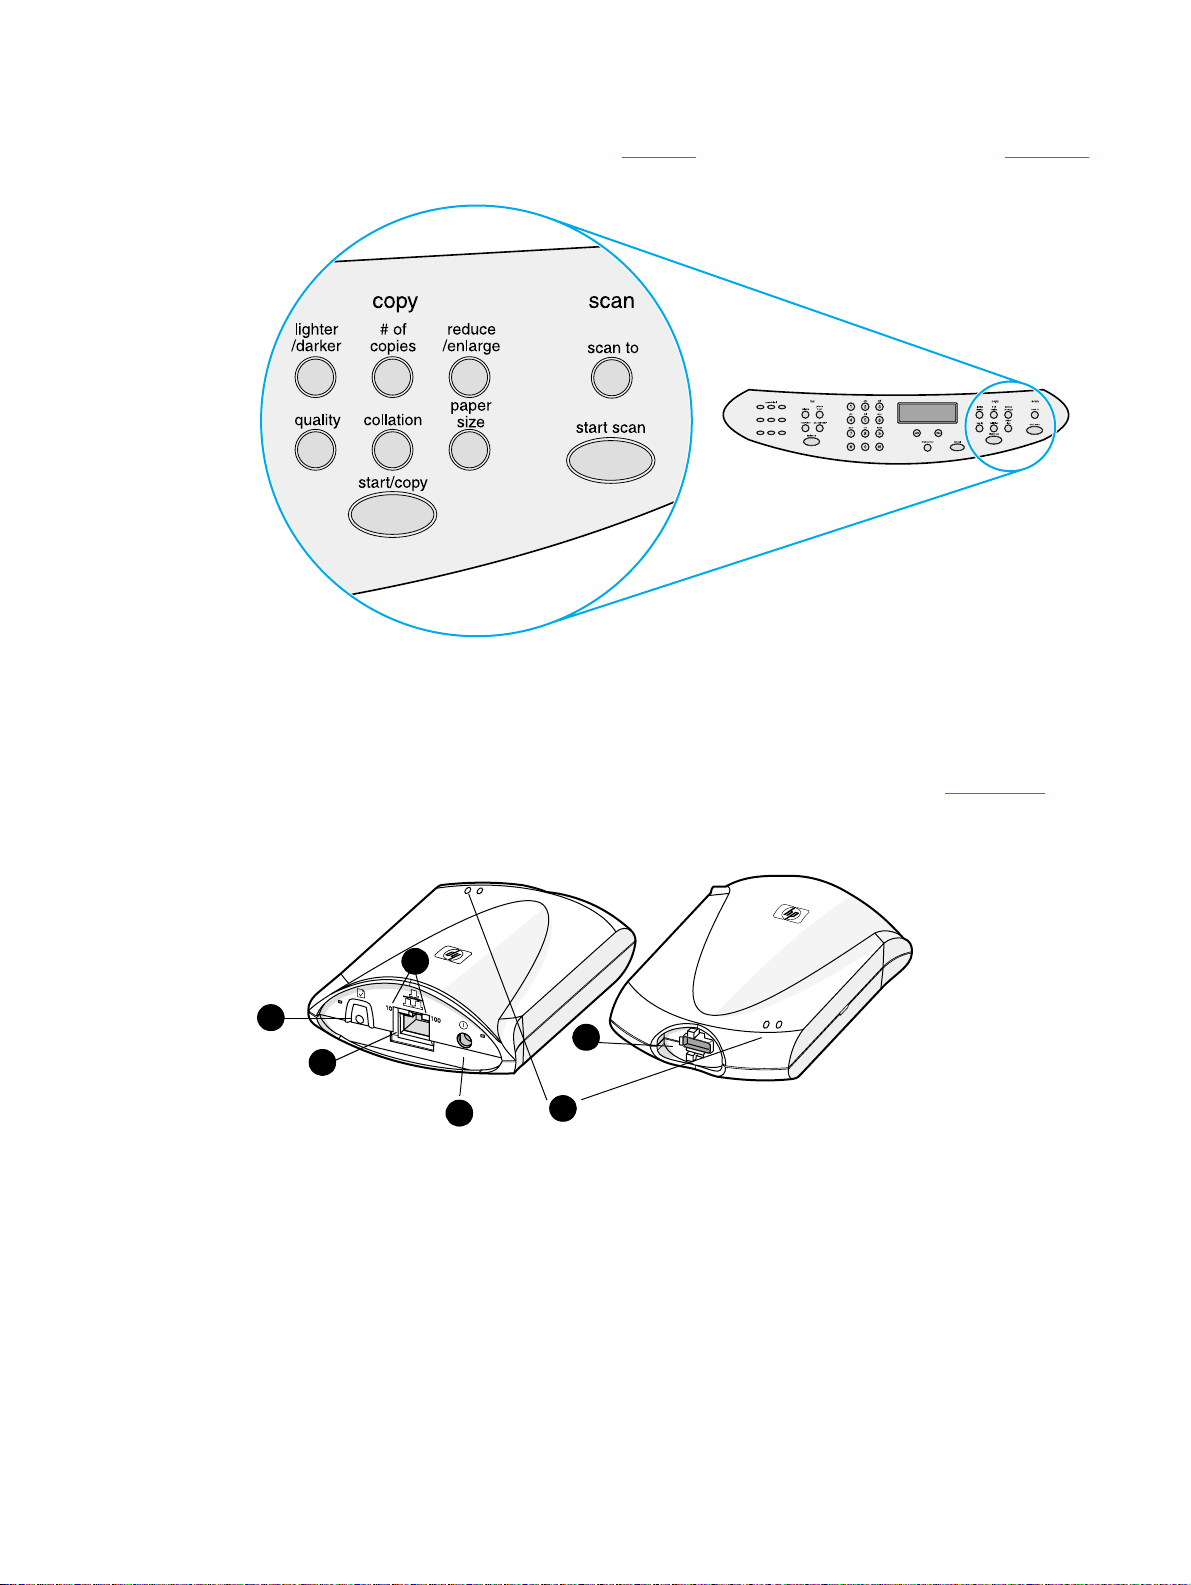
Copy, scan, and start controls
Use these controls to change commonly used default settings, to start scanning, and to start
copying. For instructions on copying, see Copying
. For instructions on scanning, see Scanning.
Identifying HP Jetdirect 310x print server components
If you purchased an HP LaserJet 3320n model, an HP Jetdirect 310x print server was included
with it. The graphic below points out the main features of the print server. See Networking
information about using the print server to connect the product to a network.
3
1
2
4
1 Test button
2 Network port
3 10 and 100 LED lights
5
6
for
4 Power outlet
5USB port
6 Status indicator lights
EN Identifying HP Jetdirect 310x print server components 23
Page 26

Identifying your product’s software components
Note Software components installed depend on OS, installation type, and the HP LaserJet 3300.
Below are the software items included with your product:
● HP LaserJet Director
● HP LaserJet Scan Control Viewer
● TWAIN Scan Driver
● HP LaserJet Fax
● HP LaserJet Configuration Utility
● HP Photo Center
● Read Iris OCR
● Uninstaller
24 1 Getting to know your product EN
Page 27

2
Getting started
Use this information to perform basic assembly and installation tasks for your HP LaserJet 3300
series product:
● Finding a location for your product
● Connecting a printer cable to your product
● Installing a print cartridge
● Installing and loading the media input trays
● Installing the ADF input tray
● Connecting the power cord
● Loading originals to copy or scan
● Verifying your work
EN 25
Page 28
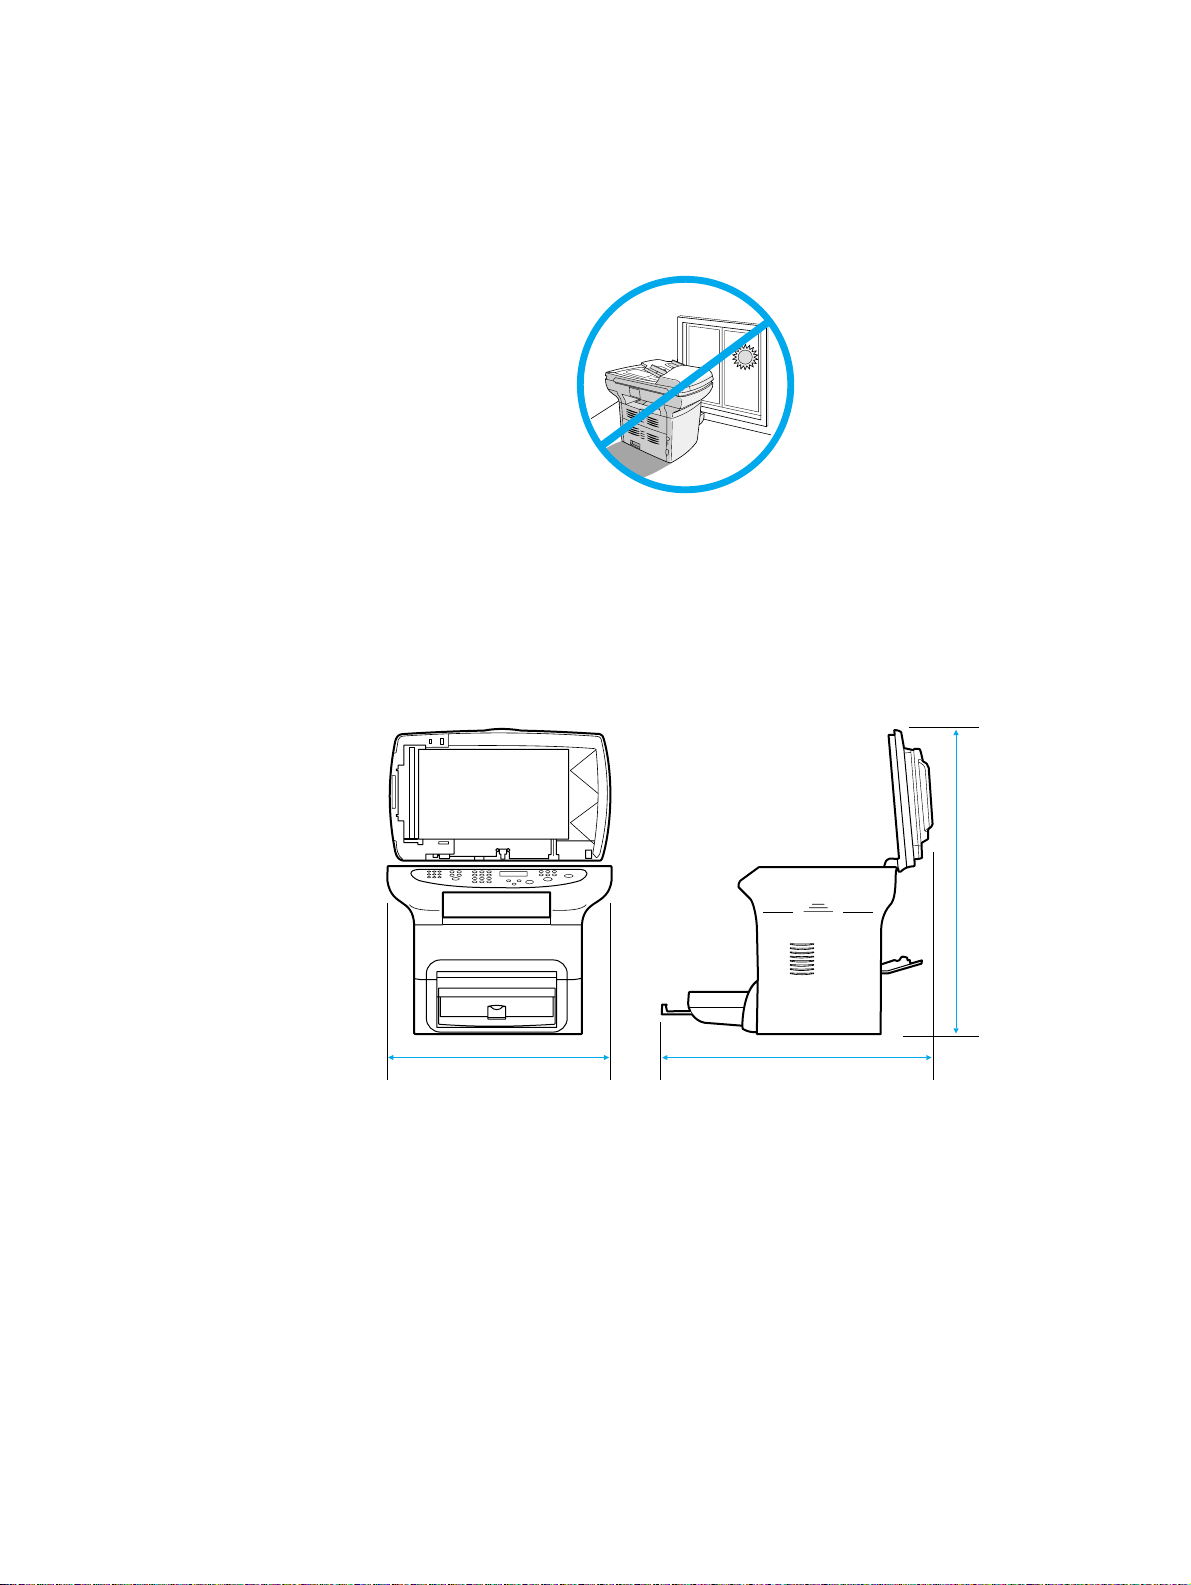
Finding a location for your product
Install the product in a location that meets the following requirements:
● Situate the product on a sturdy, level surface out of direct sunlight and away from dust, open
flames, and ammonia fumes.
● Make sure the environment is well ventilated, free from abrupt temperature or humidity
changes, and within the following limits:
• Temperature: 15 to 32.5° C (59 to 90.5° F)
• Relative Humidity: 10 to 80% humidity (no condensation)
● Make sure that there is enough space around the product for media access and proper
ventilation; media fed into the straight-through media path will emerge behind the product.
53 cm (21 inches)
74 cm (29 inches)
81 cm (32 inches)
26 2 Getting started EN
Page 29
Connecting a printer cable to your product
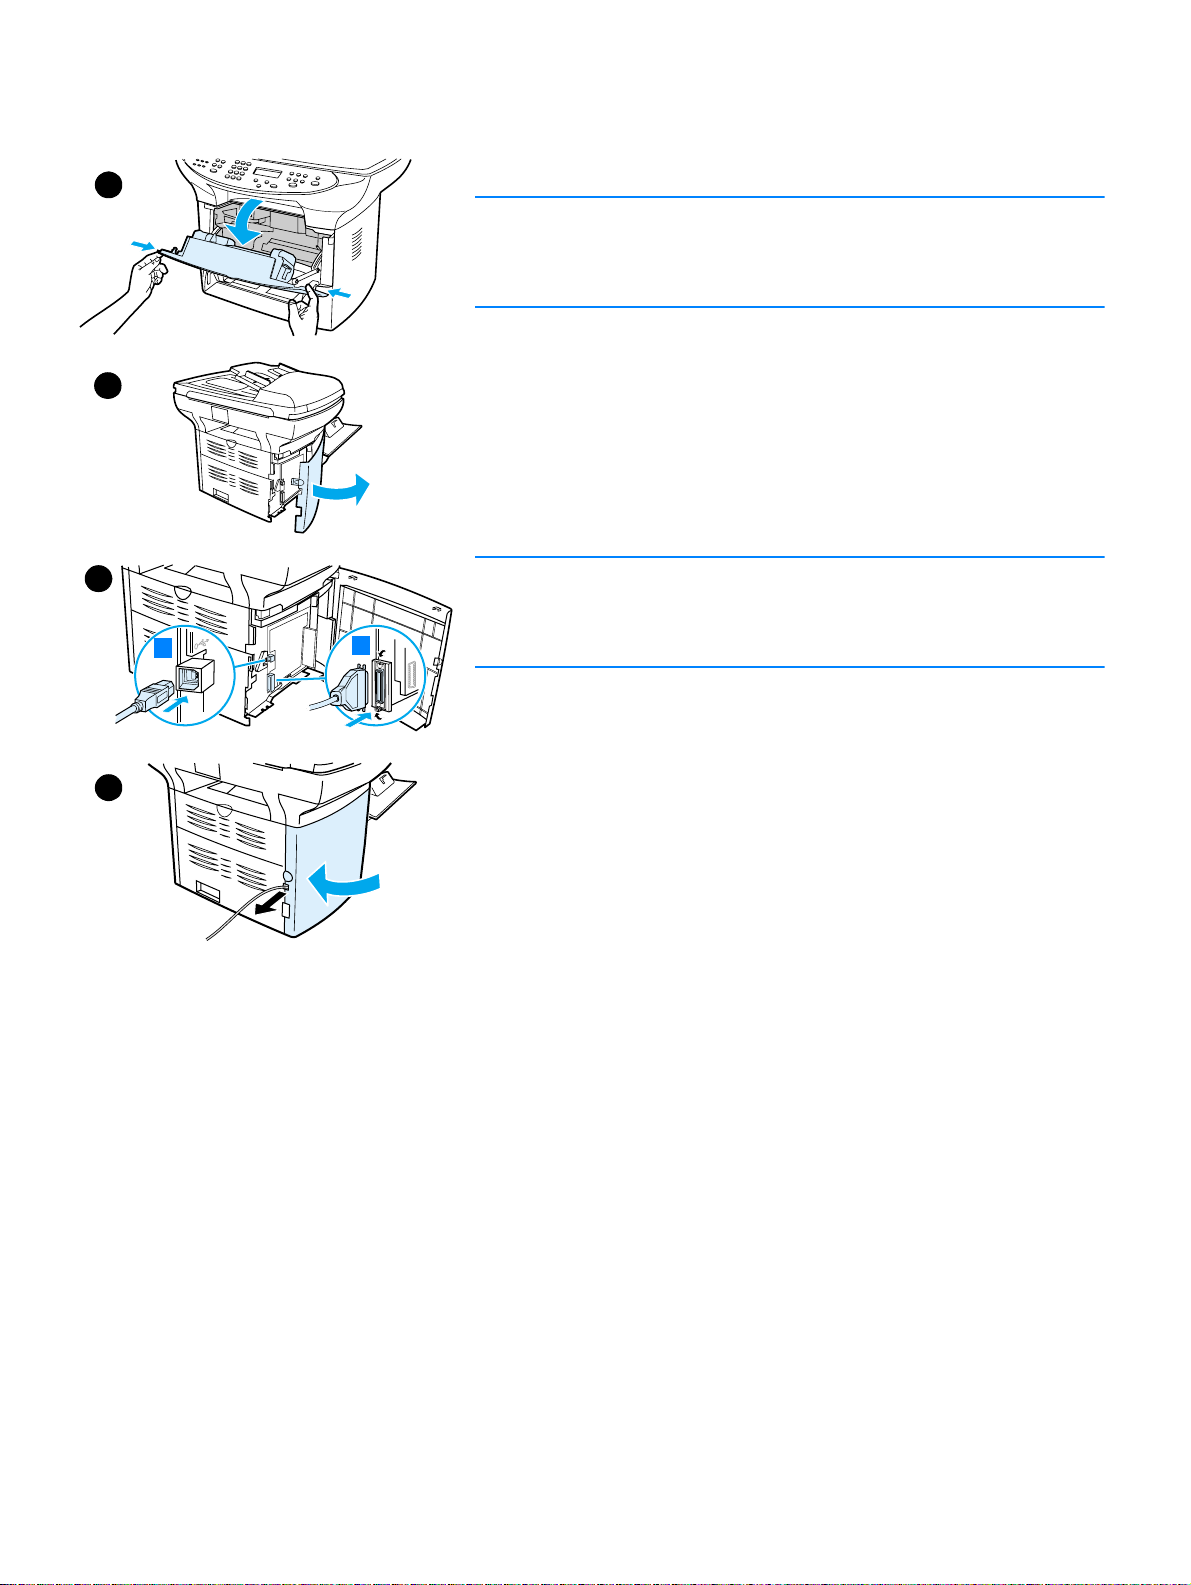
To connect a printer cable to your product, use the following steps:
1
Note
Windows 95 and Windows NT 4.0 do not support USB cable
connections with the printer. Macintosh computers do not support
parallel cable connections.
1 Open the print cartridge door by pulling the sides of the door
2
forward as shown.
2 Open the product’s left side panel by pressing the release latch.
3 Plug one end of the USB (1) or parallel cable (2) into the correct
socket inside the left side panel as shown.
4 Thread the cable through the left side panel opening as shown, and
close the left side panel.
3
Note
If you are using a USB cable, it should be threaded through the upper
notch in the left side panel. If you are using a parallel cable, it should be
1
2
threaded through the lower notch.
4
EN Connecting a printer cable to your product 27
Page 30
Installing a print cartridge
1
2
3
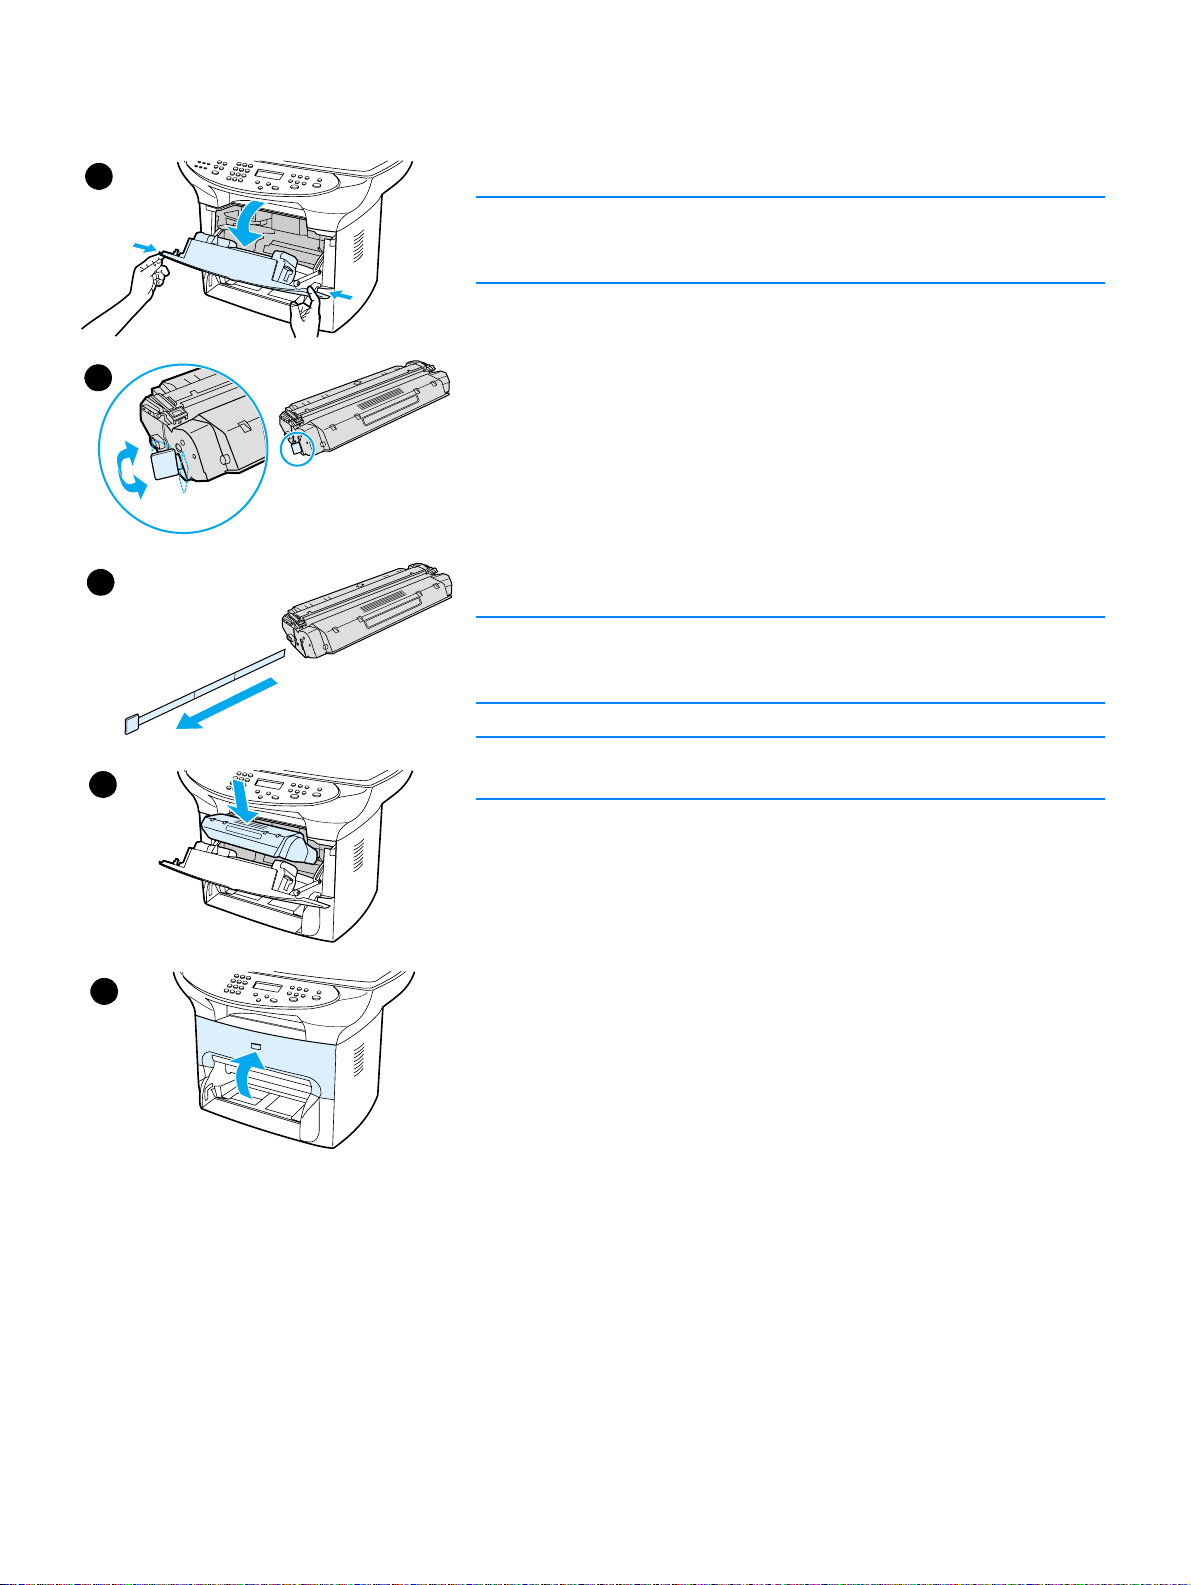
To install a print cartridge, use the following steps:
CAUTION
To prevent damage to the print cartridge, do not expose it to light for
more than a few minutes.
1 Make sure the print cartridge door is open.
2 Remove the print cartridge from its packaging, and locate the
sealing tape at the end of the cartridge.
3 To remove the sealing tape from the cartridge, grasp the tape and
pull it straight out from the cartridge. Avoid touching any black toner
on the tape.
4 Insert the cartridge as shown, with the arrows pointing into the
product.
5 Close the print cartridge door. The print cartridge engages when
the door is closed.
Note
If toner gets on your clothing or other fabric, wipe off the toner with a dry
cloth. Wash the items in cold water and air dry.
CAUTION
4
5
Hot water or heat from a dryer can set toner into fabric.
Hewlett-Packard Company cannot recommend the use of non-HP print
cartridges, either new, refilled, or remanufactured. Since they are not
HP products, HP cannot influence their design or control their quality.
28 2 Getting started EN
Page 31
Installing and loading the media input trays
1
3
4
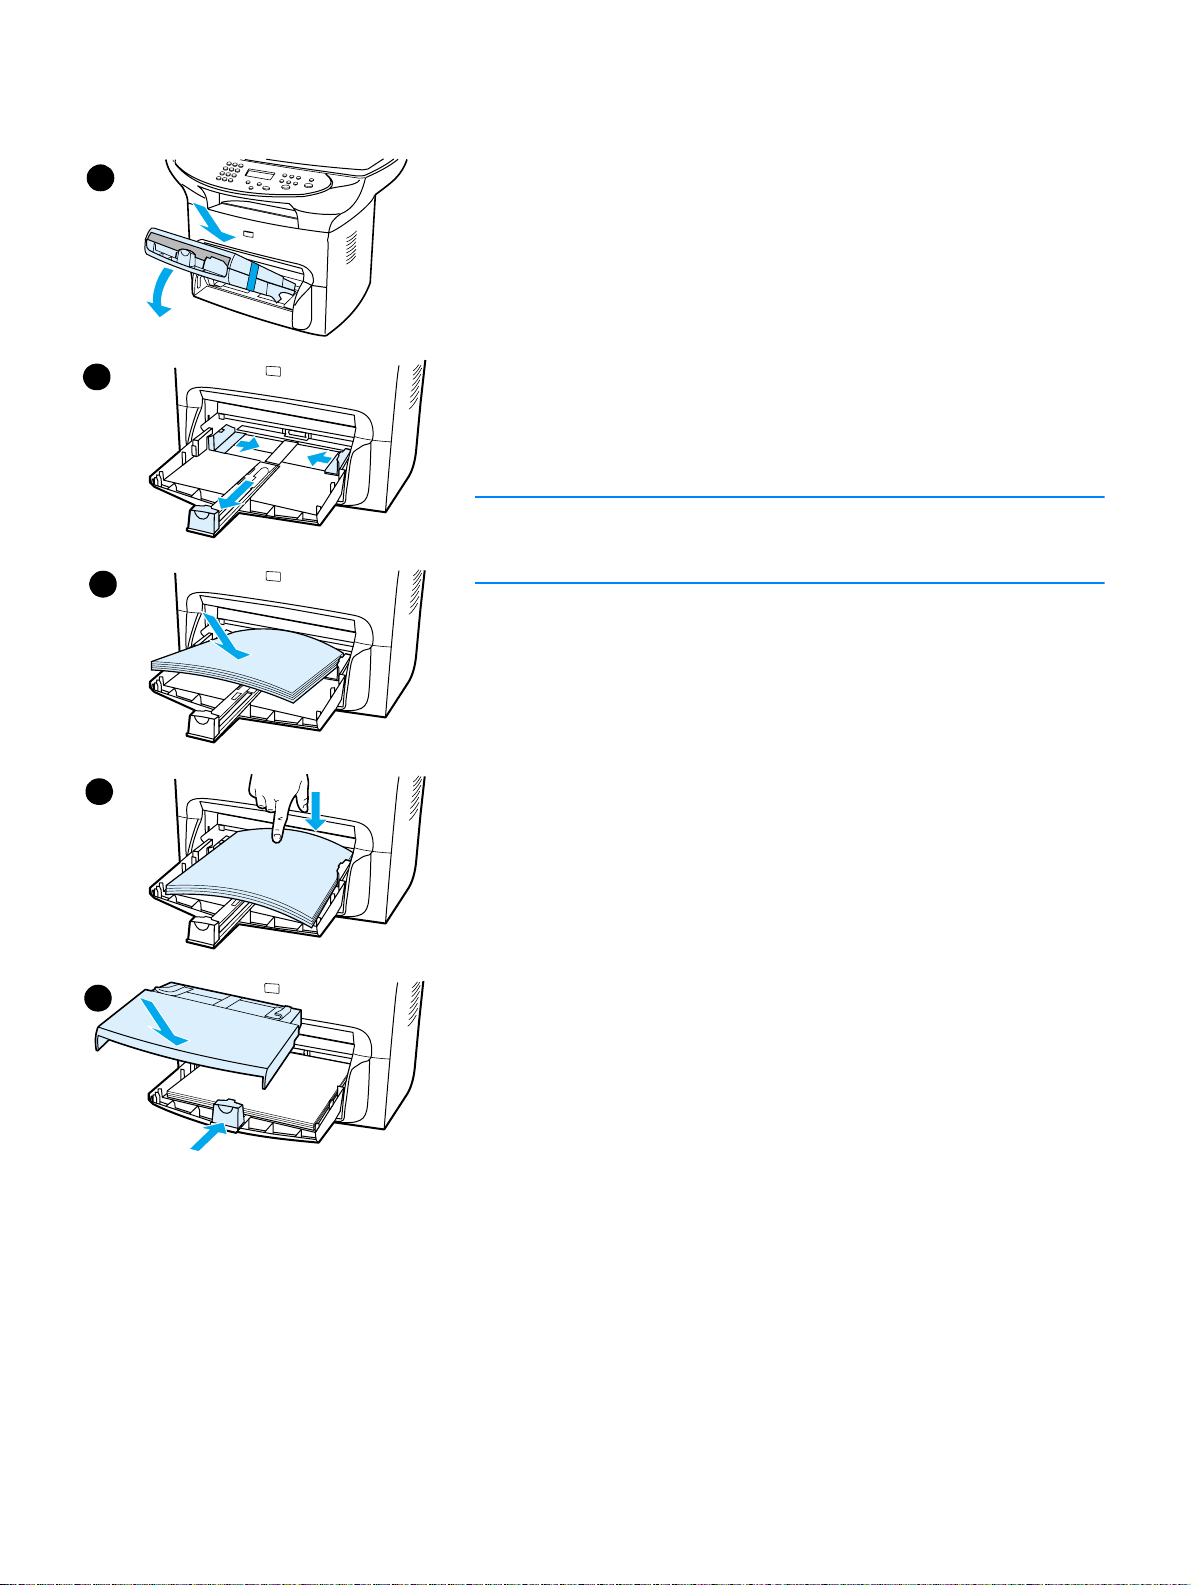
To install and load the media input tray and the priority input tray, use
the following steps:
1 Slide the trays in and down at an angle until they fit securely.
Remove the tape connecting the two trays.
2 Remove the priority input tray.
3 Push in the guides past the normal paper size mark.
4 Roll the paper and place it in the tray.
5 Push down on the paper so it lies flat in the tray.
6 Push in the bottom guide so it is snug.
7 Install the priority input tray over the media input tray.
Note
If the media guides are not sufficiently tight, your media may skew and
cause a media jam.
5
6
EN Installing and loading the media input trays 29
Page 32

Installing the ADF input tray
If your HP LaserJet 3300 series product comes with an ADF, or if you purchased the HP LaserJet
3300 series ADF accessory, use the following instructions to install the ADF input tray:
1 Align the two tabs on the input tray with the two grooves in the ADF lid.
2 Slide the tray into the grooves as shown until the tray snaps into place.
Connecting the power cord
To connect your product to a power source, use the following steps.
1 If you have the 220V product, locate the power switch on the back of the product and make
sure the product is switched off.
2 Connect the power cord to the product, as shown (1).
3 Plug the other end of the power cord directly into a grounded AC outlet (2).
1
4 If you have the 220V product, switch on the power. If you have the 110V product, there is no
power switch. It will automatically power on when it is plugged in.
2
Note HP does not recommend the use of uninterrupted power supply (UPS) battery backup devices or
surge suppressors with this product. Many surge suppressors and battery backups can cause print
defects.
30 2 Getting started EN
Page 33

Loading originals to copy or scan
Use these instructions to load originals into your HP LaserJet 3300 series product for copying or
scanning. For the best quality scans and copies, use the flatbed scanner. See Selecting media for
the ADF for guidelines on choosing original documents for scanning and copying.
If you purchased an HP LaserJet 3300 product and want to purchase an ADF, see Ordering
HP parts and accessories for more information.
To load originals onto the flatbed scanner
1 Make sure the ADF is free of media.
2 Lift the flatbed scanner cover.
3 Place the original document face down on the flatbed scanner with the top left corner of the
document located in the lower right corner of the glass.
4 Gently close the lid.
5 The document is ready to be copied or scanned.
Top Edge
CAUTION T o prev ent damaging the product, do not allow the scanner lid to fall onto the flatbed scanner surface.
Always close the scanner lid when the product is not in use.
EN Loading originals to copy or scan 31
Page 34

To load originals into the ADF input tray
Note ADF capacity is up to 50 sheets of 75 g/m2 (20-pound) media (depending on the thickness of the
media), or until the ADF input tray is full.
The minimum size for media in the ADF is 127 x 127 mm (5 x 5 inches). For smaller sizes use the
flatbed scanner. The maximum size for media in the ADF is 215.9 mm wide by 381 mm long (8.5 x
15 inches).
1 Make sure the flatbed scanner is free of media.
2 Close the flatbed scanner cover and put the top end of the original media stack into the ADF
input tray, with the media stack face up and the first page to be scanned, copied, or faxed on
top of the stack.
3 Slide the media stack into the ADF until the media does not move any farther.
4 Adjust the media guides until they are snug.
5 The document is now ready to be copied or scanned.
2
4
32 2 Getting started EN
Page 35

Verifying your work
After setting up the product, verify your work by testing your HP LaserJet 3300 product’s printing
and copying functions.
To self-test the printer
To test the printer, use the following steps:
1 On the product’s control panel, press menu/enter.
2 Use the < and > buttons to select Reports and press menu/enter.
3 Use the < and > buttons to select Config Report and press menu/enter.
A configuration page prints, showing the product’s current configuration and the control panel
display returns to Ready. If the page does not print successfully, see Troubleshooting printing
problems.
To self-test the copier using the ADF input tray
Use the configuration page you just printed to test the copier.
1 Adjust the guides on the ADF input tray to the size of the configuration page.
2 Place the configuration page into the ADF input tray top first, print side up. Verify that the
control panel display reads Document Loaded.
3 On the product’s control panel, press start/copy.
The product makes a copy of the configuration page and the control panel display returns to
Ready. If the page does not copy successfully, see Troubleshooting copy problems
1
2
.
EN Verifying your work 33
Page 36

To self-test the copier using the flatbed scanner
If your product does not have an ADF input tray, you can still test the copier by placing the
configuration page on the flatbed scanner.
1 Place the configuration page face down on the flatbed scanner with the top left corner of the
document located in the l ower right corner of the glass.
2 Gently close the lid.
3 On the product’s control panel, press start/copy.
The product makes a copy of the configuration page and the control panel display returns to
Ready. If the page does not copy successfully, see Troubleshooting copy problems
CAUTION T o prevent damaging the product, do not allow the scanner lid to fall onto the flatbed scanner surface.
Always close the scanner lid when the product is not in use.
.
To print a control panel menu map
In addition to printing a configuration page, you can also test your product by printing a menu map
that shows all of the control panel menu options.
To prin t a contr ol pan el menu map, use the following steps:
1 On the product’s control panel, press menu/enter.
2 Use the < and > buttons to select Reports and press menu/enter.
3 Use the < and > buttons to select Menu Structure and press menu/enter.
A menu map prints, showing all of the product’s control panel menu options. If the menu map does
not print succ es sf ull y, see Troubleshooting printing problems
.
34 2 Getting started EN
Page 37

Changing your product’s general
3
default settings
Use these topics to learn about your HP LaserJet 3300 series product’s general default settings,
how to check them, how to change them from the control panel, and how to access them using the
product software.
● HP LaserJet 3300 series product settings
● Printing a configuration page
● Printing a control panel menu map
● Restoring the factory default settings
● Changing the display panel language
● Changing the default paper size
● Using the product’s volume controls
● Changing settings from your computer
EN 35
Page 38

HP LaserJet 3300 series product settings
Using the product software is often the easiest method to adjust your product settings. The
instructions in this section show how to access the device settings from both the control panel and
the product software.
CAUTION When changing certain settings in a network environment, you are changing settings for all users.
Printing a configuration page
You can see what product settings are currently selected by printing a configuration page.
To print a configuration page
1 Press menu/enter.
2 Use the < and > buttons to select Reports and press menu/enter.
3 Use the < and > buttons to select Config Report and press menu/enter.
The product exits the Menu settings and prints the report.
Printing a control panel menu map
You can see all of your product’s control panel menu options by printing a control panel menu map.
To print a control panel menu map
1 On the product’s control panel, press menu/enter.
2 Use the < and > buttons to select Reports and press menu/enter.
3 Use the < and > buttons to select Menu Structure and press menu/enter.
4 A menu map prints, showing all of the product’s control panel menu options.
Restoring the factory default settings
This procedure returns all settings to the factory defaults and clears the fax header name and
phone number. (See Setting the information in the fax header
information to the fax header.) This procedure clears fax numbers and names associated with
one-touch keys and speed-dial codes and deletes any pages stored in memory. The procedure
then automatically restarts the product.
To restore the factory default settings
for information on how to add your
1 Press menu/enter.
2 Use the < and > buttons to select Service and press menu/enter.
3 Use the < or > button to select Restore Defaults, press menu/enter, and press
menu/enter again to confirm your selection.
4 The product automatically restarts.
36 3 Changing your product’s general default settings EN
Page 39

Changing the display panel language
Use this procedure to have the control panel display messages and reports in a language other
than the default for your country/region.
To change the display panel language
1 Press menu/enter.
2 Use the < and > buttons to select Common Settings and press menu/enter.
3 Use the < and > buttons to select Language and press menu/enter.
4 Use the < and > buttons to select the language you want.
5 Press menu/enter to save your selection.
6 The product automatically restarts.
Changing the default paper size
The paper size should be set to the size of paper you normally load in the paper input tray. The
product uses this setting for copying, printing reports, and determining autoreduction for incoming
faxes.
To change the default paper size
1 Press menu/enter.
2 Use the < or > button to select Common Settings and press menu/enter.
3 Use the < or > button to select Def. Paper Size and press menu/enter.
4 Use the < or > button until the size of paper you have loaded appears. You can choose
Letter, Legal, or A4.
5 Press menu/enter to save your selection.
Using the product’s volume controls
You can control the volume of the following sounds:
● The alarm sound the product emits when it requires attention, such as when the printer door is
open.
● The beeps emitted when you press control panel buttons.
● For the fax product, the phone line sounds for outgoing faxes.
● For the fax product, the ring volume for incoming faxes.
To change the alarm volume
The alarm is heard when the device is presenting an alert or critical error message. The alarm
duration length is either one or three seconds, based on the type of error.
1 Press menu/enter.
2 Use the < and > buttons to select Common Settings and press menu/enter.
EN Changing the display panel language 37
Page 40

3 Use the < and > buttons to select Volume Settings and press menu/enter.
4 Press menu/enter to select Alarm Volume.
5 Use the < and > buttons to select Off, Soft, Medium, or Loud.
6 Press menu/enter to save your selection.
Note The default set at the factory for the alarm volume is Soft.
To cha n ge the volume for the f a x p rod u c t
1 Press Volume.
2 Press the < or > button to select Off, Soft, Medium, or Loud.
3 Press menu/enter to save your selection.
Note The default set at the factory is Soft.
To change the ring volume of the fax product
The ring volume is heard when the device is initially sending or receiving a call. The ring duration
length is based on the local telecom ring pattern length.
1 Press menu/enter.
2 Use the < or > button to select Common Settings and press menu/enter.
3 Use the < or > button to select Volume Settings and press menu/enter.
4 Press the < or > button once to select Ring Volume and press menu/enter.
5 Use the < or > button to select Off, Soft, Medium, or Loud, and press menu/enter to save
your selection.
Note The default set at the factory is Soft.
To change the control panel key press volume
The key press volume controls the sound that is made when a control panel button is pressed.
1 Press menu/enter.
2 Use the < and > buttons to select Common Settings and press menu/enter.
3 Use the < and > buttons to select Volume Settings and press menu/enter.
4 Use the < and > buttons to select Key Press Volume and press menu/enter.
5 Use the < and > buttons to select Off, Soft, Medium, or Loud.
6 Press menu/enter to save your selection.
Note The default set at the factory for the control panel key press volume is Soft.
Changing settings from your computer
After installation, you can gain access to printer settings from the product’s printer driver or from
another software application. These settings do not affect other users on a network.
38 3 Changing your product’s general default settings EN
Page 41

Use one of the following methods to change your printer settings:
● To change default settings across all applications (Windows)
● To change default settings across all applications (Macintosh)
● To temporarily change settings from a software application (Windows)
● To temporarily change settings from a software application (Macintosh)
You can also change printer settings from the product software. For instructions on using the
product software, see the product software Help.
To change default settings across all applications (Windows)
Windows 95, 98, ME, and XP Home: F rom the Start menu, select Settings, and select Printers.
Right-click the printer icon and cl ick Properties.
Windows NT 4.0 SP3, 2000, and XP Professional: From the Start menu, select Settings, and
select Printers. For Windows 2000 right-click the printer icon, and click Printing Preferences.
Note The actual steps may vary; these are the most common methods.
To change default settings across all applications (Macintosh)
Macintosh OS 9.1:
1 From the Macintosh desktop, choose File. Then choose Print Desktop.
2 In the printer group box, choose the HP All-in-one.
3 Make the necessary changes to the settings.
4 Click the Save Settings option.
5 Click Cancel.
Macintosh OS X:
1 Open a document in a text editing application.
2 Choose File. Then choose Print.
3 Make the appropriate changes to the default settings.
4 On the settings options, choose to Save Custom Setting.
5 To invoke the settings when printing a document, choose the Custom option in the Saved
Settings section.
To temporarily change settings from a software application (Windows)
From the File menu, click Print. From the Print dialog, click Properties. Change the settings that
you want to apply for the current print job.
To temporarily change settings from a software application (Macintosh)
From the File menu, choose Print. Use the Print dialog to set print options.
Note The actual steps may vary; these are the most common methods.
EN Changing settings from your computer 39
Page 42

40 3 Changing your product’s general default settings EN
Page 43

4
Printing
Use these instructions to perform printing tasks with your HP LaserJet 3300 series product:
● Printing with manual feed
● Stopping or canceling a print job
● Printer drivers
● Understanding print quality settings
● Optimizing print quality for media types
● Printing envelopes
● Printing transparencies and labels
● Printing letterhead or preprinted forms
● Printing custom-sized media or card stock
● Printing on both sides of the media (manual duplexing)
● Printing multiple pages on a single sheet of media
● Printing booklets
● Printing watermarks
EN 41
Page 44

Printing with manual feed
You can use manual feed when printing mixed media, for example, an envelope, then a letter, then
an envelope, and so on. Load an envelope in the priority input tray and load letterhead in the main
input tray.
To print using manual feed
1 Access the printer setup from your software application, and select Manual Feed from the
Source Tray drop-down list. (For instructions on accessing the printer setup from your
computer, see Changing settings from your compu ter
2 After you have enabled the setting, wait until the display reads Manual Feed, then press
menu/enter to print each job.
.)
Stopping or canceling a print job
If your print job is currently printing, you can cancel a print job by pressing cancel on the control
panel.
CAUTION Pressing cancel clears the job currently being processed by the product. If more than one process
is running, it clears the process that currently appears on the display panel.
Printer drivers
When you installed the product software, you selected one of the following printer drivers:
PCL 6 driver: Use the PCL 6 driver to take full advantage of the product’s features. Unless
complete backward compatibility with previous PCL drivers or older printers is necessary, the PCL
6 driver is recommended.
PCL 5e driver: Use the PCL 5e driver if you need print results to look consistent with those from
older HP LaserJet printers. Certain features (FastRes 1200, ProRes 1200, and 300 dpi) are not
available in this driver. (Do not use the PCL 5e driver provided with this printer with older printers.)
PS driver: Use the PostScript (PS) driver for compatibility with PS needs. Certain features
(manual duplexing, printing booklets, watermarks, and printing more than four pages per sheet)
are not available with this driver.
Note The product automatically switches between PS emulation and PCL printer languages depending
on the driver you have selected. PS emulation emulates Adobe® PostScript Level2. P ostScript is a
registered trademark of Adobe Systems Incorporated. For information about accessing your printer
driver see Changing settings from your computer.
Understanding print quality settings
Print quality settings affect how light or dark the print is on the page and the style in which the
graphics are printed. You can also use the print quality settings to optimize the print quality for a
specific media type. See Optimizing print quality for media types
42 4 Printing EN
for more information.
Page 45

You can change the settings in the printer properties to accommodate the types of jobs you are
printing. The following settings are available depending on the printer driver you are using:
● Best Quality (ProRes 1200): This prints at 1200 dpi (dots per inch) and provides the best
print quality.
● Faster Printing (FastRes 1200): The resolution is rendered differently so that the job can
print faster. This is the default setting.
● 1200 dpi
● 600 dpi
● 300 dpi
● Custom: This prints the same as the Faster Printing setting, but you can change the scale
patterns.
● EconoMode (Save Toner): Text is printed using less toner. This setting is useful when you
are printing drafts.
Note Changing the resolution can change the formatting of your text.
To temporarily change print quality settings
To change the print quality settings only for the current software application’s use, access the
properties through the Print Setup menu in the application you are using to print. See Changing
settings from your computer for more information.
To change print quality settings for all future jobs
You can access print quality settings by selecting Printers from the Windows Start menu, then
accessing the properties for the product. The settings are on the Finishing tab (Windows) under
Print Quality settings in the printer properties. T o view the details of each setting, click Details. For
Macintosh OS 9.1 select the Imaging Options screen.
To enable EconoMode (save toner)
An excellent way to extend the life of your print cartridge is by using EconoMode. EconoMode
uses substantially less toner than normal printing. The printed image is lighter, but it is adequate
for printing drafts or proofs.
To enable EconoMode, access the printer properties. On the Finishing tab (Windows) or the
Imaging Options screen (Macintosh OS 9.1) under Print Quality, select EconoMode. For
Macintosh OS X use the Device Configuration Utility:
1 Open the HP LaserJet Director.
2 Choose Tools.
3 Choose Device Configuration.
4 Choose the Print tab.
5 On the Print Quality menu, choose to turn EconoMode On.
Note See Changing settings from your computer for instructions on enabling EconoMode for all future jobs.
EN Understanding print quali ty se ttin gs 43
Page 46

Optimizing print quality for media types
Media type settings control the temperature of your printer’s fuser. You can change the settings for
the media that you are using to optimize the print quality. The following are the media types that
you can optimize for:
● Plain paper
● Bond paper
● Card stock
● Envelope
● Heavy paper
● Labels
● Rough paper
● Thin paper
● Transparency
To access the optimizing feature
You can access the optimizing feature from the Paper tab in your Windows printer driver. For more
information, see Changing settings from your computer
.
Note Printing speeds are automatically reduced when printing special-sized media.
Note You need to reset the default after the job prints.
44 4 Printing EN
Page 47
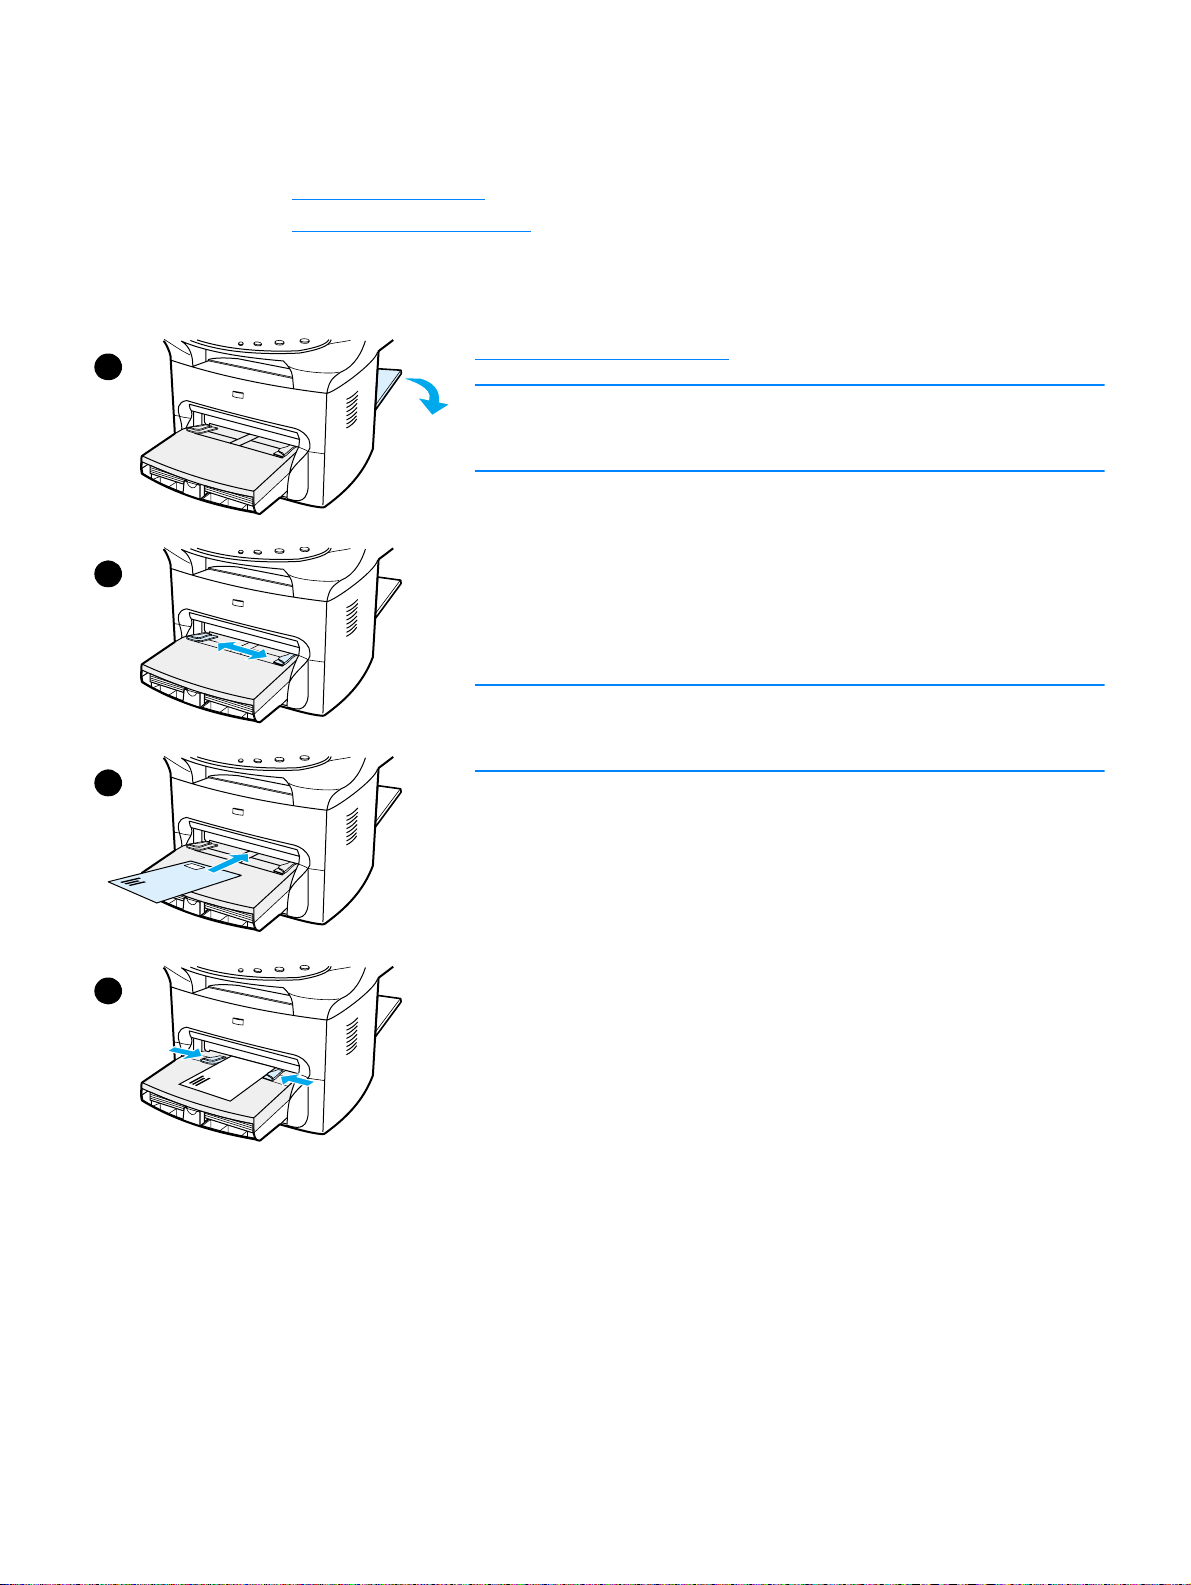
Printing envelopes
Use one of the following methods to print envelopes:
● To print one envelope
● To print multiple envelopes
1
To print one envelope
Only use envelopes that are recommended for laser printers. See
Product media specifications
Note
Use the priority input tray for printing one envelope. Use the main input
tray for printing multiple envelopes.
1 To prevent the envelopes from curling as they print, open the
straight-through output door.
for more information.
2
3
4
2 Before loading the envelopes, slide the media guides outward to
slightly wider than the envelopes.
3 Place the envelope with the stamp end forward and the side to be
printed facing up.
Note
If the envelope has a flap on the short edge, feed that edge into the
printer first.
4 Adjust the media guides to the width of the envelope. Set Optimize
for: on the Paper tab in your Windows printer driver to Envelope,
and print the envelope.
EN Printing envelopes 45
Page 48

To print multiple envelopes
Only use envelopes that are recommended for laser printers. See
1
2
3
Product media specifications
Note
Use the priority input tray for printing one envelope. Use the main input
tray for printing multiple envelopes.
1 To prevent the envelopes from curling as they print, open the
straight-through output door.
2 Before loading the envelopes, slide the media guides outward to
slightly wider than the envelopes.
3 Place the envelopes with the stamp end forward and the side to be
printed facing up.
Note
If the envelopes have a flap on the short edge, feed that edge into the
printer first.
4 Adjust the media guides to the length and width of the envelopes.
Set Optimize for: on the Paper tab in your Windows printer driver
to Envelope, and print the envelope.
for more information.
5 Replace the priority input tray.
4
46 4 Printing EN
Page 49

Printing transparencies and labels
Only use transparencies and labels that are recommended for use in laser printers, such as HP
transparency film and laser quality labels. See Product media specifications
CAUTION Inspect the media to make sure that it is not wrinkled or curled and that it does not have any torn
edges or missing labels. Do not run labels through the product more than once. The adhesive may
damage the product.
To print transparencies or labels
1 Open the straight-through output door on the back of the product.
2 Load a single page in the priority input tray or load multiple pages in the main input tray. Make
sure that the top of the media is forward and the side to be printed (rough side of
transparencies) is facing up.
3 Adjust the media guides.
4 Access the optimizing feature from the Paper tab in your Windows printer driver. Then select
Optimize for: and choose Transparency or Labels in the drop-down list.
5 Print the document. Remove the media from the back of the printer as it prints to prevent it
from sticking together, and place the printed pages on a flat surface.
for more information.
EN Printing transparencies and labels 47
Page 50

Printing letterhead or preprinted forms
Only use letterhead or preprinted forms that are recommended for use in laser printers, such as
HP laser quality letterhead and preprinted forms. See Product media specifications
information.
Use these instructions to print documents on letterhead or preprinted forms.
To print letterhead or preprinted forms
1 Load the paper with th e top forward and the side to be printed facing up. Adjus t the media
guides to fit the width of the paper.
2 Print the document.
Note To print a single-page cover letter on letterhead, followed by a multiple-page document, load the
standard paper in the main input tray first, then load the letterhead into the priority input tray. The
product automatically prints from the priority input tray first.
for more
48 4 Printing EN
Page 51

Printing custom-sized media or card stock
HP LaserJet 3300 series products can print on custom-sized media or card stock between 76 by
127 mm. (3 by 5 inches) and 216 by 356 mm. (8.5 by 14 inches). Depending on the media, you
can print up to 10 sheets from the priority input tray. Use the main input tray for more than 10
sheets.
Note Make sure that the sheets are not stuck together before you load them.
To print custom-sized media or card stock
1 Open the straight-through output door.
2 Load the media with the narrow side forward and the side to be printed facing up. Adjust the
side and rear media guides to fit the media.
3 Select the correct size in the printer settings. (Software settings can override printer
properties.)
4 If printing on card stock, access the optimizing feature from the Paper tab in your Windows
printer driver. Then select Optimize for: and choose Card stock from the drop-down list.
5 Print the document.
Printing on both sides of the media (manual duplexing)
To print on both sides of the media (manual duplexing), you must run the media through the printer
twice. You can print using the normal output path or the straight-through output path.
Hewlett-Packard recommends that you use the normal output path for lightweight paper and use
the straight-through output path for any heavy media or media that curls when printed.
See the following topics for more information:
To duplex manually on lightweight media
To duplex manually on heavy media or card stock (straight-through output path)
Note Manual duplexing is supported only in Windows.
Manual duplexing can cause the product to become dirty, reducing print quality. If the product
becomes dirty, see Cleaning and maintenance
EN Printing custom-sized media or card stock 49
for instructions.
Page 52

To duplex manually on lightweight media
1 Make sure that the straight-through output door is closed.
1
2 Access the printer properties (for instructions, see Changing
settings from your compu ter). On the Finishing tab, click Print on
Both Sides, select the Flip Pages Up check box, and click OK.
Print the document.
3 After side one has printed, remove the remaining paper from the
input tray, and set it aside until after you finish your manual
duplexing job.
3
4
5
4 Gather the printed pages, keep the printed side down, and
straighten the stack.
5 Remove the priority input tray and place the stack of media back in
the input tray. Side one should be facing down with the top edge
toward the printer. Replace the priority input tray.
6 Click Continue (on screen) and wait for side two to print.
50 4 Printing EN
Page 53
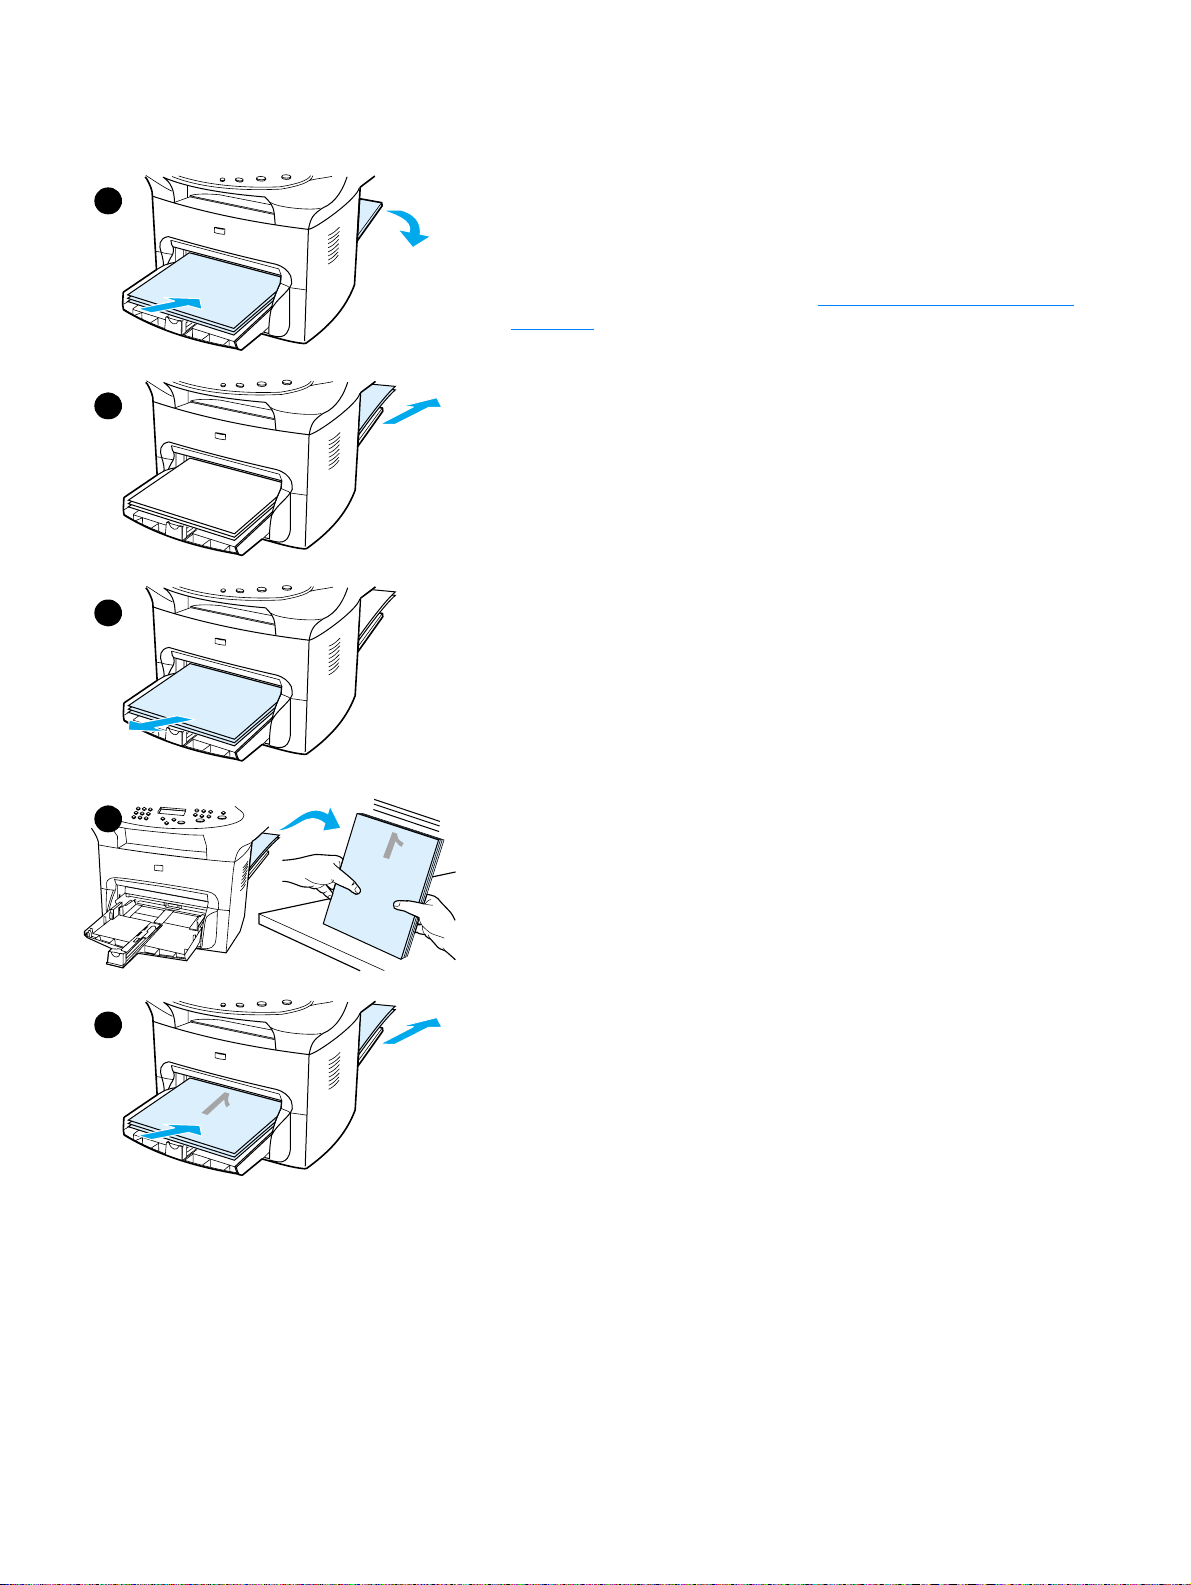
To duplex manually on heavy media or card stock (straight-through output path)
For heavy media, such as card stock, use the straight-through output
1
path.
1 Load the media, and open the straight-through output door on the
back of the product.
2 Access the printer properties. See Changing settings from your
computer for instructions. On the Finishing tab, click Print on Both
Sides, select the Straight Paper Path check box, and click OK.
Print the document.
2
3
4
3 After side one has printed, remove the remaining paper from the
input tray and set it aside until after you finish your manual
duplexing job.
4 Gather the printed pages, turn the printed side down, and
straighten the stack before placing it back in the input tray. Side one
should be facing down with the top edge toward the printer.
5 Click Continue (on screen), and wait for side two to print.
5
EN Printing on both sides of the media (manual duplexing) 51
Page 54

Printing multiple pages on a single sheet of media
You can select the number of pages that you want to print on a single sheet of media. If you
choose to print more than one page per sheet, the pages appear smaller and are arranged on the
sheet in the order that they would otherwise be printed. You can specify up to nine pages per
sheet of media for Macintosh, or up to 16 for Windows.
To print multiple pages on a single sheet (Windows)
1 From your software application, access the printer properties. See Changing settings from
your computer for instructions.
2 On the Finishing tab under Pages Per Sheet, specify the number of pages per sheet that you
want to print. You can print up to 16 pages per sheet with a Windows OS.
3 There is also a check box for page borders and a drop-down menu to specify the order of
pages printed on the sheet.
To print multiple pages on a single sheet (Macintosh)
1 From the General drop-down list, select Layout.
2 In the Pages Per Sheet drop-down list, select the number of pages per sheet to print. Y ou can
print up to nine pages per sheet with a Macintosh OS.
52 4 Printing EN
Page 55

Printing booklets
You can print booklets on letter, legal, executive, or A4 paper. This function is available for
Windows users only.
To print booklets
1
3
4
1 Load the paper, and make sure that the straight-through output
door is closed.
2 Access the printer properties. See Changing settings from your
computer for instructions. On the Finishing tab, select Print on
Both Sides, and select Letter (Left Binding) or Letter (Right
Binding) in the Booklet drop-down menu. Print the booklet.
3 After side one has been printed, remove the remaining paper from
the input tray, and set it aside until your booklet job is complete.
4 Gather the printed pages, keep the printed side down, and
straighten the stack of paper.
5 Place the printed pages back in the input tray. Side one should be
facing down with the top edge toward the printer.
6 Click Continue (on screen), and wait for side two to print.
7 Fold and staple the pages.
5
7
8
9
EN Printing booklets 53
Page 56

Printing watermarks
You can use the watermark option to print text “underneath” (in the background) of an existing
document. For example, you might want to have large gray letters reading Draft or Confidential
printed diagonally across the first page or all of the pages of a document.
To access the watermark feature
1 From your software application, access the printer properties. See Changing settings from
your computer for instructions.
2 On the Effects tab (Windows) or the Watermark/Overlay screen (Macintosh), specify the
type of watermark that you want to print on your document.
54 4 Printing EN
Page 57

5
Copying
Use these instructions to perform copying tasks with your HP LaserJet 3300 product:
● Starting a copy job
● Canceling a copy job
● Adjusting copy quality for the current job
● Adjusting the default copy quality
● Adjusting the lighter/darker (contrast) setting for the current job
● Adjusting the default lighter/darker (contrast) setting
● Reducing or enlarging copies for the current job
● Adjusting the default copy size
● Changing the copy collation setting
● Changing the number of copies
● Using HP LaserJet Copier software
● Using HP LaserJet Copy Plus software
● Copying photos, two-sided originals, or books
EN 55
Page 58

Starting a copy job
To make copies with your HP LaserJet 3300 series product, use the following instructions:
1 Load your original document onto the flatbed scanner face down (one page at a time) with the
top left corner of the document located in the lower right corner of the glass.
OR
Load your original document face up into the ADF input tray.
2 Press start/copy on the product’s control panel to start copying.
3 Repeat the process for each copy.
For more detailed instructions on loading originals onto the flatbed scanner or into the ADF input
tray, see Loading originals to copy or scan
Note If there are originals loaded in the ADF input tray and on the flatbed scanner, the product
automatically scans from the ADF regardless of whether there is an original on the flatbed scanner.
.
Canceling a copy job
To cancel a copy job, use one of the following methods:
● Press cancel on the control panel. If more than one process is running, it clears the process
that currently appears on the display panel.
● For copies started with the HP LaserJet Copier, click Cancel in the onscreen dialog box.
Note If you cancel a copy job, clear the original document from the flatbed scanner or from the ADF.
Adjusting copy quality for the current job
The default setting for copy quality is Text. This setting is the best for items that contain mostly
text.
When making a copy of a photo or graphic, you can select the Photo setting to increase the
quality of your copy, or select the Best Photo setting for the highest photo quality.
If you want to conserve toner, and the copy quality is not that important, select Draft. To change
the default copy quality, see Adjusting the default copy quality
To adjust the copy quality for the current job
1 From the control panel, press quality to display the current quality setting for the copy.
2 Use the < and > buttons to scroll through the quality setting options.
3 Select a resolution setting and press start/copy to save the selection and immediately start
the copy job, or menu/enter to save the selection without starting the job.
Note The change in the copy quality setting will remain active for two minutes after the copy job has been
completed.
.
56 5 Copying EN
Page 59

Adjusting the default copy quality
The default setting for copy quality is Text. This setting is the best for items that contain mostly
text. When making a copy of a photo or graphic, you can select Photo or Best Photo to
increase the quality. If you want to conserve toner and the copy quality is not that important, select
Draft. To change the copy quality for the current copy job only, see Adjusting copy quality for the
current job.
To adjust the copy quality
1 From the control panel, press menu/enter.
2 Use the < and > buttons to select Copy Setup and press menu/enter.
3 Press menu/enter to select Default Quality.
4 Use the < or > button to scroll through the choices.
5 Press menu/enter to save the selection.
Adjusting the lighter/darker (contrast) setting for the current job
The lighter/darker setting affects the lightness or darkness (contrast) of the copy. Use the following
procedure to change the contrast for the current copy job only. After the copy has been made, the
contrast setting returns to the default.
Note To change the default copy contrast, see Adjusting the default lighter/darker (contrast) setting.
To adjust the lighter/darker setting for the current job
1 Press lighter/darker to display the current contrast setting.
2 Use the < or > button to adjust the setting. Move the slider to the left to make the copy lighter
than the original, or move the slider to the right to make the copy darker than the original.
3 Press press start/copy to save the selection and immediately start the copy job, or
menu/enter to save the selection without starting the job.
Adjusting the default lighter/darker (contrast) setting
The default lighter/darker setting affects all copy jobs. To adjust the lighter/darker setting for the
current copy job only, see Adjusting the lighter/darker (contrast) setting for the current job
To adjust the default lighter/darker setting
1 Press menu/enter.
2 Use the < or > button to select Copy Setup and press menu/enter.
3 Use the < or > button to select Def. Light/Dark and press menu/enter.
.
4 Use the < or > button to adjust the setting. Move the slider to the left to make all copies lighter
than the original, or move the slider to the right to make all copies darker than the original.
5 Press menu/enter to save the selection.
EN Adjusting the default copy quality 57
Page 60

Reducing or enlarging copies for the current job
The HP LaserJet 3300 series product can reduce copies to as small as 25% of the original or
enlarge copies to as much as 400% of the original. It can also make the following reductions or
enlargements automatically:
● Original: (100%)
● Legal to Letter: (78%)
● Legal to A4: (83%)
● A4 to Letter: Full page (94%)
● Letter to A4: Fit to page when copying (97%)
● Full Page: (91%)
● Fit To Page
● 2 pages per sheet
● 4 pages per sheet
● Custom: (25-400%)
Note When using the Fit To Page setting, copy from the flatbed scanner only.
Note When using the 2 pages per sheet or 4 pages per sheet setting, copy from the ADF only. These
options will not display unless the ADF is installed.
To reduce or enlarge copies for the current job
To reduce or enlarge copies for the current job only, use the following instructions:
1 From the control panel, press reduce/enlarge.
2 Enter the size to which you would like to reduce or enlarge the copies in this job. You can
choose Original=100%, Ltr To A4, A4 To Ltr, Lgl To Ltr, Lgl To A4, Full
Page, Fit to Page, or Custom: 25-400%.
3 If you choose Custom 25-400%, enter a percentage using the numeric keypad.
4 Press press start/copy to save the selection and immediately start the copy job, or
menu/enter to save the selection without starting the job.
Note You must change the default paper size in the paper input tray to match the output size or part of
your copy may be cut off. For instructions, see Changing the default paper size.
Adjusting the default copy size
The default copy size is the size to which copies are normally reduced or enlarged. If you keep the
factory default size set to Original (100%), all copies will be the same size as the original
document.
Note If you only want to adjust the copy size for the job you are currently copying, see Reducing or en larging
copies for the current job.
58 5 Copying EN
Page 61

To change the default copy size
1 Press menu/enter.
2 Use the < or > button to select Copy Setup and press menu/enter.
3 Use the < or > button to select Def. Redu/Enlrg and press menu/enter.
4 Use the < or > button to select the option for how you normally want to reduce or enlarge
copies. You can choose Original=100%, Ltr To A4, A4 To Ltr , Lgl To Ltr, Lgl To
A4, Full Page, Fit to Page, or Custom: 25-400%. If you choose Custom, type in the
percentage of the original size that you normally want for copies.
5 Press menu/enter to save your selection.
Changing the copy collation setting
You can set the product to automatically collate multiple copies into sets. For example, if you are
making two copies of three pages and automatic collation is on, the pages print in this order:
1,2,3,1,2,3. If automatic collation is off, the pages print in this order: 1,1,2,2,3,3.
To use automatic collation, the original document must fit into memory. If it does not, the product
makes only one copy and displays a message notifying you of the change. If that happens, use
one of the following methods to finish the job:
● Split the job into smaller jobs containing fewer pages.
● Make only one copy of the document at a time.
● Turn off automatic collation.
● If using the Best Photo quality setting, try using the Photo setting instead.
The collation setting you choose is in effect for all copies until you change the setting.
The collation setting can also be changed from the product software. For instructions on accessing
settings from the product software, see Changing settings from your computer
To change the copy collation setting for the current job
To change the copy collation setting for the current job, press collation on the control panel.
If the copy collation setting is On, press collation to turn it Off for the current job. If the copy
collation setting is Off, press collation to turn it On for the current job.
To change the default copy collation setting
To change the copy collation default, use the following instructions:
1 From the control panel, press menu/enter.
2 Use the < and > buttons to select Copy Setup and press menu/enter.
3 Press menu/enter to select Def. Collation.
4 Use the < and > buttons to select On or Off.
5 Press menu/enter to save your selection.
Note The default set at the factory for automatic copy collation is On.
.
EN Changing the copy collati on sett ing 59
Page 62

Changing the number of copies
You can choose to have the default number of copies be any value from 1 to 99.
To change the number of copies for the current job
1 From the product’s control panel, press # of copies and use the < and > buttons to inicrement
or decrement the quantity that appears in the control panel display;
OR
Use the numeric keypad to enter the number of copies (between 1 and 99) that you want to
make for your current job.
2 Press start/copy to begin copying your job.
To change the default number of copies
1 From the control panel, press menu/enter.
2 Use the < and > buttons to select Copy Setup and press menu/enter.
3 Use the < and > buttons to select Def. # of Copies and press menu/enter.
4 Use the numeric keypad to enter the number of copies (between 1 and 99) that you want as
the default.
5 Press menu/enter to save your selection.
Note The default set at the factory for number of copies is 1.
Using HP LaserJet Copier software
You can use HP LaserJet Copier to perform any of the following tasks when you copy your original:
● Print up to 99 copies of the same document
● Enable or disable collation
● Reduce or enlarge the image
● Adjust the contrast
● Specify the copy quality
● Make color copies by sending to a color printer using HP LaserJet Copy Plus
Note This functionality is not available in Windows 95.
To access HP LaserJet Copier (Windows or Macintosh)
To access HP LaserJet Copier, use one of the following methods:
● From HP LaserJet Director, click Copy or Copy Plus.
● From the Windows task bar, click Start, Programs, HP LaserJet 3300, and HP LaserJet
Copier.
● From HP LaserJet Document Manager (Windows), click the Copier icon.
OR
From HP Workplace (Macintosh), click the Copy or Copy Plus icon.
60 5 Copying EN
Page 63

Note If you click the Copy Plus icon in addition to the standard copier settings, you can also adjust the
brightness of your copies and send the copy to another printer, including a color printer. For more
information, see Using HP LaserJet Copy Plus software.
Note For more information on using these features, see the product software Help.
Using HP LaserJet Copy Plus software
You can use HP LaserJet Copy Plus to send a scanned image to any installed Windows printer,
including color printers, enabling you to make color copies. You can also access other advanced
features, such as multiple pages per sheet copying and watermarks.
To access HP LaserJet Copy Plus (Windows)
To access HP LaserJet Copy Plus, use one of the following methods:
● From HP LaserJ et Director, click Copy Plus.
OR
Click Copy and select, I want to copy to another printer.
● From the Windows task bar, click Start, Programs, HP LaserJet 3300, and HP LaserJet
Copier. Select I want to copy to another printer.
Note This functionality is not available in Windows 95.
To access HP LaserJet Copy Plus (Macintosh)
1 From the HP LaserJet Director, click Customize.
2 Click the Customization tab.
3 Enable Copy Plus by checking the Copy Plus check box.
4 Click OK.
The HP LaserJet Director will now display a Copy Plus option. This can be used in the same
manner as the HP LaserJet Copier, see To access HP LaserJet Copier (Windows or Macintosh)
.
EN Using HP LaserJet Copy Plus software 61
Page 64

Copying photos, two-sided originals, or books
To copy or scan a photo
1 Place the photo on the flatbed scanner with the picture side down and the top left corner of the
photo in the lower right corner of the glass.
2 Gently close the lid.
3 You are now ready to scan or copy the photo using one of the methods described. See
Understanding scanning methods
for more information.
To copy a multiple page stack of 2-sided
1
3
5
originals
1 Load the stack of originals to be copied into the ADF with the first
page up.
2 Press start/copy. The odd-numbered pages will be copied and
printed.
3 Remove the stack from the ADF output tray and load the stack with
the last page up and facing forward.
4 Press start/copy. The even-numbered pages will be printed.
5 Collate the odd and even-numbered printed copies.
62 5 Copying EN
Page 65

To copy a book
1
2
3
1 Lift the lid and place the book on the flatbed scanner with the
desired book page located in the lower right corner of the glass.
2 Gently close the lid.
3 Gently press down on the lid to press the book to the flatbed
scanner surface.
4 Press start/copy, or use one of the other described methods to
copy or scan the book.
5 If your product does not have an ADF, the rear hinge may lift up to
accommodate the book. Gently press down on the center of the lid
to press the book to the flatbed scanner. If the lid comes out, align
the hinge posts to the recesses and reinstall.
5
EN Copying photos, two-sided originals, or books 63
Page 66

64 5 Copying EN
Page 67

6
Scanning
Use the following instructions to perform scanning tasks with your HP LaserJet 3300 series
product:
● Understanding scanning methods
● Scanning from the product’s control panel
● Canceling a scan job
● Scanning with the product software
● Scanning with TWAIN-compliant software
● Archiving scanned text or images
● Scanning with OCR
● Enhancing images with HP LaserJet Document Manager or HP Photo Center
● Adding annotations to HP documents
● Adding annotations to scanned image files
● Sending scanned items as e-mail attachments
● Scanner resolution and color
EN 65
Page 68

Understanding scanning methods
The HP LaserJet 3300 series product offers four ways to scan an item:
● Scan from the product: Start scanning directly from the product using the control panel’s
scan buttons. The start scan and scan to buttons can be programmed to scan to a
destination. For more information, see Scanning from the product’s control panel
● Scan from the HP LaserJet Director: Use the HP LaserJet Director for one-touch scanning
to specific programmed destinations, such as saving to a file, sending it to e-mail, or
converting it to document files.
● Scan from the HP LaserJet Scan Control Viewer: Use the HP LaserJet Scan Control
Viewer to customize your scan and send it to a selected destination. For more information, see
Scanning with the product software
Viewer are:
• Click Scan from the Document Manager.
• Click Scan from the HP LaserJet Director.
• Select Scanner from the program group in the Start menu.
● Scan from TWAIN-compliant software: If you are using Microsoft Windows 95 and want to
scan documents, you must use a TWAIN-compliant application. For all other operating
systems, using TWAIN-compliant software is optional. For more information, see Scanning
with TWAIN-compliant software.
.
. The three ways to access the HP LaserJet Scan Control
Note To learn about optical character recognition (OCR) software, see Scanning with OCR.
Note Scan buttons are not available on the 3310 model.
Scanning from the product’s control panel
Note If you purchased the HP LaserJet 3310 product, scanning from the control panel is not available. To
scan with the 3310, see Scanning with the product software.
Use the following instructions to scan directly from your HP LaserJet 3300 series product:
● To scan from the product’s control panel using the start scan button
● To use the scan to button via USB or parallel connection
● To use the scan to button via network connection
● To reprogram the scan to button destinations
● To reprogram the start scan button
Note For the best scan quality, load your originals onto the flatbed scanner.
To scan from the product’s control panel using the start scan button
To scan from the product’s control panel, use the following instructions. For more detailed
information on loading original documents onto the flatbed scanner or into the ADF input tray, see
Loading originals to copy or scan
66 6 Scanning EN
.
Page 69

1 Load the originals to be scanned face up in the ADF input tray and adjust the media guides.
OR
Lift the flatbed cover and load the original to be scanned face down on the flatbed scanner
with the top left corner of the document located in the lower right corner of the glass. Gently
close the lid.
2 To start scanning, press start scan on the product’s control panel.
Note T o scan to a particular destination, you can program the start scan button or use th e scan to button
on the product’s control panel. For more information, see To reprogram the start scan button
To reprogram the scan to button destinations.
and
To use the scan to button via USB or parallel connection
To scan to a destination using the scan to button on the product’s control panel, use the following
instructions:
1 Press scan to on the control panel.
2 Use the < and > buttons to select a destination.
3 Press start scan or menu/enter.
To use the scan to button via network connection
To use scan to through a network connection, the Display Name must be configured. The Display
Name is configured as follows:
1 From the HP LaserJet Director, click the Customize button to open the Customize property
sheet.
2 Select the Monitor Device tab.
3 Enter the text that you wish to use to identify your PC in the Display Name edit box (9
characters maximum).
4 Click Apply to make the changes and keep the Customize dialog box open, or OK to keep the
changes and return to the HP LaserJet Series Director. New destinations that include this
Display Name will now appear in the device scan to destin ations list.
5 Follow the instructions in To use the scan to button via USB or parallel connection
this destination.
to scan to
To reprogram the scan to button destinations
1 From the HP LaserJet Director, click the Customize button to open the Customize property
sheet.
2 Select the Monitor Device tab.
3 From the Device Scan To Button Settings group box, select the desired destinations, one at a
time, and click the Add button to add to the scan to list.
4 To edit the device display string or update the e-mail address for a recipient, select the
destination in the scan to list and click the Edit button.
5 To remove a destination from the scan to list, select the destination and click the Remove
button.
6 Click Apply to make the changes and keep the Customize dialog box open, or OK to keep the
changes and return to the HP LaserJet Director.
EN Scanning from the product’s control panel 67
Page 70

To reprogram the start scan button
To program the start scan button to use a scan to destination, use the following instructions:
1 From the HP LaserJet Director, click the Customize button to open the Customize property
sheet.
2 Select the Monitor Device tab.
3 Choose an action from the drop-down list. The default setting is Open the HP LaserJet
Director.
Canceling a scan job
To cancel a scan job, use one of the following methods:
● Press cancel on the control panel.
● Click the cancel button in the onscreen dialog box.
Note If you cancel a scan job, clear the original document from the flatbed scanner or from the ADF.
Note These functions vary with Macintosh computers.
Scanning with the product software
You can perform most scanning functions from HP LaserJet Di rector.
HP LaserJet Director is not supported for Microsoft Windows 95. If you are using Windows 95, see
Scanning with TWAIN-compliant software.
For more detailed instructions on loading original documents onto the flatbed scanner or into the
ADF input tray, see Loading originals to copy or scan.
To scan using HP LaserJet Director (Windows)
1 Load the originals to be scanned face up in the ADF input tray, with the top of the document
forward, and adjust the media guides.
OR
Lift the flatbed cover and load the original to be scanned face down on the flatbed scanner
with the top left corner of the document located in the lower right corner of the glass. Gently
close the li d.
2 Press start scan on the product’s control panel. If you are using the ADF, the HP LaserJet
Director launches automatically. If you are on a network, scanning from the flatbed scanner, or
the HP LaserJet Director does not automatically open, click the Start button on the Windows
task bar, point to Programs, and click HP LaserJet Director or click on it in the System T ray.
3 To open the HP LaserJet Scan Control Viewer dialog box, click the Scan button on
HP LaserJet Director.
4 Specify a scan destination.
5 If you want to scan in color, select the Color radio button.
• If there are originals loaded in the ADF input tray and on the flatbed scanner, the product
automatically scans from the ADF regardless of whether there is an original on the flatbed
scanner.
6 Choose the option to scan all pages at once.
68 6 Scanning EN
Page 71

• If you choose to scan page-by-page, see To use page-by-page scanning (Windows)
7 Click Scan.
8 If there are originals loaded in the ADF, all of the pages are scanned automatically. If the ADF
is empty, one page is scanned from the glass. The entire document is then sent to the
specified destination.
• If you send a scanned document to a file, a printer, or an e-mail application, a secondary
dialog box opens and prompts you for additional information.
.
To scan using HP LaserJet Director (Macintosh)
1 Load the originals to be scanned face up in the ADF input tray and adjust the media guides.
OR
Lift the flatbed cover and load the original to be scanned face down on the flatbed scanner
with the top left corner of the document located in the lower right corner of the glass. Gently
close the lid.
2 If the product is connected directly to your computer, the HP LaserJet Director opens after you
insert an item into the ADF input tray.
OR
If you are on a network, scanning from the flatbed scanner, or HP LaserJet Director does not
automatically open, double-click the desktop alias for the HP LaserJet Director.
3 To open the HP LaserJet Scan Control Viewer dialog box, click the Scan button in
HP LaserJet Director.
4 Specify an image type.
5 Choose the option to Scan All.
• If you choose to scan page-by-page, see To use page-by-page scanning (Macintosh)
6 After all the pages have completed the scanning process, choose Send To Destination, then
choose Send Now!
OR
Use the Save As icon to save the pages to a disk file.
.
To use page-by-page scanning (Windows)
1 Load the originals to be scanned face up in the ADF input tray and adjust the media guides.
OR
Lift the flatbed cover and load the original to be scanned face down on the flatbed scanner
with the top left corner of the document located in the lower right corner of the glass. Gently
close the lid.
2 Press start scan on the product’s control panel. If you are using the ADF, the HP LaserJet
Director launches automatically. If you are on a network, scanning from the flatbed scanner, or
the HP LaserJet Director does not automatically open, click the Start button on the Windows
task bar, point to Programs, and click HP LaserJet Director or click on it in the System Tray.
3 From the HP LaserJet Director, click Scan to launch the HP LaserJet Scan Control Viewer.
4 From the HP LaserJet Scan Control Viewer, select the option to scan one page at a time and
then click Scan. The first page is scanned and appears in the Preview window.
• If you send a scanned document to a file, a printer, or an e-mail application, a secondary
dialog box appears and prompts you for additional information.
5 Specify a destination to send the scan to, and change the settings accordingly.
6 Use the Viewer modes as necessary by clicking the corresponding button on the toolbar
located in the upper right corner of the Preview window.
EN Scanning with the product software 69
Page 72

• Selection mode allows you to specify the area in which to save.
• Edit Region mode allows you to edit the region areas and types.
7 Click Accept to save the current image.
8 If you wish to scan another page, click Yes in the message box that displays. Repeat steps 4
through 7 to scan more pages. Click No in the message box to send the current scan to its
destination.
To use page-by-page scanning (Macintosh)
1 Load the originals to be scanned face up in the ADF input tray and adjust the media guides.
OR
Lift the flatbed cover and load the original to be scanned face down on the flatbed scanner
with the top left corner of the document located in the lower right corner of the glass. Gently
close the li d.
2 If the product is connected directly to your computer, the HP LaserJet Director opens after you
insert an item into the ADF input tray.
OR
If you are on a network, scanning from the flatbed scanner, or HP LaserJet Director does not
automatically open, double-click the desktop alias for the HP LaserJet Director.
3 To open the HP LaserJet Scan Control Viewer dialog box, click the Scan button on
HP LaserJet Director.
4 Specify an image type.
5 Choose To Scan.
6 After the scan process has finished, choose Scan another page.
7 Repeat step 6 for each page of the document.
8 After all the pages have completed the scanning process, choose Send To Destination, then
choose Send Now!
OR
Use the Save As icon to save the pages to a disk file.
Scanning with TWAIN-compliant software
Note If you are using Windows 95 and want to scan documents, you will have to use a TWAIN-compliant
application. For all other operating systems, you may use a TWAIN-compliant application or the
product software.
The HP LaserJet 3300 series product is TWAIN-compliant and works with Windows- and
Macintosh-based programs that support TWAIN-compliant scanning devices. While in a
TWAIN-enabled program, you can access the scanning feature and scan an image directly into the
open application. To do so, follow the program’s instructions for acquiring an image using TWAIN.
For more specific information, see the product software Help.
Note The Macintosh product software is TWAIN version 1.9 compliant.
To use flatbed scanner preview scan
Use this procedure to preview the scanned image when you are using the TWAIN interface in
Windows.
70 6 Scanning EN
Page 73

1 In the scan (or TWAIN) software, click the preview button. The scanner will scan the image
and then display it in the preview screen.
2 If you want to save only part of the image, select the area that you want to save. The selected
area will be saved to the preset scan destination.
Archiving scanned text or images
HP software provides direct access to your file management system, which means you can quickly
store scanned images in any directory you choose. You can use HP LaserJet Director or
HP LaserJet Document Manager to store scanned images.
To archive a scanned image
1 Load the originals to be scanned face up in the ADF input tray, with the top of the document
forward, and adjust the media guides.
OR
Lift the flatbed cover and load the original to be scanned face down on the flatbed scanner
with the top left corner of the document located in the lower right corner of the glass. Gently
close the lid.
2 Press start scan on the product’s control panel. If you are using the ADF, the HP LaserJet
Director launches automatically. If you are on a network, scanning from the flatbed scanner, or
the HP LaserJet Director does not automatically open, click the Start button on the Windows
task bar, point to Programs, and click HP LaserJet Director or click on it in the System Tray.
3 In the HP LaserJet Director, click Archive. If the HP LaserJet Director does not display an
Archive option, use the Customize option in the HP LaserJet Director to activate the Archive
feature.
4 The document is scanned and stored in the destination specified by the user in the Save As
dialog.
To use the archive feature (Macintos h)
1 Load the originals to be scanned face up in the ADF input tray and adjust the media guides.
OR
Lift the flatbed cover and load the original to be scanned face down on the flatbed scanner
with the top left corner of the document located in the lower right corner of the glass. Gently
close the lid.
2 If the product is connected directly to your computer, the HP LaserJet Director opens after you
insert an item into the ADF input tray.
OR
If you are on a network, scanning from the flatbed scanner, or HP LaserJet Director does not
automatically open, double-click the desktop alias for the HP LaserJet Director.
3 In the HP LaserJet Director, click Archive. If the HP LaserJet Director does not display an
Archive option, use the Customize option in the HP LaserJet Director to activate the Archive
feature.
4 The paper document is scanned, and the created document is opened in the HP Workplace.
5 If necessary, you can crop the image or add annotations.
6 Select File. Then select Save to save the document to disk.
EN Archiving scanned text or images 71
Page 74

Scanning with OCR
To edit scanned text (Windows and Macintosh)
You can use the OCR software to import scanned text into your preferred word processing
application for editing. This allows you to edit faxes, letters, newspaper clippings, and many other
documents. The HP LaserJet Director allows you to specify the word processing application you
want to use for editing.
Note OCR cannot recognize handwritten text.
To change the OCR word processing application
You can change the default word processing program that is used for OCR.
1 Open the HP LaserJet Director.
2 Click the Customize button.
3 Select the Button Customization tab.
4 Select OCR, then click the Options button.
5 Select the desired word processing application from the Select Application drop-down list.
6 Click Next and select the application’s icon if it is not already selected.
7 Click Finish.
8 Click Apply or OK to save your selection.
Note Due to the complexity of some word processing applications and their interaction with the product,
it is sometimes preferable to scan to Wordpad (a Windows accessory) and then cut and paste the
text into your preferred word processing application.
To use HP LaserJet Director’s OCR feature
1 Load the originals to be scanned face up in the ADF input tray, with the top of the document
forward, and adjust the media guides.
OR
Lift the flatbed cover and load the original to be scanned face down on the flatbed scanner
with the top left corner of the document located in the lower right corner of the glass. Gently
close the li d. See Loading originals to copy or scan
2 Press start scan on the product’s control panel. If you are using the ADF, the HP LaserJet
Director launches automatically. If you are on a network, scanning from the flatbed scanner, or
the HP LaserJet Director does not automatically open, click the Start button on the Windows
task bar, point to Programs, and click HP LaserJet Director or click on it in the System T ray.
3 In HP LaserJet Director, click OCR.
4 The original is scanned, and your word processing software application launches
automatically.
for more information.
5 The scanned text has been optically recognized and is now ready to edit using your word
processing application.
72 6 Scanning EN
Page 75

Note If the word processing icon is not present or active, either you do not have a word processing software
application installed on your computer or the scanner software did not recognize the application
during the installation. For instructions on how to create a link to your word processing application,
see To change the OCR word processing application.
Note The OCR software does not support scanning colored text. Colored text will always be converted to
black and white text before being sent to OCR; thus, all text in the final document will be black and
white regardless of the original color.
EN Scanning with OCR 73
Page 76

Enhancing images with HP LaserJet Document Manager or HP Photo
Center
You can use HP LaserJet Document Manager or HP Photo Center to make the following
enhancements to scanned images:
● Contrast
● Brightness
● Color adjustment
● Crop
● Effects
● Invert
● Red-eye removal
● Rotate and flip
● Sharpen
● Straighten
Note If you are using the Macintosh product software, these features are found in the HP Workplace.
However, not all of the features listed above are supported by the Macintosh software.
To access image enhancement features (Windows)
● From HP LaserJet Document Manager, open a document and select an image enhancement
feature from the Image menu.
● For the Photo Center, first open a document then turn on Advanced menus from the View
menu in order to display the Image menu.
Note For instructions on using HP LaserJet Document Manager’s image enhancement features, see the
product software Help.
Adding annotations to HP documents
You can use HP software to modify and annotate scanned documents that are saved as
HP documents (.hpd extension). You can add any of the following elements to an HP document:
● Text
● Electronic sticky notes
● Highlights (to text or graphics)
● Rubber stamp (for example, Confidential)
● Lines and arrows
● Hyperlinks
To use annotations with other types of scanned documents, see Adding annotations to scanned
image files.
Note For complete instructions on using HP LaserJet Document Manager’s annotation features, see the
product software Help.
74 6 Scanning EN
Page 77

To access HP LaserJet Document Manager’s annotation features
Note These instructions apply to Windows users only.
1 If it is not open, open the document to be annotated in the HP LaserJet Document Manager.
2 Select an annotation tool from the Annotation menu.
To change the annotation settings
To change the annotations settings, open the Annotations menu and select Annotation
Properties.
Adding annotations to scanned image files
You can add annotations to .bmp, .tif, .jpg, and .gif files using the HP LaserJet Photo Center.
You can add the following annotation elements:
● Freehand drawing items
● Lines, rectangles, ovals, and polygons (filled or outlined)
● Text
To add annotations to an image file, select the Tools menu in the HP LaserJet Photo Center.
Sending scanned items as e-mail attachments
You can use either HP LaserJet Director or HP LaserJet Document Manager to scan to e-mail. Not
all e-mail applications are supported.
Note Scan to e-mail features are not supported in Windows 95.
To scan to e-mail (Windows)
Note If there are originals loaded in the ADF input tray and on the flatbed scanner, the product
automatically scans from the ADF regardless of whether there is an original on the flatbed scanner.
1 Open the HP LaserJet Director.
2 Load the originals to be scanned face up in the ADF input tray and adjust the media guides.
OR
Lift the flatbed cover and load the original to be scanned face down on the flatbed scanner
with the top left corner of the document located in the lower right corner of the glass. Gently
close the lid.
3 Press start scan on the control panel. If you are using the ADF, the HP LaserJet Director
launches automatically. If you are on a network, scanning from the flatbed scanner, or the
HP LaserJet Director does not automatically open, click the Start button on the Windows task
bar, point to Programs, and click HP LaserJet Direct or or click on it in the System Tray.
4 In HP LaserJet Director, click E-mail.
5 The original is scanned, and your computer e-mail software application launches and
automatically attaches the scanned image file to a new message. Enter an e-mail address and
click Send.
EN Adding annotations to scanned image files 75
Page 78

To scan to e-mail (Macintosh)
1 Load the originals to be scanned face up in the ADF input tray and adjust the media guides.
OR
Lift the flatbed cover and load the original to be scanned face down on the flatbed scanner
with the top left corner of the document located in the lower right corner of the glass. Gently
close the li d.
2 Open the HP LaserJet Director by double-clicking the HP LaserJet Director alias that appears
on the desktop.
3 Click the E-mail button.
4 When an e-mail appears with the scanned item attached, enter an e-mail address and click
Send.
To e-mail scanned files in an alternative mode
You can use an alternative mode to send a document in e-mail in any of the following situations:
● You do not have a compatible e-mail program.
● The E-mail button does not appear on the HP LaserJet Director.
● You do not have access to the HP LaserJet Director.
1 Load the originals to be scanned face up in the ADF input tray and adjust the media guides.
OR
Lift the flatbed cover and load the original to be scanned face down on the flatbed scanner
with the top left corner of the document located in the lower right corner of the glass. Gently
close the li d.
2 Use the HP LaserJet Director or other software to scan the document to the desktop or HP
LaserJet Scan Control Viewer.
3 Save the file in the format you want.
4 Open your e-mail program, attach the file as you normally would, enter an address, and click
Send.
Scanner resolution and color
If you are printing a scanned image or copying an image and the quality is not as you expected,
you might have selected a resolution or color setting in the copier/scanner software that does not
match your needs. Resolution and color affect scanned and copied images in the following ways:
● Image clarity
● Texture of gradations (smooth or rough)
● Scan and copy time
● File size
Resolution is measured in dots per inch (dpi) while color, gra yscale, and black and white define the
number of colors possible. You can adjust the scanner hardware resolution up to 600 dpi. The
software has the ability to perform an interpolated resolution up to 9600 dpi. You can set color and
grayscale at 1 bit (black and white) or 8 bit (256 levels of gray) to 24 bit (true color).
The resolution and color guidelines table lists simple tips that you can follow to meet your scanning
and copying needs.
76 6 Scanning EN
Page 79

Note Setting the resolution and color to a high value can create large files that take up disk space and
slow the scanning or copying process. It is important that you first determine how you are going to
use the scanned image.
Note Color and grayscale images achieve the best resolution when scanned from the flatbed scanner
rather than the ADF.
Resolution and color guidelines
Intended use Recommended resolution Recommended color settings
Fax 150 dpi ● Black and White
E-mail 150 dpi
Edit text 300 dpi
Print (graphics or text) 600 dpi for text and complex graphics
150 to 300 dpi for simple graphics
and photos
Display on screen 75 dpi
● Black and White if the image does not
require smooth gradation
● Grayscale if the image requires smooth
gradation
● Color if the image is in color
● Black and White
● Black and White for text and line art
● Grayscale for shaded or colored
graphics and photos
● Color if the image is in color
● Black and White for text
● Grayscale for graphics and photos
● Color if the image is in color
EN Scanner resolution and color 77
Page 80

Color
You can set the color values to the following settings when copying or scanning.
Setting Recommended use Where to set the color value
Color High quality color photos or documents in
which the color is important.
Black and White Use for text documents. Windows scanner software
Grayscale Use this setting when file size is an issue or
when you want a document or photograph
scanned quickly.
Photo Only Documents that contain mostly color an d
black and white photos.
Text Only Documents that contain mostly text. Windows or Macintosh TWAIN driver
Mixed Color Documents that contain mostly color
graphics.
Mixed Grayscale Documents that contain mostly black and
white graphics .
Photo Typical photo quality. Copier software
Windows scanner software
Windows scanner software
Windows or Macintosh TWAIN driver
Windows or Macintosh TWAIN driver
Windows or Macintosh TWAIN driver
Text Documents that contain m ostly text. Copier software
Best Photo Documents that contain mostly color and
black and white photos.
Best photo quality.
Draft To save toner when copying documents. Copier software
Copier software
78 6 Scanning EN
Page 81

7
Faxing
Use the instructions below to perform basic faxing tasks with your HP LaserJet 3300mfp product:
● Setting the information in the fax header
● Setting the answer mode
● Loading originals to fax
● Sending faxes
● Canceling a fax job
● Using manual dial
● Deleting faxes from memory
● Redialing manually
● Sending a fax at a future time
● Receiving faxes
● Receiving faxes to your computer
● About speed-dial codes, one-touch keys, and group-dial codes
● Managing group-dial codes
● Deleting all phone book entries
● Using dialing characters
● Inserting a dial prefix
● Using fax forwarding
● Using fax polling
● Enabling an extension phone
● Sending a fax by dialing from a telephone
● Changing the HP LaserJet 3330 product’s volume settings
● Changing the default resolution
● Changing the default contrast
● Changing the detect dial tone setting
● Changing how the product answers incoming faxes
● Changing rings-to-answer
● Changing answer ring patterns
● Changing the silence-detect mode
● Changing autoreduction settings for incoming faxes
● Enabling stamp received faxes
● Setting the fax error correction
● Selecting tone- or pulse-dialing mode
● Changing redial settings
● Using billing codes
EN 79
Page 82

Changing the V.34 setting
●
● Managing fax logs and reports
● Printing the fax activity log
● Setting the fax activity log to print automatically
● Printing a fax call report
● Setting fax call report print times
● Including the first page of each fax on the fax call report
● Printing a phone book report
● Printing the billing codes report
● Printing a T.30 protocol trace report
● Printing the block fax list
● Printing all fax reports
Setting the information in the fax header
To set the fax header
To set or change the fax header information, use the following steps. If you need help entering any
information, see Using dialing characters
.
1 On the control panel, press menu/enter.
2 Using the < and > buttons, select Time/Date, Header and press menu/enter.
3 Using the < and > buttons, select Fax Header, and press menu/enter.
4 Using the alphanumeric keypad, enter your fax number and press menu/enter.
5 Using the alphanumeric keypad, add the name of your company and press menu/enter.
Setting the answer mode
Depending on your situation, you can set the HP LaserJet 3330’s answer mode to automatic or
manual.
● Automatic: In automatic answer mode, the product answers incoming calls after a specified
number of rings or upon recognition of special fax tones. To specify the number of rings, see
Changing rings-to-answer
● Manual: In manual answer mode, the product never answers calls. You must start the
fax-receiving process yourself, either by pressing start fax on the control panel or by picking
up a phone connected to that line and dialing 1-2-3.
The default answer mode is automatic.
Note Although most users leave the answer mode set to automatic, voice callers who dial the fax phone
number will hear fax tones if the phone is not answered, or if they do not hang up by the specified
number of rings-to-answer . If you do not want voice callers to hear fax tones, use the manual setting,
but remember that fax calls are not received automatically.
.
To set the answer mode
To set or change the answer mode, use the following steps:
1 On the control panel, press menu/enter.
80 7 Faxing EN
Page 83

2 Using the < and > buttons, select Fax Setup and press menu/enter.
3 Using the < and > buttons, select Fax Recv. Setup and press menu/enter.
4 Press menu/enter to select Answer Mode.
5 Using the < and > buttons, select Automatic or Manual and press menu/enter.
6 The control panel display shows the answer mode setting that you specified.
Loading originals to fax
Use the instructions below to load original documents for faxing.
To load fax documents into the ADF input tray
1 Before loading the fax documents into the ADF input tray , check to make sure there is nothing
on the flatbed scanner.
2 Put the top ends of the document to be faxed print side up in the ADF input tray with the first
page to be scanned at the top of the stack.
3 Push the document up against the side of the ADF input tray.
4 Slide the document into the ADF input tray until it does not move any farther.
The documen t is now ready to be faxed.
Sending faxes
To send a fax to one recipient
Note If you want to improve the quality of a paper document before faxing it, scan the document, straighten
or clean the image, and send it as a fax from the software. For more information, see the product
software Help.
1 Dial the fax number using one of the following methods:
• Use the alphanumeric buttons on the product’s control panel.
• If the fax number you are calling has been assigned to a one-touch key, press that key.
• If the fax number you are calling has a speed-dial code, press speed dial, enter the
speed-dial code using the alphanumeric buttons, and press menu/enter.
Note When dialing with the alphanumeric buttons, include any pauses or other needed numbers, such as
an area code, an access code for numbers outside a PBX system (usually a 9 or 0), or a long-distance
prefix. For more information, see Using dialing characters.
2 Load the document into the ADF input tray.
3 Press fax/send.
When the last page of the fax has exited the product, you can start sending another fax, copying,
or scanning.
To fax to numbers you use regularly, you can assign a one-touch key or speed-dial code. See To
program speed-dial codes and one-touch keys and To program group-dial codes. If you have
electronic phone books available, you may be able to use them for selecting recipients. Electronic
phone books are generated with third-party applications.
EN Loading originals to fax 81
Page 84

To send a fax to multiple recipients
You can send a fax to sever al fax numbers at once. If you want to send a fax to a group of fax
numbers that you have assigned to a group-dial code, see Managing group-dial codes
to send a fax to a group of numbers (maximum of 20) without a group-dial code, see To send a fax
to an ad hoc group.
In the rare instance that your document does not fit into memory, you will need to send the
document to each fax number one at a time or use HP LaserJet Director.
Note HP LaserJet Director is not supported for Microsoft Windows 95.
To send a fax using a group-dial code
1 Load the document into the ADF input tray.
2 Adjust any fax settings, such as contrast or resolution.
3 Press the one-touch key for the group.
OR
Press phone book, press the group-dial code assigned to the group, and press menu/enter.
4 Press fax/send.
The product scans the document into memory and sends the fax to each number specified. If a
number in the group is busy or does not answer, the product will redial the number based on its
redial setting. After multiple redial attempts fail, the product updates the Fax Activity Log with the
error and proceeds to the next number in the group.
. If you want
Note The Fax Activity Log feature is not supported in the software for Microsoft Windows 95, but you can
print the Fax Activity Log using the control panel. For instructions, see P rinti ng the fax activ ity log .
To send a fax to an ad hoc group
Use the following instructions to send a fax to a group of recipients that does not have an assigned
group-dial code:
1 Load the document into the ADF input tray or the flatbed scanner.
2 Dial the first fax number using one of the following methods:
• Use the alphanumeric buttons.
• If the fax number you are calling has a one-touch key, press that key.
• If the fax number you are calling has a speed-dial code, press phone book, enter the
speed-dial code using the alphanumeric buttons, and press menu/enter.
Note When dialing using the alphanumeric buttons, include any pauses or other needed numbers, such
as an area code, an access code for numbers outside a PBX system (usually a 9), or a long distance
prefix. See Using dialing characters for more information.
3 Press menu/enter.
4 To continue entering numbers, repeat steps 2 and 3.
OR
If you are finished entering numbers, go to the next step.
5 Press fax/send.
82 7 Faxing EN
Page 85

6 The product sends the fax to each fax number. If a number in the group is busy or does not
answer, the product will redial that number based on its redial setting. If multiple redial
attempts fail, the product updates the Fax Activity Log with the error and then proceeds to the
next number in the group.
Note The Fax Activity Log feature is not supported in the software for Microsoft Windows 95, but you can
print the Fax Activity Log using the control panel. For instructions, see Printing the fax activity log.
Canceling a fax job
Use these instructions to cancel a single fax currently dialing or a fax that is being transmitted or
received.
To cancel the current fax job
Press cancel on the control panel. Any pages that have not been transmitted are canceled.
To cancel a fax job using fax job status
Use this procedure to cancel a fax job in the following situations:
● The product is waiting to redial after a busy signal or no answer.
● The fax is going to a group of numbers.
● The fax is scheduled to be sent at a future time.
Use the following steps to cancel a fax job using fax job status:
1 Press menu/enter.
2 Press menu/enter to select Fax Job Status.
3 Use the < or > button to scroll through pending jobs until you reach the job you want to clear.
4 Press menu/enter to select the job you want to cancel.
5 Press menu/enter to confirm that you want the job to be canceled.
Using manual dial
Normally, the product dials after you press fax/send. At times, however, you might want the
product to dial each number as you press it. For example, if you are charging your fax call to a
calling card, you may need to dial the fax number, wait for the acceptance tone of your telephone
company, and then dial the calling card number. When dialing internationally, you might need to
dial part of the number and then listen for dial tones before continuing to dial.
To use manual dial
1 Load the document into the ADF input tray.
2 Press fax/send.
3 Begin dialing. The fax number dials as you press each digit. This allows you to wait for pauses,
dial tones, international access tones, or calling card acceptance tones before continuing to
dial.
EN Canceling a fax job 83
Page 86

Deleting faxes from memory
Use this procedure only if you are concerned someone else has access to your product and will
try to reprint faxes from memory.
CAUTION In addition to clearing the reprint memory, this procedure clears any fax currently being sent, unsent
faxes pending redial, faxes scheduled to be sent at a future time, and faxes not printed or forwarded.
To delete faxes from memory
1 Press menu/enter.
2 Press > once to display Fax Functions and press menu/enter.
3 Use the < or > button to select Clear Saved Faxs and press menu/enter.
4 Press menu/enter to confirm the deletion.
Redialing manually
If you want to send another document to the last fax number dialed, use the following procedure to
manually redial. If you are trying to resend the same document you sent the first time, you will
want to wait until the automatic redials have stopped or you have stopped them yourself.
Otherwise, the recipient might get the fax twice: once from the manual redial attempt and once
from one of the automatic redial attempts.
Note To stop the current redial attempt for a fax, or to cancel all pending, automatic redial attempts for a
fax, see Canceling a fax job. To change redial settings, see Changing redial settings.
To redial manually
1 Load the document into the ADF input tray.
2 Press redial/pause.
3 Press fax/send. The product redials the last number dialed and attempts to send the fax.
Sending a fax at a future time
You can schedule a fax to be sent automatically at a future time to one or more people. When you
complete this procedure, the product scans the document into memory and returns to the Ready
state so you can do other tasks.
Note This feature is not supported for Microsoft Windows 95.
Note If the product cannot transmit the fax at the scheduled time, it is indicated on the fax call report (if
that option is turned on), or logged in the fax activity log. This can happen in the case of no answer,
or if a busy signal results in the failure of redial attempts. (See Setting fax call report print times
Printing the fax activity log for more information.)
and
If you have set a fax to send at a future time but need to add something to it, you can send the
additional information as another job. All faxes scheduled to go to the same fax number on the
same date and time are delivered as individual faxes.
84 7 Faxing EN
Page 87

To send a fax at a future time
1 Load the document into the ADF input tray.
2 Press menu/enter.
3 Use the < or > button to display Fax Functions and press menu/enter.
4 Use the < or > button to display Send Fax Later and press menu/enter.
5 Use the alphanumeric buttons to enter the start time. If you are set to a 12-hour clock, use the
> button to move the cursor past the fourth character to set A.M. or P.M. Select 1 for A.M. or
select 2 for P.M., and press menu/enter.
OR
If you are set to a 24-hour clock, press menu/enter.
6 Use the alphanumeric buttons to enter the date and press menu/enter.
OR
Accept the default date by pressing menu/enter.
7 Type the fax number, enter the speed-dial code, or press the one-touch key. (This feature does
not support ad hoc groups.) Press menu/enter or fax/send. The product scans the document
into memory and sends it at the designated time.
Receiving faxes
You can receive faxes to the product or to your computer. In general, incoming faxes to the product
are automatically answered; however, if you change which devices are connected to the same
phone line that the product is connected to, you will need to change how the product answers
incoming faxes. See Changing how the product answers incoming faxes
the procedures in this section to manage faxes routed to the product.
● To receive faxes when you hear fax tones
● To reprint a fax
● To block or unblock fax numbers
for instructions. Follow
To receive faxes when you hear fax tones
If you have a phone line that receives both fax and phone calls, and you hear fax tones when you
answer the phone, you can start the receiving process in one of two ways:
● If you are close to the product, press fax/send on the control panel.
● When you answer any phone connected to the line (an extension phone) and hear fax tones,
the product should begin answering the call auto mat ic ally. If not, press 1-2-3 in sequence on
the telephone keypad, listen for fax transmission sounds, and then hang up.
Note For the second method to work, the extension phone setting must be set to Yes. See Enabling an
extension phone to check or change the setting.
To reprint a fax
If you want to reprint a fax because the print cartridge was empty or if the fax printed on the wrong
type of media, you can try to reprint it. The actual number of faxes stored for possible reprinting is
determined by the available memory. The most recent fax prints first; the oldest fax prints last.
These faxes are continuously stored, and reprinting them does not clear them from memory. To
clear these faxes from memory, see Deleting faxes from memory
EN Receiving faxes 85
.
Page 88

Note You do not need to use this procedure if the fax does not print because of a jam or because the
media runs out. During these situations, faxes are received to memory. As soon as you clear the
jam or refill the media, faxes automatically resume printing.
Use the following steps to reprint a fax:
1 Press menu/enter.
2 Press > once to display Fax Functions and press menu/enter.
3 Use the < or > button to display Reprint Last and press menu/enter. The product begins
reprinting the most recently printed fax.
Note To stop the printing at any time, press cancel.
To block or unblock fax numbers
If there are people or businesses from whom you do not want to receive faxes, you can block up to
30 fax numbers using the control panel. When you block a fax number and someone from that
number sends you a fax, the display panel indicates the number is blocked, the fax does not print,
and the fax is not saved in memory. Faxes from blocked fax numbers appear in the fax activity log
with a “discarded” designation. You can unblock blocked fax numbers individually or all at one time.
Note The fax activity log feature is not supported for Microsoft Windows 95, but you can print the fax
activity log using the control panel. See Printing the fax activity log.
Note To print a list of numbers you have blocked, see Printing the block fax list.
Use the following steps to block or unblock fax numbers using the control panel:
1 Press menu/enter.
2 Use the < or > button to select Fax Settings and press menu/enter.
3 Use the < or > button to select Fax Recv. Setup and press menu/enter.
4 Use the < or > button to select Block Faxes and press menu/enter.
5 Do one of the following:
• To block a fax number, use the < or > button to select Add Entry and press menu/enter.
Enter the fax number exactly as it appears in the header (including spaces) and press
menu/enter. Enter a name for the blocked number and press menu/enter.
• To unblock a single fax number, use the < or > button to select Delete Entry and press
menu/enter. Use the < or > button to select the fax number you want and press
menu/enter to confirm the deletions.
• To unblock all blocked fax numbers, use the < or > button to select Clear All and press
menu/enter. Press menu/enter again to confirm the deletions.
Receiving faxes to your computer
To receive faxes to your computer, you must enable the receive to PC setting in the software (see
the product software Help). If you have a phone line receiving both fax and voice calls (a shared
line) and an answering machine or computer voicemail on the line, you must turn off the answering
machine or voicemail to receive faxes to the computer. If you do not, either the answering system
answers all calls, or the PC fax program does. Because of this limitation, most users choose to
receive faxes to the product.
86 7 Faxing EN
Page 89

The receive to PC setting can only be activated from the computer. If f or any reason that computer
is no longer available or accessible, you can use the procedure below to turn the receive to PC
setting off from the product control panel.
To turn the receive to PC setting off from the control panel
1 Press menu/enter.
2 Use the < or > button to select Fax Functions and press menu/enter.
3 Use the < or > button to select Stop Recv To PC and press menu/enter to confirm your
selection.
4 Once the Stop Recv to PC setting has been selected, any faxes still in the product’s
memory are printed.
Note Y ou cannot use the receive to PC feature if the product is networked, or if you are using the Macintosh
software.
About speed-dial codes, one-touch keys, and group-dial codes
You can store frequently dialed fax numbers or groups of fax numbers as one-touch keys,
speed-dial codes, or group-dial codes.
In the product’s phone book, there are a total of 275 codes available that can be used for
speed-dial codes and group-dial codes. For example, if you program 225 of the codes as
speed-dials, the remaining 50 can be used for group-dials.
See the following procedures for more information about how to use speed-dial codes, one-touch
keys, and group-dial codes:
To program speed-dial codes and one-touch keys
Speed-dial codes 1 through 9 are also associated with their corresponding one-touch keys on the
control panel. The one-touch keys can be used for speed-dial or group-dial codes. A maximum of
50 characters can be entered for a single fax number.
Note Speed-dial codes, one-touch keys, and group-dial codes are more easily programmed from the
software. For instructions on programming speed-dial codes, one-touch keys, and group-dial codes
using the product software, see the product software Help.
Use the following steps to program speed-dial codes and one-touch keys from the product’s
control panel:
1 Press menu/enter.
2 Use the < or > button to select Fax Setup and press menu/enter.
3 Press menu/enter to select Phone Book.
4 Press menu/enter to select Individual Setup.
5 Press menu/enter to select Add.
6 Using the alphanumeric buttons, enter the speed-dial code number you want to associate with
this fax number, and press menu/enter. Choosing a number from 1 to 9 also associates the
fax number with the corresponding one-touch key.
EN About speed-dial codes, one-touch keys, and group-dial codes 87
Page 90

Note When entering a fax number, you can use a comma (,) for a pause, or the letter R if you want the
product to wait for a dial tone.
7 Using the alphanumeric buttons, enter the fax number. Include any pauses or other needed
numbers, such as an area code, an access code for numbers outside a PBX system (usually a
9 or 0), or a long distance prefix.
8 Press menu/enter.
9 Using the alphanumeric buttons, enter a name for the fax number. To do so, repeatedly press
the alphanumeric button for the letter you need until the letter appears. (For a list of
characters, see Using dialing characters
Note To insert punctuation, press the asterisk (*) repeatedly until the character you want appears and
press > to go to the next space.
10 Press menu/enter to save the information.
11 If you have more speed-dial codes or one-touch keys to program, repeat steps 1 through 10.
.)
To delete speed-dial codes and one-touch keys
1 Press menu/enter.
2 Use the < or > button to select Fax Setup and press menu/enter.
3 Press menu/enter to select Phone Book.
4 Press menu/enter to select Individual Setup.
5 Use the < or > button to select Delete and press menu/enter.
6 Using the alphanumeric buttons, enter the number of the speed-dial code you want to delete
and press menu/enter.
7 Press menu/enter to confirm the deletion.
To quickly program speed-dial codes or one-touch keys
Note The following procedure cannot be used to program a group-dial code. For group-dial code
instructio ns, see To program group-dial codes.
Use the following method to program speed-dial codes and one-touch keys easily from the product
control panel:
1 On the product control panel, pres s phone book, enter an unprogrammed speed-dial code
and press menu/enter.
OR
Press an unprogrammed one-touch key. The control panel display will notify you that the
speed-dial code or one-touch key has not been programmed.
2 Press menu/enter to program the speed-dial code or one-touch key.
3 Enter the fax number and press menu/enter. Include pauses, or other needed numbers, such
as an area code, an access code for numbers outside a PBX system (usually a 9 or 0), or a
long distance prefix. (See Using dialing characters
for more information.)
Note When entering a fax number you can use a comma (,) for a pause, or the letter R if you want the
product to wait for a dial tone.
88 7 Faxing EN
Page 91

4 Enter a name for the fax number. To do so, repeatedly press the numeric button for the letter
you need until the letter appears. (See Using dialing characters
5 Press menu/enter to save the information.
for a list of characters.)
To program a one-touch key for alternate long distance
If you use an alternate long distance carrier, you can program a one-touch key to dial the service’s
access number before a fax number. When you need to use this one-touch key, press it, enter the
fax number, and press fax/send. Both the access number and the fax number are then dialed
together. If the access number is used almost every time you dial a fax, it might be easier to
program the access number as a dialing prefix (see Inserting a dial prefix
Note Speed-dial codes, one-touch keys, and group-dial codes are more easily programmed from the
software (not available in Windows 95). For instructions on programming speed-dial codes,
one-touch keys, and group-dial codes using the product software, see the product software Help.
Use this procedure if the access number has more than 10 characters or if you only occasionally
use the access number.
for more information).
1 Follow steps 1 through 6 of To program speed-dial codes and one-touch keys
the fax number, you might also have to do one or both of the following tasks:
• If you have to wait for an access tone at some point in the number, enter one or more
three-second pauses by pressing pause/redial.
• Enter a personal identification number (PIN), if applicable.
2 When you are finished entering the access number, press pause/redial. A pause at the end of
the string tells the product not to dial this number until you dial the fax number.
3 Continue with steps 7 through 10 of To program speed-dial codes and one-touch keys
Managing group-dial codes
If you send information to the same group of people on a regular basis, you can program a
group-dial code to simplify the task. Any available speed-dial codes can be programmed with
group-dial codes. Group-dial codes using numbers 1 through 9 are also associated with the
corresponding one-touch key on the control panel. Any individual can be added to a group. All
group members must have programmed speed-dial codes or one-touch keys assigned to them
before being added to the group-dial code.
Use these instructions to manage your group-dial codes:
To program group-dial codes
To delete group-dial codes
. When enterin g
.
To delete an individual from a group-dial code
Note Speed-dial codes, one-touch keys, and group-dial codes are more easily programmed from the
software (not available in Windows 95). For instructions on programming speed-dial codes,
one-touch keys, and group-dial codes using the product software see the product software Help.
To program group-dial codes
1 Assign a speed-dial code to each fax number you want in the group. (For instructions, see To
program speed-dial codes and one-touch keys.)
2 Press menu/enter.
EN Managing group-dial codes 89
Page 92

3 Use the < or > button to select Fax Setup and press menu/enter.
4 Press menu/enter to select Phone Book.
5 Use the < or > button to select Group Setup and press menu/enter.
6 Use the < or > button to select Add Group and press menu/enter.
7 Using the alphanumeric buttons, enter the number you want to associate with this group and
press menu/enter. Choosing 1 through 9 also associates the group with the corresponding
one-touch key.
8 Using the alphanumeric buttons, enter a name for the group. See Using dialing characters
instructions on using the buttons. After the name of the group has been entered, press
menu/enter.
9 Press the one-touch key or choose the speed-dial code for the group member you want to add
and press menu/enter. Press menu/enter again to confirm the addition. Repeat this step for
each group member you want to add.
10 When you are finished, press cancel.
11 If you have more group-dial codes to enter, press menu/enter and repeat steps 1 through 10.
for
To delete group-dial codes
1 Press menu/enter.
2 Use the < or > button to select Fax Setup and press menu/enter.
3 Press menu/enter to select Phone Book.
4 Use the < or > button to select Group Setup and press menu/enter.
5 Use the < or > button to select Delete Group and press menu/enter.
6 Using the alphanumeric buttons, enter the number of the group-dial code you want to delete
and press menu/enter.
7 Press menu/enter to confirm the deletion.
To delete an individual from a group-dial code
1 Press menu/enter.
2 Use the < or > button to select Fax Setup and press menu/enter.
3 Press menu/enter to select Phone Book.
4 Use the < or > button to select Group Setup and press menu/enter.
5 Use the < or > button to select Del. # in Group and press menu/enter.
6 Use the < or > button to select the individual you want to delete from the group.
7 Press menu/enter to confirm the deletion.
8 Repeat steps 6 and 7 to delete other individuals from the group.
OR
Press cancel if you are finished.
90 7 Faxing EN
Page 93

Deleting all phone book entries
You can delete all speed-dial codes, one-touch keys, and group-dial codes that are programmed in
the product.
CAUTION Once speed-dial codes, one-touch keys, and group-dial codes are deleted, they cannot be recovered.
To delete all phone book entries
Use the following instructions to delete all speed-dial codes, one-touch keys, and group-dial codes
that are programmed in your product:
1 Press menu/enter.
2 Use the < or > button to select Fax Setup and press menu/enter.
3 Press menu/enter to select Phone Book.
4 Use the < or > button to select Delete All and press menu/enter.
5 Press menu/enter to confirm the deletion.
Using dialing characters
When using the control panel to enter your name in the header or type a name for a one-touch key ,
speed-dial code, or group-dial code, press the appropriate numeric button repeatedly until the
letter you need appears. Then, press > to select that letter and move to the next space.
Dialing character table
This table shows which letters and numbers appear on each numeric button when the default
language is set to English.
Button number Characters
11
2 ABCabc
3 DEFdef
4GHIghi
5JKLjkl
6MNOmno
7PQRSpqrs
EN Deleting all phone book entries 91
Page 94

8TUVtuv
9 WXYZwxyz
00
* ( ) + - . / , “ *&@
# space #
To insert a pause or wait
You can insert pauses into a fax number you are dialing or programming to a one-touch key,
speed-dial code, or group-dial code. Pauses are often needed when dialing internationally or
connecting to an outside line.
Press pause/redial to insert a three-second pause in your dialing sequence (models sold in
France insert a two-second pause). A comma appears on the control panel display, indicating the
pause will occur at that point in the dialing sequence.
Inserting a dial prefix
A dial prefix is a number or group of numbers automatically added to the beginning of every fax
number you enter at the control panel or from the software.
By default, this setting is off. You may want to turn this setting on and enter a prefix if, for example,
you have to dial a number such as 9 to get a phone line outside your company’s phone system.
While this setting is on, you can still dial a fax number without the dial prefix by using manual dial.
For instructions, see Using manual dial
To set the dial prefix
Use the following instructions to set the dial prefix:
1 Press menu/enter.
2 Use the < or > button to select Fax Setup and press menu/enter.
3 Press > once to select Fax Send Setup and press menu/enter.
4 Use the < or > button to select Dial Prefix and press menu/enter.
5 Use the < or > button to select On or Off and press menu/enter.
6 If you choose On, use the numeric buttons to enter the prefix and press menu/enter. You can
use numbers, pauses, and dialing symbols.
.
92 7 Faxing EN
Page 95

Using fax forwarding
You can set your product to forward incoming faxes to another fax number. When the fax arrives at
your product, it is stored in memory. Then your product dials the fax number you have specified
and sends the fax. If it cannot forward a fax because of an error (for example, the number is busy)
and repeated attempts to redial are unsuccessful, your product will print the fax.
If the product runs out of memory while receiving a fax, it will terminate the incoming fax and only
forward the pages and partial pages already stored in memory.
When using this feature, the product must be the one receiving faxes (not the computer) and the
answer mode must be set to Automatic (see Changing how the product answers incoming faxes
To use fax forwarding
1 Press menu/enter.
2 Use the < or > button to select Fax Setup and press menu/enter.
3 Use the < or > button to select Fax Recv. Setup and press menu/enter.
4 Use the < or > button to select Forward Fax and press menu/enter.
5 Press > to select On or Off and press menu/enter.
6 If you choose to turn fax forwarding on, use the alphanumeric buttons to enter the fax number
where you want the fax to go, and press menu/enter to save your selection.
).
Using fax polling
If someone else has set up a fax to be polled, you can request that the fax be sent to your product
(this is known as polling another machine).
To poll (request a fax from) another fax machine
1 Press menu/enter.
2 Use the < or > button to select Fax Functions and press menu/enter.
3 Use the < or > button to select Polling Receive and press menu/enter.
4 Use the alphanumeric buttons to enter the number of the fax machine that you want to request
the fax from and press menu/enter.
5 Your product dials the other fax machine and requests the fax.
Enabling an extension phone
With this setting turned on, you can alert the product to pick up the incoming fax call by pressing
1-2-3 sequentially on the telephone keypad. The default is Yes. T urn this setting off only if you have
a service from your telephone company that also uses the 1-2-3 sequence. The service will not
work if it conflicts with the product.
To enable an extension phone
Use the following instructions to enable an extension phone:
1 Press menu/enter.
EN Using fax forwarding 93
Page 96

2 Use the < or > button to select Fax Setup and press menu/enter.
3 Use the < or > button to select Fax Recv. Setup and press menu/enter.
4 Use the < or > button to select Extension Phone and press menu/enter.
5 Use the < or > button to select On or Off and press menu/enter to save your selection.
Sending a fax by dialing from a telephone
At times, you might want to dial a fax number from a telephone connected to the same line as the
product. For example, if you are sending a fax to a person whose product is in manual receive
mode, you can call first to let that person know the fax is coming.
To send a fax by dialing from a telephone
1 Load the document into the ADF input tray.
2 Pick up the handset of a phone connected to the same line as the product and dial the fax
number using either the phone’s or the product’s numeric buttons.
3 When the recipient answers, instruct the recipient to start the fax machine.
4 When you hear the fax tones, press fax/send to begin transmitting the fax, wait until the
display reads Connecting, and hang up the phone.
Changing the HP LaserJet 3330 product’s volume settings
You can control the volume of the following fax sounds from the product’s control panel:
● The fax sounds associated with incoming and outgoing faxes
● The ring for incoming faxes
For information on controlling general volume settings, see Using the product’s volume controls
To change the fax sounds (line monitor) volume
1 Press volume on the control panel.
2 Use the < and > buttons to select Off, Soft, Medium, or Loud.
3 Press menu/enter to save your selection.
Note The default set at the factory is Soft.
To cha n ge the ring volume
The ring is heard when the device is initially sending or receiving a call. The ring duration length is
based on the local telecom ring pattern length.
.
1 Press menu/enter.
2 Use the < or > button to select Common Settings and press menu/enter.
3 Use the < or > button to select Volume Settings and press menu/enter.
4 Press the > button once to select Ring Volume and press menu/enter.
5 Use the < or > button to select Off, Soft, Medium, or Loud.
94 7 Faxing EN
Page 97

6 Press menu/enter to save your selection.
Note The default set at the factory for ring volume is Soft.
Changing the default resolution
Resolution affects the quality, in dots per inch, of documents to be faxed. It also affects the
transmission speed.
Use this procedure to change the default resolution for all fax jobs.
To change the default resolution
1 Press resolution to display the current resolution setting.
2 Use the < and > buttons to display the desired resolution setting.
3 Press menu/enter to save the selection.
Changing the default contrast
To change the default contrast
The default contrast is the contrast normally applied to items being faxed. The slider is set to the
middle as the default contrast setting.
1 Press menu/enter.
2 Use the < or > button to select Fax Setup and press menu/enter.
3 Use the < or > button to select Fax Send Setup and press menu/enter.
4 Use the < or > button to select Def. Light/Dark.
5 Use the < button to move the slider to the left to make the fax lighter than the original, or use
the > button to move the slider to the right to make the fax darker than the original.
6 Press menu/enter to save your selection.
Changing the detect dial tone setting
Normally the product waits for a dial tone before attempting to a dial a fax number. If you are using
the product on the same line as your phone, turn on the detect dial tone setting. This will prevent
the product from sending a fax while someone is on the phone.
To change detect dial tone
1 Press menu/enter.
2 Use the < and > buttons to select Fax Setup and press menu/enter.
3 Press > once to select Fax Send Setup and press menu/enter.
4 Use the < and > buttons to select Detect Dial Tone and press menu/enter.
5 Use the < and > buttons to select On or Off and press menu/enter.
EN Changing the default resolution 95
Page 98

Note The default set at the factory for detect dial tone is On for France and Hungary, and Off for all other
countries/regions.
Changing how the product answers incoming faxes
The product’s answer mode is set when you set up the product. You only need to change these
settings if you change the devices connected to this phone line.
To set the answer mode to automatic or manual
1 Press menu/enter.
2 Use the < and > buttons to select Fax Setup and press menu/enter.
3 Use the < and > buttons to select Fax Recv. Setup and press menu/enter.
4 Press menu/enter to select Answer Mode.
5 Use the < and > buttons to se lect Automatic or Manual and press menu/enter to save y our
selection.
Changing rings-to-answer
When the answer mode is set to automatic, the product’s rings-to-answer setting determines the
number of times the phone rings before an incoming call is answered.
If the product is connected to a line receiving both fax and voice calls (a shared line) with an
answering machine, you may need to adjust the rings-to-answer. The number of rings-to-answer
for the product must be greater than the rings-to-answer on the answering machine. This allows
the answering machine to answer the incoming call and record a message if it is a voice call.
When the answering machine answers the call, the product listens to the call and automatically
answers it if it detects fax tones.
Refer to the fax guide that came with your product to determine the default and recommended
rings-to-answer settings for your country or region.
To set the number of rings-to-answer
To set or change the number of rings-to-answer, use the following steps:
1 On the control panel, press menu/enter.
2 Use the < and > buttons to select Fax Setup and press menu/enter.
3 Use the < and > buttons to select Fax Recv. Setup and press menu/enter.
4 Use the < and > buttons to select Rings To Answer and press menu/enter.
5 Use the alphanumeric keypad to enter the number of rings-to-answer and press menu/enter.
Note If you have an answering machine or computer voicemail connected to this line for the other phone
number (on the single ring pattern), make sure the product’s rings-to-answer is set to a lower number
than the rings-to-answer on the answering machine or voicemail. If it is not, the product will be unable
to receive fax calls.
96 7 Faxing EN
Page 99

Changing answer ring patterns
If you subscribe to ring pattern service with your telephone company, you can enable the product
to detect ring patterns. If you do not have ring pattern service, and you change this setting, the
product will not be able to receive faxes.
What is ring pattern service?
Ring pattern service, such as distinctive ring, is available from some local telephone companies. It
allows you to have two or three phone numbers on one line. This costs less than paying for two or
three separate lines. Each of the phone numbers has a different ring pattern. Ring patterns allow
you to answer voice calls and allow the product to answer fax calls.
How do I get the service?
Call your local telephone company to check the availability and to subscribe. The service might not
be available in all areas. Also, your telephone company might use a different name for this service.
If ring pattern service is available and you choose to subscribe to it, remember the following:
● Determine which ring pattern is used for phone calls and which is used for fax calls.
● Make sure the telephone company assigns the correct ring pattern to the fax number. The
product ignores other ring patterns.
How will I know if it is working?
After product installation is complete, ask someone you know to send you a fax. Make sure you
provide the correct fax number.
To change answer ring patterns
Note Do not change the all rings default setting if you do not have ring pattern service from your telephone
company . If you do not have ring pattern service and you change this setting, the product might not
be able to receive faxes.
1 Press menu/enter.
2 Use the < and > buttons to select Fax Setup and press menu/enter.
3 Use the < and > buttons to select Fax Recv. Setup and press menu/enter.
4 Use the < and > buttons to select Answer Ring Type and press menu/enter.
5 Use the < and > buttons to select the ring pattern you want the product to use when answering
incoming fax calls and press menu/enter to save your selection.
Changing the silence-detect mode
This setting controls whether or not you can receive faxes from older-model fax machines that do
not emit a fax signal during fax transmissions. At the time of this publication, these silent-model fax
machines represented very few of the fax machines in use. The default setting is Off. It should be
changed only if you regularly receive faxes from someone with an older-model fax machine.
EN Changing answer ring patterns 97
Page 100

To change the silence detect mode
1 Press menu/enter.
2 Use the < and > buttons to select Fax Setup and press menu/enter.
3 Use the < and > buttons to select Fax Recv. Setup and press menu/enter.
4 Use the < and > buttons to select Silence Detect and press menu/enter.
5 Use the < and > buttons to select On or Off.
Changing autoreduction settings for incoming faxes
If the fit to page option is on, the product automatically reduces long faxes to fit on the product’s
default paper size (up to a 75% reduction), for example from legal to letter size.
If the fit to page option is turned off, long faxes print at full size on multiple pages.
If you have the stamp received faxes option on, you may want to turn autoreduction on also. This
reduces the size of incoming faxes just slightly and prevents the page stamp from forcing a
received fax page onto two pages.
Note Make sure the paper size setting matches the size of paper loaded in the paper input tray . T o change
the default paper size, see Changing the default paper size.
To cha n ge autored uction for incomi ng fa xes
1 Press menu/enter.
2 Use the < and > buttons to select Fax Setup and press menu/enter.
3 Use the < and > buttons to select Fax Recv. Setup and press menu/enter.
4 Use the < and > buttons to select Fit to Page and press menu/enter.
5 Use the < and > buttons to select On or Off and press menu/enter to save your selection.
Note The default set at the factory for incoming fax autoreduction is On.
Enabling stamp received faxes
The HP LaserJet 3330 product is set up to print the sender’s identification at the top of each
received fax. You can also choose to have your header information included on each received fax
to confirm the date and time the fax was received.
Note This option only applies to received faxes that are printed by the product.
To enable stamp received faxes
1 Press menu/enter.
2 Use the < and > buttons to select Fax Setup and press menu/enter.
3 Use the < and > buttons to select Fax Recv. Setup and press menu/enter.
4 Use the < and > buttons to select Stamp Faxes and press menu/enter.
5 Use the < and > buttons to select On or Off and press menu/enter to save your selection.
98 7 Faxing EN
 Loading...