

Page 1

hp LaserJet 3200/3200m
printer fax copier scanner·· ·
user
guide
LaserJet
all-in-one
Page 2

Page 3

hp LaserJet 3200/3200m product
user guide
Page 4

Copyright and License
© Hewlett-Packard Company 2001
All Rights Reserved. Except as allowed by copyright laws or herein, reproduction, adaptation, or translation
without prior written permission is prohibited.
A user of the Hewlett-Packard printer associated with this user guide is granted a license to: a) print hard
copies of this user guide for PERSONAL, INTERNAL, or COMPANY use subject to the restriction not to
sell, resell, or otherwise distribute the hard copies; and b) place an electronic copy of this user guide on a
network server provided access to the electronic copy is limited to PERSONAL, INTERNAL users of the
Hewlett-Packard printer associated with this user guide.
Third Edition, April 2001
Warranty
The information contained in this document is subject to change without notice.
Hewlett-Packard makes no warranty of any kind with respect to this information. HEWLETT-PACKARD
SPECIFICALLY DISCLAIMS THE IMPLIED WARRANTY OF MERCHANTABILITY AND FITNESS FOR A
PARTICULAR PURPOSE
Hewlett-Packard shall not be liable for any direct, indirect, incidental, consequential, or other damage
alleged in connection with the furnishing or use of this information.
NOTICE TO U.S. GOVERNMENT USERS: RESTRICTED RIGHTS COMMERCIAL COMPUTER
SOFTWARE: Use, duplication, or disclosure by the Government is subject to restrictions as set forth in
subparagraph (c)(1)(ii) of the Rights in Technical Data Clause at DFARS 52.227-7013.
Material scanned by this product may be protected by governmental laws and other regulations, such as
copyright laws. The customer is solely responsible for complying with all such laws and regulations.
EN
Page 5

Trademark Credits
Microsoft, Windows, and MS-DOS are U.S. registered trademarks of Microsoft Corporation. ENERGY
STAR is a U.S. registered service mark of the U.S. EPA. CompuServe is a trademark of CompuServe, Inc.
All other products mentioned herein may be trademarks of their respective companies.
This product is approved for use only in:
Australia, Canada, Hong Kong, Ireland, Malaysia, New Zealand, Singapore, the United
States, and the United Kingdom.
Local country laws may prohibit the use of this product outside of the countries specified. It is strictly
forbidden by law in most countries to connect nonapproved telecommunications equipment (fax machines)
to public telephone networks.
Safety Information
WARNING!
Potential Shock Hazard
Always follow basic safety precautions when using this product to reduce risk of injury from fire or electric
shock.
1 Read and understand all instructions in the user guide.
2 Use only a grounded electrical outlet when connecting the HP LaserJet 3200 product to a power
source. If you don’t know whether the outlet is grounded, check with a qualified electrician.
3 Do not touch the contacts on the end of the telephone cord or any of the sockets on the HP LaserJet
3200 product. Replace damaged cords immediately.
4 Never install telephone wiring during a lightning storm.
5 Observe all warnings and instructions marked on the product.
6 Unplug this product from wall outlets and telephone jacks before cleaning.
7 Do not install or use this product near water or when you are wet.
8 Install the product securely on a stable surface.
9 Install the product in a protected location where no one can step on or trip over the line cord and the
line cord will not be damaged.
10 If the product does not operate normally, see see chapter (starting on page 147).
11 Refer all servicing questions to qualified personnel.
Information regarding FCC Class B, Parts 15 and 68 requirements can be found in “Specifications” on
page 227.
EN
Page 6

EN
Page 7

Contents
1 About This Guide
Introduction . . . . . . . . . . . . . . . . . . . . . . . . . . . . . . . . . . . . . . . . . .11
Using this guide with your product functionality . . . . . . . . . . . . . .12
2 Getting to Know the Product
Introduction . . . . . . . . . . . . . . . . . . . . . . . . . . . . . . . . . . . . . . . . . .13
What you can do with the product . . . . . . . . . . . . . . . . . . . . . . . .14
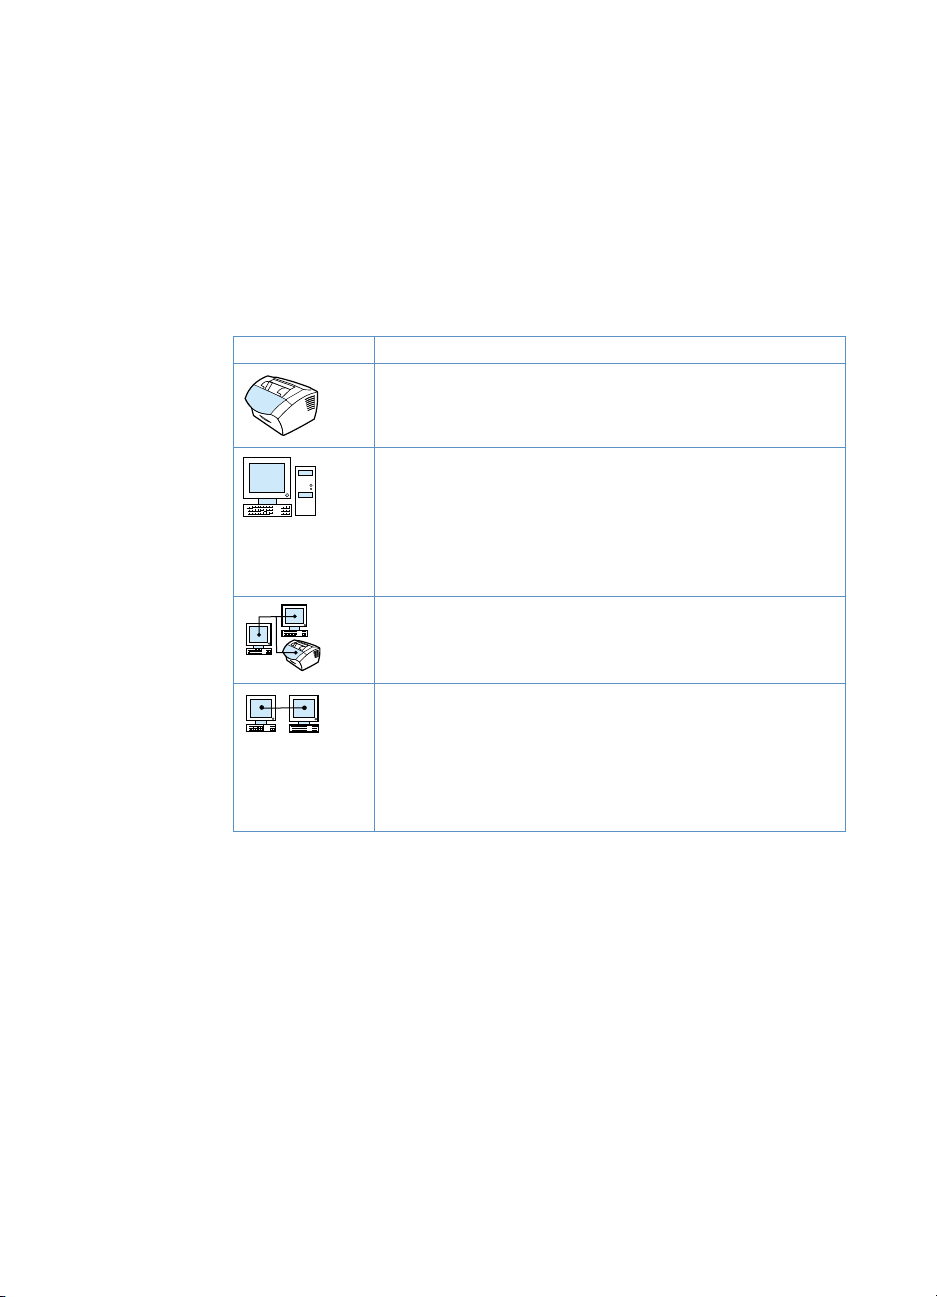
When the product is directly connected to a computer. . . . . .14
When the product is connected to a network . . . . . . . . . . . . .16
Identifying product components . . . . . . . . . . . . . . . . . . . . . . . . . .18
Control panel lights and keys . . . . . . . . . . . . . . . . . . . . . . . . .18
Identifying hardware parts . . . . . . . . . . . . . . . . . . . . . . . . . . .21
Selecting print media. . . . . . . . . . . . . . . . . . . . . . . . . . . . . . . . . . .23
Selecting media to print . . . . . . . . . . . . . . . . . . . . . . . . . . . .23
Selecting items for faxing, copying, or scanning . . . . . . . . . .25
Loading print media. . . . . . . . . . . . . . . . . . . . . . . . . . . . . . . . . . . .26
Loading print media to be faxed, copied, or scanned . . . . . .26
Loading media to be printed . . . . . . . . . . . . . . . . . . . . . . . . .28
Selecting the output path . . . . . . . . . . . . . . . . . . . . . . . . . . . .31
Features available only through the software . . . . . . . . . . . . . . . .32
Using the HP LaserJet Director . . . . . . . . . . . . . . . . . . . . . . .32
Using the HP LaserJet Document Manager (Windows) or the HP
LaserJet Workplace (Mac OS) . . . . . . . . . . . . . . . . . . . . .35
3 Managing General Default Settings, Logs, and
Reports
Introduction . . . . . . . . . . . . . . . . . . . . . . . . . . . . . . . . . . . . . . . . . .37
Changing general default settings . . . . . . . . . . . . . . . . . . . . . . . .38
Changing the default paper size for the paper input tray . . .38
Changing sound volume. . . . . . . . . . . . . . . . . . . . . . . . . . . . .39
Changing the language on the display panel . . . . . . . . . . . . .41
Restoring factory defaults. . . . . . . . . . . . . . . . . . . . . . . . . . . .41
Managing logs and reports . . . . . . . . . . . . . . . . . . . . . . . . . . . . . .42
Printing the fax activity log . . . . . . . . . . . . . . . . . . . . . . . . . . .43
Setting the fax activity log to print automatically. . . . . . . . . . .44
Printing a fax call report . . . . . . . . . . . . . . . . . . . . . . . . . . . . .45
Setting when the fax call report prints. . . . . . . . . . . . . . . . . . .45
Including the first page of each fax on the fax call report . . . .46
Printing a one-touch, speed-dial, and group-dial report . . . . .47
EN Contents 5
Page 8

Printing the control panel menu structure. . . . . . . . . . . . . . . .47
Printing a configuration report. . . . . . . . . . . . . . . . . . . . . . . . .48
Printing the block fax list . . . . . . . . . . . . . . . . . . . . . . . . . . . . .48
Printing a PCL font list . . . . . . . . . . . . . . . . . . . . . . . . . . . . . .49
Printing a PostScript font list . . . . . . . . . . . . . . . . . . . . . . . . .49
Printing all fax reports . . . . . . . . . . . . . . . . . . . . . . . . . . . . . . .50
Printing a T.30 protocol trace report . . . . . . . . . . . . . . . . . . .50
Setting when the T.30 protocol trace report prints . . . . . . . . .51
4 Faxing
Introduction . . . . . . . . . . . . . . . . . . . . . . . . . . . . . . . . . . . . . . . . . .53
Sending faxes . . . . . . . . . . . . . . . . . . . . . . . . . . . . . . . . . . . . . . . .54
Sending faxes to one recipient . . . . . . . . . . . . . . . . . . . . . . . .55
Quickly programming speed-dial codes or one-touch keys . .55
Sending faxes to multiple recipients . . . . . . . . . . . . . . . . . . . .57
Sending a fax at a future time . . . . . . . . . . . . . . . . . . . . . . . .59
Redialing manually . . . . . . . . . . . . . . . . . . . . . . . . . . . . . . . . .60
Using the Contrast button to adjust th e contrast for the current fax
or copy job . . . . . . . . . . . . . . . . . . . . . . . . . . . . . . . . . . .61
Adjusting the resolution for the current job . . . . . . . . . . . . . .62
Canceling the current fax job . . . . . . . . . . . . . . . . . . . . . . . . .64
Canceling a fax job using Fax Job Status . . . . . . . . . . . . . . .64
Receiving faxes. . . . . . . . . . . . . . . . . . . . . . . . . . . . . . . . . . . . . . .65
Receiving faxes when you hear fax tones . . . . . . . . . . . . . . .65
Reprinting faxes . . . . . . . . . . . . . . . . . . . . . . . . . . . . . . . . . . .66
Blocking or unblocking fax numbers. . . . . . . . . . . . . . . . . . . .67
Advanced send fax features and settings . . . . . . . . . . . . . . . . . . .69
About speed-dial codes, one-touch keys,
and group-dial codes . . . . . . . . . . . . . . . . . . . . . . . . . . . .70
Programming speed-dial codes and one-touch keys . . . . . . .71
Programming a one-touch key for alternate long distance . .73
Programming group-dial codes . . . . . . . . . . . . . . . . . . . . . . .74
Deleting all speed-dial codes, one-touch keys,
and group-dials codes . . . . . . . . . . . . . . . . . . . . . . . . . . .76
Using Manual Dial . . . . . . . . . . . . . . . . . . . . . . . . . . . . . . . . .77
Sending a fax by dialing from a telephone . . . . . . . . . . . . . . .77
Inserting a pause or wait into a fax number . . . . . . . . . . . . . .78
Using dialing characters . . . . . . . . . . . . . . . . . . . . . . . . . . . . .78
Changing the information in the fax header . . . . . . . . . . . . . .79
Changing the default contrast and resolution
for outgoing faxes. . . . . . . . . . . . . . . . . . . . . . . . . . . . . . .81
Selecting tone- or pulse-dialing mode. . . . . . . . . . . . . . . . . . .82
Changing how the product redials . . . . . . . . . . . . . . . . . . . . .83
Inserting a dial prefix. . . . . . . . . . . . . . . . . . . . . . . . . . . . . . . .84
Changing the detect dial tone setting . . . . . . . . . . . . . . . . . . .85
6 Contents
EN
Page 9

Advanced receive fax features and settings . . . . . . . . . . . . . . . . .86
Using fax forwarding. . . . . . . . . . . . . . . . . . . . . . . . . . . . . . . .87
Requesting a fax from another fax machine (polling) . . . . . . .88
Clearing faxes from memory . . . . . . . . . . . . . . . . . . . . . . . . .89
Changing how the product answers incoming faxes. . . . . . . .90
Changing answer ring patterns . . . . . . . . . . . . . . . . . . . . .91
Enabling an extension phone . . . . . . . . . . . . . . . . . . . . . . . . .93
Changing the silence-detect mode . . . . . . . . . . . . . . . . . . . . .94
Changing autoreduction for incoming faxes . . . . . . . . . . . . . .95
Enabling stamp received faxes . . . . . . . . . . . . . . . . . . . . . . .96
Setting error correction . . . . . . . . . . . . . . . . . . . . . . . . . . . . .97
Faxing using the software . . . . . . . . . . . . . . . . . . . . . . . . . . . . . . .98
Sending faxes from the software . . . . . . . . . . . . . . . . . . . . . .98
Receiving faxes to your computer. . . . . . . . . . . . . . . . . . . . . .99
Customizing your own fax cover sheet. . . . . . . . . . . . . . . . .100
5 Printing
Introduction . . . . . . . . . . . . . . . . . . . . . . . . . . . . . . . . . . . . . . . . .103
Printer drivers . . . . . . . . . . . . . . . . . . . . . . . . . . . . . . . . . . . . . . .104
Choosing a printer driver. . . . . . . . . . . . . . . . . . . . . . . . . . . .104
Gaining access to the printer driver . . . . . . . . . . . . . . . . . . .105
Printer tasks . . . . . . . . . . . . . . . . . . . . . . . . . . . . . . . . . . . . . . . .106
Printing on letterhead and envelopes . . . . . . . . . . . . . . . . . .107
Printing on special media . . . . . . . . . . . . . . . . . . . . . . . . . . .109
Stopping a print job. . . . . . . . . . . . . . . . . . . . . . . . . . . . . . . .111
Saving toner when printing drafts . . . . . . . . . . . . . . . . . . . . .111
Printing on both sides of paper . . . . . . . . . . . . . . . . . . . . . .112
Printing multiple pages on one sheet of paper . . . . . . . . . . .114
Creating and using watermarks . . . . . . . . . . . . . . . . . . . . . .114
Printer settings . . . . . . . . . . . . . . . . . . . . . . . . . . . . . . . . . . . . . .115
Changing the resolution . . . . . . . . . . . . . . . . . . . . . . . . . . . .115
Saving printer settings for different print jobs . . . . . . . . . . . .116
Printing Tips . . . . . . . . . . . . . . . . . . . . . . . . . . . . . . . . . . . . . . . .117
Tips for printing custom sizes . . . . . . . . . . . . . . . . . . . . . . . .117
Tips for printing envelopes . . . . . . . . . . . . . . . . . . . . . . . . . .117
Tips for printing labels . . . . . . . . . . . . . . . . . . . . . . . . . . . . .118
6 Copying
Introduction . . . . . . . . . . . . . . . . . . . . . . . . . . . . . . . . . . . . . . . . .119
Copying tasks . . . . . . . . . . . . . . . . . . . . . . . . . . . . . . . . . . . . . . .120
Making black and white copies . . . . . . . . . . . . . . . . . . . . . .121
Making color copies . . . . . . . . . . . . . . . . . . . . . . . . . . . . . . .122
Using the Contrast button to adjust the contrast for the current fax
or copy job . . . . . . . . . . . . . . . . . . . . . . . . . . . . . . . . . .122
Adjusting copy quality for the current job . . . . . . . . . . . . . . .123
Reducing or enlarging copies for the current job . . . . . . . . .123
EN Contents 7
Page 10

Default Copy Settings . . . . . . . . . . . . . . . . . . . . . . . . . . . . . . . . .125
Changing the default copy quality. . . . . . . . . . . . . . . . . . . . .126
Changing the default copy contrast . . . . . . . . . . . . . . . . . . .126
Changing the default copy size. . . . . . . . . . . . . . . . . . . . . . .127
Changing the default copy collation . . . . . . . . . . . . . . . . . . .128
Changing the default number of copies . . . . . . . . . . . . . . . .129
7 Scanning
Introduction . . . . . . . . . . . . . . . . . . . . . . . . . . . . . . . . . . . . . . . . .131
Scanning basics . . . . . . . . . . . . . . . . . . . . . . . . . . . . . . . . . . . . .132
Scanning from the product software . . . . . . . . . . . . . . . . . . . . . .133
Starting a scan . . . . . . . . . . . . . . . . . . . . . . . . . . . . . . . . . . .133
Working with scanned items . . . . . . . . . . . . . . . . . . . . . . .136
About OCR software . . . . . . . . . . . . . . . . . . . . . . . . . . . . . .138
Scanning from the product control panel. . . . . . . . . . . . . . . . . . .139
Using the Scan key to scan . . . . . . . . . . . . . . . . . . . . . . . . .139
Adding or deleting scan destinations . . . . . . . . . . . . . . . . . .140
Scanning with TWAIN-enabled software. . . . . . . . . . . . . . . . . . .142
Sending scanned items as e-mail attachments. . . . . . . . . . . . . .143
Sending e-mail from the product. . . . . . . . . . . . . . . . . . . . . .143
Sending e-mail in an alternative mode . . . . . . . . . . . . . . . . .145
8 Problem Solving and Product Maintenance
Introduction . . . . . . . . . . . . . . . . . . . . . . . . . . . . . . . . . . . . . . . . .147
General troubleshooting checklist . . . . . . . . . . . . . . . . . . . . . . .148
Resolving fax problems. . . . . . . . . . . . . . . . . . . . . . . . . . . . . . . .149
Fax setup checklist . . . . . . . . . . . . . . . . . . . . . . . . . . . . . . . .149
General fax problems . . . . . . . . . . . . . . . . . . . . . . . . . . . . . .152
Sending fax problems. . . . . . . . . . . . . . . . . . . . . . . . . . . . . .153
Receiving fax problems. . . . . . . . . . . . . . . . . . . . . . . . . . . . .155
Resolving printing problems . . . . . . . . . . . . . . . . . . . . . . . . . . . .159
General printing problems. . . . . . . . . . . . . . . . . . . . . . . . . . .159
Printing problems when using MS-DOS . . . . . . . . . . . . . . . .163
Resolving copying problems . . . . . . . . . . . . . . . . . . . . . . . . . . . .164
Resolving scanning problems . . . . . . . . . . . . . . . . . . . . . . . . . . .166
Resolving paper feed problems. . . . . . . . . . . . . . . . . . . . . . . . . .170
Clearing jams from the printer path areas. . . . . . . . . . . . . . .170
Clearing jams from the scanner path areas . . . . . . . . . . . . .177
Resolving image quality problems. . . . . . . . . . . . . . . . . . . . . . . .181
Resolving control panel error messages. . . . . . . . . . . . . . . . . . .195
Common Macintosh problems. . . . . . . . . . . . . . . . . . . . . . . . . . .202
Problems in the Chooser . . . . . . . . . . . . . . . . . . . . . . . . . . .203
Printing errors . . . . . . . . . . . . . . . . . . . . . . . . . . . . . . . . . . . .204
USB problems. . . . . . . . . . . . . . . . . . . . . . . . . . . . . . . . . . . .204
Selecting an alternate PPD. . . . . . . . . . . . . . . . . . . . . . . . . .206
Renaming the printer driver . . . . . . . . . . . . . . . . . . . . . . . . .207
8 Contents EN
Page 11

Resolving PostScript Errors . . . . . . . . . . . . . . . . . . . . . . . . .207
Restoring the factory defaults . . . . . . . . . . . . . . . . . . . . . . . . . . .209
Uninstalling the software . . . . . . . . . . . . . . . . . . . . . . . . . . . . . .210
Product Maintenance . . . . . . . . . . . . . . . . . . . . . . . . . . . . . . . . .211
Cleaning the print paper path . . . . . . . . . . . . . . . . . . . . . . . .211
Cleaning the scanner path . . . . . . . . . . . . . . . . . . . . . . . . . .213
Recalibrating the scanner. . . . . . . . . . . . . . . . . . . . . . . . . . .216
Managing HP LaserJet toner cartridges . . . . . . . . . . . . . . . .216
Using Memory (DIMMs) . . . . . . . . . . . . . . . . . . . . . . . . . . . .220
Installing a new document scanner separation pad . . . . . . .225
Appendix A Specifications
Introduction . . . . . . . . . . . . . . . . . . . . . . . . . . . . . . . . . . . . . . . . .227
Product specifications . . . . . . . . . . . . . . . . . . . . . . . . . . . . . . . . .228
Overall specifications . . . . . . . . . . . . . . . . . . . . . . . . . . . . . .228
Faxing specifications. . . . . . . . . . . . . . . . . . . . . . . . . . . . . . .229
Printing specifications. . . . . . . . . . . . . . . . . . . . . . . . . . . . . .229
Copying specifications . . . . . . . . . . . . . . . . . . . . . . . . . . . . .230
Scanning specifications . . . . . . . . . . . . . . . . . . . . . . . . . . . .230
Paper specifications. . . . . . . . . . . . . . . . . . . . . . . . . . . . . . . . . .231
Supported paper sizes . . . . . . . . . . . . . . . . . . . . . . . . . . . . .231
Paper weight equivalence table (approximate) . . . . . . . . . .232
Transportation . . . . . . . . . . . . . . . . . . . . . . . . . . . . . . . . . . . . . . .233
Laser safety statement . . . . . . . . . . . . . . . . . . . . . . . . . . . . . . . .233
FCC regulations . . . . . . . . . . . . . . . . . . . . . . . . . . . . . . . . . . . . .234
FCC part 68 requirements. . . . . . . . . . . . . . . . . . . . . . . . . . . . . .235
Telephone consumer protection act (U.S.) . . . . . . . . . . . . . . . . .236
IC CS-03 requirements . . . . . . . . . . . . . . . . . . . . . . . . . . . . . . . .237
Regulatory information for European Union countries . . . . . . . .238
New Zealand Telecom Regulatory Notices. . . . . . . . . . . . . . . . .238
Declaration of conformity. . . . . . . . . . . . . . . . . . . . . . . . . . . . . . .239
Canadian DOC regulations . . . . . . . . . . . . . . . . . . . . . . . . . . . . .240
Environmental product stewardship program . . . . . . . . . . . . . . .240
Material safety data sheet . . . . . . . . . . . . . . . . . . . . . . . . . . . . . .243
Battery Specifications . . . . . . . . . . . . . . . . . . . . . . . . . . . . . . . .243
Appendix B Service and Support Information
Warranty information. . . . . . . . . . . . . . . . . . . . . . . . . . . . . . . . . .245
Hewlett-Packard limited warranty statement. . . . . . . . . . . . .245
Obtaining hardware service . . . . . . . . . . . . . . . . . . . . . . . . .247
Returning the unit . . . . . . . . . . . . . . . . . . . . . . . . . . . . . . . . .247
Service information form . . . . . . . . . . . . . . . . . . . . . . . . . .248
Software license agreement . . . . . . . . . . . . . . . . . . . . . . . . . . . .249
HP Customer Care . . . . . . . . . . . . . . . . . . . . . . . . . . . . . . . . . . .251
EN Contents 9
Page 12

HP sales and service offices . . . . . . . . . . . . . . . . . . . . . . . . . . .253
Worldwide Hewlett-Packard Country/R eg ion
Sales and Service Offices . . . . . . . . . . . . . . . . . . . . . . .253
Ordering parts . . . . . . . . . . . . . . . . . . . . . . . . . . . . . . . . . . . . . . .257
Ordering software . . . . . . . . . . . . . . . . . . . . . . . . . . . . . . . . . . . .259
Glossary
Index
10 Contents
EN
Page 13

About This Guide
Introduction
This user guide provides details for initiating tasks from the product
control panel, changing infrequently used settings, resolving
problems, and contacting HP support. This guide also provides an
overview of how the software works.
Other resources for product information
You can obtain product information that is not included in this guide
from the following resources:
l Getting Started Guide – You already referred to this guide when
you set up the product. It includes specific information about
setting up the product and installing the software.
l Software Help – The software Help includes overview
information about and procedures performed using the software.
l World Wide Web – The following is a website created for the HP
LaserJet 3200 product:
http://www.hp.com/support/lj3200/
EN Introduction 11
Page 14
Using this guide with your product functionality
Because product functionality varies according to installation, all
procedures in this guide will have one or more of the following icons
above them to denote the location from which you can perform that
procedure. This user guide focuses on control panel procedures,
some of which you can also do from the software. More than one icon
can appear above a procedure .
This icon Appears
For procedures you can do from the control panel.
For procedures you can do from the HP LaserJet
Director or software when the product is directly
connected to your computer using a universal serial
bus (USB) or parallel cable.
For more information regarding these procedures,
see the software Help.
For procedures you can do from your computer if the
product is connected to the network using a
supported HP JetDirect print server.
For procedures you can do from your Windowscompatible computer if the product is directly
connected to someone else’s computer using a
parallel cable and the other person has Windows
sharing available. The only procedures you can do
are printing-related.
12 Chapter 1 - About This Guide EN
Page 15

Getting to Know the Product
Introduction
The HP LaserJet 3200 product, a powerful business tool, gives you
the capabilities of a full range of office equipment. With this product,
you can:
l Fax – Use the product as a standalone fax machine to send and
receive laser-quality faxes, as well as to perform advanced tasks
such as forwarding faxes to another location. See “Faxing” on
page 53 for more information.
l Print – Easily print documents at 1200 dots per inch (dpi) with a
print speed of nine pages per minute. See “Printing” on page 103
for more information.
l Copy – Make superior laser-quality copies. You can make up to
99 copies of a 30-page original. You can also adjust the contrast,
enlarge or reduce the copies, collate, and m or e. See “Copy i ng ”
on page 119 for more information.
l Scan – Scan important color or black-and-white documents to
create electronic files of them. Scan documents and save them
on a website. Use the scanner to make a fax cover sh eet, or scan
documents for use with other software. You can also scan a
document and attach it to an e-mail message (if you have a
compatible e-mail program). See “Scanning” on page 131 for
more information.
l Use Software – Use the software to store and organize
documents so you can quickly find that invoice, receipt, or
business card from weeks ago. See the software Help for more
information about using the software.
This multifunction product helps increase your productivity by
allowing you to do more than one task at a time. For example, send
an electronic fax while the product makes copies, or scan a document
while printing. See “What you can do with the product” on page 14.
EN Introduction 13
Page 16
What you can do with the product
The tables in this section show which functions will work when
another function is already in use:
l When the product is directly connected to a computer, or
l When the product is connected to a network.
When the product is directly connected to a computer
This table shows what functions will work when another function is
already in use if the product is directly connected to your comp uter.
If the
product
is:
Printing a
file
Printing a
paper fax
Receiving
a paper
fax
Sending a
paper fax
Copying
Can I?
Send a
print job
Yes. Prints
when first
print job
ends.
Yes. Prints
when fax
printing
ends.
Yes. Prints
when fax
printing
ends.
Yes. No.
Yes. Prints
when
copying
ends.
Receive
a paper
fax
Yes.
Prints
when
first job
ends.
Yes.
Prints
when
first job
ends.
No.
Phone
line is in
use.
Phone
line is in
use.
Yes.
Prints
when
copying
ends.
Send a
paper fax
Yes. Yes. Yes. Yes. No.
Yes. Yes. Yes. Yes. No.
Yes.
Sends
when first
fax job
ends.
Yes.
Sends
when first
fax job
ends.
Yes, if the
document
feeder tray
is not in
use.
Receive
a PC fax
No.
Phone
line is in
use.
No.
Phone
line is in
use.
Yes. Yes. Yes, if the
Send a PC
fax
Yes.
Sends
when first
fax job
ends.
Yes.
Sends
when first
fax job
ends.
Scan to
the PC
Yes. Yes, if a
Yes, if the
document
feeder tray
is not in
use.
document
feeder tray
is not in
use.
Copy
Wait until
print job
ends.
Wait until
print job
ends.
print job is
not
activated.
Yes, if the
document
feeder tray
is not in
use.
No.
Wait until
print job
ends.
14 Chapter 2 - Getting to Know the Product EN
Page 17
If the
product
is:
Receiving
a PC fax
Sending a
PC fax
Scanning
Send a
print job
Receive
a paper
Send a
paper fax
fax
No. No.
Phone
line is in
use.
Yes. No.
Phone
line is in
use.
No. Sends
when first
fax job
ends.
Yes.
Sends
when first
fax job
ends.
Yes. Yes. No.
Document
feeder tray
is in use.
Can I?
Receive
a PC fax
No.
Phone
line is in
use.
No.
Phone
line is in
use.
Send a PC
fax
No. Sends
when first
fax job
ends.
Yes.
Sends
when first
fax job
Scan to
the PC
No. No.
Yes. Yes.
ends.
Yes. Yes. No.
Document
feeder tray
is in use.
Copy
No.
Document
feeder tray
is in use.
EN What you can do with the product 15
Page 18

When the product is connected to a network
This table shows what functions will work when you or another
network user are using some other func tion , an d the pr od u ct is
connected to the network using a supported HP JetDirect print server.
If the
product
is:
Printing a
file
Printing a
paper fax
Receiving
a paper
fax
Sending a
paper fax
Copying
Receiving
a PC fax
Sending a
PC fax
Can I?
Send a
print job
Yes.
Prints
when first
print job
ends.
Yes.
Prints
when fax
printing
ends.
Yes.
Prints
when fax
printing
ends.
Yes. No. Phone
Yes.
Prints
when
copying
ends.
No.
Network
users
cannot
receive
PC faxes.
Yes. No. Phone
Receive a
paper fax
Yes.
Prints
when file
print job
ends.
Yes.
Prints
when first
job ends.
No. Phone
line is in
use.
line is in
use.
Yes.
Prints
when
copying
ends.
No.
Network
users
cannot
receive
PC faxes.
line is in
use.
Send a
paper fax
Yes. No. Not
Yes. No. Not
Yes.
Sends
when first
fax job
ends.
Yes.
Sends
when first
fax job
ends.
Yes, if the
document
feeder tray
is not in
use.
No.
Network
users
cannot
receive PC
faxes.
Yes.
Sends
when first
fax job
ends.
Receive a
PC fax
available
to network
users.
available
to network
users.
No. Not
available
to network
users.
No. Not
available
to network
users.
No. Not
available
to network
users.
No. Not
available
to network
users.
No. Not
available
to network
users.
Send a
PC fax
Yes. Yes. No.
Yes. Yes. No.
Yes.
Sends
when first
fax job
ends.
Yes.
Sends
when first
fax job
ends.
Yes. Yes, if the
No.
Network
users
cannot
receive
PC
faxes.
Yes.
Sends
when first
fax job
ends.
Scan to
the PC
Yes.
Yes, if the
document
feeder tray
is not in
use.
document
feeder tray
is not in
use.
No.
Network
users
cannot
receive PC
faxes.
Yes. Yes.
Copy
Wait until
print job
ends.
Wait until
print job
ends.
Yes, if print
job is not
activated.
Yes, if the
document
feeder tray
is not in
use.
No.
Wait until
print job
ends.
No.
Network
users
cannot
receive PC
faxes.
16 Chapter 2 - Getting to Know the Product EN
Page 19

If the
product
is:
Scanning
Can I?
Send a
print job
Receive a
paper fax
Send a
paper fax
Yes. Yes. No.
Document
feeder tray
is in use.
Receive a
PC fax
No. Not
available
to network
users.
Send a
PC fax
Scan to
the PC
Yes. No.
Document
feeder tray
is in use.
Copy
No.
Document
feeder tray
is in use.
EN What you can do with the product 17
Page 20
Identifying product components
The topics in this section familiarize you with the control panel and
how to use it. They also provide graphics of the prod uc t to he lp
identify the different external hardware parts.
l Control panel lights and keys
l Using the control panel menu structure
l Identifying hardware parts
Control panel lights and keys
The lights on the control panel provide the status of the product, and
the keys are used to fax paper-based documents, make copie s, scan
documents, and adjust settings for the product. See “Using the
control panel menu structure” on page 19 for more information about
menu settings.
2
3
4
1
19
18
17
16
1 Error light – When solid, indicates an error
condition.
3 Control Panel Display – Displays messages
or Menu settings.
5 Back Space key – Use to go up one level in
the Menu settings or to backspace when
typing text.
5
6
9
8
10
7
11
12
14
15
2Ready Light – When solid, indicates the
4 Enter/Menu key – Use to gain access to the
6 Back Arrow key (<) – Use to scroll back
13
product is ready and has no error conditions.
When blinking, indicates the product is
processing a job.
Menu, save a selection, or go down one level in
the Menu settings.
through items at the same Menu level or to
move back through text.
18 Chapter 2 - Getting to Know the Product EN
Page 21

7 Forward Arrow key (>) – Use to scroll forward
through items at the same Menu level or to
insert a space when typing text.
9 Scan key – Starts the scan function. 10 Copy key – Starts the copy function.
11 One-touch keypad – Use the keys on the one-
touch keypad to store frequently dialed fax
numbers.
13 Volume key – Use to adjust the line monitor
volume for incoming and outgoing fax sounds.
15 Redial/Pause key – Press to redial the last
fax number or to insert a pause into a fax
number.
17 Reduce/Enlarge key – Use to adjust the size
of the current copy job.
19 Contrast key – Use to adjust the contrast, or
difference between light and dark areas, for
the current fax or copy job.
8 Stop/Clear key – Stops or clears any action in
progress, or exits the Menu settings.
12 Fax/Send key – Starts the fax function, or use
to enter into manual dialing mode.
14 Speed-Dial key – Press this key plus a
one-, two-, or three-digit code on the numeric
keys to fax to previously stored fax numbers.
16 Numeric keys – Use to type codes and enter
fax numbers. Also use to add letters when
typing a name in the fax header or for speeddials.
18 Resolution key – Use to adjust the resolution,
or sharpness, for the current fax or copy job.
Using the control panel menu structure
What follows is a hierarchical diagram of the control panel menu
structure. You might want to refer to this menu structure while making
changes to settings and features.
To print a copy of this menu structure, see “Printing the control panel
menu structure” on page 47. To see which settings are currently
selected, print a configuration report. See “Printing a configuration
report” on page 48 fo r inst ru ctio ns .
The following is a general procedure for using the control panel
menu.
To use the control panel keys:
1 Press E
NTER/MENU to begin.
2 Use the < or > key to select one of the choices from the main
Menu, and then press E
NTER/MENU.
3 Use the < or > key to select one of the choices from the Submenu
and press E
NTER/MENU.
4 If applicable, use the < or > key to select one of the choices from
the second Submenu and press E
EN Identifying product components 19
NTER/MENU.
Page 22

Control panel main menu and first submenu
The following lists the choices in the control panel main menu and the
corresponding first submenu.
Main Menu Submenu
FAX JOB STATUS
FAX FUNCTIONS SEND FAX LATER
STOP RECEIVE TO PC
REPRINT LAST FAXES
POLLING RECEIVE
CLEAR STORED FAXES
TIME/DATE, HEADER TIME/DATE
FAX HEADER
COPY SETUP DEFAULT QUALITY
DEFAULT CONTRAST
DEFAULT COLLATION
DEFAULT # OF COPIES
DEF. REDUCE/ENLARGE
REPORTS FAX ACTIVITY LOG
FAX CALL REPORT
SPEED DIAL REPORT
MENU STRUCTURE
CONFIGURATION REPORT
BLOCK FAX LIST
PCL FONT LIST
POSTSCRIPT FONTS
ALL FAX REPORTS
FAX SETUP SPEED DIALS
FAX SEND SETUP
FAX RECEIVE SETUP
ALL FAXES
COMMON SETTINGS LANGUAGE
DEFAULT PAPER SIZE
PRINT DENSITY
VOLUME SETTINGS
SERVICE SCAN CALIBRATION
PRINT T .30 TRACE
CLEANING MODE
RESTORE DEFAULTS
20 Chapter 2 - Getting to Know the Product EN
Page 23
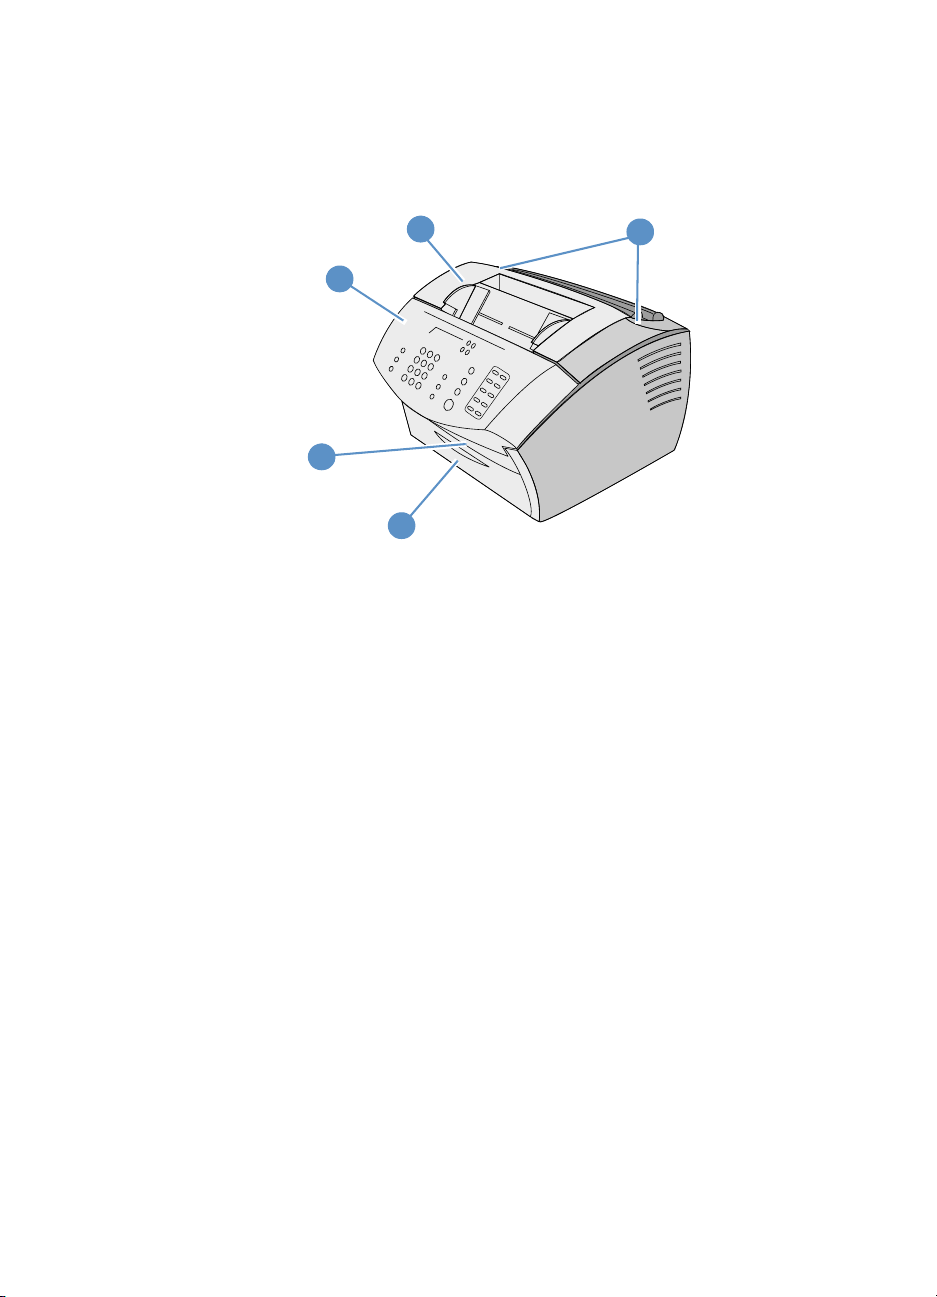
Identifying hardware parts
The two graphics that follow show the external hardware parts of the
product.
4
3
2
1
1 Front paper path door
2 Document output slot
3 Document release door/control panel
4 Printer door
5 Printer door release latches
5
EN Identifying product components 21
Page 24
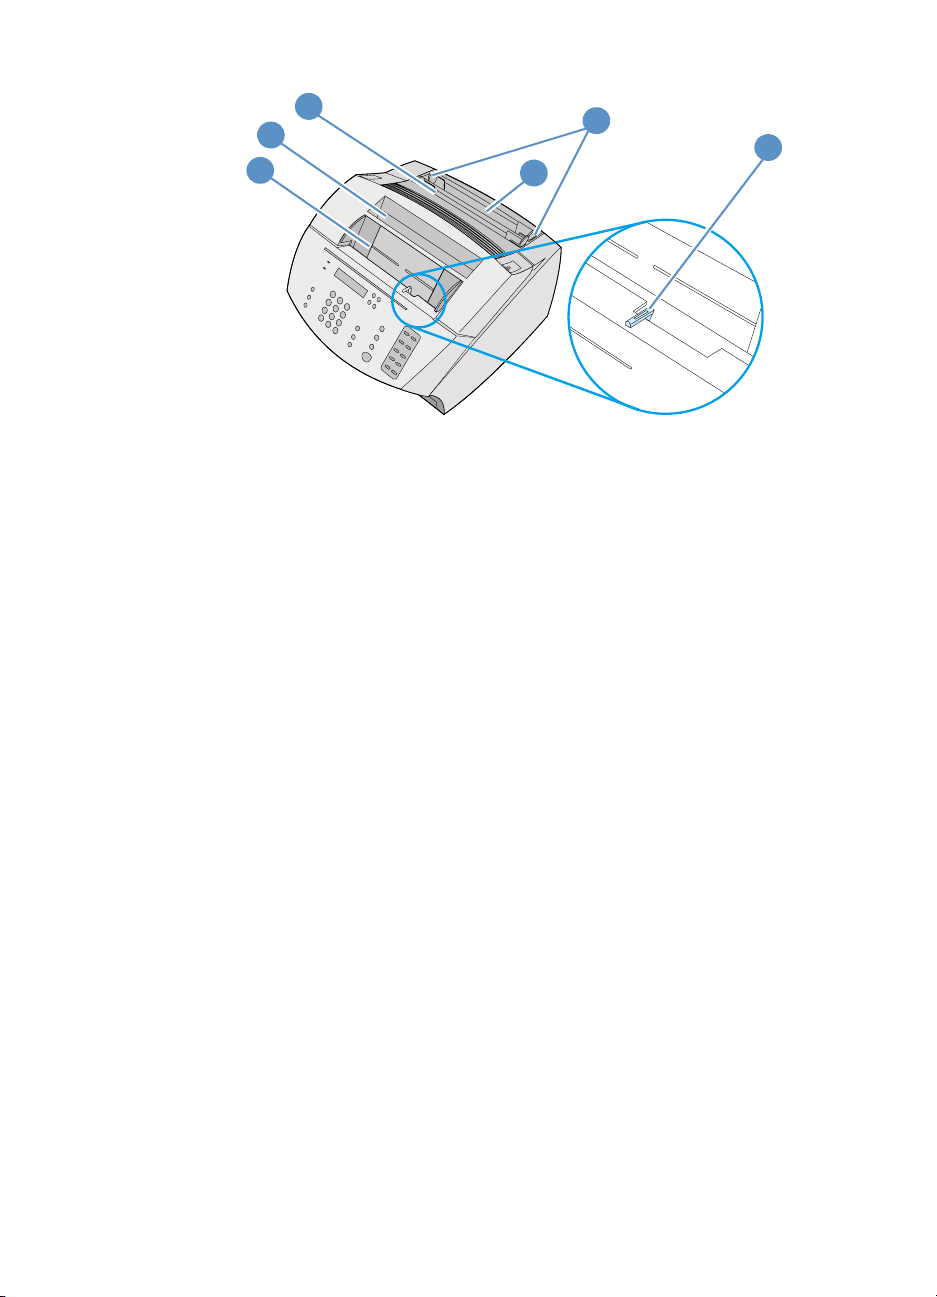
8
7
6
6 Document feeder tray
7 Paper output bi n
8 Single-sheet input slot
9 Paper input tray
10 Paper input guides
11 Special media lever
10
11
9
22 Chapter 2 - Getting to Know the Product EN
Page 25

Selecting print media
In this section you will find information on:
l Selecting media to print
l Selecting items for faxing, copying, or scanning
Selecting media to print
If available in your area, HP recommends that you use HP LaserJet
or HP Multipurpose paper (because it has been designed specifically
for use with your product), use or paper that meets HP’s
specifications. You can use paper with up to 100% recycled fiber
content if it meets HP’s specifications. To order HP paper or the Print
Media Guide for HP LaserJet printers, see “Ordering parts” on
page 257.
Highly textured stock, such as linen, might not print evenly. Very
glossy papers might jam or repel toner. Multipart forms can wrinkle or
get jammed in the product. And paper in poor condition, such as
paper with tears, wrinkles, or bent edges, can jam.
Avoid envelopes that have a very slick finish, ones that have self-stick
adhesives, or those with clasps or windows. Also avoid envelopes
with thick, irregular, or curled edges, or areas that are wrinkled, torn,
or otherwise damaged.
Use a sturdy envelope of approximately 16 to 27 pounds (7.25 to
12.25 kg) weight. Use tightly constructed envelopes, and make sure
the folds are sharply creased.
EN Selecting print media 23
Page 26

Print media sizes
The paper input tray can hold up to 125 sh eets of 20 lb ( 75 g/m2) print
media. The single-sheet input slot is designed to hold one sheet. Both
can be adjusted to hold media measuring from 3 by 5 inches (76.2 by
127 mm) to 8.5 by 14 inches (216 by 356 mm). This includes, but is
not limited to, the following paper and envelope sizes:
Paper type English Metric
Letter 8.5 by 11 in 216 by 279 mm
Legal 8.5 by 14 in 216 by 356 mm
Executive 7.25 by 10.5 in 184 by 267 mm
A4 8.25 by 11.75 in 210 by 297 mm
COM10 Envelopes 4.125 by 9.5 in 105 by 241 mm
DL Envelopes 4.33 by 8.67 in 110 by 220 mm
C5 Envelopes 6.4 by 9 in 162 by 229 mm
B5 Envelopes 6.9 by 9.85 in 176 by 250 mm
Monarch Envelopes 3.875 by 7.5 in 98.5 by 190.5 mm
Other custom-size
media
For information about how to print on special media, see “Printing on
special media” on page 109.
custom custom
24 Chapter 2 - Getting to Know the Product EN
Page 27

Selecting items for faxing, copying, or scanning
The product can scan items of various sizes, from 2 by 3.5 inches (51
by 89 mm) (the size of a business card) to 8.5 by 14 inches (215 by
356 mm), and can fax and copy items ranging from 2 by 3.5 inches
(51 by 89 mm) to 8.5 by 35 inches (215 by 889 mm).
The product accepts bond paper, onionskin paper, newspaper pages,
magazine pages, recycled paper, transparencies, and photographs
and other items in carrier sheets. Coarse papers scan more easily
than smooth items. Slick papers can go through the product, although
they may be more difficult to feed through. For best results, feed slick
sheets one at a time and have the special media lever set correctly.
Perform the following actions to minimize the possibility of jams:
l Remove self-adhesive notes.
l Remove staples and paper clips.
l Straighten any curls or wrinkles in documents before putting them
into the document feeder tray.
l Do not insert any document with glue, correction fluid, or wet ink
on it.
l Do not insert gum-backed paper or labels.
l Place documents with tears, perforations, or punch holes in a
carrier sheet, which you can buy or make. (See “To load special
items” on page 27.)
l Avoid multiple-copy forms.
EN Selecting print media 25
Page 28
Loading print media
In this section you will find information on:
l Loading print media to be faxed, copied, or scanned
l Loading media to be printed
l Selecting the output path
Loading print media to be faxed, copied, or scanned
Whether you want to fax, copy, or scan, the procedure for loading the
document is the same. If your document is on a standard-weight
paper (from 12 to 28 lb, or 46 to 105 g/m
media” on page 26. If your document is a transparency, is in a carrier
sheet, or is not on standard-weight paper, see “To load special items”
on page 27.
To load normal print media
1 Adjust the guides in the document feeder tray to fit the size of the
item you are loading.
2
), see “To load normal print
2 Place up to 30 pages top first, face down, into the document
feeder tray.
26 Chapter 2 - Getting to Know the Product EN
Page 29
To load special items
When loading items to be faxed, copied, or scanned, you need to
protect small, fragile, lightweight (less than 12 lb. or 46 g/m
2
), or
irregularly sized items such as receipts, newspaper clippings,
photographs, and old or worn documents.
1 Do one of the following:
• Place the item in a carrier sheet. You can buy a carrier sheet,
or you can make one by taping a transparency and piece of
paper together along one of the short sides. Insert the item to
be faxed, copied, or scanned into the carrier, and insert the
carrier into the document feeder tray, taped edge first.
• Using clear tape, tape the leading and trailing edges of the
item to a sheet of letter- or A4-size paper. If the item is not
square or rectangular, tape all edges of the item to the paper.
• If you have use of a standard size copier, copy the item first
and then send the copy through the scanner.
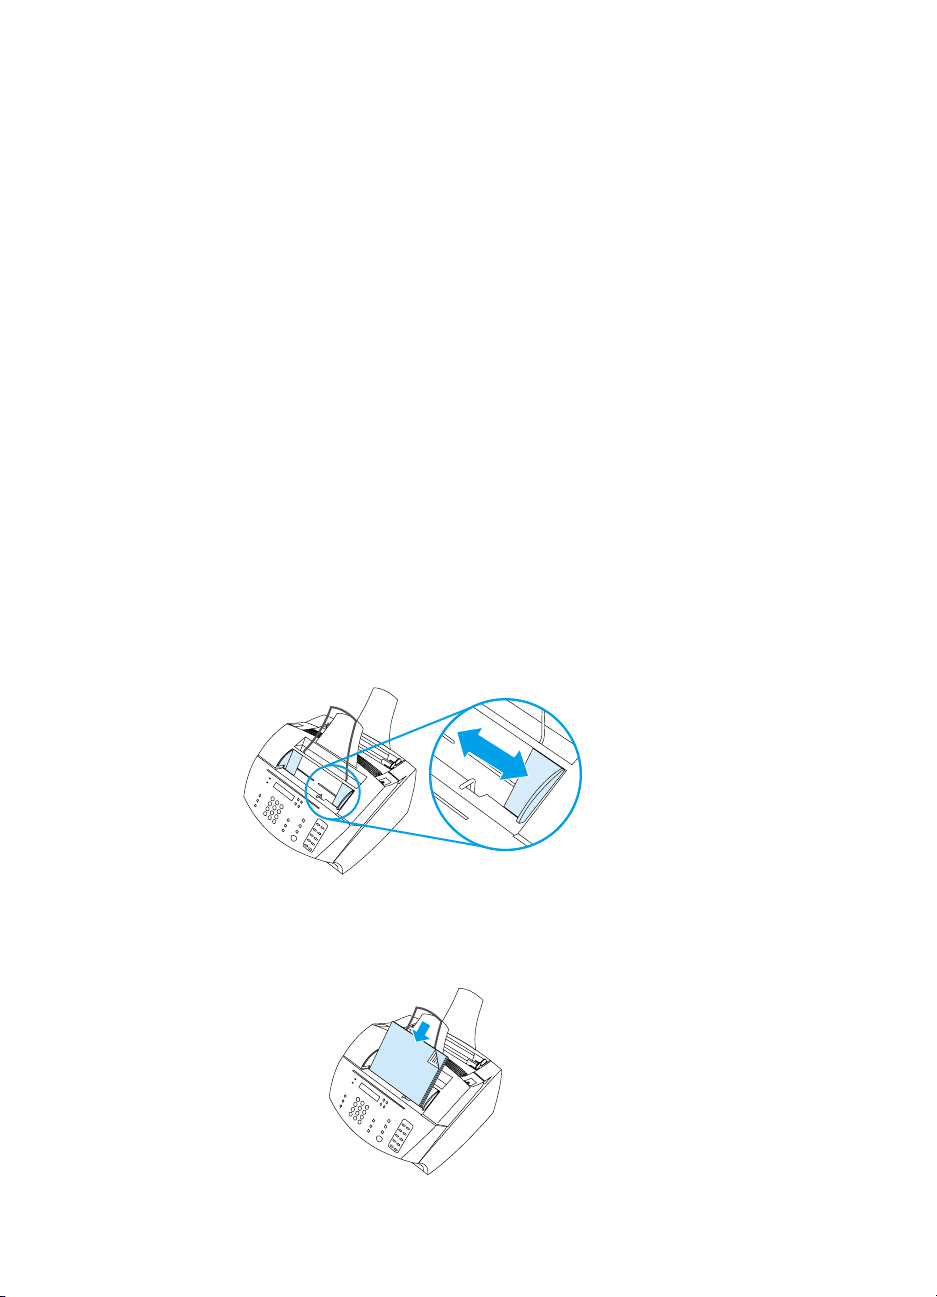
2 Adjust the guides in the document feeder tray to fit the size of the
item you are loading.
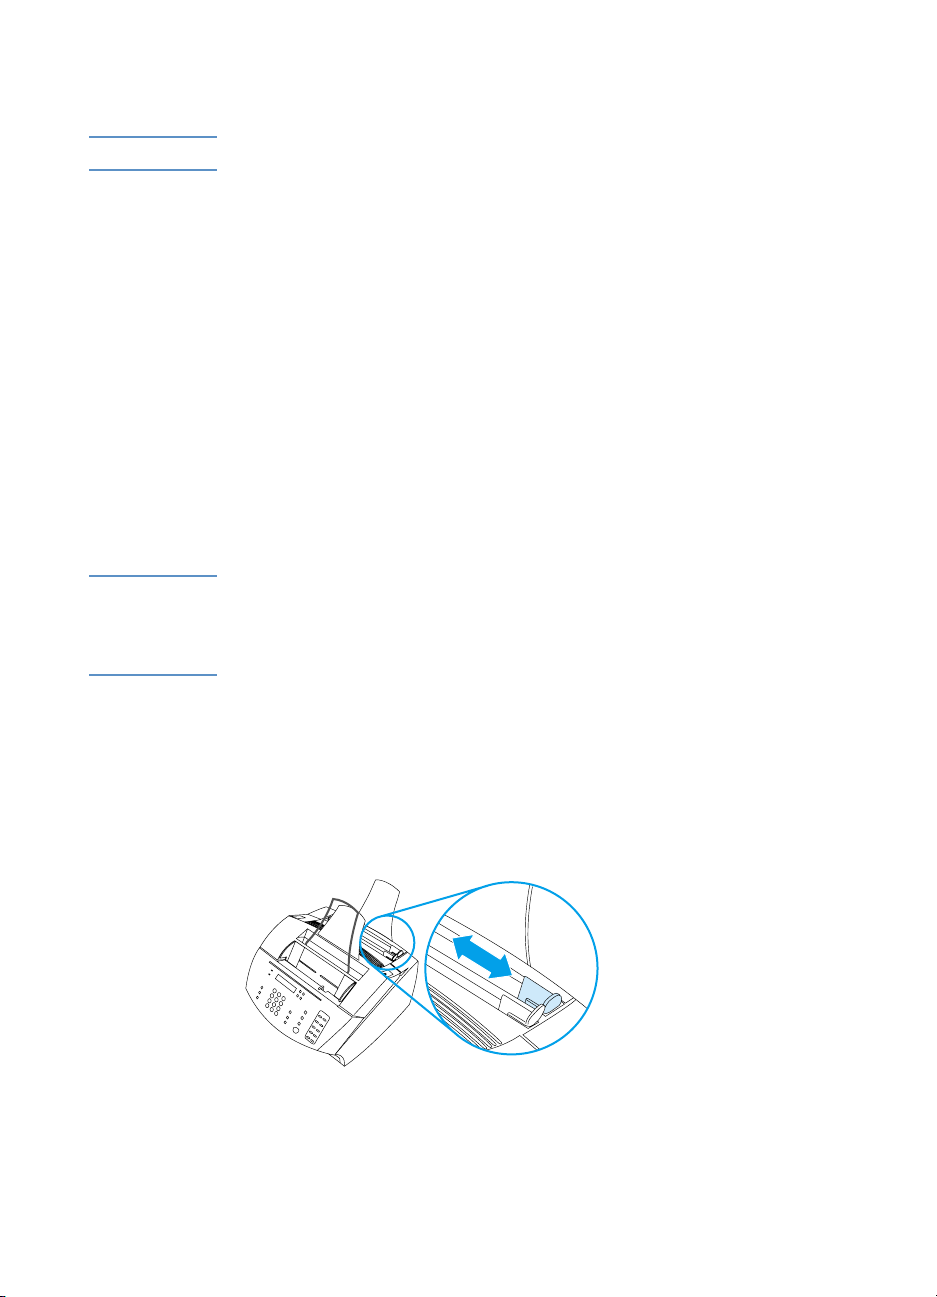
3 Locate the special media lever (see “Identifying hardware parts”
on page 21) on the top edge of the control panel and move it to
the right.
CAUTION Do not move the lever after the product has begun sending the page.
EN Loading print media 27
Page 30
4 Load only one sheet at a time, top first, face down, into the
document feeder tray.
Note If you are loading a business card, load it long edge first.
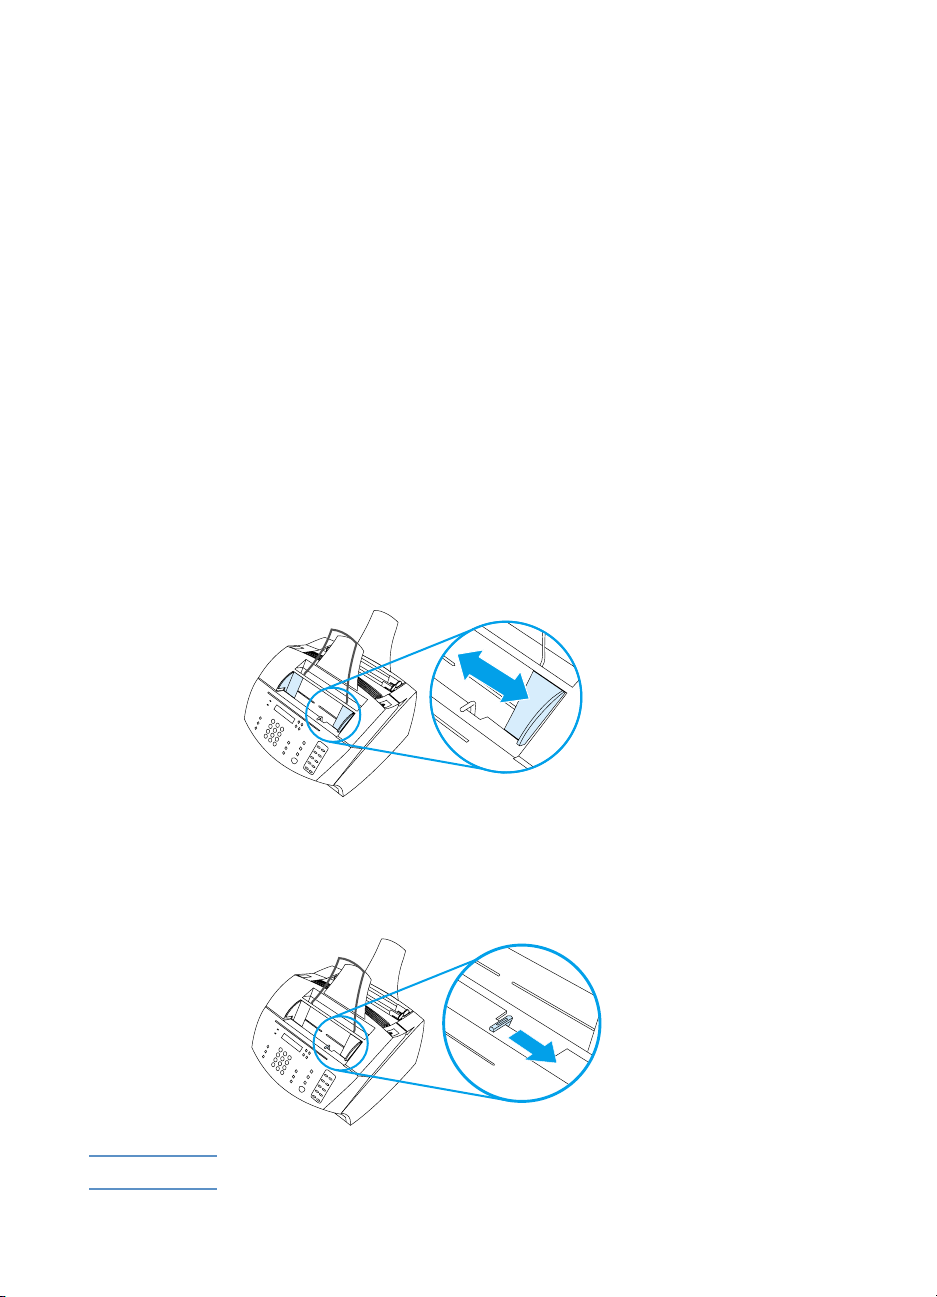
5 Move the special media lever back to the left after special items
have been fed. A stack of regular pages sent with the lever to the
right can go through in multiples, and can cause jams.
Loading media to be printed
You can load media to be printed in paper input tray or in the singlesheet input slot. See the instructions in this section for more
information.
Loading the paper input tray
You can load up to 125 sheets of 20 lb (75 g /m2) media into the paper
input tray, or you can feed one sheet at a time into the single-sheet
input slot.
Note Insert all media vertically (portrait orientation) into the paper input tray
or single-sheet input slot. If you want to print horizontally (landscape
orientation), make that selection through your software. The product
cannot print on paper smaller than 3 by 5 inches (76.2 by 127 mm).
The product prints, copies, and prints received faxes using media
from the paper input tray (or the single-sheet input slot).
To load the paper input tray
1 Adjust the guides on the paper input tray to fit the size of media
you are loading.
28 Chapter 2 - Getting to Know the Product EN
Page 31

2 Insert up to 125 sheets of paper into the paper input tray. Be
careful not to overfill the tray.
Note When adding paper to an existing stack in the paper input tray, always
remove the existing paper and realign it with the new paper before
loading to reduce multiple feeds or jams.
Note If you have loaded special media, make sure to choose the lower paper
output path. See “To select the output path” on page 31.
3 Readjust the guides to center the stack.
Using the single-sheet input slot
Using the single-sheet input slot, you can print one sheet of media at
a time without using the paper input tray. The product takes media
loaded in the single-sheet input slot before it takes media from the
paper input tray.
Note The single-sheet input slot is helpful when the first page of your job is
different from the rest. For example, you might want the first page of
your print job on letterhead, or you might want to print an envelope fir st.
To print using the single-sheet input slot
1 Adjust the guides on the single-sheet input slot to the
approximate size of the sheet you are using.
EN Loading print media 29
Page 32

2 Insert one sheet of media into the single-sheet input slot. If
loading special media or letterhead, insert media top first, facing
forward.
3 Readjust the guides to center the sheet.
Note If you have loaded special media, make sure to choose the lower paper
output path. See “To select the output path” on page 31.
30 Chapter 2 - Getting to Know the Product EN
Page 33

Selecting the output path
Selecting the output path determines whether printed media come out
of the paper output bin or out of the front paper output slot. Choose
the front paper output slot if you are printing on special media, such
as 28 lb (100 g/m
transparencies, or labels. This prevents wrinkling and paper curl.
To select the output path
l To use the paper output bin, make sure that the front paper path
door is closed.
- Or -
l To eliminate curl, use the straight-through paper path by openin g
the front paper path door. All printed media coming out of the
front paper output slot will be in reverse order.
2
) or heavier weight paper, envelopes,
Note To avoid jams, keep the area in front of the front paper path slot clear
so that media can easily exit the slot, and make sure the front paper
path door is completely open.
EN Loading print media 31
Page 34

Features available only through the software
The tools and options described in the sections listed below are
available only through the software that came with the HP LaserJet
3200 product.
l Using the HP LaserJet Director
l Using the HP LaserJet Document Manager (Windows) or the HP
LaserJet Workplace (Mac OS)
Note For more detailed informatio n ab o ut ho w to use th e too ls or opt ion s,
see the software Help.
Using the HP LaserJet Director
If your computer is directly connected to the product, the computer is
on, and you have installed the software, the HP LaserJet Director
appears when you load a document into the document feeder tray.
Note The HP LaserJet Director is not supported for Microsoft Windows 95.
The HP LaserJet Director is a shortcut toolbar that allows you to
process documents quickly using HP LaserJet 3200 tools, such as
the scanner, copier, and fax machine. If you would like the HP
LaserJet Director to not appear when a document is loaded into the
document feeder tray, see “To turn off the HP LaserJet Director” on
page 34.
If the product is connected to your computer using a supported
HP JetDirect print server, the HP LaserJet Director will not appear
when a document is loaded into the document feeder tray. To open
the HP LaserJet Director in Microsoft Windows, click the HP LaserJet
Director icon on the taskbar as shown below.
32 Chapter 2 - Getting to Know the Product EN
Page 35
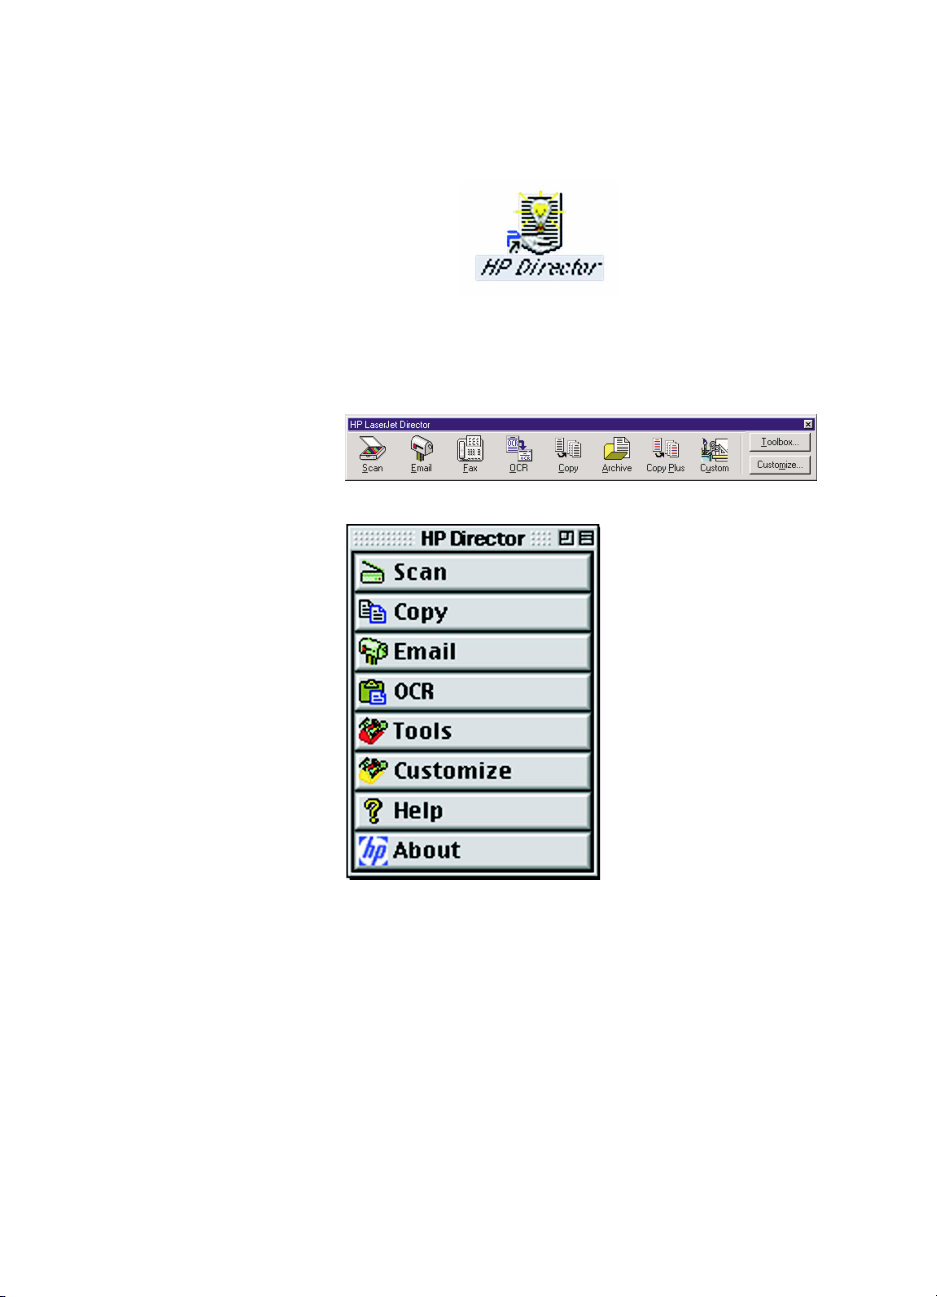
Windows
Mac OS
To open the HP LaserJet Director in the Mac OS, double-click the
alias for the HP LaserJet Director that appears on the desktop as
shown below.
The following examples of the HP LaserJet Director for Windows and
the Mac OS shows only the default buttons.
EN Features available only through th e sof twa re 33
Page 36

The following table explains the buttons that appear on the HP
LaserJet Director.
Button Description
Scan Scans the document in the docume nt feeder tray.
Email Attaches a copy of the document in the document
feeder tray to a new e-mail message, and displays the
new message so you can address it and send it.
Fax Opens the HP LaserJet Send Fax dialog box. From
that dialog box you can add recipients, add a cover
sheet, and then send the item.
OCR
(Optical Character
Recognition)
Copy Opens the HP LaserJet Copier dialog box. From that
Archive Scans the document in the document feeder tray and
Toolbox (Windows)
Tools (Mac OS)
Customize Displays the Customize dialog box where you can
Scans the document in the document feeder tray and
converts it to text that you can edit in a word
processing program.
dialog box you can adjust the number of copies,
reduce or enlarge the copy, adjust the contrast and
copy quality, and change the output paper size.
stores it in a default destination.
Displays tools and Support help.
change settings for HP LaserJet Director.
To turn off the HP LaserJet Director
Use the following if you do not want the HP LaserJet Director to
appear when a document is loaded into the document feeder tray.
Windows
1 On the HP LaserJet Director toolbar, click the Customize
button.
2 Click the Monitor Device tab.
3 Clear the Use the Director to Monitor Actions on the Device
check box, and then click OK to confirm that you want to turn off
the HP LaserJet Director.
4 Click Apply, and then click OK.
Note To restart the HP LaserJet Director after turning it off, click Start, point
to Programs, p oint to HP LaserJet 3200, and then click HP LaserJet
Director.
34 Chapter 2 - Getting to Know the Product EN
Page 37

Mac OS
1 On the HP LaserJet Director toolbar, click the Customize button.
2 Click the General tab.
3 Click "Show the Document Assistant when paper is inserted into
the scanner automatic document feeder" to de select this option,
and then click OK.
4 Click Apply, and then click OK.
Note You can still open the HP LaserJet Director double-clicking the alias
on the desktop.
Using the HP LaserJet Document Manager (Windows) or the HP LaserJet Workplace (Mac OS)
The HP LaserJet Document Manager for Windows-compatible
computers or the HP LaserJet Workplace for Macintosh-compatible
computers is a complete set of tools you can use to manage all your
document input and output needs. With HP LaserJet Document
Manager and HP LaserJet Workplace, you can:
l organize your document desktop.
l fax, print, scan, or copy documents using the product.
l make annotations to .HPD files (.HPD files are scanned
documents that are saved using the HP LaserJet Document
Manager or HP LaserJet Workplace).
l add simple graphics, such as rectangles, arrows, and freehand
polygons, to documents.
See the software Help for more information about how to use the HP
LaserJet Document Manager and HP LaserJet Workplace.
Note The HP LaserJet Document Manager is not supported for Microsoft
Windows 95.
EN Features available only through th e sof twa re 35
Page 38

36 Chapter 2 - Getting to Know the Product EN
Page 39

Managing General Default Settings, Logs, and Reports
Introduction
This chapter contains the procedures for printing reports and altering
general default settings for the product. For information about settings
that pertain to faxing, printing, copying, or scanning, see the
corresponding section. The instructions included in this section are
those for the control panel.
Adjusting settings from the software is sometimes the easiest
method. To gain access to default settings in the software on a
Windows-compatible computer, click Start, point to Programs, point
to HP LaserJet 3200, point to Tools, and then click HP LaserJet
Device Configure. To gain access to default settings on a
Macintosh-compatible computer, double-click the HP LaserJet
Director alias on the desktop, click Tools, and then click Device
Configuration.
CAUTION When changing settings in a network environment, you are changing
settings for all users.
Hint You can find out what product settings are curr ently selected by printing
a configuration report (see “Printing a configuration report” on
page 48.)
For further instructions about adjus tin g pr od uc t set tin gs fr om the
software, see the software Help.
EN Introduction 37
Page 40

Changing general default settings
This section contains instructions for:
l Changing the default paper size for the paper input tray
l Changing sound volume
l Changing the language on the display panel
l Restoring factory defaults
Changing the default paper size for the paper input tray
The paper size should be set to the size of paper you normally load in
the paper input tray. The product uses this setting for copying,
printing reports, and determining autoreduction for incoming faxes.
Note The printing function does not use this setting. If you are loading
special-size media for only your current print job, do not change this
setting. After you have finished printing, reload the original paper.
To change the default paper size
1 Press ENTER/MENU.
2 Use the < or > key to select
E
NTER/MENU.
3 Use the < or > key to select
press E
4 Use the < or > key until the size of paper you have loaded
appears. You can choose
5 Press E
38 Chapter 3 - Managing General Default Settings, Logs, and Reports EN
NTER/MENU.
NTER/MENU to save your selection.
COMMON SETTINGS, and then press
DEFAULT PAPER SIZE, and then
LETTER, LEGAL, or A4.
Page 41

Changing sound volume
You can control the volume of the following:
l The fax sounds associated with incoming and outgoing faxes.
l The ring for incoming faxes.
l The alarm sound the product emits when it requires attention,
such as when the printer door is open.
l The beeps emitted when you press control panel keys.
To change the fax sounds (line monitor) volume
Note The default set at the factory is Soft.
1 Press V
2 Use the < or > key to select
then press E
OLUME.
OFF, SOFT, MEDIUM, or LOUD, and
NTER/MENU to save your selection.
To change ring volume
The ring volume is heard when the device is initially sending or
receiving a call. The ring duration length is based on the local telecom
ring pattern length.
Note The default set at the factory for ring volume is Soft.
1 Press E
2 Use the < or > key to select
E
3 Use the < or > key to select
E
4 Press the > key once to select
E
5 Use the < or > key to select
then press E
NTER/MENU.
COMMON SETTINGS, and then press
NTER/MENU.
VOLUME SETTINGS, and then press
NTER/MENU.
RING VOLUME, and then press
NTER/MENU.
OFF, SOFT, MEDIUM, or LOUD, and
NTER/MENU to save your selection.
EN Changing general default settings 39
Page 42

To change the alarm volume
The alarm is heard when the device is presenting an alert or critical
error message. The alarm duration length is either one or three
seconds, based on the type of error.
Note The default set at the factory for the alarm volume is Soft.
1 Press E
2 Use the < or > key to select
E
3 Use the < or > key to select
E
4 Press E
5 Use the < or > key to select
then press E
NTER/MENU.
COMMON SETTINGS, and then press
NTER/MENU.
VOLUME SETTINGS, and then press
NTER/MENU.
NTER/MENU to select ALARM VOLUME.
OFF, SOFT, MEDIUM, or LOUD, and
NTER/MENU to save your selection.
To change control panel key press volume
The key press volume will be heard when a control panel key is
pressed.
Note The default set at the factory for the control panel key press is Soft.
1 Press E
2 Use the < or > key to select
E
3 Use the < or > key to select
E
NTER/MENU.
COMMON SETTINGS, and then press
NTER/MENU.
VOLUME SETTINGS, and then press
NTER/MENU.
4 Use the < or > key to select
E
NTER/MENU.
5 Use the < or > key to select
then press E
NTER/MENU to save your selection.
KEY PRESS VOLUME, and then press
OFF, SOFT, MEDIUM, or LOUD, and
40 Chapter 3 - Managing General Default Settings, Logs, and Reports EN
Page 43
Changing the language on the display panel
Use this procedure to have the control panel display messages and
reports in a language other than the default for your country.
To change the language on the display panel
1 Press ENTER/MENU.
2 Use the < and > keys to select
press E
3 Use the < and > keys to select
M
4 Use the < and > keys to select the language you want.
5 Press E
NTER/MENU.
ENU.
NTER/MENU to save your selection.
Common Settings, and then
Language, and the press ENTER/
Restoring factory defaults
This procedure returns all settings to the factory defaults and clears
the fax header name and phone number. (See “Changing the
information in the fax header” on page 79 for information on how to
add your information to the fax header.) This procedure does not
clear fax numbers and names associated with one-touch keys and
speed-dial codes or delete any pages stored in memory.
To restore factory defaults
1 Press ENTER/MENU.
2 Use the < or > key to select
ENU.
M
3 Use the < or > key to select
M
ENU, and then press ENTER/MENU again to confirm your
selection.
EN Changing general default settings 41
SERVICE, and then press ENTER/
RESTORE DEFAULTS, press ENTER/
Page 44

Managing logs and reports
This section contains the following procedures for pr inting reports and
for establishing a schedule for printing certain reports:
l Printing the fax activity log
l Setting the fax activity log to print automatically
l Printing a fax call report
l Setting when the fax call report prints
l Including the first page of each fax on the fax call report
l Printing a one-touch, speed-dial, and group-dial report
l Printing the control panel menu structure
l Printing a configuration report
l Printing the block fax list
l Printing a PCL font list
l Printing a PostScript font list
l Printing all fax reports
l Printing a T.30 protocol trace report
l Setting when the T.30 protocol trace report prints
42 Chapter 3 - Managing General Default Settings, Logs, and Reports EN
Page 45

Printing the fax activity log
On demand, you can print a log of the last 40 faxes. This log includes
entries for:
l All faxes received to the product
l All faxes sent from the control panel
l All faxes sent from the HP LaserJet Document Manager (for
Windows-compatible computers directly connected to the
product)
l All faxes sent from the HP Workplace (for Macintosh-compatible
computers directly connected to the prod u ct)
Note The HP LaserJet Document Manager is not supported for Microsoft
Windows 95.
To print the fax activity log
1 Press ENTER/MENU.
2 Use the < or > key to select
M
ENU.
3 Use the < or > key to select
NTER/MENU.
E
4 Press E
NTER/MENU to select PRINT FAX LOG NOW. The product
REPORTS, and then press ENTER/
FAX ACTIVITY LOG, and then press
exits the Menu settings and prints the log.
EN Managing logs and reports 43
Page 46

Setting the fax activity log to print automatically
The fax activity log provides a chronological history of the last 40
faxes that were received, sent, or deleted, as well as any errors that
occurred. You can decide whether or not you want the fax log to print
automatically after every 40 entries. The factory default is On.
To set when the fax log prints
1 Press ENTER/MENU.
2 Use the < or > key to select
ENU.
M
3 Use the < or > key to select
4 Press > once to select
E
NTER/MENU.
5 Use the < or > key to select
M
ENU to confirm your selection.
AUTO. LOG PRINTING, and then press
REPORTS, and then press ENTER/
FAX ACTIVITY LOG.
ON or OFF, and then press ENTER/
44 Chapter 3 - Managing General Default Settings, Logs, and Reports EN
Page 47

Printing a fax call report
A fax call report is a brief report indicating the status of the last sent or
received fax. You can set the fax call report to print automatically.
See “Setting when the fax call report prints” on page 45 for more
information.
To print a fax call report
1 Press ENTER/MENU.
2 Use the < or > key to select
ENU.
M
3 Use the < or > key to select
E
NTER/MENU.
4 Press E
NTER/MENU to select PRINT FAX CALL NOW. The product
REPORTS, and then press ENTER/
FAX CALL REPORT, and then press
exits the Menu settings and prints the report.
Setting when the fax call report prints
A fax call report contains information about the last sent or received
fax. You can choose to have the report print for one of the following:
l Every Fax Error (the default)
l Send Fax Error
l Receive Fax Error
l Every Fax
l Send Fax Only
l Never
If you choose Never, you will have no indication that a fax failed to
transmit unless you print a fax activity log.
EN Managing logs and reports 45
Page 48

To set when fax call reports print
1 Press ENTER/MENU.
2 Use the < or > key to select
ENU.
M
3 Use the < or > key to select
NTER/MENU.
E
4 Press the > key once to select
E
NTER/MENU.
5 Use the < or > key to select the option for when you want the fax
call reports to print.
6 Press E
NTER/MENU to save the selection.
REPORTS, and then press ENTER/
FAX CALL REPORT, and then press
PRINT REPORT, and then press
Including the first page of each fax on the fax call report
If this option is turned on, the fax call report will display a thumbnail
(50% reduction) of the first page of the last fax that was sent or
received. The default setting for the thumbnail is On.
To include the first page of each fax on the fax call
report
1 Press ENTER/MENU.
2 Use the < or > key to select
M
ENU.
3 Use the < or > key to select
NTER/MENU.
E
4 Use the < or > key to select
press E
5 Use the < or > key to select
M
46 Chapter 3 - Managing General Default Settings, Logs, and Reports EN
NTER/MENU.
ENU to confirm your selection.
REPORTS, and then press ENTER/
FAX CALL REPORT, and then press
INCLUDE FIRST PAGE, and then
ON or OFF, and then press ENTER/
Page 49

Printing a one-touch, speed-dial, and groupdial report
This report lists the fax numbers that are assigned to the one-touch
keys and speed-dial and group-dial code s.
To print a one-touch, speed-dial and group-dial report
1 Press ENTER/MENU.
2 Use the < or > key to select
ENU.
M
3 Use the < or > key to select
press E
prints the report.
NTER/MENU. The product exits the Menu settings and
REPORTS, and then press ENTER/
SPEED DIAL REPORT, and then
Printing the control panel menu structure
Use this procedure if you’d like to print a copy of the control panel
menu structure. This menu structure might be a useful reference as
you alter settings in the menu.
To print the control panel menu structure
1 Press ENTER/MENU.
2 Use the < or > key to select
ENU.
M
3 Use the < or > key to select
NTER/MENU. The product exits the Menu settings and prints the
E
report.
REPORTS, and then press ENTER/
MENU STRUCTURE, and then press
EN Managing logs and reports 47
Page 50

Printing a configuration report
Print this report to show the current product settings.
To print a configuration report
1 Press ENTER/MENU.
2 Use the < or > key to select
M
ENU.
3 Use the < or > key to select
press E
prints the report.
NTER/MENU. The product exits the Menu settings and
REPORTS, and then press ENTER/
CONFIGURATION REPORT, and then
Printing the block fax list
Use this procedure to print a list of the blocked fax numbers. See
“Blocking or unblocking fax numbers” on page 67.
To print the block fax list
1 Press ENTER/MENU.
2 Use the < or > key to select
ENU.
M
3 Use the < or > key to select
E
NTER/MENU. The product exits the Menu settings and prints the
list.
REPORTS, and then press ENTER/
BLOCK FAX LIST, and then press
48 Chapter 3 - Managing General Default Settings, Logs, and Reports EN
Page 51

Printing a PCL font list
Use this procedure to print a list of the PCL fonts.
To print a PCL font list
1 Press ENTER/MENU.
2 Use the < or > key to select
M
ENU.
3 Use the < or > key to select
NTER/MENU. The product exits the Menu settings and prints the
E
list.
REPORTS, and then press ENTER/
PCL FONT LIST, and then press
Printing a PostScript font list
Use this procedure to print a list of the PostScript fonts available in
the product memory.
To print a PostScript font list
1 Press ENTER/MENU.
2 Use the < or > key to select
M
ENU.
3 Use the < or > key to select
NTER/MENU. The product exits the Menu settings and prints the
E
list.
REPORTS, and then press ENTER/
POSTSCRIPT FONTS, and then press
EN Managing logs and reports 49
Page 52

Printing all fax reports
Use this procedure to print the following reports at one time:
l Fax activity log
l One-touch, speed-dial, and group-dial report
l Configuration report
l Block fax list
To print all fax reports
1 Press ENTER/MENU.
2 Use the < or > key to select
ENU.
M
3 Use the < or > key to select
E
NTER/MENU. The product exits the Menu settings and prints the
reports.
REPORTS, and then press ENTER/
ALL FAX REPORTS, and then press
Printing a T.30 protocol trace report
This report is used by service technicians to troubleshoot fax
transmission issues.
To print a T.30 protocol trace report
1 Press ENTER/MENU.
2 Use the < or > key to select
3 Use the < or > key to select
NTER/MENU.
E
4 Use the < or > key to select
product exits the Menu settings and prints the reports.
SERVICE and press ENTER/MENU.
PRINT T.30 TRACE and press
NOW and press ENTER/MENU. The
50 Chapter 3 - Managing General Default Settings, Logs, and Reports EN
Page 53

Setting when the T.30 protocol trace report prints
You can set the T.30 protocol trace report to print:
l Never (the default)
l If an error occurs
l At the end of every send and received fax
To set when the T.30 protocol trace reports prints
1 Press ENTER/MENU.
2 Use the < or > key to select
3 Use the < or > key to select
E
NTER/MENU.
4 Use the < or > key to select the option for when you want the T.30
protocol trace report to print.
5 Press E
NTER/MENU to save the selection.
SERVICE and press ENTER/MENU.
PRINT T.30 TRACE and press
EN Managing logs and reports 51
Page 54

52 Chapter 3 - Managing General Default Settings, Logs, and Reports EN
Page 55

Faxing
Introduction
All users can fax to and from the product. The product operates just
like a regular fax machine; you do not have to install the software or
have the computer on for it to work. From the control panel, you can
send and receive paper faxes and adjust all settings needed for
faxing.
Normally, received faxes are printed at the product. However, you
can choose to have incoming faxes routed to your computer if it is
directly connected to the product, or to anot he r fa x ma ch ine .
This section provides an overview of faxing capabilities from the
control panel, as well as information about fax default settings.
Hint You can find out what product settings are curr ently selected by printing
a configuration report (see “Printing a configuration report” on
page 48).
EN Introduction 53
Page 56

Sending faxes
This section contains the following topics:
l Sending faxes to one recipient
l Quickly programming speed-dial codes or one-touch keys
l Sending faxes to multiple recipients
l Sending a fax at a future time
l Redialing manually
l Using the Contrast button to adjust the contrast for the current fax
or copy job
l Adjusting the resolution for the current job
l Resolution options
l Canceling the current fax job
l Canceling a fax job using Fax Job Status
54 Chapter 4 - Faxing EN
Page 57

Sending faxes to one recipient
This procedure details how to send a fax to one recipient.
Hint If you want to improve the quality of a paper document before faxing
it, scan the document first and straighten or clean the image. Then,
send it as a fax from the software. See the software Help for more
information.
To send a fax
1 Dial the fax number using one of the following methods:
• Use the numeric keys.
• If the fax number you are calling has been assigned to a onetouch key, press that key.
• If the fax number you are calling has a speed-dial code, press
S
PEED DIAL, enter the speed-dial code using the numeric keys,
and press E
NTER/MENU.
Note When dialing using the numeric keys, include any pauses or other
needed numbers, such as an area code, an access code for numbers
outside a PBX system (usually a 9 or 0), or a long-distance prefix. See
“Using dialing characters” on page 78 for more information.
2 Load the document into the document feeder tray.
3 Adjust any options, such as contrast or resolution.
4 Press F
After the last page of the fax has exited the product, you can start
sending another fax, copying, or scanning.
Hints To fax to numbers you use regularly, you can assign a one-touch key
or speed-dial code. See “About speed-dial codes, one-touch keys, and
group-dial codes” on page 70 for instructions.
If you have electronic phone books available, you can use them for
selecting recipients. Electronic phone books are generated with thirdparty applications. See the software Help for more information.
AX/SEND.
Quickly programming speed-dial codes or
EN Sending faxes 55
Page 58

one-touch keys
Use the following method to program speed-dial codes and one-touch
keys easily from the product control panel.
To quickly program speed-dial codes or one-touch
keys
Note This procedure cannot be used to program a group-dial code. See
“Programming group-dial codes” on page 74.
1 Do one of the following:
Press
SPEED DIAL and enter an unprogrammed speed-dial code
and press E
-Or-
Press an unprogrammed one-touch key.
The control panel display will notify you that the speed-dial code
or one-touch key has not been programmed.
NTER/MENU.
2 Press the E
NTER/MENU to program the speed-dial codes or one-
touch key.
3 Enter the fax number, and then press E
NTER/MENU. Include any
pauses, a hook flash, or other needed numbers, such as an a rea
code, an access code for numbers outside a PBX system (usually
a 9 or 0), or a long distance prefix. See “Using dialing characters”
on page 78 for more information.
Note When entering a fax number you can use a comma for a pause, use
the letter R if you want the product to wait for a di al to ne, and use the
letter W for a hook flash.
4 Enter a name for the fax number. To do so, repeatedly press the
numeric key for the letter you need until the letter appears. (See
“Using dialing characters” on page 78 for a list of characters.) For
example, if the first letter you need is a "C," press 2 repeatedly
until a C appears. Press > to go to the next space.
5 Press E
NTER/MENU to save the information.
56 Chapter 4 - Faxing EN
Page 59

Sending faxes to multiple recipients
You can send a paper fax to several fax numbers at on ce. If you wa nt
to send a fax to a group of fax numbers you have assigned to a
group-dial code, see “To send a fax using a group-dial code.” If you
want to send to up to 20 numbers that do no t have a group -dial cod e,
see “To send a fax to an ad-hoc group.”
In the rare instance that your document does not fit into memory, you
will need to send the document to each fax number one at a time, or
use the HP LaserJet Director.
Note The HP LaserJet Director is not supported for Microsoft Windows 95.
Hint If you want to improve the quality of a paper document before faxing
it, scan the document first and straighten or clean the image. Then,
send it as a fax from the software. See the software Help for more
information.
To send a fax using a group-dial code
1 Load the document into the document feeder tray.
2 Adjust any options, such as contrast or resolution.
3 Press the one-touch key for the group.
- Or -
Press S
press E
4 Press F
PEED DIAL and the group-dial code for the group, and then
NTER/MENU.
AX/SEND.
The product scans the document into memory and sends the fax to
each fax number specified. If a number in the group is busy or does
not answer and the redial settings are not set correctly, the product
might not redial that number. If multiple redial attempts fail, the
product will update the Fax Activity log with the error and then
proceed to the next number in the group.
EN Sending faxes 57
Page 60

To send a fax to an ad-hoc group
1 Dial the first fax number using one of the following methods:
• Use the numeric keys.
• If the fax number you are calling has a one-touch key, press
that key.
• If the fax number you are calling has a speed-dial code, press
S
PEED DIAL, enter the speed-dial code using the numeric keys,
and then press E
• If you are calling multiple recipients assigned to a group-dial
code, press the one-touch key for the group or press S
D
IAL and the group-dial code for the group, and then press
E
NTER/MENU.
Note When dialing using the numeric keys, include any pauses or other
needed numbers, such as an area code, an access code for numbers
outside a PBX system (usually a 9), or a long distance prefix. See
“Using dialing characters” on page 78 for more information.
NTER/MENU.
PEED
2 Press E
NTER/MENU.
3 Repeat steps 1 an d 2 to cont inu e enter i ng numb er s.
- Or -
Go to the next step.
4 Load the document into the document feeder tray.
5 Adjust any options, such as contrast or resolution.
6 Press F
AX/SEND.
The product sends the fax to each fax number. If a number in the
group is busy or does not answer and the redial set ting s ar e no t set
correctly, the product might not redial that number. If multiple redial
attempts fail, the product will update the Fax Activity log with the error
and then proceed to the next number in the group.
Note The fax activity log feature is not supported for Microsoft Windows 95
but you can print the fax activity log using the control panel. See
“Printing the fax activity log” on page 43.
58 Chapter 4 - Faxing EN
Page 61

Sending a fax at a future time
You can schedule a fax to be sent automatically at a future time to
one or more people. When you complete this procedure, the product
scans the document into memory and retu rn s t o the Rea d y stat e so
you can do other tasks.
Note This feature is not supported for Microsoft Windows 95.
If the product cannot transmit the fax at the scheduled time, it is
indicated on the fax call report (if that option is turned on) o r logged in
the fax activity log. This can happen in the case of a no answer or if a
busy results in the failure of redial attempts. (See “Setting when the
fax call report prints” on page 45 or “Printing the fax activity log” on
page 43 for more information.)
Hint If you have set a fax to send at a future time but need to add something
to it, you can send the additional information as another job. All faxes
scheduled to go to the same fax number on the same date and time
are delivered as individual faxes.
If a power failure occurs, any pending faxes will need to be
rescheduled.
To send a fax at a future time
1 Load the document into the document feeder tray.
2 Press E
3 Use the < or > key to display
E
4 Press E
M
5 Use the numeric keys to enter the start time. If you are set to a
12-hour clock, use the > key to move the cursor past the fourth
character to set A.M. or P.M. Select
P.M., and then press E
- Or -
If you are set to a 24-hour clock, press E
EN Sending faxes 59
NTER/MENU.
FAX FUNCTIONS and then press
NTER/MENU.
NTER/MENU to select SEND FAX LATER and press ENTER/
ENU.
1 for A.M. or select 2 for
NTER/MENU.
NTER/MENU.
Page 62

6 Use the numeric keys to type the date, and then press ENTER/
M
ENU.
- Or -
Accept the default date by pressing E
NTER/MENU.
7 Type the fax number, enter the speed-dial code, or press the
one-touch key. (This feature does not support ad hoc groups.)
Press E
NTER/MENU or FAX/SEND.
The product scans the document into memory and sends it at the
designated time.
Redialing manually
If you want to send another document to the last fax number dialed,
use the following procedure to manually redial. If you are trying to
resend the same document you sent the first time, you will probably
want to wait until the automatic redials have stopped or you have
stopped them yourself. Otherwise, the recipient might get the fax
twice: once from the manual redial attempt and once from one of the
automatic redial attempts.
Note To stop the current redial attempt for a fax, see “Canceling the current
fax job” on page 64. To cancel all pending, automatic redial attempts
for a fax, see “Canceling a fax job using Fax Job Status.” To change
when the product redials, see “Changing how the product redials” on
page 83.
To redial manually
1 Load the document into the document feeder tray.
2 Press R
3 Press F
attempts to send the fax.
60 Chapter 4 - Faxing EN
EDIAL/PAUSE.
AX/SEND. The product redials the last number and
Page 63

Using the Contrast button to adjust the
contrast for the current fax or copy job
The contrast setting affects the lightness or darkness of an outgoing
fax as it is being sent or the resulting copy. Using the following
procedure changes the contrast for the current job only. After the fax
has been sent or the copy is made, the contrast setting returns to the
default.
Note To change the default contrast for outgoing faxes, see “Changing the
default contrast and resolution for outgoing faxes” on page 81.
To adjust the contrast
1 Press CONTRAST to display the current contrast setting.
2 Use the < or > key to move the slider to the left to make the fax or
copy lighter than the original, or move the slider to the right to
make the fax or copy darker than the original.
3 Press E
NTER/MENU to save the selection.
EN Sending faxes 61
Page 64

Adjusting the resolution for the current job
Resolution affects the quality, in dots per inch, of documents to be
faxed. It also affects the transmission speed. For a discussion of
which resolution to choose, see “Resolution options” below.
Use this procedure to change the resolution for the current job only.
After the fax has been sent, the resolution setting returns to the
default.
Note To change the default resolution setting, see “Changing the default
contrast and resolution for outgoing faxes” on page 81.
To adjust the resolution
1 Press RESOLUTION to display the current resolution setting.
2 Use the < or > key to scroll through the choices.
3 Press E
NTER/MENU to save the selection.
Resolution options
Use this table to determine which resolution setting to choose for your
fax. Note that each increase in quality lengthens transmission time.
Choose this resolution: For this result:
Standard
(203 by 98 dpi)
Fine
(203 by 196 dpi)
Superfine
(300 by 300 dpi)
Standard quality for text.
l Use this setting when speed is more important than quality.
This is the fastest of the resolution settings.
l All fax machines can receive at this quality.
l Words have better quality than graphics or photos at this
setting.
Higher quality for words.
l Use this setting for good all-around quality.
l Most fax machines can receive at this setting. Fax machines
that do not, will receive at Standard.
l Words have better quality than graphics or photos at this
setting.
Best quality for words.
l Words have better quality than graphics or photos at this
setting.
l Only a few fax machines receive at this mode. Fax machines
that do not will receive at the highest supported resolution.
62 Chapter 4 - Faxing EN
Page 65

Choose this resolution: For this result:
Photo
(halftone images scan up to
300 by 300 dpi)
Draft Available only by pressing
Best quality for graphics and photos.
l Use this setting when the quality of graphics and photos in
the document is more important than th e qu a l ity of words.
l Only a few fax machines receive at this mode. Fax machines
that do not will receive at the highest supported resolution.
l The document will be scanned as a halfton e ima g e (w hi ch
simulates shades of gray) at up to 300 by 300 dpi.
l This setting requires the longest transmission time.
This setting provides the same quality as the Standard setting.
RESOLUTION on the control panel.
EN Sending faxes 63
Page 66

Canceling the current fax job
Use this procedure to stop a single fax currently dialing or being
transmitted or received.
To cancel the current fax job
Press STOP/CLEAR on the control panel. Any pages that have not
already been transmitted are canceled.
Canceling a fax job using Fax Job Status
Use this procedure to cancel a fax that:
l Is waiting to redial after a busy signal or no answer.
l Is going to a group of numbers.
l Is scheduled to be sent at a future time.
To cancel a fax job using Job Status
1 Press ENTER/MENU.
2 Press E
3 Use the < or > key to scroll through the pending jobs until you
reach the job you want to clear.
4 Press E
5 Press E
canceled.
64 Chapter 4 - Faxing EN
NTER/MENU to select FAX JOB STATUS.
NTER/MENU to select the job you want to cancel.
NTER/MENU to confirm that you want the job to be
Page 67

Receiving faxes
You can receive faxes to the product or to your computer. In gen er al,
incoming faxes to the product are automatically answered, however if
you change what devices are connected to the same phone line to
which the product is connected, you will need to change how the
product answers incoming faxes. See the “Changing how the product
answers incoming faxes” on page 90 topic in the “Advanced receive
fax features and settings” section.
Follow the procedures in this section to manage faxes routed to the
product.
l Receiving faxes when you hear fax tones
l Reprinting faxes
l Blocking or unblocking fax numbers
Receiving faxes when you hear fax tones
If you have a phone line that receives both fax and phone calls and
you hear fax tones when you answer the phone, you can start the
receiving process in one of two ways:
l If you are close to the product, press FAX/SEND on the control
panel.
l When you answer any phone connected to th e line (an extensio n
phone) and hear fax tones, the product should begin answering
the call automatically. If not, press 1-2-3, in sequence on the
telephone keypad, listen for fax transmission sounds, and then
hang up.
Note For the second method to work, the Extension phone setting must be
set to Yes. See “Enabling an extension phone” on page 93 to check or
change the setting.
EN Receiving faxes 65
Page 68

Reprinting faxes
If a fax did not print because the toner ran out or if the fax prin te d on
the wrong type of media, you can try to reprint it. The actual number
of faxes stored for possible reprinting is determined by how much
memory is available. The most recent fax prints first; the oldest fax
prints last.
These faxes are continuously stored, and reprinting them does not
clear them from memory. To clear these faxes from memory, see
“Clearing faxes from memory” on page 89.
Note You do not need to use this procedure if faxes did not print because of
a jam or because the media ran out. During those situations, faxes are
received to memory. As soon as you clear the jam or refill the media,
faxes automatically resume printing.
To reprint faxes
1 Print a fax activity log to check which faxes may have been lost.
See “Printing the fax activity log” on page 43 for instructions.
2 Press E
3 Press > once to display
M
4 Use the < or > key to display
press E
recently printed faxes.
Note To stop the printing at any time, press STOP/CLEAR.
66 Chapter 4 - Faxing EN
NTER/MENU.
FAX FUNCTIONS and then press ENTER/
ENU.
REPRINT LAST FAXES and then
NTER/MENU. The product begins reprinting the most
Page 69

Blocking or unblocking fax numbers
If there are people or businesses from whom you do no t wan t to
receive faxes, you can block their fax numbers using the control
panel. You can block up to 30 fax numbers. When you block a fax
number and someone from that number sends you a fax, the display
panel indicates that the number is blocked, and the fax does not print
and is not saved in memory. Faxes from blocked fax numbers appear
in the fax activity log with a “discarded” designat ion .
Note The fax activity log feature is not supported for Microsoft Windows 95
but you can print the fax activity log using the control panel. See
“Printing the fax activity log” on page 43.
Note To print a list of numbers you have blocked, see “Printing the block fax
list” on page 48.
To block or unblock fax numbers using the control
panel
You can unblock blocked fax numbers individually or all at one time.
1 Press E
2 Use the < or > key to select
E
3 Use the < or > key to select
E
4 Use the < or > key to select
M
NTER/MENU.
FAX SETTINGS and then press
NTER/MENU.
FAX RECEIVE SETUP and then press
NTER/MENU.
BLOCK FAXES and then press ENTER/
ENU.
5 Do one of the following:
• To block a fax number: use the < or > key to select
and then press ENTER/MENU. Enter the fax number
ENTRY
ADD
exactly as it appears in the header (including spaces), and
then press E
number, and then press E
EN Receiving faxes 67
NTER/MENU. Enter a name for the blocked
NTER/MENU.
Page 70

• To unblock a single fax number: use the < or > key to select
DELETE ENTRY and then press ENTER/MENU. Use the < or >
key to select the fax number you want, and then press E
M
ENU to confirm the deletions.
• To unblock all blocked fax numbers: use the < or > key to
CLEAR ALL and then press ENTER/MENU. Press ENTER/
select
ENU again to confirm the deletions.
M
NTER/
68 Chapter 4 - Faxing EN
Page 71

Advanced send fax features and settings
The section describes advanced procedures and settings you can
use when sending faxes. The topics include:
l About speed-dial codes, one-touch keys, and group-dial codes
l Programming speed-dial codes and one-touch keys
l Programming a one-touch key for alternate long distance
l Programming group-dial codes
l Deleting all speed-dial codes, one-touch keys, and group-dials
codes
l Using Manual Dial
l Sending a fax by dialing from a telephone
l Inserting a pause or wait into a fax number
l Using dialing characters
l Changing the information in the fax header
l Changing the default contrast and resolution for outgoing faxes
l Selecting tone- or pulse-dialing mode
l Changing how the product redials
l Inserting a dial prefix
l Changing the detect dial tone setting
l Clearing faxes from memory
l Setting error correction
EN Advanced send fax features and settings 69
Page 72

About speed-dial codes, one-touch keys, and group-dial codes
To simplify the dialing process for a fax number you dial frequently
from the control panel, store it in a one-touch key, speed-dial code, or
group-dial code. In the phone book, ther e ar e a to ta l of 250 cod es
available for the HP LaserJet 3200 product and 275 codes for the HP
LaserJet 3200se and 3200m product that can be used for speed-dial
codes and group-dial codes. For exampl e, if you ar e usin g the HP
LaserJet 3200se product and program 200 of the codes as speeddials, the remaining 75 can be used for group-dials.
See the following procedures for more information about how to use
speed-dial codes, one-touch keys, and group-dial code s:
l To program speed-dial codes and one-touch keys
l To delete speed-dial codes and one-touch keys
l To program a one-touch key for alternate long distance
l To program group-dial codes
l To delete group-dial codes
l To delete an individual in a group-dial code
l To delete all speed-dial codes, one-touch keys, and group-dials
codes
70 Chapter 4 - Faxing EN
Page 73

Programming speed-dial codes and onetouch keys
Speed-dial codes 1 through 10 are also associated with the
corresponding one-touch key on the co ntr o l pan el. The one - to uch
keys can be used for speed-dial or group-dial codes. You can
program all of the codes with speed-dials. A maximum of 50
characters can be entered for a single fax number.
Hint Speed-dial codes and one-touch keys are more easily programmed
from the software.
To program speed-dial codes and one-touch keys
1 Press ENTER/MENU.
2 Use the < or > key to select
M
ENU.
3 Press E
4 Press E
5 Press E
NTER/MENU to select SPEED DIALS.
NTER/MENU to select INDIVIDUAL SETUP.
NTER/MENU to select ADD INDIVIDUAL.
FAX SETUP and then press ENTER/
6 Using the numeric keys, enter the number of the speed-dial code
you want to associate with this fax number, and then press
E
NTER/MENU. Choosing 1 through 10 also associates the fax
number with the corresponding one-touch key.
Note When entering a fax number you can use a comma for a pause, the
letter R if you want the product to wait for a dial tone, and use the letter
W for a hook flash.
7 Using the numeric keys, enter the fax number. Include any
pauses or other needed numbers, such as an area code, an
access code for numbers outside a PBX system (usually a 9 or
0), or a long distance prefix.
8 Press E
NTER/MENU.
EN Advanced send fax features and settings 71
Page 74

9 Using the numeric keys, enter a name for the fax number. To do
so, repeatedly press the numeric key for the letter you need until
the letter appears. (See “Using dialing characters” on page 78 for
a list of characters.) For example, if the first letter you need is a
“C,” press 2 repeatedly until a
C appears. Press > to go to the
next space.
Note To insert punctuation, press * repeatedly until the character you want
appears and then press > to go to the next space. To delete a letter,
press > until you reach the space to the right of the letter, and then
press BACK SPACE.
10 Press E
NTER/MENU to save the information.
11 If you have mor e speed-dial codes or one- touch keys to program,
repeat steps 1 through 10.
To delete speed-dial codes and one-touch keys
1 Press ENTER/MENU.
2 Use the < or > key to select
M
ENU.
3 Press E
4 Press E
NTER/MENU to select SPEED DIALS.
NTER/MENU to select INDIVIDUAL SETUP.
5 Use the < or > key to select
E
NTER/MENU.
6 Using the numeric keys, enter the number of the speed-dial code
you want to delete, and then press E
7 Press E
NTER/MENU to confirm the deletion.
FAX SETUP and then press ENTER/
DELETE INDIVIDUAL and then press
NTER/MENU.
72 Chapter 4 - Faxing EN
Page 75

Programming a one-touch key for alternate
long distance
If you use an alternate long distance service, you can program a onetouch key to dial the service’s access number before a fax number.
When you need to use this one-touch key, press it, enter the fax
number, and then press F
fax number are then dialed together.
If the access number is used almost every time you dial a fax, it might
be easier to program the access number as a dialing prefix (see
“Inserting a dial prefix” on page 84). Use the procedure on this page if
the access number has more than 10 numbers or if you only need to
use the access number occasionally.
Hint This procedure is more easily accomplished from the software.
To program a one-touch key for alternate long
distance
AX/SEND. Both the access number and the
1 Follow steps 1 through 6 of “Programming speed-dial codes and
one-touch keys” on page 71. When entering the fax number, you
might also have to do one or more of the following:
• If you have to wait for an access tone at some point in the
number, enter one or more three-second pauses by pressing
R
EDIAL/PAUSE.
• Enter a personal identification number (PIN), if applicable.
2 When you are finished entering the access number, press
R
EDIAL/PAUSE. A pause at the end of the string tells the product
not to dial this number until you dial the fax number.
3 Continue with steps 7 through 10 of “Programming speed-dial
codes and one-touch keys” on page 71.
EN Advanced send fax features and settings 73
Page 76

Programming group-dial codes
If you send information to the same group of people on a regular
basis, you can program a group-dial code. You can program any of
the remaining speed-dial codes with group-dial codes. Group-d ial
codes using numbers 1-10 are also associated with the
corresponding one-touch key on the control panel. Any individual can
be added to a group.
Each group member must have a programmed speed-dial code or
one-touch key assigned to them before bein g added to th e group- dial
code. To print a list of which one-touch keys and speed-dial codes
are programmed, see “Printing a one-touch, speed-dial, and groupdial report” on page 47.
This section contains the following procedures:
l To program group-dial codes
l To delete group-dial codes
l To delete an individual in a group-dial code
Hint Group-dial codes are more easily programmed from the software. See
the software Help for more information.
To program group-dial codes
1 Assign a speed-dial code to each fax number you want in this
group. See “To delete speed-dial codes and one-touch keys” on
page 72.
2 Press E
3 Use the < or > key to select
M
4 Press E
5 Use the < or > key to select
M
6 Use the < or > key to select
M
74 Chapter 4 - Faxing EN
NTER/MENU.
FAX SETUP and then press ENTER/
ENU.
NTER/MENU to select SPEED DIALS.
GROUP SETUP and then press ENTER/
ENU.
ADD GROUP and then press ENTER/
ENU.
Page 77

7 Using the numeric keys, enter the number you want to associate
with this group and press E
NTER/MENU. Choosing 1 through 10
also associates this group with the corresponding one-touch key.
8 Using the numeric keys, enter a name for the group. To do so,
repeatedly press the numeric key for the letter you need until the
letter appears. (See “Using dialing characters” on page 78 for a
list of characters.) For example, if the first letter you need is a “C,”
press 2 repeatedly until a
space. After the name of the group has been typed, press E
M
ENU.
C appears. Press > to go to the next
NTER/
Note To delete a letter, press > until you reach the space to the right of the
letter and then press BACK SPACE.
9 Press the one-touch key or choose the speed-dial code for the
member you want, and then press E
M
ENU again to confirm the addition.
NTER/MENU. Press ENTER/
10 Repeat step 9 for each member you want to add.
11 When finished, press S
12 If you have more group-dial codes to enter, press E
TOP/CLEAR.
NTER/MENU
and repeat steps 1 through 12.
For instructions about using a group-dial code to send a fax, see
“Sending faxes to multiple recipients” on page 57.
To delete group-dial codes
1 Press ENTER/MENU.
2 Use the < or > key to select
ENU.
M
3 Press E
NTER/MENU to select SPEED DIALS.
4 Use the < or > key to select
ENU.
M
5 Use the < or > key to select
NTER/MENU.
E
6 Using the numeric keys, enter the number of the group-dial you
want to delete and then press E
7 Press E
NTER/MENU to confirm the deletion.
FAX SETUP and then press ENTER/
GROUP SETUP and then press ENTER/
DELETE GROUP and then press
NTER/MENU.
To delete an individual in a group-dial code
1 Press ENTER/MENU.
EN Advanced send fax features and settings 75
Page 78

2 Use the < or > key to select FAX SETUP and then pre ss ENTER/
ENU.
M
3 Press E
4 Use the < or > key to select
M
5 Use the < or > key to select
E
NTER/MENU to select SPEED DIALS.
GROUP SETUP and then press ENTER/
ENU.
DELETE # IN GROUP and then press
NTER/MENU.
6 Use the < or > key to select the individual you would like to delete
from the group.
7 Press E
NTER/MENU to confirm the deletion.
8 Repeat steps 6 and 7 to delete other individuals from the group.
-Or-
Press S
TOP/CLEAR if you are finished.
Deleting all speed-dial codes, one-touch keys, and group-dials codes
You can delete all speed-dial codes, one-touch keys, and gro up-dials
codes that are programmed in the product .
CAUTION Once speed-dial codes, one-touch keys, and group-dial codes are
deleted, they cannot be recovered.
To delete all speed-dial codes, one-touch keys, and
group-dials codes
1 Press ENTER/MENU.
2 Use the < or > key to select
ENU.
M
3 Press E
NTER/MENU to select SPEED DIALS.
4 Use the < or > key to select
press E
5 Press E
NTER/MENU.
NTER/MENU to confirm the deletion.
76 Chapter 4 - Faxing EN
FAX SETUP and then press ENTER/
DELETE ALL ENTRIES and then
Page 79

Using Manual Dial
Normally, the product dials after you press FAX/SEND. At times,
however, you might want the product to dial each number as you
press it. For example, if you are charging your fax call to a calling
card, you’ll need to dial the fax number, wait for the acceptance tone
of your telephone company, and then dial the calling card number.
When dialing internationally, you might need to dial part of the
number and then listen for dial tones before continuing to dial.
To use Manual Dial
1 Place the document in the document feeder tray.
2 Press F
3 Begin dialing. The fax number dials as you press each digit. This
allows you to wait for pauses, dial tones, international access
tones, or calling card acceptance tones before continuing to dial.
AX/SEND.
Sending a fax by dialing from a telephone
At times, you might want to dial a fax number from a telephone
connected to the same line as the product. For example, if you are
sending a fax to a person whose product is in Manual mode, yo u can
call first to let that person know the fax is coming.
To send a fax by dialing from a telephone
1 Place the document in the document feeder tray.
2 Pick up the handset of a phone connected to same line as the
product and dial the fax number using the phone’s or the
product’s numeric keys.
3 When the recipient answers, instruct the recipient to start the fax
machine.
4 When you hear the fax tones, press F
transmitting the fax, and then hang up the phone.
EN Advanced send fax features and settings 77
AX/SEND to begin
Page 80

Inserting a pause or wait into a fax number
You can insert pauses into a fax number you are dialing or
programming to a one-touch key, speed-dial code, or group-dial
code. Pauses are often needed when dialing internationally or
connecting to an outside line.
To insert a pause or wait
Press REDIAL/PAUSE to enter a three-second pause in your dialing
sequence. A comma appears on the control panel display, indicating
that the pause will occur at that point in the dialing sequence.
Using dialing characters
When using the control panel to type your name in the header or typ e
a name for a one-touch key, speed-dial co de, or group-d ial code, yo u
press a numeric key repeatedly until the letter you need appears.
Then, you press > to select that letter and move to the next space.
This table shows you which letters and numbers appear on each
numeric key when the default language is set to English:
Key number Contains these characters
11
2A B C 2
3D E F 3
4G H I 4
5J K L 5
6M N O 6
7P Q R S 7
8T U V 8
9 W X Y Z 9
00
* ( ) + - . / , " *
#space #
78 Chapter 4 - Faxing EN
Page 81

Changing the information in the fax header
You already entered fax header information when you first set up the
product. You only need this procedure to change the date, time, your
fax number, and company name for the fax header.
Changing the date and time
The date and time information is included in the header that prints at
the top of faxes you send. The time and date also appear on the
control panel display when the product is idle.
To change the date and time:
1 Press E
2 Use the < or > key to select
E
3 Press E
NTER/MENU.
TIME/DATE, HEADER and then press
NTER/MENU.
NTER/MENU to select TIME/DATE.
4 Use the < or > key to select a 12-hour or 24-hour clock, and then
press E
NTER/MENU.
5 Using the numeric keys, enter the current time.
Note If you type a number incorrectly, press BACK SPACE until you reach the
digit. Then type the number.
6 If you chose the 24-h ou r cloc k, pr es s E
NTER/MENU.
- Or -
If you chose the 12-hour clock, use the the > key to move the
cursor past the fourth character. Select
pm, and then press E
NTER/MENU.
1 for am or select 2 for
7 Enter the current date using the numeric keys. Make sure to enter
the month and day using both digits (for example, “05” for May),
and then press E
NTER/MENU.
EN Advanced send fax features and settings 79
Page 82

Changing the fax number and company name
You already entered this information when installing the software or
when you first set up the product. You only need this procedure if you
want to change the information from the control panel.
The header contains information about your name or your company’s
name and your fax number. When a fax you sent arrives at its
destination, this header is printed at the top of the pa ge . Filling in
this information is a legal requirement.
Hint The fax header is more easily changed from the software. See the
software Help for more information.
To change the fax number and company name
1 Press E
2 Use the < or > key to select
E
3 Use the < or > key to select
M
4 Enter your fax number, and then press E
NTER/MENU.
TIME/DATE, HEADER and then press
NTER/MENU.
FAX HEADER and then press ENTER/
ENU.
NTER/MENU. To separate
numbers, press > to insert spaces. To add a plus sign, press *.
5 Use the numeric keys to add the name of your company. To do
so, repeatedly press the numeric key for the letter you need until
the letter appears. (See “Using dialing characters” on page 78 for
a list of characters.) For example, if the first letter you need is a
“C,” press 2 repeatedly until a
C appears. Use the > key to go to
the next space.
Note To insert punctuation, press * repeatedly until the character you want
appears, and then press > to go to the next space. To delete a letter,
press < or > unti l you reach the space to the right of the letter, and then
press BACK SPACE.
6 When you have finished, press E
NTER/MENU.
80 Chapter 4 - Faxing EN
Page 83

Changing the default contrast and resolution for outgoing faxes
The contrast affects the lightness and darkness of an outgoing fax as
it is being sent. Resolution affects the sharpness of outgoing faxes. It
also affects the transmission speed of faxes. See “Resolution
options” on page 62 for more information.
To change the default contrast
The default contrast is the contrast normally applied to items being
faxed. The slider is set to the middle as the default contrast setting.
Note If you only want to change the contrast for the current job, see “Using
the Contrast button to adjust the contrast for the current fax or copy
job” on page 61.
Hint You might want to test the contrast settings on some documents before
you set the default.
1 Press E
2 Use the < or > key to select
M
3 Use the < or > key to select
E
4 Use the < or > key to select
5 Use the < key to move the slider to the left to make the fax lighter
than the original, or use the > key to move the slider to the right to
make the fax darker than the original.
6 Press E
EN Advanced send fax features and settings 81
NTER/MENU.
FAX SETUP and then press ENTER/
ENU.
FAX SEND SETUP and then press
NTER/MENU.
DEFAULT CONTRAST.
NTER/MENU to save your selection.
Page 84

To change the default resolution
The choices for this setting are Fine (the factory default), Standard,
Superfine, and Photo. See “Resolution options” on page 62 for more
information.
Note If you only want to change the resolution for the fax job you are currently
sending, see “Adjusting the resolution for the current job” on page 62.
1 Press E
2 Use the < or > key to select
M
3 Use the < or > key to select
E
4 Press E
5 Use the < or > key to select
NTER/MENU.
FAX SETUP and then press ENTER/
ENU.
FAX SEND SETUP and then press
NTER/MENU.
NTER/MENU to select DEFAULT RESOLUTION.
FINE (the default), STANDARD,
SUPERFINE, or PHOTO.
6 Press E
NTER/MENU to save your selection.
Selecting tone- or pulse-dialing mode
Use this procedure to set the product to tone- or pulse-dialing mode.
You can use this procedure to set the product to tone- or pulse-dialing
mode. The default is set to Tone. Leave this as Tone unless you
know your telephone is incapable of tone dialing.
To select tone- or pulse-dialing
1 Press ENTER/MENU.
2 Use the < or > key to select
ENU.
M
3 Press > once to select
4 Use the < or > key to select
E
NTER/MENU.
5 Use the < or > key to select
NTER/MENU to save your selection.
E
82 Chapter 4 - Faxing EN
FAX SETUP and then press ENTER/
SEND SETUP and then press ENTER/MENU.
DIALING MODE and then press
TONE or PULSE and then press
Page 85

Changing how the product redials
If the product was unable to send a fax because the receiving fax
machine did not answer or was busy, the product will attempt to redial
based on the Redial On Busy and Redial On No Answer options. Use
the procedures in this section to turn these options on or off.
Note The product will, by default, redial if the receiving fax machine is busy
but will not, by default, redial if the receiving fax machine does not
answer.
To turn the Redial On Busy option on or off
The product is set to redial busy numbers five times automatically.
1 Press E
2 Use the < or > key to select
M
3 Use the < or > key to select
E
4 Use the < or > key to select
E
5 Use the < or > key to select
M
NTER/MENU.
FAX SETUP and then press ENTER/
ENU.
FAX SEND SETUP and then press
NTER/MENU.
REDIAL ON BUSY and then press
NTER/MENU.
ON or OFF and then press ENTER/
ENU.
To turn the Redial On No Answer on or off
The product is set to redial on no answer one time automatically in
the United States and Canada, and two times automatically for all
other countries.
1 Press E
2 Use the < or > key to select
M
3 Use the < or > key to select
E
NTER/MENU.
FAX SETUP and then press ENTER/
ENU.
FAX SEND SETUP and then press
NTER/MENU.
4 Use the < or > key to select
press E
EN Advanced send fax features and settings 83
NTER/MENU.
REDIAL ON NO ANSWER and then
Page 86

5 Use the < or > key to select ON or OFF and then press ENTER/
ENU.
M
Inserting a dial prefix
A dial prefix is a number or numbers automatically added to the
beginning of every fax number you enter at the control panel or from
the software. By default, this setting is Off. You may want to turn this
setting on and enter a prefix if, for example, you have to dial a
number such as “9” to get a phone line outside your company’s
phone system.
While this setting is on, you can still dial a fax number without the dial
prefix by using Manual Dial. See “Using Manual Dial” on page 77.
To set the dial prefix
1 Press ENTER/MENU.
2 Use the < or > key to select
ENU.
M
3 Press > once to select
ENU.
M
FAX SEND SETUP and then press ENTER/
4 Use the < or > key to select
M
ENU.
5 Use the < or > key to select
ENU.
M
6 If you chose
then press E
ON, use the numeric keys to enter the prefix, and
NTER/MENU. You can use numbers, pauses, and
dialing symbols.
FAX SETUP and then press ENTER/
DIAL PREFIX and then press ENTER/
ON or OFF and then press ENTER/
84 Chapter 4 - Faxing EN
Page 87

Changing the detect dial tone setting
Normally the product waits for a dial tone before attempting to a dial a
fax number. If you are using the product on the same line as your
phone, turn on the detect dial tone setting. This will prevent the
product from sending a fax while someone is on the phone. In
Australia, this setting by default is set to Off.
To change detect dial tone
1 Press ENTER/MENU.
2 Use the < or > key to select
M
ENU.
3 Press > once to select
ENU.
M
4 Use the < or > key to select
NTER/MENU.
E
5 Use the < or > key to select
M
ENU.
FAX SEND SETUP and then press ENTER/
FAX SETUP and then press ENTER/
DETECT DIAL TONE and then press
ON or OFF and then press ENTER/
EN Advanced send fax features and settings 85
Page 88

Advanced receive fax features and settings
The section describes more advanced procedures and setting s you
can use for receiving faxes. The topics include:
l Using fax forwarding
l Requesting a fax from another fax machine (polling)
l Receiving faxes to your computer
l Clearing faxes from memory
l Changing how the product answers incoming faxes
l Changing answer ring patterns
l Enabling an extension phone
l Changing the silence-detect mode
l Changing autoreduction for incoming faxes
l Enabling stamp received faxes
l Setting error correction
86 Chapter 4 - Faxing EN
Page 89

Using fax forwarding
You can set your product to forward incoming faxes to another fax
number. When the fax arrives at your product, it is stored in memory.
Then, your product dials the fax number you have specified and
sends the fax.
If it cannot forward a fax after repeated attempts because of an error,
such as the number being busy and redials failing, your product will
print the fax. If it runs out of memory while receiving a fax, it will
terminate the incoming fax and only forward the pages and partial
pages already stored in memory.
When using this feature, the product must be the one receiving
faxes (not the computer) and the answer mode must be se t to
Automatic (see “Changing how the product answers incoming faxes”
on page 90).
To use fax forwarding
1 Press ENTER/MENU.
2 Use the < or > key to select
M
ENU.
3 Use the < or > key to select
NTER/MENU.
E
4 Use the < or > key to select
ENU.
M
5 Press > to select
6 If you choose to turn fax forwarding on, use the numeric keys to
enter the fax number where you would like the fa x to go, and then
press E
EN Advanced receive fax features and settings 87
NTER/MENU to save your selection.
ON or OFF and then press ENTER/MENU.
FAX SETUP and then press ENTER/
FAX RECEIVE SETUP and then press
FORWARD FAX and then press ENTER/
Page 90

Requesting a fax from another fax machine (polling)
If someone else has set up a fax to be polled, you can request that
the fax be sent to your product. (This is also known as polling another
machine.)
To request a fax from another fax machine
1 Press ENTER/MENU.
2 Use the < or > key to select
NTER/MENU.
E
3 Use the < or > key to select
NTER/MENU.
E
4 Use the numeric keys to enter the number of the fax machine
from which you want to request the fax, and then press E
M
ENU.
Your product dials the other fax machine and requests the fax.
FAX FUNCTIONS and then press
POLLING RECEIVE and then press
NTER/
88 Chapter 4 - Faxing EN
Page 91

Clearing faxes from memory
Only use this procedure if you are concerned someone else has
access to your product and will try to reprint faxes in the reprint
memory.
CAUTION In addition to clearing the reprint memory, this procedure clears fax
currently being sent, unsent faxes pending redial, faxes scheduled to
be sent at a future time, and faxes not printed or forwarded.
To clear faxes from memory
1 Press ENTER/MENU.
2 Press > once to display
ENU.
M
3 Use the < or > key to select
press E
4 Press E
NTER/MENU.
NTER/MENU to confirm the deletion.
FAX FUNCTIONS and then press ENTER/
CLEAR STORED FAXES and then
EN Advanced receive fax features and settings 89
Page 92

Changing how the product answers incoming faxes
You set the answer mode when you set up the product. You will only
need to change these settings if you change what devices are
connected to this phone line.
To set the answer mode to automatic or manual
1 Press ENTER/MENU.
2 Use the < or > key to select
ENU.
M
3 Use the < or > key to select
E
NTER/MENU.
4 Press E
5 Use the < or > key to select
press E
NTER/MENU to select ANSWER MODE.
NTER/MENU to save your selection.
FAX SETUP and then press ENTER/
FAX RECEIVE SETUP and then press
AUTOMATIC or MANUAL and then
90 Chapter 4 - Faxing EN
Page 93

Changing answer ring patterns
If you subscribe to ring pattern service with your telep hon e compa ny,
enable the product to detect ring patterns. If you do not have ring
pattern service, and you change this setting, the product will not be
able to receive faxes.
What is ring pattern service?
Ring pattern service, such as distinctive ring, is available from some
local telephone companies. It allows you to have two or three phone
numbers on one line. This costs less than paying for two or three
separate lines. Each of the phone numbers has a different ring
pattern. Ring patterns allow you to answer voice calls and allow the
product to answer fax calls.
How do I get the service?
Call your local telephone company to check the availability and to
subscribe. The service might not be available in all areas. Also, your
telephone company might use a different name for this service.
If ring pattern service is available and you choo se to sub scr ib e to it,
keep in mind the following:
l Determine which ring pattern is used for phone calls and which is
used for fax calls.
l Make sure the telephone company assigns th e cor re ct ring
pattern to the fax number. In New Zealan d, it should be a doublering pattern with long pauses. The product ignores other ring
patterns.
l Important! If you have an answering machine or computer
voicemail on this line for the other phone number, make sure
the product’s rings to answer is set to a lower number than the
rings to answer on the answering machine or voicemail. In the
case of ring pattern detection, the product must answer calls first
in order to be able to receive fax calls.
EN Advanced receive fax features and settings 91
Page 94

How will I know if it’s working?
After product installation is complete, ask someone you know to send
you a fax. Make sure you provide the correct fax number.
To change answer ring patterns
Note Do not change the All Rings default setting if you do not have ring
pattern service from your telephone company. If you do not have ring
pattern service, and you change this setting, the product might not be
able to receive faxes.
1 Press E
2 Use the < or > key to select
M
3 Use the < or > key to select
E
4 Use the < or > key to select
press E
NTER/MENU.
FAX SETUP and then press ENTER/
ENU.
FAX RECEIVE SETUP and then press
NTER/MENU.
ANSWER RING PATTERN and then
NTER/MENU.
5 Use the < or > key to select the ring pattern you want the product
to use when answering incoming fax calls, and then press E
M
ENU to save your selection.
NTER/
Note If you have an answering machine or computer voicemail connected
to this line for the other phone number (on the single ring pattern), make
sure the product’s rings to answer is set to a lower number than the
rings to answer on the answering machine or voicemail. If it is not, the
product will be unable to receive fax calls.
92 Chapter 4 - Faxing EN
Page 95

Enabling an extension phone
With this setting turned on, you can alert the product to pick up the
incoming fax call by pressing 1-2-3 sequentially on the telephone
keypad. The default is Yes. Turn this setting off only you have a
service from your telephone company that also uses the 1-2-3
sequence, and the service will not work because of the conflict.
1 Press E
NTER/MENU.
2 Use the < or > key to select
ENU.
M
3 Use the < or > key to select
NTER/MENU.
E
4 Use the < or > key to select
E
NTER/MENU.
5 Use the < or > key to select
ENU to save your selection.
M
FAX SETUP and then press ENTER/
FAX RECEIVE SETUP and then press
EXTENSION PHONE and then press
ON or OFF and then press ENTER/
EN Advanced receive fax features and settings 93
Page 96

Changing the silence-detect mode
This setting controls whether or not you can receive faxes from oldermodel fax machines that do not emit a fax signal during fax
transmissions. At the time of this publication, these silent-model fax
machines represented very few of the fax machines in use.
The default setting is No. It should be changed only if you regularly
receive faxes from someone with an older-model fax machine.
To change the silence detect mode
1 Press ENTER/MENU.
2 Use the < or > key to select
M
ENU.
3 Use the < or > key to select
NTER/MENU.
E
4 Use the < or > key to select
NTER/MENU.
E
5 Use the < or > key to select
M
ENU to save your selection.
FAX SETUP and then press ENTER/
FAX RECEIVE SETUP and then press
SILENCE DETECTION and then press
ON or OFF and then press ENTER/
94 Chapter 4 - Faxing EN
Page 97

Changing autoreduction for incoming faxes
If the Fit To Page option is on, the product automatically reduces long
faxes to fit on the paper. If the feature is turned off, long faxes print at
full size on multiple pages.
If you have the page stamp option on, you may want to choo se On.
This reduces the size of incoming faxes just slightly to prevent the
page stamp from forcing a received fax page onto two pages. The
default for this setting is On.
Note Make sure the paper size setting matches the size of paper loaded in
the paper input tray. See “Changing the default pa per size for the paper
input tray” on page 38 for instructions.
To change autoreduction for incoming faxes
1 Press ENTER/MENU.
2 Use the < or > key to select
M
ENU.
3 Use the < or > key to select
E
NTER/MENU.
4 Use the < or > key to select
ENU.
M
5 Use the < or > key to select
M
ENU to save your selection.
FAX SETUP and then press ENTER/
FAX RECEIVE SETUP and then press
FIT TO PAGE and then press ENTER/
ON or OFF and then press ENTER/
EN Advanced receive fax features and settings 95
Page 98

Enabling stamp received faxes
The product is set up to print the sender’s identification at the top of
each received fax. You can also choose to have your header
information included to confirm the date and time the fax was
received.
If you want the product to include your header infor m at ion to ea ch
received fax, follow the procedure below. The default setting is Off.
Note This option only applies to received faxes that are printed by the
product.
To enable stamp received faxes
1 Press ENTER/MENU.
2 Use the < or > key to select
ENU.
M
3 Use the < or > key to select
NTER/MENU.
E
4 Use the < or > key to select
press E
5 Use the < or > key to select
M
NTER/MENU.
ENU to save your selection.
FAX SETUP and then press ENTER/
FAX RECEIVE SETUP and then press
STAMP RECEIVED FAXES, and then
ON or OFF and then press ENTER/
96 Chapter 4 - Faxing EN
Page 99

Setting error correction
Normally, the product monitors the signals on the telephone line while
it is sending or receiving a fax. If the product detects an error signal
during the transmission and the Error Correction setting is on, the
product can request that a portion of the fax be resent.
The factory default for this setting is On. Only change it to Off if you
are having trouble sending or receiving a fax and want to accept the
errors in the transmission. Turning the setting off might be useful
when you are trying to send or receive a fax overseas or using a
satellite telephone connection.
To set error correction
1 Press ENTER/MENU.
2 Use the < or > key to select
M
ENU.
3 Use the < or > key to select
ENU.
M
4 Use the < or > key to select
NTER/MENU.
E
5 Use the < or > key to select
M
ENU to save your selection.
FAX SETUP and then press ENTER/
ALL FAXES and then press ENTER/
ERROR CORRECTION and then press
ON or OFF and then press ENTER/
EN Advanced receive fax features and settings 97
Page 100

Faxing using the software
This section contains some instructions about sending and receiving
faxes using the software that came with the produc t, as well as
creating your own cover page. All other software-related topics are
covered in the software Help.
See the following topics in this guide to learn more about how to fax
using the software:
l Sending faxes from the software
l Receiving faxes to your computer
l Customizing your own fax cover sheet
Note The HP LaserJet Director and HP LaserJet Document Manager are
not supported for Microsoft Windows 95, therefore you cannot fax using
the software.
Sending faxes from the software
You can fax electronic documents from your computer if:
l the HP LaserJet product is connected directly to your computer or
connected to your computer over the network using an HP
JetDirect print server,
l the software is installed on your computer, and
l you are using Microsoft Windows 98, 2000, or NT 4.0, or Mac OS
8.6 or 9.0.
To send a fax from the software
The following are typical steps required to send a fax:
1 Select a document to fax. Documents can be:
• opened in the HP LaserJet Workplace on Macintoshcompatible computers
• opened in the HP LaserJet Document Manager on Windowscompatible computers
• placed in the document feeder tray on the product.
98 Chapter 4 - Faxing EN
 Loading...