

Page 1

User Guide
hp StorageWorks
HA-Fabric Manager
Product Version: FW v06.xx/HAFM SW v08.02.00
Fourth Edition (July 2004)
Part Number: AA–RS2CE–TE
This guide describes the HP StorageWorks High Availability Fabric Manager (HAFM) and its
features. It tells you how to use the HAFM to monitor, configure, and manage the Fibre Channel
in which managed products operate. This guide also covers Fabric zoning, HAFM appliance
administration, and HAFM logs.
Page 2

© Copyright 2001–2004 Hewlett-Packard Development Company, L.P.
Hewlett-Packard Company makes no warranty of any kind with regard to this material, including, but not limited to,
the implied warranties of merchantability and fitness for a particular purpose. Hewlett-Packard shall not be liable for
errors contained herein or for incidental or consequential damages in connection with the furnishing, performance,
or use of this material.
This document contains proprietary information, which is protected by copyright. No part of this document may be
photocopied, reproduced, or translated into another language without the prior written consent of Hewlett-Packard.
The information contained in this document is subject to change without notice. The only warranties for HP products
and services are set forth in the express warranty statements accompanying such products and services. Nothing
herein should be construed as constituting an additional warranty. HP shall not be liable for technical or editorial
errors or omissions contained herein.
Java is a trademark of Sun Microsystems, Inc.
Microsoft®, MS-DOS®, Windows®, and Windows NT® are U.S. registered trademarks of Microsoft Corporation.
Hewlett-Packard Company shall not be liable for technical or editorial errors or omissions contained herein. The
information is provided “as is” without warranty of any kind and is subject to change without notice. The warranties
for Hewlett-Packard Company products are set forth in the express limited warranty statements for such products.
Nothing herein should be construed as constituting an additional warranty.
Printed in the U.S.A.
HA-Fabric Manager User Guide
Fourth Edition (July 2004)
Part Number: AA–RS2CE–TE
Page 3

3HA-Fabric Manager User Guide
Contents
Contents
About this Guide. . . . . . . . . . . . . . . . . . . . . . . . . . . . . . . . . . . . . . . . . . . . . . . . . . .19
Overview. . . . . . . . . . . . . . . . . . . . . . . . . . . . . . . . . . . . . . . . . . . . . . . . . . . . . . . . . . . . . . . . . 20
Intended Audience . . . . . . . . . . . . . . . . . . . . . . . . . . . . . . . . . . . . . . . . . . . . . . . . . . . . . . 20
Related Documentation . . . . . . . . . . . . . . . . . . . . . . . . . . . . . . . . . . . . . . . . . . . . . . . . . . 20
Conventions . . . . . . . . . . . . . . . . . . . . . . . . . . . . . . . . . . . . . . . . . . . . . . . . . . . . . . . . . . . . . . 21
Document Conventions . . . . . . . . . . . . . . . . . . . . . . . . . . . . . . . . . . . . . . . . . . . . . . . . . . 21
Text Symbols . . . . . . . . . . . . . . . . . . . . . . . . . . . . . . . . . . . . . . . . . . . . . . . . . . . . . . . . . . 21
Equipment Symbols . . . . . . . . . . . . . . . . . . . . . . . . . . . . . . . . . . . . . . . . . . . . . . . . . . . . . 22
Rack Stability . . . . . . . . . . . . . . . . . . . . . . . . . . . . . . . . . . . . . . . . . . . . . . . . . . . . . . . . . . . . . 24
Getting Help . . . . . . . . . . . . . . . . . . . . . . . . . . . . . . . . . . . . . . . . . . . . . . . . . . . . . . . . . . . . . . 25
HP Technical Support . . . . . . . . . . . . . . . . . . . . . . . . . . . . . . . . . . . . . . . . . . . . . . . . . . . 25
HP Storage Web Site . . . . . . . . . . . . . . . . . . . . . . . . . . . . . . . . . . . . . . . . . . . . . . . . . . . . 25
HP Authorized Reseller . . . . . . . . . . . . . . . . . . . . . . . . . . . . . . . . . . . . . . . . . . . . . . . . . . 25
1 Introduction and General Information . . . . . . . . . . . . . . . . . . . . . . . . . . . . . . . . . . .27
The Life Cycle of a SAN . . . . . . . . . . . . . . . . . . . . . . . . . . . . . . . . . . . . . . . . . . . . . . . . . . . . 28
Product Licensing Overview . . . . . . . . . . . . . . . . . . . . . . . . . . . . . . . . . . . . . . . . . . . . . . . . . 29
License Keys . . . . . . . . . . . . . . . . . . . . . . . . . . . . . . . . . . . . . . . . . . . . . . . . . . . . . . . . . . 29
Feature Keys. . . . . . . . . . . . . . . . . . . . . . . . . . . . . . . . . . . . . . . . . . . . . . . . . . . . . . . . . . . 29
Introduction to High Availability Fabric Management . . . . . . . . . . . . . . . . . . . . . . . . . . . . . 31
HAFM Appliance Information. . . . . . . . . . . . . . . . . . . . . . . . . . . . . . . . . . . . . . . . . . . . . 34
User Interface Description . . . . . . . . . . . . . . . . . . . . . . . . . . . . . . . . . . . . . . . . . . . . . . . . 34
Menu Bar . . . . . . . . . . . . . . . . . . . . . . . . . . . . . . . . . . . . . . . . . . . . . . . . . . . . . . . . . . 35
Toolbar. . . . . . . . . . . . . . . . . . . . . . . . . . . . . . . . . . . . . . . . . . . . . . . . . . . . . . . . . . . . 36
Product List . . . . . . . . . . . . . . . . . . . . . . . . . . . . . . . . . . . . . . . . . . . . . . . . . . . . . . . . 36
Physical/Topology Map. . . . . . . . . . . . . . . . . . . . . . . . . . . . . . . . . . . . . . . . . . . . . . . 37
Master Log. . . . . . . . . . . . . . . . . . . . . . . . . . . . . . . . . . . . . . . . . . . . . . . . . . . . . . . . . 37
Connection Utilization Legend . . . . . . . . . . . . . . . . . . . . . . . . . . . . . . . . . . . . . . . . . 38
Minimap. . . . . . . . . . . . . . . . . . . . . . . . . . . . . . . . . . . . . . . . . . . . . . . . . . . . . . . . . . . 39
Floating the Minimap . . . . . . . . . . . . . . . . . . . . . . . . . . . . . . . . . . . . . . . . . . . . . 39
Page 4

Contents
4 HA-Fabric Manager User Guide
Anchoring the Minimap . . . . . . . . . . . . . . . . . . . . . . . . . . . . . . . . . . . . . . . . . . . 39
Resizing the Minimap. . . . . . . . . . . . . . . . . . . . . . . . . . . . . . . . . . . . . . . . . . . . . 39
Status Bar. . . . . . . . . . . . . . . . . . . . . . . . . . . . . . . . . . . . . . . . . . . . . . . . . . . . . . . . . . 40
Toolbox . . . . . . . . . . . . . . . . . . . . . . . . . . . . . . . . . . . . . . . . . . . . . . . . . . . . . . . . . . . 41
Searching the Online Help . . . . . . . . . . . . . . . . . . . . . . . . . . . . . . . . . . . . . . . . . . . . . . . . 41
Backing Up and Restoring Data. . . . . . . . . . . . . . . . . . . . . . . . . . . . . . . . . . . . . . . . . . . . 41
2 Setting Up the Application. . . . . . . . . . . . . . . . . . . . . . . . . . . . . . . . . . . . . . . . . . . .43
Configuring an Appliance. . . . . . . . . . . . . . . . . . . . . . . . . . . . . . . . . . . . . . . . . . . . . . . . . . . . 44
Configuring a New HAFM Appliance. . . . . . . . . . . . . . . . . . . . . . . . . . . . . . . . . . . . . . . 44
Getting a License Key for New Software . . . . . . . . . . . . . . . . . . . . . . . . . . . . . . . . . 44
Retrieving Lost Keys. . . . . . . . . . . . . . . . . . . . . . . . . . . . . . . . . . . . . . . . . . . . . . . . . 45
Entering a License Key . . . . . . . . . . . . . . . . . . . . . . . . . . . . . . . . . . . . . . . . . . . . . . . 45
Entering a Feature License Key. . . . . . . . . . . . . . . . . . . . . . . . . . . . . . . . . . . . . . . . . 46
Ordering Additional Features . . . . . . . . . . . . . . . . . . . . . . . . . . . . . . . . . . . . . . . . . . 47
Upgrading the HAFM Application . . . . . . . . . . . . . . . . . . . . . . . . . . . . . . . . . . . . . . . . . 47
Uninstalling the Appliance. . . . . . . . . . . . . . . . . . . . . . . . . . . . . . . . . . . . . . . . . . . . . . . . 47
Uninstalling the HAFM Client. . . . . . . . . . . . . . . . . . . . . . . . . . . . . . . . . . . . . . . . . . . . . 47
Accessing HAFM. . . . . . . . . . . . . . . . . . . . . . . . . . . . . . . . . . . . . . . . . . . . . . . . . . . . . . . 47
Accessing HAFM on the HAFM Appliance . . . . . . . . . . . . . . . . . . . . . . . . . . . . . . . 48
Accessing Remote HAFM appliances. . . . . . . . . . . . . . . . . . . . . . . . . . . . . . . . . . . . 51
Adding an Appliance to the Log In Dialog Box List of Appliances . . . . . . . . . . . . . . . . 52
Removing an Appliance from the Log In Dialog Box List of Appliances . . . . . . . . . . . 53
Logging Out of an Appliance. . . . . . . . . . . . . . . . . . . . . . . . . . . . . . . . . . . . . . . . . . . . . . 53
Starting and Stopping HAFM Services . . . . . . . . . . . . . . . . . . . . . . . . . . . . . . . . . . . . . . 54
Managing Remote Access to the HAFM Appliance . . . . . . . . . . . . . . . . . . . . . . . . . . . . 54
Requirements for Remote Workstations . . . . . . . . . . . . . . . . . . . . . . . . . . . . . . . . . . 54
Installing Software on Remote Workstations . . . . . . . . . . . . . . . . . . . . . . . . . . . . . . 55
Starting HAFM on Remote Workstations . . . . . . . . . . . . . . . . . . . . . . . . . . . . . . . . . . . . 55
Starting HAFM on a Windows System. . . . . . . . . . . . . . . . . . . . . . . . . . . . . . . . . . . 55
Starting HAFM on an HP-UX, AIX, Linux, or Solaris System . . . . . . . . . . . . . . . . 55
Managing Users . . . . . . . . . . . . . . . . . . . . . . . . . . . . . . . . . . . . . . . . . . . . . . . . . . . . . . . . . . . 57
Viewing the List of Users . . . . . . . . . . . . . . . . . . . . . . . . . . . . . . . . . . . . . . . . . . . . . . . . 57
Adding a User Account . . . . . . . . . . . . . . . . . . . . . . . . . . . . . . . . . . . . . . . . . . . . . . . . . . 57
Changing a User Account . . . . . . . . . . . . . . . . . . . . . . . . . . . . . . . . . . . . . . . . . . . . . . . . 58
Removing a User Account . . . . . . . . . . . . . . . . . . . . . . . . . . . . . . . . . . . . . . . . . . . . . . . . 59
Filtering Event Notifications for a User. . . . . . . . . . . . . . . . . . . . . . . . . . . . . . . . . . . . . . 60
Configuring Remote Access . . . . . . . . . . . . . . . . . . . . . . . . . . . . . . . . . . . . . . . . . . . . . . 61
Viewing Active User Sessions. . . . . . . . . . . . . . . . . . . . . . . . . . . . . . . . . . . . . . . . . . . . . 62
Page 5

Contents
5HA-Fabric Manager User Guide
Disconnecting a User. . . . . . . . . . . . . . . . . . . . . . . . . . . . . . . . . . . . . . . . . . . . . . . . . 62
Managing User Groups. . . . . . . . . . . . . . . . . . . . . . . . . . . . . . . . . . . . . . . . . . . . . . . . . . . . . . 64
About User Groups and Access Levels . . . . . . . . . . . . . . . . . . . . . . . . . . . . . . . . . . . . . . 64
Creating a User Group . . . . . . . . . . . . . . . . . . . . . . . . . . . . . . . . . . . . . . . . . . . . . . . . . . . 64
Changing a User Group . . . . . . . . . . . . . . . . . . . . . . . . . . . . . . . . . . . . . . . . . . . . . . . . . . 66
Removing User Groups . . . . . . . . . . . . . . . . . . . . . . . . . . . . . . . . . . . . . . . . . . . . . . . . . . 66
Assigning Users to Groups. . . . . . . . . . . . . . . . . . . . . . . . . . . . . . . . . . . . . . . . . . . . . . . . 67
Determining User Groups . . . . . . . . . . . . . . . . . . . . . . . . . . . . . . . . . . . . . . . . . . . . . . . . 68
Discovering a SAN. . . . . . . . . . . . . . . . . . . . . . . . . . . . . . . . . . . . . . . . . . . . . . . . . . . . . . . . . 69
How Discovery Works. . . . . . . . . . . . . . . . . . . . . . . . . . . . . . . . . . . . . . . . . . . . . . . . . . . 69
Setting Up Discovery . . . . . . . . . . . . . . . . . . . . . . . . . . . . . . . . . . . . . . . . . . . . . . . . . . . . 69
Configuring IP Addresses and Community Strings. . . . . . . . . . . . . . . . . . . . . . . . . . . . . 70
Adding an IP Address . . . . . . . . . . . . . . . . . . . . . . . . . . . . . . . . . . . . . . . . . . . . . . . . 71
Changing an IP Address . . . . . . . . . . . . . . . . . . . . . . . . . . . . . . . . . . . . . . . . . . . . . . 72
Removing an IP Address . . . . . . . . . . . . . . . . . . . . . . . . . . . . . . . . . . . . . . . . . . . . . . 72
Configuring a Community String . . . . . . . . . . . . . . . . . . . . . . . . . . . . . . . . . . . . . . . 72
Reverting to a Default Community String. . . . . . . . . . . . . . . . . . . . . . . . . . . . . . . . . 73
Turning Discovery On and Off . . . . . . . . . . . . . . . . . . . . . . . . . . . . . . . . . . . . . . . . . . . . 74
Turning Discovery On. . . . . . . . . . . . . . . . . . . . . . . . . . . . . . . . . . . . . . . . . . . . . . . . 74
Turning Discovery Off . . . . . . . . . . . . . . . . . . . . . . . . . . . . . . . . . . . . . . . . . . . . . . . 74
Determining the Discovery State . . . . . . . . . . . . . . . . . . . . . . . . . . . . . . . . . . . . . . . . . . . 74
Configuring the SNMP Agent . . . . . . . . . . . . . . . . . . . . . . . . . . . . . . . . . . . . . . . . . . . . . . . . 75
Setting Up the SNMP Agent . . . . . . . . . . . . . . . . . . . . . . . . . . . . . . . . . . . . . . . . . . . . . . 75
Turning On the SNMP Agent . . . . . . . . . . . . . . . . . . . . . . . . . . . . . . . . . . . . . . . . . . . . . 76
Turning Off the SNMP Agent . . . . . . . . . . . . . . . . . . . . . . . . . . . . . . . . . . . . . . . . . . . . . 76
Adding Trap Recipients . . . . . . . . . . . . . . . . . . . . . . . . . . . . . . . . . . . . . . . . . . . . . . . . . . 76
Editing Trap Recipients . . . . . . . . . . . . . . . . . . . . . . . . . . . . . . . . . . . . . . . . . . . . . . . . . . 77
Removing Trap Recipients. . . . . . . . . . . . . . . . . . . . . . . . . . . . . . . . . . . . . . . . . . . . . . . . 77
Customizing the Main Window . . . . . . . . . . . . . . . . . . . . . . . . . . . . . . . . . . . . . . . . . . . . . . . 79
Creating a Customized View . . . . . . . . . . . . . . . . . . . . . . . . . . . . . . . . . . . . . . . . . . . . . . 79
Editing a Customized View . . . . . . . . . . . . . . . . . . . . . . . . . . . . . . . . . . . . . . . . . . . . . . . 82
Deleting a Customized View . . . . . . . . . . . . . . . . . . . . . . . . . . . . . . . . . . . . . . . . . . . . . . 82
Selecting a Customized View . . . . . . . . . . . . . . . . . . . . . . . . . . . . . . . . . . . . . . . . . . . . . 83
Grouping on the Topology. . . . . . . . . . . . . . . . . . . . . . . . . . . . . . . . . . . . . . . . . . . . . . . . 83
Collapsing Groups. . . . . . . . . . . . . . . . . . . . . . . . . . . . . . . . . . . . . . . . . . . . . . . . . . . 83
Expanding Groups . . . . . . . . . . . . . . . . . . . . . . . . . . . . . . . . . . . . . . . . . . . . . . . . . . . 83
Customizing the Product List. . . . . . . . . . . . . . . . . . . . . . . . . . . . . . . . . . . . . . . . . . . . . . 84
Adding a Column to the Product List . . . . . . . . . . . . . . . . . . . . . . . . . . . . . . . . . . . . 84
Page 6

Contents
6 HA-Fabric Manager User Guide
Changing a Column on the Product List . . . . . . . . . . . . . . . . . . . . . . . . . . . . . . . . . . 85
Removing a Column from the Product List. . . . . . . . . . . . . . . . . . . . . . . . . . . . . . . . 85
Viewing Levels of Detail on the Product List. . . . . . . . . . . . . . . . . . . . . . . . . . . . . . 86
Viewing All. . . . . . . . . . . . . . . . . . . . . . . . . . . . . . . . . . . . . . . . . . . . . . . . . . . . . 86
Viewing Only Products. . . . . . . . . . . . . . . . . . . . . . . . . . . . . . . . . . . . . . . . . . . . 86
Zooming In and Out of the Topology . . . . . . . . . . . . . . . . . . . . . . . . . . . . . . . . . . . . . . . 86
Zooming In . . . . . . . . . . . . . . . . . . . . . . . . . . . . . . . . . . . . . . . . . . . . . . . . . . . . . . . . 87
Zooming Out . . . . . . . . . . . . . . . . . . . . . . . . . . . . . . . . . . . . . . . . . . . . . . . . . . . . . . . 87
Showing Levels of Detail on the Physical Map. . . . . . . . . . . . . . . . . . . . . . . . . . . . . . . . 87
Turning Flyovers On or Off. . . . . . . . . . . . . . . . . . . . . . . . . . . . . . . . . . . . . . . . . . . . 88
Exporting and Importing. . . . . . . . . . . . . . . . . . . . . . . . . . . . . . . . . . . . . . . . . . . . . . . . . . . . . 89
Exporting Data . . . . . . . . . . . . . . . . . . . . . . . . . . . . . . . . . . . . . . . . . . . . . . . . . . . . . . . . . 89
Importing Data . . . . . . . . . . . . . . . . . . . . . . . . . . . . . . . . . . . . . . . . . . . . . . . . . . . . . . . . . 91
Backing Up and Restoring Data . . . . . . . . . . . . . . . . . . . . . . . . . . . . . . . . . . . . . . . . . . . . . . . 93
What is Backed Up?. . . . . . . . . . . . . . . . . . . . . . . . . . . . . . . . . . . . . . . . . . . . . . . . . . . . . 93
HAFM Appliance Backup and Restore . . . . . . . . . . . . . . . . . . . . . . . . . . . . . . . . . . . . . . 93
Restoring Data . . . . . . . . . . . . . . . . . . . . . . . . . . . . . . . . . . . . . . . . . . . . . . . . . . . . . . 94
3 Configuring SAN Products and Fabrics. . . . . . . . . . . . . . . . . . . . . . . . . . . . . . . . . . .95
Managing Products . . . . . . . . . . . . . . . . . . . . . . . . . . . . . . . . . . . . . . . . . . . . . . . . . . . . . . . . . 96
Opening a Product’s Element Manager . . . . . . . . . . . . . . . . . . . . . . . . . . . . . . . . . . . . . . 96
Opening the Element Manager from the Interface . . . . . . . . . . . . . . . . . . . . . . . . . . 96
Opening the Element Manager from the Command Line . . . . . . . . . . . . . . . . . . . . . 96
Searching for Products in a SAN . . . . . . . . . . . . . . . . . . . . . . . . . . . . . . . . . . . . . . . . . . . 97
Changing Product Properties . . . . . . . . . . . . . . . . . . . . . . . . . . . . . . . . . . . . . . . . . . . . . . 97
Determining a Product’s Operational Status . . . . . . . . . . . . . . . . . . . . . . . . . . . . . . . . . . 98
Showing Routes Between Two End-Products . . . . . . . . . . . . . . . . . . . . . . . . . . . . . . . . . 99
Requirements. . . . . . . . . . . . . . . . . . . . . . . . . . . . . . . . . . . . . . . . . . . . . . . . . . . . . . . 99
Procedure. . . . . . . . . . . . . . . . . . . . . . . . . . . . . . . . . . . . . . . . . . . . . . . . . . . . . . . . . 100
Hiding Routes Between Two End-Products . . . . . . . . . . . . . . . . . . . . . . . . . . . . . . . . . 101
Viewing Properties of Routes Between Two End-Products . . . . . . . . . . . . . . . . . . . . . 101
Changing a Fabric’s Properties . . . . . . . . . . . . . . . . . . . . . . . . . . . . . . . . . . . . . . . . . . . 102
Configuring Enterprise Fabric Mode . . . . . . . . . . . . . . . . . . . . . . . . . . . . . . . . . . . . . . . . . . 103
About Enterprise Fabric Mode. . . . . . . . . . . . . . . . . . . . . . . . . . . . . . . . . . . . . . . . . . . . 103
Setting Enterprise Fabric Mode . . . . . . . . . . . . . . . . . . . . . . . . . . . . . . . . . . . . . . . . . . . 104
Configuring Fabric Binding . . . . . . . . . . . . . . . . . . . . . . . . . . . . . . . . . . . . . . . . . . . . . . . . . 105
Enabling Fabric Binding . . . . . . . . . . . . . . . . . . . . . . . . . . . . . . . . . . . . . . . . . . . . . . . . 105
Adding Switches to the Fabric Binding Membership . . . . . . . . . . . . . . . . . . . . . . . . . . 106
Persisting and Unpersisting Fabrics . . . . . . . . . . . . . . . . . . . . . . . . . . . . . . . . . . . . . . . . . . . 107
Page 7

Contents
7HA-Fabric Manager User Guide
Persisting a Fabric . . . . . . . . . . . . . . . . . . . . . . . . . . . . . . . . . . . . . . . . . . . . . . . . . . . . . 107
Unpersisting a Fabric . . . . . . . . . . . . . . . . . . . . . . . . . . . . . . . . . . . . . . . . . . . . . . . . . . . 107
Unpersisting a Single Product . . . . . . . . . . . . . . . . . . . . . . . . . . . . . . . . . . . . . . . . . . . . 108
Graphic Indicators Related to Persisted Fabrics . . . . . . . . . . . . . . . . . . . . . . . . . . . . . . 108
Determining a Persisted Fabric’s Status . . . . . . . . . . . . . . . . . . . . . . . . . . . . . . . . . 108
Determining Status of a Product in a Persisted Fabric . . . . . . . . . . . . . . . . . . . . . . 109
Determining the Status of Connections in a Persisted Fabric . . . . . . . . . . . . . . . . . 109
Clearing ISL Alerts . . . . . . . . . . . . . . . . . . . . . . . . . . . . . . . . . . . . . . . . . . . . . . . . . 110
Merging Persisted Fabrics . . . . . . . . . . . . . . . . . . . . . . . . . . . . . . . . . . . . . . . . . . . . . . . 110
Splitting Persisted Fabrics . . . . . . . . . . . . . . . . . . . . . . . . . . . . . . . . . . . . . . . . . . . . . . . 110
Layout Changes in Persisted Fabrics . . . . . . . . . . . . . . . . . . . . . . . . . . . . . . . . . . . . . . . 110
Finding Devices in a Persisted Fabric . . . . . . . . . . . . . . . . . . . . . . . . . . . . . . . . . . . . . . 111
Configuring Trap Forwarding. . . . . . . . . . . . . . . . . . . . . . . . . . . . . . . . . . . . . . . . . . . . . . . . 111
Configuring Trap Forwarding . . . . . . . . . . . . . . . . . . . . . . . . . . . . . . . . . . . . . . . . . . . . 111
Adding Trap Recipients . . . . . . . . . . . . . . . . . . . . . . . . . . . . . . . . . . . . . . . . . . . . . . . . . 112
Removing Trap Recipients. . . . . . . . . . . . . . . . . . . . . . . . . . . . . . . . . . . . . . . . . . . . . . . 112
4 Monitoring SAN Products . . . . . . . . . . . . . . . . . . . . . . . . . . . . . . . . . . . . . . . . . . .113
Event Monitoring . . . . . . . . . . . . . . . . . . . . . . . . . . . . . . . . . . . . . . . . . . . . . . . . . . . . . . . . . 114
Viewing Logs. . . . . . . . . . . . . . . . . . . . . . . . . . . . . . . . . . . . . . . . . . . . . . . . . . . . . . . . . 114
Exporting Log Data . . . . . . . . . . . . . . . . . . . . . . . . . . . . . . . . . . . . . . . . . . . . . . . . . . . . 115
Filtering Events in the Master Log. . . . . . . . . . . . . . . . . . . . . . . . . . . . . . . . . . . . . . . . . 116
Copying Log Entries . . . . . . . . . . . . . . . . . . . . . . . . . . . . . . . . . . . . . . . . . . . . . . . . . . . 116
Copying Rows . . . . . . . . . . . . . . . . . . . . . . . . . . . . . . . . . . . . . . . . . . . . . . . . . . . . . 116
Copying the Entire Master Log . . . . . . . . . . . . . . . . . . . . . . . . . . . . . . . . . . . . . . . . 117
Using Event Notification Features . . . . . . . . . . . . . . . . . . . . . . . . . . . . . . . . . . . . . . . . . . . . 118
Configuring Email Notification . . . . . . . . . . . . . . . . . . . . . . . . . . . . . . . . . . . . . . . . . . . 118
Configuring Call Home Notification . . . . . . . . . . . . . . . . . . . . . . . . . . . . . . . . . . . . . . . 119
Part 1: Specifying Support Center Information. . . . . . . . . . . . . . . . . . . . . . . . . . . . 119
Part 2: Enabling Call Home Notifications. . . . . . . . . . . . . . . . . . . . . . . . . . . . . . . . 120
Enabling Ethernet Events. . . . . . . . . . . . . . . . . . . . . . . . . . . . . . . . . . . . . . . . . . . . . . . . 120
Creating Reports. . . . . . . . . . . . . . . . . . . . . . . . . . . . . . . . . . . . . . . . . . . . . . . . . . . . . . . . . . 122
Generating and Printing Reports . . . . . . . . . . . . . . . . . . . . . . . . . . . . . . . . . . . . . . . . . . 122
Viewing and Printing Reports . . . . . . . . . . . . . . . . . . . . . . . . . . . . . . . . . . . . . . . . . . . . 123
Deleting Reports. . . . . . . . . . . . . . . . . . . . . . . . . . . . . . . . . . . . . . . . . . . . . . . . . . . . . . . 124
5 Optional Features . . . . . . . . . . . . . . . . . . . . . . . . . . . . . . . . . . . . . . . . . . . . . . . . .127
Event Management Overview . . . . . . . . . . . . . . . . . . . . . . . . . . . . . . . . . . . . . . . . . . . . . . . 128
Uses for Event Management . . . . . . . . . . . . . . . . . . . . . . . . . . . . . . . . . . . . . . . . . . . . . 128
Page 8

Contents
8 HA-Fabric Manager User Guide
Event Management Component Overview . . . . . . . . . . . . . . . . . . . . . . . . . . . . . . . . . . 128
About Triggers. . . . . . . . . . . . . . . . . . . . . . . . . . . . . . . . . . . . . . . . . . . . . . . . . . . . . 128
Trigger Operators . . . . . . . . . . . . . . . . . . . . . . . . . . . . . . . . . . . . . . . . . . . . . . . 129
Values . . . . . . . . . . . . . . . . . . . . . . . . . . . . . . . . . . . . . . . . . . . . . . . . . . . . . . . . 129
Phrase Operators . . . . . . . . . . . . . . . . . . . . . . . . . . . . . . . . . . . . . . . . . . . . . . . . 129
About Event Triggers . . . . . . . . . . . . . . . . . . . . . . . . . . . . . . . . . . . . . . . . . . . . . . . 130
About Schedule Triggers. . . . . . . . . . . . . . . . . . . . . . . . . . . . . . . . . . . . . . . . . . . . . 130
About Actions . . . . . . . . . . . . . . . . . . . . . . . . . . . . . . . . . . . . . . . . . . . . . . . . . . . . . 131
Event Management Page Description . . . . . . . . . . . . . . . . . . . . . . . . . . . . . . . . . . . . . . 131
Using Event Management. . . . . . . . . . . . . . . . . . . . . . . . . . . . . . . . . . . . . . . . . . . . . . . . . . . 133
Specifying a Rule’s Triggers . . . . . . . . . . . . . . . . . . . . . . . . . . . . . . . . . . . . . . . . . . . . . 133
Adding an Event Trigger. . . . . . . . . . . . . . . . . . . . . . . . . . . . . . . . . . . . . . . . . . . . . 133
Specifying Time Limits for an Event Trigger . . . . . . . . . . . . . . . . . . . . . . . . . . . . . 135
Adding a Schedule Trigger . . . . . . . . . . . . . . . . . . . . . . . . . . . . . . . . . . . . . . . . . . . 136
Specifying a Rule’s Actions. . . . . . . . . . . . . . . . . . . . . . . . . . . . . . . . . . . . . . . . . . . . . . 138
Specifying an E-mail Action . . . . . . . . . . . . . . . . . . . . . . . . . . . . . . . . . . . . . . . . . . 138
Specifying an Export Action . . . . . . . . . . . . . . . . . . . . . . . . . . . . . . . . . . . . . . . . . . 139
Specifying a Launch Action . . . . . . . . . . . . . . . . . . . . . . . . . . . . . . . . . . . . . . . . . . 141
Specifying a Log Action . . . . . . . . . . . . . . . . . . . . . . . . . . . . . . . . . . . . . . . . . . . . . 142
Specifying a Message Action . . . . . . . . . . . . . . . . . . . . . . . . . . . . . . . . . . . . . . . . . 143
Specifying a Pause Action. . . . . . . . . . . . . . . . . . . . . . . . . . . . . . . . . . . . . . . . . . . . 144
Specifying a Sound Action . . . . . . . . . . . . . . . . . . . . . . . . . . . . . . . . . . . . . . . . . . . 145
Editing a Rule. . . . . . . . . . . . . . . . . . . . . . . . . . . . . . . . . . . . . . . . . . . . . . . . . . . . . . . . . 146
Copying a Rule. . . . . . . . . . . . . . . . . . . . . . . . . . . . . . . . . . . . . . . . . . . . . . . . . . . . . . . . 146
Deleting a Rule. . . . . . . . . . . . . . . . . . . . . . . . . . . . . . . . . . . . . . . . . . . . . . . . . . . . . . . . 147
Activating Rules. . . . . . . . . . . . . . . . . . . . . . . . . . . . . . . . . . . . . . . . . . . . . . . . . . . . . . . 147
Activating an Existing Rule. . . . . . . . . . . . . . . . . . . . . . . . . . . . . . . . . . . . . . . . . . . 147
Activating a New Rule . . . . . . . . . . . . . . . . . . . . . . . . . . . . . . . . . . . . . . . . . . . . . . 147
Deactivating Rules . . . . . . . . . . . . . . . . . . . . . . . . . . . . . . . . . . . . . . . . . . . . . . . . . . . . . 148
Deactivating an Existing Rule. . . . . . . . . . . . . . . . . . . . . . . . . . . . . . . . . . . . . . . . . 148
Deactivating a New Rule. . . . . . . . . . . . . . . . . . . . . . . . . . . . . . . . . . . . . . . . . . . . . 148
Turning the Event Management Feature On or Off. . . . . . . . . . . . . . . . . . . . . . . . . . . . 148
FICON Management Server. . . . . . . . . . . . . . . . . . . . . . . . . . . . . . . . . . . . . . . . . . . . . . . . . 149
Installation . . . . . . . . . . . . . . . . . . . . . . . . . . . . . . . . . . . . . . . . . . . . . . . . . . . . . . . . . . . 149
Configuring the FICON Management Server . . . . . . . . . . . . . . . . . . . . . . . . . . . . . 149
Configuration Procedure . . . . . . . . . . . . . . . . . . . . . . . . . . . . . . . . . . . . . . . . . . . . . 151
Open Systems Management Server . . . . . . . . . . . . . . . . . . . . . . . . . . . . . . . . . . . . . . . . 152
Installing the Open Systems management Server . . . . . . . . . . . . . . . . . . . . . . . . . . 152
Page 9

Contents
9HA-Fabric Manager User Guide
Configuring the Open Systems Management Server . . . . . . . . . . . . . . . . . . . . . . . 153
SANtegrity Features . . . . . . . . . . . . . . . . . . . . . . . . . . . . . . . . . . . . . . . . . . . . . . . . . . . . . . . 154
Fabric Binding . . . . . . . . . . . . . . . . . . . . . . . . . . . . . . . . . . . . . . . . . . . . . . . . . . . . . . . . 154
Enable/Disable and Online State Functions . . . . . . . . . . . . . . . . . . . . . . . . . . . . . . 154
Switch Binding. . . . . . . . . . . . . . . . . . . . . . . . . . . . . . . . . . . . . . . . . . . . . . . . . . . . . . . . 155
Configuring Switch Binding Overview. . . . . . . . . . . . . . . . . . . . . . . . . . . . . . . . . . 155
Enable/Disable Switch Binding. . . . . . . . . . . . . . . . . . . . . . . . . . . . . . . . . . . . . . . . 156
Editing the Switch Membership List. . . . . . . . . . . . . . . . . . . . . . . . . . . . . . . . . . . . 157
Enable/Disable and Online State Functions . . . . . . . . . . . . . . . . . . . . . . . . . . . . . . 158
Zoning with Switch Binding Enabled . . . . . . . . . . . . . . . . . . . . . . . . . . . . . . . . . . . 159
Enterprise Fabric Mode . . . . . . . . . . . . . . . . . . . . . . . . . . . . . . . . . . . . . . . . . . . . . . . . . . . . 160
Fabric Binding . . . . . . . . . . . . . . . . . . . . . . . . . . . . . . . . . . . . . . . . . . . . . . . . . . . . . . . . 160
Switch Binding. . . . . . . . . . . . . . . . . . . . . . . . . . . . . . . . . . . . . . . . . . . . . . . . . . . . . . . . 160
Rerouting Delay . . . . . . . . . . . . . . . . . . . . . . . . . . . . . . . . . . . . . . . . . . . . . . . . . . . . . . . 160
Domain RSCNs . . . . . . . . . . . . . . . . . . . . . . . . . . . . . . . . . . . . . . . . . . . . . . . . . . . . . . . 161
Insistent Domain Identification (ID) . . . . . . . . . . . . . . . . . . . . . . . . . . . . . . . . . . . . . . . 161
Open Trunking . . . . . . . . . . . . . . . . . . . . . . . . . . . . . . . . . . . . . . . . . . . . . . . . . . . . . . . . . . . 162
Enabling and Configuring Open Trunking . . . . . . . . . . . . . . . . . . . . . . . . . . . . . . . . . . 162
Using the Pop-Up Menu . . . . . . . . . . . . . . . . . . . . . . . . . . . . . . . . . . . . . . . . . . . . . 165
Open Trunking Log . . . . . . . . . . . . . . . . . . . . . . . . . . . . . . . . . . . . . . . . . . . . . . . . . . . . 166
Monitoring Performance. . . . . . . . . . . . . . . . . . . . . . . . . . . . . . . . . . . . . . . . . . . . . . . . . . . . 167
Monitoring Connection Utilization . . . . . . . . . . . . . . . . . . . . . . . . . . . . . . . . . . . . . . . . 167
Monitoring Switch Performance . . . . . . . . . . . . . . . . . . . . . . . . . . . . . . . . . . . . . . . . . . 168
Gathering and Viewing Performance Data . . . . . . . . . . . . . . . . . . . . . . . . . . . . . . . . . . 169
Storing Performance Data . . . . . . . . . . . . . . . . . . . . . . . . . . . . . . . . . . . . . . . . . . . . 169
Viewing Performance Data . . . . . . . . . . . . . . . . . . . . . . . . . . . . . . . . . . . . . . . . . . . 169
Exporting Performance Data . . . . . . . . . . . . . . . . . . . . . . . . . . . . . . . . . . . . . . . . . . 169
Monitoring Port Performance . . . . . . . . . . . . . . . . . . . . . . . . . . . . . . . . . . . . . . . . . . . . 171
Setting Performance Thresholds . . . . . . . . . . . . . . . . . . . . . . . . . . . . . . . . . . . . . . . . . . 172
Working with the Planning Module . . . . . . . . . . . . . . . . . . . . . . . . . . . . . . . . . . . . . . . . . . . 174
Planning Window. . . . . . . . . . . . . . . . . . . . . . . . . . . . . . . . . . . . . . . . . . . . . . . . . . . . . . 174
Devices Toolbox . . . . . . . . . . . . . . . . . . . . . . . . . . . . . . . . . . . . . . . . . . . . . . . . . . . 175
Planning a New SAN . . . . . . . . . . . . . . . . . . . . . . . . . . . . . . . . . . . . . . . . . . . . . . . . . . . 175
Opening an Existing Plan. . . . . . . . . . . . . . . . . . . . . . . . . . . . . . . . . . . . . . . . . . . . . . . . 176
Designing a Plan . . . . . . . . . . . . . . . . . . . . . . . . . . . . . . . . . . . . . . . . . . . . . . . . . . . . . . 176
Adding Planned Devices . . . . . . . . . . . . . . . . . . . . . . . . . . . . . . . . . . . . . . . . . . . . . 176
Adding Individual Devices . . . . . . . . . . . . . . . . . . . . . . . . . . . . . . . . . . . . . . . . 176
Adding Multiple Devices . . . . . . . . . . . . . . . . . . . . . . . . . . . . . . . . . . . . . . . . . 176
Page 10

Contents
10 HA-Fabric Manager User Guide
Editing Port Types. . . . . . . . . . . . . . . . . . . . . . . . . . . . . . . . . . . . . . . . . . . . . . . . . . 177
Displaying a Planned Device as an Installed Device . . . . . . . . . . . . . . . . . . . . . . . 178
Connecting Planned Devices. . . . . . . . . . . . . . . . . . . . . . . . . . . . . . . . . . . . . . . . . . 178
Arranging Planned Devices. . . . . . . . . . . . . . . . . . . . . . . . . . . . . . . . . . . . . . . . . . . 178
Configuring Planned Devices . . . . . . . . . . . . . . . . . . . . . . . . . . . . . . . . . . . . . . . . . 178
Configuring Planned Ports. . . . . . . . . . . . . . . . . . . . . . . . . . . . . . . . . . . . . . . . . . . . 179
Deleting Planned Devices . . . . . . . . . . . . . . . . . . . . . . . . . . . . . . . . . . . . . . . . . . . . 179
Evaluating a Plan Using Planning Rules . . . . . . . . . . . . . . . . . . . . . . . . . . . . . . . . . . . . 180
Planning Rules. . . . . . . . . . . . . . . . . . . . . . . . . . . . . . . . . . . . . . . . . . . . . . . . . . . . . 180
Setting Planning Rules. . . . . . . . . . . . . . . . . . . . . . . . . . . . . . . . . . . . . . . . . . . . . . . 184
Evaluating a Plan . . . . . . . . . . . . . . . . . . . . . . . . . . . . . . . . . . . . . . . . . . . . . . . . . . . . . . 185
Outputting a Plan . . . . . . . . . . . . . . . . . . . . . . . . . . . . . . . . . . . . . . . . . . . . . . . . . . . . . . 186
Saving a Plan . . . . . . . . . . . . . . . . . . . . . . . . . . . . . . . . . . . . . . . . . . . . . . . . . . . . . . 186
Saving the Plan with its Current Name. . . . . . . . . . . . . . . . . . . . . . . . . . . . . . . 186
Saving the Plan with a New Name . . . . . . . . . . . . . . . . . . . . . . . . . . . . . . . . . . 186
Exporting a Plan . . . . . . . . . . . . . . . . . . . . . . . . . . . . . . . . . . . . . . . . . . . . . . . . . . . 186
Printing a Plan . . . . . . . . . . . . . . . . . . . . . . . . . . . . . . . . . . . . . . . . . . . . . . . . . . . . . 188
6 Configuring Zoning. . . . . . . . . . . . . . . . . . . . . . . . . . . . . . . . . . . . . . . . . . . . . . . .189
Zoning Limitations . . . . . . . . . . . . . . . . . . . . . . . . . . . . . . . . . . . . . . . . . . . . . . . . . . . . . . . . 190
Configuring Zoning . . . . . . . . . . . . . . . . . . . . . . . . . . . . . . . . . . . . . . . . . . . . . . . . . . . . . . . 192
Creating a New Zone . . . . . . . . . . . . . . . . . . . . . . . . . . . . . . . . . . . . . . . . . . . . . . . . . . . 193
Creating a New Member in a Zone . . . . . . . . . . . . . . . . . . . . . . . . . . . . . . . . . . . . . . . . 194
Adding Members to a Zone . . . . . . . . . . . . . . . . . . . . . . . . . . . . . . . . . . . . . . . . . . . . . . 195
Creating a Zone Set . . . . . . . . . . . . . . . . . . . . . . . . . . . . . . . . . . . . . . . . . . . . . . . . . . . . 196
Adding Zones to Zone Sets . . . . . . . . . . . . . . . . . . . . . . . . . . . . . . . . . . . . . . . . . . . . . . 196
Removing a Member from a Zone. . . . . . . . . . . . . . . . . . . . . . . . . . . . . . . . . . . . . . . . . 197
Removing a Zone from a Zone Set . . . . . . . . . . . . . . . . . . . . . . . . . . . . . . . . . . . . . . . . 197
Activating a Zone Set. . . . . . . . . . . . . . . . . . . . . . . . . . . . . . . . . . . . . . . . . . . . . . . . . . . 197
Enabling or Disabling the Default Zone . . . . . . . . . . . . . . . . . . . . . . . . . . . . . . . . . . . . 199
Deactivating a Zone Set . . . . . . . . . . . . . . . . . . . . . . . . . . . . . . . . . . . . . . . . . . . . . . . . . 199
Exporting a Zone Set . . . . . . . . . . . . . . . . . . . . . . . . . . . . . . . . . . . . . . . . . . . . . . . . . . . 201
Importing a Zone Set . . . . . . . . . . . . . . . . . . . . . . . . . . . . . . . . . . . . . . . . . . . . . . . . . . . 202
Zoning Administration . . . . . . . . . . . . . . . . . . . . . . . . . . . . . . . . . . . . . . . . . . . . . . . . . . . . . 203
Renaming a Zone . . . . . . . . . . . . . . . . . . . . . . . . . . . . . . . . . . . . . . . . . . . . . . . . . . . . . . 203
Renaming a Zone Set . . . . . . . . . . . . . . . . . . . . . . . . . . . . . . . . . . . . . . . . . . . . . . . . . . . 203
Replacing Zone Members . . . . . . . . . . . . . . . . . . . . . . . . . . . . . . . . . . . . . . . . . . . . . . . 204
Manually Replacing Zone Members . . . . . . . . . . . . . . . . . . . . . . . . . . . . . . . . . . . . . . . 204
Duplicating a Zone Set. . . . . . . . . . . . . . . . . . . . . . . . . . . . . . . . . . . . . . . . . . . . . . . . . . 205
Page 11

Contents
11HA-Fabric Manager User Guide
Deleting a Zone . . . . . . . . . . . . . . . . . . . . . . . . . . . . . . . . . . . . . . . . . . . . . . . . . . . . . . . 205
Deleting a Zone Set . . . . . . . . . . . . . . . . . . . . . . . . . . . . . . . . . . . . . . . . . . . . . . . . . . . . 206
Viewing Properties for Zones and Zone Sets. . . . . . . . . . . . . . . . . . . . . . . . . . . . . . . . . 206
Finding Members in a Zone . . . . . . . . . . . . . . . . . . . . . . . . . . . . . . . . . . . . . . . . . . . . . . 207
Finding Zones in a Zone Set . . . . . . . . . . . . . . . . . . . . . . . . . . . . . . . . . . . . . . . . . . . . . 207
Listing Zone Members. . . . . . . . . . . . . . . . . . . . . . . . . . . . . . . . . . . . . . . . . . . . . . . . . . 207
Saving the Active Zone Set into a Zoning Library . . . . . . . . . . . . . . . . . . . . . . . . . . . . 208
Comparing Zone Sets. . . . . . . . . . . . . . . . . . . . . . . . . . . . . . . . . . . . . . . . . . . . . . . . . . . 209
A Configuring HAFM Through a Firewall . . . . . . . . . . . . . . . . . . . . . . . . . . . . . . . . . .211
Polling Client Function. . . . . . . . . . . . . . . . . . . . . . . . . . . . . . . . . . . . . . . . . . . . . . . . . . . . . 212
Configuring for Faster Logins . . . . . . . . . . . . . . . . . . . . . . . . . . . . . . . . . . . . . . . . . . . . 212
Forcing a Client to Be Polling. . . . . . . . . . . . . . . . . . . . . . . . . . . . . . . . . . . . . . . . . 212
Forcing All Clients to Be Polling . . . . . . . . . . . . . . . . . . . . . . . . . . . . . . . . . . . . . . 213
Configuring TCP Port Numbers to Allow Firewall Access . . . . . . . . . . . . . . . . . . . . . . . . . 215
HAFM Function with RMI at TCP Port Level . . . . . . . . . . . . . . . . . . . . . . . . . . . . . . . 215
Forcing Port in RMI Registry . . . . . . . . . . . . . . . . . . . . . . . . . . . . . . . . . . . . . . . . . . . . 216
HAFM_sc.bat File . . . . . . . . . . . . . . . . . . . . . . . . . . . . . . . . . . . . . . . . . . . . . . . . . . 217
HAFM_co.bat File. . . . . . . . . . . . . . . . . . . . . . . . . . . . . . . . . . . . . . . . . . . . . . . . . . 218
Forcing Server and Client Export Port Number. . . . . . . . . . . . . . . . . . . . . . . . . . . . . . . 218
HAFM_sc.bat File . . . . . . . . . . . . . . . . . . . . . . . . . . . . . . . . . . . . . . . . . . . . . . . . . . 219
HAFM_co.bat File. . . . . . . . . . . . . . . . . . . . . . . . . . . . . . . . . . . . . . . . . . . . . . . . . . 220
B Troubleshooting . . . . . . . . . . . . . . . . . . . . . . . . . . . . . . . . . . . . . . . . . . . . . . . . . .221
Problems with Discovery . . . . . . . . . . . . . . . . . . . . . . . . . . . . . . . . . . . . . . . . . . . . . . . . . . . 222
Problems with Products . . . . . . . . . . . . . . . . . . . . . . . . . . . . . . . . . . . . . . . . . . . . . . . . . . . . 225
Problems with Addresses . . . . . . . . . . . . . . . . . . . . . . . . . . . . . . . . . . . . . . . . . . . . . . . . . . . 226
Miscellaneous Problems. . . . . . . . . . . . . . . . . . . . . . . . . . . . . . . . . . . . . . . . . . . . . . . . . . . . 227
Problems with Zoning. . . . . . . . . . . . . . . . . . . . . . . . . . . . . . . . . . . . . . . . . . . . . . . . . . . . . . 230
C Information and Error Messages . . . . . . . . . . . . . . . . . . . . . . . . . . . . . . . . . . . . . .231
D Configuring Remote Workstations . . . . . . . . . . . . . . . . . . . . . . . . . . . . . . . . . . . . .251
Configuring Windows Systems . . . . . . . . . . . . . . . . . . . . . . . . . . . . . . . . . . . . . . . . . . . . . . 252
Requirements . . . . . . . . . . . . . . . . . . . . . . . . . . . . . . . . . . . . . . . . . . . . . . . . . . . . . . . . . 252
Installation Procedure. . . . . . . . . . . . . . . . . . . . . . . . . . . . . . . . . . . . . . . . . . . . . . . . . . . 252
Running the High Availability Fabric Manager . . . . . . . . . . . . . . . . . . . . . . . . . . . 256
Configuring Solaris Systems . . . . . . . . . . . . . . . . . . . . . . . . . . . . . . . . . . . . . . . . . . . . . . . . 257
Requirements . . . . . . . . . . . . . . . . . . . . . . . . . . . . . . . . . . . . . . . . . . . . . . . . . . . . . . . . . 257
Page 12

Contents
12 HA-Fabric Manager User Guide
Installation Procedure. . . . . . . . . . . . . . . . . . . . . . . . . . . . . . . . . . . . . . . . . . . . . . . . . . . 257
Running the High Availability Fabric Manager . . . . . . . . . . . . . . . . . . . . . . . . . . . 259
Configuring HP-UX, AIX, and Linux Systems . . . . . . . . . . . . . . . . . . . . . . . . . . . . . . . . . . 260
Requirements . . . . . . . . . . . . . . . . . . . . . . . . . . . . . . . . . . . . . . . . . . . . . . . . . . . . . . . . . 260
Installation Procedure. . . . . . . . . . . . . . . . . . . . . . . . . . . . . . . . . . . . . . . . . . . . . . . . . . . 261
Running the High Availability Fabric Manager . . . . . . . . . . . . . . . . . . . . . . . . . . . 263
E Editing Batch Files . . . . . . . . . . . . . . . . . . . . . . . . . . . . . . . . . . . . . . . . . . . . . . . . .265
Configuring the Application to Use Dual Network Cards . . . . . . . . . . . . . . . . . . . . . . . . . . 265
Windows Systems . . . . . . . . . . . . . . . . . . . . . . . . . . . . . . . . . . . . . . . . . . . . . . . . . . . . . 265
Setting the Zoning Delay . . . . . . . . . . . . . . . . . . . . . . . . . . . . . . . . . . . . . . . . . . . . . . . . . . . 266
Windows Systems . . . . . . . . . . . . . . . . . . . . . . . . . . . . . . . . . . . . . . . . . . . . . . . . . . . . . 266
Specifying a Host IP Address in Multi-NIC Networks . . . . . . . . . . . . . . . . . . . . . . . . . . . . 267
Windows Systems . . . . . . . . . . . . . . . . . . . . . . . . . . . . . . . . . . . . . . . . . . . . . . . . . . . . . 267
F Reference . . . . . . . . . . . . . . . . . . . . . . . . . . . . . . . . . . . . . . . . . . . . . . . . . . . . . . .269
Compatibility with Other Applications . . . . . . . . . . . . . . . . . . . . . . . . . . . . . . . . . . . . . . . . 270
Icon Legend . . . . . . . . . . . . . . . . . . . . . . . . . . . . . . . . . . . . . . . . . . . . . . . . . . . . . . . . . . . . . 271
Product Icons . . . . . . . . . . . . . . . . . . . . . . . . . . . . . . . . . . . . . . . . . . . . . . . . . . . . . . . . . 271
Product Status Icons. . . . . . . . . . . . . . . . . . . . . . . . . . . . . . . . . . . . . . . . . . . . . . . . . . . . 272
Event Icons. . . . . . . . . . . . . . . . . . . . . . . . . . . . . . . . . . . . . . . . . . . . . . . . . . . . . . . . . . . 272
Band Information Status Icons. . . . . . . . . . . . . . . . . . . . . . . . . . . . . . . . . . . . . . . . . . . . 272
Planned Device Icons. . . . . . . . . . . . . . . . . . . . . . . . . . . . . . . . . . . . . . . . . . . . . . . . . . . 272
Group Icons . . . . . . . . . . . . . . . . . . . . . . . . . . . . . . . . . . . . . . . . . . . . . . . . . . . . . . . . . . 273
Connections . . . . . . . . . . . . . . . . . . . . . . . . . . . . . . . . . . . . . . . . . . . . . . . . . . . . . . . . . . 273
Zoning Naming Conventions . . . . . . . . . . . . . . . . . . . . . . . . . . . . . . . . . . . . . . . . . . . . . . . . 275
Event Management . . . . . . . . . . . . . . . . . . . . . . . . . . . . . . . . . . . . . . . . . . . . . . . . . . . . . . . . 276
Event Trigger Properties . . . . . . . . . . . . . . . . . . . . . . . . . . . . . . . . . . . . . . . . . . . . . . . . 276
SNMP Trap Event Properties . . . . . . . . . . . . . . . . . . . . . . . . . . . . . . . . . . . . . . . . . 276
Event Property. . . . . . . . . . . . . . . . . . . . . . . . . . . . . . . . . . . . . . . . . . . . . . . . . . 276
Device Property. . . . . . . . . . . . . . . . . . . . . . . . . . . . . . . . . . . . . . . . . . . . . . . . . 276
System Property Set . . . . . . . . . . . . . . . . . . . . . . . . . . . . . . . . . . . . . . . . . . . . . 277
Performance Event Properties . . . . . . . . . . . . . . . . . . . . . . . . . . . . . . . . . . . . . . . . . 278
Event Property Set . . . . . . . . . . . . . . . . . . . . . . . . . . . . . . . . . . . . . . . . . . . . . . 278
Device Property Set . . . . . . . . . . . . . . . . . . . . . . . . . . . . . . . . . . . . . . . . . . . . . 278
System Property Set . . . . . . . . . . . . . . . . . . . . . . . . . . . . . . . . . . . . . . . . . . . . . 279
User Action Event Properties . . . . . . . . . . . . . . . . . . . . . . . . . . . . . . . . . . . . . . . . . 280
Event Property Set . . . . . . . . . . . . . . . . . . . . . . . . . . . . . . . . . . . . . . . . . . . . . . 280
System Property Set . . . . . . . . . . . . . . . . . . . . . . . . . . . . . . . . . . . . . . . . . . . . . 280
Page 13

Contents
13HA-Fabric Manager User Guide
User Property Set . . . . . . . . . . . . . . . . . . . . . . . . . . . . . . . . . . . . . . . . . . . . . . . 281
Device State Event Properties . . . . . . . . . . . . . . . . . . . . . . . . . . . . . . . . . . . . . . . . . 281
Event Property Set . . . . . . . . . . . . . . . . . . . . . . . . . . . . . . . . . . . . . . . . . . . . . . 282
Device Property Set . . . . . . . . . . . . . . . . . . . . . . . . . . . . . . . . . . . . . . . . . . . . . 282
System Property Set . . . . . . . . . . . . . . . . . . . . . . . . . . . . . . . . . . . . . . . . . . . . . 283
Writing Event Management Macros. . . . . . . . . . . . . . . . . . . . . . . . . . . . . . . . . . . . . . . . . . . 284
Keyboard Shortcuts . . . . . . . . . . . . . . . . . . . . . . . . . . . . . . . . . . . . . . . . . . . . . . . . . . . . . . . 287
Index . . . . . . . . . . . . . . . . . . . . . . . . . . . . . . . . . . . . . . . . . . . . . . . . . . . . . . . . . .289
Figures
1 The Life Cycle of a SAN . . . . . . . . . . . . . . . . . . . . . . . . . . . . . . . . . . . . . . . . . . . . . . . . . 28
2 Product management options. . . . . . . . . . . . . . . . . . . . . . . . . . . . . . . . . . . . . . . . . . . . . . 33
3 View All - HAFM 8 window . . . . . . . . . . . . . . . . . . . . . . . . . . . . . . . . . . . . . . . . . . . . . . 35
4 Menu bar . . . . . . . . . . . . . . . . . . . . . . . . . . . . . . . . . . . . . . . . . . . . . . . . . . . . . . . . . . . . . 36
5 Toolbar . . . . . . . . . . . . . . . . . . . . . . . . . . . . . . . . . . . . . . . . . . . . . . . . . . . . . . . . . . . . . . . 36
6 Master Log . . . . . . . . . . . . . . . . . . . . . . . . . . . . . . . . . . . . . . . . . . . . . . . . . . . . . . . . . . . . 37
7 Connection Utilization Legend . . . . . . . . . . . . . . . . . . . . . . . . . . . . . . . . . . . . . . . . . . . . 38
8 Minimap. . . . . . . . . . . . . . . . . . . . . . . . . . . . . . . . . . . . . . . . . . . . . . . . . . . . . . . . . . . . . . 39
9 Status Bar . . . . . . . . . . . . . . . . . . . . . . . . . . . . . . . . . . . . . . . . . . . . . . . . . . . . . . . . . . . . . 40
10 The Toolbox. . . . . . . . . . . . . . . . . . . . . . . . . . . . . . . . . . . . . . . . . . . . . . . . . . . . . . . . . . . 41
11 License dialog box . . . . . . . . . . . . . . . . . . . . . . . . . . . . . . . . . . . . . . . . . . . . . . . . . . . . . . 46
12 VNC Authentication window. . . . . . . . . . . . . . . . . . . . . . . . . . . . . . . . . . . . . . . . . . . . . . 48
13 Welcome to Windows dialog box . . . . . . . . . . . . . . . . . . . . . . . . . . . . . . . . . . . . . . . . . . 48
14 Log On to Windows dialog box. . . . . . . . . . . . . . . . . . . . . . . . . . . . . . . . . . . . . . . . . . . . 49
15 HAFM Log In dialog box . . . . . . . . . . . . . . . . . . . . . . . . . . . . . . . . . . . . . . . . . . . . . . . . 49
16 View All - HAFM window . . . . . . . . . . . . . . . . . . . . . . . . . . . . . . . . . . . . . . . . . . . . . . . 51
17 HAFM 8 Server Users dialog box . . . . . . . . . . . . . . . . . . . . . . . . . . . . . . . . . . . . . . . . . . 57
18 Add User dialog box . . . . . . . . . . . . . . . . . . . . . . . . . . . . . . . . . . . . . . . . . . . . . . . . . . . . 58
19 Change User dialog box. . . . . . . . . . . . . . . . . . . . . . . . . . . . . . . . . . . . . . . . . . . . . . . . . . 59
20 Define Filter dialog box . . . . . . . . . . . . . . . . . . . . . . . . . . . . . . . . . . . . . . . . . . . . . . . . . . 60
21 Remote Access dialog box. . . . . . . . . . . . . . . . . . . . . . . . . . . . . . . . . . . . . . . . . . . . . . . . 61
22 Active Sessions dialog box . . . . . . . . . . . . . . . . . . . . . . . . . . . . . . . . . . . . . . . . . . . . . . . 62
23 Disconnect User message box . . . . . . . . . . . . . . . . . . . . . . . . . . . . . . . . . . . . . . . . . . . . . 63
24 HAFM Group dialog box. . . . . . . . . . . . . . . . . . . . . . . . . . . . . . . . . . . . . . . . . . . . . . . . . 65
25 Discover Setup dialog box . . . . . . . . . . . . . . . . . . . . . . . . . . . . . . . . . . . . . . . . . . . . . . . . 70
26 Domain Information dialog box (IP Address tab) . . . . . . . . . . . . . . . . . . . . . . . . . . . . . . 71
27 Domain Information dialog box (Community Strings tab) . . . . . . . . . . . . . . . . . . . . . . . 73
Page 14

Contents
14 HA-Fabric Manager User Guide
28 SNMP Agent Setup dialog box . . . . . . . . . . . . . . . . . . . . . . . . . . . . . . . . . . . . . . . . . . . . 75
29 Add Trap Recipient dialog box . . . . . . . . . . . . . . . . . . . . . . . . . . . . . . . . . . . . . . . . . . . . 76
30 Edit Trap Recipient dialog box . . . . . . . . . . . . . . . . . . . . . . . . . . . . . . . . . . . . . . . . . . . . 77
31 Create View dialog box (View Members tab) . . . . . . . . . . . . . . . . . . . . . . . . . . . . . . . . . 80
32 Create View dialog box (Columns tab) . . . . . . . . . . . . . . . . . . . . . . . . . . . . . . . . . . . . . . 81
33 Edit View dialog box . . . . . . . . . . . . . . . . . . . . . . . . . . . . . . . . . . . . . . . . . . . . . . . . . . . . 82
34 A Group on the Physical Map . . . . . . . . . . . . . . . . . . . . . . . . . . . . . . . . . . . . . . . . . . . . . 83
35 Create Column dialog box . . . . . . . . . . . . . . . . . . . . . . . . . . . . . . . . . . . . . . . . . . . . . . . . 84
36 Edit Column Dialog Box . . . . . . . . . . . . . . . . . . . . . . . . . . . . . . . . . . . . . . . . . . . . . . . . . 85
37 Zoom dialog box . . . . . . . . . . . . . . . . . . . . . . . . . . . . . . . . . . . . . . . . . . . . . . . . . . . . . . . 87
38 Export dialog box. . . . . . . . . . . . . . . . . . . . . . . . . . . . . . . . . . . . . . . . . . . . . . . . . . . . . . . 89
39 Select Switches dialog box. . . . . . . . . . . . . . . . . . . . . . . . . . . . . . . . . . . . . . . . . . . . . . . . 90
40 Export Confirmation message . . . . . . . . . . . . . . . . . . . . . . . . . . . . . . . . . . . . . . . . . . . . . 91
41 Import dialog box. . . . . . . . . . . . . . . . . . . . . . . . . . . . . . . . . . . . . . . . . . . . . . . . . . . . . . . 91
42 Search Box . . . . . . . . . . . . . . . . . . . . . . . . . . . . . . . . . . . . . . . . . . . . . . . . . . . . . . . . . . . . 97
43 Properties dialog box . . . . . . . . . . . . . . . . . . . . . . . . . . . . . . . . . . . . . . . . . . . . . . . . . . . . 98
44 Show Route dialog box . . . . . . . . . . . . . . . . . . . . . . . . . . . . . . . . . . . . . . . . . . . . . . . . . 100
45 Show Route example . . . . . . . . . . . . . . . . . . . . . . . . . . . . . . . . . . . . . . . . . . . . . . . . . . . 100
46 Route Properties dialog box. . . . . . . . . . . . . . . . . . . . . . . . . . . . . . . . . . . . . . . . . . . . . . 101
47 Fabric Properties dialog box . . . . . . . . . . . . . . . . . . . . . . . . . . . . . . . . . . . . . . . . . . . . . 102
48 Enterprise Fabric Mode dialog box . . . . . . . . . . . . . . . . . . . . . . . . . . . . . . . . . . . . . . . . 104
49 Fabric Binding dialog box . . . . . . . . . . . . . . . . . . . . . . . . . . . . . . . . . . . . . . . . . . . . . . . 105
50 SANtegrity feature message. . . . . . . . . . . . . . . . . . . . . . . . . . . . . . . . . . . . . . . . . . . . . . 106
51 Add Detached Switch dialog box. . . . . . . . . . . . . . . . . . . . . . . . . . . . . . . . . . . . . . . . . . 106
52 Unpersist Fabric confirmation box. . . . . . . . . . . . . . . . . . . . . . . . . . . . . . . . . . . . . . . . . 107
53 Persisted Fabric icon on Physical Map . . . . . . . . . . . . . . . . . . . . . . . . . . . . . . . . . . . . . 108
54 Persisted Fabric icon on Product List. . . . . . . . . . . . . . . . . . . . . . . . . . . . . . . . . . . . . . . 108
55 Product Added to Persisted Fabric. . . . . . . . . . . . . . . . . . . . . . . . . . . . . . . . . . . . . . . . . 109
56 Product Removed from Persisted Fabric . . . . . . . . . . . . . . . . . . . . . . . . . . . . . . . . . . . . 109
57 Removed Connection in a Persisted Fabric . . . . . . . . . . . . . . . . . . . . . . . . . . . . . . . . . . 110
58 Configure Trap Forwarding dialog box . . . . . . . . . . . . . . . . . . . . . . . . . . . . . . . . . . . . . 111
59 Add Trap Recipient dialog box . . . . . . . . . . . . . . . . . . . . . . . . . . . . . . . . . . . . . . . . . . . 112
60 View Logs dialog box . . . . . . . . . . . . . . . . . . . . . . . . . . . . . . . . . . . . . . . . . . . . . . . . . . 115
61 Define Filter dialog box . . . . . . . . . . . . . . . . . . . . . . . . . . . . . . . . . . . . . . . . . . . . . . . . . 116
62 Email Notification Setup dialog box . . . . . . . . . . . . . . . . . . . . . . . . . . . . . . . . . . . . . . . 118
63 Call Home Configuration dialog box (for U.S. installations) . . . . . . . . . . . . . . . . . . . . 119
64 Call Home Event Notification dialog box . . . . . . . . . . . . . . . . . . . . . . . . . . . . . . . . . . . 120
65 Configure Ethernet Event dialog box. . . . . . . . . . . . . . . . . . . . . . . . . . . . . . . . . . . . . . . 120
Page 15

Contents
15HA-Fabric Manager User Guide
66 Select Template Dialog Box . . . . . . . . . . . . . . . . . . . . . . . . . . . . . . . . . . . . . . . . . . . . . 123
67 HAFM Reports Dialog Box . . . . . . . . . . . . . . . . . . . . . . . . . . . . . . . . . . . . . . . . . . . . . . 124
68 Trigger phrase development. . . . . . . . . . . . . . . . . . . . . . . . . . . . . . . . . . . . . . . . . . . . . . 129
69 Event Management tab. . . . . . . . . . . . . . . . . . . . . . . . . . . . . . . . . . . . . . . . . . . . . . . . . . 133
70 Add Rule dialog box . . . . . . . . . . . . . . . . . . . . . . . . . . . . . . . . . . . . . . . . . . . . . . . . . . . 134
71 Add Rule dialog box (Time Limits). . . . . . . . . . . . . . . . . . . . . . . . . . . . . . . . . . . . . . . . 136
72 Add Rule dialog box (Schedule) . . . . . . . . . . . . . . . . . . . . . . . . . . . . . . . . . . . . . . . . . . 137
73 Add Rule dialog box (E-mail) . . . . . . . . . . . . . . . . . . . . . . . . . . . . . . . . . . . . . . . . . . . . 139
74 Add Rule dialog box (Export) . . . . . . . . . . . . . . . . . . . . . . . . . . . . . . . . . . . . . . . . . . . . 140
75 Add Rule dialog box (Launch). . . . . . . . . . . . . . . . . . . . . . . . . . . . . . . . . . . . . . . . . . . . 141
76 Add Rule dialog box (Log) . . . . . . . . . . . . . . . . . . . . . . . . . . . . . . . . . . . . . . . . . . . . . . 142
77 Add Rule dialog box (Message). . . . . . . . . . . . . . . . . . . . . . . . . . . . . . . . . . . . . . . . . . . 144
78 Add Rule dialog box (Pause) . . . . . . . . . . . . . . . . . . . . . . . . . . . . . . . . . . . . . . . . . . . . . 145
79 Add Rule dialog box (Sound) . . . . . . . . . . . . . . . . . . . . . . . . . . . . . . . . . . . . . . . . . . . . 146
80 Configure FICON Management Server dialog box . . . . . . . . . . . . . . . . . . . . . . . . . . . . 151
81 Configure Feature Key dialog box. . . . . . . . . . . . . . . . . . . . . . . . . . . . . . . . . . . . . . . . . 152
82 New Feature Key dialog box . . . . . . . . . . . . . . . . . . . . . . . . . . . . . . . . . . . . . . . . . . . . . 152
83 Configure Open Systems Management Server dialog box . . . . . . . . . . . . . . . . . . . . . . 153
84 Switch Binding State Change dialog box. . . . . . . . . . . . . . . . . . . . . . . . . . . . . . . . . . . . 156
85 Switch Binding Membership List dialog box . . . . . . . . . . . . . . . . . . . . . . . . . . . . . . . . 157
86 Configure Open Trunking dialog box . . . . . . . . . . . . . . . . . . . . . . . . . . . . . . . . . . . . . . 163
87 Open Trunking log. . . . . . . . . . . . . . . . . . . . . . . . . . . . . . . . . . . . . . . . . . . . . . . . . . . . . 166
88 Utilization Legend . . . . . . . . . . . . . . . . . . . . . . . . . . . . . . . . . . . . . . . . . . . . . . . . . . . . . 167
89 Switch Performance graph . . . . . . . . . . . . . . . . . . . . . . . . . . . . . . . . . . . . . . . . . . . . . . . 168
90 Export dialog box. . . . . . . . . . . . . . . . . . . . . . . . . . . . . . . . . . . . . . . . . . . . . . . . . . . . . . 170
91 Port Performance Graph dialog box. . . . . . . . . . . . . . . . . . . . . . . . . . . . . . . . . . . . . . . . 171
92 Planning window . . . . . . . . . . . . . . . . . . . . . . . . . . . . . . . . . . . . . . . . . . . . . . . . . . . . . . 174
93 Devices Toolbox . . . . . . . . . . . . . . . . . . . . . . . . . . . . . . . . . . . . . . . . . . . . . . . . . . . . . . 175
94 New Plan dialog box . . . . . . . . . . . . . . . . . . . . . . . . . . . . . . . . . . . . . . . . . . . . . . . . . . . 175
95 Open Plan dialog box. . . . . . . . . . . . . . . . . . . . . . . . . . . . . . . . . . . . . . . . . . . . . . . . . . . 176
96 Insert Multiple Devices dialog box . . . . . . . . . . . . . . . . . . . . . . . . . . . . . . . . . . . . . . . . 177
97 Port Properties dialog box . . . . . . . . . . . . . . . . . . . . . . . . . . . . . . . . . . . . . . . . . . . . . . . 177
98 Planned device Properties dialog box . . . . . . . . . . . . . . . . . . . . . . . . . . . . . . . . . . . . . . 179
99 Planning Rules dialog box . . . . . . . . . . . . . . . . . . . . . . . . . . . . . . . . . . . . . . . . . . . . . . . 185
100 Export dialog box . . . . . . . . . . . . . . . . . . . . . . . . . . . . . . . . . . . . . . . . . . . . . . . . . . . . . 187
101 Zoning dialog box . . . . . . . . . . . . . . . . . . . . . . . . . . . . . . . . . . . . . . . . . . . . . . . . . . . . . 192
102 Add Zone Member dialog box. . . . . . . . . . . . . . . . . . . . . . . . . . . . . . . . . . . . . . . . . . . . 194
103 Activate Zone Set dialog box . . . . . . . . . . . . . . . . . . . . . . . . . . . . . . . . . . . . . . . . . . . . 198
Page 16

Contents
16 HA-Fabric Manager User Guide
104 Activate Zone Set confirmation message . . . . . . . . . . . . . . . . . . . . . . . . . . . . . . . . . . . 198
105 Deactivate Zone Set dialog box. . . . . . . . . . . . . . . . . . . . . . . . . . . . . . . . . . . . . . . . . . . 200
106 Export Zone Set dialog box. . . . . . . . . . . . . . . . . . . . . . . . . . . . . . . . . . . . . . . . . . . . . . 201
107 Import Zone Set dialog box. . . . . . . . . . . . . . . . . . . . . . . . . . . . . . . . . . . . . . . . . . . . . . 202
108 Replace Zone Member dialog box. . . . . . . . . . . . . . . . . . . . . . . . . . . . . . . . . . . . . . . . . 205
109 List Zone Members dialog box . . . . . . . . . . . . . . . . . . . . . . . . . . . . . . . . . . . . . . . . . . . 208
110 HAFM appliance and client communications . . . . . . . . . . . . . . . . . . . . . . . . . . . . . . . . 215
111 Remote Client Installation screen . . . . . . . . . . . . . . . . . . . . . . . . . . . . . . . . . . . . . . . . . 253
112 Available Installers page . . . . . . . . . . . . . . . . . . . . . . . . . . . . . . . . . . . . . . . . . . . . . . . . 254
113 File Download dialog box . . . . . . . . . . . . . . . . . . . . . . . . . . . . . . . . . . . . . . . . . . . . . . . 254
114 Online connection with online devices . . . . . . . . . . . . . . . . . . . . . . . . . . . . . . . . . . . . . 273
115 Offline connection and offline loop and storage device . . . . . . . . . . . . . . . . . . . . . . . . 274
116 Connection performance as displayed on Physical Map. . . . . . . . . . . . . . . . . . . . . . . . 274
117 Switch on Topology showing ports. . . . . . . . . . . . . . . . . . . . . . . . . . . . . . . . . . . . . . . . 274
Tables
1 Document Conventions . . . . . . . . . . . . . . . . . . . . . . . . . . . . . . . . . . . . . . . . . . . . . . . . . . 21
2 Event Icons. . . . . . . . . . . . . . . . . . . . . . . . . . . . . . . . . . . . . . . . . . . . . . . . . . . . . . . . . . . . 37
3 Connection Utilization Legend . . . . . . . . . . . . . . . . . . . . . . . . . . . . . . . . . . . . . . . . . . . . 38
4 User Groups and Access Levels. . . . . . . . . . . . . . . . . . . . . . . . . . . . . . . . . . . . . . . . . . . . 64
5 Product Status Icons. . . . . . . . . . . . . . . . . . . . . . . . . . . . . . . . . . . . . . . . . . . . . . . . . . . . . 99
6 Trigger Operators. . . . . . . . . . . . . . . . . . . . . . . . . . . . . . . . . . . . . . . . . . . . . . . . . . . . . . 129
7 Event Management Options. . . . . . . . . . . . . . . . . . . . . . . . . . . . . . . . . . . . . . . . . . . . . . 131
8 Port Name Language Code Pages . . . . . . . . . . . . . . . . . . . . . . . . . . . . . . . . . . . . . . . . . 150
9 Utilization Legend Description . . . . . . . . . . . . . . . . . . . . . . . . . . . . . . . . . . . . . . . . . . . 167
10 Planning Rule Parameters . . . . . . . . . . . . . . . . . . . . . . . . . . . . . . . . . . . . . . . . . . . . . . . 181
11 Connection Rules Syntax. . . . . . . . . . . . . . . . . . . . . . . . . . . . . . . . . . . . . . . . . . . . . . . . 182
12 Property Validation Rules Syntax . . . . . . . . . . . . . . . . . . . . . . . . . . . . . . . . . . . . . . . . . 182
13 Capacity Control Rules Syntax . . . . . . . . . . . . . . . . . . . . . . . . . . . . . . . . . . . . . . . . . . . 183
14 Zoning Parameters Supported Limits. . . . . . . . . . . . . . . . . . . . . . . . . . . . . . . . . . . . . . . 190
15 RMI Protocol Level . . . . . . . . . . . . . . . . . . . . . . . . . . . . . . . . . . . . . . . . . . . . . . . . . . . . 215
16 Discovery Problems and Resolutions. . . . . . . . . . . . . . . . . . . . . . . . . . . . . . . . . . . . . . . 222
17 Product Problems and Resolutions. . . . . . . . . . . . . . . . . . . . . . . . . . . . . . . . . . . . . . . . . 225
18 Address Problems and Resolutions . . . . . . . . . . . . . . . . . . . . . . . . . . . . . . . . . . . . . . . . 226
19 Miscellaneous Problems and Resolutions . . . . . . . . . . . . . . . . . . . . . . . . . . . . . . . . . . . 227
20 Zoning Problems and Resolutions . . . . . . . . . . . . . . . . . . . . . . . . . . . . . . . . . . . . . . . . . 230
21 HAFM Messages . . . . . . . . . . . . . . . . . . . . . . . . . . . . . . . . . . . . . . . . . . . . . . . . . . . . . . 231
22 Product Icons . . . . . . . . . . . . . . . . . . . . . . . . . . . . . . . . . . . . . . . . . . . . . . . . . . . . . . . . . 271
Page 17

Contents
17HA-Fabric Manager User Guide
23 Product Status Icons. . . . . . . . . . . . . . . . . . . . . . . . . . . . . . . . . . . . . . . . . . . . . . . . . . . . 272
24 Event Icons. . . . . . . . . . . . . . . . . . . . . . . . . . . . . . . . . . . . . . . . . . . . . . . . . . . . . . . . . . . 272
25 Band Information Status Icons. . . . . . . . . . . . . . . . . . . . . . . . . . . . . . . . . . . . . . . . . . . . 272
26 Planned Device Icons. . . . . . . . . . . . . . . . . . . . . . . . . . . . . . . . . . . . . . . . . . . . . . . . . . . 273
27 Group Icons . . . . . . . . . . . . . . . . . . . . . . . . . . . . . . . . . . . . . . . . . . . . . . . . . . . . . . . . . . 273
28 Event Property . . . . . . . . . . . . . . . . . . . . . . . . . . . . . . . . . . . . . . . . . . . . . . . . . . . . . . . . 276
29 Device Property . . . . . . . . . . . . . . . . . . . . . . . . . . . . . . . . . . . . . . . . . . . . . . . . . . . . . . . 276
30 System Property Set . . . . . . . . . . . . . . . . . . . . . . . . . . . . . . . . . . . . . . . . . . . . . . . . . . . . 277
31 Event Property Set . . . . . . . . . . . . . . . . . . . . . . . . . . . . . . . . . . . . . . . . . . . . . . . . . . . . . 278
32 Device Property Set . . . . . . . . . . . . . . . . . . . . . . . . . . . . . . . . . . . . . . . . . . . . . . . . . . . . 278
33 System Property Set . . . . . . . . . . . . . . . . . . . . . . . . . . . . . . . . . . . . . . . . . . . . . . . . . . . . 279
34 Event Property Set . . . . . . . . . . . . . . . . . . . . . . . . . . . . . . . . . . . . . . . . . . . . . . . . . . . . . 280
35 System Property Set . . . . . . . . . . . . . . . . . . . . . . . . . . . . . . . . . . . . . . . . . . . . . . . . . . . . 280
36 User Property Set . . . . . . . . . . . . . . . . . . . . . . . . . . . . . . . . . . . . . . . . . . . . . . . . . . . . . . 281
37 Event Property Set . . . . . . . . . . . . . . . . . . . . . . . . . . . . . . . . . . . . . . . . . . . . . . . . . . . . . 282
38 Device Property Set . . . . . . . . . . . . . . . . . . . . . . . . . . . . . . . . . . . . . . . . . . . . . . . . . . . . 282
39 System Property Set . . . . . . . . . . . . . . . . . . . . . . . . . . . . . . . . . . . . . . . . . . . . . . . . . . . . 283
40 Event Context Property Set . . . . . . . . . . . . . . . . . . . . . . . . . . . . . . . . . . . . . . . . . . . . . . 284
41 Device Context Property Set . . . . . . . . . . . . . . . . . . . . . . . . . . . . . . . . . . . . . . . . . . . . . 285
42 TIME Context Property Set . . . . . . . . . . . . . . . . . . . . . . . . . . . . . . . . . . . . . . . . . . . . . . 285
43 User Context Property Set . . . . . . . . . . . . . . . . . . . . . . . . . . . . . . . . . . . . . . . . . . . . . . . 286
44 System Context Property Set . . . . . . . . . . . . . . . . . . . . . . . . . . . . . . . . . . . . . . . . . . . . . 286
45 Keyboard Shortcuts . . . . . . . . . . . . . . . . . . . . . . . . . . . . . . . . . . . . . . . . . . . . . . . . . . . . 287
Page 18

Contents
18 HA-Fabric Manager User Guide
Page 19

19HA-Fabric Manager User Guide
About This
Guide
About this Guide
About this Guide
This user guide provides information to help you:
■ Use the High Availability Fabric Manager (HAFM) to monitor, configure,
and manage the Fibre Channel in which managed products operate.
■ Manage Fabric zoning and HAFM logs.
“About this Guide” topics include:
■ Overview, page 20
■ Conventions, page 21
■ Rack Stability, page 24
■ Getting Help, page 25
Page 20

About this Guide
20 HA-Fabric Manager User Guide
Overview
This section covers the following topics:
■ Intended Audience
■ Related Documentation
Intended Audience
This book is intended for use by data center administrators, LAN administrators,
operations personnel, and customer support personnel who:
■ Administer user access to the HAFM application.
■ Monitor and manage product operation.
Related Documentation
For a list of corresponding documentation, refer to the Related Documents section
of the Release Notes that came with the product.
For the latest information, documentation, and firmware releases, please visit the
following StorageWorks web site:
http://h18006.www1.hp.com/storage/saninfrastructure.html
For information about Fibre Channel standards, visit the Fibre Channel
Association web site, located at
http://www.fibrechannel.org
.
Page 21
About this Guide
HA-Fabric Manager User Guide
21
Conventions
Conventions consist of the following:
■ Document Conventions
■ Text Symbols
■ Equipment Symbols
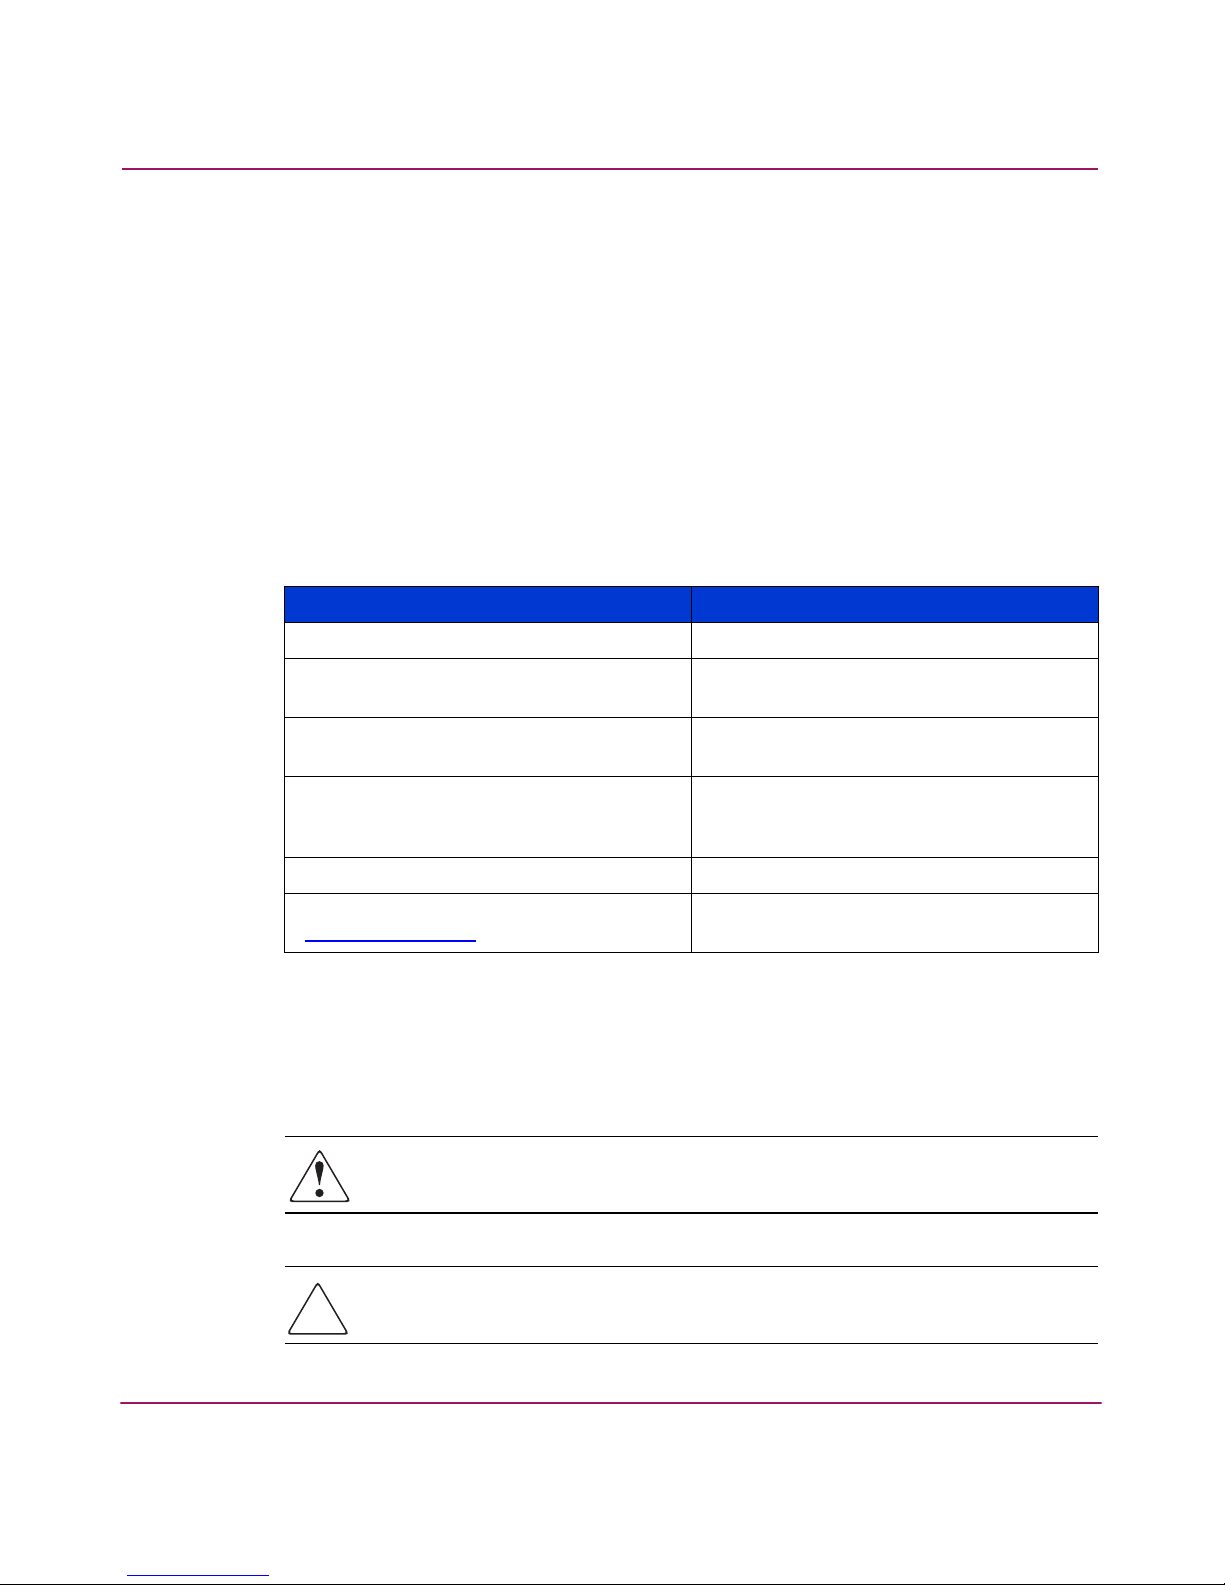
Document Conventions
This document follows the conventions in Tab le 1.
Text Symbols
The following symbols may be found in the text of this guide. They have the
following meanings:
WARNING: Text set off in this manner indicates that failure to follow
directions in the warning could result in bodily harm or death.
Caution: Text set off in this manner indicates that failure to follow directions
could result in damage to equipment or data.
Table 1: Document Conventions
Convention Element
Blue text: Figure 1 Cross-reference links
Bold Menu items, buttons, and key, tab, and
box names
Italics
Text emphasis and document titles in
body text
Monospace font User input, commands, code, file and
directory names, and system responses
(output and messages)
Monospace, italic font Command-line and code variables
Blue underlined sans serif font text
(
http://www.hp.com
)
Web site addresses
Page 22

About this Guide
22 HA-Fabric Manager User Guide
Tip: Text in a tip provides additional help to readers by providing nonessential or
optional techniques, procedures, or shortcuts.
Note: Text set off in this manner presents commentary, sidelights, or interesting points
of information.
Equipment Symbols
The following equipment symbols may be found on hardware for which this guide
pertains. They have the following meanings:
Any enclosed surface or area of the equipment marked with these
symbols indicates the presence of electrical shock hazards. Enclosed
area contains no operator serviceable parts.
WARNING: To reduce the risk of personal injury from electrical shock
hazards, do not open this enclosure.
Any RJ-45 receptacle marked with these symbols indicates a network
interface connection.
WARNING: To reduce the risk of electrical shock, fire, or damage to the
equipment, do not plug telephone or telecommunications connectors
into this receptacle.
Any surface or area of the equipment marked with these symbols
indicates the presence of a hot surface or hot component. Contact with
this surface could result in injury.
WARNING: To reduce the risk of personal injury from a hot component,
allow the surface to cool before touching.
Page 23
About this Guide
HA-Fabric Manager User Guide
23
Power supplies or systems marked with these symbols indicate the
presence of multiple sources of power.
WARNING: To reduce the risk of personal injury from electrical
shock, remove all power cords to completely disconnect power
from the power supplies and systems.
Any product or assembly marked with these symbols indicates that the
component exceeds the recommended weight for one individual to
handle safely.
WARNING: To reduce the risk of personal injury or damage to the
equipment, observe local occupational health and safety requirements
and guidelines for manually handling material.
Page 24
About this Guide
24 HA-Fabric Manager User Guide
Rack Stability
Rack stability protects personnel and equipment.
WARNING: To reduce the risk of personal injury or damage to the
equipment, be sure that:
■ The leveling jacks are extended to the floor.
■ The full weight of the rack rests on the leveling jacks.
■ In single rack installations, the stabilizing feet are attached to the rack.
■ In multiple rack installations, the racks are coupled.
■ Only one rack component is extended at any time. A rack may become
unstable if more than one rack component is extended for any reason.
Page 25

About this Guide
HA-Fabric Manager User Guide
25
Getting Help
If you still have a question after reading this guide, contact an HP authorized
service provider or access our web site:
http://www.h p.com
.
HP Technical Support
Telephone numbers for worldwide technical support are listed on the following
HP web site:
http://www .hp.com/support/
. From this web site, select the country
of origin.
Note: For continuous quality improvement, calls may be recorded or monitored.
Be sure to have the following information available before calling:
■ Technical support registration number (if applicable)
■ Product serial numbers
■ Product model names and numbers
■ Applicable error messages
■ Operating system type and revision level
■ Detailed, specific questions
HP Storage Web Site
The HP web site has the latest information on this product, as well as the latest
drivers. Access storage at:
http://www .hp.com/country/us/eng/prodserv/
storage .html
. From this web site, select the appropriate product or solution.
HP Authorized Reseller
For the name of your nearest HP authorized reseller:
■ In the United States, call 1-800-345-1518
■ In Canada, call 1-800-263-5868
■ Elsewhere, refer to the HP web site for locations and telephone numbers:
http://www .hp .com
.
Page 26

About this Guide
26 HA-Fabric Manager User Guide
Page 27

27HA-Fabric Manager User Guide
1
Introduction and General
Information
This chapter presents an overview of the High Availability Fabric Manager
(HAFM). It includes:
■ The Life Cycle of a SAN, page 28
■ Product Licensing Overview, page 29
■ Introduction to High Availability Fabric Management, page 31
Page 28
Introduction and General Information
28 HA-Fabric Manager User Guide
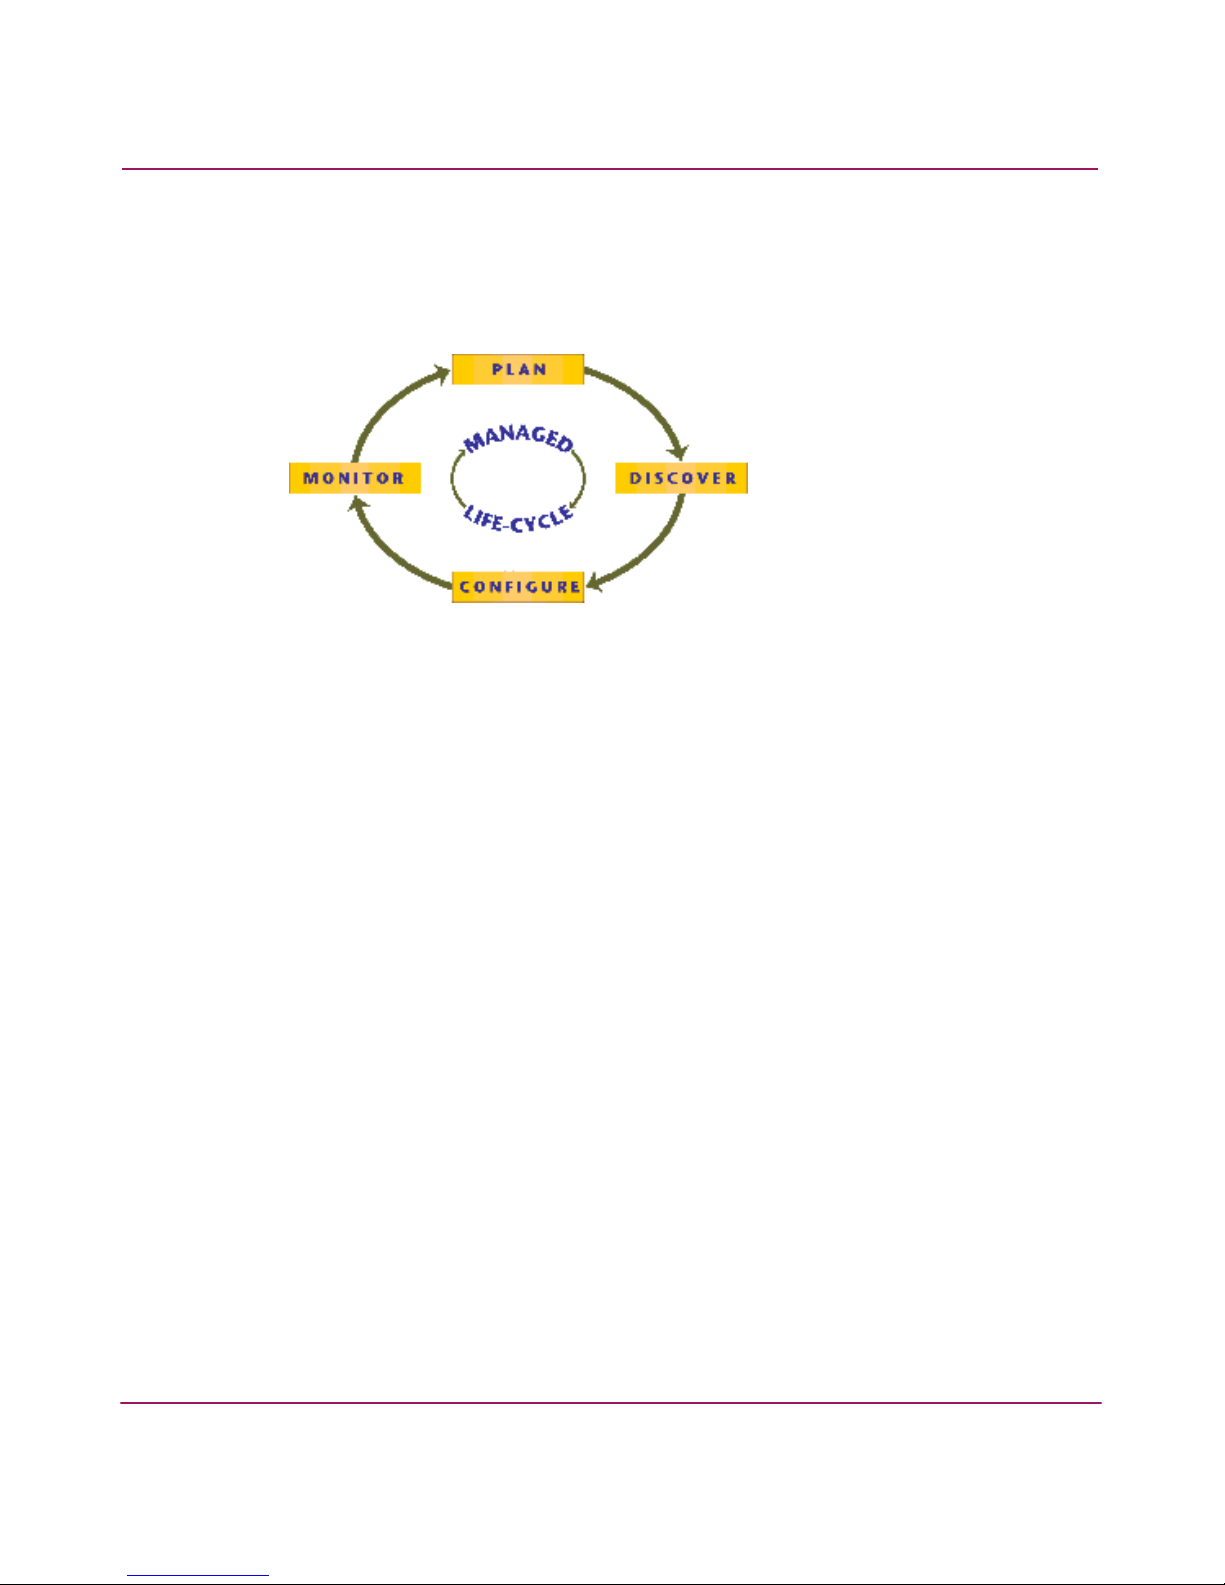
The Life Cycle of a SAN
The HAFM application enables you to proceed through the managed life cycle of
the SAN with confidence.
Figure 1: The Life Cycle of a SAN
The first stage of a SAN’s life cycle is to Plan the SAN. Use paper and pen or a
software application to plan the SAN.
The second stage of the life cycle is to Discover the SAN. The HAFM application
establishes contact with many SAN devices, gathers embedded information, and
then depicts it in the Physical Map, or topology. The application discovers the
devices attached to the SAN and presents an intuitive visual map of devices and
their connections.
The third stage of the life cycle is to Configure the SAN, during which you should
configure SAN devices and fabrics.
The final and longest stage of the life cycle is to Monitor the SAN. The
application generates events and messages about product and property status. The
user interface features an animated display of the data flow and error rates over
the entire topology. The application’s self-monitoring, event-logging, and event
notification features allow you to stay informed about the state of the SAN.
At any point, a discovered SAN can be used as a starting point to plan a new SAN,
completing the life cycle.
Page 29

Introduction and General Information
29HA-Fabric Manager User Guide
Product Licensing Overview
License and feature keys are unique strings of alphanumeric characters that verify
ownership of software and additional software modules and features that you can
purchase.
License Keys
License keys verify ownership of the license to use software application and
optional features and modules. The use of license keys is new for this release.
Depending on your upgrade situation, you may be prompted to enter the license
key and software serial number the first time that you initialize the application to
verify your software license. As you purchase additional software modules, you
must enter license keys into the License Key dialog box (Help menu, License
option). For details on acquiring license keys, see “Managing Users” on page 57.
If you order additional software modules after your initial purchase of the
application, you will need to enter your original serial number, as well as a license
key into the License Key dialog box (Help menu, License option). The software
license key allows you to access the application and all optional software features
or modules that you have purchased. Your ship kit documents provide a new
software entitlement request certificate for HAFM, based on the number of ports.
To obtain a license key, follow instructions provided with your ship kit to access
the HP licensing web site through your internet browser, enter the serial number
and registration number, and obtain a license key.
Feature Keys
Feature keys verify ownership of the Element Manager and optional features that
can be purchased for the Element Manager. The feature key, which is encoded
with a switch or director’s serial number, can only be configured on the switch or
director to which it is assigned.
When you purchase additional Element Manager features, you receive a feature
key. The feature keys that you are currently using are included in this key.
Here are some important notes about the Element Manager feature key introduced
with this release:
■ All edge switches and directors that were purchased prior to the release of
firmware 06.00.00 will automatically have the Element Manager feature
enabled when their firmware is upgraded to version 06.00.00 or later.
However, the feature key for the Element Manager will not be added or
incorporated into the existing feature key.
Page 30

Introduction and General Information
30 HA-Fabric Manager User Guide
■ Enabling the Reset Configuration option through the Element Manager
Maintenance menu clears all features that were enabled through the
Configure Feature Key dialog box. When you attempt to reinstall features
using a feature key assigned for an edge switch or director prior to the release
of 06.00.00, a warning displays that the Element Manager feature key is not
installed. You must contact customer support to get a feature key reassigned
that includes the Element Manager feature.
■ For directors and switches shipped with firmware 6.0 or later installed:
— Directors - The Element Manager enablement certificate is included with
the unit as shipped.
— Switches - The Element Manager is optional. When you want to manage a
switch through an Element Manager, you will receive an enablement
certificate with which you can obtain a Feature Key. You must activate
this key through the configure Feature Key dialog box.
Page 31

Introduction and General Information
31HA-Fabric Manager User Guide
Introduction to High Availability Fabric Management
The High Availability Fabric Manager (HAFM) is a Java-based graphical user
interface (GUI) that enables you to manage users and products, monitor products,
and open Element Managers.
HAFM Release 8.x is available for installation on the 1U rack-mount appliance
(HAFM appliance). HAFM 8.x has the ability to manage large fabrics and
provides more functionality.
The HAFM application is installed on the HAFM appliance to provide local
access to managed products. HAFM Client applications can also be installed on
remote user workstations to provide remote access to the managed products
through the HAFM appliance. A maximum of nine concurrent users (eight remote
and one local HAFM appliance user) can log in to the HAFM application.
When using two LAN connections (public and private) at the HAFM server,
Microsoft Windows and the HAFM application determine the following:
■ Which LAN is to be the private LAN for communication between the HAFM
server, and the directors and edge switches that the HAFM server manages.
■ Which LAN is to be the public LAN for communication between the HAFM
server and computers seeking remote client access to the HAFM server.
Either LAN connection on the HAFM server can be the public LAN or the private
LAN. Though the directors and edge switches can be managed via either LAN,
the public LAN is the only one that can support remote client access. Thus, if one
attempts to access the HAFM server via a remote client session and is
unknowingly using what has been designated as the private LAN, the remote
session will not be allowed. The IP address that the HAFM server has determined
to be the public LAN which supports remote client access, displays in the title bar
of the main window of the HAFM application which displays after logging in to
the HAFM application.
The HAFM application designates the public LAN as the first LAN detected
whose IP address is not the reserved private subnet 10.x.x.x. Thus, if neither IP
address is 10.x.x.x, the first LAN detected by HAFM is designated as the public
LAN. This order of detection is influenced by Microsoft Windows and not
guaranteed.
For a dual LAN configuration, both LANs must be connected when the HAFM
server is booted up. If only one is connected, the HAFM server interprets this as a
single LAN configuration, and the connected LAN will be designated as the LAN
for remote client sessions.
There are a two ways to assure the pubic and private designations of the LANs.
Page 32

Introduction and General Information
32 HA-Fabric Manager User Guide
■ If you use a private LAN IP address, i.e. 10.x.x.x, this causes this LAN to be
designated as the private LAN. You must also have the public LAN
connection active when the HAFM server is booting up, or else the HAFM
application will interpret this as a single LAN connection configuration, and
the 10.x.x.x LAN will be designated as the LAN for remote client sessions.
■ You can configure a specified Ethernet interface on the HAFM server to be
the public LAN (to listen for remote client connections). To configure this
feature, you must manually edit a file on the HAFM server to explicitly
specify which IP address HAFM should use as the public LAN.
■ Perform the following to configure an Ethernet interface:
—Open the config.properties file in directory C:\Program
Files\HAFM\, and add the following line:
ServerRmiIpAddress=x.x.x.x
where x.x.x.x is the IP address assigned to one of the Ethernet LAN
adapters which is to be used as the public LAN. This entry is case
sensitive and must be made exactly as shown. Once this line has been
added, the HAFM server must be rebooted.
Note: This does not impact the Fibre Channel operations of any edge switch or
director. Only monitoring switch operations, logging events, and implementing
configuration changes are interrupted.
If the public LAN IP address of the HAFM server is ever changed, this file must
be edited again to reflect the new IP address.
Remote workstations are not supported on the secondary adapter, and must
always connect to the public adapter as shown in Figure 2.
For details on configuring remote workstations, see “Configuring Remote
Work stati ons ” on page 251.
Page 33

Introduction and General Information
33HA-Fabric Manager User Guide
Figure 2: Product management options
Besides the HAFM and Element Managers on the HAFM appliance, out-of-band
(non-Fibre Channel) management access to HP directors and switches is provided
through the following:
■ Management using simple network management protocol (SNMP). An
SNMP agent is implemented through the HAFM application, which allows
administrators on SNMP management workstations to access product
management information using any standard network management tool.
Administrators can assign Internet Protocol (IP) addresses and corresponding
community names for up to twelve SNMP workstations functioning as SNMP
trap message recipients.
■ Management through the Internet using the Embedded Web Server (EWS)
interface installed on the director or switch. This interface supports
configuration, statistics monitoring, and basic operation of the product, but
does not offer all the capabilities of the corresponding Element Manager in
HAFM. Administrators launch the web server interface from a remote PC by
entering the product’s IP address as the Internet uniform resource locator
(URL), then entering a user name and password at a login screen. The PC
browser then becomes a management console.
HAFM Server
10/100 Mbps
Ethernet Hub
Customer Intranet
(10/100 Mbps)
Customer Intranet
(10/100 Mbps)
Remote
Workstation
Remote
Workstation
Director 2/64
Director 2/64
®
3
com
1
2
3
4
6
7
8
9
1
0
11
12
22
23
24
21
20
1
9
18
17
16
15
1
4
13
P
o
w
e
r
1
0
0
M
C
o
l
l
i
s
i
o
n
P
o
r
t
S
t
a
t
u
s
G
re
e
n
-1
0
0
M,
Ye
l
lo
w
1
0M
,
Fl
a
s
h
A
c
t
iv
ity
M
I
D
B
as
e
lin
e
1
0
/1
0
0
H
u
b
3C16411
S
u
p
e
rS
tac
k
3
®
2
1
2
0
9
1
2
2
4
8
5
1
7
4
1
6
1
13
M
D
I
X
1
0
M
5
E
N
T
E
R
L
1
L
2
FA
N
H
D
D
Page 34

Introduction and General Information
34 HA-Fabric Manager User Guide
■ Management through a PC-based Telnet session using the command line
interface (CLI). Any platform that supports Telnet client software can be
used.
HAFM Appliance Information
The HAFM appliance provides a central point of control for managed Fibre
Channel products. The HAFM appliance is required for installing, configuring,
and managing these products.
Note: Although products can perform normal operations without an HAFM
appliance, the HAFM appliance should operate at all times to monitor product
operations, report failures, log event changes, and log configuration changes.
User Interface Description
The main window is comprised of various areas. Descriptions are listed below the
graphic.
Note: Some panels may be hidden by default. To view all panels, choose View > All
Panels, or press F12.
Page 35

Introduction and General Information
35HA-Fabric Manager User Guide
Figure 3: View All - HAFM 8 window
Menu Bar
The menu bar as shown in Figure 4, is located across the top of the main window.
Pull-down menus are displayed by clicking on the menu bar option with the
mouse, or by pressing ALT with the underlined letter of the name for the menu
bar option.
1 Menu Bar
2 Toolbar
3 Product List
4 Physical/Topology Map
5 Master Log
6 Connection Utilization Legend
7 Minimap
8 Status Bar
9 Toolbox
1
2
3
4
5
6
7
8
9
Page 36

Introduction and General Information
36 HA-Fabric Manager User Guide
Figure 4: Menu bar
Toolbar
The toolbar as shown in Figure 5, is located at the top of the main window below
the Menu bar. The Toolbar provides buttons to perform various functions.
Figure 5: Toolbar
Note: Depending on your licensed modules, the buttons on your toolbar may differ.
Product List
The Product List, located on the View tab, displays an inventory of all discovered
devices and ports. The Product List is a quick way to look up product and port
information, including serial numbers and IP addresses. To display the Product
List, choose View > Product List, or press F9.
You can edit information in the Product List by double-clicking in a field marked
with a green triangle. You can sort the Product List by clicking a column heading.
1 SAN menu
2 Edit menu
3 View menu
4 Plan menu
5 Discover menu
6 Configure menu
7 Monitor menu
8 Help
1
2
3
4
5
6
7
8
1 HAFM 8 Users
2 Export
3 Properties
4 Launch Element Manager
5 Discover Setup
6 Zoning
7 Discovered SAN
8 Planned SAN
9 View Utilization
10 Persist Fabric
11 View Report
12 Label With
13 Search
14 Help
1
2
3
4
5
6
79811
10 12
13
14
Page 37

Introduction and General Information
37HA-Fabric Manager User Guide
Physical/Topology Map
The Physical/Topology Map is the map of the topology that displays when you
select the View tab on the main window. The Physical Map displays devices and
their connections and ports. A topology is a logical and/or physical arrangement
of devices on a network.
Master Log
The Master Log as shown in Figure 6, is located in the lower left area of the main
window. The Master Log lists the events that occurred on the SAN. If you do not
see the Master Log, choose View > All Panels. The default locations for the log
files are listed below:
■ <Install_Home>\Server\Universe_Home\Test
Universe\_Working\EventStorageProvider\event.log
■ <Install_Home>\Server\Local_Root\EventStorage
Provider\event.log
Figure 6: Master Log
The following fields and columns are included in the Master Log.
■ Level—The severity of the event.
Table 2: Event Icons
Event Icon Description
Informational
Warning
Fatal
Page 38

Introduction and General Information
38 HA-Fabric Manager User Guide
■ Source—The product on which the event occurred.
■ Typ e—The type of event that was performed (for example, client/server
communication events).
■ Description—Description of the event.
■ Time—The time and date the event occurred.
■ IP—The IP address of the product on which the event occurred.
■ Node Name—The name of the node on which the event occurred.
■ Port Name—The name of the port on which the event occurred.
Connection Utilization Legend
The Connection Utilization Legend as shown in Figure 7, is located in the lower
right-hand area of the main window. The Legend displays the percentage of
utilization on the trunks as well as on the utilization legend (below). To display
the connection utilization, choose Monitor > Utilization > On, or CTRL+U.
Figure 7: Connection Utilization Legend
In Tabl e 3, the color and the length of the lines indicate the bandwidth utilization.
To turn utilization off, choose Monitor > Utilization > Off.
Table 3: Connection Utilization Legend
Line Color Utilization
Red line 80% to 100% utilization
Orange line 60% to 80% utilization
Light green line 40% to 60% utilization
Dark purple line 20% to 40% utilization
Blue line 0% to 20% utilization
Gray line 0% utilization
Page 39

Introduction and General Information
39HA-Fabric Manager User Guide
Minimap
The Minimap as shown in Figure 8, is located in the lower right-hand corner of
the main window. The Minimap is useful for getting a bird’s-eye view of the
SAN, or to quickly jump to a specific place on the Physical Map. To jump to a
specific location on the Physical Map, click that area on the Minimap. A close-up
view of the selected location is displayed on the Physical Map.
Use the Minimap to view the entire SAN and to navigate more detailed map
views. This feature is especially useful if you have a large SAN.
Figure 8: Minimap
Floating the Minimap
To float the Minimap and view it in a separate window, click the Detach button
( ) in the upper right-hand corner of the Minimap.
Anchoring the Minimap
To return the Minimap to its original location on the main window, do one of the
following:
■ Click the Attach button ( ) in the upper right-hand corner of the Minimap.
■ Click the Close button ( ) in the upper right-hand corner of the Minimap.
■ Click the logo in the upper left-hand corner of the Minimap and choose Close,
or ALT+F4.
Resizing the Minimap
On an anchored Minimap, place the cursor on the left border of the Minimap until
a double-pointed arrow displays. Click and drag the adjoining divider.
On a floating Minimap, place the cursor on a border of the Minimap until a
double-pointed arrow displays. Click and drag to change the window size.
Page 40

Introduction and General Information
40 HA-Fabric Manager User Guide
Status Bar
The status bar as shown in Figure 9, is located at the bottom of the main window.
The status bar provides a variety of information about the SAN and the
application. The icons on the status bar may change to reflect different
information.
Note: Depending on your configuration, some status bar icons may not display.
Figure 9: Status Bar
■ Server Status—Displays local Server status.
■ Connection Status—Displays the appliance-client connection status.
■ Product Status—Displays the most degraded status of all devices in the
SAN. For example, if all devices are operational except one (which is
degraded), the Product Status displays as degraded. Click this icon to open the
Product State Log. See “Determining a Product’s Operational Status” on
page 98 for more information.
■ Fabric Status—Displays the state of the fabric that is least operational, based
on ISL status.
■ Attention Indicator—Displays when at least one HP product in the SAN has
an attention indicator. Click the icon to open the Service Request dialog box,
which lists all HP switches and directors that need attention.
■ Call-Home Status—Displays if the Call-Home service has been enabled. If
Call-Home has been enabled on all managed HP switches and on the HAFM
application, the icon displays as enabled. If Call-Home is disabled on any one
of the HP switches or on the HAFM application, the icon displays as disabled.
1 Server Status
2 Connection Status
3 Product Status
4 Fabric Status
5 Attention Indicator
6 Call-Home Status
7 Server Name
8 Client Count
9 User’s Access Level
2
3
46
7
8
915
Page 41

Introduction and General Information
41HA-Fabric Manager User Guide
Click the icon to open the Call Home Settings Summary dialog box, which
lists whether the Call-Home feature is enabled on the HAFM application and
on each managed HP switch or director.
■ Server Name—Displays the name of the Server to which you are connected.
■ Client Count—Displays the number of clients.
■ User’s Access Level—Displays the user ID of the logged in user.
Toolbox
The toolbox as shown in Figure 10, is located at the top right-hand side of the
Physical/Topology Map window. The Toolbox provides tools to zoom in and out
of the Physical Map, collapse and expand groups, and fit the topology to the
window, and generate Physical Map reports.
Figure 10: The Toolbox
Searching the Online Help
To find all the help topics that contain a particular word or phrase:
1. On the Help window, click the tab with the magnifying glass icon.
2. In the Find field, enter the word or phrase for which you want to search.
3. Press Enter.
If any matches are found, a list of topics displays in the panel. The number of
times the word or phrase occurs in the topic displays next to the name. Click the
name to display that topic.
Backing Up and Restoring Data
For instructions on backing up and restoring data to the 1U HAFM appliance, see
“HAFM Appliance Backup and Restore” on page 93.
1 Zoom In
2 Zoom Out
3 Expand
4 Collapse
5 Fit In View
6 Generate Physical Map Report
1
2
3
5
4
6
Page 42

Introduction and General Information
42 HA-Fabric Manager User Guide
Page 43

43HA-Fabric Manager User Guide
2
Setting Up the Application
This chapter provides instructions for setting up and customizing the application.
■ Configuring an Appliance, page 44
■ Managing Users, page 57
■ Managing User Groups, page 64
■ Discovering a SAN, page 69
■ Configuring the SNMP Agent, page 75
■ Customizing the Main Window, page 79
■ Exporting and Importing, page 89
■ Backing Up and Restoring Data, page 93
Page 44

Setting Up the Application
44 HA-Fabric Manager User Guide
Configuring an Appliance
If you are using a new HAFM appliance with HAFM 08.02.00 installed, follow
the instructions in the HA-Fabric Manager Appliance Installation Guide to install
your HAFM appliance. If you are upgrading the HAFM application on an existing
HAFM appliance, follow the instructions in “Upgrading the HAFM Application”
on page 47.
The application is comprised of two parts: the server (which runs only on the
HAFM appliance) and the client. The server is installed on one HAFM appliance
and stores SAN-related information; it does not have a user interface. To view
SAN information through a user interface, you must log in to the server running
on the appliance through a client.
Note: The server and client(s) may reside on the same machine, or on separate
machines.
In some cases, a network may utilize virtual private network (VPN) or firewall
technology, which can prohibit communication between the server application
running on HAFM appliances and clients. In other words, a client can find a
server, appear to log in, but immediately is logged out because the server cannot
reach the client. To resolve this issue, the application automatically detects the
network configuration and runs the client in “polling mode” when necessary.
When the client is not running in polling mode, the server calls the client
whenever it has new data. When the client is running in polling mode, the server
queues up the data and the client periodically checks in (approximately every 5 or
10 seconds) and gets the data.
Configuring a New HAFM Appliance
In order to activate the application, you need to request a license key. Once you
have activated the application, go to “Accessing HAFM” on page 47 for further
instructions.
Getting a License Key for New Software
If you just purchased the application, use these instructions to obtain your license
key:
1. Go to the URL listed on the software entitlement request certificate for
HAFM and click generate a license key.
Page 45

Setting Up the Application
45HA-Fabric Manager User Guide
2. Enter the Registration Number in the Registration Number field.
3. Click next.
4. Enter the serial number in the Serial Number field. You can find the serial
number on the back of the software CD case. You can also enter the
registration numbers for other HAFM application features you have
purchased, or you can enable these at a later time if you wish.
5. Enter the required registration information.
6. Click next.
7. Confirm the existing and new features to be enabled.
8. Click next.
9. The license key and all enabled features display. Print or send an e-mail
containing the information to retain a copy for your records. You need to enter
this key during the installation process. See “Upgrading the HAFM
Application” on page 47 for further instructions.
Retrieving Lost Keys
If you have lost your license key:
1. Go to the URL listed on the software entitlement request certificate for
HAFM.
2. Click reprint license certificates.
3. Enter your product’s serial number or key, and select switches from the
Hardware Platform drop-down menu
4. Click next. The license key and the enabled feature information displays.
Print or e-mail the information to retain a copy for your records.
Entering a License Key
A license key is required to run the application. The key specifies the maximum
number of switch ports you can monitor, the number of clients you can run, the
expiration date of a temporary license, as well as any licensed optional features or
modules.
1. Choose Help > License. The License dialog box displays, as shown in
Figure 11.
Page 46

Setting Up the Application
46 HA-Fabric Manager User Guide
Figure 11: License dialog box
2. Enter the license key in the License Key field.
Note: The License Key field is not case-sensitive.
3. Click Update and ensure that the information is accurate.
Note: The License dialog box displays the license information for the appliance to
which the client is currently connected. When you click Update, the dialog box
decodes the key you entered and displays the new license information without setting
a new license on the appliance. The information is set on the appliance only when you
click OK.
4. Click OK to enable the software. The application automatically logs out and
the Log In dialog box displays. Log in using the instructions in “Accessing
HAFM” on page 47.
Entering a Feature License Key
1. Choose Help > License. The License dialog box displays, as shown in
Figure 11.
2. Enter the new license key into the License Key field.
Page 47

Setting Up the Application
47HA-Fabric Manager User Guide
Note: The License Key field is not case-sensitive.
3. Click Update and ensure that the information is accurate.
4. Click OK to enable the software. The application automatically logs out and
the Log In dialog box displays. Log in using the instructions in “Accessing
HAFM” on page 47.
Ordering Additional Features
To order new features or increase managed port capabilities, contact your sales
representative.
Upgrading the HAFM Application
For instructions on upgrading the HAFM application, refer to the HP
StorageWorks HAFM 7.x to 8.0 Transition Guide.
Uninstalling the Appliance
Follow these instructions to uninstall the application from your system.
1. Choose Start > Programs > HP StorageWorks ha-fabric manager >
Uninstall.
2. The InstallShield wizard takes you through the uninstallation process.
Uninstalling the HAFM Client
Follow these instructions to uninstall the application from your system.
1. Choose Start > Programs > HP HAFM > Uninstall.
2. The InstallShield wizard takes you through the uninstallation process.
Accessing HAFM
You can access HAFM using one of the following methods:
Page 48

Setting Up the Application
48 HA-Fabric Manager User Guide
Accessing HAFM on the HAFM Appliance
You can log in to HAFM located on the appliance from a browser-capable PC
connected through an Ethernet LAN segment. Use the following steps:
1. Ensure the HAFM appliance and a browser-capable PC are connected through
an Ethernet LAN segment. At the PC, launch the browser application
(Netscape Navigator
or Internet Explorer).
2. At the PC browser, enter the URL in the following format:
http://xxx.xxx.xxx.xxx:5800
Where xxx.xxx.xxx.xxx is the default IP address or the IP address
configured for the appliance during installation. The VNC Authentication
window displays, as shown in Figure 12.
Figure 12: VNC Authentication window
3. Type the password and click OK. The Welcome to Windows dialog box
displays, as shown in Figure 13.
Note: The default TightVNC viewer password is password.
Figure 13: Welcome to Windows dialog box
Page 49

Setting Up the Application
49HA-Fabric Manager User Guide
4. Click Send Ctrl-Alt-Del at the top of the window to log on to the HAFM
appliance desktop. The Log On to Windows dialog box displays, as shown in
Figure 14.
Note: Do not simultaneously press the Ctrl, Alt, and Delete keys. This action logs the
user on to the browser-capable PC, not the HAFM appliance.
Figure 14: Log On to Windows dialog box
5. Type the Windows 2000 user name and password and click OK. The HAFM
8 Log In dialog box displays, as shown in Figure 15.
Note: The default Windows 2000 user name is Administrator and the default
password is password. The user name and password are case-sensitive.
Figure 15: HAFM Log In dialog box
6. Enter the HAFM appliance IP address in the Network Address field.
Page 50

Setting Up the Application
50 HA-Fabric Manager User Guide
The default address that displays in the Network Address field is the address
of the last appliance accessed. Click the Network Address drop down list to
see the network addresses of all HAFM appliances that were accessed from
the computer you are logged in to.
If you are logging in to the local HAFM appliance, the network address is
localhost.
If you want to connect to an HAFM appliance that is not listed, enter the IP
address in the Network Address field.
7. Enter your user name and password in the User ID and Password fields. User
names and passwords are case-sensitive.
Note: If user names have not been established, you can use the default user name
Administrator and password password. The user name and password are
case-sensitive. HP recommends that you change the default password as soon as
possible.
To add or modify user names, passwords, and user rights, see the appropriate
subsections in “Managing Users” on page 57.
8. If you want your computer to save the login information, choose the Save
Password option.
9. Click Login. The View All - HAFM 8 window displays, as shown in
Figure 16.
Page 51

Setting Up the Application
51HA-Fabric Manager User Guide
Figure 16: View All - HAFM window
Accessing Remote HAFM appliances
You can use the HAFM Client applications to remotely access an HAFM
appliance. You must have the HAFM Client application installed on your
computer before proceeding. See instructions for HAFM Client application
installation in “Configuring Remote Workstations” on page 251.
To access remote HAFM appliances, perform the following:
1. Start the HAFM Client application by following the instructions in “Starting
HAFM on Remote Workstations” on page 55.
2. Enter the appliance’s network address in the HAFM 8 Log In dialog box, as
shown in Figure 15.
3. Enter the HAFM appliance IP address in the Network Address field.
The default address that displays in the Network Address field is the address
of the last appliance accessed. Click the Network Address drop down list to
see the network addresses of all HAFM appliances that were accessed from
the computer you are logged in to.
Page 52

Setting Up the Application
52 HA-Fabric Manager User Guide
If you want to connect to an HAFM appliance that is not listed, enter the IP
address in the Network Address field.
4. Enter your user name and password in the User ID and Password fields. User
names and passwords are case-sensitive.
Note: If user names have not been established, you can use the default user name
(Administrator) and password (password). The user name and password are
case-sensitive. HP recommends that you change the default password as soon as
possible.
To add or modify user names, passwords, and user rights, see the appropriate
subsections in “Managing Users” on page 57.
5. If you want your computer to save the login information, choose the Save
Password option.
6. Click Login. The View All - HAFM 8 window displays, as shown in
Figure 16.
If the HAFM window displays, you have logged in to the appliance. The network
address you entered remains in the Network Address drop-down list for future
logins. If you fail to connect to the appliance, the network address does not remain
in the list.
Adding an Appliance to the Log In Dialog Box List of Appliances
1. Start the HAFM application on the HAFM appliance, as described in
“Accessing HAFM on the HAFM Appliance” on page 48, or on a remote
workstation, as described in “Starting HAFM on Remote Workstations” on
page 55. The HAFM 8 Log In dialog box displays, as shown in Figure 15.
2. Enter the HAFM appliance IP address in the Network Address field. If you
are logging in to the local HAFM appliance, the Network Address is
localhost.
The default address that displays in the Network Address field is the address
of the last appliance accessed. Click the Network Address drop down list to
see the network addresses of all HAFM appliances that were accessed from
the computer you are logged in to.
If you want to connect to an HAFM appliance that is not listed, enter the IP
address in the Network Address field.
Page 53

Setting Up the Application
53HA-Fabric Manager User Guide
3. Enter your user name and password in the User ID and Password fields. User
names and passwords are case-sensitive.
Note: You must have an established login and password account on the new HAFM
appliance.
4. If you want your computer to save the login information, choose the Save
Password option.
5. Click Login. The View All - HAFM 8 window displays, as shown in
Figure 16.
Removing an Appliance from the Log In Dialog Box List of Appliances
You can remove appliances from the list in the HAFM 8 Log In dialog box.
1. Turn on the HAFM appliance, or if the appliance is already turned on,
double-click the HAFM icon on the desktop. The HAFM 8 Log In dialog box
displays, as shown in Figure 15.
2. Select the appliance you want to remove from the Network Address
drop-down list. The selected appliance’s IP address displays in the Network
Address field.
3. Click Delete.
Note: The Appliance is deleted from your Network Address drop-down list without
confirmation.
Logging Out of an Appliance
To log in to a different appliance, you must first log out of the current appliance.
1. Choose SAN > Log Out. You are logged out of the current appliance and the
HAFM 8 Log In dialog box displays, as shown in Figure 15.
2. See “Accessing HAFM” on page 47 for instructions on logging in to a new
appliance.
Page 54

Setting Up the Application
54 HA-Fabric Manager User Guide
Starting and Stopping HAFM Services
Options are available for starting and stopping HAFM Services through the
desktop Start menu:
1. Choose Start > Programs > HP StorageWorks ha-fabric manager.
2. Choose Stop Services to stop all HAFM services and HAFM appliance
functions.
3. Choose Start Services to restart these functions.
HAFM Services is the software application that provides services to the HAFM
application. HAFM Services runs only on the HAFM appliance.
Managing Remote Access to the HAFM Appliance
Users at the HAFM appliance can access the HAFM and Element Managers
loaded on the appliance itself. Users at remote PC workstations can also access
the same HAFM appliance or other HAFM appliances if the workstations meet
minimum hardware and software requirements and are running the HAFM Client
application. Workstations must also be configured to connect with the HAFM
appliance over a TCP/IP network connection.
Figure 2 on page 33 illustrates a remote user workstation connected to the HAFM
appliance through a LAN. Please note that this is an example configuration only.
Operators at remote workstations can manage and monitor all products controlled
by the HAFM appliance. Each active connection between a remote workstation
and an HAFM appliance and managed products is called a session. A maximum
of nine concurrent users (eight remote and one local HAFM appliance user) can
log in to the HAFM application.
Requirements for Remote Workstations
The HAFM is downloaded and installed on user workstations from the HAFM
appliance. The remote workstations can be Windows 2000, Windows NT,
Windows XP, HP-UX, AIX, Linux, or Solaris systems.
For the minimum system requirements for remote workstations, see Appendix D
in this guide for the appropriate operating system.
Page 55

Setting Up the Application
55HA-Fabric Manager User Guide
Installing Software on Remote Workstations
For procedures to install HAFM software on remote user workstations and
configure the workstations for connection to an HAFM appliance, see
Appendix D in this guide for the appropriate operating system.
Starting HAFM on Remote Workstations
If the HAFM application is not running or the HAFM 8 Log In dialog box is not
displayed on your remote workstation, you can start the application by following
the appropriate steps for your workstation’s operating system.
Starting HAFM on a Windows System
To start the HAFM application on a Windows 2000, Windows NT, or Windows
XP system:
1. Start the HAFM Client application using one of the following options:
■ Choose Start > Programs > HP HAFM > HAFM 8.x.
■ Double-click the HAFM 8.x desktop icon.
2. Enter the Network Address, User ID, and Password for the HAFM appliance
you intend to access.
Note: The default User ID is Administrator, and the default password is password.
3. Click the Login button. The HAFM client accesses the HAFM appliance, and
the View All - HAFM 8 window displays, as shown in Figure 16.
Starting HAFM on an HP-UX, AIX, Linux, or Solaris System
To start the HAFM application on an HP-UX, AIX, Linux, or Solaris system from
the home directory:
Note: If you have saved the
HAFM
application in a different location, type in the
appropriate directory names.
1. Go to the location where you installed the application (the default is /usr).
Page 56

Setting Up the Application
56 HA-Fabric Manager User Guide
2. Start the appliance and client:
./HAFM
3. If you want to start the client only:
./Client
or
Go to the bin directory in the location where you installed the application
(the default is /opt/).
cd /<path>/HAFM 8.0/bin
4. Start the appliance.
./HAFM_Mgr start
5. Start the client.
./HAFM_Client
Page 57

Setting Up the Application
57HA-Fabric Manager User Guide
Managing Users
To grant access to the HAFM application, the administrator can assign user
names, passwords, and access rights to users. The administrator can configure up
to sixteen users in the HAFM application, but no more than nine users (eight
remote and one local user) can simultaneously access one HAFM appliance.
Viewing the List of Users
Perform the following to view a list of users, their event notification settings, and
their e-mail addresses:
1. Choose SAN > Users. The HAFM 8 Server Users dialog box displays, as
shown in Figure 17.
Figure 17: HAFM 8 Server Users dialog box
Adding a User Account
Note: You must be an administrator to perform this task.
Page 58

Setting Up the Application
58 HA-Fabric Manager User Guide
Perform the following to add a user:
1. Choose SAN > Users. The HAFM 8 Server Users dialog box displays, as
shown in Figure 17.
2. Click Add. The Add User dialog box displays, as shown Figure 18.
Figure 18: Add User dialog box
3. Enter the name in the Name field.
4. Enter the users’ email addresses in the Email Address field, separating
multiple addresses with a semicolon.
5. Click the Enable check box to enable e-mail notification for the user.
A message may display stating that you must enable event notification for the
SAN. Click Ye s.
6. Click the Filter link to specify the event types for which to send e-mail
notification to this user. See “Filtering Event Notifications for a User” on
page 60 for detailed instructions.
7. Enter the user name in the User ID field.
8. Enter the user’s password in the Password field.
9. Enter the password again in the Retype Password field.
10. Click OK. The new user displays on the HAFM 8 Server Users dialog box.
11. Click OK to close the HAFM 8 Server Users dialog box.
Changing a User Account
Note: You must be an administrator to perform this task.
Page 59

Setting Up the Application
59HA-Fabric Manager User Guide
Perform the following to modify an existing user:
1. Choose SAN > Users. The HAFM 8 Server Users dialog box displays, as
shown in Figure 17.
2. Highlight the user whose information you want to edit from the Users table.
3. Click Edit. The Change User dialog box displays, as shown in Figure 19.
Figure 19: Change User dialog box
4. Edit the information as necessary.
5. Click OK. The edited information displays on the HAFM 8 Server Users
dialog box.
6. Click OK to close the HAFM 8 Server Users dialog box.
Removing a User Account
Note: You must be an administrator to perform this task.
Note: You are not prompted for confirmation before the user’s account is removed. If
the user is logged in when you remove their account, they are not affected until they
log out and try to log in again.
Perform the following to remove a user:
1. Choose SAN > Users. The HAFM 8 Server Users dialog box displays, as
shown in Figure 17.
2. Highlight the user account you want to remove.
3. Click Remove.
Page 60

Setting Up the Application
60 HA-Fabric Manager User Guide
4. Click OK.
Filtering Event Notifications for a User
Note: You must be an administrator to perform this task.
The application provides notification of many different types of SAN events. If a
user only wants to receive notification of certain events, you can filter the events
specifically for that user.
1. Choose SAN > Users. The HAFM 8 Server Users dialog box displays, as
shown in Figure 17.
2. Click the Filter link in the Email column associated with the user for whom
you want to filter events. The Define Filter dialog box displays, as shown in
Figure 20.
The Selected Events table includes the events of which this user is notified.
The Available Events table includes all other events.
Figure 20: Define Filter dialog box
3. Move events between the tables by selecting the event and clicking the
appropriate arrow button.
4. Click OK. The HAFM 8 Server Users dialog box displays.
5. Turn on event notification for the user by choosing the Filter check box.
6. Click OK.
Page 61

Setting Up the Application
61HA-Fabric Manager User Guide
Configuring Remote Access
You can specify the network addresses that can have access to the appliance.
Perform the following to configure remote access:
1. Choose SAN > Remote Access. The Remote Access dialog box displays, as
shown in Figure 21.
Figure 21: Remote Access dialog box
2. Choose the Allow remote management sessions check box to allow others to
access the appliance remotely.
3. Enter the maximum number of remote sessions you want to allow.
4. Choose whether to allow all or some network addresses to connect from the
Allow options.
5. If you selected Only network addresses below to connect or All network
addresses EXCEPT those below to connect, add and remove addresses in
the table at the bottom of the dialog box.
■ To add an address, click Add, enter a network address, and click OK.
■ To remove an address, select the address from the table and click
Remove.
6. Click OK.
Page 62

Setting Up the Application
62 HA-Fabric Manager User Guide
Viewing Active User Sessions
A maximum of nine concurrent users (eight remote and one local HAFM
appliance user) can log in to the HAFM application. Since more than one client
can access an appliance at a time, monitoring clients can be an important part of
maintaining the SAN. View active user sessions to determine which clients are
logged in to the appliance.
To display the Active Sessions dialog box:
1. Choose SAN > Active Sessions. The Active Sessions dialog box displays, as
shown in Figure 22.
The Active Sessions dialog box lists the connected users, their network
addresses, and the date and time of when they logged in. If a user is logged in
from more than one location, there is a separate entry for each session.
Figure 22: Active Sessions dialog box
The Active Sessions dialog box displays active session information in this format:
■ ID—The id of the current user.
■ Description—The description of the user.
■ Network Address—The network address of the current user.
■ Connected—The date and time that the session was established.
Disconnecting a User
If you have administrator privileges, you can disconnect users. To disconnect a
user, perform the following:
1. Highlight the user that you want to disconnect and click Disconnect User. A
message box displays, as shown in Figure 23.
Page 63

Setting Up the Application
63HA-Fabric Manager User Guide
Figure 23: Disconnect User message box
2. Click Ye s.
The user is disconnected. The appliance immediately shuts down the
appliance-client connection. The status bar on the client displays that the
appliance connection was lost. All products and connections on the Physical
Map stay in the condition they were in when the session ended; they do not
turn grey. The client displays a message stating that a user disconnected the
client from the appliance.
Note: To prevent this user from reconnecting, remove the user account through the
HAFM 8 Server Users dialog box. See “Removing a User Account” on page 59 for
instructions.
2
Page 64

Setting Up the Application
64 HA-Fabric Manager User Guide
Managing User Groups
This section provides an overview of user groups and their access levels and
describes how to set up a user group.
About User Groups and Access Levels
A user with administrative privileges (“System Administrator”) can assign users
to user groups. Four pre-configured user groups are available with the application;
however, System Administrator users can also create user groups manually. See
“Creating a User Group” on page 64 for instructions.
Creating a User Group
Note: You must be an administrator to perform this task.
Table 4: User Groups and Access Levels
User Group Description
System
Administrator
Read/write access for all features: user can view and edit
information; all functions are enabled and allowed.
Maintenance Read/write access for Call Home Event Notification, Device
Maintenance, and Email Event Notification Setup: user can
view and edit this information.
Read-only access for all other features: user can only view this
information; editing and configuration capabilities are
disabled.
Operator Read/write access for Device Operation: user can view and
edit this information.
Read-only access for all other features: user can only view
information; editing and configuration capabilities are
disabled.
Product
Administrator
Read/write access for Device Administration: user can view
and edit this information.
Read-only access for all other features: user can only view
information; editing and configuration capabilities are
disabled.
Page 65

Setting Up the Application
65HA-Fabric Manager User Guide
You can create a user group and specify access to certain features and/or views in
the application, enhancing the security of your SAN.
1. Choose SAN > Users. The HAFM 8 Server Users dialog box displays, as
shown in Figure 17.
2. Click Add located below the Groups table. The HAFM Group dialog box
displays, as shown in Figure 24.
Figure 24: HAFM Group dialog box
3. Enter a name in the Name field.
4. Enter a description in the Description field.
5. If you want to assign permissions to only use certain views, click the Views
tab and go to step 10.
or
If you want to assign permissions to use certain features, go to step 6.
6. Select the features for which you want to provide “read and write” access in
the left-hand list. Press CTRL and click to select multiple features.
7. Click the right arrow next to the Read/Write table. The features are moved to
the Read/Write table.
Page 66

Setting Up the Application
66 HA-Fabric Manager User Guide
Note: If you can’t assign a feature to the Read/Write or Read Only table, you don’t
have read access for the feature.
8. Select the features for which you want to provide “read only” access in the
left-hand list. Press CTRL and click to select multiple features.
9. Click the right arrow next to the Read Only table. The features are moved to
the Read Only table.
10. Select the views you want the user group to be permitted to access in the
left-hand list. Press CTRL and click to make multiple selections.
11. Click the right arrow to move the selection(s) to the Selected Views table.
12. Click OK. The new group displays in the Groups table of the HAFM 8
Server Users dialog box. To add users to this group, follow the instructions in
“Assigning Users to Groups” on page 67.
13. Click OK.
Changing a User Group
Note: You must be an administrator to perform this task.
You can change a user group’s permissions to use certain features and views. This
provides added security for your SAN as well as your management application.
1. Choose SAN > Users. The HAFM 8 Server Users dialog box displays, as
shown in Figure 17 on page 57.
2. Click Edit located below the Groups table. The HAFM Group dialog box
displays, as shown in Figure 24.
3. Change permissions as necessary. See “Creating a User Group” on page 64
for detailed instructions.
4. Click OK. The HAFM 8 Server Users dialog box displays.
5. Click OK to accept the changes made.
Removing User Groups
Page 67

Setting Up the Application
67HA-Fabric Manager User Guide
Note: You must be an administrator to perform this task.
Note: After completing these steps, the user group is removed without confirmation.
You can remove a user group regardless of whether a user is assigned to the
group.
1. Choose SAN > Users. The HAFM 8 Server Users dialog box displays, as
shown in Figure 17 on page 57.
2. Highlight the group you want to remove in the Groups table.
3. Click Remove located below the Groups table.
4. Click OK.
Assigning Users to Groups
Note: You must be an administrator to perform this task.
You can assign users to groups to assign them permissions for features and
topology views. If you assign one user to multiple groups, the user has the user
rights specified in all the groups.
Note: If a user is logged in when you reassign their group, they are not affected until
they log out and try to log in again.
1. Choose SAN > Users. The HAFM 8 Server Users dialog box displays, as
shown in Figure 17 on page 57.
2. Highlight a user in the Users table.
3. Highlight the group(s) to which you want to assign the user in the Groups
table. Press CTRL and click to make multiple selections.
4. Click the right arrow button. The user is assigned to the selected groups.
5. Click OK.
Page 68

Setting Up the Application
68 HA-Fabric Manager User Guide
Determining User Groups
Note: You must be an administrator to perform this task.
You can determine the groups to which a user belongs through the HAFM 8
Server Users dialog box.
1. Choose SAN > Users. The HAFM 8 Server Users dialog box displays, as
shown in Figure 17 on page 57.
2. Highlight a user in the Users table.
3. Click Find. The groups to which the user belongs are highlighted in the
Groups list.
4. Click OK.
Page 69

Setting Up the Application
69HA-Fabric Manager User Guide
Discovering a SAN
The application discovers products, fabrics, and connections in a SAN. Through
this powerful tool, you can manage and monitor your SAN in real-time, ensuring
that any issues are resolved immediately. This chapter provides instructions for
configuring the discovery feature.
How Discovery Works
The application illustrates each product and its connections on the Physical Map
(topology). Once you log in and configure and turn on discovery, the application
discovers products connected to the SAN. See “Setting Up Discovery” on page 69
for details.
When performing out-of-band discovery, the application connects to the switches
through the IP network and product information is copied from the SNS database
on the switch to the appliance.
To correctly discover all SAN products, you must specify each product’s IP
address in the Discover Setup dialog box’s Out-of-Band tab. If you do not
configure the application to directly discover the devices, the connections and
attached devices may not display correctly. Only fabrics that have HP switches as
the principal switch display. If a HP switch is being directly managed, but exists
in a fabric where the principal switch is a third-party device, another appliance is
not allowed to connect to and manage those devices.
Setting Up Discovery
Discovery is the process by which the application contacts the devices in your
SAN. In order to perform discovery, you need to specify the IP addresses for the
devices in your SAN.
1. Choose Discover > Setup. The Discover Setup dialog box displays, as shown
in Figure 25.
Page 70

Setting Up the Application
70 HA-Fabric Manager User Guide
Figure 25: Discover Setup dialog box
2. Specify the IP addresses you want to discover through out-of-band discovery.
You can add, change, and remove IP addresses as necessary. See
“Configuring IP Addresses and Community Strings” on page 70 for
instructions.
Note: To correctly discover all SAN products, you must specify each product’s IP
address in the Discover Setup dialog box’s Out-of-Band tab. If you do not configure
the application to discover the devices directly, the connections and attached devices
may not display correctly.
3. Select IP addresses from the Available Addresses table and add them to the
Selected Individual Addresses table by clicking the buttons.
4. Click OK.
5. Turn discovery on or off by choosing Discover > On or Discover > Off.
Configuring IP Addresses and Community Strings
You can configure IP addresses and community strings through which the
application can perform discovery and communication functions.
Page 71

Setting Up the Application
71HA-Fabric Manager User Guide
Adding an IP Address
You can add IP addresses and subnets through which the SAN can be discovered.
Perform the following to add an IP address:
1. Choose Discover > Setup. The Discover Setup dialog box displays, as shown
in Figure 25 on page 70.
2. Click Add. The Domain Information dialog box displays, as shown in
Figure 26.
Figure 26: Domain Information dialog box (IP Address tab)
3. Enter a description for the product in Description field.
4. Enter the IP address in the IP Address field.
5. Enter the subnet mask associated with the IP address in the Subnet Mask
field.
6. If you want to generate a sequence of IP addresses, perform the following:
■ Choose the Generate a sequence of IP addresses check box.
■ Enter the last IP address in the Last IP field.
Note: All IP addresses in a sequence must be on the same subnet and have the same
first three octets.
7. Click OK.
Page 72

Setting Up the Application
72 HA-Fabric Manager User Guide
Changing an IP Address
You can edit IP addresses or associated subnets that are listed on the Discover
Setup dialog box.
1. Choose Discover > Setup. The Discover Setup dialog box displays, as shown
in Figure 25 on page 70.
2. Highlight the IP address in the Available Addresses table to edit.
3. Click Change. The Domain Information dialog box displays, as shown in
Figure 26 on page 71.
4. Edit the information as necessary.
5. Click OK.
6. Click OK to close the Discover Setup dialog box.
Removing an IP Address
You can remove IP addresses from the Discover Setup dialog box.
1. Choose Discover > Setup. The Discover Setup dialog box displays, as shown
in Figure 25 on page 70.
2. Highlight the IP address in the Available Addresses table to remove.
Note: When you click Remove, the IP address is removed without confirmation.
3. Click Remove.
4. Click OK to close the Discover Setup dialog box.
Configuring a Community String
You can specify community strings used to communicate with products.
1. Choose Discover > Setup. The Discover Setup dialog box displays, as shown
in Figure 25 on page 70.
2. Click to highlight the IP address in the Available Addresses table to edit.
3. Click Add. The Domain Information dialog box displays, as shown in
Figure 26 on page 71.
4. Click the Community Strings tab. The Community Strings tab displays, as
shown in Figure 27 on page 73.
Page 73

Setting Up the Application
73HA-Fabric Manager User Guide
Figure 27: Domain Information dialog box (Community Strings tab)
5. Click an option in the Read field.
— Choose Default ‘public’ to select the default string.
— Choose Custom to specify a custom string.
6. Click an option in the Write field.
— Choose Default ‘private’ to select the default string.
— Choose Custom to specify a custom string.
7. If you chose Custom in step 5 or step 6, continue to step 8. Otherwise, skip to
step 10.
8. Enter the custom string in the Custom field.
9. Enter the string again in the Confirm Custom field.
10. Click OK.
11. Click OK to close the Discover Setup dialog box.
Reverting to a Default Community String
1. Choose Discover > Setup. The Discover Setup dialog box displays, as shown
in Figure 25 on page 70.
2. Highlight an IP address from the Available Addresses table.
3. Click Add. The Domain Information dialog box displays, as shown in
Figure 26 on page 71.
4. Click the Community Strings tab. The Community Strings tab displays, as
shown in Figure 27 on page 73.
5. Click Default ‘public’ and Default ‘private’.
6. Click OK.
Page 74

Setting Up the Application
74 HA-Fabric Manager User Guide
Turning Discovery On and Off
Turn discovery on and off by using the Discover menu.
Turning Discovery On
Perform the following to turn discovery on:
1. Choose Discover > On.
Turning Discovery Off
Perform the following to turn discovery off:
1. Choose Discovery > Off.
Determining the Discovery State
Note: The Product List panel may be hidden by default. To view all panels, choose
View > All Panels or press F12.
You can determine the discovery status of products by looking at the Status
column in the Product List. Additionally, the operational status called “Unknown”
is equivalent to the discovery state named “Offline.” The operational statuses,
“Operational,” “Degraded,” and “Failed,” are equivalent to a discovery state of
“Online.”
2
Page 75

Setting Up the Application
75HA-Fabric Manager User Guide
Configuring the SNMP Agent
This section provides information to help you use the SNMP Agent module.
Setting Up the SNMP Agent
The simple network management protocol (SNMP) agent module instruments the
objects defined in the Fibre Channel Management (FCMGMT) Management
Information Base (MIB) Version 3.1 and a small number of objects defined in
MIB II. Through instrumentation of these MIB objects, the agent translates
information stored on the appliance into a form usable by SNMP management
stations.
You can configure network addresses and community names for up to 12 SNMP
trap recipients, which receive messages through SNMP for specific events that
occur on the appliance.
To configure the SNMP agent that runs on the appliance and implements the Fibre
Alliance MIB, perform the following:
1. Choose Monitor > SNMP Agent > Setup. The SNMP Agent Setup dialog
box displays, as shown in Figure 28.
Figure 28: SNMP Agent Setup dialog box
2. Click the Trap Recipients tab.
3. Choose Enable Authorization Traps to enable or disable authorization traps
to be sent when unauthorized management stations try to access SNMP
information through the appliance.
Page 76

Setting Up the Application
76 HA-Fabric Manager User Guide
4. Click Add to add a new trap recipient. See “Adding Trap Recipients” on
page 76 for more instructions.
5. Click the recipient’s row in the table and click Edit to edit an existing trap
recipient. See “Editing Trap Recipients” on page 77 for more instructions.
6. Click OK.
Turning On the SNMP Agent
To turn the SNMP Agent on, perform the following:
1. Choose Monitor > SNMP Agent > On.
Turning Off the SNMP Agent
To turn the SNMP Agent off, perform the following:
1. Choose Monitor > SNMP Agent > Off.
Adding Trap Recipients
To add a trap recipient during SNMP agent configuration, perform the following:
1. Choose Monitor > SNMP Agent > Setup. The SNMP Agent Setup dialog
box displays, as shown in Figure 28 on page 75.
2. Click the Trap Recipients tab.
3. Click Add. The Add Trap Recipient dialog box displays, as shown in
Figure 29.
Figure 29: Add Trap Recipient dialog box
4. If you want this trap recipient to be active, ensure the Activate check box is
selected.
5. Enter the IP address or DNS host name of the trap recipient in the IP Address
field. This name must be 64 characters or fewer.
Page 77

Setting Up the Application
77HA-Fabric Manager User Guide
6. Enter the UDP port number in the Port field. This overrides the default User
Datagram Protocol (UDP) port number for a trap recipient with any legal,
decimal UDP number.
7. Choose a community string from the Community String drop-down list.
8. Click OK.
Editing Trap Recipients
To edit an existing trap recipient during SNMP agent configuration, use the
following steps:
1. Choose Monitor > SNMP Agent > Setup. The SNMP Agent Setup dialog
box displays, as shown in Figure 28 on page 75.
2. Click the Trap Recipients tab.
3. Click to highlight the IP address in the Trap Recipients table to edit.
4. Click Edit. The Edit Trap Recipient dialog box displays, as shown in
Figure 30.
Figure 30: Edit Trap Recipient dialog box
5. Edit the fields as necessary.
6. Click OK.
Removing Trap Recipients
To remove an existing trap recipient during SNMP agent configuration, use the
following steps:
Note: This procedure removes trap recipients without asking for confirmation.
1. Choose Monitor > SNMP Agent > Setup. The SNMP Agent Setup dialog
box displays, as shown in Figure 28 on page 75.
Page 78

Setting Up the Application
78 HA-Fabric Manager User Guide
2. Click the Trap Recipients tab.
3. Click the recipient’s row in the table and click Remove to remove a trap
recipient.
4. Click OK.
Page 79

Setting Up the Application
79HA-Fabric Manager User Guide
Customizing the Main Window
You can customize the main window to display only the data you need by
displaying different levels of detail on the Physical Map or Product List.
You can customize the topology to display only the data you need by creating
views that display certain fabrics or by displaying different levels of detail on the
Physical Map. This section provides instructions for customizing the topology
layout and creating user-defined views of the SAN.
If you discover or import a SAN with more than approximately 2000 devices, the
devices display on the Product List, but do not display on the Physical Map.
Instead, the topology area displays a message stating that the topology cannot be
displayed. To resolve this issue, create a new view to filter the number of devices
being discovered. See “Creating a Customized View” on page 79 for instructions.
Creating a Customized View
You may want to customize the Product List and Physical Map to simplify
management of large SANs by limiting the topology size or Product List columns.
For each customized view, you can specify the fabrics that display on the Physical
Map as well as the columns that display on the Product List.
Note: Customized view settings reside on the appliance; if one user creates a view, all
users who log on to the same appliance are able to select that view.
1. Choose View > Create View or click the View tab and choose Create View.
The Create View dialog box with the View Members tab displays, as shown
in Figure 31.
Page 80

Setting Up the Application
80 HA-Fabric Manager User Guide
Figure 31: Create View dialog box (View Members tab)
2. Enter a name in the Name field.
3. Enter a description in the Description field.
4. If you want to filter the fabrics that display on the Physical Map, continue to
step 5, otherwise go to step 8.
5. Choose Include Assets via Selection option.
6. Choose the fabrics you want to include in the view from the Ava ila bl e
Fabrics table.
Note: “Other” in the Available Fabrics or Selected Fabrics tables refers to all isolated
devices and connected sets. You see all newly discovered devices in the category even
if the devices were not originally part of the view. Choose “other” to display all
isolated devices.
Note: Press CTRL and click to select multiple rows.
7. Click the button to move your selections to the Selected Fabrics table.
8. If you want to show or hide Product List columns, continue to step 9,
otherwise go to step 13.
Page 81

Setting Up the Application
81HA-Fabric Manager User Guide
9. Click the Columns tab. The Create View dialog box with the Columns tab
displays, as shown in Figure 32.
Figure 32: Create View dialog box (Columns tab)
10. Choose the columns you want to see in the Product List from the Available
Product List Columns table.
11. Click the button to move your selections to the Selected Product List
Columns table.
12. To add, edit, or remove columns, see “Adding a Column to the Product List”
on page 84, “Changing a Column on the Product List” on page 85, and
“Removing a Column from the Product List” on page 85.
13. Click OK. The new view automatically displays.
Note: If you select a customized view and new devices are discovered, those new
devices display in the customized view.
Page 82

Setting Up the Application
82 HA-Fabric Manager User Guide
Editing a Customized View
Note: Customized view settings reside on the appliance; if one user creates a view, all
users who log on to the same appliance are able to select that view.
1. Choose the View > Edit View, then select the view you want to edit. The Edit
View dialog box displays, as shown in Figure 33.
Figure 33: Edit View dialog box
2. Edit information as necessary. See “Creating a Customized View” on page 79
for detailed instructions.
3. Click OK.
Deleting a Customized View
To delete a customized view, perform the following:
1. Choose View > Delete View, then select the view you want to delete.
Note: Customized view settings reside on the appliance; if one user creates a view, all
users who log on to the same appliance are able to select that view.
Page 83

Setting Up the Application
83HA-Fabric Manager User Guide
Selecting a Customized View
To select a customized view, perform the following:
1. Click the View tab and choose the view name from the menu.
Grouping on the Topology
To simplify management, devices display in groups, as shown in Figure 34.
Groups are shown with background shading and are labeled appropriately. You
can expand and collapse groups to easily view a large topology.
Figure 34: A Group on the Physical Map
Note: ”Fabric” groups may not be true fabrics, but zonable fabrics are true fabrics.
Fabric groups are a set of connected devices that may or may not be fabric devices.
Collapsing Groups
To collapse a single group on the topology, perform one of the following:
■ Double-click the icon at the top right-hand corner of the group on the
topology ( ).
■ Double-click in the group, but not on a device.
■ Right-click in a group, but not on a device, and choose Collapse.
To collapse all groups on the topology by one level, click the Collapse icon on the
toolbox ( ).
Expanding Groups
To expand a group on the topology, perform one of the following:
■ Double-click on the group icon.
Page 84

Setting Up the Application
84 HA-Fabric Manager User Guide
■ Right-click the group icon and choose Expand.
To expand all groups on the topology by one level, click the Expand icon on the
toolbox ( ).
Customizing the Product List
You can customize the Product List to display only the data you need by creating
views that display certain fabrics or by displaying different levels of detail on the
Product List. This section provides instructions for customizing the Product List.
Adding a Column to the Product List
You can define new Product List columns to customize a view. This enables you
to further customize the Product List to display pertinent device and port
information.
1. You can add Product List columns to a new or an existing view using one of
the following methods:
— Choose View > Create View. The Create View dialog box displays, as
shown in Figure 31 on page 80.
— Choose View > Edit View, then select the view you want to edit. The
Edit View dialog box displays, as shown in Figure 33 on page 82.
2. Click the Columns tab. The Create View dialog box with the Columns tab
displays, as shown in Figure 32 on page 81.
3. Click Add. The Create Column dialog box displays, as shown in Figure 35.
Figure 35: Create Column dialog box
4. Enter a label in the Label field.
5. Enter a description in the Description field.
6. Choose whether the column displays information about products or ports
from the Type drop-down list.
7. Choose an icon to display in the column from the Icon drop-down list.
Page 85

Setting Up the Application
85HA-Fabric Manager User Guide
8. Click OK.
9. Highlight the column from the Available Columns table and click the right
arrow button to display the new column in the Product List. The column name
moves to the Selected Columns table.
10. Click OK. The new column displays in the Product List.
Changing a Column on the Product List
You can edit labels, definitions, information, and icons of existing Product List
columns.
1. You can edit Product List columns to a new or an existing view using one of
the following methods:
— Choose View > Create View. The Create View dialog box displays, as
shown in Figure 31 on page 80.
— Choose View > Edit View, then select the view you want to edit. The
Edit View dialog box displays, as shown in Figure 33 on page 82.
2. Click the Columns tab. The Create View dialog box with the Columns tab
displays, as shown in Figure 32.
3. Click Change. The Edit Column dialog box displays, as shown in Figure 36.
Figure 36: Edit Column Dialog Box
4. Edit the column properties as necessary.
5. Click OK.
6. To view the edited column in a customized view, follow the instructions in
“Editing a Customized View” on page 82.
Removing a Column from the Product List
You can remove unused Product List columns in a customized view.
1. You can edit Product List columns to a new or an existing view using one of
the following methods:
Page 86

Setting Up the Application
86 HA-Fabric Manager User Guide
— Choose View > Create View. The Create View dialog box displays, as
shown in Figure 31 on page 80.
— Choose View > Edit View, then select the view you want to edit. The
Edit View dialog box displays, as shown in Figure 33 on page 82.
2. Click the Columns tab. The Create View dialog box with the Columns tab
displays, as shown in Figure 32.
3. Make sure the column you want to remove displays in the Available
Columns table. To move a column to the Available Columns table, highlight
it in the Selected Columns table and click the left arrow button.
4. Highlight the column you want to remove.
Note: When you click Remove, the column definition is deleted without confirmation.
5. Click Remove.
Viewing Levels of Detail on the Product List
You can view different levels on the Product List.
Viewing All
To display all information on the Product List:
1. Click the View All tab.
2. Choose Levels > All Levels.
Viewing Only Products
To display only products on the Product List:
1. Click the View All tab.
2. Choose Levels > Products Only.
Zooming In and Out of the Topology
You can zoom in or out of the topology to see products and ports.
Page 87

Setting Up the Application
87HA-Fabric Manager User Guide
Zooming In
To zoom in on the Physical Map, use one of the following methods:
1. Click the zoom-in icon ( ) on the toolbox.
or
1. Choose View > Zoom. The Zoom dialog box displays, as shown as Figure 37.
Figure 37: Zoom dialog box
2. Choose a zoom percentage.
3. Click OK.
Zooming Out
To zoom out of the Physical Map, use one of the following methods:
1. Click the zoom-out icon ( ) on the toolbox.
or
1. Choose View > Zoom. The Zoom dialog box displays, as shown as Figure 37.
2. Choose a zoom percentage.
3. Click OK.
Showing Levels of Detail on the Physical Map
You can view different levels of detail on the Physical Map, making SAN
management easier. To change the view of the physical map, perform the
following:
1. Choose View > Show and then choose one of the available view options.
Page 88

Setting Up the Application
88 HA-Fabric Manager User Guide
Turning Flyovers On or Off
Flyovers display when you place the cursor on a product. They provide a quick
way to view a product’s properties. To turn flyovers on or off, perform the
following:
1. Choose View > Enable Flyover Display and then choose On or Off.
Page 89

Setting Up the Application
89HA-Fabric Manager User Guide
Exporting and Importing
The import and export features are important functions of the application. You
can import and export data for many reasons, including to communicate issues to
the support center and to capture network status.
Note: Currently, you can only export to and import from the same releases of the
application (for example, export from release 8.0 and import to release 8.0).
Importing a file imports the Physical Map, the status icons, the user properties,
and the discovered properties as they were set at the time of the export.
Exporting Data
You can export data to disk and to email.
1. Choose SAN > Export. The Export dialog box displays, as shown in
Figure 38.
Figure 38: Export dialog box
2. Choose one of the following options from the Export To drop-down list:
Page 90

Setting Up the Application
90 HA-Fabric Manager User Guide
— Disk—Saves the exported files to the disk in
<Install_Home>\Client\Data\san<date>\san*.zip.
— EMail—Mails the exported files as an e-mail attachment directly from
the application.
3. Choose the types of files that you want to export.
Note: Some file types may not be available based on the export destination you
selected in the previous step.
— SAN Files—Exports the SAN files.
— Physical Map—Exports the Physical Map, or topology.
— Performance Data—Exports the performance data. This is an optional
feature. Contact your sales representative to purchase this module. If you
choose Performance Data, you can choose what switches to export data
on by clicking Select Switches. The Select Switches dialog box displays,
as shown in Figure 39.
Figure 39: Select Switches dialog box
— Product List—Exports the Product List in tab-delimited format. To view
the product list in table format, open it in Microsoft
®
Excel.
— Reports—Exports SAN reports.
— Nicknames—Exports nicknames.
— XML Topology—Exports description of all fabric topologies in XML
format, including online and persisted product and connection
information.
— Status—Exports SAN status data used by technical support.
Page 91

Setting Up the Application
91HA-Fabric Manager User Guide
4. If you are exporting to disk, skip to step 6. Otherwise, continue to step 5.
5. If you are exporting to email, enter information in the following fields:
— Mail To—Enter the recipient’s e-mail address.
— Mail List—Click to select from a list of e-mail addresses.
— From—Enter your email address.
— Subject—Enter a subject for the e-mail message.
— Message—Enter content for the e-mail message.
6. Click OK to export the files. If you exported to disk, a Confirmation message
displays, as shown in Figure 40.
Figure 40: Export Confirmation message
7. Make a note of the file location and name and click OK.
Importing Data
You can choose to import the following information to the application:
Note: Importing files clear the Master Log of previous events.
Perform the following to import files:
1. Choose SAN > Import. The Import dialog box displays, as shown in
Figure 41.
Figure 41: Import dialog box
Page 92

Setting Up the Application
92 HA-Fabric Manager User Guide
2. Choose the type of file you want to import from the Import From list.
3. Enter the path and file name in the File Name field.
Note: The default path is:
<Install_Home>\ClientData\san<date>\san*.zip
. Be sure
to select the san*.zip file for import. Importing the rep*.zip file causes errors.
4. Click OK. A message displays, stating that imported data replaced
corresponding data on the appliance.
5. If you are sure you want to replace the data on the appliance, click OK. If you
are importing a SAN file or a properties file, the client is logged out and the
HAFM 8 Log In dialog box displays. Log back into the application.
Note: When discovery is on, the discovered SAN is replaced with the imported data.
Only one SAN can be viewed at a time. For instructions about turning on discovery,
see “Setting Up Discovery” on page 69.
Page 93

Setting Up the Application
93HA-Fabric Manager User Guide
Backing Up and Restoring Data
You can protect your SAN data by backing it up and then restore it as necessary.
The HAFM appliance provides a platform for the Enhanced Base package of the
HAFM application. This unit provides more memory for future product
enhancements.
What is Backed Up?
The following data, contained in the <Install_Home>\Call Home,
<Install_Home>\Server, and <Install_Home>\Client directories,
are backed up to disk:
Note: <Install_Home> refers to the directory where the
HAFM
application is
installed.
■ All log files.
■ Call-home configuration (including phone numbers and dialing options).
■ Configuration data.
■ License information.
■ User launch scripts.
■ User-defined sounds.
■ All data exported through the Export option on the SAN menu.
Note: Firmware files are NOT backed up.
HAFM Appliance Backup and Restore
The HAFM appliance is backed up to a compact disk, rewritable (CD-RW). As
long as a CD-RW disk remains in the CD recorder drive of the appliance, critical
data from the HAFM application is automatically backed up to the CD-RW disk
when the data directory contents change or when you restart the HAFM
application.
Page 94

Setting Up the Application
94 HA-Fabric Manager User Guide
Restoring Data
Backing up data takes some time. Wait about 45 minutes after making a
configuration change before restoring from the backup files to ensure that all your
changes are included in the backed up files. To restore data to the appliance
platforms, follow these instructions:
1. Reinstall the application, if necessary.
2. To restore data to the application, copy the three folders from the CD-RW
disk (X:\Backup\ directory) and paste them in C:\Program
Files\<Install_Home> directory. You are asked if you want to
overwrite the existing files; click Ye s .
3. On the HAFM appliance, open the HAFM application.
4. Choose SAN > Import. The Import dialog box displays, as shown in
Figure 41.
5. Choose SAN File (zip) from the Import From drop-down list.
6. Click Browse. The Browse dialog box displays.
Note: Imported data replaces the corresponding data on the appliance, including log
entries. If you want to keep the data on the appliance, perform an export before
importing the new data. See “Exporting Data” on page 89 for instructions.
7. Select the file from the directory below and click Open.
<Install_Home>\Server\Data\Backup\bkp(date and
time)\bkp(date and time).zip
8. Click OK on the Import dialog box. A message displays stating that imported
data replaces corresponding data on the appliance.
9. If you are sure you want to replace the data on the appliance, click OK. The
client is logged out and the HAFM 8 Log In dialog box displays. For
instructions on logging into HAFM, see “Accessing HAFM” on page 47.
Page 95

95HA-Fabric Manager User Guide
3
Configuring SAN Products
and Fabrics
This chapter provides instructions for configuring products and fabrics and setting
up trap forwarding.
■ Managing Products, page 96
■ Configuring Enterprise Fabric Mode, page 103
■ Configuring Fabric Binding, page 105
■ Persisting and Unpersisting Fabrics, page 107
■ Configuring Trap Forwarding, page 111
Page 96

Configuring SAN Products and Fabrics
96 HA-Fabric Manager User Guide
Managing Products
You can use the application to manage discovered products. You can search for a
product, change its properties, and perform other configuration and maintenance
tasks.
Opening a Product’s Element Manager
You can open an Element Manager to manage switches and directors directly
from the application.
Opening the Element Manager from the Interface
To open an Element Manager from the user interface, perform one of the
following steps:
■ Right-click a product icon and choose Element Manager.
■ Double-click a product icon.
Note: If you encounter problems, ensure that only one copy of the application is being
used to monitor and manage the device. Only one copy of the application should be
used to monitor and manage the same devices in a subnet.
Opening the Element Manager from the Command Line
To open an Element Manager, you can use a script that is included with the
application. In order to do this, the appliance must be running and the product
must be discovered.
1. Open the script <Install_Home>\bin\HAFM_ElementMgr.bat
using a text editor.
2. Under the heading, “rem HAFM Element Manager”, find the line that begins:
...ElementManagerStandAlone -s ServerIp -p ProductIp -u UserName
-pw Password
3. Enter information for the following parameters, ensuring that there are spaces
between the options:
■ ServerIp: Appliance’s IP address
■ ProductIp: Switch’s or director’s IP address
■ UserName: User login name
Page 97

Configuring SAN Products and Fabrics
97HA-Fabric Manager User Guide
■ Password: User password
Example
...ElementManagerStandAlone -s 172.16.9.10 -p 172.16.9.211 -u
Administrator -pw password
4. Save and close the file.
5. Run the script by double-clicking the file or entering the script name at a DOS
prompt.
6. In case of errors, verify that the appliance is on and that the switch or director
you are trying to access is being discovered.
Searching for Products in a SAN
You can search a discovered SAN for a specific product by its properties, such as
name or IP address.
1. Enter the search parameter in the Search field on the toolbar, as shown in
Figure 42.
Figure 42: Search Box
2. Click the up or down arrow to search forwards or backwards through the
Physical Map.
3. Click Search to find each product.
Note: When the application finds a product on the Physical Map, it highlights the
product on the Physical Map as well as on the Product List.
Changing Product Properties
You can change some of the properties for online products.
Page 98

Configuring SAN Products and Fabrics
98 HA-Fabric Manager User Guide
Note: This process does not change the configuration of the product. It only changes
the information that is stored on the local appliance.
1. Right-click a product icon and choose Properties. The Properties dialog box
displays, as shown in Figure 43.
Figure 43: Properties dialog box
Note: If the product you selected is offline, you are not be able to edit this
information.
2. Edit information as necessary.
3. Click OK.
Determining a Product’s Operational Status
You can determine a product’s operational status by looking at the Physical Map
or the Product List. On both the Physical Map and the Product List, you can
determine a product’s operational status by looking at the associated icons, as
shown in Table 5.
Page 99

Configuring SAN Products and Fabrics
99HA-Fabric Manager User Guide
To see a list of all products requiring attention, click the Attention Indicator icon
( ) on the Status bar at the bottom of the main window. The Service Request
dialog box displays the names and IP addresses of devices needing attention.
Click a product name hyperlink to jump to the product on the Physical Map. The
list updates dynamically.
Showing Routes Between Two End-Products
Note: This feature is only available for fabrics consisting solely of HP M-series
products.
You can use the Show Route feature to view the path that Fibre Channel frames
must take between two end-products in a multiswitch fabric. Only one route can
be shown at a time within the same fabric. If you intend to show a different route
within the same fabric, the previous route is automatically hidden.
Requirements
To view the route between two products, the following conditions must be met:
■ All switches or directors in the route must be managed by the application and
attached to the same appliance.
■ All switches or directors in the route must be Director 2/64, Director 2/140,
Edge Switch 2/32, Edge Switch 2/16, or Edge Switch 2/24 models and must
be running firmware version 1.3 or higher.
■ All attached products in the route must be in the same zone.
Table 5: Product Status Icons
Icon Status
No icon Operational
Degraded
Failed
Unknown/Offline
Page 100

Configuring SAN Products and Fabrics
100 HA-Fabric Manager User Guide
Procedure
To show the route for two specific ports on the end nodes, perform the following:
1. In the Product List, click the + symbol next to a switch product icon to expend
and see the attached nodes.
2. Right-click a node and select Show Route. The Show Route dialog box
displays, as shown in Figure 44.
Figure 44: Show Route dialog box
3. Select a destination port from the Destination Port table.
4. Click OK. The route between the ports displays on topology, as shown in
Figure 45.
Figure 45: Show Route example
 Loading...