

Page 1
HP1200/1300TECH
Technical Instructions Supplies Tools 1
CORPORATE
LOS ANGELES, USA
US 1 800 394.9900
Int’l +1 818 837.8100
FAX 1 800 394.9910
I
nt’l +1 818 838.7047
ATLANTA, USA
US 1 877 676.4223
Int’l +1 770 516.9488
FAX 1 877 337.7976
Int’l +1 770 516.7794
DALLAS, USA
US 1 877 499.4989
Int’l +1 972 840.4989
F
AX 1 877 774.1750
Int’l +1 972 840.1750
MIAMI, USA
US 1 800 595.429
Int’l +1 305 594.3396
FAX 1 800 522.8640
Int’l +1 305 594.3309
NEW YORK, USA
US 1 800 431.7884
Int’l +1 631 345.0121
FAX 1 800 431.8812
Int’l +1 631345.0690
SANFORD,USA
US 1 800 786.9049
Int’l +1 919 775.4584
FAX 1 800 786.9049
Int’l +1 919 775.4584
TORONTO, CAN
CAN 1 877 848.0818
Int’l +1 905 712.9501
FAX 1 877 772.6773
Int’l +1 905 712.9502
B
UENOS AIRES, ARG
ARG 0810 444.2656
In
t’l +011 4583.5900
AX +011 4584.3100
F
MELBOURNE, AUS
US 1 800 003. 100
A
l +62 03 9561.8102
’
t
In
FAX 1 800 004.302
Int’l +62 03 9561-7751
SYDNEY, AUS
AUS 1 800 003.100
l +62 02 9648.2630
’
t
In
FAX 1800 004.302
Int’l +62 02 9548.2635
MONTEVIDEO,URY
URY 02 902.7206
Int’l +5982 900.8358
FAX +5982 908.3816
JOHANNESBURG, S.A.
S.A. +27 11 974.6155
FAX +27 11 974.3593
Anhydrous Isopropyl Alcohol Soft Lint Free Cloth
Padding Powder Swabs
Doctor Blade Toner
rum Wiper Blade
D
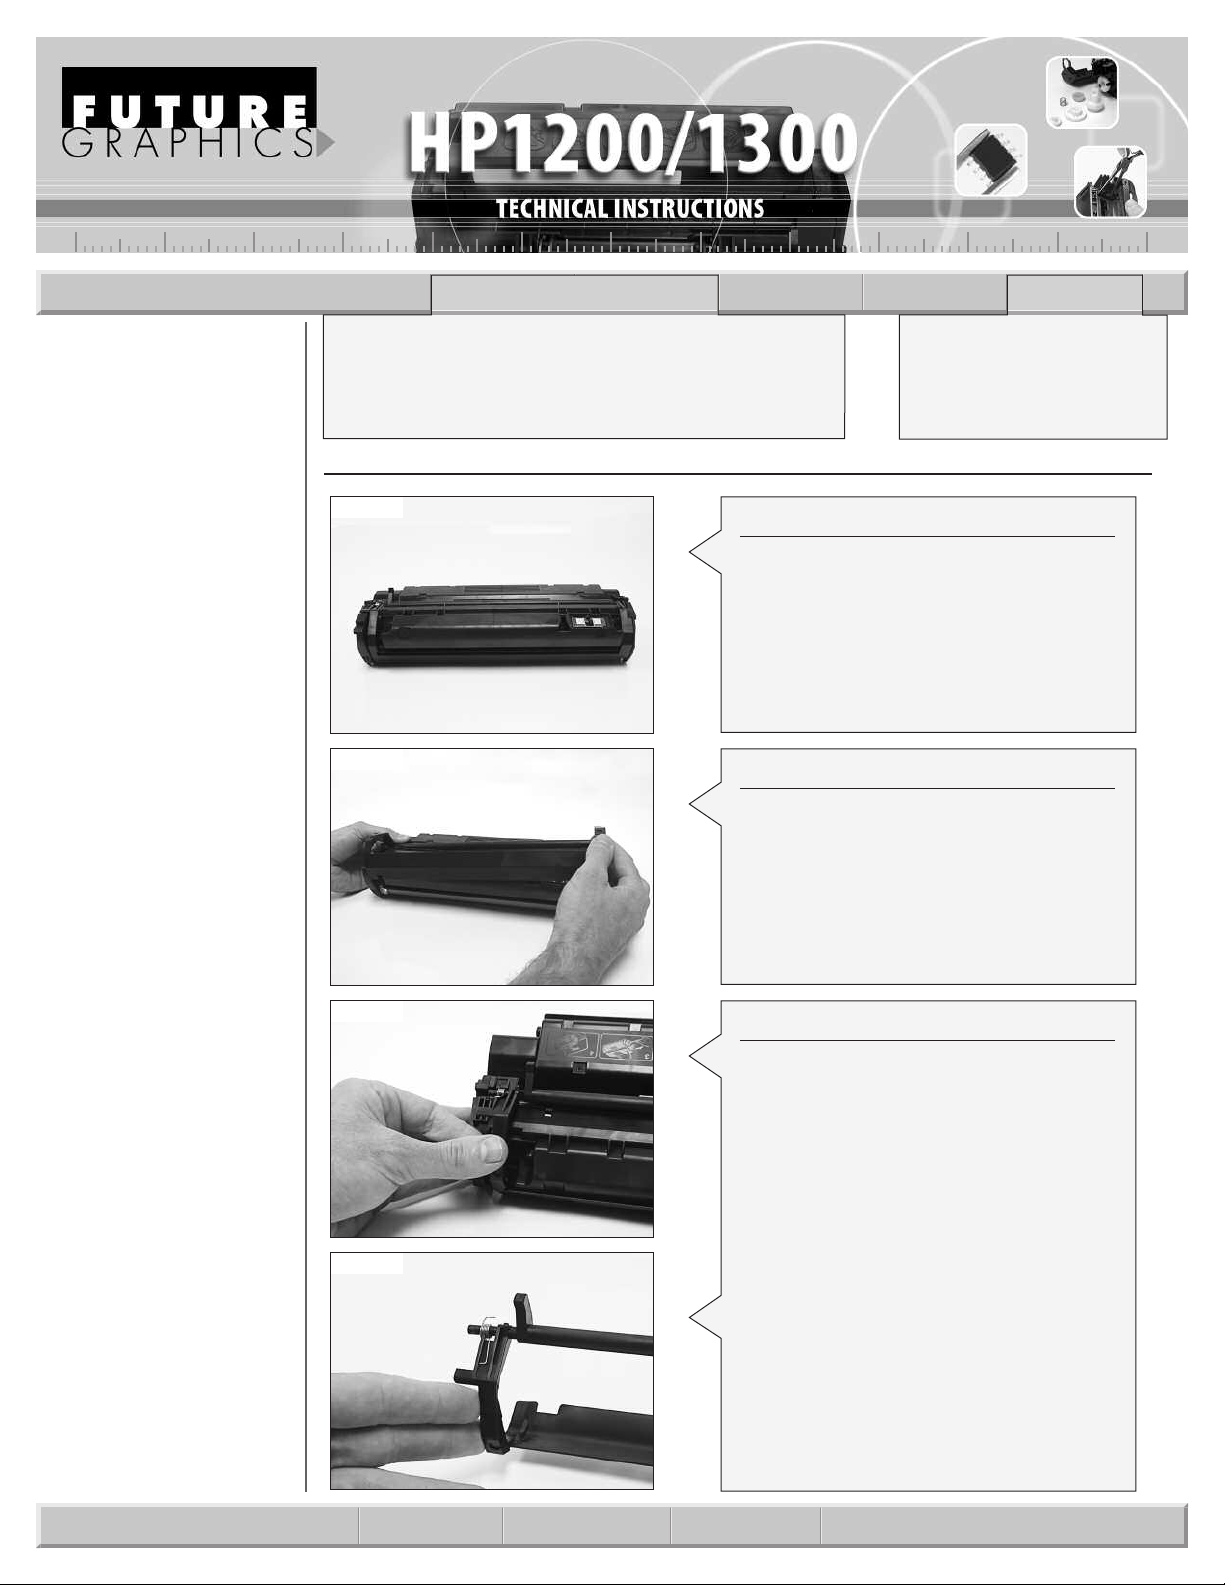
Photo 1
Step 1
Place the cartridge on the workbench so
the cartridge is right side up and the
arrow on the waste hopper is pointing
towards you. (See Photo 1)
Photo 2
Step 2
Holding the drum shutter open with your
left hand, lift the top right side of the
shutter up with your right hand. This will
dislodge the shutter post from its cradle.
(See Photo 2)
Photo 3
Step 3
Slide the drum shutter right to remove
the shutter post from the cradle on the
t side
lef
Photo 4
NOTE: Do not lose the drum shutter tension spring that sits on the left shutter
ost.
p
ee P
. (S
(See Phot
Drill; 7/64 and 9/32-drill bits
Phillips Screwdriver
Small Flat Blade Screwdriver
iagonal Cutters
D
Bend Extraction Tool
o 3)
hot
o 4)
E-mail: info@futuregraphicsllc.com Website: www.futuregraphicsllc.com
Page 2
2 HP 1200/1300 Technical Instructions
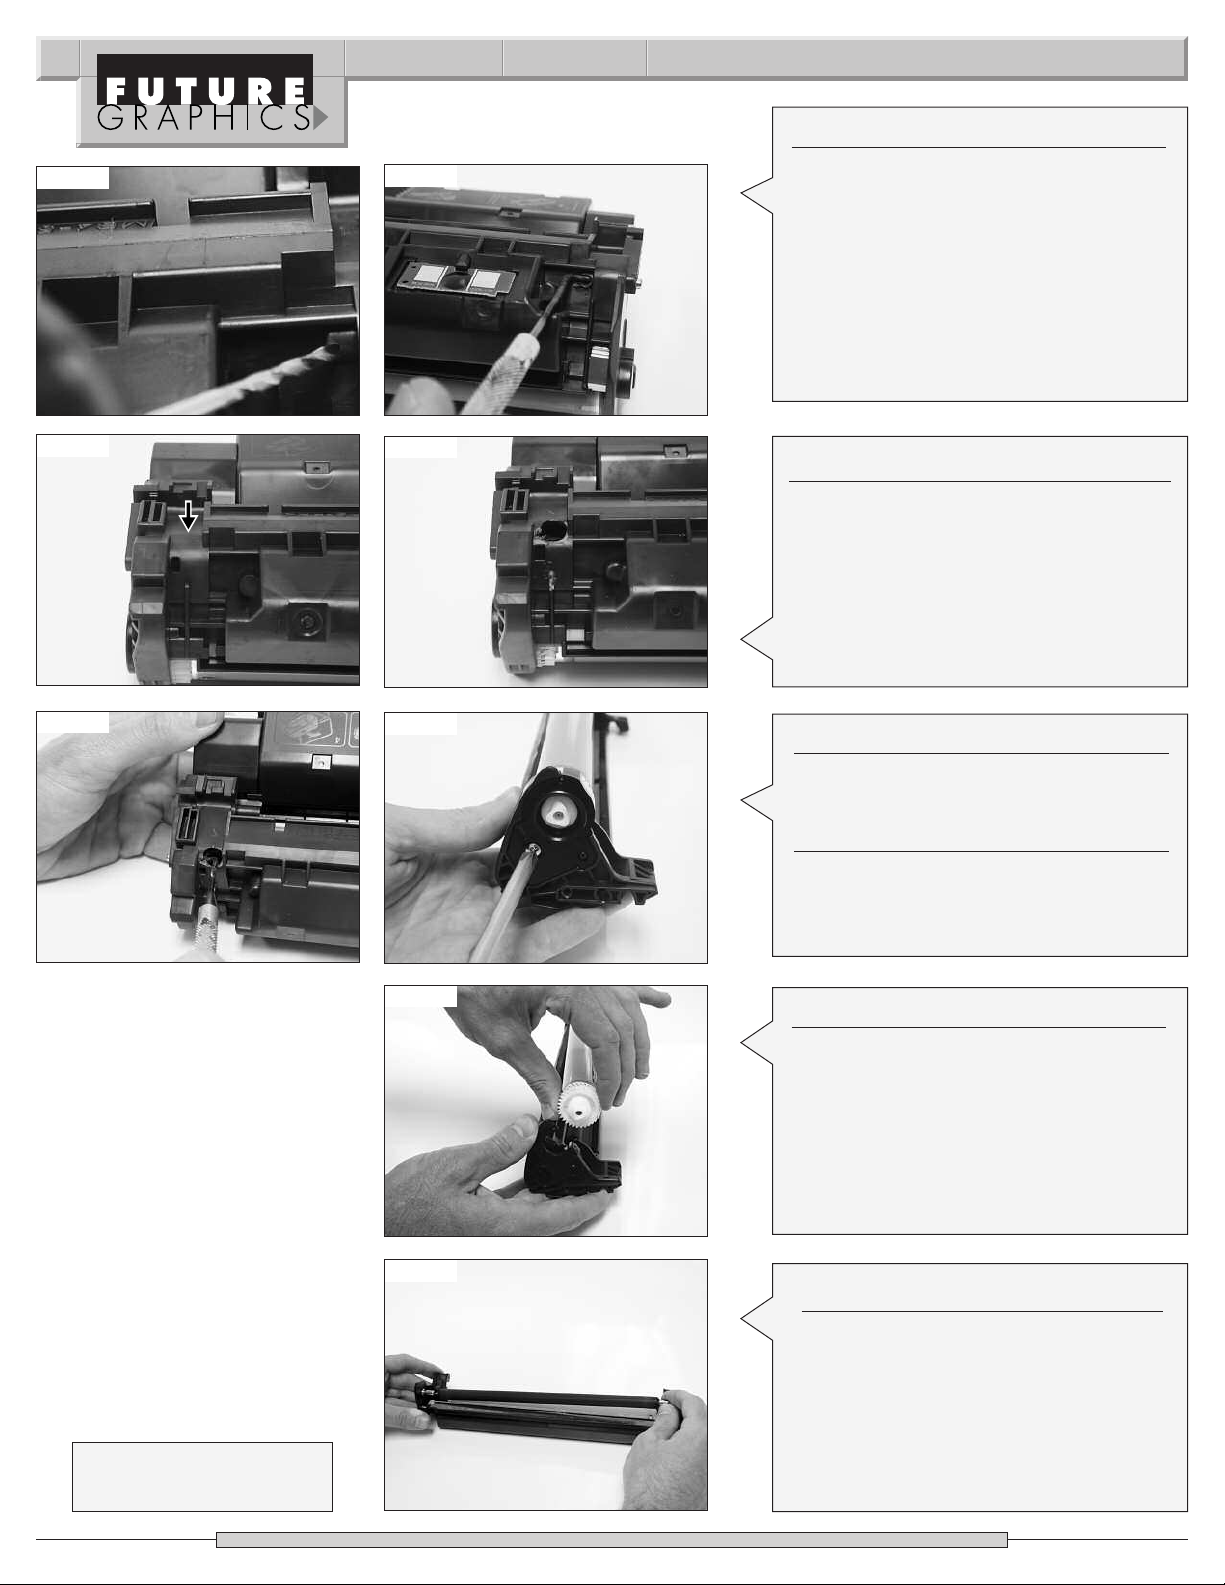
Step 4
Photo 5
Photo 6
Using a drill with a 7/64 bit, drill a hole
into the raised plastic that covers the cartridge pin on the back right side of the
waste hopper. (See Photo 5)
NOTE: Drill in just far enough to expose
the cartridge pin enabling the pin to be
pushed through the cartridge with a bent
extraction tool.
(See Photo 6)
Photo 7
Photo 9
Photo 8
Photo 10
Photo 11
Step 5
Change the bit on the drill to a 9/32 bit.
The next hole needs to be drill on the left
side of the waste hopper where the drum
shutter arm bends down toward the
Photo 7 and Photo 8 show before and
drum.
after the hole is drilled
Step 6
With a bent extraction tool push the cartridge pin out.
(See Photos 9)
Step 7
Remove the screw holding the bearing
hub on the gear end of the drum (See
Photo 10). Remove the hub.
Step 8
ab the drum by the gear.Lift and rotate
r
G
the drum counter clockwise while pulling
the drum out away from the drum contact axle pin. (See Photos 11).
Need trust-worthy, detailed Technical
Instructions for another engine?
Visit: www.futuregraphicsllc.com
hoto 12
P
St
ep 9
t the PCR out of the PCR saddles (See
Lif
Photo 12). Clean the PCR using a lint free
cloth and water.(See Photo 12)
Page 3
HP 1200/1300 Technical Instructions 3
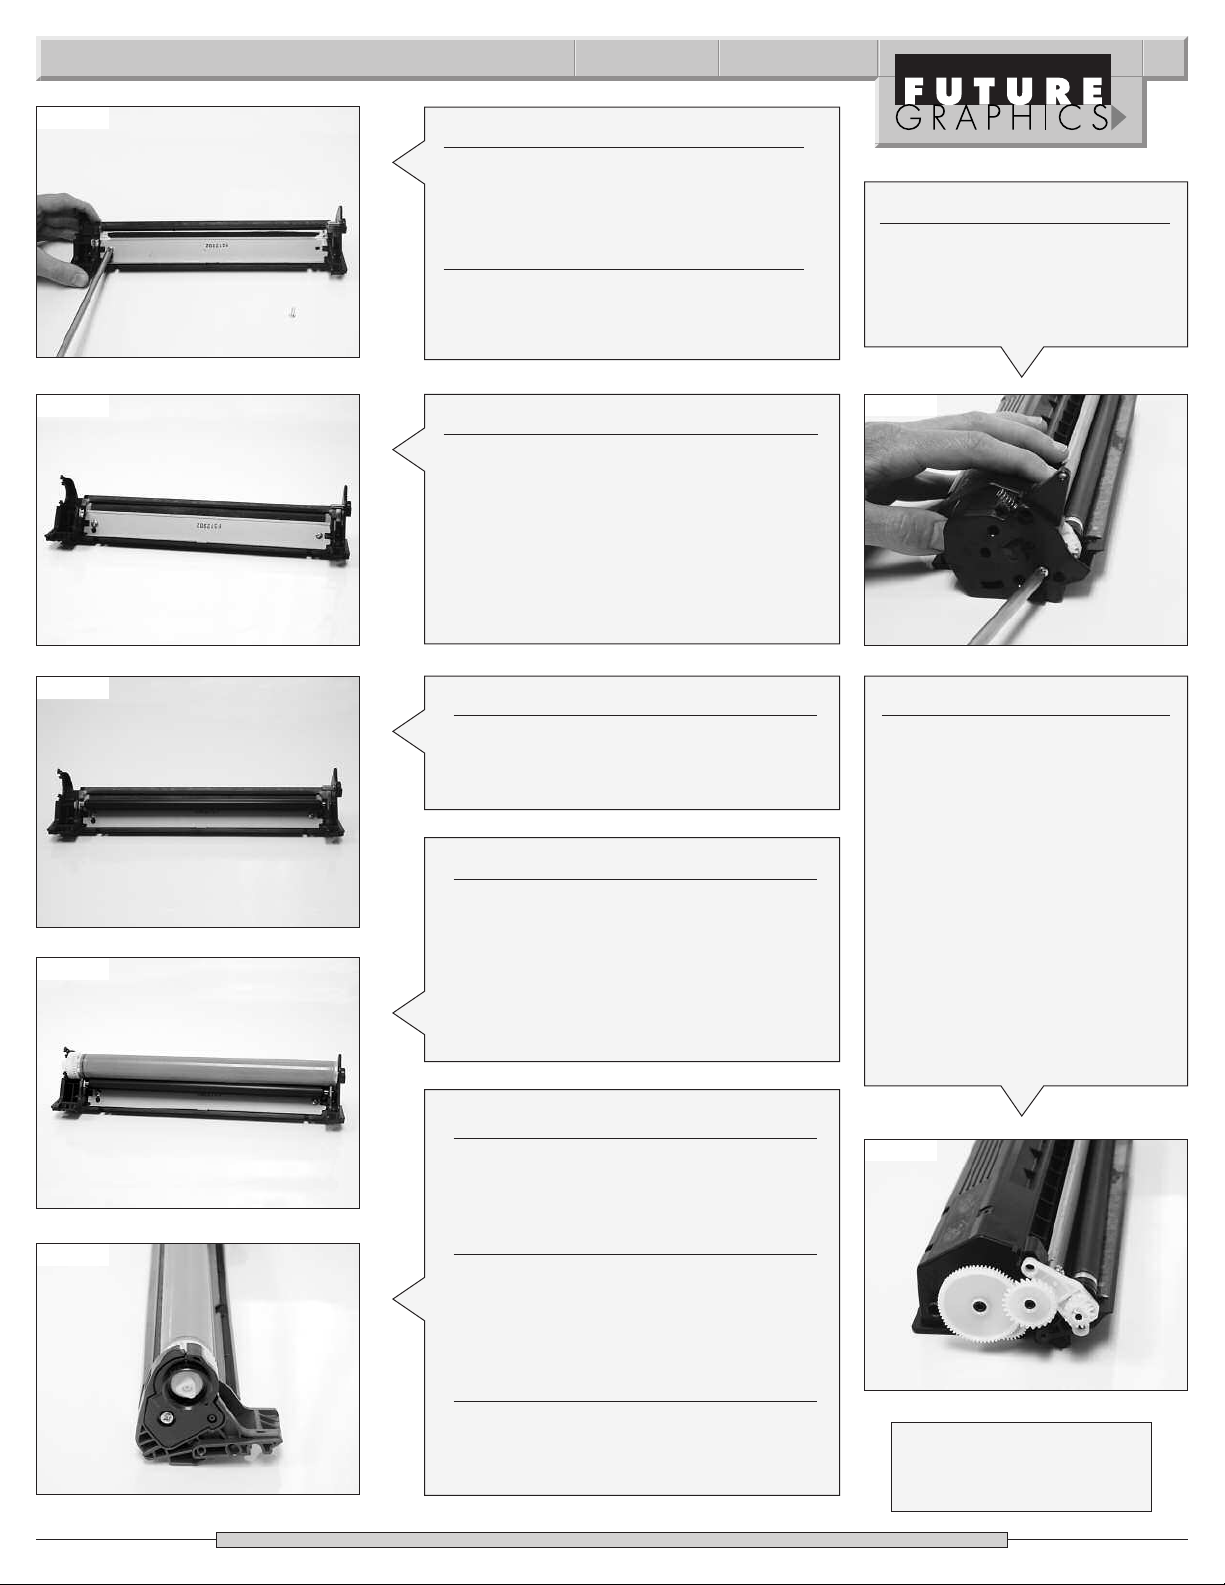
Photo 13
Photo 14
Photo 15
Step 10
Remove the 2 screws holding the wiper
blade and remove the blade.
(See Photo 13)
Step 11
Dump out the waste toner. Clean the
waste hopper using dry compressed air
or a vacuum.
Step 12
Apply padding powder to the new blade
and place the blade in the waste hopper.
Install the 2 screws that hold the wiper
blade in place.
(See Photo 14)
Step 13
Clean the PCR saddles using a cotton
swab and alcohol. Install the clean PCR
into the PCR saddles.
(See Photo 15)
Step 18
Remove the screw holding the
gear housing end cap to the
toner hopper and remove the
end cap. (See Photo 18)
Photo 18
Step 19
Remove the 3 white gears from
the end of the t
(See Photo 19)
oner hopper.
Photo 16
Photo 17
Step 14
Apply padding powder to the drum.
Slide the contact hub of the drum onto
the contact pin while rotating the drum
counter clockwise.
(See Photo 16)
Step 15
Place the drum bearing end plate onto
aste hopper and install the screw
the w
that holds the end plate. (See Photo 17)
Step 16
e the drum 4 –5 revolutions to
t
ota
R
ensure the drum rotates freely. Using a
dry lint free cloth clean the padding
om the PCR.
der fr
w
o
p
Step 17
Set the waste hopper aside in a protect-
ea out of the light.
ed ar
NOTE: The beige agitator drive
gear will stay attached to the
hopper
Photo 19
N
eed help with a particular remanu-
facturing problem?
Call the Technical Resource Center from
8am - 5pm PST: 800 394.9900
Page 4

4 HP 1200/1300 Technical Instructions
hoto 22
Step 20
otate the cartridge 180°.
R
Remove the screw holding the
ontact end cap to the toner
c
hopper and remove the end
cap. (See Photo 20)
Photo 20
Step 21
Lift the mag roller away from the
toner hopper. Remove the stabilizing arm and the mag roller bushing
from the gear side of the roller.
Remove the white contact plate
and the mag roller bushing from
the contact side of the mag
roller(See Photo 21). Clean the mag
roller bushing with a lint free cloth
and alcohol. Using a swab and alcohol clean the mag roller contact and
onductive grease.
apply ne
w c
Step 22
sing dry compressed air or a vac-
U
clean the t
uum,
roller. Using a lint free cloth and a
mag roller cleaner clean the mag
.
oller
r
oner off the mag
P
Photo 23
Photo 24
Photo 25
S
tep 23
emove the 2 screws holding the doctor
R
blade and remove the blade (See Photo
22). Clean the doctor blade using alcohol
and a lint free cloth.
OTE:The HP 1300 doctor blades have an
N
adhesive strip on the back, without this
adhesive toner will leak from behind the
blade. Make sure the blades you are using
have an adhesive back.
Step 24
Remove the toner hopper fill plug. Using
dry compressed air or a vacuum clean the
toner from toner hopper
Step 25
Remove the doctor blade end foams from
each end of the toner hopper.
(See Photo 23)
ep 26
St
Using a small flat blade screwdriver
remove the OEM sealing material from
inside the toner hopper. .
(See Photo 24)
Step 27
emove the seal exit port plug push
o r
T
the plug out from inside the toner hopper
using a small flat blade screwdriver.
Photo 25)
(See
Photo 21
Photo 26
Step 28
Clean the seal area using a swab and alcohol. Remove the backing of the seal and
ttach the seal t
a
o 26)
hot
P
o the t
E-mail: info@futuregraphicsllc.com Website: www.futuregraphicsllc.com
oner hopper.
(S
ee
Page 5

HP 1200/1300 Technical Instructions 5
Photo 27
Photo 28
Photo 29
Step 29
Slide the seal pull-tab through the exit
port and install the plug. (See Photo 27)
Step 30
Fill the toner hopper with 230 grams of
toner. Install the Fill plug.
Step 31
Place the cleaned or new doctor blade
onto the toner hopper.Install the 2 screws
that hoper the blade in place.
(See Photo 28)
Step 32
Install the cleaned mag roller bushings on
the ends of the roller, the small bushing
goes on the contact side of the mag
roller. Place the stabilizing arm on the
gear side of the mag roller and the contact plate on the mag roller.
(See Photo 29)
Step 35
Place the gear housing end cap
n the end of the toner hopper
o
and install the screw that holds
the end cap in place.
(See Photo 32)
Photo 32
Step 36
Apply a small bead of toner
across the mag roller for post
testing. Rotate the mag roller 45 revolutions.
Photo 30
Photo 31
Step 33
Place the mag roller onto the toner hopper. Place the contact end cap onto the
toner hopper and install the screw that
holds the end c
ep 34
St
Install the 3 white gears on the gear end
of the toner hopper as shown in
ap.
(S
ee Photo 30)
photo 31.
N
eed help with a particular remanu-
facturing problem?
Call the Technical Resource Center from
8am - 5pm PST: 800 394.9900
Page 6

6 HP 1200/1300 Technical Instructions
Photo33
Photo 34
Photo 35
Step 37
Join the toner hopper and waste hopper
together. Install the cartridge pins on
each side of the cartridge. (See Photo 33
and 34)
Step 38
Place the drum shutter so the small "L"
shape end of the tension spring sits on
the toner hopper as shown in
Press down on each end of the drum
shutter post to lock the shutter into its
cradle.
photo 35.
FAX NUMBERS
Angeles, USA
Los
US 1 800 394.9910
Int’l + 818 838.7047
Toronto, CAN
CAN 1 877 772.6773
Int’l +1 905 712.9502
Atlanta, USA
US 1 877 337.7976
Int’l +1 770 516.7794
Sydney, AUS
AUS 1 800 004.302
Int’l +62 02 9648.2635
Dallas, USA
US 1 877 744.1750
Int’l +1 972 840.1750
Melbourne, AUS
AUS 1 800 004.302
Int’l +62 03 9561.7751
Miami, USA
US 1 800 522.8640
Int’l +1 305 594.3309
Buenos
Int’l +01
ep 39
St
Test the cartridge.
ork, USA
Y
New
US 1 800 431.8812
Int’l +1 631 345.0690
ARG
Aires,
1 4584.3100
Sanford, USA
US 1 800 786.9049
Int’l +1 919 775.4584
Montevido, URY
Int’l +5982 908.3816
E-mail: info@futuregraphicsllc.com Website: www.futuregraphicsllc.com
Page 7

ENGINE FACT SHEET
FUTURE GRAPHICS PRODUCT LISTING
PPrroodduucctt
Cartridge Bag
Cartridge Box
C
artridge Box Insert
Cartridge Box Label
Cartridge Tech Guide
Doctor Blade
Drum
Drum
Drum Protector Felt
End Cap HP1200ENDCAPL
End Cap
Hopper Cap
Mag Roller Contact
Mag Roller Sleeve
PCR
Recovery Blade
Seal
Seal
Toner
Toner
Toner
Toner
Toner
Wiper Blade
DDeessccrriippttiioon
8X18, 2.5 mil Heat-Sealable Black/Silver Anti-Static Foil
1
4 7/8x4 1/2x8 13/16 :Tape-Top White Box/Blue Print
Use Box #BLUEBAR15X9, Die Cut Corrugated
Two-Color Self-Adhesive
Remanufacturing Instructions
Kuroki
Sinonar,Weighted
AEG,
Shutter Felt, Adhesive, 5 inch
Left Side
Righ
Fill Hole Plug
Spring Type
New, Black Surface, Onyx
Soft Foam Type, Extra Quiet
Mylar, .002 x .300 x 9.20
Adhesive G
Adhesive Onyx, Plastic Type
Bulk Bag,22 lb Per-Fil - Box of 1,ONYX, Sold per Box
150 gm Bottle, ONYX
230 gm Bottle, ONYX
10kg / 22 lb. Per-Fil
150 GM Bottle
Kuroki
n
New Technology
t Side
oldseal
IItteemm NNuummbbeer
BAG8X18
BLUEBAR15X9
AXINSERT
HP1200LABEL
HP1200TECH
HP1200DRBLADEK
HP1200SNREQ
HP1200AEGNT
SHUTTERFELT5
HP1200ENDCAPL
HP1200ENDCAPR
HP2100FILLPLUG
HP1200CONTACT
AXMAGONYX
HP1200PCREQ2
AXRBLADEW
HP1200GOLDSEAL
HP1200SEALONYXP
HP1200ONYX10KG
HP1200ONYX150
HP1200ONYX230
HP1200MICR10KG
HP1200MICR150
AXWBLADEK
r
PPaacckk QQttyy.
100
25
50
1
00
1
10/150
5/100
5/100
100
10
10
100
100
10
10
25
50
50
1
10
10
1
10
10/100
.
Los Angeles, USA
US 1 800 394.990
Int’l +1 818 837.8100
FAX 1 800 394.9910
Int’l + 818 838.7047
Toronto, CAN
CAN 1 877 848.0818
Int’l 1 905 712.9501
FAX 1 877 772.6773
Int’l +1 905 712.9502
Atlanta, USA
US 1 877 676.4223
Int’l +1 770 516.9488
FAX 1 877 337.7976
Int’l +1 770 516.7794
Sydney
AUS 1 800 003.100
Int’l +62 02 9648.2630
AX 1 800 004.302
F
Int’l +62 02 9648.2635
Dallas, USA
US 1 877 499.4989
Int’l +1 972 840.4989
FAX 1 877 744.1750
Int’l +1 972 840.1750
AUS
,
AUS 1 800 003.100
Int’l +62 03 9561.8102
F
Int’l +62 03 9561.7751
US 1800 595.4297
int’l +1 305594.3396
FAX 1 800 522.8640
Int’l +1 305 594.3309
Melbourne, AUS
AX 1 800 004.302
Miami, USA
ARG 0810 444.2656
FAX +011 4584.3100
York, USA
New
US 1 800 431.7884
Int’l +1 631 345.0121
FAX1 800 431.8812
Int’l +1 631 345.0690
Buenos Aires, ARG
Sanford, USA
US 1 800 786.9041
Int’l +1 919 775.4551
FAX 1 800 786.9049
Int’l +1 919 775.4584
Montevido, URY
URY 02 902.7206
AX +5982 908.3816
F
Page 8

ENGINE FACT SHEET
PRINTER MODEL COMPATIBILITY 1200
PPRRIINNTTEERR MMOODDEEL
L
OOEEMMNNUUMMBBEER
R
HP LaserJet 1000
H
P LaserJet 1005 W
HP LaserJet 1200
HP LaserJet 1200N
H
P LaserJet 1200Se
HP LaserJet 1220
HP LaserJet 1220Se
aserJet 3300 MFP
HP L
HP LaserJet 3320 MFP
HP LaserJet 3320n MFP
HP LaserJet 3330 MFP
C7115A
C7115A
C7115A
C7115A
C7115A
C7115A
C
7115A
C7115A
C7115A
C7115A
C7115A
PRINTER MODEL COMPATIBILITY 1300
PPRRIINNTTEERR MMOODDEEL
HP LaserJet 1300
HP LaserJet 1300N
L
OOEEMMNNUUMMBBEER
Q2613A
Q2613A
FUTURE GRAPHICS PRODUCT LISTING
PPrroodduucctt
Drum
Drum
Hopper Cap
PCR
y B
er
v
o
ec
R
S
eal
S
eal
Toner
Toner
Wiper Blade
lade
DDeessccrriippttiioon
Sinonar,Weighted
AEG, New Technology
ill Hole Plug
F
Soft Foam Type, Extra Quiet
Mylar, .002 x .300 x 9.20
Adhesive Goldseal
Adhesive Onyx, Plastic Type
150 gm Bottle, ONYX
230 gm Bottle, ONYX
Kuroki
n
R
IItteemm NNuummbbeer
HP1200SNREQ
HP1200AEGNT
HP2100FILLPL
HP1200PCREQ2
AXRBLADEW
HP1200GOLDSEAL
HP1200SEALONYXP
HP1200ONY
HP1200ONYX230
HP1100WBLADEK
r
UG
X150
PPaacckk QQttyy.
5/100
5/100
100
10
25
50
50
10
10
10/100
.
None of FG's pr
Future Graphics (FG) is a distributor of compatible replacement parts and products for imagining equipment.
o
duc
ts ar
e genuine OEM r
eplac
emen
ts and no affiliation or sponsorship is to be implied between FG and any OEM.
t par
 Loading...