

Page 1

KKuullllaann››mm KK››llaavvuuzzuu
ÇÇAAMMAAfifiIIRR KKUURRUUTTUUCCUU
TR
TTüürrkkççee,, 11
TCL831B
GB
English, 15
‹‹ççiinnddeekkiilleerr
ÖÖnneemmllii BBiillggiijj,, 22--33
KKuurruulluumm,, 44
Kurutucunuzu nereye koymal›s›n›z
Havaland›rma
Kapa¤›n ters yönde kullan›m› için talimatlar
Su boflalt›m›
Elektrik ba¤lant›s›
Kurutucuyu kullanmaya bafllamadan önce
KKuurruuttuuccuunnuunn ttaann››mm››,, 55
Kapa¤› açmak için
Özellikler
Kontrol paneli
BBaaflflllaattmmaa vvee PPrrooggrraammllaarr,, 66--88
Program seçimi
Program tablosu
Kontroller
ÇÇaammaaflfl››rrllaarr,, 99--1100
Çamafl›rlar› s›n›fland›rma
Y›kama etiketleri
Özel giysiler
Kurutma Süreleri
TR
UUyyaarr››llaarr vvee ÖÖnneerriilleerr,, 1111
Genel güvenlik
Elden ç›karma
Enerji tasarrufu ve çevreye sayg›
BBaakk››mm vvee TTeemmiizzlliikk,, 1122
Elektri¤in kapat›lmas›
Her kullan›m sonras›nda filtrenin temizlenmesi
Her kullan›m sonras›nda su haznesini boflalt›n
Her kullan›mdan sonra tamburu kontrol edin
Kondenser ünitesini temizleme
Kurutucuyu temizleme
SSoorruunn ggiiddeerrmmee,, 1133
SSeerrvviiss,, 1144
Yedek parçalar
! Gerekti¤inde baflvurmak için bu kitap盤› kolay ulafl›labilir bir yerde saklay›n. Tafl›nd›¤›n›z takdirde yan›n›zda
götürün, cihaz› satt›¤›n›z veya bir baflkas›na verdi¤iniz takdirde, bu kitap盤›n kurutucu ile birlikte verildi¤inden emin
olun, böylelikle cihaz›n yeni sahibi cihaz›n çal›flmas› ile ilgili uyar›lar ve öneriler hakk›nda bilgi sahibi olabilecektir.
! Talimatlar› dikkatle okuyun; izleyen sayfalar kurulum hakk›nda önemli bilgiler ve cihaz›n çal›flmas›yla ilgili öneriler
içermektedir.
1
Page 2
ÖÖnneemmllii BBiillggii
TR
Kondenser kurutucunuzun verimli çal›flabilmesi için, afla¤›da belirtilen düzenli bak›m program›na uyman›z
gereklidir:
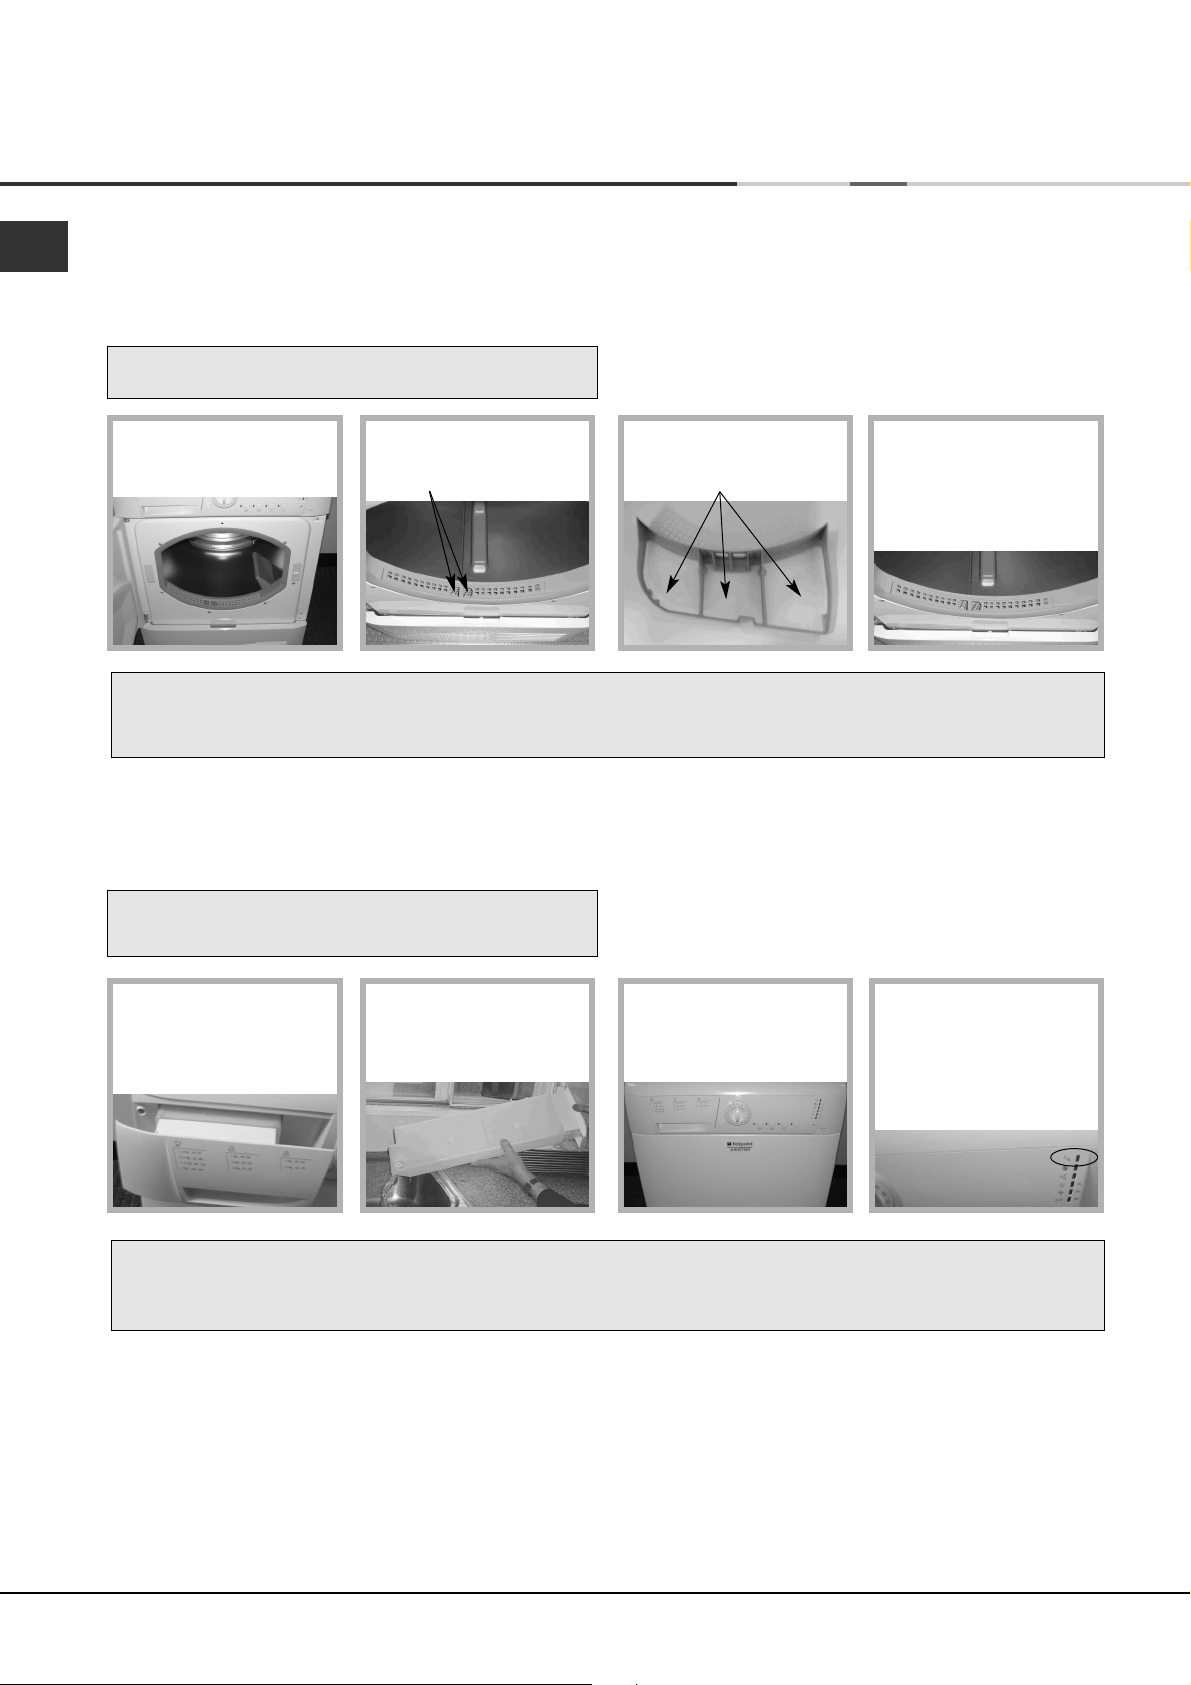
TTüüyy FFiillttrreessii......
! Tüy filtresi HER kurutma ifllemi sonras›nda
TEM‹ZLENMEL‹D‹R.
AADDIIMM 11..
Kurutucunun kapa¤›n›
aç›n.
! Filtrenin HER kullan›m sonras›nda temizlenmemesi, kurutucunuzun kurutma performans›n› etkileyecektir.
- Aksi taktirde Kurutma daha uzun sürede gerçekleflecek, bunun neticesinde kurutma s›ras›nda daha
fazla elektrik tüketilecektir.
AADDIIMM 22..
Filtreyi d›flar› çekin (iki
parmak ucuyla).
AADDIIMM 33..
Filtre a¤›nda birikenleri
temizleyin.
AADDIIMM 44..
Filtreyi geri tak›n - Filtre
yerine tak›l› de¤ilken kurutucuyu ASLA
çal›flt›rmay›n.
SSuu HHaazznneessii......
! Su Haznesi HER kurutma ifllemi sonras›nda
BOfiALTILMALIDIR.
AADDIIMM 11..
Su haznesini kendinize
do¤ru çekin ve kurutucud-
an tamamen ç›kart›n.
! Su haznesini boflaltmamak flunlara neden olur:
- Makine ›s›tmay› durdurur (kurutma ifllemi sonunda çamafl›rlar hala ›slak kalabilir).
- ‘Empty Water’ (Suyu Boflalt) ›fl›¤› su haznesinin dolu oldu¤unu göstermek için yan›p söner.
AADDIIMM 22..
Su haznesinde birikmifl
tüm suyu boflalt›n.
AADDIIMM 33..
Su haznesini geri tak›n,
yerine tamamen
oturdu¤undan emin olun.
SSuu TTooppllaammaa SSiisstteemmiinnii ÇÇaall››flflmmaayyaa HHaazz››rrllaammaa
Kurutucunuz yeniyken, sistem haz›rlanana kadar su haznesi su toplamayacakt›r...bu 1 veya 2 kurutma ifllemi sürer.
Haz›rland›ktan sonra her kurutma iflleminde su toplanacakt›r.
HHeerr pprrooggrraamm››nn bbaaflfl››nnddaa
!
vvee ssoonnuunnddaa ssuu hhaazznneessiinnii
bbooflflaallttmmaayy›› ssiizzee
hhaatt››rrllaattmmaakk iiççiinn.. ‘‘EEmmppttyy
WWaatteerr’’ ((SSuuyyuu BBooflflaalltt)) ››flfl››¤¤››
yyaann››kk kkaall››rr --
2
Page 3
ÖÖnneemmllii BBiillggii
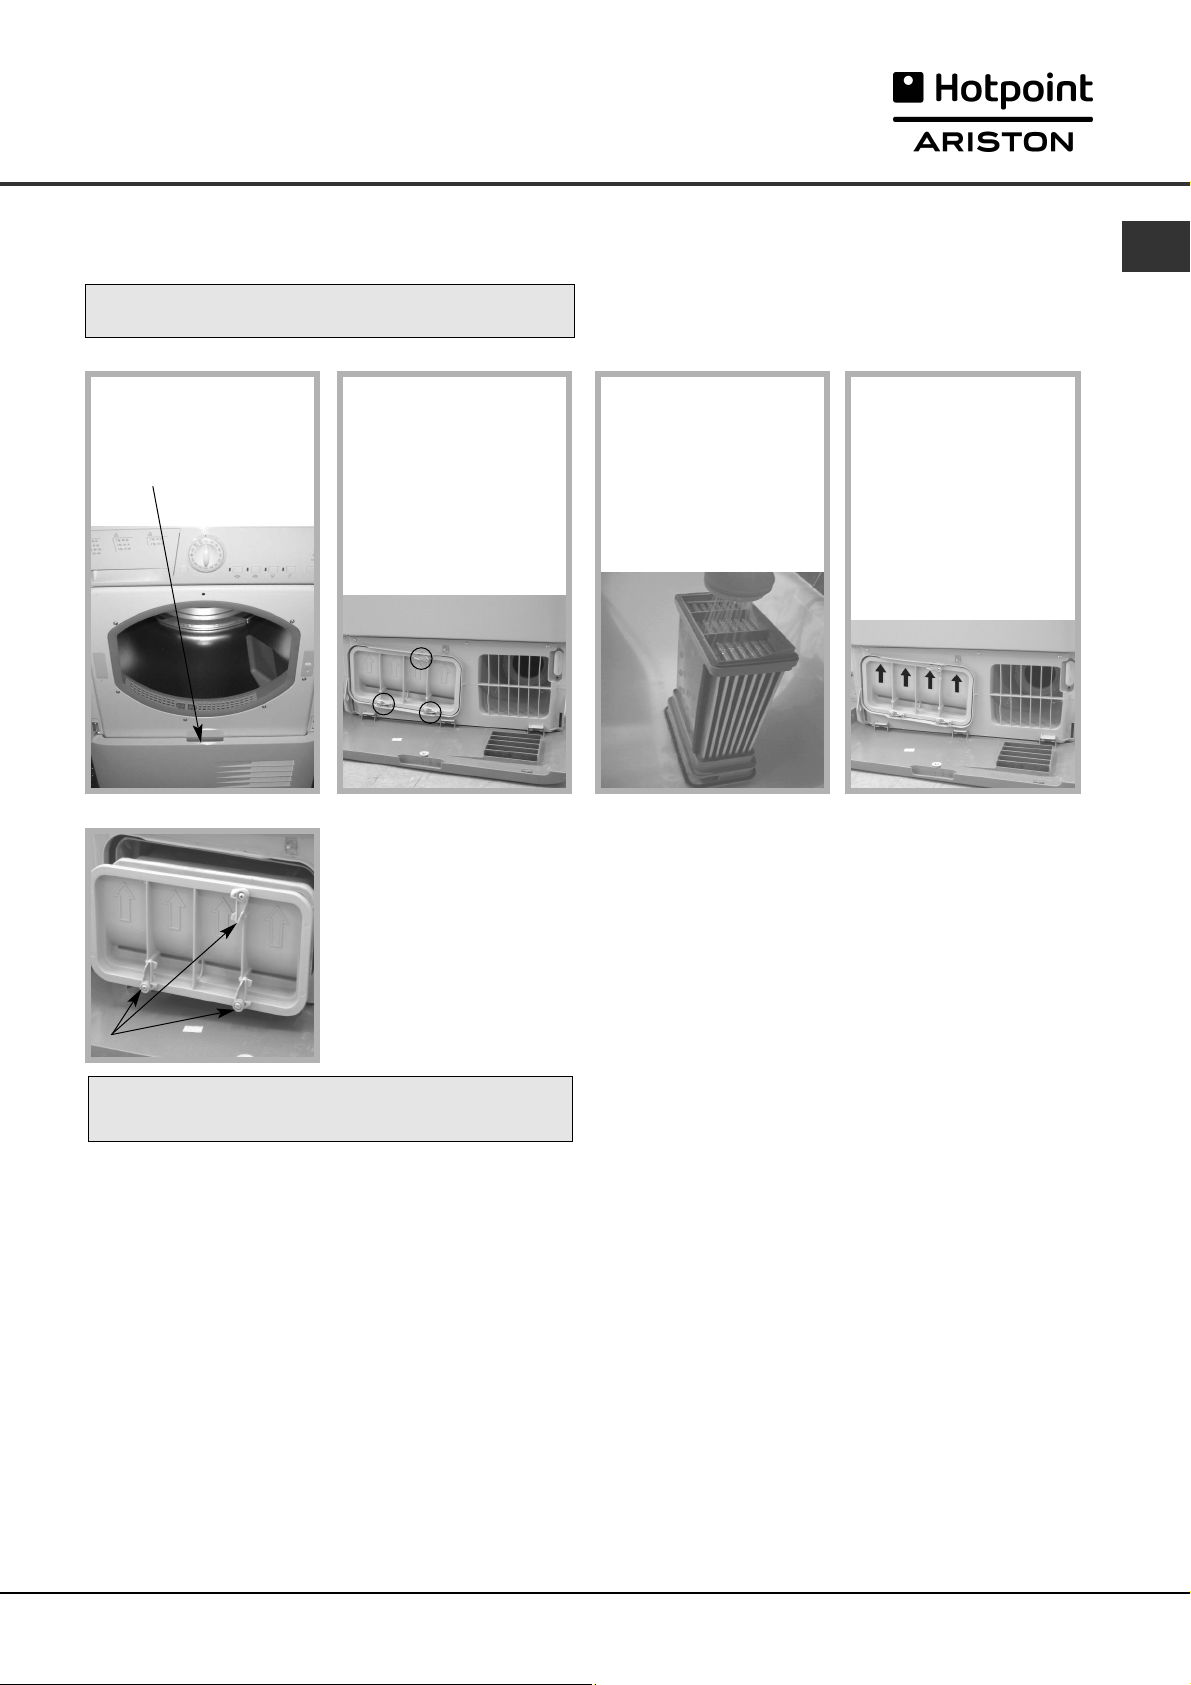
KKoonnddeennsseerr ÜÜnniitteessii......
! Kondenser HER ay tüylerden TEM‹ZLENMEL‹D‹R.
AADDIIMM 11..
Kondenser kapa¤›n›
aç›n - tutama¤› tutun ve
kendinize do¤ru çekin.
AADDIIMM 22..
Kondenseri ç›kartmak
için 3 klipsi döndürün
sonra kondenseri
kendinize do¤ru çekin.
(Tüplerde bir miktar su
olabilir, bu normaldir).
AADDIIMM 33..
Birikmifl tüy art›klar›n› temizlemek için kondenseri
arkas›ndan su ile y›kay›n.
TR
AADDIIMM 44..
Kondenser ünitesini
tekrar tak›n - ünitenin
tamamen içeri itildi¤inden,
her 3 klipsinde tekrar
sabitlendi¤inden ve
kondenserin önündeki
oklar›n yukar›y›
gösterdi¤inden emin
olun.
●
fifiuunnllaarr›› kkoonnttrrooll eeddiinn::
-- PPoozziissyyoonn ookkllaarr››nn››nn yyuukkaarr››yy›› ggöösstteerrddii¤¤iinnii..
-- 33 kklliippssiinn ''kkiilliittllii'' kkoonnuummddaa tteekkrraarr ssaabbiittlleennddii¤¤iinnii..
33 kklliippssii ddöönnddüürrüünn
! Kondenseri temizlememek kurutucunuzun erken
bozulmas›na yol açar.
3
Page 4
KKuurruulluumm
TR
KKuurruuttuuccuunnuuzzuu nneerreeyyee kkooyymmaall››ss››nn››zz
●
Alevler cihaza zarar verebilece¤i için kurutucuyu
gaz ocaklar›ndan, f›r›nlardan, ›s›t›c›lardan ve
ocaklardan uza¤a yerlefltirin.
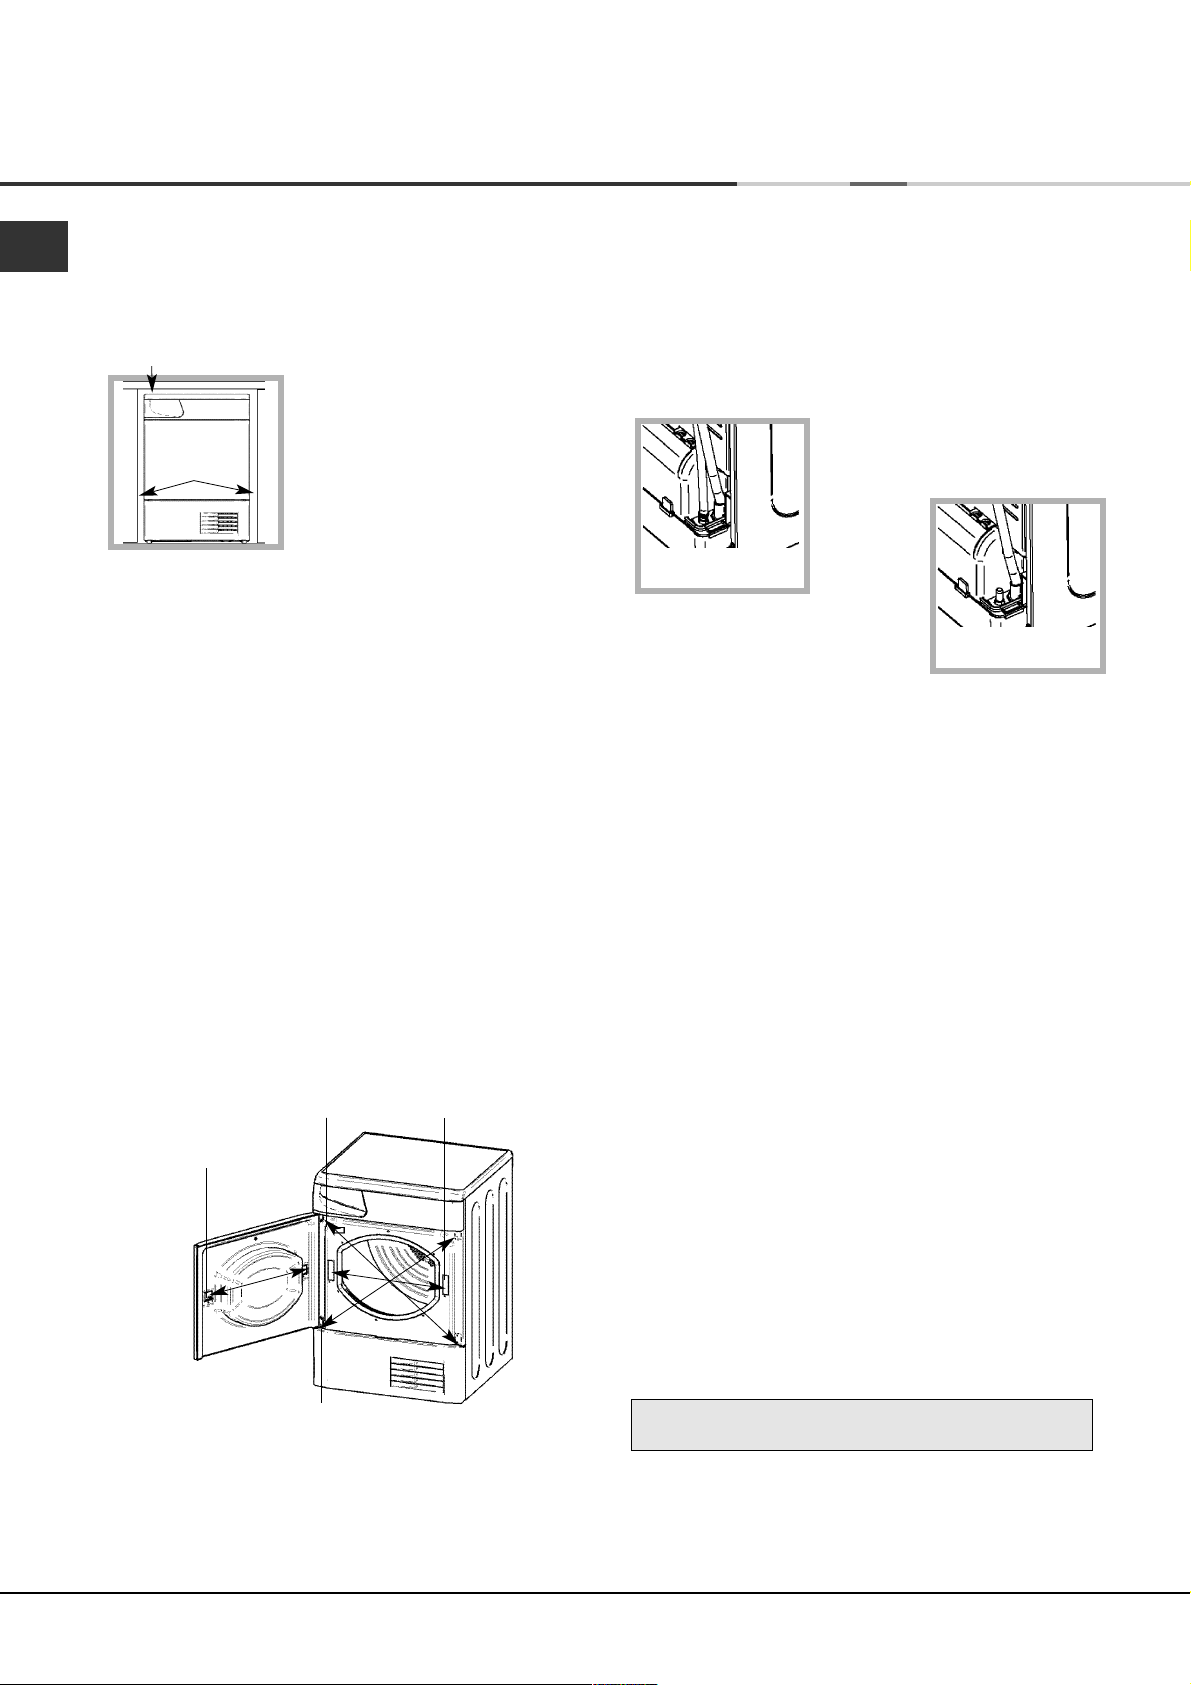
●
Minimum boflluk 10mm
Cihaz› tezgah alt›na monte
edecekseniz, üst ile aras›nda
10mm boflluk b›rakmay›
unutmay›n, yanlardan ve
Minimum boflluklar
15mm
yanal döflemelerden veya
duvarlardan b›rak›lmas›
gereken boflluk ise
15 mm'dir. Bu gereken hava
devridaimini sa¤lar. Arka
havaland›rmalar›n engellenmedi¤inden emin olun.
HHaavvaallaanndd››rrmmaa
Kurutucu kullan›mda oldu¤unda, yeterli havaland›rma
olmal›d›r. Kurutucu ›slak olmayan ve uygun flekilde
havaland›r›lan bir ortama koydu¤unuzdan emin olun.
Kurutucu etraf›ndaki hava ak›fl› y›kama s›ras›nda
üretilen suyun yo¤unlaflmas› için gereklidir, kurutucu
dolap içinde veya tamamen kapal› ortamda verimli
çal›flmaz.
! Kurutucunun dolap içine monte edilmesini tavsiye
etmeyiz ancak kurutucu asla kilitlenebilir kap›, sürgülü
kap› veya menteflesi kurutucunun kapa¤›n›nkiyle ters
yönde olan bir kap› arkas›na monte edilmemelidir.
! Kurutucu küçük veya so¤uk odada kullan›l›rsa, bir
miktar yo¤unlaflma gerçekleflebilir.
KKaappaa¤¤››nn TTeerrss YYöönnddee KKuullllaann››mm›› ‹‹ççiinn
TTaalliimmaattllaarr
Mentefle
Kapak
mandal›
Mentefle
Kurutucunuzun kap›s› ters yöne al›nabilir ve kolayl›kla
de¤ifltirilebilir. Mentefle braketlerini ve boflluk vidalar›n›
diyagonal olarak de¤ifltirin. Kap› mandal›n› ve karfl›l›k
gelen kilit yuvas›n› boflluk plakalar› ile de¤ifltirin (bkz
yukar›daki çizim).
Kapak kilit yuvas›
SSuu bbooflflaalltt››mm››
Kurutucunuz gider yak›n›na kurulduysa, suyu bu
gidere boflaltabilirsiniz. Bunu yapmak su haznesini
boflaltma ihtiyac›n› karfl›lar. Kurutucu çamafl›r makinesi
üstüne veya yan›na kurulduysa ayn› gideri paylaflabilir.
Giderin yüksekli¤i kurutucunun alt›ndan 1m'den az
olmal›d›r.
Mevcut klips ve hortumu
gösterilen pozisyondan ç›kart›n
(bkz çizim).
Klipsi ve hortumu
ç›kart›n buradan...
Uygun uzunlukta hortumu yeni
konuma yerlefltirin (bkz çizim) ve
klipsi tekrar tak›n.
...yeni hortumu tak›n ve
klipsi buraya tak›n.
! Kurutucu nihai konumundayken hortum ezilmemeli
veya s›k›flt›r›lmamal›d›r.
EElleekkttrriikk bbaa¤¤llaanntt››llaarr››
Fifli elektrik prizine takmadan önce afla¤›dakilerden
emin olun:
●
Priz toprakl› olmal›d›r.
●
Priz cihaz›n nominal de¤er etiketinde gösterilen
maksimum güç de¤erine dayanabilmelidir (bkz
Kurutucunun Tan›m›).
●
Voltaj nominal de¤er etiketinde gösterilen de¤erler
içinde olmal›d›r (bkz Kurutucunun Tan›m›).
●
Priz kurutucunun fifline uygun olmal›d›r. Böyle
olmad›¤› takdirde fifli veya prizi de¤ifltirin.
! Kurutucu korunakl› olsa bile d›fl mekanda
kurulmamal›d›r. Ya¤mur veya f›rt›naya maruz kalmas›
çok tehlikeli olabilir.
! Kurulumun ard›ndan kurutucunun elektrik kablosu ve
fifli kolay ulafl›labilir olmal›d›r.
! Uzatma kablosu kullanmay›n.
! Güç kablosu bükülmemeli veya ezilmemelidir.
! Elektrik kablosu periyodik olarak kontrol edilmeli,
gerekti¤i takdirde bu kurutucu için özel olarak
haz›rlanm›fl bir kablo ile ve sadece yetkili teknisyen
taraf›ndan de¤ifltirilmelidir. (bkz Servis). Yeni veya
daha uzun kablolar yetkili sat›c›lardan sat›n al›nabilir.
! Üretici bu kurallara uyulmamas›ndan
kaynaklanabilecekler konusunda hiç bir sorumluluk
kabul etmez.
! Yukar›dakilerle ilgili bir sorunuz oldu¤u takdirde
kalifiye elektrikçiye dan›fl›n.
KKuurruuttuuccuuyyuu kkuullllaannmmaayyaa bbaaflflllaammaaddaann öönnccee
Kurutucunuz kurulduktan ve kullan›lmaya bafllamadan
önce, tafl›ma s›ras›nda birikmifl olabilecek tozlar›
temizlemek için tamburun içini silin.
4
Page 5
KKuurruuttuuccuunnuunn TTaann››mm››
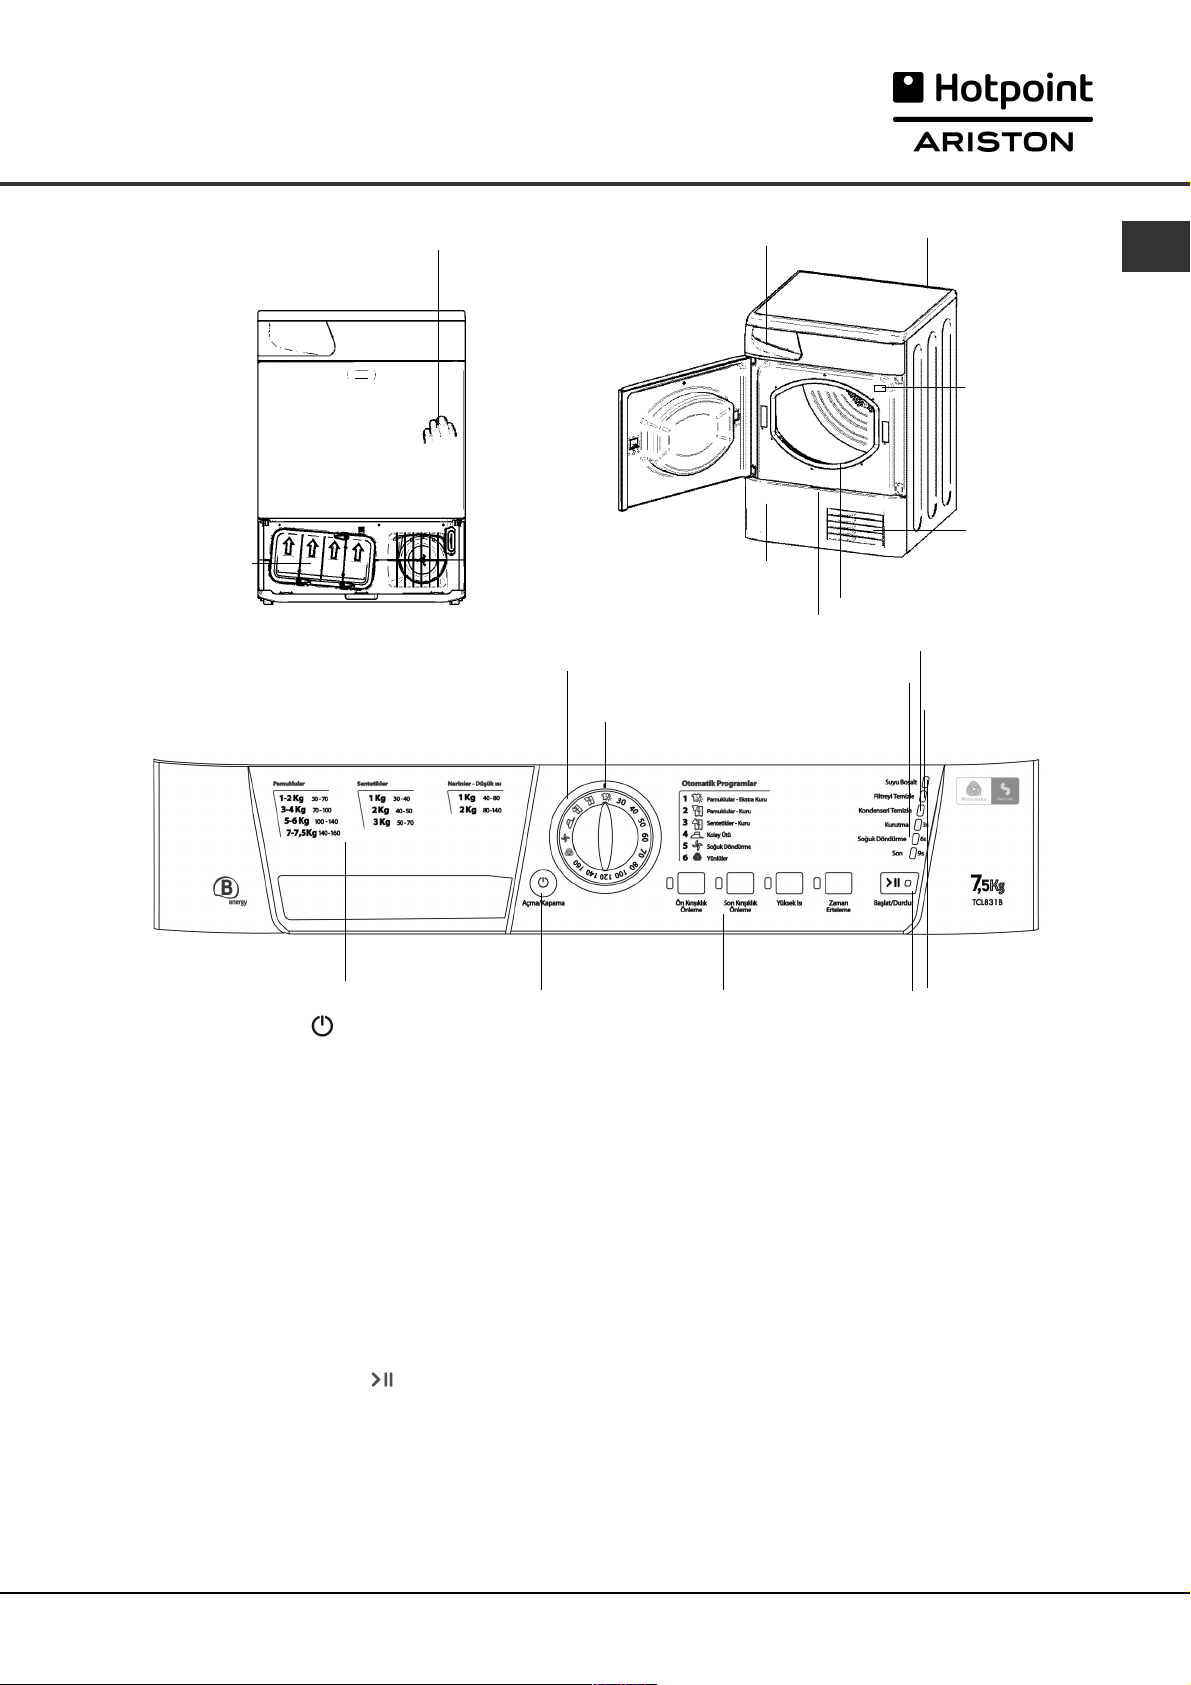
KKaappaa¤¤›› aaççmmaakk iiççiinn ÖÖzzeelllliikklleerr
Ön paneli gösterilen pozisyonda
bast›r›n ve serbest b›rak›n
Kondenser ünitesi
(Kapak aç›k)
Kondenser kapa¤
Kondenser kapa¤› tutama¤›
(Açmak için çekin)
KKoonnttrrooll ppaanneellii
PPRROOGGRRAAMMLLAARR
Çevirmeli dü¤me
Gösterge
Su haznesi
Filtre
‹‹lleerrlleemmee vveeyyaa GGeecciikkmmee
Ifl›klar
Nominal de¤erler
plakas›
Model & Seri
numaras›
Hava girifl
›zgaras›
KKoonnddeesseerrii TTeemmiizzllee
Ifl›¤›
FFiillttrreeyyii TTeemmiizzllee
Ifl›¤›
TR
KKuurruuttmmaa RReehhbbeerrii
AAÇÇMMAA//KKAAPPAAMMAA
bu dü¤meye bas›ld›¤›nda kurutucu durur. Tekrar
bast›¤›n›zda, kurutucu tekrar çal›fl›r.
KKuurruuttmmaa RReehhbbeerrii
hakk›nda sizi bilgilendirir.
PPRROOGGRRAAMMLLAARR
gösterge seçmek istedi¤iniz program› gösterene
kadar döndürün (bkz Bafllatma ve Programlar).
OOPPSS‹‹YYOONN
kullan›labilir seçenekleri seçer. Ifl›klar seçilmifl olan
opsiyonu gösterir (bkz Bafllatma ve Programlar).
BBAAfifiLLAATT//DDUURRDDUURR
program› bafllat›r. Bu dü¤meye bast›¤›n›zda bir bip
sesi duyulur ve ilerleme ›fl›klar› eylemi onaylamak için
yan›p söner. Bir program çal›fl›rken, bu dü¤meyi bas›l›
tutmak program› duraklat›r ve kurutucuyu durdurur.
Program çal›fl›rken ›fl›k yeflildir, program
duraklat›ld›¤›nda turuncu yan›p söner veya bekleme
modunda program bafllat›lmas› bekleniyorsa yeflil
yan›p söner (bkz. Bafllatma ve Programlar).
dü¤mesi : Kurutucu çal›fl›yorsa,
kumafl tipleri ve yük kapasiteleri
çevirmeli dü¤mesi programlar› ayarlar:
dü¤mesi/›fl›klar› seçti¤iniz program için
dü¤mesi/›fl›¤› seçilen
AAÇÇMMAA//KKAAPPAAMMAA
Dü¤mesi
OOPPSS‹‹YYOONN
Dü¤meler ve Ifl›klar
‹‹lleerrlleemmee vveeyyaa GGeecciikkmmee
da yan›p sönüyorsa gecikmeyi gösterir. Gecikmeli
bafllatma s›ras›nda ›fl›klar seçilen gecikmeyi gösterecek
flekilde yan›p söner. Ifl›klar (yan›p sönmediklerinde)
program›n her aflamas›n› yanmaya bafllayarak
gösterirler (bkz. Bafllatma ve Programlar).
SSuuyyuu BBooflflaalltt
gerekti¤ini gösterir. Su haznesi yerine tak›ld›ktan sonra
›fl›¤›n sönmesi bir kaç saniye al›r, bunun olmas› için
kurutucunun çal›flma gerekir (bkz. Kontroller)
NNoott::
Su haznesi dolu gösterge ›fl›¤› yan›p sönerse,
›s›tma kapat›l›r ve giysiler kurumaz.
FFiillttrreeyyii TTeemmiizzllee
kurutucuyu kullanmaya bafllamadan önce fitrenin
temizlenmesi gerekti¤ini size hat›rlat›r (bkz Bak›m ve
Temizlik).
KKoonnddeennsseerrii TTeemmiizzllee
aral›klarla temizlenmesi gerekti¤ini size hat›rlat›r (bkz
Bak›m ve Temizlik).
BBAAfifiLLAATT//DDUURRDDUURR
Dü¤me ve Ifl›k
›fl›klar› program›n durumunu ya
gösterge ›fl›¤› su haznesinin boflalt›lmas›
›fl›¤› her program öncesinde
›fl›¤› her kondenserin düzenli
SSuuyyuu BBooflflaalltt
Ifl›¤›
5
Page 6
BBaaflflllaattmmaa vvee PPrrooggrraammllaarr
TR
PPrrooggrraamm sseeççiimmii
1. Kurutucunun fiflini prize tak›n.
2. Çamafl›rlar›n›z› kumafl tipine göre ay›r›n (bkz
Çamafl›rlar).
3. Kapa¤› aç›n ve filtrenin temiz oldu¤undan, su
haznesinin bofl ve yerinde oldu¤undan emin olun
(bkz Bak›m).
4. Makineyi doldurun ve çamafl›rlar›n kapa¤a
s›k›flmad›¤›ndan emin olun. Kapa¤› kapat›n.
5. Ifl›klar›n hiç biri yanm›yorsa:
AÇMA/KAPAMA dü¤mesine bas›n.
6. Program Rehberini (bkz Programlar) ve her kumafl
tipi için göstergeleri (bkz Çamafl›r) kontrol ederek
bir program seçin.
- Program seçmek için PROGRAMLAR çevirmeli
dü¤mesini çevirin.
7. Gerekiyorsa gecikme ve di¤er seçenekleri ayarlay›n.
8. BAfiLAT/DURDUR ›fl›¤› yeflil yan›p söner:
- bafllamak için BAfiLAT/DURDUR dü¤mesine
tekrar bas›n.
Yeflil ›fl›¤›n yan›p sönmesi durur.
Kurutma program› s›ras›nda, çamafl›r›n›z› kontrol
edebilir ve di¤erleri kurumaya devam ederken
kurumufllar› alabilirsiniz. Kapa¤› tekrar kapad›¤›n›zda,
kurutmaya devam etmek için BAfiLAT/DURDUR
dü¤mesine tekrar bas›n.
(Kapak aç›ld›¤›nda BAfiLAT/DURDUR ›fl›¤› turuncu
renkte yan›p söner, kapak kapat›ld›ktan ve
BAfiLAT/DURDUR dü¤mesine bas›ld›ktan sonra,
BAfiLAT/DURAKLAT ›fl›¤›n›n yan›p sönmesi durur
ve yeflil yanar.)
9. Program tamamland›¤›nda. Düdük sesi duyulur.
Kapa¤› aç›n, çamafl›rlar› d›flar› ç›kar›n, filtreyi
temizleyin ve yerine tak›n. Su haznesini boflalt›n ve
yerine tak›n (bkz. Bak›m).
Son K›r›fl›kl›k Önleme seçene¤i seçildiyse ve
çamafl›rlar› hemen ç›kartmazsan›z, kurutucunun
tamburu 10 saat veya siz kapa¤› açana kadar ara
ara dönecektir.
10. Kurutucuyu fiflten çekin.
PPrrooggrraamm KKoollaayy ÜÜttüü
Kolay Ütü k›sa 10 dakikal›k bir programd›r (8 dakika ›s›tma ard›ndan 2 dakika döndürerek so¤utma), ayn›
konumda/pozisyonda uzun süre tutulan giysilerin liflerini açar. ‹fllem lifleri rahatlat›r, ütülenmelerini ve katlanmalar›n›
kolaylaflt›r›r.
! Kolay Ütü
En iyi sonuçlar için:
Kolay Ütü etkisi bir kumafltan di¤erine farkl›l›k gösterir. Pamuklu ve Pamuklu kar›fl›mlar› gibi geleneksel kumafllarda
iyi sonuç verir, akrilik dokumalarda ve Tencel® gibi malzemelerde daha az sonuç verir.
kkuurruuttmmaa pprrooggrraamm›› ddee¤¤iillddiirr
ve ›slak giysiler için kullan›lmamal›d›r.
1. Maksimum kapasiteden fazlas›n› yüklemeyin.
Bu a¤›rl›klar kuru a¤›rl›klar› gösterir:
KKuummaaflfl MMaakkssiimmuumm yyüükk
Pamuk ve Pamuk kar›fl›mlar› 2.5kg
Sentetikler 2kg
Kot 2kg
2. Program bitince çamafl›rlar› hemen boflalt›n, giysileri as›n, katlay›n veya ütüleyin ve dolaplara yerlefltirin.
Bu mümkün olmad›¤›nda program› tekrarlay›n.
PPrrooggrraamm WWoooollmmaarrkk ((YYüünnllüülleerr ))
●
Bu program sembolüne sahip güvenli giysileri kurutmak içindir
●
1 kg'a kadar çamafl›r (yaklafl›k 3 süveter) için kullan›labilir.
●
Kurutma öncesinde giysilerin ters yüz edilmesini tavsiye ederiz.
●
Bu program yaklafl›k 60 dakika sürer ancak yükün miktar›na ve yo¤unlu¤una ve çamafl›r makinesinde kullan›lm›fl
s›kma h›z›na ba¤l› olarak daha uzun sürebilir.
●
Bu program ile kurutulan çamafl›rlar giyilmeye haz›rd›r, ancak baz› a¤›r giysilerde uçlar hafif ›slak kalabilir.
Bunlar›n do¤al flekilde kurumas›n› sa¤lay›n, afl›r› kurutma giysiye zarar verebilir.
! Di¤er malzemeler gibi, yünün çekmesi de geri döndürülemez örn. çekti¤i takdirde orijinal boyutuna ve flekline geri
dönmez.
! Bu program Akrilik giysiler için uygun de¤ildir.
Bu makinenin yün kurutma program› çamafl›r makinesinde y›kanmas› ve kurutma makinesinde kurutulmas›
onaylanm›fl Woolmark damgal› giysilerin kurutulmas› için The Woolmark Company taraf›ndan onaylanm›flt›r, bunun
geçerlili¤i için giysilerin etiketteki ve bu kurutucunun üreticisinin talimatlar›na uygun biçimde kurutulmufl olmas›
gereklidir (M0616).
Bu program The Woolmark Company onay› sahip tek kurutma program›d›r.
6
Page 7
BBaaflflllaattmmaa vvee PPrrooggrraammllaarr
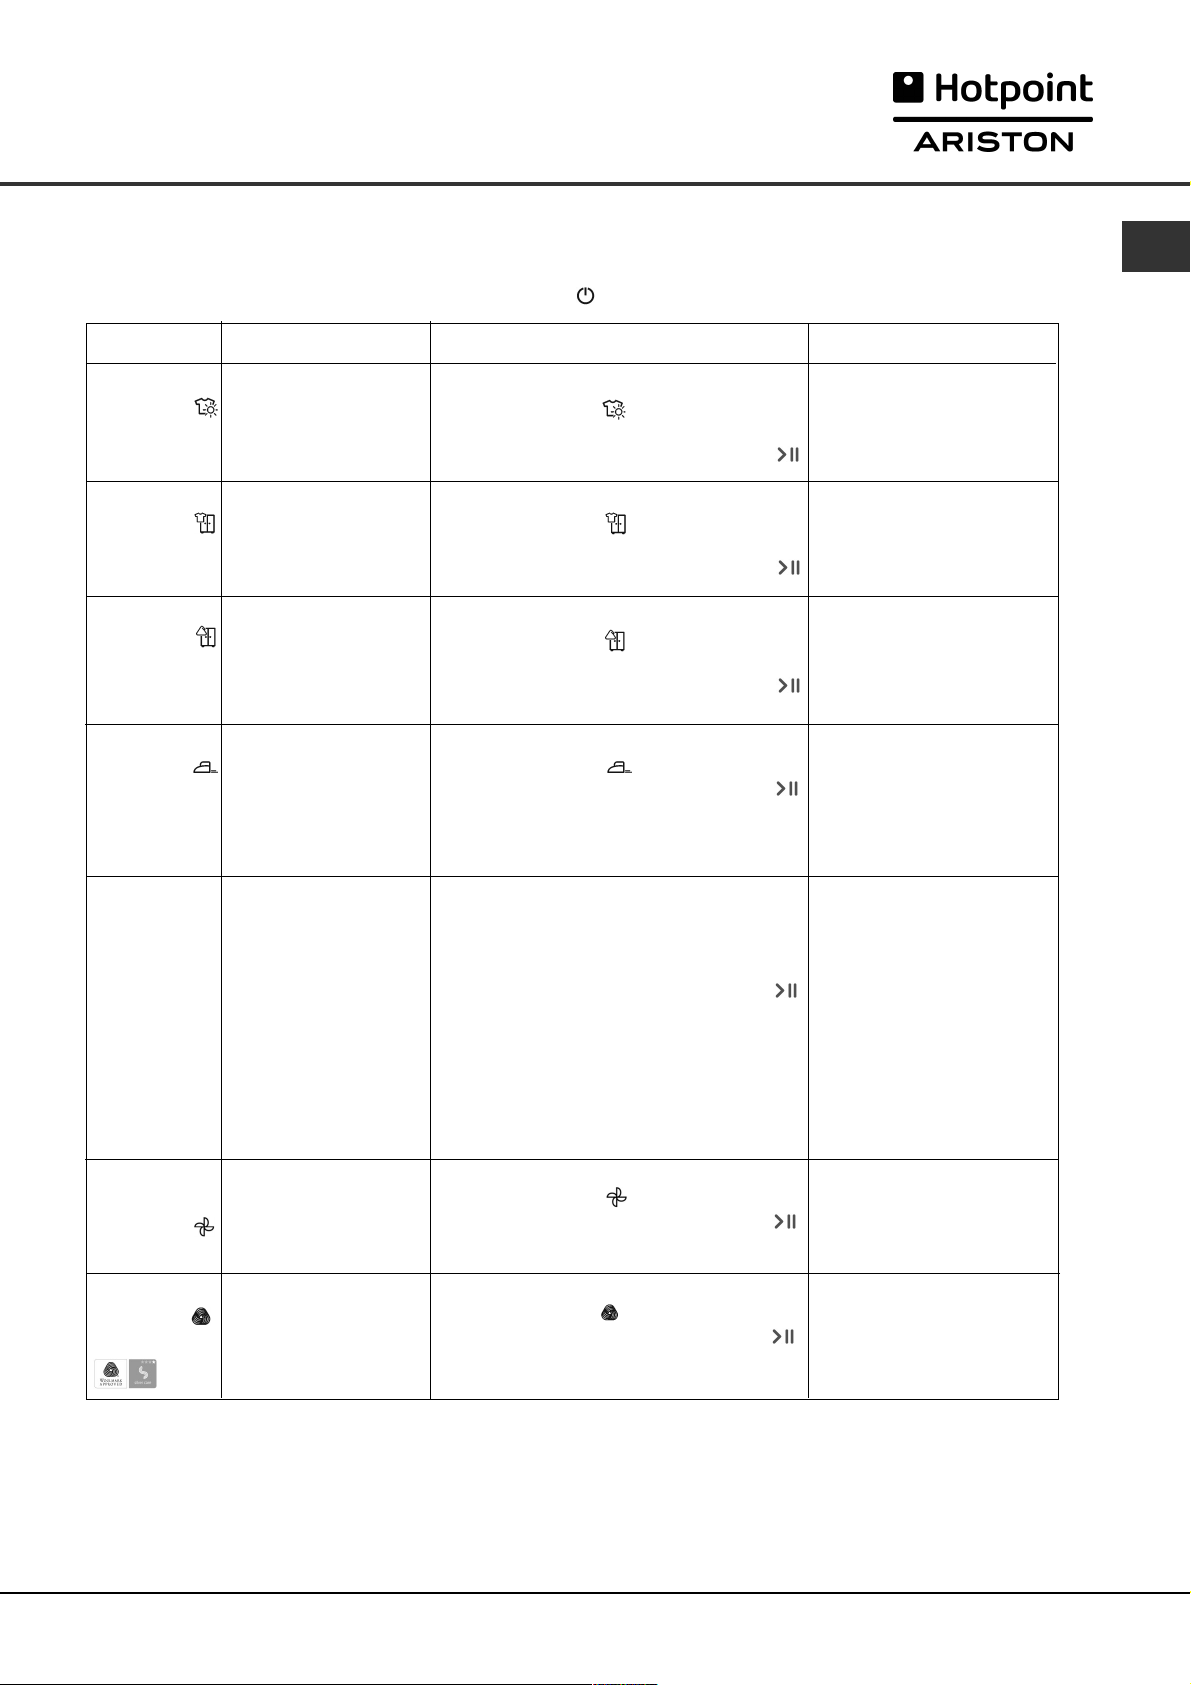
PPrrooggrraammllaarr
! Ifl›klar›n hiç biri yanm›yorsa; Açma/Kapama dü¤mesine bas›n ve program seçin.
PPrrooggrraamm
11
PPaammuukklluullaarr
- Ekstra Kuru
22
PPaammuukklluullaarr
- Kuru
33
SSeenntteettiikklleerr
- Kuru
44
KKoollaayy ÜÜttüü
NNee iiflflee yyaarraarr...... NNaass››ll aayyaarrllaann››rr......
Giysileri Yüksek ›s›
ayar›nda giyilmeye
haz›r flekilde kurutur.
Giysileri Yüksek ›s›
ayar›nda kald›r›lmaya
haz›r flekilde kurutur.
Giysileri Düflük ›s›
ayar›nda kald›r›lmaya
haz›r flekilde kurutur.
K›sa program (yaklafl›k
10 dakika) ütülemeye
haz›r giysilerin liflerini
yumuflat›r.
1. PROGRAMLAR dü¤mesinin olmas›
gereken konum
2. Gerekiyorsa Opsiyonlar› seçin.
3. BAfiLAT/DURDUR dü¤mesine bas›n .
1. PROGRAMLAR dü¤mesinin olmas›
gereken konum
2. Gerekiyorsa Opsiyonlar› seçin.
3. BAfiLAT/DURDUR dü¤mesine bas›n .
1. PROGRAMLAR dü¤mesinin olmas›
gereken konum
2. Gerekiyorsa Opsiyonlar› seçin.
3. BAfiLAT/DURDUR dü¤mesine bas›n .
1. PROGRAMLAR dü¤mesinin olmas›
gereken konum
2. BAfiLAT/DURDUR dü¤mesine bas›n .
TR
NNoott::
OOppssiiyyoonnllaarr::
Zaman Erteleme
Ön K›r›fl›kl›k Önleme
Son K›r›fl›kl›k Önleme
OOppssiiyyoonnllaarr::
Zaman Erteleme
Ön K›r›fl›kl›k Önleme
Son K›r›fl›kl›k Önleme
OOppssiiyyoonnllaarr::
Zaman Erteleme
Ön K›r›fl›kl›k Önleme
Son K›r›fl›kl›k Önleme
! Bu kurutma program›
de¤ildir (bkz önceki
sayfa).
OOppssiiyyoonnllaarr::
Hiç biri
ZZaammaannll››
KKuurruuttmmaa
(160, 140, 120,
100, 80, 70, 60,
50, 40 veya 30
dakika)
55
SSoo¤¤uukk
DDöönnddüürrmmee
66
Woolmark
YYüünnllüülleerr
Az miktarda ve düflük
›s›yla kurutmak
istedi¤iniz giysiler için
(1 kg'dan az).
Zamanl› program
kulland›¤›n›zda ›s›tma
opsiyonu ile
kullan›labilir.
K›sa program (yaklafl›k
10 dakika) lifleri veya
giysileri so¤utur.
Yünlü giysilerinizi
kurutur, (bkz önceki
sayfa).
1. PROGRAMLAR dü¤mesini istedi¤iniz
süreye getirin: 160, 140, 120, 100, 80,
70, 60, 50, 40 veya 30.
2. Gerekiyorsa Opsiyonlar› seçin.
3. BAfiLAT/DURDUR dü¤mesine bas›n .
1. PROGRAMLAR dü¤mesinin olmas›
gereken konum
2. BAfiLAT/DURDUR dü¤mesine bas›n .
1. PROGRAMLAR dü¤mesinin olmas›
gereken konum
2. BAfiLAT/DURDUR dü¤mesine bas›n .
OOppssiiyyoonnllaarr::
Yüksek Is›
Zaman Erteleme
Ön K›r›fl›kl›k Önleme
Son K›r›fl›kl›k Önleme
‘Önerilen kurutma sürelerine’
bak›n (bkz. Çamafl›rlar).
Bu programlar›n son 10
dakikalar› So¤uk Döndürme
faz›d›r, bkz. afla¤›s›.
OOppssiiyyoonnllaarr::
Hiç biri
OOppssiiyyoonnllaarr::
Hiç biri
7
Page 8
BBaaflflllaattmmaa vvee PPrrooggrraammllaarr
TR
KKoonnttrroolllleerr
●
PPRROOGGRRAAMMLLAARR ççeevviirrmmeellii ddüü¤¤mmeessii
UUyyaarr››
!
, Bafllat/Durdur dü¤mesine bas›ld›ktan sonra,
program çevirmeli dü¤mesinin pozisyonu de¤ifltirilirse,
yeni pozisyon seçilmifl program› DE⁄‹fiT‹RMEYECEKT‹R.
Seçilen program› de¤ifltirmek için, Bafllat/Durdur
dü¤mesine bas›n, ›fl›¤› turuncu renkte yan›p söner,
program›n duraklat›ld›¤›n› gösterir. Yeni program› ve
gereken opsiyonlar› seçin, ›fl›k yeflil yan›p sönmeye
bafllar. Bafllat/Durdur dü¤mesine tekrar bas›n,
seçilen program› bafllar.
●
OOPPSS‹‹YYOONN ddüü¤¤mmeessii // ››flfl››kkllaarr››
Bu dü¤meler seçti¤iniz program› ihtiyaçlar›n›za göre
özellefltirmenizi sa¤lar. Her program için tüm opsiyonlar
kullan›lamaz (bkz Bafllatma ve Programlar). E¤er
opsiyon kullan›lam›yorsa ve dü¤meye basarsan›z
düdük üç kez öter. Opsiyon kullan›labiliyorsa düdük
bir kez öter ve dü¤me ›fl›klar›n›n yan›ndaki opsiyon
›fl›¤› seçimi onaylamak için yanar.
‹‹lleerrlleemmee ((KKuurruuttuummaa,, SSoo¤¤uukk DDöönnddüürrmmee,, SSoonn)) //
GGeecciikkmmee ((33ss,, 66ss,, 99ss)) IIflfl››kkllaarr››
Gecikme dü¤mesi yan›ndaki ›fl›k yand›¤›nda, bu ›fl›klar
gecikme zaman›n› göstermek için yan›p söner. Di¤er
programlar s›ras›nda kurutucunun ilerlemesini gösterirler,
ilgili faz bafllad›kça s›ra ile yanarlar.
ZZaammaann EErrtteelleemmee
Baz› programlar›n bafllamas› (bkz Bafllatma ve
Programlar) 3sa ad›mlarla 9 saate kadar geciktirilebilir.
Gecikmeli bafllatma ayarlamadan önce su fliflesinin
bofl oldu¤undan emin olun.
Gecikmeli bafllatma sürerken, gecikme dü¤mesi
yan›ndaki ›fl›k yan›kt›r ve seçilen gecikme süresinin
›fl›¤› yan›p söner (Bafllat/Durdur dü¤mesine bas›ld›ktan
sonra). Gecikmeli bafllatma ayarlamak için, Zaman
Gecikmesi dü¤mesine bas›n, dü¤menin yan›ndaki ›fl›k
ile 3sa gecikme ›fl›¤› yanar. Dü¤meye bir kez daha
bast›¤›n›zda ayar 6sa olur, 3sa ›fl›¤› söner 6sa ›fl›¤›
yanar. Dü¤meye her bas›fl gecikmeyi 3 saat art›r›r, bu
ilgili ›fl›k ile gösterilir. 9sa ›fl›¤› yan›kken, dü¤meye
tekrar basmak gecikmeyi iptal eder. Açma/Kapama
dü¤mesini bas›l› tutmak da iptal eder.
ÖÖnn KK››rr››flfl››kkll››kk ÖÖnnlleemmee
Gecikmeli bafllatma ve bu opsiyon seçildi¤inde
gecikme süresi boyunca giysiler döndürülerek
k›r›fl›kl›klar›n oluflmas› önlenir.
YYüükksseekk IIss››
Zamanl› Kurutma Programlar› içindir. Bu dü¤meye
bast›¤›n›zda yüksek ›s› ayar› seçilir ve dü¤menin
yan›ndaki ›fl›k yanar. Zamanl› programlar varsay›lan
olarak düflük ›s›l›d›r, dü¤menin yan›ndaki ›fl›k yan›kken
dü¤meye basmak düflük ›s› ayar›n› seçer ve ›fl›k söner.
SSoonn KK››rr››flfl››kkll››kk ÖÖnnlleemmee
Seçildi¤inde, kurutma ve so¤urma ifllemlerinin
ard›ndan giysiler ara ara döndürülerek k›r›fl›kl›klar›n
oluflmas› önlenir, bu opsiyon program bitiminde
çamafl›rlar› hemen boflaltamayacaksan›z kullan›fll›d›r.
Bu faz s›ras›nda
SSoonn
›fl›¤› yanar.
SSuuyyuu BBooflflaalltt ››flfl››¤¤››/ HHaazznneessii
(E¤er kurutucu gidere ba¤land›ysa bu ›fl›k göz ard›
edilebilir, çünkü su haznesini boflaltmak gerekli de¤ildir).
Bu ›fl›k yand›¤›nda (yan›p sönme de¤il) size su
haznesini boflaltmay› hat›rlat›r.
Su haznesi program s›ras›nda dolarsa, ›s›t›c› kapan›r
ve kurutucu So¤uk Döndürme periyoduna girer, ›fl›k
yan›p söner ve düdük sesi duyulur. Su haznesini
boflaltmal› ve kurutucuyu tekrar bafllatmal›s›n›z yoksa
giysiler kurumaz. Kurutucuyu tekrar bafllatt›ktan
sonra, ›fl›¤›n sönmesi bir kaç saniye al›r.
Bunun olmas›n› önlemek için her kullan›m sonras›nda
su haznesini boflalt›n (bkz Bak›m).
●
KKaappaa¤¤›› AAççmmaa
Program s›ras›nda kapa¤› açmak (veya Bafllat/Durdur
dü¤mesine basmak) kurutucuyu durdurur ve
afla¤›dakilere sebep olur:
●
Bafllat/Durdur ›fl›¤› turuncu yan›p söner.
●
Gecikme faz› s›ras›nda gecikme geri say›m› devam
eder. Gecikmeli program›n devam edebilmesi için
Bafllat/Durdur dü¤mesine tekrar bas›lmal›d›r.
Geçerli gecikme ayar›n› göstermek için gecikme
›fl›klar›ndan biri yan›p söner.
●
Gecikmeli program›n devam edebilmesi için
Bafllat/Durdur dü¤mesine tekrar bas›lmal›d›r.
‹lerleme ›fl›klar› geçerli durumu gösterecek flekilde
de¤iflir ve Bafllat/Durdur ›fl›¤›n›n yan›p sönmesi
durur ve yeflil yanar.
●
Kurutma program›n›n Son K›r›fl›kl›k Önleme faz›
s›ras›nda program biter. Bafllat/Durdur
dü¤mesine tekrar basmak yeni bir program›
bafltan bafllat›r.
●
Program çevirmeli dü¤mesini döndürmek yeni bir
program seçer ve Bafllat/Durdur ›fl›¤› yeflil yan›p
söner.
Yeterince kuruduklar›n› düflünüyorsan›z bunu
giysileri so¤utmak amac›yla So¤uk Döndürme
program›n› seçmek için kullanabilirsiniz.
Yeni programa bafllamak için Bafllat/Durdur
dü¤mesine bas›n.
●
NNoott
Elektrik kesilirse, makineyi kapat›n veya fiflini çekin.
Elektrik geldi¤inde, Bafllat/Durdur dü¤mesine
bas›n, program kald›¤› yerden devam eder.
8
Page 9
ÇÇaammaaflfl››rrllaarr
ÇÇaammaaflfl››rrllaarr›› ss››nn››ffllaanndd››rrmmaa
●
Çamafl›rlar›n kurutuma makinesinde
kurutulabilece¤inden emin olmak için etiketlerini
kontrol edin.
●
Çamafl›rlar› kumafllar›na göre s›n›fland›r›n.
●
Ceplerini boflalt›n ve dü¤meleri kontrol edin.
●
Fermuar ve kopçalar› kapat›n, gevflek kemer ve
fleritleri ba¤lay›n.
●
Fazla suyu ak›tmak için her giysiyi s›k›n.
! Su damlatan ›slak giysileri kurutucuya koymay›n.
MMaakkssiimmuumm yyüükk mmiikkttaarr››
Maksimum kapasiteden fazlas›n› yüklemeyin.
Bu a¤›rl›klar kuru a¤›rl›klar› gösterir:
Do¤al lifler: 7.5kg maks
Sentetik lifler: 3kg maks
! Kurutucuyu afl›r› YÜKLEMEY‹N, bunu yapmak
kurutma performans›n› düflürür.
TTiippiikk aa¤¤››rrll››kkllaarr
NNoott::
GGiiyyssiilleerr
Bluz Pamuklu 150g (5oz)
Elbise Pamuklu 500g (1lb 2oz)
Kot 700g (1lb 6oz)
10 parça bez 1000g (2lb 3oz)
Gömlek Pamuklu 300g (10oz)
T-Shirt 125g (4oz)
1kg = 1000g (1lb = 16oz)
Di¤er 100g (3oz)
Di¤er 350g (12oz)
Di¤er 200g (7oz)
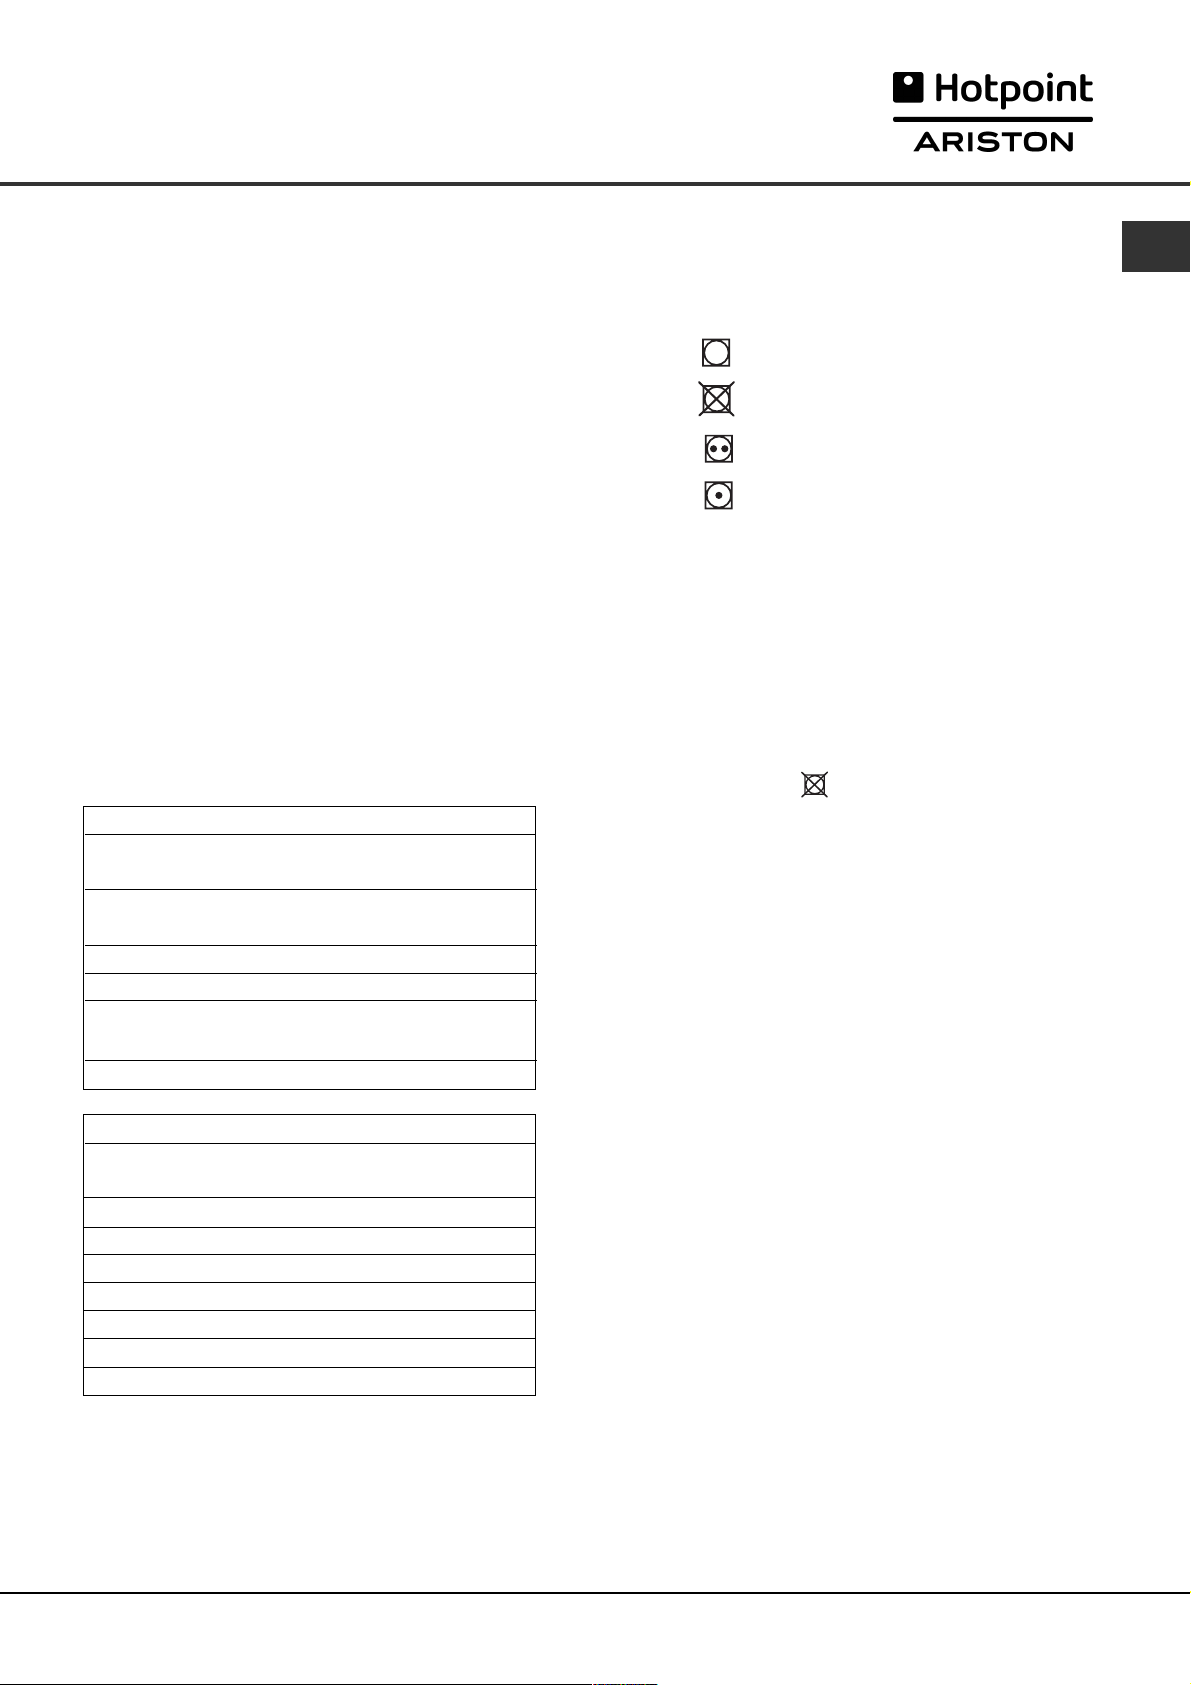
YY››kkaammaa BBaakk››mm EEttiikkeettlleerrii
Özellikle ilk kez kuruturken giysilerin etiketlerine bak›n.
Afla¤›dakiler en bilinen sembollerdir:
Makinede kurutulabilir
Makinede
kkuurruuttmmaayy››nn
Yüksek ›s› ayar›nda kurutun
Düflük ›s› ayar›nda kurutun
MMaakkiinneeddee kkuurruuttmmaa iiççiinn uuyygguunn oollmmaayyaannllaarr
●
Kauçuk veya kauçuk benzeri malzeme içeren veya
plastik filmli (yast›klar, minderler veya PVC
ya¤murluklar), di¤er yan›c› nesneler veya yan›c›
nesne içeren maddeler (saç spreyi bulaflm›fl havl›
gibi).
●
Cam elyaflar› (belirli tiplerde manifaturalar)
●
Kuru temizleme yap›lm›fl giysiler
●
ITCL Kodlu giysiler (bkz Özel giysiler). Bunlar
evde özel kuru temizleme ürünleri ile temizlenebilir.
Talimatlar› dikkatle uygulay›n.
●
Büyük hacimli eflyalar (yorganlar, uyku tulumlar›,
yast›klar, minderler, flilteler vs). Bunlar kururken
genifller ve kurutucudaki hava ak›fl›n› önlerler.
TR
EEyy eeflflyyaallaarr››
Yorgan k›l›f› Pamuklu 1500g (3lb 5oz)
(Çift kiflilik) Di¤er 1000g (2lb 3oz)
Büyük masa örtüsü 700g (1lb 6oz)
Küçük masa örtüsü 250g (9oz)
Çay Havlusu 100g (3oz)
Banyo Havlusu 700g (1lb 6oz)
El Havlusu 350g (12oz)
Çift kiflilik çarflaf 500g (1lb 2oz)
Tek kiflilik çarflaf 350g (12oz)
Pamuklu ve sentetikler bir arada grupland›ysa,
kurutma sonunda pamuklular hala ›slak olabilir.
Bu oldu¤u takdirde ilave k›sa kurutma süresi
uygulay›n.
●
NNoott::
Ayarlanan sürenin son 10 dakikas› So¤uk
Döndürme içindir, zaman› ayarlarken buna dikkat
edin, bu süre çamafl›r› kurutmaz.
9
Page 10

ÇÇaammaaflfl››rrllaarr
TR
ÖÖzzeell ggiiyyssiilleerr
BBaattttaanniiyyee vvee YYaattaakk ÖÖrrttüülleerrii
Orion, Dralon) DÜfiÜK ›s› ayar›nda özel dikkat ile
kkuurruuttuullmmaall››dd››rr
. Uzun süreli kurutmadan kaç›n›n.
PPiilleellii vveeyyaa kk››rr››flfl››kk ggiiyyssiilleerr
talimatlar›n› okuyun.
KKoollaall›› ggiiyyssiilleerr
: bunlar› kolal› olmayanlarla birlikte
kurutmay›n. Kurutucuya koymadan önce kolalay›c›
maddenin mümkün oldu¤unca fazla miktar›n›n
ç›kart›lm›fl oldu¤undan emin olun. Afl›r› kurutmay›n:
kola toz haline gelir ve giysinizde k›r›fl›kl›k b›rak›r, bu
da kolalaman›n amac›na ters düfler.
: akrilikler (Acilan, Courtelle,
: üreticinin kurutma
KKuurruuttmmaa ssüürreelleerrii
Afla¤›daki tablo YAKLAfiIK kurutma sürelerini dakika
olarak vermektedir. A¤›rl›klar kuru giysiler içindir:
Pamuklular
Yüksek (tam) Is›
Çamafl›r makinesinde 800-1000 devirde kurutma zaman›
Yar›m yük Tam yük
1kg 2kg 3kg 4kg 5kg 6kg 7 - 7.5kg
30-50 50-70 70-80 80-100 100-120 120-140140-160
Süreler yaklafl›kt›r ve farkl›l›k gösterebilir:
●
Kurutma ifllemi sonras›nda giysideki su miktar›:
havlular ve narin giysiler çok su tutar.
●
Kumafllar: ayn› kumafl cinsinden oldu¤u halde farkl›
doku ve kal›nl›ktaki kumafllar ayn› kuruma süresine
sahip olmayabilir.
●
Çamafl›r miktar›: tek çamafl›r veya az miktarda
çamafl›r daha uzun sürede kuruyabilir.
●
Kuruluk: Giysilerin baz›lar› ütülenecekse, bunlar
hafif nemliyken al›nabilir. Di¤erleri tamamen
kurumas› için daha uzun süre kalabilir.
●
Is› ayar›.
●
Oda s›cakl›¤›: e¤er kurutucunun bulundu¤u oda
s›cakl›¤› so¤uksa, giysilerin kurutulmas› daha uzun
sürer.
●
Hacimli: baz› hacimli nesneler dikkatle kurutulabilir.
Bu tip nesneleri bir kaç kez ç›kartman›z› öneririz,
kurutma bitene kadar kurutucuya geri koyman›z
gereklidir.
! Giysilerinizi afl›r› kurutmay›n:
Tüm kumafllar yumuflak olmalar›n› sa¤layan bir parça
do¤al nem içerir.
Sentetikler
Düflük (hafif) Is›
Çamafl›r makinesinde düflük devirde kurutma zaman›
Yar›m yük Tam yük
1kg 2kg 3kg
30-40 40-50 50-70
Narinler /
Düflük (hafif) Is›
Çamafl›r makinesinde düflük devirde kurutma zaman›
Yar›m yük Tam yük
1kg 2kg
40-80 80-140
10
Page 11

UUyyaarr››llaarr vvee ÖÖnneerriilleerr
! Bu cihaz uluslararas› güvenlik standartlar›na uygun
flekilde dizayn edilmifl ve üretilmifltir.
Bu uyar›lar güvenlik sebebiyle verilmifltir ve dikkatle
okunmal›d›r.
GGeenneell ggüüvveennlliikk
●
Bu kurutma makinesi yeteriz fiziksel, alg›lama veya
zihinsel kapasitedeki (çocuklar dahil) kiflilerin
kullan›m› için de¤ildir, bu gibi kiflilerin cihaz›
kullanmas› için onlar›n güvenli¤inden sorumlu
kiflinin denetiminde kullanmal›d›rlar.
●
Bu kurutma makinesi ev kullan›m› içindir, profesyonel
amaçl› de¤ildir
●
Cihaza ç›plak ayakla, ›slak el veya ayakla
dokunmay›n.
●
Fiflten tutarak fiflten çekine, kablodan çekmeyin.
●
Kullan›m esnas›nda kurutucu yak›n›nda çocuk
olmamal›d›r. Kurutucuyu kulland›ktan sonra kapat›n
ve fiflten çekin. Çocuklar›n oyuncak olarak
kullanmamalar› için kapa¤›n› kapal› tutun.
●
Kurutucu ile oynamad›klar›ndan emin olmak için
çocuklar gözetilmelidir.
●
Cihaz uygun flekilde kurulmal› ve yeterli
havaland›rmaya sahip olmal›d›r. Cihaz›n önündeki
hava girifli ve arkas›ndaki hava ç›k›fl› asla
kapat›lmamal›d›r (bkz Kurulum).
●
Kurutucuyu alttan hava giriflini önleyecek hal›lar
üzerinde asla kullanmay›n.
●
Yüklemeden önce kurutucunun bofl oldu¤undan
emin olun.
●
●
●
●
●
●
●
●
●
Kurutucunun arkas› çok s›cak olabilir.
Kullan›m s›ras›nda asla dokunmay›n.
Filtre, su haznesi ve kondenser yerinde olmad›¤›
takdirde kurutucuyu asla kullanmay›n (bkz Bak›m).
Kurutucu içinde s›v› yumuflat›c› kullanmay›n, bunu
çamafl›r makinesindeki son durulamaya ekleyin.
Kurutucuyu afl›r› yüklemeyin (maksimum yükler için
bkz Çamafl›rlar).
Su damlayan giysileri kurutucuya koymay›n.
Sadece su ve deterjanla y›kanm›fl, durulanm›fl ve
s›k›lm›fl giysileri kurutun. Su ile YIKANMAMIfi
giysilerin kurutulmas› yang›n tehlikesi oluflturur.
Giysi etiketlerindeki talimatlar› dikkatle kontrol edin
(bkz Çamafl›rlar).
Kimyasal ürünlerle ifllem yap›lm›fl giysileri
kurutmay›n.
Yan›c› maddelerle kontamine olmufl giysileri asla
kurutmay›n (yemek ya¤›, aseton, alkol, petrol,
kerozen, leke ç›kart›c›, balmumu, bal mum ç›kart›c›,
saç spreyleri) bunlar s›cak su ve bol deterjanla
y›kand›ktan sonra kurutulabilir.
●
Kauçuk ve kauçuk içeren maddeleri kurutmay›n
giysiler, kauçuk köpüklü yast›klar, köpükler (lateks
köpük), kauçuk, plastik, dufl bafll›klar›, su geçirmez
dokumalar, polietilen veya ka¤›t vb.
●
Büyük, genifl hacimli maddeleri kurutmay›n
●
Akrilik lifleri yüksek ›s›da kurutmay›n
●
Cepleri tamamen boflalt›n, özellikler çakmaklar
(patlama riski).
●
Her program› So¤uk Döndürme ile tamamlay›n Faz.
●
‹çinde s›cak giysiler varken kurutucuyu kapatmay›n.
●
Her kullan›mdan sonra filtreyi temizleyin (bkz Bak›m).
●
Her kullan›mdan sonra su haznesini boflalt›n (bkz
Bak›m).
●
Kondenseri düzenli aral›klarla temizleyin (bkz Bak›m).
●
Kurutucuda kumafl tüylerinin birikmesine izin
vermeyin.
●
Asla kurutucunun tepesine ç›kmay›n. Hasara sebep
olabilir.
●
Elektrik standartlar›na ve gereksinimlerine daima
uyun (bkz kurulum).
●
Daima orijinal yedek parça ve aksesuar sat›n al›n
(bkz Servis).
! UYARI: Tüm nesneler h›zla ç›kart›l›p yay›larak ›s›
da¤›t›lmad›¤› sürece kurutucuyu asla kurutma ifllemi
bitmeden durdurmay›n.
EEllddeenn çç››kkaarrmmaa
●
Ambalajlar›n at›lmas›: yerel yönetmeliklere uyun,
ambalaj malzemeleri geri dönüfltürülebilir.
●
Eski kurutucunuzun at›lmas›: eski kurutucunun
at›lmas›ndan önce elektrik kablosunu kesin ve
kapa¤›n› ç›kart›n.
EEnneerrjjii ttaassaarrrruuffuu vvee ççeevvrreeyyee ssaayygg››
●
Kurutma ifllemi öncesinde giysilerdeki fazla suyu
s›k›n (çamafl›r makinesi kullan›yorsan›z yüksek
h›zda s›kma kullan›n). Bunu yapmak zaman ve
enerji tasarrufu sa¤lar.
●
Daima tam yük ile kurutma yap›n - enerji tasarrufu:
tek çamafl›r veya az miktarda çamafl›r daha uzun
sürede kuruyabilir.
●
Her kullan›mdan sonra enerji sarfiyat›n› azaltmak
için filtreyi temizleyin (bkz Bak›m).
TR
11
Page 12

BBaakk››mm vvee TTeemmiizzlliikk
TR
EElleekkttrrii¤¤iinn kkaappaatt››llmmaass››
! Kullanmad›¤›n›zda, temizlik s›ras›nda ve tüm bak›m
ifllemlerinde fiflini çekin.
HHeerr kkuullllaann››mm ssoonnrraass››nnddaa ffiillttrreeyyii tteemmiizzlleeyyiinn
Filtre kurutucunun önemli bir parças›d›r:
kurutma s›ras›nda oluflan tüylenmeler burada birikir.
Kurutma bitti¤inde, filtreyi su ile y›kayarak veya elektrik
süpürgesi ile temizleyin. Filtre t›kand›¤›nda, kurutucuya
giren hava önemli ölçüde azalabilir: kurutma süreleri
uzar ve daha fazla enerji tüketilir. Kurutucunuza da
zarar verebilir.
Filtre kurutucunun ön taraf›nda bulunur (bkz çizim).
Filtrenin ç›kart›lmas›:
1. Filtrenin plastik tutucusunu yukar› çekin (bkz çizim).
2. Filtreyi temizleyin ve yerine tak›n.
Filtrenin yerine tam olarak oturdu¤undan emin olun.
! Filtreyi takamdan kurutucuyu kullanmay›n.
HHeerr kkuullllaann››mm ssoonnrraass››nnddaa ssuu hhaazznneessiinnii
bbooflflaalltt››nn
TTaammbbuurruunn tteemmiizzlleennmmeessii
! Afl›nd›r›c›lar, ovma teli veya paslanmaz çelik
temizleyicileri kullanmay›n.
Paslanmaz çelik tambur üzerinde renkli film oluflmaya
bafllayabilir, buna su ve y›kamada kullan›lan temizlik
maddeleri sebep olabilir. Oluflan bu film kurutma
performans›n› etkilemez.
KKoonnddeennsseerr üünniitteessiinniinn tteemmiizzlleennmmeessii
Kondenser ünitesini periyodik olarak (her ay) ç›kart›n
ve temizleyin, temizlemek için so¤uk musluk suyu
alt›nda y›kayabilirsiniz.
Bunu yaparken kondenser arka taraf›ndan so¤uk su
ile y›kanmal›d›r.
Kondenserin ç›kart›lmas›:
1. Kurutucunun fiflini prizden çekin.
2. Kondenser kapa¤›n› çekerek aç›n (bkz çizim).
Üç serbest b›rakma t›rna¤›n› saat yönünde 90˚
döndürerek aç›n ve çekerek kurutucudan ç›kart›n.
3. Conta yüzeylerini temizleyin ve geri tak›n, t›rnaklar›n
sabitlendi¤inden emin olun.
Hazneyi kurutucudan ç›kart›n ve uygun bir yere
boflalt›n.
Su haznesini yerine iyice yerlefltirin.
Yeni kurutma program›na bafllamadan önce hazneyi
kontrol edin ve boflalt›n.
HHeerr kkuullllaann››mm ssoonnrraass››nnddaa ttaammbbuurruu kkoonnttrrooll
eeddiinn
Arkada kalm›fl olabilecek küçük nesneleri (mendiller
gibi) çikartmak için tamburu elle döndürün.
Su haznesi
Filtre
KKuurruuttuuccuunnuunn tteemmiizzlleennmmeessii
●
Metal veya plastik parçalar ve kauçuk bölümler
nemli bez ile temizlenebilir.
●
Periyodik olarak (her 6 ayda bir) ön hava girifl
›zgaralar›n› ve kurutucunun arkas›ndaki
havaland›rmalar› temizleyin. Kondenserin önündeki
ve filtre alan›ndaki birikimleri de s›k s›k elektrik
süpürgesi ile temizleyin.
! Solvent veya afl›nd›r›c› kullanmay›n.
! Kurutucunuz ya¤lama gerektirmeyen özel yataklar
kullan›r.
! Elektriksel ve mekanik güvenli¤inden emin olmak için
kurutucunuzun yetkili servis taraf›ndan düzenli olarak
kontrol edilmesini sa¤lay›n (bkz Servis).
Musluk
Arka
Kondenser ünitesi
Kondenser kapa¤›
12
T›rnaklar
Tutamak
Hava
girifli
Ön
Kondenser ünitesi
Page 13

SSoorruunn ggiiddeerrmmee
Bir gün kurutucunuz çal›flmad›¤› takdirde. Yetkili Servisi (bkz Servis) ça¤›rmadan önce afla¤›daki sorun giderme
önerilerini uygöulad›¤›n›zdan emin olun.
SSoorruunn::
KKuurruuttuuccuu ççaall››flflmmaayyaa bbaaflflllaamm››yyoorr
OOllaass›› sseebbeepp // ÇÇöözzüümm::
●
Fifl prize takl› de¤il veya temas etmiyor.
●
Elektrik kesik.
●
Sigorta atm›fl. Cihaz› baflka bir prize takmay› deneyin.
●
Uzatma kablosu kullan›yor musunuz? Cihaz› prize do¤rudan takmay›
deneyin.
●
Kapak tam kapal› m›?
●
PROGRAMLAR çevirmeli dü¤mesi düzgün ayarlanmam›fl olabilir
(bkz Bafllatma ve Programlar).
●
BAfiLAT/DURDUR dü¤mesine bas›lmam›fl olabilir (bkz Bafllatma ve
Programlar).
KKuurruuttmmaa iiflfllleemmii bbaaflflllaamm››yyoorr..
KKuurruuttmmaa ççookk uuzzuunn ssüürrüüyyoorr..
●
Gecikme ayarlam›fl olabilirsiniz (bkz Bafllatma ve Programlar).
●
Filtre temizlenmemifl olabilir (bkz Bak›m).
●
Su haznesinin boflalt›lmas› gerekiyor mu? Su boflaltma ›fl›¤› yan›p sönüyor
mu? (bkz Bak›m).
●
Kondenserin temizlenmesi gerekiyor mu? (bkz Bak›m).
●
S›cakl›k ayar› seçti¤iniz kumafl tipi için uygun de¤il (bkz Bafllatma ve
Programlar ve bkz Çamafl›rlar).
●
Do¤ru kurutma zaman› seçilmemifl (bkz Çamafl›rlar).
●
Hava girifli veya arka havaland›rma t›kal› (bkz Kurulum ve bkz Bak›m).
●
Giysiler çok ›slak (bkz Çamafl›rlar).
●
Kurutucu çok dolu (bkz Çamafl›rlar).
TR
SSuu bbooflflaallttmmaa ››flfl››¤¤›› yyaann››yyoorr aammaa
kkuurruuttuuccuu ddaahhaa ççookk kk››ssaa bbiirr ssüürree
ççaall››flfltt››..
SSuu bbooflflaallttmmaa ››flfl››¤¤›› yyaann››yyoorr vvee ssuu
hhaazznneessii ddoolluu ddee¤¤iill..
OOPPSS‹‹YYOONN vvee BBAAfifiLLAATT//DDUURRDDUURR
››flfl››kkllaarr›› ttuurruunnccuu yyaann››pp ssöönnüüyyoorr..
PPrrooggrraamm bbiittttii¤¤iinnddee ggiiyyssiilleerr
bbeekklleenneennddeenn ddaahhaa ››ssllaakk..
●
Program›n bafl›nda su haznesi boflalt›lmam›fl olabilir. Su boflaltma
sinyalini beklemeyin, yeni kurutma program›na bafllamadan önce daima
su haznesini kontrol edin ve boflalt›n (bkz Bak›m).
●
Bu normaldir, hazne dolu oldu¤unda ›fl›k yan›p söner. Bu ›fl›k yand›¤›nda,
yan›p sönme de¤il size su haznesini boflaltmay› hat›rlat›r (bkz Bafllatma
ve Programlar).
●
E¤er Opsiyon ›fl›klar› ve BAfiLAT/DURDUR ›fl›klar› Kondenseri Temizle ve
So¤uk Döndürme ›fl›klar› ile birlikte yan›p sönüyorsa veya
BAfiLATMA/DURDUR ›fl›¤› Filtreyi Temizle, Kondenseri Temizle, So¤uk
Döndürme ve Son ›fl›klar› ile birlikte yan›yorsa:
- Kapat›n ve fiflini çekin. Filtre ve kondenseri temizleyin (bkz Bak›m).
Fiflini tak›n ve aç›n, baflka bir program bafllat›n. E¤er ayn› ›fl›k
kombinasyonlar› yan›p sönüyorsa Yetkili Servisi ça¤›r›n (bkz Servis).
●
Opsiyon ›fl›klar› ve BAfiLAT/DURDUR ›fl›¤› baflka kombinasyonlarda
yan›yorsa: Yanan ›fl›klar› not edin ve Yetkili Servisi aray›n (bkz Servis).
! Kurutucu güvenli¤i aç›s›ndan maksimum program süresi 3 saattir. E¤er bu
süre içinde otomatik program gereken son nem durumunu alg›lamazsa,
kurutucu program› tamamlar ve durur. Yukar›daki noktalar› kontrol edin ve
program› tekrar çal›flt›r›n, sonuçlar hala ›slaksa Yetkili Servisi aray›n (bkz
Servis).
13
Page 14

SSeerrvviiss
TR
YYeettkkiillii SSeerrvviissii aarraammaaddaann öönnccee::
●
Sorunu kendi kendinize çözüp çözemeyece¤inizi
görmek için Sorun Giderme rehberine bak›n (bkz
Sorun Giderme).
●
Çözemedi¤iniz takdirde, kurutucuyu kapat›n ve size
en yak›n Yetkili Servisi aray›n.
YYeettkkiillii SSeerrvviissee ssööyylleennmmeessii ggeerreekkeennlleerr::
●
isim, adres ve posta kodu.
●
telefon numaras›.
●
sorunun tipi.
●
sat›n alma tarihi.
●
cihaz›n modeli (Mod.).
●
seri numaras› (S/N).
Bu bilgiler makinenin kapa¤›n›n içindeki etikette
bulunabilir.
YYeeddeekk PPaarrççaallaarr
Bu kurutucu karmafl›k bir cihazd›r. Kendi kendinize
veya yetkili olmayan kiflilerce tamir etmeye kalk›flmak
bir veya daha fazla kiflinin yaralanmas›na, makinenin
hasar görmesine ve yedek parça garantisinin geçersiz
olmas›na yol açabilir.
Makineyi kullan›rken bir sorunla karfl›lafl›rsan›z yetkili
servisi ça¤›r›n.
Yedek parçalar özel olarak bu cihaz için dizayn
edilmifltir baflka amaçlarla kullan›lamaz.
KKaarrflfl››llaaflfltt››rrmmaall›› PPrrooggrraammllaarr
●
EN61121'e göre karfl›laflt›rmal› test için tavsiye edilen programlar
Program Seçilecek program Yük miktar›
(EN61121)
Kuru Pamuklu Pamuklular - Kuru 7.5 kg
Ütü Kurulu¤unda Pamuklu Zamanli Kurutma Yüksek Is› (100 Dakika) 7.5 kg
Kolay bak›m tekstil Sentetikler - Kuru 3 kg
NNoott::
!
Bu program opsiyonlar›n›n tam listesi de¤ildir (bkz Bafllatma ve Programlar).
14
Bu cihaz afla¤›daki EC Yönetmeliklerine uygundur:
- 2006/95/EC (Düflük Voltaj Gereksinimi)
- 89/336/EEC, 92/31/EEC ve 93/68/EEC (Elektromanyetik Uyumluluk)
Page 15

Instruction booklet
TUMBLE DRYER
TR
TTüürrkkççee,, 11
TCL831B
GB
English, 15
Contents
Important Information, 16-17
Installation, 18
Where to put your dryer
Ventilation
Door reversal instructions
Water drain
Electrical connection
Before you start using your dryer
Dryer description, 19
To open the door
The features
Control panel
Start and programmes, 20-22
Choosing a programme
Table of programmes
The controls
Laundry, 23-24
Sorting your laundry
Wash care labels
Special clothing items
Drying times
GB
Warnings and Suggestions, 25
General safety
Disposal
Saving energy and respecting the environment
Maintenance and Care, 26
Switching off the electricity
Cleaning the filter after each cycle
Empty the water container after each cycle
Check the drum after each cycle
Cleaning the condenser unit
Cleaning the dryer
Troubleshooting, 27
Service, 28
Spare parts
! Keep this instruction booklet on hand in order to refer to it when necessary. Take it with you when you move, and
should you sell this appliance or pass it on to another party, make sure that this booklet is supplied along with the
dryer so that the new owner may be informed about warnings and suggestions on how the appliance works.
! Read these instructions carefully; the following pages contain important information on installation and suggestions
on how the appliance works.
15
Page 16

Important Information
GB
For your Condenser dryer to operate efficiently, you must follow the regular maintenance schedule shown below:
Fluff Filter...
! You MUST clean the fluff filter after EVERY drying
cycle.
STEP 1.
Open the door of your
dryer.
! Failure to clean the filter after EVERY drying cycle will affect the drying performance of your machine.
- It will take longer to dry and as a result will use more electricity during drying.
STEP 2.
Pull out the filter (using
the two finger grips).
STEP 3.
Clean any fluff deposits
from the filter mesh.
STEP 4.
Refit the filter - NEVER
run the dryer without the
filter in position.
Water Container...
! You MUST empty the water container after EVERY
drying cycle.
STEP 1.
Pull the water container
towards you and remove
it fully from the dryer.
! Failure to empty the water container will result in:
- The machine will stop heating (so the load may still be wet at the end of the drying cycle).
- The ‘Empty Water’ light will flash to tell you that the water container is full.
STEP 2.
Empty all the water
collected in the water
container.
STEP 3.
Refit the water container,
ensuring that it is pushed
fully back into position.
Priming the Water Collection System
When your dryer is new, the water container will not collect water until the system is primed... this will take 1 or 2 drying
cycles. Once primed it will collect water during every drying cycle.
! The ‘Empty Water’ light
stays on - To remind you to
empty the water container
at the start and at the
end of each programme.
16
Page 17

Important Information
Condenser Unit...
! You MUST clean the fluff from the condenser EVERY
month.
STEP 1.
Open the condenser cover
- hold the handle and
pull towards you.
STEP 2.
Remove the condenser by
rotating the 3 clips then
pulling the condenser
towards you.
(There may be some water
in the tubes, this is normal).
STEP 3.
Flush the condenser, from
the rear with water, to
remove any fluff deposits.
GB
STEP 4.
Refit the condenser unit
- ensure that the unit is
pushed in fully, all 3 clips
are re-secured and the
positiong arrows on the
front of the condenser are
pointing upwards.
●
Check that:
- The positioning arrows are pointing upwards.
- The 3 clips are re-secured back into their ‘lock’ position.
Rotate 3 clips
! Failure to clean the condenser could cause premature
failure of your dryer.
17
Page 18

Installation
GB
Where to put your dryer
●
Place your dryer at a distance from gas ranges,
stoves, heaters, or cook tops because flames can
damage the appliance.
Minimum gap 10mm
●
If you are going to install
the appliance under a work
counter, be sure to leave a
10mm space between the
Minimum gaps
15mm
top and any other objects
on or above the machine and
a 15mm space between the
sides and lateral furnishings
or walls. This is to ensure
proper air circulation. Make sure that the back vents
are not obstructed.
Ventilation
When the dryer is in use, there has to be adequate
ventilation. Make sure you put your dryer in an
environment that is not damp and has proper air
circulation throughout. Airflow around the dryer is
essential to condense the water produced during the
washing, the dryer will not operate efficiently in an
enclosed space or cupboard.
! We do not recommend that the dryer is installed in a
cupboard but the dryer must never be installed
behind a lockable door, a sliding door or a door with a
hinge on the opposite side to that of the dryer door.
! If using the dryer in a small or cold room some
condensation could be experienced.
Door Reversal Instructions
Hinge
Door latch
Hinge
The door of your dryer is reversible and can easily be
changed. Exchange diagonally hinge brackets and
blanking screws. Exchange door latch and catch with
their opposite blanking plates (see diagram above).
Door catch
Water drain
If your dryer is installed next to a drain the water can be
plumbed into this drain. This does away with the need to
empty the water container. If the dryer is stacked onto or
installed next to a washing machine it can share the same
drain. The height of the drain must be less than 3' (1m)
from the bottom of the dryer.
Remove the existing clip and hose
from position shown (see diagram).
Remove clip and hose
from here...
Fit a suitable length of hose to the
new location shown (see diagram)
and refit clip.
...fit new hose and refit
clip here.
! Make sure that the hose is not squashed or kinked when
the dryer is in its final location.
Electrical connections
Make sure of the following before you insert the plug
into the the electrical socket:
●
The socket must be grounded.
●
The socket must be able to sustain the machines
maximum power, which is indicated on the rating
label (see Dryer Description).
●
Power voltage must be within the values indicated
on the rating label (see Dryer Description).
●
The socket must be compatible with the dryers plug.
Should this not be the case, replace the plug or the
socket.
! The dryer must not be installed outdoors, even if the
space is sheltered. It can be very dangerous if it is
exposed to rain or storms.
! Once installed, the dryers electrical wire and plug
must be within easy reach.
! Do not use extension cords.
! The power cord must not be bent or squashed.
! The power cord supplied should be checked
periodically and replaced by a cord specially prepared
for this dryer and fitted only by authorised technicians
(see Service). New or longer power cords are supplied
at an extra charge by authorised dealers.
! The manufacturer denies any responsibility should any
of these rules not be followed.
! If in doubt about any of the above consult a qualified
electrician.
Before you start using your dryer
Once you have installed your dryer and before you
use it, clean the inside of the drum to remove any dust
that could have accumulated during transport.
18
Page 19

Dryer Description
To open the door The features
Press and release the front
panel in position shown
Condenser unit
(Cover open)
Condenser cover
Condenser cover handle
(Pull to open)
Control panel
PROGRAMMES
Knob
Indicator
Water container
Filter
Progress or Delay
Lights
Rating plate
Model &
Serial
numbers
Air intake
grille
Clean Condenser
Light
Clean Filter
Light
GB
Drying Guide
The ON/OFF button (Açma/Kapama) : If the dryer
is running and this button is pressed, the dryer stops.
Press again, the dryer restarts.
The Drying Guide allows you to consult a user friendly
table of fabric types and load capacities.
The PROGRAMMES knob sets the programme: rotate
it until the indicator is pointing to the programme you want
to select (see Start and Programmes).
The OPTION buttons/lights select available options for
your selected programme. The lights indicate that the
option has been selected (see Start and Programmes).
The START/PAUSE button/light (Bafllat/Durdur)
starts a selected programme. When you press this
button there will be one beep and the progress lights
will flash to confirm the action. When a programme is
running, holding this button in pauses the programme
and stops the dryer.
The light is green when a programme is running, flashing
amber if the programme has been paused or flashing
green if on standby waiting to start a programme (see
Start and Programmes).
ON/OFF
Button
OPTION
Buttons & Lights
The Progress or Delay lights show you the status of
the programme, or the delay time when they flash.
During a delayed start the lights flash to show the
delay selected. When (not flashing) they show each
stage of the programme by the corresponding light
turning on (see Start and Programmes).
The Empty Water indicator light (
that the water container should be emptied. The light
will take a few seconds to go out after replacing the
empty water container, the dryer must be running for this
to happen (see The Controls).
Note: If the water bottle fills the indicator light flashes, the
heat is turned off and your clothes will not dry.
The Clean Filter light (
reminder before every programme that it is essential
to clean the filter every time the dryer is used (see
Maintenance and Care).
The Clean Condenser light (
gives you a reminder that it is essential to clean the
condenser at regular intervals (see Maintenance and
Care).
START/PAUSE
Button & Light
FFiillttrreeyyii TTeemmiizzllee
KKoonnddeennsseerrii TTeemmiizzllee
Empty Water
Light
SSuuyyuu BBooflflaalltt
) gives you a
) signals
)
19
Page 20

Start and Programmes
GB
Choosing a programme
1. Plug the dryer into the electrical socket.
2. Sort your laundry according to fabric type (see
Laundry).
3. Open the door and make sure the filter is clean
and in place and the water container is empty
and in place (see Maintenance).
4. Load the machine and make sure items are not in
the way of the door seal. Close the door.
5. If none of the lights are on: Press the ON/OFF
button (Açma/Kapama).
6. Choose a programme by checking the Programmes
Guide (see Programmes) as well as the indications
for each type of fabric (see Laundry).
- Select a programme by rotating the
PROGRAMMES knob.
7. Set a delay time and other options if necessary.
8. The START/PAUSE light (Bafllat/Durdur) is flashing
green:
- press the START/PAUSE button (Bafllat/Durdur)
to begin.
Easy Iron Programme (
‘Easy Iron’ is a short 10 minute programme (8 minutes of heat followed by a 2 minute cool tumble period) which
fluffs the fibres of clothing that have been left in the same position/location for an extended period of time.
The cycle relaxes the fibres and makes them easier to iron and fold.
! ‘Easy Iron’ is not a drying programme and should not be used for wet articles of clothing.
For best results:
1. Do not load more than the maximum capacity.
These numbers refer to the dry weight:
Fabric Maximum load
Cotton and Cotton mixtures 2.5kg
Synthetics 2kg
Denim 2kg
2. Unload the dryer immediately after the end of the programme, hang, fold or iron the articles and put
them away in the closet. Should this not be possible repeat the programme.
The ‘Easy Iron’ effect varies from one fabric to the next. It works well on traditional fabrics like Cotton or Cotton mix,
and less well on acrylic fibres and on materials such as Tencel®.
KKoollaayy ÜÜttüü))
The green light stops flashing.
During the drying programme, you can check on
your laundry and take out items that are dry
while others continue drying. When you close
the door again, press the START/PAUSE button
(Bafllat/Durdur) in order to resume drying.
(When the door is opened the START/PAUSE light
((BBaaflflllaatt//DDuurrdduurr))
closed and the START/PAUSE button
pressed, the START/PAUSE light
will stop flashing and show green.)
9. When the programme is complete. The buzzer
will sound. Open the door, take the laundry out,
clean the filter and replace it. Empty the water
container and replace it (see Maintenance).
If the Post Creasecare option (Son K›r›fl›kl›k
Önlemehas) been selected and you do not
remove the laundry immediately, the dryer will
tumble occasionally for 10 hours or until you open
the door.
10. Unplug the dryer.
will flash Amber, after the door is
((BBaaflflllaatt//DDuurrdduurr))
((BBaaflflllaatt//DDuurrdduurr))
Wool Programme
●
This is a programme for tumble dryer safe garments marked with the symbol .
●
It can be used for load sizes up to 1kg (approximately 3 sweaters).
●
We recommend that garments are turned inside out before drying.
●
This programme will take about 60 minutes, but may take longer depending on the size and density of the
load and the spin speed used in your washer.
●
Loads dried using this programme are usually ready to wear, but on some heavier garments the edges may be
slightly damp. Allow these to dry naturally as over-drying could damage garments.
! Unlike other materials, the mechanism of wool shrinkage is irreversible; i.e. it will not stretch back to original size
and shape.
! This programme is not suitable for Acrylic garments.
The wool drying cycle of this tumble dryer has been approved by The Woolmark Company for the drying of
Woolmark garments labelled as machine wash and tumble dry, provided that the garments are dried according to
instructions on the garment label and those issued by the manufacturer of this tumble dryer (M0616).
This is the first and only wool drying cycle approved by The Woolmark Company.
20
((YYüünnllüülleerr ))
Page 21

Start and Programmes
Programmes
! If none of the lights are on; Press the On/Off button (Açma/Kapama) and then select programme.
Programme
1
Cottons
Extra Dry
((PPaammuukklluullaarr
- Ekstra Kuru
2
Cottons
Cupboard Dry
((PPaammuukklluullaarr
))
- Kuru
3
Synthetics
Cupboard Dry
((SSeenntteettiikklleerr
))
- Kuru
4
Easy Iron
((KKoollaayy ÜÜttüü))
Timed Drying
(160, 140, 120,
100, 80, 70,
60, 50, 40 or
30 minutes)
What it does... How to set it... Note:
Dries your clothes on High
heat setting, ready for
wearing.
1. Position the PROGRAMME knob on
2. Select any Options, if required.
3. Press the START/PAUSE button
(Bafllat/Durdur) .
))
Dries your clothes on High
heat setting, ready for
putting away.
1. Position the PROGRAMME knob on
2. Select any Options, if required.
3. Press the START/PAUSE button
(Bafllat/Durdur) .
Dries your clothes on Low
heat setting , ready for
putting away.
1. Position the PROGRAMME knob on
2. Select any Options, if required.
3. Press the START/PAUSE button
(Bafllat/Durdur) .
Brief programme
(approximately 10 minutes)
that softens fibres of clothing
that is ready for ironing.
Dries wet clothing that you
wish to dry on low heat or
small loads (less than 1kg).
Can be used with high heat
option if you prefer to use a
timed programme.
1. Position the PROGRAMME knob on
2. Press the START/PAUSE button
(Bafllat/Durdur) .
1. Position the PROGRAMME knob on
the desired time: 160, 140, 120, 100,
80, 70, 60, 50, 40 or 30.
2. Select any Options, if required.
3. Press the START/PAUSE button
(Bafllat/Durdur) .
Options available:
Delayed Start
(Zaman Erteleme)
Pre-Creasecare
(Ön K›r›fl›kl›k Önleme)
Post Creasecare
(Son K›r›fl›kl›k Önleme)
Options available:
Delayed Start
(Zaman Erteleme)
Pre-Creasecare
(Ön K›r›fl›kl›k Önleme)
Post Creasecare
(Son K›r›fl›kl›k Önleme)
Options available:
Delayed Start
(Zaman Erteleme)
Pre-Creasecare
(Ön K›r›fl›kl›k Önleme)
Post Creasecare
(Son K›r›fl›kl›k Önleme)
! This is not a drying
programme (see previous
page).
Options available:
None
Options available:
High Heat
(
Yüksek Is›)
Delayed Start
(Zaman Erteleme)
Pre-Creasecare
(Ön K›r›fl›kl›k Önleme)
Post Creasecare
(Son K›r›fl›kl›k Önleme)
GB
5
Cool Tumble
((SSoo¤¤uukk
DDöönnddüürrmmee))
6
Woolmark
((YYüünnllüülleerr))
Brief programme
(approximately 10 minutes)
that cools fibres or clothing.
Dries your Woollen clothes,
(see previous page).
1. Position the PROGRAMME knob on
2. Press the START/PAUSE button
(Bafllat/Durdur) .
1. Position the PROGRAMME knob on
2. Press the START/PAUSE button
(Bafllat/Durdur) .
Consult ‘suggested drying
times’ (see Laundry).
The last 10 minutes of these
programmes is the Cool
Tumble phase, see below.
Options available:
None
Options available:
None
21
Page 22

GB
Start and Programmes
The Controls
●
PROGRAMMES knob
! Warning, if after pressing the Start/Pause button
(Bafllat/Durdur) , the programmes knob position
has changed, the new position will NOT change the
programme selected.
To change a selected programme, press the
Start/Pause button (Bafllat/Durdur) ,the light
flashes Amber to indicate the programme is paused.
Select the new programme and any options required,
the light will then flash green. Press the Start/Pause
button (Bafllat/Durdur) again and the new
programme will start.
●
OPTION buttons / lights
These buttons are used to customise the selected
programme to your requirements. Not all options are
available for all programmes (see Start and Programmes).
If an option is not available and you press the button,
the buzzer will beep three times. If the option is
available there will be one beep and the option light
next to the button lights to confirm the selection.
Post Creasecare
When selected, the clothes are occasionally tumbled
after the end of the drying and cool tumble cycles, to
help prevent creases developing should you not be
available to remove the load immediately the programme
is complete. The
Empty Water
(If you have plumbed your dryer to a drain this light
can be ignored, as there is no need to empty the water
container).
When this light is on (not flashing) it reminds you to
empty the water container.
If the water container fills during a programme, the
heater turns off and the dryer does a period of Cool
Tumble then the light flashes and the buzzer sounds.
You must empty the water container and restart the
dryer or the clothes will not dry. After re-starting the
dryer, the light will take a few seconds to go out.
To avoid this always empty the water container each
time you use the dryer (see Maintenance).
●
Door Opening
((SSoonn KK››rr››flfl››kkll››kk ÖÖnnlleemmee))
SSoonn
light is on during this phase.
((SSuuyyuu BBooflflaalltt))
Light / Container
Progress (Drying ‘
DDöönnddüürrmmee’’
99ss’’
‘
) Lights
, End ‘
KKuurruuttuummaa’’
SSoonn’’
) / Delay (3hr ‘
, Cool Tumble ‘
33ss’’
, 6hr ‘
SSoo¤¤uukk
66ss’’
, 9hr
When the light next to the delay button is on, these lights
flash to indicate the delay time selected. During other
programmes they indicate the progress of the dryer,
each one comes on as the corresponding phase starts.
Time Delay
((ZZaammaann EErrtteelleemmee))
The start of some programmes (see Start and
Programmes) can be delayed for up to 9 hours in 3hr
steps. Ensure the water bottle is emptied before setting
a delayed start.
When a delayed start is in progress the light next to the
delay button will be on and the selected delay period
light will flash (after the Start/Pause button (Bafllat/Durdur)
has been pressed).
To set a delayed start, press the Time Delay button,
and the light next to the button will come on together
with the 3hr delay light. Pressing the button again will
advance the delay setting to 6hr, the 3hr light goes
out and the 6hr light is on. Each time you press the
button the delay setting advances 3 hours, as indicated
by the corresponding light. If the 9hr light is on,
pressing the button again will cancel the delay.
Holding in the On/Off button (Açma/Kapama) will also
cancel.
Pre Creasecare
((ÖÖnn KK››rr››flfl››kkll››kk ÖÖnnlleemmee))
When a delayed start and this option have been
selected the clothes are tumbled occasionally during
the delayed period to help prevent creases developing.
High Heat
((YYüükksseekk IIss››))
Available for Time Drying Programmes. Press this button
and a high heat setting is selected and the light next to
the button comes on. Timed programmes have a
default of low heat, if the light alongside the button is
on then pressing the button selects a low heat setting
and the light goes out.
Opening the door (or pressing the Start/Pause button
(Bafllat/Durdur) ) during a programme will stop the
dryer and have the following effects:
●
The Start/Pause light (Bafllat/Durdur) flashes
Amber.
●
During a delay phase the delay will continue to
count down. The Start/Pause button (Bafllat/Durdur)
must be pressed to resume the delay programme.
One of the delay lights will flash to show the
current delay setting.
●
The Start/Pause button (Bafllat/Durdur) must
be pressed to resume the programme. The
progress lights will change to show the current
status and the Start/Pause light (Bafllat/Durdur)
will stop flashing and turn green.
●
During the post creasecare (Son K›r›fl›kl›k Önleme)
phase of a drying programme, the programme will
finish. Pressing the Start/Pause button (Bafllat/Durdur)
will re-start a new programme at the beginning.
●
Changing the programmes knob will select a new
programme and the Start/Pause light
(Bafllat/Durdur) will flash green. You can use this
to select the Cool Tumble programme (So¤uk
Döndürme) to cool the clothes, if you find them
dry enough. Press the Start/Pause button
(Bafllat/Durdur) to begin a new programme.
●
Note
If you have a power cut, switch off the power or
remove the plug. When power is restored, press the
Start/Pause button (Bafllat/Durdur) and the
programme will resume.
22
Page 23

Laundry
Sorting your laundry
●
Check symbols on clothing labels to make sure
that the articles can be tumble dried.
●
Sort laundry by fabric type.
●
Empty pockets and check buttons.
●
Close zippers and hooks and tie loose belts and
strings.
●
Wring out each item in order to eliminate as much
excess water as possible.
! Do not load dripping wet clothes into the dryer.
Maximum load size
Do not load more than maximum capacity.
These numbers refer to dry weight:
Natural fibres: 7.5kg max (16.5lb)
Synthetic fibres: 3kg max (6.6lb)
! DO NOT overload the dryer as this could result in
reduced drying performance.
Typical weights
Note: 1kg = 1000g (1lb = 16oz)
Clothes
Blouse Cotton 150g (5oz)
Other 100g (3oz)
Dress Cotton 500g (1lb 2oz)
Other 350g (12oz)
Jeans 700g (1lb 6oz)
10 nappies 1000g (2lb 3oz)
Shirt Cotton 300g (10oz)
Other 200g (7oz)
T-Shirt 125g (4oz)
Wash Care Labels
Look at the labels on your garments, especially when
tumble drying for the first time. The following symbols
are the most common:
May be tumble dried
Do not tumble dry
Tumble dry at high heat setting
Tumble dry at low heat setting
Items not suitable for tumble drying
●
Articles that containing rubber or rubber-like
materials or plastic film (pillows, cushions, or PVC
rainwear), any other flammable articles or objects
that contain flammable substances (towels soiled
with hair spray).
●
Glass fibres (certain types of draperies)
●
Items which have been dry cleaned
●
Items with the ITCL Code (see Special
clothing items). These can be cleaned with special
at-home dry cleaning products. Follow instructions
carefully.
●
Large bulky items (quilts, sleeping bags, pillows,
cushions, large bedspreads etc). These expand
when drying and would prevent airflow through
the dryer.
GB
Household Items
Duvet cover Cotton 1500g (3lb 5oz)
(Double) Other 1000g (2lb 3oz)
Large Tablecloth 700g (1lb 6oz)
Small Tablecloth 250g (9oz)
Tea Towel 100g (3oz)
Bath Towel 700g (1lb 6oz)
Hand Towel 350g (12oz)
Double Sheet 500g (1lb 2oz)
Single Sheet 350g (12oz)
At the end of a drying cycle, cottons could still be
damp if you grouped cottons and synthetics together.
If this happens simply give them an additional short
period of drying.
●
Note: The last 10 minutes of any time set is the
Cool Tumble, so allow for this when setting the time,
as this period will not dry your laundry.
23
Page 24

Laundry
GB
Special clothing items
Blankets and Bedspreads: acrylic items (Acilan,
Courtelle, Orion, Dralon) must be dried with special
care on LOW heat setting. Avoid drying for a long
period of time.
Pleated or creased garments: read the manufacturer’s
drying instructions on the garment.
Starched articles: do not dry these with non-starched
items. Make sure that as much of the starch solution is
removed from the load as possible before placing it in
the dryer. Do not over-dry: the starch will become
powdery and leave your clothing limp, which defeats
the purpose of starch.
Drying times
The table below presents APPROXIMATE drying times
in minutes. Weights refer to dry garments:
Cottons
High (full) Heat
Drying times 800-1000rpm in washing machine
Half Load Full Load
1kg 2kg 3kg 4kg 5kg 6kg 7 - 7.5kg
30-50 50-70 70-80 80-100 100-120 120-140140-160
Synthetics
Low (gentle) Heat
Drying times on reduced spin in washing machine
Half Load Full Load
1kg 2kg 3kg
30-40 40-50 50-70
Times are approximate and can vary depending
upon:
●
Amount of water retained in clothes after spin
cycle: towels and delicates retain a lot of water.
●
Fabrics: items that are the same type of fabric but
different textures and thicknesses may not have
the same drying time.
●
Quantity of laundry: single items or small loads
may take longer to dry.
●
Dryness: If you are going to iron some of your
clothes, they can be taken out while still a bit
damp. Others can be left longer if you need them
to be completely dry.
●
Heat setting.
●
Room temperature: if the room where the dryer is
located is cold, it will take longer for the dryer to
dry your clothes.
●
Bulk: some bulky items can be tumble dried with
care. We suggest that you remove these items
several times, shake them out, and return them to
the dryer until finished.
! Do not over-dry your clothes.
All fabrics contain a little natural moisture, which
keeps them soft and fluffy.
Acrylics /
Low (gentle) Heat
Drying times on reduced spin in washing machine
Half Load Full Load
1kg 2kg
40-80 80-140
24
Page 25

Warnings and Suggestions
●
! The appliance has been designed and built
according to international safety standards.
These warnings are given for safety reasons and must
be read carefully.
General safety
●
This tumble dryer is not intended for use by
persons (including children) with reduced physical,
sensory or mental capabilities, or lack of experience
and knowledge, unless they have been given
supervision or instruction concerning use of the
appliance by a person responsible for their safety.
●
This tumble dryer has been designed for home,
and not professional use.
●
Do not touch the appliance while barefoot or with
wet hands or feet.
●
Unplug the machine by pulling on the plug, not
the cord.
●
Children must not be in proximity of the dryer
when in use. After using the dryer, turn it off and
unplug it. Keep the door closed to make sure that
children do not use it as a toy.
●
Children should be supervised to ensure that they
do not play with the dryer.
●
The appliance must be installed correctly and
have proper ventilation. The air intake at the front
of the dryer and rear vent behind the dryer should
never be obstructed (see Installation).
●
Never use the dryer on carpeting where the pile
height would prevent air from entering the dryer
from the base.
●
Check to see if the dryer is empty before loading it.
●
●
●
●
●
●
●
●
●
The back of the dryer could become very
hot. Never touch it while in use.
Do not use the dryer unless the filter, water
container and condenser are securely in place
(see Maintenance).
Do not use liquid fabric softeners in the dryer, add
it to the final rinse of your wash.
Do not overload the dryer (see Laundry for
maximum loads).
Do not load items that are dripping wet.
Tumble dry items only if they have been washed
with detergent and water, rinsed and been through
the spin cycle. It is a fire hazard to dry items that
HAVE NOT been washed with water.
Carefully check all instructions on clothing labels
(see Laundry).
Do not dry garments that have been treated with
chemical products.
Never dry articles that are contaminated with
flammable substances (cooking oil, acetone, alcohol,
petrol, kerosene, spot removers, turpentine, waxes,
wax removers and hair sprays), unless washed in
hot water with an extra amount of detergent.
Do not tumble dry rubber, rubber backed articles and
clothes, pillows fitted with foam rubber pads, foam
(latex foam), rubber, plastic, shower caps, waterproof
textiles, nappy pants or liners, polythene or paper.
●
Do not tumble dry large, very bulky items.
●
Do not tumble dry acrylic fibres at high
temperatures.
●
Remove all objects from pockets, especially
lighters (risk of explosion).
●
Complete each programme with its Cool Tumble
Phase.
●
Do not turn off the dryer when there are still
warm items inside.
●
Clean the filter after each use (see Maintenance).
●
Empty the water container after each use (see
Maintenance).
●
Clean the condenser unit after regular intervals
(see Maintenance).
●
Do not allow lint to collect around the dryer.
●
Never climb on top of the dryer. It could result in
damage.
●
Always follow electrical standards and
requirements (see Installation).
●
Always buy original spare parts and accessories
(see Service).
! WARNING: Never stop the dryer before the end of the
drying cycle unless all items are quickly removed and
spread out so that the heat is dissipated.
Disposal
●
Disposing of the packaging material: follow local
regulations, so the packaging can be recycled.
●
Disposal of your old dryer: cut the power cord and
remove the door before disposing of an old dryer.
Saving energy and respecting the
environment
●
Wring out items to eliminate excess water before
tumble drying (if you use a washing machine first,
select a high spin cycle). Doing this will save time
and energy during drying.
●
Always dry full loads - you save energy: single
items or small loads take longer to dry.
●
Clean the filter after each use to contain energy
consumption costs (see Maintenance).
GB
25
Page 26

Maintenance and Care
GB
Switching off the electricity
! Unplug your dryer when not using it, when cleaning
it and during all maintenance operations.
Clean the filter after each cycle
The filter is an important part of your dryer:
it accumulates lint and fluff that is formed while drying.
When finished drying, clean the filter by rinsing it
under running water or with your vacuum cleaner.
Should the filter become clogged up, the airflow inside
the dryer will be seriously compromised: drying times
lengthen and you will consume more energy. It may
also damage your dryer.
The filter is found in front of the dryer trim (see diagram).
Removing the filter:
1. Pull the plastic grip of the filter upwards (see diagram).
2. Clean the filter and replace it correctly.
Ensure the filter is fully located flush into the tumble
dryer trim.
! Do not use the dryer without replacing the filter.
Empty the water container after each
cycle
Cleaning the drum
! Do not use abrasives, steel wool or stainless steel
cleaning agents to clean the drum.
A coloured film may start to appear on the stainless
steel drum, this may be caused by a combination of
water and, or cleaning agents such as fabric conditioner
from the wash. This coloured film will not affect the
dryer performance.
Cleaning the condenser unit
Periodically (every month) remove the condenser unit
and clean any build up of fluff from between the plates
by rinsing it under the tap with cold water.
This should be done with cold water from the rear of
the condenser.
Removing the condenser:
1. Unplug the dryer and open the door.
2. Pull open the condenser cover (see diagram).
Release the three catches by turning 90˚ counterclockwise then pull on the grip and remove from
the dryer.
3. Clean the surface of the seals and replace, making
sure that the catches have been secured.
Pull the container out of the dryer and empty it into a
sink or other suitable drain.
Replace the water container securely.
Always check and empty the container before you
start a new drying programme.
Check the drum after each cycle
Turn the drum manually in order to remove small items
(handkerchiefs) that could have been left behind.
Water container
Condenser unit
Condenser cover
Filter
Air intake
Cleaning the dryer
●
External parts in metal or plastic and rubber parts
can be cleaned with a damp cloth.
●
Periodically (every 6 months) vacuum the front air
intake grille and vents at the rear of the dryer, to
remove any build up of fluff, lint or dust. Also to
remove accumulation of fluff from the front of the
condenser and filter areas, clean occasionally with
a vacuum cleaner.
! Do not use solvents or abrasives.
! Your dryer uses special bearing components which
do not need lubrication.
! Have your dryer checked regularly by authorised
technicians to ensure electrical and mechanical safety
(see Service).
Ta p
Rear
Front
Condenser unit
26
Catches
Handle
Page 27

Troubleshooting
One day your dryer seems not to be working. Before you call your Service Centre (see Service), go through the
following troubleshooting suggestions:
Problem:
The tumble dryer won’t start.
Possible causes / Solution:
●
The plug is not plugged into the socket, or not making contact.
●
There has been a power failure.
●
The fuse has blown. Try to plug another appliance into the socket.
●
You are using an extension cord? Try to plug the dryer’s power cord
directly into the socket.
●
The door is not closed securely?
●
The PROGRAMMES knob has not been set properly (see Start and
Programmes).
●
The START/PAUSE button has not been pressed (see Start and Programmes).
●
Drying cycle will not begin.
Its taking a long time to dry.
You have set a delayed time (see Start and Programmes).
●
The filter has not been cleaned (see Maintenance).
●
The water container needs emptying? The empty water light is flashing?
(see Maintenance).
●
The condenser needs cleaning? (see Maintenance).
●
The temperature setting is not ideal for the type of fabric you are drying
(see Start and Programmes, and see Laundry).
●
The correct drying time has not been selected for the load (see Laundry).
●
The air intake grille or rear vents are obstructed (see Installation, and see
Maintenance).
●
The items were too wet (see Laundry).
●
The dryer was overloaded (see Laundry).
GB
Empty water light is flashing
but the dryer has only been
running for a short period.
Empty water light is on and
the water container is not full.
The OPTION lights and the
START/PAUSE light Flash
amber.
Programme finishes and
clothes are damper than
expected.
●
The water container was probably not emptied at the start of the
programme. Do not wait for the empty water signal, always check and
empty the container before starting a new drying programme (see
Maintenance).
●
This is normal, the light flashes when the container is full. If the light is on
but not flashing it is just a reminder to empty the container (see Start and
Programmes).
●
If the Option lights and the START/PAUSE light flash together with the
Clean Condenser and Cool Tumble lights; Or the START/PAUSE light
flashes together with the Clean Filter, Clean Condenser, Cool Tumble and
END lights on, then:
- Turn off and remove the plug. Clean the filter and the condenser
(see Maintenance). Then replace the plug, turn on and start another
programme. If the same combination of lights still flash contact the
Service Centre (see Service).
●
If the Option lights and the START/PAUSE light flash with any other
combination of lights on: Note down the lights that are on and contact the
Service Centre (see Service).
! For safety the dryer has a maximum programme time of 3 hours. If an
automatic programme has not sensed the required final moisture in this time
the dryer will complete the programme and stop. Check the above points
and run the programme again, if the results are still damp, contact the
Service Centre (see Service).
27
Page 28

Service
195067266.00
02/2008 - SIMLEX . Four Ashes, Wolverhampton
GB
Before calling the Service Centre:
●
Use the troubleshooting guide to see if you can
solve the problem yourself (see Troubleshooting).
●
If not, turn off the dryer and call the Service Centre
closest to you.
What to tell the Service Centre:
●
name, address and post code.
●
telephone number.
●
the type of problem.
●
the date of purchase.
●
the appliance model (Mod.).
●
the serial number (S/N).
This information can be found on the data label inside
the door of the machine.
Spare Parts
This dryer is a complex machine. Repairing it yourself
or having a non-authorised person try to repair it could
cause harm to one or more persons, could damage
the machine and could invalidate the spare parts
warranty.
Call an authorised technician if you experience problems
while using the machine.
The spare parts have been designed exclusively for
this appliance and not for other uses.
Comparative Programmes
●
Programmes recommended for comparative test to EN61121
Programme Programme to select Load size
(EN61121)
Dry Cotton Cottons - Cupboard Dry 7.5 kg
Iron Dry Cotton Timed Dry High Heat (100 Minutes) 7.5 kg
Easy-care textile Synthetics - Cupboard Dry 3 kg
! Note: This is not a full list of programme options (see Start and Programmes).
28
This appliance conforms to the following EC Directives:
- 2006/95/EC (Low Voltage Equipment)
- 89/336/EEC, 92/31/EEC and 93/68/EEC (Electromagnetic Compatibility)
 Loading...