


Instruction booklet
GB |
|
I |
|
F |
|
|
|
|
|
|
|
English, 1 |
Italiano, 20 |
Français, 39 |
|||
|
|
|
|
|
|
D |
|
NL |
|
|
|
|
|
|
|
|
|
Deutsch, 58 |
Nederlands, 77 |
|
|
||
TCD 87
First time you turn on your dryer you must select your preferred language see page 9
TUMBLE DRYER
 This symbol reminds you to read this booklet.
!Keep this instruction booklet on hand in order to refer to it when necessary. Take it with you when you move, and should you sell this appliance or pass it on to another party, make sure that this booklet is supplied along with the dryer so that the new owner may be informed about warnings and suggestions on how the appliance works.
!Read these instructions carefully; the following pages contain important information on installation and suggestions on how the appliance works.
Contents |
GB |
|
Installation, 2-3
Where to put your dryer
Ventilation
Water drain
Levelling
Electrical connection
Before you start using your dryer
Warnings, 4-5
General safety
To minimise the risk of fire
Maintenance and Care, 6-7
Switching off the electricity
Cleaning the filter after each cycle
Cleaning the heat pump filter unit
Empty the water container after each cycle
Check the drum after each cycle
Cleaning the dryer
Dryer description, 8
The features
Control panel
The Display, 9-11
Start and programmes, 11-15
Choosing a programme
Programmes Table
The Controls
Laundry, 16
Sorting your laundry
Wash care labels
Drying times
Troubleshooting, 17
Service, 18
Spare Parts
Product data, 19
Recycling and Disposal
www.hotpoint.eu
1
Installation
Where to put your dryer
GB
●Place your dryer at a distance from gas ranges, stoves, heaters, or cook tops because flames can damage the appliance.
●The dryer should be installed in an ambient room temperature of between 20 to 23˚C for optimum performance. But will function if the room is between 14 and 30˚C.
Minimum gap 10mm |
|
● |
If you are going to |
|
|
|
|
|
install the appliance |
|
|
|
|
|
|
|
|
|
under a work counter, |
|
|
|
|
be sure to leave a |
|
Minimum gaps |
|
10mm space between |
|
|
15mm |
|
the top and any other |
|
|
|
|
|
objects on or above |
|
|
|
|
the machine and a |
|
|
|
|
15mm space between |
|
|
|
|
|
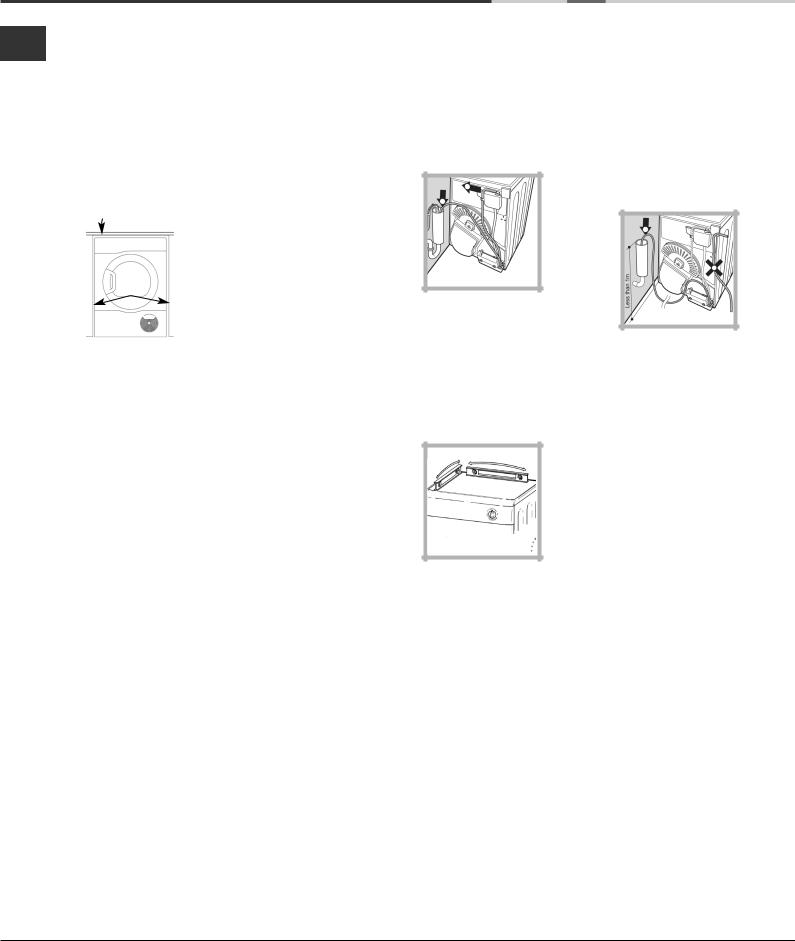
the sides and lateral furnishings or walls. This is to ensure proper air circulation. The appliance must be installed with the rear surface placed against a wall.
! Make sure that the back vents are not obstructed.
Ventilation
When the dryer is in use, there has to be adequate ventilation. Make sure you put your dryer in an environment that is not damp and has proper air circulation throughout. Airflow around the dryer is essential to condense the water produced during the washing, the dryer will not operate efficiently in an enclosed space or cupboard.
! If using the dryer in a small or cold room some
condensation could be experienced.
! We do not recommend that the dryer is installed in a cupboard but the dryer must never be installed behind a lockable door, a sliding door or a door with a hinge on the opposite side to that of the dryer door.
Water drain
If your dryer is installed next to a drain the water can be plumbed into this drain. This does away with the need to empty the water container. If the dryer is stacked onto or installed next to a washing machine it can share the same drain.
The height of the drain must be less than 3' (1m) from the bottom of the dryer.
Remove the existing hose from position shown in picture A.
picture A
Then fit a suitable length of hose to position shown in picture B.
! Make sure that the hose is not squashed or kinked when the dryer is in its final location.
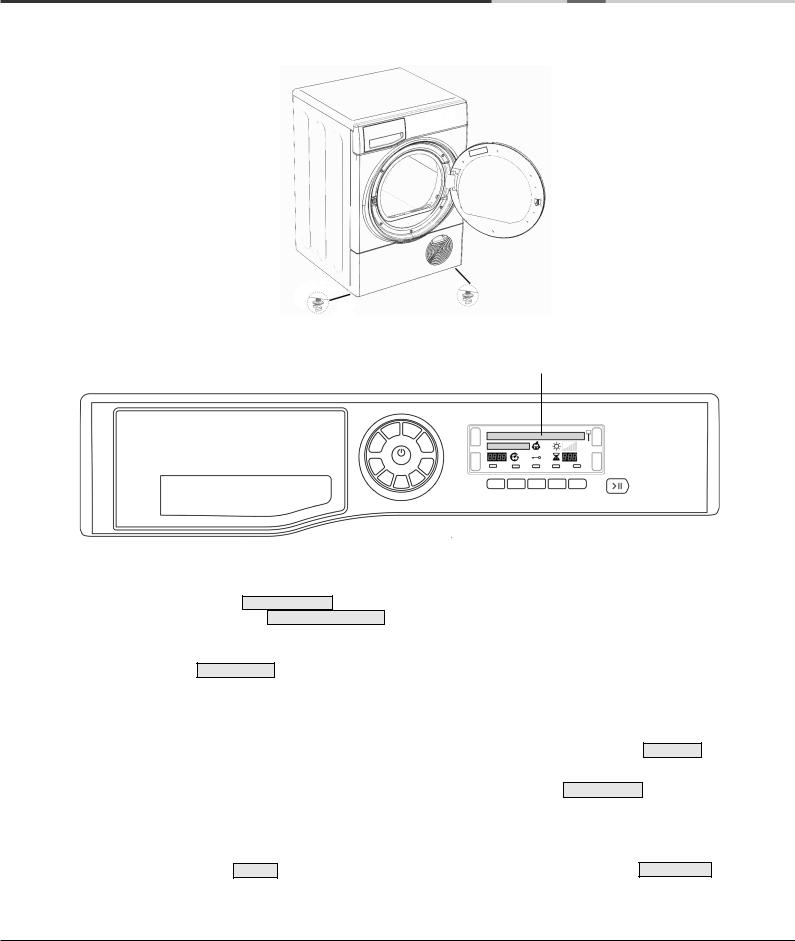
Levelling your dryer
The dryer must be installed level for correct operation. When you have installed your dryer in its final location check that it is level first side to side, then front to back.
If the dryer is not level, adjust the two front legs up or down, until your dryer is level.
! WARNING: Before you use your dryer ensure that it has been in an upright position for at least 6 hours.
2

Installation
Electrical connections
Make sure of the following before you insert the plug into the the electrical socket:
●Make sure your hands are dry.
●The socket must have an earth connection.
●The socket must be able to sustain the machines maximum power, which is indicated on the rating label (see Dryer Description).
●Power voltage must be within the values indicated on the rating label (see Dryer Description).
●The socket must be compatible with the dryers plug. Should this not be the case, replace the plug or the socket.
!The dryer must not be installed outdoors, even if the space is sheltered. It can be very dangerous if it is exposed to rain or storms.
!Once installed, the dryers electrical wire and plug must be within easy reach.
!Do not use extension cords.
!The power cord must not be bent or squashed.
!The power cord should be regularly checked. If the supply cord is damaged, it must be replaced by the manufacturer, its service agent or similarly qualified persons in order to avoid a hazard. New or longer power cords are supplied at an extra charge by authorised dealers.
!The manufacturer denies any responsibility should any of these rules not be followed.
!If in doubt about any of the above consult a qualified electrician.
Before you start using your dryer
GB
Once you have installed your dryer and before you use it, clean the inside of the drum to remove any dust that could have accumulated during transport.
Maximum load
Natural fibres : 8 kg
3

Warnings
GB |
! The appliance has been designed and |
|
built according to international safety |
|
standards. |
|
These warnings are given for safety |
|
reasons and must be followed carefully. |
General safety
●This appliance can be used by children aged from 8 years and above and persons with reduced physical, sensory or mental capabilities, or lack of knowledge if they are given supervision or instruction concerning use of the appliance in a safe way and understand the hazards involved.
●This tumble dryer has been designed for home, and not professional use.
●Do not touch the appliance while bare foot or with wet hands or feet.
●Unplug the machine by pulling on the plug, not the cord.
●After using the dryer, turn it off and unplug it. Keep the door closed to make sure that children do not use it as a toy.
●Children should be supervised to ensure that they do not play with the dryer.
●Cleaning and user maintenance should not be made by children without supervision.
●Children of less than 3 years should be kept away from the appliance unless continuously supervised.
●The appliance must be installed correctly and have proper ventilation. The air intake at the front of the dryer and rear vent behind the dryer should never be obstructed (see Installation).
●Never use the dryer on carpeting where the pile height would prevent air from entering the dryer from the base.
●Check to see if the dryer is empty before loading it.
●The back of the dryer could become very hot. Never touch it while in use.
●Do not use the dryer unless the filter, water container and heat pump filter unit are securely in place (see Maintenance).
●Do not overload the dryer (see Laundry for maximum loads).
●Do not load items that are dripping wet.
●Carefully check all instructions on clothing labels (see Laundry).
●Do not tumble dry large, very bulky items.
●Do not tumble dry acrylic fibres at high temperatures.
●Do not turn off the dryer when there are still warm items inside.
●Clean the filter after each use (see Maintenance).
●Empty the water container after each use (see Maintenance).
●Clean the heat pump filter unit at regular intervals (see Maintenance).
●Do not allow lint to collect around the dryer.
●Never climb on top of the dryer. It could result in damage.
●Always follow electrical standards and requirements (see Installation).
●Always buy original spare parts and accessories (see Service).
4

Warnings
To minimise the risk of fire in your tumble dryer, the following should be observed:
●Tumble dry items only if they have been washed with detergent and water, rinsed and been through the spin cycle. It is a fire hazard to dry items that HAVE NOT been washed with water.
●Do not dry garments that have been treated with chemical products.
●Do not tumble dry items that have been spotted or soaked with vegetable or cooking oils, this constitutes a fire hazard. Oil-affected items can ignite spontaneously, especially when exposed to heat sources such as a tumble dryer. The items become warm, causing an oxidisation reaction with the oil, Oxidisation creates heat. If the heat cannot escape, items can become hot enough to catch fire. Piling, stacking or storing oil-effected items can prevent heat from escaping and so create a fire hazard. If it is unavoidable that fabrics containing vegetable or cooking oil or those that have been contaminated with hair care products be placed in a tumble dryer they should first be washed with extra detergent - this will reduce, but not eliminate the hazard. They should not be removed from the dryer and piled or stacked while hot.
●Do not tumble dry items that have previously been cleaned in or washed in, soaked in or soiled with petrol/gasoline, dry cleaning solvents or other flammable
or explosive substances. Highly flammable |
GB |
substances commonly used in domestic |
|
|
|
environments including cooking oil, |
|
acetone, denatured alcohol, kerosene, |
|
spot removers, turpentine, waxes and |
|
wax removers. Ensure these items have |
|
been washed in hot water with an extra |
|
amount of detergent before being dried |
|
in the tumble dryer. |
|
●Do not tumble dry items containing foam rubber (also known as latex foam), or similarly textured rubber like materials. Foam rubber materials can, when heated, produce fire by spontaneous combustion.
●Fabric softener or similar products should not be used in a tumble dryer to eliminate the effects of static electricity unless the practice is specifically recommended by the manufacturer of the fabric softener product.
●Do not tumble dry undergarments that contain metal reinforcements eg. bras with metal reinforcing wires. Damage to the tumble dryer can result if the metal reinforcements come loose during drying.
●Do not tumble dry rubber, plastic articles such as shower caps or babies water proof covers, polythene or paper.
●Do not tumble dry rubber backed articles, clothes fitted with foam rubber pads, pillows, galoshes and rubber coated tennis shoes.
●Remove all objects from pockets, such as lighters and matches.
! WARNING: Never stop the dryer before the end of the drying cycle unless all items are quickly removed and spread out so that the heat is dissipated.
5
Maintenance and Care
Switching off the electricity
GB
! Unplug your dryer when not using it, when cleaning it and during all maintenance operations.
Clean the filter after each cycle
The filter is an important part of your dryer: it accumulates lint and fluff that is formed while drying.
When finished drying, clean the filter by rinsing it under running water or with your vacuum cleaner.
Should the filter become clogged up, the airflow inside the dryer will be seriously compromised: drying times lengthen and you will consume more energy. It may also damage your dryer.
The filter is found in front of the dryer trim (see diagram on next page).
Removing the filter:
1.Pull the plastic grip of the filter upwards.
2.Open the filter and clean the lint from the inside.
3.Replace it correctly. Ensure the filter is fully located flush into the tumble dryer trim.
4.Remove any lint that has built up on the inside of the door and around the door seal.
! Do not use the dryer without replacing the filter.
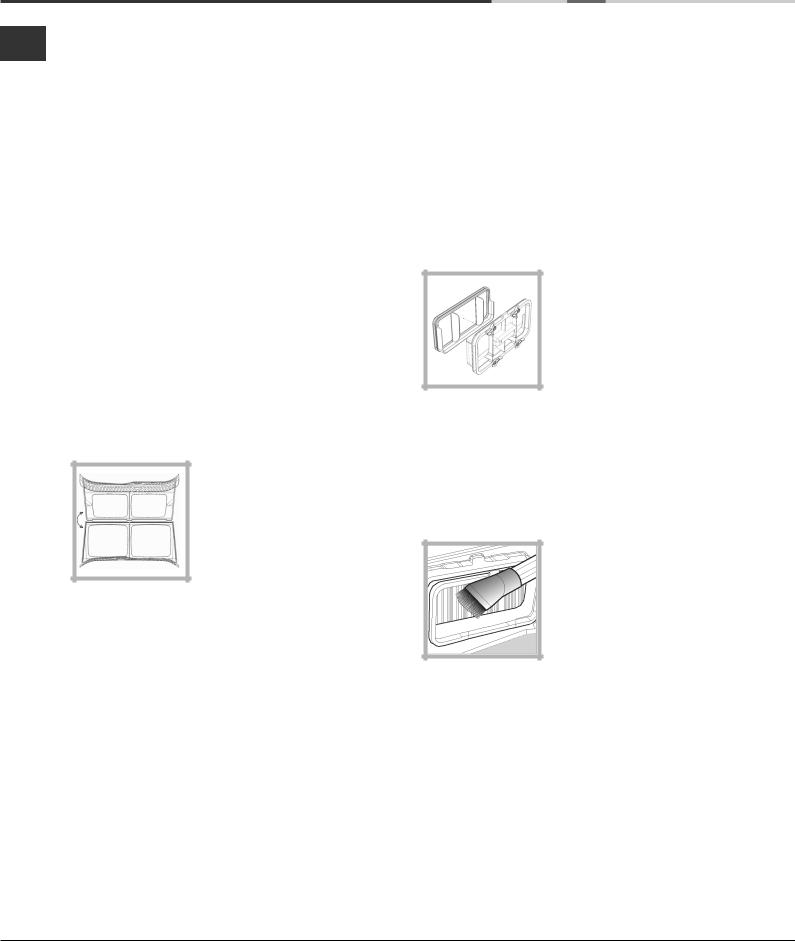
Cleaning the heat pump filter unit
Periodically (every 5 drying cycles) remove the heat pump filter unit and clean any build up of fluff from the surface of the filter. However, we recommend that you clean this filter after EVERY drying cycle to optimise the dryers performance.
To removing the heat pump filter unit:
1.Unplug the dryer and open the door.
2.Pull open the heat pump filter unit cover (see diagram on next page).
Release the 4 clips to the vertical position then pull the filter unit towards you.
3.Separate the two parts of the filter and clean the surface of the filter.
! The front of the heat pump is made from thin metal plates. Take care that you do not damage these or cut yourself when cleaning, removing or replacing the heat pump filter unit.
Whenever you clean the heat pump filter unit always clean any build up of fluff from the surface of the metal plates.
4.Carefully clean this fluff off with a damp cloth, sponge or a vacuum cleaner.
Never use your fingers.
5.Reassemble the two parts of the filter, clean the seals and replace with the 4 clips in the horizontal position, make sure that the catches are secure.
6
Maintenance and Care
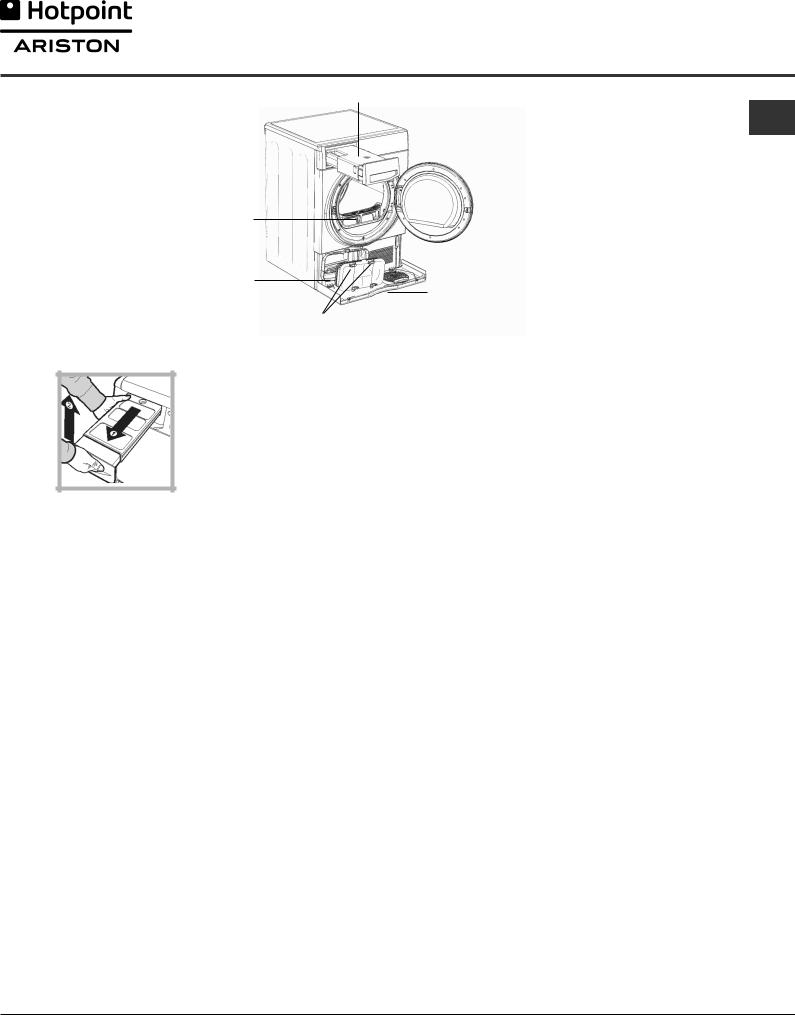
Water container
GB
Filter
Heat pump filter unit
Clips 
Empty the water container after each cycle
Heat pump filter unit cover
Cleaning the dryer
Pull the container out of the dryer and remove either the small or large cap and empty it into a sink or other suitable drain.
Refit the cap and replace the container securely.
!Always check and empty the container before you start a new drying programme.
!Failure to empty the water container may cause the following:
-The dryer will stop heating (so the load may still be damp at the end of the drying cycle).
●External parts in metal or plastic and rubber parts can be cleaned with a damp cloth.
●Periodically (every 6 months) vacuum the front air
intake grille and vents at the rear of the dryer, to remove any build up of fluff, lint or dust. Also to remove accumulation of fluff from the front of the heat pump and filter areas, clean occasionally with a vacuum cleaner.
!Do not use solvents or abrasives.
!Have your dryer checked regularly by authorised technicians to ensure electrical and mechanical safety (see Service).
Quick Tips
●Priming the water collection system
When your dryer is new, the water container will not collect water until the system is primed.
This will take 1 or 2 drying cycles. Once primed it will collect water during every drying cycle.
Check the drum after each cycle
Turn the drum manually in order to remove small items (handkerchiefs) that could have been left behind.
Cleaning the drum
! Do not use abrasives, steel wool or stainless steel cleaning agents to clean the drum.
A coloured film may start to appear on the stainless steel drum, this may be caused by a combination of water and, or cleaning agents such as fabric conditioner from the wash. This coloured film will not affect the dryer performance.
●Remember to clean the door filter and heat pump filter after each load.
●Remember to empty the water container after each load.
! Doing BOTH the above will keep your appliance working at its BEST.
7
Dryer Description
GB |
The features |
|
Water container |
|||
|
||||||
|
|
|
|
|||
|
Rating plate |
|
|
|
|
Model & Serial numbers |
|
|
|||||
|
||||||
|
|
|
|
|
||
|
|
|
|
|
|
|
|
|
|
|
|
|
|
|
|
|
|
|
|
|
|
Filter |
|
|
|
|
|||
|
|
|
|
|||||
|
|
|
|
|
|
|
|
Heat pump filter unit cover handle |
|
|
|
|
|
|
|
|
|
Air intake grille |
|
|
|
|
|
|
|
(Pull to open) |
Heat pump |
|
|
|
|
|
|||
|
|
|
||||||
|
|
|||||||
|
filter unit cover |
|||||||
|
|
|
Adjustable feet |
|||||
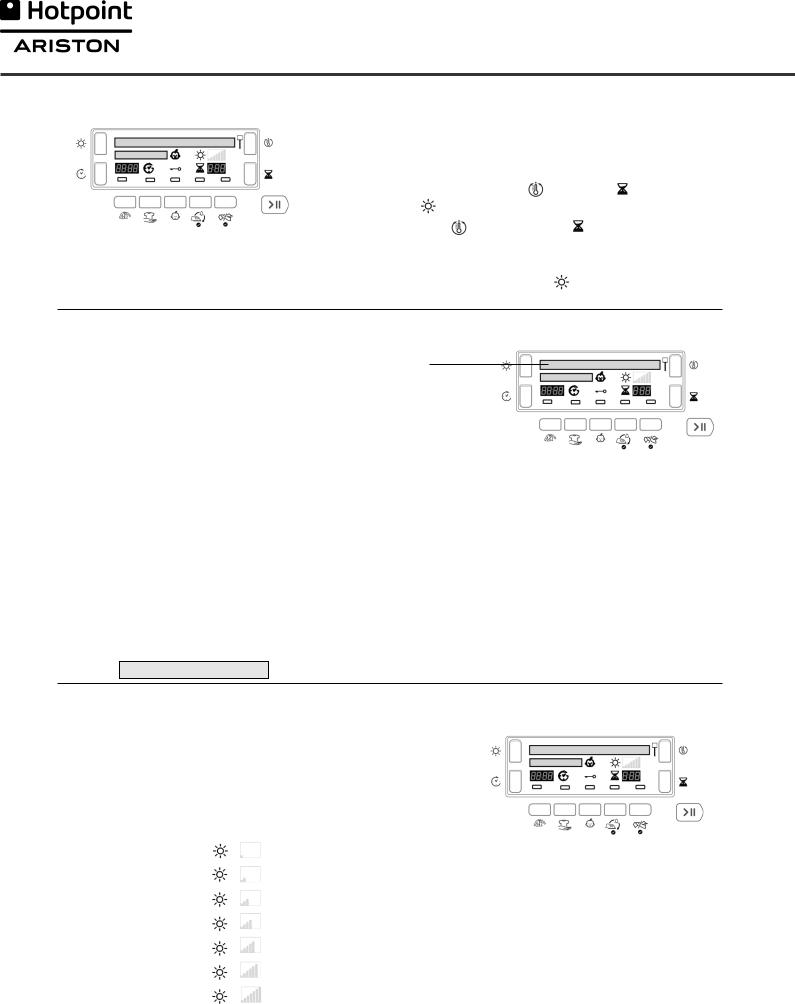
Control panel
PROGRAMME |
Display Unit |
|
Selection Buttons |
||
|
||
|
|
|
|
CHILD LOCK & |
|
|
|
|
|
|
|
ON/OFF |
|
OPTIONS |
|
START/PAUSE |
Button |
|
Buttons & Lights |
|
Button & Light |
|
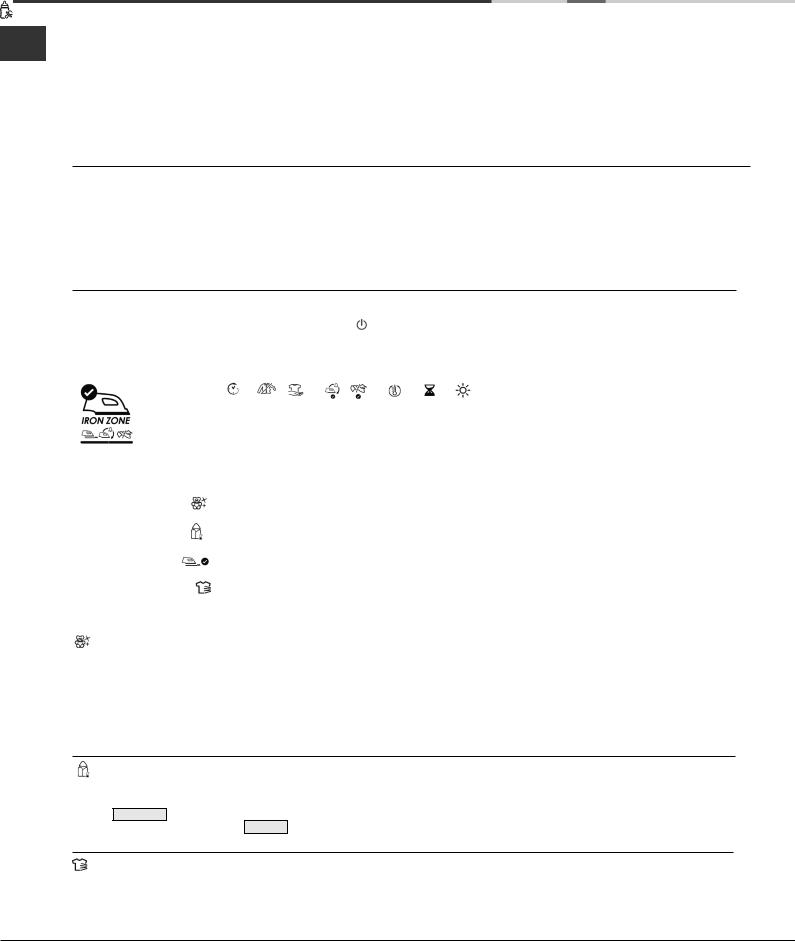
The ON/OFF button  - if pressed when the dryer is running: If the display shows TURNING OFF the dryer stops. If the display shows PRESS AND HOLD hold the botton and the display counts down 3, 2, 1 and then stops.
Press and hold again for more than 3 seconds, the display briefly shows POWER ON .
The PROGRAMME selection buttons set the programme: press the button corresponding to the programme you want to select (see Start and Programmes).
The OPTION buttons/indicators: these buttons select available options for your selected programme (see The Controls). The indicators on the display unit next to the bottom buttons light to show that the option has been selected.
The START/PAUSE button/light  starts a selected programme. When a programme is running, pressing this button in pauses the programme, there will be one beep, the display will show PAUSE and the dryer stops.
The light is green when the programme is running, flashing amber if the programme has been paused or
flashing green if on standby waiting to start a programme (see Start and Programmes).
Note: This light also flashes amber during the Post Care phase of a programme.
The Display Unit gives warnings and information about the programme selected and its progress (see next page).
The CHILD LOCK button/icon  : Press and hold this button after selecting your programme and any options, this prevents the programme settings from being changed, the display will briefly show LOCKED . When the icon is lit, the other buttons are disabled. Hold the button to cancel and the icon will go out, the display will briefly show UNLOCKED .
Note: This tumble dryer, in compliance with new energy saving regulations, is fitted with an automatic standby system which is enabled after about 30 minutes if no activity is detected. Press and hold the ON-OFF button until the display briefly shows POWER ON and the dryer then reactivates.
8
The Display
Selecting your language
The first time you turn on your dryer you should select your preferred language from the available list. |
|
GB |
||||||
|
|
To change: the language current selection must flash, on |
|
|||||
|
||||||||
|
|
the first line of the display. |
|
|
|
|
||
|
|
- Press the On/Off button to turn off the display then press |
||||||
|
|
and hold all 3 buttons: |
Heat Level, |
Timed Dry |
||||
|
|
and |
Dryness Level for 5 seconds. |
|
|
|||
|
|
- Press the |
Heat Level or the |
Timed Dry button to |
||||
|
|
scroll up or down through the list. |
|
|
||||
|
|
- When your required language is flashing on the top line |
||||||
|
|
of the display, pressing the |
|
Dryness Level button will |
||||
|
|
select your choice. |
|
|
|
|
||
Understanding the display
Programme selection and display
The selected programme is shown on the first line of the display, this message is shown while the programme is running.
Eight of the buttons have two selections, press the button once for the first choice and press again for the second choice, your selected programme is displayed. The final button selects My Cycle.
|
First Press |
Second Press |
|
1 |
|
|
|
STANDARD COTTON |
|
SHIRTS COTTONS |
|
2 |
|
|
|
BED & BATH |
|
ANTI ALLERGY |
|
3 |
|
|
|
SYNTHETICS |
|
SHIRTS SYNTHETICS |
|
4 |
|
|
|
JEANS |
|
DUVET |
|
5 |
|
|
|
WOOL |
|
SILK |
|
6 |
|
|
|
BABY |
|
DELICATES |
|
7 |
|
|
|
CUDDLY TOYS |
|
HEAT & ENJOY |
|
8 |
|
|
|
PRE IRON |
|
REFRESH |
|
9 |
MY CYCLE (see below) |
||
My Cycle When you select the My Cycle button the Display will show your selected programme with ‘M’ before its name. ie. M STANDARD COTTON (see Start and Programmes).
Dryness levels
During programme selection for an automatic programme that has different dryness levels available (see Programmes Table).
The second line of the display shows the dryness level you require, for each press of the  Dryness Level button the next option from the list below is selected and displayed. The display also shows 1 to 7 bars depending on your selection and these are displayed during the programmes progress.
! Some automatic programmes do not allow the dryness level to be changed or do not have all the dryness level options.
|
DAMP |
Dries your items ready to be ironed using a machine or rotary ironer. |
|
|
Dries your items ready to be ironed with a hand iron. |
|
IRON DRY |
|
|
|
Dries your delicate items ready to be hanged for final drying. |
|
HANGER PLUS |
|
|
|
|
|
HANGER DRY |
Dries your items ready to be hanged for final drying. |
|
|
Dries your delicate items ready to be put away. |
|
LIGHT DRY |
|
|
|
Dries your items ready to be put away. |
|
CUPBOARD DRY |
|
|
|
Dries your clothes ready to be worn. |
|
EXTRA DRY |
|
|
|
|
9
The Display
GB |
|
Programme progress |
|
|
|
|
|
|
|
|
|
|
|
|
|
|
|
The second line of the display shows the status of the programme as it progresses: |
|
|
|||
|
|
|
|||||
|
|
(long messages scroll across the line) |
|
|
|
|
|
|
|
|
|
|
|
|
|
|
|
DRY |
|
|
|
|
|
|
|
|
|
|
|
|
|
|
|
COOL TUMBLE |
Heat & Enjoy programme |
|
|
||
|
|
|
|||||
|
|
HEATING |
|||||
|
|
|
|
|
|
|
|
|
|
READY |
|
|
|
|
|
|
|
|
|
(if option Crease Care selected). |
|||
|
|
END OF CYCLE, CREASE CARE |
|||||
|
|
|
|
|
|
|
|
|
|
END OF CYCLE, CLEAN FILTER AND EMPTY WATER BOTTLE |
|
|
|
||
|
|
|
|
|
|
|
|
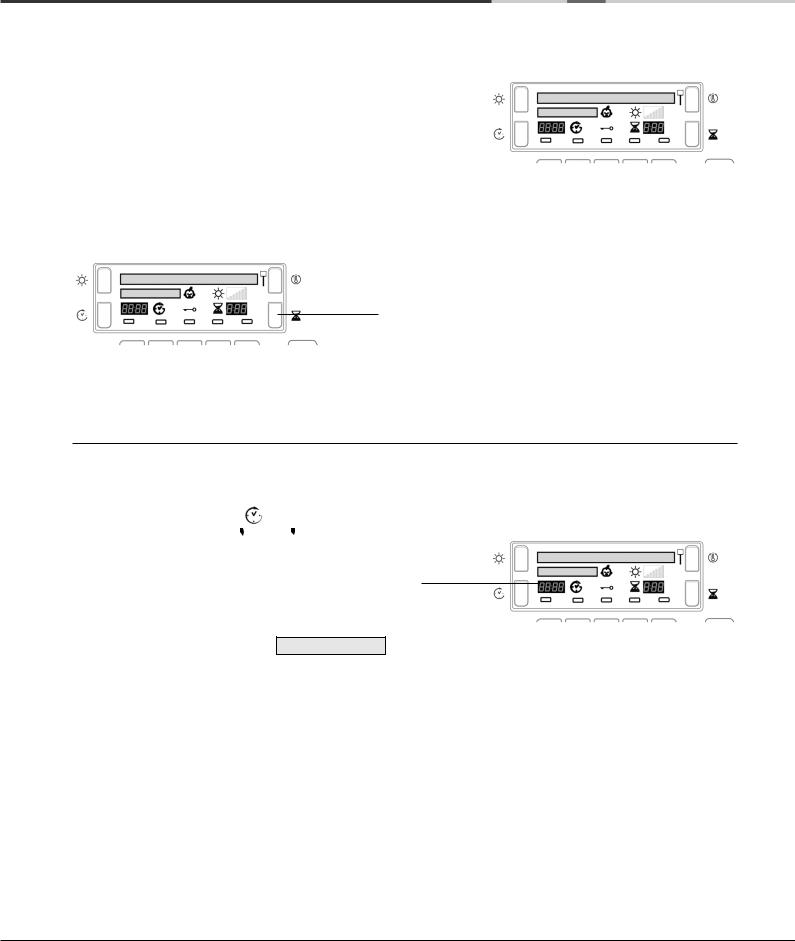
Timed drying 
After selecting a programme that has a Timed Dry option, press the  Timed button and the display will increment the selected time, each time you press and release the button (see Start and Programmes).
Each press reduces the time duration and number of available time options depending on the programme/material selected.
The Timed Dry icon  is displayed next to the time.
The selected time remains displayed after the programme starts, but can be changed anytime you wish.
Delay and Time to End
Some programmes can have a delayed start (see Start and Programmes). Press the  Delay button and the icon flashes.
Each press of the Delay button |
advances the delay setting |
|||||
in 1 hour increments, from: |
1h |
to |
24h |
, then |
OFF |
and |
then after a couple of seconds cancels the delay.
The delay time is shown on the display next to the Delay button.
The display counts down the minutes of the delay period after the Start/Pause button  is pressed.
The second line of the display shows STARTS IN
You can change or cancel the delay time selected anytime if you wish.
After the Start/Pause button is pressed the Delay or Time to End is displayed in hours and minutes and counts down each minute.
Time to End
After the delay period finishes, or for all the programme if delay not selected, this part of the display will show:
-the estimated time to the end of the programme, for automatic programmes
-the actual time remaining during a timed programme
When timed programmes are selected the time displayed throughout the cycle is the actual time remaining. When Automatic programmes are selected the time displayed is an estimate of the time remaining. When the programme is selected the display shows the time required to dry a full load. The time remaining is constantly monitored during the drying cycle and is updated to show the best forecast.
The colons between the hours and minutes in the display flash to show the time is counting down.
10
The Display
Warnings
The second line of the display also gives warnings and reminders: |
|
|
GB |
|
|||
(reminders occur at the end of the programme) |
|
||
END OF CYCLE, CLEAN FILTER AND EMPTY WATER BOTTLE
●Reminder that the water container should be
|
emptied and the filter cleaned every time you use the |
CLEAN CONDENSER, FILTER AND EMPTY WATER BOTTLE |
||||
|
dryer (see Maintenance). |
|||||
|
● |
This message indicates that you must clean the Heat |
||||
|
|
|
||||
EMPTY WATER BOTTLE |
|
|
pump Condenser filter unit (see Maintenance) and |
|||
● |
Indicates that the water container is full. The |
|
will occur at intervals depending how much you have |
|||
|
message will take a few seconds to go out after |
|
used the dryer. When you finish the next programme |
|||
|
replacing the empty water container; the dryer |
|
the message is cancelled. You must also clean the filter. |
|||
|
must be running for this to happen (see The |
|
|
|
|
|
|
CLEAN FILTER TO ENSURE ANTI ALLERGY ACTION |
|
||||
|
Controls). |
|
||||
|
● |
Shown during the Anti-Allergy programme and |
||||
|
Note: If the water container fills and this message |
|||||
|
|
|||||
|
|
indicates that the filter needs cleaning to complete |
||||
|
is displayed, the heat is turned off and your |
|
||||
|
clothes will not dry. |
|
the full anti-allergy cycle (see Maintenance). |
|||
|
|
|
|
|
||
|
|
|
|
|
|
|
Start and Programmes
Choosing a programme
1.Plug the dryer into the electrical socket.
2.Sort your laundry according to fabric type (see Laundry).
3.Open the door and make sure the filter is clean and in place and the water container is empty and in place (see Maintenance).
4.Load the machine and make sure items are not in the way of the door seal. Close the door.
5.If the Display is not lit: Press the ON/OFF button 
6.Press the Programmes Selection button that corresponds with the type of fabric being dried by checking the Programmes Table (see Programmes) as well as the indications for each type of fabric (see Laundry).
-If the  button is selected; steps 7 and 8 are not required (see below).
7.Choose Timed Drying or Dryness Levels option:
-If Timed Drying press and release the Timed button until the required time is displayed.
or - To change from default dryness setting, press and release the Dryness Levels button until required level is indicated.
! See Programmes Table, for more details: availability of Dryness Levels, Timed Dry and Options.
8.Set a delay time and other options if necessary (see The Display).
9.Press the Start/Pause button  to begin.
The display will show the estimated time to end. During the drying programme, you can check on your laundry and take out items that are dry while others continue drying. When you close the door
again, press the Start/Pause button  in order to resume drying.
If you open the door to check your laundry you will extend the drying time as the heat pump compressor will not start for 5 minutes after you close the door and press the Start/Pause button (see below).
10.During the last few minutes of Drying Programmes, before the programme is completed, the final COOL TUMBLE phase is entered (fabrics are cooled), this phase should always be allowed to complete.
11.At the end of the drying cycle a message is displayed:
-If END OF CYCLE, CLEAN FILTER AND EMPTY WATER BOTTLE
is shown, the buzzer will beep 3 times (Note: If the SOUND option was selected the buzzer beeps 3 times every 30 seconds for 5 minutes).
-If END OF CYCLE, CREASE CARE is shown, Crease
Care option has been selected and if you do not remove the laundry immediately, the dryer will tumble occasionally for 10 hours or until you open the door, the buzzer will beep 3 times to confirm the programme is completed.
12.Open the door, take the laundry out, clean the filter and replace it. Empty the Water Container and replace it (see Maintenance).
13.Unplug the dryer.
●Heat Pump Protection System
The heat pump system has a compressor protection feature that operates if you open the door or there is a power disruption or if you turn off the dryer. This system will prevent the heat pump compressor from starting for 5 minutes after the door is closed and the programme is started.
My Cycle button:
First time you press this button the display will show PRESS AND HOLD TO STORE
After selecting your favorite programme and options you can save these settings by pressing and holding in the My Cycle button for at least 5 seconds, the top line will show a flashing  followed by the selected programme. The
buzzer will then beep and the second line of the display shows MEMORY
The next time you need this programme press the  button, then the Start/Pause button
 and this programme will run. If you wish, you can change your stored favorite, by selecting a new programme and/or options and press and hold in the
  button (as above).
11
Start and Programmes
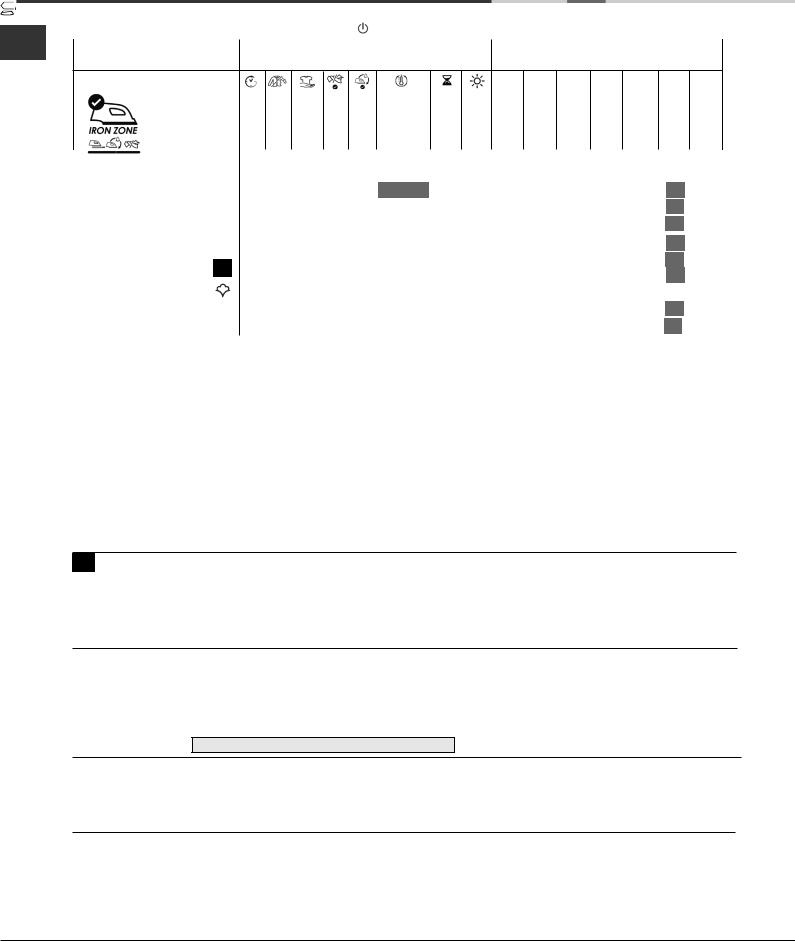
ESSENTIAL PROGRAMMES - Programmes Table
! If the Display is not lit; Press the ON/OFF button and then select programme.
GB |
|
|
|
|
|
|
Programme |
Options available |
Dryness Levels available |
||||
|
||||||
|
|
|
(default highlighted |
|
) |
|
|
|
Delay Timer |
Crease Care |
Extra Care |
Less Tangled |
Ready to Iron* |
Heat Level |
Timed Dry |
Sensor Dry |
Damp Dry |
Iron Dry |
Hanger Dry Plus |
Hanger Dry |
Light Dry |
Cupboard Dry |
Extra Dry |
|
|
|
|
|
|
|
|
- High |
|
|
|
|
|
|
|
|
|
|
1 |
Standard Cotton |
|
|
|
|
|
- High |
|
|
|
|
|
|
|
|
|
|
|
|
|
|
|
|
- Low |
|
|
|
|
|
|
|
|
|
||
|
|
|
|
|
|
- Medium |
|
|
|
|
|
|
|
|
|
||
|
Shirts Cotton |
|
|
|
|
|
|
|
|
|
|
|
|
|
|
|
|
|
Bed & Bath |
|
|
|
|
|
- High |
|
|
|
|
|
|
|
|
|
|
2 |
- Medium |
|
|
|
|
|
|
|
|
|
|||||||
|
|
|
|
|
|
|
|||||||||||
|
Anti-Allergy |
|
|
|
|
● An Automatic programme |
|
|
|
|
|
||||||
|
Synthetics |
|
|
|
|
|
- Medium |
|
|
|
|
|
|
|
|
|
|
3 |
- Low |
||||||||||||||||
Shirts Synthetic |
|
|
|
|
|
|
|
|
|
|
|
|
|
|
|
||
|
|||||||||||||||||
*Note : This option is not available with Dryness Levels ‘Iron Dry’ and ‘Damp Dry’.
 Standard Cotton
●This is a programme for cotton items.
●The duration of this programme will depend on the size of the load, the dryness setting selected and the spin speed used in your washer (see Laundry).
●The Standard Cotton programme to EU Regulation 392/2012 is Programme 1 selection with High Heat and Dryness Level Cupboard Dry (the standard/default starting configuration). It is the most efficient programme in terms of energy consumption (to EU.392/2012).
Shirts Cotton
●This is a programme for shirts made from cotton.
●It can be used for load sizes up to 3kg (approximately 10 shirts).
The duration of this programme will depend on the size of the load, the dryness setting selected and the spin speed used in your washer.
Loads dried using the Cupboard Dry setting are usually ready to wear, the edges or seams may be slightly damp. If this is the case, try turning the shirts inside out and running the programme again for a short period.
 Bed & Bath
●This is a programme for cotton towels and sheets.
●The duration of this programme will depend on the size of the load, the dryness setting selected and the spin speed used in your washer (see Laundry).
●Loads dried using the Extra Dry setting are usually ready to use, the edges or seams may be slightly damp especially on large items. If this is the case, try opening them out and running the programme again for a short period.
 Anti Allergy Programme
This programme has the ‘Seal of Approval’ endorsement from Allergy UK, which reflects the effective reduction and elimination of allergens from the clothes with the special Anti Allergy cycle. With this programme, thanks to the achievement of constant temperature for an extended period of time, the effects of the most common allergens (including House Mites and Pollen) are neutralised.
Can be used on a full size wet load to dry and treat, or on a 4kg dry load just to treat your laundry.
If the display shows CLEAN FILTER TO ENSURE ANTI ALLERGY ACTION : Clean the filter and re-start the programme.
 Synthetics
●This is a programme for items of Synthetic with low heat setting or Synthetic/Cotton mixtures with medium heat setting.
●The duration of this programme will depend on the size of the load, the dryness setting selected and the spin speed used in your washer (see Laundry).
 Shirts Synthetic
●This is a programme for shirts made from synthetic materials or a mixture of natural and synthetic materials, such as polyester and cotton.
●It can be used for load sizes up to 3kg (approximately 14 shirts).
The duration of this programme will depend on the size of the load, the dryness setting selected and the spin speed used in your washer.
Loads dried using the Cupboard Dry setting are usually ready to wear, the edges or seams may be slightly damp. If this is the case, try turning the shirts inside out and running the programme again for a short period.
12
Start and Programmes
EXCLUSIVE PROGRAMMES - Programmes Table |
|
|
|
|
|
|
|
|
|
|
|
|
|
|
|
|
|
|
|
|
|
|
|
|
|
|
|
|
|
|
|
|
|
|
|
|
|
|
|
|
|
|
|
|
|
|
|
GB |
||||||||||||||||||||||||||||||
! If the Display is not lit; Press the ON/OFF button |
|
and then select programme. |
|
|
|
|
|
|
|
|
|
|
|
|
|
|
|
|
|
|
|
|
|
|
|
|
|
|
|
|
|
|
||||||||||||||||||||||||||||||||||||||||||||||
|
|
|
|
|
|
|
|
|
|
|
|
|
|
|
|
|
|
|
|
|
|
|
|
|
|
|
|
|
|
|
|
|||||||||||||||||||||||||||||||||||||||||||||||
|
|
Programme |
|
|
|
|
Options available |
|
|
|
|
|
|
|
|
|
Dryness Levels available |
|
|
|
|
|
|
|
|
|
|
|
|
|
|
|
|
|||||||||||||||||||||||||||||||||||||||||||||
|
|
|
|
|
|
|
|
|
|
|
|
|
|
|
|
|
|
|
|
|
|
|
|
|
|
|
|
|
|
|
|
|
|
|
|
|
|
|
|
(default highlighted |
|
|
) |
|
|
|
|
|
|
|
|
|
|
|
|
|
|
|
|
|||||||||||||||||||
|
|
|
|
|
|
|
|
|
|
|
|
|
|
|
|
|
|
|
|
|
|
|
|
|
|
|
|
|
|
|
|
|
|
|
|
|
|
|
|
|
|
|
|
|
|
|
|
|
|
|
|
|
|
|
|
|
|
|
|
|
|
|
|
|
|
|
|
|
|
|
|
|
|
|
|
|
|
|
|
|
|
|
|
|
|
|
|
|
|
|
|
|
|
|
Ready to Iron |
|
Less Tangled |
|
|
|
|
|
|
|
|
|
|
|
|
|
|
|
|
|
|
|
|
Hanger Dry Plus |
|
|
|
|
|
|
|
|
|
|
Cupboard Dry |
|
|
|
|
|
|||||||||||||||||||||||
|
|
|
|
|
|
|
|
|
|
|
|
|
|
|
|
|
|
|
|
|
|
|
|
|
|
|
|
|
|
|
|
|
|
|
|
|
|
|
|
|
|
|
|
|
|
|
|
|
|
|
||||||||||||||||||||||||||||
|
|
|
|
|
|
|
|
|
|
|
|
|
|
|
|
|
|
|
|
|
|
|
|
|
|
|
|
|
|
|
|
|
|
|
|
|
|
|
|
|
|
|
|
|
|
|
|
|
|
|
|
|||||||||||||||||||||||||||
|
|
|
|
|
|
|
Delay Timer |
Crease Care |
|
|
|
Extra Care |
|
|
|
|
|
|
Heat Level |
|
Timed Dry |
|
|
|
Sensor Dry |
|
|
Damp Dry |
|
|
|
Iron Dry |
|
|
|
|
Hanger Dry |
|
|
|
|
Light Dry |
|
|
|
|
|
Extra Dry |
|
|
||||||||||||||||||||||||||||
|
|
|
|
|
|
|
|
|
|
|
|
|
|
|
|
|
|
|
|
|
|
|
|
|
|
|
|
|
|
|
|
|
|
|
|
|
|
|
|
|||||||||||||||||||||||||||||||||||||||
|
|
|
|
Jeans |
|
|
|
|
|
|
|
|
|
|
|
|
|
|
|
|
|
|
|
|
|
|
|
|
|
|
|
|
|
|
|
|
|
|
|
|
|
|
|
|
|
|
|
|
|
|
|
|
|
|
|
|
|
|
|
|
|
|
|
|
|
|
|
|||||||||||
|
|
|
|
|
|
|
|
|
|
|
|
|
|
|
|
|
|
|
|
|
|
|
|
|
|
|
|
|
|
|
|
|
|
|
|
|
|
|
|
|
|
|
|
|
|
|
|
|
|
|||||||||||||||||||||||||||||
|
|
|
|
|
|
|
|
|
|
|
|
|
|
|
|
|
|
|
|
|
|
|
|
|
|
|
|
|
|
|
|
|
|
|
|
|
|
|
|
|
|
|
|
|
|
|
|
|
|
|
|
|
|
|
|
|
|
|
|
|
|
|
|
|
|
|
|
|
|
|
|
|
|
|
|
|
||
|
4 |
|
|
|
|
|
|
|
|
|
|
|
|
|
|
|
|
|
|
|
|
|
|
- High |
|
|
|
|
|
|
|
|
|
|
|
|
|
|
|
|
|
|
|
|
|
|
|
|
|
|
|
|
|
|
|
|
|
|
|
|
|
|
|
|
|
|
|
|
|
|
|
|
||||||
|
|
Duvet |
|
|
|
|
|
|
|
|
|
|
|
|
|
|
|
|
|
|
|
|
|
● An Automatic programme |
|
|
|
|
|
|
|
|
|
|
|
|
|
|
|
|
|
|
|
|
|
|
||||||||||||||||||||||||||||||||
|
|
|
|
|
|
|
|
|
|
|
|
- Medium |
|
|
|
|
|
|
|
|
|
|
|
|
|
|
|
|
|
|
|
|
|
|
|
|
|
|
||||||||||||||||||||||||||||||||||||||||
|
|
|
|
|
|
|
|
|
|
|
|
|
|
|
|
|
|
|
|
|
|
|
|
|
|
|
|
|
|
|
|
|
|
|
|
|
|
|
|
|
|
|
|
|
|
|
|
|
|
|
|
|
|
|
|
|
|
|
|
|
|
|
|
|
|
|
|
|
|
|
|
|
||||||
|
|
|
|
|
|
|
|
|
|
|
|
|
|
|
|
|
|
|
|
|
|
|
|
|
|
|
|
|
|
|
|
|
|
|
|
|
|
|
|
|
|
|
|
|
|
|
|
|
|
|
|
|
|
|
|
|
|
|
|
|
|
|
|
|
|
|
|
|
|
|
|
|
|
|
|
|
|
|
|
|
|
|
|
|
|
|
|
|
|
|
|
|
|
|
|
|
|
|
|
|
|
|
|
|
|
|
|
|
|
|
|
|
|
|
|
|
|
|
|
|
|
|
|
|
|
|
|
|
|
|
|
|
|
|
|
|
|
|
|
|
|
|
|
|
|
|
|
|
|
|
|
|
|
|
|
||
|
|
|
|
Wool |
|
|
|
|
|
|
|
|
|
|
|
|
|
|
|
|
|
|
|
|
|
|
|
|
|
|
|
|
|
|
|
|
|
|
|
|
|
|
|
|
|
|
|
|
|
|
|
|
|
|
|
|
|
|
|
|
|
|
|
|
|
|
|
|
|
|
|
|
|
|
|
|
|
|
|
|
|
|
|
|
|
|
|
|
|
|
|
|
|
|
|
|
|
|
|
|
|
|
|
|
|
|
|
|
|
|
|
|
|
|
|
|
|
|
|
|
|
|
|
|
|
|
|
|
|
|
|
|
|
|
|
|
|
|
|
|
|
||||||||||||||||
|
|
|
|
|
|
|
|
|
|
|
|
|
|
|
|
|
|
|
|
|
|
|
|
|
|
|
|
|
|
|
|
|
|
|
|
|
|
|
|
|
|
|
|
|
|
|
|
|
|
|
|
|
|
|
|
|
|
|
|
|
|
|
|
|||||||||||||||
|
|
|
|
|
|
|
|
|
|
|
|
|
|
|
|
|
|
|
|
|
|
|
|
|
|
|
● An Automatic programme |
|
|
|
|
|
|
|
|
|
|
|
|
|
|
|
|
|
|
|
|
|
|
|||||||||||||||||||||||||||||
|
5 |
|
|
|
|
|
|
|
|
|
|
|
|
|
|
|
|
|
|
|
|
|
|
|
|
|
|
|
|
|
|
|
|
|
|
|
|
|
|
|
|
|
|
|
|
|||||||||||||||||||||||||||||||||
|
|
|
|
|
|
|
|
|
|
|
|
|
|
|
|
|
|
|
|
|
|
|
|
|
|
|
|
|
|
|
|
|
|
|
|
|
|
|
|
|
|
|
|
|
|
|
|
|
|
|
|
|
|
|
|
|
|
|
|
|
|
|
|
|
|
|
|
|
|
|
|
|
|
|
|
|
||
|
|
|
|
|
|
|
|
|
|
|
|
|
|
|
|
|
|
|
|
|
|
|
|
|
|
|
|
|
|
|
|
|
|
|
|
|
|
|
|
|
|
|
|
|
|
|
|
|
|
|
|
|
|
|
|
|
|
|
|
|
|
|
|
|
|
|
|
|
|
|
|
|
|
|
||||
|
|
|
|
|
|
|
|
|
|
|
|
|
|
|
|
|
|
|
|
|
|
|
|
|
|
|
|
|
|
|
|
|
|
|
|
|
|
|
|
|
|
|
|
|
|
|
|
|
|
|
|
|
|
|
|
|
|
|
|
|
|
|
|
|
|
|
|
|
|
|
|
|
|
|
||||
|
|
|
|
Silk |
|
|
|
|
|
|
|
|
|
|
|
|
|
|
|
|
|
|
|
|
|
|
|
|
|
|
|
|
|
|
|
|
|
|
|
|
|
|
|
|
|
|
|
|
|
|
|
|
|
|
|
|
|
|
|
|
|
|
|
|||||||||||||||
|
|
|
|
|
|
|
|
|
|
|
|
|
|
|
|
|
|
|
|
|
|
|
|
|
|
|
|
|
|
|
|
|
|
|
|
|
|
|
|
|
|
|
|
|
|
|
|
|
||||||||||||||||||||||||||||||
|
|
|
|
Baby |
|
|
|
|
|
|
|
|
|
|
|
|
|
|
|
|
|
|
|
|
|
|
|
|
|
|
|
|
|
|
|
|
|
|
|
|
|
|
|
|
|
|
|
|
|
|
|
|
|
|
|
|
|
|
|
|
|
|
|
|
|
|
|
|
|
|
|
|||||||
|
|
|
|
|
|
|
|
|
|
|
|
|
|
|
|
|
|
|
|
|
|
|
|
|
|
|
|
|
|
|
|
|
|
|
|
|
|
|
|
|
|
|
|
|
|
|
|
|
|
|
|
|
|
|
|
|
|
|
|
|
|
|
|
|
||||||||||||||
|
6 |
|
|
|
|
|
|
|
|
|
|
|
|
|
|
|
|
|
|
|
|
|
|
|
|
|
|
|
|
|
|
|
|
|
|
|
|
|
|
|
|
|
|
|
|
|
|
|
|
|
|
|
|
|
|
|
|
|
|
|
|
|
|
|
|
|
|
|
|
|
|
|
|
|
|
|
|
|
|
|
|
|
|
|
|
|
|
|
|
|
|
|
|
|
|
|
|
|
|
|
|
|
|
|
|
|
|
|
|
|
|
|
|
|
|
|
|
|
|
|
|
|
|
|
|
|
|
|
|
|
|
|
|
|
|
|
|
|
|
|
|
|
|
|
|
|
|
|
|
|
|
|
|
||||
Delicate |
|
|
|
|
|
|
|
|
|
|
|
|
|
|
|
|
|
|
|
|
|
|
|
|
|
|
|
|
|
|
|
|
|
|
|
|
|
|
|
|
|
|
|
|
|
|
|
|
|
|
|
|
|
|
|
|
|
|
|
|
|
|
|
|
|
|
|
|
||||||||||
|
|
|
|
|
|
|
|
|
|
|
|
|
|
|
|
|
|
|
|
|
|
|
|
|
|
|
|
|
|
|
|
|
|
|
|
|
|
|
|
|
|
|
|
|
||||||||||||||||||||||||||||||||||
|
|
|
|
|
|
|
|
|
|
|
|
|
|
|
|
|
|
|
|
|
|
|
|
|
|
|
|
|
|
|
|
|
|
|
|
|
|
|
|
|
|
|
|
|
|
|
|
|
|
|
|
|
|
|
||||||||||||||||||||||||
|
|
|
|
|
|
|
|
|
|
|
|
|
|
|
|
|
|
|
|
|
|
|
|
|
|
|
|
|
|
|
|
|
|
|
|
|
|
|
|
|
|
|
|
|
|
|
|
|
|
|
|
|
|
|
|
|
|
|
|
|
|
|
|
|
|
|
|
|
|
|
|
|
|
|
|
|
|
|
 Jeans
Jeans
●This is a programme for jeans made from denim cotton. Before drying your jeans turn the front pockets inside out.
●It can be used for load sizes up to 3kg (approximately 4 pairs).
●Do not mix dark and light coloured items.
●It can also be used on other garments made from the same material, such as jackets.
●The duration of this programme will depend on the size of the load, the dryness setting selected and the spin speed used in your washer.
●Loads dried using the Extra Dry programme are usually ready to wear, the edges or seams may be slightly damp. If this is the case, try turning the jeans inside out and running the programme again for a short period.
! We do not recommend that you use this programme if your jeans have elastic waist bands, studs or embroidery.
 Duvet
Duvet
! Take care with this programme DO NOT dry any items that are damaged which could result in the filling blocking the filter and air vent resulting in a fire hazard.
●Must only be used on single size duvets: NOT suitable for double or king size items.
●Loads dried using this programme are usually ready to use, but may be slightly damp in places. If this is the case, try opening them out and shaking them and running the programme again for a short period.
●Also suitable for down filled jackets.
●Select high heat for Cotton Duvets and medium heat for Synthetic duvets
●The duration of this programme will depend on the size and density of the load and the spin speed used in your washer.
 Wool Programme
●This is a programme for tumble dryer safe garments marked with the symbol  .
.
●It can be used for load sizes up to 1kg (approximately 3 sweaters).
●We recommend that garments are turned inside out before drying.
●This programme will take about 60 minutes, but may take longer depending on the size and density of the load and the spin speed used in your washer.
●Loads dried using this programme are usually ready to wear, but on some heavier garments the edges may be slightly damp. Allow these to dry naturally as over-drying could damage garments.
!Unlike other materials, the mechanism of wool shrinkage is irreversible; i.e. it will not stretch back to original size and shape.
!This programme is not suitable for Acrylic garments.
Silk
●This is a programme for drying your delicate silk.
●It can be used for load sizes up to 0.5kg.
●The duration of this programme will depend on the size of the load and the spin speed used in your washer.
●Loads dried using the Cupboard Dry setting are usually ready to use, but on some garments the edges may be slightly damp. If this is the case, try opening them out or turn items inside out and running the programme again for a short period.
13
Start and Programmes
Baby cycle
GB
●This is a programme for drying your baby’s small delicate items of clothing and bedding (Cotton and Chenille) and for drying your delicate clothes.
●DO NOT dry items such as bibs and nappy pants with plastic coverings.
●It can be used for load sizes up to 2kg.
●The duration of this programme will depend on the size and density of the load and the spin speed used in your washer.
●Loads dried using this programme are usually ready to use, but on some garments the edges may be slightly damp. If this is the case, try opening them out or turn items inside out and running the programme again for a short period.
 Delicates
●This is a programme for drying your delicate clothes ie. Acrylics.
●It can be used for load sizes up to 2kg.
●The duration of this programme will depend on the size and density of the load and the spin speed used in your washer.
●Loads dried using this programme are usually ready to use, but on some garments the edges may be slightly damp. If this is the case, try opening them out or turn items inside out and running the programme again for a short period.
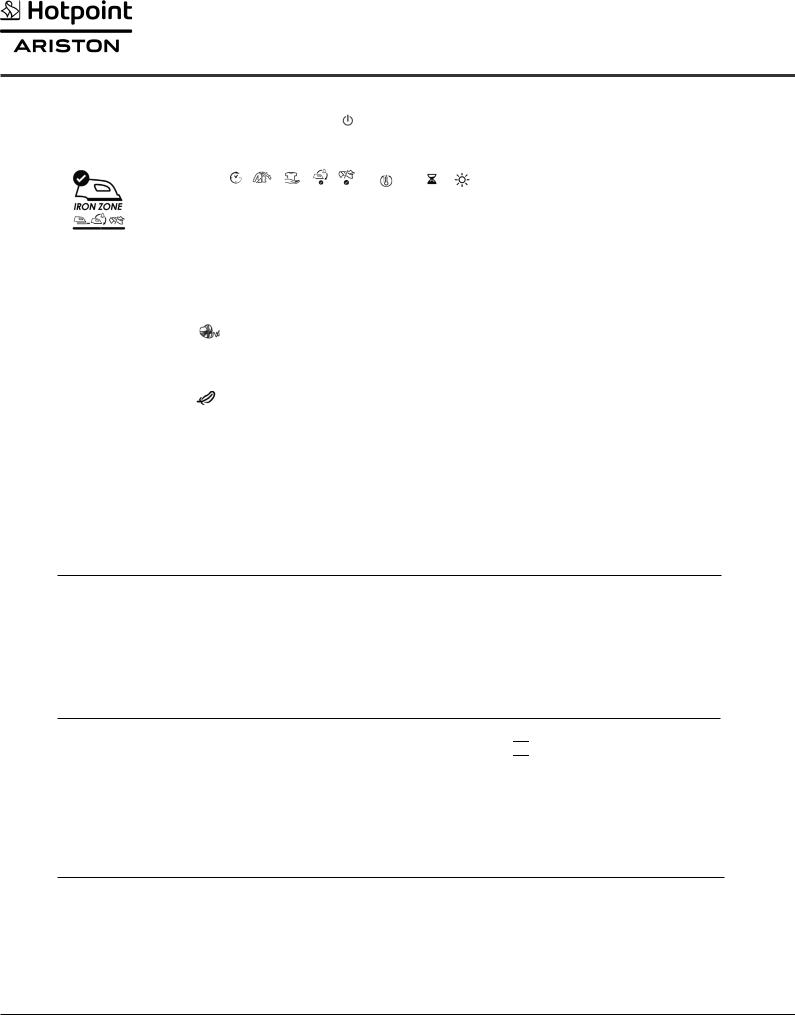
EXTRA PROGRAMMES - Programmes Table
! If the Display is not lit; Press the ON/OFF button |
|
and then select programme. |
|
|
|
|
|
|
|
|
||||||||||||||||||||||||||||||||||||||||||||||||||
|
|
|
Programme |
|
|
|
|
|
|
|
|
|
|
Options available |
|
|
|
|
|
|
|
Dryness Levels available |
|
|
||||||||||||||||||||||||||||||||||||
|
|
|
|
|
|
|
|
|
|
|
|
|
|
|
|
|
|
|
|
|
|
|
|
|
|
|
|
|
|
|
|
|
|
|
|
|
|
|
|
|
|
|
|
|
|
|
|
|
|
|
(default highlighted |
|
) |
|
|
|||||
|
|
|
|
|
|
|
|
|
|
|
|
|
|
|
|
|
|
|
|
|
|
|
|
|
|
|
|
|
|
|
|
|
|
|
|
|
|
|
|
|
|
|
|
|
|
|
|
|
|
|
|
|
|
|
|
|
|
|
|
|
|
|
|
|
|
|
|
|
|
|
|
|
|
|
|
|
|
|
|
|
|
|
|
|
|
Ready to Iron |
|
|
|
|
|
Less Tangled |
|
|
|
|
|
|
|
|
|
|
|
|
|
|
|
|
|
|
|
|
|
|
|
|
|
Cupboard Dry |
|
||
|
|
|
|
|
|
|
|
|
|
Delay Timer |
|
|
Crease Care |
|
|
|
Extra Care |
|
|
|
|
|
|
|
|
|
|
|
|
Heat Level |
|
|
|
|
Timed Dry |
|
|
Sensor Dry |
|
Damp |
Iron Dry |
Hanger Plus |
|
Hanger Dry |
|
|
Light Dry |
Extra Dry |
||||||||||||
|
|
|
|
|
|
|
|
|
|
|
|
|
|
|
|
|
|
|
|
|
|
|
|
|
|
|
|
|
|
|
|
|
|
|
|
|
||||||||||||||||||||||||
|
|
|
|
|
|
|
|
|
|
|
|
|
|
|
|
|
|
|
|
|
|
|
|
|
|
|
|
|
|
|
|
|
|
|
|
|
|
|
|
|
|
|
|
|
|
|
|
|
|
|
|
|
|
|
|
|
|
|
|
|
|
|
|
|
|
Cuddly Toys |
|
|
|
|
|
|
|
|
|
|
|
|
|
|
|
|
|
|
|
|
|
|
|
|
|
|
|
|
|
|
|
|
|
An Automatic programme |
|
|
|
|
|
|
|||||||||||||||
|
|
|
|
|
|
|
|
|
|
|
|
|
|
|
|
|
|
|
|
|
|
|
|
|
|
|
|
|
|
|
|
|||||||||||||||||||||||||||||
|
|
|
|
|
|
|
|
|
|
|
|
|
|
|
|
|
|
|
|
|
|
|
|
|
|
|
|
|
|
|
|
|
||||||||||||||||||||||||||||
|
|
|
|
|
|
|
|
|
|
|
|
|
|
|
|
|
|
|
|
|
|
|
|
|
|
|
|
|
|
|
|
|
|
|
|
|||||||||||||||||||||||||
|
|
|
|
|
|
|
|
|
|
|
|
|
|
|
|
|
|
|
|
|
|
|
|
|
|
|
|
|
|
|
|
|
|
|
|
|
||||||||||||||||||||||||
|
|
|
|
|
|
|
|
|
|
|
|
|
|
|
|
|
|
|
|
|
|
|
|
|
|
|
|
|
|
|
● |
|
|
|
|
|
|
|||||||||||||||||||||||
|
|
|
|
|
|
|
|
|
|
|
|
|
|
|
|
|
|
|
|
|
|
|
|
|
|
|
|
|
|
|
|
|
|
|
|
|
|
|
|
|
|
|
|
|
|
|
|
|
|
|
|
|
|
|
|
|
|
|
|
|
7 |
|
|
|
|
|
|
|
|
|
|
|
|
|
|
|
|
|
|
|
|
|
|
|
|
|
|
|
|
|
|
|
|
|
|
|
|
|
|
|
|
|
|
|
|
|
|
|
|
|
|
|
|
|
|
|
|
|
|||
|
|
|
|
|
|
|
|
|
|
|
|
|
|
|
|
|
|
|
|
|
|
|
|
|
|
|
|
|
|
|
|
|
|
|
|
|
|
|
|
|
|
|
|
|
|
|
|
|
|
|
|
|
|
|
|
|||||
|
|
|
|
|
|
|
|
|
|
|
|
|
|
|
|
|
|
|
|
|
|
|
|
|
|
|
|
|
|
|
|
|
|
|
|
|
|
|
|
|
|
|
|
|
|
|
|
|
|
|
|
|
|
|
|
|||||
|
|
|
|
|
|
|
|
|
|
|
|
|
|
|
|
|
|
|
|
|
|
|
|
|
|
|
|
|
|
|
|
|
|
|
|
|
|
|
|
|
|
|
|
|
|
|
|
|
|
|
|
|
|
|
|
|||||
Heat & Enjoy |
|
|
|
|
|
|
|
|
|
|
|
|
|
|
|
|
|
|
|
|
|
|
|
|
|
|
|
|
|
|
|
|
|
|
|
|
|
|
|
|
|
|
|
|
|
|
|
|
|
|
|
|
|
|
||||||
|
|
|
|
|
|
|
|
|
|
|
|
|
|
|
|
|
|
|
|
|
|
|
|
|
|
|
|
|
|
|
|
|
|
|
|
|
|
|
|
|
|
An Automatic programme |
|
|
|
|
|
|
||||||||||||
|
|
|
|
|
|
|
|
|
|
|
|
|
|
|
|
|
|
|
|
|
|
|
|
|
|
|
|
|
|
|
|
|
|
|
|
|
|
● |
|
|
|
|
|
|
||||||||||||||||
|
|
|
|
|
|
|
|
|
|
|
|
|
|
|
|
|
|
|
|
|
|
|
|
|
|
|
|
|
|
|
|
|
|
|
|
|
|
|
|
|
|
|
||||||||||||||||||
|
|
|
|
|
|
|
|
|
|
|
|
|
|
|
|
|
|
|
|
|
|
|
|
|
|
|
|
|
|
|
|
|
|
|
|
|
|
|
|
|
|
|
|
|
|
|
|
|
|
|
|
|
|
|
|
|
||||
|
|
|
|
|
|
|
|
|
|
|
|
|
|
|
|
|
|
|
|
|
|
|
|
|
|
|
|
|
|
|
|
|
|
|
|
|
|
|
|
|
|
|
|
|
|
|
|
|
|
|
|
|
|
|
|
|
|
|
|
|
|
|
|
|
|
|
|
|
|
|
|
|
|
|
|
|
|
|
|
|
|
|
|
|
|
|
|
|
|
|
|
|
|
|
|
|
|
|
|
|
|
|
|
|
|
|
|
|
|
|
|
|
|
|
|
|
|
|
|
|
|
|
|
|
|
|
|
|
|
|
|
|
|
|
|
|
|
|
|
|
|
|
|
|
|
|
|
|
|
|
|
|
|
|
|
|
|
|
|
|
|
|
|
|
|
|
|
|
|
|
|
|
|
|
|
|
|
|
|
|
|
|
|
|
|
|
|
|
|
|
|
|
|
|
|
|
|
|
|
|
|
|
|
|
|
|
|
|
|
|
|
|
|
|
|
|
|
|
|
|
|
|
|
|
|
|
|
|
|
|
|
|
|
|
|
|
|
|
|
|
|
|
|
|
|
|
|
|
|
|
|
|
|
|
|
|
|
|
|
|
|
|
|
|
|
|
|
|
|
|
|
|
|
|
|
|
|
|
|
|
|
|
|
|
|
|
|
|
|
|
|
|
|
|
|
|
|
|
|
|
||||
|
|
|
|
|
Pre Iron |
|
|
|
|
|
|
|
|
|
|
|
|
|
|
|
|
|
|
|
|
|
|
|
|
|
|
|
|
|
|
|
|
|
|
|
|
|
|
|
|
An Automatic programme |
|
|
|
|
|
|
||||||||
|
|
|
|
|
|
|
|
|
|
|
|
|
|
|
|
|
|
|
|
|
|
|
|
|
|
|
|
|
|
|
|
|
||||||||||||||||||||||||||||
|
|
|
|
|
|
|
|
|
|
|
|
|
|
|
|
|
|
|
|
|
|
|
|
|
|
|
|
|
|
|
|
|
|
|
|
|
||||||||||||||||||||||||
|
|
|
|
|
|
|
|
|
|
|
|
|
|
|
|
|
|
|
|
|
|
|
|
|
|
|
|
|
|
|
|
● |
|
|
|
|
|
|
||||||||||||||||||||||
|
|
|
|
|
|
|
|
|
|
|
|
|
|
|
|
|
|
|
|
|
|
|
|
|
|
|
|
|
|
|
|
|
|
|
|
|
|
|
|
|
|
|
|
|
|
|
|
|
|
|
|
|
|
|
|
|
|
|
||
8 |
|
|
|
|
|
|
|
|
|
|
|
|
|
|
|
|
|
|
|
|
|
|
|
|
|
|
|
|
|
|
|
|
|
|
|
|
|
|
|
|
|
|
|
|
|
|
|
|
|
|
|
|
|
|
|
|
|
|||
|
|
|
|
|
|
|
|
|
|
|
|
|
|
|
|
|
|
|
|
|
|
|
|
|
|
|
|
|
|
|
|
|
|
|
|
|
|
|
|
|
|
|
|
|
|
|
|
|
|
|
|
|
|
|
|
|||||
|
|
|
|
|
|
|
|
|
|
|
|
|
|
|
|
|
|
|
|
|
|
|
|
|
|
|
|
|
|
|
|
|
|
|
|
|
|
|
|
|
|
|
|
|
|
|
|
|
|
|
|
|
|
|
|
|||||
|
|
|
|
|
|
|
|
|
|
|
|
|
|
|
|
|
|
|
|
|
|
|
|
|
|
|
|
|
|
|
|
|
|
|
|
|
|
|
|
|
|
|
|
|
|
|
|
|
|
|
|
|
|
|
|
|||||
|
|
|
|
|
|
|
|
|
|
|
|
|
|
|
|
|
|
|
|
|
|
|
|
|
|
|
|
|
|
|
|
|
|
|
|
|
|
|
|
|
|
|
|
|
|
|
|
|
|
|
|
|
|
|
|
|||||
|
|
|
|
|
|
|
|
|
|
|
|
|
|
|
|
|
|
|
|
|
|
|
|
|
|
|
|
|
|
|
|
|
|
|
|
|
|
|
|
|
|
|
|
|
|
|
|
|
|
|
|
|
|
|
|
|
|
|||
|
|
|
|
|
Refresh |
|
|
|
|
|
|
|
|
|
|
|
|
|
|
|
|
|
|
|
|
|
|
|
|
|
|
|
|
|
|
|
|
|
● |
An Automatic programme |
|
|
|
|
|
|
||||||||||||||
|
|
|
|
|
|
|
|
|
|
|
|
|
|
|
|
|
|
|
|
|
|
|
|
|
|
|
|
|
|
|
|
|
|
|
|
|
|
|
|
|
|
|
|
|
|
|
|
|
|
|
|
|
|
|
|
|
|
|
|
|
|
|
|
|
|
|
|
|
|
|
|
|
|
|
|
|
|
|
|
|
|
|
|
|
|
|
|
|
|
|
|
|
|
|
|
|
|
|
|
|
|
|
|
|
|
|
|
|
|
|
|
|
|
|
|
|
|
|
|||
|
|
|
|
|
|
|
|
|
|
|
|
|
|
|
|
|
|
|
|
|
|
|
|
|
|
|
|
|
|
|
|
|
|
|
|
|
|
|
|
|
|
|
|
|
|
|
|
|
|
|
|
|
|
|
|
|
|
|||
|
|
|
|
|
M |
|
|
|
|
|
|
|
|
|
|
|
||||||||||||||||||||||||||||||||||||||||||||
9 |
|
My Cycle |
|
Depends on your chosen programme. See previous details. |
|
|
|
|
|
|
|
|
|
|||||||||||||||||||||||||||||||||||||||||||||||
|
|
|
|
|
|
|
|
|
|
|
|
|
|
|
|
|
|
|
|
|
|
|
|
|
|
|
|
|
|
|
|
|
|
|
|
|
|
|
|
|
|
|
|
|
|
|
|
|
|
|
|
|
|
|
|
|
|
|
|
|
Cuddly Toy Programme
With this programme you can remove dust easier and wash the cuddly toys more often because the drying time is very much reduced compared to drying in the open air. It is a delicate drying cycle that dries at low temperature and with soft mechanical action to maintain at best the original look and shine of the fur.
Note: For allergy protection, just freeze cuddly toys for 24 hours then wash and dry them. Repeat every 6 weeks. Before drying remove accessories such as clothes, collars or sound boxes and protect plastic eyes with masking tape after drying them with a cloth.
The programme time will vary dependant on the exact make up of the load. The maximum load should not exceed 2.5kg and no individual item should be greater than 600g.
Heat & Enjoy
This programme helps to heat towels & bathrobes for a warm sensation after a bath or shower. It is also useful for warming clothes before dressing during winter. The cycle heats clothes to 37°C (Body Temperature), the display shows HEATING and runs at this temperature for a maximum of 4 hours or until you stop the cycle by opening the door when the display shows READY . Maximum load 3kg.
Note : The Start/Pause button is disabled during this programme.
Refresh
! ‘Refresh’ is not a drying programme and should not be used for wet articles of clothing.
●It can be used on any load size, but is more effective on smaller loads.
●Do not overload your dryer (see Laundry).
●This is a 20 minute programme that airs your clothes with cool air. Also use to cool warm clothes.
14
Start and Programmes
 Pre Iron Programme
‘Pre Iron’ is a treatment cycle for use with dry clothes and reduces creases in order to facilitate ironing and folding,
it has a maximum duration of 15 minutes. |
GB |
! ‘Pre Iron’ is not a drying programme and should not be used for wet articles of clothing. |
|
For best results: 1. Do not load more than the maximum capacity. |
|
These numbers refer to the dry weight: |
|
Fabric |
Maximum load |
Cotton and Cotton mixtures |
2.5kg |
Denim |
2kg |
2.Unload the dryer immediately after the end of the programme, hang, fold or iron the articles and put them away in the closet. Should this not be possible repeat the programme.
The Controls
! Warning, after pressing the Start/Pause button  , the programme cannot be changed.
To change a selected programme, press the Start/Pause button  , the light flashes Amber to indicate the programme is paused. Select the new programme and any options required, the light will then flash green. Press the Start/Pause button
  again and the new programme will start.
●Option buttons
These buttons are used to customise the selected programme to your requirements. A programme must have been selected, by pressing a programme selection button, before an option can be selected. Not all options are available for all programmes (see Programmes Table). If an option is not available and you press the button, the buzzer will beep 3 times. If the option is available the indicator, on the display unit next to the bottom buttons, lights to show that the option has been selected.
 Delay Timer (Time Delay)
The start of some programmes (see The Display and Programmes tables) can be delayed for up to 24 hours. Ensure the water container is emptied before setting a delayed start.
 Crease Care
The pre-care option is only available if a delayed start has been selected. It tumbles the clothes occasionally during the delayed period to help prevent creases developing.
The post-care option occasionally tumbles the clothes after end of the drying and cool tumble cycles to prevent creases developing, should you not be available to remove the load immediately the programme is complete.
Note: The Start/Pause light flashes Amber during this phase. Selecting this option enables both the pre and post care functions if appropriate.
 Heat Level button, Display and Icons
Not all programmes allow you to change the heat level and some programmes allow all three heat level options: Low, Medium and High.
When the heat level options are available pressing this button changes the heat level and the display briefly shows the selected heat level, along with a display of the selected level icon:
HIGH HEAT |
|
|
|
|
MEDIUM HEAT |
|
|
|
|
LOW HEAT |
|
|
|
|
|
|
|
|
|
|
|
|
|
|
 Extra Care
This Anti-Ageing function for Cottons helps to maintain the brightness of your laundry for a long time, thanks to the correct drum rotation (reduced in the last part of the cycle) and the correct temperature.
Note: It cannot be used with the ‘Extra Dry’, ‘Cupboard Dry’ and ‘Light Dry’ dryness levels.
 Less Tangled
This option has the drum movement modified to give a tumbling action that reduces tangling and knotting of your clothes.
The Less Tangled option gives best results when used with smaller loads.
 Ready to Iron
This option allows you to dry loads where only some of the items need ironing and you do not wish to fully dry those items.
When Iron Dry level is reached, a buzzer sounds to let you know that the items that need ironing can be removed. The dryer then stops and the Start/Pause light flashes orange. Remove the items you wish to iron, close the door and press the Start/Pause button, the dryer continues until the remaining items reach the selected dryness level. It can be used for load sizes up to 3kg.
Note: This option is not available with the ‘Iron Dry’ and ‘Damp Dry’ dryness levels.
●TIME DISPLAY 88:88
The display shows either the amount of time delay remaining or an indication of the amount of time left for a drying programme (see The Display).
The display also shows if there is a problem with your dryer, if this occurs the display will show F followed by a fault code number (see Troubleshooting).
●Empty Water Container
(Messages about emptying can be ignored if you have plumbed your dryer into a drain as there is no need to empty the water container).
Messages are displayed to reminds you to empty the water container (see The Display).
If the water container fills during a programme, the heater turns off and the dryer does a period of Cool Tumble. After this it stops and a message tells you to
EMPTY THE WATER CONTAINER .
You must empty the water container and restart the dryer or the clothes will not dry. After re-starting the dryer the message will take a few seconds to go out.
To avoid this always empty the water container each time you use the dryer (see Maintenance).
●Door Opening
Opening the door during a programme will stop the dryer and have the following effects:
Note: The Start/Pause light flashes Amber during the Post Care phase of a programme.
● The display shows PAUSED .
●During a delay phase the delay will continue to count down. The Start/Pause button must be pressed to resume the delay programme.
The display will change to show current status.
●The Start/Pause button must be pressed to resume the programme. The display will change to show the current status.
●During the Post Care phase, the programme ends. Pressing the Start/Pause button will restart a new programme from the beginning.
●Heat Pump Protection System
The heat pump system has a compressor protection feature that operates if you open the door or there is a power disruption or if you turn off the dryer. This system will prevent the heat pump compressor from starting for 5 minutes after the door is closed and the programme is started.
●Note
If you have a power cut, switch off the power or remove the plug. When power is restored, press and hold the On/Off button until the display briefly shows POWER ON
and the dryer reactivates. Then press the Start/Pause button and the programme will resume.
15
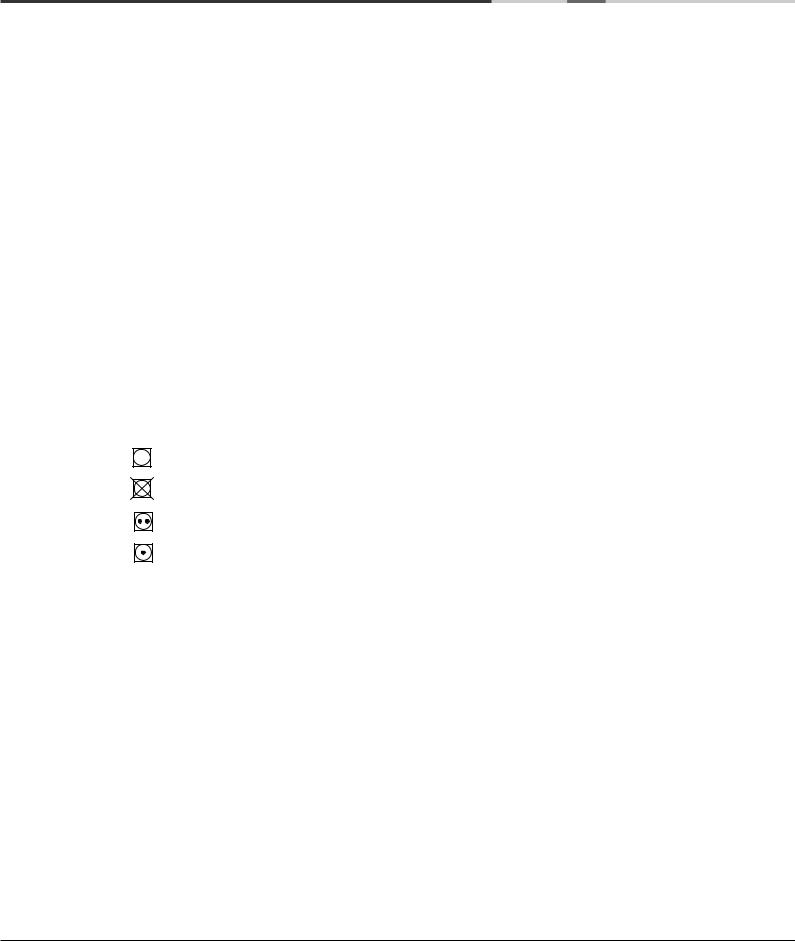
Laundry
Sorting your laundry |
Drying times |
GB |
● |
Check symbols on clothing labels to make sure |
|
|
that the articles can be tumble dried. |
|
|
|
|
● |
Sort laundry by fabric type. |
|
● |
Empty pockets and check buttons. |
|
● |
Close zippers and hooks and tie loose belts and |
|
|
strings. |
|
● |
Wring out each item in order to eliminate as much |
|
|
excess water as possible. |
|
! Do not load dripping wet clothes into the dryer. |
|
Maximum load size
Do not load more than maximum capacity.
These numbers refer to dry weight:
Natural fibres: 8kg max (18lb)
Synthetic fibres: 3kg max (6.6lb)
! DO NOT overload the dryer as this could result in reduced drying performance.
The table (see below) presents APPROXIMATE drying times in Minutes. Weights refer to dry garments.
Times are approximate and can vary depending upon:
●Amount of water retained in clothes after spin cycle: towels and delicates retain a lot of water.
●Fabrics: items that are the same type of fabric but different textures and thicknesses may not have the same drying time.
●Quantity of laundry: single items or small loads may take longer to dry.
●Dryness: If you are going to iron some of your clothes, they can be taken out while still a bit damp. Others can be left longer if you need them to be completely dry.
Wash Care Labels
Look at the labels on your garments, especially when tumble drying for the first time. The following symbols are the most common:
May be tumble dried
Do not tumble dry
Tumble dry at high heat setting
Tumble dry at low heat setting
●Heat setting.
●Room temperature: if the room where the dryer is located is cold, it will take longer for the dryer to dry your clothes.
●Bulk: some bulky items can be tumble dried with care. We suggest that you remove these items several times, shake them out, and return them to the dryer until finished.
! Do not over-dry your clothes.
All fabrics contain a little natural moisture, which keeps them soft and fluffy.
Cottons |
|
|
|
|
|
|
|
|
|
|
|
|
|
|
|
|
|
|
|
1 kg |
|
2 kg |
|
3 kg |
|
4 kg |
|
|
5 kg |
6 kg |
7 kg |
|
8 kg |
||
|
Automatic duration |
1:00 - 1:30 |
1:20 - 1:40 |
|
1:40 - 2:10 |
2:00 - 2:20 |
2:20 - 3:00 |
2:30 - 3:10 |
2:50 - 3:20 |
|
3:20 - 4:00 |
||||||
|
|
|
|
|
|
|
|
|
|
|
|
|
|
|
|
|
|
High |
Automatic minutes |
60 - 90 |
|
80 - 100 |
|
120 - 130 |
|
|
120 - 140 |
|
140 - 180 |
150 - 190 |
170 - 200 |
|
200 - 240 |
||
|
|
|
|
|
|
|
|
|
|
|
|
|
|
|
|
|
|
Heat |
Timed Dry setting |
1:00 or 1:30 |
|
1:30 |
|
1:30 or 2:00 |
|
2:00 or 2:30 |
|
2:30 |
2:30 or 3:00 |
3:00 or 3:40 |
|
3:40 |
|||
|
|
|
|
|
|
|
|
|
|
|
|
|
|
|
|
||
|
Drying times 800-1000 rpm in washing machine. |
|
|
|
|
|
|
|
|
|
|||||||
|
|
|
|
|
|
|
|
|
|
|
|
|
|
|
|
|
|
Synthetics |
|
|
|
1 kg |
|
|
|
|
|
|
2 kg |
|
|
3 kg |
|
||
|
|
|
|
|
|
|
|
|
|
|
|
|
|||||
|
Automatic duration |
|
0:40 - 0:50 |
|
|
|
|
0:50 - 1:00 |
|
|
1:00 - 1:30 |
||||||
|
|
|
|
|
|
|
|
|
|
|
|
|
|
|
|
|
|
Medium |
Automatic minutes |
|
40 - 50 |
|
|
|
|
|
50 - 60 |
|
|
60 - 90 |
|
||||
|
|
|
|
|
|
|
|
|
|
|
|
|
|
|
|
|
|
Timed Dry setting |
0:40 or 1:00 |
|
|
|
|
0:40 or 1:00 |
|
|
1:00 or 1:30 |
||||||||
Heat |
|
|
|
|
|
|
|||||||||||
|
Drying times on reduced spin in washing machine. |
|
|
|
|
|
|
|
|
|
|||||||
|
|
|
|
|
|
|
|
|
|
|
|
|
|
|
|
|
|
Delicates |
|
|
|
|
|
1 kg |
|
|
|
|
|
|
2 kg |
|
|||
(Acrylics) |
|
|
|
|
|
|
|
|
|
|
|
|
|||||
|
Automatic duration |
|
|
|
0:40 - 1:20 |
|
|
|
|
|
|
1:20 - 2:20 |
|
|
|||
|
|
|
|
|
|
|
|
|
|
|
|
|
|
|
|
|
|
|
Automatic minutes |
|
|
|
40 - 80 |
|
|
|
|
|
|
80 - 140 |
|
|
|||
|
|
|
|
|
|
|
|
|
|
|
|
|
|
|
|
|
|
Low |
Timed Dry setting |
|
|
0:40 or 1:00 or 1:30 |
|
|
|
|
1:30 or 2:00 or 2:30 |
|
|||||||
|
|
|
|
|
|
|
|
|
|
|
|
|
|
|
|
|
|
Heat |
Drying times on reduced spin in washing machine. |
|
|
|
|
|
|
|
|
|
|||||||
|
|
|
|
|
|
|
|
|
|
|
|
|
|
|
|
|
|
●Note: At the end of a drying cycle, cottons could still be damp if you grouped cottons and synthetics together. If this is the case, simply give the damp cotton items an additional short period of drying.
16

Troubleshooting
One day your dryer seems not to be working. Before you call your Service Centre (see Service), go through the
following troubleshooting suggestions: |
GB |
|
Problem:
The tumble dryer won’t start.
Drying cycle will not begin.
Its taking a long time to dry.
Empty water message is displayed but the dryer has only been running for a short period.
Empty water message is displayed and the water container is not full.
Programme finishes and clothes are damper than expected.
The display shows a fault code F followed by one or two numbers.
The display briefly shows DEMO ON every 6 seconds.
The lights on the dryer control panel are off although the dryer is switched on.
Possible causes / Solution:
●The plug is not plugged into the socket, or not making contact.
●There has been a power failure.
●The fuse has blown. Try to plug another appliance into the socket.
●You are using an extension cord? Try to plug the dryer’s power cord directly into the socket.
●The door is not closed securely?
●The programme has not been set properly (see Start and Programmes).
●The Start/Pause button has not been pressed (see Start and Programmes).
●You have set a delayed time (see Start and Programmes).
●The filter has not been cleaned (see Maintenance).
●The water container needs emptying? The empty water message is displayed? (see Maintenance).
●The heat pump filter needs cleaning? (see Maintenance).
●The temperature setting is not ideal for the type of fabric you are drying (see Start and Programmes, and see Laundry).
●The correct drying time has not been selected for the load (see Laundry).
●The air intake grille is obstructed (see Installation, and see Maintenance).
●The items were too wet (see Laundry).
●The dryer was overloaded (see Laundry).
●The water container was probably not emptied at the start of the programme. Do not wait for the empty water signal, always check and empty the container before starting a new drying programme (see Maintenance).
●This is normal, the:
END OF CYCLE, CLEAN FILTER AND EMPTY THE WATER BOTTLE message is shown as a reminder to empty the container (see The Display and Start and Programmes).
! For safety the dryer has a maximum programme time of 5 hours. If an automatic programme has not sensed the required final moisture in this time the dryer will complete the programme and stop. Check the above points and run the programme again, if the results are still damp, contact the Service Centre (see Service).
●If the display shows a fault:
-Turn off and remove the plug. Clean the filter and the heat pump filter unit (see Maintenance). Then replace the plug, turn on and start another programme. If a fault is then displayed: Note down the
code and contact the Service Centre (see Service).
●The dryer is in ‘Demo’ mode. Press and hold both the On/Off and Start/Pause buttons for 3 seconds. The display will show DEMO OFF for 3 seconds and then the dryer will resume normal operation.
●The dryer has gone into standby mode to save power. This occurs if you have had a power cut or leave your dryer either without starting a programme or after your drying programme has finished.
-Press and hold the On/Off button and the lights will come on.
17

Service
Heat Pump System
GB
This dryer is fitted with a sealed heat pump system to dry your clothes. To operate, the heat pump contains fluorinated greenhouse gases (F gases) which are covered by the Kyoto Protocol. These F gases are contained in a hermetically sealed unit. This sealed unit contains 0.29kg of the F gas R134a which acts as a refrigerant.
If the sealed unit fails then it must be replaced by a new sealed unit. Contact your nearest Service Centre for advice.
● Note: The gases contained in the sealed system are not hazardous to health, but if they escape they will have an impact on global warming.
Spare Parts
This dryer is a complex machine. Repairing it yourself or having a non-authorised person try to repair it could cause harm to one or more persons, could damage the machine and could invalidate the spare parts warranty.
Call an authorised technician if you experience problems while using the machine.
● Please note: it is an offence for an unqualified person to undertake any servicing or repair work that involves breaking into the sealed heat pump unit.
Before calling the Service Centre:
●Use the troubleshooting guide to see if you can solve the problem yourself (see Troubleshooting).
●If not, turn off the dryer and call the Service Centre closest to you.
What to tell the Service Centre:
●name, address and post code.
●telephone number.
●the type of problem.
●the date of purchase.
●the appliance model (Mod.).
●the serial number (S/N).
This information can be found on the data label inside the door of the machine.
Save energy and respect the environment
●Wring out items to eliminate excess water before tumble drying (if you use a washing machine first, select a high spin cycle). Doing this will save time and energy during drying.
●Always dry full loads - you save energy: single items or small loads take longer to dry.
●Clean the filter after each use to contain energy consumption costs (see Maintenance).
18
Product Data... (EU Regulation 392/2012)
Brand Hotpoint Ariston |
Models |
TCD 87 |
|
GB |
|
|
|
FTCD87 |
|
||
|
|
|
|||
|
|
|
|||
Rated capacity of Cotton laundry for the standard programme at full load 8 kg |
Energy efficiency class A+ |
|
|||
|
|
|
|
|
|
The weighted Annual Energy Consumption (AEc) 305.5 kWh
Consumption per year, based on 160 drying cycles of the standard cotton programme at full and partial load, and the consumption of the low-power modes. Actual energy consumption per cycle will depend on how the appliance is used.
This household tumble dryer is an Automatic Condenser Dryer
Energy consumption : full load Edry 2.59 kWh, partial load Edry1/2 1.39 kWh
Power consumption : off-mode (Po) 0.14 W, left-on mode (Pl) 3.36 W
Duration of the ‘left-on mode’ for power management systems 30 minutes
The ‘standard cotton programme’ suitable for drying normal wet cotton laundry that is the most efficient programme in terms of energy consumption for cotton used at full and partial load is Standard Cotton, High Heat, Cupboard Dry
Programme time (minutes) : weighted (Tt) full & partial load 178, full load (Tdry) 237, partial load (Tdry1/2) 133
Condensation efficiency class B
Average condensation efficiency (%) : full load (Cdry) 82, partial load (Cdry1/2) 80, weighted (Ct) full & partial load 81
Airborne acoustical noise emissions 70 dB(A) re 1 pW
* “consumer information in compliance with EU Regulation 932/2012”.
Typical energy used |
- |
Synthetics |
full load 0.68 kWh, |
partial load not applicable |
|
|
|
|
|
Typical drying time |
- |
Synthetics |
full load 70 minutes, |
partial load not applicable |
|
|
|
|
|
Recycling and Disposal Information
As part of our continued commitment to helping the environment, we reserve the right to use
quality recycled components to keep down customer costs and minimise material wastage.
●Disposing of the packaging material: follow local regulations, so the packaging can be recycled.
●To minimise risk of injury to children, remove the door and plug - then cut off mains cable, flush with the appliance. Dispose of these parts separately to ensure that the appliance can no longer be plugged into a mains socket.
Disposal of old electrical appliances
The European Directive 2012/19/EC on Waste Electrical and Electronic Equipment (WEEE), requires that old household electrical appliances must not be disposed of in the normal unsorted municipal waste stream. Old appliances must be collected separately in order to optimise the recovery and recycling of the materials they contain and reduce the impact on human health and the environment.
This dryer has a sealed heat pump unit containing F gases which should be recovered and distroyed.
The crossed out “wheeled bin” symbol on the product reminds you of your obligation, that when you dispose of the appliance it must be separately collected.
Consumers should contact their local authority or retailer for information concerning the correct disposal of their old appliance.
 This appliance conforms to the following EC Directives:
-2006/95/EC (Low Voltage Equipment)
-2004/108/EC (Electromagnetic Compatibility)
Indesit Company, Viale Aristide Merloni 47, 60044 Fabriano (AN), Italy
19

Libretto di istruzioni
I |
|
GB |
|
I |
|
F |
|
|
|
|
|
|
|
|
|
|
|
English, 1 |
Italiano, 20 |
Français, 39 |
|||
|
|
|
|
|
|
|
|
|
|
D |
|
NL |
|
|
|
|
|
|
|
|
|
|
|
|
|
Deutsch, 58 |
Nederlands, 77 |
|
|
||
TCD 87
La prima volta che si accende l’asciugatrice è necessario selezionare la lingua preferita, vedere a pag. 28
ASCIUGATRICE
!Tenere a portata di mano il presente libretto, così da poterlo consultare facilmente ad ogni evenienza. Tenere il libretto sempre vicino all’asciugatrice; nel caso in cui l’apparecchio venga venduto o ceduto ad altre persone,
ricordarsi di consegnare loro questo libretto, così da permettere anche ai nuovi possessori di conoscere le avvertenze e i suggerimenti sull’utilizzo dell’asciugatrice.
!Leggere attentamente queste istruzioni: le pagine che seguono contengono importanti informazioni sull’installazione e utili suggerimenti sul funzionamento dell’elettrodomestico.
 Questo simbolo ti ricorda di leggere questo libretto istruzioni.
Indice
Installazione, 21-22
Dove installare l’asciugatrice Aerazione
Porre l’asciugatrice su una superficie piana Tubo di scarico dell’acqua Collegamento elettrico
Informazioni preliminari
Avvertenze, 23-24
Sicurezza
Per ridurre al minimo il rischio di incendio
Cura e manutenzione, 25-26
Scollegamento dell’apparecchio dalla rete elettrica Pulizia del filtro al termine di ogni ciclo
Pulizia dell’unità filtro della pompa di calore Svuotare il recipiente di raccolta dell’acqua dopo ogni ciclo
Controllo del cestello al termine di ogni ciclo Pulizia dell’asciugatrice
Descrizione del prodotto, 27
Caratteristiche
Pannello di controllo
Il display, 28-30
Avvio e programmi, 30-34
Scelta del programma
Tabella dei programmi
I comandi
Bucato, 35
Controllo del bucato
Etichette con le istruzioni per il lavaggio Tempi di asciugatura
Ricerca guasti, 36
Assistenza, 37
Ricambi
Informazioni sul prodotto, 38
Smaltimento e Riciclaggio
Registra il tuo prodotto
chiama gratuitamente il Numero Verde 800 894 056 oppure compila e invia il form on line su www.hotpoint-ariston.it
www.hotpoint.eu
20
Installazione
Dove installare l’asciugatrice
●Le fiamme possono danneggiare l’asciugatrice che deve pertanto essere installata lontano da cucine a gas, stufe, termosifoni o piani di cottura.
●L’asciugatrice deve essere installata in un ambiente con temperatura compresa tra 20 e 23˚C per ottenere prestazioni ottimali. Il corretto funzionamento è
comunque garantito tra 14 e 30˚C.
spazio minimo 10 mm |
|
● |
Se l’elettrodomestico |
|
|
|
|||
|
|
|
|
verrà installato sotto un |
|
|
|
|
|
|
|
|
|
banco da lavoro, è |
|
|
|
|
necessario lasciare |
|
spazio minima |
|
uno spazio vuoto di |
|
|
15 mm |
|
almeno 10 mm sopra il |
|
|
|
|
|
pannello superiore |
|
|
|
|
dell’elettrodomestico; |
|
|
|
|
i pannelli laterali |
|
|
|
|
|
dovranno invece avere uno spazio libero intorno di almeno15mm. In questo modo sarà garantita la circolazione dell’aria. L’apparecchio deve essere installato con la superficie posteriore posizionata contro un muro.
! Controllare che le prese d’aria del pannello posteriore non siano ostruite.
Aerazione
È importante che l’ambiente in cui si utilizza l’asciugatrice sia sufficientemente aerato Assicurarsi inoltre che l’ambiente in cui viene installata l’asciugatrice non sia umido e che vi sia un adeguato ricambio di aria. Garantire un adeguato flusso d’aria intorno all’asciugatrice in modo da permettere che l’acqua prodotta durante il lavaggio si condensi; l’asciugatrice non funzionerà correttamente se posizionata in uno spazio chiuso o all’interno di un mobile.
! Se l’asciugatrice viene utilizzata in una stanza piccola
o fredda è possibile che si generi un po’ di condensa.
! Non è consigliabile che l’asciugatrice sia installata in un armadio, e non deve mai essere installata dietro una porta richiudibile a chiave, una porta scorrevole o una porta con cerniera sul lato opposto dello sportello dell’asciugatrice.
Tubo di scarico dell’acqua |
I |
|
Se l’asciugatrice viene collocata vicino ad un tubo di scarico, è possibile far defluire l’acqua al suo interno. In questo modo si evita di dover svuotare il recipiente di raccolta dell’acqua. Se l’asciugatrice viene posizionata sopra o di fianco ad una lavatrice, può condividere lo stesso scarico.
L’altezza dello scarico deve essere inferiore a (1m) dal fondo dell’asciugatrice.
Rimuovere il tubo flessibile esistente dalla posizione mostrata nella figura A.
figura A
Poi montare una tubo flessibile
della lunghezza adeguata nella
figura B
posizione mostrata nella figura B.
! Assicurarsi che il tubo non sia schiacciato o attorcigliato quando l’asciugatrice si trova nella sua posizione finale.
Porre l’asciugatrice su una superficie piana
Per funzionare correttamente l’asciugatrice deve essere installata su una superficie piana.
Quando si deve installare l’asciugatrice nella sua posizione finale assicurasi che sia in posizione piana primo ai lati e poi davanti e dietro. Se l’asciugatrice non si trova su una superficie piana, regolare i due piedi frontali su o giù, fino a che si trova in posizione orizzontale.
! AVVERTENZA: prima di utilizzare l’asciugatrice assicurarsi che sia stata in posizione verticale per almeno 6 ore.
21

Installazione
Collegamento elettrico
I
Prima di inserire la spina nella presa elettrica, verificare che:
●assicurarsi che le mani siano asciutte.
●la presa sia dotata di messa a terra.
●la presa sia in grado di supportare la potenza massima prevista per l’asciugatrice, così come indicata sull’etichetta che riporta le prestazioni di esercizio (vedere la sezione Descrizione del prodotto).
●la tensione di alimentazione sia compresa nei valori indicati dall’etichetta che riporta le prestazioni di esercizio (vedere la sezione Descrizione del prodotto).
●la presa sia compatibile con il tipo di spina dell’asciugatrice. In caso contrario, sostituire la spina o la presa.
!L’asciugatrice non può essere installata in ambienti all’aperto, anche se riparati. Può essere molto pericoloso esporre questo elettrodomestico alla pioggia o a un temporale.
!Dopo l’installazione dell’elettrodomestico, il cavo e la spina elettrica devono rimanere a portata di mano.
!Non utilizzare prolunghe.
!Il cavo elettrico non deve essere tagliato né calpestato.
!Il cavo elettrico deve essere controllato periodicamente. Se il cavo di alimentazione è danneggiato, esso deve essere sostituito dal produttore, dal suo servizio assistenza o da altro personale qualificato al fine di evitare pericoli. Presso i rivenditori autorizzati è possibile acquistare cavi di ricambio e cavi più lunghi di quelli montati in fabbrica.
!Il produttore declina ogni responsabilità nei casi in cui le presenti regole non vengano rispettate.
!Se si nutrono dei dubbi a riguardo, consultare un elettricista.
Informazioni preliminari
Una volta installata l’asciugatrice, prima di metterla in funzione, pulire l’interno del cestello, così da rimuovere lo sporco che può essersi accumulato durante il trasporto.
Massime dimensioni di carico
Fibre naturali : 8 kg
22

Avvertenze
! Questo elettrodomestico è stato progettato e realizzato rispettando gli standard di sicurezza internazionale. Queste avvertenze vengono fornite per motivi di sicurezza e devono essere osservate attentamente.
Sicurezza
•La presente asciugatrice può essere usata da persone (compresi i bambini da 8 anni in su) con capacità fisiche, sensoriali o mentali ridotte o senza esperienza e conoscenza, se sono sottoposte a supervisione o ricevano istruzioni relative all’uso del dispositivo da parte di una persona responsabile della loro sicurezza.
•Questa asciugatrice è stata progettata per uso domestico e non professionale.
•Non toccare l’elettrodomestico quando si è a piedi nudi né con le mani o i piedi bagnati.
•Per scollegare l’elettrodomestico dalla
rete di alimentazione,bisogna tirare la spina: mai il cavo.
•Dopo l’uso, spegnere l’asciugatrice e scollegarla dalla rete di alimentazione. Tenere lo sportello chiuso onde evitare che i bambini possano utilizzare l’asciugatrice come un gioco.
•I bambini devono essere sorvegliati per assicurarsi che non giochino con l’asciugatrice.
•Pulizia e manutenzione non devono essere eseguite dai bambini senza supervisione.
•I bambini di età inferiore a 3 anni devono essere tenuti lontano dall’asciugatrice se non sono constantemente sorvegliati.
•L’elettrodomestico deve essere installato correttamente e deve avere un’adeguata aerazione. È importante non ostruire mai la presa d’aria sulla parte frontale dell’asciugatrice e lo sfiato sul retro (vedere la sezione Installazione).
•Non utilizzare l’asciugatrice sulla moquette, nel caso in cui l’altezza del pelo sia tale da impedire l’ingresso dell’aria attraverso la base dell’asciugatrice.
• Verificare che l’asciugatrice sia vuota |
I |
prima di iniziare a caricarla. |
|
•La parte posteriore dell’asciugatrice può diventare molto calda. Evitare
assolutamente di toccarla durante il funzionamento dell’elettrodomestico.
•Non utilizzare l’asciugatrice a meno che il filtro, il recipiente dell’acqua e le unità del filtro della pompa di calore non siano saldamente in posizione (vedere la sezione Manutenzione).
•Non sovraccaricare l’asciugatrice (vedere la sezione Bucato per i vari limiti di carico).
•Non inserire capi completamente bagnati.
•Seguire sempre con attenzione tutte le istruzioni riportate sulle etichette per il lavaggio dei capi (vedere la sezione
Bucato).
•Non introdurre nell’asciugatrice capi troppo voluminosi.
•Non asciugare fibre acriliche ad alte temperature.
•Non spegnere l’asciugatrice se vi sono ancora capi caldi all’interno.
•Pulizia del filtro dopo ogni utilizzo (vedere la sezione Manutenzione).
•Svuotare il recipiente di raccolta dell’acqua dopo ogni utilizzo (vedere la sezione Manutenzione).
•Pulire l’unità filtro della pompa di calore ad intervalli regolari (vedere la sezione Manutenzione).
•Evitare l’accumulo di laniccio intorno all’asciugatrice.
•Non salire sul pannello superiore dell’elettrodomestico, perché in questo modo si potrebbe danneggiare gravemente l’asciugatrice.
•Rispettare sempre gli standard e le caratteristiche elettriche (vedere la sezione Installazione).
•Acquistare solo accessori e parti di ricambio originali (vedere la sezione Assistenza).
23

Avvertenze
Per ridurre il rischio di incendo I dell’asciugatrice, è necessario
osservare i seguenti punti:
• Prima di essere caricati nell’asciugatrice, i capi devono essere lavati con acqua e sapone, risciacquati e infine centrifugati. L’asciugatura di capi che NON siano stati precedentemente lavati con acqua, determina il pericolo di incendio.
• Non caricare nell’asciugatrice capi precedentemente trattati con prodotti chimici.
• Non asciugare articoli macchiati o imbevuti di olio vegetale o da cucina, ciò costituisce un rischio di incendio. Gli articoli sporchi di olio possono infiammarsi spontaneamente, specialmente quando vengono esposti a fonti di calore come l’asciugatrice. Gli articoli possono diventare caldi, causando una reazione di ossidazione
con l’olio, l’ossidazione crea calore. Se il calore non è in grado di fuoriuscire, gli articoli possono scaldarsi tanto da prendere fuoco. L’accumulo, l’impilamento o il deposito di capi sporchi/imbevuti di olio può impedire la fuoriuscita del calore e causare un incendio.
Se non è possibile evitare di porre nell’asciugatrice articoli sporchi/imbevuti di olio vegetale, olio da cucina o lacca, è prima necessario lavarli con detergente supplementare, ciò ridurrà, ma non eliminerà il rischio di incendio. Che non devono essere rimossi dall’asciugatrice e impilati o ammucchiati quando sono ancora caldi.
•Non inserire nell’asciugatrice capi che sono stati precedentemente lavati, puliti, imbevuti o lasciati in ammollo in benzina, solventi a secco o altre sostanze infiammabili o esplosive, le sostanze altamente infiammabili usate comunenmente negli ambienti domestici, compresi olio da cucina, acetone, alcol denaturato, cherosene, sostanze antimacchia, trementina, cere e sostanze di rimozione cere. Assicurarsi che questi capi vengano lavati in acqua calda con una quantità supplementare di detergente prima di essere inseriti nell’asciugatrice.
•Non inserire nell’asciugatrice articoli contenenti schiuma di gomma (detta anche schiuma di lattice), o materiali simili. I materiali in schiuma di lattice quando vengono riscaldati possono incendiarsi mediante la combustione spontanea.
•Non utillizzare ammorbidenti o prodotti simili nell’asciugatrice per eliminare gli effetti dell’elettricità statica, se non consigliato espressamente dal produttore dell’ammorbidente.
•Non inserire nell’asciugatrice indumenti intimi che contengono rinforzi in metallo, es. reggiseni con ferretti in metallo.
Se i ferretti si staccano durante l’asciugatura, possono danneggiare l’asciugatrice.
•Non inserire nell’asciugatrice articoli in gomma solida, in plastica, come cuffie per la doccia o teli impermeabili di protezione per bambini, polietilene o carta.
•Non inserire nell’asciugatrice articoli foderati in gomma solida, capi con imbottiture in schiuma di gomma, cuscini, galosce e scarpe da tennis rivestite in gomma.
•Togliere tutti gli oggetti dalle tasche, specialmente accendini e fiammiferi.
! AVVERTENZA: non arrestare mai l’asciugatrice prima della fine del ciclo di asciugatura, a meno che tutti gli articoli non siano stati rimossi velocemente e stesi, così da dissipare il calore.
24
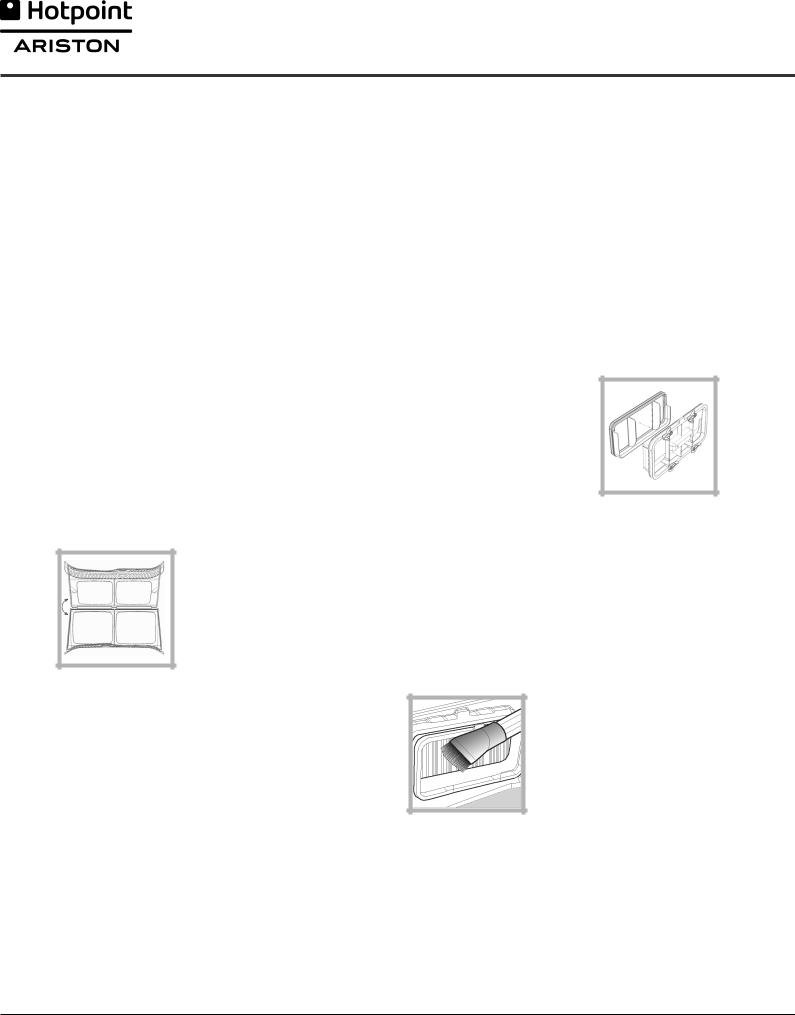
Cura e manutenzione
Scollegamento dell’apparecchio dalla rete elettrica
! L’asciugatrice deve essere sempre scollegata quando non è in funzione, durante le operazioni di pulizia e durante qualsiasi operazione di manutenzione.
Pulizia del filtro dopo ogni ciclo
Il filtro è un componente fondamentale dell’asciugatrice: la sua funzione è quella di raccogliere il laniccio e i nugoli che si formano durante l’asciugatura.
Al termine di ogni ciclo di asciugatura, è quindi importante pulire a fondo il filtro, sciacquandolo sotto l’acqua corrente o pulendolo con l’aspirapolvere. Se il filtro si intasa, il flusso dell’aria all’interno sarà gravemente compromesso: I tempi di asciugatura si allungheranno e così si consumerà molta più energia. Potrebbero anche verificarsi danni all’asciugatrice.
Il filtro si trova vicino alla guarnizione (vedere diagramma alla prossima pagina). Rimozione del filtro:
1.Tirare verso l’alto il manico in plastica del filtro.
2.Aprire il filtro e pulire i depositi di lanugine dall’interno.
3.Riposizionarlo in modo corretto.
Assicurarsi che il filtro sia inserito fino in fondo nel relativo
alloggiamento dell’asciugatrice.
4.Rimuovi tutta la lanugine che se è formata sulla parte interna della porta e sulla guarnizione.
! Non utilizzare l’asciugatrice se il filtro non è stato riposizionato.
Pulizia dell’unità filtro della pompa di |
I |
|
calore |
||
|
||
Rimuovere regolarmente (ogni 5 cicli di |
|
|
|
||
asciugatura) l’unità filtro della pompa di |
|
|
calore e pulire gli accumuli di lanugine |
|
|
dalla superficie del filtro. |
|
|
Tuttavia, al fine di ottimizzare le prestazioni di |
|
|
asciugatura consigliamo di pulire questo |
|
|
filtro dopo OGNI ciclo. |
|
Rimozione dell’unità filtro della pompa di calore:
1.Scollegare l’asciugatrice e aprire lo sportello.
2.Aprire il coperchio dell’unità del filtro della pompa di calore (vedere diagramma alla prossima pagina).
Sganciare le 4 clip ruotandole alla posizione verticale e poi tirare l’unità filtro verso di sé.
3.Separare le due parti del filtro e pulire la superficie del filtro.
! La parte frontale della pompa di calore è fatta di piastre di metallo sottile.
Assicurarsi di non danneggiarle o di tagliarsi quando si esegue la pulizia, rimuovendo o sostituendo l’unità filtro della pompa di calore.
Ogni volta che si pulisce il filtro della pompa di calore rimuovere sempre qualsiasi accumulo di lanugine dalla superficie delle piastre metalliche.
4.Rimuovere accuratamente la lanugine con un panno umido, una spugna o un aspirapolvere. NON utilizzare MAI le dita.
5.Rimontare le due parti del filtro, pulire le guarnizioni e sostituirli con i 4 clip in posizione orizzontale e assicurarsi che i dispositivi di chiusura siano ben saldi.
25
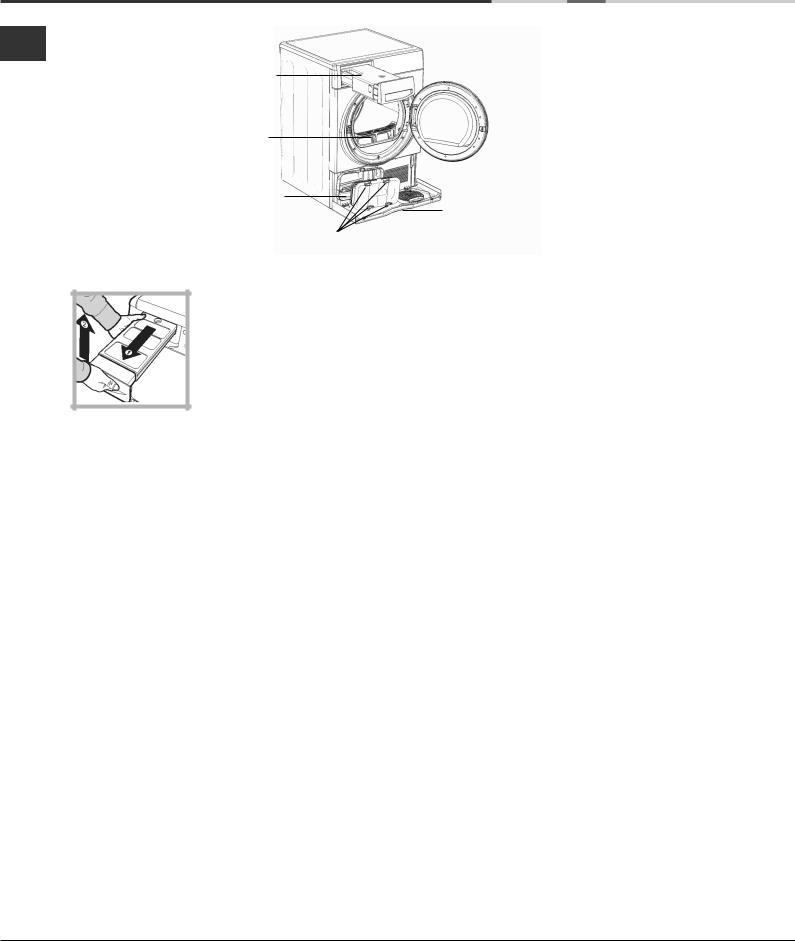
Cura e manutenzione
I
Recipiente di raccolta dell’acqua
Filtro |
|
Unità del filtro |
|
della pompa |
|
di calore |
Clip |
Svuotare il recipiente di raccolta dell’acqua dopo ogni ciclo
Estrarre il recipiente dell’asciugatrice e rimuovere il tappo piccolo o quello grande e svuotarlo in una bacinella o altro contenitore adeguato. Riposizionare il tappo e il contenitore correttamente.
!Controllare sempre il recipiente e svuotarlo prima dell’avvio di un nuovo programma di asciugatura.
!Il mancato svuotamento del contenitore di raccolta dell’acqua potrebbe causare:
-L’arresto del riscaldamento della macchina (quindi il carico potrebbe essere ancora umido alla fine del ciclo de asciugatura).
●Caricamento del sistema di raccolta dell’acqua
Quando la vostra asciugatrice è nuova, il contenitore dell’acqua non raccoglierà finché il sistema non è a regime.
Ciò potrebbe impiegare 1 o 2 cicli di asciugatura. Una volta caricato, il sistema raccoglierà l’acqua ad ogni ciclo di asciugatura.
Controllo del cestello al termine di ogni ciclo
Ruotare il cestello manualmente per rimuovere i piccoli capi (fazzoletti) che potrebbero essere rimasti all’interno dell’asciugatrice.
Pulizia del Tamburo
! Per la pulizia del tamburo non usare abrasivi, lana di acciaio o agenti di pulizia di acciaio inossidabile.
Potrebbe formarsi una patina colorata sul tamburo di acciaio inossidabile, questo potrebbe essere causato da una combinazione di acqua e/o di agenti di pulizia, come ammorbidente del lavaggio. Questa patina colorata non avrà alcun effetto sulle prestazioni dell’asciugatrice.
Coperchio dell’ unità del filtro della pompa di calore
Pulizia
•Le parti esterne in metallo e plastica e le parti in gomma possono essere pulite con un panno
umido.
●Periodicamente (ogni 6 mesi) aspirare la griglia della presa d’aria frontale e gli sfiati sul retro dell’asciugatrice per rimuovere ogni eventuale formazione di lanugine, fili o polvere. Inoltre per rimuovere accumuli di lanugine dalla parte frontale
della pompa di calore e dalle aree dei filtri, pulire di tanto in tanto con un’aspirapolvere.
!Non usare solventi o abrasivi.
!Far controllare regolarmente l’asciugatrice da personale tecnico qualificato per la sicurezza delle parti elettriche e meccaniche (vedere la sezione Assistenza).
Consigli Rapidi
●Ricorda di pulire il filtro porta a la pompa di calore dopo ogni asciugatura.
●Ricorda di svuotare il recipiente di raccolta dell’acqua dopo ogni carico.
! Così facendo, avrai il massimo delle prestazioni.
26

Descrizione del prodotto
Caratteristiche |
|
|
recipiente di raccolta |
I |
|
|
|
||||
|
|
|
|||
Prestazioni di esercizio |
|
|
dell’acqua |
|
|
|
|
||||
|
|||||
|
|
|
|
Numero di serie e numero di modello |
|
|
|
|
|
|
|
|
|
|
|||
|
|
|
|
|
|
|
|
|
|
|
|
Filtro
Maniglia coperchio dell’ unità del Griglia di entrata dell’aria filtro della pompa di calore
(Tirare per aprire)
Coperchio dell’ unità del
filtro della pompa di calore
Piedi regolabili
Pannello di controllo
Pulsanti
Selezione Programmi
pulsante
ON/OFF
Il pulsante ON/OFF  - se premuto quando l’asciugabiancheria è in esecuzione il display visualizza SPEGNIMENTO IN CORSO l’asciugabiancheria si arresta. Se il display visualizza TIENI PREMUTO PER SPEGNERE tenere premuto il bottone e il conteggio del display esegue un conto alla rovescia 3, 2, 1 e poi si ferma. Premere e tenere premuto per più di 3 secondi, sul display appare brevemente ACCENSIONE IN CORSO
I pulsanti Selezione PROGRAMMA impostano il programma: premere il pulsante corrispondente al programma che si desidera selezionare (vedere la sezione Avvio e programmi).
I pulsanti/spie OPZIONE : questi pulsanti selezionano le opzioni disponibili per il programma selezionato (vedere la sezione I Comandi). Le spie sull’unità display vicine ai pulsanti si illuminano per indicare che l’opzione è stata selezionata.
Il pulsante AVVIO/PAUSA  avvia un programma selezionato. Premendo questo pulsante quando un programma è in esecuzione, il programma viene sospeso, si sente un segnale acustico e il display visualizza PAUSA , dopodiché l’asciugabiancheria si ferma.
La spia è verde quando il programma è in funzione, lampeggia di giallo se il programma è in pausa, lampeggia di verde se è in attesa di avviare un
Unità display
BLOCCO BAMBINI & |
|
pulsante e spia |
OPZIONI |
|
AVVIO/PAUSA |
Pulsanti e spie |
|
|
programma (vedere la sezione Avvio e programmi).
Nota: questa spia lampeggia di giallo anche durante la fase Post-antipiega di un programma.
L’unità display fornisce avvertenze e informazioni sul programma selezionato e il suo andamento (vedere alla pag. seguente).
Pulsante/icona BLOCCO SICUREZZA BAMBINI  : Premere e tenere premuto questo pulsante dopo aver selezionato il programma desiderato e altre opzioni, ciò evita che le impostazioni del programma vengano cambiate, il display mostrerà brevemente
BLOCCO TASTI . Quando l’icona è accesa, gli altri pulsanti sono disabilitati. Tenere premuto il pulsante per cancellare, l’icona scomparirà, il display mostrerà brevemente SBLOCCATI
Nota bene: Questa asciugatrice, in conformità alle nuove normative legate al risparmio energetico, è dotata di un sistema di autospegnimento (standby) che entra in funzione dopo circa 30 minuti nel caso di non utilizzo. Premere e tenere premuto il pulsante ON-OFF fino a quando il display visualizza brevemente ACCENSIONE IN CORSO e poi si riaccende l'asciugabiancheria.
27
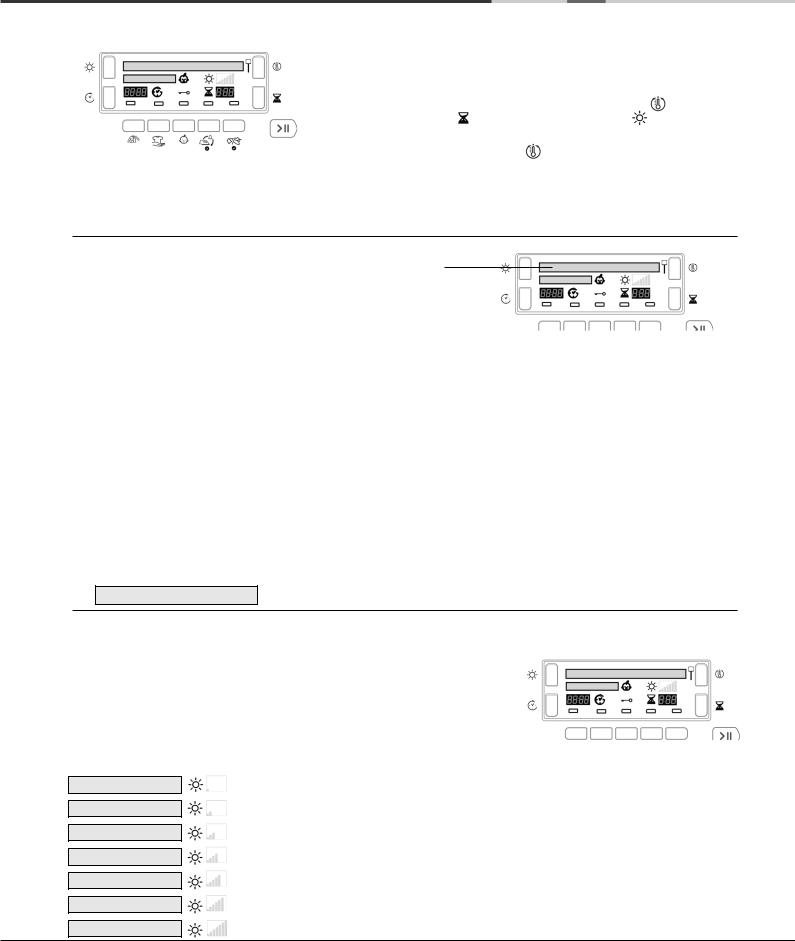
Il Display
|
Selezione della lingua |
||
I |
La prima volta che si accende l’asciugatrice è necessario selezionare la lingua preferita dall’elenco disponibile. |
||
|
|
Per modificare: la selezione attuale della lingua deve |
|
|
|
|
|
|
|||
|
|
|
lampeggiare sulla prima riga del display. |
|
|
|
|
|
|
|
- Premere il pulsante On/Off per spegnere il display, quindi |
premere e tenere premuto tutti e 3 i tasti: |
Livello di |
|
calore, |
asciugatura temporizzata e |
livello di |
asciugatura per 5 secondi. |
|
|
- Premere il pulsante livello di calore o il pulsante  asciugatura temporizzata e scorrere in alto o in basso nell’elenco
- Quando la propria lingua lampeggia nella riga superiore del display, premendo il pulsante  livello di asciugatura verrà selezionata la propria preferenza.
Capire il display
Selezione dei programmi e display
Il programma selezionato è indicato nella prima riga del display quando si seleziona il pulsante corrispondente, questo messaggio viene mostrato quando il programma è in funzione.
Otto dei pulsanti hanno due selezioni, premere il pulsante una volta per la prima selezione e premere di nuovo per la seconda, il programma selezionato viene visualizzato. L'ultimo pulsante seleziona MEMO.
|
Premendo una volta |
Premendo una seconda volta |
|||
1 |
COTONE STANDARD |
|
|
CAMICIE COTONE |
|
|
|
|
|
|
|
2 |
BIANCHERIA |
|
|
ANTI ALLERGY |
|
|
|
|
|
|
|
3 |
SINTETICI |
|
|
CAMICIE SINTETICHE |
|
|
|
|
|
|
|
4 |
JEANS |
|
|
PIUMINI |
|
|
|
|
|
|
|
5 |
LANA |
|
|
SETA |
|
|
|
|
|
|
|
6 |
BABY |
|
|
DELICATI |
|
|
|
|
|
|
|
7 |
PELUCHE |
|
|
CALDO ABBRACCIO |
|
|
|
|
|
|
|
8 |
PRE-STIRATURA |
|
|
RINFRESCA |
|
9 |
MEMO (vedere |
sotto) |
|||
Memo: Quando si seleziona il pulsante Memo, il Display mostrerà il programma selezionato con ‘M’ prima del nome
es. M COTONE STANDARD (vedere la sezione Avvio e programmi).
Livelli di asciugatura
Durante la selezione di un programma automatico che ha diversi livelli di asciugatura disponibili (vedere la tabella dei programmi).
La seconda riga del display mostra il livello di asciugatura richiesto, ad ogni pressione del pulsante livello di asciugatura  l’opzione successiva dall’elenco seguente viene selezionata e visualizzata. Il display visualizza anche 1-7 barre a seconda della selezione e queste vengono visualizzate durante lo stato di avanzamento dei programmi.
! Alcuni programmi automatici non consentono di modificare il proprio livello di asciugatura o non hanno tutte le opzioni dei livelli di asciugatura.
UMIDO
STIRARE
APPENDERE +
APPENDERE
RIP. DELICATI
RIPIEGARE
INDOSSARE
Asciugatura a umido: asciuga i capi pronti per essere stirati con una macchina stiratrice o rotante.
Asciugatura per stiratura: asciuga i capi pronti per essere stirati con un ferro a mano.
Asciugatura extra in gruccia: asciuga i capi delicati rendendoli pronti per essere appesi per l’asciugatura finale.
Asciugatura in gruccia: asciuga i capi rendendoli pronti per essere appesi per asciugatura finale.
Asciugatura leggera: Asciuga i capi delicati di modo che sono pronti per essere riposti.
Asciugatura capi pronti per l’armadio: Asciuga i capi di modo che sono pronti per essere riposti.
Asciugatura extra: asciuga i capi di modo che sono pronti per essere indossati.
28
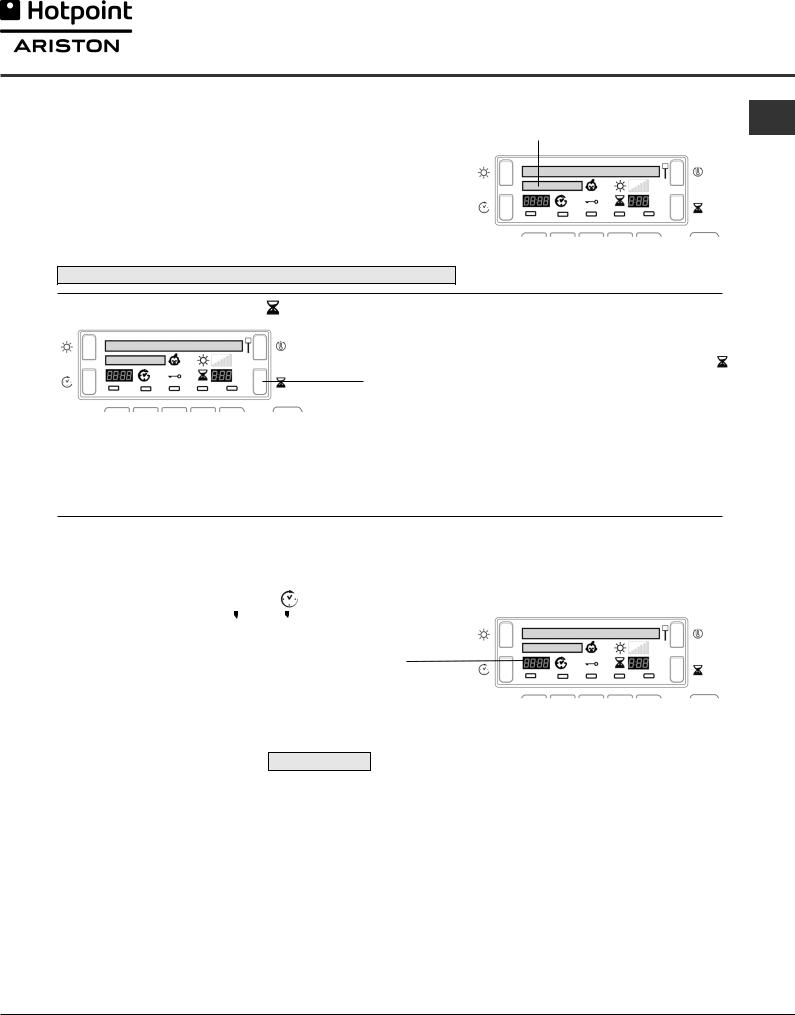
Il Display
Avanzamento del programma |
I |
|
La seconda riga del display mostra lo stato del programma nel corso del suo avanzamento: (I messaggi lunghi scorrono nella riga)
ASCIUGATURA |
|
|
|
|
|
RAFFREDDAMENTO |
|
|
|
Programma Caldo Abbraccio |
|
RISCALDAMENTO |
||
|
|
|
PRONTO |
|
|
|
|
(Se l’opzione antipiega e selezionata). |
FINE CICLO, TRATTAMENTO ANTIPIEGA |
||
|
|
|
FINE CICLO, PULIRE FILTRO E SVUOTARE BOTTIGLIA
Asciugatura Temporizzata
Dopo aver selezionato un programma con un’opzione di asciugatura temporizzata, premere il pulsante temporizzato e il display incrementerà il periodo selezionato, ogni volta
che si preme e si rilascia il pulsante (vedere la sezione Avvio e programmi).
Ogni pressione riduce la durata e il numero di opzioni temporali disponibili a seconda del programma/materiale selezionato.
L'icona asciugatura temporizzata  viene visualizzata accanto all'ora.
Il tempo selezionato rimane visualizzato dopo gli avvii del programma, ma può essere modificato in qualsiasi momento.
Ritardo e Tempo rimanente
Alcuni programmi possono avere un avvio ritardato (vedere la sezione Avvio e programmi). Premere il pulsante ritardo  e l’icona lampeggerà.
Ad ogni pressione del pulsante ritardo |
l’impostazione di |
|||||
ritardo avanza di 1 ora, da: |
|
a |
|
, quindi |
|
e |
1h |
24h |
OFF |
||||
dopo alcuni secondi il ritardo viene cancellato.
Il periodo del ritardo viene mostrato sul display vicino al pulsante ritardo.
Il display esegue il conto alla rovescia dei minuti del periodo di ritardo dopo che il pulsante Avvio/Pausa  è stato premuto.
La seconda riga del display mostra PARTE TRA
È possibile modificare o annullare il tempo di ritardo selezionato in qualsiasi momento.
Dopo che si preme il pulsante Avvio/Pausa il Ritardo o Tempo rimanente viene visualizzato in ore e minuti con conto alla rovescia per ogni minuto.
Tempo rimanente
Al termine del periodo di ritardo, o per tutto il programma, se non viene selezionato un ritardo, questa parte del display visualizzerà:
-il tempo rimanente stimato per la fine del programma, per programmi automatici
-il tempo rimanente effettivo nel corso di un programma temporizzato
Quando sono selezionati programmi temporizzati, il tempo visualizzato durante il ciclo è il tempo rimanente attuale.
Quando viene selezionato un programma automatico, il tempo visualizzato è una previsione del tempo rimanente. Quando il programma è selezionato, il display indica il tempo necessario per asciugare un carico pieno. Il tempo residuo viene costantemente monitorato durante il ciclo di asciugatura e il tempo viene modificato per mostrare la migliore stima possibile.
I punti fra le ore ed i minuti nel display lampeggiano per indicare il tempo che sta passando.
29
 Loading...