


Instructions for use
WASHING MACHINE
GB
English, 1
GR
ЕллзнйкЬ, 37
IT
Italiano, 13
RU
, 49
ECOT7D 1491
DE
Deutsch, 25
Contents
Installation, 2-3
Unpacking and levelling
Connecting the electricity and water supplies
The first wash cycle
Technical data
Description of the washing machine, 4-5
Control panel
Display
How to open and shut the drum
Running a wash cycle, 6
Load balancing system
Wash cycles and functions, 7
Table of wash cycles
Wash functions
Detergents and laundry, 8
Detergent dispenser drawer
Preparing the laundry
Special wash cycles
GB
Precautions and tips, 9
General safety
Disposal
Saving energy and respecting the environment
Care and maintenance, 10
Cutting off the water or electricity supply
Cleaning your appliance
Caring for your appliance door and drum
Cleaning the pump
Checking the water inlet hose
How to clean the detergent dispenser
Troubleshooting, 11
Service, 12
1
Installation
GB
! Keep this instruction manual in a safe place for future
reference. Should the appliance be sold, transferred or
moved, make sure the instruction manual accompanies
the washing machine to inform the new owner as to its
operation and features.
! Read these instructions carefully: they contain vital infor-
mation on installation, use and safety.
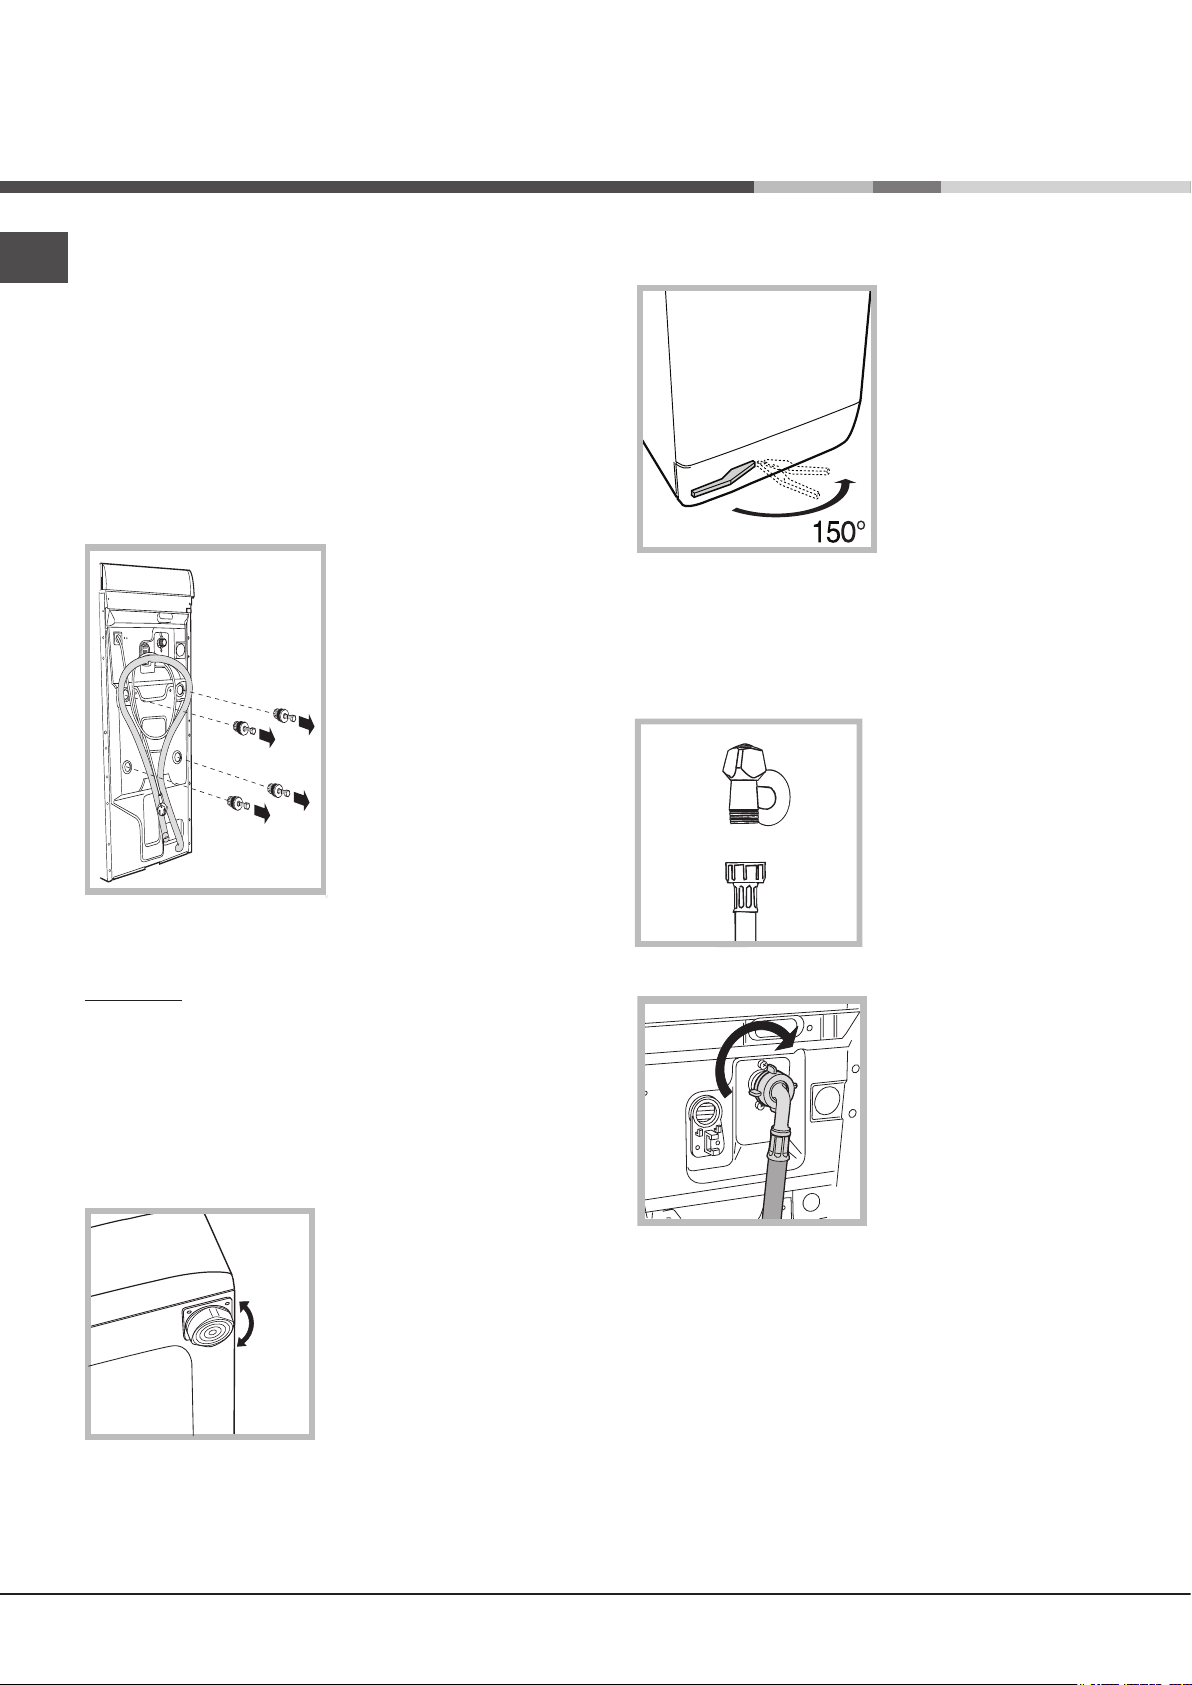
Unpacking and levelling
Unpacking
1. Unpack the washing
machine.
2. Check whether the
washing machine has
been damaged during
transport. If this is the
case, do not install it and
contact your retailer.
3. Remove the four
protective screws and
the rubber washer with
the respective spacer,
situated on the rear of the
appliance (see figure).
4. Seal the gaps using the
plastic plugs provided.
5. Keep all the parts: you will need them again if the washing machine needs to be moved to another location.
Warning: should the screws be re-used, make sure you fasten
the shorter ones at the top.
! Packaging materials are not children’s toys.
Levelling
Your machine may make a considerable amount of noise if
the two front feet have not been adjusted correctly.
1. Install the washing machine on a flat sturdy floor,
without resting it up against
walls, furniture cabinets or
other.
2. If the floor is not perfectly
level, compensate for any
unevenness by tightening
or loosening the adjustable
front feet (see figure); the
angle of inclination, measured according to the worktop, must not exceed 2°.
Levelling your appliance correctly will provide it with stability and avoid any vibrations, noise and shifting during
operation. If it is placed on a fitted or loose carpet, adjust
the feet in such a way as to allow enough room for ventilation beneath the washing machine.
Putting your appliance in place and moving it.
If your washing machine is
equipped with a special set
of retractable wheels you
can easy move it. To lower
the wheels and thus move
the appliance effortlessly, just
pull the lever, situated on the
left-hand side beneath the
base. Once the appliance is
in the required position, put
the lever back in place. The
washing machine is now
firmly in place (see figure).
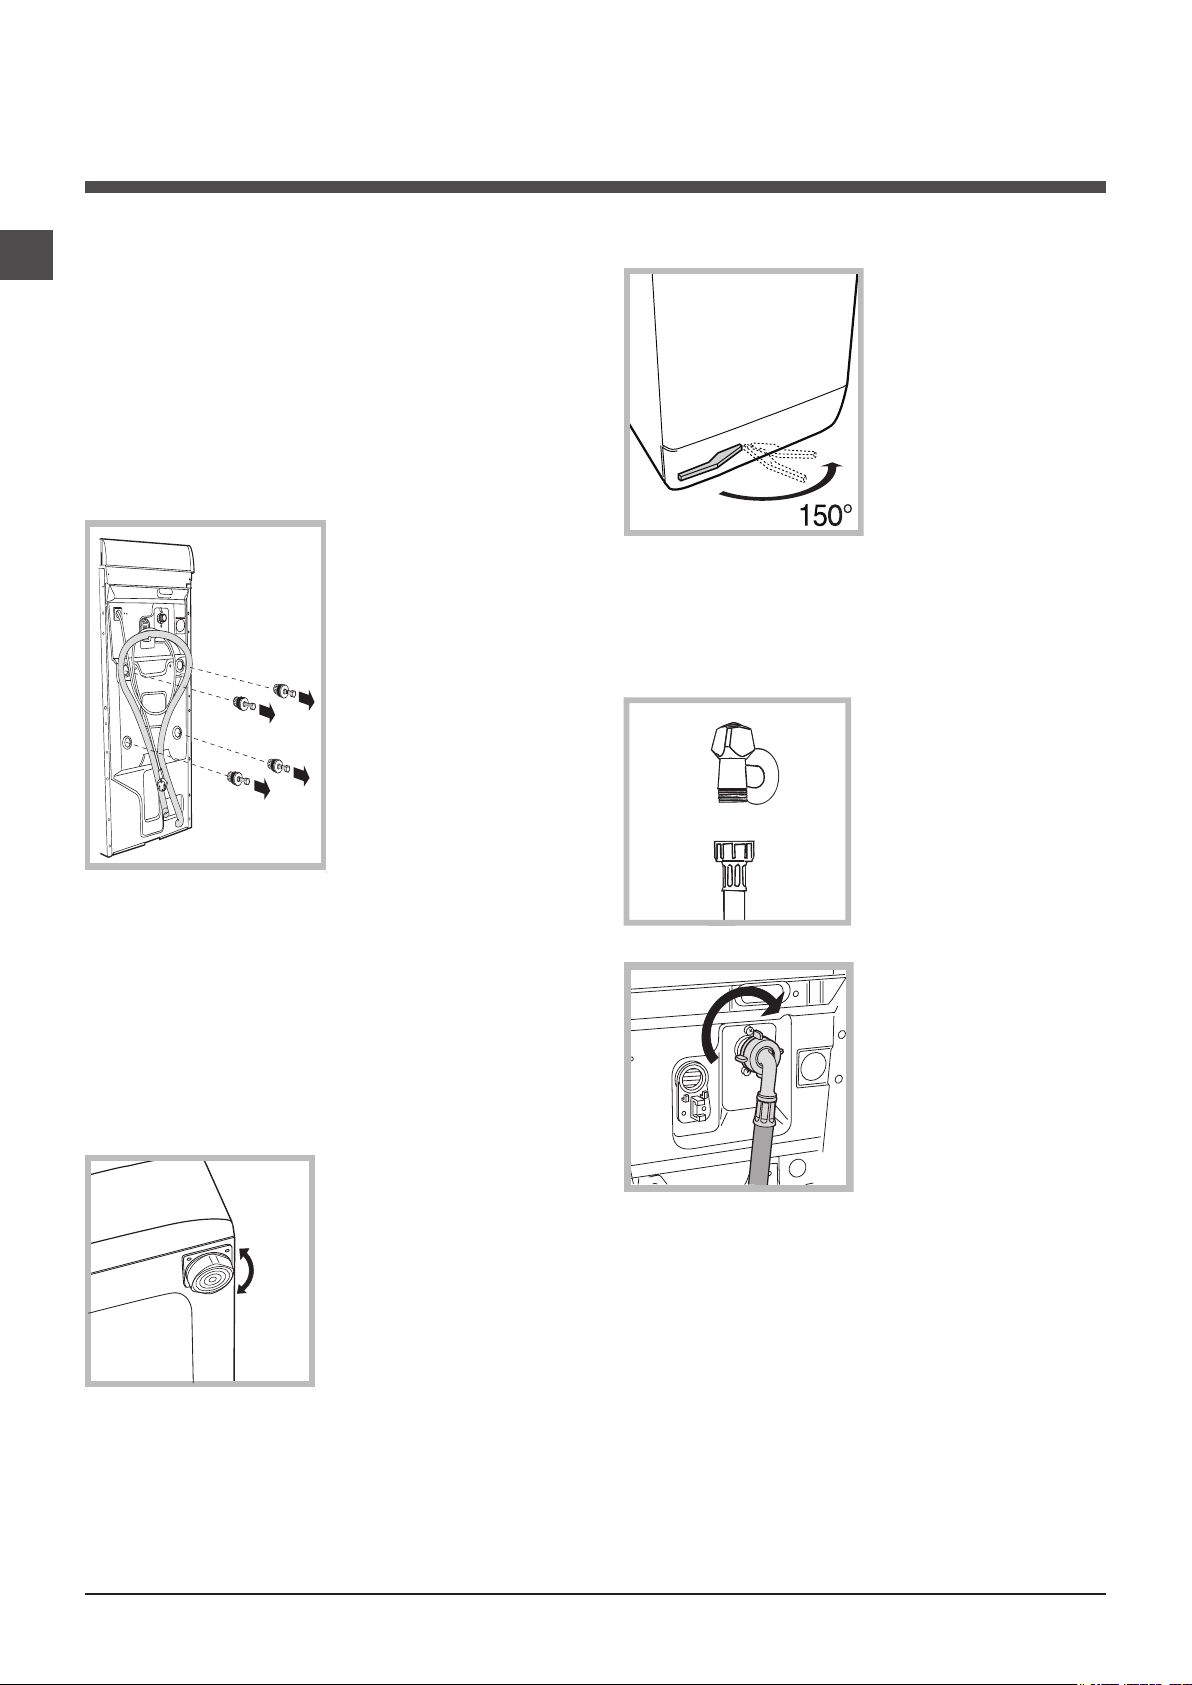
Electric and water connections
Connecting the water inlet hose
1. Connect the supply pipe
by screwing it to a cold
water tab using a ¾ gas
threaded connection (see
figure).
Before performing the connection, allow the water to
run freely until it is perfectly
clear.
2. Connect the other end of
the water inlet hose to the
washing machine, screwing
it onto the appliance’s cold
water inlet, situated on the
top right-hand side on the
rear of the appliance (see
figure).
3. Make sure there are no kinks or bends in the hose.
! The water pressure at the tap must be within the values
indicated in the Technical details table
(on the next page).
! If the water inlet hose is not long enough, contact a spe-
cialist store or an authorised serviceman.
2
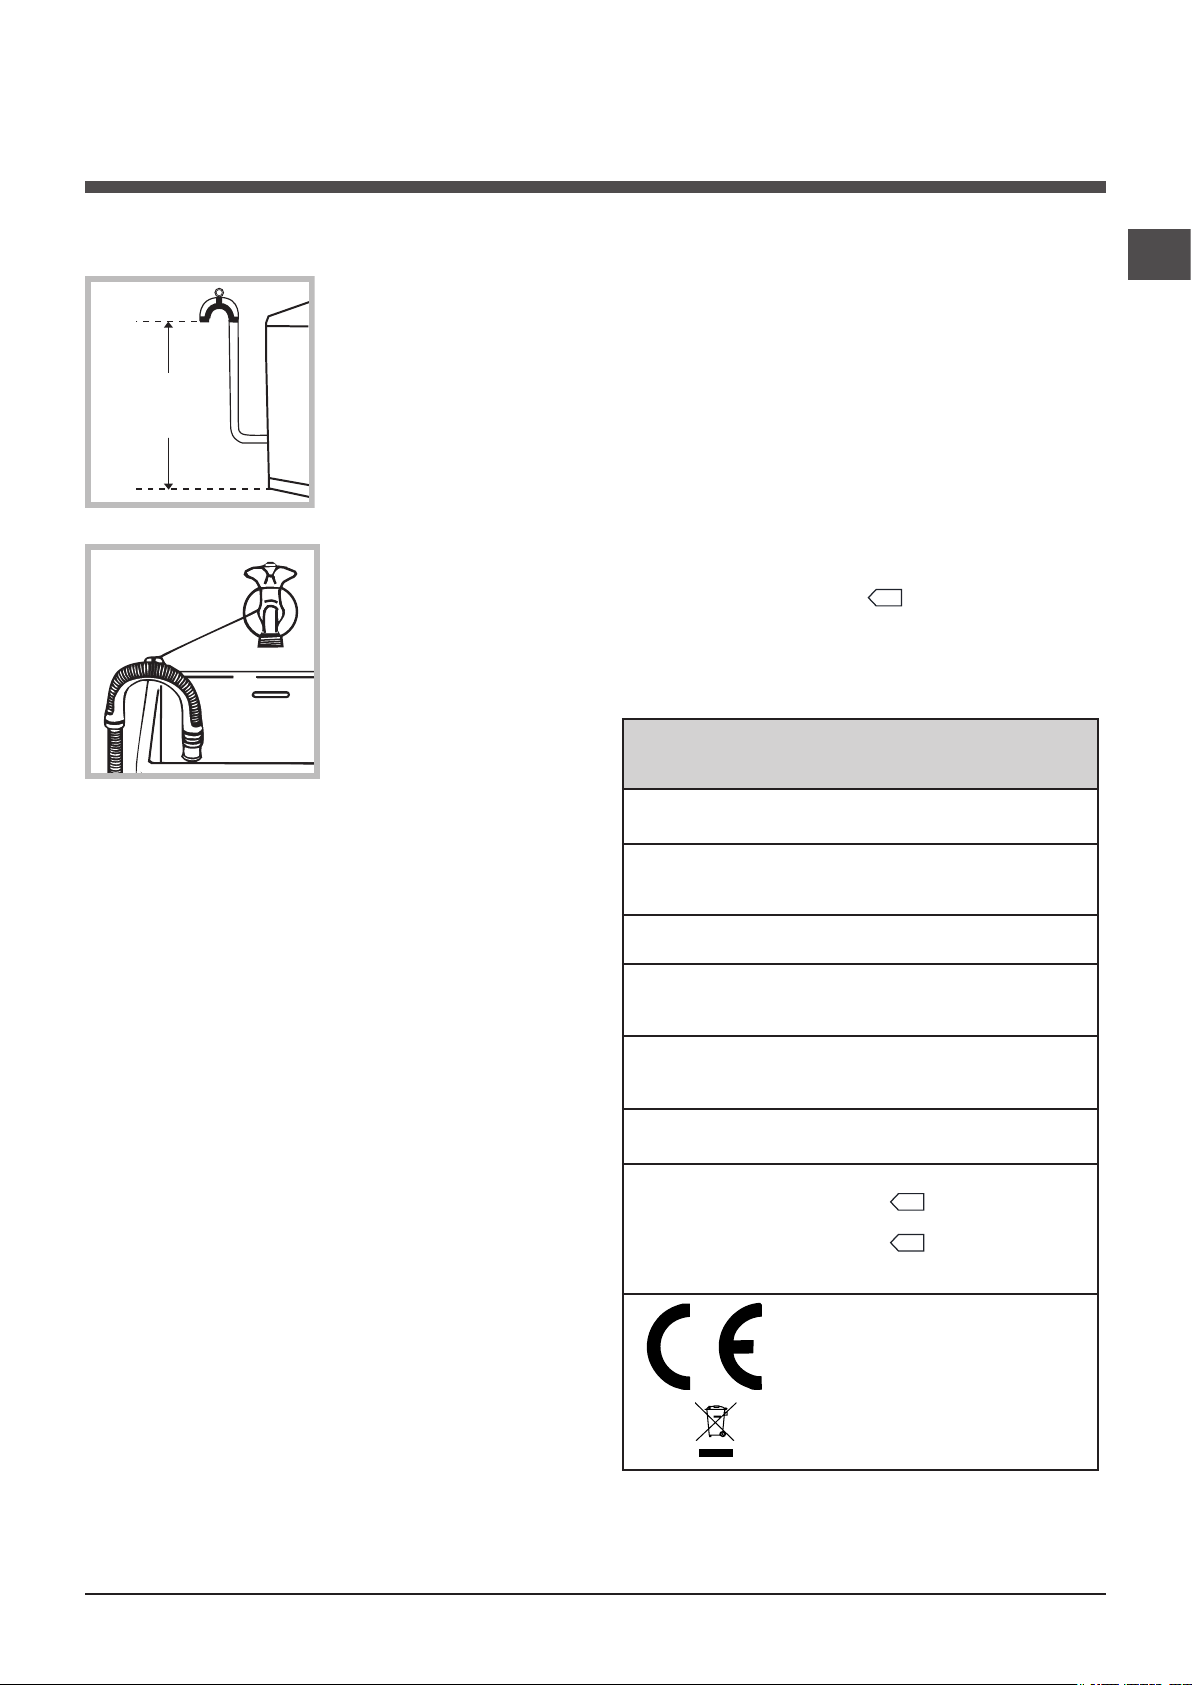
65 - 100 cm
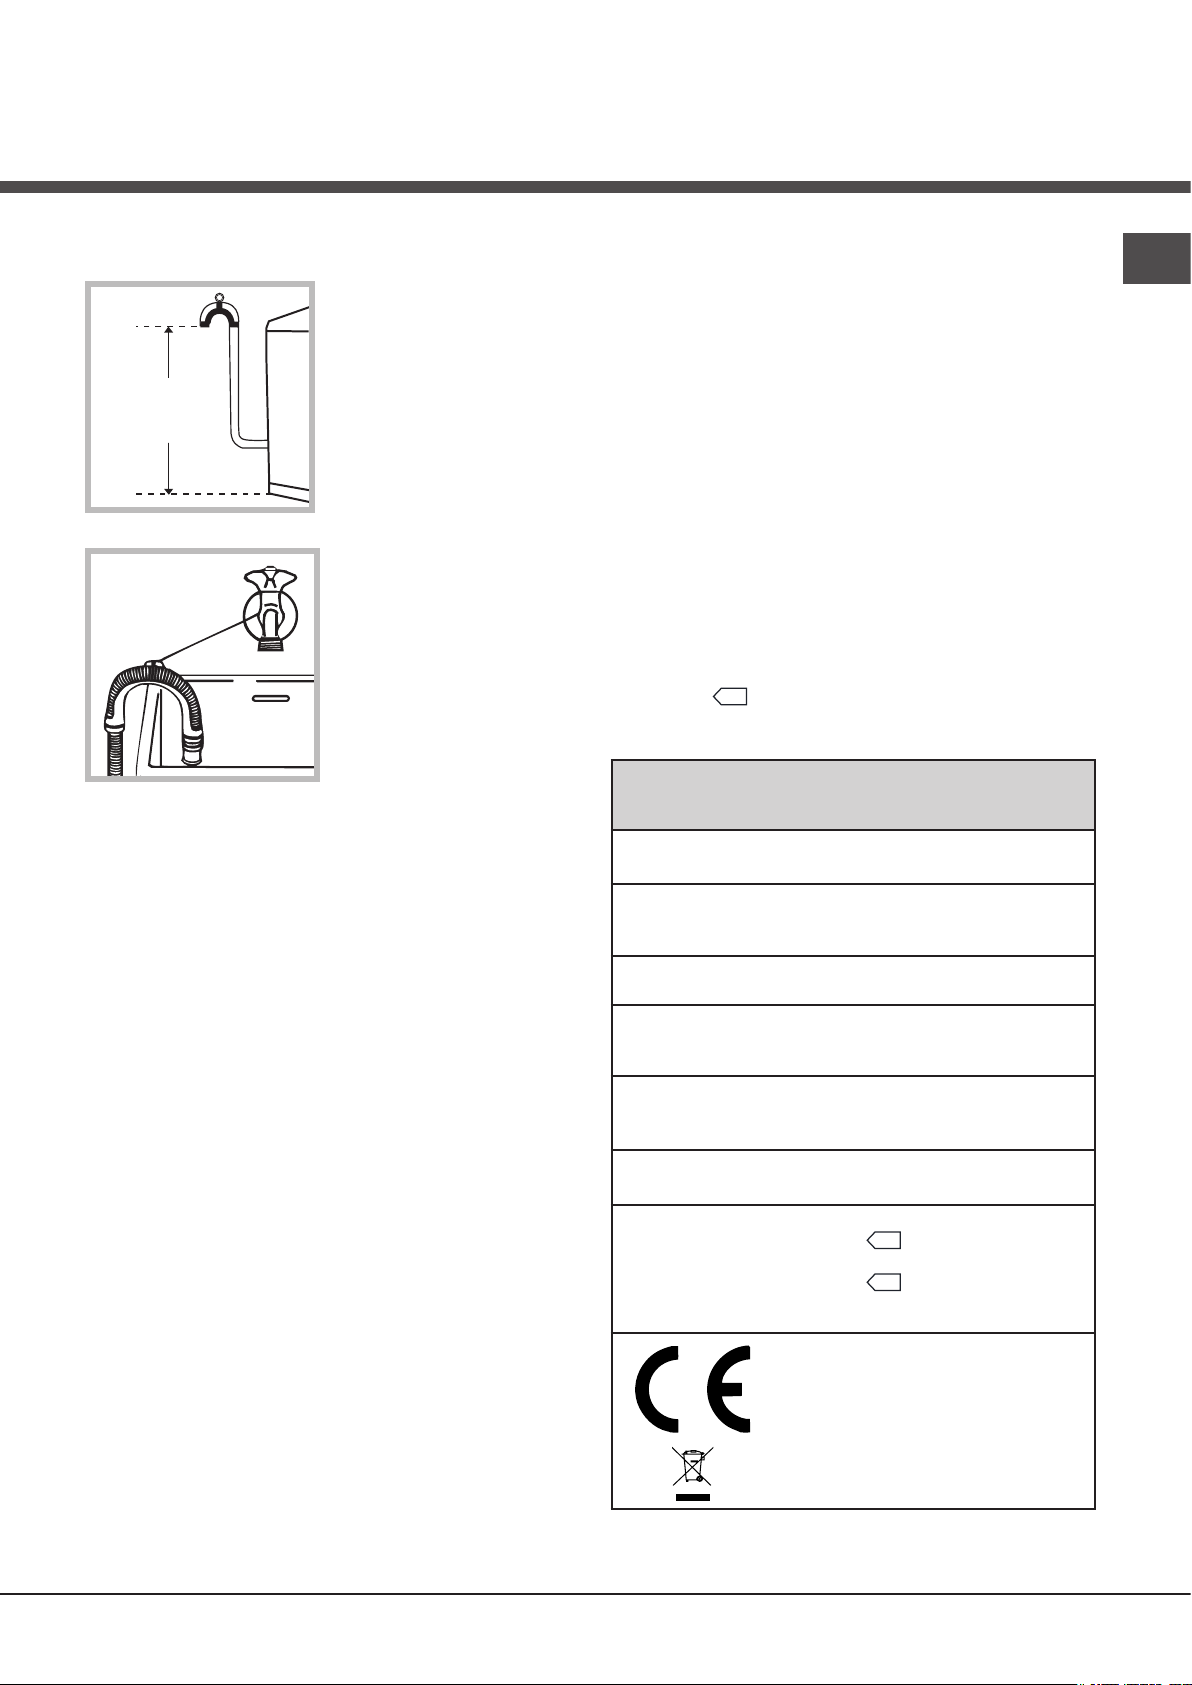
Connecting the drain hose
Connect the drain hose,
without bending it, to a drai-
nage duct or a wall drain
located at a height between
65 and 100 cm from the
floor;
! Do not use extension cords or multiple sockets.
! The cable should not be bent or compressed.
! The power supply cable must only be replaced by autho-
rised technicians.
Warning! The company shall not be held responsible in the
event that these regulations are not respected.
The first wash cycle
GB
alternatively, rest it on
the side of a washbasin
or bathtub, fastening the
duct supplied to the tap
(see figure). The free end
of the hose should not be
underwater.
! We advise against the use of hose extensions; if it is
absolutely necessary, the extension must have the same
diameter as the original hose and must not exceed 150 cm
in length.
Electrical connections
Before plugging the appliance into the electricity socket,
make sure that:
• the socket is earthed and complies with all applicable laws;
• the socket is able to withstand the maximum power load
of the appliance as indicated in the Technical data table
(see opposite);
• the power supply voltage falls within the values indicated
in the Technical data table (see opposite);
• the socket is compatible with the plug of the washing
machine. If this is not the case, replace the socket or the
plug.
! The washing machine must not be installed outdoors, even
in covered areas. It is extremely dangerous to leave the appliance exposed to rain, storms and other weather conditions.
Once the appliance has been installed, and before you use
it for the first time, run a wash cycle with detergent and no
laundry, using the wash cycle (60°C).
Technical details
Model
Dimensions
Capacity
Electric
connections
Water
connections
Spin speed
Test wash
cycles in
accordance
with directives
1061/2010 and
1015/2010
ECOT7D 1491
40 cm wide
85 cm high
60 cm deep
from 1 to 7 kg
Please refer to the technical data plate
fixed to the machine.
maximum pressure 1 MPa (10 bar)
minimum pressure 0.05 MPa (0.5 bar)
drum capacity 42 litres
up to 1400 rpm
Programme
ton): Cotton standard 60°C;
Programme
ton): Cotton standard 40°C.
This appliance is compliant with
the following European Community
Directives:
- 2004/108/CE (Electromagnetic
Compatibility)
- 2006/95/CE (Low Voltage)
- 2002/96/CE
(1° press of the but-
(2° press of the but-
! When the washing machine has been installed, the electricity
socket must be within easy reach.
3
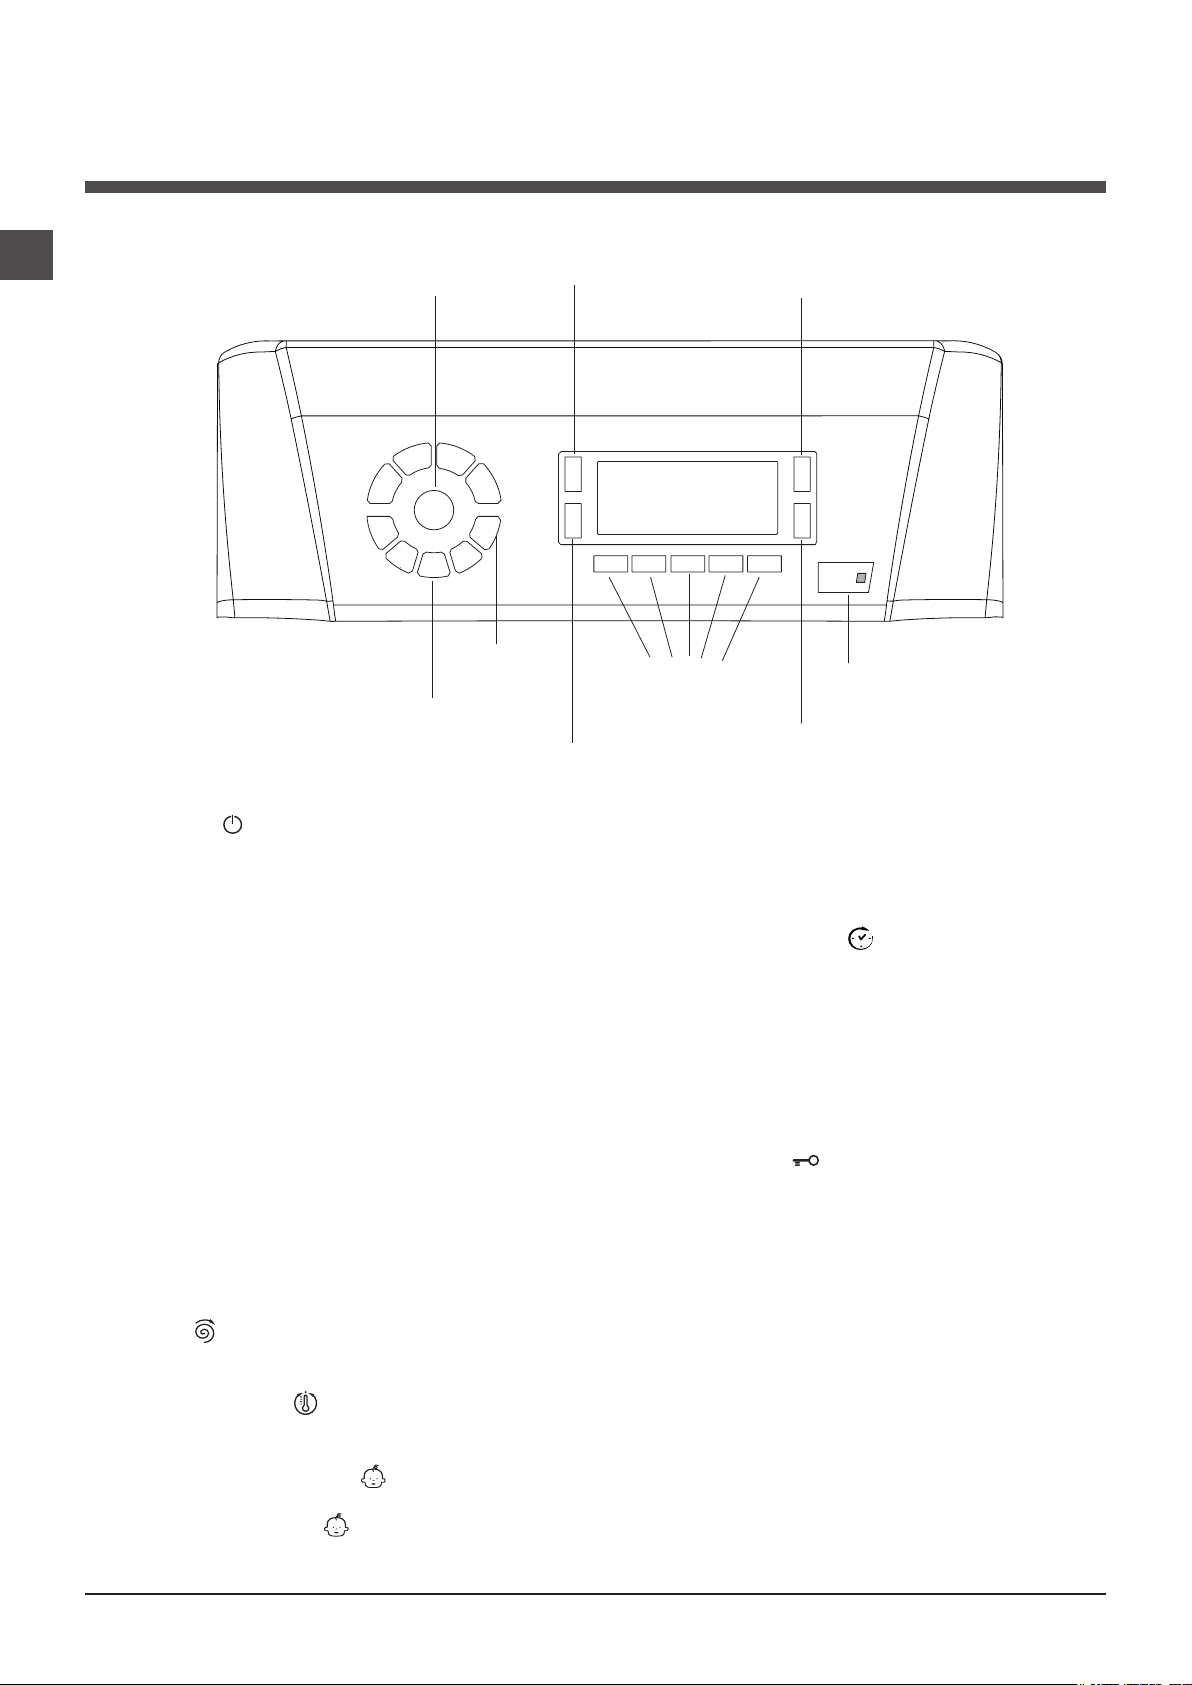
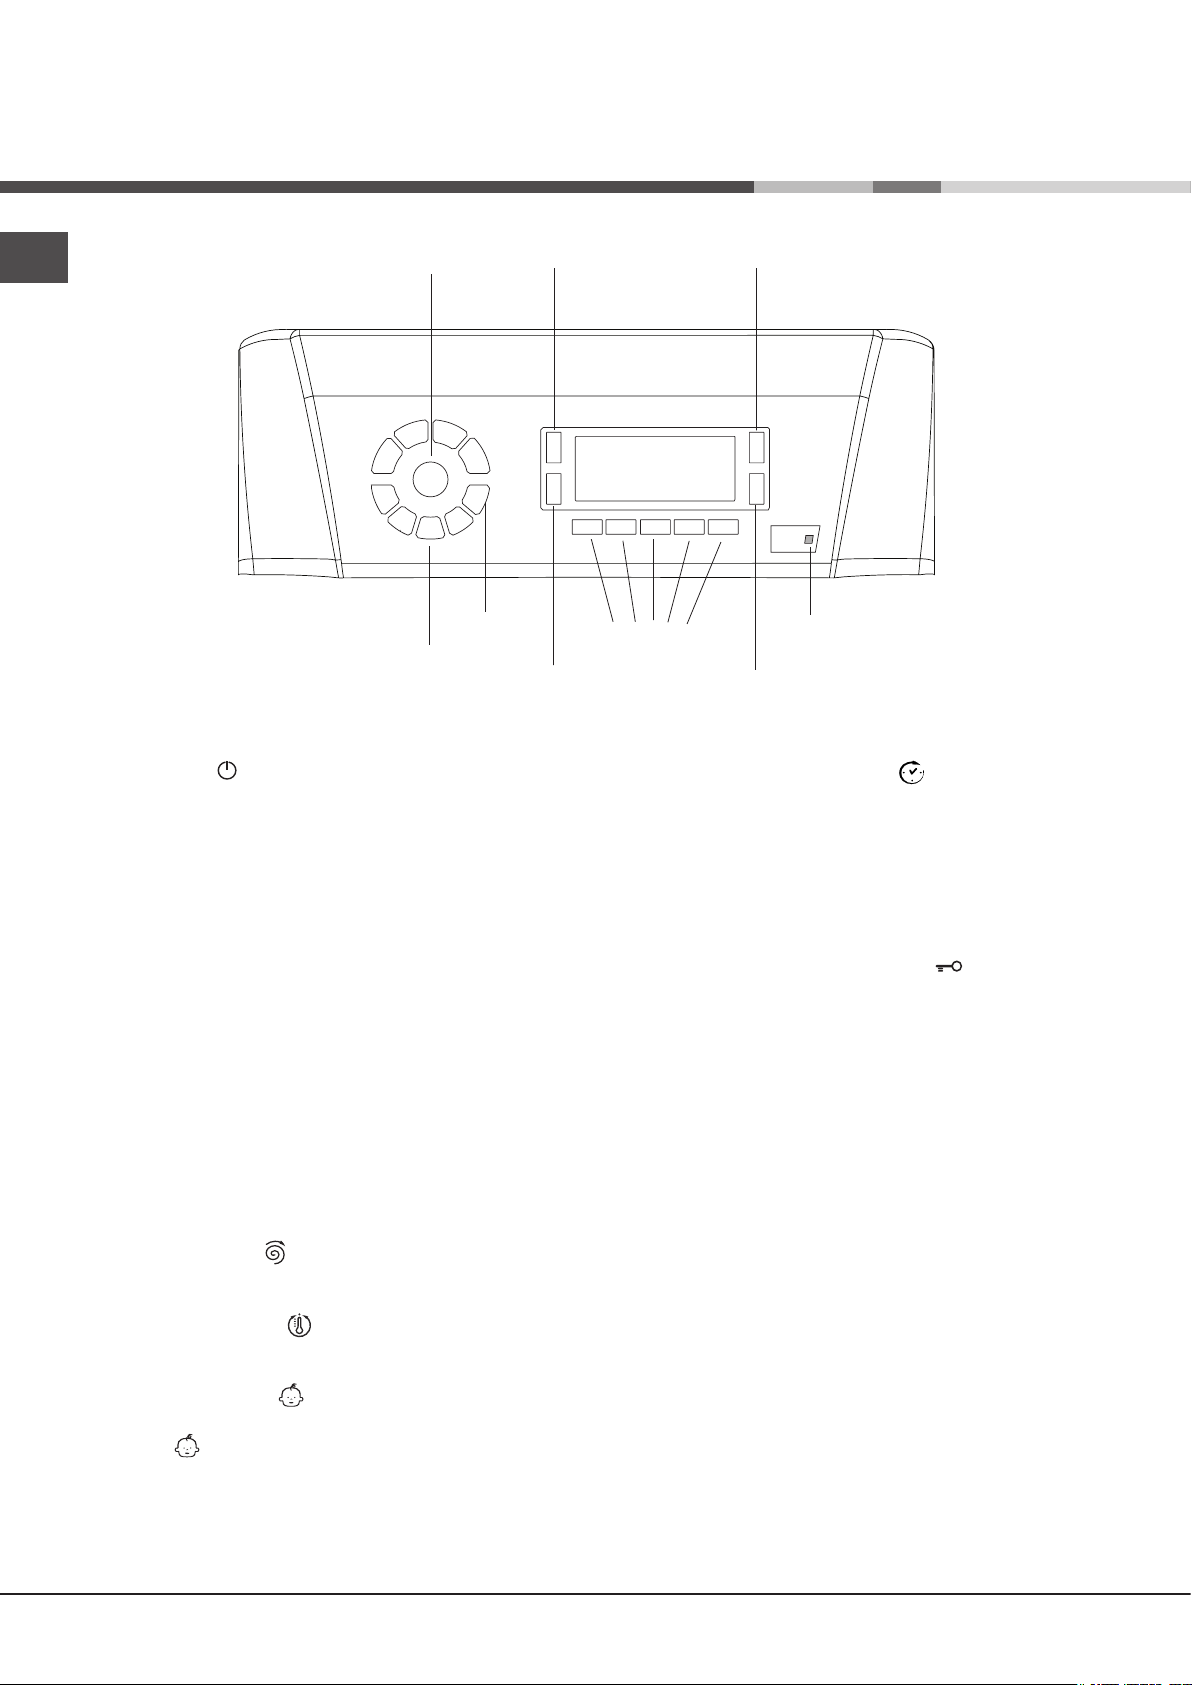
Description of the washing
machine
GB
Control panel
ON/OFF
button
WASH
CYCLE
SELECTOR
Buttons
MEMORY
Button
DELAYED
START Button
CONTROL
PANEL
LOCK Button
DISPLAY
FUNCTION
buttons
SPIN SPEED
Button
START/PAUSE
button with indicator light
TEMPERATURE
Button
ON/OFF button : press this briefly to switch the machine
on or off. The START/PAUSE indicator light, which flashes
slowly in a green colour shows that the machine is switched
on. To switch off the washing machine during the wash cycle,
press and hold the button for approximately 2 seconds; if
the button is pressed briefly or accidentally the machine will
not switch off. If the machine is switched off during a wash
cycle, this wash cycle will be cancelled.
WASH CYCLE SELECTOR buttons: used to set the desired
wash cycle (see “Table of wash cycles”).
MEMORY button: press and hold the button to store a
cycle with your own set of preferences in the memory of
the machine. To recall a previously stored cycle, press the
MEMO button.
FUNCTION buttons: press the button to select the desired
function. The corresponding indicator light on the display
will switch on.
SPIN button : press to reduce or completely exclude the
spin cycle - the value is indicated on the display.
TEMPERATURE button : press to decrease the temperature: the value will be shown on the display.
CONTROL PANEL LOCK button : to activate the control
panel lock, press and hold the button for approximately 2
seconds. When the symbol is illuminated, the control
panel is locked.
This means it is possible to prevent wash cycles from being
modified accidentally, especially where there are children in
the home. To deactivate the control panel lock, press and
hold the button for approximately 2 seconds.
DELAYED START button : press to set a delayed start
time for the selected wash cycle. The delay time will be shown
on the display.
START/PAUSE button with indicator light: when the green indicator light flashes slowly, press the button to start a
wash cycle. Once the cycle has begun the indicator light will
remain lit in a fixed manner. To pause the wash cycle, press
the button again; the indicator light will flash in an orange
colour. If the symbol is not illuminated, the door may be
opened. To start the wash cycle from the point at which it
was interrupted, press the button again.
Standby mode
This washing machine, in compliance with new energy saving
regulations, is fitted with an automatic standby system which
is enabled after about 30 minutes if no activity is detected.
Press the ON-OFF button briefly and wait for the machine
to start up again.
Consumption in off-mode: 0,5 W
Consumption in Left-on: 0,5 W
4
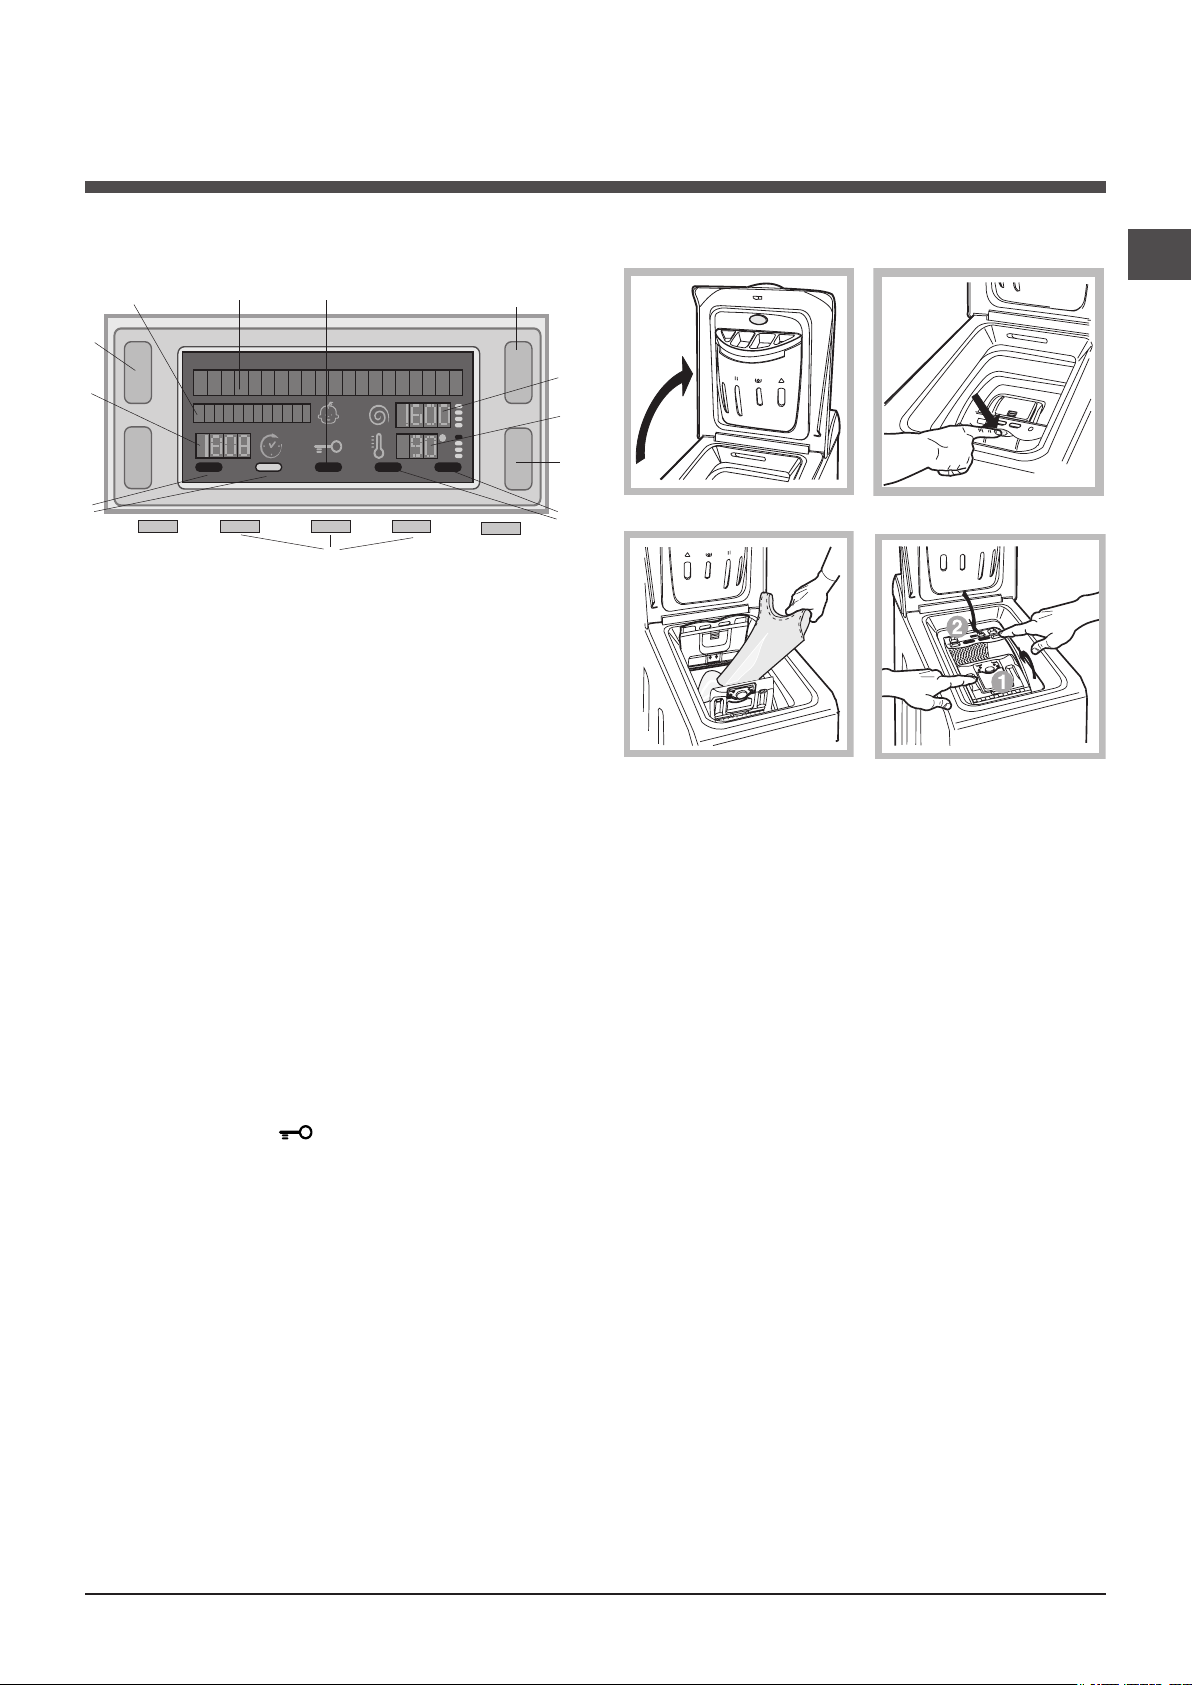
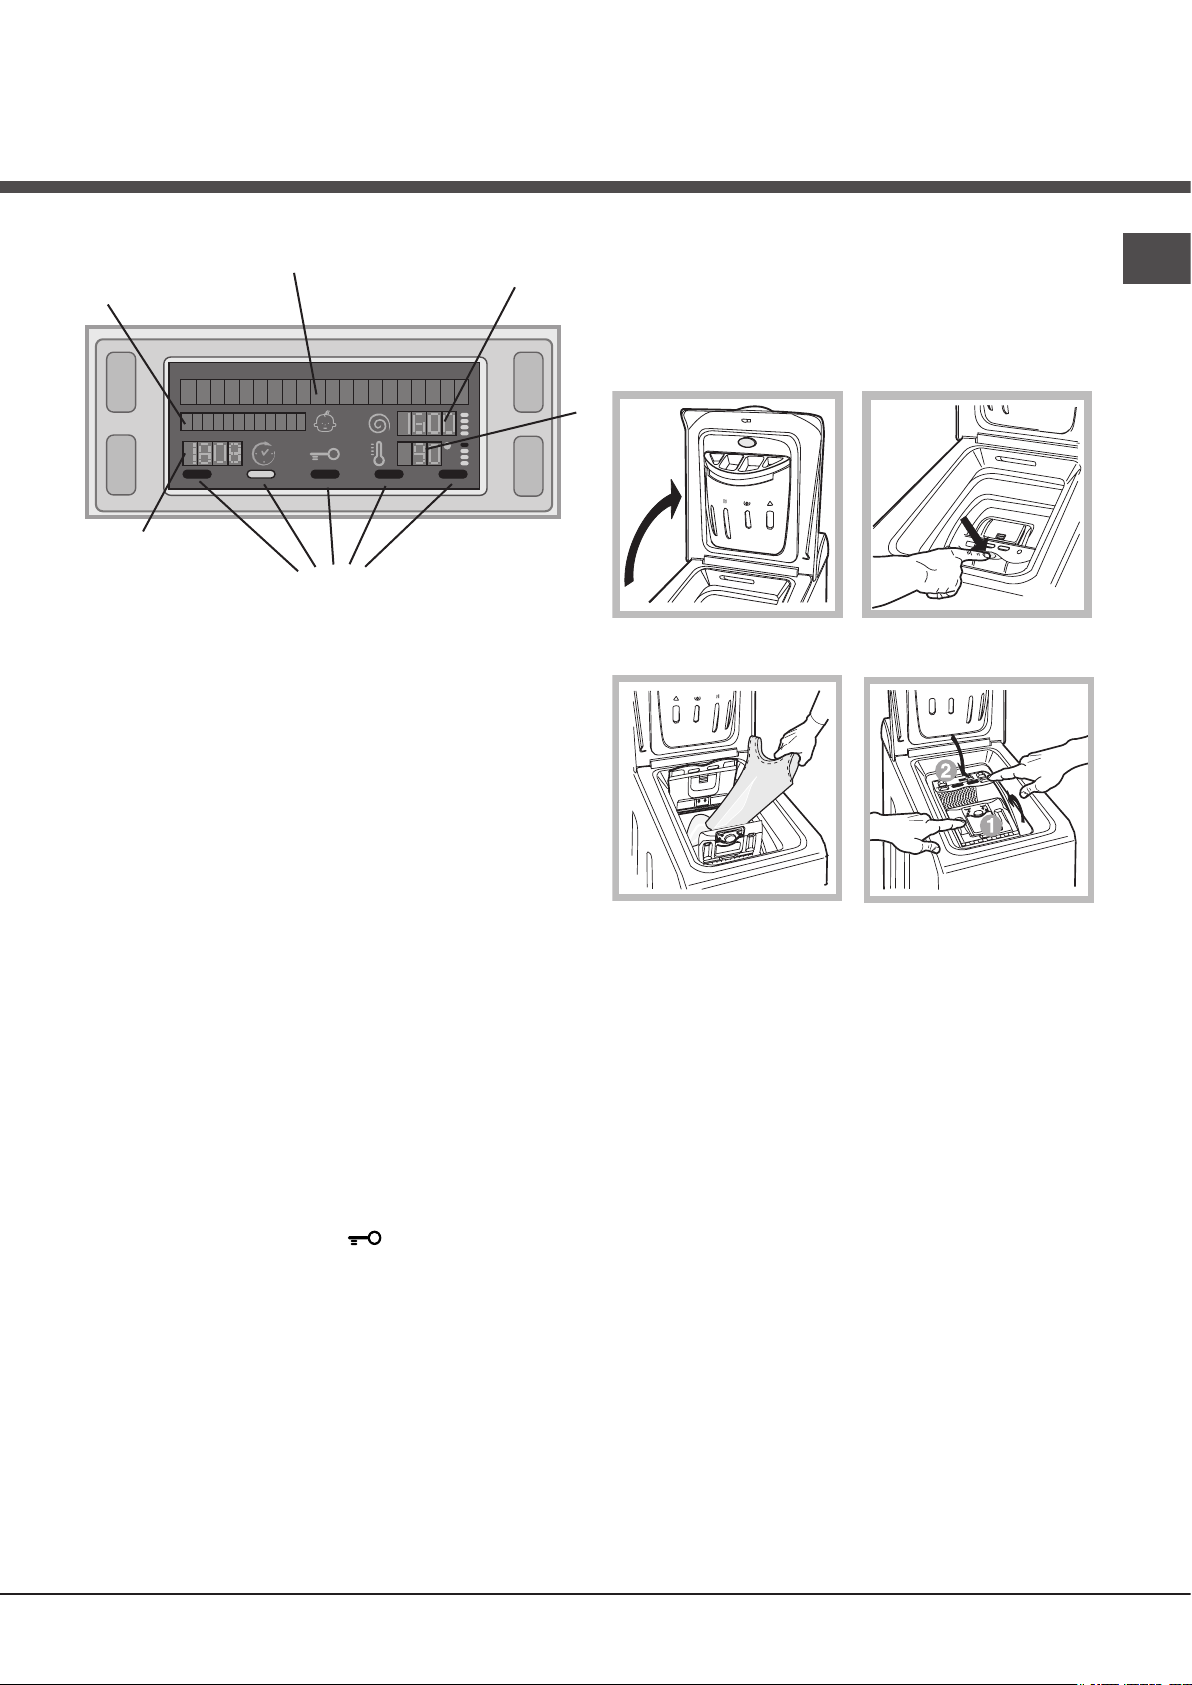
Display
How to open and to close the drum
GB
B
A
F
X
Z
C
F
L
The display is useful when programming the machine and
provides a great deal of information.
The two upper strings A and B provide details of the wash
cycle selected, the wash cycle phase in progress and all
information relating to the progress status of the wash cycle.
String C shows the time remaining until the end of the wash
cycle in progress and, if a DELAYED START has been set,
the time remaining until the start of the selected wash cycle.
String D shows the maximum spin speed value (this depen-
ds on the selected wash cycle); if the wash cycle does not
include a spin cycle, the string remains unused.
String E shows the maximum temperature value which may
be selected (this depends on the wash cycle used); if the
temperature of the wash cycle cannot be modified, the string
remains unused.
Indicator lights F correspond to the functions and light up when
the selected function is compatible with the set wash cycle.
Door locked symbol
If the symbol is lit, this indicates that the washing machine door is blocked to prevent it from being opened
accidentally. To prevent any damage from occurring,
wait for the symbol to switch itself off before opening
the appliance door (it will take about three minutes).
N.B.: if the DELAYED START function has been activated,
the door cannot be opened; pauses the machine by pressing
the START/PAUSE button if you wish to open it.
D
E
Y
F
Fig. 1
Fig. 3
A) Opening (Fig. 1):
Lift the external lid and open it completely.
B) Opening the drum (Soft opening):
With one finger, push the button indicated in fig. 2 and
the drum will open delicately.
C) Loading the washing machine (Fig. 3).
D) Shutting (Fig. 4):
- close the drum fully by first shutting the front door
followed by the rear one;
- then ensure the hooks on the front door are perfectly
housed within the seat of the rear door;
- after the hooks have clicked into position, press both
doors lightly downwards to make sure they do not
come loose;
- finally shut the external lid.
E) Drum End Stop (Fig. 2):
Once the wash cycle has been completed, the drum will
position itself with doors facing upward for ease pf opening.
Fig. 2
Fig. 4
! The first time the machine is switched on, you will be asked
to select the language and the display will automatically show
the language selection menu.
To select the desired language press the X and Y buttons; to
confirm the selection press the Z button. If you wish to change
the selected language, simultaneously press and hold all the
three buttons marked with an L in the figure, until you hear a
beep. Switch the machine on again; the language selection
menu will be displayed.
5
Running a wash cycle
GB
1. SWITCH THE MACHINE ON. Press the button;
the text WELCOME will appear on the display and the
START/PAUSE indicator light will flash slowly in a green
colour.
2. LOAD THE LAUNDRY. Open the porthole door.
Load the laundry, making sure you do not exceed
the maximum load value indicated in the table of
programmes on the following page.
3. MEASURE OUT THE DETERGENT. Pour the
detergent into the relevant compartments as described
in “Detergents and laundry”.
4. CLOSE THE DOOR.
5. SELECT THE WASH CYCLE. Press one of the WASH
CYCLE SELECTOR buttons to select the required wash
cycle; the name of the wash cycle will appear on the
display. A temperature and spin speed is set for each
wash cycle; these may be adjusted. The duration of the
cycle will appear on the display.
6. CUSTOMISE THE WASH CYCLE. Use the relevant
buttons:
Modifying the temperature and/or spin
speed. The machine automatically selects the
maximum temperature and spin speed set for the
selected wash cycle; these values cannot therefore
be increased. The temperature can be decreased by
pressing the button, until the cold wash “OFF”
setting is reached. The spin speed may be progressively
reduced by pressing the button, until it is completely
excluded (the “OFF” setting). If these buttons are
pressed again, the maximum values are restored.
! If the selected function is not compatible with
another function which has been selected previously,
the indicator light corresponding to the first function
selected will flash and only the second function will
be activated; the indicator light corresponding to the
enabled function will remain lit.
! The functions may affect the recommended load value
and/or the duration of the cycle.
7. START THE PROGRAMME. Press the START/
PAUSE button. The corresponding indicator light will
become green, remaining lit in a fixed manner, and the
door will be locked (the DOOR LOCKED symbol will
be on). During the wash cycle, the name of the phase
in progress will appear on the display. To change a
wash cycle while it is in progress, pause the washing
machine using the START/PAUSE button (the START/
PAUSE indicator light will flash slowly in an orange
colour); then select the desired cycle and press the
START/PAUSE button again.
To open the door while a cycle is in progress, press
the START/PAUSE button; if the DOOR LOCKED
symbol is switched off the door may be opened. Press
the START/PAUSE button again to restart the wash
cycle from the point at which it was interrupted.
8. THE END OF THE WASH CYCLE. This will be
indicated by the text “END OF CYCLE” on the display;
when the DOOR LOCKED symbol switches off
the door may be opened. Open the door, unload the
laundry and switch off the machine.
! If you wish to cancel a cycle which has already begun,
press and hold the button. The cycle will be stopped
and the machine will switch off.
Setting a delayed start.
To set a delayed start for the selected programme,
press the corresponding button repeatedly until the
required delay period has been reached. When this
option is enabled, the symbol lights up on the
display. To remove the delayed start function press the
button until the text “OFF” appears on the display.
Modifying the cycle settings.
• Press the button to enable the function; the indicator
light corresponding to the button will switch on.
• Press the button again to disable the function; the
indicator light will switch off.
! If the selected function is not compatible with the
programmed wash cycle, the indicator light will flash
and the function will not be activated.
6
Load balancing system
Before every spin cycle, to avoid excessive vibrations and
to distribute the load in a uniform manner, the drum rotates
continuously at a speed which is slightly greater than the
washing rotation speed. If, after several attempts, the load is
not balanced correctly, the machine spins at a reduced spin
speed. If the load is excessively unbalanced, the washing machine performs the distribution process instead of spinning.
To encourage improved load distribution and balance, we
recommend small and large garments are mixed in the load.
Wash cycles and functions
Table of wash cycles
Max.
Description of the wash cycle
Wash cycles
Everyday wash cycles (Daily)
Cotton: extremely soiled whites. 90° 1400
Cotton Standard 60° (1) (1° press of the button): heavily soiled whites and
resistant colours.
Cotton Standard 40° (2) (2° press of the button): lightly soiled whites and
delicate colours.
Cotton Standard 20° (3° press of the button): lightly soiled whites and
delicate colours.
Synthetics (1° press of the button): heavily soiled resistant colours. 60° 800
Synthetics (3) (1° press of the button): lightly soiled resistant colours. 40° 800
Synthetics (2° press of the button): lightly soiled whites and delicate colours. 40° 800
Mix 30’ (1° press of the button): to refresh lightly soiled garments quickly (not
suitable for wool, silk and clothes which require washing by hand).
Mix 15’ (2° press of the button): to refresh lightly soiled garments quickly (not
suitable for wool, silk and clothes which require washing by hand).
Special cycles / Memory
M
Memory: allows for any wash cycle to be stored.
Baby cycle: heavily soiled delicate colours. 40° 800 -
Silk/Curtains: for garments in silk and viscose, lingerie. 30° 0 -
Wool: for wool, cashmere, etc. 40° 800 -
Partial wash cycles
Spin (1° press of the button) - 1400 - - - 7 - - - 16’
Rinse (2° press of the button) - 1400 - -
Pump out (3° press of the button) - 0 - - - 7 - - - 2’
The length of cycle shown on the display or in this booklet is an estimation only and is calculated assuming standard working conditions. The actual duration can vary according to factors such as
water temperature and pressure, the amount of detergent used, the amount and type of load inserted, load balancing and any wash options selected.
1) Test wash cycle in compliance with directive 1061/2010: set wash cycle (1° press of the button) with a temperature of 60°C.
This cycle is designed for cotton loads with a normal soil level and is the most efficient in terms of both electricity and water consumption; it should be used for garments
which can be washed at 60°C. The actual washing temperature may differ from the indicated value.
2) Test wash cycle in compliance with directive 1061/2010: set wash cycle (2° press of the button) with a temperature of 40°C.
This cycle is designed for cotton loads with a normal soil level and is the most efficient in terms of both electricity and water consumption; it should be used for garments
which can be washed at 40°C. The actual washing temperature may differ from the indicated value.
For all Test Institutes:
2) Long wash cycle for cottons: set wash cycle (2° press of the button) with a temperature of 40°C.
3) Synthetic program along: set wash cycle (1° press of the button) with a temperature of 40°C.
Wash functions
Max.
temp.
speed
(°C)
(rpm)
60° 1400 -
40° 1400 -
20° 1400 -
30° 800 -
30° 800 -
“STOP WITH WATER” will appear on the display.
To drain the water so that the laundry may be removed, press
Prewash
If this function is selected, the pre-wash cycle will run; this is
useful for removing stubborn stains.
N.B.: put the detergent in the relevant compartment.
! It cannot be used with the , , , , , , programmes.
Extra rinse
the START/PAUSE button or the EASY IRON button.
! It may not be used with the , , , programmes.
Fast wash
Reduces the duration of the wash cycle, while making it possible
to save water and electricity.
! It cannot be used with the , , , , programmes.
By selecting this option, the efficiency of the rinse is increased
and optimal detergent removal is guaranteed. It is particularly
useful for sensitive skin.
! It cannot be used in conjunction with the , Spin, Pump out,
programmes.
Eco Wash
The Eco Wash function saves energy by not heating the
water used to wash your laundry – an advantage both to the
environment and to your energy bill. Instead, intensified wash
action and water optimisation ensure great wash results in the
Easy iron
By selecting this function, the wash and spin cycles will be modified in
order to reduce the formation of creases. The wash cycles ends
same average time of a standard cycle. For the best washing
results we recommend the usage of a liquid detergent.
! It cannot be used with the Mix 15, , , , , programmes.
with the laundry being left to soak in the machine; the EASY IRON
and START/PAUSE indicator lights will flash (orange) and the text
Detergents
Prewash Wash
Fabric
softener
Residual
dampness %
Max. load (kg)
7 53 1,99 62 145’
7 53 1,17 57 195’
7 53 1,09 92 190’
7 - - - 180’
2,5 44 0,85 39 105’
2,5 44 0,53 39 95’
2,5 - - - 70’
3 71 0,25 33 30’
1,5 71 0,08 29 15’
2 - - - 120’
1 - - - 55’
1 - - - 65’
7 - - - 36’
Total water lt
consumption
kWh
Energy
Cycle
duration
GB
7
Detergents and laundry
GB
Detergent dispenser drawer
Good washing results also depend on the correct dose of
detergent: adding too much detergent won’t necessarily
make for a more efficient wash, and may in fact cause build
up on the interior of your appliance and even pollute the
environment.
! Do not use hand washing detergents because these create
too much foam.
! Use powder detergent for white cotton garments, for pre-
washing, and for washing at temperatures over 60°C.
! Follow the instructions given on the detergent packaging.
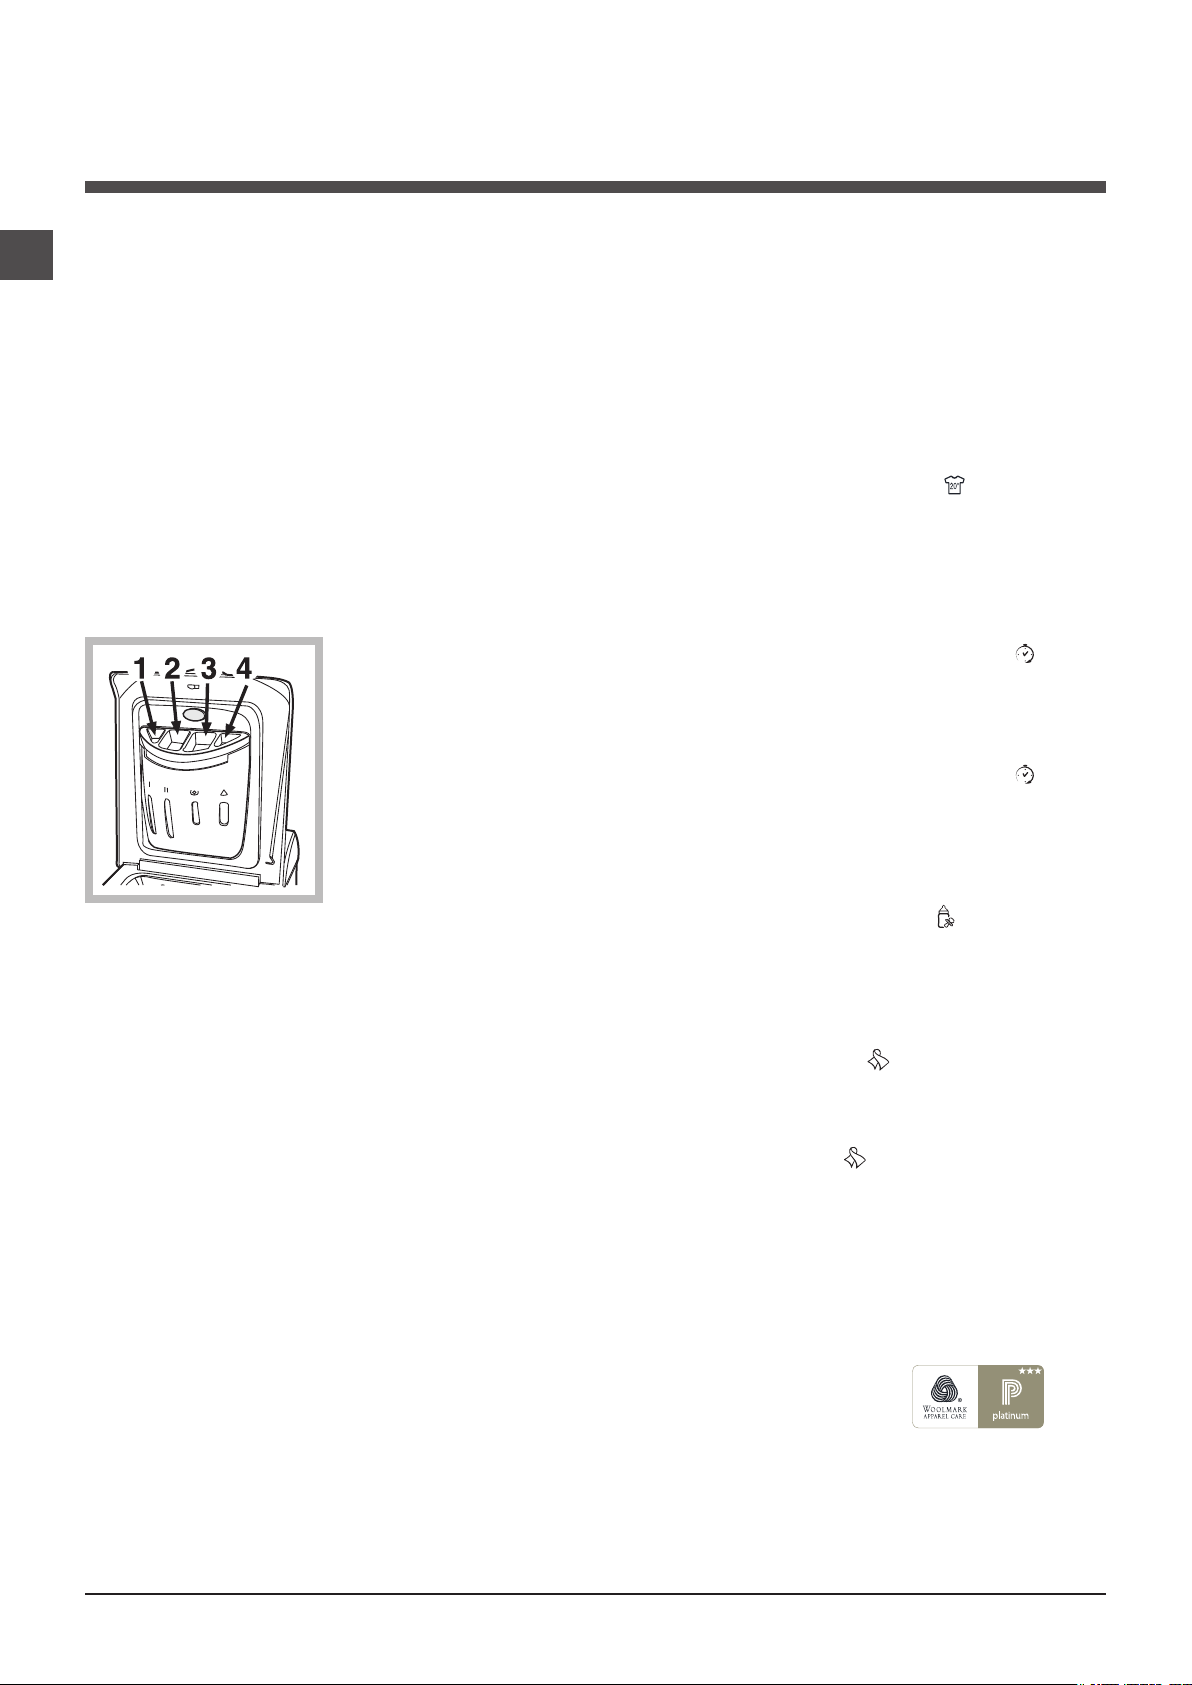
Ope n up th e de tergent
dispenser and pour in the
detergent and fabric softener, as follows.
compartment 1: Detergent for pre-wash
compartment 2: Detergent for the wash cycle
(powder or liquid)
It is recommended that you place liquid detergent directly into
the compartment using the appropriate dosing cup.
compartment 3: Additives (softener, etc.)
When pouring the softener in compartment 3, avoid exceeding the “max” level indicated.
The softener is added automatically into the machine during
the last wash. At the end of the wash programme, some
water will be left in compartment 3. This is used for the inlet
of denser fabric softeners into the machine, i.e. to dilute the
more concentrated softeners. Should more than a normal
amount of water remain in compartment 3, this means the
emptying device is blocked. For cleaning instructions, see
“Care and maintenance”.
compartment 4: Do not pour detergent into this
compartment.
cycles”, which refer to the weight of the laundry when dry.
How much does your laundry weigh?
1 sheet 400-500 g
1 pillow case 150-200 g
1 tablecloth 400-500 g
1 bathrobe 900-1200 g
1 towel 150-250 g
Special wash cycles
Cotton Standard 20°: (programme ) ideal for heavily
soiled cotton loads. The effective performance levels achieved
at cold temperatures, which are comparable to washing at
40°, are guaranteed by a mechanical action which operates
at varying speed, with repeated and frequent peaks.
Mix 30’: this wash cycle was designed to wash lightly soiled
garments quickly: it lasts just 30 minutes and therefore saves
both energy and time. By selecting this wash cycle ( at 30°C),
it is possible to wash different fabrics together (except for wool
and silk items), with a maximum load of 3 kg.
Mix 15’: this wash cycle was designed to wash lightly soiled
garments quickly: it lasts just 15 minutes and therefore saves
both energy and time. By selecting this wash cycle ( at 30°C),
it is possible to wash different fabrics together (except for wool
and silk items), with a maximum load of 1.5 kg.
Baby cycle: this wash cycle can be used to remove the soiling
typically caused by babies, while ensuring that all detergent is
removed from nappies in order to prevent the delicate skin of
babies from suffering allergies. The cycle has been designed
to reduce the amount of bacteria by using a greater quantity of
water and optimising the effect of special disinfecting additives
added to the detergent. At the end of the wash cycle, the
machine will slowly rotate the drum to prevent the formation
of creases; to end the cycle press the START/PAUSE button.
Silk: use special wash cycle to wash all silk garments.
We recommend the use of special detergent which has been
designed to wash delicate clothes.
Curtains: fold curtains and place them in a pillow case or
mesh bag. Use wash cycle .
Wool: The wool wash cycle on this Hotpoint-Ariston machine
has been tested and approved by The Woolmark Company for
washing wool garments labelled as hand washable provided
that the garments are washed according to the instructions
on the garment label and those issued by the manufacturer
of this washing machine. Hotpoint-Ariston is the first washing
machine brand to be approved by The Woolmark Company
for Apparel Care- Platinum for its washing performance and
consumption of energy and water.
Preparing the laundry
• Divide the laundry according to:
- the type of fabric/the symbol on the label
- the colours: separate coloured garments from whites.
• Empty all garment pockets and check the buttons.
• Do not exceed the values listed in the “Table of wash
8
In UK, Eire, Hong Kong and India the Woolmark trade mark is
a Certification trade mark.

Precautions and tips
! This washing machine was designed and constructed in
accordance with international safety regulations. The following information is provided for safety reasons and must
therefore be read carefully.
General safety
• This appliance is not intended for use by persons (including children) with reduced physical, sensory or mental
capabilities, or lack of experience and knowledge, unless
they have been given supervision or instruction concerning use of the appliance by a person responsible for
their safety. Children should be supervised to ensure that
they do not play with the appliance.
• The washing machine must only be used by adults, in
accordance with the instructions provided in this manual.
• This appliance was designed for domestic use only.
• Do not touch the machine when barefoot or with wet or
damp hands or feet.
• Do not pull on the power supply cable when unplugging
the appliance from the electricity socket. Hold the plug
and pull.
• Do not touch the drained water as it may reach extremely high temperatures.
• Never force the porthole door. This could damage the
safety lock mechanism designed to prevent accidental
opening.
• If the appliance breaks down, do not under any circumstances access the internal mechanisms in an attempt
to repair it yourself.
• Always keep children well away from the appliance while
it is operating.
• If the appliance has to be moved, work in a group of two
or three people and handle it with the utmost care. Never
try to do this alone, because the appliance is very heavy.
• Before loading laundry into the washing machine, make
sure the drum is empty.
Consumers should contact their local authority or
retailer for information concerning the correct
disposal of their old appliance.
Saving energy and respecting the environment
Saving on detergent, water, energy and time
• To avoid wasting resources, the washing machine should
be used with a full load. A full load instead of two half loads
allows you to save up to 50% on energy.
• The pre-wash cycle is only necessary on extremely soiled
garments. Avoiding it will save on detergent, time, water
and between 5 and 15% energy.
• Treating stains with a stain remover or leaving them to soak
before washing will cut down the need to wash them at
high temperatures. A programme at 60°C instead of 90°C
or one at 40°C instead of 60°C will save up to 50% on
energy.
• Use the correct quantity of detergent depending on the water hardness, how soiled the garments are and the amount
of laundry you have, to avoid wastage and to protect the
environment: despite being biodegradable, detergents do
contain ingredients that alter the natural balance of the
environment. In addition, avoid using fabric softener as
much as possible.
• If you use your washing machine from late in the afternoon
until the early hours of the morning, you will help reduce
the electricity board’s peak load. The “Delay Timer” option
helps to organise your wash cycles accordingly.
• If your laundry has to be dried in a tumble dryer, select a
high spin speed. Having the least water possible in your
laundry will save you time and energy in the drying process.
GB
Disposal
• Disposing of the packaging materials: observe local
regulations so that the packaging may be re-used.
• The European Directive 2002/96/EC on Waste
Electrical and Electronic Equipment, requires that
old household electrical appliances must not be
disposed of in the normal unsorted municipal waste
stream. Old appliances must be collected
separately in order to optimise the recovery and
recycling of the materials they contain and reduce
the impact on human health and the environment.
The crossed out “wheeled bin” symbol on the
product reminds you of your obligation, that when
you dispose of the appliance it must be separately
collected.
9
Care and maintenance
GB
Cutting off the water or electricity supply
• Turn off the water tap after every wash. This will limit the
wear of your appliance’s water system and also prevent
leaks.
• Unplug your appliance when cleaning it and during all
maintenance operations.
Cleaning your appliance
The exterior and rubber parts of your appliance can be cleaned with a soft cloth soaked in lukewarm soapy water. Do
not use solvents or abrasives.
Caring for your appliance door and drum
• Always leave the appliance door ajar to prevent unplea-
sant odours from forming.
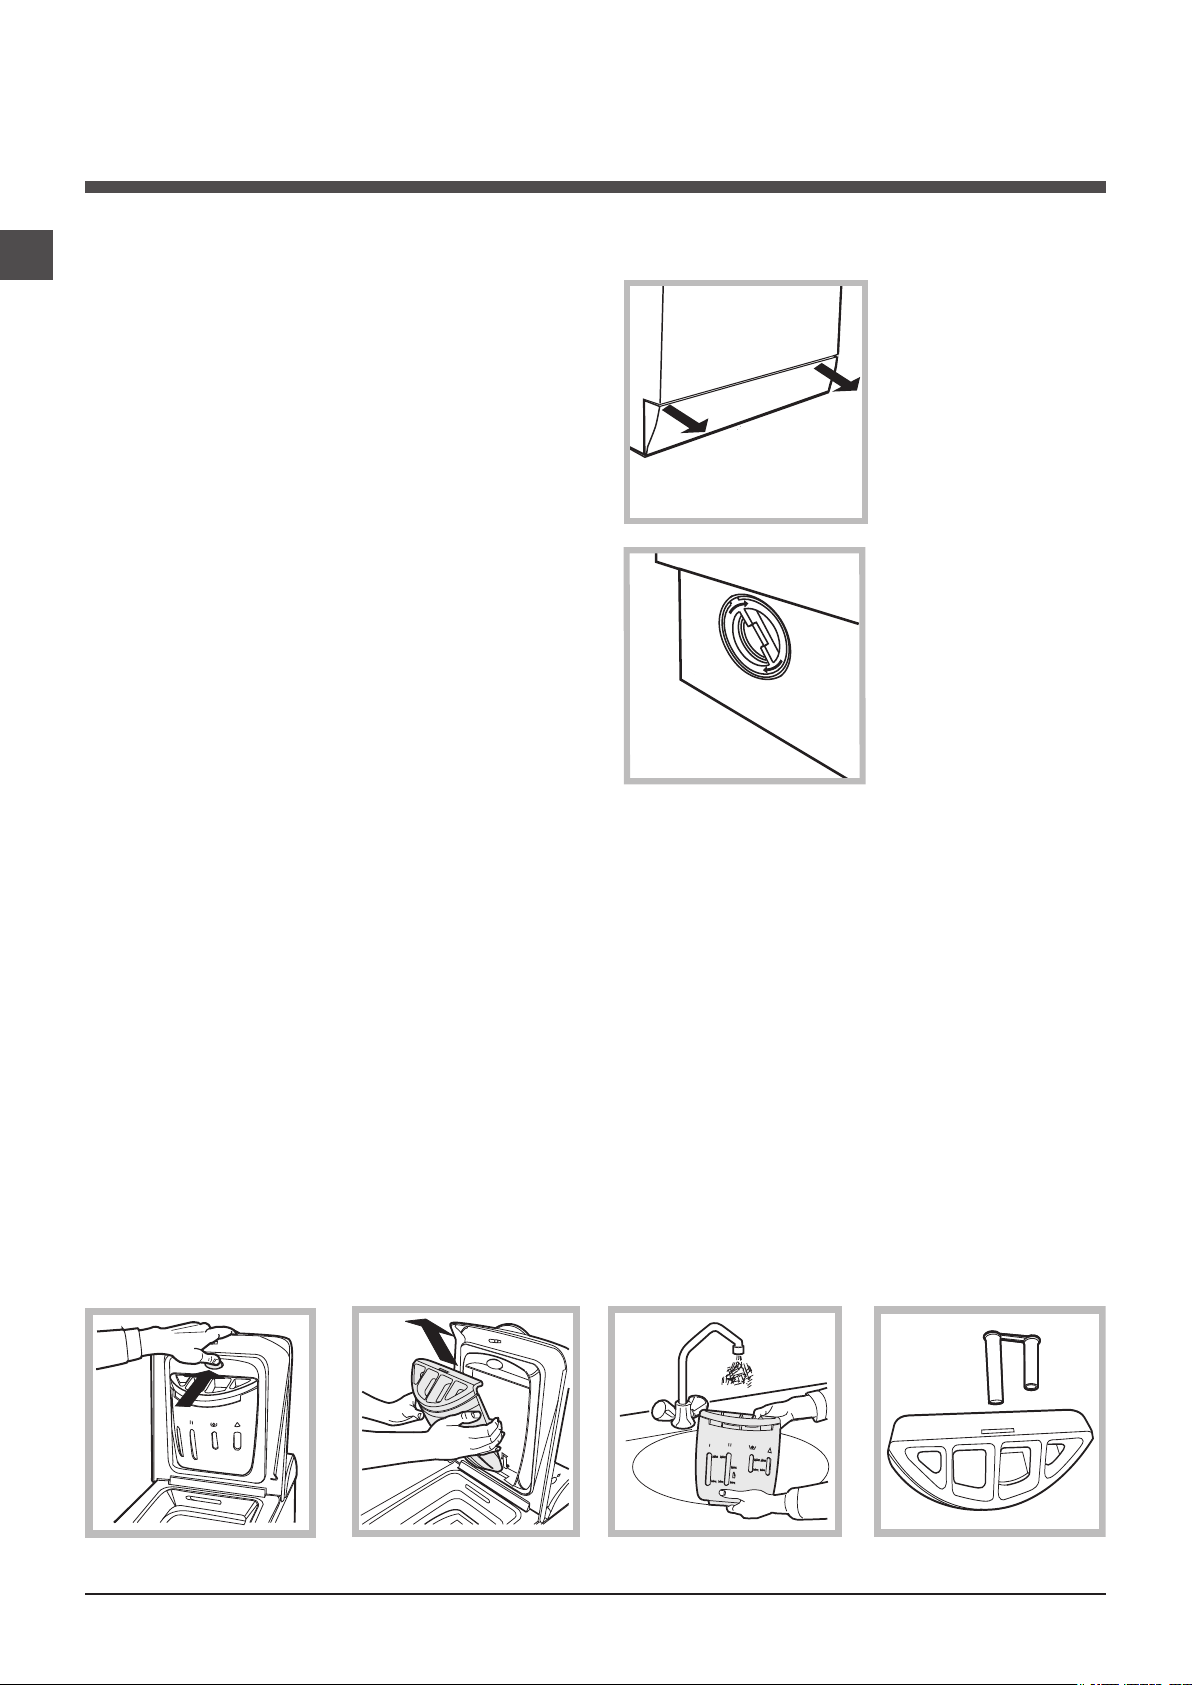
Cleaning the pump
The washing machine is fitted with a self-cleaning pump that
does not require any maintenance. Sometimes, small items
(such as coins or buttons) may fall into the pre-chamber that
protects the pump, situated in the lower part of the same.
To recover any objects that have fallen into the pre-chamber:
1. remove the plinth at the
bottom on the front side of
the washing machine by
pulling from the side with
your hands (see figure);
2. unscrew the lid rotating it
anticlock-wise (see figure):
a little water may trickle out.
This is perfectly normal;
3. clean the interior thoroughly;
4. screw the lid back on;
5. reposition the panel,
making sure the hooks are
securely in place before you
push it onto the appliance.
Checking the water inlet hose
! Make sure the wash cycle has ended and unplug the
appliance.
How to clean the detergent dispenser
Disassembly:
Press lightly on the large
button on the front of the
detergent dispenser and pull
it upwards (fig. 1, 2).
Cleaning:
Then clean the dispenser under a tap (fig. 3) using an old
toothbrush and, once the pair of siphons inserted in the top
of compartments 1 and 2 (fig. 4) have been pulled out, check
whether the same are not clogged and then rinse them.
Check the water inlet hose at least once a year. If you see
any cracks, replace it immediately: during the wash cycles,
water pressure is very strong and a cracked hose could
easily split open.
! Never use hoses that have already been used.
Reassembly:
Do not for get to reins ert
the pair of siphons into the
special housings and then to
replace the dispenser into its
seat, clicking it into place (fig.
4, 2 and 1).
Fig. 1 Fig. 2
10
Fig. 3
Fig. 4

Troubleshooting
Your washing machine could fail to work. Before contacting the Technical Assistance Centre (see “Assistance”), make sure
that the problem cannot be not solved easily using the following list.
Problem:
The washing machine does not
switch on.
The wash cycle does not start.
The washing machine does not
take in water (the text “NO WATER,
CHECK SUPPLY” appears on the
display).
The washing machine continuously
takes in and drains water.
Possible causes / Solutions:
• The appliance is not plugged into the socket fully, or is not making contact.
• There is no power in the house.
• The appliance Lid is not shut properly.
• The ON/OFF button has not been pressed.
• The START/PAUSE button has not been pressed.
• The water tap has not been opened.
• A delayed start has been set (see “Running a wash cycle”).
• The water inlet hose is not connected to the tap.
• The hose is bent.
• The water tap has not been opened.
• There is no water supply in the house.
• The pressure is too low.
• The START/PAUSE button has not been pressed.
• The drain hose is not fitted at a height between 65 and 100 cm from the floor
(see “Installation”).
• The free end of the hose is under water (see “Installation”).
• The wall drainage system is not fitted with a breather pipe.
If the problem persists even after these checks, turn off the water tap, switch
the appliance off and contact the Assistance Service. If the dwelling is on one of
the upper floors of a building, there may be problems relating to water drainage,
causing the washing machine to fill with water and drain continuously. Special
anti-draining valves are available in shops and help to avoid this inconvenience.
GB
The washing machine does not
drain or spin.
The washing machine vibrates a lot
during the spin cycle.
The washing machine leaks.
The machine is locked and the display
flashes, indicating an error code (e.g.
F-01, F-..).
There is too much foam.
• The wash cycle does not include draining: some wash cycles require the drain
phase to be started manually (see “Wash cycles and functions”).
• The EASY IRON function has been activated: To complete the wash cycle,
press the START/PAUSE button (see “Wash cycles and functions”).
• The drain hose is bent (see “Installation”).
• The drainage duct is clogged.
• The drum was not unlocked correctly during installation (see “Installation”).
• The washing machine is not level (see “Installation”).
• The washing machine is trapped between cabinets and walls (see “Installation”).
• The water inlet hose is not screwed on properly (see “Installation”).
• The detergent dispenser drawer is blocked (for cleaning instructions, see “Care
and maintenance”).
• The drain hose is not fixed properly (see “Installation”).
• Switch off the machine and unplug it, wait for approximately 1 minute and then
switch it back on again.
If the problem persists, contact the Technical Assistance Service.
• The detergent is not suitable for machine washing (it should display the text
“for washing machines” or “hand and machine wash”, or the like).
• Too much detergent was used.
11

Service
GB
Before calling for Assistance:
• Check whether you can solve the problem alone (see “Troubleshooting”);
• Restart the programme to check whether the problem has been solved;
• If this is not the case, contact an authorised Technical Assistance Centre using the telephone number provided on the
guarantee certificate.
! Always request the assistance of authorised technicians.
Have the following information to hand:
• the type of problem;
• the appliance model (Mod.);
• the serial number (S/N).
This information can be found on the data plate situated on the rear of the washing machine.
12

Istruzioni per l’uso
LAVABIANCHERIA
CARICA DALL’ ALTO
I
Italiano
ECOT7D 1491
Sommario
Installazione, 14-15
Disimballo e livellamento
Collegamenti idraulici ed elettrici
Primo ciclo di lavaggio
Dati tecnici
Descrizione della lavabiancheria, 16-17
Pannello di controllo
Display
Come aprire e chiudere il cestello
Come effettuare un ciclo di lavaggio, 18
Sistema bilanciamento del carico
Programmi e funzioni, 19
Tabella dei programmi
Funzioni di lavaggio
Detersivi e biancheria, 20
Cassetto dei detersivi
Preparare la biancheria
Programmi particolari
I
Precauzioni e consigli, 21
Sicurezza generale
Smaltimento
Risparmiare e rispettare l’ambiente
Manutenzione e cura, 22
Escludere acqua e corrente elettrica
Pulire la lavabiancheria
Curare coperchio e cestello
Pulire la pompa
Controllare il tubo di alimentazione dell’acqua
Come pulire la vaschetta del detersivo
Anomalie e rimedi, 23
Assistenza, 24
Assistenza Attiva 7 giorni su 7
13
Installazione
! È importante conservare questo libretto per poterlo consultare
I
in ogni momento. In caso di vendita, di cessione o di trasloco,
assicurarsi che resti insieme alla lavabiancheria per informare il
nuovo proprietario sul funzionamento e sui relativi avvertimenti.
! Leggere attentamente le istruzioni: ci sono
importanti informazioni sull’installazione, sull’uso
e sulla sicurezza.
Disimballo e livellamento
Disimballo
1. Disimballare la lavabiancheria.
2. Controllare che la lavabiancheria non abbia subìto
danni nel trasporto. Se fosse
danneggiata non collegarla e
contattare il rivenditore.
3. Rimuovere le quattro viti
di protezione per il trasporto
e il gommino con il relativo
distanziale, posti nella parte
posteriore (vedi figura).
4. Chiudere i fori con i tappi
di plastica in dotazione.
5. Conservare tutti i pezzi:
qualora la lavabiancheria debba essere trasportata, dovranno
essere rimontati.
Attenzione. In caso di riutilizzo le viti più corte devono essere
montate in alto.
! Gli imballaggi non sono giocattoli per bambini.
Livellamento
La vostra lavabiancheria potrà essere rumorosa se i due
piedini non sono regolati in modo che la stessa risulti perfettamente in piano.
1. Installare la lavabiancheria
su un pavimento piano e
rigido, senza appoggiarla a
muri, mobili o altro.
2. Se il pavimento non fosse
perfettamente orizzontale,
compensare le irregolarità
svitando o avvitando i piedini
anteriori posteriori (vedi figu-
ra); l’angolo di inclinazione,
misurato sul piano di lavoro, non deve superare i 2°.
Un accurato livellamento dà stabilità alla macchina ed evita
vibrazioni, rumori e spostamenti durante il funzionamento. In
caso di moquette o di un tappeto, regolare i piedini in modo
da conservare sotto la lava- biancheria uno spazio sufficien-
te per la ventilazione.
Collocazione spostamenti
La tua lavatrice è dotata
di uno speciale carrello
con ruote retrattili puoi facilmente spostarla. Per far
scendere questo carrello e
poterla così movere senza
sforzo, è necessario tirare la
leva nera, situata in basso
a sinistra, sotto lo zoccolo.
Ultimato lo spostamento
riportarla nella posizione
iniziale. La macchina a
questo punto è saldamente
collocata (vedi figura).
Collegamenti idraulici ed elettrici
Collegamento del tubo di alimentazione dell’acqua
1. Collegare il tubo di
alimentazione avvitandolo
a un rubinetto d’acqua
fredda con bocca filettata
da 3/4 gas (vedi figura).
Prima di allacciare, far
scorrere l’acqua finché
non sia limpida.
2. Collegare il tubo di
alimentazione alla lavabiancheria
avvitandolo all’apposita
presa d’acqua, nella parte
posteriore in alto a destra
(vedi figura).
3. Fare attenzione che
nel tubo non ci siano né
pieghe né strozzature.
! La pressione idrica del rubinetto deve essere compresa
nei valori della tabella Dati tecnici (vedi pagina a fianco).
! Se la lunghezza del tubo di alimentazione non fosse
sufficiente, rivolgersi a un negozio specializzato o a un
tecnico autorizzato.
14
Collegamento del tubo di scarico
65 - 100 cm
- 2004/108/CE (Compatibilità Elettromagnetica)
Collegare il tubo di scari-
co, senza piegarlo, a una
conduttura di scarico o a
uno scarico a muro posti
tra 65 e 100 cm da terra;
oppure appoggiarlo al
bordo di un lavandino o
di una vasca, legando la
guida in dotazione al
rubinetto (vedi figura).
L’estremità libera del tubo
di scarico non deve rimanere immersa nell’acqua.
! Non usare prolunghe e multiple.
! Il cavo non deve subire piegature o compressioni.
! Il cavo di alimentazione deve essere sostituito solo da
tecnici autorizzati.
Attenzione! L’azienda declina ogni responsabilità qualora queste norme non vengano rispettate.
Qualsiasi modifica apportata all’attacco predisposto dalla
fabbrica o un irregolare collegamento elettrico, una qualsiasi
modifica elettomeccanica o idraulica della macchina farà
decadere la garanzia e solleverà il costruttore ed il venditore
da eventuali responsabilità.
Primo ciclo di lavaggio
Dopo l’installazione, prima dell’uso, effettuare un ciclo di
lavaggio con detersivo e senza biancheria impostando il
programma (60°C).
I
! È sconsigliato usare tubi di prolunga; se indispensabile,
la prolunga deve avere lo stesso diametro del tubo originale e non superare i 150 cm.
Collegamento elettrico
Prima di inserire la spina nella presa della corrente, accertarsi che:
• la presa abbia la messa a terra e sia a norma
di legge;
• la presa sia in grado di sopportare il carico
massimo di potenza della macchina, indicato nella
tabella Dati tecnici (vedi a fianco);
• la tensione di alimentazione sia compresa nei
valori indicati nella tabella Dati tecnici (vedi a
fianco);
• la presa sia compatibile con la spina della
lavabiancheria. In caso contrario sostituire la
presa o la spina.
! La lavabiancheria non va installata all’aperto, nemmeno
se lo spazio è riparato, perché è molto pericoloso lasciarla esposta a pioggia e temporali.
! A lavabiancheria installata, la presa della corrente deve
essere facilmente raggiungibile.
Dati tecnici
Modello
Dimensioni
Capacità
Collegamenti
elettrici
Collegamenti
idrici
Velocità di
centrifuga
Programmi di
controllo secon-
do la direttive
1061/2010 e
1015/2010
ECOT7D 1491
larghezza cm 40
altezza cm 85
profondità cm 60
da 1 a 7 kg
vedi la targhetta caratteristiche tecniche
applicata sulla macchina
pressione massima 1 MPa (10 bar)
pressione minima 0,05 MPa (0,5 bar)
capacità del cesto 42 litri
sino a 1400 giri al minuto
programma
Cotone standard 60°C;
programma
Cotone standard 40°C.
Questa apparecchiatura è conforme alle
seguenti Direttive Comunitarie:
- 2002/96/CE
- 2006/95/CE (Bassa Tensione)
(1° pressione del tasto);
(2° pressione del tasto);
15
Descrizione della lavabiancheria
Pannello di controllo
I
Tasto ON/OFF
Tasto
BLOCCO
TASTI
DISPLAY
Tasto
CENTRIFUGA
SELETTORE
PROGRAMMI
Tasto ON/OFF : premere brevemente il tasto per accendere o spegnere la macchina. La spia START/PAUSE che
lampeggia lentamente di colore verde indica che la macchina
è accesa. Per spegnere la lavabiancheria durante il lavaggio
è necessario tenere premuto il tasto più a lungo, circa 2 sec.;
una pressione breve o accidentale non permetterà lo spegnimento della macchina.
Lo spegnimento della macchina durante un lavaggio in corso
annulla il lavaggio stesso.
Tasti SELETTORE PROGRAMMI: per impostare il program-
ma desiderato (vedi “Tabella dei programmi”).
Tasto MEMO: tenere premuto il tasto per memorizzare un
ciclo e le proprie personalizzazioni preferite. Per richiamare un
ciclo precedentemente memorizzato premere il tasto MEMO.
Tasti FUNZIONE: premere il tasto per selezionare la funzione
desiderata. Sul display si illuminerà la spia relativa.
Tasto CENTRIFUGA : premere per ridurre o escludere del
tutto la centrifuga; il valore viene indicato nel display.
Tasti
Tasto
MEMO
Tasto
PARTENZA
RITARDATA
Tasto con spia
START/PAUSE
Tasti
FUNZIONE
Tasto PARTENZA RITARDATA : premere per imposta-
re una partenza ritardata del programma prescelto; il ritardo
viene indicato nel display.
Tasto con spia START/PAUSE: quando la spia verde lam-
peggia lentamente, premere il tasto per avviare un lavaggio.
A ciclo avviato la spia diventa fissa. Per mettere in pausa il
lavaggio, premere nuovamente il tasto; la spia lampeggerà
con colore arancione. Se il simbolo non è illuminato,
si potrà aprire Il coperchio. Per far ripartire il lavaggio dal
punto in cui è stato interrotto, premere nuovamente il tasto.
Modalità di stand by
Questa lavatrice, in conformità alle nuove normative
legate al risparmio energetico, è dotata di un sistema di
autospegnimento (stand by) che entra in funzione dopo circa
30 minuti nel caso di non utilizzo. Premere brevemente il
tasto ON/OFF e attendere che la macchina si riattivi.
Consumo in off-mode: 0,5W
Consumo in Left-on: 0,5W
Tasto
TEMPERATURA
Tasto TEMPERATURA : premere per ridurre la tempera-
tura; il valore viene indicato nel display.
Tasto BLOCCO TASTI : per attivare il blocco del pannello
di controllo, tenere premuto il tasto per circa 2 secondi.
Il simbolo acceso indica che il pannello di controllo è
bloccato. In questo modo si impediscono modifiche accidentali
dei programmi, soprattutto se in casa ci sono dei bambini.
Per disattivare il blocco del pannello di controllo, tenere
premuto il tasto per circa 2 secondi.
16
Display
B
C
A
D
Se si vuole selezionare un’altra lingua premere
contemporaneamente i tasti BLOCCO TASTI +
TEMPERATURA + CENTRIFUGA per 5 secondi, quindi
ripetere le operazioni indicate precedentemente.
I
Come aprire e chiudere il cestello
E
F
Il display è utile per programmare la macchina e fornisce
molteplici informazioni.
Nelle due stringhe superiori A e B vengono visualizzati il
programma di lavaggio selezionato, la fase di lavaggio in
corso e tutte le indicazioni relative allo stato d’avanzamento
del programma.
Nella stringa C viene visualizzato il tempo residuo alla fine del
ciclo di lavaggio in corso e nel caso fosse stata impostata
una PARTENZA RITARDATA, il tempo mancante all’avvio
del programma selezionato.
Nella stringa D viene visualizzato il valore massimo della
velocità della centrifuga che la macchina può effettuare in
base al programma impostato; se il programma non prevede
la centrifuga la stringa resta spenta.
Nella stringa E viene visualizzato il valore massimo della
temperatura che si può selezionare in base al programma
impostato; se il programma non prevede l’impostazione
della temperatura la stringa resta spenta.
Le spie F sono relative alle funzioni e si accendono quando
la funzione selezionata è compatibile con il programma
impostato.
Simbolo Coperchio bloccato
Il simbolo acceso indica che il coperchio è bloccato
per impedire aperture accidentali. Per evitare danni
è necessario attendere che il simbolo si spenga prima di aprire il coperchio. L’attesa è di tre minuti circa.
N.B.: se è attiva la funzione PARTENZA RITARDATA il coperchio non si può aprire, per aprirlo mettere la macchina
in pausa premendo il tasto START/PAUSE.
Fig. 1
Fig. 3
A) Apertura coperchio superiore (Fig. 1):
Sollevare il coperchio esterno ed aprirlo completamente.
B) Apertura cestello (Soft opening):
Con un dito premere il pulsante indicato nella fig. 2
ed il cestello si aprirà delicatamente.
C) Introduzione biancheria (Fig. 3).
D) Chiusura (Fig. 4):
- richiudere bene il cestello abbassando prima lo sportello
anteriore ed appoggiandovi quindi quello posteriore;
- assicurarsi quindi che i ganci dello sportello anteriore siano
perfettamente alloggiati nella sede dello sportello posteriore;
- dopo aver sentito il “clac” dell’avvenuto aggancio, esercitare una lieve pressione verso il basso su entrambi gli sportelli
che non devono sganciarsi;
- chiudere infine il coperchio esterno.
E) Arresto finale del cestello (Fig. 2):
Al termine del lavaggio il cestello si collocherà con gli sportelli in alto per una facile apertura.
Fig. 2
Fig. 4
! Alla prima accensione verrà richiesto di selezionare la
lingua ed il display entrerà automaticamente nel menu di
selezione lingua.
Per scegliere la lingua desiderata premere i tasti
TEMPERATURA e CENTRIFUGA, per confermare la scelta
premere il tasto BLOCCO TASTI.
17
Come effettuare un ciclo di
lavaggio
1. ACCENDERE LA MACCHINA. Premere il tasto , sul
I
display comparirà la scritta OK; la spia START/PAUSE
lampeggerà lentamente di colore verde.
2. CARICARE LA BIANCHERIA. Aprire il coperchio.
Caricare la biancheria facendo attenzione a non superare
la quantità di carico indicata nella tabella programmi della
pagina seguente.
3. DOSARE IL DETERSIVO. Versare il detersivo nelle
apposite vaschette come spiegato in “De tersiv i e
biancheria”.
4. CHIUDERE IL COPERCHIO.
5. SCEGLIERE IL PROGRAMMA. Premere uno dei tasti del
SELETTORE PROGRAMMI per selezionare il programma
desiderato; il nome del programma comparirà sul display;
ad esso è associata una temperatura e una velocità di
centrifuga che possono essere modificate. Sul display
comparirà la durata del ciclo.
6. PERSONALIZZARE IL CICLO DI LAVAGGIO. Agire
sugli appositi tasti:
Modificare la temperatura e/o la centrifuga. La
macchina seleziona automaticamente la temperatura e la
centrifuga massime previste per il programma impostato
e non possono pertanto essere aumentate. Premendo il
tasto si riduce progressivamente la temperatura sino
al lavaggio a freddo “OFF”. Premendo il tasto si riduce
progressivamente la centrifuga sino alla sua esclusione
“OFF”. Un’ulteriore pressione dei tasti riporterà i valori a
quelli massimi previsti.
Impostare una partenza ritardata.
Per impostare la partenza ritardata del programma
prescelto, premere il tasto relativo fino a raggiungere il tempo
di ritardo desiderato. Quando tale opzione è attiva, sul
display si illumina il simbolo . Per rimuovere la partenza
ritardata premere il tasto fino a che sul display compare la
scritta “OFF”.
Modificare le caratteristiche del
ciclo.
! Le funzioni possono variare il carico raccomandato e/o
la durata del ciclo.
7. AVVIARE IL PROGRAMMA. Premere il tasto START/
PAUSE. La spia relativa si illuminerà di colore verde
fisso e il coperchio si bloccherà (simbolo COPERCHIO
BLOCCATO acceso). Durante il lavaggio, sul display
comparirà il nome della fase in corso. Per cambiare
un programma mentre un ciclo è in corso, mettere la
lavabiancheria in pausa premendo il tasto START/
PAUSE (la spia START/PAUSE lampeggerà lentamente
di colore arancione); selezionare quindi il ciclo desiderato
e premere nuovamente il tasto START/PAUSE.
Per aprire il coperchio mentre un ciclo è in corso premere
il tasto START/PAUSE; se il simbolo COPERCHIO
BLOCCATO è spenta sarà possibile aprire il
coperchio. Premere nuovamente il tasto START/PAUSE
per far ripartire il programma dal punto in cui era stato
interrotto.
8. FINE DEL PROGRAMMA. Viene indicata dalla scritta
“FINE CICLO” sul display, quando il simbolo COPERCHIO
BLOCCATO si spegnerà sarà possibile aprire il
coperchio. Aprire il coperchio, scaricare la biancheria e
spegnere la macchina.
! Se si desidera annullare un ciclo già avviato, premere a
lungo il tasto . Il ciclo verrà interrotto e la macchina si
spegnerà.
Sistema bilanciamento del carico
Prima di ogni centrifuga, per evitare vibrazioni eccessive e
per distribuire il carico in modo uniforme, il cestello effettua
delle rotazioni ad una velocità leggermente superiore a quella
del lavaggio. Se al termine di ripetuti tentativi il carico non
fosse ancora correttamente bilanciato la macchina effettua
la centrifuga ad una velocità inferiore a quella prevista. In
presenza di eccessivo sbilanciamento la lavabiancheria
effettua la distribuzione anzichè la centrifuga. Per favorire
una migliore distribuzione del carico e il suo corretto
bilanciamento si consiglia di mescolare capi grandi e piccoli.
• Premere il tasto per attivare la funzione; la spia
corrispondente al pulsante si accenderà.
• Premere nuovamente il tasto per disattivare la funzione;
la spia si spegnerà.
! Se la funzione selezionata non è compatibile con il
programma impostato, la spia lampeggerà e la funzione
non verrà attivata.
! Se la funzione selezionata non è compatibile con un’altra
precedentemente impostata, la spia relativa alla prima
funzione selezionata lampeggerà e verrà attivata solo la
seconda, la spia della funzione attivata si illuminerà.
18

Programmi e funzioni
Tabella programmi
Velocità
Descrizione del Programma
Programmi
Programmi Giornalieri
Cotone: bianchi estremamente sporchi.
Temp.
max.
(°C)
Cotone standard: (1) (1° pressione del tasto): bianchi e colorati
resistenti molto sporchi.
Cotone standard: (2) (2° pressione del tasto): bianchi poco spor-
chi e colori delicati.
Cotone standard 20° (3° pressione del tasto): bianchi poco
sporchi e colori delicati.
Sintetici (1° pressione del tasto): colori resistenti molto sporchi.
Sintetici (3) (1° pressione del tasto): colori resistenti poco sporchi.
Sintetici (2° pressione del tasto): bianchi poco sporchi e colori delicati.
Mix 30' (1° pressione del tasto): per rinfrescare rapidamente capi
poco sporchi (non indicato per lana, seta e capi da lavare a mano).
Mix 15' (2° pressione del tasto): per rinfrescare rapidamente capi
poco sporchi (non indicato per lana, seta e capi da lavare a mano).
Programmi Speciali / Memo
M
Memo: permette di memorizzare un qualsiasi ciclo di lavaggio.
Ciclo Baby: colori delicati molto sporchi.
Seta/Tende: per capi in seta, viscosa, lingerie.
Lana: per lana, cachemire, ecc.
Programmi Parziali
Centrifuga (1° pressione del tasto).
Risciacquo (2° pressione del tasto).
Scarico (3° pressione del tasto).
La durata del ciclo indicata sul display o su questo libretto è una stima calcolata in base a condizioni standard. Il tempo effettivo può variare in base a numerosi fattori quali la temperatura e la
pressione dell’acqua in ingresso, la temperatura ambiente, la quantità di detersivo, la quantità ed il tipo di carico, il bilanciamento del carico, le opzioni aggiuntive selezionate.
1) Programma di controllo secondo la direttiva 1061/2010: impostare il programma (1° pressione del tasto) con una temperaura di 60°C.
Questo ciclo è adatto per pulire un carico di cotone normalmente sporco ed è il più efficiente in termini di consumo combinato di energia e di acqua, da usare su
capi lavabili a 60°. La temperatura effettiva di lavaggio può differire da quella indicata.
2) Programma di controllo secondo la direttiva 1061/2010: impostare il programma (2° pressione del tasto) con una temperaura di 40°C.
Questo ciclo è adatto per pulire un carico di cotone normalmente sporco ed è il più efficiente in termini di consumo combinato di energia e di acqua, da usare su
capi lavabili a 40°. La temperatura effettiva di lavaggio può differire da quella indicata.
Per tutti Test Institutes:
2) Programma cotone lungo: impostare il programma (2° pressione del tasto) con una temperatura di 40°C.
3) Programma sintetico lungo: impostare il programma (1° pressione del tasto) con una temperatura di 40°C.
Funzioni di lavaggio
(arancione) e la scritta “IDROSTOP” apparirà su display.
max.
(giri al
minuto)
90° 1400
60° 1400 -
40° 1400 -
20° 1400 -
60° 800
40° 800
40° 800
30° 800 -
30° 800 -
40° 800 -
30° 0 -
40° 800 -
- 1400 - - - 7 - - - 16’
- 1400 - -
- 0 - - - 7 - - - 2’
Detersivi
Prela-
Lavag-
vaggio
gio
Ammor-
bidente
(Kg)
Umidità
residua %
Carico max.
7 53 1,99 62 145’
7 53 1,17 57 195’
7 53 1,09 92 190’
7 - - - 180’
2,5 44 0,85 39 105’
2,5 44 0,53 39 95’
2,5 - - - 70’
3 71 0,25 33 30’
1,5 71 0,08 29 15’
2 - - - 120’
1 - - - 55’
1 - - - 65’
7 - - - 36’
lt
Consumo
energia kWh
Acqua totale
Per scaricare l’acqua e poter rimuovere il bucato sarà necessario
Prelavaggio
Selezionando questa funzione si effettua il prelavaggio, utile
premere il tasto START/PAUSE o il tasto STIRA FACILE.
! Non è attivabile sui programmi , , , .
per rimuovere macchie ostinate.
N.B.: Aggiungere il detersivo nell’apposito scomparto.
! Non è attivabile sui programmi , , , , , ,
Extra Risciacquo
Selezionando questa opzione si aumenta l’efficacia del
risciacquo, e si assicura la massima rimozione del detersivo.
E’ utile per pelli particolarmente sensibili.
! Non è attivabile sui programmi , Centrifuga, Scarico.
Rapido
Per ridurre la durata del lavaggio, garantendo al contempo un
risparmio di acqua ed energia.
! Non è attivabile sui programmi , , , , .
Eco wash
La funzione Eco Wash contribuisce al risparmio energetico non
riscaldando l’acqua utilizzata per lavare il bucato – un vantaggio
sia per l’ambiente, sia per la bolletta elettrica. Infatti, l’azione
rafforzata e il consumo ottimizzato dell’acqua garantiscono
Stira facile
Selezionando questa funzione, il lavaggio e la centrifuga
saranno opportunamente modificati per ridurre la formazione
di pieghe. Nei programmi la macchina terminerà il
ottimi risultati nella stessa durata media di un ciclo standard.
Per ottenere i migliori risultati di lavaggio, si consiglia l’uso di
un detersivo liquido.
! Non è attivabile sui programmi Mix 15, , , , , .
ciclo con la biancheria in ammollo, la spia della funzione
STIRA FACILE e quella di AVVIO/PAUSA lampeggeranno
I
Durata ciclo
19

Detersivi e biancheria
Cassetto dei detersivi
I
Il buon risultato del lavaggio dipende anche dal corretto dosaggio del detersivo: eccedendo non si lava in modo più efficace e
si contribuisce a incrostare le parti interne della lavabiancheria
e a inquinare l’ambiente.
! Non usare detersivi per il lavaggio a mano, perché formano
troppa schiuma.
! Usare detersivi in polvere per capi in cotone bianchi e per il
prelavaggio e per lavaggi con temperatura superiore a 60°C.
! Seguire le indicazioni riportate sulla confezione di detersivo.
Alzare il coperchio al di sotto
del quale è collocato il cassetto dei detersivi e inserire
il detersivo o l’additivo come
segue.
vaschetta 1: Detersivo per prelavaggio (in polvere)
vaschetta 2: Detersivo per lavaggio (in polvere o
liquido)
E’ opportuno immettere direttamente il detersivo liquido in
vasca a mezzo dell’apposita pallina.
vaschetta 3: Additivi (ammorbidente, ecc.)
Quando si versa l’ammorbidente nel comparto 3, far attenzione
a non superare il livello “max” indicato.
L’ammorbidente viene automaticamente immesso in macchina
durante l’ultimo risciacquo. Al termine del programma di lavaggio nello scomparto 3 rimane un residuo d’acqua. Questa
serve per l’immissione di ammorbidenti molto densi, ovvero
per diluire quelli concentrati. Se nel comparto 3 rimanesse più
acqua del normale, ciò significa che il dispositivo di svuotamento è intasato. Per la pulizia vedi “Manutenzione e cura”).
vaschetta 4: Non introdurre detersivo in questo
scomparto.
Preparare la biancheria
• Suddividere la biancheria secondo:
- il tipo di tessuto / il simbolo sull’etichetta.
- i colori: separare i capi colorati da quelli bianchi.
• Vuotare le tasche e controllare i bottoni.
• Non superare i valori indicati nella “Tabella Programmi”
riferiti al peso della biancheria asciutta.
Quanto pesa la biancheria?
1 lenzuolo 400-500 gr.
1 federa 150-200 gr.
1 tovaglia 400-500 gr.
1 accappatoio 900-1.200 gr.
1 asciugamano 150-250 gr.
Programmi particolari
Cotone standard 20°: (programma ) ideale per
carichi in cotone sporchi. Le buone performance anche a
freddo, comparabili con un lavaggio a 40°, sono garantite
da un’azione meccanica che lavora con variazione di
velocità a picchi ripetuti e ravvicinati.
Mix 30’: è studiato per lavare capi leggermente sporchi
in poco tempo: dura solo 30 minuti e fa così risparmiare
energia e tempo. Impostando il programma ( a 30°C) è
possibile lavare insieme tessuti di diversa natura (esclusi
lana e seta) con un carico massimo di 3 kg.
Mix 15’: è studiato per lavare capi leggermente sporchi
in poco tempo: dura solo 15 minuti e fa così risparmiare
energia e tempo. Impostando il programma ( a 30°C) è
possibile lavare insieme tessuti di diversa natura (esclusi
lana e seta) con un carico massimo di 1,5 kg.
Baby: programma in grado di asportare lo sporco tipico
dei bambini garantendo la rimozione del detersivo dai panni
onde evitare allergie alla pelle delicata dei bambini. Il ciclo
è stato studiato per ridurre la carica batterica utilizzando
una maggior quantità di acqua e ottimizzando l’effetto di
additivi specifici igenizzanti aggiunti al detersivo. Al temine
del lavaggio la macchina effettuerà delle lente rotazioni del
cestello per evitare la creazione di pieghe; per terminare il
ciclo premere il tasto START/PAUSA.
Seta: utilizzare l’apposito programma per lavare tutti i
capi in seta. Si consiglia l’utilizzo di un detersivo specifico
per capi delicati.
Tende: si raccomanda di piegarle e sistemarle dentro una
federa o un sacchetto a rete. Utilizzare il programma .
Lana: Il ciclo di lavaggio “Lana” di questa lavatrice
Hotpoint-Ariston è stato testato e approvato dalla
Woolmark Company per il lavaggio di capi in lana
classificati come “lavabili a mano”, purché il lavaggio venga
eseguito nel rispetto delle istruzioni riportate sull’etichetta
dell’indumento e delle indicazioni fornite dal produttore
dell’elettrodomestico. Hotpoint-Ariston è la prima marca
di lavatrici ad aver ottenuto dalla Woolmark Company la
certificazione Woolmark Apparel Care - Platinum per le sue
prestazioni di lavaggio e il consumo di acqua ed energia.
20

Precauzioni e consigli
! La lavabiancheria è stata progettata e costruita in
conformità alle norme internazionali di sicurezza. Queste
avvertenze sono fornite per ragioni di
sicurezza e devono essere lette attentamente.
Sicurezza generale
• Questo apparecchio è stato concepito esclusiva-
mente per un uso di tipo domestico.
• L’apparecchio non deve essere utilizzato da
persone (bambini compresi) con capacità fisiche,
sensoriali o mentali ridotte e con esperienze e
conoscenze insufficienti, a meno che tale utilizzo
non avvenga sotto la supervisione o le istruzioni di
una persona responsabile della loro sicurezza. I
bambini devono essere sorvegliati per garantire
che non giochino con l’apparecchio.
• Non toccare la macchina a piedi nudi o con le
mani o i piedi bagnati o umidi.
• Non staccare la spina dalla presa della corrente
tirando il cavo, bensì afferrando la spina.
• Non toccare l’acqua di scarico, che può
raggiungere temperature elevate.
• Non forzare in nessun caso il coperchio: potrebbe
danneggiarsi il meccanismo di sicurezza che
protegge da aperture accidentali.
• In caso di guasto, in nessun caso accedere ai
meccanismi interni per tentare una riparazione.
• Controllare sempre che i bambini non si avvicinino
alla macchina in funzione.
• Se dev’essere spostata, lavorare in due o tre
persone con la massima attenzione. Mai da soli
perché la macchina è molto pesante.
• Prima di introdurre la biancheria controlla che il
cestello sia vuoto.
Per ulteriori informazioni, sulla corretta dismissione
degli elettrodomestici, i detentori potranno rivol-
gersi al servizio pubblico preposto o ai rivenditori.
Risparmiare e rispettare l’ambiente
Tecnologia a servizio dell’ambiente:
risparmiare detersivo, acqua, energia e tempo
• Per non sprecare risorse bisogna utilizzare la
lavabiancheria con il massimo carico. Un carico
pieno al posto di due mezzi fa risparmiare fino al
50% di energia.
• Il prelavaggio è necessario solo per biancheria
molto sporca. Evitarlo fa risparmiare detersivo,
tempo, acqua e tra il 5 e il 15% di energia.
• Trattando le macchie con uno scioglimacchia o
lasciandole in ammollo prima del lavaggio, si
riduce la necessità di lavare ad alte temperature.
Un programma a 60°C invece di 90°C o uno a
40°C invece di 60°C, fa risparmiare fino al 50% di
energia.
• Dosare bene il detersivo in base alla durezza
dell’acqua, al grado di sporco e alla quantità di
biancheria evita sprechi e protegge l’ambiente:
pur biodegradabili, i detersivi contengono elementi
che alterano l’equilibrio della natura. Inoltre evitare
il più possibile l’ammorbidente.
• Effettuando i lavaggi dal tardo pomeriggio fino alle
prime ore del mattino si collabora a ridurre il
carico di assorbimento delle aziende elettriche.
La funzione “Partenza Ritardata” aiuta molto a
organizzare i lavaggi in tal senso.
I
Smaltimento
• Smaltimento del materiale di imballaggio:
attenersi alle norme locali, così gli imballaggi
potranno essere riutilizzati.
• La direttiva Europea 2002/96/CE sui rifiuti di
apparecchiature elettriche ed elettroniche, preve-
de che gli elettrodomestici non debbano essere
smaltiti nel normale flusso dei rifiuti solidi urbani.
Gli apparecchi dismessi devono essere raccolti
separatamente per ottimizzare il tasso di recupero
e riciclaggio dei materiali che li compongono ed
impedire potenziali danni per la salute e l’ambien-
te. Il simbolo del cestino barrato è riportato su
tutti i prodotti per ricordare gli obblighi di raccolta
separata.
• Se il bucato deve essere asciugato in un
asciugatore, selezionare un’alta velocità di
centrifuga. Poca acqua nel bucato fa rispamiare
tempo ed energia nel programma di asciugatura.
21

Manutenzione e cura
Escludere acqua e corrente elettrica
I
• Chiudere il rubinetto dell’acqua dopo ogni
lavaggio. Si limita così l’usura dell’impianto
idraulico della lavabiancheria e si elimina il pericolo
di perdite.
• Staccare la spina della corrente quando si
pulisce la lavabiancheria e durante i lavori di
manutenzione.
Pulire la lavabiancheria
• La parte esterna e le parti in gomma possono
essere puliti con un panno imbevuto di acqua
tiepida e sapone. Non usare solventi o abrasivi.
Curare Coperchio e cestello
• Lasciare sempre socchiuso il coperchio per
evitare che si formino cattivi odori.
Per recuperare eventuali oggetti caduti nella preca-
camera:
1. rimuovere il pannello
di copertura sul lato
anteriore della lavabiancheria tirando con
le mani dai lati dello
zoccolo (vedi figura);
2. svitare il coperchio
ruotandolo in senso
antiorario (vedi figura): è
normale che fuori-esca
un pò d’acqua;
3. pulire accuratamente
l’interno;
4. riavvitare il coperchio;
5. rimontare il pannello
assicurandosi, prima di
spingerlo verso la macchina, di aver inserito i ganci
nelle apposite asole.
Pulire la pompa
La lavabiancheria è dotata di una pompa autopulente che non
ha bisogno di manutenzione. Può però succedere che piccoli
oggetti (monete, bottoni) cadano nella precamera che protegge
la pompa, situata nella parte inferiore di essa.
! Assicurarsi che il ciclo di lavaggio sia terminato e staccare
la spina.
Controllare il tubo di alimentazione
dell’acqua
Controllare il tubo di alimentazione almeno una volta
all’anno. Se presenta screpolature e fessure va sostituito:
durante i lavaggi le forti pressioni potrebbero provocare
improvvise spaccature.
! Non utilizzare mai tubi già usati.
Come pulire la vaschetta del detersivo
Smontaggio:
Esercitare una leggera pressione sul pulsante sulla
parte anteriore del cassetto
detersivo e tirarlo verso l’alto
(fig. 1, 2).
Pulizia:
Pulire quindi il cassetto sotto il rubinetto (fig. 3) utilizzando
anche un semplice spazzolino da denti e, sfilata la coppia di
sifoncini inseriti nella parte superiore degli scomparti 1 e 2 (fig.
4), controllare che gli stessi non siano ostruiti e risciacquarli.
Rimontaggio:
Non dimenticare di reinserire
la coppia di sifoncini negli
appo s iti allogg i a menti e
rimettere infine il cassetto
nella sua sede agganciandolo (fig. 4, 2, 1).
Fig. 1 Fig. 2
22
Fig. 3
Fig. 4

Anomalie e rimedi
Può accadere che la lavabiancheria non funzioni. Prima di telefonare all’Assistenza (vedi “Assistenza”), controllare che non si
tratti di un problema facilmente risolvibile aiutandosi con il seguente elenco.
Anomalie:
La lavabiancheria
non si accende.
Il ciclo di lavaggio
non inizia.
La lavabiancheria non carica acqua (nel display apparirà la sctitta
“Manca l’acqua, apri il rubinetto”).
La lavabiancheria carica e scarica
acqua di continuo.
Possibili cause / Soluzione:
• La spina non è inserita nella presa della corrente, o non abbastanza
da fare contatto.
• In casa non c’è corrente.
• Lo sportello non è ben chiuso.
• Il tasto ON/OFF non è stato premuto.
• Il tasto AVVIO/PAUSA non è stato premuto.
• Il rubinetto dell’acqua non è aperto.
• Si è impostato un ritardo sull’ora di avvio (PARTENZA RITARDATA,
vedi “Come effettuare un ciclo di lavaggio”).
• Il tubo di alimentazione dell’acqua non è collegato al rubinetto.
• Il tubo è piegato.
• Il rubinetto dell’acqua non è aperto.
• In casa manca l’acqua.
• Non c’è sufficiente pressione.
• Il tasto AVVIO/PAUSA non è stato premuto.
• Il tubo di scarico non è installato fra 65 e 100 cm da terra (vedi “Installazione”).
• L’estremità del tubo di scarico è immersa nell’acqua (vedi “Installazione”).
• Lo scarico a muro non ha lo sfiato d’aria.
Se dopo queste verifiche il problema non si risolve, chiudere il rubinetto dell’acqua, spegnere la lavabiancheria e chiamare l’Assistenza. Se l’abitazione si trova
agli ultimi piani di un edificio, è possibile che si verifichino fenomeni di sifonaggio, per cui la lavabiancheria carica e scarica acqua di continuo. Per eliminare
l’inconveniente sono disponibili in commercio apposite valvole anti-sifonaggio.
I
La lavabiancheria non scarica
o non centrifuga.
La lavabiancheria vibra
molto durante la centrifuga.
La lavabiancheria perde acqua.
La macchina è bloccata, il display
lampeggia e segnala un codice di
anomalia (es.: F-01, F-..).
Si forma troppa schiuma.
• Il programma non prevede lo scarico: con alcuni programmi occorre
avviarlo manualmente.
• È attiva la funzione STIRA FACILE: per completare il programma
premere il tasto AVVIO/PAUSA (“Programmi e funzioni”).
• Il tubo di scarico è piegato (vedi “Installazione”).
• La conduttura di scarico è ostruita.
• Il cestello, al momento dell’installazione, non è stato sbloccato
correttamente (vedi “Installazione”).
• La lavabiancheria non è in piano (vedi “Installazione”).
• La lavabiancheria è stretta tra mobili e muro (vedi “Installazione”).
• Il tubo di alimentazione dell’acqua non è ben avvitato (vedi “Installazione”).
• Il cassetto dei detersivi è intasato (per pulirlo vedi “Manutenzione e cura”).
• Il tubo di scarico non è fissato bene (vedi “Installazione”).
• Spegnere la macchina e togliere la spina dalla presa, attendere circa 1 minuto quindi riaccenderla.
Se l’anomalia persiste, chiamare l’Assistenza.
• Il detersivo non è specifico per lavabiancheria (deve esserci la
dicitura “per lavatrice”, “a mano e in lavatrice”, o simili).
• Il dosaggio è stato eccessivo.
23

Assistenza
Prima di contattare l’Assistenza:
I
• Verificare se l’anomalia può essere risolta da soli (vedi “Anomalie e rimedi”).
• Riavviare il programma per controllare se l’inconveniente è stato ovviato;
• In caso negativo, contattare il Numero Unico 199.199.199*.
! Non ricorrere mai a tecnici non autorizzati.
Comunicare:
• il tipo di anomalia;
• il modello della macchina (Mod.);
• il numero di serie (S/N).
Queste informazioni si trovano sulla targhetta applicata nella parte posteriore della lavabiancheria.
Assistenza Attiva 7 giorni su 7
In caso di necessità d’intervento chiamare il Numero Unico Nazionale 199.199.199*.
Un operatore sarà a completa disposizione per fissare un appuntamento con il Centro Assistenza Tecnico
Autorizzato più vicino al luogo da cui si chiama.
È attivo 7 giorni su 7, sabato e domenica compresi, e non lascia mai inascoltata una richiesta.
*
* Al costo di 14,25 centesimi di Euro al minuto (iva inclusa) dal Lun. al Ven. dalle 08:00 alle 18:30, il Sab. dalle 08:00 alle 13:00 e di 5,58 centesimi di
Euro al minuto (iva inclusa) dal Lun. al Ven. dalle 18:30 alle 08:00, il Sab. dalle 13:00 alle 08:00 e i giorni festivi, per chi chiama da telefono fisso.
Per chi chiama da radiomobile le tariffe sono legate al piano tariffario dell’operatore telefonico utilizzato.
Le suddette tariffe potrebbero essere soggette a variazione da parte dell’operatore telefonico; per maggiori informazioni consultare il sito www.
aristonchannel.com.
24

Bedienungsanleitungen
WASCHVOLLAUTOMAT
DE
Deutsch
ECOT7D 1491
INHALTSVERZEICHNIS
Installation 26-27
Auspacken und Aufstellen
Wasser- und Elektroanschlüsse
Erster Waschgang
Technische Daten
Beschreibung Ihres Waschvollautomaten, 28-29
Bedienblende
Display
So öffnen und schließen Sie die Wäschetrommel
Durchführung eines Waschprogramms, 30
Unwuchtkontrollsystem
Programme und Funktionen, 31
Programmtabelle
Waschfunktionen
Waschmittel und Wäsche 32
Waschmittelschublade
Vorsortieren der Wäsche
Sonderprogramme
DE
Vorsichtsmaßregeln und Hinweise 33
Allgemeine Sicherheit
Entsorgung
Energie sparen und Umwelt schonen
Reinigung und Pflege 34
Wasser- und Stromversorgung abstellen
Reinigung des Gerätes
Pflege der Gerätetür und Trommel
Reinigung der Pumpe
Kontrolle des Wasserzulaufschlauchs
So kann der Waschmittelbehälter gereinigt werden
Störungen und Abhilfe 35
Kundendienst 36
25

Installation
DE
! Es ist äußerst wichtig, diese Bedienungsanleitung sorgfältig
aufzubewahren, um sie jederzeit zu Rate ziehen zu können.
Sorgen Sie dafür, dass sie im Falle eines Umzugs oder Übergabe an einen anderen Benutzer das Gerät stets begleitet,
damit auch der neue Inhaber die Möglichkeit hat, diese zu
Rate zu ziehen.
! Lesen Sie bitte folgende Hinweise aufmerksam durch, sie
liefern wichtige Informationen hinsichtlich der Installation, dem
Gebrauch und der Sicherheit.
Auspacken und Aufstellen
Auspacken
1. Gerät auspacken.
2. Sicherstellen, dass der Waschvollautomat keine Transportschäden erlitten hat. Im
Falle einer Beschädigung Gerät
bitte nicht anschließen, sondern
den Kundendienst anfordern.
3. Die vier Transportschutzschrauben ausschrauben
und das an der Rückwand
befindliche Gummiteil nebst
entsprechendem Distanzstück abnehmen (siehe
Abbildung).
4. Die Löcher mittels der mitgelieferten Kunststoffstöpsel
schließen.
5. Sämtliche Teile aufbewahren: Sollte der Waschvollautomat
erneut transportiert werden müssen, müssen diese Teile
wieder eingesetzt werden.
Zur Beachtung: Im Falle einer Wiederverwendung sind
die kurzeren Schrauben oben einzusetzen.
! Verpackungsmaterial ist kein Spielzeug für Kinder
Standfläche
1. Der Waschvollautomat muss
auf einem ebenen, festen Untergrund aufgestellt werden, ohne
ihn an Wände, Möbelteile oder
ähnliches anzulehnen.
2. Sollte der Boden nicht
perfekt eben sein, müssen
die Unebenheiten durch Anbzw. Ausdrehen der vorderen
Stellfüße ausgeglichen werden
(siehe Abbildung), der auf
der Arbeitsfläche zu ermittelnde Neigungsgrad darf 2° nicht
überschreiten.
Eine präzise Nivellierung verleiht dem Gerät die erforderliche Stabilität, durch die Vibrationen, Betriebsgeräusche und ein Verrücken
des Gerätes vermieden werden. Bei Teppichböden müssen die
Stellfüße so reguliert werden, dass ein ausreichender Freiraum zur
Belüftung unter dem Waschvollautomaten gewährleistet ist.
Aufstellen, Versetzen
Sollte Ihr Geraet mit einem
Spezialgestell mit einziehbaren Raedern ausgestattet
sein, kann das Geraet muehelos verschoben wer- den.
Um dieses Gestell herunter
zu lassen, ziehen Sie den
links unter dem Sockel
befindlichen Hebel, und
versetzen dann die Waschmaschine. Bringen Sie das
Radgestell anschließend
wieder in die ursprüngliche Stellung zurück. Das Gerät steht
so fest und sicher auf dem Boden (siehe Abbildung).
Wasser- und Elektroanschlüsse
Anschluss des Zulaufschlauches
1. Schrauben Sie den Wasserschlauch an einen Kaltwasserhahn mit ¾-ZollGewindeanschluss an (siehe
Abbildung).
Lassen Sie das Wasser vor
dem Anschluss so lange
auslaufen, bis klares Wasser
austritt.
2. Schließen Sie das andere
Ende des Schlauches an den
oben rechts am Rückteil des
Waschvollautomaten befindlichen Wasseranschluss an
(siehe Abbildung).
3. Der Schlauch darf hierbei
nicht eingeklemmt oder abgeknickt werden.
! Der Wasserdruck muss innerhalb der Werte liegen, die in
der Tabelle der Technischen Daten angegebenen sind (siehe
nebenstehende Seite).
! Sollte der Zulaufschlauch nicht lang genug sein, dann
wenden Sie sich bitte an einen Fachhändler oder an einen
autorisierten Fachmann.
26

65 - 100 cm
Anschluss des Ablaufschlauches
Schließen Sie den Ablaufschlauch ohne ihn dabei
abzuknicken an einen
geeigneten Abfluss an. Die
Mindestablaufhöhe beträgt 65
- 100 cm (gemessen vom
Boden), oder hängen Sie
diesen mittels des Schlauchhalters gesichert in ein
Becken oder Wanne ein;
! Verwenden Sie bitte keine Verlängerungen oder Mehrfa-
chstecker.
! Das Netzkabel darf nicht gebogen bzw. eingeklemmt
werden.
! Das Versorgungskabel darf nur durch autorisierte Fachkräfte
ausgetauscht werden.
Achtung! Der Hersteller übernimmt keinerlei Haftung, sollten
diese Vorschriften nicht genau beachtet werden.
DE
Befestigen Sie diesen
mittels des mitgelieferten
Schlauchhalters z.B. an
einen Wasserhahn (siehe
Abbildung). Das freie Ablaufschlauchende darf nicht
unter Wasser positioniert
werden.
! Verlängerungsschläuche sollten nicht eingesetzt werden.
Sollte dies unvermeidlich sein, muss die Verlängerung denselben Durchmesser des Originalschlauchs aufweisen und
darf eine Länge von 150 cm nicht überschreiten.
Stromanschluss
Vor Einfügen des Netzsteckers in die Steckdose ist sicherzustellen, dass:
• die Steckdose über eine normgerechte Erdung verfügt;
• die Steckdose die in den Technischen Daten angegebenen Höchstlast des Gerätes trägt (siehe nebenstehende
Tabelle);
• die Stromspannung den in den Technischen Daten angegebenen Werten entspricht (siehe nebenstehende Tabelle);
• die Steckdose mit dem Netzstecker des Waschvollautomaten kompatibel ist. Andernfalls muss der Netzstecker
(oder die Steckdose) ersetzt werden.
! Der Waschvollautomat darf nicht im Freien installiert wer-
den, auch nicht, wenn es sich um einen geschützten Platz
handelt. Es ist gefährlich, das Gerät Gewittern und Unwettern
auszusetzen.
! Die Steckdose sollte nach installiertem Gerät leicht zugän-
glich sein.
Erster Waschgang
Lassen Sie nach der Installation bzw. vor erstmaligem Gebrauch erst einen Waschgang (mit Waschmittel) ohne Wäsche
durchlaufen. Stellen Sie hierzu das Waschprogramm
(60°C) ein.
Technische Daten
Modell
Abmessungen
Fassungsvermögen
Elektroanschlüsse
Wasseranschlüsse
Schleudertouren
Prüfprogramme gemäß der
Richtlinien
1061/2010 und
1015/2010
ECOT7D 1491
Breite 40 cm
Höhe 85 cm
Tiefe 60 cm
1 bis 7 kg
Siehe das am Gerät befindliche
Typenschild.
Höchstdruck 1 MPa (10 bar)
Mindestdruck 0,05 MPa (0,5 bar)
Trommelvolumen 42 Liter
bis zu 1400 U/min.
Programm
ste): Baumwolle standard 60°C.
Programm
ste): Baumwolle standard 40°C.
Dieses Gerät entspricht den folgenden EG-Richtlinien:
- 2004/108/CE (elektromagnetische
Verträglichkeit)
- 2006/95/CE (Niederspannung)
- 2002/96/CE
(1° Drücken der Ta-
(1° Drücken der Ta-
27

Beschreibung Ihres
Waschvollautomaten
DE
Bedienblende
Taste
Taste ON/OFF
PROGRAMMWAHL
Taste ON/OFF : Drücken Sie kurz auf die Taste, um das Gerät
ein- bzw. auszuschalten. Die Kontrollleuchte START/PAUSE, die
langsam grün blinkt, zeigt an, dass das Gerät eingeschaltet ist.
Um den Waschvollautomaten während eines Waschgangs auszuschalten, muss die Taste etwas länger gedrückt werden (ca. 2
Sekunden); ein kurzer oder ein ungewollter Druck bewirkt kein Ausschalten des Gerätes. Das Ausschalten des Gerätes während eines
laufenden Waschprogramms löscht den gesamten Waschzyklus.
Tasten PROGRAMMWAHL: zur Einstellung des gewünschten Programms (siehe “Programmtabelle”).
Taste SPEICHER: Halten Sie die Taste gedrückt, um einen
Waschzyklus und die gewünschten Individualisierungseinstellungen zu speichern. Um einen bereits gespeicherten Zyklus
abzurufen, drücken Sie die Taste SPEICHER.
Tasten FUNKTIONEN: Drücken Sie die Taste, um die
gewünschte Funktion auszuwählen. Auf dem Display schaltet
sich die entsprechende Kontrollleuchte ein.
Taste SCHLEUDERN : Drücken Sie die Taste, um die
Schleudergeschwindigkeit herabzusetzen oder das Schleudern
ganz auszuschließen. Der Wert wird auf dem Display angezeigt.
Taste TEMPERATUR : Drücken Sie die Taste, um die Tem-
peratur herabzusetzen: Der Wert wird auf dem Display angezeigt.
Tasten
Taste
SPEICHER
Taste
STARTZEITVORWAHL
TASTENSPERRE
Taste
SCHLEUDERN
DISPLAY
Taste mit Kontrollleuchte
Tasten
FUNKTIONEN
Zur Deaktivierung der Sperre der Bedienblende halten Sie
die Taste ca. 2 Sekunden lang gedrückt.
Taste STARTZEITVORWAHL : Zur Vorwahl der Startzeit
des gewählten Programms drücken Sie bitte diese Taste. Die
Zeitverzögerung wird auf dem Display angezeigt.
Taste mit Kontrollleuchte START/PAUSE: Sobald die grüne
Kontrollleuchte auf langsames Blinklicht schaltet, drücken
Sie die Taste, um den Waschgang zu starten. Nach Ingangsetzung des Programms schaltet die Kontrollleuchte auf
Dauerlicht. Um den Waschgang zu unterbrechen, drücken
Sie erneut die Taste; die Kontrollleuchte schaltet auf orangefarbenes Blinklicht. Wenn das Symbol nicht leuchtet,
kann die Gerätetür geöffnet werden. Um das Programm an
der Stelle, an der es unterbrochen wurde, wieder in Gang zu
setzen, drücken Sie die Taste erneut.
START/PAUSE
Taste
TEMPERATUR
Funktion Standby
Zur Erfüllung der neuen Richtlinien zum Energieverbrauch
ist diese Waschmaschine mit einem automatischen Ausschaltsystem (Standby) ausgestattet, das nach 30 Minuten
des Nichtgebrauchs in Funktion tritt. Drücken Sie kurz die
Taste ON/OFF und warten Sie, bis sich die Maschine wieder
einschaltet.
Verbrauch in Off-Betrieb: 0,5W
Verbrauch in Left-On: 0,5W
Taste TASTENSPERRE : Zur Aktivierung der Sperre
der Bedienblende halten Sie die Taste ca. 2 Sekunden lang
gedrückt. Das eingeschaltete Symbol zeigt an, dass die
Bedienblende gesperrt ist. Auf diese Weise wird verhindert,
dass ein Programm aus Versehen geändert wird, vor allem,
wenn kleine Kinder im Hause sind.
28

Display
B
Z
C
A
Soll die Sprache geändert werden, dann schalten Sie das
F
X
Gerät aus, drücken Sie gleichzeitig die in der Abbildung mit
L gekennzeichneten Tasten bis ein akustisches Signal ertönt,
schalten Sie nun das Gerät erneut ein und es wird das Menü
zur Sprachauswahl angezeigt.
DE
D
E
Y
So öffnen und schließen Sie die Wäschetrommel
F
L
Das Display dient nicht nur zur Programmierung des
Gerätes, sondern liefert auch zahlreiche Informationen.
In den beiden oberen Zeilenreihen A und B werden das
ausgewählte Waschprogramm, die laufende Waschphase
und alle Angaben zum Programmfortschritt angezeigt.
In der Zeilenreihe C werden die Restzeit bis zum Ende
des laufenden Waschvorgangs und bei Einstellung einer
STARTZEITVORWAHL die bis zum Start des ausgewählten
Programms verbleibende Zeit angezeigt.
In der Zeilenreihe D wird der Höchstwert der Schleudergeschwindigkeit angezeigt, die das Gerät für das eingestellte
Programm zulässt; wenn das Programm keinen Schleudervorgang vorsieht, bleibt die Zeilenreihe ausgeschaltet.
In der Zeilenreihe E wird der Höchstwert der Temperatur
angezeigt, der für das eingestellte Programm ausgewählt
werden kann; wenn das Programm keine Temperatureinstellung vorsieht, bleibt die Zeilenreihe ausgeschaltet.
Die Kontrollleuchten F sind den Funktionen zugeordnet und
leuchten, wenn die ausgewählte Funktion mit dem eingestellten Programm kompatibel ist.
Symbol Gerätetür gesperrt
Durch Leuchten des Symbols meldet das Gerät, dass
die Gerätetür gesperrt ist, um ein versehentliches Öffnen
zu vermeiden. Zur Vermeidung einer evtl. Beschädigung
warten Sie bis das Symbol erlischt, bevor Sie die Gerätetür
öffnen (ungefähr 3 Minuten).
NB: Wenn die Funktion STARTZEITVORWAHL aktiviert
ist, kann die Gerätetür nicht geöffnet werden. Zum Öffnen
schalten Sie das Gerät mittels der Taste START/PAUSE auf
Pause.
! Vor dem ersten Einschalten werden Sie zur Auswahl der
Sprache aufgefordert, und das Display blendet automatisch
das Menü zur Sprachauswahl ein.
Wählen Sie die gewünschte Sprache mittels der Tasten X und
Y aus und drücken Sie dann zum Bestätigen der Auswahl auf
die Taste Z.
F
Abb. 1
Abb. 3
A) Öffnen (Abb. 1):
Öffnen Sie den äußeren Deckel ganz.
B) Öffnen der Trommel (Soft opening):
Drücken Sie mit einem Finger leicht auf die auf
der Abb. 2 ersichtlichen Taste; die Trommel
öffnet sich ganz sanft.
C) Einfüllen der Wäsche (Abb. 3).
D) Schliessen (Abb. 4):
- Schließen Sie sorgfältig die Wäschetrommel. Schließen
Sie zuerst den vorderen Flügel und drücken Sie anschließend den hinteren Flügel auf;
- Stellen Sie sicher, dass sich die Haken des vorderen
Flügels ordnungsgemäß in den entsprechenden Sitzen
der hinteren Flügel befinden;
- Nach hörbarem Einrasten der Haken drücken Sie leicht
auf beide Türen; sie dürfen nicht aufspringen;
- Schließen Sie abschließend den äußeren Deckel.
E) Endposition der Trommel (Abb. 2):
Zum bequemen Be- und Entladen wird die Trommel
nach Abschluss des Waschgangs wieder mit der Öffnung nach oben platziert.
Abb. 2
Abb. 4
29

Durchführung eines
Waschprogramms
DE
1. EINSCHALTEN DES GERÄTES. Drücken Sie auf
die Taste , woraufhin auf dem Display die Meldung
WILLKOMMEN erscheint; die Kontrollleuchte START/
PAUSE blinkt langsam grün.
2. EINFÜLLEN DER WÄSCHE. Öffnen Sie die
Gerätetür. Füllen Sie die Wäsche ein. Achten Sie
hierbei bitte darauf, die in der Programmtabelle (auf der
nächsten Seite) angegebene Wäschemenge nicht zu
überschreiten.
3. DOSIERUNG DES WASCHMITTELS. Füllen Sie das
Waschmittel in die entsprechenden Kammern (siehe
“Waschmittel und Wäsche”).
4. SCHLIESSEN SIE DIE GERÄTETÜR.
5. WAHL DES WASCHPROGRAMMS. Wählen
Sie das gewünschte Programm mittels einer der
PROGRAMMWAHL-Tasten aus; die Bezeichnung
des Programms wird auf dem Display angezeigt;
dem Programm sind eine Temperatur und eine
Schleudergeschwindigkeit zugeordnet, die jedoch
geändert werden können. Auf dem Display wird die
Programmdauer angezeigt.
6. INDIVIDUALISIERUNG DES WASCHGANGS.
Verwenden Sie hierzu die entsprechenden Tasten:
Änderung der Temperatur und/
oder Schleudern. Das Gerät wählt automatisch
die für das eingestellte Programm vorgesehene
maximale Temperatur sowie die maximale
Schleudergeschwindigkeit. Diese können demnach
nicht erhöht werden. Durch Drücken der Taste
kann die Temperatur bis auf Kaltwäsche “OFF”
herabgesetzt werden. Durch Drücken der Taste kann
die Schleudergeschwindigkeit herabgesetzt oder der
Schleudervorgang auf “OFF” ausgeschlossen werden.
Ein weiterer Druck auf die Tasten bewirkt die Einstellung
der möglichen Maximalwerte.
Blinklicht und die Funktion wird nicht aktiviert.
! Ist die gewählte Funktion mit einer anderen bereits
eingestellten nicht kompatibel, schaltet die der ersten
Funktion entsprechende Kontrollleuchte auf Blinklicht und
nur die zweite Funktion wird aktiviert, die Kontrollleuchte
der aktivierten Funktion schaltet auf Dauerlicht.
! Die Funktionen können eine Änderung der
empfohlenen Beladungsmenge und/oder der Waschzeit
bewirken.
7. STARTEN DES PROGRAMMS. Drücken Sie die
Taste START/PAUSE. Die zugehörige Kontrollleuchte
schaltet auf grünes Dauerlicht und die Gerätetür
wird gesperrt (Symbol GERÄTETÜR GESPERRT
leuchtet.) Während des Programmablaufs erscheint
auf dem Display die Bezeichnung der laufenden
Programmphase. Um ein Programm während eines
laufenden Waschgangs zu ändern, schalten Sie den
Waschvollautomat mittels der Taste START/PAUSE
auf Pause (die Kontrollleuchte START/PAUSE blinkt
nun langsam orangefarben); wählen Sie daraufhin das
gewünschte Programm aus und drücken Sie erneut auf
die Taste START/PAUSE.
Um während eines laufenden Programms die Gerätetür
zu öffnen, drücken Sie die Taste START/PAUSE; wenn
das Symbol GERÄTETÜR GESPERRT erloschen ist,
kann die Gerätetür geöffnet werden. Drücken Sie die Taste
START/PAUSE erneut, um das Programm an der Stelle an
der es unterbrochen wurde, wieder in Gang zu setzen.
8. ENDE DES PROGRAMMS. Das Programmende wird
durch die Anzeige “PROGRAMMENDE” auf dem Display
angezeigt. Wenn das Symbol GERÄTETÜR GESPERRT
erlischt, kann die Gerätetür geöffnet werden. Öffnen
Sie die Gerätetür, nehmen Sie die Wäsche heraus und
schalten Sie das Gerät aus.
! Möchten Sie ein bereits in Gang gesetztes
Waschprogramm löschen, drücken Sie die Taste etwas
länger. Der Waschgang wird unterbrochen und das Gerät
schaltet sich aus.
Startzeitvorwahl.
Zur Vorwahl der Startzeit des eingestellten Programms
drücken Sie die entsprechende Taste bis die
gewünschte Zeitverschiebung angezeigt wird. Sobald
diese Zusatzfunktion aktiviert wird, leuchtet auf dem
Display das Symbol auf. Um die Startzeitvorwahl
wieder zu deaktivieren, drücken Sie die Taste bis auf
dem Display der Schriftzug “OFF” eingeblendet wird.
Änderung der Eigenschaften
des Waschgangs.
• Drücken Sie die Taste zum Aktivieren der Funktion;
die der Taste entsprechende Kontrollleuchte schaltet
sich dabei ein.
• Durch erneutes Drücken der Taste kann die Funktion
wieder ausgeschaltet werden; die Kontrollleuchte erlischt.
! Ist die gewählte Funktion nicht vereinbar mit dem
eingestellten Programm, schaltet die Kontrollleuchte auf
30
Unwuchtkontrollsystem
Um starke Vibrationen oder eine Unwucht beim Schleudern zu
vermeiden, verfügt das Gerät über ein Schleuderunwuchtsystem. Die Waschladung wird durch eine erhöhte Rotation der
Trommel als die des WAschgangs ausbalanciert. Sollte die
Wäscheladung nach Ablauf mehrerer Versuche immer noch
nicht korrekt verteilt sein, schleudert das Gerät die Wäsche bei
einer niedrigeren Geschwindigkeit als die der vorgesehenen
Schleudergeschwindigkeit. Sollte die Wäsche extrem ungleichmäßig verteilt sein, führt das Gerät anstelle des Schleudergangs einen Wäscheverteilungs-Zyklus durch. Um eine
optimale Verteilung der Wäscheladung und somit eine korrekte
Auswuchtung zu fördern, sollten große und kleine Wäscheteile
gemischt eingefüllt werden.

Programme und Funktionen
Programmtabelle
Max.
Beschreibung des Programms
Wasch-
programme
Programme für die tägliche Wäsche
Baumwolle: stark verschmutzte Kochwäsche.
Baumwolle standard 60° (1)
und farbechte Buntwäsche.
Baumwolle standard 40° (2)
empfindliche Buntwäsche.
Baumwolle standard 20°
empfindliche Buntwäsche.
Synthetik
Synthetik (3)
Synthetik (2° Drücken der Taste)
Mix 30' (1° Drücken der Taste): zum kurzen Auffrischen leicht verschmutzter
Wäsche (nicht geeignet für Wolle, Seide und Handwäsche).
Mix 15' (2° Drücken der Taste): zum kurzen Auffrischen leicht verschmutzter
Wäsche (nicht geeignet für Wolle, Seide und Handwäsche).
Spezialprogramme / Speicher
M
Speicher: hiermit kann jede beliebige Art von Waschgang gespeichert werden
Baby Zyklus: stark verschmutzte empfindliche Buntwäsche.
Seide/Gardinen: kleidungsstücke aus Seide, Viskose und Feinwäsche.
Wolle / Cashmere: wolle, Kaschmir usw.
Teilprogramme
Hauptschleudern (1° Drücken der Taste).
Spülen (2° Drücken der Taste).
Abpumpen (3° Drücken der Taste).
Die auf dem Display und in der Bedienungsanleitung genannte Zyklusdauer wird ausgehend von Standardbedingungen berechnet. Die effektiv benötigte Zeit kann aufgrund zahlreicher Faktoren wie Temperatur und Druck des Zulaufwassers, Raumtemperatur, Waschmittelmenge, Art, Menge und Verteilung der Waschladung sowie der gewählten Zusatzfunktionen variieren.
(1° Drücken der Taste)
(1° Drücken der Taste)
(1° Drücken der Taste)
(2° Drücken der Taste)
(3° Drücken der Taste)
: stark verschmutzte, farbechte Buntwäsche.
: leicht verschmutzte, farbechte Buntwäsche.
: leicht verschmutzte Weiß- und empfindliche Buntwäsche.
: stark verschmutzte Weiß-
: leicht verschmutzte Weiß- und
: leicht verschmutzte Weiß- und
Tem-
pera-
Max.
SchleuderGeschwin-
tur
digkeit
(°C)
(U/min)
90° 1400
60° 1400 -
40° 1400 -
20° 1400 -
60° 800
40° 800
40° 800
30° 800 -
30° 800 -
40° 800 -
30° 0 -
40° 800 -
- 1400 - - - 7 - - - 16’
- 1400 - -
- 0 - - - 7 - - - 2’
Waschmittel
Vorwä-
Haup-
sche
twäsche
Weich-
spüler
Max.
Beladungsmenge (kg)
7 53 1,99 62 145’
7 53 1,17 57 195’
7 53 1,09 92 190’
7 - - - 180’
2,5 44 0,85 39 105’
2,5 44 0,53 39 95’
2,5 - - - 70’
3 71 0,25 33 30’
1,5 71 0,08 29 15’
2 - - - 120’
1 - - - 55’
1 - - - 65’
7 - - - 36’
gkeit %
Energiever-
brauch kWh
Restfeuchti-
Wasser ge-
samt lt
Programm-
DE
dauer
1) Prüfprogramm gemäß 1061/2010: Programm (1° Drücken der Taste) und eine Temperatur von 60°C einstellen.
Dieser Zyklus ist für den Waschvorgang von normal schmutziger Baumwollwäsche geeignet; es ist der wirksamste in Bezug auf den kombinierten Energie-Wasser-Verbrauch; für bei 60°C zu waschende Wäsche zu verwenden. Die effektive Waschtemperatur kann von der angegebenen abweichen.
2) Prüfprogramm gemäß 1061/2010: Programm (2° Drücken der Taste) und eine Temperatur von 40°C einstellen.
Dieser Zyklus ist für den Waschvorgang von normal schmutziger Baumwollwäsche geeignet; es ist der wirksamste in Bezug auf den kombinierten Energie-Wasser-Verbrauch; für bei 40°C zu waschende Wäsche zu verwenden. Die effektive Waschtemperatur kann von der angegebenen abweichen.
Für alle Testinstitute:
2) Langes Baumwollprogramm: Programm (2° Drücken der Taste) und eine Temperatur von 40°C einstellen.
3) Langes Kunstfaserprogramm: Programm (1° Drücken der Taste) und eine Temperatur von 40°C einstellen.
Waschfunktionen
Zum Abpumpen des Wassers oder zur Entnahme der Wäsche
muss die Taste START/PAUSE oder die Taste LEICHTBÜGELN
Vorwäsche
Beim Wählen dieser Funktion wird eine Vorwäsche aktiviert, so
dass auch hartnäckige Flecken beseitigt werden.
NB: Füllen Sie das Waschpulver in die entsprechende Kammer ein.
! Diese Funktion kann zu den Programmen , , , , , , .
Extraspülgang
Wählen Sie diese Zusatzfunktion, wird die Spülwirkung erhöht und somit
ein optimales Ausspülen des Waschmittels garantiert. Dies ist besonders
angezeigt bei sehr empfindlicher Haut bzw. Waschmittelallergien.
! Diese Funktion kann zu den Programmen , Hauptschleudern,
Abpumpen.
gedrückt werden.
! Diese Funktion kann zu den Programmen , , , .
Schnell
Zur Verkürzung des Waschgangs und gleichzeitiger Einsparung
von Wasser und Strom.
! Diese Funktion kann zu den Programmen , , , , .
Eco Wash
Die Funktion Eco Wash trägt dazu bei, Energie zu sparen, indem
das Wasser für die Wäsche nicht aufgeheizt wird - ein Vorteil sowohl
für die Umwelt als auch für die Stromrechnung. Tatsächlich sichern
die verstärkte Waschaktion und der optimierte Wasserverbrauch
hervorragende Ergebnisse bei gleicher durchschnittlicher Dauer
Leichtbügeln
Bei Einstellung dieser Funktion wird zur Vermeidung einer
Knitterbildung der Wasch- und Schleudergang entsprechend
eines Standardzyklusses zu. Für maximale Waschergebnisse
empfehlen wir den Einsatz eines Flüssigwaschmittels.
! Diese Funktion kann zu den Programmen Mix 15, , , , , .
geändert. Beim Programmen bleibt am Ende des Zyklus
das Wasser in der Maschine, die Kontrollleuchte der Funktion
LEICHTBÜGELN und die der Taste START/PAUSE blinken (orange)
und auf dem Display wird “SPÜLSTOPP” angezeigt.
31

Waschmittel und Wäsche
DE
Waschmittelschublade
Ein gutes Waschergebnis hängt auch von einer korrekten
Waschmitteldosierung ab: Eine zu hohe Dosierung bedeutet
nicht unbedingt reinere Wäsche, sie trägt nur dazu bei, die
Maschineninnenteile zu verkrusten und die Umwelt zu belasten.
! Verwenden Sie keine Handwaschmittel, sie verursachen
eine zu hohe Schaumbildung.
! Waschmittel in Pulverform für Baumwollweißwäsche, für
die Vorwäsche und für Waschprogramme bei Temperaturen über 60°C verwenden.
! Bitte befolgen Sie den auf der Waschmittelverpackung
angegebenen Anweisungen.
Schublade herausziehen
und Waschmittel oder Zusätze wie folgt einfüllen:
In Kammer 1: Waschpulver für die Vorwäsche
(kein Flüssigwaschmittel)
In Kammer 2: Waschmittel für die Hauptwäsche
(Waschpulver oder Flüssigwaschmittel)
Flüssigwaschmittel nur kurz vor dem Start einfüllen.
! Verwenden Sie keine Handwaschmittel, sie verursachen
eine zu hohe Schaumbildung.
Kammer 3: Zusätze (Weichspüler usw.)
Achten Sie bei Einfüllen des Weichspülers in die Kammer 3
darauf, dass Sie die angegebene Höchstmenge “max.” nicht
überschreiten.Der Weichspüler wird beim letzten Spülgang automatisch in die Wäschetrommel eingespült. Nach Abschluss
des Waschprogramms bleibt in Kammer 3 ein kleiner Rückstand an Wasser. Dieser ist zur Einspülung sehr dickflüssiger
bzw. zur Verdünnung konzentrierter Weichspüler erforderlich.
Sollte in der Kammer 3 mehr Wasser als normal zurückbleiben,
so ist die Entnahmevorrichtung verstopft. Zur Reinigung derselben verweisen wir auf Seite “Reinigung und Pflege”.
Kammer 4: Legen Sie keine Reinigungsmittel in
diesem Kompartiment.
Vorsortieren der Wäsche
• Sortieren Sie die Wäsche nach:
- Gewebeart / Waschetikettensymbol.
- und Farben: Buntwäsche von Weißwäsche trennen.
• Entleeren Sie alle Taschen.
• Das in der „Programmtabelle“ angegebene Gewicht, beschreibt die maximale Ladung Trockenwäsche und darf
nicht überschritten werden.
Wie schwer ist Wäsche?
1 Betttuch 400-500 gr
1 Kissenbezug 150-200 gr
1 Tischdecke 400-500 gr
1 Bademantel 900-1.200 gr
1 Handtuch 150-250 gr
Sonderprogramme
Baumwolle 20°: (programme ) ideal für normalverschmutze
Baumwolle. Die auch mit kaltem Wasser erreichten
Leistungen, vergleichbar mit einer Wäsche bei 40°, werden
mechanisch erzielt. Die Trommel arbeitet mit wiederholten,
kurz auf einander folgenden Beschleunigungen.
Mix 30‘: Kurzprogramm für die tägliche Wäsche leicht
verschmutzter Teile: in nur 30 Minuten, zur Einsparung von
Zeit und Energie. Stellen Sie dieses Waschprogramm ( bei
30°C) ein, dann können, bei einer maximalen Lademenge
von 3 kg, Gewebe unterschiedlicher Art (mit Ausnahme von
Wolle und Seide) zusammen gewaschen werden.
Mix 15‘: Kurzprogramm für die Wäsche leicht verschmutzter
Teile: in nur 15 Minuten, zur Einsparung von Zeit und Energie.
Stellen Sie dieses Waschprogramm ( bei 30°C) ein, dann
können, bei einer maximalen Lademenge von 1,5 kg, Gewebe
unterschiedlicher Art (mit Ausnahme von Wolle und Seide)
zusammen gewaschen werden.
Baby Zyklus: Dieses Programm ist in der Lage, die durch
Kinder verursachten, typischen Flecken zu beseitigen, und die
Waschmittel optimal auszuspülen, um Allergien an der empfindlichen Kinderhaut zu vermeiden. Dieser Zyklus wurde
konzipiert, um Bakterienvorkommen zu reduzieren, dank des
Einsatzes einer erheblich größeren Wassermenge und Optimierung spezifischer, hygienisierender Waschmittelzusätze.
Am Ende des Waschgangs erfolgen einige langsame und
sanfte Trommelumdrehungen, um Knitterbildung zu vermeiden.
Drücken Sie abschließend die Taste START/PAUSE.
Seide: Wählen Sie das Spezialprogramm zum Waschen
aller Kleidungs- bzw. Wäschestücke aus Seide. Es empfiehlt
sich der Einsatz von Feinwaschmittel.
Gardinen: Gardinen zusammengefaltet in einem Kissenbezug oder in einem netzartigen Beutel waschen. Stellen Sie
das Programma ein.
Wolle: Das Waschprogramm „Wolle” dieser Waschmaschine
Hotpoint-Ariston wurde von der Woolmark Company für die
Wäsche von mit „Handwäsche“ gekennzeichneten Wollkleidungsstücken getestet und anerkannt, vorausgesetzt
die Wäsche erfolgt gemäß der Anweisungen auf Etikett des
Kleidungsstück und den Angaben des Herstellers des Haushaltsgeräts. Hotpoint-Ariston ist die erste Waschmaschinenmarke, die von der Woolmark Company die Zertifizierung
Woolmark Apparel Care - Platinum für ihre Waschleistungen
und den Verbrauch von Wasser und Energie erhalten hat.
32

Vorsichtsmaßregeln und
Hinweise
! Der Waschvollautomat wurde nach den strengsten inter-
nationalen Sicherheitsvorschriften entworfen und gebaut.
Nachstehende Hinweise werden aus Sicherheitsgründen
geliefert und sollten aufmerksam gelesen werden.
Allgemeine Sicherheit
• Dieses Gerät wurde ausschließlich für den Einsatz im pri-
vaten Haushalt konzipiert.
• Dieses Gerät ist nicht zur Verwendung durch Personen
(einschließlich Kinder) mit eingeschränkten körperlichen,
geistigen oder sensorialen Fähigkeiten oder ohne ausreichende Erfarhung und Kenntnis geeignet, es sei denn,
sie werden durch eine für ihre Sicherheit verantwortliche
Person beaufsichtigt und eingewiesen. Kinder müssen
beaufsichtigt werden, um sicherzustellen, dass sie nicht
mit dem Gerät spielen.
• Der Waschvollautomat darf nur von Erwachsenen und
gemäß den Anleitungen dieses Handbuchs bedient werden.
• Berühren Sie das Gerät nicht, wenn Sie barfuß sind, und
auch nicht mit nassen oder feuchten Händen oder Füßen.
• Ziehen Sie den Gerätestecker nicht am Kabel aus der
Steckdose, sondern nur am Netzstecker selbst.
• Berühren Sie nicht das Ablaufwasser, es könnte sehr heiß
sein.
• Öffnen Sie die Gerätetür nicht mit Gewalt: Der Sicherheits-
Schließmechanismus könnte hierdurch beschädigt werden.
• Bei etwaigen Störungen versuchen Sie bitte nicht, Innenteile
selbst zu reparieren.
• Halten Sie Kinder stets von dem in Betrieb befindlichen
Gerät fern.
• Muss das Gerät versetzt werden, sollten hierfür zwei oder
drei Personen verfügbar sein. Versetzen Sie es niemals
allein, das Gerät ist äußerst schwer.
• Bevor Sie die Wäsche einfüllen, stellen Sie bitte sicher, dass
die Wäschetrommel leer ist.
Entsorgung
• Entsorgung des Verpackungsmaterials: Befolgen Sie die
lokalen Vorschriften, Verpackungsmaterial kann wiederverwertet werden.
• Gemäß der Europäischen Richtlinie 2002/96/EC über
Elektro- und Elektronik-Altgeräte dürfen ElektrohaushaltsAltgeräte nicht über den herkömmlichen Haushaltsmüllkreislauf entsorgt werden. Altgeräte müssen separat gesammelt werden, um die Wiederverwertung und das Recycling
der beinhalteten Materialien zu optimieren und die Einflüsse
auf die Umwelt und die Gesundheit zu reduzieren.
Das Symbol „durchgestrichene Mülltonne” auf jedem
Produkt erinnert Sie an Ihre Verpflichtung, dass Elektrohaushaltsgeräte gesondert entsorgt werden müssen.
Endverbraucher können sich an Abfallämter der Gemeinden wenden, um mehr Informationen über die korrekte
Entsorgung ihrer Elektrohaushaltsgeräte zu erhalten.
Energie sparen und Umwelt schonen
Waschmittel, Wasser, Energie und Zeit sparen
• Verschwendung von Strom, Wasser, Waschmittel und Zeit
kann man vermeiden, indem man die Waschmaschine mit
der empfohlenen Höchstwäschemenge benutzt. Bei einer
vollen Auslastung Ihres Waschvollautomaten können Sie
bis zu 50% Energie sparen.
• Vorwäsche ist nur bei stark verschmutzter Wäsche erforderlich. Durch Vermeidung einer solchen kann Waschmittel, Zeit, Wasser und 5-15% Energie gespart werden.
• Flecken sollten mit einem Fleckenmittel vorbehandelt
werden, oder weichen Sie die Wäsche vor der Wäsche
ein. Hierdurch können hohe Waschtemperaturen vermieden werden. Ein 60°C-Programm anstelle eines 90°CProgramms, oder ein 40°C-Programm anstelle eines
60°C-Programms hilft bis zu 50% Energie zu sparen.
• Dosieren Sie Waschmittel sparsam je nach Wasserhärte,
Verschmutzungsgrad und Wäschemenge, um die Umwelt
nicht über Gebühr zu belasten: obwohl sie biologisch
abbaubar sind, beinhalten Sie dennoch Stoffe, die die
Umwelt belasten. Auch Weichmacher sollten höchst
sparsam eingesetzt werden.
• Waschen Sie am späten Nachmittag oder in den ersten
Morgenstunden, hierdurch tragen sie dazu bei, die Belastung der Elektrizitätswerke zu mindern.
Die Option “Startzeitvorwahl” hilft Ihnen in dieser Hinsicht
außerordentlich.
• Soll die Wäsche in einem Wäschetrockner getrocknet
werden, dann stellen Sie eine hohe Schleudergeschwindigkeit ein. Je trockener die Wäsche geschleudert wird,
desto niedriger ist der zum Trocknen erforderliche Energieverbrauch.
DE
33

Reinigung und Pflege
DE
Wasser- und Stromversorgung abstellen
• Wasserhahn nach jedem Waschvorgang zudrehen.
Hierdurch wird der Verschleiß der Wasseranlage verringert und Wasserlecks vorgebeugt.
• Ziehen Sie den Stecker aus der Steckdose, bevor Sie
Ihren Waschvollautomaten reinigen.
Reinigung des Gerätes
Die Gehäuseteile und die Teile aus Gummi können mit einem
mit warmer Spülmittellauge angefeuchteten Tuch gereinigt
werden. Vermeiden Sie Löse- und Scheuermittel.
Pflege der Gerätetür und Trommel
• Lassen Sie die Füllfenstertür stets leicht offen stehen, um die
Bildung unangenehmer Gerüche zu vermeiden.
Reinigung der Pumpe
Ihr Gerät ist mit einer selbstreinigenden Pumpe ausgerüstet, eine Wartung ist demnach nicht erforderlich. Es
könnte doch einmal vorkommen, dass kleine Gegenstände
(Münzen, Knöpfe) in die zum Schutz der Pumpe dienende
Vorkammer (befindlich unter der Pumpe) fallen.
! Vergewissern Sie sich, dass der Waschgang abgeschlos-
sen ist und ziehen Sie den Stecker heraus.
Zum Herausholen von in den Vorraum gefallenen
Gegenstaenden:
1. Die Abdeckung (befindlich an der Gerätefront)
mit Hilfe eines Schraubenziehers abnehmen (siehe
Abbildung);
2.den Deckel gegen den
Uhrzeigersinn abdrehen
(siehe Abbildung): es ist
ganz normal, wenn etwas
Wasser austritt;
3. das Innere gründlich
reinigen;
4. den Deckel wieder
aufschrauben;
5. die Abdeckung wieder
anbringen. Stellen Sie hierbei sicher, dass die Haken
in die Schlitze eingreifen,
bevor Sie die Abdeckung
fest andrücken.
Kontrolle des Wasserzulaufschlauchs
Kontrollieren Sie den Zulaufschlauch mindestens einmal im
Jahr. Weist er Risse bzw. Brüche auf, muss er ausgetauscht
werden. Der starke Druck während des Waschprogramms
könnte zu plötzlichem Platzen führen.
So kann der Waschmittelbehälter gereinigt werden
Abnehmen:
Drücken Sie leicht auf den
vorne im Behälter befindlichen Knopf und ziehen Sie
den Behälter dann nach
oben heraus (Abb. 1, 2).
Abb. 1 Abb. 2
Reinigen:
Reinigen Sie ihn unter fließendem Wasser (Abb.3), eventuell
unter Zuhilfenahme einer alten Zahnbürste, ziehen Sie das
im oberen Teil der Kammern 1 und 2 befindliche Siphonpaar
heraus (Abb. 4) und kontrollieren Sie, ob dieses verstopft ist.
Spülen Sie es eventuell gründlich aus.
! Verwenden Sie niemals bereits gebrauchte Schläuche.
Anbringen:
Vergessen Sie nicht, auch
das Si ph onpa a r wi e der
einzusetzen, bevor Sie den
Waschmittelbehälter wieder
einhängen. (Abb. 4, 2. 1).
Abb. 3
Abb. 4
34

Störungen und Abhilfe
Bei Funktionsstörung: Bevor Sie sich an den Technischen Kundendienst wenden (siehe „Kundendienst“), vergewissern Sie
sich zuerst, ob es sich nicht um eine Kleinigkeit handelt, die Sie selbst beheben können. Ziehen Sie hierzu nachstehendes
Verzeichnis zu Rate.
Störungen:
Der Waschvollautomat schaltet sich
nicht ein.
Der Waschgang startet nicht.
Der Waschvollautomat lädt kein
Wasser (auf dem Display wird die
Meldung “WASSERZULAUF PRÜFEN”
eingeblendet).
Der Waschvollautomat lädt laufend
Wasser und pumpt es laufend ab.
Mögliche Ursachen / Lösungen:
• Der Stecker steckt nicht in der Steckdose, oder nicht so, dass der Kontakt hergestellt wird.
• Der Strom ist ausgefallen.
• Die Gerätetür ist nicht richtig verschlossen.
• Die ON/OFF-Taste wurde nicht gedrückt.
• Die Taste START/PAUSE wurde nicht gedrückt.
• Der Wasserhahn ist nicht aufgedreht.
• Es wurde ein verzögerter Start gewählt (siehe „Durchführung eines Waschprogramms“).
• Der Zufuhrschlauch ist nicht am Wasserhahn angeschlossen.
• Der Schlauch ist geknickt.
• Der Wasserhahn ist nicht aufgedreht.
• Es ist kein Wasser da.
• Der Druck ist unzureichend.
• Die Taste START/PAUSE wurde nicht gedrückt.
• Der Ablaufschlauch befindet sich nicht auf der vorgeschriebenen Höhe, d.h. 65 – 100 cm
vom Boden (siehe „Installation“).
• Das Schlauchende liegt unter Wasser (siehe „Installation”).
• Der Abfluss der Hausinstallation wurde nicht mit einer Entlüftungsöffnung versehen.
Konnte die Störung durch diese Kontrollen nicht behoben werden, dann drehen Sie den
Wasserhahn zu, schalten das Gerät aus und fordern den Kundendienst an. Falls Sie in einer
der obersten Etagen eines Gebäudes wohnen, kann es vorkommen, dass sich im Syphon
ein Vakuum bildet, und der Waschvollautomat ständig Wasser ansaugt und wieder abpumpt.
Zur Lösung dieser Probleme bietet der Handel spezielle Syphonventile.
DE
Der Waschvollautomat pumpt nicht
ab und schleudert nicht.
Der Waschvollautomat vibriert zu
stark während des Schleuderns.
Der Waschvollautomat ist undicht.
Das Gerät ist blockiert, das Display
blinkt und zeigt einen Fehlercode an
(zum Beispiel: F-01, F-..).
Es bildet sich zu viel Schaum.
• Das Programm siehe kein Abpumpen vor: Bei einigen Programmen muss es von
Hand eingestellt werden (siehe „Programme und Funktionen“).
• Die Funktion “Leichtbügeln” wurde aktiviert: zur Beendung des Programms Taste
START/PAUSE drücken (siehe „Programme und Funktionen“).
• Der Ablaufschlauch ist geknickt (siehe „Installation“).
• Die Ablaufleitung ist verstopft.
• Die Trommel wurde bei der Installation nicht korrekt befreit (siehe „Installation“).
• Der Waschvollautomat steht nicht eben (siehe „Installation“).
• Der Waschvollautomat steht zu eng zwischen der Wand und einem Möbel (siehe
„Installation“).
• Der Zulaufschlauch wurde nicht ordnungsgemäß aufgeschraubt (siehe „Installation“).
• Die Waschmittelschublade ist verstopft (zur Reinigung siehe „Wartung und Pflege“).
• Der Ablaufschlauch ist nicht korrekt befestigt (siehe „Installation“).
• Schalten Sie das Gerät aus und ziehen Sie den Netzstecker; warten Sie daraufhin
ca. 1 Minute und schalten Sie es wieder ein.
Bleibt die Störung bestehen, kontaktieren Sie bitte den Kundendienst.
• Das Waschmittel ist für Waschmaschinen nicht geeignet (es muss mit der Aufschrift „Für
Waschmaschinen“, „Für Handwäsche und Waschmaschinen“ usw. versehen sein.
• Es wurde zu hoch dosiert.
35

Kundendienst
DE
Bevor Sie sich an den Kundendienst wenden:
• Sollten einige Kontrollen vorab selbst durchgeführt werden (siehe „Störungen und Abhilfe“);
• Starten Sie daraufhin das Programm erneut, um sicherzustellen, dass die Störung auch wirklich behoben wurde;
• Ist dies nicht der Fall, dann kontaktieren Sie den autorisierten Kundendienst unter der auf dem Garantieschein befindlichen
Telefonnummer.
! Wenden Sie sich auf keinen Fall an nicht autorisierte Techniker.
Geben Sie bitte Folgendes an:
• die Art der Störung;
• das Maschinenmodell (Mod.);
• die Seriennummer (S/N).
Diese Daten entnehmen Sie bitte dem auf der Rückseite der Maschine befindlichen Typenschild.
36

Οδηγίες χρήσης
ΠΛΥΝΤΗΡΙΟ ΡΟΥΧΩΝ
GR
Ελληνικά
ECOT7D 1491
Περιεχόμενα
Εγκατάσταση, 38-39
Αποσυσκευασία και οριζοντίωση
Υδραυλικές και ηλεκτρικές συνδέσεις
Πρώτος κύκλος πλυσίματος
Τεχνικά στοιχεία
Περιγραφή του πλυντηρίου, 40-41
Πίνακας ελέγχου
Οθόνη
Πως διενεργείται ένας κύκλος πλυσίματος, 42
Προγράμματα και λειτουργίες, 43
Πίνακας των Προγραμμάτων
Λειτουργίες πλυσίματος
Απορρυπαντικά και μπουγάδα, 44
Θήκη απορρυπαντικών
Προετοιμασία της μπουγάδας
Ειδικά προγράμματα
Προφυλάξεις και συμβουλές, 45
Γενική ασφάλεια
Διάθεση
Χειρονακτικό άνοιγμα της πόρτας
GR
Συντήρηση και φροντίδα, 46
Αποκλεισμός νερού και ηλεκτρικού ρεύματος
Καθαρισμός του πλυντηρίου
Καθαρισμός του συρταριού απορρυπαντικών
Φροντίδα της πόρτας και του κάδου
Καθαρισμός της αντλίας
Έλεγχος του σωλήνα τροφοδοσίας του νερού
Ανωμαλίες και λύσεις, 47
Υποστήριξη, 48
37

Εγκατάσταση
GR
! ЕЯнбй узмбнфйкь нб цхлЬоефе фп егчейсЯдйп бхфь гйб
нб мрпсеЯфе нб фп ухмвпхлеэеуфе прпйбдЮрпфе уфйгмЮ.
Уе ресЯрфщуз рюлзузт, рбсбчюсзузт Ю мефбкьмйузт,
вевбйщиеЯфе ьфй рбсбмЭней мбжЯ ме фп рлхнфЮсйп гйб нб
рлзспцпсеЯ фпн нЭп йдйпкфЮфз гйб фз лейфпхсгЯб кбй фйт
учефйкЭт рспейдпрпйЮуейт.
! ДйбвЬуфе рспуекфйкЬ фйт пдзгЯет: хрЬсчпхн узмбнфйкЭт
рлзспцпсЯет гйб фзн егкбфЬуфбуз, фз чсЮуз кбй фзн
буцЬлейб.
БрпухукехбуЯб кбй псйжпнфЯщуз
БрпухукехбуЯб
1. БрпухукехЬуфе фп
рлхнфЮсйп.
2. ЕлЭгофе бн фп
рлхнфЮсйп Эчей
хрпуфеЯ жзмйЭт кбфЬ
фз мефбцпсЬ. Бн
Эчей хрпуфеЯ жзмйЭт
мзн фп ухндЭефе кбй
ерйкпйнщнЮуфе ме фпн
мефбрщлзфЮ.
3. БцбйсЭуфе фйт фЭууесйт
вЯдет мефбцпсЬт кбй фп
лбуфйчЬкй ме фп учефйкь
дйбчщсйуфйкь, рпх
всЯукпнфбй уфп рЯущ мЭспт
(влЭре ейкьнб).
4. КлеЯуфе фйт прЭт ме фб
рлбуфйкЬ рюмбфб рпх убт рбсЭчпнфбй.
5. ДйбфзсеЯуфе кбй фб фсЯб фемЬчйб: бн фп рлхнфЮсйп
чсейбуфеЯ нб мефбцесиеЯ, иб рсЭрей нб обнбмпнфбсйуфпэн.
Рспуп чЮ: уе ресЯрфщуз ербнбчсзуймпрпЯзузт пй рйп
кпнфЭт вЯдет рсЭрей нб мпнфбсйуфпэн ерЬнщ.
! Пй ухукехбуЯет ден еЯнбй рбйчнЯдйб гйб мйксЬ рбйдйЬ.
ПсйжпнфЯщуз
1. ЕгкбфбуфЮуфе фп рлхнфЮсйп уе Энб дЬредп ерЯредп кбй
бниекфйкь, чщсЯт нб фп бкпхмрЮуефе уе фпЯчпхт, Эрйрлб
Ю Ьллп.
ФпрпиЭфзуз, мефбфпрЯуейт
Бн фп рл хн фЮ сйь у бт
дйбиЭфей Энб ейдйкь фсьлеы
ме фспчпэт рпх мбжеэпнфбй,
иб дйех кплхниеЯфе уфз
мефбфьрйуз. Гйб нб кбфЭвей
фп фсьлеы бхфь кбй гйб фз
мефбкЯнзуз чщсЯт дхукплЯб,
рсЭрей нб фсбвЮоефе фп
мпчль, рпх всЯукефбй кЬфщ
бсйуфесЬ, кЬф щ брь фз
вЬуз. Бцпэ плпклзсюуефе
фз мефбкЯнзуз обнбцЭсфе
фпн уфзн бсчйкЮ фпх иЭуз.
Уфп узмеЯп бхфь, фп мзчЬнзмб еЯнбй уфбиесЬ фпрпиефзмЭнп.
ВлЭре ейкьнб (Мьнп гйб фб рспвлерьменб мпнфЭлб).
ХдсбхлйкЭт кбй злекфсйкЭт ухндЭуейт
Уэндеуз фпх ущлЮнб фспцпдпуЯбт неспэ
1. УхндЭуфе фп ущлЮнб
фспцпдпуЯбт вйдюнпнфЬт
фпн уе Энб кспхнь
ксэпх неспэ ме уфьмйп
урейсюмбфпт 3/4 gas
(влЭре ейкьнб).
Рсйн фз уэндеуз, бцЮуфе
нб фсЭоей фп несь мЭчсй нб
гЯней дйбхгЭт.
2. УхндЭуфе фп ущлЮнб
фспцпдпуЯбт уфп
рлхнфЮсйп вйдюнпнфЬт фп
уфзн бнфЯуфпйчз еЯупдп
неспэ, уфп рЯущ мЭспт
ерЬнщ деойЬ (влЭре
ейкьнб).
2. Бн фп дЬредп ден
еЯнбй брьлхфб ерЯредп,
псйжпнфйюуфе фзн ухукехЮ
вйдюнпнфбт Ю оевйдюнпнфбт
фйт ейдйкЭт вЬуейт уфп
мрспуфйнь фмЮмб фзт
ухукехЮт (влЭре
ейкьнб). З гщнЯб клЯузт,
мефсзмЭнз уфзн ерйцЬнейб
есгбуЯбт, ден рсЭрей нб
оереснЬей фйт 2°.
З ущуфЮ псйжпнфЯщуз рспудЯдей уфбиесьфзфб уфп
мзчЬнзмб кбй брпупвеЯ дпнЮуейт, ипсэвпхт кбй
мефбфпрЯуейт кбфЬ фз лейфпхсгЯб. Бн фп рлхнфЮсйп
фпрпиефзиеЯ рЬнщ уе мпкЭфб Ю фЬрзфб, схимЯуфе фб
рпдбсЬкйб Эфуй юуфе нб хрЬсчей кЬфщ брь фп рлхнфЮсйп
бскефьт чюспт гйб фпн бесйумь.
38
3. ВевбйщиеЯфе ьфй п ущлЮнбт ден еЯнбй фубкйумЭнпт уе
кбнЭнб узмеЯп фпх.
! З рЯеуз фпх неспэ рсЭрей нб кхмбЯнефбй мефбоэ фщн
фймюн фпх рЯнбкб ме фб фечнйкЬ уфпйчеЯб (влЭре ерьменз
уелЯдб).
! Бн фп мЮкпт фпх ущлЮнб фспцпдпуЯбт неспэ ден
ербскеЯ, иб рсЭрей нб брехихниеЯфе уе ейдйкехмЭнп
кбфЬуфзмб Ю уе еопхуйпдпфзмЭнп фечнйкь.

65 - 100 cm
Уэндеуз фпх ущлЮнб бдейЬумбфпт
УхндЭуфе бдейЬумбфпт,
чщсЯт нб фпн дйрлюуефе,
уе Энбн бгщгь еккЭнщузт
Ю уе мйб ерйфпЯчйб
брпчЭфехуз уе брьуфбуз
áðü 65 Ýùò 100 cm áðü
фп Эдбцпт.
! Мз чсзуймпрпйеЯфе рспекфЬуейт кбй рплэрсйжб.
! Фп кблюдйп ден рсЭрей нб цЭсей рфхчЭт Ю нб еЯнбй
ухмрйеумЭнп.
! Фп кблюдйп фспцпдпуЯбт рсЭрей нб бнфйкбиЯуфбфбй
мьнп брь еопхуйпдпфзмЭнпхт фечнйкпэт.
РспупчЮ! З ерйчеЯсзуз брпрпйеЯфбй кЬие ехиэнзт уе
ресЯрфщуз рпх ден фзспэнфбй бхфпЯ пй кбньнет.
GR
ДйбцпсефйкЬ брпиЭуфе
фпн уфп чеЯлпт еньт
нйрфЮсб Ю мйбт лекЬнзт,
дЭнпнфбт фпн пдзгь
рпх убт рбсЭчефбй
уфпнкспхнь (влЭре
ейкьнб). Фп елеэиесп
Ьксп фпх ущлЮнб
бдейЬумбфпт ден рсЭрей
нб рбсбмЭней вхийумЭнп
уфп несь.
! Ден ухнйуфЬфбй з чсЮуз рспекфЬуещн ущлЮнщн.
Бн брбйфеЯфбй, з рспЭкфбуз рсЭрей нб Эчей фзн Ядйб
дйЬмефсп фпх бсчйкпэ ущлЮнб кбй нб мзн оереснЬей фб
150 cm.
ЗлекфсйкЮ уэндеуз
Рсйн ейуЬгефе фп вэумб уфзн злекфсйкЮ рсЯжб,
вевбйщиеЯфе ьфй:
• з рсЯжб дйбиЭфей геЯщуз кбй фзсеЯ фйт ек фпх ньмпх
рспдйбгсбцЭт.
• З рсЯжб нб еЯнбй уе иЭуз нб хрпцЭсей фп мЭгйуфп
цпсфЯп йучэпт фзт мзчбнЮт, рпх бнбцЭсефбй уфпн
рЯнбкб Фечнйкюн уфпйчеЯщн (влЭре дЯрлб).
Рсюфпт кэклпт рлхуЯмбфпт
МефЬ фзн егкбфЬуфбуз, рсйн фз чсЮуз, дйенесгЮуфе Энб
кэклп рлхуЯмбфпт ме брпссхрбнфйкь кбй чщсЯт спэчб
иЭфпнфбт фп рсьгсбммб (60°C).
ФечнйкЬ уфпйчеЯб
МпнфЭлп ECOT7D 1491
ДйбуфЬуейт
Чщсзфйкьфзфб áðü 1 Ýùò 7 kg
ЗлекфсйкЭт
ухндЭуейт
УхндЭуейт неспэ
рлЬфпт cm 40
эшпт cm 85
вЬипт cm 60
ВлЭре фзн рйнбкЯдб
чбсбкфзсйуфйкюн ерЯ фзт мзчбнЮт
мЭгйуфз рЯеуз 1 MPa (10 bar)
ЕлЬчйуфз рЯеуз 0,05 MPa (0,5 bar)
чщсзфйкьфзфб фпх кЬдпх 42 лЯфсб
• З фЬуз фспцпдпуЯбт нб кхмбЯнефбй мефбоэ фщн фймюн
рпх бнбцЭспнфбй уфпн рЯнбкб Фечнйкюн уфпйчеЯщн
(влЭре дЯрлб).
• З рсЯжб нб еЯнбй ухмвбфЮ ме фп вэумб фпх
рлхнфзсЯпх. Уе бнфЯиефз ресЯрфщуз, бнфйкбфбуфЮуфе
фзн рсЯжб Ю фп вэумб.
! Фп рлхнфЮсйп ден егкбиЯуфбфбй уе бнпйчфь чюсп, бкьмз
кбй бн п чюспт еЯнбй кблхммЭнпт, дйьфй еЯнбй рплэ
ерйкЯндхнп нб фп бцЮнефе екфеиеймЭнп уе вспчЮ кбй
кбкпкбйсЯб.
! Ме фзн егкбфЬуфбуз фпх рлхнфзсЯпх, з рсЯжб
сеэмбфпт рсЭрей нб еЯнбй еэкплб рспувЬуймз.
Фбчэфзфб
уфхшЯмбфпт
Προγράμματα
ελέγχου σύμφωνα
με τις οδηγίες
1061/2010 και
1015/2010
мЭчсй 1400 уфспцЭт фп лерфь
рсьгсбммб
кпхмрйпэ); κανονικό πρόγραμμα για
βαμβακερά στους 60 °C.
рсьгсбммб (2° рЬфзмб фпх
кпхмрйпэ); κανονικό πρόγραμμα για
βαμβακερά στους 40 °C.
З ухукехЮ бхфЮ еЯнбй уэмцщнз ме
фйт бкьлпхиет КпйнпфйкЭт ПдзгЯет:
- 2004/108/CE
(ЗлекфспмбгнзфйкЮ Ухмвбфьфзфб)
- 2002/96/CE
- 2006/95/CE (ЧбмзлЮ ФЬуз)
(1° рЬфзмб фпх
39

Περιγραφή του πλυντηρίου
GR
Πίνακας ελέγχου
Θήκη απορρυπαντικών: για την προσθήκη απορρυπαντικών
και πρόσθετων (βλέπε «Απορρυπαντικά και μπουγάδα»).
Κουμπί ON/OFF : πιέστε για λίγο το κουμπί για να
ανάψετε ή να σβήσετε το πλυντήριο. Το ενδεικτικό φωτάκι
START/PAUSE πράσινου χρώματος που αναβοσβήνει
αργά δείχνει ότι το πλυντήριο είναι αναμμένη. Για να
σβήσετε το πλυντήριο κατά το πλύσιμο πρέπει να κρατάτε
πατημένο το κουμπί πιο πολύ, περίπου 2 sec. Στιγμιαίο ή
τυχαίο πάτημα δεν επιτρέπει το σβήσιμο του πλυντηρίου.
Το σβήσιμο του πλυντηρίου κατά το πλύσιμο σε εξέλιξη
ακυρώνει το ίδιο το πλύσιμο
Κουμπί ΕΠΙΛΟΓΕΑΣ ΠΡΟΓΡΑΜΜΑΤΩΝ: Για να θέσετε
Κουμπί ON/OFF
Κουμπί
MNHMH
Κουμπί
ΕΠΙΛΟΓΕΑΣ
ΠΡΟΓΡΑΜΜΑΤΩΝ
το επιθυμητό πρόγραμμα (βλέπε τον “Πίνακας των
Προγραμμάτων”).
Κουμπί MNHMH: κρατήστε πατημένο το κουμπί για
την αποθήκευση ενός κύκλου και των προσωπικών
σας προτιμήσεων. Για την ανάκληση ενός κύκλου που
αποθηκεύτηκε προηγουμένως πατήστε το κουμπί MNHMH.
Κουμπι ΛΕΙΤΟΥΡΓΙΑΣ: πιέστε το πλήκτρο για να επιλέξετε
την επιθυμητή λειτουργία. Στην οθόνη θα φωτιστεί το
σχετικό ενδεικτικό φωτάκι.
Κουμπι ΣΤΥΨΙΜΑΤΟΣ : πιέστε για να μειώσετε ή να
αποκλείσετε τελείως το στύψιμο – η τιμή φαίνεται στην οθόνη.
Κουμπι ΘΕΡΜΟΚΡΑΣΙΑ : Πατήστε για να μειώσετε τη
θερμοκρασία: η τιμή εμφανίζεται στην οθόνη.
Κουμπί
ΑΣΦΑΛΙΣΗΣ
ΚΟΥΜΠΙΩΝ
Οθόνη
Κουμπι
ΛΕΙΤΟΥΡΓΙΑΣ
Κουμπί
ΚΑΘΥΣΤΕΡΗΜΕΝΗΣ
ΕΚΚΙΝΗΣΗΣ
Το αναμμένο σύμβολο δείχνει ότι ο πίνακας ελέγχου
είναι ασφαλισμένος. Με τον τρόπο αυτόν παρεμποδίζονται
τυχαίες τροποποιήσεις των προγραμμάτων, κυρίως αν
στο σπίτι υπάρχουν παιδιά. Για την απενεργοποίηση του
κλειδώματος του πίνακα ελέγχου, κρατήστε πατημένο το
κουμπί για περίπου 2 δευτερόλεπτα.
Κουμπι ΚΑΘΥΣΤΕΡΗΜΕΝΗΣ ΕΚΚΙΝΗΣΗΣ : Πατήστε για
να θέσετε μια εκκίνηση με υστέρηση του προεπιλεγμένου
προγράμματος. Η υστέρηση εμφανίζεται στην οθόνη.
Κουμπί με ενδεικτικό φωτάκι START/PAUSE: όταν το
πράσινο ενδεικτικό φωτάκι αναβοσβήνει αργά, πατήστε το
κουμπί για την εκκίνηση πλυσίματος. Με την εκκίνηση του
κύκλου το ενδεικτικό φωτάκι σταθεροποιείται. Για να θέσετε
μια παύση στο πλύσιμο, πατήστε εκ νέου το κουμπί. Το
ενδεικτικό φωτάκι θα αναβοσβήνει με πορτοκαλί χρώμα. Αν
το σύμβολο δεν είναι φωτισμένο, μπορείτε να ανοίξετε
την πόρτα. Για να ξεκινήσει πάλι το πλύσιμο από το σημείο
διακοπής, πατήστε εκ νέου το κουμπί.
Τρόπος stand by
Το πλυντήριο αυτό, σύμφωνα με τις νέες διατάξεις για
την εξοικονόμηση ενέργειας, διαθέτει ένα σύστημ α
αυτόματου σβησίματος (stand by) που τίθεται σε λειτουργία
εντός περίπου 30 λεπτών στην περίπτωση μη χρήσης.
Πιέστε στιγμιαία το κουμπί ON/OFF και περιμένετε να
ενεργοποιηθεί εκ νέου η μηχανή.
Κατανάλωση σε off-mode: 0,5W
Κατανάλωση σε Left-on: 0,5W
Κουμπί
ΣΤΥΨΙΜΑΤΟΣ
Κουμπί με ενδεικτικό
φωτάκι START/
PAUSE
Κουμπί
ΘΕΡΜΟΚΡΑΣΙΑ
Κουμ π ι BΑΣΦΑΛ Ι Σ ΗΣ ΚΟΥΜ Π Ι ΩΝ : Γι α τ ην
ενεργοποίηση του μπλοκ του πίνακα ελέγχου, κρατήστε
πατημένο το κουμπί για περίπου 2 δευτερόλεπτα.
40

Οθόνη
A
D
B
C
F
Η οθόνη είναι χρήσιμη για τον προγραμματσισμό της μηχανής
του πλυντηρίου και παρέχει πολλαπλές πληροφορίες.
Στις δύο επάνω γραμμές A και B απεικονίζονται το
επιλεγμένο πρόγραμμα πλυσίματος, η φάση πλυσίματος σε
εξέλιξη και όλες οι υποδείξεις οι σχετικές με την κατάσταση
προώθησης του προγράμματος.
Рщт бнпЯгей кбй клеЯней п кЬдпт
E
Åéê. 1 Åéê. 2
Åéê. 3
GR
Åéê. 4
Στη γραμμή C απεικονίζεται ο υπολειπόμενος χρόνος για το τέλος
του κύκλου πλυσίματος σε εξέλιξη και στην περίπτωση που τεθεί
μια ΚΑΘΥΣΤΕΡΗΜΕΝΗ ΕΚΚΙΝΗΣΗ, ο υπολειπόμενος χρόνος
για την εκκίνηση του επιλεγμένου προγράμματος.
Στη γραμμή D απεικονίζεται η μέγιστη τιμή της ταχύτητας
στυψίματος που μπορεί να διενεργήσει το πλυντήριο με
βάση το επιλεγμένο πρόγραμμα. Αν το πρόγραμμα δεν
προβλέπει το στύψιμο, η γραμμή παραμένει σβηστή.
Στη γραμμή Ε απεικονίζεται η μέγιστη τιμή της θερμοκρασία
που μπορεί να επιλεγεί με βάση το τεθέν πρόγραμμα. Αν το
πρόγραμμα δεν προβλέπει τη ρύθμιση της θερμοκρασίας,
η γραμμή παραμένει σβηστή.
Τα ενδεικτικά φωτάκια F σχετίζονται με τις λειτουργίες και ανάβουν
όταν η επιλεγμένη λειτουργία είναι συμβατή με το τεθέν πρόγραμμα.
Σύμβολο ασφαλισμένη Πόρτας
Το αναμμένο σύμβολο δείχνει ότι η πόρτα είναι ασφαλισμένη για
την παρεμπόδιση τυχαίων ανοιγμάτων. Για την αποφυγή ζημιών
πρέπει να περιμένετε να σβήσει το σύμβολο πριν ανοίξετε την πόρτα.
ΣΗΜΕΙΩΣΗ: αν είναι ενεργή η λειτουργία ΚΑΘΥΣΤΕΡΗΜΕΝΗ
ΕΚΚΙΝΗΣΗ η πόρτα δεν μπορεί να ανοίξει, για να την ανοίξετε θέστε
τη μηχανή σε παύση πιέζοντας το κουμπί START/PAUSE.
A) БНПЙГМБ (Ейк. 1):
Бнбузкюуфе фп еощфесйкь кбрЬкй кбй бнпЯофе фелеЯщт.
B) ¢нпйгмб кЬдпх (Soft opening):
Ме Энб дЬчфхлп рйЭуфе фп кпхмрЯ рпх хрпдейкнэефбй
óôçí åéê. 2 кбй п кЬдпт иб бнпЯоей брблЬ.
C) ЕЙУБГЩГЗ СПХЧЩН (Ейк. 3).
D) КЛЕЙУЙМП (Ейк. 4):
- клеЯуфе кблЬ фпн кЬдп чбмзлюнпнфбт рсюфб фзн
рсьуийб рьсфб кбй брпиЭфпнфбт кбфьрйн фзн рЯущ;
- вевбйщиеЯфе кбфьрйн ьфй пй гЬнфжпй фзт рсьуийбт
рьсфбт еЯнбй Ьшпгб фпрпиефзмЭнпй уфзн Эдсб фзт рЯущ
рьсфбт;
- бцпэ бкпэуефе фп “клбк” фпх кпхмрюмбфпт,
еобукЮуфе мйб елбцсЬ рЯеуз рспт фб кЬфщ
уе бмцьфесет фйт рьсфет рпх ден рсЭрей нб
брбуцблйуфпэн;
- фЭлпт, клеЯуфе фп еощфесйкь кбрЬкй.
E) Фелйкь уфбмЬфзмб фпх кблбийпэ (Ейк. 2):
Уфп фЭлпт фпх рлхуЯмбфпт фп кблЬий иб фпрпиефзиеЯ
шзлЬ ме фйт Ьллет иЮкет гйб еэкплп Ьнпйгмб.
! Στο πρώτο άναμμα θα ζητηθεί η επιλογή της γλώσσας και
η οθόνη θα μπει αυτόματα στο μενού επιλογής γλώσσας.
Για να επιλέξετε την επιθυμητή γλώσσα πιέστε τα κουμπιά X
και Y, για να επιβεβαιώσετε την επιλογή πιέστε το κουμπί Z.
Αν θέλετε να αλλάξετε γλώσσα, σβήστε τη μηχανή, πατήστε
ταυτόχρονα τα κουμπιά που φαίνονται στην εικόνα με την
αναφορά L μέχρι να ακουστεί ένα ακουστικό σήμα, ανάψτε εκ
νέου τη μηχανή, θα απεικονιστεί το μενού επιλογής γλώσσας.
41

Πως διενεργείται ένας κύκλος
πλυσίματος
GR
1. ΑΝΑΨΤΕ ΤΟ ΠΛΥΝΤΗΡΙΟ. Πατήστε το κουμπί ,
στην οθόνη θα εμφανιστεί η ένδειξη ΚΑΛΩΣ ΗΛΘΑΤΕ.
Το ενδεικτικό φωτάκι START/PAUSE θα αναβοσβήνει
αργά με πράσινο χρώμα.
2. ΦΟΡΤΩΣΗ ΡΟΥΧΩΝ. Ανοίξτε την πόρτα. Φορτώστε
τα ρούχα, προσέχοντας να μην ξεπεράσετε την
ποσότητα φορτίου που υποδεικνύεται στον πίνακα
προγραμμάτων της επόμενης σελίδας.
3. ΔΟΣΟΛΟΓΙΑ ΤΟΥ ΑΠΟΡΡΥΠΑΝΤΙΚΟΥ. Βγάλτε το
συρτάρι και χύστε το απορρυπαντικό στις αντίστοιχες
λεκανίτσες όπως εξηγείται στο “Απορρυπαντικά και
μπουγάδα”.
4. ΚΛΕΙΣΤΕ ΤΗΝ ΠΟΡΤΑ.
5. ΕΠΙΛΕΞΤΕ ΤΟ ΠΡΟΓΡΑΜΜΑ. Στρέψτε ένα από τα
κουμπιά του ΕΠΙΛΟΓΕΑΣ ΠΡΟΓΡΑΜΜΑΤΩΝ για να
επιλέξετε το επιθυμητό πρόγραμμα. Το όνομα του
προγράμματος θα εμφανιστεί στην οθόνη και σε αυτό
αντιστοιχίζεται μια θερμοκρασία και μια ταχύτητα
στυψίματος που μπορούν να τροποποιηθούν. Στην
οθόνη θα εμφανιστεί η διάρκεια του κύκλου.
6. ΕΞΑΤΟΜΙΚΕΥΣΗ ΤΟΥ ΚΥΚΛΟΥ ΠΛΥΣΙΜΑΤΟΣ.
Ενεργήστε στα αντίστοιχα κουμπιά:
Τροποποιήστε τη θερμοκρασία ή/και το
στύψιμο. Η μηχανή επιλέγει αυτόματα τη μέγιστη
θερμοκρασία και στύψιμο για το τεθέν πρόγραμμα
και συνεπώς δεν μπορούν να αυξηθούν. Πατώντας
το κουμπί μειώνεται προοδευτικά η θερμοκρασία
μέχρι το πλύσιμο σε κρύο νερό “OFF”. Πατώντας
το κουμπί μειώνεται προοδευτικά το στύψιμο
μέχρι τον αποκλεισμό του “OFF”. Περαιτέρω πάτημα
των κουμπιών επαναφέρει τις τιμές στις μέγιστες
προβλεπόμενες.
! Αν η επιλεγμένη λειτουργία δεν είναι συμβατή
με το τεθέν πρόγραμμα το ενδεικτικό φωτάκι θα
αναβοσβήνει και η λειτουργία δεν θα ενεργοποιηθεί.
! Αν η επιλεγμένη λειτουργία δεν είναι συμβατή με μια
άλλη που επελέγη προηγουμένως, το σχετικό φωτάκι
της πρώτης επιλεγμένης λειτουργίας θα αναβοσβήνει
και θα ενεργοποιηθεί μόνο η δεύτερη, το ενδεικτικό
φωτάκι της ενεργοποιηθείσας λειτουργίας θα φωτιστεί.
! Οι λειτουργίες μπορεί να τροποποιούν το
προτεινόμενο φορτίο ή/και τη διάρκεια του κύκλου.
7. ΕΚΚΙΝΗΣΗ ΤΟΥ ΠΡΟΓΡΑΜΜΑΤΟΣ. Πατήστε
το κουμπί START/PAUSE. Το σχετικό ενδεικτικό
φωτάκι θα φωτιστεί πράσινο σταθερό και η πόρτα
θα μπλοκάρει (σύμβολο ΑΣΦΑΛΙΣΜΕΝΗΣ ΠΟΡΤΑΣ
αναμμένο). Κατά το πλύσιμο, στην οθόνη θα
εμφανιστεί το όνομα της σε εξέλιξη φάσης. Για να
αλλάξετε ένα πρόγραμμα ενώ είναι σε εξέλιξη ένας
κύκλος, θέστε το πλυντήριο σε παύση πιέζοντας το
κουμπί START/PAUSE (το ενδεικτικό φωτάκι START/
PAUSE θα αναβοσβήνει αργά με πορτοκαλί χρώμα).
Κατόπιν επιλέξτε τον επιθυμητό κύκλο και πατήστε εκ
νέου το κουμπί START/PAUSE.
Για να ανοίξετε την πόρτα όσο ένας κύκλος είναι σε
εξέλιξη πατήστε το κουμπί START/PAUSE. Αν το
σύμβολο ΑΣΦΑΛΙΣΜΕΝΗΣ ΠΟΡΤΑΣ είναι σβηστό
μπορείτε να ανοίξετε την πόρτα. Πατήστε εκ νέου
το κουμπί START/PAUSE για να ξεκινήσει πάλι το
πρόγραμμα από το σημείο διακοπής.
8. ΤΕΛΟΣ ΤΟΥ ΠΡΟΓΡΑΜΜΑΤΟΣ. Επισημαίνεται με
την ένδειξη “ΤΕΛΟΣ ΚΥΚΛΟΥ” στην οθόνη, όταν
το σύμβολο ΑΣΦΑΛΙΣΜΕΝΗΣ ΠΟΡΤΑΣ σβήσει
μπορείτε να ανοίξετε την πόρτα. Ανοίξτε την πόρτα,
αδειάστε τα ρούχα και σβήστε τη μηχανή.
Θέστε μια εκκίνηση με υστέρηση.
Για να θέσετε την εκκίνηση με υστέρηση του
προεπιλεγμένου προγράμματος, πατήστε το σχετικό
κουμπί μέχρι να επιτευχθεί ο χρόνος της επιθυμητής
υστέρησης. Όταν η δυνατότητα αυτή είναι ενεργή,
στην οθόνη φωτίζεται το σύμβολο . Για να
απαλείψετε την εκκίνηση με υστέρηση πατήστε το
κουμπί μέχρις ότου εμφανιστεί στην οθόνη η ένδειξη
OFF.
Τροποποίηση των
χαρακτηριστικών του κύκλου.
• Πατήστε το κουμπί για την ενεργοποίηση της
λειτουργίας. Το ενδεικτικό φωτάκι του αντίστοιχου
κουμπιού θα ανάψει.
• Πατήστε εκ νέου το κουμπί για την απενεργοποίηση
της λειτουργίας. Το ενδεικτικό φωτάκι θα σβήσει.
42
! Αν επιθυμείτε αν ακυρώσετε έναν ήδη τεθέντα κύκλο,
πατήστε επί μακρόν το κουμπί . Ο κύκλος θα διακοπεί
και η μηχανή θα σβήσει.
Σύστημα ισοστάθμισης του φορτίου
Πριν από κάθε στύψιμο, για να αποφύγετε δονήσεις
υπερβολικές και για να κατανείμετε ομοιόμορφα το
φορτίο, ο κάδος διενεργεί περιστροφές σε μια ταχύτητα
ελαφρά ανώτερη εκείνης του πλυσίματος. Αν στο τέλος
των διαδοχικών προσπαθειών το φορτίο δεν έχει ακόμη
εξισορροπηθεί σωστά η μηχανή διενεργεί το στύψιμο σε
μια ταχύτητα χαμηλότερη της προβλεπόμενης. Παρουσία
υπερβολικής αστάθειας, το πλυντήριο διενεργεί την
κατανομή αντί του στυψίματος. Για να ευνοηθεί καλύτερη
κατανομή του φορτίου και της σωστής εξισορρόπησης
συνιστάται η ανάμιξη ρούχων μεγάλων και μικρών
διαστάσεων.

Προγράμματα και λειτουργίες
Υπολειπόμενη
Κατανάλωση
ενέργειας kWh
Πίνακας των Προγραμμάτων
РесйгсбцЮ фпх РспгсЬµµбфпт
Προγράμματα
РспгсЬµµбфб гйб ьлет фйт µЭсет
ВБМВБKЕPA: ЛехкЬ еобйсефйкЬ лесщµЭнб.
Κανονικό πρόγραμμα για βαμβακερά στους 60 °C (1) (1° рЬфзмб
фпх кпхмрйпэ): ЛехкЬ кбй чсщµбфйуфЬ бниекфйкЬ, рплэ лесщµЭнб.
Κανονικό πρόγραμμα για βαμβακερά στους 40 °C (2) (2° рЬфзмб
фпх кпхмрйпэ): ЛехкЬ лЯгп лесщµЭнб кбй ехбЯуизфб чсюµбфб.
Κανονικό πρόγραμμα για βαμβακερά στους 20 °C (3° рЬфзмб фпх
кпхмрйпэ): ЛехкЬ лЯгп лесщµЭнб кбй ехбЯуизфб чсюµбфб.
УхниефйкЬ (1° рЬфзмб фпх кпхмрйпэ): ЧсщµбфйуфЬ бниекфйкЬ, рплэ
лесщµЭнб.
УхниефйкЬ (3) (1° рЬфзмб фпх кпхмрйпэ): ЧсщµбфйуфЬ бниекфйкЬ, лЯгп
лесщµЭнб.
УхниефйкЬ (2° рЬфзмб фпх кпхмрйпэ): ЛехкЬ лЯгп лесщµЭнб кбй
ехбЯуизфб чсюµбфб.
ÖÑÅÓKÁPÉÓÌÁ 30' (1° рЬфзмб фпх кпхмрйпэ): Гйб фп гсЮгпсп
цсеукЬсйуµб спэчщн елбцсЬ лесщµЭнщн (ден ендеЯкнхфбй гйб
µЬллйнб, µефбощфЬ кбй спэчб рпх рлЭнпнфбй уфп чЭсй).
ÖÑÅÓKÁPÉÓÌÁ 15' (2° рЬфзмб фпх кпхмрйпэ): Гйб фп гсЮгпсп
цсеукЬсйуµб спэчщн елбцсЬ лесщµЭнщн (ден ендеЯкнхфбй гйб
µЬллйнб, µефбощфЬ кбй спэчб рпх рлЭнпнфбй уфп чЭсй).
ЕйдйкЬ РспгсЬµµбфб / Mнзмз
M
MNHMH: ЕрйфсЭрей фзн брпиЮкехуз прпйпхдЮрпфе фэрпх рлхуЯмбфпт.
ÐËÕÓH ÃÉÁ MÙPÁ: ЧсщµбфйуфЬ ехбЯуизфб лЯгп лесщµЭнб.
МЕФБОЩФБ/ КПХСФЙНЕУ: Гйб µефбощфЬ спэчб, вйукьжз, лйнЬ.
МБЛЛЙНБ: Гйб µЬллйнб, cachemire, клр.
ЕрЯ µЭспхт рспгсЬµµбфб
Уфэшйµп (1° рЬфзмб фпх кпхмрйпэ).
Оевгблµб (2° рЬфзмб фпх кпхмрйпэ).
ΑΠΟΧΕΤΕΥΣΗ ΝΕΡΟΥ (3° рЬфзмб фпх кпхмрйпэ).
Η διάρκεια του κύκλου που φαίνεται στην οθόνη ή στο εγχειρίδιο αποτελεί μια εκτίμηση υπολογισμένη με βάση τις στάνταρ συνθήκες. Ο πραγματικός χρόνος μπορεί να ποικίλει με βάση πολυάριθμους παράγοντες
όπως θερμοκρασία και πίεση του εισερχόμενου νερού, θερμοκρασία περιβάλλοντος, ποσότητα απορρυπαντικού, ποσότητα και τύπος φορτίου, ισοστάθμιση του φορτίου, πρόσθετες επιλεγμένες δυνατότητες.
1) Πρόγραμμα ελέγχου σύμφωνα με την προδιαγραφή 1061/2010: θέστε το πρόγραμμα (1° рЬфзмб фпх кпхмрйпэ) σε μια θερμοκρασία 60°C.
Ο κύκλος αυτός είναι κατάλληλος για τον καθαρισμό φορτίου βαμβακερών με συνηθισμένη βρωμιά και είναι ο πλέον αποτελεσματικός σε όρους κατανάλωσης
ενέργειας και νερού, προς χρήση σε ρούχα πλενόμενα στους 60°C. Η πραγματική θερμοκρασία πλυσίματος μπορεί να διαφέρει από την υποδεικνυόμενη.
2) Πρόγραμμα ελέγχου σύμφωνα με την προδιαγραφή 1061/2010: θέστε το πρόγραμμα (2° рЬфзмб фпх кпхмрйпэ) σε μια θερμοκρασία 40°C.
Ο κύκλος αυτός είναι κατάλληλος για τον καθαρισμό φορτίου βαμβακερών με συνηθισμένη βρωμιά και είναι ο πλέον αποτελεσματικός σε όρους κατανάλωσης
ενέργειας και νερού, προς χρήση σε ρούχα πλενόμενα στους 40°C. Η πραγματική θερμοκρασία πλυσίματος μπορεί να διαφέρει από την υποδεικνυόμενη.
Για όλα τα Test Institutes:
2) Πρόγραμμα βαμβακερών μακρύ: θέστε το πρόγραμμα (2° рЬфзмб фпх кпхмрйпэ) σε μια θερμοκρασία 40°C.
3) Συνθετικά πρόγραμμα μαζί: θέστε το πρόγραμμα (1° рЬфзмб фпх кпхмрйпэ) σε μια θερμοκρασία 40°C.
МЭгйуфз
èåñµïêñ.
(°C)
90° 1400
60° 1400 -
40° 1400 -
20° 1400 -
60° 800
40° 800
40° 800
30° 800 -
30° 800 -
40° 800 -
30° 0 -
40° 800 -
Λειτουργίες πλυσίματος
Πρόπλυση
Επιλέγοντας τη λειτουργία αυτή διενεργείται η πρόπλυση, χρήσιμη
για την απομάκρυνση δύσκολων λεκέδων.
ΠΑΡΑΤΗΡΗΣΗ: Προσθέστε το απορρυπαντικό στο αντίστοιχο διαμέρισμα .
! Δεν είναι ενεργό στα προγράμματα , , , , , ,
МЭгйуфз
фбчэфзфб
(уфспцЭт
бнЬ лерфь)
- 1400 - - - 7 - - - 16’
- 1400 - -
- 0 - - - 7 - - - 2’
Στο πρόγραμμα «Μεταξωτά» η μηχανή θα τελειώσει τον κύκλο με τη
μπουγάδα σε μούλιασμα, το ενδεικτικό φωτάκι της λειτουργίας ΕΥΚΟΛΟ
ΣΙΔΕΡΩΜΑ και εκείνο της ΕΚΚΙΝΗΣΗΣ/ΠΑΥΣΗΣ θα αναβοσβήνουν
(πορτοκαλί) και η φάση «ΠΑΥΣΗ ΜΕ ΝΕΡΑ» θα εμφανιστεί στην οθόνη.
Για να αδειάσετε το νερό και να μπορείτε να βγάλετε την μπουγάδα
πατήστε το κουμπί START/PAUSE ή το κουμπί ΕΥΚΟΛΟ ΣΙΔΕΡΩΜΑ.
! Δεν είναι ενεργό στα προγράμματα , , , .
БрпссхрбнфйкЬ
Ðëý-
Лехкб-
óéµï
нфйкь
Ìáëá-
кфйкь
МЭгйуфп
υγρασία %
ЦпсфЯп. (Kg)
7 53 1,99 62 145’
7 53 1,17 57 195’
7 53 1,09 92 190’
7 - - - 180’
2,5 44 0,85 39 105’
2,5 44 0,53 39 95’
2,5 - - - 70’
3 71 0,25 33 30’
1,5 71 0,08 29 15’
2 - - - 120’
1 - - - 55’
1 - - - 65’
7 - - - 36’
νερό lt
Συνολικό
ДйЬскейб
GR
кэклпх
Επιπλεον Ξεβγαλμα
Επιλέγοντας τη δυνατότητα αυτή αυξάνεται η αποτελεσματικότητα
του ξεβγάλματος και εξασφαλίζεται η μέγιστη απομάκρυνση του
απορρυπαντικού. Είναι χρήσιμη για επιδερμίδες ιδιαίτερα ευαίσθητες.
! Δεν είναι ενεργό στα προγράμματα , Σтύψιμο, αποχετευση
νερου.
Εύκολο Σιδέρωμα
Επιλέγοντας τη λειτουργία αυτή, το πλύσιμο και το στύψιμο
θα τροποποιηθούν κατάλληλα για τη μείωση σχηματισμού
τσαλακωμάτων. Στο τέλος του κύκλου πλύσης θα γίνουν αργές
περιστροφές του κάδου. Το ενδεικτικό φωτάκι της λειτουργίας
ΕΥΚΟΛΟ ΣΙΔΕΡΩΜΑ και START/PAUSE θα αναβοσβήνουν
(πορτοκαλί) και η ένδειξη «ΤΕΛΟΣ ΚΥΚΛΟΥ» θα εμφανίζεται στη
οθόνη. Για το πέρας του κύκλου πρέπει να πατήσετε το κουμπί
START/PAUSE ή το κουμπί ΕΥΚΟΛΟ ΣΙΔΕΡΩΜΑ.
Ταχύ
Για να μειωθεί η διάρκεια του πλυσίματος, εξασφαλίζοντας
ταυτόχρονα εξοικονόμηση νερού και ενέργειας.
! Δεν είναι ενεργό στα προγράμματα , , , ,
Eco wash
Η λειτουργία Eco Wash συμβάλλει στην εξοικονόμηση ενέργειας
μη θερμαίνοντας το νερό που χρησιμοποιείται στο πλύσιμο της
μπουγάδας – ένα πλεονέκτημα τόσο για το περιβάλλον όσο και
για τον λογαριασμό του ηλεκτρικού. Πράγματι, η ενισχυμένη
δράση και η βελτιστοποιημένη κατανάλωση εγγυώνται βέλτιστα
αποτελέσματα στην ίδια μέση διάρκεια ενός στάνταρ κύκλου. Για
να πετύχετε τα βέλτιστα αποτελέσματα πλυσίματος, συστήνεται
η χρήση ενός υγρού απορρυπαντικού.
! Δεν είναι ενεργό στα προγράμματα Фρεσαρισμα 15, , , , , .
43

Απορρυπαντικά και μπουγάδα
GR
Θήκη απορρυπαντικών
Το καλό αποτέλεσμα του πλυσίματος εξαρτάται επίσης
και από τη σωστή δοσολογία του απορρυπαντικού:
υπερβάλλοντας δεν πλένουμε αποτελεσματικότερα και
συντελούμε στη δημιουργία κρούστας στα εσωτερικά μέρη
του πλυντηρίου και στη μόλυνση του περιβάλλοντος.
! Μη χρησιμοποιείτε απορρυπαντικά για πλύσιμο στο χέρι,
διότι παράγουν πολύ αφρό.
! Να χρησιμοποιείτε απορρυπαντικά σε σκόνη για ρούχα
λευκά βαμβακερά και για την πρόπλυση και για πλυσίματα
σε θερμοκρασία μεγαλύτερη των 60°C.
! Ακολουθήστε τις υποδείξεις που αναγράφονται στη
συσκευασία του απορρυπαντικού.
Β γ ά λ τ ε τ η θ ή κ η
α π ορ ρυ π α ν τ ι κώ ν κα ι
εισάγετε το απορρυπαντικό
ή το πρόσθετο ως εξής.
θήκη 1: Απορρυπαντικό για πλύσιμο (σε σκόνη ή υγρό)
Το υγρό απορρυπαντικό χύνεται μόνο πριν την εκκίνηση.
θήκη 2: Πρόσθετα (μαλακτικό, κλπ.)
Το μαλακτικό δεν πρέπει να διαφεύγει από το πλέγμα.
θήκη πρόσθετη 3: Λευκαντικό
¼фбн чэнефе фп мблбкфйкь уфп дйбмЭсйумб 3, рспуЭофе нб
мзн оересЬуей фзн хрпдейкнхьменз уфЬимз “max”.
Фп мблбкфйкь ейуЬге фбй бхфьмбфб уфз мзчбнЮ кбфЬ
фп фелехфбЯп оЭвгблмб. Уфп фЭлпт фпх рспгсЬммбфпт
рлэузт уфп дйбмЭсйумб 3 рбсбмЭней хрьлейммб неспэ.
Бх ф ь чсзуймеэей гйб фзн ейучюсзуз рплэ рхкн юн
мблбкфйкюн, дзлбдЮ гйб нб бсбйюуей фб ухмрхкнщмЭнб.
Бн уфп дйбмЭсйумб 3 рбсбмеЯней несь ресйууьфесп брь
фп кбнпнйкь, бхфь узмбЯней ьфй з дйЬфбоз еккЭнщузт еЯнбй
впхлщмЭнз. Гйб фпн кбибсйумь влЭре “УхнфЮсзуз кбй
цспнфЯдб”.
θήκη πρόσθετη 4: Μην βάζετε απορρυπαντικό σε αυτό
το διαμέρισμα.
Προετοιμασία της μπουγάδας
• Χωρίστε τη μπουγάδα ανάλογα:
- με το είδος του υφάσματος/ το σύμβολο της ετικέτας.
- τα χρώματα: χωρίστε τα χρωματιστά ρούχα από τα λευκά.
• Εκκενώστε τις τσέπες και ελέγξτε τα κουμπιά.
• Μην ξεπερνάτε τις υποδεικνυόμενες τιμές στον “Πίνακας
των Προγραμμάτων” σε σχέση με το βάρος της στεγνής
μπουγάδας.
Πόσο ζυγίζει η μπουγάδα;
1 σεντόνι 400-500 gr.
1 μαξιλαροθήκη 150-200 gr.
1 τραπεζομάντιλο 400-500 gr.
1 μπουρνούζι 900-1.200 gr.
1 πετσέτα 150-250 gr.
Ειδικά προγράμματα
Κα ν ονικό πρ ό γ ραμμα για βαμβακ ε ρ ά στους 20°:
(πρόγραμμα ) ιδανικό για φορτία λερωμένων βαμβακερών.
Οι καλές επιδόσεις και σε χαμηλή θερμοκρασία, συγκρίσιμες με
ένα πλύσιμο στους 40°, εξασφαλίζονται από μια μηχανική δράση
που λειτουργεί με μεταβολή ταχύτητας σε επαναλαμβανόμενες
και κοντινές αυξομειώσεις.
Φρεσκαρισμα 30’: μελετήθηκε για το πλύσιμο ρούχων
ελαφρά λερωμένων σε σύντομο χρόνο: διαρκεί μόνο 30
λεπτά και σας εξοικονομεί χρόνο και ενέργεια. Θέτοντας
το πρόγραμμα ( σε 30°C) μπορείτε να πλύνετε μαζί
υφάσματα διαφορετικής φύσης (εκτός μάλλινων και
μεταξωτών) με ένα μέγιστο φορτίο 3 kg.
Φρεσκαρισμα 15’: μελετήθηκε για το πλύσιμο ρούχων
ελαφρά λερωμένων σε σύντομο χρόνο: διαρκεί μόνο 15
λεπτά και σας εξοικονομεί χρόνο και ενέργεια. Θέτοντας
το πρόγραμμα ( σε 30°C) μπορείτε να πλύνετε μαζί
υφάσματα διαφορετικής φύσης (εκτός μάλλινων και
μεταξωτών) με ένα μέγιστο φορτίο 1,5 kg.
Πλυση για μωρα: πρόγραμμα ικανό να απομακρύνει
τους λεκέδες τυπικούς των μωρών, διασφαλίζοντας
την απομάκρυνση του απορρυπαντικού από τα ρούχα
για την αποφυγή αλλεργιών στο ευαίσθητο δέρμα
των μωρών. Ο κύκλος μελετήθηκε για να μειώνει
το βακτηριδιακό φορτίο χρησιμοποιώντας μικρότερη
ποσότητα νερού και βελτιστοποιώντας την επίδραση των
ειδικών εξυγιαντικών πρόσθετων στο απορρυπαντικό.
Στο τέλος του πλυσίματος η μηχανή διενεργεί αργές
περιστροφές του κάδου για την αποφυγή δημιουργίας
πτυχώσεων. Για να τελειώσει ο κύκλος πιέστε το κουμπί
START/PAUSE.
Μεταξωτά: χρησιμοποιήστε το αντίστοιχο πρόγραμμα
για να πλύνετε όλα τα μεταξωτά ρούχα. Συνιστάται η χρήση
ενός ειδικού απορρυπαντικού για ευαίσθητα ρούχα.
Κουρτίνες: διπλώστε τις μέσα σε ένα μαξιλάρι ή σε ένα
δικτυωτό σακούλι. Χρησιμοποιήστε το πρόγραμμα .
Μάλλινα: Ο κύκλος πλυσίματος “Μάλλινα” αυτού του
πλυντηρίου Hotpoint-Ariston δοκιμάστηκε και εγκρίθηκε από
την Woolmark Company για το πλύσιμο ρούχων μάλλινων που
ταξινομούνται ως “πλενόμενα στο χέρι”, αρκεί το πλύσιμο να
εκτελείται σύμφωνα με τις οδηγίες της ετικέτας του ενδύματος
και τις υποδείξεις του κατασκευαστή της οικιακής ηλεκτρικής
συσκευής. Η Hotpoint-Ariston είναι η πρώτη μάρκα που
απέκτησε από την Woolmark Company την πιστοποίηση
Woolmark Apparel Care - Platinum για τις επιδόσεις της
στο πλύσιμο και τη χαμηλή κατανάλωση νερού και ενέργειας.
44

Προφυλάξεις και
συμβουλές
! Фп рлхнфЮсйп учедйЬуфзке кбй кбфбукехЬуфзке
уэмцщнб ме фпхт дйеинеЯт кбньнет буцблеЯбт. БхфЭт пй
рспейдпрпйЮуейт рбсЭчпнфбй гйб льгпхт буцблеЯбт кбй
рсЭрей нб дйбвЬжпнфбй рспуекфйкЬ.
ГенйкЮ буцЬлейб
• З ухукехЮ ден рсЭрей нб чсзуймпрпйеЯфбй брь Ьфпмб
(ухмресйлбмвбнпмЭнщн фщн рбйдйюн) ме цхуйкЭт,
бйуизфзсйбкЭт Ю нпзфйкЭт йкбньфзфет кбй ме емрейсЯет
кбй гнюуейт бнербскеЯт, екфьт кй бн з чсЮуз бхфЮ
гЯнефбй хрь фзн ерЯвлешз Ю фйт пдзгЯет еньт бфьмпх
хреэихнпх гйб фзн буцЬлейЬ фпхт. Фб рбйдйЬ рсЭрей
нб ерйфзспэнфбй гйб нб еобуцблйуфеЯ ьфй ден иб
рбЯопхн ме фз ухукехЮ.
• З ухукехЮ бхфЮ учедйЬуфзке брпклейуфйкЬ гйб
пйкйбкЮ чсЮуз.
• Мзн бггЯжефе фп мзчЬнзмб ме гхмнЬ рьдйб Ю ме фб
чЭсйб Ю фб рьдйб всегмЭнб.
• Мзн вгЬжефе фп вэумб брь фзн злекфсйкЮ рсЯжб
фсбвюнфбт фп кблюдйп, бллЬ нб рйЬнефе фзн рсЯжб.
• Мзн бггЯжефе фп несь бдейЬумбфпт, бцпэ мрпсеЯ нб
цфЬуей уе хшзлЭт иесмпксбуЯет.
• Мзн жпсЯжефе уе кбмЯб ресЯрфщуз фзн рьсфб: иб
мрпспэуе нб чблЬуей п мзчбнйумьт буцблеЯбт рпх
рспуфбфеэей брь фхчбЯб бнпЯгмбфб.
• Уе ресЯрфщуз влЬвзт, уе кбмЯб ресЯрфщуз нб мзн
еремвбЯнефе уфпхт еущфесйкпэт мзчбнйумпэт
рспурбиюнфбт нб фзн ерйукехЬуефе.
• Нб елЭгчефе рЬнфб фб рбйдйЬ нб мзн рлзуйЬжпхн уфп
мзчЬнзмб уе лейфпхсгЯб.
• Бн рсЭрей нб мефбфпрйуфеЯ, ухнесгбуфеЯфе дэп Ю фсЯб
Ьфпмб ме фз мЭгйуфз рспупчЮ. РпфЭ мьнпй убт гйбфЯ фп
мзчЬнзмб еЯнбй рплэ вбсэ.
• Рсйн ейуЬгефе фз мрпхгЬдб елЭгофе бн п кЬдпт еЯнбй
Ьдейпт.
ДйЬиеуз
Фп уэмвплп ме фп дйегсбммЭнп “дпчеЯп брпвлЮфщн”
уфп рспъьн хренихмЯжей уе убт фзн хрпчсЭщуЮ убт,
рщт ьфбн ерйихмеЯфе нб рефЬоефе фз ухукехЮ ,рсЭрей
нб ухллечиеЯ чщсйуфЬ.
Пй кбфбнблщфЭт иб рсЭрей нб брехиэнпнфбй уфйт
фпрйкЭт бсчЭт Ю уфб кбфбуфЮмбфб лйбнйкЮт гйб
рлзспцпсЯет рпх бцпспэн фз ущуфЮ дйЬиеуз фщн
рблбйюн злекфсйкюн ухукехюн.
Еопйкпньмзуз енЭсгейбт кбй уевбумьт фпх
ресйвЬллпнфпт
Еопйкпньмзуз брпссхрбнфйкпэ, неспэ, енЭсгейбт кбй
чсьнпх
• Гйб нб мзн опдеэефе рьспхт иб рсЭрей нб
чсзуймпрпйеЯфе фп рлхнфЮсйп ме фп мЭгйуфп цпсфЯп.
¸нб рлЮсет цпсфЯп уфз иЭуз дэп мйуюн убт
еопйкпнпмеЯ мЭчсй фп 50% енЭсгейбт.
• З рсьрлхуз еЯнбй бнбгкбЯб мьнп фб бурсьспхчб
рпх еЯнбй рплэ лесщмЭнб. БрпцеэгпнфЬт фз
еопйкпнпмеЯфе брпссхрбнфйкь, чсьнп, несь кбй брь 5
Эщт 15% енЭсгейбт.
• Реснюнфбт фпхт лекЭдет ме Энб кбибсйуфйкь Ю
бцЮнпнфЬт фпхт уе мпэлйбумб рсйн фп рлэуймп,
мейюнефбй з бнбгкбйьфзфб рлхуЯмбфпт уе хшзлЭт
иесмпксбуЯет. ¸нб рсьгсбммб уе 60°C бнфЯ фщн
90°C Ю Энб уе 40°C бнфЯ фщн 60°C, убт еопйкпнпмеЯ
мЭчсй 50% енЭсгейбт.
• Нб дпуплпгеЯфе кблЬ фп брпссхрбнфйкь ме вЬуз
фзн уклзсьфзфб фпх неспэ, фп вбимь всщмйЬт кбй
фзн рпуьфзфб фзт мрпхгЬдбт юуфе нб брпупвеЯфе
урбфЬлет кбй нб рспуфбфеэефе фп ресйвЬллпн: бкьмб
кбй фб вйпдйбурюменб брпссхрбнфйкЬ ресйЭчпхн
уфпйчеЯб рпх бллпйюнпхн фзн йупсспрЯб уфзн цэуз.
ЕрйрлЭпн нб брпцеэгефе фп мЭгйуфп дхнбфьн фп
мблбкфйкь.
GR
• ДйЬиеуз фпх хлйкпэ ухукехбуЯбт: фзсеЯфе фпхт
фпрйкпэт кбнпнйумпэт, юуфе пй ухукехбуЯет нб
мрпспэн нб ербнбчсзуймпрпйзипэн.
• З ехсщрбъкЮ пдзгЯб 2002/96/EK гйб фб Брьвлзфб
Злекфсйкпэ кбй Злекфспнйкпэ Еопрлйумпэ, брбйфеЯ
ьфй пй рблбйЭт пйкйбкЭт злекфсйкЭт ухукехЭт ден
рсЭрей нб брпвЬлпнфбй мбжЯ ме фб хрьлпйрб брьвлзфб
фпх дзмпфйкпэ дйкфэпх. Пй рблбйЭт ухукехЭт
рсЭрей нб ухллечипэн чщсйуфЬ рспкеймЭнпх нб
велфйуфпрпйзипэн з брпкбфЬуфбуз кбй з бнбкэклщуз
фщн хлйкюн рпх ресйЭчпхн кбй ме укпрь фз меЯщуз фщн
влбвесюн ерйрфюуещн уфзн бнисюрйнз хгеЯб кбй фп
ресйвЬллпн.
• РлЭнпнфбт бсгЬ фп брьгехмб мЭчсй фйт рсюфет
рсщйнЭт юсет ухмвЬллефе уфзн меЯщуз фпх
брбйфпэменпх злекфсйкпэ цпсфЯпх брь рлехсЬт
ерйчейсЮуещн злекфсйкЮт енЭсгейбт.
З дхнбфьфзфб “КбихуфесзмЭнз еккЯнзуз” впзиЬей
рплэ уфзн псгЬнщуз фщн рлхуймЬфщн ме фзн Эннпйб
бхфЮ.
• Бн з мрпхгЬдб рсЭрей нб уфегнюуей уе Энб уфегнщфЮсйп,
ерйлЭофе хшзлЮ фбчэфзфб уфхшЯмбфпт. ЛЯгп несь уфзн
мрпхгЬдб убт еопйкпнпмеЯ чсьнп кбй енЭсгейб уфп
рсьгсбммб уфегнюмбфпт.
45

Συντήρηση και φροντίδα
GR
КлеЯуймп рбспчюн неспэ кбй злекфсйкпэ
сеэмбфпт
• КлеЯнефе фзн всэуз мефЬ брь кЬие рлэуймп. ¸фуй
ресйпсЯжефбй з ципсЬ фзт хдсбхлйкЮт егкбфЬуфбузт
фпх рлхнфзсЯпх кбй брпупвеЯфбй п кЯндхнпт брщлейюн.
• ВгЬлфе фп вэумб брь фп сеэмб ьфбн кбибсЯжефе фп
рлхнфЮсйп кбй кбфЬ фйт есгбуЯет ухнфЮсзузт.
Кбибсйумьт фпх рлхнфзсЯпх
Фп еощфесйкь мЭспт кбй фб лбуфйчЭнйб мЭсз мрпспэн нб
кбибсЯжпнфбй ме Энб рбнЯ всегмЭнп ме члйбсь несь кбй
убрпэнй. Мз чсзуймпрпйеЯфе дйблэфет Ю брпохуфйкЬ.
ЦспнфЯдб фзт рьсфбт кбй фпх кЬдпх
• Нб бцЮнефе рЬнфб мйуьклейуфз фзн рьсфб гйб
íá мзн рбсЬгпнфбй дхупумЯет.
Кбибсйумьт фзт бнфлЯбт
Фп рлхнфЮсйп дйбиЭфей мйб бнфлЯб бхфпкбибсйжьменз
рпх ден чсейЬжефбй ухнфЮсзуз. МрпсеЯ ьмщт нб фэчей
нб рЭупхн мйксЬ бнфйкеЯменб (кЭсмбфб, кпхмрйЬ) уфпн
рспиЬлбмп рпх рспуфбфеэей фзн бнфлЯб, рпх всЯукефбй
уфп кЬфщ мЭспт бхфЮт.
! ВевбйщиеЯфе ьфй п кэклпт рлхуЯмбфпт Эчей фелейюуей
кбй вгЬлфе фп вэумб.
Гйб нб бнбкфЮуефе ендечьменб реумЭнб бнфйкеЯменб
уфпн рспиЬлбмп:
1. брпмбксэнефе фп
рпдбсЬкй кЬфщ уфп
рсьуийп рлехсь фпх
рлхнфзсЯпх фсбвюнфбт
ме фб чЭсйб брь фб
рлбънЬ (влЭре ейкьнб).
2. оевйдюуфе фп
кбрЬкй уфсЭцпнфЬт фп
бсйуфесьуфспцб (влЭре
ейкьнб): еЯнбй цхуйкь нб
вгбЯней лЯгп несь.
3.кбибсЯуфе ерймелют фп
еущфесйкь.
4.обнбвйдюуфе фп
кбрЬкй.
5.обнбмпнфЬсефе фп
фбмрль ьнфбт уЯгпхспй,
рсйн фп урсюоефе рспт
фп мзчЬнзмб, ьфй Эчефе
ейуЬгей фб гбнфжЬкйб уфйт
бнфЯуфпйчет еупчЭт.
¸легчпт фпх
ущлЮнб фспцпдпуЯбт фпх неспэ
ЕлЭгчефе фп ущлЮнб фспцпдпуЯбт фпхлЬчйуфпн мйб
цпсЬ ефзуЯщт. Бн рбспхуйЬжей укбуЯмбфб кбй учйумЭт
бнфйкбиЯуфбфбй: кбфЬ фб рлхуЯмбфб пй йучхсЭт рйЭуейт иб
мрпспэубн нб рспкблЭупхн обцнйкЬ урбуЯмбфб.
! Мз чсзуймпрпйеЯфе рпфЭ ущлЮнет чсзуймпрпйзмЭнпхт.
Брпухнбсмпльгзуз:
ЕобукЮ у ф е мйб ел б ц с Ь
рЯеуз уфп мегЬлп кпхмрЯ
уфп рсьуийп мЭспт фзт
иЮкзт брпссхрбнфйкпэ кбй
фсбвЮофе фзн рспт фб рЬнщ
(åéê. 1, 2).
Åéê. 1
46
Рщт кбибсЯжефбй з иЮкз брпссхрбнфйкпэ
Кбибсйумьт:
Кбфьрйн, кбибсЯуфе фз иЮкз кЬфщ брь фз всэуз (åéê. 3)
чсзуймпрпйюнфбт мйб пдпнфьвпхсфуб кбй, бцпэ фсбвЮоефе
фп жехгЬсй фщн уйцпнЯщн рпх еЯнбй вблмЭнб уфп ерЬнщ
мЭспт фщн дйбмесйумЬфщн 1 кбй 2 (åéê. 4), елЭгофе бн фб
Ядйб еЯнбй впхлщмЭнб кбй оерлэнефЭ фб.
Åéê. 2 Åéê. 3
Ербнбухнбсмпльгзуз:
Мзн оечнЬфе нб ербнейуЬгефе
фп жехгЬсй фщн уйцпнЯщн уфйт
бнфЯуфпйчет Эдсет кбй, фЭлпт,
нб обнбвЬлефе фз иЮкз уфзн
Эдсб фзт ецбсмьжпнфЬт фз
(åéê. 4, 2, 1).
Åéê. 4

Ανωμαλίες και λύσεις
Μπορεί να συμβεί το πλυντήριο να μη λειτουργεί. Πριν τηλεφωνήσετε στην Υποστήριξη (βλέπε “Υποστήριξη”), ελέγξτε αν
δεν πρόκειται για πρόβλημα που επιλύεται εύκολα με τη βοήθεια του ακόλουθου καταλόγου.
Ανωμαλίες:
Το πλυντήριο δεν ανάβει.
Ο κύκλος πλυσίματος δεν ξεκινάει.
Το πλυντήριο δεν φορτώνει νερό
(Στην οθόνη θα εμφανιστεί η ένδειξη
“ΑΠΟΥΣΙΑ ΝΕΡΟΥ, ΑΝΟΙΞΤΕ ΤΗΝ
ΠΑΡΟΧΗ”.).
Το πλυντήριο φορτώνει και αδειάζει
νερό συνεχώς.
Δυνατά αίτια / Λύση:
• Το βύσμα δεν έχει εισαχθεί στην ηλεκτρική πρίζα ή τουλάχιστον όχι αρκετά για
να κάνει επαφή.
• Στο σπίτι δεν υπάρχει ρεύμα.
• Η πόρτα δεν κλείνει καλά.
• Το κουμπί ΑΝΑΜΜΑ/ΣΒΗΣΙΜΟ δεν πατήθηκε.
• Το κουμπί START/PAUSE δεν πατήθηκε.
• Η βρύση του νερού δεν είναι ανοιχτή.
• Τέθηκε μια καθυστέρηση στον χρόνο εκκίνησης (βλέπε «Πως διενεργείται ένας
κύκλος πλυσίματος»).
• Ο σωλήνας τροφοδοσίας του νερού δεν είναι συνδεδεμένος στον κρουνό.
• Ο σωλήνας είναι διπλωμένος.
• Η βρύση του νερού δεν είναι ανοιχτή.
• Στο σπίτι λείπει το νερό.
• Δεν υπάρχει αρκετή πίεση.
• Το κουμπί START/PAUSE δεν πατήθηκε.
• Ο σωλήνας αδειάσματος δεν έχει εγκατασταθεί μεταξύ 65 και 100 cm από το
έδαφος (βλέπε «Εγκατάσταση»).
• Το άκρο του σωλήνα αδειάσματος είναι βυθισμένο στο νερό (βλέπε
“Εγκατάσταση”).
• Το επιτοίχιο άδειασμα δεν έχει απαέρωση.
Αν μετά από αυτούς τους ελέγχους το πρόβλημα δεν λύνεται, κλείστε τη βρύση
του νερού, σβήστε το πλυντήριο και καλέστε την υποστήριξη. Αν η κατοικία
βρίσκεται στους τελευταίους ορόφους ενός κτιρίου, μπορεί να διαπιστωθούν
φαινόμενα σιφωνισμού, οπότε το πλυντήριο φορτώνει και αδειάζει νερό συνεχώς.
Για την αντιμετώπιση του προβλήματος διατίθενται στο εμπόριο κατάλληλες
βαλβίδες αντι-σιφωνισμού.
GR
Το πλυντήριο δεν φορτώνει ή δεν
στύβει.
Το πλυντήριο δονείται πολύ κατά το
στύψιμο.
Το πλυντήριο χάνει νερό.
Η μηχανή είναι ασφαλισμένη, η οθόνη
αναβοσβήνει και επισημαίνει έναν
κωδικό ανωμαλίας (π.χ.: F-01, F-..).
Σχηματίζεται πολύς αφρός.
• Το πρόγραμμα δεν προβλέπει το άδειασμα: με ορισμένα προγράμματα πρέπει
να το εκκινήσετε χειρονακτικά(βλέπε “Προγράμματα και λειτουργίες”).
• Είναι ενεργή η λειτουργία ΕΥΚΟΛΟ ΣΙΔΕΡΩΜΑ: για την ολοκλήρωση του
προγράμματος πιέστε το κουμπί START/PAUSE («Προγράμματα και
λειτουργίες»).
• Ο σωλήνας αδειάσματος είναι διπλωμένος (βλέπε «Εγκατάσταση»).
• Ο αγωγός εκκένωσης είναι βουλωμένος.
• Ο κάδος, τη στιγμή της εγκατάστασης, δεν ξεμπλόκαρε σωστά (βλέπε
“Εγκατάσταση”).
• Το πλυντήριο δεν είναι οριζοντιωμένο (βλέπε “Εγκατάσταση”).
• Το πλυντήριο είναι πολύ στενά μεταξύ τοίχου και επίπλων (βλέπε
“Εγκατάσταση”).
• Ο σωλήνας τροφοδοσίας του νερού δεν είναι καλά βιδωμένος (βλέπε
“Εγκατάσταση”).
• Η θήκη των απορρυπαντικών είναι βουλωμένη (για να την καθαρίσετε βλέπε
“Συντήρηση και φροντίδα”).
• Ο σωλήνας αδειάσματος δεν έχει στερεωθεί καλά (βλέπε «Εγκατάσταση»).
• Σβήστε τη μηχανή και βγάλτε το βύσμα από την πρίζα, περιμένετε περίπου
1 λεπτό μετά ξανανάψτε τη.
Αν η ανωμαλία επιμένει, καλέστε την Υποστήριξη.
• Το απορρυπαντικό δεν είναι ειδικό για πλυντήριο (πρέπει να υπάρχει η ένδειξη
“για πλυντήριο”, “για πλύσιμο στο χέρι και στο πλυντήριο”, ή παρόμοια).
• Η δοσολογία υπήρξε υπερβολική.
47

Υποστήριξη
GR
Πριν επικοινωνήσετε με την Υποστήριξη:
• Ελέγξτε αν η ανωμαλία μπορείτε να την αντιμετωπίσετε μόνοι σας (βλέπε “Ανωμαλίες και λύσεις”);
• Επανεκκινήστε το πρόγραμμα για να ελέγξετε αν το πρόβλημα αντιμετωπίστηκε;
• Σε αρνητική περίπτωση, επικοινωνήστε με την εξουσιοδοτημένη Τεχνική Υποστήριξη στον τηλεφωνικό αριθμό που
υπάρχει στο πιστοποιητικό εγγύησης.
! Μην καταφεύγετε ποτέ σε μη εξουσιοδοτημένους τεχνικούς.
Γνωστοποιήστε:
• το είδος της ανωμαλίας;
• το μοντέλο του μηχανήματος (Mod.);
• τον αριθμό σειράς (S/N).
Οι πληροφορίες αυτές βρίσκονται στην ταμπελίτσα που υπάρχει στο πίσω μέρος του πλυντηρίου και στο πρόσθιο μέρος
ανοίγοντας την πόρτα.
48

Руководство по
эксплуатации
CIS
Русский
ECOT7D 1491
СТИРАЛЬНАЯ МАШИНА
Содержание
Установка, 50-51
Распаковка и нивелировка
Подключение к водопроводу и электричеству
Первый цикл стирки
Описание стиральной машины, 52-53
Панель управления
Дисплей
Как открыть и закрыть барабан
Порядок выполнения цикла стирки, 54
Система балансировки белья
Программы и функции, 55
Таблица программ
Функции стирки
Моющие средства и типы белья, 56
Распределитель моющих средств
Подготовка белья
Специальные программы
CIS
Предосторожности и рекомендации, 57
Общие требования к безопасности
Утилизация
Экономия энергии и охрана окружающей среды
Техническое обслуживание и уход, 58
Отключение воды и электричества
Уход за стиральной машиной
ход за дверцей машины и барабаном
Чистка насоса
Проверка заливного шланга
Как чистить распределитель моющих средств
Поиск неисправностей и методы их
устранения, 59
Сервисное обслуживание, 60
Технические данные
49

Установка
CIS
! Сохраните данное руководство. Оно должно быть в
комплекте со стиральной машиной в случае продажи,
передачи оборудования или при переезде на новую
квартиру, чтобы новый владелец оборудования мог
ознакомиться с правилами его функционирования и
обслуживания.
! Внимательно прочитайте руководство: в нем
содержатся важные сведения по установке и
безопасной эксплуатации стиральной машины.
Распаковка и выравнивание
Распаковка
1. Распакуйте
стиральную машину.
2. Убедитесь, что
оборудование не было
повреждено во время
транспортировки.
При обнаружении
повреждений –
не подключайте
машину – свяжитесь
с поставщиком
немедленно.
3. Удалите четыре
транспортировочных
винта и резиновые
пробки с прокладками,
расположенные в задней части стиральной машины
(см. рис.).
4. Закройте отверстия прилагающимися пластиковыми
заглушками.
5. Сохраняйте все детали: они Вам понадобятся при
последующей транспортировке стиральной машины.
болты, резиновые шайбы и большую металличе-
скую поперечную планку. Закройте образовавшиеся
отверс тия пластмассовыми заглушками.
! Не разрешайте детям играть с упаковочными
материалами.
Выравнивание
1. Установите стиральную
машину на ровном
и прочном полу, так
чтобы она не касалась
стен, мебели и прочих
предметов.
2. После установки
машины на место
отрегулируйте ее
устойчивое положение
путем вращения
передних ножек (см. рис.). Для этого сначала
ослабьте контргайку, после завершения регулировки
контргайку затяните. После установки машины
на место проверьте по уровню горизонтальность
верхней крышки корпуса, отклонение горизонтали
должно быть не более 2°. Правильное выравнивание
оборудования поможет избежать шума, вибраций и
смещений во время работы машины.
Если стиральная машина стоит на полу, покрытом
ковром, убедитесь, что ее основание возвышается
над ковром. В противном случае вентиляция будет
затруднена или вовсе невозможна.
Установка машины на место и перемещение
Ваша стиральная машина может быть оснащена
специальными убирающимися колесами для
облегчения ее перемещения. Чтобы опустить
колеса и передвинуть
оборудование, просто
потяните за рычаг, расположенный слева под
основанием машины.
После установки оборудования в требуемое
положение верните рычаг в исходное поло.
Подключение к водопроводной и
электрической сети
Подсоединение заливного шланга
1. Прикрутите шланг подачи
к крану холодной воды с
резьбовым отверстием
3/4 gas (см. схему). Перед
подсоединением откройте
водопроводный кран до
тех пор, пока из него не
потечет чистая вода.
2. Подсоедините
заливной шланг к
стиральной машине,
навинтив его на
водоприемник,
расположенный в задней
верхней части справа
(см. рис.).
3.Убедитесь, что шланг не перекручен и не пережат.
! Давление воды должно быть в пределах значений,
указанных в таблице Технических характеристик
(см. с. 3).
! Если длина водопроводного шланга окажется
недостаточной, обратитесь в Авторизованный
Сервисный центр.
50

65 - 100 cm
Подсоединение сливного шланга
Повесьте загнутый конец
сливного шланга на край
ракови н ы, ванн ы , или
поместите в специальный
вывод канализации. Шланг
не должен переги баться.
Верхняя точка сливного
шланга должна находиться
на высоте 65-100 см от
п о ла . Ра сп ол ож е н ие
сливного шланга должно
обеспечивать разрыв струи
при сливе (конец шланга не
должен быть опущен в воду).
В случае крепления на
край ванной или раковины,
шланг вешается с помощью
на правл яющей (входит
в комп л е кт по с тав к и) ,
которая крепится к крану
(рис.).
! Не рекомендуется
применение удлинителей
для сливного шланга, при
необходимости допускается его наращивание шлангом
такого же диаметра и длиной не более 150 см.
розетка заземлена в соответствии с нормами безопас-
ности, описанными в данном разделе инструкции (допускается организация заземления рабочим нулем,
при условии, что защитная линия не имеет разрыва
и подключена напрямую в обвод каких-либо приборов
(например, электрического счетчика).
Если вилка не подходит к розетке, ее следует заменить
на новую, соответствующую розетке, или заменить питающий кабель. За мена кабеля должна производиться
только квалифицированным персоналом. Запрещается
использование переходников, двойных и более розеток
и удлинителей (они создают опасность возгорания). Если
Вы считаете их использование необходимым, применяйте один единственный удлинитель, удовлетворяющий
требованиям безопасности.
Оборудование, подключенное с нарушением требований
безопасности бытовых приборов большой мощности,
изложенных в данной инструкции, является потенциально опасным. Производитель не несет ответственности за ущерб здоровью и собственности, если он
вызван несоблюдением указанных норм установки.
Первый цикл стирки
По завершении установки, перед началом эксплуатации
необходимо произвести один цикл стирки со стиральным
порошком, но без белья, по программе (60°C).
CIS
Подсоединение к электросети
Внимание! Оборудование обязательно должно быть
заземлено!
1. Машина подключается к электрической сети при помощи двухполюсной розетки с заземляющим контактом
(розетка не поставляется с машиной). Фазный провод
должен быть подключен через автомат защиты сети,
рассчитанный на максимальный ток (ток срабатывания)
16 А, и имеющий время срабатывания не более 0,1 с.
2. При наличии вблизи от предполагаемого места
установки машины розетки с заземляющим контактом,
имеющей трехпроводную подводку кабеля с медными
жилами сечением не менее 1,5 кв. мм (или алюминиевыми жилами сечением не менее 2,5 кв. мм), доработка
электросети не производится. При отсутствии указанной
розетки и проводки следует провести их монтаж.
3. Прокладка заземления отдельным проводом не допускается.
4. Для доработки электрической сети рекомендуется
применять провод типа ППВ 3х1,5 380 ГОСТ 6223-79.
Допускается применение других марок кабеля, обеспечивающих пожаро- и электробезопасность при эксплуатации машины.
Перед включением машины в сеть убедитесь, что:
розетка и проводка соответствуют требованиям, из-
ложенным в данном разделе инструкции;
напряжение и частота тока сети соответствуют данным
машины;
розетка и вилка одного типа;
51

Описание стиральной машины
CIS
Панель управления
Кнопка ON/OFF
Кнопки
ВЫБОРА
ПРОГРАММ
Кнопка ON/OFF : быстро нажмите эту кнопку для
включения или выключения машины. Индикатор
START/PAUSE, редко мигающий зеленым цветом,
означает, что машина включена. Для выключения
стиральной машины в процессе стирки необходимо
держать нажатой кнопку, примерно 2 секунды.
Короткое или случайное нажатие не приведет к
отключению машины. В случае выключения машины в
процессе стирки текущий цикл отменяется.
Кнопки ВЫБОРА ПРОГРАММ: служат для выбора
нужной программы (см. «Таблица программ»).
Кнопка MEMO: держите нажатой эту кнопку для
сохранения цикла и персонализированных вами
программ. Для вызова ранее сохраненного цикла
нажмите кнопку MEMO.
Кнопки ДОПОЛНИТЕЛЬНЫХ ФУНКЦИЙ: нажмите
кнопку для выбора нужной вам функции. На дисплее
загорится соответствующий индикатор.
Кнопка ОТЖИМ : нажмите эту кнопку для
сокращения скорости или полного исключения
отжима – значение показывается на дисплее.
Кнопка ТЕМПЕРАТУРА : нажмите эту кнопку
для уменьшения значения температуры: значение
показывается на дисплее.
Кнопка
MEMO
Кнопки
ЗАДЕРЖКА
ЗАПУСКА
Кнопки
БЛОКИРОВКА
КНОПОК
Дисплей
Кнопки
ДОПОЛНИТЕЛЬНЫХ
ФУНКЦИИ
Кнопка БЛОКИРОВКА КНОПОК : для включения
блокировки консоли управления держите кнопку
нажатой примерно 2 секунды. Включенный символ
означает, что консоль управления заблокирована.
Таким образом, программа не может быть случайно
изменена, особенно если в доме дети. Для
отключения блокировки консоли управления держите
кнопку нажатой примерно 2 секунды.
Кнопка ПУСК С ЗАДЕРЖКОЙ : нажмите
для программирования времени задержки
пуска выбранной программы. Время задержки
показывается на дисплее.
Кнопка с индикатором START/PAUSE: когда зеленый
индикатор редко мигает, нажмите кнопку для
запуска цикла стирки. После пуска цикла индикатор
перестает мигать. Для прерывания стирки вновь
нажмите эту кнопку; индикатор замигает оранжевым
цветом. Если символ не горит, можно открыть люк
машины. Для возобновления стирки с момента, когда
она была прервана, вновь нажмите эту кнопку.
Режим ожидания
Настоящая стиральная машина отвечает требованиям
новых нормативов по экономии электроэнергии,
укомплектована системой автоматического отключения
(режим сохранения энергии), включающейся через 30
минут простоя машины. Нажмите один раз кнопку ON/
OFF и подождите, пока машина вновь включится.
Кнопка
ОТЖИМА
Кнопка с индикатором
START/PAUSE
Кнопка
ТЕМПЕРАТУРЫ
52

Дисплей
B
Z
C
A
Если необходимо изменить язык, выключите машину,
F
X
нажмите одновременно кнопки, обозначенные на
рисунке буквой L, пока не раздастся звуковой сигнал.
Затем заново включите машину, и на экране появится
D
меню выбора языка.
E
Как открыть и закрыть барабан
CIS
Y
F
L
Дисплей служит для программирования машины и
предоставляет пользователю множество сведений.
На двух верхних строках А и В показываются
выбранная программа стирки, текущая фаза стирки и
все сведения о выполнении программы.
На строке С показывается время, остающееся до
конца текущего цикла стирки и, если был задан
ЗАДЕРЖКА ЗАПУСКА, время, остающееся до запуска
выбранной программы.
На строке D показывается максимальное значение
скорости отжима, который машина может выполнить
в зависимости от выбранной программы; если
выбранная программа не предусматривает отжим,
данная строка не включается.
На строке Е показывается максимальное значение
температуры, которое можно выбрать в зависимости
от выбранной программы; если выбранная
программа не предусматривает настройку
температуры, данная строка не включается.
Индикаторы F относятся к функциям и загораются,
когда выбранная функция является совместимой с
заданной программой.
Символ заблокированного люка
Включенный символ означает, что люк заблокирован
во избежание его случайного открывания. Во
избежание повреждений, перед тем как открыть
люк, необходимо дождаться, пока погаснет символ
(Обычно индикатор гаснет через 3 минуты после
окончания стирки). ПРИМЕЧАНИЕ: если включена
функция ЗАПУСК С ЗАДЕРЖКОЙ, люк открыть
нельзя. Для этого необходимо переключить машину в
режим паузы при помощи кнопки START/PAUSE.
! При первом включении машины потребуется
выбрать язык, и дисплей автоматически покажет
страницу меню выбора языка.
Для выбора нужного языка нажмите кнопки X и Y, для
подтверждения выбора нажмите кнопку Z.
F
рис. 1
рис. 3
A) ОТКРЫВАНИЕ (рис. 1):
Поднимите внешнюю крышку и полностью ее откройте.
B) Открывание барабана (Soft opening – Плавное
открывание):
Нажмите кнопку, показанную на рис. 2, крышка
барабана плавно откроется.
C) ЗАГРУЗКА СТИРАЛЬНОЙ МАШИНЫ (рис. 3).
D) ЗАКРЫВАНИЕ (рис. 4):
- закройте полностью барабан, опуская сначала
переднюю дверцу, а затем заднюю;
- затем удостоверьтесь, что крюки передней дверцы
точно вошли в предназначенные места задней дверце;
- после того, как крюки защелкнулись, нажмите обе двер-
цы слегка вниз, чтобы убедиться они крыты плотно;
- и, наконец, закройте внешнюю крышку.
E) OKOHЧATEЛЪHЫЙ OCTAHOB БAPAБAHA (рис. 2):
Пo зaвepшeнии cтиpки кpышки бapaбaнa oкaжyтcя
ввepxy для oблeгчeния иx oткpывaния.
рис. 2
рис. 4
53

Порядок выполнения цикла
стирки
CIS
1. ПОРЯДОК ВКЛЮЧЕНИЯ МАШИНЫ. Нажмите
кнопку , на дисплее появится надпись ОК.
Индикатор START/PAUSE редко мигает зеленым
цветом.
2. ПОРЯДОК ЗАГРУЗКИ БЕЛЬЯ. Откройте люк
машины. Загрузите в барабан белье, не превышая
максимальный допустимый вес, указанный в
таблице программ на следующей странице.
3. ДОЗИРОВКА МОЮЩЕГО СРЕДСТВА. Засыпьте
моющее средство в специальные ячейки, как
описано в разделе
«Стиральные вещества и типы белья».
4. ЗАКРОЙТЕ ЛЮК.
5. ВЫБОР ПРОГРАММЫ. Нажмите одну из кнопок
ВЫБОР ПРОГРАММЫ для выбора нужной
программы. Название программы появится на
дисплее. Вместе с программой будет показана
температура и скорость отжима, которые могут
быть изменены. На дисплее показывается
продолжительность данного цикла.
6. ПЕРСОНАЛИЗАЦИЯ ЦИКЛА СТИРКИ. Нажмите
соответствующие кнопки:
Порядок изменения температуры и/
или скорости отжима. Машина автоматически
показывает на дисплее максимальные
температуру и скорость отжима, предусмотренные
для выбранной программы, или последние
выбранные значения, если они совместимы с
выбранной программой. При помощи кнопки
можно постепенно уменьшить температуру
вплоть до стирки в холодной воде “OFF”. При
помощи кнопки можно постепенно уменьшить
скорость отжима вплоть до его исключения “OFF”.
При еще одном нажатии этих кнопок вернутся
максимальные допустимые значения.
Программирование задержка
Для программирования задержки пуска выбранной
программы нажмите соответствующую кнопку
вплоть до получения нужного значения задержки.
Когда включена функция задержки, на дисплее
загорается символ . Для отмены задержки пуска
нажмите кнопку вплоть до появления на дисплее
надписи OFF.
зап
уска.
! Если выбранная функция является
несовместимой с другой, ранее заданной
дополнительной функцией, будет мигать индикатор
первой выбранной функции, и будет включена
только вторая дополнительная функция, индикатор
включенной функции загорится.
! Дополнительные функции могут изменить
рекомендуемую загрузку машины и/или
продолжительность цикла.
7. ПУСК ПРОГРАММЫ. Нажмите кнопку START/
PAUSE: Соответствующий индикатор загорится
зеленым светом, и люк заблокируется (символ
ЛЮК ЗАБЛОКИРОВАН загорится). В процессе
стирки на дисплее показывается название
текущей фазы. Для изменения программы в
процессе выполнения цикла переключите машину
в режим паузы при помощи кнопки START/
PAUSE (индикатор START/PAUSE редко мигает
оранжевым цветом). Затем выберите новый цикл и
вновь нажмите кнопку START/PAUSE.
Если требуется открыть люк после пуска цикла,
нажмите кнопку START/PAUSE. Когда погаснет
индикатор, ЛЮК ЗАБЛОКИРОВАН , можно
открыть люк. Вновь нажмите кнопку START/PAUSE
для возобновления программы с момента, в
который она была прервана.
8. ЗАВЕРШЕНИЕ ПРОГРАММЫ. Показывается
сообщением на дисплее «КОНЕЦ ЦИКЛА». После
того, как погаснет символ ЛЮК ЗАБЛОКИРОВАН
, можно будет открыть люк. Откройте люк,
выгрузите белье и выключите машину.
! Для отмены уже запущенного цикла нажмите
на несколько секунд кнопку . Цикл прервется и
машина выключится.
Система балансировки белья
Перед каждым отжимом во избежание чрезмерных
вибраций и для равномерного распределения
белья в барабане машина производит вращения со
скоростью, слегка превышающей скорость стирки.
Если после нескольких попыток белье не будет
правильно сбалансировано, машина произведет
отжим на меньшей скорости по сравнению с
предусмотренной.
Изменение параметров цикла.
• Нажмите кнопку для включения функции;
загорится индикатор соответствующей кнопки.
• Вновь нажмите кнопку для отключения функции;
индикатор погаснет.
! Если выбранная функция является
несовместимой с заданной программой, индикатор
будет мигать, и такая функция не будет включена.
54

Программы и функции
Таблица программ
Стиральные вещества и добавки
Îïèàíèå ïîàìì
Программы
женевна поамма
ÎÎ
ХЛОПОK (1) : сильнозагрязн¸нное
белое и прочно окрашенное цветное бель¸.
ХЛОПОK (2) :
деликатное цветное белье.
ХЛОПОK :
деликатное цветное белье.
Ñ
Ñ
.
,
1 .
,
Ñïåèàëíå ïîàìì
ÑÎ
Ñ ,
Ñ ,
еполне поамм
Продолжительность цикла, показанная на дисплее или указанная в инструкциях является рассчетом, сделанным на основании стандартных условий. Фактическая
продолжительность может варьировать в зависимости от многочисленных факторов таких как температура и давление воды на подаче, температура помещения, количество
моющего средства, количество и тип загруженного белья, балансировка белья, выбранные дополнительные функции.
Для всех институтов тестирования:
1) Программы управления в соответствии с Директивой EN 60456: задайте программу (1 нажатие кнопки) с температурой 60°C.
2) Длинная программа для х/б белья: задайте программу (2 нажатие кнопки) с температурой 40°C.
очень грязное белое и
очень грязное белое и
àê
òåìï.
()
àê.
êîîò
(î. ìèí.)
90° 1400
60° 1400 -
40° 1400 -
20° 1400 -
60° 800
40° 800
30° 800 -
30° 800 -
40° 800 -
30° 0 -
40° 800 -
- 1400 - - - 7
- 1400 - -
- 0 - - - 7
Предва-
рительная
стирка
Стирка
Ополаски-
ватель
àê.
àêà
(ê)
7
7
7
7
2,5
2,5
3
1,5
2
1
1
7
îîë
æèòò
èêëà
Продолжительность программ стирки можно проверять по дисплею.
CIS
Функции стирки
Предварительная стирка
При выборе данной функции производится предварительная стирка,
способствующая удалению наиболее трудновыводимых пятен.
ПРИМЕЧА Н И Е : П о ме с т ит е с ти р а ль н ы й п о ро ш о к в
специальную ячейку.
! Функция не может быть включена с программами , ,
, , , , .
Дополнительное Полоскание
При выборе этой функции повышается эффективность
полоскания, обеспечивая мак симальное удаление
стирального вещества. Эта функция особенно удобна для
людей с кожей, чувствительной к стиральным веществам.
! Функция не может быть включена с программами ,
Отжим, Слив.
Функция Легкая глажка
При выборе этой функции циклы стирки и отжима изменяются
таким образом, чтобы сократить сминаемость белья.
При выборе программы машина завершает цикл без
слива воды, индикаторы функции РАЗГЛАЖИВАНИЕ и
START/PAUSE будут мигать (оранжевым цветом), и на
дисплее появится надпись «ОСТАНОВКА С ВОДОЙ».
Для слива воды и выгрузки белья необходимо нажать
кнопку START/PAUSE или кнопку ЛЕГКАЯ ГЛАЖКА.
! Функция не может быть включена с программами , , , .
Короткий цикл
Сокращает время стирки, гарантируя также экономию воды
и электроэнергии.
! Функция не может быть включена с программами , , , , .
Eco Wash
Функция Eco Wash позволяет экономить энергию за счет
отсутствия необходимости подогрева воды для стирки
белья – неоценимого преимущества как для окружающей
среды, так и для счета за электроэнергию. Действительно,
усиленное действие и оптимальное потребление воды
гарантируют отличный результат за ту же продолжительность
стандартного цикла. Для более эффективной стирки
рекомендуется использовать жидкое моющее средство.
! Функция не может быть включена с программами MIX 15
ÌÈÍ, , , , , .
55

Моющие средства и
типы белья
CIS
Распределитель моющих средств
Хороший результат стирки зависит также от
правильной дозировки моющего средства: его избыток
не гарантирует более эффективную стирку, напротив
может привести к образованию налетов внутри
машины и загрязнению окружающей среды.
Выдвиньте
распределитель и
заполните его
отделения моющим
средством и смягчителем:
Отделение 1: моющее средство для предварительной
стирки (порошок)
ячейка 2: Стиральное вещество (порошок или
жидкость)
Жидкое стиральное вещество следует помещать
непосредственно в барабан в специальном круглом
пластмассовом дозаторе.
ячейка 3: Добавки (ополаскиватель и т.д.)
Когда вы наливаете ополаскиватель в ячейку
3, обращайте внимание, чтобы не превысить
максимальный уровень, указанный отметкой «max».
Ополаскиватель автоматически подается в
барабан в процессе последнего ополаскивания. По
завершении программы стирки в ячейке 3 остается
вода. Она необходима для подачи в барабан очень
густых ополаскивателей, т.е. для разбавления
концентрированных ополаскивателей. Если в
ячейке 3 останется воды больше нормального, это
значит, что канал слива ополаскивателя в барабан
засорился. Смотрите описание чистки ячеек на стр.
“Техническое обслуживание и уход”.
ячейка 4: не вводить моющее средство в этом
отсеке.
Подготовка белья
• Разделите белье по следующим признакам:
- тип ткани / обозначения на этикетке.
- цвет: отделите цветное белье от белого.
• Выньте из карманов все предметы и проверьте
пуговицы.
• Не превышайте значения, указанные в «Таблице
программ», указывающие вес сухого белья:
Сколько весит белье?
1 простыня 400-500 гр.
1 наволочка 150-200 гр.
1 скатерть 400-500 гр.
1 халат 900-1200 гр.
1 полотенце 150-250 гр.
Специальные программы
ХЛОПОK (программа ) белья стандартная программа
идеально подходит для стирки х/б белья со средним
загрязнением. Отличные результаты получаются также
при стирке в холодной воде, сравнимые со стиркой при
40°, обеспечиваются механическим действием с разной
скоростью с повторяющимися частыми пиками.
Mix 30 мин: предназначена для быстрой стирки
слабозагрязненного белья цикл длится всего 30 минут,
что позволяет сэкономить время и электроэнергию.
По этой программе ( , 30°C) можно стирать вместе
белье из разных тканей (за исключением шерсти и
шелка) с максимальной загрузкой 3 кг.
Mix 15 мин: предназначена для быстрой стирки
слабозагрязненного белья цикл длится всего 15 минут,
что позволяет сэкономить время и электроэнергию.
По этой программе ( , 30°C) можно стирать вместе
белье из разных тканей (за исключением шерсти и
шелка) с максимальной загрузкой 1,5 кг.
Детское белье: Программа удаляет типичные
загрязнения детской одежды, гарантируя удаление
моющего средства из ткани во избежание аллергии
чувствительной детской кожи. Данный цикл
расчитан на сокращение количества бактерий
благод а ря использованию большего объ е м а
воды и оптимизируя воздействие специальных
дезинфицирующих добавок старильного вещества.
По завершении стирки машина продолжит медленно
вращать барабан во избежание сминания белья. Для
остановки цикла нажмите кнопку START/PAUSE.
Шелк: используйте специальную программу
для стирки всех шелковых вещей. Рекомендуется
использовать специальное стиральное вещество для
деликатных тканей.
Занавески: сверните и положите в наволочку или в
сетчатый мешочек. Используйте программу .
Шерсть: Цикл стирки “Шерсть” данной стиральной
машины Hotpoint-Ariston прошел тестирование и был
твержден Компанией Woolmark Company для стирки
шерстяных изделий, классифицированных как «для
ручной стирки» с тем, чтобы тирка выполнялась
в соответствии с инсрукциями на этикетке вещи и
инструкциями, прилагаемым изготовителем бытового
электроприбора. Hotpoint-Ariston – это первая марка
стиральных машин, получившая от Woolmark Company сертификацию Woolmark Apparel Care - Platinum
за качество стирки и за экономный расход воды и
электроэнергии.
56

Предосторожности и
рекомендации
! Стиральная машина спроектирована и изготовлена
в соответствии с международными нормативами по
безопасности. Необходимо внимательно прочитать
настоящие предупреждения, составленные в целях
вашей безопасности.
Общие требования к безопасности
• Данное изделие предназначено исключительно для
домашнего использования.
• Не разрешайте пользоваться машиной лицам (включая
детей) с ограниченными физическими, сенсорными,
умственными способностями и не обладающих
достаточными знаниями и опытом, если только они
не пользуются машиной под наблюдением и после
инструктажа со стороны лиц, ответственных за их
безопасность. Не разрешайте детям играть с машиной.
• Не прикасайтесь к изделию влажными руками,
босиком или во влажной одежде.
• Не тяните за сетевой кабель для отсоединения
изделия из электро розетки, возьмитесь за вилку
рукой.
• Избегайте контактов со сливаемой водой, так как
она может быть очень горячей.
• Категорически запрещается открывать люк силой:
это может привести к повреждению защитного
механизма, предохраняющего от случайного
открытия машины.
• В случае неисправности категорически
запрещается открывать внутренние механизмы
изделия с целью их самостоятельного ремонта.
• Избегайте контактов детей с работающей
стиральной машиной.
• При необходимости переместить стиральную
машину следует выполнять эту операцию вдвоем
или втроем с предельной осторожностью. Никогда
не перемещайте машину в одиночку, так как
машина очень тяжелая.
• Перед загрузкой в стиральную машину белья
проверьте, чтобы барабан был пуст.
Утилизация
• Уничтожение упаковочных материалов: соблюдайте
местные нормативы с целью повторного
использования упаковочных материалов.
• Согласно Европейской Директиве 2002/96/СЕ
касательно утилизации электронных и электрических
электроприборов электроприборы не должны
выбрасываться вместе с обычным городским
мусором. Выведенные из строя приборы должны
собираться отдельно для оптимизации их утилизации
и рекуперации составляющих их материалов, а также
для безопасности окружающей среды и здоровья.
Символ зачеркнутая мусорная корзинка, имеющийся
на всех приборах, служит напоминанием об их
отдельной утилизации.
За более подробной информацией о правильной
утилизации бытовых электроприборов
пользователи могут обратиться в специальную
государственную организацию или в магазин.
Экономия энергии и охрана
окружающей среды
Экономия моющих средств, воды, электроэнергии
и времени
• Для экономии ресурсов следует максимально
загружать стиральную машину. Один цикл стирки при
полной загрузке вместо двух циклов с наполовину
загруженным барабаном позволяет сэкономить до
50% электроэнергии.
• Цикл предварительной стирки необходим только для
очень грязного белья. При цикле предварительной
стирки расходуется больше стирального порошка,
времени, воды и на 5 – 15% больше электроэнергии.
• Если вы обработаете пятна пятновыводителем
или замочите белье перед стиркой, это поможет
избежать стирки при высоких температурах.
Использование программы стирки при 60°C вместо
90°C, или 40°C вместо 60°C позволяет сэкономить
до 50% электроэнергии.
• Правильная дозировка стирального порошка в
зависимости от жесткости воды, степени загрязнения
и объема загружаемого белья помогает избежать
нерационального расхода моющего средства и
загрязнения окружающей среды: хотя стиральные
порошки и являются биоразлагаемыми, они
содержат вещества, отрицательно влияющие на
экологию. Кроме того, по возможности избегайте
использовать ополаскиватели.
• Использование стиральной машины утром
или вечером уменьшит пиковую нагрузку на
электросеть. С помощью функции «ЗАДЕРЖКА
ЗАПУСКА» можно запрограммировать начало
стирки с вышеуказанной целью.
• Если белье должно сушиться в автоматической
сушке, необходимо выбрать большую скорость
отжима. Интенсивный отжим сэкономит время и
электроэнергию при автоматической сушке.
CIS
57

Техническое обслуживание
и уход
CIS
Отключение воды и электричества
• Перекрывайте водопроводный кран после каждой
стирки. Таким образом сокращается износ
водопроводной системы стиральной машины и
устраняется вероятность протечек.
• Всегда вынимайте вилку из розетки перед мойкой и
обслуживанием машины.
Уход за стиральной машиной
Внешние и резиновые части машины очищайте
мягкой тканью с теплой мыльной водой. Не
используйте растворители или абразивные чистящие
средства.
Уход за дверцей машины
и барабаном
• После каждой стирки оставляйте дверцу машины
полуоткрытой во избежание образования в
барабане неприятных запахов и плесени.
Чистка насоса
Стиральная машина имеет сливной насос
самоочищающегося типа, который не требует очистки
или особого обслуживания. Однако мелкие предметы
(монеты, пуговицы и др.) могут случайно попасть
в насос. Для их извлечения насос оборудован
«уловителем» — фильтром, доступ к которому закрыт
нижней передней панелью.
! Убедитесь, что цикл стирки закончился, и отключите
оборудование от сети.
Как достать предметы, упавшие в пространство между
барабаном и кожухом машины:
1. снимите нижний
плинтус в передней
части стиральной
машины, потянув обеими
руками за его края
(смотрите рисунок);
2. выверните крышку
фильтра, вращая ее
против часовой стрелки
(см. рис.): из насоса может
вылиться немного воды –
это нормальное явление.
3.тщательно прочистите
фильтр изнутри;
4. заверните крышку
обратно;
5. установите на место
переднюю панель,
предварительно
убедившись, что
крюки вошли в
соответствующие петли.
Проверка заливного шланга
Проверяйте шланг не реже одного раза в год. При любых
признаках течи или повреждения немедленно замените
шланг. Во время работы машины неисправный шланг,
находящийся под давлением воды, может внезапно лопнуть.
! Ни к огда н е и с пол ь зу й те ш л ан ги , бы в ши е в
употреблении.
Разборка:
Слегка нажмите на большую
кнопку на передней стороне
распределителя и вытяните
его вверх (рис. 1, 2).
рис. 1
58
Как чистить распределитель моющих средств
Чистка:
Затем промойте распределитель под струей воды (рис. 3),
используя старую зубную щетку. Выньте пару сифонов,
вставленных в вершину отделений 1 и 2 (рис. 4), проверьте не забиты ли они и промойте их.
рис. 2
рис. 3
Сборка:
Установите пару сифонов
в специальные отверстия и
затем поместите распределитель на место, вставляя
его до щелчка (рис. 4, 2, 1).
рис. 4

Поиск неисправностей и
методы их устранения
Если ваша стиральная машина не работает. Прежде чем обратиться в Центр Сервисного обслуживания (см.
Сервисное обслуживание), проверьте, можно ли устранить неисправность, следуя рекомендациям, приведенным
в следующем перечне.
Неисправности:
Стиральная машина не включается.
Цикл стирки не запускается.
Стиральная машина не заливает
воду (На дисплее показывается
сообщение «Вода слита, открыть
кран»).
Машина непрерывно заливает и
сливает воду.
Возможные причины / Методы устранения:
• Штепсельная вилка не соединена с электро розеткой или отходит и не
обеспечивает контакта.
• В доме отключено электричество.
• Люк плохо закрыт.
• Не была нажата кнопка ON/OFF.
• Не была нажата кнопка START/PAUSE.
• Перекрыт водопроводный кран.
• Была запрограммирована задержка запуска цикла (Задержка запуска,
(см. “Порядок выполнения цикла стирки”).
• Водопроводный шланг не подсоединен к крану.
• Шланг согнут.
• Перекрыт водопроводный кран.
• В доме нет воды.
• Недостаточное водопроводное давление.
• Не была нажата кнопка START/PAUSE.
• Сливной шланг не находится на высоте 65 – 100 см. от пола (см. «Установка»).
• Конец сливного шланга погружен в воду (см. «Установка»).
• Настенное сливное отверстие не оснащено вантузом для выпуска воздуха.
Если после вышеперечисленных проверок неисправность не будет устранена,
следует перекрыть водопроводный кран, выключить стиральную машину и
обратиться в Центр Сервисного Обслуживания. Если ваша квартира находится
на последних этажах здания, могут наблюдаться явления сифона, поэтому
стиральная машина производит непрерывный залив и слив воды. Для устранения
этой аномалии в продаже имеются специальные клапаны против явления сифона.
CIS
Стиральная машина не сливает
воду и не отжимает белье.
Стиральная машина сильно
вибрирует в процессе отжима.
Утечки воды из стиральной
машины.
Машина заблокирована, дисплей
мигает и показывает код
неисправности (наприм., F-01, F-..).
В процессе стирки образуется
слишком обильная пена.
• Выбранная программа не предусматривает слив воды: для некоторых
программ необходимо включить слив вручную.
• Включена функция ЛЕГКАЯ ГЛАЖКА: для завершения программы нажмите
кнопку START/PAUSE (см. «Программы и функции»).
• Сливной шланг согнут (см. «Установка»).
• Засорен сливной трубопровод.
• В момент установки стиральной машины барабан был разблокирован
неправильно (см. «Установка»).
• Стиральная машина установлена неровно (см. «Установка»).
• Машина зажата между стены и мебелью (см. «Установка»).
• Плохо прикручен водопроводный шланг (см. «Установка»).
• Засорен распределитель моющего средства (порядок его чистки см. в
параграфе «Техническое обслуживание и уход»).
• Сливной шланг плохо закреплен (см. «Установка»).
• Выключите машину и выньте штепсельную вилку из сетевой розетки,
подождите 1 минуту и вновь включите машину.
Если неисправность не устраняется, обратитесь в Сервисную Службу.
• Моющее средство непригодно для стирки в стиральной машине (на
упаковке должно быть указано «для стирки в стиральной машине», «для
ручной и машинной стирки» или подобное).
• В распределитель было помещено чрезмерное количество моющего средства.
59

Сервисное
сертификатам соответствия или получения копий сертификатов
- 4-ая и 5-ая цифры в S/N - день
обслуживание
195101606.01
05/2012 - Xerox Fabriano
CIS
Перед тем как обратиться в Службу Сервиса:
• Проверьте, нельзя ли устранить неисправность самостоятельно (см. «Неисправности и методы их
устранения»);
• Вновь запустите программу для проверки исправности машины;
• В протвном случае обратиться в Авторизованный Сервисный Центр по телефонам, указанным в гарантийном
таллоне.
! Никогда не обращайтесь к неавторизованным сервисным центрам.
При обращении в Сервисную Службу необходимо сообщить:
• тип неисправности;
• номер гарантийного документа (сервисной книжки, сервисного сертификата и т.п.);
• модель машины (Мод.) и серийный номер (S/N), указанные в информационной табличке, расположенной на
задней панели стиральной машины.
Технические данные
Модель
Страна-изготовитель Италия
Габаритные размеры
Вместимость от 1 до 7 кг
Номинальное
значение напряжения
электропитания или
диапазон напряжения
Условное обозначение
рода электрического тока
или номинальная частота
переменного тока
Класс зашиты от поражения
электрическим током
Водопроводное
подсоединение
ECOT7D 1491
ширина 40 см
высота 85 см
глубина 60 см
220-240 V ~
50 Hz
Класс защиты I
максимальное давление 1
МПа (10 бар) минимальное
давление 0,05 МПа (0,5 бар)
емкость барабана 42 литра
Программы управления в
соответствии с Директивой
EN 60456
В случае необходимости получения информации по
соответствия на данную технику, Вы можете отправить запрос
по электронному адресу cert.rus@indesit.com.
Дату производства данной
техники можно получить
из серийного номера,
расположенного под штрихкодом (S/N XXXXXXXXX),
следующим образом
программа
60°С; при загрузке до 7 кг.
Данное изделие
соответствует следующим
Директивам Европейского
Сообщества:
- 2004/108/СЕ
(Электромагнитная
совместимость);
- 2006/95/CE (Низкое
напряжение)
- 2002/96/CE
- 1-ая цифра в S/N
соответствует последней
цифре года,
- 2-ая и 3-я цифры в S/N
- порядковому номеру
месяца года,
; температура
Степень защиты от попадания твердых частиц и влаги,
Скорость отжима до 1400 оборотов в минуту
обеспечиваемая защитной оболочкой, за исключением
низковольтного оборудования, не имеющего защиты от влаги: IPX04
Класс энергопотребления A
Производитель: Indesit Company
Виале А. Мерлони 47, 60044, Фабриано (АН), Италия
Импортер: ООО “Индезит РУС”
С вопросами (в России) до 01.01.2011: Россия, 129223, Москва, Проспект Мира, ВВЦ, пав. 46
обращаться по адресу: с 01.01.2011: Россия, 127018, Москва, ул. Двинцев, дом 12, корп. 1
60
 Loading...