How it Works
Log In / Sign Up
Buy Points
How it Works
FAQ
Contact Us
Questions and Suggestions
Users
Hotpoint
Loading...
L
LL 430 FR
LL 430 FR.C
LL 430 FR.C/HA
LL 430 X FR
LL 430 X FR.C/HA
LL 43 X AUS.C
LL 6063 EU
LL 6065 EU
LL 6065 X EU
LL 6066 EX
LL 6066 SK
LL 6066 X SK
LL 6088 SK
LL 6088 X SK
LL 63 TK.2
LL 64 77
LL 64 AUS
LL64BNA
LL 64 DE
LL 64 EU
LL 64 SK
LL 64 X AUS
LL 64 X EU
LL65
LL 6546 FR
LL 65 EU
LL 65 TK.2
LL 65 X EU
LL 66 X FR
LLD 8M132
LLD 8M132 X EU
LLD 8S111 X EU
LLD 8S112 X EU
LLK 7M116 OX EU
LLK 7M121 OCX EU
LLK 7M121 X EU
LLK 7S112 X EX
LLK 7S112 X EX 60HZ
LS 240 EU
LS 245
LS 248 T
LS 248 T X
LS 630 50-60 EX
LSB 5B019
LSB 5B019 CB EU
LSB 5B019 W UK
LSB 5B019 X EU
LSB 7B116
LSB 7B116 X EU
LSB 7M019 CX EU
LSB 7M019 CX EX
LSB 7M116 CX TW 60HZ
LSB7M116X EU
LSB 7M121 B EU
2
LSB 7M121 W EU
2
LSB 7M121 X EU
LSF 712
LSF 712 AG
LSF 7237
2
LSF 723 X FR
LSF825
2
LSF 825 FR-HA
2
LSF 825 X/HA
LSF935
2
LSF 9357 X
LSF 935 SK
LSF 935 X EU-HA
LSFA 825 HA
LSFA+ 935
LSFA 935 SK
LSFF 7M09 C RU
LSFF 7M09 CX RU
LSFF 8M114 DE/SK
LSFF 8M116 C DE/SK
LSFF 8M116 C EU
LSFF 8M116 CX EU
LSFF 8M117 EU
LSFF 8M117 X EU
LSFF 8M126 UK
LSFF 9H124 C EU
LSFF 9H124 CX EU
LSFF 9M114 C EU
2
LSFF 9M114 CX EU
LSFF 9M124 CX EU
LSP 720A W
LSP720AWH
LSP 733A X
LSPA 720A.1 X/HA
LSPA 720A X
LSPB 7M116 X EU
LST114
LST 1147
LST216
3
LST 216 A CN
LST 216 A UK
2
LST328
LST 329 AX-HA
LST 4167
LST 5337 X
LST 53977
Loading...
Loading...
Nothing found
LSB 7M019 CX EX
User Manual
60 pgs
8.45 Mb
0
Table of contents
Loading...
Hotpoint LSB 7M019 CX EX User Manual
...
Hotpoint User Manual
Download
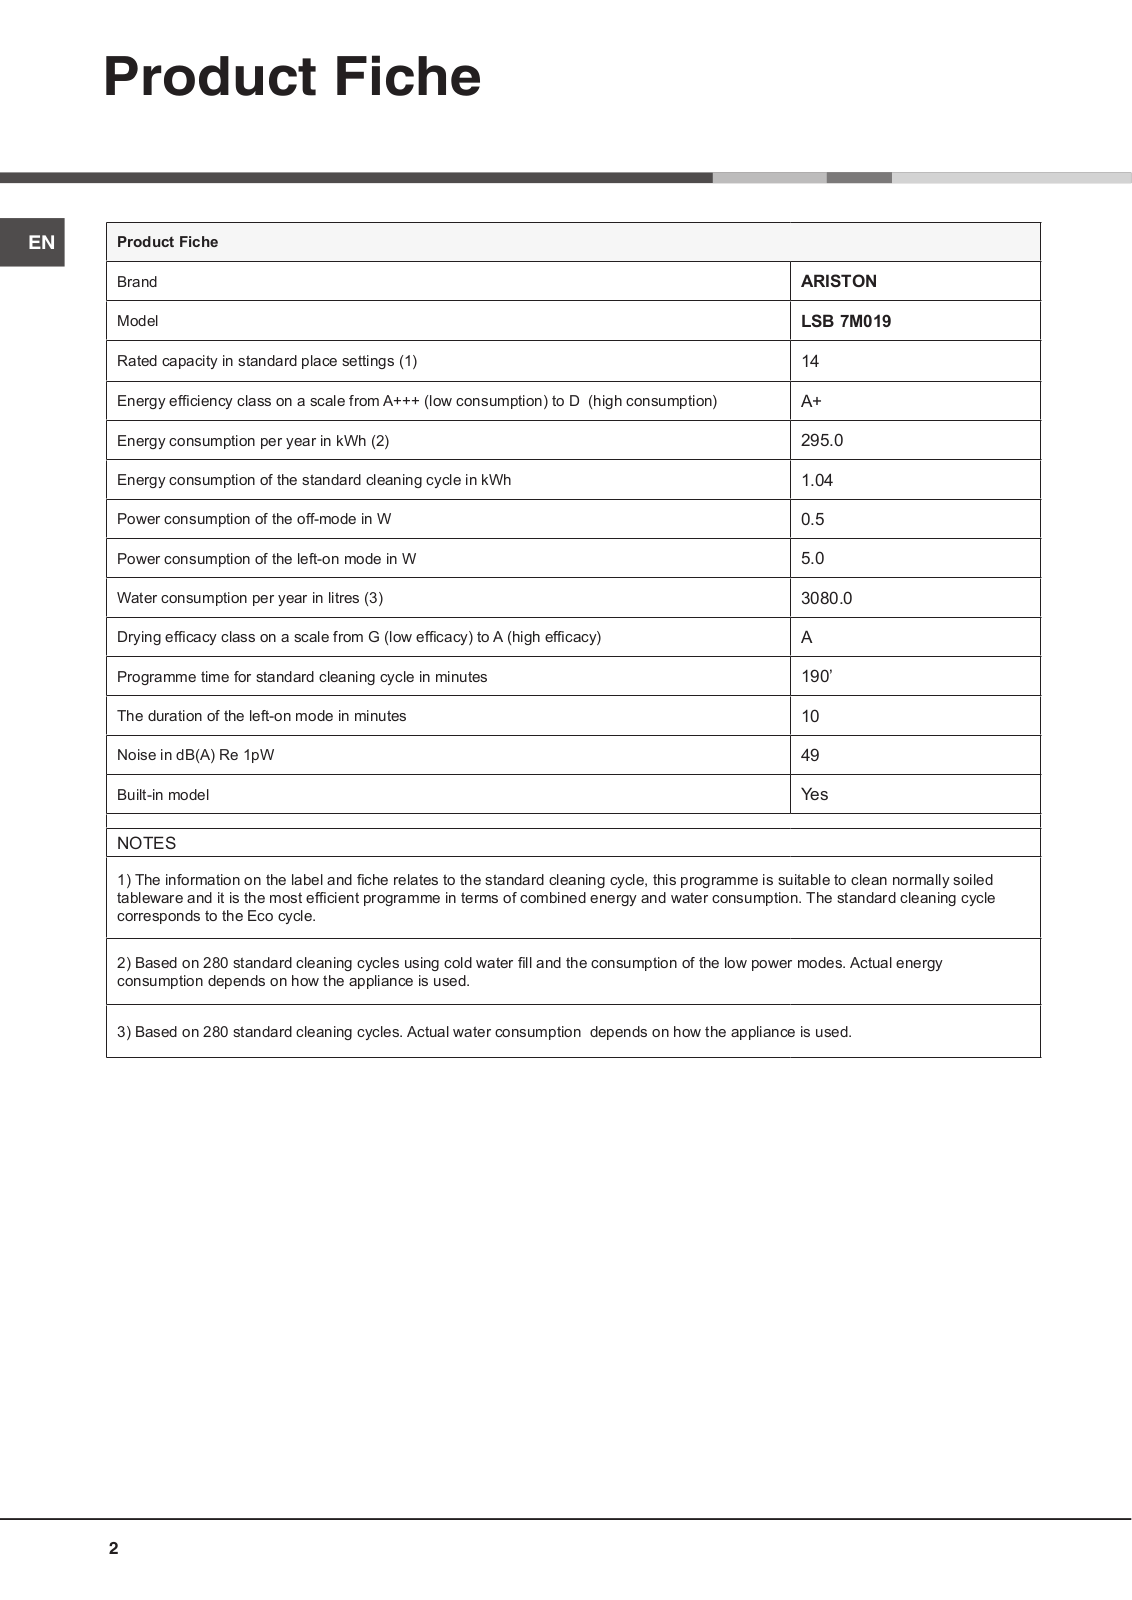
Specifications and Main Features
Frequently Asked Questions
User Manual
Download
Loading...
+
42
hidden pages
Unhide
You need points to download manuals.
1 point = 1 manual.
You can buy points or you can get point for every manual you upload.
Buy points
Upload your manuals
 Loading...