

Hotpoint LL 6066 EX User Manual

Instruction booklet
DISHWASHER
EN
English, 1
LL 6066
ES
Espanol, 13 Portuges, 25
PT
Contents
Installation, 2-3
Positioning and levelling
Connecting the water and electricity supplies
Technical data
Description of the appliance, 4
Overall view
Control panel
Loading the racks, 5
Lower rack
Cutlery basket
Upper rack
Start-up and use, 6
Starting the dishwasher
Loading the detergent
Washing options
Wash cycles, 7
Wash cycle table
Rinse aid and refined salt, 8
Loading the rinse aid
Loading the refined salt
Care and maintenance, 9
Shutting off the water and electricity supplies
Cleaning the dishwasher
Preventing unpleasant odours
Cleaning the sprayer arms
Cleaning the filters
Leaving the machine unused for extended periods
Precautions and advice, 10
General safety
Disposal
Saving energy and respecting the environment
Troubleshooting, 11
Assistance, 12
Before calling for Assistance
Installation
EN
Keep this instruction manual in a safe place for
future reference. If the appliance is sold, given away
or moved, please ensure the manual is kept with the
machine, so that the new owner may benefit from the
advice contained within it.
Please read this instruction manual carefully: it
contains important information regarding the safe
installation, use and maintenance of the appliance.
If the appliance must be moved at any time,
keep it in an upright position; if absolutely
necessary, it may be tilted onto its back.
Positioning and levelling
1. Remove the appliance from all packaging and
check that it has not been damaged during
transportation.
If it has been damaged, contact the retailer and do
not proceed any further with the installation process.
2. Check the dishwasher by placing it so that its
sides or back panel are in contact with the adjacent
cabinets or even with the wall. This appliance can
also be recessed under a single worktop (
Assembly instruction sheet*
).
see the
Connecting the water inlet hose
• To a suitable cold water connection point: before
attaching the hose, run the water until it is
perfectly clear so that any impurities that may be
present in the water do not clog the appliance;
after performing this operation, screw the inlet
hose tightly onto a tap with a ¾ gas threaded
connection.
• To a suitable hot water connection point: your
dishwasher may be provided with hot water from
the mains supply (if you have a central heating
system with radiators) provided that it does not
exceed a temperature of 60°C.
Screw the hose to the tap as described for
connection to a cold water supply.
3. Position the dishwasher on a level and sturdy floor.
If the floor is uneven, the front feet of the appliance
may be adjusted until it reaches a horizontal position
(the angle of inclination must not exceed 2 degrees).
If the appliance is levelled correctly, it will be more
stable and much less likely to move or cause
vibrations and noise while it is operating.
Connecting the water and electricity
supplies
Connection to the water and electricity supplies
should only be performed by a qualified technician.
The dishwasher should not stand on top of the
water hoses or the electricity supply cable.
The appliance must be connected to the water
supply network using new piping.
- Do not use old piping.
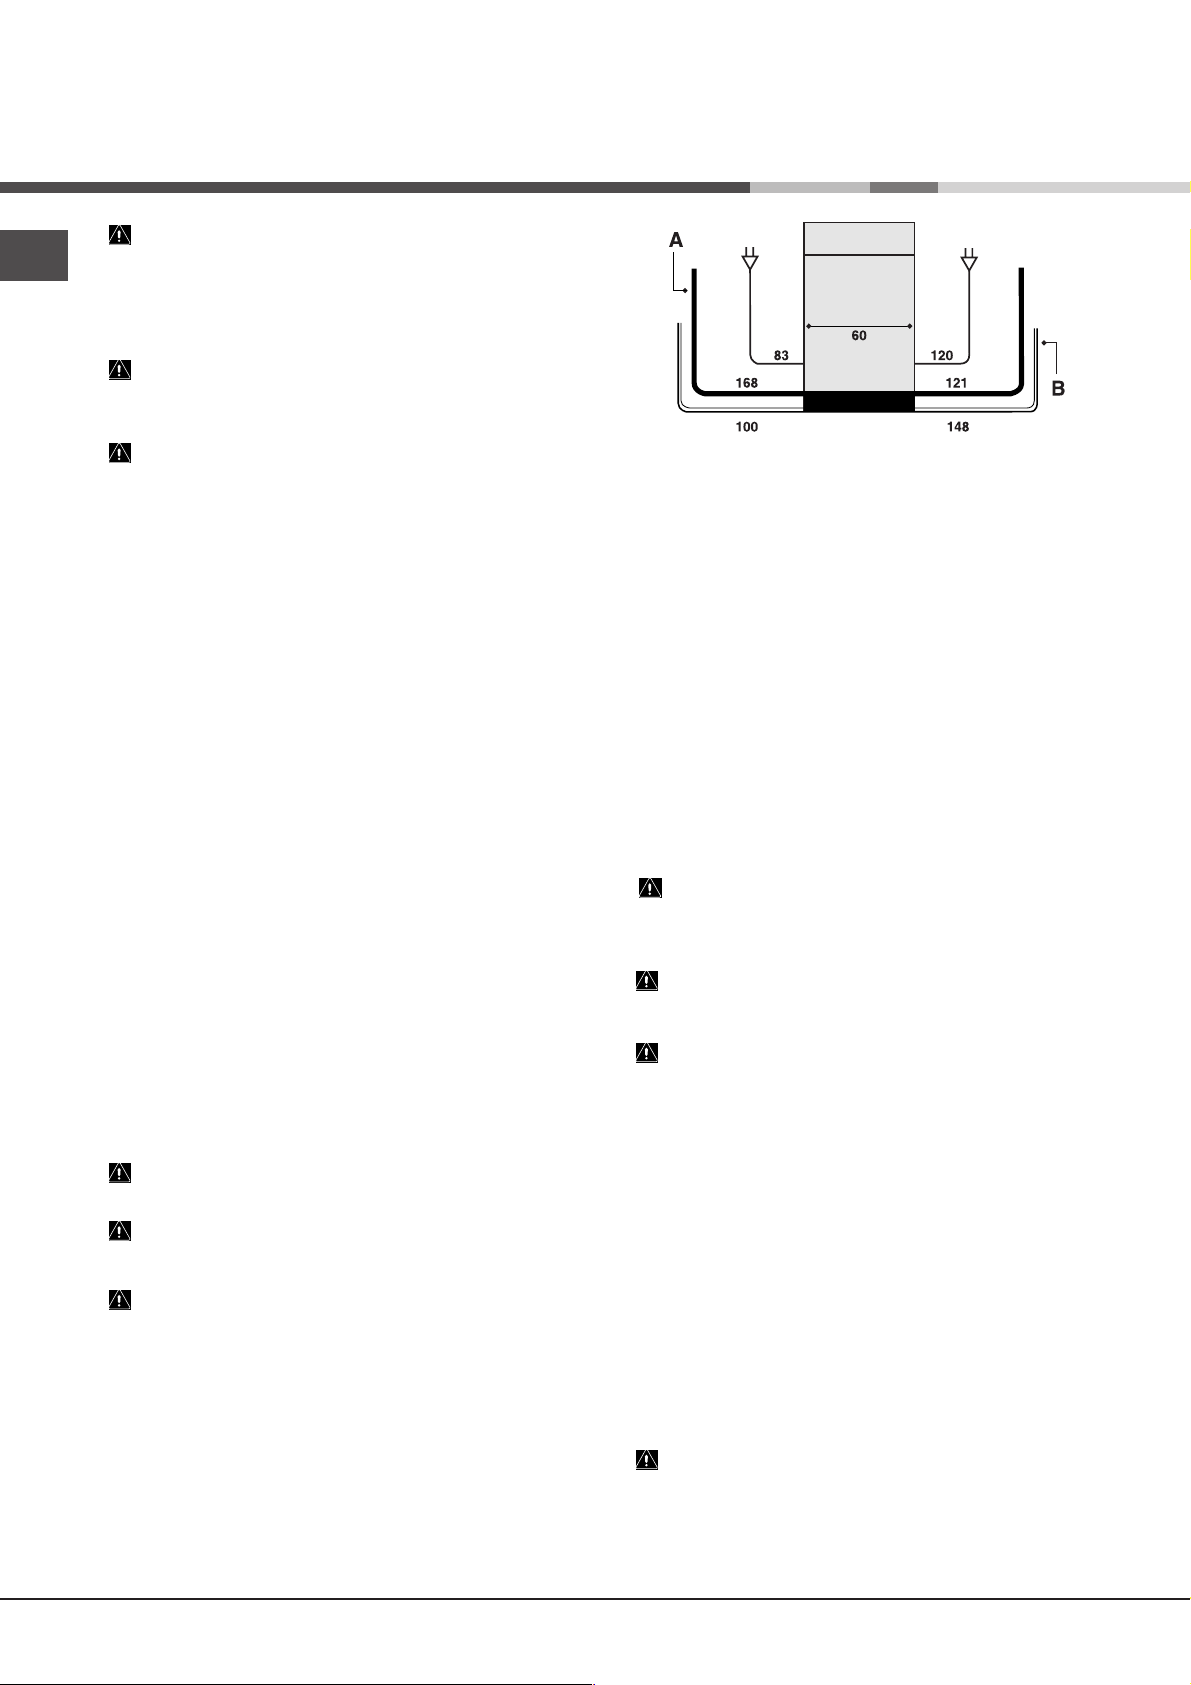
The water inlet (A) and outlet (B) hoses and the
electricity supply cable may be positioned towards
the right or the left in order to achieve the best
possible installation (
see figure
).
If the inlet hose is not long enough, contact a
specialist store or an authorised technician (
Assistance
The water pressure must be within the values
indicated in the Technical data table (
The hose should not be bent or compressed.
Anti-flooding protection
To ensure floods do not occur, the dishwasher:
- is provided with a special system which blocks the
water supply in the event of anomalies or leaks from
inside the appliance.
- is provided with a
other words it has a water inlet hose that consists of
a transparent hose on the outside and a red hose on
the inside: both the hoses can withstand extremely
high pressure. If the internal hose breaks, the
external hose becomes a bright red colour and
carries the water instead, thus avoiding any leakage.
It is very important to check the external hose
regularly: if it is a bright red colour, it must be
replaced by an authorised technician as soon as
possible (
).
Water Stop
see Assistance
* safety device, in
).
see
see below
).
2
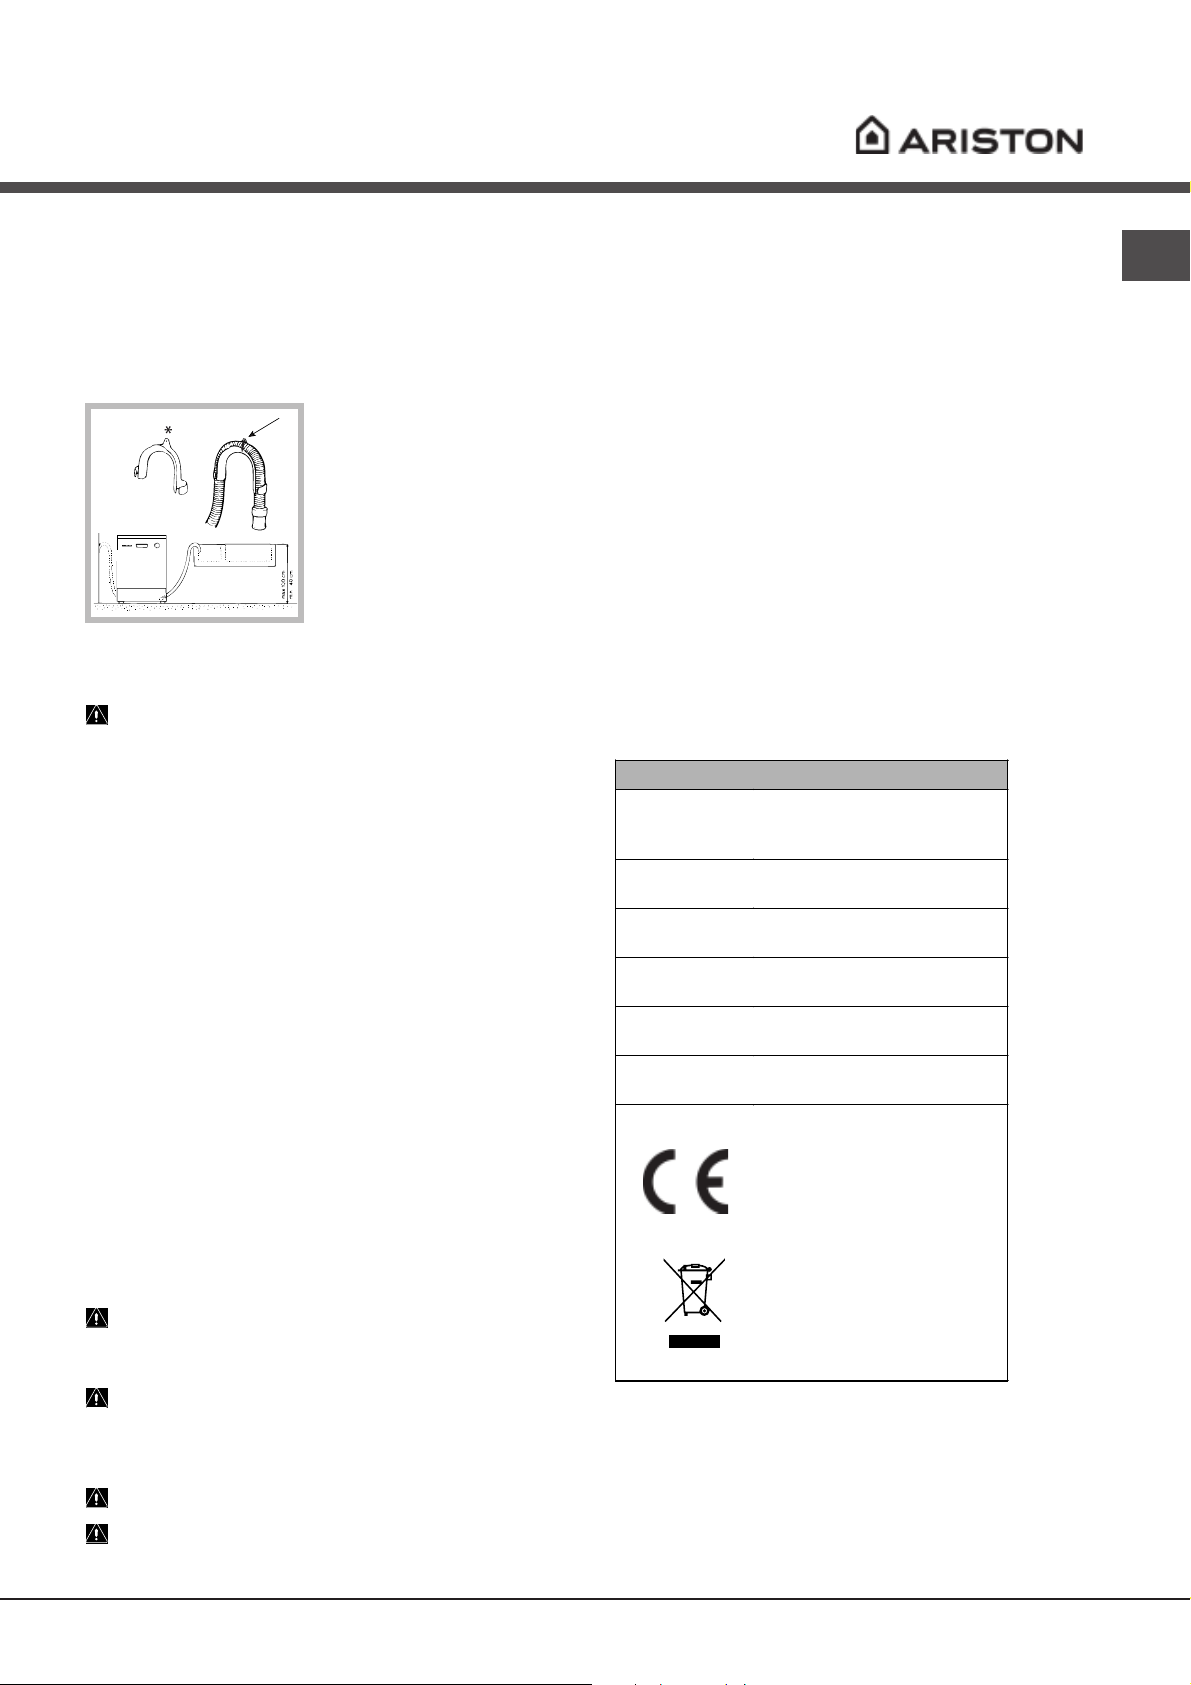
Connecting the water outlet hose
A
Connect the outlet hose (without bending it) to a
drain duct with a minimum diameter of 4 cm.
Alternatively, rest it over a sink or tub; the free end
of the hose should not remain immersed in water.
The special plastic
elbow* makes it easier to
find the best layout: fix
the elbow to the wall
securely in order to
prevent the outlet hose
from moving and spilling
the dirty water.
The part of the hose
marked with the letter A
should be between 40 and 100 cm above the ground
see figure
(
).
Advice regarding the first wash cycle
After the appliance has been installed, immediately
before running the first wash cycle, completely fill
the salt dispenser with water and add approximately
2 kg of salt (
see Rinse aid and refined salt
). The
water may overflow: this is normal and is not a
cause for concern. It is also normal that the LOW
SALT* indicator light continues to flash for a few
cycles after the salt has been loaded.
EN
We advise against the use of hose extensions.
Electrical connection
Before inserting the plug into the electrical socket,
make sure that:
• the socket is earthed and complies with current
regulations;
• the socket can withstand the maximum load of
the appliance, which is indicated on the data
plate located on the inside of the door (
Description of the appliance
);
see
• the power supply voltage falls within the values
indicated on the data plate on the inside of the
door;
• the socket is compatible with the plug of the
appliance. If this is not the case, ask an
authorised technician to replace the plug (
Assistance
); do not use extension cables or
see
multiple sockets.
Once the appliance has been installed, the
power supply cable, the electrical plug and socket
should remain accessible.
If the power supply cable is damaged, it must
be replaced by the manufacturer or its Technical
Assistance Service in order to prevent all potential
hazards. (See Assistance)
The cable should not be bent or compressed.
Technical data
width 60 cm
Dimensions
Capacity
Water supply
pressure
Power supply
voltage
Total absorbed
power
Fuse
height 85 cm
depth 60 cm
12 standard place-settings
0,05 ÷ 1MPa (0.5 ÷ 10 bar)
4.3 psi – 145 psi
See appliance data plate
See appliance data plate
See appliance data plate
This dishwasher conforms to
the following European
Community Directives:
-73/23/EEC dated 19/02/73
(Low Voltage) and subsequent
modifications
-89/336/EEC dated 03/05/89
(Electromagnetic Compatibility)
and subsequent modifications
-97/17/EC (Labelling)
-2002/96/ CE Waste Electrical
and Electronic Equipment
(WEEE)
The Company shall not be held responsible for
any incidents that occur if these regulations are not
observed.
* Only available in selected models.
3

Description of the appliance
EN
Overall view
1. Upper rack
2. Upper sprayer arm
3. Tip-up compartments
4. Rack height adjuster
5. Lower rack
6. Lower sprayer arm
7. Cutlery basket
8. Washing filter
9. Salt dispenser
10. Detergent and rinse aid dispensers
11. Data plate
Control panel
LOW SALT
indicator light*
LOW RINSE AID
indicator light*
ALL-IN-ONE TABLETS
WASH CYCLE
indicator light
Button
WASH CYCLE
SELECT
button
START/RESET
button
ALL-IN-ONE TABLETS
indicator light
PRE-WASH
WASH
RINSES
DRYING
WASH CYCLE PHASE
indicator lights
and DELAYED START
indicator light*
ON-OFF
button
ON-OFF
indicator light
DELAYED START
button*
* Only available in selected models.
4
Loading the racks
Before loading the rack, remove all food residue from the
crockery, and empty all remaining liquid from cups and
glasses.
arar
ar
arar
After loading the appliance, check that the sprayerAfter loading the appliance, check that the sprayer
After loading the appliance, check that the sprayer
After loading the appliance, check that the sprayerAfter loading the appliance, check that the sprayer
ms can rms can r
ms can r
ms can rms can r
otate frotate fr
otate fr
otate frotate fr
eelyeely
eely
eelyeely
..
.
..
Lower rack
Arrange the more difficult items to wash using the
examples
needed.
as a guide and use the collapsible supports* where
• Serving dishes and lids: place these at the sides
of the rack.
• Saucepans and salad bowls: always turn these
upside down.
• Very deep dishes: position these at an angle.
Loading
Cutlery basket
The type of cutlery basket may vary according to the
dishwasher model.
Knives and other utensils with sharp edges must be
placed in the cutlery basket with the points facing downwards,
or they must be positioned horizontally in the tip-up
compartments on the upper rack.
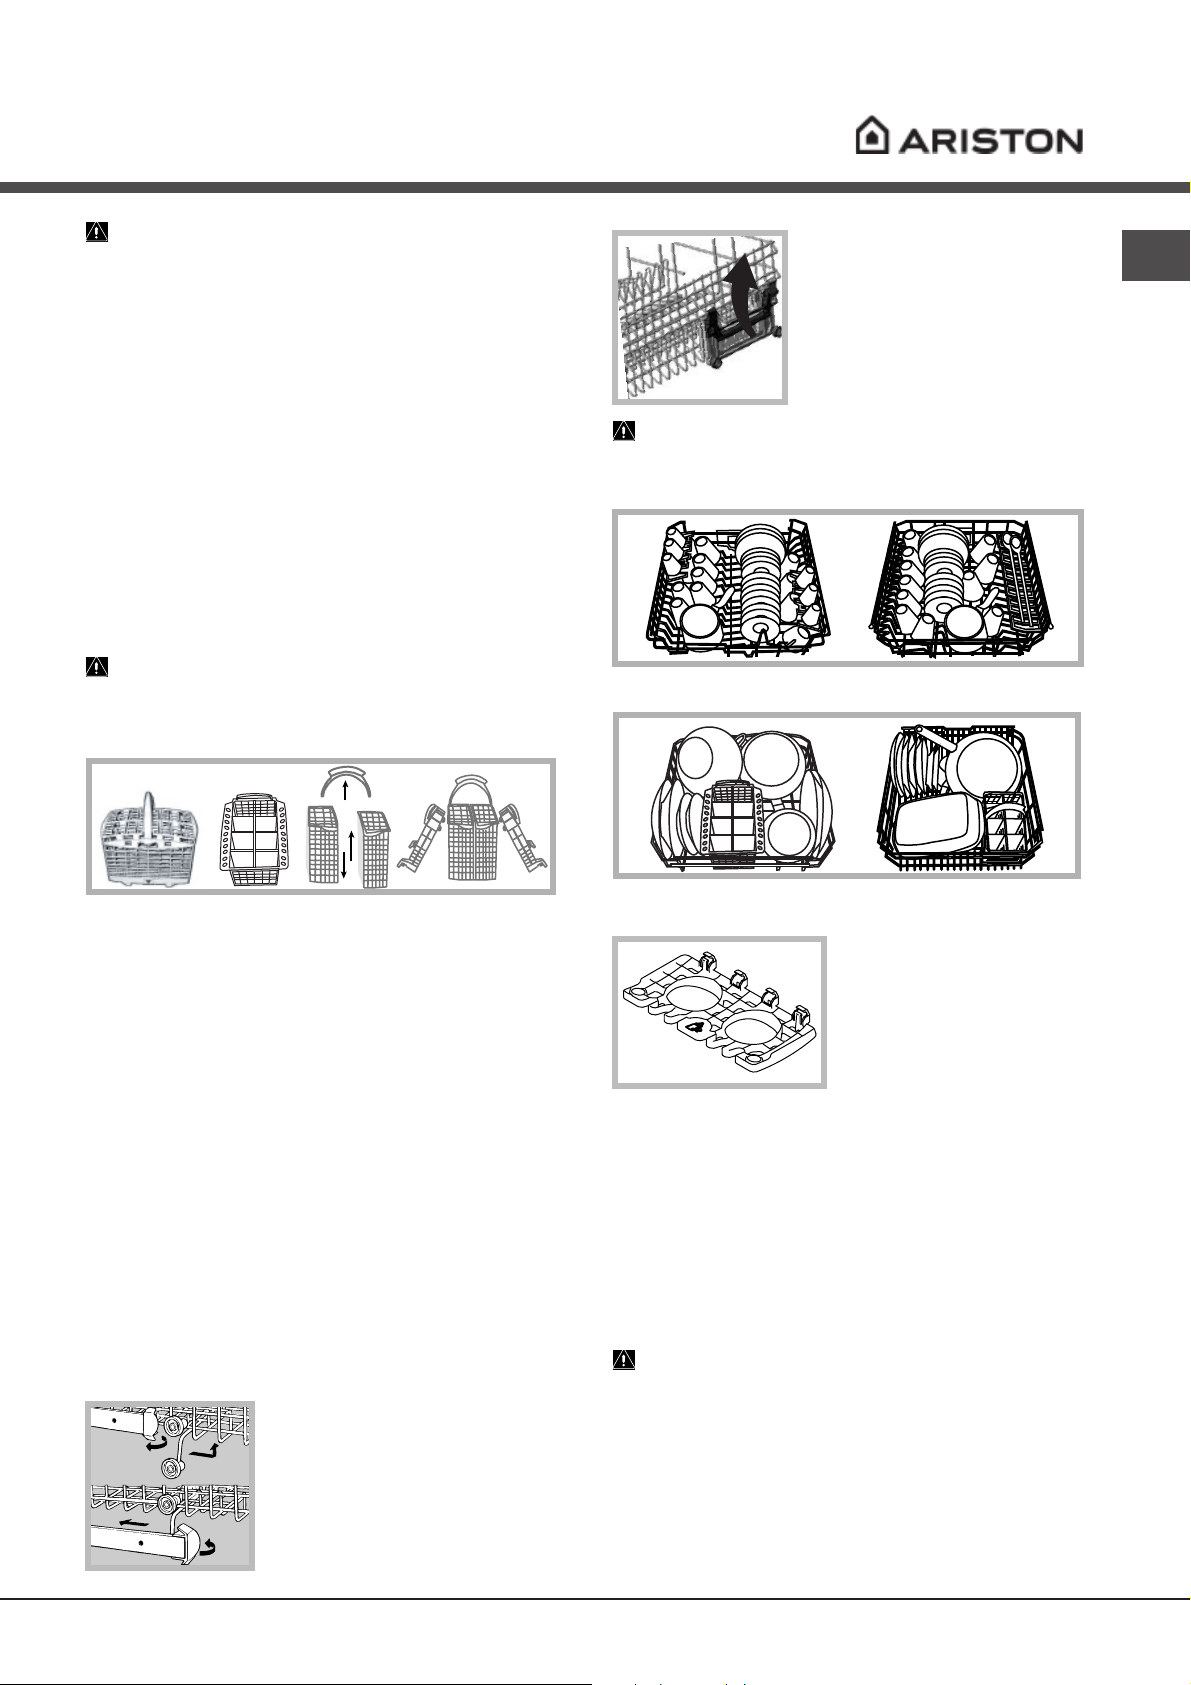
If the rack is equipped with the click
clack handles* (
them upwards or downwards to
adjust the height.
Warning
Never lift or lower the rack on one side only.
see figure
Loading examples for the upper rack
Loading examples for the lower rack
), pull
EN
To divide the central basket* into two separate pieces: pull out
the handle. The two detachable side compartments* may be
hooked onto the upper or lower rack.
The two grids* may be positioned in the basket to separate
the cutlery: place the pieces of cutlery into the appropriate
compartments with the handles at the bottom.
Upper rack
Load this rack with delicate and lightweight crockery: glasses,
tea and coffee cups, saucers, small salad bowls, saucepans
and small saucepans that are not too soiled, using the
examples
as a guide.
• Lightweight crockery: position these dishes so
that they will not be moved by the jets of water.
• Mugs and cups: place these on the tip-up
compartments**.
• Long sharp knives and serving utensils: place
these on the tip-up compartments**.
Adjusting the height of the upper rack
In order to make it easier to arrange the crockery, the upper
rack may be moved to a higher or
1
3
lower level.
Open the left and right guide rail
2
stops and pull out the rack; position
it higher or lower as required, slide it
along the guide rails until the front
wheels are in place and close the
4
stops (
see figure
).
Loading
Baby Tip-up compartments
**
For dishwasher models with a
Baby Cycle, tip-up
compartments suitable for
washing bottles, rings and
teats are provided.
Items that should not be washed in the dishwasher
• Wooden items, objects with wooden or horn handles
or glued-on parts.
• Items made from aluminium, copper, brass, pewter or
tin.
• Items made from plastic that is not heat-resistant.
• Antique or hand-painted porcelain.
• Antique silver. Silver that is not antique may, however,
be washed in the dishwasher using a delicate wash
cycle, provided that it does not come into contact
with other metals.
When buying crockery and cutlery we recommend that
you check whether it can be washed using the dishwasher.
Washing the handles*
To wash the upper and lower rack handles: remove the two
fastening plugs, lift out the handles and rinse them under
running water, then fasten them to the rack using the same
plugs.
* Only available in selected models.
** The number and position may vary.
5
Start-up and use
EN
Starting the dishwasher
1. Open the water inlet valve.
2. Press the ON/OFF button: the machine will emit a beep and
the ON/OFF indicator light will illuminate.
3. Open the door and measure out a suitable amount of
detergent
4. Load the racks
5. Select the wash cycle by pressing the SELECT WASH
CYCLE button: the corresponding indicator light will illuminate.
6. Select the wash options
7. Start the cycle by pressing the START/RESET button: the
machine will emit a confirmation beep. The WASH CYCLE
PHASE indicator lights display the status of the cycle:
Pre-wash, Wash, Rinse, or Drying.
8. At the end of the cycle two short beeps will sound and the
DRYING indicator light will flash. Switch off the appliance by
pressing the ON/OFF button and close the water inlet valve.
9. Open the door and wait for a few minutes before removing
the crockery inside, in order to avoid burns. Unload the racks,
beginning with the lower level.
Modifying the duration of a wash cycle already in
progress
If a mistake was made during the wash cycle selection
process it is possible to change the cycle, provided that it has
only just begun:press and hold the START/RESET button for 5
seconds After one long beep and three short beeps, the
WASH CYCLE PHASE indicator light will switch off: select the
new cycle and switch the machine back on by pressing the
START/RESET button.
Recap Settings
Press the SELECT WASH CYCLE button:
The indicator light corresponding to the wash cycle selected
will illuminate, followed by the HALF LOAD* indicator light or the
ALL-IN-ONE TABLETS* indicator light (if these options have
been selected).
Adding extra crockery
Press the ON/OFF button and open the door, taking care to
avoid the escaping steam, and place the crockery inside the
dishwasher. Press the ON/OFF button again: the cycle starts
from the point at which it was interrupted.
Accidental interruptions
If the door is opened during the wash cycle, or if there is a
power cut, the cycle stops. It starts again from the point at
which it was interrupted once the door has been shut or the
electricity supply is restored.
(see below)
.
(see Loading the racks)
(see below)
and shut the door.
.
DO NOT USE washing up liquid. DO NOT USE washing up liquid.
DO NOT USE washing up liquid.
DO NOT USE washing up liquid. DO NOT USE washing up liquid.
To obtain the best results from each washing and drying
cycle, powder detergent, rinse aid liquid and salt should be
used.
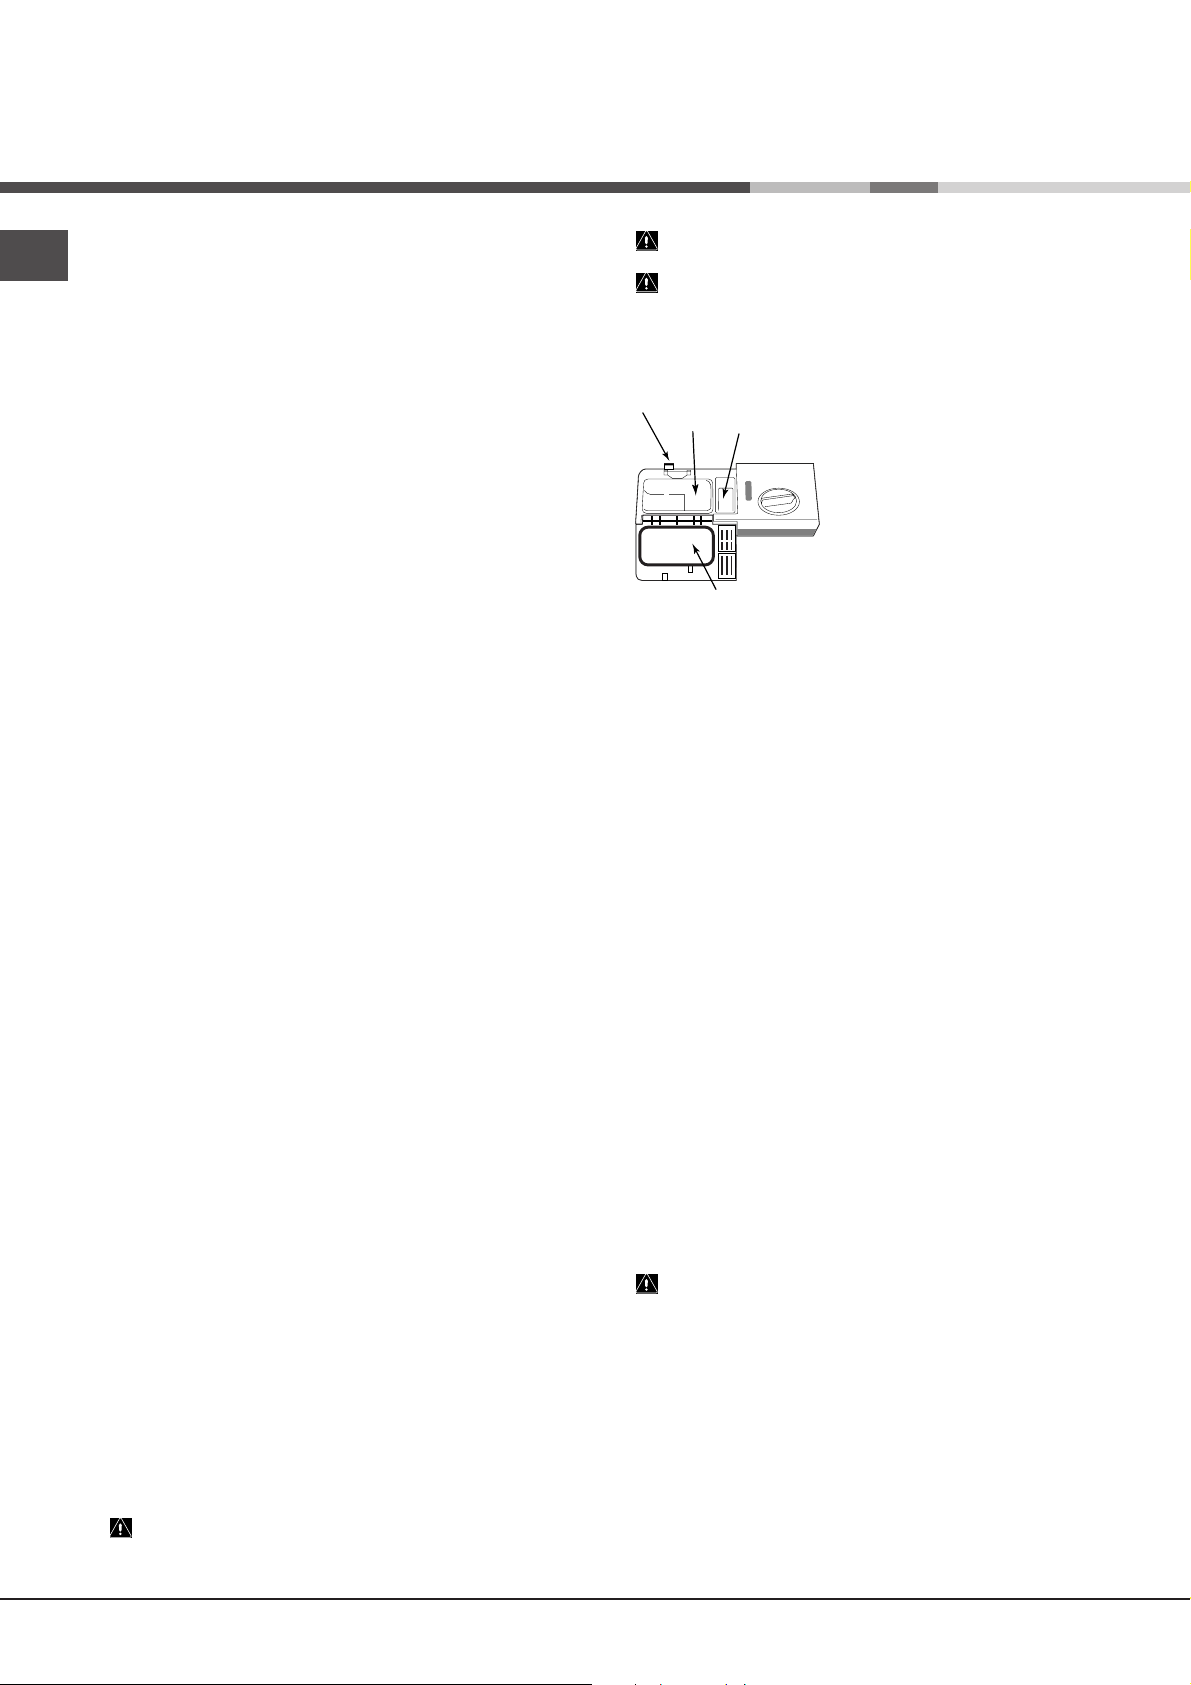
compartment Acompartment A
compartment A: Washing detergent
compartment Acompartment A
compartment Bcompartment B
compartment B: Pre-wash detergent
compartment Bcompartment B
D
A
B
tablet at the bottom of the appliance.
3. Remove detergent residues from the edges of the
compartment and close the cover until it clicks.
C
1. Open cover C by pressing button
D.
2. Pour in the detergent after
consulting the
• for powder detergent use
compartments A and B
• For detergent in tablet form: when
the cycle requires 1 tablet, place it in
compartment A and close the cover;
when it requires 2, place the second
Wash cycle table
:
Washing options
Delayed start
It is possible to delay the start time of the cycle by 12, 9, 6 or 3
hours.
1. Press the DELAYED START button: every time the button is
pressed, a beep is emitted and the selected delayed start
indicator light illuminates.
2. Select the wash cycle and press the START/RESET button:
after the beep sounds, the timer begins counting down.
3. Once this time has elapsed, the indicator light switches off
and the wash cycle begins.
To adjust the delay time and select a smaller period of time,
press the DELAYED START button. To cancel it, press the
button repeatedly until the wash cycle begins and the WASH
CYCLE PHASE indicator light corresponding to the start of the
cycle in progress illuminates.
All-in-one tablets*
When using multi-use tablets press the ALL-IN-ONE TABLETS
button. This option optimises the results of the wash. The
overall duration of the programme increases by approximately
10 minutes.
This option is not recommended for use with wash cycles
which do not specify the use of multi-use tablets (
wash cycles
).
see table of
Loading the detergent
A successful wash also depends on the correct amount of
detergent being used, as recommended by the manufacturer.
Exceeding the recommended amount does not result in a
more effective wash and pollutes the environment.
Only use detergent which has beenOnly use detergent which has been
Only use detergent which has been
Only use detergent which has beenOnly use detergent which has been
specifically designed for dishwashers.specifically designed for dishwashers.
specifically designed for dishwashers.
specifically designed for dishwashers.specifically designed for dishwashers.
6
* Only available in selected models.
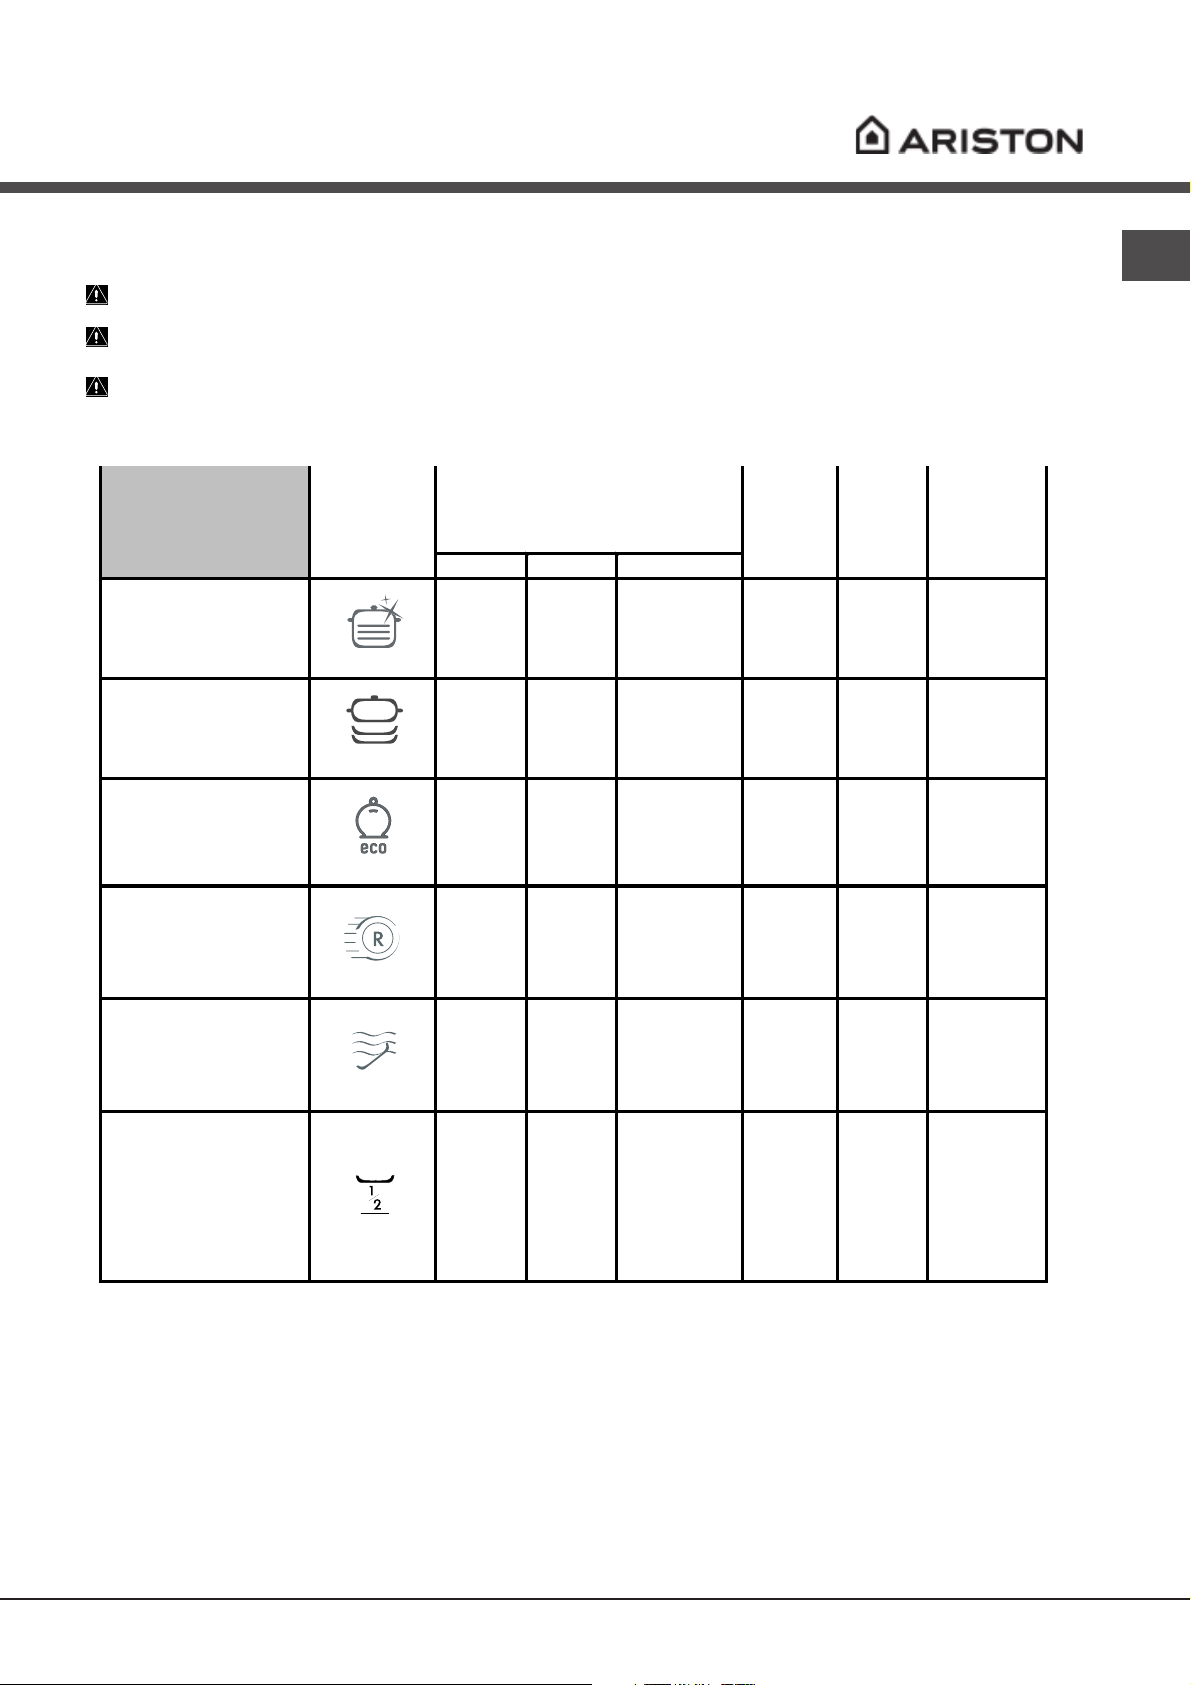
Wash cycles
Wash cycle table
Ariston dishwashers are fitted with an automatic filter cleaning system that may increase the cycle duration.
The number and type of wash cycles varies according to the model of dishwasher.
If the crockery is only lightly soiled or if it has been rinsed with water before being placed in the dishwasher,
reduce the amount of detergent used accordingly.
•
•
•
Wash cycle
duration
(tolerance
±10%)
Hrs. Min.
2:00’
1:28’
2:25’
1:00’
Wash cycle selection
instructions
Extremely soiled dishes
and pans (not to be
used for delicate items).
Normally soiled pans
and dishes. Standard
daily wash cycle.
Environmentally-friendly
wash cycle with low
energy consumption
levels, suitable for pans
and dishes.
Economic and fast
wash cycle to be used
for lightly soiled dishes.
(Run cycle immediately
after use.)
Preliminary wash cycle
for dishes while the load
is awaiting completion
with the dishes from the
next meal.
Special wash cycle,
ideal for frequent
washes and a reduced
load of dishes.
Normal soiling in the
lower rack and light
soiling in the upper
rack.
Wash cycle
Super Wash
Normal
Eco*
Rapid
Soak
Half load
Detergent
(A) = compartment A
(B) = compartment B
Powder Liquid Tablets
1 (A)
30 g (A)
5 g (B)
30 g (A) 30 ml (A) 1 (A)
25 g (A)
5 g (B)
25 g (A) 25 ml (A) 0:30'
30 g (A) 30 ml (A)
30 ml (A)
5 ml (B)
25 ml (A)
5 ml (B)
0:12'
1 (bottom of
the
appliance)
1 (A)
Pre-wash Drying
•
•
•
EN
Note
To make it easier to measure out the detergent, it is worth remembering that:
1 tablespoon = 15 grams of powder = approximately 15 ml of liquid
1 teaspoon = 5 grams of powder = approximately 5 ml of liquid
* The Eco wash cycle adheres to the regulation EN-50242. Although it has a longer duration than other wash cycles it uses less
energy and is les harmful to the environment.
7
Rinse aid and refined salt
EN
Only use products which have beenOnly use products which have been
Only use products which have been
Only use products which have beenOnly use products which have been
specifically designed for dishwashers.specifically designed for dishwashers.
specifically designed for dishwashers.
specifically designed for dishwashers.specifically designed for dishwashers.
Do not use table salt or industrial salt, orDo not use table salt or industrial salt, or
Do not use table salt or industrial salt, or
Do not use table salt or industrial salt, orDo not use table salt or industrial salt, or
washing up liquid.washing up liquid.
washing up liquid.
washing up liquid.washing up liquid.
If using a multi-functional product it is not necessary to add
rinse aid; however, we recommend that you add salt,
especially if you live in an area where the water is hard or very
hard. If you do not add salt or rinse aid, the LOW SALT* and
LOW RINSE AID* indicator lights will flash continuously.
Loading the rinse aid
Rinse aid makes it easier for the crockery to dry, as water runs
off surfaces more readily and therefore does not leave streaks
or marks.
The rinse aid dispenser should be filled:
• whenever the indicator light (H) signals that it is empty.
Illuminated light: add rinse aid; unlit light: there is no
shortage of rinse aid in the dispenser.
• when the LOW RINSE AID* indicator light on the panel
flashes;
1. Open the dispenser by
H
directly into the appliance tub.directly into the appliance tub.
directly into the appliance tub.
directly into the appliance tub.directly into the appliance tub.
Adjusting the amount of rinse aid
If you are not completely satisfied with the washing or drying
results, you may adjust the quantity of rinse aid used. Use a
screwdriver to turn the dosage adjuster to one of the 6 pre-set
positions (the default position is set to 4):
• if there are white streaks on the crockery, set the adjuster
to a lower number (1-3).
• if drops of water remain on the crockery or there are
limescale marks present after the cycle has finished, set the
adjuster to a higher number (4-6).
If you are using multi-functional tablets and you wish to
further improve the drying performance of the appliance, fill
the dispenser and set the dosage adjuster to 2.
turning the lid (G) in an
anticlockwise direction.
2. Pour in the rinse aid, making
sure it does not overflow from the
dispenser. If this happens, clean
F
the spill immediately with a dry
cloth.
G
3. Screw the lid back on.
NEVER pour the rinse aidNEVER pour the rinse aid
NEVER pour the rinse aid
NEVER pour the rinse aidNEVER pour the rinse aid
green float:
approximately every 30 wash cycles;
1. Remove the lower rack and
unscrew the cap of the dispenser
(in an anti-clockwise direction).
2. For the first wash cycle only: fill
the dispenser up to the edges with
water.
3. Position the funnel* provided
correctly (
dispenser up to the edges (approximately 2 kg); it is normal
for a little water to leak out.
4. Remove the funnel*, wipe away any salt residue from the
thread and screw the cap on tightly, so that detergent does
not leak into the dispenser during the wash cycle (this could
damage the water softening system beyond repair).
When necessary, measure out the salt before a wash
cycle so that any saline solution which has leaked out of the
salt dispenser is removed.
see figure
) and fill the salt
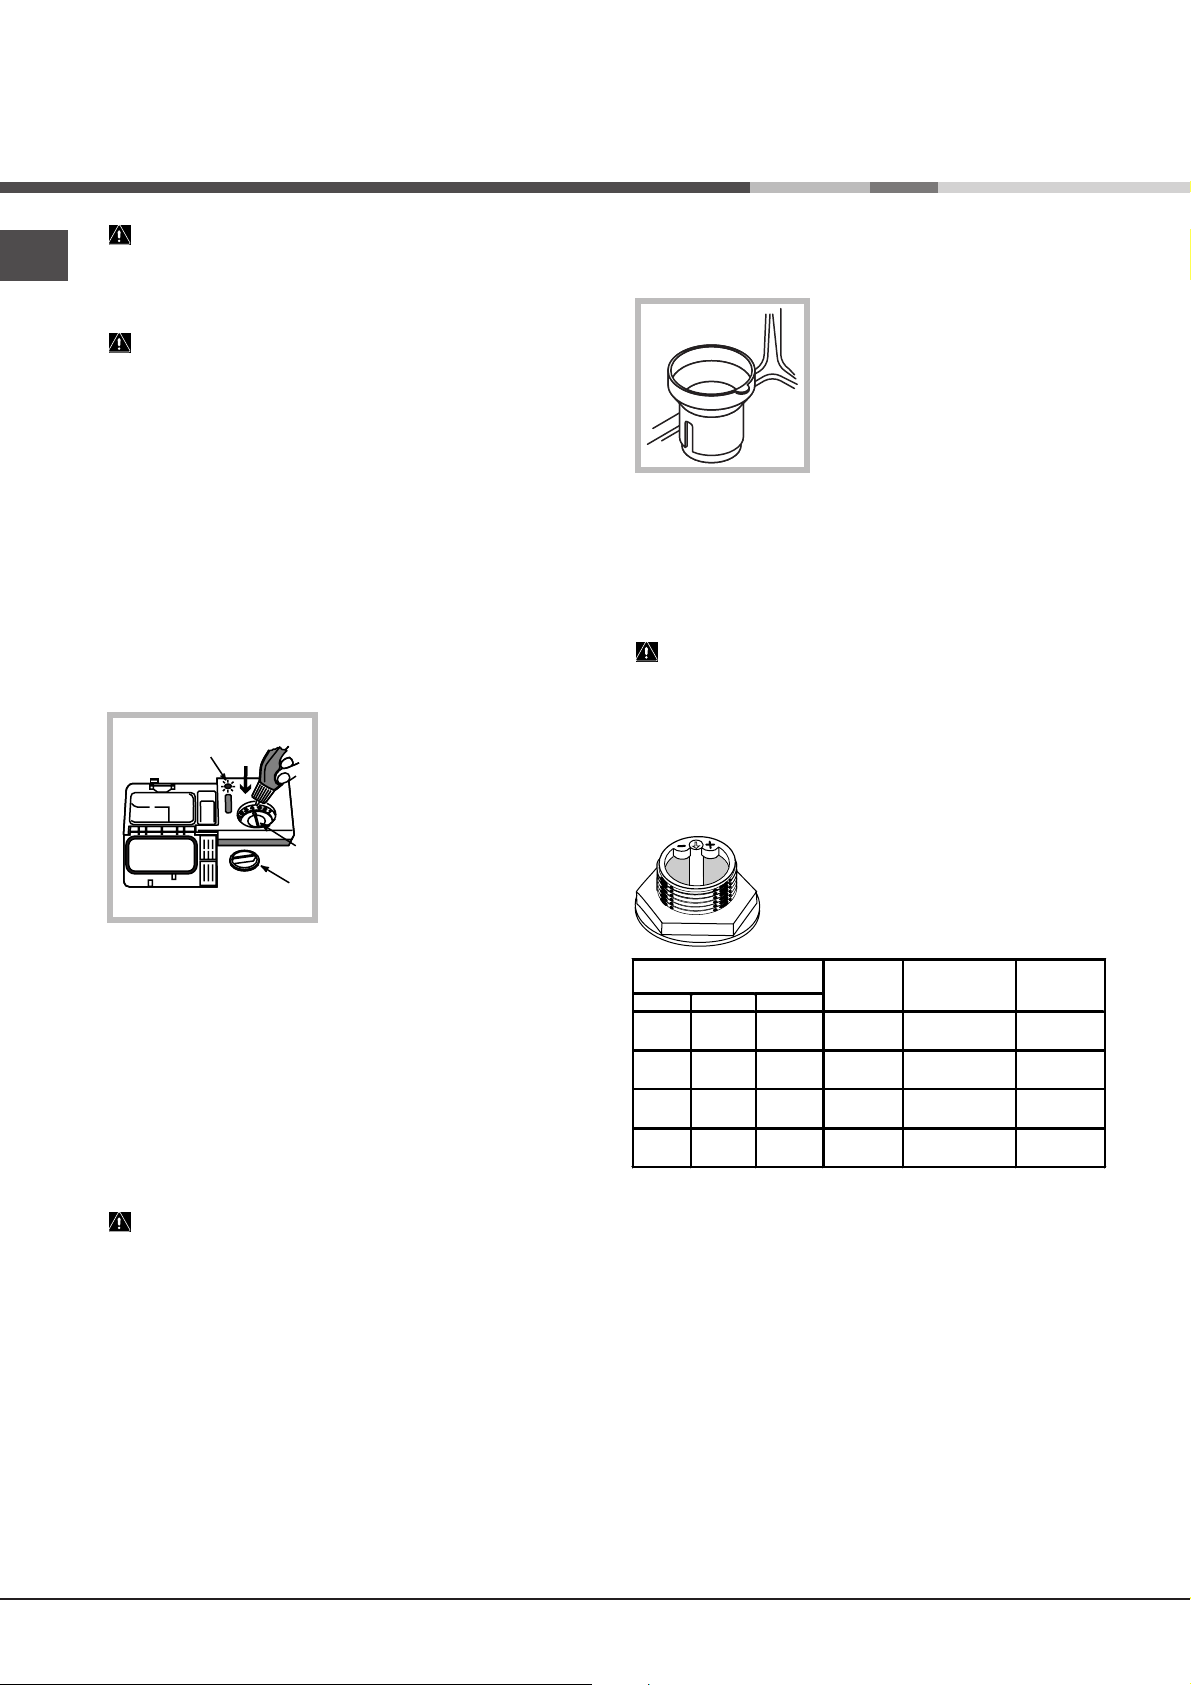
Adjusting the amount of salt*
It is possible to adjust the amount of salt used according to the
hardness of the water in your area (this information is available
from your local water board).
1. Unscrew the dispenser cap.
2. Turn the arrow on the neck of the
dispenser (
symbols, using the table below as a guide.
Hardness of the water
°dH °fH °mmol/l
0 - 10 0 - 17 0 - 1.7 / 0 /
10 – 25 18 – 44 1.8 – 4.4
25 – 50 45 – 89 4.5 – 8.9 MED 40 40
> 50 > 89 > 8.9 + 60 25
The default setting of the water softening system is +.
- If using multi-functional tablets fill the salt dispenser and set the
adjuster to -; if the hardness of the water is greater than 60°fH,
set it to +.
see figure
Selector
knob
position
- 20 60
) towards the + or -
Salt
consumption
(grams/cycle)
Autonomy
(cycles/2 kg)
Loading the refined salt
In order to obtain the best possible results from a wash cycle,
make sure that the dispenser is never empty. Refined salt
removes limescale from the water, thus avoiding the formation
of deposits on crockery. The salt dispenser is located in the
lower part of the dishwasher (
filled:
• when the green float* cannot be seen by simply looking at
the cap of the salt dispenser;
• when the LOW SALT* indicator light on the panel flashes;
• if your machine is not equipped with an indicator light or a
see Description
8
) and should be
* Only available in selected models.
Care and maintenance
Shutting off the water and electricity
supplies
• Turn off the water tap after every wash cycle to
avoid leaks.
• Remove the plug from the socket when cleaning
the machine and when carrying out maintenance
work.
Cleaning the dishwasher
• The external surfaces of the machine and the
control panel may be cleaned using a nonabrasive cloth which has been dampened with
water. Do not use solvents or abrasive products.
• Any marks on the appliance interior may be
removed using a cloth dampened with water and
a little vinegar.
Preventing unpleasant odours
• Always keep the door of the appliance ajar in
order to avoid moisture from forming and being
trapped inside the machine.
• Clean the seals around the door and detergent
dispensers regularly using a damp sponge. This
will avoid food becoming trapped in the seals,
which is the main cause of the formation of
unpleasant odours.
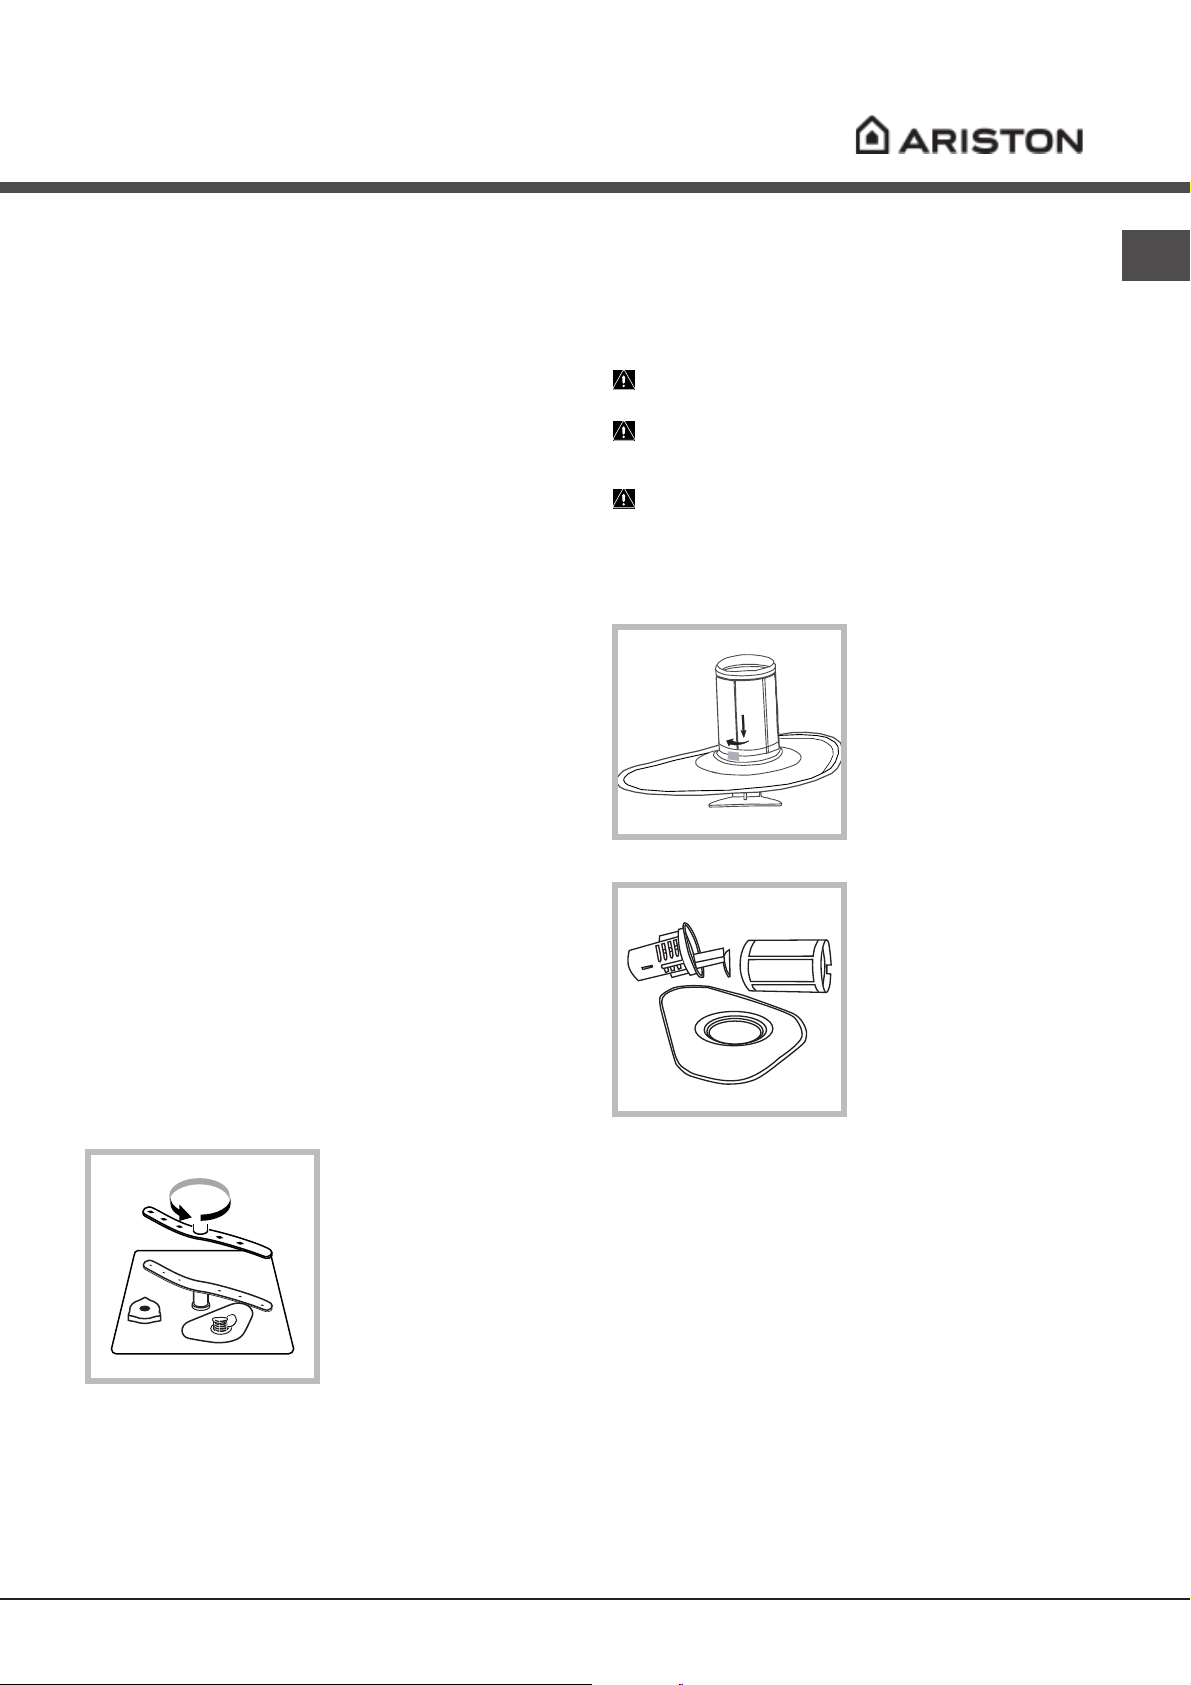
Cleaning the sprayer arms
Food residue may
become encrusted onto
the sprayer arms and
block the holes used to
spray the water. It is
therefore recommended
that the arms are
checked from time to
time and cleaned with a
small non-metallic
brush.
Cleaning the filters
The filters remove food residue from the water used
in the wash cycle: to obtain the best results from
each wash, they should be cleaned.
Clean the filters regularly.
After cleaning check that the filter assembly has
been replaced correctly.
The dishwasher should not be used without
filters or when the filter is loose.
1. Remove the filters by pulling the handle upwards.
2. Clean the filters:
• after every wash
C
1
2
A
B
running water.
B
C
A
an anti-clockwise direction). Use a small non-metallic
brush to clean these parts.
3. Reconstruct the filter assembly and replace it in
the correct position, following movements 1 and 2 as
shown in the figure, until it clicks into place.
cycle, remove the
largest pieces of
residue from
semicircular plate A
and glass B (these
may be removed by
pulling the handle) by
rinsing them under
• The entire filter
assembly should be
cleaned thoroughly
once a month: this
includes the
semicircular plate A,
the glass B and the
cylinder C (this may be
removed by turning it in
Leaving the machine unused for
extended periods
• Disconnect the appliance from the electricity
supply and shut off the water tap.
EN
• Leave the door of the appliance ajar.
• When you return, run a wash cycle when the
dishwasher is empty.
9

Precautions and advice
EN
The appliance was designed and manufactured
in compliance with current international safety
standards. The following information has been
provided for safety reasons and should therefore be
read carefully.
General safety
• The appliance was designed for domestic use
inside the home and is not intended for
commercial or industrial use.
• The appliance must be used by adults only, to
wash domestic crockery according to the
instructions in this manual.
• The appliance must not be installed outdoors,
even in covered areas. It is extremely dangerous
to leave the machine exposed to rain and storms.
• Do not touch the appliance when barefoot.
• When unplugging the appliance always pull the
plug from the mains socket, do not pull on the
cable.
• The water supply tap must be shut off and the
plug should be removed from the electrical
socket before cleaning the appliance or carrying
out any maintenance work.
• If the appliance breaks down, do not under any
circumstances touch the internal parts in an
attempt to carry out the repair work yourself.
• Never touch the heating element.
• The door should not be left open as it may create
a dangerous obstacle.
• Do not lean or sit on the open door of the
appliance: this may cause the appliance to
overturn.
• Keep detergent and rinse aid out of reach of
children.
• The packaging material should not be used as a
toy: it can become a choking or suffocation
hazard.
Disposal of old electrical appliances
The European Directive 2002/96/EC on Waste
Electrical and Electronic Equipment (WEEE),
requires that old household electrical appliances
must not be disposed of in the normal unsorted
municipal waste stream. Old appliances must be
collected separately in order to optimise the
recovery and recycling of the materials they contain
and reduce the impact on human health and the
environment. The crossed out "wheeled bin" symbol
on the product reminds you of your obligation, that
when you dispose of the appliance it must be
separately collected.
Consumers should contact their local authority or
retailer for information concerning the correct
disposal of their old appliance.
Saving energy and respecting the
environment
Saving water and energy
• Only start a wash cycle when the dishwasher is
full. While waiting for the dishwasher to be filled,
prevent unpleasant odours with the Soak cycle
see Wash Cycles
(
• Select a wash cycle that is suited to the type of
crockery and to the soil level of the crockery
using the
- for dishes with a normal soil level, use the Eco
wash cycle, which guarantees low energy and
water consumption levels.
- if the load is smaller than usual activate the Half
load option (
• If your electricity supply contract gives details of
electricity saving time bands, run wash cycles
during the periods when a lower tariff is applied.
The Delayed start* button (
helps you organise the wash cycles accordingly.
Phosphate-free and chlorine-free detergents
containing enzymes
• We strongly recommend that you use detergents
that do not contain phosphates or chlorine, as
these products are harmful to the environment.
• Enzymes provide a particularly effective action at
temperatures around 50°C, and as a result
detergents containing enzymes can be used in
conjunction with low-temperature wash cycles in
order to achieve the same results as a normal
65°C wash cycle.
• To avoid wasting detergent, use the product in
appropriate quantities based on the
manufacturer’s recommendations, the hardness
of the water and the soil level and quantity of the
crockery. Even if they are biodegradable,
detergents contain substances that may alter the
balance of nature.
* Only available in selected models.
Wash cycle table
).
:
see Start-up and use
see Start-up and use
).
)
10
Troubleshooting
Whenever the appliance fails to work, check for a solution from the following list before calling for Technical
Assistance Centre.
Malfunction: Possible causes / Solutions:
The dishwasher does not start.
No water enters the
dishwasher.
No water drains out from the
dishwasher.
The plug has not been inserted into the electrical socket
properly, or there is no power in the house.
The dishwasher door has not been shut properly.
A delayed start has been programmed (see Start-up and use).
There is no water in the mains supply.
The water inlet hose is bent (see Installation).
The dishwasher cycle has not yet finished.
The water outlet hose is bent (see Installation).
The drain duct is blocked.
The filter is clogged up with food residues.
The dishwasher makes
excessive noise.
The dishes and glasses are
covered in a white film or
limescale deposits.
The dishes and glasses are
streaked or have a bluish
The dishes are rattling against each other or against the
sprayer arms.
The level of the refined salt is low or the dosage setting is not
suited to the hardness of the water (see Rinse aid and salt).
The lid on the salt dispenser is not closed properly.
The rinse aid has been used up or the dosage is too low.
The crockery is made from non-stick material.
The rinse aid dosage is too high.
tinge.
The crockery has not been
dried properly.
The dishes are not clean.
Shut off tap alarm.
(several short beeps are
emitted)*
* Only available in selected
models
(the 2
.
nd
and 3rd WASH CYCLE
indicator lights flash, beginning
from the right).
The rinse aid has been used up or the dosage is too low (see
Rinse aid and salt).
The rinse aid dispenser setting is not high enough.
A wash cycle without a drying programme has been selected.
The racks are overloaded (see Loading the racks).
The crockery has not been arranged well.
The sprayer arms cannot move freely.
The wash cycle is too gentle (see Wash cycles).
The detergent has not been measured out correctly or it is not
suited to the type of wash cycle (see Start-up and use).
The filter is dirty or blocked (see Care and maintenance).
The refined salt level is low (see Rinse aid and salt).
Turn on the tap and the appliance will start after a few
minutes.
The appliance lock has been activated because no action was
taken when the beeps* sounded. Switch off the machine using
the ON/OFF button, turn on the tap and switch the machine
back on after 20 seconds by pressing the same button. Re-
programme the machine and
restart the wash cycle.
Blocked filter alarm
(the
nd
2
and 4th
WASH CYCLE
indicator lights flash beginning
from the right).
Water loading solenoid valve
malfunction alarm
rd
3
(the
WASH CYCLE indicator
lights flash beginning from the
Switch off the machine by pressing the ON/OFF button and
clean the filters (see Maintenance), then switch the
dishwasher back on by pressing the same button. Reprogramme the machine and restart the wash cycle.
Switch off the appliance by pressing the ON/OFF button and
switch it back on after a minute. If the alarm continues, turn
off the water tap to reduce the risk of flooding, remove the
plug from the electrical socket and call Assistance.
right).
EN
11
 Loading...