

OWNER'SMANUAL
Operatingand Servicing Instructions
Espa_ol- pdginaE1
h00ver.c0m
IMPORTANT:READCAREFULLYBEFOREASSEMBLYANDUSE.
Questions or concerns? For assistance, please call Customer Service at 1-800-944-9200
Mon-Fri 8am-7pm EST. PLEASE DO NOT RETURN THIS PRODUCT TO TI-IE STORE.
THIS PRODUCTIS INTENDEDFORHOUSEHOLDUSEONLY.
IF USEDCOMMERCIALLYWARRANTYIS VOID.
@2011 Techtronic Floor Care Technology Limited. All Rights Reserved. #961145002 ID102309-R1
Thankyou for choosing a HOOVER° product.
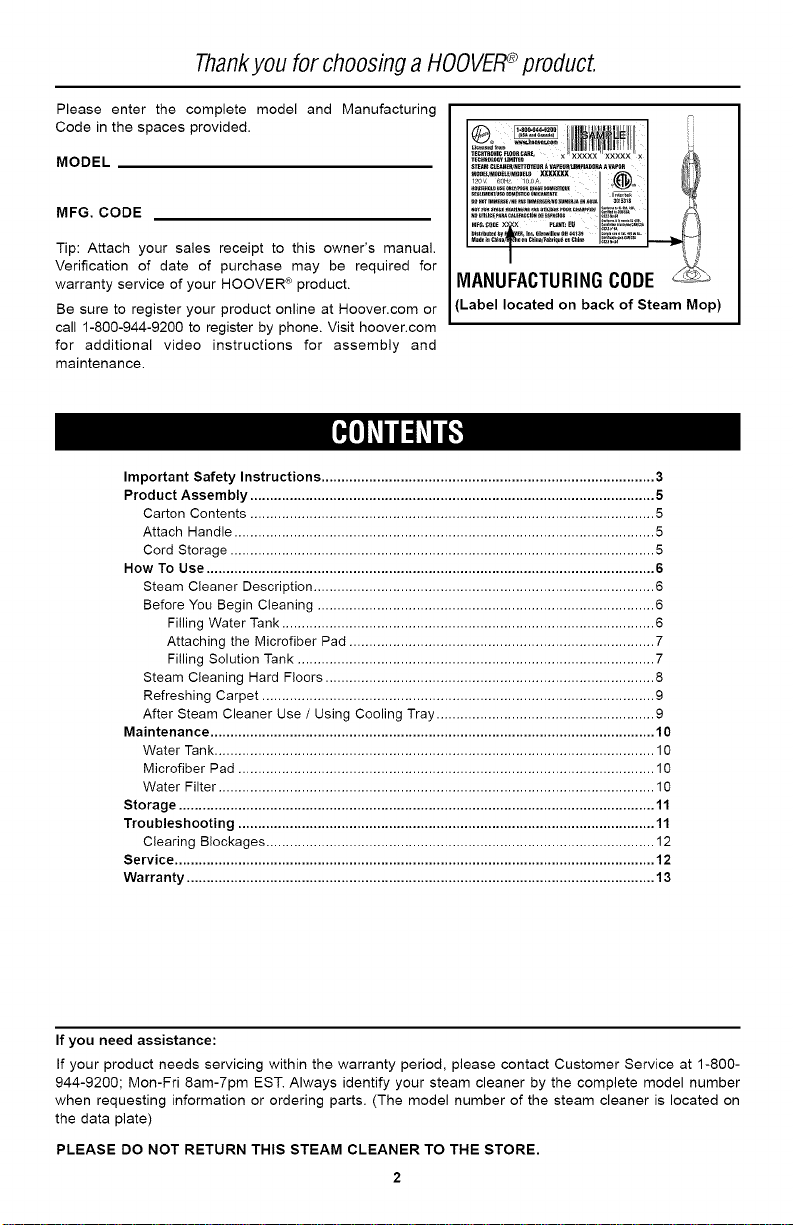
Please enter the complete model and Manufacturing
Code in the spaces provided.
MODEL
MFG. CODE
Tip: Attach your sales receipt to this owner's manual.
Verification of date of purchase may be required for
warranty service of your HOOVER ® product.
Be sure to register your product online at Hoover.corn or
call 1-800-944-9200 to register by phone. Visit hoover.com
for additional video instructions for assembly and
maintenance.
Important Safety Instructions .................................................................................... 3
Product Assembly ...................................................................................................... 5
Carton Contents ...................................................................................................... 5
Attach Handle .......................................................................................................... 5
Cord Storage ........................................................................................................... 5
How To Use ................................................................................................................. 6
Steam Cleaner Description ...................................................................................... 6
Before You Begin Cleaning ..................................................................................... 6
Filling Water Tank .............................................................................................. 6
Attaching the Microfiber Pad ............................................................................. 7
Filling Solution Tank .......................................................................................... 7
Steam Cleaning Hard Floors ................................................................................... 8
Refreshing Carpet ................................................................................................... 9
After Steam Cleaner Use / Using Cooling Tray ....................................................... 9
Maintenance ................................................................................................................ 10
Water Tank ............................................................................................................... 10
Microfiber Pad ......................................................................................................... 10
Water Filter .............................................................................................................. 10
Storage ........................................................................................................................ 11
Troubleshooting ......................................................................................................... 11
Clearing Blockages .................................................................................................. 12
Service ......................................................................................................................... 12
Warranty ...................................................................................................................... 13
O _ " I'= i
N
..... I l_.-,o ' ........... = )i>
.............................I i,
Mo_e/mee_M_,_L_;_XXXXX ,
I................ I @ I 1_
MANUFACTURINGCODE
(Label located on back of Steam Mop)
If you need assistance:
If your product needs servicing within the warranty period, please contact Customer Service at 1-800-
944-9200; Mon-Fri 8am-7pm EST. Always identify your steam cleaner by the complete model number
when requesting information or ordering parts. (The model number of the steam cleaner is located on
the data plate)
PLEASE DO NOT RETURN THIS STEAM CLEANER TO THE STORE.
IMPORTANTSAFETYINSTRUCTIONS
SAVETHESEINSTRUCTIONS
When using an electrical steam cleaner, basic precautions should always be
followed, including the following:
READ ALL INSTRUCTIONS BEFORE USING THIS STEAM CLEANER.
WARNING:TOREDUCETHERISKOFFIRE,
ELECTRICSHOCKORINJURY:
• Fullyassemble before operating.
• Operate steam cleaner only at voltage specified on data label on back of steam
cleaner.
• Do not leavesteam cleaner when plugged in. Unplug from outlet when not in use
and before cleaning or servicing.
• Do not use or store outdoors.
• Do not use for space heating purposes.
• Do not immerse in water.
• Donot allow to be used asa toy. Not intended for useby children age 12 and under.
Close supervision is necessary when used near children. To avoid injury, burn, or
damage, keep children away from product, and do not allow children to touch
steam cleaner while in use or before completely cool, or to place fingers or other
objects into any openings.
• Do not use any extension cord with this product.
• Do not handle the plug, or the Steam Mop with wet hands. Do not operate the
Steam Mop without footwear.
• Do not place hands or feet under the Steam Mop while it is in operation as the
steam cleaner gets very hot and may create a burn hazard.
• Useonly on flat, horizontal surfaces. Do not use the Steam Mop on walls, counter
tops or windows.
• To protect against a risk of electric shock, do not immerse the Steam Mop into
water or any other liquids.
• Use only as described in this manual. Use only manufacturer's recommended
attachments and products.
• Do not use with damagedcord or plug. Ifappliance is not working as it should, has
been dropped,damaged, left outdoors,or dropped intowater, call CustomerService
at 1-800-944-9200 for instructions before continuing use.
• Donot pull or carry bycord, usecord as a handle,close a dooron cord,or pull cord
around sharp edges or corners. Do not place product on cord. Do not run steam
cleaner over cord. Keepcord away from heatedsurfaces.
• Do not unplug by pulling on cord. To unplug, grasp the plug, not the cord.
• Do not handle plug or steam cleaner with wet hands.
• Do not put any object into openings. Donot use with any opening blocked.
• Keephair, loose clothing, fingers, and all parts of body away from openings.
• Turn off all controls before unplugging.
• Useextracarewhen cleaning on stairs. Whennot in use do notplace steam cleaner
on stairs or furniture, as it may result in injury or damage.
• Toavoid burn or injury, do not apply steam directly to any person or animal.
3
• Onlyusewater to refill thewater tank. Donot use any type of chemicals or additives
in the water tank.
• Do not add descaling, aromatic, alcoholic products, cleaning solutions, scented
perfumes, oils or any other chemicals to the water used in this steam cleaner as
this may damage the steam cleaner or make it unsafe for use. While this Steam
Mop is designedfor tap water, to increase effectiveness of the steam and to avoid
build up of minerals, you may use distilled water to fill Steam Mop.
• Donot use Steam Mop in an enclosedspace filled with vapor given off by oil-based
paint, paint thinners, some moth proofing substances, flammable dust, or other
explosiveor toxic vapors.
• When in use, never turn the steam cleaner over or use while on its side.
• Allow Steam Mop sufficient time to cool prior to removing the microfiber pad.
• Before cleaning the Steam Mop, unplug the power cord from the electrical outlet
and clean with a dry or damp cloth. Do not pour water or use alcohol, benzene or
paint thinner on the steam cleaner.
• Donot use in areaswhere flammable or combustible liquids, such asgasoline may
be present.
• Do not use without microfiber pad properly attached to mophead.
• Do not clean over floor electrical outlets.
• Do not use the Steam Mop on leather, wax polished furniture or floors, synthetic
fabrics, velvet or other delicate, steam sensitive materials.
• Useonly with Hoover_ SteamPlusTM CleaningSolution.
• Do not operate Steam Mop without water in water tank.
• WARNING:This product contains chemicals known to the State of California to
cause cancer, birth defects or reproductive harm. WASH HANDS AFTER
HANDLING.
CAUTION:TOREDUCETHERISKOFDAMAGE:
• Store appropriately indoors in a dry place. Do not expose machine to freezing
temperatures.
• Neveruse Steam Mop without microfiber pad attached.
• NeverleaveSteam Mop in one spot or on any surface for any period of time when
pump is turned on andsteam is activated.
WARNING:
• To reduce the risk of electric shock, this appliance has a polarized plug (one blade
is wider than the other). This plug will fit in a polarized outlet only one way. If the
plug does not fit fully in the outlet, reverse the plug. If it still does not fit, contact a
qualified electrican to install the proper outlet. Donot change the plug in any way.
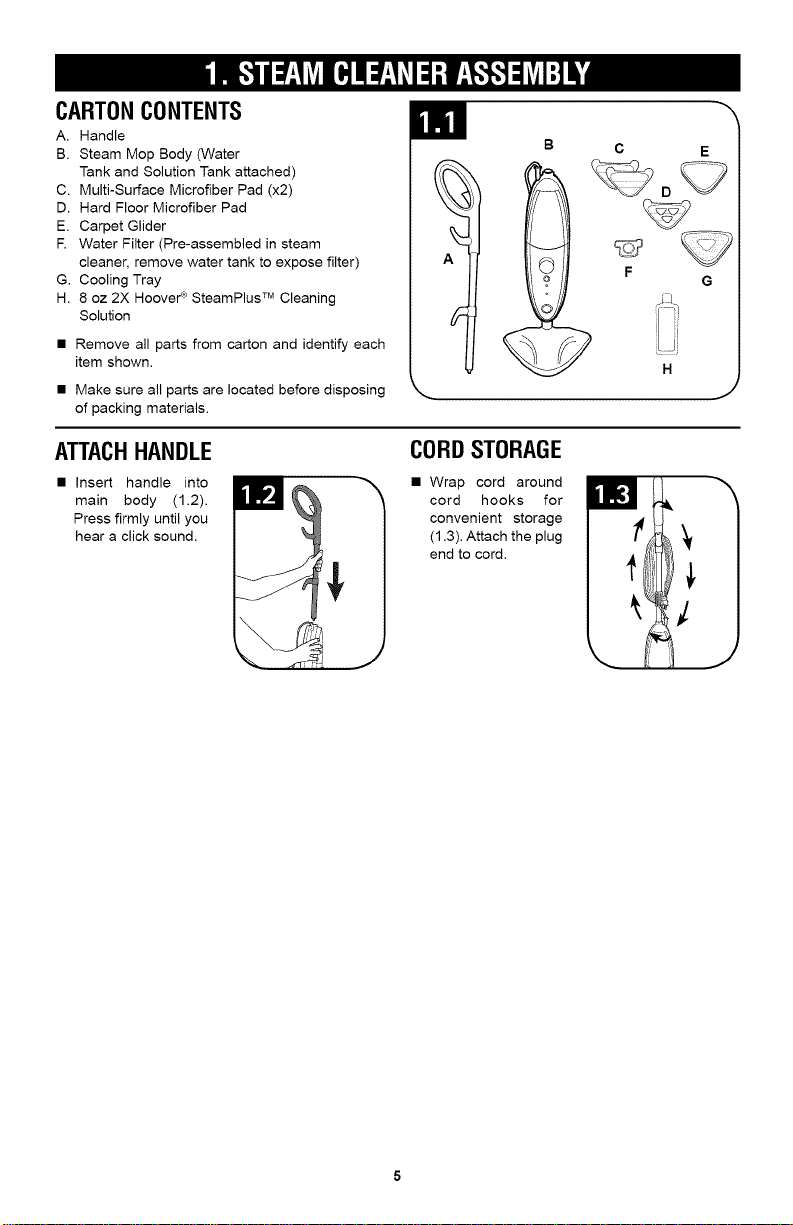
CARTONCONTENTS
A. Handle
B. Steam Mop Body (Water
Tank and Solution Tank attached)
C. Multi-Surface Microfiber Pad (x2)
D. Hard Floor Microfiber Pad
E. Carpet Glider
R Water Filter (Pre-assembled in steam
cleaner, remove water tank to expose filter)
G. Cooling Tray
H. 8 oz 2X Hoover ¢ SteamPlus TM Cleaning
Solution
• Remove all parts from carton and identify each
item shown.
• Make sure all parts are located before disposing
of packing materials.
m
\
C
F
E
G
H
ATTACHHANDLE
• Insert handle into
main body (1.2).
Press firmly until you
hear a click sound.
CORDSTORAGE
• Wrap cord around
cord hooks for
convenient storage
(1.3). Attach the plug
end to cord,
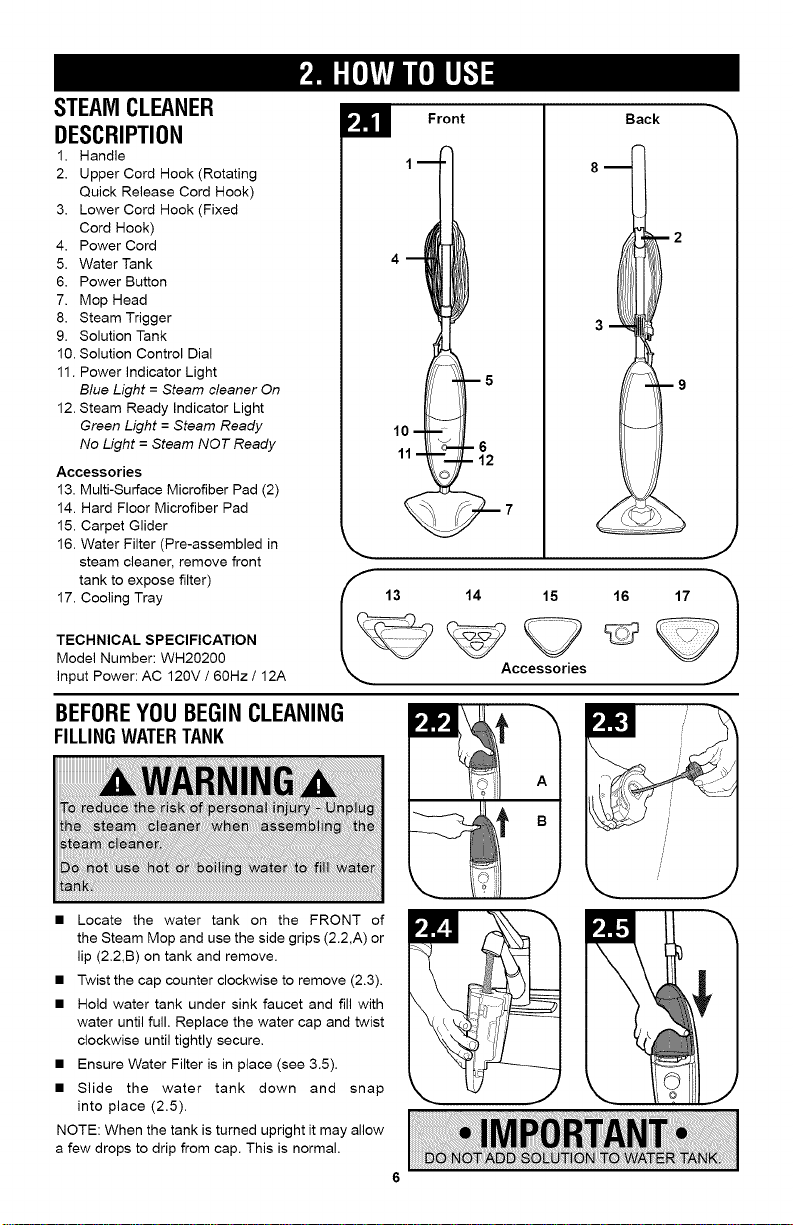
STEAMCLEANER
DESCRIPTION
1. Handle
2. Upper Cord Hook (Rotating
Quick Release Cord Hook)
3. Lower Cord Hook (Fixed
Cord Hook)
4. Power Cord
5. Water Tank
6. Power Button
7. Mop Head
8. Steam Trigger
9. Solution Tank
10. Solution Control Dial
11. Power indicator Light
Blue Light = Steam cleaner On
12. Steam Ready Indicator Light
Green Light = Steam Ready
No Light = Steam NOT Ready
Accessories
13. Multi-Surface Microfiber Pad (2)
14. Hard Floor Microfiber Pad
15. Carpet Glider
16. Water Filter (Pre-assembled in
steam cleaner, remove front
tank to expose filter)
17. Cooling Tray
TECHNICAL SPECIFICATION
Model Number: WH202OO
input Power: AC 120V / 60Hz / 12A
Back
13 14 15 16
Accessories
BEFOREYOUBEGINCLEANING
FILLINGWATERTANK
• Locate the water tank on the FRONT of
the Steam Mop and use the side grips (2.2,A) or
lip (2.2,B) on tank and remove.
• Twist the cap counter clockwise to remove (2.3).
• Hold water tank under sink faucet and fill with
water until full. Replace the water cap and twist
clockwise until tightly secure.
• Ensure Water Filter is in place (see 3.5).
• Slide the water tank down and snap
into place (2.5).
NOTE: When the tank is turned upright it may allow
a few drops to drip from cap. This is normal.
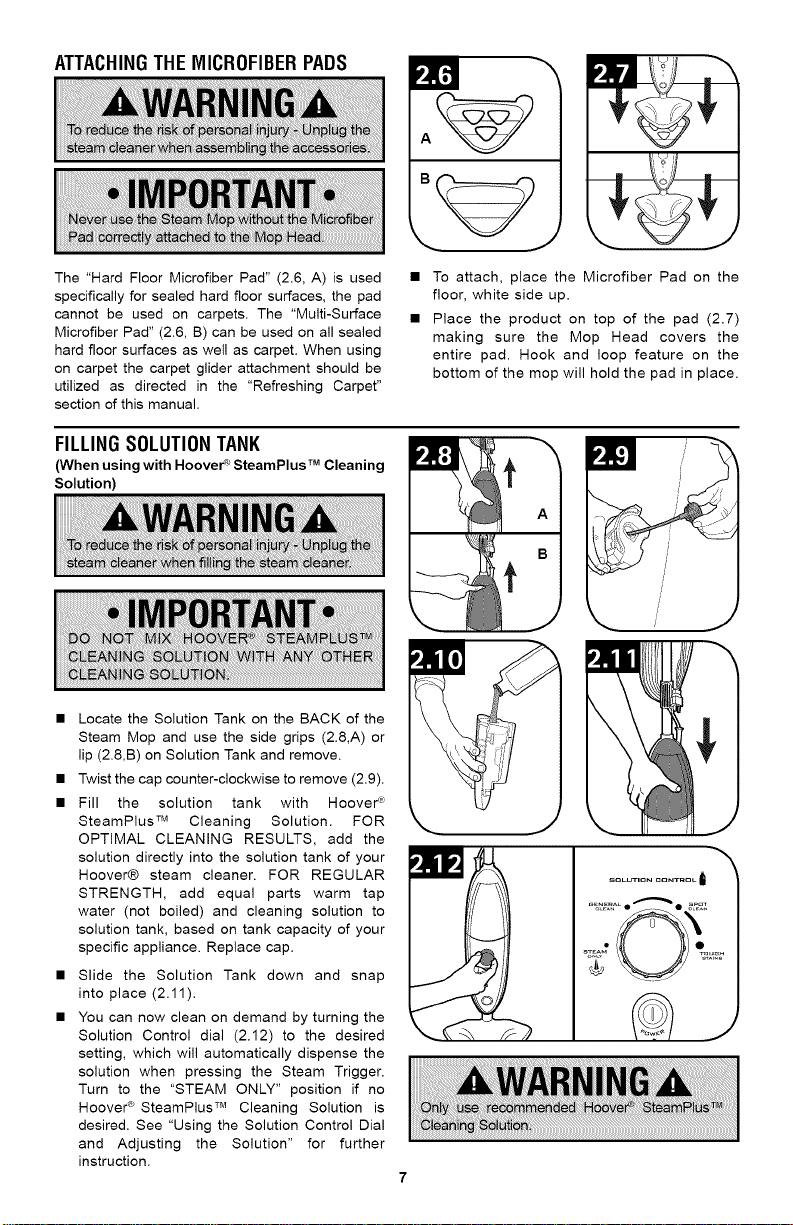
ATTACHINGTHE MICROFIBERPADS
The "Hard Floor Microfiber Pad" (2.6, A) is used
specifically for sealed hard floor surfaces, the pad
cannot be used on carpets. The "Multi-Surface
Microfiber Pad" (2.6, B) can be used on all sealed
hard floor surfaces as well as carpet. When using
on carpet the carpet glider attachment should be
utilized as directed in the "Refreshing Carpet"
section of this manual.
FILLINGSOLUTIONTANK
(When using with Hoove¢ _SteamPlus TMCleaning
Solution)
• Locate the Solution Tank on the BACK of the
Steam Mop and use the side grips (2.8,A) or
lip (2.8,B) on Solution Tank and remove.
• Twist the cap counter-clockwise to remove (2.9).
• Fill the solution tank with Hoove¢ _
SteamPlus TM Cleaning Solution. FOR
OPTIMAL CLEANING RESULTS, add the
solution directly into the solution tank of your
Hoover,) steam cleaner. FOR REGULAR
STRENGTH, add equal parts warm tap
water (not boiled) and cleaning solution to
solution tank, based on tank capacity of your
specific appliance. Replace cap.
• Slide the Solution Tank down and snap
into place (2.11).
• You can now clean on demand by turning the
Solution Control dial (2.12) to the desired
setting, which will automatically dispense the
solution when pressing the Steam Trigger.
Turn to the "STEAM ONLY" position if no
Hoover _ SteamPlus TM Cleaning Solution is
desired. See "Using the Solution Control Dial
and Adjusting the Solution" for further
instruction.
• To attach, place the Microfiber Pad on the
floor, white side up.
• Place the product on top of the pad (2.7)
making sure the Mop Head covers the
entire pad. Hook and loop feature on the
bottom of the mop will hold the pad in place.
SOLUTION CONTROL I_
USINGTHESOLUTIONCONTROLDIALANDADJUSTINGTHESOLUTION
• The Solution Control Dial controls the amount of cleaning solution that is added to the steam. It does
not adjust the amount of steam, only the cleaning solution.
• If you wish to clean with steam alone, simply turn the Solution Control Dial to "STEAM ONLY". Now
every time you press the Steam Trigger, you will release steam alone.
• If you wish to clean using cleaning solution, simply turn the Solution Control Dial to the desired
setting. Now when pressing the Steam Trigger, the steam mop will release the amount of cleaning
solution that is indicated on the Solution Control Dial as well as a steady flow of steam.
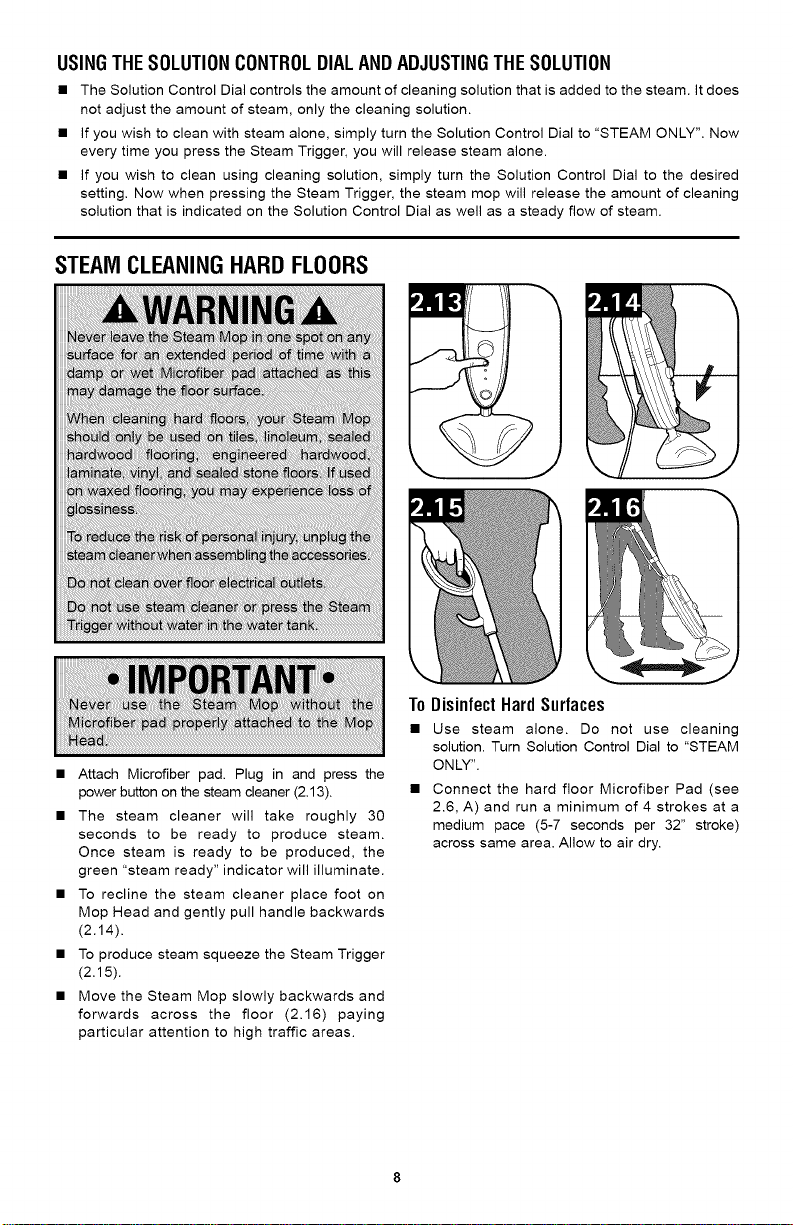
STEAMCLEANINGHARDFLOORS
• Attach Microfiber pad. Plug in and press the
power button on the steam cleaner (2.13).
• The steam cleaner will take roughly 30
seconds to be ready to produce steam.
Once steam is ready to be produced, the
green "steam ready" indicator will illuminate.
• To recline the steam cleaner place foot on
Mop Head and gently pull handle backwards
(2.14).
• To produce steam squeeze the Steam Trigger
(2.15).
• Move the Steam Mop slowly backwards and
forwards across the floor (2.16) paying
particular attention to high traffic areas.
ToDisinfectHardSurfaces
• Use steam alone. Do not use cleaning
solution. Turn Solution Control Dial to "STEAM
ONLY".
• Connect the hard floor Microfiber Pad (see
2.6, A) and run a minimum of 4 strokes at a
medium pace (5-7 seconds per 32" stroke)
across same area. Allow to air dry.

REFRESHINGCARPET
• Use steam alone. Do not use cleaning
solution. Turn Solution Control dial to
"STEAM ONLY".
• The steam cleaner will take roughly 30
seconds to be ready to produce steam.
Once steam is ready to be produced, the
green "steam ready" indicator will illuminate.
• Place the steam cleaner into the Carpet Glider
(2.17).
• To recline the steam cleaner place foot on
Mop Head and gently pull handle backwards
(2.18).
• To produce steam squeeze the Steam Trigger
(2.19).
• Move the Steam Mop slowly backwards and
forwards across the floor (2.20) paying
particular attention to high traffic areas.
NOTICE: The Carpet Glider does not stay attached
to the mop, it is designed in this way.
AFTERSTEAMCLEANERUSE/ USINGCOOLINGTRAY
After using Steam Mop and to avoid damage
to your floors, unplug and place Steam Mop
in Cooling Tray (2.21) until product cools.
Once steamer has cooled, remove
Microfiber Pad and follow maintenance
instructions on page 10 to avoid mold and
mildew.
FamiliarizeyourselfwiththesehomemaintenancetasksasproperuseandcareofyourSteamMopwill
ensurecontinuedcleaningeffectiveness.
if steam cleaner is not working as it should, has been dropped, damaged, left outdoors, or dropped
into water, call Customer Service at 1-800-944-9200 for further instruction before continuing use.
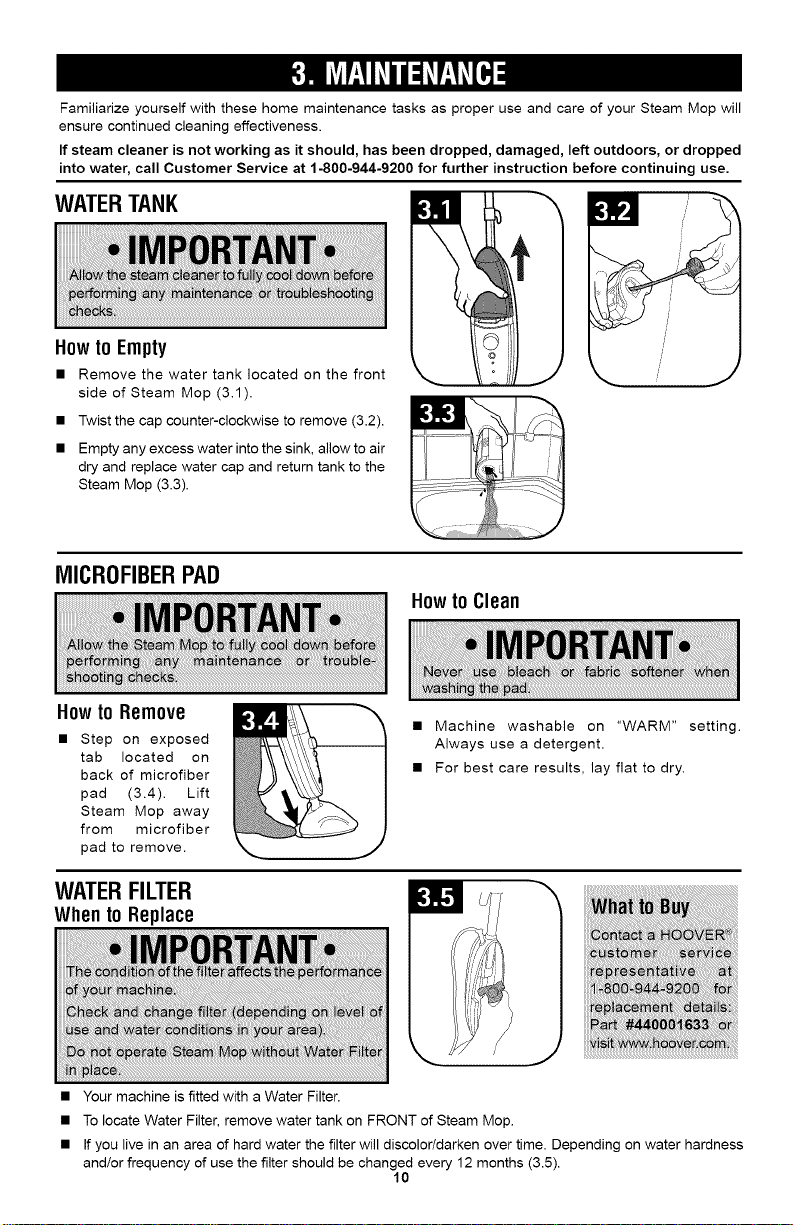
WATERTANK
Howto Empty
• Remove the water tank located on the front
side of Steam Mop (3.1).
• Twist the cap counter-clockwise to remove (3.2).
• Empty any excess water into the sink, allow to air
dry and replace water cap and return tank to the
Steam Mop (3.3).
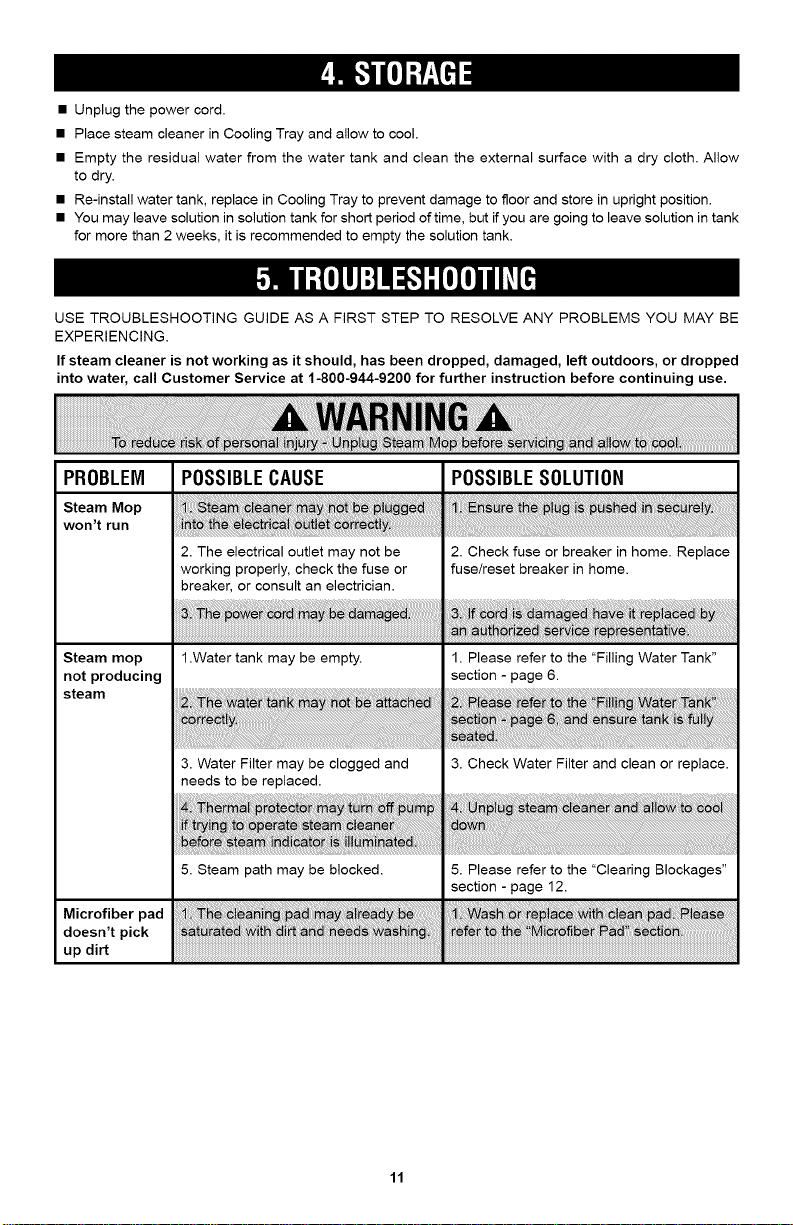
MICROFIBERPAD
Howto Clean
HOWto Remove
Step on exposed
tab located on
back of microfiber
pad (3.4). Lift
Steam Mop away
from microfiber
pad to remove.
• Machine washable on "WARM" setting.
Always use a detergent.
• For best care results, lay flat to dry.
WATERFILTER
Whento Replace
• Your machine is fitted with a Water Filter.
To locate Water Filter, remove water tank on FRONT of Steam Mop.
If you live in an area of hard water the filter will discolor/darken over time. Depending on water hardness
and/or frequency of use the filter should be changed every 12 months (3.5).
10
• Unplugthepowercord.
• PlacesteamcleanerinCoolingTrayandallowtocool.
• Emptytheresidualwaterfromthewatertankandcleantheexternalsurfacewithadrycloth.Allow
todry.
• Re-installwatertank,replaceinCoolingTraytopreventdamagetofloorandstoreinuprightposition.
• Youmayleavesolutioninsolutiontankforshortperiodoftime,butifyouaregoingtoleavesolutionintank
formorethan2weeks,itisrecommendedtoemptythesolutiontank.
USETROUBLESHOOTINGGUIDEASAFIRSTSTEPTORESOLVEANYPROBLEMSYOUMAYBE
EXPERIENCING.
Ifsteamcleanerisnotworkingasitshould,hasbeendropped,damaged,leftoutdoors,ordropped
into water, call Customer Service at 1-800-944-9200 for further instruction before continuing use.
PROBLEM
Steam Mop
won't run
Steam mop
not producing
steam
Microfiber pad
doesn't pick
up dirt
POSSIBLECAUSE POSSIBLESOLUTION
2. The electrical outlet may not be 2. Check fuse or breaker in home. Replace
working properly, check the fuse or fuse/reset breaker in home.
breaker, or consult an electrician.
1.Water tank may be empty. 1. Please refer to the "Filling Water Tank"
section - page 6.
3. Water Filter may be clogged and 3. Check Water Filter and clean or replace.
needs to be replaced.
5. Steam path may be blocked. 5. Please refer to the "Clearing Blockages"
section - page 12.
11
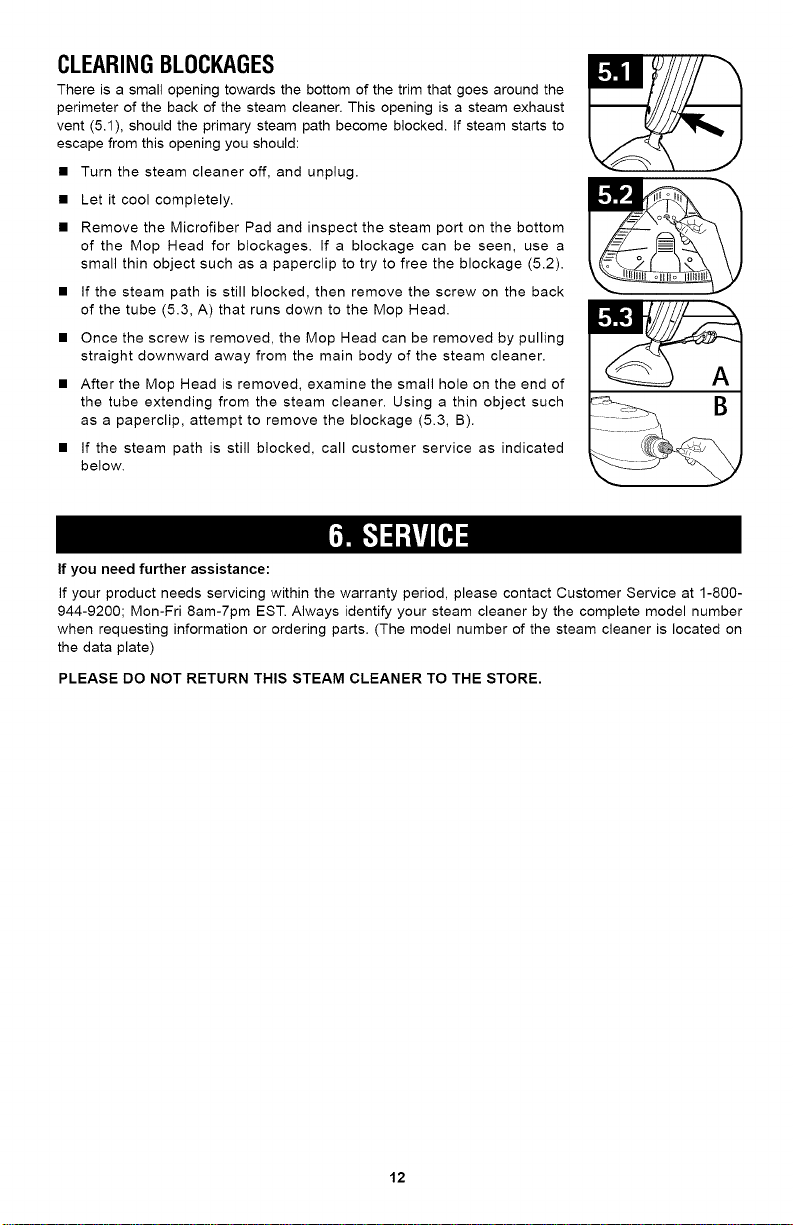
CLEARINGBLOCKAGES
There is a small opening towards the bottom of the trim that goes around the
perimeter of the back of the steam cleaner. This opening is a steam exhaust
vent (5.1), should the primary steam path become blocked. If steam starts to
escape from this opening you should:
• Turn the steam cleaner off, and unplug.
• Let it cool completely.
• Remove the Microfiber Pad and inspect the steam port on the bottom
of the Mop Head for blockages. If a blockage can be seen, use a
small thin object such as a paperclip to try to free the blockage (5.2).
• If the steam path is still blocked, then remove the screw on the back
of the tube (5.3, A) that runs down to the Mop Head.
• Once the screw is removed, the Mop Head can be removed by pulling
straight downward away from the main body of the steam cleaner.
• After the Mop Head is removed, examine the small hole on the end of
the tube extending from the steam cleaner. Using a thin object such
as a paperclip, attempt to remove the blockage (5.3, B).
• If the steam path is still blocked, call customer service as indicated
below.
If you need further assistance:
If your product needs servicing within the warranty period, please contact Customer Service at 1-800-
944-9200; Mon-Fri 8am-7pm EST. Always identify your steam cleaner by the complete model number
when requesting information or ordering parts. (The model number of the steam cleaner is located on
the data plate)
PLEASE DO NOT RETURN THIS STEAM CLEANER TO THE STORE.
12

LIMITED TWO YEAR WARRANTY
(Domestic Use)
WHAT THIS WARRANTY COVERS
When used and maintained in normal household
use in accordance with the Owner's Manual,
your HOOVER ° appliance is warranted against
original defects in material and workmanship for
a full two years from date of purchase (the
"Warranty Period"). During the Warranty Period,
Hoover e_ will provide will provide replacement
appliance or parts, at no cost to you, to correct
any such defect in appliances purchased in the
United States, U.S. Military Exchanges and
Canada.
HOW TO MAKE A WARRANTY CLAIM
If this appliance is not as warranted, call 1-800-
944-9200 OR visit Hoover ¢ online at www.hoover.
com. For additional assistance or information
concerning this Warranty, phone the Hoover _
Consumer Response Center, Phone 1-800-944-
9200, Mon-Fri 8am-7pm EST.
WHAT THIS WARRANTY DOES NOT COVER
This Warranty does not cover: use of the
appliance in a commercial operation (such as
maid, janitorial and equipment rental services),
pads, filter, improper maintenance of the
appliance, damage due to misuse, acts of God,
nature, vandalism or other acts beyond the
control of Hoover ¢, owner's acts or omissions,
use outside the country in which the appliance
was initially purchased and resales of the
appliance by the original owner. This warranty
does not cover pick up, delivery, transportation
or house calls.
This warranty does not apply to appliances
purchased outside the United States, including its
territories and possessions, outside a U.S. Military
Exchange and outside of Canada. This warranty
does not cover appliances purchased from a
party that is not an authorized retailer, dealer, or
distributor of Hoover ® appliances.
OTHER IMPORTANT TERMS
This Warranty is not transferable and may not be
assigned. This Warranty shall be governed and
construed under the laws of the state of Ohio. The
Warranty Period will not be extended by any
replacement or repair performed under this
Warranty.
THIS WARRANTY IS THE EXCLUSIVE
WARRANTY AND REMEDY PROVIDED BY
HOOVER ®. ALL OTHER WARRANTIES,
EXPRESSED OR IMPLIED, INCLUDING
WARRANTIES OF MERCHANTABILITY OR
FITNESS FOR PARTICULAR PURPOSE, ARE
DISCLAIMED. IN NO EVENT WILL HOOVER
BE LIABLE FOR ANY SPECIAL, INDIRECT,
INCIDENTAL OR CONSEQUENTIAL DAMAGES
OF ANY KIND OR NATURE TO OWNER OR
ANY PARTY CLAIMING THROUGH OWNER,
WHETHER BASED IN CONTRACT,
NEGLIGENCE, TORT OR STRICTAPPLIANCES
LIABILITY OR ARISING FROM ANY CAUSE
WHATSOEVER. Some states do not allow the
exclusion of consequential damages, so the
above exclusion may not apply to you. This
warranty gives you specific rights; you may also
have others that vary from state to state.
13

MANUALDELPROPIETARIO
Instrucciones de Funcionamiento y Servicio
®
www.h00ver.c0m
IMPORTANTE:LEAATENTAMENTEANTESDEENSAMBLARY USAR.
&Tiene alguna pregunta o inquietud? Para obtener asistencia, Ilame al Servicio de atencion al
cliente al 1-800 944 9200, de lunes a viernes, de 8 a.m. a 7 p.m., hora del ESTE.
POR FAVOR, NO DEVUELVA ESTE PRODUCTO A LA TIENDA.
ESTAASPIRADORAPARAALFOMBRASESTADISENADA
PARAUSODOMESTICO.
ELUSOCOMERCIALDE ESTEPRODUCTOANULALA GARANTIA.
©2011 Techtronic Floor Care Technology Limited. Todos los derechos reservados. #961145002 ID102309-R1
El

Graciaspor haber elegido un producto HOOVER°.
Anote los nOmeros completos de Codigo de fabricacion
en los espacios provistos.
MODELO
CODIGO DE FABRICACION
Consejo: Adjunte su recibo de compra a este Manual del
propietario. Para obtener el servicio de garantia de su
producto HOOVER e_puede requerirse la verificacion de la
fecha de compra.
Inscriba su producto en linea en Hoover.corn, o Ilame al
1-800-944-9200 si prefiere hacerlo por telefono. Visite
Hoover.com para obtener instrucciones adicionales en
video para el armado y el mantenimiento.
Salvaguardias importantes .................................................................................... E3
Ensamblado ................................................................................................................ E5
Contenido de la caja ................................................................................................ E5
Colocaci6n del mango ............................................................................................. E5
Almacenaje de la cuerda ......................................................................................... E5
C6mo usar la aspiradora ........................................................................................ E6
Descripci6n del limpiador a vapor ........................................................................... E6
Antes de comenzar a limpiar ................................................................................... E8
Llenado del tanque de agua .............................................................................. E8
Colocaci6n de la almohadila de limpie za de microfibra ................................... E7
Llenado del tanque de soluci6n ......................................................................... E7
Li mpie za al vapor de pisos duros .......................................................................... E8
Uso en alfombras .................................................................................................... E9
Des pues de usar el li mpiad or a vapor / us o de la Base de enfriamient ............. E9
Mantenimiento .......................................................................................................... El0
Tanque de agua limpia ............................................................................................ El0
Almohadilla de microfibra ........................................................................................ El0
Filtro de agua .......................................................................................................... El0
Almacenaje ................................................................................................................ Ell
Soluci6n de problemas ........................................................................................... Ell
Para despejar bloqueos ........................................................................................... E12
Servicio ...................................................................................................................... E12
Garantia ...................................................................................................................... E13
!,,:.=.o00.-,lllllH,,,li
_.N0_0_u_e _& x xxxxx xxxxx x tJ_,
M_U_LO XXXXXXX
I................ I@/ _[;
Ill
CODIG0DE FABRICACION_-o_
(Etiqueta ubicada en la parte posterior
de la fregona a vapor)
Si necesita asistencia:
Visite nuestro sitio web en hoover.Com. Llame al 1-800-944-9200 para obtener una referencia
automatica alas ubicaciones de distribuidores autorizados de Hoover _ (solamente ee. Uu.), O para
hablar con un representante de servicio al cliente; lunes a viernes, de 8:00 a.M. A 7:00 p.M. Est (hora
estandar del este).
POR FAVOR NO DEVUELVA ESTE PRODUCTO A LA TIENDA.
E2

iSALVAGUARDIASIMPORTANTES!
iGUARDEESTASINSTRUCCIONES!
AI usar un aparato electrico, observe siempre las precauciones bfisicas, incluyendo
las siguientes:
LEATODAS LAS INSTRUCCIONESANTES DE USAR ESTEAPARATO
ADVERTENCIA:PARARF.,DUCIREL RIESGODE
INCENDIOS,CHOQUESELECTRICOS0 LESIONES:
• Ensamblecompletamenteel productoantes de hacerlofuncionar.
• Opere el limpiador a vapor unicamente con la tensi6n que se especifica en la
etiqueta de datos en la parte posterior de la fregona a vapor.
• Nodejeel aparatosinsupervisi6ncuandoesteenchufado.Desenchufelodelatoma de
corrientecuandono Io este usandoy antes de limpiarloo darle mantenimiento.
• No use este aparato en lugares al aire libre ni en superficies humedas.
• No use para calentar espacios.
• No sumerja en agua.
• No permitaque esta maquinase use como un juguete. No es_ dise_adaparaque Io
utilicenni_osde 12a_osy menos.Sedebeprestarespecialatenci6ncuandoesteproducto
esusadocercadelos ni_os.Paraevitarlesioneso dafios,mantengaa losni_os lejosdel
productoy nopermitaquelosni_oscoloquenlosdedosuolrosobjetosenningunaabertura.
• No utilice ningun cable prolongador con este producto.
• No manipule el enchufe ni la fregona a vapor con las manos mojadas. No haga
funcionar la fregona a vapor sin calzado.
• Nocoloquelas manosni lospies bajo la fregona a vapor mientras este funcionando,
ya que la unidad alcanza altastemperaturas y puede provocar quemaduras.
• Utilice unicamente sobre superficies planas y horizontales. No utilice la fregona a
vapor en paredes, encimeras o ventanas.
• Paraprotegerse contra el riesgo de descargas electricas, no sumerja la fregona a
vapor en agua ni en ningun otro liquido.
• Useel productos61ocomo se describe en este manual. Use s61olos accesorios y
productosrecomendadosporel fabricante.
• No use este aparato con un cord6n o enchufe da_ados. Si el aparato no esta
funcionandoadecuadamente,se dej6caer, se daft& se dej6 a la intemperieo se dej6
caerdentrodel agua,Ileveloa un Centrode servicioantes de continuarusandolo.
• NNoIousesi el cableo enchufe estanda_ados.Si el aparato no estafuncionandode
maneraadecuada,se dej6caer,sedaft& se dej6a la intemperie,o sedej6caer dentro
del agua, Ilame a Servicios de atenci6n al c/iente al 1-800-944-9200 para recibir
instruccionesantesde volvera utilizarlo.
• NoIodesenchufetirandodelcord6n.Paradesenchufarlo,sujeteel enchufe,noel cord6n.
• Nointroduzcaobjetosenlasaberturas.Nousesi algunade lasaberturasestabloqueada.
• Mantengaelcabello, lasropassueltas,losdedosy todas las partesdelcuerpoalejadas
de lasaberturas.
• Mantengaelcabello, lasropassueltas,losdedosy todas las partesdelcuerpoalejadas
de lasaberturas.
• Apaguetodosloscontrolesantesde desenchufarelaparato.
• Tengaespecial cuidado al limpiar escaleras. Cuandono este en uso no coloque el
limpiadorsobreescaleraso muebles,ya que esto puedecausarlesioneso dafios.
• Paraevitarquemaduras o lesiones,no aplique vapor directamentesobre personaso
animales.
E3

• Utilice unicamente agua para Ilenar el tanque de agua limpia. Noutilice ningun tipo
de producto qufmico o aditivo en el tanque de agua limpia.
• Noabra la tapa del Ilenadode agua mientras este utilizando la fregona a vapor.
• No agregue productos desincrustantes, aromaticos, alcoh61icos, soluciones
limpiadoras, perfumes, aceites ni ningun otto producto qufmico al agua que se
utiliza en este aparato, ya que esto puede dafiar la unidad o hacer que su uso sea
peligroso. Si bien esta fregona a vapor esta dise_ada para agua del grifo, para
aumentar la eficacia del vapor y evitar la acumulaci6n de minerales, se puede
utilizar agua destilada para Ilenar la fregona a vapor.
• No utilice la fregona a vapor en un espacio cerrado Ileno de vapor proveniente de
pintura con base de aceite, solventes de pintura, algunas sustancias antipolilla,
polvo inflamable u otros vapores explosivos o t6xicos.
• Mientras este en uso, nunca invierta el aparato ni Io utilice sobre su costado.
• Permita que la fregona a vapor se enfrfe durante un tiempo suficiente antes de
quitar la almohadilla de microfibra.
• Antes de limpiar la fregona a vapor, desenchufe el cable del tomacorriente y
limpielo con un trapo seco o humedo. No vierta agua ni utilice alcohol, benceno o
solvente de pintura sobre la unidad.
• No use en Areas donde pueda haber liquidos inflamables o combustibles, tales
como gasolina.
• Conecteel aparato unicamente a una toma de corriente con una conexi6n a tierra
adecuada. Yea "lnstrucciones de conexi6n a tierra".
• Nuncautilice la fregona a vapor sin la almohadilla de microfibra colocada.
• No limpie sobre tomacorrientes electricos de piso.
• No utilice la fregona a vapor sobre cuero, muebles o pisos pulidos con cera, telas
sinteticas, terciopelo u otros materiales delicados y sensibles al vapor.
• Utilice solamente con la soluci6n limpiadoraSteamPlusTM de Hoover®.
• No haga funcionar la fregona a vapor sin agua en el tanque de agua limpia.
• AI)VERTENCIA: Este producto contiene sustancias quimicas reconocidas pot
el estado de California como causantes de cancer, defectos congenitos o dafio
reproductivo./._,4VESE/_AS MANO$ DESPUE$ DE USAR EL PRODUCTO.
ADVERTENCIA:
PARAREDUCIREL RIESGO
DEDANOS:
• Guardelamaquinaen un lugarseco.No la expongaa temperaturasdecongelamiento.
• Cuando el vapor este activado, no permita que el artefacto rocie un mismo lugar
durante un perfodo de tiempo prolongado, ya que esto puede provocar da_osa la
superficie.
• Nunca utilice la fregona a vapor sin la almohadilla de microfibra colocada.
• Nuncadeje la fregona a vapor en un mismo lugar o sobre una superficie durante
ningun periodode tiempocuando labomba esteencendiday el vaporeste activado.
ADVERTENCIA:
• Para disminuir el riesgo de choque electrico, este aparato tiene un enchufe
polarizado (una patilla es mas ancha que la otra). Este enchufe puede usarse en
una toma de corriente polarizada, de una sola manera. Si el enchufe no encaja
completamente en la toma de corriente, col6quelo al reves. Si aun asf no encaja,
comunfquese con un electricista calificado para que instale la toma de corriente
apropiada. No haga ningun tipo de modificaci6n al enchufe.
E4

CONTENIDODELACAJA
A. Mango
B. Cuerpo del trapeador a vapor (Tanque de agua
y tanque de solucion colocados)
C. Almohadilla de limpieza de microfibra (x2)
D. Hard Floor Microfiber Pad
E. Deslizador para alfombras
R Filtro de agua dura (colocado previamente en
el limpiador a vapor; quite el tanque delantero
para dejar expuesto el filtro)
G. Base de enfriamiento
H. 2X Solucion limpiadora Steamplus TM de
Hoover _ de 8 onzas
Retire todas las piezas de la caja e identifique
cada articulo que se muestra.
AsegQrese de ubicar todas las piezas antes de
eliminar el embalaje.
m
B C E
F
i i
H
G
J
COLOCACIONDELMANGO
• Inserte el mango en
el cuerpo principal
(1.2). Presione
firmemente hasta que
se escuche un
chasquido.
ALMACENAJEDE LA CUERDA
• Enrouler le cordon
autour des crochets
pour le ranger
facilement (1,3). Fixer
I'extremit6 avec la fiche
au cordon,
E5

DESCRIPCIONDELAASPIRADORA
1. Mango
2. Gancho superior para el cable
3. Gancho inferior para el cable
4. Cable de alimentacion
5. Tanque de agua limpia
6. Boton de encendido
7. Cabezal de piso
8. Gatillo liberador de vapor
9. Tanque de solucion
10. Dial de control de solucion
11. Luz indicadora de alimentacion electrica
Luz azul = Unidad encendida
12. Luz indicadora de vapor listo
Luz verde = Limpiador a vapor listo
Luz apagada = Tanque calentandose
Accesorios
13. Almohadiila de microfibra para
superficies m01tiples (2)
14. Almohadilla de microfibra para
pisos duros
15. Deslizador para alfombras
16. Filtro de agua dura (colocado
previamente en el limpiador a
vapor, quitar el tanque delantero
para dejar expuesto el filtro)
17. Cooling Tray
ESPECIFICACION TECNICA
N0mero de modelo: WH20200
Potencia de entrada: AC 120V / 60Hz / 12A
W
Front Back
8
14 15
Accessories
16
ANTESDECOMENZARA LIMPIAR
LLENADODELTANQUEDEAGUALIIVIPIA
• Localice el tanque de agua limpia que se
encuentra en el FRENTE de la fregona a vapor
y utilice los asideros laterales (2.2,A) o el labio
(2.2,B) del tanque para extraerlo.
• Haga girar la tapa en sentido antihorario para
quitarla (2.3).
• Sostenga el tanque de agua bajo el grifo del
fregadero y Ilenelo de agua. Vuelva a colocar la
tapa del agua y gire en sentido horatio hasta
que este ajustada firmemente.
• AsegOrese de que el filtro de agua dura este en
su lugar (vea 3.5).
• Deslice el tanque de agua limpia hacia abajo e
insertelo en su lugar (2.5).
NOTA: Cuando se coloque el tanque en posicion
vertical, es posible que se viertan algunas gotas
desde la tapa. Esto es normal.
E6

COLOCACIONDE LAALMOHADILLADELIMPIEZADEMICROFIBRA
• La "Almohadilla de Microfibra para Pisos
Duros" (2.6, A) se utiliza especificamente para
superficies de pisos duros sellados, la
almohadilla no se puede utilizar sobre
moquetas. La "Almohadilla de Microfibra para
Superficies MUltiples" (2.6, B) se puede utilizar
en todas las superficies de pisos duros
sellados, asi como tambien en moquetas, yen
forma conjunta con el deslizador para almohadillaen su lugar.
alfombras.
• Para colocarla, ubique la almohadilla de
microfibra en el piso, con el lado blanco hacia
arriba.
• Coloque el producto sobre la almohadilla
(2.7), verificando que el cabezal de la fregona
cubra toda la almohadilla. El gancho y bucle en
la parte inferior de la fregona sujetara la
LLENADODELTANQUEDESOLUCION
/
/
/
• Localice el tanque de solucion que se
encuentra en la parte POSTERIOR de la
fregona a vapor y utilice los asideros laterales
(2.8,A) o el labio (2.8,B) del tanque para extraerlo.
• Haga girar la tapa en sentido antihorario para
quitarla (2.9).
• Llene el tanque de solucion con soluci6n
limpiadora SteamPlus TM de Hoover ®. PARA
OBTENER RESULTADOS DE LIMPIEZA
OPTIMOS, agregue la solucion directamente al
tanque de solucion de su limpiador a vapor
Hoover ®. PARA OBTENER UNA
CONCENTRAClON NORMAL, agregue al
tanque de soluci6n partes iguales de agua del
grifo tibia (no hervida) y soluci6n limpiadora,
segQn la capacidad del tanque de su
electrodomestico especifico. Vuelva a colocar la
tapa y gire en sentido horario hasta que este
ajustada firmemente.
• Deslice el tanque de soluci6n hacia abajo e
insertelo en su lugar (2.11).
• Ahora puede limpiar segQn Io necesite
haciendo girar el dial de control de soluci6n
(2.12) hasta la configuraci6n que desee, Io
que dispensar& autom&ticamente la soluci6n
al presionar el gatillo. Coloque en la posici6n
"STEAM ONLY" si no se desea utilizar soluci6n
limpiadora SteamPlus TM de Hoover ®.
Consulte "Uso del dial de control de solucion y
ajuste del limpiador" para hallar m&s
instrucciones. E7

USODELDIALDECONTROLDESOLUCIONY AJUSTEDELLIIVlPIADOR
• El dial de control de solucion controla la cantidad de limpiador que se agrega al vapor. No ajusta la
cantidad de vapor, solamente la de limpiador.
• Si desea limpiar solo con vapor, simplemente gire el dial de control de solucion a "STEAM ONLY".
Ahora, cada vez que presione el gatillo de vapor usted liberara solamente vapor.
• Si desea limpiar utilizando limpiador, simplemente gire el dial de control de solucion a la
configuracion que desee. Ahora, cuando usted presione el gatillo de vapor, la fregona a vapor
liberar& la cantidad de limpiador que este indicada en el dial de control de solucion, asi como un
flujo parejo de vapor.
LIMPIEZAAL VAPORDEPISOSDUROS
• Coloque la almohadilla de microfibra. Enchufe el
aparato y presione el boton de encendido del
limpiador a vapor (2.13).
• En aproximadamente 30 segundos, la
unidad estar& lista para producir vapor. Una
vez que este lista para producir vapor, el
indicador verde de "vapor listo" se iluminar&.
• Para reclinar el limpiador a vapor coloque el
pie en el cabezal de piso e incline el mango
(2.13).
• Para producir vapor apriete el gatillo (2.14).
• Mueva el trapeador a vapor lentamente
hacia atras y adelante pot el piso (2.19)
prestando especial atencion alas areas con
alto nivel de tr&fico.
Paradesinfectar
• Gire el dial selector de control de limpieza a
"STEAM ONLY".
• Coloque la almohadilla de microfibra para
pisos duros, haga al menos 4 pasadas por la
misma area a una velocidad media, y deje
secar al aire.
E8

PARARENOVARMOQUETAS
• Utilice vapor por si solo. No utilice solucion
limpiadora. Gire el dial de control de
solucion a "OFF" (Apagado).
• La unidad necesitar& aproximadamente 30
segundos para estar lista para producir
vapor. Una vez que este lista para producir
vapor, el indicador verde de "vapor listo" se
iluminara.
• Coloque el limpiador a vapor en el deslizador
para alfombras (2.17).
• Para reclinar el limpiador a vapor coloque el pie
en el cabezal de piso e incline el mango (2.18).
• Para producir vapor apriete el gatillo (2.19).
• Mueva el trapeador a vapor lentamente hacia
atr&s y adelante pot el piso (2.20) prestando
especial atencion alas &reas con alto nivel de
trafico.
AVISO: El deslizador para alfombras no permanece
colocado en la fregona, est& diseSado de este modo.
DESPUI_SDEUSAREL LIMPIADORA VAPOR/ USODE LA BASEDE
ENFRIAMIENTO
Despues de usar el trapeador de pisos y
para evitar daSar a sus pisos, desenchufe y
co(oque el trapeador a vapor en la base de
enfriamiento (2.21) hasta que el producto
se enfrie. Una vez que el limpiador a vapor
se haya enfriado, quite la almohadilla para
vapor y siga las instrucciones de
mantenimiento de la pagina 11 para evitar
la formacion de moho y hongos.
E9

Familiariceseconestastareasdomesticasdemantenimiento,yaqueelusoycuidadocorrectosdesu
trapeadoravaporaseguraraunaprolongadaeficaciadelimpieza.
Si el electrodom_stico no est_ funcionando como deberia, se ha dejado caer, se ha dahado, se ha
dejado a la intemperie, o ha caido dentro del agua, Ilame al Servicio al Cliente al 1-800-944-9200 para
obtener m&s instrucciones antes de continuar con el uso.
TANQUEDEAGUA
COmovaciar
• Remove the clean water tank located on the
front side of Steam Mop (3.1).
• Haga girar la tapa en sentido antihorario para
quitarla (3.2).
• Vacie cualquier exceso de agua en el fregadero,
vuelva a colocar la tapa de agua y coloque
nuevamente en el limpiador a vapor (3.3).
ALMOHADILLADEMICROFIBRA
C6m0limpiar
C6m0quitar
• Pise sobre laleng_eta
expuesta, ubicada en la
parte posterior de la
almohadilla de limpieza
de microfibra (3.4).
Levante el trapeador a
vapor de la almohadilla
de microfibra para
quitarla.
• Se lava en el lavarropas en configuracion
"TIBIA". Use siempre un detergente.
• Para mejores resultados, deje secar sobre una
superficie plana.
FILTRODEAGUADURA:Cu_indosubstituir
• Su artefacto esta equipado con un filtro de agua dura.
• Para ubicar los filtros de agua dura, retire el tanque de agua
limpia en la parte DELANTERA del limpiador a vapor.
• Si vive en una zona donde hay agua dura, el filtro se decoloraral
oscurecera con el tiempo. SegQn la dureza del agua y/o la
frecuencia del uso, el filtro se deberia cambiar cada 18 meses (3.5).
EIO

• Desenchufe el cable de alimentacion.
• Coloque el limpiador a vapor en la base de enfriamiento y deje enfriar.
• Vacie el agua que quede en el tanque de agua y limpie la superficie exterior con un trapo seco. Deje secar.
• Vuelva a instalar el tanque de agua, vuelva a colocar en la base de enfriamiento para evitar daSos al
piso y guarde en posicion vertical.
• Dejar solucion sin usar en el tanque de solucion no afectar& el desempeSo, pero se recomienda vaciarlo
si el producto no se utilizara durante un periodo de tiempo prolongado.
UTILICE LA GU(A DE DETECCION Y RESOLUCION DE PROBLEMAS COMO PRIMER PASO PARA
RESOLVER CUALQUIER PROBLEMA QUE SE PRESENTE.
Si el electrodom_stico no est_ funcionando como deberia, se ha dejado caer, se ha da£1ado, se ha
dejado a la intemperie, o ha caido dentro del agua, Ilame al Servicio al Cliente al 1-800-944-9200 para
obtener m&s instrucciones antes de continuar con el uso.
PROBLEMA
El trapeador a
vapor no fun-
ciona
El trapeador a
vaporno
produce
vapor
La almohadilla
de limpieza de
microfibra no
recoge la
suciedad
CAUSAPOSIBLE
2. Es posible que el tomacorriente no 2. Verifique el fusible o disyuntor en la
funcione correctamente; verifique el casa. Reemplace el fusible o restablezca
fusible o disyuntor, o consulte a un el disyuntor en la casa.
electricista.
1. Es posible que el tanque de agua 1. Por favor consulte la seccion de
este vacio. "Limpieza del tanque de agua" - pagina 6.
3. Es posible que el filtro de agua este 3. Revise el filtro de agua, y limpielo o
obstruido y sea necesario reemplazarlo, reemplacelo.
5. Es posible que la via de vapor este 5. Por favor consulte la seccion de "Para
bloqueada, despejar bloqueos" a continuacion - p&gi-
SOLUCII_NPOSIBLE
na 12.
E11

PARADESPEJARBLOQUEOS
Hay una peque-a abertura en la parte inferior del reborde que rodea el
per'metro de la parte posterior del limpiador a vapor. Esta abertura es un
escape de vapor (5.1), en caso de que la v'a principal de vapor se
bloquee. Si comienza a salir vapor de esta abertura, usted debe:
• Apagar el limpiador a vapor y desenchufarlo.
• Dejar que se enfr'e por completo.
• Quitar la almohadilla de limpieza de microfibra e inspeccionar la
abertura de vapor en la parte inferior de la boquilla para ver si hay
bloqueos. Si se puede observar un bloqueo, use un objeto peque-o
y delgado tal como un mondadientes para intentar despejar el bloqueo.
• Si la v'a de vapor sigue bloqueada, quite el tornillo en la parte
posterior del tubo (5.2) que va hasta la boquilla.
• Una vez que se quita el tornillo, se puede quitar la boquilla tirando
directamente hacia abajo y hacia fuera del cuerpo principal del
limpiador a vapor.
• DespuZs de quitar la boquilla, examine el peque-o orificio en el
extremo del tubo que se extiende desde el limpiador a vapor.
Utilizando un objeto delgado tal como un mondadientes intente
despejar el bloqueo.
• Si la v'a de vapor sigue bloqueada, Si el paso de vapor ao_ est$
obstruido, Ilame al servicio al cliente como se indica a continuaci-a.
Si necesita recibir m:[:s ayuda:
Visite nuestro sitio web en hoover.Com. Llame al 1-800-944-9200 para obtener una referencia automStica a las
ubicaciones de distribuidores autorizados de Hoover (solamente ee. Uu.), O para hablar con un representante de
servicio al cliente; lunes a viernes, de 8:00 a.M. A 7:00 p.M. Est (hora estSndar del este).
POR FAVOR NO DEVUELVA ESTE PRODUCTO A LA TIENDA.
E12

GARANTiALIMITADA DE DOSANOS
(Para uso dom@stico)
QUE CUBRE ESTA GARANT[A
Si se utiliza y mantiene conforme al uso normal
en una casa de familia seg_n las instrucciones
del Manual del Pgpropietario, su aparato
HOOVER® y conjunto de manguera estbn garan-
tizados contra defectos originales en materiales y
mano de obra durante dos aSos completos a
partir de la fecha de compra (el "Periodo de
garantia"). Durante el periodo de garantia,
Hoover_ proporcionara un electrodomestico o
piezas de reemplazo, sin costo para usted, para
corregir cualquier defecto de ese tipo en electro-
domesticos comprados en los Estados Unidos,
tiendas militates de EE. UU., y Canada.
COMO HACER UN RECLAMO EN VlRTUD DE
LA GARANT[A
Si este electrodomestico no se encuentra tal
como se garantiza, Ilame al 1-800-944-9200 O
visite Hoover® en linea en www.hoover.com.
Para recibir asistencia o informaci6n adicional
con respecto a esta garantia, Ilame por telefono
al Centro de Respuesta al Consumidor de
Hoover,, telefono 1-800-944-9200, de lunes a
viernes, de 8:00 a.m. a 7:00 p.m. EST (Hora
Estbndar del Este).
QUte NO CUBRE ESTA GARANT[A
Esta garantia no cubre: el uso del producto con
cualquier fin comercial (como servicios de limp-
ieza, mantenimiento y de alquiler de equipos), el
mantenimiento inadecuado del producto, los
daSos provocados por el uso indebido, caso for-
tuito, hechos de la naturaleza, vandalismo u otros
actos que excedan del control de Hoover ¢, accio-
nes u omisiones del propietario, uso fuera del
pals en que el producto fue comprado inicial-
mente y reventa del producto por parte del propi-
etario original. Esta garantia no cubre el retiro del
producto, la entrega, el transporte ni las visitas a
domicilio.
Esta garantia no se aplica a los productos com-
prados fuera de los Estados Unidos, incluidos
sus territorios y posesiones, fuera de una tienda
situada en una base militar de los EE. UU. ni
fuera de Canadb. Esta garantia no cubre los
productos comprados a una parte que no sea un
minorista, concesionario o distribuidor autoriza-
dos de los productos de Hoover _.
OTROS TI:!:RMINOS IMPORTANTES
Esta Garantia no es transferible ni puede ceder-
se. Esta Garantia se regirb e interpretarb de
conformidad con las leyes del estado de Ohio. El
Periodo de Garantia no se prorrogara en funci6n
de ning_n reemplazo o reparaci6n realizados en
virtud de esta Garantia.
ESTA GARANT[A ES LA 0NICA GARANT[AY EL
0NICO RECURSO QUE HOOVER e_
PROPORCIONA. TODAS LAS DEM/kS
GARANTiAS, EXPRESAS O IMPLiCITAS,
INCLUIDAS LAS GARANTiAS DE
COMERClABILIDAD O APTITUD PAPA UN FIN
PARTICULAR, QUEDAN EXCLUIDAS. HOOVER
NO SERA RESPONSABLE EN NINGON CASO
POR NINGON DAi_IO ESPECIAL, INDIRECTO,
INCIDENTAL O MEDIATO DE NINGON TIPO O
NATURALEZA CON RESPECTO AL
PROPIETARIO O A CUALQUIER PARTE QUE
REALICE UN RECLAMO A TRAVES DEL
PROPIETARIO, YA SEA QUE SE BASE EN
RESPONSABILIDAD CONTRACTUAL,
NEGLIGENClA, RESPONSABILIDAD
EXTRACONTRACTUAL O RESPONSABILIDAD
CIVIL OBJETIVA POR LOS PRODUCTOS, O
EMERGENTE DE CUALQUIER OTRA CAUSA.
Algunos estados no permiten la exclusion de los
daSos mediatos, por Io cual es posible que la
exclusion mencionada no se aplique en su caso.
Esta garantia le otorga derechos especificos; es
posible que, adem&s, tenga otros derechos que
varian de un estado a otro.
E13

Instructions d'utilisation et d'entretien
www.hoover.com
IMPORTANT : LIRE CES INSTRUCTIONS ATTENTIVEIVIENTAVANT
D'UTILISER L'ASPIRATEUR.
Vous avez des questions ou des inquietudes? Veuillez appeler le service & la clientele au
1 800 9449200 du lundi au vendredi, de 8 h & 19 h (HNE).
VEUILLEZ NE PAS RETOURNER CE PRODUlT AU MAGASlN.
L'UTILISATION DE CE PRODUIT A DES FINS COMMERCIALES
INVALIDE LA PRI_SENTEGARANTIE.
@2011 Techtronic Floor Care Technology Limited. Tous droits r6serves. #961145002 ID102309-R1

Merci d'avoir choisi un produit HOOVERMD.
Veuillez inscrire les numeros de modele et de serie
COMPLETS dans les espaces fournis a cet effet
MODF:LE
CODE DE FABRICATION
Conseil: II est recommande de joindre votre re£u de
caisse au guide de I'utilisateur, car une verification de la
date d'achat peut 6tre effectuee avant toute reparation
couverte par la garantie de votre produit HOOVER MD.
N'oubliez pas d'enregistrer votre produit en ligne, &
I'adresse Hoover.com, ou par tel6phone, au
1-800-944-9200. Visiter le Hoover.com pour visualiser
une video presentant les instructions d'assemblage et
d'entretien.
Consignes de s_curit_ importantes ..................................................................... 3
Assemblage ............................................................................................................... 5
Contenu de I'emballage ........................................................................................... 5
Fixer le manche ....................................................................................................... 5
Cordon et rangement ............................................................................................... 5
Utilisation ................................................................................................................... 6
Description du nettoyeur vapeur .............................................................................. 6
Avant de commencer le nettoyage .......................................................................... 6
Remplir le reservoir d'eau propre ...................................................................... 6
Fixation du filtre nettoyant en microfibres .......................................................... 7
Retrait et remplissage du reservoir de solution ................................................. 7
Nettoyage a la vapeur de planchers a surface dure ............................................... 8
Utilisation sur la moquette ....................................................................................... 9
Apres I'utilisation du nettoyeur vapeur / utilisation de la base refroidissante .......... 9
Entretien ..................................................................................................................... 10
Reservoir d'eau propre ............................................................................................ 10
Tampon nettoyant en microfibres ............................................................................ 10
Filtre & eau .............................................................................................................. 10
Rangement ................................................................................................................. 11
D_pannage ................................................................................................................. 11
Elimination des obstructions .................................................................................... 12
Service ......................................................................................................................... 12
Garantie ...................................................................................................................... 13
CODEDEFABRICATION
(Etiquette situ_e & I'arri_re du balai
vapeur)
Pour obtenir de I'assistance :
Visiter notre site Web a I'adresse hoover.com. Composer le 1 800 9449200 pour acceder au service
d'aide automatise qui vous indiquera I'emplacement des distributeurs agre6s HooverMD (E.-U. seule-
ment) ou pour parler & un representant du service a la clientele (de 8 h a 19 h, HNE, du lundi au
vendredi).
NE PAS RETOURNER CE PROBUIT AU MAGASIN.

CONSIGNESDESI CURITI IMPORTANTES
RANGERETCONSERVERCESINSTRUCTIONS
Durant I'utilisation d'un appareil electrique, toujours respecter les precautions
616mentaires, y compris les suivantes •
LIRE TOUTES LES INSTRUCTIONS AVANT D'UTILISER CET APPAREIL.
AVERTISSEMENT:AFIN DEREDUIREAU
MINIMUM LESRISQUESD'INCENDIE,DE
CHOCI LECTRIQUEOUDEBLESSURES:
• AssemblercompletementavantI'utilisation.
• OperateSteamer only at voltage specified on data label on back of cleaner.
• Nepas laisserI'appareilsanssurveillanceIorsqu'ilest branche.Le debrancherquandil
n'est pas utiliseet avantd'en faire I'entretien.
• Ne pas utiliser sur des surfaces mouillees. Ne pas exposer a la pluie. Ranger
I'interieur.
• Ne pas utiliser pourchauffer.
• Ne pas immerger.
• Poureviterlesblessures,lesbrOluresou lesdommages,tenirleproduithorsdela portee
desenfants,etne pasleurpermettre detoucher I'appareilpendantson fonctionnement
ouavantqu'il aitcompletementrefroidi,ou deplacer leursdoigtsou desobjetsdans les
ouvertures.
• Ne pas utiliser derallonge avec ce produit.
• Ne pas manipuler la fiche ou I'appareil avec les mains mouillees. Ne pas utiliser
I'appareil sans porter de chaussures.
• Ne pas placer les mains ou les pieds sous I'appareil Iorsqu'il est en marche, car il
devient tres chaud et risque de provoquer des brOlures.
• Utiliser uniquement sur des surfaces planes horizontales. Nepas utiliser le balai
vapeur sur les murs, sur les comptoirs ou sur les fenetres.
• Afin d'eviter les risques de chocs electriques, ne pas immerger le balai a vapeur
dans I'eau ou tout autre liquide.
• L'appareil doit etre utilise seulement comme indique dans ce manuel. Utiliser
uniquementlesaccessoireset les produitsrecommandespar le fabricant.
• Ne pas utiliser I'appareil si la fiche ou le cordonsont endommages.Si I'appareilne
fonctionne pas normalement,si on I'a fait tomber, s'il a ete endommage, laisse
I'exterieurouimmerge, communiqueravec le servicea la clienteleau 1 800 9449200
pourobtenirde plus amplesrenseignementsavantde poursuivreI'utilisation.
• Nepas tirersur lecordonpour debrancherI'appareil,maisplutet surla fiche.
• Garder lescheveux, les vetements amples, les doigts et toute autre partie du corps
I'ecart des ouvertures.
• Ne pas inserer d'objets dans les ouverturesde I'appareil. Ne pas utiliser I'appareil
si lesorificessontobstrues.
• Garder lescheveux, les vetements amples, les doigts et toute autre partie du corps
I'ecart des ouvertures.
• Eteindretouteslescommandesavant de debrancherI'appareil.
• Ittretres prudentpendant I'utilisationdans les escaliers.Lorsqu'il n'est pas utilise, ne
pasplacer I'appareil danslesescaliers ou sur un meuble, ce qui pourrait causer des
blessuresou des dommages.
• Pour eviter les brOluresou les blessures, ne pasdiriger le jet de vapeur directement
vers une personneou un animal.

• N'utiliserquedeI'eaupourremplirlereservoird'eaupropre.Nepasverserde
produitsoud'agentschimiquesdartslereservoird'eaupropre.
• Nepasretirerlecapuchondesecurit6dureservoirpendantI'utilisationdubalai
vapeur.
• Nepasajouterdesolutionsdedetartrage,deproduitsaromatisesoualcoolises,de
solutionsdenettoyage,deparfums,d'huilesoud'autresproduitschimiquesaI'eau
utiliseeavecI'appareil,carilsrisquentd'endommagerI'appareiloudenuireD.son
utilisation securitaire. Bien que le balai a.vapeur soit congu pour etre utilise avec
I'eaudu robinet, pour accroftre I'efficacite de la vapeur et pour eviter I'accumulation
de mineraux, vous pouvez remplir le reservoir d'eau distillee.
• Ne pas utiliser I'appareil dans des espaces clos 00 abondent des vapeurs emises
par de la peinture a I'huile, des diluants a. peinture, des apprets antimite, de la
poussiere inflammable ou d'autre vapeur explosiveou toxique.
• Ne jamais retourner I'appareil Iorsqu'il est en marche ou I'utiliser Iorsqu'il repose
sur son flanc.
• Permettre a. I'appareil de refroidir suffisamment avant de retirer le tampon en
microfibres.
• Avant de nettoyer I'appareil, le debrancher de la prise de courant; le nettoyer a.
I'aide d'un chiffon sec ou humide. Nepas verser d'eau ou d'alcool, de benzeneou
de diluant a.peinture sur I'appareil.
• Ne pas utiliser darts des endroits 00 des liquides inflammables ou combustibles,
comme de I'essence, peuvent etre presents.
• Nebranchercet appareil qu'a une prisecorrectement raise a laterre.Voir la section
,, Consignesde mise a.la terre ,>.
• Nejamais utiliser le balai a.vapeur sans le tampon en microfibres.
• Ne pas nettoyer au-dessus de prises electriques sur le plancher.
• Nepas utiliser I'appareil sur du cuir, desmeubles ou des plancherscires, destissus
synthetiques ou des tissus delicats en velours ou sensiblesa.la vapeur.
• Utiliser uniquement avec la solution nettoyante SteamPlusMcdeHooverML
• Ne pas utiliser I'appareil s'il n'y a pas d'eau dans le reservoir d'eau propre.
• IMIISEEN 6ARDE : Cet appareil contient des produits chimiques reconnus par I'l_tat
de la Californiecomme pouvant causer le cancer ou, entrafner des malformations
congenitalesou d'autres troubles de la reproduction.SE LAVER LES MAINS
APRS L 'UTILISA TION DE L 'APPAREII,..
MISE ENGARDE: POURREDUIRELES
RISQUESDEDOMMAGES:
• Rangeradequatement a I'interieur, darts un endroit sec. Ne pas exposer I'appareil
destemperaturesde gel.
• Nejamais utiliser le balaia.vapeursans le tamponen microfibres.
• Ne jamais laisser le balai a. vapeur au meme endroit ou sur toute surface pendant
de Ionguesperiodes de temps Iorsquela pompeest en marcheet que la vapeurest
activee.
AVERTISSEMENT:
• Afin de reduire les risques de decharge electrique, cet appareil est muni d'une
fiche polarisee (unetige est plus large que I'autre). Cettefiche ne peut _tre inser6e
que dans une prise de courant polarisee et uniquement dans un sens. Si la fiche
ne s'insere pas completement darts la prise, il faut I'inverser. Si elle ne s'insere
toujours pas, demander a un electricien qualifie d'installer la prise appropriee. Ne
jamais modifier la fiche.
4

CONTENUDEL'EMBALLAGE
A. Poignee
B. Corps du balai a vapeur (Reservoir d'eau et
reservoir de solution nettoyante integr6s)
C. Tampon en microfibres pour surfaces
multiples (x2)
D. Tampon en microfibres pour planchers durs
E. Patin & moquette
F. Filtre a eau dure (pre-assembl6 dans le
nettoyeur vapeur, retirer du reservoir pour
exposer le filtre)
G. Base refroidissante
H. 2X Solution nettoyante SteamPlus Mcde
Hoover MD(8 oz)
• Retirer toutes les pieces de I'emballage.
• Avant d'eliminer les materiaux d'emballage,
s'assurer qu'aucune des pieces illustrees ne
manque.
m
C
F
E
G
FIXERLE MANCHE
• Inserer la poignee
dans le corps de
I'appareil (1.2). Appuyer
fermement jusqu'au
clic.
CORDONETRANGEIVIENT
Rangez le cordon dans
le guide du cordon pour
qu'il ne vous g6ne pas
Iorsque vous passez
I'aspirateur (1.3).

DESCRIPTIONDU NETTOYEURVAPEUR
1. Poignee
2. Crochet a cordon sup¢rieur
3. Crochet a cordon inferieur
4. Cordon d'alimentation
5. Reservoir de solution propre
6. Commutateur d'alimentation
Marche/Arr6t (On/Off)
7. T6te pour plancher
8. Declencheur de vapeur
9. Reservoir de solution
10. Cadran de r¢glage de la solution net
toyante
11. T¢moin de fonctionnement
Lumi¢re bleue = appareil en marche
12. Voyant indiquant que la vapeur
est pr6te
Lumiere verte = nettoyeur vapeur pr6t
Aucune lumiere = chauffage du r¢servoir
Accessoires
13. Tampon en microfibres pour surfaces
multiples (2)
14. Tampon en microfibres pour
planchers durs
15. Patin & moquette
16. Filtre a eau dure (pre-assembl6
dans le nettoyeur vapeur, retirer
du reservoir pour exposer le filtre)
17. Base refroidissante
FICHE TECHNIQUE
Numero de modele : WH20200
Alimentation electrique : AC 120V /
60Hz / 12A
W
1
13
Front
5
b
14 15 16 17
Accessories
Back
J
AVANTDE COMMENCERLE
NE'rIOYAGE
REMPLIRLERI_SERVOIRD'EAUPROPRE
• Reperer le reservoir d'eau propre a I'AVANT du
balai & vapeur et utiliser les poignees laterales
(2.2,A) ou le guide (2.2,B) du reservoir pour I
e retirer.
• Tourner le capuchon darts le sens antihoraire
pour le retirer (2.3).
• Placer le reservoir sous le robinet et le remplir
d'eau jusqu'a ce qu'il soit plein. (2.4). Remettre
le capuchon en place et tourner dans
le sens horaire jusqu'a ce qu'il soit bien fixe.
• S'assurer que le filtre & eau dure est en
place (3.5).
• Inserer le reservoir d'eau propre et le fixer en
place (2.5).
NOTA : Lorsque le reservoir est en position
verticale, il se peut que quelques gouttes s'echappent
du couvercle. Cela est normal.

FIXATIONDUFILTRENETTOYANTEN MICROFIBRES
Le <<tampon en microfibres pour planchers durs >>
(2.6, A) est specialement con£u pour les planchers
surface dure vernis; ne pas I'utiliser sur les
moquettes. Le <<tampon en microfibres pour sur-
faces multiples >>(2.6, B) est con£u pour les planch-
ers a surface dure vemis et pour les moquettes
(darts le dernier cas, il faut utiliser un patin &
moquette).
REMPLISSAGEDU RI_SERVOIR._
SOLUTION
(En cas d'utilisation avec la solution nettoyante
SteamPlus ic de Hoover MD)
• Reperer le reservoir d'eau propre a I'ARRIC:RE
du balai & vapeur et utiliser les poignees
laterales (2.8, A) ou le guide (2.8, B) du
reservoir pour le retirer.
• Tourner le capuchon dans le sens antihoraire
pour le retirer (2.9).
• Remplir le reservoir de solution nettoyante de
solution SteamPlus Mc de Hoover MD.POUR UN
NETTOYAGE OPTIMAL, ajouter la solution
directement darts le reservoir du nettoyeur &
vapeur de Hoover MD. POUR OBTENIR LA
CONCENTRATION ORDINAIRE, ajouter une
part d'eau tiede du robinet (non bouillie) a une
part de solution nettoyante darts le reservoir,
selon la capacite du reservoir de votre appareil.
Remettre le capuchon en place et toumer darts
le sens horaire (2.10)jusqu'a ce qu'il soit bien fixe.
• Inserer le reservoir et le fixer en place (2.11).
• Vous pouvez desormais nettoyer sur demande
en reglant le cadran de reglage de la solution
nettoyante (2.12) & la position desir6e, de
fagon & appliquer automatiquement la solution
nettoyante & I'aide de la g_chette. Regler le
cadran a la position <<STEAM ONLY >>si vous
n'utilisez pas la solution nettoyante
SteamPlus Mc de Hoover MD. Consulter la
B '_o ,'/
!'f
<
• Pour fixer le tampon en microfibres a I'appareil, le
deposer sur le sol (cSte blanc vers le haut).
• Placer I'appareil audessus du tampon (2.7) en
s'assurant que la t6te du balai recouvre entierement
le tampon. L'attache & velcro au bas de I'appareil
tiendra le tampon en place.
SC_Lu"rlc_NCONTROL i
section <<Utilisation du cadran de reglage de la
solution nettoyante et reglage de la solution
nettoyante >> pour obtenir de plus amples
renseignements.
7
.....

UTILISATIONDUCADRANDERI_GLAGEDELASOLUTIONNE'rfOYANTEETRI_GLAGEDE
LASOLUTIONNETTOYANTE
• Le cadran de reglage de la solution nettoyante regle la quantite de solution nettoyante ajoutee a la
vapeur. IIne regle pas la quantite de vapeur, mais uniquement la solution nettoyante.
• Pour nettoyer a la vapeur seulement, il suffit de regler le cadran de reglage de la solution nettoyante
& la position <<STEAM ONLY >>.Desormais, chaque fois que vous appuierez sur le declencheur de
vapeur, I'appareil n'emettra que de la vapeur.
• Pour nettoyer & I'aide de la solution nettoyante, il suffit de regler le cadran de reglage a la position
desir6e. Desormais, quand vous appuierez sur le declencheur de vapeur, la quantite de solution
nettoyante indiquee sur le cadran de reglage ainsi qu'un jet constant de vapeur se degageront du
balai a vapeur.
NE'rIOYAGEA LAVAPEURDE PLANCHERSA SURFACEDURE
• S'assurer que le tampon nettoyant en microfibres
est bien fixe. Brancher rappareil et appuyer sur
I'interrupteur du nettoyeur vapeur (2.13).
• L'appareil sera pr6t & produire de la vapeur
apres un delai approximatif de 30 secondes.
Des que la vapeur est pr6te & 6tre produite,
le voyant vert s'allumera.
• Pour incliner le nettoyeur vapeur, poser le
pied sur la partie du balai qui se trouve sur
le plancher et faire basculer la poignee (2.14).
• Pour produire de la vapeur, presser le
declencheur (2.15).
• Deplacer lentement le balai & vapeur vers
I'arriere et I'avant sur le plancher (2.16) en
faisant particulierement attention aux
endroits tres passants.
Pourd_sinfecterdessurfacesdures
• Utiliser la vapeur seulement. Ne pas utiliser
de solution nettoyante. Regler le cadran de
reglage de la solution nettoyante a la position
"STEAM ONLY".
• Fixer le tampon en microfibres pour
planchers durs & I'appareil et passer au moins
4 fois a allure moyenne au m_me endroit.
Laisser secher & Fair.

RAFRAJCHISSEMENTDESMOQUETTES
• Utiliser la vapeur seulement. Ne pas utiliser de
solution nettoyante. Regler le cadran de reglage
de la solution nettoyante a la position STEAM
ONLY.
• L'appareil sera pr6t & produire de la vapeur
apres un delai approximatif de 30 secondes.
Des que la vapeur est pr6te & 6tre produite,
le voyant vert s'allumera.
• Placer le nettoyeur vapeur dans le patin
moquette (2.17).
• Pour incliner le nettoyeur vapeur, poser le
pied sur la partie du balai qui se trouve sur
le plancher et faire basculer la poignee (2.18).
• Pour produire de la vapeur, presser le
declencheur (2.19).
• Deplacer lentement le balai a vapeur vers
I'arriere et I'avant sur le plancher (2.20) en
faisant particulierement attention aux
endroits tres passants.
AVIS : Le patina moquette est con£u pour ne pas
demeurer attache au balai a vapeur.
APRi::SL'UTILISATIONDU NETTOYEURVAPEUR/ UTILISATIONDELA
BASEREFROIDISSANTE
• Apres I'utilisation du balai & vapeur et pour
eviter d'endommager les planchers,
debrancher I'appareil et le placer darts la
base refroidissante (2.21) jusqu'a ce qu'il
refroidisse. Une fois que le balai a vapeur a
refroidi, retirer le tampon et suivre les
instructions d'entretien a la page 11 pour
eviter la formation de moisissures.

IIestimportantdesefamiliariseraveccest_chesd'entretienmenager,caruneutilisationetdessoins
adequatsassurerontI'efficacitecontinuedunettoyagedubalaiavapeur.
SiI'aspirateurnefonctionnepasadequatement,s'ilesttombe,aet6endommage,aet6laisse&I'exterieur
ouesttombedansI'eau,I'expedier&uncentredereparationavantdepoursuivreI'utilisation.
RI[:SERVOIRD'EAU
Nettoyage
• Retirer le reservoir d'eau du devant du balai
& vapeur (3.1).
• Tourner le capuchon dans le sens antihoraire
pour le retirer (3.2).
• Vider tout excedent d'eau dans I'evier,
replacer le capuchon et retourner au
nettoyeur vapeur (3.3).
TAMPONNETTOYANTEN MICROFIBRES
Commentle nettoyer
Commentretirer
• Poser le pied sur la
languette exposee
situee a I'arriere du
tampon nettoyant en
microfibres (3.4).
Enlever le balai a vapeur
du tampon en
microfibres pour le
retirer.
• Lavable & la machine au reglage <<TIEDE >>.
Toujours utiliser un detergent.
• Pour obtenir les meilleurs resultats, etendre
plat pour secher.
FILTREA EAU •Remplacement
• L'appareil est dote d'un filtre a eau dure.
• Pour reperer les filtres a eau dure, retirer le reservoir
d'eau propre & I'AVANT du balai a vapeur.
• En zone d'eau dure, le filtre se decolorera ou deviendra
fonce avec le temps. Selon la durete de I'eau ou la
frequence d'utilisation, le filtre devrait 6tre change tous les
18 mois (3.5).
10
,,',,'j/;),

• Debrancher le cordon d'alimentation.
• Placer le nettoyeur vapeur dans la base refroidissante et laisser refroidir.
• Vider I'eau residuelle du reservoir et nettoyer la surface externe a I'aide d'un chiffon sec. Les laisser secher.
• Installer de nouveau le reservoir d'eau, replacer I'appareil dans la base refroidissante pour ne pas
endommager le plancher et entreposer en position debout.
• Vous pouvez laisser de la solution nettoyante dans le reservoir pendant de breves periodes de temps, mais
si vous ne prevoyez pas utiliser I'appareil avant une periode de 2 semaines, il est recommande de vider le
reservoir.
SI UN PROBLEME MINEUR SURVlENT, IL EST HABITUELLEMENT POSSIBLE DE LE RESOUDRE
FAClLEMENT Sl LA CAUSE EST DETERMINEE ,ik L'AIDE DE LA LISTE Cl DESSOUS.
Si I'appareil ne fonctionne pas normalement, s'il a _t_ _chapp_, endommag_, laiss_ & I'ext_rieur ou
immerg_, communiquer avec le service & la clientele au I 800 9449200 pour obtenir de plus amples
renseignements avant de poursuivre I'utilisation.
PROBLi:IVlE
Le balai
vapeur ne
fonctionne
pas
Le balai
vapeur Re
produit pas de
vapeur
Le tampon
nettoyant en
microfibres ne
ramasse pas
la salet_
CAUSEPOSSIBLE CAUSEPOSSIBLE
2. La prise electrique peut ne pas fonc- 2. Verifier le fusible ou le disjoncteur a la
tionner correctement; verifier le fusible maison. Remplacer le fusible ou remettre
ou le disjoncteur, ou consulter un elec- en place le disjoncteur & la maison.
tricien.
rd !i
iiiiiiiiiiiiiiiiiiiiiiiiiiiiiiiiiiiiiiiiiiiiiiiiiiiiiiiiiiiiiiiiiiiiiiiiiiiiiiiiiiiiiiiiiiiiiiiiiiiiiiiiiiiiiiiiiiiiiiiiiiiiiiiiiiiiiiiii
1. Le tampon est peut 6tre deja sature 1. Consulter la section <_Remplissage du
de saletes et dolt 6tre nettoy& reservoir d'eau >>- page 6.
3. Le filtre a eau peut 6tre bouche et
dolt 6tre remplac&
5. Le conduit de vapeur peut 6tre 5. Consulter la section <<Elimination des
obstru& obstructions >>ci-dessous - page 12.
_ r6 _et_et_ :_! troy6
3. Inspecter le filtre a eau et le nettoyer ou
le remplacer.
ej re
<<Ta _ i rofi
11

ELIIVIINATIONDESOBSTRUCTIONS
II y a une petite ouverture vers I_xtrZ.mit2. de la bordure qui fait le tour du pZ.ri-
m, tre derri, re le nettoyeur vapeur. Cette ouverture est un conduit de sortie de
la vapeur (5.1), au cas o, le conduit principal s_bstrue. Si la vapeur commence
^ sortir par cette ouverture, il faut :
• Fermer le nettoyeur vapeur et le dZ.brancher.
• Le laisser compl, tement refroidir.
Retirer le tampon nettoyant en microfibres et inspecter le conduit de
vapeur situZ, au bas de la buse pour repZ.rer les obstructions. Si une
obstruction est visible, utiliser un petit objet mince, comme un
cure-dent, pour tenter de la retirer (5.2).
Si le conduit de vapeur est toujours obstruZ., retirer la vis situZ.e ^
I(_rrio re du tube (5.3, A) reliZ ^ la buse.
Une fois la vis retirZ.e, la buse peut • tre enlevZe en la tirant vers le
bas, hors du corps du nettoyeur vapeur.
Apr, s le retrait de la buse, examiner le petit trou ^ I_xtrZ.mitZ. du tube
sortant du nettoyeur vapeur. E I_lide don objet mince, comme un
cure-dent, tenter de retirer I_bstruction (5.3, B).
Si le conduit de vapeur est toujours obstruZ., apporter le produit chez
un reprZsentant de service Hoover. Si le conduit de vapeur est
toujours obstruZ, appeler le service ^ la client, le comme indiquZ
ci-dessous.
Si vous avez besoin d(_utres renseignements :
Visiter notre site Web ^ IOdresse hoover.com. Composer le 1 800 9449200 pour accZder au service dOide
automatisZ, qui vous indiquera I_mplacement des distributeurs agrZ_Zs HooverMD (f.-U. seulement) ou
pour parler ^ un reprZ.sentant du service ^ la client, le (de 8 h ^ 19 h, HNE, du lundi au vendredi).
NE PAS RETOURNER CE PRODUIT AU MAGASIN.
12

GARANTIELIMITI_E DE DEUXANS
(Usage domestique)
P_LP_MENTS COUVERTS PAR LA PRP_SENTE
GARANTIE
Votre produit HOOVER MD est garanti pour des
conditions normales d'utilisation et d'entretien
domestiques, comme il est stipul6 dans le Guide
de I'utilisateur, contre les defauts de materiaux et
de fabrication pour une periode complete de deux
ans & compter de la date d'achat (la <<Periode de
garantie >>). Pendant la periode de garantie,
Hoover MD remplacera gratuitement I'appareil ou
les pieces afin de remettre en bon etat de fonc-
tionnement tout produit achete aux #:tats-Unis, au
Canada ou par I'interm6diaire du Programme
d'echanges militaires am6ricain.
COMMENT PRESENTER UNE RPECLAMATION
AU TITRE DE LA GARANTIE
Si I'appareil ne fonctionne pas tel que garanti,
appeler le 1 800 944-9200 OU visiter Hoover MD,
en ligne a I'adresse suivante www.hoover.com.
Pour de plus amples renseignements ou pour
toute question sur la presente garantie, t616-
phoner au Centre de service & la clientele de
Hoover MDau 1 800 944-9200, du lundi au ven-
dredi de 8 h & 19 h (HNE).
#:LEMENTS NON COUVERTS PAR LA
PRPESENTE GARANTIE
La presente garantie ne couvre pas : toute utilisa-
tion commerciale du produit (ex. : dans le cadre
de services menagers, de conciergerie ou de
location de mat6riel), les tampons, les acces-
soires, I'entretien inad6quat du produit; les dom-
mages li6s & une utilisation inad6quate, & des cas
fortuits ou catastrophes naturelles, au vandal-
isme, & tout autre acte hors du contr61e de
HooverMD, ou & tout acte ou n6gligence de la
part du proprietaire de I'appareil; toute utilisation
dans un pays autre que celui o0 le produit a et6
achete initialement, et tout produit revendu par
son propri6taire original. La presente garantie ne
couvre pas le ramassage, la livraison, le transport
ou la reparation a domicile du produit. Cette
garantie ne s'applique pas aux produits achetes :
hors des #:tats-Unis (ce qui comprend ses terri-
toires et possessions); hors du Programme
d'echanges militaires am6ricain; hors du Canada.
Cette garantie ne couvre pas les produits achetes
chez un tiers autre qu'un d6taillant, marchand ou
distributeur autorise de produits Hoover MD.
AUTRES CONDITIONS IMPORTANTES
La presente garantie n'est pas transf6rable et ne
peut pas 6tre c6dee. La presente garantie sera
regie et interpr6tee selon les lois de I'#:tat de
I'Ohio. La Periode de garantie ne peut pas 6tre
prolongee par quelque reparation ou remplace-
ment que ce soit execut6 en vertu de la presente
garantie.
LA PR#:SENTE GARANTIE EST L'UNIQUE
GARANTIE ET RECOURS FOURNIS PAR
HOOVER MD. HOOVERMD D#:CLINE TOUTE
RESPONSABILIT#: QUANT tk TOUTES LES
AUTRES GARANTIES EXPRESSES OU
TAClTES, Y COMPRIS LES GARANTIES LI#:ES
tk LA QUALIT#: MARCHANDE OU tk LA
COMPATIBILIT#: DU PRODUIT POUR UN
USAGE PARTICULIER. HOOVERMD NE
POURRA EN AUCUN CAS ETRE TENUE
RESPONSABLE DE TOUS DOMMAGES-
INT#:RE_TS SP#:ClAUX OU DOMMAGES
INDIRECTS, ACCESSOIRES OU
CONS#:CUTIFS DE QUELQUE NATURE QUE
CE SOIT SUBIS PAR LE PROPRI#:TAIRE DU
PRODUIT OU PAR TOUTE PARTIE
R#:CLAMANT PAR L'INTERM#:DIAIRE DU
PROPRI#:TAIRE, QU'ILS REL#:VENT DU DROIT
DES CONTRATS, DE LA N#:GLIGENCE, DE LA
RESPONSABILIT#: ClVlLE D#:LICTUELLE OU
DE LA RESPONSABILIT#: STRICTE DU FAIT
DES PRODUITS, OU QU'ILS D#:COULENT DE
QUELQUE CAUSE QUE CE SOIT. Certains
#:tats ne permettent pas I'exclusion des dom-
mages consecutifs; par consequent, I'exclusion
prec6dente pourrait ne pas 6tre applicable dans
votre cas. La presente garantie vous donne des
droits specifiques; vous pouvez egalement avoir
d'autres droits, qui varient d'un #:tat & I'autre.
13
 Loading...