

Page 1
1
Wet/Dry Vac
®
Read these instructions
before operating cleaner
Owner’s Manual
Page 2

2
This cleaner was inspected and
packaged carefully before being
shipped from the factory. If you should
happen to need assistance during
assembly or operation, call
1-800-944-9200 for automated
referral of authorized service
outlet locations (U.S. only)
or
1-330-499-9499 to speak
with a representative in our
Consumer Response Center.
PLEASE DO NOT RETURN THIS
PRODUCT TO THE STORE.
Thank you for selecting a
HOOVER®product.
Record and retain
The HOOVER cleaner you have purchased is designed for both wet and
dry pick up and also has blower capabilities.
The model and serial number are located on the cleaner lid near the cord
storage hook.
For your personal records, please enter the COMPLETE model and serial
numbers in the spaces provided and retain this information.
Model number___________________________________________________
Serial number ___________________________________________________
It is suggested that you attach your sales receipt to this owner’s manual.
Verification of date of purchase may be required for warranty service of
your Hoover product.
Index
Assembly ....................................4-5
How to Use
Automatic Wet Shut-Off..........7
Blower ......................................7
Cleaner Description ................6
Dry pick-up ..............................7
Extension cord ........................7
Wet pick-up ..............................7
If you have a problem ..................9
Important Safeguards ..................2
Maintenance
Authorized Service..................8
Emptying tank ......................7-8
Filters........................................8
Lubrication ..............................8
Storage ..........................................7
© 1993 The Hoover Company
www.hoovercompany.com
Important Safeguards!
When using an electrical appliance, always follow
basic precautions, including the following:
READ ALL INSTRUCTIONS BEFORE USING THIS APPLIANCE.
Warning:
To reduce the risk of fire, electric shock, or injury:
• Do not expose to rain; store indoors only.
• Connect to a properly grounded outlet only. See “Grounding
Instructions”.
• Wear eye protection when operating blower.
• Close supervision is necessary when any appliance is used by or near
children. Do not allow vacuum cleaner to be used as a toy or to run
unattended at any time.
• Keep hair, loose clothing, fingers, feet and all parts of body away from
openings, and moving parts.
• Do not pick up anything that is burning or smoking, such as cigarettes,
matches, or hot ashes.
• Do not pick up flammable or combustible liquids such as gasoline, or
use in areas where they may be present.
• Do not vacuum or use blower near toxic or health endangering materials
such as asbestos, pesticides, fertilizers, or anything that is poisonous.
• Do not vacuum explosive dusts or use cleaner or blower in areas that
may contain explosive substances such as coal, grain, or any other fine,
combustible material.
• Avoid picking up hard, sharp objects with the cleaner. They may dam
age the cleaner and the filter.
• Do not use without filters in place. Clean filters frequently when picking
up very fine materials such as powder.
• Use extra care when cleaning on stairs.
• Do not put any object into openings. Do not use with any opening
blocked; keep free of dust, lint, hair, or anything that may reduce air flow.
• Do not pull or carry by cord, use cord as a handle, close door on cord or
pull cord around sharp edges or corners. Do not run appliance over
cord. Keep cord away from heated surfaces.
• Always disconnect cord from electrical outlet before servicing the cleaner.
• Unplug cleaner when not in use. Turn off all controls before unplugging.
• Do not unplug by pulling on cord. To unplug, grasp the plug, not the
cord. Never handle plug or appliance with wet hands.
• If needed, connect to a suitable extension cord. See “Extension cord
instructions”.
• Do not use with damaged cord or plug. If appliance is not working as it
should, has been dropped, damaged, left out doors, or dropped into
water, take it to a Hoover Factory Service Center or Authorized Hoover
Warranty Service Dealer (Depot).
• Use vacuum cleaner only for its intended use as described in the
instructions. Use only attachments recommended by The Hoover
Company; others may cause hazards.
Save these instructions!
Page 3
3
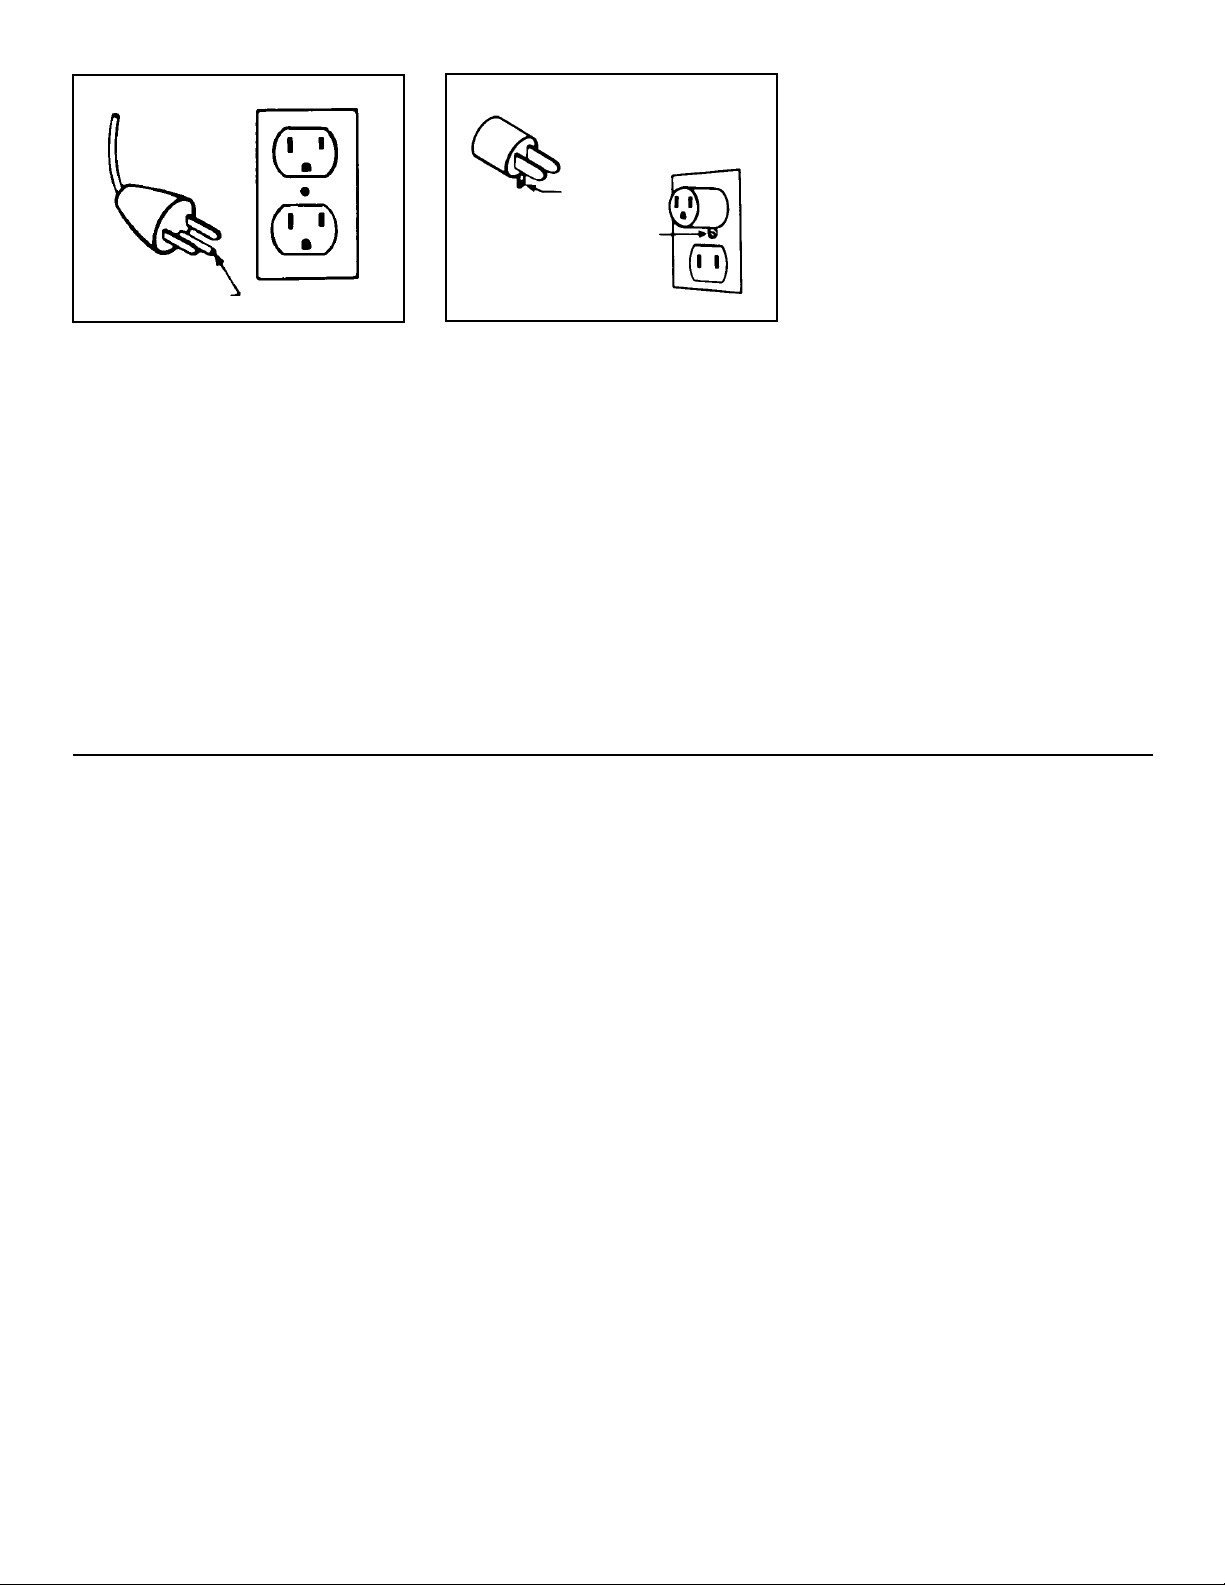
Grounding
Instructions
This appliance must be grounded.
If it should malfunction or
breakdown, grounding provides a
path of least resistance for electrical
current to reduce the risk of electric
shock. This appliance is equipped
with a cord having an equipmentgrounding conductor (C) and
grounding plug (A). The plug must
be plugged into an appropriate
outlet (B) that is properly installed
and grounded in accordance with all
local codes and ordinances.
DANGER-
Improper connection of the
equipment-grounding conductor can
result in the risk of electric shock.
Check with a qualified electrician or
service person if you are in doubt as
to whether the outlet is properly
grounded. Do not modify the plug
provided with the appliance - if it will
not fit the outlet, have a proper outlet
installed by a qualified electrician.
This appliance is for use on a
nominal 120 volt circuit and has a
grounding plug that looks like the
plug illustrated in sketch “A”.
A temporary adapter (D) may be
used to connect this plug to a 2-pole
receptacle (G) if a properly
grounded outlet is not available.
The temporary adapter should be
used only until a properly grounded
outlet (B) can be installed by a
qualified electrician. The green
colored rigid ear (E), lug, or the like
extending from the adapter must be
connected to a permanent ground
such as a properly grounded outlet
box cover. Whenever the adapter is
used, it must be held in place by a
metal screw (F).
NOTE: In Canada, the use of a
temporary adapter is not permitted
by the Canadian Electrical Code.
Questions or
Concerns?
The Hoover Company wants to
quickly resolve any concerns about
your cleaner or questions regarding
its use. Look on the list provided
with the product for your local
Hoover Factory Service Center or
in the Yellow Pages under “Vacuum
Cleaners - Household” for the
nearest Authorized Hoover
Warranty Service Dealer (Depot) or
call:
1-800-944-9200 for an
automated referral of authorized
service outlet locations (U.S. only)
OR
1-330-499-9499 to speak
with a representative in the Hoover
Consumer Response Center.
PLEASE DO NOT RETURN THIS
PRODUCT TO THE STORE OR
SEND IT TO NORTH CANTON FOR
SERVICE.
C
B
D
E
F
G
A
Page 4

4
Carton contents
Remove parts from tank and
identify the following:
A.Cleaner tank
B.Cleaner lid and motor housing
or cleaner lid and motor hous
ing (Supreme 12.5 gallon)
C.Hose
D.Caster supports (4)*
E.Casters(4)
F. Wet/Dry nozzle
G. Squeegee inser t *
H.Paper filter
I. Foam filter
J. Mounting ring
K.Extension wands (2)
L. Caster support screws (4)*
*included with some models
1. Assembly
1-1
1-2
1-3
Attach casters
(standard models)
Remove cleaner lid. Turn cleaner
tank upside down (A).
Insert caster stem into hole on
bottom of tank. Press firmly until
caster snaps into place.
Repeat with remaining casters.
Turn cleaner tank right side up.
Attach caster
supports and casters
(supreme models)
Remove cleaner lid. Turn cleaner
tank upside down (B).
Align square tabs (1) on caster
supports (3) with rails (2) on tank.
Slide tabs onto rails and press
caster support down firmly.
Insert support screw into hole
nearest tank. Tighten screw with a
Phillips screwdriver.
Insert caster stem into hole on
bottom of caster support. Press
firmly until caster snaps into place.
Repeat with remaining casters.
Turn cleaner tank right side up.
Attach filters
Disconnect cleaner from electrical
outlet before attaching or
removing filters.
NOTE: Do not attempt to remove
the filter cage or float ball. They
are not removable parts.
For dry pick-up
Slide foam filter (B) over filter cage (A).
Slide paper filter (C) over foam filter.
Make sure foam filter and paper filter
are to top of filter cage.
Slide mounting ring (D) to top of
filters. Ring will rest against ribs (E)
in housing.
A B
B
C
D
E
F
G
K
H
I
J
L
B
C
D
E
A
A
B
1
3
2
It is very important that the
mounting ring (D) is pushed over
the filters and all the way to the
ribs (E), as shown in the
illustration.
Page 5

5
1-4
1-5
1-6
1-7
1-9
1-8
For wet pick-up
Slide foam filter (B) over filter cage
(A).
Make sure that the foam filter is
pushed to the top of filter cage near
the ribs (E).
Do not use paper filter for wet
pick-up.
Attach cleaner lid
(except Supreme 12.5 gallon)
With latches (F) rotated outward,
align wand storage clips (G) with
“ears” (H) on top of tank.
Rotate latches inward to lock lid in
place.
Note: For convenience in attaching
and removing the lid, finger holds
have been provided.
Attach cleaner lid
(Supreme 12.5 gallon)
Rotate lid latches (I) outward. Align
ribs (J) on front of tank with slots (K)
on either side of hose inlets; place
lid on tank.
Rotate latches inward to lock lid in
place.
Note: For convenience in attaching
and removing the lid, finger holds
are provided.
Attach hose, wands
and cleaning tool
Push hose into hose inlet (A) or (B)
on cleaner lid; twist hose to tighten
or loosen connection.
The wands and tools attach to hose
in the same manner.
Press squeegee insert (available on
some models) firmly into nozzle
opening.
Use squeegee for wet pick-up only.
Additional tools and accessories
that are not included with your
model are available at additional
cost from your Hoover Factory
Service Center, Authorized
Hoover Warranty Dealer, by using
the enclosed order form, or
through The Hoover Comapny online at www.hoovercompany.com
A
A
E
B
F
J
I
I
K
G
H
H
Attach drain cap
(Available some models)
Screw drain cap onto lower, front of
tank as shown.
A
B
Page 6

6
Cleaner Description
1. ON/OFF switch
2. Lid latches
3. Cleaner lid
4. Hose inlet
5. Hose
6. Tank
7. Caster supports*
8. Casters
9. Tank drain cap
10. Carrying handles located on
both sides of tank
11. Extension wands
12. Wand storage clip
13. Cord hook: loop cord over
hook for storage.
14. Tool storage area
15. Blower port
16. Wet/Dry nozzle (with squeegee
insert*)
*Supreme models only
2-1
Operate cleaner only at voltage
specified on data plate on bottom
of cleaner.
This cleaner is intended for
household use.
Wear ear protecton if operating
cleaner for a prolonged period
of time.
Standard models
Supreme models
Supreme 12.5 gallon models
2. How to use
The assembled cleaner will look like
the drawing.
1
1
1
2
3
4
5
6
7
8
9
10
12
13
14
15
16
11
2
2
3
4
5
6
7
8
9
11
12
10
13
14
14
15
16
2
2
3
4
5
6
8
11
10
12
13
15
16
2
Page 7

7
2-2
Extension cord
instructions
Use at least a 16 gauge, grounding
type, SVT or SJT type extension
cord. The extension cord must
employ a 3-prong grounding type
plug and a 3-pole receptacle that
accepts the machine plug.
Dry pick-up
With foam and paper filters in place
and cleaner lid locked onto tank,
attach the desired tool to hose end.
Plug power cord into a properly
grounded outlet and turn cleaner on.
Use paper filter with foam filter for
dry pick-up only.
Wet pick-up
With foam filter only in place and
cleaner lid locked onto tank, attach
desired tool (with squeegee if
available with your model) to hose
end. Plug power cord into a
properly grounded outlet and turn
cleaner on.
Do not use paper filter for wet
pick-up.
Do not use cleaner as a pump to
clean out clogged drains, sinks, or
other plumbing fixtures.
If cleaner will not pick up, check
filters. They may need to be
cleaned or changed (See
“Maintenance” section).
Automatic wet
shut-off
When the tank is full of liquid, the
automatic shut-off mechanism will
shut off cleaner pick-up. When this
happens, the cleaner will no longer
pick up and the motor sound will
become noticeably higher in pitch.
Turn cleaner off and empty tank to
continue use.
The automatic shut-off will also
engage if the cleaner has been
tipped over. To continue use, turn
cleaner off and set it upright. Wait
a few seconds to allow motor to
come to a complete stop.
Blower feature
The blower can be used to blow dirt
out of areas where it is impossible
for suction to reach.
Inside of hose, and tools must be
free of litter before operating
blower.
We recommend that the filters be in
place when operating the blower
feature.
Disconnect cleaner from electrical
outlet.
Push hose into blower port (A) or
(B); twist hose to tighten or loosen
connection. Attach tool if desired.
CAUTION: Wear safety goggles
when using blower feature. Do not
blow toward people, animals, or
objects that may be damaged by
flying debris.
Wear ear protection if using the
blower for a prolonged period
of time.
Plug power cord into a properly
grounded outlet, grasp free end of
hose, and turn cleaner on.
Do not use blower to spray paint or
any other flammable or combustible
materials.
Storage
Empty tank (see Maintenance
section). Rinse inside of tank with
clean water before storing
particularly if kitchen spills or any
substance other than plain water
has been picked up. Wipe dry.
Loop cord over cord storage hook (C).
Slide wands into wand storage clip
(D) on sides of cleaner lid.
Press tools into areas located on top
of cleaner lid.
3. Maintenance
A
B
Emptying tank
After dry pick-up
Disconnect cleaner from
electrical outlet.
1. Release lid latches and remove
cleaner lid from tank.
2. To avoid back strain, do not lift
a full tank. First, scoop out
enough debris to make tank
easier to lift.
3. For ease in emptying tank,
“handles” are provided on bottom
of tank.
Empty contents into a suitable
receptacle.
2-3
D
D
C
C
3-1
Continued
Page 8

8
3-2
After wet pick-up
Disconnect cleaner from electrical
outlet.
For standard models follow steps
for “After dry pick up” then
proceed with step 3 below.
For Supreme models, proceed as
follows:
1. Unscrew drain cap (E) from
bottom of tank. Empty contents into
a suitable drain.
2. As the liquid level decreases, it
may be necessary to tip cleaner to
allow remaining liquid to drain out.
3. Rinse inside of tank thoroughly
with clean water particularly if
spills or other liquid substances
other than plain water have been
picked up. Wipe inside of tank dry.
Filters
Dry paper filter
Disconnect cleaner from electrical
outlet.
Replace paper filter periodically to
ensure peak cleaner performance.
See “filters” section in Assembly
instructions for proper assembly of
paper filter.
Foam filter
Disconnect cleaner from electrical
outlet.
After each wet pick-up use, remove
foam filter. Rinse filter with clean
water and let air dry.
See “filters” section of Assembly
instructions for proper assembly of
foam filter.
Optional reusable
cartridge filter
The reusable cartridge filter,
available at additional cost, can be
used for both wet and dry pick-up.
It can improve your cleaner’s
performance significantly. And
since it is reusable, the cartridge
filter will save you money that would
otherwise be spent on replacement
dry filter bags.
All filters, including the cartridge
filter, are available at your Hoover
Factory Service Center, Authorized
Hoover Warranty Dealer, on the
enclosed order form, or by writing to
The Hoover Company, North Canton,
Ohio 44720.
To assure that your cleaner
operates at peak performance, it
is imperative that you use only
genuine HOOVER filters
distributed by The Hoover
Company. HOOVER filters can be
identified by these trademarks -
Lubrication
The motor is equipped with bearings
which contain sufficient lubrication
for the life of the motor. The addition
of lubricant could cause damage.
Do not add lubricant to motor
bearings.
®
E
Service
To obtain approved HOOVER
service and genuine HOOVER parts,
locate the nearest Hoover Factory
Service Center or Authorized
Hoover Warranty Service Dealer
(Depot) by:
• checking the Yellow Pages
under “Vacuum Cleaners Household” OR -
• checking the list of Factory
Service Centers provided with
this cleaner OR -
• calling 1-800-944-9200 for an
automated referral of
authorized service outlet
locations (U.S. only) OR -
• checking the Service section of
The Hoover Company on-line at
www.hoovercompany.com
Do not send your cleaner to The
Hoover Company in North Canton
for service, this will only result
in delay.
If further assistance is needed,
contact The Hoover Company
Consumer Response Center, North
Canton, Ohio 44720
Phone: 330-499-9499.
In Canada, contact Hoover Canada,
Burlington, Ontario L7R 4A8, Phone:
1-800-263-6376.
Always identify your cleaner by the
complete model number when
requesting information or ordering
parts. (The model number appears
on the cleaner lid near the cord
storage hook.)
®
Page 9

If you have a
problem
If a minor problem occurs, it usually
can be solved quite easily by using
the checklist below.
Problem: Loss of suction or
air flow
Problem: Cleaner won’t run
Possible Cause
Possible Solution
• Not firmly plugged in.
•
Plug cleaner in firmly
• No voltage in wall plug.
•
Check fuse or breaker.
• Blown fuse/tripped breaker.
•
Replace fuse/redet breaker.
• Possible Cause
•
Possible Solution
• Obstruction in hose, wand or tool.
•
Clear obstruction.
• Clogged cartridge or foam filter.
•
Clean filter as described in
“Maintenance” section.
• Hole/split in hose.
•
Inspect and replace hose.
• Automatic shut-off engaged.
•
See “Automatic wet shut-off”
section
®
HOOVER y son marcas registradas
THE HOOVER COMPANY, NORTH CANTON, OHIO 44720
R1 4-98 S6530/45/50 Litho USA 56514-018
®
HOOVER et sont des marques déposées
THE HOOVER COMPANY, NORTH CANTON, OHIO 44720
HOOVER and are registered trademarks
THE HOOVER COMPANY, NORTH CANTON, OHIO 44720
®
 Loading...