

Page 1
User instructions
EN
WDYN P
Page 2
OUR COMPLIMENTS
EN
INDEX
EN
CHAPTER
With the purchase of this Hoover household appliance,you
have shown that you will not accept compromises: you
want only the best.
Hoover is happy to present their new washing machine,the
result of years of research and market experience through
direct contact with Consumers.You have chosen the
quality,durability and high performance that this washing
machine offers.
Hoover is also able to offer a vast range of other household
appliances: washing machines, dishwashers, washer-dryers,
cookers, microwave ovens.Traditional ovens and hobs,
refrigerators and freezers.
Ask your local retailer for the complete catalogue of Hoover
products.
Introduction
General points on delivery
Guarantee
Safety Measures
Technical Data
Setting up and Installation
Control Description
Table of Programmes
Selection
Detergent drawer
The Product
Washing
1
2
3
4
5
6
7
8
9
10
11
Please read this booklet carefully as it provides important
guide lines for safe installation,use and maintenance and
some useful advise for best results when using your washing
machine.
Keep this booklet in a safe place for further consultation.
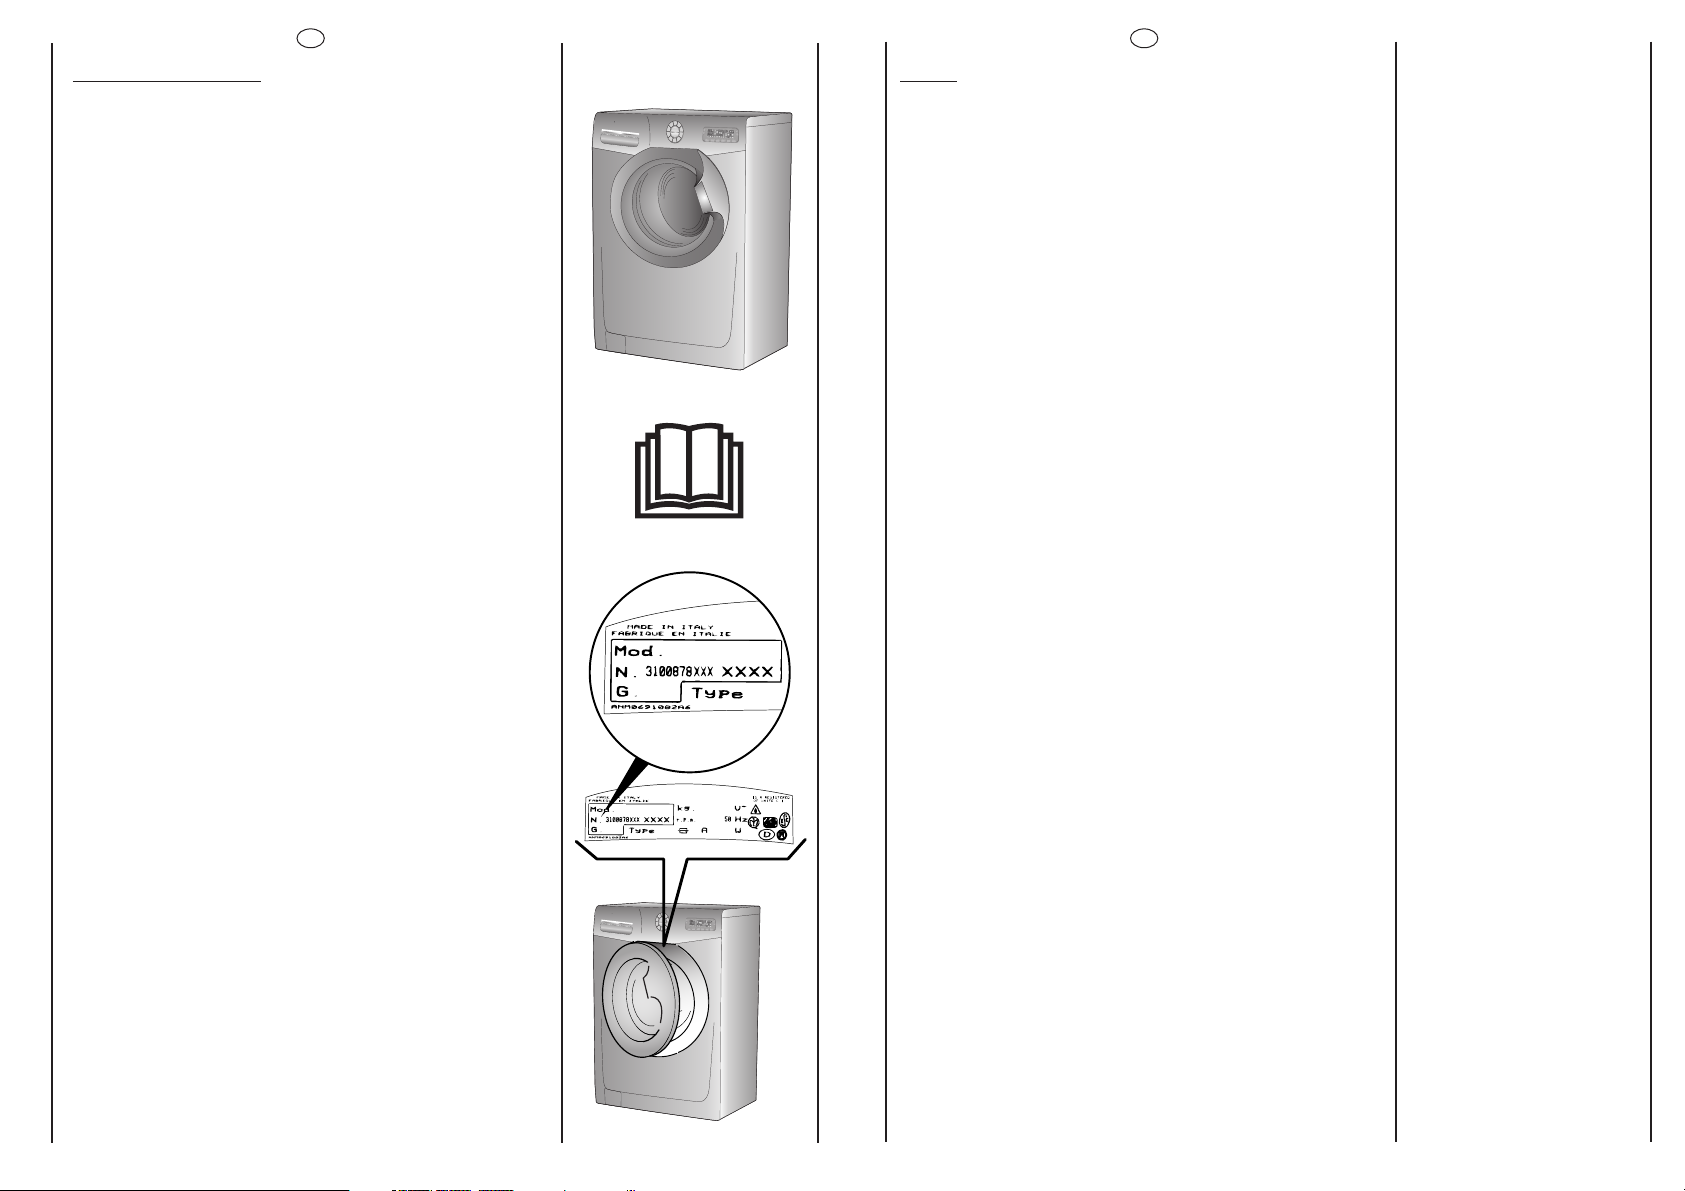
When contacting Hoover or a Customer Services Centre
always refer to the Model,No., and G number (if applicable
of the appliance see panel).
2
Drying cycle
Automatic washing/Drying cycle
Cleaning and routine maintenance
Faults Search
12
13
14
15
3
Page 3

EN
EN
CHAPTER 1
GENERAL POINTS ON DELIVERY
On delivery, check that the following are included with the
machine:
A) INSTRUCTION MANUAL
B) CUSTOMER SERVICE ADDRESSES
C) GUARANTEE CERTIFICATES
D) CAPS
E) BEND FOR OUTLET TUBE
F) LIQUID DETERGENT OR LIQUID BLEACH
COMPARTMENT (CONTAINER)
KEEP THEM IN A SAFE
PLACE
AB
C
CHAPTER 3
SAFETY MEASURES
IMPORTANT:
FOR ALL CLEANING AND MAINTENANCE WORK
● Remove the plug
● Turn off the water inlet tap.
● All Hoover appliances are earthed. Ensure that the main
electricity circuit is earthed. Contact a qualified electrician if
this is not the case.
Appliance complies with European Directives
73/23/EEC and 89/336/EEC, replaced by 2006/95/EC and
2004/108/EC, and subsequent amendments.
● This machine is solely for domestic use.
Check that the machine has not incurred damage during
transport. If this is the case, contact your nearest Hoover
Centre.
EN
CHAPTER 2
GUARANTEE
The appliance is supplied with a guarantee certificate.
Please retain purchase receipt in case service assistance
covered by the guarantee is required.
4
D
F
E
● Do not touch the appliance with wet or damp hands or
feet.
● Do not use the appliance when bare-footed.
WARNING: DURING THE WASHING CYCLE, THE WATER
CAN REACH A TEMPERATURE OF 90°C.
● Before opening the washing machine door,ensure that
there is no water in the drum.
REFER TO CHAPTER 12 FOR ADDITIONAL SAFETY
INSTRUCTIONS FOR DRYER USE.
5
Page 4
EN
● WARNING: Do not use this appliance with a cord extension
set, multiple connector or electrical
portable outlet device due to risk of overload, splashing or
ingress of moisture.
● This appliance is not intended for use by persons (including
children) with reduced physical,sensory or mental
capabilities, or lack of experience and knowledge,unless
they have been given supervision or instruction concerning
use of the appliance by a person responsible for their safety.
Children should be supervised to ensure that they do not play
with the appliance.
EN
CHAPTER 4
● Do not pull the mains lead or the appliance itself to remove
the plug from the socket.
● Do not leave the appliance exposed to atmospheric
agents (rain, sun etc.)
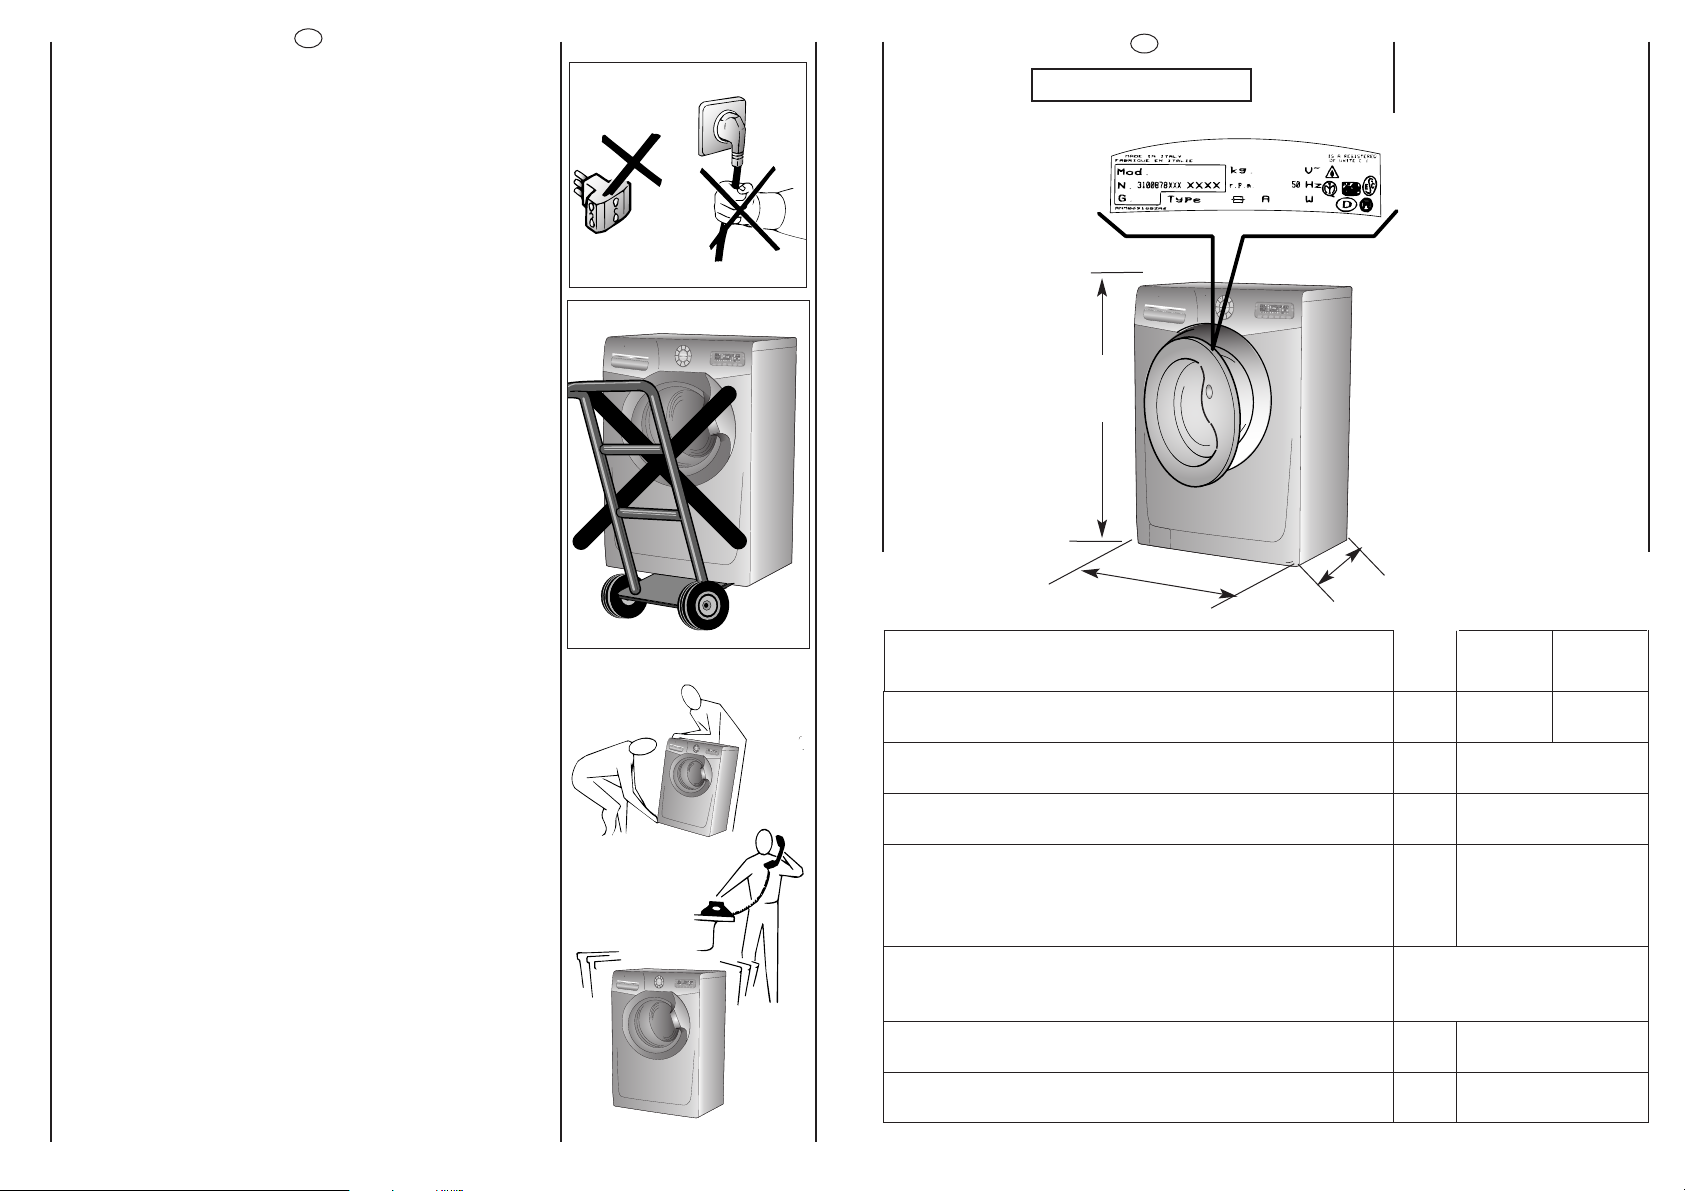
● In the case of removal,never lift the appliance by the
knobs or detersive drawer.
● During transportation do not lean the door against the
trolley.
Important!
When the appliance location is on carpet floors, attention
must be paid so as to ensure that there is no obstruction to
the bottom vents.
● Lift the appliance in pairs as illustrated in the diagram.
● In the case of failure and/or incorrect operation,turn the
washing machine off,close the water inlet tap and do not
tamper with the appliance. Contact a Hoover Customer
Service Centre for any repairs and ask for original Hoover
spare parts. Avoidance of these norms may compromise the
safety of the appliance.
85
cm
60 cm
TECHNICAL DATA
MAXIMUM WASH
LOAD DRY
NORMAL WATER LEVEL
POWER INPUT
ENERGY CONSUMPTION
(PROG. 90°C)
SPIN
r.p.m.
60 cm
Washing
kg 5
l
W
kWh
8
6÷15
2400
1,8
SSEEEE RRAATTIINNGG PPLLAATTEE
Drying
● Should the power supply cord of this appliance be
damaged, it must be replaced by an authorised
Hoover service centre or qualified person in order to avoid a
hazard.
6
WATER PRESSURE
SUPPLY VOLTAGE
kPa
V
min. 50
max. 800
220-240
7
Page 5
min 50 cm
max 85 cm
+2,6 mt max
max 100 cm
min 4 cm
EN
CHAPTER 5
EN
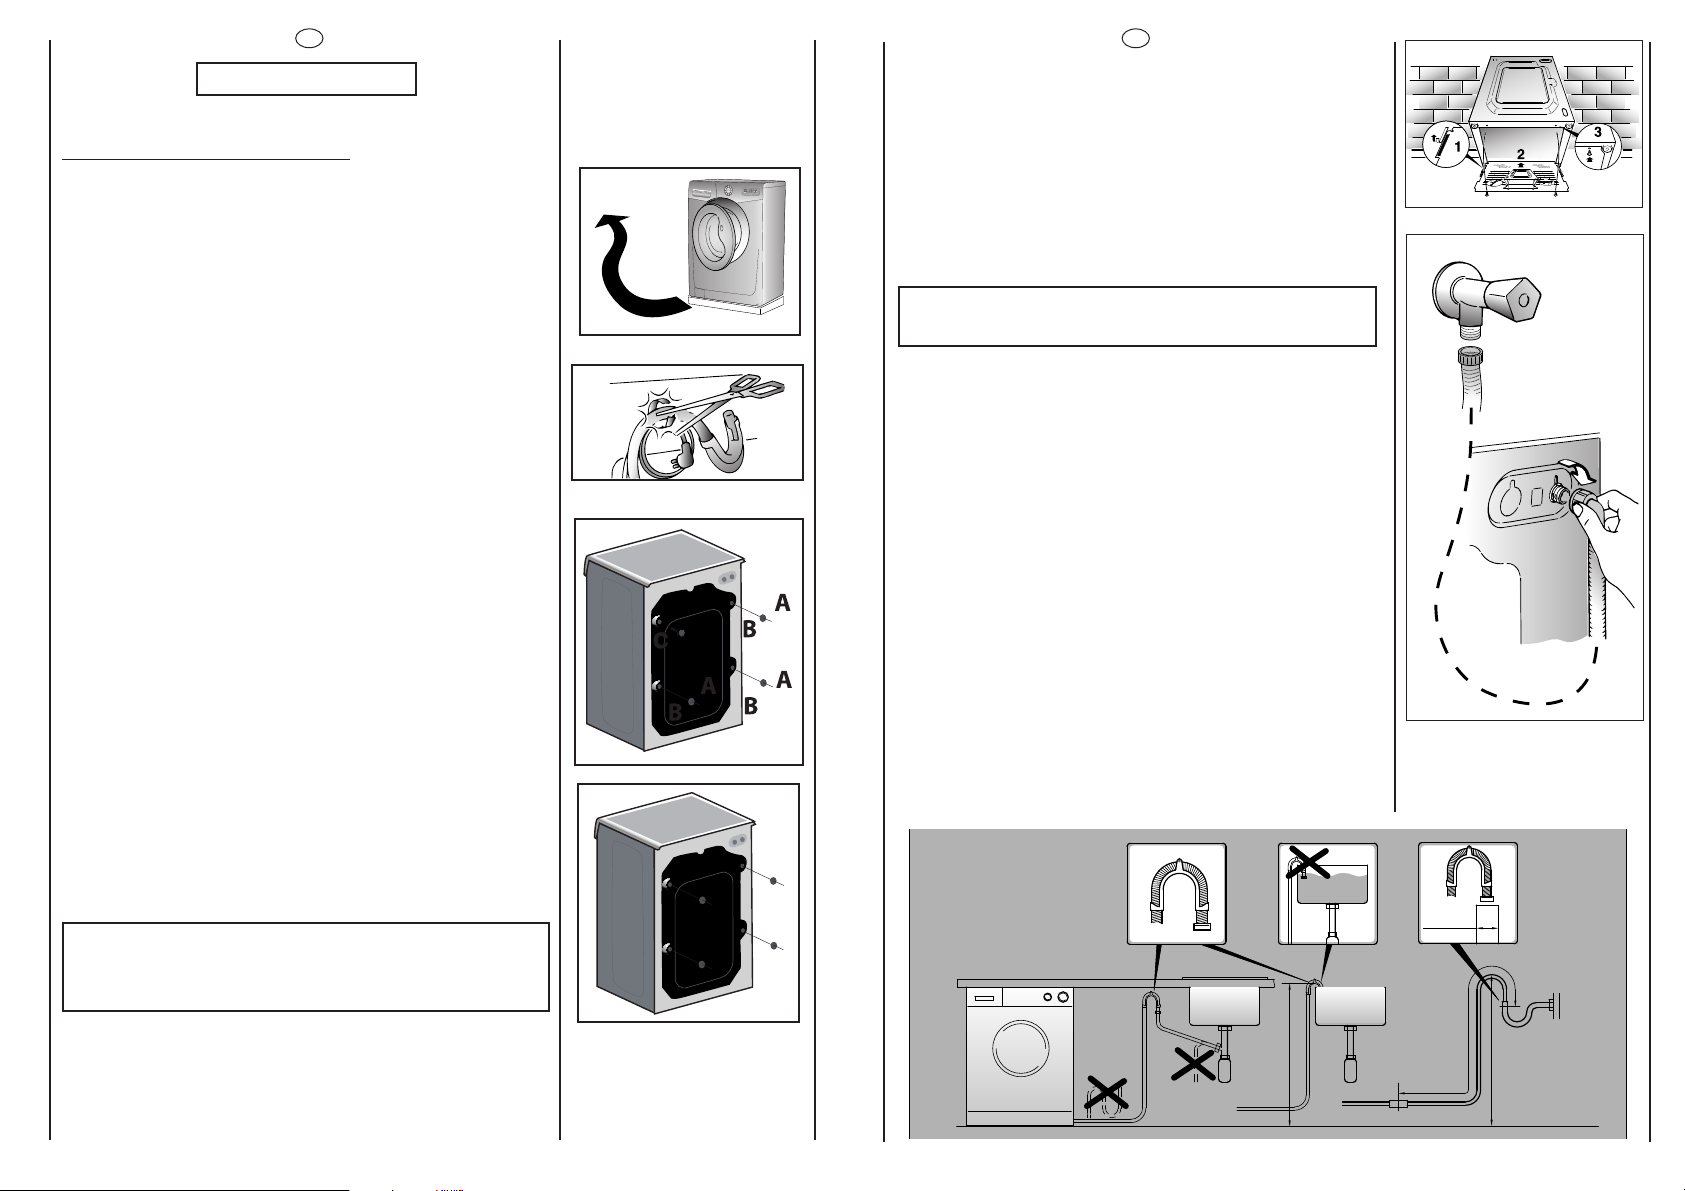
Fix the sheet of corrugated material on the bottom as shown
in picture.
SETTING UP INSTALLATION
Move the machine near its permanent position without the
packaging base.
Carefully cut the securing strap that holds the main cord and
the drain hose.
Remove the 3 fixing screws marked (A) and remove the 3
spacers marked (B)
Remove the screw (C).A spacer will fall inside the machine.
Connect the fill hose to the cold water tap only.
The appliance must be connected to the water mains using
new hose-sets.The old hose-sets should not be reused.
IMPORTANT:
DO NOT TURN THE TAP ON AT THIS TIME.
Position the washing machine next to the wall.Hook the
outlet tube to the edge of the bath tub, paying attention
that there are no bends or contractions along the tube.
It is better to connect the discharge hose to a fixed outlet of
a diameter greater than that of the outlet tube and at a
height of min. 50 cm. If is necessary to use the plastic sleeve
supplied.
The appliance must not be installed behind a lockable door,
a sliding door or a door with a hinge on the opposite side to
that of the washer dryer.
By tilting the machine, remove the above mentioned spacer.
Cover the 4 holes using the caps provided in the instruction
booklet pack.
WARNING:
DO NOT LEAVE THE PACKAGING IN THE REACH OF
CHILDREN AS IT IS A POTENTIAL SOURCE OF DANGER.
8
9
Page 6
EN
A
B
C
Use the 4 feet to level the machine with the floor:
a) Turn the nut clockwise to release the screw adjuster of the
foot.
EN
CHAPTER 6
R
B
P
ED
S
b) Rotate foot to raise or lower it until it stands firmly on the
ground.
c) Lock the foot in position by turning the nut anti-clockwise
until it comes up against the bottom of the machine.
Insert the plug.
ATTENTION:
if the power supply cord of this appliance is damaged. it
must be replaced by an
authorised Hoover service centre or qualified person in order
to avoid a hazard.
10
T
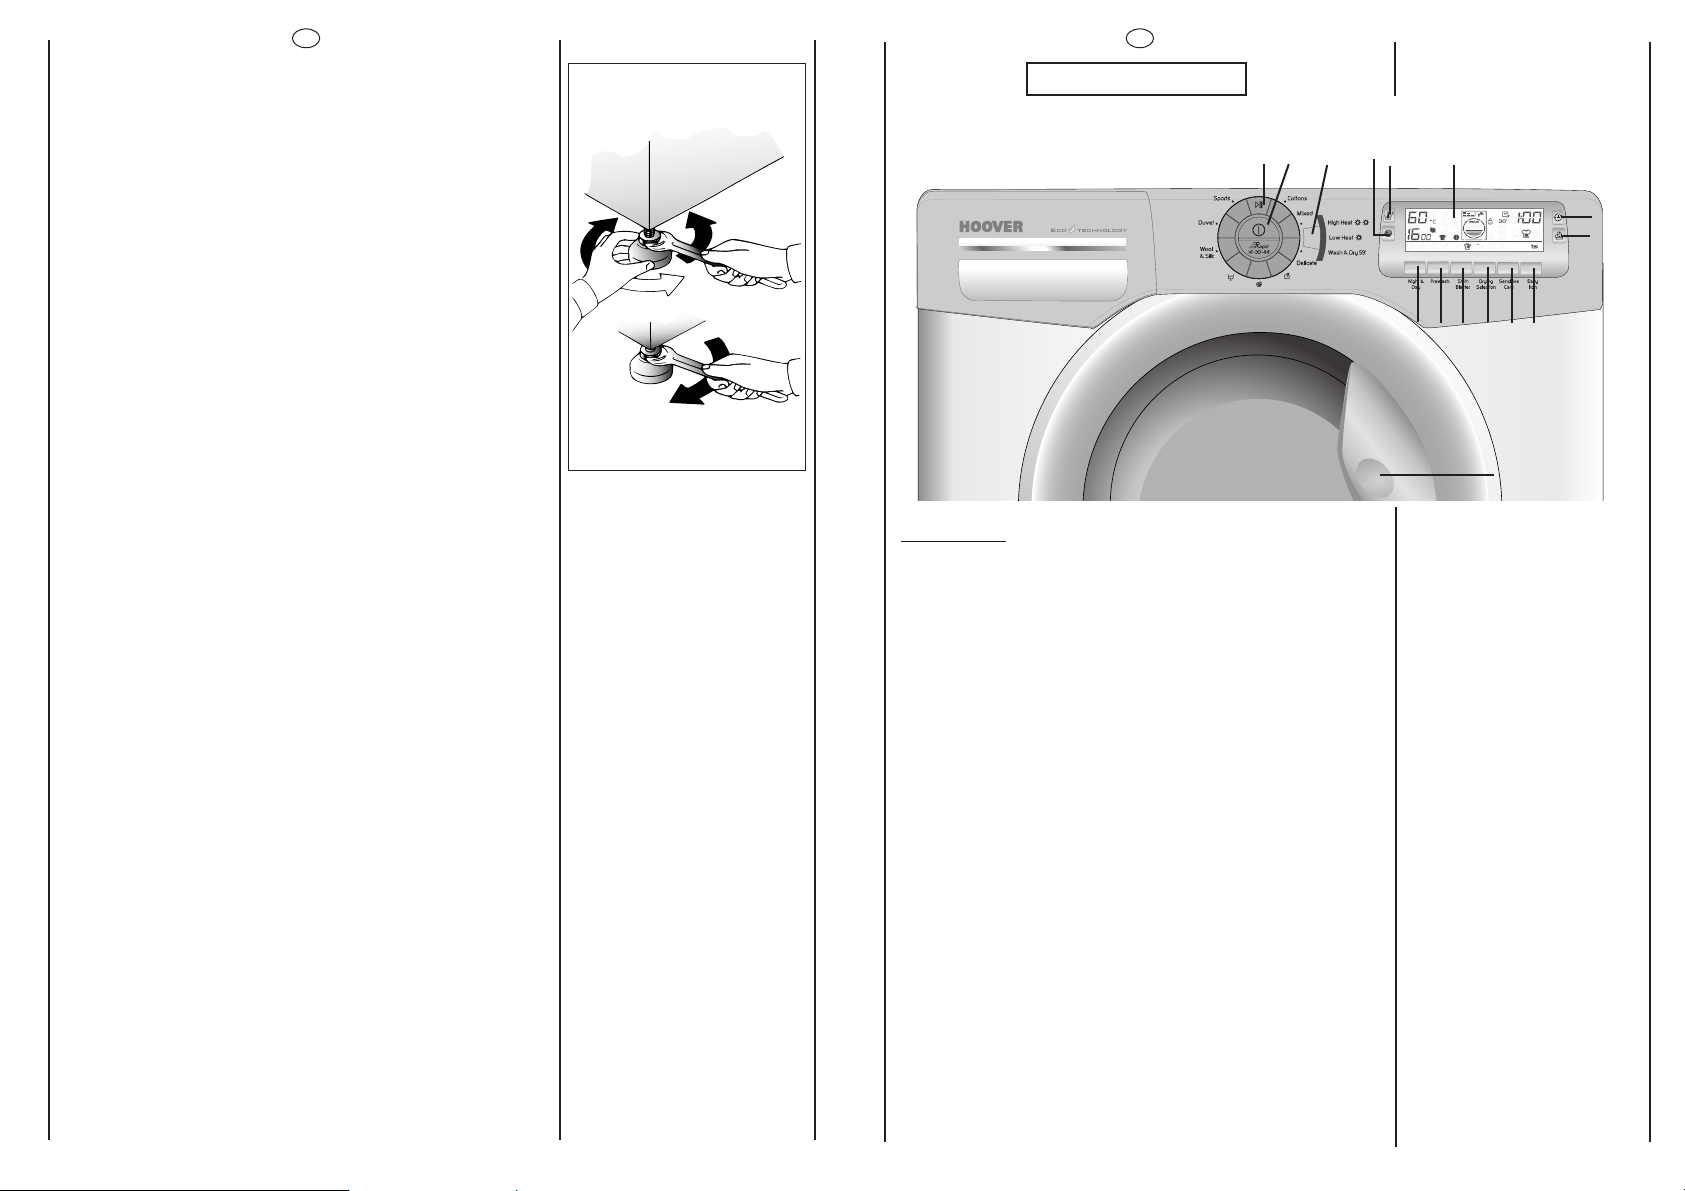
CONTROLS
Door handle
On/off button
Programme selection buttons
Spin Speed button
Wash Temperature button
Wash Time button
Start Delay button
Night & Day button
Prewash button
Stain Blaster button
Drying selection button
Sensitive Care button
Easy Iron button
Drying programme selection button
Start/Pause button
Digital Display
Detergent drawer
G
F
}
C
OIHMLN
A
A
B
C
D
E
F
G
H
I
L
M
N
O
P
R
S
T
11
Page 7
EN
EN
DESCRIPTION OF CONTROL
“Kg MODE”
(Function active only on Cotton and Synthetics programmes)
Through every wash phase “Kg MODE” allows to monitor
information on the wash load in the drum.
So, as soon as the “Kg MODE” is set in motion, in the first 4
minutes of the wash,it:
o adjusts the amount of water required
o determines the length of the wash cycle
o controls rinsing
according to the type of fabric selected to be washed it:
o adjusts the rhythm of drum rotation for the type of fabric
being washed
o recognises the presence of lather,increasing,if necessary,the
amount of water during rinsing
o adjusts the spin speed according to the load, thus avoiding
any imbalance.
In this way “Kg MODE” is able to decide, by itself,the most
suitable programme for each individual wash from the
hundreds of possible wash combinations.
“Kg MODE” meets the need for easy use by permitting a
simplified programme selection.In fact,the user need only tell
the machine the type of fabric in the drum and the degree of
soiling, to obtain a perfect wash with the highest level of drying
possible with a spin which really cares for your clothes.
DOOR HANDLE
Press the finger-bar inside the door handle to open the door.
A
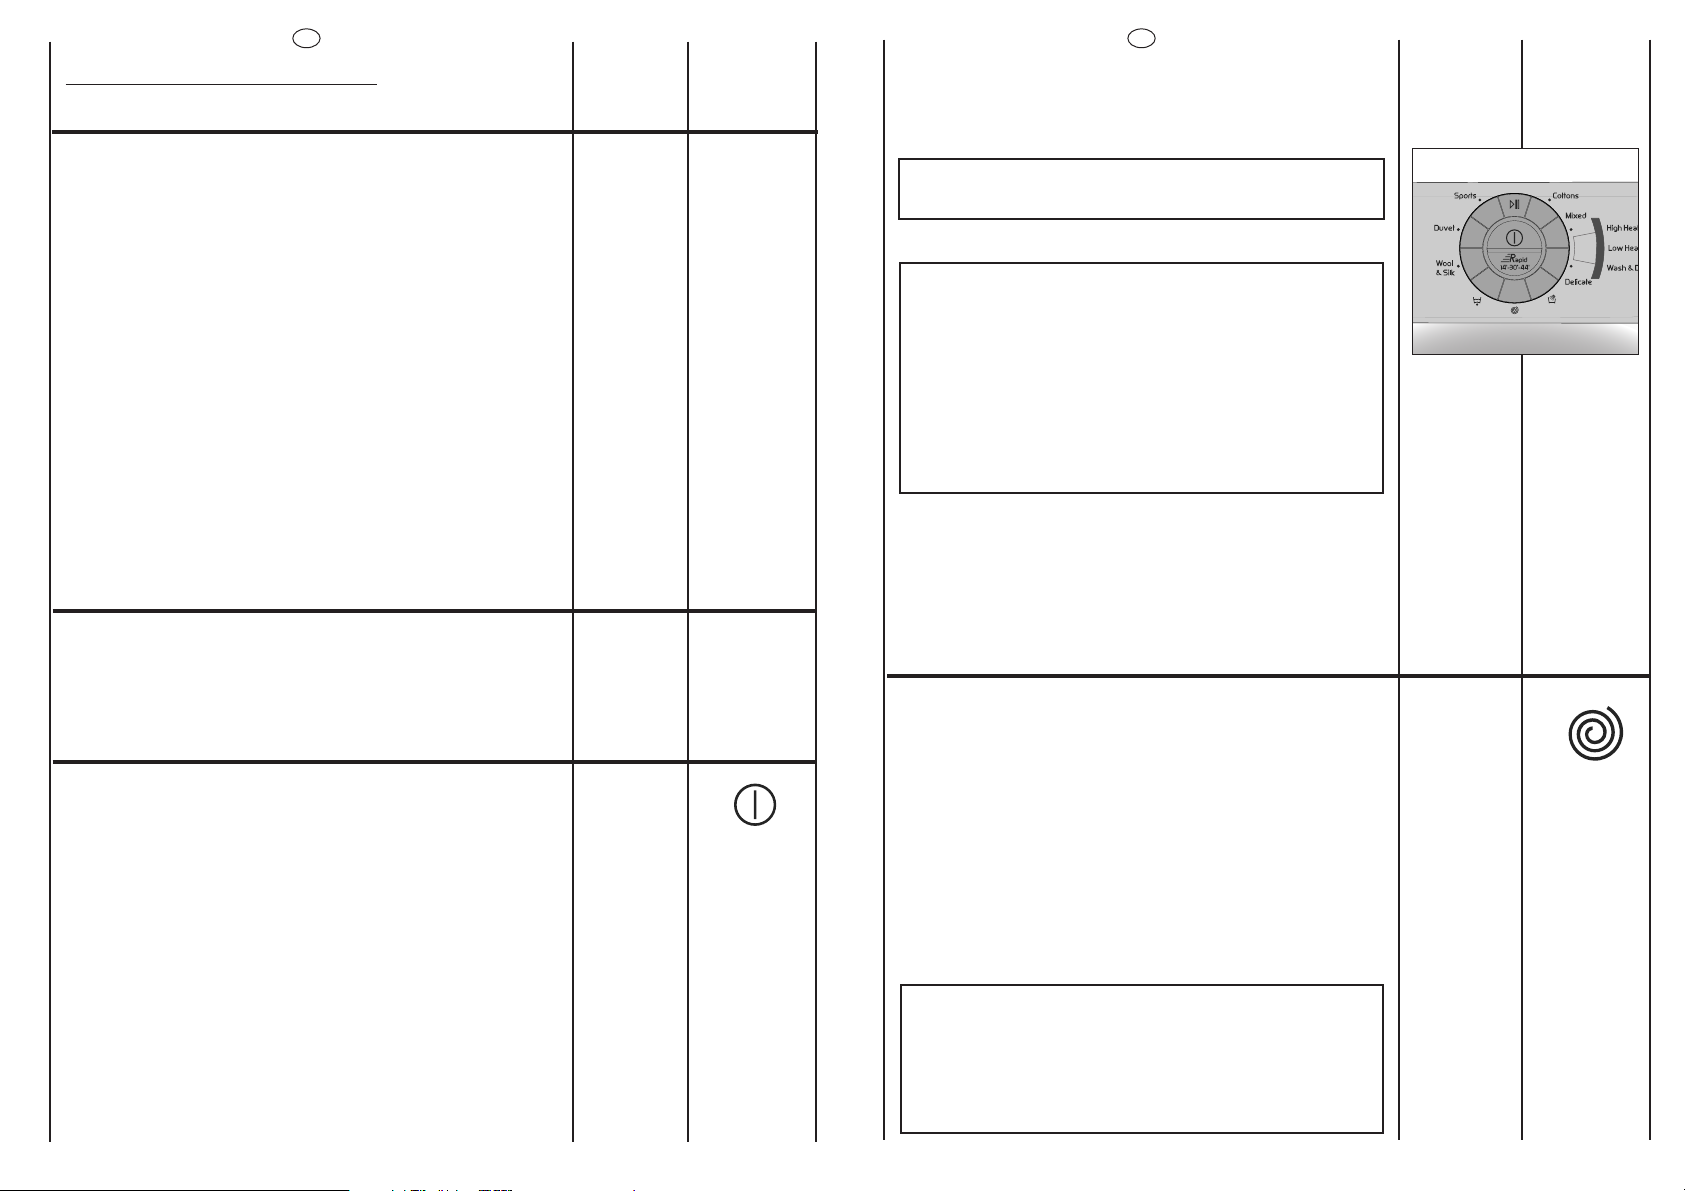
PROGRAMME SELECTION BUTTONS
Pressing a programme button the display lights up to show the
settings for the programme selected.
N.B. TO SWITCH THE MACHINE OFF PRESS THE ON/OFF
BUTTON
TODAY, MOST DETERGENTS HAVE BEEN IMPROVED TO WASH
EFFICIENTLY AT LOWER TEMPERATURES, THEREFORE WE
HAVE SET THE DEFAULT TEMPERATURE SETTINGS OF EACH
PROGRAMME TO A LOWER LEVEL, SAVING ELECTRICITY
AND REDUCING THE CARBON FOOTPRINT OF YOUR
MACHINE.
YOU CAN SELECT AN HIGH TEMPERATURE BY PRESSING THE
TEMPERATURE BUTTON.
PLEASE REFER TO THE PROGRAMME GUIDE FOR THE
MAXIMUM TEMPERATURE TO WHICH EACH PROGRAMME
CAN BE SET.
Press the START button to start the selected cycle
When the cycle ends, switch off the appliance by pressing the
ON/OFF button.
C
ON/OFF BUTTON
Press this button to switch on/off the appliance.
12
B
SPIN SPEED BUTTON
D
The spin cycle is very important to remove as much water as
possible from the laundry without damaging the fabrics.You
can adjust the spin speed of the machine to suit your needs.
By pressing this button, it is possible to reduce the maximum
speed, and if you wish, the spin cycle can be cancelled.
To reactivate the spin cycle is enough to press the button until
you reach the spin speed you would like to set.
For not damage the fabrics, it is not possible to increase the
speed over that automatically suitable during the selection of
the program.
It is possible to modify the spin speed in any moment, also
without to pause the machine.
NOTE:
THE MACHINE IS FITTED WITH A SPECIAL ELECTRONIC
DEVICE, WHICH PREVENTS THE SPIN CYCLE SHOULD
THE LOAD BE UNBALANCED.
THIS REDUCES THE NOISE AND VIBRATION IN THE
MACHINE AND SO PROLONGS THE LIFE OF YOUR
MACHINE.
13
Page 8

EN
WASH TEMPERATURE BUTTON
When a programme is selected on the display is show the
recommended wash temperature.
The temperature button can be used to decrease or increase
the temperature of your chosen wash cycle.
Each time the button is pressed, the new temperature level is
shown on the display.
WASH TIME BUTTON
By selecting this button (active only on COTTON and MIXED
FIBRES programmes) there is a choice of 3 levels of wash
intensity, depending on how much the fabrics are soiled.
Once the programme has been selected the indicator light
will automatically show the minimum level required for that
programme.Pressing the button increases the duration of the
wash cycle,and adjusts the wash settings accordingly. For
example: Using this button on the Rapid Wash cycle will
enable you to select either a 14, 30 or 44 minute wash cycle.
DELAY START BUTTON
This button allows you to pre-programme the wash cycle to
delay the start of the cycle for up to 24 hours.
To delay the start use the following procedure:
Switch on the appliance by the ON/OFF button
Select the required programme.
Press the button once to activate it (h00 appears on the
display) and then press it again to set a 1 hour delay (h01
appears on the display); the pre-set delay increases by 1
hour each time the button is pressed, until h24 appears on
the display, at which point pressing the button again will
reset the delay start to zero.
E
F
G
EN
The option buttons should be selected before pressing the
START button.
If an option is selected but it is not compatible with the
selected programme then the symbol first flashes and then
goes off.
NIGHT & DAY BUTTON
Press this button to reduce the intermediate spin speed to 400
rpm, where applicable; the water level is increased during
rinsing and the washing is kept immersed in water after the
final rinse in order to spread the fibres evenly.
During the phase in which the water is held in the tub, the
indicator lights to show that the machine is at a standstill.
Release the button to end the cycle with a spin dry (which
may be reduced or cancelled using the appropriate button)
and emptying phase.
Thanks to electronic control, the water in the intermediate
phases is emptied silently, making this option very useful for
washing at night.
PREWASH BUTTON
This option is particularly useful for heavily soiled loads and
can be used only on some programmes as shown in the
programmes table.
Detergent for this programme should be added to the
compartment of the soap drawer labelled “1” (Please refer to
Detergent Drawer Section of manual).We recommend you
use only 20% of the recommended quantities shown on the
detergent pack and fabric conditioner should not be used for
this programme.
H
I
Confirm by pressing the “START/PAUSE” button (the light on
the display starts to flash). The countdown will begin and
when it has finished the programme will start automatically.
It is possible to cancel the delay start by taking the following
action:
Press and hold the button for 5 seconds until the display will
show the settings for the programme selected.
At this stage it is possible to start the programme previously
selected by pressing the START/PAUSE button or to cancel
the process by pressing the ON/OFF button.
14
STAIN BLASTER BUTTON
By pressing this button, a sensors system come into operation.
They affect both the selected temperature, keeping it at a
constant level throughout the wash cycle, and the
mechanical function of the drum.
The drum is made to turn at two different speeds at crucial
moments. When the detergent enters the garments, the drum
rotates in such a way that the detergent is distributed in a
uniform manner; during the wash and rinse procedures,
however, the speed increases in order to maximise the
cleaning action.Thanks to this special system, the efficiency of
the wash procedure is improved WITHOUT ANY INCREASE IN
THE LENGTH OF THE PROGRAM.
L
15
Page 9

EN
DRYING SELECTION BUTTON
After pressing the ON/OFF button, select before the required
washing or drying programme and then press the button to
select the required drying degree; an indicator will light to display
the drying result selected each time you press the button.To
cancel the selection before the start of a drying programme,
press the button repeatedly until the indicators go out or press
the ON/OFF button.To cancel the cycle during the drying phase,
hold the button down for 2 seconds until the cooling indicator
lights up; given the high temperature inside the drum,we
recommend that you allow the dryer to complete the cool down
period before turn off the appliance and removing the laundry.
NOTE:
Do not dry unwashed items in the washer dryer.
Items that have been soiled with substances such as cooking oil,
acetone, alcohol, petrol, kerosene, spot removers, turpentine,
waxes and wax removers should be washed in hot water with an
extra amount of detergent before being dried in the washer
dryer.
Items such as foam rubber (latex foam),shower caps,waterproof
textiles, rubber backed articles and clothes or pillows fitted with
foam rubber pads should not be dried in the washer dryer.
Fabric softeners, or similar products,should be used as specified
by the fabric softener instructions.
The final part of a washer dryer cycle occurs without heat (cool
down cycle) to ensure that the items are left at a temperature
that ensures that the items will not be damaged.
WARNING:
Never stop a washer dryer before the end of the drying cycle
unless all items are quickly removed and spread out so that the
heat is dissipated.
SENSITIVE CARE BUTTON
By pressing this button you can activate a special new wash
cycle in the Colourfast and Mixed Fabrics programs, thanks to
the new Sensor System.This option treats with care the fibres
of garments and the delicate skin of those who wear them.
The load is washed in a much larger quantity of water and
this, together with the new combined action of the drum
rotation cycles, where water is filled and emptied,will give
you garments which have been cleaned and rinsed to
perfection.The amount of water in the wash is increased so
that the detergent dissolves perfectly, ensuring an efficient
cleaning action.The amount of water is also increased during
the rinse procedure so as to remove all traces of detergent
from the fibres.
This function has been specifically designed for people with
delicate and sensitive skin, for whom even a very small
amount of detergent can cause irritation or allergy.
You are advised to also use this function for children’s clothing
and for delicate fabrics in general,or when washing
garments made of towelling,where the fibres tend to absorb
a greater quantity of detergent.
To ensure the best performance for your wash,this function is
always activated on the Delicates and Woollens.
16
M
N
EN
EASY IRON BUTTON
The Easy Iron function minimizes creases as much as possible
with a uniquely designed anti-crease system that is tailored
to specific fabrics.
The water is gradually cooled throughout the final two rinses
with no spinning and then a delicate spin assures the
maximum relaxation of the fabrics.
DRYING PROGRAMME SELECTION BUTTON
By pressing this button, one indicator lights will go on to show
the selected drying programme:
= Cottons drying programme
= Synthetics drying programme
= Wash & Dry 59 minutes
The display shows the drying time and the symbol will
begin to flash.
Press the button “Drying selection” to select the required
drying degree.
START/PAUSE BUTTON
Press to start the selected cycle.
NOTE:
FEW SECONDS AFTER THE START, THE KG MODE
FUNCTION (ACTIVE ONLY ON COTTON AND
SYNTHETICS PROGRAMMES) WILL WEIGH THE
CLOTHES AND UPDATE THE MAXIMUM WASH TIME
REMAINING WITHIN THE FIRST 4 MINUTES OF THE
WASH CYCLE.WHILE THIS FUNCTION IS OPERATING
THE KG MODE INDICATOR IS ON.
Changing the settings after the programme has started
(PAUSE)
Once the programme has started the settings can only
altered by pressing the relevant buttons.
Press and hold the “START/PAUSE button for about 2 seconds,
the flashing of one indicator light and time remaining will show
that the machine has been paused, adjust as required and
press the START/PAUSE button again to cancel the flashing
light.
If you wish to add or remove items during washing, wait 2
minutes until the safety device unlocks the door. When you
have carried out the manoeuvre,close the door,press START
button and the appliance will continue working where it left
off.
CANCELLING THE PROGRAMME
To cancel the programme press and hold the START/PAUSE
button for about 5 seconds.
O
P
R
17
Page 10

EN
“DIGITAL” DISPLAY
The display’s indicator system allows you to be constantly
informed about the status of the machine:
1) SPIN SPEED
Once the programme has been selected,the maximum spin
speed allowed for that programme appears on the display.
Pressing the spin button will reduce the speed by 100 rpm
each time the button is pressed. The minimum speed allowed
is 400 rpm, or it is possible to omit the spin by pressing the spin
button repeatedly.
EN
S
mm
3
10
2
1
9
h
5
10
4
6
7
8
4) DOOR LOCKED INDICATOR
The “Door Locked” indicator light is illuminated when the door is
fully closed and the machine is ON.
When START is pressed on the machine with the door closed
the indicator will flash momentarily and then illuminate.
If the door is not closed the indicator will continue to flash.
A special safety device prevents the door from being opened
immediately after the end of the cycle.
2 minutes after the end of the wash the light goes off to show
that the door can now be opened.
4
5
1
5) DELAY START LIGHT
This flashes when delay start has been set.
2) WASH TEMPERATURE
When a programme is selected on the display is show the
recommended wash temperature.
The temperature button can be used to decrease or increase
the temperature of your chosen wash cycle.
Each time the button is pressed, the new temperature level is
shown on the display.
3) Kg MODE indicator
Available on Cotton and Synthetic cycles,during the first 4
minutes of the cycle the intelligent sensor will weigh the
laundry and adjust the cycle time, water and electricity
consumption accordingly.
18
6) CYCLE DURATION
mh
2
When a programme is selected the display automatically shows the
cycle duration,which can vary, depending on the options selected.
Once the programme has started you will be kept informed
constantly of the time remaining to the end of the wash.The
appliance calculates the time to the end of the selected
programme based upon a standard loading,during the cycle, the
appliance corrects the time to that applicable to the size and
composition of the load.
If is selected the automatic washing/drying cycle,at the end of the
wash phase,the drying time remaining to the end will be shown on
the display.
m
6
3
7) WASH TIME
When a programme is selected the relevant indicator will light
up to show the minimum possible wash time.
Selecting a greater time using the special button will cause the
corresponding indicator to light up.
7
19
Page 11

EN
8) BUTTONS INDICATOR LIGHT
These light up when the relevant buttons are pressed.
If an option is selected but it is not compatible with the
selected programme then the symbol first flashes and then
goes off.
9) MAXIMUM LOADING CAPACITY and DETERGENT INDICATOR
When a programme is selected on the display is shown the
maximum load of laundry suitable for that cycle and the
relative detergent quantity.
EN
10) DRYING PROGRAMME INDICATORS
The indicators display the type of the drying programme:
utomatic Programmes: By selecting one of these 3
A
automatic programmes,the washer-dryer will calculate the
time needed for drying and the residual dampness required,
according to the load and drying type selected.
After pressing the START button,the display will shown the
drying time remaining.
The appliance calculates the time to the end of the selected
8
9
programme based
upon a standard loading, during the cycle, the appliance
corrects the time to that applicable to the
size and composition of the load.
= Extra dry drying programme (recommended for
towels, bathrobes and bulky loads)
= Cupboard dry drying programme
10 10
Detergent:
20% of the maximum quantity
50% of the maximum quantity
maximum quantity The detergent quantity suggested
can be vary depending on how much the fabrics are soiled.
Maximum load
Every levels shown on the display is the 10% of the maximum
loading capacity.
When a programme is selected the maximum capacity
suggested is shown on the display.
For the programmes where the KG MODE function is active,
the appliance in the first minutes it calculates the real laundry
loaded, updating the levels on the display in real time.
10%
= Iron dry drying programme
USEFUL TIPS:
The 30 minute drying programme is recommended for small
loads (less than 1 kg) or slightly damp loads.
Your washer-dryer ends the cycle automatically when it
reaches the drying level selected.
For the correct operation of the appliance, it is preferable
not to interrupt the drying phase unless it is really necessary.
T
imed programmes:
120 minutes – 90 minutes – 60 minutes – 30 minutes:
They may be used to select timed drying programmes.
Cool do
Switched on during the final cool down period, in the last 10
minutes of each drying phase.
wn phase
:
20
21
Page 12

EN
CHAPTER 7
PROGRAM FOR:
Resistant fabrics
Cotton, linen
Mixed fabrics and synthetics
Cotton, mixed fabrics, synthetics
Very delicate fabrics
Rinse
Fast spin
Drain only
“Machine-Washable” Wool
Duvet
Mixed
Resistant fabrics
Mixed fabrics and synthetics
Rapid 14 minute
Resistant fabrics
Mixed fabrics and synthetics
Rapid 30 minute
Resistant fabrics
Mixed fabrics and synthetics
Rapid 44 minute
Cotton - Drying
Mixed - Drying
TABLE OF PROGRAMMES
PROGRAMME
SELECTION
BUTTONS:
1)
**
WEIGHT
MAX
kg
8
*
1)
4,5
*
2,5
-
*
-
*
-
1,5
3
*
2,5
*
2)
1,5
2,5
3,5
*
5
4,5
RECOMMENDED
TEMP.
°C
40°
40°
40°
-
-
-
30°
30°
30°
30°
30°
30°
-
-
Up to:
Up to:
Up to:
Up to:
Up to:
Up to:
Up to:
Up to:
Up to:
MAX
TEMP.
°C
90°
60°
40°
-
-
-
30°
30°
30°
30°
40°
40°
-
-
CHARGE DETERGENT
21
●●●
●●●
●●
●●
●●
●●
●●
●●
●●
()
()
●
Please read these notes
Washing
** Programme tested in accordance with AS/NZS 2040.2 with the maximum Wash Time
selected and a temperature of 40°C.
Drying
Cotton – Drying programme tested with Extra Dry selected in accordance with AS/NZS
2442.2.
The spin speed may also be reduced,to match any guidelines suggested on the fabric label,or
for very delicate fabrics cancel the spin completely this option is available with a spin speed
button.
()
Only with the Prewash button selected.( Programmes with Prewash button available)
Pressing the wash temperature button makes it possible to wash at any temperature below
the maximum allowed.
1) For the programmes shown you can adjust the duration and intensity of the wash using the
Wash Time button.
2) Using the Wash Time button on the Rapid cycle will enable you to select either a 14,30 or 44
minute wash cycle.
* Programmes for automatic drying.
When only a limited number of articles have stains which require treatment with liquid
bleaching agents, preliminary removal of stain can be carried out in the washing machine.
Pour the bleach into the liquid bleach container, inserted into the compartment marked “2”
in the detergent drawer, and set the special programme “RINSE” ( ) .
When this phase has terminated, switch off the appliance, add the rest of the fabrics and
proceed with a normal wash on the most suitable programme.
Cotton - Mixed
22
1,5
30°
Up to:
30°
●●
23
Page 13

EN
CHAPTER 8
SELECTION
For the various types of fabrics and various degrees of dirt the
washing machine has different programme bands according
to: wash cycle,temperature and lenght of cycle (see table of
washing cycle programmes).
RESISTANTS FABRICS
The programme is designed for maximum washing and rinsing
efficiency for normally soiled laundry.
The final spin gives more efficient removal of water.
MIXED AND SYNTHETIC FABRICS
The main wash and the rinse gives best results thanks to the
rotation rhythms of the drum and to the water levels.
A gentle spin will mean that the fabrics become less creased.
EN
SPECIAL “FAST SPIN” PROGRAMME
Programme “FAST SPIN” carries out a maximum spin (which
can be reduced by using the correct button).
DRAIN ONLY
This programme drains out the water.
WOOL & SILK PROGRAMME
This programme allows a complete washing cycle for
garments specified as “Machine-Washable” Wool fabrics and
laundry items made from silk or specified “Wash as Silk” on the
fabric label. The new motor allows the drum to move with a
pulse action.
This action of partial rotation with pauses in between creates
a delicate wash only equalled to that of hand washing.
The programme has a maximum temperature of 30°C and
concludes with 3 rinses, one for fabric conditioner, and a slow
spin.
SPECIAL DELICATE FIBRES
This is a new wash cycle which alternates washing and
soaking and is particularly recommended for very delicate
fabrics.
The wash cycle and rinses are carried out with high water
levels to ensure best results.
SPECIAL “RINSE” PROGRAMME
This programme carries out three rinses with a intermediate
spin (which can be reduced or excluded by using the correct
button). It can be used for rinsing any type of fabric,eg. use
after hand-washing.
This program can be also used as cycle of Bleaching (see
table of washing cycle programmes).
24
DUVET PROGRAMME
This is a programme dedicated to washing a single duvet or
big size laundry.
This programme washes at a cool 30°C,carries out 3 rinses
(one is for fabric conditioner) and concludes with a slow spin.
We suggested to follow the instruction on the cloths label.
SPORTS
Hoover has given sports items their own wash care
programme.
The washing machine has a unique Sportswear programme.
It is specially designed to wash mixed sportswear fabrics that
cannot be washed on hotter programmes and is designed to
remove the soil and staining created by participation in
sports activities. This programme washes at a cool 30°C, rinses
and spins slowly for the best care of your heavily soiled,
delicate garments.
25
Page 14
EN
RAPID PROGRAMME
The Rapid programme allows a washing cycle to be
completed in just 14 minutes! This programme is particularly
suited to slightly dirty cottons and mixed fabrics.
Using the Wash Time button on the Rapid cycle will enable
you to select either a 14,30 or 44 minute wash cycle.
When selecting the rapid programme,please note that we
recommend you use only 20% of the recommended
quantities shown on the detergent pack.
For information about these programmes please refer to the
programmes table.
EN
CHAPTER 9
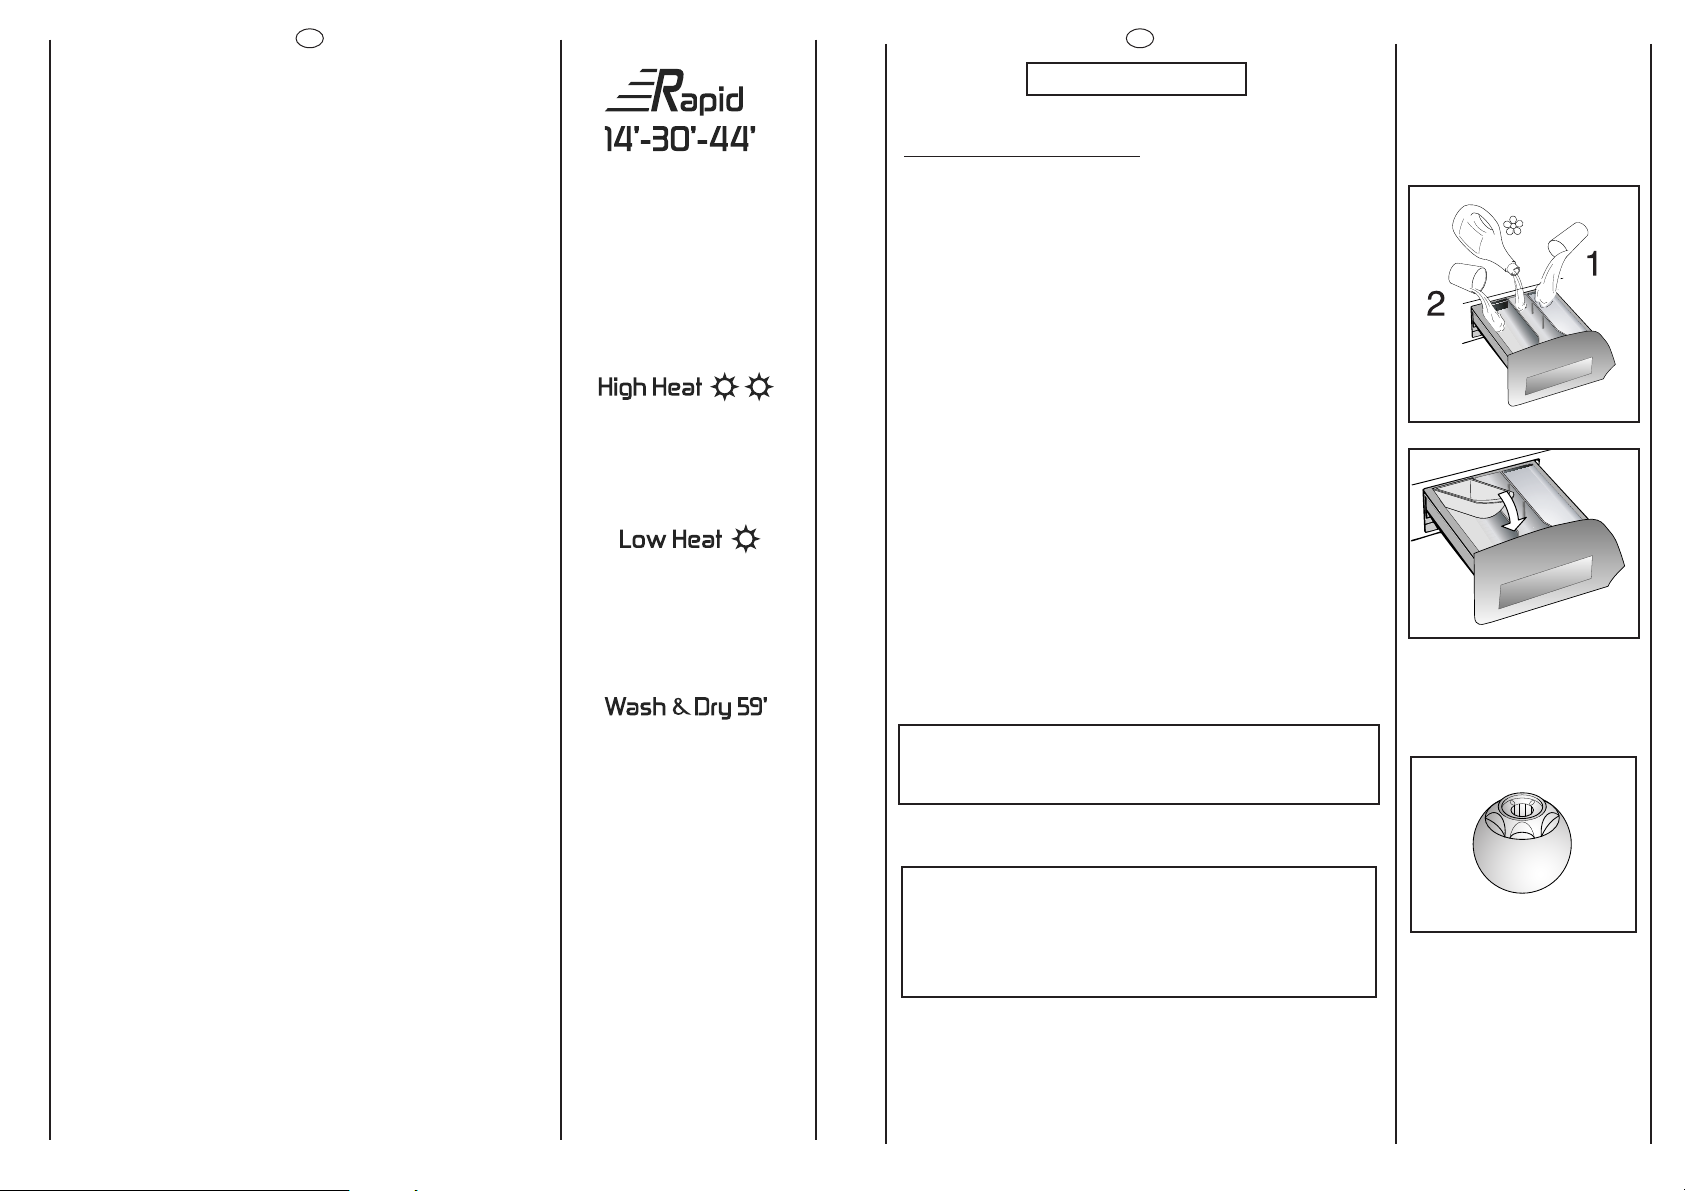
DETERGENT DRAWER
The detergent draw is split into 3 compartments:
- the compartment labelled "1" is for prewash detergent;
- the compartment labelled “✿✿” is for special additives,
fabric softeners, fragrances, starch, brighteners etc;
COTTON DRYING
Cotton, terry towelling, linen,hemp fabrics, etc...
SYNTHETICS DRYING
Mixed fabrics (synthetics/cotton), synthetic fabrics.
RAPID 59’
A complete express washing and drying cycle lasting only 59'.
This is an ideal program for having dry, refreshed and
ready-to-wear clothes as soon as the cycle is finished.
- Maximum load: 1,5 kg (4 shirts for example)
- Lightly soiled fabrics (cotton and mixed fabrics)
With this program we recommend that you reduce the
detergent loading dose (compared to the normal one), in
order to avoid detergent waste.
- the compartment labelled "2" is for main wash detergent.
If liquid detergents are used, please insert the special
container supplied into the compartment marked “2” in the
detergent drawer. This ensures that the liquid detergent
enters the drum at the right stage of the wash cycle.
This special container must be inserted into the
compartment marked "2" in the detergent drawer, also when
you wish to use the "RINSE" programme as BLEACHING cycle.
NOTE: SOME DETERGENTS ARE DIFFICULT TO REMOVE.
FOR THESE, WE RECOMMEND YOU USE THE SPECIAL
DISPENSER WHICH IS PLACED IN THE DRUM.
NOTE: ONLY PUT LIQUID PRODUCTS IN THE
COMPARTMENT LABELLED “
✿✿”. THE MACHINE IS
PROGRAMMED TO AUTOMATICALLY TAKE UP
ADDITIVES DURING THE FINAL RINSE STAGE FOR ALL
WASH CYCLES.
26
27
Page 15

EN
EN
CHAPTER 10
THE PRODUCT
IMPORTANT:
When washing heavy rugs, bed spreads and other heavy
articles, it is advisable not to spin.
To be machine-washed,woollen garments and other articles
in wool must bear the “Machine Washable Label”.
IMPORTANT:
When sorting articles ensure that:
- there are no metal objects in the washing (e.g.
brooches, safety pins, pins,coins etc.).
- cushion covers are buttoned,zips and hooks are closed,
loose belts and long tapes on dressing gowns are
knotted.
- runners from curtains are removed.
- attention is paid to garment labels.
- when sorting, any tough stains should be removed prior
to washing using stain removers only recommended on
label.
CHAPTER 11
CUSTOMER AWARENESS
A guide environmentally friendly and economic use of your
appliance.
MAXIMISE THE LOAD SIZE
Achieve the best use of energy, water,detergent and time by
using the recommended maximum load size.
Save up to 50% energy by washing a full load instead of 2 half
loads.
DO YOU NEED TO PRE-WASH?
For heavily soiled laundry only!
SAVE detergent, time,water and between 5 to 15% energy
consumption by NOT selecting Prewash for slight to normally
soiled laundry.
IS A HOT WASH REQUIRED?
Pretreat stains with stain remover or soak dried in stains in
water before washing to reduce the necessity of a hot wash
programme.
Save up to 50% energy by using a 40°C wash programme.
BEFORE USING A DRYING PROGRAMME...
SAVE energy and time by selecting a high spin speed to
reduce the water content in laundry before using a drying
programme.
28
29
Page 16

WASHING
EN
EN
● Ensure that the water inlet tap is turned on.
VARIABLE CAPACITY
This washing machine automatically adapts the level of the water
to the type and quantity of washing.In this way it is also possible to
obtain a “personalized”wash from an energy saving point of view.
This system gives a decrease in energy consumption and a
sensible reduction in washing times.
EXAMPLE:
A net bag should be used for particularly delicate fabrics.
Let us suppose that the washing consists of HEAVILY SOILED
COTTON (tough stains should be removed with suitable stain
removal).
It is advisable not to wash a load made up entirely of articles
in towelling fabric which absorb a lot of water and become
too heavy.
● And that the discharge tube is in place.
PROGRAMME SELECTION
Switch on the appliance by the ON/OFF button
Select the required programme
The display will show the settings for the programme selected.
Adjust the wash temperature if necessary.
Press the option buttons (if required)
Then press the START button.
When the START button is pressed the machine sets the
working sequence in motion.
Warning: If there is any break in the power supply while the
machine is operating,a special memory stores the selected
programme and,when the power is restored,it continues
where it left off.
● When the programme has ended the word “End” will
appear on the display
● Wait for the door lock to be released (about 2 minutes after
the programme has finished).
● Open the detergent drawer.
● Put 120 g in the main wash compartment marked 2.
● Put 50 ml of the desired additive in the additives
compartment
● Close the detergent drawer.
30
✿✿
.
● Switch off the appliance by pressing the ON/OFF button
● Open the door and remove the laundry.
● Turn off the water supply after every use.
FOR ALL TYPES OF WASH CONSULT THE PROGRAMME
TABLE AND FOLLOW THE OPERATIONS IN THE ORDER
INDICATED.
31
Page 17

EN
EN
CHAPTER 12
DRYING
To minimize the risk of fire in a tumble dryer, the following should be
observed:
● Items that have been spotted or soaked with vegetable or
cooking oil constitute a fire hazard and should not be placed in a
tumble dryer.
● Oil-affected items can ignite spontaneously, especially when
exposed to heat sources such as in a tumble dryer.The items
become warm, causing an oxidation reaction in the oil. Oxidation
creates heat. If the heat cannot escape, the items can become
hot enough to catch fire.Piling, stacking
or storing oil affected items can prevent heat from escaping and
so create a fire hazard.If it is unavoidable that fabrics that contain
vegetable or cooking oil or have been contaminated by hair care
products be placed in
a tumble dryer they should first be washed in hot water with extra
detergent-this will reduce, but not eliminate, the hazard. The 'cool
down' cycle of tumble dryers should be used to reduce the
temperature of the items.
They should not be removed from the tumble dryer or piled or
stacked while hot.
● Items that have been previously cleaned in,washed in,soaked
in or spotted with petrol/gasoline,dry-cleaning solvents or other
flammable or explosive substances should not be placed in a
tumble dryer. Highly flammable substances commonly used in
domestic environments include acetone,denatured alcohol,
petrol/gasoline,kerosene,spot removers (some brands),
turpentine, waxes and wax removers.
● Items containing foam rubber (also known as latex foam) or
similarly textured rubber like materials should not be dried in a
tumble dryer on a heat setting.
Foam rubber materials can, when heated, produce fire by
spontaneous combustion.
● Fabric softeners or similar products should not be used in a
tumble dryer to eliminate the effects of static electricity unless this
practice is specifically recommended by the manufacturer of the
fabric softener or product.
● Undergarments that contain metal reinforcements should not
be placed in a tumble dryer. Damage to the tumble dryer can
result if metal reinforcements come loose during drying. When
available a drying rack could be used
for such items.
● Plastic articles such as shower caps or babies' waterproof
napkin covers should not be placed in a tumble dryer.
● Rubber-backed articles, clothes fitted with foam rubber pads,
pillows, galoshes and rubber-coated tennis shoes should not be
placed in a tumble dryer.
IMPORTANT:
THIS DRYER CAN ONLY BE USED FOR LAUNDRY WHICH HAS BEEN
WASHED AND SPIN DRIED.
WARNING:
Indications given are general,therefore some practice is needed
for the best drying results. We recommend setting a lower drying
time than indicated, when first using, so as to establish the degree
of dryness required. We recommend not to dry fabrics that fray
easily, such as rugs or garments with a deep pile, to avoid air duct
clogging.
The water is then conveyed to the drain circuit,wich is sealed and
therefore,no steam can be released outside.
32
IMPORTANT
NEVER OPEN THE DOOR AFTER THE DRYING CYCLE
HAS BEGUN - WAIT UNTIL THE COOL DOWN PERIOD
PROVIDED FOR BY THE CYCLE.
Only dry pre-spun laundry
The washer/dryer can perform two types of drying:
1 Cotton, terry towelling, linen,hemp fabrics, etc...
Advisory note
During drying phase the drum will accelerate to a higher
speed to distribute the load and to optimize the drying
performance
2 Mixed fabrics (synthetics/cotton), synthetic fabrics.
DRYING CYCLE
● Open door.
● Fill with up to 5 kg - in case of large items (e.g. sheets) or
very absorbent items (e.g. towels or jeans), it is a good idea to
reduce the load.
● Close door.
● Press the ON/OFF button to switch on the washer dryers
Press the drying programme selection button (P)
The cottons drying programme indicator lights up.
Select the degree of dryness that you require with the button
“drying selection”.
● This ranges from Extra Dry ( ) for bath towels and
bathrobes, through Cup board Dry ( ) for items that will
be put away without ironing,to iron dry ( ) that leaves the
laundry suitable for ironing.
If you wish to select a timed drying cycle, press the “drying
selection” button until the required time indicator lights up.
MAX
5 kg
33
Page 18

EN
DOUBLE-SKIN DOOR
The appliance door is fitted with a protective shield to
prevent contact with the glass door which can reach high
temperatures, during the drying cycle.
EN
CHAPTER 13
OMATIC WASHING/DRYING
AUT
WARNING: DO NOT TOUCH DOOR FOR ANY REASON.
● Make sure water inlet valve is open.
● Make sure water drain is correctly positioned.
WARNING:
DO NOT DRY WOOLLEN GARMENTS OR ARTICLES WITH
SPECIAL PADDING, (E.G. QUILTS, QUILTED ANORAKS,
ETC.).
DELICATE FABRICS IF GARMENTS ARE DRIP/DRY, LOAD
LESS ITEMS AO AS TO PREVENT CREASING.
● Press the START button.
● The drying programme indicator will be on until the cool
down phase will begin and the indicator ( ) will go on.
WARNING: ONLY A MAXIMUM 5 KG OF DRY LAUNDRY
CAN BE LOADED OTHERWISE THE DRIED LAUNDRY WILL
BE NOT SATISFACTORY.
Washing:
Open the drawer, choose the detergent and put in the
correct amount.
Press the ON/OFF button to switch on the washer dryers
Refer to the list of washing programmes according to fabrics
to be washed (e.g.very dirty cotton) and without pressing
Start button, prepare wash as described:
Select the required programme
The display will show the settings for the programme selected.
Adjust the wash temperature if necessary.
Press the option buttons (if required)
Check that the tap is turned on and that the discharge hose
is positioned correctly.
At the end of the programme the word “END” will appear
on the display.
● Wait for the door lock to be released (about 2 minutes
after the programme has finished).
The "Door Security" indicator light will go out.
● Switch off the appliance by pressing the ON/OFF button
● Open the door and remove the laundry.
● Turn off the water supply after every use.
34
Drying:
Select the degree of dryness that you require with the button
“drying selection”.
This ranges from Extra Dry ( ) for bath towels and
bathrobes, through Cupboard Dry ( ) for items that will be
put away without ironing,to iron dry ( ) that leaves the
laundry suitable for ironing.
35
Page 19

EN
If you wish to select a timed drying cycle, press the “drying
selection” button until the required time indicator lights up.
EN
CHAPTER 14
Press the "Start/Pause" button.
At the end of the wash phase the display will shown the
drying time remaining.
The washer-dryer will then complete the entire drying
programme.
The drying programme indicator will be on until the cool
down phase will begin and the indicator ( ) will go on.
At the end of the programme the word “END” will appear on
the display.
Wait for the door lock to be released (about 2 minutes after
the programme has finished).
The "Door Security" indicator light will go out.
Switch off the appliance by pressing the ON/OFF button
Open the door and remove the laundry.
Turn off the water supply after every use.
CLEANING AND ROUTINE MAINTENANCE
Do not use abrasives, spirits and/or diluents on the exterior of
the appliance. It is sufficient to use a damp cloth.
The washing machine requires very little maintenance:
● Cleaning of drawer compartments.
● Filter cleaning
● Removals or long periods when the machine is left
standing.
CLEANING OF DRAWER COMPARTMENTS
Although not strictly necessary,it is advisable to clean the
detergent, bleach and additives compartments
occasionally.
EN
TABLE OF DRYING TIMES (IN MINUTES):
PROGRAMME
Extra
Cupboard
Iron
The appliance calculates the time to the end of the selected programme based
upon a standard loading, during the cycle,the appliance corrects the time to that
applicable to the size and composition of the load.
36
COTTON MIXED
Min 1 Kg
from 30’
from 30’
from 30’
Max 5 Kg
to 230’
to 220’
to 170’
Min 1 Kg
from 30’
from 30’
from 30’
Remove the compartments by pulling gently.
Clean with water.
Put the compartments back into place
Max 4,5 Kg
to 170’
to 150’
to 80’
37
Page 20

EN
FILTER CLEANING
The washing-machine is equipped with a special filter to
retain large foreign matter which could clog up the drain,
such as coins, buttons, etc.These can, therefore, easily be
recovered.The procedures for cleaning the filter are as
follows:
● Open the flap
● Only available on certain models:
Pull out the corrugated hose, remove the stopper and drain
the water into a container.
● Before removing the filter, place an absorbent towel below
the filter
cap to collect the small amount of water likely to be inside
the pump
● Turn the filter anticlockwise till it stops in vertical position.
● Remove and clean.
● After cleaning, replace by turning the notch on the end of
the filter clockwise.Then follow all procedures described
above in reverse order.
REMOVALS OR LONG PERIODS WHEN THE MACHINE IS LEFT
STANDING
For eventual removals or when the machine is left standing for
long periods in unheated rooms, the drain hose should be
emptied of all remaining water.
The appliance must be switched off and unplugged.A bowl is
needed. Detach the drainage hose from the clamp and
lower it over the bowl until all the water is removed.
Repeat the same operation with the water inlet hose.
38
EN
CHAPTER 15
FAU LT
1. Does not function
on any
programme
2. Does not load
water
3. Does not
discharge water
4. Water on floor
around washing
machine
5. Does not spin
6. Strong vibrations
during spin
7. Display reads error
0, 1, 5,7, 8
8. Display reads
error 2
9. Display reads
error 3
10.Display reads
error 4
11.Display reads
error 9
Mains plug not plugged in
Mains switch not on
No power
Electric circuit fuses failure
Load door open
See cause 1
Inlet tap turned off
Discharge tube bent
Odd material blocking filter
Leak from the washer between the tap
and inlet tube
The washing machine has not
discharged water
“No spin” setting (some models only)
Washing machine not perfectly level
Transport bracket not removed
Washing load not evenly distributed
No water fill.
No pump out.
Machine overfilled with water.
CAUSE
–
–
Insert plug
Turn on mains switch
Check
Check
Close load door
Check
Turn on water inlet tap
Straighten discharge tube
Check filter
Replace washer and tighten the tube
on the tap
Wait a few minutes until the machine
discharges water
Turn the programme dial onto spin
setting
Adjust special feet
Remove transport bracket
Distribute the washing evenly
Call service.
Check water supplies are on.
Check drain is clear.
Check drain hose is not kinked.
Turn off water supply to machine.
Call service.
Switch off the appliance
Wait 10-15 seconds and start again the
programme
Advisory note
During drying phase the drum will accelerate to a higher speed to distribute the load and to
optimize the drying performance
If the fault should persist, contact a Hoover Customer Service Centre. For prompt servicing, give the
model of the washing machine,to be found on the label placed on the cabinet inside of the porthole
or on the guarantee certificate.
Important
1 The use of environment friendly detersives without phosphates may produce the following effects:
- The discharge rinse water may result cloudier due to the presence of zeolites in suspension. This does
not compromise the efficiency of the rinses.
- The presence of white powder (zeolites) on the washing at the end of the washing cycle. This does
not remain incorporated in the fabric and does not alter the colour.
- The presence of foam in the last rinse water which is not necessarily a sign of inadequate rinsing.
- The non-ionic surface-active agents present in the composition of washing machine detersives are
often difficult to remove from the washing itself and, even in small quantities, may produce visible
signs of the formation of foam.
- Carrying out further rinses, in cases such as this, is not useful.
2 If your washing machine fails to function, carry out the above-mentioned checks before calling the
Hoover Customer Service Centre.
REMEDY
39
Page 21

10.05 - 41034323 - www.graficaestampa.it - Printed in Italy - Imprimé en Italie
EN
This appliance is marked according to the European directive 2002/96/EC on Waste Electrical and Electronic
Equipment (WEEE).
By ensuring this product is disposed of correctly, you will help prevent potential negative consequences for the
environment and human health, which could otherwise be caused by inappropriate waste handling of this product.
The symbol on the product indicates that this product may not be treated as household waste. Instead it shall be
handed over to the applicable collection point for the recycling of electrical and electronic equipment
Disposal must be carried out in accordance with local environmental regulations for waste disposal.
For more detailed information about treatment, recovery and recycling of this product, please contact your local city
office, your household waste disposal service or the shop where you purchased the product.
The manufacturer declines all responsibility in the event of any printing mistakes in
this booklet. The manufacturer also reserves the right to make appropriate
modifications to its products without changing the essential characteristics.
 Loading...