

Page 1

USER MANUAL
Powered Reach
TM
Lite
TM
WELCOME TO A NEW GENERATION OF CLEAN.
Page 2

For over 100 years, Hoover has reimagined the way we clean.
From the introduction of the very first electric sweeper in
1908 to the revolutionary WindTunnel
®
design, Hoover has
relentlessly pursued innovation so you can more easily
achieve the best possible clean for you and your family.
THE
ORIGINAL
INNOVATOR
Page 3

TABLE OF CONTENTS
Important Safety Instructions . . . . . . . . . . . . . . . . . . . . . . . . . . . . . . . .3
Assembly .................................................5
User Controls .............................................5
Getting to Know Your Hoover
®
REACT™ Powered Reach™ Lite
Upright . . . . . . . . . . . . . . . . . . . . . . . . . . . . . . . . . . . . . . . . . . . . . . . . . .6
Available Tools and Accessories ............................7
Hoover
®
FloorSense™ Technology...........................8
Using the Hoover App . . . . . . . . . . . . . . . . . . . . . . . . . . . . . . . . . . . . .10
Using Your Hoover® REACT™ Powered Reach™ Lite Upright .......11
Maintenance . . . . . . . . . . . . . . . . . . . . . . . . . . . . . . . . . . . . . . . . . . . . .12
Troubleshooting . . . . . . . . . . . . . . . . . . . . . . . . . . . . . . . . . . . . . . . . . .15
Warranty Information . . . . . . . . . . . . . . . . . . . . . . . . . . . . . . . . . . . . . .16
Français.................................................17
Español . . . . . . . . . . . . . . . . . . . . . . . . . . . . . . . . . . . . . . . . . . . . . . . . . 33
This manual is for models UH73400 & UH73400CA.
Page 4
Welcome to Hoover ownership.
Make it official.
Compatible with the Hoover App.
Download the Hoover App to register your new
vacuum, customize FloorSense™ settings,
receive system maintenance reminders and
access tips and tricks.
Apple and the Apple logos are
trademarks
of Apple, Inc., registered
in the U.S., and other countries.
App Store is a service mark of Apple Inc.
Android, Google Play, and the
Google Play logo are
trademarks of Google Inc.
You can also register by:
Calling: 1-877-839-2046
Visiting: Hoover.com or Hoover.ca
It’s Guaranteed.
See Warranty for complete details.
TM
Page 5

3
Important Safety Instructions
SAVE THESE INSTRUCTIONS.
IMPORTANT: READ CAREFULLY BEFORE ASSEMBLY AND USE. THIS PRODUCT IS INTENTED FOR HOUSEHOLD USE ONLY. IF USED COMMERCIALLY, WARRANTY IS VOID.
When using an electrical appliance, basic precautions should always be followed, including the following:
WARNING: TO REDUCE THE RISK OF FIRE, ELECTRIC SHOCK, DAMAGE OR INJURY:
• Fully assemble before operating.
• Operate vacuum only at voltage specified on data label on bottom of the vacuum canister.
• Do not leave appliance when plugged in. Unplug from outlet when not in use and before cleaning
or servicing.
• Do not use outdoors or on wet surfaces.
• Do not allow to be used as a toy. Not intended for use by children age 12 and under. Close attention
is necessary when used near children. To avoid injury or damage, keep children away from product,
and do not allow children to place fingers or other objects into any openings.
• Use only as described in this manual. Use only manufacturer’s recommended attachments
and products.
• Do not use with damaged cord or plug. If appliance is not working as it should, has been dropped,
damaged, left outdoors, or dropped into water, take it to a service center prior to continuing use.
• Do not pull or carry by cord, use cord as a handle, close a door on a cord or pull cord around sharp
edges or corners. Do not place product on cord. Do not run appliance over cord. Keep cord away
from heated surfaces.
• Do not unplug by pulling on cord. To unplug, grasp the plug, not the cord.
• Do not handle plug or appliance with wet hands.
• Do not put any object into openings. Do not use with any opening blocked. Keep free of dust, lint,
hair and anything that may reduce air flow.
• Keep hair, loose clothing, fingers and all parts of body away from openings and moving parts.
• Turn off all controls before unplugging.
• Use extra care when cleaning on stairs. To avoid personal injury or damage, and to prevent
the vacuum from falling, always place vacuum at the bottom of stairs on floor. Do not place
vacuum on stairs or furniture, as it may result in injury or damage. When using tools, always
ensure handle is in upright position.
• Do not use to pick up flammable or combustible liquids, such as gasoline or fine wood shavings,
or use in areas where they may be present.
• Do not pick up anything that is burning or smoking, such as cigarettes, matches or hot ashes.
• Do not use without dirt cup and/or filters in place.
• Always turn off this appliance before connecting or disconnecting the hose or motorized nozzle.
• Unplug this appliance before connecting the air-powered Turbo Tool.
Page 6

4
• The hose contains electrical wires. Avoid picking up sharp objects. If hose appears damaged, cut,
punctured or wires are exposed, unplug unit and discontinue use. Do not attempt to repair damaged
hose, take to an authorized service center for repair.
WARNING: To Reduce the Risk of Fire and Electric Shock, the Hoover Powered Stair Tool part number
440010888 must be used.
WARNING: This product contains chemicals known to the state of California to cause cancer, birth defects or
reproductive harm.
WASH HANDS AFTER HANDLING.
CAUTION: TO REDUCE THE RISK OF DAMAGE:
• Avoid picking up hard, sharp objects with this product, as they may cause damage. Store
appropriately indoors in a dry place. Do not expose machine to freezing temperatures.
• Do not use sharp objects to clean out the hose as they can cause damage.
• With brush roll on, do not allow cleaner to sit in one location for an extended period of time, as
damage to floor can result.
WARNING: TO REDUCE THE RISK OF ELECTRIC SHOCK, THIS APPLIANCE HAS A POLARIZED PLUG (ONE
BLADE IS WIDER THAN THE OTHER). THIS PLUG WILL FIT IN A POLARIZED OUTLET ONLY ONE WAY. IF THE
PLUG DOES NOT FIT FULLY IN THE OUTLET, REVERSE THE PLUG. IF IT STILL DOES NOT FIT, CONTACT A
QUALIFIED ELECTRICIAN TO INSTALL THE PROPER OUTLET. DO NOT CHANGE THE PLUG IN ANY WAY.
This equipment has been tested and found to comply with the limits for a Class B digital device, pursuant to part
15 of the FCC Rules. These limits are designed to provide reasonable protection against harmful interference in
a residential installation. This equipment generates, uses and can radiate radio frequency energy, and if not installed and used in accordance with the instructions, may cause harmful interference to radio communications.
However, there is no guarantee that interference will not occur in a particular installation. If this equipment does
cause harmful interference to radio or television reception, which can be determined by turning the equipment
off and on, the user is encouraged to try to correct interference by one or more of the following measures:
• Reorient or relocate the receiving antenna.
• Increase the separation between the equipment and receiver.
• Connect the equipment into an outlet on a circuit different from that to which the receiver
is connected.
• Consult the dealer or an experienced radio/TV technician for help.
Under Industry Canada regulations, this radio transmitter may only operate using an antenna of a type and max-
imum (or lesser) gain approved for the transmitter by Industry Canada. To reduce potential radio interference to
other users, the antenna type and its gain should be so chosen that the equivalent isotropically radiated power
(e.i.r.p.) is not more than that necessary for successful communication.
Contains transmitter module IC: 12246A-BM77SPPSYC2
This device complies with Industry Canada license-exempt RSS standards(s). Operation is subject to the
following two conditions: (1) this device may not cause interference, and (2) this device must accept any
interference, including interference that may cause undesired operation of the device.
Page 7
5
4
1
2 3 4
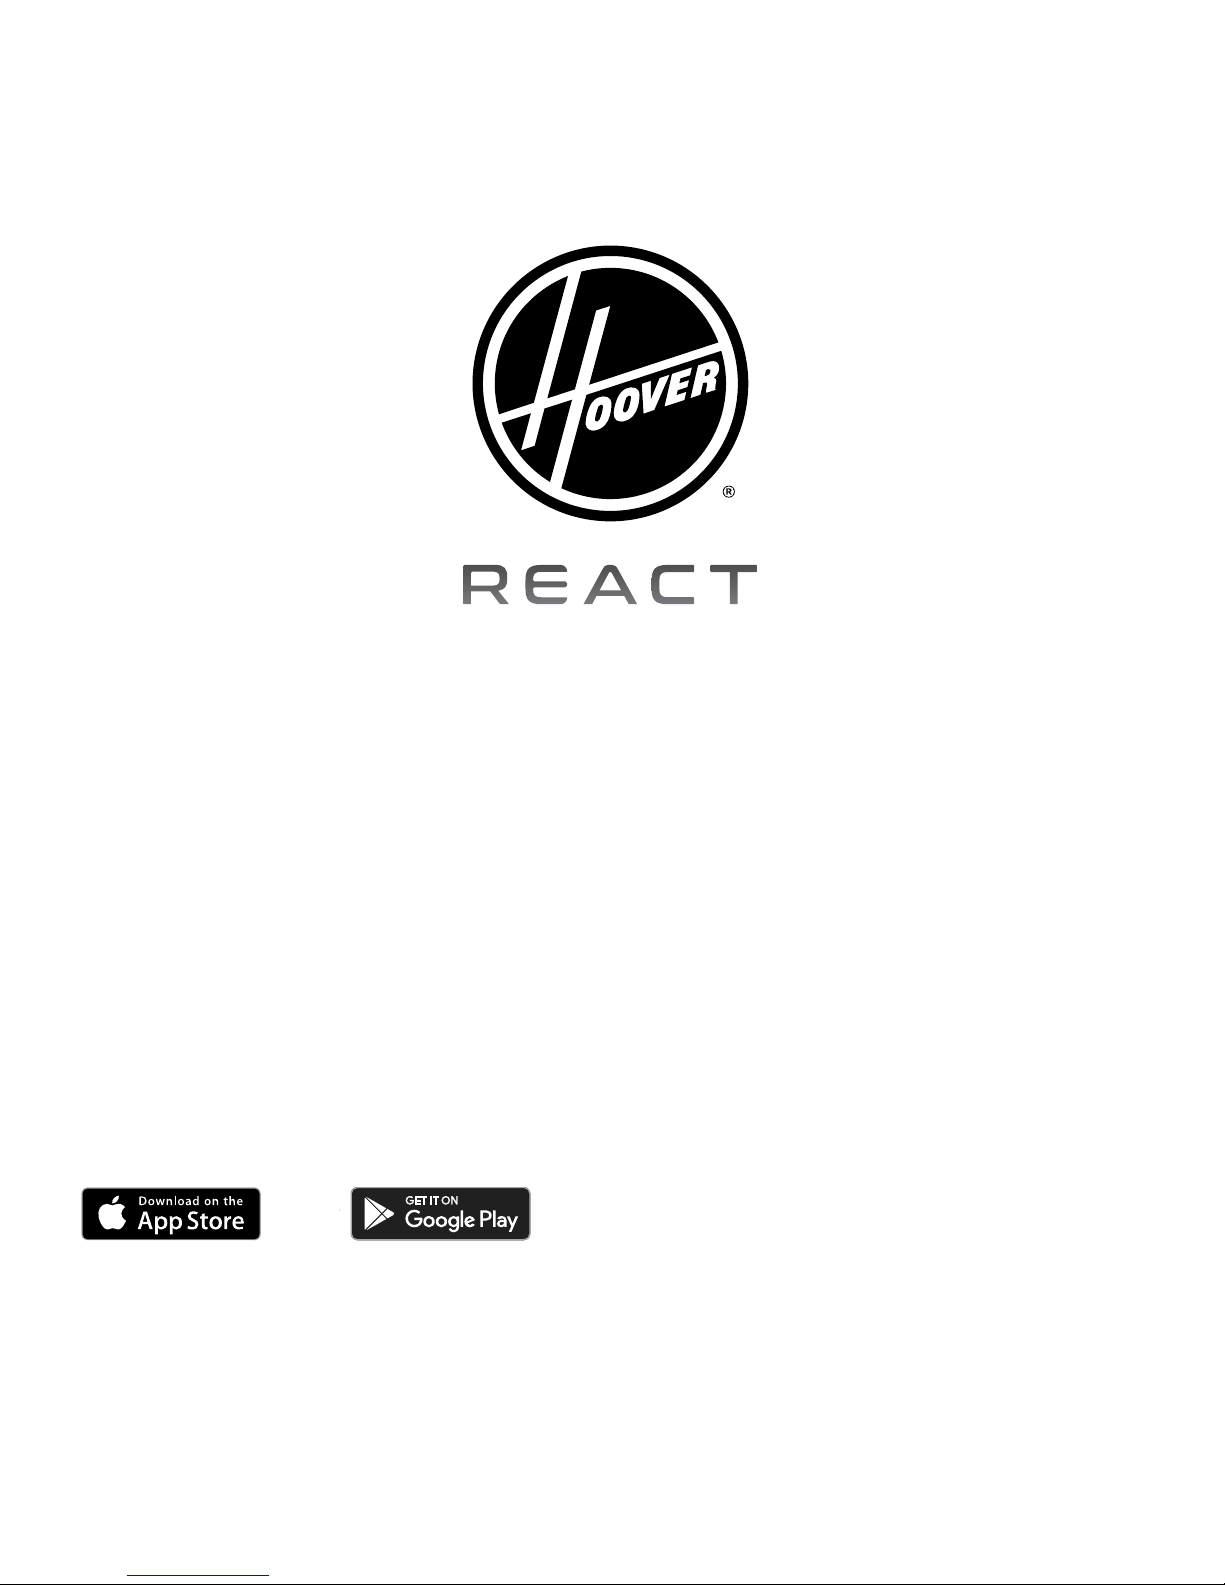
Insert wand
into the spine
until it clicks
in place.
Insert handle
into wand until it
clicks in place.
Insert hose
into canister
until it clicks
in place.
Place tools
onboard.
Assembly
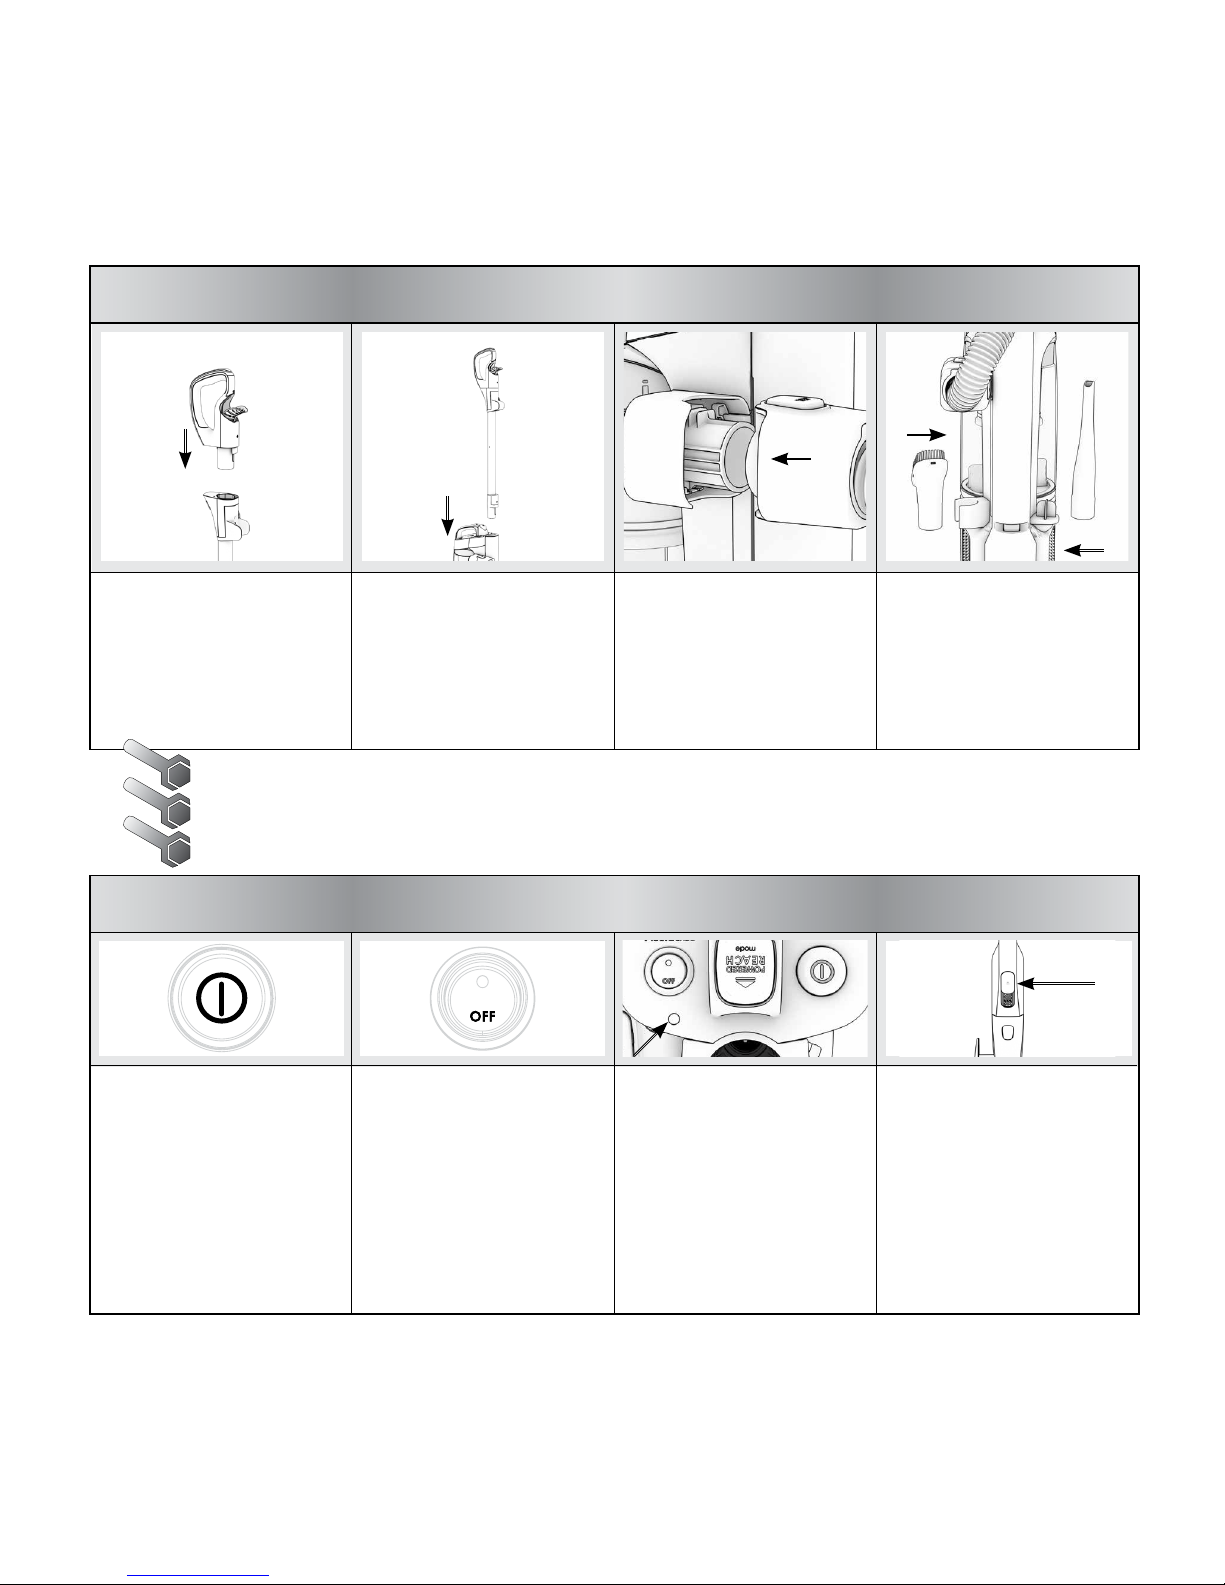
1
Power the unit
ON/OFF.*
FloorSense
™
ON/OFF.*
System Check
Indicator*
Refer to the Maintenance
section or the Hoover App
for directions on how to
remove clogs.
Tip - Make sure all pieces click into place.
Tip - Wrap cord around hooks for convenient storage. Attach the plug end to the cord.
Tip - To unwrap cord quickly, rotate cord hook 180 degrees.
User Controls
Suction Control
Valve*
If vacuum is difficult to
push, open the Suction
Control Valve on the
handle.
2 31
*See page 6 for
location of features
Page 8

6
Getting to Know Your Hoover® REACT
™
Upright
Tool
Holder
Carrying
Handle
Separator
HEPA
Filter 2
Hose
Floor
Nozzle
Dirt Cup
Release
Handle
Release
Upper
Cord
Hook
Wand
FloorSense
TM
ON/OFF
Rinsable
Filters
Hose
Release
FloorSense
TM
Dashboard
Headlights
Front View
Back View
HEPA
Filter 1
Power
ON/OFF
User Controls
Wand
Release
(Between
dirt cup
and wand)
Brush Roll
Lower
Cord
Hook
Tool
Holder
Powered
Reach
TM
Mode
System
Check
Indicator
Suction
Control
Valve
Page 9
CAUTION
Not to be used for grooming a pet.
!!
7
Pet Pe
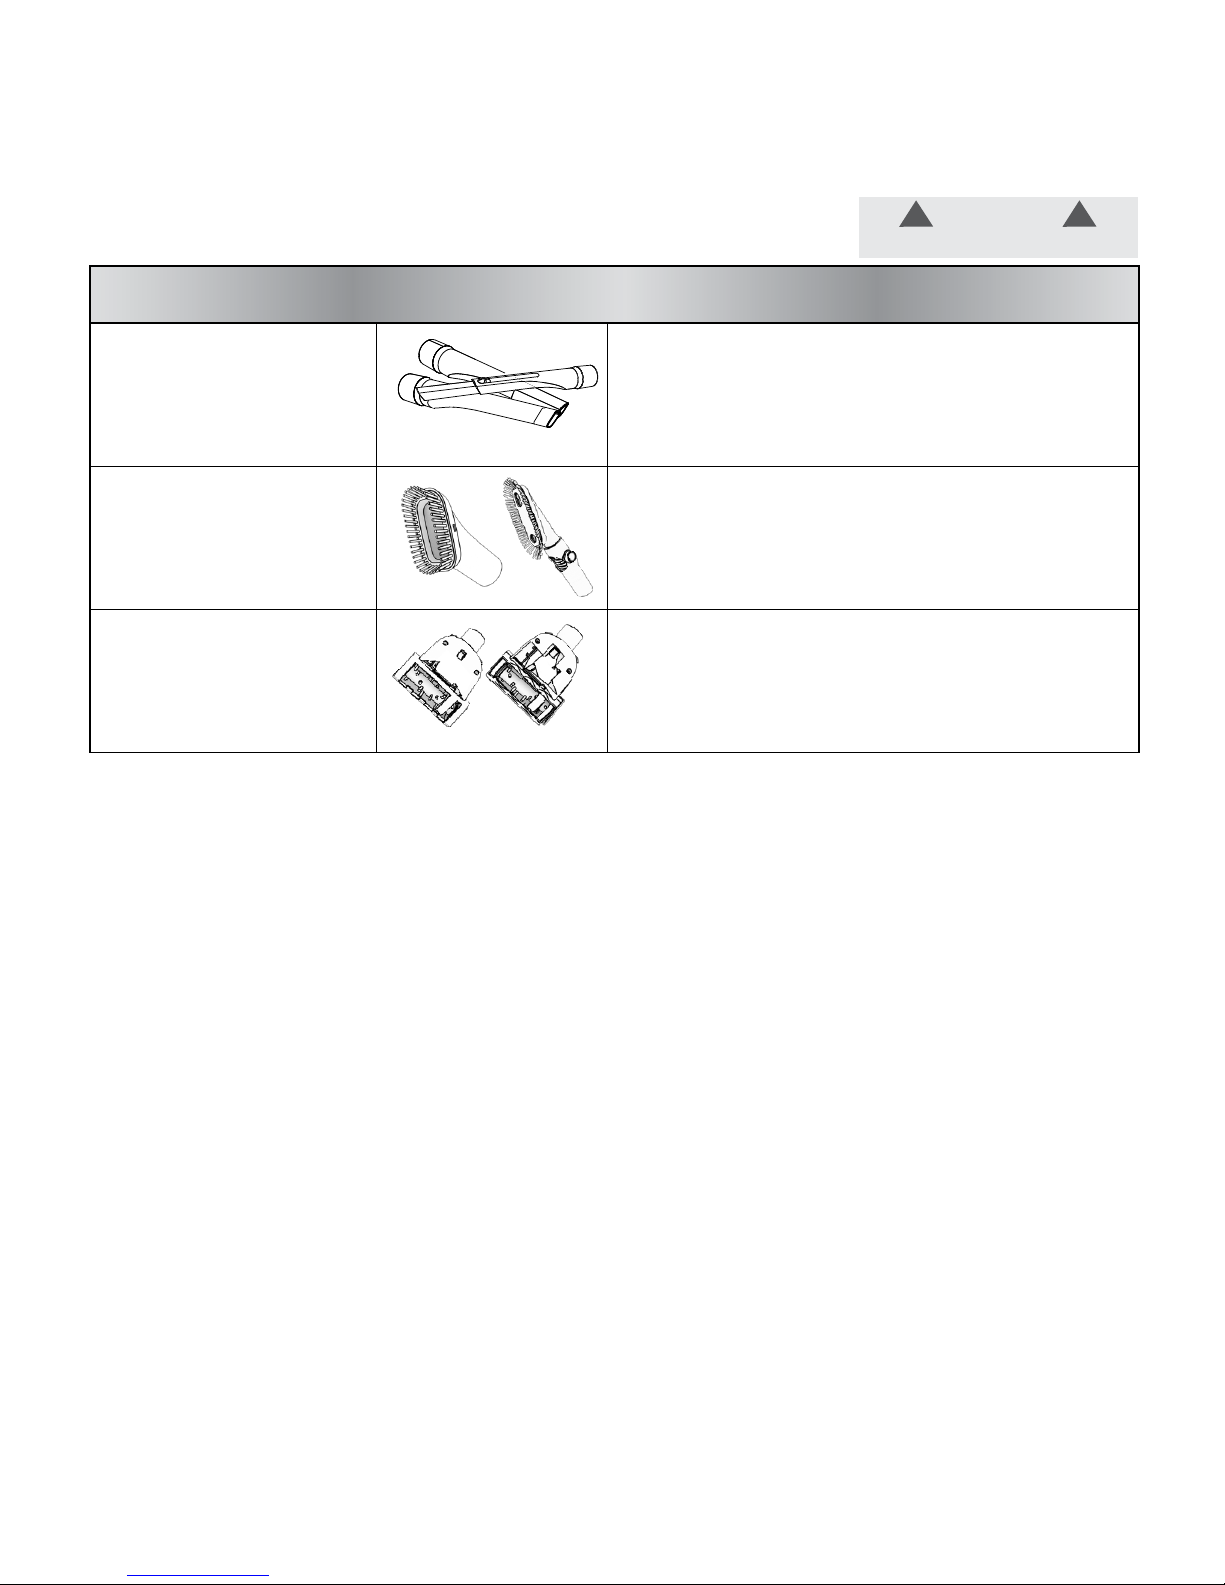
Available Tools and Accessories
***
Deluxe Crevice Tool:
Rubberized tip that protects furniture when cleaning tight
spaces.
XL Crevice Tool:
Extra-long, flexible tip that reaches into hard-to-clean spaces.
***Tools vary by model number. Refer to Hoover.com or Hoover.ca for tools included in each model.
Crevice Tool:
Great for cleaning in
tight spaces and hard-to
-clean corners.
Dusting Brush:
Delicate bristles that gently
clean fine dust.
Flexible Dusting Brush:
Dust hard-to-reach surfaces such as fan blades and
blinds.
Pet Turbo Tool:
Uniquely designed to remove stubborn pet hair from
furniture, stairs, upholstery and more.
Turbo Tool:
Easily clean furniture, stairs,
upholstery and more.
Page 10
Hoover
®
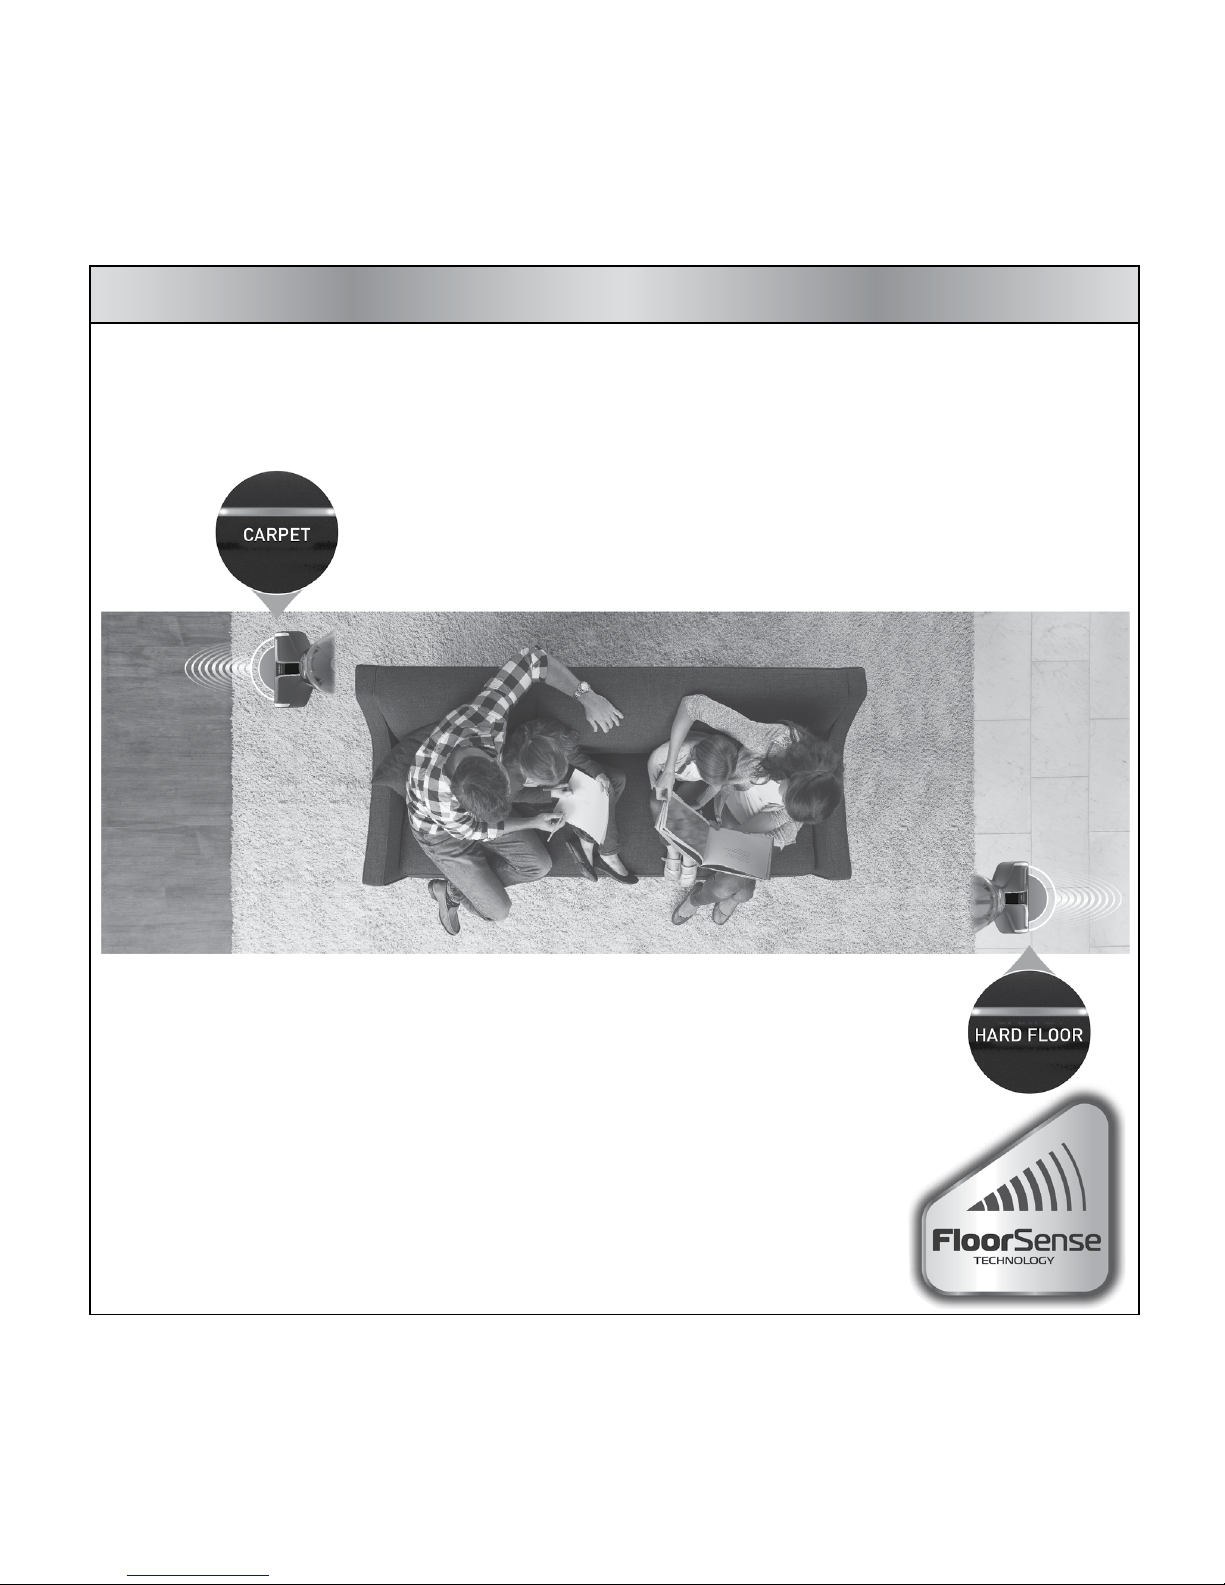
FloorSense™ Technology
Hoover® REACTTM with FloorSenseTM technology automatically optimizes
cleaning performance on carpet and hard floors.
On carpet, FloorSense
TM
automatically increases brush
roll speed to lift deep-down embedded dirt.
On hard floors, FloorSense
TM
automatically slows the
brush roll to prevent scattering of dirt across the floor.
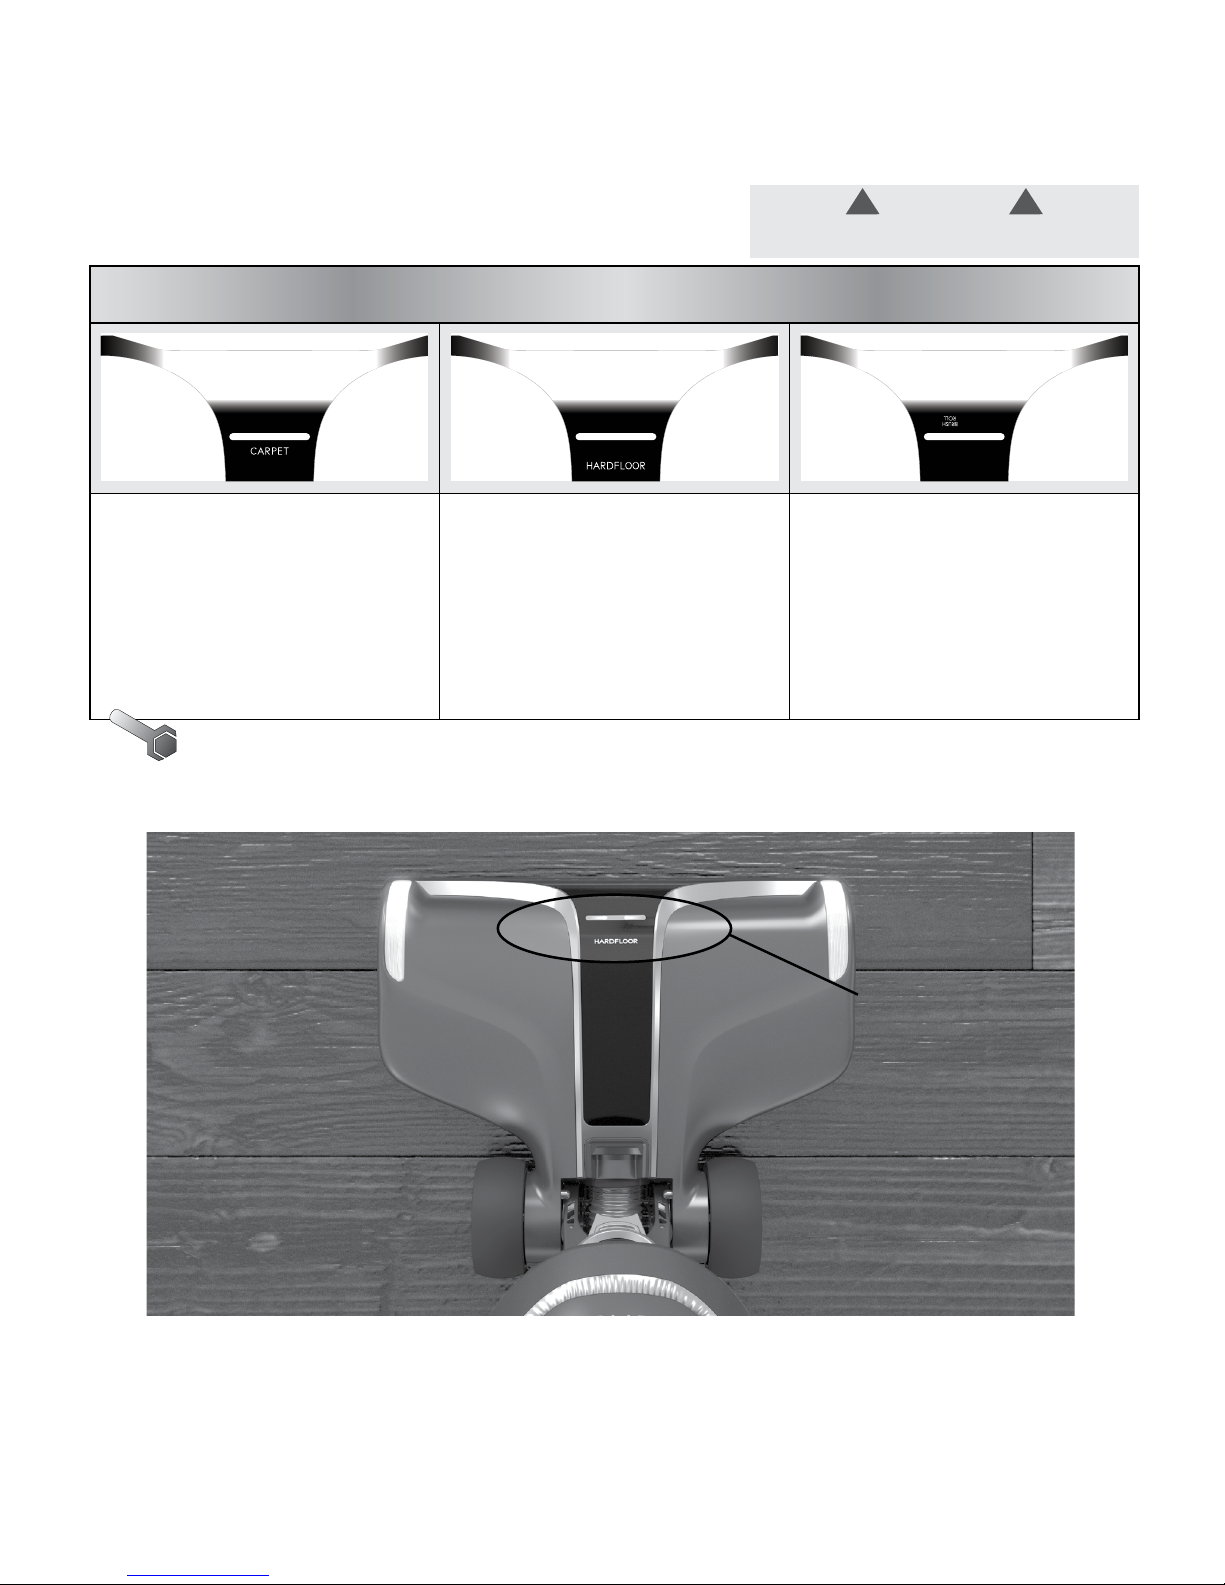
The FloorSenseTM Dashboard displays
useful functions of your
vacuum. When FloorSenseTM is active, lights on the dashboard
will pulse when sensing floor type.
Once FloorSense
TM
has determined the optimal setting for your
floor type, you will see CARPET or HARD FLOOR illuminated on
the dashboard.
8
Page 11
Hoover
®
FloorSense
™
Technology
When cleaning CARPET,
FloorSense™ automatically
increases brush roll
speed to lift deep-down
embedded dirt.
On HARD FLOOR,
FloorSense™ automatically
slows the brush roll to
prevent scattering of dirt
across the floor.
BRUSH ROLL will be
displayed when the brush
roll is jammed or overloaded.
Refer to the Maintenance
section or the Hoover App
for directions on how to
clean the brush roll.
Tip - To a
llow FloorSense™ to determine floor type and optimize brush roll speed automatically;
ensure the FloorSense™ control is in the ON position.
2 31
!!
FloorSense™
LED Dashboard
WARNING
To reduce the risk of injury from moving parts,
unplug before cleaning or servicing.
9
Page 12
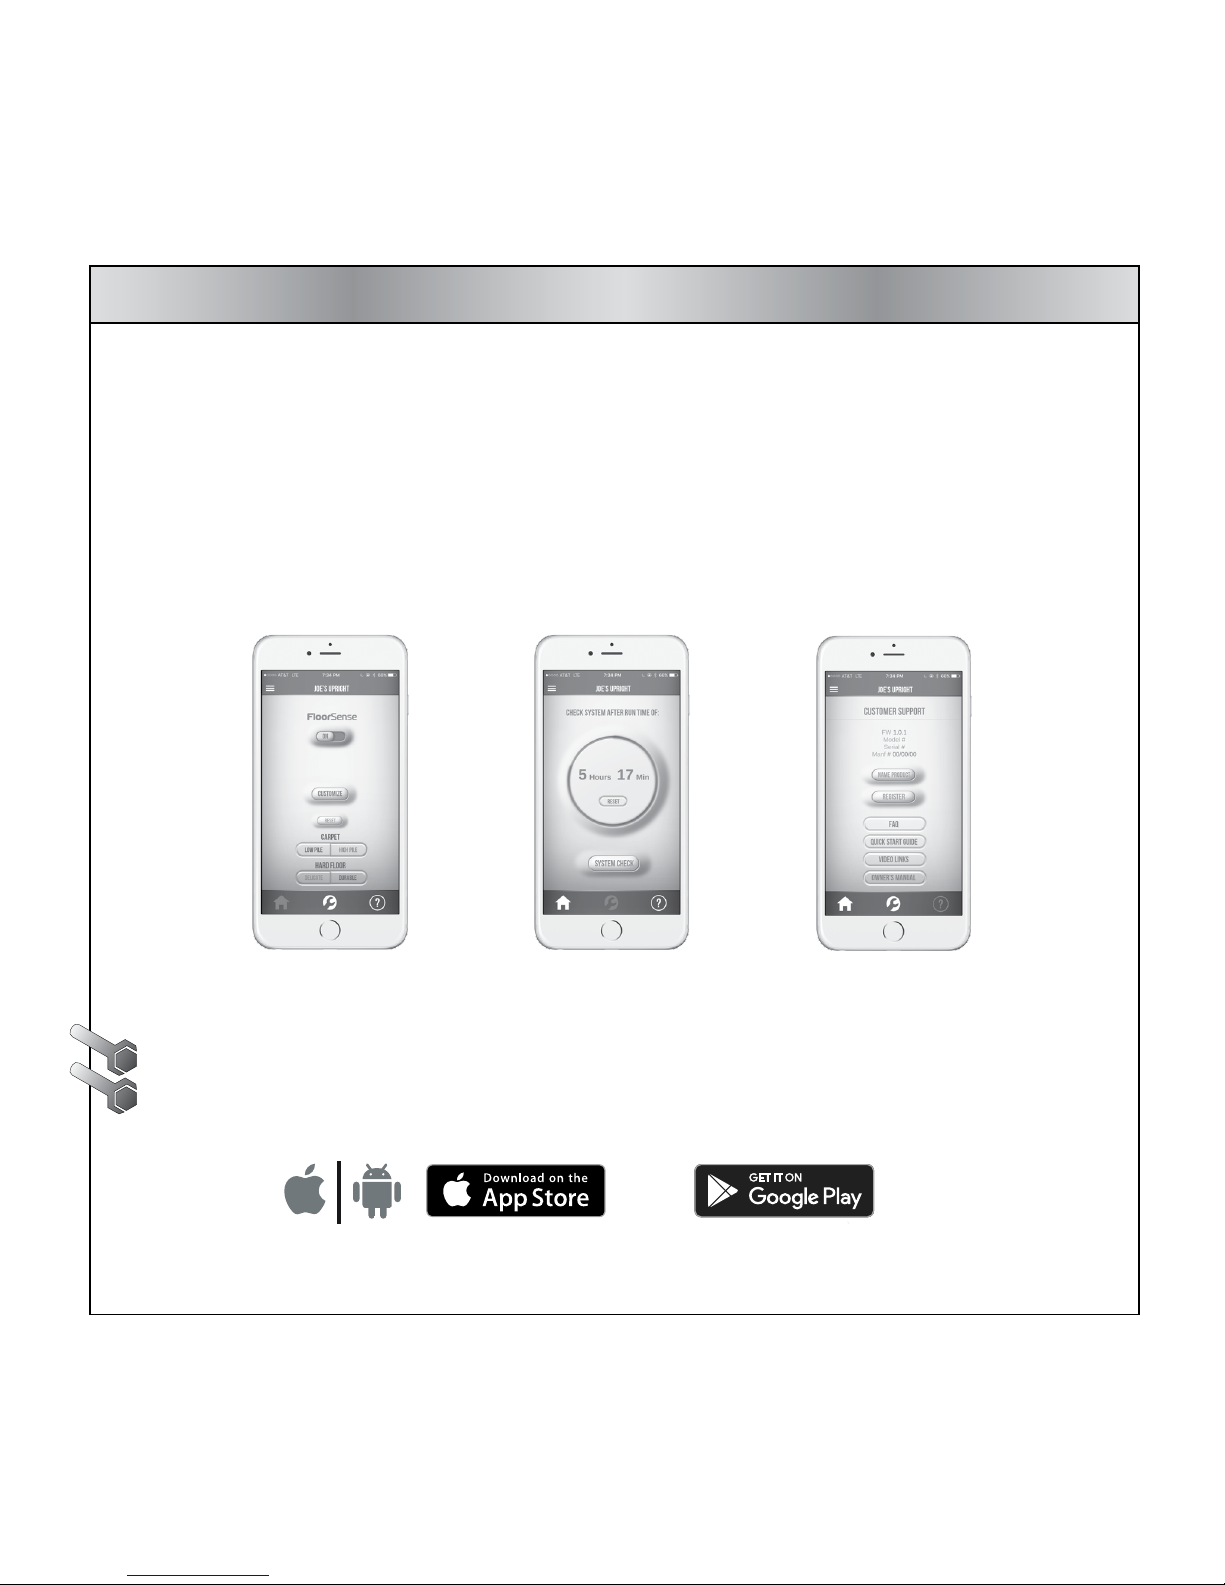
IMPORTANT: Read all instructions before using this appliance.
Hoover® REACTTM vacuums are compatible with the Hoover App.
Download the Hoover App to:
1. Register your new vacuum
2. Customize FloorSense™ settings
3. Receive system maintenance reminders
4. Access tips and tricks
Tip - Vacuum must be powered ON to connect to the Hoover App.
Tip - The headlights will flash three times when the vacuum connects to your
mobile device.
Using the Hoover App
Customize
FloorSenseTM
Settings
Access Tips
and Tricks
System
Maintenance
Reminders
Apple and the Apple logos are
trademarks
of Apple, Inc., registered
in the U.S., and other countries.
App Store is a service mark of Apple Inc.
Android, Google Play, and the
Google Play logo are
trademarks of Google Inc.
10
Page 13
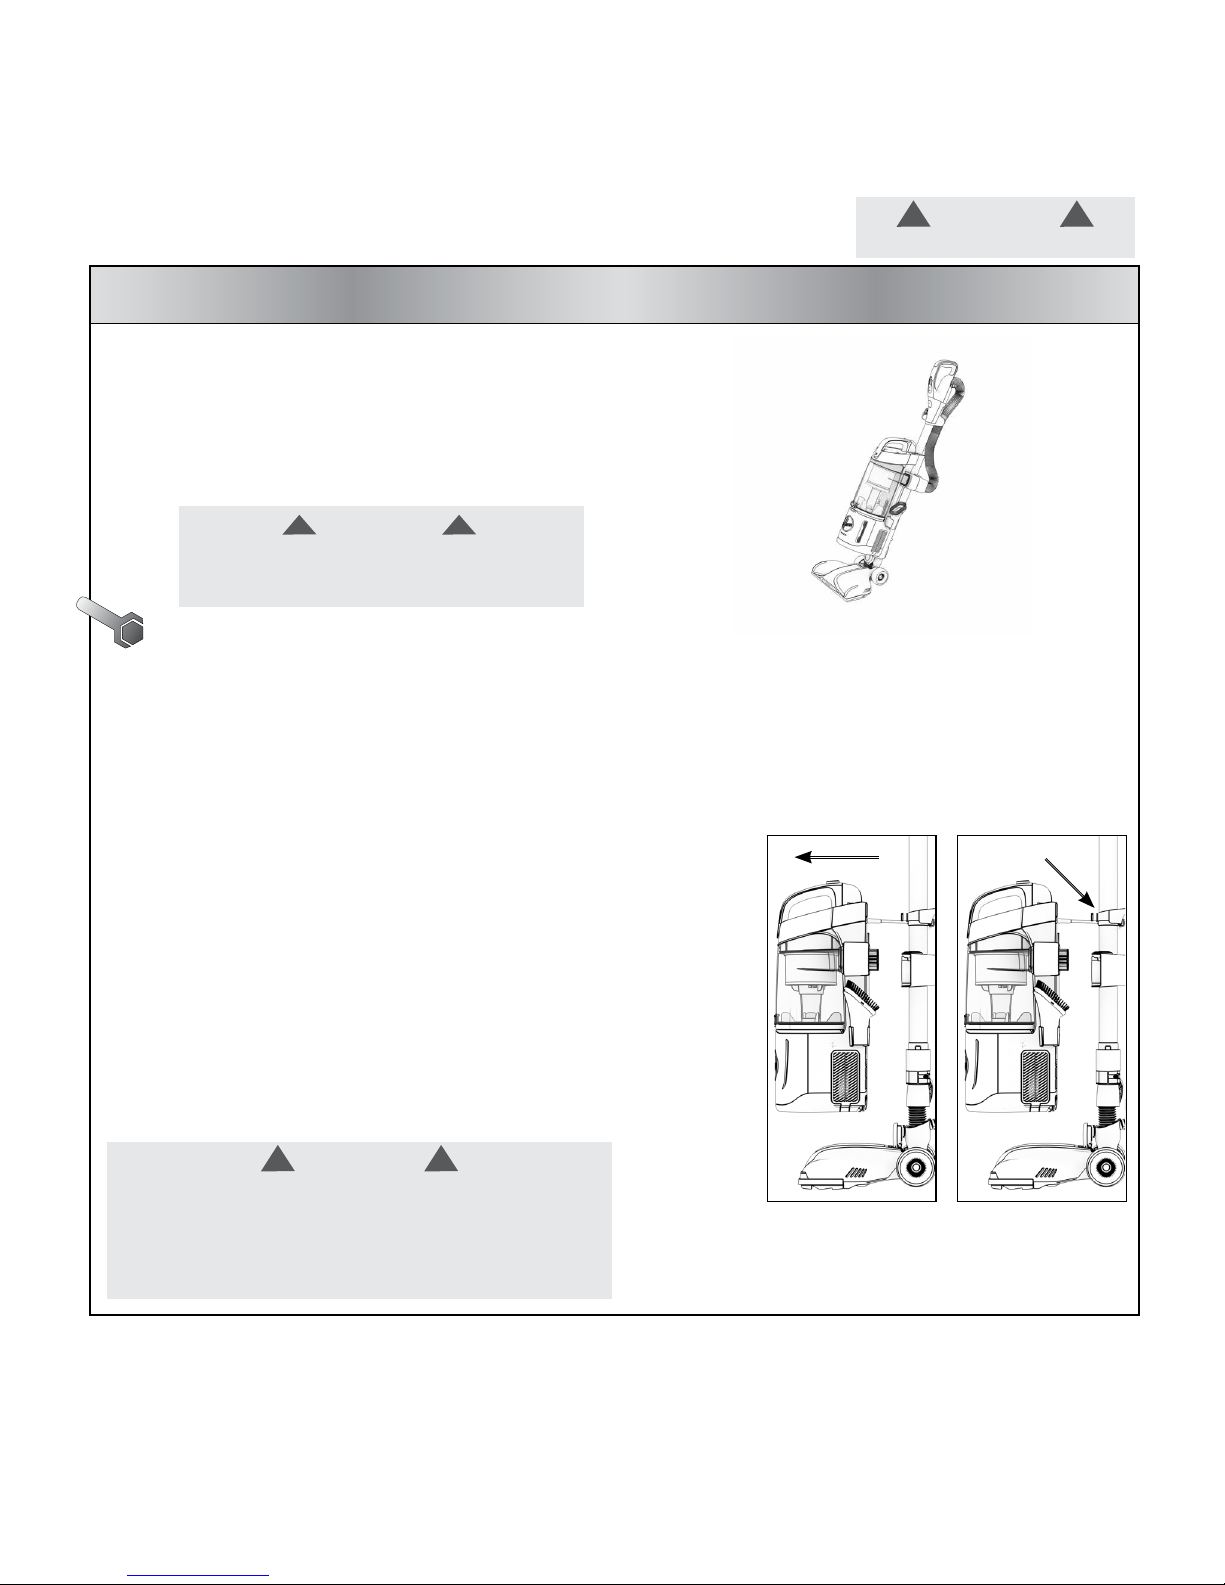
Upright Mode
1. Step on nozzle and pull handle back.
2. Turn ON vacuum.
3. Allow FloorSense™ to detect floor type
and automatically adjust settings.
Tip - For optimal performance, ensure the FloorSense™
control is switched to the ON position.
Portable Lift Mode - For extending reach beyond the floor.
1. Detach canister from the vacuum spine by pressing Powered Reach™ Mode.
2. Press wand or handle release and pull handle up.
3. Attach cleaning accessory to the end of the wand or handle.
4. Turn ON vacuum.
Powered Reach™ Mode - For extending reach under
furniture.
1. Detach canister from vacuum spine by pressing
Powered Reach™ Mode
2. Turn ON vacuum.
3. Clean under furniture with powered nozzle.
Using Your Hoover® REACT™ Upright
CAUTION
Use extra care when cleaning on stairs. To avoid personal
injur y or damage, and to prevent the cleaner from falling,
always place cleaner at the bottom of the stairs or on
the floor. Do no place cleaner on stairs or furniture, as it
may result in injury or damage. When using tools, always
ensure handle is in the upright position.
!!
CAUTION
Not to be used for grooming a pet.
!!
CAUTION
When vacuum is reclined with brush roll switched
on, never leave the vacuum in one position for any
long period of time.
! !
Wand or Handle
Release
(Between dirt cup
and wand)
11
Detach Canister
Page 14
Any other servicing should be done by an authorized service representative.
If appliance is not working as it should, has been dropped, damaged, left outdoors,
or dropped into water, take it to a service center prior to continuing use.
Hoover
®
REACTTM vacuums should have regular maintenance checks to maintain
optimal performance and suction. Refer to this manual or your Hoover App to learn
how to maintain your vacuum.
Notice: A Thermal Protector has been designed into your cleaner to protect it from
overheating. When the Thermal Protector activates, the cleaner will stop running. If
this happens proceed as follows:
1. Turn cleaner OFF and unplug it from the electrical outlet.
2. Empty the dirt cup.
3. Inspect the nozzle inlet, hose connector, hose, dirt cup inlet, cyclonic filter,
rinsable filters and HEPA filters for any obstructions. Clear obstructions
if present.
4. When cleaner is unplugged and motor cools off for 30
minutes, the Thermal Protector will deactivate and
cleaning may continue.
If the Thermal Protector continues to activate after following the
above steps, your cleaner needs servicing. Refer to the
Warranty section in the user manual for servicing information.
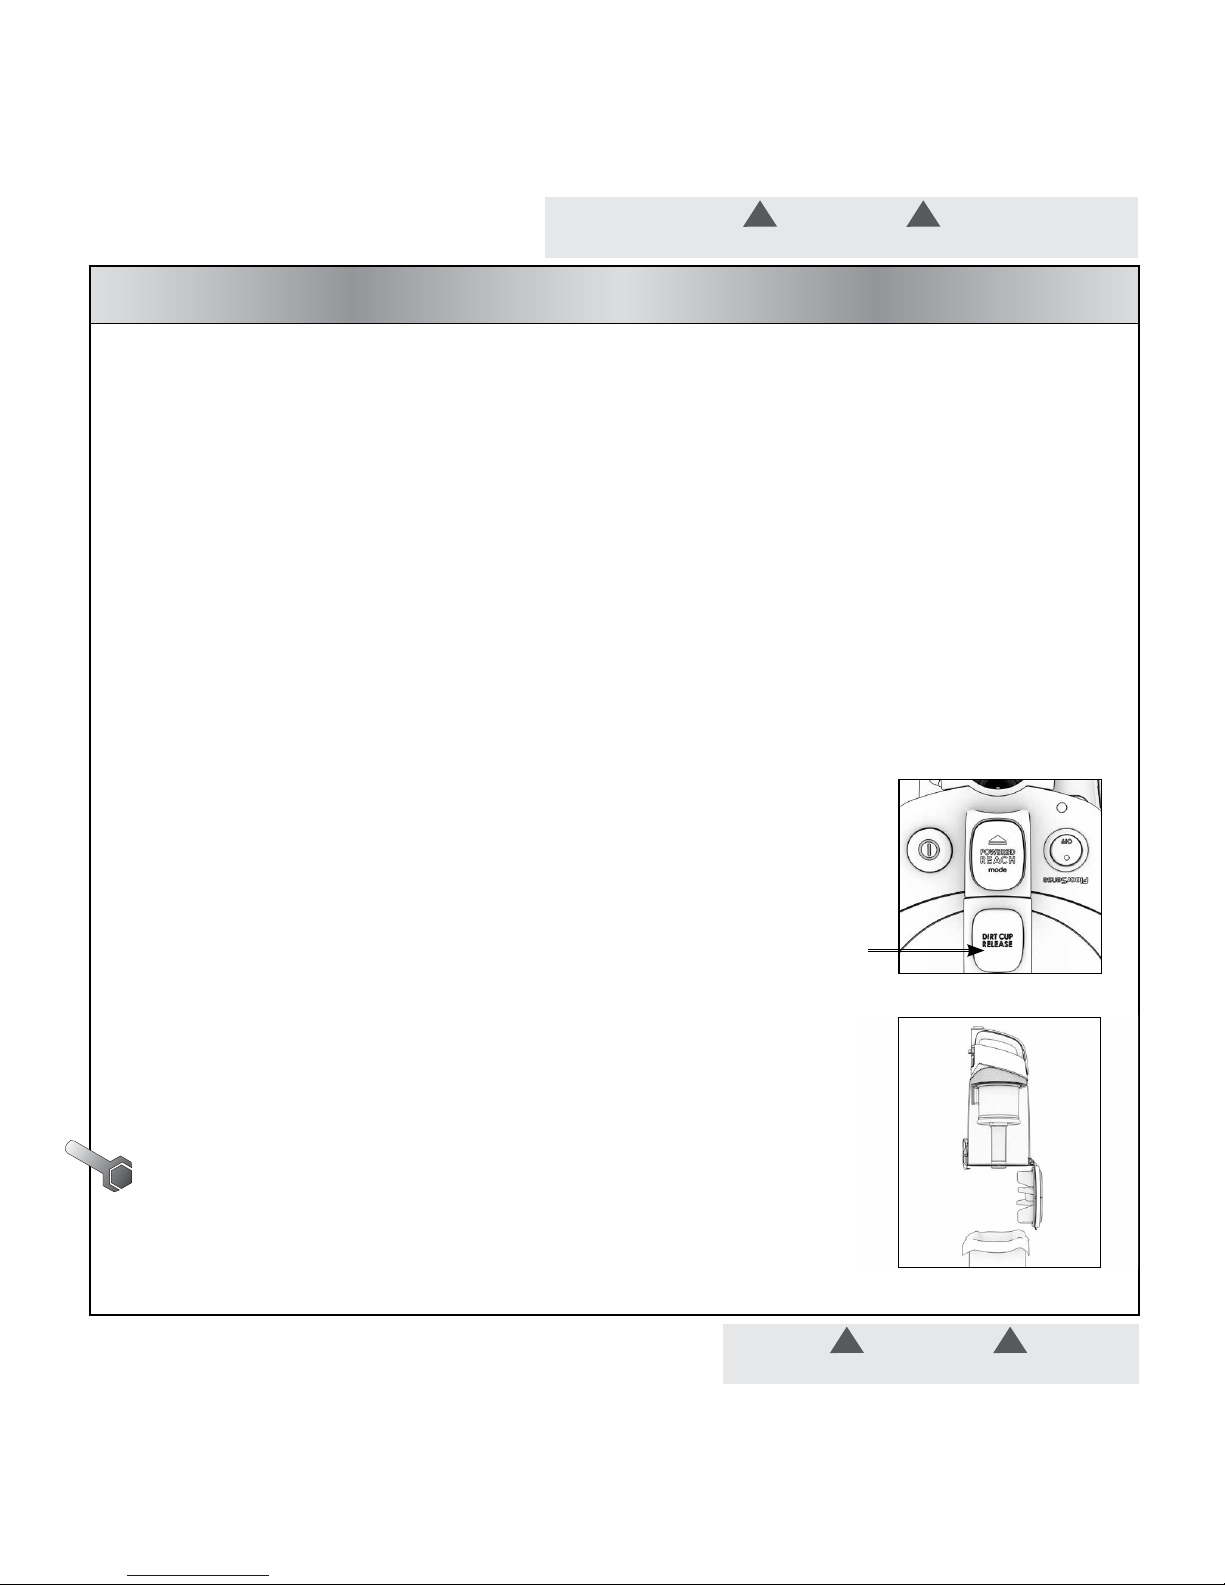
Emptying the Dirt Cup:
1. Remove dirt cup by pressing the dirt cup release
button.
2. Hold dirt cup over a trash can and press the dirt
cup trap door release to empty the dirt cup.
Tip - Empty dirt cup after every use to maintain
optimal performance.
Maintenance
WARNING
To reduce the risk of personal injury, unplug before cleaning or servicing.
!!
WARNING
Do not use vacuum without dirt cup and dry filters.
!!
Dirt Cup Release
Empty Dirt Cup
12
Page 15

Cleaning the Filters:
Rinsable Filters
1. Remove dirt cup by pressing the dirt cup release button.
2. Access the rinsable filters under the dirt cup.
3. To remove, pull up on the tab provided.
4. Rinse under running water until all dirt is out of the filters.
5. Let your filters dry for 24 hours before replacing into vacuum.
Tip - Replace filters when heavily discolored. Make sure filters
are flush to the bottom of the filter housing.
HEPA Filters
Hoover
®
REACT™ products have 2 HEPA filters. Refer to
Getting
to Know Your Hoover® REACT™ Powered Reach™ Lite for location.
1. Locate HEPA filters on each side of the vacuum below the
dirt cup.
2. Unscrew the vent cover located on the bottom of the
canister to access filters.
3. Remove filters and tap on side of trash can to release
excess dirt.
Tip -
DO NOT RINSE HEPA FILTERS. Replace filters when
heavily discolored. Do not use your vacuum without all
of the filters in place.
Cleaning and Maintaining the Brush Roll:
1. To access the brush roll, unscrew the nozzle guard from
the nozzle.
2.
Remove brush roll by pulling it up and out from the vacuum belt.
3. Remove any hair or blockages.
4. Replace brush roll and nozzle guard.
Tip - Rotate brush roll manually to ensure the belt is properly installed. Vacuum
is equipped with an automatic brush roll shutoff in the event of overload
or jam. Check for obstructions in the brush roll area and remove any
obstructions. When obstructions are cleared, resume cleaning as normal.
LUBRICATION: The motor and brush roll are equipped with bearings which contain
sufficient lubrication for their lifetime. The addition of lubrication could cause damage.
Do not add lubricant to motor or brush roll.
Maintenance
WARNING
To reduce the risk of personal injury, unplug before cleaning or servicing.
!!
CAUTION
To reduce the risk of injury from moving parts,
unplug before cleaning or servicing.
!!
Remove Filter
Clean Brush Roll
Dirt Cup Release
13
Page 16
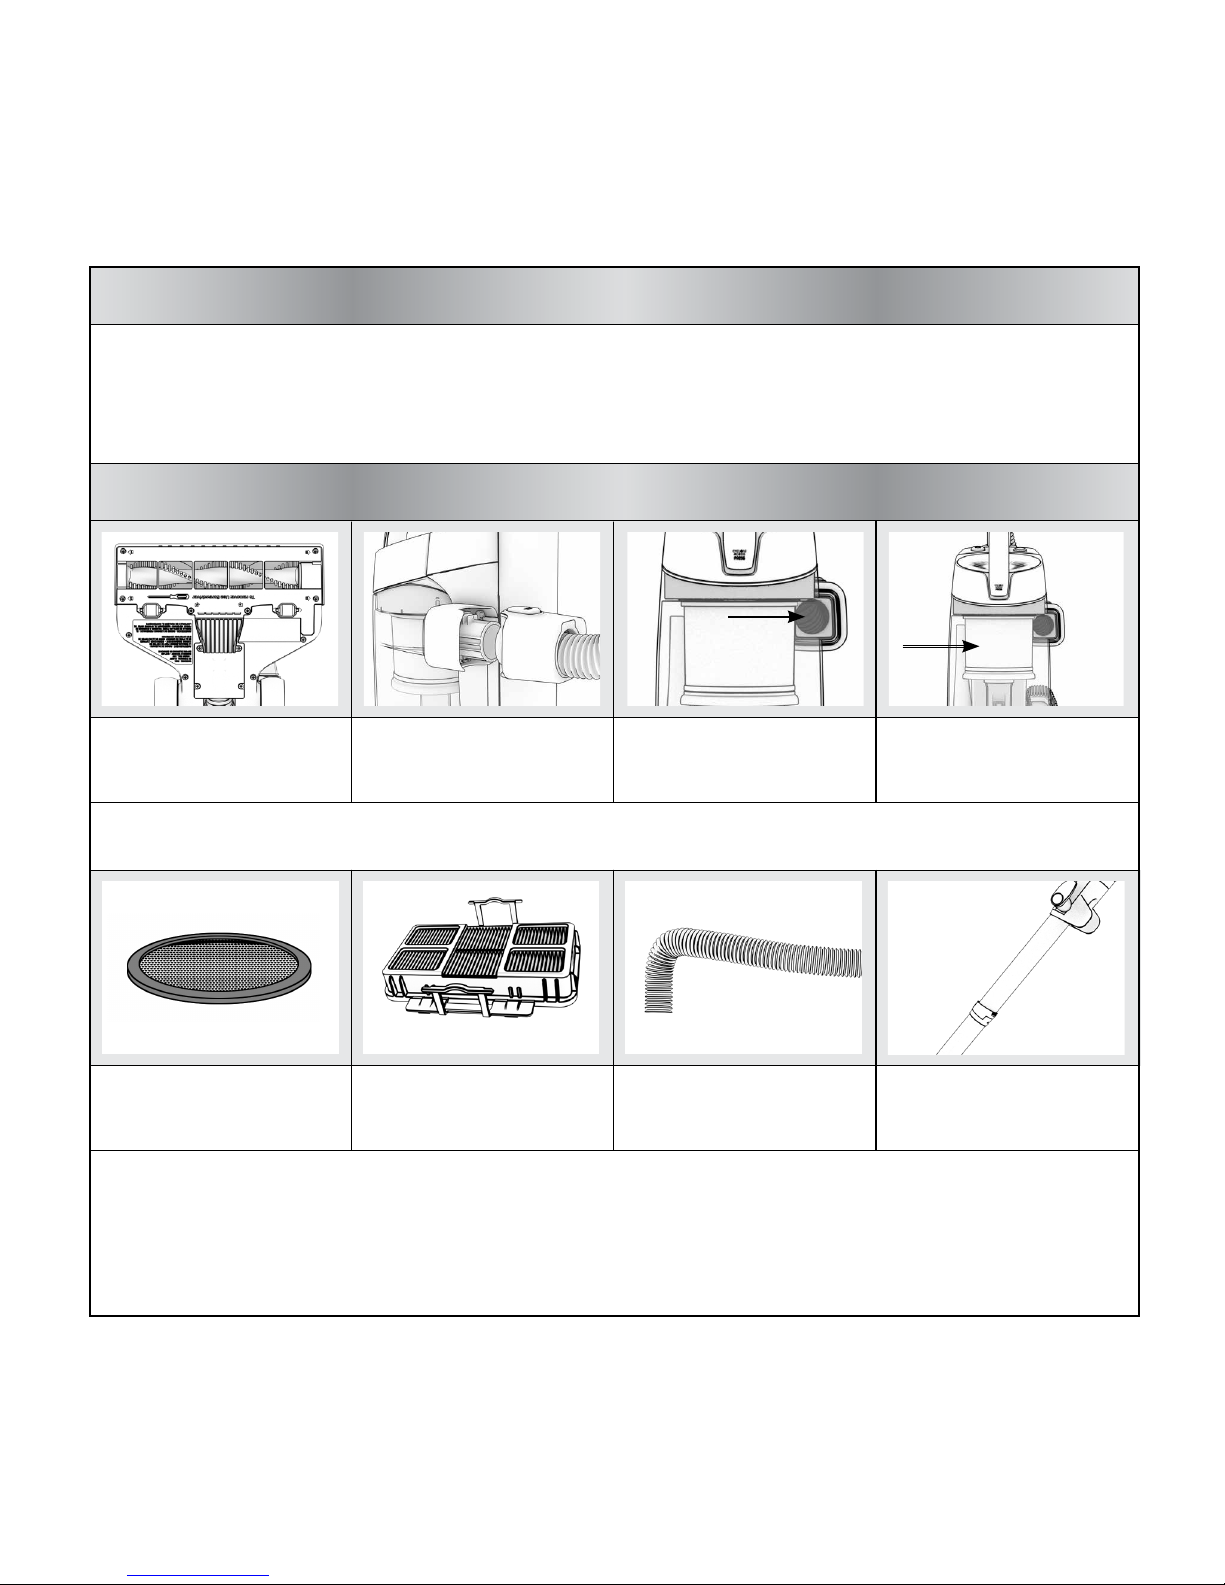
Removing System Clogs
If your vacuum is losing suction, check and remove any clogs.
Maintenance
1
2 3 4
Hose connectorNozzle inlet Dirt cup inlet
Check for clogs in the areas highlighted below.
1
Cyclonic filter
1
6 7
5
HEPA filtersRinsable filters
Hose
8
Wand
14
Page 17

Any other servicing should be done by an authorized service representative.
If appliance is not working as it should, has been dropped, damaged, left outdoors,
or dropped into water, take it to a service center prior to continuing use.
Vacuum will not turn ON.
Always be sure to plug it in firmly. A Thermal Protector may have been activated
- unplug and let vacuum cool for 30 minutes. If this does not work, there may be no
voltage in the wall plug. Check fuse or breaker in home. If there is a blown fuse or
tripped breaker, replace fuse or reset breaker in home.
My vacuum is hard to push.
Open the Suction Control Valve near the handle by sliding the valve up.
My vacuum is losing suction.
Be sure to empty the dirt cup if it is full. You may have a clogged filter. Your filter
should be rinsed every 4-6 uses. Refer to the Maintenance section or the Hoover App
for directions on how to clean your filters.
If problem persists, you may have a clog in the system. Refer to Maintenance in the
user manual for directions on removing clogs.
My brush roll is not spinning or FloorSense
TM
dashboard is not displaying correctly.
1. Unplug and remove any hair or other blockages around the brush roll if FloorSense™
is displaying “HARD FLOOR” while on carpet.
2. Clean filters. Refer to the Maintenance section or the Hoover App for directions on
how to clean filters.
3. Check for clogs in the system. Refer to the Maintenance section or the Hoover App for
directions on how to remove clogs.
4. Resume normal operation and FloorSense™ will reset.
I can’t connect my vacuum to the Hoover App.
Vacuum must be powered ON to connect to the Hoover App.
For more troubleshooting or FAQ’s please call: 1-877-839-2046 or visit Hoover.com or
Hoover.ca if you have any questions.
Troubleshooting Guide
WARNING
To reduce the risk of personal injury, unplug before cleaning or servicing.
!!
CAUTION
To reduce the risk of injury from moving parts,
unplug before cleaning or servicing.
!!
15
Page 18

SERVICE & WARRANTY FOR HOOVER
®
REACT™ POWERED REACH™ LITE PRODUCT
SERVICE INFORMATION
REPRESENTATIVE Call 1-877-839-2046 USA & Canada
In the event that further assistance is required, visit and authorized service center. Find one nearest you by visiting our website
at www.Hoover.com or Hoover.ca. Costs of any transportation to and from any place of repair are to be paid by the owner.
Always identify your product by the model number and manufacturing code when requesting information or ordering
replacement parts. (the model number and manufacturing code for the vacuum appears on the bottom of the canister.)
LIMITED FIVE YEAR WARRANTY (DOMESTIC USE)
WHAT THIS WARRANTY COVERS
When used and maintained in normal household use and in accordance with the Owner’s Manual, your HOOVER
®
product
is warranted against original defects in material and workmanship for a full five year from date of purchase (the “Warranty
Period”). During the Warranty Period, Hoover® will provide labor and parts, at no cost to you, to correct any such defect in
products purchased in the United States, U.S. Military Exchanges and Canada.
HOW TO MAKE A WARRANTY CLAIM
If this product is not as warranted, take or send the product to either a Hoover
®
Sales and Service Center or Hoover®
Authorized Warranty Service Dealer along with proof of purchase. For an automated referral to authorized service outlets in
the U.S.A., phone: 1-877-839-2046 OR visit Hoover® online at www.Hoover.com or Hoover.ca. For additional assistance or
information concerning this Warranty or the availability of warranty service outlets, phone the Hoover® Consumer Response
Center, Phone 1-877-839-2046, Mon-Fri 8am-7pm EST. In Canada, contact Hoover® Canada, Carson Building, 100 Carson
St., Etobicoke, Ontario M8W 3R9, Phone: 1-877-839-2046, Mon-Fri 8am-7pm EST.
WHAT THIS WARRANTY DOES NOT COVER
This Warranty does not cover: use of the product in a commercial operation (such as maid, janitorial and equipment rental
services), filter, brush roll, belt, improper maintenance of the product, damage due to misuse, acts of God, nature, vandalism
or other acts beyond the control of Hoover
®
, owner’s acts or omissions, use outside the country in which the product was
initially purchased and resales or transfers of the product by the original owner. This warranty does not cover pick up,
delivery, transportation or house calls. However, if you mail your product to a Hoover
®
Sales and Service Center for warranty
service, cost of shipping will be paid one way.
This warranty does not apply to products purchased outside the United States, including its territories and possessions,
outside a U.S. Military Exchange and outside of Canada. This warranty does not cover products purchased from a party that
is not an authorized retailer, dealer, or distributor of Hoover
®
products.
OTHER IMPORTANT TERMS
This Warranty is not transferable and may not be assigned. This Warranty shall be governed and construed under the laws of the state
of Ohio. The Warranty Period will not be extended by any replacement or repair performed under this Warranty.
THIS WARRANTY IS THE EXCLUSIVE WARRANTY AND REMEDY PROVIDED BY HOOVER
®
. ALL OTHER WARRANTIES,
EXPRESSED OR IMPLIED, INCLUDING WARRANTlES OF MERCHANTABILITY OR FITNESS FOR PARTICULAR
PURPOSE, ARE DISCLAIMED. IN NO EVENT WILL HOOVER BE LIABLE FOR ANY SPECIAL, INDIRECT, INCIDENTAL
OR CONSEQUENTIAL DAMAGES OF ANY KIND OR NATURE TO OWNER OR ANY PARTY CLAlMlNG THROUGH
OWNER, WHETHER BASED IN CONTRACT, NEGLIGENCE, TORT OR STRICT PRODUCTS LIABILITY OR ARISING FROM
ANY CAUSE WHATSOEVER.
Some states do not allow the exclusion of consequential damages, so the above exclusion may not apply to you. This
warranty gives you specific rights; you may also have others that vary from state to state.
Service & Warranty
16
Page 19

Consignes de sécurité importantes...........................19
Assemblage..............................................21
Commandes de l’utilisateur.................................21
Apprivoiser votre aspirateur vertical HooverMD REACTMC
Powered Reach
MC
Lite . . . . . . . . . . . . . . . . . . . . . . . . . . . . . . . . . . . . .22
Outils et accessoires offerts . . . . . . . . . . . . . . . . . . . . . . . . . . . . . .23
Technologie Hoover
MD
FloorSenseMC ........................24
Utilisation de l’appli Hoover ................................26
Utilisation de votre aspirateur vertical HooverMD REACTMC
Powered Reach
MC
Lite .....................................27
Entretien ................................................28
Dépannage . . . . . . . . . . . . . . . . . . . . . . . . . . . . . . . . . . . . . . . . . . . . . .31
Renseignements sur la garantie .............................32
Ce manuel est pour les modeles UH73400 & UH73400CA.
CONTENU
17
Page 20

Bienvenue chez Hoover.
Devenez officiellement propriétaire.
Compatible avec l’appli Hoover.
Téléchargez l’appli Hoover pour enregistrer
votre nouvel aspirateur, personnaliser
vos réglages FloorSenseMC, recevoir des
rappels d’entretien du système et consulter
les trucs et astuces.
Apple et le logo Apple sont des marques
déposées d’Apple Inc., et des marques
déposées aux États-Unis et dans d’autres
pays. App Store est une marque de
commerce d’Apple Inc.
Android, Google Play et le logo Google
Play sont des marques de commerce
de Google Inc.
L’enregistrement de votre
produit est aussi possible :
par téléphone : +1 877 839-2046
sur le Web : Hoover.com or Hoover.ca
C’est garanti.
Consultez la garantie pour
obtenir plus de détails.
TM
Page 21

Consignes de sécurité importantes
CONSERVEZ CES INSTRUCTIONS.
IMPORTANT : LISEZ ATTENTIVEMENT AVANT L’ASSEMBLAGE ET L’UTILISATION. CET APPAREIL EST
DESTINÉ UNIQUEMENT À UN USAGE DOMESTIQUE. TOUTE UTILISATION COMMERCIALE ANNULERA LA
GARANTIE.
Lorsque vous utilisez des appareils électriques, veuillez toujours respecter entre autres les consignes de
sécurité élémentaires suivantes :
AVERTISSEMENT : POUR RÉDUIRE LE RISQUE D’INCENDIE, DE DÉCHARGE ÉLECTRIQUE, DE DOMMAGE OU
DE BLESSURE :
• Assemblez entièrement l’appareil avant de l’utiliser.
• Faites seulement fonctionner l’appareil à la tension indiquée sur la plaque signalétique située au bas
du boîtier de l’aspirateur.
• Ne laissez pas l’appareil branché sans surveillance. Débranchez la fiche de la prise de courant dès la fin
de l’utilisation et avant le nettoyage ou d’en faire l’entretien.
• N’utilisez pas l’appareil à l’extérieur ni sur des surfaces humides.
• Ne permettez pas aux enfants de jouer avec l’appareil. Cet appareil ne doit pas être utilisé par des
enfants de moins de 12 ans. Exercez une surveillance étroite lorsque l’appareil est utilisé à proximité
d’enfants. Pour éviter les blessures ou les bris, tenez les enfants loin de l’appareil,et ne laissez pas ces
derniers introduire leurs doigts ou d’autres objets dans les ouvertures.
• Utilisez l’appareil uniquement aux fins décrites dans le présent guide. Utilisez uniquement les
accessoires et produits recommandés par le fabricant.
• N’utilisez pas l’appareil lorsque le cordon ou la fiche est endommagé. Cessez d’utiliser l’appareil s’il ne
fonctionne pas comme prévu, s’il a été échappé sur le sol ou dans l’eau, s’il est endommagé ou s’il a été
laissé à l’extérieur et apportez-le au centre de réparations.
• Ne tirez pas et ne transportez pas l’appareil par son cordon, n’utilisez pas le cordon comme une
poignée, ne coincez pas le cordon dans l’embrasure d’une porte et ne le tirez pas contre des arêtes ou
des cornières tranchantes. Ne placez pas l’appareil sur le cordon. Ne faites pas rouler l’appareil sur le
cordon. Tenez le cordon éloigné des surfaces chaudes.
• Ne débranchez pas l’appareil en tirant le cordon. Débranchez l’appareil en tenant la fiche et non le
cordon.
• Ne manipulez pas la fiche ou l’appareil avec des mains mouillées.
• N’insérez aucun objet dans les ouvertures. N’utilisez pas l’appareil si les ouvertures sont obstruées.
Assurez-vous qu’elles sont exemptes de poussière, de mousse, de cheveux ou de tout ce qui pourrait
réduire le débit d’air.
• Gardez les cheveux, les vêtements amples, les doigts et toute autre partie du corps à l’écart des
ouvertures et des pièces en mouvement.
• Éteignez toutes les commandes avant de débrancher l’appareil.
• Redoublez de prudence lorsque vous utilisez l’appareil dans un escalier. Pour éviter tout dommage ou
blessure et empêcher l’aspirateur de tomber, placez toujours ce dernier au bas des escaliers ou sur
le plancher. Ne placez pas l’aspirateur sur les marches d’un escalier ou sur un meuble, car cela peut
entraîner des dommages ou des blessures. Lorsque vous utilisez des outils, assurez-vous que la poignée
est toujours en position verticale.
• N’utilisez pas l’appareil pour aspirer des liquides inflammables ou combustibles comme de l’essence, ou
de la sciure de bois, ni dans des endroits où de telles substances peuvent être présentes.
19
Page 22

• Débranchez l’appareil avant de brancher L’outil Turbo à air.
• N’utilisez pas l’appareil si le vide-poussière ou les filtres ne sont pas installés.
• Éteignez toujours l’appareil avant d’installer ou de retirer le tuyau ou la buse motorisée.
• Le tuyau contient des fils électriques. Évitez de ramasser des objets aux arêtes tranchantes. Si le tuyau
semble endommagé, coupé ou percé, ou si les câbles sont exposés, débranchez l’appareil et cessez de
l’utiliser. Ne tentez pas de réparer un tuyau endommagé. Apportez-le dans un centre de service autorisé
(pour les modèles sélectionnés uniquement).
AVERTISSEMENT: Afin de réduire le risque d’incendie et de choc électrique, il faut utiliser l’outil d’escalier
Hoover Powered 440010888.
AVERTISSEMENT : Ce produit contient des produits chimiques reconnus par l’État de la Californie comme
pouvant causer le cancer, des anomalies congénitales ou des dysfonctions du système reproducteur.
BIEN SE LAVER LES MAINS APRÈS LA MANIPULATION.
MISE EN GARDE : POUR RÉDUIRE LES RISQUES DE DOMMAGE :
• Évitez d’utiliser l’appareil pour ramasser des objets durs ou aux arêtes tranchantes, car ils pourraient
endommager l’appareil. Rangez l’appareil adéquatement à l’intérieur et dans un endroit sec. N’exposez
pas l’appareil à des conditions de gel.
• N’utilisez pas d’objet aux arêtes tranchantes pour nettoyer le tuyau, car cela risquerait de l’endommager.
• Après avoir activé le rouleau-brosse, évitez l’immobilisation de l’appareil à un seul endroit pendant un
long moment, car vous risqueriez d’endommager le plancher.
AVERTISSEMENT : CET APPAREIL EST ÉQUIPÉ D’UNE FICHE POLARISÉE (LAME PLUS LARGE QUE LES
AUTRES) AFIN DE RÉDUIRE LE RISQUE D’ÉLECTROCUTION. CETTE FICHE DOIT ÊTRE BRANCHÉ DANS
UNE PRISE POLARISÉE ET DANS UN SEUL SENS. SI LA FICHE NE PEUT ÊTRE INSÉRÉE DANS LA PRISE,
RETOURNEZ-LA ET ESSAYEZ À NOUVEAU. SI VOUS NE POUVEZ TOUJOURS PAS L’INSÉRER,COMMUNIQUEZ
AVEC UN ÉLECTRICIEN QUALIFIÉ POUR FAIRE INSTALLER UNE PRISE APPROPRIÉE. NE MODIFIEZ LA FICHE
EN AUCUN CAS.
Cet appareil a été testé et déclaré conforme aux limites pour appareils numériques de classe B, conformément
à la partie 15 des règlements de la FCC. Ces restrictions visent à garantir une protection suffisante contre les
interférences nuisibles dans une installation résidentielle. Cet appareil génère, utilise et émet de l’énergie
radioélectrique et peut, en cas d’installation ou d’utilisation non conforme aux instructions, engendrer des
interférences nuisibles aux communications radio. Toutefois, rien ne garantit l’absence d’interférences dans
une installation particulière. Si cet appareil produit de l’interférence perturbant la réception radio ou
télévision, ce que vous pouvez confirmer en éteignant et en allumant l’appareil, nous vous recommandons
d’essayer d’éliminer l’interférence de l’une des façons suivantes :
• Réorienter ou repositionner l’antenne de réception.
• Augmenter l’espacement entre l’équipement et le récepteur.
• Brancher l’appareil sur un circuit différent de celui du récepteur.
• Consulter le vendeur ou un technicien radiotélévision expérimenté pour obtenir de l’aide.
Conformément à la réglementation d’Industrie Canada, le présent émetteur radio peut fonctionner avec une
antenne d’un type et d’un gain maximal (ou inférieur) approuvé pour l’émetteur par Industrie Canada. Dans le
but de réduire les risques de brouillage radioélectrique à l’intention des autres utilisateurs, il faut choisir le
type d’antenne et son gain de sorte que la puissance isotrope rayonnée équivalente (p.i.r.e.) ne dépasse pas
l’intensité nécessaire à l’établissement d’une communication satisfaisante.
Comprend le circuit intégré du module transmetteur : 12246A-BM77SPPSYC2 Cet appareil est conforme aux
normes RSS hors licence d’Industrie Canada. Son utilisation est assujettie aux deux conditions suivantes : (1)
cet appareil ne doit pas causer d’interférences et (2) cet appareil doit pouvoir recevoir toutes les interférences,
y compris celles susceptibles de gêner son bon fonctionnement.
20
Page 23

4
1
2 3 4
Insérez le
tube dans
le manchon
jusqu’à ce qu’il
s’enclenche.
Insérez la
poignée dans
le tube jusqu’à
ce qu’elle
s’enclenche.
Insérez le tuyau
dans l’entonnoir
jusqu’à ce qu’il
s’enclenche
en place.
Insérez les outils
sur l’appareil.
Assemblage
1
Allumage/
extinction de
l’appareil.*
Allumage/extinction
de la fonction
FloorSenseMC.*
Voyant de
vérification du
système.*
Reportez-vous à la
section Entretien de
l’appli Hoover pour
savoir comment retirer
les obstructions.
Astuce - Veillez à ce que toutes les pièces s’enclenchent bien.
Astuce - Enroulez le cordon autour des crochets destinés à cet effet avant de ranger
l’appareil. Fixez la fiche au cordon.
Astuce - Pour dérouler rapidement le cordon, tournez les crochets du cordon à 180 degrés.
Commandes de l’utilisateur
Robinet de débit
d’aspiration.*
Si l’aspirateur est
difficile à pousser,
ouvrez le robinet de
débit d’aspiration sur
la poignée.
2 31
21
*Voir page 22 pour l’emplace-
ment des fonctionnalités
Page 24

Apprivoiser votre aspirateur vertical HooverMD REACT
MC
Dégagement
du Tuyau
Porteoutils
Poignée de
Transport
Séparateur
Filtres
HEPA 2
Tuyau
Embout pour
Plancher
Dégagement
du videPoussière
Dégagement
de la poignée
Crochet du
Cordon
Tube
MARCHE/ARRÊT
FloorSense
MC
Tableau de bord
FloorSense
MC
Éclairage
Frontal
Vue Avant
Vue Arrière
Filtres
HEPA 1
Mise SOUS
TENSION/HORS
TENSION
Commandes de
L’utilisateur
Robinet de
débit
d’aspiration
Rouleau-brosse
Crochet du
Cordon
Inférieur
Filtres
Lavable
Porteoutils
22
Voyant de
vérification du
système
Dégagement
du Tube
(Entre Tasse
de saleté
et baguette)
Page 25

MISE EN GARDE
N’utilisez pas l’aspirateur pour toiletter un animal.
!!
23
Available Tools and Accessories
***
Suceur plat :
S’utilise dans les espaces restreints
et dans les recoins difficiles à
nettoyer.
Brosse à épousseter :
Des poils délicats qui nettoient
doucement la poussière fine.
L’outil Turbo :
Pour nettoyer facilement les
escaliers, les revêtements en
tissu et plus encore.
Suceur plat de luxe :
Un embout en caoutchouc qui protège les meubles
lorsque vous vous en servez dans des espaces restreints.
Très grand suceur plat :
Un embout extra long et souple pouvant atteindre les endroits
difficiles à nettoyer.
Brosse à épousseter souple :
Pour épousseter les surfaces difficiles comme les
pales d’un ventilateur ou les stores.
Outil Turbo pour animaux :
Un produit conçu expressément pour éliminer les poils
d’animaux incrustés des meubles, des escaliers, des
tissus de revêtement, etc.
***Les outils varient selon le numéro de modèle.
Consultez Hoover.com or Hoover.ca pour connaître les outils fournis avec les différents modèles.
Page 26

Technologie HooverMD FloorSense
MC
L’aspirateur HooverMD REACTMC avec technologie FloorSenseMC optimise
automatiquement la performance de nettoyage sur les tapis et planchers durs.
Sur le tapis, FloorSense
MC
augmente automatiquement la vitesse de rotation du
rouleau-brosse pour déloger les saletés incrustées.
Sur les planchers durs, FloorSenseMC ralentit automatiquement
la vitesse de rotation du rouleau-brosse pour ne pas étaler
les saletés sur le plancher.
Le tableau de bord FloorSense
MC
affiche des fonctions pratiques de
votre aspirateur. Lorsque FloorSense
MC
est actif, les témoins sur le
tableau de bord clignotent pendant la détection du type de plancher.
Lorsque FloorSense
MC
a déterminé le réglage optimal pour votre
type de plancher, le voyant CARPET (tapis) ou HARD FLOOR
(plancher dur) s’allume sur le tableau de bord.
24
Page 27

Technologie HooverMD FloorSense
MC
En mode CARPET (lors
du nettoyage de tapis),
FloorSense
MC
augmente
automatiquement la vitesse
de rotation du rouleau-brosse
pour déloger les saletés
profondément incrustées.
En mode HARD FLOOR (lors
du nettoyage de planchers
durs), FloorSense
MC
ralentit
automatiquement la vitesse
de rotation du rouleau-brosse
pour ne pas étaler les saletés
sur le plancher.
Le message BRUSH ROLL
(rouleau-brosse) s’affiche
lorsque le rouleau-brosse
est obstrué ou surchargé.
Reportez-vous à la section
Entretien de l’appli Hoover
pour savoir comment nettoyer
le rouleau-brosse.
Astuce -
Laissez FloorSenseMC déterminer le type de plancher et optimiser la vitesse de rotation du
rouleau-brosse automatiquement; placez la commande FloorSenseMC en position ON (marche).
2 31
AVERTISSEMENT
Pour réduire le risque de blessures dues à des pièces mobiles,
débrancher avant de nettoyer ou de réparer.
!!
Tableau de bord
del FloorSense
MC
25
Page 28

IMPORTANT : Veuillez lire toutes les instructions avant d’utiliser cet appareil.
L’aspirateur HooverMD REACTMC est compatible avec l’appli Hoover.
Téléchargez l’appli Hoover pour :
1. Enregistrer votre nouvel aspirateur
2. Personnaliser vos réglages FloorSense
MC
3. Recevoir des rappels d’entretien du système
4. Consulter les trucs et astuces
Astuce - Vide doit être alimentée SUR pour vous connecter à l’appli Hoover.
Astuce - L’éclairage frontal clignote trois fois lorsque l’aspirateur se connecte à
votre appareil mobile.
Utilisation de l’appli Hoover
Personnaliser
vos réglages
FloorSenseMC
Consulter les trucs
et astuces
Système
Rappels D’entretien
Apple et le logo Apple sont des marques
déposées d’Apple Inc., et des marques
déposées aux États-Unis et dans d’autres
pays. App Store est une marque de
commerce d’Apple Inc.
Android, Google Play et le logo Google
Play sont des marques de commerce
de Google Inc.
26
Page 29

Mode vertical
1. Appuyez sur l’embout et tirez la poignée vers l’arrière.
2. Allumez l’aspirateur.
3. Laissez FloorSense
MC
déterminer le type
de plancher et se régler automatiquement.
Astuce - Pour bénéficier d’un rendement optimal, assurez-vous que la
commande FloorSense
MC
est en position ON (marche).
Mode Levage Portatif - Portée augmentée pour le nettoyage au-dessus du sol.
1. Détachez le boîtier du manchon de l’aspirateur en appuyant sur le Powered
Reach
TM
Mode.
2. Appuyez sur le loquet de dégagement du tube ou de la poignée et tirez
la poignée vers le haut.
3. Installez l’accessoire de nettoyage à l’extrémité
du tube ou de la poignée.
4. Allumez l’aspirateur.
Powered Reach
TM
Mode - Facilite l’accès sous
les meubles.
1. Détachez le boîtier du manchon de l’aspirateur
en appuyant sur le Powered Reach
TM
Mode.
2. Allumez l’aspirateur.
3. Nettoyez sous les meubles à l’aide de la buse
motorisée.
Utilisation de votre aspirateur vertical HooverMD REACT
MC
MISE EN GARDE
Redoublez de prudence lorsque vous utilisez l’appareil dans un escalier.
Pour éviter tout dommage ou blessure et empêcher l’appareil de tomber,
placez toujours ce dernier au bas des escaliers ou sur le plancher. Ne
placez pas l’appareil sur les marches d’un escalier ou sur un meuble, car
cela peut entraîner des dommages ou des blessures. Lorsque vous utilisez
des accessoires, assurez-vous que la poignée est toujours en position
verticale.
!!
!
MISE EN GARDE
N’utilisez pas l’aspirateur pour toiletter un animal.
!
MISE EN GARDE
Lorsque l’aspirateur est incliné et que le rouleau-brosse
est en marche, ne laissez jamais l’aspirateur dans la
même position pendant une longue période
! !
Dégagement du
tube ou de
la poignée
(Entre Tasse de
saleté et baguette)
27
Détacher le
boîtier
!
Page 30

AVERTISSEMENT
N’utilisez pas l’aspirateur sans vide-poussière ou sans filtres.
!!
Toute autre tâche d’entretien doit être confiée à un représentant de service autorisé. Cessez d’utiliser l’appareil s’il ne fonctionne pas comme prévu, s’il a été
échappé sur le sol ou dans l’eau, s’il est endommagé ou s’il a été laissé à l’extérieur
et apportez-le au centre de réparations.
Un contrôle d’entretien régulier de votre aspirateur Hoover
MD
REACTMC vous garanti-
ra une aspiration et un rendement optimaux. Reportez-vous au présent manuel ou à
l’appli Hoover pour savoir comment entretenir votre aspirateur.
Remarque : Votre appareil est équipé d’un Rupteur Thermique interne afin de le
protéger contre la surchauffe. L’appareil cessera de fonctionner si ce Rupteur
Thermique s’active. Voici ce qu’il faut faire lorsque ceci survient :
1. ÉTEIGNEZ l’appareil et débranchez-le de la prise de courant.
2. Videz le vide-poussière.
3. Inspectez l’orifice de la buse, le connecteur, le tuyau, l’orifice
du vide-poussière, les filtres cyclonique, les filtres lavable
et les filtres HEPA afin de détecter toute obstruction.
Dégagez les obstructions le cas échéant.
4. Le Rupteur Thermique se réinitialisera après que l’appareil
a été débranché et que le moteur a refroidi pendant
30 minutes; vous pourrez à ce moment
Si le Rupteur Thermique se réactive constamment au terme
des étapes ci-dessus, votre appareil doit être réparé.
Reportez-vous à la section Garantie du manuel de l’utilisateur
pour connaître les dispositions d’entretien et de réparation.
Vidange du vide-poussière :
1. Retirez le vide-poussière en appuyant sur son bouton de
dégagement.
2. Maintenez le vide-poussière au-dessus d’une poubelle et
appuyez sur le loquet du panneau du vide-poussière
pour le vider.
Astuce - Videz le vide-poussière après chaque utilisation
pour conserver un rendement optimal.
Entretien
AVERTISSEMENT
Débranchez l’appareil avant de le nettoyer ou d’en effectuer
l’entretien afin de réduire le risque de blessures.
!!
Dégagement du
Vide-poussière
Godet à Pous-
sière Vide
28
Page 31

Nettoyage des filtres :
Filtres lavable
1. Retirez le vide-poussière en appuyant sur son bouton de dégagement.
2. Accédez au filtre lavable situé sous le vide-poussière.
3. Pour le retirer, tirez sur la languette fournie.
4. Rincez à l’eau courante jusqu’à ce que toute la poussière soit
éliminée du filtre.
5. Laissez votre filtre sécher pendant 24 heures avant de le remettre
dans l’aspirateur.
Astuce - Remplacez votre filtre lorsqu’il est fortement décoloré.
Filtres HEPA
Les produits HooverMD REACTMC sont dotés de deux filtres HEPA.
Reportez-vous à la section Apprivoiser votre aspirateur vertical
HooverMD REACTMC Powered ReachMC Lite pour savoir où ils sont situés.
1. Repérez les filtres HEPA de chaque côté de l’aspirateur, sous le
vide-poussière.
2. Dévissez le couvercle d’évent situé au bas du boîtier pour accéder
aux filtres.
3. Retirez les filtres et frappez-les sur la paroi d’une poubelle pour
éliminer le surplus de saletés.
Astuce - NE RINCEZ PAS LES FILTRES HEPA. Remplacez les filtres lorsqu’ils
sont fortement décolorés. N’utilisez pas l’aspirateur sans l’un de ses filtres.
Nettoyage et entretien du rouleau-brosse :
1. Pour accéder au rouleau-brosse, dévissez le protecteur de la buse.
2.
Retirez le rouleau-brosse en tirant dessus vers le haut et en le
dégageant de la courroie de l’aspirateur
3. Retirez tout amas de poils ou obstruction.
4. Replacez le rouleau-brosse et le protecteur de la buse.
Astuce -
Faites tourner le rouleau-brosse manuellement afin de vous assurer que la courroie
est bien installée. L’aspirateur est doté d’un système d’arrêt automatisé du rouleaubrosse en cas de surcharge ou de blocage. Vérifiez s’il y a des obstructions dans
la zone du rouleau-brosse et retirez-les. Lorsque les obstructions sont dégagées,
reprenez le travail normalement.
LUBRIFICATION : Le moteur et le rouleau-brosse sont équipés de roulements suffisamment
lubrifiés pour toute la durée de vie de l’appareil. L’ajout de lubrifiant pourrait causer des
dommages. N’ajoutez pas de lubrifiant au moteur ni au rouleau de brosses.
Entretien
Dégagement du
Vide-poussière
AVERTISSEMENT
Débranchez l’appareil avant de le nettoyer ou d’en effectuer
l’entretien afin de réduire le risque de blessures.
!!
AVERTISSEMENT
Débranchez l’appareil avant d’en effectuer le nettoyage ou l’entretien afin de
réduire le risque de blessures présenté par les pièces en mouvement.
!!
Retirez le Filtre
Nettoyez la Brosse
29
Page 32

1
1
1
5
1
2 3 4
Raccord du tuyauAdmission
de la buse
Admission du
vide-poussière
Vérifiez s’il y a des obstructions dans les endroits indiqués ci-dessous.
Filtre cyclonique
1
6 7
Filtres HEPAFiltres lavable
Tuyau
8
Tube
Éliminer les obstructions du système
Si votre aspirateur perd de sa puissance d’aspiration, vérifiez qu’il n’est pas obstrué. Sinon,
retirez les obstructions.
Entretien
30
Page 33

Toute autre tâche d’entretien doit être confiée à un représentant de service autorisé. Cessez
d’utiliser l’appareil s’il ne fonctionne pas comme prévu, s’il a été échappé sur le sol ou dans
l’eau, s’il est endommagé ou s’il a été laissé à l’extérieur et apportez-le au centre de réparations.
L’aspirateur ne s’allume pas.
Veillez à toujours le brancher fermement et correctement. Un Rupteur Thermique s’est activé débranchez l’aspirateur et laissez-le refroidir pendant 30 minutes. Si cela ne fonctionne pas, il
est possible que la prise murale ne soit pas alimentée. Vérifiez les fusibles ou les disjoncteurs
du domicile. Si un fusible est grillé ou si un disjoncteur est déclenché, remplacez le fusible ou
enclenchez le disjoncteur du domicile.
Mon aspirateur est difficile à pousser.
Ouvrez le robinet de débit d’aspiration situé près de la poignée en le faisant glisser vers le haut.
Mon aspirateur perd de sa puissance d’aspiration.
Veillez à vider le vide-poussière s’il est plein. Le filtre de votre aspirateur est peut-être obstrué.
Votre filtre doit être rincé toutes les quatre à six utilisations. Reportez-vous à la section
Entretien de l’appli Hoover pour savoir comment nettoyer vos filtres. Si le problème persiste,
il se peut qu’il y ait une obstruction dans le système. Reportez-vous à la section Entretien du
manuel de l’utilisateur pour savoir comment retirer les obstructions.
Mon rouleau-brosse ne tourne pas ou le tableau de bord FloorSense
MC
n’affiche pas la bonne
surface.
1. Débranchez l’aspirateur et retirez tout amas de poils ou obstruction autour du
rouleau-brosse si FloorSense
MC
affiche « HARD FLOOR » (plancher dur) alors qu’il s’agit de
tapis.
2. Nettoyez les filtres. Reportez-vous à la section Entretien de l’appli Hoover pour savoir
comment nettoyer les filtres.
3. Vérifiez s’il y a des obstructions dans le système. Reportez-vous à la section Entretien de
l’appli Hoover pour savoir comment enlever les sabots.
4. Reprenez le travail normalement et FloorSense
MC
se réinitialisera.
Je ne suis pas capable de connecter mon aspirateur à l’appli Hoover.
L’aspirateur doit être en marche pour se connecter à l’appli Hoover.
Pour d’autres éléments de dépannage ou questions fréquemment posées, téléphonez au :
+1 877 839-2046 ou visitez le Hoover.com ou Hoover.ca si vous avez des questions.
Guide de dépannage
AVERTISSEMENT
Débranchez l’appareil avant de le nettoyer ou d’en
effectuer l’entretien afin de réduire le risque de blessures.
!!
AVERTISSEMENT
Pour réduire le risque de blessures dues à des pièces mobiles,
débrancher avant de nettoyer ou de réparer.
!!
31
Page 34

ENTRETIEN ET GARANTIE DE L’ASPIRATEUR REACTMC POWERED REACHMC LITE DE HOOVERMD
RENSEIGNEMENTS RELATIFS À L’ENTRETIEN Appelez au +1 877 839-2046 (É.-U. et Canada)
Si vous avez besoin d e plus d’aide, visitez un centre de ser vice autorisé. Trouvez le centre le plus près d e chez vous en visitant notre site Web à w ww.Hoover.com or
Hoover.ca. Les frais de transport à des tination et en provena nce de l’emplacement de réparation sont payés par le propriétaire. Indiquez toujours le numéro de modèle et
le code de fabric ation de votre produit l orsque vous demandez des renseignements ou que vous commandez des pièces de rechange. (Le numéro de modèle e t le code du
fabricant de l’aspirateur sont indiqués sur le bas du boîtier.)
GARANTIE LIMITÉE DE CINQ ANS (USAGE DOMESTIQUE)
COUVERTURE DE LA GARANTIE
Lorsqu’ils son t utilisés e t entretenus dans des conditions normales d’utilis ation et d’entretien domestiques, comme il est stipulé dans le guide de l’utilisateur, votre produit
HOOVER
MD
est garanti contre les déf auts de fabrication et de main -d’œuvre pendant une période de cinq (5) ans à partir de la date d’acha t (ci-après la « Période de
garan tie »). Pendant la période de garantie, Hoover fournira la main-d’oeuvre et les pièces g ratuitement afin de corrige r une telle défectuosité pour les produits acheté s aux
État s-Unis dans les boutiques d ’échanges militaires amér icaines et au Canada.
RÉCLAMATION AU TITRE DE LA GARANTIE
Si le produit n’est pas conforme à ce qui a été garanti, apportez ou envoyez le produit à un centre de vente et de service Hoover
MD
ou chez un fournis seur autor isé de service
sous garantie HooverMD avec un e preuve d’achat. Pour obtenir la liste des points de service autorisés aux É .-U., composez le numéro du service automatisé au +1 877
839-2046 ou visitez HooverMD en ligne au www.Hoover.com or Hoover.ca. Pour obtenir du soutien ou d’autres renseignements au sujet de la garantie ou pour connaître les
boutiques offrant les réparations au titre de la garantie, appelez le Centre de réponses à la clien tèle HooverMDau numé ro +1 877 839-2046, du lundi au vendredi, d e 8 h à
19 h, EST. Au Canada, communiquez ave c HooverMD Canada, édifice Carson, 100, rue Carson, E tobicoke (Ontario), M8W 3R9. Téléphone : +1 877 839-2046, entre 8 h et
19 h (HNE) du lundi au vendredi.
ÉLÉMENTS NON COUVERTS PAR LA GARANTIE
Cette garantie ne couvre pas : l’utilisation du produit à des fins commerciales (comme par les femmes de chambre, les concierges et les services de loca tion d’équipement),
le filtre, le rouleau-b rosse, la courroie, un entretien inadéquat du produit, les bris causés par la mauvais e utilisation, les cas fortuits, les catastrophes natu relles, le vandalism e
et autres actes hors du cont rôle de Hoover
MD
, les agissements ou omissions du propriétaire, l’utilisation à l’extérieur du pays d’achat d’origine et les reventes ou transferts
du produit par le premier acheteur. La pré sente garantie ne cou vre pas le ramassage, la livraison, le trans port, ni les réparations à domic ile. Toutefois, si vous envoyez votre
produit par cour rier à un centre de vente et de service HooverMD pour une réparat ion sous garantie, les f rais de livraison de retour seron t payés.
Cette garantie ne couvre pas les produits achetés à l’exté rieur des États- Unis, y comp ris ses territoires et possessions, hors des boutiques d’échanges militaires et à l’extérieur
du Canada. Cette garantie ne couvre pas les produits achetés à une partie n’é tant pas un détaillant, un concessionnaire ou un distributeur autorisé des produits Hoove rMD.
AUTRES CONDITIONS IMPORTANTES
La présente garantie n’est pas transférable et ne peut pas être cédée. La présente garantie sera régie et interprétée selo n les lois de l’État de l’O hio. La période de garantie ne
sera pas prolongée après tout remplacement ou toute réparation au titre de la présente garantie.
CET TE GARANTIE EST VOTRE UNIQUE RECOURS ET VOI E DE DROIT FOURNIS PAR HOOVER
MD
. TOUTES AUTRES GARANTIES, E XPRESSES OU TACITES, Y COMPRIS
LES GAR ANTIES DE QUALITÉ MA RCHANDE OU D’ADAPTATION À UN USAGE PARTICULI ER, SONT DÉCLINÉES. HOOVER NE POURRA EN AUCUN CAS ÊTRE TEN UE
RESPONSABLE DE DOMMAGES -INTÉRÊTS SPÉ CIAUX OU DOMMAGES INDIRECTS, ACC ESSOIRES OU CONSÉCUTIFS DE QUELQUE NATURE QUE CE SOIT, SU BIS
PAR LE PROPRIÉTAIRE DU PRODUIT OU PAR TOUTE PARTIE RÉCL AMANT PAR L’INTERMÉDIAIRE DU P ROPRIÉTAI RE, QU’ILS RELÈVE NT DU DROIT DES CONTRATS, DE
LA NÉGLIGEN CE, DE LA RESPONSAB ILITÉ CIV ILE DÉLIC TUELLE OU DE LA RESPONSABIL ITÉ STRICTE DU FAIT DES PRODUITS, O U QU’ILS DÉCOULENT DE QUELQUE
CAUSE Q UE CE SOIT.
Certains États ne permettent p as l’exclusion des dommages consécutifs . Par conséquent, l’exclusion précé dente pour rait ne pas êt re applicable dans votre cas. La présente
garan tie vous donne des droits précis. Vous pouvez également avoir d’autres droits, lesquels varient d’une province à l’autre.
Entretien et garantie
32
Page 35

Instrucciones de seguridad importantes . . . . . . . . . . . . . . . . . . . . . .35
Ensamblaje . . . . . . . . . . . . . . . . . . . . . . . . . . . . . . . . . . . . . . . . . . . . . .37
Controles del usuario ......................................37
Conozca su aspiradora vertical REACTTM de Hoover®
Powered Reach
TM
Lite . . . . . . . . . . . . . . . . . . . . . . . . . . . . . . . . . . . . .38
Herramientas y accesorios disponibles .....................39
Tecnología FloorSense
TM
de Hoover® . . . . . . . . . . . . . . . . . . . . . . .40
Uso de la aplicación Hoover ................................42
Uso de la aspiradora vertical REACTTM de Hoover® Powered
Reach
TM
Lite .............................................43
Mantenimiento . . . . . . . . . . . . . . . . . . . . . . . . . . . . . . . . . . . . . . . . . . .44
Resolución de problemas...................................47
Información de la garantía..................................48
Este manual es para modelos UH73400 & UH73400CA.
Contenido
33
Page 36

Bienvenido a la propiedad de Hoover.
Hágalo oficial.
Compatible con la aplicación Hoover.
Descargue la aplicación Hoover para registrar su
nueva aspiradora, personalizar los ajustes de
FloorSense™, recibir recordatorios de mantenimiento
del sistema y acceder a sugerencias y trucos.
Apple y los logotipos de Apple son marcas
comerciales de Apple, Inc., registradas en
EE. UU. y en otros países. App Store es una
marca de servicio de Apple Inc.
Android, Google Play y el logotipo de
Google Play son marcas comerciales
de Google Inc.
También puede registrarse:
Llamando al: 1-877-839-2046
Visitando: Hoover.com or Hoover.ca
Tiene garantía.
Consulte la Garantía para conocer
los detalles completos.
TM
Page 37

Instrucciones de seguridad importantes
CONSERVE ESTAS INSTRUCCIONES.
IMPORTANTE: LEA ESTE MANUAL CON ATENCIÓN ANTES DE ENSAMBLAR Y USAR ESTE APARATO. ESTE
PRODUCTO TIENE COMO FIN UN USO DOMÉSTICO ÚNICAMENTE. SI SE LO UTILIZA CON FINES COMERCIALE
LA GARANTÍA QUEDARÁ ANULADA.
Cuando se utilizan aparatos eléctricos, se deben seguir siempre precauciones básicas, incluidas las siguientes:
ADVERTENCIA: PARA DISMINUIR EL RIESGO DE INCENDIO, DESCARGA ELÉCTRICA, DAÑOS O LESIONES,
RESPETE LAS SIGUIENTES MEDIDAS:
• Arme la unidad por completo antes de ponerla en funcionamiento.
• Hágala funcionar únicamente con el voltaje especificado en la etiqueta de datos que se encuentra en la
base del contenedor de la aspiradora.
• No descuide el aparato cuando esté enchufado. Desenchufe el aparato del tomacorriente cuando no esté
en uso y antes de limpiarlo o el mantenimiento.
• No utilice la aspiradora en exteriores o en superficies mojadas.
• Evite que se lo utilice como un juguete. Los niños de 12 años o menos no deben utilizar la unidad. Cuando
se la utilice cerca de niños, será necesario hacerlo bajo una estricta supervisión. Para evitar lesiones o
daños, mantenga a los niños lejos del producto y no permita que introduzcan los dedos u otros objetos en
ninguna de las aberturas.
• Utilice la unidad únicamente según el uso descrito en este manual. Utilice solo los accesorios y productos
recomendados por el fabricante.
• No lo utilice si el cable o el enchufe se encuentran dañados. Si el aparato no funciona como debe, si se ha
caído, dañado o dejado a la intemperie, o si se ha sumergido en agua, llévelo a un centro técnico antes de
continuar usándolo.
• No tire del aparato ni lo transporte tomándolo por el cable, no use el cable como una manija, no cierreuna
puerta sobre el cable ni lo enrosque alrededor de bordes o esquinas filosas. No apoye el producto sobre el
cable. No pase el aparato por encima del cable. Mantenga el cable lejos de las superficies calientes.
• No lo desenchufe tirando del cable. Para desenchufarlo, agarre el enchufe, no el cable.
• No manipule el enchufe ni el aparato con las manos mojadas.
• No coloque ningún objeto en las aberturas. No utilice la unidad si alguna de sus aberturas se encuentra
bloqueada. Manténgalas libres de polvo, pelusas, cabello y cualquier otro elemento que pueda disminuir
el flujo de aire.
• Evite que el cabello, la ropa suelta, los dedos y cualquier otra parte del cuerpo entren en contacto con las
aberturas y las piezas móviles de la unidad.
• Apague todos los controles antes de desenchufarla.
• Extreme las precauciones cuando limpie en escaleras. Para evitar lesiones o daños físicos, y a fin de
evitar que la aspiradora se caiga, siempre coloque la aspiradora al pie de las escaleras o sobre el suelo.
No coloque la aspiradora sobre las escaleras o sobre un mueble, ya que esto puede producir lesiones o
daños. Cuando use herramientas, asegúrese siempre de que el mango esté en posición vertical.
• No utilice la unidad para aspirar líquidos combustibles o inflamables, tales como gasolina o restos de
madera lijada, ni la utilice en áreas en las que dichas sustancias puedan estar presentes.
• No aspire nada que se encuentre en combustión o emita humo, como cigarrillos, fósforos o cenizas
calientes.
35
Page 38

• Desenchufe el aparato antes de conectar la Herramienta Turbo alimentada por aire.
• No utilice la unidad si esta no tiene colocados la copa de recolección de residuos o los filtros.
• Siempre apague este aparato antes de conectar o desconectar la manguera o la boquilla motorizada.
• La manguera contiene cables eléctricos. Evite aspirar objetos filosos. Si la manguera parece estar dañada,
perforada o los cables están expuestos, desenchufe la unidad y deje de usarla. No intente reparar la
manguera, llévela a un centro técnico autorizado para su reparación (disponible solo en algunos modelos).
ADVERTENCIA: Para reducir el riesgo de incendio y choque eléctrico, debe utilizarse la Hoover Powered
Stair Tool número de pieza 440010888.
ADVERTENCIA: Este producto contiene químicos reconocidos por el estado de California como causantes de
cáncer, defectos de nacimiento u otros daños reproductivos.
LÁVESE LAS MANOS LUEGO DE MANIPULARLO.
PRECAUCIÓN: PARA DISMINUIR EL RIESGO DE DAÑOS:
• Evite aspirar objetos duros y filosos con este producto, ya que pueden dañarlo. Almacene
apropiadamente en interiores, en un lugar seco. No exponga la máquina a temperaturas bajo cero.
• No utilice objetos filosos para limpiar la manguera, ya que pueden dañar la unidad.
• Cuando el cepillo giratorio esté encendido, no permita que la aspiradora se asiente en una ubicación
durante un período extendido de tiempo, ya que esto puede dañar el piso.
ADVERTENCIA: PARA REDUCIR EL RIESGO DE DESCARGA ELÉCTRICA, ESTE APARATO TIENE UN ENCHUFE
POLARIZADO (UNA CLAVIJA ES MÁS ANCHA QUE LA OTRA). ESTE ENCHUFE ENCAJA EN UN TOMACORRIENTE POLARIZADO DE UNA SOLA MANERA. SI NO ENCAJA POR COMPLETO EN EL TOMACORRIENTE, INVIERTA
EL ENCHUFE. SI AÚN NO ENCAJA, COMUNÍQUESE CON UN ELECTRICISTA CALIFICADO PARA INSTALAR EL
TOMACORRIENTE ADECUADO. REALICE NINGÚN TIPO DE MODIFICACIÓN EN EL ENCHUFE.
Este equipo se ha probado y se determinó que cumple con los límites para dispositivos digitales Clase B,
conforme a la sección 15 de las Normas FCC. Estas condiciones tienen por objeto ofrecer una protección
razonable contra interferencias perjudiciales en residencias. Este equipo genera, utiliza y puede irradiar
energía de radiofrecuencia y, si no se instala y se utiliza de acuerdo con las instrucciones suministradas,
podría ocasionar interferencias perjudiciales para las comunicaciones por radio. No obstante, no se puede
garantizar que no se vaya a producir este tipo de interferencias en una instalación en particular. Si este
equipo ocasiona interferencias perjudiciales en la recepción de radio o televisión, lo que puede comprobarse
encendiendo y apagando el equipo, se recomienda que intente corregir la interferencia mediante una de las
siguientes acciones:
• Reoriente o reubique la antena receptora.
• Aumente la separación entre el equipo y el receptor.
• Conecte el equipo a un tomacorriente de un circuito distinto al cual está conectado el receptor.
• Consulte con su distribuidor o con un técnico experto de radio y televisión.
Según las normas de Industria de Canadá, este transmisor de radio solo puede funcionar usando una antena
de un tipo y de una ganancia máxima (o menor) aprobada para el transmisor por Industria de Canadá. Para
reducir el potencial de interferencia de radio a otros usuarios, el tipo de antena y su ganancia deben ser
elegidos de tal forma que la potencia radiada equivalente (e.i.r.p.) no sea más que la permitida para una
comunicación exitosa.
Contiene módulo transmisor IC: 12246A-BM77SPPSYC2
Este dispositivo cumple con las normas RSS de Industria de Canadá exentas de licencia. El funcionamiento
está sujeto a las dos siguientes condiciones: (1) este dispositivo puede no causar interferencia, y (2) este
dispositivo debe aceptar cualquier interferencia, incluso interferencia que pueda causar el funcionamiento no
deseado del dispositivo.
36
Page 39

4
1
2 3 4
Inserte la
varilla en el
lomo hasta
que encastre
en su lugar.
Inserte el
mango en la
varilla hasta que
encastre en
su lugar.
IInserte la
manguera en el
recipiente hasta
que encaje en
su lugar.
Incorpore las
herramientas.
Ensamblaje
1
Encienda/Apague
la unidad.*
Encienda/Apague
FloorSense™.*
Indicador de
Verificación del
Sistema.*
Consulte la sección
Mantenimiento de la
aplicación Hoover para
obtener instrucciones
sobre cómo eliminar
obstrucciones.
Sugerencia - Asegúrese de que todas las piezas encastren en su lugar.
Sugerencia - Enrolle el cable en los ganchos para un almacenamiento sin inconvenientes.
Sujete el extremo del enchufe al cable.
Sugerencia - Para desenrollar el cable rápidamente, gire los ganchos para el cable 180 grados.
Controles del usuario
Válvula de control
de succión.*
Si no puede empujar
la aspiradora, abra la
válvula de control de
succión en el mango.
2 31
11
37
*Consulte la página 38
para conocer la ubicación
de las funciones
Page 40

Conozca su aspiradora vertical REACT™ de Hoover®
Mango de
Transporte
Separador
Filtros
HEPA 2
Manguera
Boquilla
para
Pisos
Liberación de la
copa de recolección
de residuos
Liberación
del Mango
Gancho
del
Cable
Varilla
ENCENDIDO/
APAGADO
FloorSense
TM
Filtros
Enjuagable
Soporte de
Herramientas
Tablero
FloorSense
TM
Luces
Delanteras
Vista Frontal
Vista Trasera
Filtros
HEPA 1
ENCENDIDO
/APAGADO
Controles del Usuario
Liberacióndel
Contenedor
(EntreTaza de
suciedad Y
la varita)
Cepillo Giratorio
Soporte de
Herramientas
Gancho del
cable
inferior
Liberación
de Manguera
38
Indicador de
Verificación
del Sistema
Válvula de
control de
succión
Page 41

***Las herramientas varían según el número de modelo.
Consulte Hoover.com or Hoover.ca para ver las herramientas incluidas en cada modelo.
PRECAUCIÓN
La aspiradora no debe utilizarse para limpiar mascotas.
!!
39
Available Tools and Accessories
***
Herramienta para limpieza
en rincones:
Ideal para limpiar en espacios
pequeños y esquinas de
difícil acceso.
Cepillo quitapolvo:
Delicadas cerdas que limpian el
polvo fino lentamente.
Herramienta Turbo:
Limpia fácilmente muebles,
escaleras, tapizados y mucho más.
Herramienta para limpieza en rincones de lujo:
La punta de caucho protege los muebles cuando se limpian
espacios pequeños.
Herramienta para limpieza en rincones XL:
Punta flexible extra larga que llega a espacios difíciles
de limpiar.
Cepillo quitapolvo flexible:
Aspira en superficies de difícil acceso, como aspas de
ventiladores y persianas.
Herramienta Turbo para pelos de animales:
Diseñada exclusivamente para eliminar pelos de animales
aferrados a muebles, escaleras, tapizados y más.
Page 42

Tecnología FloorSense™ de Hoover
®
REACTTM de Hoover® con tecnología FloorSenseTM optimiza automáticamente el
rendimiento de limpieza sobre alfombras y pisos duros.
En alfombras, FloorSense
TM
aumenta automáticamente la velocidad del cepillo
giratorio para extraer la suciedad profundamente incrustada.
En pisos duros, FloorSense
TM
disminuye
automáticamente la velocidad del cepillo giratorio para no
desparramar la suciedad en el piso.
El tablero
FloorSenseTM muestra las funciones útiles de la
aspiradora. Cuando
FloorSenseTM está activo, las luces del
tablero parpadearán al detectar el tipo de piso.
Una vez que
FloorSenseTM determine el ajuste óptimo para su tipo de
piso, verá las palabras CARPET (Alfombra) o HARD FLOOR (Piso duro)
iluminadas en el tablero.
40
Page 43

Tecnología FloorSense™ de Hoover
®
Cuando limpia
ALFOMBRAS, FloorSense™
automáticamente aumenta la
velocidad del cepillo giratorio
para extraer suciedad
profundamente incrustada.
En PISOS DUROS,
FloorSense™
automáticamente
disminuye la velocidad del
cepillo giratorio para no
desparramar la suciedad
en el piso.
Aparecerá BRUSH ROLL
(Cepillo giratorio) cuando el
cepillo giratorio esté atascado
o sobrecargado. Consulte
la sección Mantenimiento o
la aplicación Hoover para
obtener instrucciones sobre
cómo limpiar el cepillo giratorio.
Sugerencia - Deje que FloorSense™ determine el tipo de piso y optimice la velocidad del cepillo
giratorio automáticamente y asegúrese de que el control FloorSense™ esté en la
posición de ENCENDIDO.
2 31
ADVERTENCIA
Para reducir el riesgo de lesiones debidas a las piezas móviles,
Desenchufe antes de limpiar o dar servicio.
!!
Tablero LED de
FloorSense™
41
Page 44

IMPORTANTE: Lea todas las instrucciones antes de usar este aparato.
REACTTM de Hoover® es compatible con la aplicación Hoover.
Descargue la aplicación Hoover para:
1. Registrar su nueva aspiradora
2. Personalizar los ajustes de FloorSense
TM
3. Recibir recordatorios de mantenimiento del sistema
4. Acceder a sugerencias y trucos
Sugerencia - Vacío debe ser alimentado EN conectarse a la aplicación Hoover.
Sugerencia
- Las luces delanteras parpadearán tres veces cuando la
aspiradora se
conecte de su dispositivo móvil.
Uso de la aplicación Hoover
Personalizar
los Ajustes de
FloorSense
TM
Acceder a
Sugerencias
y Trucos
Recordatorios de
Mantenimiento del
Sistema
Apple y los logotipos de Apple son marcas
comerciales de Apple, Inc., registradas en
EE. UU. y en otros países. App Store es una
marca de servicio de Apple Inc.
Android, Google Play y el logotipo de
Google Play son marcas comerciales
de Google Inc.
42
Page 45

Liberación de
la varilla o
el mango
(EntreTaza de
suciedad Y la varita)
Modo vertical
1. Pise la boquilla y tire el mango hacia atrás.
2. Encienda la aspiradora.
3. Deje que FloorSense™ determine el tipo de piso
y ajuste las configuraciones automáticamente.
Sugerencia - Para obtener un rendimiento óptimo, asegúrese de que el control
FloorSense™ esté en la posición de encendido.
Modo de elevación portátil - para alcance extendido sobre el piso.
1. Desconecte el contenedor del lomo de la aspiradora presionando el Powered
Reach™ Mode.
2. Presione la liberación de la varilla o el mango y
tire del mango hacia arriba.
3. Conecte el accesorio de limpieza al extremo de
la varilla o del mango.
4. Encienda la aspiradora.
Powered Reach™ Mode - para alcance extendido
debajo de muebles.
1. Desconecte el contenedor del lomo de la
aspiradora presionando el Powered Reach™ Mode
2. Encienda la aspiradora.
3. Limpie debajo de muebles con la boquilla mecánica.
Uso de la aspiradora vertical REACT™ de Hoover
®
PRECAUCIÓN
Extreme las precauciones cuando limpie en escaleras. Para evitar
lesiones o daños físicos, y a fin de evitar que la aspiradora se caiga,
colóquela siempre al pie de las escaleras o sobre el suelo. No coloque
la aspiradora sobre las escaleras ni sobre un mueble, ya que pueden
generarse lesiones o daños. Cuando utilice las herramientas accesorias,
siempre asegúrese de que el mango se encuentre en posición vertical.
!!
!
PRECAUCIÓN
La aspiradora no debe utilizarse para limpiar mascotas.
!
PRECAUCIÓN
Cuando la aspiradora está reclinada con el cepillo giratorio
encendido, no deje nunca la aspiradora en una sola posición
durante un período prolongado de tiempo.
! !
43
Desconecte el
contenedor
!
Page 46

Cualquier otro mantenimiento lo debe realizar un representante de servicio autorizado.
Si el aparato no funciona como debe, si se ha caído, dañado o dejado a la intemperie, o
si se ha sumergido en agua, llévelo a un centro técnico antes de continuar usándolo.
Las aspiradoras REACT
TM
de Hoover® deben someterse a verificaciones de mantenimiento
periódicas para mantener un rendimiento y aspiración óptimos. Consulte este manual o
su aplicación Hoover para obtener información sobre cómo mantener la aspiradora.
Aviso - Se ha colocado un Protector Térmico en la aspiradora para protegerla contra el
sobrecalentamiento. Cuando dicho protector se active, la aspiradora dejará de funcionar.
De ser así, proceda como se indica a continuación:
1. APAGUE la limpiadora y desenchúfela del tomacorriente.
2. Vacíe la copa de recolección de residuos.
3. Revise la entrada de la boquilla, el conector de la manguera,
la manguera, la entrada de la copa de recolección de residuos,
el filtros ciclónico, el filtros enjuagable y el filtros HEPA en
busca de obstrucciones. Elimine las obstrucciones si están
presentes.
4. Una vez que la limpiadora esté desenchufada y
el motor se haya enfriado durante 30 minutos, el
Protector Térmico se desactivará y usted podrá
retomar la limpieza.
Si el Protector Térmico continúa activándose luego de haber seguido
los pasos anteriores, significa que su aspiradora requiere de un
servicio de mantenimiento. Consulte la sección Garantía del manual
del usuario para ver la información de mantenimiento.
Vaciado de la copa de recolección de residuos:
1. Retire la copa de recolección de residuos presionando el
botón de liberación de la copa de recolección de residuos.
2. Sostenga la copa de recolección de residuos sobre un
contenedor de basura y presione la liberación de la puerta
de la trampa de la copa de recolección de residuos para vaciarla.
Sugerencia - Vacíe la copa de recolección de residuos después de cada uso para
lograr unrendimiento óptimo.
Mantenimiento
ADVERTENCIA
Para disminuir el riesgo de lesiones físicas, desenchufe la unidad
antes de limpiarla o realizarle un servicio de mantenimiento.
!!
ADVERTENCIA
No use la aspiradora sin la copa de recolección de residuos y los filtros secos.
!!
Liberación de la
Copa de Recolección
de Residuos
Recipiente Vacío
44
Page 47

Limpieza de los filtros:
Filtros enjuagabler
1. Retire la copa de recolección de residuos presionando el botón de
liberación de la copa de recolección de residuos.
2. Acceda al filtros enjuagable debajo de la copa de recolección de residuos.
3. Para extraerlo, tire hacia arriba de la lengüeta provista.
4. Enjuague con agua corriente hasta retirar toda la suciedad del filtro.
5. Deje secar el filtro durante 24 horas antes de volverlo a colocar en
la aspiradora.
Sugerencia
- Reemplace los filtros cuando estén altamente decolorados.
Filtros HEPA
Los productos REACT™ de Hoover® tienen 2 filtros HEPA. Consulte
Conozca su aspiradora vertical Powered Reach™ Lite REACT™ de
Hoover® para ver la ubicación.
1. Ubique los filtros HEPA a cada lado de la aspiradora debajo de la de la
copa de recolección de residuos.
2. Desatornille la cubierta de ventilación ubicada en la parte inferior del
contenedor para acceder a los filtros.
3. Retire los filtros y golpéelos contra la parte lateral del contenedor de
basura para liberar el exceso de suciedad.
Sugerencia
-
NO ENJUAGUE LOS FILTROS HEPA. Reemplace los filtros cuando
estén altamente decolorados. No utilice la aspiradora si no tiene
colocados todos los filtros en su lugar.
Limpieza y mantenimiento del cepillo giratorio:
1. Para acceder al cepillo giratorio, desatornille la protección de la
boquilla de la boquilla.
2. Retire el cepillo giratorio tirando de él hacia arriba y afuera de la
correa de la aspiradora.
3. Retire los cabellos u obstrucciones.
4. Vuelva a colocar el cepillo giratorio y la protección de la boquilla.
Sugerencia
- Gire el cepillo giratorio en forma manual para asegurarse de
que la correa esté bien instalada. La aspiradora cuenta con un
apagado automático del cepillo giratorio que se acciona en caso de sobrecarga o
atascamiento. Verifique si hay obstrucciones en la zona del cepillo giratorio y
despéjelas. Una vez que elimine las instrucciones, reanude la limpieza normalmente.
LUBRICACIÓN: El motor y el cepillo giratorio están equipados con cojinetes que contienen
suficiente lubricación para toda su vida útil. Si le agrega lubricantes, esto podría
dañar el motor. No agregue lubricante al motor o al cepillo.
Mantenimiento
ADVERTENCIA
Para disminuir el riesgo de lesiones físicas, desenchufe la unidad
antes de limpiarla o realizarle un servicio de mantenimiento.
!!
PRECAUCIÓN
Para reducir el riesgo de lesión derivado de las piezas móviles, desconecte
el aparato antes de realizarle el servicio de mantenimiento.
!!
Retire el Filtro
Limpie el
Cepillo Giratorio
Liberación de la
Copa de Recolección
de Residuos
45
Page 48

1
1
1
5
1
2 3 4
Conector de la
manguera
Entrada de la
boquilla
Entrada de
la copa de
recolección de
residuos
Revise en busca de obstrucciones en las áreas resaltadas a continuación.
1
Filtro ciclónico
1
6 7
Filtros HEPA
Filtros enjuagable
Tuyau
8
Varilla
Extracción de obstrucciones del sistema
Si su aspiradora pierde succión, verifique y retire todas las obstrucciones.
Mantenimiento
46
Page 49

Cualquier otro mantenimiento lo debe realizar un representante de servicio
autorizado. Si el aparato no funciona como debe, si se ha caído, dañado o dejado a la
intemperie, o si se ha sumergido en agua, llévelo a un centro técnico antes
de continuar usándolo.
La aspiradora no enciende.
Asegúrese siempre de enchufarla en forma firme. Es posible que se haya activado un
Protector Térmico - desenchufe la unidad y déjela enfriar durante 30 minutos. Si esto
no funcione, es posible que no haya voltaje en el enchufe de la pared. Revise el fusible o
el disyuntor del hogar. Si hay un fusible quemado o un disyuntor activado, reemplace el
fusible o restablezca el disyuntor del hogar.
Es difícil empujar la aspiradora.
Abra la válvula de control de succión cerca del mango deslizando la válvula hacia arriba.
La aspiradora pierde succión.
Asegúrese de vaciar la copa de recolección de residuos si está llena. Es probable que el filtro
esté obstruido. El filtro debe enjuagarse cada 4 a 6 usos. Consulte la sección Mantenimiento o
la aplicación Hoover para obtener instrucciones sobre cómo limpiar los filtros. Si el problema
continúa, es posible que el sistema esté obstruido. Consulte Mantenimiento en el manual del
usuario para obtener instrucciones sobre cómo eliminar obstrucciones.
El cepillo giratorio no gira o el tablero FloorSenseTM no muestra la superficie correcta.
1. Desenchufe la unidad y extraiga los cabellos u otras obstrucciones alrededor del cepillo
giratorio si FloorSense™ muestra “HARD FLOOR” (Piso duro) cuando está en la alfombra.
2. Limpie los filtros. Consulte la sección Mantenimiento o la aplicación Hoover para
obtener instrucciones sobre cómo limpiar los filtros.
3. Revise en busca de obstrucciones en el sistema. Consulte la sección Mantenimiento o
la aplicación Hoover para obtener instrucciones sobre cómo eliminar los zuecos.
4. Reanude el funcionamiento normal y FloorSense™ se restablecerá.
No puedo conectar la aspiradora a la aplicación Hoover.
La aspiradora debe estar ENCENDIDA para conectarse a la aplicación Hoover.
Para obtener más resolución de problemas o ver las preguntas y respuestas, llame al:
1-877-839-2046 o visite Hoover.com or Hoover.ca si tiene alguna pregunta.
Guía de resolución de problemas
ADVERTENCIA
Para disminuir el riesgo de lesiones físicas, desenchufe la unidad
antes de limpiarla o realizarle un servicio de mantenimiento.
!!
PRECAUCIÓN
Para reducir el riesgo de lesiones debidas a las piezas móviles,
Desenchufe antes de limpiar o dar servicio.
!!
47
Page 50

SERVICIO Y GARANTÍA PARA EL PRODUCTO REACT™ POWERED REACH™ LITE DE HOOVER
®
INFORMACIÓN DE SERVICIO UN REPRESENTANTE Llame al 1-877-839-2046 en EE. UU. y Canadá
En caso de necesitar más ayuda, diríjase a un Centro Técnico autorizado. Encuentre el más cercano en nuestro sitio web: w ww.Hoover.com or
Hoover.ca. El propietario deberá pagar todos los costos de transporte desde y hasta cualquier lugar de reparación. Siempre identifique su producto
de acuerdo al número del modelo y el código de fábrica cuando solicite información o realice el pedido de las piezas de repuesto. (el número de
modelo y el código de fabricación de la aspiradora aparecen en la parte inferior del contenedor).
GARANTÍA LIMITADA DE CINCO AÑOS (PARA USO DOMÉSTICO)
COBERTURA DE LA GARANTÍA
En casos de uso y mantenimiento domésticos en condiciones normales y conforme al Manual del propietario, su producto HOOVER
®
tiene garantía contra fallas de fábrica en los materiales y fallas por mano de obra durante cinco años desde la fecha de compra
(el “Plazo de la garantía”). Durante el plazo de la garantía, Hoover
®
le proporcionará la mano de obra y los repuestos, sin ningún
costo, a los fines de reparar cualquier falla del producto adquirido en los Estados Unidos, en tiendas de intercambios militares de los
EE. UU. y en Canadá.
¿CÓMO HACER UN RECLAMO DE LA GARANTÍA?
Si este producto no presentara las características garantizadas, llévelo o envíelo al Centro de ventas y servicio de Hoover
®
o al distribuidor de
servicio autorizado de garantía de Hoover
®
más cercanos junto con el comprobante de compra. Para ser redirigido en forma automática a un Centro
de servicios autorizado en los EE. UU., llame al: 1-877-839-2046 O visite Hoover
®
en línea en: www.Hoover.com or Hoover.ca. Para obtener más
ayuda o información sobre esta garantía o la disponibilidad de los Centros de servicios contemplados en la garantía, llame al Centro de respuesta
al consumidor de Hoover
®
, al 1-877-839-2046, de lunes a viernes de 8:00 a. m. a 7:00 p. m. (hora estándar del este). En Canadá, comuníquese con
Hoover
®
Canada, Carson Building, 100 Carson St., Etobicoke, Ontario M8W 3R9., teléfono: 1-877-839-2046, de lunes a viernes de 8:00 a. m. a
7:00 p. m., hora estándar del este
¿QUÉ ES LO QUE NO CUBRE ESTA GARANTÍA?
La presente garantía no cubre los siguientes supuestos: el uso del producto en operaciones comerciales (tales como servicios de
contratación de equipamiento, de mantenimiento y de limpieza); el filtro, el cepillo giratorio, la correa; el mantenimiento incorrecto
del producto; los daños derivados de su mal uso; casos fortuitos o hechos de la naturaleza: vandalismo u otros actos fuera del
control de Hoover®, actos u omisiones del propietario, su uso fuera del país de compra original y las reventas o transferencias del
producto realizadas por el propietario original. Esta garantía no cubre los servicios de recolección, entrega, transporte o visitas a
domicilio. Sin embargo, si envía por correo su producto al centro de servicios y ventas de Hoover
®
para el servicio de garantía, solo
se pagará el costo de envío de ida.
Esta garantía no se aplica a los productos adquiridos fuera de los Estados Unidos, incluidos sus territorios y posesiones, fuera de los
intercambios militares de los EE. UU. y fuera de Canadá. Esta garantía no cubre los productos adquiridos a un tercero no autorizado
como minorista, concesionario o distribuidor de los productos Hoover
®
.
OTROS TÉRMINOS IMPORTANTES
Esta Garantía no es transferible y no podrá ser cedida. Esta Garantía se regirá e interpretará de conformidad con las leyes del
estado de Ohio. El Plazo de la garantía no se prolongará por ningún reemplazo o reparación realizados conforme a esta Garantía.
ESTA GARANTÍA REPRESENTA LA GARANTÍA Y EL RECURSO LEGAL EXCLUSIVOS, PROPORCIONADOS POR HOOVER®. TODAS
LAS DEMÁS GARANTÍAS, EXPRESAS O IMPLÍCITAS, SERÁN RECHAZADAS, INCLUIDAS LAS GARANTÍAS DE APTITUD PARA LA
COMERCIALIZACIÓN O ADECUACIÓN A FINES ESPECÍFICOS. EN NINGÚN CASO, HOOVER SERÁ RESPONSABLE POR LOS
DAÑOS ESPECIALES, INDIRECTOS, INCIDENTALES O MEDIATOS DE NINGÚN TIPO QUE SUFRA EL PROPIETARIO O CUALQUIER
PARTE QUE RECLAME POR INTERMEDIO DE ESTE, YA SEA CON BASE EN UN CONTRATO, POR NEGLIGENCIA, HECHO ILÍCITO
CIVIL O RESPONSABILIDAD OBJETIVA, NI POR NINGUNA OTRA CAUSA.
Algunos estados no permiten la exclusión de los daños consecuentes, por lo que la exclusión anterior puede no aplicarse a usted.
Esta garantía le otorga derechos específicos. También puede tener otros derechos, que varían según el estado.
Servicio y garantía
48
Page 51

Page 52

TM
Hoover.com
Find us on:
youtube.com/hoover
facebook.com/hoover
twitter.com/hooverusa
#961152053 - R1
 Loading...