

Page 1

®
Washing machine Instructions for use
Machine à laver Mode d’emploi
HF7 12 I
HF7 14 I
HF7 16 I
40000369.qxd 18/09/2003 11:42 Page 1
Page 2
Introduction
Please read and follow these instructions carefully and operate the machine
accordingly. This booklet provides important guidelines for safe use, installation,
maintenance and some useful advice for best results when using your machine.
Keep all documentation in a safe place for future reference or for any future
owners.
2
Note: this machine is solely for domestic use, i.e. to
wash, rinse and spin dry household textiles and
garments.
Notes on disposal
All packaging materials used are environmentally-friendly and recyclable. Please
help dispose of the packaging via environmentally-friendly means.
Your retailer or local council will be able to give you
details of current means of disposal.
Appliances that have reached the end of their useful life are not worthless
rubbish! Valuable materials can be salvaged from an old appliance via scrap
reprocessing.
Note: to ensure safety when disposing of an old
washing machine disconnect the mains plug from the
socket, cut the mains power cable and destroy this
together with the plug. To prevent children shutting
themselves in the machine break the door hinges or
the door lock.
40000369.qxd 18/09/2003 11:42 Page 2
Page 3

English 2
Français 35
Contents Page
Introduction 2
General Delivery Notes 4
Safety Notes 4
Quick Start 5
Installation & Testing 6
Useful Washing Advice 11
Using Inter@ct for the first time 12
Description of Controls 15
Detergent Drawer 19
Detergents, washing aids & amounts to use 20
Programme Selector 22
Auto Half Load 24
Sorting the Laundry 24
Selecting the wash Progamme 26
Programme Guide 27
Cleaning and Routine Maintenance 29
Trouble shooting 31
Power failure 32
Technical data 33
Customer service 34
3
40000369.qxd 18/09/2003 11:42 Page 3
Page 4
General delivery notes
Please check that the following items are delivered with the appliance:
– Instruction manual
– Guarantee card
– Blanking plug
– Inlet hose & bracket
– Base panel and x2 push clips
Check that no damage has occurred during transit. If it has, call GIAS Service,
Hoover Service or an authorised Hoover dealer. Please see Customer Service.
4
Safety notes
Note: before carrying out any cleaning or maintenance
of the washing machine.
A) Disconnect the plug from the mains supply.
B) Turn off the water supply.
C) Ensure that the mains power supply is earthed, if not, seek assistance from a
qualified electrician. This appliance must be earthed.
D) Do not touch the appliance when hands or feet are wet or damp. Do not use
the appliance with bare feet.
E) The use of adapters, multiple connectors and/or extensions is not
recommended.
F) Caution: water temperature can reach 90°C during
the whites wash cycle and as a result the door
glass may get very hot.
G) Check there is no water visible in the drum before opening the door.
H) Do not allow children or unauthorised persons to use the appliance without
supervision.
I) Do not pull the power cable or the appliance itself to remove the plug from the
socket.
J) The appliance must not be exposed to weather conditions (rain, direct sun,
etc...).
40000369.qxd 18/09/2003 11:42 Page 4
Page 5

5
Quick Start
Washing
– Open the door with the Porte button
– Select laundry and put it in the machine
– Close the door
– Put detergent in the dispenser compartments
– Select programme by turning the programme knob (Your desired programme may be seen
on the display)
– Select any function buttons required and then press the Départ/Pause button
– There may be a short time delay from pressing the Départ/Pause button to the start of the
programme, while the machine senses the water required and sets the parameters for the
programme
After washing
– Wait about two minutes for the door locking device to
disengage. The Porte Sécurisée neon will go out.
– Switch off the machine by turning the control knob to the Arrêt
position.
– Open the door and remove the laundry.
K) When moving the appliance never lift it by the controls, the detergent drawer, the hoses or
the power cable.
To avoid damaging the door when moving the appliance never rest the door against objects
e.g a trolley.
L) IMPORTANT!
If the appliance is installed on a carpeted floor ensure that the ventilation through the base
of the appliance is not obstructed.
M) When lifting the machine always use two people to help avoid injuries.
N) If the appliance is not running properly or breaks down, switch it off, disconnect the plug
from the socket, turn off the water supply and do not tamper with the appliance.
Consult GIAS Service or Hoover Service for possible repair. Failure to comply with the
above can compromise the safety of the appliance.
O) If the appliance’s power cable is damaged it must be replaced by a special cord which is
only available from GIAS Service, Hoover Service or an authorised Hoover dealer.
P) After the machine has been installed, ensure that the mains plug and water supply valves
are easily accessible.
Q) Glass fibre curtains should never be put into this machine.
R) Lint or fluff must not be allowed to collect on the floor around the outside of this machine.
S) Always ensure that the door locked indicator neon has switched itself off before opening the
door. By doing so the machine is allowed to cool down before the laundry is handled.
T) Always ensure that the base panel is fitted to the machine.
Note: Please ensure that Inter@ct set-up, installation and testing
has been completed before referring to the Quick Start.
40000369.qxd 18/09/2003 11:42 Page 5
Page 6

Remove the machine from the
packaging - close to where it will finally
be positioned - and proceed as follows:
On the back of the machine
1) Remove the central screw A and side
screws B and pull out the transit bracket C
complete with the red spacer.
2) Tilt the machine forward and remove the
polystyrene spacers.
3 Cover the central hole using the cap
enclosed in the instructions bag.
4) Adjust the two feet at the front to level the
machine.
5) Tilt the machine forward and locate the
base panel by ➀ removing the paper
backing from the adhesive tape, ➁ locate
the base panel in the front of the machine
➂ offer the base panel up to the base of the
washing machine and locate the two clips.
6
Installation & Testing
40000369.qxd 18/09/2003 11:42 Page 6
Page 7
Note: we recommend you keep the transit bracket and
screws to protect the machine for future transit.
The Manufacturers will not be responsible for any
damage to the machine caused by not following the
instructions relating to releasing the transit protection.
The user is responsible for all installation costs.
7
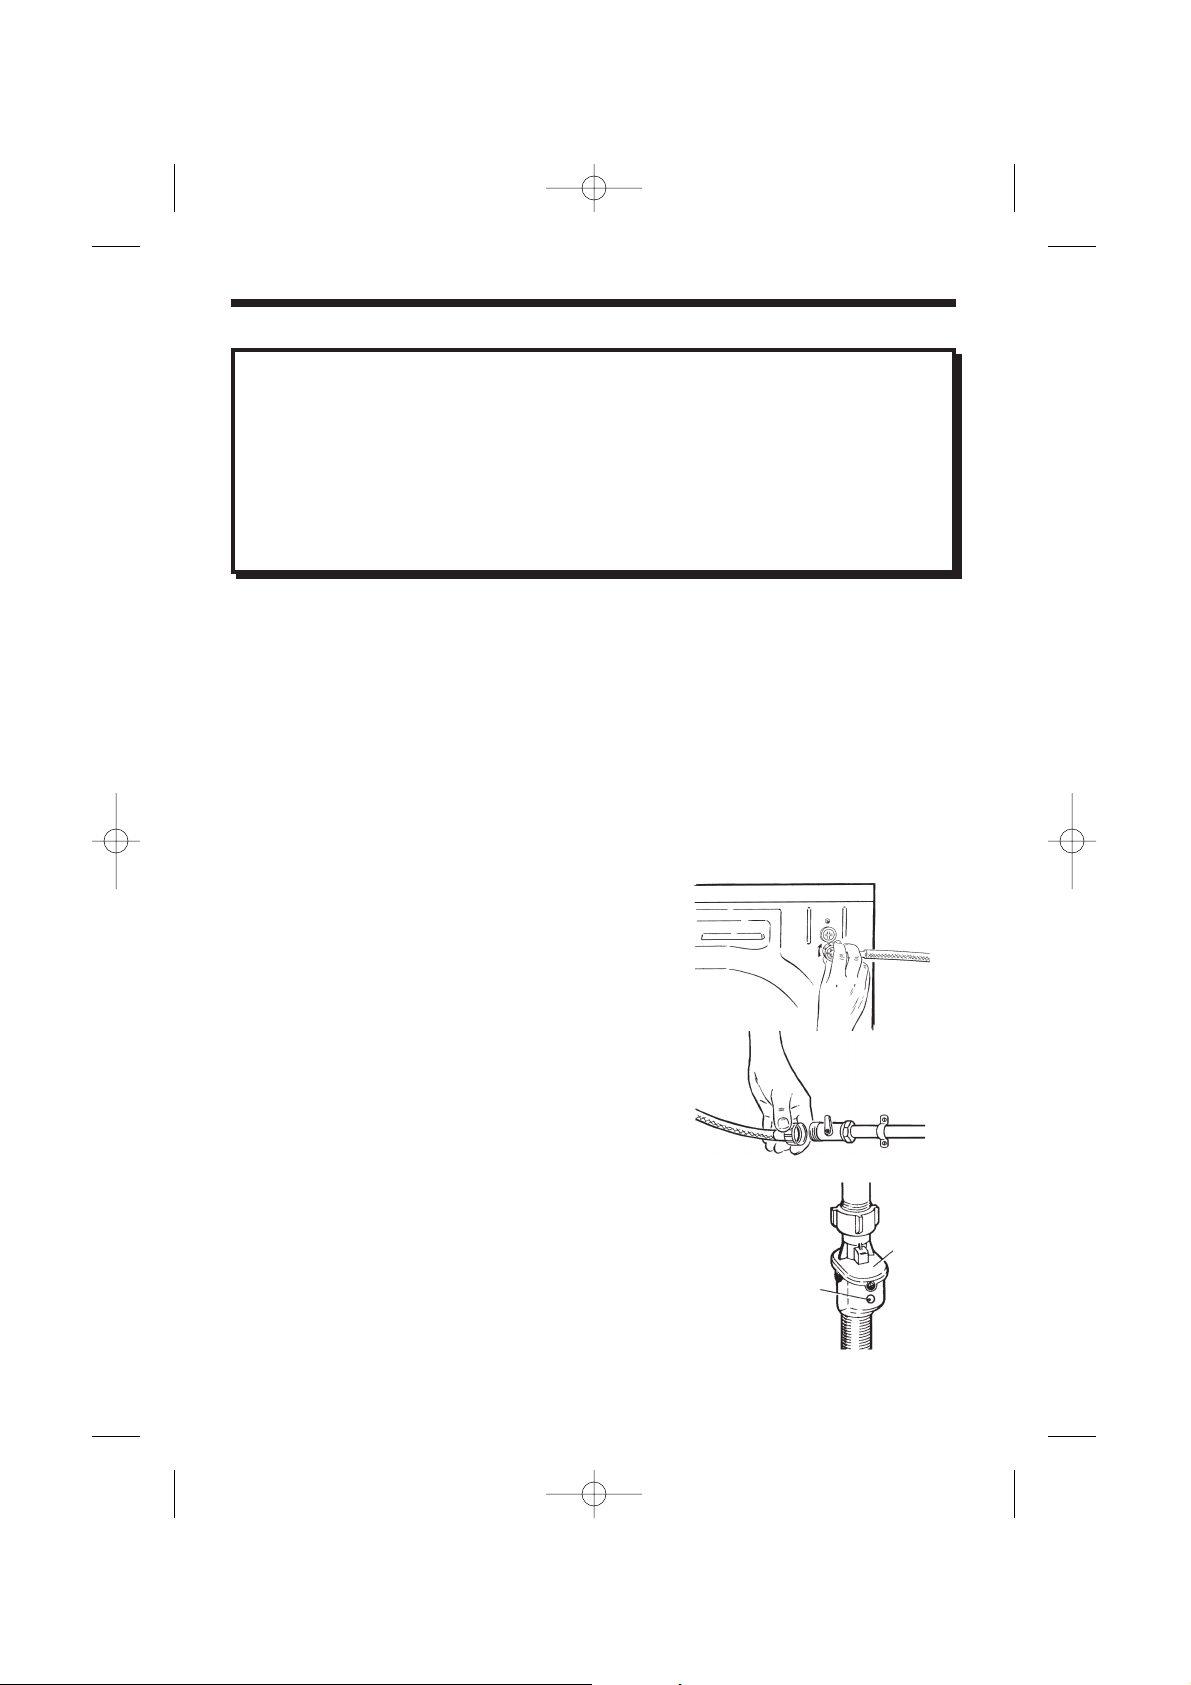
Connecting the fill hose
This machine has an inlet hose with a 19mm (3/4”) threaded ferrule fitted to the
end to attach between the threaded connector on the appliance and the water
supply.
Only use the new hose supplied to connect the machine and ensure that the
sealing washer is in place inside the hose connector.
Do not re-use old hoses which are attached to existing installations.
Do not over-tighten the connection. Hand tight is sufficient.
Do not trap or kink the hose.
1. Connect the elbow end of the hose to the back
of the machine.
2. Connect the straight end of the hose to the
stop taps.
Acqua-stop (fitted to certain models)
The fill hose supplied with this machine has a
double skin and incorporates a water valve (A). If
the inner hose bursts the valve will automatically
shut off the water supply to prevent flooding. The
indicator turns red (B).
Should this happen, turn off the water supply
immediately and have a new fill hose fitted by
Hoover Service.
B
A
40000369.qxd 18/09/2003 11:42 Page 7
Page 8

THIS MACHINE MUST BE CONNECTED IN
ACCORDANCE WITH THE WATER SUPPLY
REGULATIONS. WATER BYELAWS PROHIBIT
CONNECTION TO A SURFACE WATER DRAIN.
If the inlet hose’s connection point is changed, check that the 3/4” threaded ferrule
on the inlet hose is firmly attached to the electrovalve connector.
Water supply requirements
Connect the machine to the drainage system used by household sinks.
8
THIS MACHINE MUST BE CONNECTED IN
ACCORDANCE WITH THE WATER SUPPLY
REGULATIONS.
No other appliance should be plumbed into the standpipe.
There are two possible arrangements which can be seen below :-
DRAIN HOSE
HOSE SUPPORT
CROOK
12-15cm
32mm
min
60-80cm
HOSE SUPPORT CROOK
ATTACH HOSE
SECURELY TO
WASTE OUTLET
DRAIN HOSE
FIX SECURELY
ABOVE OVERFLOW
OUTLET OF SINK
For the washing machine to function properly the outlet end of the drain
hose must be at a minimum of 60 cm and a maximum of 80 cm from the
ground.
40000369.qxd 18/09/2003 11:42 Page 8
Page 9

9
Testing the installation
Refer to the programme guide for details of how to select programmes.
For stopping each programme before its completion, the programme must be
cancelled by holding down the Départ/Pause button for five seconds. The display
will inform you that the programme has been cancelled.
1. Turn on the water supply and check for leaks from the fill hose.
2. Switch on the electricity supply.
3. Select spin programme 15 and then press the Départ button to start the
machine. Allow the programme to continue for one minute and then cancel the
programme (Please see ‘Description of controls’ section for cancelling the
programme). This will remove any water remaining in the machine from factory
testing.
4. To check for cold water filling to the machine:
Select a rinse programme and press the Départ button to start the machine.
Allow the tumble action to continue until the water has pumped out.
Check that the drain outlet is not leaking or overflowing.
5. Switch off the machine at the end of the cycle by turning the control knob to
the Arrêt position.
6. If the machine takes longer than one minute to empty check the drain hoses
for kinks.
Installation testing is now complete.
40000369.qxd 18/09/2003 11:42 Page 9
Page 10
10
To ensure the drum is thoroughly clean after testing and storage, select
programme 2 and run the machine for a complete cycle using only wash
detergent and water.
If the machine is not to be used immediately, switch off the mains power supply
and remove the plug from the power socket. We also recommend that the water
stop taps are turned off.
Note: it is advisable to isolate the washing machine
from the water and electricity supplies after each wash.
Electricity supply and safety advice
Washing machines are supplied to operate at a voltage of 230V, 50 Hz singlephase. Check that the conductor is powerful enough to supply at least 3.0 kW,
then connect the plug to an earthed socket.
Electricity can be extremely dangerous. This washing machine must be earthed.
The socket outlet and the plug on the appliance must be of the same type.
It is not advisable to use multiple adapters and/or extension leads.
The wires in the mains lead are coloured in accordance with the following codes:
Blue – NEUTRAL
Brown – LIVE
Green & Yellow – EARTH
If the mains cord on this appliance is damaged, it must be replaced by a
special cord which is only available from the Hoover spares service,
GIAS Service or an authorised Hoover dealer.
40000369.qxd 18/09/2003 11:42 Page 10
Page 11

Useful washing advice
Tips on using your appliance in the most environmentally-friendly and economical way.
Loading your washing machine
To make further reductions of energy, water and detergent consumption, we recommend
that you put a full load into your machine. Energy savings of up to 50% can be achieved by
washing one full load compared to two half loads.
When is prewashing really needed?
Only with particularly dirty loads!
Energy savings of 5 to 15% are made by not selecting the prewash option for less dirty
laundry.
Which wash temperature should you choose?
Using stain removers before machine washing reduces the need to wash at temperatures
over 60°C.
Energy savings of up to 50% can be made by using a 40°C wash temperature.
Heavily soiled laundry
To ensure the best performance when washing a particularly dirty load, we recommend
that you reduce the amount of items to be put into the machine. If the drum is not crammed
full, the items will circulate more freely and will wash cleaner.
ARIEL - Chosen and recommended by Hoover
When we produce a new washing machine we subject it to every test possible. And one of
the most important tests is the one that enables our experts to identify the most suitable
detergent for solving laundry problems. Ariel was able to meet our needs: to make the
washing machine function efficiently, not compromise the machine’s lifespan and produce
the best wash results. Consistently excellent results, which was the main aim of the test we
carried out, determined our choice and our recommendation. The prime function of a
detergent that answers all washing requirements is to work with the water to remove dirt
from fabrics, holding it in suspension until it is removed when the water is pumped out, and
to control the amount of foam forming in the washing machine, without damaging the fibres
of the items being washed. Ariel fully satisfies all these requirements, as it contains high
quality elements, the result of the most advanced research, ensuring excellent results
under all conditions.
11
40000369.qxd 18/09/2003 11:42 Page 11
Page 12

12
Using Inter@ct for the first time
This machine will operate prior to programming the Inter@ct set up. However, this
machine has Départ Différé and Programmation Fin De Cycle functions and for these
functions to work efficiently the Inter@ct set must be programmed. This is a simple
operation and special care has been taken during manufacture to ensure that the user
can operate this machine simply and effectively.
Programming the machine
Inter@ct needs to be programmed so that the correct clock setting, language and
personal requirements are set.
When the machine is turned on and the programme dial is moved away from the
“Arrêt” position to the programme selections a welcome message will appear.
This message is displayed for a short time while the machine recognises which
programme has been selected. When the machine is ready, the programme details will
appear on the display and from here you may now beging programming the machine.
Example
Enter the Menu
Prior to entering the Inter@ct menu please note you have 30 seconds per operation to
make your selection. Should you run out of time the display will return to the start
screen, and you simply have to re-enter the Inter@ct menu and continue with the
programming.
From this stage the menu can be programmed. Hold down the “Mini Charge” and the
“Prélavage” buttons together for 5 seconds or until the beep sounds.
The menu options can be changed by pressing the “Prélavage” button.
To confirm and enter an option press the “Mini Charge” button.
HOOVER INTER@CT
WELCOME 11:06
1 WHITE COTTON
90° HEAVY 1600 RPM
40000369.qxd 18/09/2003 11:42 Page 12
Page 13

13
Set New Time
This function needs to be set for two reasons – firstly to display the current time of
day on the screen and secondly for the Programmation Fin De Cycle/Départ
Différé settings to work correctly.
You will notice in the display window that the hours on the clock will be flashing.
Set the hours by continually pressing the “Prélavage” button and then press the
“Mini Charge” button to enter the hour. Next the minutes on the clock will begin to
flash, again press the “Prélavage” button until the required minutes are displayed
and press “Mini Charge” to input the selection.
When you have Set the New Time, the display will then ask if you wish to “Set the
Time Mode”.
Setting the time mode (default setting – ABSOLUTE)
There are two ways to select the time mode.
The first is if you wish Programmation Fin De Cycle or Départ Différé to be
programmed by starting the actual time you want the programme to end or begin,
e.g., programme to end 08.00. This is called Absolute
Time Mode. When utilising
the Programmation Fin De Cycle function (or Départ Différé), an example can be
seen below when the Absolute Time Mode has been selected in the menu set-up
stage.
Therefore, when setting the Programmation Fin De Cycle the programme (as
shown above) will end at 08.00.
The second is if you wish Programmation Fin De Cycle or Départ Différé to be
programmed by adding hours; e.g., programme to end in 11/2 hours. This is called
Relative Time Mode. When utilising the Programmation Fin De Cycle function (or
Départ Différé) an example can be seen below when Relative Time Mode has
been selected is the menu set-up stage.
Therefore, when setting the Programmation Fin De Cycle the programme (as
shown above) will end at 15:30.
Both options are very useful, but we feel that the Absolute Time Mode will be
more beneficial and easier to use since there will be no need to calculate how
many hours you will need to leave before you want the machine to end or start.
PROGRAMME END
08.00 14:00
PROGRAMME END
BY 1H 30M 14:00
40000369.qxd 18/09/2003 11:42 Page 13
Page 14

On reaching the set time mode you will be asked if you would like to select
“Relative” time or – by scrolling through using the “Prélavage” button – “Absolute”
time. Enter the preferred setting by pressing the “Mini Charge” button.
When you have entered your preferred time-mode, the display will then ask for the
Enable Final Beeping to be set.
Enable Final Beeping (default setting – YES)
Here you have the option to have a beeping alarm to let you know the wash cycle
has finished. By pressing the “Prélavage” button you can scroll through the “yes”
and “no” options.
To enter your selection press the “Mini Charge” button and the screen will then
move to the next stage and ask you if you wish to “Enable Memory”.
Enable Memory (default setting – NO)
This is a useful feature if you frequently wash laundry using the same programme.
Selecting “Enable Memory” will tell the machine to remember the last programme/
functions used and set them in the memory. This function works only on cottons,
delicates, synthetics and woollens programme.The memory does not retain
settings within the special programme group.
Select “Yes” or “No” to this option by using the “Prélavage” and “Mini Charge”
buttons.
The display will then show a message that asks if you require demo mode to be
set. Please set this option to “No” if not done so already – as this is for SERVICE
use only. If the demo mode option is not set on “NO” when exiting the Inter@ct
menu the wash programme WILL NOT commence. Demo Mode must be set at
“NO” for the wash cycle to commence. On entering “NO” via the “Mini Charge”
button you will then be asked if you wish to “Exit Menu”.
Exit Menu
If you are happy with the settings you have selected, you can now exit the menu
by selecting “Yes” via the “Prélavage” and “Mini Charge” buttons.
However, if you are not happy with any of the settings selected you must select
“No” to the exit menu command and you can then commence the programming
from the beginning. By pressing the “Mini Charge” button you are able to enter and
bypass each option individually until you reach the option you would like to re-set.
14
40000369.qxd 18/09/2003 11:42 Page 14
Page 15
When you are completely satisfied with your menu selection, you may exit the
menu and testing of the installation may now commence.
If, after the initial installation you may want to change any of the menu at a later
date, again run through the menu options from the beginning and change the
options you want to reset. This may be useful to change the “Set New Time” when
the clocks go forward or back.
Once set, the menu options will remain in the memory of the machine even if the
machine is unplugged or if a power cut occurs.
DESCRIPTION OF CONTROLS
All of the buttons and dials on the washing machine control panel are listed below.
When you have selected the desired programme and any option buttons, the
information you have selected will appear on the screen in the Inter@ct
display
panel.
When programmes and option buttons are compatible a beeping sound will be
heard and the light above the option button selected remains illuminated. If you
select an option button that is not compatible with the programme you require a
buzzing sound will be heard and the button light will not illuminate.To select an
option button press it once; to deselect an option button, press it again.
Carefully read the relevant descriptions detailed below:
Programme Selector Dial
15
Note: Do not press the Départ/Pause button before
selecting the programme. If this does happen, cancel the
programme (that you have set accidentally) by pressing the
Départ/Pause button for five seconds (See programme
cancelled description).
40000369.qxd 18/09/2003 11:42 Page 15
Page 16

Départ/Pause Button
DEPART
To start a programme press this button once. The Porte Sécurisée light will illuminate. The
machine will now be sensing the wash load and ask you to please wait –
Example
The Inter@ct
panel will then display the time to complete the programme and then the
wash cycle will commence. Inter@ct calculates the time to the end of the selected
programme based upon a standard 7 Kg load, during the cycle, Inter@ct corrects the time
to that applicable to the size and composition of the load.
Example:
This display also shows the current phase of the cycle and in the bottom right hand corner,
the current time is displayed.
This display will change throughout the wash programme as the cycle develops.
PAUSE
The programme may be paused at any time during the wash cycle by holding down the
Départ/Pause button for about two seconds and a beep will sound. A message will appear
on the display to inform you that the programme has been paused.To restart the
programme press the Départ/Pause button once again. The display will inform you that the
programme will continue.
Example:
16
SETTING WASHING
PARAMETERS: PLS WAIT.
TIME TO END 1H:50M
WASHING 19:30
WHITE COTTON
PROGRAMME PAUSED
When you turn the programme selector dial and after the welcome message has
disappeared, you will see a display showing the following details:
Reading from left to right:
1. The programme number
2. The programme name
3. The wash temperature
4. The degree of soiling (how dirty the wash load is)
5. The spin speed
Example:
1 WHITE COTTON
90° HEAVY 1600 RPM
40000369.qxd 18/09/2003 11:42 Page 16
Page 17

Extra Charge button
This option can only be utilised for cotton programmes. Hoover has designed a special
wash boost system specially for large loads - by selecting the Extra Charge option button,
the volume of water within the selected wash cycle and the length of time of the
programme is increased to improve the wash performance for the bigger load.
“Mini Charge” Button
By selecting this option, the machine will wash a small quantity of fabrics (1-2kg), avoiding
every kind of waste.Thus, the water consumption is reduced by up to 55%, the energy
consumption is cut by up to 60% and the time needed is halved.
Lavage Rapide button
This option can be utilised on cotton and synthetic programmes. By selecting the option,
the wash time may be reduced by up to 50 minutes, depending on the programme
selected.
Prélavage button
This option is particularly useful for heavily soiled loads and can be used before selecting
the main wash programme. Detergent for this programme should be added to the first
compartment of the soap drawer labelled “I” (Please refer to Detergent Drawer Section of
manual). We recommend you use only 20% of the recommended quantities shown on the
detergent pack and fabric conditioner should not be used for this programme.
Extra Rinçage button
This option adds more water at the rinsing stage. This can help prevent skin irritation from
detergent residue for people with particularly sensitive skin. Selecting the Extra Rinçage
button is also recommended when washing heavily soiled fabrics which need a lot of
detergent, or when the wash load contains towelling fabrics that have a greater tendency to
retain detergent.
17
Porte button:
A special safety device prevents the door from being operated immediately after the end of the
cycle. “Porte Sécurisée” indicator light is illuminated when the door is fully closed. Wait for 2 minutes
after the wash cycle has finished before opening the door. The Por te Sécurisée neon will go out and
the door may be opened. As a safety measure check that there is no water evident in the drum.
PROGRAMME CANCELLED
CANCEL
To cancel the programme the Départ/Pause buttton must be pressed down for 5 seconds
until the beep sounds. The display will inform you that the display has been paused and
has then been cancelled.
Example:
40000369.qxd 18/09/2003 11:42 Page 17
Page 18

Verrouillage Clavier button
This is a useful feature to prevent children playing with the option buttons and tampering
with the programme you have set.
After you have set the programme and option buttons you require, press the start button.
Press the programme lock button and this “locks” the control panel.
After you have set the programme and option buttons you require, press start and then the
programme lock button.This “locks” the control panel.
You may cancel this function by pressing the programme lock button briefly until you see the
light above the button flash.While this light is flashing, press the “Fast Iron” button – the display
will inform you that the options are no longer locked and further changes can now be made.
Programmation Fin De Cycle/Départ Différé buttons
The Programmation Fin De Cycle/Départ Différé options can be used if you want the
washing to be ready at a later time (but within 24 hours).
1. Départ Différé button
Press Départ Différé/Programmation Fin De Cycle button once and press the hours and
minutes buttons (to the left and right) until the required time is set. The display returns to
the programme option if the button is pressed within 5 seconds. Once you have set the
required start delay/end time, press the start button.
To cancel Départ Différé, hold down the button for 5 seconds.
2. Programmation Fin De Cycle button
Press Départ Différé/Programmation Fin De Cycle button twice and press the hours and
minutes buttons (to the left and right) until the required time is set. When entering the
option, the display will show the minimum time which you can set the programme to end by.
This time may only be extended as you require.
NOTE: When using the Départ Différé/Programmation Fin De Cycle functions, only use
detergents via the dispenser drawer. Adding detergents etc. to the drum and then leaving
them to stand for a long period of time may damage your laundry.
Variateur d’Essorage button
On selecting the wash programme the display will inform you of the maximum spin speed
permitted for that programme. By repeatedly pressing the select spin button the speed will
decrease by increments of 100 rpm. By continuously pressing the spin speed option the
spin may be cancelled if desired. On selecting the required spin speed the display will then
inform you of the chosen programme, its temperature and the newly selected spin speed.
18
40000369.qxd 18/09/2003 11:42 Page 18
Page 19

Note: this model is fitted with an electronic device that
checks the load is balanced correctly. If the load is
slightly unbalanced the machine will re-balance it
automatically to then carry out the normal spin.
If, after several attempts, balance is not restored, a
reduced spin speed will be used.
If loads are seriously unbalanced the spin stage will be
cancelled.
This helps limit vibration, reduce noise and improve
the washing machine’s reliability and life.
19
Note: this model is fitted with an electronic “sensor”
device that checks the load is balanced correctly. If the
load is slightly unbalanced the machine will re-balance
it automatically to then carry out the normal spin.
If, after several attempts, balance is not restored a
reduced spin speed will be used.
If loads are seriously unbalanced the spin stage will be
cancelled.
This helps limit vibration, reduce noise and improve
the washing machine’s reliability and life.
Detergent drawer
The detergent draw is split into 3 compartments:
– the first, labelled “I”, is for detergent utilised
during Prewash.
– the second, labelled “II”, is for detergent
utilised during the main wash.
– the third, labelled “ ” is for special
additives, fabric softeners, fragrances,
starch, brighteners etc.
Main wash
powder
Pre-wash
powder
Fabric conditioner
Note: some forms of detergents are difficult to
dispense from the drawer e.g. concentrated powders.
For these, we suggest you use the recommended
dispenser which is placed inside the drum.
This ensures that the liquid detergent is dispersed in the drum only when needed.
40000369.qxd 18/09/2003 11:42 Page 19
Page 20

Special detergents
– Detergents for coloureds and delicates, without added bleach, also often
without any optical brightening agents, to preserve the colour.
– Detergents for a thorough wash, without added bleach or enzymes,
particularly suitable for handling woollen fibres.
– Detergents for curtains with optical brightening agents, resistant to light, to
prevent yellowing from sunlight.
– Special detergents for programmed use of chemical substances, depending
on fabric type, degree of soiling and water hardness.
Here basic detergents, softeners, bleaches/stain removers can be added
separately.
Additional laundry aids
– Water softener, means less detergent can be used where water hardness is
classed as hard to very hard.
– Prewash substances, for the programmed treatment of stains prior to the
main wash.
Using them means the subsequent wash can be at a low temperature or with
bleach-free detergents.
The machine is programmed to automatically take up additives during the final
rinse stage for all wash cycles.
20
Note: only put special additives, fabric softeners,
fragrances, starch, brighteners, etc., in the third
compartment.
Detergents, washing aids and amounts to use
Choice of detergent
General purpose detergents
– Powder detergents, for a thorough wash, with bleaching agents, are
particularly suitable for use in hot wash programmes (60°C and over), for
heavily soiled and stained laundry.
– Liquid detergents, are particularly suitable for grease stains, such as greasy
skin marks, cosmetics and oil.
These detergents are not suitable for washing stained laundry, as they do not
contain bleach.
– Biological detergents, not all the products available give a really thorough
wash.
40000369.qxd 18/09/2003 11:42 Page 20
Page 21

21
– Fabric softener, prevents static build-up in synthetic fabrics and softens
fabrics.
If you own a tumble dryer, clothes are softened even without the use of a fabric
softener.
Do not put solvents in the washing machine!
Keep detergents and other laundry products out of children’s reach.
Before pouring in the detergent check that there are no foreign bodies in the
detergent drawer.
Dosage details are usually shown on the detergent packaging. Follow those
instructions!
Dosages
Only use detergents which are suitable for use in a washing machine.
You will obtain the best results from your wash with the minimum use of chemical
products and the best care for your laundry if you take into consideration the
degree of soiling as well as the type of detergent to choose.
The amount of detergent to use depends on:
- water hardness, depending on the hardness of the water and the type of
detergent used, it is possible to reduce the amount of detergent. The softer the
water supply, the less detergent is required.
- the degree of soiling, it is possible to reduce the amount of detergent used
depending on the degree of soiling. Use less detergent for less soiled items.
- amount of laundry, it is possible to reduce the amount of detergent when
washing only a small amount of laundry. For smaller loads use less detergent.
The amounts shown on pack for detergents for washing delicates often already
refer to a reduced wash size.
Follow the dosage instructions!
Dosage for powder detergent
For normal and low concentration detergents: for normally soiled laundry
choose a programme without prewash.
Put the detergent in compartment II of the drawer.
For heavily soiled laundry, choose a programme with prewash.
Put 1/4 of the detergent in compartment I, 3/4 in compartment II of the drawer.
40000369.qxd 18/09/2003 11:42 Page 21
Page 22

When using water softeners, first put in the detergent, then add the softener to
compartment II.
For highly concentrated detergents not in single dose format, follow exactly what
is shown on pack with regards to type and amount of dosage.
To avoid the difficulty of checking if the detergent has been taken up, use the
dosage aids provided in the detergent packaging.
Liquid detergent dosage
Liquid detergents may be used in accordance with the instructions on the relevant
packaging, for all programmes without prewash, by using the recommended
dispenser which is placed in the drum.
Programme selector
The washing machine has different programme groups according to type of wash,
temperature, spin speeds and duration for handling the various types of fabric and
their level of soiling (see wash programme guide).
1. COTON
The programmes are designed for maximum washing and rinsing. With spin cycles
in between, they guarantee the laundry is rinsed perfectly. The final spin cycle
ensures laundry is spun dry as much as possible up to the maximum speed.
2. SYNTHETIQUES
Washing and rinsing performance is optimised through drum rotation speeds and
water levels. The delicate action spin minimises creasing.
3. DELICATS
This is a new concept in washing, with a cycle that comprises of alternate periods
of activity and pauses, particularly suitable for washing very delicate fabrics, such
as Pure New Wool.
The woollens programmes are designed for maximum washing at the temperature
most suitable to your woollen garments and their degree of soiling. Always read
the wash advice label for the most suitable temperature.
Wash and rinsing are carried out using a high water level to provide the best
results.
4. PROGRAMMES SPECIAUX
i) AA SPECIAL PROGRAMME at 40°C
This special programme has been studied to allow you to obtain the best washing
performance, even at full load, as the 60°C Cotton programme (the normative
cycle), but with the double advantage of:
22
40000369.qxd 18/09/2003 11:42 Page 22
Page 23

23
- washing cotton and mixed in the same cycle
- energy saving due to 40°C temperature, instead of 60°C.
ii) EXPRESS 44' - 29' – FAST PROGRAMMES
By maintaining exceptional washing performance, these programmes allow you to
know in advance the necessary time for your everyday laundry. In fact, this
washing machine is equipped with two daily rapid programmes at 40°C, that were
just studied for:
- lightly soiled fabrics;
- medium or little load.
EXPRESS 40°C - FAST 29'
A complete washing cycle (wash, rinse and spin), able to wash in approximately
29 minutes:
- a maximum load of 2 KGs;
- lightly soiled fabrics (cotton and mixed fabrics).
We recommend, with this programme, a 20% detergent loading dose (compared
to the normal one), in order to avoid detergent waste.
EXPRESS 40°C - FAST 44'
A complete washing cycle (wash, rinse and spin), able to wash in approximately
44 minutes:
- a maximum load of 3.5 KGs;
- lightly soiled fabrics (cotton and mixed fabrics).
We recommend, with this programme, a 30% detergent loading dose (compared
to the normal one), in order to avoid detergent waste.
iii) LAVAGE MAIN
This washing machine also has a gentle Hand Wash programme cycle. This
programme allows a complete washing cycle for garments specified as ‘Hand
Wash only’ on the fabric label.
The programme has a maximum temperature of 30°C and concludes with
2 rinses, one for fabric conditioner, and a slow spin.
iv) SPORT
The washing machine has a unique Sportswear programme.
It is specially designed to wash mixed sportswear fabrics that cannot be washed
on hotter programmes and is designed to remove the soiled and staining created
by participation in sports activities.
This programme starts with a cold prewash that breaks down and loosens any
excess dirt and then washes at a cool 30°C, rinses twice (one is for fabric
conditioner) and spins slowly for the best care of your heavily soiled, delicate
garments.
Hoover has given sports items their own wash care programme.
40000369.qxd 18/09/2003 11:42 Page 23
Page 24
24
24
Auto half load
The washing machine is fitted with a self adjusting water level system. This
system enables the machine to use the optimum amount of water needed to wash
and rinse the laundry in relation to the particular load. This results in a reduction
of the water and electricity used without in any way compromising the washing
and rinsing performance.
In fact, the amount of water and electricity used will always be appropriate for the
clothes load.
The washing machine automatically ensures excellent washing results at
minimum cost whilst respecting the environment.
Sorting the laundry
– It is recommended you wash only items which are washable with water and
detergent and not dry-clean items.
– If you need to wash rugs, bedspreads or other heavy items, it is best not to
spin them.
– Sort the laundry according to fabric type, degree of soiling and wash
temperature: follow the labelling on the garments.
Examples:
Laundry for hot wash
Coloured, easy-care materials
Delicates and wool
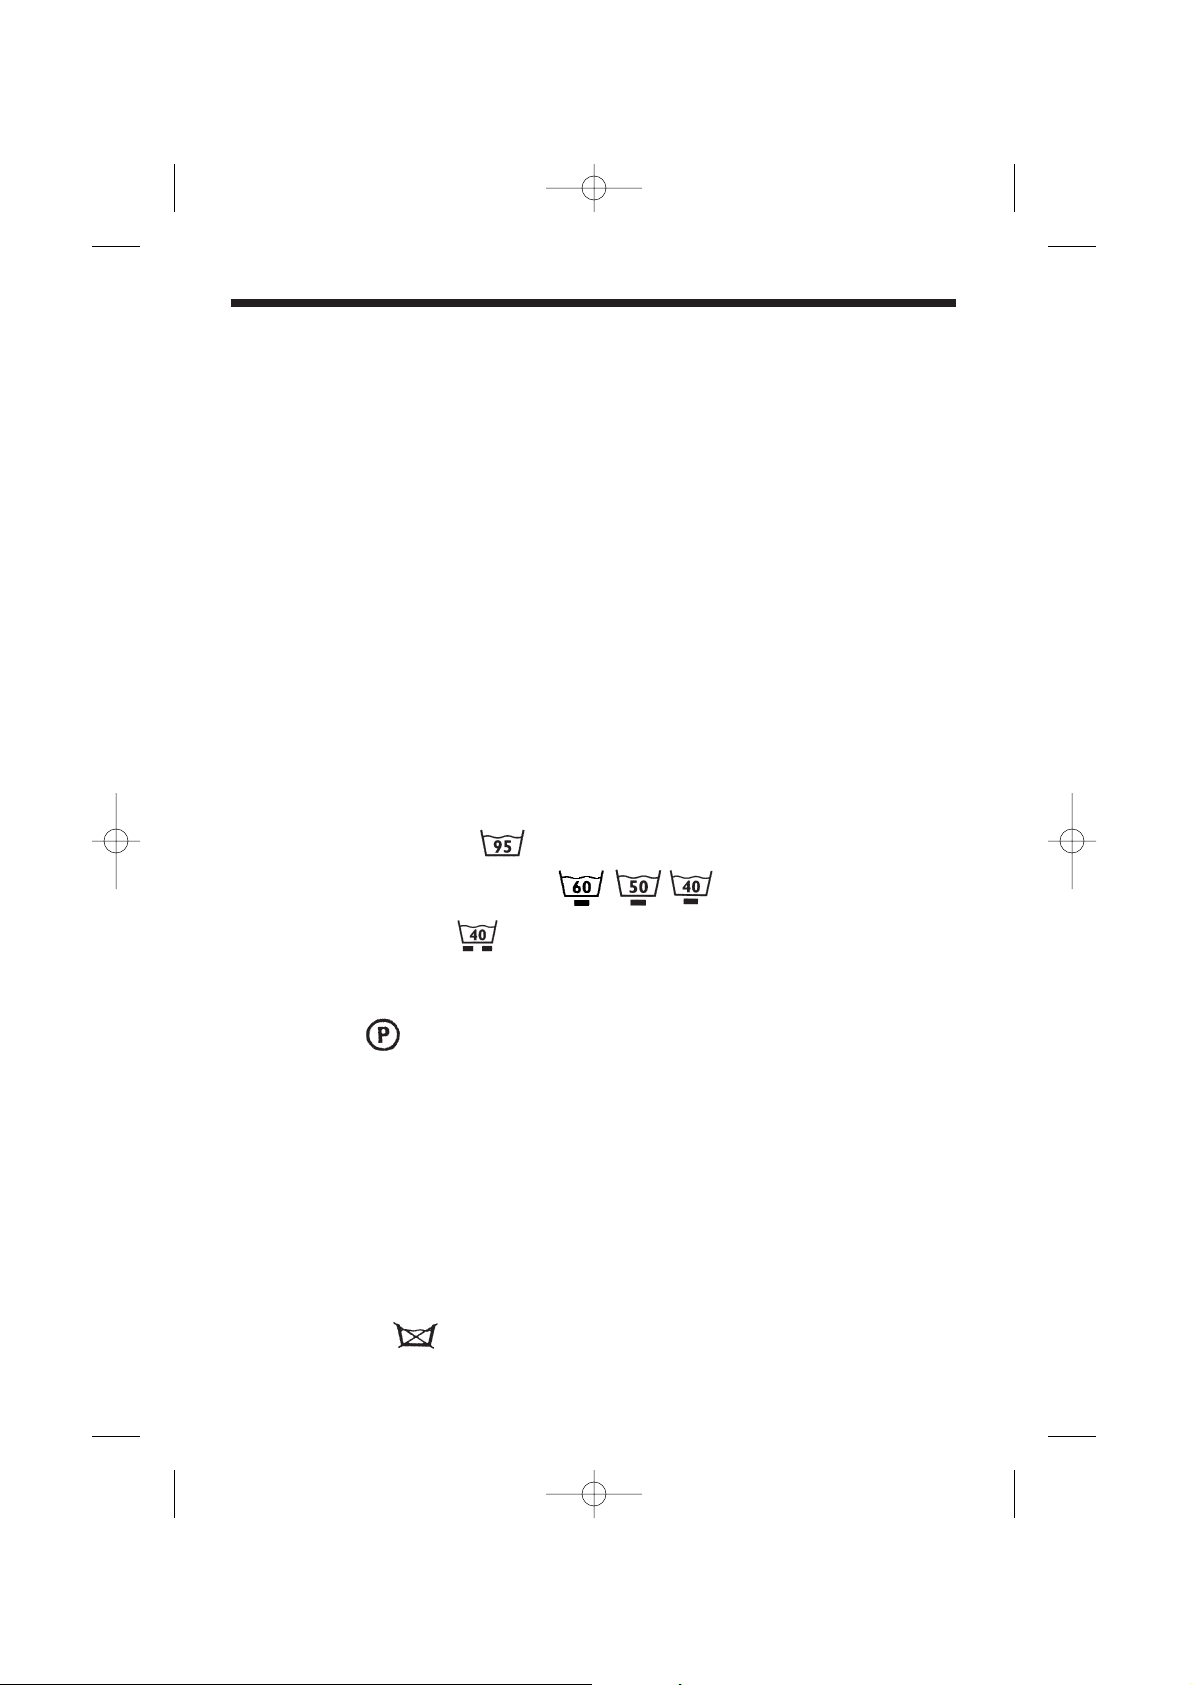
– Items labelled with the following symbols are not suitable for machine
washing:
Dry clean
For very delicate items, such as net curtains, underwear, tights etc., you are
advised to use a laundry net or wash bag.
– Woollen items must be labelled with the “Pure New Wool” symbol if they are to
be washed in the machine, and must also be labelled “non-matting” or
“machine washable”. Please check the laundry item for the label.
– Colour often leaks from new coloured items.
This can then colour other lighter items being washed.
We therefore recommend that coloured items should be washed for the first
time separately.
For future washes, non colourfast items can only be washed with white
laundry up to 40°C.
Do not wash
40000369.qxd 18/09/2003 11:42 Page 24
Page 25

Note: when sorting laundry
– check there are no metal objects in the
laundry (such as paper clips, safety pins,
pins, coins etc...); In the event of a machine
failure during the warranty period and
foreign objects are found to be the cause of
the failure a labour charge may be made for
the call out of an engineer.
– button up pillowcases, fasten zips, hook &
eye fasteners, belts and long dressing gown
cords;
– remove curtain hooks;
– pay close attention to the labels on items;
– if you notice stubborn stains whilst sorting
the laundry, remove them using a special
detergent or a special stain remover.
25
– We do not recommend washing a full load of just towelling items as they
absorb a lot of water and may become too heavy for the drum.
The correct way to wash
Preparing the laundry
A) Select and sort the laundry according to the wash care labels found on each
garment. Always check the care labels.
Loading the laundry
B) Open the door.
C) Put the laundry in the washing machine. Close the door again, ensuring that
no items of laundry are obstructing the lock or door seal.
Putting detergent in machine
D) Open the drawer, choose the detergent
and put in the correct amount, according
to the manufacturer’s instructions and
the detergent advice section of this
manual.
Add any other laundry aids (see page
20). Close the drawer again.
Liquid detergents that are to be placed
directly into the drum should use the
recommended dispensing device.
Main wash
powder
Pre-wash
powder
Fabric conditioner
40000369.qxd 18/09/2003 11:43 Page 25
Page 26

26
Selecting the wash programme
Refer to the programme guide or the programme descriptions on the front of the
machine to select the most suitable programme.
The programme is selected by turning the programme selector clockwise and
aligning the programme number with the indicator.
Check that the tap is turned on and that the discharge hose is positioned
correctly.
Press additional function buttons if you require.
Press the Départ/Pause button. The Porte Sécurisée indicator illuminates and the
programme will begin.
When the programme has finished:
– the Porte Sécurisée neon is lit and the display will read “DOOR LOCK
ACTIVATED PLEASE WAIT TO OPEN”.
– the Porte Sécurisée neon goes out (Porte Securisée released) and the display
will read “PROGRAMME COMPLETE UNLOAD THE LAUNDRY”.
– Switch off the machine by turning the control knob to the “Arrêt” position.
– Open the door and remove the laundry.
Disconnect the plug from the mains power supply and turn off the water supply
after every use.
40000369.qxd 18/09/2003 11:43 Page 26
Page 27

Programme guide
27
PROGRAMME FABRIC TYPE PROGRAMME FOR LOAD WATER DETERGENT
TEMP °C
III
Whites Colourfast fabrics Intensive - heavily 7 90°
** *
1 Cotton, linen, hemp soiled
Coloureds Cotton, mixed fabrics Intensive - heavily 7 60°
**
2 Fast Colour Fast soiled
Coloureds Cotton, mixed fabrics Normal soiling 7 40°
**
3 Non Fast Coloureds Non Fast
Coloureds Cotton, mixed fabrics Normal soiling 7 30°
**
4 Non Fast Coloureds Non Fast
Coloureds Cotton, mixed fabrics Normal - light soiling, 7 15°
**
5 Non Fast Coloureds Non Fast delicate coloureds (cold)
Mixed Mixed synthetic fabrics Heavy soiling 2.5 60°
**
6 Fabrics
Colour Fast mixed fabrics
Coloureds Mixed fabrics, Heavy soiling 2.5 50°
**
7 Cotton, synthetics
Acrylics Synthetics (Nylon) Normal soiling 2.5 40°
**
8 Coloured mixed fabrics
Acrylics Synthetics (Nylon) Normal - Light 2.5 30°
**
9 Coloured mixed fabrics soiling
Acrylics Synthetics (Nylon) Normal - Light 2.5 15°
**
10 Coloured mixed fabrics soiling (cold)
Delicates Delicates Synthetics Light soiling 1 40°
**
11 & mixed fabrics Delicate fabrics
Woollens Light soiling 1 30°
**
12
Woollens Light soiling 1 15°
**
13 (cold)
_ Rinse Mixed fabrics Thorough rinse 7 _
**
14
_ Spin Mixed fabrics High speed spin 7 _
*
15
Machine washable
Wool , very delicate
fabrics, synthetic
knits
40000369ProgGuide.qxd 18/09/2003 10:45 Page 27
Page 28

28
Programme guide
PROGRAMME FABRIC TYPE PROGRAMME FOR LOAD WATER DETERGENT
TEMP °C
III
Vidange Mixed Drains water from the 7 _
16 fabrics drum with no spin action
Special AA Mixed fabrics, Energy saving 7 40°
**
17 Cottons at 40°C
Express Mixed fabrics Lightly soiled 3.5 40°
**
18 44
'
Cottons
Express Mixed fabrics, Lightly soiled 2 40°
**
19 29
'
Cottons
Lavage Main Mixed fabrics “Hand Hand washing of 2.5 30°
**
20 Wash only” garments delicate garments
Sport Mixed fabrics Thorough wash 2.5 30°
** *
21 for small loads
Points to consider:
When washing heavily soiled laundry it is recommended the load is reduced by about 1-1.5 kg. By
doing so the laundry is allowed to circulate more freely.
Energy label data based on programme 2 tested in accordance with EN60456.
40000369ProgGuide.qxd 18/09/2003 10:45 Page 28
Page 29

Cleaning and routine maintenance
Do not use alcohol-based scourers and /or thinners on the outside of your
washing machine, just a wipe with a damp cloth will suffice. The washing
machine needs very little maintenance:
– Cleaning the drawer compartments.
– Cleaning the filter.
– Cleaning the door glass.
Cleaning the drawer
Clean the compartments occasionally to remove detergents and additives.
A) To do this you just need to pull the drawer
out firmly from the machine,
but without forcing it.
B) Clean the compartments and the
syphon cap under running water.
C) Replace the drawer.
Cleaning the filter
The washing machine is fitted with a
special filter to prevent items such as
coins, buttons, etc. blocking the
discharge hose. These may be
retrieved by:
1. Removing the kickplate by gently
pulling it from the bottom in an
outwards and upwards direction.
2. Use the kickplate to collect the
water still in the filter.
3. Use a screwdriver to loosen the
screw holding the filter, turn the filter
anticlockwise until it stops, remove it
and clean it.
After cleaning it, reassemble following
the above instructions in reverse order.
Replace the kickplate.
We recommend that the filter be cleaned
frequently, at least once a month.
29
40000369.qxd 18/09/2003 11:43 Page 29
Page 30

Transporting or storing the
appliance for long periods when
appliance is not in use
If the appliance is being transported or is out of
use for long periods in unheated places, all
remaining water must be completely removed
from all hoses.
Ensure mains power plug is disconnected, then
unclip the discharge hose and lower it into a
basin on the floor until all the water has emptied
out.
When transporting the appliance refit the transit
bracket, central screw and side screws.
30
Cleaning the door glass
Regularly clean the door glass with a damp cloth. A build up of soiling and
residues from the water may result in water leaking from the door.
Do not use abrasive cleaners as they can scratch the surface.
40000369.qxd 18/09/2003 11:43 Page 30
Page 31

Trouble shooting
What might be the cause of...
Defects you can remedy yourself
Before calling Service for technical advice please run through the following
checklist. A charge will be made if the machine is found to be working or has been
installed incorrectly or used incorrectly. If the problem persists after completing the
recommended checks, please call Service, they may be able to assist you over
the telephone.
31
CAUSE
Plug not in socket.
Not switched on.
Power failure.
Fuse blown.
Door open.
RCD tripped (trip switch)
Has the Delay start been set?
See cause 1.
Water supply turned off.
Programme selector not correctly
positioned.
Kink in discharge hose.
Foreign bodies in filter
The machine has been plumbed in
incorrectly.
Leaking gasket between tap and
water inlet hose.
Strand of clothing or dirt between
door rubber gasket and door glass.
Incorrect plumbing.
Water has not yet drained away.
‘Spin Cancel’ option selected
(certain models only).
Unbalanced load.
Washing machine not completely level.
Load not distributed evenly.
Transit brackets not removed.
Two minutes have not elapsed since
the programme finished.
–
No water fill.
No pump out.
Machine overfilled with water.
PROBLEM
1. Does not work on any programme
2. Does not fill with water
3. Water does not drain away
4. Water on floor around the washing
machine
5. Does not spin
6. Machine vibrates a lot during spin
7. Door will not open
8. Display reads error:
0,1,5,7,8,9
9. Display reads error 2
10. Display reads error 3
11. Display reads error 4
REMEDY
Plug it in.
Switch on.
Check and refer to ‘Power Failure’
section.
Check.
Close door.
Reset RCD.
Check.
Check.
Turn on water supply.
Position programme selector
correctly.
Straighten discharge hose.
See ‘Cleaning and maintenance’
section.
Check installation.
Replace gasket and tighten
connection.
Re-load the machine and keep
rubber door gasket/door glass clean.
Check plumbing.
Wait a few minutes for machine to
empty.
Check.
Rearrange load evenly.
Adjust the special adjustable feet.
Rearrange the laundry evenly.
Remove transit brackets. (See
‘Installation’ section.)
Wait two minutes.
Call service.
Check water supplies are on.
Check drain is clear.
Check drain hose is not kinked.
Turn off water supply to machine.
Call service.
40000369.qxd 18/09/2003 11:43 Page 31
Page 32

It is unlikely that water will be visible in the drum! This
is due to the latest technology that achieves the same
standard of washing and rinsing but with far less water
consumption.
32
Note:
The use of environmentally-friendly, phosphate-free detergents (check detergent
information on pack) can have the following effects:
– waste water from rinsing may be cloudier because of the presence of a white
powder (zeolites) held in suspension, without the rinse performance being
adversely affected;
– presence of white powder on laundry after washing, which is not absorbed by
the fabric and does not alter the colour of the fabric.
– The presence of foam in the final rinsing water is not necessarily an indication
of poor rinsing.
– Carrying out more rinse cycles does not serve any purpose in such cases.
Power failure
If there is a power failure the wash cycle will be interrupted, the wash programme
and functions will be suspended.
When the power is restored, the wash programme and functions will re-start from
the same point and complete the programme.
The load can be removed from the machine during a power failure as follows:
The water can be drained from the machine by:
1. Switch off the machine by the control knob and at the mains power supply.
Remove the plug from the mains power supply socket.
2. Carefully move the machine so the rear of the machine is accessible. Please
follow the safety precautions which we recommend under the ‘safety notes’
section of this manual.
3. Unclip the drain hose from the rear panel of the machine and lower the hose
into a bowl on the floor.
Important: the water may be very hot!
40000369.qxd 18/09/2003 11:43 Page 32
Page 33

33
When the bowl is full raise the end of the drain pipe to a height higher than the
top of the appliance to stop the flow of water. Empty and replace the bowl and
continue draining the machine until empty.
4. Once the machine is fully drained of water, clip the hose to the rear of the
machine. Press the Porte button and remove the load.
The door can be opened approximately 2 minutes after the power failure by simply
pressing the door button. Do not force open the door.
Important: the water and the load may be very hot!
Technical data
•
Max. load of dry laundry 7kg
•
Water pressure (0.5-8 bar)
0.05-0.8 MPa
•
Spin speed max: 1200 rpm (HF7 12 I)
max: 1400 rpm (HF7 14 I)
max: 1600 rpm (HF7 16 I)
Measurements
•
Width 59,5cm
•
Depth 65cm
•
Height 85cm
NB: For specifications regarding electrical data, see the data plate on the front of
the washing machine (door area).You will also need to refer to the information on
the data plate should you need to contact Service for any advice.
40000369.qxd 18/09/2003 11:43 Page 33
Page 34

Customer Service
The appliance is covered by a certificate of guarantee which allows you free use
of the Hoover Technical Support Service, except for the price of the call, for a
period of one year from the date of purchase. Remember to send off the
guarantee certificate for validation within 10 days of the date of purchase.
You should retain the receipt issued by the retailer when you purchased the
machine to show to the call out engineer, should you need to consult one.
If your washing machine shows signs of a defect or is not working properly, before
you contact Service we recommend you carry out the checks detailed within the
Trouble shooting section.
If the problem with the machine persists after completing all the recommended
checks, please dial Hoover Support Service.
For the cost of a telephone call, you will be connected directly to Service. It is
important you tell the advisor your product’s model number and serial number,
which you will find on the rating label (16 characters, beginning with the number
3), found on the front of the washing machine (door area). By doing this, your
enquiry will be responded to more efficiently.
34
40000369.qxd 18/09/2003 11:43 Page 34
Page 35

Introduction
Veuillez lire et suivre ces instructions avec soin et utiliser la machine
conformément. Ce livret donne des directives importantes sur la bonne utilisation,
l’installation et l’entretien de la machine, ainsi que des conseils utiles pour en
obtenir les meilleurs résultats possibles. Conservez toute la documentation dans
un endroit sûr pour pouvoir vous y reporter à une date ultérieure ou la transmettre
aux prochains propriétaires.
35
Note : cette machine est conçue uniquement pour
usage domestique, soit pour laver, rincer et essorer le
linge domestique et les vêtements.
Notes sur l’élimination
Tous les matériaux de conditionnement utilisés sont écologiques et recyclables.
Veuillez les éliminer de manière écologique.
Votre revendeur ou votre municipalité pourront vous
donner le détail exact des méthodes d’élimination en
vigueur.
Les appareils qui ont atteint la fin de leur vie utile ne doivent pas être consignés à
la poubelle ! Des matériaux utiles peuvent être récupérés des anciens appareils,
pour le recyclage.
Note : pour assurer la sécurité lors de l’élimination
d’une vieille machine à laver, veuillez débrancher la
fiche du courant de secteur, couper le câble
d’alimentation et le détruire avec la fiche. Pour
empêcher que les enfants ne s’enferment dans la
machine, cassez les charnières de la porte ou son
dispositif de verrouillage.
40000369French.qxd 18/09/2003 12:16 Page 35
Page 36

Sommaire Page
Introduction 35
Notes générales sur la livraison 37
Notes de sécurité 37
Mise en route rapide 38
Installation et essais 39
Conseils de lavage utiles 44
Utiliser Inter@ct pour la première fois 45
Description des commandes 48
Bacs à détergent 52
Détergents, aides de lavage et dosages 53
Sélecteur de programmes 55
Demi-charge automatique 57
Tri du linge 57
Sélection du programme de lavage 59
Guide de programmation 60
Nettoyage et entretien de routine 62
Dépistage de pannes 64
Coupure de courant 65
Données techniques 66
Service clientèle 67
36
40000369French.qxd 18/09/2003 12:16 Page 36
Page 37

Notes générales sur la livraison
Vérifiez que les articles suivants ont bien été livrés avec l’appareil :
– Manuel d’utilisation
– Carte de garantie
– Bonde
– Tuyau d’alimentation et support
– Panneau inférieur et 2 clips
Vérifiez que la machine n’a subi aucun dommage en transit. Dans le cas
contraire, veuillez contacter le service GIAS, le service Hoover ou un distributeur
Hoover agréé.Veuillez consulter la rubrique du Service clientèle.
37
Notes de sécurité
Note : avant toute intervention de nettoyage ou
d’entretien sur la machine à laver.
A) Débranchez la fiche du courant de secteur.
B) Coupez l’alimentation en eau.
C) Vérifiez que l’alimentation électrique est mise à la terre et dans le cas contraire,
faites appel à un électricien compétent. Cet appareil doit être mis à la terre.
D) Ne touchez pas la machine si vous avez les mains ou les pieds mouillés ou
humides. N’utilisez pas l’appareil si vous êtes à pieds nus.
E) L’utilisation d’adaptateurs, de multi-prises et/ou de rallonges n’est pas
recommandée.
F) Attention : la température de l’eau peut atteindre
90°C pendant un cycle de lavage du blanc et il se
peut par conséquent que la vitre de la porte soit
très chaude.
G) Vérifiez qu’il n’y a pas d’eau visible dans le tambour avant d’ouvrir la porte.
H) Ne laissez pas les enfants ou les personnes non autorisées utiliser la machine
sans surveillance.
I) Ne tirez pas sur le cordon d’alimentation de la machine pour le débrancher du
courant.
J) L’appareil ne doit pas être exposé aux conditions climatiques (pluie, rayons du
soleil, etc...).
K) Lorsque vous déplacez la machine, ne la soulevez jamais par ses boutons de
commande, le bac à détergent, les tuyaux ou le câble d’alimentation.
40000369French.qxd 18/09/2003 12:16 Page 37
Page 38
38
Mise en route rapide
Lessive
– Ouvrez la porte en activant le bouton Porte
– Triez le linge et placez-le dans la machine
– Fermez la porte
– Mettez le détergent dans les compartiments réservés à cet usage
– Sélectionnez le programme voulu en tournant le bouton de programmation (le cycle voulu
s’affiche)
– Sélectionnez les autres boutons de fonction que vous souhaitez et appuyez sur le bouton
Départ/Pause
– Il se peut qu’il y ait un court délai entre le moment où vous appuyez sur le bouton
Départ/Pause et le commencement du programme, pendant que la machine évalue la
quantité d’eau nécessaire et qu’elle configure les paramètres du programme
Après le lavage
– Attendez environ deux minutes que le dispositif de
verrouillage de la porte se débloque. La lumière Porte
Sécurisée s’éteint alors.
– Mettez la machine à l’arrêt en tournant le bouton de
commande à la position Arrêt.
– Ouvrez la porte et sortez le linge.
Pour éviter d’endommager la porte lorsque vous déplacez la machine, ne reposez jamais la
porte contre un objet, par exemple un chariot.
L) IMPORTANT !
Si la machine est installée sur une moquette, veillez à ce que la prise d’air à la base de la
machine ne soit pas obstruée.
M) Pour soulever la machine, assurez-vous toujours d’être à deux pour éviter de vous faire mal.
N) Si l’appareil ne fonctionne pas correctement ou qu’il tombe en panne, mettez-le à l’arrêt,
débranchez-le du courant de secteur, coupez l’alimentation en eau et ne touchez pas à la
machine.
Consultez le service GIAS ou le service Hoover en cas de besoin éventuel de réparation. Le
non-respect de ces instructions peut compromettre la sécurité de votre appareil.
O) Si le cordon d’alimentation de l’appareil est endommagé, il doit être remplacé par un cordon
spécial uniquement disponible auprès du service GIAS, du service Hoover ou d’un
distributeur Hoover agréé.
P) Une fois la machine installée, vérifiez que la prise électrique et les robinets d’alimentation
en eau sont facilement accessibles.
Q) Assurez-vous de ne jamais laver de rideaux en fibres de verre dans cette machine.
R) Veillez à empêcher l’accumulation de peluches sur le sol, autour du périmètre extérieur de
la machine.
S) Vérifiez toujours que le témoin de verrouillage de la porte est bien éteint avant d’ouvrir la
porte. Ce faisant, la machine a le temps de refroidir avant que le linge ne soit manipulé.
T) Vérifiez toujours que le panneau inférieur est bien installé sur la machine.
Note : Vérifiez que la configuration, l’installation et les essais
d’Inter@ct ont été effectués avant de vous reporter à la
procédure de mise en route rapide.
40000369French.qxd 18/09/2003 12:16 Page 38
Page 39

Retirez la machine de l’emballage, à proximité
de son emplacement définitif, et procédez
comme suit :
Au verso de la machine
1) Retirez la vis centrale A et les vis latérales
B et retirez le support de transit C ainsi que
la cale rouge.
2) Inclinez la machine vers l’avant et retirez
les cales en polystyrène.
3) Recouvrez le trou central à l’aide du
bouchon que vous trouverez dans le sac
d’instructions.
4) Ajustez les deux pieds avant pour mettre la
machine au bon niveau.
5) Inclinez la machine vers l’avant et retirez le
panneau de la base en ➀ retirant le papier du
ruban adhésif, ➁ introduisez le panneau de
la base à l’avant de la machine, ➂ installez le
panneau de la base sur la base de la
machine à laver et introduisez les deux
pinces.
39
Installation et Essais
40000369French.qxd 18/09/2003 12:16 Page 39
Page 40

Note : nous vous recommandons de conserver le
support et les vis de transit pour protéger la machine
en cas de déplacement ultérieur. Les fabricants
déclinent toute responsabilité en cas de détérioration
de la machine résultant du non-respect des
instructions sur la dépose de la protection de transit.
Tous les frais d’installation sont à la charge de
l’utilisateur.
40
Branchement du tuyau de remplissage
Cette machine est équipée d’un tuyau de remplissage dont l’extrémité est munie
d’un embout fileté de 19 mm qui est installé entre le connecteur fileté de l’appareil
et l’alimentation en eau.
Veillez à n’utiliser que le nouveau tuyau fourni pour connecter la machine et
vérifiez que la rondelle est bien en place à l’intérieur du connecteur du tuyau.
Ne réutilisez pas d’anciens tuyaux qui sont installés sur d’autres machines.
Ne serrez pas trop les raccords. Un serrage manuel est suffisant.
Assurez-vous de ne pas coincer ou couder les
tuyaux.
1. Fixez l’extrémité coudée du tuyau à l’arrière de la
machine.
2. Fixez l’extrémité droite du tuyau sur les
robinets d’arrêt.
Acqua-stop (installé sur certains modèles)
Le tuyau de remplissage fourni avec cette machine a une
double paroi et incorpore un robinet d’eau (A). Si le tuyau
interne éclate, le robinet coupe automatiquement
l’alimentation en eau pour empêcher les inondations. Le
témoin devient rouge (B).
Dans ce cas, coupez immédiatement l’alimentation en eau
et faites installer un nouveau tuyau de remplissage par le
service Hoover.
B
A
40000369French.qxd 18/09/2003 12:17 Page 40
Page 41

CETTE MACHINE DOIT ETRE CONNECTEE
CONFORMEMENT AUX REGLEMENTATIONS EN
MATIERE D’ALIMENTATION EN EAU. LES ARRETES
Si le point de connexion du tuyau d’admission change, vérifiez que l’embout fileté
de 19 mm du tuyau d’admission est bien fixé sur le connecteur de l’électrovanne.
Exigences en matière d’alimentation en eau
Branchez la machine sur le système de vidange utilisé par les éviers
domestiques.
41
CETTE MACHINE DOIT ETRE CONNECTEE
CONFORMEMENT AUX REGLEMENTATIONS EN
MATIERE D’ALIMENTATION EN EAU.
Aucune autre machine ne doit être installée sur la colonne d’alimentation.
Il existe deux possibilités qui sont illustrées ci-dessous :
TUYAU
D’EVACUATION
CROCHET DE
SUPPORT DU TUYAU
12 à 15 cm
32 mm
min
60 à 80 cm
CROCHET DE
SUPPORT DU TUYAU
FIXEZ LE TUYAU EN
TOUTE SECURITE A
L’EVACUATION DES
EAUX SALES
TUYAU
D’EVACUATION
FIXEZ-LE EN TOUTE
SECURITE AUDESSUS DE LA
SORTIE DU TROPPLEIN DE L’EVIER
Pour que la machine à laver fonctionne correctement, la sortie du tuyau
d’évacuation doit se trouver au minimum à 60 cm et au maximum à 80 cm
du sol.
40000369French.qxd 18/09/2003 12:17 Page 41
Page 42

42
Testez l’installation
Consultez le guide de programmation pour le détail de sélection des programmes.
Pour arrêter chaque programme avant qu’il ne soit terminé, annulez le programme
en maintenant le bouton Départ/Pause enfoncé pendant cinq secondes.
L’affichage indique alors que le programme a été annulé.
1. Ouvrez l’alimentation en eau et vérifiez la présence éventuelle de fuites au
niveau des tuyaux de remplissage.
2. Ouvrez l’alimentation électrique.
3. Sélectionnez le programme d’essorage 15 et appuyez sur le bouton Départ
pour mettre la machine en marche. Laissez le programme tourner pendant
une minute avant de l’annuler (voir la section “Description des commandes”
pour annuler le programme). Ceci permet d’éliminer l’eau qui reste dans la
machine suite aux essais en usine.
4. Pour vérifier le remplissage de la machine en eau froide :
Sélectionnez un programme de rinçage et appuyez sur le bouton Départ pour
mettre la machine en marche.
Attendez que toute l’eau soit vidangée.
Vérifiez qu’il n’y a pas de fuite ou de débordement au niveau de la sortie de
vidange.
5. Mettez la machine à l’arrêt à la fin du cycle en tournant le bouton de
commande à la position d’Arrêt.
6. Si la machine prend plus d’une minute à se vider, vérifiez la présence
éventuelle de coudes au niveau des tuyaux d’évacuation.
Les essais d’installation sont alors terminés.
40000369French.qxd 18/09/2003 12:17 Page 42
Page 43

43
Pour veiller à ce que le tambour soit bien propre après les essais et le stockage,
sélectionnez le programme 2 et faites tourner la machine pendant un cycle
complet, en n’utilisant que du détergent et de l’eau.
Si la machine ne va pas servir immédiatement, coupez-en l’alimentation
électrique et débranchez-la. Nous vous recommandons également de fermer les
robinets d’eau.
Note : nous vous conseillons de couper les
alimentations en eau et en électricité après chaque
lavage.
Alimentation électrique et conseils de sécurité
Les machines à laver sont prévues pour une tension monophasée de 230 V,
50 Hz. Vérifiez que le conducteur est suffisamment puissant pour alimenter au
moins 3,0 kW et branchez la machine sur une prise de terre.
L’électricité peut être extrêmement dangereuse. Cette machine à laver doit être
mise à la terre.
La prise de courant et la fiche de la machine doivent être du même type.
Il est conseillé de ne pas utiliser de multi-prises et/ou de rallonges.
Les fils du câble de secteur sont colorés en fonction des codes suivants :
Bleu – NEUTRE
Marron – SOUS TENSION
Vert et jaune – TERRE
Si le cordon électrique de cet appareil est endommagé, il doit être remplacé par
un cordon spécial qui est uniquement disponible auprès du service des pièces de
rechange de Hoover, du Service GIAS ou d’un distributeur Hoover agréé.
40000369French.qxd 18/09/2003 12:17 Page 43
Page 44

Conseils de lavage utiles
Conseils pour utiliser votre machine de la manière la plus écologique et la plus
économique possible.
Chargement de votre machine à laver
Pour réduire plus encore la consommation d’énergie, d’eau et de détergent, nous vous
recommandons d’utiliser votre machine à pleine charge. Vous pouvez réaliser des
économies jusqu’à 50 % en procédant à un lavage à pleine charge plutôt que deux en
demi-charge.
Quand le prélavage est-il vraiment nécessaire ?
Uniquement lorsque le linge est particulièrement sale !
Vous pouvez réaliser des économies de 5 à 15 % en désactivant l’option de prélavage pour
le linge moins sale.
Quelle température de lavage dois-je sélectionner ?
L’utilisation de détachants avant le lavage à la machine réduit la nécessité de laver à des
températures supérieures à 60°C.
Vous pouvez réaliser des économies d’énergie allant jusqu’à 50 % en sélectionnant une
température de lavage de 40°C.
Linge très sale
Pour assurer la meilleure performance possible lorsque vous lavez du linge
particulièrement sale, nous vous recommandons de limiter le nombre d’articles que vous
mettez dans la machine. Si le tambour n’est pas trop rempli, les articles circulent plus
librement et se lavent mieux.
ARIEL – Choisi et recommandé par Hoover
Lorsque nous produisons une nouvelle machine à laver, nous la soumettons à tous les
essais possibles et imaginables. Et l’un des essais les plus importants est celui qui permet
à nos experts d’identifier le détergent qui convient le mieux pour résoudre les problèmes
de lessive. Ariel a pu répondre à nos besoins : pour que la machine à laver fonctionne de
manière efficace, sans compromettre la durée de vie de la machine et en produisant les
meilleurs résultats de lavage. Les excellents résultats que nous avons obtenus
uniformément (et qui étaient le but principal du test) ont déterminé notre choix et notre
recommandation. La principale fonction d’un détergent qui répond à tous les besoins de
lessive est de collaborer avec l’eau pour éliminer la saleté des tissus, la tenir en
suspension jusqu’à ce que l’eau soit vidangée et contrôler la quantité de mousse dans la
machine à laver, sans endommager les fibres des articles lavés. Ariel satisfait toutes ces
exigences car il contient des ingrédients de haute qualité résultant de recherches
sophistiquées, et produit d’excellents résultats sous toutes les conditions.
44
40000369French.qxd 18/09/2003 12:17 Page 44
Page 45

45
Utiliser Inter@ct pour la première fois
Cette machine fonctionne avant la configuration d’Inter@ct. Cependant, cette
machine est équipée des fonctions Départ Différé et Programmation Fin de Cycle
qui, pour fonctionner correctement, exigent que le jeu Inter@ct soit programmé. Il
s’agit d’une opération simple et nous avons pris toutes les précautions possibles
pendant la production pour veiller à ce que l’utilisateur puisse utiliser cette
machine en toute simplicité et de manière efficace.
Programmation de la machine
Inter@ct doit être programmé pour que l’horloge, la langue et les exigences
personnelles soient réglées correctement.
Lorsque l’utilisateur met la machine en marche et tourne le cadran de
programmation de la position “Arrêt” à un programme particulier, un message de
bienvenue s’affiche.
Ce message s’affiche un court moment pendant que la machine détermine le
programme qui a été sélectionné. Lorsque la machine est prête, le détail du cycle
s’affiche et vous pouvez alors commencer la programmation de la machine.
Exemple
Entrez dans le menu
Avant d’entrer dans le menu Inter@ct, veuillez noter que vous avez 30 secondes
par opération pour effectuer votre sélection. Au cas où vous n’auriez pas
suffisamment de temps, l’affichage retourne à son premier écran et il vous suffit
de retourner dans le menu Inter@act et de continuer la programmation.
Le menu peut être programmé à partir de cette étape. Maintenez les boutons
“Mini Charge” et “Prélavage” enfoncés pendant 5 secondes ou jusqu’à ce qu’un
bip sonore se fasse entendre.
Les options du menu peuvent être changées en appuyant sur le bouton
“Prélavage”.
Pour confirmer et saisir une option, appuyez sur le bouton “Mini Charge”.
HOOVER INTER@CT
BIENVENUE ! 11:06
1 COTON BLANC
90° +SALE 1600 RPM
40000369French.qxd 18/09/2003 12:17 Page 45
Page 46

46
Configuration de la nouvelle heure
Cette fonction doit être réglée pour deux raisons : tout d’abord pour afficher
l’heure de la journée sur l’écran et ensuite pour que les configurations
Programmation Fin De Cycle/Départ Différé fonctionnent correctement.
Vous remarquerez sur la fenêtre d’affichage que les heures de l’horloge
clignotent. Réglez les heures en appuyant continuellement sur le bouton
“Prélavage” et ensuite sur le bouton “Mini Charge”, pour saisir l’heure. Les
minutes commencent alors à clignoter sur l’horloge. A nouveau, appuyez sur le
bouton “Prélavage” jusqu’à ce que les minutes voulues soient affichées et
appuyez sur “Mini Charge” pour effectuer la sélection.
Lorsque vous avez configuré la nouvelle heure, l’affichage vous invite à
“Configurer le mode temporel”.
Configuration du mode temporel
(configuration par défaut – ABSOLU)
Il existe deux façons de sélectionner le mode temporel.
La première vous permet Programmation Fin De Cycle ou Départ Différé en
indiquant l’heure à laquelle vous souhaitez que le programme commence ou se
termine, par exemple, le programme doit finir à 08h00. C’est ce que l’on appelle le
mode temporel Absolu. Lorsque vous utilisez la fonction Programmation Fin De
Cycle (ou Départ Différé), vous pouvez voir ci-dessous un exemple de sélection
du mode temporel Absolu pendant l’étape de configuration du menu.
Ainsi, lors de la configuration de la Programmation Fin De Cycle, le programme
(comme illustré ci-dessus) se terminera à 08h00.
La seconde vous permet de configurer la Programmation Fin De Cycle ou le
Départ Différé en ajoutant des heures, par exemple le programme se terminera
dans 1h
1
/2. C’est ce que l’on appelle le mode temporel Relatif
.
Lorsque vous
utilisez la fonction Programmation Fin De Cycle (ou Départ Différé), vous pouvez
voir ci-dessous un exemple de sélection du mode temporel Relatif pendant l’étape
de configuration du menu.
Ainsi, lors de la configuration de la Programmation Fin De Cycle, le programme
(comme illustré ci-dessus) se terminera à 15h30.
Les deux options sont très utiles, mais nous pensons que le mode temporel
Absolu est le plus pratique et le plus facile à utiliser car il n’est pas nécessaire de
calculer le nombre d’heures qui doivent s’écouler avant que votre machine ne
s’arrête ou ne se mette en marche.
FIN DU CYCLE
08:00 14:00
FIN DU CYCLE
1HR 30M 14:00
40000369French.qxd 18/09/2003 12:17 Page 46
Page 47

Lorsque vous arrivez à l’étape de configuration du mode temporel, vous êtes invité
à sélectionner le mode temporel “Relatif” ou, en défilant à l’aide du bouton
“Prélavage”, le mode temporel “Absolu”. Saisissez votre configuration préférée en
appuyant sur le bouton “Mini Charge”.
Lorsque vous avez saisi votre mode temporel préféré, l’affichage vous invite à
activer le bip sonore final.
Bip sonore final (configuration par défaut – OUI)
Vous avez ici la possibilité de sélectionner une alarme sonore qui indique que le
cycle de lavage est terminé. En appuyant sur le bouton “Prélavage”, vous pouvez
faire défiler les options “Oui” et “Non”.
Pour saisir votre sélection, appuyez sur le bouton “Mini Charge” et l’ecran passera
alors à l’étape suivante et vous invitera à “Activer la mémoire”.
Activer la mémoire (configuration par défaut – NON)
Il s’agit d’une fonction utile si vous utilisez souvent le même programme.
Sélectionnez “Activer la mémoire” pour mémoriser le dernier programme ou les
dernières fonctions utilisées. Cette fonction n’est possible que sur les programmes
de lavage du coton, des articles délicats, des synthétiques, et des lainages. La
mémoire ne conserve pas la configuration du groupe de programmes spéciaux.
Sélectionnez “Oui” ou “Non” en utilisant les boutons “Prélavage” et “Mini Charge”.
Vous serez invité à indiquer si vous souhaitez configurer le mode de
démonstration. Veuillez régler cette option à “Non” si vous ne l’avez pas déjà fait,
car elle est exclusivement réservée au SERVICE. Si l’option du mode de
démonstration n’est pas réglée à “NON” lorsque vous quittez le menu Inter@ct, le
programme NE COMMENCERA PAS. Le mode de démonstration doit être réglé à
“NON” pour que le cycle de lavage puisse commencer. Lorsque vous saisissez
“NON” par l’intermédiaire du bouton “Mini Charge”, vous êtes invité à indiquer si
vous souhaitez “Quitter le menu”.
Quitter le menu
Si vous êtes satisfait des réglages que vous avez sélectionnés, vous pouvez
maintenant quitter le menu en sélectionnant “Oui” par le biais des boutons
“Prélavage” et “Mini Charge”.
Cependant, si vous n’êtes pas satisfait des réglages sélectionnés, vous devez
opter pour “Non” afin de quitter la commande de sortie du menu et vous pourrez
alors recommencer votre programmation à zéro. En appuyant sur le bouton “Mini
Charge”, vous pouvez saisir et éviter chaque option individuellement jusqu’à ce
que vous arriviez à l’option que vous souhaitez modifier.
47
40000369French.qxd 18/09/2003 12:17 Page 47
Page 48

Lorsque vous êtes complètement satisfait de votre sélection, vous pouvez quitter
le menu et commencer les essais d’installation.
Si après la première installation vous souhaitez changer certaines options du
menu, à une date ultérieure, vous devez à nouveau consulter toutes les options
du menu, depuis le début, et changer celles que vous souhaitez modifier. Ceci
peut s’avérer utile pour changer “Configurer la nouvelle heure” au début ou à la fin
de l’heure d’été.
Ceci fait, les options du menu resteront dans la mémoire de la machine, même si
la machine est débranchée ou en cas de panne de courant.
DESCRIPTION DES COMMANDES
Tous les boutons et les cadrans du panneau de contrôle de la machine à laver
sont répertoriés ci-dessous.
Lorsque vous avez sélectionné le programme souhaité et les boutons d’option, les
informations que vous avez sélectionnées s’affichent sur l’écran du panneau
d’affichage Inter@ct.
Lorsque les programmes et les boutons d’options sont compatibles, un bip sonore
se fait entendre et le témoin lumineux qui se trouve au-dessus du bouton d’option
sélectionné reste allumé. Si vous sélectionnez un bouton d’option qui n’est pas
compatible au programme dont vous avez besoin, vous entendrez une sonnerie et
le voyant du bouton restera éteint. Pour sélectionner un bouton d’option, appuyez
une fois dessus ; pour le désactiver, appuyez à nouveau dessus.
Lisez soigneusement les descriptions qui figurent ci-dessous :
Cadran du sélecteur de programmes
48
Note : N’appuyez pas sur le bouton Départ/Pause avant de
sélectionner le programme. Si cela se produit, annulez le
programme (que vous avez accidentellement sélectionné)
en appuyant sur le bouton Départ/Pause pendant cinq
secondes (voir la rubrique sur l’annulation des
programmes).
40000369French.qxd 18/09/2003 12:17 Page 48
Page 49

Bouton Départ/Pause
DEPART
Pour lancer un programme, appuyez une fois sur ce bouton. Le voyant de la Porte
Sécurisée s’allumera. La machine analyse alors la charge et vous invite à patienter –
Exemple
Le panneau Inter@ct
affiche le temps nécessaire pour terminer le programme et le lavage
commence. Inter@ct calcule la durée du programme sélectionné sur la base d’une charge
standard de 7 kg ; pendant le cycle, Inter@act rectifie cette durée selon la taille et la
composition de la charge.
Exemple :
Cet affichage montre également la phase actuelle du cycle et l’heure actuelle est affichée
dans le coin inférieur droit.
Cet affichage change pendant le programme de lavage, au fur et à mesure de sa progression.
PAUSE
Il est possible d’arrêter momentanément le programme pendant le cycle de lavage, en
maintenant le bouton Départ/Pause enfoncé pendant environ deux secondes. Un bip
sonore retentit alors. Un message s’affiche pour vous informer que le programme est en
mode de pause. Pour relancer le programme, appuyez une nouvelle fois sur le bouton
Départ/Pause. L’affichage vous informe que le programme est sur le point de continuer.
Exemple :
49
PROGRAMMATION ...
ATTENDRE SVP ...
TEMPS RESTANT 1H:50M
LAVAGE 19:30
COTON BLANC
PROGRAMME EN PAUSE
Lorsque vous tournez le cadran du sélecteur de programmes et que le message de
bienvenue a disparu, les informations suivantes s’affichent :
Lire de gauche à droite :
1. Le numéro du programme
2. Le nom du programme
3. La température de lavage
4. Le degré de saleté (à quel point le linge est sale)
5. La vitesse d’essorage
Exemple :
1 COTON BLANC
90° +SALE 1600 TR.
40000369French.qxd 18/09/2003 12:17 Page 49
Page 50

Bouton Extra Charge
Cette option est uniquement disponible sur les programmes Coton. Hoover a mis au point un
système de lavage spécial pour les charges importantes. En sélectionnant le bouton Extra
Charge, le volume d’eau du cycle de lavage sélectionné et la longueur du programme
augmentent pour améliorer la performance de lavage des charges plus importantes.
Bouton “Mini Charge”
En sélectionnant cette option, la machine lave des petits lots de linge (1 à 2 kg) pour éviter
tout gaspillage. Ainsi, la consommation en eau est réduite jusqu’à 55 %, la consommation
en énergie jusqu’à 60 % et le temps nécessaire est diminué de moitié.
Bouton Lavage Rapide
Cette option peut être utilisée pour le coton et les synthétiques. En sélectionnant l’option, la
durée de lavage peut être réduite jusqu’à 50 minutes, selon le programme sélectionné.
Bouton Prélavage
Cette option est très utile pour le linge particulièrement sale et elle peut être utilisée avant
de sélectionner le programme de lavage principal. Pour ce programme, le détergent doit
être ajouté dans le premier bac de dosage de poudre, identifié par “I” (voir la section “Bacs
à détergent” de ce manuel). Nous vous recommandons de n’utiliser que 20 % des
quantités recommandées sur le paquet de détergent et de ne pas utiliser d’assouplissant
pour ce programme.
Bouton Extra Rinçage
Cette option ajoute davantage d’eau à l’étape de rinçage. Ceci permet d’empêcher les
irritations de la peau causées par les résidus de détergent chez les personnes dont la
peau est particulièrement sensible. Nous recommandons également de sélectionner le
bouton Extra Rinçage supplémentaire pour laver un linge très sale qui nécessite beaucoup
de détergent ou pour laver des articles en éponge qui ont davantage tendance à imbiber le
détergent.
50
Bouton Porte :
Un dispositif de sécurité spécial vous empêche d’ouvrir la porte immédiatement après la fin du
cycle. Le témoin lumineux “Porte Sécurisée” s’allume lorsque la porte est fermée. Attendez 2
minutes après la fin du cycle de lavage avant d’ouvrir la porte. Le voyant Porte Sécurisée s’éteint et
vous pouvez ouvrir la porte. Par mesure de sécurité, vérifiez qu’il n’y a plus d’eau dans le tambour.
PROGRAMME ANNULE
ANNULER
Pour annuler le cycle, enfoncez le bouton Départ/Pause pendant 5 secondes jusqu’à ce
qu’un bip sonore se fasse entendre. L’affichage vous informe de la pause et de l’annulation
du cycle.
Exemple :
40000369French.qxd 18/09/2003 12:17 Page 50
Page 51

Bouton Verrouillage Clavier
Il s’agit d’une fonction utile pour empêcher que les enfants ne touchent aux boutons
d’options et ne modifient le programme que vous avez configuré.
Une fois le programme et les boutons d’options configurés, appuyez sur “Marche” puis sur
le bouton de verrouillage du programme. Ceci “verrouille” le panneau de contrôle.
Lorsque vous avez configuré le programme et les boutons d’option souhaités, appuyez sur
“Marche” et ensuite sur le bouton de verrouillage du programme. Ceci “verrouille” le
panneau de contrôle.
Vous pouvez annuler cette fonction en appuyant brièvement sur le bouton de verrouillage
du programme jusqu’à ce que le témoin visuel qui se trouve au-dessus du bouton clignote.
Pendant que ce témoin clignote, appuyez sur le bouton “Variateur d’Essorage”. L’affichage
vous informe alors que les options ne sont plus verrouillées et que vous pouvez y apporter
des changements.
Boutons Programmation Fin De Cycle/Départ Différé
Les options Programmation Fin De Cycle/Départ Différé peuvent être utilisées si vous
voulez que la lessive soit prête plus tard (mais dans un délai de 24 heures).
1. Bouton Départ Différé
Appuyez une fois sur le bouton Départ Différé/Programmation Fin De Cycle et appuyez sur
les boutons des heures et des minutes (à gauche et à droite) jusqu’à ce que vous ayez
réglé l’heure. L’affichage retourne à l’option du programme si vous appuyez sur le bouton
dans un délai de 5 secondes. Lorsque vous avez réglé l’heure de commencement/fin,
appuyez sur le bouton Marche.
Pour annuler le Départ Différé, maintenez le bouton enfoncé pendant 5 secondes.
2. Bouton Programmation Fin De Cycle
Appuyez deux fois sur le bouton Départ Différé/Programmation Fin De Cycle et appuyez
sur les boutons des heures et des minutes (à gauche et à droite) jusqu’à ce que vous ayez
réglé l’heure. Lorsque vous saisissez l’option fin de programme, l’affichage montre la durée
minimale de configuration de la fin du programme. Cette période peut seulement être
prolongée si vous le désirez.
NOTE : Lorsque vous utilisez les fonctions Départ Différé/Programmation Fin De Cycle,
assurez-vous de n’utiliser de détergent que par l’intermédiaire du bac prévu à cet effet.
Vous risquez d’endommager votre linge si vous ajoutez des détergents etc. au tambour et
que vous les laissez inactifs pendant une période prolongée.
Bouton Variateur d’Essorage
Lorsque vous sélectionnez le programme de lavage, l’affichage vous indique la vitesse
d’essorage maximum autorisée pour ce programme. En appuyant à plusieurs reprises sur
le bouton de sélection de l’essorage, la vitesse diminue par étapes de 100 tours/mn. En
appuyant continuellement sur le bouton de sélection de la vitesse d’essorage, vous pouvez
si vous le souhaitez annuler l’essorage. Lorsque vous sélectionnez la vitesse d’essorage
voulue, l’affichage indique le programme sélectionné, sa température et la nouvelle vitesse
d’essorage que vous avez sélectionnée.
51
40000369French.qxd 18/09/2003 12:17 Page 51
Page 52

Note : ce modèle est équipé d’un dispositif
électronique qui vérifie que le linge est équilibré
correctement. Si la charge est légèrement
déséquilibrée, la machine la rééquilibre
automatiquement pour poursuivre un essorage
normal. Si après plusieurs tentatives l’équilibre n’est
pas restauré, il sera nécessaire d’utiliser une vitesse
d’essorage plus lente. Si le linge est très déséquilibré,
l’étape d’essorage est annulée. Ceci contribue à une
réduction des vibrations et du bruit et améliore la
fiabilité et la longévité de la machine.
52
Note : ce modèle est équipé d’un “capteur” électronique
qui vérifie que le linge est équilibré correctement. Si la
charge est légèrement déséquilibrée, la machine la
rééquilibre automatiquement pour poursuivre un
essorage normal.
Si après plusieurs tentatives l’équilibre n’est pas
restauré, il sera nécessaire d’utiliser une vitesse
d’essorage plus lente.
Si le linge est très déséquilibré, l’étape d’essorage est
annulée.
Ceci contribue à une réduction des vibrations et du
bruit et améliore la fiabilité et la longévité de la
machine.
Bacs à détergent
Il existe trois bacs à détergents :
– le premier, identifié par “I” est réservé au
détergent utilisé pendant le prélavage.
– le second, identifié par “II” est réservé au
détergent utilisé pendant le lavage principal.
– le troisième identifié par “ ” est réservé
aux additifs spéciaux, aux assouplissants,
aux parfums, à l’amidon, aux agents
éclaircissants, etc...
Poudre à laver
principale
Poudre de
prélavage
Assouplissant
Note : certains types de détergents, par exemple les
poudres concentrées, sont difficiles à doser depuis les
bacs. Dans ces cas, nous vous recommandons
d’utiliser le doseur approprié que vous placerez à
l’intérieur du tambour.
Ceci veille à ce que le détergent liquide soit uniquement dispersé dans le tambour
en fonction des besoins.
40000369French.qxd 18/09/2003 12:17 Page 52
Page 53

Détergents spéciaux
– Détergents pour les couleurs et le linge délicat, sans agents blanchissants
supplémentaires, souvent utilisés sans agents éclaircissants optiques, pour
préserver les couleurs.
– Les détergents sans agents blanchissants ou enzymes, pour un lavage en
profondeur, conviennent particulièrement aux lainages.
– Détergents pour les rideaux avec des agents éclaircissants optiques,
résistants à la lumière, pour empêcher le jaunissement au soleil.
– Détergents spéciaux pour une utilisation programmée de substances
chimiques, en fonction du type de tissu, du degré de saleté et de la dureté de
l’eau.
Ici, les détergents de base, assouplissants, agents blanchissants/détachants
peuvent être ajoutés séparément.
Aides de lavage supplémentaires
– Adoucissant, pour pouvoir utiliser moins de détergent là où l’eau est entre
dure et très dure.
– Substances de prélavage, pour le traitement programmé des taches avant le
lavage principal.
S’ils sont utilisés, le lavage suivant peut se faire à basse température ou avec
des détergents dépourvus d’agents blanchissants.
La machine est programmée de manière à absorber automatiquement les produits
complémentaires pendant le dernier rinçage de tous les cycles de lavage.
53
Note : veillez à ne placer les produits complémentaires,
comme les assouplissants, parfums, amidon, agents
éclaircissants, etc. que dans le troisième bac de dosage.
Détergents, aides de lavage et doses nécessaires
Choix de détergent
Détergents polyvalents
– Les détergents en poudre avec des agents blanchissants, pour un lavage en
profondeur, conviennent particulièrement aux programmes de lavage à haute
température (au moins 60°C), au linge très sale et taché.
– Les détergents liquides conviennent particulièrement bien aux taches
grasses, par exemple les produits cosmétiques, le gras, les traces de doigt etc.
Ces détergents ne conviennent pas au linge taché car ils ne contiennent pas
d’agents blanchissants.
– Détergents biologiques, les produits disponibles ne lavent pas tous en
profondeur.
40000369French.qxd 18/09/2003 12:17 Page 53
Page 54

54
– Assouplissant, pour empêcher l’accumulation statique sur les tissus
synthétiques et pour assouplir le linge.
Si vous avez un sèche-linge, les vêtements sont assouplis même sans utiliser
d’assouplissant.
Ne mettez pas de solvants dans la machine à laver !
Tenez les détergents et autres produits de lessive hors de portée des enfants.
Avant de verser le détergent, vérifier qu’il n’y a aucun corps étranger dans le bac
à détergent.
Le dosage recommandé figure généralement sur le paquet de détergent.
Respectez ces instructions !
Dosages
N’utilisez que des détergents qui conviennent à un lavage en machine.
Vous obtiendrez les meilleurs résultats possibles en utilisant un minimum de
produits chimiques, en tenant compte du degré de saleté du linge et en
sélectionnant soigneusement le type de détergent nécessaire.
La quantité de détergent à utiliser dépend :
- de la dureté de l’eau. En fonction de la dureté de l’eau et du type de détergent
utilisé, il est possible de réduire la quantité de détergent utilisé. Plus l’eau est
douce, moins vous avez besoin de détergent.
- du degré de saleté, il est possible de réduire la quantité de détergent utilisé
selon le degré de saleté. Utilisez moins de détergent pour le linge moins sale.
- de la quantité de linge, il est possible de réduire la quantité de détergent
lorsque vous lavez uniquement quelques articles. Pour les lots plus petits,
utilisez moins de détergent.
Les montants indiqués sur les paquets de détergent pour laver le linge délicat
reposent généralement déjà sur une petite quantité de linge.
Respectez les instructions de dosage !
Dosage pour le détergent en poudre
Pour des détergents de concentration normale à faible : pour le linge
moyennement sale, choisissez un programme sans prélavage.
Mettez le détergent dans le bac II.
Pour le linge très sale, sélectionnez un programme avec prélavage.
Placez 1/4 du détergent dans le bac I et 3/4 dans le bac II.
Lorsque vous utilisez un adoucissant, placez tout d’abord le détergent puis
l’adoucissant dans le bac II.
Pour les détergents très concentrés qui ne sont pas vendus par doses unitaires,
respectez scrupuleusement les instructions qui figurent sur le paquet pour
déterminer le type et la dose de détergent nécessaires.
40000369French.qxd 18/09/2003 12:17 Page 54
Page 55

Pour éviter la difficulté d’avoir à vérifier si le détergent a été absorbé ou non,
utilisez les doseurs qui accompagnent votre détergent.
Dosage de détergent liquide
Les détergents liquides peuvent être utilisés conformément aux instructions qui
figurent sur le paquet, pour tous les programmes sans prélavage, en utilisant le
doseur recommandé que vous placerez dans le tambour.
Sélecteur de programmes
La machine à laver a différents groupes de programmes selon le type de lavage,
la température, la vitesse d’essorage et la durée, pour différents types de textiles
et leur degré de saleté (voir le guide de programmation).
1. COTON
Les programmes sont conçus pour un lavage et un rinçage maximum. Les
cycles d’essorage garantissent un rinçage parfait de la lessive. Le dernier
cycle d’essorage veille à ce que la lessive soit essorée le plus possible, à
concurrence de la vitesse maximale.
2. SYNTHETIQUES
La performance de lavage et de rinçage est optimisée par les vitesses de
rotation du tambour et les niveaux d’eau. L’essorage délicat réduit les
froissements.
3. LINGE DELICAT
Il s’agit d’un nouveau concept dans le lavage, avec un cycle qui comprend
des périodes alternées d’activité et de repos, cela convient particulièrement
au lavage des tissus très délicats tels que la laine vierge.
Les programmes pour les lainage sont conçus pour assurer un lavage
maximum à la température qui convient le mieux à vos lainages et à leur
degré de saleté. Veillez à toujours lire l’étiquette d’entretien des vêtements
pour déterminer la température de lavage recommandée.
Le lavage et le rinçage se font en utilisant davantage d’eau pour obtenir les
meilleurs résultats possibles.
4. PROGRAMMES SPECIAUX
i) PROGRAMME SPECIAL AA à 40°C
Ce programme spécial a été étudié pour vous permettre d’obtenir la meilleure
performance de lavage possible, même en pleine charge, comme c’est le cas
du programme Coton à 60°C (le cycle habituel) mais avec le double avantage
de :
- pouvoir laver le coton et les fibres mixtes dans le même cycle
- économiser de l’énergie en raison d’une température de 40°C plutôt que
60°C.
55
40000369French.qxd 18/09/2003 12:17 Page 55
Page 56

56
ii) EXPRESS 44' – 29'
– PROGRAMMES RAPIDES
Tout en maintenant une performance de lavage exceptionnelle, ces
programmes vous permettent de connaître d’avance le temps qu’il vous
faudra pour faire votre lessive quotidienne. En fait, cette machine à laver est
équipée de deux programmes rapides quotidiens à 40°C, qui ont été étudiés
spécialement pour :
- les tissus légèrement sales ;
- un lot moyen ou petit.
EXPRESS 40°C – RAPIDE 29
'
Un cycle de lavage complet (lavage, rinçage et essorage) capable de laver en
environ 29 minutes :
- un lot maximum de 2 kg ;
- des tissus légèrements sales (coton et fibres mixtes).
Avec ce programme, nous vous recommandons d’utiliser une dose de
détergent de 20 % (par rapport à la dose habituelle) pour éviter le gaspillage
de détergent.
EXPRESS 40°C – RAPIDE 44'
Un cycle de lavage complet (lavage, rinçage et essorage) capable de laver en
environ 44 minutes :
- un lot maximum de 3,5 kg ;
- des tissus légèrement sales (coton et fibres mixtes).
Avec ce programme, nous vous recommandons d’utiliser une dose de
détergent de 30 % (par rapport à la dose habituelle) pour éviter le gaspillage
de détergent.
iii) LAVAGE MAIN
Cette machine à laver est également équipée d’un programme de Lavage à
la main. Ce programme vous permet d’effectuer un cycle de lavage complet
pour les vêtements qui exigent d’être lavés à la main.
Le programme a une température maximum de 30°C et se termine par 2
rinçages, dont un pour l’assouplissant, et un essorage rapide.
iv) SPORT
La machine à laver est équipée d’un programme Sport unique.
Elle est spécialement conçue pour laver des vêtements de sport de fibres
mixtes qui ne peuvent pas être lavés à haute température et elle est conçue
pour éliminer les saletés et les taches résultant des activités sportives.
Ce programme commence par un prélavage à froid qui décompose et détache
la saleté, lave à 30°C, rince deux fois (une fois pour l’assouplissant) et essore
lentement pour l’entretien optimal de vos vêtements délicats et très sales.
Grâce à Hoover, les vêtements de sport ont désormais leur propre
programme d’entretien.
40000369French.qxd 18/09/2003 12:17 Page 56
Page 57

Demi-charge automatique
La machine à laver est munie d’un système de niveau d’eau auto-réglable. Ce
système permet à la machine d’utiliser la quantité optimale d’eau nécessaire pour
laver et rincer le linge, pour une charge particulière. Ceci entraîne une réduction
de la consommation d’eau et d’électricité sans toutefois compromettre la
performance de lavage et de rinçage.
En fait, la quantité d’eau et d’électricité utilisée convient toujours aux charges de
vêtements.
La machine à laver veille automatiquement à donner d’excellents résultats de
lavage à un coût minimal, tout en respectant l’environnement.
Tri du linge
– Nous vous recommandons de ne laver que les articles qui peuvent être lavés
avec de l’eau et du détergent et non pas ceux qui exigent un nettoyage à sec.
– Si vous devez laver des tapis, couvre-lits et autres articles lourds, nous vous
conseillons de ne pas les essorer.
– Triez le linge selon le type de tissu, le degré de saleté et la température de
lavage : suivez les instructions qui figurent sur l’étiquette d’entretien des
vêtements.
Exemples :
Linge pour une lessive à haute température
Couleurs, tissus d’entretien facile
Linge délicat et lainages
– Les articles dont l’étiquette d’entretien comporte les symboles suivants ne
peuvent pas être lavés en machine :
Nettoyage à sec
Pour les articles très délicats, comme les rideaux de tulle, les sousvêtements, les collants, etc., nous vous conseillons d’utiliser un filet à lessive
ou un sac de lavage.
– Pour convenir à un lavage à la machine les articles en laine doivent
comporter le symbole “Laine Vierge”, ils doivent aussi comporter l’étiquette
“résistant au feutrage” ou “lavable en machine”.Vérifiez l’étiquette d’entretien
des articles à laver.
– Les couleurs des nouveaux articles déteignent souvent.
Les couleurs peuvent parfois déteindre sur d’autres articles plus pâles.
Nous vous recommandons par conséquent de laver les couleurs séparément
pour la première fois.
Pour les lavages ultérieurs, les couleurs résistantes peuvent uniquement être
lavées avec du linge blanc à une température maximale de 40°C.
Ne pas laver
57
40000369French.qxd 18/09/2003 12:17 Page 57
Page 58

Note : pendant le tri du linge
– vérifiez qu’il n’y a aucun objet métallique dans
le linge (comme par exemple des trombones,
des épingles à nourrice, des pièces de monnaie
etc…) ; En cas de panne de la machine
causée par des objets étrangers, pendant la
période de garantie, il se peut que le coût de
l’intervention du réparateur soit facturé.
– boutonnez les taies d’oreiller, fermez les
fermetures éclair, accrochez les oeillets et
crochets, nouez les ceintures et les cordes
des peignoirs de bain ;
– enlevez les crochets de rideaux ;
– portez tout particulièrement attention aux
étiquettes d’entretien ;
– si vous trouvez des taches tenaces alors que
vous triez le linge, enlevez ces taches à l’aide
d’un détergent ou d’un détachant spécial.
58
– Nous ne recommandons pas le lavage d’une charge complète d’articles en tissu
éponge, car ceux-ci absorbent énormément d’eau et risquent de devenir trop
lourds pour le tambour.
La bonne méthode de lavage
Préparer le linge
A) Sélectionnez et triez le linge selon les instructions qui figurent sur les étiquettes
d’entretien de chaque vêtement. Vérifiez toujours les étiquettes d’entretien.
Mettre le linge dans la machine
B) Ouvrez la porte.
C) Placez le linge dans la machine à laver. Refermez la porte, en veillant à ce
qu’aucun article de linge n’obstrue le verrouillage ou le joint étanche de la porte.
Mettez le détergent dans la machine
D) Ouvrez le compartiment, sélectionnez le
détergent et mettez-en la dose qui
convient, selon les instructions du
fabricant et les conseils prodigués sous la
rubrique “Détergents” de ce manuel.
Ajoutez les autres aides de lavage (voir
page 20). Refermez le compartiment.
Les détergents liquides qui sont placés
directement dans le tambour doivent être
mis dans les doseurs recommandés.
Poudre à laver
principale
Poudre de
prélavage
Assouplissant
40000369French.qxd 18/09/2003 12:17 Page 58
Page 59

59
Sélectionner le programme de lavage
Consultez le guide de programmation ou les descriptions des programmes à
l’avant de la machine pour sélectionner le programme qui vous convient le mieux.
Sélectionnez le programme en tournant le sélecteur de programmes dans le sens
des aiguilles d’une montre et en alignant le numéro du programme sur
l’indicateur.
Vérifiez que le robinet est ouvert et que le tuyau d’évacuation est bien en place.
Appuyez sur les boutons de fonction supplémentaires si vous le souhaitez.
Appuyez sur le bouton Départ/Pause. Le témoin Porte Sécurisée s’allume et le
programme commence.
Lorsque le programme est terminé :
– le témoin Porte Sécurisée est allumé et l’affichage indique “PORTE
VERROUILLEE, VEUILLEZ PATIENTER AVANT D’OUVRIR”.
– le témoin lumineux Porte Sécurisée s’éteint (la porte n’est plus sécurisée) et
l’affichage indique “PROGRAMME TERMINE, SORTEZ LE LINGE”.
– Mettez la machine à l’arrêt en tournant le bouton de commande à sa position
d’“Arrêt”.
– Ouvrez la porte et sortez le linge.
Débranchez la machine du courant de secteur et coupez l’alimentation en eau
après chaque usage.
40000369French.qxd 18/09/2003 12:17 Page 59
Page 60

Guide de programmation
60
PROGRAMME TYPE DE TISSU PROGRAMME POUR
CHARGE
TEMP DETERGENT
D’EAU
°C
III
Blanc Couleurs résistantes Intensif – 7 90°
** *
1 Coton, toile, chanvre très sale
Couleurs Coton, fibres mixtes Intensif – 7 60°
**
2 grand teint Couleurs grand teint très sale
Couleurs non Coton, fibres mixtes Normalement sale 7 40°
**
3 résistantes Couleurs non résistantes
Couleurs non Coton, fibres mixtes Normalement sale 7 30°
**
4 résistantes Couleurs non résistantes
Couleurs non Coton, fibres mixtes Normal-légèrement sale, 7 15°
**
5 résistantes Couleurs non résistantes couleurs délicates (froid)
Fibres Très sale 2,5 60°
**
6 mixtes
Couleurs Fibres mixtes, coton, Très sale 2,5 50°
**
7 synthétiques
Acrylique Synthétiques (nylon), Normalement sale 2,5 40°
**
8 couleurs mixtes
Acrylique Synthétiques (nylon), Normal-légèrement 2,5 30°
**
9 couleurs mixtes sale
Acrylique Synthétiques (nylon), Normal-légèrement 2,5 15°
**
10
couleurs mixtes sale (froid)
Linge
Linge délicat, synthétiques
Linge délicat
1 40°
**
11
délicat
& fibres mixtes
légèrement sale
Lainages
Légèrement sale
1 30°
**
12
Lainages
Légèrement sale
1 15°
**
13 (froid)
_ Rinçage Fibres mixtes Rinçage approfondi 7 _
**
14
_ Essorage Fibres mixtes Essorage de haute 7 _
*
15 vitesse
Lainages lavables en
machine , articles
très délicats, lainages
synthétiques
Fibres mixtes et tissus
synthétiques, fibres mixtes
aux couleurs grand teint
40000369ProgGuideFR.qxd 18/09/2003 12:25 Page 60
Page 61

61
Guide de programmation
PROGRAMME TYPE DE TISSU PROGRAMME POUR
CHARGE
TEMP DETERGENT
D’EAU
°C
III
Vidange Fibres mixtes Eau vidangée du 7 _
16 tambour sans essorage
Spécial AA Cotons, Economies d’énergie 7 40°
**
17 Fibres mixtes à 40°C
Express Cotons, Légèrement sale 3,5 40°
**
18 44
'
Fibres mixtes
Express Cotons, Légèrement sale 2 40°
**
19 29
'
Fibres mixtes
Lavage Fibres mixtes, Vêtements Lavage main du 2,5 30°
**
20 Main “lavage main uniquement” linge délicat
Sport Fibres mixtes Lavage approfondi 2,5 30°
** *
21 des petits lots
Points importants :
Lorsque vous lavez du linge très sale, nous vous recommandons de limiter le poids de
la charge d’1 ou 1,5 kg. Ce faisant, le linge pourra circuler plus librement.
Données de l’étiquette énergétique reposant sur le programme 2 et testées
conformément à EN60456.
40000369ProgGuideFR.qxd 18/09/2003 12:25 Page 61
Page 62
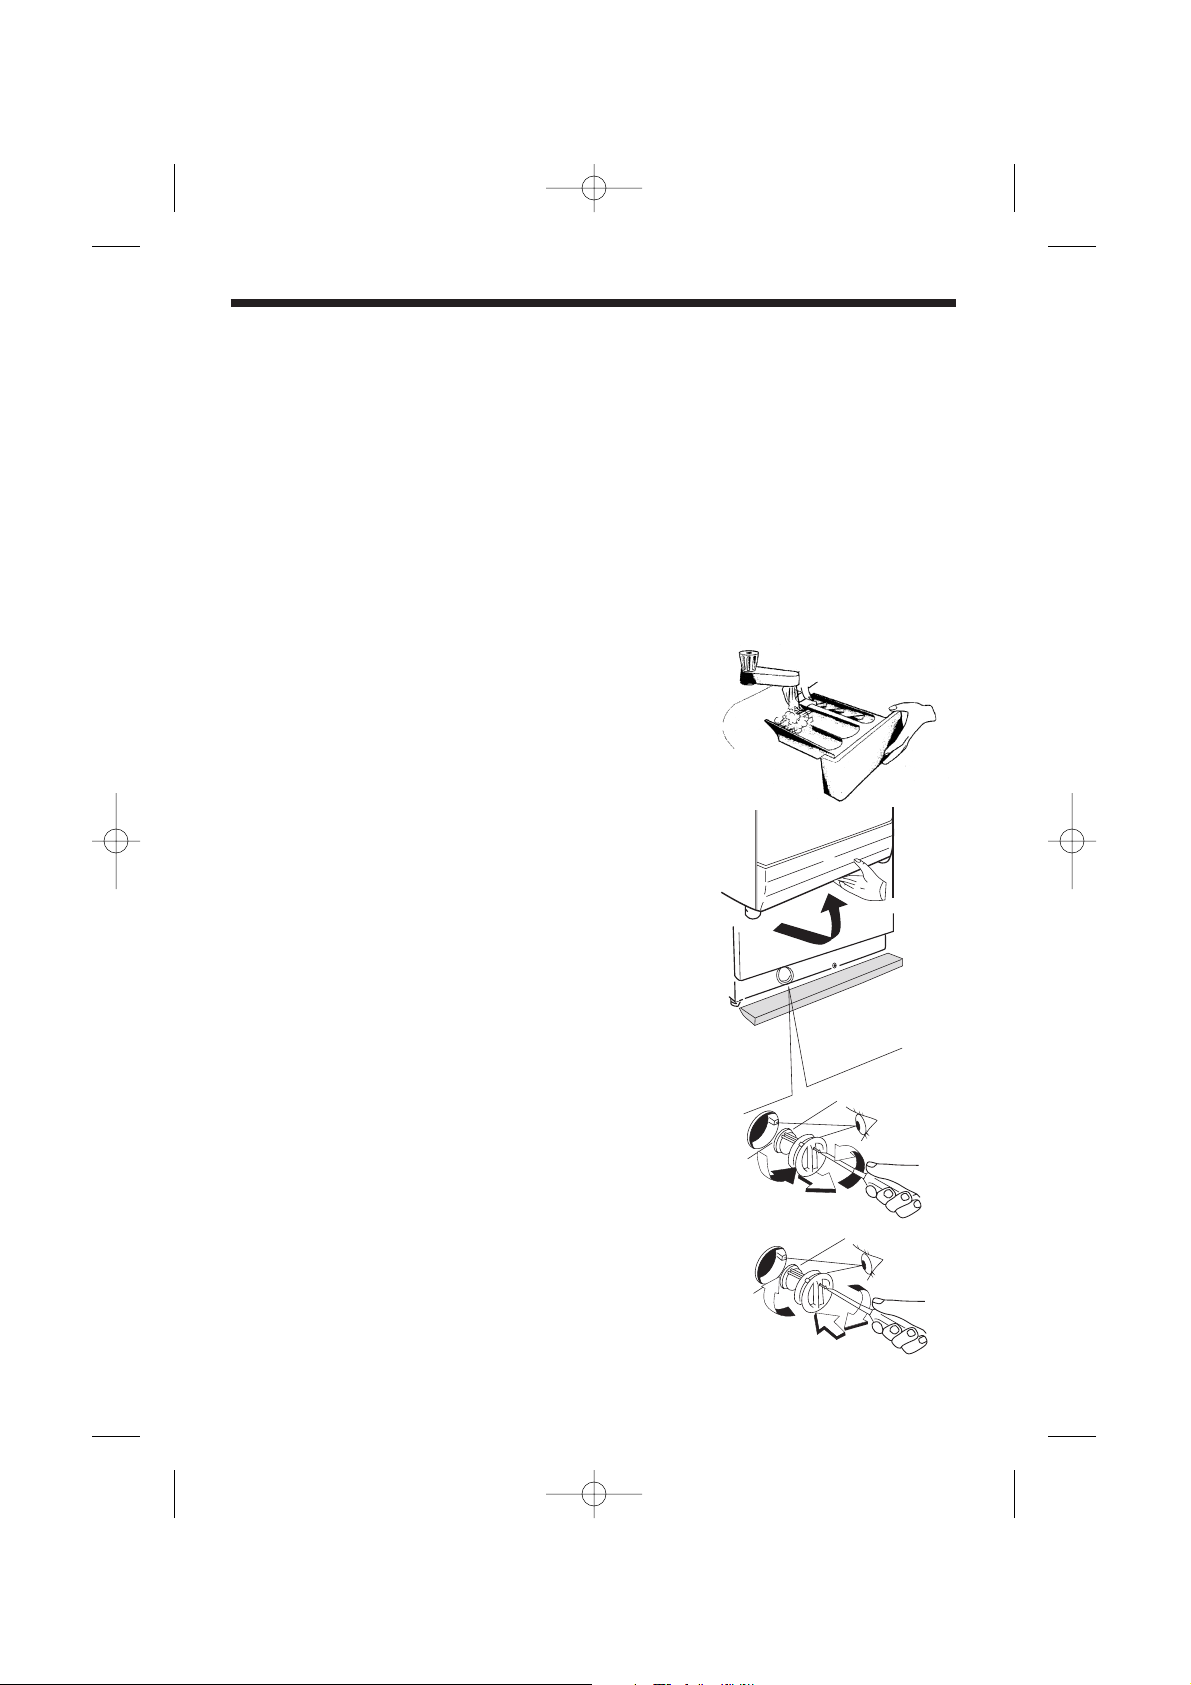
Nettoyage et entretien routiniers
N’utilisez pas de tampons à récurer à l’alcool / diluants sur la surface
extérieure de votre machine à laver. Il vous suffit de la frotter à l’aide d’un
chiffon humide. La machine à laver n’exige que très peu d’entretien :
– Nettoyez les bacs du compartiment à détergent.
– Nettoyez le filtre.
– Nettoyage du verre de la porte.
Nettoyage du compartiment à détergent
Nettoyez de temps en temps les bacs pour éliminer les détergents et les additifs.
A) Il vous suffit pour cela de tirer fermement sur
le compartiment, mais sans le forcer.
B) Passez les bacs et le bouchon
du siphon sous l’eau.
C) Remettez le compartiment en place.
Nettoyage du filtre
La machine à laver est équipée d'un filtre
spécial pour éviter que des objets,
comme des pièces, des boutons, etc.
ne bloquent le tuyau d'évacuation. Ils
peuvent être récupérés en procédant
comme suit :
1. Enlevez la plinthe en la tirant
doucement du bas, par un
mouvement de haut en bas.
2. Utilisez la plinthe pour récupérer
l'eau qui se trouve toujours dans le
filtre.
3. A l'aide d'un tournevis desserrez la vis
qui retient le filtre; tournez le filtre
Tournez le filtre à fond dans le sens
contraire des aiguilles d'une montre et
nettoyez-le.
Après l'avoir nettoyé, remontez-le en suivant
les instructions ci-dessus dans le sens inverse.
Remettez la plinthe en place.
Nous vous recommandons de nettoyer le filtre
régulièrement, au moins une fois par mois.
62
40000369French.qxd 18/09/2003 12:17 Page 62
Page 63
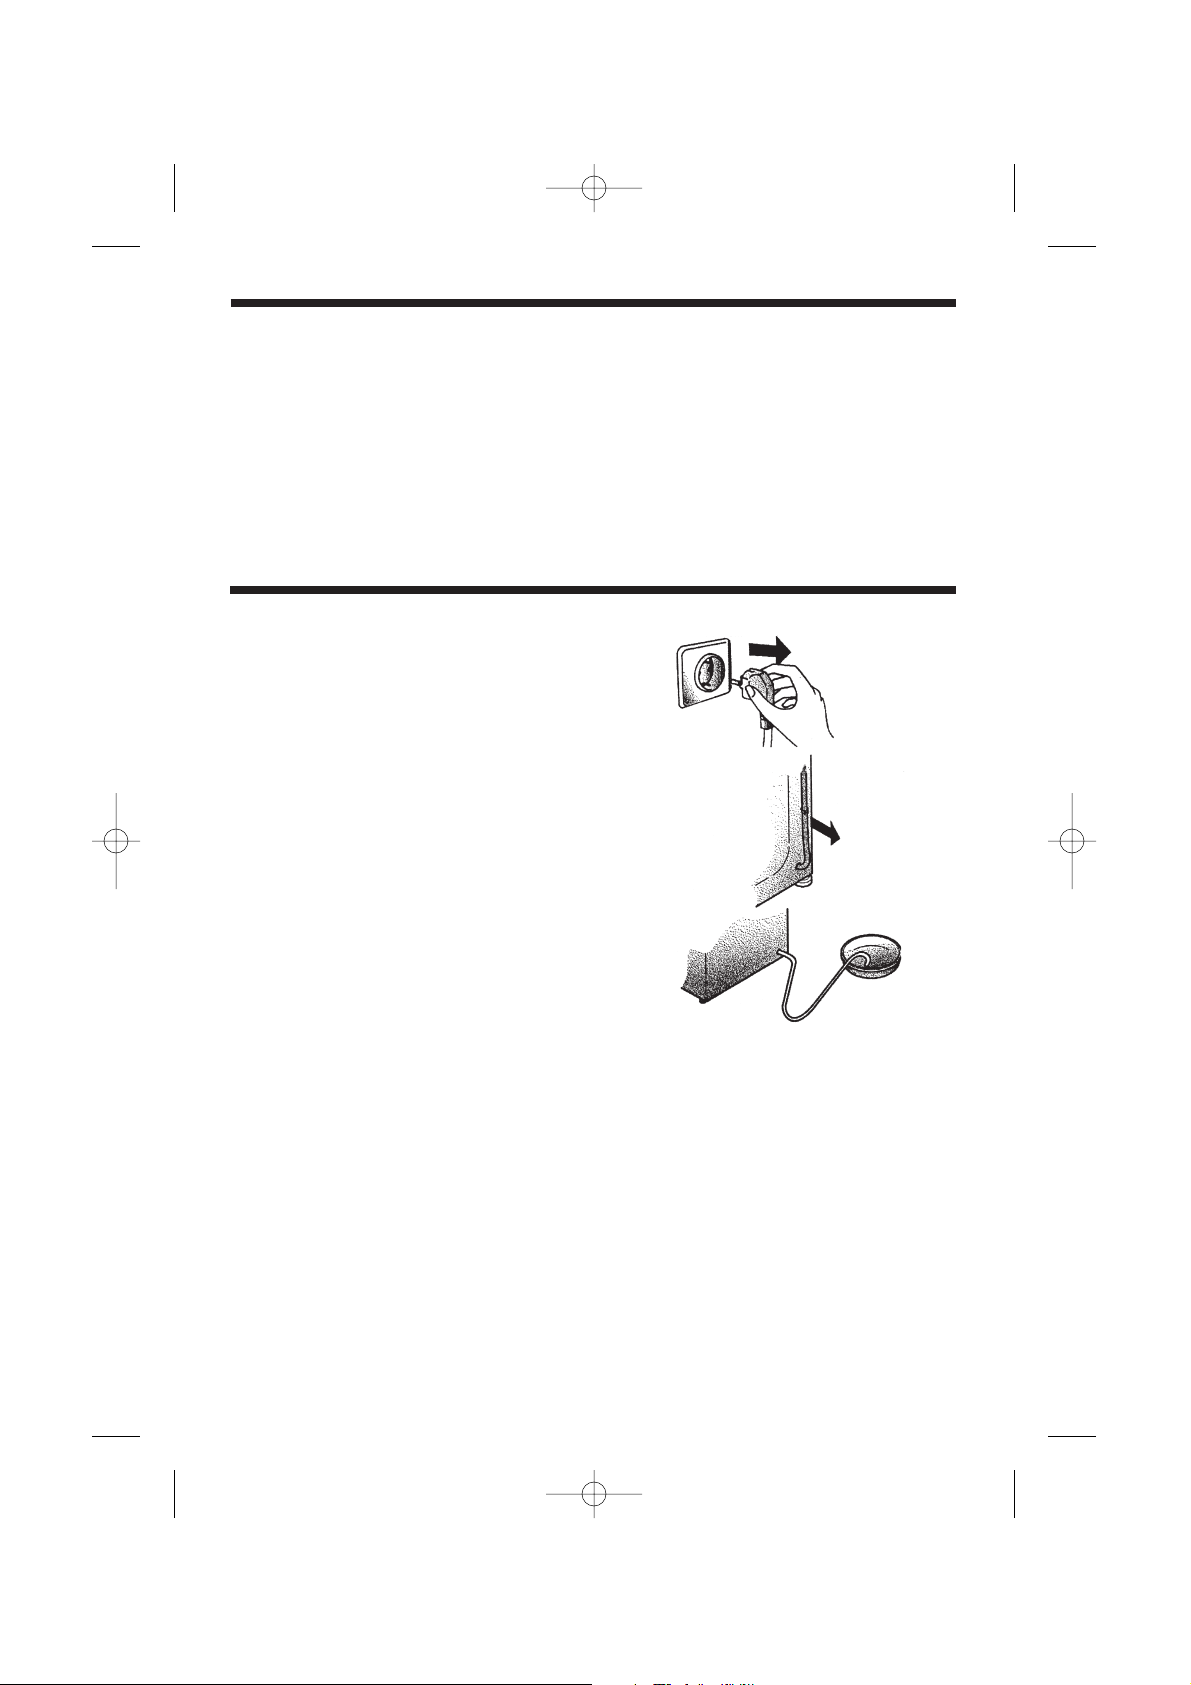
Transport ou entreposage de la
machine pendant des périodes
prolongées lorsqu’elle est hors
d’usage
Pour transporter la machine ou si elle est hors
service pendant des périodes prolongées et
dans un endroit qui n’est pas chauffé, veillez à
ce que toute l’eau soit complètement évacuée
des tuyaux.
Vérifiez que la prise électrique est débranchée,
détachez le tuyau d’évacuation et posez-le
dans une bassine, par terre, jusqu’à ce que
toute l’eau soit évacuée.
Pour transporter la machine, remettez le
support de transit, la vis centrale et les vis
latérales.
63
Nettoyage du verre de la porte
Nettoyez régulièrement le verre de la porte avec un chiffon humide. Une
accumulation de particules et de résidus aqueux peut entraîner des fuites d'eau
au niveau de la porte.
Ne pas utiliser de produits de nettoyage abrasifs pour éviter de rayer la surface.
40000369French.qxd 18/09/2003 12:17 Page 63
Page 64

Dépistage de pannes
Quelle pourrait être l’origine de...
Défauts que vous pouvez rectifier vous-même
Avant d’appeler le service technique pour obtenir des conseils, veuillez suivre la
liste des vérifications ci-dessous. L’intervention sera facturée si la machine
fonctionne correctement ou si elle a été installée ou utilisée de manière
incorrecte. Si, après avoir effectué les contrôles recommandés, le problème
persiste, appelez le Service d’entretien, il sera peut-être possible de vous aider
par téléphone.
64
CAUSE
La fiche n’est pas branchée sur la prise.
N’est pas en marche.
Panne de courant.
Le fusible a sauté.
La porte est ouverte.
Dispositif de courant résiduel déclenché.
Le départ différé a-t-il été configuré ?
Voir la cause 1.
L’alimentation en eau est fermée.
Le sélecteur de programmes n’est pas
correctement positionné.
Le tuyau d’évacuation est coudé.
Corps étrangers dans le filtre.
La machine n’a pas été installée
correctement.
Fuite du joint entre le robinet et le tuyau
d’admission d’eau.
Partie d’un vêtement ou saleté coincée
entre le joint en caoutchouc de la porte
et le verre de la porte.
Plomberie incorrecte.
L’eau n’a pas encore été évacuée.
Option “annuler l’essorage” sélectionnée
(sur certains modèles uniquement).
Charge mal équilibrée.
La machine à laver n’est pas
complètement à niveau.
La charge n’est pas distribuée
uniformément.
Les supports de transit n’ont pas été
enlevés.
Deux minutes ne se sont pas écoulées
depuis la fin du programme.
–
Pas de remplissage d’eau.
Pas de pompage.
Trop-plein d’eau dans la machine.
PROBLEME
1. Ne fonctionne pas quel que soit le
programme
2. Ne se remplit pas d’eau
3. L’eau ne s’évacue pas
4. Eau par terre autour de la machine à
laver
5 N’essore pas
6. La machine vibre beaucoup pendant
l’essorage
7. La porte ne s’ouvre pas
8. L’affichage indique l’erreur :
0,1,5,7,8,9
9. L’affichage indique l’erreur 2
10. L’affichage indique l’erreur 3
11. L’affichage indique l’erreur 4
REMEDE
Branchez-la.
Mettez-la en marche.
Vérifiez et consultez la section “Panne
de courant”.
Vérifiez.
Fermez la porte.
Réinitialisez l’interrupteur de protection
contre les courants de courts-circuits.
Vérifiez.
Vérifiez.
Ouvrez l’alimentation en eau.
Tournez le sélecteur de programmes
correctement.
Redressez le tuyau d’évacuation.
Consultez la rubrique “Nettoyage et
entretien”.
Vérifiez l’installation.
Remettez le joint en place et serrez la
connexion.
Rechargez la machine et vérifiez que
le joint en plastique de la porte/le verre
de la porte est propre.
Vérifiez la plomberie.
Attendez quelques minutes que la
machine se vide.
Vérifiez.
Réorganisez la charge uniformément.
Ajustez le pied réglable spécial.
Réorganisez le linge uniformément.
Retirez les supports de transit. (Voir la
section “Installation”.)
Attendez deux minutes.
Appelez le service technique.
Vérifiez que les robinets d’eau sont
bien ouverts.
Vérifiez que le tuyau d’évacuation n’est
pas obstrué.
Vérifiez que le tuyau d’évacuation n’est
pas coudé.
Coupez l’alimentation en eau de la
machine. Appelez le service technique.
40000369French.qxd 18/09/2003 12:17 Page 64
Page 65

Il est peu probable que l’eau soit visible dans le
tambour ! Ceci résulte de la toute dernière technologie
qui atteint le même degré de lavage et de rinçage mais
avec une consommation en eau bien inférieure.
65
Note :
L’utilisation de détergents écologiques sans phosphate (voir les informations qui
figurent sur le paquet) peut avoir les effets suivants :
– les eaux évacuées peuvent être moins claires, ceci à cause de la présence
d’une poudre blanche (zéolites) tenue en suspension, sans impact négatif sur
la performance ;
– la présence d’une poudre blanche sur le linge après le lavage, qui n’est pas
absorbée par le tissu et qui ne change pas la couleur du tissu.
– La présence de mousse dans la dernière eau de rinçage n’est pas
nécessairement signe d’un mauvais rinçage.
– Dans ces cas, il est inutile de recommencer les cycles de rinçage.
Coupure de courant
En cas de panne de courant, le cycle de lavage est interrompu, le programme de
lavage et les fonctions sont suspendus.
Lorsque le courant est rétabli, le programme et les fonctions de lavage
recommencent là où ils s’étaient arrêtés et le programme s’achève.
Il est possible de sortir le linge pendant une panne de courant, en procédant
comme suit :
L’eau peut être évacuée de la machine en procédant comme suit :
1. Mettez la machine à l’arrêt par le biais du bouton de commande et du courant
de secteur. Débranchez la machine du courant de secteur.
2. Déplacez doucement la machine de manière à pouvoir accéder à l’arrière de
la machine. Veuillez respecter les précautions de sécurité que nous
recommandons dans la section “notes de sécurité” de ce manuel.
3. Détachez le tuyau d’évacuation du panneau arrière de la machine et placez le
tuyau dans une bassine, par terre.
Important : il se peut que l’eau soit très chaude !
40000369French.qxd 18/09/2003 12:17 Page 65
Page 66

66
Lorsque la bassine est pleine, soulevez l’extrémité du tuyau d’évacuation à
une hauteur supérieure à celle de la machine, pour arrêter le débit d’eau.
Videz la bassine, remettez-la en place et continuez de vider la machine
jusqu’à ce qu’elle soit vide.
4. Lorsqu’il n’y a plus d’eau dans la machine, attachez le tuyau à l’arrière de la
machine. Appuyez sur le bouton Porte et sortez le linge.
Vous pouvez ouvrir la porte environ 2 minutes après la panne de courant en
appuyant simplement sur le bouton d’ouverture de porte. Ne forcez pas la porte à
s’ouvrir.
Important : il se peut que l’eau et le linge soient très
chauds !
Données techniques
•
Charge maxi de linge sec 7 kg
•
Pression d’eau (0,5-8 bar)
0,05-0,8 MPa
•
Vitesse d’essorage maxi : 1200 tr/mn (HF7 12 I)
maxi : 1400 tr/mn (HF7 14 I)
maxi : 1600 tr/mn (HF7 16 I)
Dimensions
•
Largeur 59,5 cm
•
Profondeur 65 cm
•
Hauteur 85 cm
NB : Pour les spécifications concernant les données électriques, veuillez
consulter la plaque technique à l’avant de la machine (sur la porte). Vous devrez
également consulter les informations qui figurent sur cette plaque au cas où vous
auriez besoin de contacter le service technique.
40000369French.qxd 18/09/2003 12:17 Page 66
Page 67

Service clientèle
La machine est couverte par un certificat de garantie qui vous confère un usage
gratuit du service de support technique de Hoover, à l’exception du coût de
l’appel, pendant une période d’un an à compter de la date d’achat. Souvenezvous d’envoyer le certificat de garantie dans un délai de 10 jours à compter de la
date d’achat pour le faire valider.
Veillez à conserver le reçu du vendeur pour le montrer au technicien au cas où
vous auriez besoin d’en consulter un.
Si votre machine à laver présente des signes de panne ou si elle ne fonctionne
pas correctement, avant de contacter le service technique nous vous
recommandons de procéder aux vérifications figurant sous la rubrique “Dépistage
de pannes”.
Si le problème persiste après avoir effectué toutes les vérifications
recommandées, veuillez contacter le service technique de Hoover.
Pour le coût d’un appel téléphonique, vous serez mis en communication directe
avec le service de support de Hoover. Il est important que vous donniez le
numéro du modèle et le numéro de série de la machine au conseiller.Vous les
trouverez sur l’étiquette (16 caractères, commençant par le numéro 3) qui figure à
l’avant de la machine à laver (sur la porte). Vous pourrez ainsi recevoir une
réponse plus efficace.
67
40000369French.qxd 18/09/2003 12:17 Page 67
Page 68

The manufacturer declines all responsibility in the event of any printing mistakes
in this booklet. The manufacturer also reserves the right to make appropriate
modifications to its products without changing the essential characteristics.
Le constructeur décline toute responsabilité en cas d’erreurs d’impression dans le
présent document. Le constructeur se réserve le droit d’apporter les modifications
nécessaires à ses produits sans en changer les caractéristiques de base.
40000369 ® Registered Trade Mark
40000369.qxd 18/09/2003 11:43 Page 35
 Loading...