

Page 1
HES 6DHES 62
Thank you for purchasing the HOOVER induction hob. Please read this instruction manual
carefully before using the hob and keep it in a safe place for future reference.
OCAKLAR
KULLANIM VE KURULUM TALİMATLARI
INDUKČNÁ VARNÁ DOSKA
S K
T
INDUKČNÍ VARNÁ DESKA
C Z
S I
Indukcijska kuhalna plošča
Návod na obsluhu
Návod k obsluze
Navodila za uporabo
I T
Piani cottura
Istruzioni
per
l’uso
ed
istallazione
Page 2
Safety Warnings
Your safety is important to us. Please read this
information before using your hob.
Installation
Electrical Shock Hazard
• Disconnect the appliance from the mains
electricity supply before carrying out any work
or maintenance on it.
• Connection to a good earth wiring system is
essential and mandatory.
• Alterations to the domestic wiring system must
only be made by a qualified electrician.
• Failure to follow this advice may result in
electrical shock or death.
Cut Hazard
• Take care - panel edges are sharp.
• Failure to use caution could result in injury or
cuts.
Important safety instructions
• Read these instructions carefully before
installing or using this appliance.
• No combustible material or products should be
placed on this appliance at any time.
• Please make this information available to the
person responsible for installing the appliance
EN-1
Page 3
as it could reduce your installation costs.
• In order to avoid a hazard, this appliance must
be installed according to these instructions for
installation.
• This appliance is to be properly installed and
earthed only by a suitably qualified person.
• This appliance should be connected to a circuit
which incorporates an isolating switch
providing full disconnection from the power
supply.
• Failure to install the appliance correctly could
invalidate any warranty or liability claims.
Operation and maintenance
Electrical Shock Hazard
• Do not cook on a broken or cracked hob surface.
If the hob surface should break or crack, switch
the appliance off immediately at the mains power
supply (wall switch) and contact a qualified
technician.
• Switch the hob off at the wall before cleaning or
maintenance.
• Failure to follow this advice may result in
electrical shock or death.
Health Hazard
• This appliance complies with electromagnetic
safety standards.
• However, persons with cardiac pacemakers or
EN-2
Page 4
other electrical implants (such as insulin
pumps) must consult with their doctor or
implant manufacturer before using this
appliance to make sure that their implants will
not be affected by the electromagnetic field.
• Failure to follow this advice may result in death.
Hot Surface Hazard
• During use, accessible parts of this appliance
will become hot enough to cause burns.
• Do not let your body, clothing or any item other
than suitable cookware contact the Induction
glass until the surface is cool.
• Beware: magnetisable metal objects worn on
the body may become hot in the vicinity of the
cooktop. Gold or silver jewellery will not be
affected.
• Keep children away.
• Handles of saucepans may be hot to touch.
Check saucepan handles do not overhang other
cooking zones that are on. Keep handles out of
reach of children.
• Failure to follow this advice could result in
burns and scalds.
Cut Hazard
• The razor-sharp blade of a hob surface scraper
is exposed when the safety cover is retracted.
Use with extreme care and always store safely
EN-3
Page 5

and out of reach of children.
• Failure to use caution could result in injury or
cuts.
Important safety instructions
• Never leave the appliance unattended when in
use. Boilover causes smoking and greasy
spillovers that may ignite.
• Never use your appliance as a work or storage
surface.
• Never leave any objects or utensils on the
appliance.
• Do not place or leave any magnetisable objects
(e.g. credit cards, memory cards) or electronic
devices (e.g. computers, MP3 players) near the
appliance, as they may be
affected by its electromagnetic field.
• Never use your appliance for warming or
heating the room.
• After use, always turn off the cooking zones
and the hob as described in this manual(i.e. by
using the touch controls). Do not rely on the
pan detection feature to turn off the cooking
zones when you remove the pans.
• Do not allow children to play with the appliance
or sit, stand, or climb on it.
• Do not store items of interest to children in
cabinets above the appliance. Children
EN-4
Page 6
climbing on the hob could be seriously injured.
• Do not leave children alone or unattended in
the area where the appliance is in use.
• Children or persons with a disability which
limits their ability to use the appliance should
have a responsible and competent person to
instruct them in its use. The instructor should
be satisfied that they can use the appliance
without danger to themselves or their
surroundings.
• Do not repair or replace any part of the
appliance unless specifically recommended in
the manual. All other servicing should be done
by a qualified technician.
• Do not use a steam cleaner to clean your hob.
• Do not place or drop heavy objects on your hob.
• Do not stand on your hob top.
• Do not use pans with jagged edges or drag pans
across the Induction glass surface as this can
scratch the glass.
• Do not use scourers or any other harsh
abrasive cleaning agents to clean your cooktop,
as these can scratch the Induction glass.
• If the power supply cable is damaged, it must
only be replaced by a qualified technician.
• This appliance is designed for domestic use
only.
• This appliance can be used by children aged
from 8 years and above and persons with
EN-5
Page 7
reduced physical, sensory or mental
capabilities or lack of experience and
knowledge if they have been given supervision
or instruction concerning use of the appliance
in a safe way and understand the hazards
involved. Children shall not play with the
appliance. Cleaning and user maintenance
shall not be made by children without
supervision.
• WARNING: Unattended cooking on a hob with
fat or oil can be dangerous and may result in
fire. NEVER try to extinguish a fire with water,
but switch off the appliance and then cover
flame e.g. with a lid or a fire blanket.
• Metallic objects such as knives, forks, spoons
and lids should not be placed on the hob
surface since they can get hot.
• After use, switch off the hob element by its
control and do not rely on the pan detector.
• The appliance is not intended to be operated by
means of an external timer or separate
remote-control system.
Congratulations
on the purchase of your new Induction Hob.
We recommend that you spend some time to read this Instruction / Installation
Manual in order to fully understand how to install correctly and operate it.
For installation, please read the installation section.
Read all the safety instructions carefully before use and keep this Instruction /
Installation Manual for future reference.
EN-6
Page 8
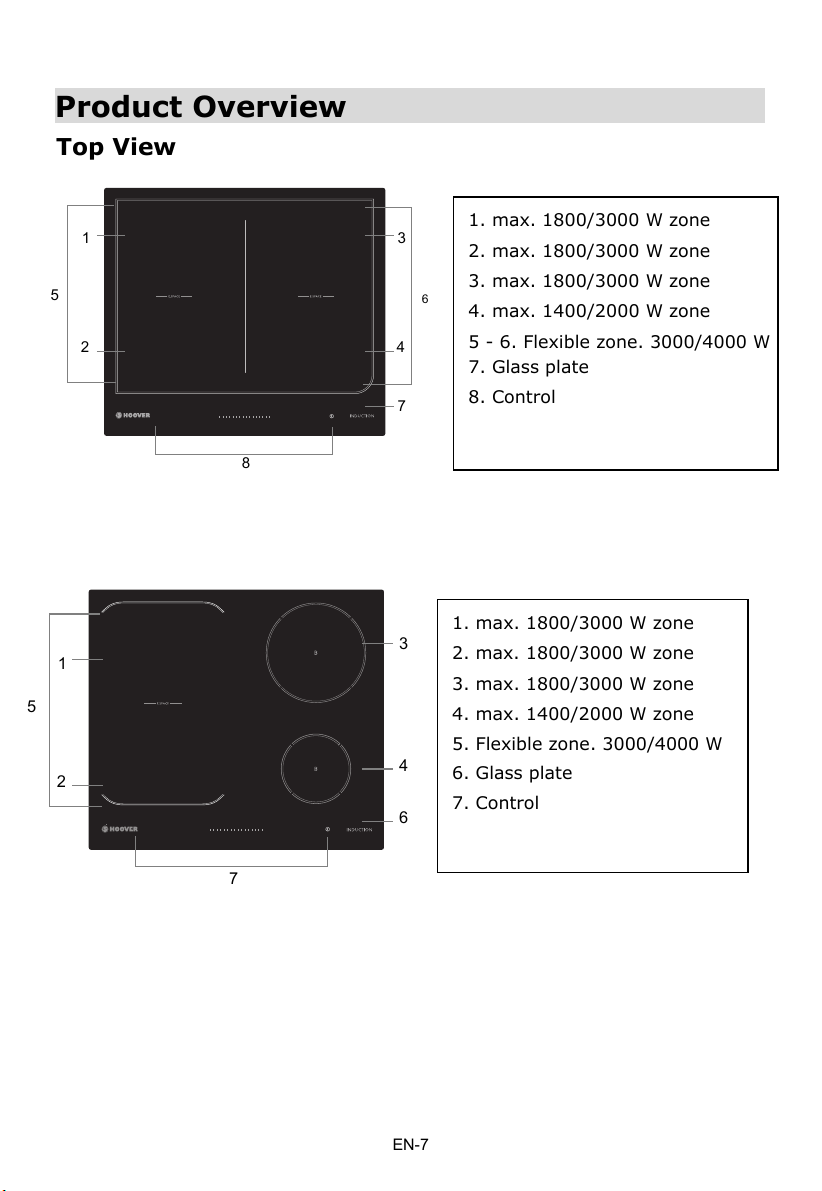
Product Overview
Top View
1. max. 1800/3000 W zone
2. max. 1800/3000 W zone
3. max. 1800/3000 W zone
4. max. 1400/2000 W zone
5. Flexible zone. 3000/4000 W
6. Glass plate
7. Control
1. max. 1800/3000 W zone
2. max. 1800/3000 W zone
3. max. 1800/3000 W zone
4. max. 1400/2000 W zone
5 - 6. Flexible zone. 3000/4000 W
7. Glass plate
8. Control
1
5
2
6
3
4
7
8
7
4
6
3
1
2
5
EN-7
Page 9
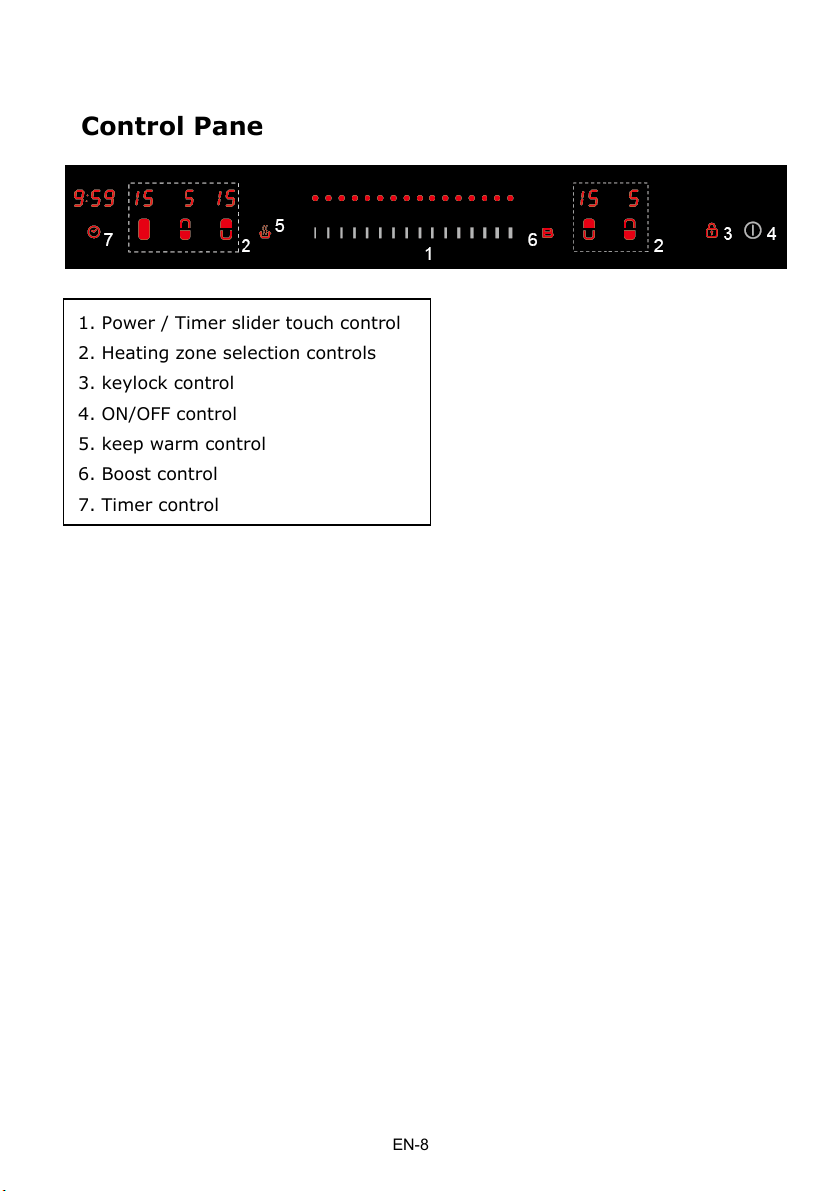
Control Pane
1. Power / Timer slider touch control
2. Heating zone selection controls
3. keylock control
4. ON/OFF control
5. keep warm control
6. Boost control
7. Timer control
EN-8
Page 10
A Word on Induction Cooking
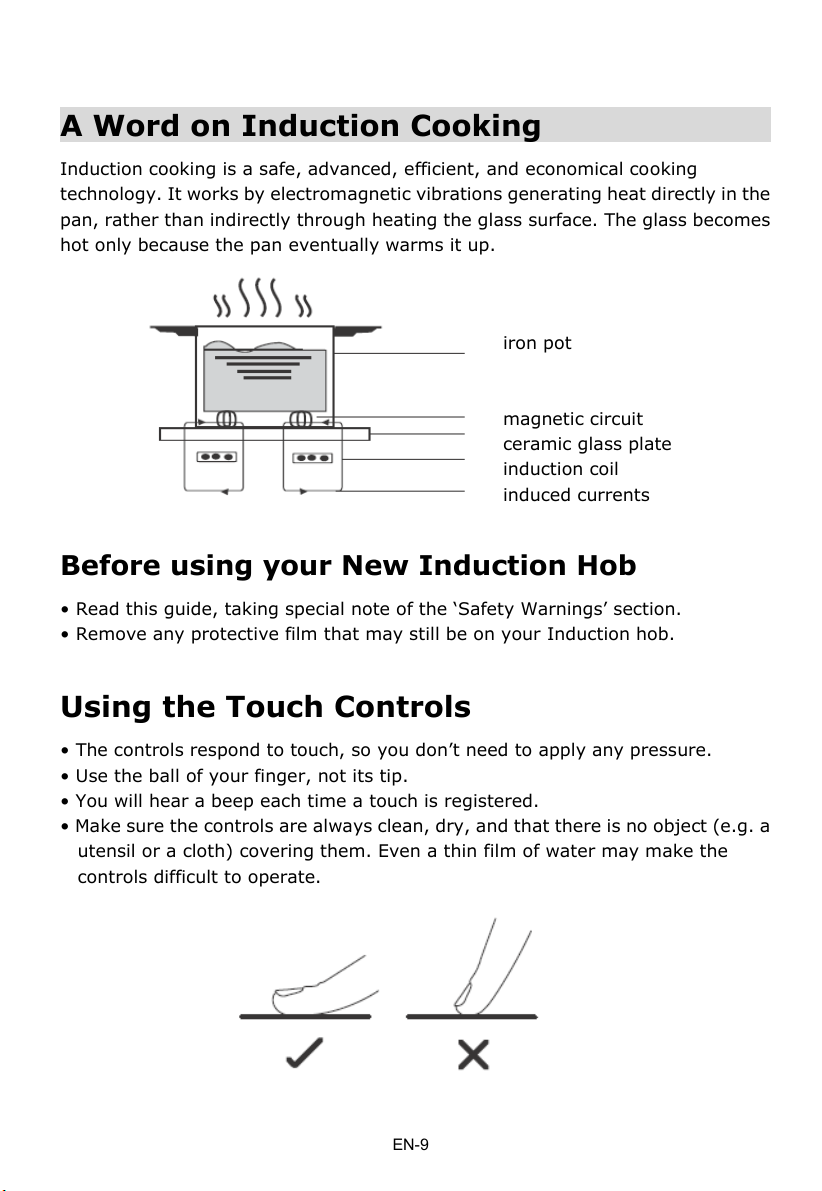
Induction cooking is a safe, advanced, efficient, and economical cooking
technology. It works by electromagnetic vibrations generating heat directly in the
pan, rather than indirectly through heating the glass surface. The glass becomes
hot only because the pan eventually warms it up.
Before using your New Induction Hob
• Read this guide, taking special note of the ‘Safety Warnings’ section.
• Remove any protective film that may still be on your Induction hob.
Using the Touch Controls
• The controls respond to touch, so you don’t need to apply any pressure.
• Use the ball of your finger, not its tip.
• You will hear a beep each time a touch is registered.
• Make sure the controls are always clean, dry, and that there is no object (e.g. a
utensil or a cloth) covering them. Even a thin film of water may make the
controls difficult to operate.
iron pot
magnetic circuit
ceramic glass plate
induction coil
induced currents
EN-9
Page 11
Choosing the right Cookware
• Only use cookware with a base suitable for induction
cooking. Look for the induction symbol on the
packaging or on the bottom of the pan.
• You can check whether your cookware is suitable by carrying out
a magnet test. Move a magnet towards the base of the pan. If it
is attracted, the pan is suitable for induction.
• If you do not have a magnet:
1. Put some water in the pan you want to check.
2. Follow the steps under ‘To start cooking’.
3. If does not flash in the display and the water is heating, the pan is suitable.
• Cookware made from the following materials is not suitable: pure stainless steel, aluminium or
copper without a magnetic base, glass, wood, porcelain, ceramic, and earthenware.
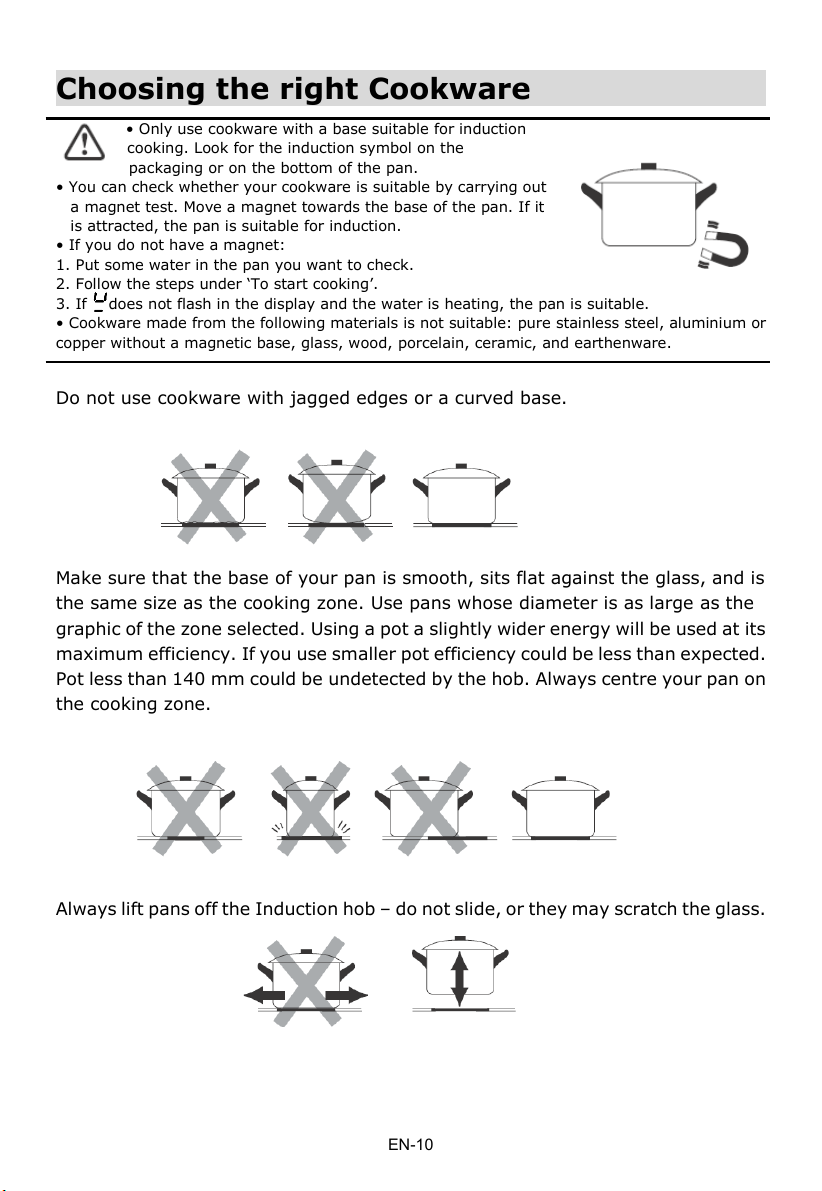
Do not use cookware with jagged edges or a curved base.
Make sure that the base of your pan is smooth, sits flat against the glass, and is
the same size as the cooking zone. Use pans whose diameter is as large as the
graphic of the zone selected. Using a pot a slightly wider energy will be used at its
maximum efficiency. If you use smaller pot efficiency could be less than expected.
Pot less than 140 mm could be undetected by the hob. Always centre your pan on
the cooking zone.
Always lift pans off the Induction hob – do not slide, or they may scratch the glass.
EN-10
Page 12
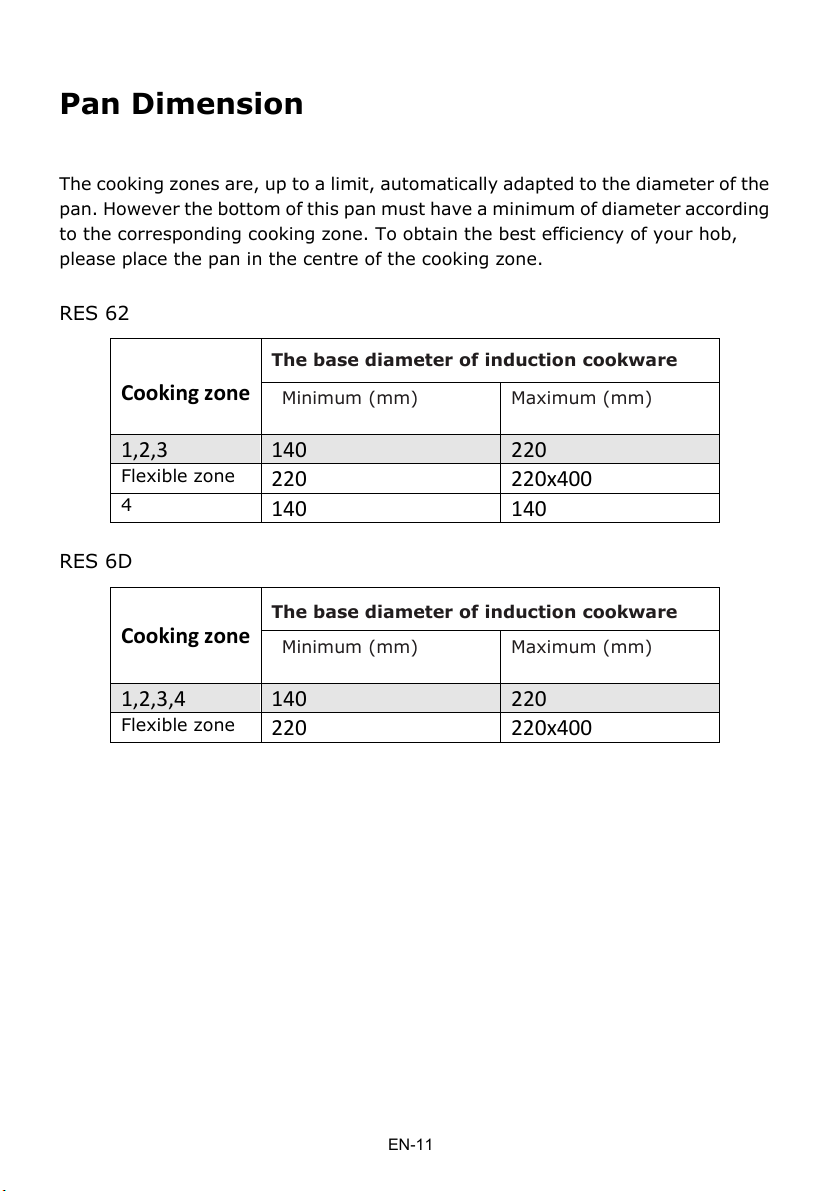
Pan Dimension
The cooking zones are, up to a limit, automatically adapted to the diameter of the
pan. However the bottom of this pan must have a minimum of diameter according
to the corresponding cooking zone. To obtain the best efficiency of your hob,
please place the pan in the centre of the cooking zone.
RES 62
RES 6D
Cooking zone
The base diameter of induction cookware
Minimum (mm)
Maximum (mm)
1,2,3
140
220
Flexible zone
220
220x400
4
140
140
Cooking zone
The base diameter of induction cookware
Minimum (mm)
Maximum (mm)
1,2,3,4
140
220
Flexible zone
220
220x400
EN-11
Page 13
Using your Induction Hob
To start cooking
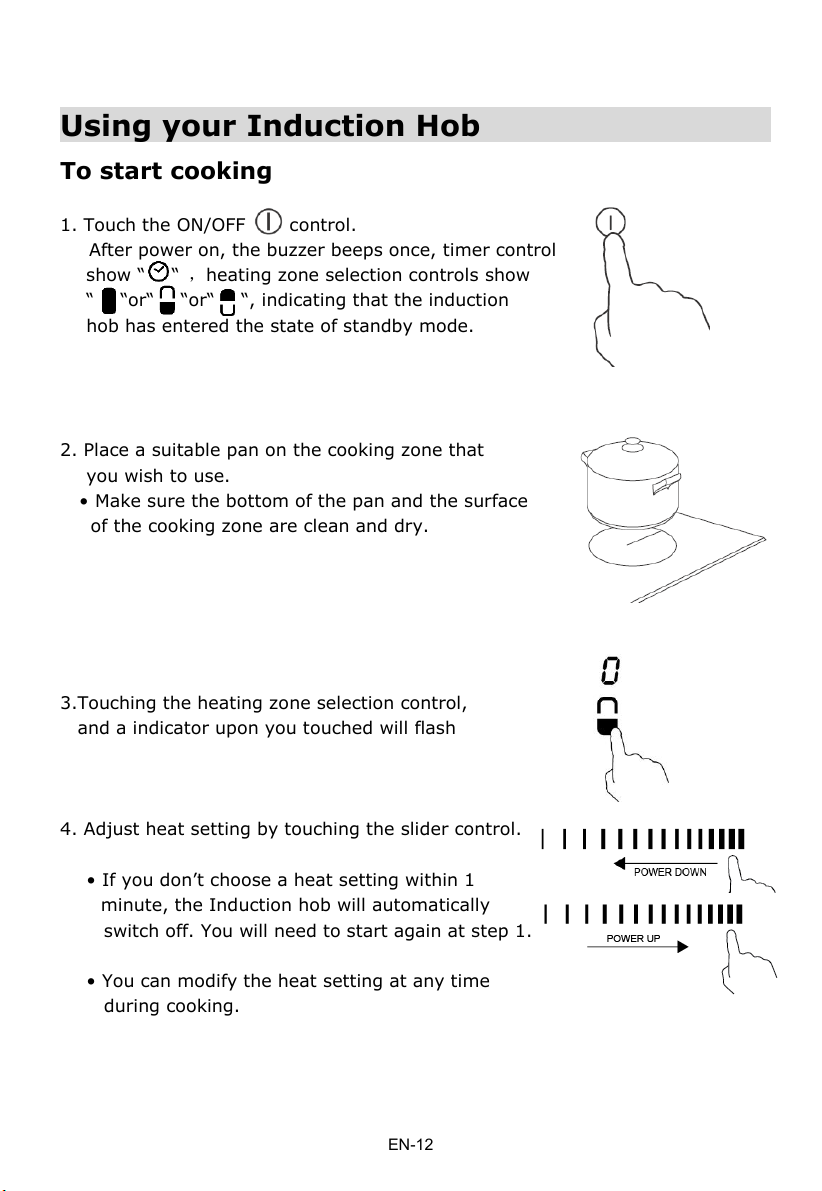
1. Touch the ON/OFF control.
After power on, the buzzer beeps once, timer control
show “ “ ,heating zone selection controls show
“ “or“ “or“ “, indicating that the induction
hob has entered the state of standby mode.
2. Place a suitable pan on the cooking zone that
you wish to use.
• Make sure the bottom of the pan and the surface
of the cooking zone are clean and dry.
3.Touching the heating zone selection control,
and a indicator upon you touched will flash
4. Adjust heat setting by touching the slider control.
• If you don’t choose a heat setting within 1
minute, the Induction hob will automatically
switch off. You will need to start again at step 1.
• You can modify the heat setting at any time
during cooking.
EN-12
Page 14
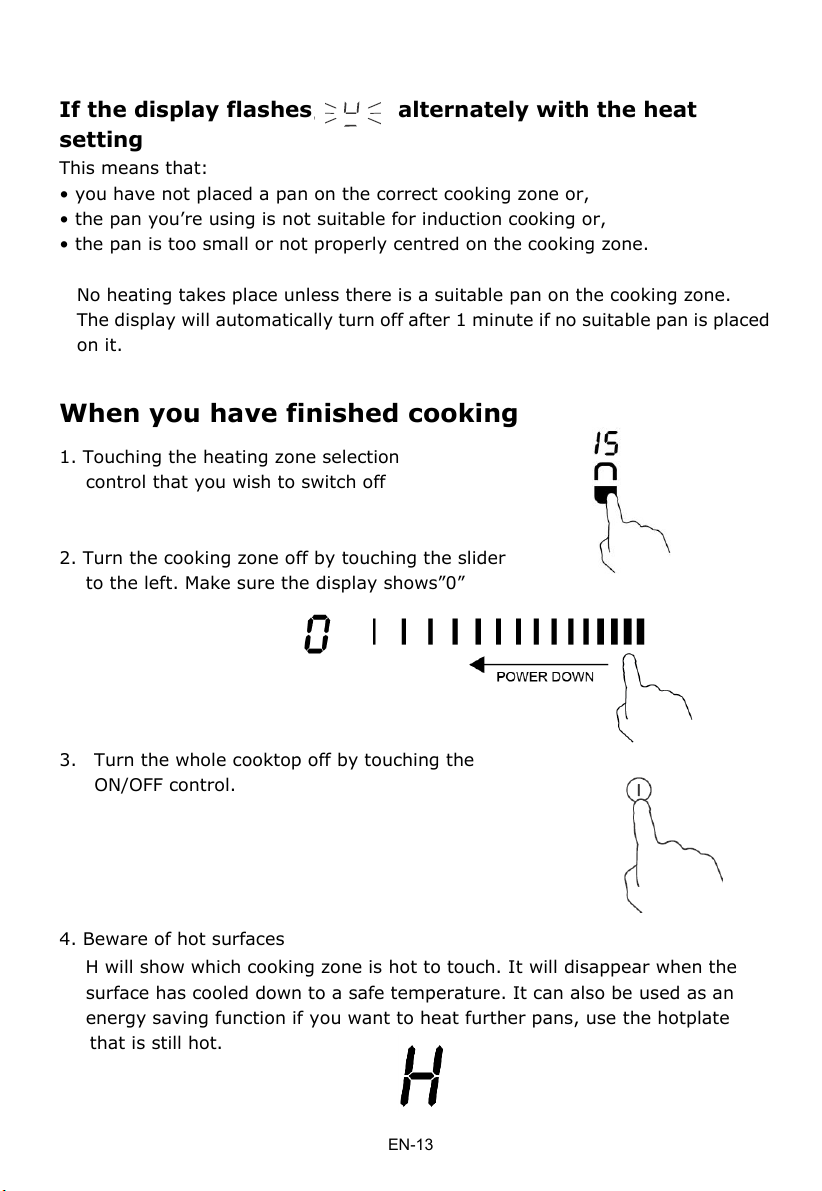
If the display flashes alternately with the heat
setting
This means that:
• you have not placed a pan on the correct cooking zone or,
• the pan you’re using is not suitable for induction cooking or,
• the pan is too small or not properly centred on the cooking zone.
No heating takes place unless there is a suitable pan on the cooking zone.
The display will automatically turn off after 1 minute if no suitable pan is placed
on it.
When you have finished cooking
1. Touching the heating zone selection
control that you wish to switch off
2. Turn the cooking zone off by touching the slider
to the left. Make sure the display shows”0”
3. Turn the whole cooktop off by touching the
ON/OFF control.
4. Beware of hot surfaces
H will show which cooking zone is hot to touch. It will disappear when the
surface has cooled down to a safe temperature. It can also be used as an
energy saving function if you want to heat further pans, use the hotplate
that is still hot.
EN-13
Page 15
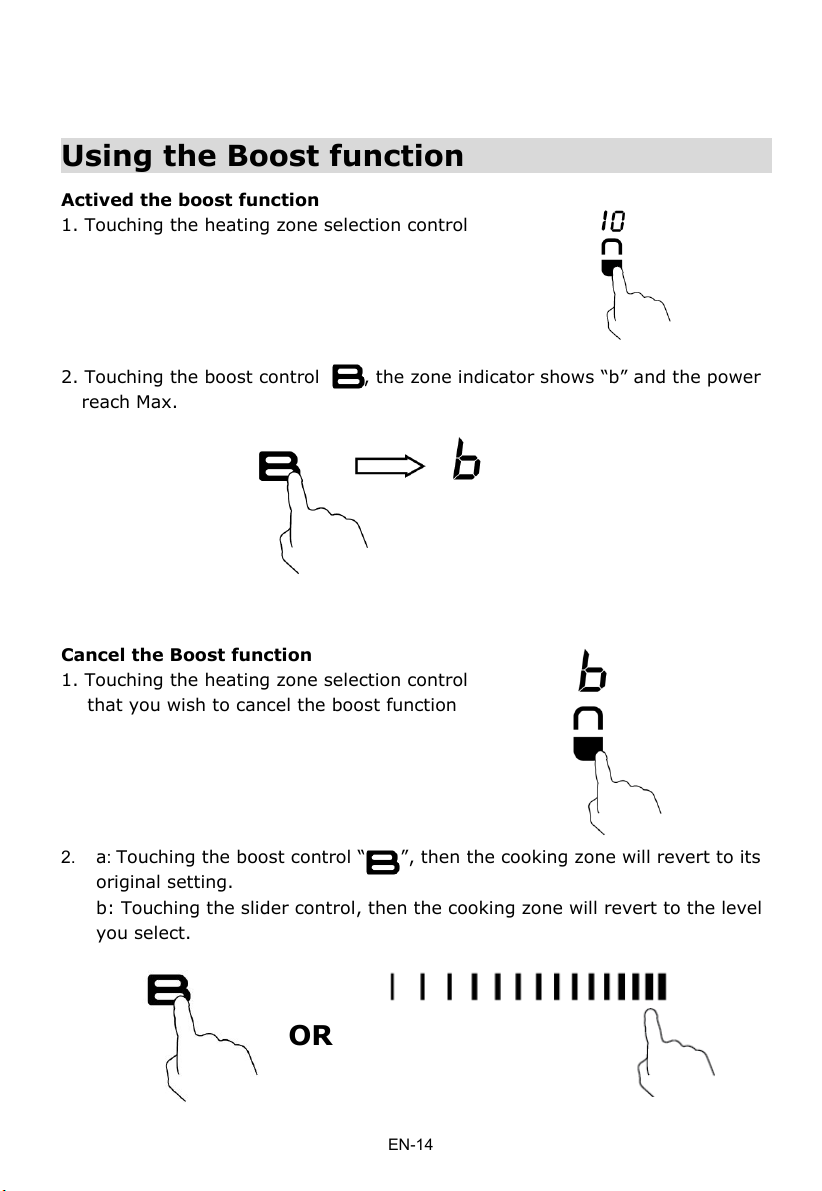
Using the Boost function
Actived the boost function
1. Touching the heating zone selection control
2. Touching the boost control
, the zone indicator shows “b” and the power
reach Max.
Cancel the Boost function
1. Touching the heating zone selection control
that you wish to cancel the boost function
2. a: Touching the boost control “ ”, then the cooking zone will revert to its
original setting.
b: Touching the slider control, then the cooking zone will revert to the level
you select.
OR
EN-14
Page 16
• The function can work in all cooking zones
• The cooking zone returns to its original setting after 5 minutes.
• As the boost function of 1st cooking zone is activated ,the 2nd cooking zone is
limited under level 2 automatically. vice versa
• If the original heat setting equals b, it will return to 15 after 5 minutes
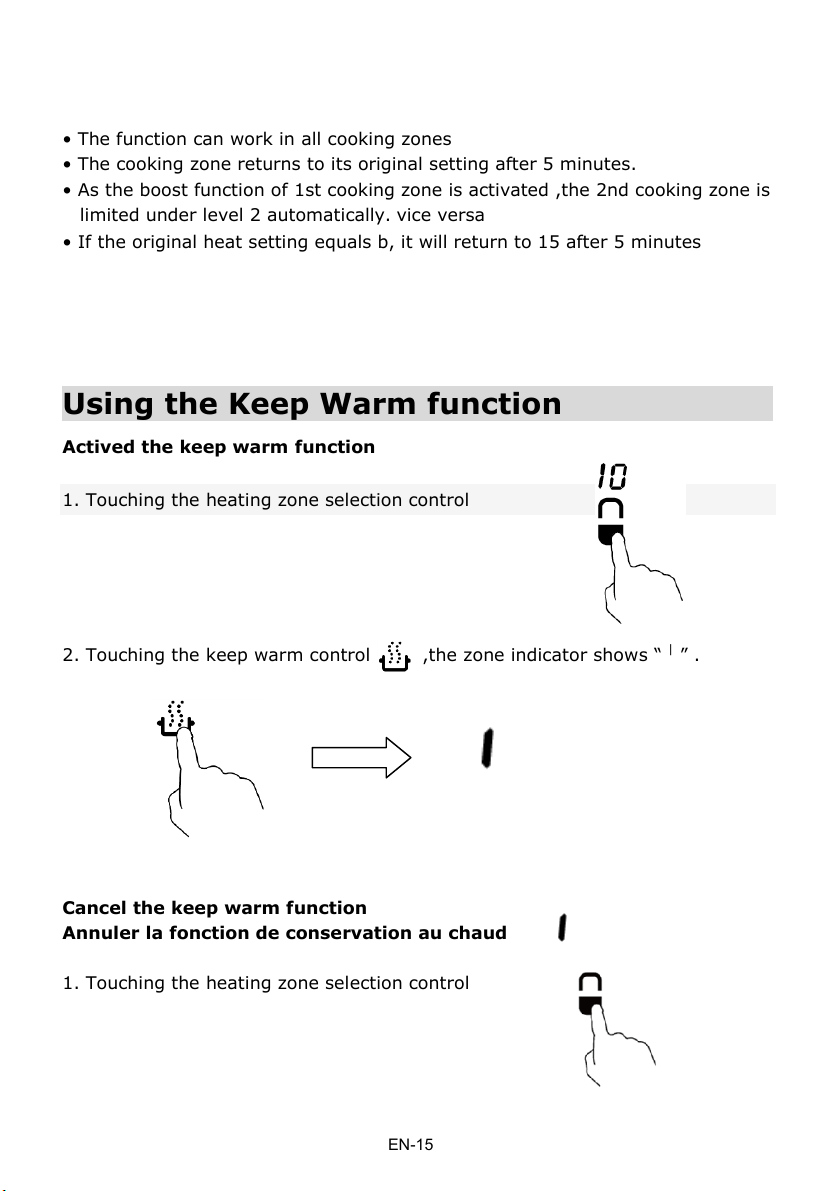
Using the Keep Warm function
Actived the keep warm function
1. Touching the heating zone selection control
2. Touching the keep warm control ,the zone indicator shows “ | ” .
Cancel the keep warm function
Annuler la fonction de conservation au chaud
1. Touching the heating zone selection control
EN-15
Page 17
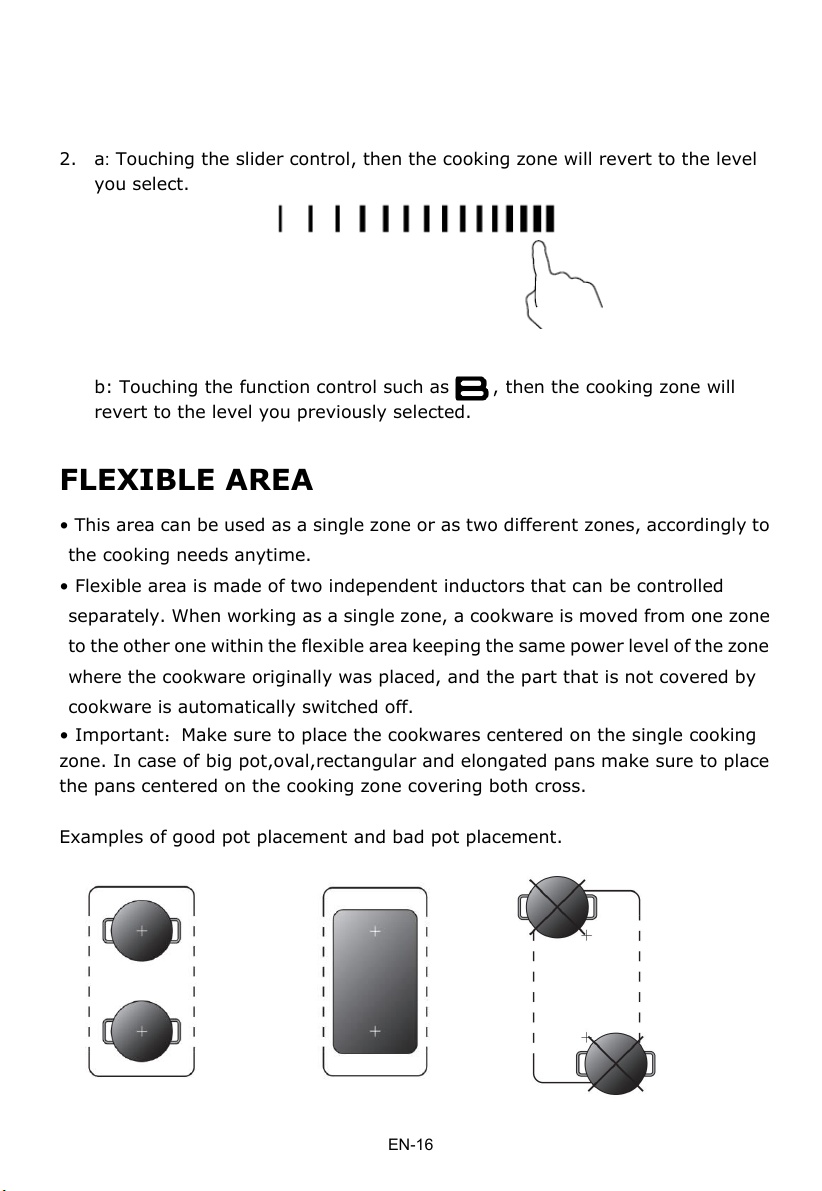
2. a: Touching the slider control, then the cooking zone will revert to the level
you select.
b: Touching the function control such as , then the cooking zone will
revert to the level you previously selected.
FLEXIBLE AREA
• This area can be used as a single zone or as two different zones, accordingly to
the cooking needs anytime.
• Flexible area is made of two independent inductors that can be controlled
separately. When working as a single zone, a cookware is moved from one zone
to the other one within the flexible area keeping the same power level of the zone
where the cookware originally was placed, and the part that is not covered by
cookware is automatically switched off.
• Important:Make sure to place the cookwares centered on the single cooking
zone. In case of big pot,oval,rectangular and elongated pans make sure to place
the pans centered on the cooking zone covering both cross.
Examples of good pot placement and bad pot placement.
EN-16
Page 18
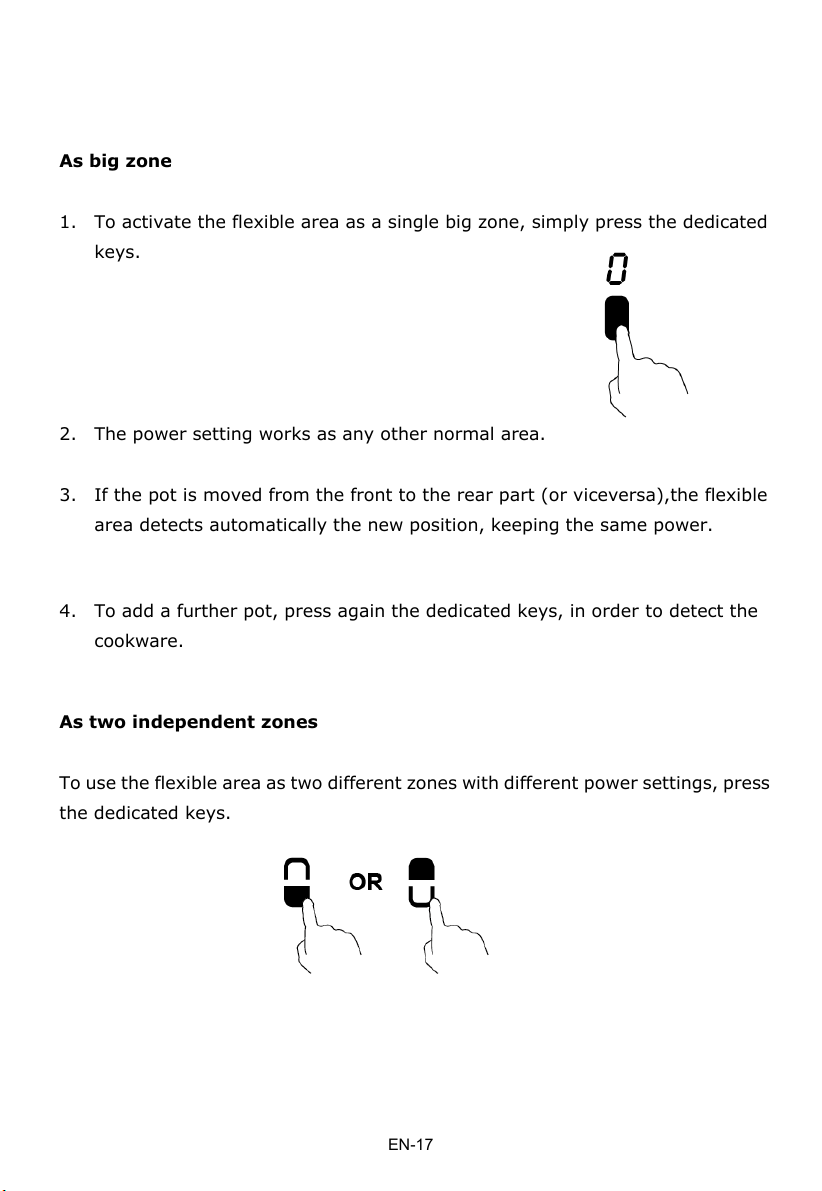
As big zone
1. To activate the flexible area as a single big zone, simply press the dedicated
keys.
2. The power setting works as any other normal area.
3. If the pot is moved from the front to the rear part (or viceversa),the flexible
area detects automatically the new position, keeping the same power.
4. To add a further pot, press again the dedicated keys, in order to detect the
cookware.
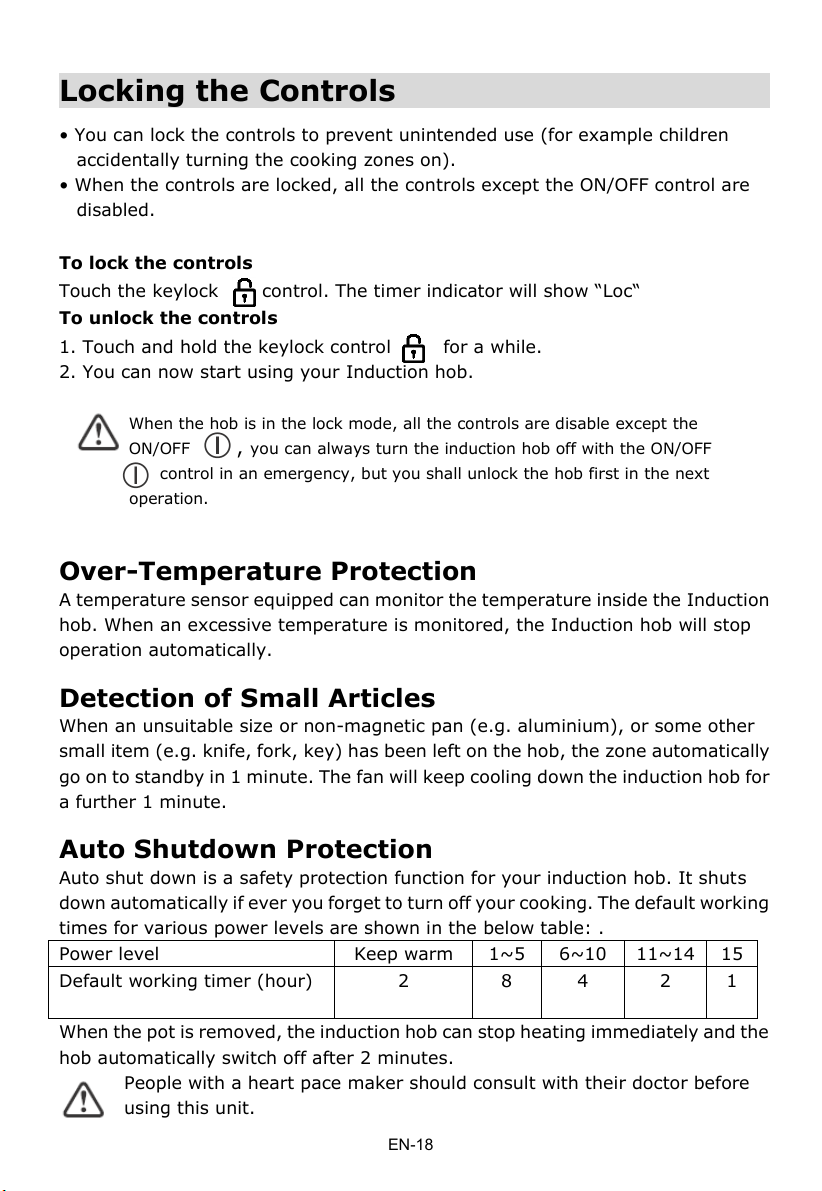
As two independent zones
To use the flexible area as two different zones with different power settings, press
the dedicated keys.
EN-17
Page 19
Locking the Controls
• You can lock the controls to prevent unintended use (for example children
accidentally turning the cooking zones on).
• When the controls are locked, all the controls except the ON/OFF control are
disabled.
To lock the controls
Touch the keylock control. The timer indicator will show “Loc“
To unlock the controls
1. Touch and hold the keylock control for a while.
2. You can now start using your Induction hob.
When the hob is in the lock mode, all the controls are disable except the
ON/OFF , you can always turn the induction hob off with the ON/OFF
control in an emergency, but you shall unlock the hob first in the next
operation.
Over-Temperature Protection
A temperature sensor equipped can monitor the temperature inside the Induction
hob. When an excessive temperature is monitored, the Induction hob will stop
operation automatically.
Detection of Small Articles
When an unsuitable size or non-magnetic pan (e.g. aluminium), or some other
small item (e.g. knife, fork, key) has been left on the hob, the zone automatically
go on to standby in 1 minute. The fan will keep cooling down the induction hob for
a further 1 minute.
Auto Shutdown Protection
Auto shut down is a safety protection function for your induction hob. It shuts
down automatically if ever you forget to turn off your cooking. The default working
times for various power levels are shown in the below table: .
Power level
Keep warm
1~5
6~10
11~14
15
Default working timer (hour)
2
8 4 2
1
When the pot is removed, the induction hob can stop heating immediately and the
hob automatically switch off after 2 minutes.
People with a heart pace maker should consult with their doctor before
using this unit.
EN-18
Page 20
Using the Timer
You can use the timer in two different ways:
• You can use it as a minute minder. In this case, the timer will not turn any
cooking zone off when the set time is up.
• You can set it to turn cooking zones off after the set time is up.
• You can set the timer for up to 99 minutes.
Using the Timer as a Minute Minder
If you are not selecting any cooking zone
1. Make sure the cooktop is turned on.
Note: you can use the minute minder even if you’re not selecting any cooking
zone.
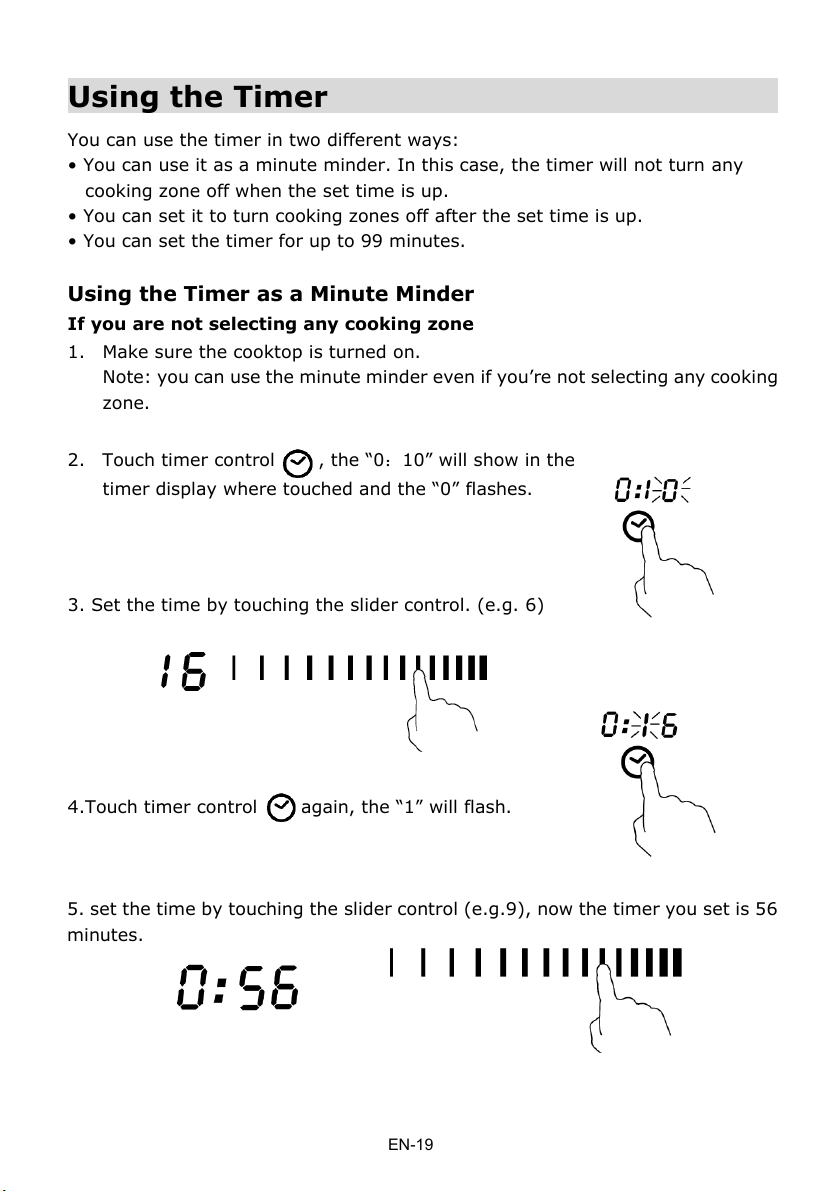
2. Touch timer control , the “0:10” will show in the
timer display where touched and the “0” flashes.
3. Set the time by touching the slider control. (e.g. 6)
4.Touch timer control again, the “1” will flash.
5. set the time by touching the slider control (e.g.9), now the timer you set is 56
minutes.
EN-19
Page 21
6. Buzzer will beep for 30 seconds and the timer
indicator shows “0:00 “ when the setting time
finished.
Setting the timer to turn cooking zones off
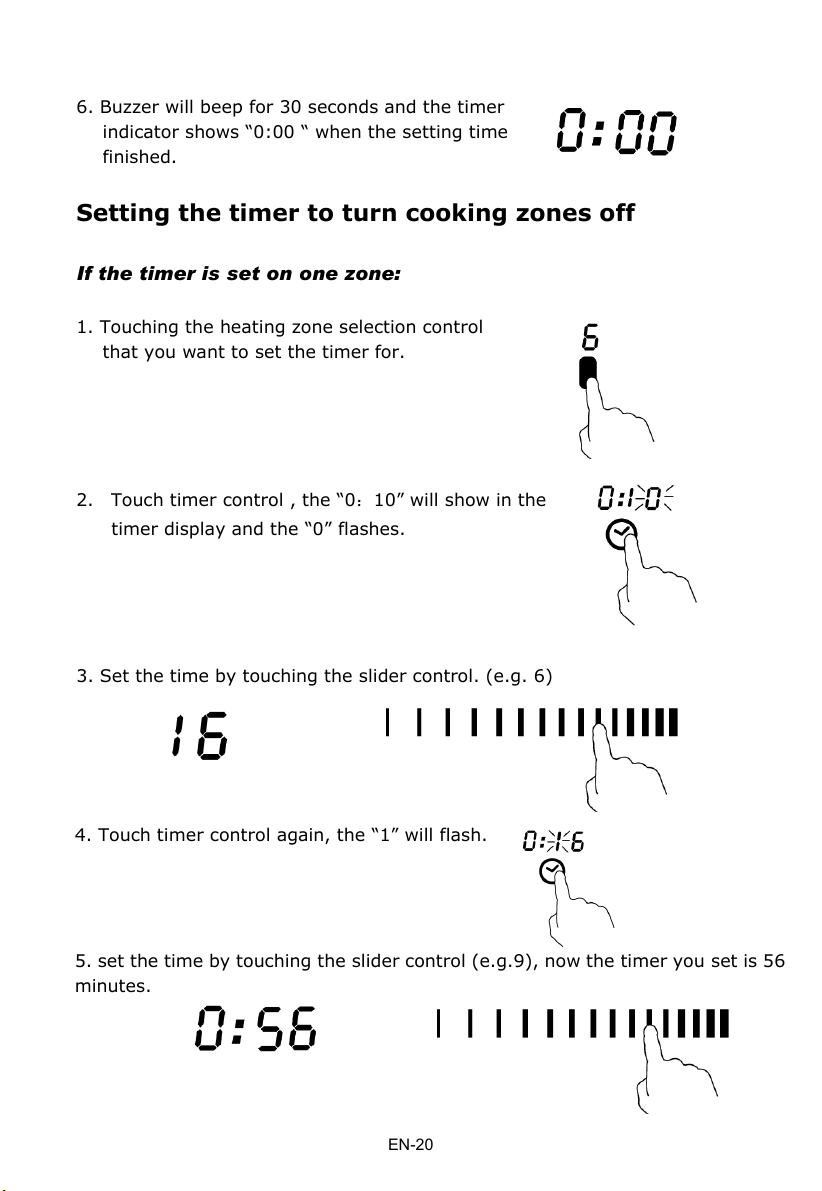
If the timer is set on one zone:
1. Touching the heating zone selection control
that you want to set the timer for.
2. Touch timer control , the “0:10” will show in the
timer display and the “0” flashes.
3. Set the time by touching the slider control. (e.g. 6)
4. Touch timer control again, the “1” will flash.
5. set the time by touching the slider control (e.g.9), now the timer you set is 56
minutes.
EN-20
Page 22
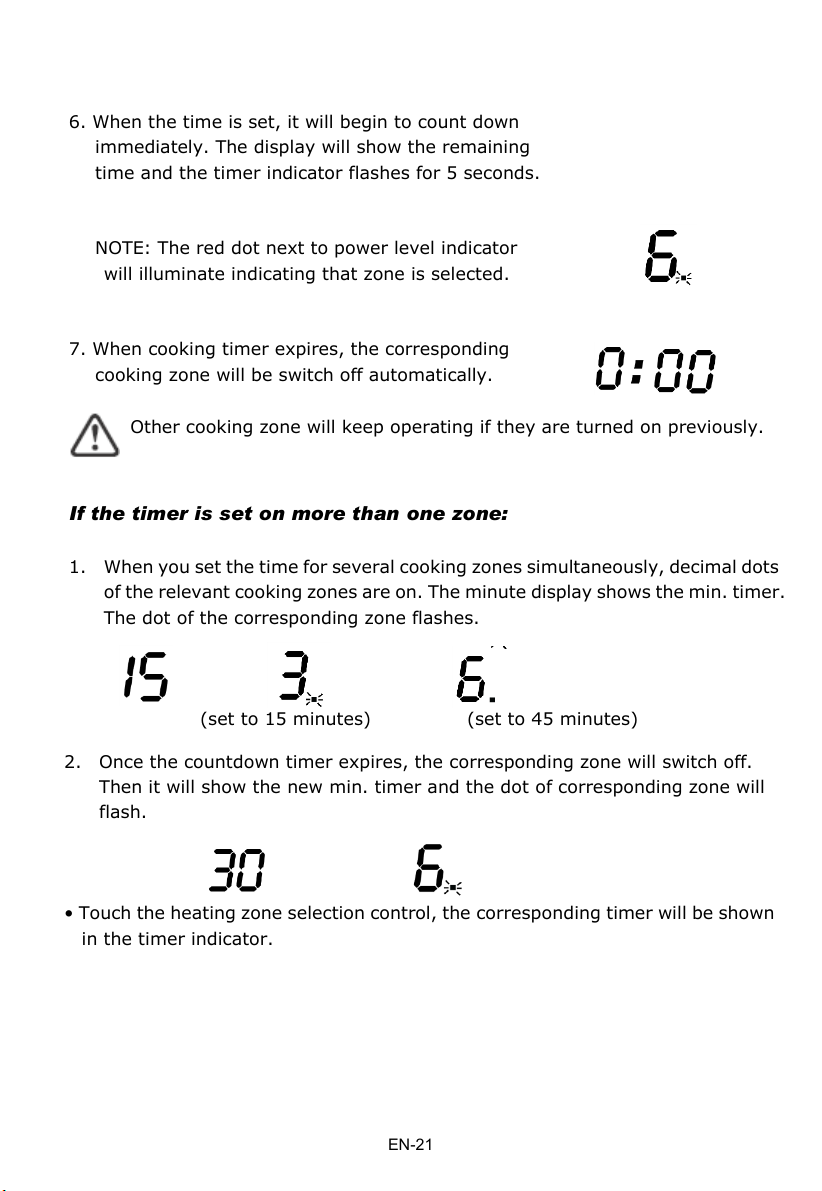
6. When the time is set, it will begin to count down
immediately. The display will show the remaining
time and the timer indicator flashes for 5 seconds.
NOTE: The red dot next to power level indicator
will illuminate indicating that zone is selected.
7. When cooking timer expires, the corresponding
cooking zone will be switch off automatically.
Other cooking zone will keep operating if they are turned on previously.
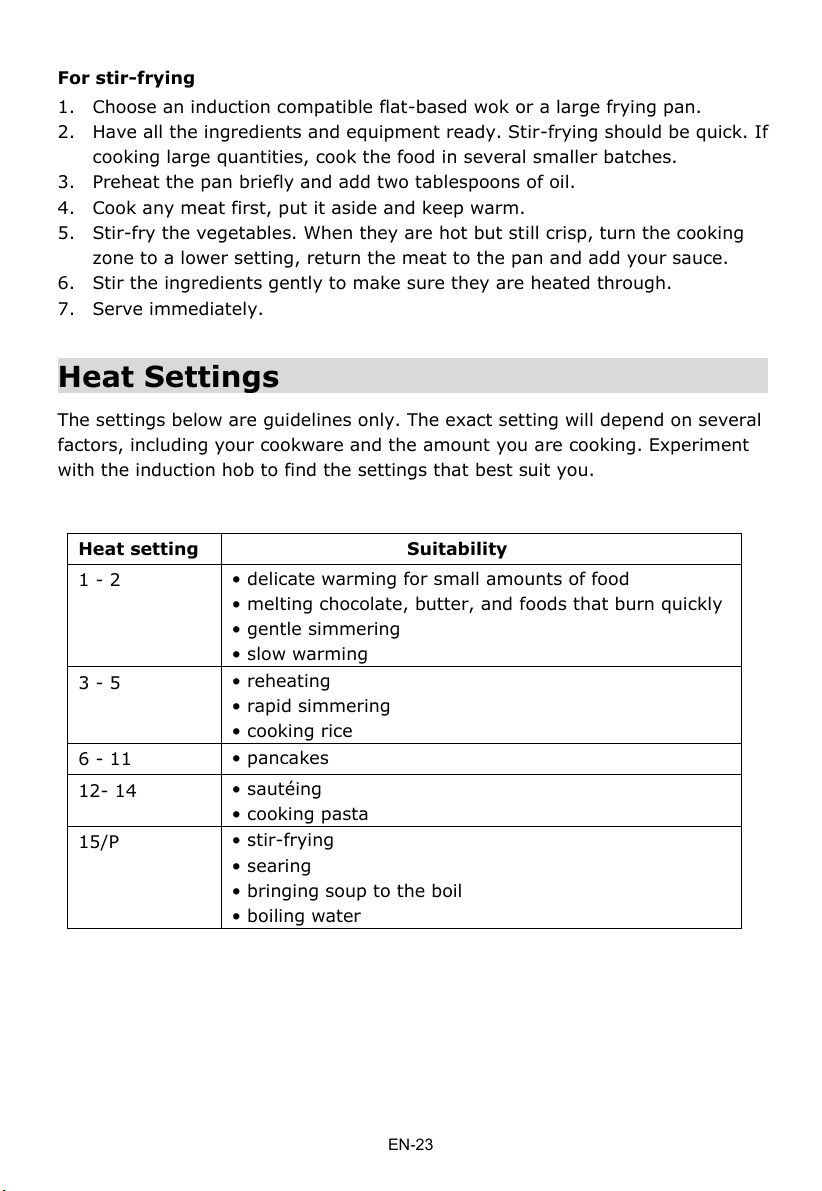
If the timer is set on more than one zone:
1. When you set the time for several cooking zones simultaneously, decimal dots
of the relevant cooking zones are on. The minute display shows the min. timer.
The dot of the corresponding zone flashes.
(set to 15 minutes) (set to 45 minutes)
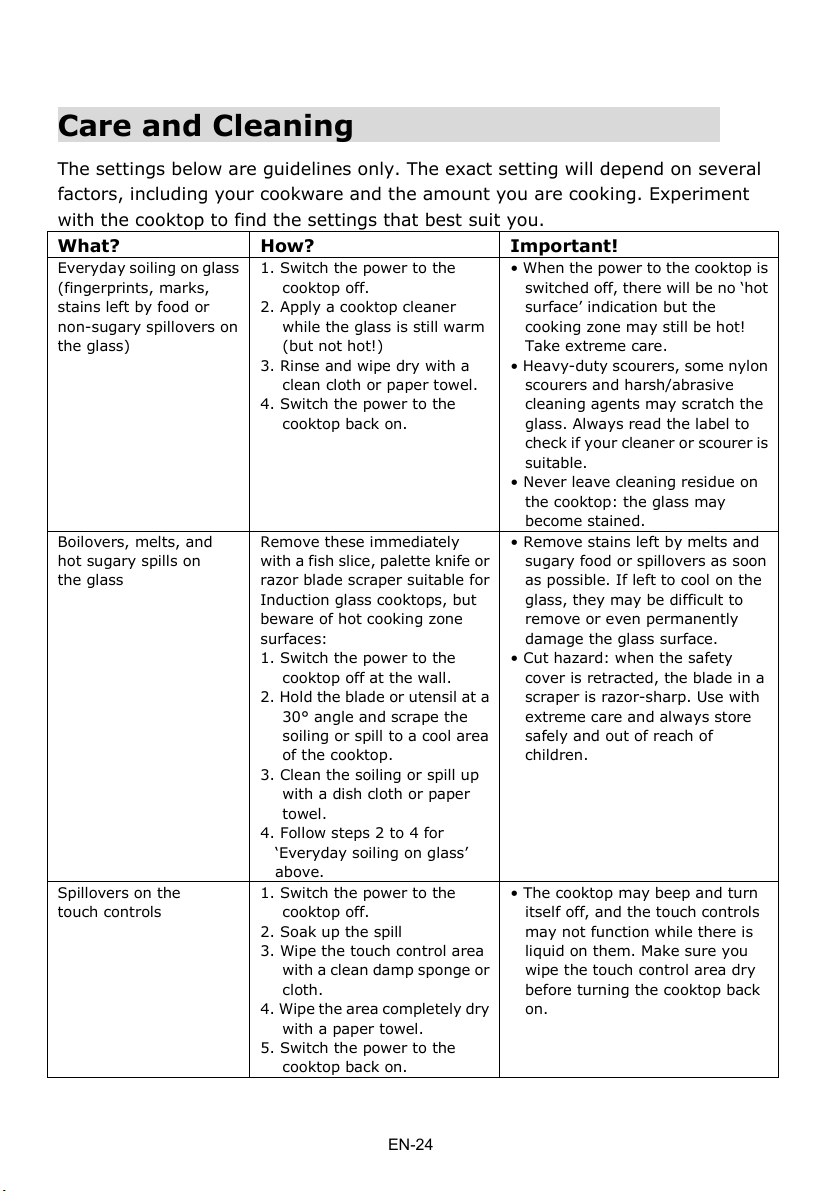
2. Once the countdown timer expires, the corresponding zone will switch off.
Then it will show the new min. timer and the dot of corresponding zone will
flash.
• Touch the heating zone selection control, the corresponding timer will be shown
in the timer indicator.
EN-21
Page 23
Cooking Guidelines
Take care when frying as the oil and fat heat up very quickly, particularly
if you’re using PowerBoost. At extremely high temperatures oil and fat will
ignite spontaneously and this presents a serious fire risk.
Cooking Tips
• When food comes to the boil, reduce the temperature setting.
• Using a lid will reduce cooking times and save energy by retaining the heat.
• Minimise the amount of liquid or fat to reduce cooking times.
• Start cooking on a high setting and reduce the setting when the food has heated
through.
Simmering, cooking rice
• Simmering occurs below boiling point, at around 85˚C, when bubbles are just
rising occasionally to the surface of the cooking liquid. It is the key to delicious
soups and tender stews because the flavours develop without overcooking the
food. You should also cook egg-based and flour thickened sauces below boiling
point.
• Some tasks, including cooking rice by the absorption method, may require a
setting higher than the lowest setting to ensure the food is cooked properly in
the time recommended.
Searing steak
To cook juicy flavoursome steaks:
1. Stand the meat at room temperature for about 20 minutes before cooking.
2. Heat up a heavy-based frying pan.
3. Brush both sides of the steak with oil. Drizzle a small amount of oil into the hot
pan and then lower the meat onto the hot pan.
4. Turn the steak only once during cooking. The exact cooking time will depend
on the thickness of the steak and how cooked you want it. Times may vary
from about 2 – 8 minutes per side. Press the steak to gauge how cooked it is
– the firmer it feels the more ‘well done’ it will be.
5. Leave the steak to rest on a warm plate for a few minutes to allow it to relax
and become tender before serving.
EN-22
Page 24
For stir-frying
1. Choose an induction compatible flat-based wok or a large frying pan.
2. Have all the ingredients and equipment ready. Stir-frying should be quick. If
cooking large quantities, cook the food in several smaller batches.
3. Preheat the pan briefly and add two tablespoons of oil.
4. Cook any meat first, put it aside and keep warm.
5. Stir-fry the vegetables. When they are hot but still crisp, turn the cooking
zone to a lower setting, return the meat to the pan and add your sauce.
6. Stir the ingredients gently to make sure they are heated through.
7. Serve immediately.
Heat Settings
The settings below are guidelines only. The exact setting will depend on several
factors, including your cookware and the amount you are cooking. Experiment
with the induction hob to find the settings that best suit you.
Heat setting
Suitability
1 - 2
• delicate warming for small amounts of food
• melting chocolate, butter, and foods that burn quickly
• gentle simmering
• slow warming
3 - 5
• reheating
• rapid simmering
• cooking rice
6 - 11
• pancakes
12- 14
• sautéing
• cooking pasta
15/P
• stir-frying
• searing
• bringing soup to the boil
• boiling water
EN-23
Page 25
Care and Cleaning
The settings below are guidelines only. The exact setting will depend on several
factors, including your cookware and the amount you are cooking. Experiment
with the cooktop to find the settings that best suit you.
What?
How?
Important!
Everyday soiling on glass
(fingerprints, marks,
stains left by food or
non-sugary spillovers on
the glass)
1. Switch the power to the
cooktop off.
2. Apply a cooktop cleaner
while the glass is still warm
(but not hot!)
3. Rinse and wipe dry with a
clean cloth or paper towel.
4. Switch the power to the
cooktop back on.
• When the power to the cooktop is
switched off, there will be no ‘hot
surface’ indication but the
cooking zone may still be hot!
Take extreme care.
• Heavy-duty scourers, some nylon
scourers and harsh/abrasive
cleaning agents may scratch the
glass. Always read the label to
check if your cleaner or scourer is
suitable.
• Never leave cleaning residue on
the cooktop: the glass may
become stained.
Boilovers, melts, and
hot sugary spills on
the glass
Remove these immediately
with a fish slice, palette knife or
razor blade scraper suitable for
Induction glass cooktops, but
beware of hot cooking zone
surfaces:
1. Switch the power to the
cooktop off at the wall.
2. Hold the blade or utensil at a
30° angle and scrape the
soiling or spill to a cool area
of the cooktop.
3. Clean the soiling or spill up
with a dish cloth or paper
towel.
4. Follow steps 2 to 4 for
‘Everyday soiling on glass’
above.
• Remove stains left by melts and
sugary food or spillovers as soon
as possible. If left to cool on the
glass, they may be difficult to
remove or even permanently
damage the glass surface.
• Cut hazard: when the safety
cover is retracted, the blade in a
scraper is razor-sharp. Use with
extreme care and always store
safely and out of reach of
children.
Spillovers on the
touch controls
1. Switch the power to the
cooktop off.
2. Soak up the spill
3. Wipe the touch control area
with a clean damp sponge or
cloth.
4. Wipe the area completely dry
with a paper towel.
5. Switch the power to the
cooktop back on.
• The cooktop may beep and turn
itself off, and the touch controls
may not function while there is
liquid on them. Make sure you
wipe the touch control area dry
before turning the cooktop back
on.
EN-24
Page 26
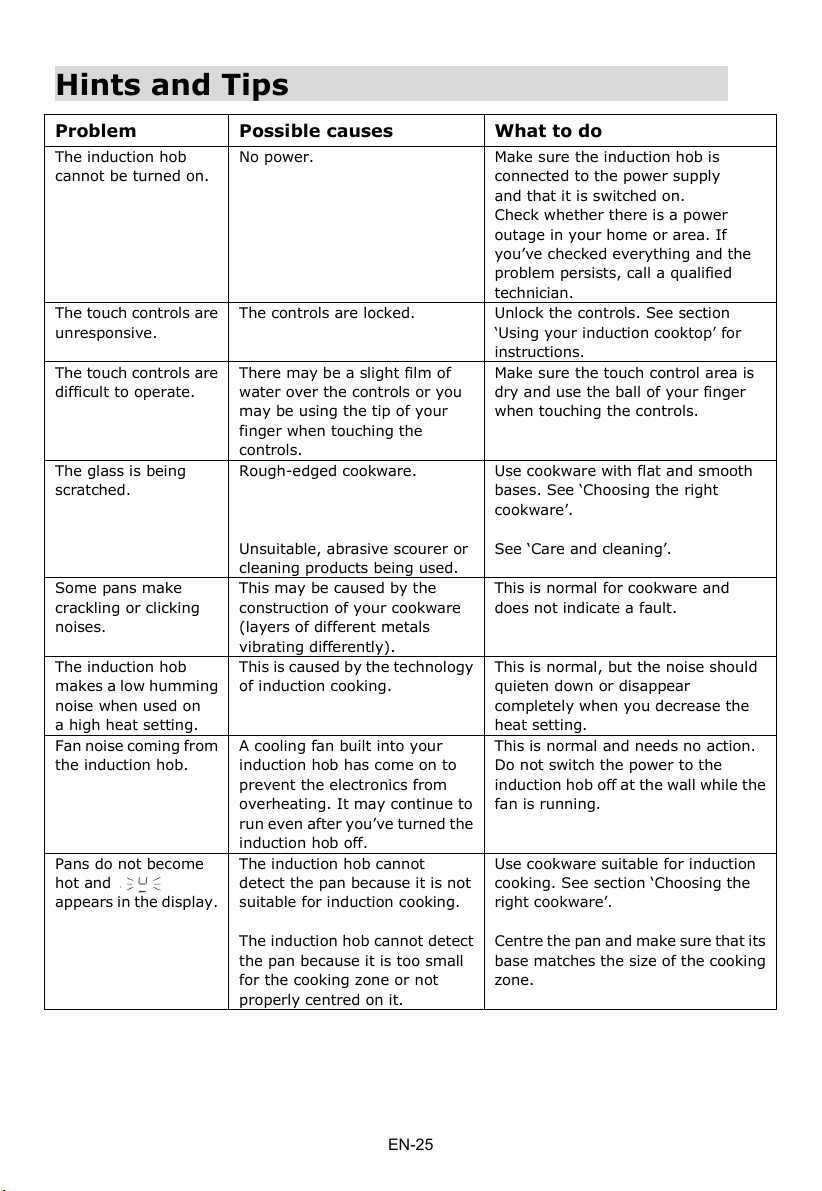
Hints and Tips
Problem
Possible causes
What to do
The induction hob
cannot be turned on.
No power.
Make sure the induction hob is
connected to the power supply
and that it is switched on.
Check whether there is a power
outage in your home or area. If
you’ve checked everything and the
problem persists, call a qualified
technician.
The touch controls are
unresponsive.
The controls are locked.
Unlock the controls. See section
‘Using your induction cooktop’ for
instructions.
The touch controls are
difficult to operate.
There may be a slight film of
water over the controls or you
may be using the tip of your
finger when touching the
controls.
Make sure the touch control area is
dry and use the ball of your finger
when touching the controls.
The glass is being
scratched.
Rough-edged cookware.
Unsuitable, abrasive scourer or
cleaning products being used.
Use cookware with flat and smooth
bases. See ‘Choosing the right
cookware’.
See ‘Care and cleaning’.
Some pans make
crackling or clicking
noises.
This may be caused by the
construction of your cookware
(layers of different metals
vibrating differently).
This is normal for cookware and
does not indicate a fault.
The induction hob
makes a low humming
noise when used on
a high heat setting.
This is caused by the technology
of induction cooking.
This is normal, but the noise should
quieten down or disappear
completely when you decrease the
heat setting.
Fan noise coming from
the induction hob.
A cooling fan built into your
induction hob has come on to
prevent the electronics from
overheating. It may continue to
run even after you’ve turned the
induction hob off.
This is normal and needs no action.
Do not switch the power to the
induction hob off at the wall while the
fan is running.
Pans do not become
hot and
appears in the display.
The induction hob cannot
detect the pan because it is not
suitable for induction cooking.
The induction hob cannot detect
the pan because it is too small
for the cooking zone or not
properly centred on it.
Use cookware suitable for induction
cooking. See section ‘Choosing the
right cookware’.
Centre the pan and make sure that its
base matches the size of the cooking
zone.
EN-25
Page 27
The induction hob or a
cooking zone has
turned itself off
unexpectedly, a tone
sounds and an error
code is displayed
(typically alternating
with one or two digits
in the cooking timer
display).
Technical fault.
Please note down the error
letters and numbers, switch
the power to the induction hob
off at the wall, and contact a
qualified technician.
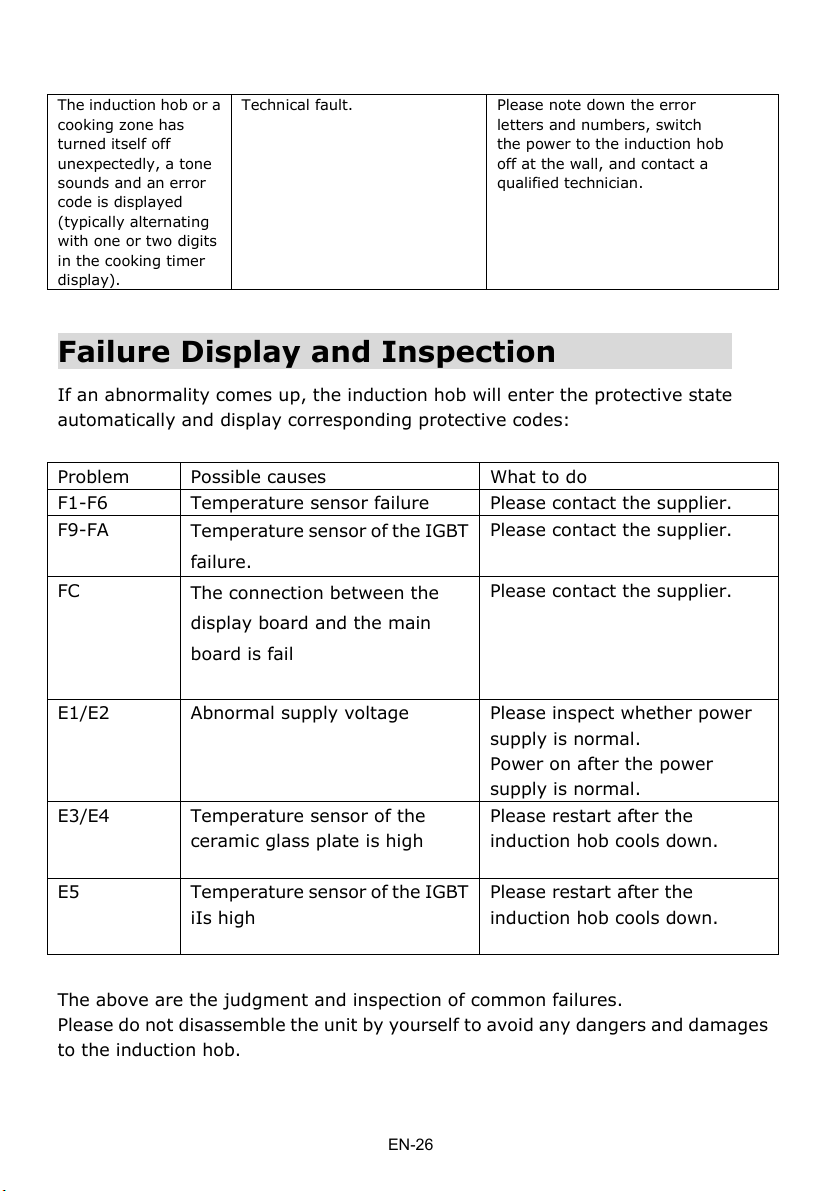
Failure Display and Inspection
If an abnormality comes up, the induction hob will enter the protective state
automatically and display corresponding protective codes:
Problem
Possible causes
What to do
F1-F6
Temperature sensor failure
Please contact the supplier.
F9-FA
Temperature sensor of the IGBT
failure.
Please contact the supplier.
FC
The connection between the
display board and the main
board is fail
Please contact the supplier.
E1/E2
Abnormal supply voltage
Please inspect whether power
supply is normal.
Power on after the power
supply is normal.
E3/E4
Temperature sensor of the
ceramic glass plate is high
Please restart after the
induction hob cools down.
E5 Temperature sensor of the IGBT
iIs high
Please restart after the
induction hob cools down.
The above are the judgment and inspection of common failures.
Please do not disassemble the unit by yourself to avoid any dangers and damages
to the induction hob.
EN-26
Page 28
Technical Specification
Cooking Hob
HES 62 – HES6D
Cooking Zones
4 Zones
Supply Voltage
220-240V~ 50/60Hz
Installed Electric Power
7200W
Product Size D×W×H(mm)
590X520X60
Building-in Dimensions A×B (mm)
560X490
Weight and Dimensions are approximate. Because we continually strive to
improve our products we may change specifications and designs without prior
notice.
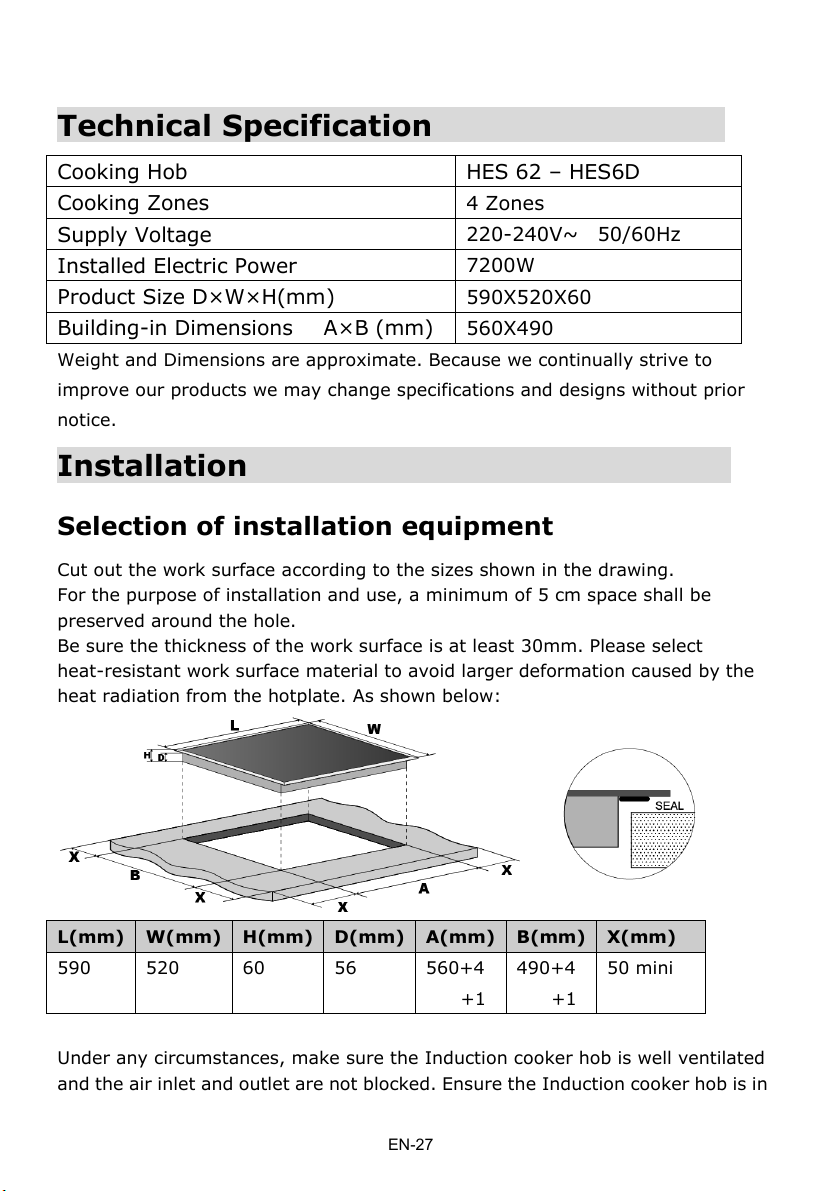
Installation
Selection of installation equipment
Cut out the work surface according to the sizes shown in the drawing.
For the purpose of installation and use, a minimum of 5 cm space shall be
preserved around the hole.
Be sure the thickness of the work surface is at least 30mm. Please select
heat-resistant work surface material to avoid larger deformation caused by the
heat radiation from the hotplate. As shown below:
L(mm)
W(mm)
H(mm)
D(mm)
A(mm)
B(mm)
X(mm)
590
520
60
56
560+4
+1
490+4
+1
50 mini
Under any circumstances, make sure the Induction cooker hob is well ventilated
and the air inlet and outlet are not blocked. Ensure the Induction cooker hob is in
EN-27
Page 29
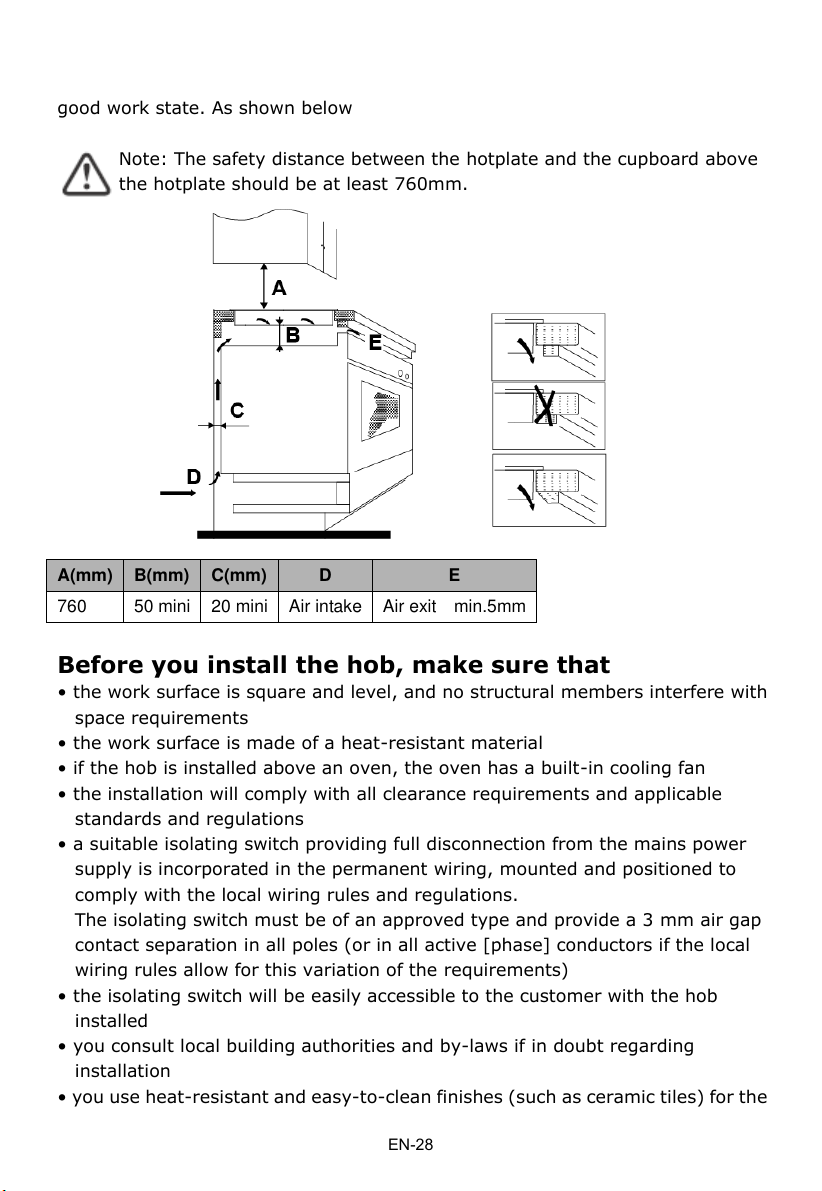
good work state. As shown below
Note: The safety distance between the hotplate and the cupboard above
the hotplate should be at least 760mm.
A(mm)
B(mm)
C(mm) D E
760
50 mini
20 mini
Air intake
Air exit min.5mm
Before you install the hob, make sure that
• the work surface is square and level, and no structural members interfere with
space requirements
• the work surface is made of a heat-resistant material
• if the hob is installed above an oven, the oven has a built-in cooling fan
• the installation will comply with all clearance requirements and applicable
standards and regulations
• a suitable isolating switch providing full disconnection from the mains power
supply is incorporated in the permanent wiring, mounted and positioned to
comply with the local wiring rules and regulations.
The isolating switch must be of an approved type and provide a 3 mm air gap
contact separation in all poles (or in all active [phase] conductors if the local
wiring rules allow for this variation of the requirements)
• the isolating switch will be easily accessible to the customer with the hob
installed
• you consult local building authorities and by-laws if in doubt regarding
installation
• you use heat-resistant and easy-to-clean finishes (such as ceramic tiles) for the
EN-28
Page 30
wall surfaces surrounding the hob.
When you have installed the hob, make sure that
• the power supply cable is not accessible through cupboard doors or drawers
• there is adequate flow of fresh air from outside the cabinetry to the base of the
hob
• if the hob is installed above a drawer or cupboard space, a thermal protection
barrier is installed below the base of the hob
• the isolating switch is easily accessible by the customer
Before locating the fixing brackets
The unit should be placed on a stable, smooth surface (use the packaging). Do not
apply force onto the controls protruding from the hob.
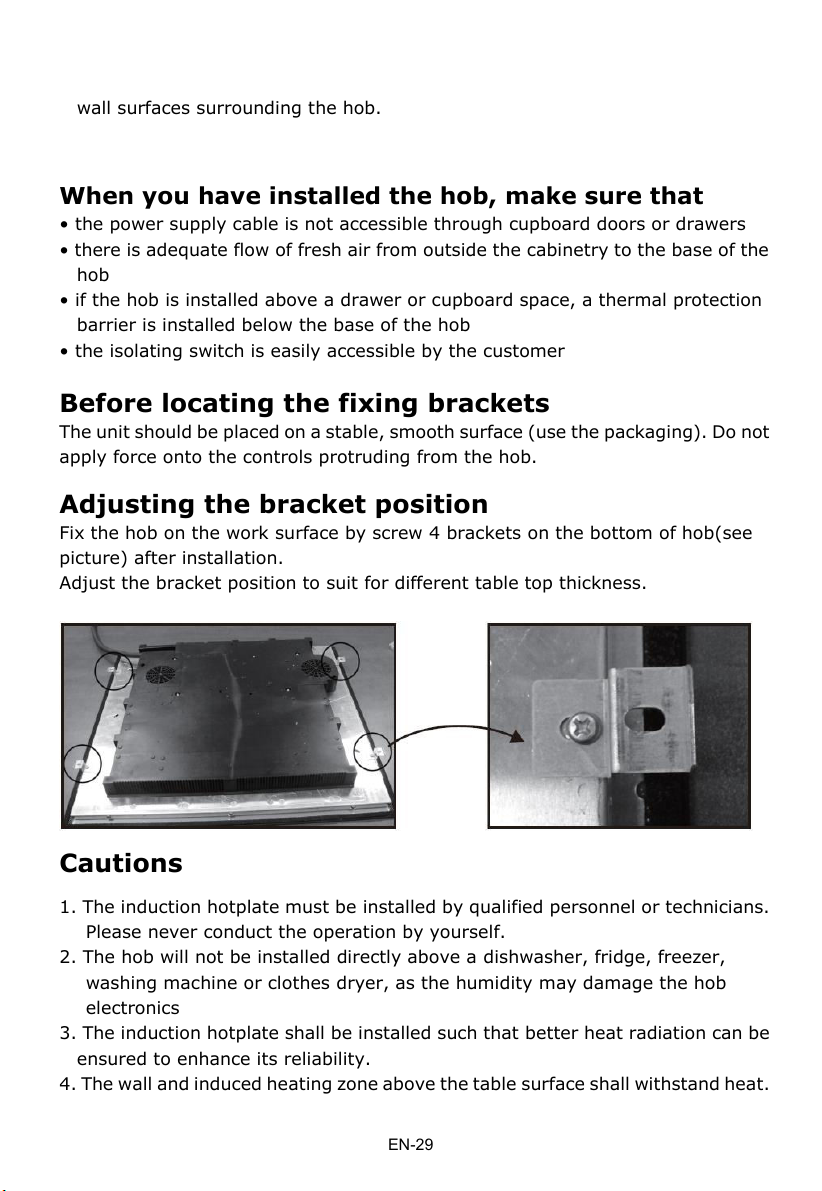
Adjusting the bracket position
Fix the hob on the work surface by screw 4 brackets on the bottom of hob(see
picture) after installation.
Adjust the bracket position to suit for different table top thickness.
Cautions
1. The induction hotplate must be installed by qualified personnel or technicians.
Please never conduct the operation by yourself.
2. The hob will not be installed directly above a dishwasher, fridge, freezer,
washing machine or clothes dryer, as the humidity may damage the hob
electronics
3. The induction hotplate shall be installed such that better heat radiation can be
ensured to enhance its reliability.
4. The wall and induced heating zone above the table surface shall withstand heat.
EN-29
Page 31

5. To avoid any damage, the sandwich layer and adhesive must be resistant to
heat.
Connecting the hob to the mains power supply
This hob must be connected to the mains power supply only by a suitably qualified person.
Before connecting the hob to the mains power supply, check that:
1. the domestic wiring system is suitable for the power drawn by the hob.
2. the voltage corresponds to the value given in the rating plate
3. the power supply cable sections can withstand the load specified on the rating plate.
To connect the hob to the mains power supply, do not use adapters, reducers, or branching
devices, as they can cause overheating and fire.
The power supply cable must not touch any hot parts and must be positioned so that its
temperature will not exceed 75˚C at any point.
Check with an electrician whether the domestic wiring system is suitable without alterations.
Any alterations must only be made by a qualified electrician.
The power supply should be connected in compliance with the relevant standard,
or a single-pole circuit breaker. The method of connection is shown below.
• If the cable is damaged or to be replaced, the operation must be carried out by
the after-sale agent with dedicated tools to avoid any accidents.
• If the appliance is being connected directly to the mains an omnipolar
circuit-breaker must be installed with a minimum opening of 3mm between
contacts.
• The installer must ensure that the correct electrical connection has been made
and that it is compliant with safety regulations.
• The cable must not be bent or compressed.
• The cable must be checked regularly and replaced by authorised technicians
only.
220-240 V~
220-240 V~
220-240 V~
400V~
220-240 V~
220-240 V~
N2 N1 L2 L1 N2 N1 L2 L1 N2 N1 L2 L1
Yellow / Green
Black
Brown
Grey
Blue
Yellow / Green
Black
Brown
Grey
Blue
Yellow / Green
Black
Brown
Grey
Blue
EN-30
Page 32
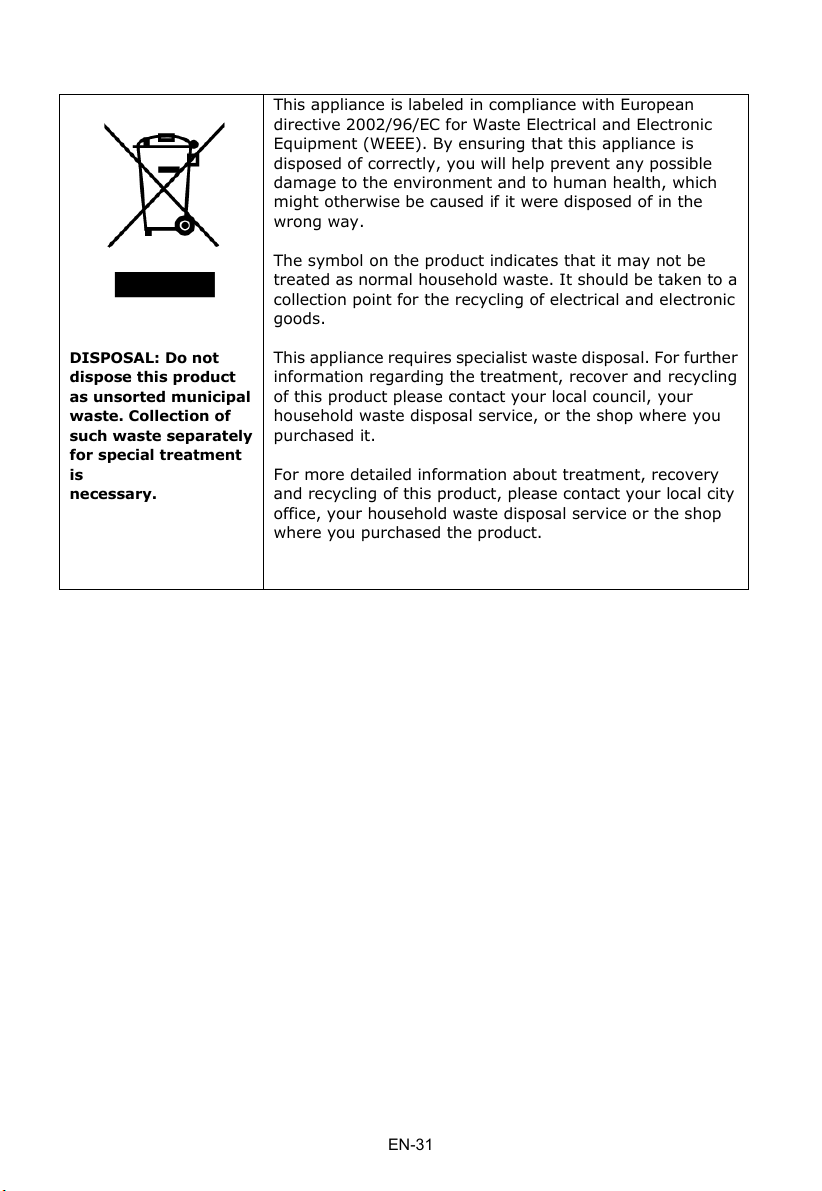
DISPOSAL: Do not
dispose this product
as unsorted municipal
waste. Collection of
such waste separately
for special treatment
is
necessary.
This appliance is labeled in compliance with European
directive 2002/96/EC for Waste Electrical and Electronic
Equipment (WEEE). By ensuring that this appliance is
disposed of correctly, you will help prevent any possible
damage to the environment and to human health, which
might otherwise be caused if it were disposed of in the
wrong way.
The symbol on the product indicates that it may not be
treated as normal household waste. It should be taken to a
collection point for the recycling of electrical and electronic
goods.
This appliance requires specialist waste disposal. For further
information regarding the treatment, recover and recycling
of this product please contact your local council, your
household waste disposal service, or the shop where you
purchased it.
For more detailed information about treatment, recovery
and recycling of this product, please contact your local city
office, your household waste disposal service or the shop
where you purchased the product.
EN-31
Page 33
Mise en garde de sécurité
Votre sécurité est importante pour nous. Merci
de bien lire ce manuel avant d’installer et
d’utiliser votre appareil.
INSTALLATION
Risques de chocs électriques
• Débrancher l'appareil du réseau électrique
avant d'effectuer tout travaux ou entretien.
• L’appareil doit être relié à la terre selon les
recommandations en vigueur
• Les modifications apportées au système de
câblage intérieur doivent être effectués par
un électricien qualifié.
Risques de coupures
• Attention aux bords de la table qui peuvent
être coupants.
Consignes de sécurité importantes
Lire attentivement ces instructions avant
d'installer ou d'utiliser cet appareil.
• Aucun matériau ou produit inflammable ne
doit être placé sur cet appareil.
• Afin d'éviter tout danger, cet appareil doit être
installé conformément aux instructions
fournies dans ce manuel.
• Cet appareil doit être correctement installé et
relié à la terre par une personne qualifiée.
FR-1
Page 34

• Cet appareil doit être connecté à une prise
murale en parfait état.
• Ne pas installer correctement l'appareil
pourrait invalider toutes les réclamations de
garantie ou de responsabilité du fabricant.
UTILISATION ET ENTRETIEN
Risques de chocs électriques
• Ne pas faire cuire sur une table de cuisson
cassée ou fissurée. Si la surface de la plaque se
brise ou se fissure, débrancher l’appareil de la
prise murale et contacter un technicien qualifié.
• Débrancher la table de cuisson de la prise
murale avant le nettoyage ou l'entretien.
Danger pour la santé
Cet appareil est conforme aux normes de
sécurité électromagnétiques.
Toutefois, les personnes portant un
pacemaker ou d'autres implants
électriques (tels que les pompes à insuline)
doivent consulter leur médecin ou le
fabricant du pacemaker avant d'utiliser cet
appareil pour s’assurer que leurs implants
ne seront pas affectés par le champ
électromagnétique.
FR-2
Page 35
Risques de brûlures
Pendant l'utilisation, la surface de la table
de cuisson peut devenir suffisamment
chaude ce qui peut entrainer des risques de
brûlures.
• Eviter de toucher la surface de la table et de
laisser sur le verre des tissus ou tout objet autre
que des plats compatibles avec le table tant que
la surface est encore chaude
• Les objets métalliques tels que couteaux,
fourchettes, cuillères et couvercles ne doivent
pas ê tre placé s sur la surface de cuisson car ils
risquent de chauffer.
• Ne laisser pas les enfants à proximité de la
table sans surveillance.
Consignes de sécurité importantes
surveillance lors de l'utilisation.
Ne laissez jamais l'appareil sans
fumée et des déversements graisseux
pouvant s’enflammer.
Les éclaboussures peuvent causer de la
• Ne jamais utiliser votre appareil comme
surface de travail ou de stockage.
• Ne jamais laisser d'objets ou ustensiles sur
l'appareil.
ou des appareils électroniques (ordinateurs,
lecteurs MP3) près de l'appareil, car ils peuvent
être affectés par son champ électromagnétique.
• Ne pas placer ou laisser d'objets magnétiques
(par exemple cartes de crédit, cartes mémoire)
FR-3
Page 36

Ne jamais utiliser l’appareil pour chauffer la
pièce.
• Après utilisation, toujours éteindre les zones
de cuisson et la table de cuisson comme décrit
dans ce manuel (c’est à dire en utilisant les
commandes tactiles). Ne pas compter sur la
fonction de détection de casserole pour éteindre
les zones de cuisson lorsque vous retirez les
casseroles.
• Ne jamais laisser les enfants jouer, s’assoir,
ou monter sur la table de cuisson.
• Ne laisser pas les enfants à proximité de la
table sans surveillance.
• Les enfants ou les personnes ayant un
handicap qui limite leur capacité à utiliser
l'appareil devrait avoir une personne
responsable et compétente pour les instruire
dans son utilisation. L'instructeur doit s’assurer
qu'ils peuvent utiliser l'appareil sans danger
pour eux-mêmes ou leur environnement.
• Ne pas réparer ou remplacer toute pièce de
l'appareil. Toute réparation doit être effectuée
par un technicien qualifié.
• Ne pas utiliser un nettoyeur à vapeur pour
nettoyer la table de cuisson.
FR-4
Page 37
• Ne pas placer ou laisser tomber des objets
lourds sur votre table de cuisson.
• Ne jamais monter sur votre table de cuisson.
• Ne pas utiliser de casseroles dont le dessous
serait rugueux afin d’éviter d’endommager la
surface en vitrocéramique de votre table de
cuisson.
• Ne pas utiliser de tampons à récurer ou
d'autres agents de nettoyage abrasifs pour
nettoyer votre table de cuisson, car ils peuvent
rayer le verre à induction.
• Si le cordon d'alimentation est endommagé, il
doit être remplacé par le fabricant, son agent de
service ou un technicien qualifié afin d'éviter
tout danger.
Cet appareil est conçu pour
fonctionner dans un foyer domestique et
dans les établissements de type suivant :
Local cuisine, structures de type Bed and
Breakfast, ferme et hôtels, motels et autres
organismes accueillant des clients, cuisines
industrielles.
• ATTENTION: Sans assistance, une cuisson sur
une plaque de cuisson avec de la graisse ou de
l'huile peut être dangereux
• L'appareil n’est pas destiné à être actionné au
moyen d'une minuterie externe ou un système
de télécommande séparée.
FR-5
Page 38

Félicitations pour l’achat de cette table à induction. Nous vous
recommandons de prendre le temps de lire cette notice d’installation et
d’utilisation pour comprendre comment installer et utiliser votre table. Pour
l’installation, veuillez lire la partie « Installation ». Lire attentivement toutes les
conseils de sécurité avant toute utilisation et garder ce manuel pour toute
utilisation ultérieure.
Détails du produit
Vue du dessus
1. max. 1800/3000 W zone
2. max. 1800/3000 W zone
3. max. 1800/3000 W zone
4. max. 1400/2000 W zone
5. Zones Flexibles 3000/4000 W
6
7
1. max. 1800/3000 W zone
2. max. 1800/3000 W zone
3. max. 1800/3000 W zone
4. max. 1400/2000 W zone
5-6. Zones Flexibles 3000/4000 W
7
8
. Surface en verre
. Bandeau de commandes
. Surface en verre
. Bandeau de commandes
1
5
2
6
3
4
7
8
7
4
6
3
1
2
5
FR-6
Page 39

Bandeau de commandes
1.
2.
3.
4.
5.
6.
7.
Touche ON/OFF
Fonction verrouillage
Fonction booster
Commandes des niveaux de puissance
par slider
7. Minuteur
Fonction maintient au chaud
Selection de la zone de chauffe
FR-7
Page 40

Avant d’utiliser votre nouvelle table à
induction
Lire ce manuel, en particulier la partie “Conseils de sécurité”.
Retirer le film de protection éventuellement présent sur votre table
Utilisation des commandes tactiles
• Les commandes répondent au toucher, il n’est donc pas nécessaire d’appuyer
fort.
• Utiliser la pointe de votre doigt, pas son extrémité.
• Un “bip” retentit à chaque appui sur une touche
• S’assurer que les commandes soient toujours propres, sèches et qu’aucun
objet ne les recouvrent (ex: ustensile ou torchon) Même une fine pellicule
d’eau peut gêner l’utilisation des commandes.
Casserole en fer
Circuit magnétique
Dessus
vitrocéramique
Inducteurs
Flux d’induction
La cuisson à induction
La cuisson à induction est une technologie sure, efficace et économique. Cela
fonctionne par vibrations électromagnétiques qui génèrent de la chaleur
directement dans la casserole, plutôt qu’indirectement par la chauffe de la
surface en verre. Le verre devient chaud uniquement lorsque la casserole
chauffe.
FR-8
Page 41

Suffit de faire un test en passant un aimant sous le récipient.
Si le récipient est attiré par l’aimant, il est compatible avec l’induction.
• Si vous n’avez pas d’aimant :
1. Mettre de l’eau dans le récipient
2. Suivre les instructions sous “Pour commencer à cuisiner”.
3. Si le signe n’apparait pas sur le bandeau et que l’eau chauffe, alors le récipient est
compatible.
• Les récipients fabriqués à partir des matériaux suivants ne sont pas comptables : inox pur,
aluminium ou cuivre sans une base magnétique, verre, bois, porcelaine, céramique ou faïence.
Ne pas utiliser de récipients avec des bords dentés ou une base courbe.
S’assurer que la base de votre récipient est lisse, qu’elle repose bien à plat sur
le dessus de la table et qu’elle correspond à la taille de la zone de cuisson.
Utiliser des récipients dont le diamètre est le même que celui de la zone de
cuisson. En utilisant un récipient un peu plus large, l’énergie sera utilisée à son
efficacité maximale. En utilisant un récipient plus petit, l’efficacité sera diminuée.
Les récipients ayant un diamètre inférieur à 14cm peuvent ne pas être détectés
par la table. Toujours mettre le récipient au centre de la zone de cuisson.
Toujours soulever les récipients au-dessus de la table à induction- ne pas les
faire glisser, ou bien ils risqueraient de rayer le verre.
Choisir les bons récipients
• Utiliser seulement des récipients compatibles avec l’induction. Pour cela, vérifier la
présence du symbole induction sur l’emballage ou sous le récipient.
• Pour vérifier la compatibilité de votre récipient avec l’induction, il
FR-9
Page 42

Les dimensions de casserole
Jusqu’à une certaine limite, les zones de cuisson sont automatiquement adaptées au diamètre de la casserole.
Cependant, le dessous de la casserole doit avoir un diamètre minimum selon la zone de cuisson
correspondante. Pour obtenir la meilleure efficacité de votre plaque de cuisson, veuillez mettre la casserole au
centre de la zone de cuisson.
RES 62
RES 6D
Zones de
cuisson
Diamètre de la base de la plaque à induction
Minimum (mm)
Maximum (mm)
1,2,3
140
220
220
220x400
4
140
140
Zones de
cuisson
Diamètre de la base de la plaque à induction
Minimum (mm)
Maximum (mm)
1,2,3,4
140
220
220
220x400
Zones Flexibles
Zones Flexibles
FR-10
Page 43

Utilisation de votre table induction
Commencer une cuisson
2. Mettre un récipient compatible avec l’induction sur la zone que vous souhaitez
utiliser.
• S’assurer que le dessous du récipient et la surface
de la zone de cuisson soient propres et secs.
3. Appuyer sur l’icône de la zone que vous souhaitez utiliser. Une lumière va
s’afficher pour vous indiquer que la zone est bien sélectionnée.
4. Ajuster la puissance de chauffe grâce au slider. Pour augmenter la puissance
faites glisser votre doigt de gauche à droite et pour diminuer faites glisser votre
doigt de droite à gauche.
• Si aucune puissance n’est sélectionnée la table s’éteint automatiquement
au bout d’1 minute.
Pour rallumer la table vous devez alors recommencer à l’étape
1. Il est possible de modifier la puissance de chauffe pendant la cuisson.
1. Touchez la commande ON/OFF pendant trois secondes.
Après l’allumage, le buzzer bipe une fois, le minuteur indique
tous les affichages indiquent “ “, “ “ ou“ “, pour signaler
que la plaque à induction est entrée en mode standby.
FR-11
Page 44

Si le display affiche en alternance avec la
puissance de chauffe.
• Le récipient n’est pas sur la zone de chauffe sélectionnée, ou
• Le récipient utilisé n’est pas compatible avec l’induction, ou
• Le récipient est trop petit ou mal positionné sur la zone et donc n’est pas
détecté par les inducteurs
La table ne chauffe pas si aucun récipient n’est détecté et s’éteint
automatiquement au bout de 2 minutes.
Quand votre cuisson est terminée
1. Appuyer sur l’icône de la zone que vous souhaitez éteindre.
2. Faire glisser votre doigt sur le slider de droite à gauche jusqu’à le chiffre
apparaissent à côté de l’icône de la zone.
3. Pour éteindre complétement toute la table de cuisson appuyer sur le bouton
ON/OFF.
4. Attention au résidu de chaleur.
Un “H” apparaitra à côté de l’icône de zone vous indiquant que la surface du
verre est encore chaude. Il disparaitra lorsque la température sera
redescendue à niveau de sécurité de suffisant
FR-12
Page 45

FONCTION BOOSTER
Pour activer la fonction booster
1. Appuyer sur l’icône de la zone que vous souhaitez utiliser.
2. Appuyer sur la touche booster “ ”, un « b » va alors apparaitre et la zone
va atteindre le niveau maximum de chauffe.
Désactiver la fonction booster
1. Appuyer sur l’icône de la zone sur laquelle vous désactiver la fonction
« booster »
2. Appuyer sur la touche « booster » « » et la zone de chauffe se remettra en mode
normal.
• La fonction booster se désactive automatiquement au bout de 5 minutes, la
puissance revient alors sur un réglable manuel
• Si la puissance de chauffe était 0 avant l’activation du booster, la table se règle
automatiquement sur la puissance 9 une fois le booster désactivé
• Si le booster est active sur la zone n° 1, la zone n°2 aura une puissance de 2
maximum et inversement.
• Si le booster est active sur la zone n° 3, la zone n°4 aura une puissance de 2
maximum et inversement.
OR
FR-13
Page 46

Fonction spéciale
Fonction maintien au chaud
• Vous pouvez utiliser cette fonction pour maintenir des aliments au chaud
sans les cuire
• Cette fonction peut être active sur toutes les zones.
1. Appuyez sur l’icône de la zone que vous souhaitez utiliser.
2. Appuyez sur la touche « Maintien au chaud » un « » apparait pour
vous indiquer que la fonction est activée.
|
Annuler la fonction de conservation au chaud
1. Touchez la touche de sélection de zone de chauffe.
2. Touchez la commande slider, puis la zone de cuisson reviendra au niveau de cuisson choisi.
b: Touchez la fonction contrôle tel que , puis la zone de cuisson reviendra à votre sélection.
FR-14
Page 47

Les zones Flexibles
La zone peut être utilisée comme une zone simple ou deux zones distinctes selon les besoins de
cuisson du moment.
La zone flexible est composée de deux inducteurs indépendants qui peuvent être contrôlés
séparément. Lorsque vous cuisinez sur une zone simple, la casserole peut être déplacée d’une
zone à l’autre, à l’intérieur de la zone flexible tout en gardant le même niveau de puissance de la
zone. Et la partie qui n’est pas couverte par la casserole est automatiquement éteinte.
Important : Assurez-vous de placer les casseroles au milieu de zone de chauffe. Dans le cas d’une
grande casserole, ovale, rectangulaire ou allongée, veuillez placer les casseroles au milieu de la
zone de cuisson en couvrant chaque croix.
Voici deux exemples d’un bon placement et d’un mauvais placement de casseroles.
Utilisation de la zone flexible
1. Activez la zone flexible comme une seule et unique grande zone simplement en appuyant sur la
touche prévue à cet effet.
2. Le système d’allumage de cette plaque fonctionne comme toute autre zone normale.
3. Si la casserole est déplacée de l’avant vers l’arrière (ou vice versa), la zone flexible détecte
automatiquement la nouvelle position de la casserole, en gardant la même puissance de cuisson.
4. Pour ajouter une nouvelle casserole, appuyez de nouveau sur la touche prévue à cet effet.
FR-15
Page 48
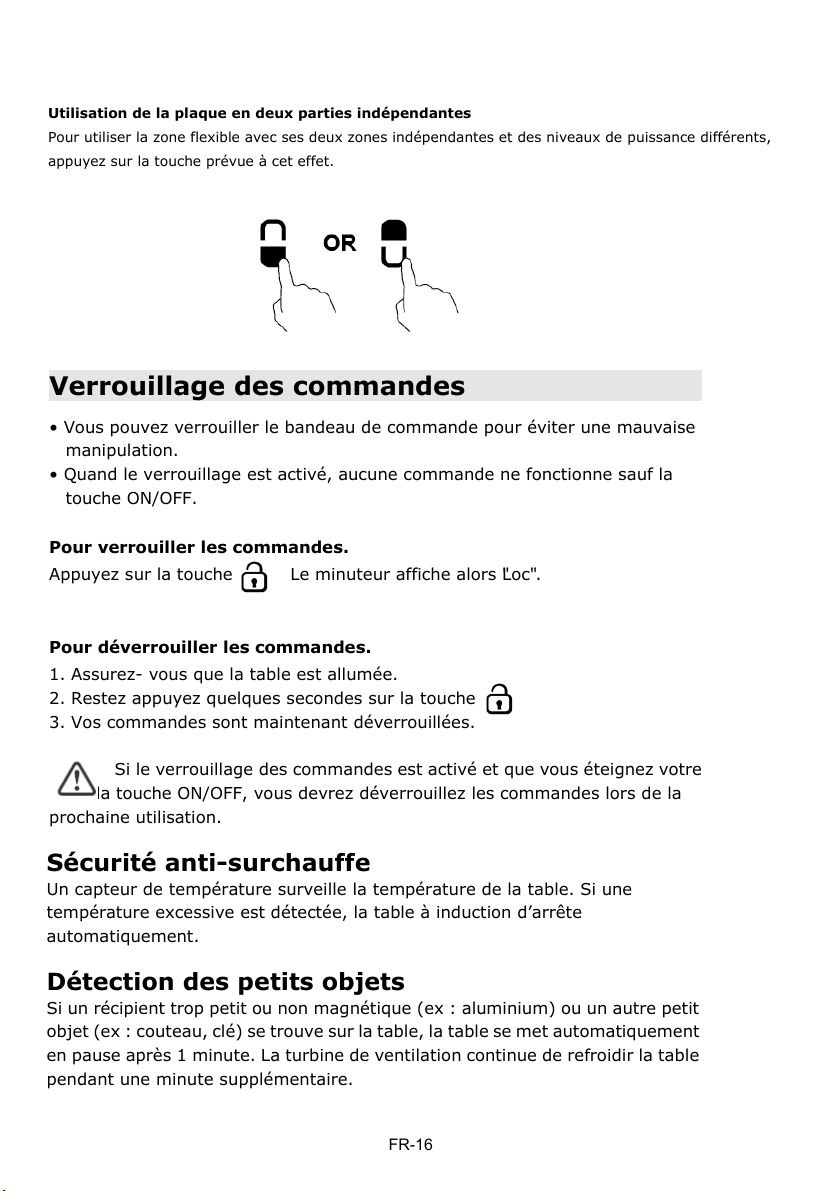
Utilisation de la plaque en deux parties indépendantes
Pour utiliser la zone flexible avec ses deux zones indépendantes et des niveaux de
puissance différents,
appuyez sur la touche prévue à cet effet.
Verrouillage des commandes
• Vous pouvez verrouiller le bandeau de commande pour éviter une mauvaise
manipulation.
• Quand le verrouillage est activé, aucune commande ne fonctionne sauf la
touche ON/OFF.
Pour verrouiller les commandes.
Appuyez sur la touche Le minuteur affiche alors
Pour déverrouiller les commandes.
1. Assurez- vous que la table est allumée.
2. Restez appuyez quelques secondes sur la touche
3. Vos commandes sont maintenant déverrouillées.
Si le verrouillage des commandes est activé et que vous éteignez votre
table la touche ON/OFF, vous devrez déverrouillez les commandes lors de la
prochaine utilisation.
c" . "Lo
Sécurité anti-surchauffe
Un capteur de température surveille la température de la table. Si une
température excessive est détectée, la table à induction d’arrête
automatiquement.
Détection des petits objets
Si un récipient trop petit ou non magnétique (ex : aluminium) ou un autre petit
objet (ex : couteau, clé) se trouve sur la table, la table se met automatiquement
en pause après 1 minute. La turbine de ventilation continue de refroidir la table
pendant une minute supplémentaire.
FR-16
Page 49

Sécurité coupure automatique
La coupure automatique est une sécurité apportée à votre table à induction. Elle
éteint automatiquement la table si vous oubliez de le faire. Les temps pour les
différents niveaux de puissance sont récapitulés dans le tableau ci-dessous :
Niveaux de puissance
Temps maximum de
fonctionnement (heure)
Lorsque le récipient est enlevé, la table à induction s’arrête de chauffer
immédiatement et la table s’éteint automatiquement au bout de 2 minutes.
Les personnes portant un pacemaker sont priées de consulter un médecin avant
d’utiliser ce produit.
Keep warm
1~5
6~10
11~14
15
2
8 4 2
1
Utilisation du minuteur
Vous pouvez utiliser le minuteur de 2 façons :
• Minuterie classique: le minuteur n’est associé à aucune zone et vous informe
par un bip quand le temps est écoulé mais n’éteint aucune zone.
• Vous pouvez l’activer sur une ou plusieurs zones en même temps et la zone
s’éteindra automatiquement une fois le temps écoulé.
Remarques : Vous pouvez programmer le minuteur de 1 à 99 minutes.
Utilisation du minuteur comme compte à rebours
Si vous n’avez sélectionné aucune zone.
1. Assurez- vous que votre table est allumée.
Remarque: vous pouvez utiliser le minuteur même si aucune zone n’est
sélectionnée.
“
jusqu’à ce que le chiffre " 0:10 " apparaisse.
“ du minuteur 2. Appuyez sur les touche
FR-17
Page 50

immédiatement. L’afficheur montre le temps restant.
5. Lorsque le temps est programmé, le compte à rebours est lancé
affiche « 0 :00 » lorsque le temps est terminé.
6. Le minuteur sonne pendant 30 secondes et
z l'heure en appuyant sur le contrôle slider. 3 . Régle
4 .Minuterie de toucher, encore une fois, le « 1 » se met à clignoter.
Si le minuteur est réglé sur une zone :
1. 1 Toucher la zone de cuisson sur laquelle vous
souhaitez programmer le minuteur.
2. Appuyer sur les touches , jusqu’à ce que “0:10” apparaisse.
Régler le minuteur pour éteindre les zones de cuisson
FR-18
Page 51

immédiatement. L’afficheur montre le temps restant.
6. Lorsque le temps est programmé, le compte à rebours est lancé
NB: Le point rouge à côté du niveau de puissance s’illumine pour indiquer la
zone sélectionnée
immédiatement. L’afficheur montre le temps restant.
5. Lorsque le temps est programmé, le compte à rebours est lancé
z l'heure en appuyant sur le contrôle slider. 3 . Régle
4 .Minuterie de toucher, encore une fois, le « 1 » se met à clignoter.
7. Lorsque le temps expire, la zone de cuisson
correspondante s’éteint automatiquement.
Les autres zones de cuisson continuent de fonctionner si elles ont été
allumées auparavant.
FR-19
Page 52
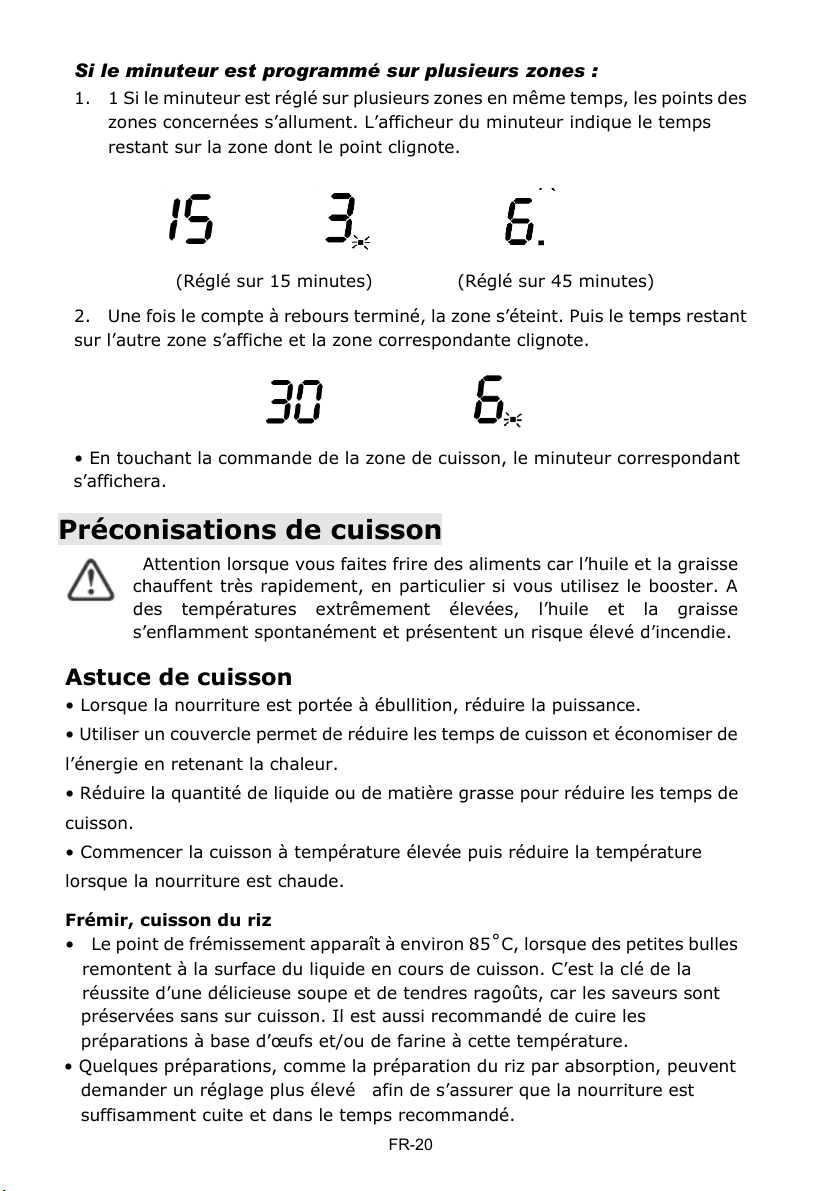
Si le minuteur est programmé sur plusieurs zones :
1. 1 Si le minuteur est réglé sur plusieurs zones en même temps, les points des
zones concernées s’allument. L’afficheur du minuteur indique le temps
restant sur la zone dont le point clignote.
(Réglé sur 15 minutes)
2. Une fois le compte à rebours terminé, la zone s’éteint. Puis le temps restant
sur l’autre zone s’affiche et la zone correspondante clignote.
• En touchant la commande de la zone de cuisson, le minuteur correspondant
s’affichera.
(Réglé sur 45 minutes)
Préconisations de cuisson
Attention lorsque vous faites frire des aliments car l’huile et la graisse
chauffent très rapidement, en particulier si vous utilisez le booster. A
des températures extrêmement élevées, l’huile et la graisse
s’enflamment spontanément et présentent un risque élevé d’incendie.
Astuce de cuisson
• Lorsque la nourriture est portée à ébullition, réduire la puissance.
• Utiliser un couvercle permet de réduire les temps de cuisson et économiser de
l’énergie en retenant la chaleur.
• Réduire la quantité de liquide ou de matière grasse pour réduire les temps de
cuisson.
• Commencer la cuisson à température élevée puis réduire la température
lorsque la nourriture est chaude.
Frémir, cuisson du riz
• Le point de frémissement apparaît à environ 85˚C, lorsque des petites bulles
remontent à la surface du liquide en cours de cuisson. C’est la clé de la
réussite d’une délicieuse soupe et de tendres ragoûts, car les saveurs sont
préservées sans sur cuisson. Il est aussi recommandé de cuire les
préparations à base d’œufs et/ou de farine à cette température.
• Quelques préparations, comme la préparation du riz par absorption, peuvent
demander un réglage plus élevé afin de s’assurer que la nourriture est
suffisamment cuite et dans le temps recommandé.
FR-20
Page 53

Saisir une viande
Pour cuire des steaks juteux et savoureux :
1. Sortir la viande à température ambiante pendant 20 minutes avant de la
cuire. 2. Chauffer la poêle.
3. Badigeonner d’huile chaque côté du steak. Verser une petite quantité d’huile
dans la poêle puis mettre la viande dans la poêle chaude.
4. Retourner le steak une fois lors de la cuisson. Le temps de cuisson dépend
de l’épaisseur de la viande et du type de cuisson que vous souhaitez. Ce
temps peut varier entre 2 et 8 minutes par côté. Piquer le steak pour jauger
de la cuisson – plus il sera ferme, plus il sera cuit.
5. Laisser le steak refroidir sur une assiette chaude pendant quelques minutes
pour le laisser s’attendrir avant de servir.
Pour poêler
1. Choisir un wok à base plate ou un large poêle compatible avec l’induction.
2. Préparer tous les ingrédients et les équipements nécessaires. La poêlée doit
être une opération rapide. Si vous préparez de larges quantités, cuisinez-en
plusieurs fois.
3. Préchauffer rapidement la poêle et ajouter 2 cuillères à soupe d’huile.
4. Préparer la viande en premier, réserver et maintenir au chaud.
5. Poêler les légumes. Lorsqu’ils sont chauds mais toujours croquants,
abaisser la puissance de la cuisson, rajouter la viande dans la poêle et
ajouter la sauce.
6. Mélanger les ingrédients doucement pour s’assurer qu’ils sont bien cuits
7. Servir immédiatement.
FR-21
Page 54

Réglage de la
puissance
Usage
1 - 2
• • cuisson délicate pour de petites quantités de
nourriture
• fondre du chocolat, du beurre et des aliments sensibles
• faire mijoter doucement
• cuisson douce
3 - 4
• réchauffer
• mijotage rapide
• cuire du riz
5 - 6
• crêpes
7 - 8
• poêlées
• cuisson des pâtes
9/B
• faire sauter
• saisir (une viande)
• porter la soupe à ébullition
• faire bouillir de l’eau
Régler la chaleur
Les réglages figurant ci-dessous sont seulement des recommandations. Le
réglage précis dépend de plusieurs facteurs, notamment de votre récipient et de
la quantité de nourriture à cuire. Nous vous recommandons d’essayer votre
table à induction afin de trouver les réglages qui vous conviennent le mieux.
Entretien
Quoi?
Pourquoi?
Important!
Entretien au
quotidien des
salissures sur le
verre (traces de
doigts, marques,
taches de nourriture
ou projections)
1. Eteindre la table.
2. Appliquer un produit
d’entretien tant que le verre
est encore chaud (mais pas
brûlant)
3. Rincer et sécher à l’aide d’un
chiffon propre ou d’un
essuie-tout
4. Rallumer la table
• Lorsque la table est éteinte, il n’y a
pas d’indication “surface chaude”
mais la zone de cuisson peut encore
être chaude! Faire attention.
• Les tampons à récurer, les éponges
abrasives et certains produits de
nettoyage abrasifs peuvent rayer le
verre
• Ne jamais laisser de résidus de
produit d’entretien sur la table : le
verre pourrait se tacher.
FR-22
Page 55

Débordements,
aliments fondus ou
projections chaudes
à base de sucre sur
le verre
Les retirer immédiatement à
l’aide d’un racloir, couteau plat
ou d’un grattoir compatible
avec les tables à induction en
verre, tout en faisant attention
à la chaleur des zones de
cuisson:
1. Eteindre la table.
2. Tenir la lame ou l’ustensile à
un angle de 30° et gratter la
saleté ou la faire glisser vers
une zone froide de la table.
3. Nettoyer à l’aide d’un
torchon ou d’un essuie-tout.
4. Suivre les étapes 2 à 4 du
paragraphe « Entretien au
quotidien » ci-dessus
• Enlever dès que possible les taches
restantes de sucre ou de projections.
Si elles refroidissent sur la table, elles
pourraient être difficiles à enlever ou
pourraient même endommager la
surface en verre de manière
permanente.
• Risque de coupure : la lame d’un
grattoir peut être très coupante. A
utiliser avec précaution et hors de
portée des enfants.
Projections sur les
touches de
commande
1. Eteindre la table.
2. Eponger la projection
3. Essuyer le bandeau de
commande à l’aide d’une
éponge humide et propre ou
d’un chiffon.
4. Essuyer complètement la
zone à l’aide d’un essuie-tout
sec.
5. Rallumer la table.
• La table peut émettre un signal
sonore et s’éteindre, et les touches de
commande peuvent ne pas
fonctionner s’il y a du liquide
par-dessus. S’assurer que la zone soit
bien sèche avant de rallumer la table
Trucs et astuces
Problème
Causes Possibles
Que faire ?
La table à induction
ne s’allume pas
Il n’y a pas de courant/ Elle
n’est pas branchée
S’assurer que la table à induction
est branchée et que l’électricité
fonctionne.
Vérifier s’il n’y a pas une coupure de
courant chez vous ou dans votre
quartier. Si après avoir fait ces
vérifications le problème persiste,
appeler un technicien qualifié.
Les touches de
commande ne
répondent pas
Les commandes sont bloquées.
Débloquer les commandes (cf. la
section « Bloquer les commandes» )
FR-23
Page 56

Les touches de
commandes
répondent mal
Il peut y avoir une fine pellicule
d’eau sur les commandes ou
vous utilisez la pointe du doigt
pour toucher les commandes
S’assurer que le bandeau de
commande est sec et utiliser le bout
du doigt pour toucher les
commandes.
Le verre est rayé
Ustensiles avec des bords
coupants.
Utilisation de grattoirs ou bien
des produits d’entretien
inappropriés ou abrasifs
Utiliser des ustensiles à fond plat et
lisse. Voir la section « Choisir les
bons récipients ».
Voir la section “Entretien”.
Des récipients font
des bruits de
craquements ou de
cliquetis.
Cela peut être causé par la
composition de votre récipient
(couches de différents métaux
vibrant différemment)
C’est normal et cela n’indique pas un
défaut de votre ustensile.
La table à induction
émet un petit
ronronnement
lorsqu’on utilise à une
haute température
Cela est dû à la technologie de
la cuisson à induction
C’est normal, et le bruit doit
diminuer ou disparaitre
complètement lorsqu’on diminue le
niveau de puissance.
Un bruit de
ventilateur vient de la
table
Il y a une turbine de
refroidissement à l’intérieur de
la table qui permet d’empêcher
aux composants électroniques
de surchauffer. Elle peut
continuer à fonctionner même
après que vous avez éteint
votre table.
Cela est normal et ne requiert
aucune intervention. Ne pas
débrancher la table à induction tant
que la turbine fonctionne.
Les récipients ne
chauffent pas et
n’apparaissent pas
sur l’afficheur.
La table à induction ne peut pas
détecter le récipient car il n’est
pas compatible avec
l’induction.
La table à induction ne peut pas
détecter le récipient car il est
trop petit pour la zone de
cuisson et pas centré dessus.
Utiliser des récipients compatibles
avec l’induction. Voir la section
« Choisir les bons récipients »
Centrer le récipient et s’assurer que
sa taille convient à la zone de
cuisson.
La zone de cuisson
s’est éteinte de
manière inattendue,
un bruit a retenti et
un message d’erreur
apparaît
Problème technique
Noter les lettres et numéros de
l’erreur, débrancher la table, et
contacter un technicien qualifié.
FR-24
Page 57

Affichage des erreurs et Inspection
Si une anomalie apparait, la table à induction se bloque alors automatiquement
et affiche les codes suivants :
Problème
Causes Possibles
Que faire ?
F1-F6
Erreur sur le capteur de
température
Merci de contacter le
fournisseur.
F9-FA
Erreur sur le capteur de
température de l’IGBT
Merci de contacter le
fournisseur.
FC
E1/E2
Apport d’un voltage anormal
Merci de vérifier si la fourniture
d’énergie est normale.
Rallumer dès que l’apport en
énergie est redevenu normal
E3/E4
E5
Merci de redémarrer lorsque la
table a refroidi
Les indications ci-dessus sont des erreurs courantes
Merci de ne pas démonter la table vous-même pour éviter tout risque et
d’endommager la table à induction.
La connexion entre le panneau
d’affichage et le panneau
principal a échoué.
Veuillez contacter le
fournisseur.
La température de la plaque est
élevée.
Veuillez rallumer après que la
plaque à induction se soit
refroidie.
La température du transistor
est élevée.
Spécifications Techniques
Table de cuisson
Zones de cuisson
Branchement
Puissance électrique totale installée
Dimensions du produit L×l×h(mm)
Dimensions d’encastrement A×B
(mm)
ES 62 – ES6D
4 Zones
220-240V~ 50/60Hz
7200W
590X520X60
560X490
H H
FR-25
Page 58
Le poids et les dimensions sont des estimations. Parce que nous nous attachons
à améliorer continuellement nos produits, il est possible que les spécifications et
les designs changent sans modification de la notice.
Installation
Choix de l’équipement
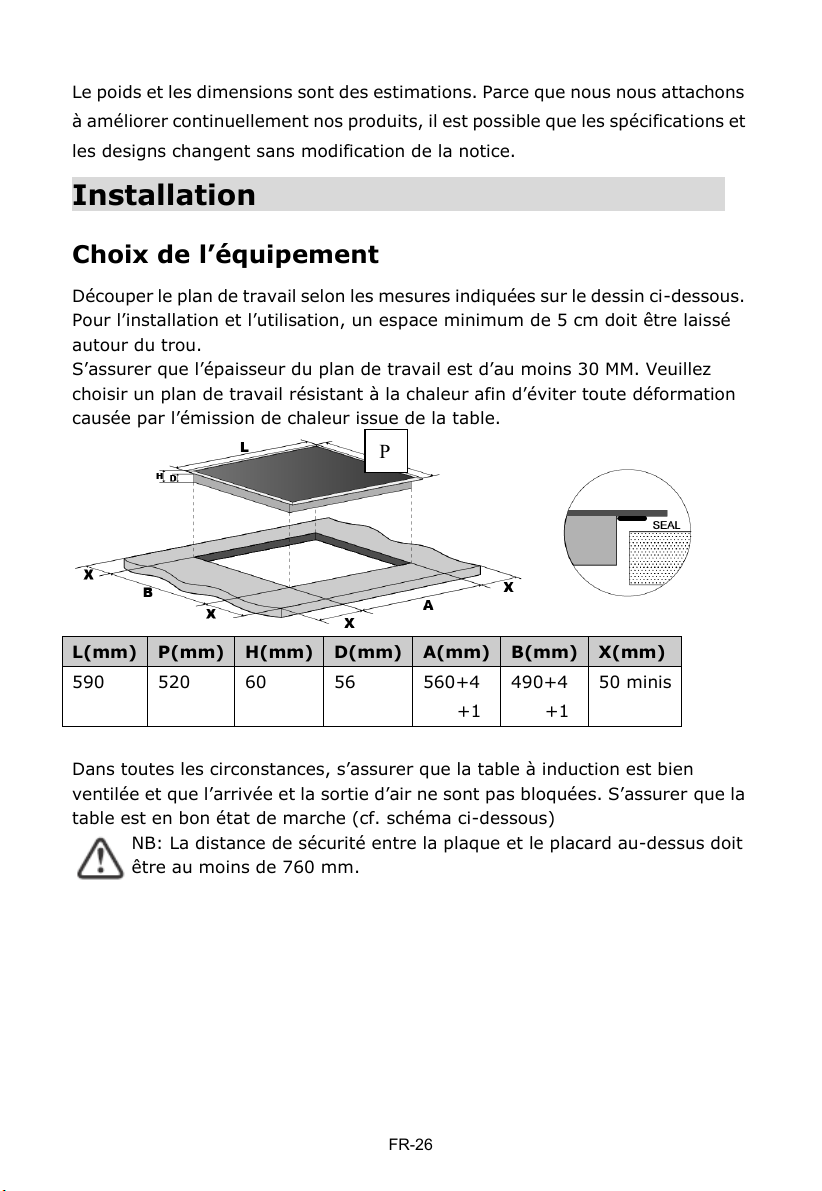
Découper le plan de travail selon les mesures indiquées sur le dessin ci-dessous.
Pour l’installation et l’utilisation, un espace minimum de 5 cm doit être laissé
autour du trou.
S’assurer que l’épaisseur du plan de travail est d’au moins 30 MM. Veuillez
choisir un plan de travail résistant à la chaleur afin d’éviter toute déformation
causée par l’émission de chaleur issue de la table.
L(mm)
P(mm)
H(mm)
D(mm)
A(mm)
B(mm)
X(mm)
590
520
60
56
560+4
+1
490+4
+1
50 minis
Dans toutes les circonstances, s’assurer que la table à induction est bien
ventilée et que l’arrivée et la sortie d’air ne sont pas bloquées. S’assurer que la
table est en bon état de marche (cf. schéma ci-dessous)
NB: La distance de sécurité entre la plaque et le placard au-dessus doit
être au moins de 760 mm.
P
FR-26
Page 59

A(mm)
B(mm)
C(mm) D E
Avant d’installer la table, s’assurer que:
• le plan de travail est plane, et qu’aucun élément ne vienne entraver l’espace
nécessaire
• le plan de travail est composé de matériaux résistant à la chaleur
• si la table est installée au-dessus d’un four, le four est équipé d’une turbine de
refroidissement
• l’installation se conformera à toutes les exigences et les normes en vigueur
• le raccordement électrique au réseau doit être effectué par une prise de
courant avec prise de terre, ou par l’intermédiaire d’un dispositif à coupure
omnipolaire ayant une distance d’ouverture d’au moins 3 mm
• la prise de terre est facilement accessible une fois la table installée
• en cas de doute sur l’installation, contacter les autorités locales
• des matériaux résistant à la chaleur et faciles à nettoyer (comme des carreaux
en faïence) entourent la table.
FR-27
Page 60

• le câble d’alimentation n’est pas accessible à travers les portes de placard ou
les tiroirs.
• une quantité suffisante d’air puisse passer de l’extérieur vers la base de la
table
• si la table est installée au-dessus d’un tiroir ou d’un placard, une barrière de
protection thermique est installée sous la base de la table
• la prise de terre est facile d’accès
Avant de placer les pattes de fixation
La plaque doit être placée sur une surface plane. Ne pas appuyer trop fortement
sur les commandes dépassant de la table de cuisson.
Ajuster la position des pattes de fixation
Fixer la table de cuisson au plan de travail en vissant 4 pattes de fixation sur le
dessous de la table (voir photo) après l’installation.
Mise en garde
1. La table à induction doit être installée par du personnel qualifié ou des
techniciens. Nous avons des professionnels à votre service. Ne jamais faire
cette opération vous-même.
2. La table ne doit pas être installée directement au-dessus d’un lave-vaisselle,
d’un réfrigérateur, d’un congélateur, d’un lave-linge ou d’un sèche-linge, car
l’humidité pourrait endommager les circuits électroniques de la table.
3. La table à induction doit être installée de façon à ce que l’émission de chaleur
soit optimale afin d’améliorer ses performances.
4. Le mur et la zone située autour du dessus de la table doivent supporter la
chaleur.
5. Pour éviter tout dégât, le joint adhésif doit résister à la chaleur.
Une fois la table installée, s’assurer que :
FR-28
Page 61

Raccorder la table
Cette table doit être raccordée uniquement par une personne qualifiée.
Avant de procéder au raccordement électrique, vérifier que :
1. le système de câblage domestique convient à la puissance de la table.
2. le voltage correspond à celui précisé sur la plaque du produit
3. les fils du câble d’alimentation peuvent supporter la puissance indiquée sur la plaque
du produit.
Pour connecter la table de cuisson au courant, ne pas utiliser d’adaptateurs, de
réducteurs ou brancher des appareils, car ils peuvent provoquer une surchauffe et un départ de
feu.
Le câble de raccordement ne doit pas toucher une zone chaude et doit être placé de façon
à ce que la température n’excède jamais 75°C.
Vérifier avec un électricien si le système de raccordement électrique convient sans
transformation. Toute transformation doit être effectuée par un électricien qualifié.
L’alimentation doit être connectée en conformité avec les normes, ou par un
disjoncteur unipolaire. La méthode de connexion est indiquée ci-dessous.
• Si le câble est endommagé ou doit être remplacé, l’opération doit être
effectuée par un technicien équipé d’outils spécifiques afin d’éviter tout
accident.
• Si l’appareil est connecté directement au secteur, un disjoncteur omnipolaire
doit être installé avec une ouverture minimale de 3 mm entre les contacts.
• L’installateur doit s’assurer que la connexion électrique a bien été effectuée et
qu’elle est conforme aux normes de sécurité.
• Le câble ne doit pas être plié ou compressé
• Le câble doit être vérifié régulièrement et remplacé par des techniciens agréés
uniquement.
Bleu
Gris
Marron
Noir
Jaune / Vert
220-240 V~
220-240 V~
220-240 V~
400V~
220-240 V~
220-240 V~
N2 N1 L2 L1
N2 N1 L2 L1 N2 N1 L2 L1
Yellow / Green
Black
Brown
Grey
Blue
Yellow / Green
Black
Brown
Grey
Blue
Yellow / Green
Black
Brown
Grey
Blue
FR-29
Page 62

Cet appareil est commercialisé en accord avec
la directive européenne 2002/96/CE sur les
déchets des équipements électriques et électroniques
(DEEE). En vous assurant que ce produit
est correctement recyclé, vous participez à la
prévention des conséquences négatives sur
l’environnement et la santé publique qui pourrait
être causé par une mise au rebut inapproprié
de ce produit. Le symbole sur ce produit indique
qu’il ne doit pas être traité comme un déchet ménager. Il doit
être rapporté jusqu’à un point de recyclage des déchets électriques
et électroniques. La collecte de ce produit doit se faire en accord
avec les règlementations environnementales concernant la mise
au rebut de ce type de déchets.
Pour plus d’information au sujet du traitement, de la collecte et
du recyclage de ce produit, merci de contacter votre mairie, votre
centre de traitement des déchets ou le magasin où vous avez
acheté ce produit.
FR-30
Page 63

Güvenlik Uyarıları
Güvenliğiniz bizim için önemlidir. Ocağınızı kullanmadan
önce lütfen bu bilgileri okuyun.
Kurulum
Elektrik Çarpması Riski
• Herhangi bir işlem ya da bakım yürütmeden önce
cihazınızın güç bağlantısını kesin.
• İyi bir topraklama bağlantısı gerekli ve zorunludur.
• Evdeki elektrik tesisatında yapılan değişiklikler yalnızca
kalifiye bir elektrikçi tarafından yapılmalıdır.
• Bu tavsiyeye uymamak elektrik çarpmasına ve
ölüme yol açabilir.
Kesilme Riski
• Dikkatli olun - panel uçları keskindir.
• Dikkatli bir şekilde kullanılmaması yaralanmalara ve
kesiklere yol açabilir.
Önemli Güvenlik Talimatları
• Bu cihazı kurmadan veya kullanmadan önce
talimatları dikkatlice okuyun.
• Cihazın üzerine asla yanıcı malzeme ve ürünler
yerleştirilmemelidir.
• Kurulum maliyetlerini azaltacak bu bilgileri cihazın
kurulumundan sorumlu kişiyle lütfen paylaşın.
TR-1
Page 64
• Olası bir kazanın önüne geçmek için bu cihaz kurulum
talimatlarına uygun olarak kurulmalıdır.
• Bu cihaz yalnızca uygun bir kalifiye kişi tarafından
düzgünce kurulmalı ve topraklanmalıdır.
• Bu cihaz, güç kaynağına tamamen bağlantısız olan bir
yalıtım şalteri içeren bir devreye bağlanmalıdır.
• Bu cihazı doğru bir şekilde kurmamak her türden garanti
ya da sorumluluk iddiasını geçersiz kılabilir.
Kullanma ve bakım
Elektrik Çarpması Riski
• Kırık ya da çatlak ocak yüzeyinde yemek pişirmeyin.
Ocak yüzeyi kırık ya da çatlaksa cihazı derhal güç
kaynağından (duvar şalteri) kapatın ve kalifiye bir
teknisyenle iletişime geçin.
• Temizleme ya da bakım öncesinde ocağı duvar
şalterinden kapatın.
• Bu tavsiyeye uyulmaması elektrik çarpmasına ve
ölüme yol açabilir.
Sağlık Riski
• Bu cihaz elektromanyetik güvenlik standartlarına
uygundur.
• Ancak, kalp pili ya da diğer elektrikli implantlara (insülin
pompaları gibi) sahip kişiler, implantlarının elektromanyetik
alandan etkilenip etkilenmeyeceğinden emin olmak için
cihazı kullanmadan önce doktorlarına ya da implant
üreticilerine danışmalıdır.
TR-2
Page 65
• Bu tavsiyeye uymamak ölüme yol açabilir.
Sıcak Yüzey Riski
• Kullanım esnasında, bu cihazın erişilebilir parçaları
yanmalara sebebiyet verecek kadar sıcak olacaktır.
• Uygun yemek pişirme gereçleri dışındaki herhangi bir
eşyanın, vücudunuz ya da kıyafetlerinizin, yüzey
soğuyana dek İndüksiyon camına değmesine izin
vermeyin.
• Dikkat: vücudunuzda bulunan manyetik özellikli metal
nesneler pişirme yüzeyi yakınındayken ısınabilir. Altın ve
gümüş takılar bu durumdan etkilenmeyecektir.
• Çocukları cihazdan uzak tutun.
• Tencerelerin tutamaçları dokunulamayacak kadar sıcak
olabilir. Tencere tutamaçlarını kontrol edin, açık olan
diğer pişirme bölgeleri üzerinde kalmamalarını sağlayın.
Çocukların erişemeyeceği şekilde konumlandırın.
• Bu tavsiyeye uyulmaması yanıklara ve
yaralanmalara yol açabilir.
Kesilme Riski
• Ocak yüzeyi kazıyıcısının keskin bıçağı, güvenlik kılıfı
çıkarıldıktan sonra, tehlike yaratmaya açıktır.
Çok dikkatli bir şekilde kullanın ve daima güvenli ve
çocuklardan uzak olacak bir şekilde saklayın.
TR-3
Page 66
• Dikkatli bir şekilde kullanılmaması yaralanmalara ve
kesiklere yol açabilir.
Önemli Güvenlik Talimatları
• Cihaz çalışırken asla yanından uzaklaşmayın. Taşmalar,
ateşlemeye sebebiyet verebilecek tütmelere ve yağlı
dökülmelere yol açabilir.
• Cihazınızı asla bir çalışma ya da saklama yüzeyi olarak
kullanmayın.
• Cihazın üzerinde hiçbir nesne ya da alet
bırakmayın.
• Elektromanyetik alandan etkilenebileceğinden dolayı,
cihaz yakınında herhangi bir manyetik etkili nesne (ör.
kredi kartı, hafıza kartı) ya da elektronik cihaz (ör.
bilgisayar, MP3 çalar) yerleştirmeyin ya da bırakmayın.
• Cihazınızı asla odayı ısıtmak için kullanmayın.
• Kullanım sonrasında, pişirme bölgelerini ve ocağı
kullanım daima kılavuzunda belirtildiği şekilde kapatın
(yani, dokunma kontrollerini kullanarak). Tavaları
kaldırdığınızda pişirme bölgelerini kapatmak üzere tava
algılama özelliğine güvenmeyin.
• Çocukların cihazla oynamasına, üzerine oturmasına ya
da tırmanmasına izin vermeyin.
• Cihaz üzerindeki dolaplarda çocukların ilgisini
çekebilecek eşyaları saklamayın. Ocağın üzerine
tırmanan çocuklar ciddi bir şekilde yaralanabilir.
TR-4
Page 67
• Cihazın kullanıldığı alanda çocukları yalnız veya
gözetimsiz bırakmayın.
• Çocuklar veya cihazı kullanma becerisini kısıtlayan bir
engeli bulunan kişiler, cihazı kullanmalarında onlara
talimat verecek bir sorumlu ya da yetkili kişiyle cihazı
kullanmalıdır. Talimat veren kişi cihazın kendileri ve
çevreleri için bir tehlike arz etmediğinden emin olmalıdır.
• Özel olarak kılavuzda önerilmediği takdirde cihazın
herhangi bir kısmını onarmayın ya da değiştirmeyin. Tüm
diğer servis işleri kalifiye bir teknisyen tarafından
yapılmalıdır.
• Ocağı temizlemek için buhar temizleyicisi kullanmayın.
• Ocağınızın üzerine ağır nesneler yerleştirmeyin ya da
atmayın.
• Ocağınızın üzerine basmayın.
• Camın çizilmesine neden olabileceği için tırtıklı kenarları
olan ya da sürgülü tavaları İndüksiyon cam yüzeyi
üzerinde kullanmayın.
• İndüksiyon camını çizebileceğinden dolayı, pişirme
yüzeyini temizlemek için tel ya da herhangi diğer sert
aşındırıcı temizlik malzemesini kullanmayın.
• Kablo hasar görmüşse yalnızca kalifiye bir teknisyen
tarafından değiştirilmelidir.
• Bu cihaz yalnızca evde kullanılmak üzere
tasarlanmıştır.
• Bu cihaz, yanlarında güvenliklerinden sorumlu olacak
veya onlara cihazın güvenli bir şekilde kullanımıyla ilgili
gerekli talimatları verecek ve tehlikeleri anlamalarını
sağlayacak bir kişi bulunduğu sürece 8 yaşından büyük
çocuklar ve fiziksel, duyusal veya zihinsel
yeteneklerinde yetersizlik bulunan veya bilgisiz ya da
deneyimsiz olan kişiler tarafından kullanılabilir.
TR-5
Page 68

Çocukların cihazla oynamasına izin verilmemelidir.
Temizlik ve kullanıcı tarafından gerçekleştirilen bakım
işlemleri, yanlarında bir yetişkin bulunmadığı sürece
çocuklar tarafından yapılmamalıdır.
• UYARI: Yağ kullanarak pişirme yaparken ocağın
yanından ayrılmak tehlikeli olabilir ve yangına yol açabilir.
ASLA yangını suyla söndürmeye çalışmayın, cihazı
kapatın ve alevi bir kapak veya bir yangın battaniyesiyle
örtün.
• Bıçak, çatal, kaşık ve kapak gibi metal nesneler,
ısınabileceği için ocak yüzeyine yerleştirilmemelidir.
• Kullandıktan sonra ocak elemanını kontrol
düğmesinden kapatın, tencere detektörüne
güvenmeyin.
• Bu cihaz, harici bir kronometre veya ayrı bir
uzaktan kumanda sistemiyle çalıştırılmaya uygun
değildir.
Yeni İndüksiyon ocağınızı satın aldığınız için tebrik ederiz.
Ürünü doğru şekilde nasıl kuracağınızı ve çalıştıracağınızı tamamen anlayabilmeniz adına,
bu Talimat / Kurulum Kılavuzunu okumak için zaman ayırmanızı öneriyoruz.
Kurulum için, lütfen kurulum kısmını okuyun.
Kullanım öncesinde tüm güvenlik talimatlarını dikkatlice okuyun ve bu Talimat / Kurulum
Kılavuzunu ileride kullanmak için saklayın.
TR-6
Page 69

Ürüne Genel Bakış
Üstten Görünüş
1. maks. 1800/3000 W bölgesi
2. maks. 1800/3000 W bölgesi
3. maks. 1800/3000 W bölgesi
4. maks. 1400/2000 W bölgesi
5 6. Esnek bölge. 3000/4000 W
7. Cam plaka
8. Kumanda paneli
1. maks. 1800/3000 W bölgesi
2. maks. 1800/3000 W bölgesi
3. maks. 1800/3000 W bölgesi
4. maks. 1400/2000 W bölgesi
5. Esnek bölge. 3 000/4000 W
6. Cam plaka
7. Kumanda paneli
1
5
2
6
3
4
7
8
7
4
6
3
1
2
5
TR-7
Page 70

Kumanda Paneli
1. Güç / Zamanlayıcı için kaydırmalı dokunmatik kumanda
2. Isıtma bölgesi seçme kumandaları
3. tuş kilidi kumandası
4. AÇMA/KAPAMA kumandası
5. sıcak tutma kumandası
6. Hızlı ısıtma kumandası
7. Zamanlayıcı kumandası
TR-8
Page 71
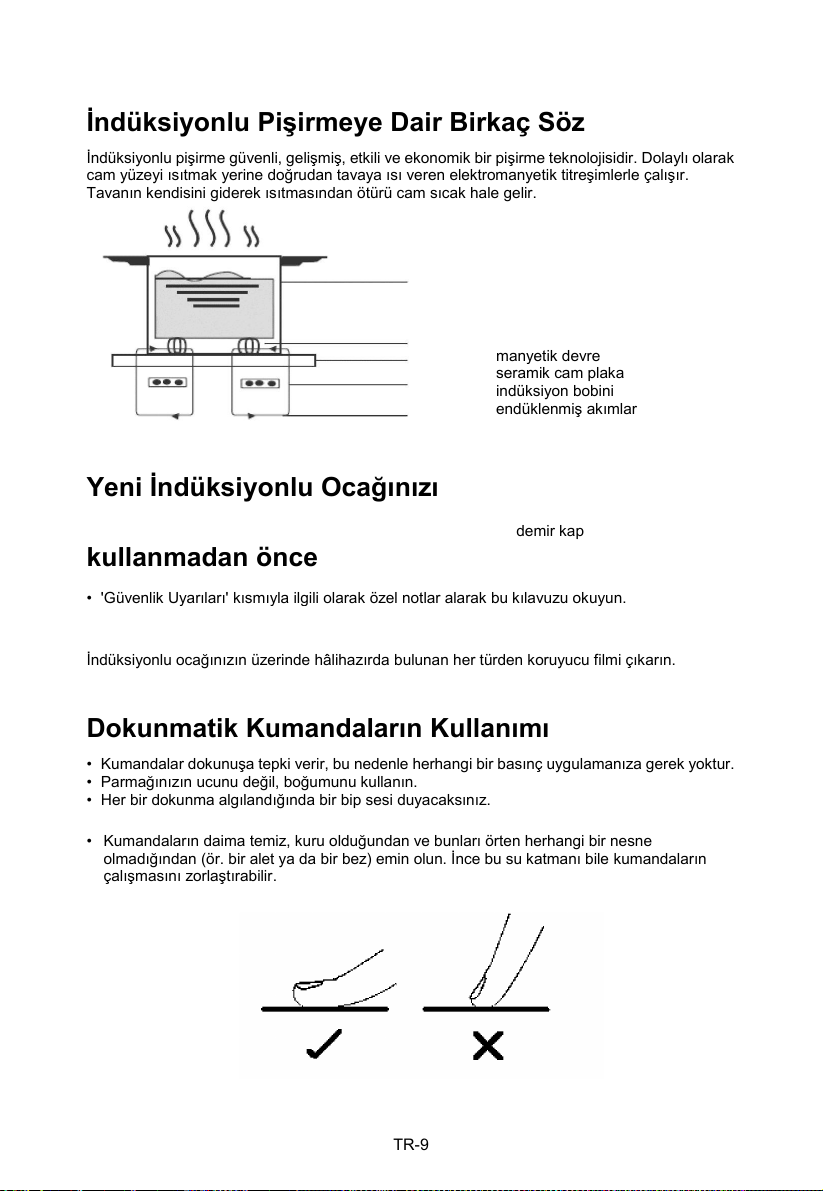
İndüksiyonlu Pişirmeye Dair Birkaç Söz
İndüksiyonlu pişirme güvenli, gelişmiş, etkili ve ekonomik bir pişirme teknolojisidir. Dolaylı olarak
cam yüzeyi ısıtmak yerine doğrudan tavaya ısı veren elektromanyetik titreşimlerle çalışır.
Tavanın kendisini giderek ısıtmasından ötürü cam sıcak hale gelir.
Yeni İndüksiyonlu Ocağınızı
kullanmadan önce
• 'Güvenlik Uyarıları' kısmıyla ilgili olarak özel notlar alarak bu kılavuzu okuyun.
İndüksiyonlu ocağınızın üzerinde hâlihazırda bulunan her türden koruyucu filmi çıkarın.
Dokunmatik Kumandaların Kullanımı
• Kumandalar dokunuşa tepki verir, bu nedenle herhangi bir basınç uygulamanıza gerek yoktur.
• Parmağınızın ucunu değil, boğumunu kullanın.
• Her bir dokunma algılandığında bir bip sesi duyacaksınız.
• Kumandaların daima temiz, kuru olduğundan ve bunları örten herhangi bir nesne
olmadığından (ör. bir alet ya da bir bez) emin olun. İnce bu su katmanı bile kumandaların
çalışmasını zorlaştırabilir.
demir kap
manyetik devre
seramik cam plaka
indüksiyon bobini
endüklenmiş akımlar
TR-9
Page 72

Doğru Pişirme kabının seçilmesi
• Yalnızca indüksiyonlu pişirmeye uygun bir tabanı olan pişirme kapları kullanın.
Ambalajın üzerindeki ya da tavanın altındaki indüksiyon sembolüne bakın.
• Bir manyetizma testi yaparak pişirme kabının
uygun olup olmadığını kontrol edebilirsiniz. Bir
mıknatıs alıp tencerenin dibinde hareket ettirin.
Eğer çekilme varsa tava indüksiyon için
uygundur.
• Eğer bir mıknatısınız yoksa:
1. Kontrol etmek istediğiniz tavanın içine biraz su koyun.
2. "Pişirmeye başla" başlığı altındaki adımları izleyin.
3. Eğer ekranda yanıp sönmüyorsa ve su ısınıyorsa tava uygundur.
4. Aşağıdaki malzemelerden yapılan pişirme kapları uygun değildir: saf paslanmaz çelik,
manyetik tabanı olmayan alüminyum ve bakır, cam, tahta, porselen, seramik ve toprak.
Tırtıklı kenarı ya da eğimli bir tabanı olan pişirme kaplarını kullanmayın.
Tavanızın tabanının pürüzsüz olduğundan, cam üzerine düz bir şekilde oturduğundan ve pişirme
bölgesiyle aynı boyutta olduğundan emin olun. Çapı, seçilen ocak gözünün büyüklüğüne eşit olan
tencereleri kullanın. Tencere ısıtma gözünden biraz daha büyük olursa, enerji maksimum verimlilikte
kullanılacaktır. Daha küçük tencereler kullandığınızda, verimlilik beklenenin altında kalabilir. 140
mm’den küçük tencereler ocak tarafından algılanmayabilir. Tavanızı daima pişirme gözüne ortalayın.
Tavalarınızı İndüksiyonlu ocaktan daima kaldırarak alın, sakın kaydırmayın; aksi takdirde camı çizebilirler.
TR-10
Page 73

Tava Ölçüleri
Belirli bir limite kadar, pişirme gözleri tavanın çapına otomatik olarak uyarlanır. Ancak söz konusu
tavanın altının minimum çapı ilgili pişirme bölgesine uygun olmalıdır. Ocağınızdan en yüksek
verimliliği elde etmek için lütfen tencereyi ocak gözünün ortasına yerleştirin.
RES 62
Pişirme
bölgesi
İndüksiyonlu pişirme kabının taban çapı
Minimum (mm)
Maksimum (mm)
1,2,3
140
220
Esnek bölge
220
220x400
4
140
140
RES 6D
Pişirme
bölgesi
İndüksiyonlu pişirme kabının taban çapı
Minimum (mm)
Maksimum (mm)
1,2,3,4
140
220
Esnek bölge
220
220x400
TR-11
Page 74

İndüksiyonlu Ocağınızın kullanılması
Pişirmeyi
başlatmak için
1. AÇMA/KAPAMA kumandasına dokunun.
Ürüne güç verildikten sonra, alarmdan bir kereliğine bip sesi gelir;
zamanlayıcı kumandası " " ibaresini gösterir ve ısıtma bölgesi
seçim kumandaları, indüksiyonlu ocağın bekleme moduna girdiğini
belirten " " yazısını gösterir.
2. Kullanmak istediğiniz pişirme bölgesi üzerine uygun bir
tava yerleştirin.
• Tavanın altının ve pişirme bölgesi yüzeyinin temiz ve kuru
olduğundan emin olun.
3. Isıtma bölgesi seçim kumandasına dokunduğunuzda
ilgili bir gösterge yanıp sönecektir
4. Kaydırmalı kumandaya dokunarak ısıtma ayarlarını
düzenleyin.
• 1 dakika içerisinde bir ısıtma ayarı seçmezseniz, İndüksiyonlu
ocak otomatik olarak kapalı moda geçecektir. Tekrar adım
1'den başlamanız gerekecektir.
• Pişirme esnasında istediğiniz zaman ısıtma ayarını
değiştirebilirsiniz.
GÜCÜ AZALIR
GÜCÜ ARTAR
TR-12
Page 75

Eğer ekran ısıtma ayarı ibaresi ile ardışık olarak yanıp
sönerse
Bu şu anlama gelir:
• tavayı doğru pişirme bölgesine yerleştirmediniz ya da
• kullandığınız tava indüksiyonlu pişirmeye uygun değil ya da
• tava çok küçük ya da pişirme bölgesine uydun bir şekilde ortalanmamış.
Pişirme bölgesi üzerine uygun bir tava yerleştirmedikçe ısıtma gerçekleşmeyecektir.
Yerleştirilmiş herhangi bir uygun tava yoksa 1 dakika sonra ekran otomatik olarak kapanacaktır.
Pişirme işleminiz sona erdiğinde
1. Kapatmak istediğiniz ısıtma bölgesine ait
seçim kumandasına dokunun.
2. Kaydırmalı kumandaya sol yönde dokunarak pişirme
bölgesini kapalı konuma getirin.
GÜCÜ AZALTMAK
3. AÇMA/KAPAMA kontrolüne dokunarak tüm
set-üstünü kapatın.
4. Sıcak yüzeylere dikkat edin.
Hangi pişirme yüzeyinin dokunmak için sıcak olduğunu gösterecektir. Yüzey güvenli bir
sıcaklığa soğuduğunda ortadan kalkacaktır. Aynı zamanda bir enerji tasarrufu özelliği olarak
kullanılabilir, daha fazla tava kullanmak istiyorsanız hala sıcak olan ısıtıcıyı kullanın.
TR-13
Page 76

Hızlı ısıtma fonksiyonunun kullanımı
Hızlı ısıtma fonksiyonunun aktive edilmesi
1. Isıtma bölgesi seçim kumandalarına dokunulması
2. Hızlı ısıtma kumandasına bastığınızda bölge göstergesi "b" gösterecek ve güç
maksimuma ulaşacaktır.
Hızlı ısıtma fonksiyonunun iptal edilmesi
1. Hızlı ısıtma fonksiyonunu iptal etmek istediğiniz ısıtma
bölgesi seçim kontrolüne dokunun
2. a: Hızlı ısıtma fonksiyonuna dokunduktan sonra, pişirme bölgesi orijinal ayarlarına
dönecektir.
b: Kaydırma fonksiyonuna dokunduktan sonra, ısıtma bölgesi seçtiğiniz seviyeye dönecektir.
VEYA
TR-14
Page 77

• Fonksiyon tüm pişirme bölgelerinde çalışabilir.
• 5 dakika sonra pişirme bölgesi orijinal ayarlarına dönecektir.
• 1. ocak gözünün hızlı ısıtma fonksiyonu etkinleştirildiğinde, 2. ocak gözü otomatik olarak 2.
seviye ile sınırlandırılır, bu durumun tersi de söz konusudur.
• Orijinal ısıtma ayarı b'ye eşitse, 5 dakika sonra 15'e dönecektir.
Sıcak Tutma fonksiyonunun kullanılması
Sıcak Tutma fonksiyonunun aktive edilmesi
1. Isıtma bölgesi seçme kontrollerine dokunulması
2. Sıcak tutma kontrolüne dokunulduğunda , bölge göstergesi “ | ”
gösterecektir.
Sıcak Tutma fonksiyonunun iptal edilmesi
1. Isıtma bölgesi seçme kontrollerine dokunulması
TR-15
Page 78
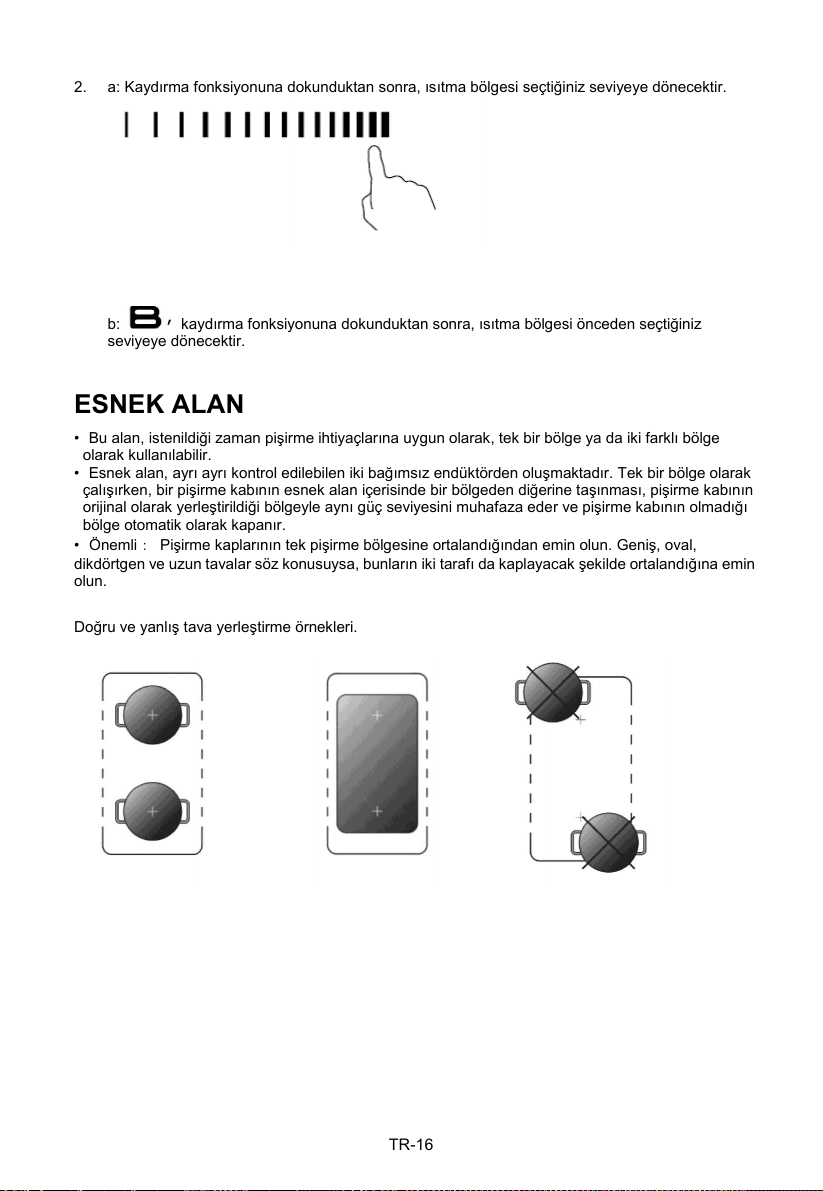
2. a: Kaydırma fonksiyonuna dokunduktan sonra, ısıtma bölgesi seçtiğiniz seviyeye dönecektir.
b: kaydırma fonksiyonuna dokunduktan sonra, ısıtma bölgesi önceden seçtiğiniz
seviyeye dönecektir.
ESNEK ALAN
• Bu alan, istenildiği zaman pişirme ihtiyaçlarına uygun olarak, tek bir bölge ya da iki farklı bölge
olarak kullanılabilir.
• Esnek alan, ayrı ayrı kontrol edilebilen iki bağımsız endüktörden oluşmaktadır. Tek bir bölge olarak
çalışırken, bir pişirme kabının esnek alan içerisinde bir bölgeden diğerine taşınması, pişirme kabının
orijinal olarak yerleştirildiği bölgeyle aynı güç seviyesini muhafaza eder ve pişirme kabının olmadığı
bölge otomatik olarak kapanır.
• Önemli: Pişirme kaplarının tek pişirme bölgesine ortalandığından emin olun. Geniş, oval,
dikdörtgen ve uzun tavalar söz konusuysa, bunların iki tarafı da kaplayacak şekilde ortalandığına emin
olun.
Doğru ve yanlış tava yerleştirme örnekleri.
TR-16
Page 79

Büyük bölge olarak
1. Esnek alanı tek bir büyük bölge olarak etkinleştirmek için sadece bununla ilgili olan tuşlara basın.
2. Güç ayarları diğer normal alan gibi çalışır.
3. Tava arka taraftan ön tarafa kaymışsa (ya da tam tersi), esnek alan, aynı gücü koruyarak yeni
konumu otomatik olarak tespit eder.
4. Ekstra tava ilave etmek için pişirme kabını tespit etmesi amacıyla tekrardan ilgili tuşlara basın.
İki bağımsız bölge olarak
Esnek alanı iki farklı güç ayarı olan iki farklı bölge olarak kullanmak için ilgili tuşlara basın.
VEYA
TR-17
Page 80

Kumandaların kilitlenmesi
• İstenmeyen kullanımların önüne geçmek için kumandaları kilitleyebilirsiniz (örneğin
çocukların pişirme bölgelerini kazara açması gibi)
• Kumandalar kilitliyken, AÇMA/KAPAMA kumandası dışında tüm kumandalar devre dışıdır.
Kumandaları kilitlemek için:
Tuş kilidi kontrolüne dokunun Zamanlayıcı göstergesi "Loc" olarak gözükecektir.
Kumandaların kilidini açmak için:
1. Tuş kilidi kontrolüne dokunun ve bir süre basılı tutun.
2. Şimdi İndüksiyonlu Ocağınızı kullanmaya başlayabilirsiniz.
Ocak kilitli moddayken, AÇMA/KAPAMA dışındaki tüm kumandalar devre
dışıdır, herhangi bir acil durumda indüksiyonlu ocağı daima AÇMA/KAPAMA
kumandası ile kapatabilirsiniz, fakat bir sonraki işlemde ocağın kilidini açmanız
gerekmektedir.
Aşırı Sıcaklık Koruması
Dahili bir sıcaklık sensörü İndüksiyonlu ocak içerisindeki sıcaklığı izleyebilir. Aşırı bir sıcaklık
gözlemlendiğinde, İndüksiyonlu ocak işlemi otomatik olarak durduracaktır.
Küçük Parçaların Tespit Edilmesi
Uygun olmayan bir boyutta ya da manyetik olmayan bir tava (ör. alüminyum) ya da başka
küçük aletler (ör. bıçak, çatal, anahtar) ocak üzerinde unutulduğunda, ocak 1 dakika
içerisinde otomatik olarak bekleme moduna geçer.
Otomatik Kapatma Koruması
Otomatik kapatma, indüksiyonlu ocağınız için bir güvenlik koruması fonksiyonudur. Bu, eğer
ocağınızı kapatmayı unutursanız, ocağı otomatik olarak kapatır. Çeşitli güç seviyeleri için
varsayılan çalışma zamanları aşağıdaki tabloda gösterilmektedir:
Güç seviyesi
Sıcak Tutma
1~5
6~10
11~14
15
Varsayılan çalışma zamanlayıcısı
(saat)
2 8 4 2 1
Tava alındığında, indüksiyonlu ocak ısıtmayı derhal durdurabilir ve 2 dakika içerisinde ocak
otomatik olarak kapanır.
Kalp pili olan kişiler bu üniteyi kullanmadan önce doktoruna başvurmalıdır.
TR-18
Page 81

Zamanlayıcının kullanımı
Zamanlayıcıyı iki farklı şekilde kullanabilirsiniz:
• Dakika hatırlatıcısı olarak kullanabilirsiniz. Bu durumda, ayarlanan zaman dolduğunda
zamanlayıcı herhangi bir pişirme bölgesini kapatmaz.
• Ayarlanan zamanının dolmasından sonra pişirme bölgesini kapatacak şekilde ayarlayabilirsiniz.
• Zamanlayıcıyı 99 dakikaya kadar ayarlayabilirsiniz.
Zamanlayıcının Dakika Hatırlatıcı olarak kullanımı
Herhangi bir pişirme bölgesi seçmediyseniz
1. Set üstünün açık olduğuna emin olun
Not: Herhangi bir pişirme bölgesi seçmiyor olsanız bile dakika hatırlatıcıyı kullanabilirsiniz.
2. Zamanlayıcı kumandasına dokunun, sonrasında
zamanlayıcı göstergesinde "10" ibaresi gösterilecek ve "0" yanıp
sönecektir.
3. Kaydırmalı kumandaya dokunarak zamanı ayarlayın. (ör. 6)
4. Zamanlayıcı kumandasına tekrar dokunun ,“1”
yanıp sönecektir.
5. Kaydırmalı kumandaya dokunarak zamanı ayarlayın (ör. 9), artık
ayarladığınız zamanlayıcı 56 dakikadır.
TR-19
Page 82

6. Sesli ikaz 30 saniye boyunca bipleyecektir ve
ayarlama zamanı sona erdiğinde zamanlayıcı
göstergesi "0:00"'ı gösterecektir.
Pişirme bölgelerini kapatmak için zamanlayıcının ayarlanması
Zamanlayıcı bir bölgede ayarlıysa:
1. Zamanlayıcısını ayarlamak istediğiniz ısıtma bölgesi
seçim kontrolüne dokunun.
2. Zamanlayıcı kontrolüne dokunun, dokunulduğunda
zamanlayıcı göstergesinde “0:10” gösterilecek ve "0"
parlayacaktır.
3. Kaydırma kontrolüne dokunarak zamanı ayarlayın. (ör. 6)
4 . Zamanlayıcı kontrolüne tekrar basın ,“1” yanıp
sönecektir.
5. Kaydırma kontrolüne dokunarak zamanı ayarlayın (ör. 9),
artık ayarladığınız zamanlayıcı 56 dakikadır.
TR-20
Page 83

6. Zaman ayarlandığında, derhal geri saymaya başlayacaktır. Ekran
kalan zamanı gösterecektir ve zamanlayıcı göstergesi 5 saniye
boyunca yanıp söner.
NOT: Güç seviyesi göstergesinin bitişiğindeki kırmızı nokta
seçilen bölgeyi göstererek aydınlanır.
7. Pişirme zamanlayıcısı bittiğinde, ilgili pişirme bölgesi
otomatik olarak kapanacaktır.
Daha önceden açıldıysa diğer pişirme bölgeleri çalışmaya devam edecektir.
Zamanlayıcı birden fazla göz için ayarlıysa:
1. Süreyi birden çok göz için eşzamanlı olarak ayarladığınızda, ilgili ocak gözlerinin ondalık
noktaları yanar. Dakika ekranı zamanlayıcı dakikasını gösterir.
İlgili bölgenin noktası yanıp söner.
(15 dakikaya ayarlı) (45 dakikaya ayarlı)
2. Geri sayım süresi bittiğinde, ilgili ocak gözü kapanır.
Ardından yeni zamanlayıcı dakikası görünür ve ilgili ocak gözünün noktası yanıp söner.
• Isıtma bölgesi seçim kontrolüne dokunun, ilgili zamanlayıcı zamanlayıcı göstergesinde
gösterilecektir.
TR-21
Page 84

Pişirme Ana Hatları
Yağ çok hızlı bir şekilde ısındığı için kızartma yaparken dikkatli olun, özellikle de Power
Boost kullanıyorsanız. Aşırı yüksek sıcaklıklarda yağ aniden ateşlenir ve bu ciddi bir yangın
riski oluşturur.
Pişirme İpuçları
• Yemek kaynadığında, sıcaklık ayarını düşürün.
• Kapak kullanımı pişirme süresini azaltacak ve ısıyı tutarak enerji tasarrufu yapacaktır.
• Pişirme süresini azaltmak için sıvı ya da yağ miktarını azaltın.
• Pişirmeye yüksek bir ayarda başlayın ve yemek tamamen ısındığında ayarı düşürün.
Ağır ateşte pişirme, pilav yapma
• Ağır ateşte pişirme kaynama noktasının altında, 85˚C civarında, pişen sıvının yüzeyine rastgele
yükselen kabarcıklar olduğunda gerçekleşir. Bu, lezzetli çorbaların ve güzel yahnilerin kilit
noktasıdır çünkü lezzet yemek fazla pişirilmediğinde daha çok ortaya çıkar. Aynı zamanda yumurta
bazlı ve terbiyeli sosları da kaynama noktasının altında pişirmeniz gerekir.
• Soğurma yöntemiyle pilav yapmak da dahil olmak üzere bazı pişirim işleri, yemeğin önerilen
zamanda doğru bir şekilde pişmesini sağlamak için en düşük ayardan daha yüksek bir ayarı
gerektirir.
Et kavurma
Sulu lezzetli etler pişirmek için:
1. Eti pişirmeden önce oda sıcaklığında 20 dakika civarı tutun.
2. Ağır tabanlı bir kızartma tavasını ısıtın.
3. Etin her iki tarafını da yağlayın. Sıcak tavaya az bir miktar yağ serpin ve ardından eti sıcak tavaya
koyun.
4. Pişirme sırasında eti yalnızca bir sefer çevirin. Net pişirme süresi etin kalınlığına ve nasıl
pişirmek istediğinize bağlı olacaktır. Bu süreler etin bir tarafı başına 2 ila 8 dakika civarında
değişebilir. Nasıl piştiğini ölçmek için ete bastırın - et katılaştıkça daha "iyi pişmiş" olacaktır.
5. Eti gevşemesi ve servis edilmeden önce yumuşaması için birkaç dakika sıcak plakanın üzerinde
beklemeye bırakın.
TR-22
Page 85

Wok'ta karıştırarak kızartmak için
1. İndüksiyona uygun bir düz tabanlı wok ya da geniş bir kızartma tavası seçin.
2. Tüm malzemeleri ve ekipmanı hazırlayın. Wok'ta kızartma hızlı olmalıdır. Eğer fazla
miktarda malzeme pişiriyorsanız, yemeği birkaç küçük parçalar halinde pişirin.
3. Tavayı kısa bir süre ön ısıtmaya tabi tutun ve iki yemek kaşığı yağ ekleyin.
4. Herhangi bir eti önce pişirin, kenara koyun ve sıcak tutun.
5. Sebzeleri wok'ta kızartın. Bu sebzeler sıcak ama hala gevrekken, pişirme bölgesini
daha düşük bir ayara getirin, eti tavaya geri koyun ve sosu ekleyin.
6. Her tarafının ısındığından emin olmak için malzemeleri yavaşça karıştırın.
7. Hemen servis edin.
Isıtma Ayarları
Aşağıdaki ayarlar sadece kılavuz niteliğindedir. Tam doğru ayar, pişirme kabınız ve
pişirdiğiniz miktar dahil olmak üzere birkaç faktöre bağlıdır. Size en çok uyan ayarı bulmak
için indüksiyonlu ocağınızla denemelerde bulunun.
Isıtma Ayarları
Uygunluk
1 - 2
• az miktardaki yemekler için hassas ısıtma
• çikolata, yağ ve hızlıca yanan yemekleri eritme
• hassas haşlama
• yavaş ısıtma
3 - 5
• tekrar ısıtma
• hızlı haşlama
• pilav pişirme
6 - 11
• pancake
12- 14
• soteleme
• makarna pişirme
15/P
• wok'ta karıştırarak kızartma
• mühürleme
• çorba kaynatma
• su kaynatma
TR-23
Page 86
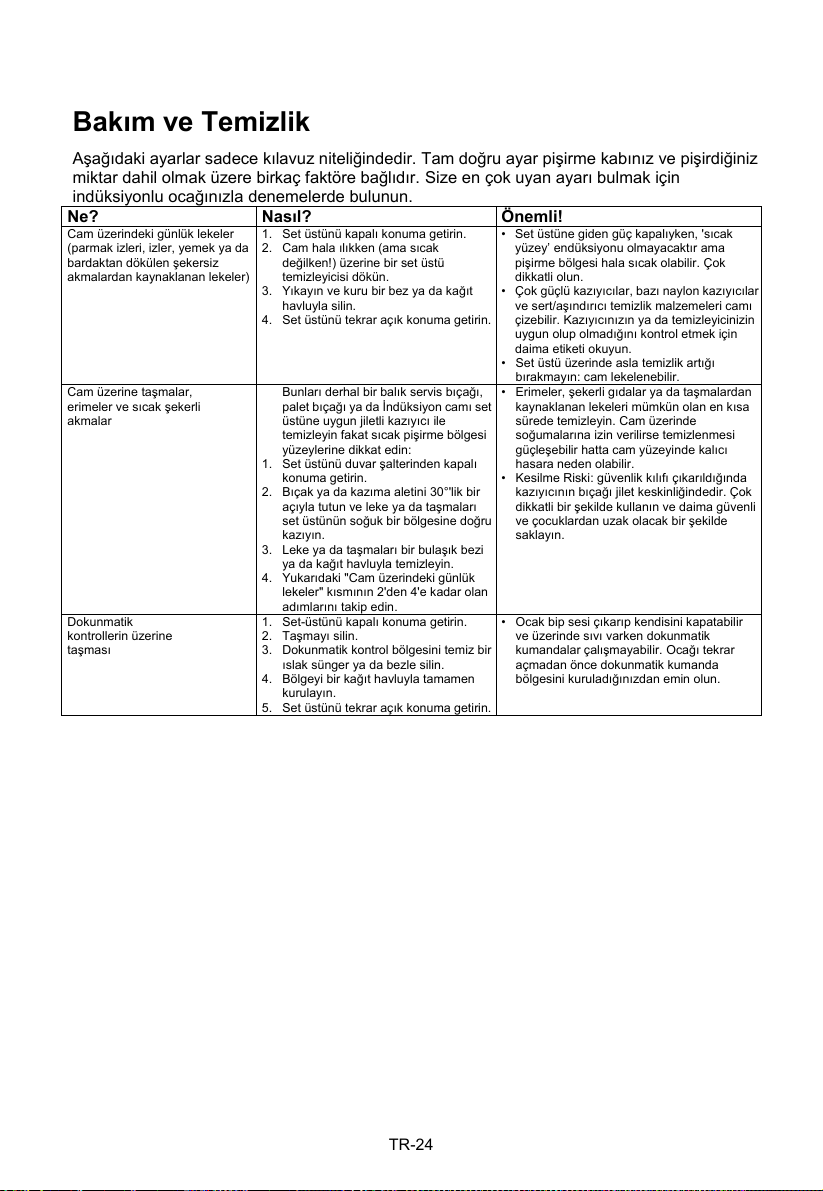
Bakım ve Temizlik
Aşağıdaki ayarlar sadece kılavuz niteliğindedir. Tam doğru ayar pişirme kabınız ve pişirdiğiniz
miktar dahil olmak üzere birkaç faktöre bağlıdır. Size en çok uyan ayarı bulmak için
indüksiyonlu ocağınızla denemelerde bulunun.
Ne?
Nasıl?
Önemli!
Cam üzerindeki günlük lekeler
(parmak izleri, izler, yemek ya da
bardaktan dökülen şekersiz
akmalardan kaynaklanan lekeler)
1. Set üstünü kapalı konuma getirin.
2. Cam hala ılıkken (ama sıcak
değilken!) üzerine bir set üstü
temizleyicisi dökün.
3. Yıkayın ve kuru bir bez ya da kağıt
havluyla silin.
4. Set üstünü tekrar açık konuma getirin.
• Set üstüne giden güç kapalıyken, 'sıcak
yüzey’ endüksiyonu olmayacaktır ama
pişirme bölgesi hala sıcak olabilir. Çok
dikkatli olun.
• Çok güçlü kazıyıcılar, bazı naylon kazıyıcılar
ve sert/aşındırıcı temizlik malzemeleri camı
çizebilir. Kazıyıcınızın ya da temizleyicinizin
uygun olup olmadığını kontrol etmek için
daima etiketi okuyun.
• Set üstü üzerinde asla temizlik artığı
bırakmayın: cam lekelenebilir.
Cam üzerine taşmalar,
erimeler ve sıcak şekerli
akmalar
Bunları derhal bir balık servis bıçağı,
palet bıçağı ya da İndüksiyon camı set
üstüne uygun jiletli kazıyıcı ile
temizleyin fakat sıcak pişirme bölgesi
yüzeylerine dikkat edin:
1. Set üstünü duvar şalterinden kapalı
konuma getirin.
2. Bıçak ya da kazıma aletini 30°'lik bir
açıyla tutun ve leke ya da taşmaları
set üstünün soğuk bir bölgesine doğru
kazıyın.
3. Leke ya da taşmaları bir bulaşık bezi
ya da kağıt havluyla temizleyin.
4. Yukarıdaki "Cam üzerindeki günlük
lekeler" kısmının 2'den 4'e kadar olan
adımlarını takip edin.
• Erimeler, şekerli gıdalar ya da taşmalardan
kaynaklanan lekeleri mümkün olan en kısa
sürede temizleyin. Cam üzerinde
soğumalarına izin verilirse temizlenmesi
güçleşebilir hatta cam yüzeyinde kalıcı
hasara neden olabilir.
• Kesilme Riski: güvenlik kılıfı çıkarıldığında
kazıyıcının bıçağı jilet keskinliğindedir. Çok
dikkatli bir şekilde kullanın ve daima güvenli
ve çocuklardan uzak olacak bir şekilde
saklayın.
Dokunmatik
kontrollerin üzerine
taşması
1. Set-üstünü kapalı konuma getirin.
2. Taşmayı silin.
3. Dokunmatik kontrol bölgesini temiz bir
ıslak sünger ya da bezle silin.
4. Bölgeyi bir kağıt havluyla tamamen
kurulayın.
5. Set üstünü tekrar açık konuma getirin.
• Ocak bip sesi çıkarıp kendisini kapatabilir
ve üzerinde sıvı varken dokunmatik
kumandalar çalışmayabilir. Ocağı tekrar
açmadan önce dokunmatik kumanda
bölgesini kuruladığınızdan emin olun.
TR-24
Page 87

İpucu ve öneriler
Sorun
Olası Nedenler
Ne yapmalı
İndüksiyonlu ocak
açılmayabilir.
Güç yok.
İndüksiyonlu ocağın güç kaynağına bağlı
ve açık olduğundan emin olun.
Evinizde ya da bölgede bir elektrik
kesintisi olup olmadığını kontrol edin. Her
şeyi kontrol ettiyseniz ve sorun hala
devam ediyorsa kalifiye bir teknisyen
çağırın.
Dokunmatik kumandalar
cevap vermiyor.
Kumandalar kilitli.
Kumandaların kilidini açın. Talimatlar
için 'İndüksiyonlu set üstünüzün
kullanımı' bölümüne bakın.
Dokunmatik kumandalar
zor çalışıyor.
Kumandalar üzerinde ince bir su
tabakası olabilir ya da kumandalara
dokunurken parmağınızın ucunu
kullanıyor olabilirsiniz.
Dokunmatik kumanda bölgesinin kuru
olduğundan ve kumandalara dokunurken
parmağınızın boğumunu kullandığınızdan
emin olun.
Cam çizilmiş.
Pürüzlü kenarlı pişirme tavası.
Uygun olmayan, aşındırıcı tel ya da
temizlik malzemesi kullanılmış.
Düz ve pürüzsüz tabanlı pişirme kapları
kullanın. "Doğru pişirme kabının
seçilmesi" bölümüne bakın.
"Bakım ve Temizlik" bölümüne bakın.
Bazı tavalar çatırdama
veya tıklama sesi
çıkarabilir.
Bu pişirme tavanızın yapısından
kaynaklanabilir (farklı metal
katmanlar farklı titreşimler üretir).
Bu pişirme tavası için normal bir
durumdur ve bir arıza belirtmez.
İndüksiyonlu ocak yüksek
sıcaklık ayarında
kullanıldığında düşük bir
uğultu sesi çıkarır.
Bu, indüksiyonlu pişirme
teknolojisinden kaynaklanır.
Bu durum normaldir fakat sıcaklık ayarını
düşürdüğünüzde bu gürültünün azalması
ya da tamamen sona ermesi beklenir.
İndüksiyonlu ocaktan
gelen fan gürültüsü.
Elektronik aksamın aşırı ısınmasını
engellemek için İndüksiyonlu
ocağınıza yerleştirilmiş bir soğutma
fanı bulunmaktadır. İndüksiyonlu
ocağı kapatmanızın ardında da
çalışmaya devam edebilir.
Bu normaldir ve herhangi bir şey
yapılmasına gerek yoktur. Fan çalışırken
indüksiyonlu ocağın gücünü duvar
şalterinden kapatmayın.
Tavalar ısınmıyor ve
ekranda ibaresi
görünüyor.
İndüksiyonlu ocak tavayı
algılayamıyor çünkü indüksiyonlu
pişirme için uygun değil.
İndüksiyonlu ocak tavayı
algılayamıyor çünkü tava pişirme
bölgesine göre çok küçük ya da uygun
bir şekilde ortalanmamış.
Yalnızca indüksiyonlu pişirmeye uygun
pişirme kapları kullanın. "Doğru pişirme
tavasının seçilmesi" bölümüne bakın.
Tavayı ortalayın ve tabanının pişirme
bölgesinin ebadına uyduğundan emin olun.
TR-25
Page 88

İndüksiyonlı ocak ya da bir
pişirme bölgesi beklenmedik
bir şekilde kendini kapattı, bir
ses çıktı ve bir hata kodu
gösterildi (genellikle pişirme
zamanlayıcı ekranında bir ya
da iki rakam sırayla
gösterilecektir).
Teknik arıza.
Hata harf ve numaralarını lütfen not edin,
indüksiyonlu ocağın gücünü duvar
şalterinden kesin ve kalifiye bir
teknisyenle iletişime geçin.
Arıza Gösterimi ve Denetleme
Bir anormallik olması durumunda, indüksiyonlu ocak otomatik olarak koruma moduna geçecek ve
ilgili koruma kodlarını gösterecektir:
Sorun
Olası Nedenler
Ne yapmalı
F1-F6
Sıcaklık sensörü hatası
Lütfen tedarikçiyle irtibata geçin.
F9-FA
IGBT'deki sıcaklık sensörü hatası
Lütfen tedarikçiyle irtibata geçin.
FC
Ekran paneli ve ana panel arasında
bağlantı kurulmuyor.
Lütfen tedarikçiyle irtibata geçin.
E1/E2
Anormal güç besleme gerilimi
Güç kaynağının normal olup
olmadığını denetleyin.
Güç kaynağının normal olduğunu
tespit ettikten sonra gücü açın.
E3/E4
Seramik cam plakadaki sıcaklık
sensörü yüksek
İndüksiyonlu ocak soğuduktan
sonra lütfen yeniden başlatın.
E5
IGBT'deki sıcaklık sensörü yüksek
İndüksiyonlu ocak soğuduktan
sonra lütfen yeniden başlatın.
Yukarıdakiler yaygın arızalara ilişkin değerlendirme ve kontrollerdir.
Herhangi bir tehlike yaratmamak ve indüksiyonlu ocağa herhangi bir zarar vermemek için lütfen üniteyi
kendi başınıza sökmeyin.
TR-26
Page 89

Teknik Özellikler
Pişirme Ocağı
RES 62 – RES6D
Ocak gözleri
4 bölge
Besleme gerilimi
220-240V~ 50/60Hz
Kullanılan elektrik gücü
7200W
Ürün boyutları DxGxY (mm)
590X520X60
Ankastre montaj alanı boyutları AxB (mm)
560x490
Genişlik ve boyutlar yaklaşık olarak verilmiştir. Sürekli olarak ürünlerimizi geliştirmeye
çalıştığımız için önceden bildirmeden özellikleri ve tasarımları değiştirebiliriz.
Kurulum
Kurulum ekipmanı seçimi
Çalışma yüzeyini çizimde gösterilen ebatlara göre kesin.
Kurulum ve kullanım amaçları doğrultusunda, delik etrafında en az 5 cm'lik bir boşluk
korunacaktır.
Çalışma yüzeyinin kalınlığının en az 30 mm olduğundan emin olun. Isıtıcıdan ısı
yayılmasından kaynaklanan daha geniş çaplı deformasyonları engellemek için lütfen ısıya
dayanıklı çalışma yüzeyi malzemesi seçin. Aşağıda gösterildiği şekilde:
U(mm)
G(mm)
Y(mm)
D(mm)
A(mm)
B(mm)
X(mm)
590
520
60
56
560+4
+1
490+4
+1
50 mini
Herhangi bir koşulda, İndüksiyonlu pişirme ocağının havalandırıldığından ve hava giriş ve
çıkışının tıkalı olmadığından emin olun. İndüksiyonlı pişirme ocağının iyi bir çalışma
CONTA
TR-27
Page 90
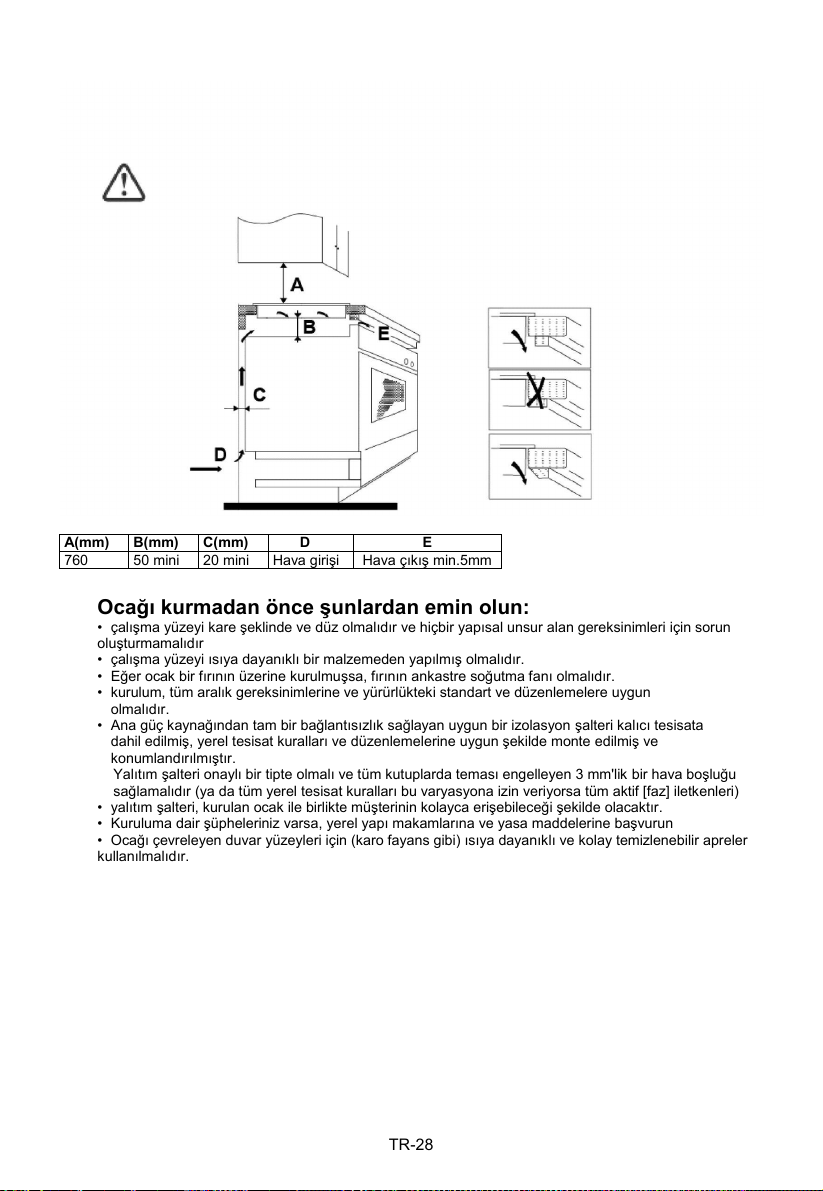
A(mm)
B(mm)
C(mm) D E
760
50 mini
20 mini
Hava girişi
Hava çıkış min.5mm
Ocağı kurmadan önce şunlardan emin olun:
• çalışma yüzeyi kare şeklinde ve düz olmalıdır ve hiçbir yapısal unsur alan gereksinimleri için sorun
oluşturmamalıdır
• çalışma yüzeyi ısıya dayanıklı bir malzemeden yapılmış olmalıdır.
• Eğer ocak bir fırının üzerine kurulmuşsa, fırının ankastre soğutma fanı olmalıdır.
• kurulum, tüm aralık gereksinimlerine ve yürürlükteki standart ve düzenlemelere uygun
olmalıdır.
• Ana güç kaynağından tam bir bağlantısızlık sağlayan uygun bir izolasyon şalteri kalıcı tesisata
dahil edilmiş, yerel tesisat kuralları ve düzenlemelerine uygun şekilde monte edilmiş ve
konumlandırılmıştır.
Yalıtım şalteri onaylı bir tipte olmalı ve tüm kutuplarda teması engelleyen 3 mm'lik bir hava boşluğu
sağlamalıdır (ya da tüm yerel tesisat kuralları bu varyasyona izin veriyorsa tüm aktif [faz] iletkenleri)
• yalıtım şalteri, kurulan ocak ile birlikte müşterinin kolayca erişebileceği şekilde olacaktır.
• Kuruluma dair şüpheleriniz varsa, yerel yapı makamlarına ve yasa maddelerine başvurun
• Ocağı çevreleyen duvar yüzeyleri için (karo fayans gibi) ısıya dayanıklı ve kolay temizlenebilir apreler
kullanılmalıdır.
durumunda olmasını sağlayın. Aşağıda gösterildiği şekilde:
Not: Isıtıcı ve ısıtıcı üzerindeki dolap arasındaki güvenlik mesafesi en az 760 mm olmalıdır.
TR-28
Page 91

Ocağı kurduğunuzda şunlardan emin olun:
• güç kaynağı kablosuna dolaplar ya da çekmeceler üzerinde ulaşılmamalıdır
• tahta aksamın dışından ocak tabanına yeterli temiz hava akışı olmalıdır
• ocak bir çekmece ya da dolap boşluğunun üzerine kuruluysa, ocak tabanının altına bir termal
koruma bariyeri kurulmalıdır.
• yalıtım şalterine müşteri tarafından kolayca erişilebilmelidir.
Sabitleme kelepçelerini konumlandırmadan önce
Ünite sabit ve pürüzsüz bir yüzey üzerine yerleştirilmelidir (ambalajı kullanın). Ocağın dışına doğru
uzanan kumandalar üzerine güç uygulamayın.
Braket konumunun ayarlanması
Ocağı çalışma yüzeyi üzerine, kurulum sonrasında ocağın altına 4 adet braket vidalayarak sabitleyin
(resme bakın).
Braket konumunu farklı masa üstü kalınlıklarına uyacak şekilde ayarlayın.
Uyarılar
1. İndüksiyonlu ısıtıcı kalifiye personel ya da teknisyenlerce kurulmalıdır.
Lütfen işlemleri asla kendi başınıza gerçekleştirmeye kalkışmayın.
2. Nem, ocağın elektronik aksamına zarar verebileceği için ocak, doğrudan bir bulaşık makinesi,
dondurucu, buzdolabı, çamaşır makinesi ya da kurutucu üzerine kurulmayacaktır.
3. İndüksiyonlu ısıtıcı, emniyeti arttırmak için daha iyi bir ısı yayılımını sağlayacak şekilde
kurulacaktır.
4. Duvar ve masa yüzeyi üzerindeki indüksiyonlu ısıtma bölgesi ısıya dayanacaktır.
TR-29
Page 92
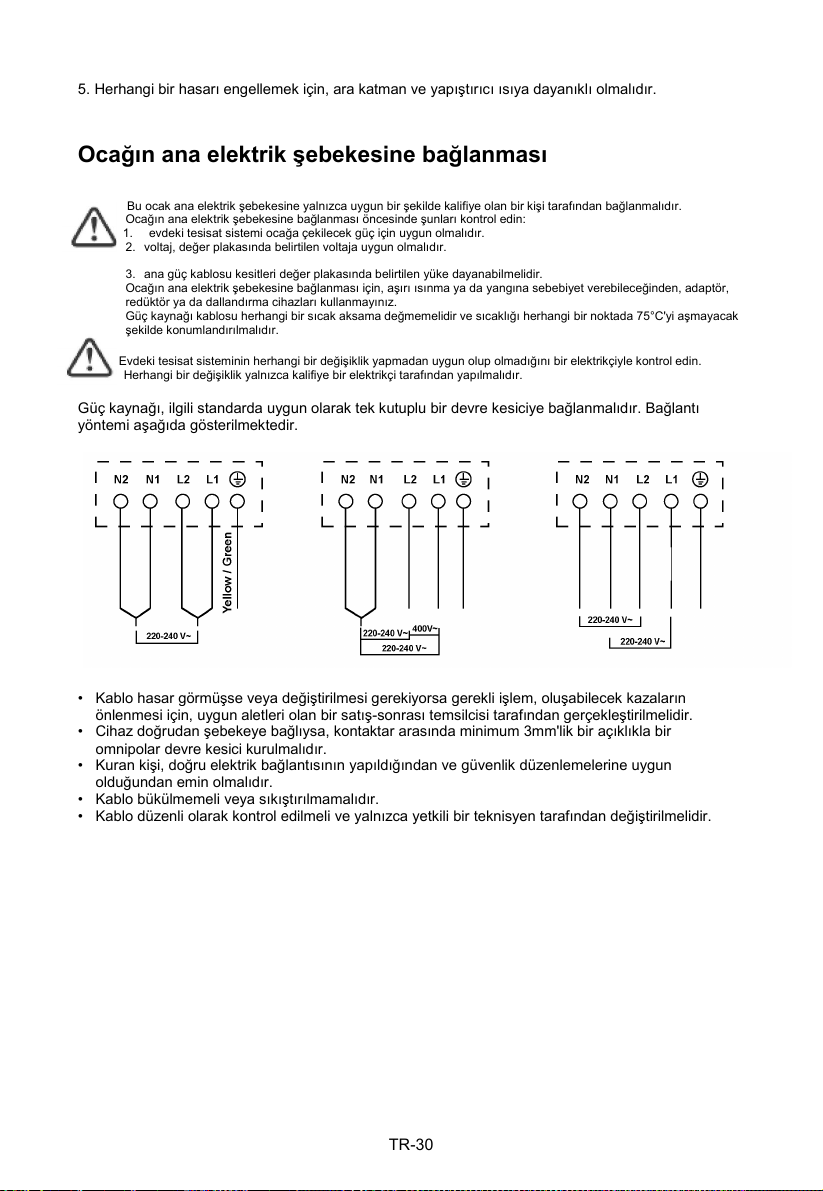
5. Herhangi bir hasarı engellemek için, ara katman ve yapıştırıcı ısıya dayanıklı olmalıdır.
Ocağın ana elektrik şebekesine bağlanması
Bu ocak ana elektrik şebekesine yalnızca uygun bir şekilde kalifiye olan bir kişi tarafından bağlanmalıdır.
Ocağın ana elektrik şebekesine bağlanması öncesinde şunları kontrol edin:
1. evdeki tesisat sistemi ocağa çekilecek güç için uygun olmalıdır.
2. voltaj, değer plakasında belirtilen voltaja uygun olmalıdır.
3. ana güç kablosu kesitleri değer plakasında belirtilen yüke dayanabilmelidir.
Ocağın ana elektrik şebekesine bağlanması için, aşırı ısınma ya da yangına sebebiyet verebileceğinden, adaptör,
redüktör ya da dallandırma cihazları kullanmayınız.
Güç kaynağı kablosu herhangi bir sıcak aksama değmemelidir ve sıcaklığı herhangi bir noktada 75°C'yi aşmayacak
şekilde konumlandırılmalıdır.
Evdeki tesisat sisteminin herhangi bir değişiklik yapmadan uygun olup olmadığını bir elektrikçiyle kontrol edin.
Herhangi bir değişiklik yalnızca kalifiye bir elektrikçi tarafından yapılmalıdır.
Güç kaynağı, ilgili standarda uygun olarak tek kutuplu bir devre kesiciye bağlanmalıdır. Bağlantı
yöntemi aşağıda gösterilmektedir.
• Kablo hasar görmüşse veya değiştirilmesi gerekiyorsa gerekli işlem, oluşabilecek kazaların
önlenmesi için, uygun aletleri olan bir satış-sonrası temsilcisi tarafından gerçekleştirilmelidir.
• Cihaz doğrudan şebekeye bağlıysa, kontaktar arasında minimum 3mm'lik bir açıklıkla bir
omnipolar devre kesici kurulmalıdır.
• Kuran kişi, doğru elektrik bağlantısının yapıldığından ve güvenlik düzenlemelerine uygun
olduğundan emin olmalıdır.
• Kablo bükülmemeli veya sıkıştırılmamalıdır.
• Kablo düzenli olarak kontrol edilmeli ve yalnızca yetkili bir teknisyen tarafından değiştirilmelidir.
Sarı / Yeşil
Sarı / Yeşil
Sarı / Yeşil
Kahver
engi
Kahver
engi
Kahvere
ngi
Siyah
Mavi
Mavi
Gri
Mavi
Gri
Siyah
Siyah
Gri
TR-30
Page 93

Bu cihaz, Atık Elektrikli ve Elektronik Cihazlar (WEEE) hakkındaki
2002/96/EC sayılı Avrupa yönergesine uygun biçimde etiketlenmiştir.
Bu cihazın doğru bir şekilde atılmasını sağlayarak, yanlış bir şekilde
atılmış olsaydı ortaya çıkabilecek olan, çevreye ve insan sağlığına olası
herhangi bir zararın önlenmesine yardımcı olacaksınız.
Ürün üzerindeki sembol, bu ürünün normal evsel atıklarla aynı şekilde
işlenemeyeceğini ifade etmektedir. Elektrikli ve elektronik cihazların geri
dönüştürülmesine yönelik bir toplama noktasına verilmelidir.
ATMA: Bu ürünü ayrılmamış
kentsel atık olarak atmayın.
Söz konusu atıkların özel
işlem için ayrı bir şekilde
toplanması gerekmektedir.
Bu cihaz özel atık bertarafı gerektirmektedir. Bu ürünle ilgili işlemler, geri
kazanım ve geri dönüşüm hakkında daha ayrıntılı bilgi için lütfen yerel
konseye, evsel atıkları toplayan bir şirkete ya da ürünü satın almış
olduğunuz mağazaya başvurun.
Bu ürünle ilgili işlemler, geri kazanım ve geri dönüşüm hakkında daha
ayrıntılı bilgi için lütfen yerel belediye makamlarına, evsel atıkları toplayan
bir şirkete ya da ürünü satın almış olduğunuz mağazaya başvurun.
TR-31
Page 94

Bezpečnostné varovania
Vaša bezpečnosť je pre nás dôležitá. Prečítajte si tieto informácie pred použitím varnej dosky.
Inštalácia
Zasiahnutie elektrickým prúdom
• Pred údržbou a čistením odpojte spotrebič od elektrickej siete.
• Pripojenie k dobre uzemnenému systému napájania je nutné.
• Zmeny domáceho systému elektrického pripojenia môže vykonávať len kvalikovaný technik.
• Nedodržaním týchto pokynov môže nastať zasiahnutie elektrickým prúdom alebo smrť.
Nebezpečenstvo porezania
• Zvýšte pozornosť - hrany panela sú ostré.
• Nedodržaním tohto varovania sa môžete vážne zraniť.
Dôležité bezpečnostné pokyny
• Prečítajte si tieto pokyny pozorne pred inštaláciou alebo použitím spotrebiča.
• Na spotrebič nikdy nedávajte horľavé materiály.
• Poskytnite tieto informácie osobe zodpovednej za inštaláciu spotrebiča, tým môžete znížiť
náklady za inštaláciu.
• Aby ste zabránili nebezpečenstvu, tento spotrebič sa musí inštalovať v súlade s týmito
pokynmi.
• Tento spotrebič môže inštalovať a správne uzemniť len kvalikovaný odborník.
• Tento spotrebič sa musí pripojiť k obvodu, ktorý obsahuje odpájací prepínač ponúkajúci
kompletné odpojenie od elektrickej energie.
• Nesprávnou inštaláciou spotrebiča môžete stratiť právo na záruku.
Prevádzka a obsluha
Riziko zasiahnutia elektrickým prúdom
• Nevarte na prasknutej varnej doske. Ak varná doska praskne, spotrebič ihneď vypnite od
elektrickej siete (istič) a kontaktujte kvalikovaného technika.
• Pred čistením a údržbou vypnite a odpojte varnú dosku od elektrickej siete.
• Nedodržanie tohto postupu môže spôsobiť zasiahnutie elektrickým prúdom alebo smrť.
Ohrozenie zdravia
• Tento spotrebič vyhovuje štandardom pre elektromagnetickú bezpečnosť.
• Osoby s kardiostimulátorom alebo inými elektrickými implantátmi (ako sú inzulínové pumpy)
musia kontaktovať lekára alebo výrobcu zariadenia pred použitím varnej dosky pre zaistenie,
že ich implantáty nebudú ovplyvnené elektromagnetickým poľom.
• Nedodržanie týchto pokynov môže viesť k smrti.
Riziko horúceho povrchu
• Počas použitia sú prístupné časti spotrebiča dostatočne horúce na spôsobenie popálenia.
• Zabráňte kontaktu tela, odevov alebo iných predmetov okrem vhodného varného riadu s
indukčnou varnou doskou, pokým povrch nevychladne.
• Upozornenie: magnetické kovové predmety na tele sa môžu zahriať, ak sa dostanú do
blízkosti varnej dosky. Zlaté alebo strieborné šperky nebudú ovplyvnené.
• Držte deti mimo dosahu.
SK-1
Page 95

• Rukoväti panvíc môžu byť horúce na dotyk. Skontrolujte, či rukoväti panvíc neprekrývajú iné
varné zóny, ktoré sú zapnuté. Držte rukoväti dosahu detí.
• Nedodržanie týchto pokynov môže viesť k popáleniu a obareniu.
Riziko porezania
• Čepeľ škrabky na varnú dosku je odkrytá po zložení ochranného krytu. Škrabku používajte so
zvýšenou opatrnosťou a vždy ju skladujte mimo dosahu detí.
• Nedodržanie týchto pokynov môže spôsobiť zranenie.
Dôležité bezpečnostné pokyny
• Spotrebič nenechávajte počas použitia nikdy bez dozoru. Vyvrenie môže spôsobiť dym a
môže sa vznietiť.
• Váš spotrebič nikdy nepoužívajte ako pracovnú alebo odkladaciu plochu.
• Na spotrebiči nenechávajte žiadne náradie ani iné cudzie predmety.
• V blízkosti spotrebiča nenechávajte žiadne magnetické predmety (napr. kreditné karty,
pamäťové karty) alebo elektronické zariadenia (nape. počítače, MP3 prehrávače), pretože
môžu byť ovplyvnené elektromagnetickým poľom.
• Nikdy nepoužívajte váš spotrebič na vykurovanie miestnosti.
• Po použití spotrebiča vypnite varné zóny podľa popisu v tomto návode (napr. pomocou
dotykových ovládačov). Nespoliehajte sa na vypnutie varných zón pomocou funkcie detekcie
riadu.
• Nedovoľte deťom hrať sa so spotrebičom, ani na naň sadať, stúpať a liezť.
• Do skriniek nad spotrebičom neukladajte predmety lákavé pre deti. Deti lezúce na varnú
dosku sa môžu vážne zraniť.
• Počas prevádzky spotrebiča nenechávajte deti v blízkosti bez dozoru.
• Deti alebo osoby s obmedzenými senzorickými schopnosťami musia byť pod dozorom osoby
zodpovednej za ich bezpečnosť. Zodpovedná osoba sa musí uistiť, že tieto osoby môžu
používať spotrebič bez ohrozenia seba alebo svojho okolia.
• Neopravujte ani nemeňte žiadne časti tohto spotrebiča, ak to nie je uvedené v návode.
Všetky servisné zásahy musí vykonávať kvalikovaný servisný technik.
• Na čistenie varnej dosky nepoužívajte vysokotlakový parný čistič.
• Na varnú dosku nedávajte ťažké predmety.
• Na varnú dosku si nestúpajte.
• Nepoužívajte riad so zubatými okrajmi ani neťahajte riad cez varnú dosku, pretože môžete
poškriabať sklo varnej dosky.
• Nepoužívajte škrabky ani iné drsné čistiace prostriedky na čistenie varnej dosky, mohli by ste
poškriabať sklo varnej dosky.
• Ak je poškodený prívodný kábel, musí ho vymeniť len kvalikovaný technik.
• Spotrebič je určený na použitie v domácnosti.
• Tento spotrebič môžu používať deti od 8 rokov a osoby s obmedzenými fyzickými,
senzorickými alebo mentálnymi schopnosťami alebo bez dostatočných skúseností a
znalostí, ak boli poučené o použití spotrebiča správnym spôsobom a porozumeli možným
bezpečnostným rizikám. Nedovoľte deťom hrať sa so spotrebičom. Čistenie a údržbu nesmú
vykonávať deti bez dozoru.
• VAROVANIE: Varenie na varnej doske s olejmi a tukmi bez dozoru je nebezpečné a môže
viesť k prehriatiu a požiaru. NIKDY sa nepokúšajte uhasiť plamene vodou, spotrebič len
vypnite a potom prekryte plameň pokrývkou alebo protipožiarnou prikrývkou.
SK-2
Page 96

• Na varnej doske nenechávajte kovové predmety ako sú nože, vidličky, lyžičky a pokrývky,
pretože sa môžu zahriať.
• Po použití vypnite varnú dosku pomocou ovládača a nespoliehajte sa na vypnutie pomocou
detekcie riadu.
• Spotrebič nie je určený na ovládanie pomocou externého časovača alebo systému
samostatného diaľkového ovládania.
Blahoželáme k zakúpeniu vašej novej indukčnej varnej dosky. Odporúčame, aby ste venovali
určitý čas čítaniu týchto pokynov/Návodu na inštaláciu pre plné porozumenie, ako správne
inštalovať a obsluhovať varnú dosku.
Za účelom inštalácie si prečítajte časť o inštalácii.
Pred použitím a inštaláciou si prečítajte všetky bezpečnostné pokyny a uschovajte si tento
návod na bezpečnom mieste.
Popis spotrebiča
Pohľad zhora
1. max. 1800/3000 W zóna
2. max. 1800/3000 W zóna
3. max. 1800/3000 W zóna
4. max. 1400/2000 W zóna
5 - 6. exibilná zóna. 3000/4000 W
7. Sklokeramická varná doska
8. Ovládanie
1. max. 1800/3000 W zóna
2. max. 1800/3000 W zóna
3. max. 1800/3000 W zóna
4. max. 1400/2000 W zóna
5. Flexibilná zóna. 3 000/4000 W
6. Sklokeramická varná doska
7. Ovládanie
1
5
2
6
3
4
7
8
SK-3
7
4
6
3
1
2
5
Page 97
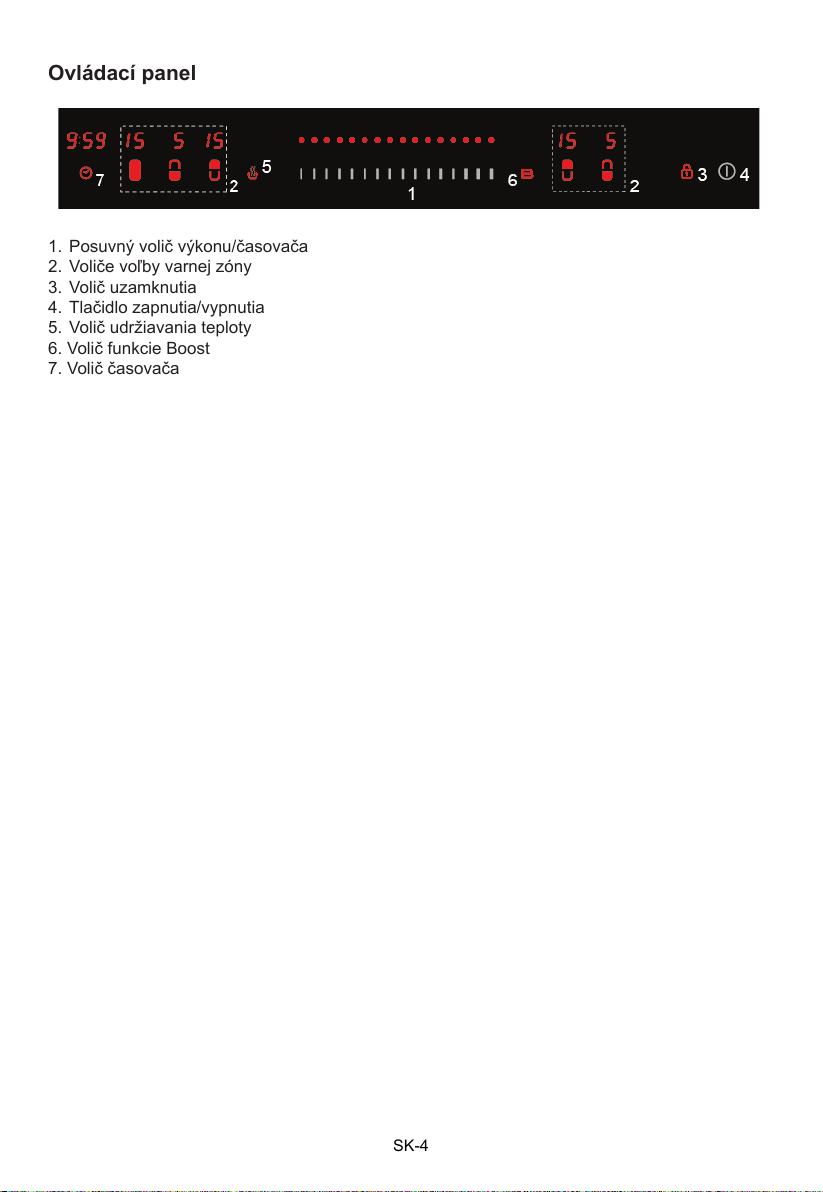
Ovládací panel
1. Posuvný volič výkonu/časovača
2. Voliče voľby varnej zóny
3. Volič uzamknutia
4. Tlačidlo zapnutia/vypnutia
5. Volič udržiavania teploty
6. Volič funkcie Boost
7. Volič časovača
SK-4
Page 98

Úvod
Indukčné varenie je bezpečná, zdokonalená, účinná a ekonomická technológia varenia.
Funguje pomocou elektromagnetických vibrácií vytvárajúcich teplo priamo v riade, namiesto
prestupovania tepla cez sklokeramický povrch. Sklokeramický povrch je horúci len ak sa
dostatočne zahreje riad.
Pred použitím vašej novej indukčnej varnej dosky
• Prečítajte si tento návod, dbajte hlavne na časť „Bezpečnostné upozornenia“.
• Odstráňte všetky ochranné fólie, ktoré sa môžu nachádzať na varnej doske.
Použitie dotykových ovládačov
• Ovládacie prvky reagujú na dotyk, preto na ne nemusíte tlačiť silou.
• Používajte bruško prsta, nie špičku.
• Po každom zaregistrovaní dotyku budete počuť akustický signál.
• Zaistite, aby boli ovládacie prvky vždy čisté, suché a že sa na nich nenachádzajú žiadne
predmety (napr. náradie alebo utierky). Aj tenký lm vody môže sťažiť obsluhu ovládacích
prvkov.
Oceľový riad
Magnetický obvod
Sklokeramická varná doska
Indukční cievka
Indukovaný prúd
SK-5
Page 99

Voľba varného riadu
• Používajte len varný riad s dnom vhodným pre indukčné varenie. Viď symboly na obale
alebo na dne riadu.
• Vhodnosť riadu môžete skontrolovať pomocou magnetického
testu. Presuňte magnet bližšie ku dnu riadu. Ak sa prichytí, riad je
vhodný na indukciu.
• Ak nemáte magnet:
1. Nalejte trochu vody do riadu, ktorý chcete testovať.
2. Postupujte podľa krokov „Spustenie varenia‟.
3. Ak na displeji nebliká
a voda sa hreje, riad je vhodný.
• Riad z nasledujúcich materiálov nie je vhodný: čistá nerezová
oceľ, hliníkový alebo medený bez magnetického dna, sklo, drevo, porcelán, keramika a
kamenina.
Nepoužívajte riad so zakriveným dnom alebo ostrými okrajmi.
Uistite sa, či je dno riadu hladké, pasuje presne na sklo a či má rovnakú veľkosť ako varná
zóna. Používajte riad, ktorého priemer je rovnaký ako zobrazená varná zóna. Použitím riadu s
mierne väčším priemerom využijete energiu s maximálnou účinnosťou. Ak použijete menší riad,
účinnosť môže byť nižšia ako očakávaná.
Riad s priemerom menším ako 140 mm nemusí varná doska detekovať. Riad vždy vycentrujte
na varnej zóne.
Riad z varnej dosky vždy dvíhajte – nepresúvajte, mohli by ste ju poškriabať.
SK-6
Page 100
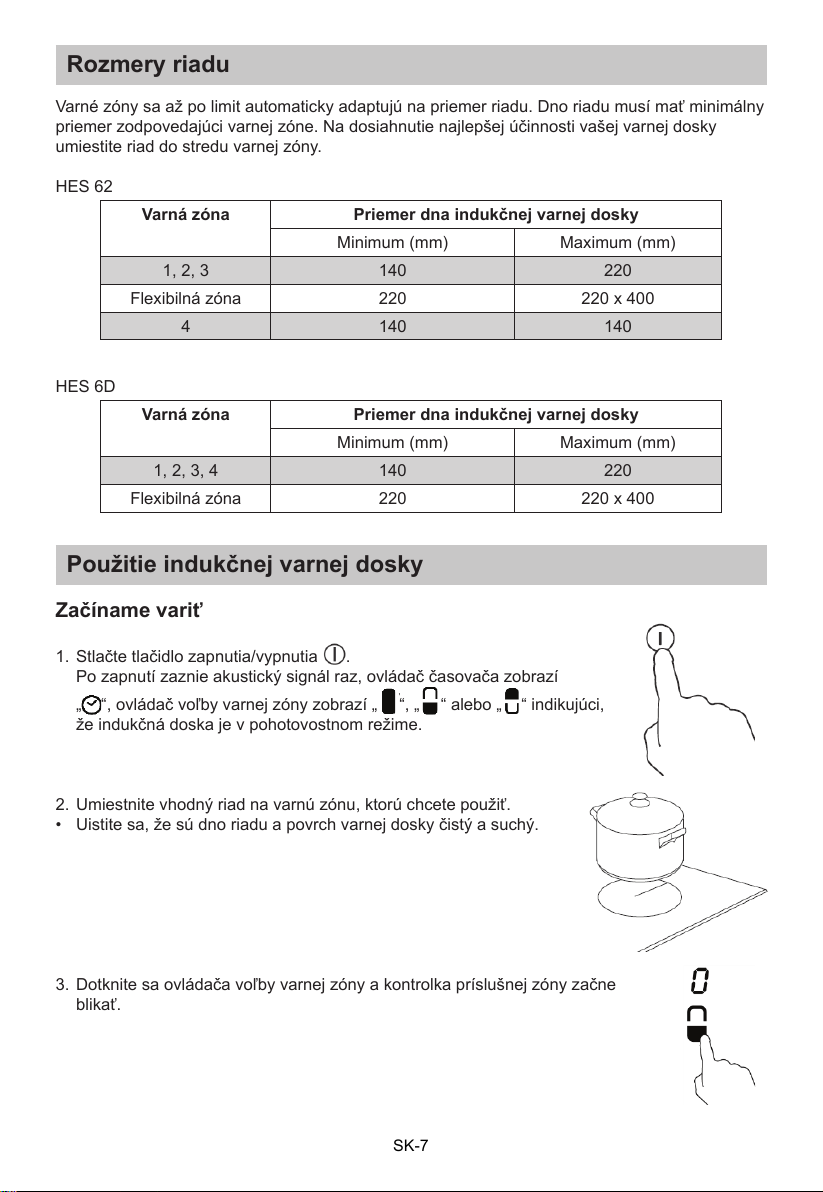
Rozmery riadu
Varné zóny sa až po limit automaticky adaptujú na priemer riadu. Dno riadu musí mať minimálny
priemer zodpovedajúci varnej zóne. Na dosiahnutie najlepšej účinnosti vašej varnej dosky
umiestite riad do stredu varnej zóny.
HES 62
Varná zóna Priemer dna indukčnej varnej dosky
Minimum (mm) Maximum (mm)
1, 2, 3 140 220
Flexibilná zóna 220 220 x 400
4 140 140
HES 6D
Varná zóna Priemer dna indukčnej varnej dosky
Minimum (mm) Maximum (mm)
1, 2, 3, 4 140 220
Flexibilná zóna 220 220 x 400
Použitie indukčnej varnej dosky
Začíname variť
1. Stlačte tlačidlo zapnutia/vypnutia
.
Po zapnutí zaznie akustický signál raz, ovládač časovača zobrazí
„
“, ovládač voľby varnej zóny zobrazí „
³
“, „“ alebo „“ indikujúci,
že indukčná doska je v pohotovostnom režime.
2. Umiestnite vhodný riad na varnú zónu, ktorú chcete použiť.
• Uistite sa, že sú dno riadu a povrch varnej dosky čistý a suchý.
3. Dotknite sa ovládača voľby varnej zóny a kontrolka príslušnej zóny začne
blikať.
SK-7
 Loading...