

Page 1
40000494English.fm Page 1 Thursday, August 28, 2003 3:27 PM
HDV 70X
®
English 2-11
Português 12-22
Dansk 23-33
Italiano 34-44
Page 2

05651276SWE.qxd 18-07-02 14:00 Page 4
Page 3
05651276SWE.qxd 18-07-02 14:00 Page 4
Page 4
40000494English.fm Page 2 Thursday, August 28, 2003 3:27 PM
ENGLISH
Safety reminders
WARNING Check that the product has no
visible signs of damage before use. If damaged
do not use and please contact GIAS Service.
WARNING Do not use the product if the fluff
filter is not in position or is damaged; fluff
could be ignited.
WARNING Foam rubber materials can, under
certain circumstances, when heated become
ignited by spontaneous combustion. Foam
plastic, foam rubber and rubber-like material
are not suitable for tumble drying. Articles
made from these materials MUST NOT be
placed in the dryer.
Always refer to the laundry care labels for
directions on suitability for drying.
WARNING Misuse of a tumble dryer may
create a fire hazard.
WARNING Where the hot surface symbol
is located the temperature rise during operation
of the tumble dryer may be in excess of 60° C.
User's manual. This machine should only be
used for its intended purpose as described in
this manual. Ensure that it is fully understood
before operating.
Installation. This machine should not be
installed in a bathroom or shower room.
Never install the dryer against curtains and be
sure to prevent items from falling or collecting
behind the dryer.
Ventilation. Adequate ventilation must be
provided in the room where the tumble dryer is
located to prevent gases from appliances burning
other fuels, including open fires, being drawn into
the room during operation of the tumble dryer.
Exhaust air must not be discharged into a flue
which is used for exhausting fumes from
appliances burning gas or other fuels.
Check regularly that the air flowing through the
dryer is not restricted:
Check the fluff filter after use, and clean, if
necessary.
The venting hose or duct should be checked
periodically and any accumulation of fluff
removed.
The inlet and outlets should be kept free from
obstructions.
If the dryer is used frequently the period
between checks should be reduced accordingly.
Dryness. Clothes should be spin dried or
thoroughly wrung before they are put into the
tumble dryer. Clothes that are dripping wet
should NOT be put into the dryer.
Lighters and matches must not be left in
pockets and NEVER use flammable liquids
near the machine.
Glass fibre curtains should never be put in this
machine. Skin irritation may occur if other
garments are contaminated with the glass fibres.
Garments treated or contaminated with
flammable cleaning sprays or liquids such as
petrol, cooking oil or aerosol sprays must not be
put in this machine.
Lint or fluff must not be allowed to collect on
the floor around the outside of the machine.
Cool down period. The drum inside may be
very hot. Always allow the dryer to complete
the cool down period before removing the
laundry.
Faults. Do not continue to use this machine if it
appears to be faulty.
After use. Remove the plug from the electricity
supply. Always remove the plug before cleaning
the appliance.
Supply cord. If the supply cord on this
appliance is damaged, it must be replaced by a
special cord which is only available from GIAS
Service or an authorised dealer.
GIAS Service. To ensure the continued safe and
efficient operation of this appliance we
recommend that any servicing or repairs are only
carried out by an authorised service engineer.
2
Page 5
40000494English.fm Page 3 Thursday, August 28, 2003 3:27 PM
ENGLISH
Safety reminders 2 Opening the door 6
Electrical requirements 3 Filter 6
Ventilation requirements 4 Drying guide 7
Preparing the load 5 Controls & indicators 8
Clothes preparation 5 Operation 9
Maximum drying weight 5 Cleaning the dryer 10
Sorting the load 5 Technical specification 10
Do not tumble dry 5 Trouble shooting 11
Energy saving 5
PLEASE READ THESE INSTRUCTIONS THOROUGHLY
This appliance must be operated in accordance with the instructions given in this manual.
It is for domestic use only in drying household textiles and garments where a water solution
has been used in the cleaning process. It MUST NOT be used with dry cleaning fluids. For
your safety, this dryer must be correctly installed.
If there is any doubt about installation, call GIAS Service for advice.
Before using the tumble dryer for the
first time:
● please read this instruction book
thoroughly.
● remove all items packed inside drum.
● wipe the inside of the drum and door
with a damp cloth to remove any dust
which may have settled in transit.
IMPORTANT: This dryer must only be
used for drying household textiles and
garments where a water solution has
been used for the cleaning process.
DO NOT tumble dry fabrics treated with
dry cleaning fluids.
Electrical requirements
WARNING!
ELECTRICITY CAN BE
EXTREMELY DANGEROUS.
THIS APPLIANCE MUST BE
EARTHED.
This appliance is fitted with a moulded-on
non-rewireable plug.
The plug should be accessible for
disconnection after the appliance has been
installed.
IMPORTANT: The wires in the mains
lead are coloured in accordance with the
following code:
Blue - NEUTRAL
Brown - LIVE
Green-and-yellow - EARTH
If the supply cord on this appliance is
damaged, it must be replaced by a
special cord which is only available from
GIAS Service or an authorised GIAS
Dealer.
3
Page 6
40000494English.fm Page 4 Thursday, August 28, 2003 3:27 PM
ENGLISH
Installation and
Ventilation requirements
1
SUPPLY CORD
AIR INLET
VENTS
HOT AIR
OUTLET
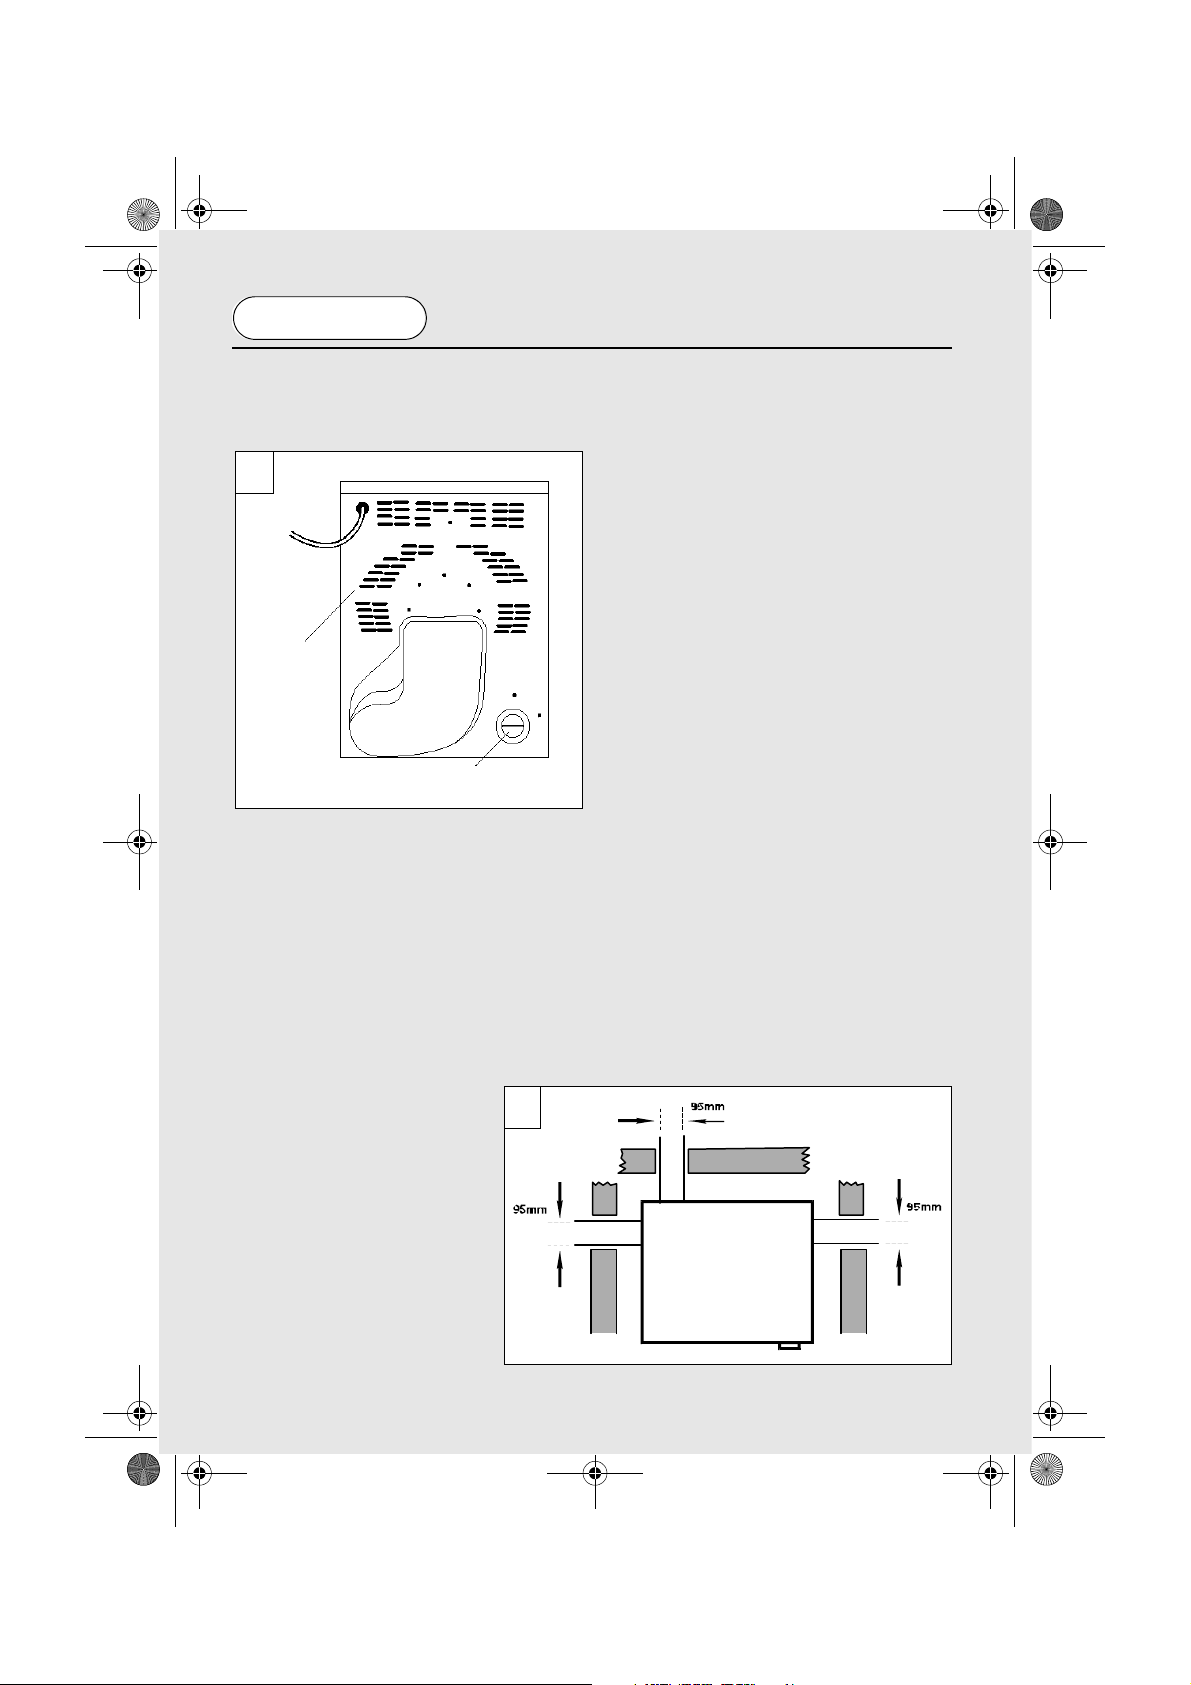
IMPORTANT: This dryer must be
installed such that the air inlets and
outlets are not restricted (fig. 1).
There should be a gap of at least 12 mm
(0.5 inches) between the sides and rear of
the machine and the surrounding walls and
cabinets.
To ensure adequate ventilation the space
between the bottom of the machine and the
floor must not be obstructed.
NEVER install the dryer up
against curtains.
Prevent items from falling or
collecting between the sides and
rear of the dryer as these may
obstruct the air inlet and outlets.
A venting hose is supplied with
this tumble dryer.
The use of the venting hose to
exhaust hot air to the external
atmosphere is strongly
recommended to ensure
2
maximum drying efficiency. Protect the
external outlet from prevailing winds to
ensure back-draughts do not reduce the
drying performance.
If the dryer is installed under a worktop or
built-in, it is essential to use the venting
hose to carry the hot moist air away from
the dryer otherwise re-circulation of the
moist air will prevent the dryer from
working efficiently.
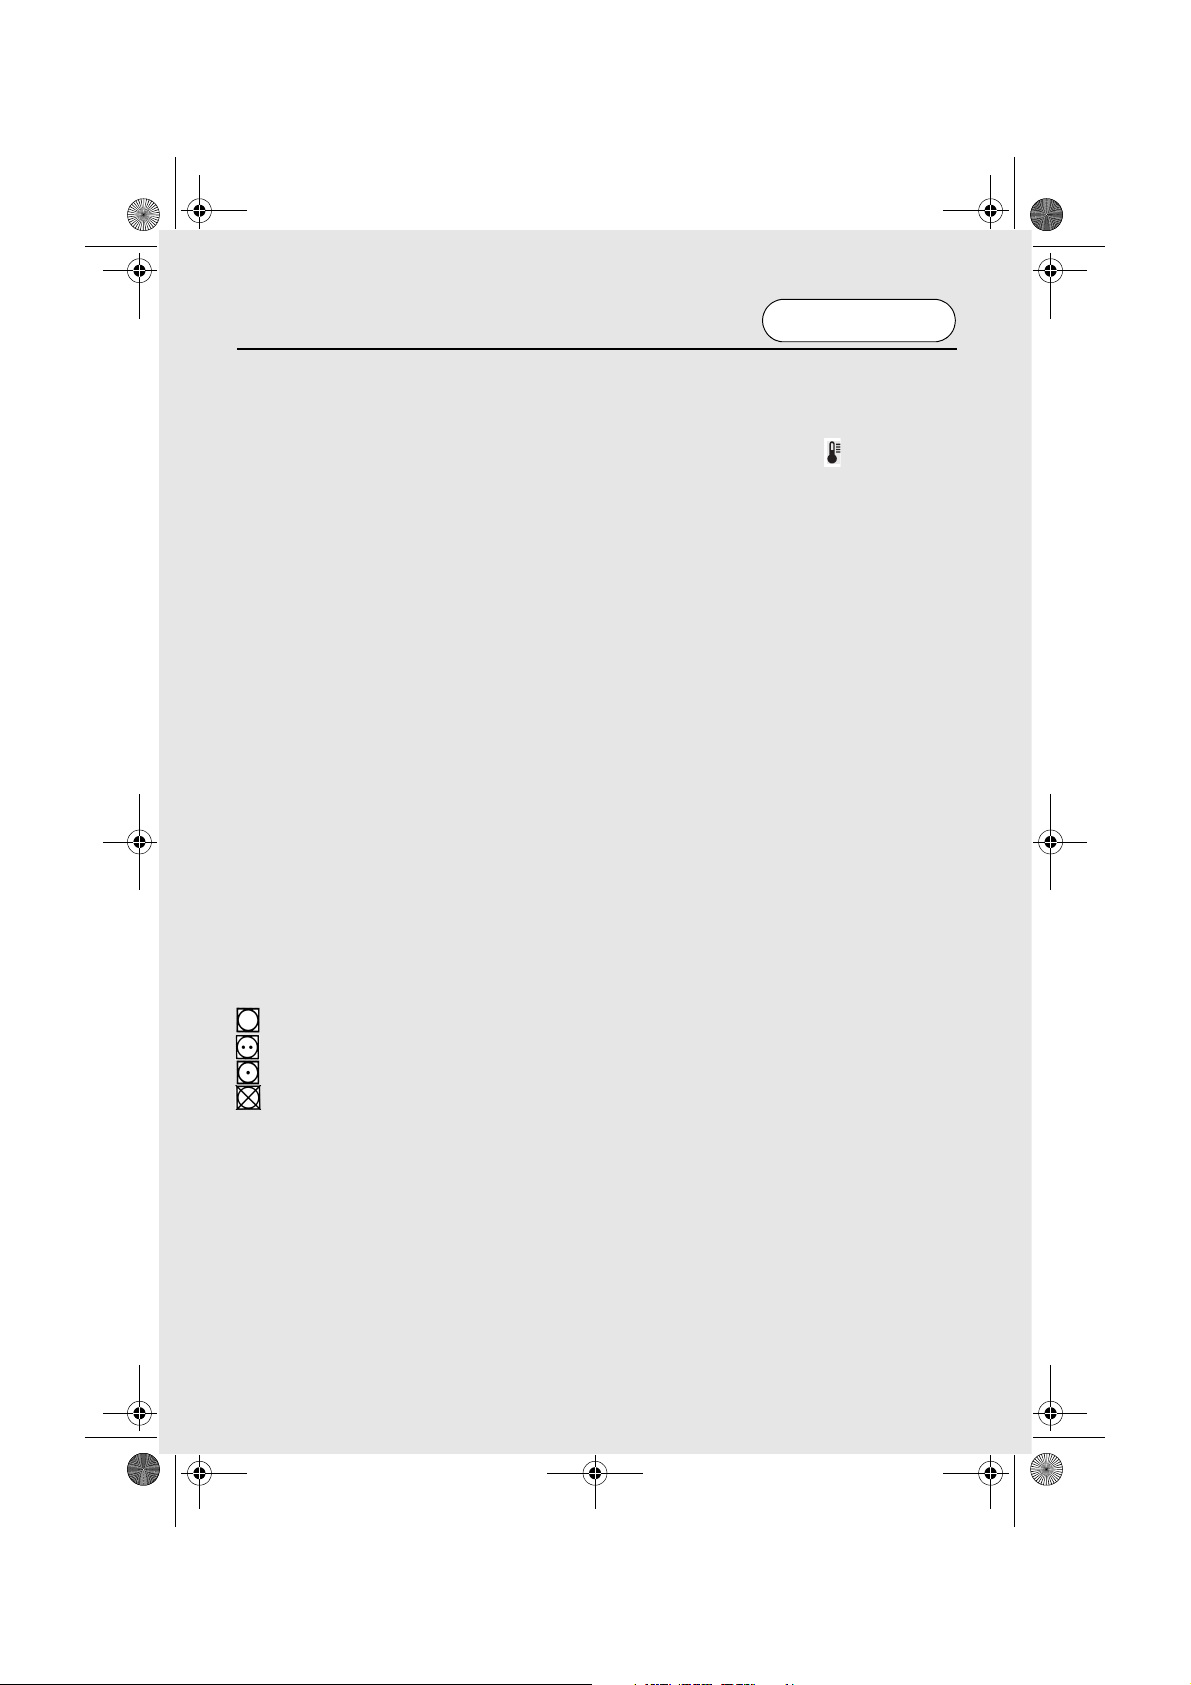
The hose may be fitted through a wall or
through an open door or window (fig. 2).
The hose is 95 mm (3.75 inches) in
diameter and will extend up to 1.8 metres
(6 feet).
Venting hoses longer than 1.8 metres
(6 feet) are not recommended as the dryer
performance will be reduced.
Ensure that the venting hose is not
kinked as this will prevent the dryer
from working efficiently.
There are three air outlets – one at the rear
and one on each side of the dryer. The
venting hose must only be attached to one
of these outlets. The covers must be fitted
to the two unused outlets to maintain
maximum drying efficiency.
WALL
DRYER
WALL
WALL
4
Page 7
40000494English.fm Page 5 Thursday, August 28, 2003 3:27 PM
ENGLISH
Preparing the load
Before using the dryer for the first time
wipe the inside of the drum and door with a
damp cloth.
Make sure that the laundry you are going to
dry is suitable for drying in a tumble dryer,
as shown by the care symbols on each item.
Clothes preparation
Check that all fastenings are closed and that
pockets are empty. Turn the articles inside
out. Place clothes loosely in the drum to
make sure that they don’t get tangled.
Do not overload the drum, particularly
when drying large items, otherwise, the
laundry may stick to the drum and not dry
evenly.
Maximum drying weight
● Cottons Max. 7 kg
● Synthetics Max. 3 kg
Sort the load as follows:
A) By care symbols
On the collar or inside seam:
Suitable for tumble drying.
Tumble drying at high temperature.
Tumble drying at low temperature only.
DO NOT tumble dry.
B) By amount and thickness
Whenever the load is bigger than the
dryer capacity, separate clothes
according to thickness (e.g. towels
from thin underwear).
C) By type of fabric
Cottons/linen: Towels, cotton jersey,
bed and table linen.
Synthetics: Blouses, shirts, overalls,
etc. made of polyester or polyamid, as
well as for cotton/synthetic mixes.
D) By drying level
● Sort into: iron dry, cupboard dry, etc.
● For delicate articles press the
‘DELICATES’ button ( ) to select low
drying temperature.
Do not tumble dry:
Woollens, silk, delicate fabrics, nylon
stockings, delicate embroidery, fabrics
with metallic decorations, garments with
PVC or leather trimmings, training shoes,
bulky items such as sleeping bags, etc.
IMPORTANT: Do not dry articles
which have been treated with a dry
cleaning fluid or rubber clothes (danger
of fire or explosion).
Energy saving
Only put into the tumble dryer laundry
which has been thoroughly wrung or spindried. The drier the laundry the shorter the
drying time thus saving electricity.
ALWAYS try to dry the maximum weight
of laundry, this will save time and
electricity.
NEVER exceed the maximum weight, this
will waste time and electricity.
ALWAYS check that the filter is clean
before every drying cycle.
NEVER put dripping wet items into the
tumble dryer, this may damage the
appliance.
5
Page 8
40000494English.fm Page 6 Thursday, August 28, 2003 3:27 PM
ENGLISH
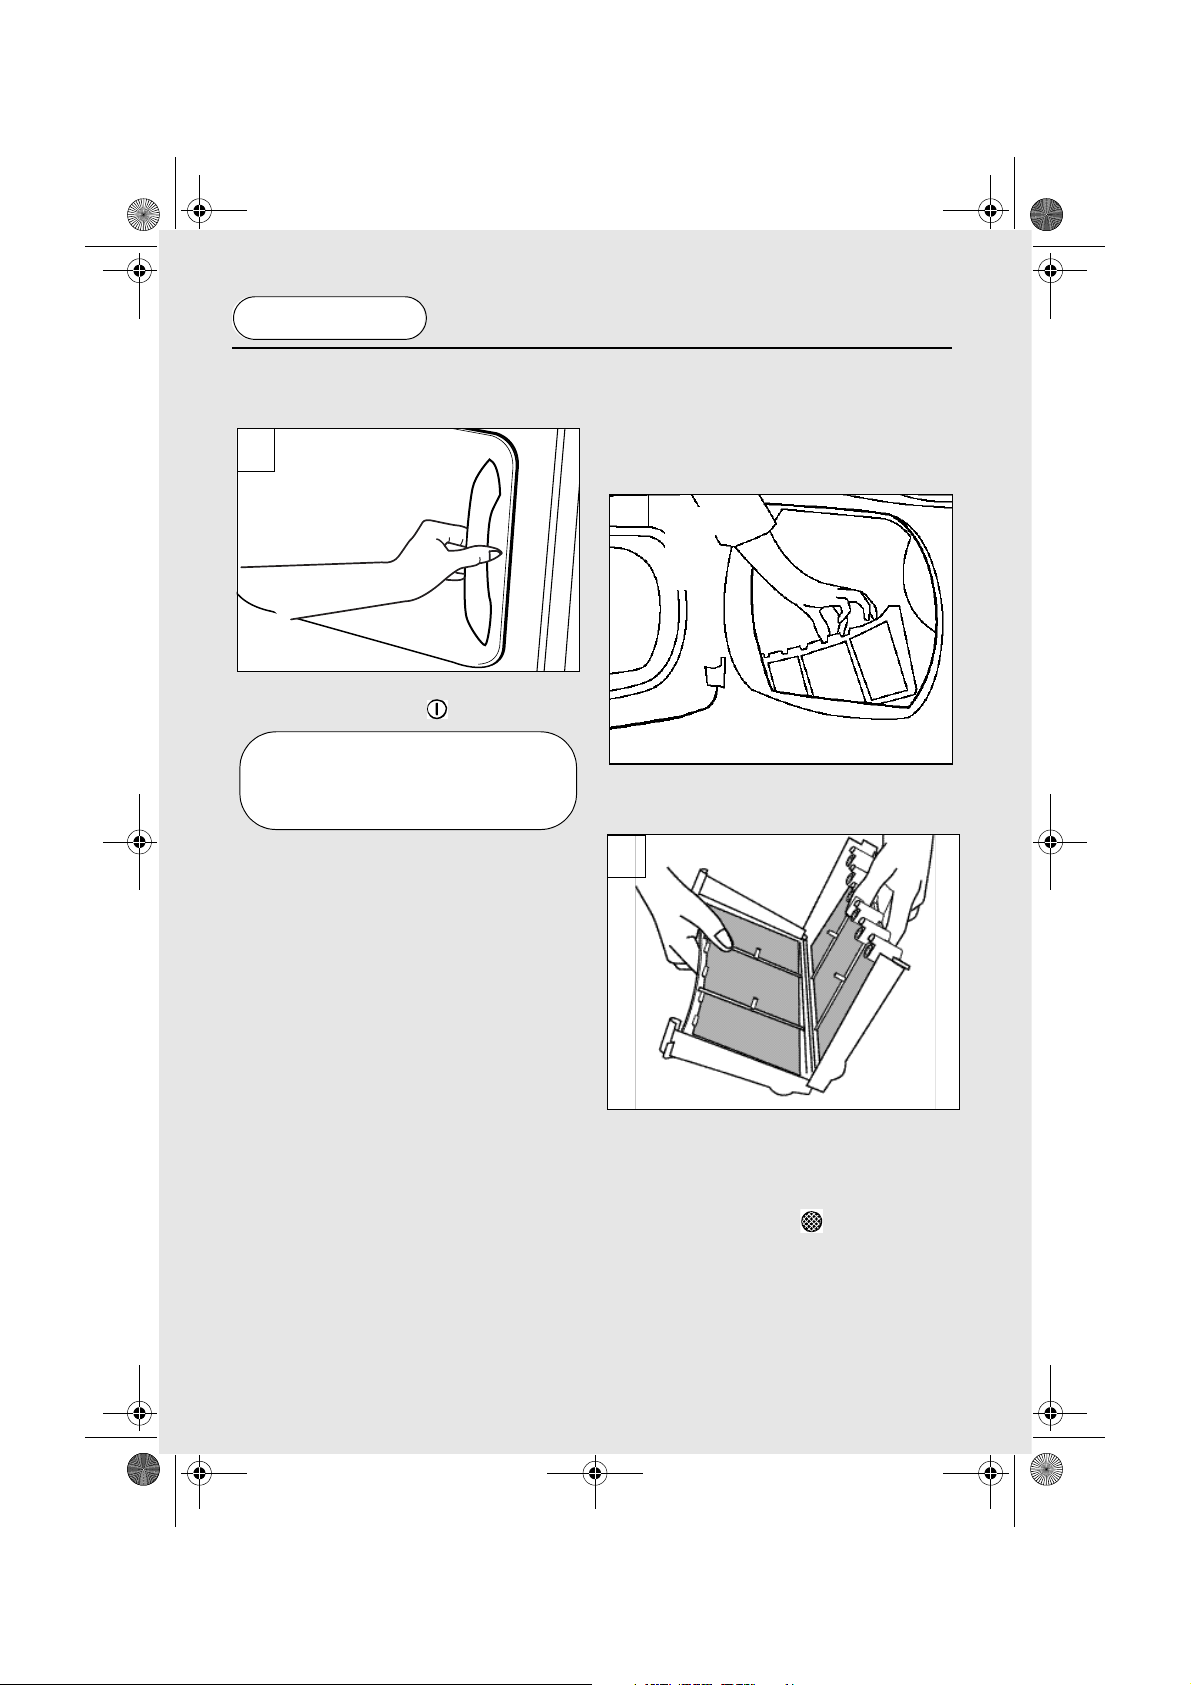
Opening the door
Pull on handle to open the door (fig. 3).
3
To restart the dryer, close the door and
press the ‘ON’ button
WHEN THE TUMBLE DRYER
IS IN USE THE DRUM AND
DOOR MAY BE VERY HOT.
().
WARNING!
Filter
IMPORTANT: To maintain the
efficiency of the dryer check that the
fluff filter is clean before each drying
cycle.
4
1. Pull the filter upwards (fig. 4).
2. Open filter as shown (fig. 5).
5
3. Gently remove lint using a soft brush or
your fingertips.
4. Snap the filter together and push back
into place.
Filter Care Indicator ( )
Lights when the filter needs cleaning.
If the laundry is not drying check that the
filter is not clogged. The indicator will also
light when the venting hose is blocked or
kinked.
6
Page 9
40000494English.fm Page 7 Thursday, August 28, 2003 3:27 PM
ENGLISH
Drying guide
The table shows approximate drying times, depending on the type of fabric and
dampness of the clothes.
HEAT SETTING HEAVY LOAD MEDIUM LOAD LIGHT LOAD
COTTON ( )
SYNTHETICS ( )
ACRYLICS ( )
PRE-IRON PROGRAM: RELAXES CREASES – EASIER TO IRON
REMEMBER: During the last 10 minutes the load is always tumbled in cool air.
For delicate fabrics select the ‘DELICATES’ button ( ) for all Drying Programmes.
This reduces the drying temperature to protect your garments.
HIGH 140-165 Min 70-80 Min 50-65 Min
LOW - 70-80 Min 40-55 Min
LOW - 50-65 Min 30-40 Min
7
Page 10
40000494English.fm Page 8 Thursday, August 28, 2003 3:27 PM
ENGLISH
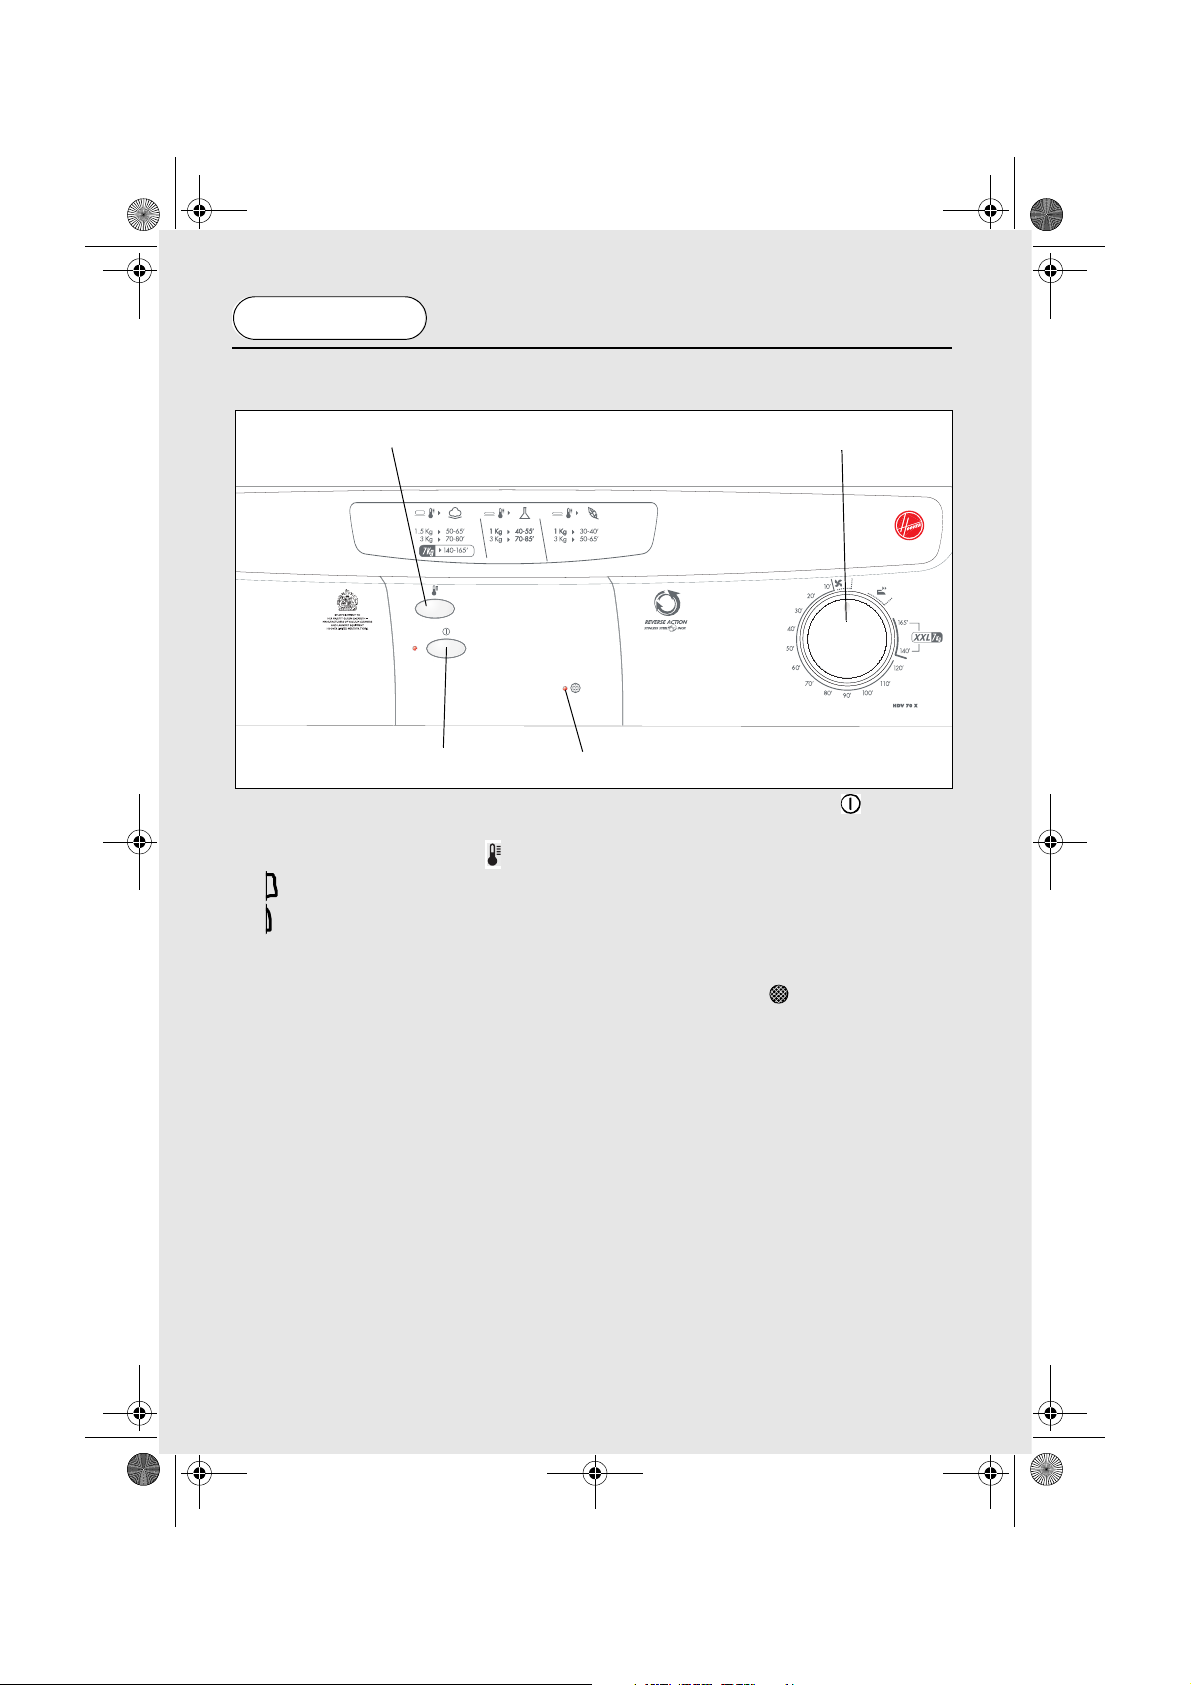
Control panel and indicator lights
2
1
1. ‘ON’ button and indicator – press to switch on, the indicator will light ( ).
2. ‘DELICATES’ button – press to reduce the heat level for delicate items, press again
to select high temperature (
HIGH Heat setting
LOW Heat setting
3. ‘DRYING TIME’ dial – selects drying time or pre-ironing option.
4. ‘FILTER CARE’ indicator lights when filter needs cleaning ( ).
).
4
3
8
Page 11
40000494English.fm Page 9 Thursday, August 28, 2003 3:27 PM
ENGLISH
Operation
1. Open the door and load the drum with
laundry. Ensure that garments do not
hinder closure of the door.
2. If drying delicate items press the
‘DELICATES’ button to reduce the
heat level. Press again on completion,
to select high temperature.
HIGH Heat setting
LOWLOW Heat setting
3. Turn ‘DRYING TIME’ dial to select
the required drying time.
The PRE-IRONING setting shown by
the symbol on the ‘DRYING
TIME’ dial provides a conditioning and
anti-crease function. The dryer will
heat the load for 8 minutes followed by
a 2 minute cool down period and is
especially good for garments which
may have been left for some time prior
to ironing, in a linen basket for
example. Garments may also become
stiffened when dried outside on a
washing line or inside on radiators. The
PRE-IRONING process relaxes the
creases in the fabric making ironing
quicker and easier.
4. Gently close the door pushing it slowly
until you hear the door ‘click’ shut.
5. Press the ‘ON’ button. The indicator
will light and the drying cycle begins.
6. The load is dried by tumbling in
thermostatically controlled warm air.
Cool air is used for the last 10 minutes
to reduce creasing and cool the load
ready for handling.
7. When the program is fully completed
the drum will stop rotating and the
mark on the dial will be at the top.
Open the door and remove the load.
WARNING!
THE DRUM, DOOR AND LOAD
MAY BE VERY HOT.
8. Clean the filter after every drying cycle
to ensure maximum dryer efficiency.
(See ‘Filter’ section.)
9
Page 12
40000494English.fm Page 10 Thursday, August 28, 2003 3:27 PM
ENGLISH
Cleaning the dryer
IMPORTANT: Always switch off and
remove the plug from the electricity
supply before cleaning this appliance.
Clean the filter after every drying cycle.
After each period of use, wipe the inside of
the drum and leave the door open for a
while to allow circulation of air to dry it.
Wipe the outside of the machine and the
door with a soft cloth.
DO NOT use abrasive pads or cleaning
agents.
To prevent the door sticking, periodically
clean the door gasket with a ‘non-scratch
cream cleaner.’
Technical specifications
Drum capacity 115 litres
Maximum load 7 kg
Height 85 cm
Width 60 cm
Depth 60 cm
Energy Label Band C
Note: For electrical data refer to the rating
label on the front of the dryer cabinet (with
the door open).
10
Page 13
40000494English.fm Page 11 Thursday, August 28, 2003 3:27 PM
ENGLISH
Trouble shooting
Should your dryer operate incorrectly,
check the following points before calling
for a service engineer.
Drying time is too long/clothes are not
dry enough:
● Have you selected the correct drying
time/program? Go to page 7.
● Were the clothes too wet? Were the
clothes thoroughly wrung or spindried?
● Does the filter need cleaning? Go to
page 6.
● Is the dryer overloaded? Go to page 5.
● Is the venting hose kinked or blocked?
Go to page 4.
● Is the load too small? Go to page 9.
● Has the ‘DELICATES’ option been
selected from a previous cycle? Go to
page 8.
The dryer does not operate:
● Is there a working electricity supply to
the dryer? Check using another
appliance such as a table lamp.
● Is the plug properly connected to the
mains supply?
● Is there a power failure?
● Has the fuse blown?
● Is the door fully closed? Go to
page 9.
● Is the dryer switched on, both at the
mains supply and at the machine? Go to
page 8.
● Has the drying time or the program
been selected? Go to page 8.
● Has the ‘ON’ button been pressed after
opening the door? Go to page 6.
Filter Care Indicator on
● Does the filter need cleaning? Go to
page 6.
● Is the venting hose kinked or blocked?
Go to page 4.
If the supply cord on this appliance is
damaged, it must be replaced by a special
cord which is only available from GIAS
Service or an authorised GIAS Dealer.
Should there still be a problem with your
dryer after completing all the
recommended checks, please call GIAS
Service for advice. They may be able to
assist you over the telephone or arrange for
a suitable appointment for an engineer to
call under the terms of your guarantee.
However, a charge may be made if any of
the following applies to your machine:
● Is found to be in working order.
● Has not been installed in accordance
with the installation instructions.
● Has been used incorrectly.
11
Page 14
Portuguese 40000494.fm Page 12 Thursday, August 28, 2003 3:56 PM
PORTUGUÊS
Segurança
AT EN ÇÃ O Verifique se o produto não tem
quaisquer sinais visíveis de danos antes da
utilização. Se estiver danificado, não o utilize e
contacte o Serviço de Assistência Técnica GIAS.
AT EN ÇÃ O Não utilize o produto se o filtro de
cotão não estiver bem posicionado ou se estiver
danificado; o cotão é inflamável.
AT EN ÇÃ O Os materiais de borracha esponjosa
podem, em certas circunstâncias, ser inflamáveis
por combustão espontânea quando aquecidos.
Plástico esponjoso, borracha esponjosa e materiais
à base de borracha, não são apropriados para
secagem em máquina. Os artigos em cuja
composição entrem estes materiais NÃO PODEM
ser colocados na máquina.
Consulte sempre as indicações das etiquetas de
lavagem e secagem.
AT EN ÇÃ O A má utilização de uma máquina de
secar pode criar risco de incêndio.
AT EN ÇÃ O O aumento de temperatura durante o
funcionamento da máquina de secar pode exceder
os 60 graus C, onde exista o símbolo de superfície
quente .
Manual do utilizador. Esta máquina deve apenas
ser utilizada para os fins para os quais foi
concebida, conforme descrito neste manual.
Assegure-se de que o compreendeu bem antes de
começar a utilizá-la.
Instalação. Esta máquina não deve ser instalada
numa casa de banho.
Nunca instale a máquina junto a cortinas e tenha o
cuidado de evitar a queda ou acumulação de
objectos atrás da máquina.
Ve nt i la ç ão . A sala onde está localizada a máquina
de secar deve possuir uma ventilação adequada
para evitar que os gases provenientes dos
electrodomésticos que queimem outros
combustíveis, incluindo chamas vivas, sejam
atraídos à sala durante o funcionamento da
máquina de secar.
O ar de exaustão não pode ser eliminado pelo tubo
de chaminé que é utilizado para os fumos de
exaustão de electrodomésticos que queimem gás
ou outros combustíveis.
Verifique regularmente se nada está a limitar o
fluxo de ar na máquina:
Verifique a eventual presença de cotão após a
utilização e limpe, se necessário.
Verifique periodicamente a mangueira ou tubo de
ventilação e retire o cotão acumulado.
As entradas e saídas devem manter-se livres de
quaisquer obstruções.
Se a máquina de secar for utilizada
frequentemente, o período entre verificações deve
ser reduzido em conformidade.
Secagem. A roupa deve ser centrifugada ou bem
torcida antes de ser colocada na máquina de secar.
NÃO deve pôr na máquina roupa ensopada e a
pingar.
Não deixe isqueiros e fósforos nos bolsos e
NUNCA utilize líquidos inflamáveis perto da
máquina.
Nunca deverá utilizar esta máquina para secar
cortinas de fibra de vidro. Se outras roupas
forem contaminadas com estas fibras, podem
provocar irritações na pele.
As peças tratadas ou contaminadas com
aerossóis ou líquidos de limpeza inflamáveis,
tais como gasolina, óleo de cozinha ou aerossóis
não podem ser colocadas nesta máquina.
Fibra de algodão ou cotão não pode ser
acumulado no chão que rodeia o exterior da
máquina.
Período de arrefecimento. O interior do tambor
pode estar muito quente. Antes de retirar a roupa,
deixe sempre a máquina de secar completar o
período de arrefecimento.
Av ar i as . Não insista em utilizar a máquina, se lhe
parecer que existe qualquer avaria.
Após a utilização. Retire a ficha da tomada de
corrente eléctrica. Faça o mesmo antes de limpar a
máquina.
Cabo de alimentação. Se o cabo de alimentação
desta máquina estiver danificado, deve ser
substituído por um cabo especial que se encontra
somente disponível no Serviço de Assistência
Técnica GIAS ou Agente Autorizado.
Serviço de Assistência Técnica GIAS. Para
assegurar o funcionamento seguro, eficiente e
continuado desta máquina, recomendamos que as
reparações e os serviços de manutenção sejam
apenas executados por um técnico autorizado.
12
Page 15
Portuguese 40000494.fm Page 13 Thursday, August 28, 2003 3:56 PM
PORTUGUÊS
Segurança 12 Abrir a porta 16
Requisitos eléctricos 13 Filtro 16
Requisitos de ventilação 14 Guia de secagem 17
Preparação da carga 15 Comandos e indicadores 18
Preparação da roupa 15 Funcionamento 19
Peso máximo de secagem 15 Limpeza da máquina 20
Separação da carga 15 Especificações técnicas 20
Não pôr na máquina de secar 15 Resolução de problemas 21
Economia de energia 15 Termos de garantia 22
LEIA, POR FAVOR, ESTAS INSTRUÇÕES COM ATENÇÃO
Esta máquina deve ser posta a funcionar de acordo com as instruções deste manual.
Destina-se apenas a uso doméstico no que se refere à secagem de têxteis e vestuário,
utilizando uma solução de água no processo de limpeza. NÃO DEVE utilizar-se
com produtos de limpeza a seco. Para sua segurança, a máquina deve ser correctamente
instalada.
Se tiver alguma dúvida sobre a instalação, aconselhe-se com o Serviço de Assistência
Técnica GIAS.
Antes de utilizar a máquina de secar roupa
pela primeira vez:
● leia com atenção este livro de instruções.
● retire tudo o que estiver no tambor.
● limpe o interior do tambor e a porta com
um pano húmido para remover o pó que
possa ter-se instalado durante o
transporte.
IMPORTANTE: Esta máquina de secar
roupa deve apenas utilizar-se para têxteis e
vestuário, utilizando uma solução de água
no processo de limpeza.
NÃO pôr na máquina de secar roupa
tecidos tratados com produtos de limpeza a
seco.
Requisitos eléctricos
ATENÇÃO!
A ELECTRICIDADE PODE SER
EXTREMAMENTE PERIGOSA.
ESTE ELECTRODOMÉSTICO
DEVE SER LIGADO À TERRA.
Esta máquina está apetrechada com uma ficha
vulcanizada.
A ficha deve ficar acessível para se poder
desligar a máquina após a sua instalação.
IMPORTANTE: Os fios do cabo de
alimentação têm cores diferentes, de
acordo com o seguinte código:
Azul - NEUTRO
Castanho - FASE
Verde e amarelo - TERRA
Se o cabo de alimentação desta máquina
estiver danificado, deve ser substituído por
um cabo especial que se encontra somente
disponível no Serviço de Assistência
Técnica GIAS ou Agente Autorizado.
13
Page 16

Portuguese 40000494.fm Page 14 Thursday, August 28, 2003 3:56 PM
PORTUGUÊS
Requisitos de instalação
e ventilação
1
CABO DE
ALIMENTAÇÃO
ABERTURAS
DE ENTRADA
DE AR
SAIDA DE AR
QUENTE
IMPORTANTE: Esta máquina deve ser
instalada de modo a que as entradas e as
saídas de ar não fiquem obstruídas (fig. 1).
Deve deixar-se um espaço de, pelo menos,
12 mm (0,5 polegadas) entre os lados e a parte
posterior da máquina e as paredes e armários
que a rodeiam.
Para uma ventilação adequada, o espaço entre
a base da máquina e o chão deverá estar
desobstruído.
NUNCA instale a máquina junto a cortinas.
Evite que caiam e se acumulem objectos atrás
e ao lado da máquina, uma vez que
podem obstruir as entradas e
saídas de ar.
Esta máquina de secar roupa é
fornecida com uma mangueira
de ventilação.
Recomenda-se o uso da
mangueira de ventilação para
expelir ar quente para a atmosfera,
e assim assegurar máxima
eficiência de secagem. Proteja a
saída externa dos ventos
predominantes para assegurar que
2
o retorno da corrente de ar não reduza o
desempenho da secagem.
Se a máquina for instalada sob uma bancada
de cozinha ou se for embutida, é essencial
utilizar uma mangueira de ventilação para
eliminar o ar quente e húmido, evitando assim
que a recirculação de ar húmido impeça que a
máquina funcione eficientemente.
A mangueira pode passar através de uma
parede ou de uma porta ou janela abertas
(fig. 2). A mangueira tem 95 mm
(3,75 polegadas) de diâmetro e um
comprimento de até 1,8 metros (6 pés).
Mangueiras de ventilação de comprimento
superior a 1,8 metros (6 pés), não se
recomendam pois reduzem o desempenho da
máquina.
Assegure-se de que a mangueira de
ventilação não está torcida, o que impedirá
o funcionamento eficiente da máquina.
Há três saídas de ar - uma na parte traseira e
uma de cada lado da máquina. A mangueira
de ventilação deve apenas ligar-se a uma
destas saídas. Devem colocar-se as
respectivas tampas nas duas saídas não
utilizadas para manter eficiência máxima de
secagem.
PAREDE
PAREDE
PAREDE
MÁQUINA DE
SECAR
14
Page 17

Portuguese 40000494.fm Page 15 Thursday, August 28, 2003 3:56 PM
PORTUGUÊS
Preparação da carga
Antes de usar a máquina de secar pela
primeira vez, limpe o interior do tambor e da
porta com um pano húmido.
Certifique-se de que a roupa que vai secar é
apropriada para secagem por máquina de
secar, conforme indicado nos símbolos das
etiquetas, representativos dos cuidados a ter
com cada um dos artigos.
Preparação da roupa
Certifique-se de que todos os fechos estão
fechados e os bolsos vazios. Vire os artigos
do avesso. Coloque a roupa livremente no
tambor de modo a não se emaranhar.
Não sobrecarregue o tambor, particularmente
ao secar artigos volumosos, senão, a roupa
pode ficar presa ao tambor e não secar
uniformemente.
Peso máximo de
secagem
● Algodões Máx.de 7 kg
● Sintéticos Máx.de 3 kg
Separe a carga como se
segue:
A) Por símbolos de cuidados de secagem
Na gola ou no interior da bainha:
Pode ser seco em máquina de secar.
Secagem a alta temperatura.
Secagem apenas a baixa temperatura.
NÃO pôr na máquina de secar roupa.
B) Por quantidade e volume
Sempre que a carga for superior à
capacidade da máquina, separe a roupa
de acordo com o volume (por exemplo,
toalhas e roupa interior).
C) Por tipo de tecido
Algodões/Linho: Toalhas, camisolas de
algodão, lençóis e toalhas de mesa.
Sintéticos: Blusas, camisas, fatosmacacos, etc. em cuja composição
entrem poliésteres ou poliamidas, bem
como misturas de algodão/fibras
sintéticas.
D) Por grau de secagem
● Separe por: Secagem para engomar,
secagem para guardar, etc.
● Para artigos delicados, prima a tecla
‘DELICATES’ (TECIDOS
DELICADOS) ( ) para seleccionar uma
temperatura de secagem baixa.
Não pôr na máquina de
secar:
Lãs, sedas, tecidos delicados, meias de nylon,
bordados delicados, tecidos com decoração
metálica, vestuário com guarnições de PVC
ou couro, ténis, artigos volumosos, tais como
sacos-cama, etc.
IMPORTANTE: Não seque artigos
tratados com um produto de limpeza a seco
ou vestuário de borracha (perigo de
incêndio ou de explosão).
Economia de energia
Ponha somente na máquina de secar roupa as
peças que tenham sido bem torcidas ou
centrifugadas. Quanto mais seca estiver a
roupa, menor será o tempo de secagem,
resultando numa economia de electricidade.
Tente SEMPRE secar o peso máximo de
roupa, o que origina economia de tempo e de
electricidade.
NUNCA exceda o peso máximo
recomendado, o que provocará desperdício de
tempo e de electricidade.
Verifique SEMPRE se o filtro está limpo
antes de cada ciclo de secagem.
NUNCA ponha na máquina artigos
ensopados e a pingar, o que pode danificar a
máquina.
15
Page 18

Portuguese 40000494.fm Page 16 Thursday, August 28, 2003 3:56 PM
PORTUGUÊS
Abrir a porta
Puxe o manípulo para abrir a porta (fig. 3).
3
Para reiniciar o programa de secagem, feche a
porta e prima a tecla ‘ON’ ().
ATENÇÃO!
QUANDO A MÁQUINA DE
SECAR ROUPA ESTIVER A
UTILIZAR-SE, O TAMBOR E A
PORTA PODEM ESTAR
MUITO QUENTES.
Filtro
IMPORTANTE: Para manter a eficiência
da máquina, verifique se o filtro do cotão
está limpo antes de cada ciclo de secagem.
4
1. Puxe o filtro para cima (fig. 4).
2. Abra o filtro como ilustrado (fig. 5).
5
16
3. Retire com cuidado os resíduos de tecido,
usando uma escova macia ou a ponta dos
dedos.
4. Junte e feche entre si as duas metades do
filtro e volte a montá-lo no seu lugar.
Indicador de Controlo do Estado
do Filtro ( )
Acende quando o filtro necessitar de limpeza.
Se a roupa não estiver a secar, verifique se o
filtro não está obstruído. O indicador iluminarse-á também quando a mangueira de ventilação
estiver obstruída ou torcida.
Page 19

Portuguese 40000494.fm Page 17 Thursday, August 28, 2003 3:56 PM
PORTUGUÊS
Guia de secagem
A tabela mostra os tempos aproximados de secagem, dependendo do tipo de
tecido e do grau de humidade da roupa.
ALGODÃO ( )
TECIDOS DE FIBRAS
SINTÉTICAS ( )
TECIDOS DE FIBRAS
ACRÍLICAS ( )
REGULAR O
CALOR
ALTO 140-165 Min 70-80 Min 50-65 Min
BAIXO - 70-80 Min 40-55 Min
BAIXO - 50-65 Min 30-40 Min
CARGA
PESADA
CARGA
MÉDIA
CARGA
LEVE
PROGRAMA PRÉ-FERRO DE PASSAR: SUAVIZA OS VINCOS –
FACILITA A ACÇÃO DE PASSAR A FERRO
LEMBRE-SE: Durante os últimos 10 minutos, utiliza-se sempre ar frio para secar
a roupa.
Para tecidos delicados seleccione a tecla ‘DELICATES’ (TECIDOS DELICADOS)
( ) para todos os Programas de Secagem. Isto reduz a temperatura de secagem
para proteger as roupas.
17
Page 20

Portuguese 40000494.fm Page 18 Thursday, August 28, 2003 3:56 PM
PORTUGUÊS
Painel de controlo e luzes indicadoras
2
1
1. Indicador e tecla ‘ON’ – prima para ligar, o indicador iluminar-se-á ( ).
2. Tecla
ALTO Regular Calor
BAIXO Regular Calor
3. Selector ‘DRYING TIME’ (TEMPO DE SECAGEM) – selecciona o tempo de secagem
4. O indicador ‘FILTER CARE’ (CONTROLO DO ESTADO DO FILTRO) acende-se
‘DELICATES’ (TECIDOS DELICADOS) – para reduzir o grau de calor para
artigos delicados, e prima novamente para seleccionar alta temperatura ( ).
ou a opção de secagem para engomar.
quando o filtro necessitar de limpeza ( ).
4
3
18
Page 21

Portuguese 40000494.fm Page 19 Thursday, August 28, 2003 3:56 PM
PORTUGUÊS
Funcionamento
1. Abra a porta e coloque a roupa no
tambor. Assegure-se de que a roupa não
entrava o fecho da porta.
2. Ao secar artigos delicados, prima a tecla
‘DELICATES’ (TECIDOS
DELICADOS)
calor. Prima novamente para voltar à
selecção de alta temperatura.
ALTO Regular Calor
BAIXO Regular Calor
3. Rode o selector ‘DRYING TIME’
(TEMPO DE SECAGEM) para
seleccionar o tempo de secagem
necessário.
A regulação PRE-IRONING
(PROCESSO DE SECAGEM PARA
PASSAR A FERRO) indicada pelo
símbolo no selector ‘DRYING
TIME’ proporciona uma função
condicionadora e de anti-rugas. A
máquina aquecerá a carga durante 9
minutos, seguidos de um período de
arrefecimento de 3 minutos, sendo
especialmente vantajoso para roupas que
possam ter sido deixadas por um tempo
considerável antes de serem passadas a
ferro, por exemplo, num cesto de roupa.
A roupa pode também ficar endurecida
quando seca no exterior, num estendal, ou
no interior junto a aquecedores. O
processo de SECAGEM PARA PASSAR
A FERRO suaviza os vincos do tecido,
facilitando a acção de passar a ferro e
tornando-a mais rápida.
4. Feche a porta com cuidado,
empurrando-a lentamente até ouvir-se
um clique.
5. Prima a tecla ‘ON’. O indicador
ilumina-se, iniciando-se o ciclo de
secagem.
para reduzir o grau de
6. A roupa é seca revolvendo-se em ar
quente controlado por um termóstato.
Durante os últimos 10 minutos do ciclo
de secagem é utilizado ar frio para
minimizar a formação de vincos e
arrefecer a roupa de forma a ser
manuseada.
7. Quando o programa chegar ao fim, o
tambor pára a sua rotação e a marca
existente no selector ficará posicionada
na parte superior.
Abra a porta e retire a roupa.
ATENÇÃO!
O TAMBOR, A PORTA E A
CARGA PODEM ESTAR
MUITO QUENTES.
8. Limpe o filtro após cada ciclo de
secagem para assegurar eficiência de
secagem máxima. (Vá à secção ‘Filtro’.)
19
Page 22

Portuguese 40000494.fm Page 20 Thursday, August 28, 2003 3:56 PM
PORTUGUÊS
Limpeza da máquina
IMPORTANTE: Desligue sempre a
máquina e retire a ficha da tomada da
corrente antes de limpá-la.
Limpe o filtro após cada ciclo de secagem.
Após cada utilização, limpe o interior do
tambor e deixe a porta aberta por alguns
instantes, de modo a permitir que a circulação
do ar o seque.
Limpe o exterior da máquina e a porta com
um pano macio.
NÃO usar produtos ou discos de limpeza
abrasivos.
Para evitar que a porta se encrave, limpe
periodicamente a junta da porta com um
creme de limpeza resistente a riscos.
Especificações técnicas
Capacidade do tambor 115 litros
Carga máxima 7 kg
Altura 85 cm
Largura 60 cm
Profundidade 60 cm
Faixa da Etiqueta de Energia C
Note: Quanto a dados eléctricos, consulte a
etiqueta na frente da máquina (com a porta
aberta).
20
Page 23

Portuguese 40000494.fm Page 21 Thursday, August 28, 2003 3:56 PM
PORTUGUÊS
Resolução de problemas
Se a máquina de secar não funcionar
correctamente, verifique os seguintes pontos
antes de chamar um técnico de assistência:
O tempo de secagem é demasiado longo/as
roupas não estão suficientemente secas:
● Seleccionou o tempo/programa de
secagem correctos? Vá à página 17.
● A roupa estava demasiado ensopada? Foi
bem torcida ou centrifugada?
● O filtro necessita de limpeza? Vá à
página 16.
● A máquina está com excesso de roupa?
Vá à página 15.
● A mangueira de ventilação está torcida
ou obstruída? Vá à página 14.
● A carga é demasiado pequena? Vá à
página 19.
● A tecla ‘DELICATES’ foi seleccionada
num ciclo anterior? Vá à página 18.
A máquina não funciona
● Existe energia eléctrica para alimentar a
máquina? Verificar usando outro aparelho
eléctrico, por exemplo, um candeeiro.
● A ficha está correctamente ligada à
corrente eléctrica?
● Houve algum corte de corrente?
● O fusível fundiu-se?
● A porta está bem fechada? Vá à
página 19.
● A máquina está ligada à corrente, quer
através da tecla ‘ON’, quer através do
cabo de alimentação? Vá à página 18.
● O programa de tempo de secagem foi
seleccionado? Vá à página 18.
● A tecla ‘ON’ foi premida após ter aberto a
porta? Vá à página 16.
O Indicador de Controlo do Estado do
Filtro Está Aceso
● O filtro necessita de limpeza? Vá à
página 16.
● A mangueira de ventilação está torcida
ou obstruída? Vá à página 14.
Se o cabo de alimentação desta máquina
estiver danificado, deve ser substituído por
um cabo especial que se encontra somente
disponível no Serviço de Assistência Técnica
GIAS ou Agente Autorizado.
Se após todas as verificações recomendadas,
ainda subsistir qualquer problema com a
máquina, ligue por favor para o Serviço de
Assistência GIAS para aconselhamento.
Podem conseguir ajudá-lo pelo telefone ou
combinar consigo a intervenção adequada de
um técnico, nos termos da garantia. No
entanto, pode ser debitado nas seguintes
situações:
● A máquina está em bom estado de
funcionamento.
● Não foi instalada de acordo com as
instruções de instalação.
● Foi utilizada incorrectamente.
21
Page 24

Portugese guarantee.fm Page 22 Thursday, August 28, 2003 2:39 PM
PORTUGUÊS
Termos da garantia
País
Portugal
Hoover Eléctrica Portuguesa, Lda,
Rua D. Estefânia, 90-A
1000 Lisboa
Período de validade
12 meses a partir da data de compra.
Direito à garantia.
Prova da data de compra (guardar o
recibo).
A garantia cobre
Defeitos de fabrico e mau
funcionamento domaterial.
A garantia é aplicável
No país onde o aparelho foi comprado.
Reparações em garantia
Serão efectuadas por técnicos autorizados
da Hoover.
Ao abrigo desta garantia, as reparações
necessárias serão executadas como segue:
Custo de material
Nulo.
Custo de mão-de-obra
Nulo.
Custo de transporte
Contra pagamento.
Custo de transporte incluindo
embalagem e despesas de correio
Contra pagamento, e à responsabilidade do
comprador.
Esta garantia não abrange
Escovas, correias, sacos de papel, perfumadores do ar e filtros por dependerem dos
cuidados e tempo de utilização.
Despesas ou prejuízos ocasionados por
avaria deste aparelho, nem a troca do
mesmo.
Tratamento defeituoso dispensado ao
aparelho.
Abuso no trabalho a que foi submetido.
Ligação a corrente elétrica diferente da
indicada na chapa de características.
Termo de Garantia
Esta Garantia cessa imediatamente em
caso de reparações, ou tentativa de reparação executadas por pessoas não autorizadas pela Hoover.
Esta Garantia tem por fim remediar o mais
economicamente possível, para os seus clientes, qualquer defeito no seu aparelho
Hoover.
22
Page 25

40000494Danish.fm Page 23 Thursday, August 28, 2003 5:05 PM
Sikkerhedspåmindelser
DANSK
ADVARSEL Kontroller at produktet ikke viser
tegn på beskadigelse – før det tages i brug. Er det
beskadiget må det ikke bruges og GIAS Service
skal kontaktes.
ADVARSEL Produktet må ikke bruges hvis
fnugfilteret sidder forkert eller er beskadiget;
fnug kan antændes.
ADVARSEL Skumgummimateriale kan, under
visse omstændigheder, selvantænde, hvis det
bliver for varmt. Skumplastic, skumgummi og
gummilignende materiale er ikke egnet til
tørretumbling. Genstande fremstillet af disse
materialer MÅ IKKE anbringes i
tørretumbleren.
Kontroller altid vaskemærkerne, om tøjet tåler
tørretumbling.
ADVARSEL Misbrug af tørretumbleren kan
medføre brandfare.
ADVARSEL Der hvor symbolet for varm
overflade er placeret, kan temperaturen, under
tumbling, overstige 60°C .
Brugervejledning. Denne maskine må kun
anvendes til det tilsigtede formål som beskrevet
i denne håndbog. Det skal sikres, at den forstås
fuldt ud før betjeningen.
Installation. Denne maskine må ikke
installeres i et bade- eller bruserum.
Tørretumbleren må aldrig installeres opad
gardiner, og genstande skal forhindres i at falde
ned bag ved eller samles bag tørretumbleren.
Ventilation. Der skal være tilstrækkelig
ventilation i det rum, hvor tørretumbleren
placeres, så det undgås at gasser fra andre
apparater, eller åben ild, trækkes ind i rummet
under tørrebumbling.
Udsugningsluft må ikke afledes i en trækkanal,
der er beregnet til aftræk af røggasser fra
apparater, der kører på gas eller anden
brændsel.
Kontroller regelmæssigt at luften, der strømmer
gennem tørretumbleren, ikke hæmmes:
Kontroller fnugfiltret efter brug og rengør det
om nødvendigt.
Aftræksslangen eller -kanalen skal kontrolleres
periodisk og eventuel ophobning af fnug skal
fjernes.
Indløb og udløb skal holdes fri for tilstopninger.
Hvis tørretumbleren anvendes hyppigt, skal
perioden mellem kontroleftersynene reduceres i
overensstemmelse hermed.
Tørhed. Tøjet skal centrifugeres eller vrides
omhyggeligt, før det lægges i tørretumbleren.
Tøj, der er drivvådt, må IKKE lægges i
tørretumbleren.
Lightere og tændstikker må ikke efterlades i
lommer, og der må ALDRIG anvendes
brandfarlige væsker i nærheden af maskinen.
Glasfibergardiner må ikke lægges i maskinen.
Der kan opstå hudirritation, hvis andre
beklædningsgenstande kontamineres med
glasfibre.
Beklædningsgenstande behandlet med
brandfarlige rensesprays eller væsker såsom
benzin, madolie eller aerosolspray må ikke
lægges i denne maskine.
Bomuldsfibre eller fnug må ikke ophobes på
gulvet omkring maskinen.
Afkølingsperiode. Tromlens inderside kan
være meget varm. Lad altid tørretumbleren
fuldføre afkølingsperioden før tøjet tages ud.
Fejl. Maskinen må ikke anvendes, hvis den
virker defekt.
Efter brug. Tag stikket ud at kontakten. Tag
altid stikket ud før apparatet rengøres.
Apparatledning. Hvis apparatledningen til
dette apparat er beskadiget, skal den udskiftes
med en særlig ledning, som kun kan fås hos
GIAS Service eller hos en autoriseret
forhandler.
GIAS Service. For at sikre apparatets fortsatte
sikre og effektive drift anbefaler vi, at eventuel
service eller reparation kun udføres af en
autoriseret servicetekniker.
23
Page 26

40000494Danish.fm Page 24 Thursday, August 28, 2003 5:05 PM
DANSK
Sikkerhedspåmindelser 23 Åbning af døren 27
Elektriske krav 24 Filter 27
Ventilationskrav 25 Tørrevejledning 28
Forberedelse af ilægning af tøj 26 Betjeningsknapper & indikatorer 29
Klargøring af tøj 26 Betjening 30
Maksimal tørrevægt 26 Rengøring af tørretumbleren 31
Sortering af tøj til ilægning 26 Tekniske specifikationer 31
Må ikke tørres i tørretumbler 26 Fejlfinding 32
Energibesparelse 26 Service og reservedele 33
LÆS VENLIGST DENNE VEJLEDNING GRUNDIGT
Apparatet skal betjenes i overensstemmelse med vejledningen i denne håndbog. Den er
kun til husholdsningsbrug til tørring af tekstiler og beklædningsgenstande i en husholdning, hvor der har været anvendt en vandopløsning til rensningsprocessen. Den MÅ IKKE
anvendes sammen med kemiske rensevæsker. Af hensyn til Deres egen sikkerhed skal
denne tørretumbler være installeret korrekt.
Hvis der er nogen tvivl om installation, skal De ringe til GIAS Service for at få råd.
Før tørretumbleren anvendes første
gang:
● læs venligst denne instruktionsbog
grundigt.
● fjern alle genstande som er pakket inde
i tromlen.
● aftør tromlens inderside og dør med en
fugtig klud for at fjerne eventuelt støv,
som har sat sig under transporten.
VIGTIGT: Denne tørretumbler må kun
anvendes til tørring af tekstiler og
beklædningsgenstande i en husholdning,
hvor der har været anvendt vand til
vasken.
De MÅ IKKE tørretumble tørt stof
behandlet med kemiske rensevæsker.
Elektriske krav
ADVARSEL!
ELEKTRICITET KAN VÆRE
MEGET FARLIGT. DETTE
APPARAT SKAL VÆRE
JORDFORBUNDET.
Apparatet er udstyret med et påvulkaniseret
stik, hvori der ikke kan trækkes nye
ledninger.
Stikket skal være tilgængeligt til afbrydelse
efter, at apparatet er blevet installeret.
VIGTIGT: Ledningerne i netledningen
er farvede i overensstemmelse med
følgende kode:
Blå - NEUTRAL
Brun - STRØMFØRENDE
Grøn-og-gul - JORDLEDNING
Hvis apparatledningen til dette apparat
er beskadiget, skal den udskiftes med en
særlig ledning, som kun kan fås hos
GIAS Service eller hos en autoriseret
GIAS forhandler.
24
Page 27

40000494Danish.fm Page 25 Thursday, August 28, 2003 5:05 PM
DANSK
Installations- og
ventilationskrav
1
APPARATLEDNING
LUFTINDSUGNINGS
-KANALER
VARMLUFTUDSUGNING
VIGTIGT: Denne tørretumbler skal
installeres, så luftindsugning og udsugning ikke hæmmes (fig. 1).
Der skal være en afstand på mindst 12 mm
(0,5 tommer) mellem maskinens sider og
bagside og de omgivende vægge og skabe.
For at sikre tilstrækkelig ventilation må
mellemrummet mellem maskinens bund og
gulvet ikke tilstoppes.
Tørretumbleren må ALDRIG installeres op
mod gardiner.
Genstande skal forhindres i at
falde ned og samles mellem
tørretumblerens sider og
bagside, da disse kan tilstoppe
luftindsugning og -udsugning.
Der følger en aftræksslange
med tørretumbleren.
Det anbefales stærkt at anvende
aftræksslangen til udblæsningen
af varm luft til det fri, for at sikre
maksimal tørreeffektivitet.
2
Beskyt den udvendige udsugning mod
almindelig vind for at sikre, at modtræk
ikke reducerer tørreevnen.
Hvis tørretumbleren installeres under et
arbejdsbord eller indbygges, er det vigtigt
at anvende aftræksslangen til at
transportere den varme, fugtige luft væk fra
tørretumbleren, da recirkulation af den
fugtige luft ellers vil forhindre
tørretumbleren i at arbejde effektivt.
Slangen kan monteres gennem en mur eller
gennem en åben dør eller et åbent vidue
(fig. 2). Slangen er 95 mm (3,75 tommer) i
diameter og er op til 1,8 meter lang
(6 fod).
Aftrækningsslanger som er længere end
1,8 meter
(6 fod) anbefales ikke, da tørretumblerens
ydeevne vil blive nedsat.
Det skal sikres, at aftrækslangen ikke
slår bugter, da dette vil forhindre
tørretumbleren i at arbejde effektivt.
Der er tre luftudgange – en bag på og en på
hver side af tørretumbleren.
Aftræksslangen må kun sættes på en af
disse udgange. Der skal monteres dæksler
på de to ubrugte udgange for at bevare
maksimal tørreeffektivitet.
MUR
TØRRETUMBLER
MUR
MUR
25
Page 28

40000494Danish.fm Page 26 Thursday, August 28, 2003 5:05 PM
DANSK
Forberedelse af ilægning
af tøj
Før tørretumbleren anvendes første gang,
skal tromlens inderside og døren tørres af
med en fugtig klud.
De skal sikre, at det vasketøj, De skal til at
tørre, egner sig til tørring i en tørretumbler,
som vist på plejesymboler på hver
genstand.
Klargøring af tøj
Kontroller at alle lukninger er lukkede, og
at lommerne er tomme. Vend vrangen ud
på genstandene. Læg tøjet løst i tromlen for
at sikre, at det ikke filtrer sig sammen.
Tromlen må ikke overfyldes, især ikke når
der tørres store genstande, da vasketøjet
ellers kan sidde fast i tromlen og ikke blive
ensartet tørret.
Maksimal tørrevægt
● Bomuld, maks. 7 kg
● Syntetiske stoffer, maks. 3 kg
C) Efter stoftype
Bomuld/linned: Håndklæder,
bomuldsjersey, sengelinned og duge.
Syntetisk stof: Skjortebluser, skjorter,
overalls, osv., fremstillet af polyester
eller polyamid samt efter bomulds/
syntetiske blandinger.
D) Efter tørringsniveau
● Sorter tøjet i: Strygetørt, skabsstørt, osv.
● For sarte genstande tryk på knappen
‘SARTE TEKSTILER’ ( ) for at
vælge lav tørretemperatur.
Må ikke tørres i
tørretumbler:
Uld, silke, sarte stoffer, nylonstrømper, sart
broderi, stof med metaldekoration,
beklædningsgenstande med PVC eller
læderkanter, gummisko, pladskrævende
genstande, som f.eks. soveposer, osv.
VIGTIGT: Tør ikke genstande som er
behandlet med kemisk rensevæske eller
gummitøj (fare for brand eller
eksplosion).
Sorter tøjet, der skal
lægges i, som følger:
A) Efter plejesymboler
I kraven eller indvendig søm:
Egnet til tørring i tumbler.
Tørring i tumbler ved høj temperatur.
Kun tørring i tumbler ved lav
temperatur.
MÅ IKKE tørres i tørretumbler.
B) Efter antal og tykkelse
Når som helst det tøj, der skal lægges i,
overstiver tørretumblerens kapacitet,
skal tøjet adskilles i overensstemmelse
med tykkelse (f.eks. håndklæder fra
tyndt undertøj).
26
Energibesparelse
Læg kun vasketøj i tørretumbleren som er
blevet grundigt vredet eller centrifugeret.
Jo mere tørt vasketøj er, jo kortere vil
tørretiden være og derved spare elektricitet.
Prøv ALTID at tørre vasketøj af maksimal
vægt, dette sparer tid og elektricitet.
Den maksimale vægt må ALDRIG
overskrides, dette vil spilde tid og
elektricitet.
Det skal ALTID kontrolleres, at filtret er
rent før hver tørrecyklus.
Læg ALDRIG drivvåde genstande i
tørretumbleren, dette kan beskadige
apparatet.
Page 29

40000494Danish.fm Page 27 Thursday, August 28, 2003 5:05 PM
DANSK
Åbning af døren
Træk i håndtaget for at åbne døren (fig. 3).
3
Genstart tørretumbleren ved at lukke døren
og trykke på knappen ‘ON’
ADVARSEL!
NÅR TØRRETUMBLEREN ER
I BRUG KAN TROMLEN OG
DØREN VÆRE MEGET
VARME.
().
Filter
VIGTIGT: For at bevare
tørretumblerens effektivitet skal det
kontrolleres, at fnugfiltret er rent før
hver tørring.
4
1. Træk filtret ud (fig. 4).
2. Åbn filtret som vist (fig. 5).
5
3. Fjern forsigtigt bomuldsfibrene med en
blød børste eller fingerspidserne.
4. Smæk filtret sammen og skub det på
plads.
Filterplejeindikator ( )
Lyser når filtret behøver rengøring.
Hvis vasketøjet ikke tørrer, skal det
kontrolleres, at filtret ikke er tilstoppet.
Indikatoren lyser også, når
udluftningsslangen er blokeret eller slår
bugter.
27
Page 30

40000494Danish.fm Page 28 Thursday, August 28, 2003 5:05 PM
DANSK
Tørrevejledning
Tabellen viser omtrentlige tørretider afhængig af stoftype og tøjets fugtighed.
BOMULD ( )
SYNTETISKE
STOFFER ( )
ACRYL ( )
VARME-
INDSTILLING
HØJ 140-165 Min 70-80 Min 50-65 Min
LAV - 70-80 Min 40-55 Min
LAV - 50-65 Min 30-40 Min
STOR
MÆNGDE
MEDIUM
MÆNGDE
LILLE
MÆNGDE
FØRSTRYGNINGSPROGRAM: UDGLATTER FOLDER – LETTERE
AT STRYGE
HUSK: I de sidste 10 minutter tørres tøjet altid i kold luft.
Til sarte stoffer vælges knappen ‘SARTE TEKSTILER’ ( ) til alle tørrepogrammer.
Dette nedsætter tørretemperaturen for at beskytte dit tøj.
28
Page 31

40000494Danish.fm Page 29 Thursday, August 28, 2003 5:05 PM
Kontrolpanel og indikatorlys
DANSK
2
1
1. ‘ON’ knap og indikator – tryk på den for at tænde maskinen, indikatoren lyser (over
knappen) ( ).
2. Knappen ‘SARTE TEKSTILER’ – tryk på den for at reducere varmeniveauet til sarte
genstande, tryk en gang til på den for at vælge høj temperatur ( ).
HØJ
Varmeindstilling
3. ‘TØRRETID’ drejeskive – vælger tørretid eller førstrygningsmulighed.
4. ‘FILTERPLEJE’ indikatoren lyser, når filtret skal renses ( ).
4
3
29
Page 32

40000494Danish.fm Page 30 Thursday, August 28, 2003 5:05 PM
DANSK
Betjening
1. Åbn døren og læg vasketøjet i tromlen.
De skal sikre, at beklædningsgenstandene ikke hindrer døren i at lukke.
2. Hvis De tørrer sarte genstande, skal De
trykke på knappen ‘SART’ for at
reducere varmeniveauet. Tryk på
knappen igen når tøjet er færdigt for at
vælge høj temperatur.
HØJ Varmeindstilling
LAV Varmeindstilling
3. Knappen ‘TØRRETID’ drejes for at
indstille den ønskede tørretid.
Med
FØRSTRYGNINGSINDSTILLINGE
N vist med symbolet på skiven
‘TØRRETID’ fås en funktion med
regulering af fugtighedsindholdet og
antikrøl. Tørretumbleren opvarmer
tøjet i 8 minutter efterfulgt af en 2
minutters afkølingsperiod og er især
god til beklædningsgenstande, som kan
have ligget i et stykke tid inden
strygning i f.eks. en tøjkurv.
Beklædningsgenstande kan også blive
stive, når de tørres i fri luft på en
tørresnor eller indendøre på radiatorer.
FØRSTRYGNINGSPROCESSEN
udglatter folderne i stoffet, så
strygningen går hurtigere og nemmere.
4. Luk forsigtigt døren ved at skubbe den
langsomt i indtil de kan høre, at døren
lukkes med et ‘klik’.
5. Tryk på ‘ON’ knappen. Indikatoren
lyser, og tørringscyklussen begynder.
6. Tøjet tørres ved tumbling i termostatisk
styret varm luft. Der anvendes kold luft
de sidste 10 minutter for at reducere
krølning og for at afkøle tøjet til
håndtering.
7. Når programmet er helt færdigt,
stopper tromlen, og mærket på knappen
er igen helt oppe.
Åbn døren og tag tøjet ud.
ADVARSEL!
TROMLEN, DØREN OG TØJET
KAN VÆRE MEGET VARMT.
8. Rens filtret efter hver tørring for at
sikre maksimal tørreeffektivitet.
(Se afsnittet ‘Filter’.)
30
Page 33

40000494Danish.fm Page 31 Thursday, August 28, 2003 5:05 PM
Rengøring af
tørretumbleren
VIGTIGT: Sluk altid for og tag stikket
ud af kontakten før apparatet rengøres.
Rens filtret efter hver tørring.
Efter hver anvendelsesperiode aftørres
tromlens inderside og døren efterlades åben
i et stykke tid, så den kan tørre ved
luftcirkulation.
Aftør maskinens yderside og døren med en
blød klud.
BRUG IKKE skuresvampe eller slibende
rengøringsmidler.
For at forhindre døren i at klæbe fast, skal
dørens mellemlæg rengøres periodisk med
ikke ridsende skurepulver.
DANSK
Tekniske specifikationer
Tromlekapacitet 115 liter
Maksimal vægt 7 kg
Højde 85 cm
Bredde 60 cm
Dybde 60 cm
Energietiketbånd C
Bemærk: For elektriske data se
klassificeringsetiketten på tørretumblerens
forside (med døren åben).
31
Page 34

40000494Danish.fm Page 32 Thursday, August 28, 2003 5:05 PM
DANSK
Fejlfinding
Hvis tørretumbleren ikke fungerer korrekt,
skal følgende punkter kontrolleres, før De
ringer efter en servicetekniker.
Tørretiden er for lang/tøjet er ikke tørt
nok:
● Har De valgt den korrekte tørretid/det
korrekte program? Gå til side 28.
● Var tøjet for vådt? Var tøjet blevet
vredet grundigt eller centrifugeret?
● Trænger filtret til at blive renset? Gå til
side 27.
● Er der for meget tøj i tørretumbleren?
Gå til side 26.
● Er aftræksslangen bugtet eller
tilstoppet? Gå til side 25.
● Er tøjmængden for lille? Gå til side 30.
● Er knappen ‘SARTE TEKSTILER’
blevet valgt ved et tidligere program?
Gå til side 29.
Tørretumbleren fungeer ikke:
● Findes der en elektricitetsforsyning der
virker til tørretumbleren? Kontroller det
ved at anvende et andet apparat, som
f.eks. en bordlampe.
● Er stikket korrekt forbundet til
lysnettet?
● Er der strømsvigt?
● Er sikringen sprunget?
● Er døren helt lukket? Gå til side 30.
● Er der tændt for tørretumbleren, både
ved lysnettet og ved maskinen? Gå til
side 29.
● Er der valgt tørretid eller program? Gå
til side 29.
● Er der trykket på ‘ON’ knappen efter, at
døren er åbnet? Gå til side 27.
Filterplejeindikator tændt
● Trænger filtret til at blive renset? Gå til
side 27.
● Er aftræksslangen bugtet eller
tilstoppet? Gå til side 25.
Hvis apparatledningen til dette apparat er
beskadiget, skal den udskiftes med en
særlig ledning, som kun kan fås hos GIAS
Service eller hos en autoriseret GIAS
forhandler.
Hvis der stadig er et problem med Deres
tørretumbler efter hele den anbefalede
kontrol er udført, bedes De ringe til GIAS
Service for rådgivning. De vil måske kunne
hjælpe Dem over telefonen eller arrangere
aftale om besøg af en tekniker i henhold til
Deres garantis bestemmelser. Der kan
imidlertid opkræves et gebyr, hvis følgende
finder anvendelse på Deres maskine:
● Det konstateres, at den fungerer.
● Er ikke blevet installeret i
overensstemmelse med
installationsvejledningen.
● Er blevet anvendt forkert.
32
Page 35

HOOVER-Danish guarantee.fm Page 33 Thursday, August 28, 2003 4:12 PM
DANSK
Service og Reservedele
Det er vigtigt for os, at De har stor glæde af
Deres HOOVER produkt i mange år.
Derfor anbefaler vi Dem at benytte
originale HOOVER reservedele og at lade
service udføre af HOOVER's
Serviceafdeling:
HOOVER A/S
Frydenborgvej 27k
DK-3400 Hillerød
Telefon: 48 24 58 20
Telefax: 48 24 58 28
Garanti:
Der ydes 1 års garanti på fabrikations-/
materialefejl eller mangler på produktet.
Garantien omfatter materialeomkostninger,
arbejdsløn og kørsel. Service skal udføres
af HOOVER Service.
Såfremt vore undersøgelser viser at
produktet ikke er behæftet med fejl eller
mangler, forbeholder vi os retten til at
debitere vore omkostninger.
HOOVER påtager sig intet ansvar for
købers tab som følge af fejl eller mangler
og hæfter ikke for evt. driftstab.
Dokumentation for Udførelse af
Garantiservice:
Forhandlerens købskvittering eller
garantibevis.
Vi håber De får stor glæde af Deres
HOOVER produkt.
De er altid velkommen til at kontakte vor
serviceafdeling for råd og vejledning.
33
Page 36

Italian 40000494.fm Page 34 Thursday, August 28, 2003 5:57 PM
ITALIANO
Consigli di sicurezza
ATTENZIONE Prima dell’uso, controllare che
il prodotto non presenti segni visibili di danni. In
tal caso, non utilizzarlo e contattare il Servizio
Assistenza GIAS.
ATTENZIONE Non utilizzare il prodotto se il
filtro antifilacce non è correttamente posizionato
o risulta danneggiato; il filtro non è ignifugo.
ATTENZIONE In determinate circostanze, i
materiali in gomma possono essere soggetti ad
autocombustione se riscaldati. I materiali in
plastica, in gomma e similgomma non sono
adatti ad essere asciugati meccanicamente.
EVITARE ASSOLUTAMENTE di asciugare
articoli in questi materiali.
Leggere attentamente le etichette con le
istruzioni di lavaggio per conoscere le
caratteristiche dell’asciugatura idonea.
ATTENZIONE L’uso improprio
dell’asciugatrice può provocare rischio di
incendio.
ATTENZIONE Nell’ubicazione del simbolo
indicante il riscaldamento della superficie ,
quando l’asciugatrice è in funzione la
temperatura può essere superiore a 60 gradi C.
Istruzioni per l’uso. La macchina qui descritta
deve essere utilizzata esclusivamente per lo
scopo al quale è destinata secondo quanto
illustrato nel presente libretto. Prima di attivare la
macchina è opportuno leggere attentamente il
presente libretto.
Installazione. Non installare la macchina in
bagno.
Non installare l’asciugatrice vicino ai tendaggi e
rimuovere tempestivamente eventuali oggetti
caduti dietro la macchina.
Ventilazione. Il locale in cui viene installata
l’asciugatrice deve essere adeguatamente
ventilato onde evitare che i gas provenienti da
apparecchiature funzionanti con altri
combustibili, comprese fiamme libere, siano
aspirati nel locale dove l’asciugatrice è in
funzione.
Non scaricare l’aria nella canna fumaria
utilizzata per lo scarico di fumi provenienti da
attrezzature funzionanti a gas o altri combustibili.
Controllare periodicamente che nell’asciugatrice
vi sia una buona circolazione d’aria, senza
impedimenti di sorta:
Dopo l’uso ispezionare il filtro antifilacce e, se
necessario, pulirlo.
Controllare periodicamente il tubo o il condotto
di sfiato eliminando eventuali filacce
accumulatesi al suo interno.
Verificare costantemente che presa e sfiati non
siano ostruiti.
In caso d’impiego frequente dell’asciugatrice,
accorciare opportunamente l’intervallo fra un
controllo e l’altro.
Asciugatura. Gli indumenti devono essere
introdotti nell’asciugatrice solo dopo essere stati
opportunamente centrifugati in lavatrice o
strizzati a mano. EVITARE di caricare nel
cestello indumenti ancora gocciolanti.
Controllare accuratamente che nelle tasche degli
indumenti da asciugare non siano presenti
accendini o fiammiferi ed EVITARE
assolutamente l’uso di prodotti infiammabili in
prossimità della macchina.
Evitare assolutamente di asciugare tende in
fibra di vetro. La contaminazione dei capi con le
fibre di vetro può infatti dar luogo a fenomeni
d’irritazione cutanea.
Non introdurre nella macchina indumenti
trattati o contaminati con spray o liquidi
detergenti infiammabili, come benzina, olio da
cucina o spray con aerosol.
Non consentire l’accumulo di filacce sul
pavimento attorno alla macchina.
Raffreddamento della macchina. Dopo il ciclo
di asciugatura, l’interno del cestello può essere
molto caldo. Prima di estrarre la biancheria è
pertanto opportuno lasciar raffreddare
completamente la macchina.
Guasti. Se si presume che la macchina sia
guasta, non continuare ad usarla.
Dopo l’uso. Staccare la spina dalla presa
elettrica. Prima di pulire la macchina, staccare
sempre la spina.
Cavo di alimentazione. Nel caso risulti
danneggiato, il cavo di alimentazione
dell’apparecchio deve essere prontamente
sostituito con apposito cavo reperibile
esclusivamente presso il Servizio Assistenza
GIAS o i rivenditori autorizzati.
Servizio Assistenza GIAS. Ai fini della durata e
del buon funzionamento della macchina, per gli
eventuali interventi di assistenza o riparazione
consigliamo di rivolgersi esclusivamente al
servizio assistenza autorizzato.
34
Page 37

Italian 40000494.fm Page 35 Thursday, August 28, 2003 5:57 PM
ITALIANO
Consigli di sicurezza 34
Requisiti elettrici 35
Requisiti di ventilazione 36
Preparazione della biancheria 37
Preparazione dei capi 37
Peso massimo di asciugatura 37
Selezione della biancheria 37
Evitare di asciugare 37
Risparmio energia 37
Apertura del portellone 38
Filtro 38
Guida ad una corretta
asciugatura 39
Comandi e spie 40
Funzionamento 41
Pulizia dell’asciugatrice 42
Specifiche tecniche 42
Ricerca guasti 43
Regolamento per la garanzia 44
LEGGERE ATTENTAMENTE LE ISTRUZIONI CHE SEGUONO
La macchina qui descritta dev’essere utilizzata in conformità alle istruzioni del presente
libretto. La macchina è prevista esclusivamente per uso domestico per l’asciugatura di capi
e indumenti casalinghi preventivamente lavati con soluzioni acquose. La macchina NON
dev’essere utilizzata con prodotti di pulizia a secco. Ai fini della sicurezza personale è
essenziale che l’asciugatrice venga installata correttamente.
In caso di dubbi sull’installazione, rivolgersi al Servizio Assistenza GIAS.
Prima di utilizzare l’asciugatrice per la
prima volta:
● leggere attentamente il presente libretto
d’istruzioni.
● logliere tutti gli articoli presenti
all’interno del cestello.
● pulire l’interno del cestello e il
portellone con un panno umido in modo
da eliminare l’eventuale polvere
depositata durante il trasporto.
IMPORTANTE: L’asciugatrice è prevista
esclusivamente per uso domestico ed è
destinata all’asciugatura di capi e
indumenti casalinghi preventivamente
lavati con soluzioni acquose.
EVITARE di asciugare articoli trattati con
prodotti di pulizia a secco.
Requisiti elettrici
AVVERTENZA!
L’ELETTRICITÀ PUÒ ESSERE
ESTREMAMENTE PERICOLOSA.
L’APPARECCHIO DEV’ESSERE
OPPORTUNAMENTE
COLLEGATO A TERRA.
L’apparecchio è dotato di cavo con spina
pressofusa.
Una volta completata l’installazione, la spina
deve risultare accessibile e facilmente
scollegabile.
IMPORTANTE: I fili dell’impianto
elettrico sono dei seguenti colori:
Blu - NEUTRO
Marrone - SOTTO TENSIONE
Verde e giallo - TERRA
Nel caso risulti danneggiato, il cavo di
alimentazione dell’apparecchio dev’essere
prontamente sostituito con apposito cavo
reperibile esclusivamente presso il Servizio
Assistenza GIAS o i rivenditori autorizzati
GIAS.
35
Page 38

Italian 40000494.fm Page 36 Thursday, August 28, 2003 5:57 PM
ITALIANO
Requisiti d’installazione e
ventilazione
1
CAVO DI
ALIMENTAZIONE
PRESE ARIA
SFIATO ARIA
CALDA
IMPORTANTE: La macchina dev’essere
installata in modo da evitare che prese e
scarichi aria siano ostruiti (fig. 1).
Prevedere uno spazio libero di almeno 12 mm
(0,5 pollici) tra i fianchi e il retro della
macchina e le pareti/i mobili adiacenti.
Per assicurare un’idonea ventilazione è
essenziale che lo spazio tra il fondo macchina
e il pavimento non sia ostruito.
EVITARE ASSOLUTAMENTE d’installare
la macchina contro tendaggi.
Rimuovere tempestivamente
eventuali oggetti caduti tra i
fianchi e il retro della macchina in
quanto potrebbero ostruire la
presa e gli sfiati d'aria.
L’asciugatrice viene fornita
corredata da un tubo di sfiato.
Ai fini della massima efficacia di
asciugatura si consiglia vivamente
di utilizzare il tubo di sfiato per lo
scarico dell’aria calda
all’atmosfera. Proteggere lo
scarico esterno dal vento in modo
2
da impedire che eventuali controtiraggi
possano ridurre le prestazioni di asciugatura.
Nel caso la macchina venga installata sotto un
piano di lavoro o ad incasso, è essenziale
utilizzare il tubo di sfiato per l’eliminazione
dell’aria calda umida prodotta durante il
funzionamento. In tal modo si elimina anche
il ricircolo di aria umida che potrebbe
impedire il corretto funzionamento della
macchina.
Il tubo di sfiato dev’essere fatto passare
attraverso una parete o una porta/finestra
aperta (fig. 2). Il tubo di sfiato misura 95 mm
(3,75 pollici) di diametro e 1,8 metri (6 piedi)
di lunghezza.
Si sconsiglia l’impiego di tubi di sfiato di
lunghezza superiore a 1,8 metri (6 piedi) in
quanto limiterebbero le prestazioni della
macchina.
Verificare che il tubo di sfiato non sia
piegato in quanto ciò impedirebbe il
corretto funzionamento della macchina.
Sono presenti tre sfiati di scarico aria - uno sul
retro ed uno su ogni fianco della macchina. Il
tubo di sfiato dev'essere collegato
esclusivamente ad uno di questi sfiati. Per
assicurare la massima efficacia di asciugatura
è opportuno chiudere i due sfiati non utilizzati
con gli appositi tappi.
PARETE
ASCIUGATRICE
PARETE
PARETE
36
Page 39

Italian 40000494.fm Page 37 Thursday, August 28, 2003 5:57 PM
ITALIANO
Preparazione della
biancheria
Contestualmente al primo impiego della
macchina, pulire l’interno del cestello e il
portellone con un panno umido.
Verificare che la biancheria da asciugare sia
idonea per l’asciugatura meccanica, come
indicato dai simboli sull’etichetta di lavaggio
dei vari articoli.
Preparazione dei capi
Controllare che le chiusure siano chiuse e le
tasche vuote. Girare i capi con il rovescio
all’esterno. Introdurre i capi nel cestello uno
ad uno, in modo che non si aggroviglino.
Non sovraccaricare il cestello,
particolarmente quando si devono asciugare
articoli di grandi dimensioni. Diversamente,
la biancheria potrebbe incollarsi al cestello
con conseguente asciugatura non uniforme.
Peso massimo di
asciugatura
● Capi in cotone. 7 kg
● Capi sintetici. 3 kg
Selezionare la biancheria
nel modo seguente:
A) In base ai simboli delle etichette di
lavaggio
Sul collo o sulle cuciture interne:
Articolo idoneo per l’asciugatura
meccanica.
Asciugatura ad alta temperatura.
Solo asciugatura a bassa temperatura.
Articolo NON idoneo all’asciugatura
meccanica.
B) In base al quantitativo ed alla
pesantezza
Se il carico è superiore alla capacità
della macchina, separare i capi in base
alla pesantezza (p. es., separare gli
asciugamani dalla biancheria leggera).
C) In base al tipo di tessuto
Articoli di cotone/lino: Asciugamani,
jersey di cotone, biancheria da tavola/
letto.
Articoli sintetici: Camicette, camicie,
tute, etc. in poliestere o poliammide e
misti cotone/sintetici.
D) In base al grado di asciugatura
● Selezionare fra: Capi asciutti da stirare,
capi pronti da riporre etc.
● Per gli articoli delicati premere il tasto
‘DELICATI’ ( ) impostando una
temperatura di asciugatura ridotta.
Evitare di asciugare:
Articoli di lana, seta, tessuti delicati, calze di
nylon, ricami delicati, tessuti con decorazioni
metalliche, indumenti con guarnizioni in PVC
o in pelle, scarpe da ginnastica, articoli
pesanti come sacchi a pelo ecc.
IMPORTANTE: Evitare di asciugare
articoli preventivamente trattati con
prodotti di pulizia a secco o capi in gomma
(pericolo d’incendio o esplosione).
Risparmio energia
Introdurre nell’asciugatrice solo biancheria
accuratamente strizzata a mano o centrifugata
a macchina. Quanto più asciutta è la
biancheria, tanto più rapido è il tempo
richiesto per l’asciugatura, con conseguente
risparmio di consumo elettrico.
Cercare SEMPRE di asciugare il carico
massimo di biancheria: si risparmia tempo ed
elettricità.
NON superare MAI il peso massimo: si perde
tempo e si consuma più elettricità.
Prima di ogni ciclo di asciugatura verificare
SEMPRE che il filtro sia pulito.
EVITARE di caricare capi ancora
gocciolanti: si rischia di rovinare la macchina.
37
Page 40

Italian 40000494.fm Page 38 Thursday, August 28, 2003 5:57 PM
ITALIANO
Apertura del portellone
Tirare la maniglia per aprire lo sportello
(fig. 3).
3
Per riavviare la macchina, richiudere il
portellone e premere il tasto di accensione
‘ON’ ().
AVVERTENZA!
SI RICORDA CHE QUANDO
LA MACCHINA È IN
FUNZIONE IL CESTELLO E IL
PORTELLONE POSSONO
ESSERE MOLTO CALDI.
Filtro
IMPORTANTE: Ai fini della massima
efficacia della macchina, prima di ogni
ciclo di asciugatura è essenziale verificare
la pulizia del filtro antifilacce.
4
1. Tirare il filtro verso l’alto (fig. 4).
2. Aprire il filtro come illustrato (fig. 5).
5
38
3. Rimuovere delicatamente le filacce con
la punta delle dita o aiutandosi con uno
spazzolino morbido.
4. Richiudere il filtro e reinserirlo in sede.
Spia di pulizia filtro ( )
Si accende segnalando la necessità di pulire il
filtro.
Se la biancheria non si asciuga verificare che
il filtro non sia intasato. La spia si accende
anche quando il tubo di sfiato è bloccato o
piegato.
Page 41

Italian 40000494.fm Page 39 Thursday, August 28, 2003 5:57 PM
ITALIANO
Guida ad una corretta asciugatura
In tabella sono riportati i tempi di asciugatura indicativi in funzione del tipo di
tessuto e del grado di umidità dei capi.
COTONE ( )
SINTETICI ( )
ACRILICI ( )
SELEZIONE
TEMPERATURA
ELEVATA 140-165 min 70-80 min 50-65 min
BASSA - 70-80 min 40-55 min
BASSA - 50-65 min 30-40 min
CARICO
PESANTE
CARICO
MEDIO
CARICO
LEGGERO
PROGRAMMA ANTIPIEGA: ATTENUA LE PIEGHE –
FACILITA LA STIRATURA
RICORDA: Nel corso degli ultimi 10 minuti, il carico viene sempre asciugato con
aria fredda.
Per i tessuti delicati, premere il tasto ‘DELICATI’ con tutti i programmi di
asciugatura. Ciò consente di ridurre la temperatura di asciugatura e di proteggere
così i vostri capi delicati.
39
Page 42

Italian 40000494.fm Page 40 Thursday, August 28, 2003 5:57 PM
ITALIANO
Pannello di comando e spie luminose
2
1
1. Tasto e spia di macchina accesa (‘ON’) – serve per attivare la macchina (si accende la
relativa spia) ( ).
2. Tasto ‘DELICATI’ – serve per ridurre il grado di calore quando si devono asciugare
articoli delicati; ripremere il tasto per selezionare una temperatura elevata (
Selezione della temperatura ELEVATA
Selezione della temperatura BASSA
3. Selettore ‘TEMPO DI ASCIUGATURA’ – consente di selezionare la durata del ciclo
di asciugatura o l’opzione pre-stiratura.
4. La spia ‘PULIZIA FILTRO’ accesa segnala la necessità di pulire il filtro ().
4
3
).
40
Page 43

Italian 40000494.fm Page 41 Thursday, August 28, 2003 5:57 PM
ITALIANO
Funzionamento
1. Aprire il portellone e caricare la
biancheria nel cestello. Verificare che i
capi non impediscano la chiusura del
portellone.
2. Dovendo asciugare articoli delicati
premere il tasto ‘DELICATI’ e ridurre
il grado di calore. Al termine del ciclo,
ripremere il tasto di selezione della
temperatura, impostando una
temperatura elevata.
Selezione della
temperatura ELEVATA
Selezione della
temperatura BASSA
3. Ruotare il selettore ‘TEMPO DI
ASCIUGATURA’ per selezionare il
tempo di asciugatura desiderato.
Il ciclo PRE-STIRATURA indicato dal
simbolo sul selettore ‘TEMPO DI
ASCIUGATURA’ assicura una
funzione di trattamento antipiega. La
macchina effettua un ciclo di
riscaldamento della biancheria per 9
minuti, seguito da 3 minuti di
raffreddamento. Si tratta di una
funzione particolarmente utile quando
si prevede di riporre la biancheria (ad
esempio, nel cesto della biancheria) per
un certo periodo di tempo prima della
stiratura. I capi possono ‘seccarsi’
eccessivamente anche quando vengono
fatti asciugare all’aperto sul filo o
vengono posti su radiatori. Il ciclo di
PRE-STIRATURA attenua le pieghe
sul tessuto rendendo più facile e più
rapida la stiratura.
4. Chiudere delicatamente il portellone
spingendola lentamente fino ad
avvertirne lo scatto di chiusura.
5. Premere il tasto ‘ON’. Si accende la
spia di accensione ed ha inizio il ciclo
di asciugatura.
6. Il carico viene asciugato mediante aria
calda controllata termostaticamente.
Negli ultimi 10 minuti del ciclo viene
utilizzata aria fredda al fine di ridurre le
pieghe sui tessuti e di raffreddare il
carico prima del prelievo.
7. Al termine del programma, il cestello
smette di ruotare e apparirà la spia in
l'alto.
Aprire il portellone e togliere la
biancheria.
AVVERTENZA!
IL CESTELLO, IL PORTELLONE
E IL CARICO POSSONO ESSERE
MOLTO CALDI.
8. La pulizia del filtro dopo ogni ciclo di
asciugatura assicura la massima
efficienza della macchina. (Cfr. la
sezione ‘Filtro’.)
41
Page 44

Italian 40000494.fm Page 42 Thursday, August 28, 2003 5:57 PM
ITALIANO
Pulizia dell’asciugatrice
IMPORTANTE: Prima di procedere
alla pulizia, disattivare sempre la
macchina e staccare la spina dalla presa
a muro.
Pulire il filtro dopo ogni ciclo di
asciugatura.
Dopo l’uso, pulire l’interno del cestello e
lasciare aperto il portellone per un certo
periodo di tempo in modo che circoli aria e
si asciughi.
Pulire l’esterno della macchina e il
portellone con un panno morbido.
NON usare spugnette abrasive né prodotti
di pulizia.
Per evitare che il portellone resti
‘incollato’, pulire regolarmente le
guarnizioni del portellone con un prodotto
in crema ‘antigraffio’.
Specifiche tecniche
Capacità del cestello 115 litri
Carico massimo 6 kg
Altezza 85 cm
Larghezza 60 cm
Profondità 60 cm
Efficienza Energetica C
Nota: Per i dati elettrici vedere la targhetta
dei dati posta sul davanti del mobile della
macchina (con portellone aperto).
42
Page 45

Italian 40000494.fm Page 43 Thursday, August 28, 2003 5:57 PM
ITALIANO
Ricerca guasti
In caso di cattivo funzionamento della
macchina, prima di rivolgersi al tecnico di
assistenza effettuare i seguenti controlli.
Tempo di asciugatura eccessivamente
lungo/capi non sufficientemente asciutti:
● Il programma/tempo di asciugatura
selezionato è quello corretto? Leggere
pag. 39.
● I capi sono stati introdotti
eccessivamente bagnati? Si è
provveduto a strizzare o centrifugare
adeguatamente i capi prima d’introdurli
nella macchina?
● Si deve pulire il filtro? Leggere pag. 38.
● L’asciugatrice è stata caricata
eccessivamente? Leggere pag. 37.
● Il tubo di sfiato è piegato o bloccato?
Leggere pag. 36.
● Il carico è eccessivamente piccolo?
Leggere pag. 41.
● Il tasto ‘DELICATI’ è stato selezionato
da un ciclo precedente? Leggere pag.
40.
L’asciugatrice non funziona:
● L’alimentazione elettrica cui è collegata
la macchina è attiva? Controllare
provando con un altro apparecchio (ad
esempio, lampada da tavolo).
● La spina di alimentazione è stata
collegata correttamente
all’alimentazione elettrica?
● Manca la corrente?
● Fusibile bruciato?
● Il portellone è stato chiuso
perfettamente? Leggere pag. 41.
● La macchina è stata opportunamente
attivata (sia collegata all’alimentazione
sia attivata localmente)?
Leggere pag. 40.
● È stato selezionato il tempo (o il
programma) di asciugatura? Leggere
pag. 40.
● Il tasto ‘ON’ è stato premuto dopo
l’apertura del portellone? Leggere pag.
38.
Spia di segnalazione pulizia filtro accesa
● Si deve pulire il filtro? Leggere pag. 38.
● Il tubo di sfiato è piegato o bloccato?
Leggere pag. 36.
Nel caso risulti danneggiato, il cavo di
alimentazione dell’apparecchio
dev’essere prontamente sostituito con
apposito cavo reperibile esclusivamente
presso il Servizio Assistenza GIAS o i
rivenditori autorizzati GIAS.
Se il problema persiste anche dopo aver
effettuato tutti i controlli consigliati,
rivolgersi al Servizio Assistenza GIAS.
Sarà a disposizione per suggerire
eventuali soluzioni per telefono o per
fissare la visita del tecnico in base alle
condizioni di garanzia. Si ricorda che
l’intervento del tecnico può essere
soggetto a pagamento nel caso la
macchina:
● risulti perfettamente funzionante.
● non sia stata installata secondo quanto
indicato nelle istruzioni d’installazione.
● sia stata utilizzata in modo improprio.
43
Page 46

Italian guarantee.fm Page 44 Thursday, August 28, 2003 5:12 PM
ITALIANO
Regolamento per la
garanzia
Garante
Per l’Italia:
GIAS Service
Via Comolli, 16
20047 Brugherio (MI)
Per la Svizzera:
Hoover Apparate A.G.
Boesch 21
CH-6331 Hunenberg
Periodo di garanzia
12 mesi dalla data di acquisto.
Prova della data d’acquisto
Esibizione al momento della riparazione
della fattura o di documento equipollente,
regolarmente datato, rilasciato dal
rivenditore all’atto dell’acquisto.
Guasti coperti dalla garanzia
La garanzia copre tutti i guasti derivanti da
difetti del materiale impiegato, di
lavorazione o di funzionamento.
Prestazioni in garanzia
Il diritto alla garanzia verrà soddisfatto
mediante le riparazioni da effettuarsi dai
tecnici autorizzati dalla Hoover.
Le riparazioni in garanzia verranno
effettuate come segue:
Costo del materiale
Gratuito
Costo della mano d’opera
Gratuito
Costi di viaggio
A carico dell’utente
Trasporto compreso imballaggio e
affrancatura
A carico dell’utente e a suo rischio.
Limitazioni della garanzia
Sono escluse dalla garanzia le parti da
sostituire per normale usura e le avarie
dovute al cattivo uso o all’uso in condizioni
errate di funzionamento. È pertanto escluso
dalla garanzia il cattivo funzionamento
dovuto a cause non imputabili a chi
garantisce quale, per esempio, l’impiego di
un voltaggio diverso da quello prescritto.
I diritti derivanti dalla presente garanzia si
estinguono immediatamente in caso di
riparazioni o tentativi di riparazione
effettuati da persone non autorizzate dalla
Hoover.
La presente garanzia mira ad offrirvi il
mezzo più economico per riparare
eventuali guasti del vostro apparecchio
Hoover. Nel caso in cui la riparazione si
dimostrasse impossibile, le presenti
condizioni non pregiudicheranno i diritti
spettanti all’utente a termini di legge.
44
Page 47

05651276SWE.qxd 18-07-02 14:00 Page 4
Page 48

Back Page.fm Page 39 Wednesday, August 27, 2003 11:29 AM
ITALIANO
40000494 © 2001 ® REGISTERED TRADE MARK
39
 Loading...