

Page 1
WAP-PLUS Wireless Access Point – Quick Installation Guide
For Online Support visit: http://www.security.honeywell.com/hsc/resources/MyWebTech/
General information
This guide provides information on installing and setting up Honeywell's WAP-PLUS Wireless Access Point. Out of the
box, the WAP-PLUS functions as a wireless access point
to support most Honeywell iPCAM installations. However to
support the iPCAM installations for use with the LYNX Touch (L5100 series) control, the WAP-PLUS must be
configured as described in this document.
The WAP-PLUS provides an easy-to-setup secure wireless solution that enables Honeywell's iPCAM series internet
video cameras to communicate with AlarmNet.
Some major features of Honeywell's WAP-PLUS are:
The WAP-PLUS utilizes the 802.11b/g/n protocol with WPA2-PSK wireless security.
The WAP-PLUS supports WPS security. WPS (Wi-Fi Protected Setup) is a standard for easy setup of a secure
wireless network. In addition there are three 10/100 Mbps Ethernet ports available for wired cameras.
IMPORTANT: This device is for indoor use only. The WAP-PLUS must be spaced 5 to 10 feet from other wireless
devices. For detailed information on wired and wireless operating distances, refer to the camera’s installation guide.
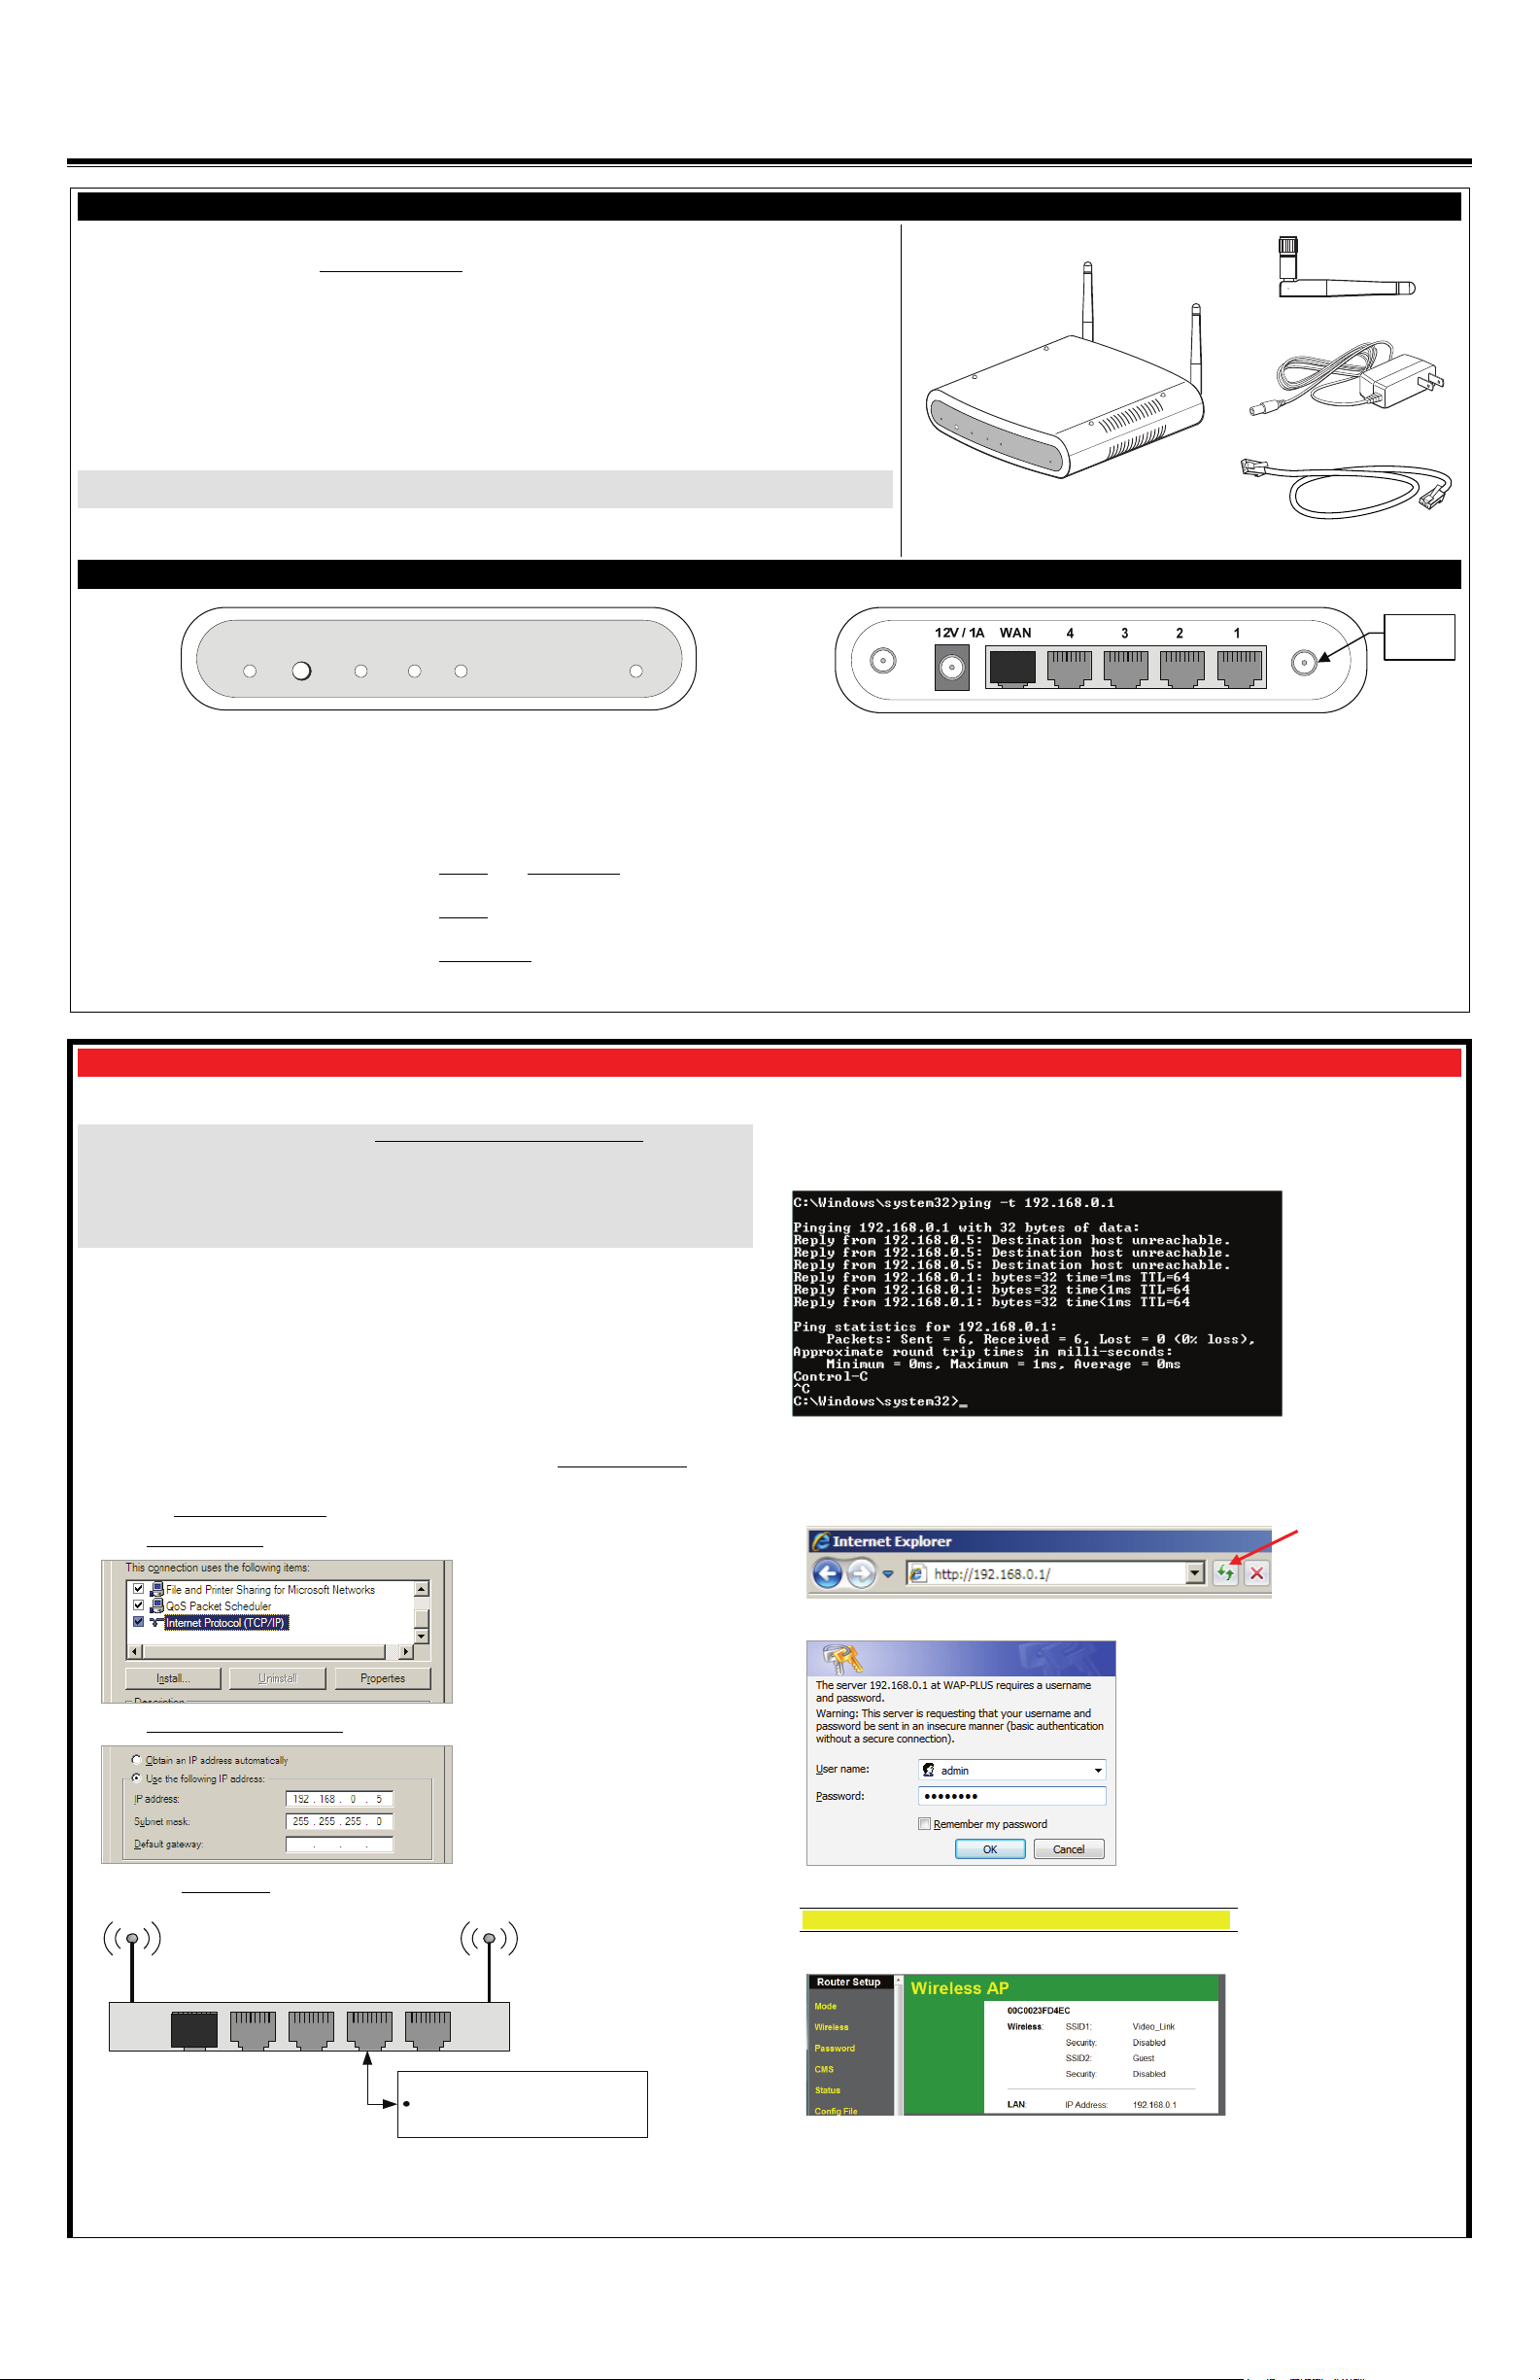
Indicator and connector identification
Security WPS Wireless LAN Power Reset
Security:
On – Wi-Fi security is set to on.
Flashing – Flashes when WPS button has been
pressed for 3 seconds and released, to indicate
the WAP-PLUS is transmitting a new security
key to the wireless camera. When the wireless
camera replies, the Security LED lights solid.
WPS (button): Used to setup a secured
wireless connection. (Refer to the documentation for the wireless camera.)
Wireless:
On – Wireless connection exist.
Off – No Wireless connections exist.
LAN:
On – The LAN port(s) is active.
Power: When power is applied the LED blinks
during an initialization period, then remains steady
to indicate power is connected.
Reset (switch): This switch has two functions;
Reboot
, and Clear All Data. Use a paper clip to
depress.
– Depress and Release to reboot. (Allow
Reboot
cycle to complete.)
Clear All Data
clear all data, and restore factory settings. (Allow
cycle to complete.)
– Depress and hold for 10 seconds to
PACKAGE CONTENTS
Antenna [Qty 2]
Security
WPS
Wireless
LAN
Power
Reset
Power Transformer
WAP-PLUS
Ethernet Cable
12V / 1A: Connect Power Transformer.
WAN: Not Used. (Do not remove the cap plug.)
Ports 1, 2, 3, 4: For connection to Ethernet devices.
Antenna Ports: Connect the supplied antennas to these ports.
Antenna
Port (2)
Configuring the WAP-PLUS for use with LYNX Touch, L5100 series
To support the LYNX Touch (L5100 series), the WAP-PLUS must be configured as described here.
IMPORTANT: If you press the WPS button without first configuring the WAP-PLUS, and you
successfully enroll at least one IP device; then you will not be able to access the admin/password
credentials to configure the WAP-PLUS. The WAP-PLUS will work in a “locked out” mode. In this
mode, the wireless security level will set to WPA2-PSK with a randomly generated WPA key.
You can restore the WAP-PLUS to the factory defaults by performing a reset. Use the Reset
button to clear all data.
The best practice is for the dealer to configure the WAP-PLUS prior to installation at the customer’s premises. You will perform the following:
Determine the IP address and access the configuration page.
Set the SSID name and Security level.
Set the User Name and Password for the WAP-PLUS.
Configuring the WAP-PLUS:
Depending on what version of Windows you are using, screen appearance will vary and certain
buttons may have somewhat different labels for the same function.
1. Disconnect the PC from the internet or LAN. At the PC, select the My Network Places
icon,
right click, and select Properties.
2. Select the Local Area Connection
3. Select Internet Protocol
(TCP/IP or TCP/IPv4) and click Properties.
icon, right click, and select Properties.
7. Verify the WAP-PLUS is ready to communicate by performing a “ping” test. From the Window’s
Task Bar navigate, Start > Run, and enter cmd, then click OK.
8. A command window opens. Enter ping –t 192.168.0.1 and hit [Enter]. The command box
displays the ping results.
9. When you get at least 3 replies from the WAP-PLUS (192.168.0.1) halt the pinging with a
[Ctrl] + [C] keyboard command, then close the command box.
10. At the PC, open the browser and enter http://192.168.0.1 into the address field. Then click
refresh.
11. The WAP-PLUS log in screen appears.
4. Select Use the following IP address
and enter 192.168.0.5.
5. Click in the Subnet mask
field, and it will populate with 255.255.255.0. Click OK. Then close
all the network windows and connect the PC to the WAP-PLUS as follows:
WAN 4 3 2 1
DO NOT connect
any other ports.
PC
Used to access the WAP-PLUS
configuration page.
6. Power up the WAP-PLUS and ensure it is set to factory defaults by depressing the RESET
button (use a bent paper clip) for 10 seconds then release. Allow the WAP-PLUS to reboot as
indicated by the LEDs going off then back on. This may take some time.
12. Enter the default User name (admin) and password (password), then click OK.
NOTE: Do not change any settings other than the ones below.
13. The Wireless AP screen appears.
14. Proceed.
 Loading...