

Page 1
T775 Series 2000 Electronic
Stand-Alone Controllers
APPLICATION GUIDE AND CROSS REFERENCE
63-7147-05
Page 2

T775 SERIES 2000 ELECTRONIC STAND-ALONE CONTROLLERS
IMPORTANT
The T775R is an operating control, not a limit or safety control. If used in applications requiring safety or limit controls, a
separate safety or limit control device is required.
TABLE OF CONTENTS
T775 Application Tips .............................................. 3
Compatible Components......................................... 3
Temperature Sensors................................................. 3
Humidity Sensors (T775U only) ................................. 3
Low Differential Pressure Sensors (T775U only) ....... 3
Universal Sensors (T775U only) ................................ 3
Accessories................................................................ 4
Features .................................................................... 4
T775 Operations....................................................... 6
Integral Action ............................................................ 6
Derivative Action ........................................................ 6
Differential vs. Throttling Range................................. 6
Setpoint High Limit..................................................... 6
Reset Programming
(T775L, T775P, T775R, and T775U models only)...... 7
T775 Applications .................................................... 8
Water Source Heat Pump Loop
Water Controller – T775B ......................................... 8
Chiller – T775B .......................................................... 9
Chiller, Rotary Compressor – T775B ....................... 10
Cooling Tower Control – T775B2040 ........................11
Time-based Control of Fan,
Pump, etc. — T775 (all models) .............................. 12
Damper or Valve Modulation – T775M or T775R..... 13
Hot Water Reset – T775R........................................ 14
Chilled Water Reset – T775R .................................. 16
Multi-Stage Boiler Control (No Reset) – T775P ....... 17
Multi-Stage Boiler Control (Reset) – T775P .............18
Multi-Stage Chiller Control (No Reset) – T775P....... 20
4 Stage with Pump Output and Reset –
T775P using a T775S Expansion Module ................21
4 Stage with Pump Output and Reset (continued) ... 22
3 Stage Reciprocating Chiller – T775L ..................... 23
4 Stage Heat and 6 Stage Cool – T775L ..................24
4 Stage Heat and 6 Stage Cool (continued) .............25
Pressure with a Variable
Frequency Drive (VFD) – T775U..............................26
Carbon Dioxide (CO2) Sensing – T775U ................. 27
Resetting Zone Air Temp Based on
Outside Air Temp (2 stage cooling) .......................... 28
Resetting Discharge Air Temp Based
on Return Air Temp (Modulating cooling valve) ........ 29
Using the T775R as a Differential
Temperature Controller for Solar Water Heating ...... 30
Maintaining Differential Temperature
for both Heating and Cooling....................................32
T775 Application Replacement Examples 33
T775M2030 Replacement for W973A Logic Panel ..33
T775R Replacement for W964F Aquatrol
Panel with Floating Actuator.....................................35
T775L Replacement for S984 Step Controller.......... 38
T775L Replacement for W7100C
Discharge Air Controller ........................................... 41
T775 Cross Reference............................................44
Notes........................................................................55
63-7147—05 2
Page 3

T775 SERIES 2000 ELECTRONIC STAND-ALONE CONTROLLERS
T775 APPLICATION TIPS
Q Does the T775 save programmed values if the power is
lost?
A Yes. The T775 has an EEPROM that saves all values
entered and restores them once power is reapplied. The
date and time settings are retained for 24 hours after a
power outage. After a power loss of more than 24 hours,
the date and time settings may need to be reentered. All
other settings are stored permanently.
Q What is the time constant for the T775?
A The T775 standard sensor (50021579-001) has a time con-
stant of approximately 8 seconds. The T775 samples sensor input every 100 milliseconds and updates the control
and display every 1 second.
Q Can sensors be shared by several T775s to simplify instal-
lation or provide more stages?
A Each T775 must be wired to its own sensor(s), However, a
benefit of the T775 controller's high accuracy is that there
is no more than a 2° differential between any two T775
controllers.
COMPATIBLE COMPONENTS
Temperature Sensors
The controller accepts 1,097 Ohms PTC at 77° F (25° C):
• 50021579-001 – Standard sensor (included with all models
except T775U2006 and NEMA 4X models)
• T775-SENS-STRAP – Strap on sensor with wiring box
• T775-SENS-WR – Water resistant with 5 foot leads
(included with NEMA 4X models)
• T775-SENS-WT – Watertight with 6 foot lead
• T775-SENS-OAT – Outdoor air temperature sensor
• C7031B2005 – 6 inch duct mount with wiring box.
• C7031D2003 – 5 inch immersion sensor with wiring box
(use immersion well; P/N 50001774-001)
• C7031J2009 – 12 foot duct averaging sensor with wiring
box
• C7046D1008 – 8 inch duct probe with mounting flange
• C7100D1001 – 12 inch fast response, duct averaging
sensor with flange
• C7130B1009 – Room mount sensor
Humidity Sensors (T775U only)
The controller accepts 0-10 Vdc or 4-20 mA input with a range
of 0-100%
H7625, H7635, and H7655 models (available in 2, 3, and 5%
RH accuracy) can be used.
1
Q Can a T775 be powered with dc voltage?
A No. The T775 controllers may be powered with 24 Vac,
120 Vac, or 240 Vac only, and a separate earth ground is
required.
Q Is a separate earth ground required?
A Yes. Each T775 controller must have its own earth ground,
regardless of the power source (24, 120, or 240 Vac). The
earth ground must be connected to the earth ground terminal on the 24 Vac terminal block.
Q Can sensors be series-parallel wired to the T775 to provide
an average temperature?
A Yes. Sensors can be series-parallel wired to the T775. In
order to maintain control accuracy, the number of sensors
wired must be of the n
Q How do I know that my selection or value has been
entered?
A Once you have selected an item from a list or entered a
value using the and buttons, pressing the or or
HOME button accepts your selection or value and stores it
in the controller’s memory.
Q What are the T775 Series 2000 Controller specifications?
A Refer to the T775 Series 2000 Electronic Stand-Alone
Controllers - Specification Data (form 63-1318).
2
power (i.e. 4, 9, 16, etc.).
Low Differential Pressure Sensors (T775U only)
P7640A pressure transducer models with selectable pressure
ranges can be used.
The controller accepts pressure sensors with a signal output
of 0-10 Vdc or 4-20 mA for any output range within the
following ranges (the minimum and maximum for the sensor
output range can be adjusted within the following limits):
-500 to 500 PSI
-30.0 to 30.0 inches w.c.
-3,000 to 3,000 Pa
-3,000 to 3,000 kPa
Universal Sensors (T775U only)
The controller accepts 0-10 Vdc or 4-20 mA input for
temperature, pressure, humidity, etc. C7232 and C7632 CO
sensors are also compatible but output is displayed in %
instead of ppm. (Refer to Table 2 on page 35 and the T775U
installation Instructions, form 62-0255-01.)
Actuators
For more information on compatible actuators or other
Honeywell products, such as dampers and valves, go to
www.customer.honeywell.com. From the home page select
Product Selection Tool under Products.
• Spring return models: ML6425, ML7425, MS4105,
MS4110, MS4120, MS7505, MS7510, MS7520, MS8105,
MS8110, MS8120
• Non-spring return models: ML4161, ML6174, ML7161,
ML7164, MN1010, MN6105, MN7505, MN8810
1
See form 62-0265 - Temperature Sensor for the T775 Series
2000 Stand-alone Controller
2
3 63-7147—05
Page 4
T775 SERIES 2000 ELECTRONIC STAND-ALONE CONTROLLERS
Accessories
• 107324A – Bulb Holder, duct insertion
• 107408 – Heat Conductive Compound, 4 ounce
• 50001774-001 – Immersion Well, stainless steel 304,
1/2 in. threading
Table 1. T775 controller features by model number.
Feature
User Interface
2x4 inch LCD display with English language display n/a
Keypad lockout n/a
Applications
Standard heating/cooling
Modulating
Boiler/Chiller
Reset
Stage (Loop) control of up to 12 relays
Temperature, humidity, pressure, or other
application requiring 0-10 Vdc or 4-20 mA input
Expansion module (4-relays per module; 2 modules
max.)
Power
24 or 120/240 Vac with separate earth ground
Relay Outputs
SPDT
Number of standard 124244042424442202 4
Number of floating
(each floating output eliminates 2 relays)
Runtime displayed on relays 1-4 (optional) n/a
Configurable minimum off time
Expandable to 12 relays using T775S expansion
modules (4 relays per expansion module)
Warm weather shutdown n/a
Modulating Outputs
Number of outputs 000000222220022022 0
Independently selectable for 0-10 Vdc, 2-10 Vdc,
4-20 mA, or Series 90
Modulating high/low limit control n/a
Digital Output
Number of outputs 000000000001000000 0
High, low, and differential alarm
Pump Output (configurable for last relay)
Number of outputs 000000000001000000 1
Prepurge/Postpurge
Pump Exercise
T775A2009
T775B2016
T775B2024
012120000000200100 0
FEATURES
In Table 1 a check mark () indicates that the controller model
has this feature. A number indicates the quantity (e.g., the
T775M2030 has 4 standard SPDT relay outputs), and
“n/a” indicates the feature is not applicable to that controller
model.
T775M2006
T775M2014
T775M2022
T775M2030
T775B2032
T775B2040
T775L2007
T775M2048
T775P2003
T775R2001
T775R2019
T775R2027
T775R2035
T775R2043
T775U2006
T775S2008
63-7147—05 4
Page 5

T775 SERIES 2000 ELECTRONIC STAND-ALONE CONTROLLERS
Table 1. T775 controller features by model number. (Continued)
T775M2006
T775M2014
T775M2022
T775M2030
T775A2009
T775B2016
T775B2024
T775B2032
T775B2040
T775L2007
T775M2048
T775R2001
T775R2019
T775R2027
T775R2035
T775R2043
T775P2003
T775U2006
T775S2008
Feature
Sensor Inputs
Number of sensor inputs 122222222223222222 0
Number of sensors included 111111111113222220n/a
1097 Ohms PTC at 77° F (25° C) n/a
0-10 Vdc or 4-20 mA input for temperature, humidity,
n/a
pressure, etc.
Calibration capability ±10° F (±6° C) or
n/a
for T775U, ±10% of sensor range
1° sensed temperature accuracy n/a
Sensed temperature range from -60° to 270° F
n/a
(-51° to 132° C)
Digital Input
Number of inputs 111111111111111111 1
Setpoints
Maximum number of setpoints 124244264641464224n/a
Range -40° to 248° F (-40° to 120° C)
Maximum high setpoint option (irreversible) n/a
Integral and Derivative Options
Integral time selectable from 0 to 3,600 seconds n/a
Derivative time selectable from 0 to 3,600 seconds n/a
Staging
Standard staging
First on, first off
Equalized runtime
On delay and Off delay between stages
Time Clock Scheduler
DST option n/a
2 events per day n/a
Selectable for setback, disable, or ignore to control
n/a
all outputs
Enclosures
NEMA 1
NEMA 4X
5 63-7147—05
Page 6

T775 SERIES 2000 ELECTRONIC STAND-ALONE CONTROLLERS
T775 OPERATIONS
Integral Action
“Droop” and equipment hunting can be minimized by
summing (integrating) the offset errors over time and adding
this correction to the output voltage.
A non-zero value for the integral time will allow the controlled
temperature to try and reach the setpoint value.
The integral time is factory set for 400 seconds and is similar
to the response time of the T775 Series 1000 models. This is
a good middle range and should satisfy many applications.
The integral time can be increased for applications where
sensed response is slow, and can be decreased for
applications where sensed response is fast (e.g. discharge air
control).
As a starting point, an optimal integral time for discharge air
typically ranges from 12 to 200 seconds. An optimal integral
time for room control typically ranges from 60 to 2,500
seconds. The purpose of integral action is to reduce or
eliminate the offset from setpoint during steady state control
that is often seen in proportional-only control.
Keep in mind that the controller is most sensitive to throttling
range. Adjust the throttling range first before making any
adjustment to integral time. Adjust throttling range to be as
wide as possible to start, because this will provide the most
stable control. Remember that the integral will eliminate the
steady state error so you do not need to have a small throttling
range to have accurate control. (Integral action allows for
controlling to setpoint even with a wide throttling range.)
Derivative Action
Proportional-integral-derivative (PID) control adds the
derivative function to PI control. The derivative function
opposes any change and is proportional to the rate of change.
The more quickly the control point (actual sensed
temperature) changes, the more corrective action the PID
system provides.
If the control point moves away from the setpoint, the
derivative function outputs a corrective action to bring the
control point back more quickly than through integral action
alone. If the control point moves toward the setpoint, the
derivative function reduces the corrective action to slow down
the approach to the setpoint, which reduces the possibility of
overshoot. The rate time setting determines the effect of the
derivative action. The rate time is the time interval by which
the derivative function advances the effect of the proportional
action. In T775 controllers, the derivative rate time can range
from 0 to 3,600 seconds. The higher the derivative setting, the
greater the effect.
For all T775 Series 2000 controllers, the derivative default
value is factory set to zero (no derivative control). It is strongly
recommended that the derivative remain at zero (0) unless
you have a very good reason to adjust it. Derivative control is
not needed in the vast majority of HVAC applications.
Setpoint and Differential
The following describes the relationship between setpoint and
differential for heating and cooling. These settings are
programmed for each output relay.
HEATING MODE SETPOINT AND DIFFERENTIAL
In heating mode, the differential is below the setpoint. The
relay de-energizes when the temperature rises to the setpoint.
As the temperature drops to the setpoint minus the
differential, the relay energizes.
COOLING MODE SETPOINT AND DIFFERENTIAL
In cooling mode, the differential is above the setpoint. The
relay de-energizes when the temperature falls to the setpoint.
As the temperature rises to the setpoint plus the differential,
the relay energizes.
Throttling Range
The throttling range brackets the setpoint setting, e.g., if the
setpoint is 72° F (22° C) and the throttling range is 10° F
(-12° C), then the effective throttling temperature range is
67° to 77° F (19° to 25° C) . This applies to both modulating
outputs and floating outputs.
Throttling Range for Modulating High or
Low Limit
On models that support this feature, the throttling range for
the modulating high or low limit positions the setpoint at the
end of the throttling range. For example, with a high (Heat)
limit at Sensor B of 200° F (93° C) and a throttling range of
10° F (-12° C), the modulating output controlling Sensor A
begins to throttle back at 190° F (88° C), and fully closes at
200° F (93° C). Conversely, the throttling range for the low
limit begins above the Cooling setpoint in the same manner.
Setpoint High Limit
You can set an irreversible setpoint high limit maximum value
for any single setpoint temperature value. This prevents the
user from setting any setpoint above the chosen high setpoint
limit, which is useful for meeting some local codes.
Adjust the setpoint (at any output) to the desired maximum
setpoint. Then, simultaneously press the HOME, , and
buttons, and continue to press all three buttons for five
seconds to set the setpoint high limit maximum to this value.
NOTE: You must press all three buttons at exactly the same
time for this action to occur.
IMPORTANT
1. This action sets the maximum setpoint value of all
outputs to the setpoint high limit maximum.
2. Setting the high limit setpoint maximum is
irreversible. If you perform the action inadvertently
and this setpoint adversely affects the control of your
system, you must replace the controller.
Differential vs. Throttling Range
Differential is used for relay outputs, and throttling range is
used for modulating outputs.
63-7147—05 6
Page 7
T775 SERIES 2000 ELECTRONIC STAND-ALONE CONTROLLERS
SENSOR B
SP MAX A1
(BOILER MAX)
SP MIN A2
(BOILER MIN)
200
140
10
SETBACK
OFFSET
-10°F
190
20
30 40 50 60
70
°F80
150
160
170
210
220
180
°F
RESET B1
(OUTSD MIN)
RESET B2
(OUTSD MAX)
S
E
N
S
O
R
A
M24861
Reset Programming (T775L, T775P, T775R, and T775U models only)
To program an output for reset, refer to the values as shown in
the example below and in Fig. 1. Choose your own
appropriate values for Sensor A maximum and minimum and
Sensor B maximum and minimum.
Reset Example:
• Sensor A is the boiler sensor and Sensor B is the
outdoor sensor.
• Maximum boiler temperature desired is 210° F (99° C)
when the outdoor temperature is 20° F (-7° C).
• Minimum boiler temperature desired is 160° F (71° C)
when the outdoor temperature is 70° F (21° C).
With the above settings example, when the outdoor
temperature is 50° F (10° C), the effective setpoint is 180° F
(82° C).
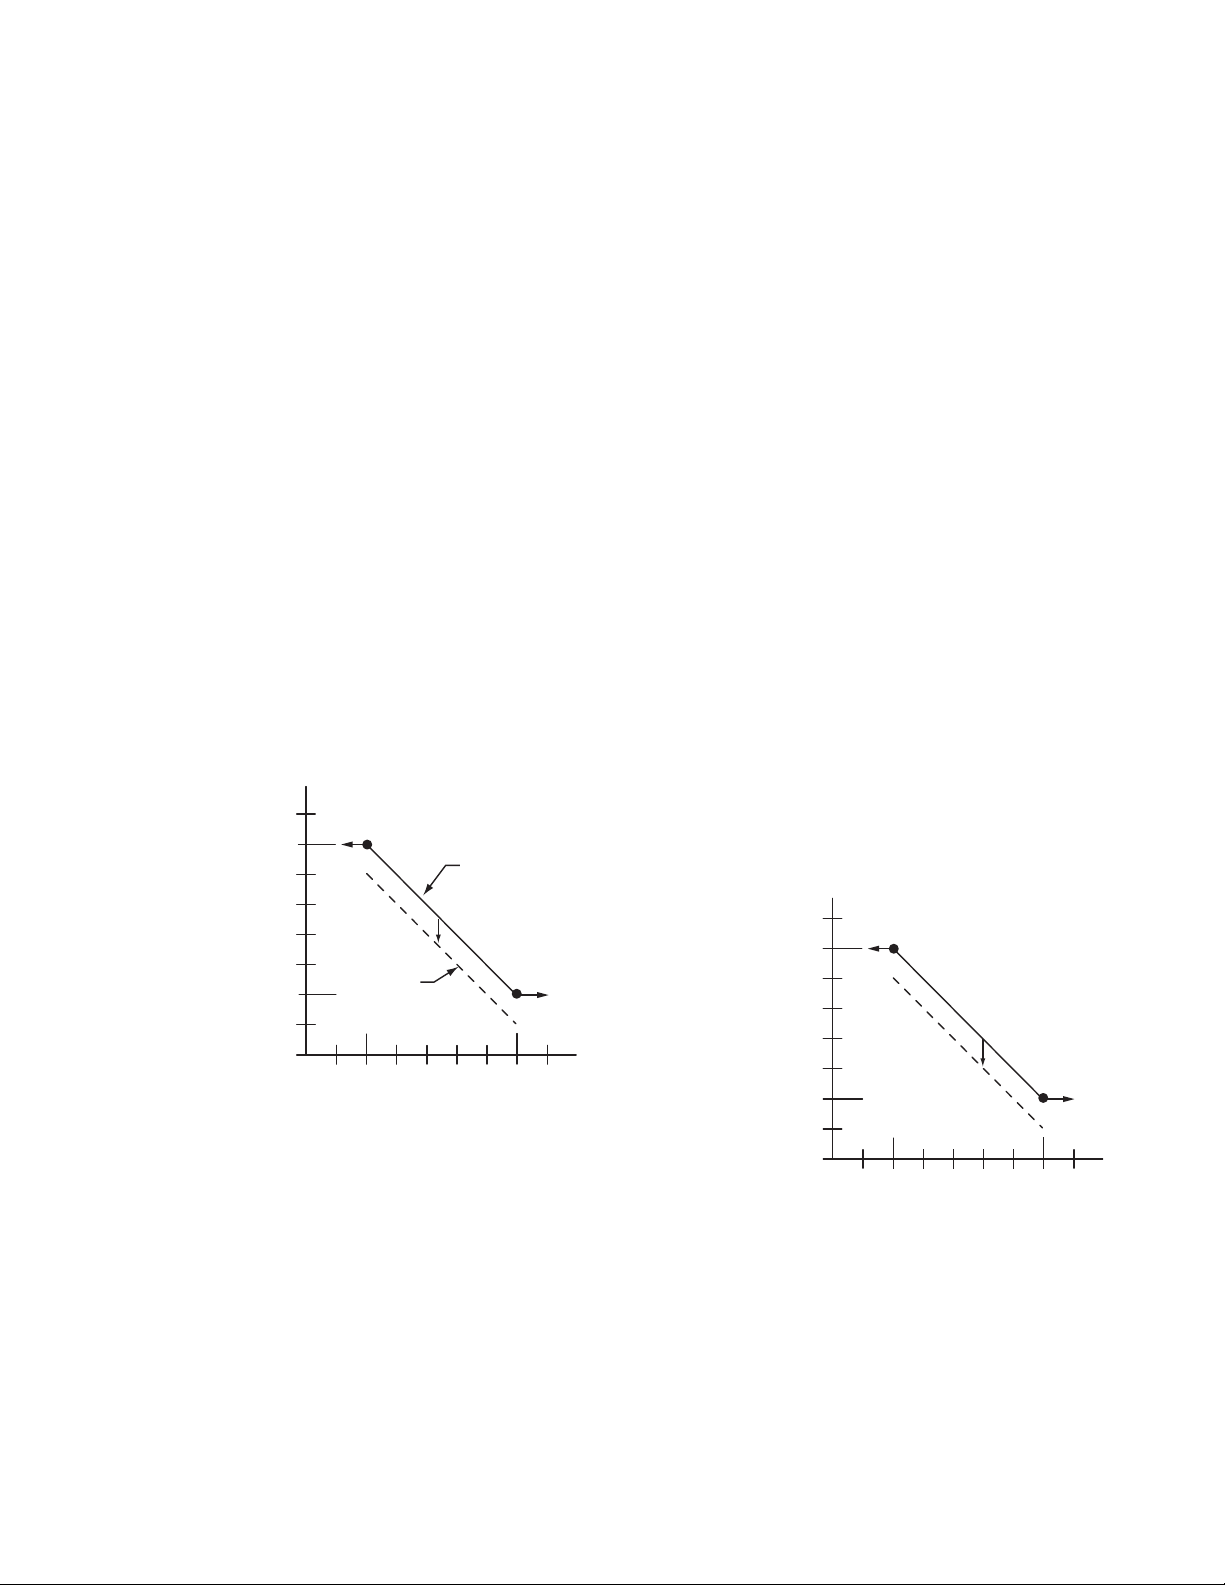
Setpoint Offset
NOTE: The Setpoint Offset is used for subsequent
This value is the number of degrees plus (+) or minus (-) that
you want the temperature to be offset from the first output’s
setpoint. See Fig. 1. For example, If you want the second
output setpoint to be 10° F (-12° C) less than the first output
setpoint, enter -10° F (-23° C).
.
outputs only.
SP MAX A1
(BOILER MAX)
S
E
N
S
O
R
A
SP MIN A2
(BOILER MIN)
220
210
200
190
180
170
160
150
140
°F
RELAY 2
SETPOINT
OFFSET
-10°F
10
20
RESET B1
(OUTSD MIN)
RELAY 1
SETPOINT
30 40 50 60
(OUTSD MAX)
SENSOR B
70
RESET B2
°F80
M24862
Choose Reset = NO for any outputs you do not wish to reset,
then press the HOME button to record your selection.
NOTES:
1. A single reset curve is programmed for the first
output and is used by all outputs setup for Reset.
2. For subsequent outputs, a setpoint offset is used
if that output is also being Reset.
When Reset is programmed, the home screen conveniently
displays the calculated Heat/Cool setpoint(s) for the outputs
based on the reset curve.
Setback (Optional) Description
The Setback temperature option is available only if scheduling
is enabled or the Digital Input Option is set to Setback.
This value is the number of degrees plus (+) or minus (-) that
you want the temperature to be setback (offset) from the
setpoint at a predetermined time.
For example, if you want the temperature to be 10° F (-12° C)
less than the setpoint during setback mode, enter -10° F
(-23° C). See Fig. 2.
In normal operations for heating, the offset will be a negative
value; for cooling, the offset will be a positive value.
Setback (optional) Example:
Setback of -10° F (-23° C) is used to drop the temperature at
night by 10° F (-12° C).
With the above settings example, when the outdoor
temperature is 50° F (10° C), the effective setback setpoint is
170° F (77° C) 180° F (82° C) setpoint minus the 10° F
(-12° C) setback).
Fig. 1. Reset curve with offset for subsequent outputs.
The reset curve established when programming the first
output (Fig. 1) is then used for all subsequent outputs that are
configured for Reset = YES, and each of those outputs will be
offset from this curve.
Fig. 2. Reset curve for first output with setback offset.
7 63-7147—05
Page 8
T775 SERIES 2000 ELECTRONIC STAND-ALONE CONTROLLERS
L1
L2
SENSOR A
(LOOP WATER)
C
NO
NC
C
NO
NC
C
NC
NO
C
NC
NO
T
T
HI TEMP
ALARM
RELAY
1
SUBTRACT
HEAT
LO TEMP
ALARM
C
+
ADD
HEAT
RELAY
4
RELAY
3
RELAY
2
T775B
120
COM
240
1
2
120 VAC
M24863
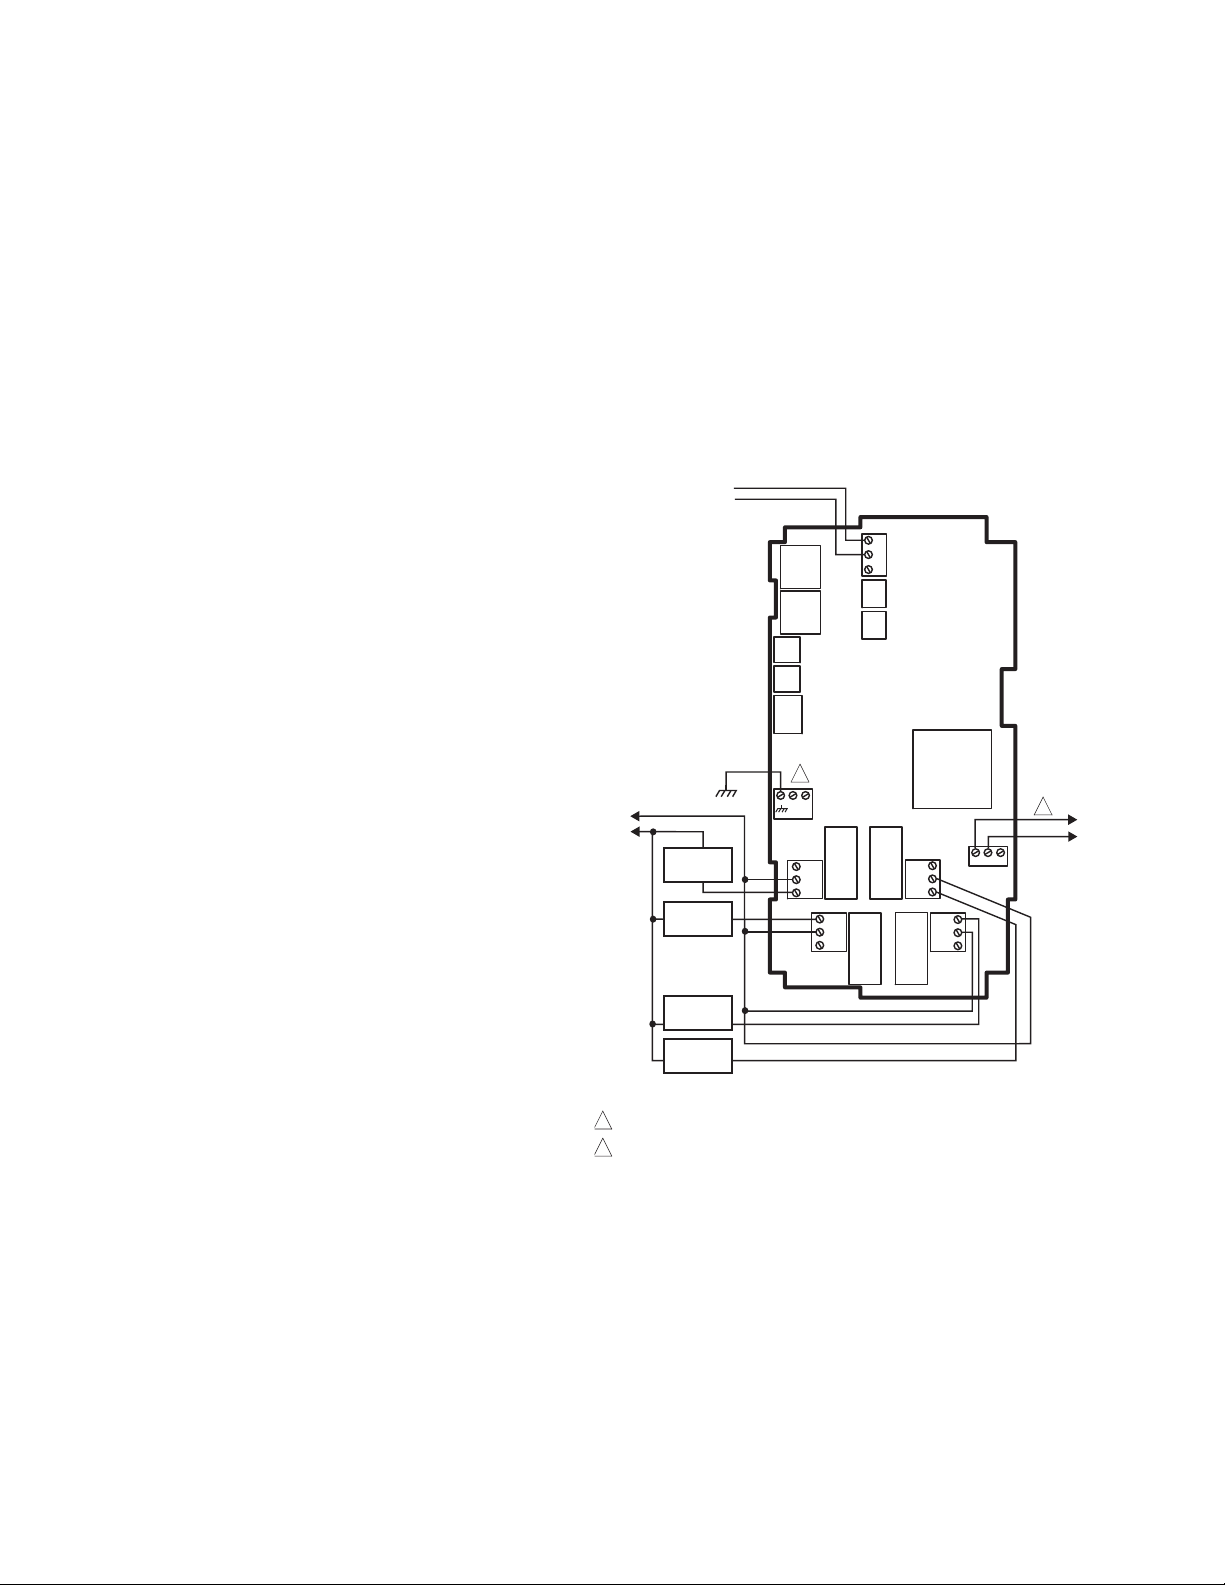
POWER WITH 24 VAC OR 120/240 VAC AT THE APPROPRIATE TERMINAL BLOCK.
24 VAC POWER TERMINAL BLOCK.
1
2
T775 APPLICATIONS
Water Source Heat Pump Loop Water
Controller – T775B
Application Description
Water is circulated in a loop to remove waste heat and to
provide cooling from a multiple heat pump system. In this
example, the T775B controls heating and cooling systems to
maintain the loop water temperature between preset upper
and lower limits. Alarms are sounded to annunciate
abnormally high or low water temperatures.
NOTE: T775R reset models can also be used in this
application.
Sensor Designation
This device application only requires one sensor. Sensor A is
mounted in a well, located in the main loop water line, before
the water source heat pump take-offs.
Operation
In this example, if the loop water temperature drops to 55° F
(13° C), heat is added to the system by the boiler (Relay 1)
until it reaches the setpoint. If the temperature drops further,
Relay 2 sounds the low temperature alarm at 54° F (12° C).
If the loop water temperature rises to 95° F (35° C), Relay 3
brings on cooling. If the temperature rises to 96° F (36° C),
Relay 4 powers the high temperature alarm.
NOTE: If no alarms are present, relays 2 and 4 may be used
as additional heating and cooling relays.
Setpoints may differ according to equipment manufacturers.
See their recommendations.
IMPORTANT
After the desired value is selected, be sure to press
the or or HOME button in order to save that
value in the controller’s memory.
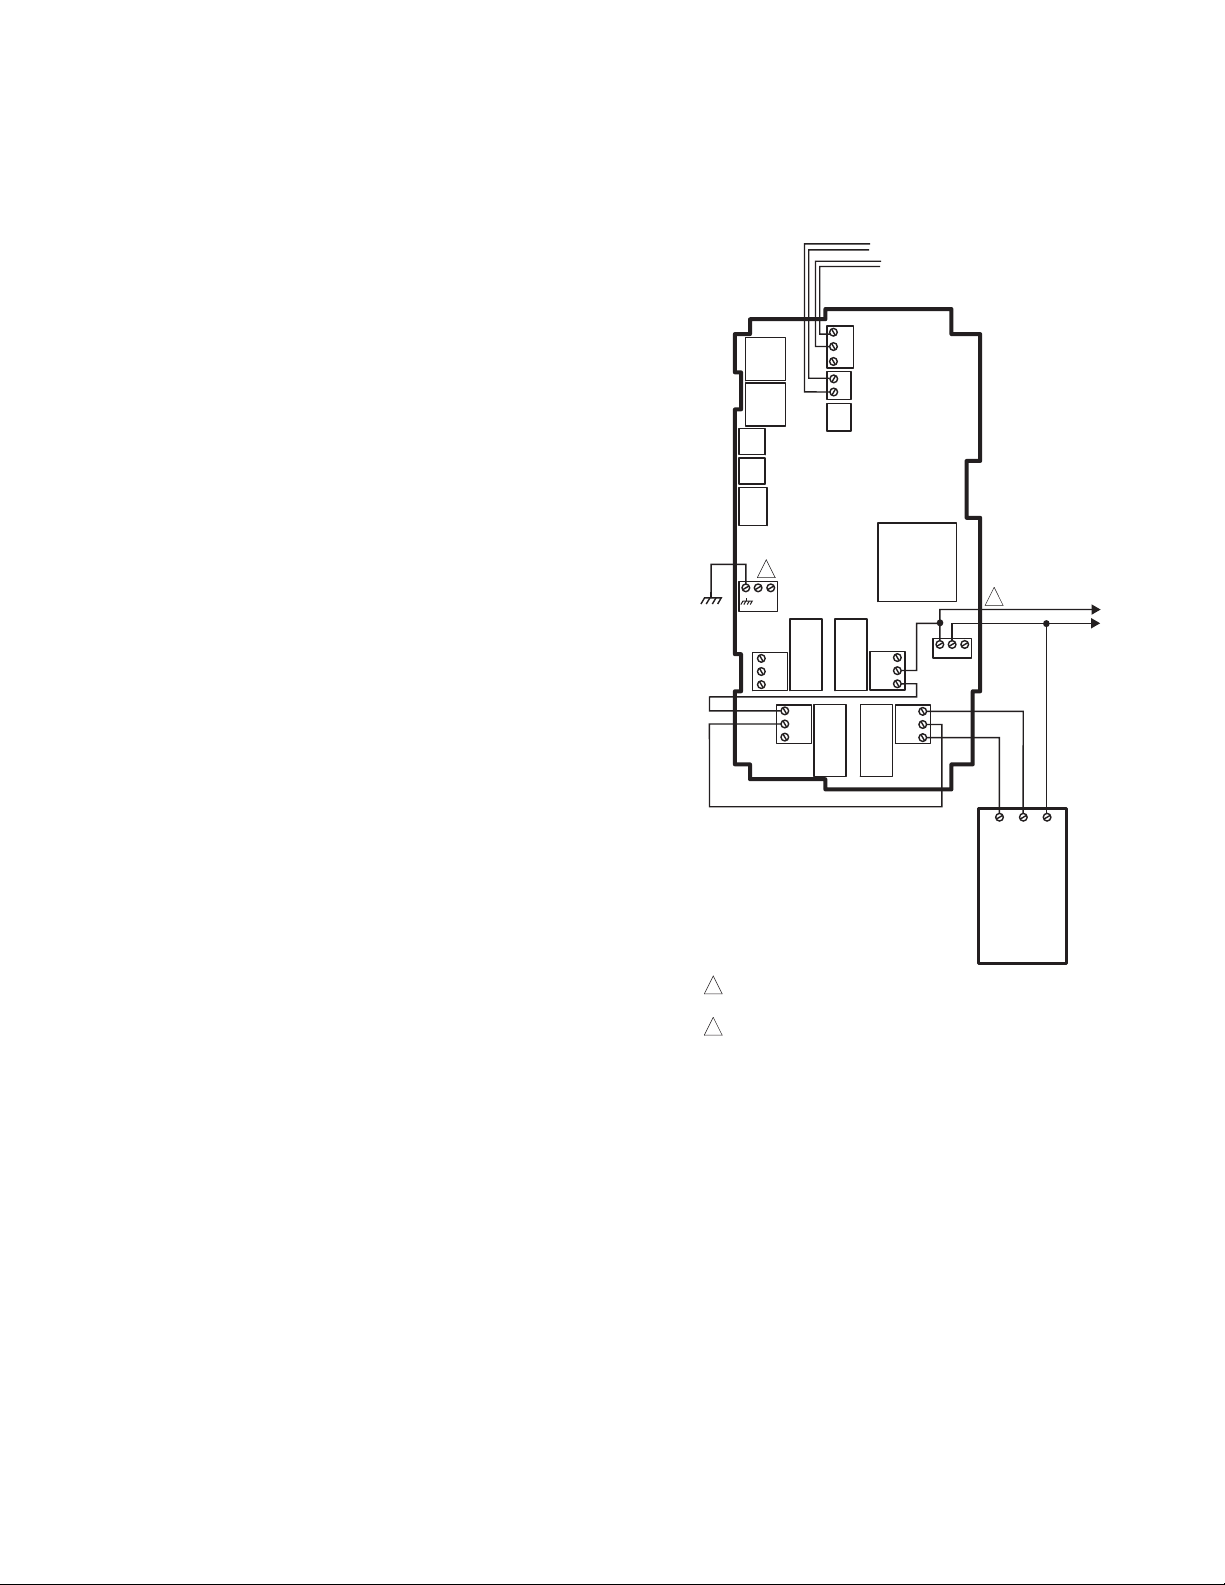
Wiring
All output relays should have a common power wiring source,
which may or may not be the same as the T775 power wiring.
See Fig. 3.
Programming Example
Relay 1: Enables boiler circuit
Program for:
—Heat
— Setpoint = 65° F (18° C)
— Differential = 10° F (-12° C)
Relay 2: Low temperature alarm circuit
Program for:
—Heat
— Setpoint = 55° F (13° C)
— Differential = 1° F (-17° C)
Relay 3: Enables cooling circuit (heat extraction)
Program for:
—Cool
— Setpoint = 85° F (29° C)
— Differential = 10° F (-12° C)
Relay 4: High temperature alarm circuit
Program for:
—Cool
— Setpoint = 95° F (35° C)
— Differential = 1° F (-17° C)
Fig. 3. T775B wiring — loop water controller.
63-7147—05 8
Page 9

T775 SERIES 2000 ELECTRONIC STAND-ALONE CONTROLLERS
Chiller – T775B
Application Description
As the water temperature in the sump rises, the T775B
sequentially cycles on the spray pump valve and two relays of
fans. If the water temperature in the sump drops below 40° F
(4° C), the T775B energizes a sump dump drain valve to
prevent system freeze up.
NOTE: T775R reset models can also be used in this
application.
Sensor Designation
This device application only requires one sensor. Sensor A is
sensing sump water temperature.
Operation
In this example, the sump water temperature rises above the
Cooling Relay 1 setpoint plus differential 65° F (18° C) to bring
on the spray pump valve. If the temperature continues to rise,
Cooling relays 2; 70° F (21° C) and 3; 75° F (24° C) energize
the evaporation fans as needed.
If the sump water temperature drops below 40° F (4° C)
(setpoint minus differential), the sump water freeze up
protection is provided by energizing Heating Relay 4.
Programming Example
Relay 1: Controlling spray water pump and/or valve
Program for:
—Cool
— Setpoint = 60° F (16° C)
— Differential = 5° F (12° C)
Relay 2: Controlling fan # 1
Program for:
—Cool
— Setpoint = 65° F (18° C)
— Differential = 5° F (12° C)
Relay 3: Controlling fan # 2
Program for:
—Cool
— Setpoint = 70° F (21° C)
— Differential = 5° F (12° C)
Relay 4: Controlling dumping of sump at freeze condition
Program for:
—Heat
— Setpoint = 50° F (10° C)
— Differential = 10° F (-12° C)
IMPORTANT
After the desired value is selected, be sure to press
the or or HOME button in order to save that
value in the controller’s memory.
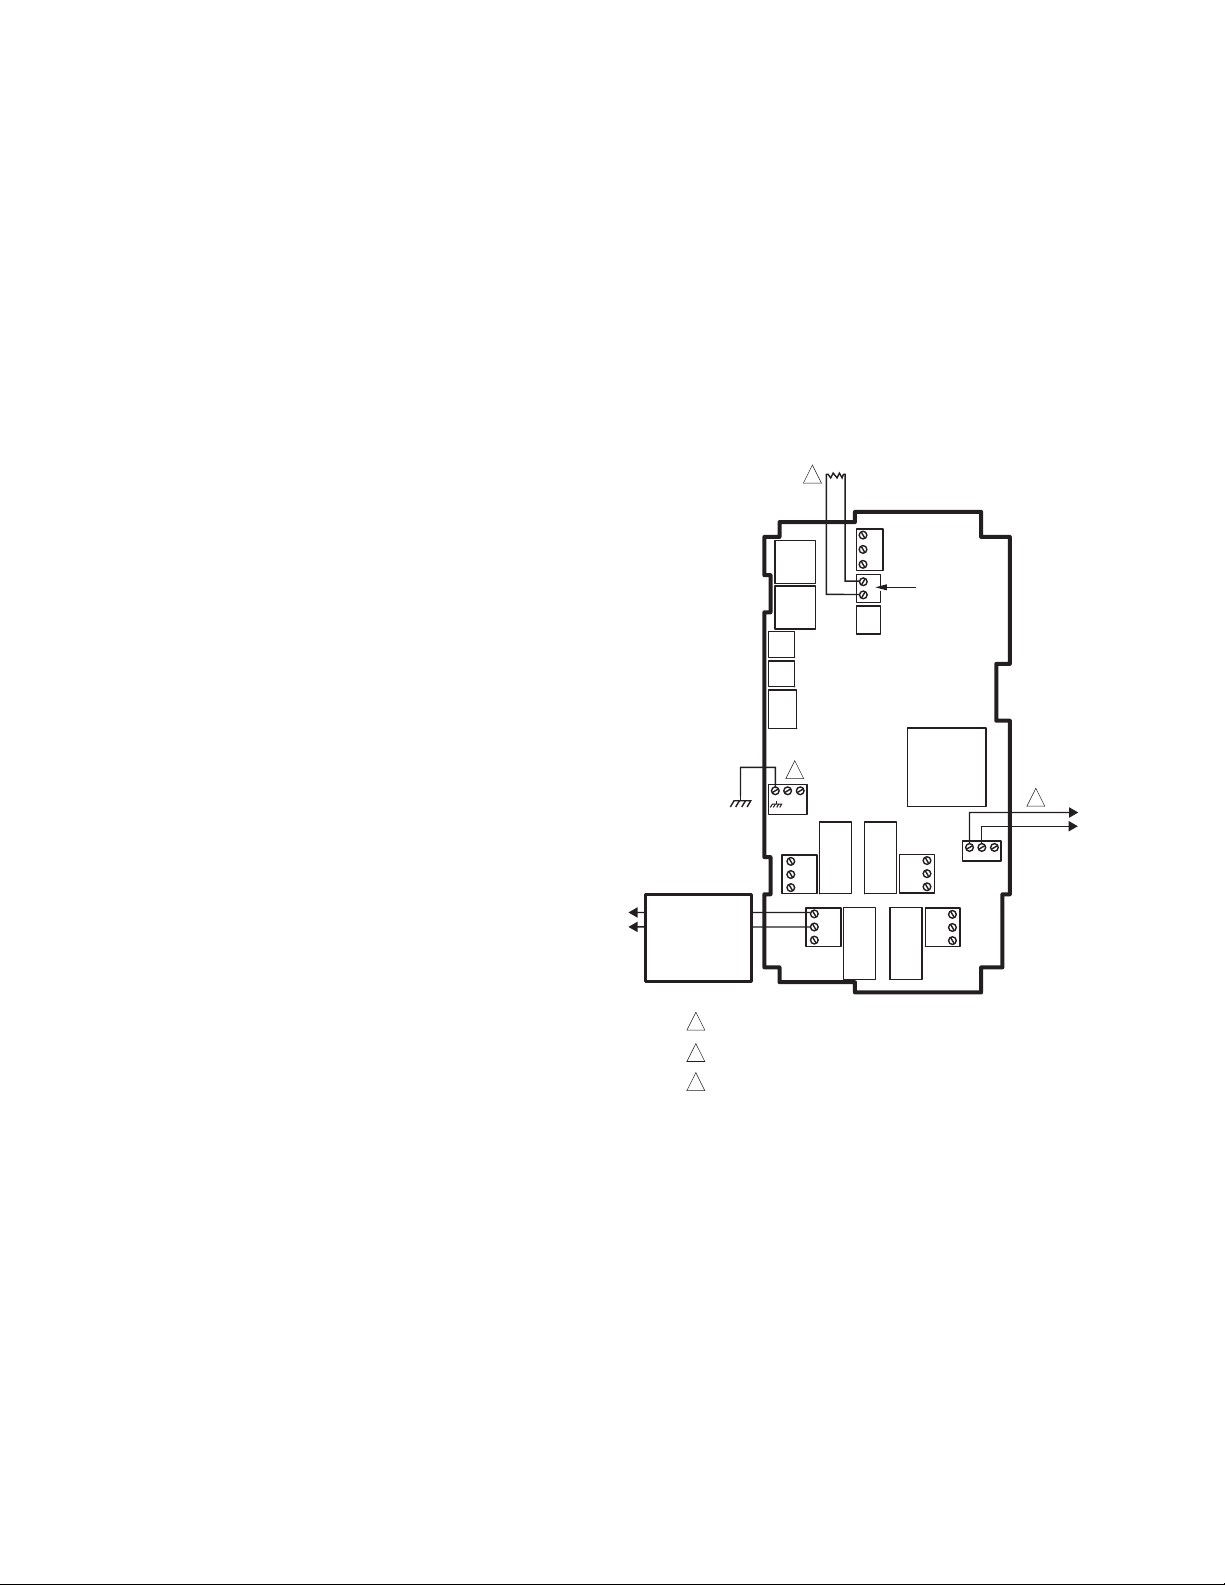
Wiring
All output relays should have a common power wiring source,
which may or may not be the same as the T775 power wiring.
See Fig. 4.
SENSOR A
(SUMP WATER)
T
T
T775B
L1
(HOT)
L2
SUMP
DUMP
VALV E
SPRAY
PUMP
VALV E
FAN
#1
FAN
#2
POWER WITH 24 VAC OR 120/240 VAC AT THE APPROPRIATE
1
TERMINAL BLOCK.
2
24 VAC POWER TERMINAL BLOCK.
Fig. 4. T775B wiring — chiller.
2
C
+
RELAY
4
NC
NO
C
NO
NC
RELAY
1
1
120
COM
120 VAC
240
M24864
RELAY
3
NC
C
NO
C
NO
C
NC
RELAY
2
9 63-7147—05
Page 10

T775 SERIES 2000 ELECTRONIC STAND-ALONE CONTROLLERS
Chiller, Rotary Compressor – T775B
Application Description
The T775B is controlling the discharge water temperature of a
rotary compressor. The T775B provides an optional low
temperature or low pressure cut-out circuit.
NOTE: T775R reset models can also be used in this
application.
Sensor Designation
This device application only requires one sensor. Sensor A is
sensing discharge water and controls 1 or 2 compressors.
Operation
In this example, the cooling capacity of a Rotary Compressor
is controlled by a slide valve, which when moved towards
open or closed allows more or less refrigerant into the
compressor. Open and Closed solenoid valves position this
slide valve. The T775B is configured such that two relays are
used to position a single slide valve in a floating mode by
controlling the respective solenoid valves. Capacity of rotary
compressors may also be controlled by variable speed drives,
not covered here.
Programming Example
Relay 1: Compressor #1 controlling the Close solenoid valve
Program for:
—Cool
— Setpoint = 52° F (11° C)
— Differential = 2° F (-17° C)
Relay 2: Compressor #1 controlling the Open solenoid valve
Program for:
—Cool
— Setpoint = 56° F (13° C)
— Differential = 2° F (-17° C)
Relay 3: Compressor #2 controlling the Close solenoid valve
Program for:
—Cool
— Setpoint = 56° F (13° C)
— Differential = 2° F (-17° C)
Relay 4: Compressor #2 controlling the Open solenoid valve
Program for:
—Cool
— Setpoint = 60° F (16° C)
— Differential = 2° F (-17° C)
IMPORTANT
After the desired value is selected, be sure to press
the or or HOME button in order to save that
value in the controller’s memory.
Wiring
All output relays should have a common power wiring source,
which may or may not be the same as the T775 power wiring.
See Fig. 5.
(DISCHARGE WATER)
SENSOR A
T
T
T775B
2
C
+
RELAY
4
NC
C
NO
NO
C
NC
RELAY
1
COOL MODE COMPRESSOR #1
OPEN SOLENOID
ENERGIZED
NULL
CLOSE SOLENOID
ENERGIZED
COOL MODE COMPRESSOR #2
OPEN SOLENOID
ENERGIZED
NULL
CLOSE SOLENOID
ENERGIZED
RELAY
3
NC
C
NO
RELAY
NO
C
NC
(HOT)
L1
L2
COMPRESSOR
#2
OPEN
SOLENOID
COMPRESSOR
#1
CLOSE
SOLENOID
COMPRESSOR
#1
OPEN
SOLENOID
COMPRESSOR
#2
CLOSE
SOLENOID
1
POWER WITH 24 VAC OR 120/240 VAC AT THE APPROPRIATE
TERMINAL BLOCK.
2
24 VAC POWER TERMINAL BLOCK.
T
E
M
P
E
R
A
F
T
A
U
L
R
L
E
T
E
M
P
E
R
A
F
T
A
U
L
R
L
E
2°
56°
2°
52°
2°
60°
2°
56°
Fig. 5. T775B wiring — chiller, rotary compressor.
1
120 VAC
120
240
COM
2
R
T
I
E
S
M
E
P
E
R
A
T
U
R
E
R
T
I
E
S
M
E
P
E
R
A
T
U
R
E
M24865
63-7147—05 10
Page 11
T775 SERIES 2000 ELECTRONIC STAND-ALONE CONTROLLERS
Cooling Tower Control – T775B2040
Application Description
The T775B2040 is controlling a cooling tower fan, based on
two sensor inputs, to control the low and high fan speeds and
provide cold weather shutdown.
NOTE: T775R2001 reset model can also be used in this
application.
Sensor Designation
This device application requires two sensors:
• Sensor A is sensing the sump temperature.
• Sensor B is sensing the outside air temperature.
Operation
As the sump temperature increases, the low fan speed is
energized by Relay 1. On further increase in temperature,
Relay 2 closes, which energizes the high fan speed and shuts
off the low fan speed. Relay 3 provides cold weather
shutdown of the fan. Relay 3 is wired in series with the
common wire of relays 1 and 2, so when Relay 3 breaks at
55° F (13° C), power to the fan is interrupted.
Programming Example
Optional: In Setup, label sensors A and B as desired.
Relay 1: Control to the fan low speed based on the sump
temperature.
Program for:
— Setpoint = 65° F (18° C)
— Differential =5° F (12° C)
—Cool
— Sensor A
Wiring
All output relays should have a common power wiring source,
which may or may not be the same as the T775 power wiring.
See Fig. 6.
SENSO R B - OUTSI DE AIR T EMPER ATURE
SENSO R A - SUMP T EMPER ATURE
T
T
T
T775B2040
T
2
120
COM
240
NO
NC
1
120 VAC
COM
FAN
NO
COM
C
+
RELAY
4
NC
NO
C
NO
NC
RELAY
1
RELAY
3
NC
C
NO
C
NO
C
NC
RELAY
2
Relay 2: Control to the fan high speed based on the sump
temperature
Program for:
— Setpoint = 70° F (21° C)
— Differential = 5° F (12° C)
—Cool
— Sensor A
Relay 3: Control to the fan cutoff based on the outside air
temperature
Program for:
— Setpoint = 55° F (13° C)
— Differential = 1° F (12° C)
—Cool
— Sensor B
IMPORTANT
After the desired value is selected, be sure to press
the or or HOME button in order to save that
value in the controller’s memory.
IMPORTANT
By programming the Relay 3 setpoint at 55° F (13°
C), the T775 is wired to cutoff power to the cooling
fan. Once the outside air temperature rises above
55° F (13° C), relays 1 and 2 control the fan speed
based on their setpoints for Sensor A Sump.
MOTOR COMMON
LOW SPEED WINDING
HIGH SPEED WINDING
1
POWER WITH 24 VAC OR 120/240 VAC AT THE APPROPRIATE
TERMINAL BLOCK.
2
24 VAC POWER TERMINAL BLOCK.
M25513
Fig. 6. T775B2040 wiring for cooling tower control.
Device Checkout
The T775B performance can be checked out to determine if
proper operation exists.
For example, when the outside air temperature is at 55° F
(13° C) or less, the fan should be off. Use the alternate Home
screens to verify that the fan is on or off, based on the outside
air temperature (Sensor B).
NOTE: The alternate Home screens do not show live
updates of the sensor temperature. They show the
temperature only at the moment the button is
pressed.
1. From the Home screen, use the button to verify
the setpoint temperature for Relay 3.
2. Then, press the HOME button to view the actual
outside air temperature (Sensor B).
11 63-7147—05
Page 12
T775 SERIES 2000 ELECTRONIC STAND-ALONE CONTROLLERS
Time-based Control of Fan, Pump,
etc.
— T775 (all models)
Application Description
In this example, the T775B is able to energize a fan, pump,
lights, economizer, or other device based on a daily time
schedule rather than based on temperature.
Operation
In this example, one relay will energize at 6:00 a.m. and deenergize at 6:00 p.m. daily to operate a fan, pump, or anything
at all.
Configuration Example
Place a 1,000 Ohm resistor at Sensor B (to simulate a
constant 32° F (0° C) temperature reading).
Wire the device to the normally open contacts on a relay.
Relay 1 is used in this example. See Fig. 7
Programming Example
Program in Setup for:
— Outputs
Options
Use Scheduler = YES
NOTE: Keep in mind that if the scheduler is energized, all
relays will follow the time schedule. If you do not
want some outputs to go into a setback mode,
choose Scheduler = NO for those outputs, or
program the setpoint and setback to the same
temperature.
IMPORTANT
After the desired value is selected, be sure to press
the or or HOME button in order to save that
value in the controller’s memory.
Wiring
All output relays should have a common power wiring source,
which may or may not be the same as the T775 power wiring.
1
T
T775B
T
T
SENSOR B
T
Program in Schedule for:
— Options
Set Date = current date
1
Set Time = current time
Set Daylight = YES or NO
— Mon-Fri
E1 Setpoint = Setpoint
E1 Time = 06:00 AM
E2 Setpoint = Setback
E2 Time = 6:00 PM
Relay 1: Control the device (fan, pump, etc.)
Program for:
— Setpoint = 0° F (-17° C)
— Differential = 1° F (-17° C)
— Sensor = Sensor B
— Setback =100° F (38° C)
— Action = Cool
Now the relay will close at 6:00 a.m. and open at 6:00 p.m.,
daily.
1
The date must be set before the time is set.
2
COM
3
120 VAC
240
L2
L1
(HOT)
C
+
RELAY
4
NC
C
FAN,
PUMP,
LIGHTS,
ECONOMIZER,
OR
OTHER DEVICE
INSERT 1000 OHM RESISTOR.
1
24 VAC POWER TERMINAL BLOCK.
2
POWER WITH 24 VAC OR 120/240 VAC AT THE APPROPRIATE
3
TERMINAL BLOCK.
NO
RELAY
NO
C
NC
1
RELAY
3
NC
C
NO
RELAY
NO
NC
120
C
2
Fig. 7. T775B wiring for time-based fan, pump or other
device.
M28021
63-7147—05 12
Page 13
T775 SERIES 2000 ELECTRONIC STAND-ALONE CONTROLLERS
Damper or Valve Modulation – T775M
or T775R
Application Description
In this example, a T775M is controlling an actuator, based on
temperature input, to modulate a damper or valve.
Sensor Designation
This device application requires one sensor.
• Sensor A is sensing outside temperature
NOTE: Sensor A or Sensor B can be used in this
application.
Programming Example
Program in Setup for:
— Modulating Output (MOD) 1:
Type = 2-10V (or whatever output signal is preferred)
Minimum Output % = 0% (range is 0-100%)
Modulating Output 1:Enable actuator circuit
Program for:
— Setpoint = 120° F (49° C)
— Throttling Range = 10° F (-12° C)
— Sensor = Sensor A
— Heat or Cool
IMPORTANT
After the desired value is selected, be sure to press
the or or HOME button in order to save that
value in the controller’s memory.
MS75xx
SPRING RETURN
DIRECT COUPLED ACTUATOR (DCA)
WIRING
STRIP
1
2
3
4
5
MOD 1
1
POWER SUPPLY. PROVIDE DISCONNECT MEANS AND OVERLOAD
PROTECTION AS REQUIRED.
B
R
W
L1
(HOT)
1
L2
C
–
+
S
V
T
T
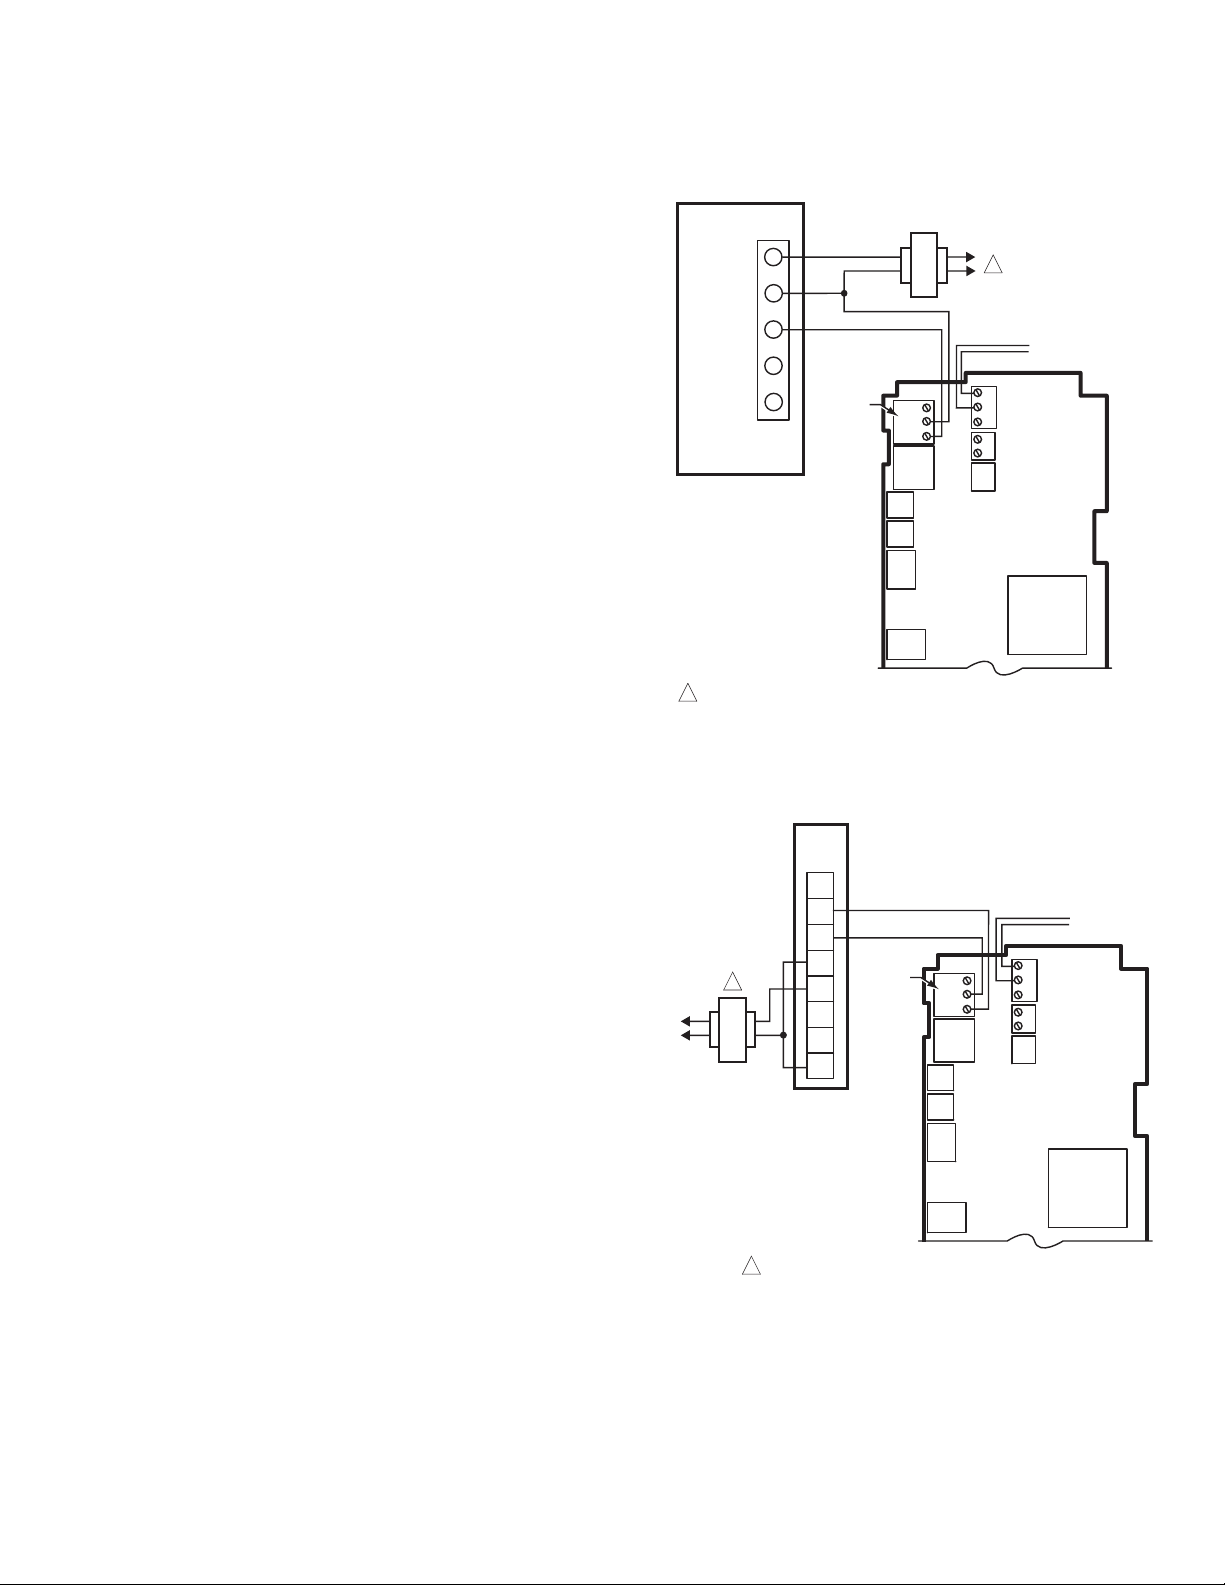
Fig. 8. T775M wiring — damper modulation
(2-10 Vdc shown).
SENSOR A
T775M
M24881A
Wiring
See Fig. 8 and 9 for wiring connections for the T775M with
examples of an MS75xx actuator and an ML7425 valve
actuator.
ML7425
SPRING RETURN
ACTUATOR
VALV E
WIRING
STRIP
F
+
–
T2
L1
(HOT)
L2
1
1
POWER SUPPLY. PROVIDE DISCONNECT MEANS AND OVERLOAD
PROTECTION AS REQUIRED.
T1
O1
O2
TS
MOD 1
B
–
R
+
W
Fig. 9. T775M wiring — valve modulation (2-10 Vdc
shown).
C
S
V
T
T
SENSOR A
T775M
M28042
13 63-7147—05
Page 14
T775 SERIES 2000 ELECTRONIC STAND-ALONE CONTROLLERS
M24871
SENSOR B
SP MAX A1
(BOILER MAX)
SP MIN A2
(BOILER MIN)
200
140
10
RELAY 2
SETPOINT
OFFSET -10°F
190
20
30 40 50 60
70
°F80
150
160
170
210
220
180
°F
RESET B1
(OUTSD MIN)
RESET B2
(OUTSD MAX)
S
E
N
S
O
R
A
RELAY 1
SETPOINT
Hot Water Reset – T775R
Application Description
The T775R is controlling the boiler water temperature with two
stages (relays), based on outside temperature using a reset
curve and an offset for Relay 2.
Sensor Designation
This device application requires two sensors.
• Sensor A is sensing hot water discharge temperature of
the boiler.
• Sensor B is sensing outside air temperature
Operation
In this example, when the outside temperature reaches
70° F (21° C), the desired water temperature of the boiler is
160° F (71° C). Likewise, when the outside temperature drops
to 20° F (-7° C), the hot water temperature needs to be
210° F (99° C). See Fig. 10.
Fig. 10. Hot water reset curve.
Programming Example
Program in Setup:
Press and hold the MENU button for 5 seconds to enter
Setup mode. Select the Outputs menu, and then select:
—MOD 1
— # Relays = 2
— Relay 1 → Reset = YES-BOILER
— Relay 2
Relay 1: Control to the discharge water temperature
Program for: (Refer to the reset curve in Fig. 10.)
— Boiler Max = 210° F (99° C)
— Outside Min = 20° F (-7° C)
— Boiler Min = 160° F (71° C)
— Outside Max = 70° F (21° C)
— Differential = 20° F (-7° C)
— Sensor A
—Heat
Relay 2: Control to the discharge water temperature
Program for:
— Setpoint Offset = -10° F (-12° C) (See Fig. 11)
— Sensor A
—Heat
63-7147—05 14
→ Reset = YES-BOILER
→ Reset = YES-BOILER
MENU
PROGRAM
RELAY 2
OFFSET
-10
ENTER
SETPOINT
OFFSET
FOR
RELAY 2
o
F
M24321
PROGRAM
RELAY 2
MENU
PROGRAM
RELAY 2
OFFSET
DIFFRNTL
HEAT/COOL
SETBACK
EXIT
Fig. 11. Program mode — Relay 2 offset.
IMPORTANT
After the desired value is selected, be sure to press
the or or HOME button in order to save that
value in the controller’s memory.
IMPORTANT
By programming the boiler setpoint at 210° F (99° C)
the T775 has established 210° F (99° C) as the
highest operating point that will be allowed when the
outside temperature falls below 20° F (-7° C). As the
outside temperature increases above 20° F (-7° C),
the boiler will be reset downward per the reset ratio
until it reaches the minimum setpoint, 160° F.
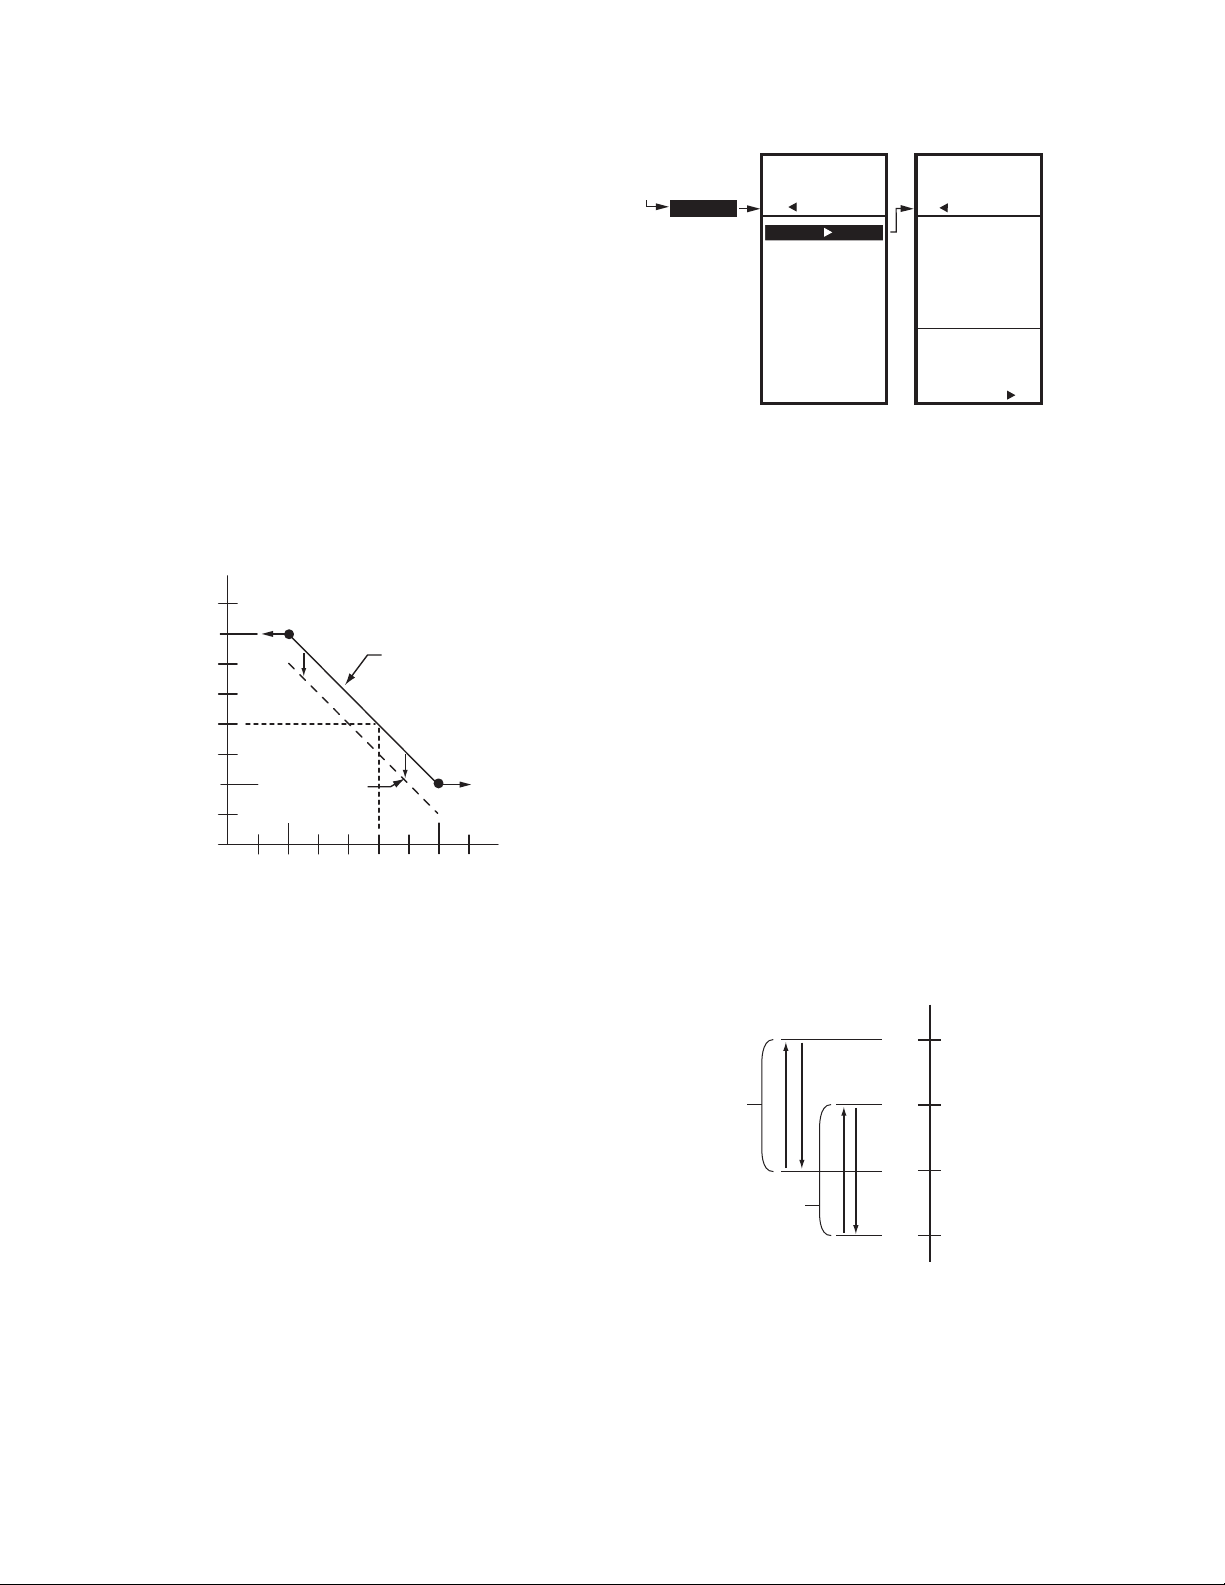
Assuming an outside temperature of 20° F (-7° C), Fig. 12
describes the actions of relays 1 and 2 to control the boiler
temperature. As the boiler temperature falls below 210° F
(99° C), Relay 1 activates (Relay 1 Differential is 20° F (-7° C),
so relay closes at 190° F (88° C). If Relay 1 cannot raise the
boiler temperature and the boiler temperature continues to fall
to 180° F °, Relay 2 activates (Relay 2 differential is 20° F
(-7° C) 180° to 200° F (82° to 93° C). When the boiler is able
to reach 200° F (93° C), then Relay 2 deactivates and Relay 1
remains active until the temperature reaches 210° F (99° C).
.
BOILER DISCHARGE
TEMPERATURE
RELAY 1 OFF
RELAY 2 OFF
RELAY 1 ON
RELAY 2 ON
M24877
RELAY 1
DIFFERENTIAL
RANGE
DIFFERENTIAL
RELAY 2
RANGE
210°
200°
190°
180°
Fig. 12. Relay actions.
NOTE: The hot water reset application continues on the next
page.
Page 15
T775 SERIES 2000 ELECTRONIC STAND-ALONE CONTROLLERS
Hot Water Reset (continued)
Wiring
All output relays should have a common power wiring source,
which may or may not be the same as the T775 power wiring.
See Fig. 13.
(HOT WATER DISC HARG E)
L1
(HOT)
L2
SENSOR A
SENSOR B
(OUTSIDE AIR)
HOT
WATER
BOILER #1
HOT
WATER
BOILER #2
2
C
+
RELAY
4
NC
NO
C
NO
NC
RELAY
1
T
T
T
T775R
T
1
120
COM
120 VAC
240
RELAY
3
NC
C
NO
C
NO
C
NC
RELAY
2
Device Checkout
The T775 performance can be checked out to determine if
proper operation exists.
For example, when the outside air temperature is at 50° F
(10° C), the boiler setpoint temperature should be 180° F
(82° C). See Fig. 14. Use the alternate Home screens to
check that the effective setpoint is adjusting correctly based
on the outside air temperature (Sensor B).
NOTE: The alternate Home screens do not show live
Fig. 14. Boiler discharge temperature setpoint vs. outside
updates of the sensor temperature. They show the
temperature only at the moment the button is
pressed.
1. From the Home screen, use the button to verify
the setpoint temperature for each output.
2. Then, press the HOME button to view the actual
outside air temperature (Sensor B).
BOILER SETPOINT
TEMPERATURE
210°
190°
180°
170°
160
OUTSIDE AIR
TEMPERATURE
20°
30°200°
40°
50°
60°
70°
M24873
temperature.
POWER WITH 24 VAC OR 120/240 VAC AT THE APPROPRIATE
1
TERMINAL BLOCK.
2
24 VAC POWER TERMINAL BLOCK.
Fig. 13. T775R wiring — hot water reset.
M24872
15 63-7147—05
Page 16

T775 SERIES 2000 ELECTRONIC STAND-ALONE CONTROLLERS
Chilled Water Reset – T775R
Application Description
The T775R is controlling the chiller water temperature, based
on outside temperature using a reset curve.
Multiple stages can also be controlled by using an offset from
the main setpoint for the subsequent relay outputs. When
enabling multiple stages for reset, each stage can have its
own programmable offset from Relay 1 (stage 1).
Sensor Designation
This device application requires two sensors.
• Sensor A is sensing the water temperature of the chiller.
• Sensor B is sensing outside air temperature.
Operation
In this example, when the outside temperature reaches 90° F
(32° C), the desired water temperature of the chiller is
45° F (7° C). Likewise, when the outside temperature drops to
70° F (21° C), the chilled water temperature needs to be 60° F
(16° C).
.
SP MAX A1
SENSOR A
(CHILLER)
°F
65
60
55
50
Relay 1: Control to the chilled water temperature
Program for: (Refer to the reset curve in Fig. 15.)
— Setpoint Max A1 (Chiller) = 60° F (16° C)
— Reset B1 (Outside Min) = 70° F (21° C)
— Setpoint Min A2 (Chiller) = 45° F (7° C)
— Reset B2 (Outside Max) = 90° F (32° C)
— Differential = 10° F (-12° C)
—Cool
IMPORTANT
After the desired value is selected, be sure to press
the or or HOME button in order to save that
value in the controller’s memory.
IMPORTANT
By programming the Chiller setpoint at 45° F (7° C)
the T775 has established 45° F (7° C) as the lowest
operating control point that will be allowed during
reset with the above conditions satisfied.
Wiring
All output relays should have a common power wiring source,
which may or may not be the same as the T775 power wiring.
SENSOR B
(OUTSIDE AIR)
SENSO R A (CHILL ED WATER)
T
T
T
T775R
T
SP MIN A2
45
40
65 95
RESET B1
(OUTSD MIN)
70
75 80 85
90
RESET B2
(OUTSD MAX)
SENSOR B (OUTSIDE AIR)
Fig. 15. Chiller reset curve.
Programming Example
Program in Setup:
Press and hold the MENU button for 5 seconds to enter
Setup mode. Select the Outputs menu, and then select:
—MOD 1
— # Relays = 1
— Relay 1 → Reset = YES-OTHER
→ Reset = YES-OTHER
°F
M24874
2
C
+
L2
L1
(HOT)
RELAY
4
NC
C
NO
CHILLER
POWER WITH 24 VAC OR 120/240 VAC AT THE APPROPRIATE
1
TERMINAL BLOCK.
2
24 VAC POWER TERMINAL BLOCK.
NO
NC
RELAY
1
C
RELAY
NC
C
NO
Fig. 16. T775R wiring — chilled water reset.
3
NO
RELAY
1
120 VAC
120
240
COM
C
NC
2
M24875
63-7147—05 16
Page 17

T775 SERIES 2000 ELECTRONIC STAND-ALONE CONTROLLERS
Chilled Water Reset (continued)
Device Checkout
The T775 performance can be checked out to determine if
proper operation exists.
For example, when the outside air temperature is at 80° F
(27° C), the chiller water temperature should be 52.5° F
(11° C). See Fig. 17. Use the alternate Home screens to
check that the effective setpoint is adjusting correctly based
on the outside air temperature (Sensor B).
NOTE: The alternate Home screens do not show live
updates of the sensor temperature. They show the
temperature only at the moment the button is
pressed.
1. From the Home screen, use the button to verify
the setpoint temperature for each output.
2. Then, press the HOME button to view the actual
outside air temperature (Sensor B).
CHILLED WATER
SETPOINT TEMPERATURE
60°
56.25°
52.5°
48.75°
45°
Fig. 17. Chiller setpoint vs. outside temperature.
OUTSIDE AIR
TEMPERATURE
70°
75°
80°
85°
90°
M24876
Multi-Stage Boiler Control (No Reset)
– T775P
Application Description
The T775P is providing multistage boiler control based on the
boiler's discharge water temperature. The T775P uses the
fourth output relay to energize the primary pump.
Sensor Designation
This device application requires two sensors.
• Sensor A is sensing discharge water and is used to control
3 boiler stages.
• Sensor C is sensing the return water.
NOTE: Control can be to either Sensor A or C.
Operation
In this example, as the heating load increases, additional
stages of heat will cycle ON as the boiler water temperature
decreases. The T775P will stage three boilers to provide
sufficient heating. (See Fig. 18.) The primary circulating pump
energizes whenever any stage is energized.
Programming Example
Program in Setup:
Press and hold the MENU button for 5 seconds to enter
Setup mode. Select the Outputs menu, and then select:
— # Stages = 3 (T775 assigns pump to Relay 4)
— Options
Seconds = 0 to 3,600 (default is 0)
— Options → WWSD = YES or NO
Temperature = 30 to 100° F (-1 to 38° C)
— STG4/Pump: (Relay 4 controls the pump output)
Enable = YES
Exercise = YES or NO
Prepurge = -300 to 300 seconds (default is 0)
Postpurge = 0 to 300 seconds (default is 0)
NOTES:
1. A positive Prepurge time causes the pump to
2. The Postpurge time causes the pump to run for
Return to the Setup menu, and select Alarms:
— High Alarm = YES
— High Limit = 220° F (93° C)
NOTE: This model has Equal Runtime options, which can be
→ On Delay and Off Delay:
energize before the first stage energizes.
A negative time causes the pump to energize
after the first stage energizes.
the set number of seconds after the last stage
de-energizes.
configured with the Lead Lag output option in Setup.
Stages 1-3: Control to the discharge water temperature
Program for:
— Setpoint = 200° F (93° C)
— Throttling Range = 18° F (-8° C)
— Sensor A
—Heat
IMPORTANT
After the desired value is selected, be sure to press
the or or HOME button in order to save that
value in the controller’s memory.
17 63-7147—05
Page 18

T775 SERIES 2000 ELECTRONIC STAND-ALONE CONTROLLERS
Refer to the staging diagram in Fig. 18 for individual stage
behavior.
STAGES
STAGE 3 ON
HYST.
STAGE 2 ON
STAGE 1 ON
STAGE 1
-33%
206°F 200°F 194°F 188°F
1
STAGE ENERGIZES STAGE DE-ENERGIZES
DISCHARGE WATER TEMPERATURE
1
STAGE 2
0% 33% 67%
THROTTLING RANGE (18°F)
STAGE 3
M24867
Fig. 18. Boiler control staging behavior (when the
effective setpoint = 200° F).
Wiring
All output relays should have a common power wiring source,
which may or may not be the same as the T775 power wiring.
See Fig. 19.
SENSO R A (DISCH ARGE WATER)
T
SENSOR C
(RETURN WATER)
ALARM
NC
NO
C
NC
C
RELAY
2
+
4
NC
NO
C
RELAY
(HOT)
L1
(HOT)
L2
L1
L2
DIGITAL OUTPUT
C
NO
PUMP
BOILER #1
BOILER #2
BOILER #3
POWER WITH 24 VAC OR 120/240 VAC AT THE APPROPRIATE
1
TERMINAL BLOCK.
2
24 VAC POWER TERMINAL BLOCK.
Fig. 19. T775P wiring — multi-stage boiler control
(no reset).
T
T775P
T
T
1
120
COM
120 VAC
240
M24866
RELAY
3
NC
C
NO
NO
C
NC
1
NO
C
NC
RELAY
2
Multi-Stage Boiler Control (Reset) –
T775P
Application Description
The T775P is providing multistage boiler control based on the
boiler's discharge water temperature. The T775P uses the
fourth output relay to energize the primary pump.
Any number of stages from 1 to 12 can be configured (T775P
and T775L models). The throttling range is divided equally
among the stages.
Sensor Designation
This device application requires three sensors.
• Sensor A is sensing discharge water and is used to control
3 boiler stages.
• Sensor B is sensing outside temperature and is used for
reset.
• Sensor C is sensing the return water temperature.
NOTE: Control can be to either Sensor A or C.
Operation
In this 3-stage example, as the heating load increases,
additional stages of heat will cycle ON as the boiler water
temperature decreases. The T775P will stage three boilers to
provide sufficient heating. See Fig. 20 for staging behavior.
The primary circulating pump energizes whenever any stage
is energized.
Programming Example
Program in Setup:
Press and hold the MENU button for 5 seconds to enter
Setup mode. Select the Outputs menu, and then select:
— # Stages = 3 (T775 assigns pump to Relay 4)
— Options
— Options
Seconds = 0 to 3,600 (default is 0)
— Options → WWSD = YES or NO
Temperature = 30 to 100° F (-1 to 38° C)
— STG4/Pump: (Relay 4 controls the pump output)
Enable = YES
Exercise = YES or NO
Prepurge = -300 to 300 seconds (default is 0)
Postpurge = 0 to 300 seconds (default is 0)
Return to the Setup menu, and select Alarms:
— High Alarm = YES
— High Limit = 220° F (104° C)
Stages 1-3: Control to the discharge water temperature
Program for: (Refer to the reset curve in Fig. 21.)
— Boiler Max = 210° F (99° C)
— Outside Min = 20° F (-7° C)
— Boiler Min = 160° F (71° C)
— Outside Max = 70° F (21° C)
— Throttling Range = 18° F (-8° C)
— Sensor A
—Heat
— Setback = -10° F (-12° C) (Optional)
1
See Notes in “Programming Example” on page 18 for an
explanation of Prepurge and Postpurge times.
→ Reset = YES-BOILER
→ On Delay and Off Delay:
1
63-7147—05 18
Page 19

T775 SERIES 2000 ELECTRONIC STAND-ALONE CONTROLLERS
IMPORTANT
After the desired value is selected, be sure to press
the or or HOME button in order to save that
value in the controller’s memory.
STAGES
STAGE 3 ON
HYST.
STAGE 2 ON
STAGE 1 ON
STAGE 1
-33% 0% 33% 67%
206°F 200°F 194°F 188°F
1
STAGE ENERGIZES STAGE DE-ENERGIZES
DISCHARGE WATER TEMPERATURE
1
STAGE 2
THROTTLING RANGE (18°F)
STAGE 3
M28043
Fig. 20. Boiler control staging behavior (when effective
setpoint = 200° F).
°F
220
SP MAX A1
(BOILER MAX)
SP MIN A2
(BOILER MIN)
210
S
200
E
N
190
S
O
180
R
A
170
160
150
140
10
(OUTSD MIN)
20
RESET B1
SETBACK
OFFSET
-10°F
(OPTIONAL)
30 40 50 60
SENSOR B
70
RESET B2
(OUTSD MAX)
°F80
M24869
Wiring
All output relays should have a common power wiring source,
which may or may not be the same as the T775 power wiring.
See Fig. 22.
NOTE: The Multi-Stage Boiler Control (Reset) application
continues on the next page.
Multi-Stage Boiler Control (Reset) (continued)
SENSOR B (OUTSID E AIR)
SENSOR C
(RETURN WATER)
2
C
+
RELAY
L1
(HOT)
L2
L1
(HOT)
L2
1
2
PUMP
BOILER #1
BOILER #2
BOILER #3
POWER WITH 24 VAC OR 120/240 VAC AT THE APPROPRIATE TERMINAL BLOCK.
24 VAC POWER TERMINAL BLOCK.
4
NC
C
NO
RELAY
NO
C
NC
1
SENSOR A
(DISCHARGE WATER)
T
T
T
T775P
T
T
T
RELAY
3
NC
C
NO
NO
C
NC
RELAY
2
120
COM
1
120 VAC
240
M24868
Fig. 21. Reset curve with optional setback offset.
Fig. 22. T775P wiring — multi-stage boiler control
with reset.
19 63-7147—05
Page 20

T775 SERIES 2000 ELECTRONIC STAND-ALONE CONTROLLERS
Multi-Stage Chiller Control (No
Reset) – T775P
Application Description
The T775P is providing multistage cooling control based on
the chiller’s discharge water temperature. The T775P uses
the fourth output relay to energize the primary pump.
Any number of stages from 1 to 12 can be configured (T775P
and T775L models). The throttling range is divided equally
among the stages.
Sensor Designation
This device application requires three sensors.
• Sensor A is sensing chiller discharge water and is used to
control 3 chiller stages.
• Sensor B is sensing outside temperature and is used to
control Relay 4, the pump output.
• Sensor C is sensing the chiller return water temperature.
NOTE: Control can be to either Sensor A or C.
Operation
In this 3-stage example, as the cooling load increases,
additional stages of cooling will cycle ON as the chiller water
temperature increases. The T775P will stage three chillers to
provide sufficient cooling. See Fig. 23 for staging behavior.
The primary circulating pump energizes whenever any stage
is energized.
Programming Example
Program in Setup:
Press and hold the MENU button for 5 seconds to enter
Setup mode. Select the Outputs menu, and then select:
— # Stages = 3 (T775 assigns pump to Relay 4)
— Options
Seconds = 0 to 3,600 (default is 0)
— STG4/Pump: (Relay 4 controls the pump output)
Enable = YES
Exercise = YES or NO
Prepurge = -300 to 300 seconds (default is 0)
Postpurge = 0 to 300 seconds (default is 0)
Return to the Setup menu, and select Alarms:
— Low Alarm = YES
— Low Limit = 54° F (12° C)
Stages 1-3: Control to the discharge water temperature
Program for:
— Setpoint = 72° F (22° C)
— Throttling Range = 12° F (-11° C)
— Sensor A
—Cool
IMPORTANT
1
See Notes in See “Programming Example” on page 17. for
an explanation of Prepurge and Postpurge times.
→ On Delay and Off Delay:
1
After the desired value is selected, be sure to press
the or or HOME button in order to save that
value in the controller’s memory.
STAGES
STAGE 3 ON
HYST.
STAGE 2 ON
STAGE 1 ON
STAGE 1
-33%
68°F 72°F 76°F 80°F
1
STAGE ENERGIZES STAGE DE-ENERGIZES
CHILLER DISCHARGE WATER TEMPERATURE
1
STAGE 2
0% 33% 67%
THROTTLING RANGE (12°F)
STAGE 3
M28009
Fig. 23. Chiller control staging behavior (when the
effective setpoint = 72° F).
Wiring
All output relays should have a common power wiring source,
which may or may not be the same as the T775 power wiring.
See Fig. 24.
SENSOR B (OUTSID E AIR)
SENSOR C
(CHILLER
RETURN WATER)
2
C
+
RELAY
L1
(HOT)
L2
L1
(HOT)
L2
1
2
PUMP
CHILLER 1
CHILLER 2
CHILLER 3
POWER WITH 24 VAC OR 120/240 VAC AT THE APPROPRIATE TERMINAL BLOCK.
24 VAC POWER TERMINAL BLOCK.
4
NC
C
NO
RELAY
Fig. 24. T775P wiring — multi-stage chiller control
SENSOR A
(CHILL ER DISC HARG E WATER)
T
T
T
T
T
T
RELAY
NC
C
NO
NO
C
NC
1
(no reset).
T775P
3
NO
C
NC
RELAY
2
120
COM
1
120 VAC
240
M28008
63-7147—05 20
Page 21

T775 SERIES 2000 ELECTRONIC STAND-ALONE CONTROLLERS
4 Stage with Pump Output and Reset
– T775P using a T775S Expansion
Module
Application Description
The T775P is providing multistage boiler control based on the
boiler's discharge water temperature. Four stages and a
dedicated pump output are used in this example. The T775P
uses the eighth output relay to energize the primary pump.
NOTE: The pump output is always the last relay output. In
this application example, four relays are used for
staged boiler control. A T775S expansion module is
added to provide the additional relay for the pump.
However, the pump must be the last relay, so it is
configured as Relay 8 on the T775S module.
1
See Notes in “Programming Example” on page 18 for an
explanation of Prepurge and Postpurge times.
IMPORTANT
After the desired value is selected, be sure to press
the or or HOME button in order to save that
value in the controller’s memory.
IMPORTANT
By programming the boiler setpoint at 210° F
(-99° C) the T775 has established 210° F (-99° C) as
the highest operating point that will be allowed when
the temperature falls below 20° F (-7° C). As
temperature increases above 20° F (-7° C), the boiler
will be reset downward per the reset ratio until it
reaches the minimum setpoint of 160° F (-99° C), at
70° F (21° C) and above outdoor temperature.
Any number of stages from 1 to 12 can be configured (T775P
and T775L models). The throttling range is divided equally
among the stages.
Sensor Designation
This device application requires three sensors.
• Sensor A is sensing discharge water and controls 4 stages.
• Sensor B is sensing outside temperature and is used for
reset.
• Sensor C is sensing the return water temperature.
NOTE: Control can be to either Sensor A or C.
Operation
As the heating load increases additional stages of heat will
cycle ON as the boiler water temperature decreases. In this
example, the T775P provides four stage control when the
effective setpoint is 200° F (93° C). (See Fig. 25.) The primary
circulating pump energizes whenever any stage is energized.
NOTE: The pump output must always be the last relay on the
controller or expansion module (Relay 4, 8, or 12).
NOTE: For applications with 3 stages or less with a pump out-
put, an additional expansion module is not needed.
Programming Example
Program in Setup:
Press and hold the MENU button for 5 seconds to enter
Setup mode. Select the Outputs menu, and then select:
— # Stages = 4 (T775 assigns pump to Relay 8)
— Options
— STG8/Pump: (Relay 8 controls the pump output)
Enable = YES
Exercise = YES or NO
Prepurge = -300 to 300 seconds (default is 0)
Postpurge = 0 to 300 seconds (default is 0)
Stages 1-4: Control to the discharge water temperature
Program for: (Refer to the reset curve in Fig. 26.)
— Boiler Max = 210° F (99° C)
— Outside Min = 20° F (-7° C)
— Boiler Min = 160° F (71° C)
— Outside Max = 70° F (21° C)
— Throttling Range= 20° F (-7° C)
— Sensor A
—Heat
→ Reset = YES-BOILER
1
STAGES
STAGE 4 ON
50%
STAGE 4
75%0% 25%
M28010
STAGE 3 ON
STAGE 2 ON
STAGE 1 ON
HYST.
STAGE 2
STAGE 1
-25%
205°F 185°F200°F 195°F 190°F
1
THROTTLING RANGE (20°F)
STAGE ENERGIZES STAGE DE-ENERGIZES
DISCHARGE WATER TEMPERATURE
1
STAGE 3
Fig. 25. Staging behavior
(when the effective setpoint = 200° F (93° C)
°F
220
SP MAX A1
(BOILER MAX)
SP MIN A2
(BOILER MIN)
210
S
200
E
N
190
S
O
180
R
A
170
160
150
140
(OUTSD MIN)
10
20
RESET B1
30 40 50 60
SENSOR B
(OUTSD MAX)
70
RESET B2
°F80
M24878
Fig. 26. Reset curve.
NOTE: The 4 stage with pump output and reset application
continues below.
21 63-7147—05
Page 22

T775 SERIES 2000 ELECTRONIC STAND-ALONE CONTROLLERS
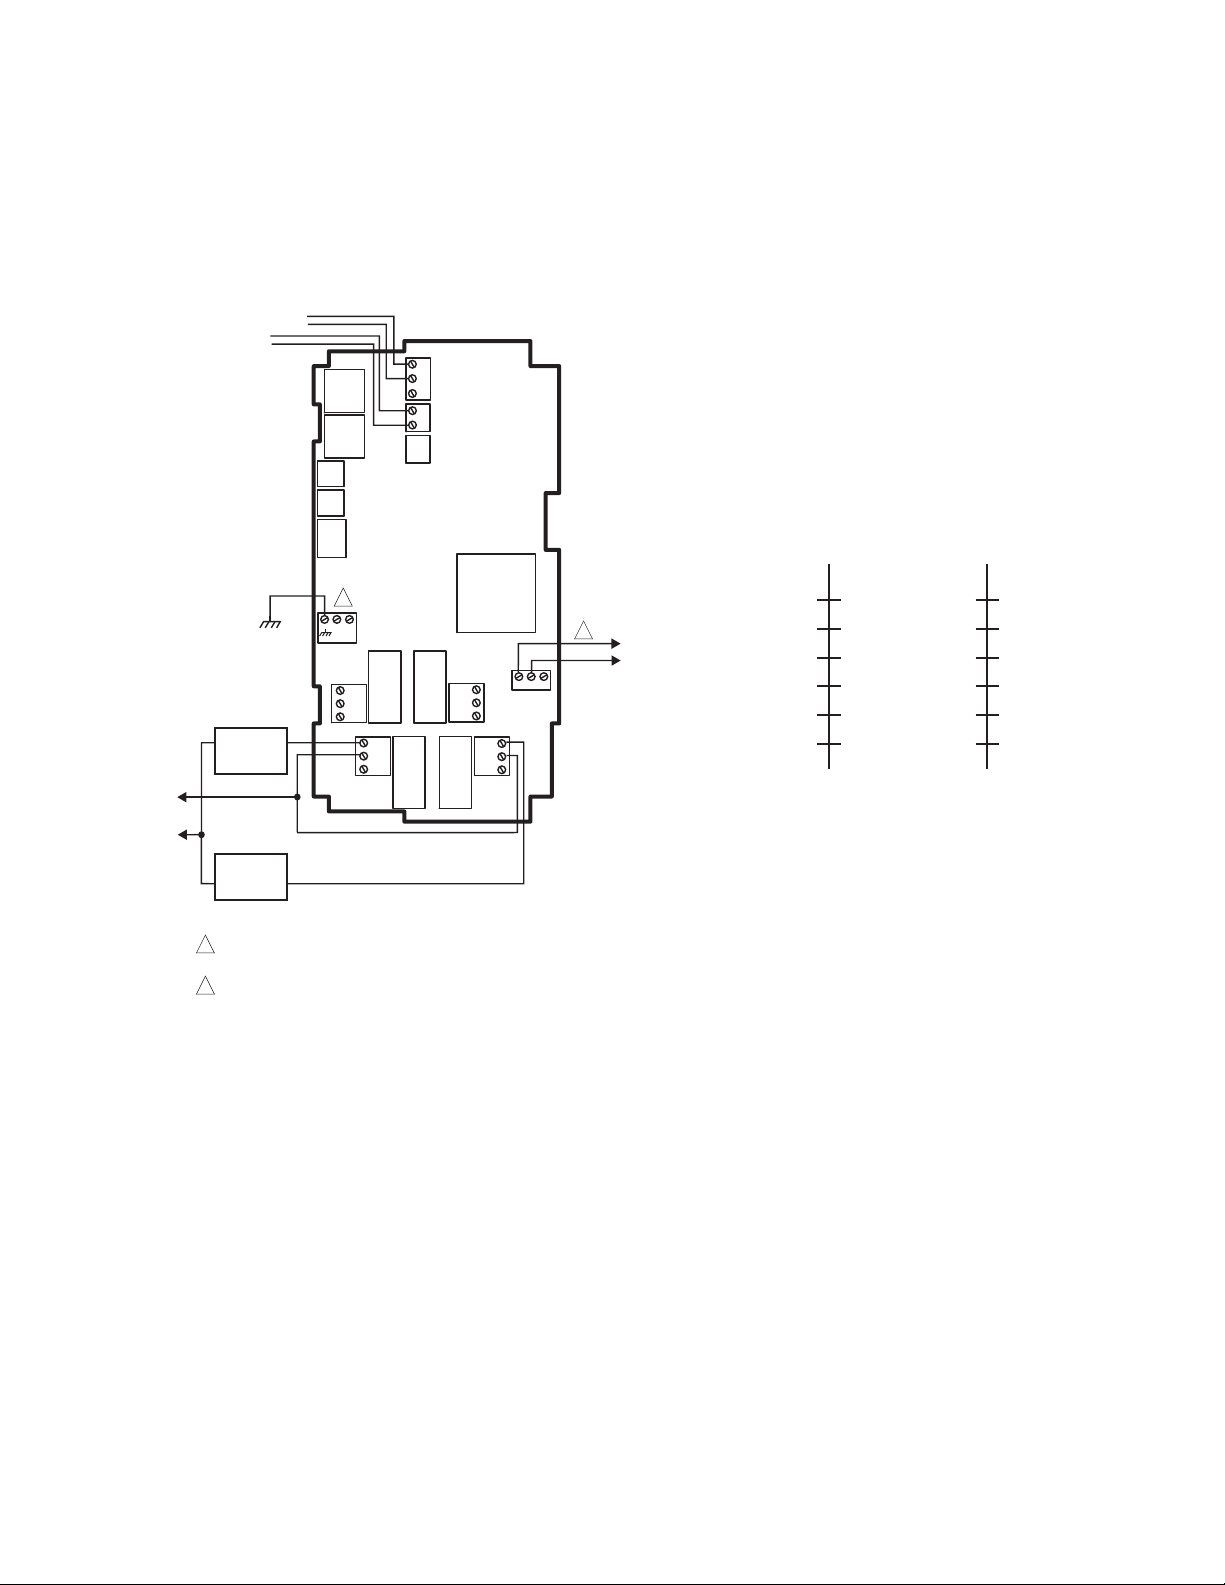
4 Stage with Pump Output and Reset (continued)
Wiring
All output relays should have a common power wiring source,
which may or may not be the same as the T775 power wiring.
See Fig. 27.
SENSOR B
SENSOR A
SENSOR C
(HOT)
T
T
T
T775P T775S
T
T
–
1
+
L1
L2
STAGE
4
COM
NO
STAGE
STAGE
STAGE
NO
COM
1
2
3
3
C
+
RELAY
4
NC
NO
1
2
3
C
RELAY
T
2
120
COM
COM
NO
120 VAC
240
RELAY
3
NC
C
NO
NO
C
NC
1
T775 BUS TERMINALS PROVIDE WIRING CONNECTIONS TO/FROM T775P/L AND T775S.
POWER WITH 24 VAC OR 120/240 VAC AT THE APPROPRIATE TERMINAL BLOCK.
24 VAC POWER TERMINAL BLOCK.
NO
C
NC
RELAY
2
COM
NO
1
COM
NO
–
+
3
C
+
RELAY
8
NC
C
NO
PUMP
RELAY
T
T
2
120
COM
120 VAC
240
M24556
RELAY
7
NC
C
NO
NO
C
NC
5
L2
L1
(HOT)
NO
C
NC
RELAY
6
Fig. 27. T775P wiring — 4 stage with pump output and reset.
Device Checkout
The T775 performance can be checked out to determine if
proper operation exists.
For example, when the outside air temperature is at 50° F
(10° C), the boiler temperature should be 180° F (22° C). See
Fig. 28. Use the alternate Home screen to check that the
effective setpoint is adjusting correctly based on the outside
air temperature (Sensor B).
NOTE: The alternate Home screen does not show live
updates of the sensor temperature. It shows the temperature only at the moment the button is pressed.
1. From the Home screen, use the button to verify
the setpoint temperature for each output.
2. Then, press the HOME button to view the actual
outside air temperature (Sensor B).
63-7147—05 22
BOILER DISCHARGE
SETPOINT TEMPERATURE
210°
OUTSIDE AIR
TEMPERATURE
20°
30°200°
190°
180°
170°
160
40°
50°
60°
70°
M24880
Fig. 28. Boiler discharge temperature vs. outside
temperature.
Page 23

T775 SERIES 2000 ELECTRONIC STAND-ALONE CONTROLLERS
3 Stage Reciprocating Chiller –
T775L
Application Description
The T775L is controlling the return water in a reciprocating
chiller with fast-dump freeze protection, low temperature
cutoff, and optional low pressure cutoff.
Sensor Designation
This device application requires two sensors.
• Sensor A is sensing return water and controlling three
stages of cooling.
• Sensor B is sensing discharge water and is controlling
Relay 4 for freeze protection.
Operation
Return water is one indication of the cooling load in the water
loop. For example, the higher the return water temperature
the higher the apparent load and more stages of refrigeration
or cooling would be required. If a large load is quickly dropped
from the loop, or for some reason water flow through the
chiller is reduced, discharge water temperature may drop
rapidly to freezing conditions. In this example, Sensor B in the
discharge water will prevent damage to the system by fast-
dumping all cooling stages upon close-to-freezing conditions.
Programming Example
Program in Setup:
Press and hold the MENU button for 5 seconds to enter
Setup mode. Select the Outputs menu, and then select:
— # Relays = 3
— # Loops = 1
— Options
— Loop 1 → # Relays = 3
— Loop 1
Loop 1: Chiller cooling
Program for:
— Setpoint = 62° F (17° C)
— Throttling Range = 12° F (-11° C)
— Sensor A
—Cool
Relay 4: Low temperature cutoff for freeze protection
Program for:
— Setpoint = 40° F (4° C)
— Differential = 4° F (-16° C)
— Sensor B
—Heat
IMPORTANT
→ DI Options = Disable
(acts as low pressure cutoff)
→ Reset = NO
After the desired value is selected, be sure to press
the or or HOME button in order to save that
value in the controller’s memory.
Wiring
All output relays should have a common power wiring source,
which may or may not be the same as the T775 power wiring.
See Fig. 29.
SENSOR A
(RETURN WATER)
SENSOR B
(DISCHARGE
WATER)
DIGITAL INPUT
(LOW PRESSURE
CUTOFF)
L1 (HOT)
L2
COOL #1
COOL #2
COOL #3
12POWER WITH 24 VAC OR 120/240 VAC AT THE APPROPRIATE TERMINAL BLOCK.
24 VAC POWER TERMINAL BLOCK.
2
C
RELAY
4
NC
NO
C
RELAY
Fig. 29. T775L wiring — reciprocating chiller.
STAGES
STAGE 3 ON
STAGE 2 ON
STAGE 1 ON
STAGE 1
-33%
58°F 62°F 66°F 70°F
1
THROTTLING RANGE (12°F)
STAGE ENERGIZES STAGE DE-ENERGIZES
CHILLER DISCHARGE WATER TEMPERATURE
1
T
T
T
T775L
T
RELAY
3
NC
C
NO
C
NC
RELAY
2
STAGE 3
120
NO
NO
C
NC
1
HYST.
STAGE 2
0% 33% 67%
COM
240
1
120 VAC
COM
M13895
M25514
Fig. 30. Chiller control staging behavior (when the
effective setpoint = 62° F (17° C)).
23 63-7147—05
Page 24

T775 SERIES 2000 ELECTRONIC STAND-ALONE CONTROLLERS
4 Stage Heat and 6 Stage Cool –
T775L
Application Description
The T775L is providing control for four boilers based on the
boiler's discharge water temperature and providing multistage
cooling control.
NOTE: The T775L (with up to two expansion modules) can
control any number of heating and cooling stages up
to a maximum of 12 stages.
Sensor Designation
This device application requires two sensors.
• Sensor A is sensing boiler discharge water temperature for
staged heating control.
• Sensor B is used for cooling control.
Operation
In this example, as the heating load increases, additional
stages of heat will cycle ON as the temperature decreases at
Sensor A. The T775L will use four stages to provide sufficient
heating. The six cooling stages are controlled by Sensor B.
NOTES:
1. The Interstage ON and OFF delay is an option for
both the heating and the cooling loops.
2. Because only 10 of the 12 relays are being used,
the remaining two relays can be used as
independent controls, each with its own setpoint
and throttling range.
Loop 2: Control to Sensor B
Program for:
— Setpoint = 72° F (22° C)
— Throttling Range = 12° F (-11° C)
— Sensor B
—Cool
— Relays = 5-10
IMPORTANT
After the desired value is selected, be sure to press
the or or HOME button in order to save that
value in the controller’s memory.
Wiring
All output relays should have a common power wiring source,
which may or may not be the same as the T775 power wiring.
See Fig. 31.
NOTE: The 4 Stage Heat and 6 Stage Cool application
continues on the next page.
Programming Example
Program in Setup:
Press and hold the MENU button for 5 seconds to enter
Setup mode. Select the Outputs menu, and then select:
— # Relays = 10 (4 heat and 6 cool)
— # Loops = 2
— Loop 1
— Loop 1 → Reset = NO
— Loop 2 → # Relays = 6
— Loop 2 → Reset = NO
NOTES:
1. The Integral setup parameter can be left at the
2. The On Delay and Off Delay setup parameters
Loop 1: Control to Sensor A
Program for:
— Setpoint = 200° F (93° C)
— Throttling Range = 20° F (-7° C)
— Sensor A
—Heat
— Relays = 1-4
1
Reset can be used for the T775L. However, keep in mind
that only one reset curve can be programmed. This means
that you can offset from the curve, but you cannot create a
second reset curve. Normally reset curves can be used for
Heat or Cool, not both.
→ # Relays = 4
factory default setting or adjusted as needed for
each loop.
can be adjusted according to the application.
1
63-7147—05 24
Page 25

4 Stage Heat and 6 Stage Cool (continued)
SENSOR B
SENSOR A
25 63-7147—05
(HOT)
L1
(HOT)
L2
L1
L2
24 VAC
HEAT
4
HEAT
1
HEAT
2
HEAT
3
COM
NO
NO
COM
T
T
T
T775L FIRST
T
–
1
+
–
1
+
5
C
C
+
RELAY
4
NC
NO
C
NO
NC
RELAY
1
NO
C
NC
RELAY
2
COM
NO
120
4
COM
COM
240
COM
NO
NO
COM
RELAY
3
NC
C
NO
C
+
RELAY
8
NC
NO
C
RELAY
NO
2
NO
C
NC
5
COOL 4
T
T
T775S
–
1
+
–
3
+
55
C
RELAY
7
NC
C
NO
COOL 3
NO
C
NC
RELAY
6
120
240
COM
NO
NO
COM
4
120 VAC
COOL
1
COOL
2
RELAY
NO
COM
+
12
NC
NO
C
RELAY
T
T
SECOND
T775S
4
120 VAC
RELAY
11
NC
C
NO
NO
C
NC
9
NO
C
NC
RELAY
10
120
COM
240
NO
COM
COOL
6
T775 SERIES 2000 ELECTRONIC STAND-ALONE CONTROLLERS
COOL 5
T775 BUS TERMINALS PROVIDE WIRING CONNECTIONS TO/FROM T775L AND T775S.
1
2
USE PIGTAIL CONNECT IONS TO WI RE THE T 775 BUS TERMIN ALS ON T HE FIRST T 775S
SECOND T775S M UST HAVE A JUMPER I NSTALLED AS S HOWN AT THE J UMPER T ERMIN AL.
3
POWER WITH 24 VAC OR 120/240 VAC AT THE APPROPRIATE TERMINAL BLOCK.
4
24 VAC POWER TERMINAL BLOCK.
5
Fig. 31. T775L wiring — 4 stage heat and 6 stage cool using 2 loops.
M27239
Page 26

T775 SERIES 2000 ELECTRONIC STAND-ALONE CONTROLLERS
Pressure with a Variable Frequency
Drive (VFD) – T775U
Application Description
In this application the T775U is controlling duct pressure with
a fan controlled by an NXS or NXL Variable Frequency Drive.
A P7640 pressure sensor, located in the duct, is providing
sensor input to the T775U to control the fan speed. The VFD
is looking for a 4-20 mA PID control signal from the T775U
and will drive the fan with a signal directly proportional to this
T775U output.
For additional information about the NXS or NXL variable
frequency drives (VFD), refer to the VFD Reference Guide,
form 63-9469.
Sensor Designation
This device application requires one sensor.
• Sensor A is sensing pressure at the duct (reference is at
the room).
Operation
In this example, as the sensed pressure decreases, the fan
speed increases. Assume we have a 0-10 Vdc sensor output
for 0-5 inches water column. First, set up a Sensor type of
0-10 Vdc into the T775U Sensor A settings, and a minimum
(0) and maximum (5) inches water column for the sensor
range.
Also set up a 4-20 mA PID modulating output loop (MOD 1) at
the T775U with a setpoint of 2.5 inches and a throttling range
of 2 inches, and a reverse acting action. At a sensed pressure
of 2.5 inches (in other word, at setpoint), MOD 1 will output
close to 50% or about 12 mA. At 1.5 inches water column, the
output will be 100% or about 20 mA, and at 3.5 inches water
column, the output will be 0% or about 4 mA. Keep in mind
these values are valid for proportional control and will differ in
a PID loop where integral (usually desired) and derivative
(less often required) are set to non-zero values.
IMPORTANT
After the desired value is selected, be sure to press
the or or HOME button in order to save that
value in the controller’s memory.
IMPORTANT
After programming the VFD, be sure to check the
following:
1. Verify that the VFD value P7.1.1.2 (AI2 mode) is set
to 2 (4-20 mA).
2. Verify that the jumper block X2 on the Expansion
board A is in Current Input Mode (a jumper is across
the A terminals, and a jumper is across the B
terminals).
3. Verify that the P7640A pressure sensor is set to:
Output = Voltage
Range = 0 to 5 inches w.c.
Mode = Unidirectional (default)
Volt = 10 Vdc
Wiring
See Fig. 32 for wiring connections for the T775U, the pressure
sensor, and the Variable Frequency Drive.
VFD BOARD A
54
SHIELDED CABLE
MOD 1
C
B
–
R
+
W
S
SENSOR A
V
T
T
NOTES:
1. SHIELDED CABLE MUST BE
CONNECTED TO A SEPARATE
EARTH GROUND. HOWEVER,
DO NOT GROUND SHIELDED
CABLE AT SENSOR END.
2. TO MINIMIZE NOISE PICKUP,
MAKE SENSOR CONNECTION
FROM SHIELDED CABLE AS
CLOSE AS POSSIBLE TO
SENSOR BODY.
Integral and derivative time may need to be adjusted, along
with the throttling range.
Programming Example
Program in Setup:
Press and hold the MENU button for 5 seconds to enter
Setup mode, and then select:
— Sensors
Type = 0-10V
Units = IN WC
Minimum Value = 0.0
Maximum Value = 5.0
— Outputs
Type = 4-20 mA
Program MOD 1 for:
— Setpoint = 2.5
— Throttling Range = 2 inches w.c.
— Action = REV ACT
63-7147—05 26
→ Sensor A:
→ MOD 1 (Modulating Output):
CSV
OUT
P7640A
COM
PRESSURE
SENSOR;
0-10 VDC
CONNECTION
M28006
POWER
Fig. 32. T775U wiring — pressure with a VFD (loop
powered wiring).
Page 27

T775 SERIES 2000 ELECTRONIC STAND-ALONE CONTROLLERS
Carbon Dioxide (CO2) Sensing –
T775U
Application Description
In this application, the T775U is controlling an outside air
damper based on CO
CO
levels.
2
Sensor Designation
This device application requires one sensor.
• Sensor A is sensing CO
Operation
In this example, as the CO2 level increases a damper is
opened to allow fresh air to enter the facility.
Many CO
Parts per million (ppm) units not available on the T775U.
sensors are used with a 0-2,000 ppm output range.
2
• Set the units for Ppm and enter 0 for a minimum and 2,000
for a maximum. The controller will simply convert the input
signal (0-10 Vdc or 4-20 mA) into the correct ppm value
and display it on the screen.
Programming Example
Program in Setup:
Press and hold the MENU button for 5 seconds to enter
Setup mode, and then select:
— Sensors
Type = 0-10V
Units = PPM
Minimum Value = 0.0
Maximum Value = 2000
NOTE: Sensor A is a 0-10 Vdc CO
range of 0 to 2,000 PPM
sensing input, to maintain reasonable
2
in parts per million
2
→ Sensor A:
sensor (C7232) with a
2
IMPORTANT
After the desired value is selected, be sure to press
the or or HOME button in order to save that
value in the controller’s memory.
Wiring
See Fig. 33 for wiring connections for the T775U and the CO2
sensor.
SHIELDED CABLE
–
+
SENSOR A
1
L1 (HOT)
USE SEPARATE 24 V TRANFORMER TO POWER THE C7232 CO2 SENSOR.
1
PROVIDE DISCONNECT MEANS AND OVERLOAD PROTECTION AS REQUIRED.
Fig. 33. T775U wiring — carbon dioxide sensing control.
NOTES:
1. SHIELDED CABLE MUST BE
CONNECTED TO A SEPARATE
EARTH GROUND. HOWEVER,
DO NOT GROUND SHIELDED
CABLE AT SENSOR END.
2. TO MINIMIZE NOISE PICKUP,
MAKE SENSOR CONNECTION
FROM SHIELDED CABLE AS
CLOSE AS POSSIBLE TO
SENSOR BODY.
+
24 V
+
ANALOG
OUT
C7232 CO2 SENSOR
(0-10 VDC CONNECTION)
RED
BLACK
L2
–
–
M24882
27 63-7147—05
Page 28

T775 SERIES 2000 ELECTRONIC STAND-ALONE CONTROLLERS
50 55 60 65 70 75 80 85 90
M31190
65
68
70
75
SP MIN A2
SENSOR A
ZONE AIR TEMP
SP MAX A1
RESET B1
(RETURN MIN)
SENSOR B
OUTDOOR AIR TEMP
RESET B1
(RETURN MIN)
Resetting Zone Air Temp Based on Outside Air Temp (2 stage cooling)
Application Description
In this example, the T775L provides two stage DX cooling
based on zone temperature. The T775L calculates the zone
air temperature setpoint based on the actual outside air
temperature using a reset curve.
Sensor Description
This device application requires two sensors.
• Sensor A is sensing zone air temperature.
• Sensor B is sensing outside air temperature.
Operation
When the outdoor air temperature reaches 90 ° F the desired
zone air temp is 75 ° F, Likewise when the outside air temp
drops to 50 ° F the zone temp needs to be 68 ° F.
Programming Example
Program in Setup:
Press and hold the MENU button for 5 seconds to enter Setup
mode. Select the Outputs menu, and then select:
# RELAYS = 2
# LOOPS = 1
LOOP 1
LOOP 1 → RESET = YES-OTHER
LOOP 1 Program for: (Refer to the reset curve in Figure 34)
- Setpoint Max A1 (Zone Max) = 75° F (24° C)
- Reset B1 (Outside Min) = 50° F (10° C)
- Setpoint Min A2 (Zone Min) = 68° F (20° C)
- Reset B2 (Outside Max) = 90° F (32° C)
- Differential = 20° F (-7° C)
- Cool.
→ # RELAYS = 2
SENSOR B
SENSOR A
T
T
T
T
C
Fig. 34. Zone air reset curve
+
120
COM
NO
C
NC
COM
NO
FOR 240 VAC LOAD, CO NNECT TO 240 TERMI NAL.
1
NO
C
NC
240
COM
120V
COM
NO
1
POWER SUPPLY
LOAD 2
LOAD 1
L1 (HOT)
L2
M24287A
Fig. 35. T775 wiring — 2 stage cooling
63-7147—05 28
Page 29

T775 SERIES 2000 ELECTRONIC STAND-ALONE CONTROLLERS
M31192
ML7425
SPRING RETURN
VALV E
ACTUATOR
WIRING
STRIP
F
+
T2
T1
O1
O2
TS
–
L1
L2
POWER SUPPLY. PROVIDE DISCONNECT MEANS AND OVERLOAD
PROTECTION AS REQUIRED.
1
24 VAC POWER TERMINAL BLOCK.
2
1
SENSOR A
(DISCHARGE AIR TEMP
SENSOR B
(RETURN AIR TEMP)
T
T
C
S
V
B
R
W
+
–
MOD 1
T775R
C
+
2
Resetting Discharge Air Temp Based on Return Air Temp (Modulating cooling valve)
Application Description
The T775R is controlling discharge air temperature based on
return air temp using a reset curve.
The T775R calculates the discharge temp setpoint based on
the actual return temp in the air handling unit.
Sensor Description
This device application requires two sensors:
• Sensor A is sensing discharge air temperature.
• Sensor B is sensing return air temperature.
Operation
In this example, the T775R controls an actuator, based on the
discharge temperature setpoint to modulate the cool water
valve.
When the return air temperature reaches 75, the desired
discharge air temp is 50. Likewise when the return air temp
drops to 70, the discharge temp needs to be 60.
SP MIN A1
60
Programming Example
Program in Setup:
Press and hold the MENU button for 5 seconds to enter
Setup mode. Select the Outputs menu, and then select:
MOD 1
MOD1 Program for: (Refer to the reset curve in Figure 36)
- Setpoint Max A1 (Discharge Max) = 60° F (16° C)
- Reset B1 (Return Min) = 70° F (21° C)
- Setpoint Min A2 (Discharge Min) = 50° F (10° C)
- Reset B2 (Return Max) = 75° F (24° C)
- Throttling Range = 10° F (-12° C)
- Cool.
→RESET = YES-OTHER
DISCHARGE AIR
SENSOR A
TEMP
55
50SP MIN A2
65
70 75 80
RESET B1
(RETURN MIN)
SENSOR B RETURN AIR TEMP
RESET B2
(RETURN MAX)
Fig. 36. Discharge air reset curve
Fig. 37. T775 wiring — valve modulation
M31191
29 63-7147—05
Page 30

T775 SERIES 2000 ELECTRONIC STAND-ALONE CONTROLLERS
M32047
RESET CURVE
STORAGE WATER TEMPERATURE (°F)
COLLECTOR
WATER
TEMPERATURE
(°F)
240
220
180
160
140
120
100
80
60
40
20
0
0 20 40 60 80 100 120 140 160 180 200 220 240
PUMP TURNS ON
PUMP TURNS OFF
STORAGE TANK
TEMPERATURE
EX: STORAGE TANK TEMPERATURE OF
80°F, PUMP TURNS ON AT 105°F AND
OFF AT 85°F
Using the T775R as a Differential Temperature Controller for Solar Water Heating
Application Description
The T775 can be used as a differential temperature controller
for solar water heating applications. The controller regulates
the circulation of water between the solar energy collector and
the water storage tank. The circulation pump turns on/off
based on the desired (predetermined) temperature differential
between the collector and the tank.
Sensor Description
This device application requires two sensors:
• Sensor A is sensing collector water temperature.
• Sensor B is sensing storage water temperature.
Operation
Programming example: Settings may be changed according
to geographical location, equipment, and other preferences.
Pump turns on when there is a 25°F differential between the
solar collector water temperature and the storage tank
temperature and turns off when the differential is 5°F.
High limit shut off or alarm at 190°F.
Optional low temperature purge or alarm at 40°F.
Programming Example
Program in Setup:
Press and hold the MENU button for 5 seconds to enter Setup
mode. Select the Outputs menu, and then select:
Setting up the Sensor label names (Optional).
→SENSORS→SENSOR A
SETUP
Select Label then highlight DISCHRG A. Press the once to
get back to the SENSORS menu. Select SENSOR B.
Select Label then highlight RETURN B. Choose other
names if desired.
Setting up RELAY 1 and RELAY 2 for reset.
SETUP
RELAY 1
RELAY 2
RELAY 3
Press Home to exit Setup, and press Menu to enter
RELAY 1: The below settings for RELAY 1 are to establish the
SP MAX A1 = 248ºF
RESET B1 = 248ºF
SP MIN A2 = -40ºF
RESET B2 = -40ºF
DIFFRENTL = N/A
HEAT/COOL = HEAT
→ OUTPUTS
→ RESET = YES-OTHER (used only to set the dif-
ferential curve, do not wire Relay 1)
→ RESET = YES
→ RESET = YES
programming.
offset curve only. There will not be any electrical connections to RELAY 1. (Refer to reset curve in Fig. 38).
Fig. 38. Reset curve.
63-7147—05 30
RELAY 2: Enter the temperature differential at which you want
the pump to turn on. In our example this value is 25°F.
- OFFSET = 25°F
Next you must determine the value at which you want the
pump to shut off. The differential will determine the number of
degrees below the setpoint (25°F differential) at which the
pump will turn off. In our example this value is 20°F (i.e., 5°F
above the storage tank temperature).
- DIFFRNTL = 20°F
- HEAT
RELAY 3: Enter the high limit temperature. The pump will shut
off if the return water temperature from the storage tank
reaches this temperature. In our example this value is
190°F.
- SETPOINT = 190°F
- DIFFRTL = 5°F
- SENSOR: SENSOR B
- HEAT
RELAY 4: Enter the low limit temperature. An alarm will turn
on or valve will close when the return water from the storage tank reaches this temperature. In our example this
value is 40F.
- SETPOINT = 40°F
- DIFFRTL = 2°F
- SENSOR: SENSOR B
- HEAT
Page 31

T775 SERIES 2000 ELECTRONIC STAND-ALONE CONTROLLERS
SENSOR B
(STORAGE
WATER TEMP.)
C
+
RELAY
4
NC
C
NO
RELAY
1
FOR 240 VAC LOAD, CONNECT TO 240 VAC TERMINAL
1
SENSOR A (COLLECTOR
WATER TEMP.)
T
T
T
T
NO
C
NC
RELAY
3
NC
C
NO
RELAY
1
120V
COM
120
240
COM
NO
C
NC
PUMP
2
ALARM/
VALV E
M32046
Fig. 39. T775R wiring diagram for solar water heating.
31 63-7147—05
Page 32

T775 SERIES 2000 ELECTRONIC STAND-ALONE CONTROLLERS
M32048
RESET CURVE
SENSOR B
(OUTSIDE) °F
70
69
68
67
66
65
64
63
62
61
61 62 63 64 65 66 67 68 69 70
SENSOR A
(ROOM) °F
EXAMPLE: ROOM TEMPERATURE IS 63°F. COOLING TURNS ON
WHEN TEMP RISES TO 66°F AND TURNS OFF WHEN TEMP
FALLS TO 64°F. HEATING TURNS ON WHEN TEMP FALLS TO
60°F AND TURNS OFF WHEN TEMP RISES TO 62°F.
COOLING
ON
COOLING
OFF
ROOM
TEMP
HEATING
ON
HEATING
OFF
Maintaining Differential Temperature for both Heating and Cooling
Application Description
This T775 program can be used to maintain a differential
temperature between Sensor A and Sensor B. This is done by
using the T775R2001, which can be used to maintain a delta
temperature between the sensors.
Sensor Description
This device application requires two sensors.
• Sensor A is sensing room temperature.
• Sensor B is sensing outside air temperature.
Operation
In this example, the T775 program energizes dampers to
open for free cooling or free heating. One relay energizes for
cooling whenever the outside temperature (Sensor B) is at
least 3ºF above the room temperature (Sensor A), and deenergizes when the temperature drops to 1ºF above the room
temperature. A second relay energizes for heating when
temperature is at least 3ºF below the room temperature and
turns off when temp rises to 1ºF below the room temperature.
Select Label, then highlight ROOM A. Press once to get
back to the SENSORS menu. Select SENSOR B. Select
Label then highlight OUTDOOR B. Choose other names if
desired.
Setting up RELAY 1 and RELAY 2 for reset.
SETUP → OUTPUTS
RELAY 1
→ RESET = YES-OTHER (used only to set the dif-
ferential curve, do not wire Relay 1)
RELAY 2
RELAY 3
→ RESET = YES (used for cooling)
→ RESET = YES (used for heating)
Press Home to exit Setup, and press Menu to enter
programming.
RELAY 1: The below settings for RELAY 1 are to establish the
reset curve only. There will not be any electrical connec-
tions to RELAY 1. (Refer to reset curve in Fig. 40).
SP MAX A1 = 248ºF
RESET B1 = 248ºF
SP MIN A2 = -40ºF
RESET B2 = -40ºF
DIFFRENTL = N/A
HEAT/COOL = HEAT
RELAY 2: Enter the temperature delta (difference) at which
you want the cooling to turn on. In our example this value is
3ºF above the room temperature.
OFFSET= 3ºF
Next, the differential will determine the number of degrees
below the setpoint (3ºF differential) at which the cooling will
turn off. In our example this value is 2ºF
(i.e., 1°F above the room temperature).
DIFFRNTL = 2ºF
Programming Example
Program in Setup:
Press and hold the MENU button for 5 seconds to enter Setup
mode. Select the Outputs menu, and then select:
Setting up the Sensor label names (Optional).
SETUP
→ SENSORS → SENSOR A
Fig. 40. Reset curve.
SENSOR B
(OUTDOOR
AIR TEMP.)
C
+
RELAY
4
NC
C
NO
RELAY
1
1
FOR 240 VAC LOAD, CONNECT TO 240 VAC TERMINAL.
SENSOR A (ROOM TEMP.)
T
T
T
T
NO
C
NC
RELAY
3
NC
C
NO
NO
C
NC
RELAY
2
120
COM
1
120V
COM
240
HEAT
COOL
M32045
Fig. 41. T775R wiring diagram for maintaining differential
temperature for both heating and cooling.
63-7147—05 32
Page 33

T775 SERIES 2000 ELECTRONIC STAND-ALONE CONTROLLERS
T775 APPLICATION REPLACEMENT EXAMPLES
This section describes how a T775 Series 2000 Electronic
Stand-Alone Controller is wired and programmed to replace
various older generation Honeywell devices.
T675A COMPRESSOR LOCKOUT
W973A
2
COOL 2
T775M2030 Replacement for W973A Logic Panel
This replacement example illustrates how a T775M2030 is
configured to replace a two-stage Heat and two-stage Cool
W973A Logic Panel.
• Fig. 42 illustrates the wiring connections for the W973A
Logic Panel.
• Fig. 43 and Table 2 on page 35 illustrate the wiring and
configuration of the T775M2030 controller.
T675A HIGH LIMIT
1HEAT2
1COOL2
L1
(HOT)
HEAT 1
HEAT 2
1
L2
1
(HOT)
1
L1
(HOT)
L2
DISCHARGE
SENSOR
L1
L2
C7046
4
FAN RELAY
FAN START
RELAY
COOL 1
W1
T1
B1
T2
R1
M954 MOTOR
(HEATING)
(OPTIONAL) PLENUM
FAN CONTROL
4
MOD-HEAT MOD-COOL
SENSOR STAT 24V ECONO
C +20 NH
T
T7067 THERMOSTAT
1
POWER SUPPLY. PROVIDE DISCONNECT MEANS AND OVERLOAD PROTECTION AS REQUIRED.
W973A SHOWN. W973B HAS 3 HEAT AND 3 COOL STAGES.
2
USE MODULATING AND/OR OUTPUT RELAYS DEPENDING ON APPLICATION.
3
USE FAN START RELAY AND/OR PLENUM FAN CONTROL FOR AUTOMATIC FAN OPERATION IN
4
HEATING MODE.
3
RHBHWH
R
15243
6
7
8
WCBCRC
YBWRTT15243T1 R
M954 MOTOR
H205 OUTSIDE
AIR CHANGEOVER
L1
(HOT)
1
L2
(COOLING)
R1
T1
B1
T2
W1
MIN. POSITION
POT ENTIOMETER
M955 MOTOR (ECONOMIZER)
R
W
BWR
31 2
R1
W1
B1
L1
(HOT)
L2
1
1
L1
T1
T2
(HOT)
L2
Fig. 42. W973A wiring connections (pre-existing control).
NOTE: The T775M2030 Replacement for W973A Logic Panel continues on the next page.
33 63-7147—05
M24562
Page 34

T775 SERIES 2000 ELECTRONIC STAND-ALONE CONTROLLERS
T775M2030 Replacement for W973A Logic Panel (continued)
HONEYWELL ELECTRONIC SERIES 90 MODUTROL MOTOR
OPTIONAL
SPDT
CHANGEOVER
(H705)
4
MINIMUM
POSITION
POTENTIOMETER
1
L1 (HOT)
1
2
3
4
5
6
7
(Q20 9)
HONEYWELL
ELECTRONIC
SERIES 90
MODUTROL
MOTOR
L2
OTHER MOTORS SUCH AS 4-20 MA, 0-10 VDC, AND 2-10 VDC, MAY BE USED.
TO VERIFY OUTPUT, TEST OPEN CIRCUIT VOLTAGE BETWEEN THE MOD 1 TERMINALS W AND R.
- MINIMUM (DRIVE CLOSED) SIGNAL LESS THAN 0.17 VDC
- MAXIMUM (DRIVE OPEN) SIGNAL IS GREATER THAN 1.7 VDC
USE SEPARATE TRANSFORMER FOR T775M WHEN USING 24 VAC.
A 250 OHM R ESISTOR PROVIDES 4 0% AUTHO RITY W HEN USI NG A 150 OHM M INIM UM POSI TION POT ENTIOMETER .
INSERT 340 OHM RESISTOR (INCLUDED) ACROSS TERMINALS R AND W.
POWER WITH 24 VAC OR 120/240 VAC AT THE APPROPRIATE TERMINAL BLOCK.
24 VAC POWER TERMINAL BLOCK.
W R B
COOLING
T1 T2 B WR
T675A COMPRESSOR
LOCKOUT
T675A
HIGH LIMIT
COOL 2
HEAT 1
HEAT 2
COOL 1
3
HEATING
POWER
OUTPUT
MOD 1
MOD 2
COM
NO
NO
COM
BWRT1 T2
3
NOTE: Fig. 43 is for wiring purposes only. A thorough review
of the existing W973A application is required in order
to determine the capability of the T775 controller
replacement.
1
2
SENSOR A (ROOM)
SENSOR B (DISCH ARGE)
–
C
B
–
R
+
W
B
–
R
+
W
7
C
+
RELAY
4
NC
NO
C
NO
RELAY
1
5
C
NC
T
S
+
T
V
5
T
T
T775M2030
6
120
COM
COM
NO
120 VAC
240
M28012
RELAY
3
NC
C
NO
NO
C
NC
RELAY
2
NO
COM
Fig. 43. T775M2030 wiring connections for replacing a W973A Logic Panel.
NOTE: The T775M2030 Replacement for W973A Logic Panel continues on the next page.
63-7147—05 34
Page 35

T775 SERIES 2000 ELECTRONIC STAND-ALONE CONTROLLERS
T775M2030 Replacement for W973A
In this replacement application, the T775M2030 provides the
following, as described in Table 2.
Logic Panel (continued)
Table 2. T775M2030 replacement for W973A
Component/Function W973A Logic Panel T775M2030 Replacement
Thermostat T7067 Sensor A (Room) - C7130B1008.
Discharge Sensor C7046 Sensor B (Discharge) - C7046D1008.
Heating/Cooling Motor M954 Series 90, 4-20 mA, 0-10 Vdc, or 2-12 Vdc motor may be used.
Fan Start Fan Start Relay If a relay is available, it can be used for fan control (e.g., 1 stage Heat and 2
stage Cool using the T775M2030).
Economizer M955 With the T775M2030 there are two modulating outputs. Therefore, two of the
three functions (Heat, Cool, or Economizer) are available to be used. The
example in Fig. 35 uses the Heat and Cool functions; no Economizer.
Outside Air Changeover H205 Optional – SPDT Changeover (H705).
T775R Replacement for W964F
This replacement example illustrates how a T77R is
configured to replace a W964F Aquatrol Panel.
Aquatrol Panel with Floating
Actuator
• Fig. 45 illustrates the wiring connections for the W964F
Aquatrol Panel.
• Fig. 46 and Table 4 on page 34 illustrate the wiring and
configuration of the T775R controller.
W964F
L 54A4123ABCDN T3T3T2T276
L
1
N
1
120 V, 60 HZ POWER SUPPLY. PROVIDE DISCONNECT MEANS AND OVERLOAD PROTECTION AS REQUIRED.
JUMPER BETWEEN B AND D.
2
TERMINALS Y, T, AND G ARE NOT USED.
3
2
3
T123Y BRWG
M944B
T7044A
T7043A
T7043B
M28013
Fig. 44. W964F wiring connections (pre-existing Control).
NOTE: The T775R Replacement for W964F Aquatrol Panel with Floating Actuator continues on the next page.
35 63-7147—05
Page 36

T775 SERIES 2000 ELECTRONIC STAND-ALONE CONTROLLERS
T775R Replacement for W964F Aquatrol Panel with Floating Actuator (continued)
OPTIONAL
MOTOR
CONFIGURATION
MODULATING OUTPUT (MOD 1)
T1 T2 B WR
POWER
3
OUTPUT
7
NO
COM
B
R
W
RELAY
NOTE: Table 45 is for wiring purposes only. A thorough
HONEYWELL ELECTRONIC SERIES 90
MODUTROL MOTOR
2
SENSOR A (STANDARD T EMPER ATURE SEN SOR)
SENSOR B (OUTDO OR SENS OR)
–
C
T
S
+
T
V
4
T
T
T775R
RELAY
3
NC
C
NO
NO
C
NC
RELAY
2
C
–
+
5
+
4
NC
C
NO
NO
NC
RELAY
1
C
review of the existing W964F application is required
in order to determine the capability of the T775 controller replacement.
1
6
120 VAC
120
240
COM
NO
COM
7
MOTOR
OPEN
COM
CLOSE
8
120/240 VAC LINE
1
OTHER MOTORS SUCH AS 4-20 MA, 0-10 VDC, AND 2-10 VDC, MAY BE USED ON THE MOD 1 OUTPUT.
2
TO VERIFY OUTPUT, TEST OPEN CIRCUIT VOLTAGE BETWEEN THE MOD 1 TERMINALS W AND R.
- MINIMUM (DRIVE CLOSED) SIGNAL LESS THAN 0.17 VDC
- MAXIMUM (DRIVE OPEN) SIGNAL IS GREATER THAN 1.7 VDC
3
USE SEPARATE TRANSFORMER FOR T775R WHEN USING 24 VAC.
4
INSERT 340 OHM RESISTOR (INCLUDED) ACROSS TERMINALS R AND W.
5
24 VAC POWER TERMINAL BLOCK.
6
POWER WITH 24 VAC OR 120/240 VAC AT THE APPROPRIATE TERMINAL BLOCK.
7
RELAY 1 CLOSES TO DRIVE DEVICE OPEN.
RELAY 2 CLOSES TO DRIVE DEVICE CLOSED.
8
MOTOR CAN BE AN M944B, M644, M6184, ML6984, ML6420, ETC.
M28014
Fig. 45. T775R wiring connections for replacing a W964F Aquatrol Panel.
NOTE: The T775R Replacement for W964F Aquatrol Panel with Floating Actuator continues on the next page.
63-7147—05 36
Page 37

T775 SERIES 2000 ELECTRONIC STAND-ALONE CONTROLLERS
T775R Replacement for W964F
In this replacement application, the T775R provides the
following, as described in Table 3.
Aquatrol Panel with Floating
Actuator (continued)
Table 3. T775R replacement for W964F
Component/Function W964F Aquatrol T775R Replacement
Sensors T7044A or T7043A
T7043B
Reset ratio and parallel shift n/a Reset programming in the T775R provides the reset curve.
On/Off motor control Jumper terminals 1
and 2 on the W964F
Actuator motor speed n/a Use the Integral Time and Throttling Range to tune the T775R control.
Differential n/a Use the Throttling Range to tune the T775R control.
Program setback n/a The T775R provides Setback and alternate setpoint programming parameters.
Motor M944B Series 90, 4-20 mA, 0-10 Vdc, or 2-12 Vdc motor may be used.
Sensor A - Standard 1097 Ohm temperature sensor.
Sensor B - Standard 1097 Ohm temperature sensor.
“See “Temperature Sensors1” on page 3..
If the W964F provided On/Off motor control, then wire motor to a relay output
on the T775R to provide On/Off control.
37 63-7147—05
Page 38

T775 SERIES 2000 ELECTRONIC STAND-ALONE CONTROLLERS
T775L Replacement for S984 Step Controller
This replacement example illustrates how a T775L using a
T775S Expansion module is configured to replace a S984
Step Controller.
SERIES 90
CONTROLLER
S400A
DELAY
TIMER
9
132
L1 (HOT) L2
1
R
R
WHITE
B
B
W
9
5
W
6
4
ORANGE
S984 STEP CONTROLLER
STAGE 1 STAGE 2 STAGE 3 STAGE 4 STAGE 5
NC
NO
NC
NOTE: This replacement section also applies to the S684
Step Controller.
Fig. 46 illustrates the wiring connections for the S984 Step
Controller.
Fig. 47 and Table 4 on page 40 illustrate the wiring and
configuration of the T775L controller.
NO
NC
2 3
NO
NC
NO
NC
NO
1R1
6
L1
L2
3
4
W
4
R
B
P
7
N
ON-OFF
SWITCH
1
8
L1 (HOT)
L1 (HOT)
9
L2
1
L2
1
POWER SUPPLY. PROVIDE DISCONNECT MEANS AND OVERLOAD PROTECTION AS REQUIRED.
SWITCHES SHOWN WITH DEVICE ENERGIZED.
2
REFER TO SPECIFICATIONS FOR NUMBER OF SWITCHES.
3
AUXILIARY POTENTIOMETER ON S984J ONLY. TERMINAL LABELED “AUX.”
4
THIS HOOKUP IS FOR A COOLING SYSTEM. FOR A HEATING SYSTEM, REVERSE W AND B.
5
6
WHEN SHIPPED, LEADS ARE JOINED WITH A WIRE NUT. TO DELAY STAGES ON, REMOVE WIRE NUT FROM ORANGE AND WHITE
LEADS AND CONNECT TO DELAY TIMER. TO DELAY STAGES OFF, REMOVE WIRE NUT
FROM BLUE AND WHITE LEADS AND CONNECT TO DELAY TIMER.
7
REMOVE JUMPER AND CONNECT ON-OFF SWITCH HERE IF S984 MUST RETURN TO START PPOSITION DURING OFF CYCLE.
CLIP OUT JUMPER (TERMINAL 6 TO L1) AND CONNECT SEPARATE POWER SOURCE HERE IF SEPARATION OF SWITCHING STAGES
8
AND CONTROL OPERATION IS DESIRED.
NOT PART OF STEP CONTROLLER.
9
Fig. 46. S984 wiring connections (pre-existing control).
NOTE: The T775L replacement for S984 step controller continues on the next page.
63-7147—05 38
M28015
Page 39

T775 SERIES 2000 ELECTRONIC STAND-ALONE CONTROLLERS
T775L Replacement for S984 Step Controller (continued)
SENSO R A (C7100D1001)
SENSOR B (SPACE OR OUT DOOR T EMPER ATURE)
T
T
T775L T775S
RELAY
3
NC
C
NO
NO
C
NC
RELAY
2
COM
NO
(HEAT/COOL CHANGEOVER)
2
L1
(HOT)
L2
DIGITAL INPUT
T6031 OR T675A
24 VAC
COOL 2
HEAT
1
HEAT
2
COOL 1
COM
NO
NO
COM
T
T
1
–
+
–
+
4
C
+
RELAY
4
NC
C
NO
NO
C
NC
RELAY
1
T775 BUS TERMINALS PROVIDE WIRING CONNECTIONS TO/FROM T775L AND T775S.
1
SETUP T HE CON TROL (T6031 OR T 765) SO TH AT IT CLOSES ON A TEMPER ATURE FALL .
2
POWER WITH 24 VAC OR 120/240 VAC AT THE APPROPRIATE TERMINAL BLOCK.
3
24 VAC POWER TERMINAL BLOCK.
4
120
3
COM
COM
NO
NOTE: Fig. 47 is for wiring purposes only. A thorough review
of the existing S984 application is required in order to
determine the capability of the T775 controller
replacement.
1
–
+
4
C
240
NO
COM
+
RELAY
8
NC
NO
C
NO
NC
RELAY
5
RELAY
7
NC
C
NO
C
NO
C
NC
RELAY
6
120
COM
240
NO
COM
3
120 VAC
COOL 4
COOL 3
M28018
Fig. 47. T775L wiring connections for replacing a S984 Step Controller.
In this replacement application, the T775L provides the following, as described in Table 4:
39 63-7147—05
Page 40

T775 SERIES 2000 ELECTRONIC STAND-ALONE CONTROLLERS
Table 4. T775L replacement for S684 or S984.
Component/Function S684 or S984 T775L Replacement
Sensor Series 60, Series
90, T915, T991,
T921, W902, etc.
controller
Sensor A - Standard 1097 Ohm temperature sensor.
Sensor B - Standard 1097 Ohm temperature sensor; (required only if reset
control is used; i.e. a T991B or W902A controller was used.)
See “Temperature Sensors” on page 3.
NOTE: If you are implementing two-sensor reset control, Sensor A must always
be the controlled temperature and Sensor B must always be the
controlling temperature. For example, in a reset control based on outside
temperature, Sensor A must be the inside sensor and Sensor B must be
the outside sensor.
Delay Timer S400A Use the On Delay and Off Delay programmable parameters of the T775L.
Throttling Range n/a Set the programmable Throttling Range parameter to match the application.
Reset T991B or W902A
Reset programming in the T775L provides the reset curve.
(if used)
Loads 1 - 5 n/a Program the 5 relays into a single loop.
Auxiliary Pot. S964J only The T775L Controller with two T775S Expansion modules allows for up to 12 relay
outputs.
63-7147—05 40
Page 41

T775 SERIES 2000 ELECTRONIC STAND-ALONE CONTROLLERS
T775L Replacement for W7100C Discharge Air Controller
This replacement example illustrates how a T775L using a
T775S Expansion module is configured to replace a two-stage
Heat and four-stage Cool W7100C Discharge Air Controller.
L1 (HOT)
1
L2
L1 (HOT)
1
L2
M955 MOTOR
(ECONOMIZER)
W1
7
DISCHARGE
4
4
R1
TR
TR
B1
2
C7100
SENSOR
WR
WR
7 6
2K2
W
W
2K2
1K1
5
1K1
5
MINIMUM POSITION
POTENTIOMETER
2K1
400 OHM (4 COOLING STAGES)
8
2K1
200 OHM (2 HEATING STAGES)
T7047C1025 SPACE RESET SENSOR OR
C7031G1016 OUTDOOR RESET SENSOR
Q209A
R
W
BWR
31 2
H205 OUTDOOR
AIR CHANGEOVER
S963B1037 REMOTE
POTENTIOMETER
3
S963B1078 OR S963B1086
HEATING REMOTE
SETPOINT POTENTIOMETER
S963B1078 OR S963B1086
COOLING REMOTE
SETPOINT POTENTIOMETER
1
POWER SUPPLY. PROVIDE DISCONNECT MEANS AND OVERLOAD PROTECTION AS REQUIRED.
2
USE ONLY WITH SPACE RESET SENSOR. CONNECT IN SERIES AS SHOWN.
3
WHEN RESET NOT USED, JUMPER TERMINALS 6 AND 7.
SET HEAT AND COOL DISCHARGE SETPOINTS USING REMOTE SETPOINT POTENTIOMETERS. TURN SETPOINT KNOB ON W7100
4
TO MINIMUM POSITION. USE OF THE S963B1086 WILL CHANGE SETPOINT RANGE TO 40 TO 140°F.
GROUND CASE OF REMOTE SETPOINT POTENTIOMETER TO PREVENT PROBLEMS DUE TO STATIC ELECTRICITY.
5
WHEN CHANGEOVER TERMINALS 9 AND 10 ARE USED ON HEAT/COOL MODELS, JUMPER TERMINALS 9 AND 10 TO CHANGE OVER TO
6
HEATING (LOCKS OUT COOLING WHEN JUMPERED).
WHEN ECONOMIZER IS NOT USED, JUMPER TERMINALS Y AND 9 WITH THE 510 OHM, 1/4 WATT, 5 PERCENT RESISTOR CONTAINED
7
IN THE 4074EFV BAG ASSEMBLY.
8
REMOVE FACTORY INSTALLED 400 OHM RESISTOR JUMPER AND RECONNECT FOR COOLING-ONLY MODE, 4-STAGE OPERATION
(CHANGE VALUE FOR OTHER NUMBER OF STAGES). FOR 2-STAGES IN HEATING MODE, USE 200 OHM, 1/8 WATT RESISTOR FOR
BEST OPERATION.
Fig. 48 illustrates the wiring connections for the W7100C
Discharge Air Controller.
Fig. 49 and Table 5 on page 43 illustrate the wiring and
configuration of the T775L controller.
(MAKE ON TEMP. DROP)R822N RELAY (1K)
BR
T675A HEAT/COOL SWITCH
CHANGEOVER
W
R822N RELAY (2K)
GND
TR
TR
W
R
B
Y
10
9
8
7
6
T
T1
P
P1
5
4
3
2
1
24VAC
ECONO
CHANGE
OVER
STAGES
RESET
SENSOR
REMOTE
SETPOINT
SATELLITE
SETPOINT °F
RESET °F
COOL
HEAT
CONTROL BAND
HEAT 1
HEAT 2
COOL 4
COOL 3
COOL 2
°F
COOL 1
W7100C DISCHARGE AIR CONTROLLER
B
C
A
B
C
A
B
C
A
B
C
A
B
C
A
B
C
A
HEAT 1
HEAT 2
COOL 4
COOL 3
COOL 2
COOL 1
POWER
SUPPLY
M28017
Fig. 48. W7100C wiring connections (pre-existing control).
NOTE: The T775L Replacement for W7100C Discharge Air Controller continues on the next page.
41 63-7147—05
Page 42

T775 SERIES 2000 ELECTRONIC STAND-ALONE CONTROLLERS
T775L Replacement for W7100C Discharge Air Controller (continued)
SENSO R A (C7100D1001)
SENSOR B (SPACE OR OUT DOOR T EMPER ATURE)
T
T
T775L T775S
NO
C
NC
RELAY
2
COM
NO
120
3
COM
COM
NO
RELAY
3
NC
C
NO
(HEAT/COOL CHANGEOVER)
2
L1
(HOT)
L2
DIGITAL INPUT
T6031 OR T675A
24 VAC
COOL 2
HEAT
1
HEAT
2
COOL 1
Fig. 49. T775L wiring connections for replacing a W7100C Discharge Air Controller.
COM
NO
NO
COM
T
T
1
–
+
–
+
4
C
+
RELAY
4
NC
C
NO
NO
C
NC
RELAY
1
T775 BUS TERMINALS PROVIDE WIRING CONNECTIONS TO/FROM T775L AND T775S.
1
SETUP T HE CON TROL (T6031 OR T 765) SO TH AT IT CLOSES ON A TEMPER ATURE FALL .
2
POWER WITH 24 VAC OR 120/240 VAC AT THE APPROPRIATE TERMINAL BLOCK.
3
24 VAC POWER TERMINAL BLOCK.
4
NOTE: Fig. 49 is for wiring purposes only. A thorough review
of the existing W7100C application is required in
order to determine the capability of the T775
controller replacement.
1
–
+
4
C
240
NO
COM
+
RELAY
8
NC
C
NO
NO
NC
RELAY
5
RELAY
7
NC
C
NO
C
NO
C
NC
RELAY
6
120
COM
240
NO
COM
3
120 VAC
COOL 4
COOL 3
M28018
NOTE: The T775L Replacement for W7100C Discharge Air Controller continues on the next page.
63-7147—05 42
Page 43

T775 SERIES 2000 ELECTRONIC STAND-ALONE CONTROLLERS
T775L Replacement for W7100C
In this replacement application, the T775L provides the
following, as described in Table 5:
Discharge Air Controller (continued)
Table 5. T775L Replacement for W7100C.
W7100C
Component/Function
Sensor C7100
Economizer M955, Q209A, and H705 The T775L can not provide a direct economizer function. However, an
Heat/Cool switch
changeover
Setpoint and Reset • Setpoint and Reset dial Reset programming in the T775L provides the reset curve.
Control Band Control Band dial Set the programmable Throttling Range parameter to match the
Satellite (if used) W7101A (if used) By adding up to two T775S Expansion modules, you have up to 12
Discharge Air Controller T775L Replacement
Sensor A - C7100D1001
T7047C1025 and S963B1037
T675A Connect the Digital Input terminal to an outdoor temperature control,
• S963B1078 or S963B1086 Remote setpoint adjustment is not possible.
• S963B1037 and
T7047C1025
Sensor B - Standard 1097 Ohm temperature sensor; space or outdoor
See “Temperature Sensors” on page 3.
output relay can be used to enable a separate economizer module
(e.g., W7212) to provide economization.
e.g. T6031 or T675A).
Program the Digital Input for Setback using -40° F (-40° C) for the
T675A cooling setpoint to lock out the cooling system during cold
weather.
NOTES: 1. Reset can be used for Heating or Cooling, but not both.
2. Remote adjustment of the reset curve is not possible.
application.
relays available.
43 63-7147—05
Page 44

63-7147—05 44
T775 CROSS REFERENCE
Table 6 lists the manufacturers in the following order:
• Johnson (System 350) — beginning on page page 44.
• Honeywell — beginning on page 45.
Table 6. Cross Reference.
Recommended
Temperature ° F/
Old
Control Manufacturer
NOTE: For all T775 Series 2000 Controllers, the Setpoint Temperature Range is -40° to 248° F (-40° to 120° C).
A350A/B Johnson T775A2009 Johnson model: 1 SPDT temperature
A350A/B with
1 S350
A350A/B with
up to 3 S350s
A350A/B with
more than 3
S350s
A350P Johnson T775M2006 Johnson model: 1 mod temperature
A350P with
up to 2 S350s
A350P with
up to 4 S350s
A350R with
up to 3 S350s
A350S with
up to 4 S350s
A350P with
A350R
A350P with
A350R and
multiple
S350s
R353 with
S353s
W351A Johnson T775U2006 Johnson model: 1 SPDT humidity
Johnson T775B2032 Johnson model: Multiple SPDT temperature
Johnson T775B2040 Johnson model: Multiple SPDT temperature
Johnson T775B2040 plus
Johnson T775M2048 Johnson model: 1 mod temperature with relays
Johnson T775M2030 Johnson model: 1 mod temperature with relays
Johnson T775R2001 or
Johnson T775R2001 or
Johnson T775R2043 Johnson model: 1 mod temperature with reset
Johnson T775R2027 or
Johnson T775L2007 or
Humidity
Range (RH)
Switch
Action
Cap
Length
Honeywell
Electromechanical
Replacement
Johnson System 350
• Johnson (Mechanical) — beginning on page 49.
• White Rogers — beginning on page 51.
• Barber Colman — beginning on page 52.
• Ranco — beginning on page 53.
• Tekmar — beginning on page 54
Recommended
Honeywell
Well #
(Order Sep.)
Honeywell
Electronic
Replacement
additional T775Bs as
needed.
T775R2035
T775R2035
T775R2019
T775P2003
Honeywell
Well #
(Order Sep.) Comments
Johnson model: Multiple SPDT temperature
Johnson model: Mod temperature with reset and
SPDTs
Johnson model: Mod temperature with reset and
SPDTs
Johnson model: 1 mod temperature with reset
and SPDTs
Johnson model: Sequenced relays
T775 SERIES 2000 ELECTRONIC STAND-ALONE CONTROLLERS
Page 45

Table 6. Cross Reference. (Continued)
Recommended
Honeywell
Electronic
Replacement
Honeywell
Well #
(Order Sep.) Comments
Old
Control Manufacturer
W351A with 1
Johnson T775U2006 Johnson model: 2 SPDT humidity
Temperature ° F/
Humidity
Range (RH)
Switch
Action
Cap
Length
Recommended
Honeywell
Electromechanical
Replacement
Honeywell
Well #
(Order Sep.)
S351
W351P Johnson T775U2006 Johnson model: 1 mod humidity
P352 Johnson T775U2006 Johnson model: 1 mod pressure
P352 with up
Johnson T775U2006 Johnson model: 1 mod pressure with 2 SPDT
to 2 S352s
Any system
with D350
Any system
with Y350
Johnson See comment. All T775 Series 2000 controllers have an LCD
display
Johnson See comment. All T775 Series 2000 controllers can accept 24
Vac, 120/240 Vac
A319 Johnson T775A2009 Johnson model: 1 SPDT with no display
A419 Johnson T775A2009 Johnson model: 1 SPDT with small display
Honeywell
H775A1006 Honeywell 5 to 95% RH 1-SPDT T775U2006 5001774-001
45 63-7147—05
H775A1022 Honeywell 5 to 95% RH 2-SPDT T775U2006 5001774-001
H775A1048 Honeywell 5 to 95% RH 3-SPDT T775U2006 5001774-001 T775U has only 2 relays
H775A1063 Honeywell 5 to 95% RH 4-SPDT T775U2006 5001774-001 T775U has only 2 relays
H775B1005 Honeywell 5 to 95% RH 2-SPDT T775U2006 5001774-001
H775C1004 Honeywell 5 to 95% RH 4-SPDT T775U2006 5001774-001 T775U has only 2 relays
H775D1003 Honeywell 5 to 95% RH 2-SPDT T775U2006 5001774-001
H775E1002 Honeywell 5 to 95% RH 2-SPDT T775U2006 5001774-001
T4031A1008 Honeywell -30 to 50 SPST 5 ft. T775A2009 5001774-001
T4031A1016 Honeywell -30 to 50 SPST 5 ft. T775A2009 5001774-001
T4031A1073 Honeywell -30 to 90 SPST 8 ft. T775A2009 5001774-001
T4031C1004 Honeywell 40 to 180 SPST 7.5 ft. T775A2009 5001774-001
T4031C1012 Honeywell 40 to 180 SPST 5.5 ft. T775A2009 5001774-001
T4031E1009 Honeywell 40 to 180 SPST 5.5 ft. T775A2009 5001774-001
T4031F1007 Honeywell 40 to 180 SPST 5.5 ft. T775A2009 5001774-001
T4031H1003 Honeywell 35 to 45 SPST 5.5 ft. T775A2009 5001774-001
T4031J1016 Honeywell 35 to 45 SPST 5.5 ft. T775A2009 5001774-001
T475A1016 Honeywell 70 to 140 SPST 10/30 ft. T775R2035 5001774-001 The T775R is a Reset controller
T475A1032 Honeywell 70 to 140 SPST 10/30 ft. T775R2035 5001774-001 The T775R is a Reset controller
T475A1057 Honeywell 70 to 140 SPST 10/30 ft. T775R2035 5001774-001 The T775R is a Reset controller
T775 SERIES 2000 ELECTRONIC STAND-ALONE CONTROLLERS
Page 46

63-7147—05 46
Temperature ° F/
Old
Control Manufacturer
Humidity
Range (RH)
Switch
Action
Cap
Length
Table 6. Cross Reference. (Continued)
Recommended
Honeywell
Electromechanical
Replacement
Honeywell
Well #
(Order Sep.)
Recommended
Replacement
Honeywell
Electronic
Honeywell
Well #
(Order Sep.) Comments
T6031A1011 Honeywell 15 to 90 SPDT 5 ft. T775A2009 5001774-001
T6031A1029 Honeywell -30 to 90 SPDT 8 ft. T775A2009 5001774-001
T6031A1045 Honeywell -30 to 50 SPDT 5 ft. T775A2009 5001774-001
T6031A1052 Honeywell -30 to 50 SPDT 5 ft. T775A2009 5001774-001
T6031A1060 Honeywell -30 to 90 SPDT 20 ft. T775A2009 5001774-001
T6031A1086 Honeywell -31 to 86 SPDT 8 ft. T775A2009 5001774-001
T6031A1136 Honeywell -30 to 90 SPDT 8 ft. T775A2009 5001774-001
T6031A1250 Honeywell -20 to 100 SPDT 5 ft. T775A2009 5001774-001
T6031C1009 Honeywell 40 to 180 SPDT 5.5 ft. T775A2009 5001774-001
T6031C1025 Honeywell 0 to 90 SPDT 5.5 ft. T775A2009 5001774-001
T6031C1033 Honeywell 40 to 80 SPDT 5.5 ft. T775A2009 5001774-001
T6031C1041 Honeywell 41 to 176 SPDT 5.5 ft. T775A2009 5001774-001
T6031C1058 Honeywell 100 to 240 SPDT 5 ft. stainless T775A2009 5001774-001 Use stainless well
T6031D1007 Honeywell 40 to 180 SPDT 7.5 ft.
T775A2009 5001774-001 Protect sensor wires
armored
T6031D1015 Honeywell 40 to 180 SPDT 5.5 ft. T775A2009 5001774-001
T6031D1031 Honeywell 0 to 70 SPDT 5.5 ft. T775A2009 5001774-001
T6031D1049 Honeywell 30 to 270 SPDT 5.5 ft. T775A2009 5001774-001
T6031E1004 Honeywell 40 to 180 SPDT 5.5 ft. T775A2009 5001774-001
T6031F1010 Honeywell 55 to 90 SPDT 5.5 ft. T775A2009 5001774-001
T6031G1000 Honeywell 0 to 90 SPDT 6 ft. T775A2009 5001774-001
T6031J1003 Honeywell 55 to 85 SPDT 5.5 ft. T775A2009 5001774-001
T6031K1001 Honeywell 15 to 75 SPDT 5.5 ft. T775A2009 5001774-001
T675A1045 Honeywell 0 to 100 SPDT 20 ft.
T775A2009 5001774-001 Use stainless well
stainless
T675A1102 Honeywell 160 to 260 SPDT 20 ft. T775A2009 5001774-001
T675A1136 Honeywell 0 to 100 SPDT 20 ft. T775A2009 5001774-001
T675A1243 Honeywell 167 to 257 SPDT 5 ft. T775A2009 5001774-001
T675A1425 Honeywell 55 to 175 SPDT 20 ft. T775A2009 5001774-001
T675A1441 Honeywell 55 to 175 SPDT 20 ft.
T775A2009 5001774-001 Use stainless well
stainless
T675A1458 Honeywell 55 to 175 SPDT 5 ft. T775A2009 5001774-001
T675A1508 Honeywell 0 to 100 SPDT 5 ft. T775A2009 5001774-001
T775 SERIES 2000 ELECTRONIC STAND-ALONE CONTROLLERS
Page 47

Table 6. Cross Reference. (Continued)
Recommended
Honeywell
Electronic
Replacement
Honeywell
Well #
(Order Sep.) Comments
Old
Control Manufacturer
Temperature ° F/
Humidity
Range (RH)
Switch
Action
Cap
Length
Recommended
Honeywell
Electromechanical
Replacement
Honeywell
Well #
(Order Sep.)
T675A1516 Honeywell 0 to 100 SPDT 5 ft. T775A2009 5001774-001
T675A1524 Honeywell 55 to 175 SPDT 20 ft. T775A2009 5001774-001
T675A1532 Honeywell 160 to 260 SPDT 5 ft. T775A2009 5001774-001
T675A1540 Honeywell 55 to 175 SPDT 5 ft. T775A2009 5001774-001
T675A1565 Honeywell 0 to 100 SPDT 20 ft. T775A2009 5001774-001
T675A1706 Honeywell 0 to 100 SPDT 5 ft. T775A2009
Fast response; Clip Capacitor
+ C7100D1001
T675A1722 Honeywell 55 to 175 SPDT 5 ft. T775A2009
Fast response; Clip Capacitor
+ C7100D1001
T675A1771 Honeywell 55 to 175 SPDT 5 ft. T775A2009
Fast response; Clip Capacitor
+ C7100D1001
T675A1854 Honeywell 10 to 110 SPDT 5 ft. T775A2009
Fast response; Clip Capacitor
+ C7100D1001
T675B1002 Honeywell 30 to 50 SPDT 10 ft. T775A2009 5001774-001 Add S445A1010 to convert T775 to manual reset
47 63-7147—05
T675B1010 Honeywell 30 to 50 SPDT 20 ft. T775A2009 5001774-001 Add S445A1010 to convert T775 to manual reset
T675B1028 Honeywell -20 to 50 SPDT 10 ft. T775A2009 5001774-001 Add S445A1010 to convert T775 to manual reset
T675B1032 Honeywell 80 to 220 SPDT 10 ft. T775A2009
Averaging
+ 50021579-001 (x3)
or
+ C7031J2009
or
+ C7100D1001
T678A1015 Honeywell 0 to 100 2-SPDT 20 ft. T775B2032 5001774-001
T678A1080 Honeywell 160 to 260 2-SPDT 5 ft. T775B2032 5001774-001
T678A1163 Honeywell 5 to 95 2-SPDT 20 ft. T775B2032 5001774-001
T678A1361 Honeywell 55 to 175 2-SPDT 20 ft. T775B2032 5001774-001
T678A1437 Honeywell 0 to 100 2-SPDT 5 ft. T775B2032 5001774-001
T678A1445 Honeywell 55 to 175 2-SPDT 5 ft. T775B2032 5001774-001
T775A1001 Honeywell -20 to 240 1-SPDT T775A2009
T775A1019 Honeywell -20 to 240 2-SPDT T775B2032
T775A1027 Honeywell -20 to 240 3-SPDT T775B2040
T775A1035 Honeywell -20 to 240 4-SPDT T775B2040
T775A1068 Honeywell 55 to 175 2-SPDT T775B2040 5001774-001
T775B1000 Honeywell -20 to 240 2-SPDT T775B2032
T775 SERIES 2000 ELECTRONIC STAND-ALONE CONTROLLERS
Page 48

63-7147—05 48
Table 6. Cross Reference. (Continued)
Recommended
Honeywell
Well #
(Order Sep.)
Old
Control Manufacturer
Temperature ° F/
Humidity
Range (RH)
Switch
Action
Cap
Length
Honeywell
Electromechanical
Replacement
T775B1018 Honeywell -20 to 240 3-SPDT T775B2040
T775B1026 Honeywell -20 to 240 4-SPDT T775B2040
T775B1042 Honeywell -20 to 220 4-SPDT T775B2040
T775C1009 Honeywell -20 to 240 4-SPDT T775B2024
T775D1008 Honeywell -20 to 240 4-SPDT T775B2024
T775E1015 Honeywell -20 to 220 1-SPDT T775M2048
T775E1023 Honeywell -20 to 220 2-SPDT T775M2048
T775E1056 Honeywell -20 to 220 1-SPDT T775M2048
T775E1064 Honeywell -20 to 220 2-SPDT T775M2048
T775E1098 Honeywell -20 to 220 1-SPDT T775M2048
T775E1114 Honeywell -20 to 220 3-SPDT T775M2030
T775F1022 Honeywell -20 to 220 3-SPDT T775M2030
T775F1055 Honeywell -20 to 220 3-SPDT T775M2030
T775F1089 Honeywell -20 to 220 3-SPDT T775M2030
T775G1005 Honeywell -20 to 220 3-SPDT T775M2014
T775G1013 Honeywell -20 to 220 3-SPDT T775M2014
T775G1021 Honeywell -20 to 220 3-SPDT T775M2014
T775G1039 Honeywell -20 to 220 4-SPDT T775M2014
T775J1001 Honeywell -20 to 240 1-SPDT T775R2035
T775J1019 Honeywell -20 to 240 None T775R2043
T775J1027 Honeywell -20 to 240 None T775R2043
T775J1035 Honeywell -20 to 240 None T775R2043
T775J1043 Honeywell -20 to 240 1-SPDT T775R2027
T775J1050 Honeywell -20 to 240 1-SPDT T775R2027
T775J1068 Honeywell -20 to 240 1-SPDT T775R2027
T775J1076 Honeywell -20 to 240 2-SPDT T775R2035
Recommended
Honeywell
Electronic
Replacement
T775 SERIES 2000 ELECTRONIC STAND-ALONE CONTROLLERS
Honeywell
Well #
(Order Sep.) Comments
Page 49

Table 6. Cross Reference. (Continued)
Recommended
Honeywell
Electronic
Replacement
Honeywell
Well #
(Order Sep.) Comments
Old
Control Manufacturer
Temperature ° F/
Humidity
Range (RH)
Switch
Action
Cap
Length
Recommended
Honeywell
Electromechanical
Replacement
Honeywell
Well #
(Order Sep.)
Johnson (Mechanical)
A19ABA-40 Johnson -30 to 100 SPST No cap T4031A1073 1/2” - 123869A T775A2009 5001774-001
3/4” - 123870A
A19ABC-4 Johnson 50 to 130 SPDT 8 ft. T675A1425 1/2” - 112622AA T775A2009 5001774-001
3/4” - 112630AA
A18ABC-24 Johnson -30 to 100 SPDT 8 ft. T6031A1136 1/2” - 123869A T775A2009 5001774-001
3/4” - 123870A
A19ABC-36 Johnson -30 to 100 SPDT 20 ft. T6031A1060 1/2” - 123869A T775A2009 5001774-001
3/4” - 123870A
A19ABC-37 Johnson -30 to 100 SPDT 10 ft. T6031A1060 1/2” - 123869A T775A2009 5001774-001
3/4” - 123870A
A19ACC-4 Johnson 0 to 80 SPDT 6 ft. T6031A1136 1/2” - 123869A T775A2009 5001774-001
49 63-7147—05
3/4” - 123870A
A19AAD-5 Johnson 30 to 50 SPST 6 ft. None None T775A2009 5001774-001
A19AAD-12 Johnson -30 to 50 SPST 7 ft. T6031A1136 1/2” - 123869A T775A2009 5001774-001
3/4” - 123870A
A19AAF-12 Johnson 25 to 225 SPDT 10 ft. None 1/2” - 123869A T775A2009 5001774-001
3/4” - 123870A
A19AAF-20 Johnson -30 to 100 SPDT 6 ft. T6031A1136 1/2” - 123869A T775A2009 5001774-001
3/4” - 123870A
A19AAF-21 Johnson 40 to 90 SPDT 6 ft. T6031A1136 1/2” - 123869A T775A2009 5001774-001
3/4” - 123870A
A19ACA-14 Johnson -30 to 100 SPST 6 ft. L480G1044
None T775A2009 5001774-001 Add S445A1010 to convert T775 to manual reset
(20 to 60° F)
A19ACA-15 Johnson -30 to 100 SPST 10 ft. L480G1044 None T775A2009 5001774-001 Add S445A1010 to convert T775 to manual reset
A19ADB-1 Johnson 100 to 240 SPST 6 ft. L4008E1156
(110 to 290° F)
A19AAB-4 Johnson 30 to 110 SPST 6 ft. T675A1425
(55 to 175° F)
A19AAC-9 Johnson 100 to 240 SPDT 6 ft. L6008A1192 121371L
121371L
T775A2009 5001774-001 Add S445A1010 to convert T775 to manual reset
(3 in. insulation)
1/2” - 112622AA T775A2009 5001774-001
3/4” - 112630AA
T775A2009 5001774-001
(3 in. insulation)
A28AA-8 Johnson -30 to 50 2-SPDT 6 ft. T678A1437
(0 to 110° F)
1/2” - 112622AA T775B2032 5001774-001 T678 has no weatherproof enclosure
3/4” - 112630AA
T775 SERIES 2000 ELECTRONIC STAND-ALONE CONTROLLERS
Page 50

63-7147—05 50
Temperature ° F/
Old
Control Manufacturer
Humidity
Range (RH)
Switch
Action
Cap
Length
Table 6. Cross Reference. (Continued)
Recommended
Honeywell
Electromechanical
Replacement
Honeywell
Well #
(Order Sep.)
Recommended
Replacement
Honeywell
Electronic
Honeywell
Well #
(Order Sep.) Comments
A28AA-9 Johnson 20 to 80 2-SPDT 6 ft. T678A1437 1/2” - 112622AA T775B2032 5001774-001 T678 has no weatherproof enclosure
3/4” - 112630AA
A28AA-28 Johnson 30 to 110 2-SPDT 6 ft. T678A1478
(fast response)
None T775B2032
+ 50021579-001 (x3)
5001774-001 T678 has no weatherproof enclosure
or
+ C7031J2009
or
+ C7100D1001
A28AA-29 Johnson -30 to 110 2-SPDT 8 ft. T678A1627
(0 to 100° F)
A28AA-36 Johnson 40 to 90 2-SPDT 6 ft. T678A1437
(0 to 100° F)
A28AA-37 Johnson 60 to 140 2-SPDT 6 ft. T678A1445
(55 to 175° F)
A28AJ-4 Johnson 20 to 80 2-SPDT 6 ft. T678A1437
(0 to 100° F)
A28KA-1 Johnson 0 to 150 2-SPDT 10 ft. T678A143
(0 to 100° F)
or
1/2” - 112622AA T775B2032 5001774-001 T678 has no weatherproof enclosure
3/4” - 112630AA
1/2” - 112622AA T775B2032 5001774-001 T678 has no weatherproof enclosure
3/4” - 112630AA
1/2” - 112622AA T775B2032 5001774-001 T678 has no weatherproof enclosure
3/4” - 112630AA
1/2” - 112622AA T775B2032 5001774-001 T678 has no weatherproof enclosure
3/4” - 112630AA
1/2” - 112622AA T775B2024 5001774-001 T678 has no weatherproof enclosure
3/4” - 112630AA
T678A1445
(55 to 175° F)
A28MA-1 Johnson 40 to 120 2-SPDT 6 ft. T678A1437
(0 to 100° F)
or
1/2” - 112622AA T775B2024 5001774-001 T678 has no weatherproof enclosure
3/4” - 112630AA
T678A1445
(55 to 175° F)
A28MA-2 Johnson 40 to 120 2-SPDT 6 ft. T678A1437
(0 to 100° F)
or
1/2” - 112622AA T775B2024 5001774-001 T678 has no weatherproof enclosure
3/4” - 112630AA
T678A1445
(55 to 175° F)
A36AHA-50 Johnson 55 to 95 4-SPDT 18 in. None 112620BB T775B2040 5001774-001
A36AHA-52 Johnson 55 to 95 4-SPDT 6 ft. None 112620BB T775B2040 5001774-001
A36AHA-58 Johnson 0 to 70 4-SPDT 15 ft. None 112620BB T775B2040 5001774-001
A36AHB-33 Johnson 0 to 70 4-SPDT 15 ft. None 112620BB T775B2040 5001774-001
A80ABA-1 Johnson -20 to 50 135 Ohm 6 ft. T991A2044 121371Q T775M2048 5001774-001 T991 has 5 ft. cap; other models available
A80ABA-2 Johnson 10 to 90 135 Ohm 6 ft. T991A1426 112622AA T775M2048 5001774-001 T991 has 5 ft. cap; other models available
T775 SERIES 2000 ELECTRONIC STAND-ALONE CONTROLLERS
Page 51

Table 6. Cross Reference. (Continued)
Recommended
Honeywell
Electronic
Replacement
Honeywell
Well #
(Order Sep.) Comments
Old
Control Manufacturer
Temperature ° F/
Humidity
Range (RH)
Switch
Action
Cap
Length
Recommended
Honeywell
Electromechanical
Replacement
Honeywell
Well #
(Order Sep.)
A80ABA-3 Johnson 60 to 140 135 Ohm 6 ft. T991A1244 121371Q T775M2048 5001774-001 T991 has 5 ft. cap; other models available
A80ABA-4 Johnson 120 to 200 135 Ohm 6 ft. T915C1928 112622AA T775M2048 5001774-001 T915 has 5 ft. cap; other models available
A80ABA-5 Johnson 190 to 260 135 Ohm 6 ft. T991A1061 112622AA T775M2048 5001774-001
A80ABA-22 Johnson 85 to 245 135 Ohm 6 ft. T915D1273 112622AA T775M2048 5001774-001
A80ACA-1 Johnson 60 to 140 135 Ohm 6 ft. None — T775M2048
A80ACA-7 Johnson 10 to 90 135 Ohm 6 ft. None None T775M2048
A80ADA-1 Johnson 10 to 90 135 Ohm 6 ft. None None T775M2048
A80ADA-2 Johnson 60 to 140 135 Ohm 6 ft. None T775M2048
White Rodgers
1609-90 White Rodgers -20 to 50 SPST 8 ft. T4031A1073 1/2” - 123869A T775A2009 5001774-001
3/4” - 123870A
1609-101 White Rodgers -30 to 90 SPST 5 ft. T4031A1073 1/2” - 123869A T775A2009 5001774-001
51 63-7147—05
3/4” - 123870A
1609-102 White Rodgers -30 to 90 SPST 8 ft. T4031A1073 1/2” - 123869A T775A2009 5001774-001
3/4” - 123870A
1609-103 White Rodgers -30 to 90 SPST 10 ft. T4031A1073
(8 ft. cap)
1/2” - 123869A T775A2009 5001774-001
3/4” - 123870A
1609-104 White Rodgers -30 to 90 SPST 20 ft. T6031A1060 1/2” - 123869A T775A2009 5001774-001
3/4” - 123870A
1609-105 White Rodgers -30 to 90 SPST 5 ft. T4031A1073 1/2” - 123869A T775A2009 5001774-001
3/4” - 123870A
1609-106 White Rodgers -30 to 90 SPST 5 ft. T675A1706
None T775A2009 5001774-001 Fast response element
(0 to 100° F° F)
1609-114 White Rodgers 20 to 90 SPST 8 ft. T4031A1073 1/2” - 123869A T775A2009 5001774-001
3/4” - 123870A
1687-9 White Rodgers -30 to 90 SPST 8 ft. T6031A1136 1/2” - 123869A T775A2009 5001774-001
3/4” - 123870A
2A38-14 White Rodgers 20 to 120 SPDT 20 ft. T675A1565
(0 to 100° F)
230-22 White Rodgers 20 to 120 SPST 8 ft. T4031A1004
(40 to 180° F)
1/2” - 112622AA T775A2009 5001774-001
3/4” - 112630AA
1/2” - 123869A T775A2009 5001774-001
3/4” - 123870A
T775 SERIES 2000 ELECTRONIC STAND-ALONE CONTROLLERS
Page 52

63-7147—05 52
Temperature ° F/
Old
Control Manufacturer
Humidity
Range (RH)
Switch
Action
Cap
Length
230-22 White Rodgers 20 to 120 SPST 8 ft. T4031A1004
Table 6. Cross Reference. (Continued)
Recommended
Honeywell
Electromechanical
Replacement
Honeywell
Well #
(Order Sep.)
Recommended
Replacement
1/2” - 123869A T775A2009 5001774-001
(40 to 180° F)
3/4” - 123870A
Honeywell
Electronic
Honeywell
Well #
(Order Sep.) Comments
241-2 White Rodgers 20 to 90 SPST 8 ft. T4031A1073 1/2” - 123869A T775A2009 5001774-001
3/4” - 123870A
241-16 White Rodgers 20 to 90 SPST 8 ft. T4031A1073 1/2” - 123869A T775A2009 5001774-001
3/4” - 123870A
445-6 White Rodgers 20 to 90 SPDT 5 ft. T6031A1136 1/2” - 123869A T775A2009 5001774-001
3/4” - 123870A
16A35-3 White Rodgers N/A SPST 7 ft. None None None None Ice-Trol
1050-1 White Rodgers Select T475
with correct ratio
1/2” - 121371 P T775R2035 The T775R is a Reset controller
3/4” - 121371Q
Barber Colman
TC282 Barber Colman 10 to 90 3-SPDT 6 ft. None 112620BB T775B2040
TC282-20 Barber Colman 10 to 90 3-SPDT 20 ft. None 112620BB T775B2040
TC288 Barber Colman 10 to 90 4-SPDT 6 ft. None 112620BB T775B2040
TC-4111 Barber Colman -40 to 120 SPDT 6 ft. T6031A1136
(-30 to 90° F)
TC-4111-020 Barber Colman -40 to 120 SPDT 20 ft. T6031A1136
(-30 to 90° F)
TC4112 Barber Colman 100 to 260 SPDT 6 ft. L6008A1192
1/2” - 123869A T775A2009
3/4” - 123870A
1/2” - 123869A T775A2009 5001774-001
3/4” - 123870A
121371A T775A2009
(100 to 240° F)
TC4115 Barber Colman -40 to 120 SPDT 6' T6031A1136
(-30 to 90° F)
1/2” - 123869A T775A2009
3/4” - 123870A
TC4151 Barber Colman 70 to 120 SPDT 30 ft. T475A1057 1/2” - 121371P T775R2035 5001774-001 The T775R is a Reset controller
3/4” - 121371Q
TC4152 Barber Colman 70 to 120 SPDT 30 ft. T475A1032 1/2” - 121371P T775R2035 The T775R is a Reset controller
3/4” - 121371Q
TC4211 Barber Colman -40 to 120 SPDT 6 ft. T678A1437
1/2” - 11262AA T775B2032
(0 to 100° F)
3/4” - 112630AA
TC4251 Barber Colman 70 to 120 SPDT 30 ft. None 1/2” - 112622AA T775R2035 5001774-001 The T775R is a Reset controller
3/4” - 112630AA
T775 SERIES 2000 ELECTRONIC STAND-ALONE CONTROLLERS
Page 53

Table 6. Cross Reference. (Continued)
Recommended
Honeywell
Electronic
Replacement
Honeywell
Well #
(Order Sep.) Comments
Old
Control Manufacturer
Temperature ° F/
Humidity
Range (RH)
Switch
Action
Cap
Length
Recommended
Honeywell
Electromechanical
Replacement
Honeywell
Well #
(Order Sep.)
TC4252 Barber Colman 70 to 120 SPDT 30 ft. T678B1006 1/2” - 112622AA T775R2035 5001774-001 The T775R is a Reset controller
3/4” - 112630AA
TC4316 Barber Colman -40 to 120 SPDT 6 ft. None — T775B2032 5001774-001
TC4416 Barber Colman -40 to 120 2-SPDT 6 ft. None None T775B2040 5001774-001
TC5131 Barber Colman 34 to 60 SPDT 20 ft. L480B1239 None T775A2009 5001774-001
TC5141 Barber Colman 34 to 60 SPDT 20 ft. L480G1044 None T775A2009 5001774-001 Add S445A1010 to convert T775 to manual reset
Ranco
ETC-111000 Ranco T775A2009
ETC-111100 Ranco T775M2048
ETC-112000 Ranco T775M2048
ETC-112100 Ranco T775M2048
ETC-141000 Ranco T775B2016
ETC-211000 Ranco T775B2932
53 63-7147—05
ETC-211100 Ranco T775M2048
ETC-212000 Ranco T775B2032
ETC-212100 Ranco T775M2048
ETC-24100 Ranco T775B2016
T775 SERIES 2000 ELECTRONIC STAND-ALONE CONTROLLERS
Page 54

Table 7. Cross Reference. (Continued)
Tekmar Model & T775 Cross
T775 SERIES 2000 ELECTRONIC STAND-ALONE CONTROLLERS
Features
Adjustable Minimum Off Time
Auto Differential
Boiler Demand
Built-in Display
Combustion Air or Alarm Contact
DHW Control
Digital Input for Setback or Disable
Equal Run Time
External Input 0-10Vdc or 2-10Vdc
First On / First Off Rotation
First On/ Last OFF Rotation
Fixed Last Rotation
Fixed Lead Rotation
150
O n e S t a g e
Setpoint Control
T775A2009
152
T w o S t a g e
Setpoint Control
T 7 7 5 B 2 0 3 2
256
O n e S t a g e
Boiler Control
T7775P2003 T775R2035
260
One Stage Boiler
& DHW Control
T7775P2003 T775R2035
262
Two Stage Boiler &
DHW Control
T7775P2003
264
O u r S t a g e
Boiler & DHW
Control
T775P2003
2 6 8
N i n e S t a g e
Boiler & DHW
Control
T775P2003 & (2)
T775S2008
use DI use DI
use DI use DI
use DI
use DI
Digital Output for
Alarm
Digital OutPut for
Alarm
Digital Output for
Alarm
Both
Digital Output for
Alarm
Both
Digital Output for
Alarm
Boiler Demand
Boiler Demand
Boiler Demand
Boiler Demand
Boiler Demand
Floating Output
Integral Voltage Options Type based
Irreversible High Set Point Limit
54 63-7147—05
Lo/ Hi or Hi/ Lo staging
Modulating Outputs (T775M2048) T775R2027 T775R2027
Nema 4x Models (T775B2016)
Optional Input Sensor
Outdoor Reset
Power Supply Voltage 20 to 28 Vac 24, 120, 240 Vac 20 to 28 Vac 24, 120, 240 Vac 24Vac 24, 120, 240 Vac 24, 120, 240 Vac 120 Vac 24, 120, 240 Vac 24, 120, 240 Vac 120 Vac 24, 120, 240 Vac 115 Vac 24, 120, 240 Vac 115 Vac 24, 120, 240 Vac
Pump Exercising
Pump Purging
PWM Mode
Relay Rating 24 Vac 24, 120, 240 Vac 24 Vac 24, 120, 240 Vac 24, 120, 240 Vac 24, 120, 240 Vac 24, 120, 240 Vac 24, 120, 240 Vac 24, 120, 240 Vac 24, 120, 240 Vac 24, 120, 240 Vac 24, 120, 240 Vac 24, 120, 230 Vac 24, 120, 240 Vac 24, 120, 230 Vac 24, 120, 240 Vac
Relay Outputs 1 SPDT 1 SPDT 2 SPST 2 SPDT 1 SPST 4 SPDT 2 SPDT 1 SPST 4 SPDT 2 SPDT 2 SPST 4 SPDT 4 SPST
Sensor Calibration
Type based
Type based
Type based
Type based
2
4 SPDT
9
12 SPDT
3
Sensor Inputs 1122232332533333
Sensor Type
Time Clock with Setback
Adjustable Interstage Delay
Warm Weather Shut Down
1
can be configured with up to two T775S expansion modules for a maximum of 12 stages
2
if staging 4 relays and a pump output add one T775S2008 expansion module
3
if staging 9 relays and a pump output add two T775S2008 expansion modules
Ω at 77°F 1097Ω at 77°F 10kΩ at 77°F 1097Ω at 77°F 10kΩ at 77°F 1097Ω at 77°F 1097Ω at 77°F 10kΩ at 77°F 1097Ω at 77°F 1097Ω at 77°F 10kΩ at 77°F 1097Ω at 77°F 10kΩ at 77°F 1097Ω at 77°F 10kΩ at 77°F 1097Ω at 77°F
10k
need external timer
(tekmar Timer 031)
need external timer
(tekmar Timer 031)
need external timer
(tekmar Timer 031)
need external timer
(tekmar Timer 031)
need external timer
(tekmar Timer 031)
Page 55

NOTES
55 63-7147—05
Page 56

Automation and Control Solutions
Honeywell International Inc.
1985 Douglas Drive North
Golden Valley, MN 55422
Honeywell Limited-Honeywell Limitée
35 Dynamic Drive
Toronto, Ontario M1V 4Z9
customer.honeywell.com
® U.S. Registered Trademark
© 2010 Honeywell International Inc.
63-7147—05 M.S. Rev. 10-10
Printed in U.S.A.
 Loading...