

Page 1
INSTALLATION AND
OPERATING INSTRUCTIONS
T7560H SETPOINT SELECTOR
Auto
DESCRIPTION
The T7560H setpoint selector measures the room temperature
and transfers the measured values to the heating system controller.
The operating mode keys allow you to select the operating mode
and timer program and to activate and deactivate the lock.
By means of the setting wheel, you can adjust the desired temperature by ± 7 °C and also the time settings in order to adjust
the timer program to your needs.
The T7560H is compatible with the following control systems:
• MCR 35, 36, 200*
• DHC 23
• Excel 500
* not for MCR 200-61 large installation and MCR 200-62
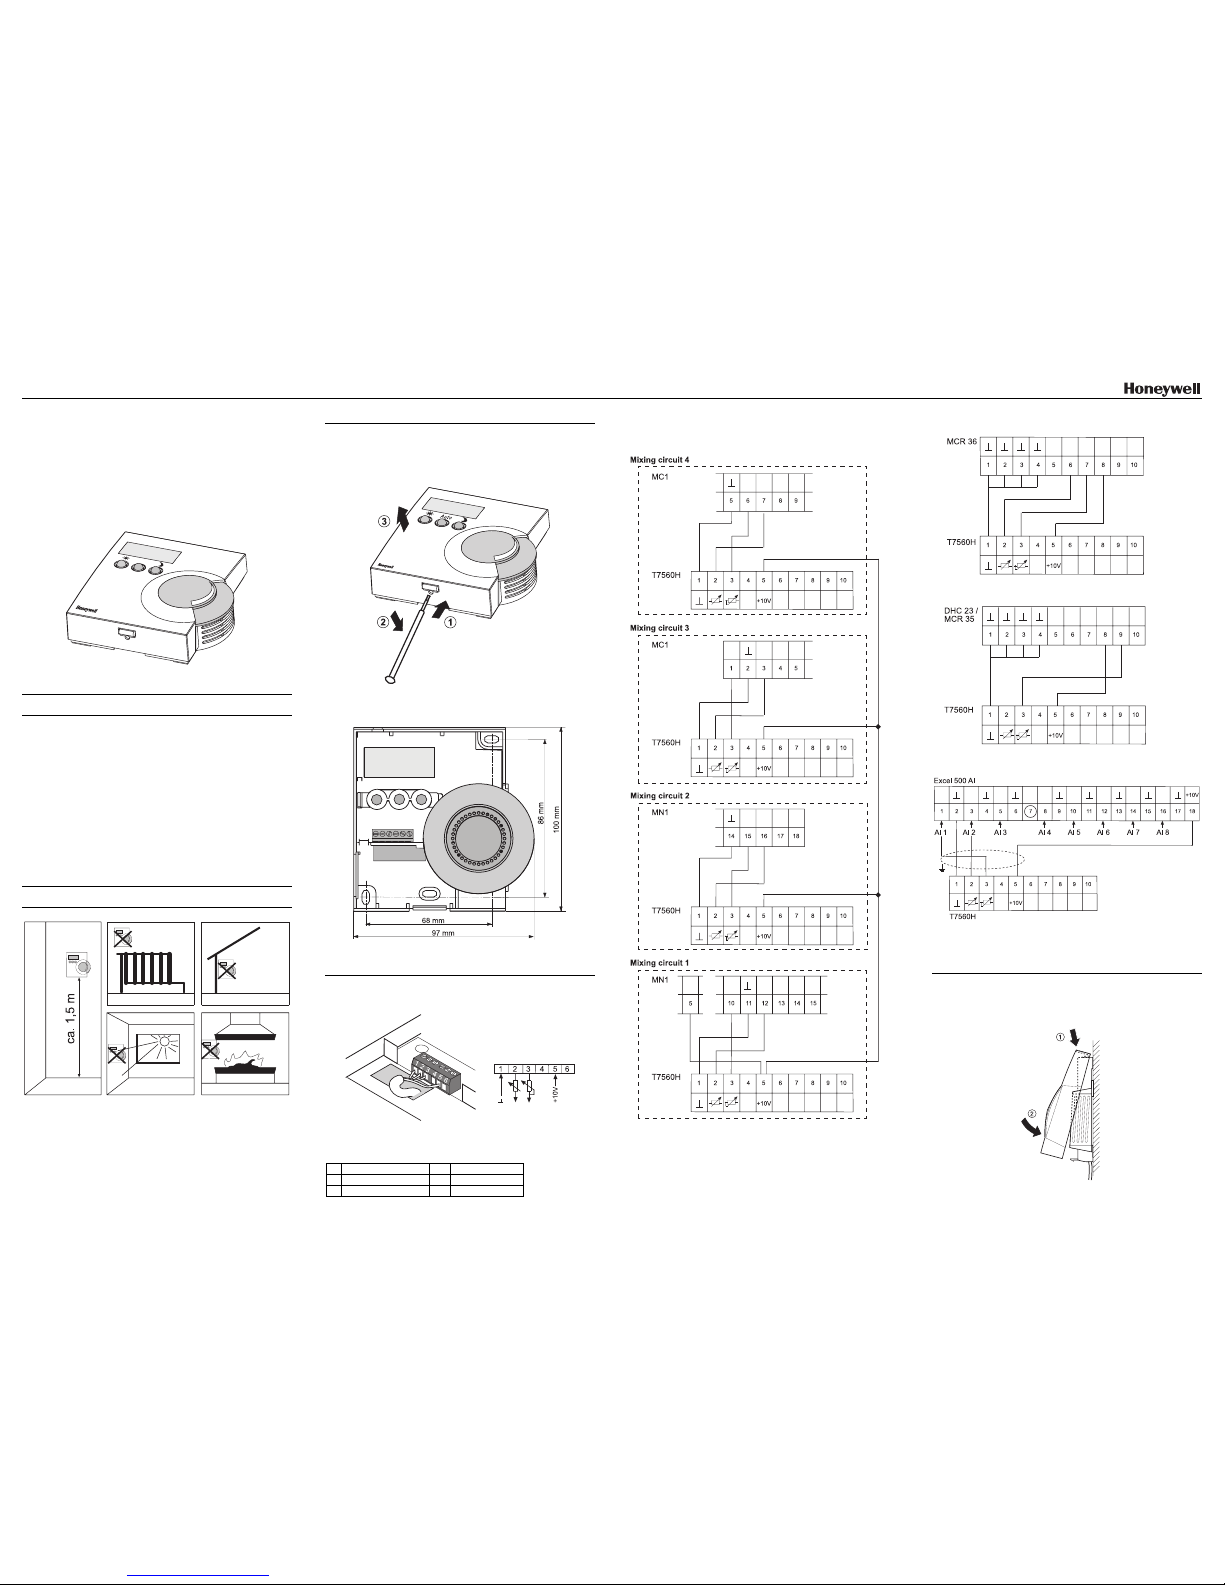
INSTALLATION
Figure 1: Installation
Mounting of housing
1. Place a screwdriver in the recess at the base of the housing.
2. Carefully pull the opening strap outwards.
3. Remove the housing cover upwards.
Figure 2: Removing of housing cover
4. Screw setpoint selector onto the wall.
Figure 3: Drill holes and housing dimensions
Wiring diagram
– Connect the cable coming from the controller.
Figure 4: Wiring diagram
Wiring of the terminals:
1 GND 4 not used
2 Room sensor 5 + 10 V
3 Setpoint 6 not used
Connection to MCR 200-45
For other controllers, please refer to the respective controller
instructions.
Connection to MCR 36
Connection to DHC 23 or MCR 35
Connection to Excel 500
XF 521 A analog input module
Desired temperature to AI 1
Room temperature sensor to AI 2
Closing of housing
– Return cover to housing by placing top edge against back-
plate and snap lower part of cover onto housing.
Figure 5: Returning cover to housing
Page 2
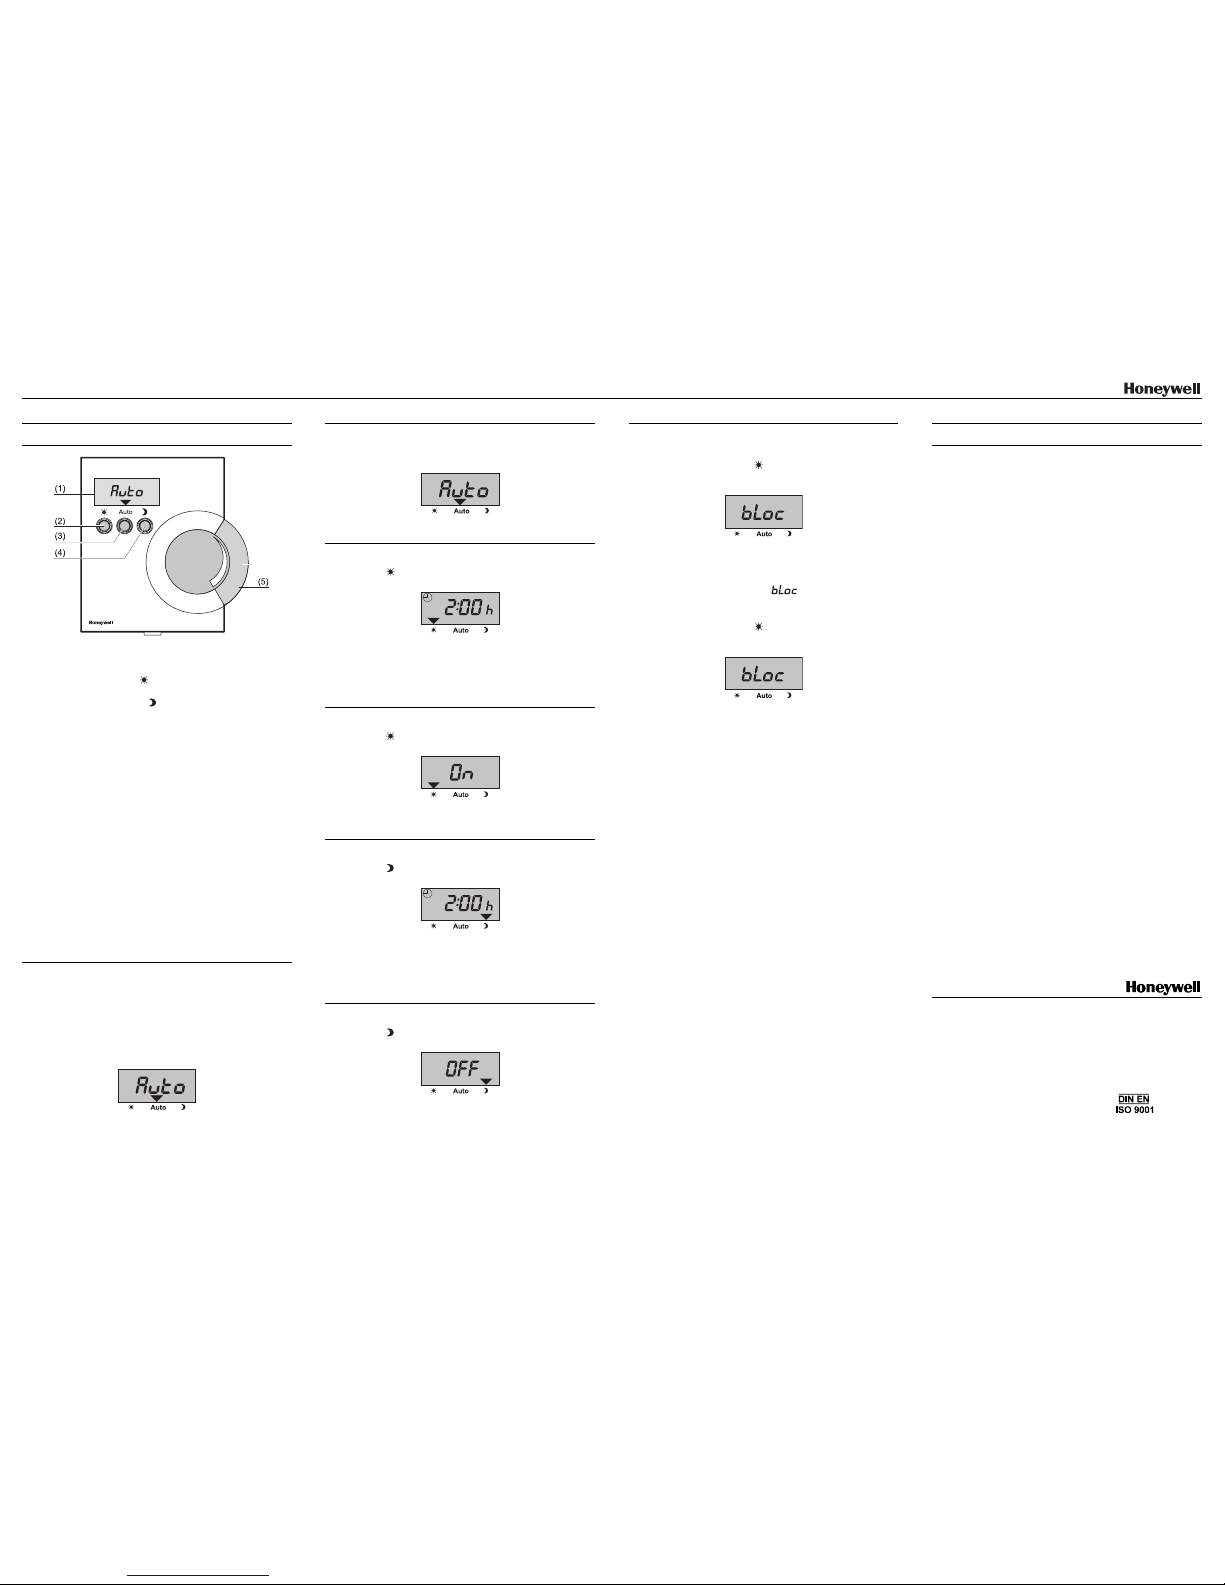
OPERATION
Figure 6: Operating devices and indicators
(1) Display
(2) Button for day operation
(3) Button for automatic mode Auto
(4) Button for switch-off mode
(5) Regulator wheel
The T7560H setpoint selector is equipped with 3 operating
modes:
• Automatic mode:
The room temperature is regulated according to the control
program of the heating system controller. By means of the
setting wheel, the desired temperature can be adjusted by
±7 °C.
• Daytime mode:
The room temperature is maintained continuously or for a
limited period only at the desired daytime temperature.
Adjustments of the desired temperature in automatic mode
are effective.
• Switch-off mode:
The heating period is limited or the heating is switched off.
The frost protection remains activated.
Note
The domestic hot water program of the heating system
controller is not affected by the selected operating mode.
For MCR 200, the desired daytime temperature code is
107 and the desired nighttime temperature code is 108.
Adjusting desired temperature
Note
The desired temperature can only be adjusted in automatic mode.
1. If the T7560H is not in automatic mode,
press the Auto button.
The display reads as follows:
2. Turn the setting wheel clockwise to increase the desired
temperature. Turn the setting wheel anti-clockwise to lower
the desired temperature.
Note
The adjusted desired temperature is applied in daytime
mode.
Automatic mode
1. Press the Auto button.
The display reads as follows:
The T7560H is now set to automatic mode.
Limited daytime mode
1. Press the button.
The display reads as follows:
2. Turn the setting wheel to adjust the time period. The time
period can be set to intervals of 1–23 hours or 1– 99 days.
For the selected time period, the room temperature is maintained at the desired daytime temperature. After the lapse of the
selected period, the T7560H returns to automatic mode.
Continuous daytime mode
1. Press the button twice.
The display reads as follows:
The room temperature is maintained at the desired daytime
temperature until a different operating mode is selected.
Limited switch-off mode
1. Press the button.
The display reads as follows:
2. Turn the setting wheel to select the time period. The time
period can be set to intervals of 1–23 hours or 1– 99 days.
The heating will be switched off for the selected period of time.
After the lapse of the period, the T7560H returns to automatic
mode.
Continuous switch-off mode
1. Press the button twice.
The display reads as follows:
The heating remains switched off until a different operating
mode is selected. In the event of danger of frost, the heating
pump and the burner are automatically switched on.
Local operation lock
Activating lock mode:
1. Simultaneously press the
and the Auto buttons for at
least 2 seconds.
The display reads as follows:
As soon as you release the buttons, the display shows the
previously selected operating mode.
The T7560H is now locked and protected against accidental
operation. As soon as the operating mode button or the setting
wheel are activated, the message
is displayed.
Deactivating local operation lock:
1. Simultaneously press the and the Auto button for at least
2 seconds.
The display reads as follows:
As soon as you release the buttons, the display shows the
previously selected operating mode.
The lock is now deactivated.
Note
The local operation lock can be activated/deactivated in
any operating mode.
TECHNICAL DATA
Sensor element: NTC thermistor
Resistance: 20 kOhm at 25 °C
Temperature range: –15...+40 °C
Dimensions (H×W×D): 103 × 98 × 28 mm
Installation: Installation on wall
Max. ambient
temperature / humidity: 0...50 °C / 5...95 %
Max. storage temperature /
humidity: –35...+70 °C / 5...95 %
Electric connection: Terminals for max. 1.0 mm
2
wire diameter
Protection class: IP 30, DIN 40 050
or IEC 144
Timer programs: 1 × daytime mode, limited period
1 × switch-off mode, limited period
Time range: 1 hour (h) to 99 days (d)
Time intervals: 1...23 hours (h) at intervals of 1 hour
1...99 days (d) at intervals of 1 day
For technical information on NTC thermistor:
see publication GE 3R-1106.
Centra Regelungstechnik
Honeywell AG
Böblinger Strasse 17
D-71101 Schönaich
Telephone: ++49 (0)7031 637 01
Fax: ++49 (0)7031 637 574
http://www. honeywell.de/hga
Subject to change
Company
certified
This document replaces all previously issued instructions and is
only applicable to the product with which it is supplied.
.
No. 7157407 EN1H-155 GE51R0100
 Loading...