

Honeywell SUGPACK-UK, SUEPACK-E, SUGPACK-EU, Sucre Box, SUEPACK-EG Quick Installation Manual
...Page 1

-English-
Le Sucre™
Quick Installation guide
MANDATORY STEPS TO FOLLOW BEFORE BEGINNING
YOUR INSTALLATION ................................................................ 2
Panel Identification ............................................................................................. 2
STEP 1: Connecting Le Sucre ........................................................................... 3
STEP 2: Creating your account on Internet...................................................... 5
INSTALLING YOUR SYSTEM ..................................................... 6
Registering the « Badge Reader » or the keypad ............................................ 9
Registering the badges .................................................................................... 13
Registering the Door Contact .......................................................................... 13
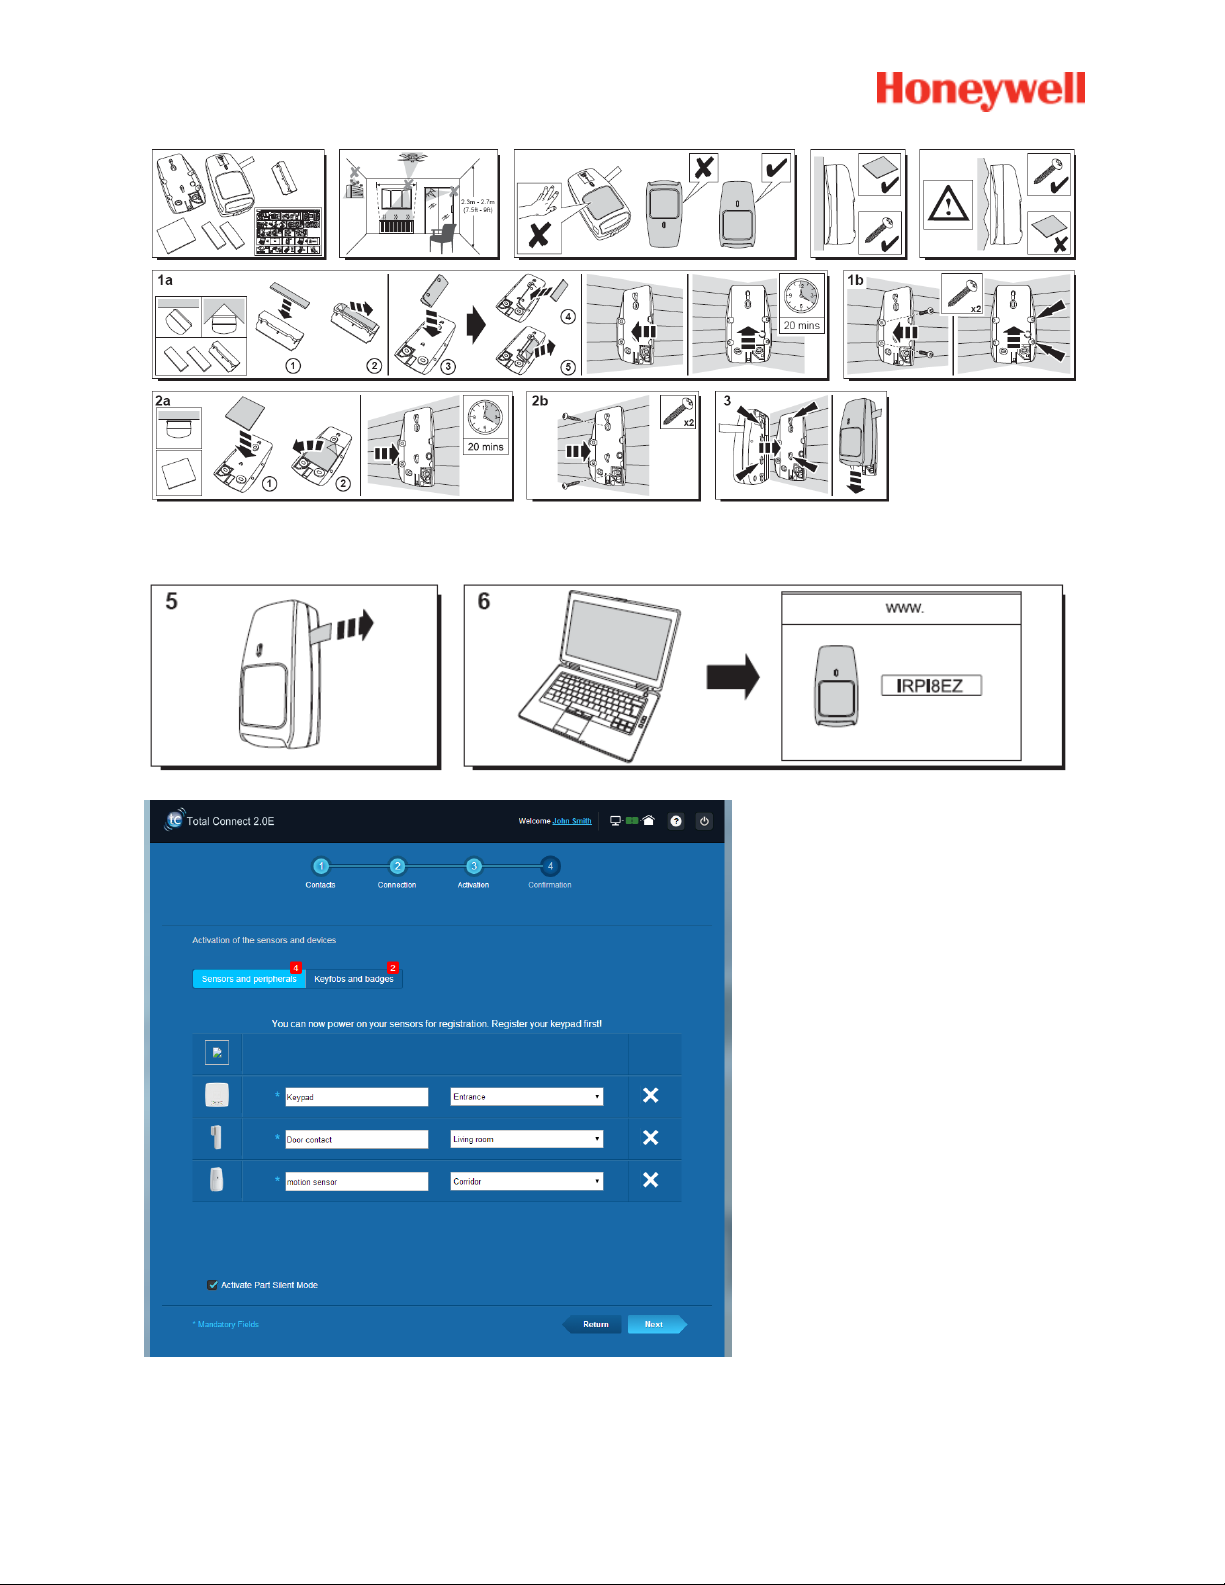
Registering the motion sensor ........................................................................ 14
Installing other peripherals.............................................................................. 16
Finalizing the installation ................................................................................. 16
Le Sucre pre-configured parameters ...................................... 16
800-19460-C
10/2015
Page 2

MANDATORY STEPS TO FOLLOW BEFORE BEGINNING YOUR
INSTALLATION
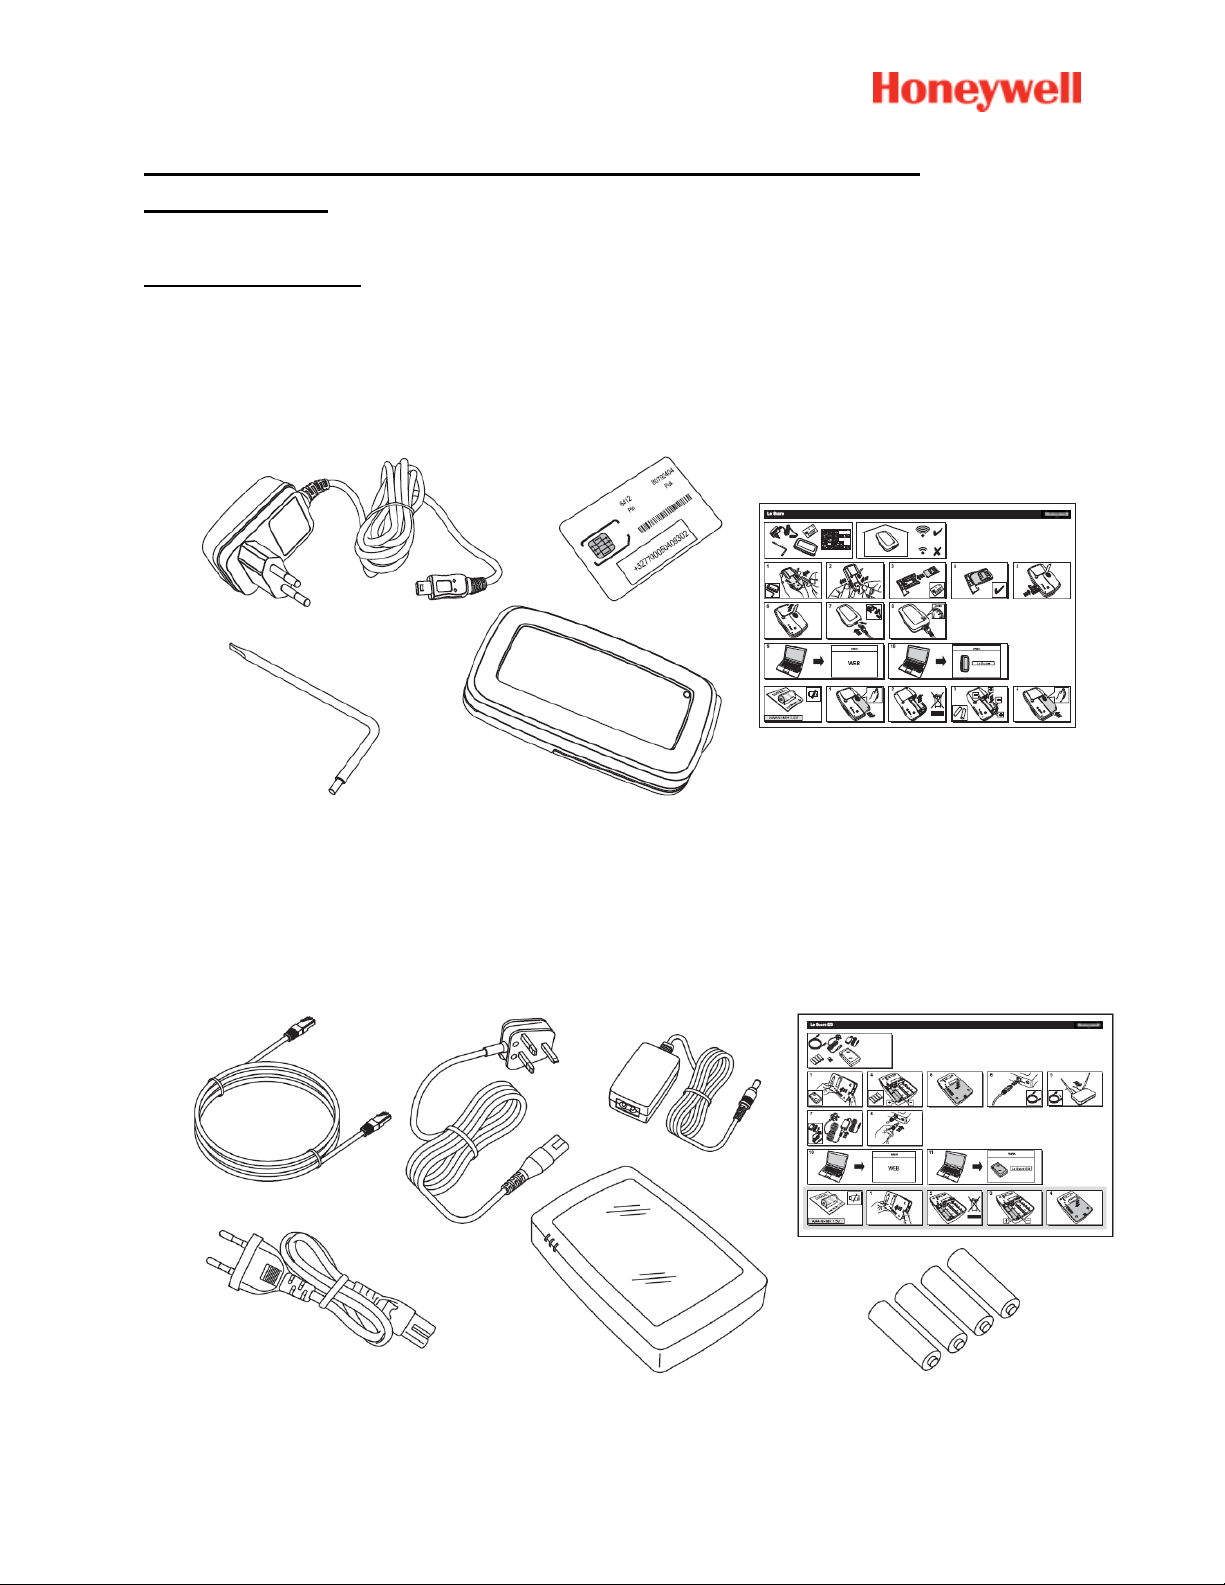
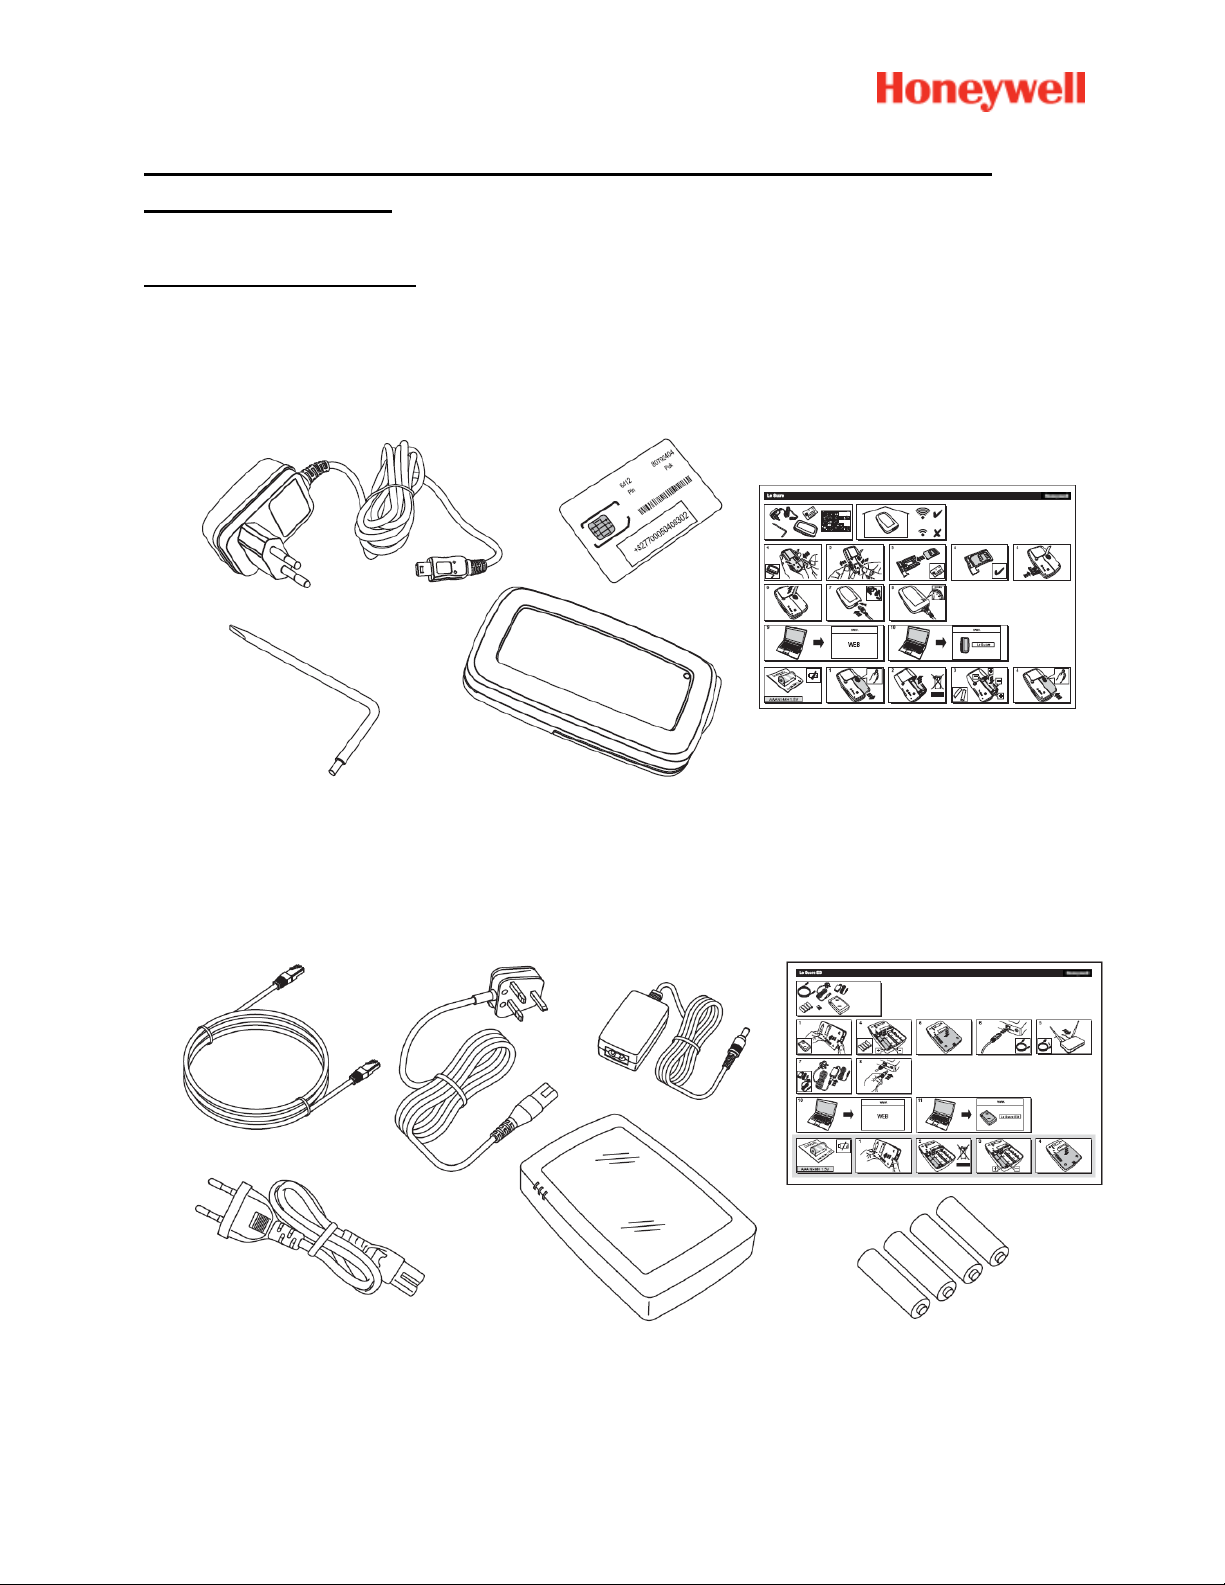
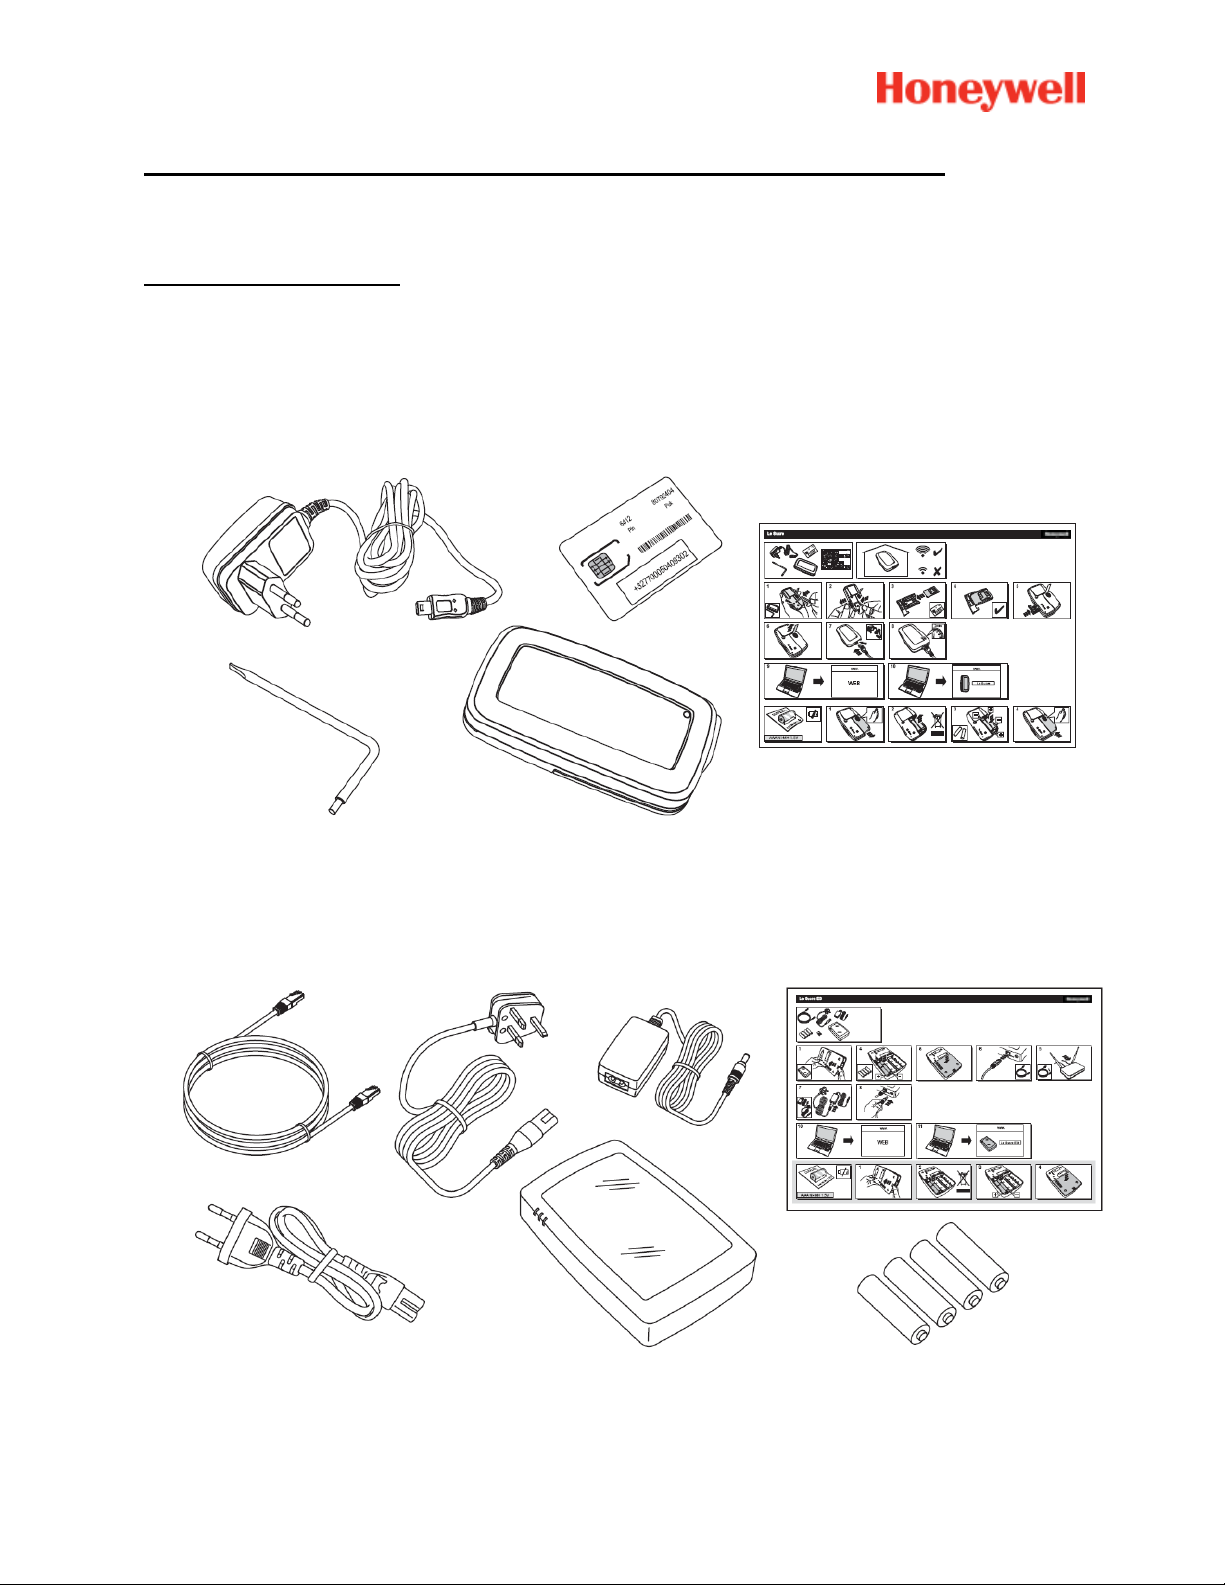
Panel Identification
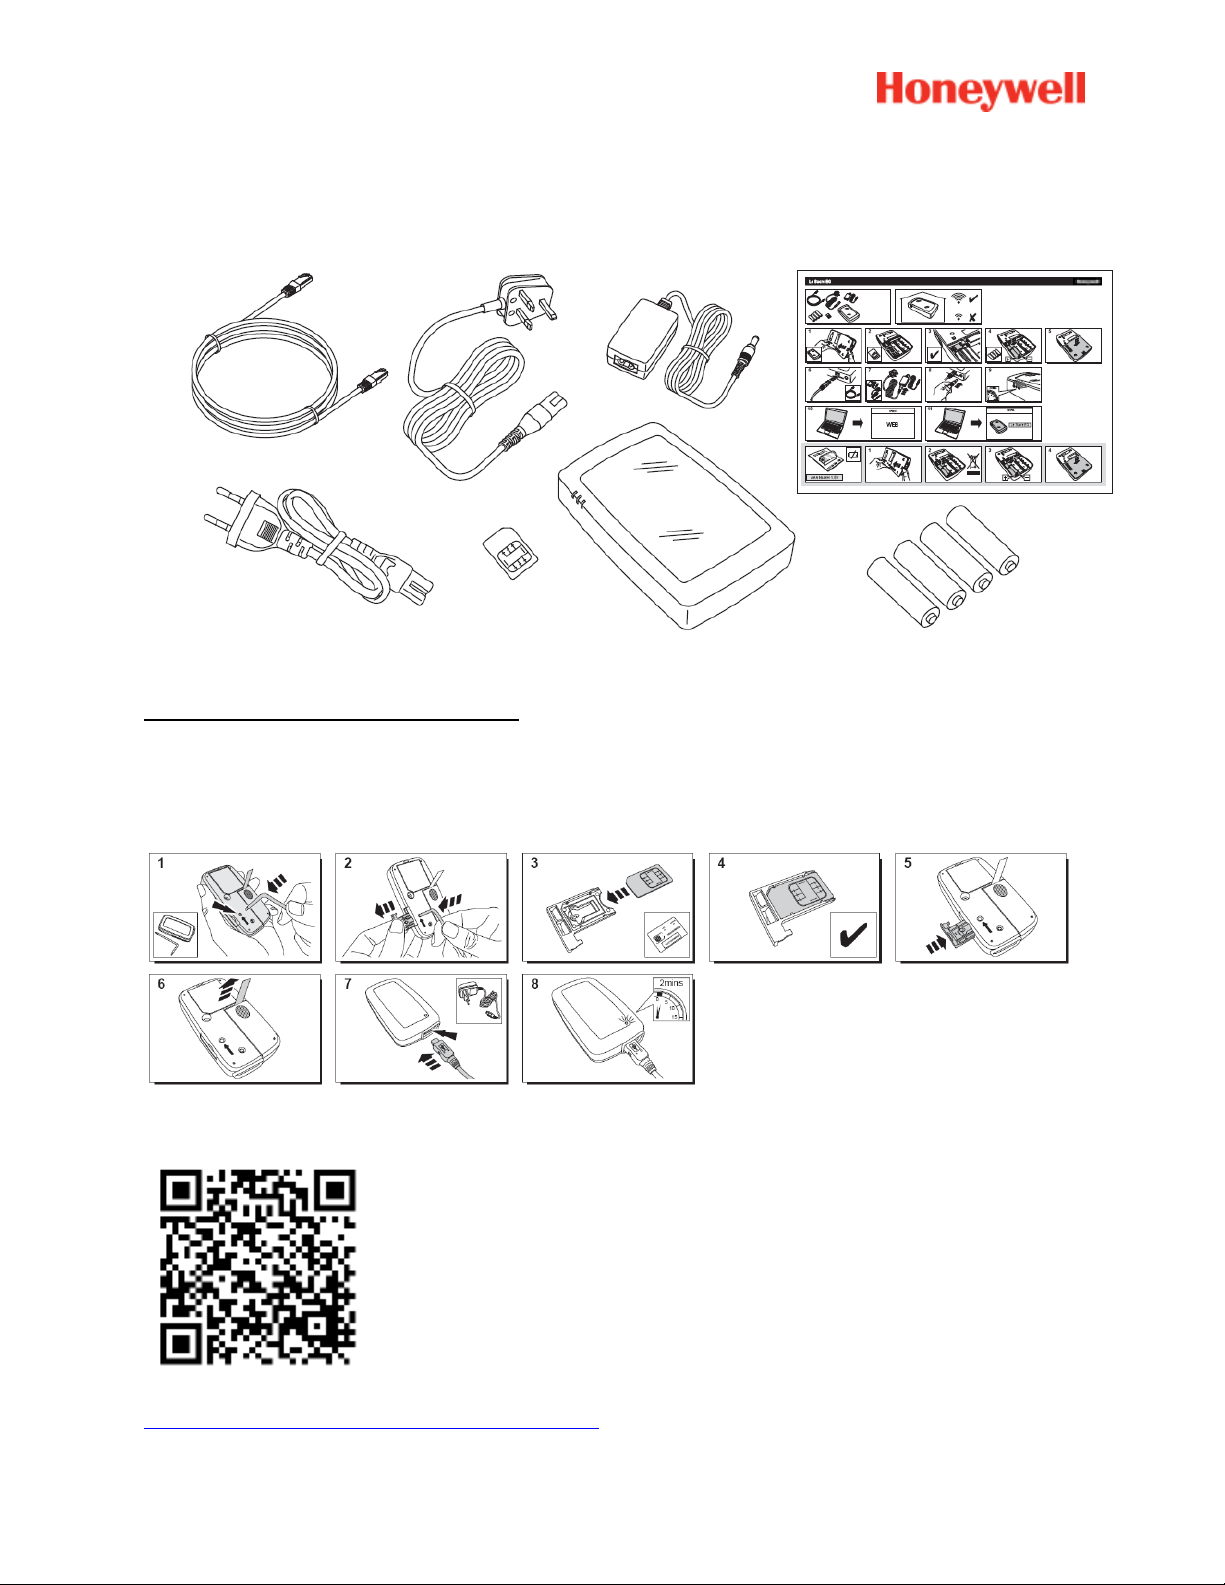
Please be sure to identify the type of panel you have as some slight differences exist in the installation
process from one version to another.
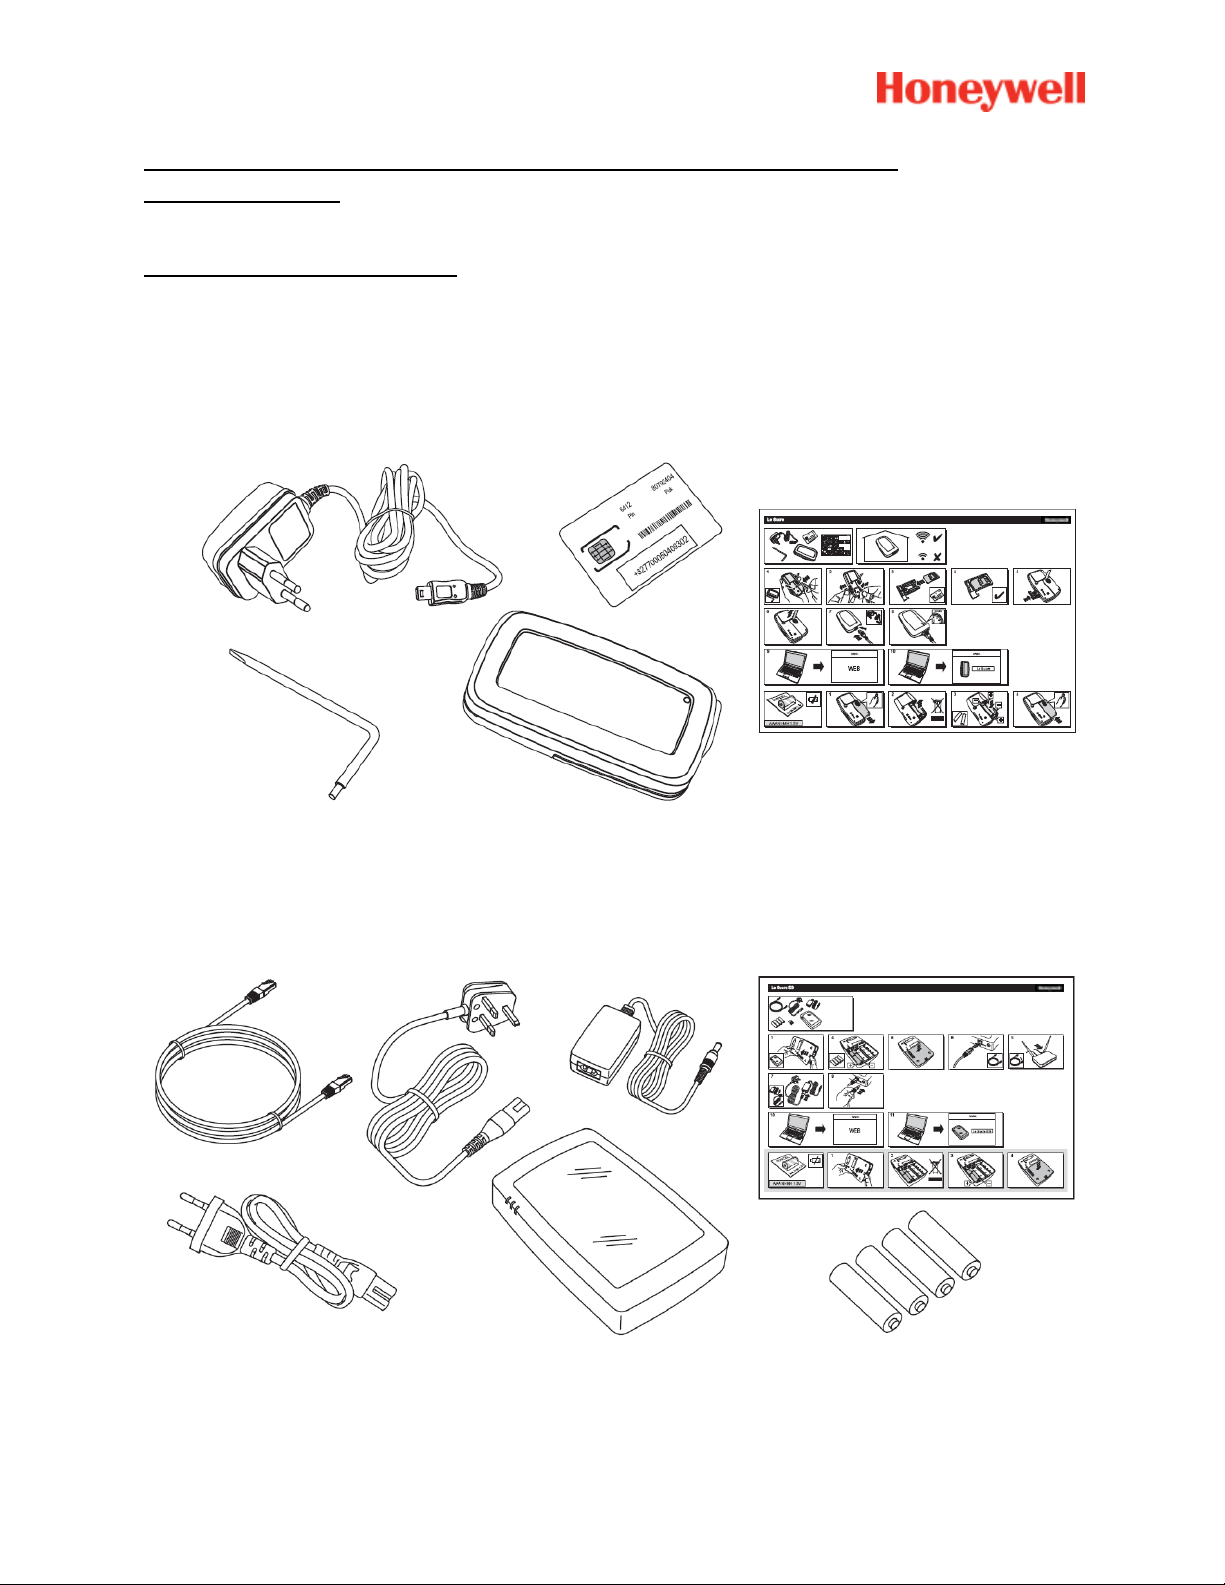
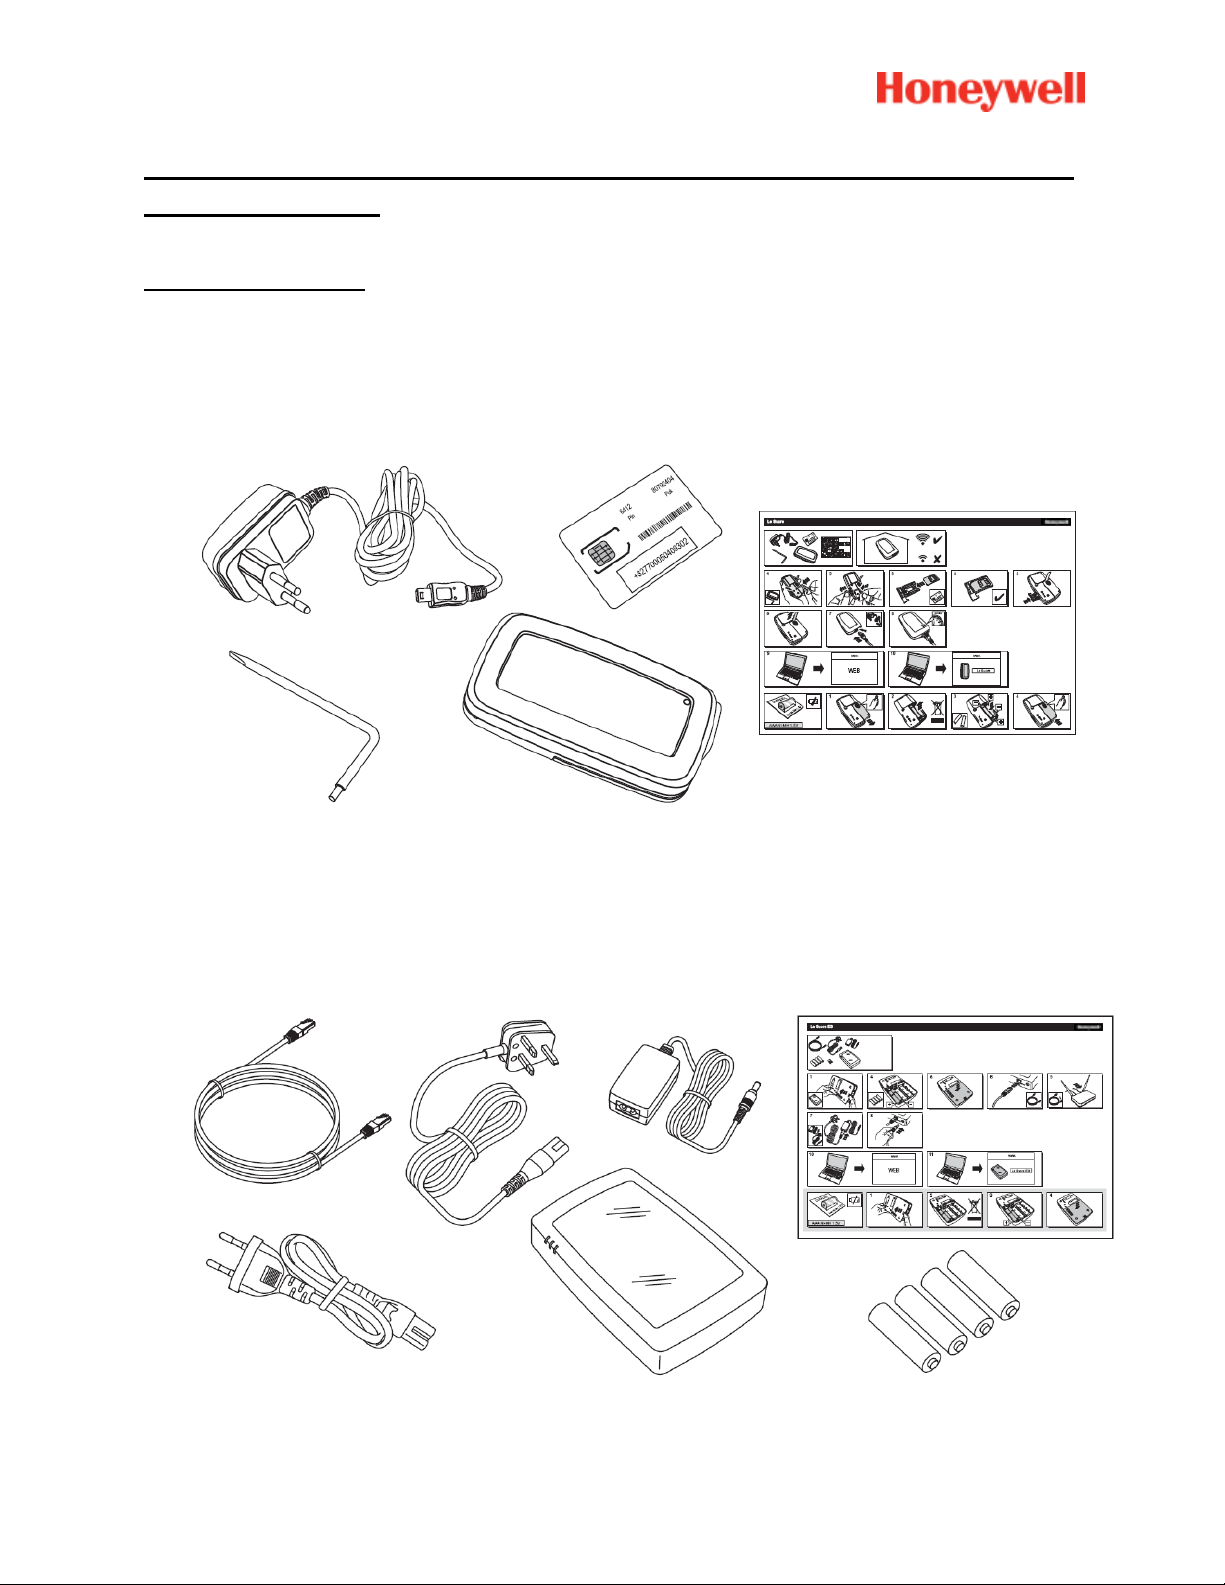
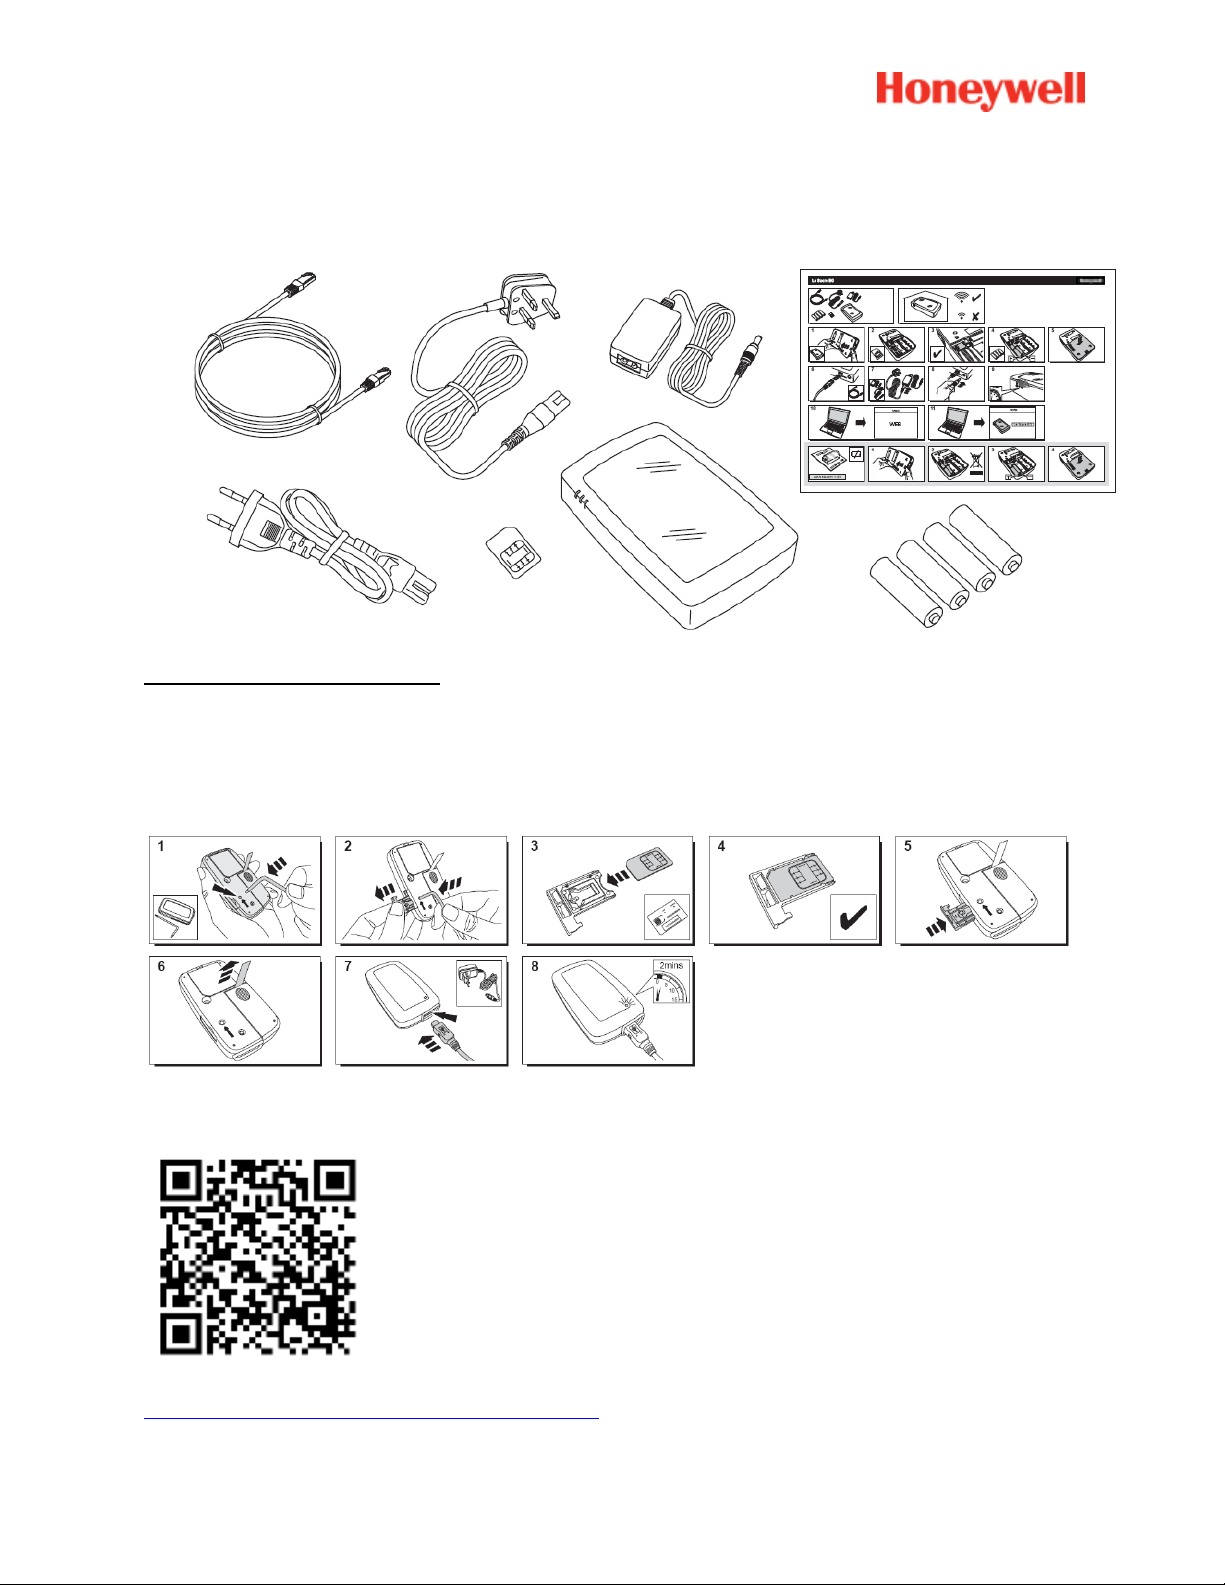
Sucre GPRS (SUGPACK-EU/SUGPACK-UK)
Sucre Box (SUEPACK -E)
2
Page 3
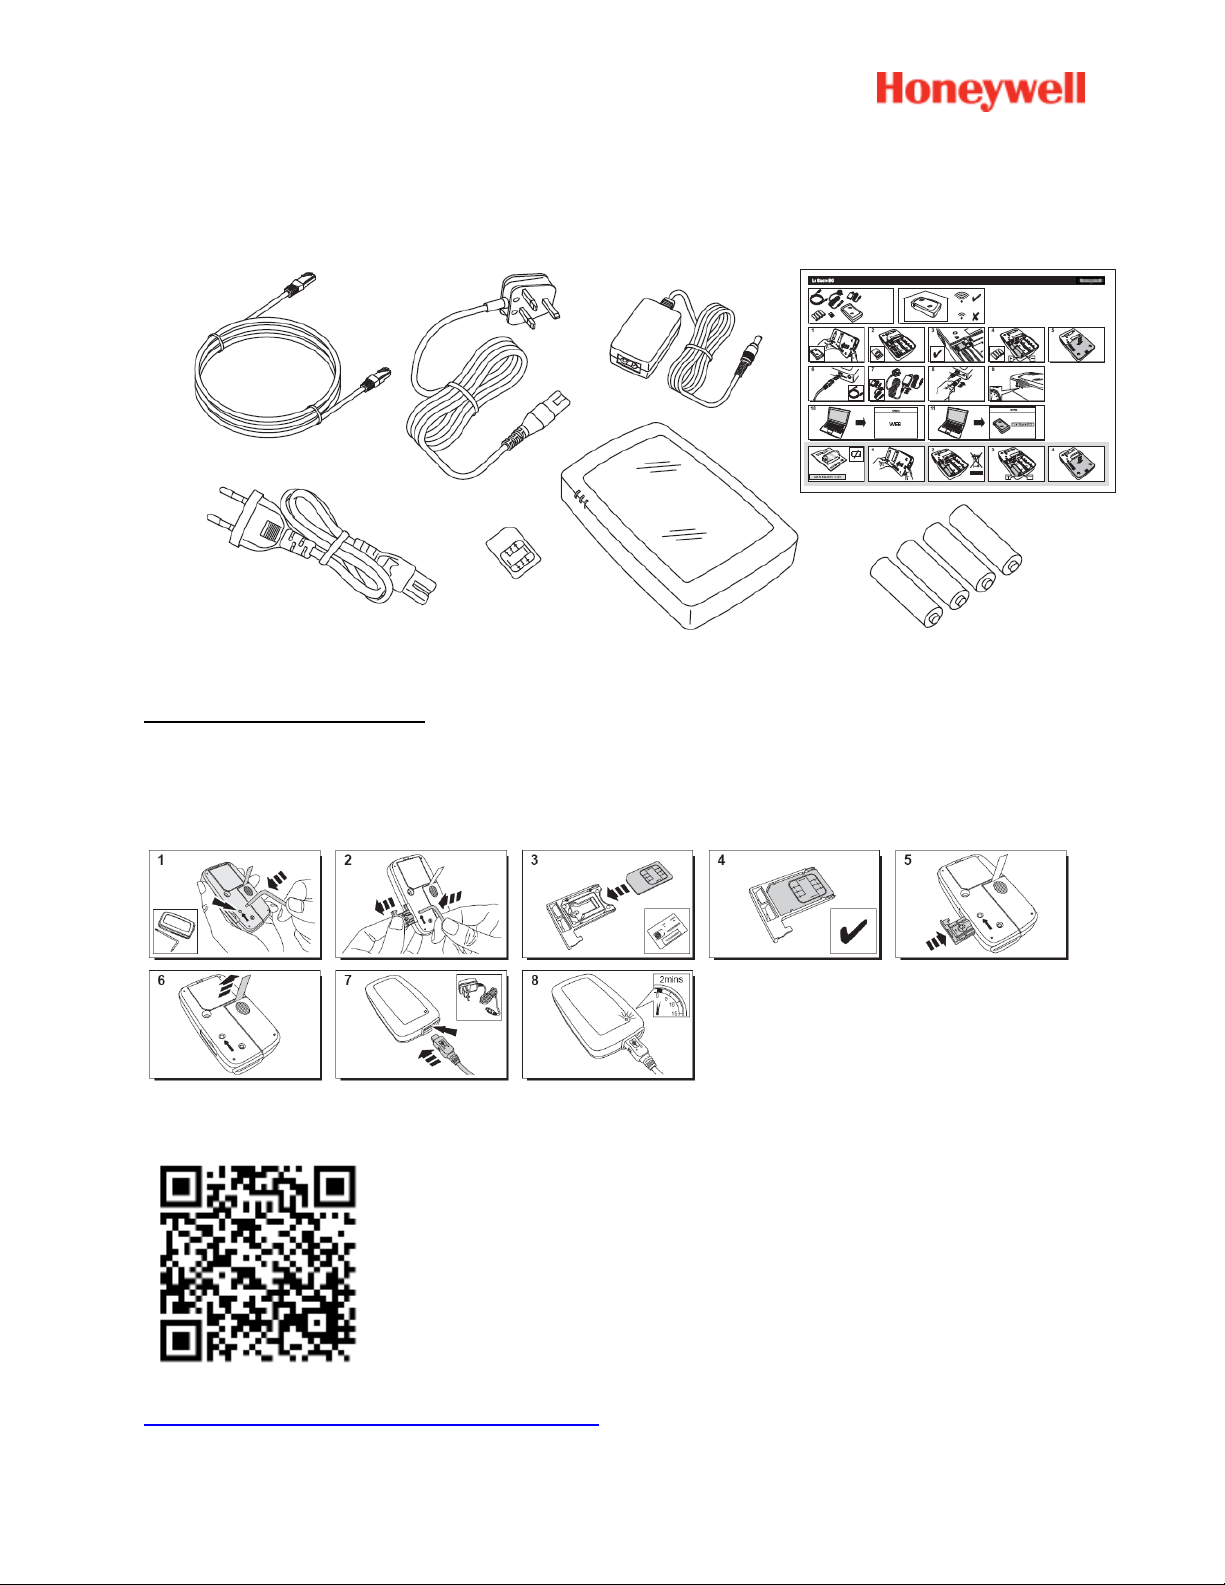
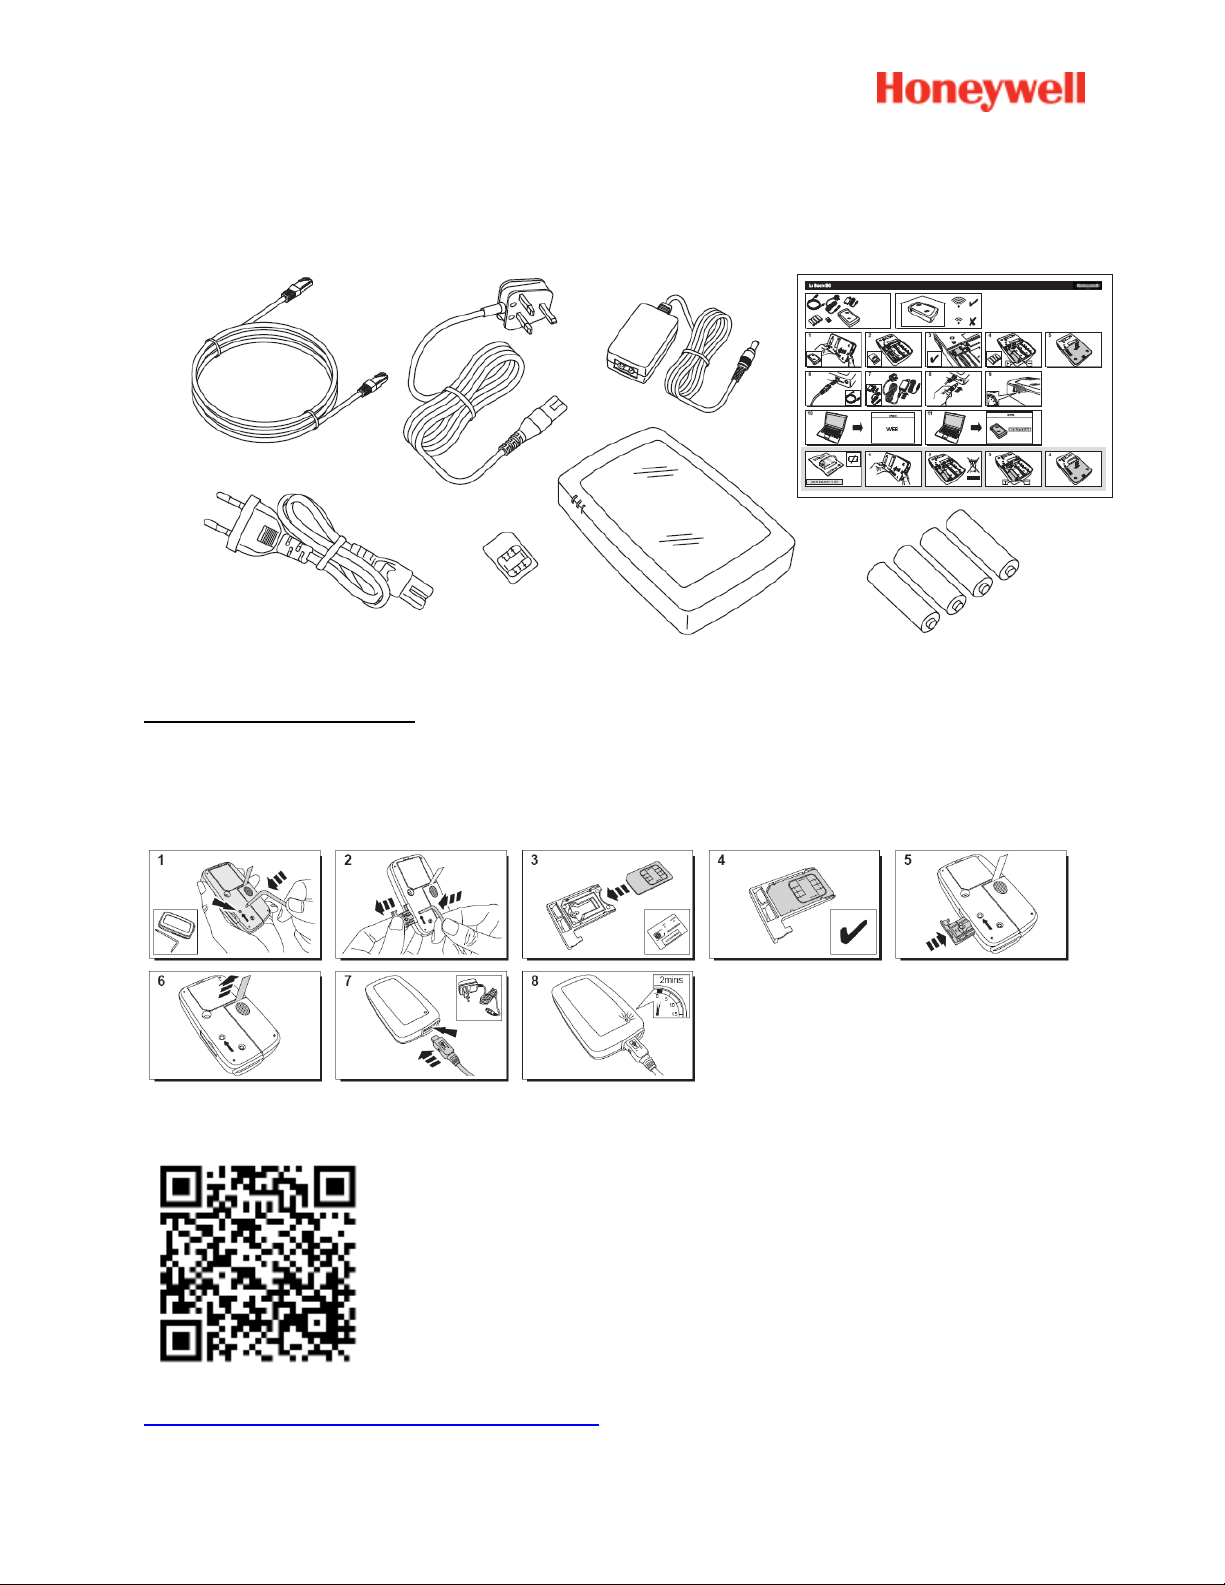
Sucre Box+ (SUEPACK-EG)
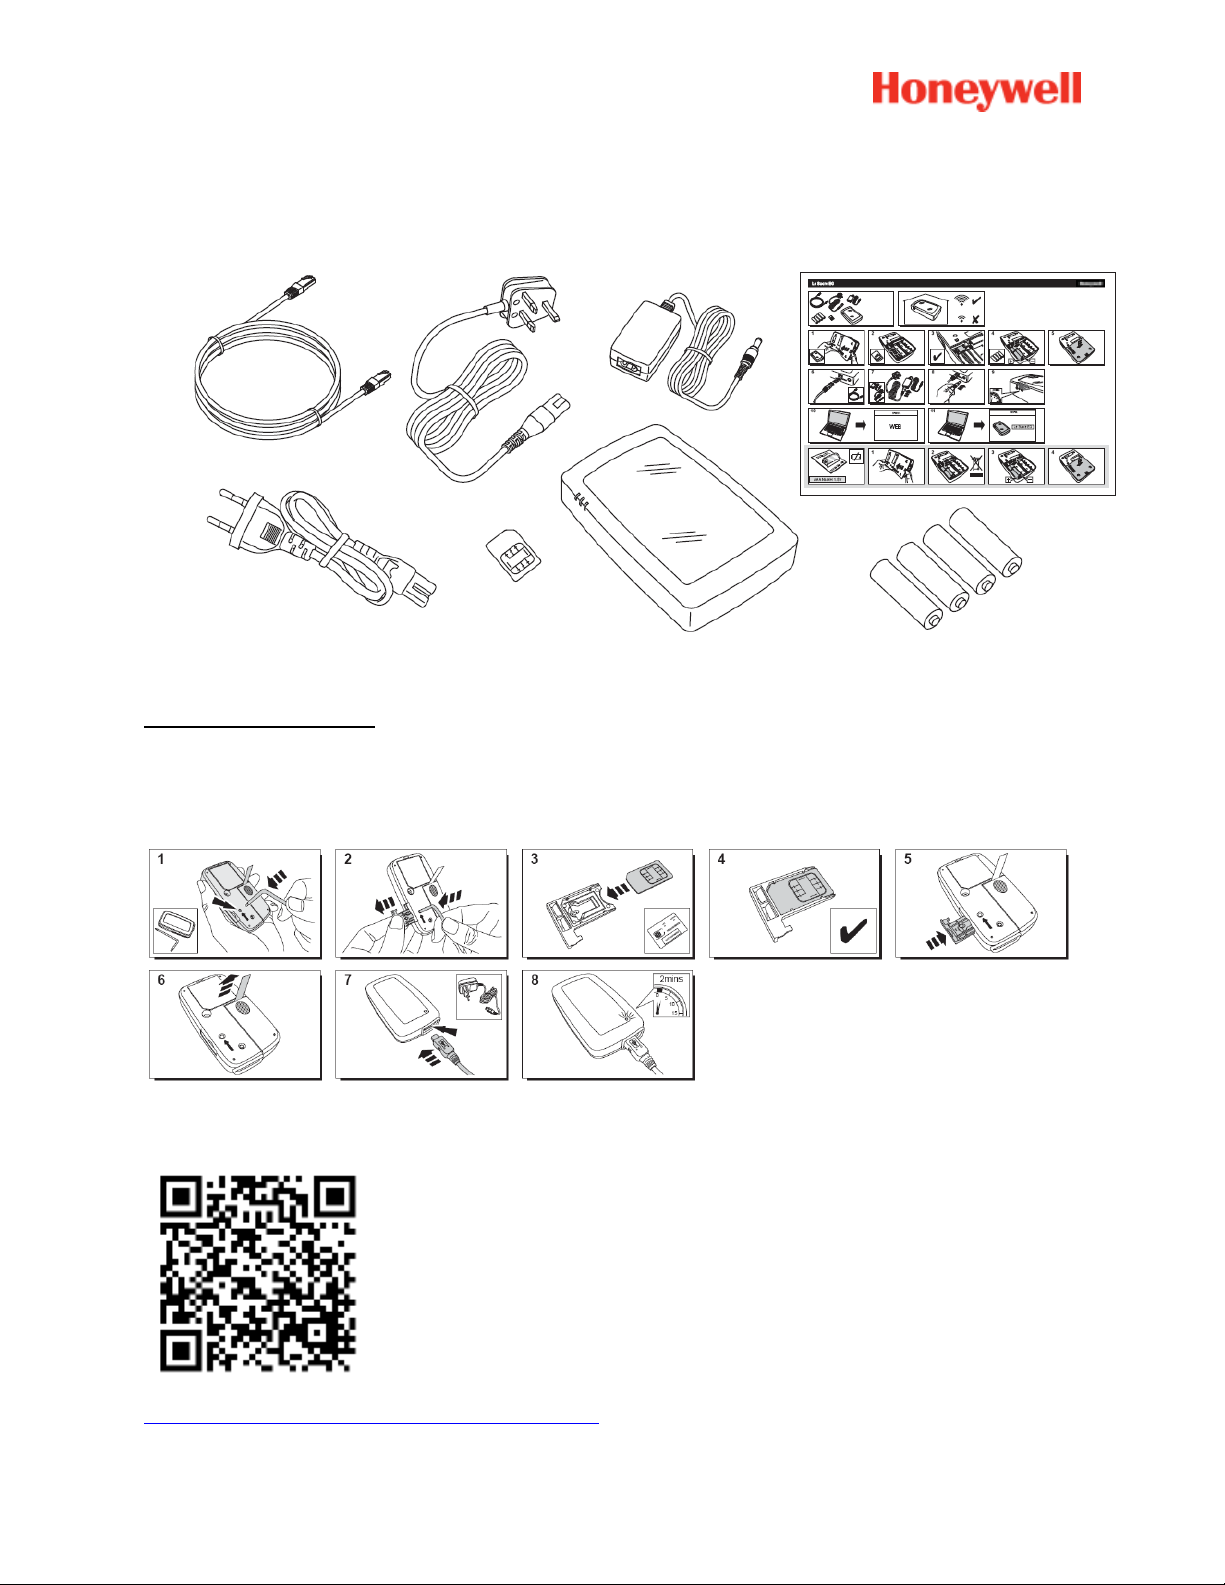
STEP 1: Connecting Le Sucre
Sucre GPRS
A help video can be found here:
http://honeywell.total-connect.eu/video/lesucre.mp4
3
Page 4
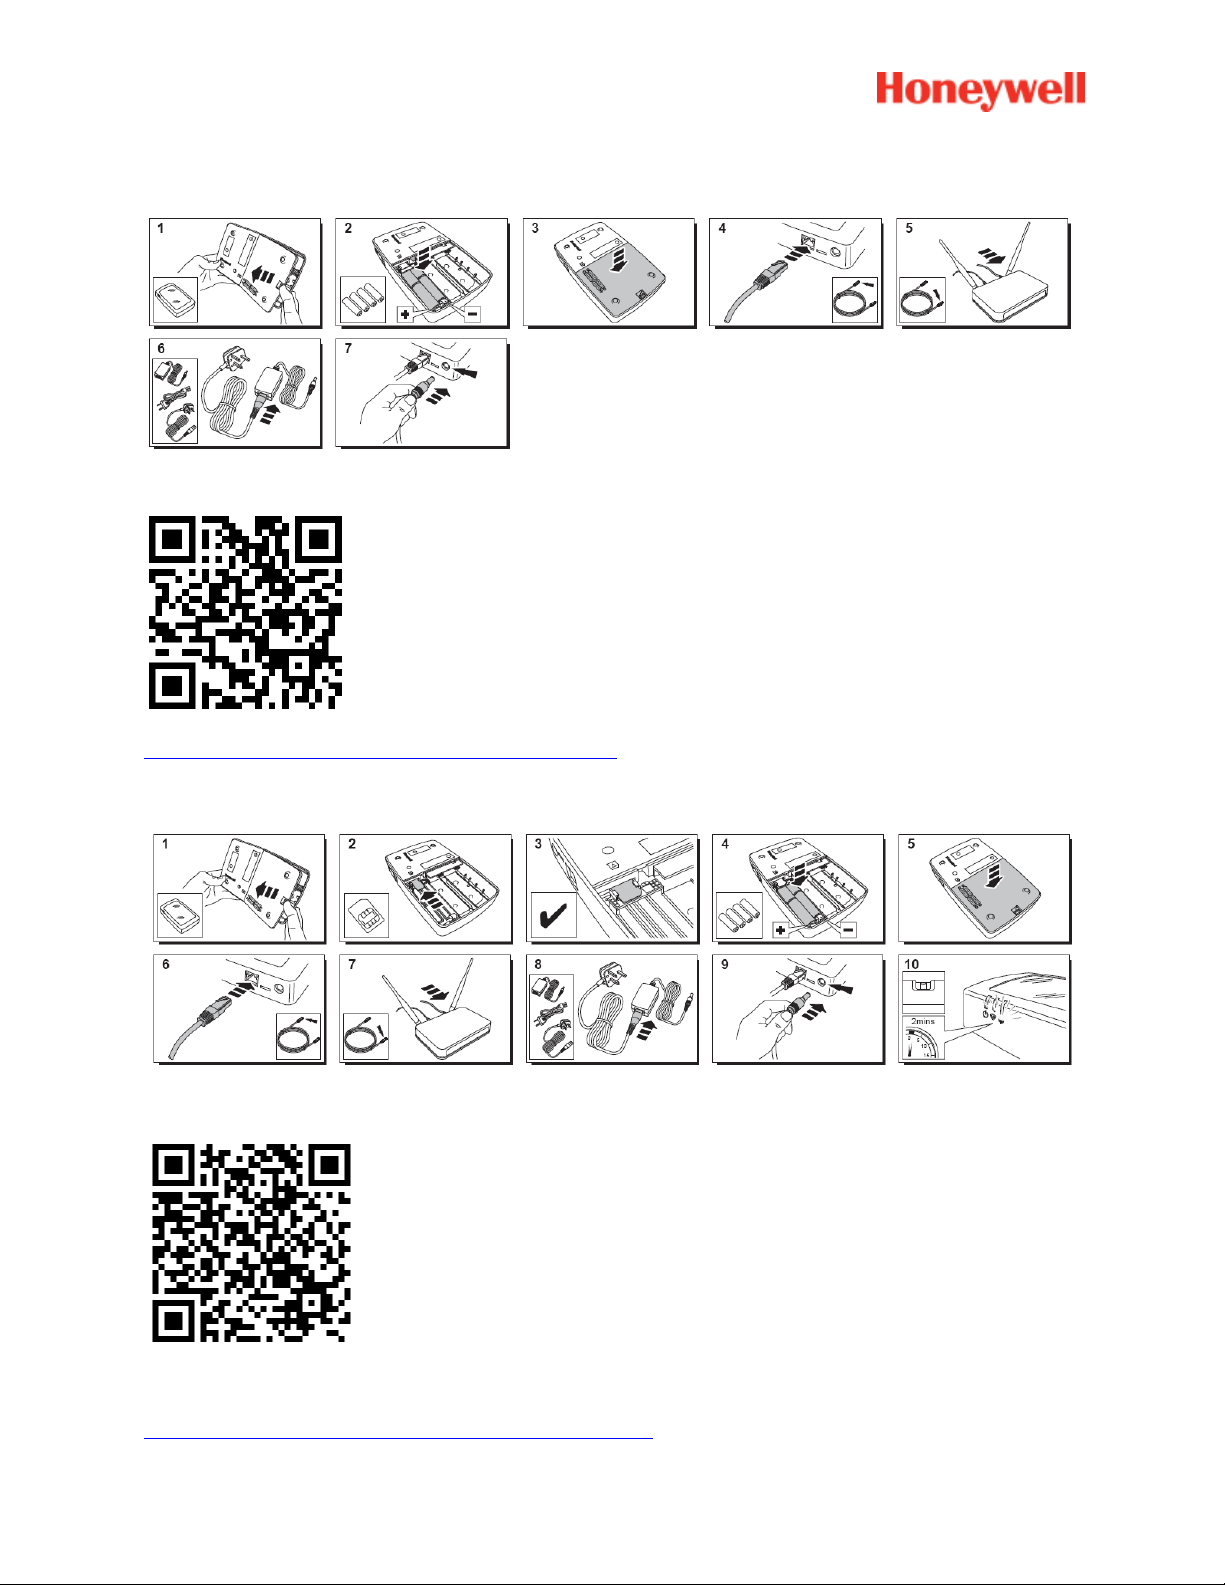
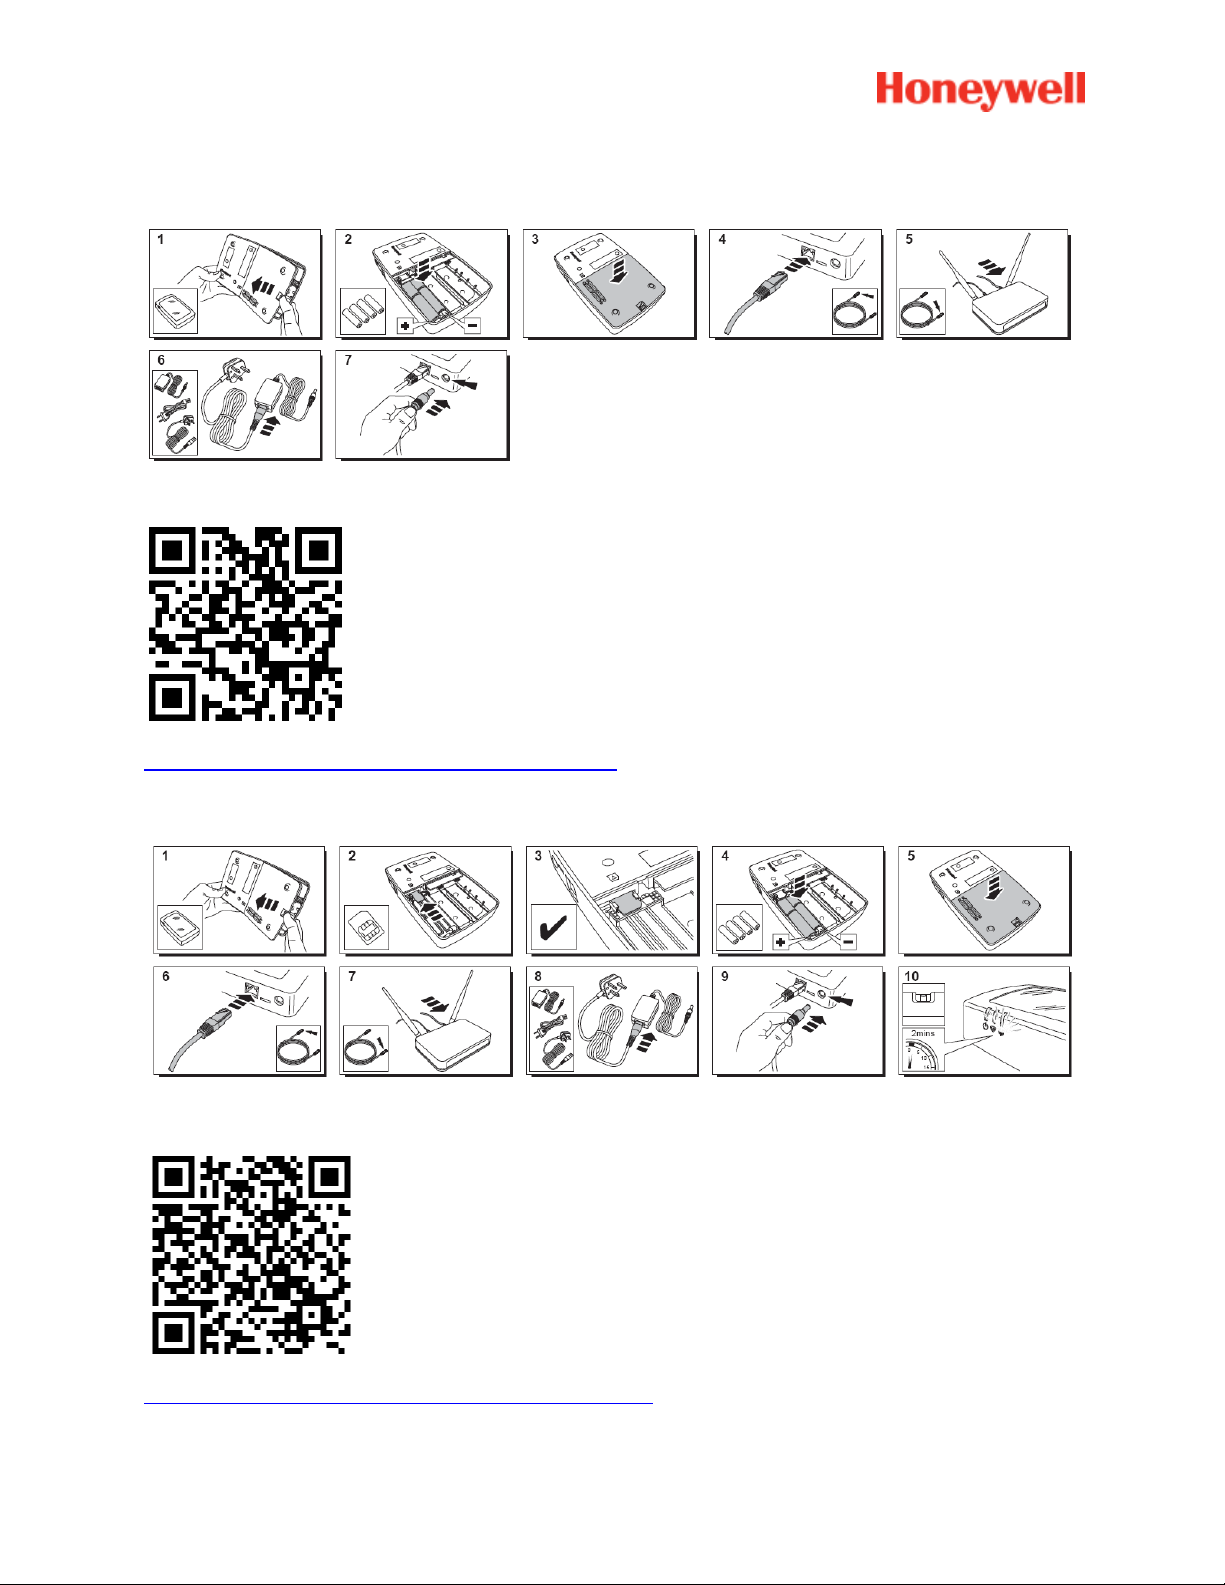
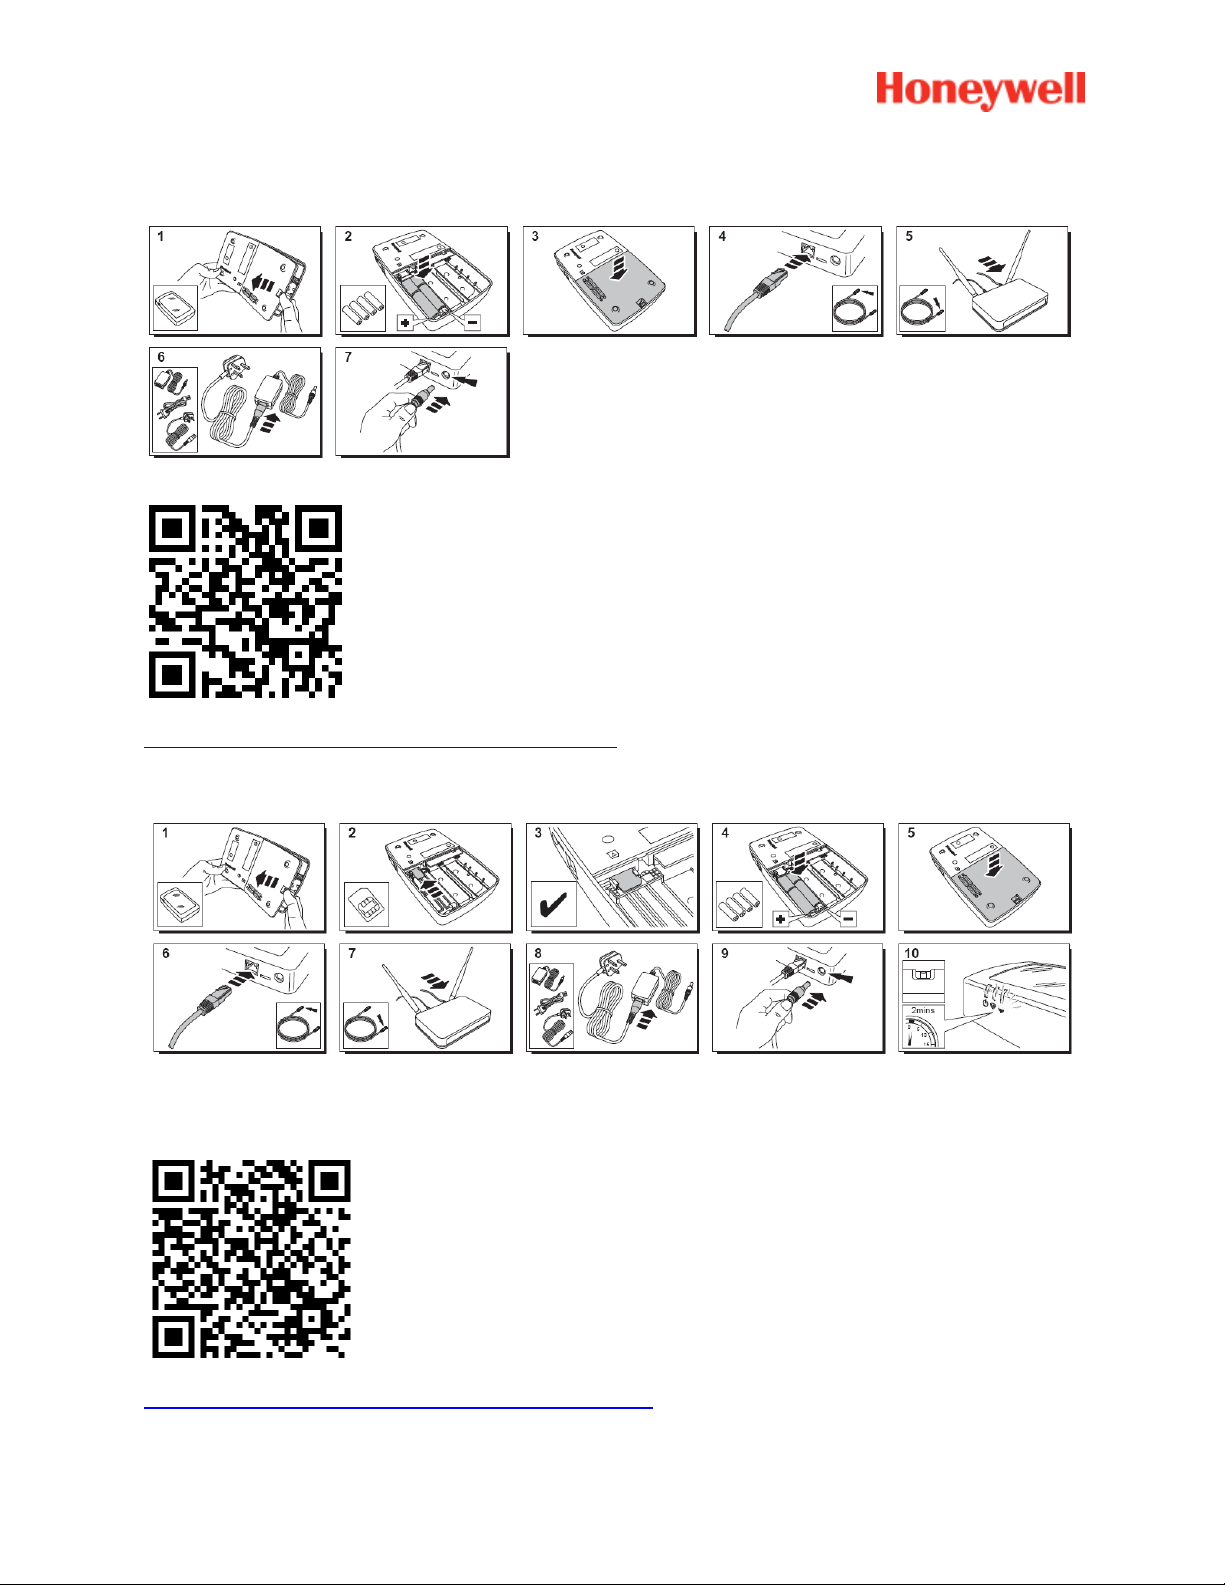
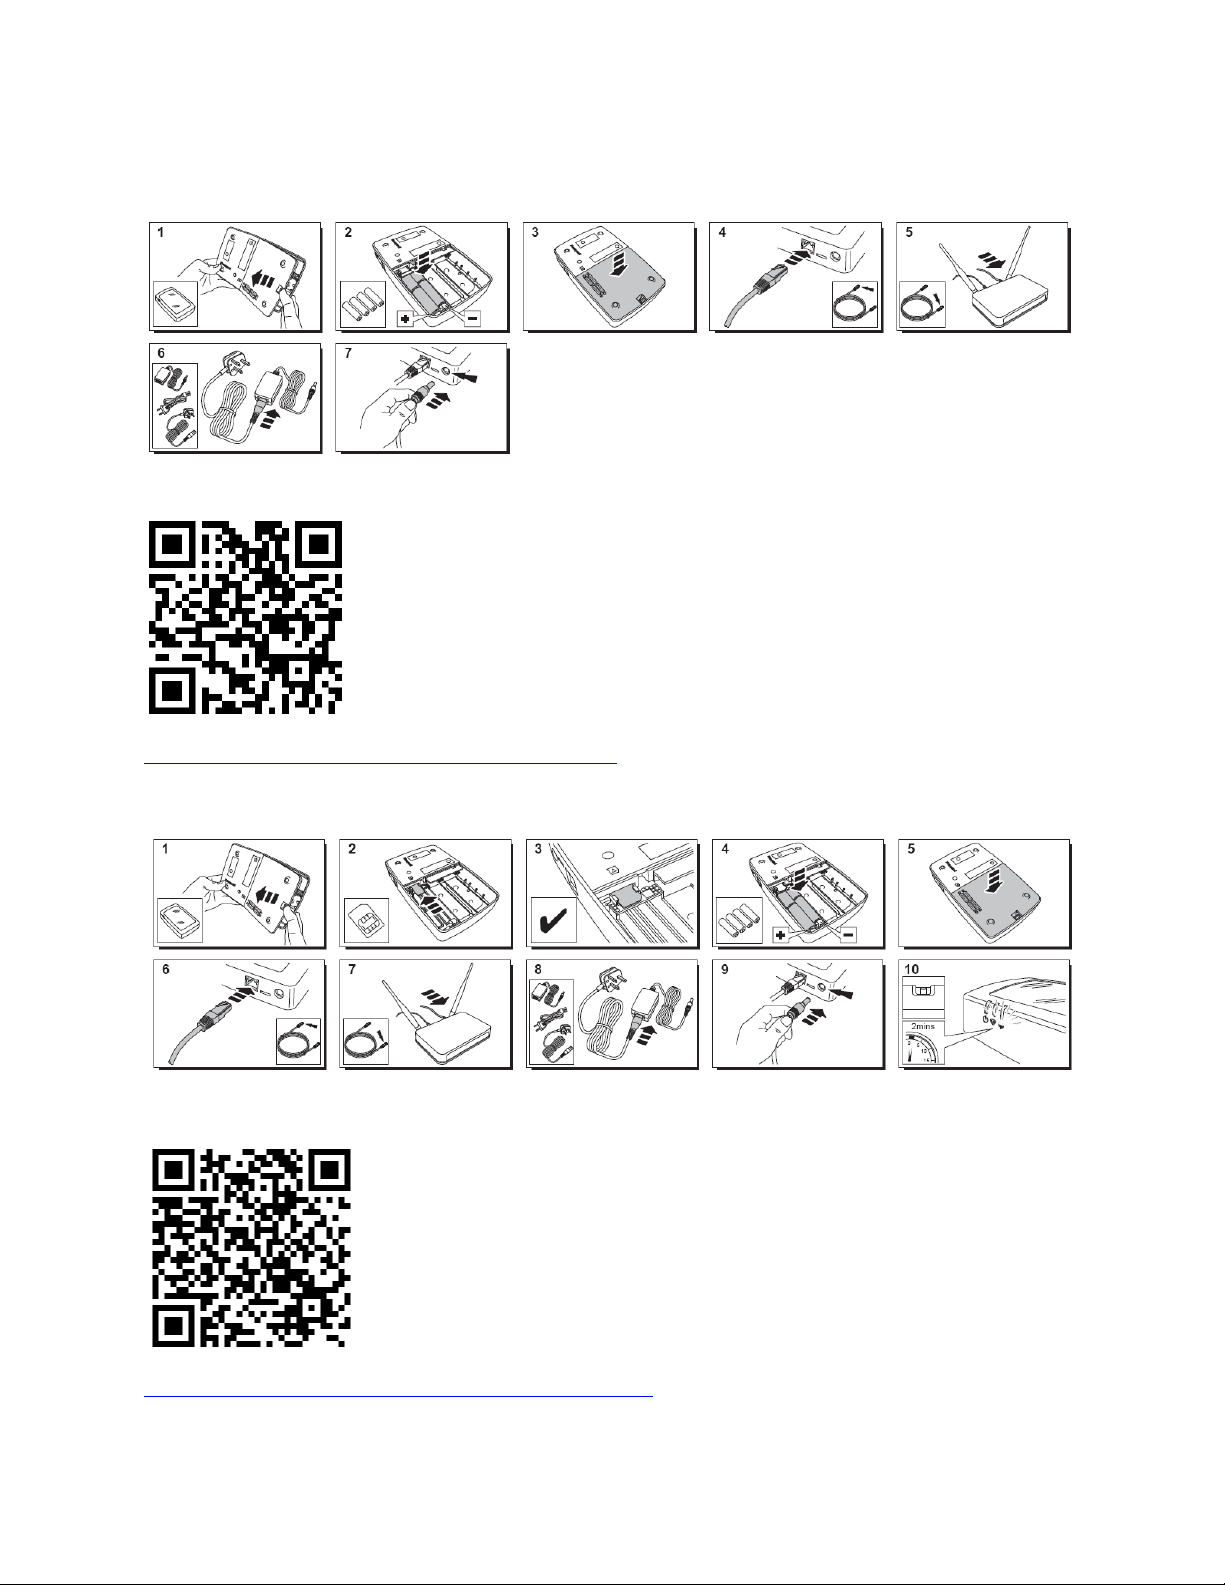
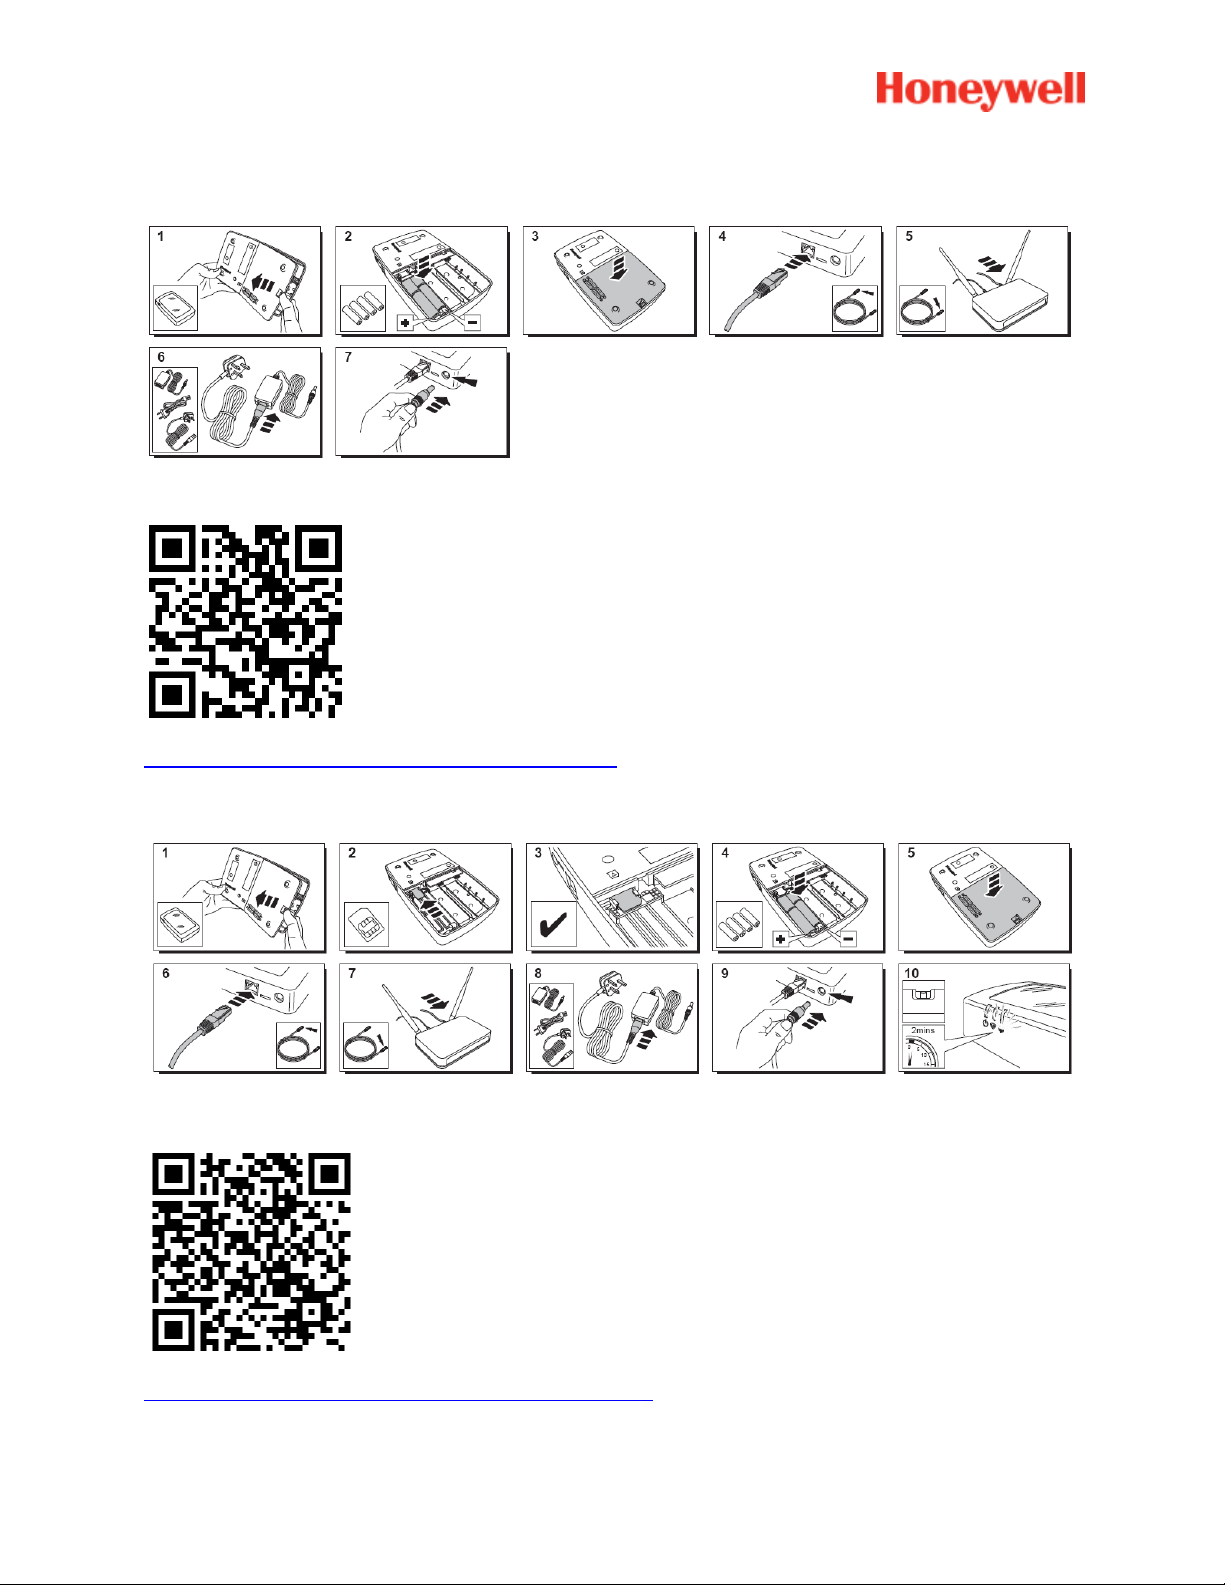
Sucre Box
A help video can be found here:
http://honeywell.total-connect-eu/video/sucrebox.mp4
Sucre Box+
A help video can be found here:
http://honeywell.total-connect-eu/video/sucreboxplus.mp4
4
Page 5
STEP 2: Creating your account on Internet
1. Logon to the website https://tc20e.total-connect.eu
2. Click on “Create user” to create your account. You will then be asked to enter a 20 digit long ID
code. This code is printed on a sticker located on Le Sucre.
3. You will then be able to choose your username and password used to login the system. You
will also be asked to enter a valid email to be contacted in case of problem or forgotten
password.
All fields with * are mandatory.
Once you have completed the form, check the case at the bottom of the page to agree to the Terms and
conditions and click on “Next”.
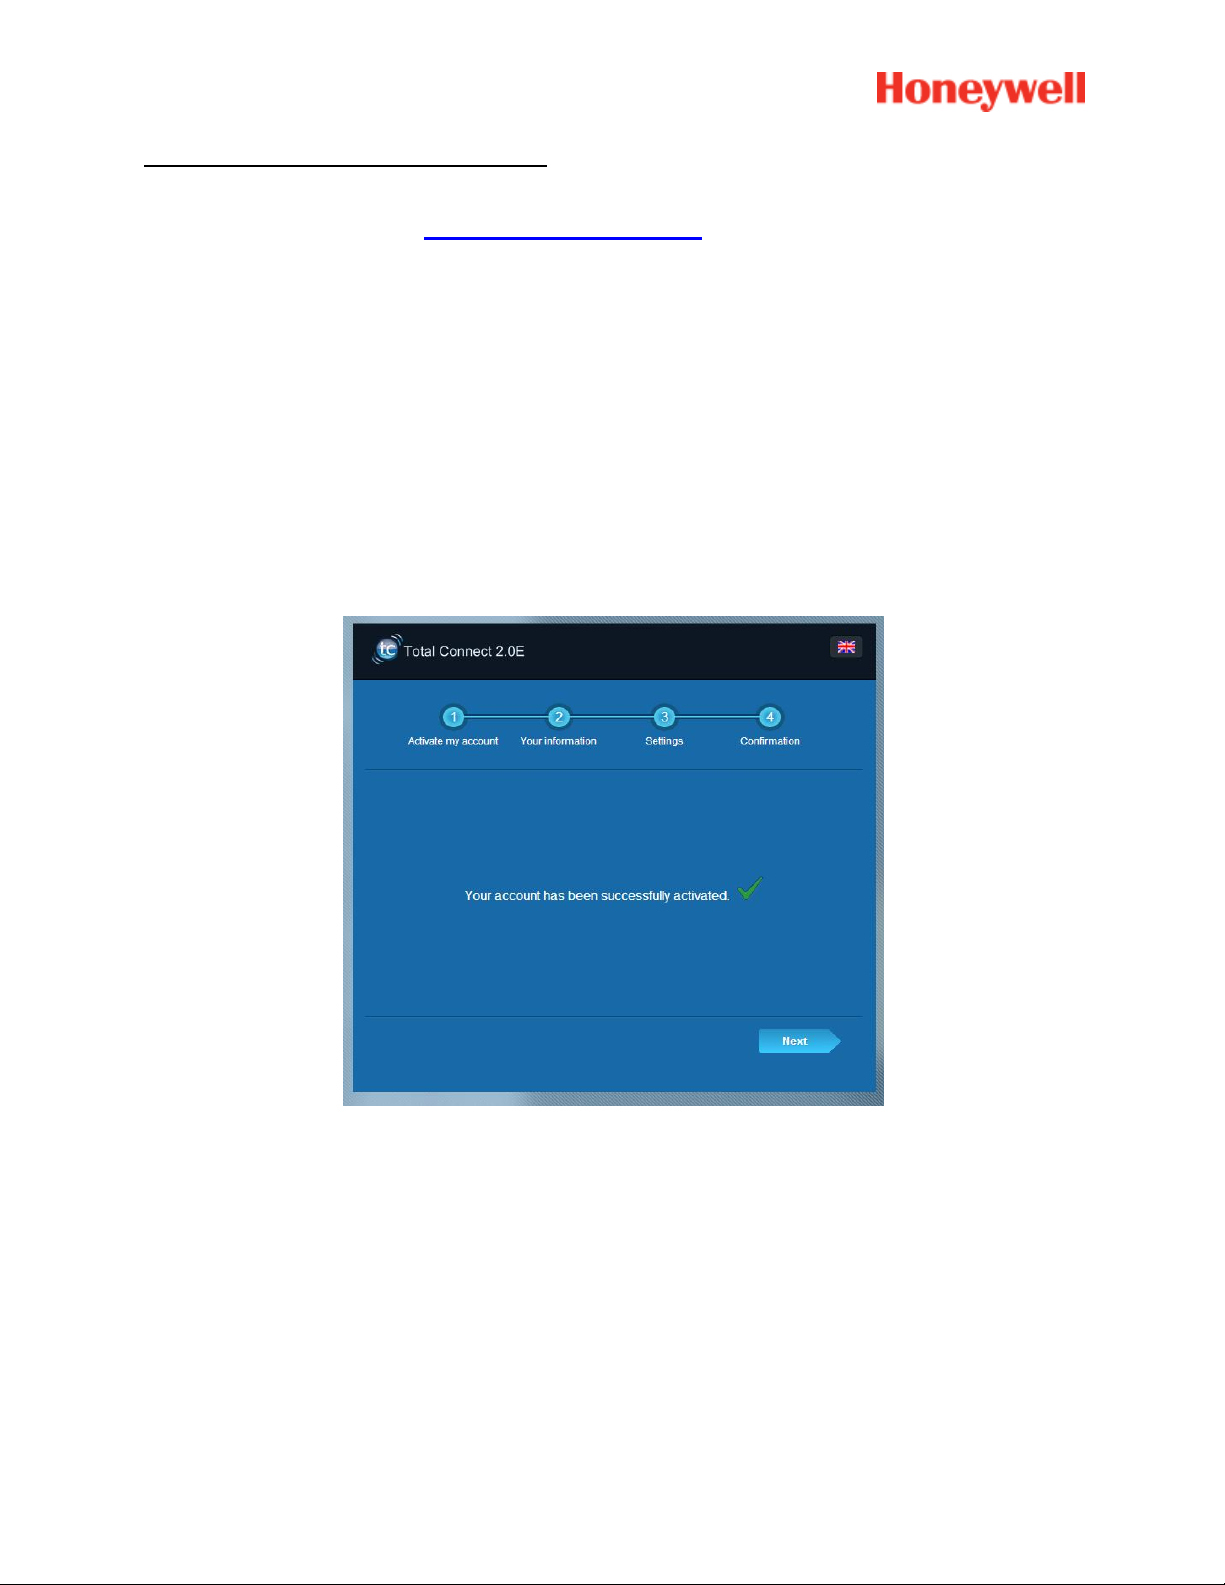
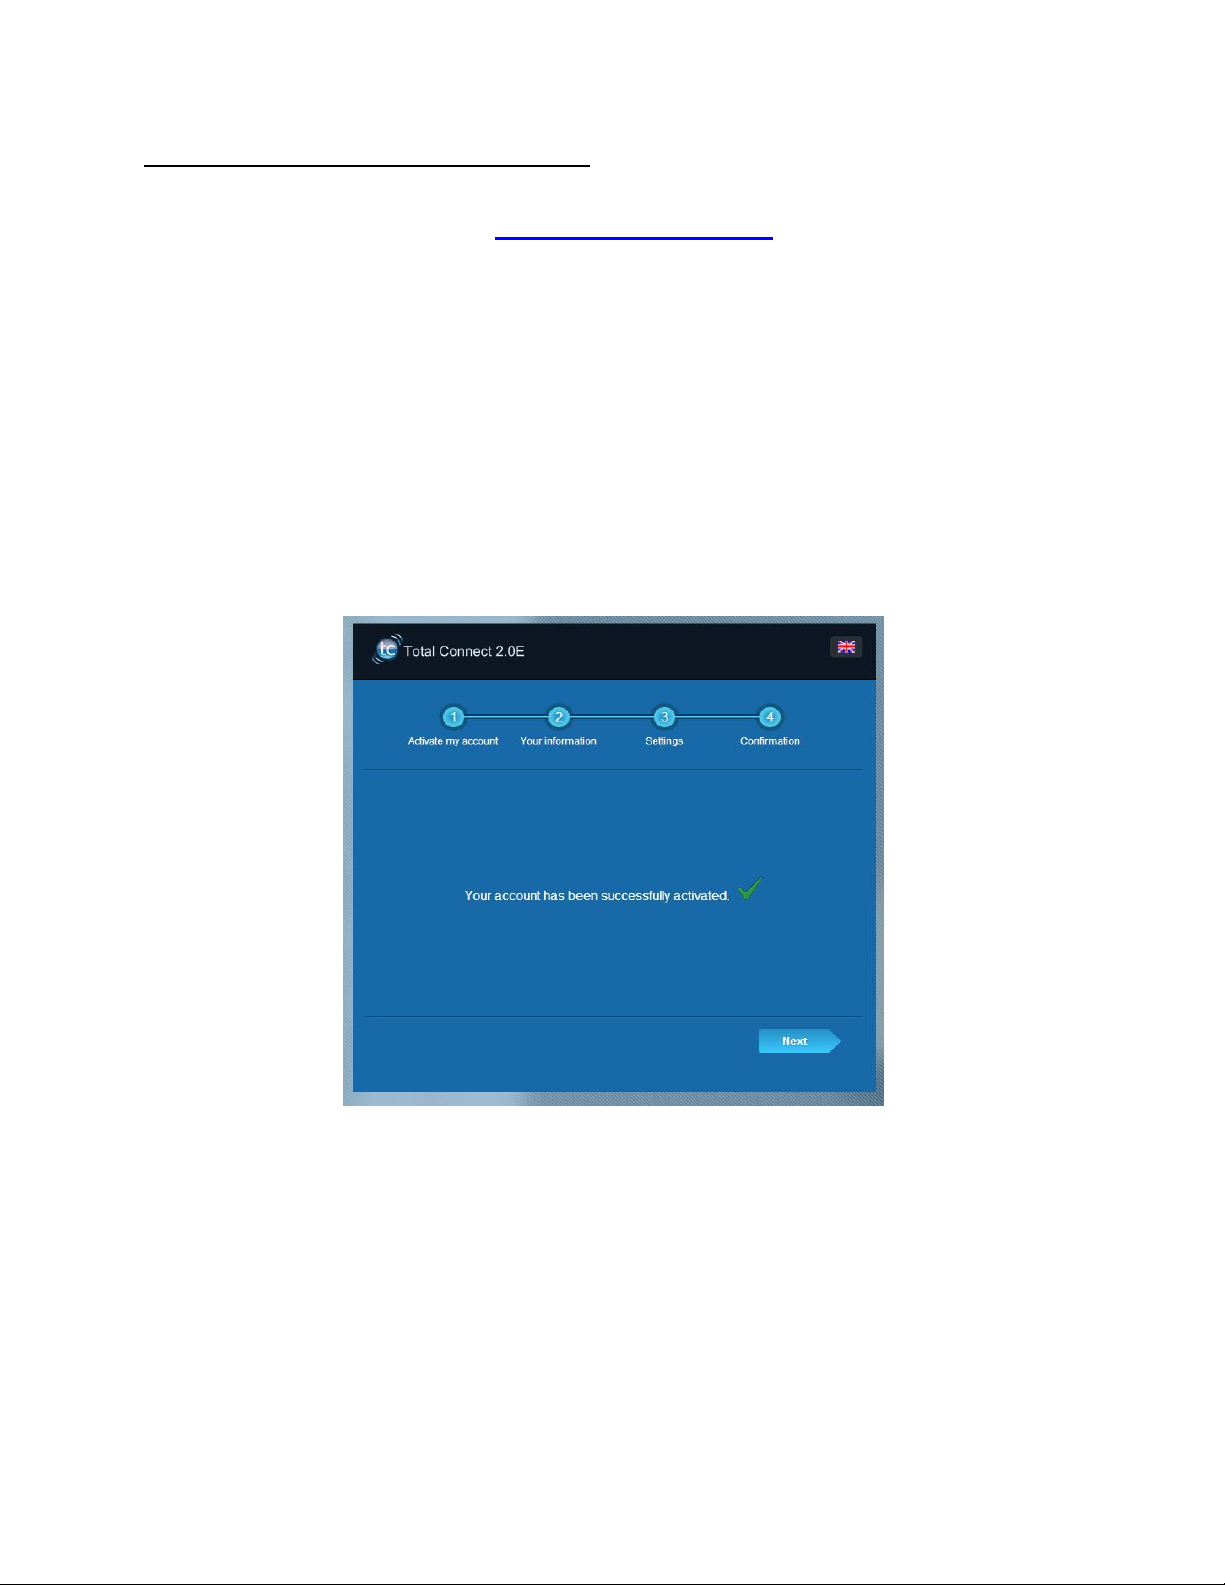
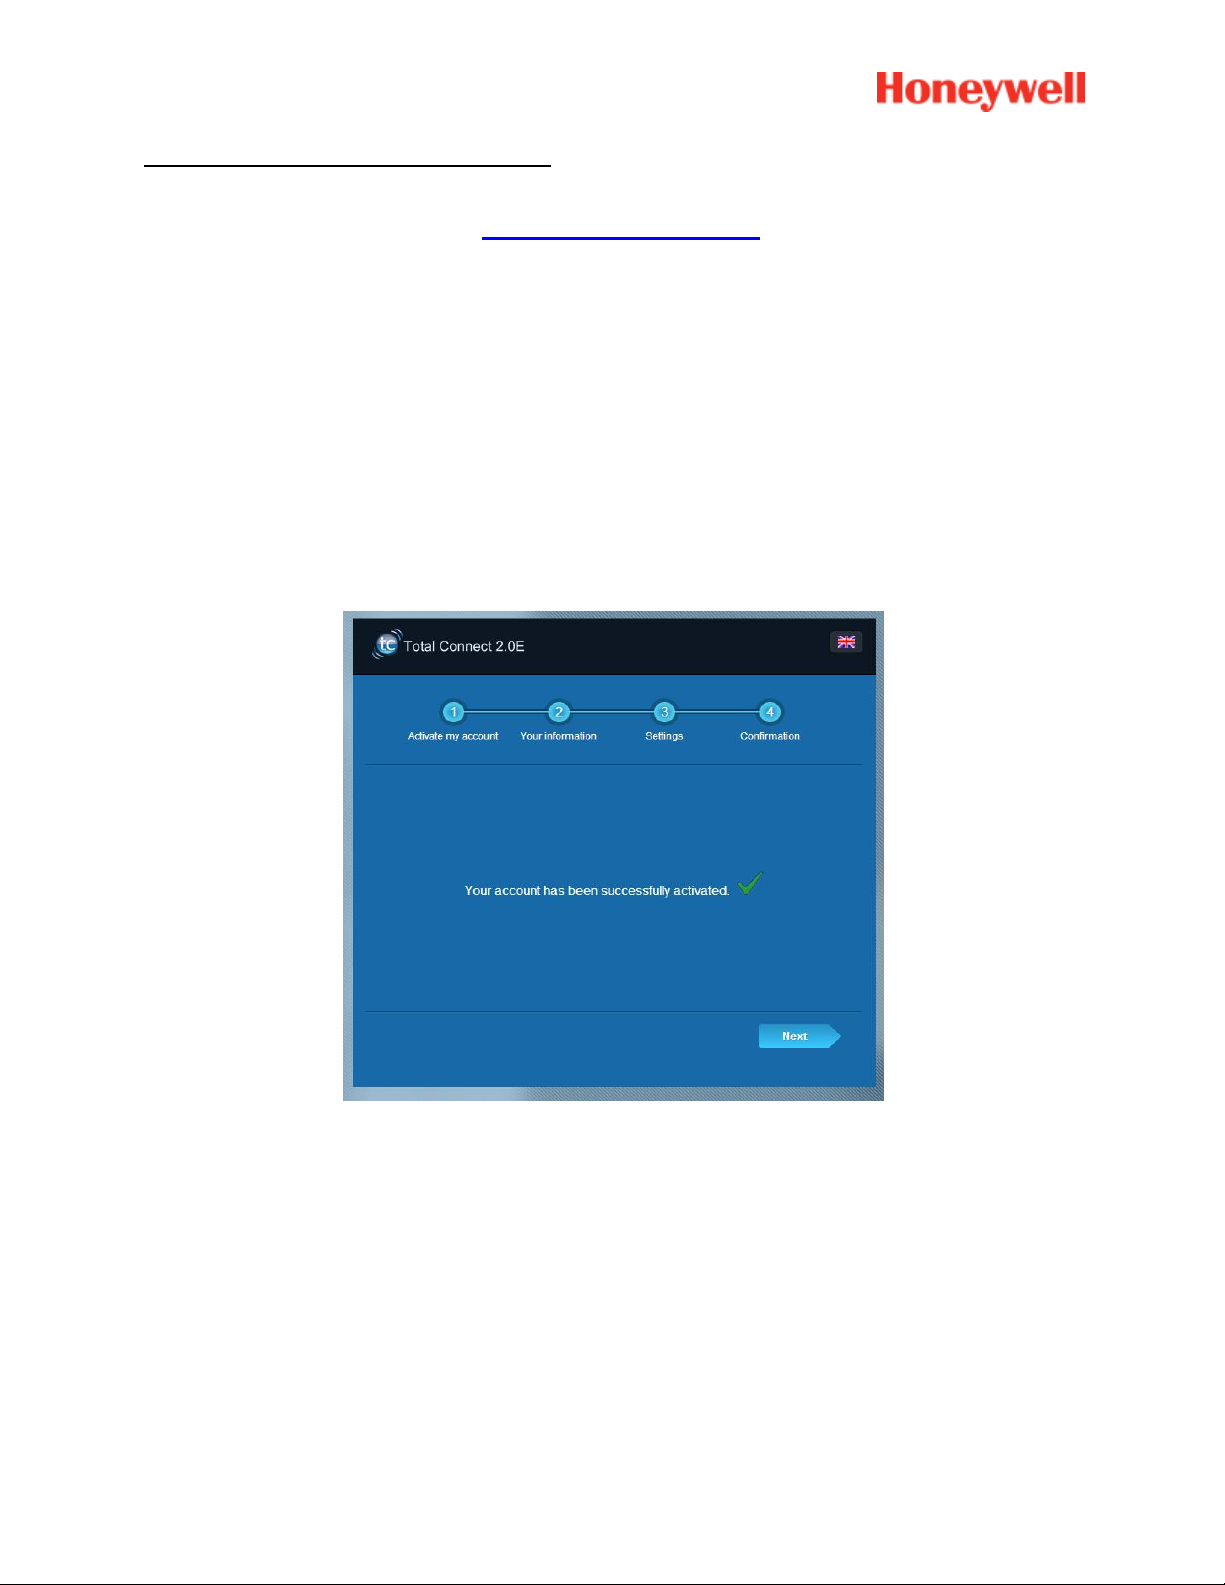
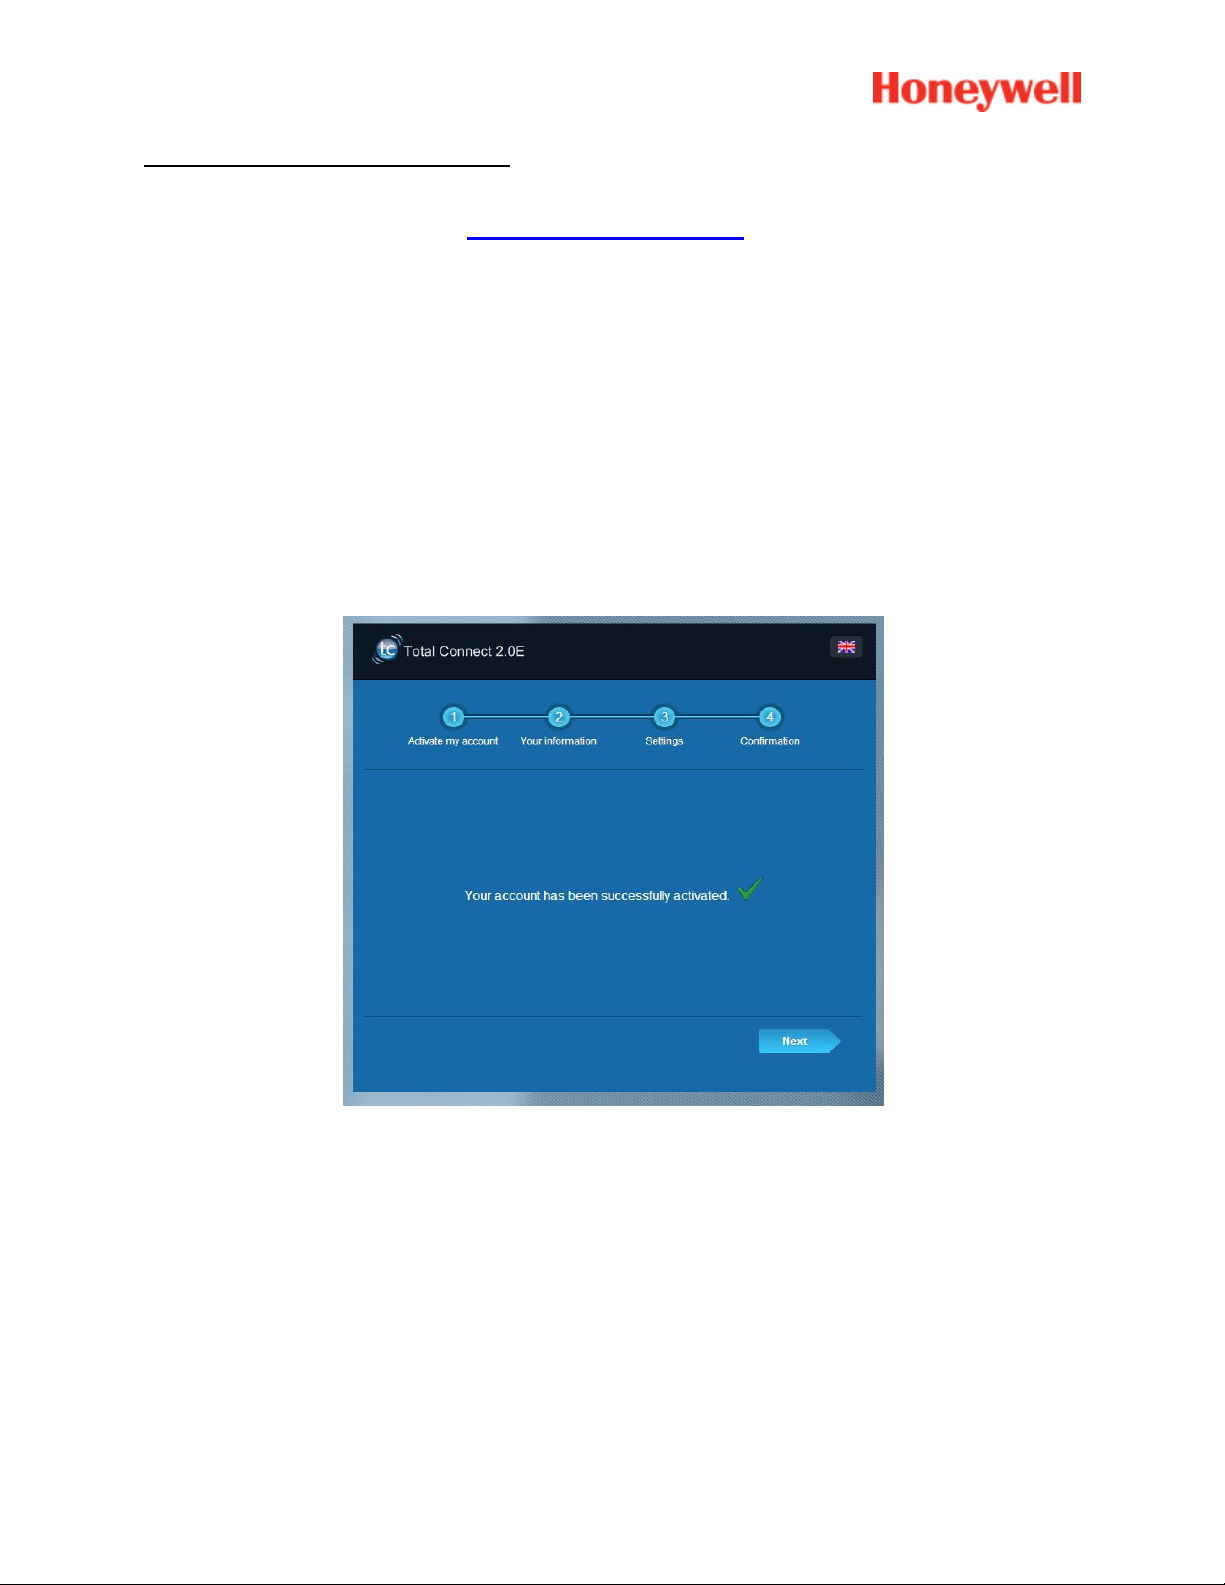
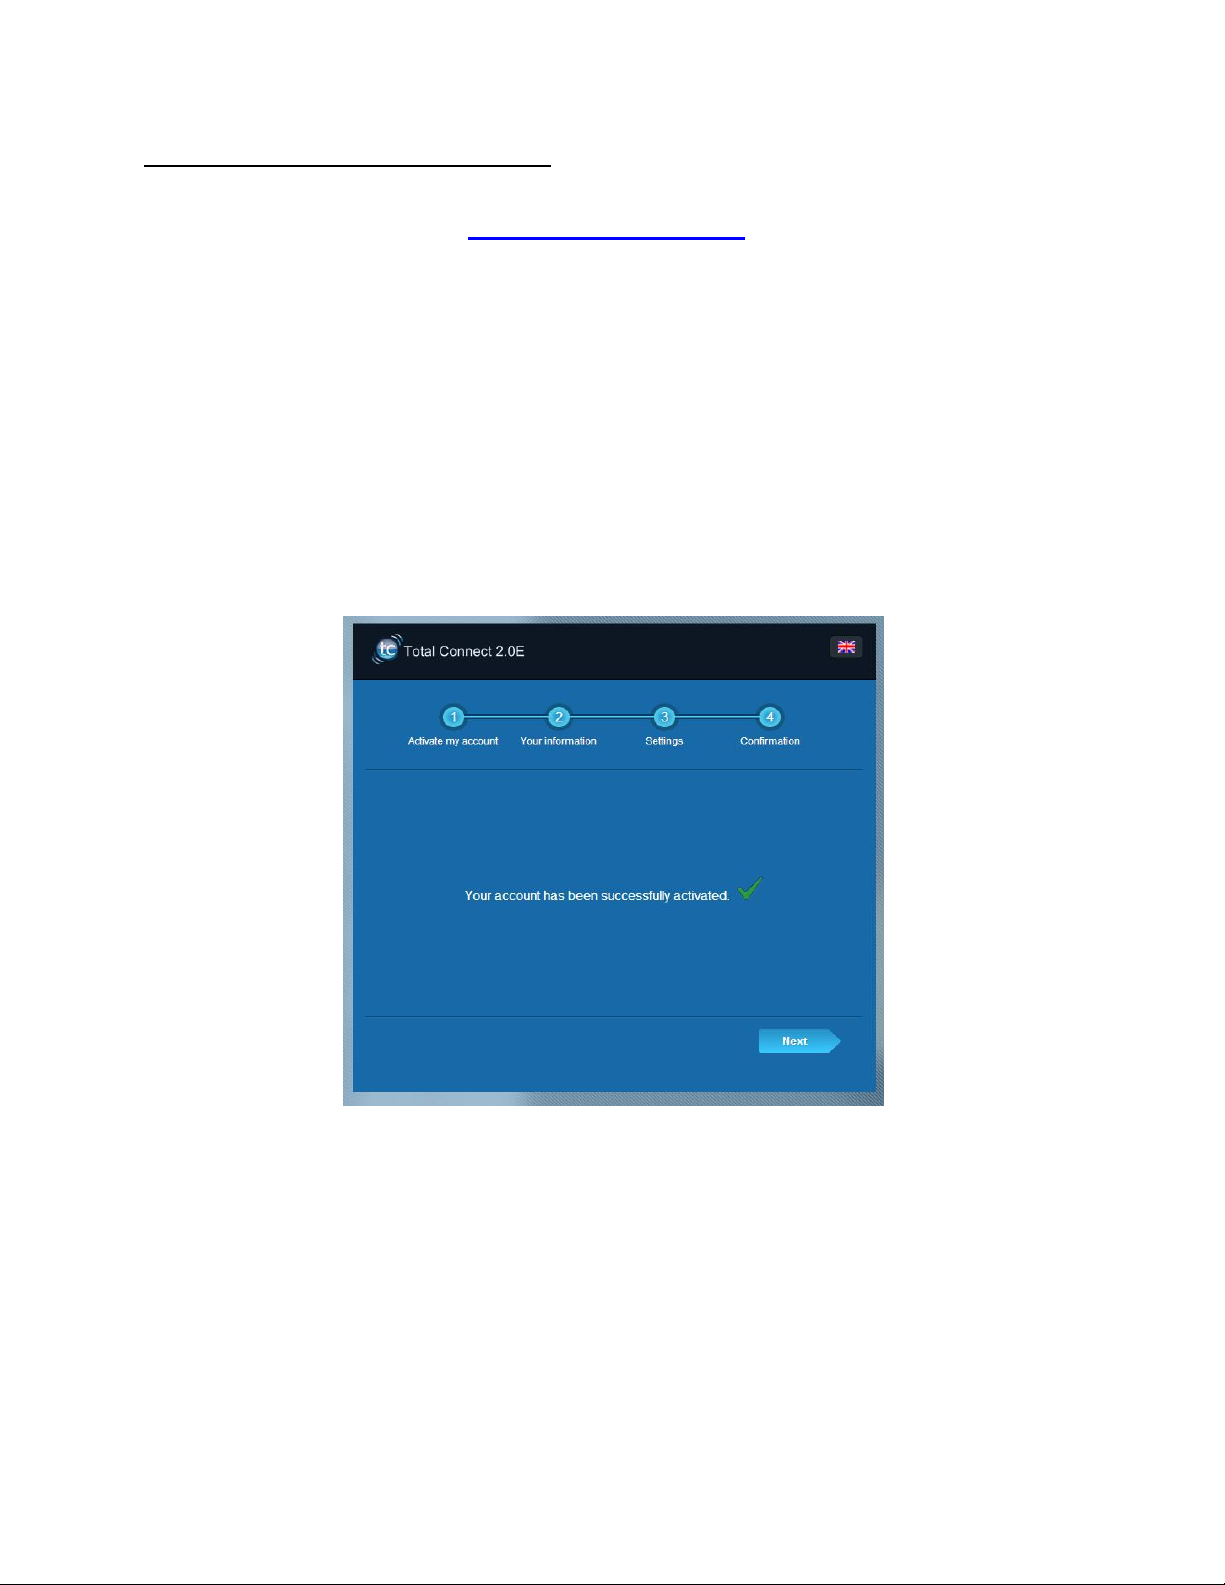
The following message then appears: « Your account has been sucessfully activated ». Clik on the blue
button to continue.
A confirmation email will be sent to you reminding your login and password for the website.
Some information regarding the specificities of your system will also be given. If you haven’t
recived the email please check in the Spam directory also.
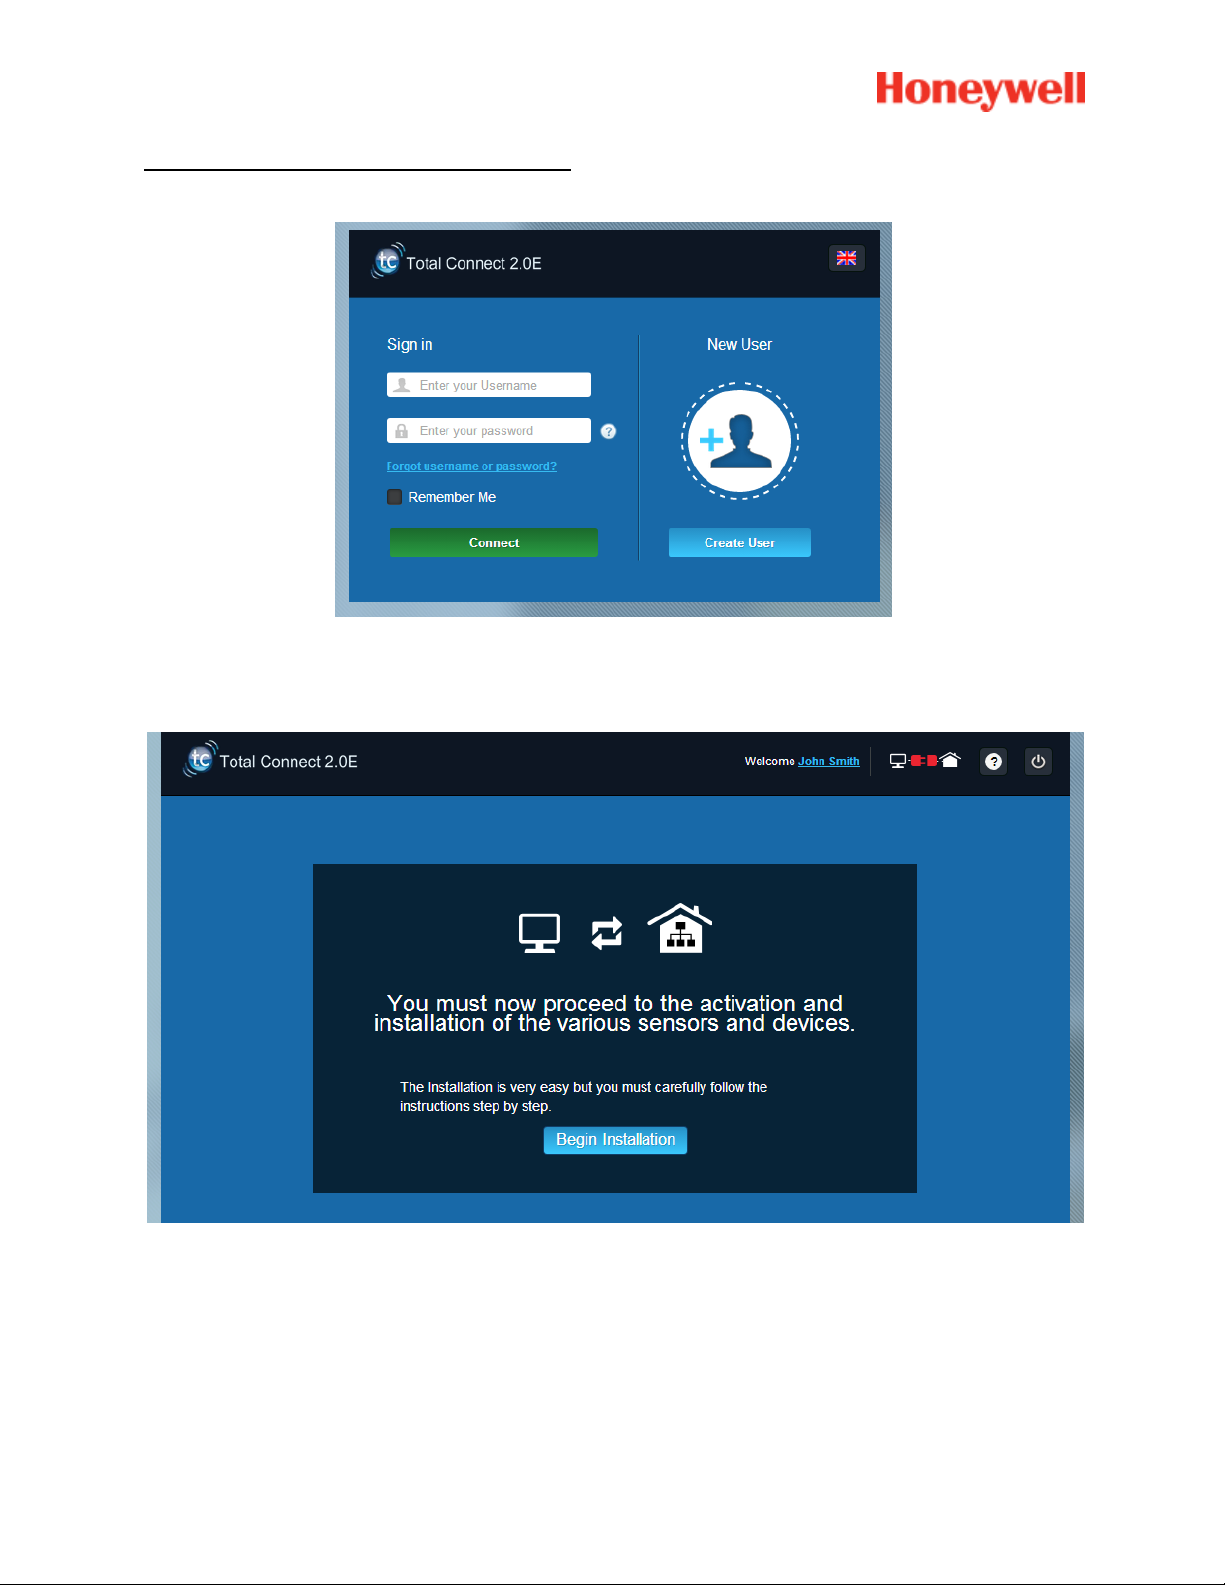
Now you can log in you account through the main page of the website.
5
Page 6
INSTALLING YOUR SYSTEM
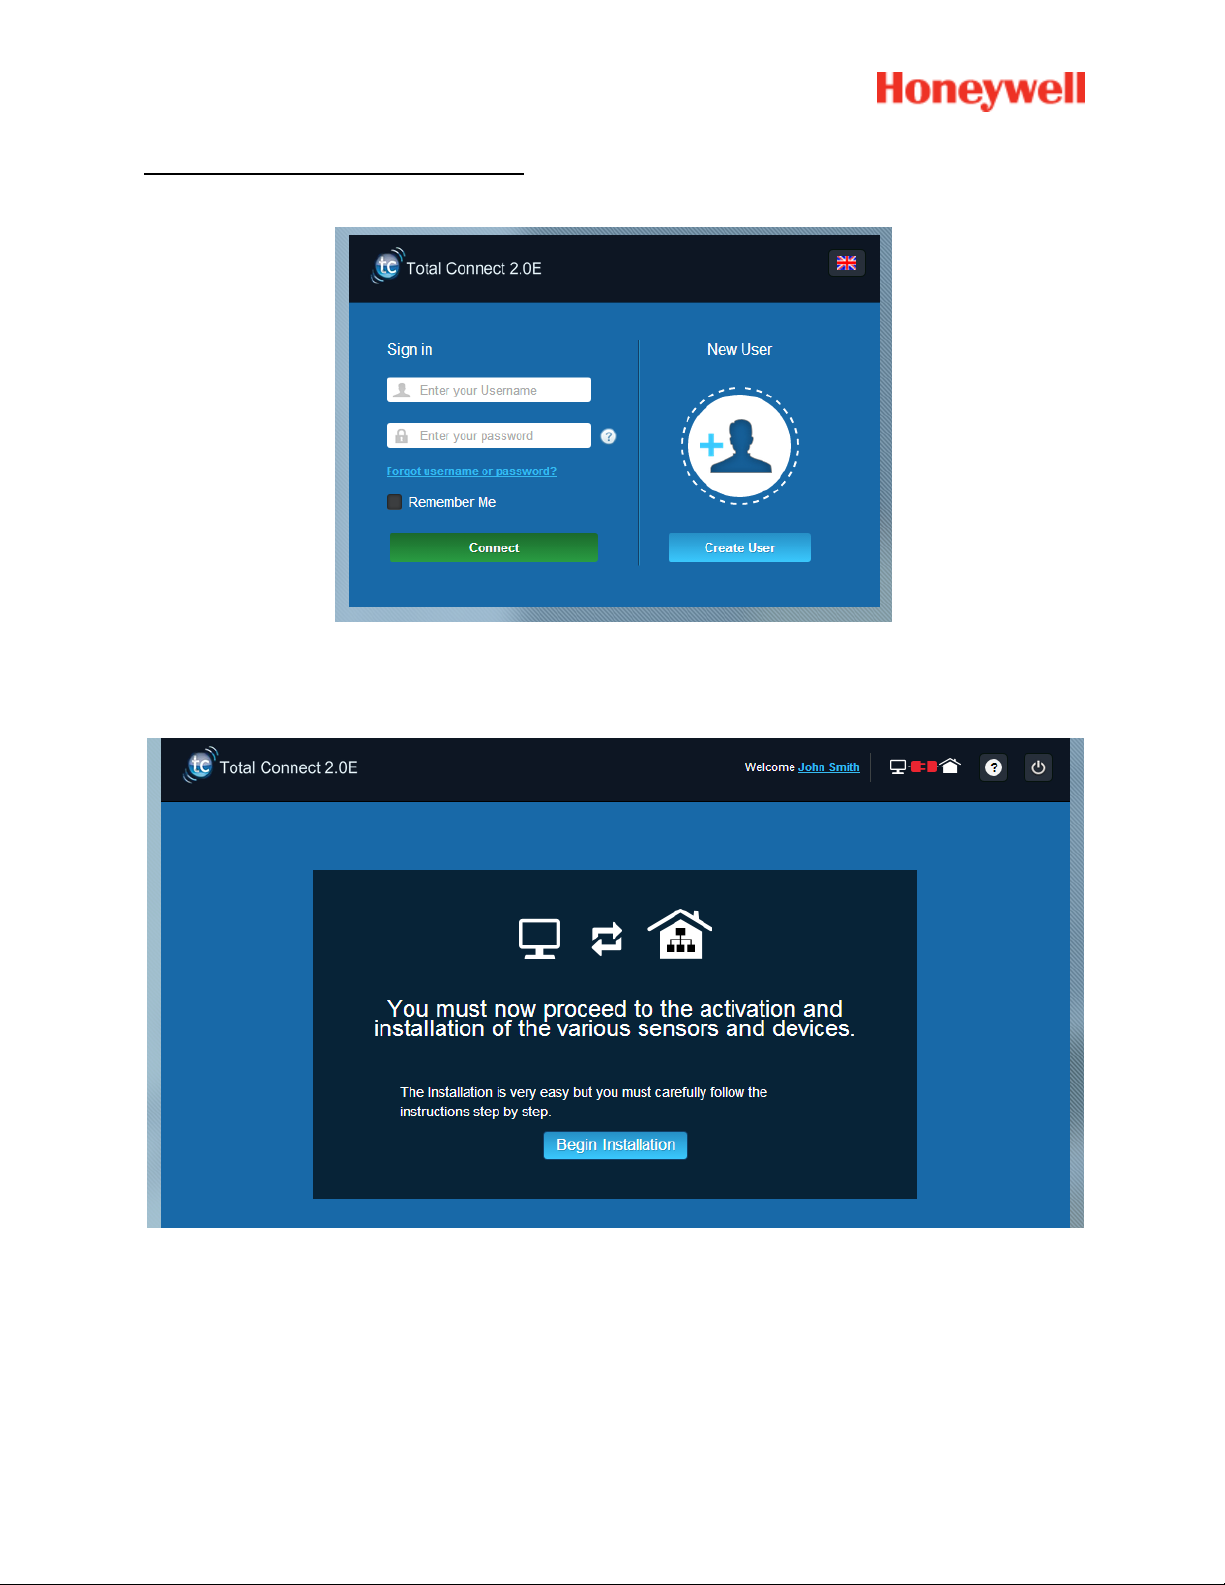
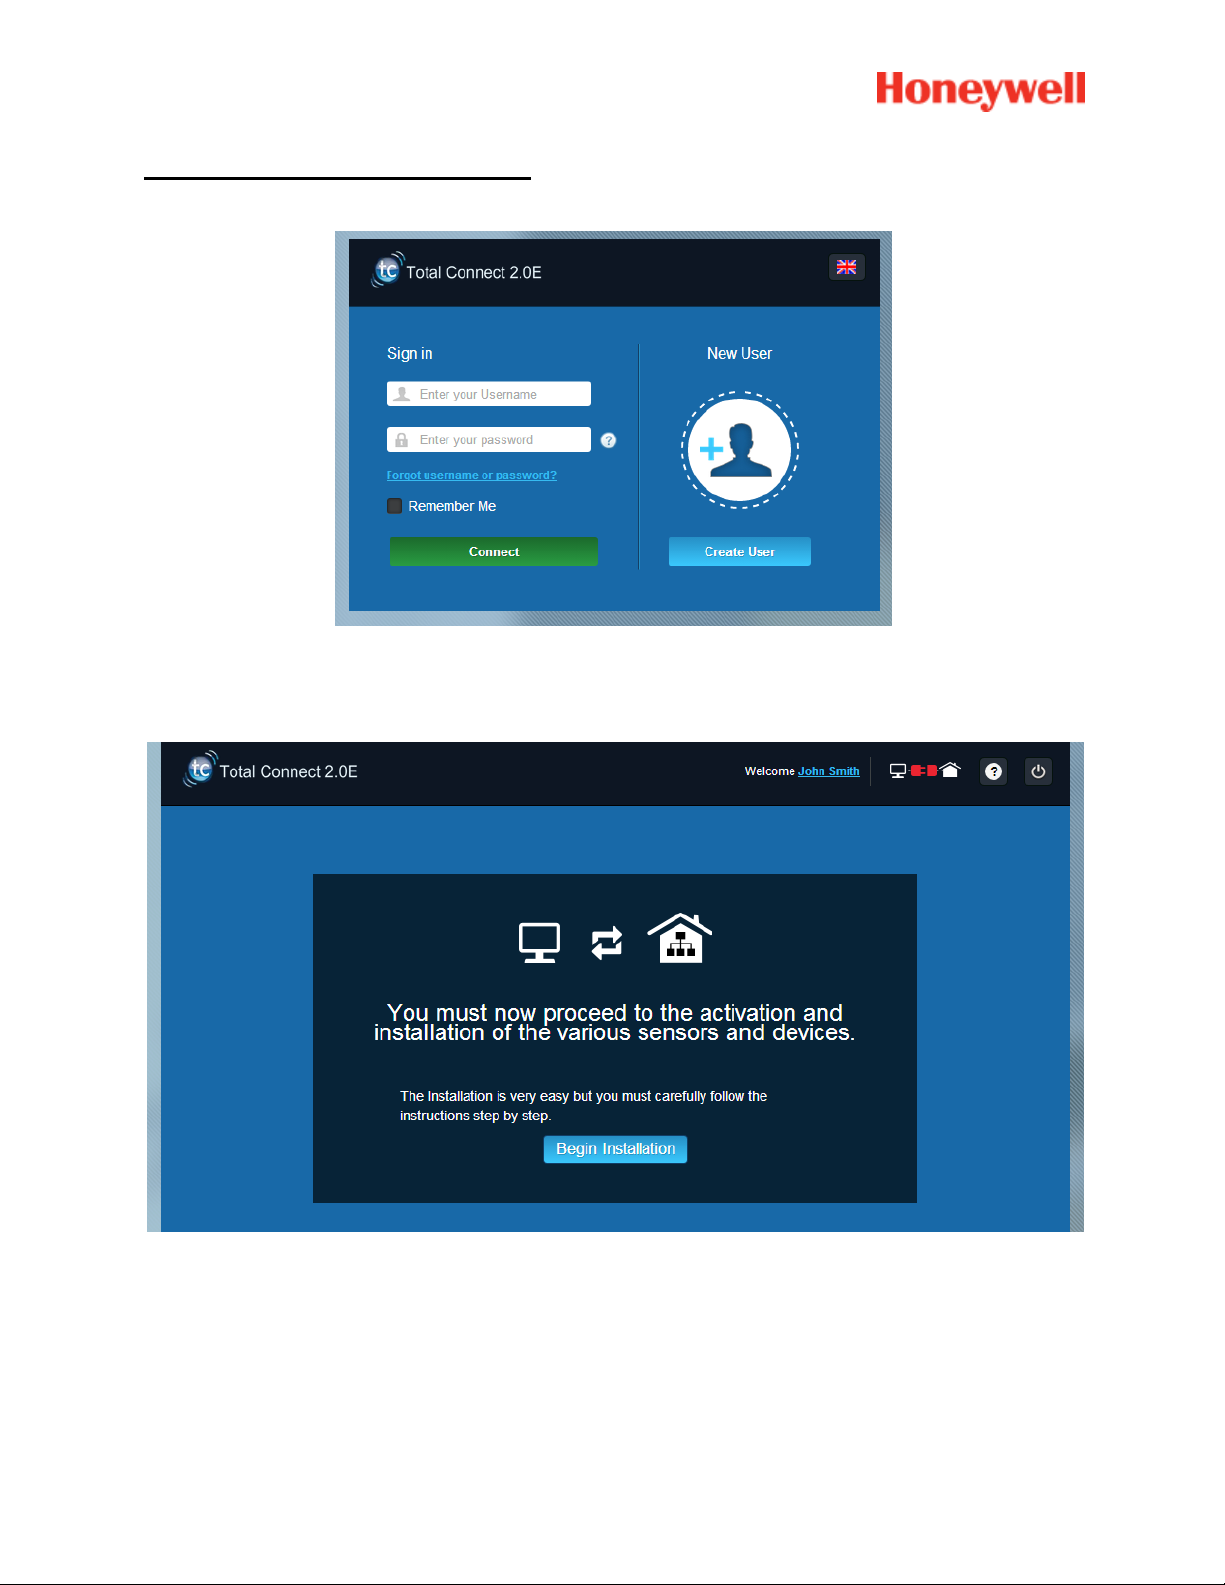
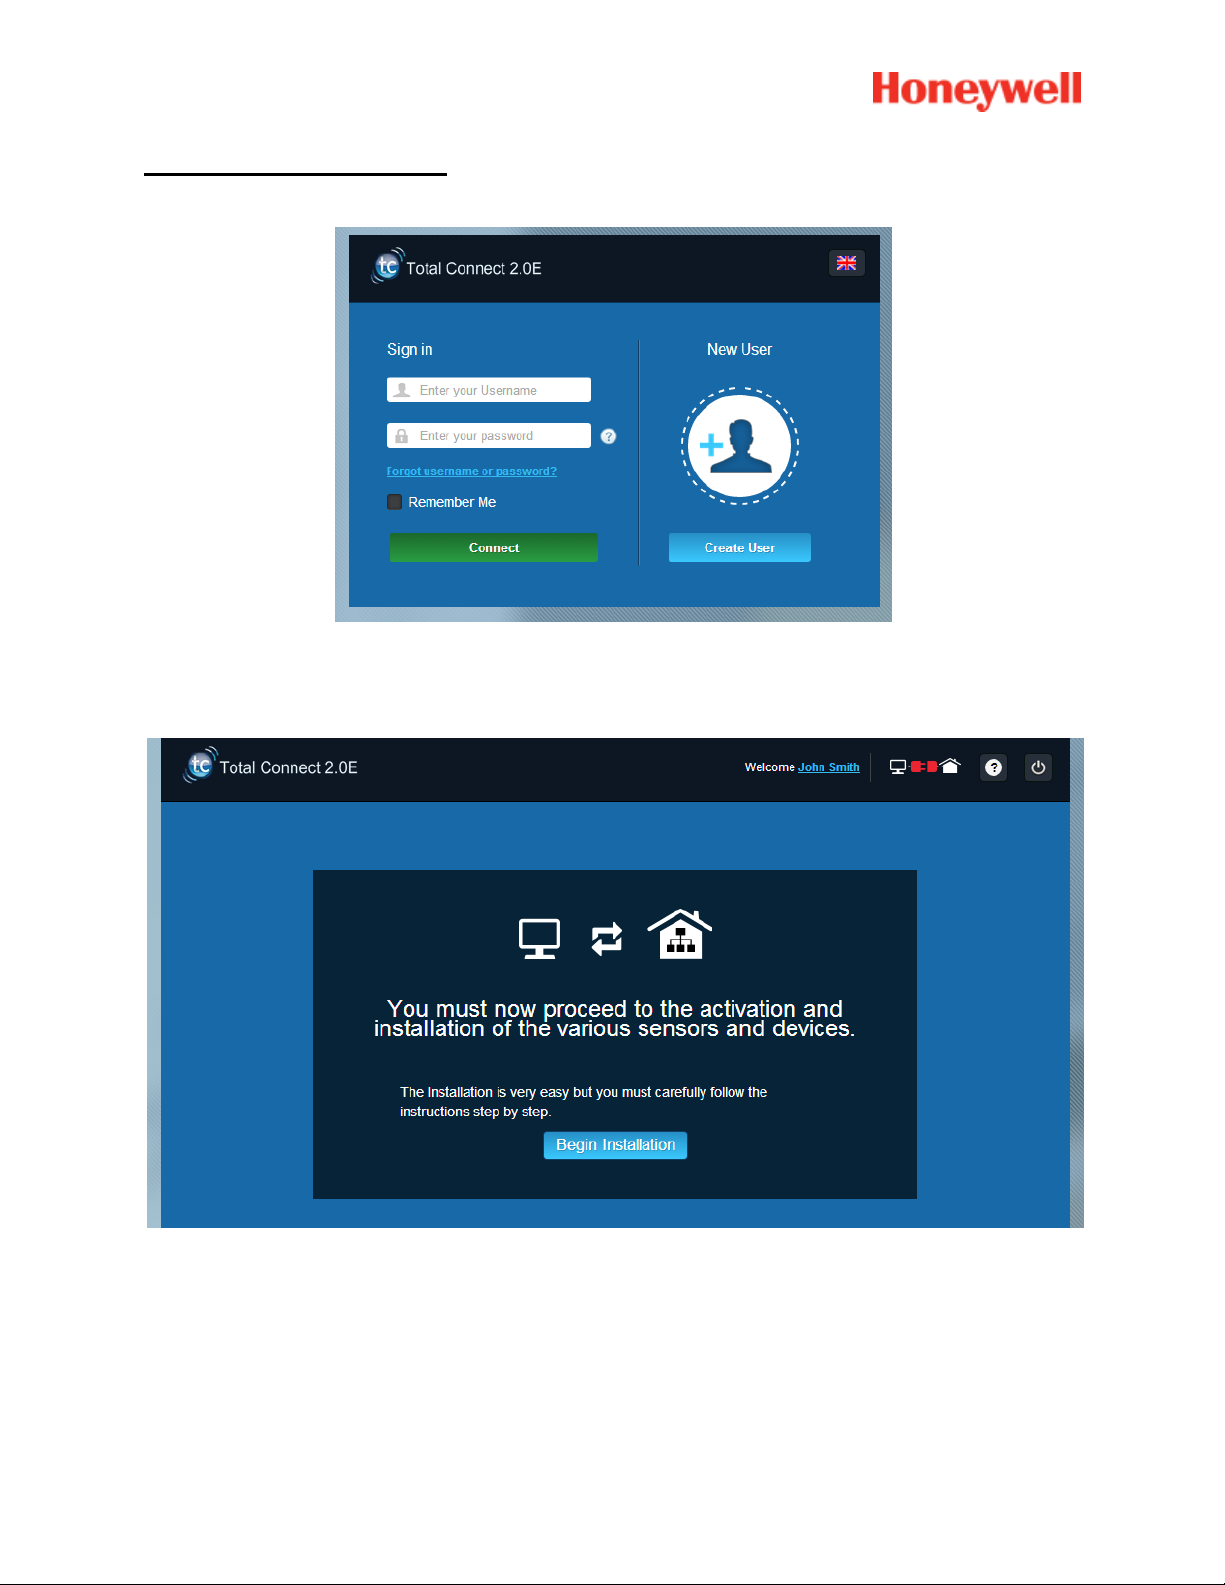
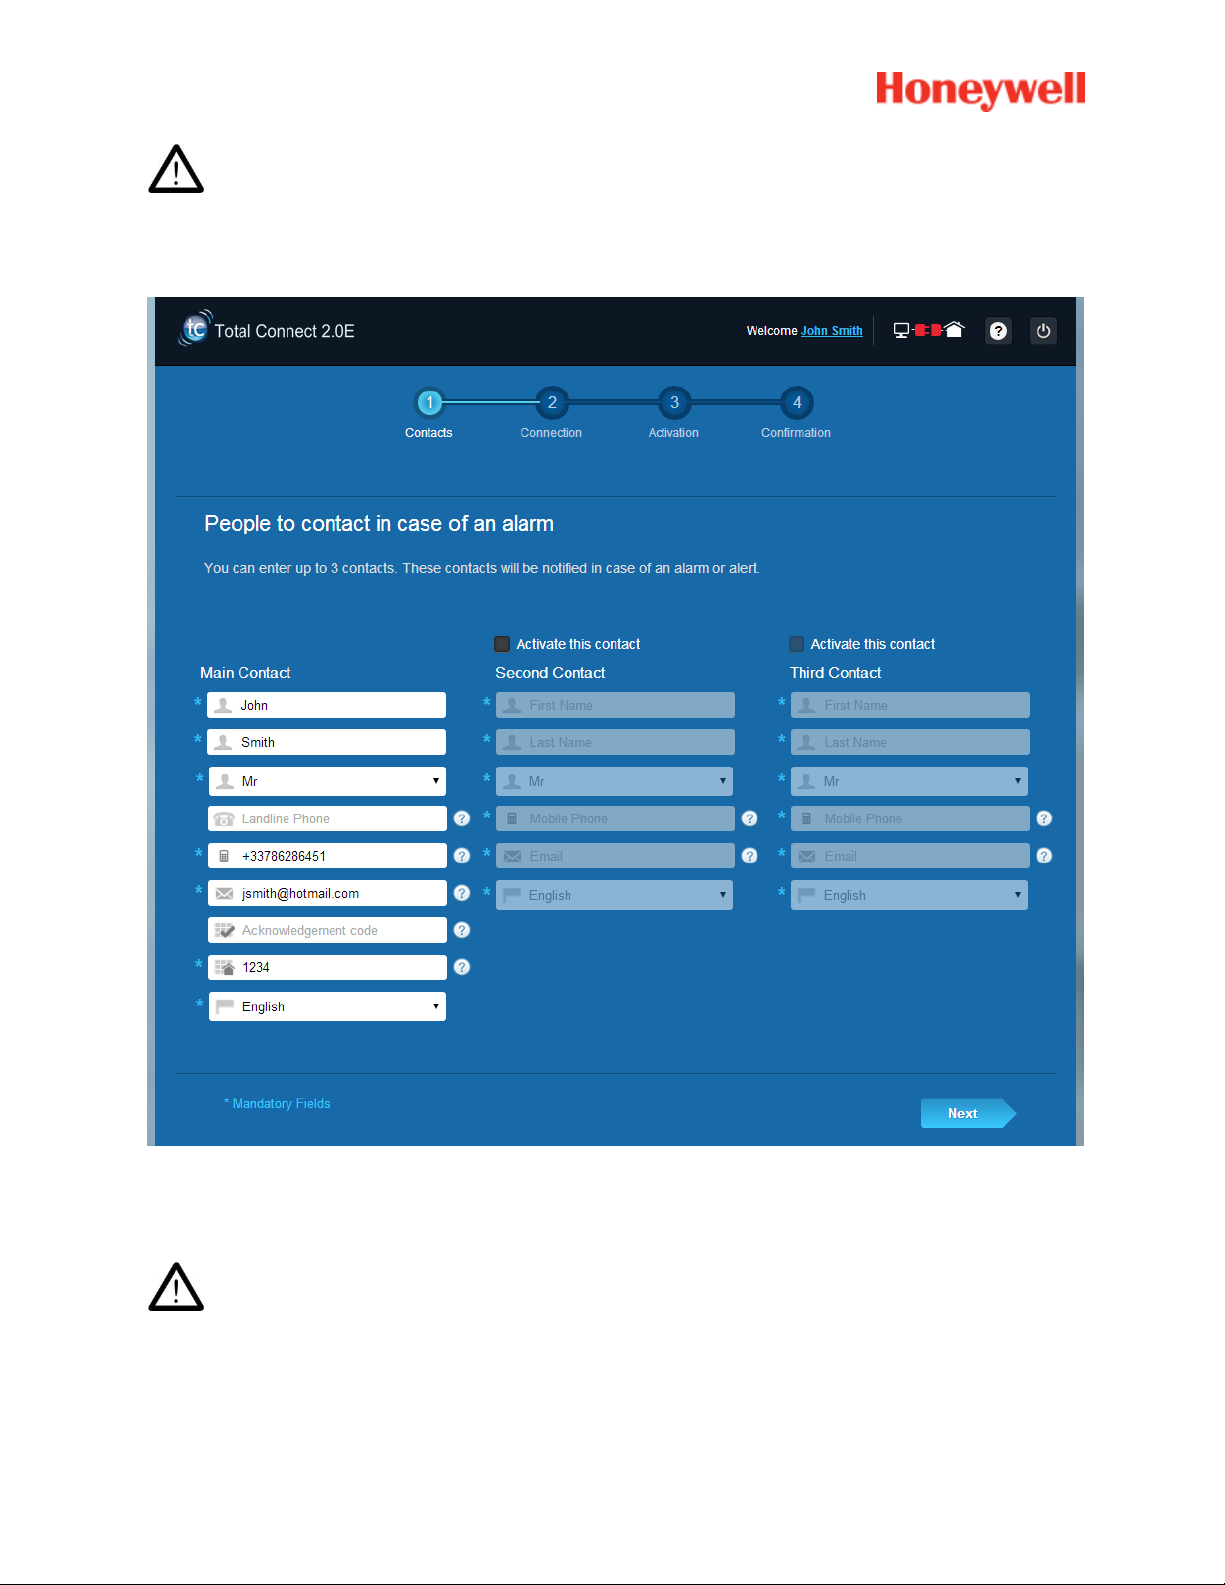
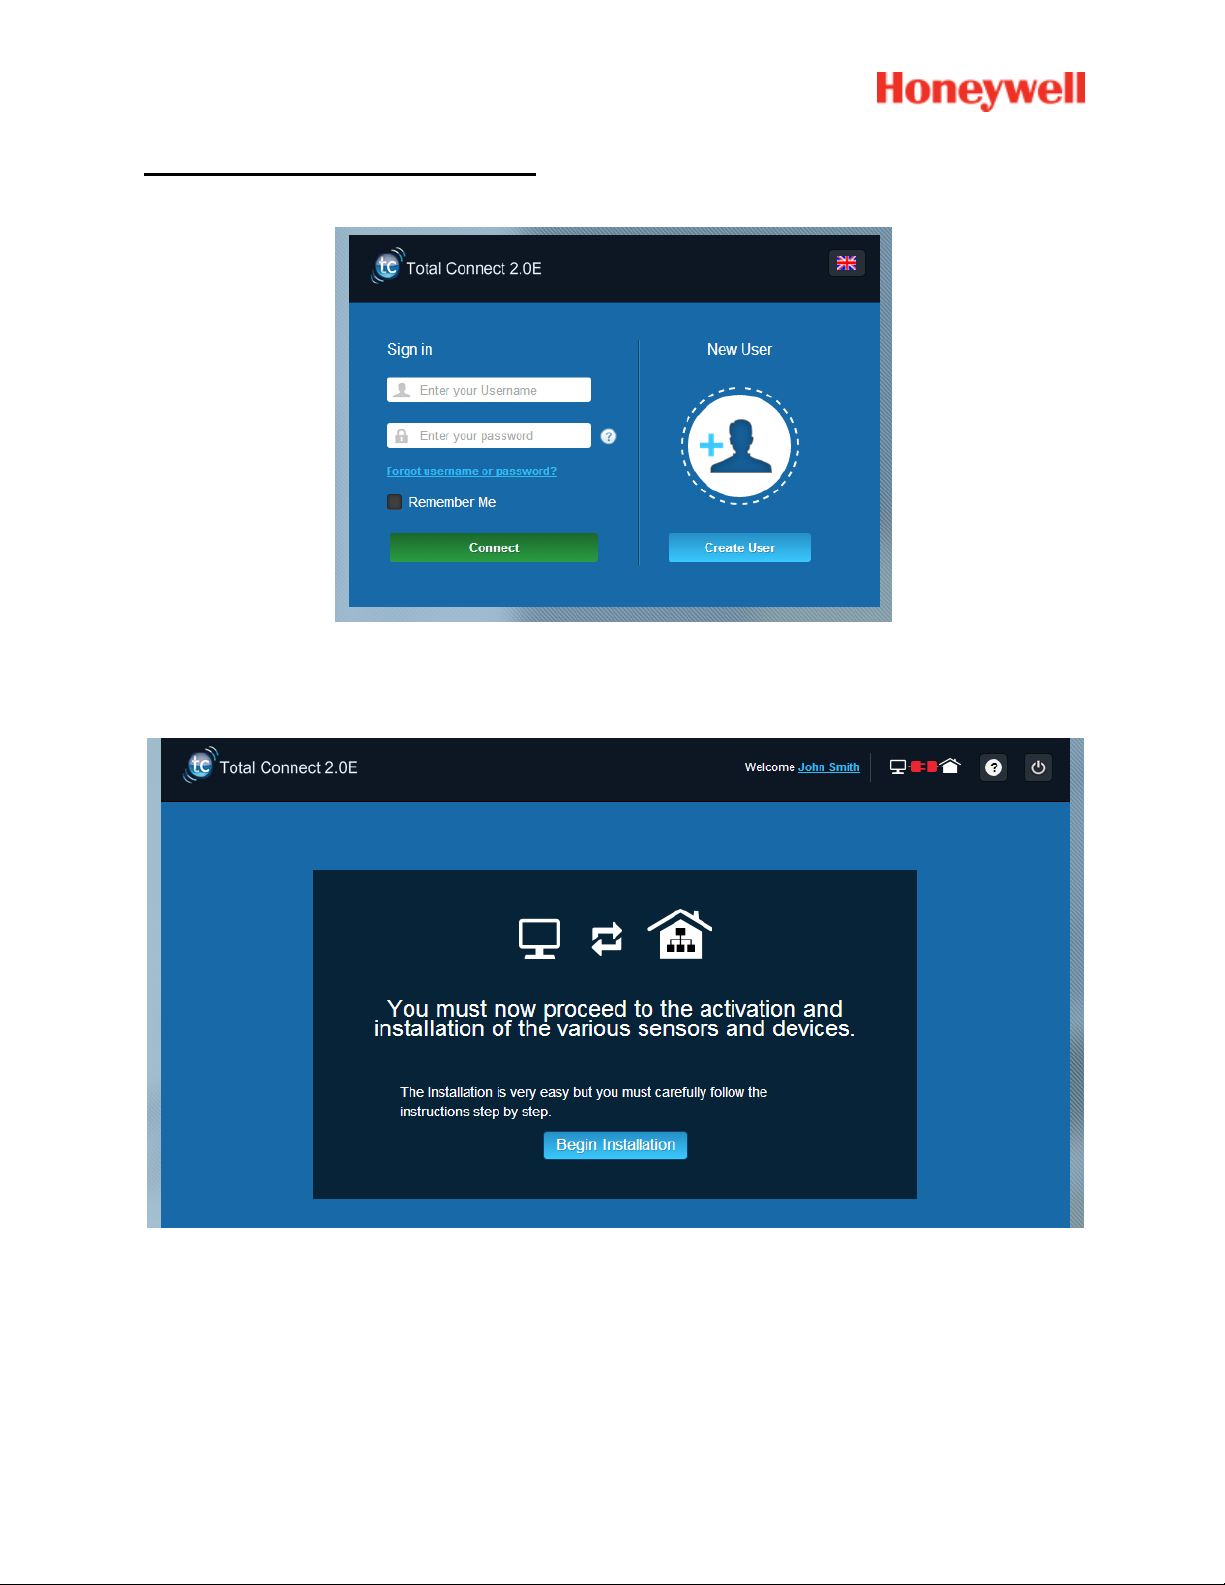
After logging in, the following message then appears:
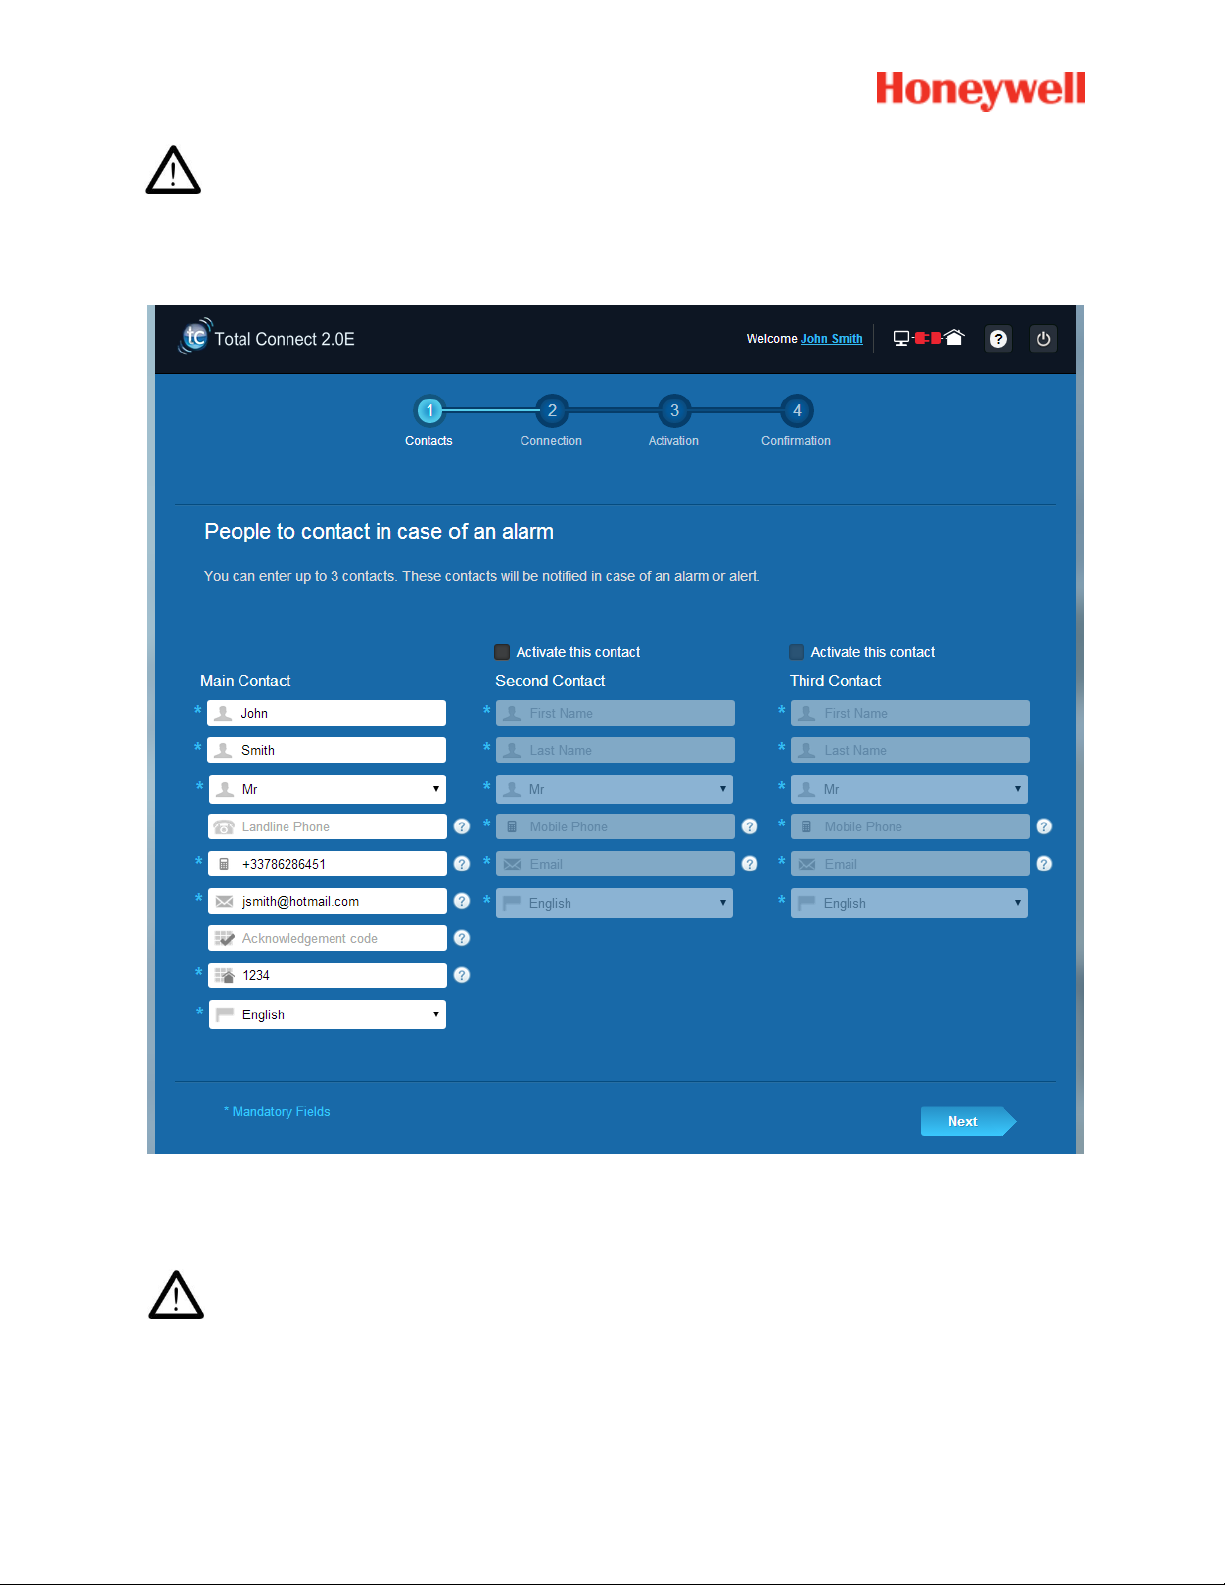
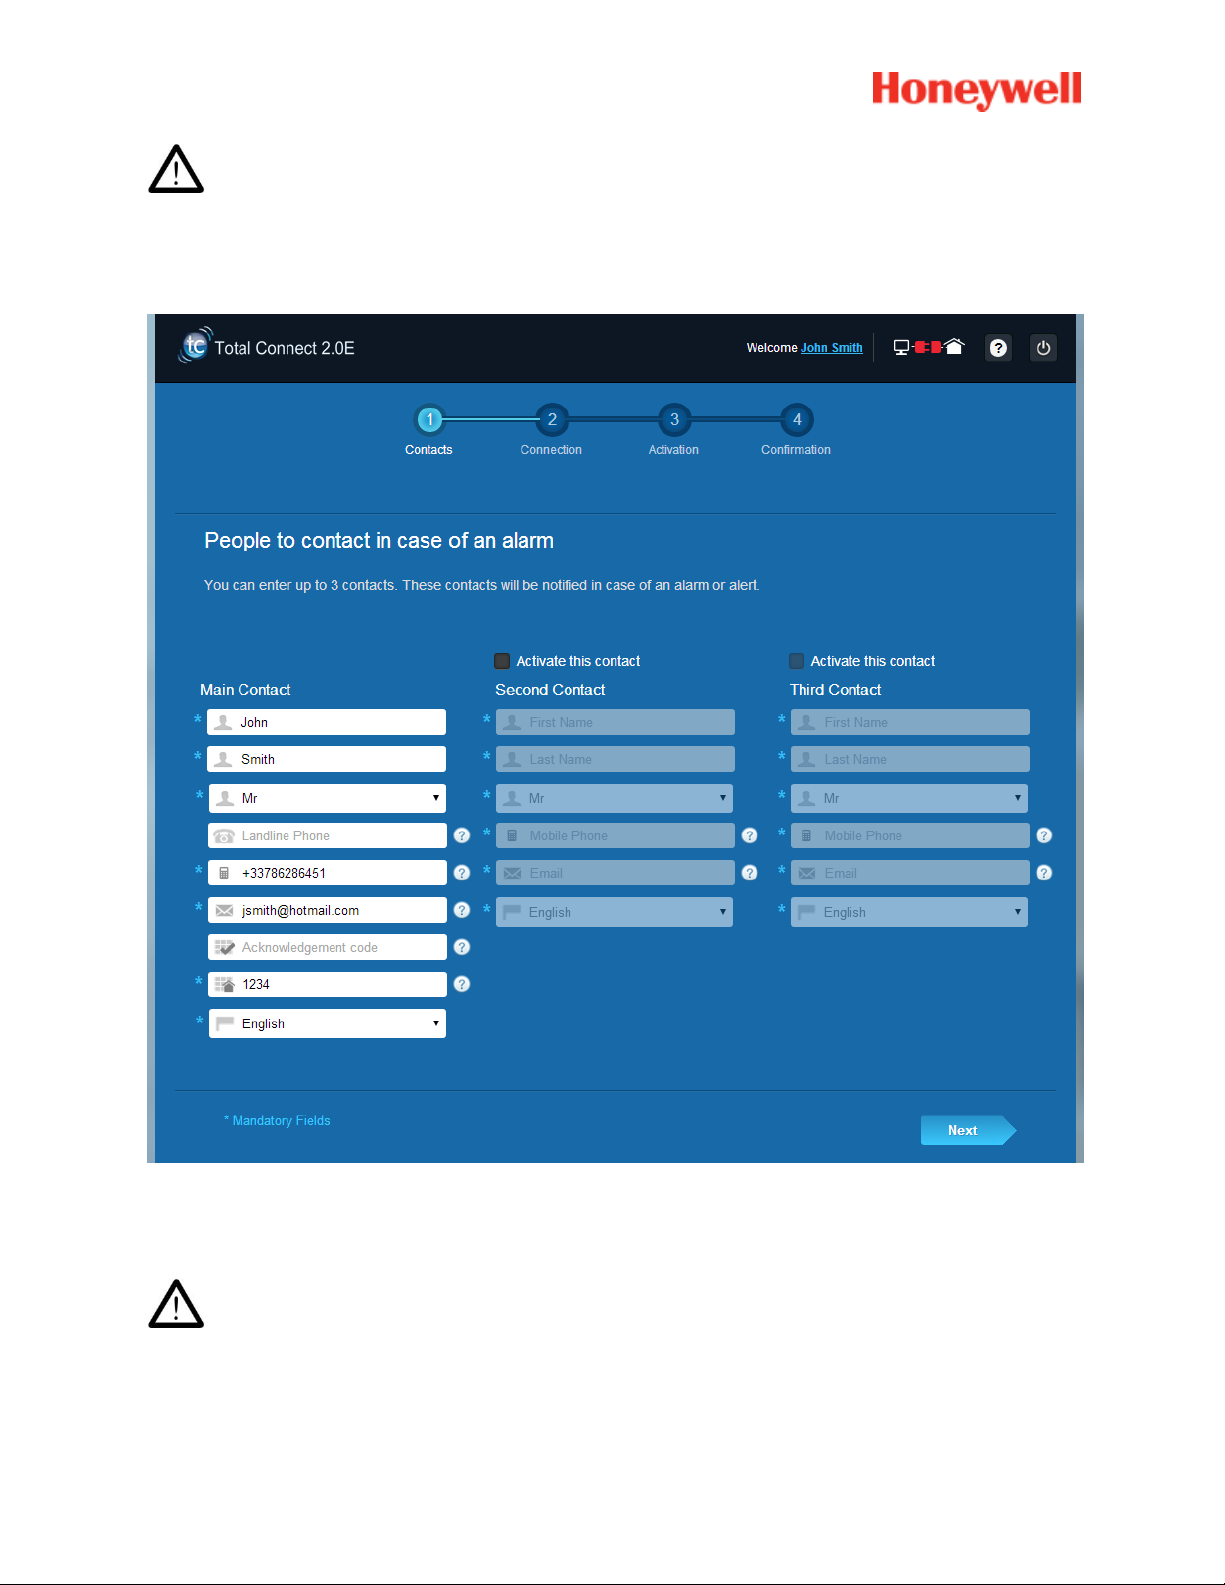
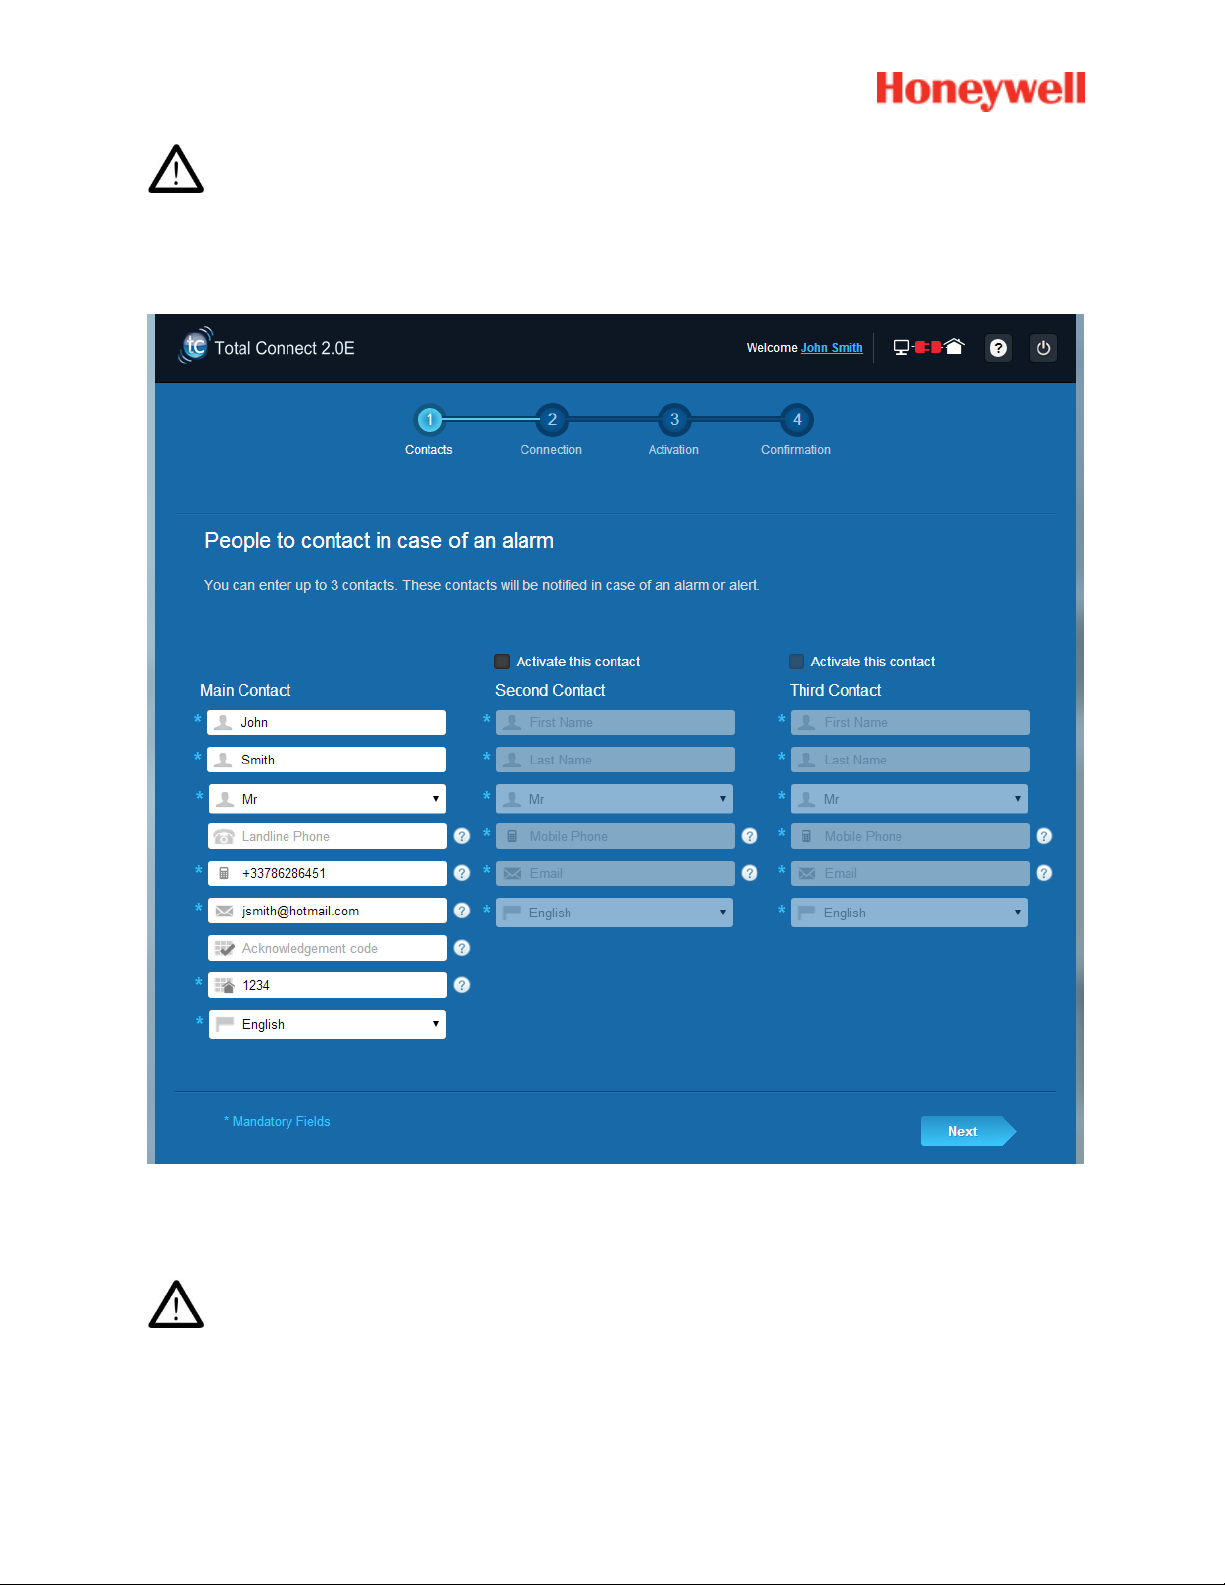
1. The first step is to set your contacts: these are the people who will be notified by email or SMS
when an alarm or a problem occurs in your premises.
Up to three contacts can be set up. The first contact is usually yourself and is mandatory. The
second and third contacts are optional and can be skipped during the installation. You will be able
to modify these contacts at any time after the initial installation.
6
Page 7
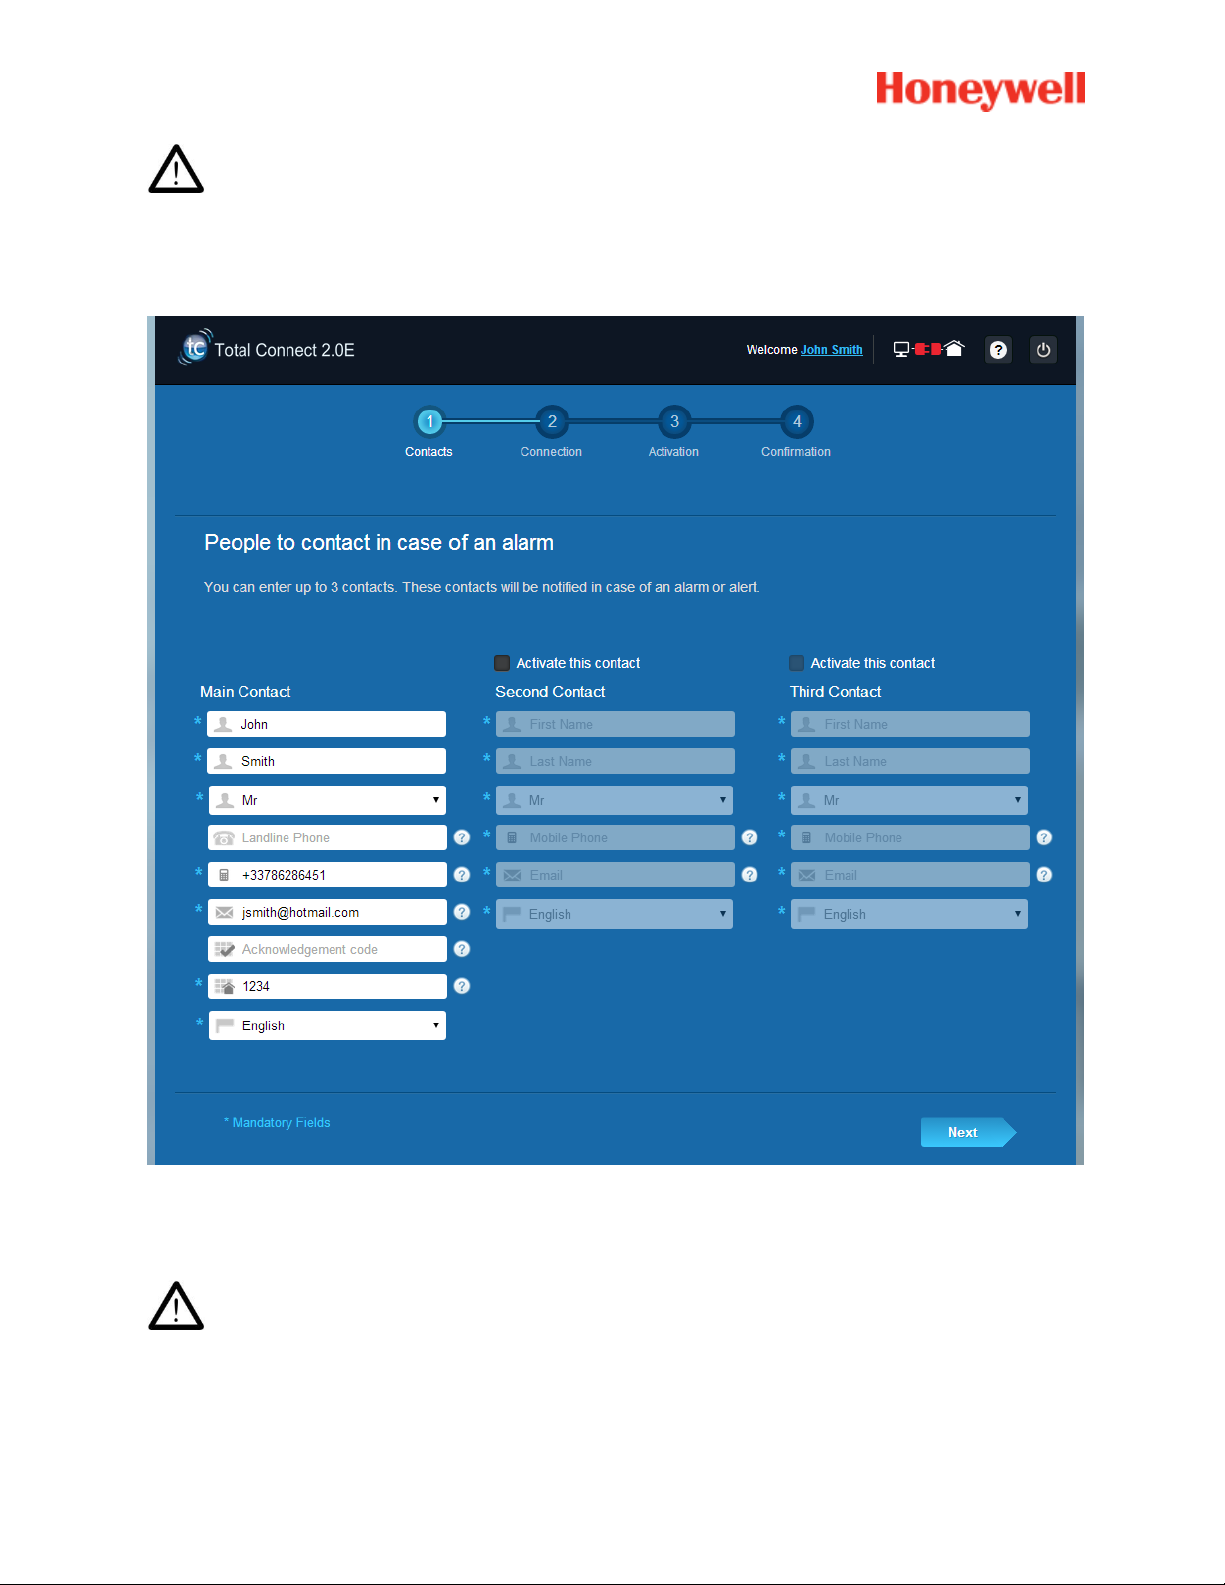
You have to use the international format when entering the contacts’ phone numbers. Example:
number starting with +44 for the UK or +33 for France.
2. Depending on your panel, you may have to enter a phone number corresponding to the SIM card
supplied with your system
You have to use the international format when entering the SIM card phone number.
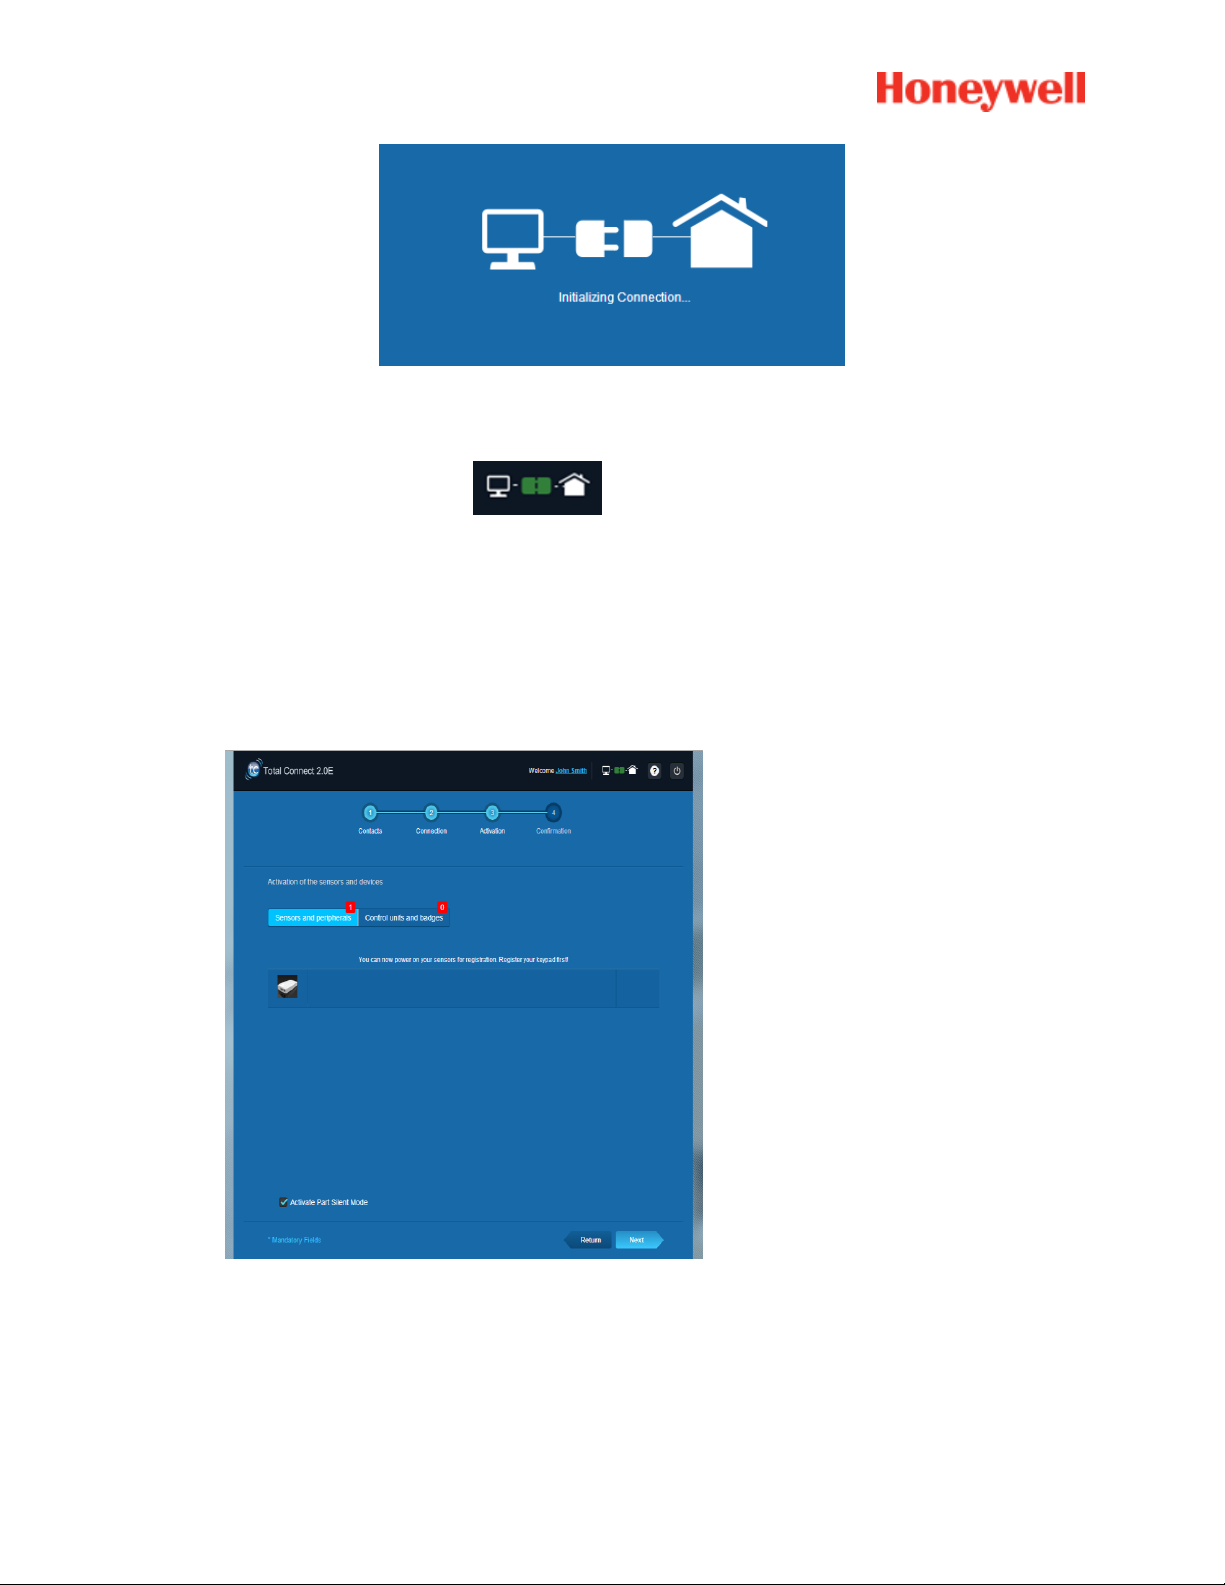
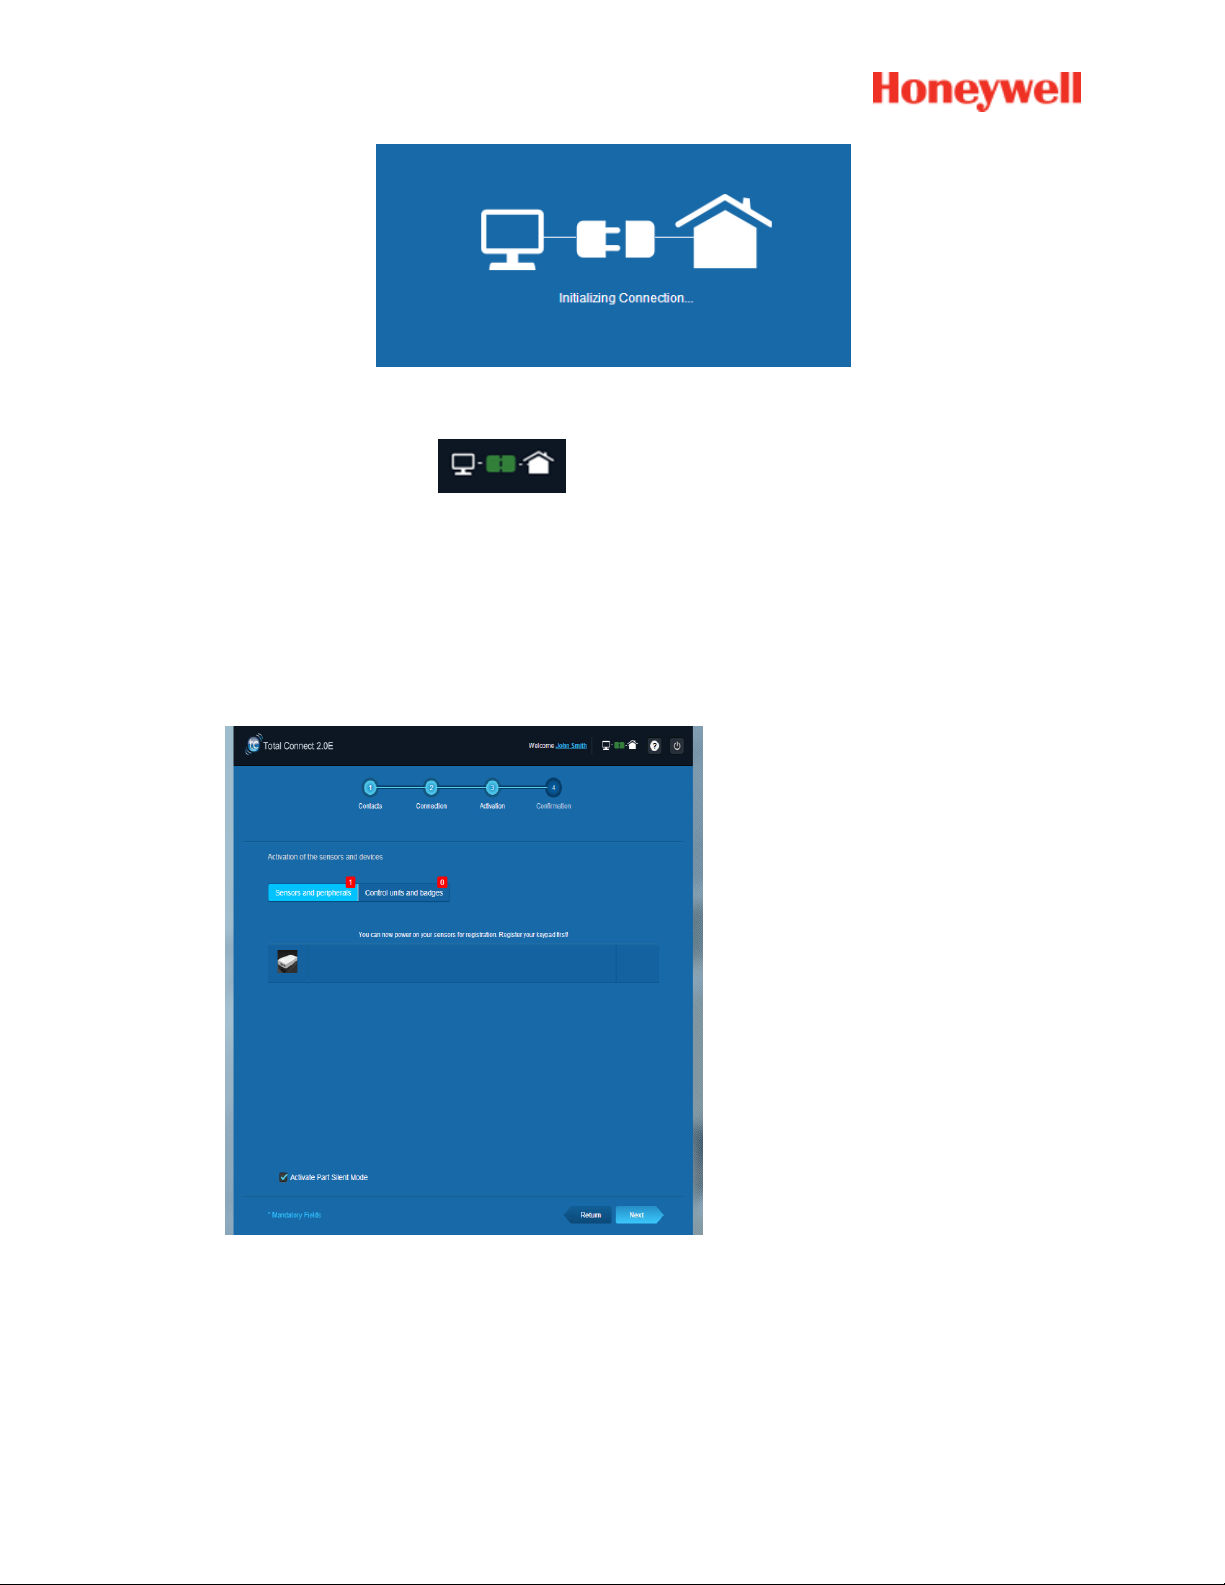
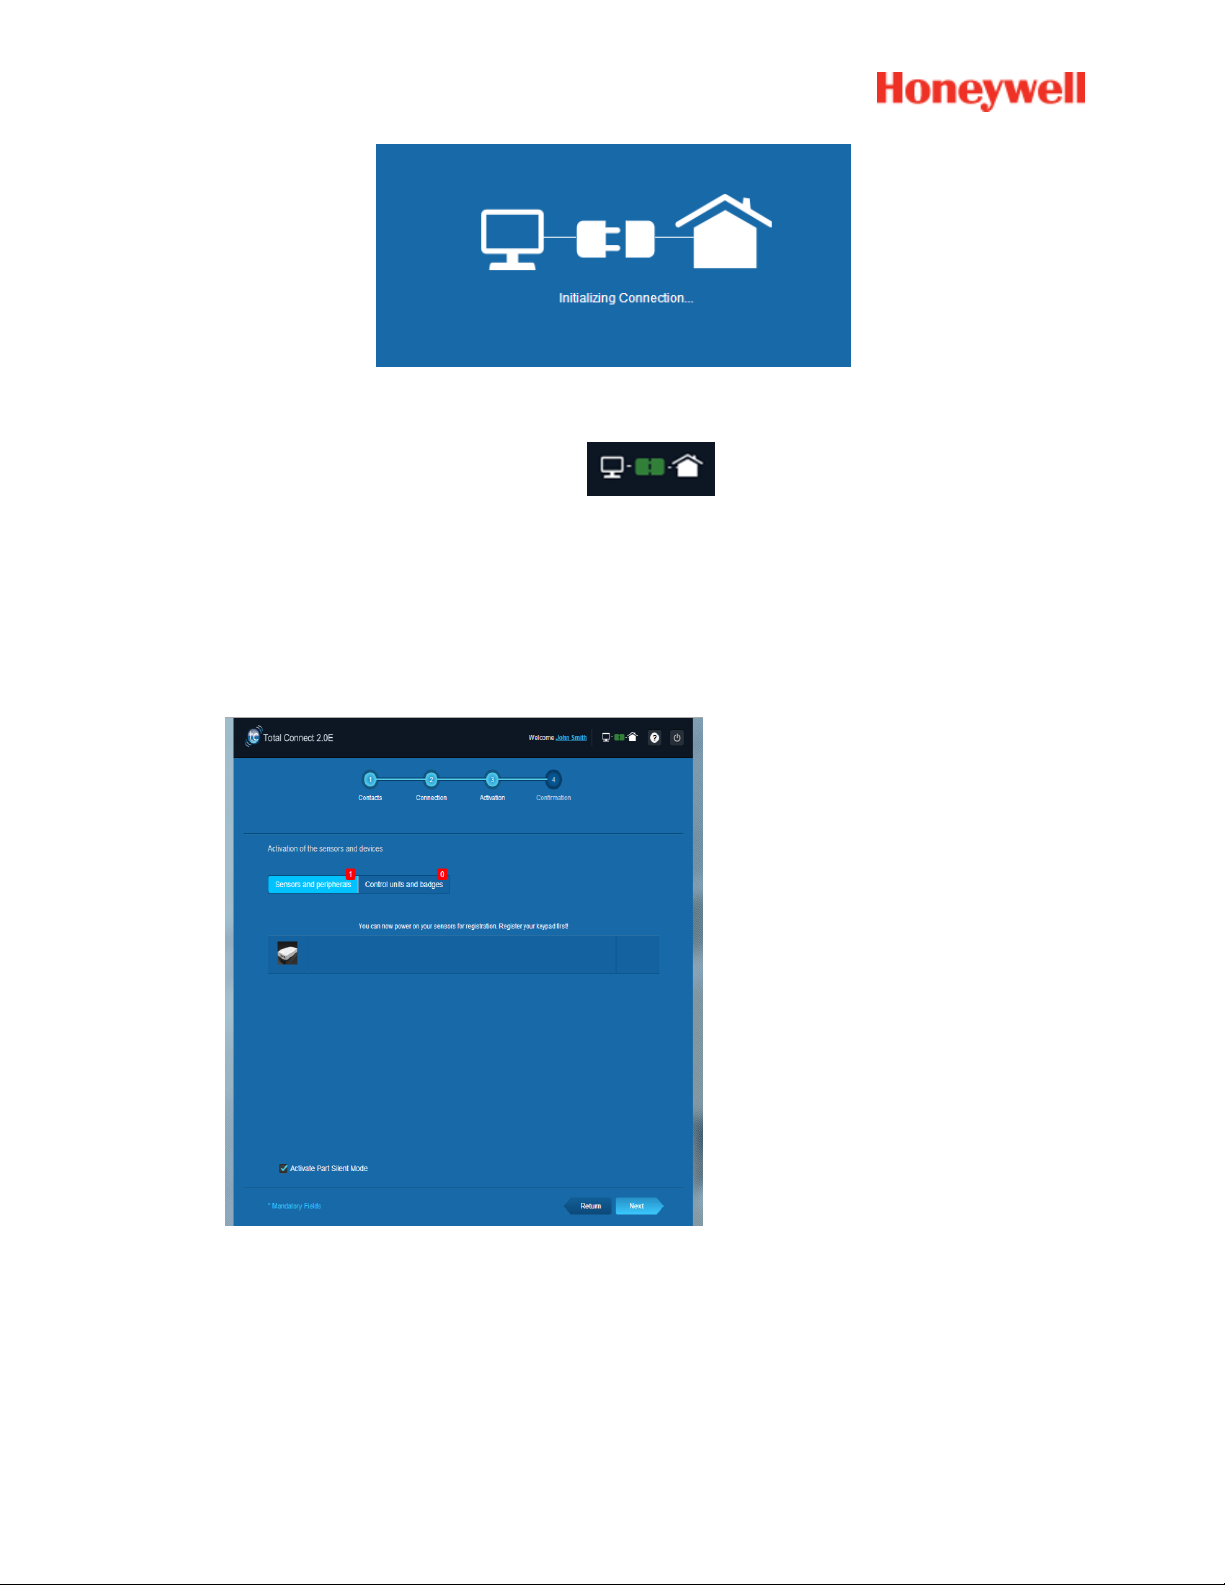
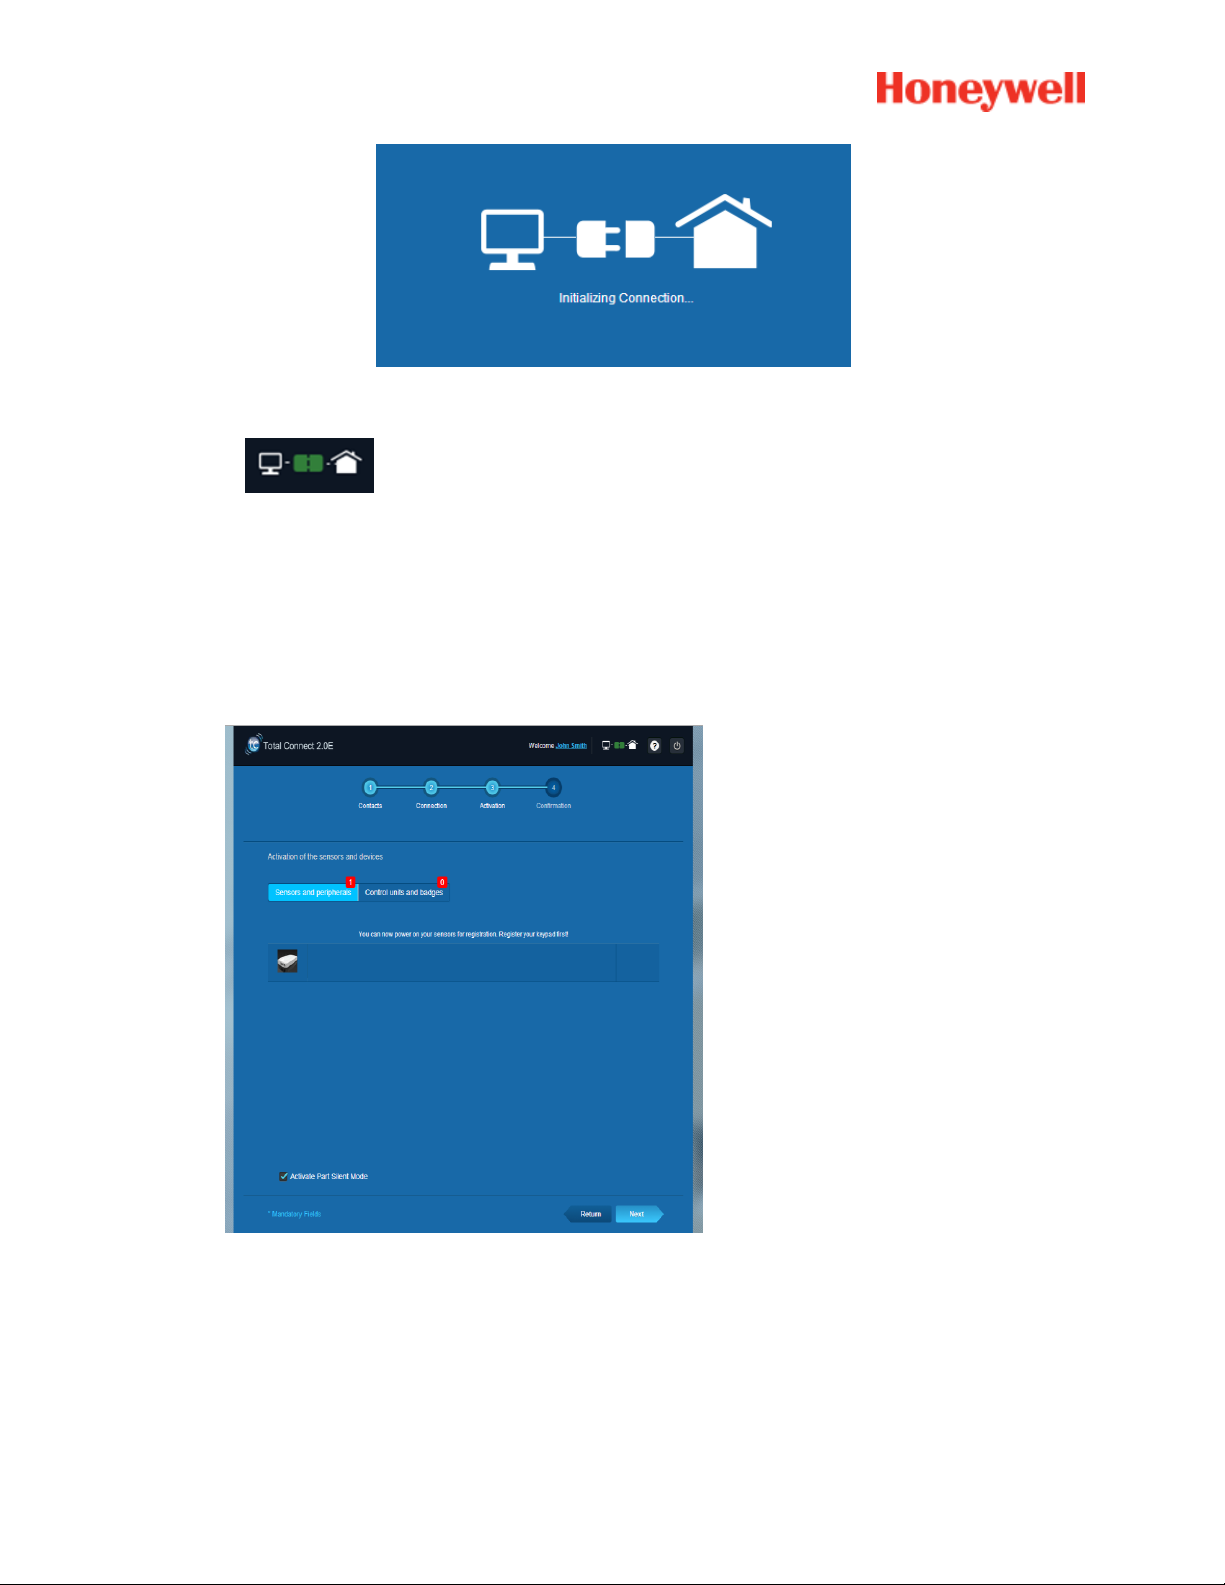
After following the different steps on the screen, the connection with Le Sucre™ begins
7
Page 8
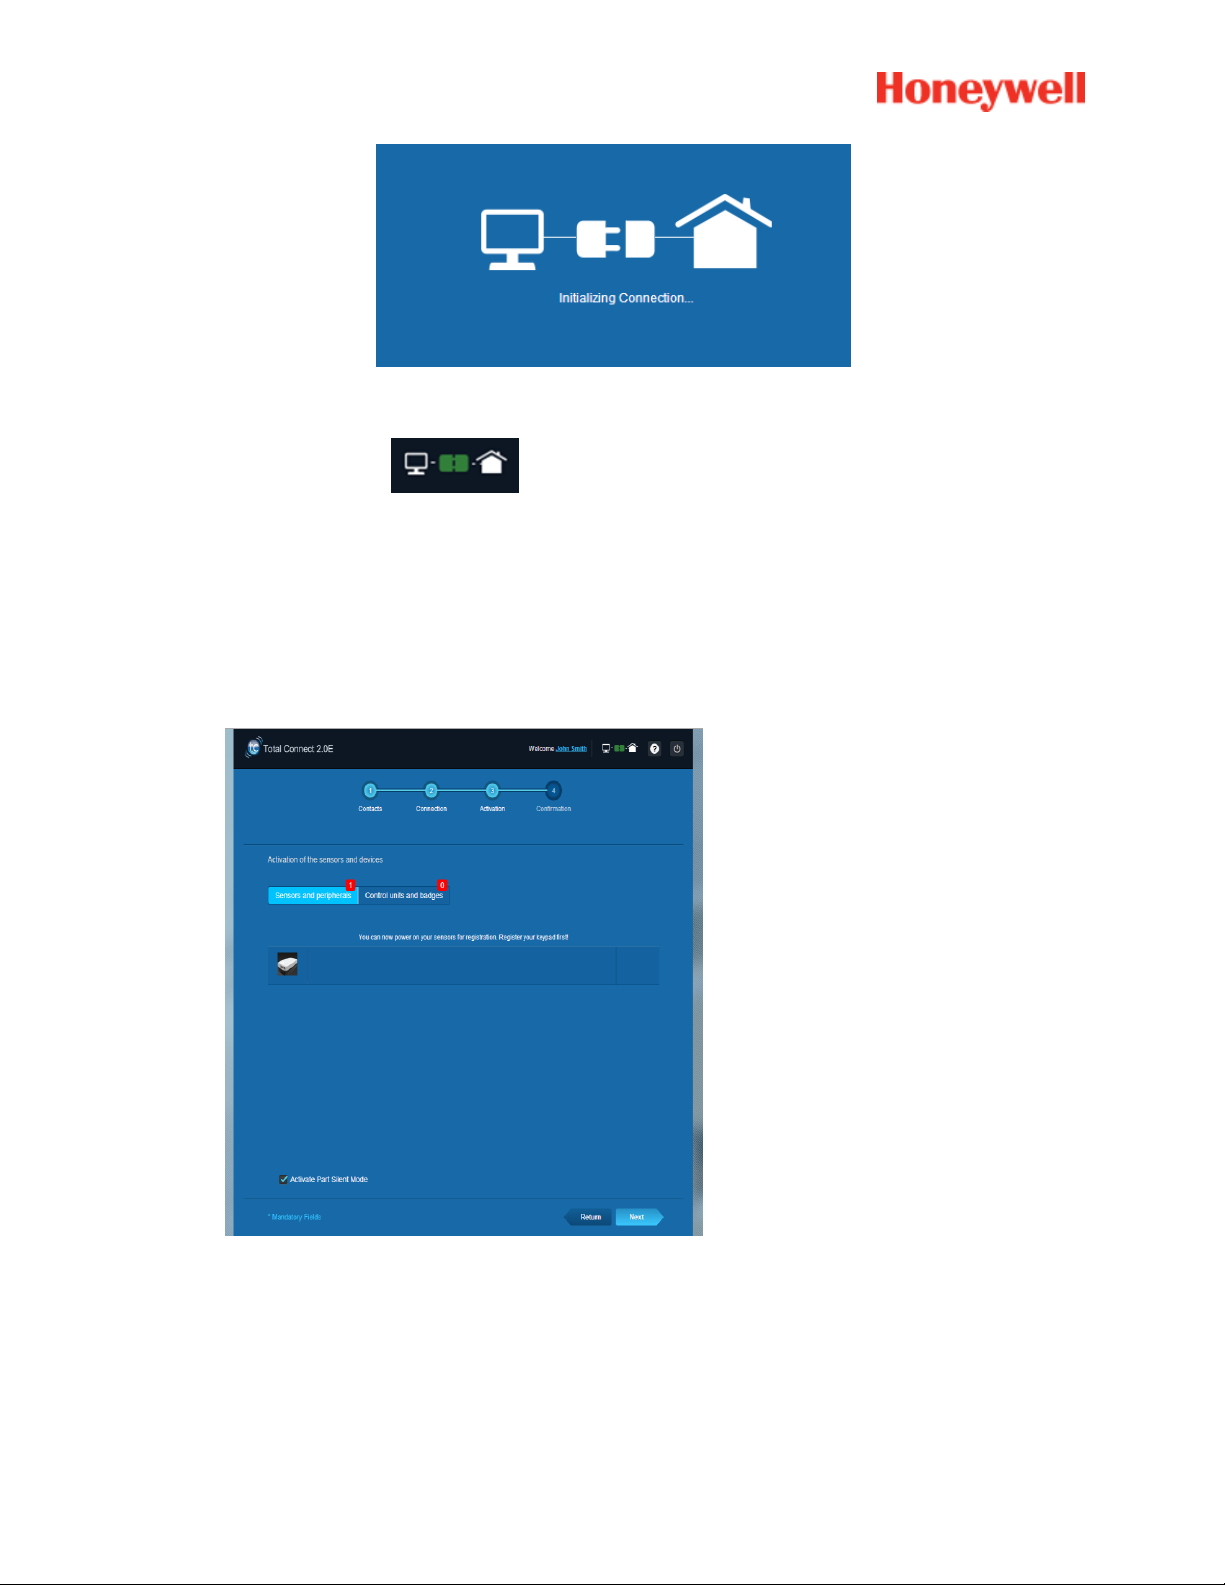
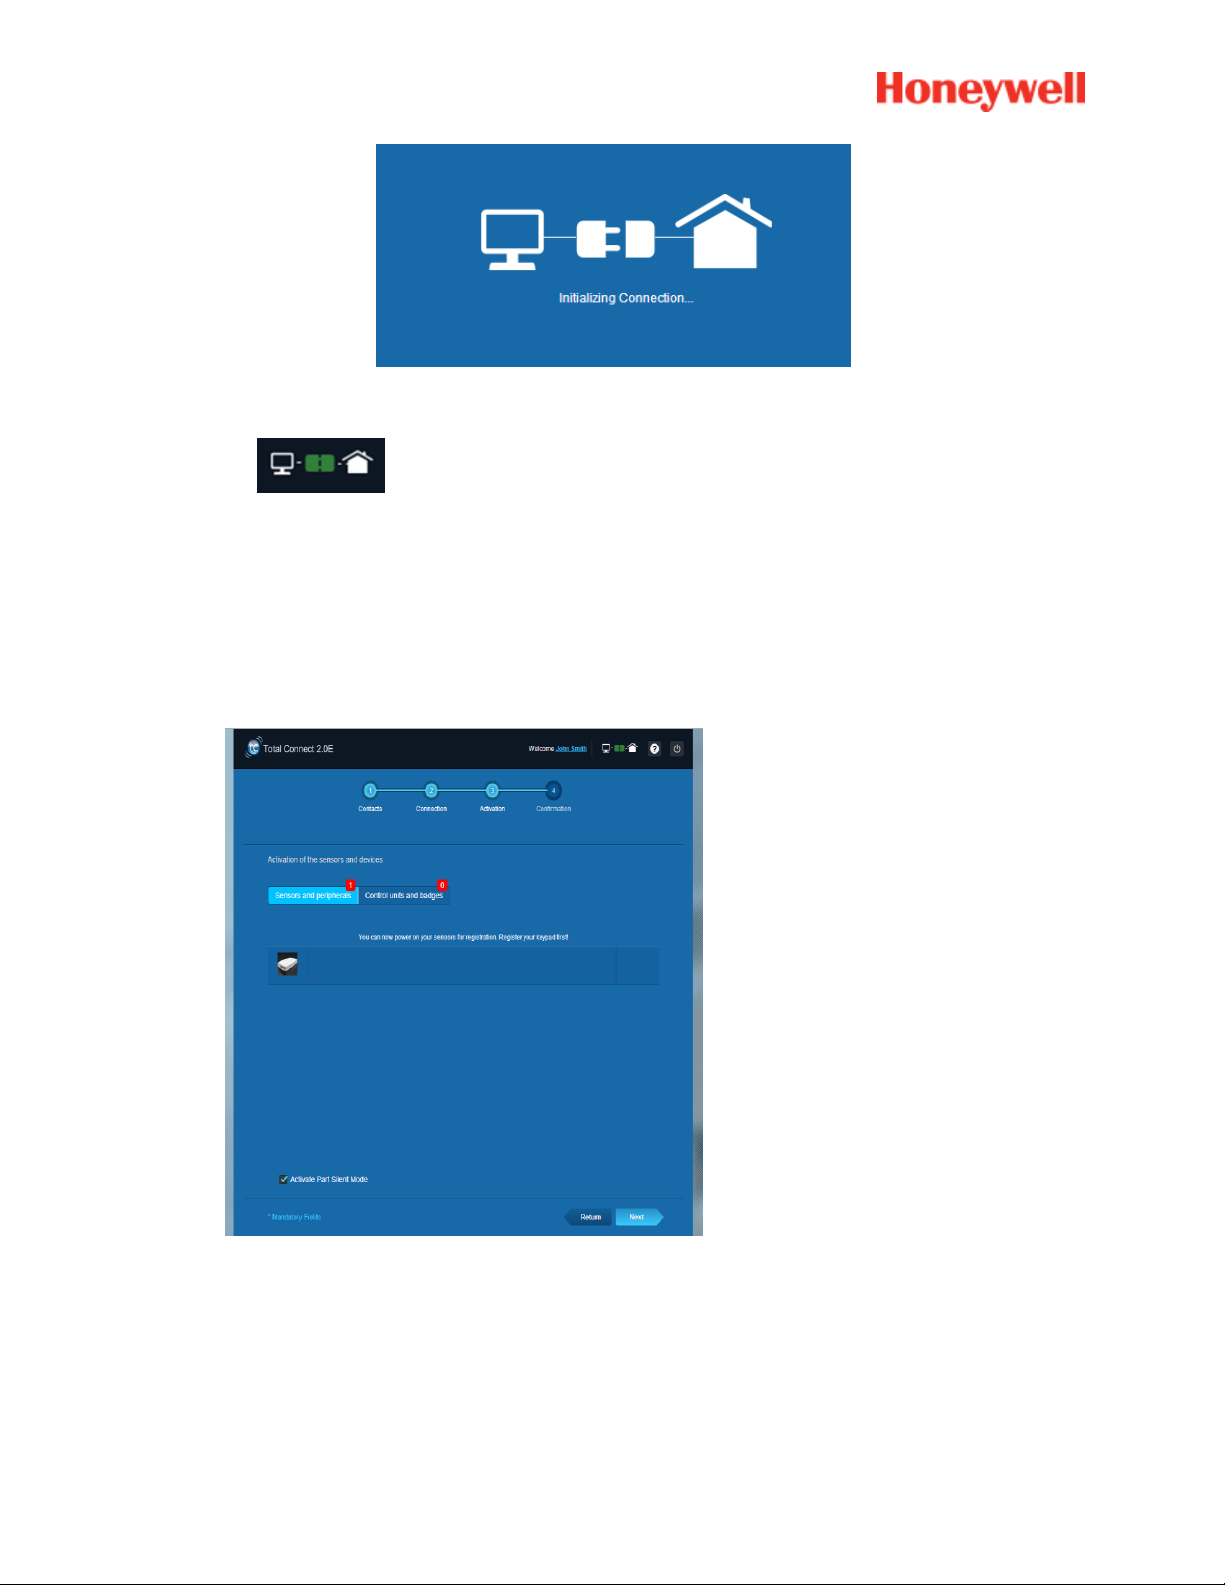
The connection may take several minutes. Once the connection is established you will see the green icon
at the top right of the page: .
The system is now in the installation mode
3. Wait for Le Sucre™ to be recognized by the Website and to be displayed on the screen as
shown below :
8
Page 9

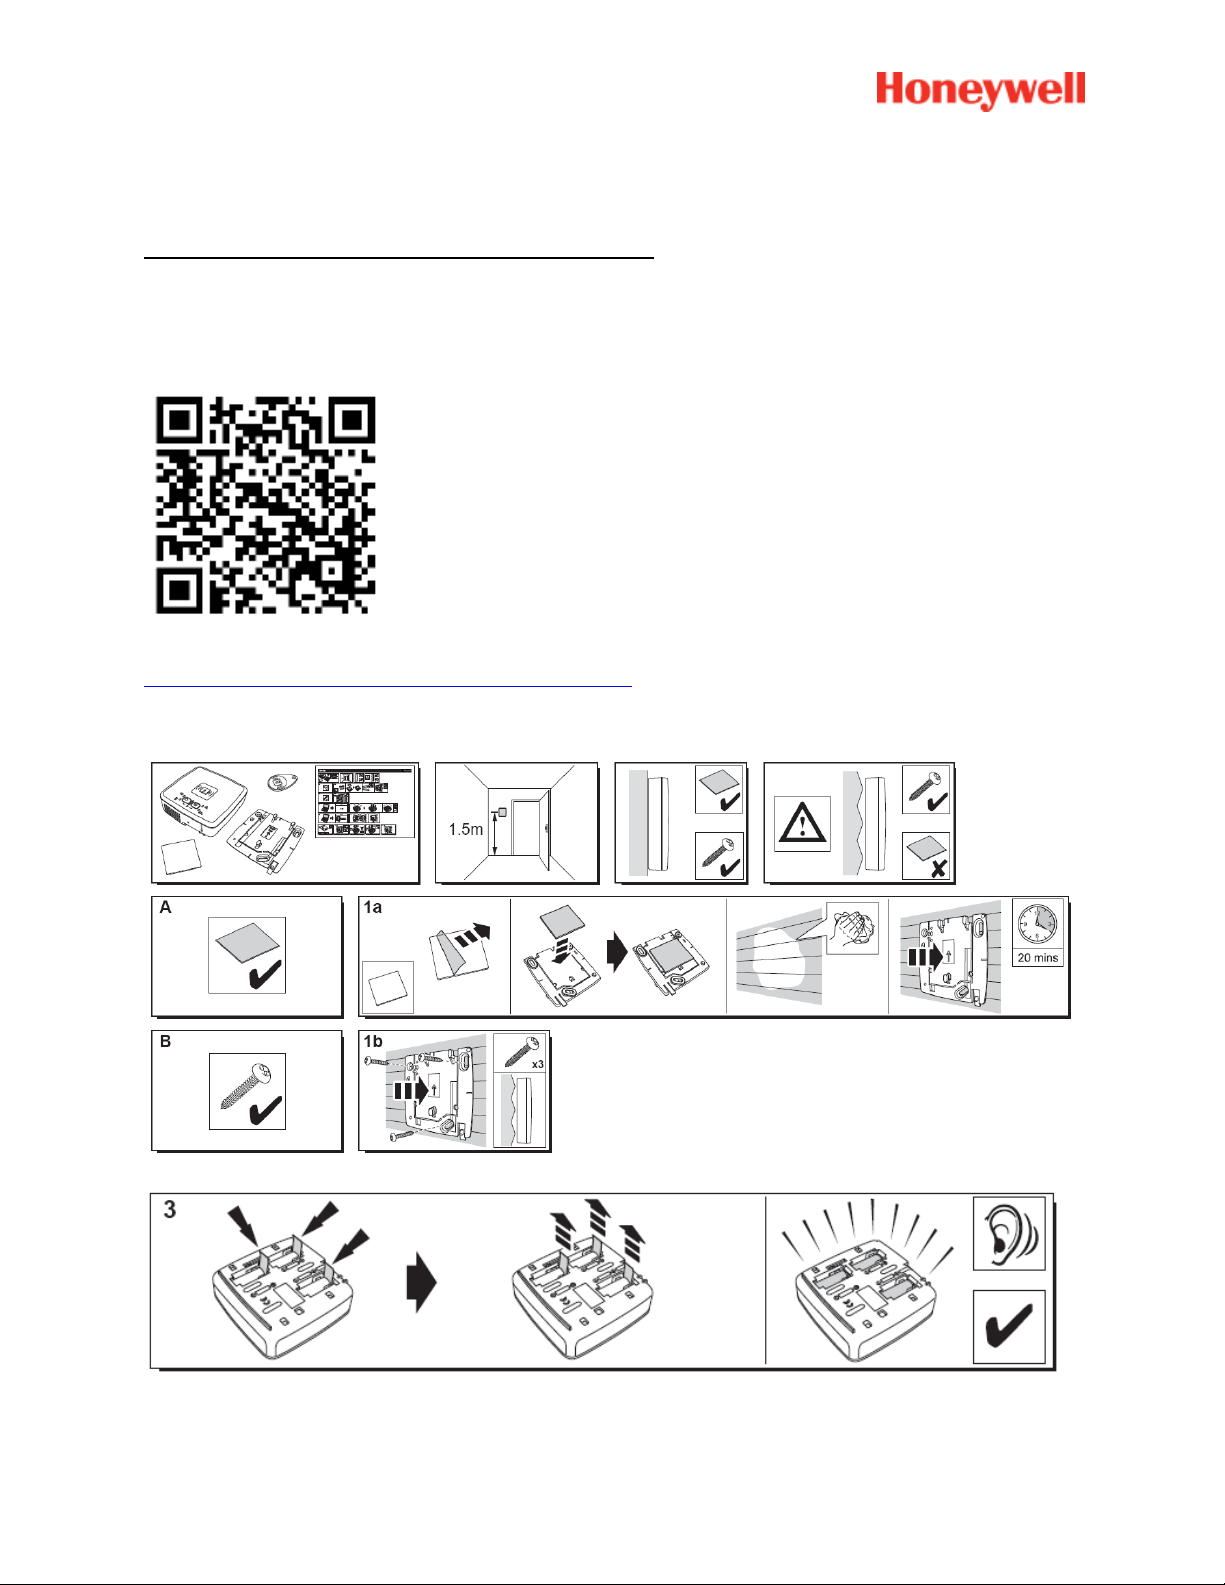
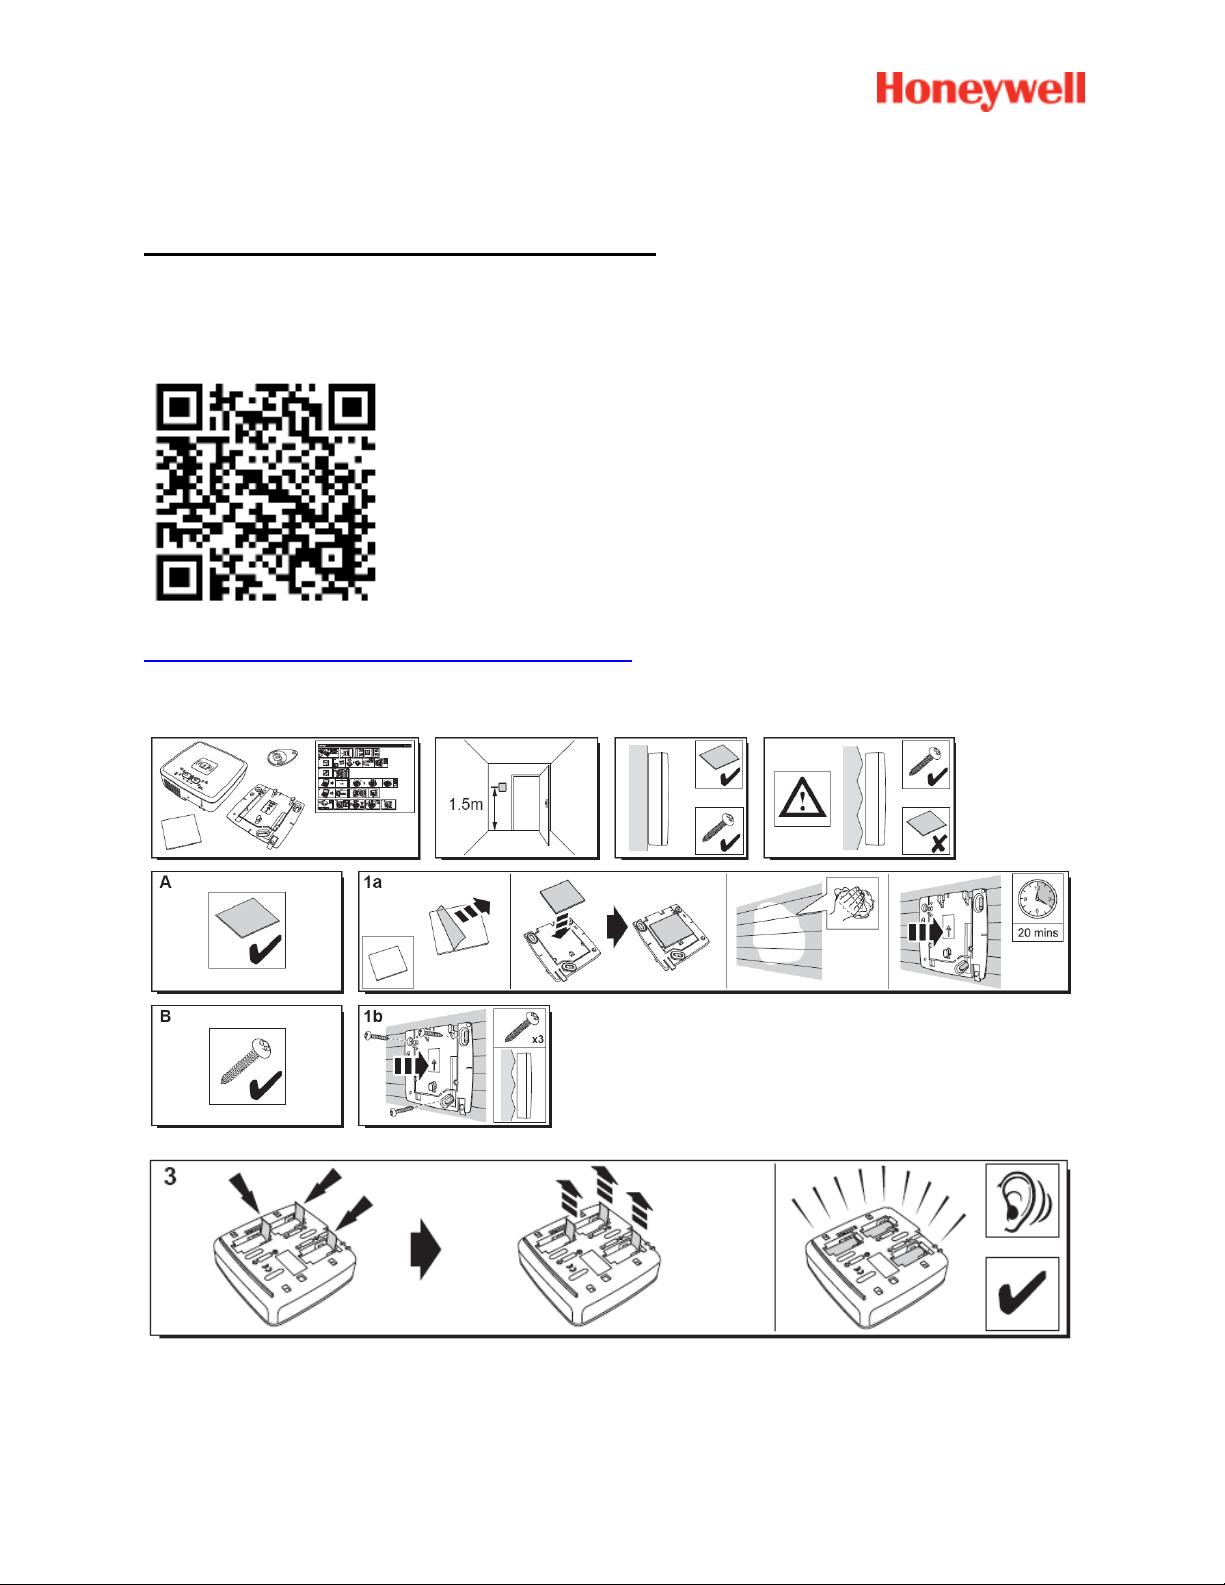
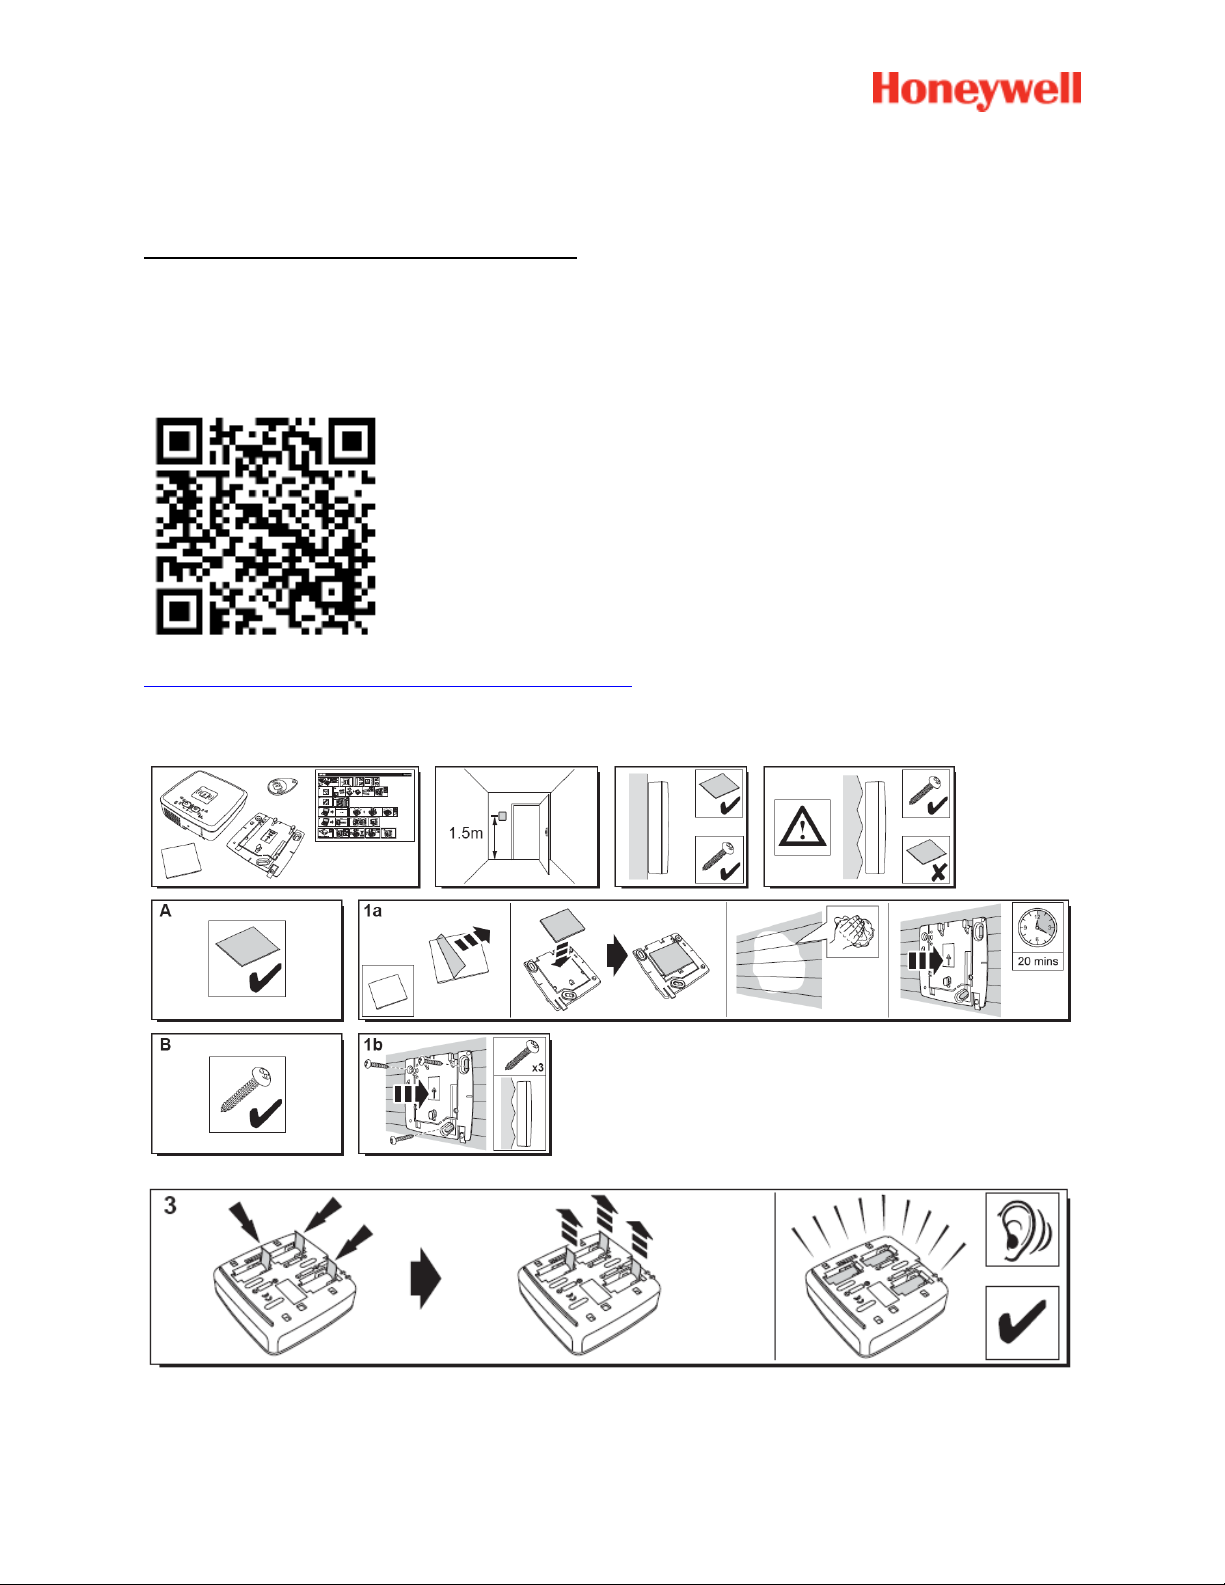
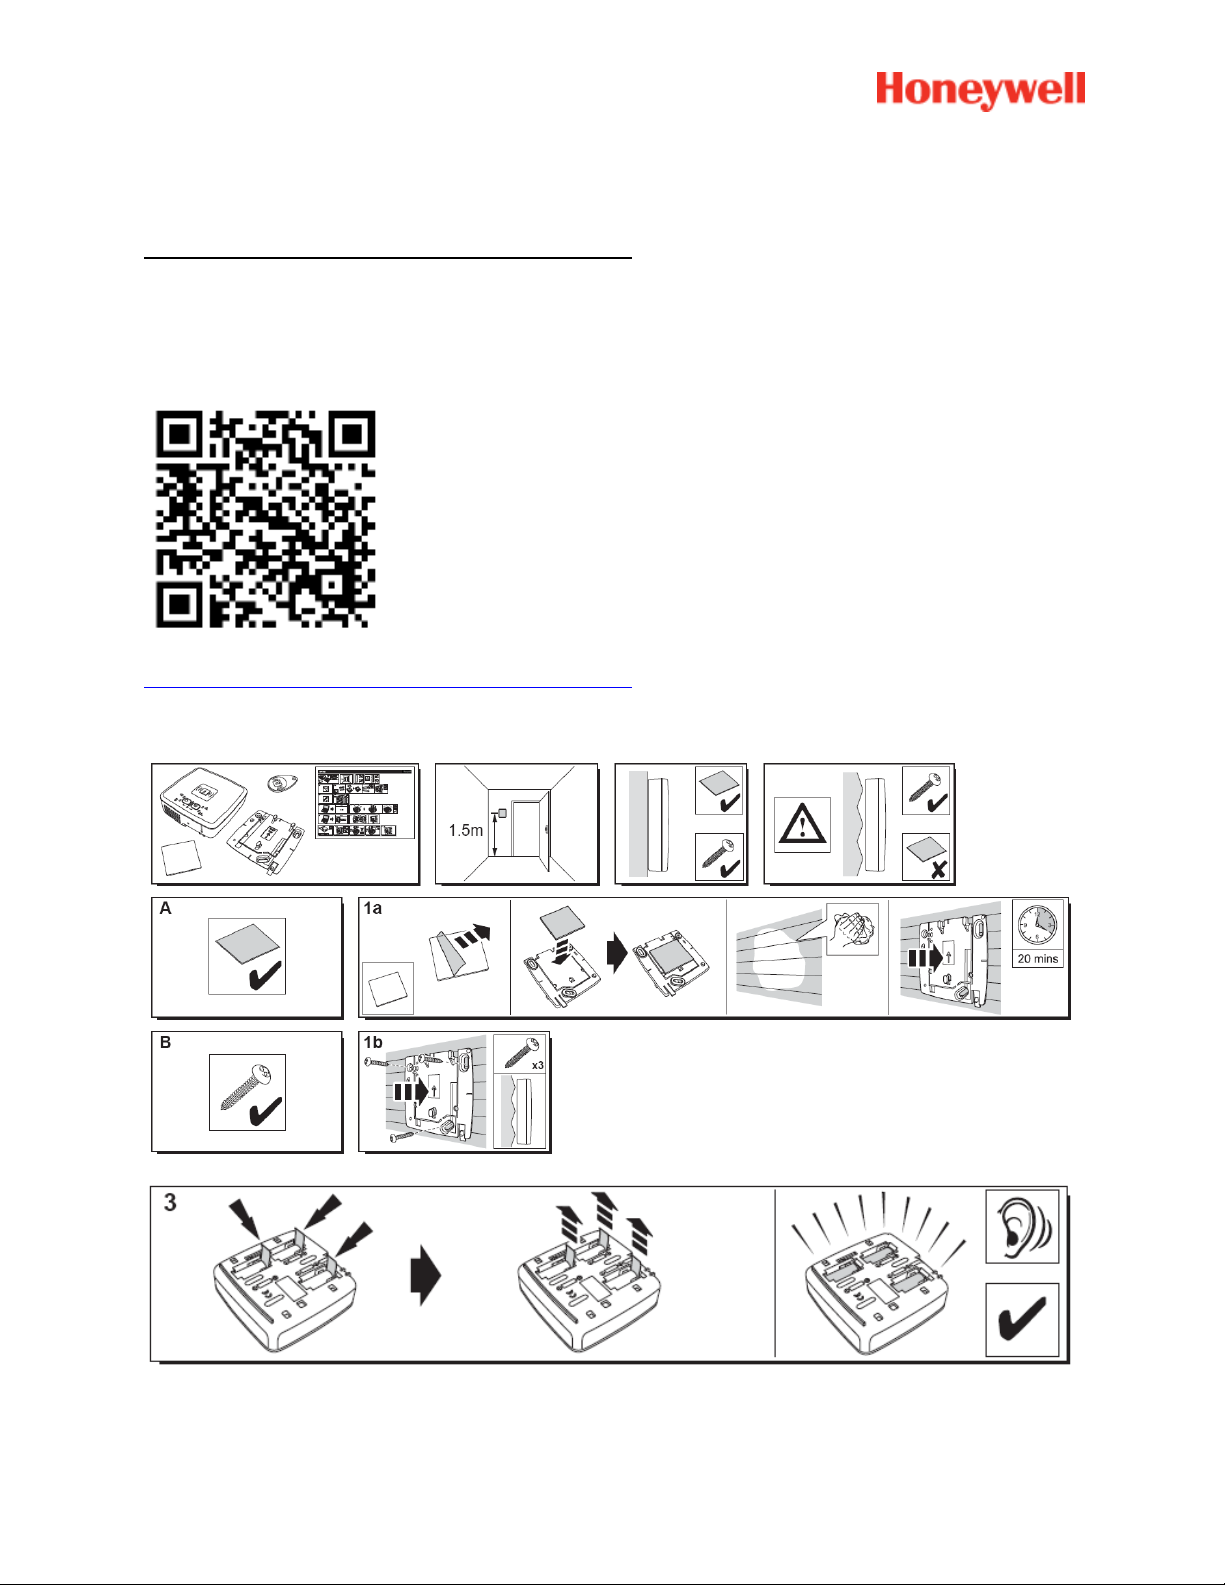
You can now start to install your devices and sensors:
Registering the « Badge Reader » or the keypad
1. Badge reader
A help video can be found here:
http://honeywell.total-connect.eu/video/SPR-S8EZ.mp4
9
Page 10
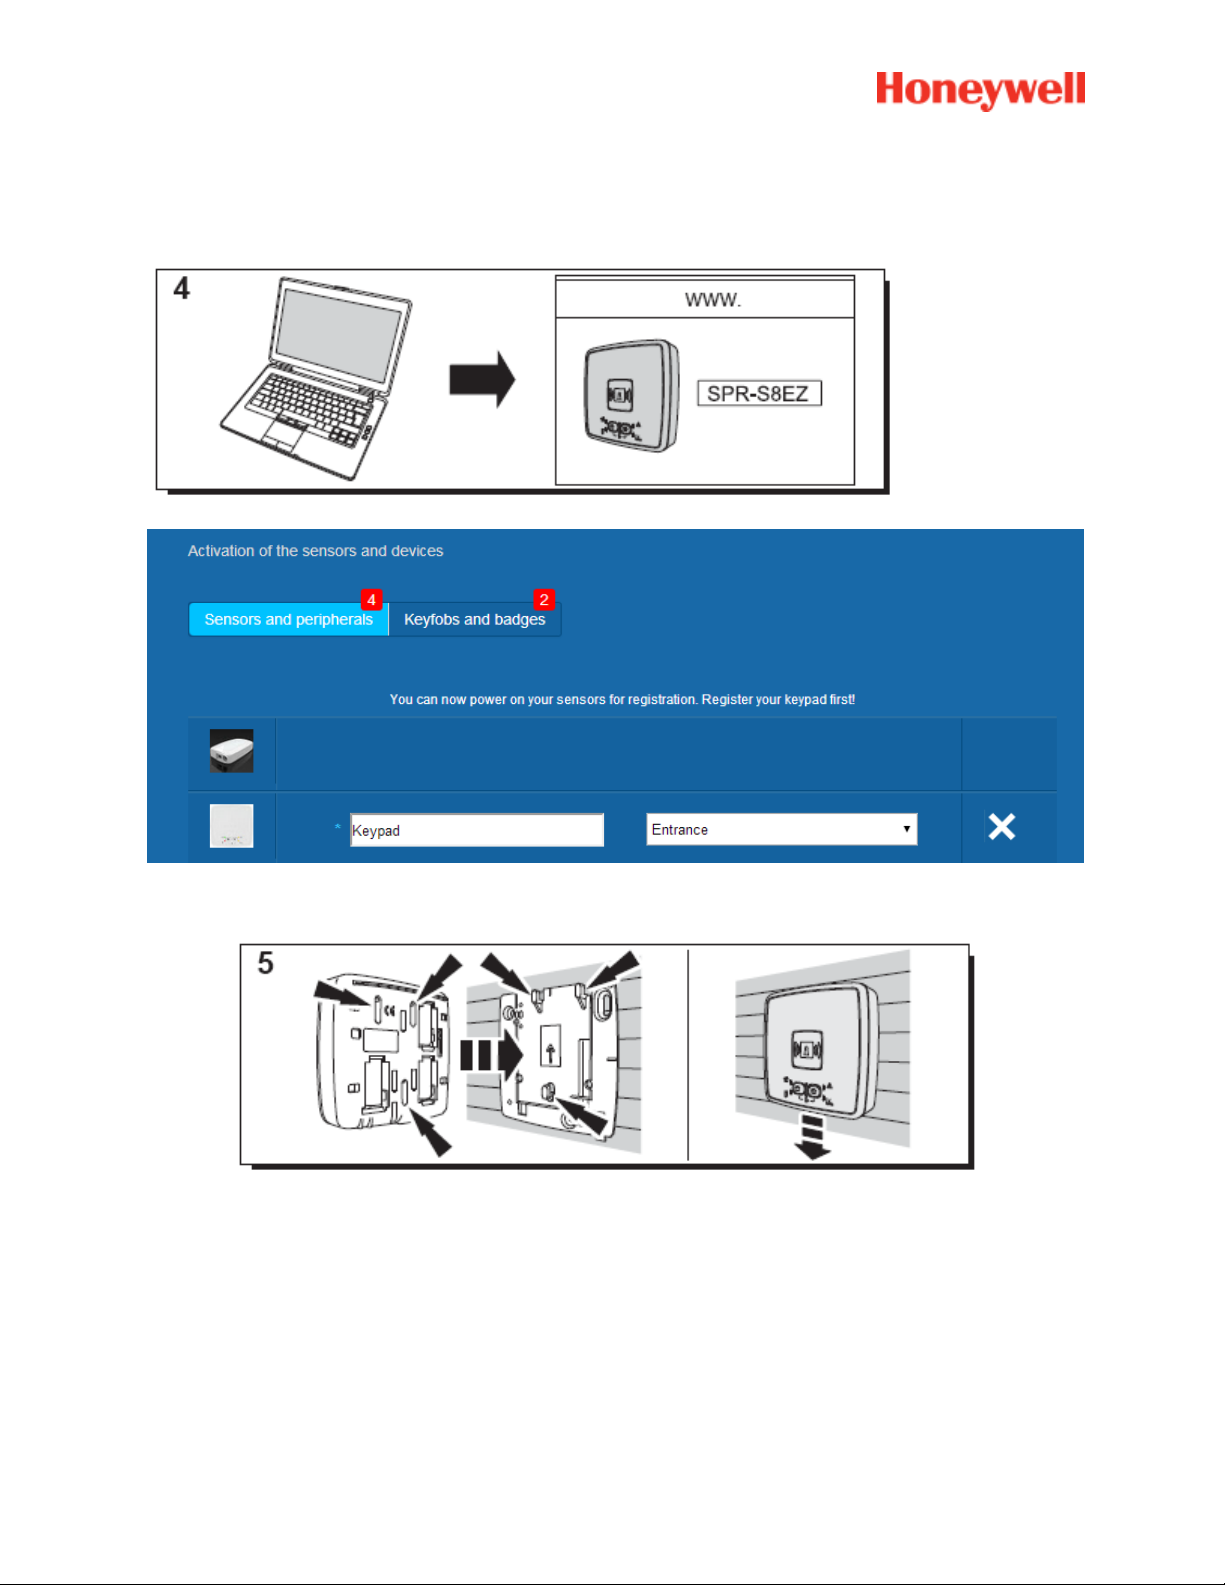
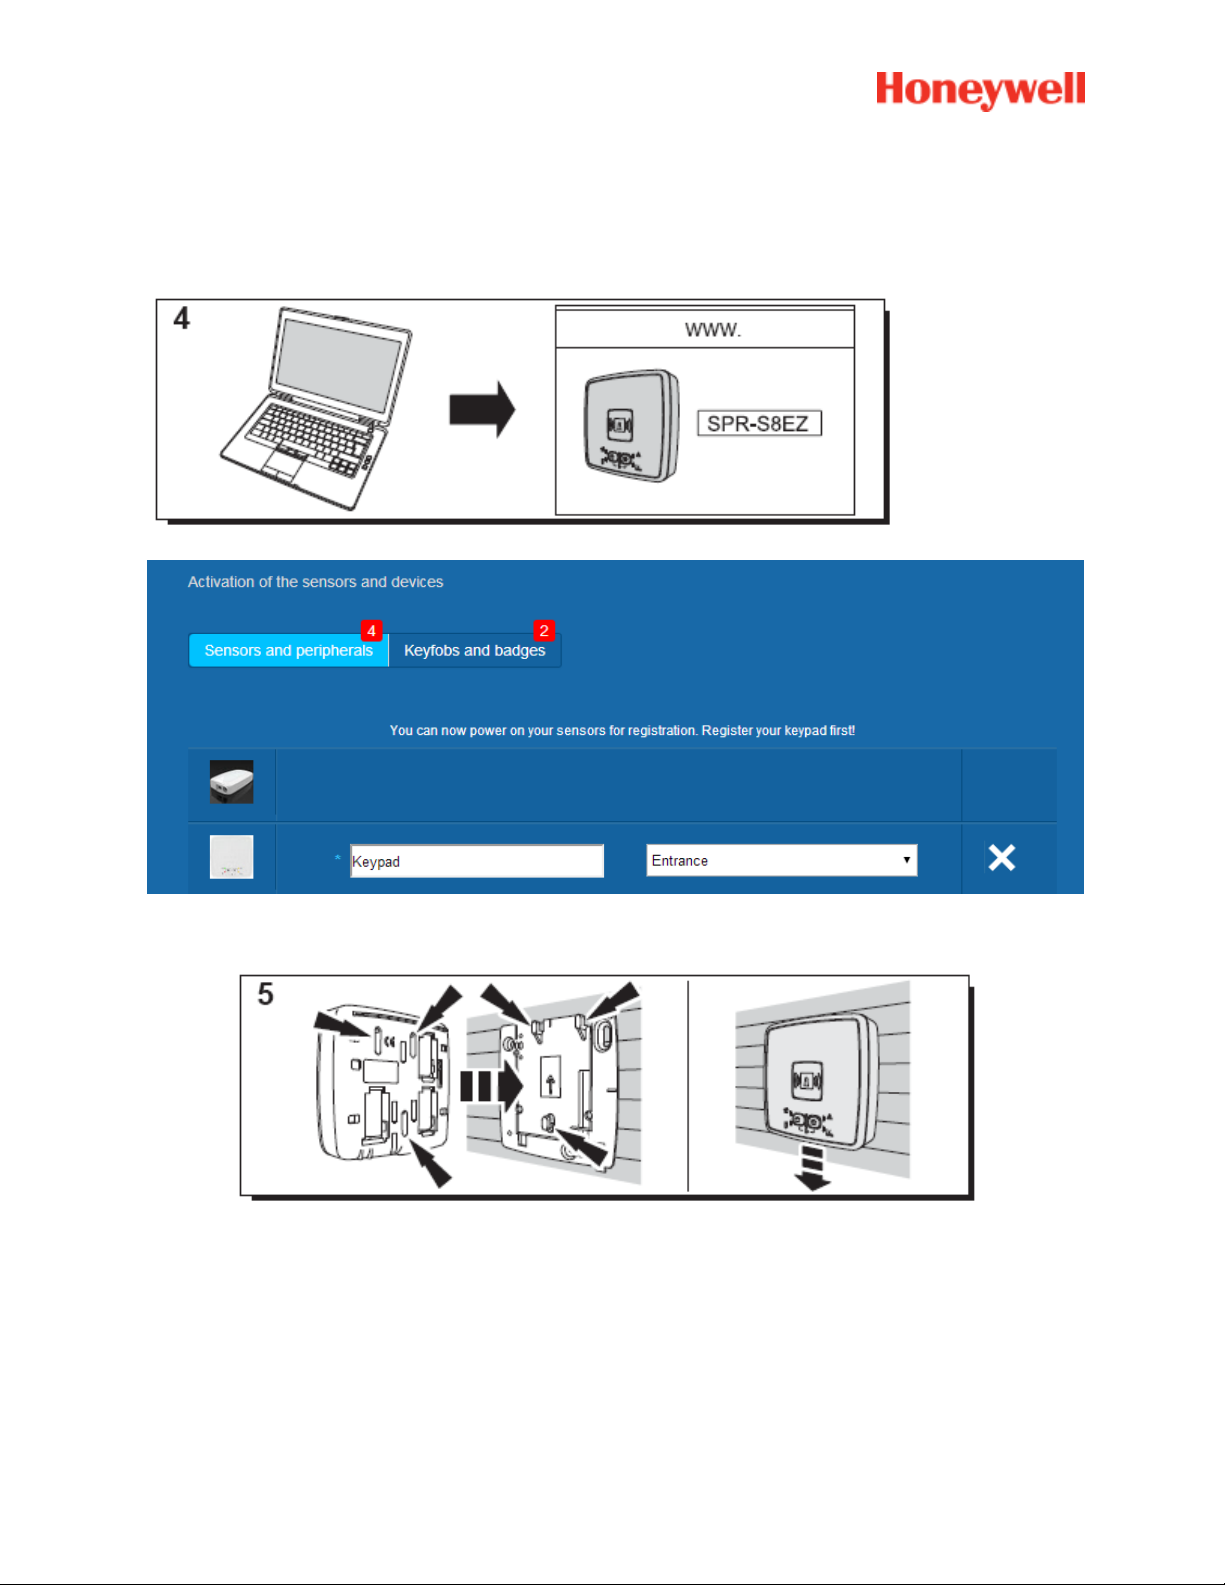
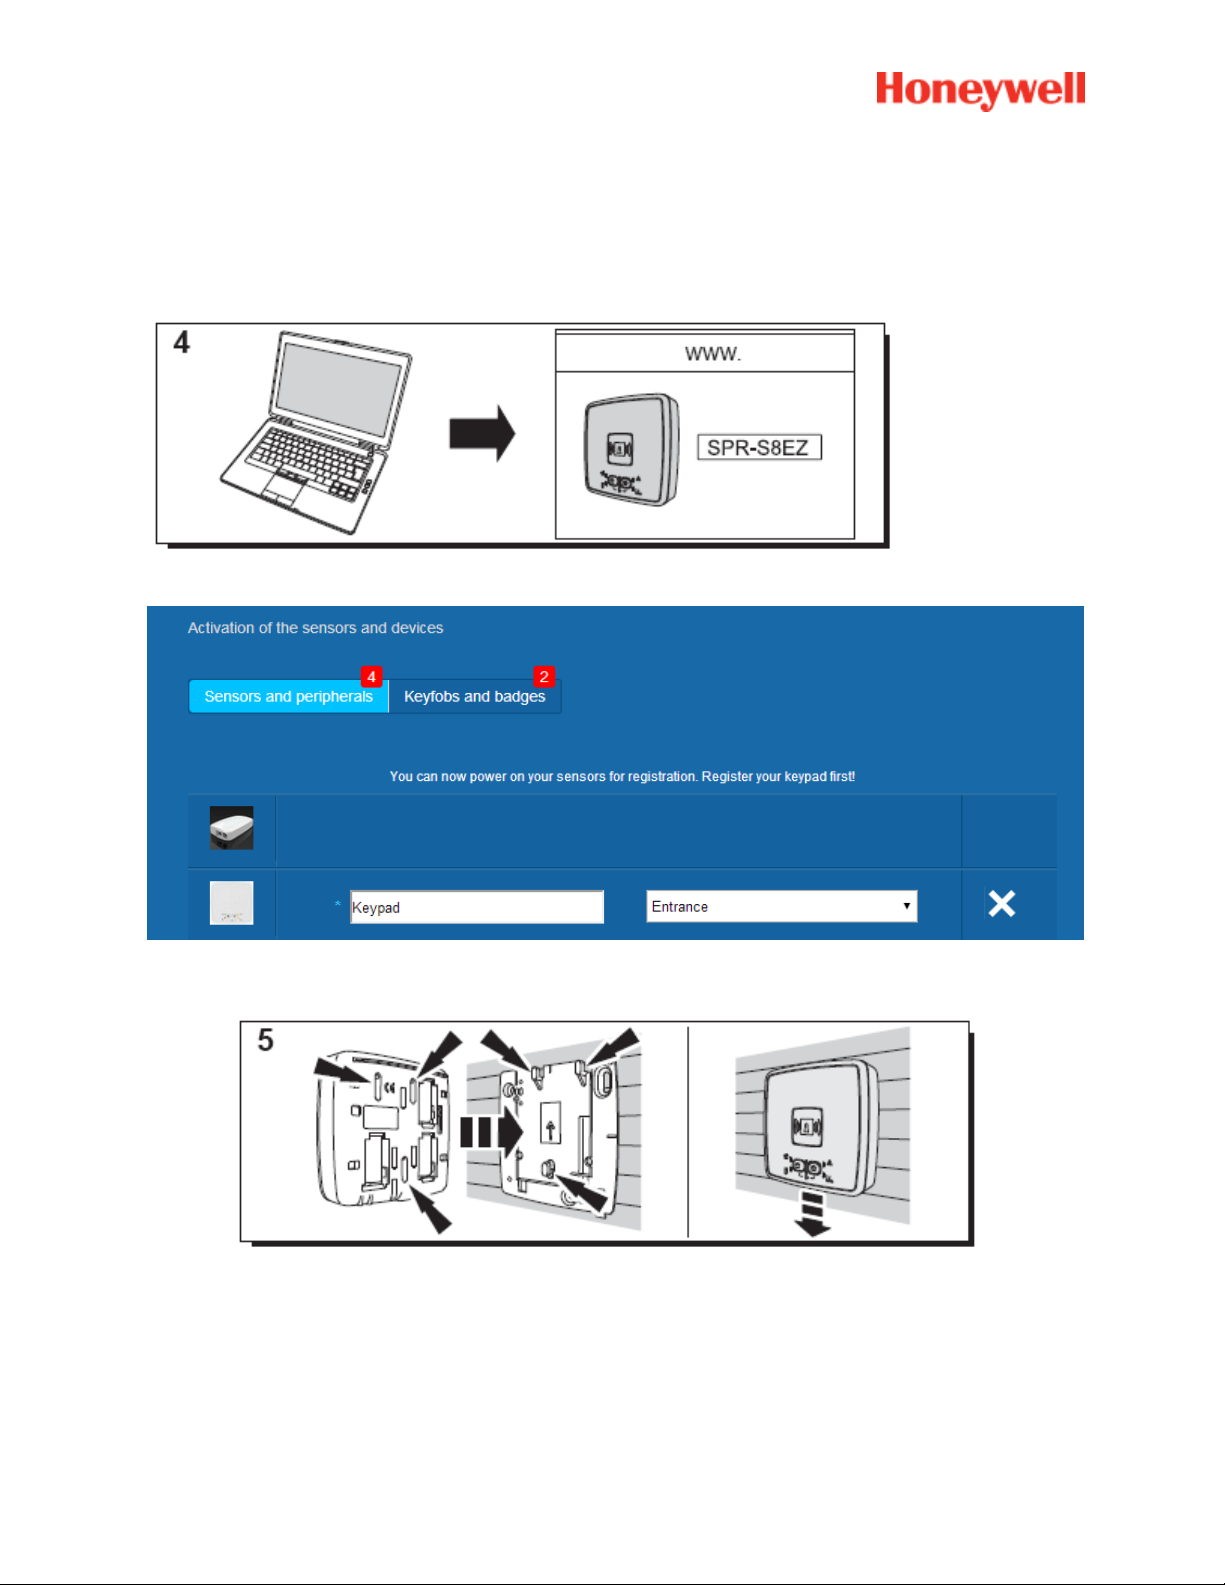
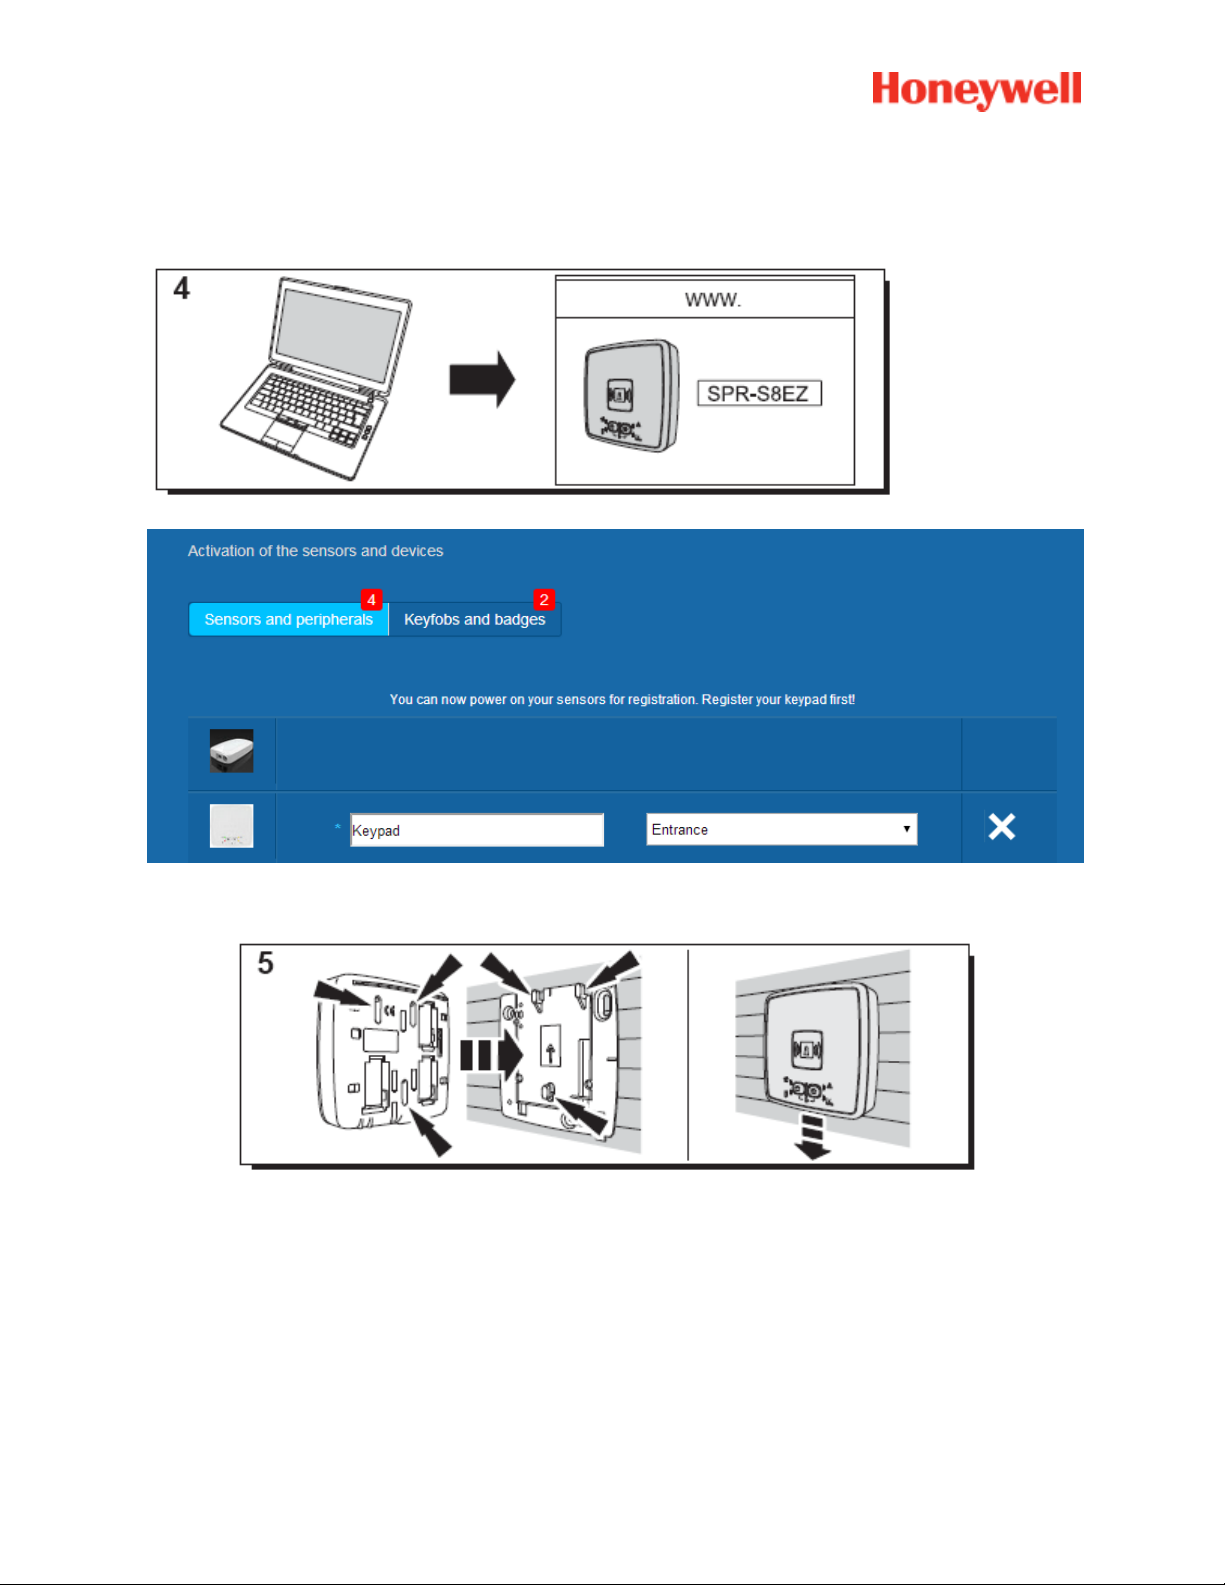
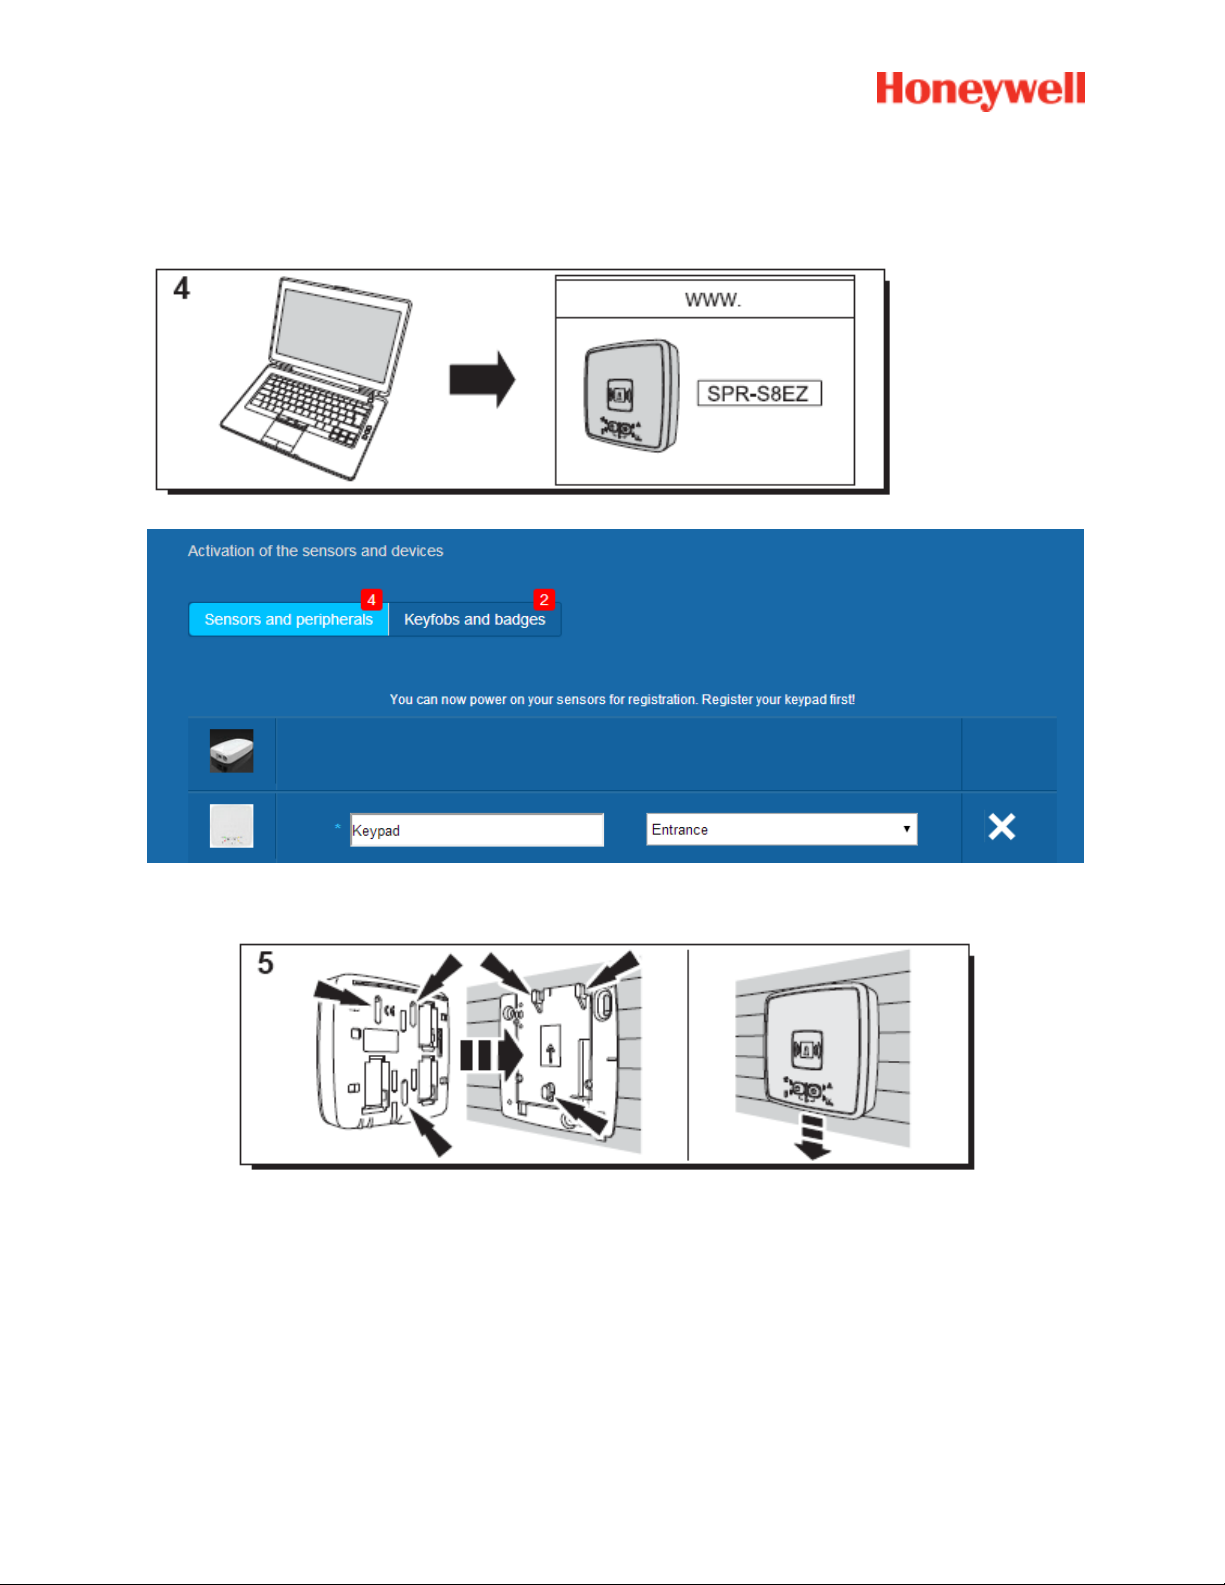
The badge reader plays a series of beeps and then 3 fast beeps. The Website shows the detection of the
new peripheral with the message in the upper strip: ”New Devicel incoming… ”
Wait for the badge reader to appear in the “Sensors and peripherals” section as shown below:
Set the location and the name you want to give to it : here the name is “Keypad” and the location is
“Entrance”.
Warning : To validate the name field you have to click elsewhere on the screen with the mouse.
The badge reader is now saved and registered on your system.
10
Page 11
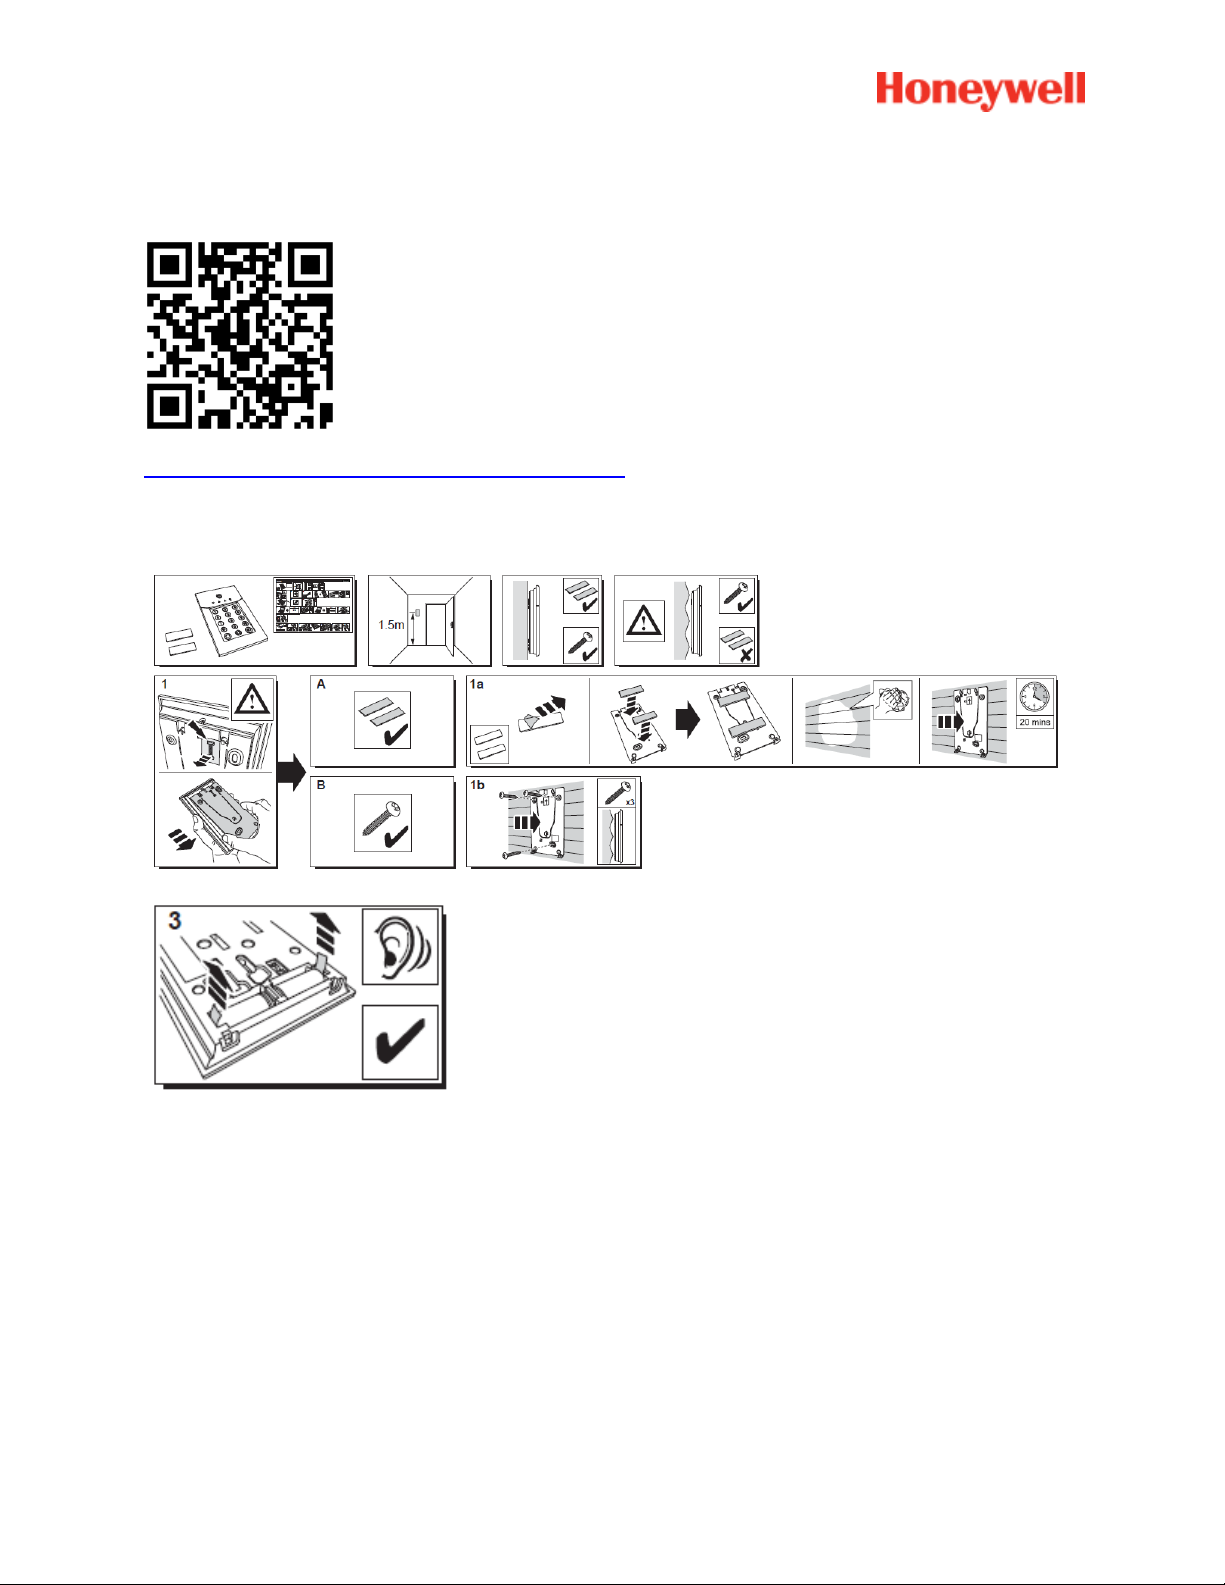
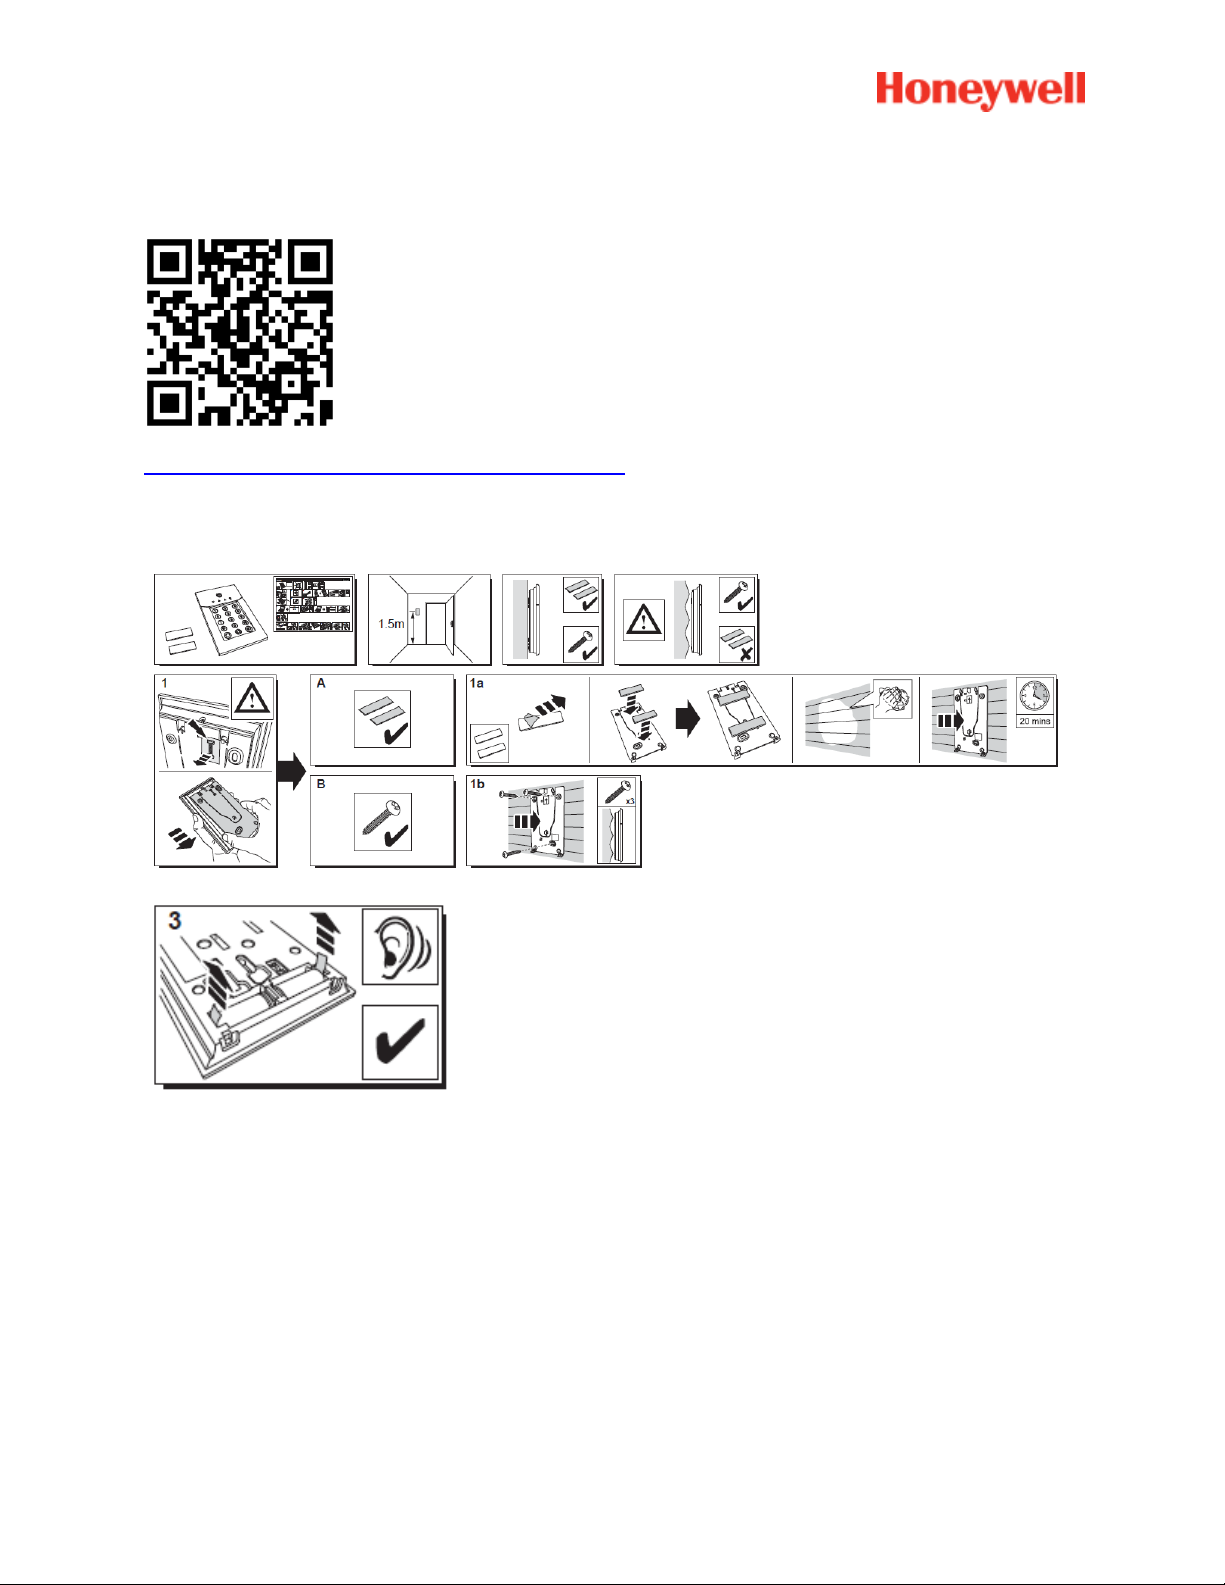
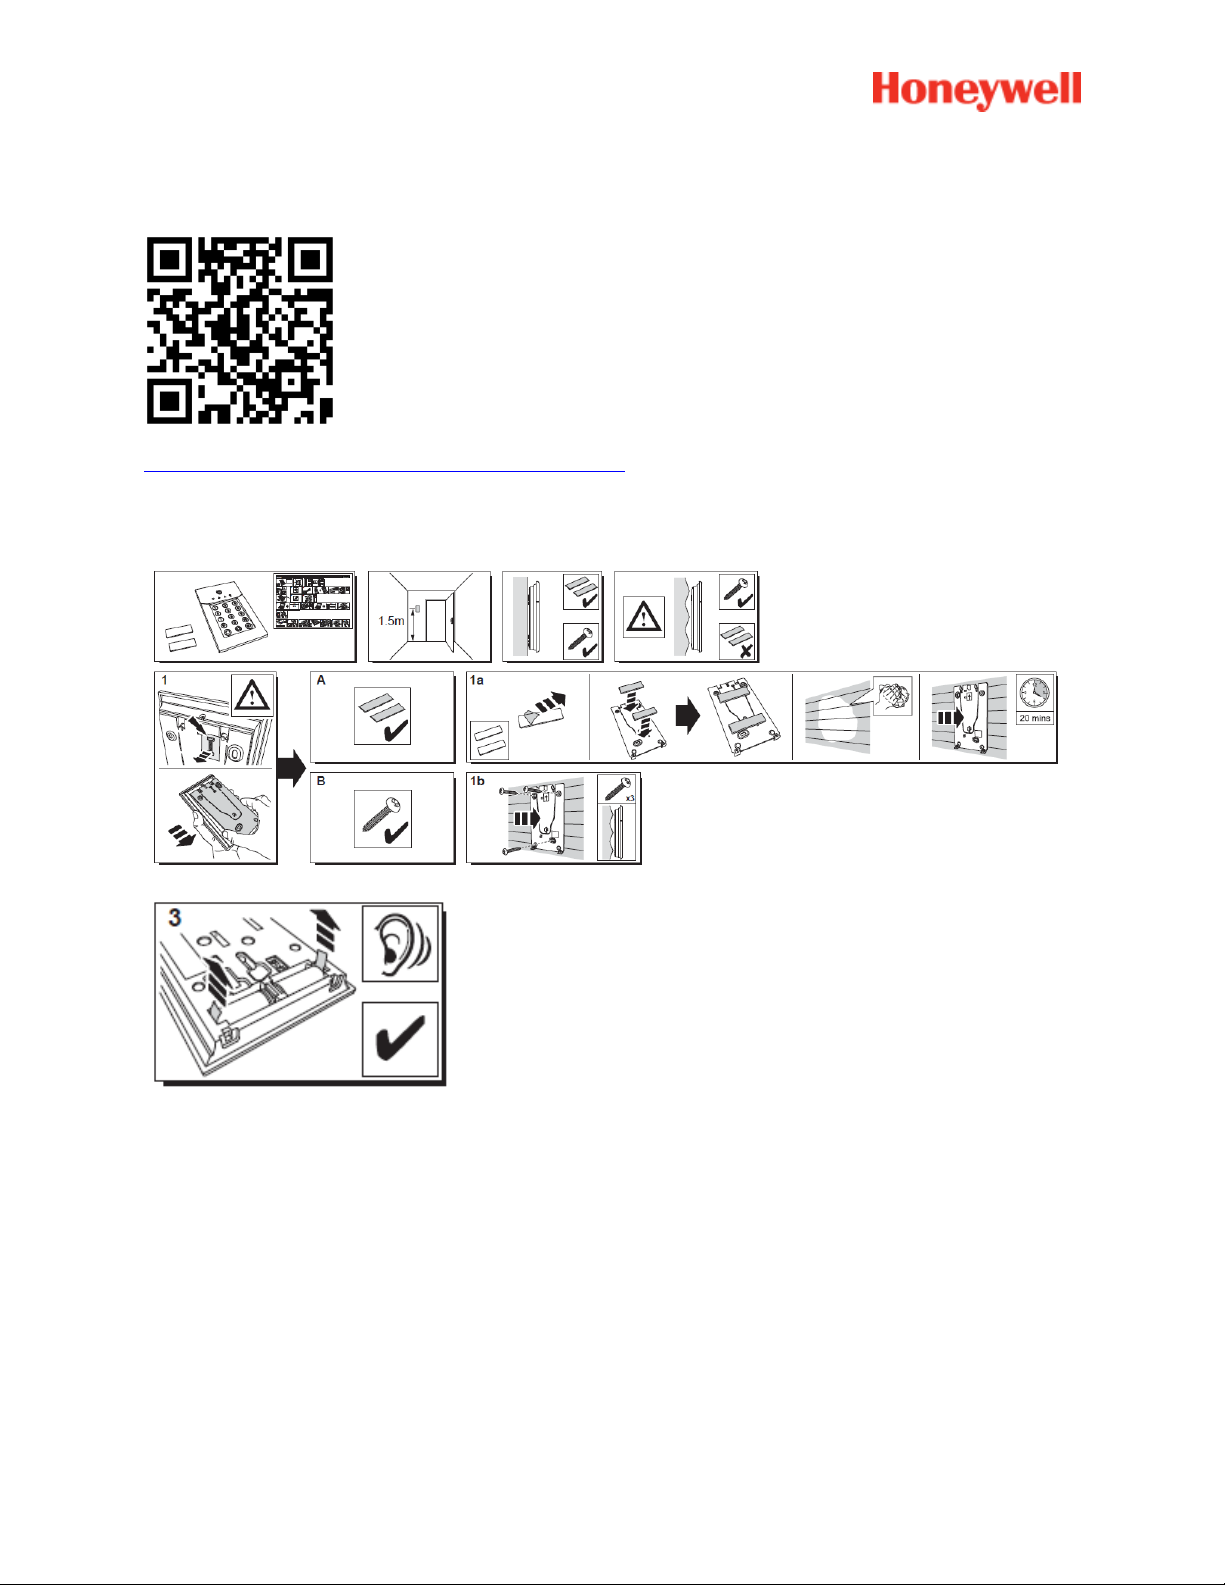
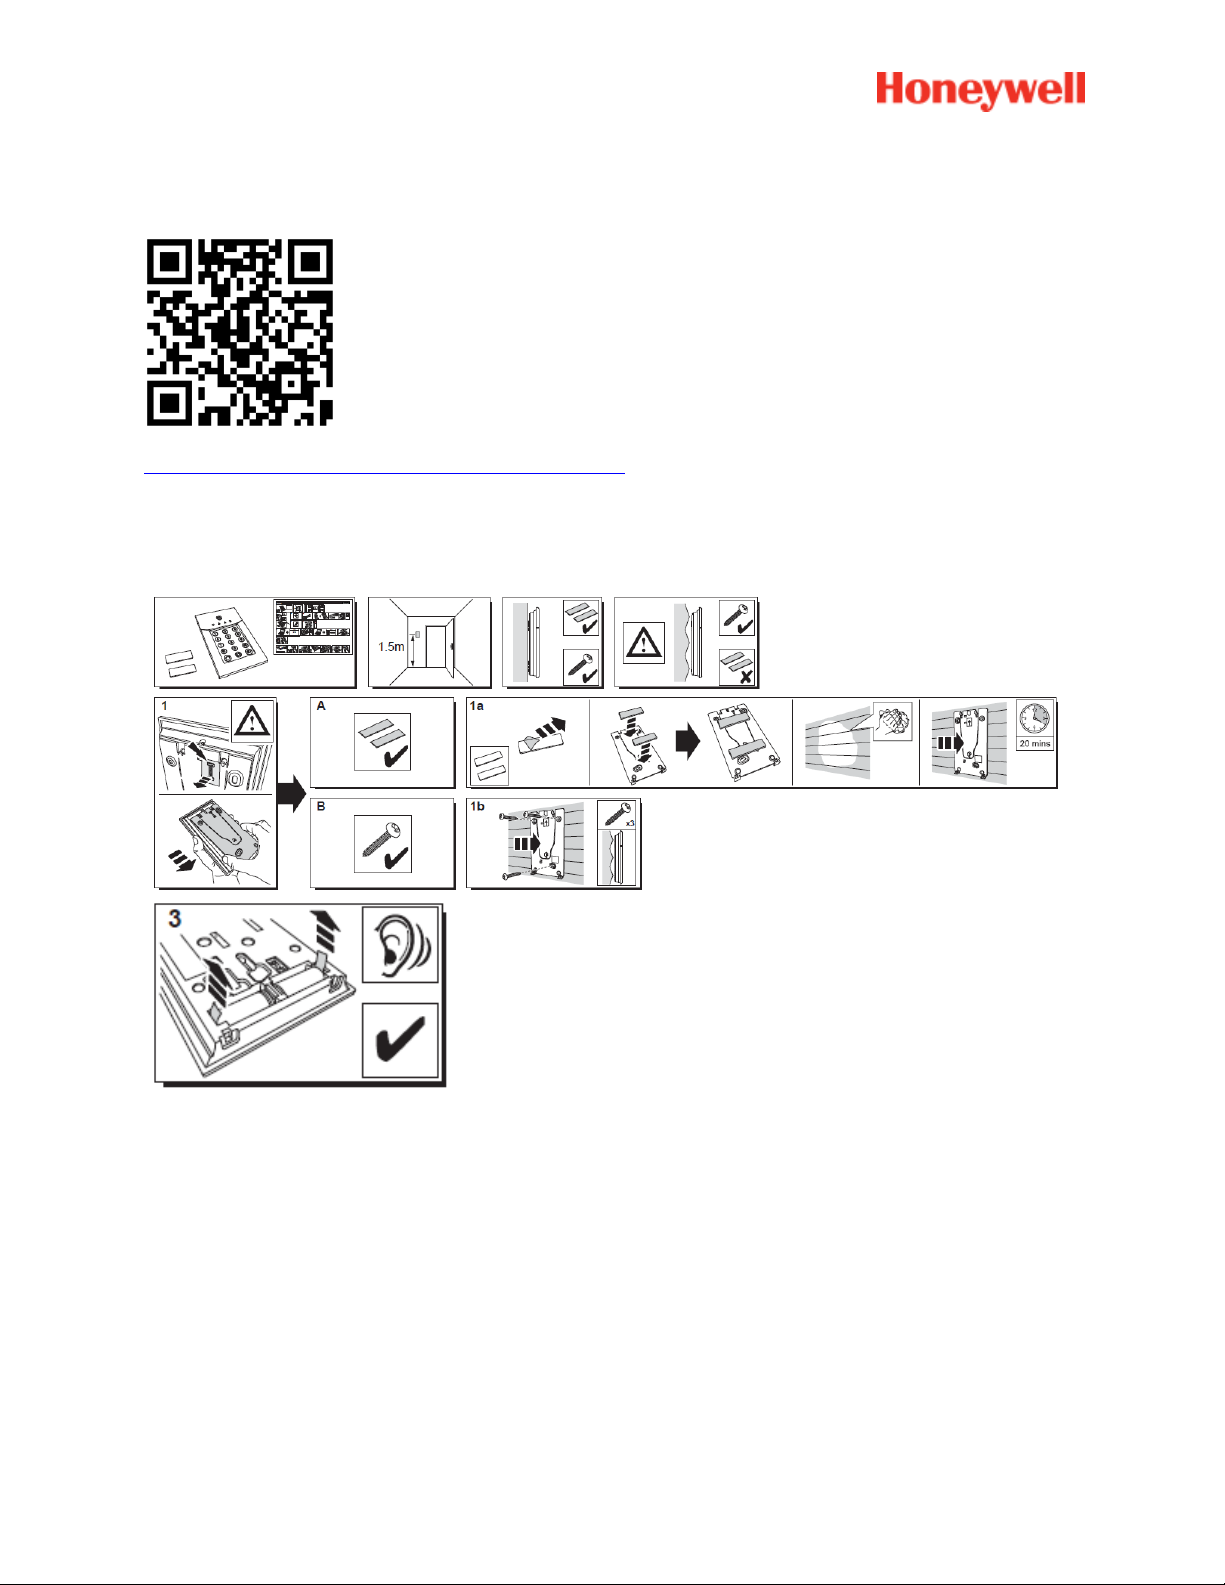
2. Keypad
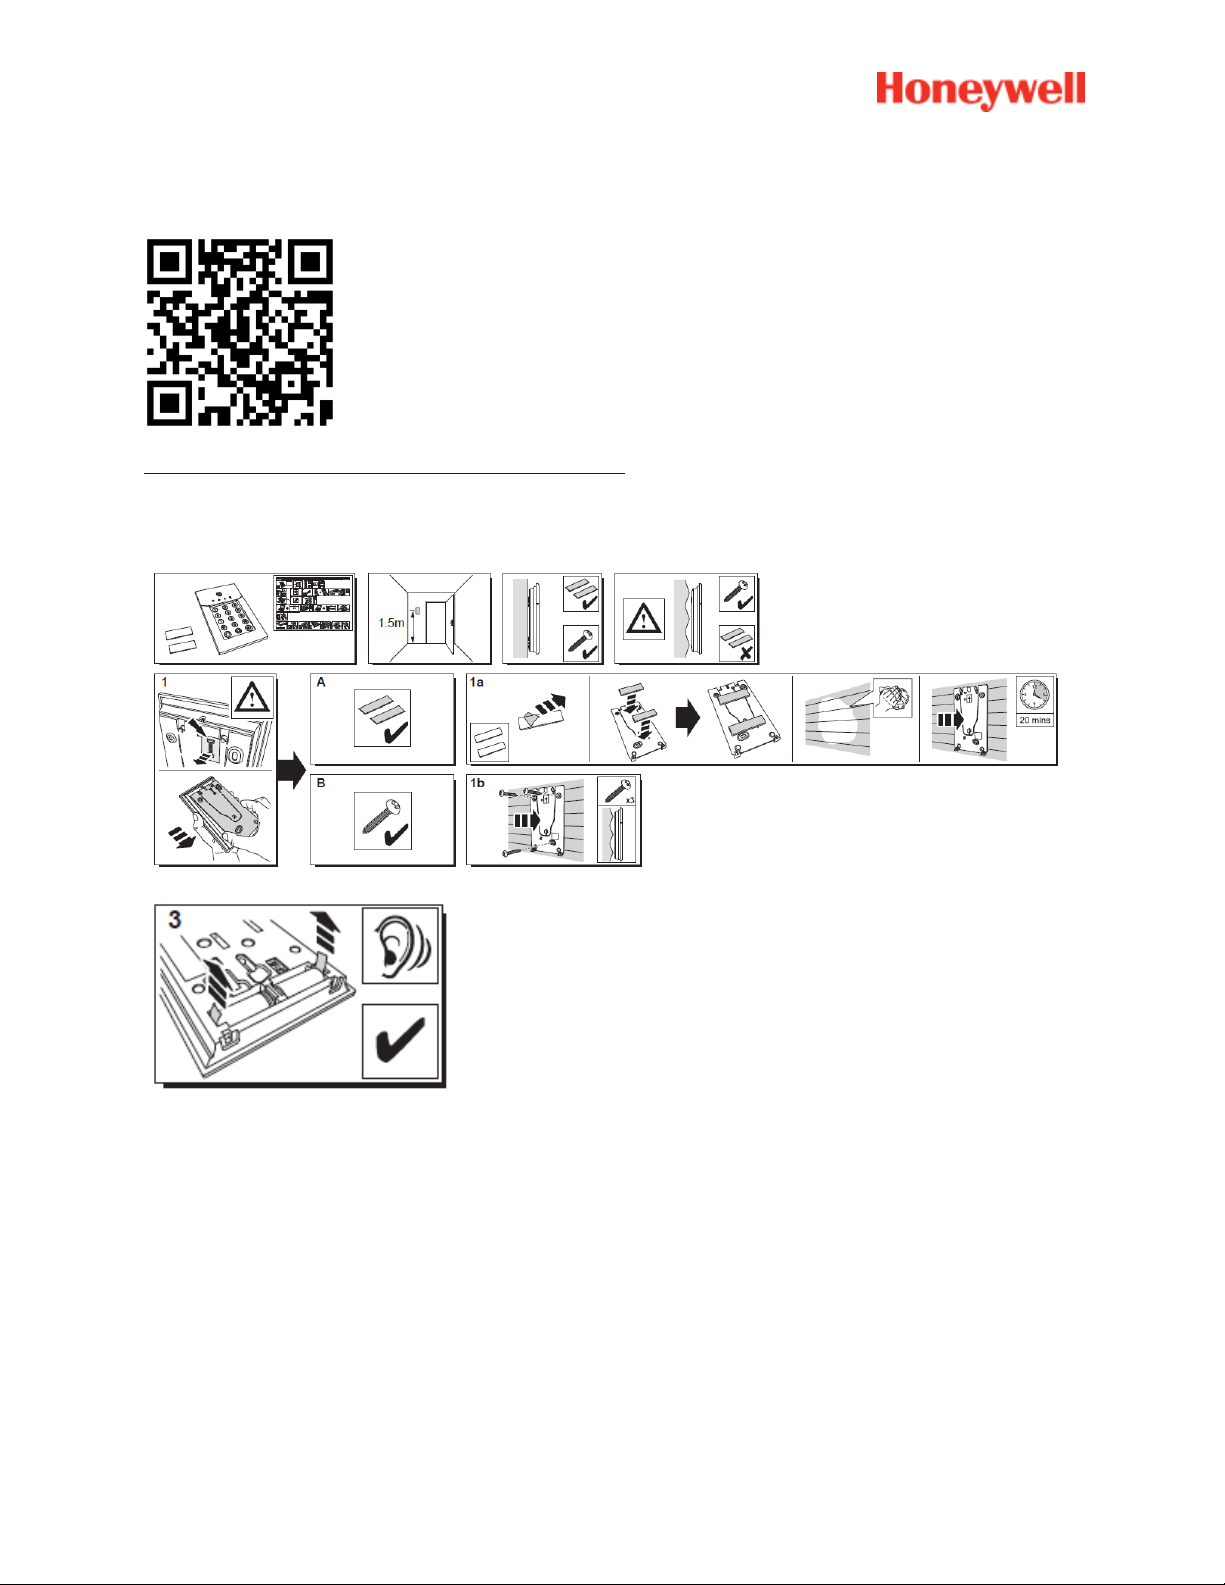
A help video can be found here:
http://honeywell.total-connect.eu/video/GKP-S8M.mp4
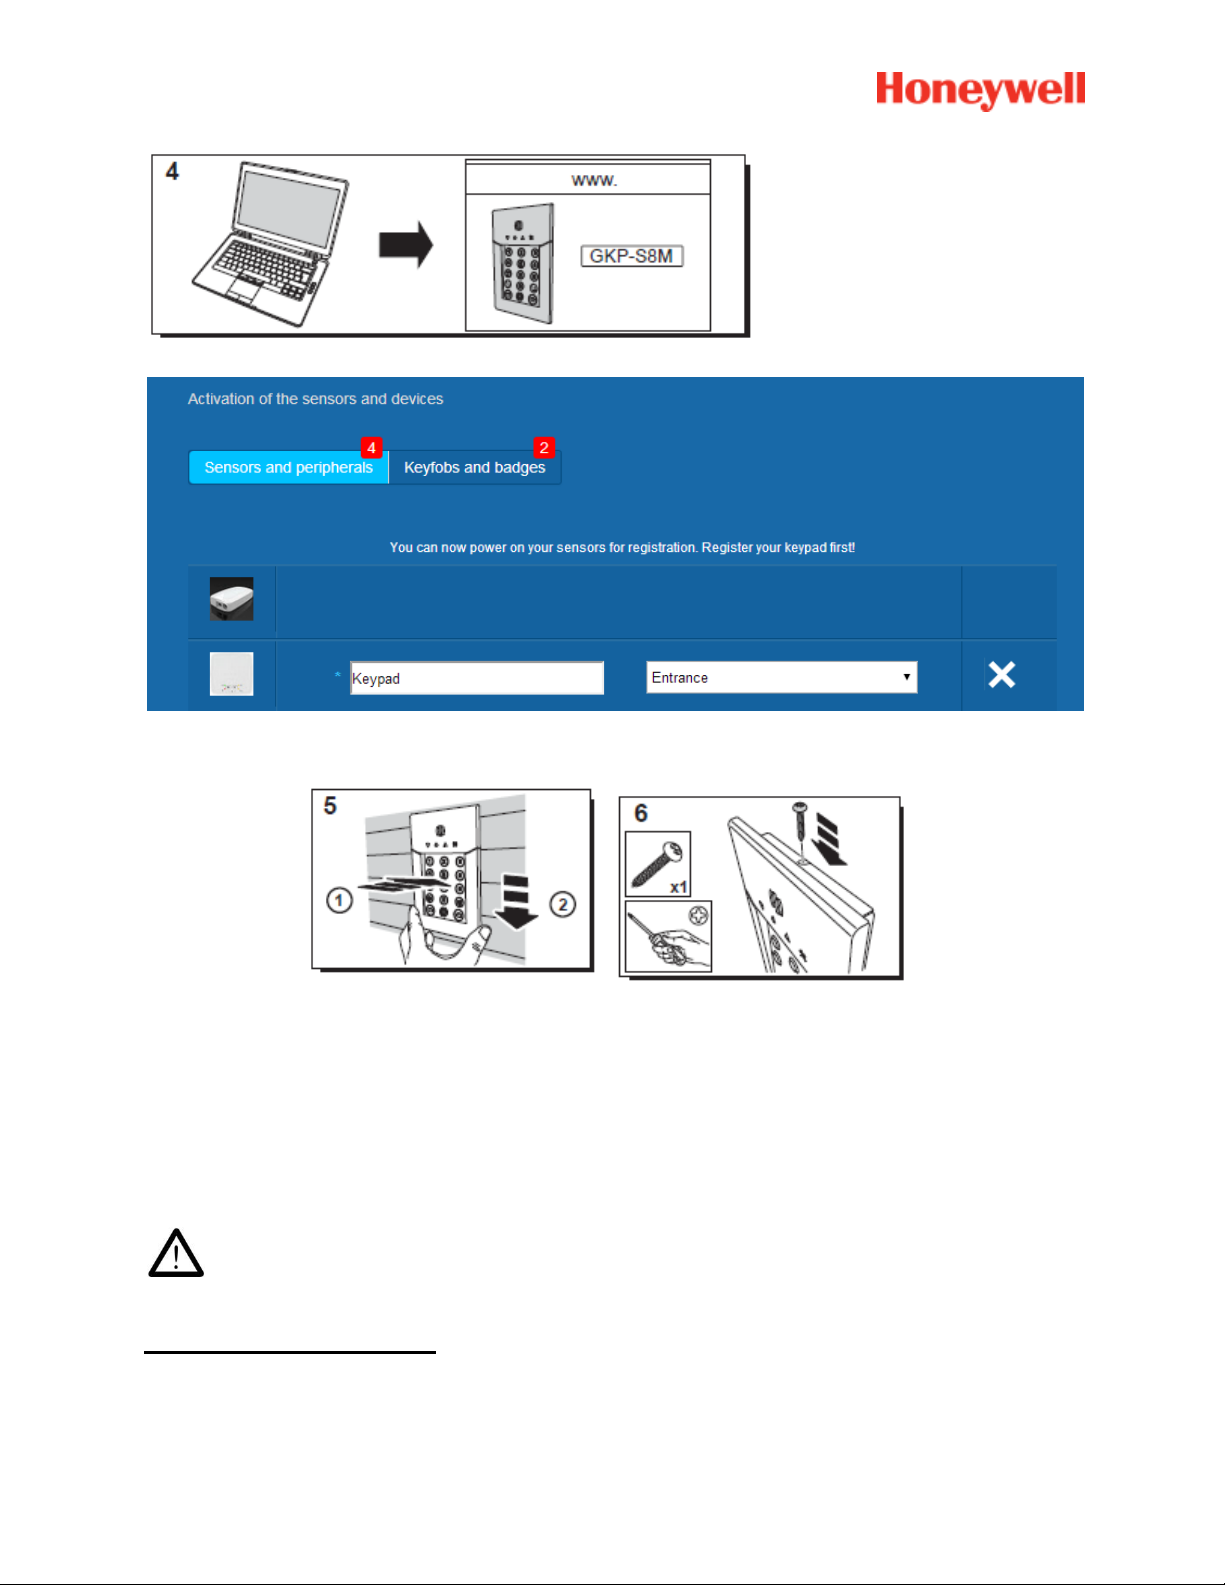
The keypad plays a series of beeps. The Website shows the detection of the new peripheral with the
message in the upper strip: ”New Device incoming… ”
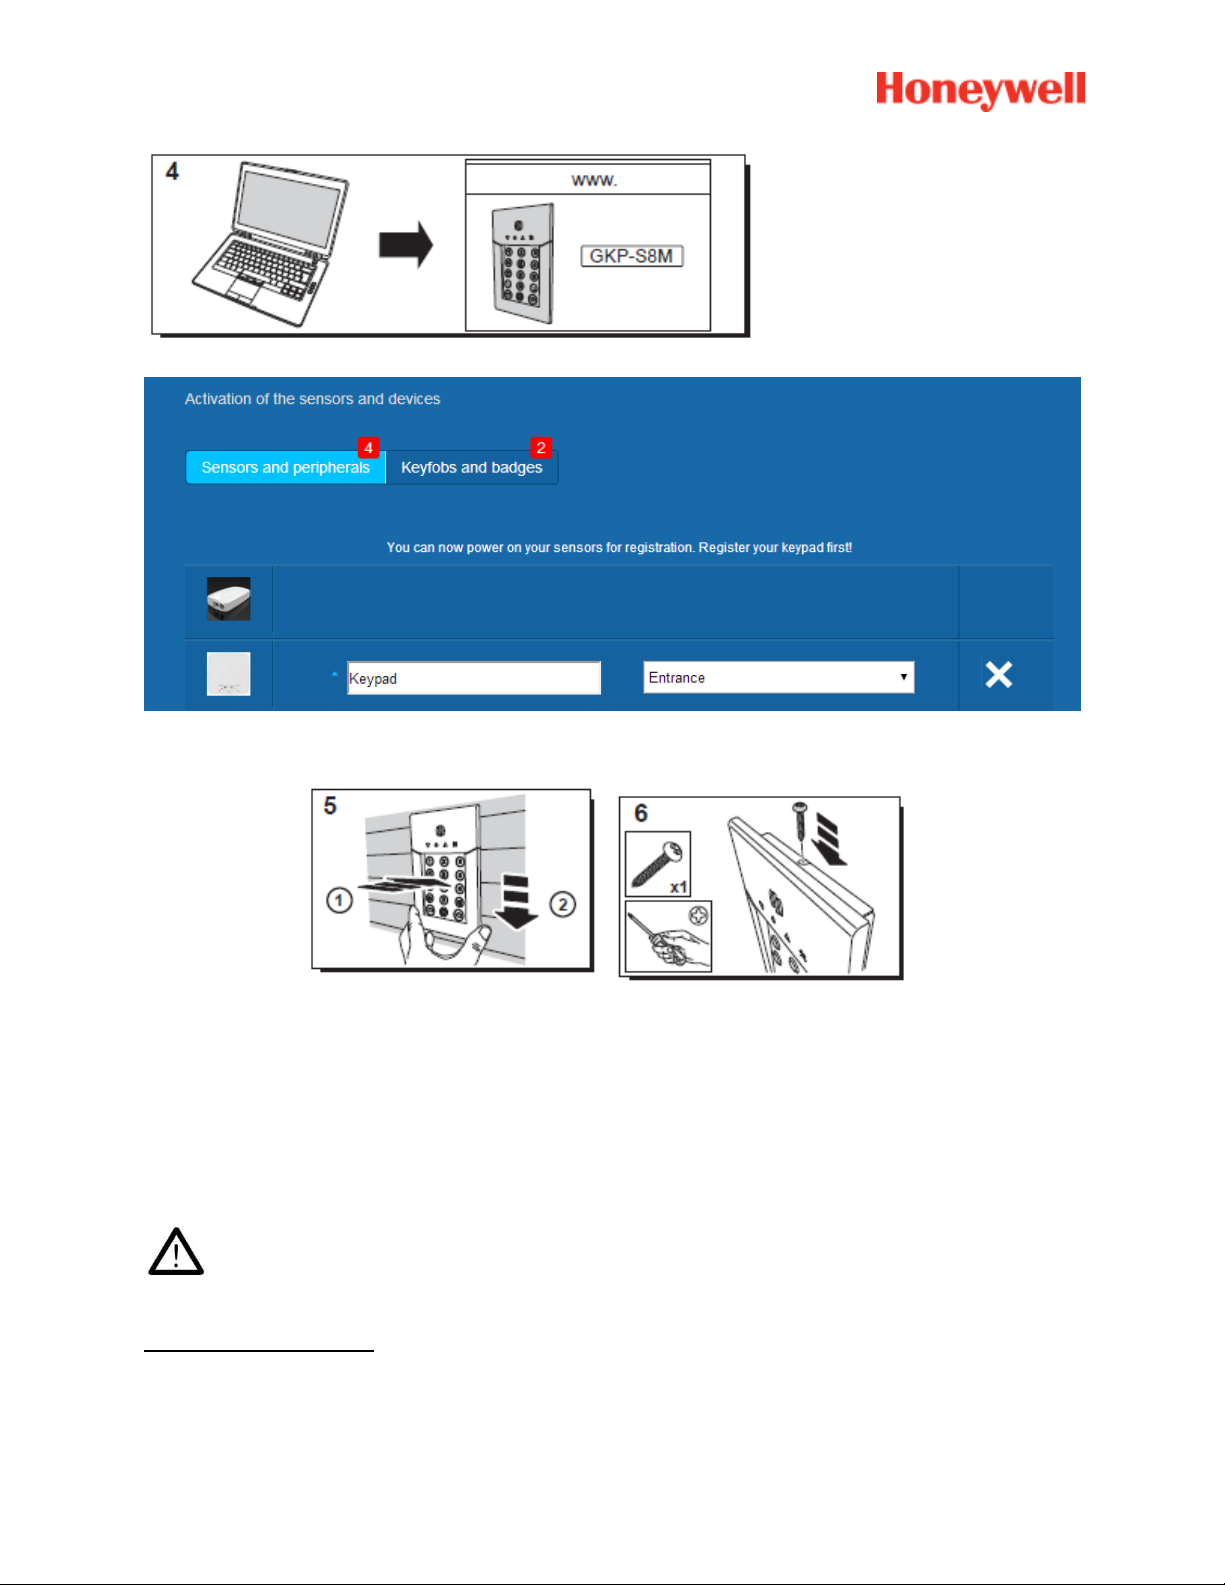
Wait for the keypad to appear in the “Sensors and peripherals” section as shown below:
11
Page 12
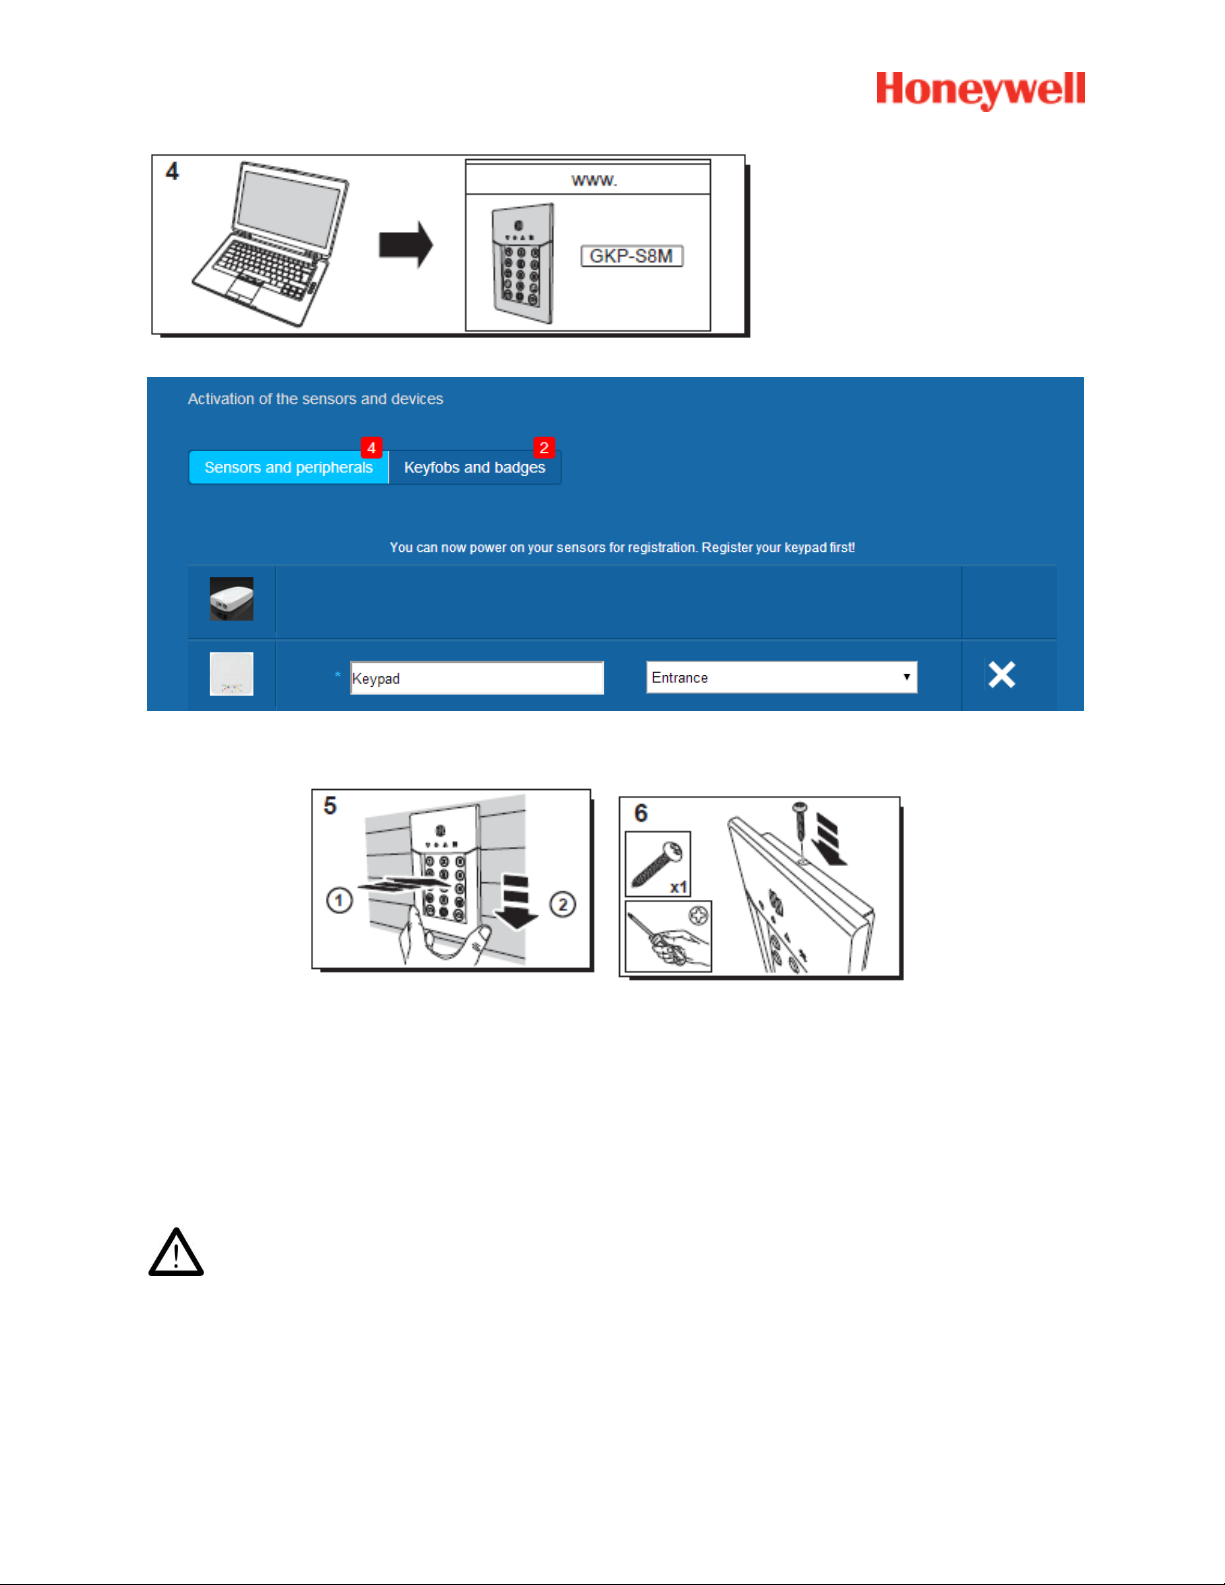
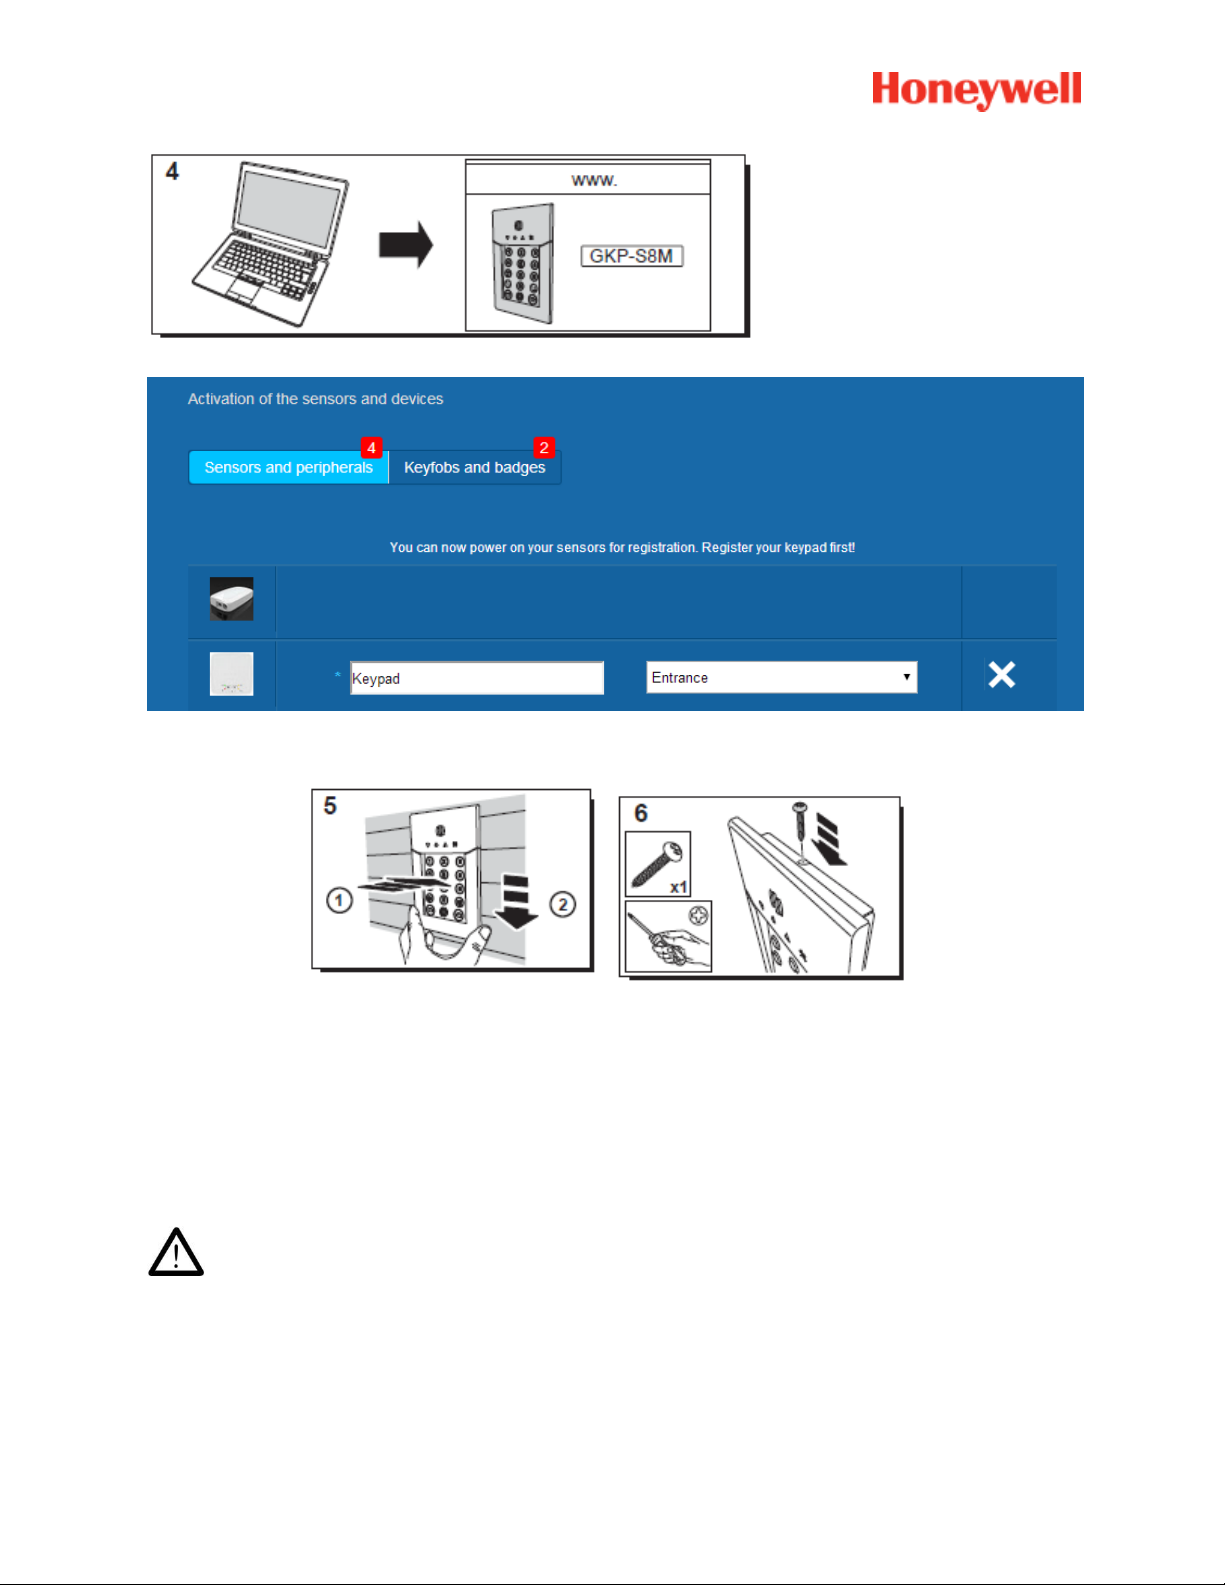
Set the location and the name you want to give to it : here the name is “Keypad” and the location is
“Entrance”.
Warning : To validate the name field you have to click elsewhere on the screen with the mouse.
The keypad is now saved and registered on your system.
Please refer to the keypad manual to set up user codes. By default, user 1 has the code
1234. Don’t forget to change it at installation!
12
Page 13

Registering the badges
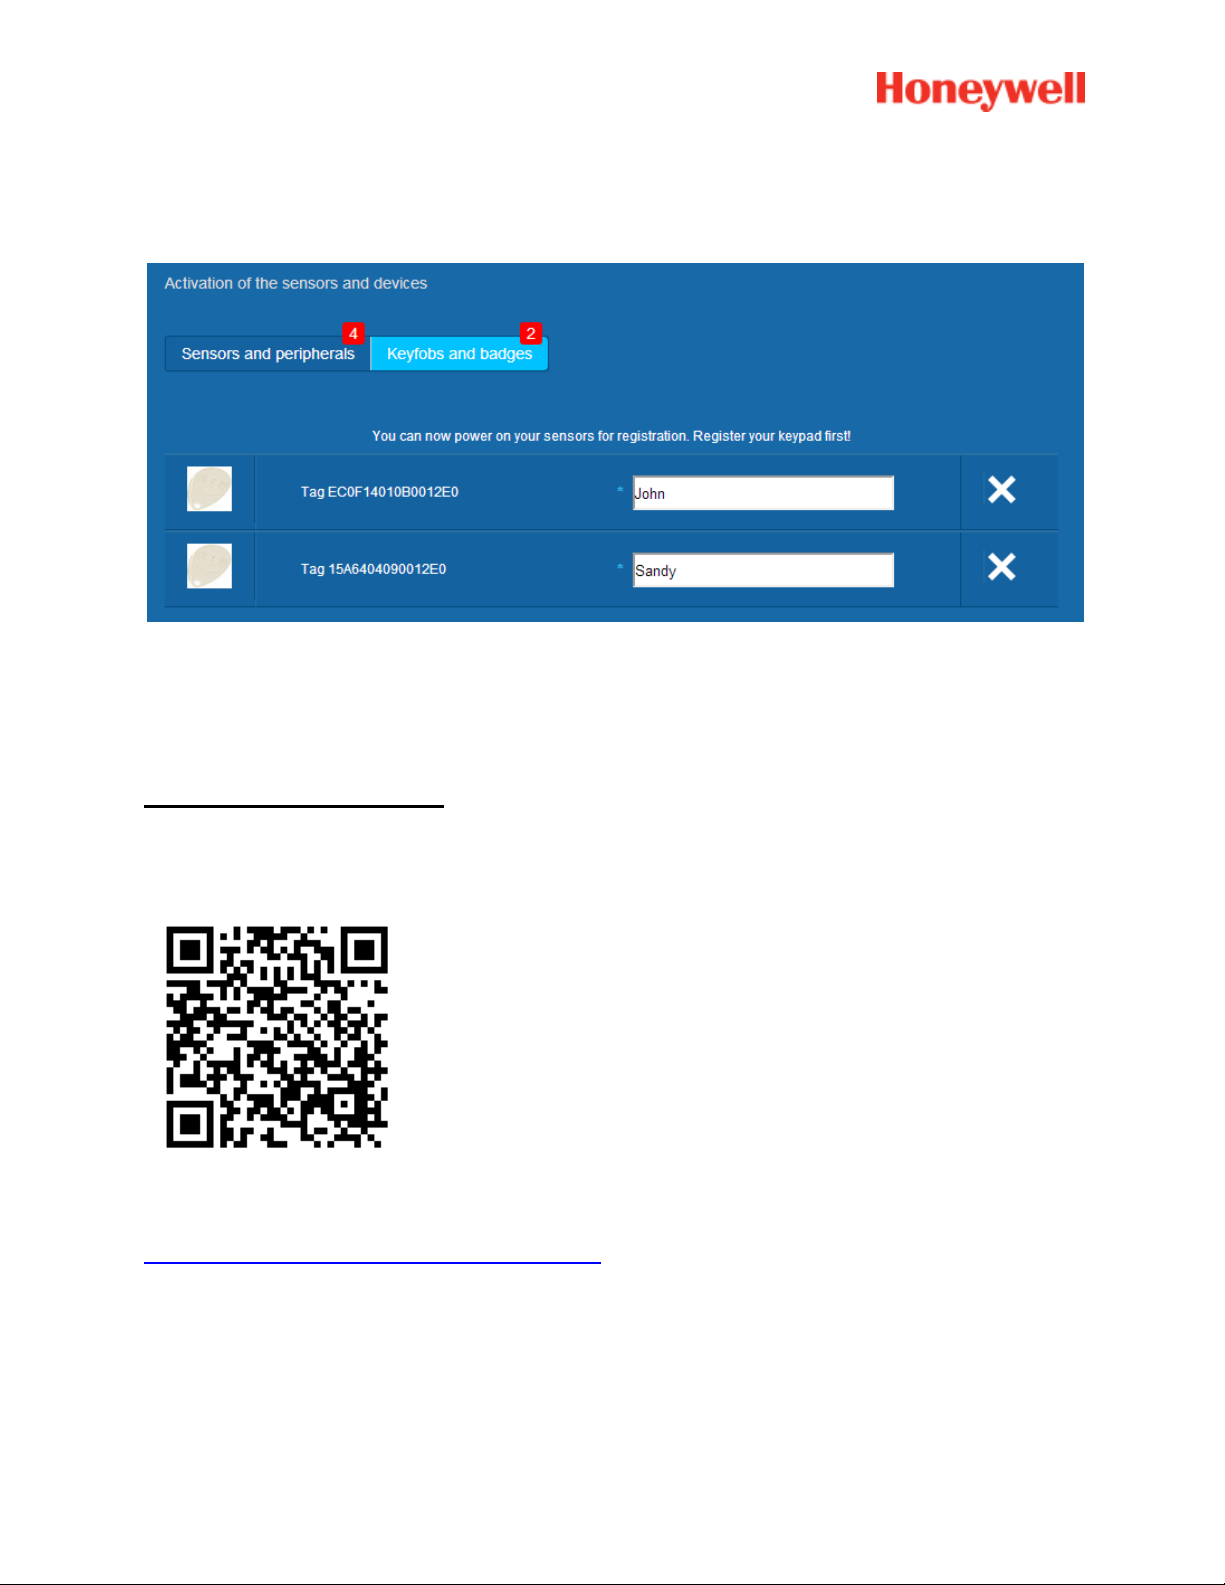
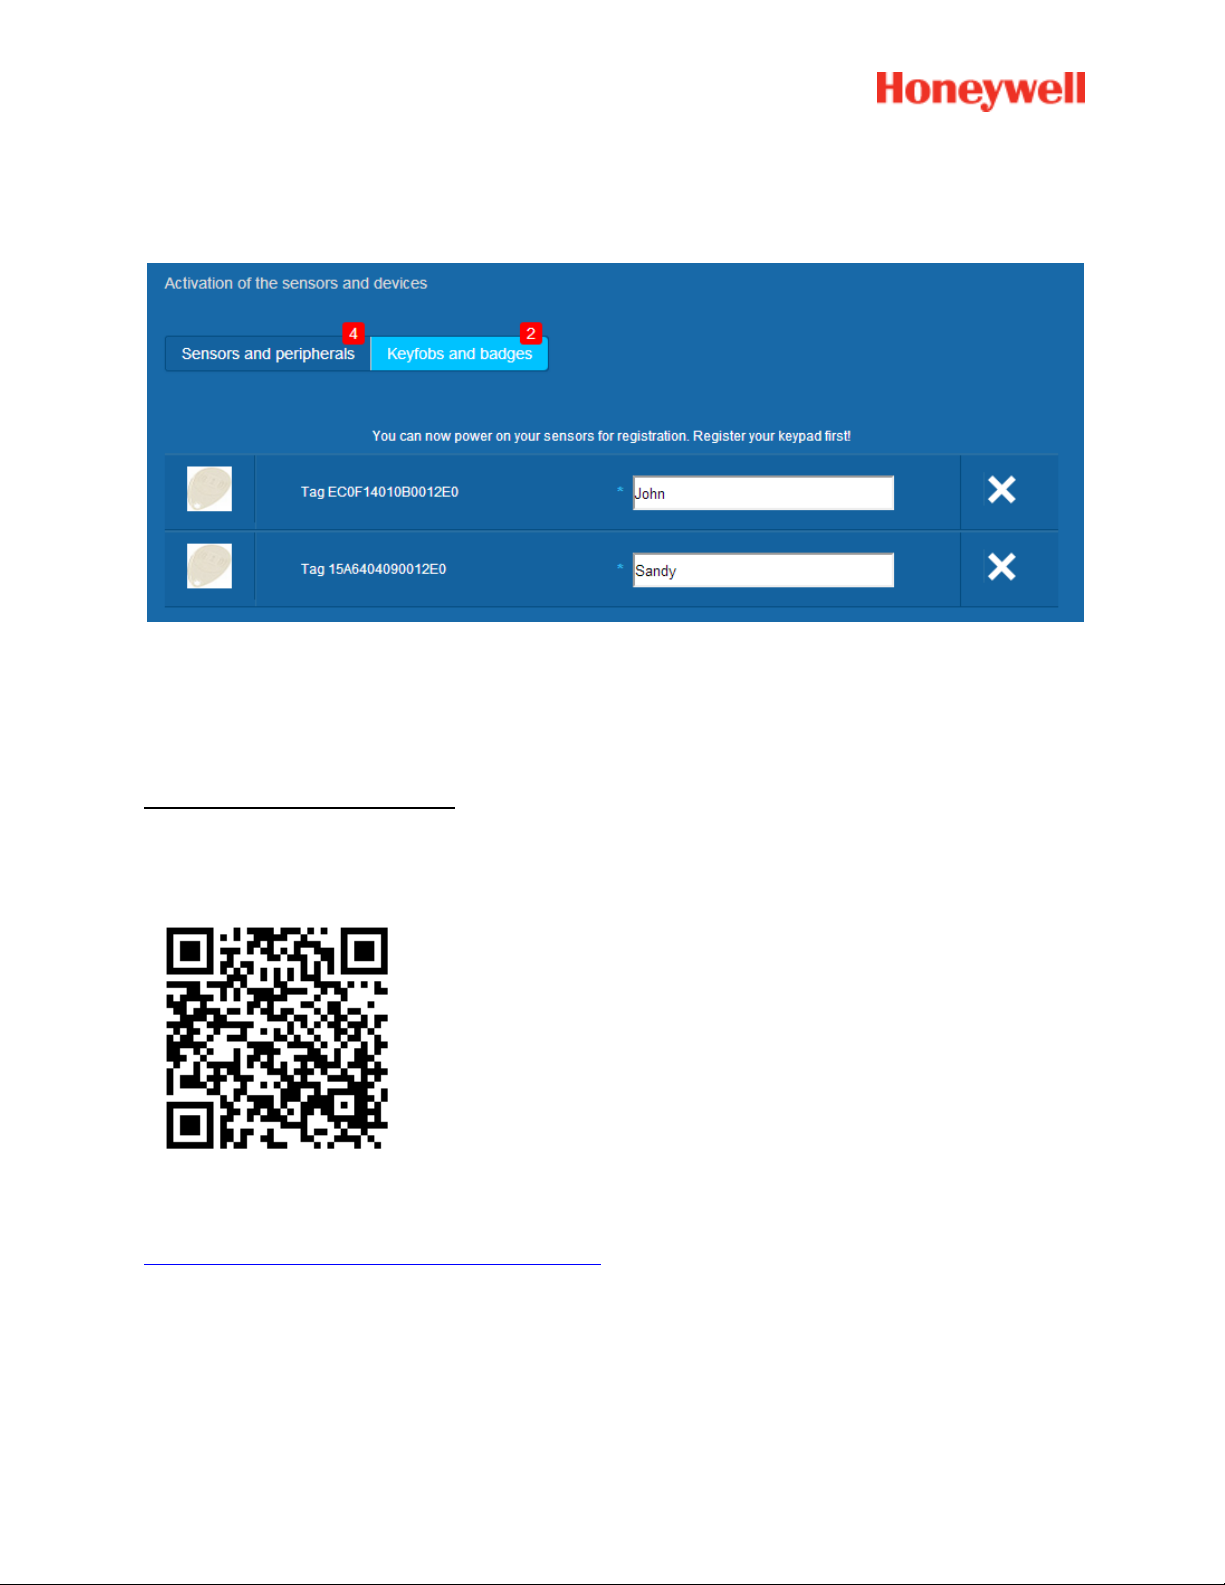
To register the first Badge, present it at the front centre of the Badge reader or keypad until you hear a
beep. The Badge appears in the “Keyfobs and badges” section.
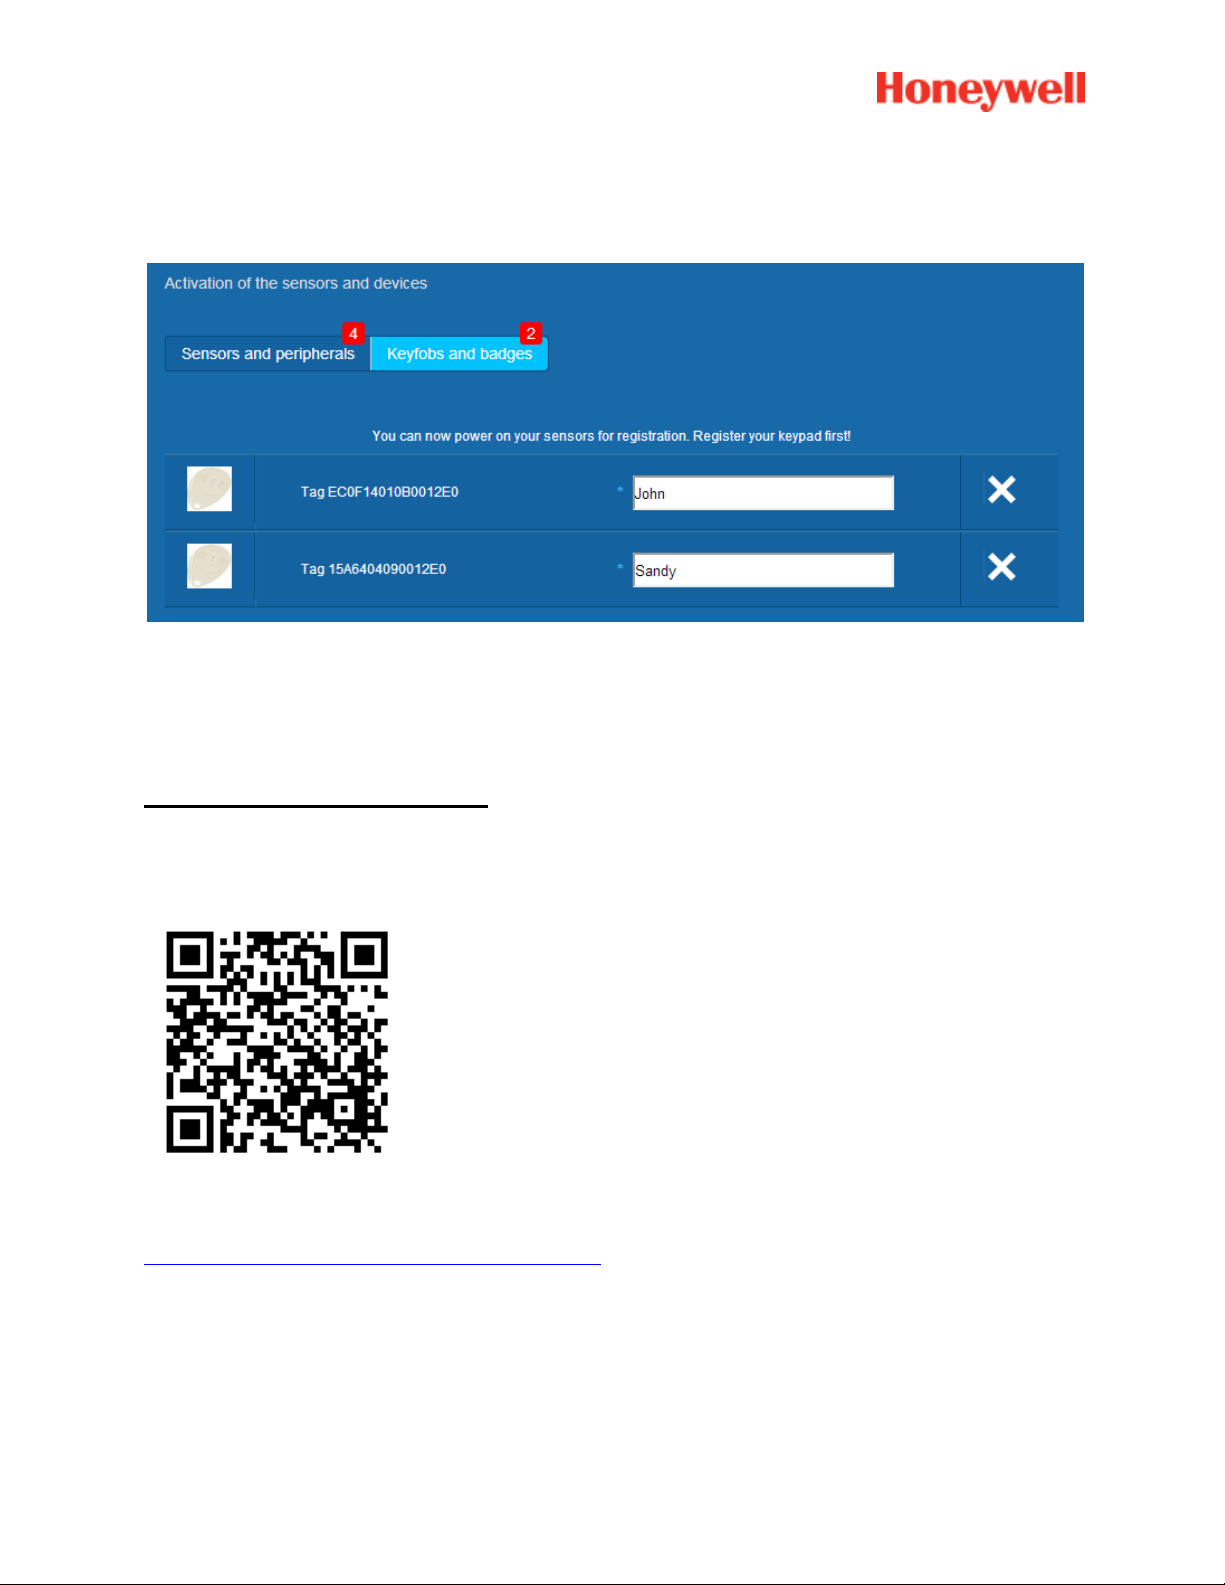
You can now set the owner’s name in the field next to the Badge serial number. Register the next Badge
the same way.
Here both “John” and “Sandy” ‘s badges have been registered.
The badges are now saved and registered on your system.
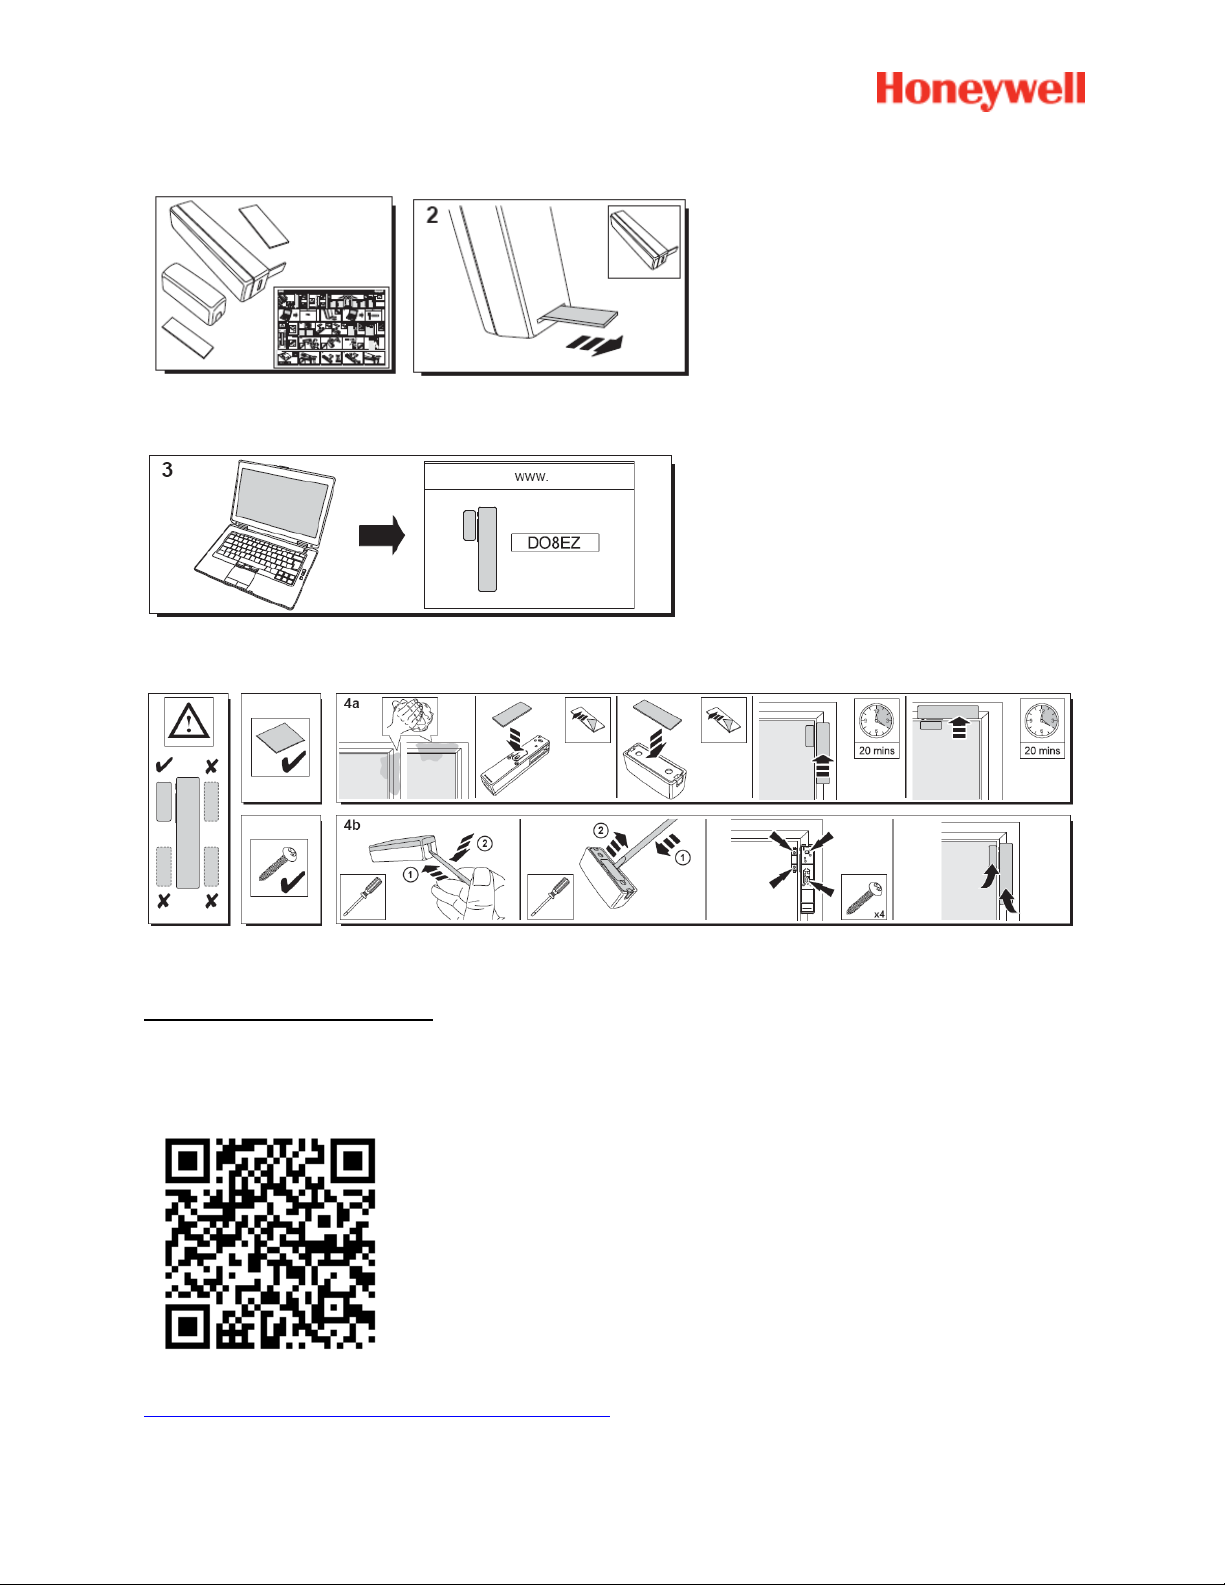
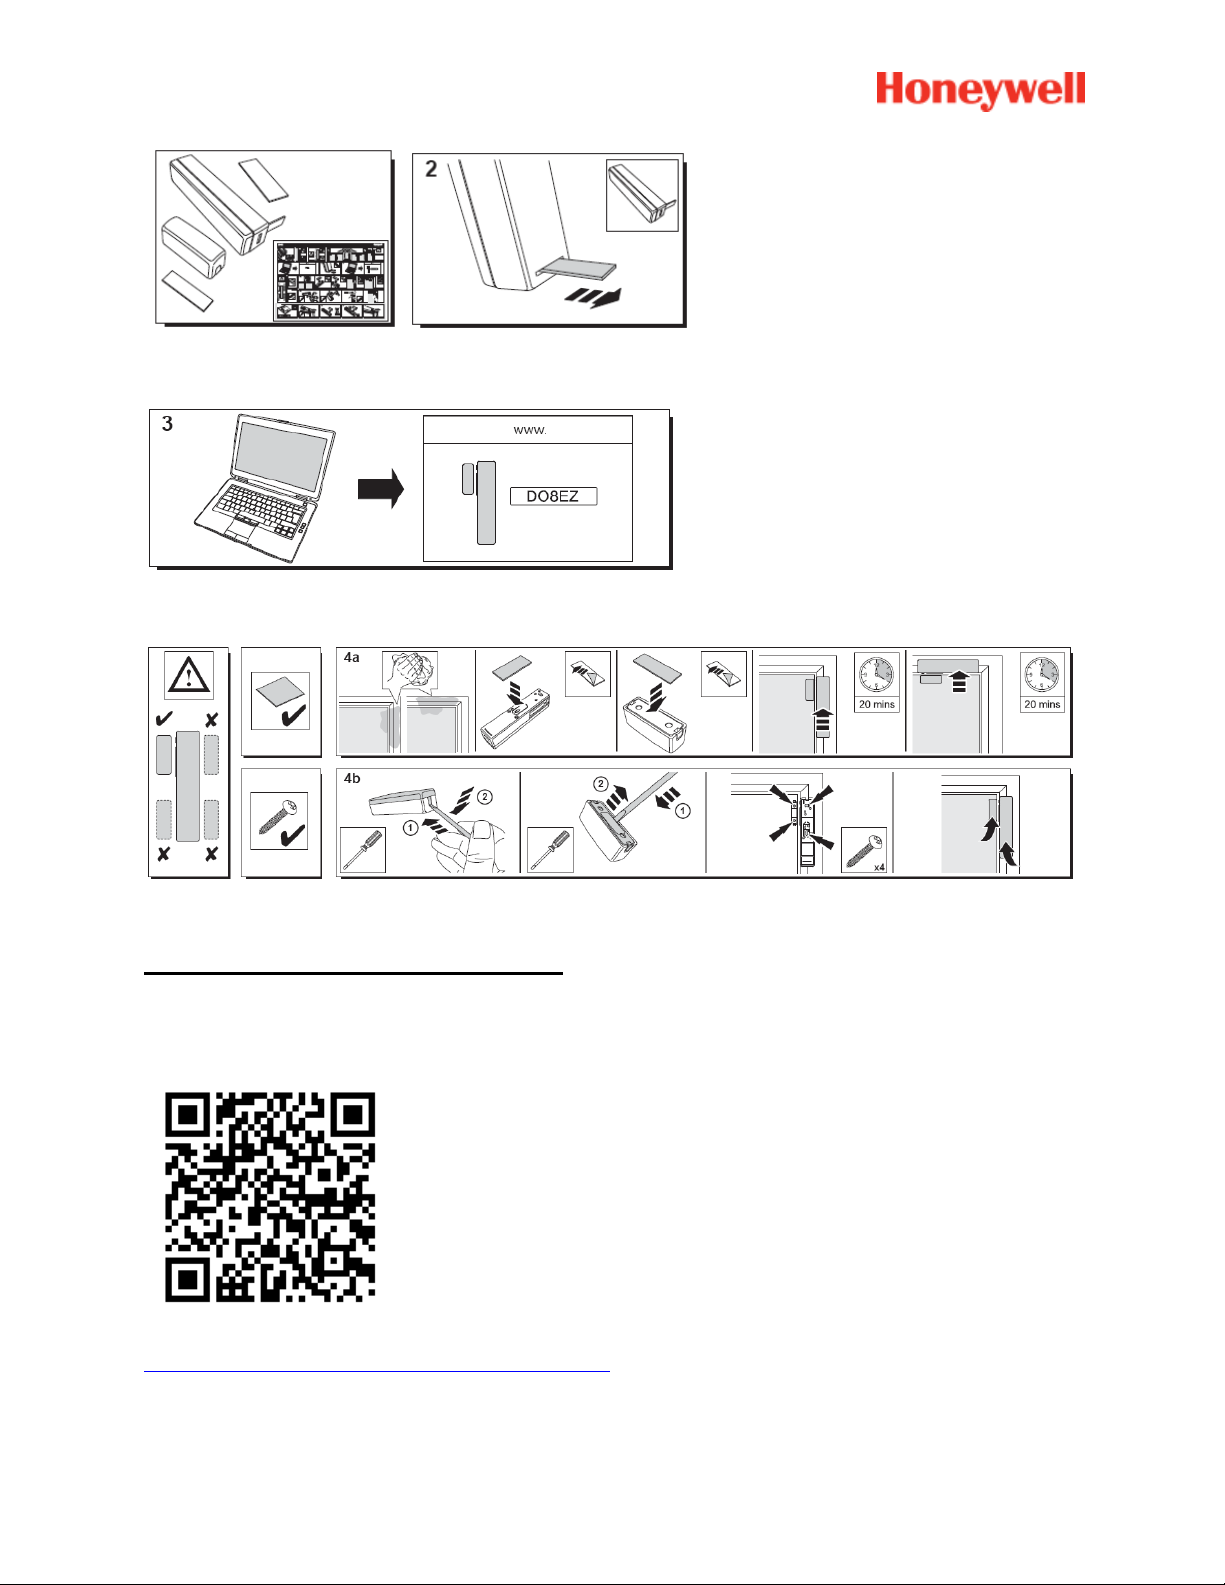
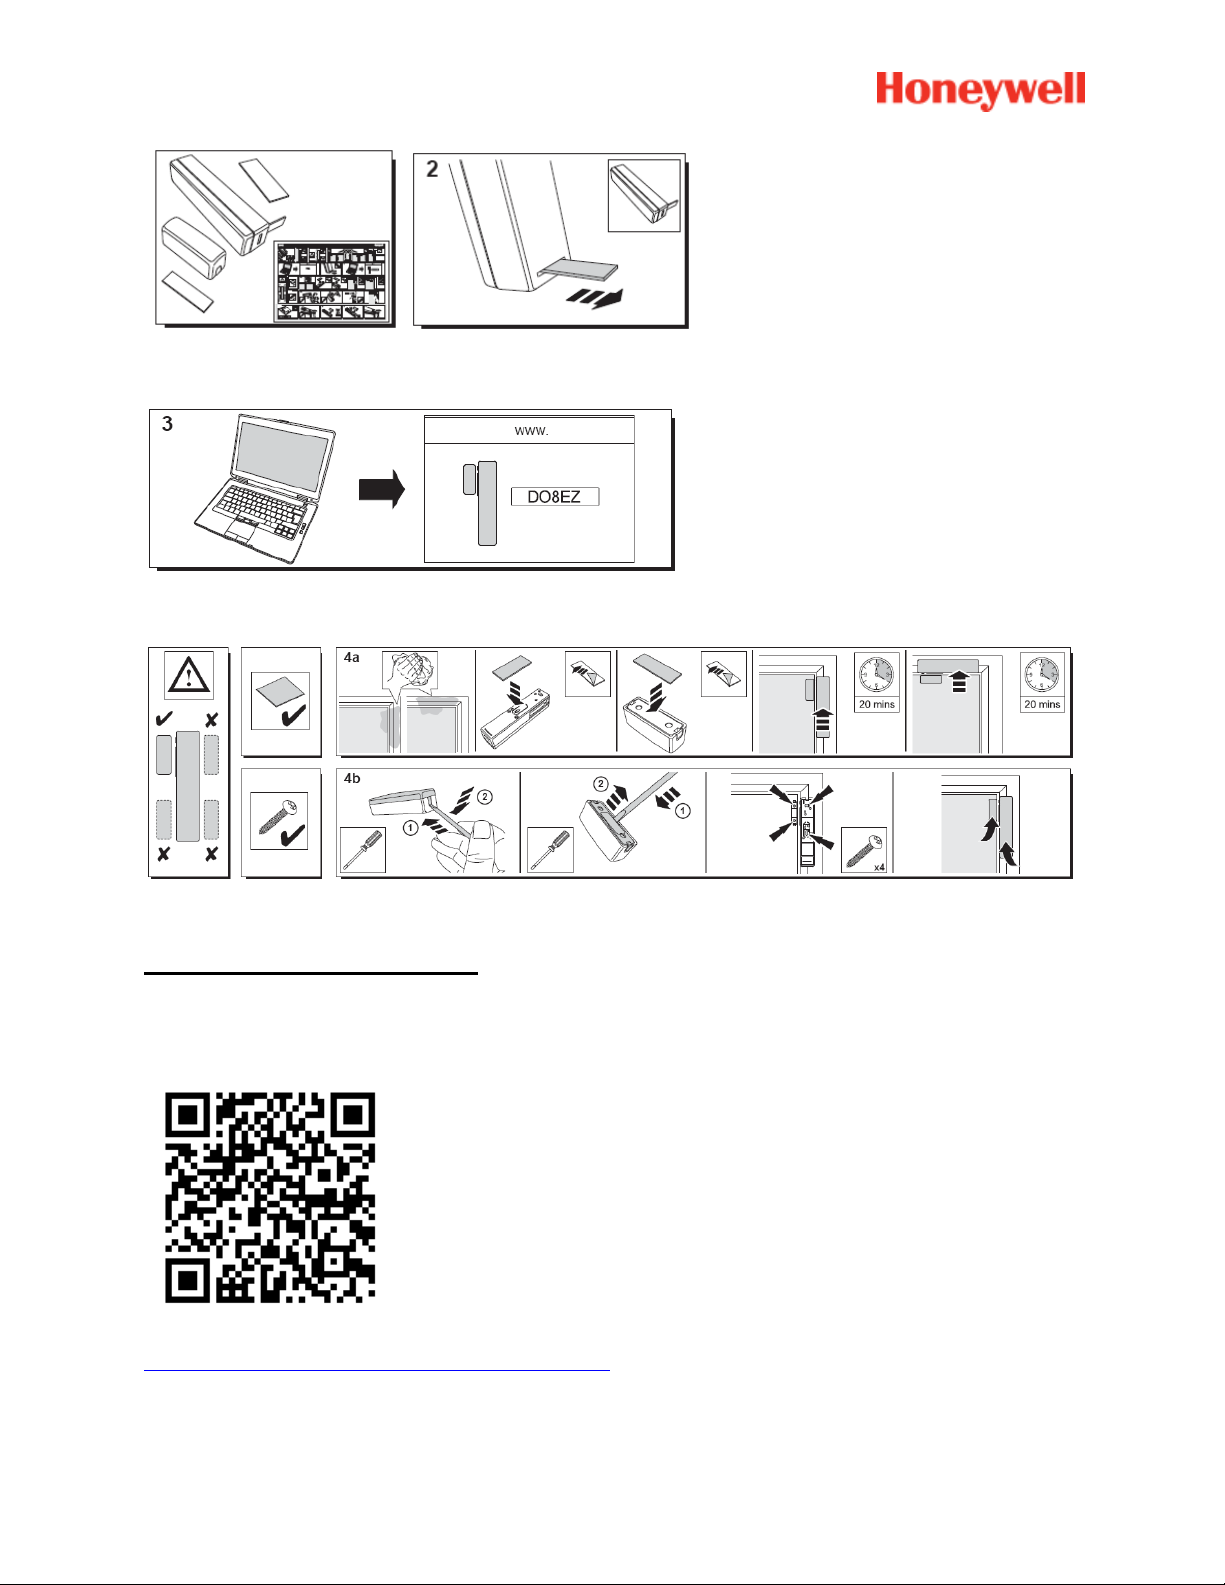
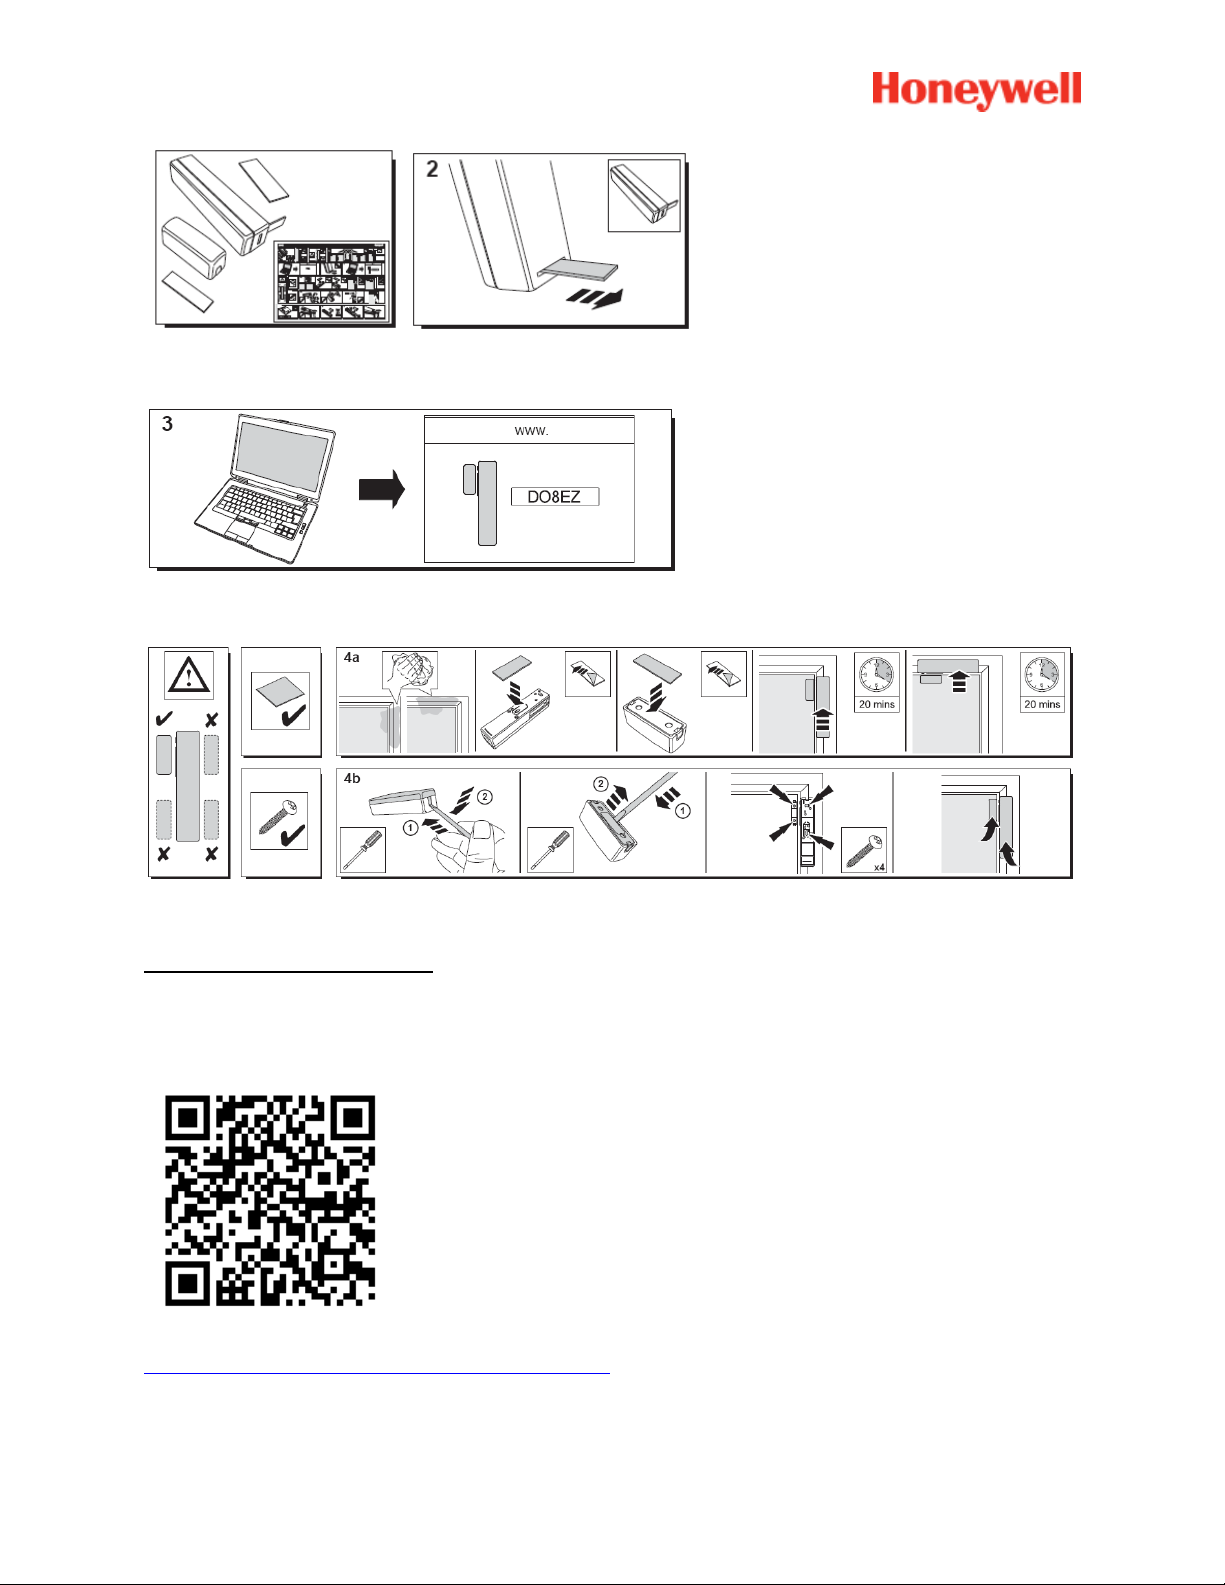
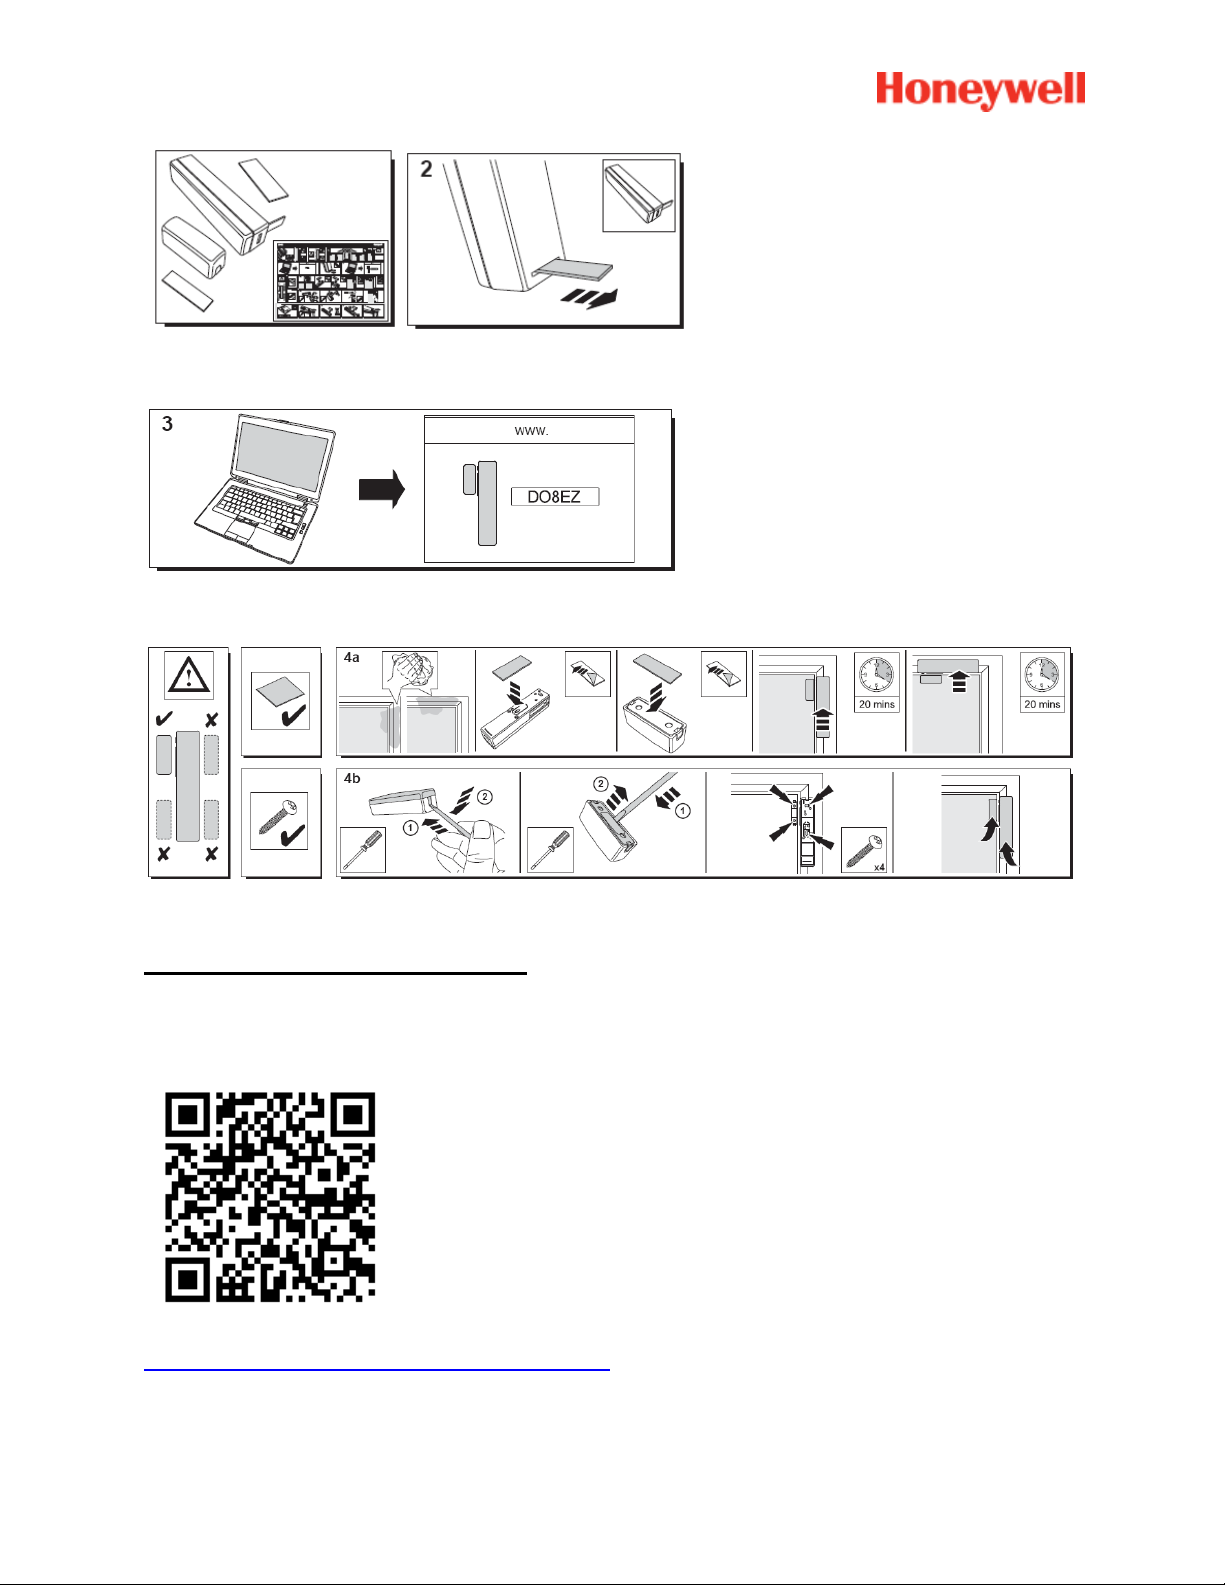
Registering the Door Contact
A help video can be found here:
http://honeywell.total-connect.eu/video/DO8EZ.mp4
13
Page 14
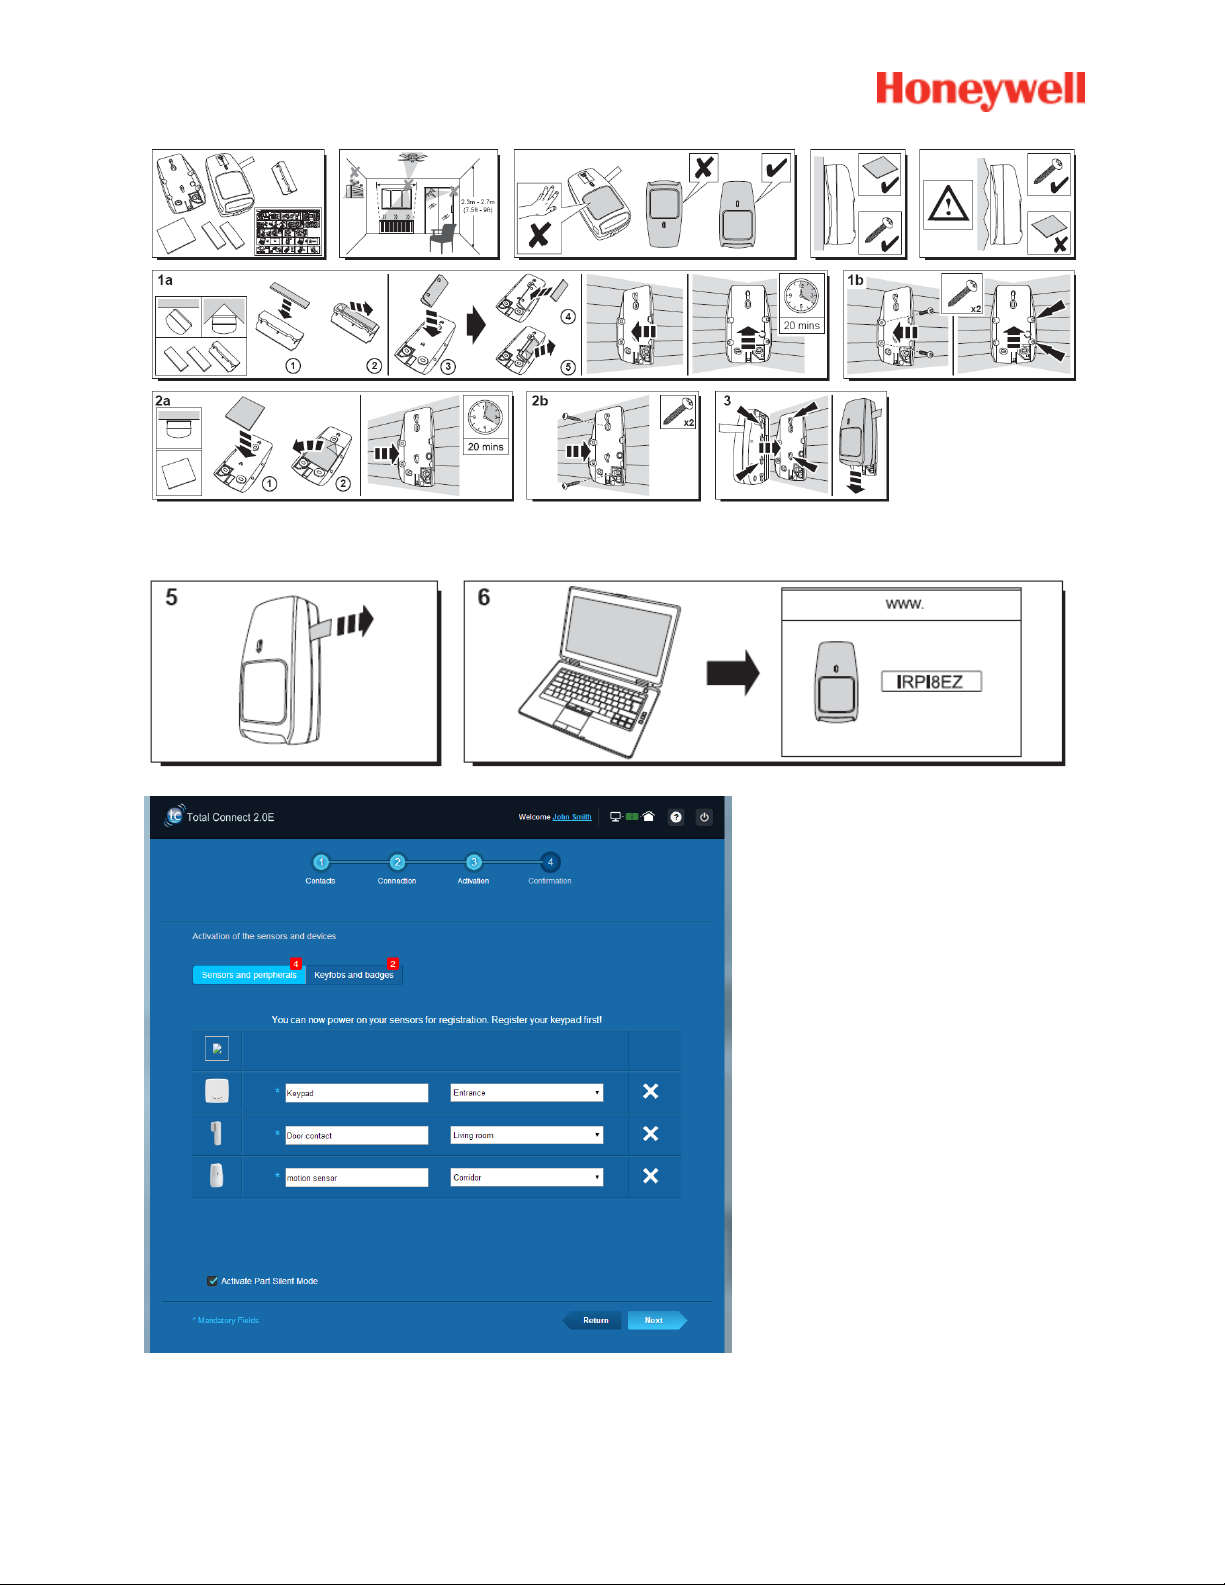
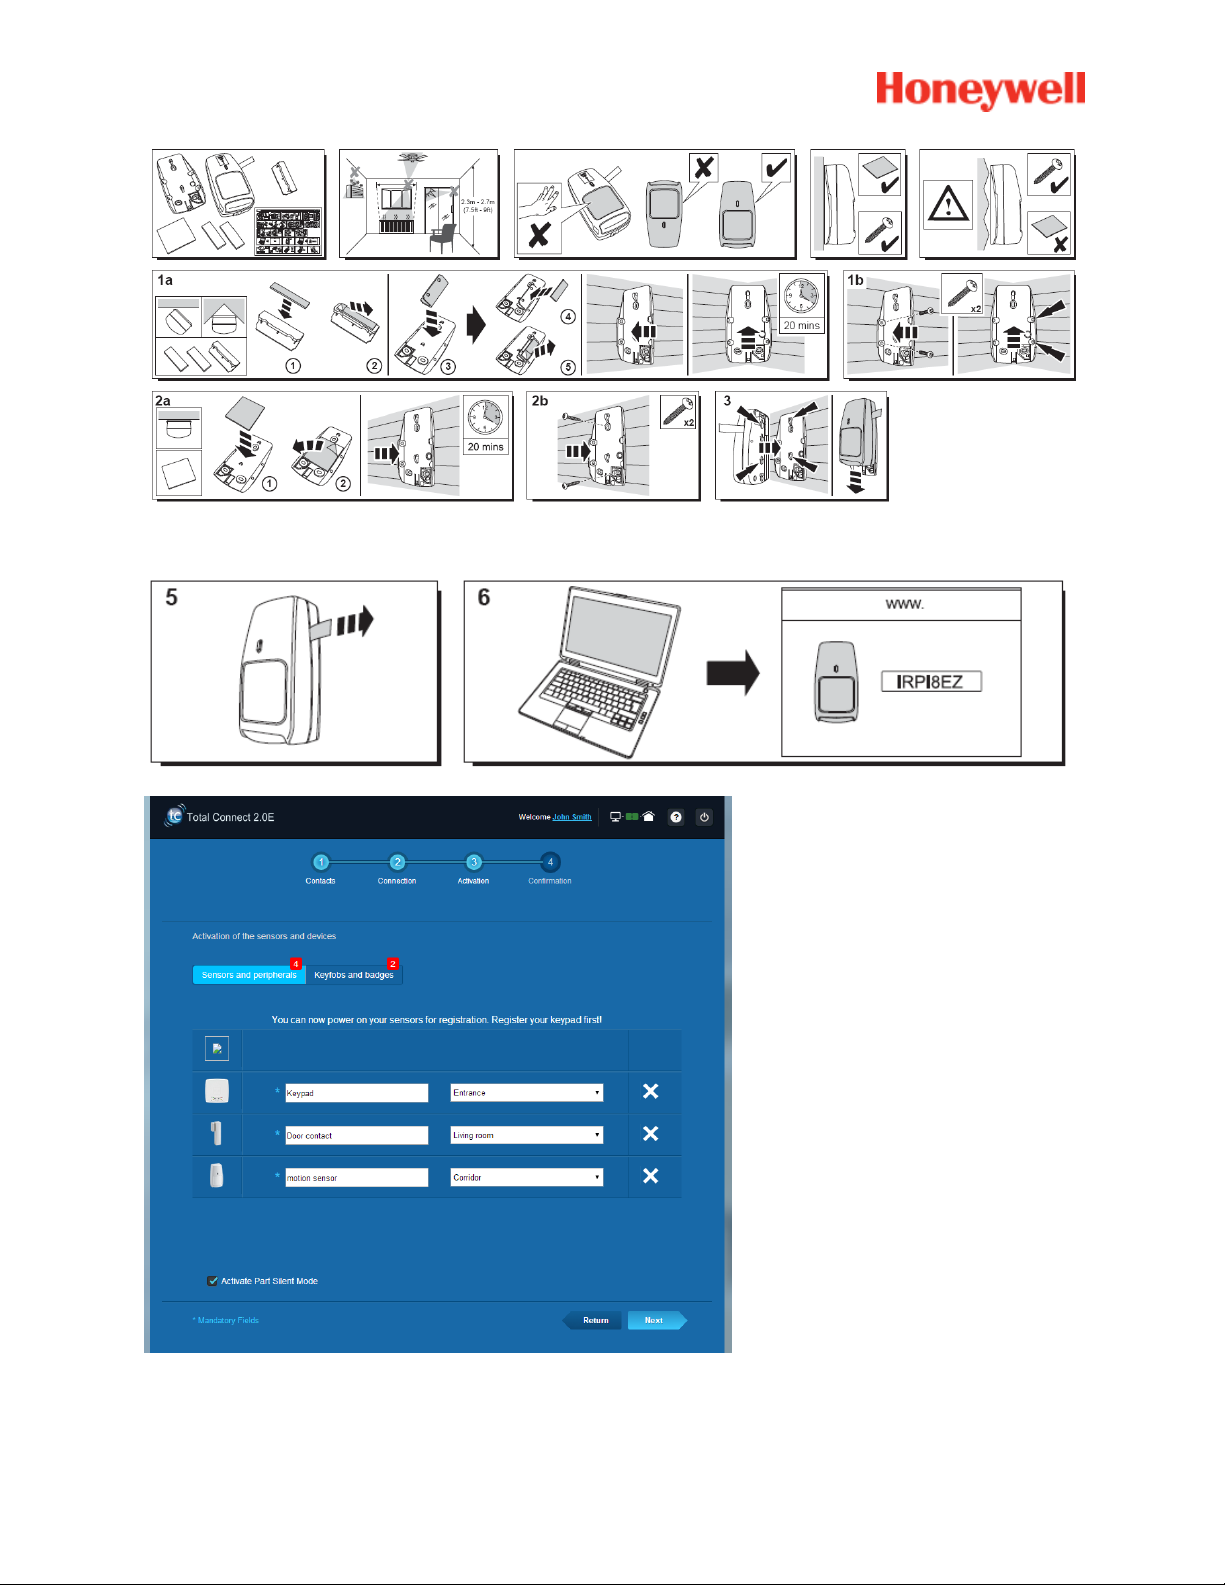
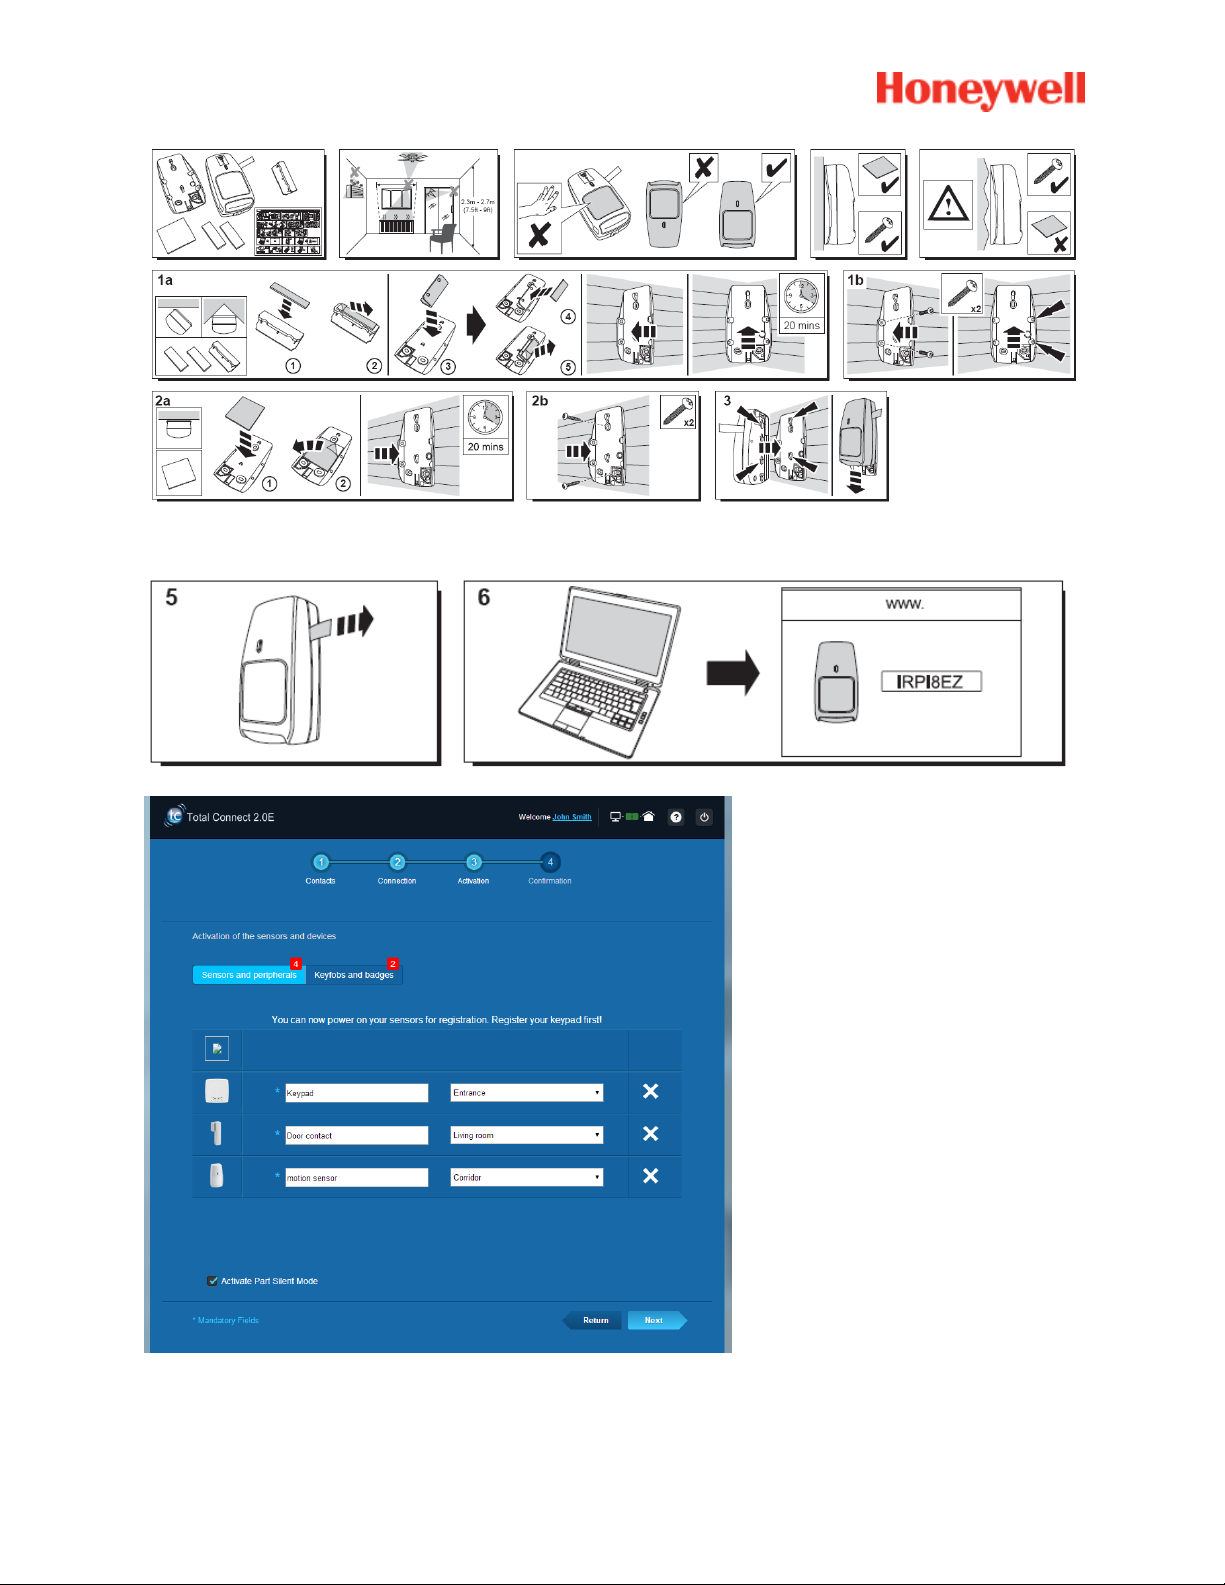
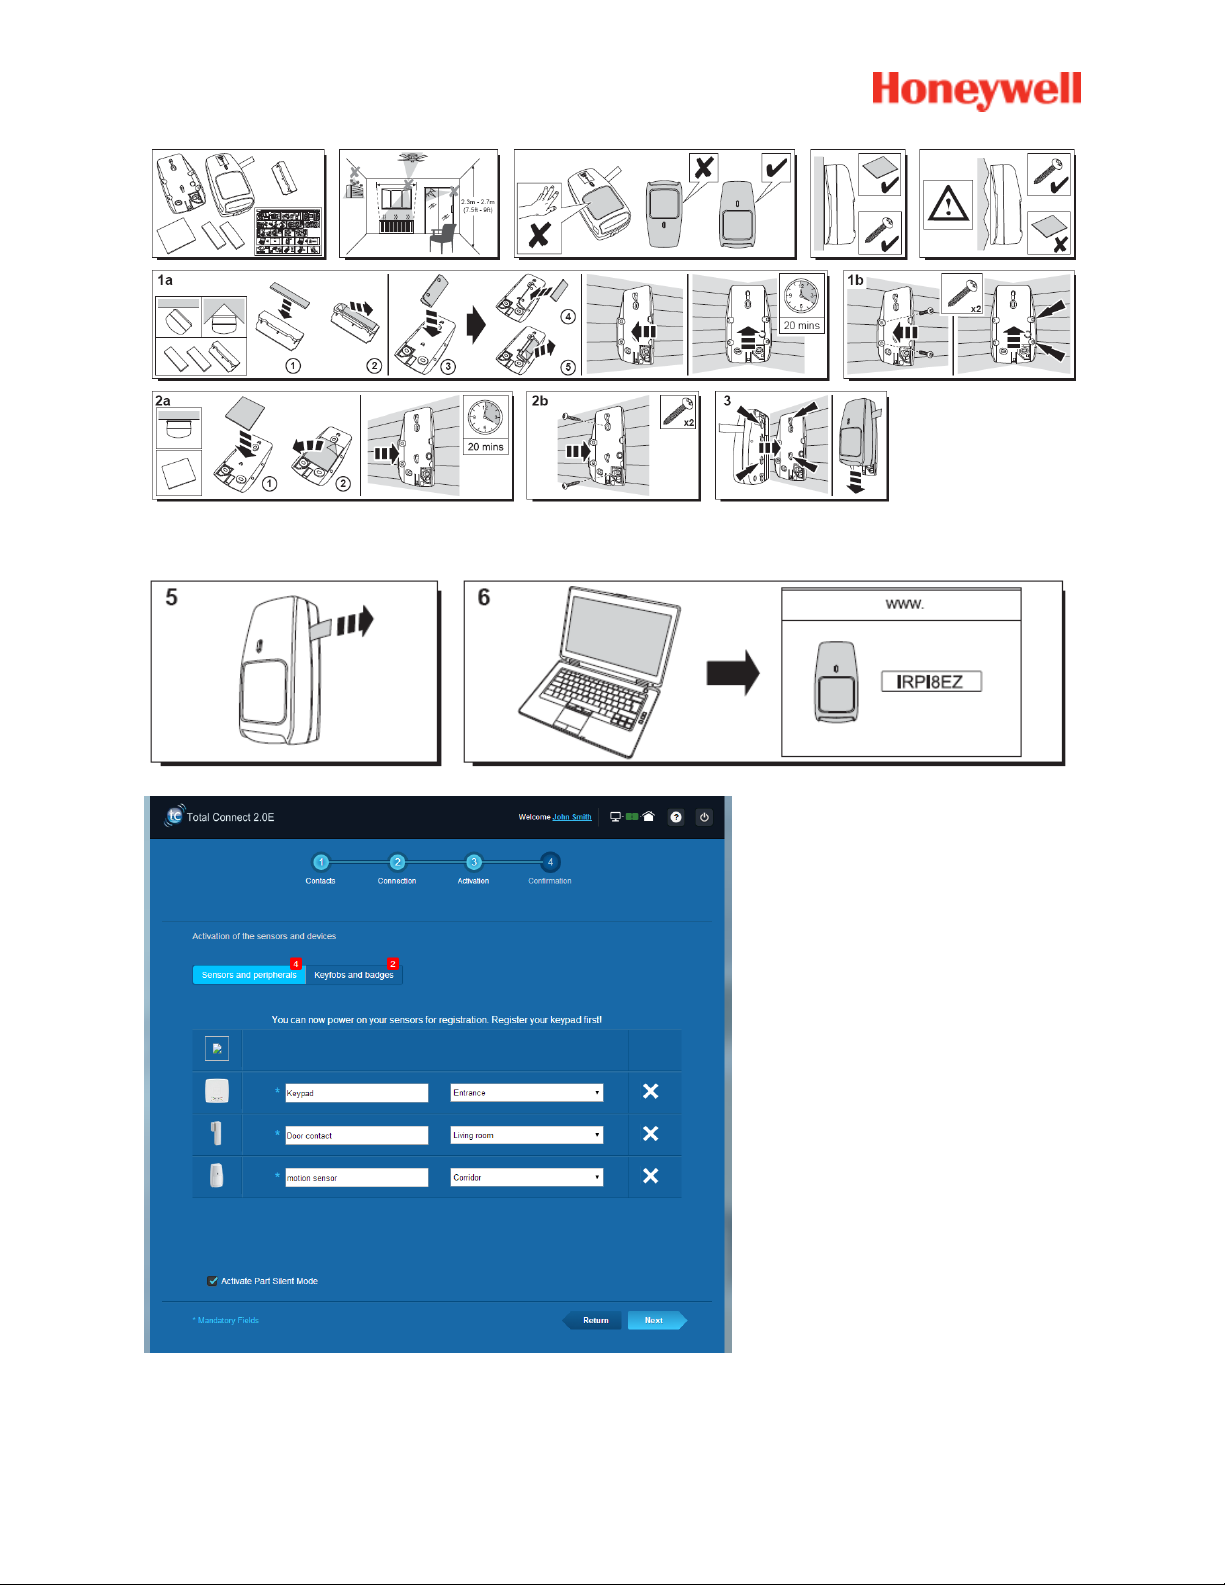
Registering the motion sensor
A help video can be found here:
http://honeywell.total-connect.eu/video/IRPI8EZ.mp4
14
Page 15
15
Page 16

Installing other peripherals
For each device being registered you have the upper message “New Device incoming…” and you will
hear the beeps from the badge reader.
Finalizing the installation
Once all peripherals are registered , finish the installation by clicking on the “Finish” button.
The finalization may take several minutes.
Le Sucre pre-configured parameters
- Peripheral parameter :
- DO8M, SHK8M detectors are :
Delayed
In partial partition (working in total and partial mode)
- IRPI8M, IR8M, CAMIR-F1, DT8M, DTPI8M, FG8M detectors are :
Delayed
In total partition (working only in total mode)
- All Life safety detectors (CO8M, DFS8M) are:
Immediate
In 24/24 partition
- DET8M detector is:
Immediate
In 24/24 partition
- CAMIR-F1 parameters:
Pictures per set: 5
Time between pictures: 300 ms
- Entry/Exit delays:
o Total partition
Entry delay: 30 s
Exit delay: 30s
o Partial partition
Entry delay: 30s
Exit delay: 30s
- Tag reader siren parameters:
Intrusion alarm duration: 180s
- Smoke alarm duration: 300s
Entry and exit beeps:
Beeps only present for total arm, silent for partial arm
16
Page 17

-Français-
Le Sucre™
Guide d'installation rapide
ÉTAPES À SUIVRE OBLIGATOIREMENT AVANT DE
COMMENCER L'INSTALLATION ................................................ 2
Identification du type de centrale ...................................................................... 2
Étape 1 : Connexion de l'unité Le Sucre .......................................................... 3
Étape 2 : Création de votre compte sur Internet .............................................. 5
INSTALLATION DE VOTRE SYSTÈME ...................................... 6
Enregistrement du « Lecteur de badge » ou du clavier .................................. 9
Enregistrement des badges............................................................................. 12
Enregistrement du contact de porte ............................................................... 13
Enregistrement du détecteur de mouvement ................................................. 14
Installation d'autres périphériques ................................................................. 16
Finalisation de l'installation ............................................................................. 16
Paramètres préconfigurés de l’unité Le Sucre ....................... 16
800-19460-C
01/2016
,
Page 18
ÉTAPES À SUIVRE OBLIGATOIREMENT AVANT DE COMMENCER
L'INSTALLATION
Identification du type de centrale
Veillez à identifier le type de centrale dont vous disposez, car le processus d’installation présente de
légères différences selon les versions.
Sucre GPRS (SUGPACK-EU/SUGPACK-UK)
Sucre Box (SUEPACK –E)
2
Page 19
Sucre Box + (SUEPACK-EG)
Étape 1 : Connexion de l'unité Le Sucre
Sucre GPRS
Vous trouverez une vidéo d’aide ici :
http://honeywell.total-connect.eu/video/lesucre.mp4
3
Page 20
Sucre Box
A help video can be found here:
http://honeywell.total-connect-eu/video/sucrebox.mp4
Sucre Box+
A help video can be found here:
http://honeywell.total-connect-eu/video/sucreboxplus.mp4
4
Page 21
Étape 2 : Création de votre compte sur Internet
1. Connectez-vous au site Web https://tc20e.total-connect.eu
2. Cliquez sur « Créer un utilisateur» pour créer votre compte. Entrez ensuite le code « ID code »
à 20 chiffres. Ce code se trouve sur une étiquette collée sur l'unité Le Sucre.
3. Vous pourrez ensuite choisir votre nom d'utilisateur et votre mot de passe pour vous connecter
à votre système. Vous devrez également entrer une adresse e-mail valide afin d'être contacté
en cas de problème ou si vous oubliez votre mot de passe.
Tous les champs marqués d'un * sont obligatoires.
Une fois le formulaire rempli, cochez la case au bas de la page pour accepter les Conditions générales,
puis cliquez sur « Suivant ».
Le message suivant apparaît : « Votre compte a été correctement activé ». Cliquez sur le bouton bleu
pour continuer.
Un e-mail de confirmation vous sera adressé pour vous rappeler l'identifiant et le mot de passe
qui vous donnent accès au site Web. Il vous fournira également quelques informations
concernant les spécificités de votre système. Si vous n’avez pas reçu cet e-mail, veuillez vérifier
dans le dossier « Courrier Indésirable ».
Vous pouvez maintenant vous connecter à votre compte depuis la page d'accueil du site Web.
5
Page 22
INSTALLATION DE VOTRE SYSTÈME
Une fois connecté, le message suivant apparaît :
1. La première étape consiste à définir vos contacts : il s'agit des personnes qui recevront une
notification par e-mail ou par SMS si une alarme se déclenche ou si un problème survient dans
vos locaux.
Vous pouvez définir jusqu'à trois contacts. Le premier contact (il s'agit de vous en général) est
obligatoire. Le deuxième et le troisième contact sont facultatifs et peuvent être ignorés au cours
de l'installation. Vous pourrez modifier ces contacts à tout moment après l’installation initiale.
6
Page 23

Vous devez entrer les numéros de téléphone des contacts au format international. Exemple :
numéro commençant par +44 pour le Royaume-Uni ou +33 pour la France.
2. Selon votre type de centrale, il est possible que vous deviez saisir un numéro de téléphone
correspondant à la carte SIM fournie avec votre système
Vous devez entrer le numéro de téléphone correspondant à la carte SIM au format international.
Après avoir réalisé les différentes étapes qui s’affichent à l’écran, la connexion avec l’unité Le Sucre™
commence
7
Page 24
Elle peut prendre plusieurs minutes. Une fois la connexion établie, l'icône verte s'affiche en haut, à droite
de la page : .
Le système est désormais en mode d'installation
3. Attendez que Le Sucre™ soit reconnu par le site Web et apparaisse à l'écran comme
ci-dessous :
8
Page 25
Vous pouvez à présent commencer à installer les périphériques et les capteurs :
Vous trouverez une vidéo d’aide ici :
http://honeywell.total-connect.eu/video/SPR-S8EZ.mp4
Enregistrement du « Lecteur de badge » ou du clavier
1. Lecteur de badge
9
Page 26
Le lecteur de badge émet une série de signaux sonores, puis trois signaux sonores courts. Le site Web
annonce la détection du nouveau périphérique avec le message suivant dans le bandeau supérieur :
« Arrivée d'un nouveau périphérique… »
Attendez que le lecteur de badge apparaisse dans la section « Détecteurs et périphériques », comme
ci-dessous :
Indiquez l'emplacement et le nom que vous souhaitez lui donner : ici le nom est « Keypad » et
l'emplacement est « Entrance ».
Avertissement : pour valider le champ Nom, vous devez cliquer ailleurs sur l'écran avec la souris.
Le lecteur de badge est désormais enregistré sur votre système.
10
Page 27
2. Clavier
Vous trouverez une vidéo d’aide ici :
http://honeywell.total-connect.eu/video/GKP-S8M.mp4
Le lecteur de badge émet une série de signaux sonores. Le site Web annonce la détection du nouveau
périphérique avec le message suivant dans le bandeau supérieur : « Arrivée d'un nouveau
périphérique… »
Attendez que le clavier apparaisse dans la section « Détecteurs et périphériques », comme ci-dessous :
11
Page 28

Indiquez l'emplacement et le nom que vous souhaitez lui donner : ici le nom est « Keypad » et
l'emplacement est « Entrance ».
Avertissement : pour valider le champ Nom, vous devez cliquer ailleurs sur l'écran avec la souris.
Le lecteur de badge est désormais enregistré sur votre système.
Merci de vous référer au manuel du clavier pour définir les codes utilisateur. Par défaut,
l’utilisateur 1 a le code 1234. N’oubliez pas de le changer lors de l’installation !
Enregistrement des badges
Pour enregistrer le premier badge, présentez-le devant le lecteur de badge ou le clavier jusqu'à ce qu'un
signal sonore retentisse. Le badge apparaît dans la section « Keyfobs and badges ».
12
Page 29
Vous pouvez maintenant saisir le nom du propriétaire dans le champ texte face au numéro de série du
badge. Enregistrez le badge suivant de la même manière.
Ici les badges de « John » et de « Sandy » ont été enregistrés.
Les badges sont désormais enregistrés sur votre système.
Enregistrement du contact de porte
Vous trouverez une vidéo d’aide ici :
http://honeywell.total-connect.eu/video/DO8EZ.mp4
13
Page 30
Enregistrement du détecteur de mouvement
Vous trouverez une vidéo d’aide ici :
http://honeywell.total-connect.eu/video/IRPI8EZ.mp4
14
Page 31
15
Page 32

Installation d'autres périphériques
Le message « Arrivée d'un nouveau périphérique… » s'affiche quand un périphérique est enregistré et le
lecteur de badge émet des signaux sonores.
Finalisation de l'installation
Une fois tous les périphériques enregistrés, achevez l'installation en cliquant sur le bouton « Terminer ».
La finalisation peut prendre plusieurs minutes.
Paramètres préconfigurés de l’unité Le Sucre
- Paramètre de périphérique :
- Les détecteurs DO8M, SHK8M sont :
Temporisés
En partition partielle (fonctionne en mode total et partiel)
- Les détecteurs IRPI8M, IR8M, CAMIR-F1, DT8M, DTPI8M, FG8M sont :
Temporisés
En partition totale (fonctionne uniquement en mode total)
- Tous les détecteurs Protection vitale (CO8M, DFS8M) sont :
Immédiats
En partition 24/24
- Le détecteur DET8M est :
Immédiat
En partition 24/24
- Paramètres de CAMIR-F1 :
Images par série : 5
Temps entre les images : 300 ms
- Délais d’entrée/de sortie :
o Partition totale
Délai d’entrée : 30 s
Délai de sortie : 30 s
o Partition partielle
Délai d’entrée : 30 s
Délai de sortie : 30 s
- Paramètres de sirène du lecteur d’étiquettes :
Durée de l’alarme antieffraction : 180 s
- Durée de l’alarme fumée : 300 s
Signaux sonores d’entrée et de sortie :
Signaux sonores uniquement présents pour l’armement total, silencieux pour
l’armement partiel
16
Page 33

-Español-
Le Sucre™
Guía de instalación rápida
PASOS QUE DEBE SEGUIR OBLIGATORIAMENTE ANTES
DE INICIAR LA INSTALACIÓN ................................................... 2
Identificación del panel ...................................................................................... 2
PASO 1: Conexión de Le Sucre ......................................................................... 3
PASO 2: Creación de su cuenta en Internet ..................................................... 4
INSTALACIÓN DEL SISTEMA .................................................... 6
Registro del «lector de identificaciones» o del teclado .................................. 9
Registro de los identificadores ....................................................................... 12
Registro del contacto de puerta ...................................................................... 13
Registro del sensor de movimiento ................................................................ 14
Instalación de otros periféricos ...................................................................... 16
Finalización de la instalación .......................................................................... 16
Parámetros preconfigurados de Le Sucre .............................. 16
800-19460-C
01/2016
Page 34
PASOS QUE DEBE SEGUIR OBLIGATORIAMENTE ANTES DE INICIAR
LA INSTALACIÓN
Identificación del panel
Asegúrese de identificar el tipo de panel que tiene porque hay ligeras diferencias de instalación entre las
versiones.
Sucre GPRS (SUGPACK-EU/SUGPACK-UK)
Sucre Box (SUEPACK -E)
2
Page 35
Sucre Box+ (SUEPACK-EG)
PASO 1: Conexión de Le Sucre
Sucre GPRS
Puede encontrar un vídeo de ayuda aquí:
http://honeywell.total-connect.eu/video/lesucre.mp4
3
Page 36
Sucre Box
Puede encontrar un vídeo de ayuda aquí:
http://honeywell.total-connect-eu/video/sucrebox.mp4
Sucre Box+
Puede encontrar un vídeo de ayuda aquí:
http://honeywell.total-connect-eu/video/sucreboxplus.mp4
4
Page 37
PASO 2: Creación de su cuenta en Internet
1. Inicie sesión en el sitio web https://tc20e.total-connect.eu
2. Haga clic en “Crear un usuario” para crear su cuenta. A continuación, se le pedirá que escriba
un código de ID de 20 dígitos de longitud. Este código está impreso en una etiqueta adherida
a Le Sucre.
3. A continuación podrá elegir el nombre de usuario y la contraseña que utilizará para iniciar
sesión en el sistema. También se le pedirá que escriba una dirección de correo electrónico
de contacto válida por si olvida la contraseña.
Todos los campos con * son obligatorios.
Una vez que haya completado el formulario, lea el cuadro de la parte inferior de la cámara para aceptar
los Términos y condiciones y haga clic en “Siguiente".
Aparecerá el mensaje siguiente: «Su cuenta se ha activado correctamente». Haga clic en el botón azul
para continuar.
Se le enviará un mensaje de correo electrónico de confirmación para recordarle su nombre de inicio de
sesión y su contraseña para el sitio web.
Se le enviará un mensaje de correo electrónico de confirmación para recordarle su nombre de
inicio de sesión y su contraseña para el sitio web. También recibirá información sobre las
características específicas de su sistema. Si no ha recibido el mensaje, compruebe su carpeta
de correo basura (spam).
Ahora puede iniciar sesión en su cuenta a través de la página principal del sitio web.
5
Page 38
INSTALACIÓN DEL SISTEMA
Una vez iniciada la sesión, aparecerá el siguiente mensaje:
1. El primer paso consiste en establecer sus contactos: estas son las personas a las que se avisará
por correo electrónico o SMS cuando se produzca una alarma o un problema en sus instalaciones.
Se puede configurar hasta tres contactos. El primer contacto es habitualmente usted y es obligatorio.
El segundo y el tercer contactos son opcionales y se pueden omitir durante la instalación. Podrá
modificar estos contactos en cualquier momento después de la instalación inicial.
6
Page 39
Cuando escriba los números de teléfono de los contactos, debe utilizar el formato internacional.
Ejemplo: los números empiezan por +44 para Reino Unido o por +33 para Francia.
2. Dependiendo de su panel, quizá deba introducir un número teléfono correspondiente a la tarjeta
SIM suministrada con su sistema.
Cuando escriba el número de teléfono de la tarjeta SIM debe utilizar el formato internacional.
Después de seguir los diferentes pasos de pantalla, la conexión con Le Sucre™ se inicia.
7
Page 40
La conexión puede tardar varios minutos. Una vez establecida la conexión, verá el icono verde en la
parte superior derecha de la página: .
El sistema está ahora en el modo de instalación.
3. Espere a que el sitio web reconozca Le Sucre™ y lo muestre en la pantalla como se
ve a continuación:
8
Page 41
Ahora puede comenzar a instalar sus dispositivos y sensores:
Registro del «lector de identificaciones» o del teclado
1. Lector de identificaciones
Puede encontrar un vídeo de ayuda aquí:
http://honeywell.total-connect.eu/video/SPR-S8EZ.mp4
9
Page 42
El Lector de identificadores reproduce una serie de pitidos y, a continuación, 3 pitidos rápidos. El sitio
web muestra la detección del nuevo periférico con el mensaje en la tira superior: “Nueva entrada de
dispositivo…”
Espere a que aparezca el lector de identificadores en la sección “Sensores y perifericos”, como se
muestra a continuación:
Ajuste la ubicación y el nombre que desee darle: aquí, el nombre es “Teclado” y la ubicación
es “Entrada”.
Advertencia: para validar el campo de nombre, debe hacer clic en otro punto de la pantalla con el ratón.
El lector de identificadores está ahora guardado y registrado en el sistema.
10
Page 43
2. Teclado
Puede encontrar un vídeo de ayuda aquí:
http://honeywell.total-connect.eu/video/GKP-S8M.mp4
El teclado emite un conjunto de pitidos. El sitio web muestra la detección del nuevo periférico con el
mensaje en la tira superior: “Nueva entrada de dispositivo…”
Espere a que aparezca el teclado en la sección “Sensores y perifericos”, como se muestra a
continuación:
11
Page 44
Establezca la ubicación y el nombre que desea asignarle: en este caso el nombre es “Teclado” y la
ubicación “Entrada”.
Advertencia: Para validar el campo de nombre, debe hacer clic con el ratón en otro punto de la pantalla.
El lector de identificaciones está guardado y registrado en su sistema.
Por favor vea el manual del teclado para co0nfigurar códigos, no olvide Cambiar el usuario
1 de fabrica 1234
Registro de los identificadores
Para registrar el primer identificador, preséntelo frente al centro del lector de identificadores o el teclado
hasta que oiga un pitido. El identificador aparece en la sección “llaves via radio y TAG”.
12
Page 45
Ahora puede ajustar el nombre del propietario en el campo que está junto al número de serie del
identificador. Registre el siguiente identificador de la misma manera.
Aquí, se han registrado los identificadores de “John” y “Sandy”.
Los identificadores están ahora guardados y registrados en el sistema.
Registro del contacto de puerta
Puede encontrar un vídeo de ayuda aquí:
http://honeywell.total-connect.eu/video/DO8EZ.mp4
13
Page 46
Registro del sensor de movimiento
Puede encontrar un vídeo de ayuda aquí:
http://honeywell.total-connect.eu/video/IRPI8EZ.mp4
14
Page 47
15
Page 48

Instalación de otros periféricos
Para cada dispositivo que se registre verá el mensaje “Nueva entrada de dispositivo…” en la parte
superior y oirá los pitidos del lector de identificadores.
Finalización de la instalación
Una vez registrados todos los periféricos, finalice la instalación haciendo clic en el botón “Terminar”.
La finalización puede tardar varios minutos.
Parámetros preconfigurados de Le Sucre
- Parámetro de periférico:
- Detectores DO8M, SHK8M:
Retardado
En partición parcial (funcionando en modo total y parcial)
- Detectores IRPI8M, IR8M, CAMIR-F1, DT8M, DTPI8M, FG8M:
Retardado
En partición total (funcionando solo en modo total)
- Todos los detectores de prevención de accidentes (CO8M, DFS8M):
Inmediato
En partición 24/24
- Detector DET8M:
Inmediato
En partición 24/24
- Parámetros de CAMIR-F1:
Imágenes por juego: 5
Tiempo entre imágenes: 300 ms
- Retardos de entrada/salida:
o Partición total
Retardo de entrada: 30 s
Retardo de salida: 30 s
o Partición parcial
Retardo de entrada: 30 s
Retardo de salida: 30 s
- Parámetros de sirena de lector de etiquetas:
Duración de la alarma de intrusión: 180 s
- Duración de la alarma de humos: 300 s
Pitidos de entrada y salida:
Pitidos solo para armado total, silencio para armado parcial
16
Page 49

-Português-
Le Sucre™
Guia de instalação rápida
PASSOS OBRIGATÓRIOS A SEGUIR ANTES DE INICIAR A
INSTALAÇÃO ............................................................................... 2
Identificação do Painel ....................................................................................... 2
PASSO 1: ligar Le Sucre .................................................................................... 3
PASSO 2: criar a sua conta na Internet ............................................................ 5
INSTALAR O SISTEMA ............................................................... 6
Registar o «leitor de distintivos» ou o teclado ................................................ 9
Registar os distintivos ..................................................................................... 13
Registar o contacto da porta ........................................................................... 14
Registering the motion sensor ........................................................................ 15
Instalar outros periféricos ............................................................................... 17
Finalizar a instalação ....................................................................................... 17
Parâmetros pré-configurados do Le Sucre ............................ 17
800-19460-C
10/2015
Page 50
PASSOS OBRIGATÓRIOS A SEGUIR ANTES DE INICIAR A
INSTALAÇÃO
Identificação do Painel
Por favor, certifique-se de que identifica o painel que tem uma vez que existem algumas diferenças no
processo de instalação de uma versão para a outra.
Sucre GPRS (SUGPACK-EU/SUGPACK UK)
Sucre Box (SUEPACK -E)
2
Page 51
Sucre GPRS
Um video de ajuda pode ser encontrado aqui:
http://honeywell.total-connect.eu/video/lesucre.mp4
Sucre Box+ (SUEPACK-EG)
PASSO 1: ligar Le Sucre
3
Page 52
Sucre Box
A help video can be found here:
http://honeywell.total-connect-eu/video/sucrebox.mp4
Sucre Box+
A help video can be found here:
http://honeywell.total-connect-eu/video/sucreboxplus.mp4
4
Page 53
PASSO 2: criar a sua conta na Internet
1. Inicie sessão no site Web https://tc20e.total-connect.eu
2. Clique em “Criar utilizador” para criar a sua conta. Ser-lhe-á solicitada a introdução de com
código de ID com 20 dígitos. Este código está impresso num autocolante no Le Sucre.
3. Em seguida, poderá escolher o seu nome de utilizador e a palavra-passe utilizados para iniciar
sessão no sistema. Ser-lhe-á solicitada a introdução de um e-mail válido para ser contactado
no caso de um problema ou palavra-passe esquecida.
Todos os campos com * são obrigatórios.
Assim que tiver preenchido o formulário, verifique a caixa na parte inferior da página para concordar com
os termos e condições e clique em “Seguinte”.
É apresentada a seguinte mensagem: “A Sua conta foi ativada com sucesso”. Clique no botão azul para
continuar.
Ser-lhe-á enviado um e-mail de confirmação para lembrar o início de sessão e a palavra-passe para o
site Web. Alguma informação relacionada com as especificidades do seu sistema serão também
fornecidas. Se não tiver recebido o email, por favor, verifique também no diretório de Spam.
Agora pode iniciar sessão na conta através da página principal do site Web.
5
Page 54
INSTALAR O SISTEMA
Depois de iniciar sessão, a seguinte mensagem é apresentada:
1. O primeiro passo é configurar os seus contactos: estas são as pessoas que serão notificadas por
e-mail quando um alarme ou um problema ocorrer nas suas instalações.
É possível configurar até três contactos. Normalmente o primeiro contacto é você e é obrigatório.
O segundo e terceiro contactos são opcionais e podem ser ignorados durante a instalação. Será
capaz de modificar estes contactos a qualquer momento depois da instalação inicial.
6
Page 55
Tem de utilizar o formato internacional ao introduzir os números de telefone dos contactos.
Exemplo: um número a começar com +44 para o Reino Unido ou +33 para França.
2. Dependendo do seu painel, pode ter de introduzir um número de telefone que corresponda ao
cartão SIM fornecido com o seu sistema.
Tem de utilizar o formato internacional ao introduzir os números de telefone dos contactos.
Depois de seguir estes diferentes passos no ecrã, a ligação com Le SucreTM começa
7
Page 56
A ligação pode demorar vários minutos. Assim que a ligação for estabelecida, verá o ícone verde no
canto superior direito da página: .
O sistema está agora no modo de instalação
3. Aguarde que o Le Sucre™ seja reconhecido pelo site Web e apresentado no ecrã como
mostrado abaixo:
8
Page 57
Agora pode começar a instalar dispositivos e sensores:
Registar o «leitor de distintivos» ou o teclado
1. Leitor de dispositivos
Um video de ajuda pode ser encontrado aqui:
http://honeywell.total-connect.eu/video/SPR-S8EZ.mp4
9
Page 58
O leitor de distintivos reproduz diversos bipes e, em seguida, três bipes rápidos. O site Web mostra a
deteção do novo periférico com a mensagem na faixa superior: “Novo dispositivo recebido...”
Aguarde que o leitor de distintivos apareça na secção “Sensores e periféricos” como mostrado abaixo:
Defina a localização e o nome que lhe pretende atribuir: aqui o nome é “Teclado” e a localização é
“Entrada”.
Aviso: para validar o campo de nome tem de clicar em qualquer lugar no ecrã com o rato.
O leitor de distintivos é agora guardado e registado no seu sistema.
10
Page 59
2. Teclado
Um vídeo de ajuda pode ser encontrado aqui:
http://honeywell.total-connect.eu/video/GKP-S8M.mp4
O teclado emite uma série de bipes. O site Web mostra a deteção do novo periférico com a mensagem
na faixa superior: “Novo dispositivo recebido...”
Aguarde que o teclado apareça na secção “Sensores e periféricos” como exibido abaixo:
11
Page 60
Defina a localização e o nome que lhe pretende atribuir: aqui o nome é “Teclado” e a localização é
“Entrada”.
Aviso: para validar o campo de nome tem de clicar em qualquer lugar no ecrã com o rato.
O leitor de distintivos é agora guardado e registado no seu sistema.
Please refer to the keypad manual to set up user codes. By default, user 1 has the code
1234. Don’t forget to change it at installation!
12
Page 61

Registar os distintivos
Para registar o primeiro distintivo, apresente-o no centro frontal do leitor de distintivos ou teclado até
ouvir um bipe. O distintivo aparece na secção “Keyfobs e distintivos”.
13
Page 62
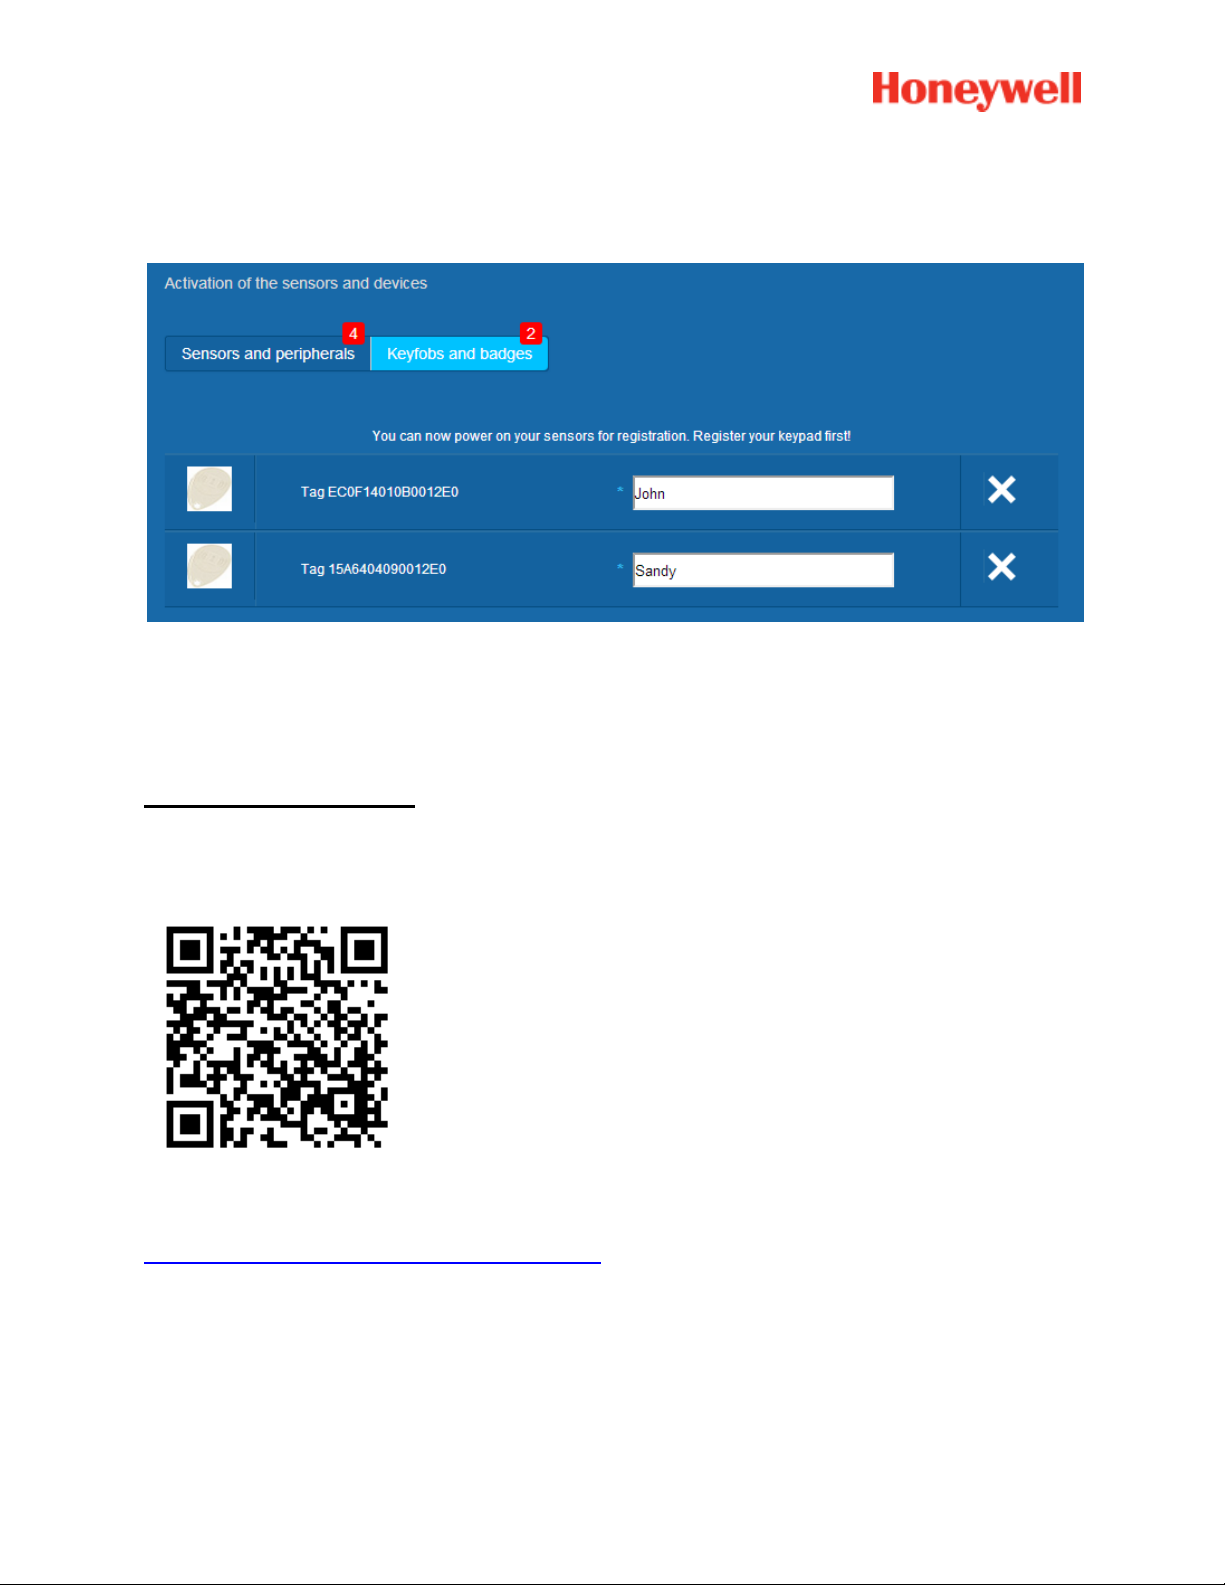
Agora pode definir o nome do proprietário do campo junto do número de série do distintivo. Registe o
próximo distintivo da mesma forma.
Aqui foram registados os distintivos de “John” e “Sandy”.
Os distintivos estão agora guardados e registados no seu sistema.
Registar o contacto da porta
Um vídeo de ajuda pode ser encontrado aqui:
http://honeywell.total-connect.eu/video/DO8EZ.mp4
14
Page 63
Registering the motion sensor
Um vídeo de ajuda pode ser encontrado aqui:
http://honeywell.total-connect.eu/video/IRPI8EZ.mp4
15
Page 64
16
Page 65

Instalar outros periféricos
Para cada dispositivo a ser registado receberá a mensagem “Novo dispositivo recebido...” e ouvirá três
bipes do leitor de distintivos.
Finalizar a instalação
Assim que todos os periféricos forem registado, termine a instalação ao clicar no botão “Concluir”.
A finalização pode demorar vários minutos.
Parâmetros pré-configurados do Le Sucre
- Parâmetro do periférico:
- Os detetores DO8M e SHK8M estão:
Atrasados
Em partição parcial (a funcionar no modo total e parcial)
- Os detetores IRPI8M, IR8M, CAMIR-F1, DT8M, DTPI8M e FG8M:
Atrasados
Em partição total (a funcionar apenas no modo total)
- Todos os detetores de segurança de vida (CO8M, DFS8M) são:
Imediatos
Em partição 24/24
- O detetor DET8M é:
Imediato
Em partição 24/24
- Parâmetros CAMIR-F1:
Imagens por conjunto: 5
Tempo entre imagens: 300 ms
- Atrasos de entrada/saída:
o Partição total
Atraso de entrada: 30 s
Atraso de saída: 30 s
o Partição parcial
Atraso de entrada: 30 s
Atraso de saída: 30 s
- Parâmetros da sirene do leitor de etiquetas:
Duração do alarme de intrusão: 180 s
- Duração do alarme de fumo: 300 s
Bipes de entrada e saída:
Bipes apenas apresentados para ativação total, silencioso para ativação parcial
17
Page 66

-Italiano-
Le Sucre™
Guida rapida all'installazione
PROCEDURA OBBLIGATORIA DA SEGUIRE PRIMA DI
INIZIARE L'INSTALLAZIONE ...................................................... 2
Identificazione della centrale ............................................................................. 2
PASSO 1: Connessione a Le Sucre .................................................................. 3
PASSO 2: Creazione di un account Internet .................................................... 5
INSTALLAZIONE DEL SISTEMA ................................................ 6
Registrazione del “lettore di badge” o del tastierino ...................................... 9
Registrazione dei badge .................................................................................. 12
Registrazione del contatto porta ..................................................................... 13
Registrazione del sensore di movimento ....................................................... 14
Installazione di altre periferiche ...................................................................... 16
Completamento dell'installazione ................................................................... 16
Parametri pre-configurati di Le Sucre ..................................... 16
800-19460-C
01/2016
Page 67
PROCEDURA OBBLIGATORIA DA SEGUIRE PRIMA DI INIZIARE
L'INSTALLAZIONE
Identificazione della centrale
Assicurarsi di aver identificato il tipo di centrale di cui si dispone in quanto possono sussistere leggere
differenze nella procedura di installazione tra una versione e l’altra.
Sucre GPRS (SUGPACK-EU/SUGPACK-UK)
Sucre Box (SUEPACK -E)
2
Page 68
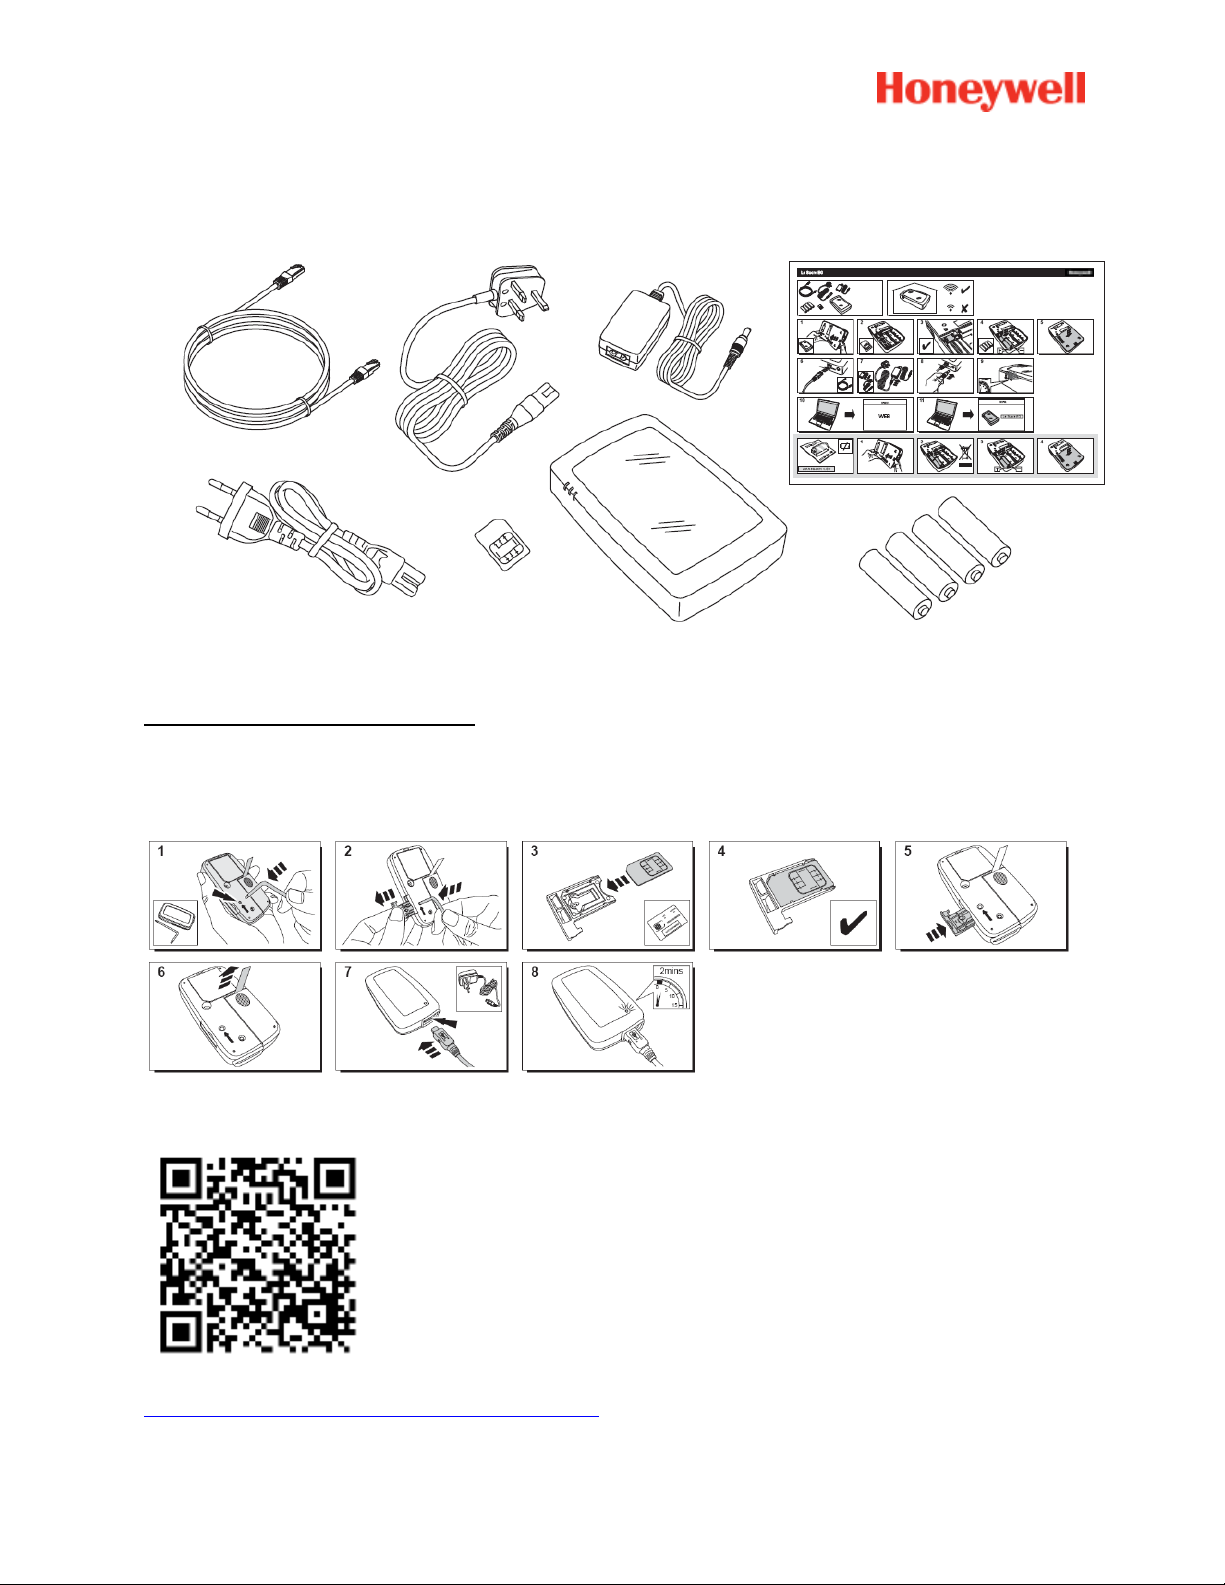
Sucre Box+ (SUEPACK-EG)
PASSO 1: Connessione a Le Sucre
Sucre GPRS
Un video di aiuto è disponibile al seguente indirizzo:
http://honeywell.total-connect.eu/video/lesucre.mp4
3
Page 69
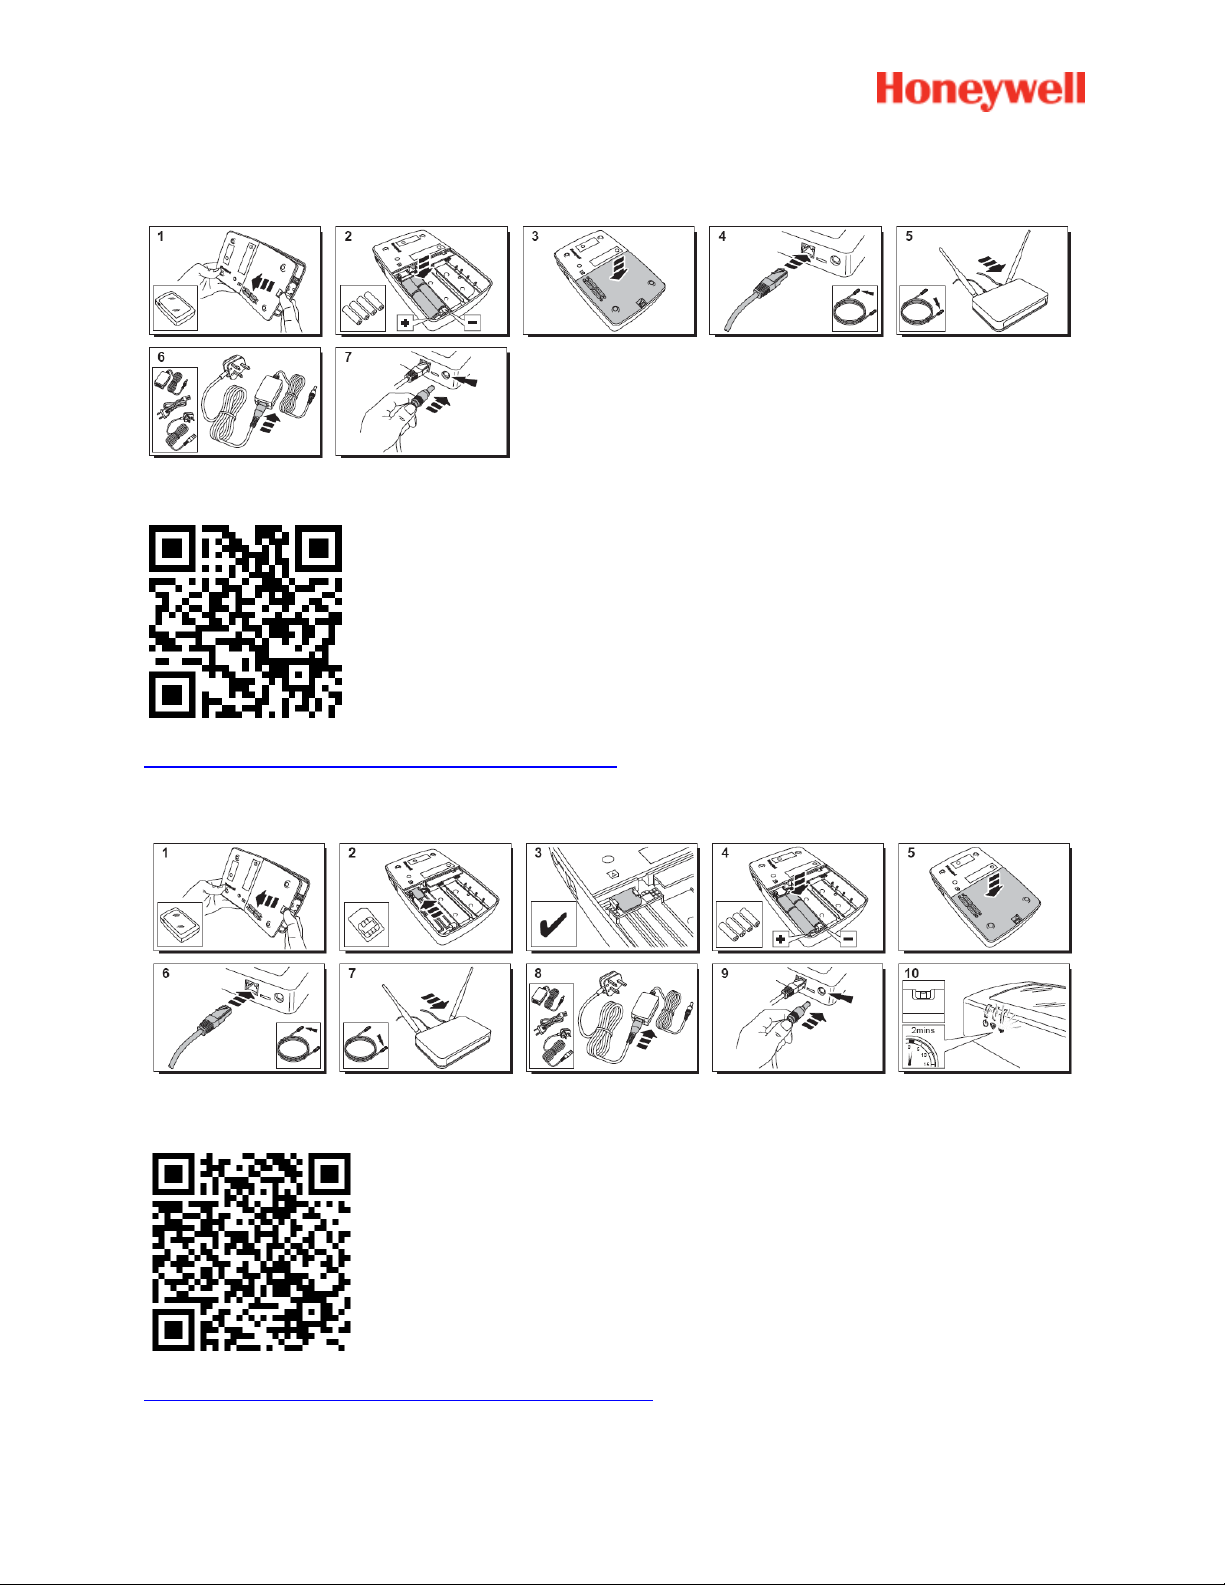
Sucre Box
Un video di aiuto è disponibile al seguente indirizzo:
http://honeywell.total-connect-eu/video/sucrebox.mp4
Sucre Box+
Un video di aiuto è disponibile al seguente indirizzo:
http://honeywell.total-connect-eu/video/sucreboxplus.mp4
4
Page 70
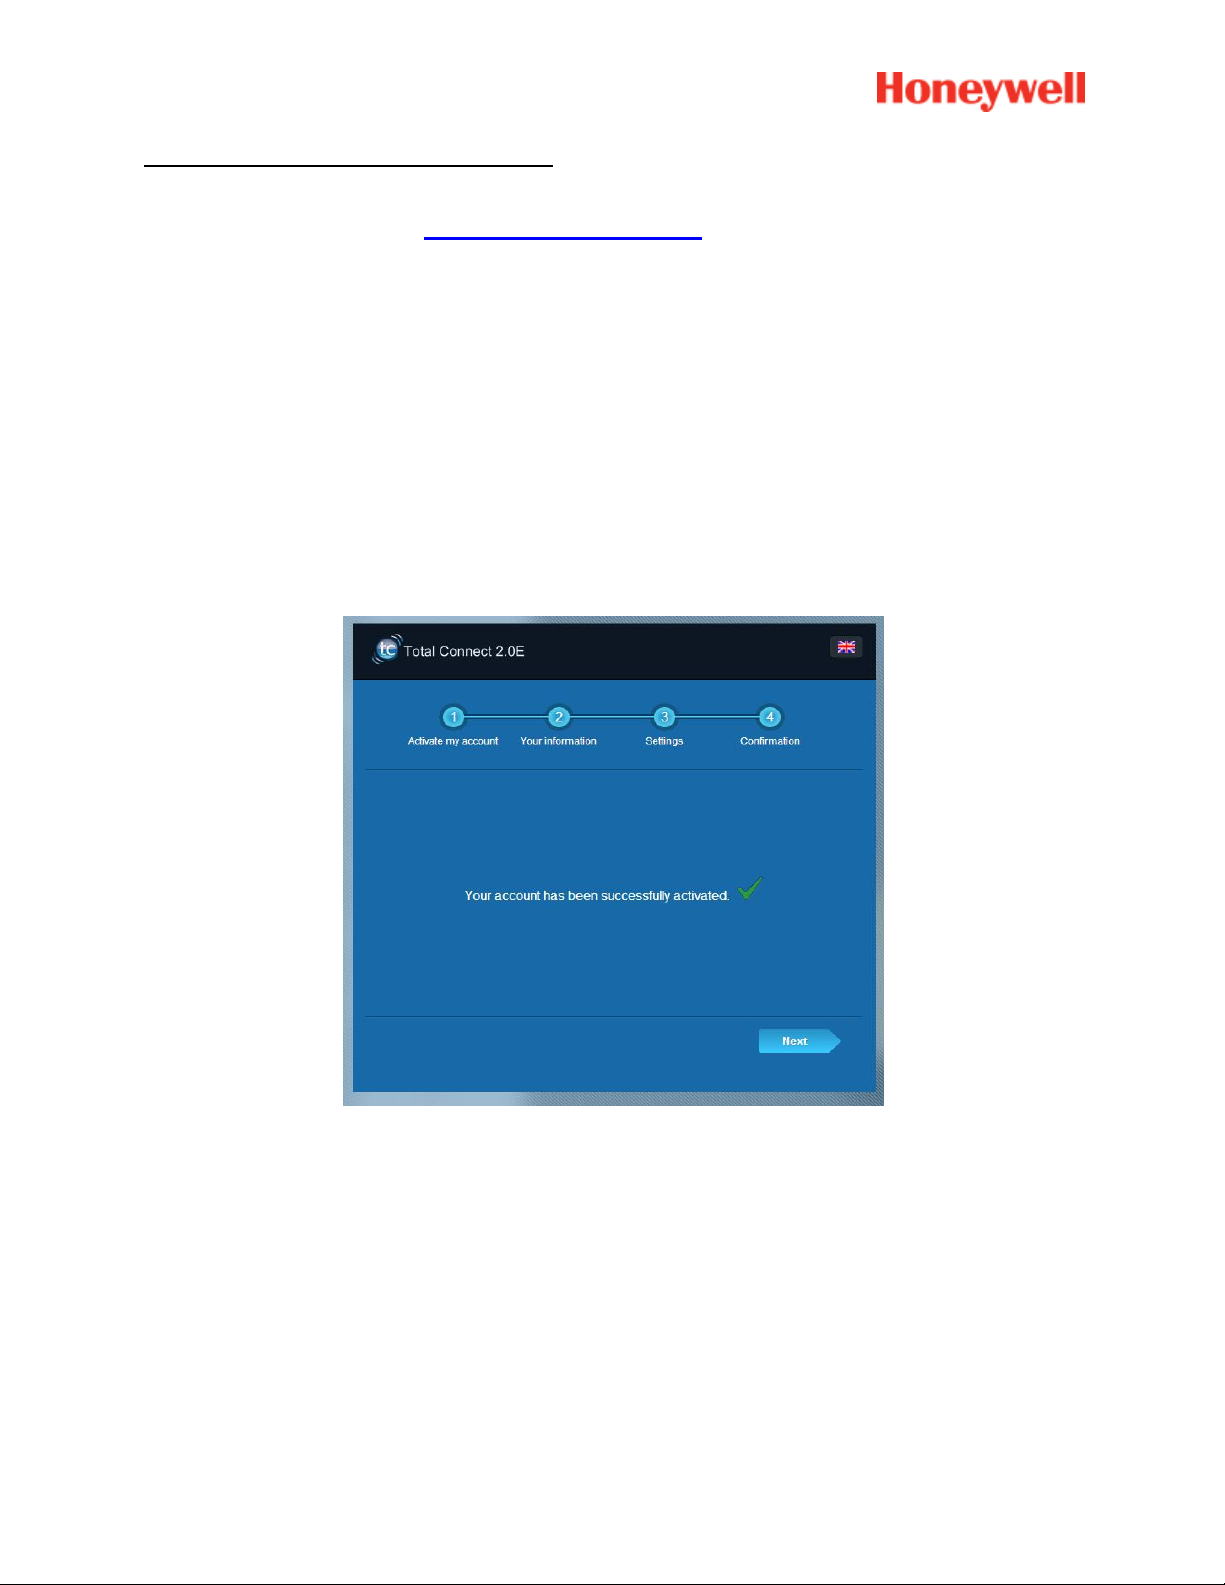
PASSO 2: Creazione di un account Internet
1. Accedere al sito web https://tc20e.total-connect.eu
2. Fare clic su “Crea utente” per creare un account. Viene richiesto di immettere un codice ID di
20 cifre. Il codice è stampato su un adesivo applicato a Le Sucre.
3. Sarà quindi possibile scegliere il proprio nome utente e password per accedere al sistema.
Viene inoltre richiesto di immettere un indirizzo email valido da contattare in caso di problemi
o se si dimentica la password.
Tutti i campi contrassegnati dal segno * sono obbligatori.
Una volta completato il modulo, selezionare la casella nella parte inferiore della pagina per accettare i
termini e condizioni e fare clic su “Avanti”.
Viene visualizzato il seguente messaggio: “Il tuo account è stato attivato con successo”. Fare clic sul
pulsante blu per continuare.
Si riceverà un'e-mail di conferma che ricorda nome utente e password per accedere al sito Web.
Verranno inoltre fornite informazioni riguardanti le specifiche del sistema. Nel caso in cui l’e-mail
non sia stata ricevuta, verificare la cartella Spam.
È ora possibile accedere all'account dalla pagina principale del sito Web.
5
Page 71
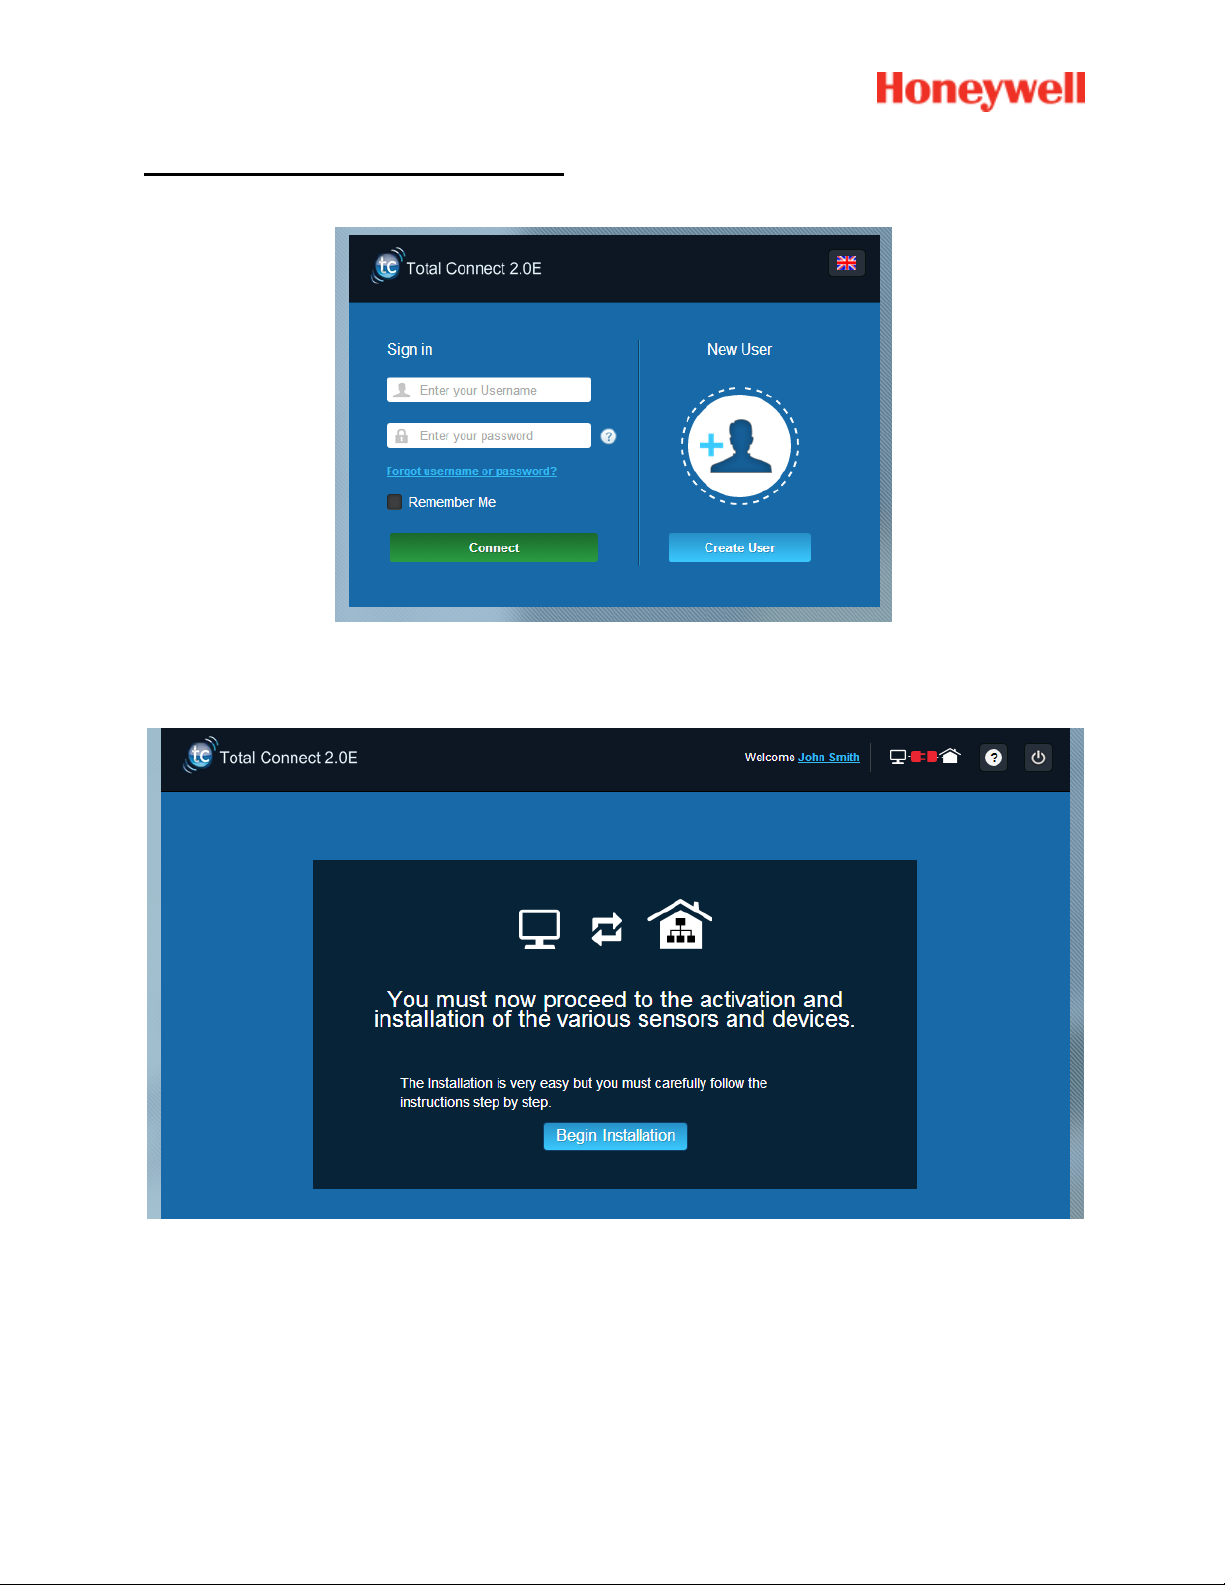
INSTALLAZIONE DEL SISTEMA
Una volta eseguito l'accesso, viene visualizzato il seguente messaggio:
1. Il primo passo è impostare i contatti, ovvero le persone che riceveranno una notifica via e-mail o
SMS quando si verifica un allarme o un problema nell'abitazione.
È possibile impostare fino a tre contatti. Il primo contatto è in genere chi utilizza il sistema ed è
obbligatorio. Il secondo e terzo contatto sono opzionali ed è possibile ignorarli durante
l'installazione. Sarà possibile modificare questi contatti in qualsiasi momento dopo l’installazione
iniziale.
6
Page 72
Utilizzare il formato internazionale per immettere i numeri di telefono dei contatti. Ad esempio:
+44 per i numeri di telefono del Regno Unito o +33 per la Francia.
2. In base al tipo di centrale, è possibile dover impostare un numero di telefono corrispondente alla
scheda SIM fornita con il sistema
Utilizzare il formato internazionale per immettere il numero di telefono della scheda SIM.
Dopo avere seguito le varie fasi sulla schermata, verrà avviata la connessione a Le Sucre™
7
Page 73
La connessione può richiedere diversi minuti. Una volta stabilita la connessione, viene visualizzata l'icona
verde nella parte superiore a destra della pagina: .
Il sistema è ora in modalità di installazione
3. Attendere che Le Sucre™ sia riconosciuto dal sito Web e visualizzato a schermo come
mostrato di seguito:
8
Page 74
È ora possibile avviare l'installazione di dispositivi e sensori:
1. Lettore di badge
Un video di aiuto è disponibile al seguente indirizzo:
http://honeywell.total-connect.eu/video/SPR-S8EZ.mp4
Registrazione del “lettore di badge” o del tastierino
9
Page 75
Il lettore di badge emette una serie di bip e 3 bip veloci. Il sito mostra il rilevamento della nuova periferica
con il messaggio “Nuovo Dispositivo in arrivo…” nella striscia superiore.
Attendere che il lettore di badge appaia nella sezione “Sensori e periferiche” come indicato di seguito:
Impostare la posizione e specificare il nome: qui il nome è “Keypad” e la posizione è “Entrance”.
Avvertenza: per convalidare il campo del nome è necessario fare clic con il mouse su un punto
della schermata.
Il lettore di badge è ora salvato e registrato nel sistema.
10
Page 76
2. Tastierino
Un video di aiuto è disponibile al seguente indirizzo:
http://honeywell.total-connect.eu/video/GKP-S8M.mp4
Il tastierino emette una serie di bip. Il sito mostra il rilevamento della nuova periferica con il messaggio
“Nuovo dispositivo in arrivo…” nella striscia superiore.
Attendere che il tastierino appaia nella sezione “Sensori e periferiche” come indicato di seguito:
11
Page 77
Impostare la posizione e specificare il nome: qui il nome è “Keypad” e la posizione è “Entrance”.
Avvertenza: per convalidare il campo del nome è necessario fare clic con il mouse su un punto
della schermata.
Il lettore di badge è ora salvato e registrato nel sistema.
Fare riferimento al manual della tastiera per inserire I codici utenti. A default, l’utente 1 ha il
codice 1234. Ricordarsi di modificarlo durante l’installazione!
Registrazione dei badge
Per registrare il primo badge, mostrarlo alla parte anteriore centrale del lettore di badge o tastierino fino a
quando viene emesso un bip. Il badge appare nella sezione relativa ai telecomandi e badge.
12
Page 78
È ora possibile impostare il nome del proprietario nel campo accanto al numero di serie del badge.
Registrare il badge successivo allo stesso modo.
Nell'esempio in figura sono stati registrati i badge di “John” e “Sandy”.
I badge sono ora salvati e registrati nel sistema.
Registrazione del contatto porta
Un video di aiuto è disponibile al seguente indirizzo:
http://honeywell.total-connect.eu/video/DO8EZ.mp4
13
Page 79
Registrazione del sensore di movimento
Un video di aiuto è disponibile al seguente indirizzo:
http://honeywell.total-connect.eu/video/IRPI8EZ.mp4
14
Page 80
15
Page 81

Installazione di altre periferiche
Per ogni dispositivo registrato viene visualizzato il messaggio in alto “Nuovo dispositivo in arrivo…” e il
lettore di badge emetterà i bip.
Completamento dell'installazione
Una volta registrate tutte le periferiche, per completare l'installazione fare clic sul pulsante “Fine”.
Il completamento può richiedere diversi minuti.
Parametri pre-configurati di Le Sucre
- Parametro periferica:
- I rilevatori DO8M, SHK8M sono:
Ritardati
In partizione parziale (in modalità totale e parziale)
- I rilevatori IRPI8M, IR8M, CAMIR-F1, DT8M, DTPI8M, FG8M sono:
Ritardati
In partizione totale (solamente in modalità totale)
- Tutti i rilevatori di sicurezza personale (CO8M, DFS8M) sono:
Immediati
In partizione 24/24
- Il rilevatore DET8M è:
Immediato
In partizione 24/24
- Parametri CAMIR-F1:
Immagini per gruppo: 5
Tempo tra immagini: 300 ms
- Ritardi di ingresso/uscita:
o Partizione totale
Ritardo di ingresso: 30 s
Ritardo di uscita: 30 s
o Partizione parziale
Ritardo di ingresso: 30 s
Ritardo di uscita: 30 s
- Parametri sirena del lettore TAG:
Durata allarme intrusione: 180 s
- Durata allarme di rilevamento fumo: 300 s
Bip di ingresso e uscita:
Bip presenti solamente per l’inserimento totale, silenziosi per l’inserimento
parziale
16
Page 82

-Nederlands-
Le Sucre™
Snelle installatiegids
VERPLICHT UIT TE VOEREN STAPPEN VOOR
INSTALLATIE ............................................................................... 2
Identificatie van het paneel ................................................................................ 2
STAP 1: Le Sucre aansluiten ............................................................................. 3
STAP 2: Uw account aanmaken op internet ..................................................... 4
UW SYSTEEM INSTALLEREN .................................................... 6
De « Badgelezer » of het toetsenblok registreren ........................................... 9
De badges registreren ...................................................................................... 12
Het deurcontact registreren ........................................................................... 13
De bewegingssensor registreren .................................................................. 14
Andere randapparatuur installeren ................................................................. 16
De installatie afronden ..................................................................................... 16
Vooraf geconfigureerde instellingen Le Sucre ...................... 16
800-19460-C
01/2016
Page 83
VERPLICHT UIT TE VOEREN STAPPEN VOOR INSTALLATIE
Identificatie van het paneel
Controleer welk type paneel u hebt omdat er per versie enige kleine verschillen in het installatieproces
zijn.
Sucre GPRS (SUGPACK-EU/SUGPACK-UK)
Sucre Box (SUEPACK -E)
2
Page 84
Sucre Box+ (SUEPACK-EG)
STAP 1: Le Sucre aansluiten
Sucre GPRS
Een hulpvideo vindt u hier:
http://honeywell.total-connect.eu/video/lesucre.mp4
3
Page 85
Sucre Box
Een hulpvideo vindt u hier:
http://honeywell.total-connect-eu/video/sucrebox.mp4
Sucre Box+
Een hulpvideo vindt u hier:
http://honeywell.total-connect-eu/video/sucreboxplus.mp4
4
Page 86
STAP 2: Uw account aanmaken op internet
1. Meld u aan op de website https://tc20e.total-connect.eu
2. Klik op “Gebruiker aanmaken” om uw account aan te maken. Vervolgens moet u een ID-code
van 20 cijfers invoeren. Deze code staat op een sticker op Le Sucre.
3. U kunt dan uw gebruikersnaam en wachtwoord kiezen voor gebruik bij het aanmelden. U wordt
ook verzocht een geldig e-mailadres in te voeren waarmee contact kan worden opgenomen bij
een probleem of wanneer u het wachtwoord bent vergeten.
Alle velden met * zijn verplicht.
Als u het formulier ingevuld hebt, vink dan het veld onderin de pagina aan om akkoord te gaan met de
Voorwaarden en klik op 'Volgende'.
De volgende melding wordt weergegeven: « Uw account is geactiveerd ». Klik op de blauwe knop om
door te gaan.
Er wordt een bevestigingse-mail naar u verzonden met uw aanmeldnaam en wachtwoord voor de
website. Ook wordt enige informatie over uw specifieke systeem verstrekt. Als u de e-mail niet
hebt ontvangen, controleert u de map Ongewenste Mail.
U kunt zich nu aanmelden bij uw account via de startpagina van de website.
5
Page 87
UW SYSTEEM INSTALLEREN
Na het aanmelden wordt de volgende melding weergegeven:
1. De eerste stap is het instellen van uw contacten: dit zijn mensen die een e-mail of een SMS-
bericht ontvangen wanneer er een alarm afgaat of een probleem optreedt op uw locatie.
U kunt maximaal drie contacten invullen. De eerste contactpersoon bent u meestal zelf en deze is
verplicht. Het tweede en derde contact zijn optioneel en kunnen tijdens de installatie
overgeslagen worden. Na de initiële installatie, kunt u deze contacten op elk gewenst moment
wijzigen.
6
Page 88
U moet de telefoonnummers van de contacten in de internationale indeling invoeren.
Bijvoorbeeld: een telefoonnummer in Nederland begint met +31 en een telefoonnummer in België begint
met +32
2. Afhankelijk van uw paneel, moet u een telefoonnummer instellen dat correspondeert met de bij
uw systeem geleverde SIM-kaart
U moet het SIM-kaartelefoonnummer in de internationale indeling invoeren.
Nadat u de verschillende stappen op het scherm hebt uitgevoerd, begint het verbinden met Le Sucre™
7
Page 89
De aansluiting kan enkele minuten duren. Als er verbinding is, ziet u het groene pictogram rechts bovenin
de pagina: .
Het systeem staat nu in installatiemodus
3. Wacht tot Le Sucre™ herkend wordt door de website en op het scherm wordt weergegeven als
hieronder te zien is:
8
Page 90
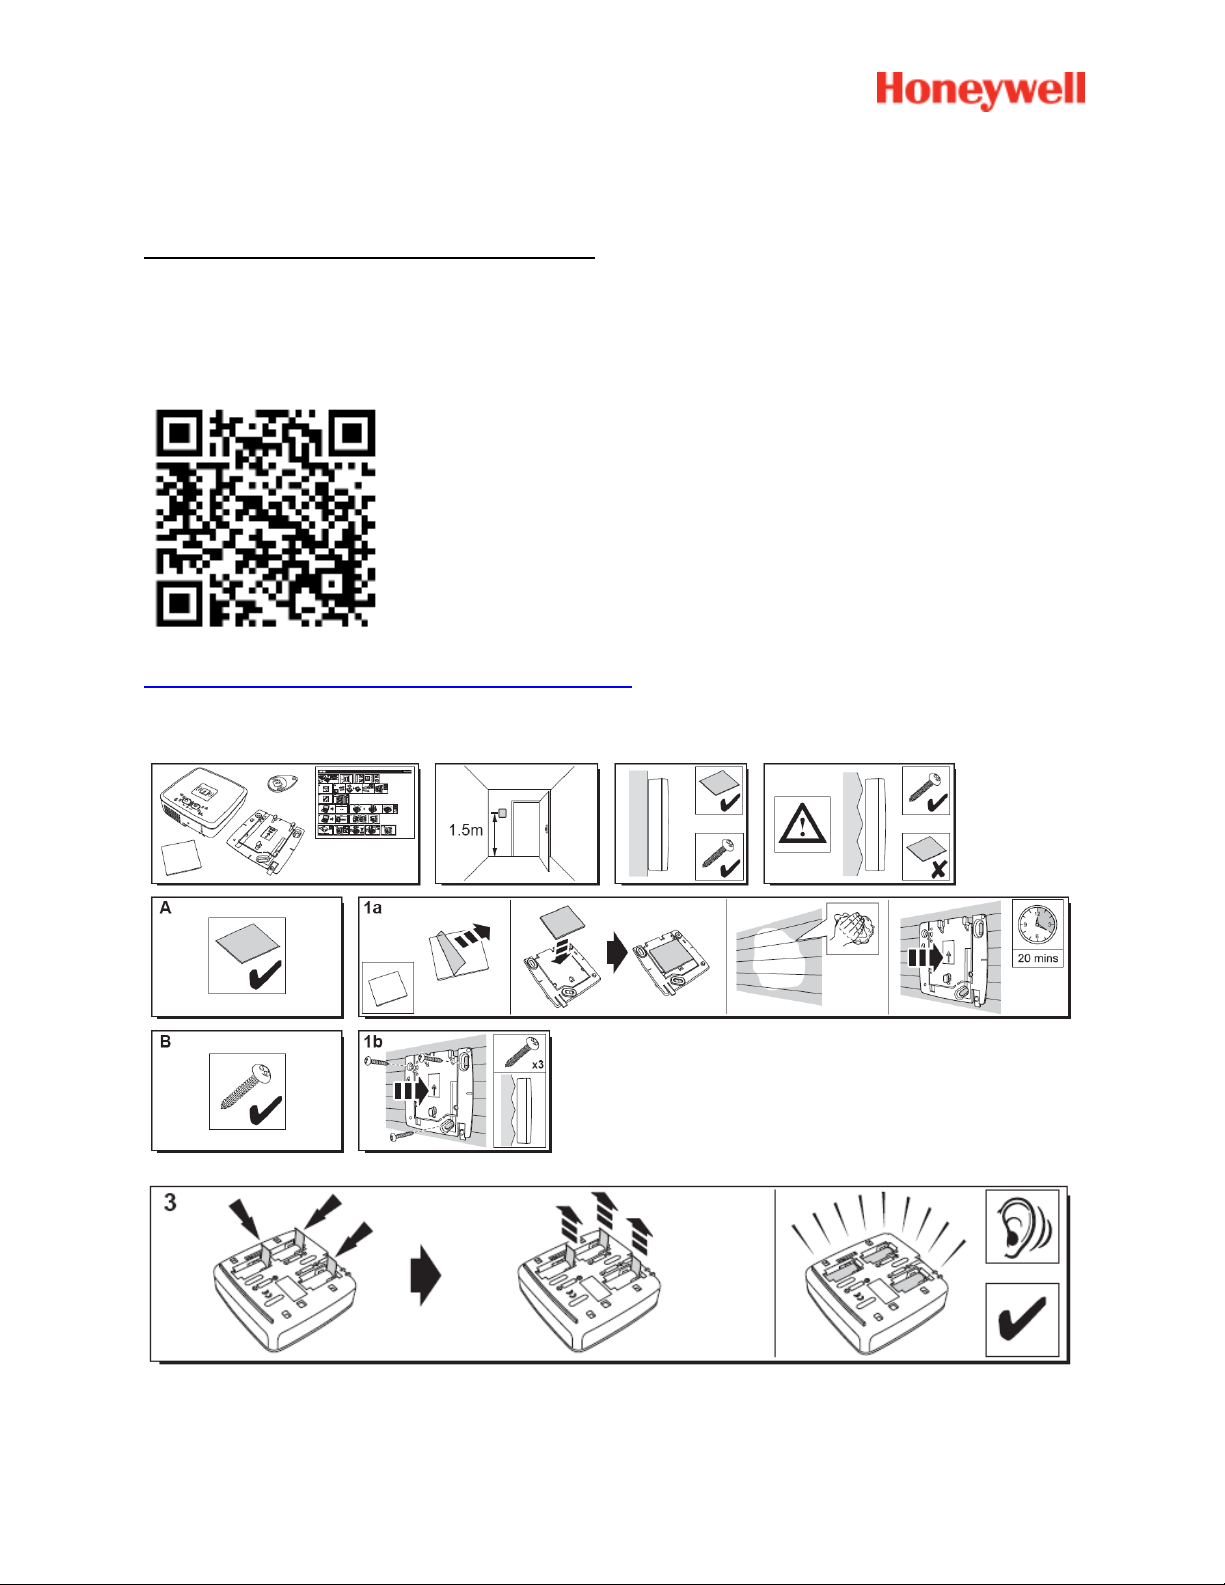
U kunt nu beginnen met de installatie van uw apparaten en sensors:
De « Badgelezer » of het bediendeel registreren
1. Badge-lezer
Een hulpvideo vindt u hier:
http://honeywell.total-connect.eu/video/SPR-S8EZ.mp4
9
Page 91
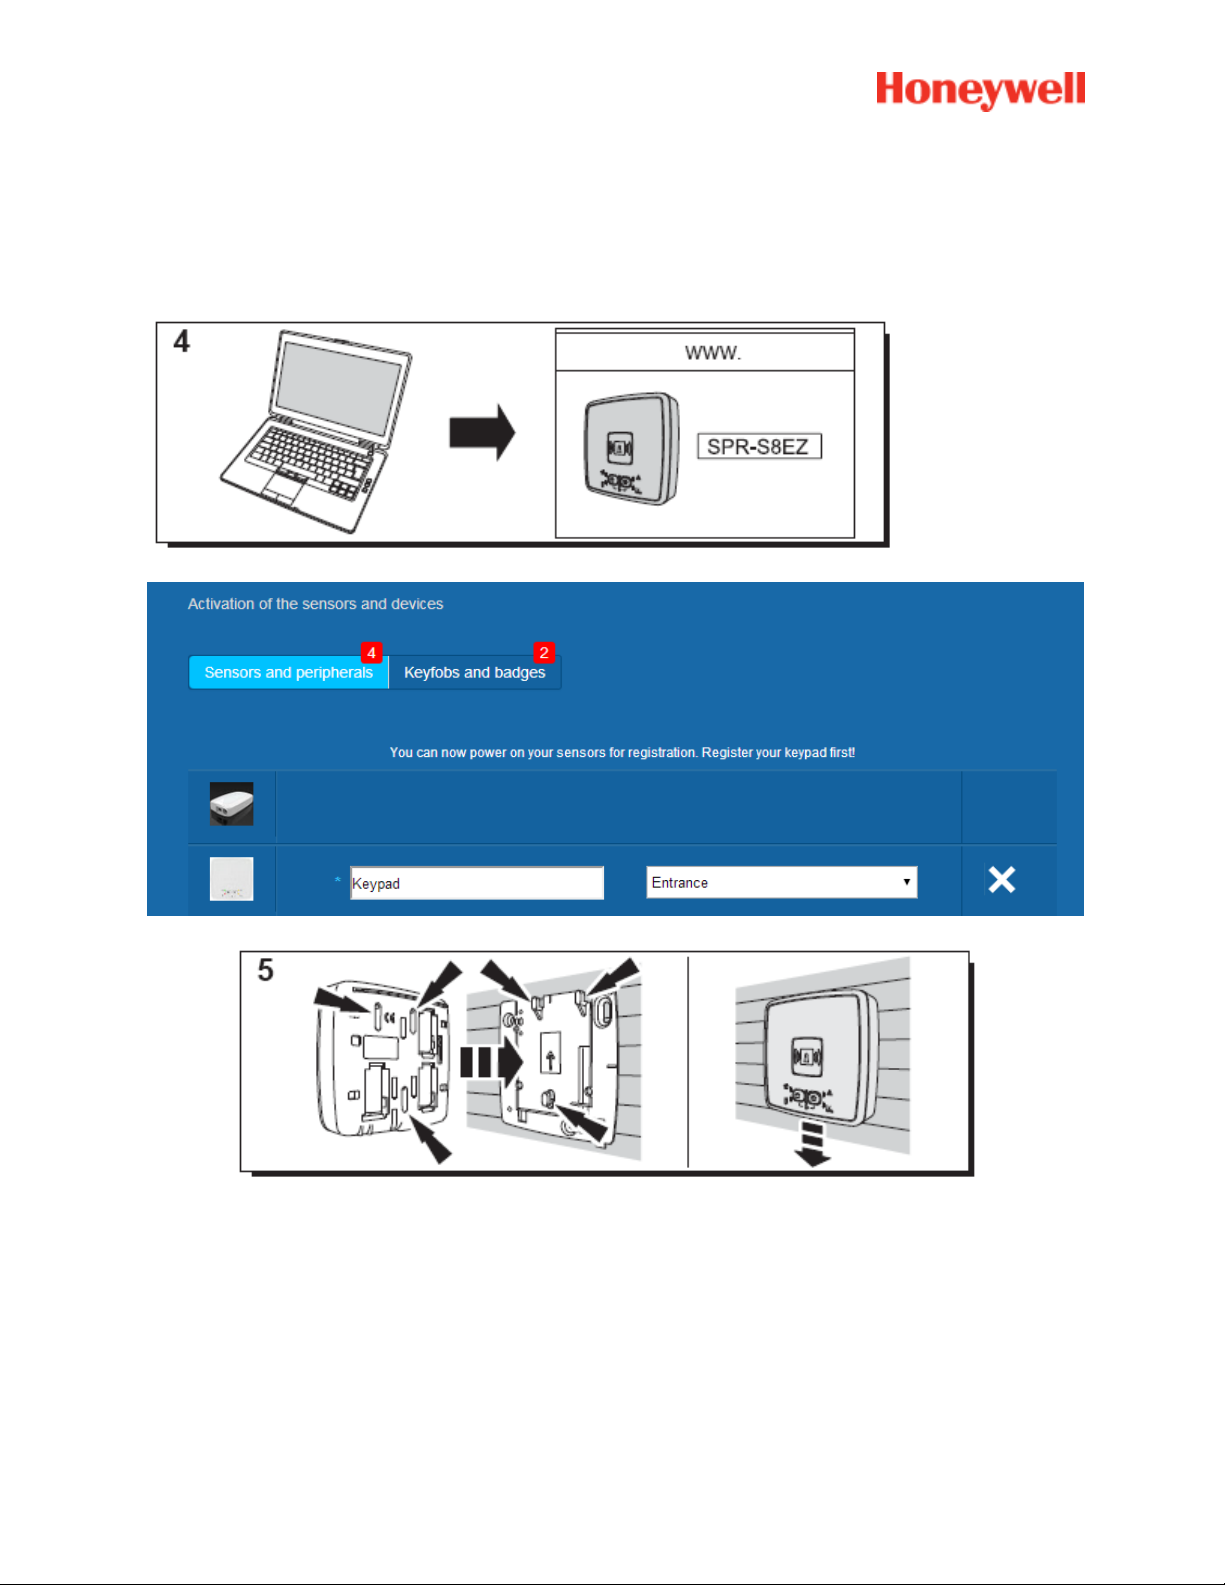
De badge-lezer speelt een serie piepjes af gevolgd door 3 snelle pieptonen. Op de website wordt de
detectie van het nieuwe apparaat weergegeven met het volgende bericht in de bovenste balk: “Nieuw
apparaat aansluiten…”
Wacht tot de badge-lezer in de sectie “Sensors en randapparatuur” wordt weergegeven, zoals hieronder
te zien is:
Stel de locatie in en de naam die u daaraan wilt geven: hier is de naam “Bediendeel” en de locatie is
“Ingang”.
Waarschuwing: om het naamveld te controleren, moet u met de muis elders op het scherm
klikken.
De badge-lezer is nu opgeslagen en in uw systeem geregistreerd.
10
Page 92
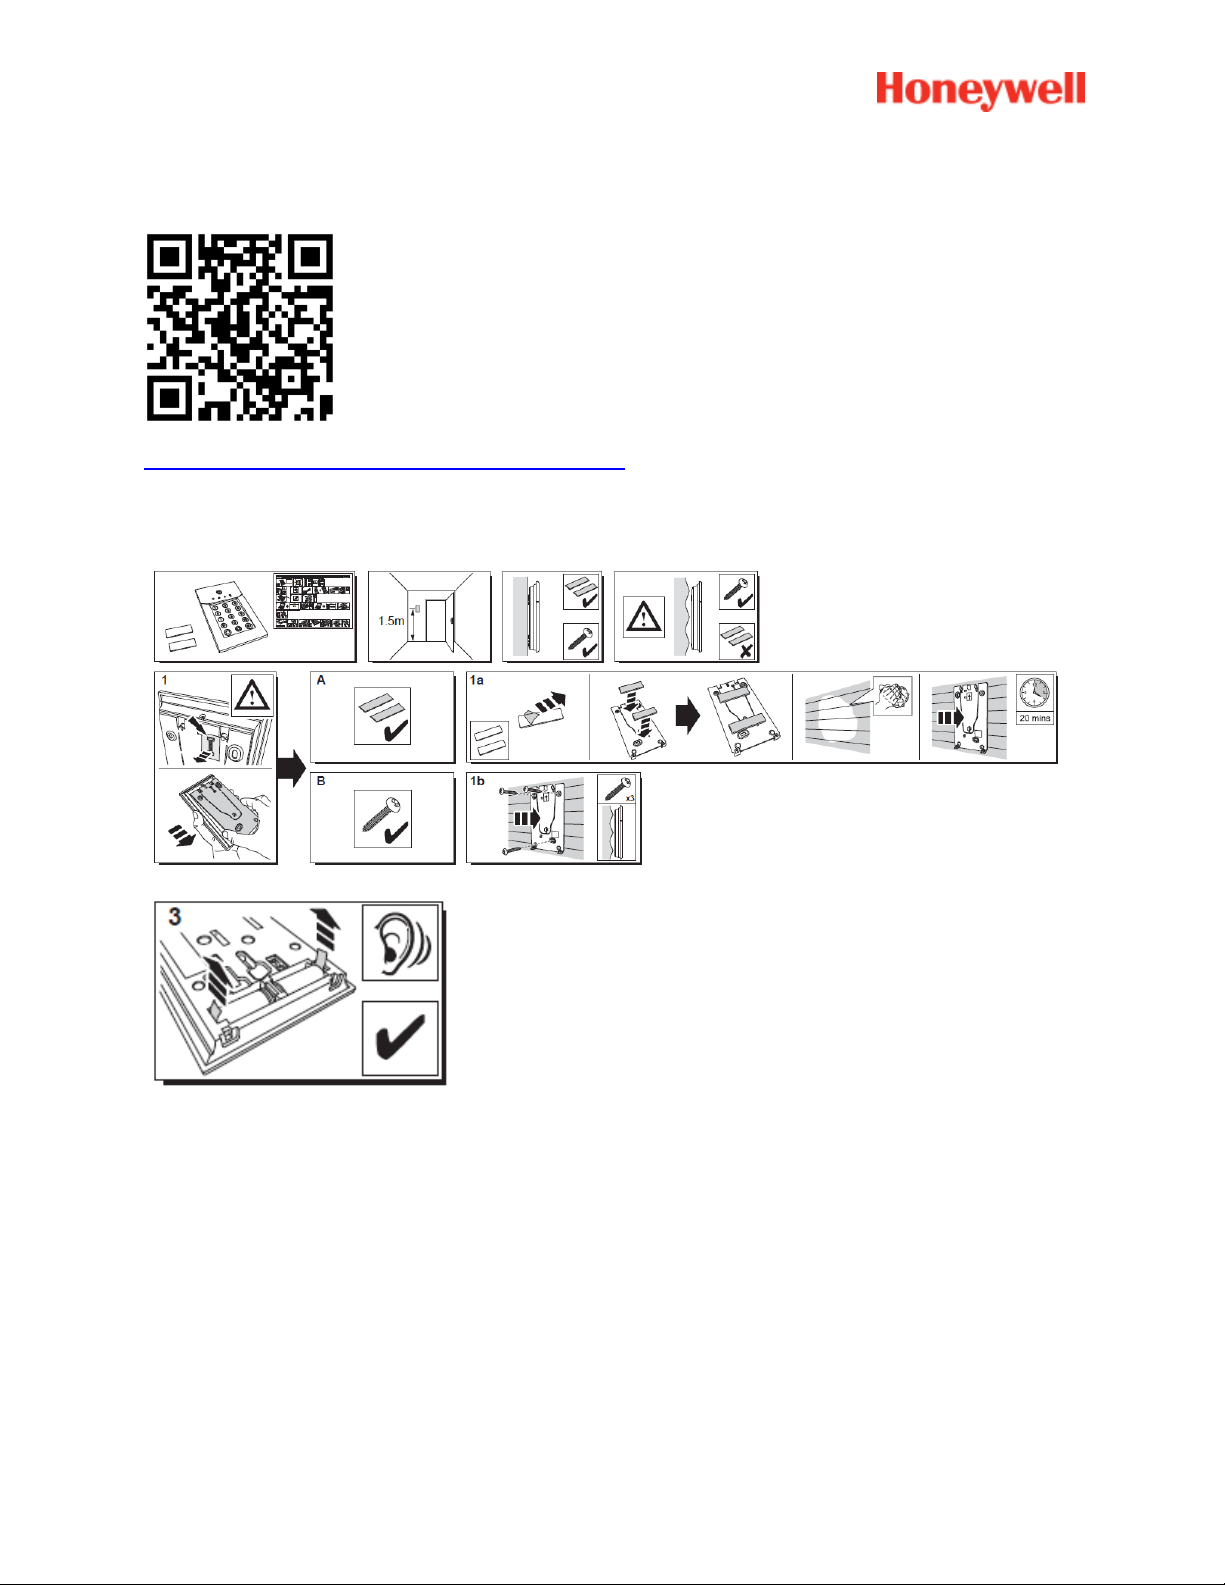
2. Bediendeel
Een hulpvideo vindt u hier:
http://honeywell.total-connect.eu/video/GKP-S8M.mp4
Het bediendeel speelt een serie piepjes af. Op de website wordt de detectie van het nieuwe apparaat
weergegeven met het volgende bericht in de bovenste balk: “Nieuw apparaat aansluiten…”
Wacht tot het bediendeel verschijnt in de sectie “Sensors en randapparatuur” zoals hieronder weergeven:
11
Page 93
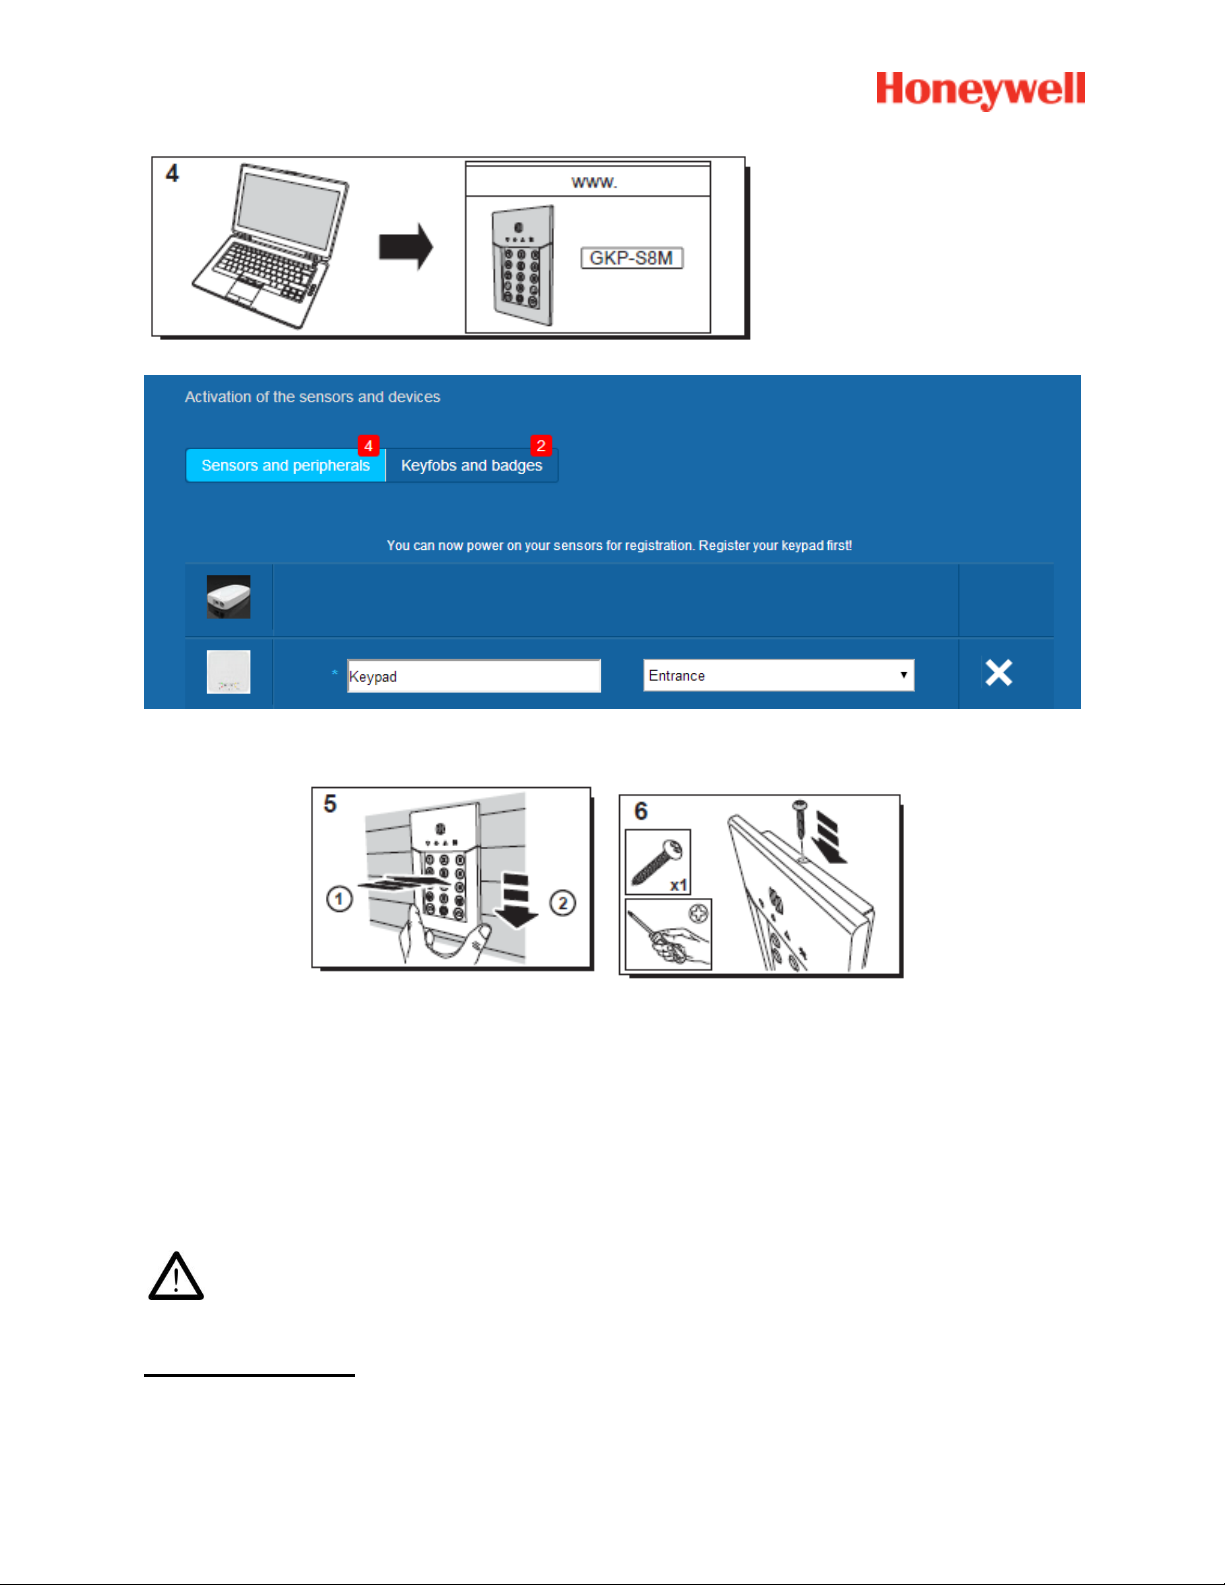
Stel de locatie in en de naam die u eraan wilt geven: hier is de naam “Bediendeel” en de locatie is
“Ingang”.
Waarschuwing: om het naamveld te controleren, moet u met de muis elders op het scherm
klikken.
De badge-lezer is nu opgeslagen en in uw systeem geregistreerd.
Bekijk de handleiding van het bediendeel op gebruikerscodes in te stellen. Standaard heeft
gebruiker 1 code 1234. Vergeet dit niet te veranderen tijdens de installatie!
De badges registreren
Om de eerste badge te registreren, houdt u deze midden voor de badge-lezer op het bediendeel tot u een
pieptoon hoort. De badge verschijnt in de sectie “Keyfobs en badges”
12
Page 94
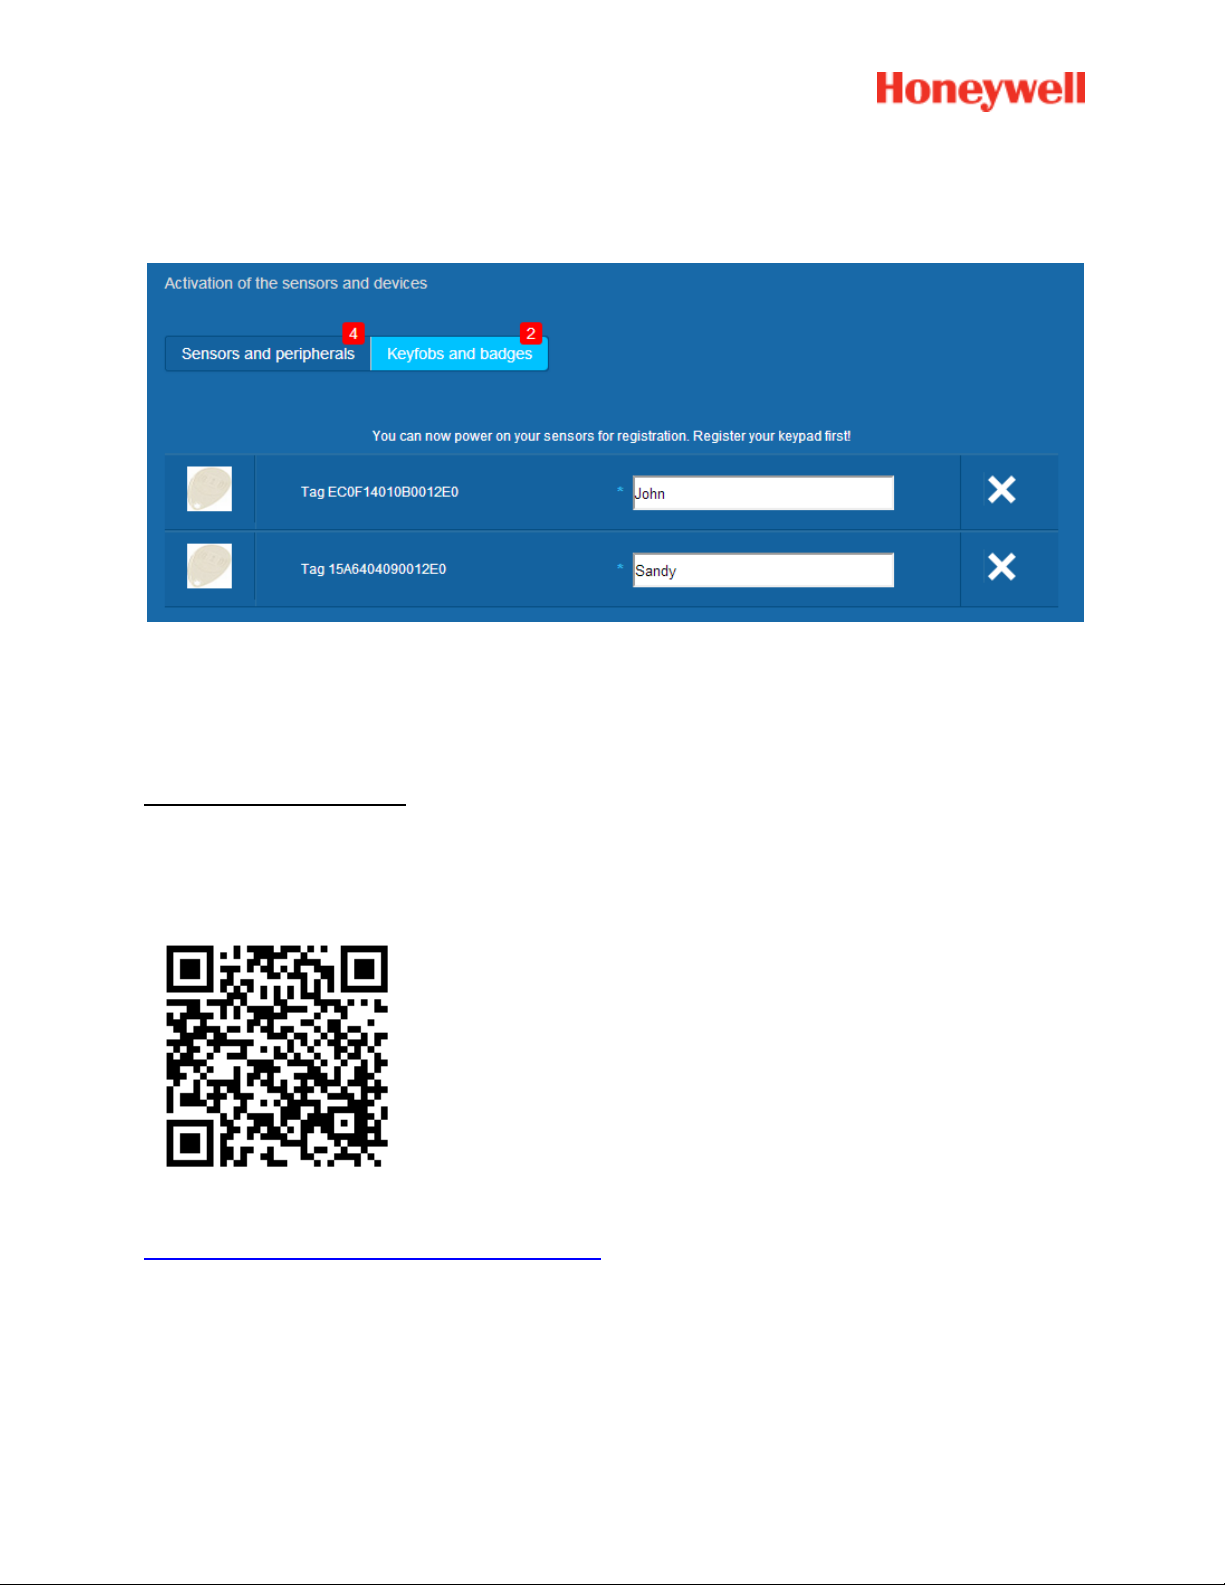
U kunt de naam van de eigenaar instellen in het veld naast het badge-serienummer. Registreer de
volgende badge op dezelfde manier.
Hier zijn de badges van “John” en “Sandy” geregistreerd.
De badges zijn nu opgeslagen en geregistreerd op uw systeem.
Het deurcontact registreren
Een hulpvideo vindt u hier:
http://honeywell.total-connect.eu/video/DO8EZ.mp4
13
Page 95
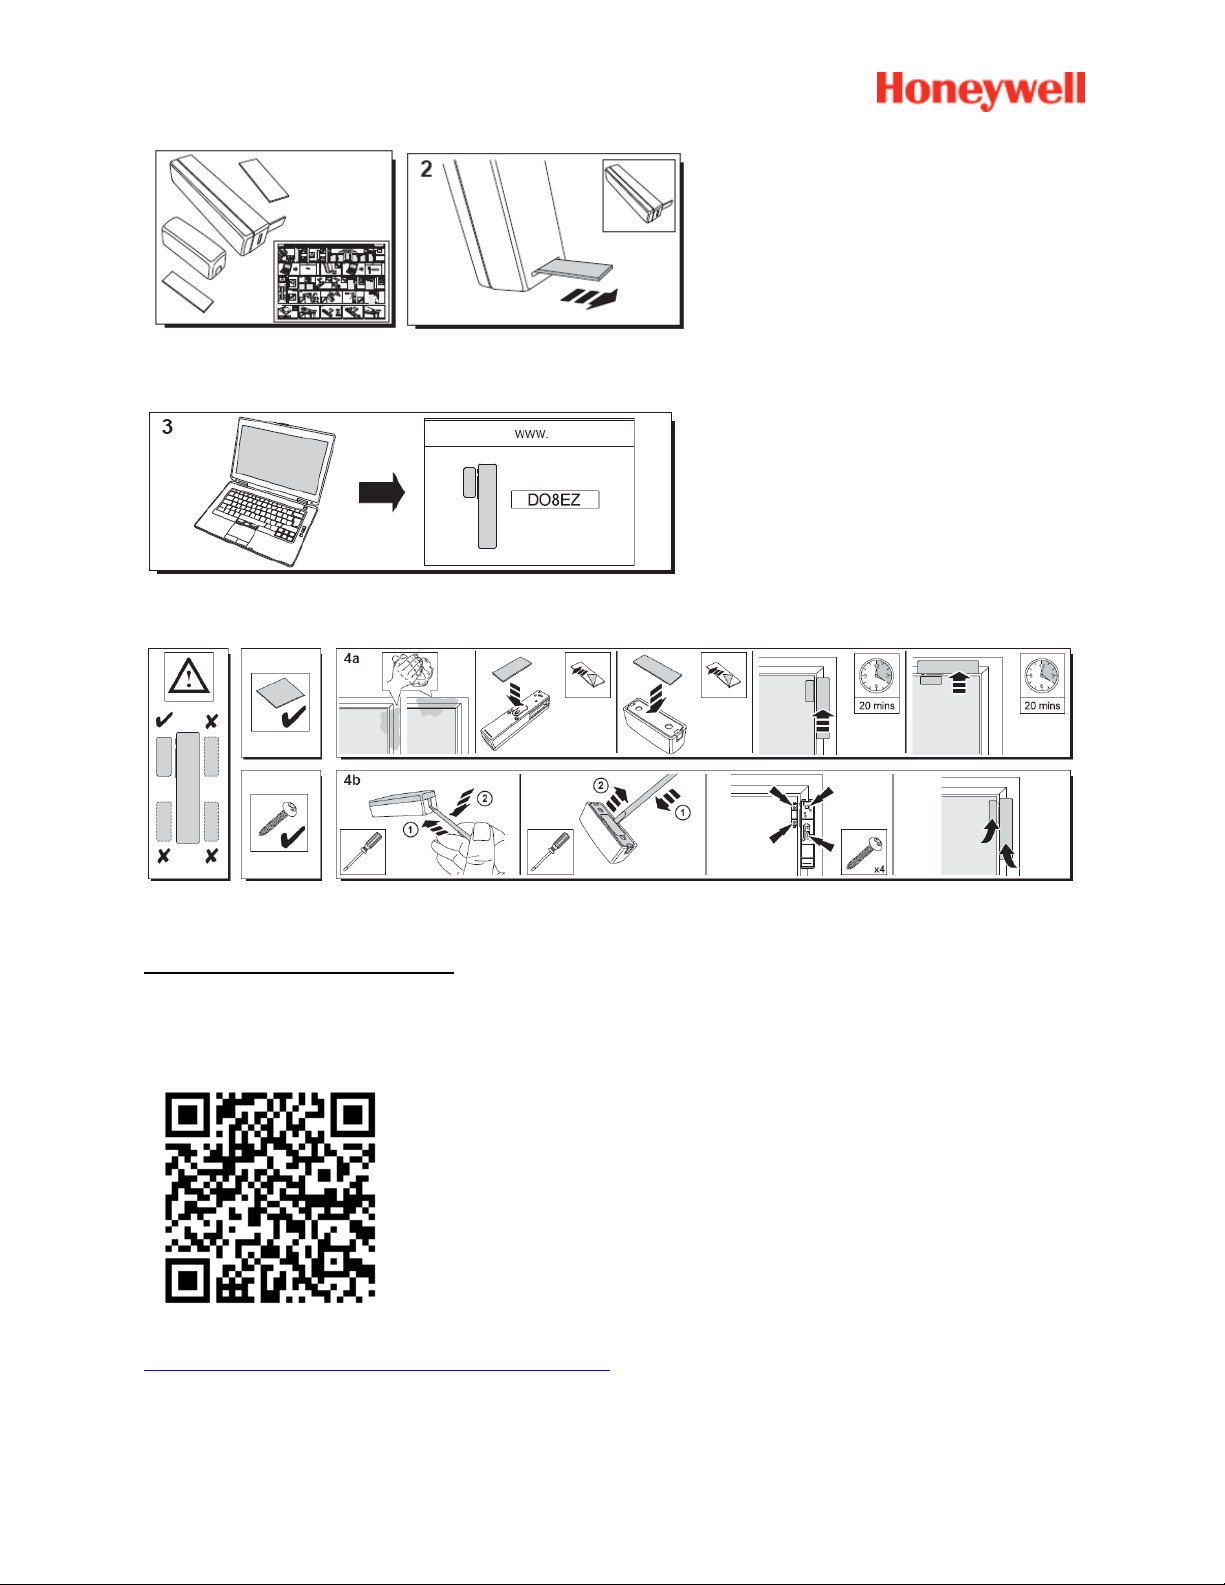
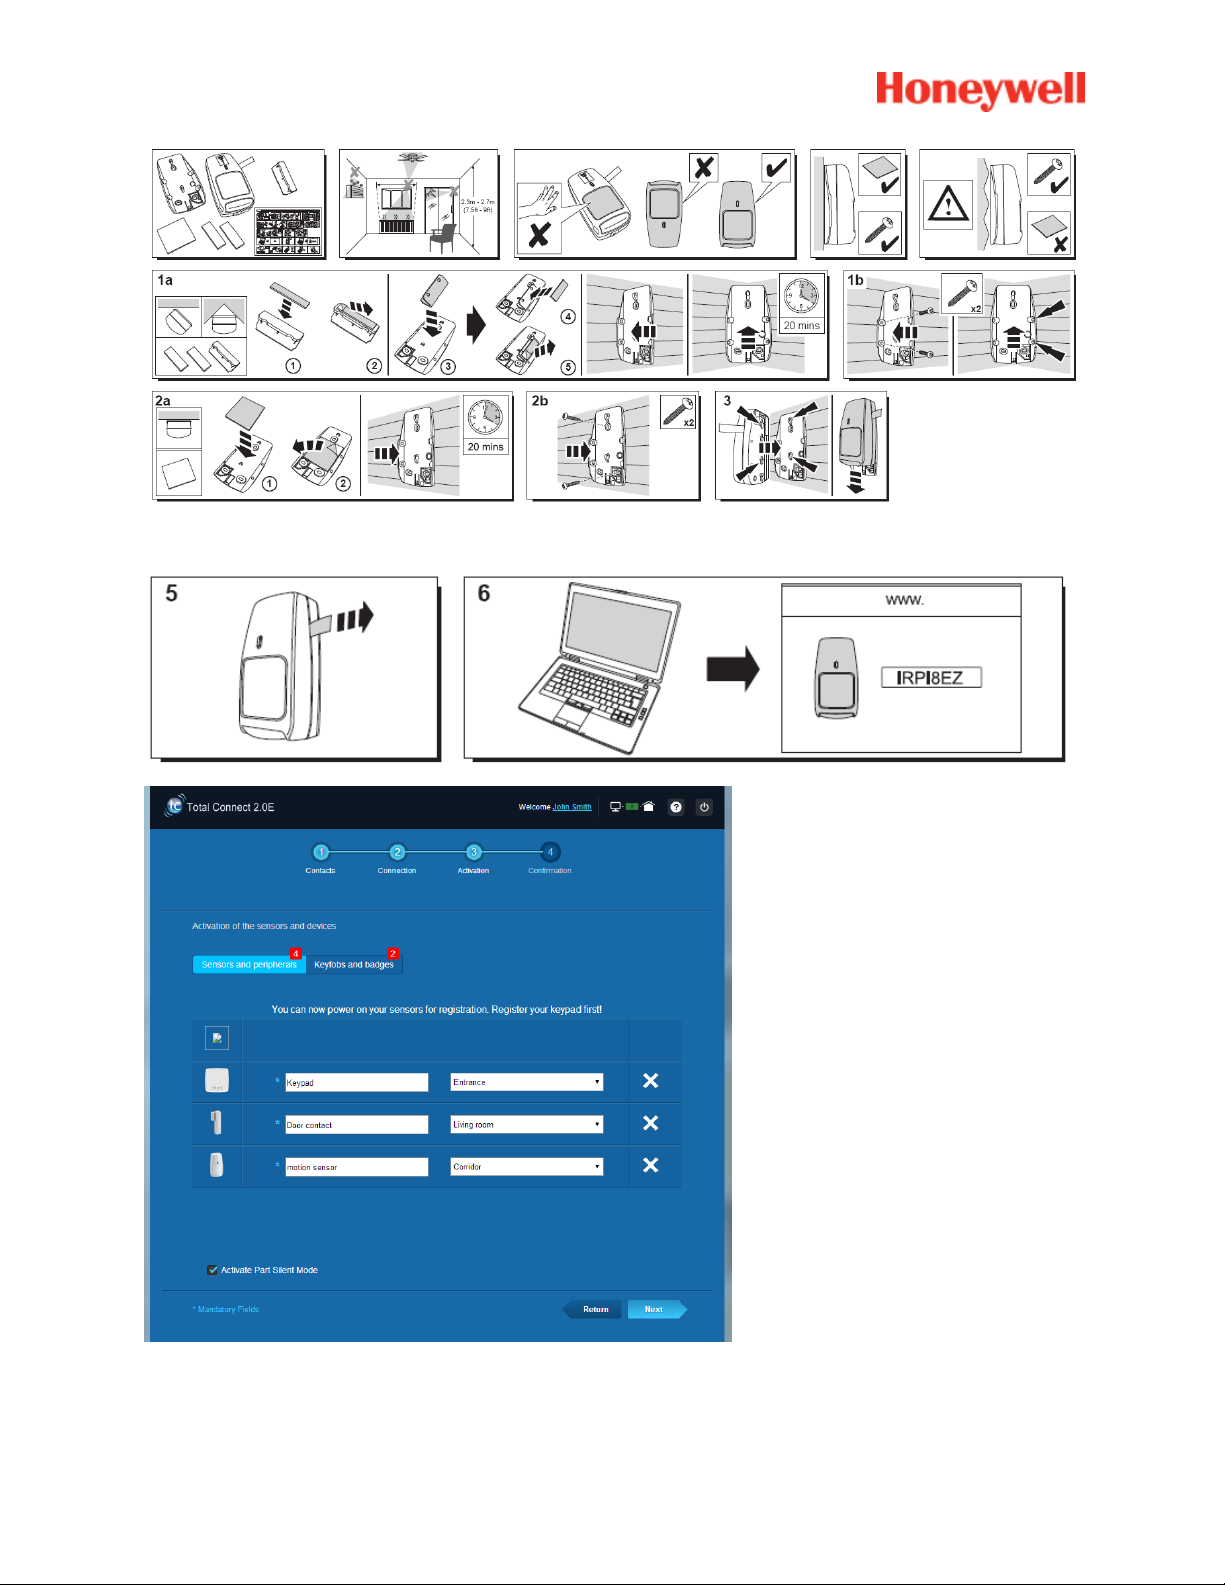
De bewegingssensor registreren
Een hulpvideo vindt u hier:
http://honeywell.total-connect.eu/video/IRPI8EZ.mp4
14
Page 96
15
Page 97

Andere randapparatuur installeren
Voor ieder apparaat dat geregistreerd wordt, verschijnt de melding “Nieuw apparaat aansluiten....” en
hoort u de pieptonen op de badge-lezer.
De installatie afronden
Als alle randapparaten geregistreerd zijn, voltooit u de installatie door op de knop “Voltooien” te klikken.
Het voltooien kan enkele minuten duren.
Vooraf geconfigureerde instellingen Le Sucre
- Instelling randapparaat:
- DO8M, SHK8M-detectors zijn:
Vertraagd
In gedeelde partitie (werken in totale of gedeeltelijke modus)
- IRPI8M-, IR8M-, CAMIR-F1-, DT8M-, DTPI8M-, FG8M-detectors zijn:
Vertraagd
In totale partitie (werken alleen in totale modus)
- Alle veiligheidsdetectors (CO8M, DFS8M) zijn:
Direct
In 24/24-partitie
- DET8M-detector is:
Direct
In 24/24-partitie
- Instellingen CAMIR-F1:
Afbeeldingen per set: 5
Tijd tussen afbeeldingen: 300 ms
- Ingangs/uitgangsvertragingen:
o Totale partitie
Ingangsvertraging: 30 s
Uitgangsvertraging: 30 s
o Gedeelde partitie
Ingangsvertraging: 30 s
Uitgangsvertraging: 30 s
- Alarminstellingen tag-lezer:
Duur inbraakalarm: 180 s
- Duur brandalarm: 300 s
Ingangs- en uitgangspieptonen:
Pieptonen alleen voor totale inschakeling, stil voor gedeeltelijke inschakeling
16
Page 98

-Deutsch-
800-19460-C
10/2015
Le Sucre™
Kurzanleitung zur Installation
OBLIGATORISCHE ARBEITSSCHRITTE VOR DER
INSTALLATION ............................................................................ 2
Anlagenidentifikation ......................................................................................... 2
SCHRITT 1: Le Sucre anschließen .................................................................... 3
SCHRITT 2: Internet-Konto anlegen ................................................................. 4
SYSTEM INSTALLIEREN ............................................................ 6
Ausweiskartenleser oder die Tastatur eintragen ........................................... 10
Ausweiskarten eintragen ................................................................................. 13
Türkontakt eintragen ........................................................................................ 14
Bewegungsmelder eintragen .......................................................................... 15
Andere Peripherie installieren ......................................................................... 17
Installation abschließen ................................................................................... 17
Vorkonfigurierte Parameter okwvon Le Sucre ....................... 17
1
Page 99
OBLIGATORISCHE ARBEITSSCHRITTE VOR DER INSTALLATION
Anlagenidentifikation
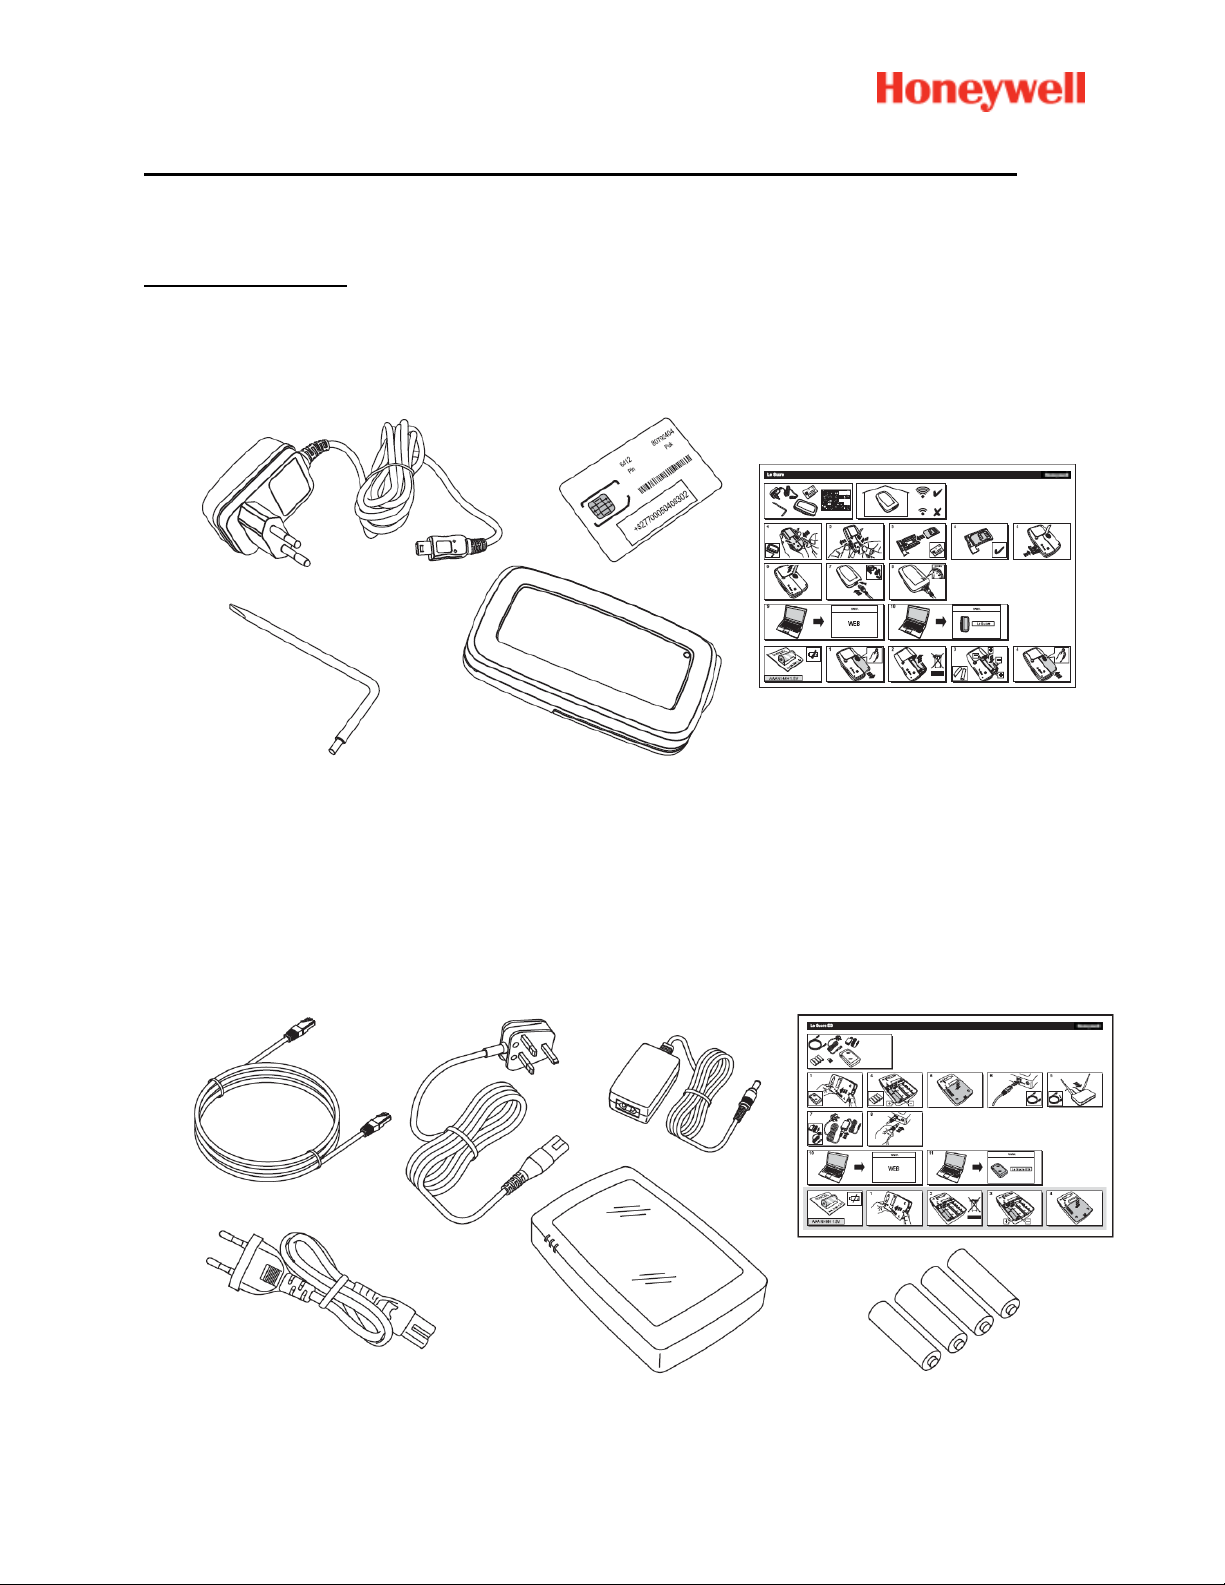
Da es leichte Unterschiede in der Vorgehensweise bei der Installation der einzelnen Anlagenversionen
gibt, sollten Sie Ihren jeweiligen Anlagentyp genau identifizieren.
Sucre GPRS (SUGPACK-EU/SUGPACK-GB)
Sucre Box (SUEPACK -E)
2
Page 100
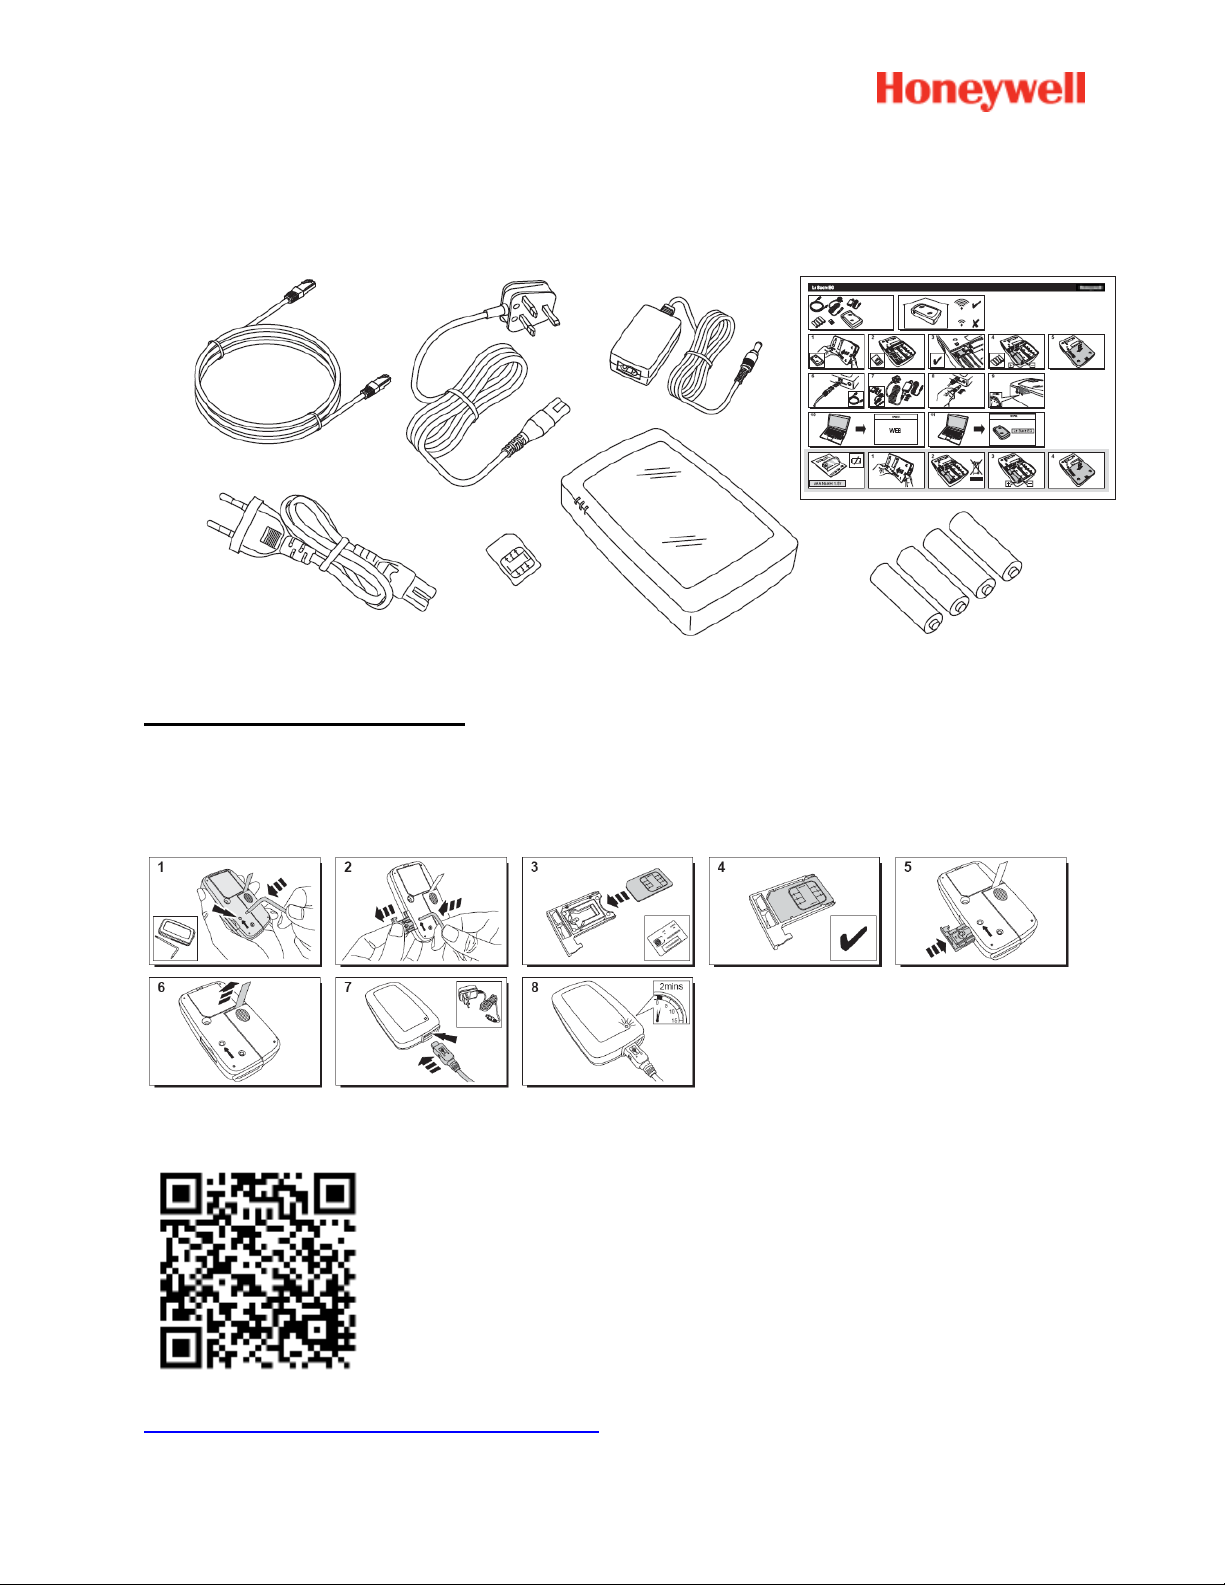
Sucre Box+ (SUEPACK-EG)
SCHRITT 1: Le Sucre anschließen
Sucre GPRS
Eine Videoanleitung ist hier zu finden:
http://honeywell.total-connect.eu/video/lesucre.mp4
3
 Loading...