


Solaris 7980g
Area-Imaging Vertical Slot Scanner
User Guide

Disclaimer
Honeywell International Inc. (“HII”) reserves the right to make changes in specifications and other information contained in
this document without prior notice, and the reader should in all cases consult HII to determine whether any such changes
have been made. The information in this publication does not represent a commitment on the part of HII.
HII shall not be liable for technical or editorial errors or omissions contained herein; nor for incidental or consequential
damages resulting from the furnishing, performance, or use of this material. HII disclaims all responsibility for the selection and use of software and/or hardware to achieve intended results.
This document contains proprietary information that is protected by copyright. All rights are reserved. No part of this document may be photocopied, reproduced, or translated into another language without the prior written consent of HII.
Copyright 2015-2018 Honeywell International Inc. All rights reserved.
Web Address:
Other product names or marks mentioned in this document may be trademarks or registered trademarks of other companies and are the property of their respective owners.
Microsoft® Windows® and the Windows logo are trademarks or registered trademarks of Microsoft Corporation.
Checkpoint® is a registered trademark of Checkpoint Systems, Inc.
Sensormatic® is a registered trademark of Tyco Retail Solutions.
Other product names or marks mentioned in this document may be trademarks or registered trademarks of other compa-
nies and are the property of their respective owners.
For patent information, refer to www.hsmpats.com.
www.honeywellaidc.com

TABLE OF CONTENTS
Customer Support ........................................................................................................................ xi
Technical Assistance ............................................................................................................. xi
Product Service and Repair ................................................................................................ xi
Limited Warranty .................................................................................................................... xi
Chapter 1 - Get Started ....................................................................................1
About This Manual......................................................................................................................... 1
Unpack Your Device....................................................................................................................... 1
Connect the Device........................................................................................................................ 1
Connect with USB....................................................................................................................1
Connect with Keyboard Wedge .......................................................................................... 2
Connect with RS232 Serial Port ........................................................................................ 5
Connect with RS485............................................................................................................... 6
Connect EAS .................................................................................................................................... 7
Checkpoint® ............................................................................................................................... 8
Sensormatic®............................................................................................................................. 8
Connect Auxiliary Scanner .........................................................................................................8
Button Functionality.................................................................................................................. 10
Beeper Volume Adjustment.............................................................................................. 10
Beeper Frequency Adjustment........................................................................................ 11
Reading Techniques................................................................................................................... 11
Menu Bar Code Security Settings......................................................................................... 11
Set Custom Defaults .................................................................................................................. 11
Reset the Custom Defaults...................................................................................................... 12
Solaris 7980g User Guide i

Chapter 2 - Program the Interface.............................................................. 13
Introduction ...................................................................................................................................13
Program the Interface - Plug and Play ...............................................................................13
Keyboard Wedge ..........................................................................................................................13
Laptop Direct Connect ..............................................................................................................14
RS232 Serial Port.........................................................................................................................14
RS485...............................................................................................................................................14
RS485 Packet Mode.............................................................................................................15
USB IBM SurePos ........................................................................................................................16
USB PC or Macintosh Keyboard ............................................................................................16
USB HID........................................................................................................................................... 17
USB Serial .......................................................................................................................................17
CTS/RTS Emulation .............................................................................................................17
ACK/NAK Mode......................................................................................................................18
Verifone® Ruby Terminal Default Settings .........................................................................18
Gilbarco® Terminal Default Settings.....................................................................................18
Wincor Nixdorf Terminal Default Settings.........................................................................19
Wincor Nixdorf Beetle™ Terminal Default Settings........................................................19
Wincor Nixdorf RS232 Mode A...............................................................................................19
Keyboard Country Layout.........................................................................................................20
Keyboard Style ..............................................................................................................................27
Keyboard Conversion .................................................................................................................28
Control Character Output.........................................................................................................29
Keyboard Modifiers.....................................................................................................................29
RS232 Modifiers ..........................................................................................................................31
RS232 Baud Rate ..................................................................................................................31
RS232 Word Length: Data Bits, Stop Bits, and Parity ............................................32
RS232 Receiver Time-Out .................................................................................................33
RS232 Handshaking............................................................................................................33
RS232 Timeout.......................................................................................................................34
XON/XOFF...............................................................................................................................34
ii Solaris 7980g User Guide

ACK/NAK...................................................................................................................................34
Chapter 3 - Input/Output Settings .............................................................37
Power Up Beeper..........................................................................................................................37
Beep on BEL Character .............................................................................................................37
Good Read and Error Indicators.............................................................................................38
Beeper – Good Read .............................................................................................................38
Beeper Volume – Good Read ............................................................................................38
Beeper Pitch – Good Read .................................................................................................38
Beeper Pitch – Error .............................................................................................................39
Beeper Duration – Good Read..........................................................................................39
LED – Good Read...................................................................................................................40
Number of Beeps – Good Read........................................................................................40
Number of Beeps – Error....................................................................................................40
Good Read Delay....................................................................................................................40
User-Specified Good Read Delay ....................................................................................41
Serial Trigger Mode .....................................................................................................................41
Read Time-Out........................................................................................................................41
Presentation Mode ......................................................................................................................42
Presentation Idle Mode.......................................................................................................42
Presentation Sleep Mode ...................................................................................................43
LED Illumination - Presentation Mode.........................................................................44
Presentation LED Behavior after Decode....................................................................44
Presentation Sensitivity ......................................................................................................45
Presentation Centering.......................................................................................................45
Streaming Presentation™ Mode.............................................................................................47
Mobile Phone Read Mode ........................................................................................................47
Poor Quality PDF Codes............................................................................................................48
Poor Quality Code Enhanced Mode .....................................................................................48
Reread Delay ..................................................................................................................................48
User-Specified Reread Delay...................................................................................................49
Illumination Lights......................................................................................................................49
Centering.........................................................................................................................................49
Solaris 7980g User Guide iii

Preferred Symbology..................................................................................................................51
High Priority Symbology ....................................................................................................52
Low Priority Symbology ...................................................................................................... 52
Preferred Symbology Time-out........................................................................................52
Preferred Symbology Default ........................................................................................... 53
Character Activation Mode ......................................................................................................53
Activation Character ............................................................................................................53
End Character Activation After Good Read.................................................................53
Character Activation LED Timeout.................................................................................54
Character Deactivation Mode.................................................................................................54
Deactivation Character....................................................................................................... 55
Output Sequence Overview .....................................................................................................55
Output Sequence Editor.....................................................................................................55
To Add an Output Sequence .............................................................................................55
Output Sequence Editor Commands...................................................................................56
Enter Output Sequence.............................................................................................................59
Partial Sequence ...................................................................................................................59
No Read ...........................................................................................................................................62
Video Reverse ................................................................................................................................62
Working Orientation ...................................................................................................................63
Chapter 4 - Data Edit ..................................................................................... 65
Prefix/Suffix Overview ...............................................................................................................65
To Add a Prefix or Suffix:.....................................................................................................66
Clear One or All Prefixes or Suffixes ..............................................................................66
Add a Carriage Return Suffix to All Symbologies .....................................................67
Prefix Selections...........................................................................................................................67
Suffix Selections...........................................................................................................................67
Function Code Transmit............................................................................................................68
Intercharacter, Interfunction, and Intermessage Delays.............................................68
Intercharacter Delay ............................................................................................................69
User Specified Intercharacter Delay..............................................................................69
Interfunction Delay .............................................................................................................. 70
iv Solaris 7980g User Guide

Intermessage Delay..............................................................................................................70
Chapter 5 - Data Format ................................................................................71
Data Format Editor Introduction ...........................................................................................71
Show Data Format .......................................................................................................................72
Add a Data Format.......................................................................................................................72
Other Programming Selections.......................................................................................73
Terminal ID Table...................................................................................................................74
Data Format Editor Commands .............................................................................................74
Move Commands...................................................................................................................79
Search Commands................................................................................................................81
Miscellaneous Commands ................................................................................................83
Data Formatter..............................................................................................................................86
Data Format Non-Match Error Tone..............................................................................87
Primary/Alternate Data Formats ...........................................................................................88
Single Scan Data Format Change...................................................................................88
Chapter 6 - Symbologies................................................................................91
All Symbologies.............................................................................................................................92
Message Length Description..................................................................................................92
Codabar............................................................................................................................................92
Codabar Concatenation......................................................................................................94
Codabar Redundancy ..........................................................................................................94
Code 39 ............................................................................................................................................95
Code 32 Pharmaceutical (PARAF) ..................................................................................97
Full ASCII...................................................................................................................................98
Code 39 Code Page...............................................................................................................98
Interleaved 2 of 5..........................................................................................................................99
NEC 2 of 5 ....................................................................................................................................100
Code 93 ......................................................................................................................................... 102
Code 93 Append..................................................................................................................102
Code 93 Code Page............................................................................................................103
Straight 2 of 5 Industrial (three-bar start/stop)...........................................................103
Solaris 7980g User Guide v

Straight 2 of 5 IATA (two-bar start/stop)......................................................................... 104
Matrix 2 of 5................................................................................................................................ 105
Code 11......................................................................................................................................... 106
Code 128...................................................................................................................................... 107
ISBT 128 Concatenation ................................................................................................. 108
Code 128 Code Page ........................................................................................................109
GS1-128 ....................................................................................................................................... 109
Telepen.......................................................................................................................................... 110
UPC-A............................................................................................................................................ 111
UPC-A/EAN-13 with Extended Coupon Code.............................................................. 114
Coupon GS1 DataBar Output .............................................................................................. 115
UPC-E0 ......................................................................................................................................... 115
UPC-E1 ......................................................................................................................................... 118
EAN/JAN-13 ............................................................................................................................... 118
ISBN Translate..................................................................................................................... 125
EAN/JAN-8.................................................................................................................................. 125
MSI.................................................................................................................................................. 127
GS1 DataBar Omnidirectional............................................................................................. 129
GS1 DataBar Limited .............................................................................................................. 129
GS1 DataBar Expanded ......................................................................................................... 130
Trioptic Code............................................................................................................................... 131
Codablock A ................................................................................................................................131
Codablock F ................................................................................................................................132
Label Code................................................................................................................................... 133
PDF417......................................................................................................................................... 133
MacroPDF417............................................................................................................................ 134
MicroPDF417............................................................................................................................. 134
GS1 Composite Codes ............................................................................................................ 135
UPC/EAN Version .............................................................................................................. 136
GS1 Emulation........................................................................................................................... 136
TCIF Linked Code 39 (TLC39) ............................................................................................. 137
vi Solaris 7980g User Guide

QR Code ........................................................................................................................................138
QR Code Page ......................................................................................................................139
Data Matrix ..................................................................................................................................139
Data Matrix Code Page.....................................................................................................141
MaxiCode......................................................................................................................................141
Aztec Code ...................................................................................................................................142
Aztec Code Page .................................................................................................................143
Chinese Sensible (Han Xin) Code.......................................................................................143
Postal Codes - 2D......................................................................................................................144
Single 2D Postal Codes:...................................................................................................144
Combination 2D Postal Codes:.....................................................................................145
Postal Codes - Linear ..............................................................................................................149
China Post (Hong Kong 2 of 5)......................................................................................149
Korea Post..............................................................................................................................150
Chapter 7 - EAS Settings ............................................................................151
EAS Considerations .................................................................................................................151
EAS Deactivation.......................................................................................................................151
EAS Deactivation Zone.....................................................................................................152
EAS Deactivation Range..................................................................................................152
Sensormatic ................................................................................................................................152
Checkpoint...................................................................................................................................153
EAS Controller Settings ...................................................................................................153
EAS Controller............................................................................................................................153
EAS Mode of Operation..........................................................................................................153
EAS Interlocked Duration Timeout..............................................................................154
Chapter 8 - Program an Auxiliary Scanner ............................................. 155
Introduction.................................................................................................................................155
Connect by USB Serial ............................................................................................................155
Connect by USB Keyboard.....................................................................................................155
Solaris 7980g User Guide vii

Chapter 9 - Imaging Commands ...............................................................157
Single-Use Basis....................................................................................................................... 157
Command Syntax .....................................................................................................................157
Image Snap - IMGSNP............................................................................................................ 158
IMGSNP Modifiers............................................................................................................. 158
Image Ship - IMGSHP............................................................................................................. 161
IMGSHP Modifiers............................................................................................................. 162
Image Size Compatibility ................................................................................................170
Intelligent Signature Capture - IMGBOX ........................................................................171
Signature Capture Optimize.......................................................................................... 171
IMGBOX Modifiers............................................................................................................. 172
Chapter 10 - Utilities ...................................................................................177
Add a Test Code I.D. Prefix to All Symbologies.............................................................. 177
Show Decoder Revision.......................................................................................................... 177
Show Scan Driver Revision.................................................................................................... 177
Show Software Revision ......................................................................................................... 178
Show Data Format.................................................................................................................... 178
Test Menu .................................................................................................................................... 178
TotalFreedom.............................................................................................................................. 178
Application Plug-Ins (Apps) ................................................................................................. 179
EZConfig Cloud for Scanning Introduction ................................................................... 179
EZConfig Cloud for Scanning Operations................................................................ 179
Install EZConfig Cloud for Scanning.......................................................................... 180
Reset the Factory Defaults.................................................................................................... 180
Chapter 11 - Serial Programming Commands.......................................183
Conventions................................................................................................................................ 183
Menu Command Syntax ........................................................................................................183
Query Commands..................................................................................................................... 184
Trigger Commands................................................................................................................... 186
Resetting the Custom Defaults........................................................................................... 187
viii Solaris 7980g User Guide

Menu Commands .....................................................................................................................187
Chapter 12 - Product Specifications........................................................209
Solaris 7980g Scanner Product Specifications............................................................209
Depth of Field Charts ..............................................................................................................210
Typical Performance..........................................................................................................210
Guaranteed Performance................................................................................................211
Standard Connector Pinouts................................................................................................211
Keyboard Wedge .................................................................................................................212
Serial Output ........................................................................................................................212
RS485 Output ......................................................................................................................212
USB...........................................................................................................................................213
EAS...........................................................................................................................................213
USB Auxiliary Scanner - Solaris end ...........................................................................214
Chapter 13 - Maintenance and Troubleshooting ..................................215
Repairs...........................................................................................................................................215
Maintenance...............................................................................................................................215
Cleaning the Scanner .......................................................................................................215
Cleaning the Window ........................................................................................................215
Inspecting Cords and Connectors...............................................................................216
Replacing Cables ......................................................................................................................216
Replacing the Interface Cable .......................................................................................216
Replacing an EAS Cable ..................................................................................................217
Troubleshooting.........................................................................................................................218
Appendix A - Reference Charts..................................................................221
Symbology Charts.....................................................................................................................221
Linear Symbologies...........................................................................................................221
2D Symbologies ..................................................................................................................222
Postal Symbologies ...........................................................................................................223
ASCII Conversion Chart (Code Page 1252) ....................................................................224
Lower ASCII Reference Table................................................................................................225
Solaris 7980g User Guide ix

ISO 2022/ISO 646 Character Replacements................................................................ 228
Keyboard Key References ...................................................................................................... 231
Sample Symbols........................................................................................................................ 233
Programming Chart................................................................................................................. 235
x Solaris 7980g User Guide

Customer Support
Technical Assistance
If you need assistance installing or troubleshooting your device, please contact us
by using one of the methods below:
Knowledge Base: www.hsmknowledgebase.com
Our Knowledge Base provides thousands of immediate solutions. If the Knowledge
Base cannot help, our Technical Support Portal (see below) provides an easy way to
report your problem or ask your question.
Technical Support Portal: www.hsmsupportportal.com
The Technical Support Portal not only allows you to report your problem, but it also
provides immediate solutions to your technical issues by searching our Knowledge
Base. With the Portal, you can submit and track your questions online and send
and receive attachments.
Web form: www.hsmcontactsupport.com
You can contact our technical support team directly by filling out our online support form. Enter your contact details and the description of the question/problem.
Telephone: www.honeywellaidc.com/locations
For our latest contact information, please check our website at the link above.
Product Service and Repair
Honeywell International Inc. provides service for all of its products through service
centers throughout the world. To obtain warranty or non-warranty service, please
visit www.honeywellaidc.com and select Support > Contact Service and Repair to
see your region's instructions on how to obtain a Return Material Authorization
number (RMA #). You should do this prior to returning the product.
Limited Warranty
Refer to www.honeywellaidc.com/warranty_information for your product’s warranty information.
Solaris 7980g User Guide xi

xii Solaris 7980g User Guide

CHAPTER
1
GET STARTED
About This Manual
This User’s Guide provides installation and programming instructions for the
Solaris 7980g area-imaging vertical slot scanners. Product specifications, dimensions, warranty, and customer support information are also included.
Honeywell bar code scanners are factory programmed for the most common terminal and communications settings. If you need to change these settings, programming is accomplished by scanning the bar codes in this guide.
An asterisk (*) next to an option indicates the default setting.
Unpack Your Device
After you open the shipping carton containing the product, take the following
steps:
• Check for damage during shipment. Report damage immediately to the carrier
who delivered the carton.
• Make sure the items in the carton match your order.
• Save the shipping container for later storage or shipping.
Connect the Device
Connect with USB
The scanner can be connected to the USB port of a computer.
Solaris 7980g User Guide 1
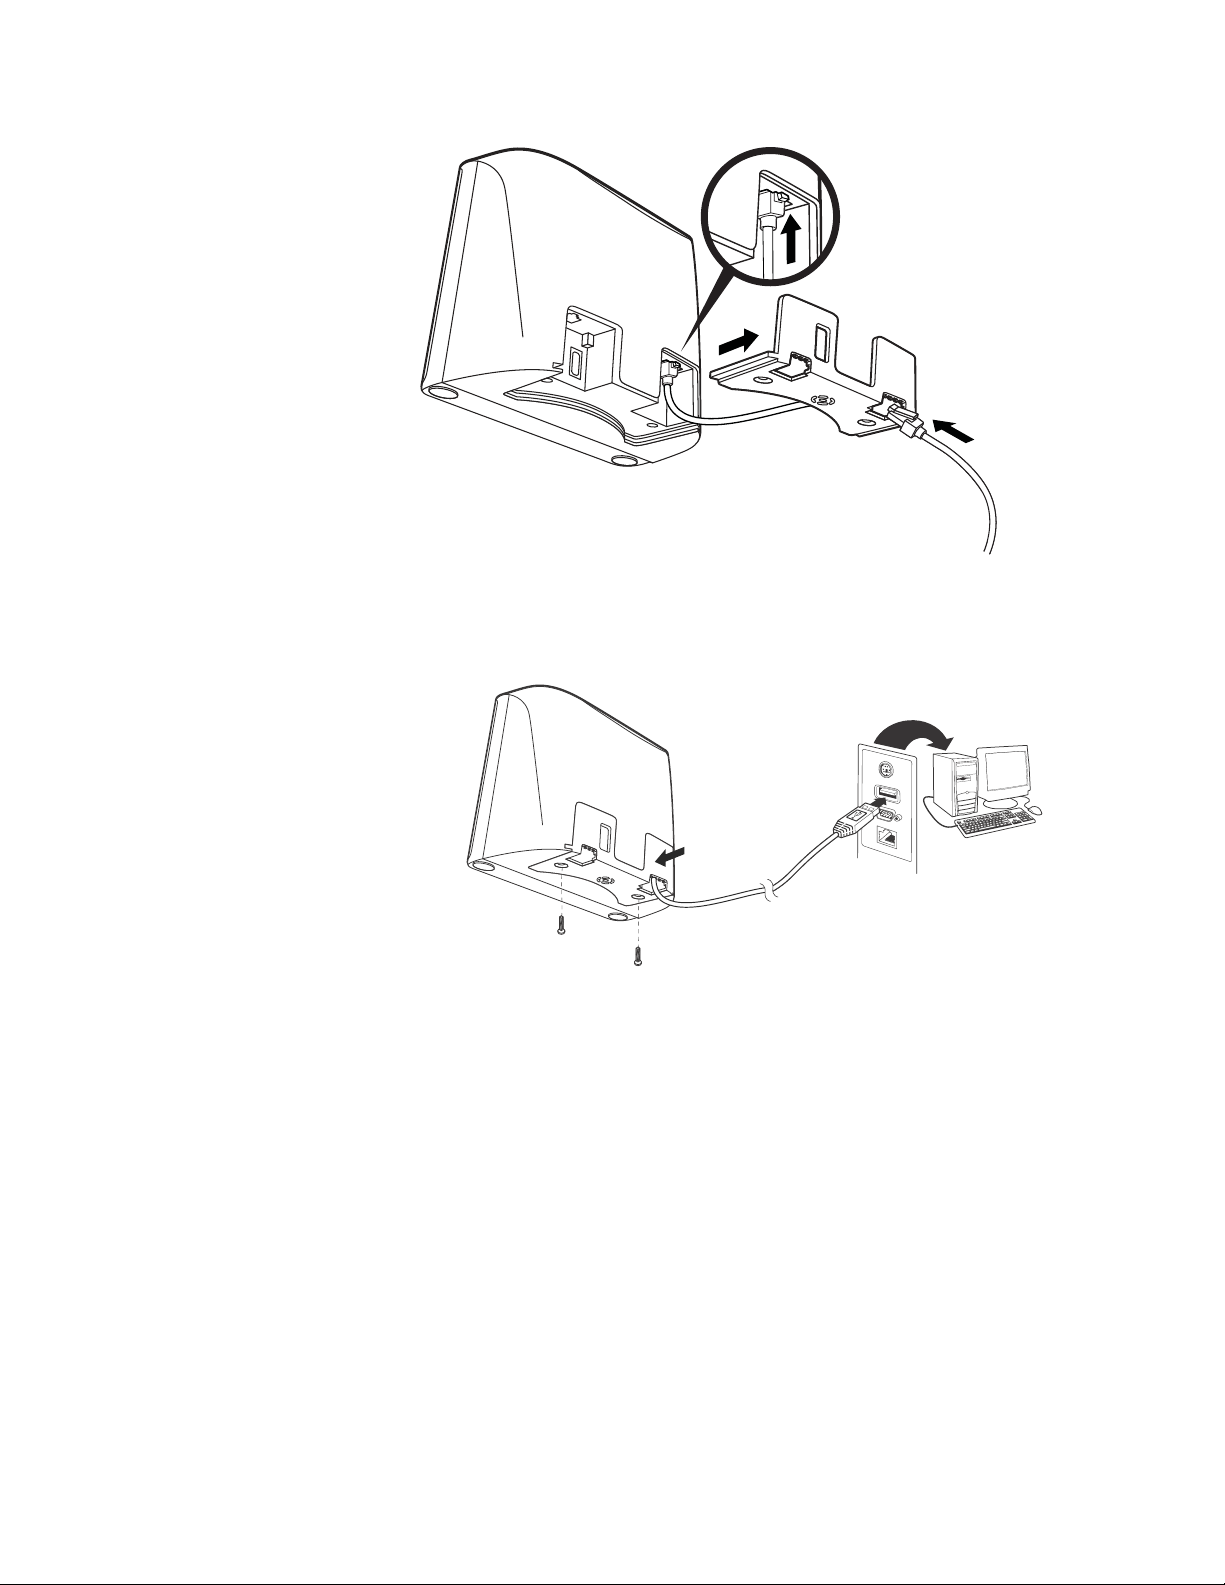
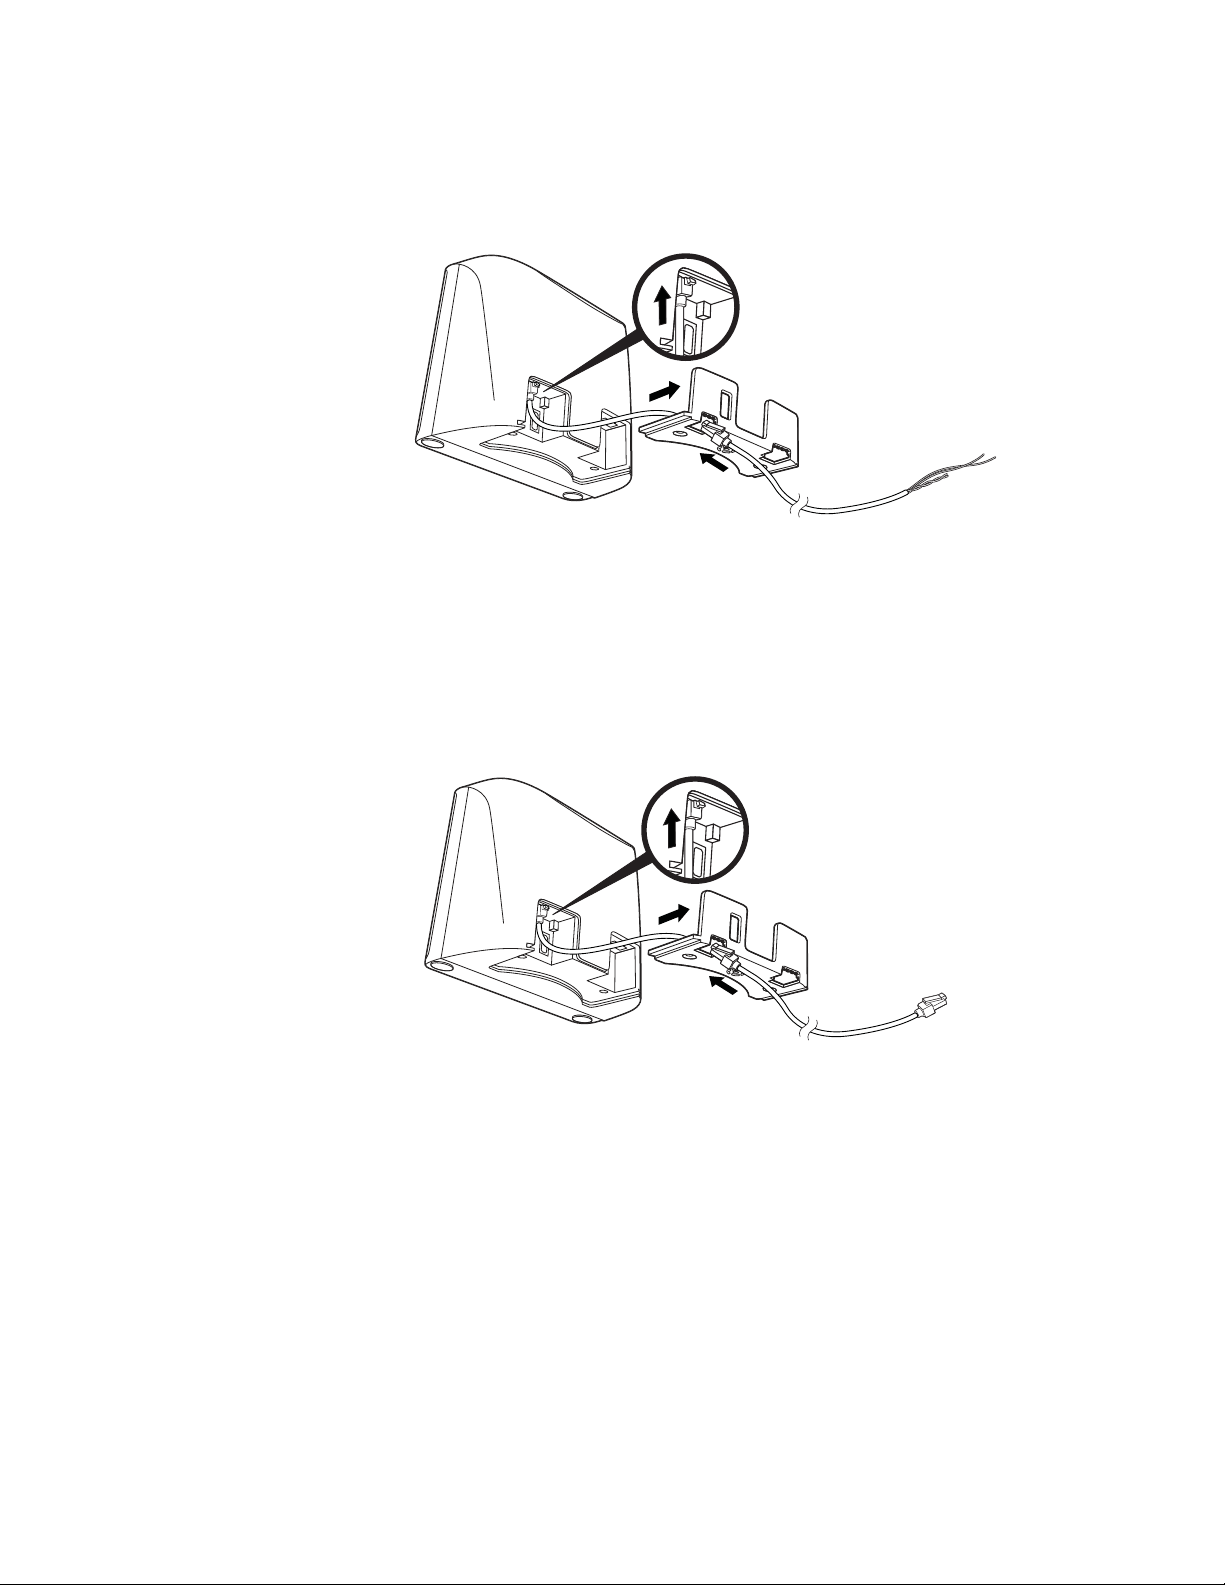
1. Remove the back cover and feed the interface cable through to the device.
2
3
1
USB Connection:
2
3
1
2. Slide the back cover on and screw the back cover to the device, and then
connect the interface cable to the computer.
Connect with Keyboard Wedge
2 Solaris 7980g User Guide
3. The scanner beeps.
4. Verify the scanner operation by scanning a bar code from the Sample Symbols
on page 233.
The unit defaults to a USB PC Keyboard. Refer to page 16 for other USB terminal
settings.
For additional USB programming and technical information, refer to “USB Application Note,” available at the Knowledge Base www.hsm.force.com/publickb.
The scanner can be connected between the keyboard and PC as a “keyboard
wedge,” where the scanner provides data output that is similar to keyboard entries.
The following is an example of a keyboard wedge connection:
1. Turn off power and disconnect the keyboard cable from the back of the termi-
2
3
1
2
1
nal/computer.
2. Remove the back cover and feed the interface cable through to the device.
3. Feed the power supply cable through the back cover to the device. Make sure
the power cable is completely inserted into the device.
Note: The power supply must be ordered separately.
Solaris 7980g User Guide 3

4. Slide the back cover on and screw the back cover to the device. Connect the
Keyboard Wedge Connection:
2
3
1
4
interface cable to the computer, and then plug the power supply into the outlet.
5. Turn the terminal/computer power back on. The scanner beeps.
6. Verify the scanner operation by scanning a bar code from the Sample Symbols
on page 233. The scanner beeps once.
The unit defaults to an IBM PC AT and compatibles keyboard wedge interface with
a USA keyboard. A carriage return (CR) suffix is added to bar code data.
4 Solaris 7980g User Guide
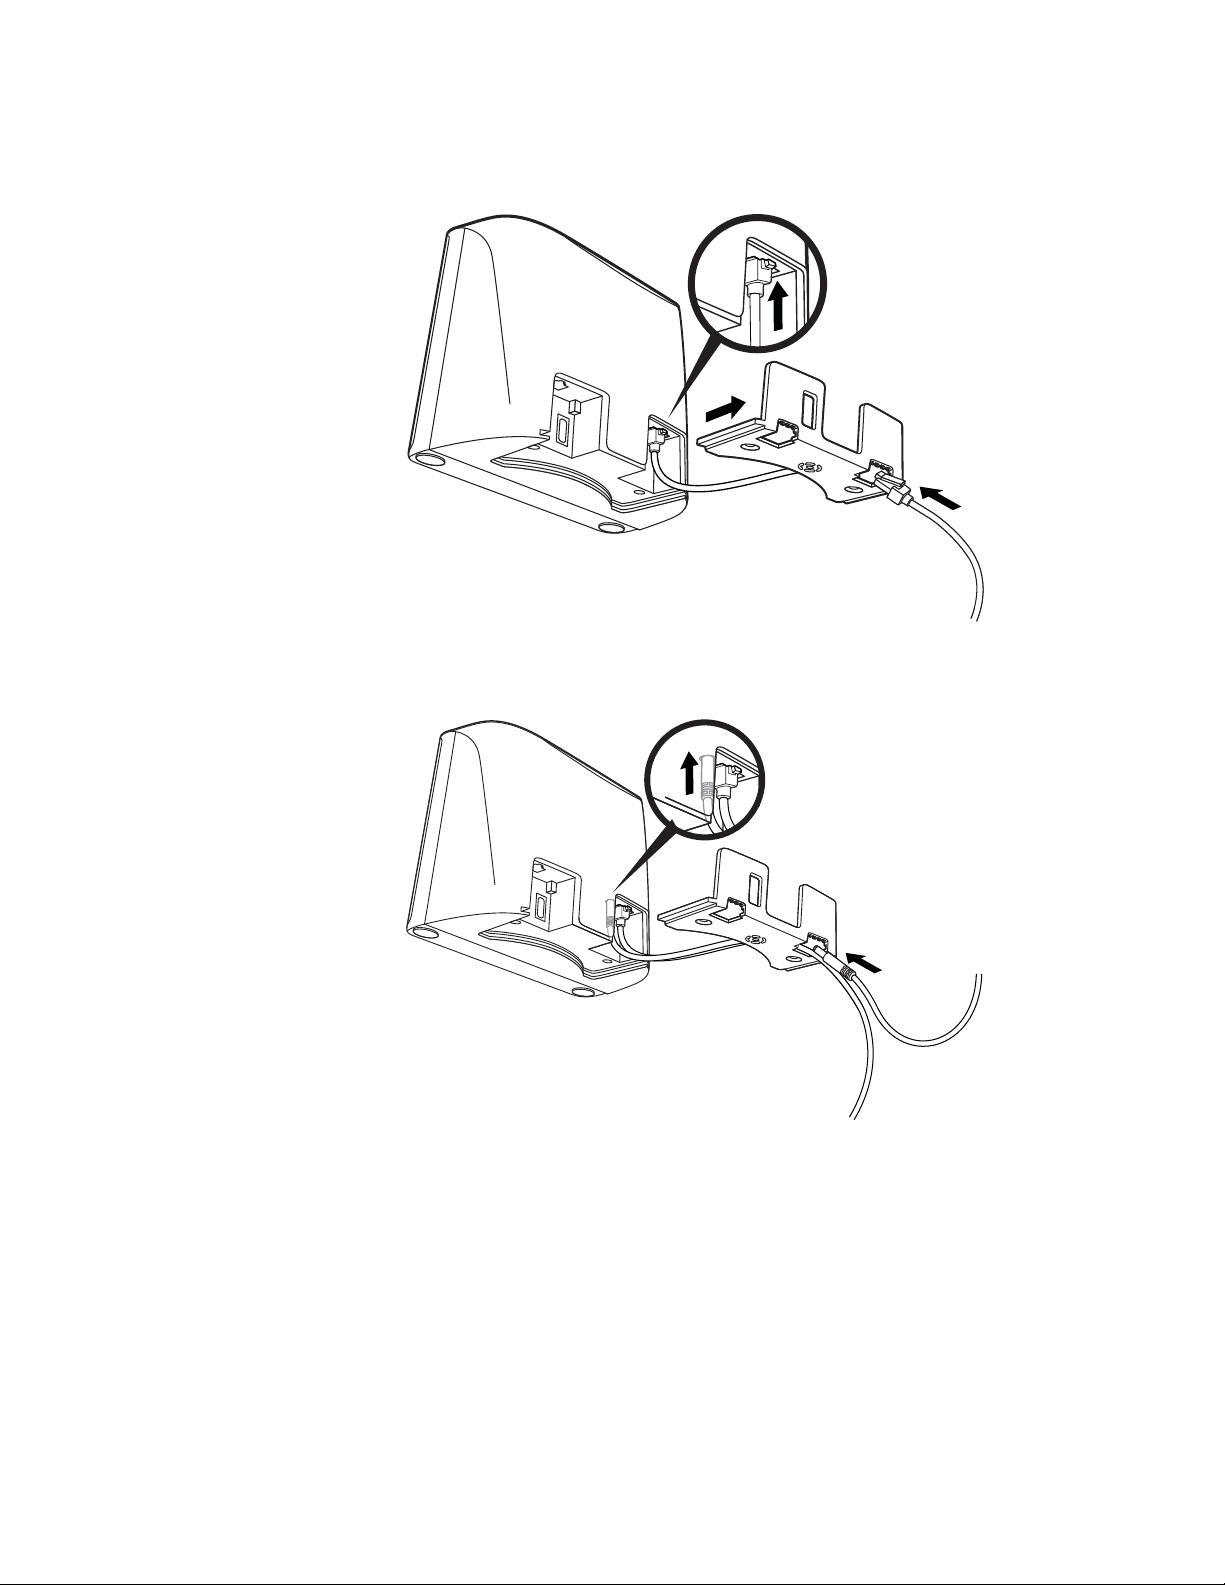
Connect with RS232 Serial Port
2
3
1
2
1
1. Turn off power to the terminal/computer.
2. Remove the back cover and feed the interface cable through to the device.
Note: For the scanner to work properly, you must have the correct cable for your type of
terminal/computer.
3. Feed the power supply cable through the back cover to the device. Make sure
the power cable is completely inserted into the device.
Note: The power supply must be ordered separately.
Solaris 7980g User Guide 5

4. Slide the back cover on and screw the back cover to the device. Connect the
2
1
RS232 Serial Port Connection:
3
4
interface cable to the computer and tighten the two screws to secure the
connector to the port. Plug the power supply into the outlet.
5. Once the scanner has been fully connected, power up the computer.
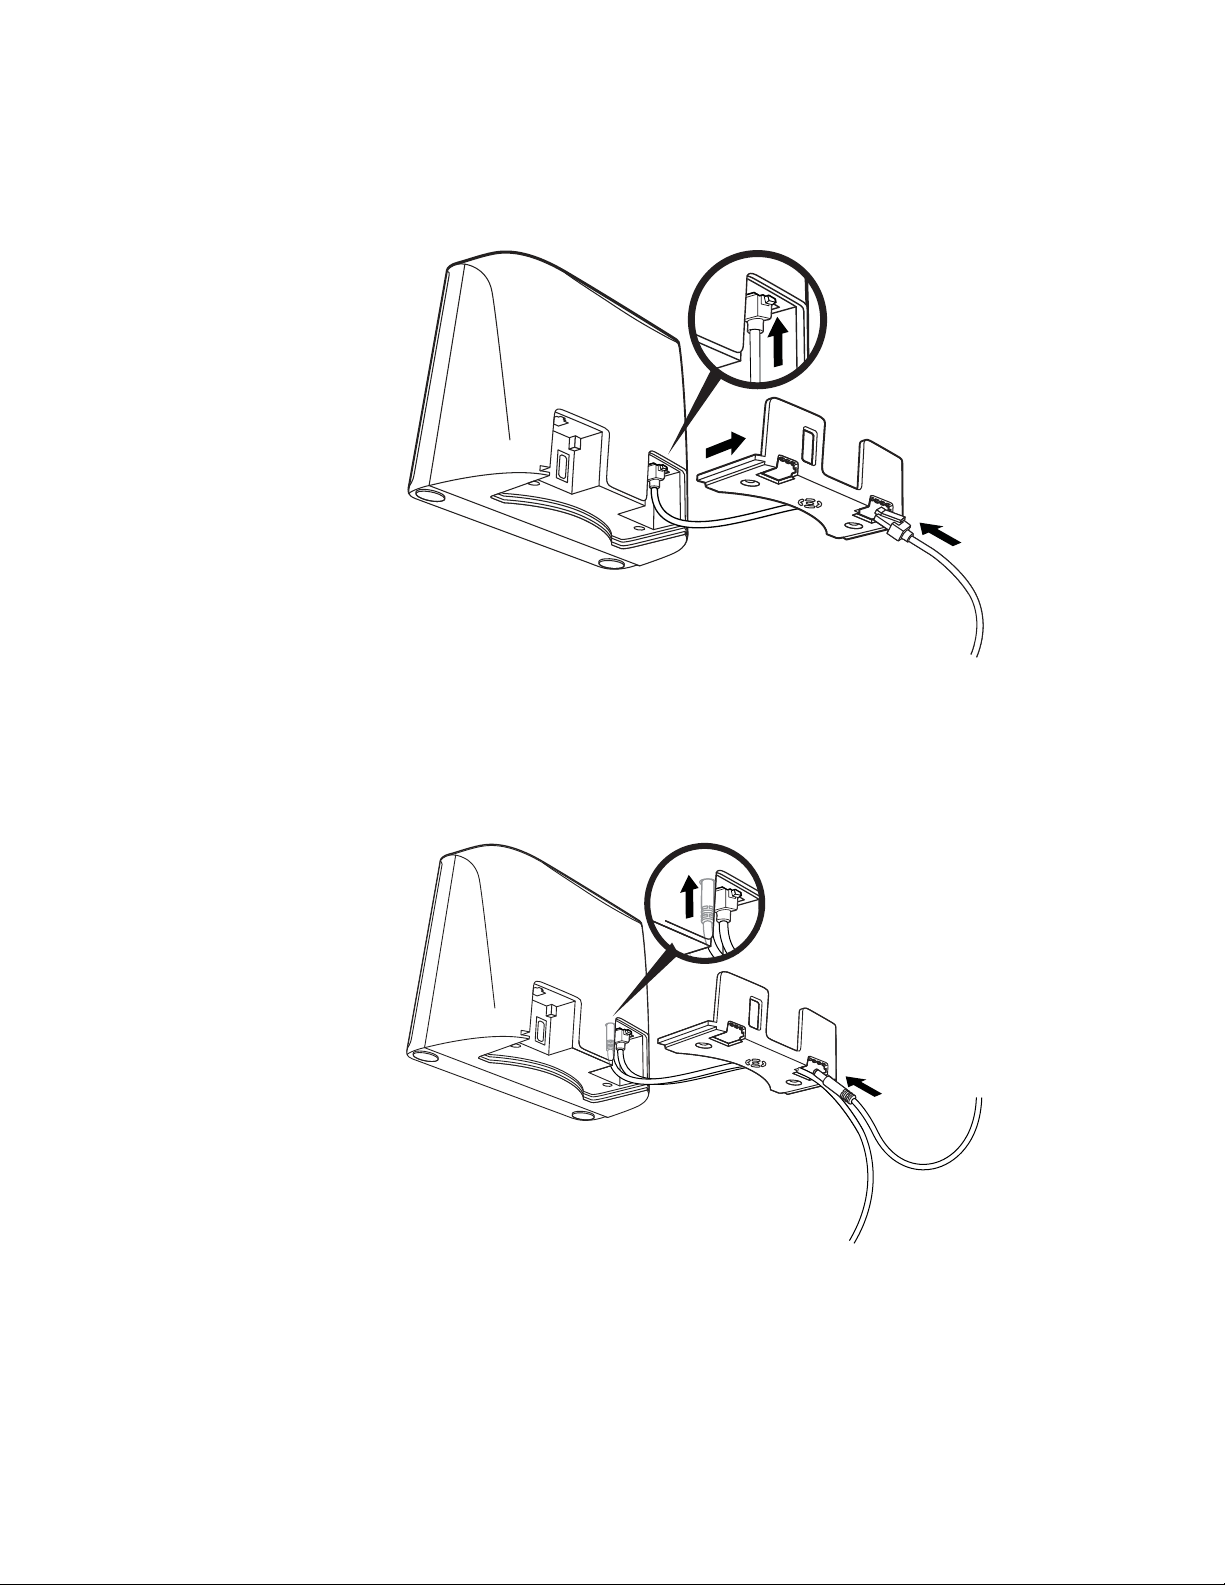
Connect with RS485
This interface programs 115,200 baud, 8 data bits, no parity, and 1 stop bit.
The scanner can be connected for an IBM POS terminal interface.
6 Solaris 7980g User Guide
1. Remove the back cover and feed the interface cable through to the device.
2
3
1
RS485 Connection:
2
3
1
2. Slide the back cover on and screw the back cover to the device, and then
connect the interface cable to the computer.
Connect EAS
Solaris 7980g User Guide 7
3. Turn the terminal/computer power back on. The scanner beeps.
4. Verify the scanner operation by scanning a bar code from the Sample Symbols
on page 233. The scanner beeps once.
For further RS485 settings, refer to RS485,page 14.
Note: The 7980GEL does not support the EAS interface.
Checkpoint®
2
3
1
2
3
1
When connecting to a Checkpoint EAS system, connect the Checkpoint EAS cable
to the EAS port on the left side of the scanner. Refer to EAS Settings beginning on
page 151 for configuration codes and further EAS programming information.
Sensormatic®
When connecting to a Sensormatic EAS system, connect the Sensormatic EAS
cable to the EAS port on the left side of the scanner. Contact Tyco for further information about Sensormatic installation and configuration. Refer to EAS Settings
beginning on page 151 for configuration codes and further EAS programming
information.
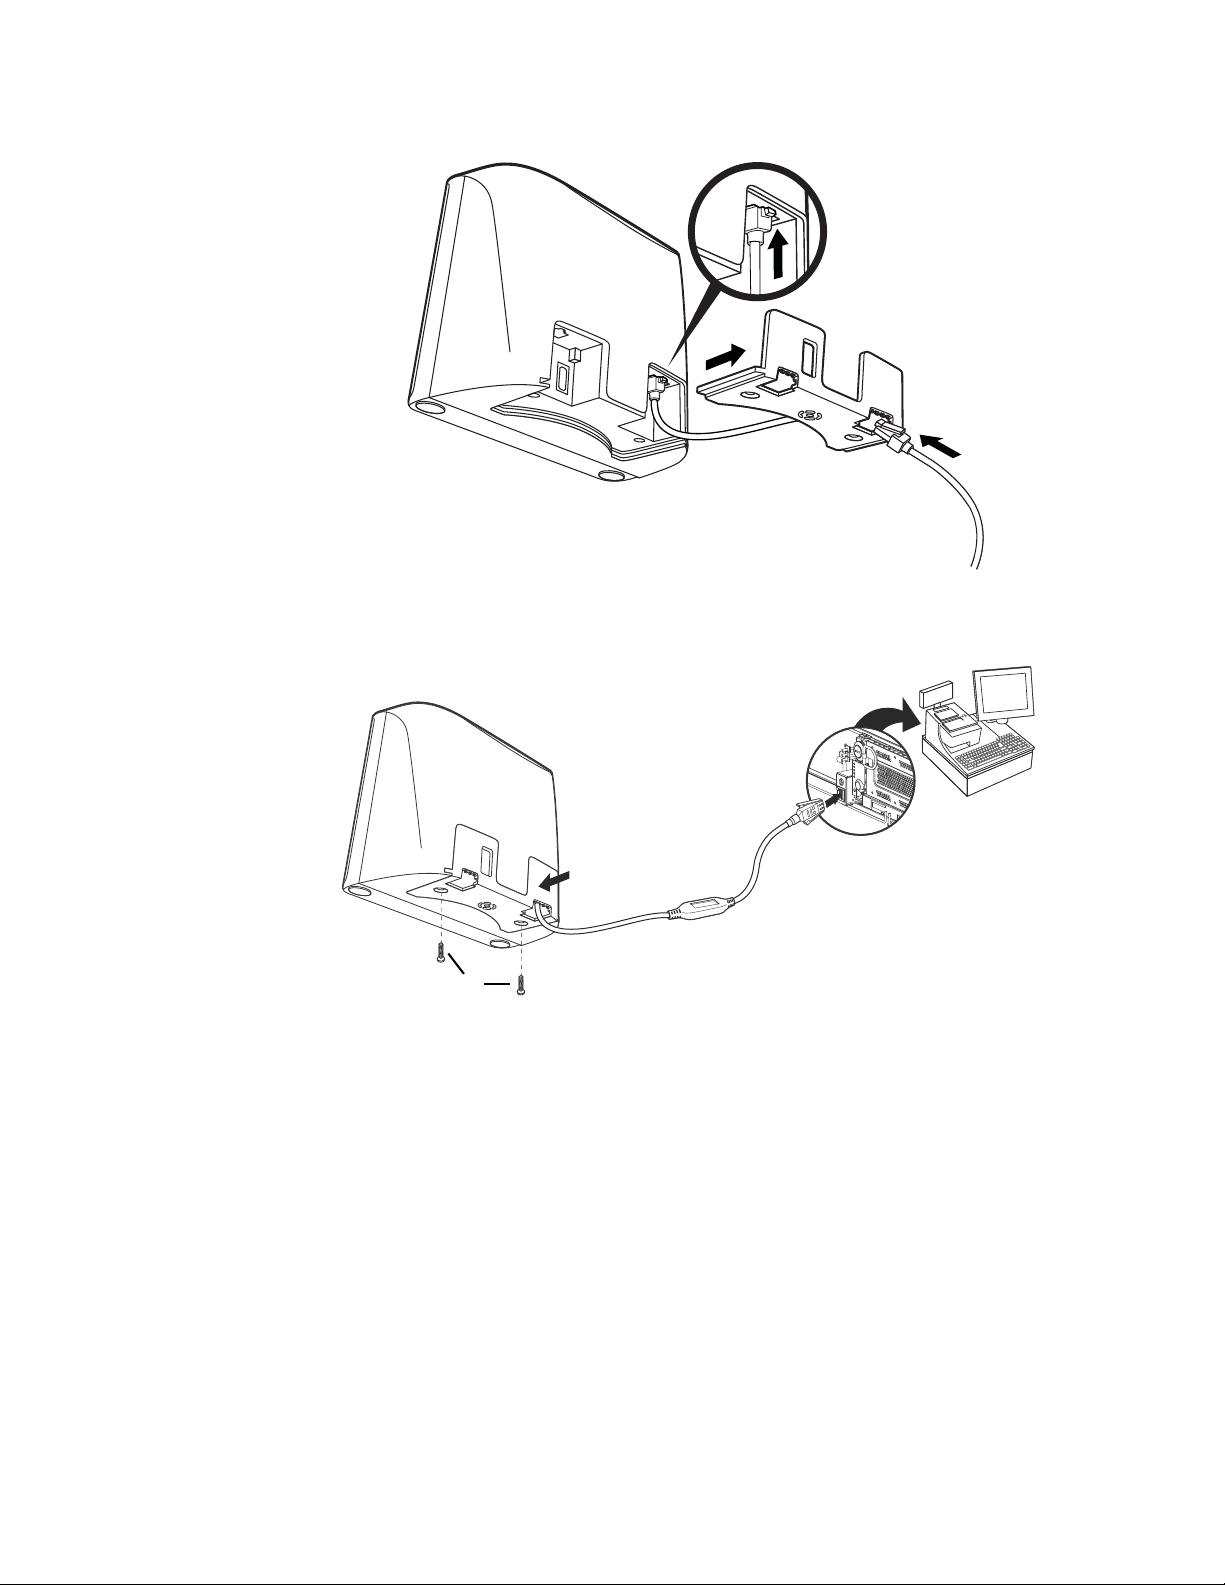
Connect Auxiliary Scanner
Note: The 7980GEL does not support an Auxiliary Scanner.
8 Solaris 7980g User Guide

1. Connect the interface cable. See Connect the Device on page 1 for further
2
1
2
3
1
information.
2. Remove the back cover and feed the power supply cable through to the device.
Make sure the power cable is completely inserted into the device.
3. Slide the back cover on and screw the back cover to the device. Plug the power
supply into the outlet
Solaris 7980g User Guide 9
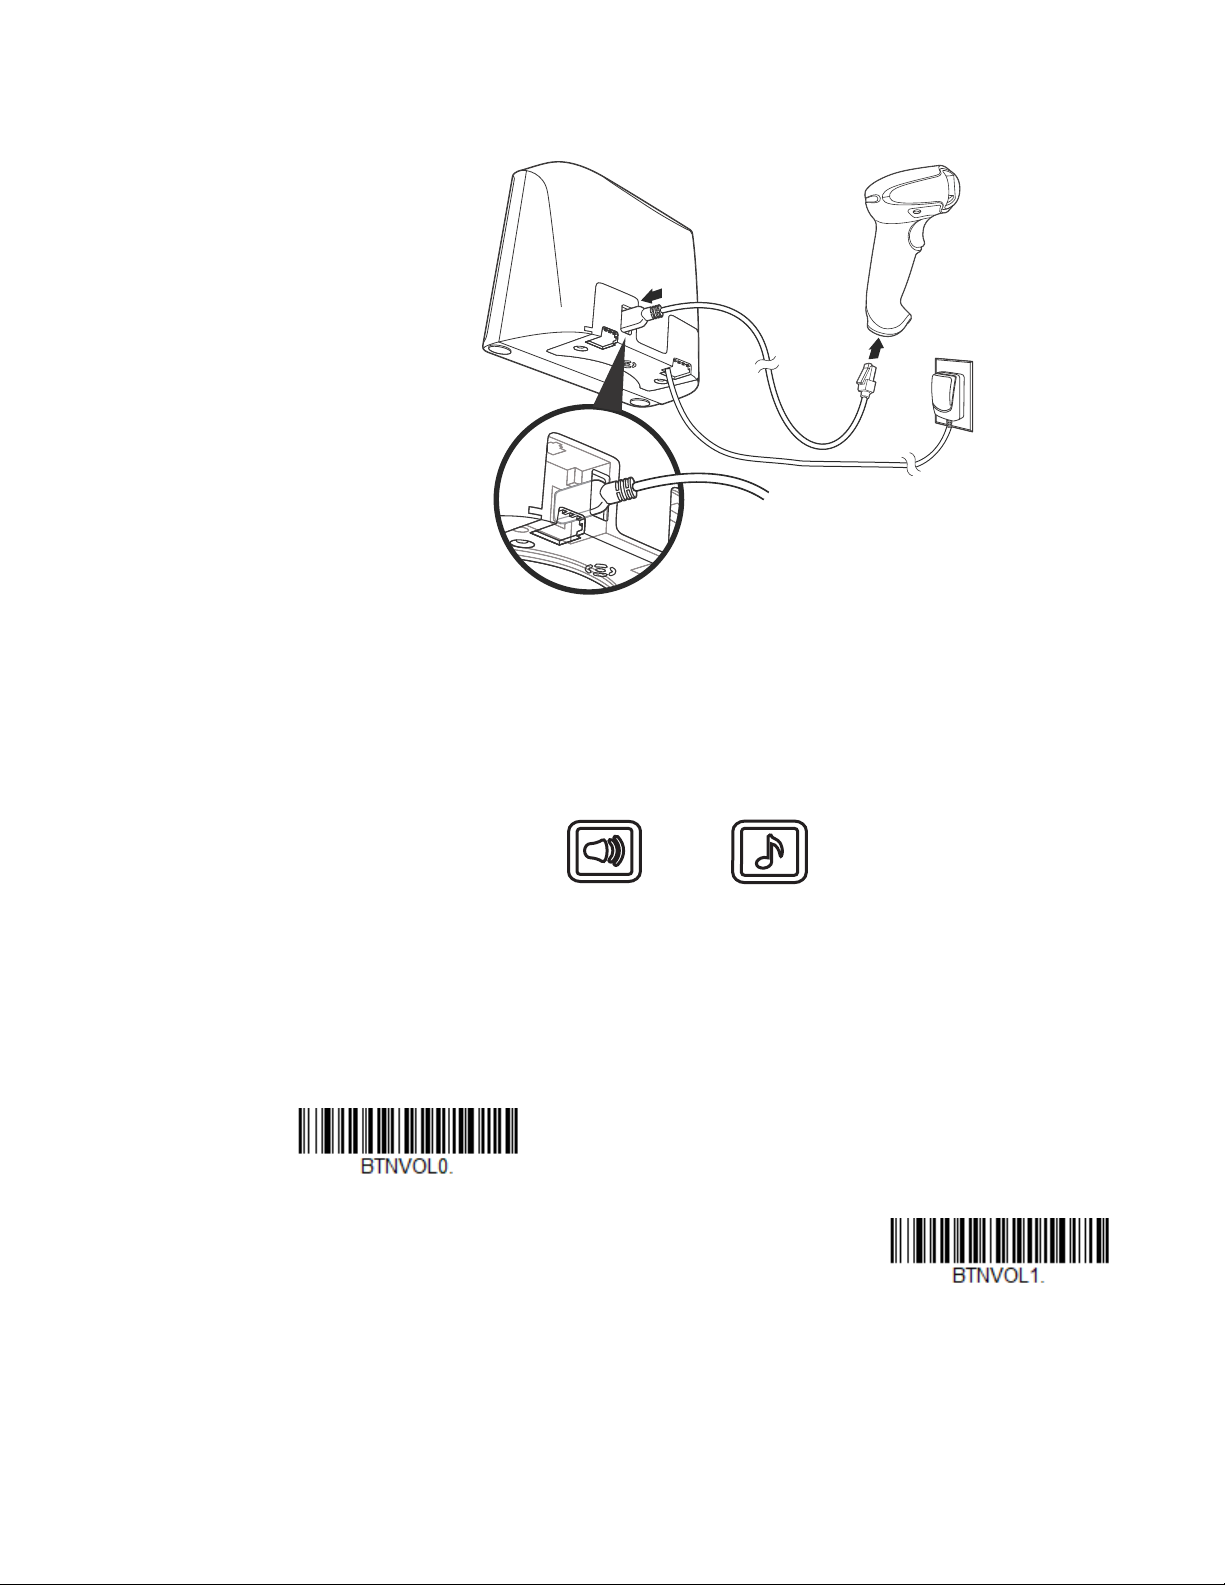
4. Connect the USB cable to the USB port on the left side of the scanner, and then
2
1
Beeper Volume
Beeper Frequency
Volume Adjustment Off
* Volume Adjustment On
connect the interface cable to the auxiliary scanner.
Button Functionality
Note: The 7980GEL does not support Button Functionality.
There are two buttons on the front of the device. The following is a brief description
of the settings for the buttons.
Beeper Volume Adjustment
When Volume Adjustment is set to On, pressing the Sound button repeatedly
scrolls through the volume settings for the scanner’s beeper. When set to Off, the
Sound button does not scroll through these settings. Default = Volume Adjustment
On.
10 Solaris 7980g User Guide

Beeper Frequency Adjustment
Frequency Adjustment Off
* Frequency Adjustment On
When Frequency Adjustment is set to On, holding the Sound button down for up to
3 seconds scrolls through the frequency (tone) settings for the scanner’s beeper.
When set to Off, the Sound button does not scroll through these settings. Default =
Frequency Adjustment On.
Reading Techniques
Present the bar code to the scanner. The LEDs turn up to read the code. If the light
level in the room is not high enough, the code may not be read.
Menu Bar Code Security Settings
Honeywell scanners are programmed by scanning menu bar codes or by sending
serial commands to the scanner. If you want to restrict the ability to scan menu
codes, you can use the Menu Bar Code Security settings. Please contact the nearest technical support office (see Technical Assistance on page xi) for further information.
Set Custom Defaults
You have the ability to create a set of menu commands as your own, custom
defaults. To do so, scan the Set Custom Defaults bar code below before scanning
the menu commands for your custom defaults. If a menu command requires scanning numeric codes from the Programming Chart, then a Save code, that entire
Solaris 7980g User Guide 11

sequence will be saved to your custom defaults. When you have entered all the
Set Custom Defaults
Save Custom Defaults
Activate Custom Defaults
commands you want to save for your custom defaults, scan the Save Custom
Defaults bar code.
You may have a series of custom settings and want to correct a single setting. To do
so, just scan the new setting to overwrite the old one. For example, if you had previously saved the setting for Beeper Volume at Low to your custom defaults, and
decide you want the beeper volume set to High, just scan the Set Custom Defaults
bar code, then scan the Beeper Volume High menu code, and then Save Custom
Defaults. The rest of the custom defaults will remain, but the beeper volume setting will be updated.
Reset the Custom Defaults
If you want the custom default settings restored to your scanner, scan the Activate
Custom Defaults bar code below. This is the recommended default bar code for
most users. It resets the scanner to the custom default settings. If there are no custom defaults, it will reset the scanner to the factory default settings. Any settings
that have not been specified through the custom defaults will be defaulted to the
factory default settings.
12 Solaris 7980g User Guide

CHAPTER
2
PROGRAM THE INTERFACE
IBM PC AT and Compatibles with
CR suffix
Introduction
This chapter describes how to program your system for the desired interface.
Program the Interface - Plug and Play
Plug and Play bar codes provide instant scanner set up for commonly used interfaces.
Note: After you scan one of the codes, power cycle the host terminal to have the interface in
effect.
Keyboard Wedge
If you want your system programmed for an IBM PC AT and compatibles keyboard
wedge interface with a USA keyboard, scan the bar code below. Keyboard wedge is
the default interface.
Note: The following bar code also programs a carriage return (CR) suffix.
Solaris 7980g User Guide 13

Laptop Direct Connect
Laptop Direct Connect
with CR suffix
RS232 Interface
IBM Port 5B Interface
IBM Port 9B
HHBCR-1 Interface
IBM Port 17 Interface
For most laptops, scanning the Laptop Direct Connect bar code allows operation
of the scanner in parallel with the integral keyboard. The following Laptop Direct
Connect bar code also programs a carriage return (CR) suffix and turns on Emulate External Keyboard (page 28).
RS232 Serial Port
The RS232 Interface bar code is used when connecting to the serial port of a PC or
terminal. The following RS232 Interface bar code also programs a carriage return
(CR) and a line feed (LF) suffix, baud rate, and data format as indicated below. It
also changes the trigger mode to manual.
Option Setting
Baud Rate 115,200 bps
Data Format 8 data bits, no parity bit, 1 stop bit
RS485
Scan one of the following “Plug and Play” codes to program the scanner for an IBM
POS terminal interface.
Note: After scanning one of these codes, you must power cycle the cash register.
14 Solaris 7980g User Guide
Each bar code above also programs the following suffixes for each symbology:
IBM Port 5B Interface
IBM Port 9B
HHBCR-2 Interface
* Packet Mode Off
Packet Mode On
* Suffixes programmed for Code 128 with IBM 4683 Port 5B, IBM 4683 Port 9B HHBCR-1, and IBM 4683
Port 17 Interfaces
**Suffixes programmed for Code 128 with IBM 4683 Port 9 HHBCR-2 Interface
RS485 Packet Mode
The following selection allows you to break up large bar code data into smaller
packets on an IBM POS terminal. To break up large bar codes into small packets,
scan the Packet Mode On bar code below. Scan the Packet Mode Off bar code if
you want large bar code data to be sent to the host in a single chunk. Default =
Packet Mode Off.
Symbology Suffix Symbology Suffix
EAN 8 0C Code 39 00 0A 0B
EAN 13 16 Interleaved 2 of 5 00 0D 0B
UPC A 0D Code 128 * 00 0A 0B
UPC E 0A Code 128 ** 00 18 0B
Aztec 00 34 0B
PDF417 00 2E 0B
Data Matrix 00 32 0B
QR 00 33 0B
Solaris 7980g User Guide 15
RS485 Packet Length
Packet Length
USB IBM SurePos
(USB Handheld Scanner)
Interface
USB IBM SurePos
(USB Tabletop Scanner)
Interface
U
S
B
K
e
y
b
o
a
r
d
(
P
C
)
If you are using Packet mode, you can specify the size of the data “packet” that is
sent to the host. Scan the Packet Length bar code, then the packet size (from 20 -
256) from the Programming Chart, then Save. Default = 40.
USB IBM SurePos
Scan one of the following “Plug and Play” codes to program the scanner for an IBM
SurePos (USB handheld scanner) or IBM SurePos (USB tabletop scanner) interface.
Note: After scanning one of these codes, you must power cycle the cash register.
Each bar code above also programs the following suffixes for each symbology:
Symbology Suffix Symbology Suffix
EAN 8 0C Code 39 00 0A 0B
EAN 13 16 Interleaved 2 of 5 00 0D 0B
UPC A 0D Code 128 00 18 0B
UPC E 0A Code 39 00 0A 0B
USB PC or Macintosh Keyboard
Scan one of the following codes to program the scanner for USB PC Keyboard or
USB Macintosh Keyboard. Scanning these codes also adds a CR suffix.
16 Solaris 7980g User Guide
 Loading...