

Honeywell SiXGB Installation Instructions Manual
> 2.0m (6.5')
Optimal
Satisfactory
No
> 1m
(3.3')
<
7.6m (25')
> 1m
(3.3')
> 5 cm
(2”) Diameter
RF6GB-W allMount
Wall Mo unt ( TopView )
Do NOT mo unt o n
co lumns, po sts o r po le s.
Glass
Ceiling Mount (Side View)
RF6GB-Ce ilingMount
Ceiling
Glass
Floo r
3.5 mm x 25 mm
(#6 x 1")
[2]
3.5 mm x 25 mm
(#6 x 1")
[1]
A
L
I
G
N
t
o
D
I
M
P
L
E
SiXTM
Series
The SiXGB is a wireless glassbreak detector intended for use with Honeywell controls that support SiX™ Series
devices.
SiXGB
Installation Instructions
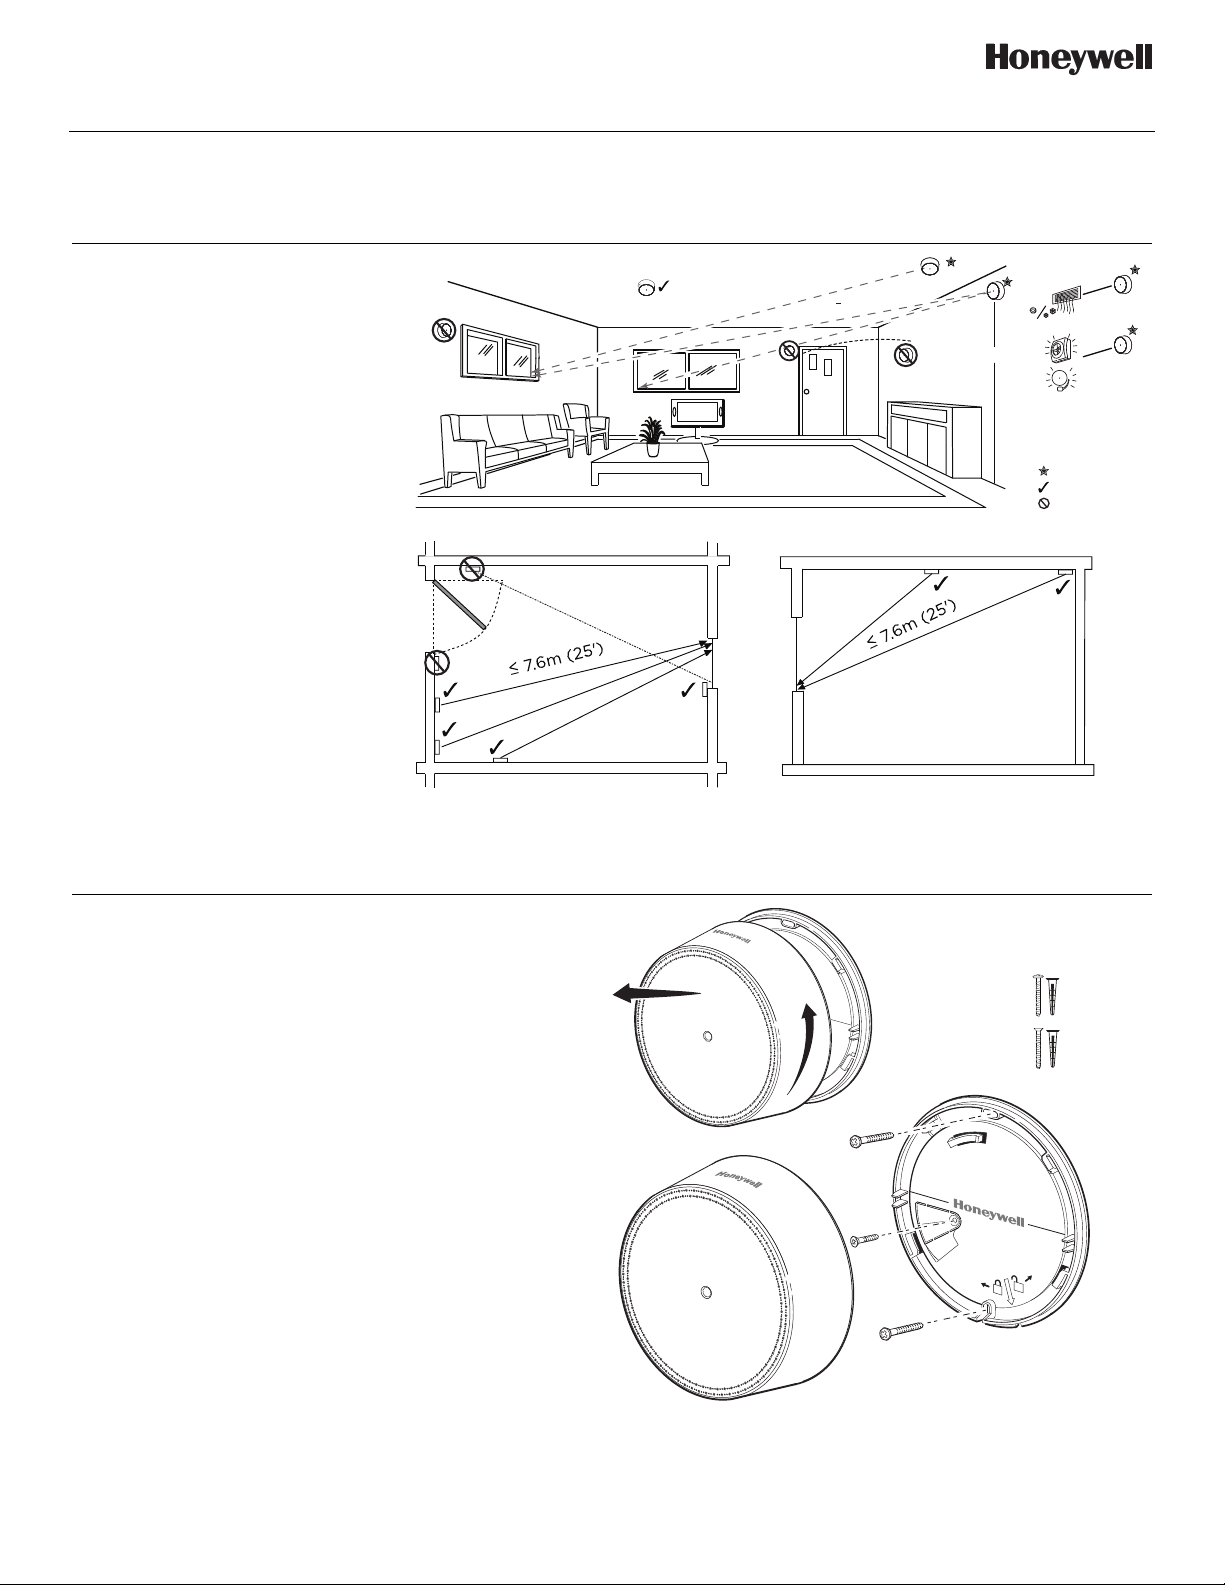
Mounting Guidelines
The SiXGB can be mounted on the
wall or on the ceiling:
• within 7.6 m (25 feet) of the
protected glass
• within clear view of the protected
glass
• at least 2 m (6.5 feet) from the floor
• at least 1 m (3.3 feet) from forced
air ducts
• at least 1 m (3.3 feet) from sirens or
bells greater than 5 cm (2 inches) in
diameter
• between the protected glass and
any heavy window coverings
• when heavy window coverings are
present, the detector can be
mounted on the window frame
• Avoid mounting the detector on the
same wall as the protected glass,
on free-standing posts or pillars, or
in rooms with noisy equipment (air
compressors, bells, power tools,
etc.), if this equipment is operated
when the detector is armed.
To remove the mounting bracket:
Turn the top of the detector 15 degrees counterclockwise and separate the mounting bracket.
NOTE: Before mounting the device permanently,
conduct Go/No Go tests (see controller’s
instructions) to verify adequate signal strength and
adjust the device location and orientation as
necessary.
The rear tamper plate MUST be mounted to a stud,
solid wood, or with a robust wall anchor.
PULL
TO
CONNECT
Serial Number Loop Number
Zone Description 1 Zone Description 2
Device Type Response Type
Alarm Report Chime Supervision
Panic Home
The Green LED
is ON for
3 seconds
1
2
4
Trigger the
device again
3
The Green LED
flashes. Wait up to
about 20 seconds
30
0
45
20
10
PULL
TO
CONNECT
Programming Mode > Zones >
Add New > Serial Number
/
5
Press SAVE
6
Enroll
This device can be enrolled and programmed
either before or after installation.
1. Set the Lyric Controller in Programming
Mode and go to Zone Programming. Select
Add New, then Serial Number. Follow the
controller’s instructions to begin enrollment.
2. Remove the battery tab to activate the device
and begin the enrollment process.
3. The Green [G1]1 LED flashes during
enrollment (up to about 20 seconds*)
*NOTE: Enrollment time varies depending on the
signal strength between the device and the
controller.
• The device sends its unique MAC ID
(Serial Number) and Services information
to the controller.
• The controller registers the device and
displays the transmitter data on screen.
4. The Green [G1] LED is ON for 3 seconds
and the controller beeps to confirm
enrollment.
5. Trigger the detector as shown to complete
enrollment.
6. Press SAVE.
If the sensor is not successfully enrolled during
the enrollment period, the LED turns off and the
device powers down. Activate the tamper, power
down and up again, or use the FG-701
Glassbreak Simulator to restart the enrollment
process.
The device can also be manually enrolled. See
the Controller’s Programming Guide for details.
1
Refer to the SiXGB LEDs section.
Program the SiXGB
Consult the Controller’s instructions for programming
the device in the system.
Adjust the detector sensitivity setting in the controller
programming mode. Refer to the table on the right for
sensitivity options.
After enrolling, update the SiXGB firmware (via the Controller)
to ensure the latest version is used. See the Controller’s
instructions.
NOTE: Once enrolled in a system, the detector cannot be used with
another controller until it is removed from the current controller. See the
Controller’s instructions for details.
Sensitivity Setting Approximate Range
High* 4.6-7.6m / 15-25 ft.
Medium 3-4.6m / 10-15 ft.
Low 1.5-3m / 5-10 ft.
Lowest 0-1.5m / 0-5 ft.
*Factory default. Change the sensitivity setting at
the Controller.
2
 Loading...