


1
(Loop 3)
2
(Loop 2)
3
(Loop 4)
4
(Loop 1)
8*
(Loop 5)
Serial Number Loop Number
Zone Description 1 Zone Description 2
Device Type Response Type
Alarm Report Chime Supervision
Panic Home
LEDs
ON for
3 seconds
Programming Mode > Keys > Add New >
Select Key Type [Key Fob*] > Serial Number
Press the
buttons again
to complete
enrollment
1
2
3
4
5
LEDs flash alternately
Up to about 20 seconds
~ 2 seconds
30
0
45
20
10
Assign the desired Zone Type for each button key.
6
Assign a User Number for the Key Fob and press SAVE.
7
SiXTM
Series
SiXFOB
Installation Instructions
This bi-directional wireless key fob (wireless key) is
intended for use with Honeywell controls that support
SiX™ series devices.
Press and hold each button about 2 seconds to
activate. (For two-button Panic, press and hold both
buttons for 2 seconds.)
Enroll and Program the SiXFOB
1. Set the Lyric Controller in Programming mode. Go to the
Keys enrollment screen, select Add New, select “Key Fob”*
Key Type and select Serial Number. (*Refer to For SIA
Installations section below for SIA selections.)
2. Press and hold the top two buttons for about two seconds to
activate the enrollment process.
3.
The LEDs alternately flash green during enrollment (up to
about 20 seconds).
NOTE: Enrollment time varies depending on the signal strength
between the device and the controller.
• The device sends its unique MAC ID (Serial Number) and
Services information to the controller.
• The controller registers the device and displays the
transmitter data on screen.
4. The LEDs light solid green for 3 seconds and the SiXFOB
emits a chirp to confirm enrollment.
5. Press the top two buttons again to complete enrollment.
NOTE: If enrollment is not confirmed, press and hold the top two
buttons for two seconds again to restart the enrollment process.
6. Use Zone Program menu to change default key functions as
desired.
7. Assign a User Number to the key fob and press SAVE.
Follow instructions in the Controller’s programming guide to
program the SiXFOB services.
The device can also be manually enrolled. See the Controller’s
Programming Guide for details.
After enrolling, update the SiXCT firmware (via the
Controller) to ensure the latest version is used. See the
Controller’s instructions.
*For SIA Installations
Button Keys 1-4
(Corresponding Loop numbers are
seen when programming the key
fob through the Zone Programming
menu.)
*SIA NOTE: SIA requires 2-button press for
panic functions. Select “8 Button” (or “6
Button”) Key Type and follow the directions
in the For SIA Installations section below.
NOTE: Once enrolled in a system, the SiXFOB
cannot be used with another controller until it is
removed from the current controller. When
removed from a system, the key fob will revert to
factory default settings.
There are two methods to enroll the device when two-button press is required for Panic functions.
Method A (uses 8 zones in the system): Follow the directions above, except select Key Type “8 Button” and program
Button Key 8 for the desired panic function. Continue the directions above to complete enrollment.
Method B (uses 6 zones in the system): Follow the direction above except select Key Type “6 Button”. Continue the
directions above to assign the desired panic function to Button 6. Take note of the Zone number assigned to Button 6.
After assigning the User Number and selecting SAVE, enter Zone Programming mode. Scroll to the Button 6 Zone
number and reassign the Loop for Button 6 to Loop 5. Select SAVE.
3 sec
GG
G
20 sec
/
R
2-3 sec
2 x
R 2-3 sec
4 x
2-3 sec
G
1 x
G 2-3 sec
1 x
G
1 sec
2 sec
G
R = Red
G = Green
On
=
=
Slow Flash
R
=
Rapid Flash
=
Beep
=
Chirp
=
/
LEDs Alternate
Sounder
LEDs
1
2
Maxell CR2032
Duracell DL2032
3
4
5
press for 2 seconds
30
0
45
10
Wait about
10 seconds
or
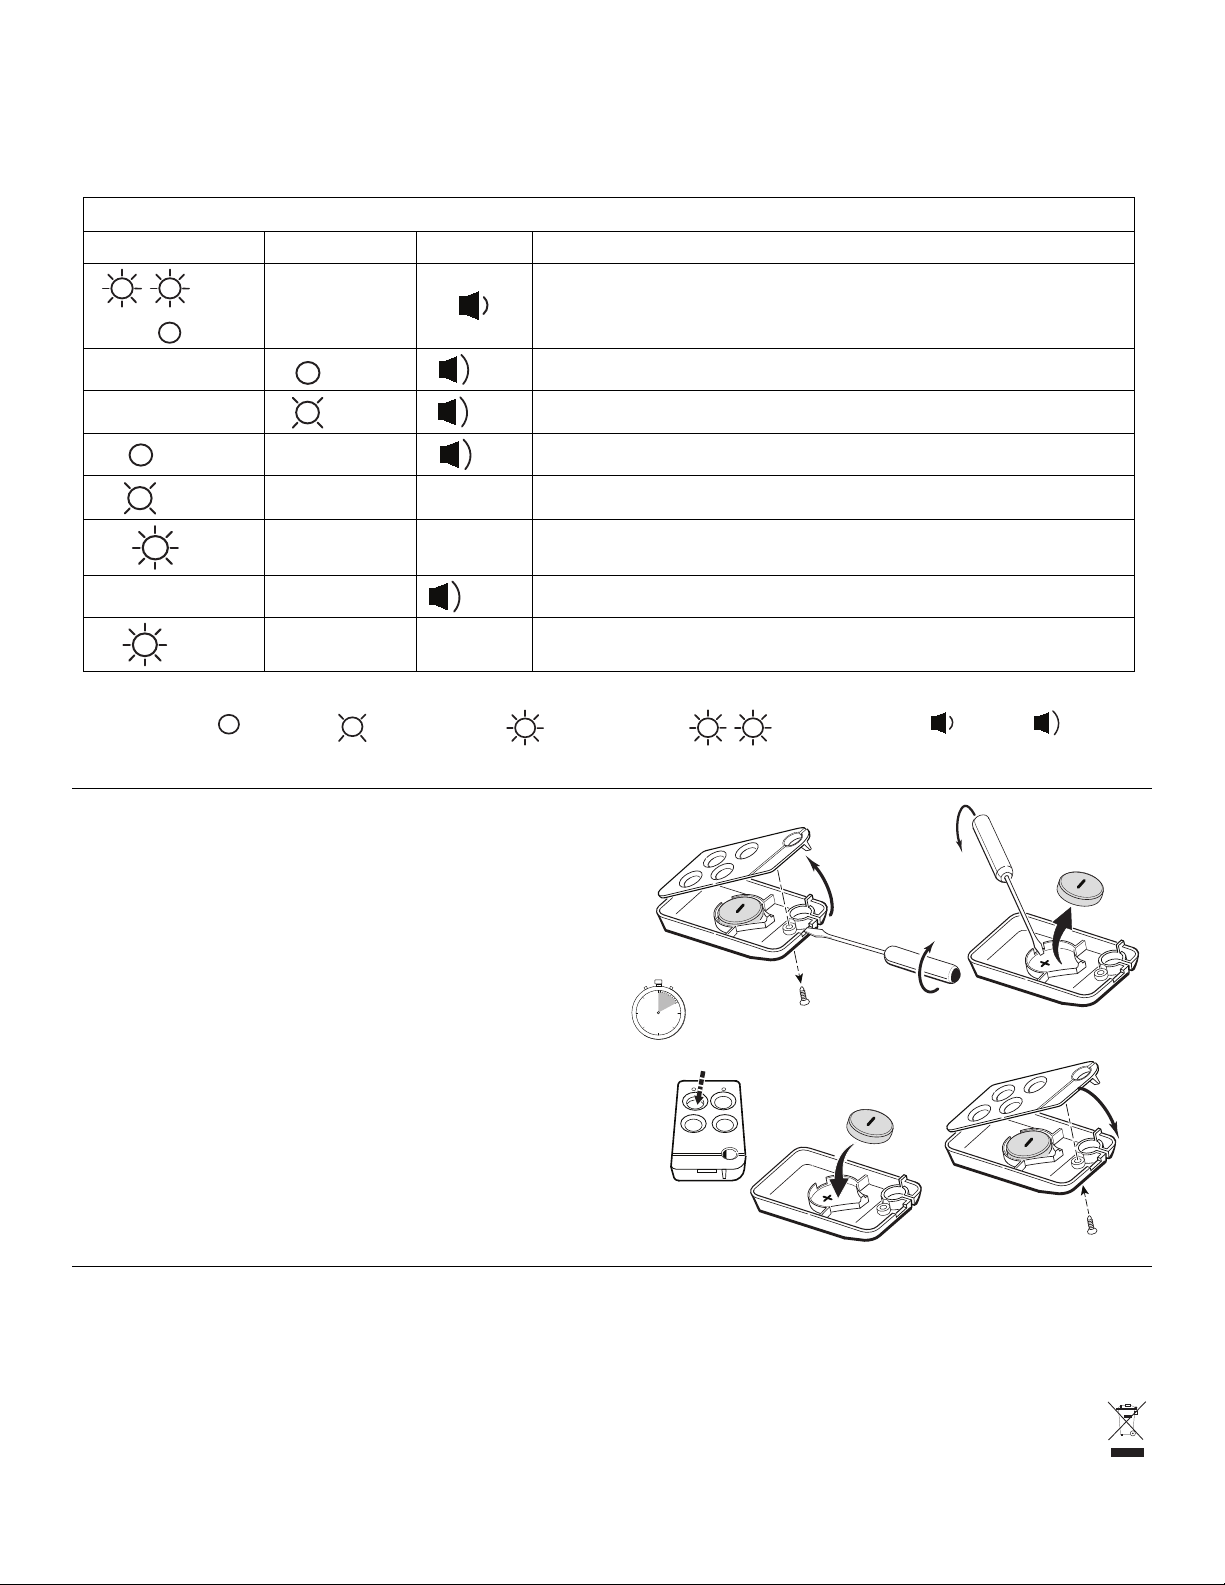
System Status and Sounder Indications
The SiXFOB can be used to control the Lyric Controller system (e.g., arm, disarm the system); and receive system
status information (armed status, not ready to arm, in alarm, in RF transmission mode, and more). Press and release
any button and observe the key fob. Refer to the table below for system status information.
System Status Indications
G R System Status
Battery Replacement
Device Enrollment
System is Armed
Alarm in progress or System in Audible Panic Mode
Disarmed, Ready to Arm
Disarmed, Not Ready to Arm
RF Transmission
Not Hearing from the Controller
Deleting the Keyfob from the system
When the battery is low, the LEDs do not flash during
transmission. To replace the battery:
1. Remove the screw from the back housing and use a
screwdriver to gently separate the front and back
housings.
2. Use a screwdriver to carefully remove the battery.
3. Wait 10 seconds or press a key fob button for 2
seconds to ensure full power discharge.
4. Insert a new Lithium, 3V, 210mAh battery as shown.
Recommended replacement battery:
Maxell CR2032 or Duracell DL2032
5. Replace the front housing and secure the housings
with the cover screw.
BATTERY CAUTION: Risk of fire, explosion and burns. Do not recharge,
disassemble, heat above 212 F (100 C) or incinerate. Dispose of used
batteries properly. Keep away from children.
Specifications
Battery: Lithium, 3V, 210mAh; Maxell CR2032, Duracell DL2032
RF Frequency: 2.4GHz
Operating Temperature: 0° to 50° C / 32° to 122° F
(Agency compliance 0° to 49° C / 32° to 120° F)
Relative Humidity: 95% max. (Agency compliance – 93% max.),
non-condensing
Dimensions: 11 mm H x 65.5 mm L x 36 mm W / 0.43” H x 2.58” L x 1.42” W
:
Approval Listings:
FCC / IC
cETLus Listed
Conforms to UL 1023 & UL 985
Certified to ULC ORD- C1023
& ULC-S545
Other Standards:
SIA CP-01 RoHS C-Tick
Product must be tested at least once each
year.
2
 Loading...