

Page 1
PX940
High Performance Industrial Printer
User Guide
Page 2

Disclaimer
Honeywell International Inc. (“HII”) reserves the right to make changes in specifications and other information contained in
this document without prior notice, and the reader should in all cases consult HII to determine whether any such changes
have been made. The information in this publication does not represent a commitment on the part of HII.
HII shall not be liable for technical or editorial errors or omissions contained herein; nor for incidental or consequential
damages resulting from the furnishing, performance, or use of this material. HII disclaims all responsibility for the selection and use of software and/or hardware to achieve intended results.
This document contains proprietary information that is protected by copyright. All rights are reserved. No part of this document may be photocopied, reproduced, or translated into another language without the prior written consent of HII.
Copyright 2019 Honeywell International Inc. All rights reserved.
Web Address:
Microsoft® Windows®, Windows NT®, Windows 2000, Windows ME, Windows XP, and the Windows logo are trademarks or
registered trademarks of Microsoft Corporation.
Apple is a trademark of Apple Inc., registered in the U.S. and other countries.
Zebra is a trademark or registered trademark of Zebra Corporation.
Other product names or marks mentioned in this document may be trademarks or registered trademarks of other companies and are the property of their respective owners.
For patent information, refer to www.hsmpats.com.
www.honeywellaidc.com
Page 3

TABLE OF CONTENTS
Customer Support ........................................................................................................................ ix
Technical Assistance ............................................................................................................. ix
Product Service and Repair ................................................................................................ ix
Limited Warranty .................................................................................................................... ix
Chapter 1 - Get Started ....................................................................................1
Features ............................................................................................................................................. 1
Full Touch Display ................................................................................................................... 1
Print Button................................................................................................................................ 1
Ready Screen............................................................................................................................. 2
Main Menu ................................................................................................................................. 3
Navigate the Main Menu ...................................................................................................... 4
Wizards............................................................................................................................................... 4
Printing Wizard......................................................................................................................... 5
Communications Wizard ...................................................................................................... 5
Calibration Wizard................................................................................................................... 5
Printer Command Languages................................................................................................... 6
Autosense ...................................................................................................................................6
Fingerprint.................................................................................................................................. 6
Intermec Printer Language (IPL) ......................................................................................6
ZPL Simulator (ZSim)............................................................................................................. 7
DPL Simulator (DSim) ...........................................................................................................7
Access the Printer Web Page .....................................................................................................7
Set the Printer Command Language ..................................................................................... 7
From the Printer Web Page.................................................................................................. 7
PX940 User Guide i
Page 4

From the Main Menu ..............................................................................................................8
Chapter 2 - Set Up the Printer ........................................................................9
Power Up the Printer......................................................................................................................9
Calibrate the Touch Screen......................................................................................................10
To calibrate the screen from the website: .................................................................... 10
About the Media ........................................................................................................................... 10
Load Media for Tear-Off Printing ...................................................................................10
Load Media for Rewind Printing .....................................................................................14
Load Media for Peel-Off Printing ...................................................................................15
Load Fanfold Media ............................................................................................................. 16
About the Ribbon .........................................................................................................................16
Load Ribbon ............................................................................................................................ 17
Print a Test Label...................................................................................................................18
Printhead Pressure and Toggle Position............................................................................ 19
Pressure Adjustment ...........................................................................................................19
Toggle Position Adjustment..............................................................................................19
Chapter 3 - Connect the Printer.................................................................. 21
Connect the Printer to Your PC ..............................................................................................21
Connect the Printer Using a Serial Cable....................................................................21
Connect the Printer Using a USB Cable.......................................................................21
Connect the Printer to Your Network ...................................................................................21
Connect the Printer to an Ethernet Network..............................................................22
................................................................................................................................................22
Configure Bluetooth Communications from the Web Page ................................ 23
Configure Bluetooth Communications from the Main Menu............................. 23
Printer Drivers ...............................................................................................................................23
Install Printer Drivers...........................................................................................................24
Install Authentication Certificates .................................................................................24
USB Host Port ...............................................................................................................................25
Connect a USB Device......................................................................................................... 25
Chapter 4 - Configure the Printer............................................................... 27
Printer Configuration Menus..................................................................................................27
ii PX940 User Guide
Page 5

Printing Menu.........................................................................................................................28
System Settings Menu ........................................................................................................29
Verifier Menu...........................................................................................................................29
Alert Menu ................................................................................................................................30
Printer Configuration...........................................................................................................30
Restrict Access to the Main Menu ..................................................................................30
Access the Printer Web Page ............................................................................................31
Printer Webpage User Name and Password...............................................................31
Configure the Printer from the Web Page..........................................................................31
Configure the Printer with Honeywell PrintSet 5 ............................................................32
Configure the Printer with Programming Commands..................................................32
Uploading from the Web Page .........................................................................................33
Uploading from a USB Storage Device .........................................................................33
Change Background Image for the Ready Screen..........................................................34
Printer Profiles...............................................................................................................................35
Save a Printer Profile from the Web Page....................................................................35
Load a Printer Profile from the Web Page ...................................................................35
Save a Printer Profile from the Main Menu.................................................................36
Load a Printer Profile from the Main Menu ................................................................36
Load a Printer Profile Using Programming Commands........................................36
Install a Configuration File from a USB Storage Device........................................37
Export a Configuration File to a USB Storage Device.............................................37
Menu Shortcuts ............................................................................................................................38
Create Menu Shortcuts .......................................................................................................38
Customize the Printer Web Page...........................................................................................39
Chapter 5 - About the Verifier ......................................................................41
Setting up the Verifier.................................................................................................................41
Webpage ...................................................................................................................................42
Front Panel...............................................................................................................................42
Verifier License .............................................................................................................................42
Calibration ......................................................................................................................................42
Verifier Calibration Card .....................................................................................................42
PX940 User Guide iii
Page 6

Verifier Settings ............................................................................................................................ 43
Verification Type ....................................................................................................................43
Passing Grade.........................................................................................................................43
Aperture ....................................................................................................................................43
Retries........................................................................................................................................44
Verification Failure Action .................................................................................................44
Save Failed Label Images ..................................................................................................44
Void Pattern.............................................................................................................................44
Print Modes and Speed.......................................................................................................44
Barcode Symbologies Supported ...................................................................................45
Barcode Orientations...........................................................................................................45
Barcode Size Supported .....................................................................................................45
Verification Length...............................................................................................................45
Maximum Number of Barcodes per Label..................................................................45
Printing Behavior after Error Recovery.........................................................................46
Printing Behavior after Recovered from error above: .............................................46
Printing Errors........................................................................................................................47
Unsupported Barcode Behavior......................................................................................48
Example:.............................................................................................................................48
Verification Failed Error Handling..................................................................................48
Failed Label Image File ...............................................................................................49
USB Thumbdrive............................................................................................................. 49
Reporting and Statistics.....................................................................................................50
Report Formats ......................................................................................................................51
Individual Report ................................................................................................................... 51
Report Header.................................................................................................................52
Barcode Information............................................................................................................53
All Supported 1D Barcodes Overall Parameters.......................................................54
2D Barcode, Datamatrix Overall Parameters.............................................................55
1D barcode 10 line Profile Grading Parameters.......................................................57
Summary Report ...................................................................................................................58
Restore Default Verification Files ...................................................................................58
Fingerprint Command.........................................................................................................59
iv PX940 User Guide
Page 7

Chapter 6 - Troubleshooting.........................................................................61
System Information.....................................................................................................................61
Statistics....................................................................................................................................61
Printer Odometer .........................................................................................................................62
Maintenance Alerts .....................................................................................................................62
Set Alerts ...................................................................................................................................62
Alert Notifications .................................................................................................................63
Error Alerts and Solutions ..................................................................................................64
Verifier Error Alerts and Solutions ..................................................................................65
Troubleshoot Printer Problems and Find Solutions.......................................................65
Print Quality Problems ........................................................................................................65
Verifier Problems ...................................................................................................................67
Networking Problems ..........................................................................................................68
Restore Printer Defaults............................................................................................................68
Restore Defaults from the Printer Web Page..............................................................68
Restore Defaults from the Main Menu .........................................................................69
Restore Defaults with a Hardware-Based Reset .......................................................69
Upgrade the Printer Firmware ................................................................................................69
Upgrade Firmware from the Printer Web Page..........................................................70
Upgrade Firmware from a USB Storage Device ........................................................70
Chapter 7 - Maintenance...............................................................................71
Clean the Printer...........................................................................................................................71
Clean the Printhead..............................................................................................................71
Clean the Front Sensor (PX940A) ...................................................................................72
Clean the Verifier (PX940V)...............................................................................................72
Clean the Media Path...........................................................................................................73
Clean the Exterior of the Printer......................................................................................73
Replace the Printhead................................................................................................................73
Replace the Platen Roller..........................................................................................................74
Printhead Pressure and Toggle Adjustment .....................................................................75
Pressure Adjustment............................................................................................................75
Label Taken Sensor Calibration.......................................................................................76
Label Gap and Black Mark Sensor Adjustments ......................................................76
PX940 User Guide v
Page 8

Chapter 8 - Product Specifications............................................................. 77
Printer and Environmental Specifications ........................................................................77
Supported Command Languages ........................................................................................77
Media Sensors ..............................................................................................................................77
Network Services.......................................................................................................................... 78
Fonts ................................................................................................................................................. 78
Resident Fonts........................................................................................................................78
Downloadable Fonts ............................................................................................................80
Supported Font Types .........................................................................................................80
Bar Code Symbologies ........................................................................................................ 81
1D Bar Code Symbologies...........................................................................................81
2D Bar Code Symbologies...........................................................................................81
Graphic File Types.................................................................................................................82
Appendix A - Default Settings...................................................................... 83
Communications Settings .......................................................................................................83
Serial Port.................................................................................................................................83
Ethernet ....................................................................................................................................84
Bluetooth Settings ......................................................................................................................84
Media Settings..............................................................................................................................85
Print Quality Settings.................................................................................................................87
System Settings............................................................................................................................88
General System ......................................................................................................................88
Display and Audio Settings ...............................................................................................89
System I/O ...............................................................................................................................89
System Network Services ................................................................................................... 90
Verifier Settings......................................................................................................................91
vi PX940 User Guide
Page 9

Verification Type..............................................................................................................91
Passing Grade .................................................................................................................92
Aperture ..............................................................................................................................93
Retries..................................................................................................................................94
Verification Failure Action ...........................................................................................95
Save Failed Label Images ...........................................................................................96
Void Pattern ......................................................................................................................96
Maintenance Alerts...............................................................................................................97
Appendix B - Print Labels with INPrint.......................................................99
The INPrint Page ..........................................................................................................................99
Print INPrint Labels..............................................................................................................99
Appendix C - Accessory Installation Instructions ................................. 101
Verifier Calibration Card.........................................................................................................101
Handling Instructions.......................................................................................................101
PX940 User Guide vii
Page 10

viii PX940 User Guide
Page 11

Customer Support
Technical Assistance
To search our knowledge base for a solution or to log in to the Technical Support
portal and report a problem, go to www.hsmcontactsupport.com.
For our latest contact information, see www.honeywellaidc.com/locations.
Product Service and Repair
Honeywell International Inc. provides service for all of its products through service
centers throughout the world. To obtain warranty or non-warranty service, return
your product to Honeywell (postage paid) with a copy of the dated purchase
record. To learn more, go to www.honeywellaidc.com and select Service & Repair at
the bottom of the page.
Limited Warranty
For warranty information, go to www.honeywellaidc.com and click Get Resources >
Product Warranty.
PX940 User Guide ix
Page 12

x PX940 User Guide
Page 13

CHAPTER
1
Features
GET STARTED
The PX940 series industrial printer includes both PX940 productivity version
(PX940A) and PX940 Verifier version(PX940V) with integrated barcode verification
module.
Both PX940A and PX940V printers are rugged label printers that include
integrated USB, RS-232, and Ethernet interfaces. You can connect the printers to a
single PC, a wired network, or a wireless network.
• Print speed of up to 14 ips.
• USB host port for connecting storage devices, scanners, or keyboards.
• USB device port to connect to a PC.
• Support for printer programming languages including Fingerprint (FP), Direct
Protocol (DP), Intermec Printer Language (IPL), Zebra Printer Language (ZPL),
and Datamax Printer Language (DPL).
Full Touch Display
The front panel has a 3.5 inch full-touch screen that supports touch input with
fingers, gloved hands, or a stylus.
Print Button
PX940 User Guide 1
Page 14
Use the Print button to feed media, pause print jobs, and print.
Ready Screen
Printer State Print Button Action
Startup Press the Print button during startup to enter Calibration mode or to restore
defaults if the printhead is lifted.
Ready Press the Print button to advance the media.
If the print key feature is on, press the Print button to reprint the last job.
Press and hold the Print button to calibrate the media sensors.
Printing Press the Print button to stop or pause printing. The printer stops after
completing the current label.
Paused Press the Print button to resume printing.
Error Press the Print button to advance the media.
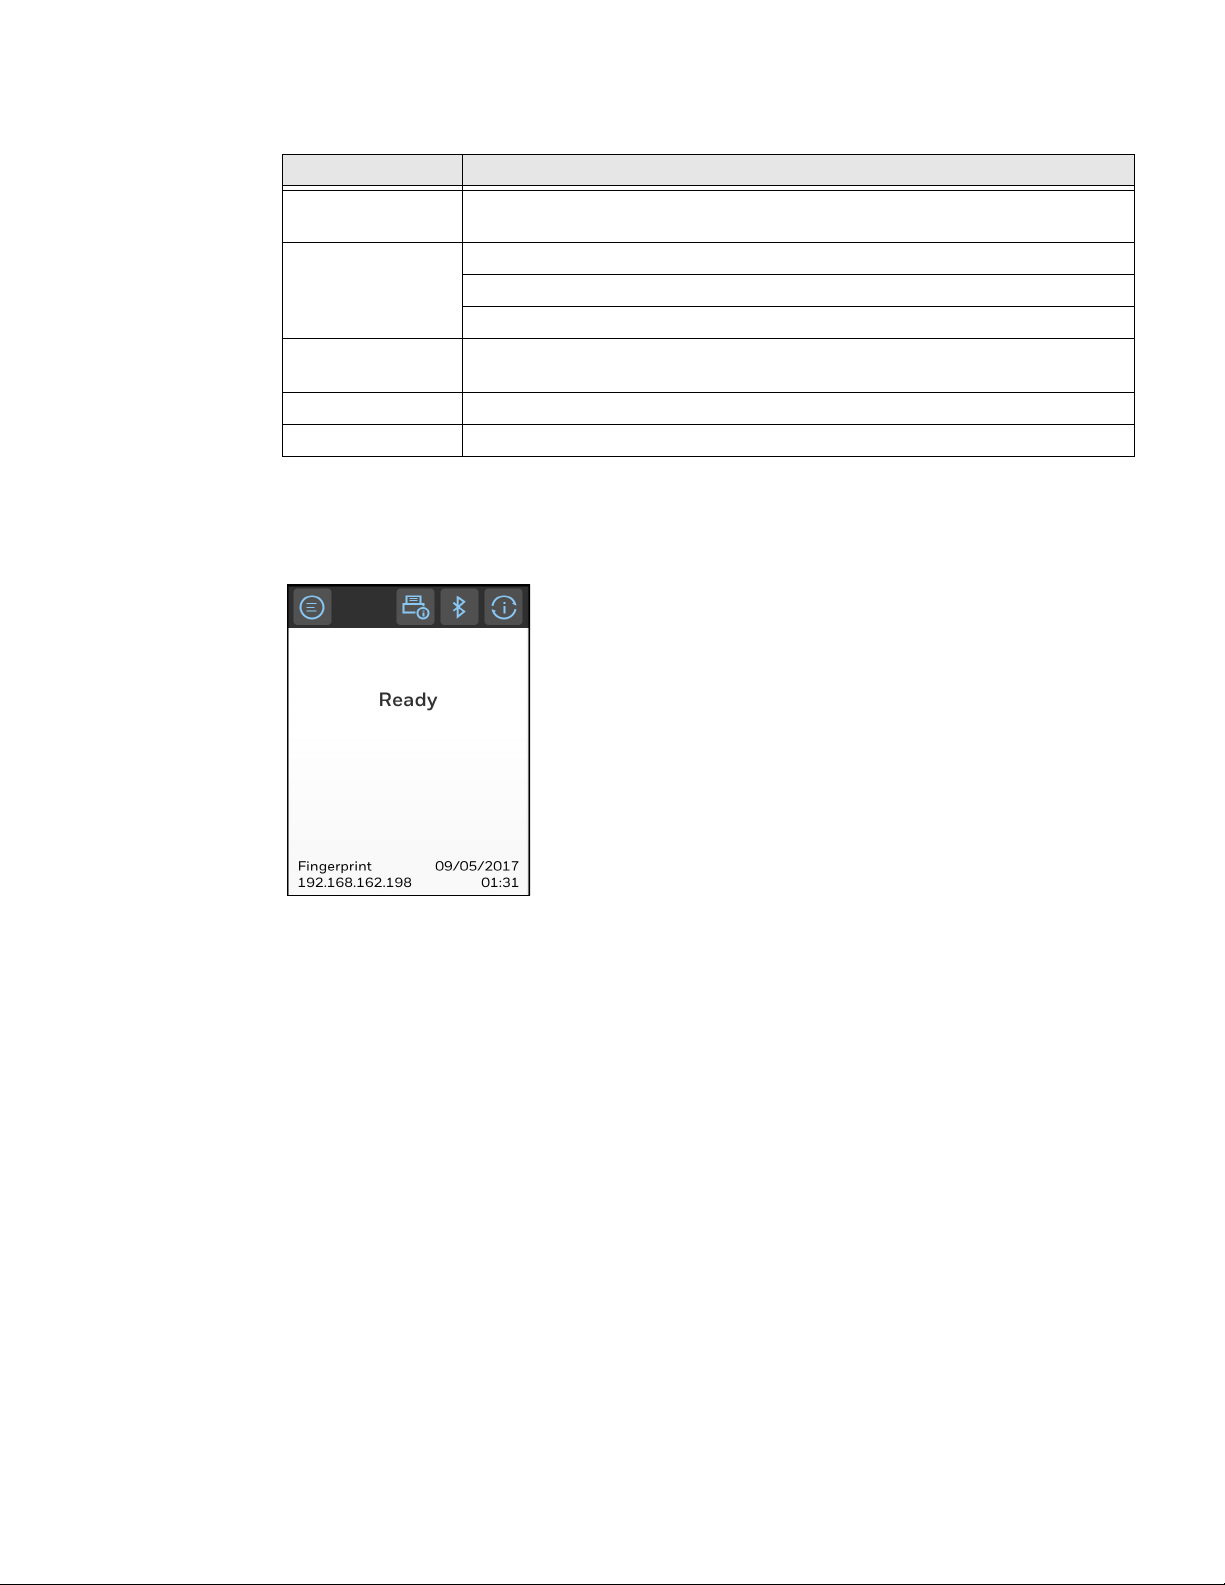
The Ready Screen appears when the printer is powered on and has completed its
startup process.
Note: The icon for WiFi status appears only when the optional WiFi module is installed.
By default, the information bar at the bottom of the screen shows the printer command language and the printer IP address. You will see the time and current date
only if the real time clock (RTC) is installed. You can customize the screen to show
different types of information.
2 PX940 User Guide
Page 15
The status bar at the top of the screen includes these icons:
Icon Name Description
Main Menu Press the icon to view the main menu for your printer.
Main Menu
Communications
Printing
Bluetooth
Back
Press the icon to view communications information for your
printer.
Press the icon to view specific printer information.
Press the icon to view Bluetooth information for your printer.
Press this icon to navigate back through the printer menus.
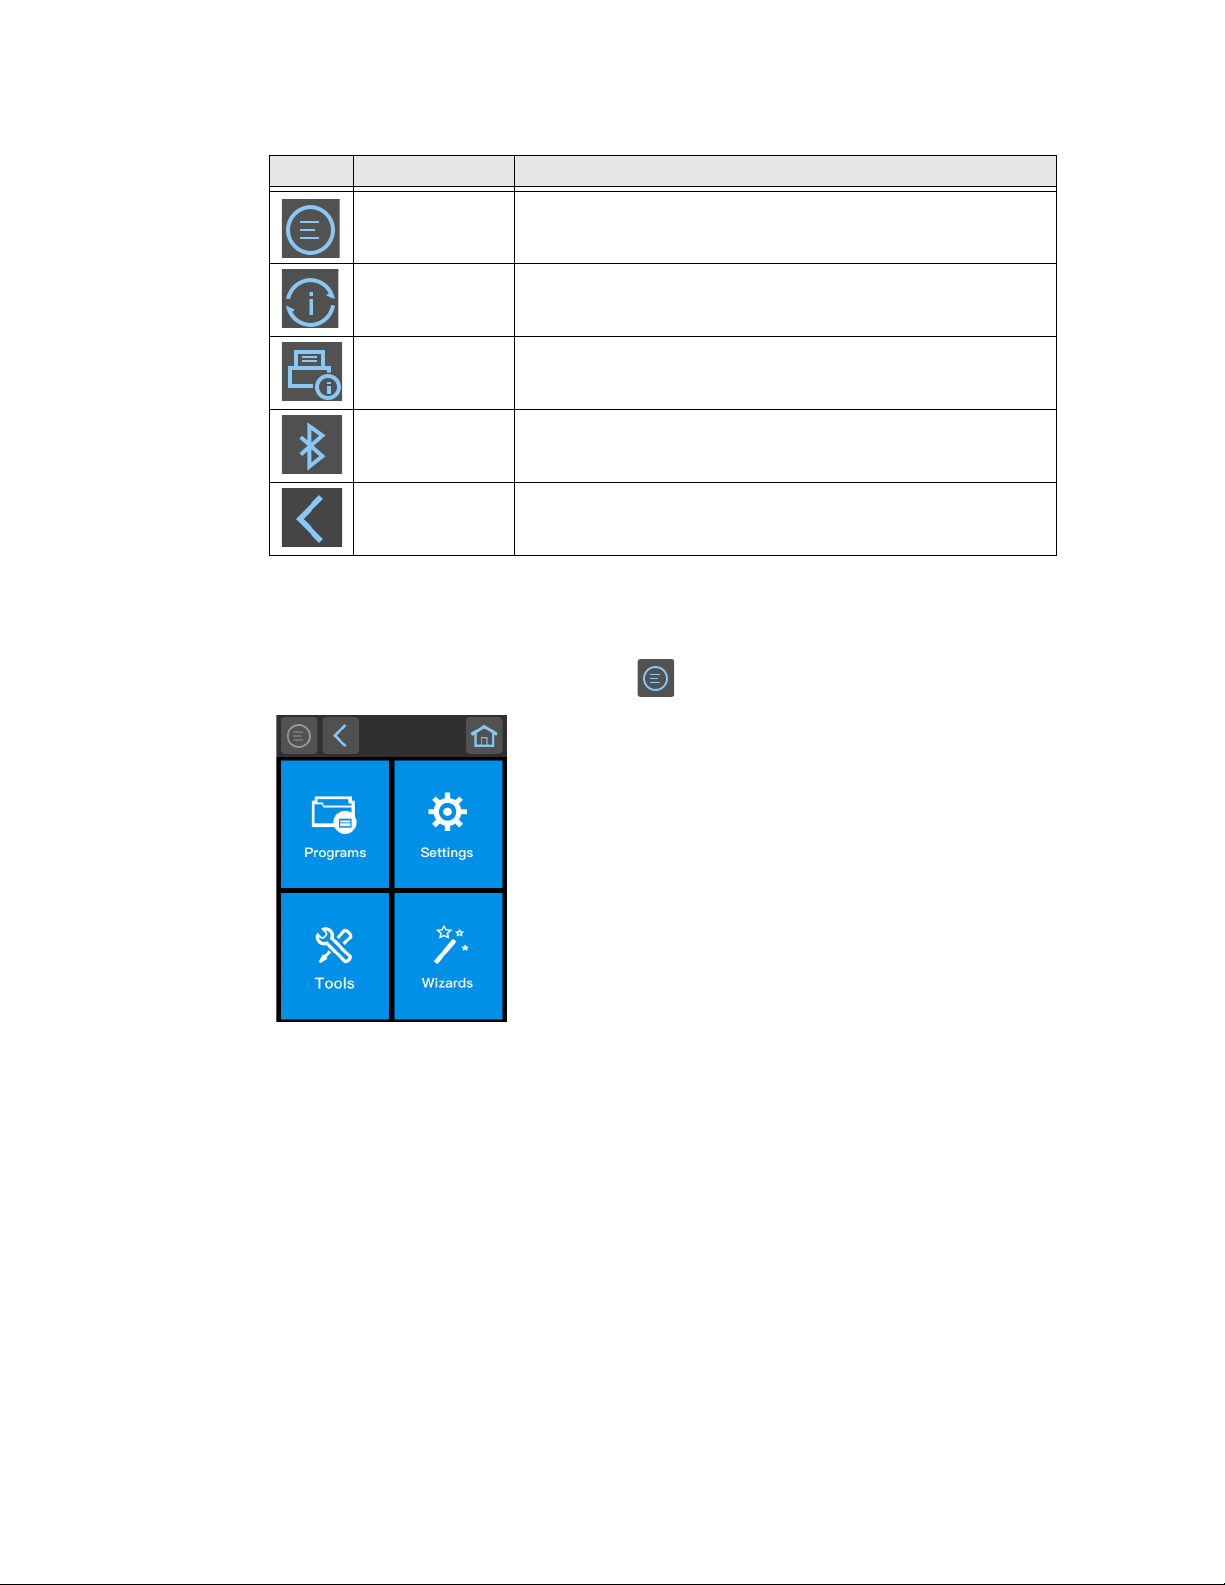
On the printer Ready screen, press to view the Main Menu.
Note: If you create menu shortcuts, the Main Menu is replaced by the Quick Choices menu.
Press a button to select the Programs, Settings, Tools, or Wizards menu.
• Programs displays a list of programs installed on the printer. This list includes
utility programs provided as part of the firmware and programs you have
installed. Programs appears in the Main Menu only if the printer is using
Fingerprint or Direct Protocol as the command language.
• Select Settings to view and change printer settings.
• Select Tools to print test labels, manage a connected USB storage device,
restore printer default settings, or save and load printer profiles.
• Select Wizards to see a list of wizards that help you configure printing or
communication settings, or calibrate the media sensors.
Note: The printer cannot print while the Main Menu is showing. Exit the Main Menu and
return to the Ready screen to begin printing.
PX940 User Guide 3
Page 16
Navigate the Main Menu
Use the status bar buttons to navigate between menus in the Main menu and save
changes.
Button Description
Returns to the Main menu
Goes back one level in the menu
Returns to the Ready screen
Moves between options in a settings menu
Moves to additional options not viewable in the menu
Bluetooth: Gives the device name and device address
Information: Gives Communications information such as
ethernet, serial, and usb
Printer Information
Note: Use the horizontal scroll bar for settings with additional options.
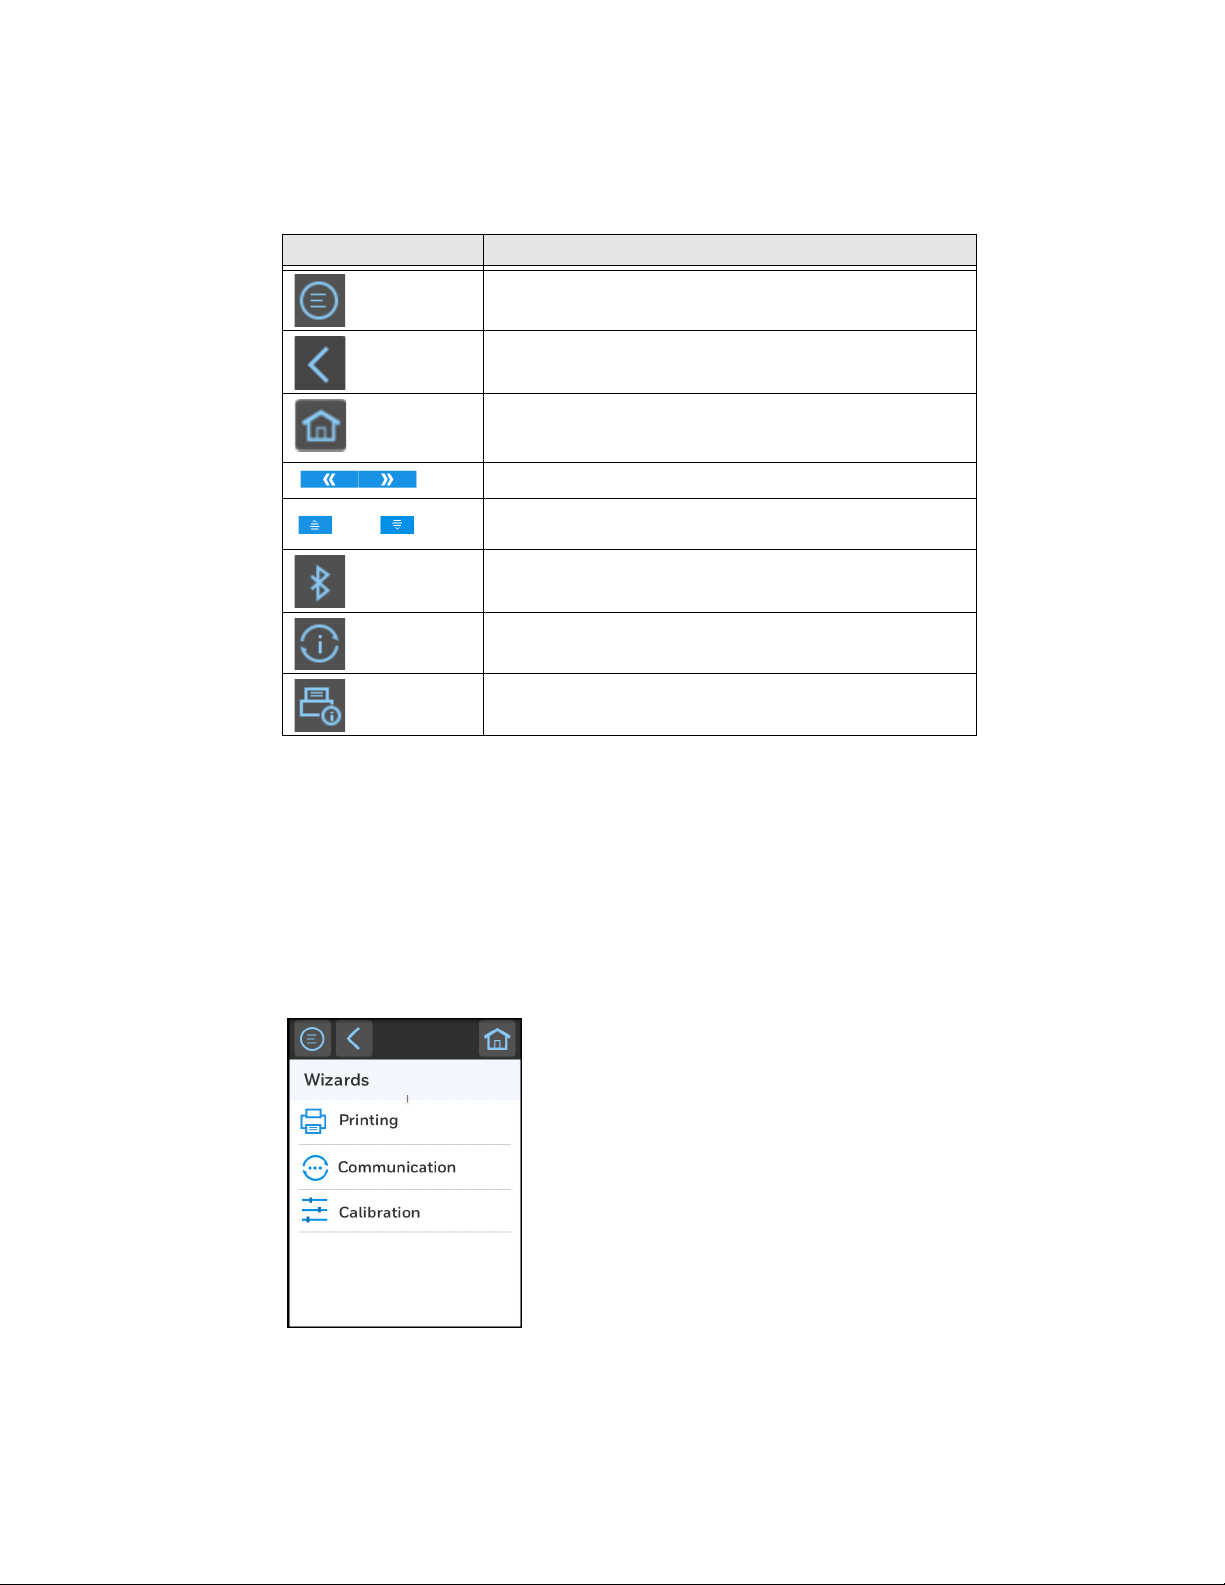
Wizards
The full touch printer includes several wizards you can use to quickly set up your
printer. You can start all of the wizards from the Main menu except for the startup
wizard. The startup wizard appears the first time you turn on the printer and after
the printer has been reset to the factory default state.
4 PX940 User Guide
Page 17
Printing Wizard
Wizard Description
Media Loading Guide Shows how to load media.
Ribbon Loading Guide (TTR printers only) Shows how to load ribbon.
Media Setup Select media and printing type (DT or TTR), media width, length, and X-
Print Quality Prints a series of labels to determine the best print quality setting.
Communications Wizard
Wizard Description
Line Analyzer Logs all incoming data on all communications channels and saves the
Calibration Wizard
Wizard Description
margin, Start and Stop Adjust values, and print speed.
data to a log file. For experienced users.
Media Calibrates all media sensors and shows current print settings.
Verifier Calibrates the Verifier. (for PX940V only)
Label Taken Sensor Calibrates the label taken sensor used with the label dispenser. Available
when the label taken sensor is installed.
Date and Time Calibrates the date and time.
Screen Calibrates the touch screen.
PX940 User Guide 5
Page 18

Printer Command Languages
A printer command language is a set of instructions that controls printer functions:
• Configure the printer.
• Return the status of the printer.
• Control peripheral devices.
• Format a label or receipt for printing.
The printer supports these command languages and language simulator support
options:
• Autosense
• Fingerprint
• Intermec Printer Language (IPL)
• ZPL Simulator (ZSim)
• DPL Simulator (DSim)
Autosense
Autosense allows the printer to automatically sense from label to label, the
incoming data stream and its language, and print each label accordingly.
Fingerprint
Fingerprint is a BASIC-inspired general purpose printer language. Use Fingerprint
to design custom label formats and write printer application software. If you plan
to run Smart Printing applications directly on the printer, without connecting to a
PC, select Fingerprint as your printer command language. For more information,
see the Fingerprint Command Reference.
Fingerprint is the default printer command language.
Intermec Printer Language (IPL)
IPL is a host-based printer command language. Use IPL to design, modify, and
download label formats; write printer application software; and configure the
printer. If you are sending IPL label files to the printer, select IPL as your printer
command language. For more information, see the IPL Command Reference.
Note: IPL can be supported on 200dpi and 300dpi printer only
6 PX940 User Guide
Page 19

ZPL Simulator (ZSim)
ZSim (ZPL command language simulator) interprets Zebra™ programs (ZPL II or
later) without requiring any host programming changes. If you are sending ZPL
label files to the printer, select ZSim as your printer command language. For more
information, see the ZSim Command Reference.
DPL Simulator (DSim)
DSim (DPL command language simulator) interprets Datamax™ data streams
without requiring any host programming changes. If you are sending DPL label
files to the printer, select DSim as your printer command language. For more information, see the DSim Command Reference.
Access the Printer Web Page
1. Open a browser window on your PC.
2. In the location or address bar, type the printer IP address and press Enter.
The printer web page appears.
3. Click Login. The login page appears.
You will be prompted for a user name and password. The default username is itad-
min and the default password is pass.
Set the Printer Command Language
You can use one of these methods to change the printer command language:
• From the printer Web Page
• From the Main Menu
• PrintSet 5
From the Printer Web Page
To set the command language from the printer web page, you need to turn on the
printer and connect to your network.
1. Make sure that the printer has media and ribbon (if necessary) installed.
2. Open a browser window on your PC.
3. In the location or address bar, type the printer IP address and press Enter. The
printer web page appears.
4. Click Login. The login page appears.
PX940 User Guide 7
Page 20

5. Type your Username and Password and click Login. The default username is
itadmin and the default password is pass.
6. Click the Configure tab.
7. Click System Settings > General.
8. Select the printer command language you want to use from the Command
Language list, and then click Save.
9. Click the Services tab.
10. Click Reboot Printer, and then click Reboot. The printer restarts in the
command language you selected.
From the Main Menu
You can use this procedure to change the printer command language from the
Main Menu.
1. From the Ready screen, press the Main Menu button.
2. From the Main Menu, press Settings > System Settings > General.
3. Scroll down until you reach Command Language.
4. Select your desired command language.
5. Turn the printer off and then on. The printer starts up in the command
language you selected.
8 PX940 User Guide
Page 21
CHAPTER
2
SET UP THE PRINTER
This section contains information about loading media and ribbon, printing a test
label, calibrating the full touch screen, and adjusting the printer.
Power Up the Printer
The full touch printer goes through a startup wizard the first time you turn on the
power.
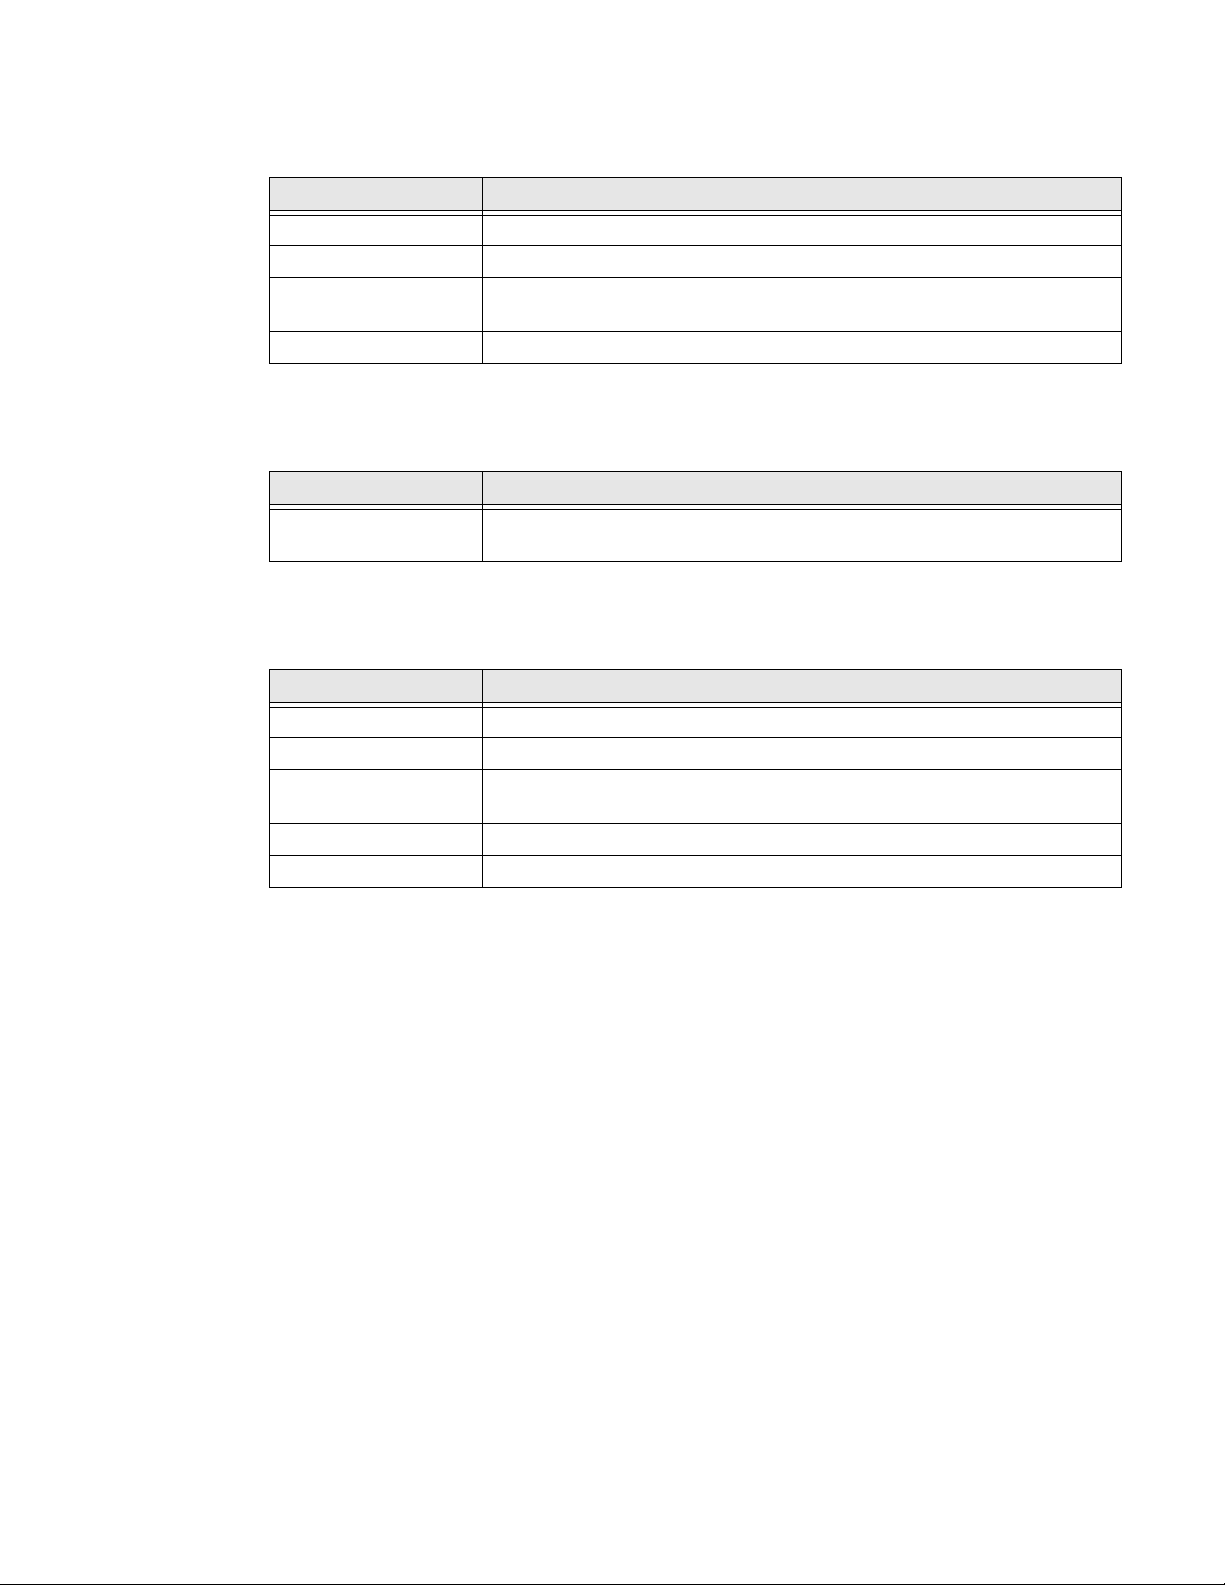
1. Connect one end of the power cord to the back of the printer and plug the other
end to AC power.
2. Press the power switch to turn on the printer.
3. As the printer starts up, a progress bar appears, then the startup wizard
appears.
4. Follow the steps on the touch screen to complete the start up wizard.
PX940 User Guide 9
Page 22

Calibrate the Touch Screen
You can calibrate the screen from the printer website or from the touch panel on
the printer.
To calibrate the screen from the website:
To access the website, make sure your printer is connected to the same network as
your computer.
1. Open your browser and type the printer IP address into the web address bar.
2. In the menu section, click on Services > Screen Calibration. If you are
prompted to login, the temporary username is itadmin and the password is
pass.
3. Click on the blue Screen Calibration button, this will engage the touch panel
to start screen calibration.
• When the small square appears on the front touch panel of the printer, touch
the square and continue to touch the square until the printer beeps.
4. Once calibration is complete, your touch screen will automatically return to the
Ready screen.
Note: Typical screen calibration consists of five touches (one in each corner and one in the
middle of the screen)
About the Media
The printers can print on labels, tickets, tags, and continuous stock. The procedure
you use to load media depends on how you are operating the printer and the
options you have installed.
Load Media for Tear-Off Printing
Tear-off printing is applicable to media with perforation. Printed labels, tickets, and
other printed media are manually torn from the front of the printer. These of media
can be used for tear-off printing:
• Non-adhesive continuous stock
• Self-adhesive continuous stock with liner
• Self-adhesive labels with liner
• Tickets with gaps, with or without perforations
• Tickets with black marks, with or without perforations
To load media for tear off printing:
10 PX940 User Guide
Page 23
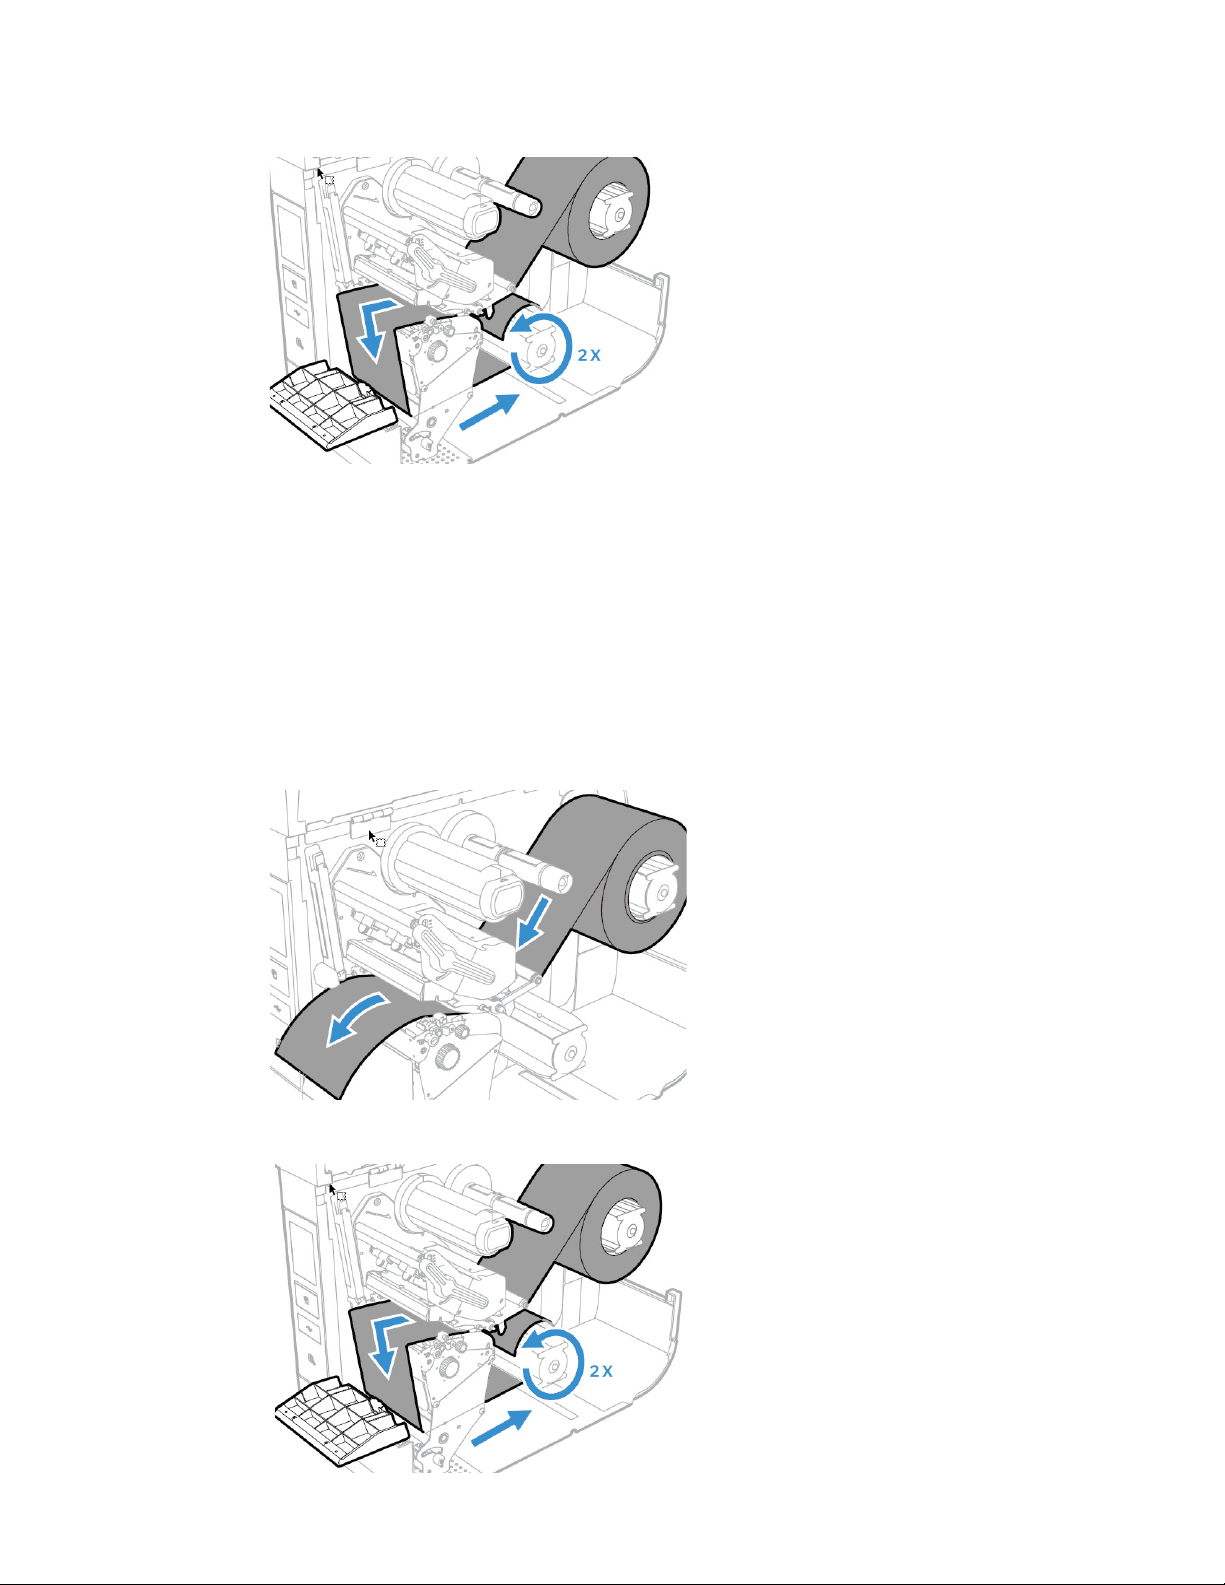
1. Open the media cover and remove the rewind plate (if installed).
2. Turn the printhead lift lever counterclockwise to raise the printhead or verifier
arm.
3.
print head arm lifted verifier arm lifted
4. Load a media roll onto the media supply hub. Make sure you push the roll all
the way against the inner wall of the printer and adjust the edge guide and the
dancer guide to hold the media in place.
PX940 User Guide 11
Page 24

5. Route the media through the print mechanism, through the front sensor
(PX940A) or verifier module (PX940V)
6. Adjust the media and dancer guides to hold the media in place.
Note: There is a media guide that is located near the printhead. It is recommended to adjust
the media guide all the way to the right in order to insert the media. If not, it can be
difficult to load the media.
12 PX940 User Guide
Page 25
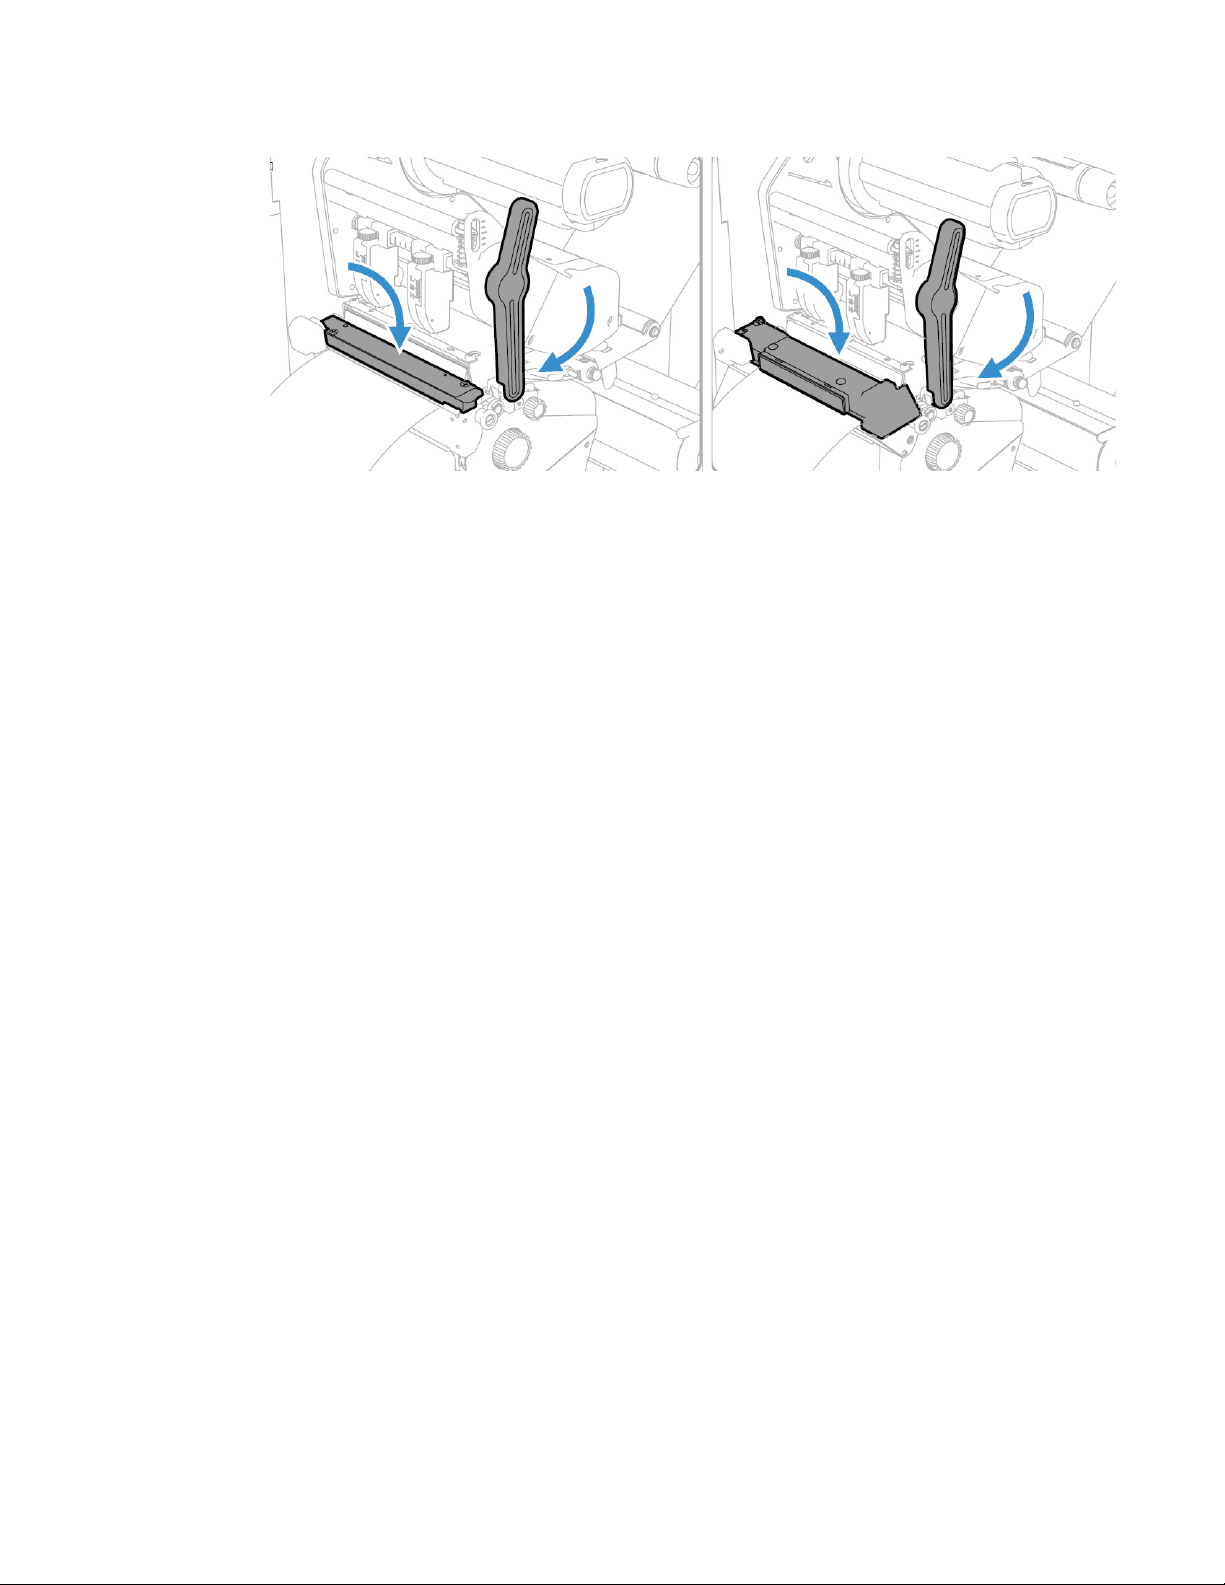
7. Turn the printhead lift lever clockwise to close the printhead and lower the
front sensor/verifier arm and click into place.
print arm in place verifier arm in place
8. Press the Print button to advance the media.
9. Adjust the label gap and black mark sensor. The sensor blue LED should line
up with the center of the media.
10. Close the media cover.
PX940 User Guide 13
Page 26

Load Media for Rewind Printing
Follow steps 1-9 from Load Media for Tear-Off Printing, then:
1. Assemble the rewinder plate back to the printer.
2. Round the media through the rewinder plate.
3. Insert the media in the opening between the label dispenser and the platen
roller.
4. Route the media around the media rewinder.
14 PX940 User Guide
Page 27
5. Push the Rewind/Liner Take-Up knob into closed position.
6. Put media roll holder in place
7. Go to Main Menu > Setting > Printing > Media > Printing Mode, select
Rewind from the list
Load Media for Peel-Off Printing
Follow steps 1-9 from Load Media for Tear-Off Printing, then:
1. Insert the media in the opening between the label dispenser and the platen
roller.
2. Round the liner around the media rewinder.
PX940 User Guide 15
Page 28

3. Pull the liner tight and push the Rewind/Liner Take-Up knob into closed
position.
4. Put media roll holder in place.
5. Go to Main Menu > Setting > Printing > Media > Printing Mode, select
Peel-Off from the list.
Load Fanfold Media
To load Fanfold Media from behind the printer:
To load Fanfold media from bottom access slot:
About the Ribbon
Thermal transfer printing provides a durable printout that is less vulnerable to
chemicals, heat, and sunlight than direct thermal printing. Select a ribbon type
that matches the media you are using and configure the printer for thermal transfer media.
16 PX940 User Guide
Page 29
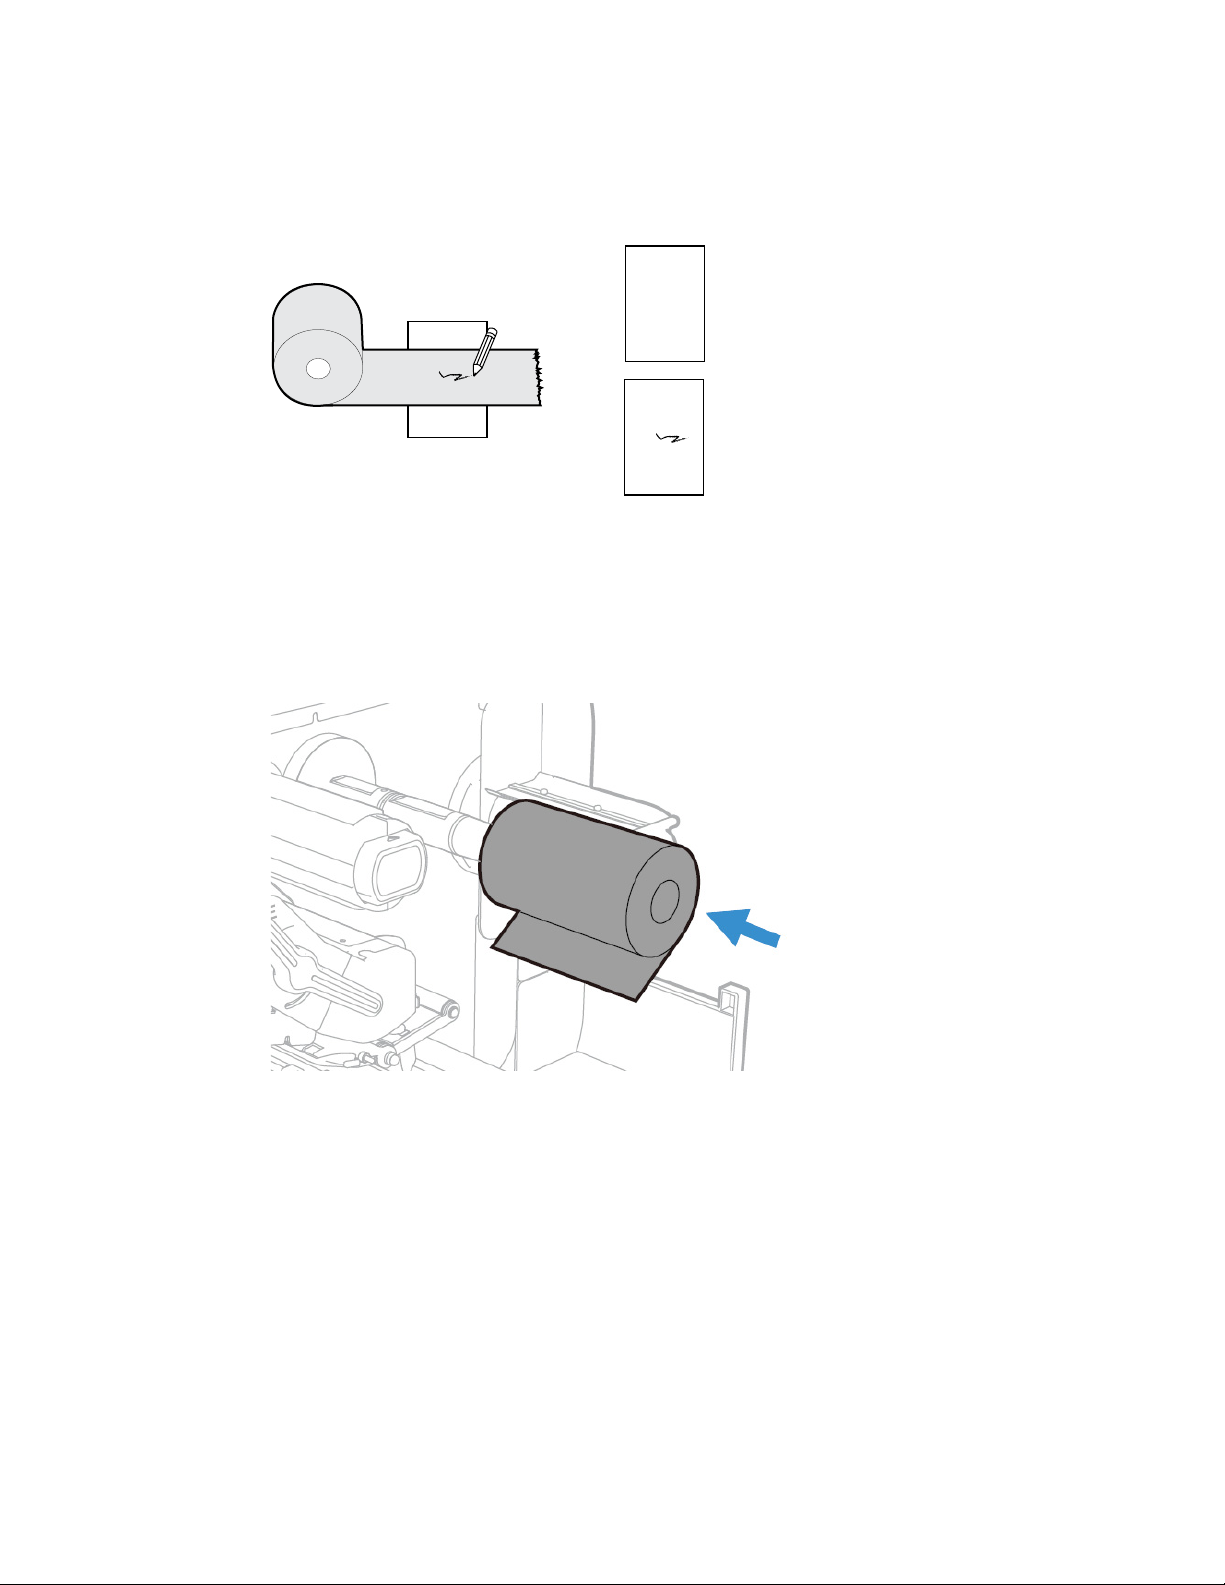
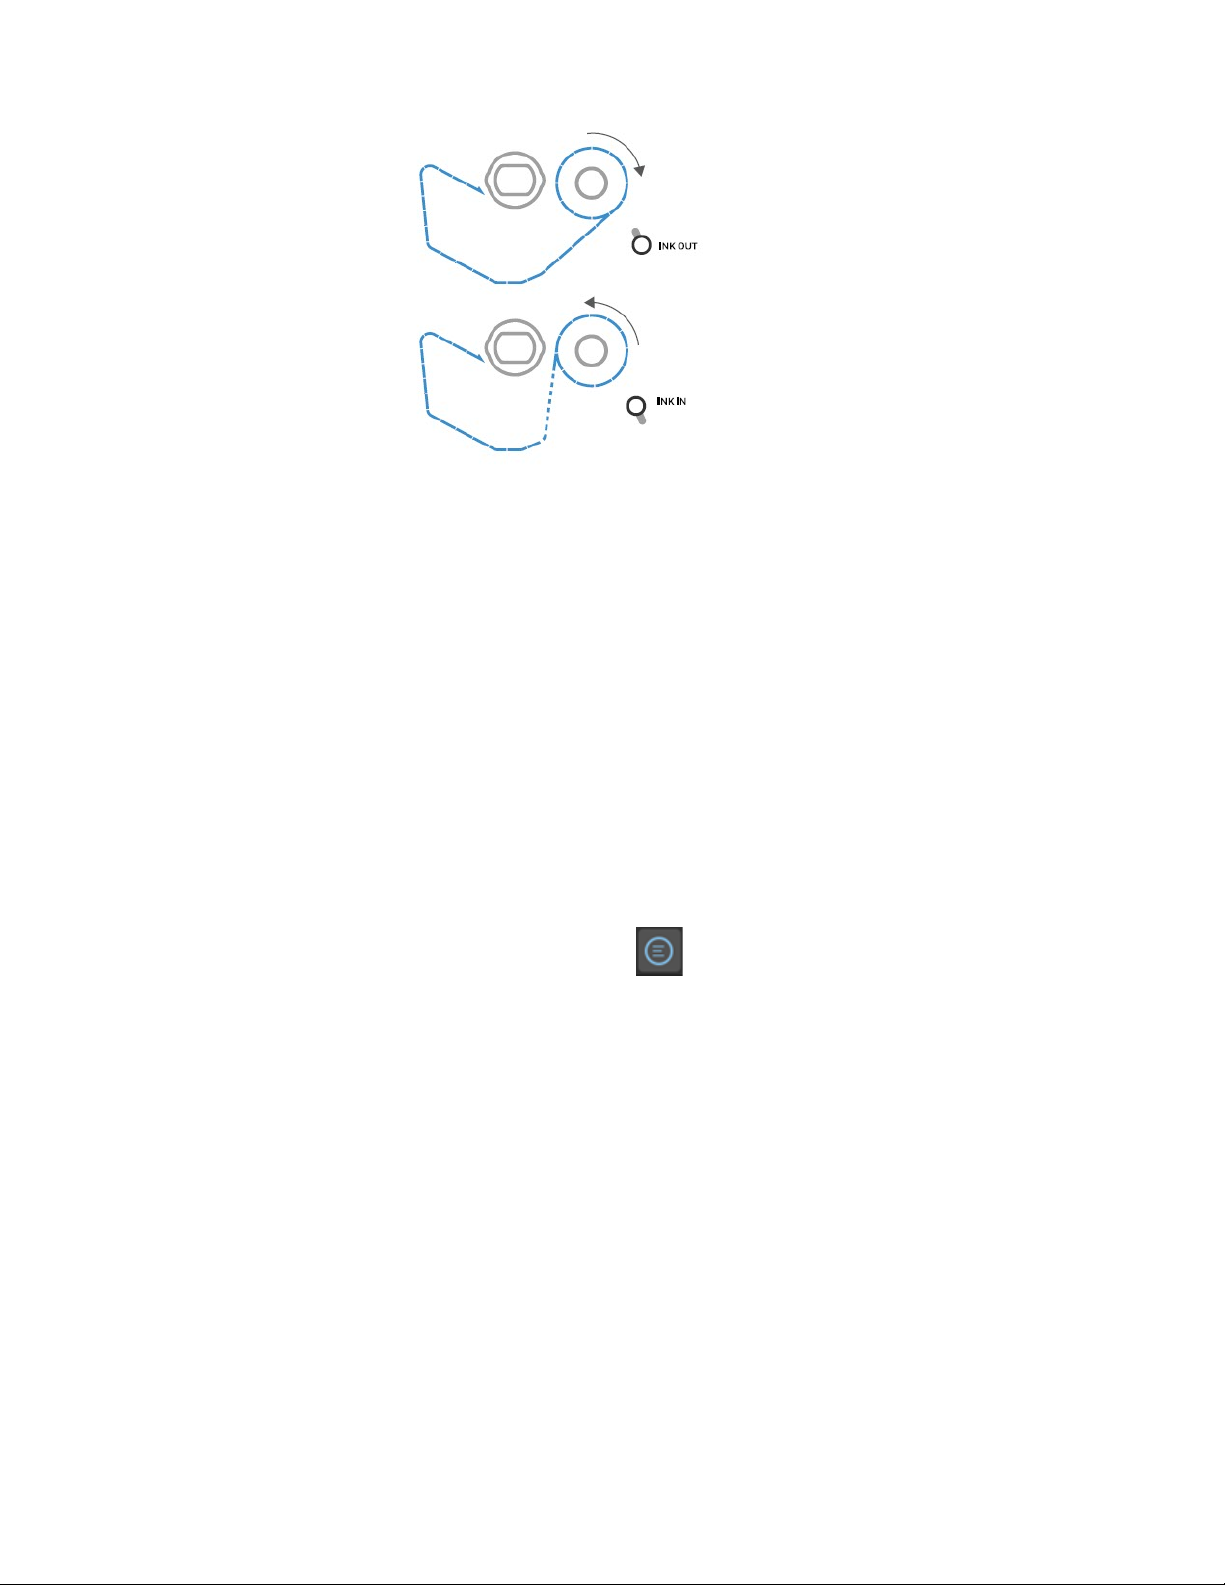
Load Ribbon
= Ink out
The printer supports thermal transfer ribbon rolls with the ink-coated side facing
either inward or outward. To determine which type of ribbon you have, place the
ribbon on a piece of paper as shown, and use a pen or other sharp object to scratch
the ribbon. If you see a mark on the paper, your ribbon is wound ink out.
= Ink in
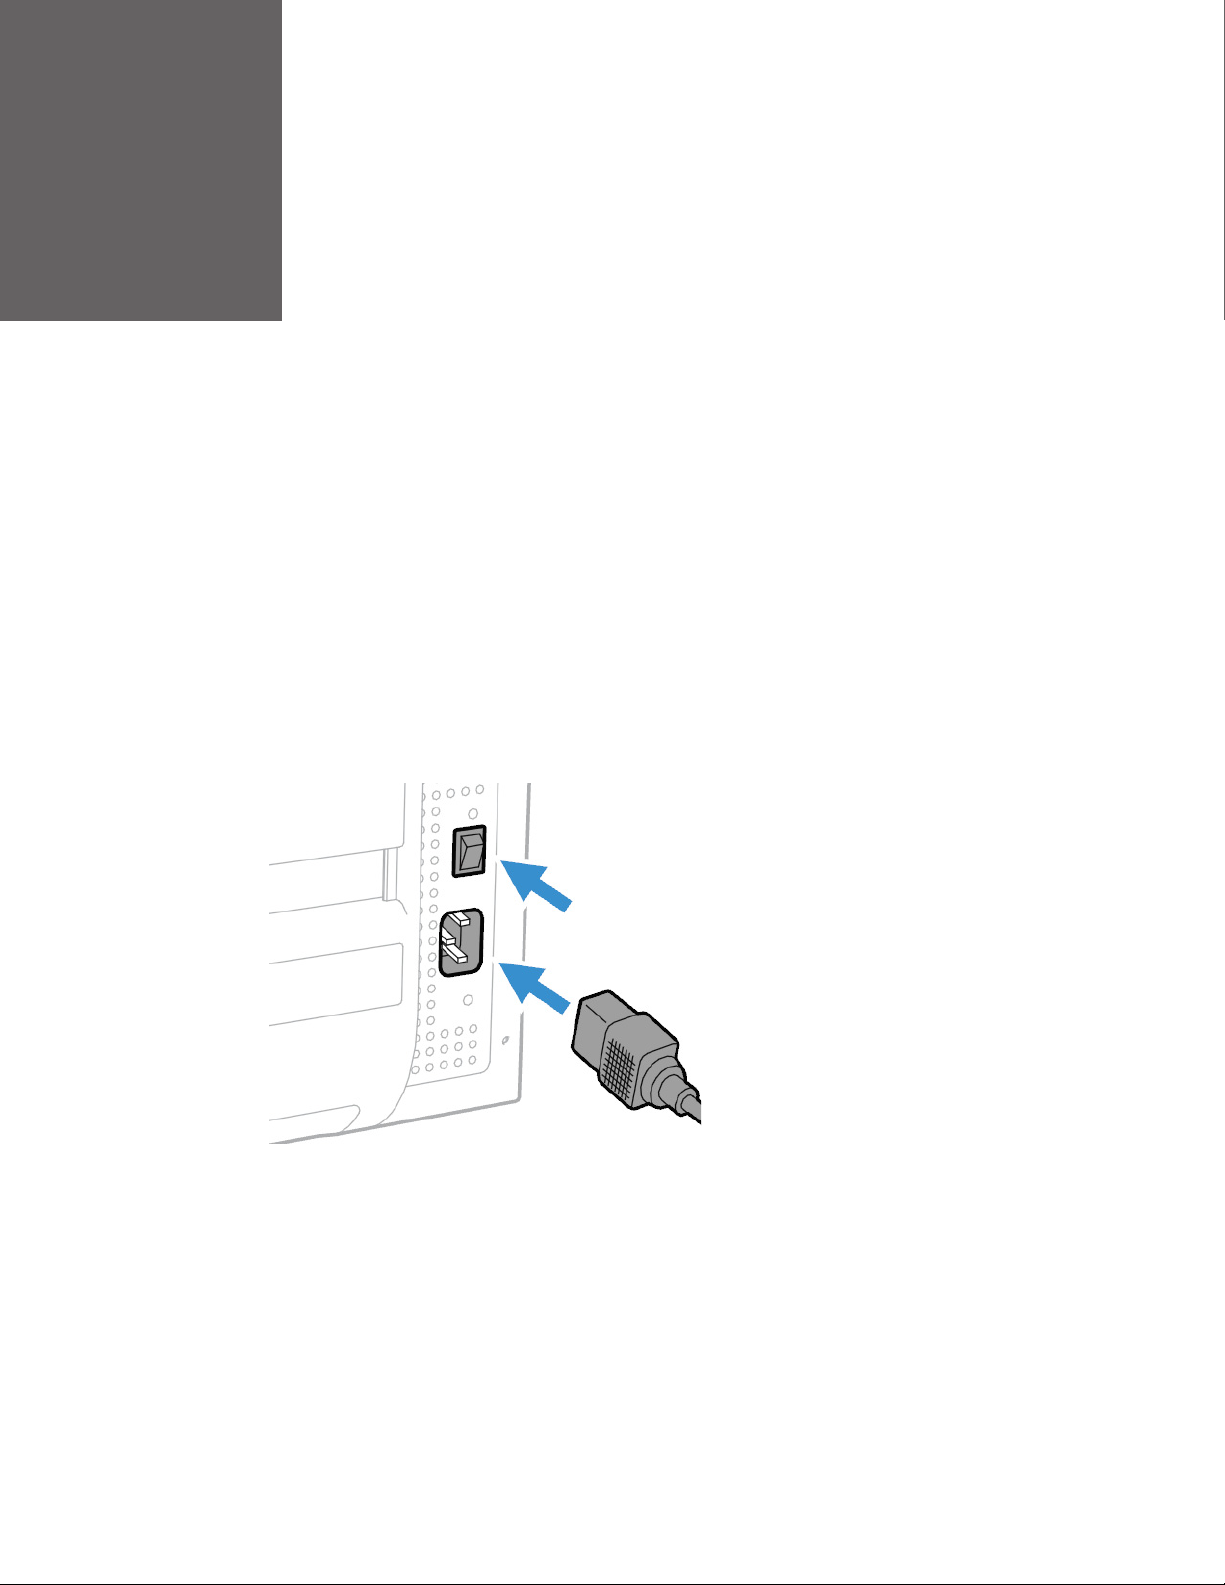
1. Open the media cover.
2. Turn the printhead lift lever counterclockwise to raise the printhead.
3. Slide the ribbon roll onto the ribbon take-up hub.
Note: For ribbon that has the ink wound out, place the ribbon on the supply hub with the
ribbon wound clockwise. For ribbon that has the ink wound in, place the ribbon on the
supply hub with the ribbon wound counterclockwise.
4. Route the ribbon through the print mechanism and pull out approximately 8
inches (20cm) of ribbon leader.
The dotted line in this illustration shows how to load ribbon with the ink wound in.
PX940 User Guide 17
Page 30
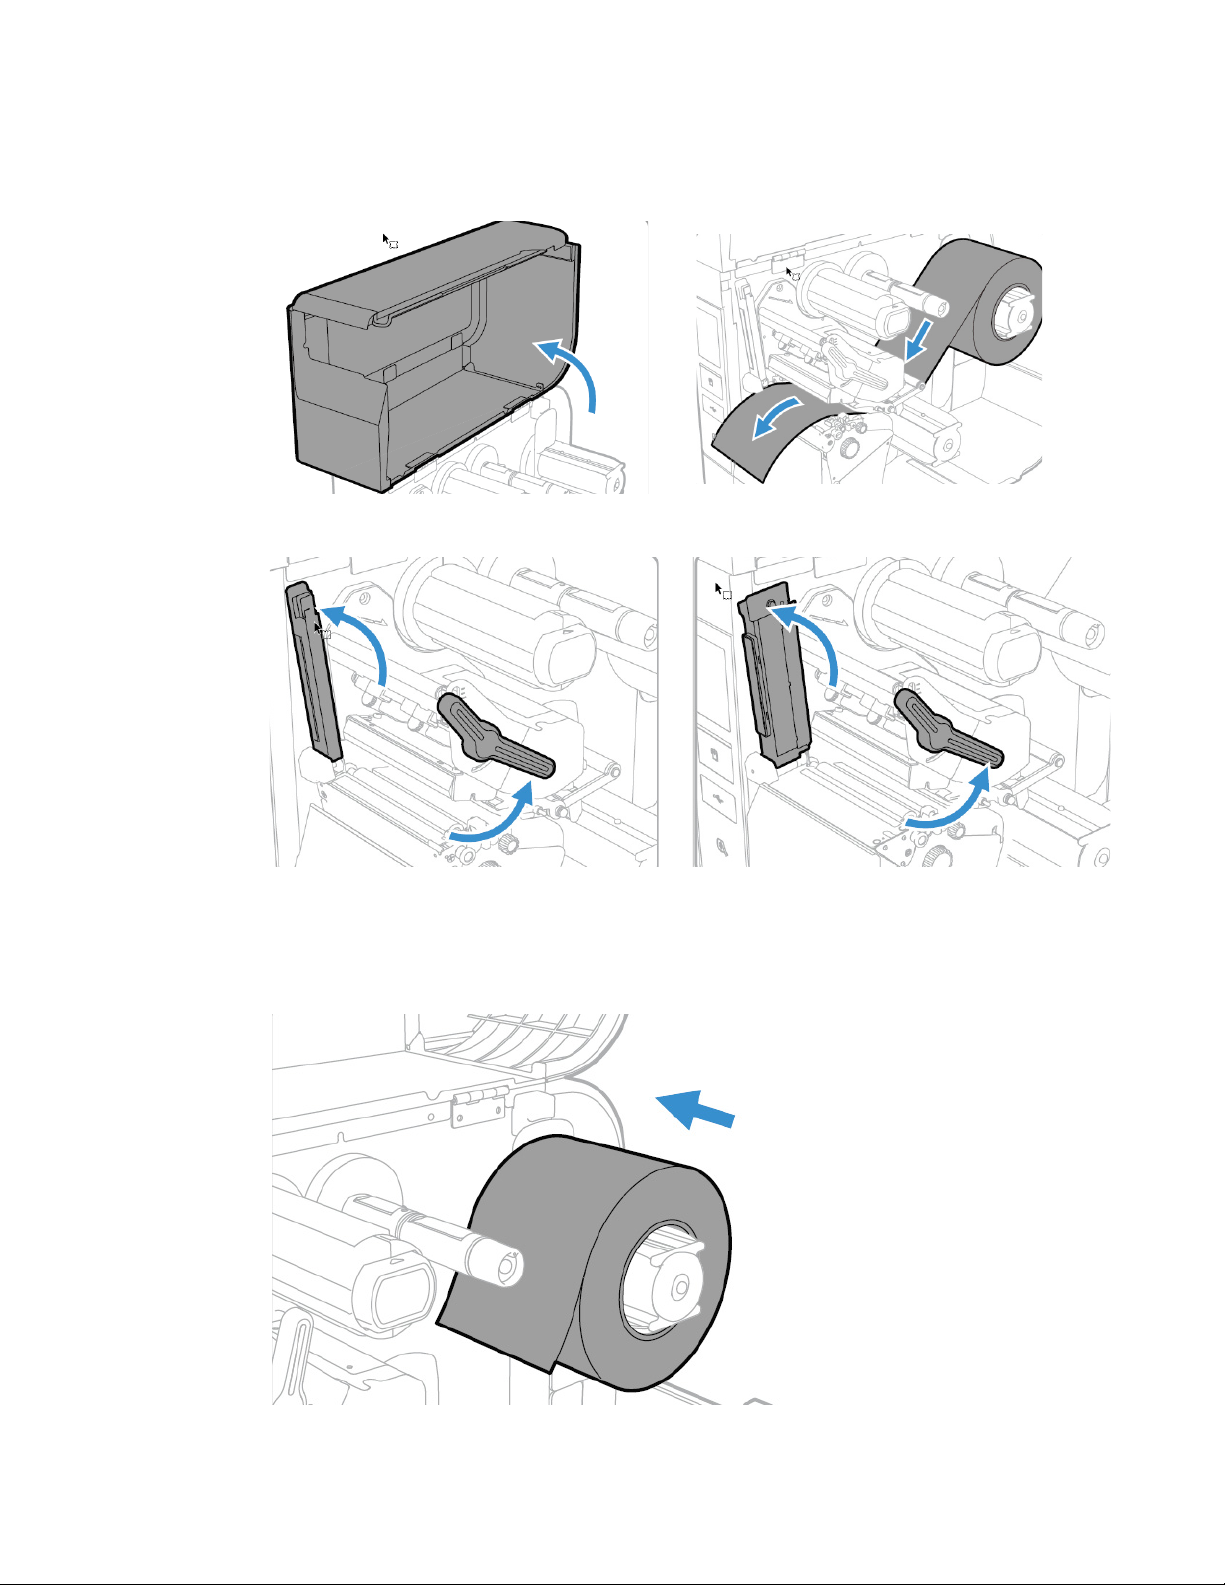
5. Turn the ribbon take-up hub counterclockwise until the ribbon becomes tight
and runs wrinkle-free through the print mechanism.
6. Close the media cover.
Print a Test Label
The first time you turn on the full touch printer or reset to factory defaults, the
printer runs a startup wizard to let you enter basic setup information. After the
startup wizard finishes, the printer enters Ready mode where you can access the
Main Menu and print a test label.
1. Connect the printer to power and turn on the printer.
2. After the startup sequence finishes, the startup wizard begins. Enter all the
information on the wizard screens then tap No when prompted to run other
wizards.
3. From the Ready screen, press to view the Main Menu.
4. From the Main Menu, tap Tools > Test Labels.
5. Select the test label you want to print and tap it.
Your test label prints. If print quality is low, go to Wizards > Printing > Print Quality.
Note: You can use command languages, like Fingerprint, and language simulators, like ZPL
Simulator (ZSim), to create and print labels. For more information, see the command
reference manual for the language.
18 PX940 User Guide
Page 31

Printhead Pressure and Toggle Position
Pressure Adjustment
You may need to adjust the printhead pressure on the printer if:
• You are using thicker or thinner media than previously.
• Your thermal transfer ribbon starts to crease.
Do not use a higher printhead pressure than necessary. It may increase the wear on
the printhead and shorten its life.
1. Use your finger to turn the wheel to adjust pressure.
• Rotate the wheel clockwise to increase the pressure resulting in darker print.
• Rotate the wheel counterclockwise to decrease the pressure resulting in
lighter print.
2. Test for Print Quality
Note: Marking on the toggle, “L”: Light pressure; “M”: Middle pressure; “H”: High pressure.
Toggle Position Adjustment
If the toggles are not adjusted in the correct position or do not apply the correct
pressure, the following issues may occur:
• Labels print lighter on one side than the other
• Media and ribbon may slip
• Ribbon may wrinkle
• Media may move from side to side during printing
PX940 User Guide 19
Page 32

You probably have an unbalanced printhead. The printer is adjusted at the factory
for full-width media. If you are using media that is less than full-width (4 inches or
102mm), recommends that you adjust the position of the pressure toggles so that
the printhead is correctly pressured again the media.
• Adjust the position of the toggle as necessary to provide the even pressure on
the media.
Note: Especially for narrower media and narrower ribbon, position the inside toggle at the
left of the media, and move to outside toggle to right side and decrease the pressure
on it.
Narrow Media position
Wide Media position
20 PX940 User Guide
Page 33

CHAPTER
3
CONNECT THE PRINTER
This section contains information about connecting the printer to a PC or to a network. Use the From the Printer Web Page or the Main Menu on a full touch printer
to configure the settings.
Connect the Printer to Your PC
You can connect the printer to your PC using one of the following methods.
Connect the Printer Using a Serial Cable
You can use a serial connection to communicate with your PC and send commands
directly to the printer through a terminal connection.
1. Connect one end of the DB9 to DB9 RS-232 cable to the back of your printer
and connect the other end to a serial COM port on your PC.
2. If necessary, change the PC serial port configuration to match your printer.
Connect the Printer Using a USB Cable
Connect only one printer to your PC, either directly or through a hub. You do not
need to set up any parameters for USB communications.
1. Download and install the InterDriver software on your PC (see Install Printer
Drivers).
2. When prompted, connect one end of the USB Type A cable to the back of the
printer and connect the other end to your PC.
Connect the Printer to Your Network
These network interfaces provide features such as security, FTP server, web page,
and Alert handling.
PX940 User Guide 21
Page 34

Connect the Printer to an Ethernet Network
Use the Ethernet port to set up your printer as a network printer. The printer is set
to automatically retrieve an IP number from the network (DHCP) when you turn the
printer. You can use the network connection with InterDriver. You can also use it to
send commands directly to the printer through a terminal connection (Telnet), or
through FTP.
1. Turn the printer off.
2. Connect the Ethernet cable to the Ethernet port in the rear of the printer and
connect the other end of the cable to your network.
3. Turn the printer on.
4. If your printer uses a DHCP server to assign IP addresses, the IP address
appears in the lower left corner of the screen.
• For an icon printer, use Honeywell PrintSet 5 to retrieve the printer IP
address.
5. If you are not using a DHCP server to automatically assign IP addresses to
devices in your network, you must set a static IP address and other network
information manually. Continue with the next step.
6. For a non-DHCP network:
• For a full touch printer, from the Main Menu select Settings >
Communications > Ethernet > IPv4 or IPv6 and change the settings as
needed.
• For an icon printer, configure the Ethernet settings through Honeywell
PrintSet 5.
Setting Default
(IPv4) IP Assignment Method DHCP
(IPv4) IP Address 0.0.0.0
Subnet Mask 0.0.0.0
Default Router 0.0.0.0
DHCP Response Broadcast
(IPv6) IP Assignment Method Automatic
(IPv6) IP Address Automatic
22 PX940 User Guide
Page 35

Configure Bluetooth Communications from the Web Page
The printer must be connected to an Ethernet or wireless network and you must
know the printer IP address.
1. Open a web browser on your PC.
2. Click Login.
3. Type your Username and Password and then click Login. The default value for
Username is admin and the default value for Password is pass.
4. Click the Configure tab. The Configuration Summary page appears.
5. Click Communications > Bluetooth. The Bluetooth settings page appears.
6. Change Bluetooth settings as needed. You can also click Default Settings to
restore all default Bluetooth settings.
7. Click Save when you are finished.
Configure Bluetooth Communications from the Main Menu
Use this procedure to configure Bluetooth settings from the printer Main Menu.
You may need to configure these settings if you want to connect to a mobile computer through Bluetooth.
1. Press the Main Menu button.
2. Select Settings > Communications > Bluetooth.
3. Change settings as needed for your Bluetooth device.
4. Tap Save when you are finished.
Printer Drivers
Before you can use the printer with Microsoft® Windows® printing applications, you
must install printer driver software on the PC. Drivers enable the printer to communicate with your PC and with software applications such as Honeywell PrintSet 5.
(Access the Honeywell Technical Support Downloads portal (https://
hsmftp.honeywell.com) and go to Software > Printers > Printer Applications >
PrintSet 5.)
Note: Although Windows may auto-detect the printer when you connect it to a PC through
a USB port, you still need to install printer drivers on the PC for the printer to operate
correctly.
PX940 User Guide 23
Page 36

Install Printer Drivers
Use InterDriver to install printer driver software on your PC. Access the Honeywell
Technical Support Downloads portal (https://hsmftp.honeywell.com) and go to
Software > Printers > Printer Drivers > Intermec Windows driver.
Note: Although Windows may auto-detect the printer when you connect it to a PC through
a USB port, you must still install printer drivers on the PC for correct printer operation.
1. Access the Honeywell Technical Support Downloads portal at https://
hsmftp.honeywell.com.
2. Go to Software > Printers > Printer Drivers > Intermec Windows driver.
3. Open the Honeywell Software Download Manager and follow the instructions
to download the file.
4. Extract the driver files to a location on your PC.
Double-click the .exe file to install InterDriver and follow the prompts to complete
the installation.
Install Authentication Certificates
If you are using Wireless 802.11 security, you may need to install authentication
certificates in the printer for the highest level of security.
1. Configure the printer for the correct date and time.
2. On your PC, open an FTP connection to the IP address of the printer.
3. Transfer your certificate to /home/user/certificates/public.
4. On your PC, open a Telnet session to the printer.
5. Change the directory to: /home/user/certificates/public.
6. Type the command: ls -la.
7. You should see the certificate that you transferred in step 3.
8. Use the certinstall script to install the certificate using this format:
<prompt> certinstall.sh <certificate name>
Example: itadmin@PX940A-12345678 /home/user/certificates/public$
certinstall.sh entrust.cer
9. When you receive confirmation that the certificate was installed, type this
command to make sure you see a .pem file and another soft link to the same
file: ls -la.
10. Use the printer web page (see Access the Printer Web Page), the Main Menu on
a full touch printer, or Honeywell PrintSet 5 to specify the certificate .pem file
to use for security.
24 PX940 User Guide
Page 37

USB Host Port
Use the USB host interface port on the printer to connect these peripheral devices:
Device Description
Keyboard Use a standard USB keyboard to send Fingerprint printer language commands
Bar code scanner Use USB bar code scanners for data input with a Smart Printing application. The
USB storage
device
You can also connect a peripheral device through the USB-to-Serial or USB-toParallel adapter cable accessories. Contact your local sales representative for
information.
Connect a USB Device
A USB storage device can be inserted into the USB host port on the front of
printer or into the USB host port on the back of the printer.
directly to the printer or to enter information if you are running a Smart Printing
application.
printer also supports other USB scanners that use a generic keyboard driver.
Use a USB storage device to load applications, configuration files, fonts, and
images into the printer memory, or to perform firmware upgrades. You can also
save configuration files to a USB storage device for upload to a printer. The USB
storage device must have a single partition and be formatted as FAT16 or
FAT32.
1. If you are connecting a USB storage device, make sure the device has a single
partition and is formatted as FAT16 or FAT32.
2. Connect the device to one of the USB host ports.
3. If you connected a USB storage device to an LCD printer, select Tools > USB
Menu for more options.
PX940 User Guide 25
Page 38

26 PX940 User Guide
Page 39

CHAPTER
4
CONFIGURE THE PRINTER
Use one of these methods to view and change printer settings:
•Printer web page
• Main Menu
• PrintSet 5
• Programming commands
Printer Configuration Menus
The structure of the printer configuration menus is consistent among the different
interfaces. The same organization appears whether you are accessing the menus
through the web page or the printer Main Menu. There are four main printer
configuration menus for each interface:
•Printing
• System Settings
• Verifier (PX900V only)
•Alert
Use the following illustrations to understand where information is located in the
printer configuration menus. Not all configuration items appear in each type of
interface.
PX940 User Guide 27
Page 40
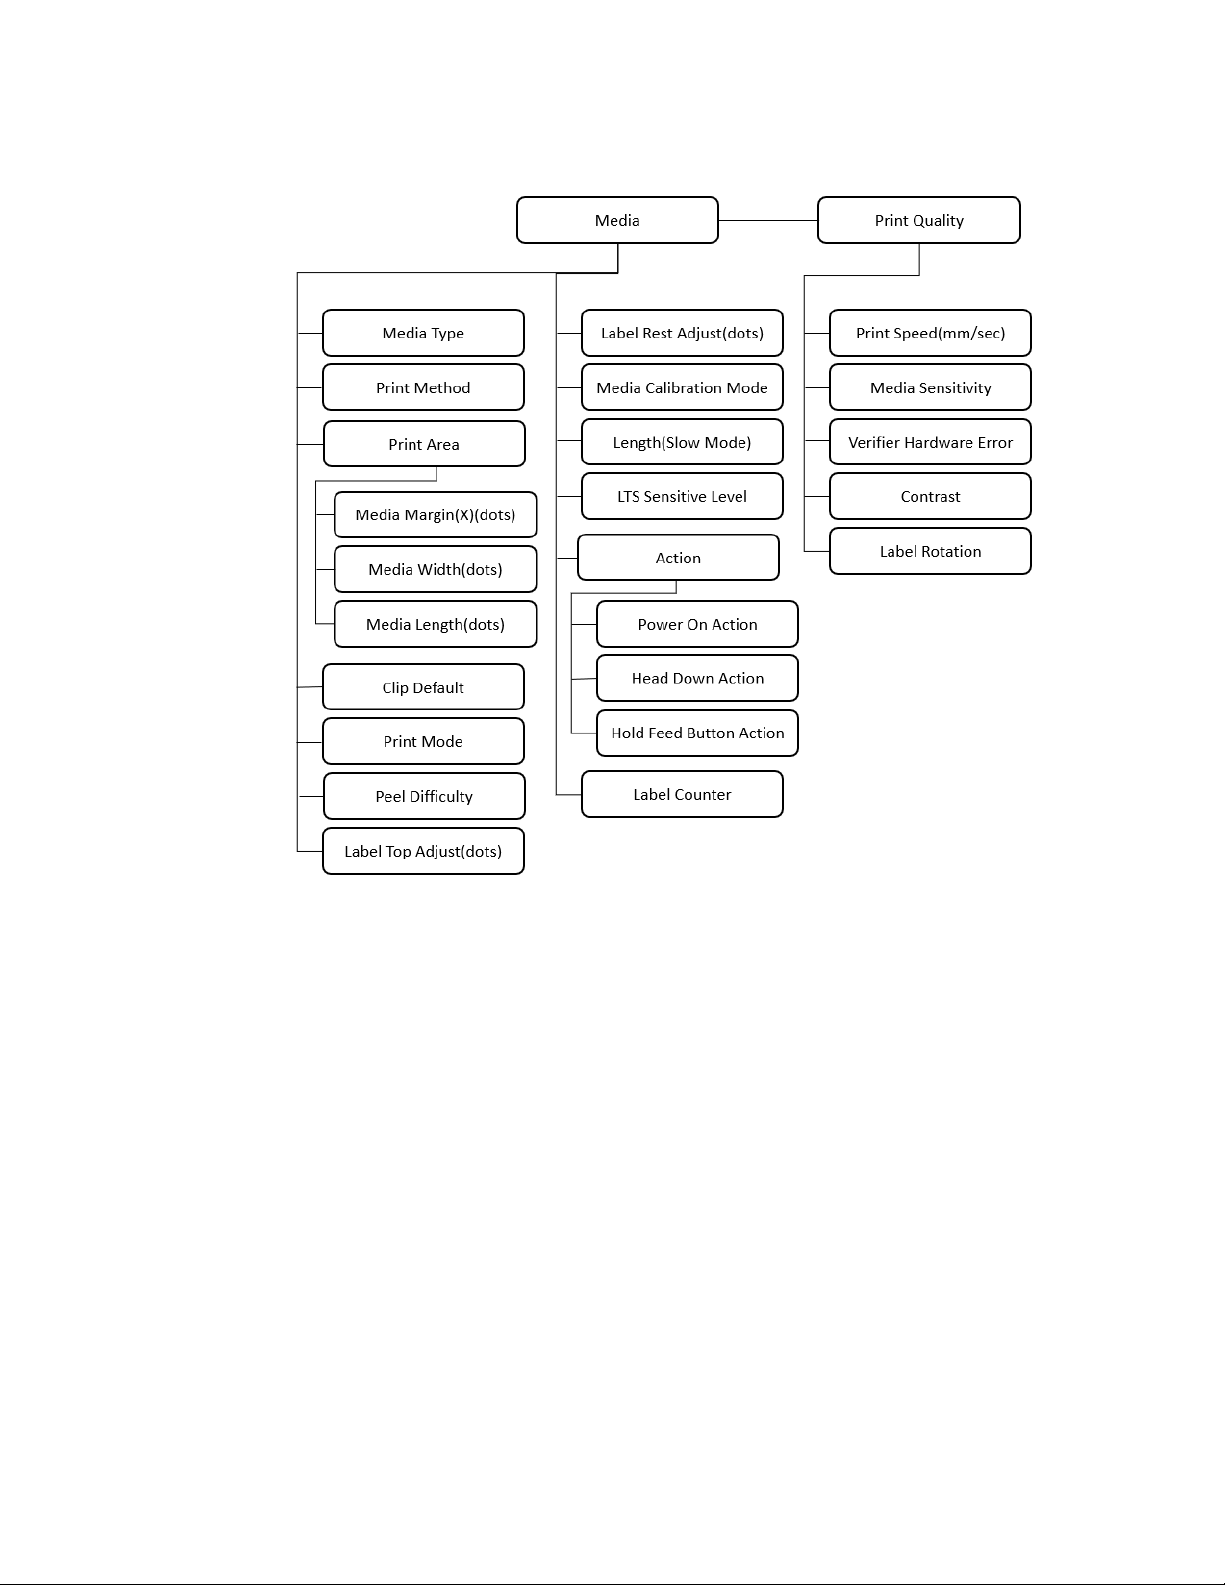
Printing Menu
28 PX940 User Guide
Page 41

System Settings Menu
Verifier Menu
PX940 User Guide 29
Page 42

Alert Menu
Printer Configuration
Configure the Printer from the Main Menu
If you have a full touch printer, you can view or change the configuration settings
by pressing the Settings button from the Main Menu.
1. From the Ready screen, press the Main Menu button.
2. From the Main Menu, press the Settings button. The Settings menu appears.
3. Select the settings you want to configure and make your changes.
4. Save your changes when prompted.
Restrict Access to the Main Menu
By default, all menus are available from the Main Menu the first time you turn on
the printer. If necessary, you can require a PIN to restrict access to menus or you
can disable access to all menus.
Menu Access
Setting
Enable (default) All users can access the menus from the Main
Enable with PIN Users need to enter a PIN to access the Main
Disable Users cannot access the menus from the Main
Description
Menu and from the USB flash drive menu.
Menu or USB flash drive menu.
Menu or from the USB flash drive menu.
1. Go to the Display menu for the printer:
• From the web page (see Access the Printer Web Page), select Configure >
30 PX940 User Guide
System Settings > Display.
Page 43

• From the Main Menu on a full touch screen, select Settings > System
Settings > Display.
2. Select a Menu Access setting and save your changes.
3. If you select Enable with PIN, you also need to type in a PIN and save your
changes.
Access the Printer Web Page
4. Open a browser window on your PC.
5. In the location or address bar, type the printer IP address and press Enter.
The printer web page appears.
6. Click Login. The login page appears.
Printer Webpage User Name and Password
You will be prompted for a user name and password. The default username is
itadmin and the default password is pass.
Configure the Printer from the Web Page
If you are using Ethernet or WiFi communications, you can change configuration
settings from the web page of the printer. Connect the printer to your network and
obtain an IP address.
1. Open a web browser on your PC.
2. In the address bar, type the IP address of your printer and press Enter. The
printer web page appears.
3. Click Login. The Login page appears.
4. Type your Username and Password and then click Login. The default value for
Username is itadmin and the default value for Password is pass.
5. Click Configure. The Configuration Summary page appears.
6. To see a complete list of printer settings, click Configuration Summary.
7. To configure printer settings, click an item in the navigation pane:
• For serial, Ethernet, Wireless 802.11, or Bluetooth settings, click
Communications.
• For media or print quality settings, click Printing.
• For display, audio, service, and general settings, or maintenance alert
message triggers click System Settings.
• To set conditions that trigger error, warning, and information alert
messages, click Alerts.
PX940 User Guide 31
Page 44

• For network-related settings (such as DNS, WINS, Net1), for web and email
server information, or if you are using a network management application,
click Network Services.
8. Make any changes to the settings you want to configure.
9. To save your changes, click Save.
10. To reset all parameters on the page to the default settings, click Default
Settings.
Configure the Printer with Honeywell PrintSet 5
You can use PrintSet 5 to change configuration settings on your printer.
Download the PrintSet 5 console from the App Store onto your mobile device.
You can download Honeywell applications to extend the capabilities of the printer.
You may need to purchase a license to run some applications. To learn more about
the PrintSet 5, licenses, and other Honeywell software solutions, go to
www.honeywellaidc.com > Browse Products > Software.
Support for Honeywell Safety and Productivity Solutions products is available
online through the Technical Support Portal.
Configure the Printer with Programming Commands
You can change configuration settings by sending programming commands
directly from your PC to the printer through a terminal program (such as
HyperTerminal), a serial connection, or a network connection.
If your printer uses the Fingerprint programming language, use the SETUP GET
command followed by the node, subnode, and parameter setting. For example, this
changes your media setting to labels with gaps:
SETUP GET “MEDIA,MEDIA TYPE,LABEL (W GAPS)”
You must log in as an itadmin to perform a SET operation, but you do not need to
log in to perform a GET operation.
If your printer uses the IPL programming language, this example changes your
media setting to labels with gaps:
<STX><SI>T1<ETX>
For more information on how to change configuration settings with a
programming language, see either the Fingerprint Command Reference or the
IPL Command Reference.
32 PX940 User Guide
Page 45

Uploading from the Web Page
You can use the printer web page to install fonts, images, applications, formats,
and web forms to the printer.
1. Open a web browser on your PC.
2. In the address bar, type the IP address of your printer and press Enter. The
printer web page appears.
3. Click Login. The Login page appears.
4. Type your Username and Password and then click Login. The default value for
Username is itadmin and the default value for Password is pass.
5. Click the Manage tab. The Overview page appears.
6. Click on the desired item in the Overview list. The upload page appears for the
option you selected. For example, this is the Fonts page:
7. To upload a file to the printer, click Browse to locate your file. Double-click the
file to select it, then click Upload. The file uploads to the printer.
8. Click Save when you are finished.
Uploading from a USB Storage Device
You can use a USB storage device to install fonts, images, applications, formats,
and web forms to the printer. Use this table to understand where your files need to
be located on the USB storage device for the printer to install them.
File Type
Application /apps /home/user/apps
Configuration /config
Configuration profile /profiles /home/user/profiles
Display images /display /home/user/display
PX940 User Guide 33
Directory to
Place the File
Installed in this
Printer Directory
Page 46

File Type
Fingerprint script /scripts /home/user/scripts
Firmware /firmware
Font /fonts /home/user/fonts
Form/layout /forms /home/user/forms
Printed images /images /home/user/images
Installation package
(UFF file)
Start file Root of USB storage
Web Form /webforms /home/user/webforms
Directory to
Place the File
Root of USB storage
device
device
Installed in this
Printer Directory
1. Copy your files to a USB storage device using the directories in the table.
2. Insert the USB storage device into one of the USB host ports on the printer.
3. If you have an icon printer, the files are automatically uploaded to the printer.
If you have a full touch printer, the USB Device menu automatically appears:
a. Select Install Resources.
b. Select the file you want to install and wait until the item turns gray and a
checkmark appears next to it. The file is now successfully installed in the
printer.
c. Continue to another file if you have more files to install.
Change Background Image for the Ready Screen
You may customize the Ready screen that appears on the printer. The background
image you create must be:
• 320 x 240 pixels.
•named background_idle.png.
1. Create a /display directory on your USB storage device.
2. Copy your background_idle.png file to the /disp lay directory on the USB
storage device.
3. Insert the USB storage device into one of the USB host ports on the printer.
4. If you have an icon printer the file is automatically uploaded to the /home/
user/display directory on the printer.
5. If you have a full touch printer, use the USB Device menu to upload the file to
the printer.
6. Restart the printer.
The new image file you uploaded appears in place of the original Ready screen.
34 PX940 User Guide
Page 47

Printer Profiles
You can save updated printer default settings as a printer profile. The printer
supports multiple profiles that can be saved and loaded at any time. For example,
you can create one profile to use when you are printing on continuous label stock,
and a different profile to use when you are printing on label stock with gaps.
The following printer settings are not saved in a profile:
• IP address for either IPv4 or IPv6 networks
• Media calibration settings for the label stop sensor
• Remote port or remote host values for a remote computer accessing the printer
through raw TCP
Save a Printer Profile from the Web Page
From the printer web page, you can save the current settings as a profile that you
can load from the printer memory at any time.
1. In the printer web page (see Access the Printer Web Page), click the Configure
tab.
2. Click System Settings > General.
3. Click Save As Profile. The Save As Profile screen appears.
4. Enter a name in the Profile field, and then click Save.
Load a Printer Profile from the Web Page
You can load a saved profile from the printer web page.
1. In the printer web page (see Access the Printer Web Page), click the Manage
tab.
2. Click Profiles.
3. The Resident list includes profiles that are saved in the printer memory.
4. To load a profile from the printer memory, select the profile in the Resident list
and then click Activate. The profile is loaded.
5. To load a profile from another location, lick Browse and browse to the location
of the file. Double-click the file to select it, then click Upload. The profile is
uploaded to the printer.
PX940 User Guide 35
Page 48

Save a Printer Profile from the Main Menu
Use this procedure to save the current settings as a printer profile.
1. From the Ready screen, press the Main Menu button. The Main Menu appears.
2. Select Tools > Profiles. The Profiles menu appears.
3. Select Create. The Create Profile menu appears.
Note: selecting Create acts as the Save function
4. Select the Filename text box and type a name for the profile. The profiles can
have up to sixteen characters.
5. Press on the SIP to save your profile name and go back to the Save Profile
menu.
6. Press and wait until Complete appears on the screen.
7. Press to return to the Main Menu.
Load a Printer Profile from the Main Menu
Use this procedure to load a saved printer profile on the full touch printer.
1. From the Ready screen, press the Main Menu button. The Main Menu appears.
2. Select Tools > Profiles. The Profiles menu appears.
3. Select Load. The Load Profile menu appears.
4. Select the profile you want to load on the printer and press .
5. When Complete appears on the screen, press to return to the Main
Menu.
Load a Printer Profile Using Programming Commands
You can load a saved LCD printer profile to another printer by sending
programming commands directly from your PC to the printer through a terminal
program (such as HyperTerminal), a serial connection, or a network connection. All
commands are case-sensitive.
Note: To load printer profiles that modify communication settings that require itadmin
rights, you must log in as an itadmin: RUN “su -p pass”.
36 PX940 User Guide
Page 49

Connection Programming Commands
Printer running
Fingerprint
Printer running IPL <STX><ESC>.x,/system/usr/bin/cfg -o xmlimportset -k /home/user/
Telnet connection over
Port 23
RUN “/system/usr/bin/cfg -o xmlimportset -k /home/user/profiles/
myprofile”
profiles/myprofile<ETX>
/system/usr/bin/cfg -o xmlimportset -k /home/user/profiles/myprofile
Install a Configuration File from a USB Storage Device
After you save an .xml configuration file to a USB storage device, you can install it
on the printer at any time.
Note: If there is more than one configuration file on the USB storage device, the printer
imports the first file found alphabetically by file name.
1. Insert the USB storage device in the printer USB host port.
2. From the Ready screen, press the Main Menu button. The Main Menu appears.
3. Select Tools > USB Menu.
4. Select Configuration.
5. Select Install Configuration. The printer imports the configuration file.
• For most printer languages, the configuration file is imported directly into
the working configuration and is not copied to the /config directory.
• An IPL configuration file is copied to /home/user/config/ipl.
6. Press OK when the confirmation message appears.
Export a Configuration File to a USB Storage Device
You can save an .xml configuration file to a USB storage device and install it on
other printers.
1. Make sure the USB storage device has a single partition and is formatted as
FAT16 or FAT32.
2. Insert the storage device into the printer USB host port.
3. From the Ready screen, press the Main Menu button. The Main Menu appears.
4. Select Tools > USB Menu.
5. Select Configuration.
6. Select Export Configuration. A list of the available files appears.
7. Select the file to export.
8. Press OK when the confirmation message appears.
PX940 User Guide 37
Page 50

Menu Shortcuts
If you have a full touch printer, you can create shortcuts to access frequently used
menus or items, such as profiles, applications, test labels, and wizards. These
shortcuts are added to a Quick Choices menu, which replaces the Main Menu.
The Main Menu appears as the first item in the Quick Choice menu. Items in the
Quick Choice menu appear in the order in which they are added. The Main Menu
always appears as the first item.
Menu shortcuts can be very useful in these situations:
• You need to frequently change media. Create a profile for each media type and
create shortcuts for each profile. To quickly change the printer media settings,
press the Main Menu icon from the Ready screen to display the Quick
Choice menu, then select the appropriate media profile.
• You frequently run Smart Printing applications. Create a shortcut for each
Smart Printing application. To access these applications, press the Main Menu
icon from the Ready screen to display the Quick Choice menu, and select
the appropriate application.
Create Menu Shortcuts
1. From the Main Menu, select Tools > Quick Choices > Add.
2. To load a profile:
a. Select Load Profile
b. Select Load Profile again and a check mark appears in the box.
c. Select the arrow at the bottom of the screen.
d. Select the check mark icon at the bottom of the screen.
3. To select applications:
a. Select Programs.
b. To add a Program, select each program and a check mark appears in each
box.
c. Select the check mark icon at the bottom of the screen.
38 PX940 User Guide
Page 51

4. To select test labels:
a. Select Tools
b. Select Test Labels .
c. To add individual test labels, select each test label option and a check mark
appears in each box.
d. Select the check mark icon at the bottom of the screen.
5. To select wizards:
a. Select Wizards.
b. To add individual wizards, select each wizard and a check mark appears in
each box.
c. Select the check mark icon at the bottom of the screen.
6. The next time you press the Main Menu icon from the Ready screen, the
Quick Choice menu (containing the Main Menu and your menu shortcuts)
appears.
Customize the Printer Web Page
The printer web page visual presentation is specified using a CSS (Cascading Style
Sheet). You can customize the look of the web page by modifying the CSS. The
printer web page loads the default style.css prior to loading the user customized
style.css. The customized style.css does not need to contain the complete set of
CSS directives, it may only specify the subset of CSS styles that the user wishes to
customize.
1. Retrieve the default CSS file from the printer: http://<printerip>/format/
style.css.
2. Modify the style sheet and save your changes.
3. Upload the style sheet to the printer via /home/user/webpage/style.css.
PX940 User Guide 39
Page 52

40 PX940 User Guide
Page 53

CHAPTER
5
ABOUT THE VERIFIER
The verifier provides commercial, error-free barcode printing and identifies and
verifies the barcodes in printed outputs using supported command languages.
When labels are printed, the verifier ensures barcode readability.
Setting up the Verifier
The verifier can be configured through the webpage:
or the front touch panel:
PX940 User Guide 41
Page 54

Webpage
The supported features are listed as the following:
• Verification configurations
• Verification statistics
• Restore default verification database and failed label image files
• Verification reports for download
Front Panel
The supported features are listed as the following:
• Verifier Calibration Wizard
• Verification Results Display Wizard - Allow the user to browse through all the
barcodes detailed result in the last label printed.
USB menu to export all verification reports and saved label image file.
Verifier License
The verifier feature is activated when the appropriate license is installed on the
printer.
To install verifier license from the touch screen, go to Tools > USB Menu > Install
Verifier License
For more help on installing the verifier license, visit www.honeywellaidc.com
Calibration
Calibrating the verifier maintains the accuracy of the verifier when scanning an
image. Calibration is usually performed prior to the shipment of the printer.
Verifier Calibration Card
The calibration card is used to calibrate the verifier. It is very important to follow the
instructions on the calibration card packaging for proper care of the calibration
card. If you lose your calibration card, visit www.honeywellaidc.com.
If your verifier is not calibrated, follow these steps:
1. Open the verifier arm and print head arm.
2. Remove any media and ribbon from the printer media path.
3. Clean the TPH, platen roller and verifier glass with a soft, lint-free cloth and
isopropyl alcohol.
4. Place the calibration card on the media path, according of the instructions
written on the card.
42 PX940 User Guide
Page 55

• The three chevrons on the card indicating the orientation. The "FRONT" text
on the card placed outside of the verifier
• Align the black line with the printer tear bar. Use the diamond cut out on the
calibration card black line to align to the tear bar.
Note: You should see the tear bar through the diamond cut on the calibration card black
line.
• Align the card evenly toward the printer spine and resting against the media
guide.
5. Close the verifier arm and then the printhead arm.
6. From the front touch panel, go to: Wizards > Calibration > Verifier and follow
the instructions.
7. Press NEXT on the touch screen.
• The card will move back and forth as the calibration process is running.
8. Once completed, the front panel will show if the calibration pass or fail.
Note: If Calibration fails, see Verifier Error Alerts and Solutions, beginning on page 65.
Verifier Settings
This section gives a brief description of the verifier settings. For more details about
Verification Settings, see Appendix A.
Verification Type
Select the verification type to check the barcode.
• None - No barcode validation
• Read/No Read - Validate if barcode is readable
• ISO15415/15416 - Full ANSI grading of barcode
Passing Grade
Sets the minimum passing grade for barcode grading.Grade 0.0 (F) is the lowest
grade.Grade 1.5 (C) is the default and recommended by ISO standard. Only applied
when verification type is set to ISO15415/15416.
Aperture
Indicates the aperture size (in mils) used for verification. Aperture size will be
chosen automatically based on ISO standard. Change only if required by an
overriding application.
PX940 User Guide 43
Page 56

Retries
Sets maximum number of times printer reprints label after verification failure. This
setting is only applicable when the Verification Failure Action is set to Void and
Reprint.
Verification Failure Action
Indicates action to take when label fails verification.
• Void and Reprint - Retract and void the failed label, then reprint the failed label.
Stop reprint if the maximum retries have been reached.
• Void and Print Next - Retract and void the failed label, then continue to print the
next label.
• Pause for User Action - Stop the printing once the label verification fails and
prompt the user for action to take.
• Ignore and Continue - No voiding when verification fails. Result is saved and
next label is printed.
Note: Note: During multiple label printing, printer will void the failed label (plus all printed
and yet to be verified labels) in order to keep the good labels in sequence.
Save Failed Label Images
When enabled, the printer saves all failed label images in non-volatile memory.
Maximum 100 images can be saved (if memory available). At maximum capacity
oldest image file will be replaced by newest.
Void Pattern
Select the void pattern type to mark the failed label.
Print Modes and Speed
The printer works for the following mode:
• Printer command language: Autosense, FP/DP, ZPL, IPL, DPL
• Recommended maximum print speed: 4ips for 203 and 300 dpi; 2 ips for 600 dpi
Note: Voiding not supported in peel off mode
44 PX940 User Guide
Page 57

Barcode Symbologies Supported
The verifier supports the following barcode symbologies:
•Code 39
•HIBC 39
•Code 128
•ISBT-128
•HIBC 128
•EAN-8
•EAN-13
•EAN-128
•UPC-A
•UPC-E
• UPC Shipping Container Code
• Interleaved 2 of 5
•ITF-14
• Data Matrix
• ISBT Data Matrix
Barcode Orientations
• Picket or ladder orientation
Barcode Size Supported
• Minimum 1D barcode size: 10 mils
• Minimum 2D barcode size: 15 mils
Verification Length
Support maximum verification length up to 12 inches
Maximum Number of Barcodes per Label
A total of 32 barcodes can be scanned and verified per label. If the number of barcodes on one label exceeds 32, the verifier system will show an error message.
PX940 User Guide 45
Page 58

Printing Behavior after Error Recovery
-BCFMTOPUZFUWFSJGJFEPS
WFSJGJDBUJPOJOQSPDFTT
-BCFMTOPUZFUWFSJGJFEPS
WFSJGJDBUJPOJOQSPDFTT
Possible printer error during printing & verification:
•Printhead lifted
•Front arm lifted
• Next label not found
• Out of media
• Out of ribbon
• Ribbon installed
Printing Behavior after Recovered from error above:
1. No void printing. User will need to manually mark/discard the labels between
the verifier module and printhead.
2. Reprint all unverified labels and verification failed labels.
The following diagrams show which labels will be reprinted in different scenarios.
Scenario 1
• All blue labels will be reprinted and verified after error recovery.
• All blue labels will be marked as FAIL in verification result database.
Scenario 2
• All blue labels will be reprinted and verified after error recovery.
• All blue labels will be marked as FAIL in verification result database.
46 PX940 User Guide
Page 59

Scenario 3
-BCFMPOMZDPOUBJOT
CBSDPEFJOUIJTBSFB
-BCFMPOMZDPOUBJOT
CBSDPEFJOUIJTBSFB
• Label verification in progress.
• This label will be marked PASS in verification result database.
Scenario 4
• Label verification in progress.
• This label will be marked FAIL in verification result database.
Printing Errors
Possible reasons for error during printing & verification:
• Printhead lifted
• Front arm lifted
• Next label not found
• Out of media
•Out of ribbon
• Ribbon installed
PX940 User Guide 47
Page 60

Unsupported Barcode Behavior
The printer will display an “Unsupported Barcode” warning message in all user
interfaces (UI, webpage, SNMP, Printset, etc.) if there is an unsupported barcode
type or unsupported barcode size in the label.
In the verification report, if all the supported barcodes in the label are PASS, then
“Label Status” will display PASS and the printer will rely on the “Label Status” for
verification failure handling.
If there an unsupported barcode exists in the label, there will be a status field to
indicate the barcode is unsupported due to unsupported type or unsupported size.
Example:
Scenario 1: All barcodes printed on the label are unsupported or unsupported size
• Label Status = Pass
• Individual barcode status = Unsupported Barcode / Unsupported Size
•UI display “Unsupported Barcode” warning message
Scenario 2: At least one barcode printed on the label is supported
• Label Status = Pass/Fail (based on supported barcode)
• Individual barcode status = Pass/Fail/Unsupported Barcode/Unsupported
Size
• UI display “Verification Fail” if label status is Fail, otherwise it will display
“Unsupported Barcode”
Verification Failed Error Handling
When the print job's barcode has failed in the verification process, there are several
ways to identify and fix the issue:
• Voiding the label and reprinting (default)
• Voiding the label without reprinting
• Pause print job and wait for user action
• No voiding and proceed with subsequent print jobs
Note: All actions above will be automatically executed, except pause print job and wait for
user action. During void and reprint process, the print job pause action is not
supported.
Note: In the Webpage menu, Services > Verifier Image, you can access the last label image
scan (if available)
48 PX940 User Guide
Page 61

Failed Label Image File
Summary Description
Image Format JPG
Maximum Files 100 files or flash memory is 75% full before the printer start to replace the
Path /home/user/verifier/images
File name <Printer Model Name>_<Printer Serial
The failed label image will not be generated if one of the following scenarios is true
• All supported barcodes in the label are meeting the passing grade or readability
criteria.
• "Saved Failed Label Images" setting is disabled.
The example below shows the number of failed label image saved when the "Saved
Failed Labels" setting is enabled and "Retries" setting set to 3.
• Initial print - FAIL (save the failed label image)
• First reprint - FAIL (save the failed label image)
oldest file in a round robin.
Number>_<LabelID>_YYYYMMDD_HHMMSS.jpg
Example: PX940V_0000001234567_1_20181026_142800.jpg
• Second reprint - PASS
Total failed label image saved is 2.
The failed label image file can be downloaded through the following method:
•USB Thumbdrive
•FTP
•Webpage
USB Thumbdrive
1. Export all existing individual verification reports and failed label image files
Note: If images are saved on a thumbdrive, the limit is the thumbdrive capacity.
• Insert the USB thumb drive to the printer
• Go to TOOLS menu from the LCD to export all verification results (individual
verification report and failed label image if any)
• Select "Remove USB" in USB menu in order to safely remove the USB
thumbdrive.
PX940 User Guide 49
Page 62

2. Saving verification results in run-time
• Create a directory in the root of USB thumbdrive named “verifier”
• Insert the USB thumbdrive to the printer
• The printer will start saving from the next verification XML report and failed
label image if any to the USB thumbdrive.
• Select "Remove USB" in USB menu in order to safely remove the USB
thumbdrive.
Reporting and Statistics
In the Webpage > System Information > Statistics > Verification Results you can
see the list of the individual reports (if available).
You can also see the number of labels verified, failure rates, and print statistics.
50 PX940 User Guide
Page 63

Report Formats
Summary Description
File Format xml
File Name Individual report:
Content The various measured parameters for all verified barcodes found in the
Individual Report
For individual report, it saves the detailed information of the barcodes in the label.
The content includes barcode type, size, encoded data, ANSI grade and the
detailed parameter of ANSI grade. Each individual label report consists of 3 parts.
<Printer Model Name>_<Printer Serial Number>_<Label
ID>_<YYYYMMDD>_<HHMMSS>.xml
Example: PX940V_0000001234567_1_20181026_142800.xml
Summary report:
<Printer Model Name>_<Printer Serial Number>_<Start of Label ID>_<End of
Label ID>.xml
Example: PX940V_0000001234567_1_50.xml
label
• Report header
• Barcode information
• Barcode grading parameter (not applicable for Read/No Read verification type)
• 1D Barcode 10 line profile grading parameter (not applicable for Read/No Read
verification type)
PX940 User Guide 51
Page 64

Report Header
Content
Label ID Yes Yes Unique counter for each printed label. Reset to 1 when user reset the
PrintJob ID Yes Yes Unique counter for each print job. Reset to 1 when user reset the
Verification
Type
Passing
Grade
Threshold
Hardware
Aperture
Date Yes Yes Date when the label is printed
Time Yes Yes time when the label is printed
Last
Calibration
Date
Label Grade No Yes Indicate the lowest grade of the barcode in the label
Label Status Yes Yes Verification status for the label, Pass or Fail
Image Yes Yes Failed label image file name
Barcodes Yes Yes A total number of barcodes in this label
Read/No
Read
Yes Yes Barcode verification type
No Yes Passing grade threshold - not applicatble for the Read/NoRead and
Yes Yes Integrated verifier sperture size measured.
Yes Yes Last verifier calibration date “Expired” will be indicated if the last
ISO 15415/
15416
Description
verification user storage/database
Example:
<Label ID="1"> - First label verified after reset.
verification user storage/database
Example:
<PrintJobID>1<PrintJobID> - First print job after reset
Example:
<VerificationType>Read/No Read</VerificationType>
GS1 application. GS1 will have an individual passing grade for each
barcode type defined in the profile.
Example:
<PassingGrade>1.5 (C)</PassingGrade>
Example:
<hardwareAperture>4.4 mils</HardwareAperture>
Format: YYYYMMDD
Example:
,Date>20180320</Date>
Format: HHMMSS
Example:
<Time>131120</Time>
calibration date is past the duration determined by the design.
Format: YYYYMMDD
Example:
<CalibrationDate>20180320</CalibrationDate> or
<CalibrationDate>Expired</CalibrationDate>
Example:
<LabelGrade>3.3 (B)</LabelGrade>
Example:
<LabelStatus>Pass</LabelStatus>
Example:
<Image>PX940V 0000001234567 1 20180322 093000.jpg</Image>
52 PX940 User Guide
Page 65

Barcode Information
Content
Barcode ID Yes Yes Unique number for individual barcode in each label. Number start
Symbology Yes Yes Barcode type
Size Yes Yes Barcode size
Data Yes Yes Decoded data. For Read / No Read, this field will leave empty if
Grade No Yes Grading results for this barcode
Status Yes Yes Verification status for this barcode, Pass or Fail
Scan Line
Data Check
X position Yes Yes Barcode X coordinate start position in pixel. Refer to the diagram
Y position Yes Yes Barcode Y coordinate start position in pixel. Refer to the diagram
Width Yes Yes Barcode width in pixels
Height Yes Yes Barcode height in pixels
Read/
NoRead
Yes Yes Scan line data consistency check status for 1D barcode.
ISO 15415/
15416
Description
from 1.
Example: <Barcode ID="1">
Example: <Symbology>CODE39</Symbology>
Example: <Size>9.8 mils</Size>
failed in either one of the passing criteria.
Example: <Data>1234567890</Data>
Example: <Grade>3.3 (B)/5/660</Grade>
Example: <Status>Pass</Status>
Status:
a) Pass - All 10 scan line data is same.
b) Fail - At least 1 of the scan line data mismatched with others.
c) NA - 2D barcode
Example:
<ScanLineDataCheck>Pass</ScanLineDataCheck>
below for barcode's coordinate details.
Example: <XPos>100</XPos>
below for barcode's coordinate details.
Example: <YPos>100</YPos>
Example: <Width>720 pixels</Width>
Example: <Height>480 pixels</Height>
PX940 User Guide 53
Page 66

All Supported 1D Barcodes Overall Parameters
Content Description
R Max The highest reflectance in any element or quiet zone in a scan reflectance profile, or the highest
reflectance of any sample are in a two-dimensional matrix symbol.
Example:
<RMax>79.2%</RMax>
R Min The lowest reflectance in any element in a scan reflectance profile, or the lowest reflectance of any
sample area in a two-dimensional matrix symbol.
Example:
<RMin Grade="4.0">0.5%</RMin>
Min Edge
Contrast
Symbol
Contrast
Modulation The ratio of minimum contrast to symbol contrast.
Defects Irregularities found within elemens and quiet zones; measured in terms of element reflectance
Decodability A measure of the accuracy of its production in relation to the appropriate reference decode
Decode Decodable symbols shall comply with the symbology specification. Value in grade.
Quiet Zone The areas to the left and right of the barcode that is free from text or graphics to successfully read
Global
Threshold
Print
Contrast
Signal
Average Bar
Gain
The minimum difference between bar reflectance and space reflectance of two adjacent elements.
Example:
<ECMin Grade="4.0">67.2%</ECMin>
The difference between the highest and lowest reflectance values in a scan reflectance profile.
Example:
<SymbolContrast Grade="4.0">84.0%</SymbolContrast>
Example:
<Modulation Grade="4.0">80.0%</Modulation>
non-uniformity.
Example:
<Defects Grade="4.0">8.5%</Defects>
algorithm.
Example:
<Decodability Grade="4.0">76.5%</Decodability>
Example:
<Decode Grade="4.0"/>
the barcode.
Example:
<QuietZone Grade="4.0"/>
The reflectance level midway between the maximum and minimum reflectance values in a scan
reflectance profile, used for the initial identification of elements.
Example:
<GlobalThreshold>42.5%</GlobalThreshold>
The contrast between bars and spaces or background.
Example:
<PCS>99.4%</PCS>
Average bar gain or loss in percentage
Example:
<BarGain>-1.1%</BarGain>
54 PX940 User Guide
Page 67

2D Barcode, Datamatrix Overall Parameters
Content Description
R Max The highest reflectance in any element or quiet zone in a scan reflectance profile, or the
highest reflectance of any sample area in a two-dimensional matrix symbol.
Example:
<RMax>86.6%</RMax>
R Min The lowest reflectance in any element in a scan reflectance profile, or the lowest
reflectance of any sample are in a two-dimensional matrix symbol.
Example:
<RMin>16.8%</RMin>
Symbol Contrast The difference between the highest and lowest reflectance values in a scan reflectance
profile.
Example:
<SymbolContrast Grade="4.0">69.8%</SymbolContrast>
Modulation A measure of the uniformity of reflectance of the dark and light modules, respectively.
Example:
<Modulation Grade="4.0"/>
Decode Decodable symbols shall comply with the symbology specification. Value in grade
Example:
<Decode Grade="4.0"/>
Axial
Nonuniformity
Grid
Nonuniformity
Unused Error
Correction
Fixed Pattern
Damage
L1 (left of L
finder)
L2 (bottom of L
finder)
QZL1 (left quiet
zone)
QZL2 (bottom
quiet zone)
OCTASA (overall
clock track and
solid area)
Measures the grades and spacing of te mapping centers (sampling points) or
intersections of the grid and tests for uneven scaling of the symbol.
Example:
<AxialNonuniformity Grade="4.0">1.9%</AxialNonuniformity>
Measures and grades the largest vector deviation of the grid intersections.
Example:
<GridNonuniformity Grade="4.0">5.4%</GridNonuniformity>
Tests the extent to which regional or spot damage in the symbol has eroded the reading
safety margin that error correction provides.
Example:
<UnusedEC Grade="4.0">100.0%</UnusedEC>
Tests the damage to the finder pattern, quiet zone timing, navigation, and other fixed
patterns.
Example:
<FixedPatternDamage Grade="4.0"/>
L1 in grade
Example:
<L1 Grade="4.0"/>
L2 in grade
Example:
<L1 Grade="4.0"/>
QZL1 in grade
Example:
<QZL1 Grade="4.0"/>
QZL2 in grade
Example:
<QZL2 Grade="4.0"/>
OCTASA in grade
Example:
<OCTASA Grade="4.0"/>
PX940 User Guide 55
Page 68

Content Description
AG (average
grade)
Contrast
Uniformity
Print Growth X Print growth X in percentage
Print Growth Y Print growth Y in percentage
MatrixSize Matrix size
AG in grade
Example:
<AG Grade="4.0"/>
The minimum MOD value found in any module contained in the data region of the symbol
and does not affect the overall grade.
Example:
<ContrastUniformity>52.8%</ContrastUniformity>
Example:
<PrintGrowthX>9.3%</PrintGrowthX>
Example:
<PrintGrowthY>9.3%</PrintGrowthY>
Example:
<MatrixSize>16x16</MatrixSize>
56 PX940 User Guide
Page 69

1D barcode 10 line Profile Grading Parameters
Content Description
Line ID Scan line number for individual barcode. Number start from 1.
Example:
<Line ID="1">
Grade Grading results for this barcode line
Example:
<Grade>3.3</Grade>
R Max The highest reflectance in any element or quiet zone in a scan reflectance profile, or the
highest reflectance of any sample area in a two-dimensional matrix symbol.
Example:
<RMax>79%</rMax>
R Min The lowest reflectance in any element in a scan reflectance profile, or the lowest
reflectance of any sample are in a two-dimensional matrix symbol.
Example:
<RMin Grade="4.0">0.2%</RMin>
Min Edge
Contrast
Symbol Contrast The difference between the highest and lowest reflectance values in a scan reflectance
Modulation The ratio of minimum edge contrast to symbol contrast.
Defects Irregularities found within elements and quiet zones; measured in terms of element
Decodability A measure of the accuracy of its production in relation to the appropriate reference
Decode Decodable symbols shall comply with the symbology specification. Value in grade.
Quiet Zone Quiet Zone. Value in grade.
Global Threshold The reflectance level midway between the maximum and minimum reflectance values in
Print Contrast
Signal
Average Bar Gain Average bar gain in percentage
The minimum difference between bar reflectance and space reflectance of two adjacent
elements.
Example:
<ECMin Grade="4.0">68.4%</ECMin>
profile.
Example:
<SymbolContrast Grade="4.0">83.3%</SymbolContrast>
Example:
<Modulation Grade="4.0">82.2%</Modulation>
reflectance.
Example:
<Defects Grade="4.0">6.2%</Defects>
decode algorithm.
Example:
<Decodability Grade="4.0">75.5%</Decodability>
Example:
<Decode Grade="4.0"/>
Example:
<QuietZone Grade="4.0"/>
a scan reflectance profile used for the initial identification of elements.
Example:
<GlobalThreshold>41.0%</GlobalThreshold>
Print Contrast Signal (PCS) in percentage
Example:
<PCS>97.0%</PCS>
Example:
<BarGain>3.0%</BarGain>
PX940 User Guide 57
Page 70

Summary Report
Summary report is generated based on the individual report's label ID range
exported by the user. For example, user exported individual report starting from
label ID, 1000 to 2000, then the summary report will be generated based on data in
the individual report for label ID from 1000 to 2000.
Content Description
Summary ID Summary report ID
Total
Number
Failed
Number
Failed Rate Failure rate in percentage
Failed Label
Details
Summary ID Summary report ID
Example:
<Summary ID="1000_2000>
Total number of individual reports created based on the input range. This
number includes the retry report.
Example:
<TotalNumber>1000</TotalNumber>
Number of failed individual reports
Example:
<FailedNumber>2</FailedNumber>
Example:
<FailedRate>0.2%</FailedRate>
Failed label details
Example:
<FailLabel Retry="0" PrintJob="13" LabelID="14">
Example:
<Summary ID="1000_2000>
Restore Default Verification Files
You can restore the default verification database and remove all failed label image
files in order to free up the memory through the following interfaces:
• PrintSet
•Web page
•LCD
To restore the default verification database:
1. Go to Webpage > Services > Restore Defaults > Verification Files
2. Click Restore.
3. Restart the printer.
58 PX940 User Guide
Page 71

Fingerprint Command
To show verification results/record summary on standard I/O or label after the last
verification database been reset.
VERIFIER RESULT [PRINT]
Argument Description
PRINT To print the summary on the label
Send this command to retrieve summary of verification results. A typical result
might be:
• Verified: 104 labels
• Failed: 3 labels
•Failure Rate: 2.9%
To get the summary printed on the label:
VERIFIER > RESULT > PRINT
PX940 User Guide 59
Page 72

60 PX940 User Guide
Page 73

CHAPTER
6
TROUBLESHOOTING
System Information
Look in the System Information tab on the printer web page for useful information
and statistics on the printer hardware and firmware.
Statistics
Use the printer web page to view important statistics about your printer.
Statistic Type Information Available
System Information Printer uptime and CPU usage, firmware and kernel versions, printer
Supply Printhead and ribbon information
Hardware Options Input/output devices, serial port information
Network Interfaces MAC address, TCP/IP, Bluetooth, and 802.11 network information
Font Information Name, type, location, and size of installed fonts
Bar Code Information Name and type of installed bar code fonts
Image Information Name, type, location, and size of installed images
configuration and serial numbers, flash and RAM memory information
1. Open a web browser on your PC.
2. In the address bar, type the IP address of your printer and press Enter. The
printer web page appears.
3. Click the System Information tab.
4. Click Statistics > System Information. The System Information page appears.
5. For more detailed statistics, click another choice in the Statistics list.
PX940 User Guide 61
Page 74

Printer Odometer
You can check the odometer from the printer web page to see the printhead usage
and how the current values compare to the alert values.
Note: To check the printer odometer from the web page, the printer must be turned on and
connected to your network.
1. Open a web browser on your PC.
2. In the address bar, type the IP address of your printer and press Enter. The
printer home page appears.
3. Click the System Information tab.
4. Select Odometer. The list of current odometer statistics appears.
Maintenance Alerts
To help maintain the printer, you can configure the printer to send alert messages
when certain conditions occur. For example, the printer can send a message when
the odometer reaches a certain value, or if the printhead is lifted during printing.
There are three types of alerts:
Set Alerts
• Error alerts
• Information alerts
• Warning alerts
You configure alert settings in the printer web page. Alert messages can be sent to
an email address, an SNMP trap, or both. You can enable or disable each type of
alert, set the number of times the alert is repeated, set the unit of measure that
determines how often the alert is sent, and change the default text message for the
alert.
You can set maintenance alerts to determine the threshold or value at which an
alert is sent to you
1. Open a web browser on your PC.
2. In the address bar, type the IP address of your printer and press Enter. The
printer web page appears.
3. Click Login. The Login page appears.
4. Type your Username and Password and then click Login. The default value for
Username is itadmin and the default value for Password is pass.
5. Click the Configure tab. The Configuration Summary page appears.
62 PX940 User Guide
Page 75

6. Click System Settings > Maintenance Alerts. The Maintenance Alerts settings
page appears.
7. Type the values you want to set for each maintenance alert.
8. Click Save when you are finished.
Alert Notifications
The way you receive error alerts is determined by the notification method you configure. You can choose between receiving notifications by SNMP trap, email, or
SNMP trap + email.
• From the printer Main Menu, select Settings > System Settings > General >
Alert Notification Method.
Or
• From the printer web page, login and then click the Configure tab > System
Settings > General > Alert Notification Method.
PX940 User Guide 63
Page 76

Error Alerts and Solutions
Use these tables to understand and troubleshoot some common error alerts you
may receive and how to fix them.
Error Alert Solution
Label Not Taken Printing has been stopped because a label is obstructing the label taken
Printhead Lifted Lower the printhead.
Front Arm Lifted Lower Front Arm
Out of Ribbon Load ribbon in the printer.
Out of Media Load media in the printer.
Ribbon Low The diameter of the remaining roll of media is lower than the specified value
Media Low The diameter of the remaining roll of media is lower than the specified value
Ribbon Installed The printer is configured as a direct thermal printer and thermal transfer
Printer in Pause
Mode
Printer in Menu
Mode
Application Break Fingerprint only. An application breaks uncontrolled.
Print Job Complete A print job has been successfully completed.
Odometer (Printer) The printer has reached a limit set in the Odometer (Printer) setting in
Odometer
(Printhead)
Odometer (User
Resettable)
Printhead Too Hot The printhead is overheated and needs to cool down. Wait for printing to
Printhead Not
Detected
Faulty Dot The printhead has reached the number of faulty dots set in the Faulty Dots
Replace Printhead The printer has reached a limit set in the Replace Printhead setting in
Clean Printhead The printer has reached a limit set in the Clean Printhead setting in
Upgrading Firmware The printer is going to start upgrading the firmware. Do not try to send
Printer is Rebooting The printer is going to restart. Wait until the printer is ready before
Started The printer is in the process of starting up.
sensor. Remove the label to resume printing or try LTS sensor calibration to
clear this error.
in the Ribbon Low Diameter setting. Replace the ribbon.
in the Media Low Diameter setting. Replace the media.
ribbon is installed. Remove the ribbon or configure the printer for thermal
transfer media.
A print job is paused from the front panel. Press the Print button to resume
printing.
A user entered a menu from the front panel. Press the Home button to return
to the Ready screen.
Maintenance Alerts for the amount of media to print before being alerted.
The printhead has reached a limit set in the Odometer (Printhead) setting in
Maintenance Alerts for the amount of media to print before being alerted.
The printer has reached a limit set in the Odometer (User Resettable) setting
in Maintenance Alerts for the amount of media printed since the last reset.
resume automatically.
The printer is not detecting the printhead. Check to make sure the printhead
is installed and that the printhead cable is firmly connected to the printhead.
setting in Maintenance Alerts. You may need to replace the printhead.
Maintenance Alerts for the amount of media to print before replacing the
printhead. Replace the printhead.
Maintenance Alerts for the amount of media to print before cleaning the
printhead. Clean the printhead.
anything to the printer.
attempting to communicate with it.
64 PX940 User Guide
Page 77

Verifier Error Alerts and Solutions
Error Alert Solution
Verifier Power Failed Set the Verifier Settings to READ/NO READ or ISO 15415/15416
Align the calibration card with the tear bar
Calibration Failed Clean the verifier glass. Make sure that the calibration card is aligned
correctly to the tear bar. Check the condition of the calibration card.
Front Arm Lifted Lower Front Arm
Verification Failed Check the quality of the printed label. Clean the verifier glass and calibrate
the verifier.
Verifier Calibration
Required
Verifier Hardware
Error
Unsupported
Barcode
Verifier Calibration
Expired
Feed Card Failed Check whether the calibration card is feeding out correctly.
Color Out of Range Calibration card replacement
Aperture Failed Contact support at www.honeywellaidc.com
LED Calibration
Failed
Calibrate the Verifier using the calibration card
Contact support at www.honeywell.aidc.com
No impact on the label verification status. the unsupported barcode will be
ignored
Recalibrate the verifier to make sure the ANSI grading conforms to the
standard.
Check the condition of the calibration card. ALign the calibration card with
the tear bar. If the problem persists, contact support at
www.honeywellaidc.com
Troubleshoot Printer Problems and Find Solutions
Use this section to find possible solutions to printer problems.
Print Quality Problems
Problem Possible Solution
The printout is weak Try these possible solutions in order:
• Make sure that your media > print quality setting is
appropriate for hte type of media you are using.
• The contrast may be too low. Increase the contrast.
• The printhead pressure may be too low. Increase the
printhead pressure.
• Replace the printhead.
The printout is weaker on one
side
PX940 User Guide 65
Adjust the printhead balance.
Page 78

Problem Possible Solution
There are weak spots on the
printout.
The printout is dark or there is
excessive bleeding on the
media
There are dark lines along the
media path
There are white vertical lines on
the printout
Part of a dotted line is missing Try these possible solutions in order:
The inner edge of the printout is
missing
The content on the printout is
compressed
Nothing shows up on the
thermal transfer printout.
The ribbon breaks Try these possible solutions in order:
The ribbon wrinkles Try these possible solutions in order:
Try these possible solutions in order:
• There may be foreign particles on the media. Clean or replace
the media.
• Make sure that your media and ribbon are compatible.
• Make sure that you are using high quality media and ribbon.
• The contrast may be too low. Increase the contrast.
Try these possible solutions in order:
• Make sure your media > print quality setting is appropriate for
the type of media you are using.
• The contrast may be too high. Decrease the contrast.
• The printhead pressure may be too high. Decrease the
printhead pressure.
• The printhead voltage may be incorrect or the energy control
may be faulty. For help, contact Product Service and Repair.
The printhead may be dirty. Clean the printhead.
Try these possible solutions in order:
• The printhead may be dirty. Clean the printhead.
• There may be missing dots on the printhead. Replace the
printhead.
• The printhead may be failing. Replace the printhead.
• The strobe signal may be failing. For help, contact Product
Service and Repair.
Try these possible solutions in order:
• The media may not be properly installed or aligned. Reload the
media.
• The media margin or X-start parameter may be set too low.
Increase the setting.
The print speed may be too high. Lower the print speed.
The ink-coated side of the ribbon may not be facing the media.
Reload the ribbon.
• Make sure your media setting is appropriate for the type of
media you are using.
• Make sure that the ribbon is fitted correctly. Reload the
ribbon.
• The energy control may be faulty. For help, contact Product
Service and Repair.
• It is possible that the ribbon was not loaded correctly, check
the Ribbon Ink In and Ink Out Switch is in the correct position.
• Darkness setting may be too high, reduce darkness setting
• You may need to adjust the media edge guide and use/adjust
the Media roll holder.
• Incorrect or uneven print head pressure, adjust Print head
Pressure and Toggle Position.
• Adjust the ribbon tension bar, turn the tension bar screw
clockwise to move the bar lower and decrease the tension.
turn the tension bar screw counterclockwise to move the bar
upper and increase the tension.
66 PX940 User Guide
Page 79

Problem Possible Solution
The printer is connected to the
PC using a virtual COM port
and printing stops. There are no
errors.
The printer is connected to a
serial port on the PC but the
printer is not working.
Verifier Problems
Problem Possible Solution
Inconsistent barcode grading Avoid interfering with the printed media during verification
Poor grading Clean the verifier glass and printhead
Voiding good labels Adjust the verification passing grade
Verifier is not functioning Check if the license is installed
Low reflectance/low grading Try these possible solutions in order:
Minimum Edge Contrast low
grading
Symbol contrast low grading Try these possible solutions in order:
Modulation low grading Use a lighter, non-glossy media
Defects low grading Try these possible solutions in order:
Decodability low grading Make sure that your print quality setting is appropriate for the
Make sure that bidirectional support is disabled. From the printer
properties dialog box, click the Ports tab, and then clear the
Enable bidirectional support check box.
Try these possible solutions:
• Make sure the serial port settings are configured correctly.
• Make sure the serial cable pinouts are correct and that the
cable is not damaged.
• If you have the Windows driver for an RS-232 printer installed
on your PC, uninstall the driver.
Calibrate the verifier
Check if the verification type is set to Read/No Read or ISO
15415/15416
• Make sure that your print quality setting is appropriate for the
type of media that you are using.
• The contrast may be too low; increase the contrast
• The printhead pressure may be too low; increase printhead
pressure
Use a lighter, non-glossy media
Increase barcode size-X dimension
• The contrast may be too low; increase contrast
• The printead pressure may be too low; increase printhead
pressure
• Use non-glossy media
Increase barcode size-X dimension
• Make sure that your print quality setting is appropriate for the
type of media that you are using.
• The contrast may be too low; increase the contrast
• The printhead pressure may be too low; increase printhead
pressure
• There may be foreign particles on the media. Clean or replace
the media
• The printhead may be dirty. Clean the printhead.
type of media that you are using.
PX940 User Guide 67
Page 80

Networking Problems
Problem Possible Solution
The Ethernet or wireless
network connection is not
working correctly
I can’t connect to the printer
web page
Try these possible solutions:
• Make sure your network cable is securely connected to your
printer and a straight pin-to-pin cable, not a crossover cable.
• Make sure your PC is correctly configured for and connected
to your network.
• Make sure your printer is correctly configured for your
network.
If you are connecting your printer with a crossover network cable,
you may need to disable the web browser’s proxy settings on your
computer to access the printer web page.
Restore Printer Defaults
To restore factory defaults on the printer, use the printer web page or the Main
Menu on the full touch printer. From the printer web page and the Main Menu on a
full touch printer, you can choose to restore default network settings, keep or delete
user-installed files, and to restore all system settings.
Restore Defaults from the Printer Web Page
Restore your printer’s defaults from the printer web page if you are connected to a
WiFi or Ethernet network.
1. Start a web browser on your desktop PC.
2. In the address field, type the printer IP address and press Enter. The printer
web page appears.
3. Click Login in the upper right corner of the screen. The Login page appears.
4. Type your Username and Password in the text fields and click Login.
5. Select Services > Restore Defaults. The Restore Defaults menu appears with
none of the check boxes selected.
6. To restore all default settings, select all of the check boxes and then click
Restore. You can also restore only the defaults for specific settings:
• To restore the current network settings, select the Network settings check
box.
• To restore all applications, fonts, and other files you have installed on the
printer, select the User files check box.
• To restore all current system settings, select the System Settings check box.
7. When you receive a message to reboot the printer on your desktop PC, click OK
and restart the printer.
68 PX940 User Guide
Page 81

Restore Defaults from the Main Menu
Restore a full touch printer’s defaults from the Tools menu.
1. From the Ready screen, open the Main Menu.
2. Select Tools > Restore Defaults. The Restore Defaults menu appears with all
items in the list selected by default.
3. To restore all default settings, continue with the next step. You can also change
the settings that are restored as follows:
• To keep the current network settings, clear the Network settings check box.
• To keep all applications, fonts, and other files you have installed on the
printer, clear the User files check box.
• To keep all current system settings, clear the System Settings check box.
4. Tap the right arrow and, when prompted, tap Ye s to restore default settings
and reboot. A confirmation message appears.
5. To return to the Main Menu without restoring the default settings, select No. To
return to the Restore Defaults list without restoring any defaults, select
Cancel.
Restore Defaults with a Hardware-Based Reset
Restore the printer defaults on a full touch printer by performing a hardware-based
reset.
1. Turn the printer off and open the media cover.
2. Turn the printhead lift lever counterclockwise to raise the printhead.
3. Turn the printer on while pressing and holding the Feed button.
4. Release the Feed button when the status bar is nearly full.
5. All of the settings are restored on the printer.
6. Turn the printhead lift lever clockwise to lower the printhead and close the
media cover.
Upgrade the Printer Firmware
Check for periodic updates to the printer firmware. The latest version of the firmware is available from the Honeywell Technical Support Downloads portal
(https://hsmftp.honeywell.com). Go to Software > Printers > Printer Drivers >
Intermec Windows driver.)
You can upgrade the printer firmware using:
• The printer web page
• A USB storage device
PX940 User Guide 69
Page 82

• PrintSet 5
Note: After you upgrade the printer firmware, restore the default settings and calibrate the
media sensors.
Upgrade Firmware from the Printer Web Page
1. Start a web browser on your desktop PC.
2. In the address field, type the printer IP address and press Enter. The printer
web page appears.
3. Click Login in the upper right corner of the screen. The Login page appears.
4. Type your Username and Password in the text fields and click Login.
5. Click the Services tab and select Firmware Upgrade. The Firmware Upgrade
screen appears, showing the current firmware version.
6. Click Browse to locate the upgrade file. Select it and click Open.
7. Click Upgrade. The printer web page shows that it is upgrading firmware on
your printer.
Upgrade Firmware from a USB Storage Device
Place the upgrade file in the root directory on the USB storage device.
Note: For best results, use a USB storage device that contains no other files besides the
upgrade file.
1. Copy the firmware upgrade file to the root directory of the USB storage device.
2. Turn the printer off.
3. Insert the USB storage device into a USB host port.
4. Restart your printer. An upgrading firmware message appears as the upgrade
file is loaded into the printer memory. This process may take a few minutes.
5. Remove the USB storage device.
70 PX940 User Guide
Page 83

CHAPTER
7
MAINTENANCE
Clean the Printer
To properly maintain the printer, you should clean it regularly. You can clean these
parts of the printer:
•The printhead
• The media guides
• The exterior of the printer
Caution: To avoid possible personal injury or damage to the printer, never insert
any pointed or sharp objects into the printer.
Caution: Use only the cleaning agents specified in this section. Honeywell is
Caution: Isopropyl alcohol is a highly flammable, moderately toxic, and mildly
Follow these guidelines for cleaning the printer:
• Always remove the power cord before cleaning.
• Never spray the printer with water. Protect it from water when cleaning the
premises.
Clean the Printhead
Cleaning the printhead on a regular basis is important for the life of the printhead
and for the print quality. Clean the printhead each time you replace the media.
Follow this procedure to clean the printhead using the cleaning card. If you need to
clean additional residue from the platen roller or tear bar, use a cotton swab
moistened with isopropyl alcohol.
Caution: Never use any sharp tools for removing stuck labels. The
not responsible for damage caused by any other cleaning materials
used on this printer.
irritating substance.
printhead and rollers are delicate.
PX940 User Guide 71
Page 84

1. Turn the printer off and disconnect the printer from power.
2. Open the media cover.
3. Remove the media and ribbon (if installed).
4. Insert most of the cleaning card under the printhead, and then lower the
printhead.
5. Pull out the cleaning card and raise the printhead.
6. Wait for approximately 30 seconds to allow the cleaning fluid to dissolve the
residue.
7. Repeat Steps 4 through 6 if necessary.
8. If necessary, clean residue from the platen roller or tear bar with a cotton swab
moistened with isopropyl alcohol.
9. Once the parts are dry, replace the media (and ribbon) in the printer.
10. Close the media cover, reconnect power, and turn on the printer.
Clean the Front Sensor (PX940A)
Both the upper and lower of front sensor are transparent to allow light to pass
between the two parts of the label gap and label mark sensors. It is important to
keep these surfaces free of dust, stuck labels, and adhesive residue.
1. Turn the printer off and disconnect the printer from power.
2. Open the media cover.
3. Lift up the front sensor arm and clean both the upper and lower of front sensor
with a soft, lint-free cloth soaked in isopropyl alcohol.
4. Once the parts are dry, close the front sensor.
Clean the Verifier (PX940V)
Cleaning the verifier on a regular basis to accurately verify the barcode. It is
important to keep the verifier surfaces free of dust, stuck labels, and adhesive residue.
1. Turn the printer off and disconnect the printer from power.
2. Open the media cover.
3. Lift up the verifier and clean the glass with a soft, lint-free cloth soaked in
isopropyl alcohol.
4. Once the parts are dry, close the verifier.
72 PX940 User Guide
Page 85

Clean the Media Path
Both the upper and lower media guides are transparent to allow light to pass
between the two parts of the label gap and label mark sensors. It is important to
keep these surfaces free of dust, stuck labels, and adhesive residue.
1. Turn the printer off and disconnect the printer from power.
2. Open the media cover.
3. Remove the media and ribbon (if installed).
4. Insert a cleaning card or a soft cloth soaked in isopropyl alcohol between the
two media guides to clean them.
5. Wait for approximately 30 seconds to allow the cleaning fluid to dissolve the
residue.
6. Once the parts are dry, replace the media (and ribbon) in the printer.
7. Close the media cover, reconnect power, and turn on the printer.
Clean the Exterior of the Printer
Keep the exterior of the printer clean. Maintaining a clean exterior will reduce the
risk of dust or foreign particles reaching the inside of the printer and affecting
printer function.
Use a soft cloth moistened with water or a mild detergent when cleaning the printer
exterior. Keep the surface surrounding the printer clean as well.
Replace the Printhead
You need to replace the printhead periodically when it wears out due to the rapid
heating and cooling process used during printing. How often you need to replace
the printhead depends on factors such as what type of images you print, the type
of media or ribbon you use, the amount of energy to the printhead, the print speed,
and the ambient temperature of the room you print in. The firmware detects the
new printhead when you restart the printer.
1. Turn the printer off and disconnect the printer from power.
2. Open the media cover.
3. Remove the media and ribbon (if installed).
4. Turn the printhead lift lever counterclockwise to raise the printhead.
5. Pull down the Front Sensor(PX940A)/Verifier(PX940V).
6. Move the inside toggle and outside toggle to the center of printhead.
7. Use the screw driver to loose the left and right screws.
PX940 User Guide 73
Page 86

8. Disconnect the two cables from the printhead as you remove it from the
printer.
9. Connect the two printhead cables to the new printhead.
10. Insert the new printhead to the bracket into the printer.
11. Fasten the left and right screw.
12. Lock the Front Sensor(PX940A)/Verifier(PX940V) module back to the printer.
13. Replace the media (and ribbon) in the printer.
14. Turn the printhead lift lever clockwise to lower it.
15. Close the media cover, reconnect power, and turn on the printer.
Replace the Platen Roller
If the printer platen roller gets damaged or wears out, it may need to be replaced.
1. Turn the printer off and disconnect the printer from power.
2. Open the media cover.
3. Remove the media.
4. Turn the printhead lift lever counterclockwise to raise the printhead.
5. Pull out the verifier or front sensor locker toward the outside.
6. Pull down the front sensor (on PX940Amodel) or the verifier module (on
PX940V model) toward the front side.
74 PX940 User Guide
Page 87

7. Rotate the platen roller latch clockwise to detach it from the printer and pull the
platen roller away from the printer.
8. Insert the new platen roller and slide it into the printer.
9. Lock the platen roller by rotating the latch clockwise.
Printhead Pressure and Toggle Adjustment
Your printer may need to be adjusted to accommodate how you are printing or to
improve printer performance.
Pressure Adjustment
You may need to adjust the printhead pressure on the printer if:
• You are using thicker or thinner media than previously used
• Labels are printing lighter on one side than the other
• The thermal transfer ribbon starts to crease
Note: Do not use a higher printhead pressure than necessary, it may increase the wear on
the printhead and shorten its life.
For more information, see Printhead Pressure and Toggle Position, beginning on
page 19.
PX940 User Guide 75
Page 88

Label Taken Sensor Calibration
If your printer has the optional label taken sensor or the label dispenser (which
includes the sensor), use the wizard to calibrate the sensor for your media.
Note: For best results, calibrate the sensor each time you load media or move the printer to
a different environment. If you installed the label taken sensor module or the label
dispenser in the printer, calibrate the sensor before you begin printing.
Before you calibrate the sensor, load media and ribbon in the printer as necessary.
1. In the Main Menu, select Wizards > Calibration > Label Taken Sensor.
2. Follow the prompts to calibrate the sensor.
Label Gap and Black Mark Sensor Adjustments
The label gap sensor is a transmissive sensor that controls how the printer feeds
media by detecting gaps between the labels. The black mark sensor is a reflective
sensor that detects black marks on continuous media.
The sensor contains a blue LED that is strong enough to see through media. You
can use the blue LED to help determine the proper location for the sensor.
1. Open the media cover.
2. Adjust the label gap and black mark sensor:
• Turn the sensor adjustment knob counterclockwise to move the sensor
toward the outside of the printer.
• Turn the sensor adjustment knob clockwise to move the sensor toward the
inside of the printer.
3. Close the media cover.
76 PX940 User Guide
Page 89

CHAPTER
8
PRODUCT SPECIFICATIONS
Printer and Environmental Specifications
1. Go to www.honeywellaidc.com.
2. Navigate to PX940 product page.
3. Locate the Products tab.
4. Click on your printer model.
5. Select one of the following tabs:
• Specifications
Printer specifications are listed here.
• Documents
Download the Data Sheet, Quick Start Guide, User Guide, Regulatory
Information, and other product documentation.
Supported Command Languages
•Autosense
•Fingerprint
• Direct Protocol
•Intermec Printer Language (IPL)
•ZSim
•DSim
• Smart Printing
Media Sensors
• Label gap/tag notch
•Black mark
PX940 User Guide 77
•Printhead lift
Page 90

• Media low (with rotational hanger option)
• Ribbon present/end (thermal transfer models only)
•Ribbon end
•Ribbon low
Network Services
•FTP
• HTTP Server
•SNMP v1/2c/3
• SNMP client support for IPv4 and IPv6
• WINS for IPv4
• BOOTP for IPv4
• DNS client support for IPv4 and IPv6
• Line Printer Protocol
•Raw TCP (Telnet in/out)
• DHCP client for IPv4 and IPv6 network (dual stack)
•IPv4 and IPv6
•Ping
• IPSEC/IKEv2 over IPv6
• SSH
• Time Server
Fonts
Resident Fonts
•Andale Mono
•Andale Mono Bold
• CG Times
•CG Times Bold
• CG Triumvirate Condensed Bold
• Century Schoolbook Roman
• Dutch 801 Roman
•EPL203FNT1
•EPL203FNT2
78 PX940 User Guide
Page 91

•EPL203FNT3
•EPL203FNT4
•EPL300FNT1
•EPL300FNT2
•EPL300FNT3
•EPL300FNT4
•EPL300FNT5
• Honeywell Sans TT Bold
•IPLFNT0H
•IPLFNT1H
•IPLFNT20
•IPLFNT20H
•IPLFNT21
•IPLFNT21H
•IPLFNT22
•IPLFNT23
•IPLFNT23H
•IPLFNT24
•IPLFNT24H
•IPLFNT2H
•IPLFNT30
•IPLFNT30H
•IPLFNT31
•IPLFNT31H
•IPLFNT32
•IPLFNT32H
•IPLFNT33
•IPLFNT33H
•IPLFNT34
•IPLFNT34H
•IPLFNT35
•IPLFNT36
•IPLFNT37
•IPLFNT7H
•IPLFONT0
PX940 User Guide 79
Page 92

•IPLFONT1
•IPLFONT2
•IPLFONT7
• Letter Gothic
•MHeiGB18030C-Medium
•Monospace 821
• Monospace 821 Bold
•OCR A
•OCR B
•Univers
•Univers Bold
•Univers Condensed Bold
• Univers Extra Condensed
Downloadable Fonts
For broader language and character support, any Unicode TrueType or TrueTypebased OpenType font may be downloaded. Fonts from Monotype Imaging are recommended to address global languages. The fonts below have been tested and are
available for purchase and download at www.fonts.com.
WorldType Collection fonts support all global languages whereas the other fonts
listed support specific languages.
• Angsana New Regular
• Helvetica World
•MSung PRC Medium
•MSung HK Medium
•HYGothic-Medium
•TBMinPro-Light
• NarkisClassicMF
• WorldType Collection J
• WorldType Collection K
• WorldType Collection S
• WorldType Collection T
Supported Font Types
•TrueType
•OpenType
• Bitmap
80 PX940 User Guide
Page 93

Bar Code Symbologies
1D Bar Code Symbologies
• Codabar
•Code 11
•Code 39
•Code 93
•Code 128
•DUN-14/16
•EAN
•HIBC 39
•HIBC 128
•Industrial 2 of 5
• Interleaved 2 of 5
•ISBT-128
• Matrix 2 of 5
• Straight 2 of 5
•UPC
2D Bar Code Symbologies
•Aztec
•Code 16K
•Code 49
• Data Matrix
•DotCode
•Grid Matrix
• MaxiCode
•MicroPDF417
• MSI (modified Plessey)
•PDF417
•Planet Code
•Plessey Code
•Postnet
•QR Code
• RSS-14
• USPS 4-State Customer Bar Code
PX940 User Guide 81
Page 94

Graphic File Types
•PCX
•PNG
•GIF
•BMP
82 PX940 User Guide
Page 95

APPENDIX
A
DEFAULT SETTINGS
Use this appendix to view the printer’s factory default settings.
Communications Settings
Serial Port
The printer must be connected to the PC through a serial port to view the settings:
• From the printer Main Menu, select Settings > Communications > Serial >
COM1.
• From the printer web page, click the Configure tab. Go to Communications >
Serial.
Serial Port
Setting
Baud Rate Transmission speed in bits per second (bps) for the serial
Data Bits Number of bits that define a character or byte. 8
Parity Specifies how the printer checks the integrity of the
Stop Bits Number of bits sent at the end of every character to allow the
Hardware Specifies if hardware flow control (RTS/CTS) is used to
ENQ/ACK Specifies if software flow control (ENQ/ACK) is used to
XON/XOFF To Specifies if software flow control (XON/XOFF) is used to
XON/XOFF From Specifies if software flow control (XON/XOFF) is used to
New Line Character Defines the characters that the printer echoes to the host to
Description Default
115200
port.
None
transmitted data.
1
receiving signal hardware to detect the end of a character
and to resynchronize with the character stream.
Disable
manage the rate of data transmission between the device
and the host.
Disable
manage the rate of data transmission between the device
and the host.
Disable
manage the rate of data transmission to the host.
Disable
manage the rate of data transmission from the host.
CR/LF
indicate that it has moved to a new line.
PX940 User Guide 83
Page 96

Ethernet
To view these settings:
• From the printer Main Menu, select Settings > Communications > Ethernet.
• From the printer web page, click the Configure tab. Go to Communications >
Ethernet.
Ethernet Setting Description Default
(IPv4) IP Assignment
Method
(IPv4) IP Address Specifies the unique network-level address that is
Subnet Mask Specifies a number that defines the range of IP addresses
Default Router Specifies the IP address of a router that is used when a
DHCP Response Specifies if the printer receives DHCP responses by
(IPv6) IP Assignment
Method
(IPv6) IP Address Specifies the unique network-level address that is
Bluetooth Settings
To view these settings:
• From the printer Main Menu, select Settings > Communications > Bluetooth.
Specifies how the printer obtains an IP address. DHCP
0.0.0.0
assigned to each device in a TCP/IP network (IPv4).
0.0.0.0
that can be used in a TCP/IP network.
0.0.0.0
device sends a packet to another subnet or to an
unknown destination.
Broadcast
broadcast or unicast.
Specifies how the printer obtains an IP address (for IPv6
networks).
assigned to each device in a TCP/IP network (IPv6).
Automatic
Automatic
• From the printer web page, click the Configure tab. Go to Communications >
Bluetooth.
Bluetooth
Setting
Device Name Sets the name that identifies the printer in the
Description Default
Printer model number
Bluetooth network. Maximum length is 16 characters.
and serial number.
84 PX940 User Guide
Page 97

Media Settings
To view these settings:
• From the printer Main Menu, select Settings > Printing > Media.
• From the printer web page, click the Configure tab. Go to Printing > Media.
Media Setting Description Default
Media Type Selects the type of media that is loaded in the printer. Media With Gaps
Print Method Selects the method of printing that the printer is using. Ribbon (TTR) for
Media Margin (X) Sets the width of the margin from the left edge of the
thermal transfer
printers, or No
Ribbon (DT) for
direct thermal
printers
Variable
label along the printhead to the edge of the printable
area. Unit of measurement is defined in the Unit of
Measurement parameter.
Media margin (X)
Media Width Sets the width of the printable area measured from the
media margin (X) across the printhead. Unit of
measurement is defined in the Unit of Measure
parameter.
Media width (X)
Variable
PX940 User Guide 85
Page 98

Media Setting Description Default
Media Length Sets the length of the printable area measured from one
edge of the label to the edge that is closest to the
printhead. Unit of measurement is defined in the Unit of
Measurement parameter.
Media length (X)
Clip Default Determines if the printer prints items outside the
printable area of the label.
When this is set to Off, the printer returns an error if any
part of a bar code label cannot be printed because that
part extends beyond the printable area. When this is set
to On, the printer prints all bar code labels, but may also
print unreadable, incomplete labels.
Print Mode Selects the printer tear off, peel off, or rewind media
mode
Peel Strength Selects strength the printer uses to peel the label off
from liner. Use Medium or High if the printer has trouble
to peel certain types of media.
Label Top Adjust Sets the length of media the printer feeds (positive
value) or retracts (negative value) before printing a label.
Unit of measurement is defined in the Unit of Measure
parameter. Range is -9999 to +9999.
Label Reset
Adjust
Media Calibration
Mode
Length (Slow
Mode)
LTS Sensitivity
Level
Sets the length of media the printer feeds (positive
value) or retracts (negative value) after printing a label.
Unit of measurement is defined in the Unit of Measure
parameter. Range is -9999 to +9999.
Selects the mode the printer uses to calibrate media. Use
Slow if the printer has trouble identifying gaps or marks
in media. Use Fast with Retraction or Slow with
Retraction to retract the media and ribbon fed for
calibration back to the printer.
If Media Calibration Mode is set to Slow, the printer
prints the media length plus 10 mm. This value sets an
additional amount of media to be printed. Unit of
measurement is defined in the Unit of Measurement
parameter. Range is 0 to 3200.
Sets the sensitivity of the label taken sensor. 0
Variable
Off
Tear Off
Low
0
0
Slow
0
86 PX940 User Guide
Page 99

Media Setting Description Default
Power Up Action Sets the action when you turn the printer on:
No Action
Formfeed: The printer feeds one label.
Testfeed: The printer prints two configuration labels as it
calibrates the media sensors.
Smart Calibration: Detects media type (gap, black mark,
or continuous, detects printing method (ribbon or noribbon), and calibrates media length.
Head Down
Action
Hold Feed Button
Action
Label Counter Specifies a label counter (from 1 to 49) that SNMP uses
Sets the action when you close the print mechanism
after opening it:
No Action
Formfeed: The printer feeds one label.
Testfeed: The printer prints two configuration labels as it
calibrates the media sensors.
Smart Calibration: Detects media type (gap, black mark,
or continuous, detects printing method (ribbon or noribbon), and calibrates media length.
Sets the action when you press and hold the Print button
for more than 2 seconds:
Testfeed: The printer prints two configuration labels as it
calibrates the media sensors.
Smart Calibration: Detects media type (gap, black mark,
or continuous, detects printing method (ribbon or noribbon), and calibrates media length.
to report media counts.
Smart Calibration
Smart Calibration
Smart Calibration
0 (off)
Print Quality Settings
To view these settings:
• From the printer Main Menu, select Settings > Printing > Print Quality.
• From the printer web page, click the Configure tab. Go to Printing > Print
Quality.
Print Quality
Setting
Print Speed Sets how fast the printer prints labels. The unit of measure is
Media Sensitivity Sets the level of sensitivity of the media to the printhead heat
Darkness Sets the image darkness for media and ribbon. Adjust this
Contrast Adjusts the blackness of the printing on the label in 2%
Description Default
defined in the Unit of Measure parameter.
for media and ribbon.
parameter with the Media Sensitivity parameter. Range is 1 to
100.
increments from -10% to +10%.
200dpi:100
300dpi:100
600dpi: 50
High
55
+0%
PX940 User Guide 87
Page 100

System Settings
General System
To view these settings:
• From the printer Main Menu, select Settings > System Settings > General.
• From the printer web page, click Configure > System Settings > General.
General System Setting Description Default
System Name Sets the network identification name (WINS
name) of the printer.
System Location Sets the location of the printer. Empty string
System Contact Sets the name of the printer administrator. Empty string
XML Response Mode Determines if the printer provides XML
responses to printing requests (over Telnet
and HTTP).
Display Language (LCD printers only.) Selects the language the
printer uses to display text on the screen.
Display Language (Web
Page)
Keyboard Input Selects the language of the external keyboard
Time Sets the current time. System time
Date Sets the current date. System date
Command Language Sets the printer command language. If
Alert Notification Method Selects how you want the printer to notify you
Unit of Measure Selects the unit of measure that is used to
Zero with Slash Determines how the zero character is printed
Time Zone Sets the time zone. (UTC 00:00)
DST Adjust Determines if Daylight Saving Time is
Selects the language the printer uses to
display text on the web page.
that is connected to the printer.
changed, requires restart.
of printer alerts.
define several printing parameters.
and displayed on the screen. Disable (0) or
Enable (
automatically adjusted.
∅).
Printer model
number and serial
number.
False
English
English
U.S./U.K.
Autosense
SNMP Trap + Email
Dots
Disable
Universal Time
Disable
88 PX940 User Guide
 Loading...