

Page 1

View
Operator Guide
for Rapid Eye Multi-Media Units
K5404V9 – 12/04 – Rev. B
Page 2

Page 3

ISSUE DATE REVISIONS
V9 September 2004 Honeywell template
V9–B December 2004 Formatting: pagination; minor edits.
Page 4

Page 5

Table of Contents
1 Running View................................................................................ 1–1
1.1 Starting View ................................................................................................................................ 1–1
1.2 View Window: the Sites Tab ........................................................................................................ 1–2
1.3 Your Account Information ............................................................................................................ 1–4
1.4 Customizing the View Window .................................................................................................... 1–5
1.5 More About View.......................................................................................................................... 1–6
2 Live Video ..................................................................................... 2–1
2.1 Viewing Live Video....................................................................................................................... 2–1
2.2 Resolution of Live Video .............................................................................................................. 2–8
2.3 Pan, Tilt and Zoom..................................................................................................................... 2–16
2.4 Ending a Live Session................................................................................................................ 2–19
3 Recorded Video ............................................................................ 3–1
3.1 Viewing Recorded Video.............................................................................................................. 3–1
3.2 Controlling Playback.................................................................................................................... 3–3
3.3 Resolution of Recorded Video..................................................................................................... 3–6
3.4 Ending a Retrieval Session .......................................................................................................... 3–8
4 Troubleshooting Video ................................................................. 4–1
4.1 Adjusting a Video Feed................................................................................................................ 4–1
4.2 At the Source…............................................................................................................................ 4–4
5 Searching for Motion.................................................................... 5–1
5.1 Setup............................................................................................................................................ 5–1
5.2 Preparation................................................................................................................................... 5–2
5.3 Search Report .............................................................................................................................. 5–7
5.4 Video from Motion Search ........................................................................................................... 5–9
5.5 Opting for a Retrieval Session ................................................................................................... 5–12
5.6 False Positive Reports................................................................................................................ 5–13
5.7 Saving & Reusing Search Data.................................................................................................. 5–16
6 Alarms and Events ....................................................................... 6–1
6.1 About Alarms................................................................................................................................ 6–1
6.2 Live-alarmed Session................................................................................................................... 6–4
6.3 Alarm Session .............................................................................................................................. 6–6
6.4 Rearming Alarms.......................................................................................................................... 6–8
6.5 Video from Site of Event: Options................................................................................................ 6–8
6.6 Controlling an Onsite Device: Output........................................................................................ 6–10
6.7 Setting an Alarm......................................................................................................................... 6–11
6.8 Multi-Media Event Reference .....................................................................................................6–15
6.9 Reading the Alarm Log .............................................................................................................. 6–18
5
Page 6

View: Operator Guide
6.10 Alarm Station.............................................................................................................................. 6–20
6.11 Fault Relay ................................................................................................................................. 6–21
7 Clips and Stills ............................................................................. 7–1
7.1 Making and Saving a Clip............................................................................................................ 7–1
7.2 Viewing a Clip .............................................................................................................................. 7–5
7.3 Coarse Editing ............................................................................................................................. 7–6
7.4 Stills.............................................................................................................................................. 7–7
8 Audio............................................................................................. 8–1
8.1 Overview ...................................................................................................................................... 8–1
8.2 Live Audio .................................................................................................................................... 8–1
8.3 Recorded Audio ........................................................................................................................... 8–2
8.4 Setting Up .................................................................................................................................... 8–3
8.5 Audio for Multi-Media LT.............................................................................................................. 8–3
8.6 Eagle Audio.................................................................................................................................. 8–4
9 Watching Site Tours ..................................................................... 9–1
9.1 About Site Tour ............................................................................................................................ 9–1
9.2 Running a Site Tour ..................................................................................................................... 9–2
9.3 Site Tour: Properties .................................................................................................................... 9–3
9.4 Stopping a Site Tour .................................................................................................................... 9–3
10 Event Search Session ................................................................ 10–1
10.1 Overview .................................................................................................................................... 10–1
10.2 Searching for Event Records..................................................................................................... 10–1
10.3 Results........................................................................................................................................ 10–3
11 Customer Devices ...................................................................... 11–1
11.1 Live Data .................................................................................................................................... 11–1
11.2 Recorded Data ........................................................................................................................... 11–1
11.3 Searching for Data ..................................................................................................................... 11–1
12 Scheduling.................................................................................. 12–1
12.1 Camera Schedule ...................................................................................................................... 12–2
12.2 Alarm Schedule.......................................................................................................................... 12–5
13 Find-it.......................................................................................... 13–1
13.1 Knowledge Base ........................................................................................................................ 13–1
13.2 Tables......................................................................................................................................... 13–5
13.3 Illustrations................................................................................................................................. 13–5
13.4 FAQs .......................................................................................................................................... 13–9
14 Index ........................................................................................... 14–1
6
Page 7

Page 8

Page 9

1 Running View
Preparation
Your Rapid Eye Multi system administrator (Multi SA) needs to prepare a Multi database
before operators can run View. How to do so is explained in the Admin User Guide,
part no. K5403.
1.1 Starting View
Figure 1. Shortcut for View, on the Windows desktop
!!!!1 To start and log on to View
1. On your Microsoft Windows desktop, do one of the following:
• click Start, point or click to Programs and then Rapid Eye Multi-Media. Click
Rapid Eye Multi-Media View.
• double-click the shortcut to View.
2. In the logon dialog’s User ID box, type the name of a Multi operator account.
See fig. 2, below.
3. If your Multi SA has assigned a password to the account, type it in the
Password box.
4. If a Multi-Media database (Multi db) was not selected during the installation of
View, see your Multi SA for its type (Access or SQL), location (path) and name.
5. Click OK. The Rapid Eye Multi-Media View - Logon window is displayed.
1–1
Page 10
View: Operator Guide
User account and password
Passwords can be assigned to a user account. Use of passwords is optional. How to
setup passwords is explained in the Admin User Guide, part no. K5403.
Fig. 2. Logging-on to a Multi system
1.2 View Window: the Sites Tab
Fig. 3. On the Sites tab, Multi sites are either Multi-Media units and/or older Multi units.
action tabs. The Sites tab is where you begin. See figure 3. Clicking other action tabs—
Tours, Log, Clips—displays different buttons on the toolbar.
1–2
session pane. Where video and text are displayed. Sessions are shown at operator’s
discretion. Sessions include: Live, Retrieval, Maintenance, Motion search, Event search
and Data search sessions. Alarm sessions can appear as alarms are triggered.
menus. The menus list commands for View.
Page 11
1.2.1 Selecting a Multi Site
A “site” is a Multi-Media unit or Multi unit that is connected and operational.
!!!!2 To select a site
• After starting View, the Sites action tab and its toolbar are displayed by default.
Click a “site” name listed on the tab. For lists of sites that are long, use the
Quick Search.
Missing site
If the site is not listed, click Refresh, as explained 1.3: Your Account Information. If the
site still does not appear in the list, ask your Multi SA if an entry for the unit was made in
the Multi database or if your View Operator Account let’s you use the site.
1.2.2 Site: Quick Search
Running View
Fig. 4. Find Site... box. To locate a Multi-Media unit named “Rosde lab 35”, type “35”,
“sde” or other text fragment in the box.
!!!!3 To search through long lists of Multi sites
1. Click the Sites tab if it is not selected.
2. In the Find Site Containing box (see figure 4), type a few characters that follow
each other in the site’s name. The first site where this combination of characters
occurs is selected.
• You can type any sequence of characters in a site name: they can be at the
beginning, middle or end of the name. For example: to locate “Rosde lab 35”,
you can type either “35” or “sde”.
• You have the option of typing in more contiguous characters of the site’s name
to narrow the search.
3. Once the site that you are looking for is highlighted, start a session.
1–3
Page 12

View: Operator Guide
1.2.3 Site Properties
A site’s properties—name, location, and connection details—are controlled by a Multi
SA. You can view, but not edit, a site's properties.
Finding out about a site’s properties can be useful:
• to check if the time zone from which images are being obtained is correctly set
• to obtain a remote unit’s serial number to report a malfunction
• to check the phone number on a dial-up connection, if the connection cannot
be established.
!!!!4 To display a site’s properties
1. Using Multi View, click a site on the Sites tab.
2. To view the properties, do one of the following:
3. Click
4. Either:
• Place the mouse pointer on a site: a message appears—like a “tool tip”—,
showing information about a site.
• Right-click on the site name to view the shortcut menu and select Properties
• Click Properties on the Actions menu.
5. To close the Site Properties dialogue, click OK.
in the Toolbar.
1.3 Your Account Information
!!!!5 To obtain the latest site list
Click the Refresh command on the View menu or the Refresh button.
Fig. 5. Refresh command button.
The Refresh command updates:
• the list of the sites and connections in your Multi-Media system
• information about your Multi user account
1–4
• site tours…
Your Multi SA can let you know whenever changes have been made to these items.
Using Multi-Media sites: restrictions
Your account to operate Multi-Media units can be restricted by your organization’s Multi
SA. Access to units can be denied. A time limit for operating units can be set. The time
limit is shown when you connect to a unit, and a countdown shows how much time
remains. The countdown is not shown when processing alarms: the time limit is
cancelled while processing alarms.
Page 13
Info: viewing your administrative information
Multi View makes your Multi account’s information available. Info indicates the database
file in use, its location, the name of the user account, the rights of the operator using the
account, the status of alarm notification and more.
!!!!6 To display the Information dialog
• Click Info on the View menu.
1.4 Customizing the View Window
Screen real estate: hiding the toolbar and status bar
On smaller PC screens, real estate for video can be limited. Removing the toolbar and
status bar can help free up more of the screen for video or other feeds.
The toolbar and status bar are displayed when you click their commands on the View
menu and checkmarks appears (see figure 6).
Running View
Fig. 6. The first two commands on the View menu can help show video from more
cameras
!!!!7 To give the session pane more screen real estate
1. Click Toolbar on the View menu. See figure 6. When no check mark appears,
the main view toolbar is hidden away.
2. Click Status Bar on the View menu so that no check mark appears. This hides
the bottom of the View window.
!!!!8 To return the toolbar and status bar to the work area
1. Click Toolbar on the View menu so that a check mark appears. See figure 6.
2. Click Status Bar on the View menu so that a check mark appears.
Alternatively, you can move the Toolbar by dragging the two vertical bars at the far-left
side of it. The Status bar cannot be moved.
1–5
Page 14
View: Operator Guide
1.4.1 Sites Tab: Toolbar Reference
Table 1
Sites toolbar
Command Function/Session Section
To use the latest Multi database: rights in user account,
sites added, modified or deleted, and so on.
To display this guide in PDF format.
To display live video from the site that is selected on the
Sites tab.
To display recorded video, stored at a site.
To search a site for events that are set to be silently
recorded.
To search for data from customer devices.
To search recorded video for motion. Note: works only
if motion detection is enabled before video is recorded.
To list alarms, if any, from or about a site.
To set alarms, to configure the connected cameras, and
so on.
For connecting to a site without running a session;
mostly for dial-up, to save time when starting sessions.
To end the connection to a site, giving you a quick,
one-step way to end all sessions involving that site.
To list some of the communication settings for a site.
1.3
1.5
2.1.1
3.1.2
10.2
11
5
6.3.1
6.7
n/a
n/a
1.2.3
1.5 More About View
Index
The topics in this guide are indexed; see the Index, starting on p. 14–1.
Learning Rapid Eye Multi-Media View
The View procedures that you will use most often are documented in this user guide.
They are grouped by tasks, so that you may start using View as quickly as possible.
Reference information is included as needed, usually at the end of subsections.
1–6
Page 15

Running View
Other guides
Other guides by Honeywell are available after installing View software:
Honeywell, Please Read This First!, K9700
———, Multi-Media Software: Software Setup Instructions, K5401
These user guides are available in Adobe’s portable document format (PDF), on the
View operator’s PC, by clicking:
Start / Programs / Rapid Eye Multi-Media 6.2 / Documentation / …
Web site
http://www.Honeywellvideo.com
Customer Support
For installation questions, or for ordering and parts information, have your Multi SA
contact the vendor or distributor of the system.
For software training, or for reporting a malfunction, the Multi SA can call Honeywell
Multi Technical support at 1 (800) 796–2288.
Historical note about Multi-Media unit
You may find other names for a Multi-Media unit in older editions of user guides. Terms
no longer used are: data acquisition unit (DAU), remote video unit (RVU) and remote unit
(RU). They are recalled here to avoid confusion when talking about older versions and
models, such as Multi and Plus units, or for dealing with technical support.
1–7
Page 16

View: Operator Guide
Please continue.
1–8
Page 17

2 Live Video
Live video versus recorded video
Using a Live session, you can access and monitor the video feed of many cameras at
once, and even access many Multi sites, all at once.
This section shows how to:
• obtain live video
• use cameras that can pan, tilt and zoom
• end a Live session.
See also
recorded video. See 3: Recorded Video, starting on p. 3–1
data. See 11.1: Live Data, on p. 11–1.
audio. See 8.2: Live Audio on p. 8–1
On a dial-up connection: do not use audio. Video can be corrupted by using audio
over dial-up. Live video can be combined with audio only on a network
connection.
2.1 Viewing Live Video
Process
Start by selecting a Multi site and then running a Live session. Select which cameras to
use. Video reaches your PC until the Live session ends.
2.1.1 Starting a Live Session
!!!!9 To start a live session at a site
1. Run View; to do so, see 1.1: Starting View, on p. 1–1.
2. After selecting a site, do one of the following:
• Click
• Double-click the site name. If a live session is already running, double-clicking
the site name has no effect.
• Right-click on the site name; on the shortcut menu that appears, click Live.
• Click Live on the Actions menu.
on the toolbar.
2–1
Page 18
View: Operator Guide
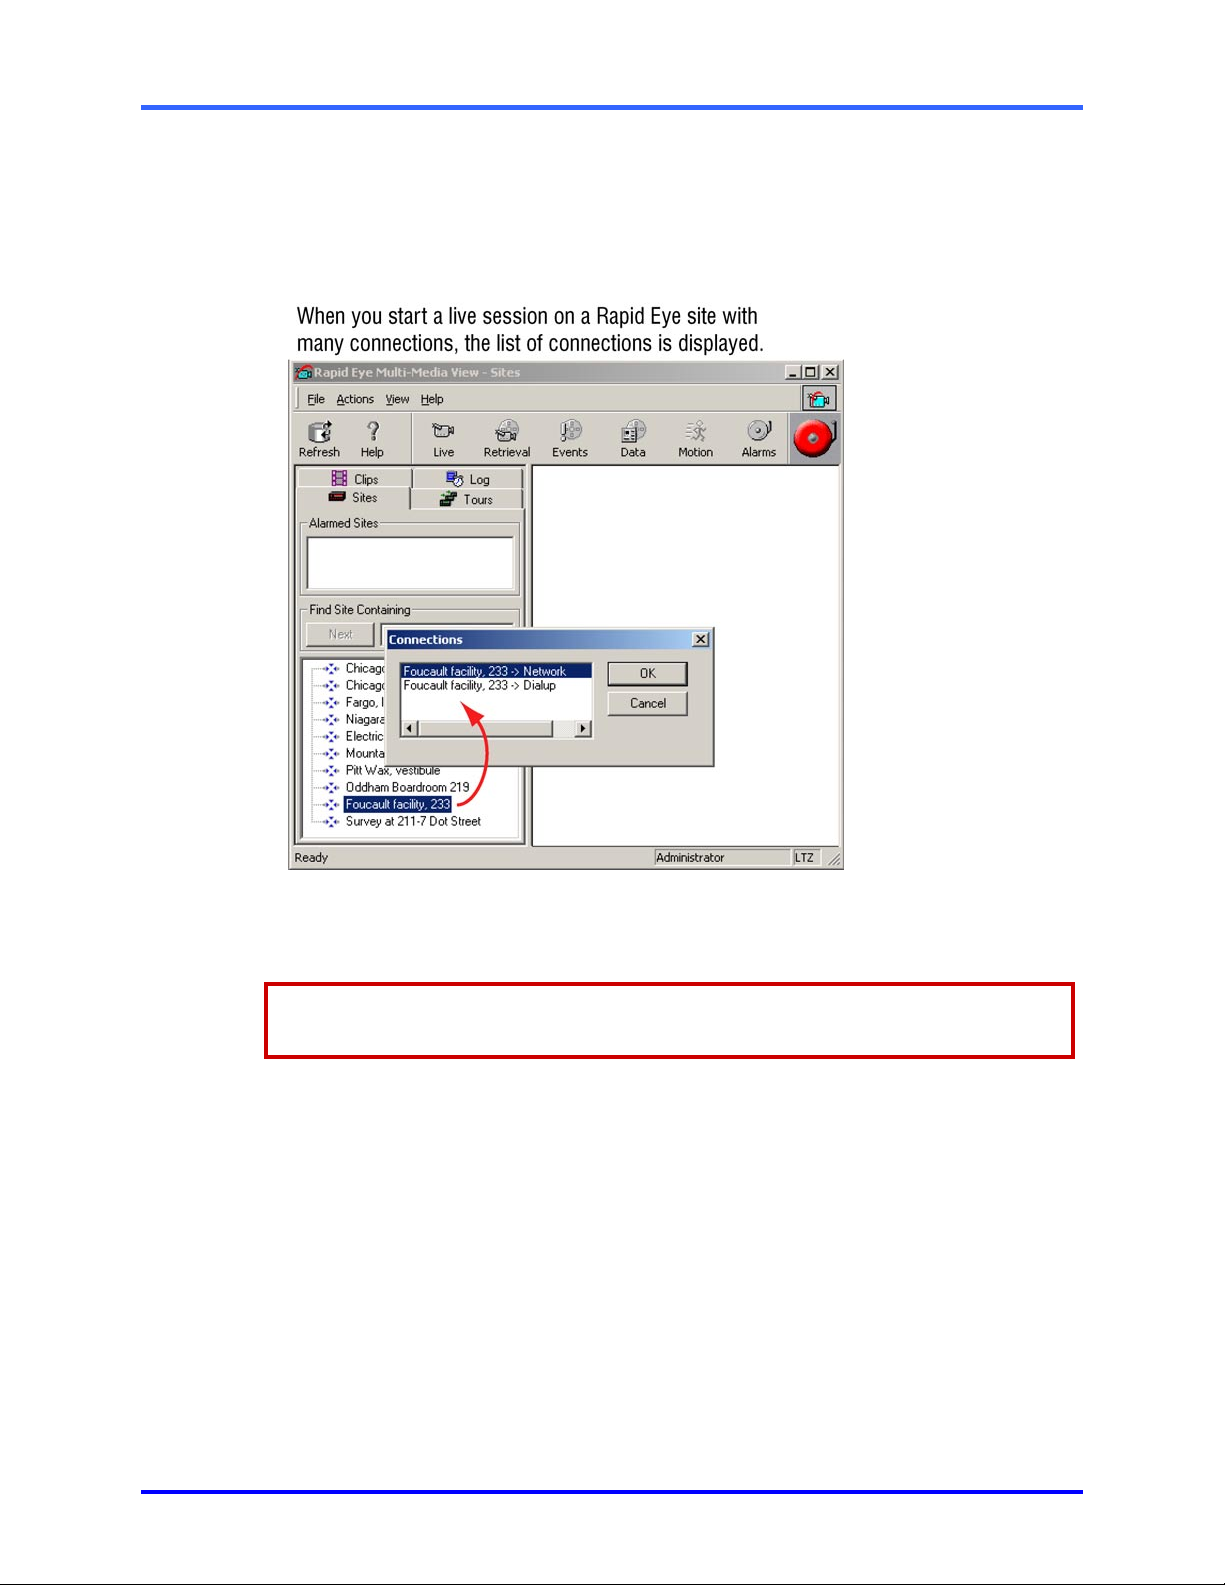
3. Either:
• a Connection dialog appears; see figure 7, below. Select a connection, then
• a tear-away player appears in the session pane and a list of streams (cameras
click OK. A tear-away player then appears, as in figure 8.
and other data devices) is displayed; see figure 8.
Fig. 7. Choosing a connection.
2.1.2 Selecting Cameras
“Stream” identifies the different feeds—video, audio or data—coming through a
Multi-Media unit.
!!!!10 To select live video feeds from a site
1. In the Stream List dialog (see figure 8), select as many cameras as you need.
2. Click OK. Each live video feed is displayed in its own camera window.
2–2
Page 19
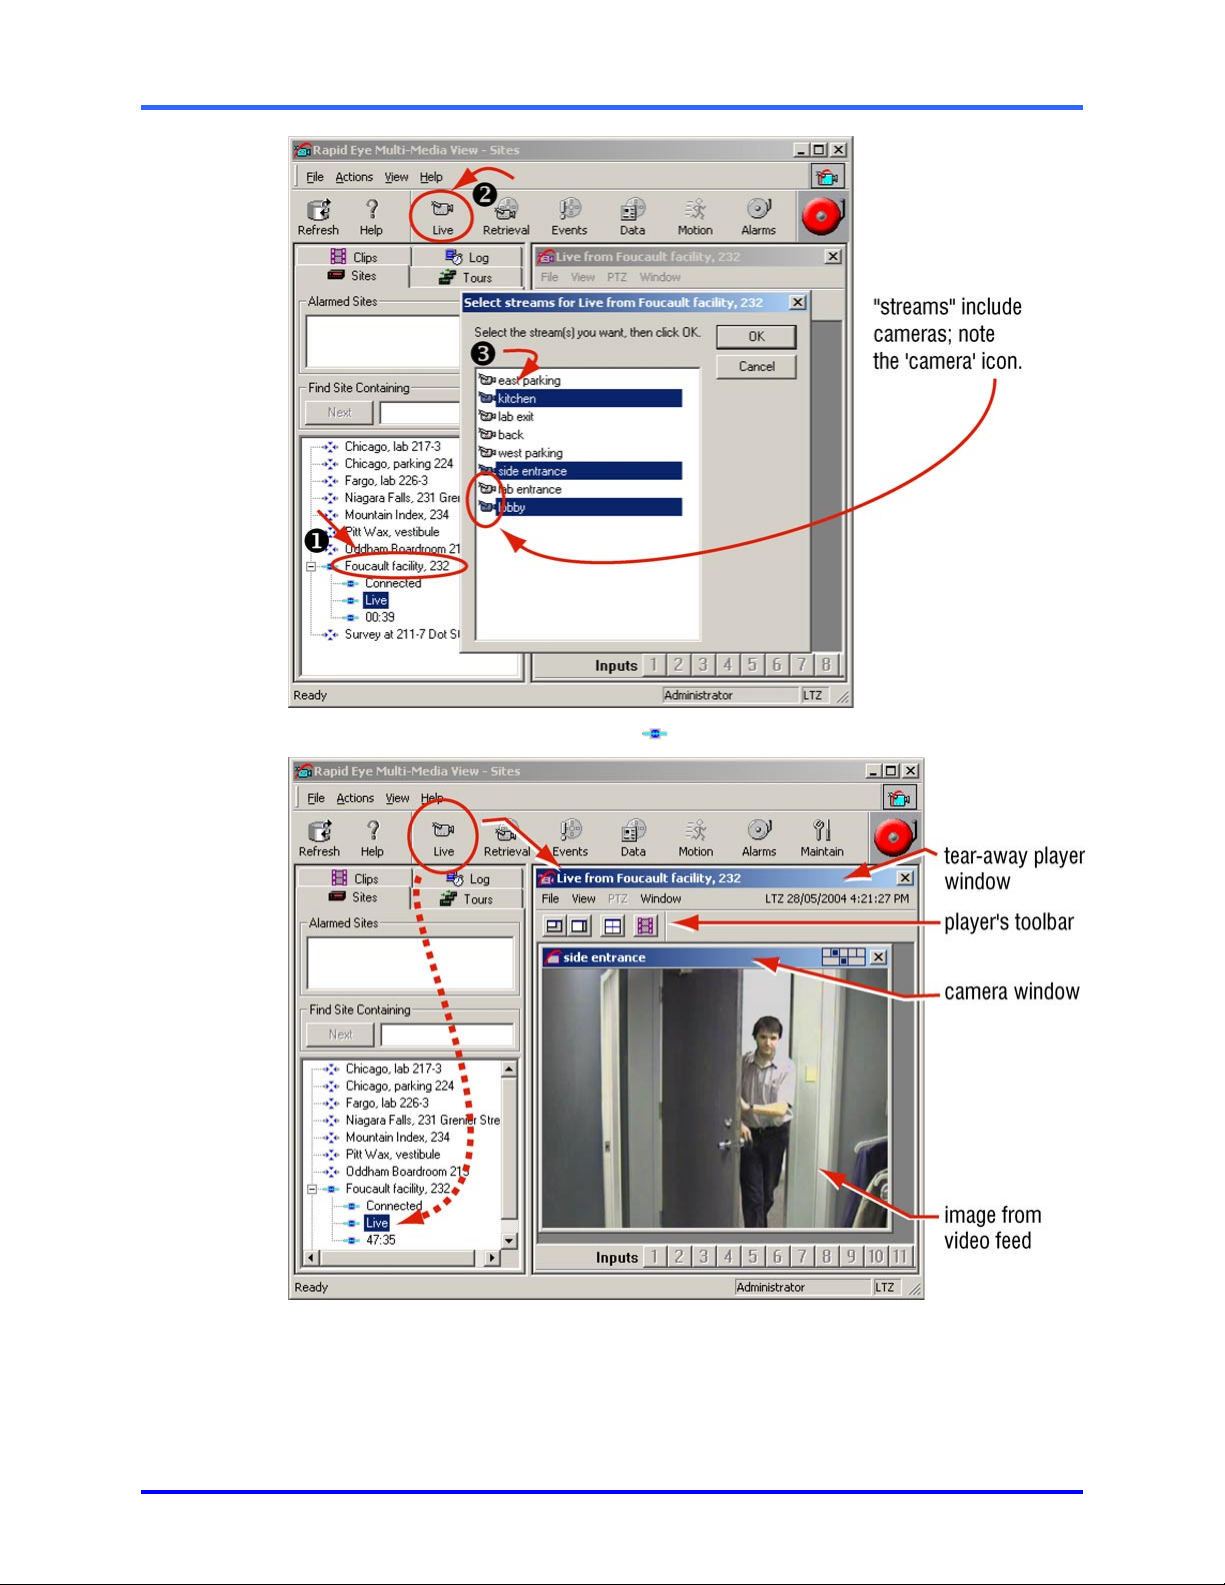
Live Video
Fig. 8. Live session: connection icons (
) appear on the site list.
Fig. 9. Live video feed, from a camera named ‘side entrance’, at a site called ‘Foucault
facility, 232’.
2–3
Page 20

View: Operator Guide
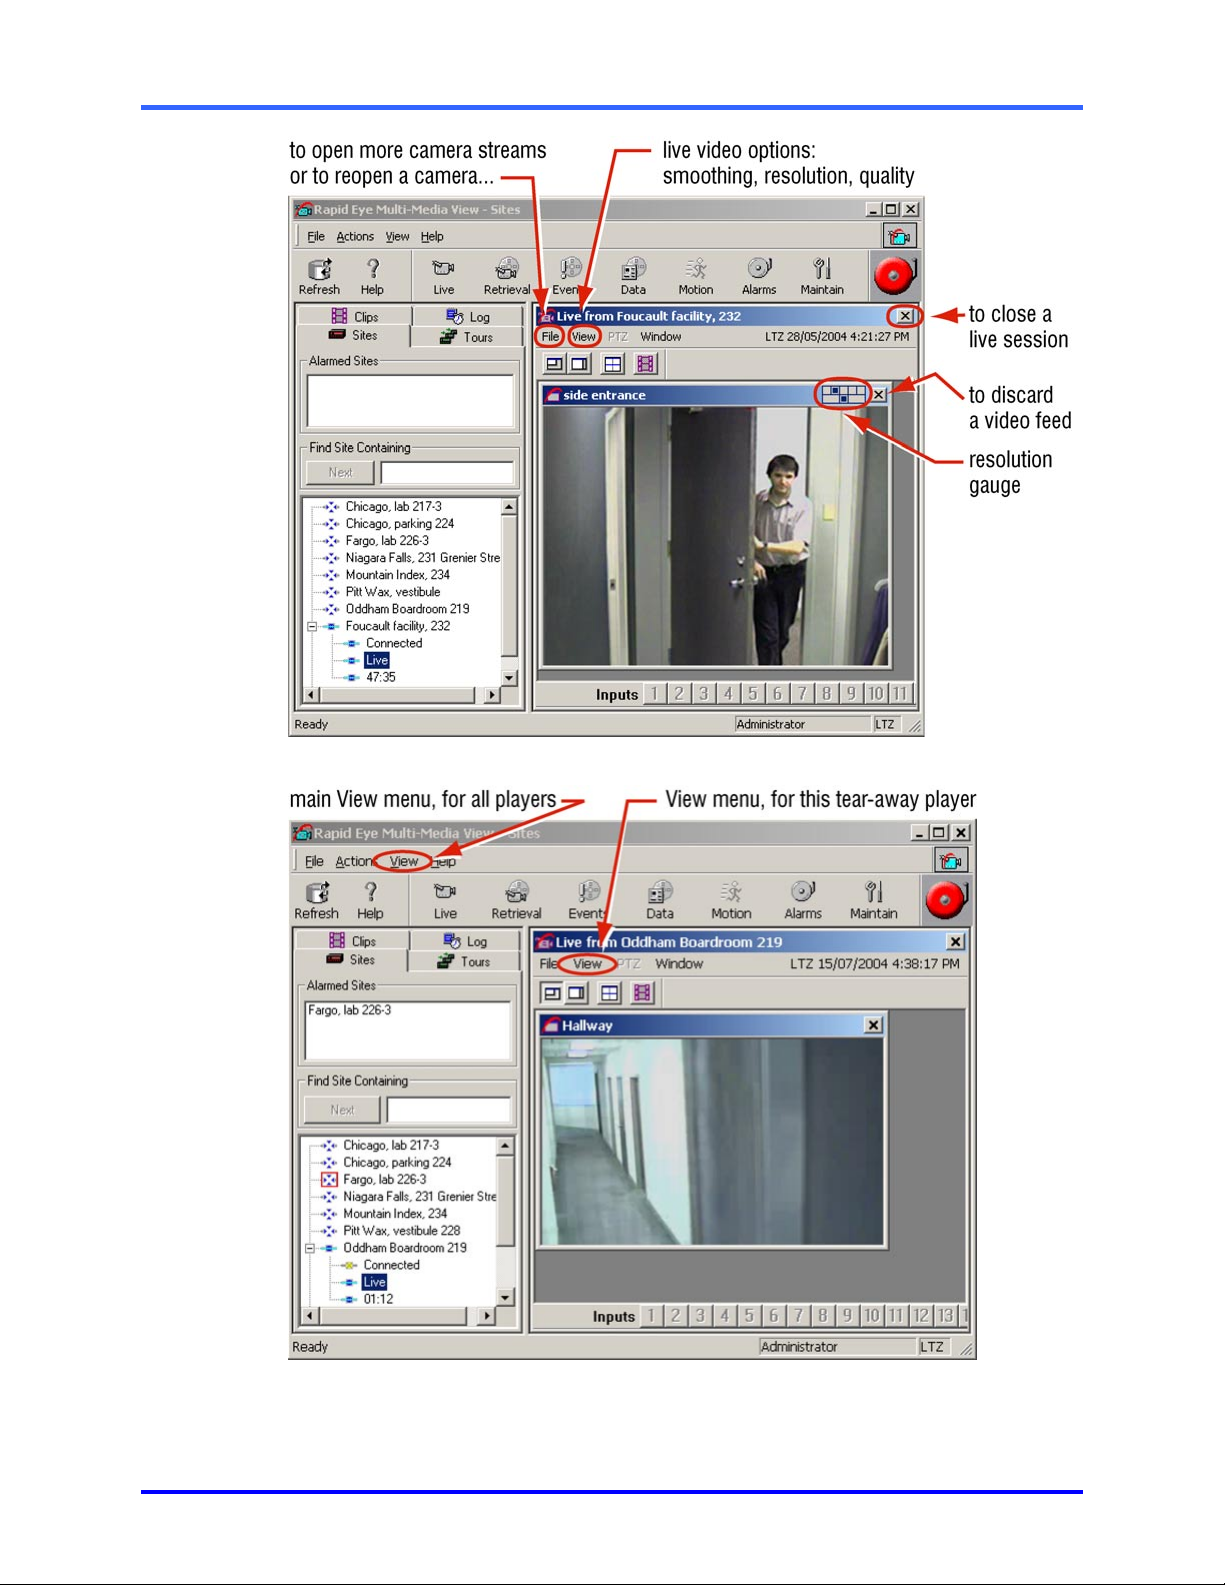
!!!!11 To move and size a tear-away player window
• You can drag a player window from the View window. When dragged away, an
!!!!12 To return a tear-away player to its session pane
Click either:
asterisk is added to the title of the tear-away player’s name.
•
• Embed command, on a session’s Windows menu.
A player returns to the session pane. When not embedded, an asterisk is added to the
title of the tear-away player’s name.
Renaming cameras
Your Multi SA has the option of renaming cameras from the default “Camera 1”,
“Camera 2”… and so on. See page 4–1, figure 34.
Printing an image
Printouts of images from a video feed can be made only during the retrieval of recorded
video or when watching a video clip. See 7.4: Stills, on p. 7–7.
. The Embed button. It appears when a tear-away player is dragged from
the session window.
2.1.3 Managing Video Feeds
!!!!13 To move, size and tile camera windows
1. Each tear-away player has its own menu, listing commands for the orderly
display of camera and text windows.
2. Individual feeds can be dragged and resized within a session window, as
needed.
2–4
!!!!14 To discard a video feed
• Close the video feed’s camera window. See figure 10. Ending a live session
discards all video feeds.
Closing unnecessary camera windows can increase the speed of video feeds
from that site, most noticeably when connected using dial-up.
!!!!15 To reopen a closed camera window
1. Display the site’s Stream List by clicking Add Stream on the player’s File menu,
for a list of unused video feeds. You can see a Stream List in figure 8, on p. 2–3.
2. Choose one or more cameras.
3. Click OK. You may have to use the scroll bars to view the newly opened window.
Page 21
Live Video
Fig. 10. Locating commands to manage video feeds.
Fig. 11. The “View” menus: a “main” one, in the View window, and in each player.
2–5
Page 22
View: Operator Guide
!!!!16 To toggle the size of a camera window/data window
• Double-click the title bar of a camera window. The camera window quadruples
in area; its video is now a “double-sized stream”. To return the camera window
to its original size, double-click the title bar again.
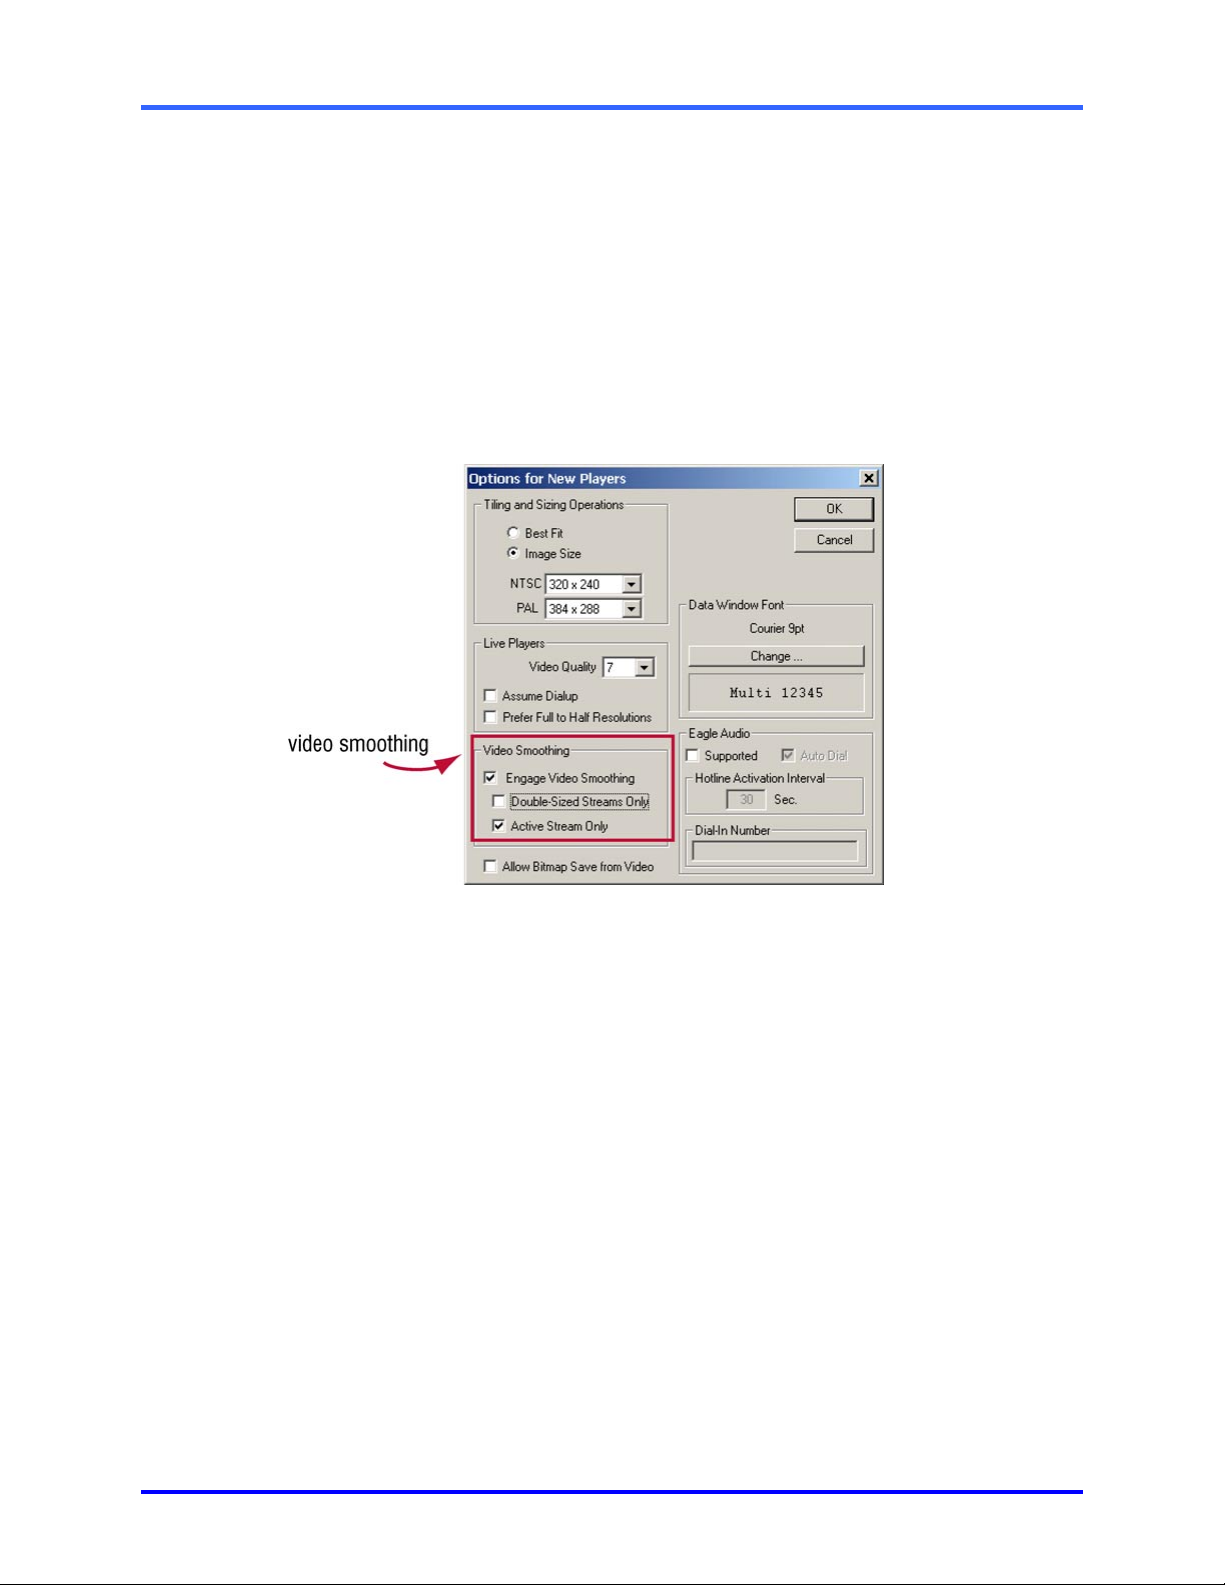
2.1.4 Video Smoothing and Quality
Video smoothing
Smoothing markedly improves the display of video on a PC monitor. Smoothing is not
recorded; it is an effect that you can apply to live or recorded video. It is applied globally
to video feeds from every site that the operator can access.
Fig. 12. Video Smoothing is off by default, to avoid taxing slower PCs.
!!!!17 To change the video smoothing default
1. While running View, click Options on the main View menu.
2. Click New Players. The Options for New Players dialog appears. See fig. 12.
3. Click Engage Video Smoothing.
4. You have the option of removing the settings of Only on Double-Sized
Streams and/or Only on Active Streams.
5. Click OK. The default is set.
!!!!18 To override the video smoothing default, on only one player
1. While running either a Live or Retrieval session, click Options on the View menu
in the player. See figure 11.
2. Select Video Smoothing. The default(s) for video smoothing are displayed.
3. Click an option to toggle its value.
4. The player returns to the default when the session is disconnected.
2–6
Page 23

Live Video
Video quality: Live sessions
Video quality while monitoring live sessions can be lowered on low-speed dial-up
connections to improve the transmission time of images. It can also be heightened on
one camera for more detail, as needed.
The Video quality of recording is customized globally.
Once video is recorded, its Quality setting cannot be changed. See 4.1: Adjusting a
Video Feed on p. 4–1.
!!!!19 To set the Video Quality on one camera
1. Do one of the following:
• right-click in a camera window. A menu appears showing Video Quality.
• View->Options->Video Quality.
2. Place the mouse pointer on the Video Quality command, slide to another value
and click.
!!!!20 To set the Video Quality on all cameras used in a player, for that live session
• All cameras can be set at once by pressing and holding the CTRL key on the
PC keyboard, while customizing a Video Quality setting.
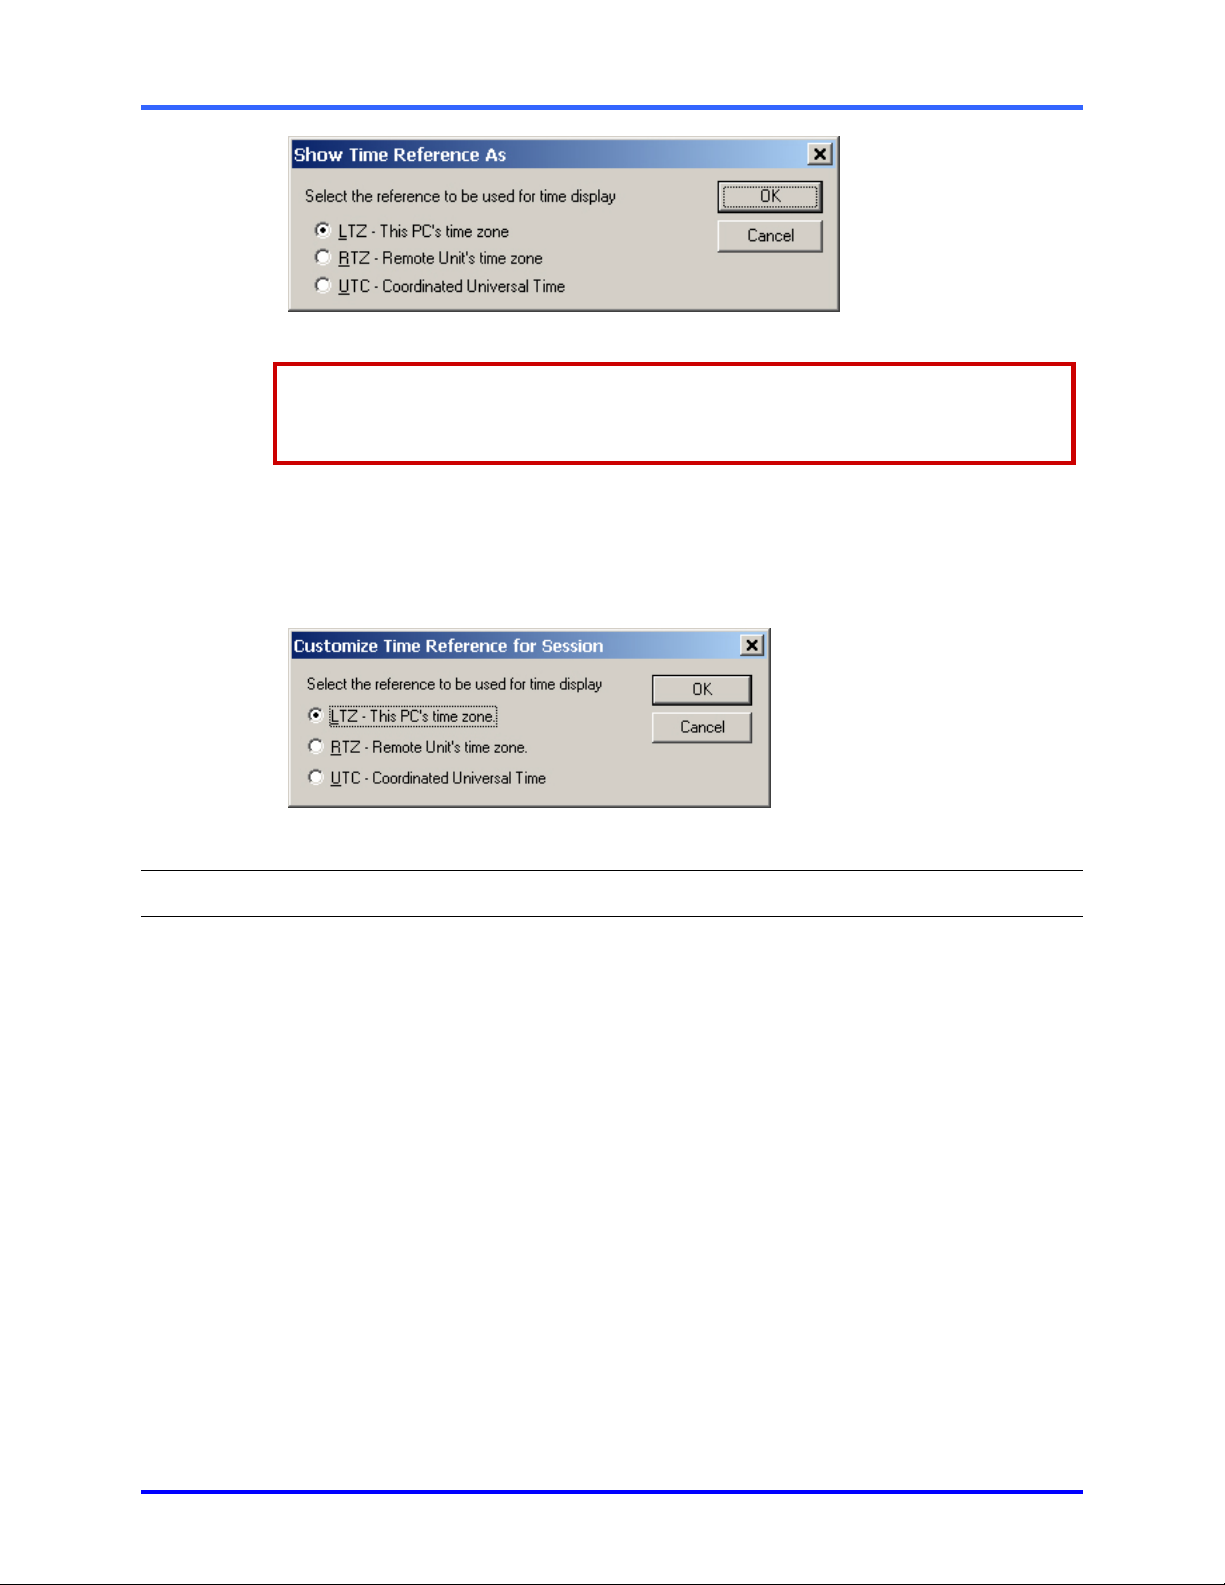
2.1.5 Customizing the Time Display
Time reference
You have the option of displaying time as U
the Multi-Media unit’s “r
(LTZ). Check if the PC’s clock is set correctly before doing so.
emote” time zone (RTZ) or the View operator’s own local time
niversal Coordinated Time (UTC), or showing
“UTC” is also known as Greenwich Mean Time (GMT).
!!!!21 To set the date and time on an operator’s PC
1. In the Microsoft Windows Control Panel, double-click the Regional Settings icon.
2. Click the Time tab; set the style, separator and symbols as required.
3. Click the Date tab; set the Short date style and Date separator as required.
!!!!22 To set the time reference on an operator’s PC
1. Using View, on its main View menu (see figure 11) click Options, then Time
Reference. The Show Time Reference As dialog is displayed.
2. Set the time display reference to either your local time zone (LTZ), the camera’s
remote time zone (RTZ) or to Universal Coordinated Time (UTC).
3. Click OK.
2–7
Page 24
View: Operator Guide
Fig. 13. Globally customizing the time reference.
Customizing the time reference does not change the time on your Multi-Media
unit or your PC. Only the display changes. See also 6.9.1: Setting the Date for
Correct Alarm Sorting, p. 6–20.
!!!!23 To temporarily change a time reference
Click Set Time Reference on the tear-away player’s File menu. A Customize Time
Reference for Session dialog is displayed to set the time display reference to either your
LTZ, the camera’s RTZ or to UTC. When you close the tear-away player, these
temporary settings are reset.
Fig. 14. Customizing the time reference for a session.
2.2 Resolution of Live Video
Dynamic resolution for Live video
Video resolution is dynamic for live sessions. As an operator makes a camera window
larger or smaller, the resolution of its video image is optimized for window size and
speed of delivery.
2.2.1 Monitor Settings in Microsoft Windows
Setting Microsoft Windows
For operators who plan to use View's higher resolution settings, Honeywell recommends
that the Screen area (for the monitor) be set to "1280 by 1024 pixels" or higher while
running View. Microsoft Windows is used to set this value, not View software.
Larger monitors
Larger computer screens and better video cards are assets when setting Microsoft
Windows for high Screen area settings. Using View to work with video can also benefit
from a larger viewing space and better hardware.
2–8
Page 25
Live Video
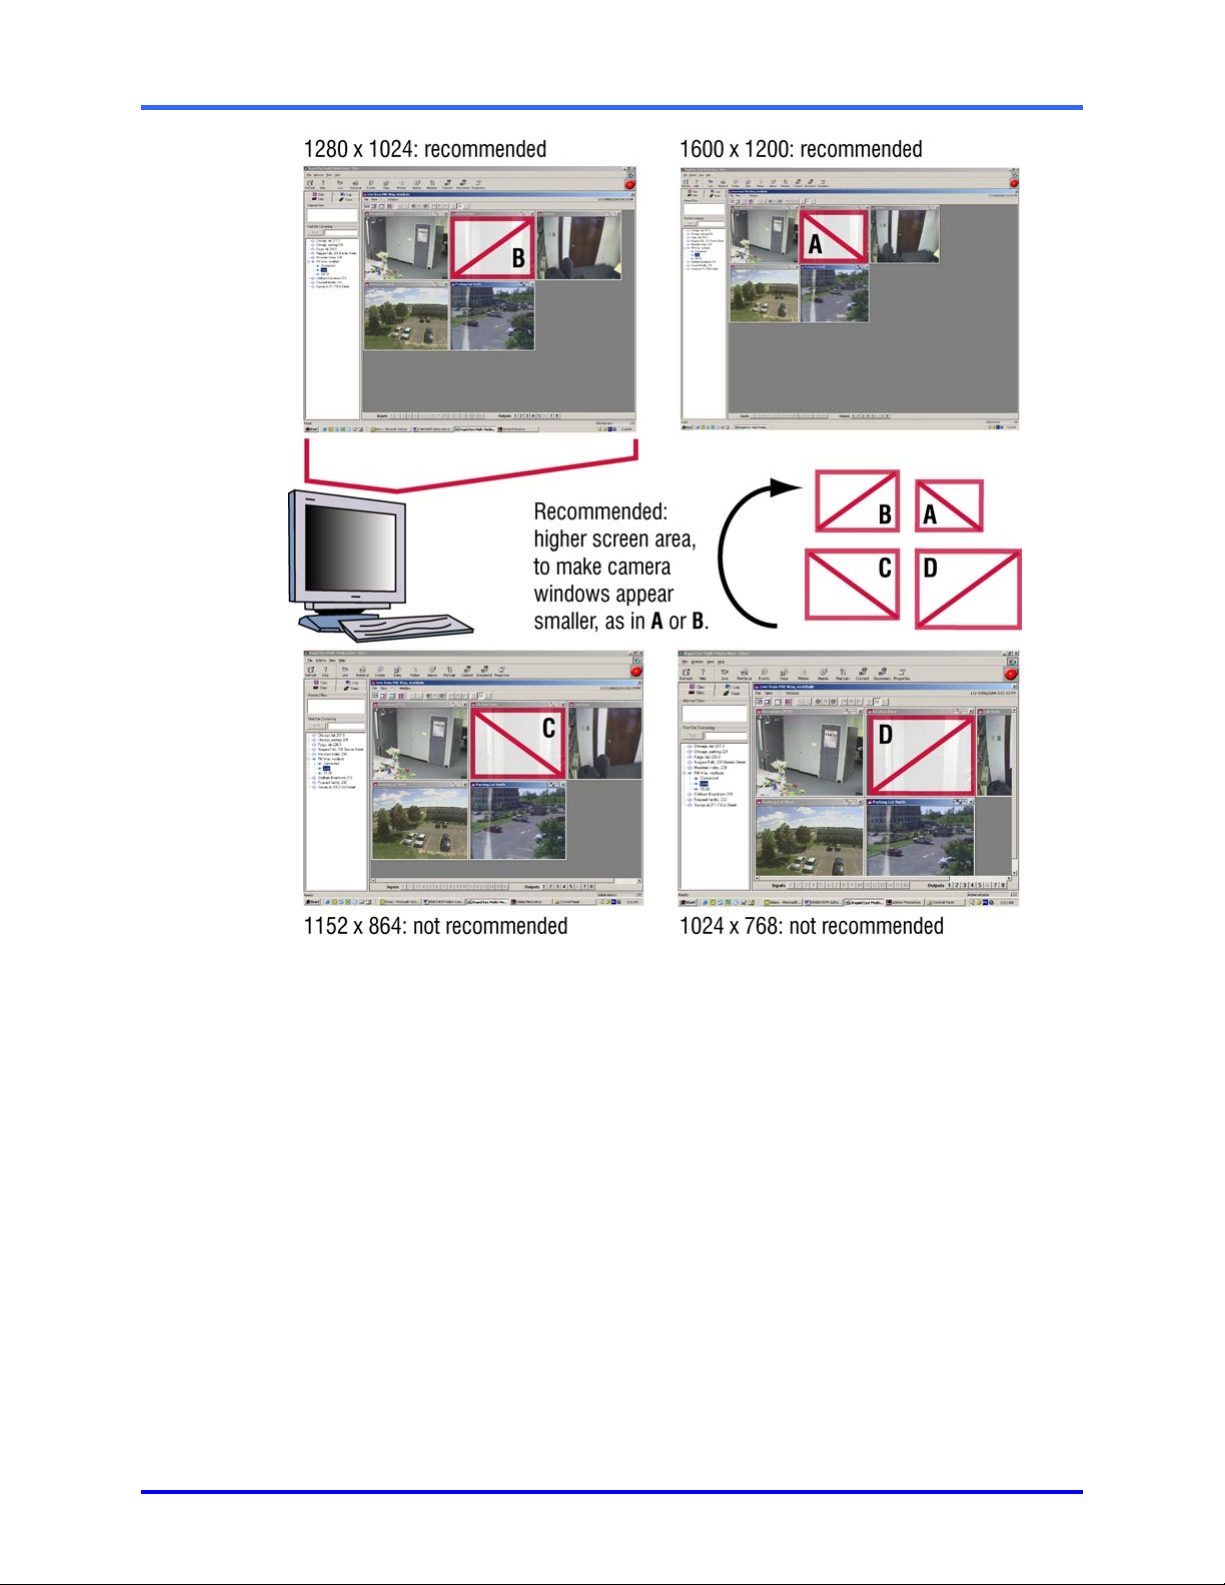
Fig. 15. Microsoft Windows’ screen area settings. Note the change in size of the camera
windows, as the screen area changes—camera 2 is highlighted for comparison. More
cameras can be seen at once, and at higher resolutions (here five cameras at 320×240
resolution) when a recommended setting is used, as in A or B. Even at settings that are
not recommended, video can still be viewed: some camera windows then extend
beyond the monitor’s surface. At any setting, camera windows can be dragged as
needed and the player window scrolled.
!!!!24 To change a PC monitor’s Display Properties
1. On the Microsoft Windows' desktop, click Start. A list of menus appears showing the
Settings menu.
2. Click Control Panel on the Settings menu. A Control Panel window appears.
3. Click the Display icon, in the Control Panel window. The Display Properties
window appears.
4. Click the Settings tab, in the Display Properties window.
5. Drag the slider in the Screen area. Recommended values are listed in table 2.
2–9
Page 26

View: Operator Guide
Table 2
Microsoft Windows: Display Properties, Settings
Screen area
(pixels)
1600 by 1200 yes
1280 by 1024 yes
1152 by 864 no
1024 by 768 no
800 by 600 no
640 by 480 no
* Video can still be viewed and worked with by using smaller screen area settings; see
figure 15.
!!!!25 To change a PC monitor’s Refresh Rate
1. On the Microsoft Windows' desktop, click Start. A list of menus appears
showing the Settings menu.
2. Click Control Panel on the Settings menu. A Control Panel window appears.
3. Click the Display icon, in the Control Panel window. The Display Properties
window appears.
4. Click the Settings tab, in the Display Properties window.
Recommended by Honeywell
for viewing higher video resolutions
5. Click Advanced…, on the Settings tab. It takes a few seconds before a
General tab and others are displayed in another window.
6. Do one of the following:
• Click the Monitor tab. You can change the Refresh Frequency, as needed.
• Click the Adapter tab, then click List All Modes…. You can change the refresh
rate (Hertz) along with a screen area with one click, as needed.
7. Click OK. The tabs for advanced settings disappear and the Display Properties
window is shown.
8. Click Close. For some settings, you need to restart your computer.
Higher refresh rates can alleviate eye fatigue when monitoring video over time.
Not all monitors and video cards support the recommended resolutions or offer various
refresh rates. Consult the documentation supplied with your monitor and video card.
Recorded video
For recording video, your organization’s Multi SA sets a resolution, depending on
storage and application needs. Resolution settings for recorded video are discussed in
the Admin user guide, K5403. The flexibility of setting resolutions independently for
recording video contributes to optimal system performance.
The setting for the resolution of recorded video does not change when live video
alters its resolution on-the-fly.
2–10
Page 27
2.2.2 Sizing Camera Windows
Optimal rendering
As an operator makes a camera window larger or smaller, the resolution of its video
image changes. The resolution is optimized for window size and speed of delivery.
Live Video
For live work, video at higher resolutions makes more use of the processing
power of an operator’s PC.
Sizing camera windows
An operator can size camera windows optimally for a given resolution.
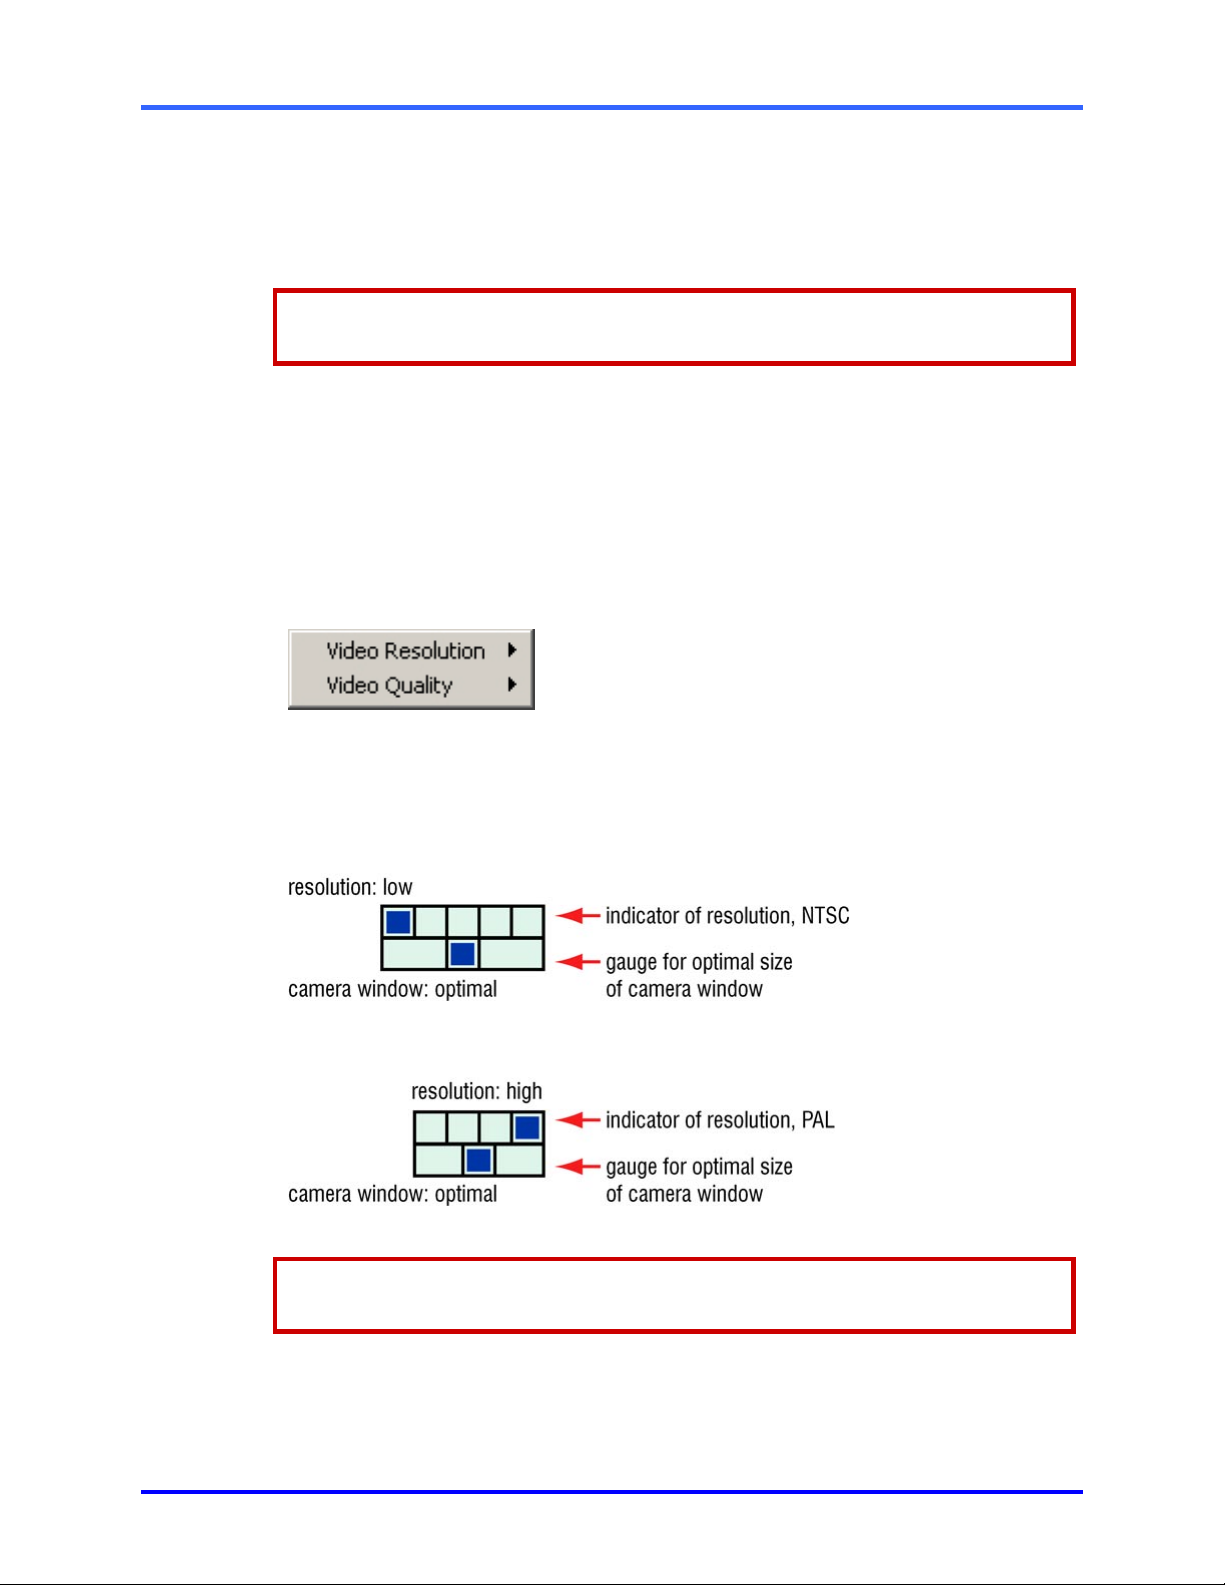
!!!!26 To size a camera window optimally for a resolution
1. While running a Live session, right-click on a camera window’s video. A small
menu appears on the video. See figure 16.
2. Point to, or click Video Resolution to display a list of resolutions.
3. Click a value. The menu vanishes and the camera window is sized optimally.
Fig. 16. Menu available in a camera window during a Live session.
Resolution gauge: amount of resolution
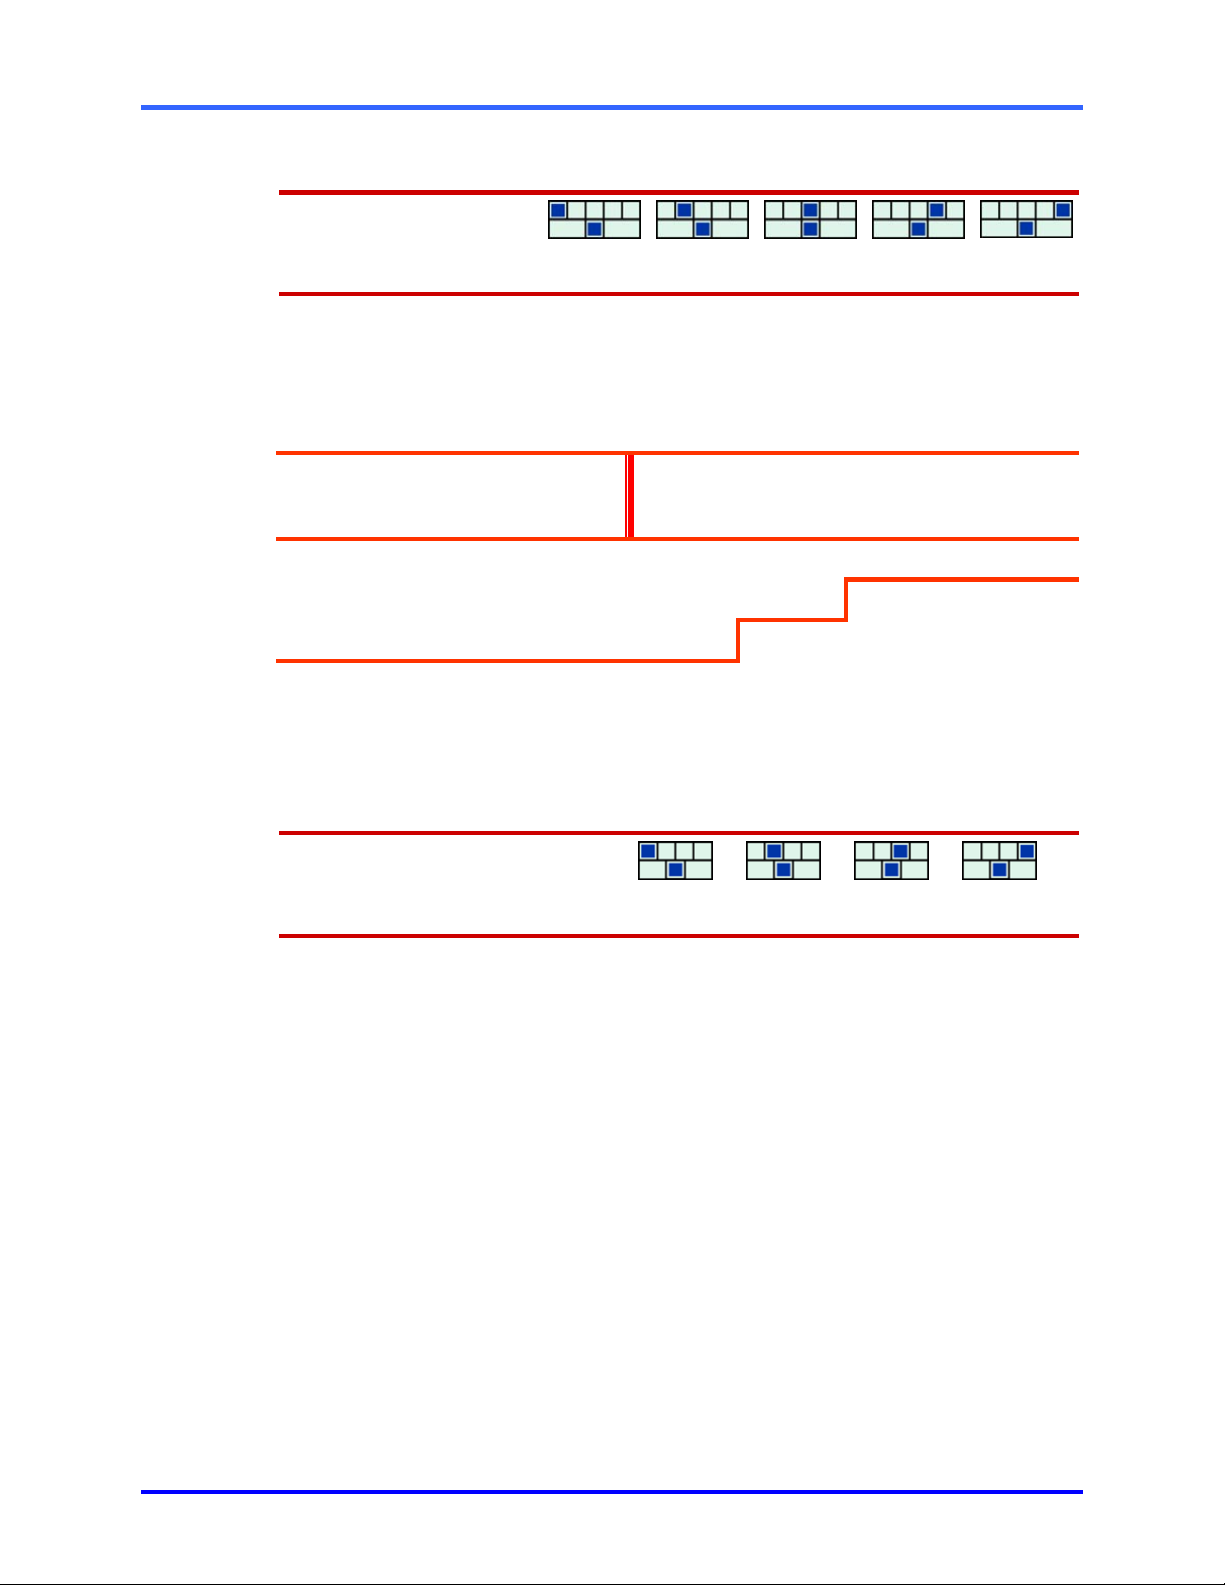
After sizing a camera window, a resolution gauge reports if resolution is low, high or in
between. The icon is shown in figures 17 (for NTSC) and 18 (for PAL).
Fig. 17. Resolution gauge for NTSC cameras: one of five resolutions is dynamically
assigned.
Fig. 18. Resolution gauge for PAL: one of four resolutions is dynamically assigned.
Set a Multi-Media unit to use either NTSC or PAL cameras; both types cannot be
used on the same unit.
2–11
Page 28

View: Operator Guide
Resolution gauge: metering
When an operator sizes a camera window smaller or larger than optimal, marks appear
in the rectangles of the resolution gauge. Figures 19 and 20 illustrate metering, when an
operator sizes a camera window with the mouse. The icon’s bottom row behaves the
same way for NTSC and PAL.
Fig. 19. Meter in resolution gauge: Camera window is stretched from smaller than
optimal size to optimal size.
Fig. 20. The resolution gauge reports how far or close a camera window is from optimal
size.
Maximum resolution: technical note
At the highest resolution (NTSC: 704 × 480 pixels; PAL: 704×576 pixels), View displays
an image using all of the pixels obtained from a CCTV camera’s signal.
2.2.3 Beyond Resolution
Other settings for good video
A camera’s resolution is one of many components for obtaining good video. Use: View’s
settings for: Quality, Picture and Microsoft Windows’ Screen area. The “best” setting
for an application can vary; experimenting is worthwhile. If a video feed needs more
improvement, consider testing or modifying a camera’s focus, distance, angle, and
lighting. See 4.2: At the Source… on p. 4–4.
2–12
Page 29
2.2.4 Initial Camera Window Size
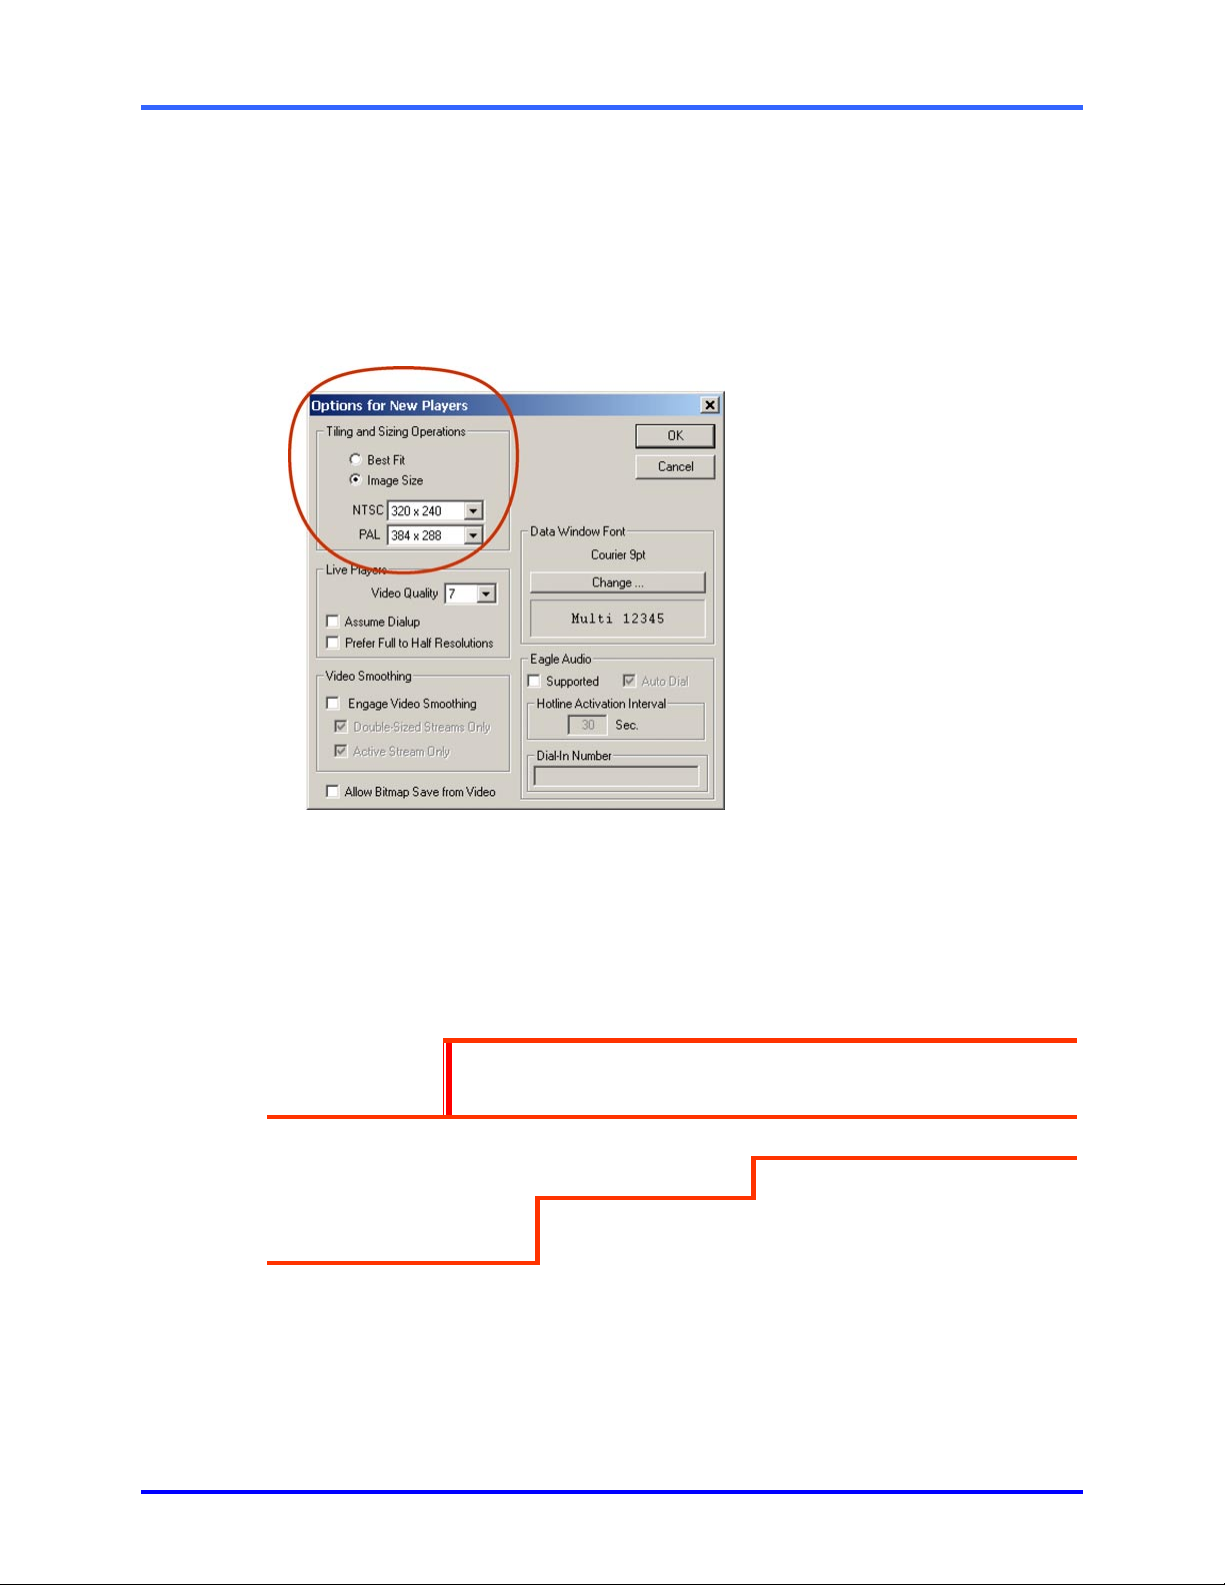
You can customize the initial size at which camera windows appear.
!!!!27 To customize the size at which camera windows open
1. On the main View menu, click Options, then New Players. The Options for New
Players window appears, as in figure 21.
2. Select either Best Fit or Image Size. If you select Image Size, you can then
choose a size for Multi-Media units using NTSC, PAL or both.
Live Video
Fig. 21. Changing the size at which Camera windows appear.
2.2.5 Resolution Reference
NTSC resolutions: Multi-Media
Table 3
Multi-Media unit, NTSC video feeds: resolutions offered for viewing
unit’s CPU resolution (pixel × pixel)
†
(Intel)*
legacy
Pentium 4 (P4)
Pentium 3 (P3)
P3 running older
software
* Use procedure !28, below on p. 2–14, to identify a Multi-Media unit’s processor.
†
The legacy setting (320×192) is the resolution used by the older “Multi” units. See
figure 22. The “legacy” resolution is not assigned dynamically to live camera windows.
‡
Not available on Multi-Media LT units, except during maximal zoom of one video feed
while using LocalView, which automatically sets the resolution to 704×480 pixels, for
optimal public monitor use.
160 × 120 320 × 240 640 × 240 640×480
* * * * * *
* * * < =
* < = n /a
‡
704×480
‡
2–13
Page 30
View: Operator Guide
Table 4
Resolution legend: NTSC camera (pixel × pixel).
resolution gauge n/a
resolution legacy 160×120 320×240 640×240 640×480* 704×480*
* Not shown when connected to Multi-Media LT units.
PAL resolutions: Multi-Media
Table 5
Dynamic resolutions for PAL cameras
unit processor (CPU) resolution (pixel × pixel)
type*
Pentium 4 (P4)
Pentium 3 (P3)
P3 running older software
* Use procedure !28, below on p. 2–14, to identify a Multi-Media unit’s processor.
†
Not available on Multi-Media LT units, except during maximal zoom of one video feed
192×144 384×288 704×288 704×576
* * * *
* * < =
* < =
unavailable
†
while using LocalView.
Table 6
Resolution legend: PAL camera (pixel × pixel).
resolution gauge
resolution (pixel × pixel) 192×144 384×288 704×288 704×576*
* Not available on Multi-Media LT unit.
Multi-Media unit’s processor
!!!!28 To identify a unit’s processor
1. Continue or start a maintenance session for the Rapid Eye site.
2. Click the Hardware tab. Next to Main Board, the unit’s central processing unit
(CPU) is listed—P4, P3 and so on.
3. You have the option of ending the maintenance session.
If you have access to the unit, you can interpret the unit’s processor from the message
displayed on the unit’s blue screen, by using table 7.
2–14
Page 31

Live Video
Table 7
Unit’s message
message CPU version*
Rapid Eye Multi-Media V6.2 P4 4.5
Rapid Eye Multi-Media V6.1 P4 4.4
Rapid Eye Multi-Media V5.2 P3 4.5
Rapid Eye Multi-Media V5.1 P3 4.4
ADEMCO Video Multi*Media V5 P3 4.1.0 to 4.3.0
* The version is listed in Maintenance on the System tab.
Older units
Older Rapid Eye units (Multi, Plus) use a “Legacy” resolution of 320 × 192 pixels. When
viewing video from an older unit, Camera windows are smaller and no resolution gauge
appears. See figure 22.
Fig. 22. Video feed from older unit appears in a smaller camera window.
Newer units set to legacy resolution
If resolution is set to “Legacy” on a newer Multi-Media unit, the picture is cropped and
the resolution gauge does not appear. See figure 22. No cropping occurs at other
resolutions.
2–15
Page 32

View: Operator Guide
2.3 Pan, Tilt and Zoom
Flexibility
Like most of the Multi security features, use of cameras that can pan, tilt and zoom (PTZ)
is optional. Your Multi SA can inform you if PTZ cameras are connected to Multi-Media
unit(s) in your system.
Before you can use a PTZ camera ...
To use the PTZ controls, your Multi SA first has to:
• add the Use PTZ right to a View operator account. This enables the PTZ toolbar in
a live session.
- and to -
• grant access to the site(s) assigned to operator(s) by their supervisors.
Your Multi SA sets View to control PTZ cameras. You will notice that “[PTZ]” is added to
the title bar of a camera window when running a live session using a PTZ camera.
Buttons for PTZ commands appear on the toolbar when a PTZ camera window is
selected. See figure 23.
2–16
Fig. 23. Using the mouse to control PTZ cameras. As you move the mouse-pointer
through a PTZ camera window, the pointer changes to a white octagon or to an arrow
with a number.
!!!!29 To see PTZ controls in a live session
1. Run a live session at a site that has PTZ-type cameras. To find out how to run a
live session, see procedure 9 on p. 2–1.
2. Click a camera window that displays [PTZ] in its name.
3. You can see the pan (i.e., turn) controls by moving the mouse-pointer in the
camera window, as illustrated in figure 23.
Page 33

!!!!30 To pan/tilt a PTZ camera
• Click the mouse when the pointer displays an arrow.
!!!!31 To stop a PTZ camera that continues to pan/tilt
1. Move the pointer to the center of the image until a small, white, octagon—a “stop”
icon—appears.
2. Click the stop icon.
2.3.1 Using Preset PTZ Positions
Security effects of PTZ use on recorded video
Moving a camera affects the video being recorded by your Rapid Eye Multi-Media unit.
Your organization may have security policies on the positioning and use of PTZ
cameras.
!!!!32 To return a PTZ camera to a preset position
1. Run a live session at a site that has PTZ-type cameras. To find out how to run a
live session, see procedure 9 on p. 2–1.
2. Display the PTZ camera’s window, by selecting the camera when the live
session starts.
3. In the PTZ camera window, right-click the mouse. A menu appears in the
camera window next to the pointer.
4. Click or drag the pointer to PTZ Preset. A list is displayed.
Live Video
5. Click one of the preset labels. The camera moves to the location set in the
preset.
Changing a preset
The position of a PTZ camera when not being monitored can be assigned to preset #1.
To record useful video when not monitored, change a “preset #1” in consultation with a
Multi SA or your security officer.
!!!!33 To set a PTZ preset
1. Run a live session at the site with the PTZ-type camera that you want to set. To
find out how to run a live session, see 2.1.
2. Using the PTZ controls, set the camera in the position that you need.
3. Click the Save Presets command on the tear-away player’s PTZ menu. A list of
Preset 1 to Preset 8 appear.
4. To save the position, click one of the “Preset n” labels. The position is assigned
to that label.
Position of PTZ camera after close of session
A security officer may need a PTZ camera to return to a set direction and zoom after use.
See table 8. A Multi SA selects different settings using maintenance functions. See the
Admin User Guide, K5403.
2–17
Page 34

View: Operator Guide
Table 8
Position after close of session, for PTZ cameras
Session ends... Behavior
Stay put The camera remains in the last position used by the operator. If it
Go to preset 1 The camera returns to “preset 1” configured using Multi.
Start tour 1* Some camera models can keep moving when not in use by an
* A “PTZ tour” differs from site tours; see 9: Watching Site Tours.
PTZ and motion search
Video recorded while a PTZ dome or camera can be searched for motion. When the
camera is fixed, results are as expected; see 5: Searching for Motion, on p. 5–1.
However, motion search is not effective on video recorded as a PTZ camera is panning,
tilting or zooming. If you plan to use motion search on a PTZ camera, use “Stay put” or a
preset after close of session. See table 8. Motion search can also be used to find out
when a PTZ camera was moved, if that camera should be staying put.
is panning, it keeps on panning; if it is not moving, it stays put.
The “stay put” behavior makes available the Return to Auto-iris
and Return to Auto-focus options.
operator.
2.3.2 PTZ Command Reference
Table 9
PTZ commands on toolbar
Button Function Result
zoom in - zoom out (+) subjects in the camera window
opens/closes the
aperture* of the camera
focuses the camera
lens*
governs the amount of
panning, tilting and
zoom
*
Use and action of some functions may depend on dome manufacturer.
Ultrak KD6i domes & auto-aperture
Before an aperture setting can be changed manually on an Ultrak KD6i dome, the
operator needs to turn OFF the auto-aperture. Auto-aperture is also known as “auto-iris”.
appear closer
(-) subjects in the camera window
appear further away
increases/decreases the brightness of
the video feed
sharpens (F+) or dulls (F-) subjects in
the camera window, depending on
distance.
selects a “nudge” factor of small (S),
medium (M) or large (L)
2–18
Page 35

2.4 Ending a Live Session
!!!!34 To end a live video monitoring session
• Close the tear-away player “Live from …” window.
- or -
• Click Disconnect on the View toolbar. This also closes other sessions such as
retrieval or alarm at the site.
This removes the “Live” indicator beneath that site, on the Site action tab. Ending a live
session discards all video feeds. A live session also ends when you exit View.
Live Video
2–19
Page 36

View: Operator Guide
Please continue.
2–20
Page 37

3 Recorded Video
Recorded video
Using a Retrieval session, you can access the recordings from many cameras, and even
access many Multi sites, all at once.
3.1 Viewing Recorded Video
Process
Start by selecting a Multi site and then running a Retrieval session. You can specify the
date and time of the start of the video. Recorded video reaches your PC until you end
the Retrieval session. Use procedures !35 to !39.
3.1.1 Selecting a Site
!!!!35 To select a site
1. Run View; if you are not sure how to do this, see 1.1: Starting View, on p. 1–1.
2. Click the Sites tab.
3. Click a “site” name listed on the tab. See 1.2.1: Selecting a Multi Site, on p. 1–3.
3.1.2 Starting a Retrieval Session
!!!!36 To obtain a tear-away, video player
After selecting a site, do one of the following:
• Click
• Right-click on the site name; on the shortcut menu that appears, click Retrieval.
- or -
• Click Retrieval on the Actions menu.
Then, either :
• a tear-away player appears in the session pane; a list of streams (cameras and
other data devices) is displayed; see figure 24.
on the Toolbar.
- or -
• a Connection dialog appears if there are other, optional connections to a site.
Select a connection, then click OK. A tear-away player then appears with its
streams, as in figure 24.
You can run retrieval and live sessions concurrently, from one or many sites.
3–1
Page 38

View: Operator Guide
3.1.3 Specifying the Start Time
When you start a Retrieval session, Multi automatically sets the start date and time to the
nearest minute. You can change the start of a Retrieval session.
You have the option of specifying the beginning date/time of the retrieval session before
or after selecting video feeds.
!!!!37 To type the start date and time of a retrieval
1. In the Stream List dialog, click the part of the date or time that you want to
change in the Retrieve from boxes.
2. Use the arrow keys on your keyboard to change the number, or type a number
that you want.
3. Repeat these steps as needed.
3–2
Fig. 24. As a Retrieval session is established, connection icons (
listing the sites.
) appear on the tree
Page 39

!!!!38 To set the date of a retrieval with the calendar utility
1. In the Stream List dialog, display the calendar utility by clicking the arrow next
to the date box. See figure 24, above.
2. Click a date in the calendar. To go to another month, click the arrow keys next
to the month/year heading in the utility.
3.1.4 Selecting Cameras
You have the option of selecting cameras before or after specifying the beginning
date/time of the retrieval session.
!!!!39 To select feeds of recorded video
1. In the Stream list dialog, select as many cameras as you need. For your
convenience, all of the video, audio and text streams are pre-selected.
2. Click OK. Each feed of retrieved video is displayed in its own camera window.
3.2 Controlling Playback
A retrieval session automatically adds the playback toolbar to its tear-away player. The
playback controls for viewing recorded video are conveniently grouped on a toolbar.
Recorded Video
Fig. 25. Playback toolbar
3.2.1 Playback Speed: Slider
Fig. 26. Setting the playback speed slider to ten times the normal speed.
!!!!40 To scan a recorded video feed more quickly
• Drag the speed slider to the right of its center position. The slider’s speed
setting appears as a tool tip (see figure 26).
!!!!41 To slow down and pause a recorded video feed
• Drag the speed slider to the left of its center position. Sliding it to the very left
pauses the video.
Dial-up connections cannot achieve playback speeds much greater than 2x, even
if the Speed Slider is set at higher values.
3–3
Page 40

View: Operator Guide
3.2.2 Skipping Through Video
For quickly spotting recorded video, use the skip-to-time slider.
!!!!42 To spot video by skipping through it
• Drag the skip-to-time slider to the right of its center position.
The amount of skip appears as a tool tip on the slider. See figure 27. After using the time
slider, the time in a Camera window caption changes and the skip-to-time slider returns
to a central, “Now” position. Skipping can be combined with playback speed (see
above) to optimize scanning of video.
Fig. 27. Skipping to a later time.
!!!!43 To return to an event you have just seen
1. Set the speed slider to scan the video at a comfortable speed.
2. Jump to a time before the event by repeatedly dragging the time jumper to the
left of its center position by small amounts.
3. Place the mouse pointer above the pause button.
4. When the event occurs, click pause.
“Top-of-the-minute” means that the jump-to-time slider rounds partial minutes to
the earliest time.
Go to
When you know the time of the recorded video that you need, click Go to. This displays
a Go To a Specific Time dialog for typing a date and time (see figure 28).
Fig. 28. Go to viewing video recorded at another date and time
First available video, sound or data
later media. If an operator requests video from a time at which the unit was not recording,
the first image after the requested time is displayed. The same applies to data and sound.
Later media is indicated by an icon that flashes in the upper-right corner of the Retrieval
window to indicate that what is being monitored is later than the “from time” that the
operator requested.
3–4
Fig. 29. The later media indicator resembles a clock face.
Page 41

Recorded Video
Power outages and so on, can temporarily stop a unit from recording. When
recording resumes, there is a “hole” in the video archive. These holes can cause
the later media indicator to appear.
!!!!44 To obtain a report on later media
• If after skipping through video (see above) a later media indicator appears and
flashes, click its clock-face icon. A report appears, as in figure 30. Right-clicking
hides the icon and no report is produced.
Fig. 30. Obtaining a later media report.
3.2.3 Top-of-the-minute
Skipping
Skipping to “two minutes later”, from 10:02:57 brings you to 10:04:00, the top of the
minute (not 10:04:57.) The same applies to jumping to later/earlier times using other
intervals. See table 10 for more examples.
3–5
Page 42

View: Operator Guide
Table 10
Jump-to-time results
recorded video (time) tool tip (text) jumps to... (time)
10:02:02 2 minutes later 10:04:00
10:02:57 2 minutes later 10:04:00
10:02:02 2 minutes earlier 10:01:00
10:02:57 2 minutes earlier 10:01:00
Requesting video from many cameras
Since images from many cameras may need a few seconds more to appear, retrieving
video from many cameras at once offers images from slightly before the top of the
minute of the “Go to time” you request. For examples, see table 11.
Table 11
“Go to” results
go to time (input) cameras* obtains video starting from ... (time)
10:02:30 1 10:01:59
10:02:30 4 10:01:56 to 10:01:59
* On systems connected to many cameras, selecting one of the higher numbered
cameras also slightly pushes back the time of the first image obtained.
3.3 Resolution of Recorded Video
Optimal size for camera windows in a Retrieval
During a Retrieval session, an operator can size camera windows optimally for the
resolution at which recording was made.
!!!!45 To size a camera window optimally for a resolution
1. While running a Retrieval session, right-click on a camera window’s video. A
small window appears on the video listing Image Size. See figure 31.
2. Click the value that matches the “Recorded at n × m” value. The menu
vanishes and the camera window is sized optimally.
Recorded video cannot be retrieved at a higher resolution than the one at which it
was recorded.
Video is recorded at one, set resolution, which can be lower than those viewed in a live
session. The resolution for recorded video is chosen by your organization’s Multi SA.
3–6
Page 43

Recorded Video
Fig. 31. Image size: menu and report, available in a camera window during a Retrieval
session.
Resolution gauge: the resolution at which the recording was made
During a Retrieval session, a resolution gauge reports if a camera window’s size is
smaller-than-optimal, optimal or greater-than-optimal for the recorded resolution. The
icon is shown in figures 32 (for NTSC) and 33 (for PAL).
Fig. 32. Resolution gauge for NTSC: indicates resolution setting for video recorded by
that camera.
Fig. 33. Resolution gauge for PAL: indicates resolution setting for video recorded by that
camera.
Set a Multi-Media unit to use either NTSC or PAL cameras; both types cannot be
used on the same unit.
The resolution of the recorded video is shown by the resolution gauge. See tables 12
and 13. The red dot in the upper row of the icon indicates that the resolution applies to
recorded video.
Table 12
Recording: resolution selection for NTSC camera (pixel × pixel)
resolution
160×120 legacy* 320×240 640×240 640×480
†
704×480
†
gauge
n/a
*
Legacy, used by older Multi units, is included for compatibility. This setting has no icon.
†
Not available on Multi-Media LT units.
3–7
Page 44

View: Operator Guide
Table 13
Recording: resolution selection for PAL camera (pixel × pixel)
resolution
gauge
* Not available on Multi-Media LT units.
192×144 384×288 704×288 704×576*
3.4 Ending a Retrieval Session
!!!!46 To end a recorded video monitoring session
Do one of the following:
• Close a “Retrieval from [site name]” window.
- or -
• Click Disconnect on the Toolbar. This also closes other sessions (e.g., live
video, retrieval, alarm) at the site. On the Site action tab, beneath that site, the
“Retrieval” indicator is removed.
Exiting View also disconnects sites.
See also
audio. See 8.3: Recorded Audio on p. 8–2.
data. 11.1: Live Data, p. 11–1.
Live Video. 2.0, p. 2–1.
scheduling. See 12: Scheduling, p. 12–1. A Multi-Media unit can be scheduled to
suspend the recording of video feeds.
3–8
Page 45

4 Troubleshooting Video
4.1 Adjusting a Video Feed
Camera attributes of video feed
To adjust the video feed of cameras, ask your Multi-Media system administrator (Multi
SA) or View operator that has the right to run maintenance sessions. Video feeds are
adjusted individually for each camera while running a maintenance session.
You can adjust a video feed’s:
• brightness
• contrast
• hue
• saturation
• gain (AGC)
Fig. 34. The Motion and PTZ selections show different controls.
Honeywell recommends you leave the gain to automatic.
To do so leave/set a checkmark in the AGC box on the Video tab, during a
maintenance session.
4–1
Page 46

View: Operator Guide
The cameras connected to a Multi-Media unit are detected automatically. You can name
a camera and adjust a camera’s picture settings during a maintenance session.
!!!!47 To configure a Rapid Eye site’s camera(s)
1. Run a maintenance session at the site.
2. Click the Video tab and adjust Picture controls as needed. See figure 34. The
3. You have the option of renaming cameras as shown in figure 34.
Right to change camera settings
A View-operator account may not have the right to run a maintenance session to modify
a camera’s configuration. Ask your Multi SA about account rights and camera settings.
Honeywell recommends that changes to camera settings be tested by running
Live and Retrieval sessions, by a View operator or by the Multi SA.
Extreme settings can produce recorded video that might not meet your organization’s
security needs.
adjustments are made on the fly; you do not need to click the Apply button, as
for older Multi units.
4.1.1 Configuration Tips
Common sense caution
The flexibility that Multi offers lets you configure the system beyond the capacity of Multi
to perform to your configuration specification. In these situations, you will observe slower
live video and other symptoms of an overtaxed system.
In a straightforward usage situation, such as when Multi-Media unit is used as a Digital
Video Recorder (DVR), recording rates can reach those listed in table 14:
Table 14
Multi-Media unit recording rates
capture cards in unit images per second* per unit
1 20
2 40
3 60
4 80
* This ideal maximum depends on the complexity and motion of images.
4–2
Page 47

Troubleshooting Video
Fig. 35. High recording rates can slow live sessions.
System priority
If overtaxed, the priority of a Multi-Media unit is always to capture and store video, audio,
data and alarms. This may result in slower service to View operators. If the video you are
observing appears sluggish, Honeywell recommends that a Multi SA:
• Set similar recording rates for all cameras. Try to set up similar recording
rates for all cameras. For example, setting a recording rate to 1 or 2 fps for all
cameras lets Multi perform image capture efficiently. A Multi-Media unit will not
work as efficiently if you set some cameras to rates of less than 1 fps and other
cameras to higher rates.
• Motion detection. Enable motion detection only on cameras where you need to
monitor motion.
• Data recording. When enabled, rules to log events or generate alarms should
only be set for important data. Rules that generate many alarms can slow
performance.
• Close unnecessary camera windows. Fewer open camera windows increases
the speed of the other video feeds being displayed from that site. To discard a
video feed from monitoring in a Live session, close its Camera window; see
figure 10 on p. 2–4, in section 2.1.3: Managing Video Feeds.
• Set Recording Rate to a lower number. See figure 35. If you have a
configuration that is putting lots of demand on a Multi-Media unit, set your total
recording rates to not exceed a total of 32 fps for all cameras combined. This
will reserve some hardware capacity to deliver all of the other services that are
being asked of the Multi-Media unit.
Slow video due to other software
View makes use of Windows video resources and your PC’s CPU. Other software that
makes heavy use of these resources—software for: graphics, CAD, music listening—can
hamper the delivery of video to your desktop. Network intensive applications—large
downloads, backups can also slow things down. Neither affect the recording of video,
only its delivery.
4–3
Page 48

View: Operator Guide
4.2 At the Source…
Cameras in the environment
Normal operation of View can reveal weaknesses in the position of cameras. Video
surveillance can be hampered by:
• blind spots. Mobile equipment, vehicle docking, renovation work, and so on.
• environmental lighting. a camera can be rendered ineffective by direct sunlight,
artificial lighting or their opposite, darkness.
• environmental conditions. Condensation, excessive heat or cold, even a dirty
camera lens, due to dust or grease can be common over time and require
onsite maintenance.
Report problems with camera position to your organization. A discussion of good
camera position, corrective photography, and so on, are beyond the scope of this guide.
For such background questions, see reference works such as:
• Kruegle, Herman, CCTV Surveillance: Video practices and technology,
Butterworth–Heinemann, Newton (MA), 1995
• Newman, Oscar, Defensible Space: Crime Prevention Through Urban Design,
Macmillan, New York, 1973
4–4
Page 49

5.1 Setup
Before you can use motion search, your Multi SA needs to run a maintenance session to
enable Motion detection for each of the cameras whose video may eventually be
searched for motion.
!!!!48 To enable motion detection
• See the Admin User’s Guide.
5 Searching for Motion
Motion search works only if “motion detection” was enabled during the
recording of the video that you plan to search.
Fig. 36. Motion button, for starting a Motion session.
Starting a Session
Fig. 37. Online reminder of what comes next when searching for motion.
!!!!49 To start a Motion Search session
On the Site action tab, either:
• right-click the name of the site you plan to search. Click Motion on the menu
that appears.
• click the name of the site you plan to search, then the Motion button on the
View toolbar.
5–1
Page 50

View: Operator Guide
A “Search for Motion at [sitename]” session appears in the session pane.
Contextual help
A reminder of the next step that you need to take is displayed near the upper-right
corner of the Search for Motion window. See figure 37, above.
5.2 Preparation
Fig. 38. Steps to prepare a search for motion.
!!!!50 To prepare a motion search
1. Click Motion Search and click the arrow in the Stream box to display a list of
the site’s cameras. Other streams are not listed in a Motion Search. Select a
camera from the Stream list. See #1 in figure 38.
2. Indicate date and/or time by clicking and typing in the From and To boxes. A
calendar utility is available by clicking the From and To arrows.
3. Click Fetch. Two frames of video are displayed: an initial frame from the “From…”
time and date, another, final frame, from the “To…”. The initial frame is enlarged,
for setting search options.
4. Do one of the following:
• Click Search. The “Search” button changes to either: Redefine or Stop, in case
you need change the motion options and search again.
• Use Motion Threshold options or Masking that Detects Motion, as explained
shortly, in 5.2.2 and 5.2.3.
5–2
Page 51

5.2.1 Early “From”; Future “To”
First available video
From. If the “from time…” for a motion search is a time at which the unit was not
recording video, the first image after the requested time is displayed. A flashing later
media icon appears, indicating that the image in a still frame is later than the “from time”
requested. See figures 39 and 40. The earliest date that can be selected using the
calendar utility is January first, 2000.
Fig. 39. The icon for the later media indicator resembles a clock face.
!!!!51 To obtain the time offset of later media
• Click the later media icon. If the image is dark, check the time in the Offset
Image Time window to find out if, for example, the video was recorded at night.
Searching for Motion
Fig. 40. Requesting video from a time when none is available.
Future date and time
To. Requests for a future date or time cannot be requested.
Power outages and so on, can temporarily stop a unit from recording. When
recording resumes, there is a “hole” in the video archive. These holes can cause
the later media indicator to appear.
5–3
Page 52

View: Operator Guide
5.2.2 Motion Threshold
Options can be ignored
The simplest way to obtain a report of motion in the video is to click Search after clicking
Fetch; see procedure 50 in 5.2, above. Use of Motion Threshold or Masking that Detects
Motion, explained in this section and 5.2.3, are optional. If this is your first read-through
of these options, please skip to p. 5–7 for 5.3: Search Report, and come back to find out
about the search options later. See figure 41.
Sensitivity. Threshold for reporting movement. Moving the slider right of center picks up
smaller movements. Setting the slider to the far left turns off motion search. Slider range
of magnitudes: 1 to 100.
Interval. Minimum amount of time, in seconds, between reports. Two or more
occurrences of movement within the interval are reported as a single item in the motion
search report. Adjust the interval as needed. Range: 1’’ to 9999’’ (or 2h:46’:39’’).
Fig. 41. Detection options toolbar: Sensitivity and Interval.
5.2.3 Masking that Detects Motion
You can focus View to search for motion only on areas of the video that you mask.
Mask buttons
Show / Hide masking grid. Toggle for the presence/absence of a grid overlay on
the video image, to help select the area(s) used to search for motion.
Show / Hide mask and Enable/ Disable mask edit. Toggle, to search for motion
using either a partial area (mask) or the full area of a video image. When enabled, only
the areas that you have masked are searched for motion. See figure 42. Procedure !52,
below, explains how to focus motion search on part of a video feed. The mask(s) can
also be shown during the playback of video, in a Motion Search session. To save a
mask, see 5.7.1, Repeating a Motion Search, on p.5–16.
5–4
Page 53

!!!!52 To focus motion search on an area of a video feed’s picture
Searching for Motion
1. After preparing a motion search, as explained in 5.2, Preparation, click
the Show / Hide mask button. You have the option of clicking
the Show / Hide masking grid button.
2. On the larger image, click where you need the motion search to occur. Blocks
appear as you click on the image. You can click as many times as needed. See
figure 42.
!!!!53 To remove a block in a mask
• Click the block.
!!!!54 To view more masking commands
• Place the mouse pointer on the large video image of a motion session and
right-click. A menu appears, showing global masking commands. See
figure 42.
,
,
Fig. 42. Enlarged detail of image used during a motion search.
5–5
Page 54

View: Operator Guide
Global masking commands
Show mask. Displays/hides where the search for motion occurs. When masks are
hidden, the entire area of the video is searched.
Show grid. Toggle to display a grid overlay, to help select the area(s) used to search for
motion. Works like the Show / Hide masking grid button.
Set all. Covers the entire area of a video image with a mask. The mouse can then be
used to remove part of the mask, as needed. When used with the Invert Mask command,
small areas can be excluded from a search. See procedure !56, below.
Clear all. Removes all masks from the image area. The mouse can then be used to add
new masks.
Invert mask. Unmasks masked areas, and masks unmasked areas.
!!!!55 To mask a larger area with one click
• Press and hold the Ctrl key on the PC’s keyboard, then click the larger image.
!!!!56 To exclude an area from a search
1. After preparing a motion search (see 5.2, Preparation), click
A larger mask (3x3 blocks) is inserted
, the Show / Hide mask button. You have the option of clicking , the
Show / Hide masking grid button.
2. Click on areas of the image where you need to exclude a search for motion. As
you click, blocks appear. See figure 42.
3. Show the masking commands, by placing the mouse pointer on the large video
image and right-clicking.
4. Click Invert Mask.
5. You have the option of saving the mask, along with other search options, see
the procedures in section 5.7.1: Repeating a Motion Search.
5–6
Page 55

5.3 Search Report
!!!!57 To obtain a report
• After preparing a motion search (see 5.2, Preparation), and using the optional
motion options, click Search. A motion search report is produced. See figure
43.
Motion is reported each time it is detected between the From and To date and time.
Searching for Motion
Fig. 43. Motion search report.
5.3.1 Report Options
Magnitudes filter (Filter Mag.)
In figure 43, you can see that the leftmost column of a report shows the magnitude, or
how strongly a video image has changed. Low magnitudes of 10% to 20% indicate that
gradual changes in lighting or slow movement are being detected. Higher magnitudes
(70% or more) usually mean quick motion or sudden, dramatic changes in lighting.
!!!!58 To customize the range of magnitudes reported
1. After obtaining a motion search report, click in the magnitude filter’s Filter Mag.
From or To boxes, as needed.
2. Adjust the value by either:
• typing a value
• clicking on the arrows at the right-hand side of the box.
5–7
Page 56

View: Operator Guide
Example
To obtain a report of only the highest magnitudes, say from 90% to 100%:
• click in the From box and then type “90”, without quotation marks. The report is
updated on-the-fly.
Fig. 44. Detail of selection in frequency chart of a report.
Selecting items in the report
You can select one or more items in the report using either:
• the list of every detected motion.
• the density chart, at the top of the report. See figure 44.
Zoom
The frequency chart of a selection of items can be zoomed for an enhanced view of the
chart between reports of motion detection. See figure 45. You can double-click a vertical
bar to see the video excerpt associated with it.
Trim
The Trim button works when you have zoomed the frequency chart, showing only your
selection of items in the list. Together with the magnitudes filter, Trim can help reduce
the amount of items in a motion search report, for using the report with other software.
Norm
The Norm (normal) button cancels the zoomed view of the frequency chart. The
frequency chart for the whole report is displayed.
5–8
Page 57

Unselect
To show the report without any highlighting, click Unselect.
Searching for Motion
Fig. 45. Effect of Zoom button on selection of list items. Zooming makes a cluster of
items appear more spread-out, and facilitates a finer selection.
Items that are out-of-order in the list
Setting the clock on the Multi-Media unit back in time can produce such results. The
items are still in order, even if the time index contradicts the list.
5.4 Video from Motion Search
!!!!59 To view video of results in the Motion Search session
In the motion search report, do one of the following:
• double-click a list item. The video excerpt plays in the Working Frame of the
Search for Motion window. See figure 46.
• click Video. Video from the first item in the motion report plays in the Working
Frame of the Search for Motion window.
• select one or many items, then click Video. Video plays, starting at the time of
the first of the selected items.
Video is shown using the camera that detected the motion.
Video keeps playing until you stop it or until the Motion Search session is closed.
5–9
Page 58

View: Operator Guide
Fig. 46. Detection options toolbar: Sensitivity and Interval.
You can control the playback using the playback toolbar, much as you would in a
Retrieval session. See figure 47, in the next section.
5.4.1 Video Controls for Motion
Replay video: seeing a video excerpt again
The Replay button restarts an excerpt of video.
Step / next frame
Click repeatedly, as needed, to view video frame-by-frame. Useful if the pause
button is clicked just a moment too soon. While video is playing, clicking Step / Next
Frame pauses the video. Click again to see the next frame of video.
5–10
Fig. 47. Buttons on the video toolbar of a Motion Search session.
Page 59

Searching for Motion
Fast-forward to next event
The fast-forward button speeds up video, then slows down video to 1x speed (auto1x), four seconds before the video shows the detected motion. The slowing of video is a
cue that motion is about to be displayed. After you have witnessed the motion, you have
the option of leaving the video at 1x speed or of clicking the fast-forward button again,
speeding up video leading to the next instance of motion. This behavior can be defeated;
see procedure !61.
!!!!60 To optimize watching video from motion report
1. After obtaining a motion search report, double-click a list item or a bar in the
frequency chart. The video excerpt plays in the working frame.
2. Click
of pre-detection video, then slows to normal speed (1x) a few seconds before
motion is detected, and remains at normal speed. You have the option of
clicking the pause button as needed.
3. To view the next instance of motion, click
!!!!61 To use fast-forward without any slowing
• Set the slider for playback speed to its rightmost setting (“Fast”). See figure 48.
Fig. 48. Fast-forward options
Viewing video of events just prior to detection of motion
You can adjust the amount of video seen before motion was detected, using the
Mins. Pre. (minutes of viewing, prior to detection) box. See figures 49 and 47.
on the Motion Search toolbar. Video speeds up through the minutes
as needed.
Fig. 49. Setting the minutes of pre-detection viewing
By default, the preview is set to two minutes. You may not need to adjust the amount of
time spent on pre-detection viewing, due to the enhanced
!!!!62 To change the amount of pre-detection viewing
1. After obtaining a motion search report, click in the Mins. Pre. box.
2. Adjust the value by: typing a value, or by clicking the arrows at the right-hand
side of the box.
fast-forward button.
5–11
Page 60

View: Operator Guide
5.5 Opting for a Retrieval Session
Video from many cameras
To view video from many cameras, at the time that the motion was detected, a Retrieval
session can be started from a Motion Search session.
!!!!63 To view video in a Retrieval session
1. Select one or many items in the Motion Search report.
2. Click Retrieval. A Retrieval session starts, starting at the time indicating that
motion was detected, using all cameras. A box is added, showing that a Motion
event is being shown. When many items are selected, they are listed in that
Retrieval session’s item box. See figure 50.
Fig. 50. An item box appears along with a Retrieval session when an operator starts
Retrieval from a Motion Search session.
Returning to the motion search report
The Motion Search report is still available, if you need video reported at other times.
!!!!64 To return to a Motion Search from a Retrieval session
1. Either:
• Minimize the Retrieval session to make the motion Search session visible.
• Drag the Retrieval session aside. If the tear-away player is maximized, “restore
down” the Retrieval session before dragging it aside.
• Close the Retrieval session.
2. In the Search for Motion… window, either:
• double-click a list item. The video excerpt plays in the working frame of the
Search for Motion window. See figure 46.
• select one or many items, then click Retrieval. A Retrieval session starts, using
all cameras and starting at the time of the first of the selected items.
5–12
Page 61

5.6 False Positive Reports
Motion search can be triggered by changes in lighting or movement outside of an area
of interest.
5.6.1 Flashing Lights
A Source of false positives
A computer monitor can also be a source of false positives. To unmask it or a flashing
light from a search for motion, see figure 51.
!!!!65 To mask out a flashing monitor
Searching for Motion
1. After preparing a motion search (see 5.2, Preparation), click
Hide mask button.
2. Click on areas of the image where there are computer monitors, television sets
or other sources of flashing light that need to be excluded from a search for
motion. As you click, blocks appear. See figure 51, image 2.
3. Show the masking commands, by placing the mouse pointer on the large video
image and right-clicking.
4. Click Invert Mask. See figure 51, image 3.
, the Show /
Fig. 51. Masking sources of false positive reports. Here, the flashing of a PC monitor is
masked, followed by the Invert Mask command.
Procedure !!!!56, on p. 5–6 also explains how to exclude an area.
5–13
Page 62

View: Operator Guide
5.6.2 Smaller Detection Masks
The easiest solution for false reports of motion is to use smaller masks to search for
motion. For example: to search for the opening of a door, when many people walk by
that door, set the motion search mask on the top corner of the door. See figure 52.
Fig. 52. A small detection mask. Dotted line shows lower bound of the mask.
Motion masks behave differently when used to trigger alarms. Read about motion
detection in the Admin User Guide.
5–14
Fig. 53. Masking the entrance/exit to a parking lot. You can search for arrival and
departure times by using masks at entry points to an area, and/or at the boundaries of
an image. Use of a mask excludes unmasked areas from being searched for movement.
Page 63

5.6.3 Using Highlighting
Motion Highlighting. Enables/disables the highlighting of motion. If you are
getting more reports of movement than you expect (false positives), click the Motion
Highlighting button, while running a video feed. This lets you “see motion” as it is
detected by a Multi-Media unit: when enabled, moving objects produce colored pixels.
The color indicates if Multi will report the movement or not. For the location of the button,
see figure 47.
• red or green. Indicate motion at or above the detection threshold.
• blue. Indicates motion that is below the threshold of Sensitivity or detected
before the time set in Interval has elapsed. This movement is not reported. If
you need it to be reported, adjust the time of Interval and/or the Sensitivity.
See procedures !66 and !67.
!!!!66 To turn motion highlighting on or off
1. After preparing a motion search (see 5.2, Preparation) and obtaining search
results (5.3, Search Report), view video of a result.
Searching for Motion
2. Click
Changing how a Multi-Media unit sees motion
Sensitivity. Moving the slider right of center shows movements more as red or green;
less as blue. Setting the slider further left makes movements shown more as blue, then
not at all.
!!!!67 To adjust for false positives or false negatives
1. Using the information reported by motion highlighting, make a mental note if
too much or too little movement is being detected.
2. Click Redefine. The button is renamed to “Search”.
3. Adjust the Sensitivity slider. Set it towards the right if too little movement was
being detected; set it to the left if too much movement is detected.
4. Lengthen or shorten the time of Interval.
5. Click Search. You have the option of clicking Stop and redefining further.
, the Motion Highlight button.
5.6.4 More Solutions
Camera position. For false positives that occur at the edge of camera windows,
consider repositioning a camera. Placing a camera on the ceiling gives an odd view but
may mask flickering naturally. Movement from cars on a roadway, outside the area of
interest, can also be remedied by repositioning a camera.
Report customization. Customize the range of magnitudes reported, as explained in
5.3.1, Report Options.
5–15
Page 64

View: Operator Guide
5.7 Saving & Reusing Search Data
You can save the:
• date and time for a motion search and its motion detection options for reuse.
- and/or -
• lists of movement found in the video or edited lists, for further use with word
processing software or spreadsheets.
5.7.1 Repeating a Motion Search
!!!!68 To save the date, time, mask, motion options
1. You have the option of saving all preparation settings by clicking Save Cfg
(“save the configuration settings”). A dialog appears for saving the information
as a computer file.
2. Type a filename and select a folder, as needed.
3. Click OK. The information is saved in a file that has a .rmc extension.
!!!!69 To reuse a date and time for a motion search
1. In a Motion Search session, click the arrow in the Stream box to display a list of
the site’s cameras. You can see the arrow in figure 38 on p. 5–2.
2. Select a camera from the Stream list.
3. Click Load Cfg (“load the configuration settings”). A dialog appears for
selecting a computer file.
4. Select a file with a .rmc extension, and folder as needed.
5. Click OK.
6. Click Fetch, and then click Search.
Reusing settings on the same video generates the same motion detection report.
For a different report, change the motion options, the date and time or both.
5.7.2 Using a Report
A motion search report can be saved as a text file, then opened using a word processor,
for further enhancement.
!!!!70 To Save a motion Report as a text file
1. After obtaining a motion search report, click Save. A dialog appears for saving
the information as a computer file.
2. Type a filename and select a folder, as needed.
3. Click OK.
You have the option of filtering the magnitudes and/or trimming the report before
saving it as a text file. Only the items in the list are saved.
5–16
Page 65

6 Alarms and Events
6.1 About Alarms
Flexibility
A Multi system administrator (Multi SA) can set a Multi-Media unit to:
• log events and/or have them trigger an alarm. No special hardware is needed
for such alarms: they ring on an operator’s PC. By default, some events are
always logged, for administrative purposes.
• send alarms to a designated PC. Such a PC is then known as a Multi-Media
alarm station. See 6.10: Alarm Station, starting on p. 6–20.
Fig. 54. A Multi SA can set a unit to send alarms to a specific PC.
Alarm notification
When an alarm reaches a View operator’s PC, the alarm bell icon in View appears to
vibrate and the PC produces a beeping sound (figure 55).
Fig. 55. The alarm bell icon in View software
To stop the ringing of an alarm, click the alarm bell icon, shown in figure 55
Alarms are not acknowledged; only the ringing stops. Ringing resumes if session is
reopened.
6–1
Page 66

View: Operator Guide
Viewing video from the time of the alarm
A View operator has the option of customizing if and how video from the time and site of
the alarm is received. Video can be seen:
• immediately. Live video from the site where the alarm was sent is seen full-
• on request. See 6.3: Alarm Session. Video from multiple alarms can be
Event processing
screen. See 6.2: Live-alarmed Session. Alarms are then acknowledged and
rearmed as needed.
managed, with video retrieved as needed.
Fig. 56. Once set to “alarm”, an event can trigger an alarm in View. The alarm’s
information is stored in the Multi central database after the alarm is acknowledged.
6.1.1 Customizing Alarms
Flexibility
Options for customizing alarms can be changed as needed.
!!!!71 To customize alarm options in View
1. Display the Alarm Handling Options, by using the main View menu to click
Options and then Alarm Handling…
2. Select options as needed. Click OK. See figure 57.
Fig. 57. Multi options for video delivery options during an alarm
6–2
Page 67

Alarms and Events
Options
Run live alarm session on alarm. Running a live session while an alarm is pending
causes live video of all cameras at a site to be displayed full screen. Receiving an alarm
during an alarm session does not open a Live-alarmed session. See 6.2: Live-alarmed
Session.
Beep on alarms. Makes the operator’s PC produce and repeat a short, pitched,
electronic tone when a Multi-Media unit reports an alarm. An operator can use this
feature even if the PC does not have speakers or a sound card. The large alarm bell icon
still vibrates when Beep… is disabled.
Launch retrieval on selection from alarm list. During alive-alarmed session, it may be
more interesting for the operator to retrieve video from the time of the event, than to view
live video from the site. The option enables you to start a retrieval session from the time
of the alarm, by selecting an alarm from the alarm list in the live alarmed session. See
figure 58. The option can be disabled by removing the checkmark.
Automatically acknowledge (ACK) alarms. During a live-alarmed session, makes
the small alarm bell button acknowledge all alarms from that site. See figure 58. The
small alarm bell button is not the large alarm bell icon, illustrated in figure 55; clicking the
large icon only stops the beeping.
Fig. 58. Live Alarmed toolbar detail. For context, see figure 59.
Automatic record for live alarm. Recording a clip starts immediately when an alarm is
received at the operator’s PC. Preparation.
Accept Alarm Callbacks. Setting for PCs designated as Multi-Media alarm stations.
Set Limit of callbacks to n. The “n” is a number from 1 to 16; the maximum number of
units from which callbacks are accepted before more are turned away to callback other
alarm stations.
Something to watch out for…
Alarms can be scheduled not to trigger at certain times or days. See 12.2: Alarm
Schedule, on p. 12–5.
6–3
Page 68

View: Operator Guide
6.1.2 Alarm Rights for Operators
!!!!72 To receive and process alarms
A View operator needs the Multi SA to:
1. Add the Process alarms right to a View-operator account.
- and to -
2. Grant access to sites set to send alarms.
Time limit for operating sites: suspended while processing alarms
Operator accounts restricted by a time limit for operating Multi-Media units do not show
a countdown when processing alarms: the time limit is cancelled while processing
alarms. Alarms usually mean some type of emergency is occurring, which may require
more time to be dealt with.
Setting an alarm
Setting an alarm requires additional user-account rights. See 6.7: Setting an Alarm.
6.2 Live-alarmed Session
When an alarm is triggered...
If an operator is connected to the Multi site sending the alarm, a “Live Alarmed” session
takes up the entire PC screen (The Live Alarmed window is maximized) and all cameras
at the site are displayed.
For systems with many Multi-Media units
During a full screen LIVE alarm session, the name of the site is in the window’s title bar.
When alarms are received from two or more sites, Multi is designed so that they be dealt
with site-by-site, to avoid confusion.
!!!!73 To retrieve video recorded at the time of an alarm
1. Select the “Launch a retrieval on selection from alarm list” option as
explained in 6.1.1: Customizing Alarms. This makes a checkmark appear next to
the list of alarms, under the live-alarmed toolbar. See fig. 58.
2. Click the arrow to view the list of alarms. Note: there can be one or more
alarms.
3. Start a retrieval session by selecting an alarm from the list. The retrieval session
starts in a new tear-away player.
6–4
Page 69

Alarms and Events
Fig. 59. Location of toolbar in a full-screen Live Alarmed session. This Multi-Media site is
using only four of a possible sixteen cameras.
6.2.1 Clip of Alarm Video
A clip of all live cameras can be made manually or automatically.
Preparation
• Automatic. Select Automatic record for live alarm box, as explained in 6.1.1:
Customizing Alarms. During a Live-alarmed session, the clip starts recording
without prompting, in the background.
• Manual. Remove the checkmark in the Automatic record for live alarm box,
as explained in 6.1.1: Customizing Alarms. During a Live Alarmed session, click
on the Playback toolbar. The color of the button changes to red, indicating
that video feeds are being recorded.
6–5
Page 70

View: Operator Guide
!!!!74 To stop making a clip during an alarmed-live session
1. To stop recording, do one of the following:
• click
• close the live alarmed session.
2. Either:
• save the clip. Type a name for the clip in the Save dialog that appears and
click OK.
• discard the clip. Click Cancel.
,
the recording-a-clip button
6.3 Alarm Session
Depending on your selection of alarm handling options, a live alarm session may be
disabled. You can use an alarm session to see the list of alarms and/or acknowledged
alarms at a site.
6.3.1 The Alarm Session Window
You can run an alarm session even if no alarms are set or ringing.
!!!!75 To run an alarm session
1. Using View, select a site on the Sites list.
2. Do one of the following:
• Select the site; then click
• Right-click on the site name; click Alarm on the shortcut menu.
- or -
• Select the site; then click Alarms on the Actions menu.
3. If many connections to the unit are available, a Connections dialog appears.
Choose the network or dial-up connection that your Multi SA recommends you
use and click OK. An alarm window is displayed in the session pane. See figure
60.
A Connections dialog does not appear if there is only one connection.
on the toolbar.
6–6
Page 71

6.3.2 Acknowledging an Alarm
Why acknowledge (ACK) before REARM?
When operators ACK alarms, the alarms remain listed, for operator reference. Alarms
cannot be triggered again if not rearmed. This can be simpler than turning alarms off, for
example: during construction work or other temporary onsite situations. See your
security officer about alarm handling and alarm suspension.
!!!!76 To acknowledge an alarm in an alarm session
1. Start an alarm session, or switch to one. If you are not sure how to do so, see
6.3: Alarm Session, above.
2. Select an alarm. A red, octagonal, status icon (
alarms. See figure 60.
3. To acknowledge the alarm, click ACK (acknowledge). Its icon changes from
red to blue, and takes its chronological place in the acknowledged part of the
list. If other alarms remain unacknowledged, an alarm may keep ringing.
Alarms and Events
) identifies unacknowledged
Clicking ACK ALL acknowledges all of the alarms at once.
The alarms are sorted chronologically.
Fig. 60. Alarm session components. A red square around a site’s connection icon
indicates that a site is sending alarms.
6–7
Page 72

View: Operator Guide
!!!!77 To acknowledge all alarms in a live-alarmed session
1. Set your copy of View to “Automatically acknowledge alarms”, as explained
2. In a live-alarmed window click the small
in 6.1.1: Customizing Alarms.
on the toolbar. An “(A)” appears
next to alarms in the alarm list.
If Automatically Acknowledge Alarms is not enabled
the button only stops the alarm bell.
If disconnected...
If you end the alarm session before acknowledging the alarm, or are disconnected from
the site, the alarm is kept active, and is again reported when you run the next alarm
session.
6.4 Rearming Alarms
Alarms on a Multi-Media unit can be rearmed with or without acknowledgment. Once
rearmed, if the event occurs again, a fresh alarm can sound at the Multi operator’s
station.
!!!!78 To rearm an alarm in a live-alarmed session
1. Select an alarm; the alarm can be active or acknowledged.
2. Right-click the alarm list. A menu is displayed.
3. Click Rearm.
!!!!79 To rearm an alarm in an alarm session
1. Start or switch to an alarm session.
2. Select an alarm. A red, octagonal, status icon (
alarms; a blue icon, acknowledged alarms.
3. Click REARM ALL.
) identifies unacknowledged
Clicking REARM ALL resets all alarms, acknowledged or not.
6.5 Video from Site of Event: Options
Run a Retrieval session
Video from the time of the event that triggered the alarm, can be displayed. See
procedure !80.
Go live
You can elect to obtain live video from the site, instead of recorded video. This can be
especially effective when an event is still in progress. See procedure !81.
Make a clip
A clip of recorded video from the time of an alarm can be produced as explained in 7.1:
Making and Saving a Clip, on p. 7–1.
6–8
Page 73

Alarms and Events
!!!!80 To view recorded video from the time of an alarm
1. While running an alarm session, select an alarm from the session’s tear-away
player, as explained in 6.3: Alarm Session.
2. To start a Retrieval session from the time of the alarm, click Video. When a site
has many cameras, you are asked to select one or more. See figure 60 and 61.
3. To watch video obtained before or after the time of the alarm, use the jump-to-
time slider as needed. For other controls, see 3.2: Controlling Playback, on p.
3–3.
4. To display the Alarm session, click “Alarms”, below the name of the site on the
Site action tab.
Fig. 61. Retrieval session started from an Alarm session. An alarm is selected, then
Video is clicked. The Retrieval session has been dragged down, revealing the Alarm
session in the background. For the location of Video button in an Alarm session, see
figure 60.
!!!!81 To view live video after receiving an alarm
• Start a live session at the site of the alarm; how to do so is shown in section
2.1.1: Starting a Live Session, on p. 2–1.
- or -
• Enable Run Live Alarm... as explained in section Live-alarmed Session on p.
6–4.
6–9
Page 74

View: Operator Guide
Surveillance common sense
View operators may find that security video from outside world and customer-device
events is usually more informative than from other events. For example, viewing video
from the time of an alarm, caused by an intrusion detection sensor at your site, makes
good sense. Video from the time of a session start might/might not make as much sense
since the event did not happen at a Multi site. For a list of outside world, customer-
device and other events, see table 16 on p. 6–17.
6.5.1 Dealing with Multiple Alarms
!!!!82 To switch to video from one alarm to another
1. While running an alarm session, select more than one alarm from the session’s
tear-away player. To select specific alarms, use MS-Windows mouse and
keyboard techniques.
2. Click Video. When a site has many cameras, you are asked to select one or
more. A Retrieval session starts, displaying the date and time of the earliest
alarm that you selected at step 1.
3. To display a list of the other alarms selected at step 1, click the arrow at the
right of the item box; an item box can be seen in figure 61.
4. Select an alarm in the list that appears.
5. To display the Alarm session, click “Alarms”, below the name of the site on the
Site action tab.
6.6 Controlling an Onsite Device: Output
Flexibility
Like other Multi features, use of outputs to control onsite devices is optional. Ask your
Multi SA if such devices are connected to the Rapid Eye Multi-Media unit(s) in
your system.
Taking action, before, during or after an alarm
You can use outputs to remotely control onsite devices such as lights, sirens, or gates.
Before you can use outputs ...
To use the outputs, View operators need specific rights in their user account. Your Multi
SA has to:
• add the Use outputs and Live video rights to the user account. This enables a
View operator to run a live session and click the output buttons.
• grant access to the site(s) assigned to the operator by supervisor.
6–10
!!!!83 To use an output
• The outputs are displayed during a Live session. Click the output that matches
the device. Your Multi SA can inform you as to which output matches which
device.
Page 75

Terminology note
Outputs can also be referred to as general-purpose outputs (GPOs), in some technical
documentation.
6.6.1 Peephole Application
One application for outputs is to remotely unlock a door after visual inspection of a
doorway.
Preparations
Installation personnel wire two devices to a Multi-Media unit:
• the locking mechanism of a security door (or gate)
• a doorbell.
The Multi SA sets the Multi-Media unit’s input connected to the doorbell, to trigger an
alarm and sets up the sites Multi-Media unit to call an alarm station. The Run live alarm
session on alarm option can be disabled, to taste.
!!!!84 To control access at a site (in this doorbell example)
1. At a Multi site that is setup as described at the beginning of this section (on
p. 6–11), run an alarm session when an alarm rings. For the procedure, see 6.3:
Alarm Session.
2. If the alarm is from the input connected to the doorbell, acknowledge it. For the
procedure, see 6.3.
3. Start a Live video session to view the caller. Live video sessions are explained
starting in section 2: Live Video, on p. 2–1.
4. Use the output that matches the door. For the procedure, see 6.6: Controlling
an Onsite Device: Output.
5. Rearm the alarm. For those procedures, see the following sections.
Alarms and Events
6.7 Setting an Alarm
Process
A maintenance session is used to set an event to trigger an alarm, as illustrated in figure
62. If your Multi user account cannot run a maintenance session, your Multi system
administrator (Multi SA) can inform you about which alarms, if any, are set on your Multi
system.
Before you can set an alarm ...
Before you can start a maintenance session, your Multi SA has to:
• add the Modify configuration right to the user account. With this right, you can
start a maintenance session at a site and to set events to be ignored, trigger
alarms or to be logged; this right also enables a View operator to configure
cameras and to perform many other maintenance tasks. See your Multi SA for
more information on the other tasks.
• grant access to the site(s) assigned to operator(s) by their supervisors.
6–11
Page 76

View: Operator Guide
How can Multi events be processed?
Events are set during site-by-site maintenance sessions, to either:
• sound an alarm. View operators are warned when the event occurs. Operators
can use information about it, to search for video at the time of the event. See
figure 56.
• be logged. The event name and its time are logged on the remote video unit.
Logged events are not listed during an alarm session. See figure 76 on p. 10–1.
• do both. An event can sound an alarm and be logged.
• do nothing. This is the default setting for some events. Unless set to do
otherwise, these events are not logged, nor do they set off alarms. See table 15
on p. 6–16.
6.7.1 Maintenance Session
!!!!85 To start a maintenance session
A maintenance session only affects the site that is selected.
1. Do either one of the following:
• select a site, then click
• right-click a site and selecting Maintenance in the shortcut menu
2. If a Connections dialog appears, choose the connection recommended by your
Multi SA and click OK. The maintenance tabs are displayed.
Wait for the “System Operational” message in the Feedback box. See figure 62 on
p. 6–13.
!!!!86 To end a maintenance session
Do any one of the following:
• click
• click Disconnect on the Actions menu
• close the Maintenance window
on the toolbar.
6–12
• close View.
Using Apply and Restore
Apply/Reset button. Used after changes are made to Events and Data recording. The
Apply/Reset button remains active, when you click another tab to which no changes
have been made.
Restore button. Works like an “undo”: the settings at the start of the maintenance
session are re-applied. Quitting the maintenance session ends the possibility of restoring
previous settings at that site. For example, suppose that you make changes on a tab,
click Apply, click another tab and click Apply a second time; clicking Restore brings the
Page 77

Multi-Media unit back to the state that it was in, before the two “applies”. For an
illustration of these buttons in the Maintenance window, see figure 62 on p.6–13.
6.7.2 Events
!!!!87 To set an alarm on the events tab
1. Continue or start a maintenance session. To start a session, see 6.7.1:
Maintenance Session.
2. Click the Events tab. Select a sub-tab, as needed. The sub-tabs on the Events
tab list Session events, System events, and so on—each with its own Log
check box and Alarm check box.
3. Add a checkmark to the Alarm check box next to the event that you want to set
as an alarm.
4. Repeat steps 3 and 4 for other events, as needed.
5. Click Apply. From now on, should these events occur, an alarm is triggered in
View.
6. You have the option of ending the maintenance session.
Alarm doubling
Alarms and Events
When a Multi-Media unit has been setup to call back an alarm station, and you happen
to be running an alarm session at the alarm station, an event at the site triggers a call
and an alarm.
Fig. 62. Using maintenance to set events to report an alarm.
6–13
Page 78

View: Operator Guide
6.7.3 Customer Device
Selecting a customer device
Your Multi SA configures your Multi system to deal with customer devices. For example,
a retail store wants to obtain video of employees at a point of sale (POS), when goods
are purchased. Figure 63 shows what the Data Recording tab might look like.
!!!!88 To set an alarm for a customer device
1. Continue or start a maintenance session. See 6.7.1: Maintenance Session.
2. Click the Data Recording tab. Customer devices are listed in the Devices box.
See the example in figure 63.
3. Select a device. Its events are listed in the Events box. Events are set by your
Multi SA. There could be no events for a device. The example in figure 63
shows events.
4. Select one event.
5. Add a checkmark to the Alarm box, the Log box, both or none.
6. Click Update.
7. For other customer device events, repeat steps 3 to 6, as needed.
8. Click Apply/Reset. From now on, should these events occur, an alarm is
triggered in View.
Fig. 63 . Events for a customer device are listed in a maintenance session. You can use
these events to trigger an alarm, be logged, or both. Here, events from a cash register
“device” are listed.
6–14
Page 79

6.8 Multi-Media Event Reference
Flexibility
Your Multi SA, security personnel or View operators decide which events should trigger
alarms.
Sources of events
• outside world. Events triggered by sensors connected to a unit or by Rapid
Eye’s motion detection.
• customer-device. Messages from a cash register, card swipe and so on, that
can be sent to a Multi-Media unit.
• Multi-Media unit. For notification a Multi SA of events at the unit. Extended
power outages that stop a unit can also be monitored by connecting a MultiMedia unit to an alarm panel. See 6.11: Fault Relay, on p. 6–21.
• View operator. An administrator can trace events caused by View operators,
such as use of a site, and so on. Notification of such events usually matters
more than video.
Alarms and Events
Fig. 64. Alarms can be triggered by different sources.
By default, events are not set to trigger alarms. Setting events to trigger alarms is
an option; alternatively, events can be set to be only silently logged for
administrative purposes, and some to do nothing. See also 6.7: Setting an Alarm,
on p. 6–11.
6–15
Page 80

View: Operator Guide
Table 15
Event default settings for log and alarm
source event log alar
m
View operator Session: connect, reject and
disconnect
Multi-Media unit System: run-time failure, self-restart,
outside world Inputs: activate, deactivate
customer-device user defined: Not on Event tab; on
* Control Output 6 is unavailable as an event when Fault Relay is enabled. The Control
Outputs on a Multi-Media LT unit remain available when its Fault Relay is enabled.
Maintenance: configuration, security,
system files, synchronize time, clear
storage, clear stream
Outputs: activate, deactivate*
reboot, no video recording, time
server unusable, no synchronization
in 24 hours, excessive system clock
drift, SMART disk failure
Video: signal unlock, signal unlock
Motion: Not on Event tab; on the
Video tab.
the Serial Devices tab.
nil nil
“ “
“ “
log by default “
nil “
“ “
“ “
“ “
6–16
Page 81

Table 16
Event reference, by source and tab.
Alarms and Events
Source Event in maintenance,
except where noted
outside
System: no video recording* a cut cable, dead camera, power
world
Inputs: activate, input ports 1
to 16
Inputs: deactivate, input
ports 1 to 16
Video: signal unlock,
cameras 1 to 16
Video: lock
†
, cameras 1 to 16 a buggy camera; time since video
Motion: Not on Event tab; on
the Video tab.
customerdevice
View
operator
user defined: Not on Event
tab; on Serial Devices tab.
Session: connect, reject and
disconnect
Maintenance: changes to
configuration, security, time,
storage and so on…
‡
Outputs: activate, output
ports 1 to 8
Outputs: deactivate, output
ports 1 to 8
Cause: an alarm or log entry
could indicate …
outage
security sensor has been triggered or
the Multi-Media unit is booting
security sensor has been reset or the
unit is booting
cut cable, hardware failure in a Rapid
Eye Multi Multi-Media unit, faulty
camera… Can be momentary.
unlock helps troubleshooting
intruder, a change in lighting, fire, an
explosion, vermin, and so on.
transaction made using hardware at a
customer’s facility
use/misuse of View to connect to or
disconnect from a site. Session
rejections can also be watched
use/misuse of maintenance by an
operator or Multi SA; for example to
monitor Clear storage or Synchronize
time by operator of View
use/misuse of an onsite device by a
View operator ex.: locking a gate at a
site, by remote control
use/misuse of an onsite device by a
View operator
ex.: unlocking a gate at a site, by
remote control
System: no video recording* camera disabled by View operator
System: reboot use/misuse of Reboot command by
operator
Multi-Media
unit
System: failure, self-restart,
†
reboot
power failure or catastrophic failure of
unit
System: No video recording* failure of unit’s video hardware
System: time server,
no synch, clock drift…
failure of network or network’s time
server
System: disk failure warning of imminent failure of storage
* Some events are repeated in the table: their source can vary. For example: an alarm
triggered by an “outside world” events can also be triggered by rebooting a unit.
†
A Multi SA can set a Video lock event to be only logged rather than trigger an alarm.
‡
Some configuration settings can be changed onsite, using LocalView. These changes
are not logged nor do they trigger an alarm when the configuration event is set tot do so.
6–17
Page 82

View: Operator Guide
6.8.1 Testing Alarms
It is a good idea to test the alarms that you set. Find out if you are better served with a
Live-alarmed response from View. To set alarm options, see 6.1.1: Customizing Alarms,
on p. 6–2.
6.8.2 Logging Events Silently
“Logged” events that do not produce an alarm are stored in the Rapid Eye Multi-Media
unit, onsite. Logged events are not listed in the alarm log; to find them, see
10.2: Searching for Event Records, on p. 10–1.
!!!!89 To log an event
1. While running a maintenance session, depending on the type of event that you
want to set, either:
• Click the Events tab. There are sub-tabs on the Events tab—for Session events,
System events, and so on. Select a sub-tab, as needed. See figure 62, on p.6–
13. Add a checkmark to the Log box next to the event that you want to log.
- or -
• Click the Serial Devices tab. Select a device and one of its events. Then click
the Log box. The example in figure 63 shows a cash register Device and its
Events.
For customer data events, click Update each time.
2. Repeat steps 1 and 2 for other events, as needed.
3. Click Apply/Reset.
4. You have the option of ending the maintenance session.
6.9 Reading the Alarm Log
The Alarm Log displays all alarms at all sites, whether acknowledged, rearmed or new.
Fig. 65. Alarm Log Search. The date uses a format from the Regional Settings of your
Windows Control Panel.
6–18
Page 83

Alarms and Events
!!!!90 To display the alarm log
1. Using View, click the Log action tab. The buttons on the View toolbar may change.
2. Leave or select another “earliest date and time” in the Show Alarms from
boxes. See figure 65.
3. Leave or select another “latest date and time” in the Show Alarms up to boxes.
4. Click Display Alarm Log or
pane.
!!!!91 To input different times and dates
Click on the part of the time or date that you want to change. Then:
• press the cursor keys, → ←, move the cursor to another field, and the ↑ ↓ keys
increase/decrease a value.
- or -
• type a value, as needed.
You can display a calendar utility by clicking the arrow next to the date box.
!!!!92 To set the date using the calendar utility
1. Click the arrow next to the date box.
2. Click a date in the calendar. To go to another month, click the arrow keys next
to the month/year heading in the utility.
You cannot go beyond the limits of the log
Attempting to input or select dates or times beyond the limits of the log sets the input to
that limit.
!!!!93 To find out about the earliest/latest alarm in the log
. The alarm log appears in the session
• Click
in the toolbar.
6–19
Page 84

View: Operator Guide
6.9.1 Setting the Date for Correct Alarm Sorting
Multi-Media reports use true chronological lists of alarms only if care is taken to express
the date in numbers.
Make the date display as “yyyy-MM-dd” in Microsoft Windows.
!!!!94 To set the windows date
1. Using Microsoft Windows, click Start.
2. Click Control Panel on the Settings menu.
3. Double-click the Regional Settings icon. A Regional Settings Properties window
appears. For Win2000 users: the icon is labeled “Regional Options” in Win2000.
4. Click the Date tab.
5. In the Short Date Style box, type “yy-mm-dd”. What matters most is that one
uses a “year, month, day” sequence and that months are expressed in
numbers, not text. The double “m” and “d” ensure that single digits are padded
with zeroes. For example, June 7 is expressed as 06/07. For Win2000 users: the
box is labeled Short Data Format.
6. Click Apply.
7. Click OK.
6.10 Alarm Station
Alarm station definition
Although you can run many alarm sessions in sequence (a polling method), this may be
inconvenient on Multi systems that rely on dial-up connections. Your Multi SA can
configure a Rapid Eye Multi-Media unit to call a specific PC when an alarm is triggered
by an event. Such a PC is then a Multi Alarm Station.
6.10.1 Alarm: Station vs. Session
Sites are set to call/callback Multi alarm stations by a Multi SA. Critical sites should be
setup this way to ensure that alarms reach your alarm station, even when there is no
alarm session in progress. For example, callbacks can be most effective for managing:
• A large number of sites. It can be impractical to start, use and end alarm
sessions on many video units, especially via dial-up. Having a Multi SA set up a
callback frees you of polling the sites for alarms.
• 24/7 situations. Having a Multi SA set up a callback ensures notification of your
alarm station. Alarm sessions can be ended.
6–20
Page 85

Alarms and Events
Speed of alarm notification
After you have set events to “alarm”, and alarm hardware connected to the video unit is
triggered, notification of the event is either:
• immediate. Your Multi-Media units are networked to the alarm station or an
alarm session is in progress at the site where the alarm occurs. Note that units
using dial-up connections monopolize an operator’s modem: it is not possible
to run alarm sessions at many of these sites, at the same time. Until the alarm is
rearmed, more occurrences of the event are ignored. However, you can record
multiple occurrences of an event by silently logging them. See 6.8.2: Logging
Events Silently.
• within the minute. Your Multi Administrator has set the video unit to “call” an
alarm station, as soon as possible after an alarm. You are notified of the alarm
whether or not an alarm session is in progress at that site. Should the alarm
station be unavailable or busy, an attempt to call it back is made every minute
until a connection to View is established. When more than one alarm station is
assigned, they are polled in sequence.
- or -
• deferred. When a Multi-Media unit is not assigned to an alarm station, the unit
“holds” alarms until you start an alarm session for the site.
Alarm doubling
When a Multi-Media unit has been setup to call back an alarm station, and you happen
to be running an alarm session at the alarm station, an event at the site triggers a call
and an alarm.
6.11 Fault Relay
Your Multi SA has the option of enabling a FAULT RELAY on a Multi-Media unit.
!!!!95 To check if this pulse is enabled on a unit
• On the Events tab, click the Outputs subtab. The name of Output 6 shows
“System Status Pulse”; however, others may have changed the name, by
typing in the box.
6–21
Page 86

View: Operator Guide
Please continue.
6–22
Page 87

7 Clips and Stills
7.1 Making and Saving a Clip
Definition
A clip is a copy of video, audio or data. A clip is made during a live session or a retrieval
session. Clips are listed on the Clips action tab. See figure 66.
Purpose of clips
After using View to make clips, you can:
• view portions of video without having to connect to a site
• review clips at a later time
• copy clips to other computers. How to check folders for clips is explained in 7.2.
• view clips on computers not running Multi software, using Clip Player.
Fig. 66. The Clips action tab in View software.
7–1
Page 88

View: Operator Guide
7.1.1 Clip of Live Video
Clips made from live video hold all streams, unlike clips made from recorded video.
!!!!96 To make a clip from live video
1. From a site, start a live session; see 2.1.1: Starting a Live Session, p. 2–1.
2. Select the streams that you need to record. Only the video that is being shown is
recorded. You have the option of adding/removing streams while the clip is playing.
Only while their camera windows are open will their video be part of the clip.
3. Click
flashes, indicating that the video feed is being recorded.
4. When all the video you need is recorded, click
Live at [site name] : Save Recorded Clip to File.
5. You have the option of:
• changing the name of the clip, by typing another name; the default for naming
clips is explained in table 17, on p. 7–3.
• choosing another drive and/or folder to store the clip.
6. Click Save. The clip is stored as a *.rem file and the Save As dialog is closed.
7. You have the option of ending the live session; see 2.4 on p. 2–19.
on the Playback toolbar. The color of the button changes to red and
Honeywell recommends storing stills and clips in their own folder.
Clips and stills can be erased routinely after use, making it easy to erase other files by
mistake. Storing clips and stills in a folder other than View’s application folder (the
default folder for clips and stills) prevents the deletion of View system files.
7.1.2 Clip from Recorded Video
Clips made from recorded video only hold the streams that are used while making the
clip, unlike clips made from live video.
again. A dialog is displayed:
7–2
!!!!97 To make a clip from recorded video
1. From a site, start a retrieval session; for a reminder on how to do this, see 3.1.2:
Starting a Retrieval Session, p. 3–1.
2. Select the streams that you need to record. Only the video that is being shown
is recorded. You have the option of adding/removing streams while the clip is
playing. Only while their camera windows are open will their video be part of the
clip.
3. Control the playback of the video (see 4.3) to determine where a clip is to
begin. You have the option of clicking Pause.
4. Click
flashes while recorded video is being copied to a clip. You have the option of
clicking the Fast Forward button on the playback toolbar to reduce the time
spent making the clip.
Making a clip of recorded video at a faster speed does not affect playback.
on the Playback toolbar. The color of the button changes to red and
Page 89

Clips and Stills
5. When all the video you need is recorded, click again. A dialog is displayed:
Retrieval at [site name]: Save Recorded Clip to File.
6. As you would with any file, name the clip and choose a folder where the clip will
be stored. When you save the clip, it is stored as a *.rem file and the …Save…
dialog is closed.
7. You have the option of ending the session. See 3.4, on p. 3–8.
Honeywell recommends storing stills and clips in their own folder.
Clips and stills can be erased routinely after use, making it easy to erase other files by
mistake. Storing clips and stills in a folder other than View’s application folder (the
default folder for clips and stills) prevents the deletion of View system files.
7.1.3 Clip: Name Reference
Table 17 explains each part of a clip’s filename, using as an example:
402 Lalu Drive_LTZ_2002_12_04_13_31_14.REM . Note the “.REM” extension of the
file.
Table 17
Default format for Multi clip names
Example* Format element
402 Lalu Drive site name
LTZ time reference
2002 four digit year
12 two digit month
04 two digit day
13 two digit hour, 24 hour clock
51 two digit minute
14 two digit second
.rem Microsoft Windows file extension
REM File file “Type” in Microsoft Windows’ Explorer
* See the clip listed in figure 67.
You have the option of renaming clips.
See 7.1.1, above. Leaving the “.REM” file extension is recommended.
7.1.4 Automatic Clip of Alarms
You can set View to make a clip automatically during a “live alarmed” session. The
opportunity to save the clip (or discard it) is offered when the session is closed. See the
Automatic record for live alarm option in 6.1.1: Customizing Alarms, starting on p. 6–2.
7–3
Page 90

View: Operator Guide
7.1.5 Customizing Storage
Clips and stills are stored by default in the Multi application folder. To store them
elsewhere, use the next procedure (98) to create a folder.
!!!!98 To create a folder to store stills and/or clips
1. Using View, click the Clips action tab.
2. Click the Directory button.
3. Click the “create new folder” button,
4. Type the name of your choice for the stills and clip folder, such as: “Multi Clips
and Stills”.
5. Double click the icon of the folder that you have added.
6. Click Open. The folder that you have added and named will hold all clips and
stills made from then on.
.
7–4
Fig. 67. Changing the folder for Multi stills and clips to “Multi Clips and Stills”.
Honeywell recommends storing stills and clips in their own folder.
Clips and stills can be erased routinely after use, making it easy to erase other files by
mistake. Storing clips and stills in a folder other than View’s application folder (the
default folder for clips and stills) prevents the deletion of View system files.
!!!!99 To browse other folders for clips (*.REM files)
• Click [Directory] in the toolbar (or on the Actions menu).
!!!!100 To delete a clip
1. Click a clip on the Clips action tab.
2. Do one of the following:
• Click
- or -
• Right-click on the recorded name and select [Delete].
in the Toolbar.
Page 91

7.2 Viewing a Clip
Play options
Using View, you can play
• one clip at different speeds, as during a retrieval session.
• many clips at once, each in its own session. Use this to compare two scenes
or two subjects at different times.
- or -
• copies of the same clip. Use this to compare a clip with itself, to note minute
details of what is captured on video, or to compare two times within the same
clip.
Fig. 68. List of clips on the Clips action tab
Clips and Stills
!!!!101 To view a clip
1. Click the Clips action tab in the Multi View window.
2. To view the clip, do one of the following:
• Double-click its name on the Clips action tab.
• Click its name and click [Play] on the Toolbar.
- or -
• Right-click on its name in the Clips action tab and select [Play].
!!!!102 To view a clip in reverse
• For clips, Backwards and Rewind VCR-like buttons are added to the playback
toolbar. Click them as required.
7.2.1 Using MultiClip Player
The MultiClip Player utility can play back clips on personal computers that are not part of
the Rapid Eye / Multi system. It is available for free, from:
http://www.ademcovideo.com/products/DigitalVidStor/REMultiMedia.htm
!!!!103 To play *.rem files with the MultiClip Player program
1. Use standard Windows techniques to install REMClip.exe to a workstation.
2. Obtain a clip (*.rem file) from a Multi View user.
3. Associate *.rem files with MultiClipPlayer.exe, using standard Windows
techniques.
4. Open the clip.
There is no need for MultiClip Player on a PC running View software; MultiClip Player
cannot be installed on PCs running View software.
7–5
Page 92

View: Operator Guide
Double-clicking several *.rem files causes multiple MultiClip Player sessions to
be opened. To free up Windows resources, remember to close MultiClip Player
sessions when finished.
7.3 Coarse Editing
Comparing events: making a clip with a jump
While making a clip from recorded video: after clicking
have the option of using the Go to command
coarse editing is useful for comparing two events within the same clip.
7.3.1 Time Gap
Jumping into the future
Making a clip of two segments, say from 8:00 AM to 8:05 AM, on two consecutive days,
introduces a gap of 24 hours in the clip. On playback, the clip stops at the point where
the jump occurs, until the time of the next image. Rather than waiting 24 hours through
the gap, use procedure !104 to see the clip in a reasonable amount of time.
!!!!104 To avoid waiting for a clip to resume playing, when it contains a time gap
• When the video reaches the gap and appears paused, click Pause, then click
Play.
Jumping into the past
One way to avoid gaps is to jump back, rather than forward in time. For example: for a
clip of two segments, say from 8:00 AM to 8:05 AM, on two dates, start with the later
date. By doing so, the clip fools playback into believing there is no gap. Since the
second segment is in the past, it is played immediately.
on the Playback toolbar, you
to jump to a past or future time. This
7.3.2 Viewing Many Clips at Once
Another way to compare video is to play two or more clips.
!!!!105 To compare clips
1. View a clip (see 5.2).
2. Drag the tear-away player from the session pane; to do so, see figure 9 on p. 2–
3.
3. Repeat steps 1 and 2 as needed.
7–6
Page 93

!!!!106 To view copies of the same clip at once
To highlight a portion of a clip, you may want to view a copy of it slightly out of sequence
with the original.
1. Using Microsoft Windows’ Explorer, duplicate the *.rem file in its folder. To do
so, use Windows explorer to locate the file and to make a copy of it in the same
directory. By default, Windows makes a copy of filename and names it copy of
filename. Use standard Windows techniques to rename the copy of the file as
you see fit.
2. Play the original clip.
3. Drag the tear-away player from the session pane.
4. Play the copy of the clip. Each clip is in its own session, making it easy to pause
one of the clips at some point (for example, before a theft), and then to pause the
copy at some other point of interest, for the sake of comparison (for example,
after the theft).
7.4 Stills
Handouts for users and non-users of Rapid Eye Multi
Clips and Stills
You can distribute stills of video as computer files. They are known as “bitmaps” in View
software. These stills can be viewed and printed using any bitmap reading software,
such as: Corel Paint Studio, Adobe Photoshop, Microsoft Paintbrush, and others.
7.4.1 Producing Stills
!!!!107 To enable View to produce bitmaps
1. While running View, click Options on the View menu, then click New Players. The
Options for New Players dialog appears.
2. Click the Allow Bitmap Save from Video checkbox, so that it bears a
checkmark. See figure 69.
3. Click OK.
7–7
Page 94

View: Operator Guide
Fig. 69. Enabling production of still shots from video (i.e. bitmaps).
After enabling View to produce bitmaps, a stills button appears on the session toolbar
when you run live, retrieval or clip sessions. See figure 70.
Many bitmaps from one click
Stills are produced at a rhythm matching the camera frame rate. For example, setting
cameras to capture 10 frames of video per second each produces ten bitmap files
(*.BMP) per second, per open camera. The size of Multi-Media bitmap files varies with
resolution. See table 19. Stills can also be obtained while viewing a video clip; see 7.2:
Viewing a Clip, above.
Fig. 70. Button for stills— “Start Recording Bitmaps”—shown in a live session.
7–8
Honeywell recommends that when producing bitmaps for more than a few
seconds, the operator keep an eye on the PC’s hard disk; bitmap production can
quickly fill up a PC’s storage.
Page 95

!!!!108 To produce bitmaps of a camera feed
• While running a live, retrieval or clip session, click the stills button. The button
starts flashing.
!!!!109 To stop producing bitmaps of a camera feed
• While the stills button is flashing, click it.
7.4.2 Still: Name Reference
Clips and Stills
Fig. 71. Stills listed on the Clips action tab. Note the *.bmp files.
Microsoft Windows file explorer
The File Type for bitmaps is “Bitmap Image” in Windows. File names are a combination
of the site name, camera name and a number, each separated by an underscore.
For example, the file name of an image (saved as a still) could be:
Oddham Boardroom 219_Hallway_00000192.bmp .
You have the option of renaming stills.
Honeywell recommends leaving the file extension as “.bmp”.
The name’s parts are defined in table 18.
Table 18
Name format for Multi stills (bitmaps with *.bmp extensions)
Example Meaning
Oddham Boardroom 219 site name
Hallway Camera name
00000192 eight-digit, sequence number
.bmp extension
Bitmap Image
Microsoft Windows file Type
7–9
Page 96

View: Operator Guide
7.4.3 Still: Size Reference
The size of Multi-Media stills gets bigger with higher resolution. For the meaning of
resolution gauge readings and resolution settings, see 2.2: Resolution of Live Video,
starting on p. 2–8.
Table 19
Size of Multi-Media stills (bitmaps with *.bmp extensions) as a function of resolution
resolution (pixel×pixel) bitmap size (KB) gauge*
NTSC
PAL
704×480 991
640×480 901
640×240 451
320×240 226
legacy + crop 226
legacy 181
160×120 57
704×576 1,189
704×288 595
384×288 325
192×144 82
n/a
n/a
7–10
* Shown at time bitmap was made. The gauge does not appear in the bitmap.
Page 97

8.1 Overview
Flexibility of Multi audio
Like most of the Multi features, use of audio is optional. Audio can monitored and
recorded along with video or independently of it.
Your Multi system administrator (Multi SA) can inform you about which Multi sites have
audio in an operational state.
Hardware need
View operators need a sound card in their PC to hear sound from the Rapid Eye site, to
send sound to it and to have the audio toolbar shown in figure 2, appear in the session
pane.
8 Audio
Fig. 2. Audio toolbar. When the mouse pointer is placed on a button, “tool help”
appears to identify the channel.
A Multi-Media unit offers two channels of audio. Each channel of sound can be
monitored independently or together. For Multi-Media LT, see 8.5: Audio for Multi-
Media LT.
The audio toolbar (illustrated in figure 2) does not appear on a PC without a sound
card.
8.2 Live Audio
To listen to a Multi site
• Click the channel 1 Listen button on the audio toolbar,
the channel 2 Listen button or both. See figure 2.
Listening is metered at the bottom of the peak-talk-listen metering of each channel.
See figure 2. Many users running live sessions to the same Multi site can listen in
at once. All sound sources are mixed at a Multi operator’s station, regardless of the
number of sites being monitored at once.
8–1
Page 98

View: Operator Guide
Do not use audio on a dial-up connection with video.
Video can be corrupted due to bandwidth limitations. Live video can be combined with
audio only on a network connection.
To minimize background noise
• End audio monitoring of the Multi sites that do not need it.
Background noise can build-up as an operator monitors more sites all at once.
To talk to a Multi site
• Click the channel 1 Talk button on the audio toolbar, the channel 2 Talk
Talk is metered in the center of the peak-talk-listen metering of each channel. See figure 2.
An operator
can broadcast on either or both channels, and to as many sites at once as can be opened,
that have audio.
button or both.
Talk button availability
Use of Talk, is on a first-come-first-served basis. When two or more View operators start
live sessions at one Multi site, only the first to connect to the site will find the Talk button
available. The Talk button on other View operators’ PCs is unavailable until the first user
disconnects.
When two View operators start live sessions at different Multi sites, each can use the
Talk button, unless one is logged into the other’s site as well.
LocalView
At sites where LocalView is in use, one channel of audio can be reserved for onsite use.
View operators using these sites can use only the remaining channel of audio.
See also
video. See 2: Live Video, on p. 2–1
data. See 11.1: Live Data, on p. 11–1.
8.3 Recorded Audio
Recorded audio is available along with video when performing a retrieval session. Your
Multi system administrator (Multi SA) can inform you about which Multi sites are set to
record sound.
8–2
See also
video. See 3: Recorded Video, on p. 3–1
data. See 11: Customer Devices, on p. 11–1.
Page 99

Audio
In many situations, unwarranted recording of audio can be unlawful. Check with
local authorities if you are unsure.
8.4 Setting Up
Audio setup is performed during a maintenance session. Microphones, speakers, and so
on are needed for audio, both at the operator’s station and at the Multi-Media site. For
audio setup procedures, see the Multi-Media Unit Installation Instructions, K9696 and the
Admin User Guide, K5403.
8.5 Audio for Multi-Media LT
8.5.1 Broadcasting and Monitoring Audio
Audio from a Multi-Media LT unit offers a single channel of audio that can be used
during live sessions and retrieval sessions.
Do not use audio on a dial-up connection with video.
Video can be corrupted due to bandwidth limitations. Live video can be combined with
audio only on a network connection or from a LocalView station.
Audio toolbar
The audio toolbar for a Multi-Media LT unit shows one talk and one listen button. See
figure 3.
Fig. 3. Audio toolbar for a Multi-Media LT unit, when using View.
!!!!110 To interrupt an audio broadcast
• Use either the microphone’s ON/OFF switch or the Talk button. Do not use the
gain controls in Maintenance.
8–3
Page 100

View: Operator Guide
Testing recording
If audio recording is used, Honeywell recommends testing if the recorded audio meets
your needs. After recording a few typical audio interactions, run a retrieval session to
hear what was recorded. You may need to further adjust the gain controls for
microphones and the volume on your speaker systems. Testing while audio interference
occurs (alarm bells and so on) can reveal other needs.
Fig. 4. Audio tab detail. You have the option of recording audio.
In many situations, unwarranted recording of audio can be unlawful. Check with
local authorities if you are unsure.
Loud alarms can interfere with microphones or a speaker at times when they could
be needed most.
8.6 Eagle Audio
Eagle Audio is an optional audio interface; it is discussed in the Multi and Eagle Audio
Configuration Guide, part number K9203. Eagle Audio is not explained or described in
this document.
8–4
 Loading...