

Page 1

HONEYWELL COMPETENCY MANAGEMENT - IMMERSIVE COMPETENCY
RELEASE 200.1
User Guide
IMCDOC-X532-en-2001A
April 2020
Page 2

Page 3

Disclaimer
This document contains Honeywell proprietary information. Information contained herein is to be
used solely for the purpose submitted, and no part of this document or its contents shall be
reproduced, published, or disclosed to a third party without the express permission of Honeywell
International Sàrl.
While this information is presented in good faith and believed to be accurate, Honeywell disclaims
the implied warranties of merchantability and fitness for a purpose and makes no express
warranties except as may be stated in its written agreement with and for its customer.
In no event is Honeywell liable to anyone for any direct, special, or consequential damages. The
information and specifications in this document are subject to change without notice.
Copyright 2020 - Honeywell International Sàrl
- 3 -
Page 4

Contents 4
Chapter 1 - About This Guide 7
1.1 Intended Audience 7
1.2 Skills Required 8
1.3 Terms and Acronyms 8
Chapter 2 - What's New in Immersive Competency R200.1 10
Chapter 3 - Introduction 11
Chapter 4 - Administrator Tasks 12
4.1 Install Workflow 12
4.2 Upgrade Workflow 12
4.3 IC Management Console 13
4.4 Registration 15
4.5 License Management 18
4.5.1 Export Usage Data 19
4.5.2 Top-up Plan 20
4.5.3 License Expiry Notification 21
4.5.4 Renew License Plan 22
4.6 Create New Users 23
4.7 Role Configuration 24
4.7.1 Default Permissions 24
4.7.2 Editing Default Permission 25
Chapter 5 - Trainer/Trainee Tasks 28
5.1 IC Management Console Login 28
5.1.1 New User -Trainer or Trainee Task 28
5.2 Change Password 30
5.3 Forgot Password 31
Chapter 6 - Install ICApplication 34
6.1 Desktop 34
6.2 Mixed Reality Requirement 34
6.2.1 System Requirements 34
6.2.2 Enable Windows Mixed Reality Applications in the Enterprise 36
6.2.3 Set up Windows Mixed Reality 36
6.3 Microsoft HoloLens Configuration 37
- 4 -
Page 5

6.3.1 Microsoft HoloLens Prerequisite 37
6.3.2 Pre-Installation Tasks 37
6.3.3 Upgrade to Latest HoloLens Version 38
6.4 Downloading and Installing Honeywell Immersive
Competency SM Application 38
Chapter 7 - Safety Manager System 40
7.1 Launch the Honeywell Immersive Competency SM
Application 40
7.2 Navigate in the IC Application 42
7.3 Safety Manager Library Components 43
7.4 Familiarize with Safety Manager Components 44
7.5 List of Safety Manager Lessons 47
7.6 Learn Safety Manager through Standard Lessons 48
7.7 Requesting New Virtual Machine with Experion PKS or Safety
Manager 52
7.8 Requesting for VM with Experion PKS or Safety Manager 53
7.9 Export Training Modules from IC Management Console 57
7.10 Exporting Training Modules 57
7.11 Establishing Connection between Safety Manager and
Safety Builder 57
7.11.1 On Safety Builder system 57
7.11.2 On the IC SM Application 60
7.11.3 On the Safety Builder system 60
7.11.4 On the IC SM Application 60
7.12 Troubleshoot 61
7.12.1 Management Console 61
7.12.2 IC Client Application 61
Chapter 8 - Uninstall IC Client Application 63
Chapter 9 - Experion PKS System 65
9.1 Downloading and Installing IC Client Application 65
9.2 Use IC Client Application 66
9.2.1 Launch the IC Application for Experion PKS 66
9.2.2 Navigate in the IC Application 70
9.2.3 Library Components 71
9.2.4 Limitations 71
- 5 -
Page 6

9.2.5 Actions to Perform in C300 Cabinet 71
9.3 Learn Experion PKS Through Standard Lessons 72
9.3.1 List of Experion PKS Lessons 73
9.3.2 Export Training Modules from IC Management Console 74
9.3.3 Exporting Training Modules 74
9.3.4 Requesting New Virtual Machine with Experion PKS or Safety Manager 75
9.3.5 Requesting for VM with Experion PKS or Safety Manager 75
9.3.6 Establishing Connection between C300 and Control Builder 80
9.3.7 Import Control Strategies to Control Builder 81
9.3.8 Open Lesson 83
9.3.9 Lesson Status 100
9.4 Open Standard Hardware Setup 101
9.4.1 List of Standard Hardware Setup 102
9.4.2 Viewing Standard Hardware 103
9.5 Create New Hardware or Lesson for Experion PKS 103
9.5.1 Create New Hardware Setup 103
9.5.2 Create New Lesson 105
9.6 Export Hardware Modules or Lessons 107
9.6.1 Export Hardware setups 107
9.7 Import Hardware Setup or Lessons 108
9.7.1 Import Training Modules 109
9.8 Delete Hardware or Lessons 109
9.8.1 Delete Published Lesson 109
9.8.2 Delete Published Hardware Setups 110
9.9 Troubleshoot 110
9.9.1 Management Console 110
9.9.2 IC Client Application 110
9.10 Appendix: SIM C300 Icons 112
- 6 -
Page 7
CHAPTER
1
The purpose of this guide is to provide guidance for using the Immersive Competency R200.1
cloud solution for the first time also if you are upgrading from R101.1.
If you are using the Honeywell Immersive Competency for first time, then begin with Registration
and follow the order mentioned in the Install Workflow section. If you are upgrading from R101.1,
then begin with Top-up and follow the order mentioned in the Upgrade Workflow section.
ABOUT THIS GUIDE
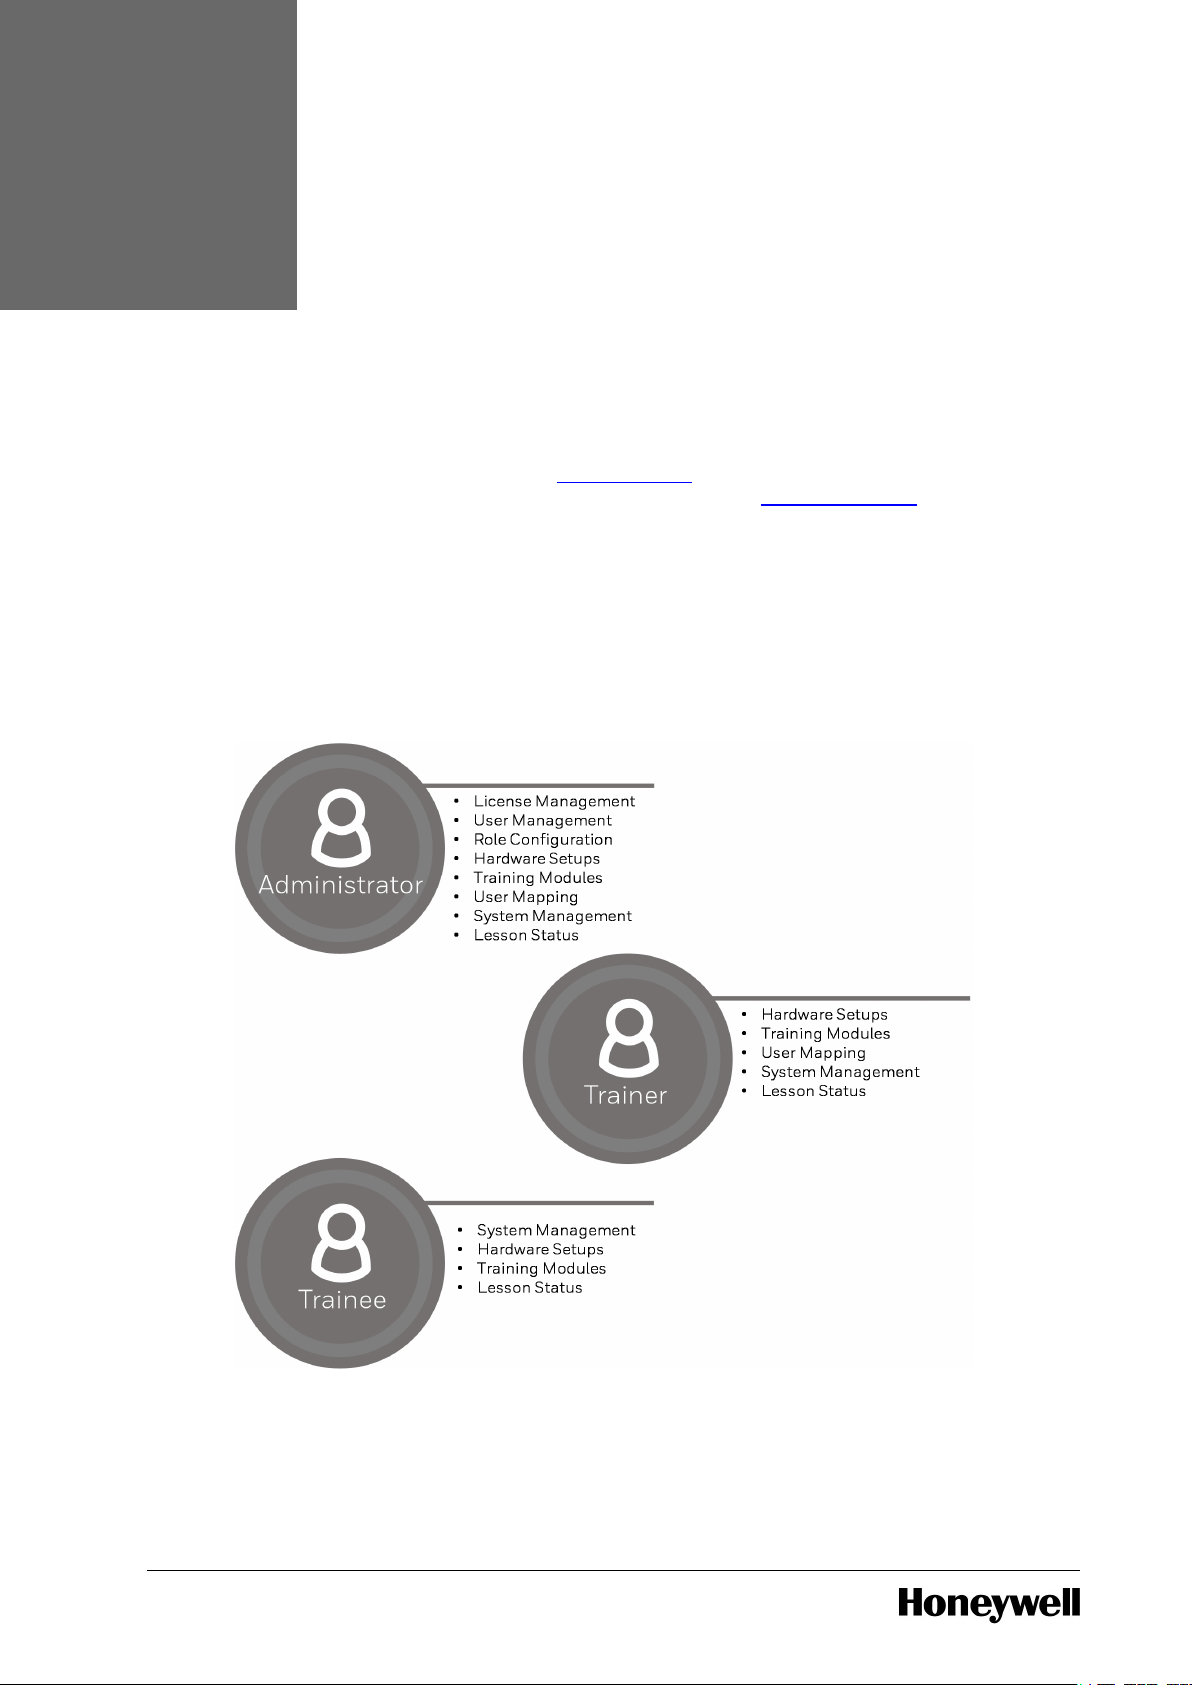
1.1 Intended Audience
This guide is intended for System Administrators responsible for company registration, users
management, and license management using the Honeywell Competency Management Immersive Competency Management Console, for Trainers who will create custom (New) lessons,
and for Trainers who will learn maintenance of control system using the Standard and Custom
Lessons and Hardware setups.
- 7 -
Page 8
Documents Purpose
C300 Controller User
Guide
Information to operate and troubleshoot of C300 Process Controllers
in an Experion system.
Fault Tolerant Ethernet
Overview and
Implementation Guide
Overview of Fault Tolerant Ethernet.
Control Building User
Guide
Overview of Control Builder, review, create and load control
strategies, and configure modules.
Series C I/O User's Guide Information to perform basic tasks with the Series C I/O such as
configuring hardware devices, continuous control strategies.
Safety Manager
Installation and Upgrade
Guide
Information about module and structure creation.
Safety Manager On-line
Modification Guide
describes the theory, steps and tasks related to upgrading Safety
Builder and embedded software and modifying an application online
in a redundant Safety Manager.
Safety Manager
Hardware Reference
Specifies the hardware components that build a Safety Manager
project.
Safety Manager Software
Reference
specifies the software functions that build a Safety Manager project
and contains guidelines on how to operate them.
Term Definition
IC Management Console The web-based console enables you to perform both
administrative and management tasks. Administrative tasks
such as procure the license, create users,
and
assign roles.
IC Client Application The Skills Insight-IC Client is an application that provides the
virtual platform to create the hardware infrastructure using the
standard 3D holograms. Hologram library consist of cabinets,
Series C - IOTA, C300, CF9, AI/AO, DI/DO, network cables, and
field devices. The IC Client enables you to learn how to create
the hardware infrastructure, inject faults, and view relevant
changes simulated in an Experion PKS. IC Client application can
be installed on either Microsoft HoloLens or Desktop.
Standard Hardware
Setups/Training
Modules/Lessons
Honeywell provides six Hardware setups and eighteen Training
Modules (Lessons) that can be used for training without any
modification.
Custom Hardware
Setups/Training
Additional Hardware setups and Training Modules (Lessons)
can be created to cater to custom requirement.
Chapter 1 - About This Guide
1.2 Skills Required
It is assumed you have some knowledge about Experion PKS control systems, Safety systems, and
experience of working in a Microsoft Windows environment.
The following list identifies few documents that may be sources of reference.
For more information about Experion control system, see Experion PKS System Documentation.
For more information about Safety system, see Safety Manager Documentation.
1.3 Terms and Acronyms
- 8 -
Page 9

Chapter 1 - About This Guide
Term Definition
Modules/Lessons
- 9 -
Page 10

CHAPTER
2
The following are features and enhancements available in Honeywell Immersive Competency
R200.1.
Immersive Competency Management Application:
A new application Honeywell Immersive Competency SM is introduced to provide a virtual
maintenance experience for the Safety Manager solution. The application is available for
download in the Microsoft Store. Honeywell Immersive Competency SM R200.1 is compatible with
Microsoft HoloLens, Mixed Reality Devices, and Desktop. This application can co-exist with
Experion PKS (Skills Insight Immersive Competency R101.1) application. However, you will be able
to actively use only one application at a time.
Honeywell Immersive Competency SM R200.1 contains the following salient features:
l Audio based virtual guide to learn and familiarize various components that is essentially
present in the Safety Manager cabinets.
l Thirteen lessons in assisted mode (Help Me mode) are available for learning the maintenance
activities.
WHAT'S NEW IN IMMERSIVE COMPETENCY R200.1
o
Seven lessons to learn how to install various components and establish
communication between Safety Manager and Safety Builder.
o
Five lessons to learn how to inject faults and replace components such as QPP
Module, USI Module, SDI-1624 Input Module, SDI-1620 Input Module, and SDI-0824
Output Module.
o
One lesson dedicated to learn how to perform On-line Modification.
For more information about lessons and hardware, see the chapter Safety Manager System.
Immersive Competency Management Console:
l Automated top-up process - Enhanced top-up process that automatically updates the number
of hours and users immediately after approval is complete.
l System Filter – A new option is introduced in Hardware Setup and Training Modules pages to
filter hardware setup or lesson based on the required system – Experion PKS or Safety
Manager.
l Enhanced System Request – System Management page is enhanced to request both
Experion PKS and Safety Manager Virtual Machines as required. However, only one system
can be actively used at any given instance.
l VM Status Notification – Email notification indicating VM status such as Assigned, Started,
Shutdown, and Deleted.
- 10 -
Page 11

CHAPTER
3
Immersive Competency is an cloud solution that provides a virtual platform to learn the control
and safety system maintenance. With IC, Honeywell leverages the power of cutting-edge
augmented reality technology enabling Maintenance Engineers to engage and interact with
control and safety system hardware and software on a virtual platform. IC brings the plant control
system to the training room wherein you can carry the virtual training platform with you and
practice modular and graded lessons in a hazard free environment.
The virtual, hands-on experience that IC brings to the hardware equipment Maintenance
Engineers to handle Experion PKS Server and Safety Manager operations, event sequences, and
maintenance familiarity which translates to a confidence boost when handling real plant and
safety system maintenance. IC not only enables Maintenance Engineers to train on a control and
safety system, it also enables instructors to set up courses and assessments.
The virtual platform provides the significant advantages of being available on-demand, giving
freedom of accessibility, providing hardware independence, and delivering an immersive learning
experience.
Immersive Competency provides the following out-of-the-box features:
l Hardware setups. Interactive component familiarization for Safety Manager system. 3D
holograms of hardware modules to create a hardware infrastructure and lesson for Experion
PKS system.
l Lessons that caters from installing and configuring a hardware setup to recovering from
faulty hardware scenario.
l Report on progress made in learning.
INTRODUCTION
- 11 -
Page 12
CHAPTER
4
ADMINISTRATOR TASKS
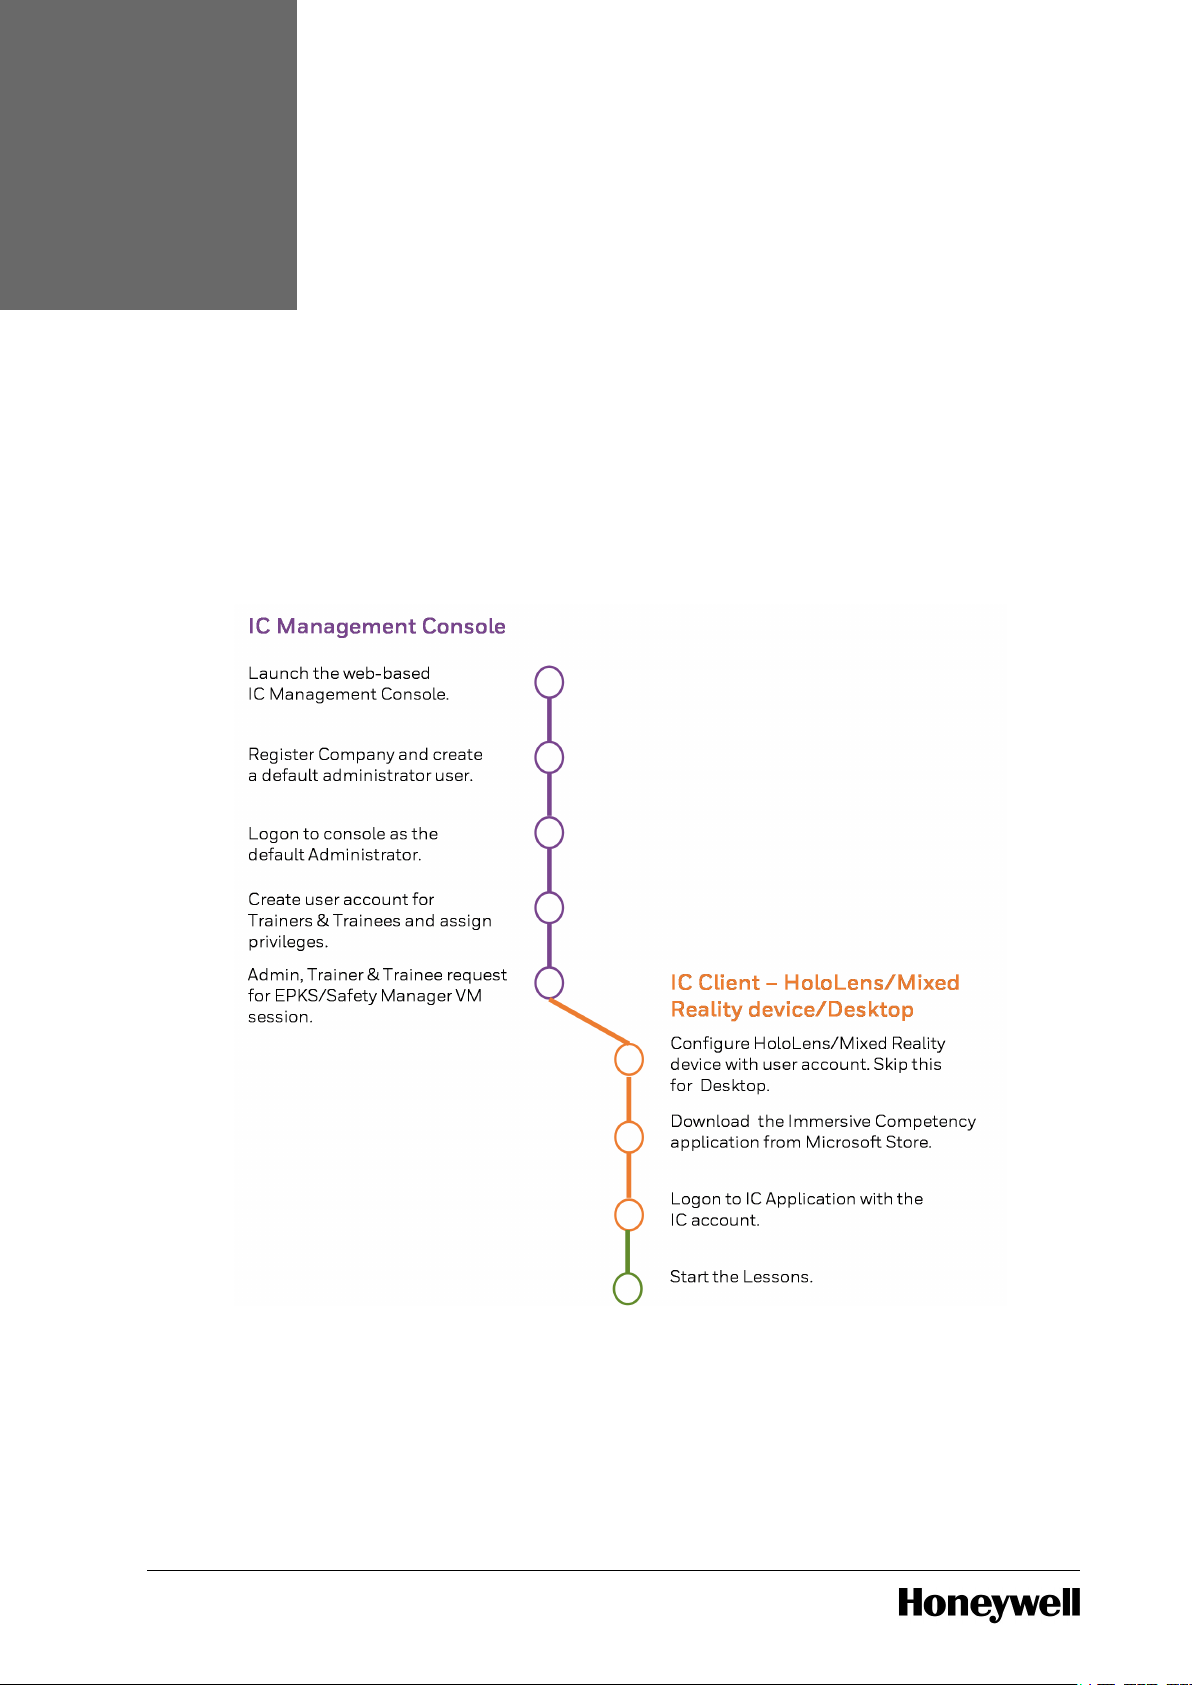
4.1 Install Workflow
To begin using the Honeywell Competency Management - Immersive Competency solution for
the first time, perform the steps as depicted in the following image. If you are using Desktop as
your IC Client, then you can perform both IC Management Console tasks and IC Client tasks from
the same Desktop. If you are using Microsoft HoloLens/Mixed Reality device as your IC Client,
then you can perform IC Management Console tasks on the Desktop/Laptop (thin-provisioned)
and perform IC Client tasks on HoloLens/Mixed Reality device.
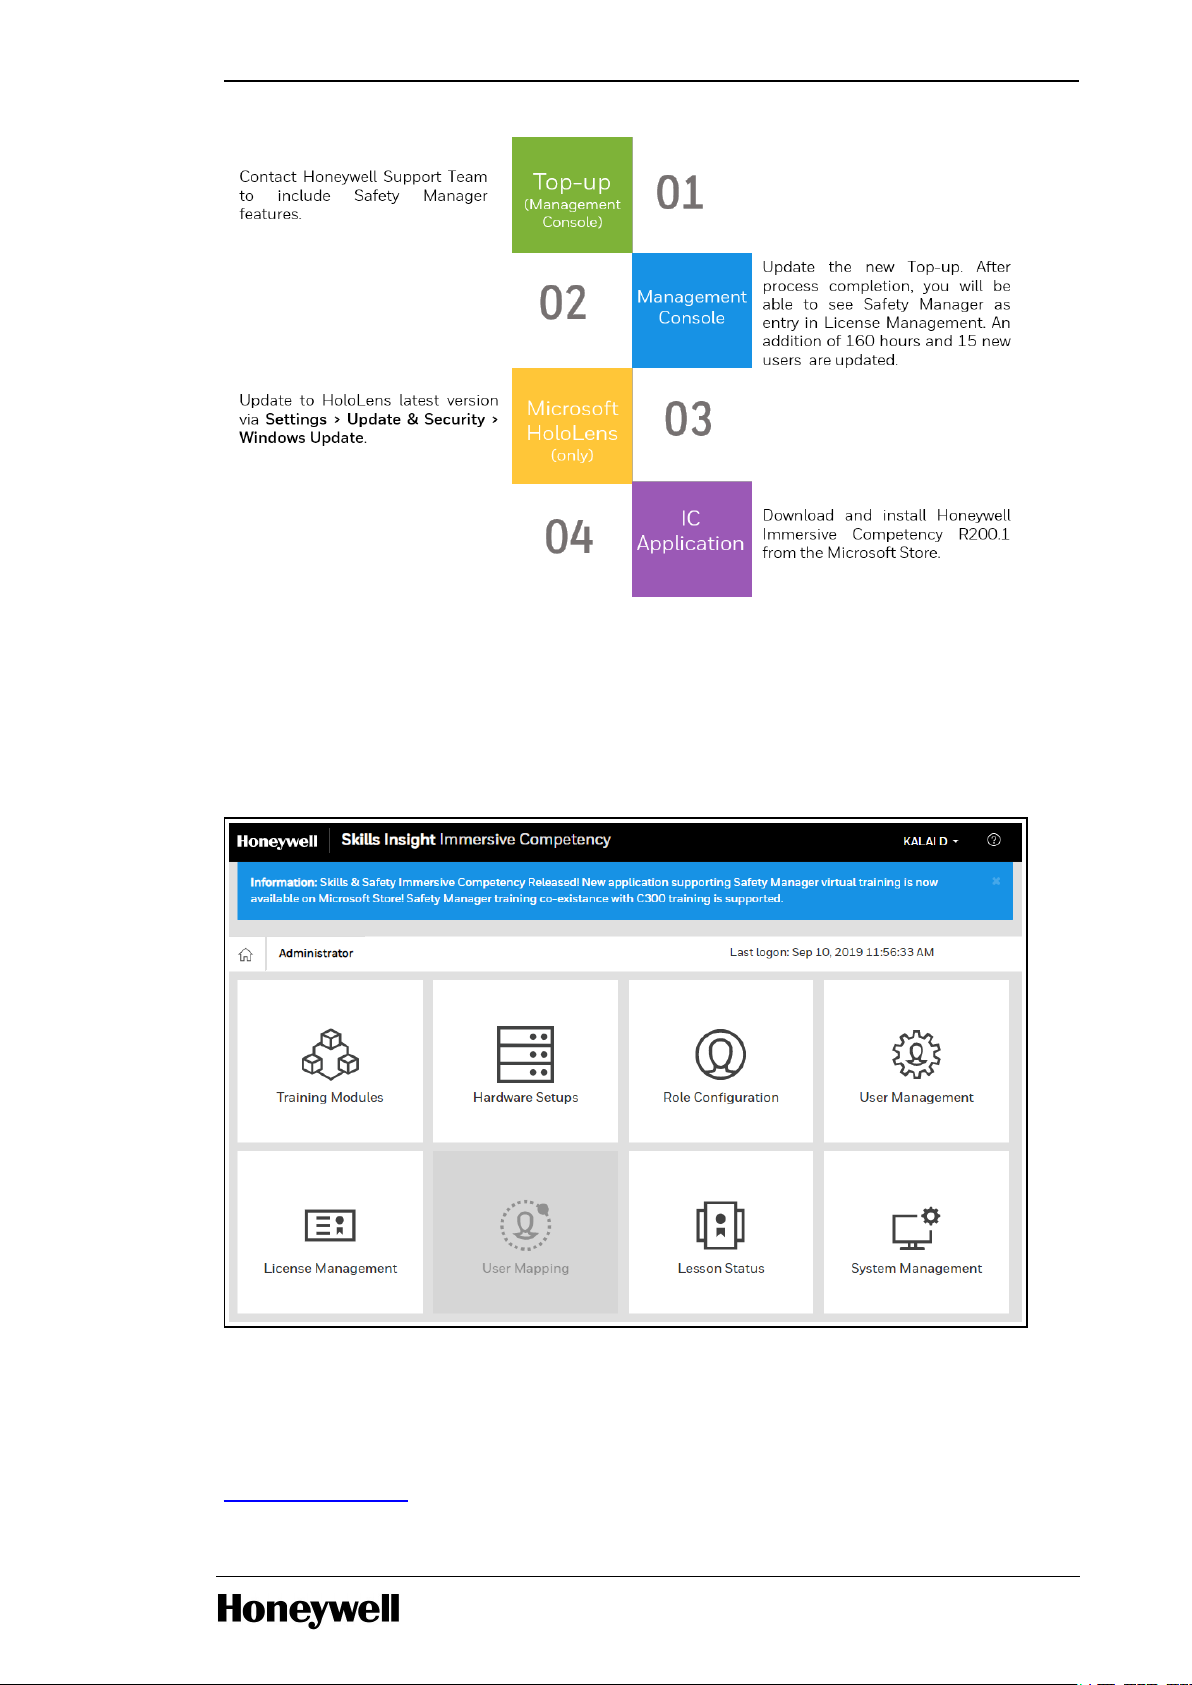
4.2 Upgrade Workflow
If you have already installed Immersive Competency R101.1, then perform the steps as depicted in
the following infographic to upgrade to Immersive Competency 200.1 version.
- 12 -
Page 13
Chapter 4 - Administrator Tasks
How to identify if Immersive Competency upgrade is required?
IC Management Console is upgraded with the latest features automatically. You will receive a Email notification informing about the down-time for the up-gradation. For the complete list of New
Features, see Immersive Competency R101. Software Change Notification. You can view a message
stating the availability of new version of IC application on the Management Console. Make sure to
uninstall existing version and install the latest version available at Microsoft Store.
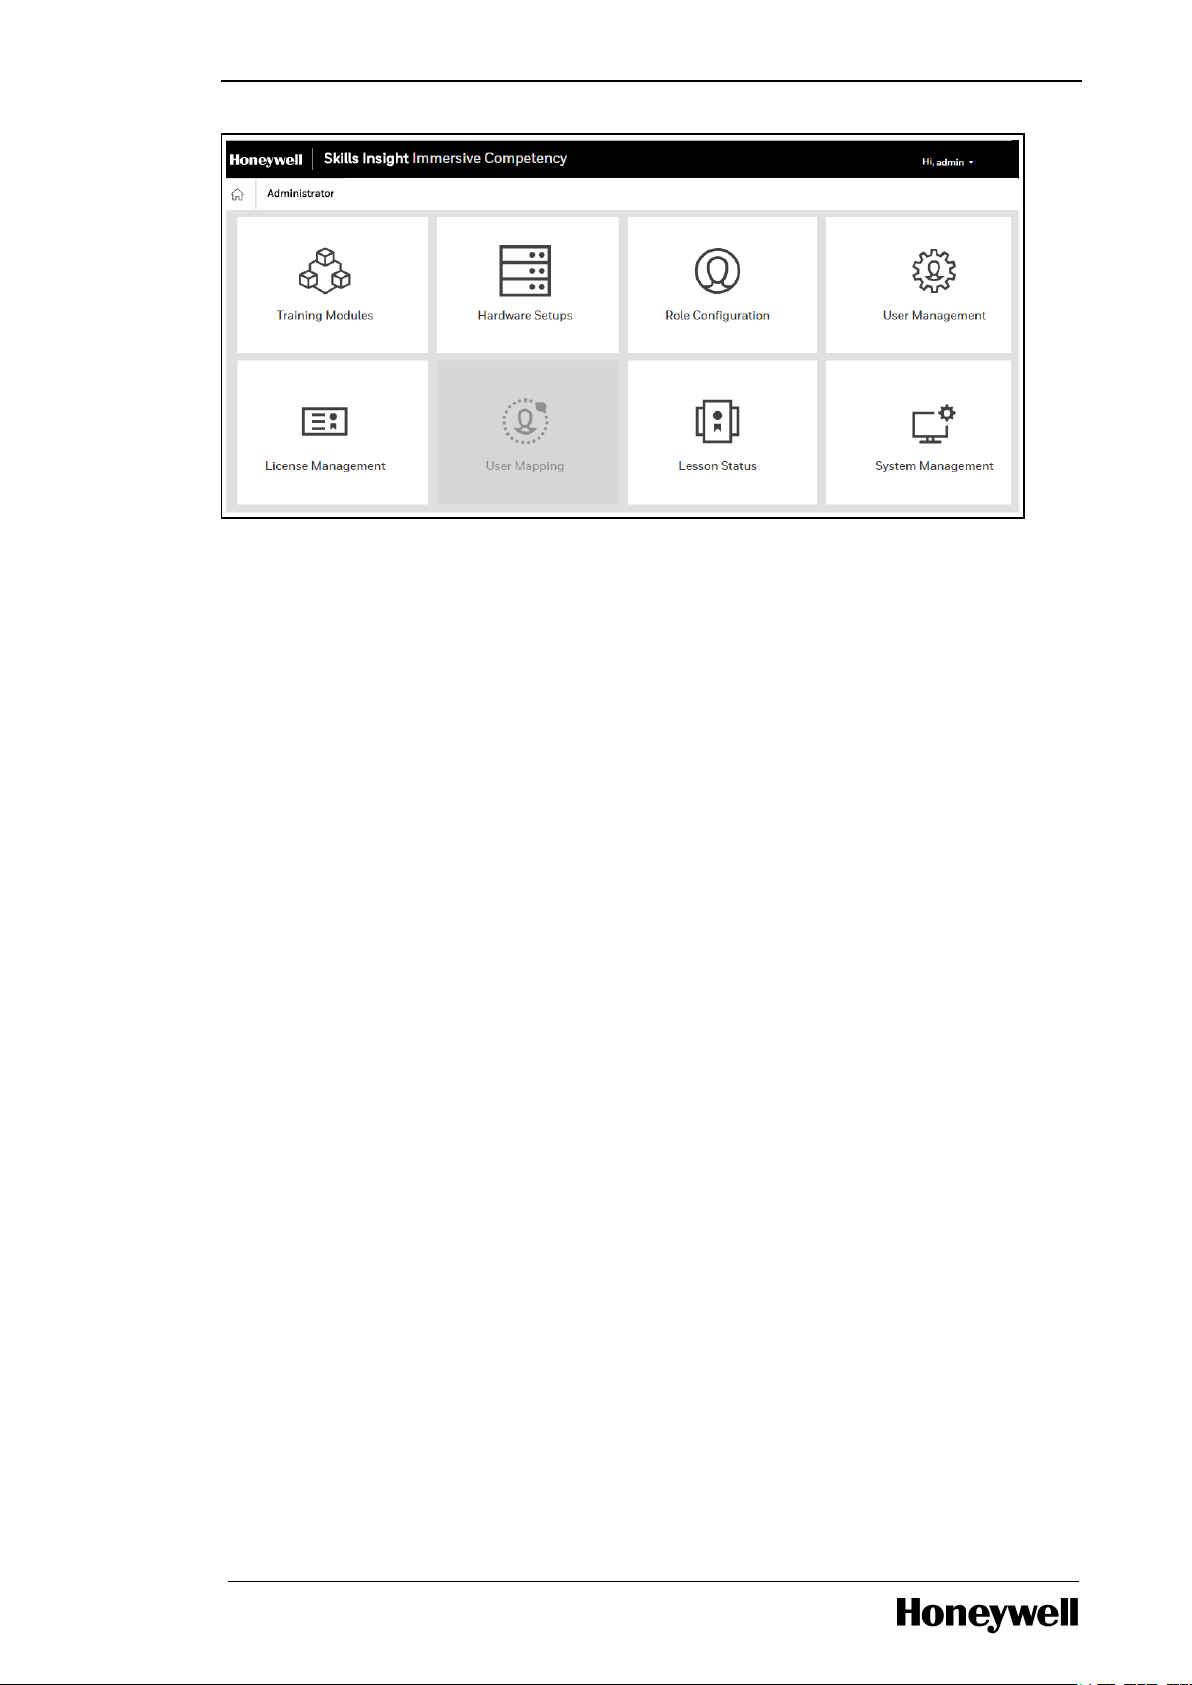
4.3 IC Management Console
IC Management Console enables you to perform administrative and management tasks. Based on
the user role, specific features are enabled or disabled. For more information, see the section
Roles and Permission.
Following figure displays Administrator view of the IC Management Console.
- 13 -
Page 14
Chapter 4 - Administrator Tasks
- 14 -
Page 15
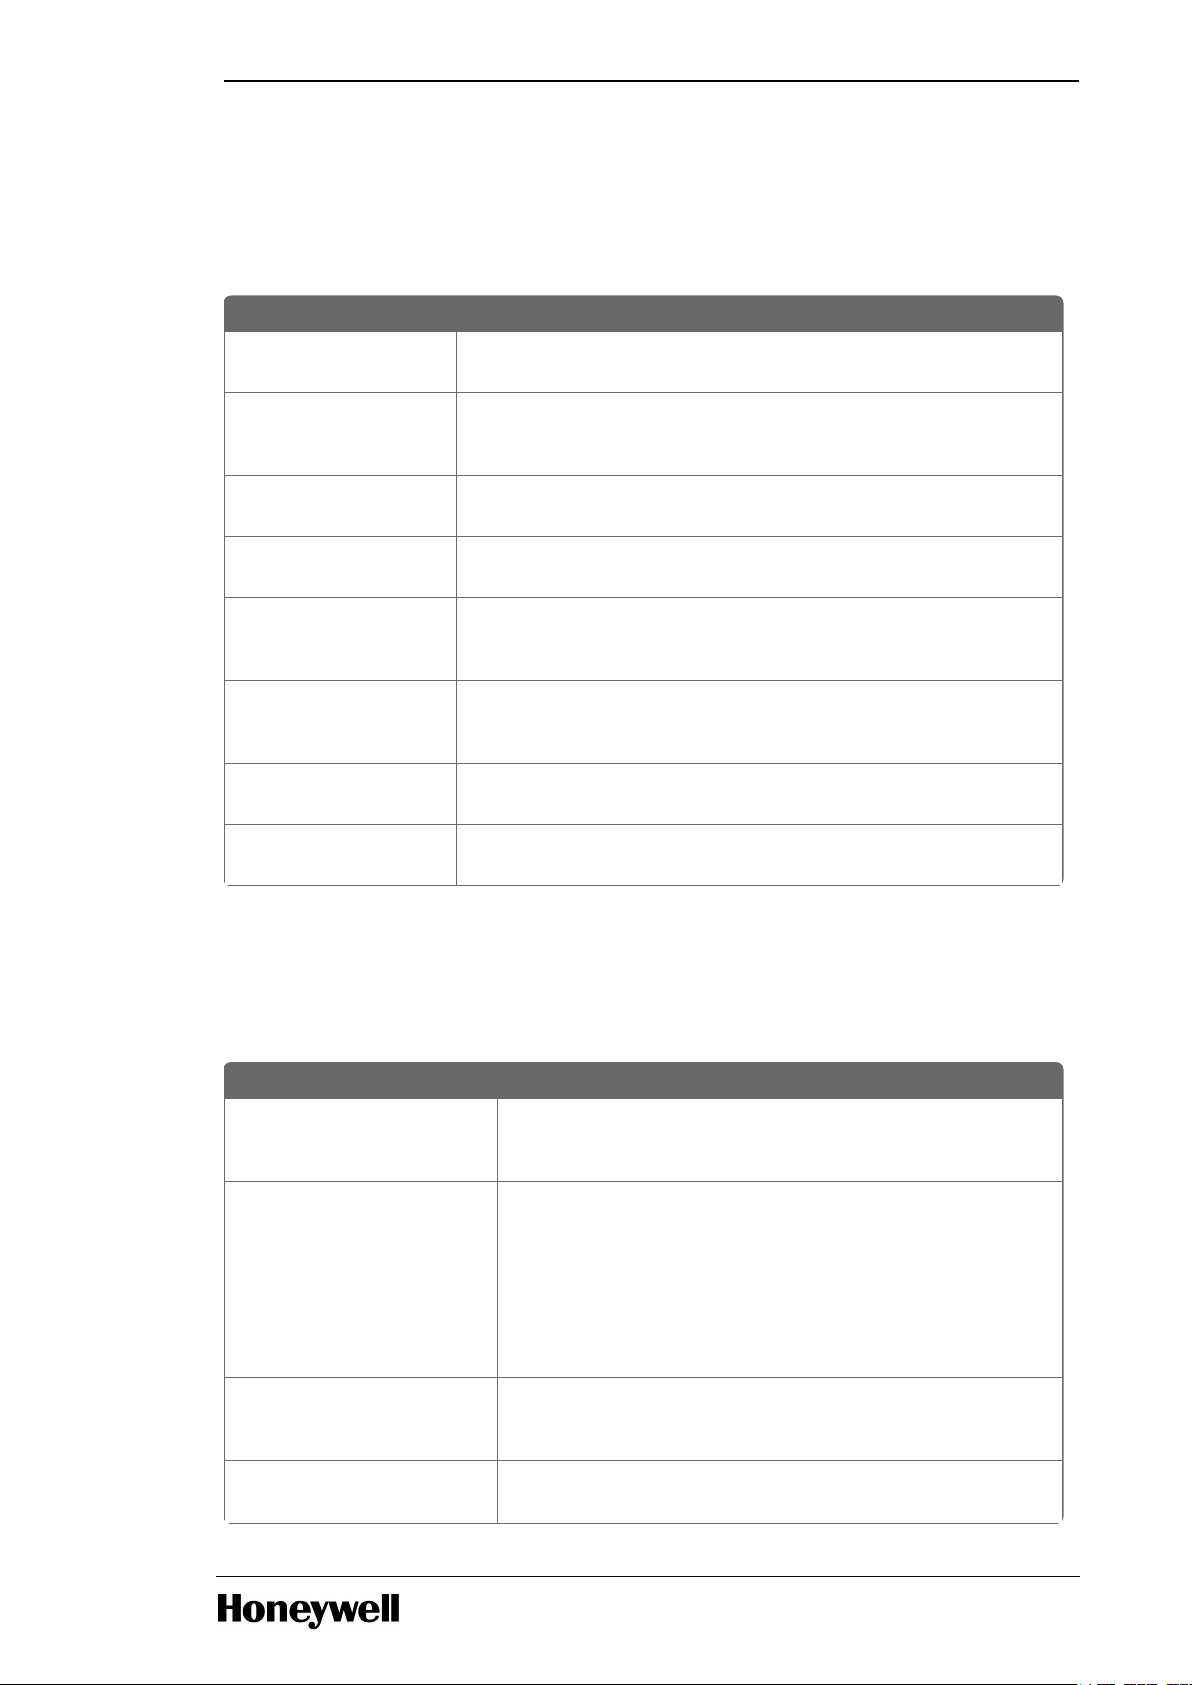
Field Description
Company
Name
Provide complete company title.
License
Key
Enter the license key received from the Honeywell License Team.
Default Admin User Information
Name Provide the first name and last name of the user. First name will be display
as logged in user on the console.
User
Name
Provide a name to create an email ID to access the console.
User Name
can
be different from
Name
provided above.
Chapter 4 - Administrator Tasks
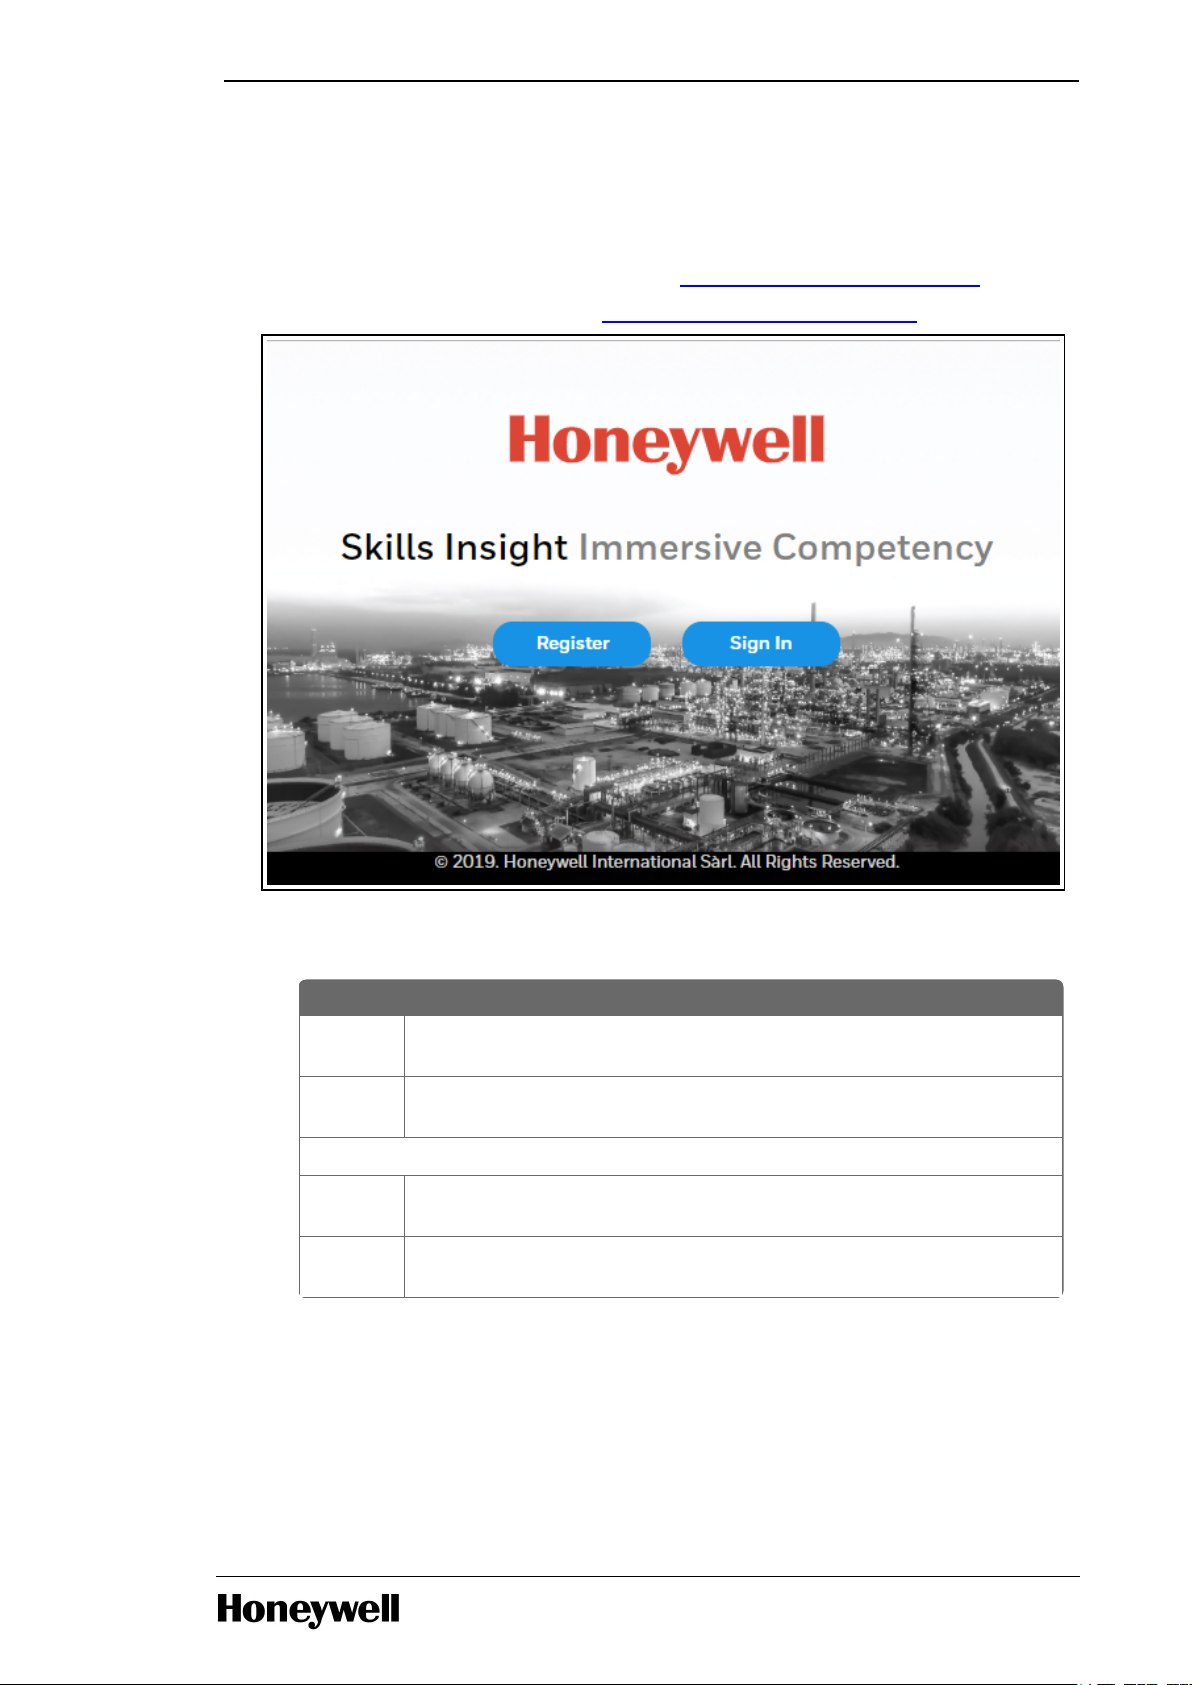
4.4 Registration
On receiving the license key from the License team, logon to the Management Console
https://ic.skillsinsight.honeywell.com and register the company. While registering you can also
create one default user with administrator privilege to proceed with further tasks. For more
information about responsibility of administrator, see Management Console Introduction.
1. Launch the Management Console URL https://ic.skillsinsight.honeywell.com .
2. Click Register.
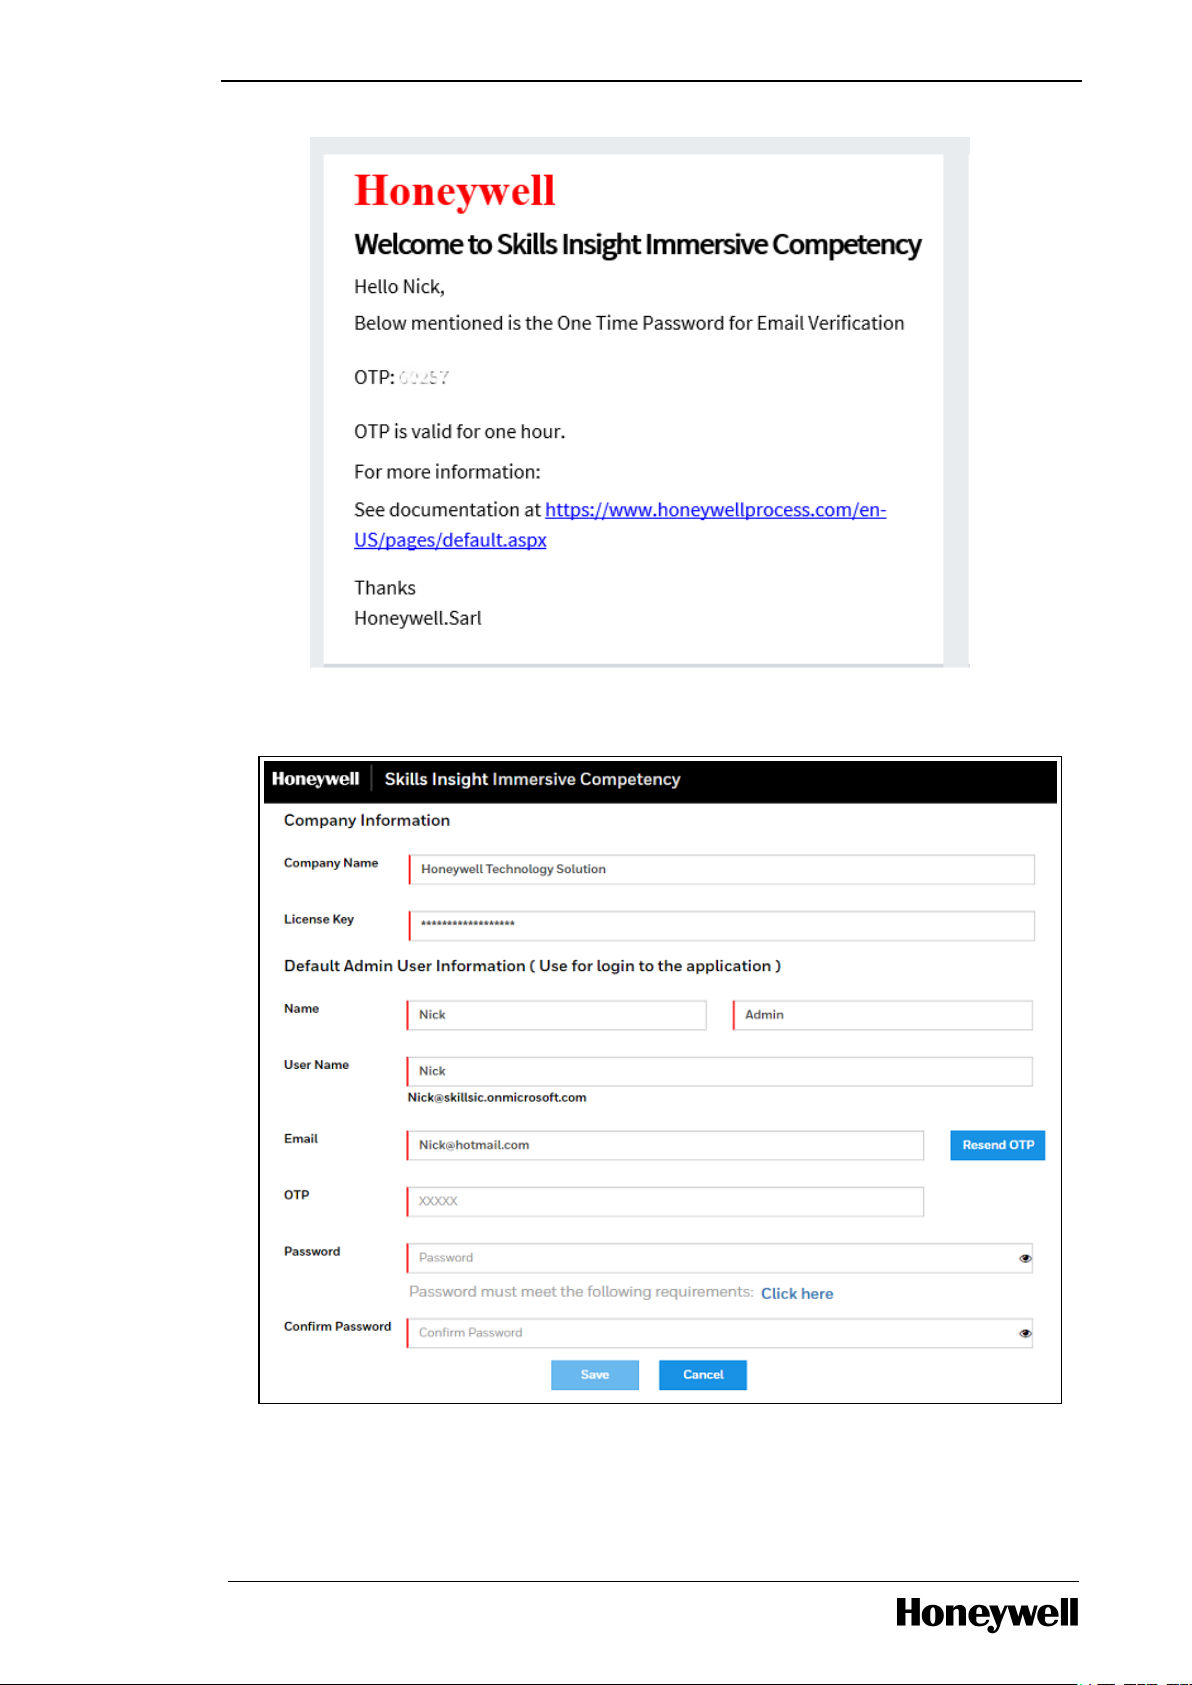
3. In the Company Information page, enter the following details:
4. Follow the steps:
a. In the Email field, enter a valid email address to receive OTP.
b. Click Send OTP.
A mail with OTP is sent to the Email address and new field appears to enter the received
OTP in the IC Management Console.
- 15 -
Page 16
Chapter 4 - Administrator Tasks
The OTP field will be displayed.
c. In the OTP field, enter the received OTP over the mail.
- 16 -
Page 17
Chapter 4 - Administrator Tasks
NOTE
If you do not receive OTP to your mail, click Resend OTP.
5. In the Password field, create a password which abide the following criteria: Minimum length of
8 character containing minimum of one uppercase and one lowercase alphabet, one number,
and one special character.
6. In the Confirm Password field, reenter the password.
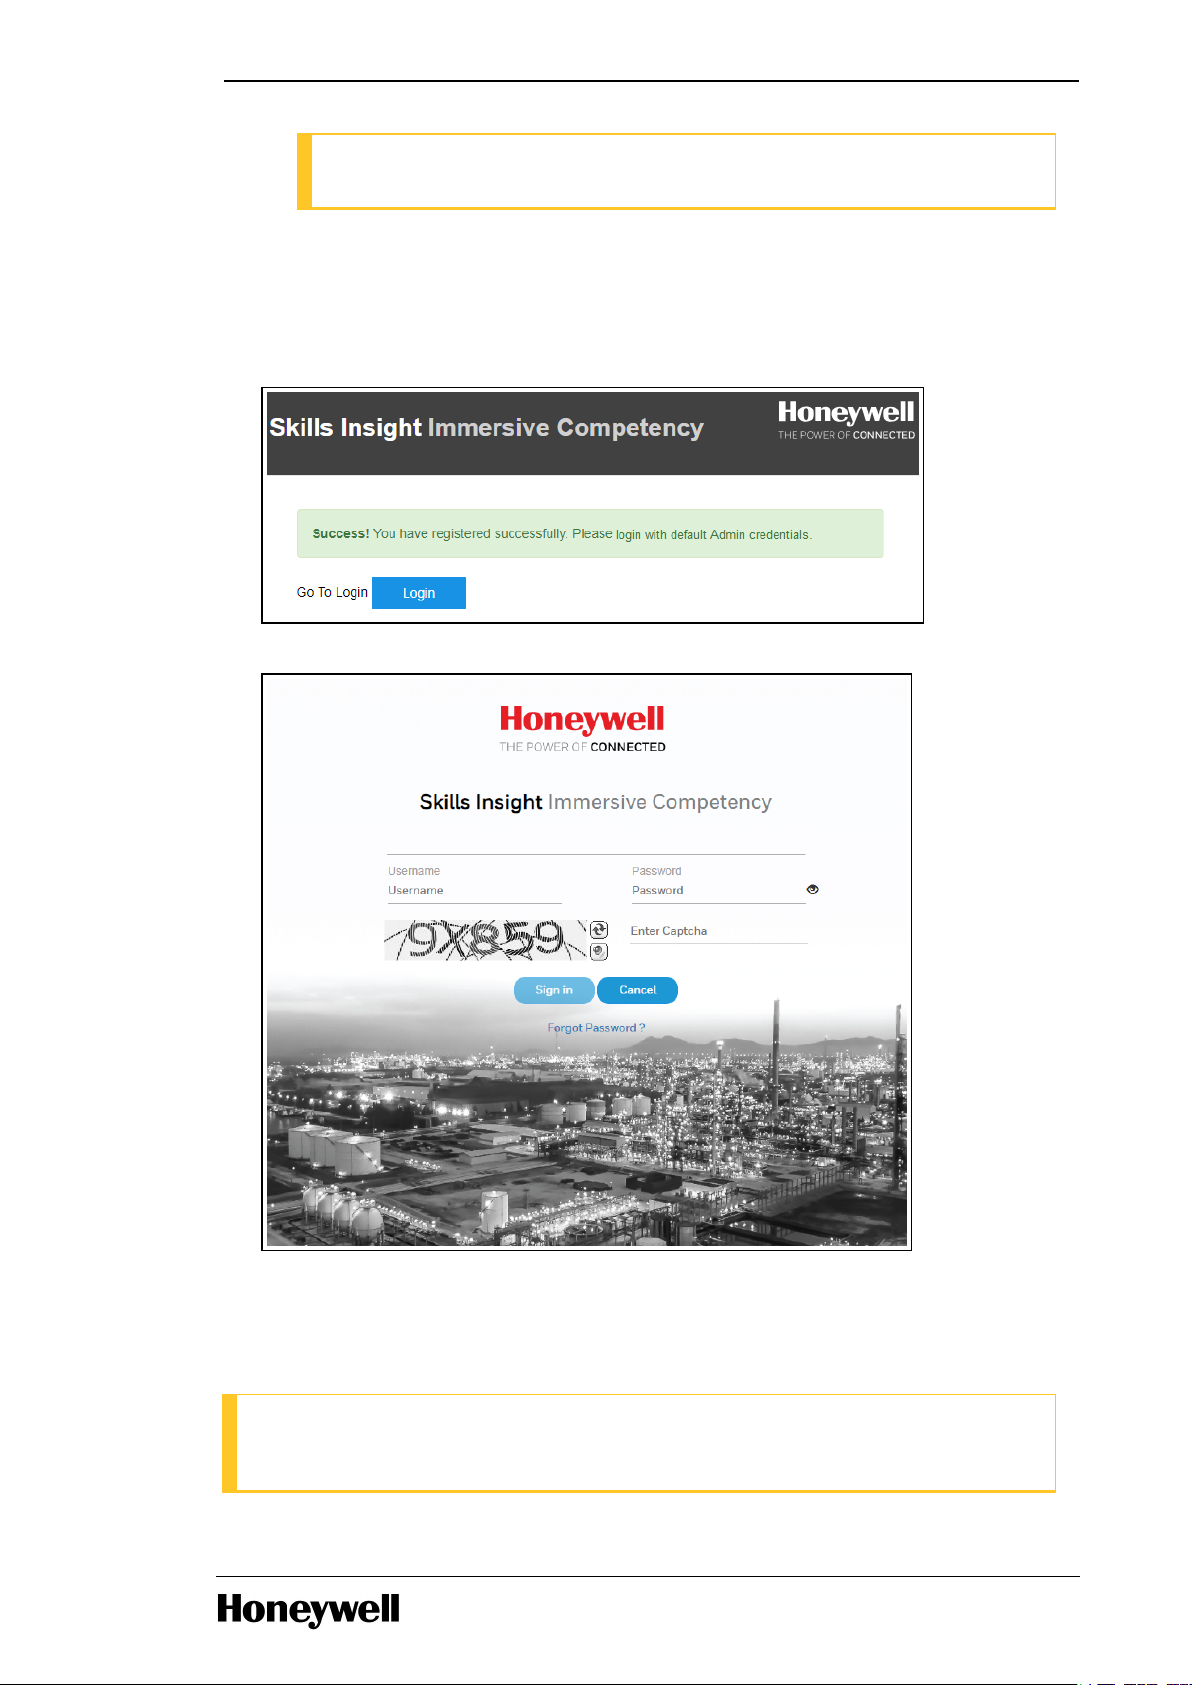
7. Click Save. A successful message is displayed.
8. Click Login.
9. Login with the user credential received over the mail in Step7.
10. Enter the displayed captcha.
11. Click Sign in.
NOTE
Registration requires 60 seconds to take effect. If default Administrator signs in within this
period, you might not be able to perform tasks successfully.
- 17 -
Page 18

You must next create users-(Trainers and Trainees) in the User Management and assign
Features Description Base Premium
Access Training
Modules
Access task based training through Lessons. Perform
Lessons in Show Me, Help Me and Try Me modes.
Assessment
Ability to assess the performance of Trainees. NA
Create Training
Module
Create new task based modules (Lessons). NA
Create Virtual
Hardware Setup
Create new virtual hardware setup.
Perform
Engineering Tasks
Ability to perform Engineering tasks such as create
simulated C300 in Control Builder, create and load
control strategies, checkpoint save/restore, and so on.
Export Training
Module
Export standard task based modules (Lessons). NA
Inject Fault to
hardware setup
Inject fault onto the virtual hardware modules.
Import/Export
Virtual Hardware
Setup
Import new hardware setup or Export Standard
hardware setup.
Import Training
Modules
Import task based modules (lessons).
Number of hours
Number of hours allotted for consumption on the cloud
platform.
Number of Users
Number of Users created across groups.
Operator Tasks
Ability to perform Operator tasks such as change
parameters using station faceplate, view and
acknowledge alarms, view event summary and so on.
C300 System for which license is procured. Based on license,
C300 and Safety Manager are listed in the features.
Safety Manager System for which license is procured. Based on license,
C300 and Safety Manager are listed in the features.
appropriate privileges to the users in the Role Configuration.
4.5 License Management
Honeywell Competency Management - Immersive Competency subscription provides a default
limit of 160 hours for 365 days and maximum of 15 users. This can be consumed by multiple
Immersive Competency users. Starting with R200.1, Immersive Competency supports training in
the Safety Manager. You can opt to purchase either Safety Manager as standalone training
module or Top-up to existing C300 license with Safety Manager modules. Based on the training
module purchased respective system module will be displayed in the License Management.
Based on whether the license type is Base or Premium following features are available. You can
contact Honeywell Support Team to update the license type based on the requirement.
Chapter 4 - Administrator Tasks
- 18 -
Page 19

Chapter 4 - Administrator Tasks
List of features available for the procured license is displayed in the License Management option.
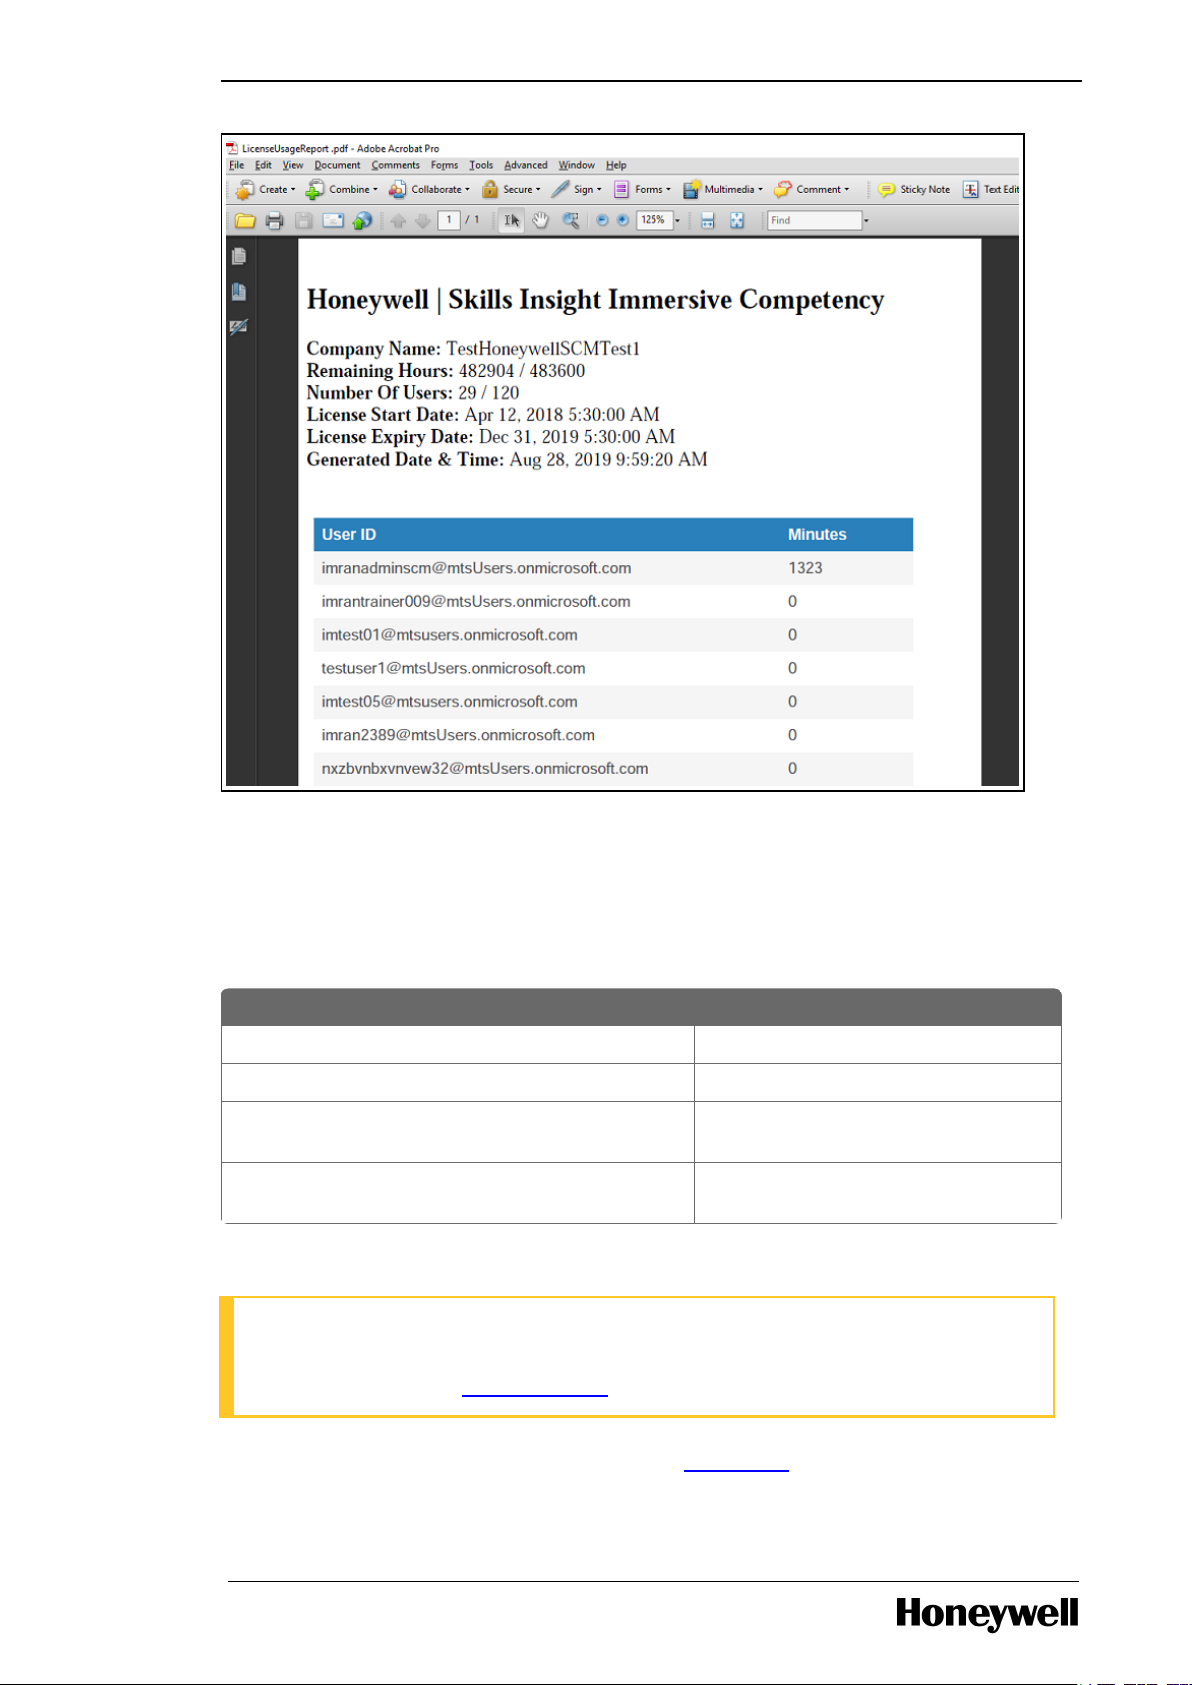
4.5.1 Export Usage Data
Administrator can export the application usage for each user.
1. Open the IC Management Console.
2. Click License Management option.
3. Click Export Usage.
A LicenseUsageReport.pdf is downloaded. Following is a sample usage report.
- 19 -
Page 20
Chapter 4 - Administrator Tasks
Feature Top-up option
Number of Users n * 5
Number of hours n * 40
Safety Manager (MS-ICSM) Hardware setup, Lessons, and Virtual
Machine specific to Safety Manager.
C300 (MS-ICC300) Hardware setup, Lessons, and Virtual
Machine specific to Experion PKS.
4.5.2 Top-up Plan
You can use the Top-up to increase the limit of usage hours or number of users in case you have
reached the maximum limit within the stipulated License Term. In case you want to training
module for additional system (Experion PKS / Safety Manager) than the system already procured
then include the required system in the list of top-up features you need update.
In this instance, n = 1,2,3
NOTE
Number of Users and Number of hours Top-up will expire on the License termination. You
must renew the license to continue using the solution. For more information about license
renewal, see the section License Renewal.
In case you have to renew the license, see the section Top-up Plan.
- 20 -
Page 21
Chapter 4 - Administrator Tasks
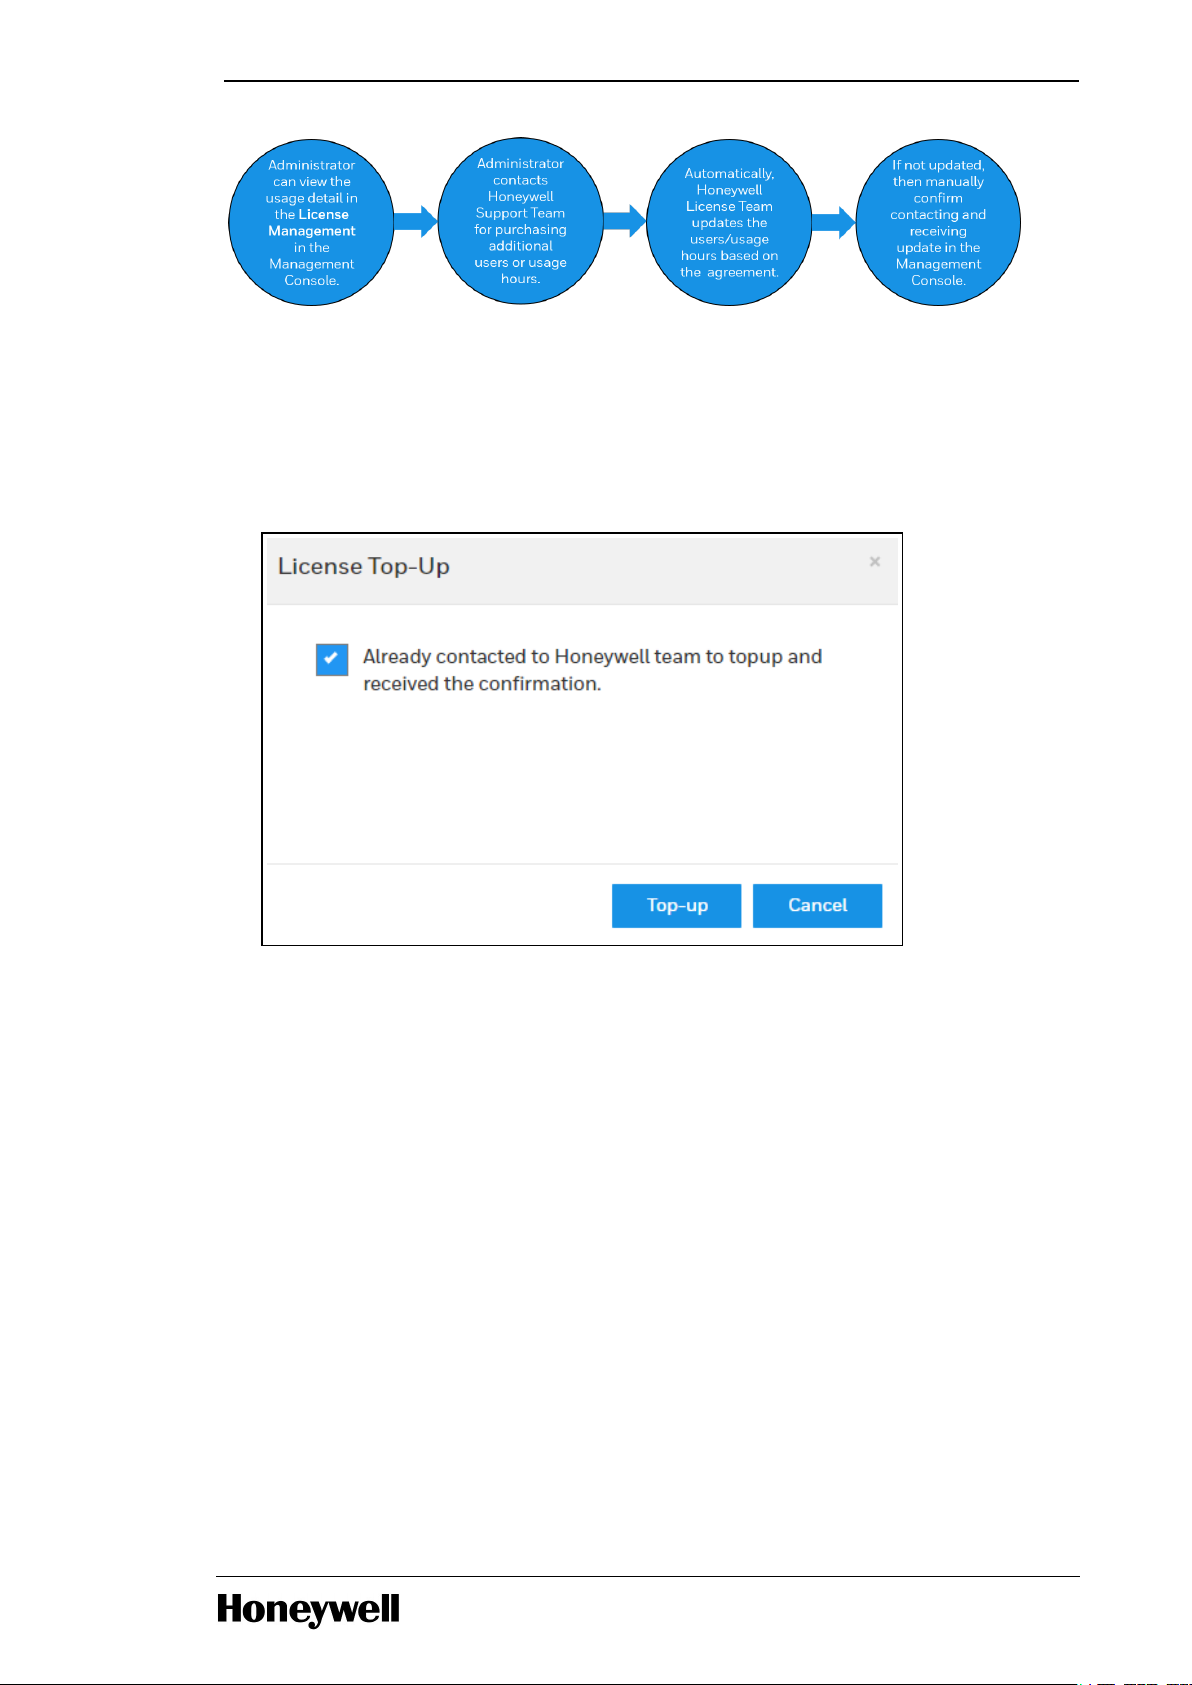
To Top-up the term, you must contact Honeywell License Team - ACT. On completing the process
with Honeywell License Team, the requested features will be automatically updated and visible in
the License Management page. In case the features are updated as requested, perform the
following to manually confirm the process completion.
1. Open the IC Management Console.
2. Click License Management option.
3. Click Top-up.
4. Select the check box to confirm reception of top-up from the License Team and click Top-up.
Based on the agreement, Training System, Application Usage, and User limits are updated.
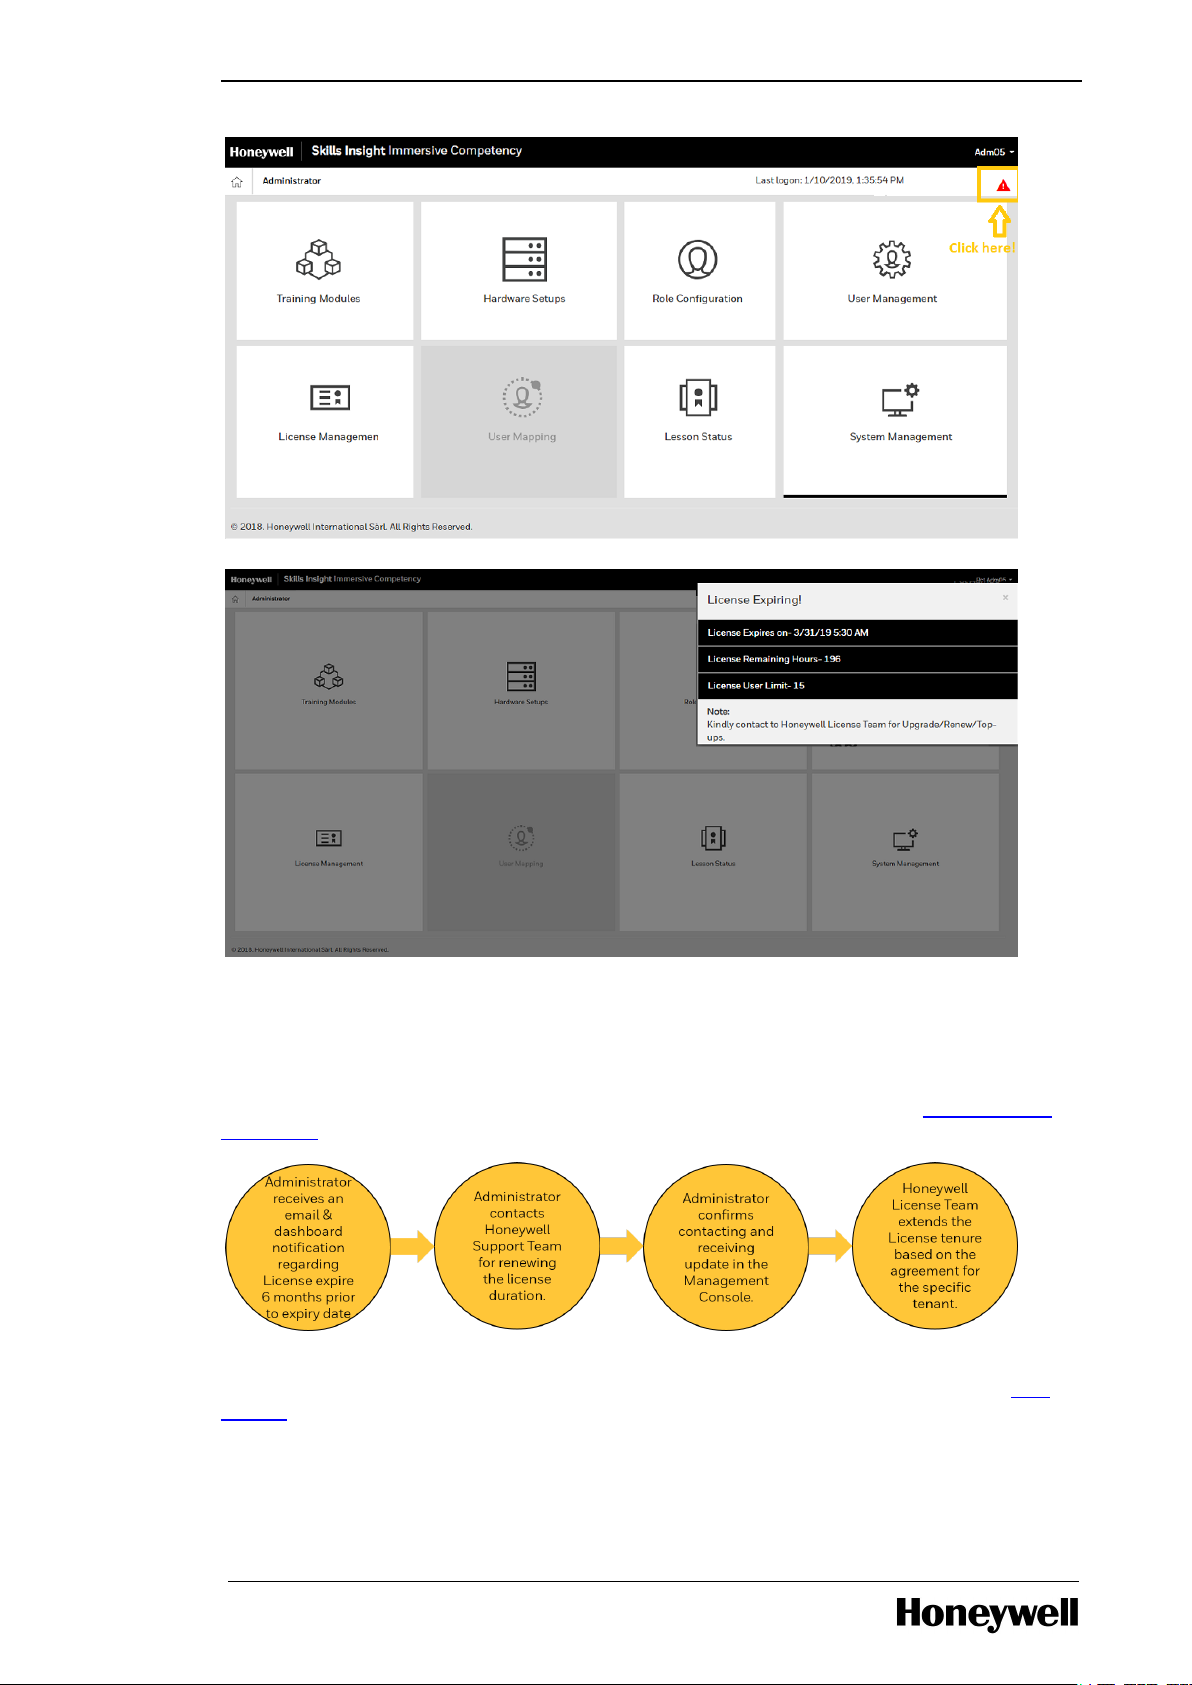
4.5.3 License Expiry Notification
Administrators would be Notified about the current application usage, user limit, and License
expiry details on the ICManagement Console. Administrator can evaluate the requirement and
contact Honeywell License Team for Upgrading package (to Premium from Base), Top-up
(purchase additional usage hours or users), or Renew (if license is about to expire).
- 21 -
Page 22
Chapter 4 - Administrator Tasks
4.5.4 Renew License Plan
You can renew your license if you want to continue using Immersive Competency solution.
Administrator will receive an email notifying the remaining duration of the license and further
actions for renewal. Also, indicator appears at the top-right corner, see the section License Expiry
Notification.
In case you have more than 6 months of license duration but you have exceeded application user
limit or application usage limit, you can opt for Top-up. For more information, see the section Top-
up Plan.
To renew the license term, you must contact Honeywell License Team - ACT. On completing the
renewal process with Honeywell License Team, launch the IC Management Console and perform
the following.
- 22 -
Page 23
Chapter 4 - Administrator Tasks
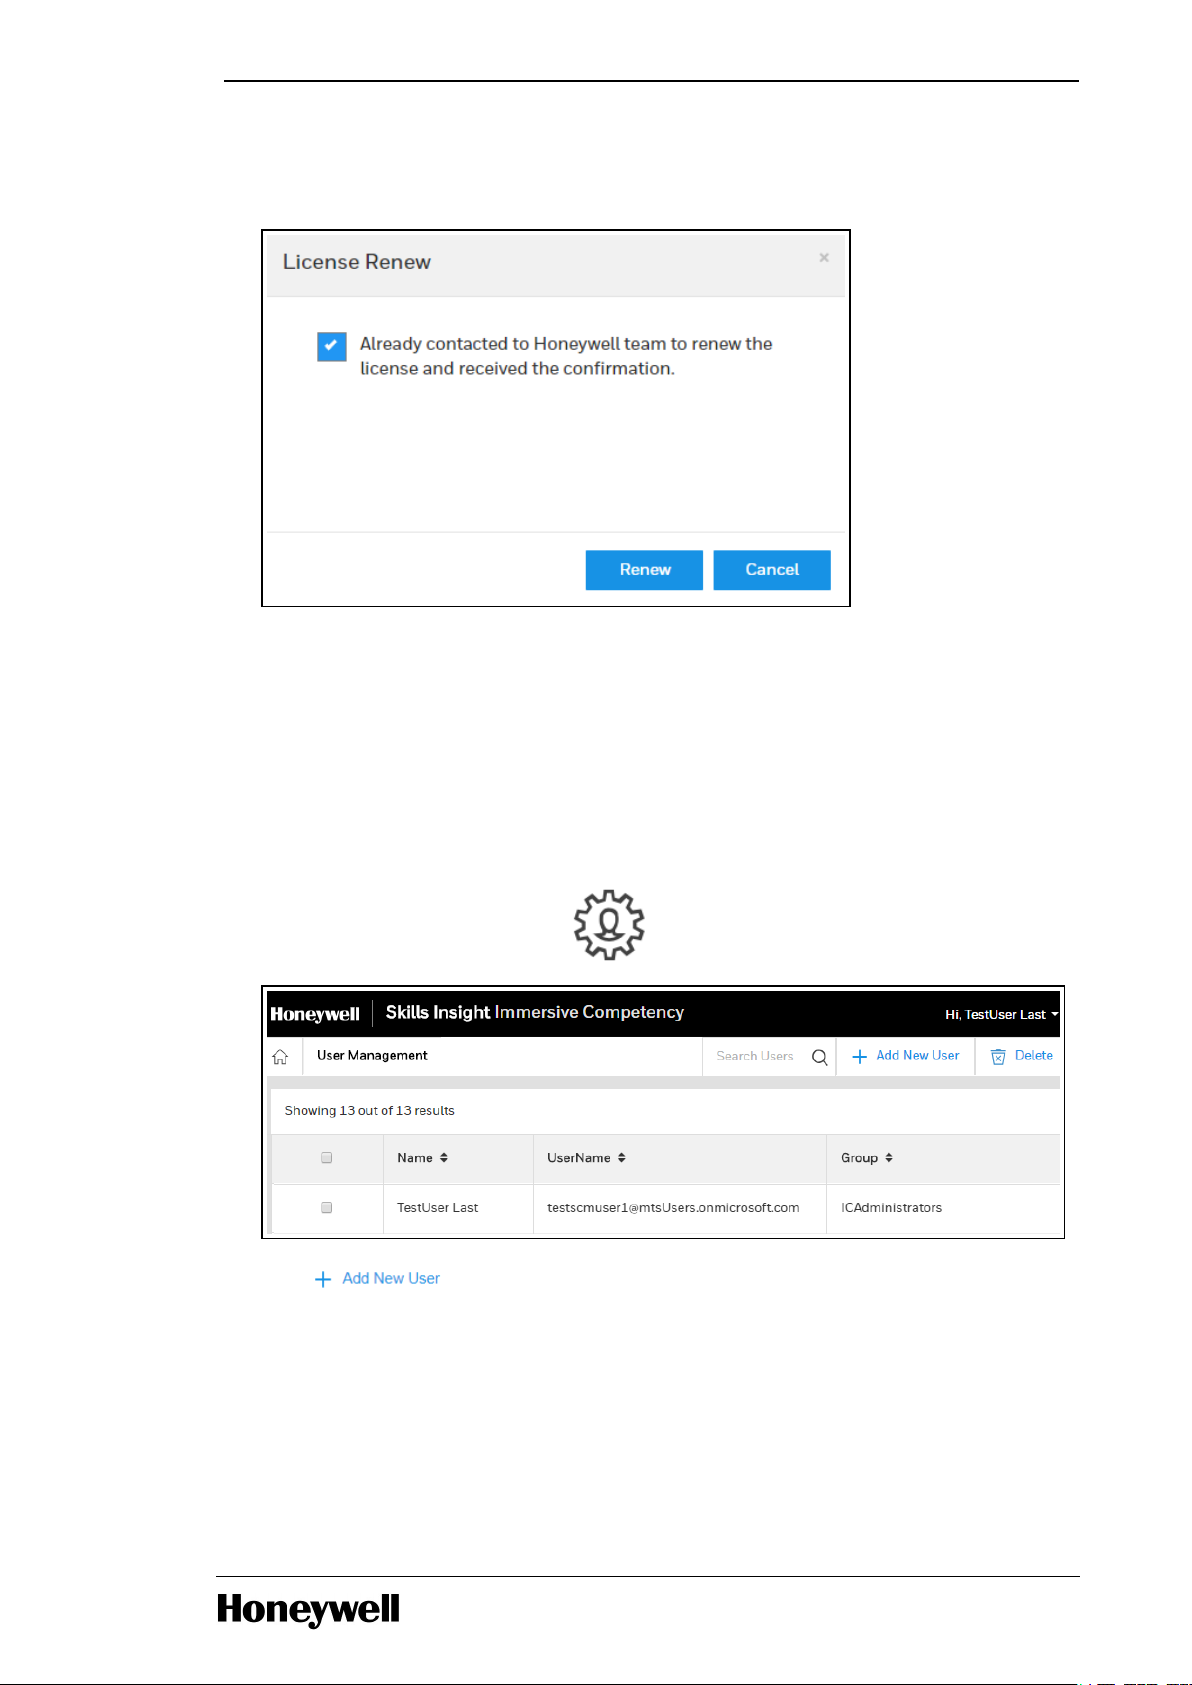
1. Open the IC Management Console.
2. Click License Management option.
3. Click Renew.
4. Select the check box to confirm reception of renewal from the License Team and click Renew.
On completion, a successful message is displayed. Based on the license agreement, license
tenure, Application Usage, and User limit are renewed.
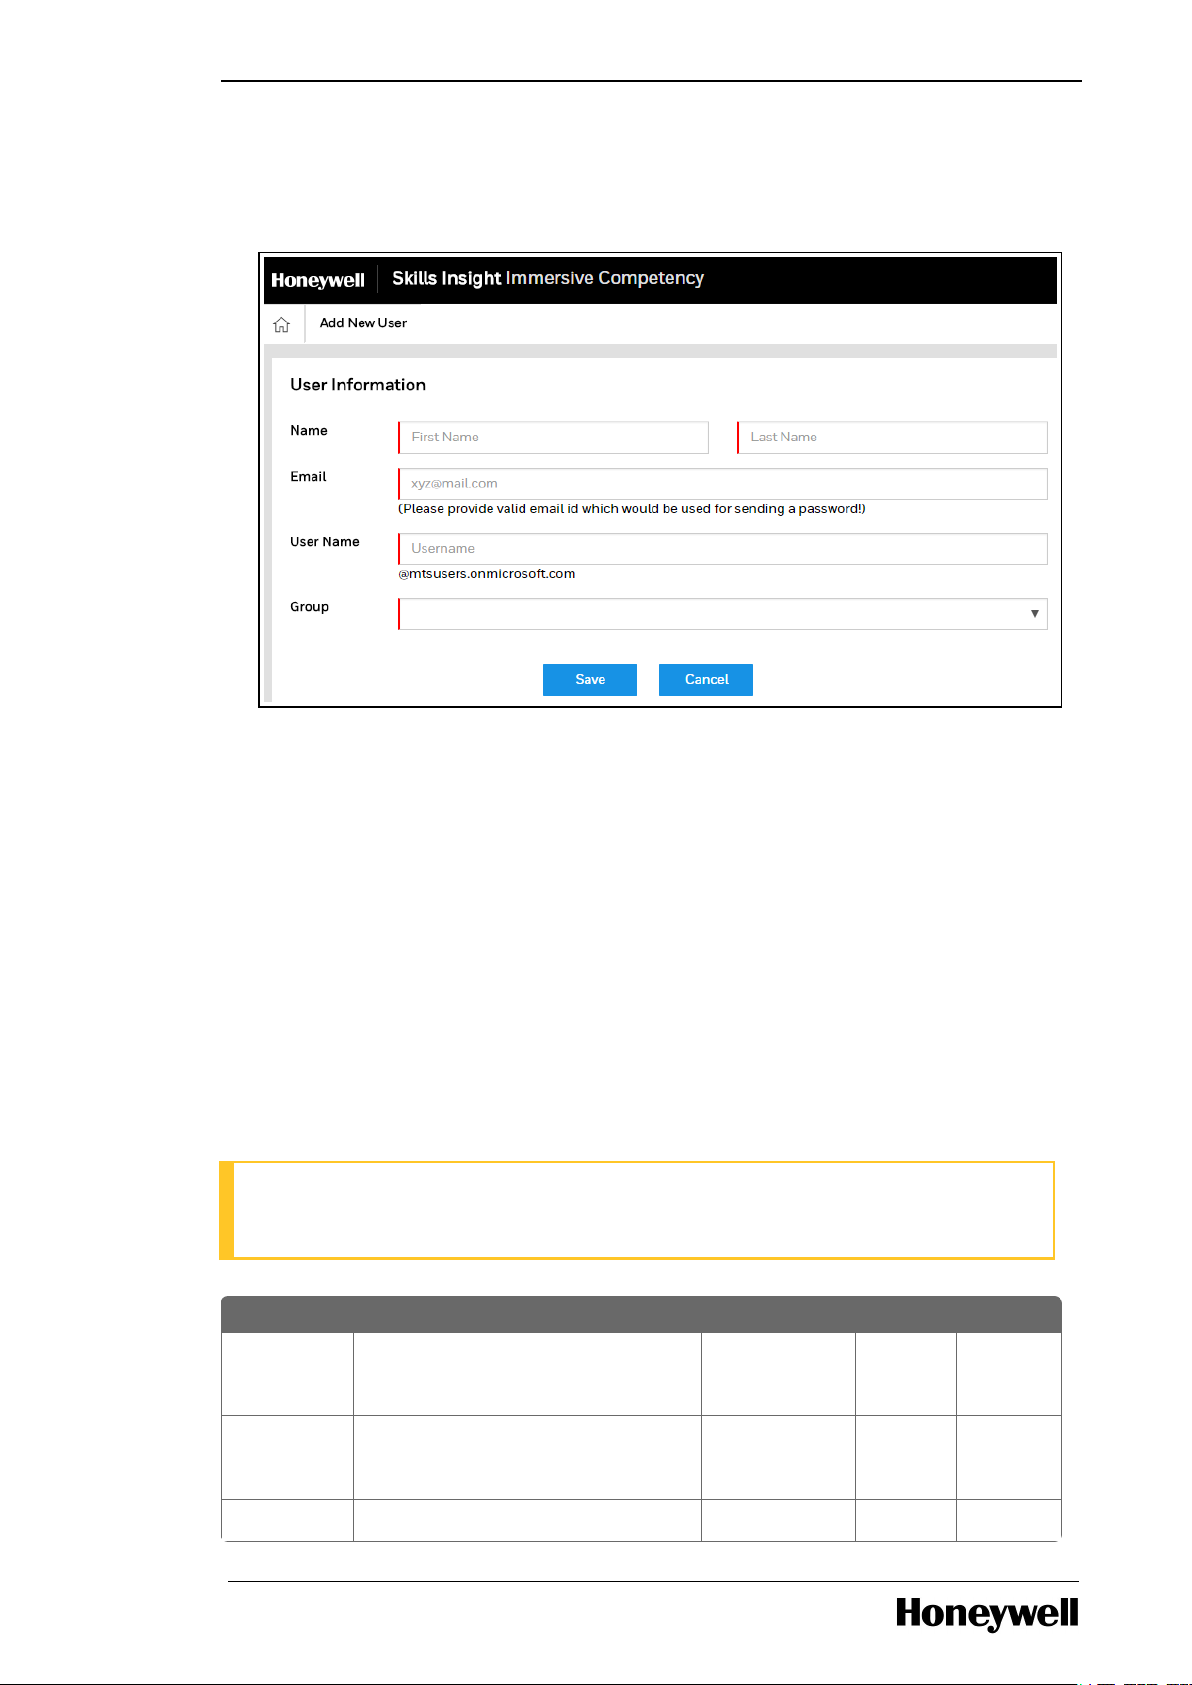
4.6 Create New Users
You must create user Account for every new user to access the Honeywell Competency
Management - Immersive Competency.
1.
On the Management Console, click User Management.
2.
Click .
3. Provide following information for a particular user.
a. In Name field, enter the First Name and Last Name of the user.
b. In the Email field, enter the valid corporate Email ID.
d. In the Group field, select if the user belongs to IC Administrators, IC Trainers or IC
- 23 -
Page 24
Chapter 4 - Administrator Tasks
Actions Description ICAdministrators ICTrainers ICTrainees
Export
Hardware
setups
Export the published control strategies,
these hardware setup are not
associated with any lesson.
Yes Yes Yes
Import
Hardware
Setup
Import hardware setup. Yes Yes No
Publish Publish new hardware setup for global Yes Yes No
Trainees group.
d. In the Group field, select if the user belongs to IC Administrators, IC Trainers or IC
Trainees group.
e. Click Save.
An email with user credentials and next task is send to the Email ID provided in step 3b.
4.7 Role Configuration
You can view the permission assigned to you. Only Administrator can modify the default
permission assigned to Trainers and Trainees.
4.7.1 Default Permissions
Whenever a new user is created, based on the user role (ICAdministrator, ICTrainer, or ICTrainee)
default permissions are assigned. Default permission for each user is detailed in the following
table. By default every user can create and save new hardware setup.
To save a new lesson the user group that specific user belong to must have Lesson Management
and Publish Lesson permissions. For example, for a Trainer to save new lesson, ICTrainers group
must have privileges to Lesson Management and Publish Lesson actions.
NOTE
Honeywell published standard Hardware Setups and lessons cannot be deleted with either
Delete Hardware setups or Delete Lesson permission.
- 24 -
Page 25

Actions Description ICAdministrators ICTrainers ICTrainees
Hardware
Setup
usage.
Delete
Hardware
setups
Delete custom created hardware
setup.
Yes Yes No
Lesson
Management
Create new or edit existing lessons. Yes Yes No
Delete
Lesson
Delete custom created lessons. Yes Yes No
Publish
Lesson
Publish custom created lessons for
global usage.
Yes Yes No
Export
Lesson
Export the lesson and the control
strategies associated with the lesson.
Yes Yes Yes
Import
Lesson
Import lesson with required hardware
setup.
Yes Yes No
User
Management
Create new users. Yes No No
License
Management
View the list of feature available based
on the license type.
Yes No No
Chapter 4 - Administrator Tasks
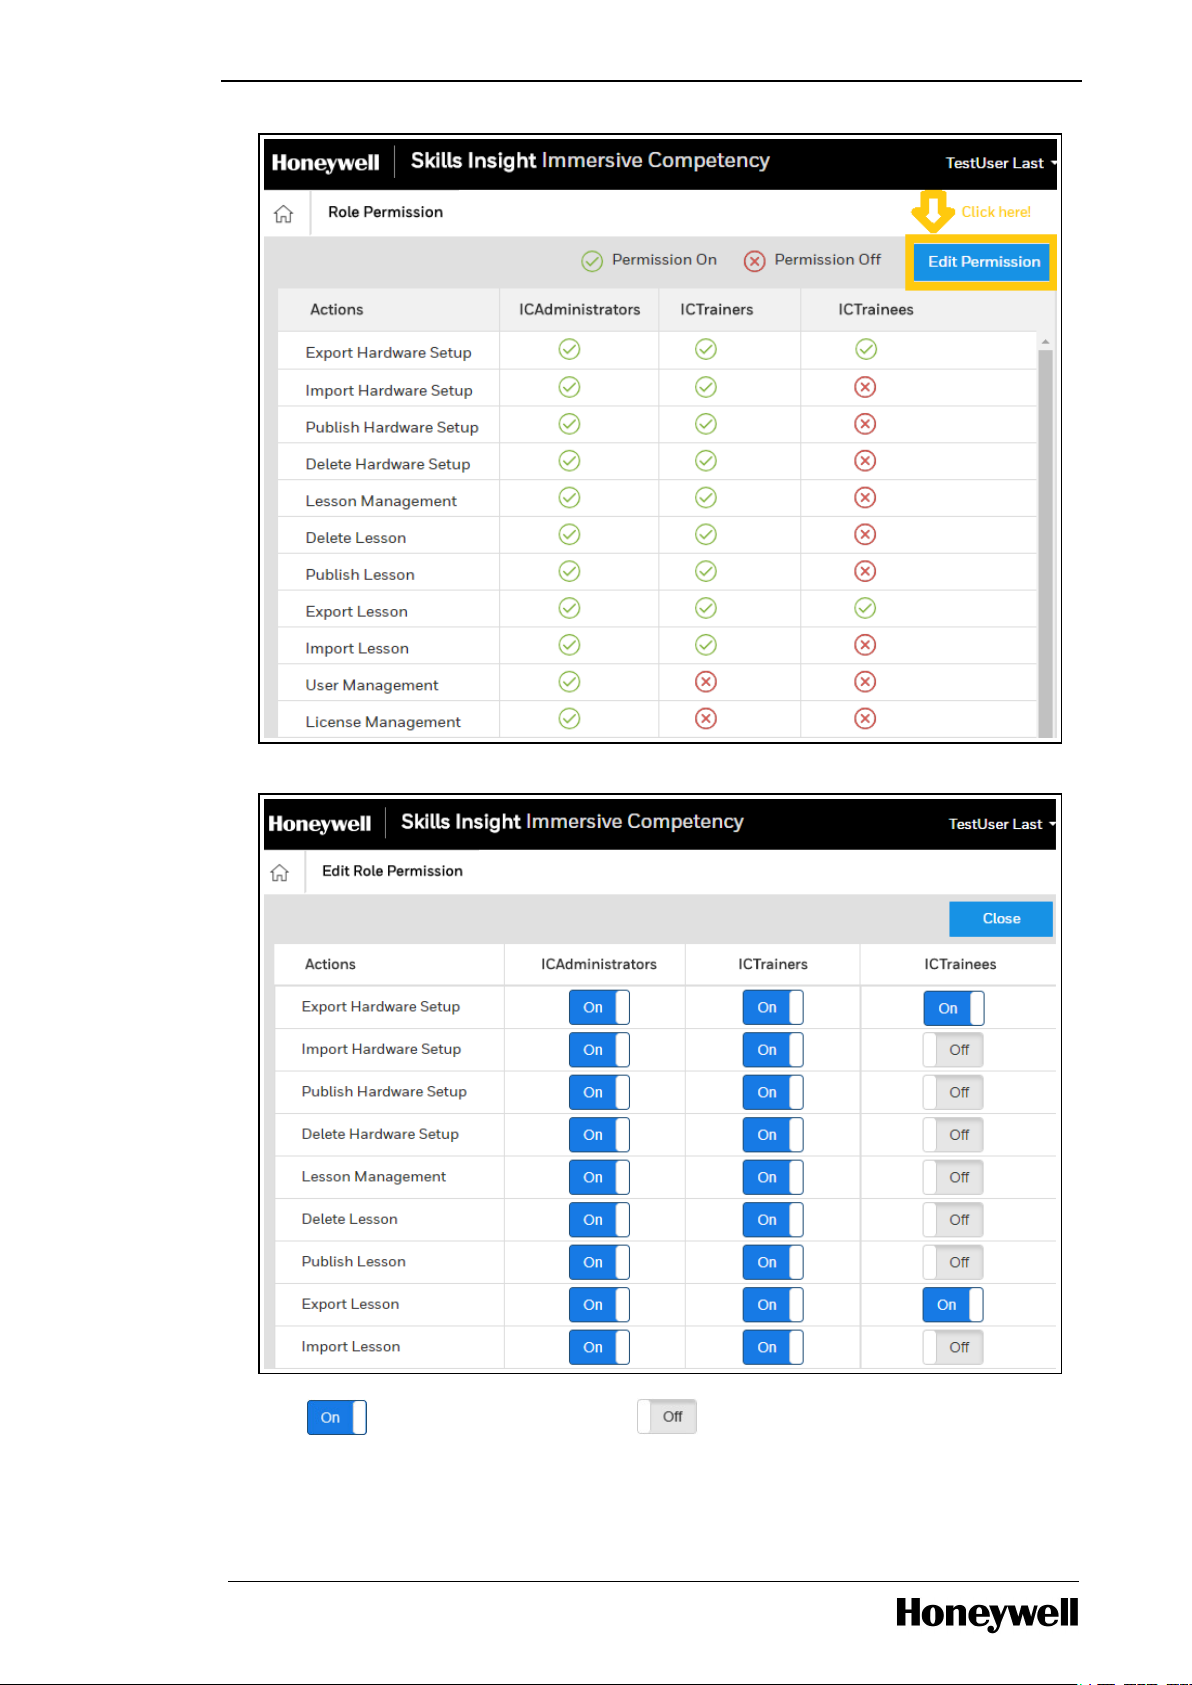
4.7.2 Editing Default Permission
ICAdministrators can overwrite the default permission and provide additional privilege as required.
1. On the Management Dashboard, click Role Permission. Details containing features, user and
current permission levels are displayed.
- 25 -
Page 26
Chapter 4 - Administrator Tasks
2. Click the Edit Permission.
3.
Click to provide permission. Or click to reduce permission for a user.
4. Click Close or Home.
- 26 -
Page 27

Chapter 4 - Administrator Tasks
Role permission is updated only when the user whose permission is edited logs out of the current
session and login again.
- 27 -
Page 28
CHAPTER
5
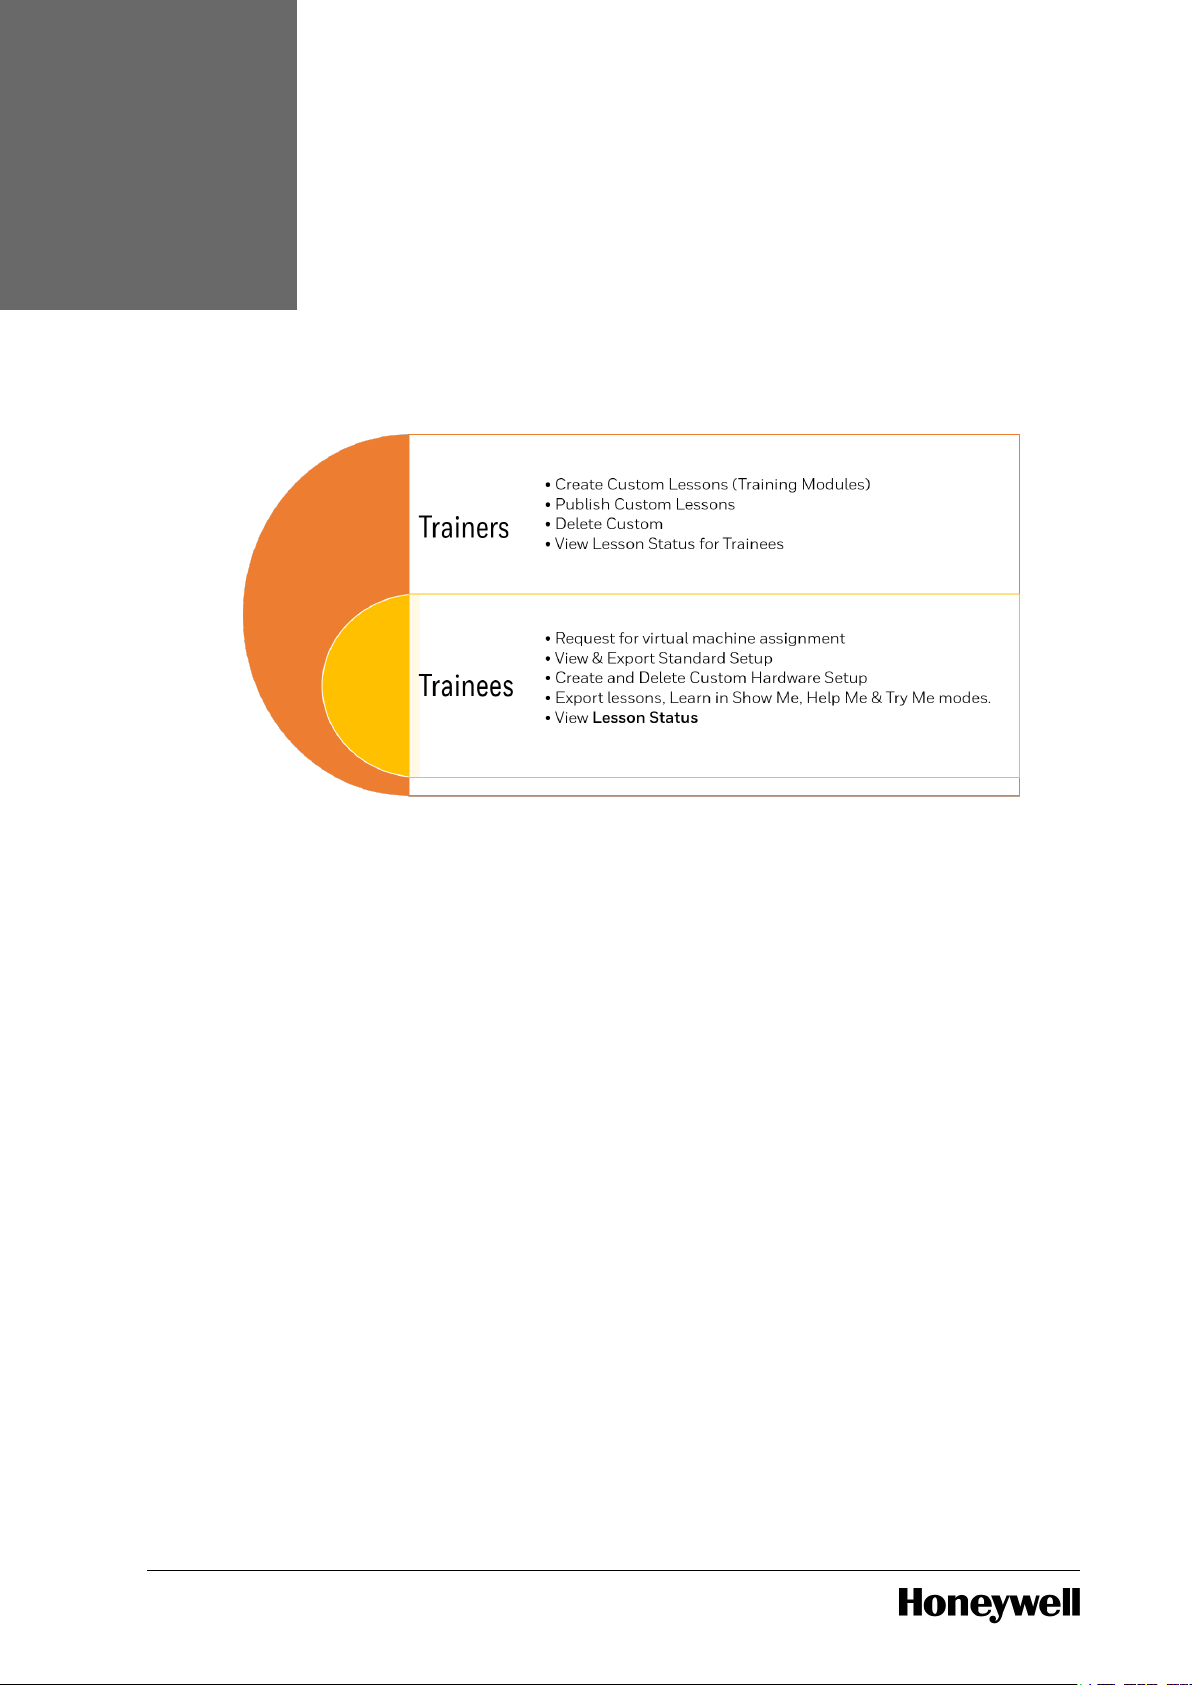
Following figures depicts tasks that a Trainer or Trainee can perform.
TRAINER/TRAINEE TASKS
5.1 IC Management Console Login
The user accounts created with the User Management. Only Administrator have the privilege to
create new users. Trainers and Trainees must use this account to perform following:
l Login to the Honeywell Competency Management - Immersive Competency Management
Console,
l Login to IC Client Application in either Microsoft HoloLens or Desktop.
5.1.1 New User -Trainer or Trainee Task
You will receive an email containing the Management Console link with login credential. Follow
the steps:
- 28 -
Page 29

Chapter 5 - Trainer/Trainee Tasks
1. New user receives a welcome mail containing logon credential for the portal.
2. Launch the Immersive Competency Management Console URL
https://ic.skillsinsight.honeywell.com.
3. Click Sign in. Following is the Immersive Competency Login screen appears with a sample
captcha code.
- 29 -
Page 30

Chapter 5 - Trainer/Trainee Tasks
4. In the Username and Password fields, enter the credentials provided in the e-mail
respectively.
5.
Recognize the alphanumeric Captcha and enter in the field. Click for audio assistance if
required.
6. Click Sign in.
7. Trainer or Trainee must Logon to the Honeywell Competency Management - Immersive
Competency Management Console using the credentials.
8. You can opt to reset the default password. Click Change Password. For more information, see
the section Change Password.
You can next begin to configure your IC Client and then request VM with Experion PKS Server.
5.2 Change Password
User password is set to expire at 90 days from the day of reset. Hence, it is highly recommended to
update the password every 90 days using the Change Password option. Recommended best
practice is to logout from both IC Management Console and IC Application active sessions before
changing the password.
- 30 -
Page 31

Chapter 5 - Trainer/Trainee Tasks
1. You can opt to reset the default password. Click Change Password.
2. Enter Current and New Password and Click Save.
3. Password change is successful message is displayed. You are required to login again with
updated password.
5.3 Forgot Password
Starting from R101.1, you can request to reset your password in case you do not remember.
- 31 -
Page 32

1. Launch the IC Management Console.
Chapter 5 - Trainer/Trainee Tasks
2. Click Forgot Password ? The Forgot Password page appears.
3. Enter the Username received over the email in the User Id field and click Send OTP. A onetime password will be sent to the User Id.
4. Enter the OTP under the User Id field and click Verify OTP.
- 32 -
Page 33

Chapter 5 - Trainer/Trainee Tasks
You will receive a mail to your User id with a new password which can be modified if required.
5. Login with the new password.
- 33 -
Page 34

System Requirement Specification for Windows Mixed Reality Ultra PCs
Operating System Windows 10 Fall Creators Update (RS3) - Home, Pro,
CHAPTER
6
The augmented reality application- Honeywell Immersive Competency SM Application is available
in the Microsoft Store for Microsoft HoloLens, Mixed Reality Devices, and Desktop. This section
provides information about preparing and installing the IC Client application on Microsoft
HoloLens, Mixed Reality Devices, and Desktop.
You can download the Honeywell Immersive Competency SM application from the Microsoft
Store. Honeywell Immersive Competency SM application is independent of Skills Insight
Immersive Competency R101.1 application. You need not uninstall If Skills Insight Immersive
Competency R101.1 application is already installed on your device. However, make sure you
(Administrator) have availed Safety Manager features via Top-up option in the Management
Console.
l Desktop Requirement
l Microsoft HoloLens Requirement
l Installation of IC Client Application
6.1 Desktop
INSTALL ICAPPLICATION
Software Requirement
Minimum Windows 10 Version 1703 OS Build 15063
6.2 Mixed Reality Requirement
Honeywell Competency Management - Immersive Competency application is supported on
Windows Mixed Reality headset available till date. For more information about supported headset,
see https://www.microsoft.com/en-us/store/collections/vrandmixedrealityheadsets.
Following are the Honeywell qualified Windows Mixed Reality devices:
l Asus HC102
l Samsung HMD Odyssey
l HP VR1000-127il
l Dell Visor
l Acer AH101-D8EY
l Lenovo Explorer
6.2.1 System Requirements
Following table provide information about the system requirements to use Immersive
Competency application in Mixed Reality environment.
- 34 -
Page 35

System Requirement Specification for Windows Mixed Reality Ultra PCs
Business, Education.
NOTE Mixed Reality is not supported on N
versions or Windows 10 Pro in S Mode.
Processor Intel Core i5 4590 (4th generation), quad-core (or
better) AMD Ryzen 5 1400 3.4Ghz (desktop), quad-core
(or better)
RAM 8GB DDR3 (or better)
Free disk space At least 20 GB
Graphics Card NVIDIA GTX 1060 (or greater) DX12-capable discrete
GPU
AMD RX 470/570 (or greater) DX12-capable discrete
GPU
NOTE GPU must be hosted in a PCIe 3.0 x4+
Link slot. Hybrid graphics configurations are
compatible. Remember discrete card of hybrid
system must be similar specification as listed
in this table.
Graphics Driver Windows Display Driver Model (WDDM) 2.2
Graphics display port HDMI 2.0 or DisplayPort 1.2
Display Connected external or integrated VGA (800x600)
display (or better).
For better performance, use laptop with screen of
minimum 15 inches.
USB connectivity USB 3.0 Type-A or Type-C
Bluetooth
connectivity (for
motion controllers)
Bluetooth 4.0
Expected headset
framerate
90 Hz
Chapter 6 - Install ICApplication
For more information about the hardware requirement, see https://docs.microsoft.com/en-
us/windows/mixed-reality/enthusiast-guide/windows-mixed-reality-minimum-pc-hardwarecompatibility-guidelines.
- 35 -
Page 36

Chapter 6 - Install ICApplication
6.2.2 Enable Windows Mixed Reality Applications in the Enterprise
You can add Windows features packages known as Features on Demand (FOD) at any time. You
can request the feature package from Windows Update when a Windows 10 PC needs a new
feature. In case your organization uses Windows Server Update Services (WSUS), you must enable
the Windows Mixed Reality.
1. Windows 10 must be of latest version to enable Mixed Reality. You must be Verify and update
to latest version of Windows 10.
2. Windows Mixed Reality Feature on Demand (FOD) is downloaded from Windows Update. If
access to Windows Update is blocked, you must manually install the Windows Mixed Reality
FOD.
a. Select the FOD . cab file that matches your operating system version and download the
file from Windows 10, version 1809, Windows 10, version 1803, or Windows 10, version
1709.
b. Use Add-Package to add Windows Mixed Reality FOD to the image.
Add-Package
Dism /Online /add-package /packagepath:(path)
c. In Settings > Update & Security > Windows Update, click Check for updates.
For more information about enabling, see https://docs.microsoft.com/en-us/windows/application-
management/manage-windows-mixed-reality.
6.2.3 Set up Windows Mixed Reality
1. Pair the motion controllers.
NOTE Make sure plug-in a USB Bluetooth 4.0 adapter to enable motion controllers.
In case you plan to use an Xbox gamepad or mouse, you can skip this step.
- 36 -
Page 37

Chapter 6 - Install ICApplication
a. Press the Windows button for 2 seconds until the lights glow indicating controller is
powered on.
b. Remove the battery cover of the motion controller and find a small pairing button at the
edge of the controller. Follow the instructions on the Mixed Reality portal to pair the
controller with your PC.
The firmware on your controller is updated. Do not turn off your controller when the
update is in progress.
On update completion, controller will automatically restart, connection to the host is
established, and LED will glow bright constantly.
2. Choose either room-scale or desk-scale experience.
a. Desk-scale: You will confined to your desk and still be able to indulge in immersive reality
experience. You must select Set up for seated and standing option. No further
configuration is required.
b. Room-scale: You will be able to walk around the room and experience most immersive
reality motion. For this you must select Set me up for all experiences option. Make sure
to clear up space around to be able to move around. Center your headset and start
tracing the boundary. To complete the boundary keep the headset pointed towards your
PC. You will now be able to experience mixed reality in the defined boundary.
For more information, see https://docs.microsoft.com/en-us/windows/mixed-reality/enthusiast-
guide/set-up-windows-mixed-reality.
6.3 Microsoft HoloLens Configuration
l Microsoft HoloLens Prerequisite
l Pre-Installation Tasks
6.3.1 Microsoft HoloLens Prerequisite
Following are few recommendations required for using Microsoft HoloLens:
l Create a Microsoft account for HoloLens users to register the device. Choose to create new
email ID, for more information see https://support.microsoft.com/en-
in/help/4026324/microsoft-account-sign-up-for-a-microsoft-account.
l Make sure the HoloLens is charged.
l Wi-Fi network with internet connectivity.
l Supported web browser to connect to the device portal – Internet Explorer (IE) 11 (or higher)
and Google Chrome 60 (or higher).
For more information about the requirement, see https://docs.microsoft.com/en-
us/hololens/hololens-requirements.
6.3.2 Pre-Installation Tasks
Configure the Microsoft HoloLens. For more information about configuring Microsoft HoloLens,
see https://docs.microsoft.com/en-us/hololens/hololens-setup.
Following are the high-level tasks to configure HoloLens before installing the Skills Insight-IC
Client:
- 37 -
Page 38

Chapter 6 - Install ICApplication
1. Make sure the HoloLens is charged and turn on the device. Calibrate and learn gestures.
2. Connect to Wi-fi or hotspot with internet connectivity and register. For more information, see
https://docs.microsoft.com/en-us/windows/mixed-reality/connecting-to-wi-fi-on-hololens.
NOTE
Make sure connected Wi-fi network does not have any security restrictions and
enables connecting PC to remote virtual machine.
3. Select I own it and click Next.
a. Enter the account (Example: tony@outlook.com) for registration and click Next.
b. Enter the password and click Next.
Device time zone is updated based on the details obtained from the Wi-Fi network.
Connecting to Device Portal (optional)
To configure the device portal, make sure the HoloLens and the associated system (physical or
virtual) are connected to the same network. Configure the Device portal to Developer mode. For
more information about configuring device portal, see the sections Setting up HoloLens to use
Windows Device Portal and Connecting over Wi-Fi in https://docs.microsoft.com/en-
us/windows/mixed-reality/using-the-windows-device-portal. Make sure the HoloLens and the
associated physical system are connected to the same network.
6.3.3 Upgrade to Latest HoloLens Version
Make sure to install the Windows 10 October 2018 Update on the Microsoft HoloLens. To verify the
HoloLens version, go to Settings > System > About. If the current HoloLens version is lagging by
more than one version, then you must repeat the following update procedure until the HoloLens
is upgraded to the latest version.
Follow to check and install the latest version:
1. Make sure the HoloLens is connected to Wi-Fi and the device is atleast 40 percent charged,
else plug the device for charging.
2. Open the Settings.
3. Navigate to Update & Security > Windows Update.
4. Tap the Check for Updates. If any update is available, new version is automatically
downloaded.
5. Tap the Renew Now to begin the installation.
NOTE
Do not Turn OFF the HoloLens while the download and installation is in progress.
On successful completion of upgrade, the HoloLens restarts automatically.
6.4 Downloading and Installing Honeywell Immersive Competency
SM Application
You can download the Honeywell Immersive Competency SMClient application from the Microsoft
Store. Follow the steps to download the Honeywell Immersive Competency SM on Microsoft
HoloLens, Mixed Reality Device, or PC.
- 38 -
Page 39

Chapter 6 - Install ICApplication
1. Login to Microsoft HoloLens, Mixed Reality device, or PC.
2.
Launch the Microsoft Store and Sign in with your Microsoft Account.
3. In Apps tab, search for Honeywell Immersive Competency SM.
4.
Select Honeywell Immersive Competency SM and click . Download begins.
5.
Click .
The Honeywell IC SM client application is loaded into the IC Client (Microsoft HoloLens, Mixed
Reality device or PC).
- 39 -
Page 40

CHAPTER
7
Safety Manager is the logic solver of a Safety Instrumentation System (SIS) performing specific
Safety Instrumentation Functions (SIF) to ensure that risk are kept at predefined levels.
Honeywell Immersive Competency provides standard lessons that range from installing various
components onto the cabinet, connecting with Input and Output modules, establishing
communication between the Safety Manager and Safety Builder, injecting faults to replacements
of modules, to online modification in the assisted mode. However, provision to create custom
lesson are not available in this release. You will not be able to delete the Honeywell published
lessons.
SAFETY MANAGER SYSTEM
7.1 Launch the Honeywell Immersive Competency SM Application
You can launch the application:
1. Launch IC SM Application:
On the Mixed Reality Device:
a. Click Windows button
b. Select Honeywell Immersive Competency SM application from the Start menu.
If the Mixed Reality Portal configured and Controllers are paired, then the application
automatically opens in Mixed Reality environment.
On the Microsoft HoloLens:
- 40 -
Page 41

Chapter 7 - Safety Manager System
a. Bloom gesture.
b. Tap All Apps icon.
c. Locate and air-tap on the Honeywell Immersive Competency SM.
On the Desktop:
- 41 -
Page 42

l Click Start > Honeywell Immersive Competency SM.
Chapter 7 - Safety Manager System
2. Enter the following details and login to the application.
a. In the Username field, enter the Immersive Competency account.
b. In the Password field, enter the password.
c. Click Sign In.
The Dashboard appears.
3. In HoloLens, air-tap on specific area to place the dashboard.
4. On the Immersive Competency Dashboard, you can select one of the following actions:
Hardware or Lesson.
You can first select the Hardware option and familiarize with the various components involved in
building the Safety Manager hardware setup in the cabinet. Then you can select a lesson to start
learn about building a working Safety Manager cabinet.
7.2 Navigate in the IC Application
l Microsoft HoloLens
For more information about controls in Microsoft HoloLens, see
https://docs.microsoft.com/en-us/windows/mixed-reality/gestures .
l Desktop
- 42 -
Page 43

Chapter 7 - Safety Manager System
To navigate to the rear side of the cabinet use, follow the steps-
1. Press W key to zoom-in to view the wall.
2. Use combination of Ctrl + mouse left button to turn toward the rear side of the cabinet.
l MR devices
For more information about controls in MR, see https://docs.microsoft.com/en-
us/windows/mixed-reality/motion-controllers.
Additionally, for launching or selecting you must use the button located at the controller grip.
This button is accessible via index finger on holding the controllers.
7.3 Safety Manager Library Components
Following are the simulated hardware components available in the library (Mixed Reality/Microsoft
HoloLens/PC):
l Ethernet Cable
l BKM-Cable
l IO Chassis
l PSU-Module
l Power Supply
l QPP-Module
l USI-Module
l CP Chassis
l Network Switch
l Power Cable
l DI Termial
l DO Terminal
l Module AI
l AO Module
l DI Module
l DO Module
l AI Power Module
l AI Terminal
- 43 -
Page 44

Chapter 7 - Safety Manager System
l IO Power Cable
l Watchdog Cable
l IO Bus Extender
l Cross Cable
l Ethernet Cable- Yellow
l Flat Cable
7.4 Familiarize with Safety Manager Components
Before diving into learning how to build the Safety Manager cabinet, you may want to first learn
about the various hardware components that constitute the complete setup.
1. On the dashboard, click Hardware. The list of hardware setups are displayed.
2. Select / Tap the Component Familiarization.. option and click down-arrow adjacent to the title.
The selected hardware setup is downloaded.
- 44 -
Page 45

Chapter 7 - Safety Manager System
3. Click/Tap on the Play icon.
4. The Safety Manager Cabinet with various components is loaded.
- 45 -
Page 46

Chapter 7 - Safety Manager System
5. Click/ Tap on the circular marking on the cabinet to learn what the hardware module is.
- 46 -
Page 47

# System Type
Lesson
ID
Description
42 Safety
Manager
L01 Installation of Redundant controller chassis
Chapter 7 - Safety Manager System
6. Once you are familiar with all the components, turn left / Press S Key to view the Action pane.
7. Click/Tap on Exit.
8. Click/Tap Yes to confirm to exit the mode.
7.5 List of Safety Manager Lessons
Following are the list of lessons that you can use to learn about Safety Manager. Starting from
R200.1, lessons L01-L13 for Safety Manager system are available for learning.
- 47 -
Page 48

Chapter 7 - Safety Manager System
# System Type
Lesson
ID
Description
43 Safety
Manager
L02 Installation of Safety Manager control processor modules
44 Safety
Manager
L03 Installation of Redundant IO chassis
45 Safety
Manager
L04 Redundant DI module & FTA installation
46 Safety
Manager
L05 Redundant AI module & FTA installation
47 Safety
Manager
L06 Redundant DO module & FTA installation
48 Safety
Manager
L07 Power up Safety Manager cabinet and Load from Safety
Builder
49 Safety
Manager
L08 Fault injection & Replacement of QPP Module
50 Safety
Manager
L09 Fault injection & Replacement of USI Module
51 Safety
Manager
L10 Fault injection & Replacement of SDI-1624 Input Module
52 Safety
Manager
L11 Fault injection & Replacement of SAI-1620 Input Module
53 Safety
Manager
L12 Fault injection & Replacement of SDO-0824 Output
Module
54 Safety
Manager
L13 Online Modification
7.6 Learn Safety Manager through Standard Lessons
Lessons for Safety Manager consists of installing various components onto the cabinet,
connecting with Input and Output modules, establishing communication between the Safety
Manager and Safety Builder, injecting faults and replacements of modules, and online
modification. A Virtual Machine to Safety Builder is required to establish communication with
Safety Manager and learn how to replace modules and perform online modification. You must
request for a Safety Manager VM from the IC Management Console to proceed from lesson L07
onwards. For more information about request VM, see the section Requesting New Virtual
Machine and for information about establishing communication, see the section Establish
communication.
- 48 -
Page 49

Chapter 7 - Safety Manager System
1. On the dashboard, click Hardware. The list of hardware setups are displayed.
2. You can use the Right and Left arrows to view the complete list of lesson available. Select /
Tap the lesson you want to learn and click/Tap download icon adjacent to the title. The
selected lesson is downloaded.
3. Click/Tap on the Play icon.
- 49 -
Page 50

Chapter 7 - Safety Manager System
4. Instructions to proceed with the lesson are displayed on the cabinet.
5. You will be able to see a blinking circle on the component required to perform the step. Click/
Tap on the appropriate component in the library.
- 50 -
Page 51

Chapter 7 - Safety Manager System
The component appears in the space between the library and the cabinet. You are also
prompted the location where the component must be placed in the cabinet by the yellow
glowing circle.
6. Click/ Tap on the prompted location to fit the component into the cabinet.
7. Follow the instructions. You may have to literally go to the back panel to perform few steps.
8. Once you have completed all the steps, turn left/Press A key to view the action pane.
9. Click/Tap on Finish.
- 51 -
Page 52

Chapter 7 - Safety Manager System
10. Message indicating completing of the lesson appears.
7.7 Requesting New Virtual Machine with Experion PKS or Safety
Manager
Starting with R200, you can request for both Experion PKSand Safety Manager systems based on
your License and training module.
You can request for Experion PKS/Safety Manager Virtual Machine to configure and view the state
changes that occurs as a result of changes in the hardware setup. Each Trainee is assigned with
an individual Safety Manager VM. VM assignment is initiated and FQDN is displayed. You must
connect remotely to the Safety Manager through remote session within 30 minutes of VM
assignment. If there is a delay more than 30 minutes, then the VM is released to the resource pool.
Experion VM is also returned to the pool resource in case VM is idle for 30 days.
You can perform the following activity in the System Management:
l Start - For the first instance, request for Virtual Machine assignment. During subsequent
instance, you can start the VM in case it is shutdown.You will receive an email notifying about
the allocation of the VM along with FQDN required to connect remotely to the system.
l Stop - Shutdown the VM. However, VM is still assigned to the requested user. You will receive
an email notifying that you must Start the VM from the Management Console.
l Delete - You can return the VM to the resource pool on completion of tasks in Safety Builder. If
the VM is idle for 30 days, then it is automatically deleted. In both the case, VM will disassociated
from the assigned user. You must request for new VM using Start option. You will receive an
email notifying that assign VM is deleted and you must initiate the VM request process from the
Management Console.
l Refresh - Fetches the latest system detail.
- 52 -
Page 53

Chapter 7 - Safety Manager System
7.8 Requesting for VM with Experion PKS or Safety Manager
1.
On the Management Console, click System Management.
2.
Click . You will be redirected to the Virtual Machine Status
page.
3.
Click Add New System or . The Configure New System dialog appears.
4. Select the system required and set the credentials to access the system from the remote
desktop.
a. In the System field, select either Experion PKS or Safety Manager system based on the
training requirement.
b. In the User Name field, enter a name. The User Name can be different from the IC Login
account.
c. In the Password field, create a password which meet the following criteria: Minimum
length of 14 characters containing minimum of one uppercase and one lowercase
alphabet, one number, and one special character.
d. In the Confirm Password field, reenter the password provided above.
NOTE
It is recommended to make note of the User Name and Password required for
remotely connecting to Experion PKS or Safety Manager VM.
e. Click Save.
- 53 -
Page 54

Chapter 7 - Safety Manager System
5. Process begins to identify, provision, and assign the VM. You will receive an email confirming
the assignment and instruction for next action.
6. Click Download button to download the RDP file. This RDP file is valid for only 15 minutes.
However, you can download the RDP file multiple times.
- 54 -
Page 55

Chapter 7 - Safety Manager System
NOTE
Make sure you connect to assigned VM within 30 minutes from assignment. After
30 minutes, VM will be released to the resource pool and you must restart the
request again.
Once VM is assigned, remotely connect to Experion PKS/SafetyManager system from thinclient. This session is active for an hour, after that you must re-download the RDP file and
establish the connection afresh.
7. Connect to Experion PKS Server / Safety Manager VM:
a. On the desktop (thin-provisioned), click Start button. Launch Run, enter mstsc and click
OK.
b. Enter (or copy-paste) the complete FQDN displayed in Step 3.
c. Click Connect.
d. Trust the remote connection and click Connect.
- 55 -
Page 56

Chapter 7 - Safety Manager System
e. Click Other user and enter credentials created in Step 4 and OK.
f. Click Yes.
Or
a. Click Download. A Default.rdp is downloaded to connect to Safety Manager Server.
b. Click Default.rdp and click Connect. Enter Your Credentials dialog appear. In R200.1,
superuser is considered for login by default.
c. Click More Choice > Use a different User and enter the user credentials created in Step
4.
d. Click OK.
8. For Safety Manager system, you will be able to view system configuration details displayed on
the Desktop. The displayed information CP1 IP Address and CP2 IP Address are required to
complete the configuration in Safety Builder.
You can begin to view and learn how hardware faults and changes impact the state change in
C300 controller status in the Control Builder. For more information about C300 lessons to learn,
see the section Lessons.
- 56 -
Page 57

Chapter 7 - Safety Manager System
7.9 Export Training Modules from IC Management Console
Honeywell Competency Management - Immersive Competency provides Training Modules. You
must export the to import the control strategies to Experion PKS Server.
You can also create new custom modules as per the requirement. Training modules must be
created using IC Client Application on Microsoft HoloLens/PC. In IC Client Application Training
Modules are termed as Lessons. You can import these modules into Skills InsightIC Management
Console and publish. Assign the modules to the trainer or trainee. Make sure to add Experion
configurations files to each module. For more information about creating new Training Module
(Lesson), see the section How to Create New Lesson.
7.10 Exporting Training Modules
Training modules created can be exported from IC Management Console. The associated control
strategy required to complete the lesson must be imported into the Control Builder.
1. On the Honeywell Competency Management - Immersive Competency Dashboard, click
Training Modules.
2. From the System Type drop-down, select Experion.
3.
Select the module to export and click .
7.11 Establishing Connection between Safety Manager and Safety
Builder
Once the complete virtual Safety Manager hardware setup is created in the IC application, you
must proceed to establish a connection between the Safety Manager and Safety Builder. For doing
this, you must first request for SM Virtual Machine that contain the Safety Builder component. For
more information about requesting SM system, see the section Requesting Safety Builder System.
7.11.1 On Safety Builder system
1. Launch the Safety Builder and create a new project.
a. Start > Honeywell > Safety Builder.
b. Click New Project.
c. Enter the Plant name to replicate the plant hierarchy in the Safety system.
d. Click OK.
2. Component View:
- 57 -
Page 58

Chapter 7 - Safety Manager System
a. In the Component pane, right-click the plant created in Step (1a) and select Restore
Configuration.
b. Browse to the location where the Training Module that was exported from the
Management Console is saved.
c. Select the backup file with extension BAK.
d. Confirm the file selection and click OK.
3. Create a Physical View:
a. Click Physical View.
b. Drag and drop Safety Builder.
c. Click Physical Network. Change the Interface option to Ethernet. Provide justification for
the change and click OK.
d. Drag and drop SM Controller.
l General Tab
1. In Controller Architecture field, select either redundant or non-redundant option
based on your system.
2. Select the Remote Load Enable checkbox.
3. Select the Load to Simulation Environment checkbox.
4. In the IP Address field, enter the CP1IP address displayed on the SB desktop.
l COM Module 1 Tab
Based on the CP1 Address and CP2 Address assigned to the Safety Manager system,
enter IP Address and Gateway Address respectively.
- 58 -
Page 59

Chapter 7 - Safety Manager System
l COMModule 2 Tab
Select USI-0002 option.
- 59 -
Page 60

e. Click OK.
4. Create a Logical View. Click Generate Logical View.
5. Create a Hardware Configurator.
NOTE Make sure SM Controller is selected in the Network Configurator before
navigating to Hardware Configurator.
The controller modules are loaded based on the BAK file imported into Safety Builder and the
corresponding setup is displayed.
6. In the left-pane, click Application Compiler. A message is displayed.
7. Click Yes to confirm the compilation request. Compilation begins and justification for the action
for audit purpose is demanded.
8. Enter justification for the request and click OK.
After the application is successfully compiled, launch lesson from IC application.
7.11.2 On the IC SM Application
Chapter 7 - Safety Manager System
1. Launch lesson from IC SM application.
2. Turn QPP Key Switch from Stop to Idle position.
A message stating "Powered up waiting to load." is displayed.
When the QPPis in Idle state, you must create a connection between the Safety Manager
component and Safety Builder elements.
7.11.3 On the Safety Builder system
1. In the left-pane, click Online.
2. In the center-pane, click Controller Management.
3. Click Load Controller.
4. Right-click the controller and select Temporary Connect (Ethernet) option.
5. Click Start.
6. Load the Virtual Controller.
You will be able to view the load status in the ICApplication.
7.11.4 On the IC SM Application
A message stating Loading is displayed.
On successfully loading the virtual controller, you will be able to see Controller status as Halt with
Flt. After making the temporary connection, USI module status LED will be stable.
1. Now turn QPP Key Switch from Idle to Run position.
A message stating QP Ready is displayed.
2. Reset the BKM module.
Controller status will now be Running with Flt.
- 60 -
Page 61

Chapter 7 - Safety Manager System
7.12 Troubleshoot
7.12.1 Management Console
Service not available
Problem: License Management page displays the Service not running error message.
Solution: Refresh the Management Console (Ctrl + F5).
7.12.2 IC Client Application
Login failure
Problem: Unable to login to the Immersive Competency application.
Cause: Delay in fetching or validating the user credentials due to slow network speed.
Solution: Wait until the application response or provide the credentials and log in again.
Cabinet is above your eye-level in the Mixed Reality environment
Problem: In your Mixed Reality environment cabinet and other hologram would appear above your
eye-level causing discomfort in performing the operation.
Cause: In case you have changed the location, then the previous environment setting would not
match the dimension of your current environment.
Solution: Reset the environment to the current location, and verify the actual ground matches the
ground in Mixed Reality.
Follow the steps to reset the environment:
- 61 -
Page 62

Chapter 7 - Safety Manager System
1. Open the Mixed Reality Portal.
2. Click ellipses at the bottom-left corner and select Settings. The Settings page appears.
3. In the left-pane, click Environment. In the center-pane, click Clear environment data.
- 62 -
Page 63

CHAPTER
8
Perform the following to uninstall the IC client application:
On Microsoft HoloLens:
You can uninstall application either directly in HoloLens or through Device portal.
1. Bloom gesture.
2. Tap on All Apps, gaze at the Honeywell Immersive Competency SM.
UNINSTALL IC CLIENT APPLICATION
3. Tap and hold until menu appears.
4. Tap Uninstall.
- 63 -
Page 64

Chapter 8 - Uninstall IC Client Application
On PC and Mixed Reality Device :
1. Click Start and locate Honeywell Immersive Competency SM.
2. Right-click the Honeywell Immersive Competency SM and click Uninstall.
3. Click Uninstall.
- 64 -
Page 65

9.1 Downloading and Installing IC Client Application 65
9.2 Use IC Client Application 66
9.3 Learn Experion PKS Through Standard Lessons 72
9.4 Open Standard Hardware Setup 101
9.5 Create New Hardware or Lesson for Experion PKS 103
9.6 Export Hardware Modules or Lessons 107
9.7 Import Hardware Setup or Lessons 108
9.8 Delete Hardware or Lessons 109
9.9 Troubleshoot 110
9.10 Appendix: SIM C300 Icons 112
CHAPTER
9
EXPERION PKS SYSTEM
9.1 Downloading and Installing IC Client Application
You can download the Honeywell Immersive Competency SMClient application from the
Microsoft Store. Follow the steps to download the Honeywell Competency Management Immersive Competency on Microsoft HoloLens, Mixed Reality Device, or PC.
NOTE
In case you have previous version of Honeywell Competency Management - Immersive
Competency application installed, then complete the uninstallation first. For more
information about uninstall, see the section Uninstall IC Application.
1. Login to Microsoft HoloLens, Virtual Reality device, or PC.
2.
Launch the Microsoft Store and Sign in with your Microsoft Account.
3. In Apps tab, search for Honeywell Competency Management - Immersive Competency.
4. Select Honeywell Competency Management - Immersive Competency and click
- 65 -
Page 66

Chapter 9 - Experion PKS System
. Download begins.
5.
Click .
The Skills Insight – IC Client components are loaded into the IC Client (Microsoft HoloLens, Mixed
Reality device or PC).
9.2 Use IC Client Application
After installing and configuring Skills Insight IC - application and creating users, Trainers/Trainees
can proceed to use the solution in Microsoft HoloLens/PC. Honeywell Competency Management Immersive Competency provides standard hardware setups and lessons to start exploring the
learning options. 3D hologram of hardware modules are available to create new hardware setup
and lesson to enhance the experience. New SIM C300 icons are introduced in Control Builder to
indicate the state changes that is affected based on trigger in the hardware modules. For more
information about 3D holograms for hardware, see Simulated Modules. For more information
about new SIM C300 icons, see SIM C300 Icons.
9.2.1 Launch the IC Application for Experion PKS
You can launch the application:
- 66 -
Page 67

1. Launch IC Application:
On the Mixed Reality Device:
a. Click Windows button
Chapter 9 - Experion PKS System
b. Select Skills Insight Immersive Competency application from the Start menu.
If the Mixed Reality Portal configured and Controllers are paired, then the application
automatically opens in Mixed Reality environment.
On the Microsoft HoloLens:
- 67 -
Page 68

Chapter 9 - Experion PKS System
a. Bloom gesture.
b. Tap All Apps icon.
c. Locate and air-tap on the Skills Insight Immersive Competency.
- 68 -
Page 69

Chapter 9 - Experion PKS System
On the Desktop:
l Click Start > Skills Insight Immersive Competency.
2. Enter the following details and login to the application.
a. In the Username field, enter the Immersive Competency account.
b. In the Password field, enter the password.
c. Click Sign In.
- 69 -
Page 70

Chapter 9 - Experion PKS System
The Skills Insight-IC Dashboard appears.
3. In HoloLens, air-tap on specific area to place the dashboard.
4. On the Skills & Safety - IC Dashboard, you can select one of the following actions: Hardware or
Lesson.
Based on the selection, a list of hardware setups or lessons is displayed.
You can first select the Hardware option and familiarize with the various components
involved in building the Safety Manager hardware setup in the cabinet. Then you can
select the lesson to learn about building a working Safety Manager cabinet.
9.2.2 Navigate in the IC Application
l Microsoft HoloLens
For more information about controls in HoloLens, see https://docs.microsoft.com/en-
us/windows/mixed-reality/gestures .
l Desktop
- 70 -
Page 71

l MR devices
Icons Label Description
Plug Insert a new AI, AO, C300, CF9, DI, DO - IOTA
boards, Series -C modules, or network cables
onto the cabinet.
Half screw Tighten the screw half-way through to hold onto
the board.
For more information about controls in MR, see https://docs.microsoft.com/en-
us/windows/mixed-reality/motion-controllers.
9.2.3 Library Components
Chapter 9 - Experion PKS System
Following are the simulated hardware components available in the library (Microsoft
HoloLens/PC):
l Cabinets - Device Holder/Rack, Series-C Cabinet, Switch Cabinet/Rack
l Series C IOTA - AI, AO, C300, CF9, DI, DO
l Series C Modules - AI, AO, C300, CF9, DI, DO
l Network Cables - 4-20 mA cable, C300 Battery Cable, FTE Green, FTE Yellow, IO Grey-Green, IO
Grey-Yellow, IO Violet-Green, IO Violet-Yellow, Redundancy
l Miscellaneous - C300 Battery, Cabinet Power Supply, Fuse
l Field Devices - Control Valve, Pressure Transmitter
l Switches - CISCO-2960-24
9.2.4 Limitations
l Series C - AI/AO redundant infrastructure can be created, however system interaction is not
supported in this version.
9.2.5 Actions to Perform in C300 Cabinet
When you are performing lesson task in any of the mode or creating new hardware setup/lesson,
based on the module selected you will view following menu. Following table provides brief
description for each menu.
- 71 -
Page 72

Icons Label Description
Screw Tighten the screw C300 controller, CF9 or IOTA
board completely onto the board.
Swap Interchange the ports to which the black and
red cables are currently connected in the
assembly.
Hard Reset Forced IOM module initiation.
Turn on Power ON the Fuse, IOTA board, Power Supply,
or modules.
Inject Fault Inject menu-based faults to the selected
hardware component.
Unplug Unplug to remove IOTA or module from the
cabinet.
Unscrew Loosen the screw to aid the removal of C300
controller, CF9, or IOTA board.
Delete Endpoint Delete the specific cable endpoint.
Delete Throw the unplugged faulty cable, module,
IOTA, power supply, or fuse.
Turn OFF Power OFF the Power Supply, Fuse, IOTA, or
modules.
Delete Delete the complete network cable.
Chapter 9 - Experion PKS System
9.3 Learn Experion PKS Through Standard Lessons
Honeywell Competency Management - Immersive Competency provides Standard lessons. You
can learn how to perform maintenance task in one of the following modes. You can start with
Show Me mode which demonstrates step-by-step sequence how to rectify the induced faults. You
can also create new lesson to cater to the custom requirement. For more information about
- 72 -
Page 73

creating lesson, see the section How to Create New Lesson.
#
System
Type
Lesson
ID
Description
1 Experion L01 Non-Redundant C300 with Control Firewall installation and
Configuration
2 Experion L02 Redundant C300 with Control Firewall installation and
Configuration
3 Experion L03 Faulty C300 controller Module replacement (non-redundant)
with same firmware
4 Experion L04 Faulty C300 controller Module replacement (redundant partner)
with same firmware
5 Experion L05 Faulty C300 controller IOTA (non-redundant) replacement (no
battery backup)
6 Experion L06 Faulty C300 controller IOTA (redundant partner) replacement
7 Experion L07 C300 controller (redundant partner) fuse replacement
8 Experion L08 C300 controller (non-redundant) fuse replacement (no battery
backup)
9 Experion L09 Faulty Control Firewall (CF9) module replacement
10 Experion L10 Faulty Control Firewall (CF9) IOTA replacement
11 Experion L11 Series-C cabinet faulty power supply (redundant partner)
replacement
12 Experion L12 C300 controller battery replacement
13 Experion L13 C300 with Series-C AI installation and configuration
14 Experion L14 C300 with Series-C AO installation and configuration
15 Experion L15 C300 with Series-C DI installation and configuration
16 Experion L16 C300 with Series-C DO installation and configuration
17 Experion L17 Add AI device (2-wire transmitter) in Series-C IO spare channel
18 Experion L18 Add AO device in Series-C IO spare channel
19 Experion L19 Add DI device in Series C IOspare channel
20 Experion L20 Add DO device in Series C IOspare channel
21 Experion L21 Add AI device in Series C IOspare channel with junction box
22 Experion L22 Add AO device in Series C IOspare channel with junction box
23 Experion L23 Add DI device in Series C IOspare channel with junction box
24 Experion L24 Add DO device in Series C IOspare channel with junction box
25 Experion L25 Swap wire connection Fault fixing at AI IOTA
26 Experion L26 Swap wire connection Fault fixing at DO IOTA
You must perform following steps in section 6.2 through 6.5 to complete a lesson.
9.3.1 List of Experion PKS Lessons
Following are the list of lesson that you can view in Show Me, Help Me, and Try Me modes.
Chapter 9 - Experion PKS System
- 73 -
Page 74

#
System
Type
Lesson
ID
Description
27 Experion L27 Swap wire connection Fault fixing at AO IOTA
28 Experion L28 Disconnecting cable end points from Junction Box which is
connected to DI device
29 Experion L29 Disconnecting cable end points from Junction Box which is
connected to DO device
30 Experion L30 Faulty AI IOTA replacement
31 Experion L31 Faulty AO IOTA replacement
32 Experion L32 Faulty DI IOTA replacement
33 Experion L33 Faulty DO IOTA replacement
34 Experion L34 Faulty AI Module replacement
35 Experion L35 Faulty AO Module replacement
36 Experion L36 Faulty DI Module replacement
37 Experion L37 Faulty DO Module replacement
38 Experion L38 Open Wire identification and recovery for AI device
39 Experion L39 Open Wire identification and recovery for AO device
40 Experion L40 Open Wire identification and recovery for DI device
41 Experion L41 Open Wire identification and recovery for DO device
Chapter 9 - Experion PKS System
9.3.2 Export Training Modules from IC Management Console
Honeywell Competency Management - Immersive Competency provides Training Modules. You
must export the to import the control strategies to Experion PKS Server.
You can also create new custom modules as per the requirement. Training modules must be
created using IC Client Application on Microsoft HoloLens/PC. In IC Client Application Training
Modules are termed as Lessons. You can import these modules into Skills InsightIC Management
Console and publish. Assign the modules to the trainer or trainee. Make sure to add Experion
configurations files to each module. For more information about creating new Training Module
(Lesson), see the section How to Create New Lesson.
9.3.3 Exporting Training Modules
Training modules created can be exported from IC Management Console. The associated control
- 74 -
Page 75

Chapter 9 - Experion PKS System
strategy required to complete the lesson must be imported into the Control Builder.
1. On the Honeywell Competency Management - Immersive Competency Dashboard, click
Training Modules.
2. From the System Type drop-down, select Experion.
3.
Select the module to export and click .
9.3.4 Requesting New Virtual Machine with Experion PKS or Safety Manager
Starting with R200, you can request for both Experion PKSand Safety Manager systems based on
your License and training module.
You can request for Experion PKS/Safety Manager Virtual Machine to configure and view the state
changes that occurs as a result of changes in the hardware setup. Each Trainee is assigned with
an individual Safety Manager VM. VM assignment is initiated and FQDN is displayed. You must
connect remotely to the Safety Manager through remote session within 30 minutes of VM
assignment. If there is a delay more than 30 minutes, then the VM is released to the resource pool.
Experion VM is also returned to the pool resource in case VM is idle for 30 days.
You can perform the following activity in the System Management:
l Start - For the first instance, request for Virtual Machine assignment. During subsequent
instance, you can start the VM in case it is shutdown.You will receive an email notifying about
the allocation of the VM along with FQDN required to connect remotely to the system.
l Stop - Shutdown the VM. However, VM is still assigned to the requested user. You will receive
an email notifying that you must Start the VM from the Management Console.
l Delete - You can return the VM to the resource pool on completion of tasks in Safety Builder. If
the VM is idle for 30 days, then it is automatically deleted. In both the case, VM will disassociated
from the assigned user. You must request for new VM using Start option. You will receive an
email notifying that assign VM is deleted and you must initiate the VM request process from the
Management Console.
l Refresh - Fetches the latest system detail.
9.3.5 Requesting for VM with Experion PKS or Safety Manager
1.
On the Management Console, click System Management.
2.
Click . You will be redirected to the Virtual Machine Status
page.
3.
Click Add New System or . The Configure New System dialog appears.
- 75 -
Page 76

Chapter 9 - Experion PKS System
4. Select the system required and set the credentials to access the system from the remote
desktop.
a. In the System field, select either Experion PKS or Safety Manager system based on the
training requirement.
b. In the User Name field, enter a name. The User Name can be different from the IC Login
account.
c. In the Password field, create a password which meet the following criteria: Minimum
length of 14 characters containing minimum of one uppercase and one lowercase
alphabet, one number, and one special character.
d. In the Confirm Password field, reenter the password provided above.
NOTE
It is recommended to make note of the User Name and Password required for
remotely connecting to Experion PKS or Safety Manager VM.
e. Click Save.
- 76 -
Page 77

Chapter 9 - Experion PKS System
5. Process begins to identify, provision, and assign the VM. You will receive an email confirming
the assignment and instruction for next action.
6. Click Download button to download the RDP file. This RDP file is valid for only 15 minutes.
However, you can download the RDP file multiple times.
- 77 -
Page 78

Chapter 9 - Experion PKS System
NOTE
Make sure you connect to assigned VM within 30 minutes from assignment. After
30 minutes, VM will be released to the resource pool and you must restart the
request again.
Once VM is assigned, remotely connect to Experion PKS/SafetyManager system from thinclient. This session is active for an hour, after that you must re-download the RDP file and
establish the connection afresh.
7. Connect to Experion PKS Server / Safety Manager VM:
a. On the desktop (thin-provisioned), click Start button. Launch Run, enter mstsc and click
OK.
b. Enter (or copy-paste) the complete FQDN displayed in Step 3.
c. Click Connect.
d. Trust the remote connection and click Connect.
- 78 -
Page 79

Chapter 9 - Experion PKS System
e. Click Other user and enter credentials created in Step 4 and OK.
f. Click Yes.
Or
a. Click Download. A Default.rdp is downloaded to connect to Safety Manager Server.
b. Click Default.rdp and click Connect. Enter Your Credentials dialog appear. In R200.1,
superuser is considered for login by default.
c. Click More Choice > Use a different User and enter the user credentials created in Step
4.
d. Click OK.
8. For Safety Manager system, you will be able to view system configuration details displayed on
the Desktop. The displayed information CP1 IP Address and CP2 IP Address are required to
complete the configuration in Safety Builder.
You can begin to view and learn how hardware faults and changes impact the state change in
C300 controller status in the Control Builder. For more information about C300 lessons to learn,
see the section Lessons.
- 79 -
Page 80

Chapter 9 - Experion PKS System
9.3.6 Establishing Connection between C300 and Control Builder
After the Expreion PKS VM is assigned, you must establish connection between the C300
hardware (cabinet and modules build in IC application) and Control Builder to understand how the
status change in hardware results in the soft status changes and the implications.
1. Connect to Experion PKS Server:
a. Click Download. A Default.rdp is downloaded to connect to Experion PKS Server.
b. Click Default.rdp and click Connect. Enter Your Credentials dialog appear.
c. In case logged in user is selected, click More Choice > Use a different User and enter the
user credentials created while requesting for the system.
d. Click OK.
2. Click OK if following notice is displayed.
3. Your prompted to install Windows Updates, you can ignore the updates. Click View Details and
close the dialog.
4. Open Configuration Studio, click Start > Honeywell Experion Tools >Configuration Studio.
- 80 -
Page 81

5. Select the Experion PKS 500.2 and click Connect.
Chapter 9 - Experion PKS System
6. In the Configuration Studio, select Control Strategy > Configure process control strategies.
7.
From the Task Bar, launch . The Control Builder - Library appears.
8. In the Project - Assignment pane, strategy for non-redundant C300 controller is displayed.
9.3.7 Import Control Strategies to Control Builder
Assumption: You have requested for Experion PKS VM and connected to an active remote session.
For more information, see System Management.
Preparation to begin lessons L03 through L41:
- 81 -
Page 82

Chapter 9 - Experion PKS System
1. From the Experion PKS machine login to the Management Console and click Training
Modules.
2. Select the lesson and click Export. A Download.zip file containing the Control Strategy is
downloaded.
3. Extract the contents of the Download.zip and import the control strategies from Control
Builder.
4. In Control Builder, go to File > Import. The Import dialog box appears.
5. Click Browse and navigate to the location where the <download_location>\Download\Setup
folder containing the saved strategy.
6. Under the Available Objects For Import, select the strategy and click Select. Click Import.
7. In Project tab of Control Builder, right-click the controller (Example: C300_NR) and select
Module Properties.
8. In the Main tab, perform the following:
- 82 -
Page 83

Chapter 9 - Experion PKS System
a. Scroll-down to Simulation Node Configuration section.
b. Select Load to simulation Environment check box.
c. In the Host IP Address field, enter the IP Address of the Experion PKSServer.
d. Click OK.
9.3.8 Open Lesson
You can open lesson in following three modes:
- 83 -
Page 84

Chapter 9 - Experion PKS System
Plugging in Hardware Modules
You can plug-in IOTA, modules, network switches, or field devices in two scenarios. First when you
are creating a new hardware infrastructure and second when you are replacing a faulty hardware
module. However, to plug-in the hardware in second scenario requires you to perform one
additional task. The additional task is to select the target location to plug-in the module and then
select (click or air-tap) the module to view the menu options.
For example, when you are replacing faulty IOTA, you must first unplug the C300 and network
cables plugged into the IOTA. After replacing the faulty IOTA, before plugging in C300 or network
cable, you must first select the target IOTA location and then select (click or air-tap) the unplugged
C300 or cable to view the menu to select the action.
- 84 -
Page 85

Chapter 9 - Experion PKS System
Show Me
In Show Me mode, you can view the sequence of action that must be performed in other to
complete the lesson. During the course of each lesson you must perform few configuration steps
in the Control Builder.
1. Click or air-tap Lesson in the Dashboard.
2. Select the lesson and click Show Me
3. Warning to wait until controller boot-up is displayed.
- 85 -
Page 86

Chapter 9 - Experion PKS System
4. Warning to perform the selected lesson only if secondary controller is faulty is displayed.
5. Hardware loading process begins.
- 86 -
Page 87

6. Hardware for the selected lesson is loaded.
Chapter 9 - Experion PKS System
7. Instruction to be performed in the Experion PKS - Control Builder is displayed.
At this point, all the controllers and CF9s starts booting up, LED blinks, alphanumeric display
on the controller shows the boot sequence. Note the IP address of the controller at the end of
boot sequence should show 12.12.12.X with status as “NODB” (X is the device index set on the
controller and 12.12.12.0 is the base IP set in control builder. If base IP set is different, the IP
will show as per the defined base IP in the control builder).
8. View the next steps that are automatically displayed sequentially.
9. Task to perform from the Control Builder.
- 87 -
Page 88

Chapter 9 - Experion PKS System
For more information about the controller status representation, see Appendix.
10. Click Ok.
Help Me
In Help Me mode, you will be prompted with action that must be performed at each step. During
the course of each lesson you might have to perform few configuration steps in the Control
Builder. Following procedure shows the steps for Lesson - L03 Faulty C300 controller Module
replacement (non-redundant) with same firmware in Help Me mode as an example.
- 88 -
Page 89

1. Click or air-tap Lesson in the Dashboard.
Chapter 9 - Experion PKS System
2. Select the lesson and click Help Me.
3. Warning to wait until controller boot-up is displayed.
- 89 -
Page 90

Chapter 9 - Experion PKS System
4. Warning to perform the selected lesson only if secondary controller is faulty is displayed.
5. Hardware loading process begins.
- 90 -
Page 91

6. Hardware for the selected lesson is loaded.
Chapter 9 - Experion PKS System
7. Instruction to be performed in the Experion PKS - Control Builder is displayed.
- 91 -
Page 92

Chapter 9 - Experion PKS System
At this point, all the controllers and CF9s starts booting up, LED blinks, alphanumeric display
on the controller shows the boot sequence. Note the IP address of the controller at the end of
boot sequence should show 12.12.12.X with status as “NODB” (X is the device index set on the
controller and 12.12.12.0 is the base IP set in control builder. If base IP set is different, the IP
will show as per the defined base IP in the control builder).
8. Click or air-tap Turn off the fuse.
9. Click or air-tap Unscrew to loosen the side screws.
- 92 -
Page 93

Chapter 9 - Experion PKS System
10. Click or air-tap Unscrew the middle screw.
11. Click or air-tap Unplug Device to detach the controller from IOTA. Do not delete the device
before unplugging.
- 93 -
Page 94

Chapter 9 - Experion PKS System
12. Click or air-tap Delete to dispatch the faulty controller. A message confirming the delete action
appears. Click OK.
13. Select a new controller from the Library and add it in the cabinet.
- 94 -
Page 95

a. Prompt to add new controller.
Chapter 9 - Experion PKS System
b. Turn left to view the modules in the Library.
14. Click or air-tap Plug Device to add the Controller on to the IOTA.
- 95 -
Page 96

Chapter 9 - Experion PKS System
15. Click or air-tap Screw to tighten the center screw.
16. Click or air-tap Screw to tighten the side screws.
- 96 -
Page 97

Chapter 9 - Experion PKS System
17. Click or air-tap Turn on the fuse. Replacing the faulty hardware component is complete. Now
you must enable synchronization from the Control Builder.
18. Task to perform from the Control Builder.
- 97 -
Page 98

Chapter 9 - Experion PKS System
19. Click Ok.
For more information about the controller status representation, see Appendix.
20. Turn left and click/air-tap Lessons to go back to list of lessons.
21. Click Ok confirming the action.
- 98 -
Page 99

Chapter 9 - Experion PKS System
Try Me
1. On the dashboard, click Lesson. The list of lessons is displayed.
2. Select the Lesson and click Try Me.
3. Complete the task based on learning in Show Me and Help Me modes. For more information
about the controller status representation, see Appendix.
4. Once tasks in lesson are complete, Lesson Finish message appears. Click Ok.
5. Turn left and in the Action Manager, click Finish Lesson.
6. Click Ok to confirm the lesson completion.
7. Summary of the lesson and status is displayed.
8.
Click Close.
- 99 -
Page 100

User Lesson Status
Administrator/Trainer View the lesson cumulative lesson status report and status for individual
user and self.
Trainee View the status of completed vs pending.
Chapter 9 - Experion PKS System
9.
Click Lessons to go back to the list of lessons or click Home to go back the dashboard.
10. Click Ok to confirm the action.
The Summary section on the IC Application dashboard is updated based on the lesson status. If
lesson is completed successfully, count under Completed increases and count under Not Started
decreases. If unable to complete the lesson successfully due to incorrect steps performed,
interrupted, or aborted, then count would increase under Incompleted and still decrease under
Not Started.
Pictorial representation and report of the Lesson status can be viewed in the IC Management
Console-Lesson Status option. For more information, see Lesson Status.
9.3.9 Lesson Status
Pictorial representation of the lesson status is displayed. You can export Lesson status to PDF
format. You can view the current status of the training, number of lessons completed and pending
against total number of lessons.
Administrator/Trainer View
- 100 -
 Loading...