

Page 1
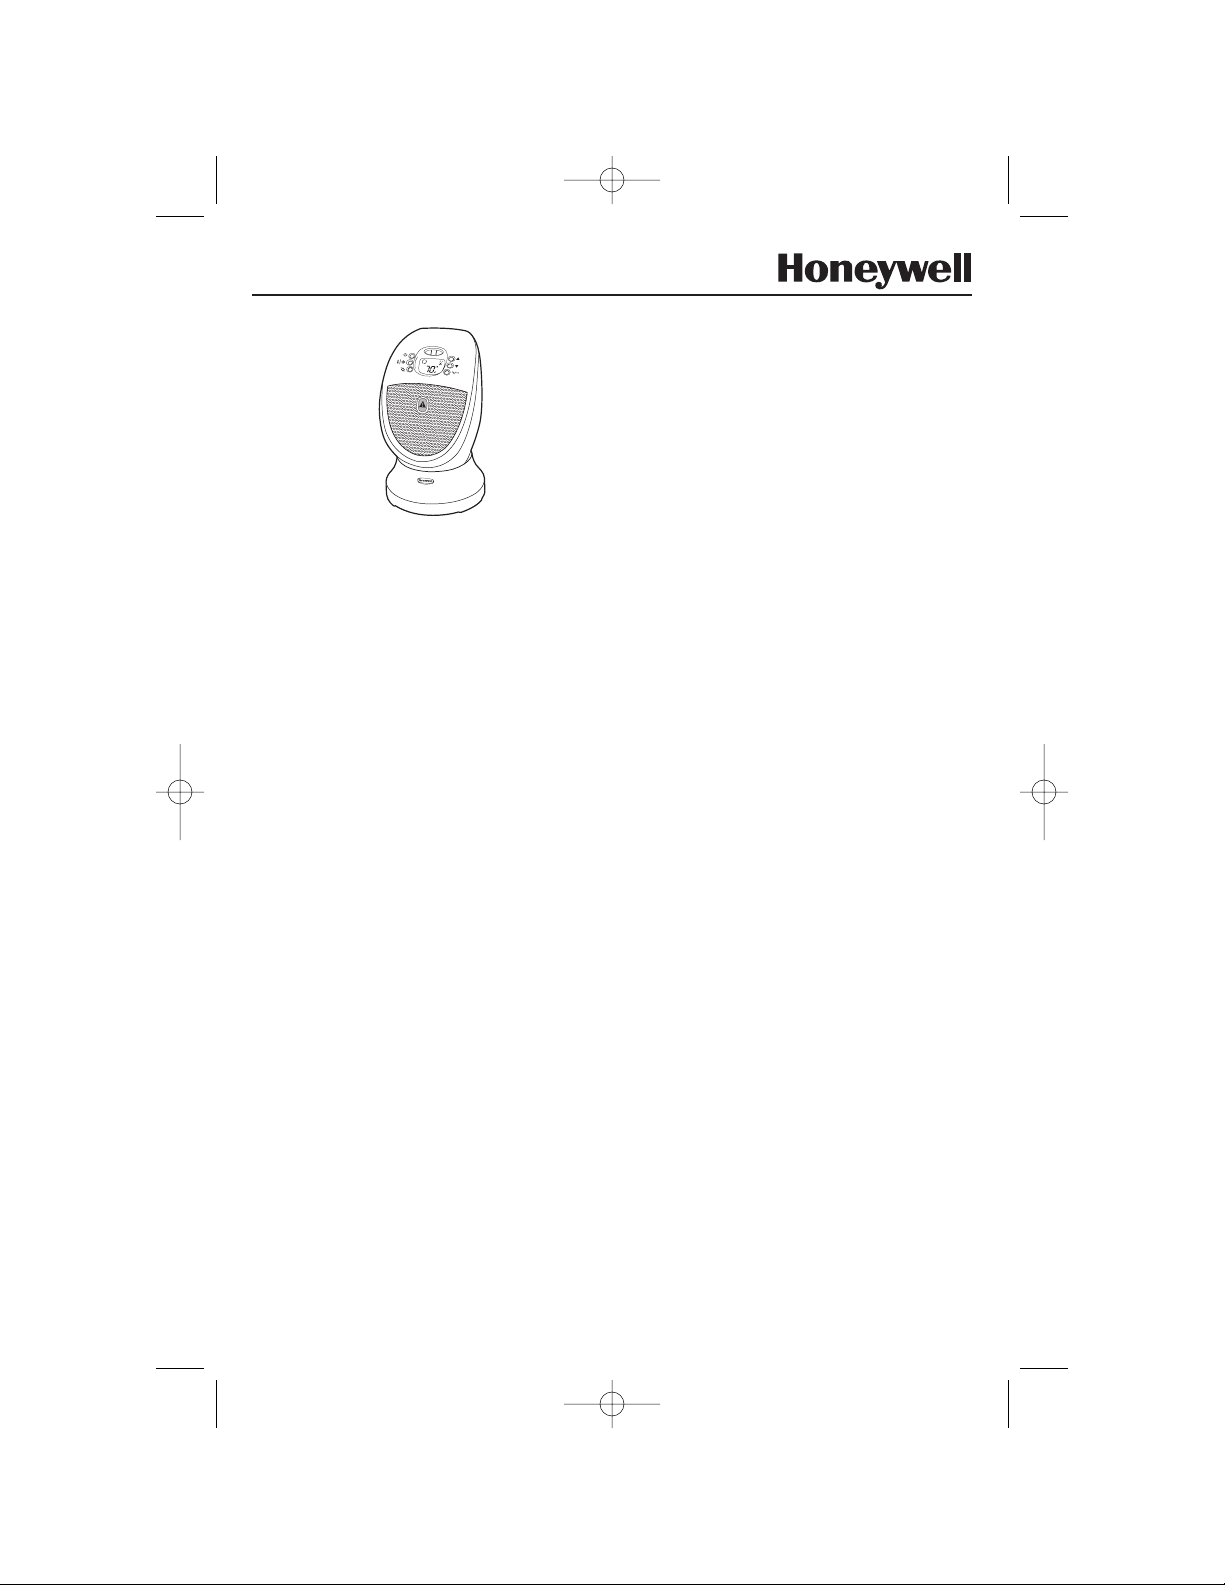
DIGITAL CERAMIC HEATER
Model HZ-339 Series
Model HZ-341 Series
IMPORTANT SAFETY
INSTRUCTIONS
When using electrical appliances, basic
precautions should always be followed to
reduce the risk of fire, electric shock, and
injury to persons, including the following:
1. Read all instructions before using this heater.
2. This heater is hot when in use. To avoid burns,
do not continually let bare skin touch hot
surfaces. If provided, use handle when moving
this heater. Keep combustible materials, such as
furniture, pillows, bedding, papers, clothes, and
curtains at least 3 feet (0.9 m) from the front of
the heater and keep them away from the sides
and rear.
3. Extreme caution is necessary when any heater is
used by or near children or invalids and whenever
the heater is left operating and unattended.
4. Always unplug heater when not in use.
5. Do not operate any heater with a damaged cord
or plug or after the heater malfunctions, has been
dropped or damaged in any manner.
6. Do not use outdoors.
7. This heater is rated at 1500W, 120 VAC. It is
intended for use on tabletops or desktops and
floors. It is not to be used in wet or moist
locations, such as bathrooms and laundry areas.
If an extension cord must be used, it must be 14
gauge or larger and rated no less than 1875
watts.
8. Do not run cord under carpeting. Do not cover
cord with throw rugs, runners, or the like.
Arrange cord away from traffic area where it will
not be tripped over.
9. This appliance has a polarized plug (one blade is
wider than the other). To reduce the risk of
shock, this plug is intended to fit only one way in
a polarized outlet. If the plug does not fit
securely in the outlet, reverse the plug. If it still
does not fit, contact a qualified electrician.
DO NOT attempt to defeat this safety feature.
10. This heater draws 12.5 amps during operation
when in the high setting. To prevent overloading
a circuit, do not plug the heater into a circuit that
already has other appliances working.
11. It is normal for the plug to feel warm to the touch;
however, a loose fit between the AC outlet
(receptacle) and plug may cause overheating and
distortion of the plug. Contact a qualified
electrician to replace loose or worn outlet.
12. To disconnect the heater, first turn controls to the
OFF position, then grip the plug and pull it from
the wall outlet. Never pull by the cord.
13. Do not insert or allow foreign objects to enter any
ventilation or exhaust opening as this may cause
an electric shock or fire, or damage the heater.
14. To prevent a possible fire, do not block air intakes
or exhaust in any manner. Do not use on soft
surfaces, like a bed, where openings may
become blocked.
15. A heater has hot and arcing or sparking parts
inside. Do not use it in the areas where gasoline,
paint, or flammable liquids are used or stored.
16. Use this heater only as described in this manual.
Any other use not recommended by the
manufacturer may cause fire, electric shock, or
injury to persons.
17. The output of this heater may vary and its
temperature may become intense enough to burn
exposed skin. Use of this heater is not
recommended for persons with reduced
sensitivity to heat or an inability to react to avoid
burns.
18.
SAVE THESE
INSTRUCTIONS
The Honeywell trademark is used by Kaz, Inc. under license from Honeywell Intellectual Properties, Inc.
HZ-339_341_OM_Rev2.qxd 6/22/05 5:15 PM Page 1
Page 2
This heater is equipped with SureSet™Digital Controls that provide the ability to set the temperature to the
exact degree desired. To operate, simply follow these instructions.
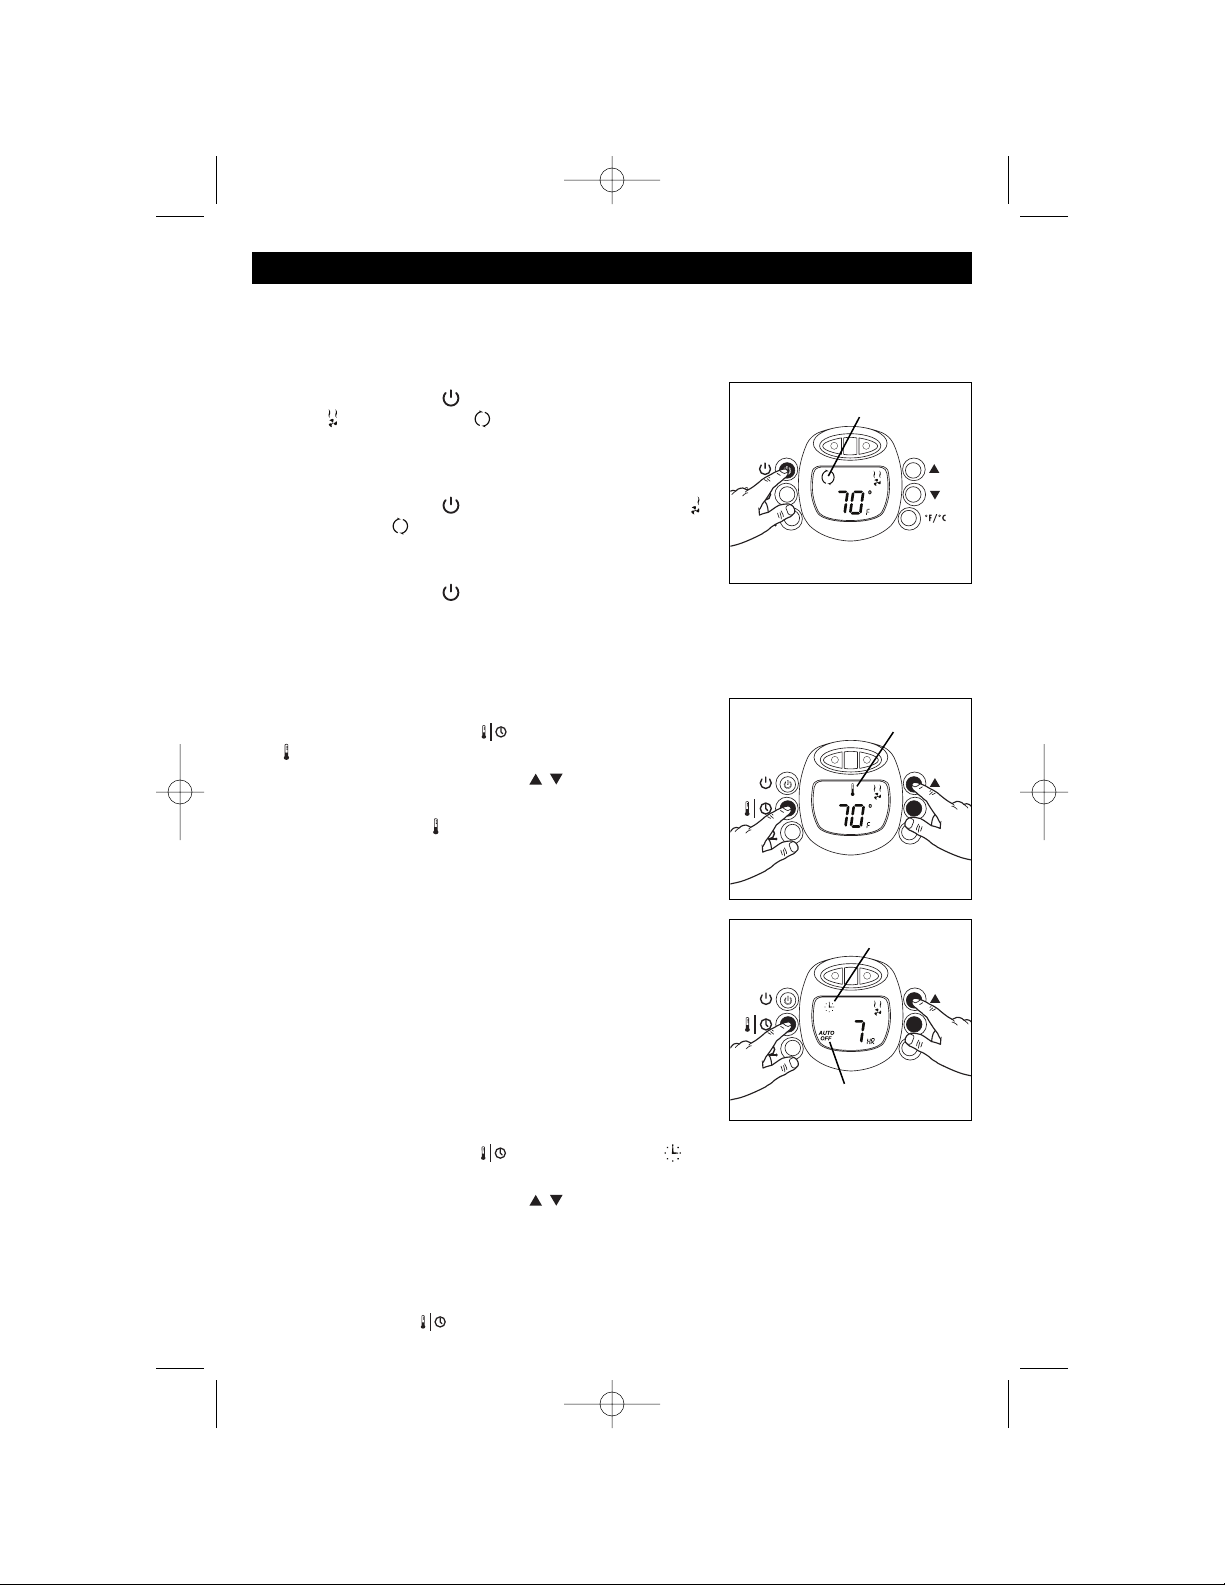
STEP 1: POWER
• Press the Power button ( ) once to start the heater on High
Power ( ), Continuous Run ( ) (Fig. 1). If left at this setting,
the unit will run continuously on High Power (1500 watts, 12.5
amps) and will not shut off until the unit is manually turned
off.
• Press the Power button ( ) again to change to Low Power ( ),
Continuous Run ( ). If left at this setting, the unit will run
continuously on Low Power (900 watts, 7.5 amps) and will not
shut off until the unit is manually turned off.
• Press the Power button ( ) a third time to turn the heater OFF.
NOTE: If operated at the Low setting, the heater will not provide as much heat output as in the High
setting, however, the Low setting will not require as much electrical current to operate. To avoid
overloading a circuit, do not plug the heater into a circuit that already has other appliances working.
STEP 2: SET TEMPERATURE
• Press the Temp/Timer button ( ) until the Temperature Icon
( ) blinks. The current room temperature will appear (Fig. 2).
• Use the Up and Down arrow buttons ( ) to set the Desired
Temperature (Fig. 2).
• The Temperature Icon ( ) will stop blinking and the current room
temperature will reappear after the Desired Temperature is set.
• The heater will turn off shortly after the Desired Temperature is
reached and the Temperature Display will blink.
• The heater will turn back on when the room temperature drops
below the Desired Temperature. The Temperature Display will
then stop blinking and will display the current room temperature.
STEP 3: SET TIMER
NOTE: This function should only be set if you desire that the heater
be automatically shut off after a certain period of time (1 to 10 hours
from the time the function is set). Always set the Desired
Temperature prior to setting the Timer (see Step 2) so that the heater
will shut off at the Desired Temperature setting and not run
continuously.
• Press the Temp/Timer button ( ) until the Timer Icon ( ) blinks. The Hour Display will appear.
The Auto Off icon will also appear (Fig. 3).
• Use the Up and Down arrow buttons ( ) to set the heater operation time between 1 and 10 hours
(Fig. 3). Once the timer function is set the hour set will remain displayed until the time set runs out.
• The heater will automatically turn off when time runs out.
NOTE: If the Desired Temperature was set prior to setting the Timer function, the heater will cycle on and
off as per the selected Desired Temperature setting. To return to the Continuous Run Mode (Fig. 1), press
the Temp/Timer button ( ) a third time.
OPERATION
Fig. 3
Fig. 2
Fig. 1
Continuous Run Icon
Temperature Icon
Timer Icon
Auto Off Icon
HZ-339_341_OM_Rev2.qxd 6/22/05 5:15 PM Page 2
Page 3
REMOTE CONTROL OPERATION
(MODEL HZ-341 SERIES ONLY)
Two (2) AAA batteries are included and are required to operate the
Remote Control.
The Remote Control can be stored on the heater when not in use by
hanging the remote on the hook located on the side of the heater
(See Fig. 7).
The Remote Control works the same as the corresponding buttons on
the Control Panel. The Control Panel display on the heater will show
the appropriate icons when the various functions are activated.
STEP 1: POWER
• Press the Power button ( ) once to start the heater on High
Power ( ), Continuous Run ( ) (Fig. 8). If left at this setting,
the unit will run continuously on High Power (1500 watts, 12.5
amps) and will not shut off until the unit is manually turned
off.
• Press the Power button ( ) again to change to Low Power ( ),
Continuous Run ( ). If left at this setting, the unit will run
continuously on Low Power (900 watts, 7.5 amps) and will not
shut off until the unit is manually turned off.
• Press the Power button ( ) a third time to turn the heater OFF.
OPERATION
(CONTINUED)
STEP 4: FAHRENHEIT/CELSIUS FUNCTION
This heater offers the option to read the temperature setting in either
Fahrenheit or Celsius.
• °F/°C feature functions from only the Power or Set Temperature
screens.
• Press °F/°C button to toggle between Fahrenheit and Celsius
(Fig. 4).
STEP 5: OSCILLATION
• The Oscillation feature functions in all Power and Temp/Timer
settings.
• Press the Oscillation button ( ) to
toggle this feature on and off (Fig. 5).
NOTE: This product is equipped with a
SafeGuard
™
Alert Heat Indicator Badge
(Fig 6). When the SafeGuard
™
Alert Badge
located on the top of the grill changes from
black to red the grill is hot to the touch.
Do not touch the grille until the unit has
been turned off and the SafeGuard
™
Alert
Badge has turned back to black.
Fig. 4
°F/°C Temperature
Display
Fig. 5
Fig. 8
Power
Fig. 7
Fig. 6
Heat
Indicator
Badge
HZ-339_341_OM_Rev2.qxd 6/22/05 5:15 PM Page 3
Page 4
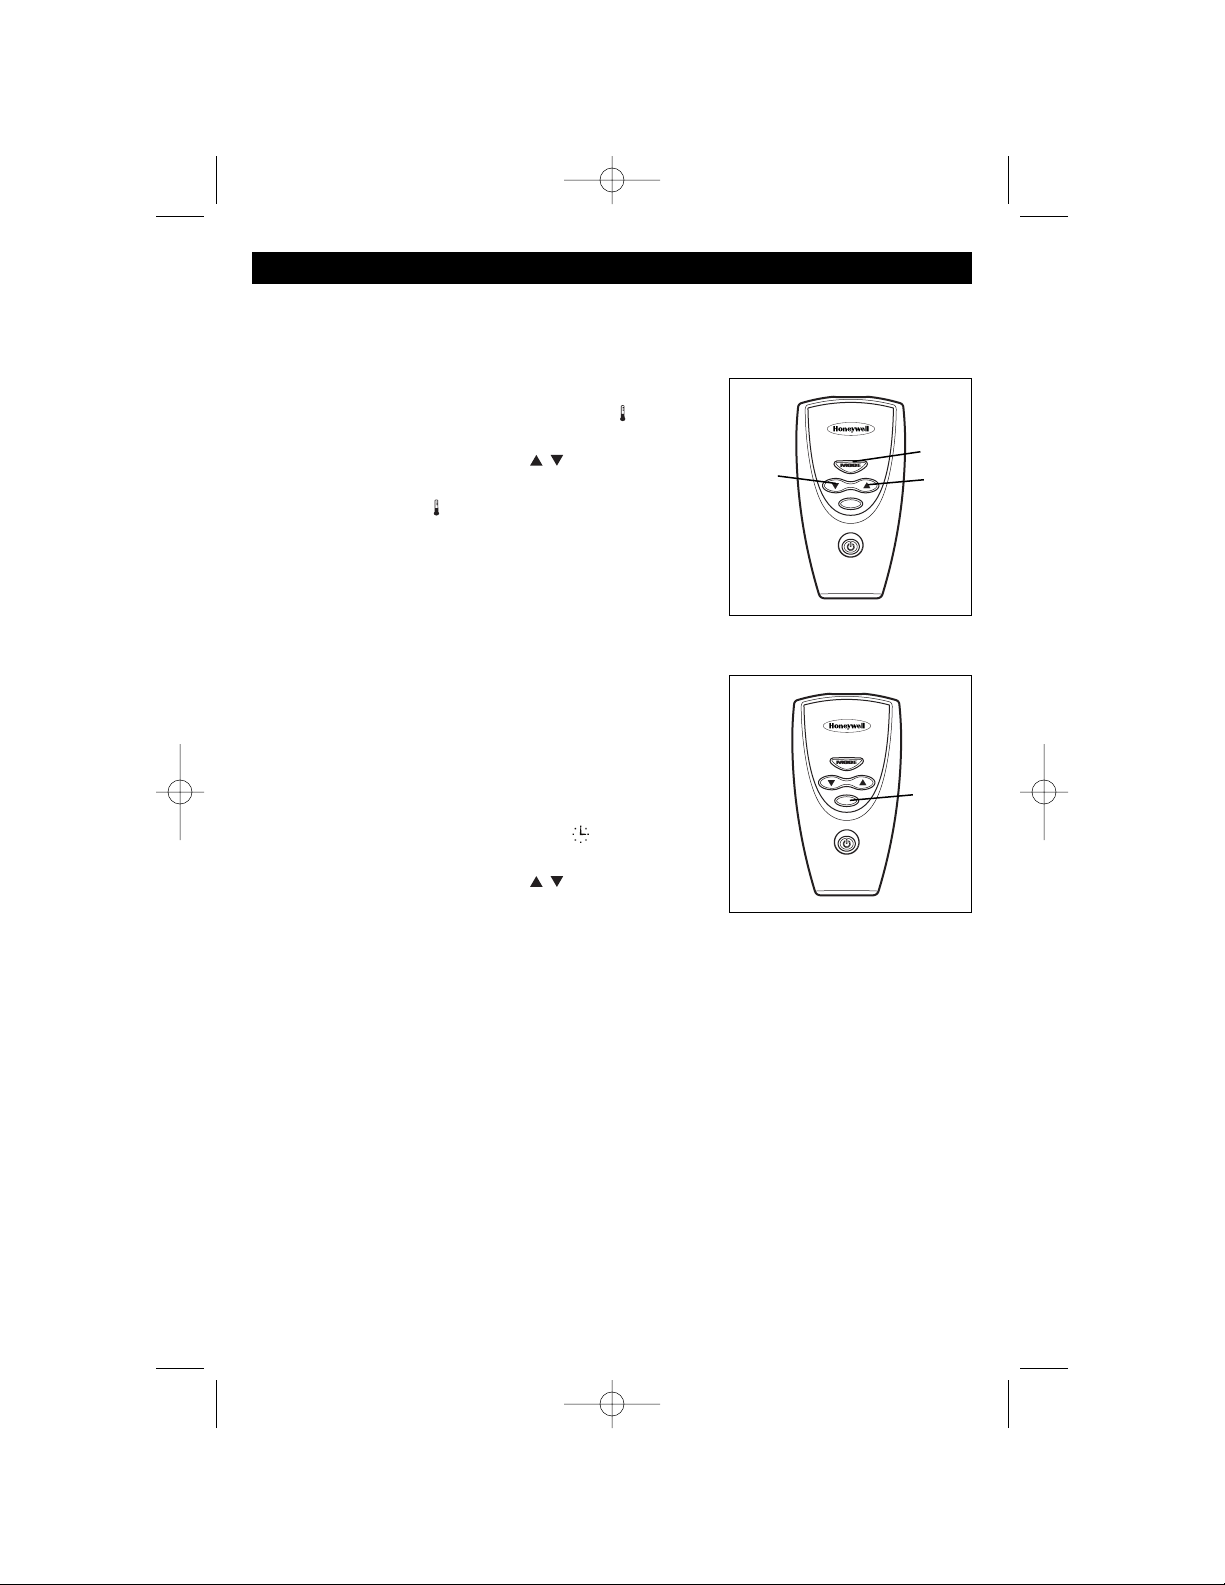
REMOTE CONTROL OPERATION
(CONTINUED)
NOTE: If operated at the Low setting, the heater will not provide as much heat output as in the High
setting, however, the Low setting will not require as much electrical current to operate. To avoid
overloading a circuit, do not plug the heater into a circuit that already has other appliances working.
STEP 2: SET TEMPERATURE
• Press the Mode button until the Temperature Icon ( ) blinks.
The current room temperature will appear (Fig. 9).
• Use the Up and Down arrow buttons ( ) to set the Desired
Temperature (Fig. 9).
• The Temperature Icon ( ) will stop blinking and the current room
temperature will reappear after the Desired Temperature is set.
• The heater will turn off shortly after the Desired Temperature is
reached and the Temperature Display will blink.
• The heater will turn back on when the room temperature drops
below the Desired Temperature. The Temperature Display will
then stop blinking and will display the current room temperature.
STEP 3: SET TIMER
NOTE: This function should only be set if you desire that the heater be
automatically shut off after a certain period of time (1 to 10 hours
from the time the function is set). Always set the Desired
Temperature prior to setting the Timer (see Step 2) so that the heater
will shut off at the Desired Temperature setting and not run
continuously.
• Press the Mode button until the Timer Icon ( ) blinks. The Hour
Display will appear. The Auto Off icon will also appear (Fig. 9).
• Use the Up and Down arrow buttons ( ) to set the heater
operation time between 1 and 10 hours (Fig. 9). Once the timer
function is set the hour set will remain displayed until the time set runs out.
• The heater will automatically turn off when time runs out.
NOTE: If the Desired Temperature was set prior to setting the Timer function, the heater will cycle on and
off as per the selected Desired Temperature setting. To return to Continuous Run Mode (Fig. 1), press the
Mode button a third time.
STEP 4: OSCILLATION
• The Oscillation feature functions in all Power and Temp/Timer settings.
• Press the Oscillation button to toggle this feature on and off (Fig. 10).
Fig. 9
Fig. 10
Down
Up
Mode
Oscillation
HZ-339_341_OM_Rev2.qxd 6/22/05 5:15 PM Page 4
Page 5
ELECTRICAL RATING
This product is rated 12.5 Amps (1500 watts) @ 120V, 60Hz.
CONSUMER RELATIONS
Mail questions or comments to:
Kaz, Incorporated
Consumer Relations Dept.
250 Turnpike Road
Southborough, MA 01772
Call us toll-free at: 1-800-332-1110
E-mail: consumerrelations@kaz.com
Or visit our website at: www.kaz.com
Please be sure to specify a model number.
NOTE: IF YOU EXPERIENCE A PROBLEM, PLEASE CONTACT CONSUMER RELATIONS FIRST, RETURN
THE HEATER TO THE ORIGINAL PLACE OF PURCHASE OR SEE YOUR WARRANTY. DO NOT ATTEMPT TO
OPEN THE MOTOR HOUSING YOURSELF, DOING SO MAY VOID YOUR WARRANTY AND CAUSE DAMAGE
TO THE HEATER OR PERSONAL INJURY.
TROUBLESHOOTING
If your heater shuts off unexpectedly, safety features may have been activated to prevent overheating. If
this happens:
• Be sure the power cord is plugged into a working electrical outlet.
• Check your Desired Temperature setting. The unit may be off because you have reached your Desired
Temperature setting.
• Check for any obstructions. If you find one, turn the heater OFF and unplug it. Wait at least 10 minutes
to allow the heater to cool completely before removing any obstruction. When done, plug in the heater
and follow the OPERATION instructions.
CLEANING AND STORAGE
We recommend that the heater be cleaned at least once a month and before off-season storage.
• Turn the heater OFF and unplug it. Allow it to cool completely.
• Use only a dry cloth to clean the external surfaces of the heater. DO NOT USE WATER, WAX, POLISH,
OR ANY CHEMICAL SOLUTION.
• Clean your heater using the above-mentioned steps, then pack the heater in its original container and
store in a cool, dry place.
• This heater does not disassemble.
SAFETY FEATURES
This heater is equipped with several devices and features for added protection:
• A tip-over switch that disables the heater if accidently tipped over (HZ-341BW only).
• A SafeGuard
™
Alert Heat Indicator Badge that indicates the grille is hot and should not be touched -
turns from black to red.
• A high temperature safety control prevents overheating (Hi-limit).
• A back-up thermal circuit breaker that will permanently shut down the heater should it operate at
higher than normal temperatures.
HZ-339_341_OM_Rev2.qxd 6/22/05 5:15 PM Page 5
Page 6
You should first read all instructions before
attempting to use this product.
A. This 5 year limited warranty applies to repair
or replacement of product found to be
defective in material or workmanship. This
warranty does not apply to damage resulting
from commercial, abusive, unreasonable use or
supplemental damage. Defects that are the
result of normal wear and tear will not be
considered manufacturing defects under this
warranty. KAZ IS NOT LIABLE FOR
INCIDENTAL OR CONSEQUENTIAL DAMAGES
OF ANY NATURE. ANY IMPLIED WARRANTY
OF MERCHANTABILITY OR FITNESS FOR A
PARTICULAR PURPOSE ON THIS PRODUCT IS
LIMITED IN DURATION TO THE DURATION OF
THIS WARRANTY. Some jurisdictions do not
allow the exclusion or limitation of incidental or
consequential damages or limitations on how
long an implied warranty lasts, so the above
limitations or exclusions may not apply to you.
This warranty gives you specific legal rights,
and you also may have other rights which vary
from jurisdiction to jurisdiction. This warranty
applies only to the original purchaser of this
product from the original date of purchase.
B. At its option, Kaz will repair or replace this
product if it is found to be defective in material
or workmanship. Defective product should be
returned to the place of purchase in
accordance with store policy. Thereafter, while
within the warranty period defective product
may be returned to Kaz.
C. This warranty does not cover damage resulting
from any unauthorized attempts to repair or
from any use not in accordance with the
instruction manual.
D. Return defective product to Kaz, Incorporated
with a brief description of the problem. Include
proof of purchase and a $10 US/$15.50 CAN
check or money order for handling, return
packing and shipping charges. Please include
your name, address and a daytime phone
number. You must prepay shipping charges.
Send to:
In U.S.:
Kaz, Incorporated
Attn: Returns Department
4755 Southpoint Drive
Memphis, TN 38118
USA
In Canada:
Kaz, Incorporated
Attn: Returns Department
510 Bronte Street South
Milton, ON L9T 2X6
Canada
© 2005 Kaz, Incorporated. All Rights Reserved.
P/N: 31IM0341192
5 YEAR LIMITED WARRANTY
HZ-339_341_OM_Rev2.qxd 6/22/05 5:15 PM Page 6
Page 7

APPAREIL DE CHAUFFAGE
CÉRAMIQUE NUMÉRIQUE
Modèle de la série HZ-339
Modèle de la série HZ-341
IMPORTANTES
INSTRUCTIONS
DE SÉCURITÉ
L'utilisation d'appareils électriques nécessite des
précautions élémentaires afin de réduire les risques
d'incendie, de choc électrique ou de blessures. Parmi les
précautions à observer, on compte les suivantes :
1. Lire toutes les instructions avant d'utiliser l'appareil de
chauffage.
2. Cet appareil de chauffage devient chaud lorsqu’il fonctionne.
Afin de prévenir les brûlures, éviter le contact continu entre la
peau nue et les surfaces chaudes. Si l’appareil est muni de
poignées, utiliser les poignées pour déplacer l’appareil. S’assurer
que les matières combustibles comme les meubles, les oreillers,
la literie, le papier, les vêtements et les rideaux se trouvent à une
distance d’au moins 0,9 m (3 pi) du devant de l’appareil et
qu’elles n’entrent pas en contact avec les côtés ou l’arrière de
l’appareil.
3. La plus grande prudence est recommandée au moment d'utiliser
tout appareil de chauffage en présence d'enfants ou de
personnes handicapées ou dans le cas où l'appareil est laissé
sans surveillance.
4. Toujours débrancher l'appareil de chauffage quand celui-ci ne
sert pas.
5. Éviter d'utiliser tout appareil de chauffage dont la fiche ou le
cordon d'alimentation est endommagé. Éviter également
d'utiliser l'appareil si celui-ci a montré des signes de mauvais
fonctionnement, si on l'a laissé tomber ou s'il a été endommagé
de quelque façon que ce soit.
6. Ne pas utiliser l'appareil à l'extérieur.
7. Cet appareil de chauffage a une puissance nominale de 1 500 W,
120 V c.a.. Il est conçu pour être placé sur le dessus d'une table
ou d'un bureau ou sur le sol. Il ne doit pas être utilisé dans des
endroits mouillés ou humides comme les salles de bain et les
salles de lessive. Si on doit utiliser une rallonge, elle doit être de
calibre 14 ou plus, et avoir une puissance nominale d'au moins 1
875 W.
8. Éviter de faire passer le cordon d'alimentation sous les tapis ou
de le couvrir d'une carpette, d'un chemin de couloir, etc. Éloigner
le cordon des endroits très passants et de là où l'on risquerait de
trébucher dessus.
9. Cet appareil est équipé d'une fiche polarisée (fiche dont l'une des
lames est plus large que l'autre). Afin de réduire les risques de
choc électrique, cette fiche ne peut être insérée que d'une seule
manière dans la prise de courant polarisée. Si la fiche ne s'insère
pas complètement dans la prise, tourner la fiche. Si la fiche ne
s'insère toujours pas dans la prise, contacter un électricien.
ÉVITER de contourner le dispositif de sécurité que constitue
la fiche polarisée.
10. Cet appareil de chauffage tire 12,5 ampères quand il fonctionne
à l’intensité élevée. Afin de ne pas surcharger le circuit, éviter de
brancher l’appareil sur un circuit qui alimente déjà d’autres
appareils en marche.
11. Il est normal que la fiche soit un peu chaude au toucher.
Cependant, une connexion trop lâche entre la sortie de courant
alternatif (prise de courant) et la fiche peut entraîner une
surchauffe et une déformation de la fiche. Contacter un
électricien pour faire remplacer les prises de courant lâches ou
usées.
12. Pour débrancher l’appareil de chauffage, régler les boutons de
commande à OFF, puis tirer sur la fiche pour l’enlever de la prise
de courant. Ne jamais tirer sur le cordon d’alimentation.
13. S’assurer qu’aucun corps étranger ne pénètre dans les
ouvertures prévues pour la ventilation ou l’évacuation, au risque
de recevoir une décharge électrique, de déclencher un incendie
ou d’endommager l’appareil de chauffage.
14. Afin de prévenir un incendie, éviter de boucher de quelque façon
que ce soit les orifices d’admission ou d’évacuation d’air. Éviter
de placer l’appareil sur une surface molle comme un lit, ce qui
pourrait boucher les orifices.
15. Un appareil de chauffage contient des pièces chaudes et
susceptibles de produire des étincelles. Éviter de faire
fonctionner l'appareil dans des endroits où sont utilisés ou
entreposés de l'essence, de la peinture ou d'autres liquides
inflammables.
16. Utiliser uniquement cet appareil de chauffage conformément aux
directives contenues dans le présent guide d'utilisation. Tout
autre usage non recommandé par le fabricant pourrait être cause
d'incendie, de choc électrique ou de blessures.
17. La quantité de chaleur émise par cet appareil de chauffage peut
varier, et sa température peut devenir suffisamment intense pour
brûler la peau nue. Pour cette raison, l'usage de cet appareil
n'est pas recommandé aux personnes qui ont une sensibilité
réduite à la chaleur ou qui ont une capacité de réaction limitée
pour éviter les brûlures.
18.
CONSERVER CES
INSTRUCTIONS
La marque de commerce Honeywell est utilisée par Kaz, Inc. avec l'autorisation de Honeywell Intellectual Properties, Inc.
HZ-339_341_OM_Rev2.qxd 6/22/05 5:15 PM Page 7
Page 8

Cet appareil de chauffage possède des commandes numériques SureSet
MD
permettant de régler la température exactement au degré désiré. Pour effectuer
le réglage, il suffit de suivre les instructions suivantes.
ÉTAPE 1: MISE EN MARCHE
• Appuyer une fois sur le bouton d’alimentation ( ) pour mettre l’appareil
de chauffage en marche à l’intensité élevée ( ) et en mode de
fonctionnement continu ( ) (Fig. 1). Si on conserve ce réglage,
l’appareil fonctionnera sans arrêt à l’intensité élevée (1 500 watts, 12,5
ampères) et ne s’éteindra que lorsqu’il sera mis hors tension
manuellement.
• Appuyer une seconde fois sur le bouton d’alimentation ( ) pour régler l’appareil à basse intensité ( ) et en mode
de fonctionnement continu ( ). Si on conserve ce réglage, l’appareil fonctionnera sans arrêt à l’intensité basse (900
watts, 7,5 ampères) et ne s’éteindra que lorsqu’il sera mis hors tension manuellement.
• Appuyer une troisième fois sur le bouton d’alimentation ( ) pour éteindre l’appareil de chauffage.
REMARQUE : Lorsque l’appareil fonctionne à basse intensité, sa production de chaleur est moins élevée que lorsqu’il
fonctionne à l’intensité élevée. Toutefois, un appareil fonctionnant à basse intensité tire moins de courant électrique. Afin
d’éviter la surcharge d’un circuit, ne pas brancher l’appareil sur un circuit qui alimente déjà d’autres appareils en
marche.
ÉTAPE 2: RÉGLAGE DE LA TEMPÉRATURE
• Appuyer sur le bouton Température/Minuterie ( ) jusqu’à ce que l’icône
de température ( ) clignote. La température actuelle de la pièce apparaîtra
(Fig. 2).
• Utiliser les boutons marqués d’une flèche vers le haut et d’une flèche vers le
bas ( ) pour régler la température voulue (Fig. 2).
• Une fois la température réglée, l’icône de température ( ) arrête de
clignoter et l’écran affiche à nouveau la température actuelle de la pièce.
• L’appareil de chauffage s’éteint peu de temps après que la température
voulue a été atteinte et l’affichage de température clignote.
• L’appareil de chauffage se remet en marche lorsque la température de la
pièce descend sous la température réglée. L’affichage de température
arrête alors de clignoter et la température actuelle de la pièce s’affiche.
ÉTAPE 3 : RÉGLAGE DE LA MINUTERIE
REMARQUE: Cette fonction devrait seulement être réglée quand on désire que
l’appareil de chauffage s’arrête automatiquement après un certain temps (de 1
à 10 heures après que la minuterie a été réglée). Toujours régler la température
voulue avant de régler la minuterie (voir l’étape 2) afin que l’appareil de
chauffage s’éteigne lorsque la température voulue a été atteinte. Sinon, il fonctionnera sans arrêt.
• Appuyer sur le bouton Température/Minuterie jusqu’à ce que l’icône de minuterie ( ) clignote. L’affichage des
heures apparaîtra, de même que l’icône d’arrêt automatique (Fig. 3).
• Utiliser les boutons marqués d’une flèche vers le haut et d’une flèche vers le bas ( ) pour régler la durée de
fonctionnement de l’appareil, entre 1 et 10 heures (Fig. 3). Une fois la minuterie réglée, le nombre d’heures réglé
restera affiché jusqu’à ce que le temps de fonctionnement voulu se soit écoulé.
• L’appareil de chauffage s’éteint automatiquement lorsque le temps est écoulé.
FONCTIONNEMENT
Fig. 3
Fig. 2
Fig. 1
Icône Mode de
fonctionnement continu
Icône de température
Icône de la
minuterie
Icône d'arrêt
automatique
HZ-339_341_OM_Rev2.qxd 6/22/05 5:15 PM Page 8
Page 9

FONCTIONNEMENT DE LA TÉLÉCOMMANDE
(MODÈLE DE LA SÉRIE HZ-341 SEULEMENT)
FONCTIONNEMENT
(SUITE)
REMARQUE: Si la température voulue est réglée avant la minuterie, l’appareil
de chauffage se met en marche et s’éteint afin de maintenir la pièce à la
température réglée. Pour revenir au mode de fonctionnement continu (Fig. 1),
appuyer une troisième fois sur le bouton Température/Minuterie.
ÉTAPE 4 : OPTION FAHRENHEIT OU CELSIUS
Cet appareil de chauffage offre la possibilité de lire la température en degrés
Fahrenheit ou Celsius.
• L’option °F/°C ne fonctionne qu’à partir de l’écran initial (quand on appuie
sur le bouton d’alimentation) ou de l’écran de réglage de la température.
• Appuyer sur le bouton °F/°C pour alterner entre Fahrenheit et Celsius (Fig. 4).
ÉTAPE 5 : OSCILLATION
• L’option d’oscillation fonctionne à partir de
tous les écrans : initial, de réglage de la
température et de réglage de la minuterie.
• Appuyer sur le bouton Oscillation ( ) pour
alterner entre l’activation et la désactivation
de cette fonction (Fig. 5).
REMARQUE: Cet appareil est pourvu d’un
indicateur SafeGuard
MC
de chaleur intense (Fig 6).
Quand l’indicateur SafeGuard
MC
de chaleur intense, situé dans la partie supérieure de la grille, passe du noir au rouge,
cela indique que la grille est chaude. Ne pas toucher à la grille tant que l’appareil n’a pas été mis hors tension et
que l’indicateur SafeGuard
MC
n’est pas redevenu noir.
Fig. 4
Affichage de température
en °F ou en °C
Fig. 5
Fig. 6
Indicateur
de chaleur
intense
Deux (2) piles AAA sont fournies avec l’appareil et elles sont nécessaires
pour faire fonctionner la télécommande.
Quand on n’utilise pas la télécommande, on peut la ranger sur l’appareil de
chauffage en la suspendant au crochet situé sur le côté de l’appareil (Fig. 7).
Les boutons de la télécommande fonctionnent de la même façon que leurs
boutons correspondants sur le tableau de commande. L’écran du tableau de
commande de l’appareil de chauffage affiche les icônes appropriées quand
les diverses fonctions sont activées.
ÉTAPE 1: MISE EN MARCHE
• Appuyer une fois sur le bouton d’alimentation ( ) pour mettre l’appareil
de chauffage en marche à l’intensité élevée
(),
et en mode de
fonctionnement continu ( ) (Fig. 8). Si on conserve ce réglage,
l’appareil fonctionnera sans arrêt à l’intensité élevée (1 500 watts,
12,5 ampères) et ne s’éteindra que lorsqu’il sera mis hors tension
manuellement.
• Appuyer une seconde fois sur le bouton d’alimentation
( )
pour régler
l’appareil à basse intensité
(),
et en mode de fonctionnement continu
( ). Si on conserve ce réglage, l’appareil fonctionnera sans arrêt à
l’intensitee basse (900 watts, 7,5 ampères) et ne s’éteindra que
lorsqu’il sera mis hors tension manuellement.
Fig. 8
Bouton
d’alimentation
Fig. 7
HZ-339_341_OM_Rev2.qxd 6/22/05 5:15 PM Page 9
Page 10

FONCTIONNEMENT DE LA TÉLÉCOMMANDE (SUITE)
• Appuyer une troisième fois sur le bouton d’alimentation ( ) pour éteindre l’appareil de chauffage.
REMARQUE: Lorsque l’appareil fonctionne à basse intensité, sa production de chaleur est moins élevée que lorsqu’il
fonctionne à l’intensité élevée. Toutefois, un appareil fonctionnant à basse intensité tire moins de courant électrique. Afin
d’éviter la surcharge d’un circuit, ne pas brancher l’appareil sur un circuit qui alimente déjà d’autres appareils en
marche.
ÉTAPE 2: RÉGLAGE DE LA TEMPÉRATURE
• Appuyer sur le bouton Mode jusqu’à ce que l’icône de température ( )
clignote. La température actuelle de la pièce apparaîtra (Fig. 9).
• Utiliser les boutons marqués d’une flèche vers le haut et d’une flèche vers le
bas ( ) pour régler la température voulue (Fig. 9).
• Une fois la température réglée, l’icône de température ( ) arrête de
clignoter et l’écran affiche à nouveau la température actuelle de la pièce.
• L’appareil de chauffage s’éteint peu de temps après que la température
réglée a été atteinte et l’affichage de température clignote.
• L’appareil de chauffage se remet en marche lorsque la température de la
pièce descend sous la température voulue. L’affichage de température
arrête alors de clignoter et la température actuelle de la pièce s’affiche.
ÉTAPE 3 : RÉGLAGE DE LA MINUTERIE
REMARQUE: Cette fonction devrait seulement être réglée quand on désire
que l’appareil de chauffage s’arrête automatiquement après un certain temps
(de 1 à 10 heures après que la minuterie a été réglée). Toujours régler la
température voulue avant de régler la minuterie (voir l’étape 2) afin que
l’appareil de chauffage s’éteigne lorsque la température voulue a été
atteinte. Sinon, il fonctionnera sans arrêt.
• Appuyer sur le bouton Mode jusqu’à ce que l’icône de Minuterie ( )
clignote. L’affichage des heures apparaîtra, de même que l’icône d’arrêt
automatique (Fig. 9).
• Utiliser les boutons marqués d’une flèche vers le haut et d’une flèche vers
le bas ( ) pour régler la durée de fonctionnement de l’appareil, entre
1 et 10 heures (Fig. 9). Une fois la minuterie réglée, le nombre d’heures
réglé restera affiché jusqu’à ce que le temps de fonctionnement voulu se soit écoulé.
• L’appareil de chauffage s’éteint automatiquement lorsque le temps est écoulé
REMARQUE: Si la température voulue est réglée avant la minuterie, l’appareil de chauffage se met en marche et
s’éteint afin de maintenir la pièce à la température réglée. Pour revenir au mode de fonctionnement continu (Fig. 1),
appuyer une troisième fois sur le bouton Mode.
ÉTAPE 4 : OSCILLATION
• L’option d’oscillation fonctionne à partir de tous les écrans : initial, de réglage de la température et de réglage
de la minuterie.
• Appuyer sur le bouton Oscillation pour alterner entre l’activation et l’arrêt de cette fonction (Fig. 10).
Fig. 9
Fig. 10
Bas
Haut
Mode
Oscillation
HZ-339_341_OM_Rev2.qxd 6/22/05 5:15 PM Page 10
Page 11

CARACTÉRISTIQUES ÉLECTRIQUES ASSIGNÉES
Cet appareil a les caractéristiques assignées suivantes : 12,5 ampères (1 500 watts), 120 V, 60 Hz.
SERVICE À LA CLIENTÈLE
Adressez toute question ou remarque à :
Kaz, Incorporated
Consumer Relations Dept.
250 Turnpike Road
Southborough, MA 01772
Composez sans frais le 1-800-332-1110
Courriel : consumerrelations@kaz.com
Ou visitez notre site Web à : www.kaz.com
Prière de spécifier le numéro de modèle.
REMARQUE : EN CAS DE PROBLÈME, VEUILLEZ COMMUNIQUER D'ABORD AVEC NOTRE SERVICE À LA CLIENTÈLE,
RAPPORTER L'APPAREIL DE CHAUFFAGE À L'ENDROIT OÙ IL A ÉTÉ ACHETÉ OU CONSULTER LA GARANTIE. NE
TENTEZ PAS D'OUVRIR VOUS-MÊME LE BOÎTIER DU MOTEUR, CE QUI POURRAIT ANNULER LA GARANTIE ET
RISQUERAIT D'OCCASIONNER DES DOMMAGES ET DES BLESSURES.
DÉPANNAGE
Si l’appareil de chauffage s’éteint inopinément, c’est peut-être qu’une des caractéristiques de sécurité a été activée
afin d’éviter une surchauffe. Le cas échéant :
• S’assurer que le cordon d’alimentation est branché dans une prise de courant qui fonctionne.
• Vérifier le réglage de la température. L’appareil ne fonctionne peut-être plus simplement parce que la température
voulue a été atteinte.
• Vérifier qu’il n’y a pas d’objet qui obstrue l’appareil. Si c’est le cas, mettre l’appareil hors tension et le débrancher.
Laisser l’appareil de chauffage refroidir complètement (pendant au moins 10 minutes), puis enlever l’objet qui
l’obstrue. Brancher ensuite l’appareil de chauffage et suivre les instructions de FONCTIONNEMENT.
NETTOYAGE ET ENTREPOSAGE
Il est recommandé de nettoyer l’appareil de chauffage au moins une fois par mois ainsi qu’avant de le remiser en fin
de saison.
• Mettre l’appareil de chauffage hors tension et le débrancher. Le laisser refroidir complètement.
• Utiliser seulement un chiffon sec pour nettoyer les surfaces externes de l’appareil de chauffage. NE PAS UTILISER
D’EAU, DE CIRE, DE PRODUITS À POLIR, NI UNE SOLUTION CHIMIQUE, QUELLE QU’ELLE SOIT.
• Nettoyer l’appareil de chauffage en suivant les étapes mentionnées précédemment, puis emballer l’appareil de
chauffage dans sa boîte d’origine et le remiser dans un endroit frais et sec.
• Cet appareil de chauffage ne se désassemble pas.
CARACTÉRISTIQUES DE SÉCURITÉ
Cet appareil de chauffage est pourvu de plusieurs dispositifs et caractéristiques offrant une protection accrue :
• Un interrupteur de sécurité mettant l’appareil de chauffage hors tension si celui-ci est renversé accidentellement
(HZ-341BW seulement);
• Un indicateur SafeGuard
MC
de chaleur intense qui indique quand la grille est trop chaude pour être touchée –
l’indicateur passe alors du noir au rouge;
• Un dispositif de sécurité contre les hautes températures prévenant les surchauffes;
• Un disjoncteur thermique de sécurité qui éteint l’appareil de chauffage de façon permanente si celui-ci se met à
fonctionner à des températures plus élevées que la normale.
HZ-339_341_OM_Rev2.qxd 6/22/05 5:15 PM Page 11
Page 12

Prière de lire toutes les instructions avant de tenter
d'utiliser ce produit.
A. Cette garantie limitée de 5 ans s'applique à la
réparation ou au remplacement d'un produit
comportant un vice de matière ou de main-d’œuvre.
Cette garantie ne s'applique pas aux dégâts
découlant d'un usage commercial, abusif ou
déraisonnable, ni aux dégâts supplémentaires. Les
défaillances résultant de l’usure normale ne sont
pas considérées comme des vices de fabrication en
vertu de la présente garantie. KAZ N'EST
NULLEMENT RESPONSABLE POUR LES
DOMMAGES FORTUITS OU INDIRECTS, QUELS
QU'ILS SOIENT. TOUTE GARANTIE IMPLICITE DE
QUALITÉ MARCHANDE ET DE CONVENANCE
RELATIVE À CE PRODUIT A LA MÊME DURÉE
LIMITE QUE LA PRÉSENTE GARANTIE. Dans
certaines régions, on ne permet pas l’exclusion ou la
limitation des dommages fortuits ou indirects, ni les
limites de durée applicables à une garantie
implicite; par conséquent, il est possible que ces
limitations ou exclusions ne s’appliquent pas dans
votre cas. Cette garantie vous confère des droits
précis, reconnus par la loi. Ces droits diffèrent d’une
région à l’autre, et il est possible que vous en ayez
d’autres. Cette garantie s'applique uniquement à
l'acheteur initial de ce produit, à compter de la date
de l'achat initial.
B. À sa discrétion, Kaz réparera ou remplacera ce
produit si l'on constate qu'il comporte un vice de
matière ou de main-d'œuvre. Tout produit
défectueux devrait être retourné à l'endroit où il a
été acheté, conformément à la politique du magasin.
Par la suite, tout produit défectueux dont la garantie
est toujours valide peut être retourné à Kaz.
C. Cette garantie ne couvre pas les dommages
découlant des tentatives de réparation non
autorisées ou de toute utilisation non conforme au
présent manuel.
D. Retourner tout produit défectueux à Kaz,
Incorporated, accompagné d'une brève description
du problème. Inclure une preuve d'achat et un
chèque ou un mandat de poste de 10,00 $US ou de
15,50 $CAN pour les frais de manutention,
d'emballage de retour et d'expédition. Prière
d'indiquer nom, adresse et numéro de téléphone
durant la journée. Les frais d'expédition doivent être
payés à l'avance. Adresser à :
Aux États-Unis :
Kaz, Incorporated
Attn: Returns Department
4755 Southpoint Drive
Memphis, TN 38118
USA
Au Canada :
Kaz, Incorporated
Attn: Returns Department
510 Bronte Street South
Milton, ON L9T 2X6
Canada
© 2005 Kaz, Incorporated. Tous droits réservés.
P/N: 31IM0341192
GARANTIE LIMITÉE DE 5 ANS
HZ-339_341_OM_Rev2.qxd 6/22/05 5:15 PM Page 12
Page 13

APARATO DE CALEFACCIÓN
CERÁMICA DIGITAL
Modelo de la serie HZ-339
Modelo de la serie HZ-341
IMPORTANTES
INSTRUCIONES
DE SEGURIDAD
El uso de aparatos eléctricos requiere las
precauciones elementales para minimizar
los riesgos de incendio, choque eléctrico o
heridas. Entre las cuales:
1. Lea todas las instrucciones antes de usar el
aparato de calefacción.
2. El radiador se calienta cuando está en
funcionamiento. Para no quemarse, evite todo
contacto de la piel con las superficies calientes.
Si el aparato tiene asas, úselas para moverlo.
Aleje todo material inflamable (como muebles,
almohadas, ropa de cama, papel, prendas de
vestir y cortinas) a al menos 0,9 m (3 pies) de la
parte frontal del aparato, de los laterales y de la
parte trasera del mismo.
3. Se recomienda la mayor prudencia si usa un
aparato de calefacción en presencia de niños o
personas minusválidas, o si deja dicho aparato
sin vigilancia.
4. Desenchufe el aparato de calefacción siempre
que no lo use.
5. No use el aparato de calefacción si el enchufe o
el cable de alimentación están dañados. No use
el aparato si muestra señales de un mal
funcionamiento, si se ha caído o ha sufrido daño
alguno.
6. No use el aparato en el exterior.
7. La potencia nominal de este aparato de
calefacción es de 1.500 W, 120 V CA. Puede
colocarlo sobre una mesa o escritorio o sobre el
piso. No puede usarlo en lugares mojados o
húmedos como cuartos de baño o salas de
lavado. Si debe usar un cable de extensión, que
sea de un grosor mínimo de 14 AWG y calibrado
para al menos 1.875 vatios.
8. No pase el cable de alimentación bajo la
moqueta, ni lo cubra con una alfombra o tapiz de
ningún tipo. Aleje el cable de los lugares de
mucho tránsito y de donde pudieran tropezarse
con él.
9. Su radiador viene con un enchufe polarizado (una
patilla más ancha que otra). Para minimizar el
riesgo de choque eléctrico, sólo hay una forma de
introducir el enchufe en la toma de corriente
polarizada. Si el enchufe no entra
completamente, gírelo. Si aún así no logra
introducir el enchufe en la toma, llame a un
electricista. El enchufe polarizado es un
dispositivo de seguridad, NO LO EVITE.
10. El aparato de calefacción gasta 12,5 amperios
cuando funciona al máximo. Para evitar
sobrecargas, no enchufe el aparato en un circuito
que esté alimentando otros aparatos prendidos.
11. Es normal que el enchufe esté algo caliente al
tocarlo. Sin embargo, una conexión suelta entre la
salida de corriente alterna (toma de corriente) y el
enchufe puede provocar recalentamiento y
deformación del enchufe. Pida a un electricista
que cambie las toma de corriente defectuosas o
sueltas.
12. Para desenchufar el aparato de calefacción,
ponga el selector en OFF y saque el enchufe de la
toma de corriente. No tire del cable de
alimentación.
13. Asegúrese que no penetren cuerpos extraños por
las ranuras de ventilación o evacuación para
evitar descargas eléctricas, un posible incendio o
que se dañe el aparato de calefacción.
14. Para evitar un incendio, no bloquee de ninguna
forma los orificios de entrada y salida de aire. No
deje el aparato sobre una superficie blanda (como
una cama), pues podría bloquear los orificios.
Kaz, Inc. utiliza la marca de comercio Honeywell con autorización de Honeywell Intellectual Properties, Inc.
HZ-339_341_OM_Rev2.qxd 6/22/05 5:15 PM Page 13
Page 14

Los mandos digitales SureSetMCde su radiador le permiten ajustar la temperatura exactamente a los
grados que desee. Para ajustar la temperatura, siga las siguientes instrucciones :
ETAPA 1 : PUESTA EN MARCHA
• Pulse una vez el interruptor de alimentación ( ). El radiador se
pondrá en marcha a intensidad máxima ( ) y en modo continuo
( ) (Fig. 1). Si mantiene dicha programación, el radiador
funcionará sin interrupción a intensidad máxima (1.500 W,
12,5 amperios) hasta que Ud. lo pare manualmente.
• Pulse por segunda vez el interruptor de alimentación ( ). El
radiador funcionará a intensidad mínima ( ) y en modo conitinuo
( ). Si mantiene dicha programación, el radiador funcionará
sin interrupción a intensidad mínima (900 W, 7,5 amperios)
hasta que Ud. lo pare manualmente.
• Pulse por tercera vez el interruptor de alimentación ( ) para apagar el radiador.
NOTA : el radiador producirá menos calor si funciona a intensidad mínima. Sin embargo, también gasta
menos corriente que cuando funciona a intensidad máxima. Para evitar sobrecargas, no enchufe el
aparato en un circuito que esté alimentando otros aparatos prendidos.
ETAPA 2 : AJUSTE DE LA TEMPERATURA
• Pulse el botón de temperatura/temporizador ( ) hasta que el
símobolo de la temperatura ( ) parpadee. Aparecerá la
temperatura real de la habitación (Fig. 2).
• Sírvase de las flechas hacia ariba y hacia abajo ( ) para
seleccionar la temperatura deseada (Fig. 2).
• Una vez programada la temperatura, el símbolo de la temperatura
( ) dejará de parpadear y volverá a aparecer la temperatura real
de la habitación.
• El radiador se detendrá una vez alcanzada la temperatura preseleccionada. La temperatura
programada parpadeará.
• El radiador volverá a ponerse en marcha cuando la temperatura de la habitación sea inferior a la
preseleccionada. La temperatura programada dejará de parpadear y aparecerá la temperatura real
de la habitación.
FUNCIONAMIENTO
Fig. 2
Fig. 1
Símbolo de
funcionamiento continuo
Símbolo de la temperatura
INSTRUCIONES (CONTINUACIÓN)
15. Los aparatos de calefacción contienen piezas calientes que pueden echar chispas. No conecte el aparato en
lugares donde se use o almacene gasolina, pintura ni ningún otro líquido inflamable.
16. Use únicamente este aparato de calefacción observando todas las normas del presente manual. Todo uso
del aparato no recomendado por el fabricante puede ser causa de incendio, choque eléctrico o heridas.
17. La cantidad de calor que emite este aparato de calefacción es variable y su temperatura puede llegar a
quemar la piel. Por esta razón, se desaconseja su uso a personas de débil sensibilidad al calor y de limitada
capacidad de reacción para evitar las quemaduras.
18.
CONSERVE ESTAS INSTRUCCIONES.
HZ-339_341_OM_Rev2.qxd 6/22/05 5:15 PM Page 14
Page 15

ETAPA 3 : AJUSTE DEL TEMPORIZADOR
NOTA : programe esta función únicamente si desea que el radiador se pare automáticamente transcurrido
cierto tiempo (de 1 a 10 horas después que lo haya programado). Antes de ajustar el temporizador, debe
programar previamente la temperatura (vea la etapa 2) para que el radiador se detenga una vez alcanzada
la temperatura deseada. De lo contrario, funcionará
ininterrumpidamente.
• Pulse el botón de temperatura/temporizador ( ) hasta que el
símbolo del temporizador ( ) empiece a parpadear. En la
pantalla, aparecerán las horas y el símbolo de parada automática
(Fig. 3).
• Use las flechas hacia arriba y hacia abajo ( ) para programar
el tiempo de funcionamiento del radiador, entre 1 y 10 horas (Fig.
3). Una vez programado el temporizador, las horas permanecerán
en la pantalla hasta que haya transcurrido el tiempo programado.
• El radiador se apagará automáticamente una vez transcurrido el tiempo preseleccionado.
NOTA : si ha programado la temperatura antes de ajustar el temporizador, el radiador se pondrá en
marcha y se detendrá automáticamente para mantener la temperatura programada. Para volver al modo
de funcionamiento continuo (Fig. 1), pulse por tercera vez el botón de temperatura/temporizador ( ).
ETAPA 4 : LECTURA EN FAHRENHEIT O EN CELSIUS
Este radiador puede leer la temperatura en Fahrenheit o en Celsius.
• La opción °F/°C funciona únicamente a partir de la pantalla inicial
(al pulsar el interruptor de alimentación) o de la pantalla de ajuste
de la temperatura.
• Pulse el botón °F/°C para cambiar el modo de lectura de
Fahrenheit a Celsius (Fig. 4).
ETAPA 5 : OSCILACIÓN
• La opción de oscilación funciona a partir de cualquier pantalla :
inicial, de ajuste de la temperatura o del temporizador.
• Pulse el botón de oscilación ( ) para activar o desactivar dicha
función (Fig. 5).
NOTA : su radiador posee un indicador de
calor intenso SafeGuard
MC
(Fig. 6). Cuando
dicho indicador, situado en la parte superior
de la rejilla, pasa del negro al rojo, significa
que la rejilla está caliente.
No toque la rejilla mientras no haya
apagado el radiador y que el indicador
SafeGuard
MC
haya vuelto a ponerse
negro.
Fig. 3
Símbolo del temporizador
Símbolo de parada automática
FUNCIONAMIENTO (CONTINUACIÓN)
Fig. 4
°F/°C Temperature
Display
Fig. 5
Fig. 6
Indicador
de calor
intenso
HZ-339_341_OM_Rev2.qxd 6/22/05 5:15 PM Page 15
Page 16

FUNCIONAMIENTO DEL MANDO A DISTANCIA (MODELO DE LA SERIE HZ-341 ÚNICAMENTE)
El mando a distancia funciona con las dos (2) pilas AAA
suministradas.
Si no utiliza el mando a distancia, cuélguelo del soporte lateral del
aparato de calefacción (Fig. 7).
El mando a distancia funciona igual que sus botones
correspondientes del aparato de calefacción. Al seleccionar las
distintas funciones, aparecerán los símbolos adecuados en la
pantalla.
ETAPA 1 : PUESTA EN MARCHA
• Pulse una vez el interruptor de alimentación ( ). El radiador se
pondrá en marcha en marcha a intensidad máxima ( ) y en modo
continuo ( ) (Fig. 8). Si mantiene dicha programación, el
radiador funcionará ininterrumpidamente a intensidad
máxima (1.500 W, 12,5 amperios) hasta que Ud. lo pare
manualmente.
• Pulse por segunda vez el interruptor de alimentación ( ). El
radiador funcionará a intensidad mínima ( ) y en modo continuo
( ). Si mantiene dicha programación, el radiador funcionará
ininterrumpidamente a intensidad mínima (900 W, 7,5
amperios) hasta que Ud. lo pare manualmente.
• Pulse por tercera vez el interruptor de alimentación ( ) para
apagar el radiador.
NOTA : el radiador producirá menos calor si funciona a intensidad mínima. Sin embargo, también gasta
menos corriente que cuando funciona a intensidad máxima. Para evitar sobrecargas, no enchufe el
aparato en un circuito que esté alimentando otros aparatos prendidos.
ETAPA 2 : AJUSTE DE LA TEMPERATURA
• Pulse el botón “Mode” hasta que el símbolo de la temperatura ( )
parpadee. Aparecerá la temperatura real de la habitación (Fig. 9).
• Sírvase de las flechas hacia ariba y hacia abajo ( ) para
seleccionar la temperatura deseada (Fig. 9).
• Una vez programada la temperatura, el símbolo de la temperatura
( ) dejará de parpadear y volverá a aparecer la temperatura real
de la habitación.
• El radiador se detendrá una vez alcanzada la temperatura
preseleccionada. La temperatura programada parpadeará.
• El radiador volverá a ponerse en marcha cuando la temperatura de
la habitación sea inferior a la preseleccionada. La temperatura programada dejará de parpadear y
aparecerá la temperatura real de la habitación.
Fig. 8
Interruptor de
alimentación
Fig. 9
Flecha
hacia
abajo
Flecha
hacia
arriba
Botón
“Mode”
Fig. 7
HZ-339_341_OM_Rev2.qxd 6/22/05 5:15 PM Page 16
Page 17

FUNCIONAMIENTO DEL MANDO A DISTANCIA (CONTINUACIÓN)
ETAPA 3 : AJUSTE DEL TEMPORIZADOR
NOTA : programe esta función únicamente si desea que el radiador se pare automáticamente transcurrido
cierto tiempo (de 1 a 10 horas después que lo haya programado). Antes de ajustar el temporizador, debe
programar previamente la temperatura (vea la etapa 2) para que el radiador se detenga una vez alcanzada
la temperatura deseada. De lo contrario, funcionará ininterrumpidamente.
• Pulse el botón “Mode” hasta que el símbolo del temporizador ( ) empiece a parpadear. En la pantalla,
aparecerán las horas y el símbolo de parada automática (Fig. 9).
• Use las flechas hacia arriba y hacia abajo ( ) para programar el tiempo de funcionamiento del
radiador, entre 1 y 10 horas (Fig. 9). Una vez programado el temporizador, las horas permanecerán en
la pantalla hasta que haya transcurrido el tiempo programado.
• El radiador se apagará automáticamente una vez transcurrido el tiempo preseleccionado.
NOTA : si ha programado la temperatura antes de ajustar el temporizador, el radiador se pondrá en
marcha y se detendrá automáticamente para mantener la temperatura programada. Para volver al modo
de funcionamiento continuo (Fig. 1), pulse por tercera vez el botón “Mode.
ETAPA 4 : OSCILACIÓN
• La opción de oscilación funciona a partir de cualquier pantalla :
inicial, de ajuste de la temperatura o del temporizador.
• Pulse el botón de oscilación para activar o desactivar dicha función
(Fig. 10).
Fig. 10
Oscilación
PROBLEMAS
Si el radiador se apaga repentinamente, puede que uno de los dispositivos de seguridad se haya activado
para evitar su sobrecalentamiento.
• Asegúrese que el cable de alimentación del radiador está enchufado y que la toma de corriente
funciona.
• Compruebe el ajuste de la temperatura. Puede que el radiador se haya parado porque haya alcanzado
la temperatura preseleccionada.
• Compruebe que no hay ningún objeto que obstruya el aparato. En caso afirmativo, apague el radiador y
desenchúfelo. Déjelo enfriar completamente (al menos 10 minutos) y quite dicho objeto. Seguidamente,
vuelva a enchufar el radiador siguiendo las instrucciones de la sección FUNCIONAMIENTO.
HZ-339_341_OM_Rev2.qxd 6/22/05 5:15 PM Page 17
Page 18

CARACTERÍSTICAS ELÉCTRICAS
Las características eléctricas de este aparato son : 12,5 amperios (1.500 W), 120 V, 60 Hz.
ATENCIÓN AL CLIENTE
Envíe sus preguntas o comentarios a:
Kaz, Incorporated
Consumer Relations Dept.
250 Turnpike Road
Southborough, MA 01772
CLlame gratis al 1 800 332-1110
Correo electrónico : consumerrelations@kaz.com
O visite nuestro sitio Web : www.kaz.com
Por favor, indique el número de modelo.
NOTA: EN CASO DE PROBLEMA CON EL RADIADOR, COMUNIQUE PRIMERO CON NUESTRO SEVICIO DE
ATENCIÓN AL CLIENTE, LLEVE EL APARATO AL LUGAR DONDE LO COMPRÓ O CONSULTE LA
GARANTÍA. NO INTENTE ABRIR EL RADIADOR, PODRÍA ANULAR LA GARANTÍA Y DAÑAR EL APARATO
O ACCIDENTARSE.
LIMPIEZA Y ALMACENAMIENTO
Se recomienda que limpie el radiador al menos una vez al mes y antes de guardarlo a final de la
temporada.
• Apague el radiador y desenchúfelo. Deje que se enfríe completamente.
• Con un paño seco únicamente, limpie las superficies exteriores del aparato. NO USE AGUA, CERA,
NINGÚN PRODUCTO DE ABRILLANTADO NI NINGUNA OTRA SOLUCIÓN QUÍMICA.
• Este radiador no se desmonta.
CARACTERÍSTICAS DE SEGURIDAD
Este aparato de calefacción posee varios dispositivos de seguridad para una mayor protección:
• un interruptor de seguridad que desconecta el radiador si se vuelca accidentalmente (únicamente el
modelo de HZ-341BW);
• el indicador de calor intensa SafeGuard
MC
indica si la rejilla está caliente pasando del negro al rojo;
• un dispositivo de seguridad para altas temperaturas para evitar sobrecalentamientos;
• un fusible térmico que apaga el aparato de forma permanente si se pone a funcionar a una
temperatura más elevada de lo normal.
HZ-339_341_OM_Rev2.qxd 6/22/05 5:15 PM Page 18
Page 19

Por favor, lea todas las instrucciones antes de usar el
radiador.
A. La presente garantía limitada de 5 años cubre la
reparación o sustitución de todo producto con un
defecto de fábrica o de mano de obra. Esta garantía
excluye los defectos ocasionados por el uso
comercial, abusivo o desrazonable y los daños
adicionales. Los fallos resultantes del desgaste
normal no se consideran defectos de fábrica en
virtud de la presente garantía. KAZ QUEDA EXENTA
DE TODA RESPONSABILIDAD POR DAÑOS
FORTUITOS O INDIRECTOS DE TODO TIPO. TODA
GARANTÍA IMPLÍCITA DE CALIDAD COMERCIAL O
DE CONVENIENCIA RELACIONADA CON ESTE
PRODUCTO TENDRÁ LA MISMA VIGENCIA QUE LA
PRESENTE GARANTÍA. En ciertos lugares no se
permite la exclusión o limitación a daños fortuitos o
indirectos, ni los límites de duración aplicables a
una garantía implícita. Por consiguiente, es posible
que estas limitaciones o exclusiones no se apliquen
en su caso. Esta garantía le confiere unos derechos
precisos, reconocidos por la ley. Dichos derechos
difieren de un lugar a otro y es posible que usted
tenga otros. La presente garantía sólo será válida
con la compra inicial del producto a partir de la
fecha de compra inicial.
B. Kaz se reserva todo derecho de reparación o
sustitución del presente producto si se constata que
presenta un defecto de fábrica o mano de obra.
Todo producto defectuoso debe devolverse al lugar
donde lo compró y de acuerdo con la política de
dicho comercio. Seguidamente, todo producto
defectuoso cuya garantía esté en vigor, podrá ser
devuelto a Kaz.
C. Esta garantía no cubre los daños ocasionados por
tentativas de reparación no autorizadas o por el uso
no conforme con el presente manual.
D. Para devolver un producto defectuoso a Kaz,
Incorporated, adjunte una descripción breve del
problema junto con una prueba de compra y un
cheque o giro postal de 10,00 $ US ó 15,50 $ CAD
para los gastos de manutención, embalaje de vuelta
y reenvío. Indique su nombre, dirección y un número
de teléfono donde podamos localizarle durante el
día. Los gastos de envío deben pagarse por
adelentado. Enviar a:
En los Estados Unidos :
Kaz, Incorporated
Attn: Returns Department
4755 Southpoint Drive
Memphis, TN 38118
USA
En Canadá :
Kaz, Incorporated
Attn: Returns Department
510 Bronte Street South
Milton, ON L9T 2X6
Canada
© 2005 Kaz, Incorporated. Reservados todos los derechos.
P/N: 31IM0341192
GARANTÍA LIMITADA DE 5 AÑOS
HZ-339_341_OM_Rev2.qxd 6/22/05 5:15 PM Page 19
 Loading...