

Page 1
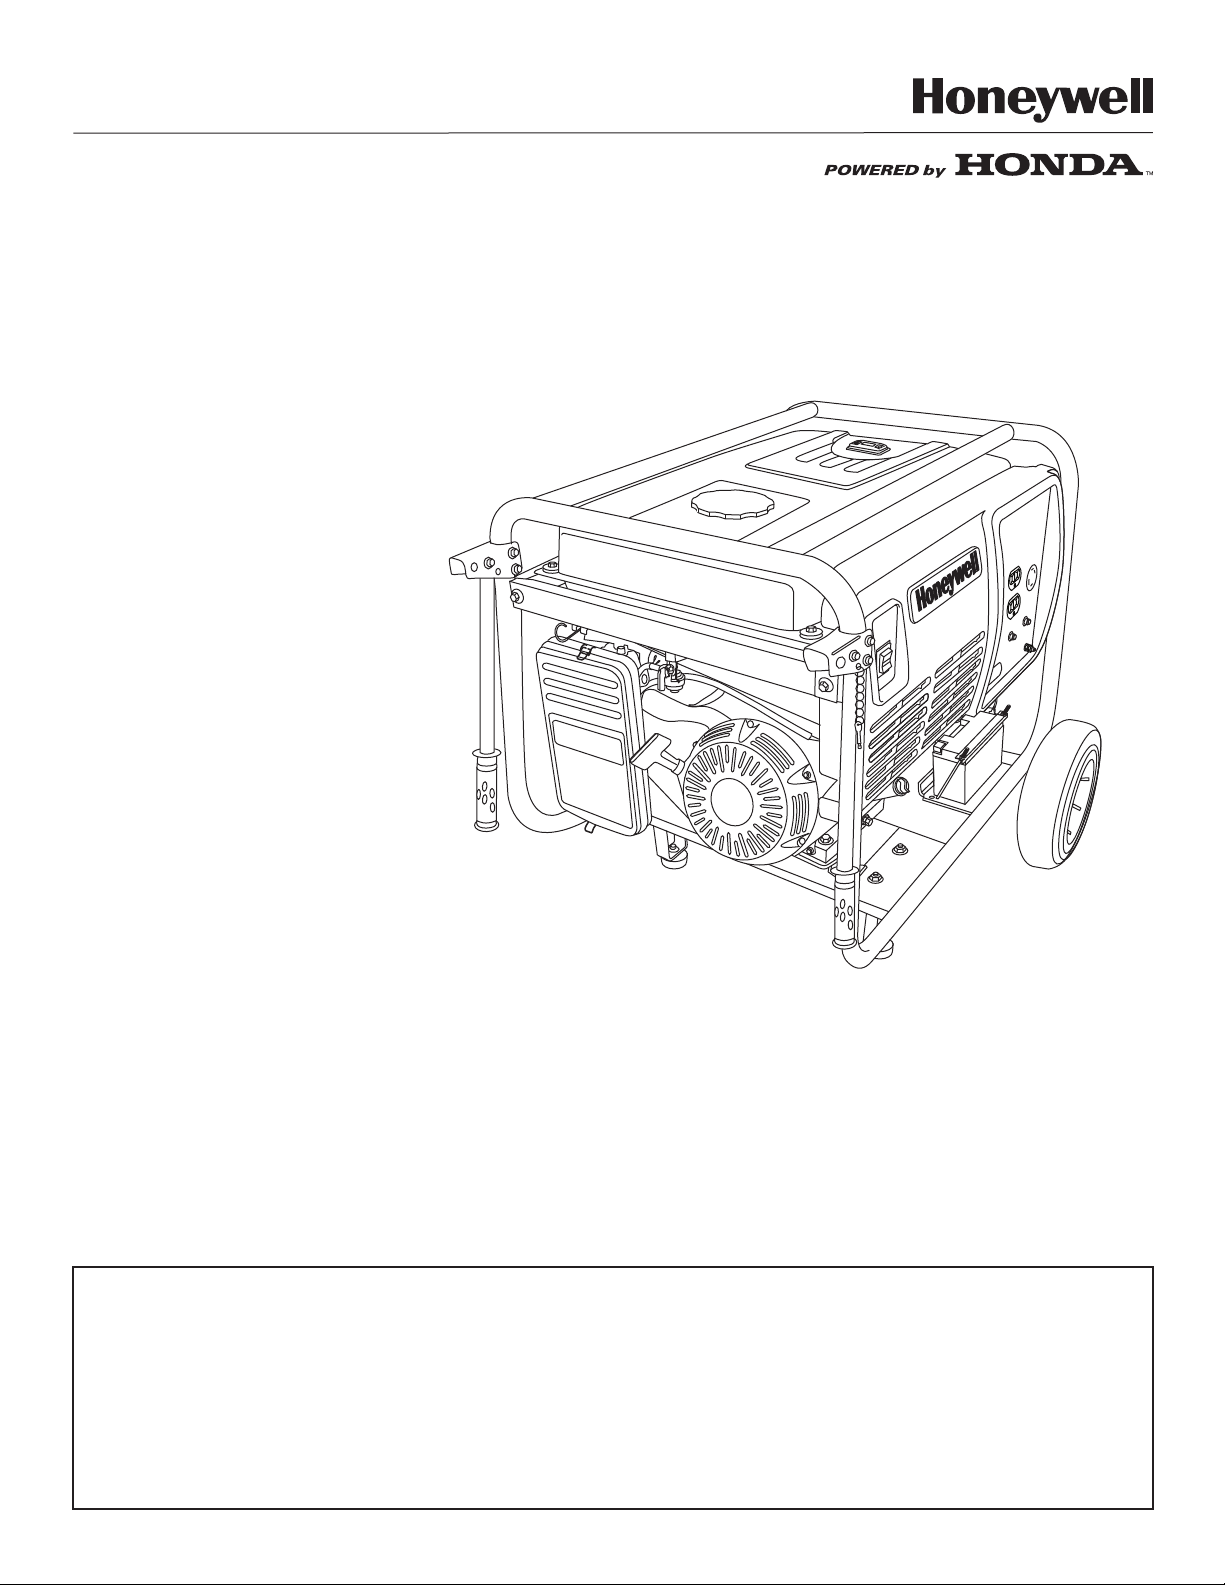
Portable Electrical Generator
Owner’s Manual
Manual del Propietario
HW7000EH
For product inquiries or support, visit www.honeywellgenerators.com or call
toll-free at 1-888-HWHELP1 (494-3571).
Si tiene preguntas acerca de los productos o requiere de asistencia, visite
www.honeywellgenerators.com o llame gratis al 1-888-HWHELP1 (494-3571).
Page 2
Congratulations on owning a Honeywell portable generator!
WARNING
This manual contains important instructions for operating this generator. For your safety and the
safety of others, be sure to read this manual thoroughly before operating the generator. Failure to
properly follow all instructions and precautions can cause you and others to be seriously hurt or
killed.
Please use the spaces provided below to record important information about your generator. You may be asked to
provide this information should you require product service or support.
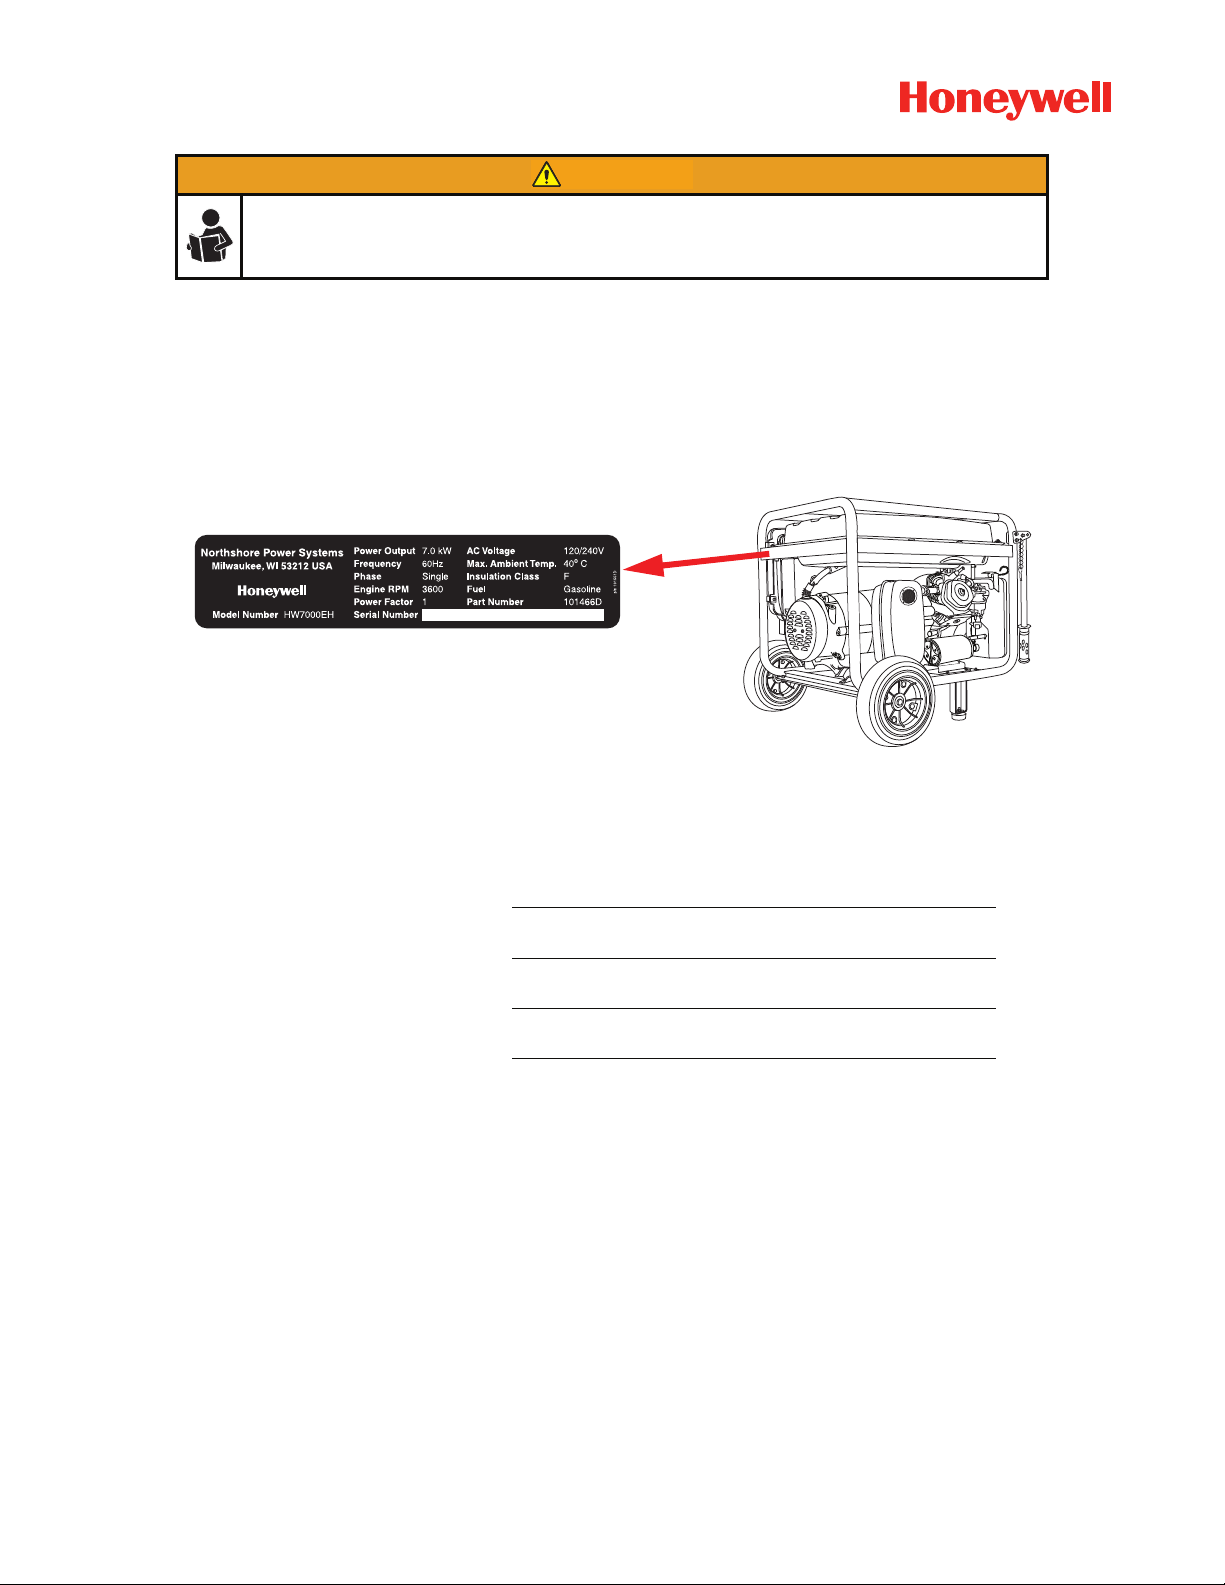
Identification information specific to your generator (model number and serial number) can be found on the generator nameplate.
Date of Purchase:
Store/Dealer Purchased From:
Generator Model Number:
Generator Serial Number:
Northshore Power Systems, LLC
4425 N. Port Washington Rd., Suite 105
Milwaukee, WI 53212-1082 USA
TEL 1-888-HWHELP1 (494-3571)
www.honeywellgenerators.com
© 2009 Northshore Power Systems, LLC
The Honeywell Trademark is used under license from
Honeywell International Inc.
Honeywell International Inc. makes no representations or
warranties with respect to this product.
Page 3
PRODUCT REGISTRATION
1 - PERSONAL INFORMATION
2 - PRODUCT INFORMATION
FIRST NAME
LAST NAME
CHECK HERE TO RECEIVE ANNUAL MAINTENANCE REMINDERS AND SPECIAL OFFERS FROM HONEYWELL
GENERATORS
CHECK HERE TO RECEIVE INFORMATION FROM OTHER COMPANIES VIA EMAIL, UNDERSTANDING YOUR
EMAIL ADDRESS MAY BE SHARED OR COMBINED WITH INFORMATION FROM OTHER SOURCES
DATE OF PURCHASE:
MM DD YYYY
//
*MODEL NUMBER:
*SERIAL NUMBER (18-digits):
PURCHASE LOCATION:
IN-STORE
ONLINE
STORE NAME:
PURCHASE PRICE: $___________.00
FEATURES INFLUENCING PRODUCT PURCHASE:
BRAND REPUTATION EASE OF USE
PORTABILITY SIZE / WEIGHT
POWER RATING STYLE/APPEARANCE
PRICE WARRANTY
HOW DID YOU BECOME AWARE OF THIS PRODUCT?
IN-STORE RADIO/TV
INTERNET STORE CIRCULAR
PRINT WORD OF MOUTH
OTHER BRANDS CONSIDERED WHEN SHOPPING
FOR THIS PRODUCT:
PRIMARY USE FOR PRODUCT:
TOOL POWER
RECREATION POWER
EMERGENCY POWER
PRIMARY LOCATION FOR PRODUCT USE:
HOME
WORK
TYPE OF WORK, IF PRODUCT BEING USED FOR
PROFESSION:
WHAT OTHER TYPE OF POWER EQUIPMENT ARE
YOU INTERESTED IN PURCHASING IN THE FUTURE?
WHO DECIDED TO PURCHASE THIS PRODUCT?
STREET ADDRESS
CITY, STATE, ZIP
COUNTRY
PHONE
EMAIL
*Found on nameplate of generator
To register your product, please complete the information below and mail to the address at the end of the form or register
online at www.honeywellgenerators.com. 18-digit serial number must be completed in order for warranty to be acti-
vated.
Page 4
3 - DEMOGRAPHIC INFORMATION
GENDER:
MALE
FEMALE
MARITAL STATUS:
MARRIED
SINGLE
DATE OF BIRTH:
MM DD YYYY
//
INCLUDING YOURSELF, HOW MANY PEOPLE LIVE IN
YOUR HOUSEHOLD:
NUMBER OF CHILDREN UNDER 18 LIVING IN YOUR
HOUSEHOLD:
PRIMARY RESIDENCE:
OWN
RENT
EDUCATION:
SOME HIGH SCHOOL
HIGH SCHOOL DIPLOMA
COLLEGE DEGREE
GRADUATE DEGREE
THANK YOU FOR REGISTERING YOUR PRODUCT. THE INFORMATION YOU PROVIDED MAY BE USED
FOR MARKETING PURPOSES IN ORDER TO OFFER YOU VARIOUS PRODUCT INFORMATION AND
OFFERS.
CHECK HERE IF YOU DO NOT WISH TO BE CONTACTED ABOUT SPECIAL OFFERS.
PLEASE RETURN THIS FORM TO THE FOLLOWING ADDRESS:
Northshore Power Systems, LLC
4425 N Port Washington Road
Suite 105
Milwaukee, WI 53212-1082
PLEASE MAIL THIS FORM IN A SEALED ENVELOPE. DO NOT STAPLE.
HOUSEHOLD INCOME:
LESS THAN $15,000 $100,000 - $124,999
$15,000 - $29,999 $125,000 - $149,999
$30,000 - $49,999 $150,000 - $174,999
$50,000 - $79,999 $175,000 - $199,999
$80,000 - $99,999 $200,000 OR OVER
PRIMARY METHOD OF PURCHASING HOUSEHOLD
ITEMS:
IN-STORE
ONLINE
TV
MAIL ORDER
TYPES OF CREDIT CARDS HELD BY HOUSEHOLD
MEMBERS:
VISA / MASTERCARD
DISCOVER
AMERICAN EXPRESS
GAS / RETAIL
OTHER
NONE
HOUSEHOLD INTERESTS:
HOME IMPROVEMENT
AUTOMOTIVE WORK
CAMPING
OTHER
Page 5

CONTENTS
IMPORTANT SAFETY INSTRUCTIONS ............................................................................. 1
Safety Messages ......................................................................................................................................... 1
Location of Important Labels .......................................................................................................................3
GETTING STARTED ......................................................................................................... 5
Unpacking Guidelines ..................................................................................................................................5
Record Generator Information ..................................................................................................................... 5
Assembly .....................................................................................................................................................6
Grounding the Generator ...........................................................................................................................11
Using Generator for Backup Power ...........................................................................................................11
COMPONENTS ............................................................................................................... 13
OPERATION ................................................................................................................... 15
Generator Location .................................................................................................................................... 15
Preparing for Operation ............................................................................................................................. 15
Starting Generator .....................................................................................................................................16
Stopping Generator ................................................................................................................................... 18
High-Altitude Operation .............................................................................................................................18
Powering Appliances .................................................................................................................................18
MAINTENANCE .............................................................................................................. 21
Maintenance Schedule ..............................................................................................................................21
Adding Engine Fuel ................................................................................................................................... 22
Adding Engine Oil ......................................................................................................................................22
Engine Maintenance .................................................................................................................................. 23
Cleaning Spark Arrestor Screen ................................................................................................................23
Battery Service .......................................................................................................................................... 24
Cleaning Fuel Sediment Cup .....................................................................................................................24
Transporting Generator .............................................................................................................................25
Storing Generator ......................................................................................................................................25
TROUBLESHOOTING .................................................................................................... 27
SPECIFICATIONS ........................................................................................................... 29
WARRANTY .................................................................................................................... 31
NORTHSHORE POWER SYSTEMS CONSUMER LIMITED WARRANTY .............................................31
NORTHSHORE POWER SYSTEMS EVAPORATIVE EMISSIONS CONTROL WARRANTY .................32
INDEX .............................................................................................................................. 35
MAINTENANCE PARTS ................................................................................................. 37
HW7000EH Portable Electrical Generator Owner’s Manual www.honeywellgenerators.com i
Page 6

THIS PAGE INTENTIONALLY LEFT BLANK
ii www.honeywellgenerators.com HW7000EH Portable Electrical Generator Owner’s Manual
Page 7
SAVE THESE INSTRUCTIONS
NOTE:
WARNING
DANGER
WARNING
CAUTION
NOTICE
+
DANGER
IMPORTANT SAFETY INSTRUCTIONS
ANYONE using or servicing this generator must read, understand, and follow all safety and operation instructions provided in the product manual. Failure to closely follow these instructions can result in circumstances leading to death,
serious injury, and property damage.
Hazard Symbols and Meanings
Since there are many variations in the circumstances surrounding the installation, operation, service, and maintenance of this generator, we cannot possibly anticipate or
provide advice or safety messages to cover every situation.
In addition to the signal words, the following symbols may
be used to draw your attention to specific types of haz-
ards.
Safety Messages
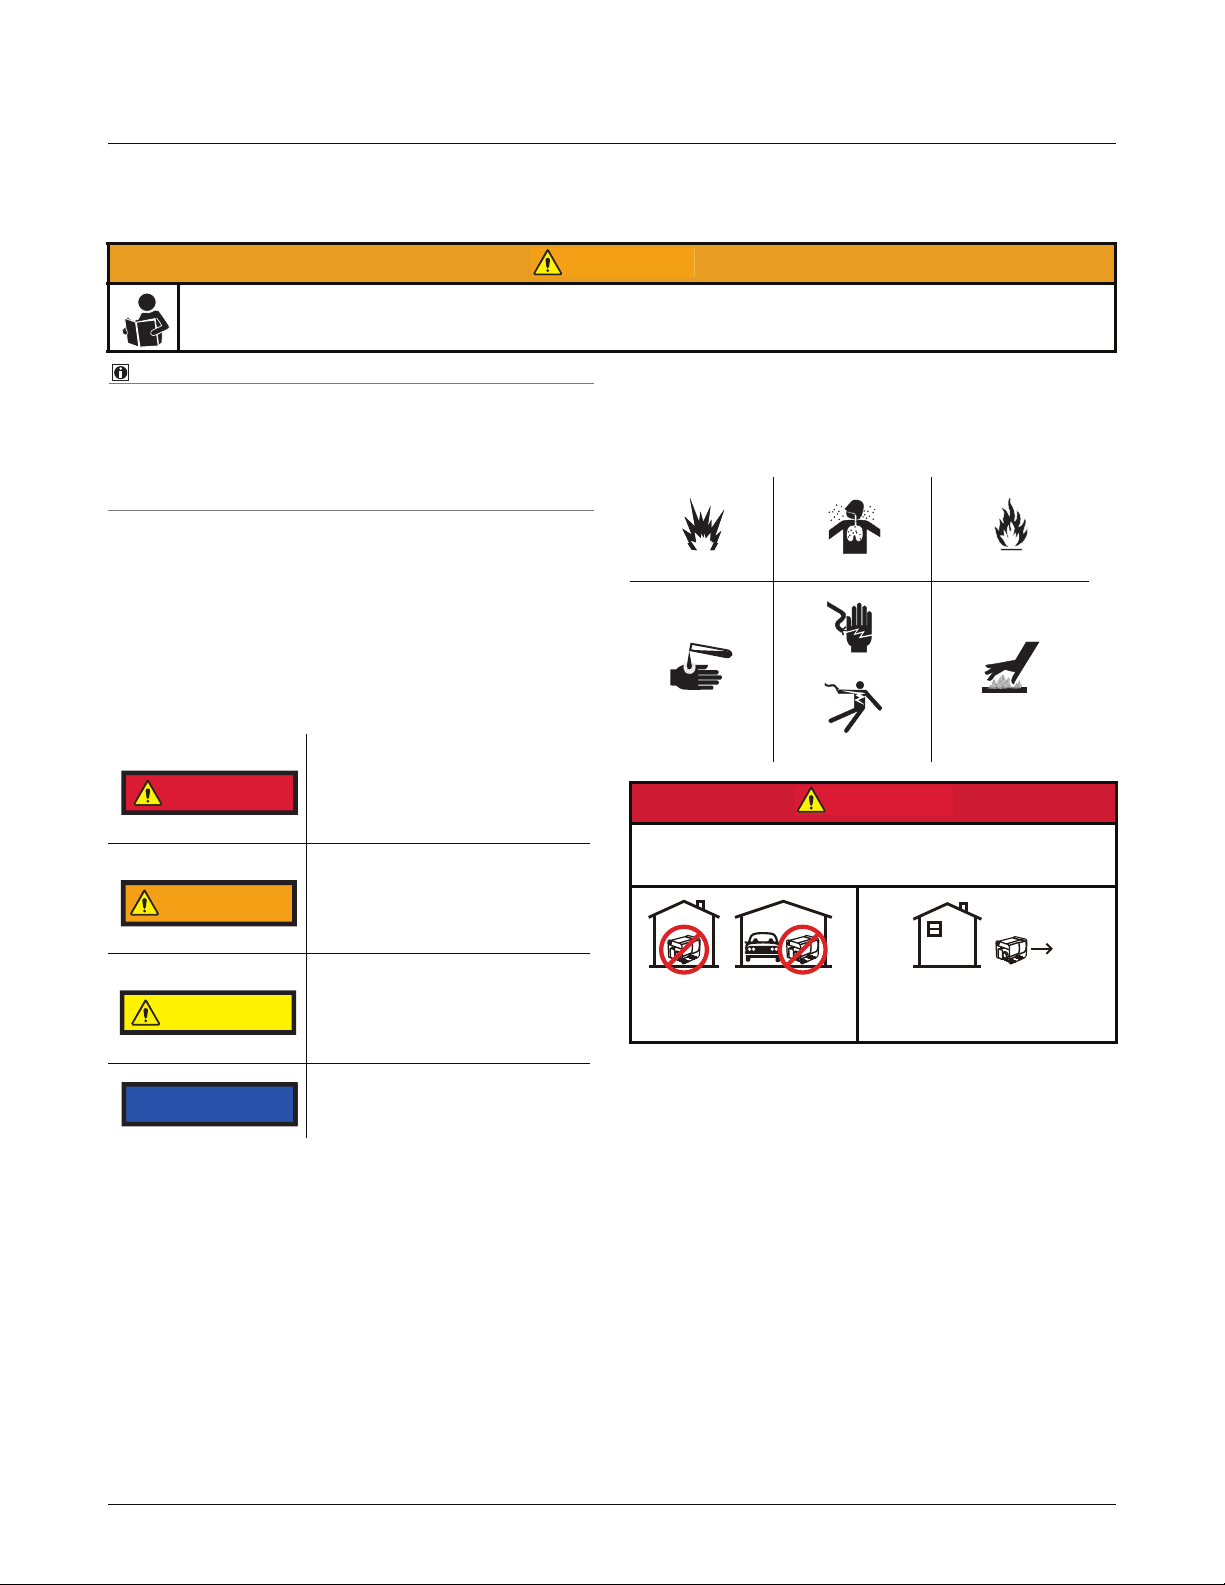
Signal Words
Safety messages are provided throughout this manual to
help prevent personal injury and equipment damage. All
safety messages are introduced by a signal word indicating the hazard level.
Indicates an imminently hazardous situation which, if not
avoided, will result in death or
serious injury to the operator or
to bystanders.
Indicates a potentially hazardous
situation which, if not avoided,
could result in death or serious
injury to the operator or to
bystanders.
Indicates a potentially hazardous
situation which, if not avoided,
may result in moderate or minor
injury to the operator or to
bystanders.
Indicates a situation which, if not
avoided, may result in damage to
the generator components.
Explosion
Chemical burn
Using a generator indoors CAN KILL YOU IN MINUTES.
Generator exhaust contains carbon monoxide. This is a poison you cannot see or smell.
NEVER use inside a home
or garage, EVEN IF doors
and windows are open.
Tox i c f u m e s
Electrical shock
Only use OUTSIDE and far
away from windows, doors, and
vents.
Fire
Hot surface
HW7000EH Portable Electrical Generator Owner’s Manual www.honeywellgenerators.com 1
Page 8
Safety Messages
WARNING
WARNING
WARNING
WARNING
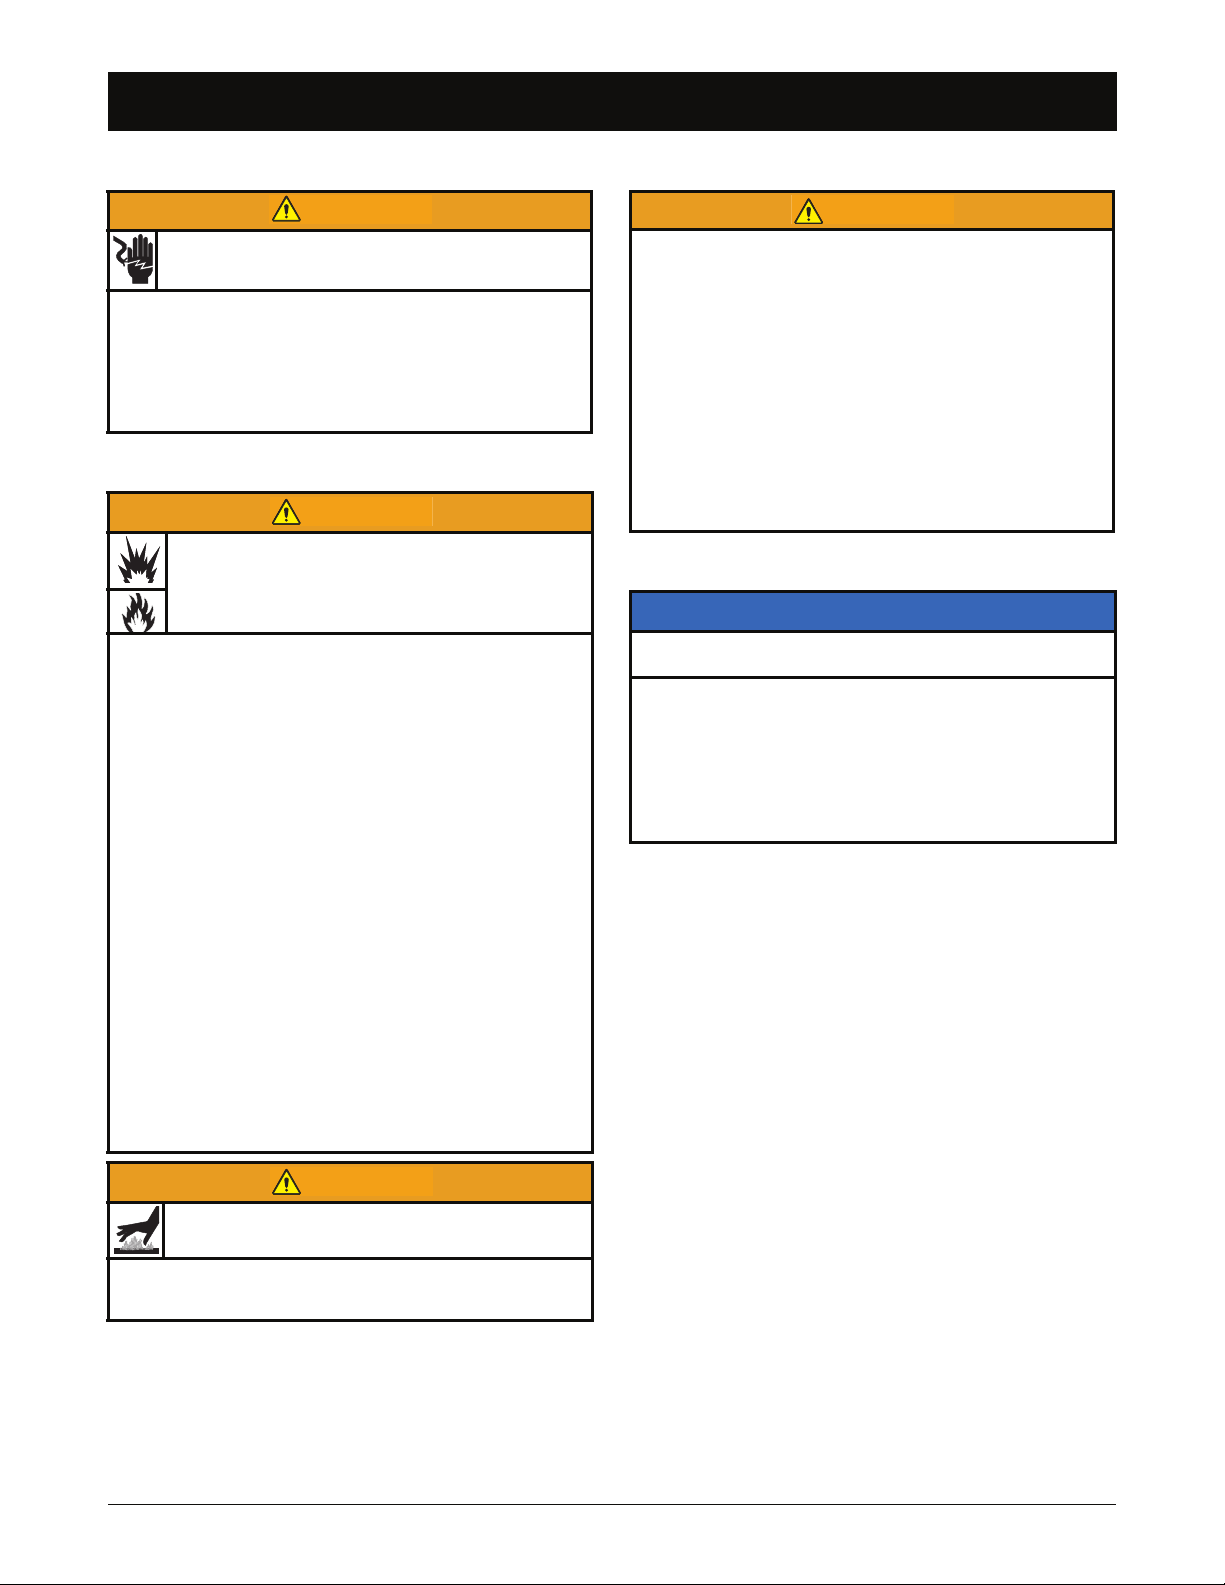
Electric Shock Hazards
Generator produces powerful voltage that can cause
death or great physical harm.
• NEVER touch bare wires or receptacles.
• NEVER use generator with electrical cords that are
worn, frayed, bare, or otherwise damaged.
• NEVER operate generator in rain or snow, or when
the generator is set on wet surface.
Fire and Burn Hazards
Fuel and its vapors are extremely flammable and
explosive under certain conditions.
• Refuel generator only outdoors, in a well-ventilated
area.
• NEVER enclose the generator in any structure.
• Keep generator at least 6 feet (2 meters) away from
buildings, other equipment, and combustible materials during operation.
• NEVER fill fuel tank while the engine is running. Turn
generator OFF and allow to cool before filling with
fuel.
• NEVER smoke or allow flames or sparks near the
generator or where gasoline is stored.
• NEVER overfill the fuel tank (there should be no fuel
in the filler neck). After refueling, make sure the tank
cap is closed properly and securely.
• Be careful not to spill fuel when refueling. Spilled fuel
or fuel vapor may ignite. If any fuel is spilled, be sure
the area is dry before starting the engine.
• Avoid repeated or prolonged contact with skin or
breathing of vapor.
Medical and Life Support Uses
• In case of emergency, call 911 immediately.
• NEVER use this product to power life support
devices or life support appliances.
• NEVER use this product to power medical devices or
medical appliances.
• Inform your electricity provider immediately if you or
anyone in your household depends on electrical
equipment to live.
• Inform your electrical provider immediately if a loss
of power would cause you or anyone in your household to experience a medical emergency.
Generator Damage Hazards
NOTICE
Improper treatment or misuse of generator can cause permanent damage.
• NEVER modify generator in any way.
• NEVER tamper with governed speed. Generator
supplies correct rated frequency and voltage when
running at governed speed.
• Damage to generator caused by misuse or modifica-
tion is not covered under warranty.
• NEVER touch hot surfaces and avoid hot gases.
• Let engine cool before storing the generator indoors.
2 www.honeywellgenerators.com HW7000EH Portable Electrical Generator Owner’s Manual
The muffler becomes very hot during operation and
remains hot for a while after stopping the engine.
Page 9
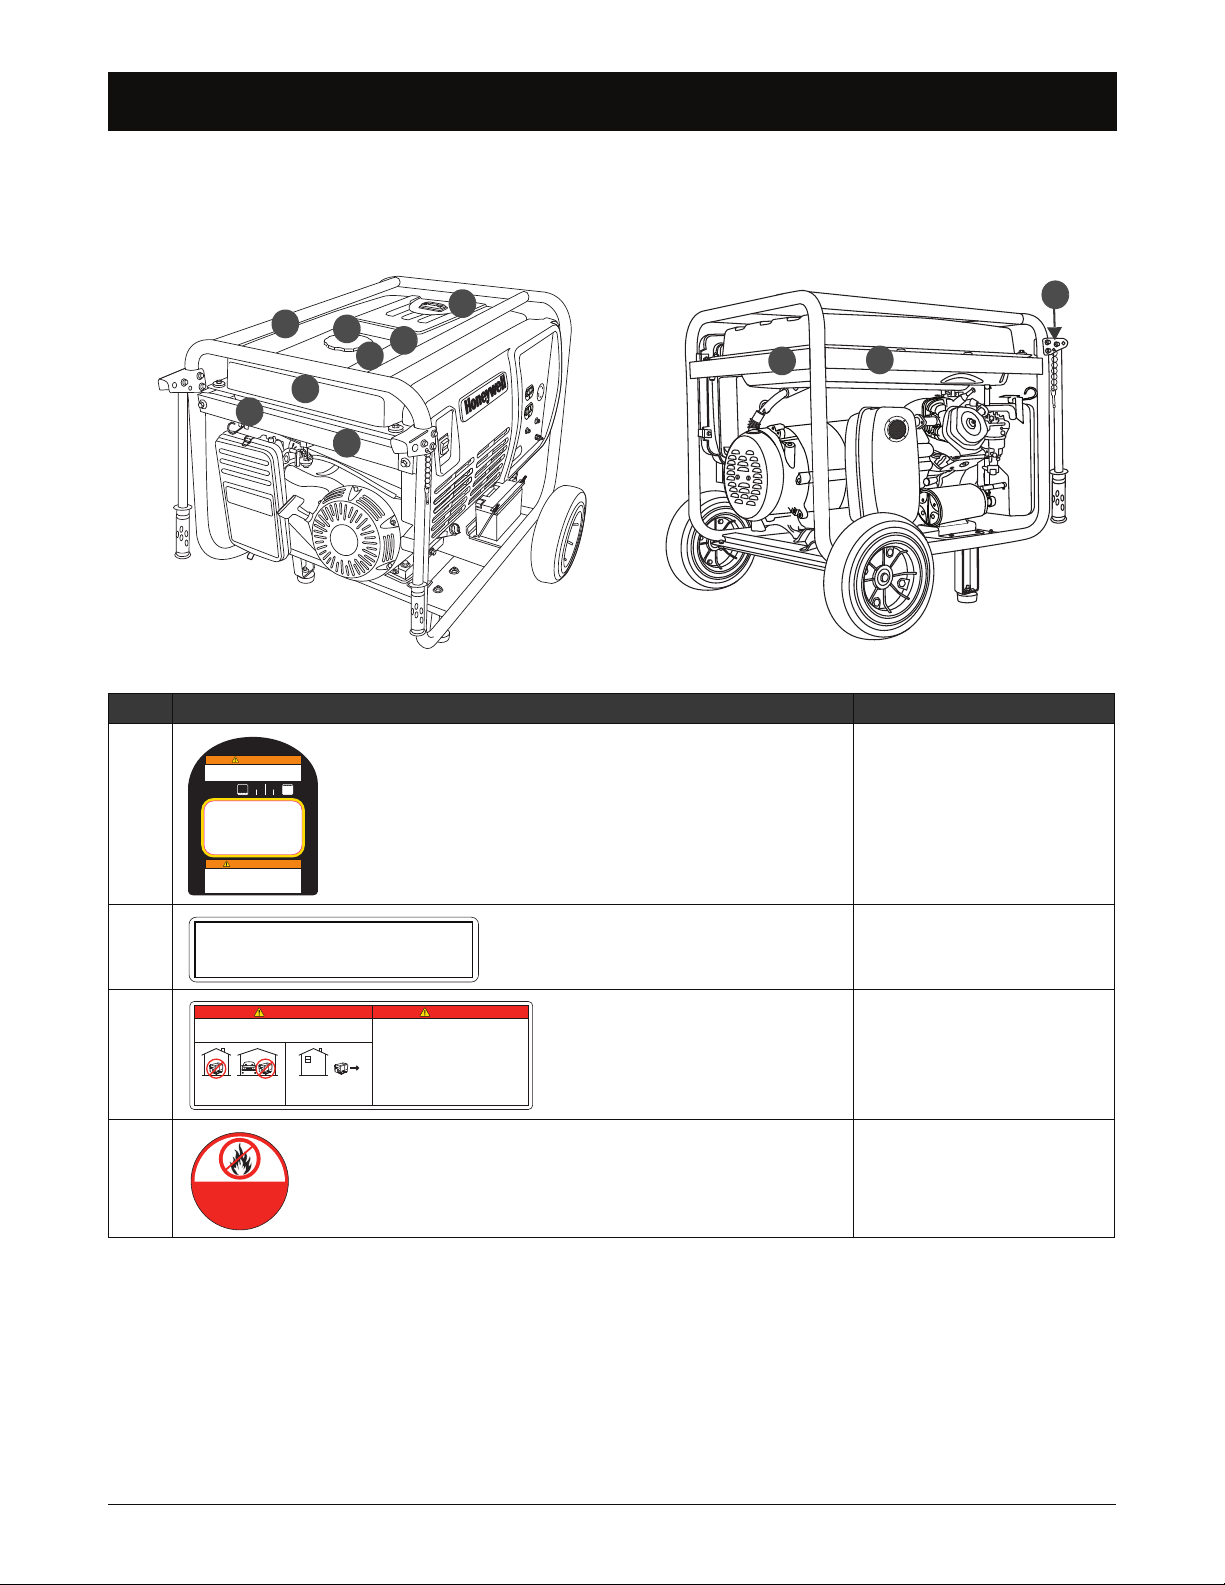
Location of Important Labels
A
F
C
G
H
A
E
B
D
I
J
I
NEVER FUEL UNIT WITH ENGINE RUNNING.
ALWAYS FUEL UNIT IN WELL VENTILATED AREA.
ALWAYS CLEAN FUEL SPILLS.
ALWAYS ALLOW UNIT TO COOL BEFORE FUELING.
WARNING
NUNCA LLENE LA UNIDAD DE COMBUSTIBLE
CON EL MOTOR PRENDIDO.
SIEMPRE LLENE LA UNIDAD EN UN ÁREA BIEN VENTILADA.
SIEMPRE LIMPIE CUALQUIER DERRAME DE COMBUSTIBLE.
SIEMPRE DEJE QUE LA UNIDAD SE ENFRÍE ANTES
DE LLENARLA DE COMBUSTIBLE.
ADVERTENCIA
CUTOUT
p/n 101796A
For Technical Assistance and Service Call
1-888-HWHELP1 (494-3571)
Para la ayuda técnica y servicio llamada
p/n 102029A
USAR EL GENERATOR EN INTERIORES
LO PUEDE MATAR EN MINUTOS.
EL ESCAPE DEL GENERATOR CONTIENE
MONÓXIDO DE CARBONO.
ESTE GAS ES UN VENENO QUE NO SE
PUEDE VER NI OLER.
NUNCA USE EL GENERADOR DENTRO
DEL HOGAR O EL GARAJE, AÚN SI LAS
PUERTAS Y VENTANAS ESTÁN ABIERTAS.
SOLO USELO EN EXTERIORES Y LEJOS DE
VENTILACIONES, PUERTAS Y VENTANAS ABIERTAS.
PELIGRODANGER
USING A GENERATOR INDOORS CAN KILL YOU IN MINUTES.
GENERATOR EXHAUST CONTAINS CARBON MONOXIDE.
THIS IS A POISON YOU CANNOT SEE OR SMELL.
ONLY USE OUTSIDE AND
FAR AWAY FROM WINDOWS,
DOORS, AND VENTS.
NEVER USE INSIDE A HOME
OR GARAGE, EVEN IF DOORS
AND WINDOWS ARE OPEN.
Use regular unleaded gasoline
with a minimum octane
rating of 86
Utilice gasolina sin plomo
con un octanaje
mínimo de 86
p/n 102094A
Location of Important Labels
Your generator has several labels which provide important safety and maintenance information. Samples of these labels are
provided below. Should any of these labels become illegible or damaged, contact the Customer Hotline at 1-888-HWHELP1
(494-3571) to request replacement.
FIGURE 1: Label Locations
PRODUCT LABEL PART NUMBER
FUEL
A 101796B
B
102029B
C 100886B
D
102094A
HW7000EH Portable Electrical Generator Owner’s Manual www.honeywellgenerators.com 3
Page 10
Location of Important Labels
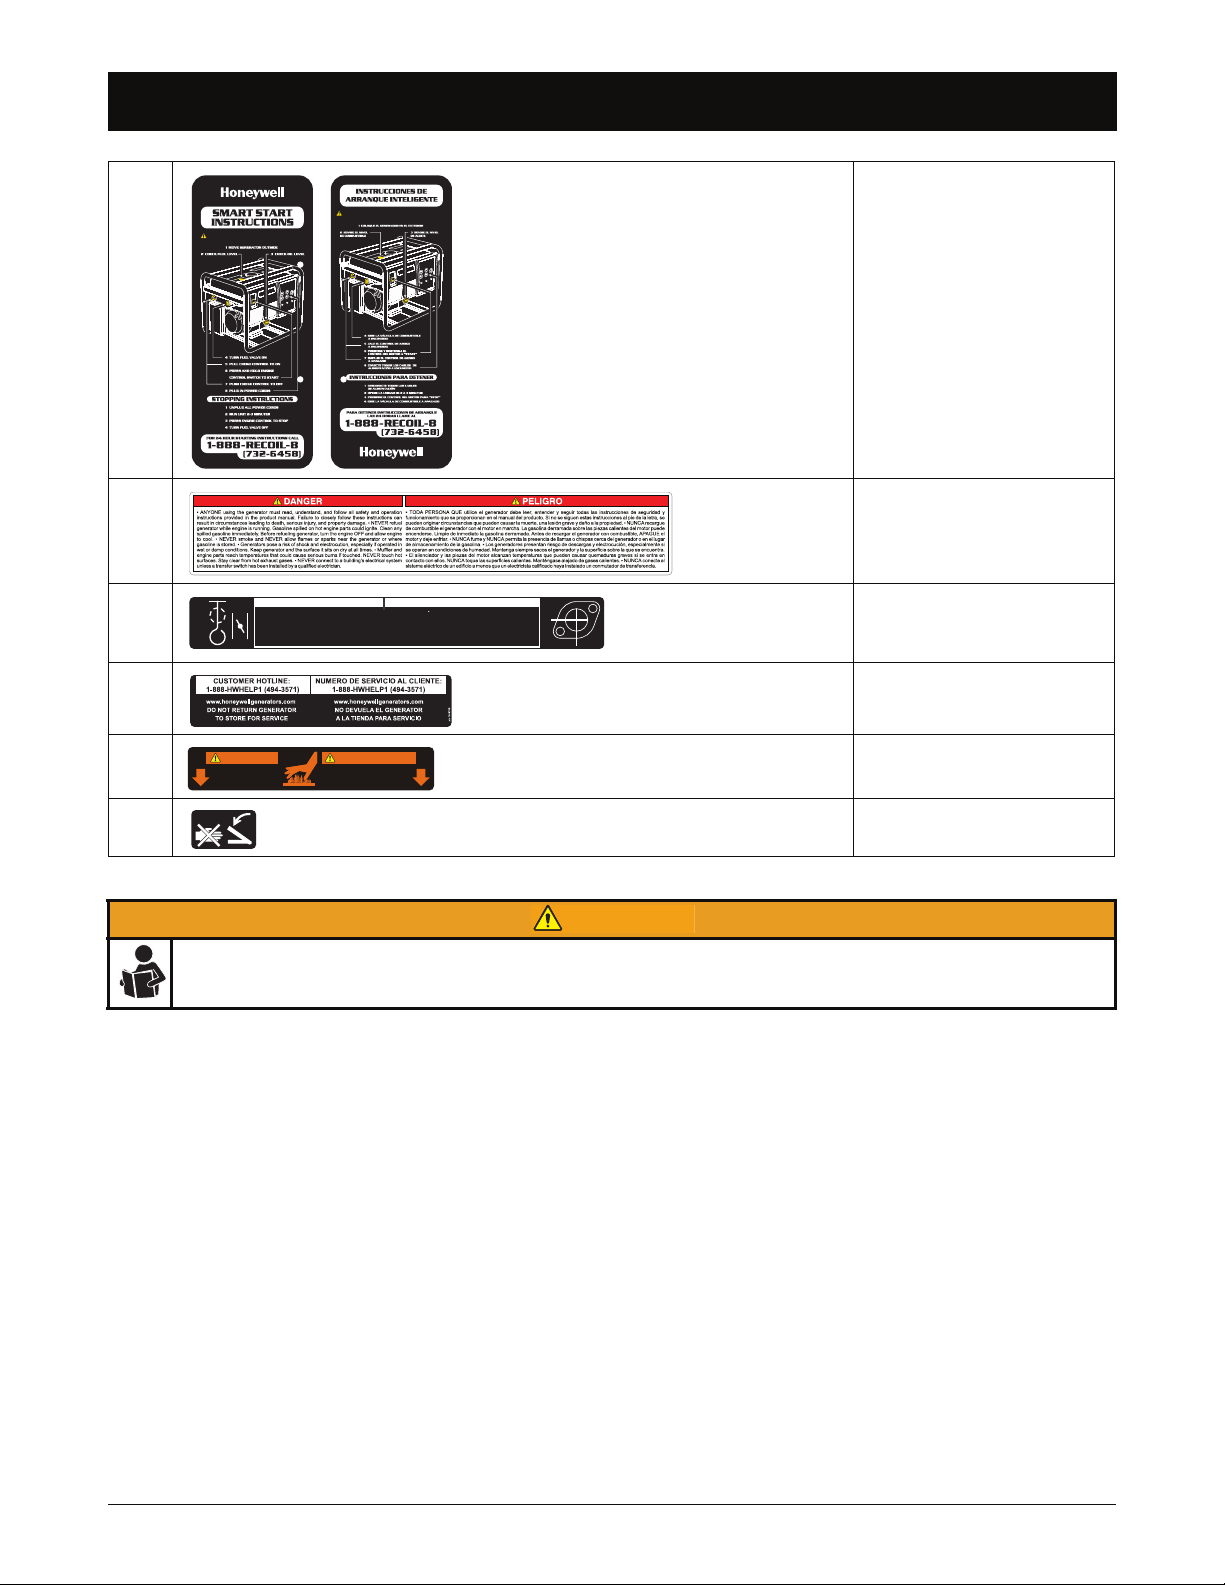
ALL USERS MUST READ AND UNDERSTAND OWNER’S MANUAL!
p/n 100849C
TODOS LOS USUARIOS DEBEN LEER Y COMPRENDER EL MANUAL DEL PROPIETARIO
ON
OFF
Clean up in cleansing solvent and dry up
once every 50 hours (every 10 hours in
unusually dusty circumstances) and then
immerse in clean engine oil until
saturated. Squeeze out excessive oil.
MAINTAIN AIR CLEANER
MANTENGA EL FILTRO DE AIRE
Límpielo segun las instrucciones en el manual del
usuario y séquelo una vez cada 50 horas (o cada 10
horas en condiciones cuando haya mucho polvo)
entonces sumérjalo en aceite de motor limpio hasta
saturarse, exprima el aceite de sobra.
ON
OFF
HOT
SURFACES
SUPERFICIES
CALIENTES
WARNING
ADVERTENCIA
p/n 100881B
WARNING
E 100849C
F 100887B
G 100883B
H 100879C
I 100885B
J 100881B
The Smart Start instruction card (see E above) is NOT intended to replace information provided in this Owner’s Manual. Be sure to thoroughly read and understand all information provided in Owner’s Manual before operating generator.
Failure to properly follow all instructions and precautions can cause you and others to be seriously injured or killed.
4 www.honeywellgenerators.com HW7000EH Portable Electrical Generator Owner’s Manual
Page 11
GETTING STARTED
WARNING
CAUTION
Use the information in this section to get your generator ready for operation.
ANYONE using this generator must read, understand, and follow all safety and operation instructions provided in the
product manual. Failure to closely follow these instructions can result in circumstances leading to death, serious injury,
and property damage.
Unpacking Guidelines
1. Set carton on a rigid, flat surface.
2. Remove carton contents.
Generator is heavy! Lifting generator can cause back or other bodily injury. NEVER lift generator without assistance.
3. Remove and discard silica gel packs.
4. Verify all of the following items are included in the generator package:
HW7000EH Portable Electrical Generator
Wheel Kit (including handle assembly and assembly hardware)
Battery
1 L Engine Oil
Funnel
Owner’s Manual
Honda Engine Manual
5. Remove the “No Oil” tag from the generator. See “Adding Engine Oil” on page 22.
CAUTION
OIL HAS BEEN DRAINED FOR SHIPPING
Failure to fill engine with oil before starting
engine will result in permanent damage
and will void engine warranty.
(Please remove tag prior to operating)
p/n 101179B
Inspect for Damage
Carefully inspect generator for any damage that may have occurred during shipment. If loss or damage is noted after
delivery, separate damaged materials and call Customer Hotline at 1-888-HWHELP1 (494-3571).
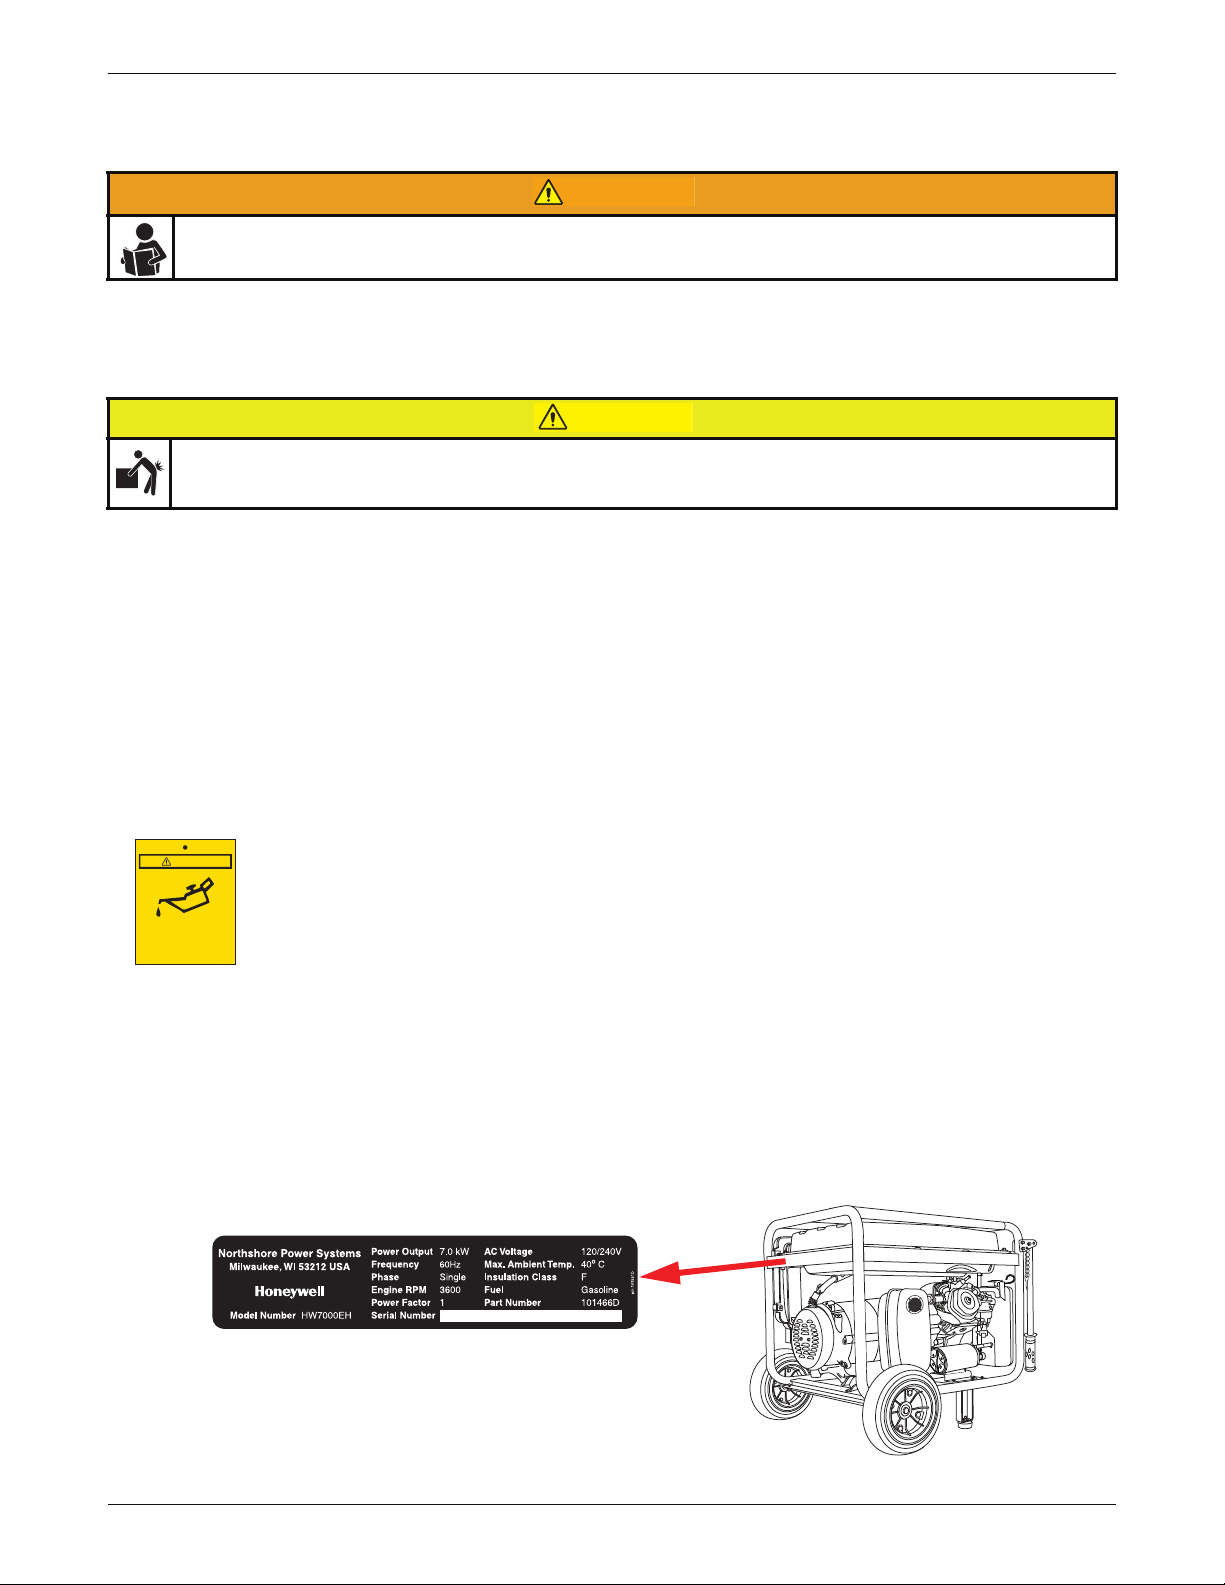
Record Generator Information
Write down the identification information specific to your generator in the spaces provided on the inside cover of this
Owner’s Manual. This information is located on the generator nameplate (see illustration below).
FIGURE 2: Generator Nameplate Location
HW7000EH Portable Electrical Generator Owner’s Manual www.honeywellgenerators.com 5
Page 12
Assembly
CAUTION
Assembly
Wheel Kit
Generator must be empty of engine oil and fuel. Drain engine oil and fuel, if necessary.
Generator is heavy! Lifting generator can cause back or other bodily injury. NEVER lift generator without
assistance.
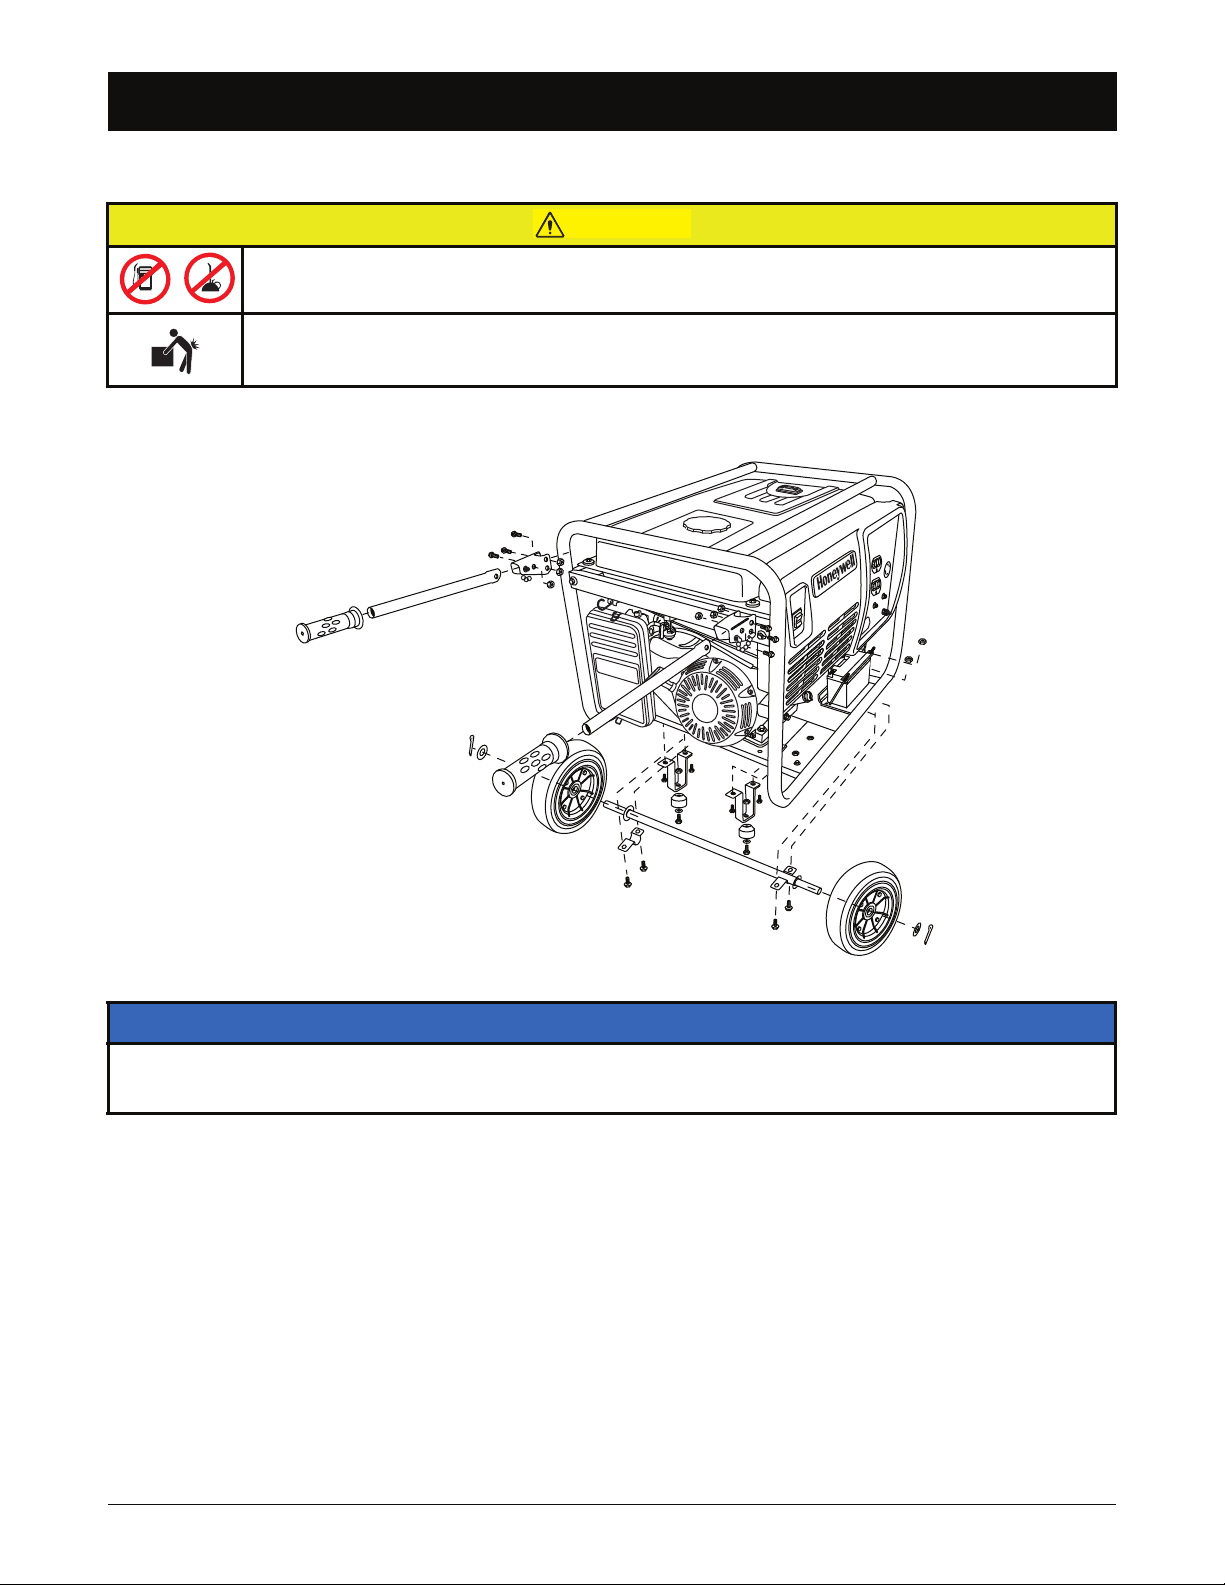
FIGURE 3: Wheel Kit Assembly
NOTICE
• Wheel kit is intended to be used specifically with this generator.
• NEVER use wheel kit for any other purpose.
• NEVER use wheel kit on-road.
6 www.honeywellgenerators.com HW7000EH Portable Electrical Generator Owner’s Manual
Page 13
Assembly
CAUTION
Step 1: Install Support Legs
To install support legs, you will need:
M8 x 30 mm long full-thread hex bolts (2)
M8 x 22 mm OD x 1.5 mm washers (2)
M8 serrated flange nuts (2)
M8 x 16 mm long full-thread hex bolts (4)
Support legs (2)
Rubber stoppers (2)
Socket wrench with 10 mm socket
* Not included
Generator must be empty of engine oil and fuel.
Drain engine oil and fuel, if necessary.
Generator is heavy! Lifting generator can cause
back or other bodily injury. NEVER lift generator
without assistance.
1. Place generator on a flat, level surface.
2. Stand at side of generator opposite recoil starter
handle. Grip frame; carefully pull up and push to tilt
generator backward.
*
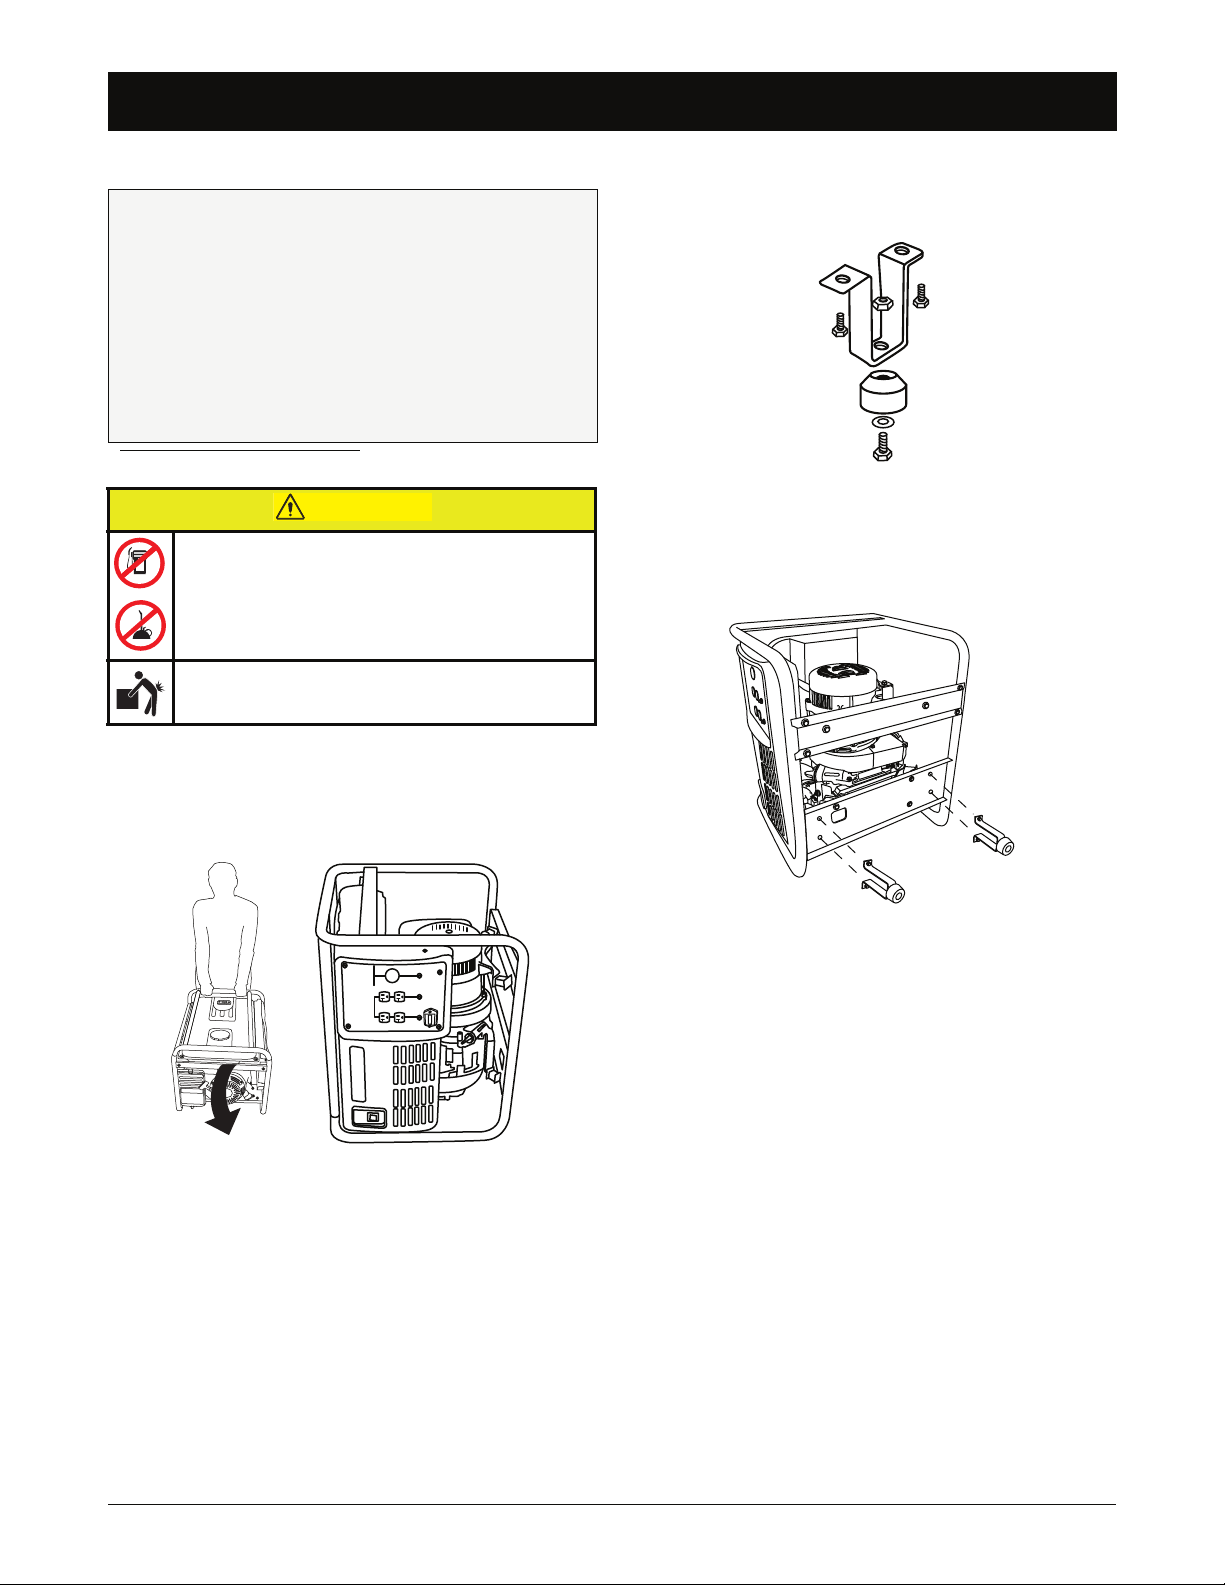
5. Attach a rubber stopper to the bottom of each support
leg using a 30 mm long full-thread hex bolt and a serrated flange nut; tighten until securely seated.
FIGURE 5: Rubber Stopper Attached to Support Leg
6. Attach each support leg to pre-drilled holes on bottom
of generator frame, using 16 mm long full-thread hex
bolts; tighten until securely seated.
FIGURE 4: Tip onto Generator Recoil Side
3. Gently set generator onto the recoil side or elevate
the generator by placing solid wood pieces underneath unit.
4. Place a washer in the center of each rubber stopper.
FIGURE 6: Support Leg Attached to Generator
HW7000EH Portable Electrical Generator Owner’s Manual www.honeywellgenerators.com 7
Page 14

Assembly
Step 2: Install Wheel Axle and Wheels
To install wheel assembly, you will need:
Wheel axle (1)
M8 x 16 mm long full-thread hex bolts (4)
M8 serrated flange nuts (4)
Axle bracket* (1)
Wheels (2)
M16 x 30 mm OD x 2.5 mm washers (2)
Cotter pins (2)
12 mm open end wrench
Socket wrench with 10 mm socket
Needle-nose pliers
* Two brackets are needed to install wheel axle. One bracket
comes already attached to wheel axle; other bracket is included
in wheel kit box.
† Not included.
1. Install wheel axle brackets to frame using 16 mm long
full-thread hex bolts and serrated flange nuts.
1A. Install pre-attached bracket to frame first.
1B. Install other bracket (included in hardware bag) to
frame.
†
†
†
4. Slide cotter pin into pre-drilled hole until fully seated.
5. Using needle-nose pliers, bend each end of cotter pin
in opposing directions to secure wheel to axle.
FIGURE 9: Cotter Pin Installation
6. Return generator to upright position (so that wheels
and leg supports are touching the ground).
FIGURE 7: Wheel Axle Attached to Generator
On each end of axle:
2. Slide and push wheel onto axle.
FIGURE 8: Slide Wheel onto Wheel Axle
3. Slide 9/16" washer onto axle.
8 www.honeywellgenerators.com HW7000EH Portable Electrical Generator Owner’s Manual
Page 15
Assembly
NOTE:
CAUTION
Step 3: Install Handle Assembly
To install handle assembly, you will need:
Handle brackets (2)
Handle bars (2)
Pins (2)
Chains (2)
Rubber handle grips (2)
M6 x 40 mm long flange-head hex bolts (6)
M6 serrated flange nuts (6)
Socket wrench with 10 mm socket
10 mm open end wrench*
* Not included
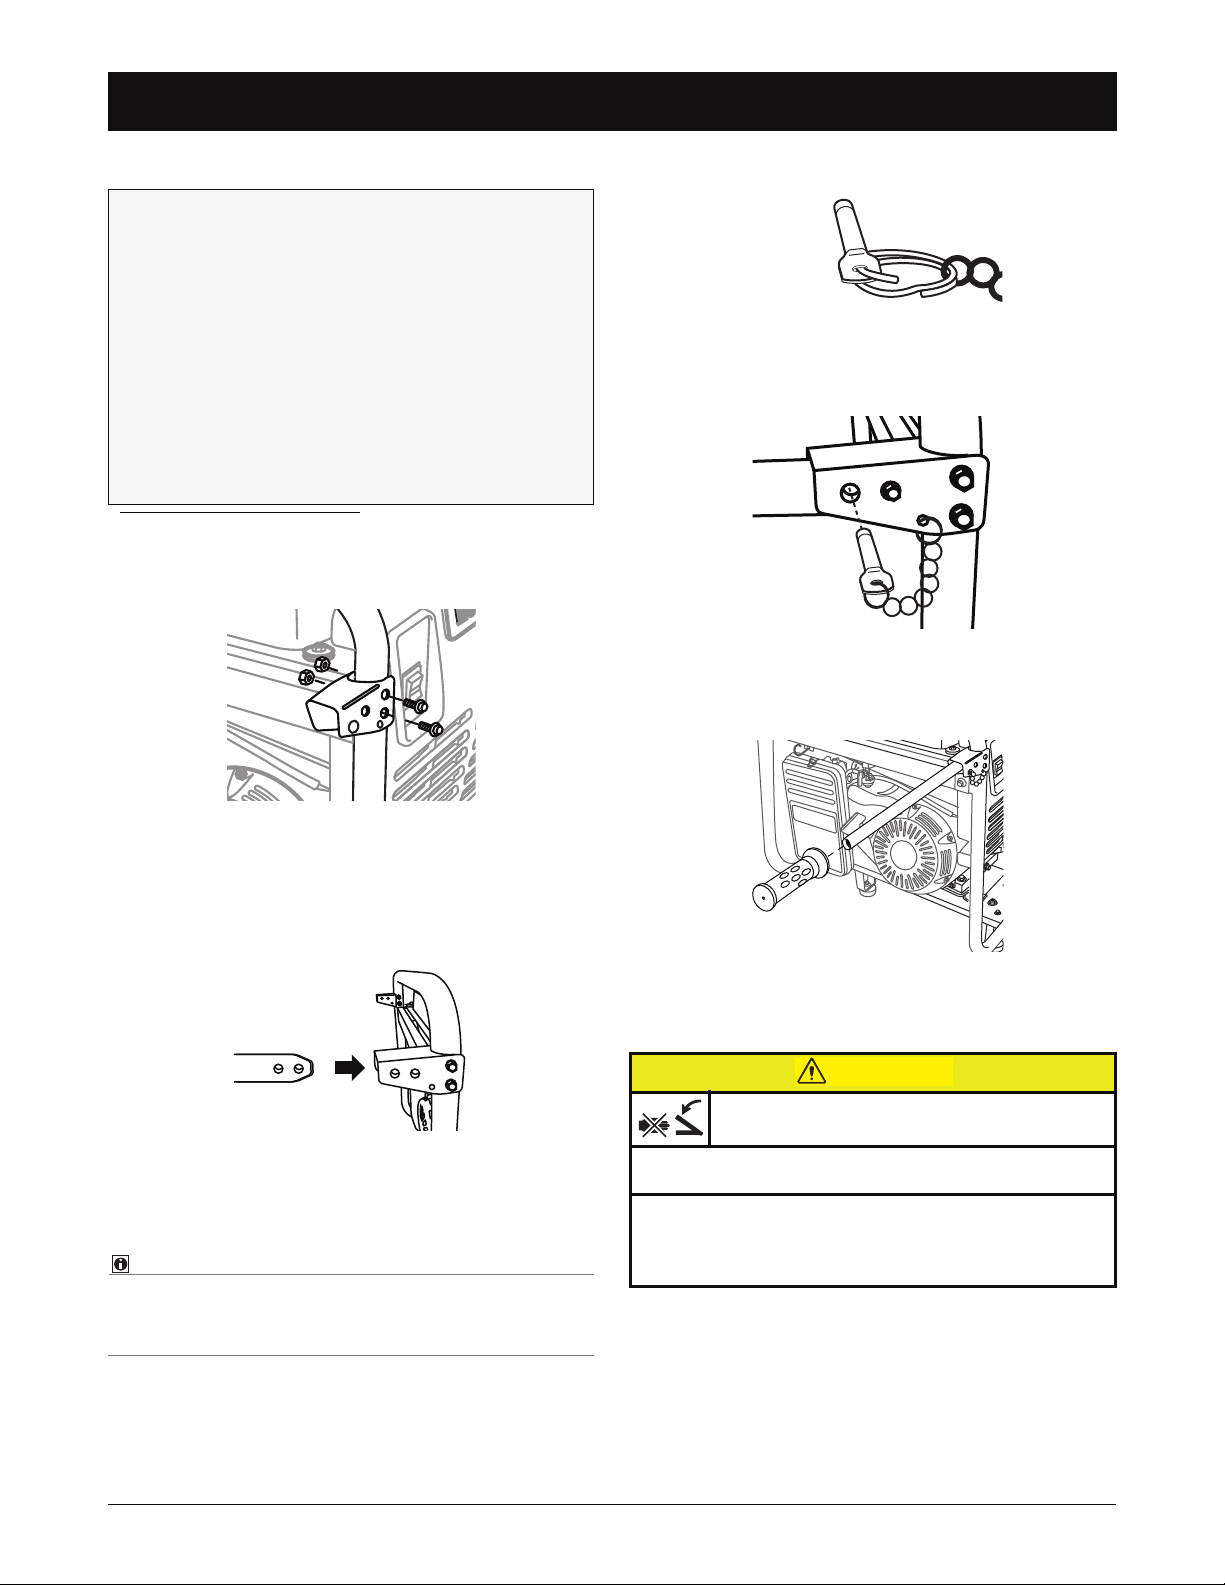
1. Hold handle bracket over pre-drilled holes on frame
as shown in Figure 10.
*
5. Attach pin to chain.
FIGURE 12: Attach Pin and Chain
6. Attach chain to handle bracket as illustrated below.
Insert pin through bracket and handle.
FIGURE 13: Attach Chain to Handle Bracket
7. Slide rubber handle grip onto each handle bar and
push to achieve snug fit.
FIGURE 10: Handle Bracket to Frame
2. Attach bracket to frame using 40 mm long flange-
head hex bolts and serrated flange nuts and tighten.
3. Slide handle bar through center of each bracket and
line up bolt holes.
FIGURE 11: Insert Handle Bar to Bracket
4. Attach handle to each bracket using 40 mm long
flange-head hex bolt and serrated flange nut to hole
closest to frame and tighten.
Handle should be in a horizontal position after tightening
bolts and nuts. If handle seems to hang down, tighten
bolts and nuts further.
FIGURE 14: Attach Grips to Handle
Once properly installed, the handles can be collapsed, if
desired, by removing the pins.
Hands and fingers can be pinched from collapsible
handles.
• Keep hands and fingers clear from hinges when
collapsing generator handles.
• Handles should only be used to roll the generator to a
new location. If lifting the generator (i.e. into a vehicle),
never use the handles to support the complete weight
of the generator.
• To collapse handles, remove pins and push firmly
down on handle until it rests vertically against generator frame.
• To return handles to horizontal position, pull up on
handle and lock with pins.
HW7000EH Portable Electrical Generator Owner’s Manual www.honeywellgenerators.com 9
Page 16
Assembly
NOTE:
NOTE:
WARNING
WARNING
WARNING
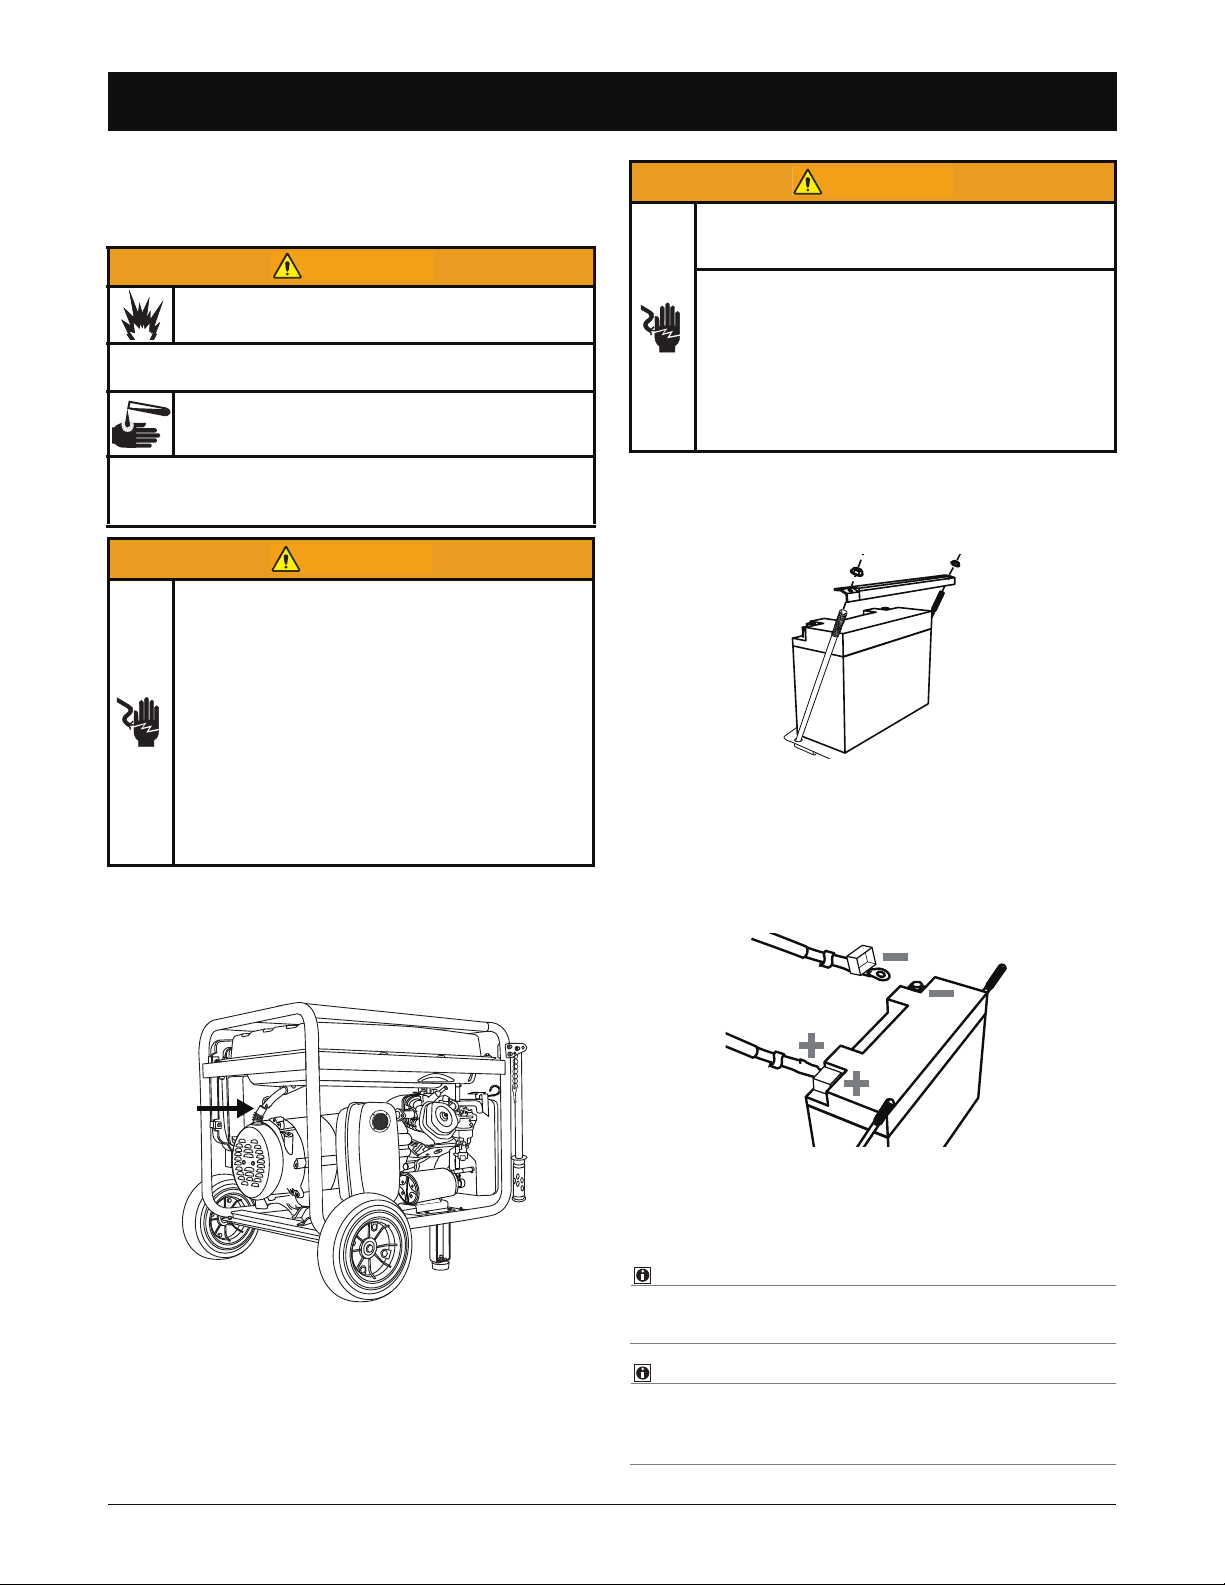
Step 4: Install Battery
To use the electric start feature, the battery (included)
must be connected to generator’s electric starter.
Battery gases are explosive.
• NEVER allow open flames, lit cigarettes, sparks, or
spark-producing equipment near the battery.
Battery electrolyte fluid is comprised of sulfuric acid,
which can be very dangerous and cause severe
burns.
• NEVER allow battery fluid to contact eyes, skin, or
clothing. If contact or spillage occurs, immediately flush
the area with water.
Exposed terminals, even on disconnected batteries,
can cause electric shock.
• NEVER touch both battery terminals with bare
hands at the same time.
• Remove rings, watches or any other object
containing metal when working with battery. If
metal comes into contact with battery terminals, electric shock and serious burns can
result.
• Only use insulated/non-conducting tools when
working with or near battery.
• NEVER lay tools or other metal objects on top
of battery.
1. The generator is packaged with the black negative (-)
battery lead attached to the top of the alternator with
a plastic tie wrap. Carefully cut the tie wrap to disen-
gage the battery lead and remove the plastic bag.
To avoid electric arcing, which can result in electric
shock, follow these instructions exactly.
When connecting or disconnecting battery leads:
• ALWAYS connect positive (+) battery lead
first.
• ALWAYS disconnect negative (-) battery lead
first.
• NEVER connect negative (-) battery lead to
positive (+) post on battery.
• NEVER connect positive (+) battery lead to
negative (-) post on battery.
2. To access battery posts:
2A. Loosen and remove nuts on retaining plate; slide
retaining plate off support rods.
FIGURE 16: Electric Start Battery—Remove Retaining Plate
2B. Tip battery slightly forward.
3. Remove bolt/nut from each battery post.
4. Confirm red positive (+) battery lead is securely fas-
tened to the positive (+) post as it may have loosened
during shipping. Place boot over battery post.
10 www.honeywellgenerators.com HW7000EH Portable Electrical Generator Owner’s Manual
FIGURE 15: Negative Battery Lead Attached to Alternator for Shipping
FIGURE 17: Electric Start Battery—Lead Connection
5. Connect the black negative (-) battery lead to the neg-
ative (-) battery post; install bolt, nut, and boot.
6. Reinstall retaining plate; tighten bolts and nuts.
Actual battery appearance may vary from illustration provided.
While the engine is running, a small “trickle” charge is
applied to the battery.This keeps an adequate battery
charge.
Page 17
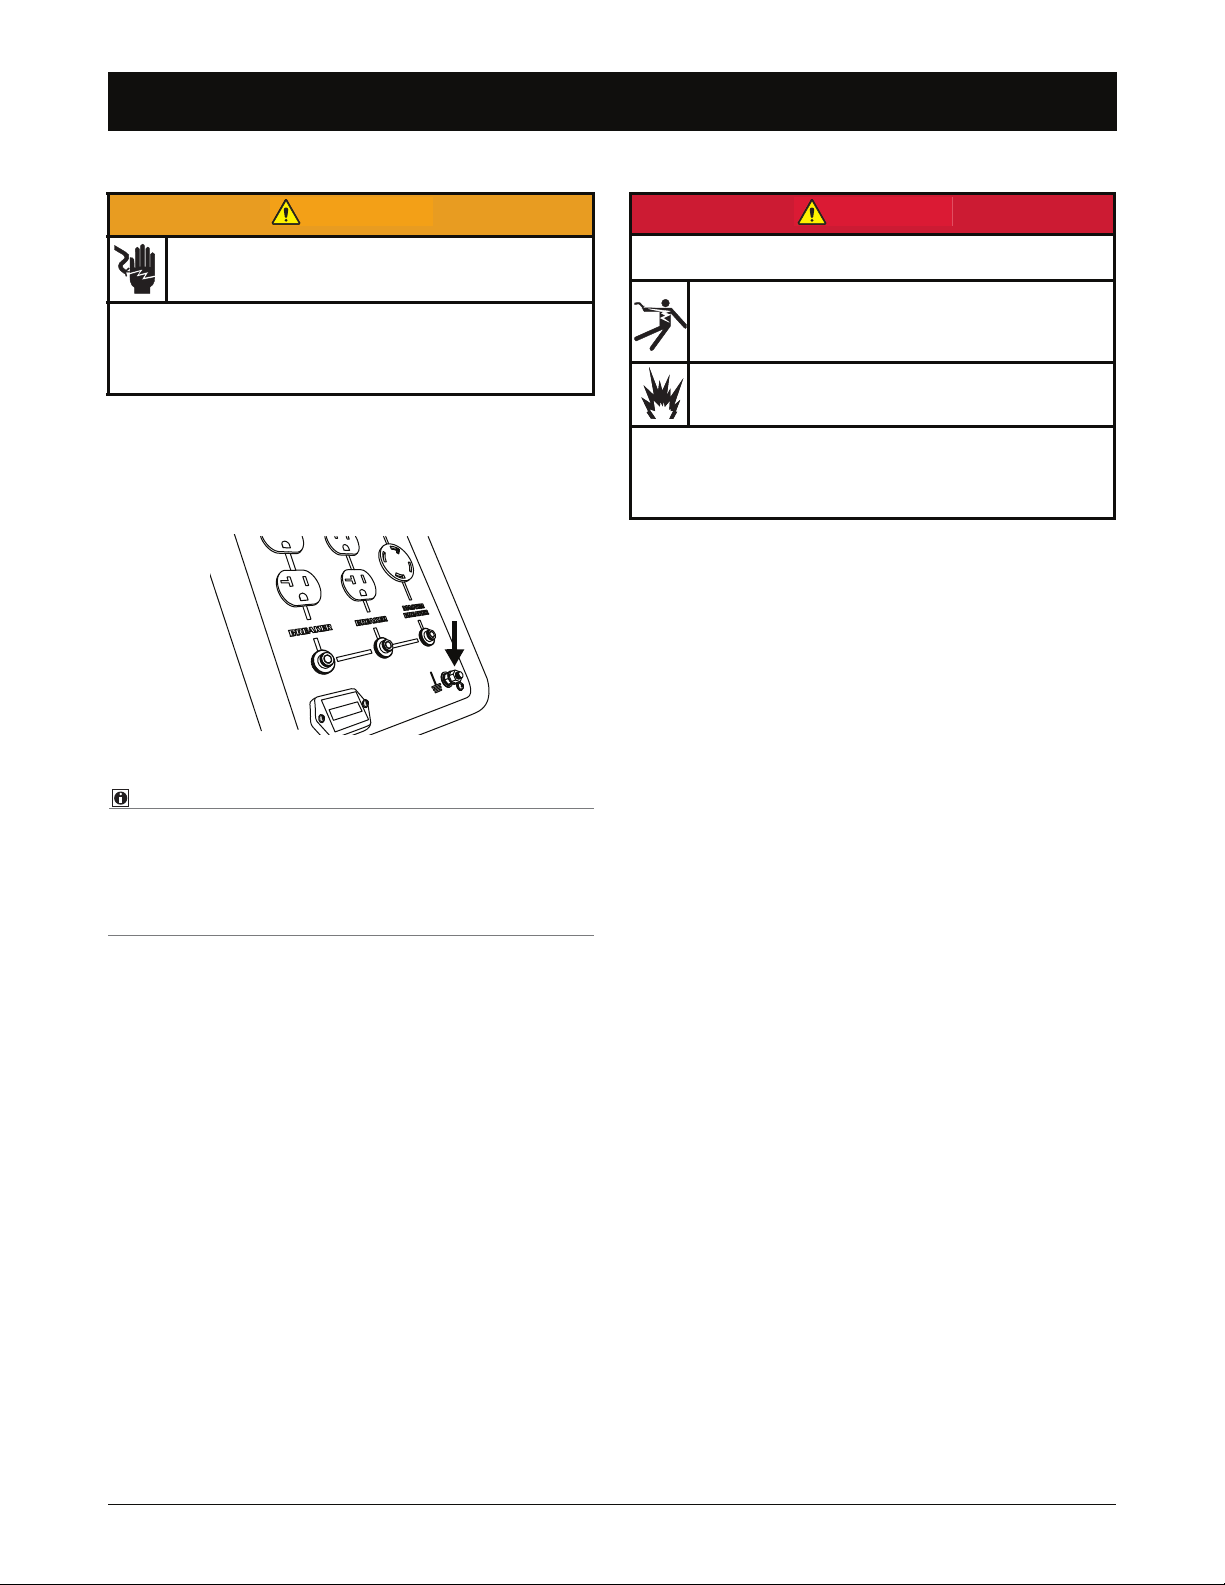
Grounding the Generator
NOTE:
WARNING
DANGER
Grounding the Generator
Generator must be grounded to prevent electrical
shock from faulty appliances.
• Before using generator, consult a qualified electrician,
electrical inspector, or local agency having jurisdiction
for local codes or ordinances that apply to the intended
use of generator.
The National Electric Code (NEC) requires the generator
to be connected to an earth ground. Before using the generator, connect a copper wire (minimum 10 AWG) from the
ground terminal (see Figure 18) to an earth ground. Consult a licensed electrician for proper grounding methods.
Using Generator for Backup Power
Improper connections of the generator to a building’s electrical system can be deadly.
Electrical current from generator can feedback into
utility lines. Such feedback may electrocute utility
company workers or others who contact utility lines
during a power outage.
Electrical current can feedback into generator. When
utility power is restored, generator may explode,
burn, or cause fires in building's electrical system.
• Before connecting to a building’s electrical system, consult a qualified electrician, electrical inspector, or local
agency having jurisdiction for local codes or ordinances
that apply to the intended use of generator.
FIGURE 18: Ground Terminal
The generator has a floating neutral which means the
ground terminal on the generator is not connected to the
AC neutral wire in the generator. If using a receptacle
tester, it will not show the same ground circuit condition
as for a home receptacle.
Special Requirements
There may be Federal or State Occupational Safety and
Health Administration (OSHA) regulations, local codes, or
ordinances that apply to the intended use of generator.
Please consult a qualified electrician, electrical inspector,
or the local agency having jurisdiction.
• In some areas, generators are required to be regis-
tered with local utility companies.
• If generator is used at a construction site, there may
be additional regulations which must be observed.
HW7000EH Portable Electrical Generator Owner’s Manual www.honeywellgenerators.com 11
Page 18

THIS PAGE INTENTIONALLY LEFT BLANK
12 www.honeywellgenerators.com HW7000EH Portable Electrical Generator Owner’s Manual
Page 19
CAUTION
J
G
B
I
H
K
E
C
D
A
F
M
L
N
Set
Tripped
CAUTION
WARNING
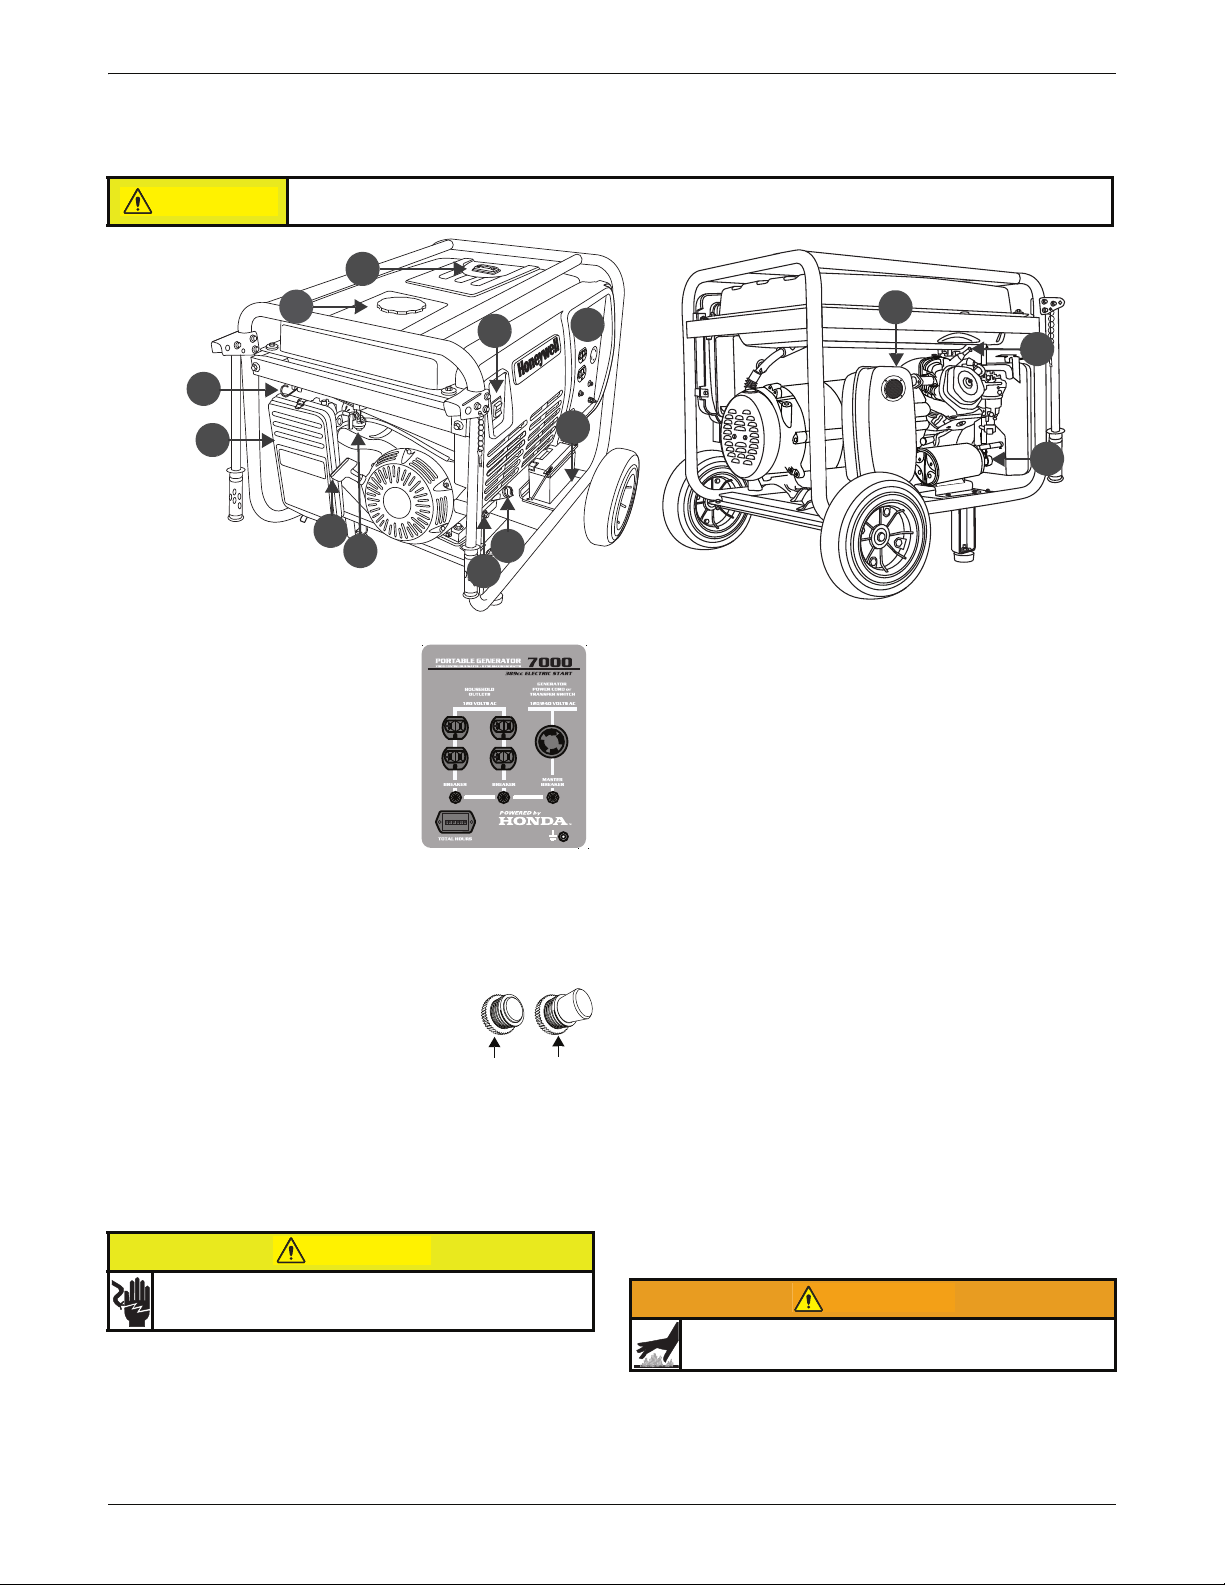
COMPONENTS
Use information provided in this section to become familiar with your generator’s components.
The information below is provided for reference only. Refer to “OPERATION” on page 15 for instructions
on operating the generator.
FIGURE 19: HW7000EH Portable Electrical Generator
A—Power Control Center
Household Outlets
125VAC 20 Amp Duplex (NEMA 520R) outlets to connect 120V appliances to generator for power.
Generator Cord
125/250VAC 30 Amp Twist-Lock
(NEMA L14-30R) outlet can be used
to:
• Power 120V appliances using 4-in-1 power cord (not
included).
• Power 240V appliances using appropriate (NEMA L14-
30P) power cord (not included).
Breakers
Protects circuits from damage caused by
overload or short-circuit by stopping the flow
of electricity from the generator to the appliance. Master circuit breaker controls power
to all outlets. If there is no power at outlets,
see Troubleshooting section.
Hour Meter
Shows the total unit run time for maintenance purposes.
Ground Terminal
Connects generator to ground wire for grounding protection.
Generator must be grounded to prevent electrical
shock from faulty appliances. See page 11.
B—Battery Tray and Battery
Provides power for electric start feature.
C—Oil Fill Dipstick
Seals off engine oil fill hole and provides indicator for engine
oil level.
HW7000EH Portable Electrical Generator Owner’s Manual www.honeywellgenerators.com 13
D—Oil Drain Screw
Allows engine oil to drain from generator.
E—Engine Control Switch
Control used to start and stop the engine. Engine control
switch has three positions:
• START—Starts generator engine
• RUN—Prepares engine to start (manual start);
Indicates engine is currently running (electric start)
• STOP—Stops generator engine
F—Fuel Shut-off Valve
Controls flow of fuel from fuel tank to carburetor.
G—Recoil Starter Grip Handle
Provides means to manually start engine, if needed.
H—Air Cleaner Assembly
Removes dust from engine intake air.
I— Choke Control
Controls choke valve. Choke control must be moved to ON
position when starting a cold engine.
J—Fuel Tank Cap
Provides a secure seal on fuel tank.
K—Fuel Gauge
Indicates level of fuel currently in fuel tank.
L—Muffler Equipped with Spark Arrestor
Provides outlet for engine exhaust. Prevents sparks and other
combustible materials from escaping generator.
Muffler reaches temperatures that can cause serious
burns if touched. NEVER touch hot surfaces.
M—Spark Plug Cap (Wire)
Delivers voltage to spark plug. When spark plug needs service, cap must be removed.
N—Carbon Canister
Reduces hydrocarbon emissions.
Page 20

THIS PAGE INTENTIONALLY LEFT BLANK
14 www.honeywellgenerators.com HW7000EH Portable Electrical Generator Owner’s Manual
Page 21

OPERATION
DANGER
+
WARNING
WARNING
WARNING
DANGER
DANGER
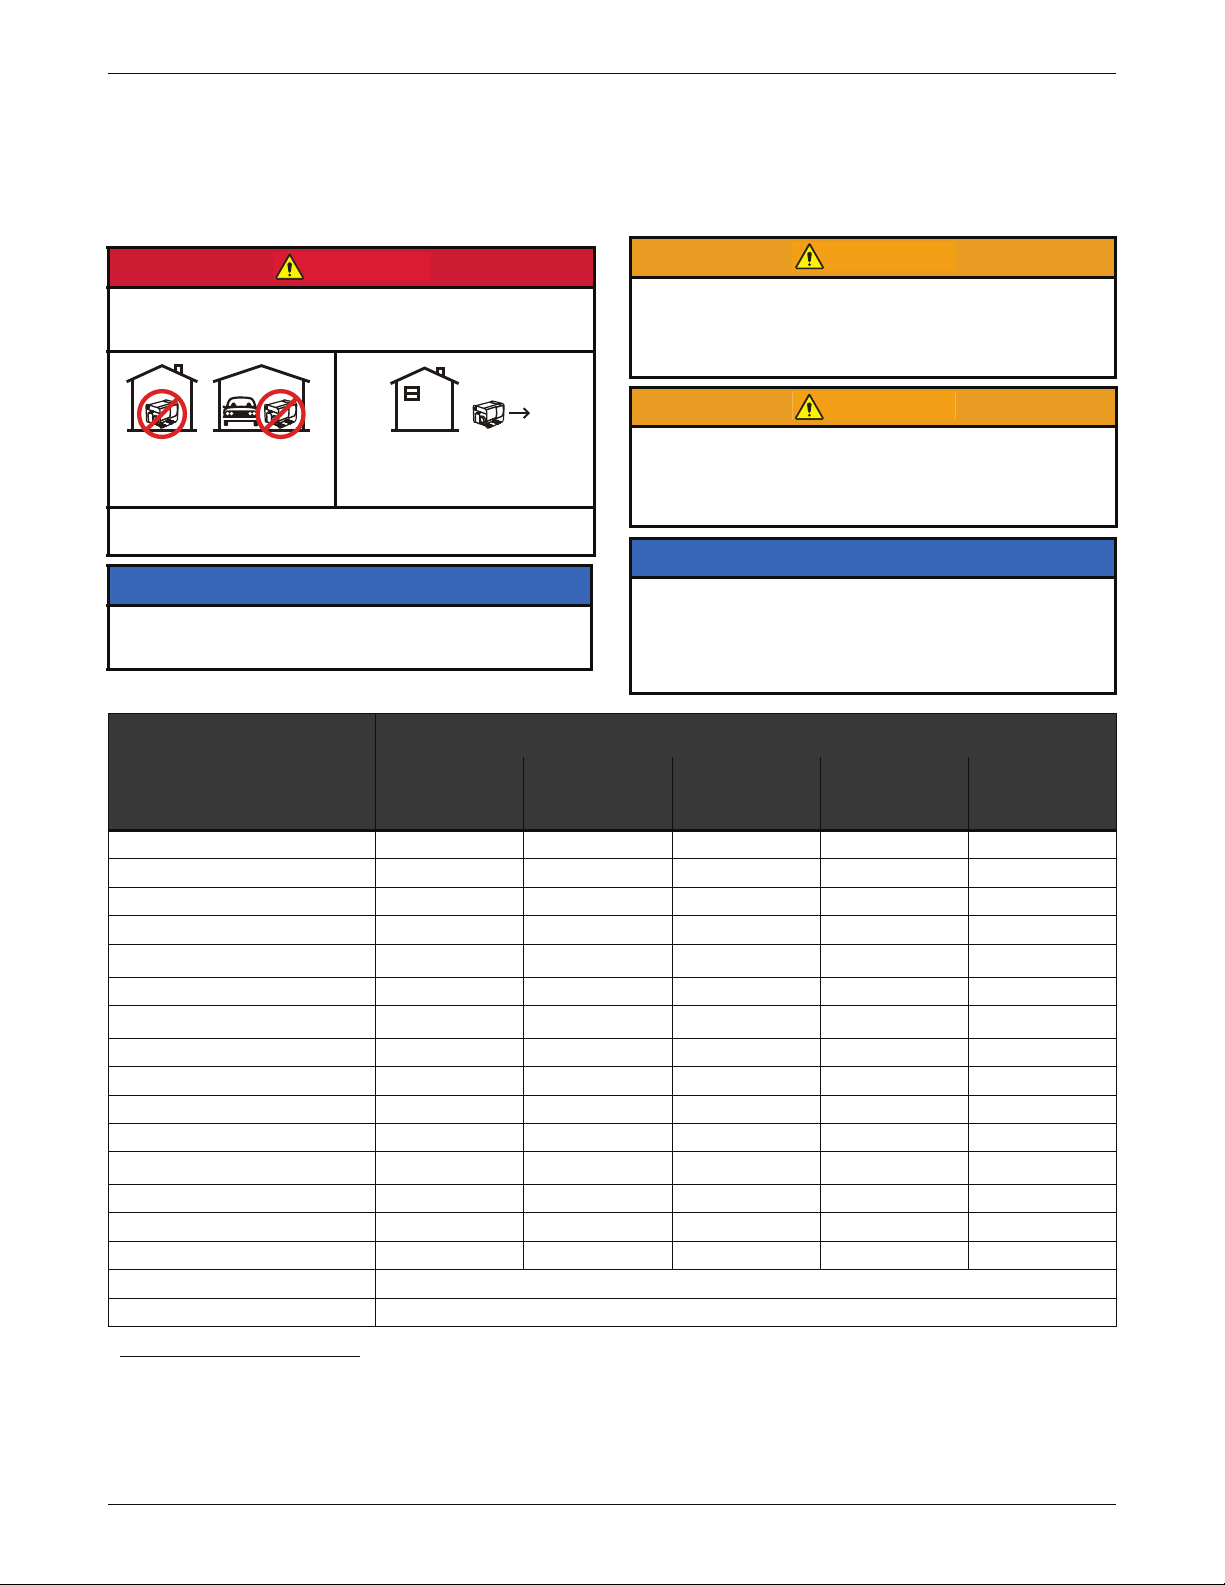
Generator Location
When deciding on the location to place your generator,
keep in mind the following safety rules:
Depressed areas such as construction foundations,
pools, or any low-lying areas, can cause carbon
monoxide to accumulate. Inhalation of carbon monoxide can kill you in minutes.
• NEVER use generator inside homes, garages,
crawl spaces, sheds, or similar enclosed
spaces. Use generator only outdoors and far
away from windows, doors, and vents.
If generator is placed on an uneven or flexible surface, generator could tilt or overturn, causing fuel to
spill from gas tank. Spilled fuel could ignite.
• Place generator on firm, level surface and avoid
loose sand or snow. If generator is tilted or
overturned, fuel spillage may result. Also, if
generator is overturned or sinks into a soft surface, sand, dirt, or water may enter generator.
NEVER operate generator in rain or snow, or when
the generator is set on wet surface.
Keep generator at least 6 feet (2 meters) away from
buildings, other equipment, and combustible materials during operation.
Preparing for Operation
CARBON MONOXIDE
Generator exhaust contains high levels of carbon monoxide
(CO), a poisonous gas you cannot see or smell. If you can
smell the generator exhaust, you are breathing CO. But even
if you cannot smell the exhaust, you could be breathing CO.
• NEVER use a generator inside homes, garages, crawlspaces, or other partly enclosed areas. Deadly levels
of carbon monoxide can build up in these areas. Using
a fan or opening windows and doors does NOT supply
enough fresh air.
• ONLY use a generator outdoors and far away from
open windows, doors, and vents. These openings can
pull in generator exhaust.
Even when you use a generator correctly, CO may leak into
the home. ALWAYS use a battery-powered or batterybackup CO alarm in the home.
If you start to feel sick, dizzy, or weak after the generator has
been running, move to fresh air RIGHT AWAY. See a doctor.
You could have carbon monoxide poisoning.
Before starting generator, complete the following preparation tasks:
Be sure generator is placed outdoors in a well
ventilated area. Using a generator indoors CAN KILL
YOU IN MINUTES.
Consult a licensed electrician or utility company if
you will be using your generator for back-up
power. See “Using Generator for Backup Power” on
page 11.
Before connecting to a building’s electrical system,
consult utility company or qualified electrician.
• Electrical current from generator can feedback
into utility lines. Such feedback may electrocute
utility company workers or others who contact
utility lines during a power outage.
Check/add engine oil—See “Adding Engine Oil” on
page 22. For initial start-up, follow instructions on oil
container provided with generator.
*
Check/add fuel
—See “Adding Engine Fuel” on
page 22.
Be sure ground terminal is properly connected to
earth ground—See “Grounding the Generator” on
page 11.
Check extension cords—be sure cords are:
In good condition.
Rated for outdoor use and match amperage and
voltage ratings of generator outlet.
Equipped with plugs that have a ground terminal.
* You must add fuel before using the generator for the first time
See “Adding Engine Fuel” on page 22.
HW7000EH Portable Electrical Generator Owner’s Manual www.honeywellgenerators.com 15
Page 22
Starting Generator
NOTE:
WARNING
Set Tripped
ON
OFF
START
ENGINE
STOP
RUN
CAUTION
Starting Generator
Before starting generator, be sure to thoroughly read
all information provided in this Owner’s Manual.
NOTICE
It is very important to maintain proper level of engine oil to
keep engine in good running condition.
• Check engine oil level prior to each use.
Starting generator with appliances connected can cause
permanent damage to appliances.
• NEVER start generator with electrical appliances
plugged in and turned on.
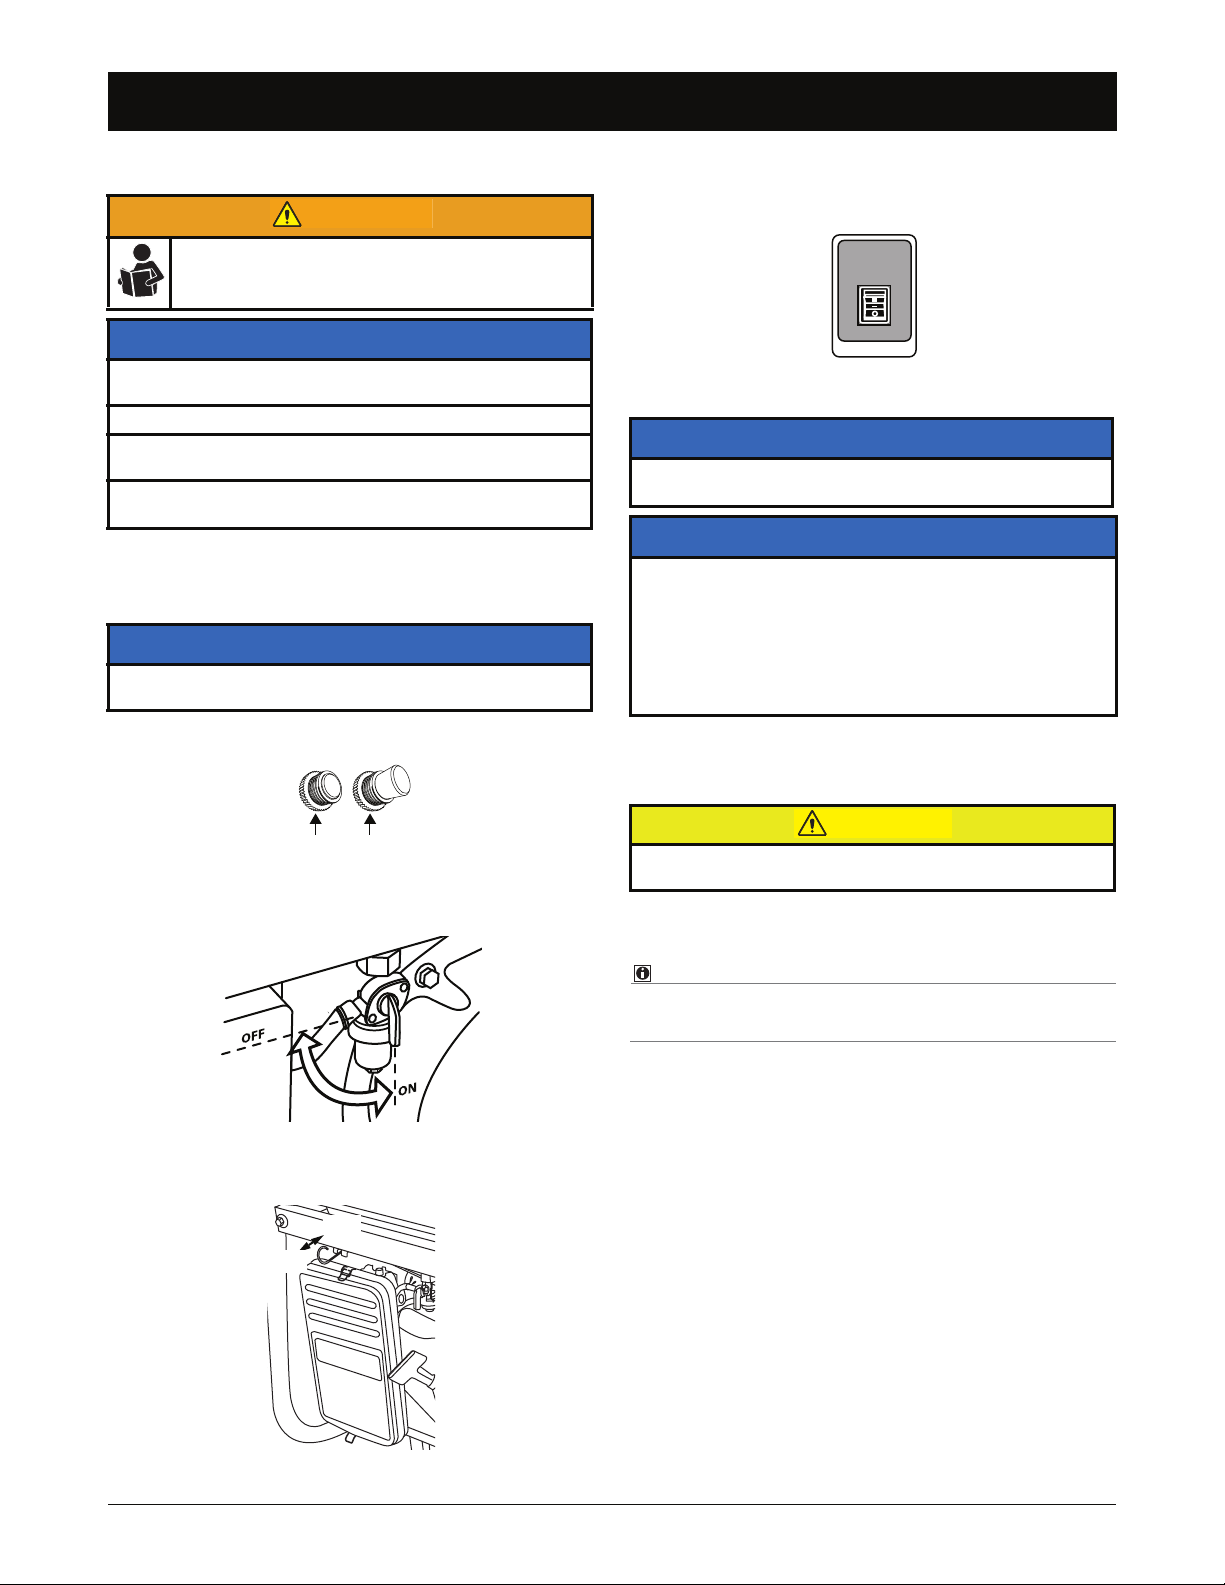
Electric Start
1. Place generator outside in a well-ventilated area.
NOTICE
Keep the generator at a minimum of 6 feet (2 meters) from
any building, object, or wall.
2. Confirm the circuit breakers are set.
5. Press and hold engine control switch in START posi-
tion until engine starts.
FIGURE 23: Engine Control Switch
NOTICE
If engine will not start, move the choke to the OFF position to reduce fuel to the engine.
NOTICE
• Holding engine control switch for more than 5 seconds
can damage starter motor. If engine fails to start after 5
seconds, release engine control switch and wait 10
seconds before attempting to start engine again.
• If you notice engine cranking speed drop after a period
of time, it may be an indication the battery should be
recharged.
6. When the engine starts, release the engine control
switch allowing it to settle to the RUN (center) position.
FIGURE 20: Circuit Breaker Position
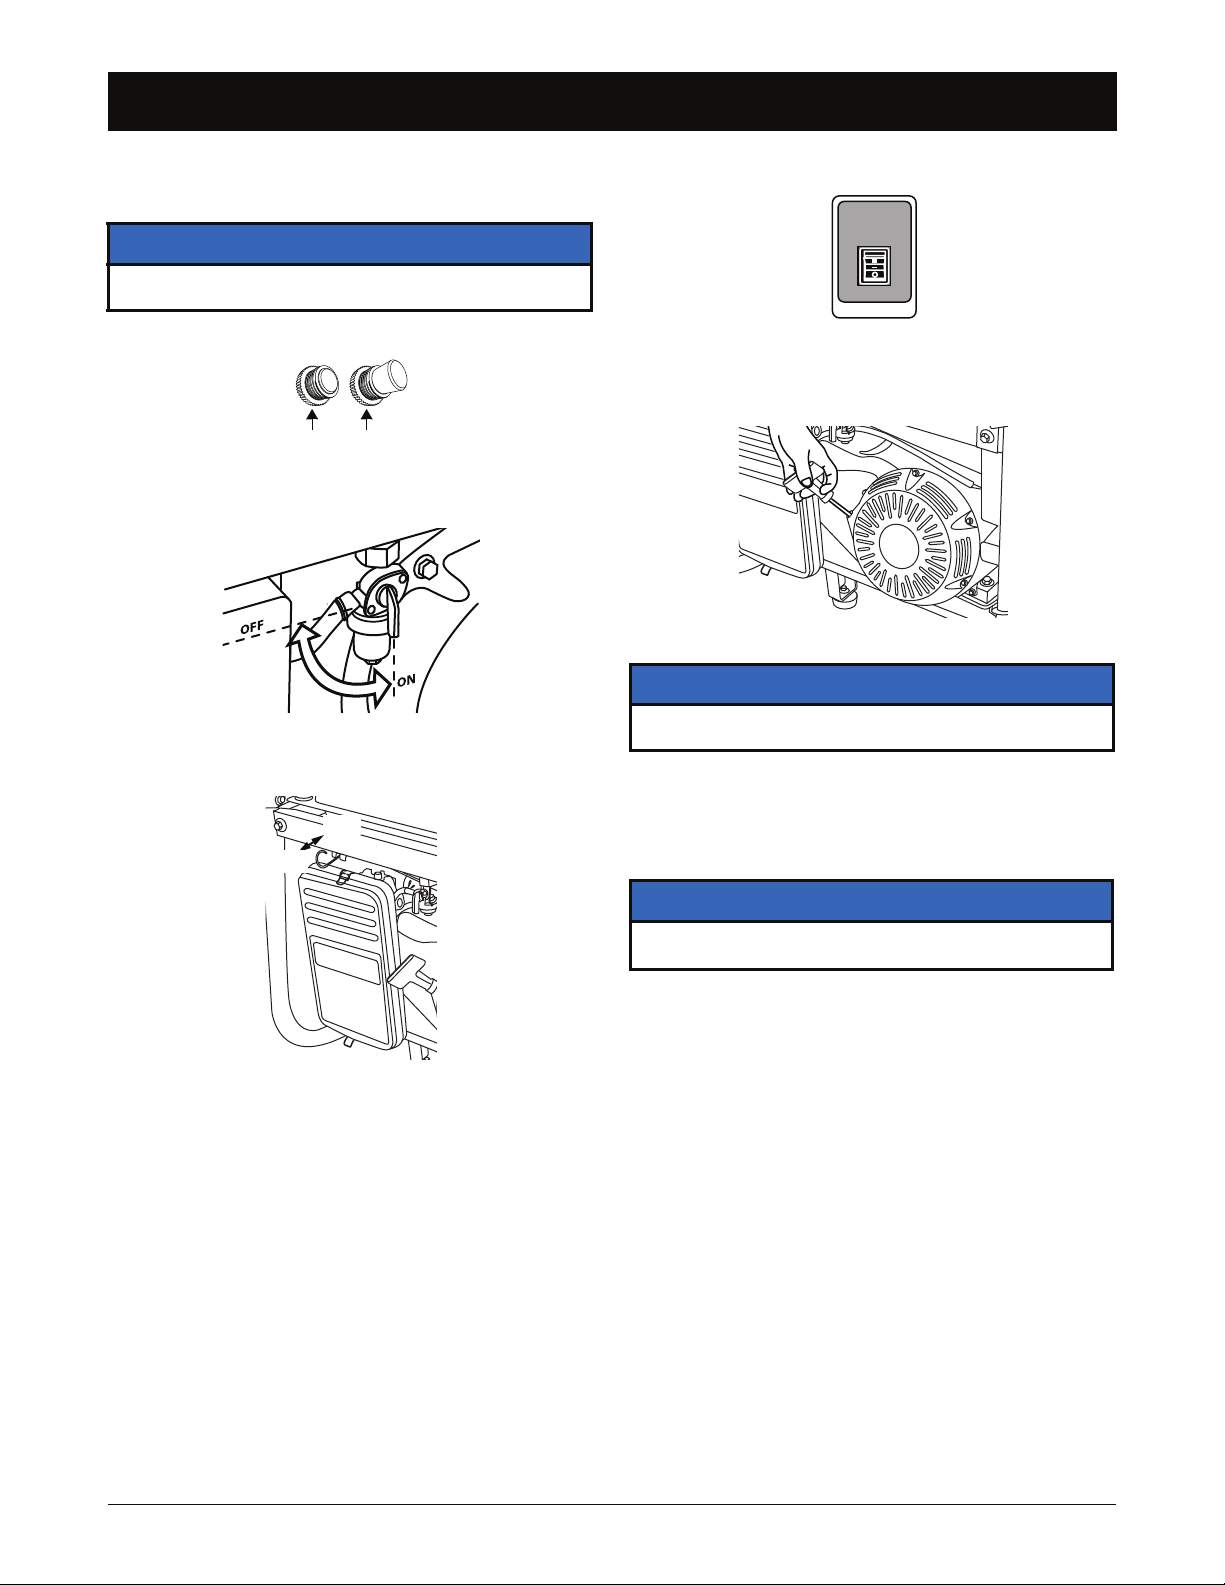
3. Turn fuel shut-off valve to ON position.
FIGURE 21: Fuel Shut-off Valve — ON/OFF position
4. Pull choke control to ON position.
To avoid generator damage, NEVER press the engine control switch to the START position while generator is running
7. As the engine warms up, and RPM stabilizes, gradu-
ally push choke control to the OFF position.
While engine is running, a small “trickle” charge is applied
to starting battery.This keeps an adequate battery charge.
16 www.honeywellgenerators.com HW7000EH Portable Electrical Generator Owner’s Manual
FIGURE 22: Choke Control
Page 23
Starting Generator
Set Tripped
Manual (Recoil) Start
1. Place generator outside in a well-ventilated area.
NOTICE
Keep the generator at a minimum of 6 feet (2 meters) from
any building, object, or wall.
2. Confirm the circuit breakers are set.
FIGURE 24: Circuit Breaker Position
3. Turn fuel shut-off valve to ON position.
FIGURE 25: Fuel Shut-off Valve — ON/OFF position
5. Press engine control switch to RUN position.
ENGINE
START
RUN
STOP
FIGURE 27: Engine Control Switch
6. Grip recoil starter handle and pull slowly until you feel
slight resistance.
FIGURE 28: Recoil Starter Handle
NOTICE
NEVER allow the starter grip to snap back against the
engine. Return it gently to prevent damage to the starter.
4. Pull choke control to ON position.
OFF
ON
FIGURE 26: Choke Control
7. Apply a swift, single pull to start the engine and care-
fully return the recoil starter handle to its original position. This may need to be repeated 2-3 times until the
engine starts.
NOTICE
If engine will not start, move the choke to the OFF position to reduce fuel to the engine.
8. As engine warms up, and RPM stabilizes, gradually
push in choke control to OFF position.
HW7000EH Portable Electrical Generator Owner’s Manual www.honeywellgenerators.com 17
Page 24
Stopping Generator
NOTE:
WARNING
WARNING
Stopping Generator
In an emergency:
Press engine control switch to STOP position.
In normal use:
1. Turn OFF any connected appliances and unplug any
connected power cords.
2. Allow generator to run for 2-3 minutes.
3. Press engine control switch to STOP position.
4. Turn fuel shut-off valve to OFF position.
For long-term storage instructions, see page 25.
High-Altitude Operation
At high altitudes, standard carburetor air-fuel mixture will
be excessively rich. Performance will decrease and fuel
consumption will increase.
High-altitude performance can be improved by installing a
smaller diameter main fuel jet in the carburetor and then
readjusting the pilot screw. If you always operate the
engine at altitudes higher than 5000 feet (1500 meters)
above sea level, have an authorized generator dealer perform this carburetor modification.
Even with suitable carburetor jetting, engine horsepower
will decrease approximately 3.5% for each 1000 foot (300
meter) increase in altitude above sea level. The effect of
altitude on horsepower will be greater than this if no carburetor modification is made.
NOTICE
If the engine is jetted for high-altitude and is used at a lower
altitude, it will run a lean air-fuel mixture that results in
reduced performance, possible over-heating, and possible
serious engine damage.
Powering Appliances
In this manual, the term “appliance” refers to any electrical device that can be connected to generator for power.
Rules for Powering Appliances
NOTICE
NEVER start generator with electrical appliances plugged in
and turned on.
Faulty appliances and power cords can result in electrical shock.
• Before attempting to power an appliance, be sure generator has been properly grounded, and that appliance
and power cord are in good working order.
• Keep the generator away from other electric cables or
wires including commercial power supply lines.
• NEVER use generator for any purpose other than its
intended use.
• NEVER parallel connect generators or lengthen the
exhaust pipe.
• NEVER connect generator to any household circuit,
otherwise it may destroy generator or home electric
equipment.
Medical and Life Support Uses
• In case of emergency, call 911 immediately.
• NEVER use this product to power life support devices
or life support appliances.
• NEVER use this product to power medical devices or
medical appliances.
• Inform your electricity provider immediately if you or
anyone in your household depends on electrical equipment to live.
• Inform your electrical provider immediately if a loss of
power would cause you or anyone in your household to
experience a medical emergency.
18 www.honeywellgenerators.com HW7000EH Portable Electrical Generator Owner’s Manual
• Plan carefully: Before using the generator to power
appliances, take time to add power ratings (wattage) of each appliance and verify that total wattage
does not exceed rated output of generator. Power
rating information can usually be found on an appliance’s product label, stamped inside, or on the
back of the appliance.
average appliance wattage requirements.
See Table 1 for a listing of
• NEVER overload: Circuit breakers will stop the flow
of electricity between generator and appliance if the
generator is overloaded. This will be indicated by a
“tripped” breaker. If this happens, power off and disconnect appliance(s), wait a few minutes
breakers to cool (master breaker is not thermal), and
then push circuit breaker to reset.
for thermal
Page 25
Powering Appliances
CAUTION
CAUTION
• Pay attention to appliance operation: If appliance
begins to operate abnormally, becomes sluggish, or
stops suddenly, turn it OFF immediately. Disconnect
appliance and determine whether problem is appliance, or if rated load capacity of generator has been
exceeded.
• Use suitable extension cords: If using an extension
cord to connect appliance to generator, use only ULlisted, three-prong extension cords. Be sure extension
cord is proper size (wire-gauge) to handle electric
load that will be plugged into it.
NEVER run power cords under carpet, rugs, or other materials where heat might build up or cord damage may go unnoticed.
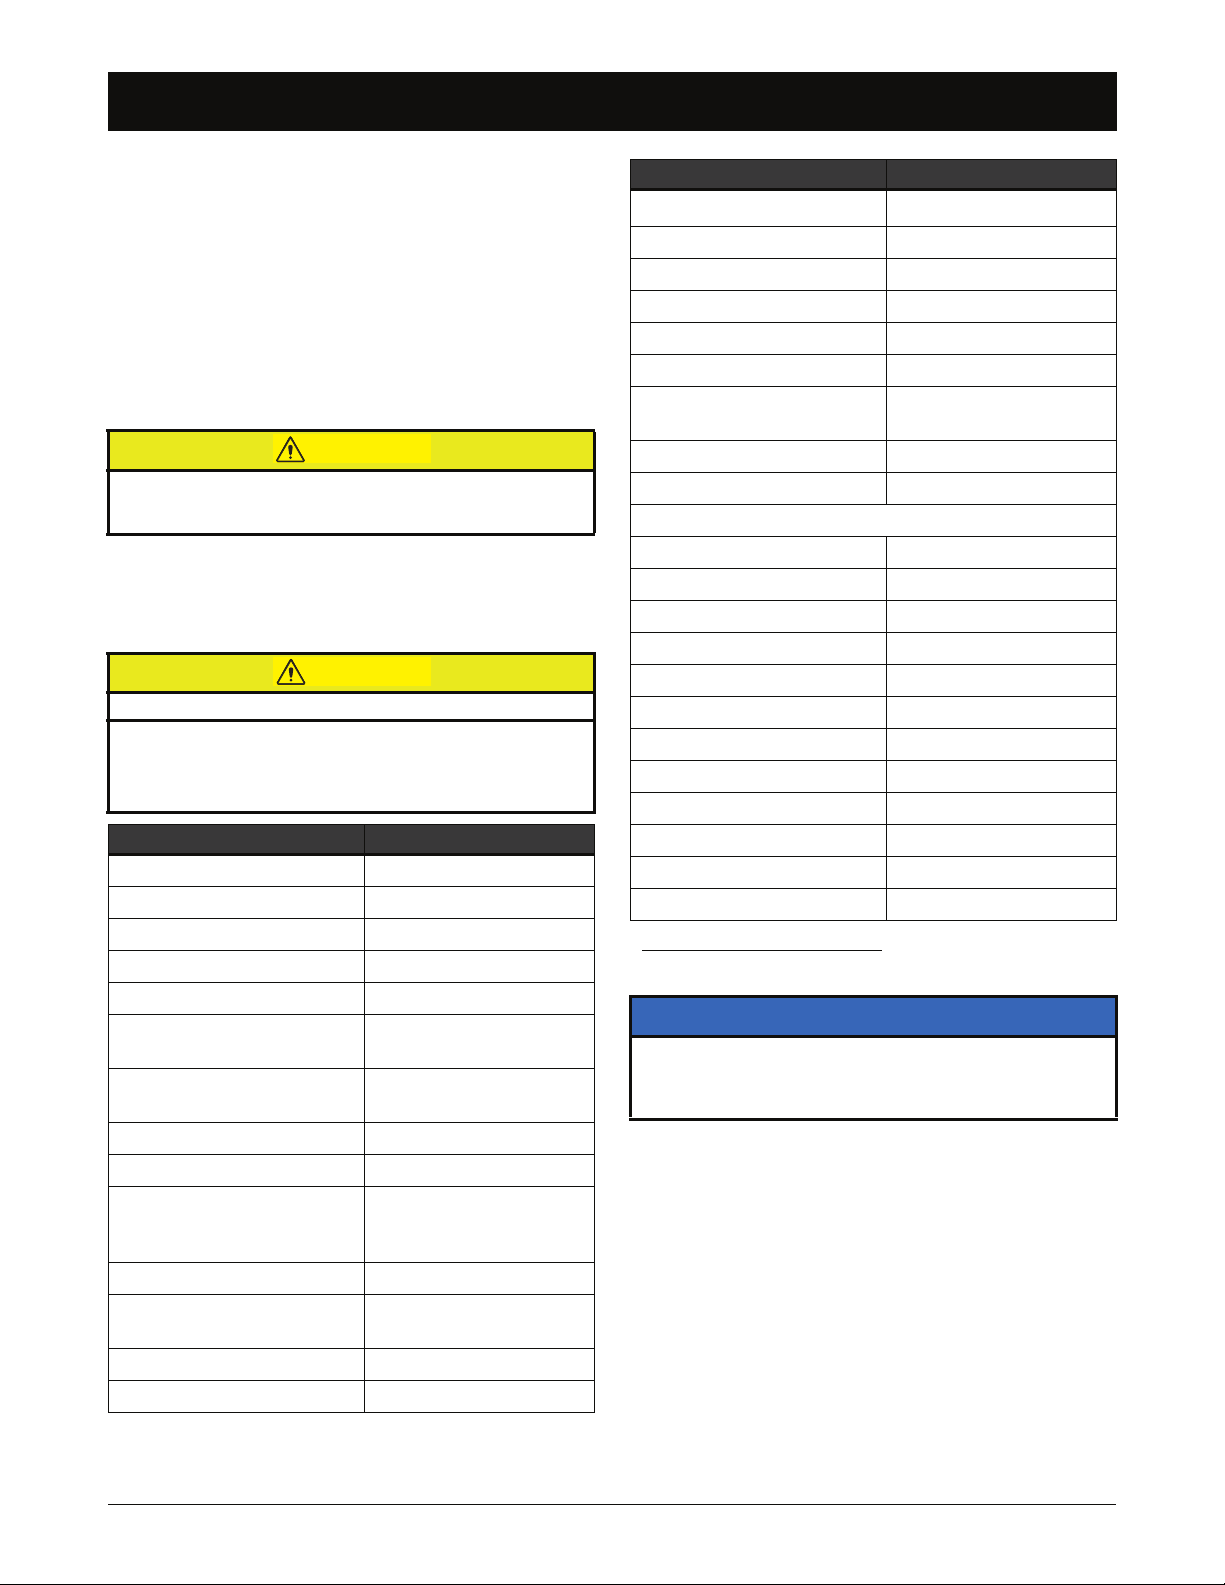
Appliance Wattage Information
Use table below as a guide to determine how much power
you will need to run appliances using generator.
The values provided in following table are estimates only.
• ALWAYS verify actual wattage requirements for appliance you will be powering. Check labels inside or on
the back of appliance, refer to appliance operating
manuals, or contact appliance manufacturer.
Appliance Typical Running Watts
Air Conditioner, Central* 3500
Air Conditioner, Window* 500-1440
Aquarium 50-1210
Clock Radio 10
Coffee Maker 900-1200
Computer, CPU -
Awake / Asleep
Computer, Monitor - Awake /
Asleep
Computer, Laptop 50
Dehumidifier* 785
Dishwasher*
Dryer, Electric 1800-5000
Electric Blanket
(Single/Double)
Fan, Ceiling* 65-175
Fan, Window* 55-250
TABLE 1. Typical Appliance Running Wattages
120 / 30 or less
150 / 30 or less
1200-2400 (using drying
feature greatly increases
energy consumption)
60 / 100
Appliance Typical Running Watts
Furnace*
Hair Dryer 1200-1875
Heater, Portable 750-1500
Iron 1000-1800
Microwave Oven 750-1100
Radio, Stereo 70-400
Refrigerator, Frost-free, 16
Cubic Feet*
Sump Pump, 1/2 hp* 2150
Sump Pump, 1/3 hp* 2300
Television
• 19"
• 27"
• 36"
• 53"-61" Projection
• Flat Screen
Toaster 800-1400
Toaster Oven 1225
Vacuum Cleaner* 1000-1440
VCR/DVD 17-21 / 20-25
Washing Machine 350-500
Water Heater, Electric, 40 gal 4500-5500
Water Pump, Deep Well* 250-1100
TABLE 1. Typical Appliance Running Wattages
* Allow up to three times normal running watts for starting this
appliance.
*
750
725
65-110
113
133
170
120
NOTICE
Starting appliances that have motors requires more power.
Examples of motorized appliances include refrigerators,
water pumps, and furnace blowers. Be sure that power rating
of appliance does not exceed that of generator.
HW7000EH Portable Electrical Generator Owner’s Manual www.honeywellgenerators.com 19
Page 26

THIS PAGE INTENTIONALLY LEFT BLANK
20 www.honeywellgenerators.com HW7000EH Portable Electrical Generator Owner’s Manual
Page 27
MAINTENANCE
DANGER
WARNING
WARNING
Maintenance Schedule
Periodic maintenance and adjustment are necessary to keep the generator in good operating condition. Perform service and
inspection at intervals shown in Generator Maintenance Schedule (see Table 2).
Using a generator indoors CAN KILL YOU IN MINUTES.
Generator exhaust contains carbon monoxide. This is a poison you cannot see or smell.
Accidental starting of generator can cause severe injury or
death. Before performing maintenance, disconnect spark
plug cap from spark plug. Also disconnect both starting battery cables. Remove the negative (-) cable first to reduce the
risk of arcing.
NEVER use inside a home
or garage, EVEN IF doors
and windows are open.
Only use OUTSIDE and far
away from windows, doors, and
vents.
• Shut off engine before performing any maintenance. If
Improper maintenance, or failure to correct a problem before
operation, can cause a malfunction in which you can be seriously hurt or killed. Always follow inspection and maintenance recommendations and schedules in this owner's
manual.
engine must be run, be sure area is well ventilated.
NOTICE
NOTICE
Maintenance, replacement, or repair of the emission
control devices and systems may be performed by any
non-road engine repair establishment or individual.
MAINTENANCE TASK
Before each
use
Inspect for/clean debris X
Check engine oil level X
Change engine oil X X
Check air filter X
Clean air filter
Replace air filter X
Run engine
Check/adjust spark plug X
Replace spark plug X
Clean fuel sediment cup X
Clean spark arrestor X
Clean cylinder cooling fins
Check/adjust idle speed X**
Check/adjust valve clearance X**
Clean fuel tank and filter X**
Clean combustion chamber Every 500 hours **
Check fuel tube Every 2 years (replace if necessary)**
TABLE 2. Generator Maintenance Schedule
* Perform at every indicated month or operating hour interval, whichever comes first.
† Clean more often when using generator in dusty areas.
‡ It is recommended that the generator is run for 30-60 minutes every three months to ensure the battery remains charged.
If the unit is stored for more than a year without running, a battery charger may necessary to recharge the generator battery.
** These items should be serviced by a Honda service dealer, unless you have the proper tools and are mechanically proficient. Refer to
the Honda shop manual for service procedures.
First month or
20 hours of
The maintenance schedule applies to normal operating conditions. If you operate generator under severe conditions,
such as sustained high-load or high-temperature, or use it in
unusually wet or dusty conditions, consult your servicing
dealer for recommendations applicable to your individual
needs and use.
*
Every 6
months or 100
Every year or
300 hours of
hours of use
†
‡
use
FREQUENCY
Every 3
months or 50
hours of use
X
X
use
X
**
HW7000EH Portable Electrical Generator Owner’s Manual www.honeywellgenerators.com 21
Page 28

Adding Engine Fuel
NOTE:
DANGER
B
A
C
D
DANGER
WARNING
Adding Engine Fuel
Fuel and fuel vapors are extremely flammable and
explosive under certain conditions.
• Refuel generator only outdoors, in a well-ventilated
area.
• NEVER fill fuel tank while engine is running. Turn generator OFF and allow to cool before filling with fuel.
• NEVER smoke or allow flames or sparks near generator or where gasoline is stored.
• NEVER overfill fuel tank (no fuel should be in filler
neck). After refueling, be sure fuel tank cap is closed
properly and securely.
• Be careful not to spill fuel when refueling. Spilled fuel
or fuel vapor may ignite. If any fuel is spilled, be sure
area is dry before starting engine.
• Avoid repeated or prolonged contact with skin or
breathing of vapor.
NOTICE
To avoid damage to engine, never use stale or contaminated
gasoline or oil/gasoline mixture. Avoid getting dirt or water in
fuel tank.
Occasional, light spark knock, "pinging", or rattling noise
is normal while operating under heavy loads. If spark
knock, pinging, or rattling occurs at a steady engine
speed, under normal load, drain fuel (page 26) and refill
with fresh gasoline. If noise persists, see an authorized
generator dealer.
NOTICE
Running engine with persistent spark knock or pinging can
cause engine damage. Warranty does not cover parts damaged by misuse.
Adding Engine Oil
NOTICE
It is very important to maintain proper level of engine oil to
keep engine in good running condition.
• Check engine oil level prior to each use. Refill engine
oil if oil level is too low.
1. Stop generator if engine is running.
Use fresh gasoline with a pump octane rating of 86 or
higher.
1. Stop generator if engine is running. Allow to com-
pletely cool.
2. Place the generator on a flat, level surface.
3. Remove fuel tank cap (A).
4. Slowly pour gasoline into fuel tank. Be careful not to
overfill above the filler neck that supports the fuel
strainer (C).
FIGURE 29: Top of Fuel Tank (B) and Maximum Fuel Level (D)
Be careful not to spill fuel when refueling. Spilled
fuel or fuel vapor may ignite. If any fuel is spilled,
be sure area is dry before starting engine.
ALWAYS stop engine before removing oil fill dipstick.
Crankcase pressure can cause hot engine oil to
spray out of engine fill hole. Hot engine oil can
cause severe burns.
2. Place generator on a flat, level surface.
3. Using clean cloth, wipe around oil fill and drain plug
areas to clean any dirt and debris.
4. Remove oil fill dipstick.
FIGURE 30: Oil Fill Dipstick Removal
5. Slowly pour oil into oil fill hole using funnel to the level
specified in the Honda Owner’s Manual.
6. Check oil level.
7. Replace oil fill dipstick and fully tighten.
5. Reinstall fuel tank cap (A) and fully tighten.
22 www.honeywellgenerators.com HW7000EH Portable Electrical Generator Owner’s Manual
Page 29
Engine Maintenance
WARNING
WARNING
WARNING
B
C
Engine Maintenance
See the Honda Owner’s Manual for instructions on
how to properly maintain the engine.
Contact an authorized Honda service dealer for
engine maintenance and repairs. In some locations,
authorized Honeywell service dealers are also Honda
service dealers. Contact your local dealer before
transporting your generator for service.
Gasoline and flammable solvents can cause fire or
explosion. NEVER use gasoline or flammable solvent to clean air filter element.
• Use only household soap and water to clean air filter
element.
Frequent or prolonged contact with engine oil may cause skin
cancer.
• Immediately after handling engine oil, thoroughly wash
hands and any areas of skin exposed to engine oil, with
soap and water.
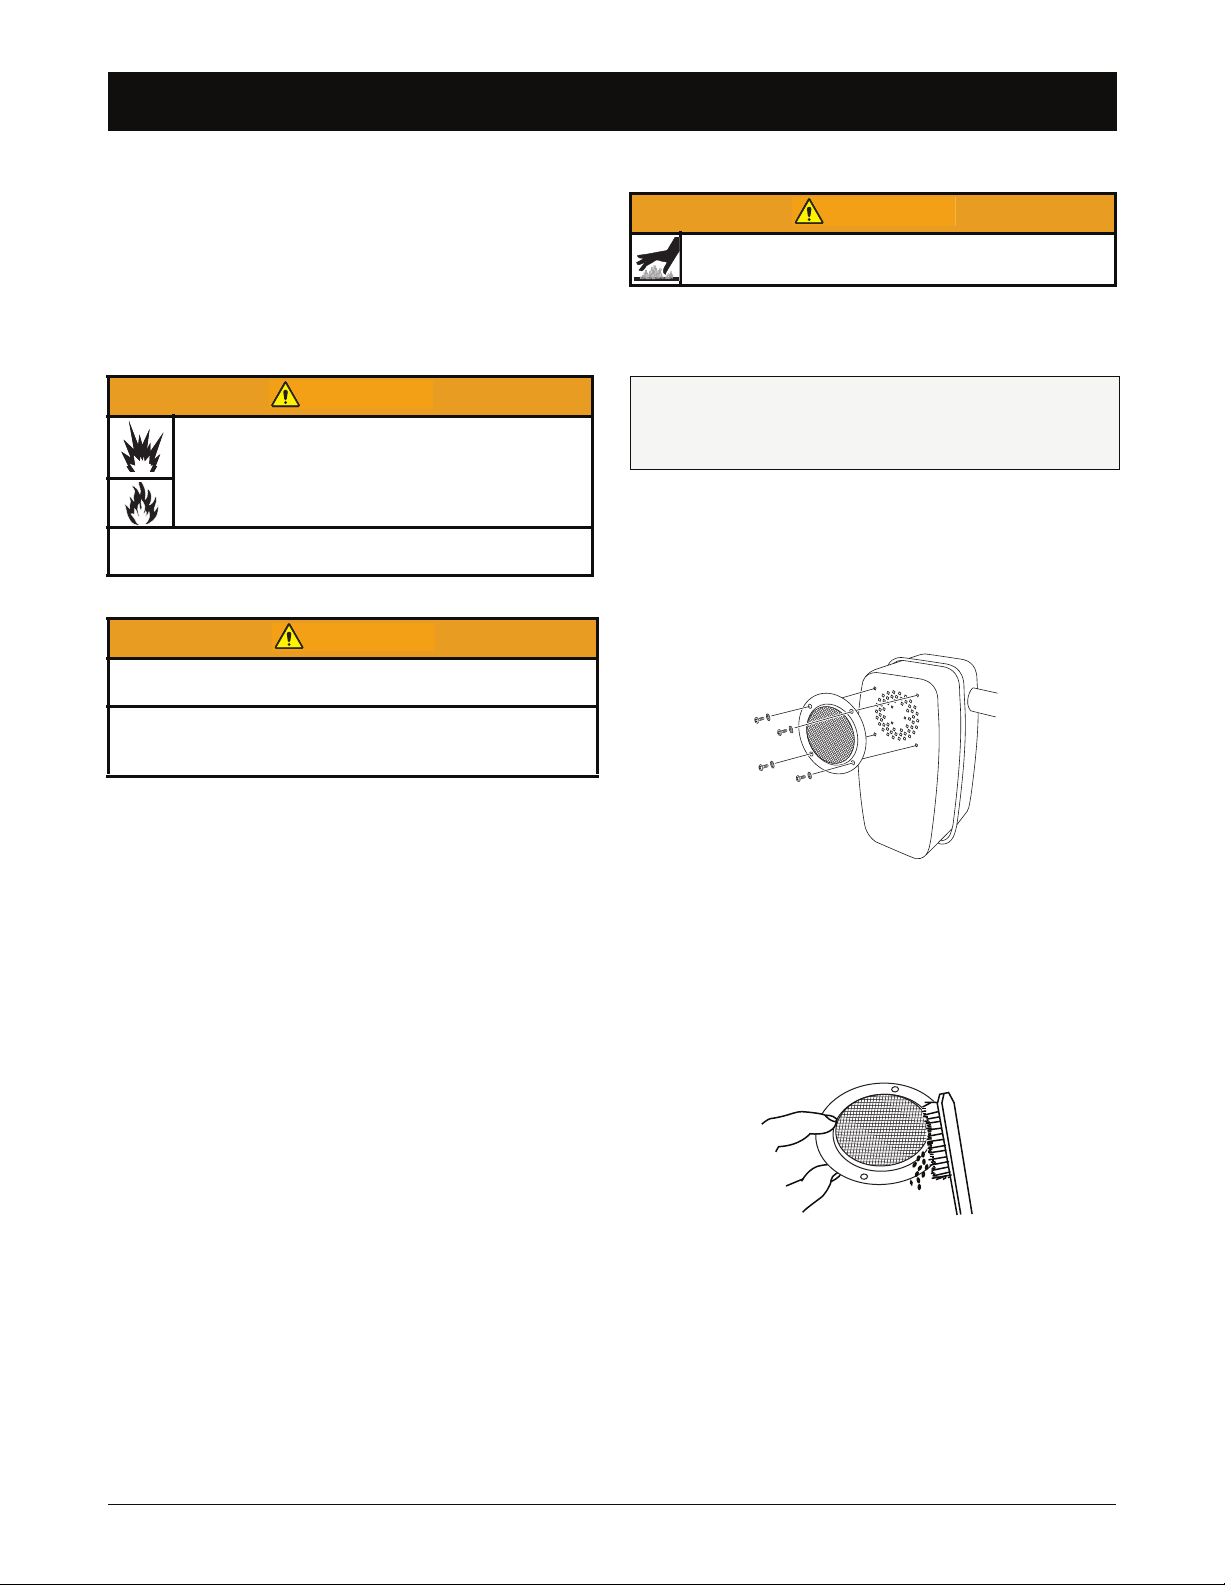
Cleaning Spark Arrestor Screen
Muffler reaches temperatures that can cause serious
burns if touched. NEVER touch hot surfaces.
Generator muffler is equipped with spark arrestor screen,
which must be cleaned according to maintenance schedule (Table 2).
To clean spark arrestor screen, you will need:
#2 Phillips screwdriver
Wire brush
1. Stop generator if engine is running. Allow to com-
pletely cool.
2. Place generator on a flat, level surface.
3. Use a Phillips screwdriver to remove the spark arres-
tor screws and washers.
4. Remove the spark arrestor.
FIGURE 31: Spark Arrestor Assembly
5. Inspect the spark arrestor screen.
If the screen is damaged or excessively worn,
replace the spark arrestor.
If the screen is in good condition, clean using a
wire brush.
FIGURE 32: Clean Screen
6. Reinstall spark arrestor carefully aligning screw holes.
HW7000EH Portable Electrical Generator Owner’s Manual www.honeywellgenerators.com 23
Page 30

Battery Service
NOTE:
A
B
C
Battery Service
To ensure the battery remains charged, it is recommended that the generator is started every three months.
If the unit is stored for more than a year without running, a
battery charger may be required to recharge the generator
battery.
Recommended Battery Replacement:
Xtreme
Yuasa 12N14-3A
TABLE 3. Replacement Batteries
To replace battery:
1. Loosen and remove nuts on retaining plate; slide
retaining plate off support rods.
XTAX14AHL-BS
Cleaning Fuel Sediment Cup
The sediment cup helps prevent fuel tank residue from
entering the carburetor.
Clean fuel sediment cup at the intervals specified in
Table 2.
To clean fuel sediment cup, you will need:
10 mm box wrench
22 mm open end wrench
Household soap and water
Clean, dry cloth
To clean fuel sediment cup:
1. Stop engine if it is running. Allow to completely cool.
2. Place generator on a flat, level surface.
3. Turn fuel shut-off valve to OFF position.
4. While holding the fitting above the fuel shut-off valve
with a 22 mm open end wrench, remove the fuel sediment cup assembly (sediment cup, o-ring, and fuel
screen) using a 10 mm box wrench.
FIGURE 33: Electric Start Battery—Remove Retaining Plate
2. Tip battery slightly forward.
3. Disconnect the black negative (-) battery lead remov-
ing the boot, bolt, and nut.
FIGURE 34: Electric Start Battery—Lead Connection
4. Disconnect the red positive (+) battery lead removing
the boot, bolt, and nut.
5. Remove the battery.
Dispose of used battery according to guidelines established by your local or state government.
6. Place the new battery in the generator frame.
7. Connect the red positive (+) battery lead to the posi-
tive (+) post on the battery; install bolt, nut, and boot.
8. Connect the black negative (-) battery lead to the neg-
ative (-) post on the battery; install bolt, nut, and boot.
9. Reinstall retaining plate; tighten bolts and nuts.
FIGURE 35: Fuel Sediment Cup Assembly Removal
FIGURE 36: Fuel Sediment Cup Assembly
5. Clean fuel screen (A), o-ring (B), and sediment cup
(C), with soap and water.
6. Rinse parts thoroughly with water.
7. Wipe pieces clean with clean, dry cloth.
8. Reinstall sediment cup, o-ring, and fuel filter.
9. Turn fuel shut-off valve to ON position.
10. Start generator and check for leaks.
24 www.honeywellgenerators.com HW7000EH Portable Electrical Generator Owner’s Manual
Page 31
Transporting Generator
WARNING
DANGER
Transporting Generator
Hot engine or exhaust system can cause serious
burns or fires. Cool generator completely before
transporting or storing.
When transporting the generator:
•
Press engine control switch to OFF position.
• Turn fuel shut-off valve to OFF position.
• Keep generator level to prevent fuel spillage.
• Be sure pins are in place in the handle / handle
bracket before moving generator.
NOTICE
To avoid damage to generator, take care not to drop or strike
generator when transporting. Do not place heavy objects on
generator.
Storing Generator
NOTICE
Follow service procedures for preparing generator for storage. Inadequate or improper care of generator can result in
damage to generator components and will void limited warranty.
Before storing generator for extended period of time:
• Be sure storage area is free of excessive humidity
and dust.
• Refer to Table 4 for recommended preparation proce-
dures.
Storage Time Recommended Preparation
Less than 1
month
1 to 2 months
2 months to 1
year or more
TABLE 4. Recommended Service Procedures Based on Storage
Time
* Use gasoline conditioners formulated to extend storage life.
Contact authorized generator dealer for conditioner recommendations.
To prepare generator for long-term storage:
No preparation required.
Fill fuel tank with fresh gasoline and
add gasoline conditioner
See procedure below.
*
.
Fuel and its vapors are extremely flammable and
explosive under certain conditions.
• NEVER smoke or allow flames or sparks near generator or where gasoline is stored.
1. Stop generator if engine is running. Allow to com-
pletely cool.
2. Clean all exterior surfaces. Touch up any damaged
paint and coat other areas that may rust with a light
film of oil.
NOTICE
Using a garden hose or pressure washing equipment can
force water into the air cleaner or muffler opening causing
damage.
3. Drain fuel into suitable container (see page 26) or add
gasoline stabilizer (follow the manufacturer’s instructions).
4. Change engine oil (see page 22).
5. Remove spark plug. Add a tablespoon of clean
engine oil into spark plug hole.
6. Place rag over spark plug hole and pull recoil starter
handle slowly to turn engine and distribute oil.
7. Use a flashlight to view in the spark plug hole and pull
the recoil starter handle slowly until the piston is at the
top of its compression stroke. This closes both the
intake and exhaust valves and protects the engine
from internal corrosion.
8. Reinstall spark plug.
HW7000EH Portable Electrical Generator Owner’s Manual www.honeywellgenerators.com 25
Page 32
Storing Generator
WARNING
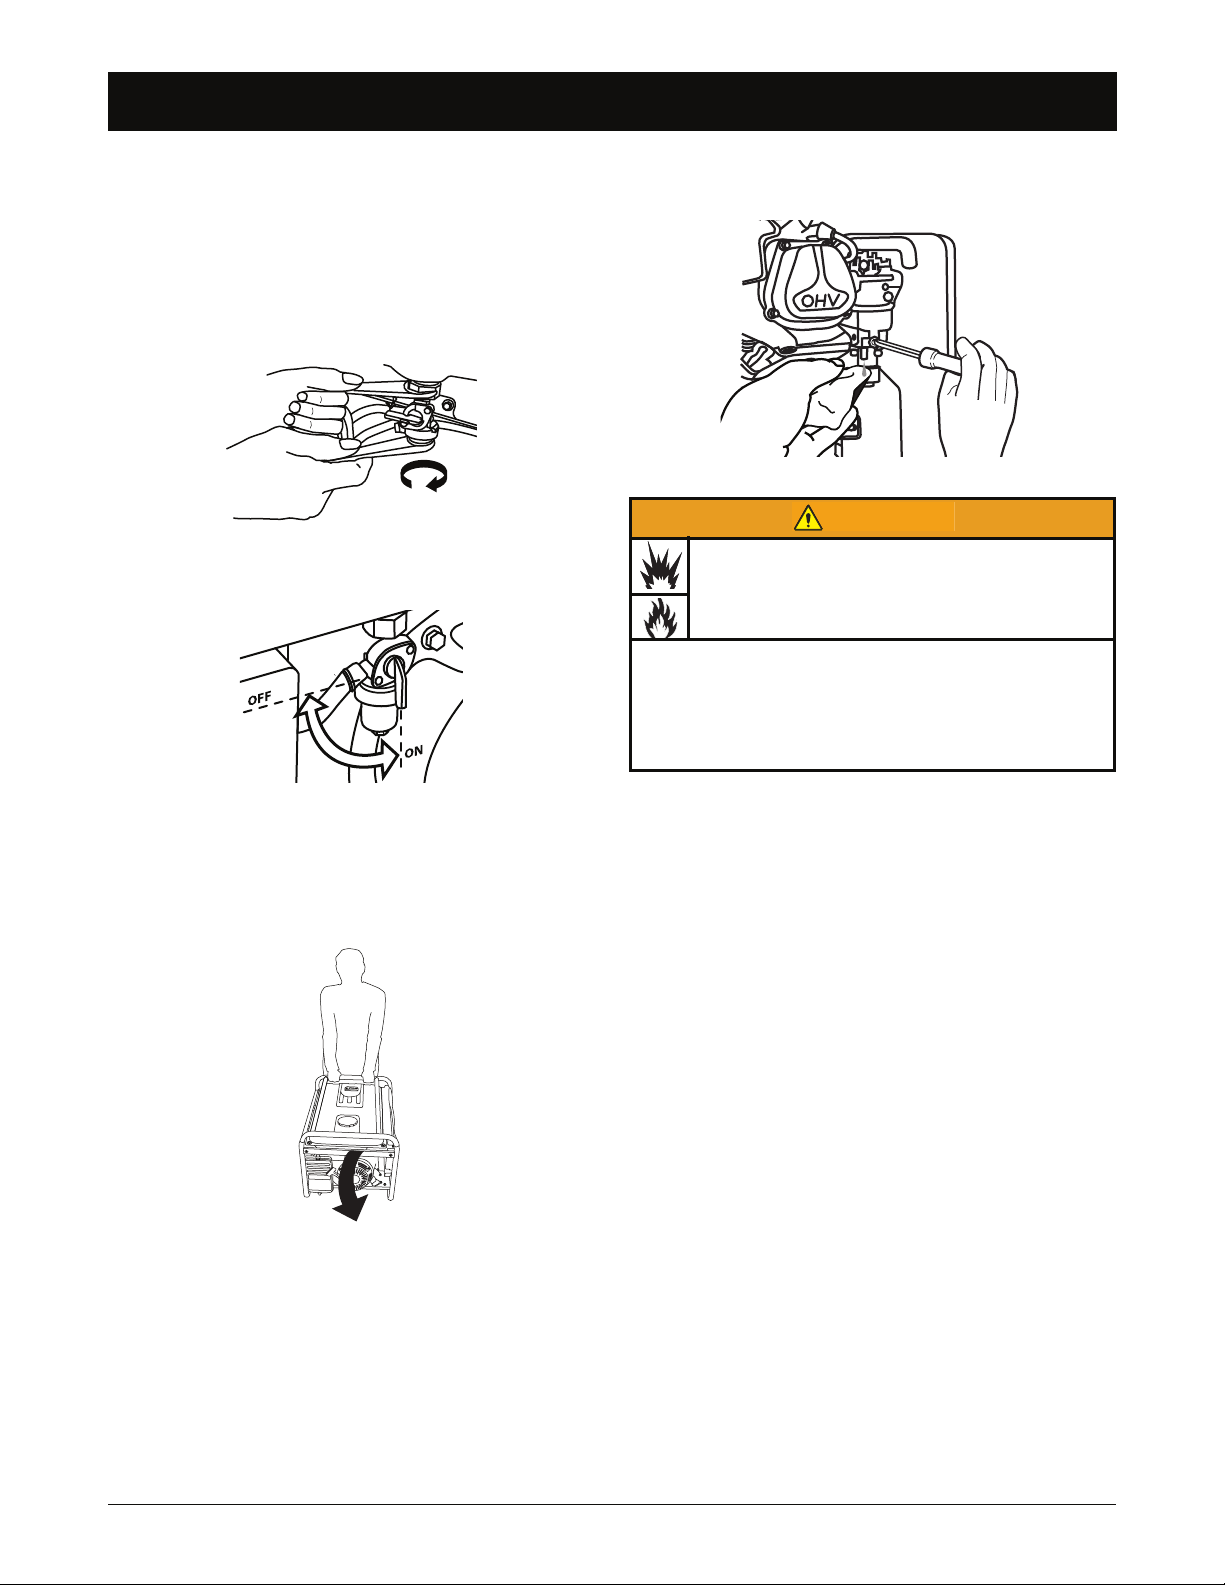
Draining Fuel
1. Turn fuel shut-off valve to OFF position.
2. Place suitable container underneath drain hole to
catch fuel.
3. Loosen bolt (underneath fuel sediment cup) using a
10 mm box wrench while holding the fitting above the
fuel shut-off valve with a 22 mm open end wrench.
FIGURE 37: Loosen Bolt to Drain Fuel
4. Turn fuel shut-off valve to ON position.
11. Loosen carburetor fuel bowl screw and use a rag to
absorb fuel from the drain port.
FIGURE 40: Drain Fuel Bowl
Fuel and its vapors are extremely flammable and
explosive under certain conditions.
• Be careful not to spill fuel when refueling. Spilled fuel
or fuel vapor may ignite. If any fuel is spilled, be sure
the area is dry before starting the engine.
• Avoid repeated or prolonged contact with skin or
breathing of vapor.
FIGURE 38: Fuel Shut-off Valve — ON/OFF position
5. Allow fuel to drain into container.
6. To ensure all fuel is drained, carefully tip generator by
pulling up on frame at side opposite of recoil starter
handle.
FIGURE 39: Tip Generator to Completely Drain Fuel
7. Allow fuel to completely drain into container.
8. Reinstall bolt.
9. Run engine until it stops due to lack of fuel.
10. Turn fuel shut-off valve to the OFF position.
12. When ready to put generator back into operation, refill
with fresh fuel (see page 22).
26 www.honeywellgenerators.com HW7000EH Portable Electrical Generator Owner’s Manual
Page 33

TROUBLESHOOTING
NOTE:
NOTE:
WARNING
DANGER
Set Tripped
ANYONE using or servicing this generator must read, understand, and follow all safety and operation instructions provided in the product manual. Failure to closely follow these instructions can result in circumstances leading to death,
serious injury, and property damage.
Using a generator indoors CAN KILL YOU IN MINUTES.
Generator exhaust contains carbon monoxide. This is a poison you cannot see or smell.
NEVER use inside a home
or garage, EVEN IF doors
and windows are open.
Only use OUTSIDE and far
away from windows, doors, and
vents.
For all customer service inquiries, call 1-888-HWHELP1 (494-3571) or visit www.honeywellgenerators.com.
Contact an authorized Honda service dealer for engine maintenance and repairs. In some locations, authorized
Honeywell service dealers are also Honda service dealers. Contact your local dealer before transporting your
generator for service.
PROBLEM PROBABLE CAUSE SOLUTION
No fuel. Add fuel (page 22).
Stale fuel. Drain fuel tank; fill with fresh fuel (page 26).
No or low engine oil. Add engine oil (page 22).
Engine will not start or
starts and runs rough
Engine suddenly stops
No power at AC
receptacle
Speed of starter motor
drops after period of time
TABLE 5. Troubleshooting — Probable Causes and Solutions
Spark plug wire (cap) disconnected. Install spark plug cap over spark plug.
Faulty/bad spark plug. Check/replace spark plug (see Honda Owner’s Manual).
Fuel not reaching carburetor. Clean fuel sediment cup (page 24).
Dirty air filter. Clean or replace air filter (see Honda Owner’s Manual).
Dirty spark arrestor screen. Clean spark arrestor screen (page 23).
No fuel. Add fuel (page 22).
No or low engine oil. Add engine oil (page 22).
Electrical overload on generator.
Poor connection or defective cord. Check cord connection. Replace defective cord.
Connected electrical appliance/
equipment is defective.
Battery is losing charge. Recharge battery.
Check all circuit breakers for “tripped’
position or overload indicator light on.
Reduce electrical load on circuit, wait
several minutes for thermal breakers to
cool (master breaker is not thermal),
and then push to reset circuit breaker.
Check electrical appliance/equipment for defects. Disconnect defective appliance/equipment from the generator. Have appliance serviced by qualified repair facility.
HW7000EH Portable Electrical Generator Owner’s Manual www.honeywellgenerators.com 27
Page 34

THIS PAGE INTENTIONALLY LEFT BLANK
28 www.honeywellgenerators.com HW7000EH Portable Electrical Generator Owner’s Manual
Page 35

SPECIFICATIONS
GENERATOR
Dimensions
*
Length [in / mm]
Height [in / mm]
Width [in / mm]
Dry Weight [lb / kg]
AC Output
Rated Power [watts]
Maximum Power [watts]
Frequency [hertz]
Voltage [volts]
Operating Temperature
Maximum [F / C]
Minimum [F / C]
ENGINE
Speed [rpm]
Ty pe
Displacement [cc]
Fuel Tank Capacity [gal / l]
30 / 762.0
27 / 685.8
29 / 736.6
210 / 95.3
7000
8750
60
120 / 240
104
q/ 40q
14q / -10q
3600
OHV 4-Cycle
389
6.5 / 24.6
Engine Oil Capacity [qt / l]
See Honda Owner’s Manual for Additional Engine Information
TABLE 6. HW7000EH Portable Electrical Generator Specifications
* Measurements given reflect dimensions with wheel kit installed to generator.
1.2 / 1.1
HW7000EH Portable Electrical Generator Owner’s Manual www.honeywellgenerators.com 29
Page 36

THIS PAGE INTENTIONALLY LEFT BLANK
30 www.honeywellgenerators.com HW7000EH Portable Electrical Generator Owner’s Manual
Page 37

WARRANTY
NORTHSHORE POWER SYSTEMS
CONSUMER LIMITED WARRANTY
Honeywell Portable Generator
Effective March 1, 2009
LIMITED WARRANTY
Northshore Power Systems, LLC will repair or replace, free of
charge, to the original retail customer, in North America, any
parts of the portable generator found by Northshore Power
Systems or an authorized service center to be defective in
material or workmanship. This limited warranty covers the
cost of the replacement parts and labor for defects. Transportation charges are the responsibility of the customer. This limited warranty has time period conditions, operating conditions
and disclaimers, limitations of remedies & exclusions as
stated below. For warranty service, customer should locate
an authorized Honeywell Generator Dealer from www.honeywellgenerators.com or by calling 1-888-HWHELP1 (494-
3571).
LIMITED WARRANTY PERIODS
Consumer Use: 3 Years Limited. 1st year, parts and labor.
2nd & 3rd years, parts only.
Commercial Use: 1 Year Limited. No warranty for rental use.
Commencement and Definitions.The limited warranty period
begins on the date of retail purchase by the original purchaser. The limited warranty is not transferable. "Consumer
use" is personal use by a retail customer. "Commercial use"
is any usage for income producing, business related use.
No Extension of Warranty. Repair or replacement pursuant to
this limited warranty shall not renew or extend the original
warranty period, and any repaired product shall be warranted
for the remaining original warranty period only.
DISCLAIMERS, LIMITATIONS OF REMEDIES &
EXCLUSIONS
This warranty gives you specific legal rights, and you may
also have other rights which vary from state to state.
MEDICAL AND LIFE SUPPORT USES. This warranty
excludes any use of this product intended to power life support devices, life support appliances, medical devices, or
medical appliances.
DISCLAIMER OF OTHER WARRANTIES. TO THE FULLEST EXTENT PERMITTED BY APPLICABLE LAW, THIS
LIMITED WARRANTY IS EXCLUSIVE AND EXPRESSLY IN
LIEU OF ANY AND ALL OTHER WARRANTIES, INCLUDING, WITHOUT LIMITATION, ANY IMPLIED WARRANTIES
OF MERCHANTABILITY OR FITNESS FOR A PARTICULAR
PURPOSE OR ANY OTHER IMPLIED WARRANTIES THAT
MAY ARISE FROM A COURSE OF DEALING OR USAGE
OF TRADE. NORTHSHORE POWER SYSTEMS HEREBY
DISCLAIMS AND EXCLUDES ALL OTHER WARRANTIES.
To the extent that Northshore Power Systems's products are
consumer products under applicable federal or state law with
respect to any customer, the duration of any implied warranties (including, but not limited to, implied warranties of merchantability or fitness for a particular purpose) are limited to
the shortest duration permitted by applicable law or the limited warranty period provided herein, whichever is longer.
LIMITATIONS OF REMEDIES. NORTHSHORE POWER
SYSTEMS SHALL NOT BE LIABLE TO CUSTOMER, OR TO
ANYONE CLAIMING UNDER CUSTOMER, FOR ANY
OTHER OBLIGATIONS OR LIABILITIES, INCLUDING, BUT
NOT LIMITED TO, OBLIGATIONS OR LIABILITIES ARISING
OUT OF BREACH OF CONTRACT OR WARRANTY, NEGLIGENCE OR OTHER TORT OR ANY THEORY OF STRICT
LIABILITY, WITH RESPECT TO THE GENERATOR OR
NORTHSHORE POWER SYSTEMS'S ACTS OR OMISSIONS OR OTHERWISE. TO THE FULLEST EXTENT PERMITTED BY APPLICABLE LAW, NORTHSHORE POWER
SYSTEMS SHALL NOT, IN ANY EVENT, BE LIABLE FOR
INCIDENTAL, COMPENSATORY, PUNITIVE, CONSEQUENTIAL, INDIRECT, SPECIAL OR OTHER DAMAGES,
INCLUDING BUT NOT LIMITED TO LOSS OF USE, LOSS
OF INCOME, LOSS OF TIME, LOSS OF SALES, INJURY
TO PERSONAL PROPERTY, OR LIABILITY CUSTOMER
INCURS WITH RESPECT TO ANY OTHER PERSON, OR
ANY OTHER TYPE OR FORM OF CONSEQUENTIAL DAMAGE OR ECONOMIC LOSS.
EXCLUSIONS. In addition to the foregoing disclaimers, limitations and terms, this limited warranty shall not apply to and
does not cover accessories, nor does it cover products that
are in any way subjected to: (i) improper setup, installation or
storage; (ii) lack of proper maintenance and service; (iii) accident, damage, abuse or misuse; (iv) abnormal operating conditions or applications; (v) repair or modification by customer
or any third party without prior written consent of Northshore
Power Systems; (vi) use under operating conditions or in
applications not made known to or contemplated by Northshore Power Systems; or (viii) acts of God. The application of
these exclusions will be determined at Northshore Power
Systems's sole discretion.
This generator is equipped with an engine that is covered
exclusively by a separate warranty from the engine manufacturer. Please refer to the engine documentation included with
the generator for warranty information related to the engine.
REGISTRATION
Warranty registration with the Company is required on all
products. You may send in the enclosed Product Registration,
or register your product on-line at www.honeywellgenerators.com.
Warranty is also available by keeping and showing your original receipt from date of purchase to an authorized Honeywell
Generator Dealer.
GENERATOR SERVICE
Do not return your generator to place of purchase for service.
For all customer service inquiries, call 1-888-HWHELP1
(494-3571) or visit www.honeywellgenerators.com.
Warranty inquiries can be addressed to:
Northshore Power Systems, LLC
Attention: Service and Warranty Dept.
4425 N Port Washington Road
Suite 105
Milwaukee, WI 53212-1082
HW7000EH Portable Electrical Generator Owner’s Manual www.honeywellgenerators.com 31
Page 38

WARRANTIES
WARRANTIES
NORTHSHORE POWER SYSTEMS EVAPORATIVE EMISSIONS CONTROL WARRANTY
Honeywell Portable Generator
WARRANTY STATEMENT
The California Air Resources Board and Northshore Power
Systems, LLC are pleased to explain the evaporative emission control system (EECS) warranty on your 2009 portable
generator. In California, new portable generators must be
designed, built and equipped to meet the State’s stringent
anti-smog standards. Northshore Power Systems must warrant the EECS on your portable generator for the period of
time listed below provided there has been no abuse, neglect
or improper maintenance of your portable generator. Your
EECS may include parts such as the carburetor, fuel lines,
fuel caps, valves, canisters, filters, vapor hoses, clamps, and
other associated emission-related components. Where a warrantable condition exists, Northshore Power Systems will
repair your portable generator at no cost to you including
diagnosis, parts and labor.
MANUFACTURER’S WARRANTY COVERAGE
This evaporative emission control system is warranted for two
years. If any evaporative emission-related part on your equipment is defective, the part will be repaired or replaced by
Northshore Power Systems.
OWNER’S WARRANTY RESPONSIBILITIES
As the portable generator owner, you are responsible for performance of the required maintenance listed in your owner’s
manual. Northshore Power Systems recommends that you
retain all receipts covering maintenance on your portable
generator, but Northshore Power Systems cannot deny warranty solely for the lack of receipts. As the portable generator
owner, you should however be aware that Northshore Power
Systems may deny you warranty coverage if your portable
generator or a part has failed due to abuse, neglect, or
improper maintenance or unapproved modifications. You are
responsible for presenting your portable generator to Northshore Power Systems’s distribution center or service center
as soon as the problem exists. The warranty repairs should
be completed in a reasonable amount of time, not to exceed
30 days. If you have a question regarding your warranty coverage, you should contact www.honeywellgenerators.com or
by calling 1-888-HWHELP1 (494-3571).
GENERAL EVAPORATIVE EMISSIONS WARRANTY
COVERAGE
Northshore Power Systems warrants to the ultimate purchaser and each subsequent purchaser that the portable
generator is: Designed, built and equipped so as to conform
with all applicable regulations; and free from defects in materials and workmanship that cause the failure of a warranted
part to be identical in all material respects to that part as
described in the application for certification. The warranty
period begins on the date the portable generator is delivered
to an ultimate purchaser or first placed into service. The warranty period is two years. Subject to certain conditions and
exclusions as stated below, the warranty on emission-related
parts is as follows:
1. Any warranted part that is not scheduled for replacement
as required maintenance in the written instructions supplied, is warranted for the warranty period stated above.
If the part fails during the period of warranty coverage,
the part will be repaired or replaced by Northshore
Power Systems according to subsection (4) below. Any
such part repaired or replaced under warranty will be
warranted for the remainder of the period.
2. Any warranted part that is scheduled only for regular
inspection in the written instructions supplied is warranted for the warranty period stated above. Any such
part repaired or replaced under warranty will be warranted for the remaining warranty period.
3. Any warranted part that is scheduled for replacement as
required maintenance in the written instructions supplied
is warranted for the period of time before the first scheduled replacement date for that part. If the part fails before
the first scheduled replacement, the part will be repaired
or replaced by Northshore Power Systems according to
subsection (4) below. Any such part repaired or replaced
under warranty will be warranted for the remainder of the
period prior to the first scheduled replacement point for
the part.
4. Repair or replacement of any warranted part under the
warranty provisions herein must be performed at an
authorized Honeywell Service Center.
5. Notwithstanding the provisions herein, warranty services
or repairs will be provided at an authorized Honeywell
Service Center at no charge to the owner.
6. The portable generator owner will not be charged for
diagnostic labor that is directly associated with diagnosis
of a defective, emission-related warranted part, provided
that such diagnostic work is performed at a warranty station.
7. Northshore Power Systems is liable for damages to other
engine or equipment components proximately caused by
a failure under warranty of any warranted part.
8. Throughout the portable generator warranty period
stated above, Northshore Power Systems will maintain a
supply of warranted parts sufficient to meet the expected
demand for such parts.
9. Any replacement part may be used in the performance of
any warranty maintenance or repairs and must be provided without charge to the owner. Such use will not
reduce the warranty obligations of Northshore Power
Systems.
10. Add-on or modified parts that are not exempted by the
Air Resources Board may not be used. The use of any
non-exempted add-on or modified parts by the ultimate
purchaser will be grounds for disallowing a warranty
claims. Northshore Power Systems will not be liable to
warrant failures of warranted parts caused by the use of
a non-exempted add-on or modified part.
32 www.honeywellgenerators.com HW7000EH Portable Electrical Generator Owner’s Manual
Page 39

WARRANTED PARTS
The repair or replacement of any warranted part otherwise
eligible for warranty coverage may be excluded from such
warranty coverage if Northshore Power Systems demonstrates that the portable generator has been abused,
neglected, or improperly maintained, and that such abuse,
neglect, or improper maintenance was the direct cause of the
need for repair or replacement of the part. That notwithstanding, any adjustment of a component that has a factory
installed, and properly operating, adjustment limiting device is
still eligible for warranty coverage. The following emission
warranty parts are covered:
A. Fuel Tank
B. Fuel Cap
C. Fuel Line
D. Fuel Line Fittings
E. Clamps
F. Vapor Hoses
G. Carbon Canister
H. Canister Mounting Brackets
I. Carburetor Purge Port Connector
QUESTIONS
If you have questions regarding your emissions warranty
rights and responsibilities, you should contact the Service
and Warranty department at Northshore Power Systems.
By phone: 1-414-332-2375
Via web: www.honeywellgenerators.com
By US mail:
Northshore Power Systems, LLC
Attention: Service and Warranty Dept.
4425 N Port Washington Road
Suite 105
Milwaukee, WI 53212-1082
WARRANTIES
HW7000EH Portable Electrical Generator Owner’s Manual www.honeywellgenerators.com 33
Page 40

THIS PAGE INTENTIONALLY LEFT BLANK
34 www.honeywellgenerators.com HW7000EH Portable Electrical Generator Owner’s Manual
Page 41

INDEX
A
Appliances
powering
18
rules for powering 18
wattage information 19
Assembly
handle
9
support legs 7
wheels 8
B
Battery
10
C
Carbon Canister
13
Checklist, Generator Contents 5
Components and Controls
breakers
13
choke control 13
engine control switch 13
fuel gauge 13
fuel shut-off valve 13
hour meter 13
outlets 13
recoil starter grip handle 13
spark plug cap 13
D
Damage, Inspecting for
Draining Fuel 26
E
Engine Control Switch
Engine Maintenance 23
F
Fuel Sediment Cup, Cleaning
Fuel Shut-off Valve 13
G
Generator
location
15
nameplate information 5
operation 15
outlets 13
safety labels 3
specifications 29
starting 16
stopping 18
storing 25
transporting 25
Ground 11
special requirements 11
terminal 13
13
H
Handles, Installing
9
High Altitude Operation 18
Hour Meter 13
M
Maintenance
21
cleaning spark arrestor 23
engine 23
fuel sediment cup 24
parts listing 37
schedule 21
Manual (Recoil) Start 17
O
Operation
high altitude
18
preparing for 15
Outlets 13
P
Power Control Center
ground terminal
13
household outlets 13
S
Safety Labels
3
Spark Arrestor Cleaning 23
5
Specifications 29
Starting Generator 16
Stopping Generator 18
Storage Recommendations 25
T
Transporting
25
Troubleshooting 27
24
U
Unpacking Guidelines
5
W
Warranty
emissions control
32
limited 31
Wattage, Typical Appliance 19
Wheels, Installing 8
HW7000EH Portable Electrical Generator Owner’s Manual www.honeywellgenerators.com 35
Page 42

THIS PAGE INTENTIONALLY LEFT BLANK
36 www.honeywellgenerators.com HW7000EH Portable Electrical Generator Owner’s Manual
Page 43

MAINTENANCE PARTS
To order maintenance parts, visit www.honeywellgenerators.com or call the Customer Hotline at 1-888-HWHELP1
(494-3571).
PART N AME PART NUMBER
Battery 101536A
Wheel 100844C
HW7000EH Maintenance Parts List
For part numbers of replacement product labels, see page 3 and page 4.
HW7000EH Portable Electrical Generator Owner’s Manual www.honeywellgenerators.com 37
Page 44

¡Felicitaciones por su adquisición de un generador portátil Honeywell!
ADVERTENCIA
Este manual contiene instrucciones importantes para el funcionamiento de este generador. Para su
seguridad, y la seguridad de los demás, asegúrese de leer minuciosamente este manual antes de
hacer funcionar el generador. Si no sigue las instrucciones y las precauciones de manera correcta,
se pueden producir graves lesiones o incluso la muerte.
Utilice los espacios a continuación para registrar información importante acerca de su generador. Posiblemente se
le solicitará que informe estos datos en caso de que requiera servicio o asistencia con el producto.
La información de identificación específica de su generador (número de modelo y número de serie) aparece en la
placa de identificación del generador.
Fecha de compra:
Tienda/Distribuidor donde se
compró:
Número de modelo del
generador:
Número de serie del generador:
Northshore Power Systems, LLC
4425 N. Port Washington Rd., Suite 105
Milwaukee, WI 53212-1082 USA
TEL 1-888-HWHELP1 (494-3571)
www.honeywellgenerators.com
© 2009 Northshore Power Systems, LLC
La marca comercial Honeywell se utiliza bajo licencia de
Honeywell International Inc.
Honeywell International Inc. no emite ninguna declaración
o garantía con respecto a este producto.
Page 45

REGISTRO DEL PRODUCTO
1- INFORMACIÓN PERSONAL
2-INFORMACIÓN DEL PRODUCTO
NOMBRE
APELLIDO
MARQUE AQUÍ PARA RECIBIR RECORDATORIOS ANUALES DE MANTENIMIENTO Y OFERTAS ESPECIALES
DE LOS GENERADORES HONEYWELL
MARQUE AQUÍ PARA RECIBIR POR CORREO ELECTRÓNICO INFORMACIÓN DE OTRAS COMPAÑÍAS Y ACEPTAR QUE SU
DIRECCIÓN DE CORREO ELECTRÓNICO PUEDA SER COMPARTIDA O COMBINADA CON INFORMACIÓN DE OTRAS FUENTES
FECHA DE COMPRA:
MM DD AA
//
*NÚMERO DE MODELO:
*NÚMERO DE SERIE
(18 DÍGITOS):
LUGAR DE COMPRA
EN UNA TIENDA
EN LÍNEA
NOMBRE DE LA TIENDA:
PRECIO DE COMPRA $___________.00
CARACTERÍSTICAS QUE INFLUYERON EN LA
COMPRA DEL PRODUCTO
REPUTACIÓN DE LA MARCA
FACILIDAD DE USO
FACILIDAD DE TRANSPORTE
DIMENSIÓN/PESO
POTENCIA DE SALIDA
ESTILO/APARIENCIA
PRECIO
GARANTÍA
¿CÓMO SUPO DE ESTE PRODUCTO?
EN UNA TIENDA
RADIO/TV
INTERNET
CIRCULAR EN UNA TIENDA
PUBLICIDAD IMPRESA
RECOMENDACIÓN
OTRAS MARCAS QUE SE CONSIDERARON CUANDO
SE COMPRÓ ESTE PRODUCTO
USO PRINCIPAL DEL PRODUCTO
ENERGÍA PARA HERRAMIENTAS
ENERGÍA PARA RECREACIÓN
ENERGÍA PARA EMERGENCIAS
UBICACIÓN PRINCIPAL PARA EL USO DEL PRODUCTO
HOGAR
TRABAJO
TIPO DE TRABAJO, SI EL PRODUCTO
SE USA PARA TRABAJAR:
¿QUÉ OTRO TIPO DE EQUIPO MOTORIZADO
LE INTERESA COMPRAR EN EL FUTURO?
¿QUIÉN DECIDIÓ COMPRAR ESTE PRODUCTO?
DOMICILIO
CIUDAD, ESTADO, C.P.
PAÍS
TELÉFONO
CORREO
ELECTRÓNICO
*Se encuentra en la placa de identificación del generador
Para registrar su producto, complete la siguiente información y envíela por correo a la dirección que aparece al final del
formulario, o regístrese a través de Internet en www.honeywellgenerators.com. Se deberá llenar el número de serie de
18 dígitos a fin de activar la garantía.
Page 46

3-INFORMACIÓN DEMOGRÁFICA
SEXO:
HOMBRE
MUJER
ESTADO CIVIL:
CASADO
SOLTERO
FECHA DE NACIMIENTO:
MM DD AA
//
INCLUYÉNDOSE USTED, ¿CUÁNTAS PERSONAS
VIVEN EN SU CASA?:
NÚMERO DE NIÑOS MENORES DE 18 AÑOS QUE
VIVEN EN SU CASA:
RESIDENCIA PRINCIPAL:
PROPIA
RENTADA
EDUCACIÓN:
PREPARATORIA TRUNCA
CERTIFICADO DE PREPARATORIA
LICENCIATURA
POSGRADO
GRACIAS POR REGISTRAR SU PRODUCTO. LA INFORMACIÓN PROPORCIONADA PODRÁ SER USADA
PARA PROPÓSITOS DE MERCADO A FIN DE OFRECERLE DIFERENTE INFORMACIÓN DE PRODUCTOS
Y OFERTAS.
MARQUE AQUÍ SI NO QUIERE QUE LO CONTACTEMOS PARA OFRECERLE OFERTAS ESPECIALES.
SÍRVASE DEVOLVER ESTA FORMA A LA SIGUIENTE DIRECCIÓN:
Northshore Power Systems, LLC
4425 N Port Washington Road
Suite 105
Milwaukee, WI 53212-1082
COLOQUE ESTA FORMA EN UN SOBRE CERRADO. NO LO ENGRAPE.
INGRESO FAMILIAR:
MENOS DE $15,000 $100,000 - $124,999
$15,000 - $29,999 $125,000 - $149,999
$30,000 - $49,999 $150,000 - $174,999
$50,000 - $79,999 $175,000 - $199,999
$80,000 - $99,999 $200,000 O MÁS
PRINCIPAL MÉTODO DE COMPRA DE LA
FAMILIA:
EN UNA TIENDA
EN LÍNEA
TELEVISIÓN
VENTA POR CORREO
TIPOS DE TARJETAS DE CRÉDITO QUE USAN
LOS MIEMBROS DE LA FAMILIA:
VISA/MASTERCARD
DISCOVER
AMERICAN EXPRESS
GASOLINA/COMERCIOS
OTRA
NINGUNA
INTERESES DE LA FAMILIA:
MEJORAS DEL HOGAR
TRABAJO AUTOMOTRIZ
CAMPAMENTO
OTRA
Page 47

CONTENIDO
INSTRUCCIONES DE SEGURIDAD IMPORTANTES ........................................................ 1
Mensajes de seguridad ...............................................................................................................................1
Ubicación de etiquetas importantes ............................................................................................................3
PRIMEROS PASOS .......................................................................................................... 5
Pautas de desembalaje ...............................................................................................................................5
Registro de información del generador .......................................................................................................5
Montaje ........................................................................................................................................................6
Conexión a tierra del generador ................................................................................................................ 11
Usar el generador para obtener energía de reserva ................................................................................. 11
COMPONENTES ............................................................................................................. 13
FUNCIONAMIENTO ........................................................................................................ 15
Ubicación del generador ............................................................................................................................15
Preparación para el funcionamiento .......................................................................................................... 15
Arranque del generador .............................................................................................................................16
Cómo detener el generador ....................................................................................................................... 18
Funcionamiento a grandes alturas ............................................................................................................18
Cómo alimentar artefactos ........................................................................................................................18
MANTENIMIENTO .......................................................................................................... 21
Programa de mantenimiento .....................................................................................................................21
Para agregar combustible al motor ........................................................................................................... 22
Agregar aceite para motor .........................................................................................................................22
Mantenimiento del motor ...........................................................................................................................23
Limpieza de la pantalla protectora contra chispas ....................................................................................23
Servicio de la batería ................................................................................................................................. 24
Limpieza del receptáculo para sedimentos de combustible ......................................................................24
Transporte del generador ..........................................................................................................................25
Almacenamiento del generador .................................................................................................................25
RESOLUCIÓN DE PROBLEMAS ................................................................................... 27
ESPECIFICACIONES ..................................................................................................... 29
GARANTÍA ...................................................................................................................... 31
GARANTÍA LIMITADA DE NORTHSHORE POWER SYSTEMS .............................................................31
GARANTÍA DE CONTROL DE EMISIONES EVAPORATIVAS DE NORTHSHORE POWER SYSTEMS 32
ÍNDICE ALFABÉTICO .................................................................................................... 35
PIEZAS DE MANTENIMIENTO ...................................................................................... 37
Generador eléctrico portátil HW7000EH Manual del propietario www.honeywellgenerators.com i
Page 48

ESTA PÁGINA SE DEJÓ INTENCIONADAMENTE EN BLANCO
ii www.honeywellgenerators.com Generador eléctrico portátil HW7000EH Manual del propietario
Page 49

GUARDE ESTAS INSTRUCCIONES
NOTA:
ADVERTENCIA
PELIGRO
ADVERTENCIA
PRECAUCIÓN
AVISO
+
PELIGRO
INSTRUCCIONES DE SEGURIDAD IMPORTANTES
TODA PERSONA que use o realice servicio a este generador debe leer, entender y seguir todas las instrucciones de
seguridad y funcionamiento que se suministran en el manual del producto. Si no sigue estas instrucciones al pie de la
letra puede generar circunstancias que pueden causar la muerte, lesiones graves y daño a la propiedad.
Símbolos de peligro y su significado
Dado que las circunstancias en torno a la instalación,
funcionamiento, servicio y mantenimiento de este
generador son muy variadas, no podemos prever o
proporcionar consejos o mensajes de seguridad para
cubrir cada situación.
Además de las palabras de señal descritas
anteriormente, se pueden utilizar los siguientes símbolos
para captar su atención a tipos de peligros específicos.
Mensajes de seguridad
Palabras de señal
En este manual se proveen mensajes de seguridad para
ayudar a evitar lesiones personales y daños en el equipo.
Todos los mensajes de seguridad se presentan con una
palabra de señal que indica el nivel de peligro.
Indica una situación
inminentemente peligrosa
que, de no evitarse, causará
la muerte o una lesión grave
al operador o los
espectadores.
Indica una situación
potencialmente peligrosa
que, de no evitarse, puede
causar la muerte o una
lesión grave al operador o
los espectadores.
Indica una situación
potencialmente peligrosa
que, de no evitarse, puede
causar una lesión moderada
o menor al operador o los
espectadores.
Explosión
Quemadura
química
El uso de un generador en interiores PUEDE MATARLO EN
MINUTOS.
El escape del generador contiene monóxido de carbono, que
es un veneno que no se puede ver ni oler.
NUNCA lo use en el interior
de una casa o un garaje,
INCLUSO SI las puertas y
ventanas están abiertas.
Humos tóxicos
Descarga eléctrica
Sólo utilícelo EN EL
EXTERIOR y lejos de
ventanas, puertas y orificios de
ventilación.
Incendio
Superficie caliente
Generador eléctrico portátil HW7000EH Manual del propietario www.honeywellgenerators.com 1
Indica una situación que, de
no evitarse, puede causar
daño en los componentes
del generador.
Page 50

Mensajes de seguridad
ADVERTENCIA
ADVERTENCIA
ADVERTENCIA
ADVERTENCIA
Peligros de descarga eléctrica
El generador produce un voltaje potente que puede
causar la muerte o un gran daño físico.
• NUNCA toque cables o receptáculos descubiertos.
• NUNCA use el generador con cables eléctricos
desgastados, pelados, descubiertos o dañados.
• NUNCA haga funcionar el generador bajo la lluvia o
nieve o si el generador se encuentra sobre una
superficie mojada.
El amortiguador se calienta demasiado durante el
funcionamiento y permanece caliente por un tiempo
después de que el motor se ha detenido.
• NUNCA toque las superficies calientes y evite los
gases calientes.
• Deje que el motor se enfríe antes de guardar el
generador en un lugar interior.
Usos médico y de auxilio vital
Peligros de incendio y quemadura
El combustible y sus vapores son extremadamente
inflamables y explosivos bajo ciertas condiciones.
• Sólo reabastezca de combustible el generador en un
área exterior y bien ventilada.
• NUNCA encierre el generador en una estructura.
• Mantenga el generador a por lo menos 6 pies
(2 metros) de edificios, otros equipos y materiales
combustibles durante su funcionamiento.
• NUNCA llene el tanque de combustible cuando el
motor esté en funcionamiento. APAGUE el generador
y deje que se enfríe antes de llenarlo con combustible.
• NUNCA fume ni permita la presencia de llamas
abiertas o chispas cerca del generador o de un lugar
de almacenamiento de gasolina.
• NUNCA llene en exceso el tanque de combustible
(no debe de haber combustible en el cuello del
depósito). Después de rellenar con combustible,
asegúrese de que la tapa del tanque de combustible
esté cerrada de manera correcta y segura.
• Tenga cuidado de no derramar combustible al
reabastecerlo. El combustible derramado o su vapor
se pueden encender. Si se derrama combustible,
asegúrese de que el área esté seca antes de poner
en marcha el motor.
• Evite el contacto repetido o prolongado con la piel o
respirar el vapor.
• En caso de emergencia, llame inmediatamente al 911.
• NUNCA use este producto para alimentar los
dispositivos de auxilio vital o los accesorios de
auxilio vital.
• NUNCA use este producto para alimentar
dispositivos médicos o accesorios médicos.
• Informe inmediatamente a su proveedor de energía
eléctrica si usted o alguien de su casa depende de
equipos eléctricos para vivir.
• Informe inmediatamente a su proveedor de energía
eléctrica si algún corte de energía causaría que
usted o que alguien de su casa experimente una
emergencia médica.
Peligros de daño en el generador
AVISO
El trato incorrecto o el uso indebido del generador puede
causar daño permanente.
• NUNCA modifique el generador en absoluto.
• NUNCA altere la velocidad regulada. El generador
suministra la frecuencia y el voltaje nominal
correctos al funcionar a la velocidad regulada.
• La garantía no cubre los daños del generador
causados por uso indebido o modificación.
2 www.honeywellgenerators.com Generador eléctrico portátil HW7000EH Manual del propietario
Page 51

Ubicación de etiquetas importantes
A
E
C
F
G
A
D
B
H
I
J
I
NEVER FUEL UNIT WITH ENGINE RUNNING.
ALWAYS FUEL UNIT IN WELL VENTILATED AREA.
ALWAYS CLEAN FUEL SPILLS.
ALWAYS ALLOW UNIT TO COOL BEFORE FUELING.
WARNING
NUNCA LLENE LA UNIDAD DE COMBUSTIBLE
CON EL MOTOR PRENDIDO.
SIEMPRE LLENE LA UNIDAD EN UN ÁREA BIEN VENTILADA.
SIEMPRE LIMPIE CUALQUIER DERRAME DE COMBUSTIBLE.
SIEMPRE DEJE QUE LA UNIDAD SE ENFRÍE ANTES
DE LLENARLA DE COMBUSTIBLE.
ADVERTENCIA
CUTOUT
p/n 101796A
For Technical Assistance and Service Call
1-888-HWHELP1 (494-3571)
Para la ayuda técnica y servicio llamada
p/n 102029A
USAR EL GENERATOR EN INTERIORES
LO PUEDE MATAR EN MINUTOS.
EL ESCAPE DEL GENERATOR CONTIENE
MONÓXIDO DE CARBONO.
ESTE GAS ES UN VENENO QUE NO SE
PUEDE VER NI OLER.
NUNCA USE EL GENERADOR DENTRO
DEL HOGAR O EL GARAJE, AÚN SI LAS
PUERTAS Y VENTANAS ESTÁN ABIERTAS.
SOLO USELO EN EXTERIORES Y LEJOS DE
VENTILACIONES, PUERTAS Y VENTANAS ABIERTAS.
PELIGRODANGER
USING A GENERATOR INDOORS CAN KILL YOU IN MINUTES.
GENERATOR EXHAUST CONTAINS CARBON MONOXIDE.
THIS IS A POISON YOU CANNOT SEE OR SMELL.
ONLY USE OUTSIDE AND
FAR AWAY FROM WINDOWS,
DOORS, AND VENTS.
NEVER USE INSIDE A HOME
OR GARAGE, EVEN IF DOORS
AND WINDOWS ARE OPEN.
Use regular unleaded gasoline
with a minimum octane
rating of 86
Utilice gasolina sin plomo
con un octanaje
mínimo de 86
p/n 102094A
Ubicación de etiquetas importantes
Su generador tiene varias etiquetas que contienen información importante de seguridad y mantenimiento. A continuación se
proporcionan ejemplos de estas etiquetas. Si alguna de estas etiquetas se dañara y ya no fuera legible, comuníquese con la
Línea de asistencia al cliente al 1-888-HWHELP1 (494-3571) para solicitar reemplazos.
FIGURA 1: Ubicaciones de las etiquetas
ETIQUETA DEL PRODUCTO NÚMERO DE PIEZA
FUEL
A 101796B
B
102029B
C 100886B
D
102094A
Generador eléctrico portátil HW7000EH Manual del propietario www.honeywellgenerators.com 3
Page 52

Ubicación de etiquetas importantes
ALL USERS MUST READ AND UNDERSTAND OWNER’S MANUAL!
p/n 100849C
TODOS LOS USUARIOS DEBEN LEER Y COMPRENDER EL MANUAL DEL PROPIETARIO
ON
OFF
Clean up in cleansing solvent and dry up
once every 50 hours (every 10 hours in
unusually dusty circumstances) and then
immerse in clean engine oil until
saturated. Squeeze out excessive oil.
MAINTAIN AIR CLEANER
MANTENGA EL FILTRO DE AIRE
Límpielo segun las instrucciones en el manual del
usuario y séquelo una vez cada 50 horas (o cada 10
horas en condiciones cuando haya mucho polvo)
entonces sumérjalo en aceite de motor limpio hasta
saturarse, exprima el aceite de sobra.
ON
OFF
HOT
SURFACES
SUPERFICIES
CALIENTES
WARNING
ADVERTENCIA
p/n 100881B
ADVERTENCIA
E
100849C
F 100887B
G 100883B
H 100879C
I 100885B
J 100881B
4 www.honeywellgenerators.com Generador eléctrico portátil HW7000EH Manual del propietario
La tarjeta de instrucciones Smart Start (ver E en página 4) NO tiene como finalidad reemplazar la información que se
proporciona en este Manual del propietario. Asegúrese de leer minuciosamente y entender toda la información del
Manual del propietario antes de hacer funcionar el generador. Si no sigue las instrucciones y las precauciones de
manera correcta, se pueden producir graves lesiones o incluso la muerte.
Page 53

PRIMEROS PASOS
ADVERTENCIA
PRECAUCIÓN
PRECAUCIÓN
CAUTION
OIL HAS BEEN DRAINED FOR SHIPPING
Failure to fill engine with oil before starting
engine will result in permanent damage
and will void engine warranty.
(Please remove tag prior to operating)
p/n 101179B
Utilice la información que se incluye en esta sección para preparar su generador para su funcionamiento.
TODA PERSONA que use este generador debe leer, entender y seguir todas las instrucciones de seguridad y de
funcionamiento que se proporcionan en el manual del producto. Si no sigue estas instrucciones al pie de la letra puede
generar circunstancias que pueden causar la muerte, lesiones graves y daño a la propiedad.
Pautas de desembalaje
1. Coloque la caja sobre una superficie plana y rígida.
2. Extraiga el contenido de la caja.
¡El generador es pesado! Levantar el generador puede causar lesiones en la espalda u otras partes del cuerpo.
NUNCA levante el generador sin ayuda.
3. Retire y deseche los paquetes de gel de sílice.
4. Verifique que el paquete del generador incluya todos los siguientes elementos:
Generador eléctrico portátil HW7000EH
Kit de ruedas (incluye el conjunto de la manija y los accesorios de montaje)
Batería
1 litro de aceite para motor
Embudo
Manual del propietario
Manual del motor Honda
5. Retire la etiqueta “sin aceite” del generador. Ver “Agregar aceite para motor” on página 22.
Inspección para comprobar daños
Inspeccione minuciosamente el generador para comprobar si se ha producido algún daño durante el envío. Si se
observa una pérdida o un daño después de la entrega, separe los materiales dañados y llame a la línea de asistencia al
cliente al 1-888-HWHELP1 (494-3571).
Registro de información del generador
Escriba la información de identificación específica de su generador en los espacios provistos para ello en la portada
interior de este Manual del propietario. Encontrará esta información en la placa de identificación del generador (vea la
siguiente ilustración).
FIGURA 2: Ubicación de la placa de identificación del generador
Generador eléctrico portátil HW7000EH Manual del propietario www.honeywellgenerators.com 5
Page 54

Montaje
CAUTION
PRECAUCIÓN
PRECAUCIÓN
Montaje
Kit de ruedas
El generador no debe contener aceite para motor ni combustible. Si es necesario, drene el aceite para
motor y el combustible.
¡El generador es pesado! Levantar el generador puede causar lesiones en la espalda u otras partes del
cuerpo. NUNCA levante el generador sin ayuda.
FIGURA 3: Conjunto del kit de ruedas
AVISO
• El kit de ruedas está diseñado para ser utilizado específicamente con este generador.
• NUNCA UTILICE el kit de ruedas para otro fin.
• NUNCA UTILICE el kit de ruedas en carretera.
6 www.honeywellgenerators.com Generador eléctrico portátil HW7000EH Manual del propietario
Page 55
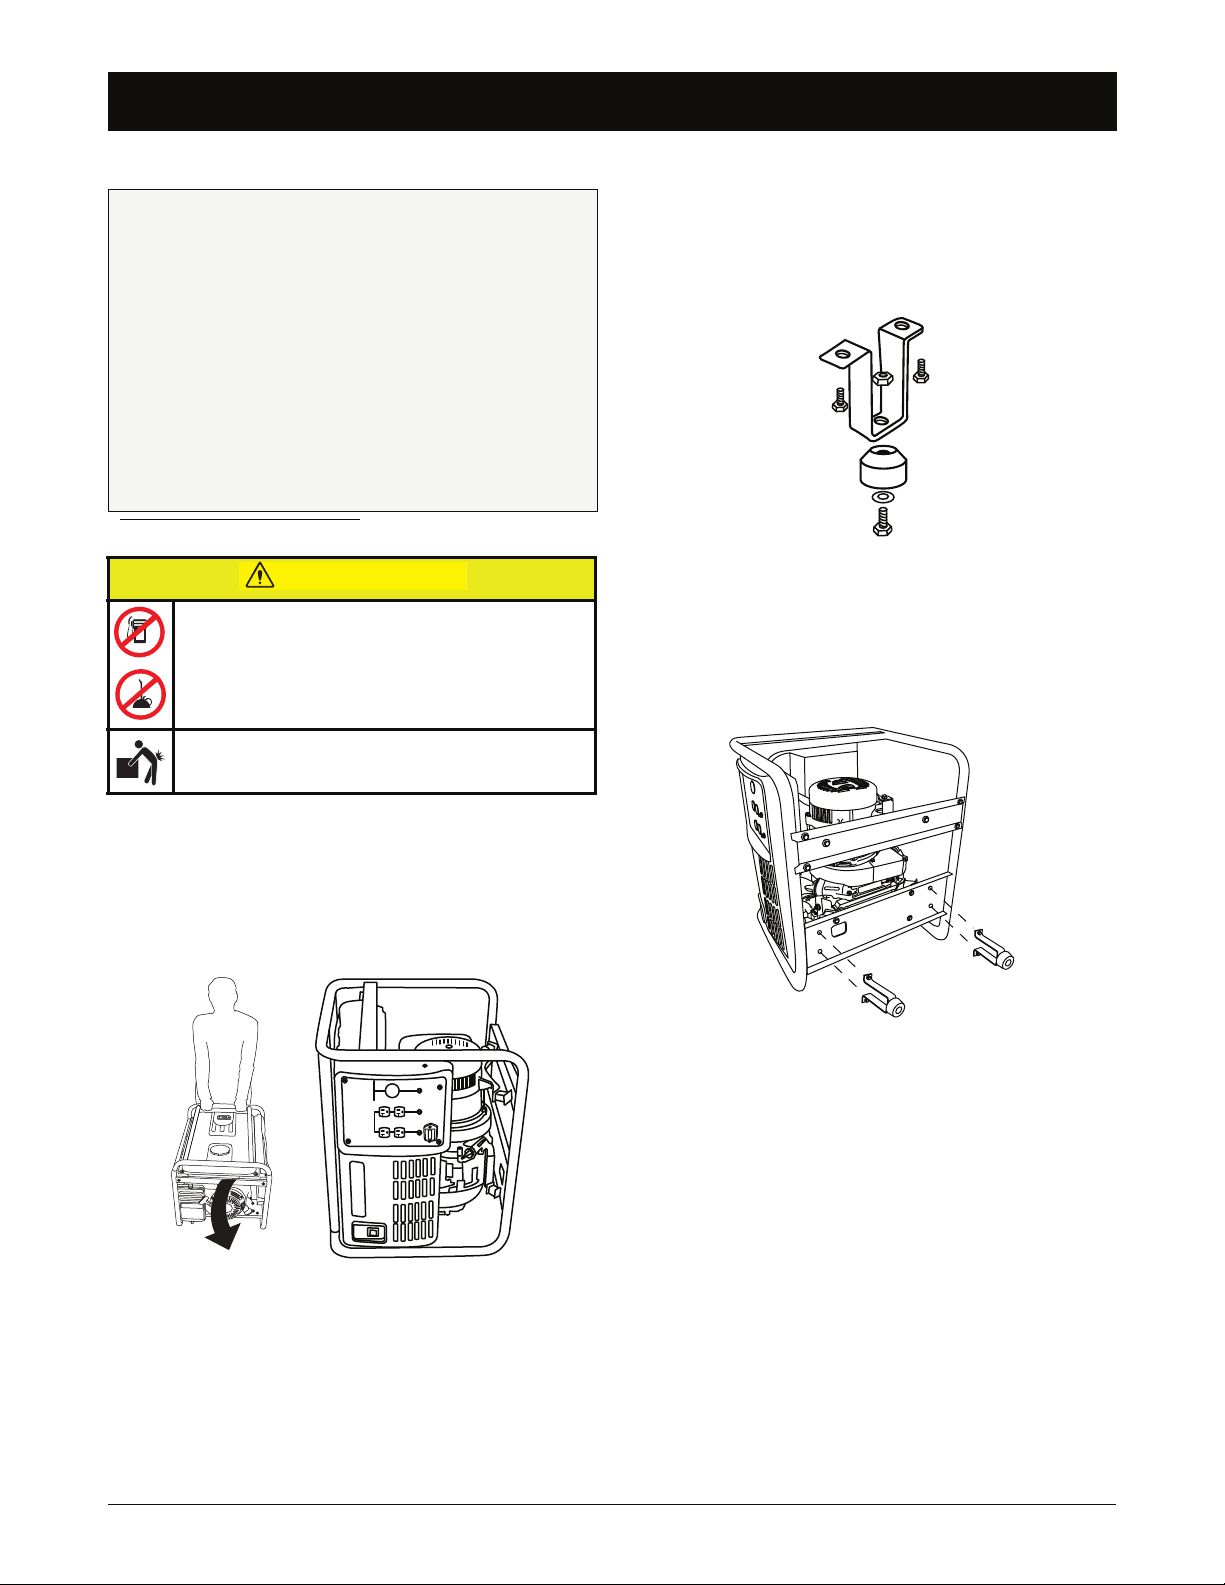
Montaje
PRECAUCIÓN
PRECAUCIÓN
Paso 1: Instale las patas de apoyo
Para instalar las patas de apoyo, necesitará:
(2) pernos largos hexagonales de hilo completo
de M8 x 30 mm
(2) arandelas de M8 x 22 mm de diámetro externo
x 1.5 mm
(2) tuercas dentadas con brida de M8
(4) pernos largos hexagonales de hilo completo
de M8 x 16 mm
(2) patas de apoyo
(2) tapón de goma
Llave de dados con dado de 10 mm
* No se incluye
El generador no debe contener aceite para motor ni
combustible.
Si es necesario, drene el aceite para
motor y el combustible.
¡El generador es pesado! Levantar el generador
puede causar lesiones en la espalda u otras partes
del cuerpo. NUNCA levante el generador sin ayuda.
*
4. Coloque la arandela en el centro de cada tope de
goma.
5. Instale un tope de goma en la parte inferior de cada
pata de apoyo usando un perno largo hexagonal de
hilo completo de 30 mm y una tuerca dentada de
brida; apriete hasta que esté firmemente asentado.
FIGURA 5: Instalación del tope de goma en la pata de
apoyo
6. Instale un tope de goma en los orificios de la parte
inferior del armazón del generador, usando pernos
largos hexagonales de hilo completo de 16 mm;
apriete hasta que esté firmemente asentado.
1. Coloque el generador sobre una superficie plana y
nivelada.
2. Párese al lado del generador opuesto a la manija del
arrancador manual. Agarre el armazón; levante
cuidadosamente hacia arriba y empuje para inclinar
el generador hacia atrás.
FIGURA 4: Incline hacia el lado de la cuerda de
arranque del generador
3. Suavemente coloque el generador sobre el lado del
rebobinador o levante el generador colocando
pedazos sólidos de madera debajo de la unidad.
FIGURA 6: Instalación de la pata de apoyo en el
generador
Generador eléctrico portátil HW7000EH Manual del propietario www.honeywellgenerators.com 7
Page 56

Montaje
Paso 2: Instale el eje de la rueda y las ruedas
Para instalar el conjunto de las ruedas, necesitará:
(1) eje de la rueda
(4) pernos largos hexagonales de hilo completo
de M8 x 16 mm
(4) tuercas dentadas con brida de M8
(1) soporte del eje
(2) ruedas
(2) arandelas de M16 x 30 mm de diámetro
externo x 2.5 mm
(2) pasadores de chaveta
Llave española de 12 mm
Llave de dados con dado de 10 mm
Alicate de punta fina
* Se requieren dos soportes para instalar el eje de la rueda. Un
soporte ya se encuentra instalado en el eje y se incluye otro
soporte en la caja del kit del volante.
† No se incluye.
1. Instale los soportes del eje de la rueda en el armazón
usando pernos largos hexagonales de hilo completo
de 16 mm y tuercas dentadas de brida.
1A. Instale primero el soporte previamente instalado en el
armazón.
1B. Instale el otro soporte (que se incluye en la bolsa de
accesorios) en el armazón.
*
†
†
†
3. Deslice la arandela hacia el eje.
4. Deslice el pasador de chaveta en el orificio hasta que
esté completamente asentado.
5. Con el alicate de punta fina, doble cada extremo del
pasador de chaveta en direcciones opuestas para
asegurar la rueda al eje.
FIGURA 9: Instalación del pasador de chaveta
6. Regrese el generador a la posición vertical (de modo
que las ruedas y las patas de apoyo toquen el piso).
FIGURA 7: Eje de la rueda instalado en el generador
En cada extremo del eje:
2. Deslice y empuje la rueda hacia el eje.
FIGURA 8: Deslice la arandela hacia el eje de la rueda
8 www.honeywellgenerators.com Generador eléctrico portátil HW7000EH Manual del propietario
Page 57

Montaje
NOTA:
PRECAUCIÓN
PRECAUCIÓN
Paso 3: Instale el conjunto de la maniija
Para instalar el conjunto de la manija, necesitará:
(2) soportes de manija
(2) barras de manija
(2) pasadores
(2) cadena
(2) mangos de goma
(6) pernos largos hexagonales con brida
de M6 x 40 mm
(6) tuercas dentadas con brida de M6
Llave de dados con dado de 10 mm
Llave española de 10 mm*
* No se incluye
1. Sostenga el soporte de la manija sobre los orificios
del armazón como se muestra en la Figura 10.
*
5. Fije el pasador a la cadena.
FIGURE 12: Instale el pasador y la cadena
6. Instale la cadena en el soporte de la manija como se
ilustra a continuación. Inserte el pasador a través del
soporte y la manija.
FIGURA 13: Conecte la cadena en el soporte de la manija
7. Deslice el mango de goma hacia cada barra de la
manija y empuje para lograr un buen ajuste.
FIGURA 10: Soporte de manija al armazón
2. Instale el soporte en el armazón usando pernos
largos hexagonales con brida de 40 mm y tuercas
dentadas de brida; apriete hasta que esté firmemente
asentado.
3. Deslice la barra de la manija por el centro de cada
soporte y alinee los orificios de los pernos.
FIGURA 11: Inserte la barra de la manija en el
soporte
4. Fije la manija a cada soporte con un perno de brida
largo hexagonal de 40 mm y tuerca de brida dentada
en el orificio más cerca del marco y apriétela.
La manija deberá quedar en posición horizontal después
de apretar los pernos y las tuercas. Si queda colgando,
apriete más los pernos y las tuercas.
FIGURE 14: Conecte las empuñaduras a la manija
Una vez que estén correctamente instaladas, las manijas
se pueden plegar, si lo desea.
Las manijas plegables pueden pellizcar las manos
y los dedos.
• Mantenga sus manos y dedos fuera del alcance de las
bisagras cuando pliegue las manijas del generador.
• Las manijas solamente deberán ser usadas para rodar
el generador hacia una nueva ubicación. Si levanta el
generador (para subirlo a un vehículo), nunca utilice
las manijas para sostener el peso completo del
generador.
• Para plegar las manijas, retire los pasadores y
empuje firmemente la manija hacia abajo hasta que
quede en posición vertical respecto del generador.
• Para regresar las manijas a la posición horizontal,
jale la manija hacia arriba y sujétela con los
pasadores.
Generador eléctrico portátil HW7000EH Manual del propietario www.honeywellgenerators.com 9
Page 58
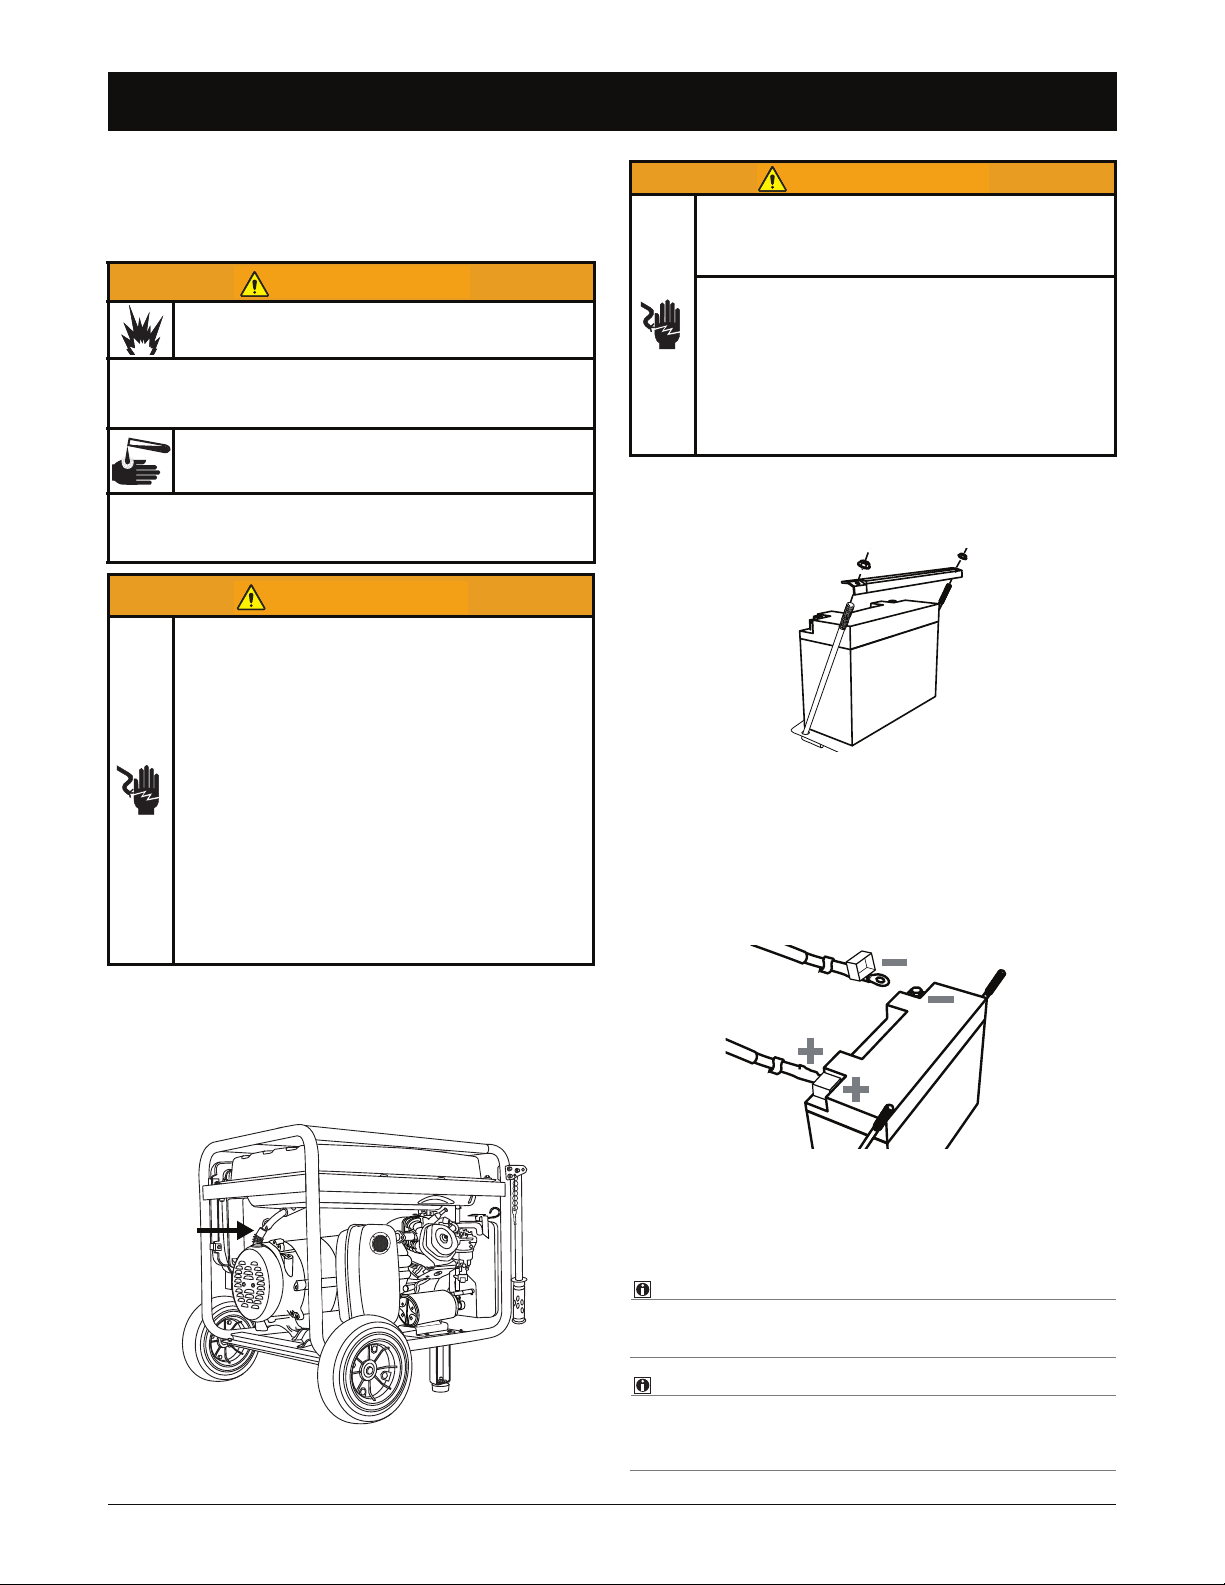
Montaje
NOTA:
NOTA:
ADVERTENCIA
ADVERTENCIA
ADVERTENCIA
Paso 4: Instale la batería
Para usar la función de arranque eléctrico, la batería
(se incluye) debe estar conectada al arrancador eléctrico
del generador.
Los gases de la batería son explosivos.
• NUNCA permita la presencia de llamas abiertas,
cigarrillos encendidos, chispas o equipos que generen
chispas cerca de la batería.
El líquido de electrolito de la batería está compuesto
de ácido sulfúrico, que puede ser muy peligroso y
causar quemaduras graves.
• NUNCA permita que el líquido de la batería entre en
contacto con los ojos, la piel o la ropa. Si se produce
contacto o derrame, lave inmediatamente el área con agua.
Los terminales expuestos, incluso en baterías
desconectadas, pueden causar una descarga
eléctrica.
• NUNCA toque ambos terminales de la batería
con las manos sin protección al mismo tiempo.
• Cuando trabaje con una batería, quítese los
anillos, relojes o cualquier otro objeto que
contenga metal. Si el metal entra en contacto
con los terminales de la batería, se puede
producir una descarga eléctrica y graves
quemaduras.
• Sólo utilice herramientas aisladas/no
conductoras al trabajar con una batería o
cerca de una.
• NUNCA deje herramientas u otros objetos
metálicos sobre la batería.
Para evitar arcos eléctricos, que pueden causar
una descarga eléctrica, siga estas instrucciones al
pie de la letra.
Al conectar o desconectar los cables de la batería:
•SIEMPRE conecte primero el cable de batería
positivo (+).
•SIEMPRE desconecte el cable de batería
negativo (-) primero.
• NUNCA conecte el cable de batería negativo
(-) al terminal positivo (+) de la batería.
• NUNCA conecte el cable de batería positivo
(+) al terminal negativo (-) de la batería.
2. Para acceder a los terminales de la batería:
2A. Suelte y retire las tuercas de la placa de retención;
deslice la placa de retención por las varillas de
soporte para sacarla.
FIGURA 16: Batería eléctrica de inicio—
Retiro de la placa de retención
2B. Incline la batería levemente hacia delante.
3. Retire el perno/la tuerca de cada terminal de la
batería.
4. Confirme que el cable positivo (+) rojo de la batería
esté firmemente sujeto al terminal positivo (+), ya que
pudo haberse aflojado durante el envío. Coloque la
funda sobre el poste de la batería.
1. El generador tiene instalado un cable de batería
negro negativo (-) en la parte superior del alternador
con una correa plástica. Corte cuidadosamente la
correa para desenganchar el cable de la batería y
retire la bolsa de plástico.
FIGURA 15: Cable de batería negativo instalado en el alternador
para el envío
10 www.honeywellgenerators.com Generador eléctrico portátil HW7000EH Manual del propietario
FIGURA 17: Batería eléctrica de inicio—Conexión de cables
5. Conecte el cable negativo (-) negro de la batería al
terminal negativo (-) de la batería; instale el perno, la
tuerca y la funda.
6. Vuelva a instalar la placa de retención; apriete los
pernos y las tuercas.
La apariencia real de la batería puede ser diferente a la
de la ilustración.
Con el motor funcionando, se aplica una pequeña carga
controlada a la batería. Eso mantiene una carga
adecuada de la batería.
Page 59
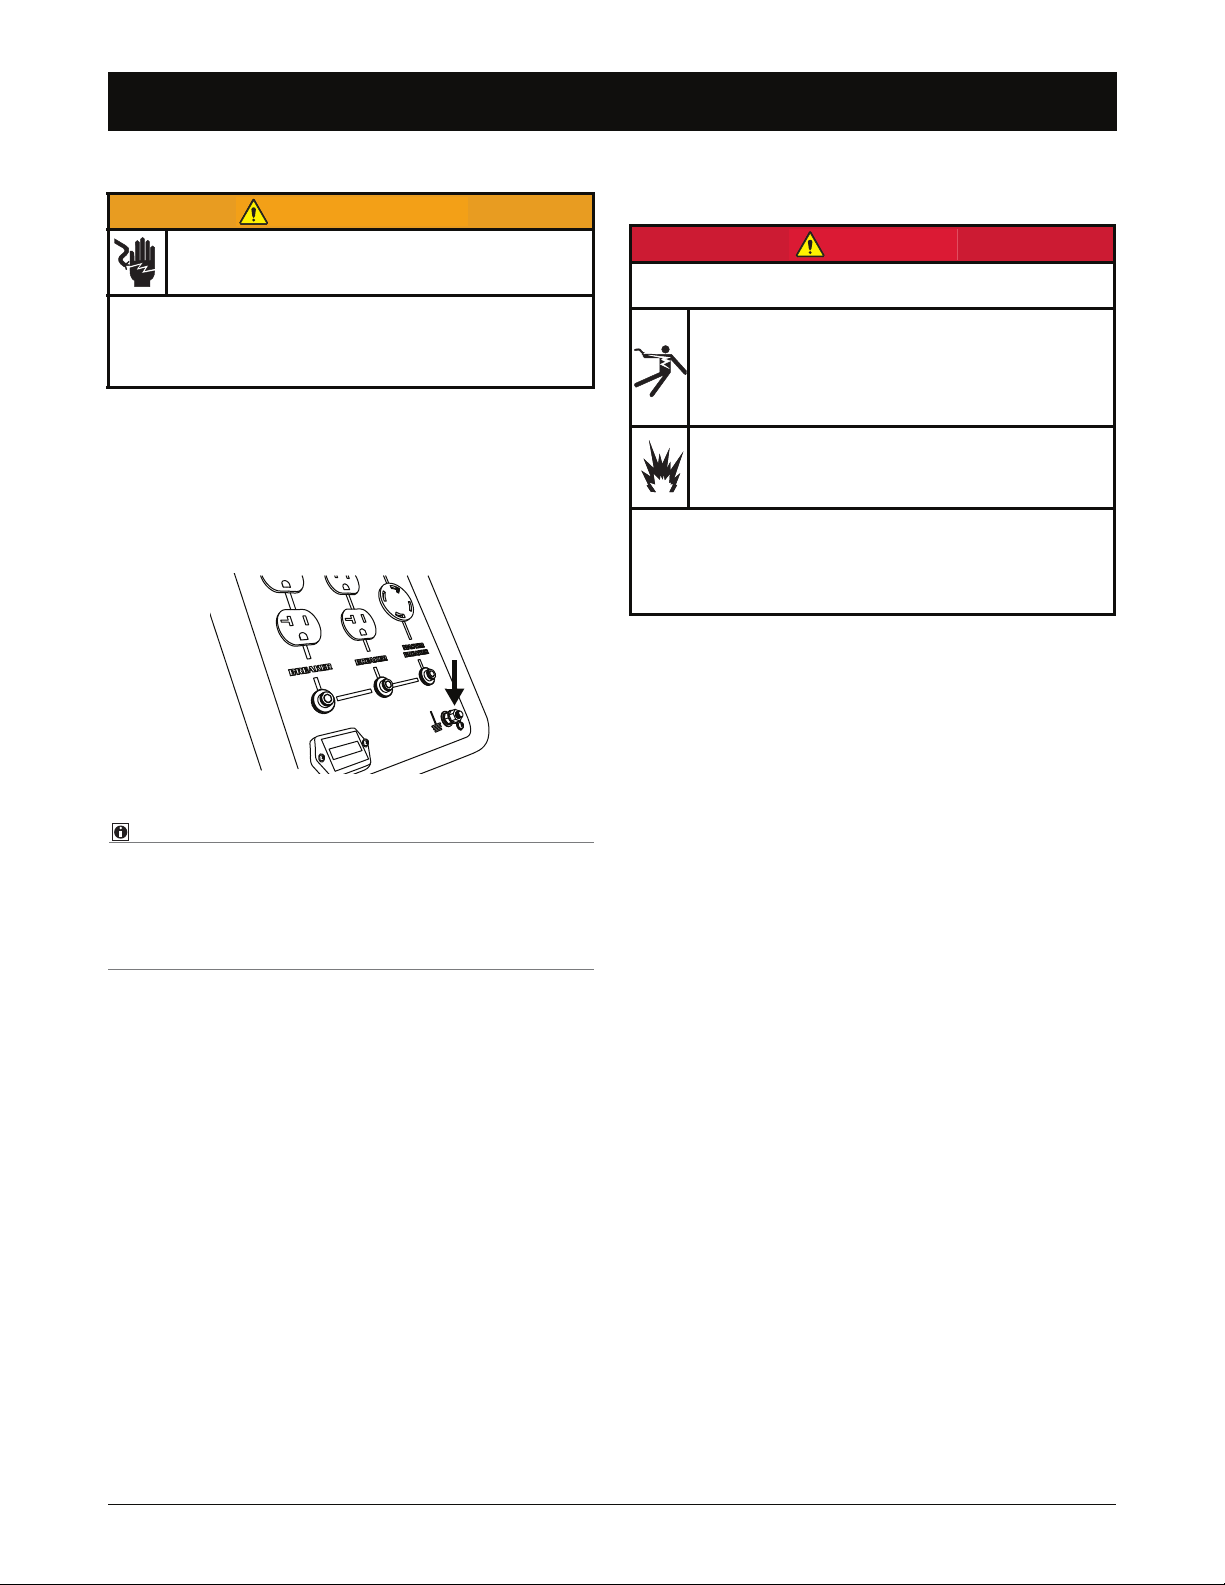
Conexión a tierra del generador
NOTA:
ADVERTENCIA
PELIGRO
Conexión a tierra del generador
El generador se debe conectar a tierra para evitar
una descarga eléctrica de artefactos defectuosos.
• Antes de usar el generador, consulte a un electricista
calificado, inspector eléctrico u organismo local con
jurisdicción los códigos o las ordenanzas locales que
se aplican para el uso previsto del generador.
El Código Eléctrico Nacional (NEC, por sus siglas en
inglés) requiere que el generador esté conectado a tierra
física. Antes de usar el generador, conecte un alambre de
cobre (mínimo 10 AWG) desde la terminal a tierra
(vea Figura 18) hasta la tierra física. Consulte con un
electricista autorizado los métodos apropiados de
conectar a tierra.
Usar el generador para obtener energía de reserva
Las conexiones incorrectas del generador al sistema
eléctrico de unedificio pueden resultar mortales.
La corriente eléctrica del generador puede alimentar
las líneas de servicios públicos. Dicha alimentación
puede electrocutar a los trabajadores de la empresa
de servicios públicos o a otras personas que entren
en contacto con las líneas de servicios públicos
durante una interrupción del suministro eléctrico.
La corriente eléctrica puede retroalimentar al
generador. Cuando se restablece la energía, el
generador puede explotar, quemarse o causar
incendios en el sistema eléctrico del edificio.
• Antes de conectarse al sistema eléctrico de un edificio,
consulte a un electricista calificado, inspector eléctrico
u organismo local con jurisdicción los códigos o las
ordenanzas locales que se aplican para el uso previsto
del generador.
FIGURA 18: Terminal a tierra
El generador tiene un hilo neutro que significa que la
terminal a tierra del generador no está conectada al cable
neutral de CA en el generador. Si se usa un probador de
receptáculos, no mostrará la misma condición del circuito
de conexión a tierra que para un receptáculo doméstico.
Requisitos especiales
Es posible que existan reglamentaciones de la
Administración de Seguridad y Salud Ocupacional
(OSHA, por sus siglas en inglés) federales o estatales,
códigos locales u ordenanzas para el uso previsto del
generador. Consulte a un electricista calificado, inspector
eléctrico o al organismo local competente.
• En algunas áreas, los generadores deben registrarse
en las empresas de servicios públicos locales.
• Si el generador se utiliza en una obra de construcción,
posiblemente existan otras reglamentaciones que se
deben respetar.
Generador eléctrico portátil HW7000EH Manual del propietario www.honeywellgenerators.com 11
Page 60

ESTA PÁGINA SE DEJÓ INTENCIONADAMENTE EN BLANCO
12 www.honeywellgenerators.com Generador eléctrico portátil HW7000EH Manual del propietario
Page 61

COMPONENTES
PRECAUCIÓN
PRECAUCIÓN
J
G
B
I
H
K
E
C
D
A
F
M
L
N
Ajus
Descon
PRECAUCIÓN
PRECAUCIÓN
ADVERTENCIA
Utilice la información que se incluye en esta sección para familiarizarse con los componentes de su generador.
La siguiente información se proporciona únicamente como referencia. Remítase a
“FUNCIONAMIENTO” on página 15 para obtener información sobre el funcionamiento del
generador.
A—Centro de control de
FIGURA 19: Generador eléctrico portátil HW7000EH
alimentación
Tomacorrientes domésticos
Tomacorrientes dobles (NEMA 5-20R)
125VAC , 20 amperios para conectar
artefactos de 120 voltios al generador
para recibir alimentación.
Cordón del generador
El tomacorrientes con seguro de giro
125/250VAC, 30 amperios (NEMA
L14-30R) se puede utilizar para:
• Alimentar artefactos de 120 voltios usando el cable de
alimentación 4 en 1 (no se incluye).
• Alimentar artefactos de 240 voltios usando el cable de
alimentación adecuado (NEMA L14-30P) (no se incluye).
Disyuntores
Protege los circuitos contra los daños
causados por una sobrecarga o un corto
circuito al detener el flujo de electricidad
entre el generador y el artefacto. El disyuntor
maestro controla la alimentación a todos los
tomacorrientes. Si los tomacorrientes no tienen energía,
consulte la sección Resolución de problemas.
Contador horario
Muestra el tiempo total de operación de la unidad para
propósitos de mantenimiento.
Terminal a tierra
Conecta el generador al cable de conexión a tierra para
protección a tierra.
E—Interruptor de control del motor
El control se usa para hacer arrancar y detener el motor.
El interruptor de control del motor tiene tres posiciones:
• START (Arranque)—Arranca el motor del generador
• RUN (Funcionamiento)—Prepara el motor para arrancar
(arranque manual);
Indica que el motor está funcionando (arranque eléctrico)
• STOP (Detención)—Detiene el motor del generador
F—Válvula de corte de combustible
Controla el flujo de combustible desde el tanque de
combustible al carburador.
G—Mango de la manija del arrancador manual
Proporciona los medios para arrancar el motor en forma
manual, si es necesario.
H—Conjunto del filtro de aire
Elimina el polvo del aire de admisión del motor.
I— Contol del estrangulador
Controla la válvula de estrangulamiento. El control del
estrangulador se debe mover a la posición ON (Encendido)
al arrancar con el motor en frío.
J—Tapa del tanque de combustible
Ofrece un sello seguro para el tanque de combustible.
K—Indicador de combustible
Indica el nivel actual de combustible en el tanque.
L—Amortiguador equipado con protector para chispas
Ofrece una salida para los gases de escape del motor. Evita que
las chispas y otros materiales combustibles salgan del generador.
B—Bandeja de la batería y batería
Suministra energía para la función de arranque eléctrico.
C—Varilla indicadora de nivel para llenado de aceite
Sella el orificio de llenado de aceite para motor e indica el
nivel de aceite para motor.
D—Tornillo de drenaje del aceite
Permite que el aceite para motor se drene desde el generador.
Generador eléctrico portátil HW7000EH Manual del propietario www.honeywellgenerators.com 13
El generador se debe conectar a tierra para evitar una
descarga eléctrica de artefactos defectuosos. Consulte
la página 11.
El amortiguador alcanza temperaturas que pueden
causar quemaduras graves al contacto. NUNCA
toque las superficies calientes.
M—Tapa de la bujía (cable)
Suministra voltios a la bujía. Si la bujía necesita servicio, se
debe retirar la tapa.
N—Filtro de carbón
Reduce las emisiones de hidrocarburo.
Page 62

ESTA PÁGINA SE DEJÓ INTENCIONADAMENTE EN BLANCO
14 www.honeywellgenerators.com Generador eléctrico portátil HW7000EH Manual del propietario
Page 63
FUNCIONAMIENTO
PELIGRO
+
ADVERTENCIA
ADVERTENCIA
ADVERTENCIA
PELIGRO
PELIGRO
Ubicación del generador
Al decidir la ubicación para su generador, recuerde las
siguientes normas de seguridad:
Las áreas en desnivel, como cimientos de una
construcción, piscinas o cualquier área a baja
altura pueden causar acumulación de monóxido de
carbono. La inhalación del monóxido de carbono
puede matarlo en minutos.
• NUNCA use el generador dentro de una casa,
garaje, espacio debajo del piso, cobertizo o
espacios cerrados similares. Sólo utilice el
generador en el exterior y lejos de ventanas,
puertas y orificios de ventilación.
Si el generador se instala sobre una superficie
irregular o flexible, podría inclinarse o voltearse,
causando un derrame de combustible desde el
tanque de gasolina. El combustible derramado se
puede encender.
• Coloque el generador sobre una superficie firme y
nivelada y evite la arena suelta o la nieve. Si el
generador se inclina o vuelca, se puede producir un
derrame de combustible. Además, si el generador
se vuelca o hunde en una superficie blanda, puede
entrar arena, suciedad o agua al generador.
NUNCA haga funcionar el generador bajo la lluvia o
nieve o si el generador se encuentra sobre una
superficie mojada.
Preparación para el funcionamiento
MONÓXIDO DE CARBONO
El escape del generador contiene grandes niveles de
monóxido de carbono (CO), un gas venenoso que no se
puede ver ni oler. Si usted puede oler el escape del
generador, usted está respirando CO. Pero incluso si no
huele el escape, usted puede estar respirando CO.
• NUNCA use el generador dentro de una casa, garaje,
espacio debajo del piso u otras áreas parcialmente
encerradas. En estas áreas se pueden acumular niveles
mortales de monóxido de carbono. El uso de un
ventilador o abrir las ventanas y las puertas NO
proporciona suficiente aire limpio.
• SÓLO utilice el generador en el exterior y lejos de
ventanas, puertas y orificios de ventilación. Estas
aberturas pueden jalar el escape del generador.
Aunque use correctamente un generador, puede haber fuga de
CO dentro de la casa. SIEMPRE use en el hogar una alarma
contra CO accionada por batería o respaldada por batería.
Si se empieza a sentir mal, mareado, o débil después de poner
en funcionamiento el generador, cámbiese INMEDIATAMENTE
a un área con aire fresco. Consulte a un doctor. Puede tener
envenenamiento por monóxido de carbono.
Antes de encender el generador, complete las siguientes
tareas de preparación:
Asegúrese de instalar el generador en el exterior
en un área bien ventilada. El uso de un generador
en interiores PUEDE MATARLO EN MINUTOS.
Consulte a un electricista certificado o una empresa
de servicios públicos si usará el generador para
obtener energía de reserva. Ver “Usar el generador
para obtener energía de reserva” en página 11.
Mantenga el generador a por lo menos 6 pies
(2 metros) de edificios, otros equipos y materiales
combustibles durante su funcionamiento.
Antes de conectarse al sistema eléctrico de un
edificio, consulte a la empresa de servicios públicos
o a un electricista calificado.
• La corriente eléctrica del generador puede
alimentar las líneas de servicios públicos. Dicha
alimentación puede electrocutar a los
trabajadores de la empresa de servicios públicos
o a otras personas que entren en contacto con
las líneas de servicios públicos durante una
interrupción del suministro eléctrico.
Revise/agregue aceite para motor— Ver “Agregar
aceite para motor” en página 22. Para la puesta en
marcha inicial, siga las instrucciones que se indican
en la botella de aceite que se incluye con el
generador.
Revise/agregue combustible
*
—Ver “Para agregar
combustible al motor” en página 22.
Asegúrese que la terminal de conexión a tierra
esté correctamente conectada a tierra—Ver
“Conexión a tierra del generador” en página 11.
Revise los cables de extensión—asegúrese de que
los cables de extensión:
Estén en buenas condiciones.
Estén calificados para uso en exterior y coincidan
con los límites de amperaje y voltaje de la toma del
generador.
Equipados con conectores que tengan terminar a
tierra.
Generador eléctrico portátil HW7000EH Manual del propietario www.honeywellgenerators.com 15
* Debe añadir combustible antes de usar el generador por primera vez
ver “Agregar aceite para motor” en página 22.
Page 64
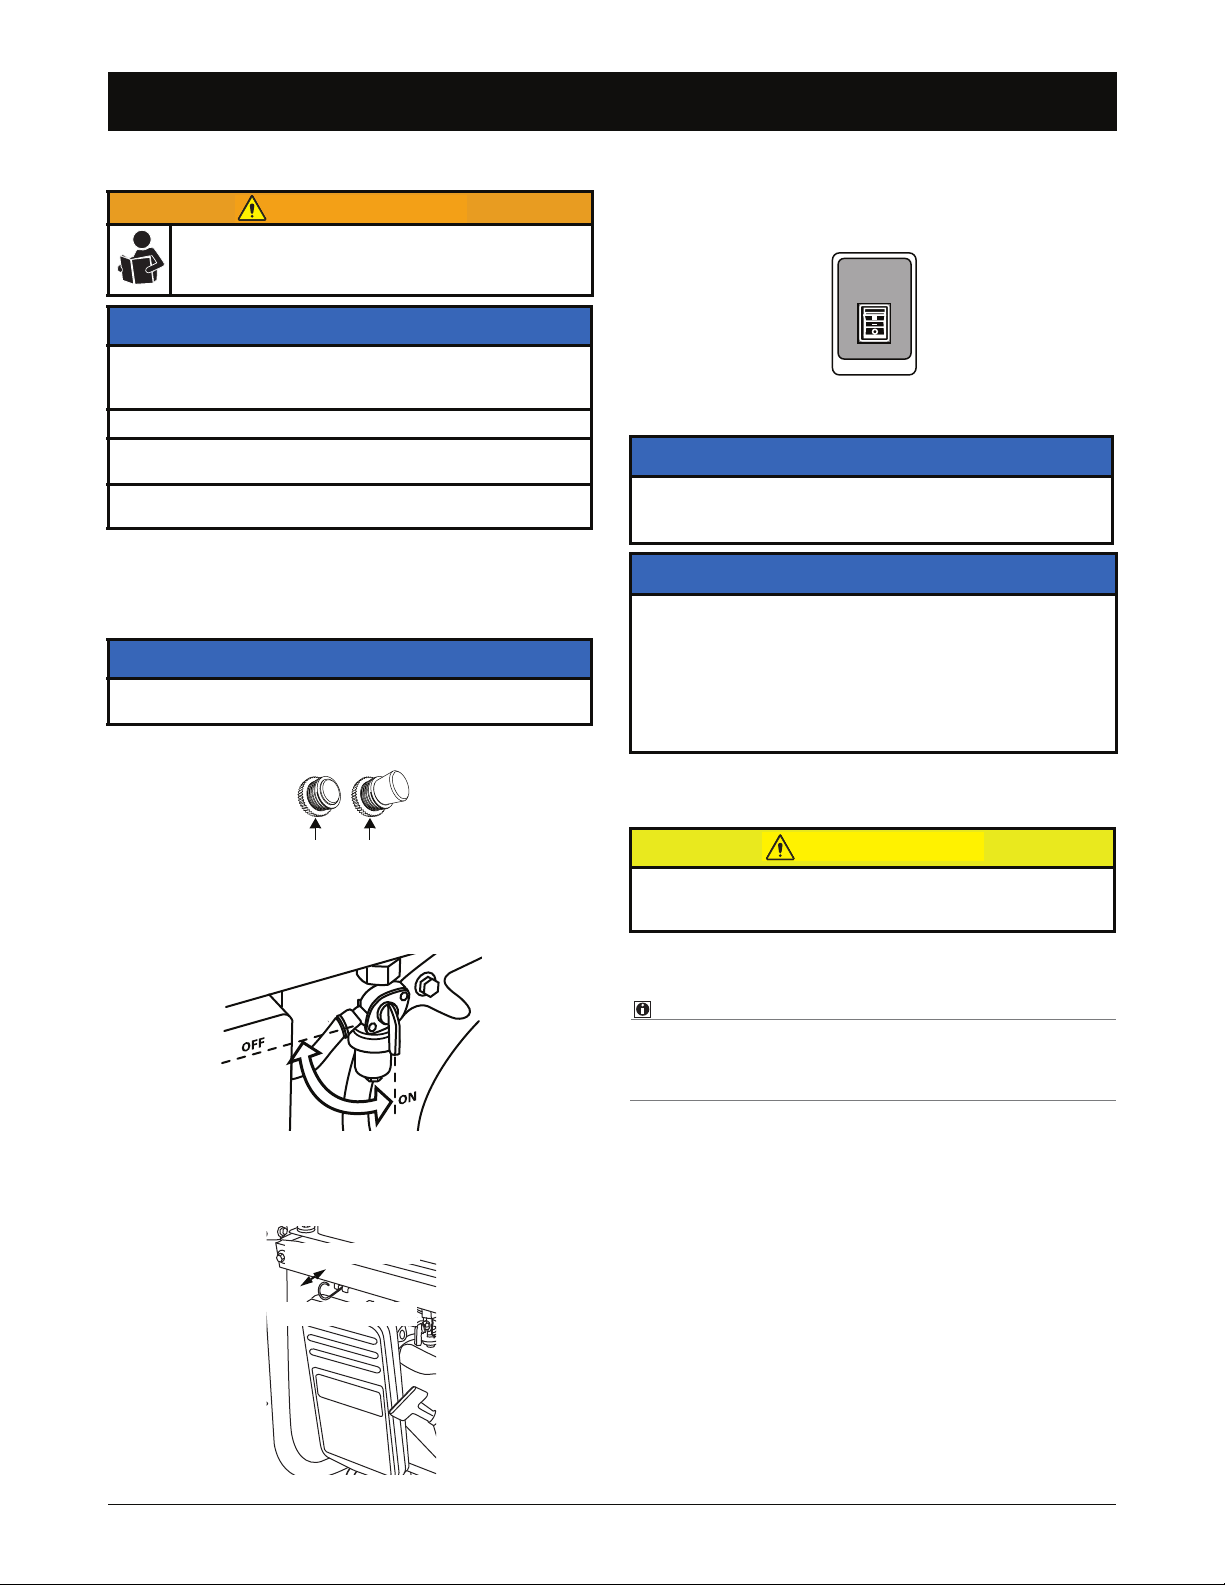
Arranque del generador
NOTA:
ADVERTENCIA
Ajus Descon
START
ENGINE
STOP
RUN
PRECAUCIÓN
PRECAUCIÓN
Arranque del generador
Antes de arrancar el generador, asegúrese de leer
minuciosamente toda la información de este Manual
del propietario.
AVISO
Es muy importante mantener el nivel adecuado de aceite
para motor a fin de mantener el motor en buenas
condiciones de funcionamiento.
• Revise el nivel de aceite para motor antes de cada uso.
Si arranca el generador con artefactos conectados, puede
causar daño permanente a dichos artefactos.
• NUNCA arranque el generador con artefactos eléctricos
enchufados y encendidos.
Arranque eléctrico
1. Coloque el generador en un área exterior y bien
ventilada.
AVISO
Mantenga el generador a un mínimo de 6 pies (2 metros)
lejos de cualquier edificio, objeto o pared.
2. Compruebe que estén colocados los disyuntores.
5. Pulse y mantenga presionado el interruptor de control
en la posición START (Arranque) hasta que el motor
arranque.
FIGURA 23: Interruptor de control del motor
AVISO
Si el motor no arranca, mueva el estrangulador a la
posición OFF (Apagado) para reducir el combustible que
entra al motor.
AVISO
• Si mantiene presionado el interruptor de control del motor
por más de 5 segundos puede dañar el motor de arranque.
Si el motor no arranca después de 5 segundos, libere el
interruptor de control del motor y espere 10 segundos antes
de intentar arrancar nuevamente el motor.
• Si observa una disminución en la velocidad de arranque
después de un tiempo, puede indicar que es necesario
recargar la batería.
6. Cuando el motor arranca, el interruptor de control del
motor se ajusta gradualmente en la posición RUN
(Funcionamiento) (centro).
FIGURA 20: Posición de los disyuntores
3. Gire la válvula de corte de combustible a la posición
ON (Encendido).
FIGURA 21: Válvula de corte de combustible —
Posición ON/OFF (Encendido/Apagado)
4. Tire el estrangulador a la posición ON (Encendido).
OFF (Apagado)
ON (Encendido)
Para evitar daños en el generador, NUNCA presione el
interruptor de control del motor a la posición START
(Arranque) mientras esté funcionando el motor.
7. A medida que el motor se caliente y las RPM se
estabilizan, mueva gradualmente el estrangulador a
la posición OFF (Apagado).
Con el motor funcionando, se aplica una pequeña carga
controlada para arrancar la batería. Eso mantiene una
carga adecuada de la batería.
16 www.honeywellgenerators.com Generador eléctrico portátil HW7000EH Manual del propietario
FIGURA 22: Contol del estrangulador
Page 65

Arranque del generador
Ajus Descon
ON (Encendido)
OFF (Apagado)
START
ENGINE
STOP
RUN
Arranque manual (cuerda de arranque)
1. Coloque el generador en un área exterior y bien
ventilada.
AVISO
Mantenga el generador a un mínimo de 6 pies (2 metros)
lejos de cualquier edificio, objeto o pared.
2. Compruebe que estén colocados los disyuntores.
FIGURA 24: Posición de los disyuntores
3. Gire la válvula de corte de combustible a la posición
ON (Encendido).
FIGURA 25: Válvula de corte de combustible —
Posición ON/OFF (Encendido/Apagado)
4. Tire el estrangulador a la posición ON (Encendido).
5. Presione el interruptor de control del motor a la
posición RUN (Funcionamiento).
FIGURA 27: Interruptor de control del motor
6. Agarre la manija del arrancador manual y tírela
lentamente hasta que sienta una leve resistencia.
FIGURA 28: Manija del arrancador manual
AVISO
NUNCA permita que el arrancador manual se contraiga
contra el motor. Regréselo suavemente para no dañar el
arrancador.
7. Aplique un tirón rápido para arrancar el motor y regrese
cuidadosamente la manija del arrancador manual a su
posición original. Es posible que sea necesario repetir
esto 2-3 veces hasta que arranque el motor.
Generador eléctrico portátil HW7000EH Manual del propietario www.honeywellgenerators.com 17
AVISO
Si el motor no arranca, mueva el estrangulador a la posición
OFF (Apagado) para reducir el combustible que entra al motor.
8. A medida que el motor se caliente y las RPM se
estabilizan, mueva gradualmente el estrangulador a
la posición OFF (Apagado).
FIGURA 26: Contol del estrangulador
Page 66
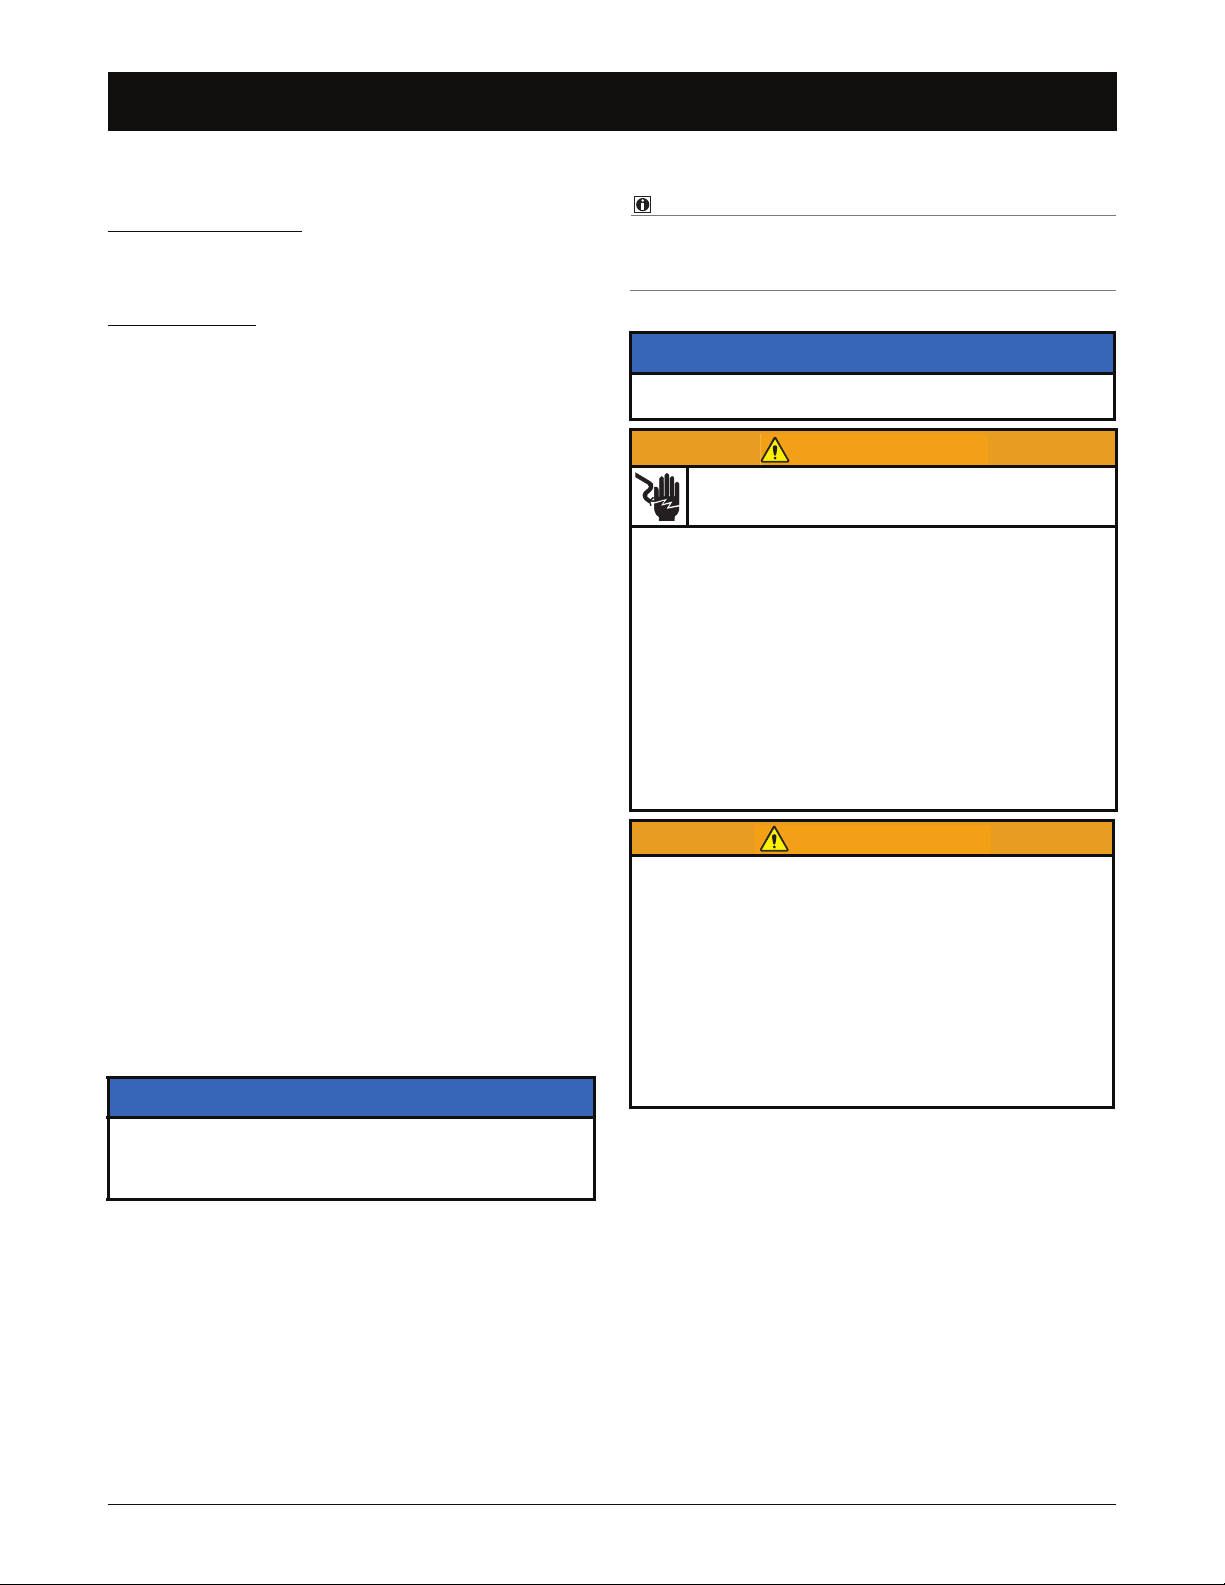
Cómo detener el generador
NOTA:
ADVERTENCIA
ADVERTENCIA
Cómo detener el generador
En una emergencia:
Presione el interruptor de control del motor a la posición
STOP (Detención).
En uso normal:
1. Apague los artefactos conectados y desenchufe los
cables de alimentación conectados.
2. Deje funcionar el motor durante 2 a 3 minutos.
3. Presione el interruptor de control del motor a la
posición STOP (Detención).
4. Gire la válvula de corte de combustible a la posición
OFF (Apagado).
Para consultar las instrucciones de un almacenamiento
prolongado, vea página 25.
Funcionamiento a grandes alturas
A grandes alturas, la mezcla de aire-combustible del
carburador estándar será excesivamente rica. El
rendimiento disminuirá y el consumo de combustible
aumentará.
El rendimiento a grandes alturas se puede mejorar al
instalar un difusor de combustible de menor diámetro en
el carburador y luego volver a ajustar el tornillo piloto. Si
siempre hace funcionar el motor a alturas superiores a
5000 pies (1500 metros) sobre el nivel del mar, solicite a
un distribuidor autorizado del generador que realice la
modificación del carburador.
Incluso con un difusor correcto en el carburador, la
potencia del motor disminuirá aproximadamente 3,5% por
cada incremento de 1000 pies (300 metros) en altura
sobre el nivel del mar. El efecto de la altura sobre la
potencia será mayor que si no se realiza ninguna
modificación al carburador.
AVISO
Si se utiliza un motor con difusor para grandes alturas a una
altura menor, la mezcla de aire-combustible pobre reducirá
el rendimiento y puede sobrecalentar el motor y dañarlo
gravemente.
Cómo alimentar artefactos
En este manual, el término "artefacto" se refiere a
cualquier dispositivo eléctrico que se puede conectar al
generador para ser alimentado.
Normas para alimentar artefactos
AVISO
NUNCA arranque el generador con artefactos eléctricos
enchufados y encendidos.
Los artefactos defectuosos y los cables de
alimentación pueden provocar una descarga eléctrica.
• Antes de intentar alimentar un artefacto, asegúrese de que
el generador se haya conectado correctamente a tierra y
de que tanto el artefacto como el cable de alimentación
estén en buenas condiciones de funcionamiento.
• Mantenga alejado el generador de otros cables o
alambres eléctricos incluyendo las líneas de suministro
de energía comercial.
• NUNCA utilice el generador para otro fin que no sea para
el uso previsto.
• NUNCA conecte generadores en paralelo ni alargue el
tubo de escape.
• NUNCA conecte el generador a ningún circuito doméstico
o, de lo contrario, puede destruir el generador o el equipo
eléctrico doméstico.
Usos médico y de auxilio vital
• En caso de emergencia, llame inmediatamente al 911.
• NUNCA use este producto para alimentar los dispositivos
de auxilio vital o los accesorios de auxilio vital.
• NUNCA use este producto para alimentar dispositivos
médicos o accesorios médicos.
• Informe inmediatamente a su proveedor de energía
eléctrica si usted o alguien de su casa depende de
equipos eléctricos para vivir.
• Informe inmediatamente a su proveedor de energía
eléctrica si algún corte de energía causaría que usted o que
alguien de su casa experimente una emergencia médica.
• Planifique con cuidado: Antes de usar el
generador para alimentar artefactos, agregue
potencia de salida (vatios) a cada artefacto y
verifique que el vataje total no sea superior a la
potencia nominal del generador. Generalmente
puede encontrar información sobre la potencia
nominal en la etiqueta del artefacto o impresa en el
interior o en la parte posterior del artefacto.
Consulte la Tabla 1 para ver un listado de los
requisitos de vataje de los artefactos promedio.
• NUNCA sobrecargue: Los disyuntores detendrán el
flujo de electricidad entre el generador y el artefacto si
el generador se sobrecarga. Esto se indicará mediante
un disyuntor "desconectado". De suceder esto, apague
y desconecte el (los) aparato(s), espere algunos
minutos a que se enfríen los interruptores térmicos (el
interruptor maestro no es térmico) y después presione
para inicializar el cortacircuitos.
18 www.honeywellgenerators.com Generador eléctrico portátil HW7000EH Manual del propietario
Page 67

Cómo alimentar artefactos
PRECAUCIÓN
PRECAUCIÓN
PRECAUCIÓN
PRECAUCIÓN
• Preste atención al funcionamiento de los artefactos:
Si un artefacto comienza a funcionar de manera
anormal, se torna lento o se detiene repentinamente,
apáguelo de inmediato. Desconecte el artefacto y
determine si el problema es el artefacto o si se ha
excedido la capacidad de carga nominal del generador.
• Utilice cables de extensión adecuados: Si utiliza
un cable de extensión para conectar un artefacto al
generador, sólo utilice cables de extensión de tres
terminales, con certificación de UL. Asegúrese de
que el cable de alimentación sea de tamaño correcto
(calibre de alambre) para manejar la carga eléctrica
que se le aplicará.
NUNCA instale cables de alimentación bajo alfombras u
otros materiales donde se pueda acumular calor o los daños
en el cable puedan pasar inadvertidos.
Información sobre el vataje de los artefactos
Utilice la siguiente tabla como una guía para determinar
cuánta energía necesitará para hacer funcionar los
artefactos con el generador.
Los valores que se proporcionan en la siguiente tabla son
sólo estimaciones.
• SIEMPRE verifique los requisitos de vataje reales para
el artefacto que alimentará. Revise las etiquetas en el
interior o en la parte posterior del artefacto, consulte
los manuales de funcionamiento del artefacto o
comuníquese con el fabricante del artefacto.
Artefacto
Aire acondicionado, central* 3500
Aire acondicionado, ventana* 500-1440
Acuario 50-1210
Radio reloj 10
Cafetera 900-1200
Computadora personal, CPU -
encendida/apagada
Computadora personal,
Monitor - encendido/apagado
Computadora, computadora
portátil
Deshumidificador* 785
Lavadora de platos*
TABLE 1. Vatajes para funcionamiento de artefactos típicos
Vatios de
funcionamiento típicos
120 / 30 ó menos
150 / 30 ó menos
50
1200-2400 (al usar la
función de secado
aumenta el consumo de
energía)
Artefacto
Secadora, eléctrica 1800-5000
Frazada eléctrica
(individual/doble)
Ventilador, de techo* 65-175
Ventilador, ventana* 55-250
Horno*
Secador de pelo 1200-1875
Calefactor, portátil 750-1500
Plancha 1000-1800
Horno de microondas 750-1100
Radio, estéreo 70-400
Refrigerador, anti-escarcha,
16 píes cúbicos*
Bomba de sumidero, 1/2 hp* 2150
Bomba de sumidero, 1/3 hp* 2300
Televisión
• 19"
• 27"
• 36"
• Proyector de 53"-61"
• Pantalla plana
Tostador 800-1400
Horno tostador 1225
Aspiradora* 1000-1440
VCR/DVD 17-21 / 20-25
Lavadora de ropa 350-500
Calentador de agua, eléctrico,
40 galones
Bomba de agua, pozo
profundo*
TABLE 1. Vatajes para funcionamiento de artefactos típicos
* Permita hasta tres veces los vatios normales (cuando esté en
funcionamiento) para arrancar este artefacto.
Vatios de
funcionamiento típicos
60 / 100
*
750
725
65-110
113
133
170
120
4500-5500
250-1100
AVISO
El arranque de los artefactos con motores requiere de mayor
potencia. Algunos ejemplos de artefactos motorizados
incluyen refrigeradores, bombas de agua y sopladores de
horno. Asegúrese de que la potencia de salida del artefacto
no sea superior a la del generador.
Generador eléctrico portátil HW7000EH Manual del propietario www.honeywellgenerators.com 19
Page 68

ESTA PÁGINA SE DEJÓ INTENCIONADAMENTE EN BLANCO
20 www.honeywellgenerators.com Generador eléctrico portátil HW7000EH Manual del propietario
Page 69

MANTENIMIENTO
PELIGRO
ADVERTENCIA
ADVERTENCIA
Programa de mantenimiento
El mantenimiento y ajuste periódicos son necesarios para conservar el generador en buenas condiciones de funcionamiento.
Realice servicio e inspecciones en los intervalos que se indican en el Programa de mantenimiento del generador (vea la Tabla 2).
El uso de un generador en interiores PUEDE MATARLO EN
MINUTOS.
El escape del generador contiene monóxido de carbono, que
es un veneno que no se puede ver ni oler.
El arranque accidental del generador puede causar lesiones
graves o la muerte. Antes de realizar tareas de
mantenimiento, desconecte la tapa de la bujía de la bujía.
También desconecte ambos cables de inicio de la batería.
Retire primero el cable negativo (-) para reducir el riesgo de
formación de arcos.
NUNCA lo use en el interior
de una casa o un garaje,
INCLUSO SI las puertas y
ventanas están abiertas.
Sólo utilícelo EN EL
EXTERIOR y lejos de
ventanas, puertas y orificios de
ventilación.
Un mantenimiento inadecuado o no corregir un problema antes
del funcionamiento, puede causar un desperfecto en el que
puede resultar gravemente lesionado o incluso morir. Siempre
siga las recomendaciones y los programas de inspección y
mantenimiento que se incluyen en este manual del propietario.
• Apague el motor antes de realizar cualquier
mantenimiento. Si es necesario hacer funcionar el motor,
asegúrese de que el área cuente con suficiente ventilación.
El programa de mantenimiento se aplica a condiciones de
AVISO
funcionamiento normal. Si hace funcionar un generador bajo
AVISO
El mantenimiento, la reparación o el reemplazo de
cualquier dispositivo y sistema para control de emisiones
puede ser realizado por cualquier establecimiento o
condiciones extremas, como una carga alta o temperatura
elevada sostenida, o lo utiliza en condiciones inusualmente
húmedas o sucias, consulte a su representante de servicio
para que le indique las recomendaciones para sus
necesidades y uso específicos.
individuo de reparación de motores todo terreno.
FRECUENCIA
TAREA DE MANTENIMIENTO
Antes
de cada
uso
Comprobar la presencia de desechos/limpiarlos X
Revisar el nivel de aceite para motor X
Cambiar el aceite para motor X X
Revisar el filtro de aire X
Limpiar el filtro de aire
Cambiar el filtro X
Arrancar el motor
Revisar/ajustar la bujía X
Cambiar la bujía X
Limpiar el receptáculo para sedimentos de
combustible
Limpiar el protector contra chispas X
Limpie las aletas de enfriamiento del cilindro X**
Revisar/ajustar el ralentí
Revisar/ajustar la holgura de la válvula X**
Limpiar el tanque y el filtro de combustible X**
Limpiar la cámara de combustión Cada 500 horas **
Revisar el tubo de combustible Cada 2 años (reemplace si es necesario)**
TABLE 2. Programa de mantenimiento del generador
* Realice en cada mes que se indica o intervalo de horas de funcionamiento, lo que ocurra primero.
† Limpie con más frecuencia cuando se use el generador en áreas con mucho polvo.
‡ Para asegurarse de que la batería se mantenga cargada, se recomienda hacer funcionar el generador durante 30 a 60 minutos cada
tres meses. Si se guarda la unidad durante más de un año sin arrancarla, es probable que sea necesario un cargador de baterías para
recargar la batería del generador.
** Deberá acudir con un distribuidor de servicio Honda para dar servicio a estos elementos, a menos que tenga las herramientas
adecuadas y que sea experto en mecánica. Consulte en el manual del taller Honda los procedimientos de servicio.
Primes mes o
después de
20 horas de uso
Cada 3 meses o
después de
50 horas de uso
†
X
‡
X
*
Cada 6 meses o
después de
100 horas de uso
X
Cada año o
después de
300 horas de uso
**
X
Generador eléctrico portátil HW7000EH Manual del propietario www.honeywellgenerators.com 21
Page 70

Para agregar combustible al motor
NOTA:
PELIGRO
B
A
C
D
PELIGRO
ADVERTENCIA
Para agregar combustible al motor
El combustible y sus vapores son extremadamente
inflamables y explosivos bajo ciertas condiciones.
• Sólo reabastezca de combustible el generador en un
área exterior y bien ventilada.
• NUNCA llene el tanque de combustible con el motor en
funcionamiento. APAGUE el generador y deje que se
enfríe antes de llenarlo con combustible.
• NUNCA fume ni permita la presencia de llamas abiertas
o chispas cerca del generador o de un lugar de
almacenamiento de gasolina.
• NUNCA llene en exceso el tanque de combustible (no
debe de haber combustible en el cuello del depósito).
Después de rellenar con combustible, asegúrese de que
la tapa del tanque de combustible esté cerrada de
manera correcta y segura.
• Tenga cuidado de no derramar combustible al
reabastecerlo. El combustible derramado o su vapor se
pueden encender. Si se derrama combustible, asegúrese
de que el área esté seca antes de encender el motor.
• Evite el contacto repetido o prolongado con la piel o
respirar el vapor.
AVISO
Para evitar daños en el motor, nunca use gasolina vencida o
contaminada ni una mezcla de aceite con gasolina. Evite
que entre suciedad o agua al tanque de combustible.
1. Detenga el generador si el motor está en
funcionamiento. Deje que se enfríe por completo.
2. Coloque el generador sobre una superficie plana y
nivelada.
3. Retire la tapa del tanque de combustible (A).
4. Vierta lentamente la gasolina en el tanque de combustible.
Asegúrese de no llenar en exceso sobre el cuello del
depósito que sostiene el filtro de combustible (C).
Un ruido ocasional de detonación leve, de golpeteo o
repiqueteo es normal si la unidad está en funcionamiento
bajo cargas pesadas. Si la detonación, el golpeteo, o
repiqueteo ocurre a una velocidad uniforme del motor, bajo
carga normal, drene el combustible (página 26) y rellene con
gasolina nueva. Si el ruido persiste, consulte a un
distribuidor autorizado del generador.
AVISO
Hacer funcionar el motor con un ruido persistente puede
causar daños en el motor. La garantía no cubre las piezas
dañadas por uso indebido.
Agregar aceite para motor
AVISO
Es muy importante mantener el nivel adecuado de aceite
para motor a fin de mantener el motor en buenas
condiciones de funcionamiento.
• Revise el nivel de aceite para motor antes de cada uso.
Rellene el aceite para motor si el nivel está demasiado bajo.
1. Detenga el generador si el motor está en
funcionamiento.
SIEMPRE detenga el motor antes de retirar la
varilla indicadora de nivel para llenado de aceite.
La presión del cárter puede causar que el aceite
para motor caliente salpique hacia afuera del
orificio para llenado de aceite. El aceite para motor
caliente puede provocar quemaduras graves.
2. Coloque el generador sobre una superficie plana y
nivelada.
3. Con un paño limpio, limpie la suciedad y los desechos
de las áreas del tapón de drenaje y llenado de aceite.
4. Retire la varilla indicadora de nivel para llenado de
aceite.
FIGURA 29: Parte superior del tanque de combustible (B) y nivel
máximo de combustible (D)
Tenga cuidado de no derramar combustible al
reabastecerlo. El combustible derramado o su
vapor se pueden encender. Si se derrama
combustible, asegúrese de que el área esté seca
antes de encender el motor.
5. Vuelva a instalar la tapa del tanque de
combustible (A) y apriete por completo.
22 www.honeywellgenerators.com Generador eléctrico portátil HW7000EH Manual del propietario
FIGURA 30: Retirar la varilla indicadora de nivel
para llenado de aceite
5. Vierta lentamente el aceite en el orificio de llenado de
aceite usando el embudo hasta el nivel indicado en el
Manual del propietario Honda.
6. Revise el nivel del aceite.
7. Reemplace la varilla indicadora de nivel para llenado de
aceite y apriete por completo.
Page 71

Mantenimiento del motor
ADVERTENCIA
ADVERTENCIA
ADVERTENCIA
A
B
C
Mantenimiento del motor
Consulte en el Manual del propietario Honda las
instrucciones sobre cómo dar mantenimiento
adecuado al motor.
Contacte al distribuidor de servicio autorizado de
Honda para mantenimiento y reparaciones del motor.
En algunas locaciones, los distribuidores autorizados
de servicio de Honeywell también son distribuidores
de servicio de Honda. Contacte a su distribuidor local
antes de transportar su generador para servicio.
La gasolina y los solventes inflamables pueden
causar incendios o explosiones. NUNCA use
gasolina o un solvente inflamable para limpiar el
elemento de filtro de aire.
• Sólo use jabón de uso doméstico y agua para limpiar el
elemento de filtro de aire.
El contacto frecuente o prolongado con el aceite para motor
puede causar cáncer de piel.
• Inmediatamente después de manipular aceite para
motor, lave bien sus manos y otras áreas de la piel
expuestas al aceite con agua y jabón.
Limpieza de la pantalla protectora contra chispas
El amortiguador alcanza temperaturas que pueden
causar quemaduras graves al contacto. NUNCA
toque las superficies calientes.
El amortiguador del generador está equipado con un
protector contra chispas, que se debe limpiar de acuerdo
con el programa de mantenimiento (Tabla 2).
Para limpiar el protector contra chispas, necesitará:
Destornillador Phillips #2
Cepillo metálico
1. Detenga el generador si el motor está en
funcionamiento. Deje que se enfríe por completo.
2. Coloque el generador sobre una superficie plana y
nivelada.
3. Use un destornillador Phillips para remover los
tornillos y las arandelas del parachispas.
4. Retire el protector contra chispas.
FIGURA 31: Conjunto del protector contra chispas
5. Revise la pantalla protectora contra chispas.
Si la pantalla está dañada o excesivamente
desgastada, cambie el protector contra chispas.
Si la pantalla está en buenas condiciones, límpiela
con el cepillo metálico.
FIGURA 32: Limpiar la pantalla
6. Vuelva a instalar el protector contra chispas,
Generador eléctrico portátil HW7000EH Manual del propietario www.honeywellgenerators.com 23
alineando cuidadosamente los orificios de tornillo.
Page 72

Servicio de la batería
NOTA:
A
B
C
Servicio de la batería
Se recomienda arrancar el generador cada tres meses
para asegurar que la batería se mantenga cargada. Si se
guarda la unidad durante más de un año sin arrancarla,
es probable que sea necesario un cargador de baterías
para recargar la batería del generador.
Recomendación para reemplazo de batería:
Xtreme
Yuasa 12N14-3A
TABLE 3. Baterías de reemplazo
Para reemplazar la batería:
1. Suelte y retire las tuercas de la placa de retención;
deslice la placa de retención por las varillas de
soporte para sacarla.
FIGURA 33: Batería eléctrica de inicio—
Retiro de la placa de retención
2. Incline la batería levemente hacia delante.
3. Para desconectar el borne negativo (-) negro de la
batería, retire la capucha protectora, el tornillo y la
tuerca.
XTAX14AHL-BS
Limpieza del receptáculo para sedimentos de combustible
El receptáculo para sedimentos evita que la suciedad o el
agua del tanque de combustible ingrese al carburador.
Limpie el receptáculo para sedimentos de combustible en
los intervalos especificados en la Tabla 2.
Para limpiar el receptáculo para sedimentos de
combustible, necesitará:
Llave de dados con dado de 10 mm
Llave española de 22 mm
Jabón de uso doméstico y agua
Paño limpio y seco
Para limpiar el receptáculo para sedimentos de
combustible:
1. Detenga el motor si está en funcionamiento. Deje que
se enfríe por completo.
2. Coloque el generador sobre una superficie plana y
nivelada.
3. Gire la válvula de corte de combustible a la posición
OFF (Apagado).
4. Mientras sostiene el acoplador sobre la válvula de
corte de combustible, con una llave de dados con un
dado de 10 mm, retire el conjunto del receptáculo
para sedimentos de combustible (receptáculo para
sedimentos, anillo 'O' y filtro de combustible).
FIGURA 35: Retiro del conjunto del receptáculo
para sedimentos de combustible
FIGURA 34: Batería eléctrica de inicio—Conexión de cables
4. Para desconectar el borne positivo (+) rojo de la
batería, retire la capucha protectora, el tornillo y la
tuerca.
5. Retire la batería.
FIGURA 36: Montaje del receptáculo para
Elimine la batería usada de acuerdo con las pautas
sedimentos de combustible
establecidas por su gobierno local o estatal.
5. Limpie el filtro de combustible (A), el anillo 'O' y el
6. Coloque la batería nueva en el armazón del generador.
7. Conecte el cable positivo (+) rojo de la batería al
terminal positivo (+) de la batería; apriete con el
perno y la tuerca.
8. Conecte el cable negativo (-) negro de la batería al
terminal negativo (-) de la batería; instale el perno, la
tuerca y la funda.
9. Vuelva a instalar la placa de retención; instale el
perno, la tuerca y la funda.
24 www.honeywellgenerators.com Generador eléctrico portátil HW7000EH Manual del propietario
receptáculo para sedimentos de combustible (C) con
agua y jabón.
6. Enjuague completamente las partes usando agua.
7. Limpie las piezas con un paño limpio y seco.
8. Vuelva a instalar el receptáculo para sedimentos, el
anillo 'O' y el filtro de combustible.
9. Gire la válvula de corte de combustible a la posición
ON (Encendido).
10. Arranque el generador y revise que no presente
fugas.
Page 73

Transporte del generador
ADVERTENCIA
PELIGRO
Transporte del generador
El motor o sistema de escape caliente puede
provocar quemaduras graves o incendios. Enfríe
completamente el generador antes de transportarlo
o almacenarlo.
Al transportar el generador:
•
Presione el interruptor de control del motor a la
posición OFF (Apagado).
• Gire la válvula de corte de combustible a la posición
OFF (Apagado).
• Mantenga el generador nivelado para evitar derrame
de combustible.
• Antes de mover el generador, asegúrese de que los
pasadores estén en su lugar en la manija/soporte de
la manija
AVISO
Para evitar daños en el generador, tenga cuidado de no
dejar caer o golpear el generador al transportarlo. No
coloque objetos pesados sobre el generador.
Almacenamiento del generador
AVISO
Siga los procedimientos de servicio para preparar el
generador para su almacenamiento. Un cuidado inapropiado
o incorrecto del generador puede causar daños en los
componentes del generador y anulará la garantía limitada.
Antes de almacenar el generador durante un periodo
prolongado:
• Asegúrese de que el área de almacenamiento no
tenga exceso de humedad y polvo.
• Consulte los procedimientos de preparación
recomendados en la Tabla 4.
Tiempo de
almacenamiento
Menos de 1 mes No se requiere preparación.
1 a 2 meses
2 meses a 1 año o más Vea el siguiente procedimiento.
TABLE 4. Procedimientos de servicio recomendados según el
tiempo de almacenamiento
* Utilice acondicionadores de gasolina formulados para
almacenamiento prolongado. Comuníquese con el distribuidor
autorizado del generador para solicitar recomendaciones sobre
el acondicionador.
Para preparar el generador para un almacenamiento
prolongado:
Preparación recomendada
Llene el tanque de combustible con
gasolina nueva y agregue
acondicionador de gasolina
*
.
El combustible y sus vapores son extremadamente
inflamables y explosivos bajo ciertas condiciones.
• NUNCA fume ni permita la presencia de llamas
abiertas o chispas cerca del generador o de un lugar
de almacenamiento de gasolina.
1. Detenga el generador si el motor está en
funcionamiento. Deje que se enfríe por completo.
2. Limpie las superficies exteriores. Retoque cualquier
pintura dañada y cubra otras áreas que puedan oxidarse
con una ligera capa de aceite.
AVISO
Usar una manguera de jardín o un equipo de lavado a
presión puede hacer que penetre agua en el filtro de aire o
en la abertura del mofle, causando daños.
3. Drene el combustible en un receptáculo adecuado (ver
página 26) o agregue estabilizador de gasolina (siga las
instrucciones del fabricante).
4. Cambie el aceite para motor (ver página 22).
5. Retire la bujía. Agregue una cucharada de aceite para
motor limpio al orificio de la bujía.
6. Coloque un trapo sobre el orificio de la bujía y tire la
manija del arrancador manual lentamente para girar el
motor y distribuir el aceite.
7. Utilice una lámpara de mano para ver dentro del orificio
de la bujía y tire la manija del arrancador manual
lentamente hasta que el pistón quede en la parte
superior de su golpe de compresión. Esto cierra ambas
válvulas, de entrada y de escape, y protege el motor
contra oxidación interna.
8.
Vuelva a instalar la bujía.
Generador eléctrico portátil HW7000EH Manual del propietario www.honeywellgenerators.com 25
Page 74
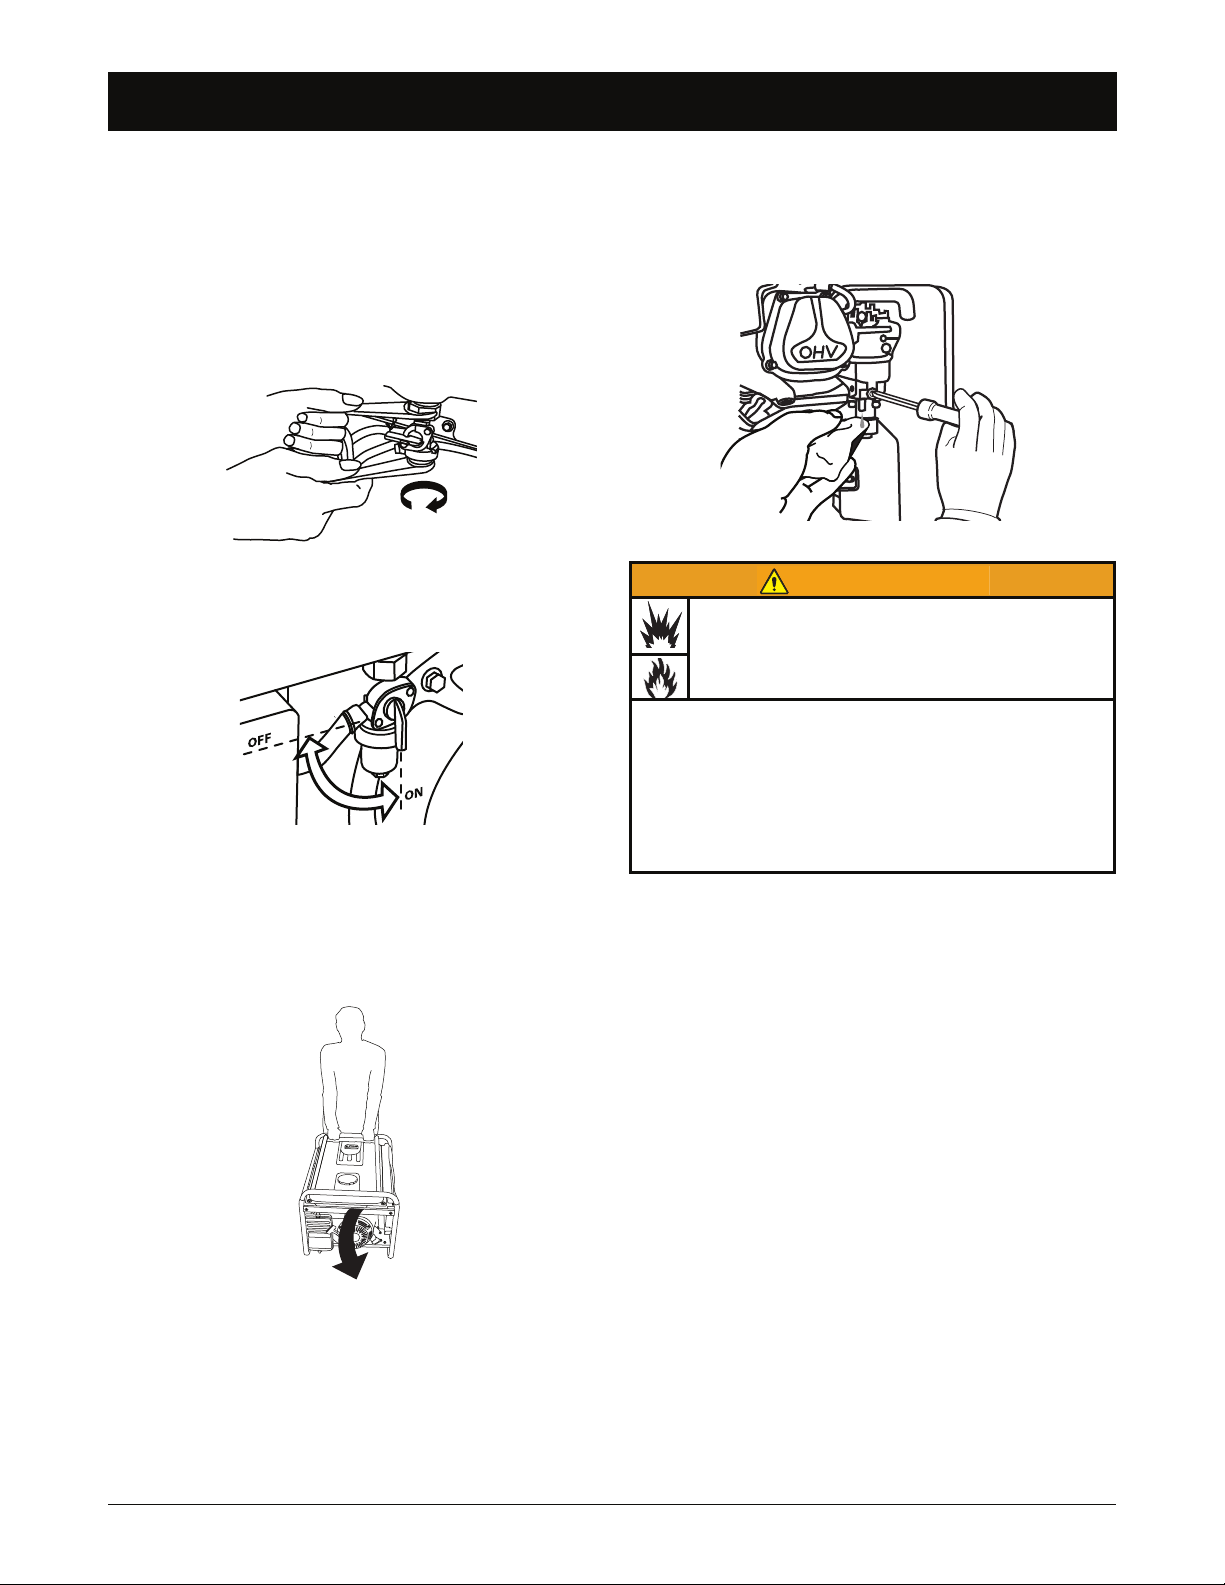
Almacenamiento del generador
ADVERTENCIA
Drenaje de combustible
1. Gire la válvula de corte de combustible a la posición
OFF (Apagado).
2. Coloque un receptáculo adecuado bajo el orificio de
drenaje para coger el combustible.
3. Mientras sostiene el acoplador sobre la válvula de
corte de combustible, con una llave de dados con un
dado de 10 mm suelte el perno (debajo del
receptáculo para sedimentos de combustible).
FIGURA 37: Suelte el perno para drenar el
combustible
4. Gire la válvula de corte de combustible a la posición
ON (Encendido).
FIGURA 38: Válvula de corte de combustible — Posición
ON/OFF (Encendido/Apagado)
5. Deje que el combustible drene hacia el receptáculo.
6. Para asegurar que se drene todo el combustible,
voltee el generador con cuidado al empujarlo hacia
arriba en el armazón al lado opuesto de la manija del
arrancador manual.
10. Gire la válvula de corte de combustible a la posición
OFF (Apagado).
11. Afloje el tornillo del receptáculo de combustible del
carburador y use un trapo para absorber el
combustible del puerto de drenaje.
FIGURA 40: Receptáculo para drenaje de combustible
El combustible y sus vapores son extremadamente
inflamables y explosivos bajo ciertas condiciones.
• Tenga cuidado de no derramar combustible al
reabastecerlo. El combustible derramado o su vapor
se pueden encender. Si se derrama combustible,
asegúrese de que el área esté seca antes de poner
en marcha el motor.
• Evite el contacto repetido o prolongado con la piel o
respirar el vapor.
12. Cuando esté listo para volver a hacer funcionar el
generador, rellene con combustible nuevo
(ver página 22).
FIGURA 39: Voltee el generador para drenar el
combustible por completo
7. Deje que el combustible drene completamente hacia
el receptáculo.
8. Vuelva a instalar el perno.
9. Haga funcionar el motor hasta que se detenga por
falta de combustible.
26 www.honeywellgenerators.com Generador eléctrico portátil HW7000EH Manual del propietario
Page 75
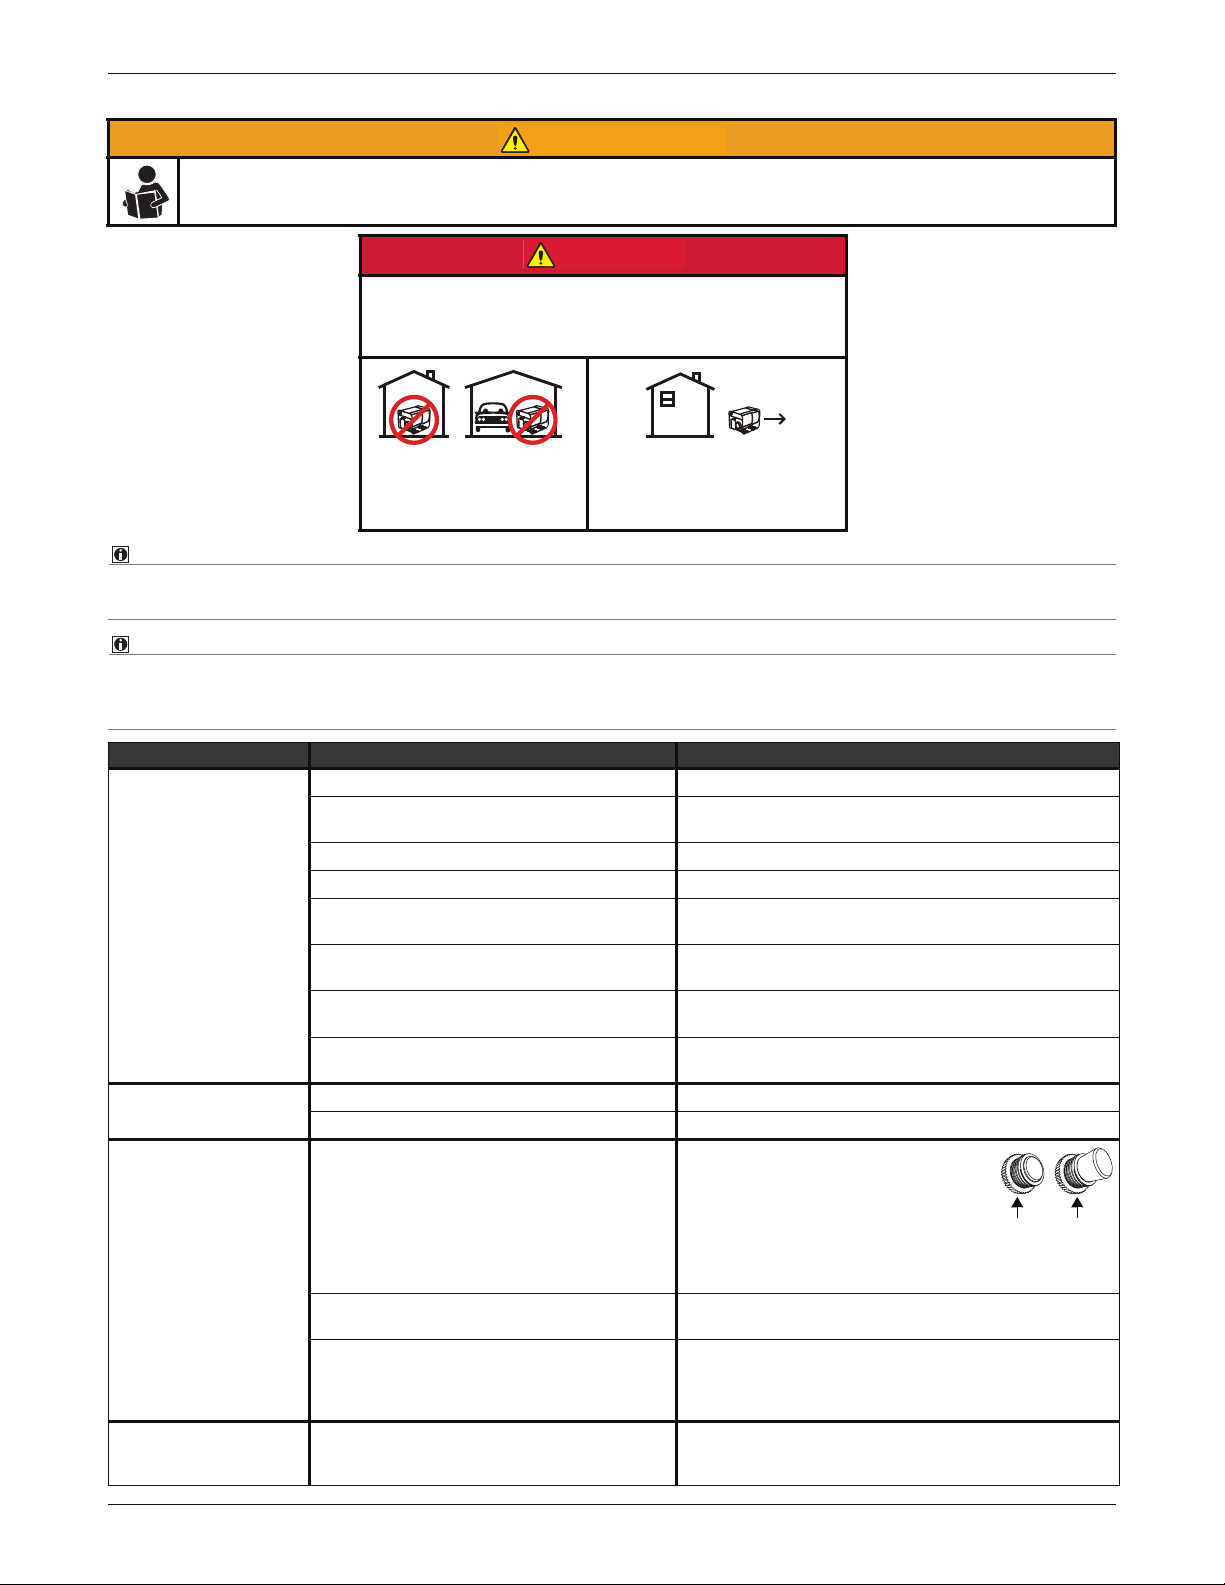
RESOLUCIÓN DE PROBLEMAS
NOTA:
NOTA:
ADVERTENCIA
PELIGRO
Ajus Descon
TODA PERSONA que use o realice servicio a este generador debe leer, entender y seguir todas las instrucciones de
seguridad y funcionamiento que se suministran en el manual del producto. Si no sigue estas instrucciones al pie de la
letra puede generar circunstancias que pueden causar la muerte, lesiones graves y daño a la propiedad.
El uso de un generador en interiores PUEDE MATARLO EN
MINUTOS.
El escape del generador contiene monóxido de carbono, que
es un veneno que no se puede ver ni oler.
NUNCA lo use en el interior
de una casa o un garaje,
INCLUSO SI las puertas y
ventanas están abiertas.
Sólo utilícelo EN EL
EXTERIOR y lejos de
ventanas, puertas y orificios de
ventilación.
Si tiene alguna pregunta de servicio al cliente, llame al 1-888-HWHELP1 (494-3571) o visite
www.honeywellgenerators.com.
Contacte al distribuidor de servicio autorizado de Honda para mantenimiento y reparaciones del motor. En
algunas locaciones, los distribuidores autorizados de servicio de Honeywell también son distribuidores
de servicio de Honda. Contacte a su distribuidor local antes de transportar su generador para servicio.
PROBLEMA POSIBLE CAUSA SOLUCIÓN
No tiene combustible. Agregue combustible (página 22).
Combustible vencido.
No tiene aceite para motor o su nivel es bajo. Agregue aceite para motor (página 22).
El cable (tapa) de la bujía está desconectado. Instale la tapa de la bujía sobre la bujía.
El motor no arranca o
arranca y funciona en
forma brusca
El motor se detiene
repentinamente
No hay alimentación en el
receptáculo de CA
La velocidad del motor de
arranque cae después de
un periodo de tiempo
TABLE 5. Resolución de problemas — Posibles causas y soluciones
Generador eléctrico portátil HW7000EH Manual del propietario www.honeywellgenerators.com 27
Bujía defectuosa/mala.
El combustible no llega al carburador.
Filtro de aire sucio.
Pantalla protectora contra chispas sucia.
No tiene combustible. Agregue combustible (página 22).
No tiene aceite para motor o su nivel es bajo. Agregue aceite para motor (página 22).
Sobrecarga eléctrica en el generador.
Conexión mala o cable defectuoso.
El artefacto/equipo eléctrico conectado está
defectuoso.
La batería está perdiendo carga. Recargue la batería
Drene el tanque de combustible y rellene con
combustible nuevo (página 26).
Revise/cambie la bujía (ver el Manual del propietario
Honda).
Limpie el receptáculo para sedimentos de combustible
(página 24).
Revise o cambie el filtro de aire (ver el Manual del
propietario Honda).
Limpie la pantalla protectora contra chispas
(página 23).
Revise si todos los disyuntores están
"desconectados" o tienen encendida la
luz indicadora de sobrecarga. Reduzca
la carga eléctrica del circuito, espere
varios minutos a que se enfríen los
interruptores térmicos (el interruptor
maestro no es térmico) y después presione para
inicializar el cortacircuitos.
Revise la conexión de los cables. Cambie los cables
defectuosos.
Revise si el artefacto/equipo eléctrico presenta defectos.
Desconecte el artefacto/ equipo eléctrico defectuoso del
generador. Solicite a un taller de reparación calificado que
realice servicio al artefacto.
Page 76

ESTA PÁGINA SE DEJÓ INTENCIONADAMENTE EN BLANCO
28 www.honeywellgenerators.com Generador eléctrico portátil HW7000EH Manual del propietario
Page 77
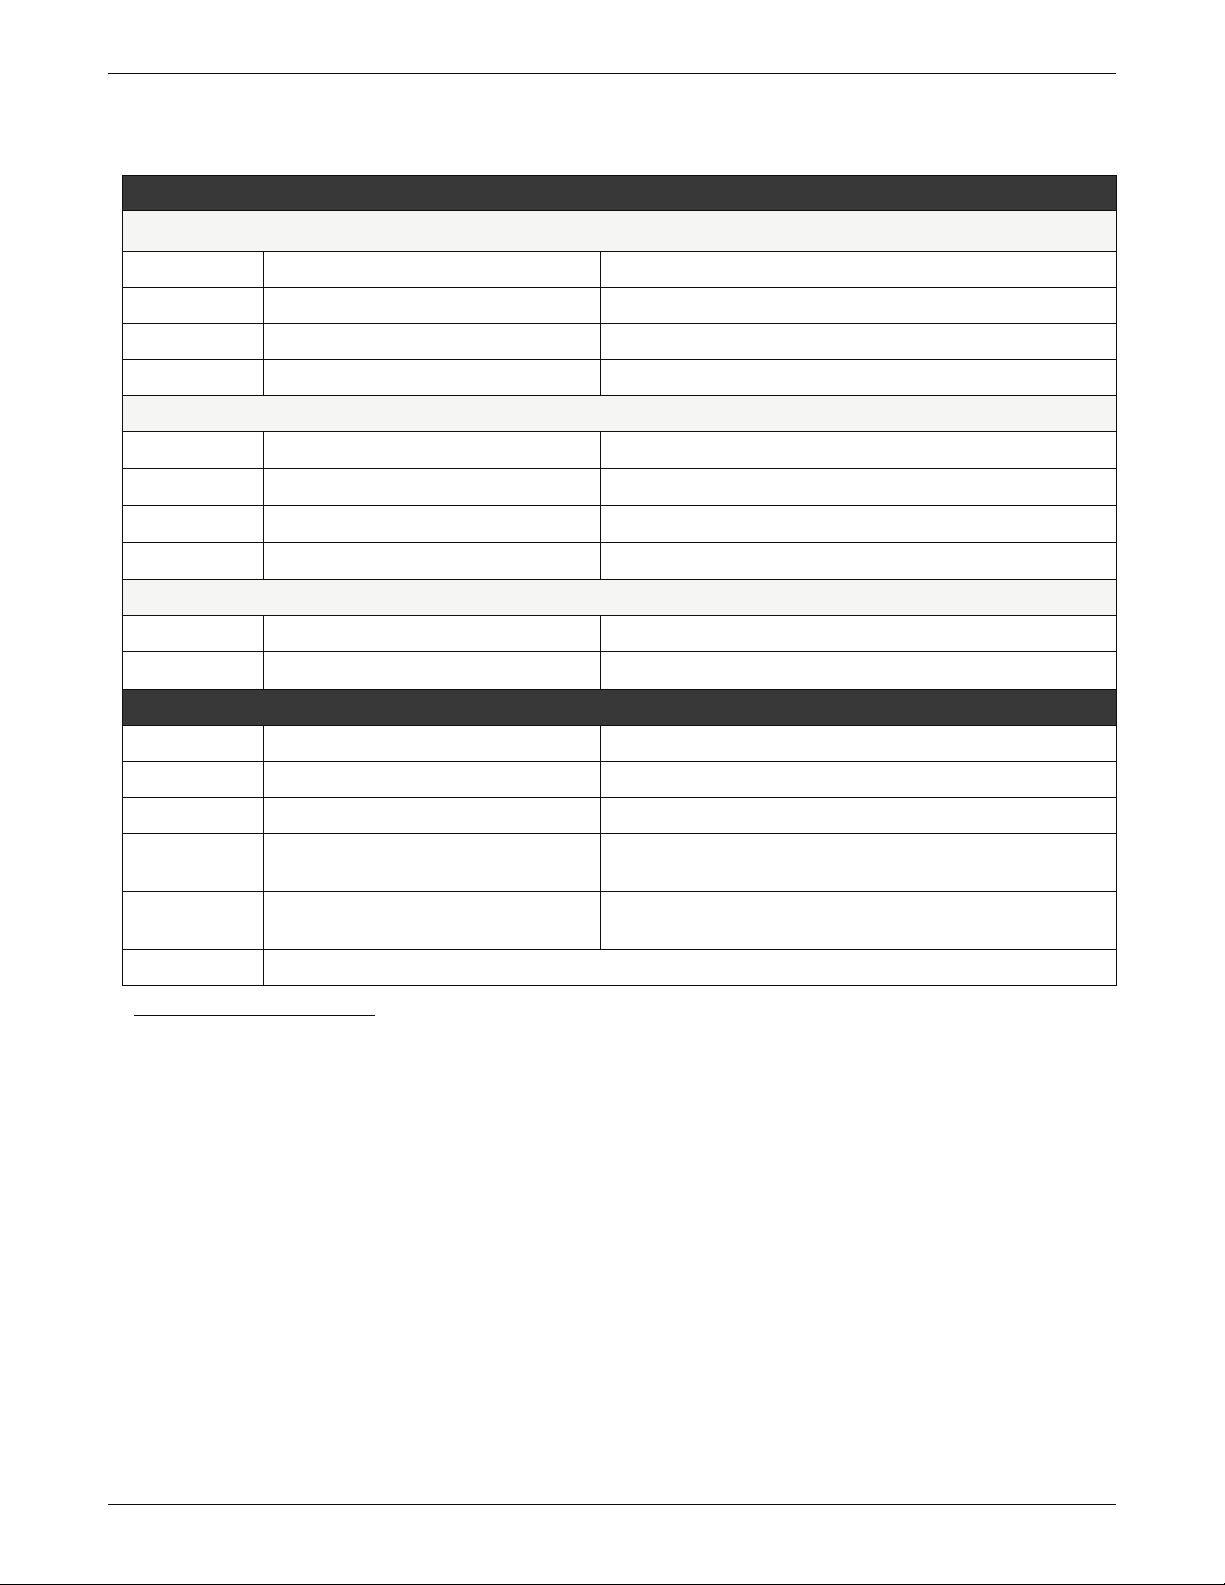
ESPECIFICACIONES
GENERADOR
Dimensiones
*
Longitud [pulg./mm.]
Altura [pulg./mm.]
Ancho [pulg./mm.]
Peso seco [libras/kilos]
Salida de CA
Potencia continua (nominal) [vatios]
Potencia máxima [vatios]
Frecuencia [hertz]
Voltaje [voltios]
Temperatura de funcionamiento
Máxima [F / C]
Mínima [F / C]
MOTOR
Velocidad [rpm]
Tipo
Desplazamiento [cc]
30 / 762,0
27 / 685,8
29 / 736,6
210 / 95,3
7000
8750
60
120 / 240
q/ 40q
104
14
q / -10q
3600
OHV 4 ciclos
389
Capacidad del tanque de combustible
[galones/litros]
Capacidad de aceite del motor [cuarto
de galón/litros]
Consulte en el Manual del propietario Honda la información adicional del motor
TABLE 6. Generador eléctrico portátil HW7000EH Especificaciones
* Las mediciones que se indican no reflejan las dimensiones con el kit de rueda instalado en el generador.
6,5 / 24,6
1,2 / 1,1
Generador eléctrico portátil HW7000EH Manual del propietario www.honeywellgenerators.com 29
Page 78

ESTA PÁGINA SE DEJÓ INTENCIONADAMENTE EN BLANCO
30 www.honeywellgenerators.com Generador eléctrico portátil HW7000EH Manual del propietario
Page 79

GARANTÍA
GARANTÍA LIMITADA DE
NORTHSHORE POWER SYSTEMS
Generador portátil Honeywell
Vigente a partir del 1 de marzo de 2009
GARANTÍA LIMITADA
Northshore Power Systems, LLC reparará o reemplazará, sin
costo alguno para el cliente minorista original, en América del
Norte, cualquier pieza del generador portátil que Northshore
Power Systems o un centro de servicio autorizado considere
como defectuosa en material o mano de obra. Esta garantía
limitada cubre el costo de las piezas de reemplazo y la mano de
obra por defectos. Los gastos de transporte son responsabilidad
del cliente. Esta garantía limitada tiene condiciones de vigencia,
condiciones de funcionamiento y exenciones, limitaciones de
recursos y exclusiones conforme se indica más adelante. Para
obtener servicio de garantía, ubique a un distribuidor autorizado
del generador Honeywell en www.honeywellgenerators.com o
llame al 1-888-HWHELP1 (494-3571).
PERIODOS DE GARANTÍA LIMITADA
Uso privado: Limitada de tres años. Primer año, piezas y
mano de obra. Segundo y tercer años, sólo piezas.
Uso comercial: Limitada de un año. No tiene garantía por uso
bajo alquiler.
Comienzo y definiciones.La vigencia de la garantía limitada
comienza en la fecha de compra minorista del comprador
original. La garantía limitada no se puede transferir. "Uso
privado" se refiere al uso personal de un cliente minorista.
"Uso comercial" se refiere a cualquier uso comercial que
genere ingresos.
No extensión de la garantía. La reparación o el reemplazo en
virtud de la presente garantía limitada no renovará ni
extenderá el periodo de garantía original, y cualquier
producto reparado sólo estará bajo garantía durante la
vigencia de la garantía original restante.
EXENCIONES, LIMITACIONES DE RECURSOS Y
EXCLUSIONES
Esta garantía le otorga derechos legales específicos, y es
posible que usted tenga otros derechos, los cuales varían de
un estado a otro.
USOS MÉDICO Y DE AUXILIO VITAL. Esta garantía excluye
cualquier uso de este producto destinado a alimentar
dispositivos de auxilio vital, accesorios de auxilio vital,
dispositivos médicos o accesorios médicos.
EXENCIÓN DE OTRAS GARANTÍAS. EN EL MÁXIMO
GRADO PERMITIDO POR LA LEY PERTINENTE, ESTA
GARANTÍA LIMITADA ES EXCLUSIVA Y SE OTORGA EN
EXPRESO REEMPLAZO DE CUALQUIER OTRA
GARANTÍA, INCLUSO, PERO SIN LIMITARSE A ELLO,
CUALQUIER GARANTÍA IMPLÍCITA DE
COMERCIABILIDAD O IDONEIDAD PARA UN PROPÓSITO
ESPECÍFICO O CUALQUIER OTRA GARANTÍA QUE
PUDIERA SURGIR DURANTE EL TRANSCURSO DE UNA
NEGOCIACIÓN O USO COMERCIAL. POR EL PRESENTE,
NORTHSHORE POWER SYSTEMS RENUNCIA Y
EXCLUYE CUALQUIER OTRA GARANTÍA. En la medida en
que los productos de Northshore Power Systems sean
productos de consumo en virtud de la ley federal o estatal
pertinente con respecto a cualquier cliente, la duración de
cualquier garantía implícita (incluso, pero sin limitarse a ello,
garantías implícitas de comerciabilidad o idoneidad para un
propósito específico) se limita a la duración mínima permitida
por la ley vigente o el periodo de garantía limitado aquí
estipulado, el que sea de mayor extensión.
LIMITACIÓN DE RECURSOS. NORTHSHORE POWER
SYSTEMS NO SERÁ RESPONSABLE ANTE EL CLIENTE,
O CUALQUIER OTRA PERSONA QUE PRESENTE UNA
RECLAMACIÓN EN NOMBRE DEL CLIENTE, POR
CUALQUIER OTRA OBLIGACIÓN O RESPONSABILIDAD,
INCLUSO, PERO SIN LIMITARSE A ELLO, OBLIGACIONES
O RESPONSABILIDADES DERIVADAS DE UN
INCUMPLIMIENTO DE CONTRATO O GARANTÍA,
NEGLIGENCIA U OTRO AGRAVIO O CUALQUIER TEORÍA
DE RESPONSABILIDAD CIVIL ESTRICTA, CON
RESPECTO AL GENERADOR O LAS ACCIONES O NO
ACCIONES DE NORTHSHORE POWER SYSTEMS U
OTRO. EN EL MÁXIMO GRADO PERMITIDO POR LA LEY
PERTINENTE, EN NINGÚN CASO NORTHSHORE POWER
SYSTEMS SERÁ RESPONSABLE DE DAÑOS
INCIDENTALES, COMPENSATORIOS, PUNITIVOS,
CONSECUENTES, INDIRECTOS, ESPECIALES O DE
OTRO TIPO, INCLUSO, PERO SIN LIMITARSE A ELLO,
PÉRDIDA DE USO, PÉRDIDA DE INGRESOS, PÉRDIDA
DE TIEMPO, PÉRDIDA DE VENTAS, DAÑO A PROPIEDAD
PERSONAL O RESPONSABILIDAD CIVIL EN QUE
INCURRA EL CLIENTE RESPECTO DE CUALQUIER OTRA
PERSONA O CUALQUIER OTRO TIPO O FORMA DE
DAÑO CONSECUENTE O PÉRDIDA ECONÓMICA.
EXCLUSIONES. Además de las exenciones, las limitaciones
y los términos anteriores, esta garantía limitada no se
aplicará ni cubrirá accesorios o productos que de alguna
manera sean objeto de: (i) configuración, instalación o
almacenamiento incorrecto; (ii) falta de mantenimiento y
servicio adecuados; (iii) accidente, daño, abuso o uso
indebido; (iv) condiciones o aplicaciones de funcionamiento
anormales; (v) reparación o modificación por parte de un
cliente o un tercero sin el consentimiento previo por escrito
de Northshore Power Systems; (vi) uso bajo condiciones de
funcionamiento o en aplicaciones que no se informen a
Northshore Power Systems o que ésta no contemple o (viii)
hechos fortuitos. Northshore Power Systems determinará la
aplicación de estas exclusiones a su exclusivo criterio.
REGISTRO
Es necesario registrar con la Empresa la garantía de todos
los productos. Puede enviar la tarjeta de garantía adjunta o
registrar su producto a través de Internet en
www.honeywellgenerators.com.
La garantía también se encuentra disponible si conserva y
luego presenta su comprobante original de la fecha de compra
a un distribuidor autorizado del generador Honeywell.
SERVICIO DEL GENERADOR
No devuelva su generador al lugar de compra para que le
realicen servicio. Si tiene alguna pregunta de servicio al
cliente, llame al 1-888-HWHELP1 (494-3571) o visite
www.honeywellgenerators.com.
Puede dirigir sus consultas acerca de la garantía a:
Northshore Power Systems, LLC
Atención: Service and Warranty Dept.
4425 N Port Washington Road
Suite 105
Milwaukee, WI 53212-1082
Generador eléctrico portátil HW7000EH Manual del propietario www.honeywellgenerators.com 31
Page 80

GARANTÍAS
GARANTÍAS
GARANTÍA DE CONTROL DE EMISIONES
EVAPORATIVAS DE NORTHSHORE POWER
SYSTEMS
Generador portátil Honeywell
DECLARACIÓN DE GARANTÍA
El Consejo de los Recursos del Aire de California y
Northshore Power Systems, LLC se complacen en explicar la
garantía del sistema de control de emisiones evaporativas
(EECS) que tiene su generador portátil 2009. En California,
los nuevos generadores portátiles deben estar diseñados,
fabricados y equipados para cumplir con las estrictas normas
anti smog. Northshore Power Systems debe garantizar el
EECS en su generador portátil por el periodo indicado más
adelante, siempre que su generador portátil no haya sido
objeto de abuso, negligencia o un mantenimiento
inadecuado. Su EECS puede incluir partes como el
carburador, líneas de combustible, tapas del combustible,
válvulas, envases, filtros, mangueras de vapor, abrazaderas,
y otros componentes asociados relacionados con las
emisiones.
Si existe una condición garantizable, Northshore Power
Systems reparará su generador portátil sin costo alguno para
usted. Dicha reparación incluye diagnóstico, piezas y mano
de obra.
COBERTURA DE LA GARANTÍA DEL FABRICANTE
Este sistema de control de emisiones evaporativas cuenta
con una garantía de dos años. Si una pieza de su equipo
relacionada con las emisiones evaporativas tiene un defecto,
Northshore Power Systems la reparará o reemplazará.
RESPONSABILIDADES DE GARANTÍA DEL
PROPIETARIO
Como el propietario del generador portátil, usted es
responsable de la realización de los mantenimientos
requeridos que se indican en su manual del propietario.
Northshore Power Systems recomienda que conserve todos
los comprobantes que cubren el mantenimiento de su
generador portátil, pero Northshore Power Systems no
puede denegar reclamaciones de garantías solamente por
falta de comprobantes. No obstante, como el propietario del
generador portátil, usted deberá tener conocimiento que
Northshore Power Systems puede negar la cobertura de su
garantía si su generador portátil o una de sus piezas ha
fallado por abuso, negligencia, mantenimiento inadecuado o
modificaciones no aprobadas. Usted es responsable de llevar
su generador portátil a un centro de distribución de
Northshore Power Systems o a un centro de servicio tan
pronto como tenga conocimiento de la existencia de un
problema. Las reparaciones en garantía deberán ser
completadas en una cantidad razonable de tiempo, sin
exceder los 30 días. Si tiene preguntas relacionadas con la
cobertura de su garantía, sírvase contactarnos mediante
www.honeywellgenerators.com o llamando al 1-888HWHELP1 (494-3571).
COBERTURA GENERAL DE LA GARANTÍA SOBRE
EMISIONES
Northshore Power Systems garantiza al comprador final y a
cada comprador subsecuente que el generador portátil está:
diseñado, construido y equipado de conformidad con todas
las normas aplicables; y libre de defectos en materiales y
mano de obra que causen que la falla de una pieza
garantizada sea idéntica en todo respecto material a dicha
pieza como se describe en la solicitud para certificación. El
periodo de garantía empieza en la fecha en que se entregue
el generador portátil a un comprador final o que se ponga en
servicio por primera vez. El periodo de la garantía es de dos
años. Sujeto a ciertas condiciones y exclusiones que se
mencionan más adelante, la garantía de las piezas
relacionadas con las emisiones es como sigue:
1. Cualquier pieza garantizada que en las instrucciones
escritas de mantenimiento que se proporcionan no deba
ser cambiada como parte del mantenimiento requerido,
está garantizada por el periodo de garantía indicado
anteriormente. Si la pieza falla durante el periodo de
cobertura de la garantía, la pieza será reparada o
sustituida por Northshore Power Systems de
conformidad con el siguiente apartado (4). Dicha pieza
reparada o sustituida bajo garantía quedará garantizada
por el resto del periodo.
2. Cualquier pieza garantizada que en las instrucciones
escritas de mantenimiento que se proporcionan
solamente se recomiende ser inspeccionada con
regularidad, está garantizada por el periodo de garantía
indicado anteriormente. Dicha pieza reparada o
sustituida bajo garantía quedará garantizada por el resto
del periodo de garantía.
3. Cualquier pieza garantizada que en las instrucciones
escritas de mantenimiento que se proporcionan deba
ser cambiada como parte del mantenimiento requerido,
está garantizada por el periodo anterior a la fecha en
que esté programado el primer cambio de dicha pieza.
Si la pieza falla antes del primer cambio programado, la
pieza será reparada o sustituida por Northshore Power
Systems de conformidad con el siguiente apartado (4).
Dicha pieza reparada o sustituida bajo garantía quedará
garantizada por el resto del periodo previo al punto del
primer cambio programado de dicha pieza.
4. La reparación o el reemplazo de cualquier pieza
garantizada al amparo de lo previsto en la presente
garantía deberá ser realizada en un Centro de Servicio
Honeywell autorizado.
5. No obstante las presentes cláusulas, los servicios o
reparaciones en garantía serán proporcionados en un
Centro de Servicio Honeywell autorizado, sin cargo para
el propietario.
6. No se efectuarán cargos al propietario del generador
portátil por mano de obra de diagnóstico que esté
directamente asociado con el diagnóstico de una pieza
garantizada defectuosa, relacionada con emisiones,
siempre y cuando dicho trabajo de diagnóstico se realice
en una estación de garantía.
32 www.honeywellgenerators.com Generador eléctrico portátil HW7000EH Manual del propietario
Page 81

GARANTÍAS
7. Northshore Power Systems es responsable de los daños
a otros componentes del motor o del equipo causados
inmediatamente por una falla bajo garantía de cualquier
pieza garantizada.
8. A lo largo del periodo de garantía del generador portátil
indicado anteriormente, Northshore Power Systems
mantendrá un inventario de piezas garantizadas
suficiente para cubrir la demanda esperada de dichas
piezas.
9. Cualquier pieza de reemplazo podrá ser usada en la
realización de cualquier mantenimiento o reparación de
garantía y deberá ser provista sin cargo para el
propietario. Dicho uso no reducirá las obligaciones de la
garantía de Northshore Power Systems.
10. No podrán usarse accesorios complementarios, piezas
modificadas o piezas que no hayan sido liberadas por el
Consejo de los Recursos del Aire. El uso por parte del
comprador final de cualquier accesorio complementario,
pieza modificada o pieza que no haya sido liberada por
el Consejo de los Recursos del Aire será causa de
rechazo de cualquier reclamación de garantía.
Northshore Power Systems no será responsable de
garantizar las fallas de las piezas garantizadas
causadas por el uso de accesorios complementarios no
liberados o piezas modificadas.
PIEZAS GARANTIZADAS
La reparación o el reemplazo de cualquier pieza garantizada
elegible para ser cubierta podrán ser excluidos de dicha
cobertura de garantía si Northshore Power Systems
demuestra abuso, negligencia, mantenimiento inadecuado
del generador portátil y que dicho abuso, negligencia, o
mantenimiento inadecuado fueron la causa directa de la
necesidad de reparación o reemplazo de la pieza. Que no
obstante, cualquier ajuste de un componente que tenga un
dispositivo de restricción de ajuste instalado en fábrica y
funcionando correctamente, sigue siendo elegible de ser
cubierta por la garantía. Están cubiertas las siguientes
piezas garantizadas contra emisiones:
A. Tanque de combustible
B. Tapa de combustible
C. Línea de combustible
D. Accesorios de la línea de combustible
E. Abrazaderas
F. Mangueras de vapores
G. Filtro de carbón
H. Soportes de montaje del filtro
I. Conector del puerto de purga del carburador
PREGUNTAS
Si tiene alguna pregunta acerca de sus derechos y
responsabilidades de garantía de emisiones, debe
comunicarse con el departamento de Servicio y Garantía
de Northshore Power Systems.
Por teléfono: 1-414-332-2375
Por Internet: www.honeywellgenerators.com
Por correo de EE.UU.:
Northshore Power Systems, LLC
Atención: Service and Warranty Dept.
4425 N Port Washington Road
Suite 105
Milwaukee, WI 53212-1082
Generador eléctrico portátil HW7000EH Manual del propietario www.honeywellgenerators.com 33
Page 82

ESTA PÁGINA SE DEJÓ INTENCIONADAMENTE EN BLANCO
34 www.honeywellgenerators.com Generador eléctrico portátil HW7000EH Manual del propietario
Page 83

ÍNDICE ALFABÉTICO
A
Almacenamiento del generador
25
Arranque manual (cuerda de arranque) 17
Artefactos
alimentar
18
Información sobre el vataje 19
normas para alimentar 18
B
Batería
10
C
Centro de control de alimentación
terminal de conexión a tierra
13
tomacorrientes domésticos 13
Cómo detener el generador 18
Componentes y controles
contador horario
13
control del estrangulador 13
disyuntores 13
indicador de combustible 13
interruptor de control del motor 13
mango de la manija del arrancador manual 13
tapa de la bujía 13
tomacorrientes 13
válvula de corte de combustible 13
Conexión a tierra 11
terminal 13
Contador horario 13
D
Daños, inspección para comprobar
Drenaje de combustible 26
E
Especificaciones
29
Etiquetas de seguridad 3
F
Filtro de carbón
13
Funcionamiento
grandes alturas
18
preparación para 15
Funcionamiento a grandes alturas 18
G
Garantía
control de emisiones
32
limitada 31
Generador
almacenamiento
25
arranque 16
detener 18
especificaciones 29
etiquetas de seguridad 3
funcionamiento 15
información de la placa de identificación 5
tomacorrientes 13
transporte 25
ubicación 15
I
Interruptor de control del motor
13
L
Limpieza de la pantalla protectora contra
chispas
23
Limpieza del receptáculo para sedimentos de
combustible
24
Lista de verificación, contenido del generador 5
M
Manijas, instalación
9
Mantenimiento 21
Limpiar la pantalla protectora contra chispas 23
listado de piezas 37
5
motor 23
programa 21
receptáculo para sedimentos de combustible 24
Mantenimiento del motor 23
Montaje
manija
9
patas 7
ruedas 8
P
Pautas de desembalaje
5
R
Resolución de problemas
27
Ruedas, instalación 8
T
Tomacorrientes
domésticos
13
Transporte 25
V
Válvula de corte de combustible
13
Vataje, artefacto típico 19
Generador eléctrico portátil HW7000EH Manual del propietario www.honeywellgenerators.com 35
Page 84

ESTA PÁGINA SE DEJÓ INTENCIONADAMENTE EN BLANCO
36 www.honeywellgenerators.com Generador eléctrico portátil HW7000EH Manual del propietario
Page 85

PIEZAS DE MANTENIMIENTO
Para ordenar piezas de mantenimiento, visite www.honeywellgenerators.com o llame a la Línea de asistencia al
cliente al 1-888-HWHELP1 (494-3571).
NOMBRE DE LA PIEZA NÚMERO DE PIEZA
Batería 101536A
Rueda 100844C
HW7000EH Listado de piezas de mantenimiento
Para consultar los números de pieza de las etiquetas de los productos, vea la página 3 y página 4.
Generador eléctrico portátil HW7000EH Manual del propietario www.honeywellgenerators.com 37
Page 86

ESTA PÁGINA SE DEJÓ INTENCIONADAMENTE EN BLANCO
38 www.honeywellgenerators.com Generador eléctrico portátil HW7000EH Manual del propietario
Page 87

Page 88

Northshore Power Systems, LLC
4425 N. Port Washington Rd., Suite 105
Milwaukee, WI 53212-1082 USA
TEL 1-888-494-3571
www.honeywellgenerators.com
HW7000EH - P/N: 101539C
July 2009
c
2009 Northshore Power Systems, LLC
The Honeywell Trademark is used under license
from Honeywell International Inc.
Honeywell International Inc. makes no representation
or warranties with respect to this product
 Loading...