

Page 1
Portable Electrical Generator
Service Manual
HW3000/L
HW4000/L
HW5500/L
HW5500E/L
HW6200/L
HW7000E/L
HW7500E/L
Read and Save These Instructions
For technical support and parts, contact your Regional Master Parts Distributor
toll-free at 1-877-HWTECHS (498-3247) or visit www.honeywellgenerators.com.
Page 2

Page 3

CONTENTS
IMPORTANT SAFETY INSTRUCTIONS ....................................................................... 1-1
WARRANTIES ............................................................................................................... 2-1
NORTHSHORE POWER SYSTEMS CONSUMER LIMITED WARRANTY ............................................2-1
NORTHSHORE POWER SYSTEMS EMISSIONS CONTROL WARRANTY ..........................................2-2
NORTHSHORE POWER SYSTEMS REPLACEMENT PARTS LIMITED WARRANTY .........................2-4
SPECIFICATIONS AND WIRING DIAGRAMS .............................................................. 3-1
SPECIFICATIONS ....................................................................................................................................3-1
BOLT AND FASTENER TORQUE INFORMATION .................................................................................3-2
WIRING DIAGRAMS ................................................................................................................................3-3
COMPONENTS .............................................................................................................. 4-1
PREPARING FOR SERVICE ......................................................................................... 5-1
REQUIRED TOOLS .................................................................................................................................5-1
TRANSPORTING GENERATOR .............................................................................................................5-1
SERVICE REPAIR TIME ANALYSIS & FLAT RATE SCHEDULE ............................... 6-1
MAINTENANCE ............................................................................................................. 7-1
CONSUMER MAINTENANCE SCHEDULE .............................................................................................7-1
AIR FILTER MAINTENANCE ...................................................................................................................7-3
CLEANING FUEL SEDIMENT CUP .........................................................................................................7-5
SPARK PLUG SERVICE ..........................................................................................................................7-5
CLEANING SPARK ARRESTOR SCREEN .............................................................................................7-6
VALVE LASH ...........................................................................................................................................7-7
GOVERNOR ADJUSTMENT ...................................................................................................................7-7
GOVERNOR RANGE ADJUSTMENT ......................................................................................................7-7
BATTERY SERVICE ................................................................................................................................7-8
TROUBLESHOOTING ................................................................................................... 8-1
ELECTRICAL DIAGNOSTICS (HW3000/L MODELS) .............................................................................8-2
ELECTRICAL DIAGNOSTICS (ALL MODELS EXCEPT HW3000/L) ......................................................8-6
ENGINE DIAGNOSTICS (ALL MODELS) ..............................................................................................8-10
SERVICE AND DISASSEMBLY .................................................................................... 9-1
CONTROL PANEL ...................................................................................................................................9-1
ENGINE AND ALTERNATOR ..................................................................................................................9-2
ALTERNATOR .........................................................................................................................................9-3
FUEL TANK SYSTEM ..............................................................................................................................9-4
EVAPORATIVE EMISSIONS CONTROL SYSTEM .................................................................................9-5
MUFFLER .................................................................................................................................................9-6
CARBURETOR ........................................................................................................................................9-7
STARTING SYSTEM ................................................................................................................................9-8
RECOIL STARTER ..................................................................................................................................9-9
FAN COVER ...........................................................................................................................................9-10
WHEEL, LEG, & HANDLE ASSEMBLY (HW3000/L MODELS) .............................................................9-11
WHEEL, LEG, & HANDLE ASSEMBLY (ALL MODELS EXCEPT HW3000/L) ......................................9-12
INDEX .......................................................................................................................... 10-1
Honeywell Portable Electrical Generator Service Manual www.honeywellgenerators.com i
Page 4

THIS PAGE INTENTIONALLY LEFT BLANK
ii www.honeywellgenerators.com Honeywell Portable Electrical Generator Service Manual
Page 5
SAVE THESE INSTRUCTIONS
NOTE:
WARNING
DANGER
WARNING
CAUTION
NOTICE
+
DANGER
1: IMPORTANT SAFETY INSTRUCTIONS
ANYONE using or servicing this generator must read, understand, and follow all safety and operation instructions provided in the product manual. Failure to closely follow these instructions can result in circumstances
leading to death, serious injury, and property damage.
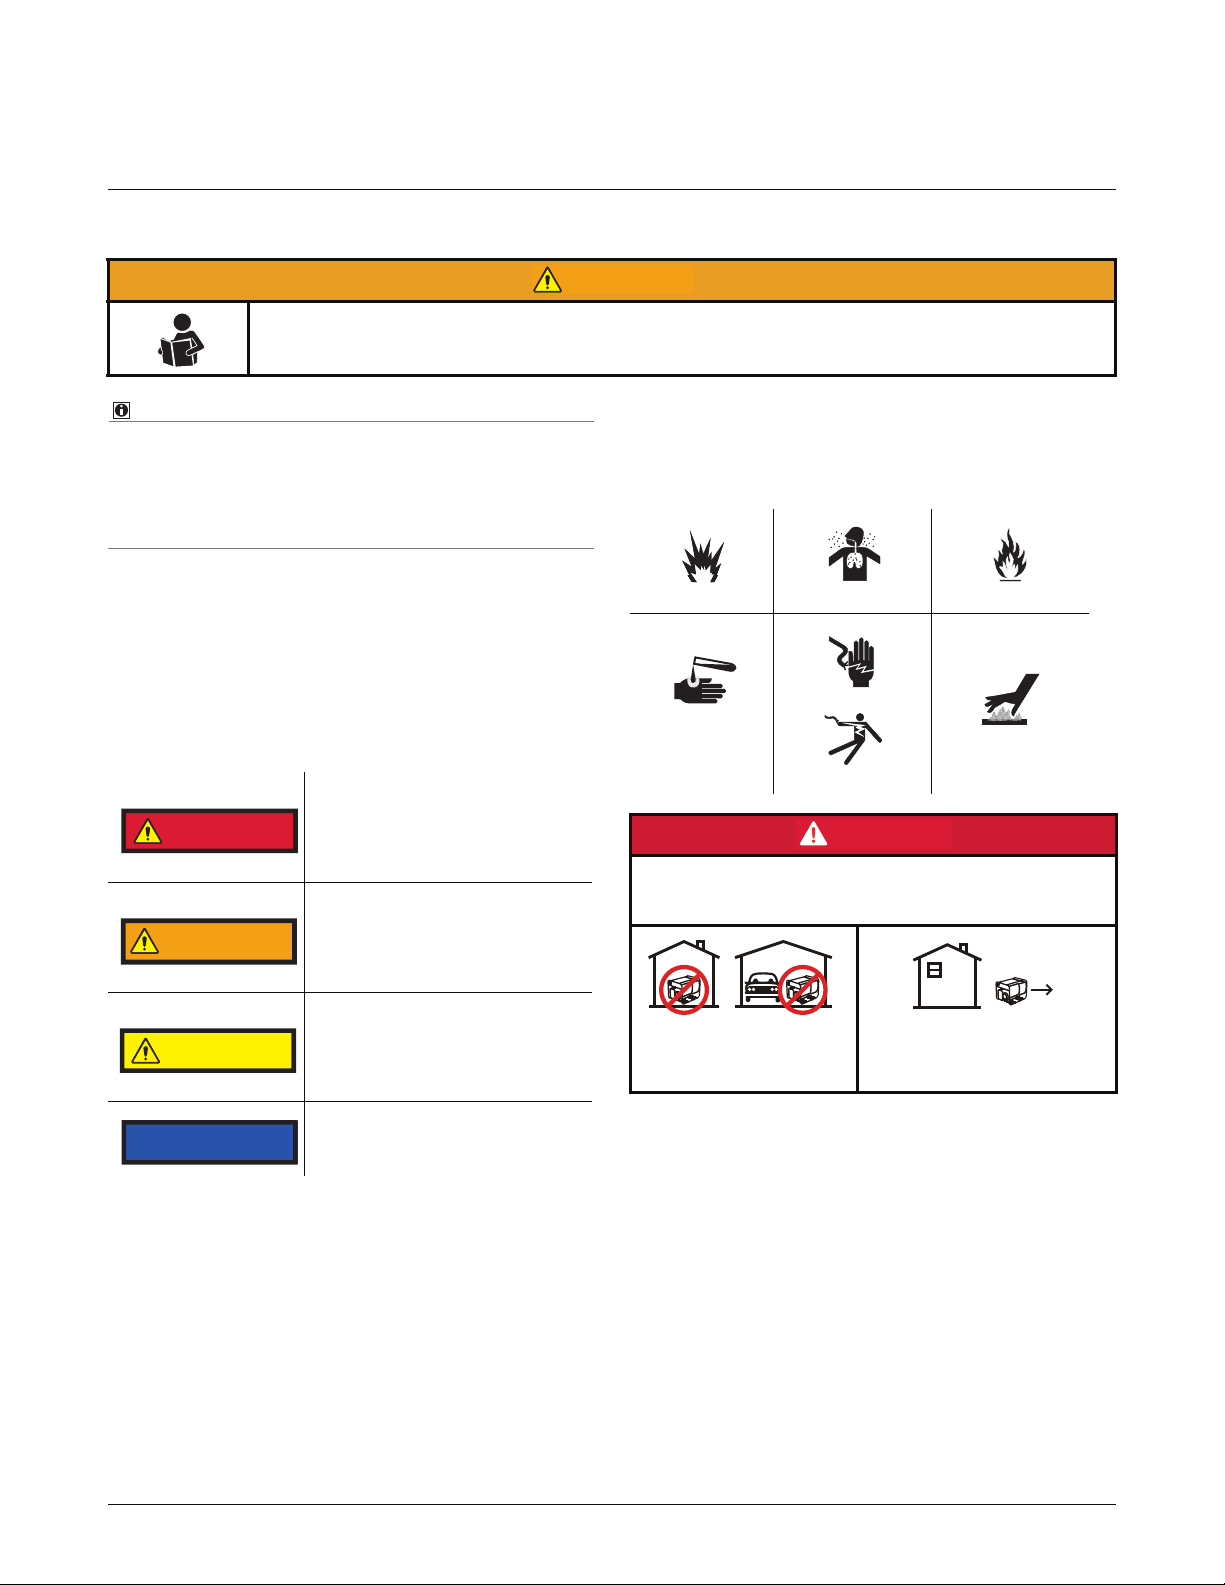
Hazard Symbols and Meanings
Since there are many variations in the circumstances surrounding the installation, operation, service, and maintenance of this generator, we cannot possibly anticipate or
provide advice or safety messages to cover every situation.
In addition to the signal words, the following symbols may
be used to draw your attention to specific types of haz-
ards.
1.1 SAFETY MESSAGES
Signal Words
Safety messages are provided throughout this manual to
help prevent personal injury and equipment damage. All
safety messages are introduced by a signal word indicating the hazard level.
Indicates an imminently hazardous situation which, if not
avoided, will result in death or
serious injury to the operator or to
bystanders.
Indicates a potentially hazardous
situation which, if not avoided,
could result in death or serious
injury to the operator or to
bystanders.
Indicates a potentially hazardous
situation which, if not avoided,
may result in moderate or minor
injury to the operator or to
bystanders.
Indicates a situation which, if not
avoided, may result in damage to
the generator components.
Explosion
Chemical burn
Using a generator indoors CAN KILL YOU IN MINUTES.
Generator exhaust contains carbon monoxide. This is a
poison you cannot see or smell.
NEVER use inside a home
or garage, EVEN IF doors
and windows are open.
Tox i c f u m es
Electrical shock
Only use OUTSIDE and
far away from windows,
doors, and vents.
Fire
Hot surface
SAFETY PRECAUTIONS
• Wear appropriate protective safety equipment, such as
safety shoes and safety glasses.
• Comply with the warnings in this manual and take special precautions when working around electrical equipment.
• NEVER wear loose or damp clothing that might get
caught in equipment or conduct electricity.
• Keep service area organized and free of unnecessary
clutter to reduce hazard potential.
• Keep guards and shields in place on machinery and
maintain equipment in good working condition.
• Store flammable liquids in approved containers and
away from fire, flame, spark, pilot light, switches, arcproducing equipment and other ignition sources.
• Use the correct tool for the job and check its condition
before starting.
• Keep fire extinguishers and safety equipment nearby.
Honeywell Portable Electrical Generator Service Manual www.honeywellgenerators.com 1-1
Page 6
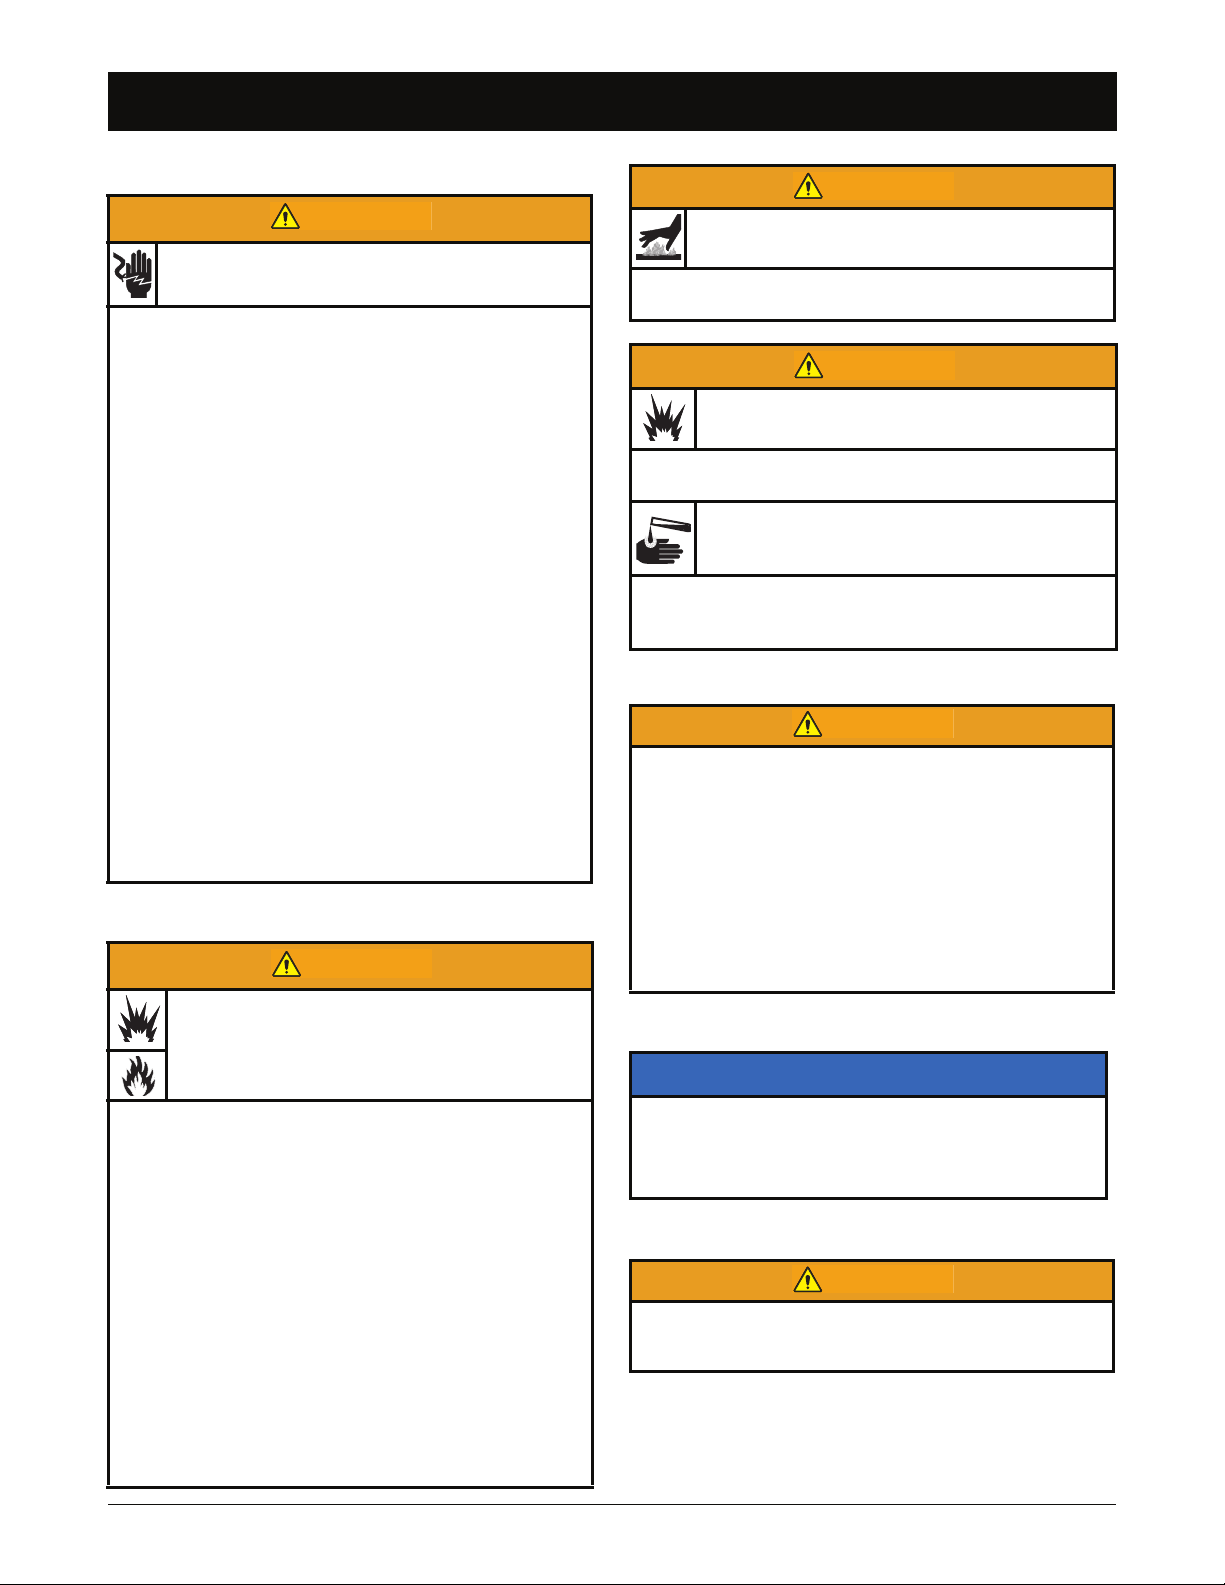
SAFETY MESSAGES
WARNING
WARNING
WARNING
WARNING
WARNING
WARNING
Electric Shock Hazards
Generators produce powerful voltage that can cause
death or great physical harm.
• Notify the utility company when using generator for
backup power. Use approved transfer equipment to isolate generator from electric utility.
• NEVER connect to a building’s electrical system unless
a transfer switch has been installed by a qualified electrician.
• NEVER touch bare wires or receptacles.
• NEVER use generator with electrical cords that are
worn, frayed, bare, or otherwise damaged.
• NEVER operate generator in rain or snow, or when the
generator is set on wet surface.
• Generator repairs should only be performed by a
trained service technician.
• Keep the generator out of reach of children, pets, and
untrained people.
• Exposed terminals, even on disconnected batteries,
can cause electric shock.
• NEVER touch both battery terminals with bare hands
at the same time.
• Remove rings, watches or any other object containing
metal when working with battery. If metal comes into
contact with battery terminals, electric shock and serious burns can result.
• Only use insulated/non-conducting tools when working
with or near battery.
• NEVER lay tools or other metal objects on top of battery.
Fire and Burn Hazards
The muffler becomes very hot during operation and
remains hot for a while after stopping the engine.
• NEVER touch hot surfaces and avoid hot gases.
• Let engine cool before storing the generator indoors.
Battery gases are explosive.
• NEVER allow open flames, lit cigarettes, sparks, or
spark-producing equipment near the battery.
Battery electrolyte fluid is comprised of sulfuric acid,
which can be very dangerous and cause severe
burns.
• NEVER allow battery fluid to contact eyes, skin, or
clothing. If contact or spillage occurs, immediately flush
the area with water.
Medical and Life Support Uses
• In case of emergency, call 911 immediately.
• NEVER use this product to power life support devices
or life support appliances.
• NEVER use this product to power medical devices or
medical appliances.
• Inform your electricity provider immediately if you or
anyone in your household depends on electrical equipment to live.
• Inform your electrical provider immediately if a loss of
power would cause you or anyone in your household to
experience a medical emergency.
• Refuel generator only outdoors, in a well-ventilated
area.
• NEVER enclose the generator in any structure.
• Keep generator at least 6 feet (2 meters) away from
buildings, other equipment, and combustible materials
during operation.
• NEVER fill fuel tank while the engine is running. Turn
generator OFF and allow to cool before filling with fuel.
• NEVER smoke or allow flames or sparks near the generator or where gasoline is stored.
• NEVER overfill the fuel tank (there should be no fuel in
the filler neck). After refueling, tighten the fuel cap
securely.
• Be careful not to spill fuel when refueling. Spilled fuel
or fuel vapor may ignite. If any fuel is spilled, the area
must be dry before starting the engine.
• Avoid repeated or prolonged contact with skin or
breathing of vapor.
1-2 www.honeywellgenerators.com Honeywell Portable Electrical Generator Service Manual
Fuel and its vapors are extremely flammable and
explosive under certain conditions.
Generator Damage Hazards
NOTICE
Improper treatment or misuse of generator can cause permanent damage.
• Damage to generator caused by misuse or modification is not covered under warranty.
California Proposition 65
The engine exhaust from this product contains chemicals
known to the State of California to cause cancer, birth
defects or other reproductive harm.
Page 7

2: WARRANTIES
NORTHSHORE POWER SYSTEMS
CONSUMER LIMITED WARRANTY
Honeywell Portable Generator
LIMITED WARRANTY
Northshore Power Systems, LLC, will repair or replace, free
of charge, to the original retail customer, in North America,
any parts of the portable generator found by Northshore
Power Systems or an authorized service center to be defective in material or workmanship. This limited warranty covers
the cost of the replacement parts and labor for defects. Transportation charges are the responsibility of the customer. This
limited warranty has time period conditions, operating conditions and disclaimers, limitations of remedies & exclusions as
stated below. For warranty service, customer should locate
an authorized Honeywell Generator Dealer from www.honeywellgenerators.com or by calling 1-888-HWHELP1 (494-
3571).
LIMITED WARRANTY PERIODS
Consumer Use: 3 Years Limited. 1st year, parts and labor.
2nd & 3rd years, parts only.
Commercial Use: 1 Year Limited. No warranty for rental use.
Commencement and Definitions.The limited warranty period
begins on the date of retail purchase by the original purchaser. The limited warranty is not transferable. "Consumer
use" is personal use by a retail customer. "Commercial use"
is any usage for income producing, business related use.
No Extension of Warranty. Repair or replacement pursuant to
this limited warranty shall not renew or extend the original
warranty period, and any repaired product shall be warranted
for the remaining original warranty period only.
DISCLAIMERS, LIMITATIONS OF REMEDIES &
EXCLUSIONS
This warranty gives you specific legal rights, and you may
also have other rights which vary from state to state.
MEDICAL AND LIFE SUPPORT USES. This warranty
excludes any use of this product intended to power life support devices, life support appliances, medical devices, or
medical appliances.
DISCLAIMER OF OTHER WARRANTIES. TO THE FULLEST EXTENT PERMITTED BY APPLICABLE LAW, THIS
LIMITED WARRANTY IS EXCLUSIVE AND EXPRESSLY IN
LIEU OF ANY AND ALL OTHER WARRANTIES, INCLUDING, WITHOUT LIMITATION, ANY IMPLIED WARRANTIES
OF MERCHANTABILITY OR FITNESS FOR A PARTICULAR
PURPOSE OR ANY OTHER IMPLIED WARRANTIES THAT
MAY ARISE FROM A COURSE OF DEALING OR USAGE
OF TRADE. NORTHSHORE POWER SYSTEMS HEREBY
DISCLAIMS AND EXCLUDES ALL OTHER WARRANTIES.
To the extent that Northshore Power Systems's products are
consumer products under applicable federal or state law with
respect to any customer, the duration of any implied warranties (including, but not limited to, implied warranties of merchantability or fitness for a particular purpose) are limited to
the shortest duration permitted by applicable law or the limited warranty period provided herein, whichever is longer.
LIMITATIONS OF REMEDIES. NORTHSHORE POWER
SYSTEMS SHALL NOT BE LIABLE TO CUSTOMER, OR TO
ANYONE CLAIMING UNDER CUSTOMER, FOR ANY
OTHER OBLIGATIONS OR LIABILITIES, INCLUDING, BUT
NOT LIMITED TO, OBLIGATIONS OR LIABILITIES ARISING
OUT OF BREACH OF CONTRACT OR WARRANTY, NEGLIGENCE OR OTHER TORT OR ANY THEORY OF STRICT
LIABILITY, WITH RESPECT TO THE GENERATOR OR
NORTHSHORE POWER SYSTEMS'S ACTS OR OMISSIONS OR OTHERWISE. TO THE FULLEST EXTENT PERMITTED BY APPLICABLE LAW, NORTHSHORE POWER
SYSTEMS SHALL NOT, IN ANY EVENT, BE LIABLE FOR
INCIDENTAL, COMPENSATORY, PUNITIVE, CONSEQUENTIAL, INDIRECT, SPECIAL OR OTHER DAMAGES,
INCLUDING BUT NOT LIMITED TO LOSS OF USE, LOSS
OF INCOME, LOSS OF TIME, LOSS OF SALES, INJURY
TO PERSONAL PROPERTY, OR LIABILITY CUSTOMER
INCURS WITH RESPECT TO ANY OTHER PERSON, OR
ANY OTHER TYPE OR FORM OF CONSEQUENTIAL DAMAGE OR ECONOMIC LOSS.
EXCLUSIONS. In addition to the foregoing disclaimers, limitations and terms, this limited warranty shall not apply to and
does not cover accessories, nor does it cover products that
are in any way subjected to: (i) improper setup, installation or
storage; (ii) lack of proper maintenance and service; (iii) accident, damage, abuse or misuse; (iv) abnormal operating conditions or applications; (v) repair or modification by customer
or any third party without prior written consent of Northshore
Power Systems; (vi) use under operating conditions or in
applications not made known to or contemplated by Northshore Power Systems; or (viii) acts of God. The application of
these exclusions will be determined at Northshore Power
Systems's sole discretion.
REGISTRATION
Warranty registration with the Company is required on all
products. You may send in the enclosed Product Registration,
or register your product on-line at www.honeywellgenerators.com.
Warranty is also available by keeping and showing your original receipt from date of purchase to an authorized Honeywell
Generator Dealer.
GENERATOR SERVICE
Do not return your generator to place of purchase for service.
For all customer service inquiries, call 1-888-HWHELP1
(494-3571) or visit www.honeywellgenerators.com.
Warranty inquiries can be addressed to:
Northshore Power Systems, LLC
Attention: Service and Warranty Dept.
4425 N. Port Washington Road
Suite 105
Milwaukee, WI 53212-1082
Honeywell Portable Electrical Generator Service Manual www.honeywellgenerators.com 2-1
Page 8

WARRANTIES
NORTHSHORE POWER SYSTEMS
EMISSIONS CONTROL WARRANTY
Honeywell Portable Generator
WARRANTY STATEMENT
The U.S. Environmental Protection Agency (EPA) and California Air Resources Board (CARB) require manufacturers of
small off-road engines (SORE) to warranty their products with
a 2-year warranty for those components that are specified as
being part of the emission control system. Northshore Power
Systems, LLC, CARB, and EPA offer the following explanation of the Emission Control Warranty.
In the United States and California, new small off-road
engines must be designed, built, and equipped to meet stringent anti-smog standards. Northshore Power Systems must
warrant the emission control system on your 2010 small offroad engine for the periods of time listed below provided
there has been no abuse, neglect or improper maintenance
of your small off-road engine. The emissions warranty is a
defects warranty and is not related to an in-use emissions
test.
Your emission control system may include parts such as the
carburetor or fuel injection system, the ignition system, and
the catalytic converter. Also included may be hoses, belts,
connectors and other emission-related assemblies.
Where a warrantable condition exists, Northshore Power Systems will repair your small off-road engine at no cost to you,
including diagnosis, parts, and labor.
COVERAGE
Emissions control parts on the engine are warranted for a
period of two years, subject to provisions set below. If any
covered part on your engine is defective, the part will be
repaired or replaced by Northshore Power Systems.
OWNER’S RESPONSIBILITIES
You are responsible to maintain the engine as defined in your
Honeywell Generator Owner's Manual. Northshore Power
Systems recommends that you retain all records/receipts
covering maintenance on your engine, but Northshore Power
Systems cannot deny warranty claims based on the lack of
receipts or for your failure to perform all scheduled maintenance. You may be denied warranty coverage if a part has
failed due to abuse, neglect, improper maintenance or unapproved modifications.
You are responsible to bring your portable generator to an
authorized Northshore Power Systems Honeywell generator
dealer for repairs as soon as a problem exists. Do not return
your generator to place of purchase for service. For emissions warranty service, contact your nearest dealer; a listing
is available at www.honeywellgenerators.com or by calling
1-877-HWTECHS (498-3247).
2.1 WARRANTIES
EMISSIONS CONTROL SYSTEMS PARTS
Coverage under this warranty extends only to the emissions
control parts listed below.
1. Fuel Metering System
A. Carburetor gaskets
B. Choke system
C. Clamps
D. Fuel filter (if equipped) and screen
E. Fuel line, control valve, and fittings
F. Fuel pump (if equipped)
G. Gasoline carburetor and internal components
(if equipped)
2. Air Induction System
A. Air cleaner
B. Intake manifold
C. Vent lines
3. Ignition System
A. Ignition coil
B. Spark plug
4. Exhaust System
A. Catalytic converter (if equipped)
B. Exhaust manifold
C. Muffler gasket
5. Crankcase Breather Assembly
A. Breather connection tube
6. Air Injection System
A. Pulse valve
7. Fuel Tank Evaporative Emissions Control System
A. Carbon canister and mounting brackets
B. Fuel cap
C. Fuel tank
D. Purge valves
8. Miscellaneous Items used in above systems
A. Hoses, belts, connectors, valves, and assemblies
B. Switches
WARRANTY PROVISIONS
1. Claims. Warranty claims shall be filed in accordance
with provisions of the Northshore Power Systems warranty and policies established with the authorized dealer
network.
2. Exclusions. Warranty coverage shall be denied for failure of an emissions control part caused by abuse,
neglect, improper maintenance as described in the Honeywell Generator Owner's Manual, use of add-on parts,
modified parts, or parts that are not equivalent to original
Honeywell generator parts in performance and durability.
3. Length of Coverage. Northshore Power Systems warrants to the original retail purchaser and each subsequent owner that the emissions control part shall be free
from defects in materials and workmanship for a period
of two years from the date the generator is delivered to
the original retail customer.
2-2 www.honeywellgenerators.com Honeywell Portable Electrical Generator Service Manual
Page 9

4. Repair or Replacement Cost. Repair or Replacement
Cost. Repair or replacement of any emissions control
part will be performed at no charge to the owner, including diagnostic labor which leads to the determination that
an emissions control part is defective, if the diagnostic
work is performed at an authorized Northshore Power
Systems Honeywell generator dealer.
5. Consequential Coverage. Coverage noted hereunder
will extend to the failure of any engine components
caused by the failure of any emissions control part still
under warranty.
6. Maintenance. The emissions control parts are warranted only for defects during the warranty period. The
warranty does not cover an emission control part that is
replaced or repaired as required by the maintenance
schedule defined in the Honeywell Generator Owner's
Manual. Any replacement part that is equivalent in performance and durability may be used for maintenance or
repairs.
QUESTIONS
If you have questions regarding your emissions warranty
rights and responsibilities, you should contact the Service
and Warranty Department at Northshore Power Systems.
By phone: 1-877-HWTECHS (498-3247)
By email: service@nspsystems.com
By US mail:
Northshore Power Systems, LLC
Attention: Service and Warranty Dept.
4425 N. Port Washington Road
Suite 105
Milwaukee, WI 53212-1082
WARRANTIES
Honeywell Portable Electrical Generator Service Manual www.honeywellgenerators.com 2-3
Page 10

WARRANTIES
NORTHSHORE POWER SYSTEMS
REPLACEMENT PARTS LIMITED WARRANTY
Honeywell Portable Generator
For a period of 90 days from the date of sale or installation of
a Northshore Power Systems, LLC supplied part, Northshore
Power Systems will, at its option and sole discretion, repair or
replace the part if it is found to be defective in material or
workmanship after inspection by Northshore Power Systems.
Any parts which the buyer claims to be defective must be
examined by the nearest Authorized Northshore Power Systems Warranty Service Facility. All shipping costs under this
limited warranty are to be borne and prepaid by the buyer.
DISCLAIMERS, LIMITATIONS OF REMEDIES &
EXCLUSIONS
This warranty gives you specific legal rights, and you may
also have other rights which vary from state to state.
DISCLAIMER OF OTHER WARRANTIES. TO THE FULLEST EXTENT PERMITTED BY APPLICABLE LAW, THIS
LIMITED WARRANTY IS EXCLUSIVE AND EXPRESSLY IN
LIEU OF ANY AND ALL OTHER WARRANTIES, INCLUDING, WITHOUT LIMITATION, ANY IMPLIED WARRANTIES
OF MERCHANTABILITY OR FITNESS FOR A PARTICULAR
PURPOSE OR ANY OTHER IMPLIED WARRANTIES THAT
MAY ARISE FROM A COURSE OF DEALING OR USAGE
OF TRADE. NORTHSHORE POWER SYSTEMS HEREBY
DISCLAIMS AND EXCLUDES ALL OTHER WARRANTIES.
To the extent that Northshore Power Systems's products are
consumer products under applicable federal or state law with
respect to any customer, the duration of any implied warranties (including, but not limited to, implied warranties of merchantability or fitness for a particular purpose) are limited to
the shortest duration permitted by applicable law or the limited warranty period provided herein, whichever is longer.
LIMITATIONS OF REMEDIES. NORTHSHORE POWER
SYSTEMS SHALL NOT BE LIABLE TO CUSTOMER, OR TO
ANYONE CLAIMING UNDER CUSTOMER, FOR ANY
OTHER OBLIGATIONS OR LIABILITIES, INCLUDING, BUT
NOT LIMITED TO, OBLIGATIONS OR LIABILITIES ARISING
OUT OF BREACH OF CONTRACT OR WARRANTY, NEGLIGENCE OR OTHER TORT OR ANY THEORY OF STRICT
LIABILITY, WITH RESPECT TO THE GENERATOR OR
NORTHSHORE POWER SYSTEMS'S ACTS OR OMISSIONS OR OTHERWISE. TO THE FULLEST EXTENT PERMITTED BY APPLICABLE LAW, NORTHSHORE POWER
SYSTEMS SHALL NOT, IN ANY EVENT, BE LIABLE FOR
INCIDENTAL, COMPENSATORY, PUNITIVE, CONSEQUENTIAL, INDIRECT, SPECIAL OR OTHER DAMAGES,
INCLUDING BUT NOT LIMITED TO LOSS OF USE, LOSS
OF INCOME, LOSS OF TIME, LOSS OF SALES, INJURY
TO PERSONAL PROPERTY, OR LIABILITY CUSTOMER
INCURS WITH RESPECT TO ANY OTHER PERSON, OR
ANY OTHER TYPE OR FORM OF CONSEQUENTIAL DAMAGE OR ECONOMIC LOSS.
EXCLUSIONS. In addition to the foregoing disclaimers, limitations and terms, this limited warranty shall not apply to and
does not cover products that are in any way subjected to: (i)
improper setup, installation or storage; (ii) lack of proper
maintenance and service; (iii) accident, damage, abuse or
misuse; (iv) abnormal operating conditions or applications;
(v) repair or modification by customer or any third party without prior written consent of Northshore Power Systems; (vi)
use under operating conditions or in applications not made
known to or contemplated by Northshore Power Systems; or
(vii) acts of God. The application of these exclusions will be
determined at Northshore Power Systems's sole discretion.
NORTHSHORE POWER SYSTEMS PARTS LIMITED
WARRANTY CLAIMS PROCEDURES
DEFECTIVE NEW PARTS. Parts which are defective from
new stock, or immediately upon installation must be filed
under limited warranty. The defective part must be returned to
Northshore Power Systems’s Service and Warranty Department under the following procedure:
1. Fill out a Warranty Claim Form listing the part number
and write “New Defective” in the description.
2. List invoice number that the part was purchased on and/
or provide receipt.
NOTE: Freight damaged parts are not valid as warranty
claims.
FAILURE WITHIN 90 DAYS. Parts which have been installed
and have failed within 90 days will be handled by the Northshore Power Systems Service and Warranty Department. A
Warranty Claim Form must accompany each part for which
coverage under the limited warranty is sought. Claims will not
be processed without the model and serial numbers of the
unit and the purchase and failure dates for the part. Attach a
copy of the original proof-of-purchase (for the part) to the
Warranty Claim Form.
WARRANTY CLAIMS
For all customer service inquiries, call 1-877-HWTECHS
(498-3247) or visit www.honeywellgenerators.com.
Warranty claim forms and inquiries can be addressed to:
Northshore Power Systems, LLC
Attention: Service and Warranty Dept.
4425 N. Port Washington Road
Suite 105
Milwaukee, WI 53212-1082
2-4 www.honeywellgenerators.com Honeywell Portable Electrical Generator Service Manual
Page 11
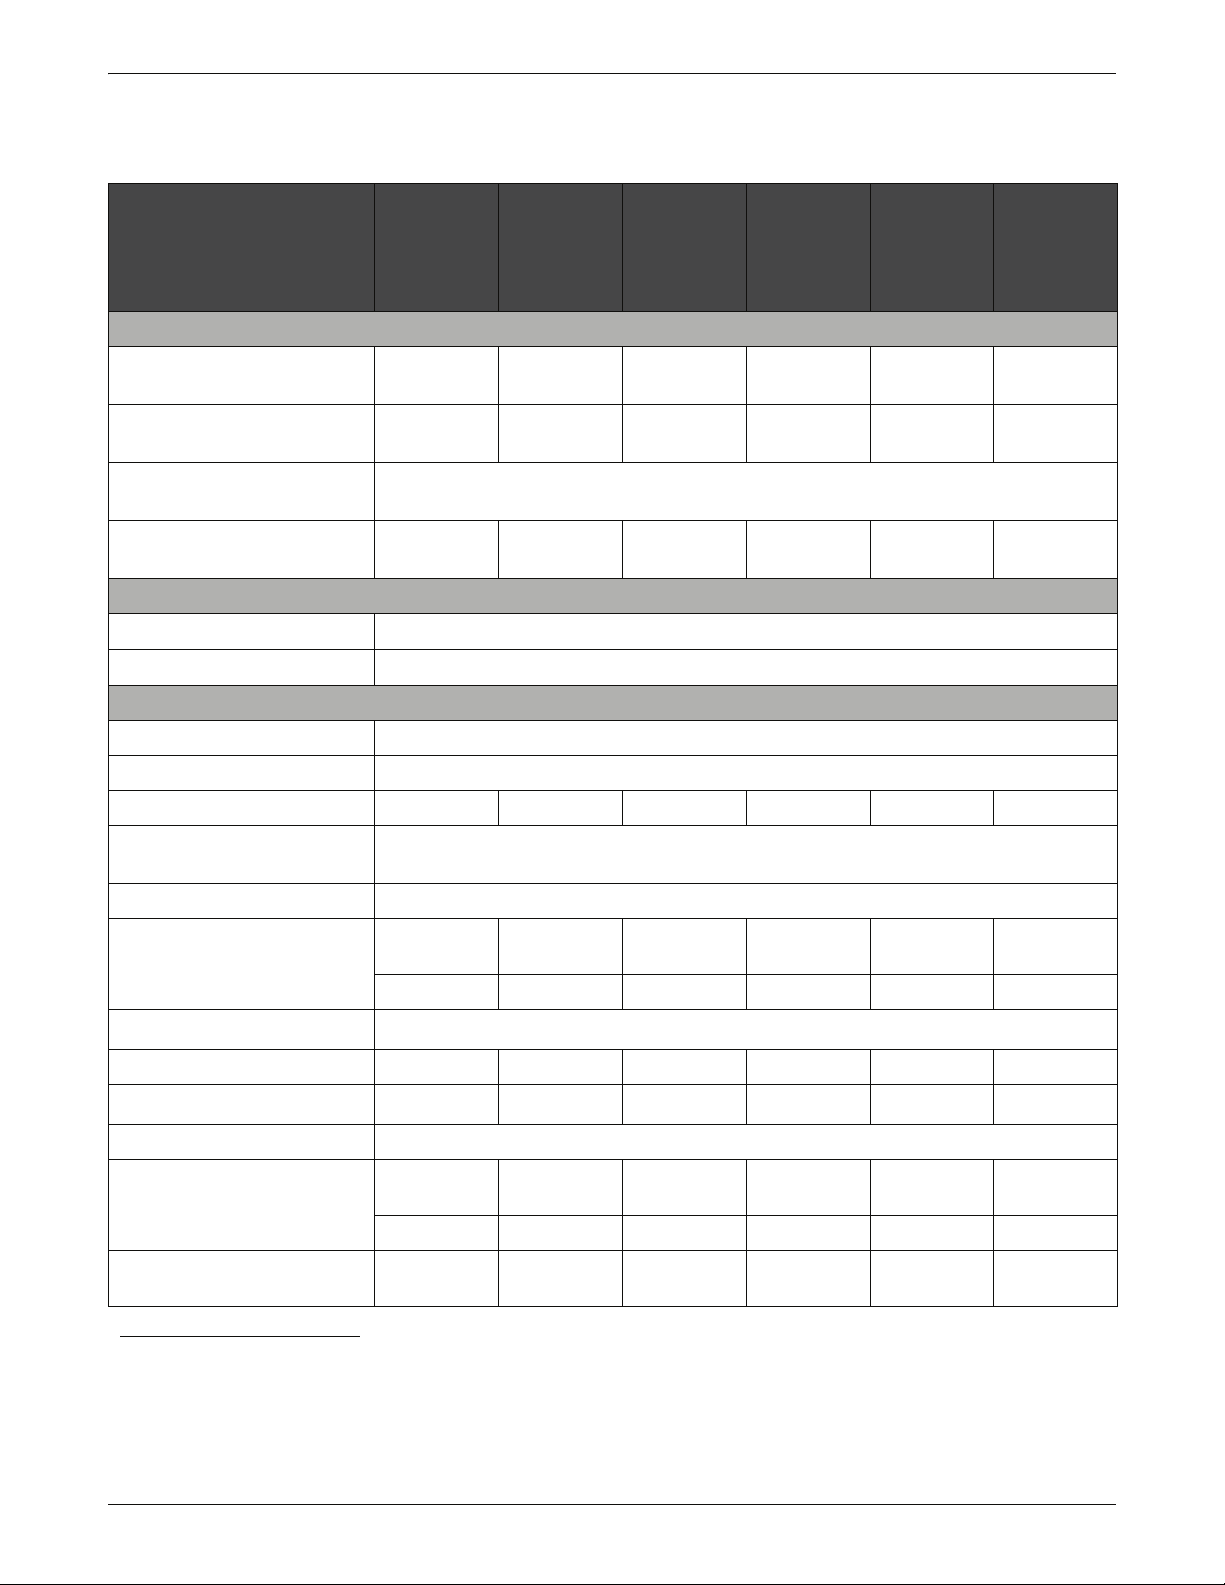
3: SPECIFICATIONS AND WIRING DIAGRAMS
3.1 SPECIFICATIONS
HW5500
HW5500E
HW5500EL
HW5500L
POWER
GENERATOR
HW3000
HW3000L
HW4000
HW4000L
HW6200
HW6200L
HW7000E
HW7000EL
HW7500E
HW7500EL
Rated [watts]
(+/-10% under load)
Maximum [watts]
(+/-10% under load)
Frequency [hertz]
(+/-5% under load)
Voltage [volts]
(+/-5% under load)
OPERATING TEMPERATURE
Maximum [F / C]
Minimum [F / C]
ENGINE
Speed [rpm]
Type OHV 4-cycle
Displacement [cc]
Valve Lash [in /mm]
Fuel
Fuel Tank Capacity [gal / L]
(Non-L Models)
3000 4000 5500 6200 7000 7500
3750 5000 6875 7750 8750 9375
60
120 120 / 240 120 / 240 120 / 240 120 / 240 120 / 240
104 / 40
14 / -10
3600
196 242 337 389 420 420
IN: 0.005±0.001 / 0.125±0.025
EX: 0.007±0.001 / 0.175±0.025
87 or higher unleaded
4.2 / 16 6.5 / 24.6 6.5 / 24.6 6.5 / 24.6 6.6 / 25 6.5 / 24.6
(Model Numbers Ending in “L”)
Engine Oil
Engine Oil Capacity [qt / L] 0.6 / 0.6
Spark Plug
Spark Plug Gap [in /mm]
Air Filter
(Non-L Models)
(Model Numbers Ending in “L”)
Battery
(Electric Start Models Only)
TABLE 3-1: Honeywell Portable Generator Specifications
* See ENGINE OIL RECOMMENDATIONS, page 7-3 for other engine oil types outside general temperature use.
† See SPARK PLUG SERVICE, page 7-5 for other recommended spark plug replacements.
Honeywell Portable Electrical Generator Service Manual www.honeywellgenerators.com 3-1
3.2 / 12 6.5 / 24.6 6.5 / 24.6 6.5 / 24.6 6.1 / 23 6.5 / 24.6
SAE 10W-30
*
1.2 / 1.1 1.2 / 1.1 1.2 / 1.1 1.2 / 1.1 1.2 / 1.1
102557A
†
100842A
†
100842A
†
100842A
†
100842A
†
100842A
0.028-0.031 / 0.7-0.8
102555A 100833A 100833A 100833A 100833A 100833A
102556A 101865A 101865A 101865A 101865A 101865A
-- -- 101536A -- 101536A 101536A
†
Page 12

BOLT AND FASTENER TORQUE INFORMATION
3.2 BOLT AND FASTENER TORQUE INFORMATION
Component-Specific Fastener Fastener Size
Alternator End Cover Bolts M5 x 0.75 x 12 4 3
Alternator Housing Bolts M10 x 1.25 x 80 48 35
Axle Bracket Bolts M8 x 1.0 x 16 25 18
Brush Assembly Bolt M5 x 0.75 x 16 2 2
Carbon Canister Bracket Bolts M6 x 1.0 x 10 2 2
Connecting Rod Bolts M8 x 1.25 15 11
Control Panel Bolts M6 x 1.0 x 15 4 3
Cooling Fan Flange Nut
Crankcase Cover Bolts M8 x 1.25 x 40 28 21
Cylinder Head Bolts M10 x 1.25 x 80 48 35
Exhaust Pipe Bolts M8 x 32 18 13
Fuel Shut-off Valve Hex Fitting M10 x 1.25 24 17
Fuel Tank Mounting Bolts M6 x 1.0 x 25 10 7
Ignition Coil Bolts M6 x 1.0 x 25 10 7
Muffler Cover Bolts M6 x 1.0 x 14 4 3
M18 x 1.5
Torque Values
N•m lb. ft.
105 77
Muffler Rear Mounting Bracket Bolts M8 x 1.0 x 16 18 13
Muffler Side Guard Bolts M6 x 1.0 x 14 4 3
Oil Drain Screw M12 x 1.5 32 24
Pivot Adjusting Nuts M6 x 0.75 12 9
Pivot Bolts M8 x 1.25 30 22
Rotor Bolt -- 48 35
Spark Arrestor Clamp Screw M4 x 0.75 x 16 1 1
Spark Arrestor Screw M3.5 x 0.75 x 10 1 1
Spark Plug 13/16” 28 21
Starter Solenoid Terminal Nut M6 x 1.0 6 4
Support Leg to Frame Bolts M8 x 1.0 x 16 25 18
Support Leg to Rubber Stopper Bolts M8 x 1.0 x 25 25 18
Wheel Handle Pivot Bracket Bolts M6 x 1.0 x 40 10 7
TABLE 3-3: Torque Values
3-2 www.honeywellgenerators.com Honeywell Portable Electrical Generator Service Manual
Page 13
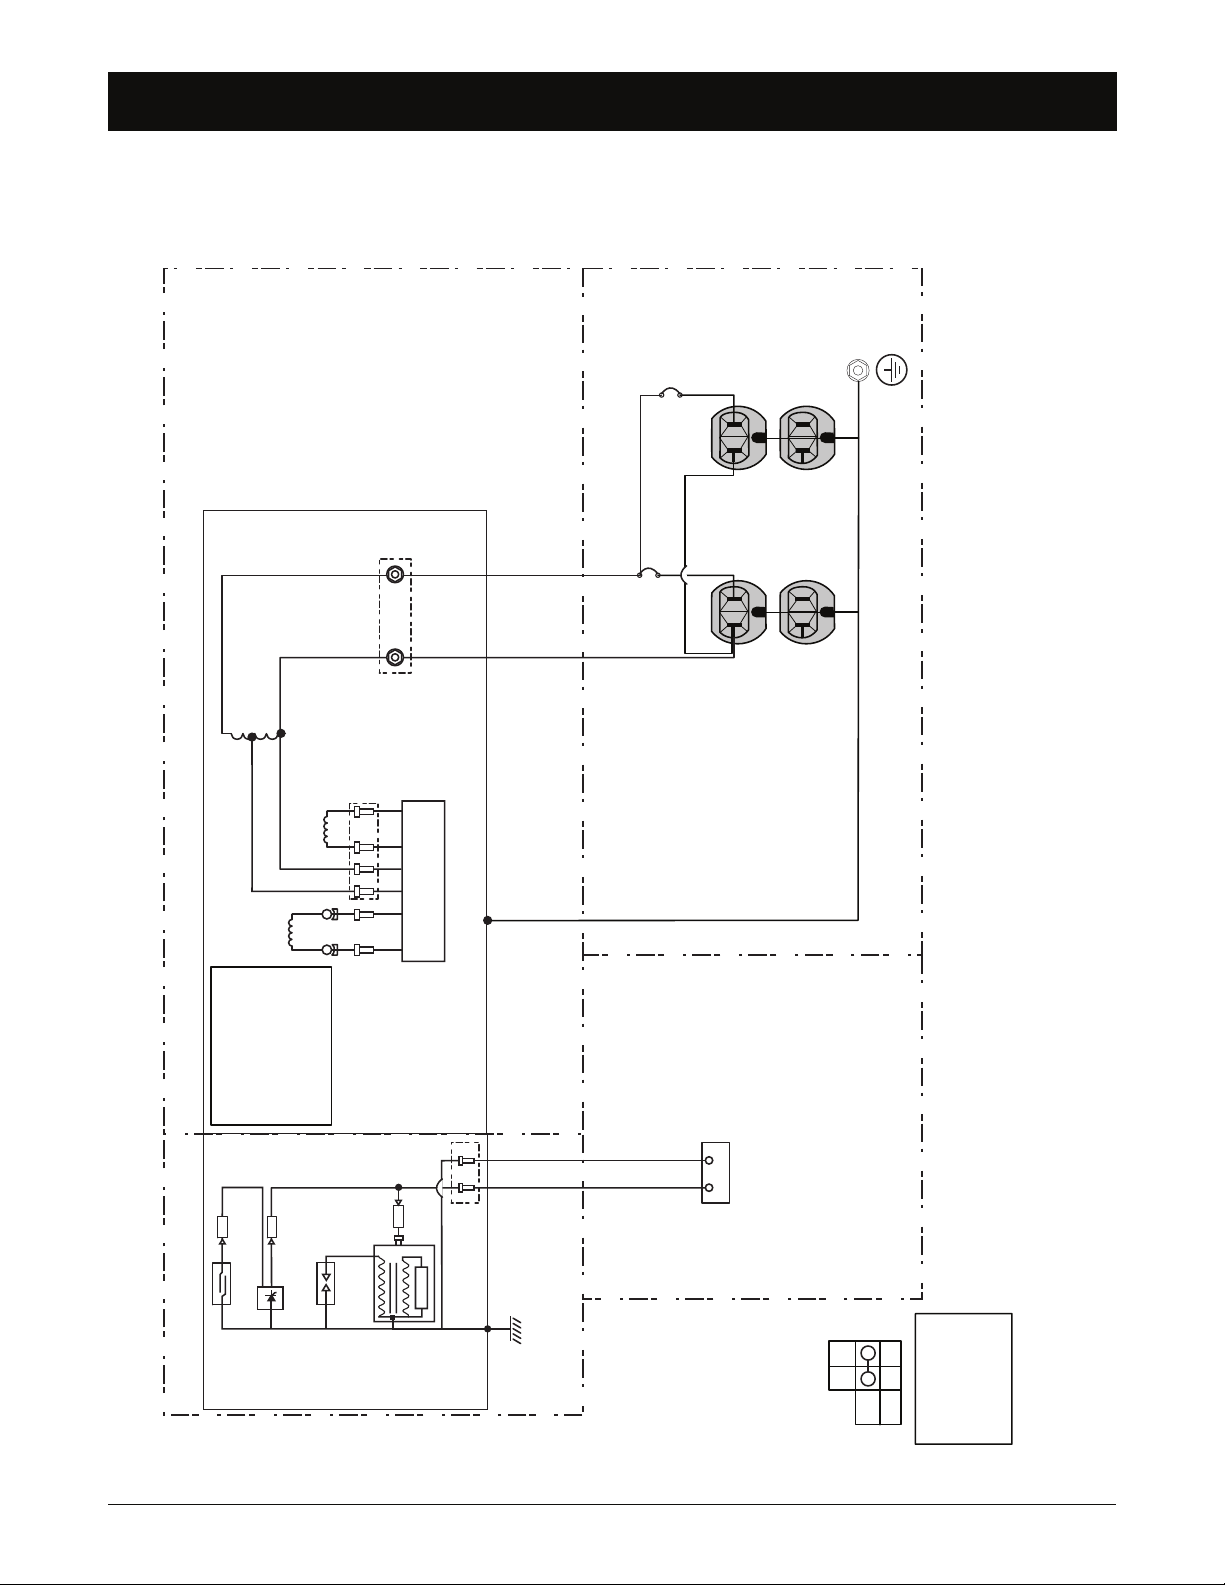
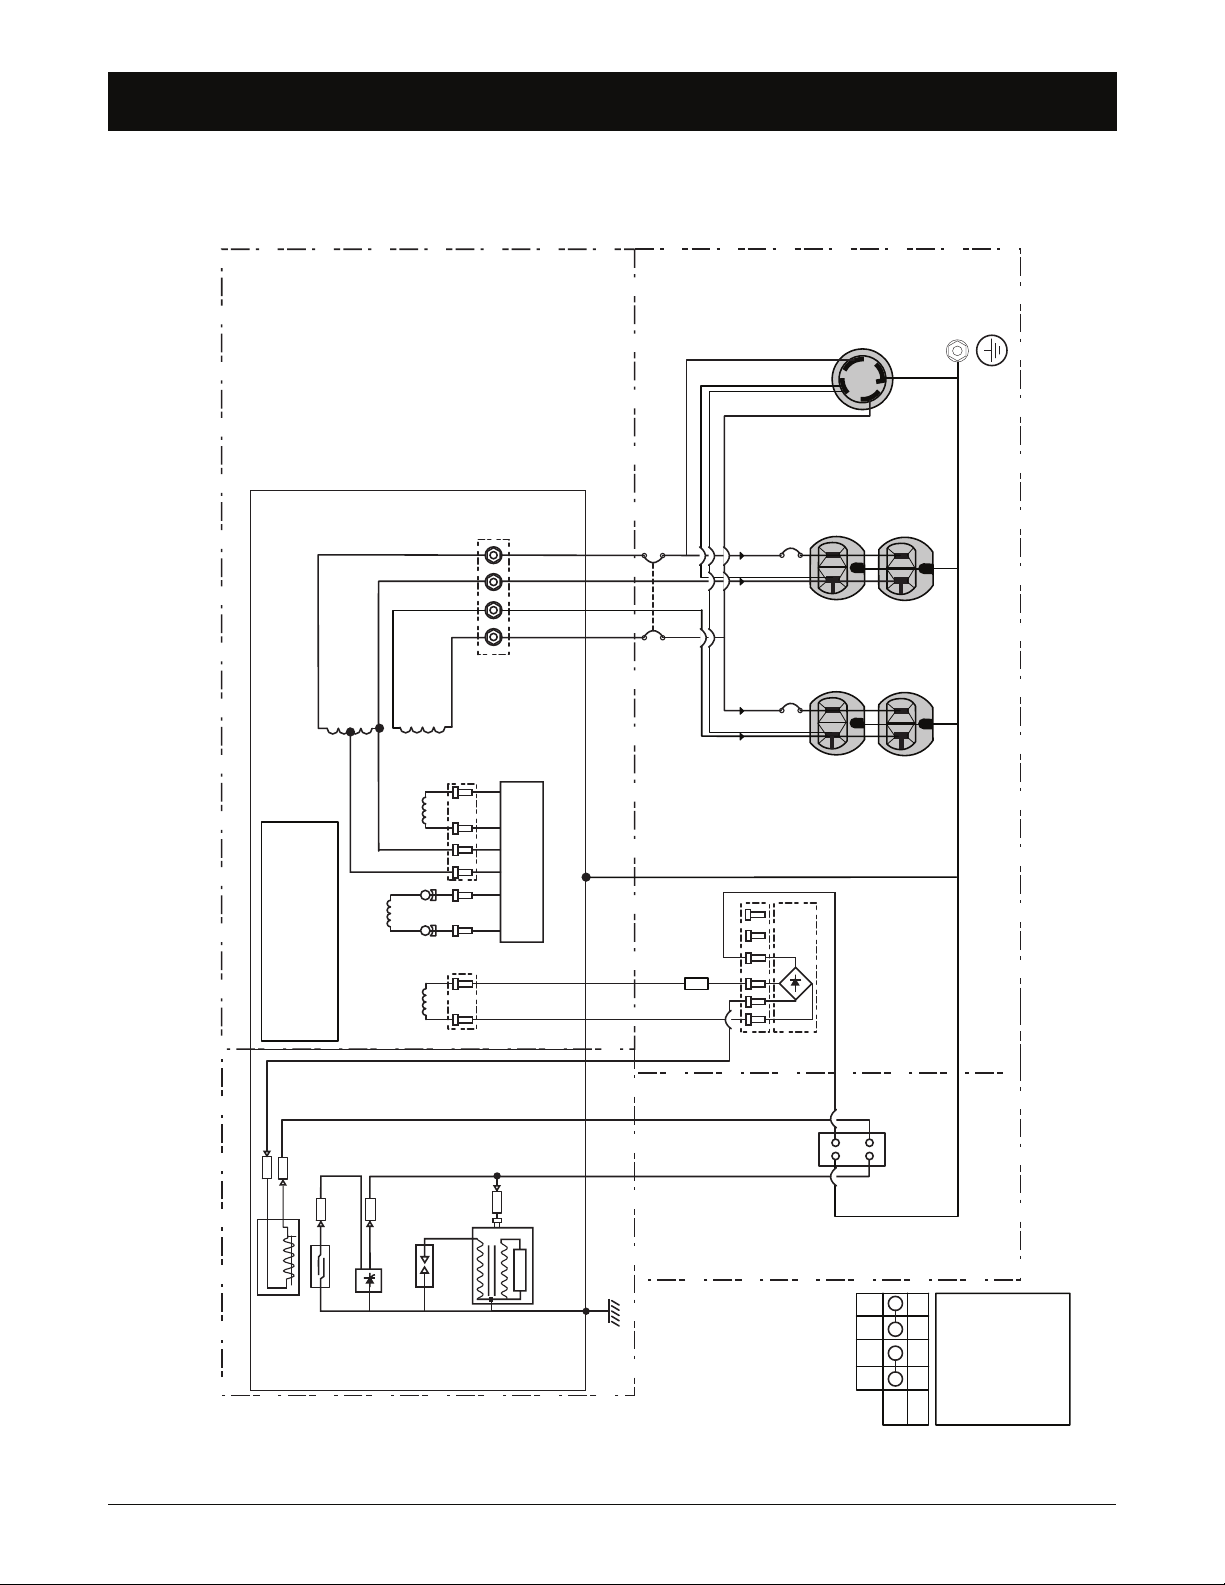
3.3 WIRING DIAGRAMS
OIL ALERT
SENDER
SPARK
PLUG
OIL
SHUTDOWN
SWITCH
IGNITION
COIL
ENGINE BLOCK
Y
Y
Bl
Bl
Bl
Bl
ENGINE
CONTROL
SWITCH
Bl Y/G
Y/G
EIG
GROUND
TERMINAL
DUPLEX
5-20R
Y/G 2.5 mm
2
THERMAL
AC BREAKER
15A
G
WX
FIELD
WINDING
MAIN
WINDING
EXCITER
WINDING
AVR
YBu BuBr Y Y
120 VAC
Bl 4 mm
2
W 4 mm
2
WBl
ALTERNATOR
Bl - Black
Bu - Blue
Br - Brown
Y - Yellow
Y/G - Yellow / Green
W - White
THERMAL
AC BREAKER
10A
NOTE:
Alternator is mechanically
connected to the engine
block providing ground
connection between the
engine block and the
alternator frame.
ON/OFF SWITCH PANEL
G
WX
G
WX
G
WX
LEFT* RIGHT*
*15 Amp Breaker will be on the left side when looking at the control panel front;10 Amp Breaker will be on the right side
W 2.5 mm
2
Bl 2.5 mm
2
Bl 2.5 mm
2
Bl 2.5 mm
2
DUPLEX
5-20R
OFF
ON
Bl Y/G
HW3000 & HW3000L
WIRING DIAGRAMS
ALTERNATOR
CONTROL PANEL
ENGINE
FIGURE 3-1: HW3000 & HW3000L Wiring Diagram
Honeywell Portable Electrical Generator Service Manual www.honeywellgenerators.com 3-3
Page 14
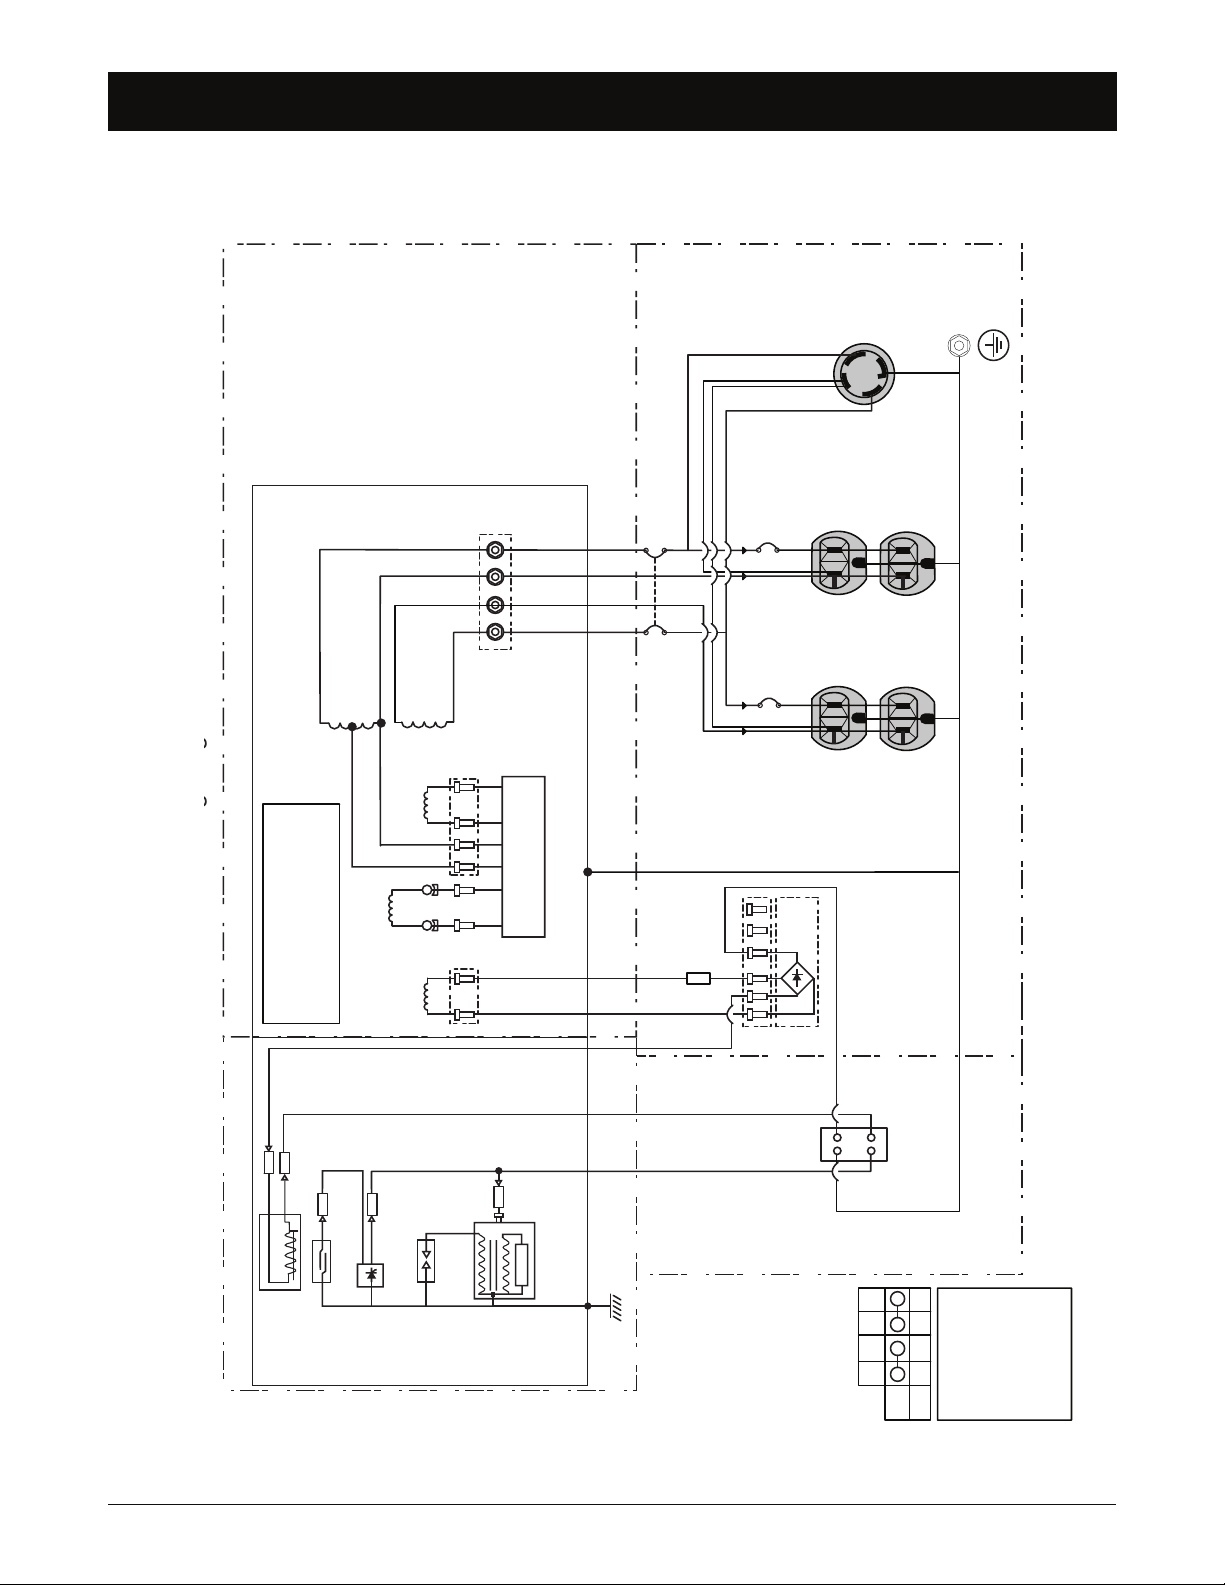
WIRING DIAGRAMS
G
Y
W
X
ALTERNATOR
CONTROL PANEL
ENGINE
OIL ALERT
SENDER
SPARK
PLUG
OIL
SHUTDOWN
SWITCH
IGNITION
COIL
ENGINE BLOCK
Y
Y
Bl
Y
Bl
Bl
ENGINE
CONTROL
SWITCH
Bl
Bu
EIG
GROUND
TERMINAL
DUPLEX 5-20R
Y/G
THERMAL
AC BREAKER
15A
G
WX
FIELD
WINDING
MAIN
WINDING
EXCITER
WINDING
AVR
WR WLg Bu Bu
ALTERNATOR
Bl - Black
Bu - Blue
Br - Brown
G/W - Green / White
Lg - Light Green
R - Red
Y - Yellow
Y/G - Yellow / Green
W - White
THERMAL
AC BREAKER
15A
NOTE:
Alternator is mechanically connected
to the engine block providing ground
connection between the engine block
and the alternator frame.
ON/OFF SWITCH PANEL
G
WX
DUPLEX 5-20R
G
WY
G
WY
MAIN
WINDING
Br WRBu
Br WRBu
FUEL
CUTOUT
WINDING
5A FUSE
G/W
G/W
TWIST-LOCK
L14-30R
Y/G
Br Br
MAGNETIC
AC BREAKER
15A
120 VAC
120 VAC
OFF
ON
Bu BlG/W Y/G
HW4000 & HW4000L
3-4 www.honeywellgenerators.com Honeywell Portable Electrical Generator Service Manual
FIGURE 3-2: HW4000 & HW4000L Wiring Diagram
FUEL CUTOUT
SOLENOID
Page 15
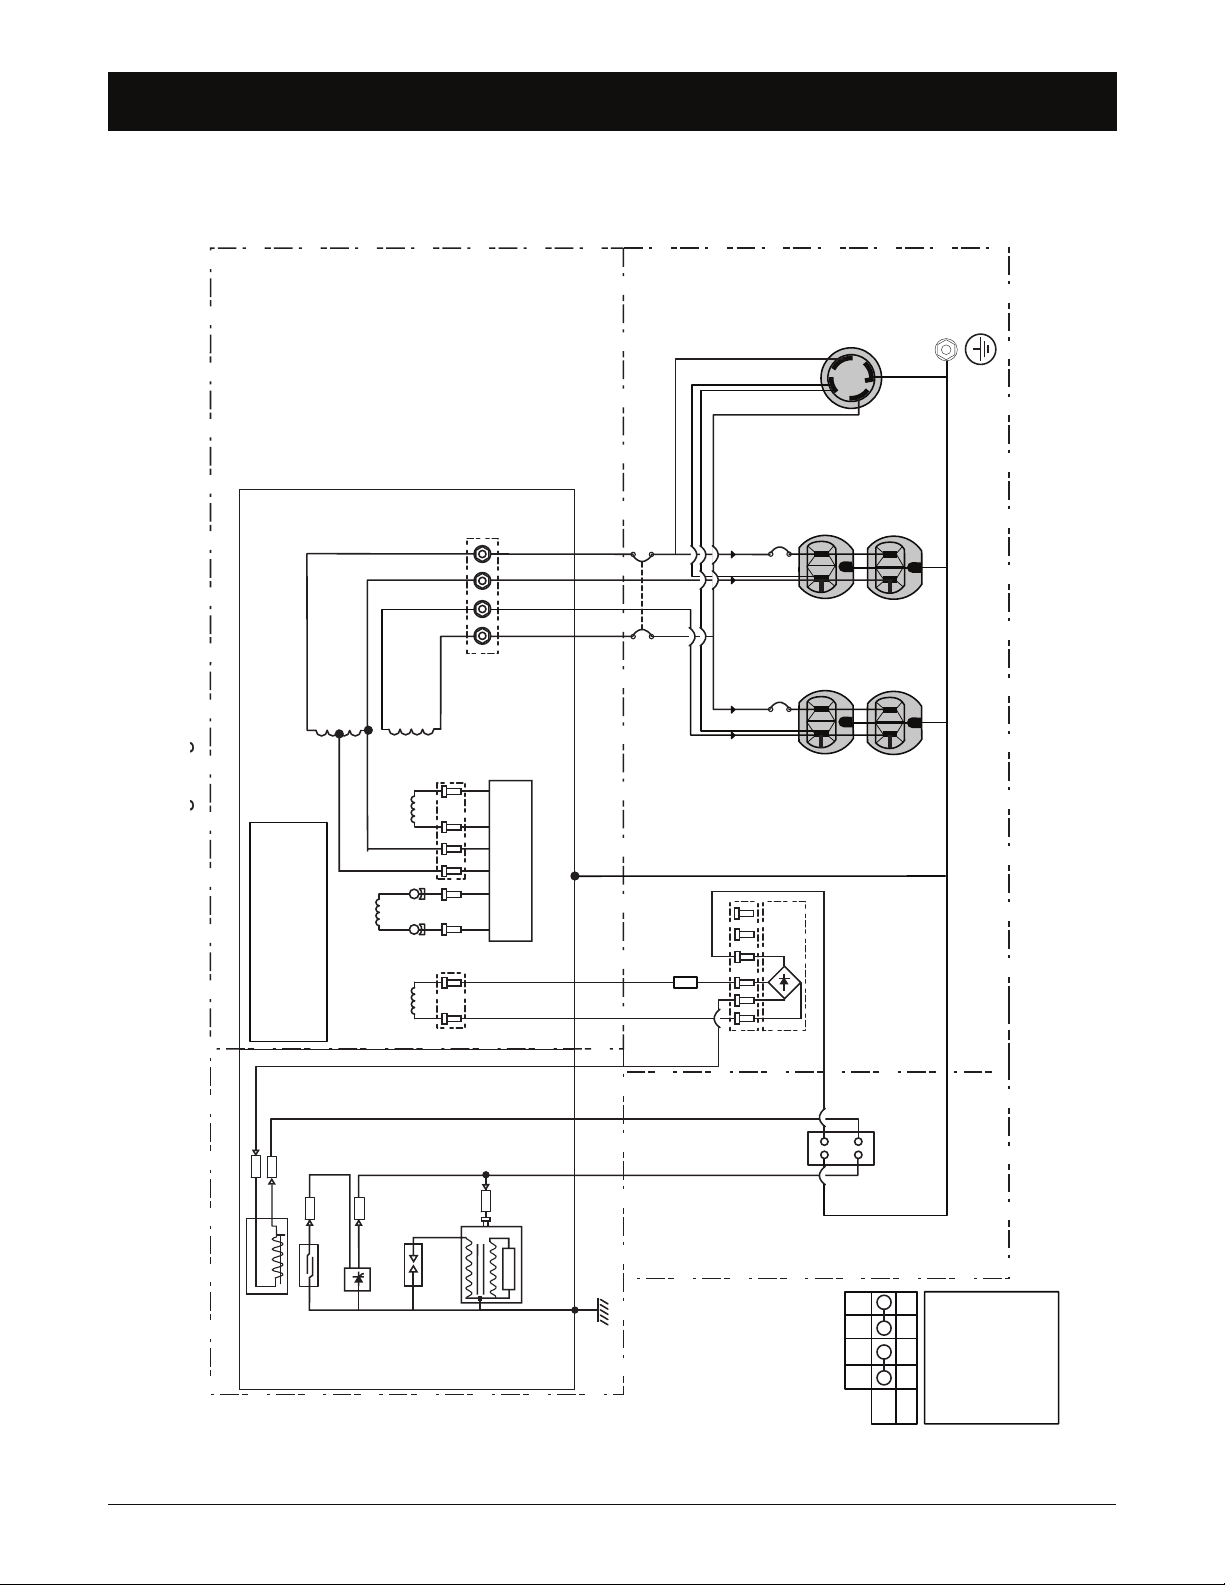
HW5500 & HW5500L
G
Y
W
X
ALTERNATOR
CONTROL PANEL
ENGINE
OIL ALERT
SENDER
SPARK
PLUG
OIL
SHUTDOWN
SWITCH
IGNITION
COIL
ENGINE BLOCK
Y
Y
Bl
Y
Bl
Bl
ENGINE
CONTROL
SWITCH
Bl
Bu
EIG
GROUND
TERMINAL
DUPLEX 5-20R
Y/G
THERMAL
AC BREAKER
20A
G
WX
FIELD
WINDING
MAIN
WINDING
EXCITER
WINDING
AVR
WR WLg Bu Bu
120 VAC
ALTERNATOR
Bl - Black
Bu - Blue
Br - Brown
G/W - Green / White
Lg - Light Green
R - Red
Y - Yellow
Y/G - Yellow / Green
W - White
THERMAL
AC BREAKER
20A
NOTE:
Alternator is mechanically connected
to the engine block providing ground
connection between the engine block
and the alternator frame.
ON/OFF SWITCH PANEL
G
WX
DUPLEX 5-20R
G
WY
G
WY
MAIN
WINDING
Br WRBu
Br WRBu
FUEL
CUTOUT
WINDING
5A FUSE
G/W
G/W
TWIST-LOCK
L14-30R
Y/G
Br Br
MAGNETIC
AC BREAKER
21A
120 VAC
OFF
ON
Bu BlG/W Y/G
WIRING DIAGRAMS
Honeywell Portable Electrical Generator Service Manual www.honeywellgenerators.com 3-5
FIGURE 3-3: HW5500 & HW5500L Wiring Diagram
FUEL CUTOUT
SOLENOID
Page 16
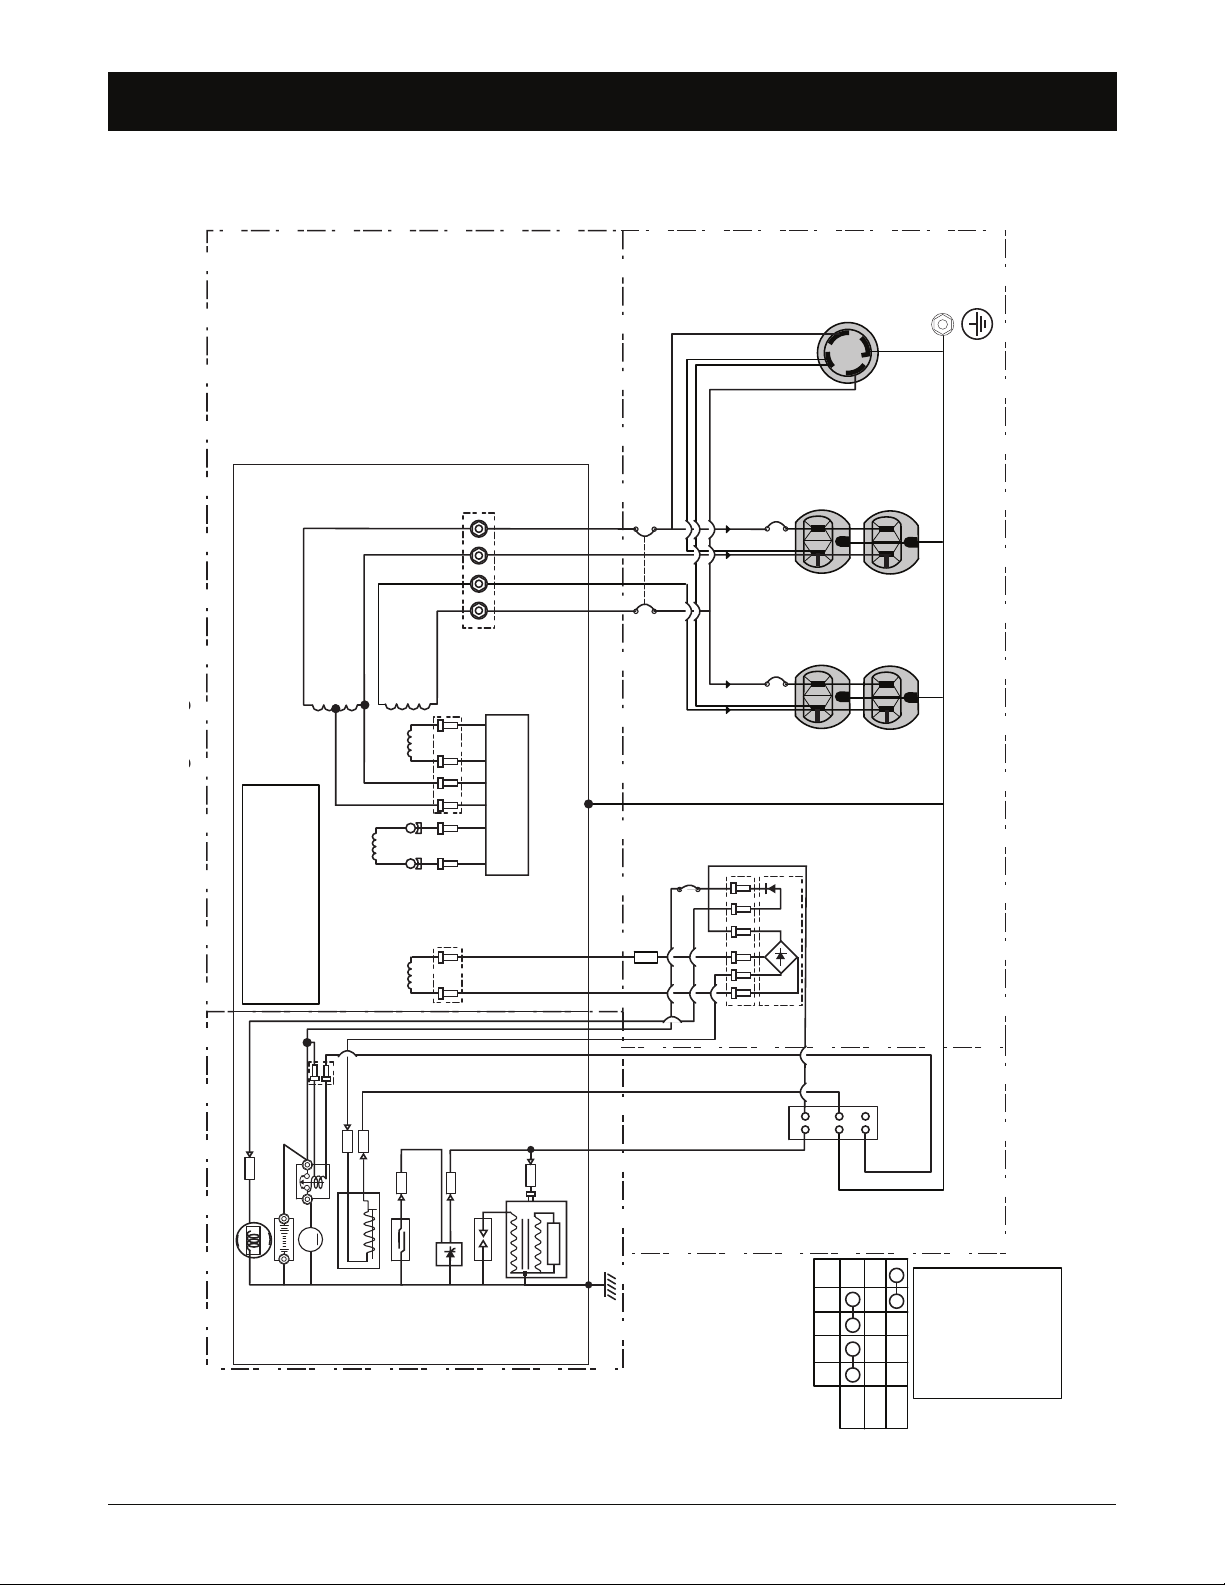
WIRING DIAGRAMS
G
Y
W
X
OIL ALERT
SENDER
SPARK
PLUG
OIL
SHUTDOWN
SWITCH
IGNITION
COIL
ENGINE BLOCK
Y
Y
Bl
Y
Bl
Bl
ENGINE
CONTROL
SWITCH
Y/G
Bu
EIG
GROUND
TERMINAL
DUPLEX 5-20R
Y/G
THERMAL
AC BREAKER
20A
G
WX
FIELD
WINDING
MAIN
WINDING
EXCITER
WINDING
AVR
WR WLg Bu Bu
120 VAC
ALTERNATOR
Bl - Black
Bl/W - Black / White
Bu - Blue
Br - Brown
G/W - Green / White
Lg - Light Green
R - Red
Y - Yellow
Y/G - Yellow / Green
W - White
THERMAL
AC BREAKER
20A
G
WX
DUPLEX 5-20R
G
WY
G
WY
MAIN
WINDING
Br WRBu
Br WRBu
FUEL
CUTOUT
WINDING
5A
FUSE
G/W
G/W
TWIST-LOCK
L14-30R
Bl
Br Br
MAGNETIC
AC BREAKER
21A
120 VAC
Br
CHARGE
COIL
BATTERY
STARTER
MOTOR
M
Gr
W
FUEL
CUTOUT
SOLENOID
AUTO
PROTECTOR
3A
Bl/W
Bl/W
OFF
START
Bu BlG/W Y/G
ON
Bl/W
NOTE:
Alternator is mechanically connected
to the engine block providing ground
connection between the engine block
and the alternator frame.
HW5500E & HW5500EL
ALTERNATOR
CONTROL PANEL
ENGINE
ON/OFF SWITCH PANEL
FIGURE 3-4: HW5500E & HW5500EL Wiring Diagram
3-6 www.honeywellgenerators.com Honeywell Portable Electrical Generator Service Manual
Page 17
HW6200 & HW6200L
G
Y
W
X
ALTERNATOR
CONTROL PANEL
ENGINE
OIL ALERT
SENDER
SPARK
PLUG
OIL
SHUTDOWN
SWITCH
IGNITION
COIL
ENGINE BLOCK
Y
Y
Bl
Y
Bl
Bl
ENGINE
CONTROL
SWITCH
Bl
Bu
EIG
GROUND
TERMINAL
DUPLEX 5-20R
Y/G
THERMAL
AC BREAKER
20A
G
WX
FIELD
WINDING
MAIN
WINDING
EXCITER
WINDING
AVR
WR WLg Bu Bu
ALTERNATOR
Bl - Black
Bu - Blue
Br - Brown
G/W - Green / White
Lg - Light Green
R - Red
Y - Yellow
Y/G - Yellow / Green
W - White
THERMAL
AC BREAKER
20A
NOTE:
Alternator is mechanically connected
to the engine block providing ground
connection between the engine block
and the alternator frame.
ON/OFF SWITCH PANEL
G
WX
DUPLEX 5-20R
G
WY
G
WY
MAIN
WINDING
Br WRBu
Br WRBu
FUEL
CUTOUT
WINDING
5A FUSE
G/W
G/W
TWIST-LOCK
L14-30R
Y/G
Br Br
MAGNETIC
AC BREAKER
25A
120 VAC
120 VAC
OFF
ON
Bu BlG/W Y/G
WIRING DIAGRAMS
Honeywell Portable Electrical Generator Service Manual www.honeywellgenerators.com 3-7
FIGURE 3-5: HW6200 & HW6200L Wiring Diagram
FUEL CUTOUT
SOLENOID
Page 18

WIRING DIAGRAMS
G
Y
W
X
OIL ALERT
SENDER
SPARK
PLUG
OIL
SHUTDOWN
SWITCH
IGNITION
COIL
ENGINE BLOCK
Y
Y
Bl
Y
Bl
Bl
ENGINE
CONTROL
SWITCH
Y/G
Bu
EIG
GROUND
TERMINAL
DUPLEX 5-20R
Y/G
SINGLE POLE
THERMAL
AC BREAKER
120V 20A
G
WX
FIELD
WINDING
MAIN
WINDING
EXCITER
WINDING
AVR
WR WLg Bu Bu
120 VAC
ALTERNATOR
Bl - Black
Bl / W - Black / White
Bu - Blue
Br - Brown
G/W - Green / White
Lg - Light Green
R - Red
Y - Yellow
Y/G - Yellow / Green
W - White
SINGLE POLE
THERMAL
AC BREAKER
120V 20A
G
WX
DUPLEX 5-20R
G
WY
G
WY
MAIN
WINDING
Br WRBu
Br WRBu
5A
FUSE
G/W
TWIST-LOCK
L14-30R
Bl
DUAL POLE
MAGNETIC
AC BREAKER
240V 30A
120 VAC
Br
CHARGE
COIL
BATTERY
STARTER
MOTOR
M
Gr
W
FUEL
CUTOUT
SOLENOID
Bl/W
OFF
START
Bu BlG/W Y/G
ON
Bl/W
FUEL
CUTOUT
WINDING
Br Br
AUTO
PROTECTOR
3A
Bl/W
NOTE:
Alternator is mechanically connected
to the engine block providing ground
connection between the engine block
and the alternator frame.
G/W
LEFT* RIGHT*
*When looking at the control panel front
HW7000E, HW7000EL, HW7500E, & HW7500EL
ALTERNATOR
CONTROL PANEL
ENGINE
FIGURE 3-6: HW7000E, HW7000EL, HW7500E & HW7500EL Wiring Diagram
3-8 www.honeywellgenerators.com Honeywell Portable Electrical Generator Service Manual
ON/OFF SWITCH PANEL
Page 19

4: COMPONENTS
K
G
B
I
H
J
E
C
D
A
F
M
L
N
Tripped
Set
CAUTION
WARNING
FIGURE 4-1: Honeywell Portable Electrical Generator Controls and Components (HW5500EL Model Illustrated)
A—Power Control Center
Electrical Outlets
• 125VAC 20 Amp Duplex (NEMA 5-20R) outlets to connect
120V appliances to generator for power.
• 125/250VAC 30 Amp Twist-Lock (NEMA L14-30R) outlet
(on select models) can be used to power appliances
using appropriate (NEMA L14-30P) power cord (with
select models) or connect a transfer switch (not
included) to a building’s main electrical system for
backup power.
Breakers
Protects circuits from damage caused by
overload or short-circuit by stopping the flow
of electricity from the generator to the appliance. Master circuit breaker controls power
to all outlets. If there is no power at outlets,
see TROUBLESHOOTING, page 8-1.
HW3000 / HW3000L models only:
• 15-amp circuit breaker (left outlet)
• 10-amp circuit breaker (right outlet)
Ground Terminal
Connects generator to ground wire for grounding protection.
E—Engine Control Switch
Control used to start and stop the engine ignition system.
• START—Starts generator engine (electric start models)
• RUN—Prepares engine to start (manual start models);
Indicates engine is currently running (electric start models)
• STOP—Stops generator engine by inhibiting ignition
F—Fuel Shut-off Valve
Controls flow of fuel from fuel tank to carburetor.
G—Recoil Starter Handle
Provides means to manually start engine, if needed.
H—Air Cleaner Assembly
Removes dust from engine intake air.
I— Choke Control
Controls choke valve. Choke control must be moved to
ON position when starting a cold engine.
J—Fuel Cap
Provides a secure seal on fuel tank.
K—Fuel Gage
Indicates level of fuel currently in fuel tank.
L—Muffler Equipped with Spark Arrestor
Provides outlet for engine exhaust. Prevents sparks and
other combustible materials from escaping generator.
Generator must be grounded to prevent electrical
shock from faulty appliances.
B—Battery Tray and Battery (Electric start models only)
Provides power for electric start feature.
C—Oil Fill Dipstick
Seals off engine oil fill hole and provides indicator for
engine oil level.
D—Oil Drain Screw
Allows engine oil to drain from generator.
Honeywell Portable Electrical Generator Service Manual www.honeywellgenerators.com 4-1
Muffler reaches temperatures that can cause serious
burns if touched. NEVER touch hot surfaces.
M—Spark Plug Cap (Wire)
Delivers voltage to spark plug. When spark plug needs
service, cap must be removed.
N—Carbon Canister (Model numbers ending in “L” only)
Reduces hydrocarbon emissions.
Page 20

THIS PAGE INTENTIONALLY LEFT BLANK
4-2 www.honeywellgenerators.com Honeywell Portable Electrical Generator Service Manual
Page 21

5: PREPARING FOR SERVICE
WARNING
WARNING
ANYONE using or servicing this generator must read, understand, and follow all safety and operation instructions provided in
this manual. Failure to closely follow these instructions can result in circumstances leading to death, serious injury, and property damage.
5.1 REQUIRED TOOLS
A complete set of standard and metric shop tools are
required to service the generator. Also needed are:
• Hammer
• Torque wrench
• Volt-ohm meter
• Frequency meter
• Resistive load - such as a load bank, heaters, light
bulbs, etc.
• Alternator removal tool
• Wood block (for rotor support)
5.2 TRANSPORTING GENERATOR
Hot engine or exhaust system can cause serious
burns or fires. Cool generator completely before
transporting.
When moving or transporting the generator:
• Press the engine control switch to the STOP position.
• Turn the fuel shut-off valve to the OFF position.
• Keep the generator level to prevent fuel spillage.
• Place pins in the handle and handle bracket before
moving the generator.
NOTICE
NEVER drop, strike, or place heavy objects on generator
when transporting.
Honeywell Portable Electrical Generator Service Manual www.honeywellgenerators.com 5-1
Page 22

THIS PAGE INTENTIONALLY LEFT BLANK
5-2 www.honeywellgenerators.com Honeywell Portable Electrical Generator Service Manual
Page 23

6: SERVICE REPAIR TIME ANALYSIS & FLAT RATE SCHEDULE
Operation
HW3000
HW3000L
(min.)
HW4000
HW4000L
(min.)
HW5500
HW5500L
(min.)
HW5500E
HW5500EL
(min.)
HW6200
HW6200L
(min.)
HW7000E
HW7000EL
(min.)
HW7500E
HW7500EL
(min.)
ELECTRICAL
Alternator Complete 120 120 120 120 120 120 120
Battery -- -- -- 30 -- 30 30
Brush Assembly 45 45 45 45 45 45 45
Charging Coil Assembly 45 45 45 45 45 45 45
Control Panel Assembly 60 60 60 60 60 60 60
Ignition Coil 50 50 50 50 50 50 50
Meters / Circuit Breakers45454545454545
Oil Shutdown Switch 40 40 40 40 40 40 40
Oil Alert Sender 40 40 40 40 40 40 40
Receptacles / Ports50505050505050
Recoil Starter Assembly 30 30 30 30 30 30 30
Spark Plug 30 30 30 30 30 30 30
Electric Starter -- -- -- 45 -- 45 45
Starter Solenoid -- -- -- 35 -- 35 35
Voltage Regulator 30 30 30 30 30 30 30
ENGINE
Air Filter 30 30 30 30 30 30 30
Air Cleaner 40 40 40 40 40 40 40
Carburetor 50 50 50 50 50 50 50
Choke45454545454545
Converter
(Model Numbers Ending in “L”)
Cylinder Head Cover 45 45 45 45 45 45 45
Cylinder Head Gasket 40 40 40 40 40 40 40
Engine Complete 180 180 180 180 210 210 210
Governor Assembly 50 50 50 50 50 50 50
Head Cover Gasket 40 40 40 40 40 40 40
FUEL & EXHAUST
Carbon Canister (with bracket)
(Model Numbers Ending in “L”)
Carbon Canister Tube
(Model Numbers Ending in “L”)
60 60 60 60 60 60 60
45 45 45 45 45 45 45
30 30 30 30 30 30 30
Exhaust Pipe
(Model Numbers Ending in “L”)
40 40 40 40 40 40 40
Fuel Gage 30 30 30 30 30 30 30
Honeywell Portable Electrical Generator Service Manual www.honeywellgenerators.com 6-1
Page 24

SERVICE REPAIR TIME ANALYSIS
NOTE:
Operation
Vapor Line
(Model Numbers Ending in “L”)
Fuel Tank 60 60 60 60 60 60 60
Fuel Shut-off Valve40404040404040
Muffler50505050606060
Muffler Gasket 50 50 50 50 60 60 60
Secondary Air Intake Valve
(with gasket)
(Model Numbers Ending in “L”)
MISC
Frame
(Model Numbers Ending in “L”)
(Non-L Models) 90 90 90 90 90 90 90
Handle Assembly 30 30 30 30 30 30 30
Leg Assembly 30 30 30 30 30 30 30
Wheel Assembly 30 30 30 30 30 30 30
HW3000
HW3000L
(min.)
HW4000
HW4000L
(min.)
HW5500
HW5500L
(min.)
HW5500E
HW5500EL
(min.)
HW6200
HW6200L
(min.)
HW7000E
HW7000EL
(min.)
HW7500EL
30 30 30 30 30 30 30
50 50 50 50 50 50 50
120 120 120 120 120 120 120
HW7500E
(min.)
Repair times represent generally accepted intervals for conducting a repair. Service centers are always advised to
provide feedback during the warranty claim process if additional time may be needed due to unforeseen circumstances.
6.1 SERVICE REPAIR TIME ANALYSIS
6-2 www.honeywellgenerators.com Honeywell Portable Electrical Generator Service Manual
Page 25

7: MAINTENANCE
DANGER
WARNING
WARNING
7.1 CONSUMER MAINTENANCE SCHEDULE
Periodic maintenance and adjustment are necessary to keep the generator in good operating condition. Perform service and
inspection at intervals shown in the Generator Maintenance Schedule (Table 7-1).
Using a generator indoors CAN KILL YOU IN MINUTES.
Generator exhaust contains carbon monoxide. This is a poison you cannot see or smell.
NEVER use inside a home
or garage, EVEN IF doors
and windows are open.
• Shut off the engine before performing any maintenance.
If the engine must be run, be sure the area is well ventilated.
Only use OUTSIDE and
far away from windows,
doors, and vents.
NOTICE
Maintenance, replacement, or repair of the emission
control devices and systems may be performed by any
non-road engine repair establishment or individual.
MAINTENANCE TASK
Inspect for/clean debris X
Check engine oil level X
Change engine oil X X
Check air filter X
Clean air filter
Run engine
Clean/change spark plug X
Clean fuel sediment cup X
Clean spark arrestor X
Clean cylinder cooling fins
Check/adjust valve lash
Check fuel line
TABLE 7-1. Generator Maintenance Schedule
* Perform at every indicated month or operating hour interval, whichever comes first.
† Clean more often when using generator in dusty areas.
‡ It is recommended that the generator is run for 15-30 minutes every three months to ensure the battery remains charged.
If the generator is stored for more than a year without running, a battery charger may required to recharge the generator battery.
** It is recommended that this maintenance task be performed by a service dealer.
Before each
use
First month
or 20 hours of
Accidental starting of generator can cause severe injury or
death. Before performing maintenance, disconnect spark
plug cap from spark plug. Also disconnect both starting battery cables. Remove the negative (-) cable first to reduce the
risk of arcing.
Improper maintenance, or failure to correct a problem before
operation, can cause a malfunction in which you can be seriously hurt or killed. Always follow inspection and maintenance recommendations and schedules in this manual.
NOTICE
The maintenance schedule applies to normal operating conditions. If you operate generator under severe conditions,
such as sustained high-load or high-temperature, or use it in
unusually wet or dusty conditions, consult your servicing
dealer for recommendations applicable to your individual
needs and use.
FREQUENCY
Every 3
months or 50
use
Every 2 years (replace if necessary)
hours of use
X
X
*
Every 6
months or 100
hours of use
†
‡
**
Every year or
200 hours of
use
X
X
**
**
Honeywell Portable Electrical Generator Service Manual www.honeywellgenerators.com 7-1
Page 26

CONSUMER MAINTENANCE SCHEDULE
DANGER
FUEL RECOMMENDATIONS
Before each use, check the fuel tank gage. If the fuel level
is low, refill the tank with recommended fuel. NEVER
OVERFILL.
Fuel and fuel vapors are extremely flammable and
explosive under certain conditions.
• Refuel generator only outdoors, in a well-ventilated
area.
• NEVER fill fuel tank while engine is running. Turn generator OFF and allow to cool before filling with fuel.
• NEVER smoke or allow flames or sparks near generator or where gasoline is stored.
• NEVER overfill fuel tank (no fuel should be in filler
neck). After refueling, tighten the fuel cap securely.
• Be careful not to spill fuel when refueling. Spilled fuel
or fuel vapor may ignite. If any fuel is spilled, the area
must be dry before starting the engine.
• Avoid repeated or prolonged contact with skin or
breathing of vapor.
General Fuel Information
Check the fuel gage located on the top of the generator
near the fuel tank and refill the tank if fuel level is low.
Refuel carefully to avoid spilling fuel. Do not fill above the
shoulder of fuel strainer. Use unleaded gasoline with a
pump octane rating of 87 or higher.
NEVER use stale or contaminated gasoline. Avoid getting
dirt or water in the fuel tank. Always keep the fuel strainer
in place while refueling.
Oxygenated Fuels
At certain times of the year, some U.S. locations may have
only oxygenated fuel available. Oxygenated fuel is
blended with alcohol or ether additives to increase octane
quality, enhance combustion, and reduce exhaust emissions.
Some areas of the United States use oxygenated fuels to
help meet clean air standards.
Before using an oxygenated fuel, ensure pump octane rating is 87 or higher.
Some states (and provinces in Canada) require this information to be posted on the fuel pump. If you notice undesirable operating symptoms, switch to a conventional
unleaded gasoline.
Oxygenated fuels can damage paint and plastic. Be careful
not to spill fuel when filling fuel tank. Damage caused by
spilled fuel is not covered under warranty.
TABLE 7-2. Oxygenated Fuel Types
Ethanol
(ethyl or grain alcohol)
Methanol
(methyl or wood
alcohol)
MTBE
(methyl tertiary butyl
ether)
To avoid damage to the engine, NEVER use stale or contaminated gasoline or oil/gasoline mixture. Avoid getting dirt or
water in the fuel tank.
Use fresh gasoline with a pump octane rating of 87 or
higher.
Running the engine with persistent spark knock or pinging
can cause engine damage. Warranty does not cover parts
damaged by misuse.
NOTICE
Gasoline containing more
than 10% ethanol by volume
may cause starting or performance problems. Gasoline
containing ethanol may be
marketed under the name
"Gasohol".
Gasoline containing methanol must contain co-solvents
and corrosion inhibitors to
protect fuel system. Gasoline
containing more than 5%
methanol by volume may
cause starting and/or performance problems and may
damage metal, rubber and
plastic parts of fuel system.
Gasoline containing up to
15% MTBE by volume can
be used.
NOTICE
NOTICE
7-2 www.honeywellgenerators.com Honeywell Portable Electrical Generator Service Manual
Page 27

AIR FILTER MAINTENANCE
NOTE:
5W-30
Synthetic 5W-30
SAE 30, 10W-30
WARNING
WARNING
ENGINE OIL RECOMMENDATIONS
NOTICE
Engine oil is a major factor affecting engine performance
and service life. NEVER use non-detergent or 2-stroke
engine oils.
• Use engine oils specified below.
It is very important to maintain proper level of engine oil to
keep engine in good running condition.
• Check engine oil level prior to each use. Refill engine
oil if oil level is too low.
Use 4-stroke oil, or equivalent high detergent, premium
quality motor oil certified to meet or exceed U.S. automobile manufacturer's requirements for API Performance
Class SL, SJ, or better.
SAE 10W-30 is recommended for general temperature
use. Refer to Figure 7-1 for information on other viscosities that may be used. Other viscosities shown in the chart
may be used when the average temperature in your area
is within the indicated range.
7.2 AIR FILTER MAINTENANCE
NOTICE
A dirty air filter will restrict air flow to carburetor, which may
cause poor engine performance or damage.
NEVER run the generator without the air cleaner assembly
properly attached.
Clean air filter every 50 hours of generator operation. If
operating generator in extremely dusty areas, clean air fil-
ter more frequently.
Gasoline and flammable solvents can cause fire or
explosion. NEVER use gasoline or flammable solvent to clean air filter element.
• Use only household soap and water to clean air filter
element.
To clean air filter, you will need:
Household soap and water
Clean, dry cloth
Clean engine oil
FIGURE 7-1: Recommended Oil Viscosity
Dispose of used motor oil according to guidelines
established by your local or state government.
Low Oil Protection
The generator engine is protected from low lubrication failure by an oil shutdown switch. This switch prevents the
operation of the ignition system until sufficient oil is added
to the crankcase for proper engine lubrication.
When engine shuts down due to low oil level:
1. The engine control switch will remain in the RUN posi-
tion.
2. The engine will not start until the required amount of
engine oil is added.
ALWAYS stop engine before removing oil fill dipstick.
1. Stop engine if it is running.
2. Remove air cleaner cover.
For Model Numbers Ending in “L”:
• Unlock the latches at the top and bottom of the air cleaner
cover.
FIGURE 7-2: Air Cleaner Cover—Model Numbers Ending in “L”
For Non-L Models:
• Turn thumbscrew counterclock wise to loosen and
remove.
• Pull bottom of air cleaner cover out and lift up to release
plastic tabs.
Honeywell Portable Electrical Generator Service Manual www.honeywellgenerators.com 7-3
Crankcase pressure can cause hot engine oil to
spray out of engine fill hole. Hot engine oil can
cause severe burns.
FIGURE 7-3: Air Cleaner Cover—Non-L Models
Page 28

AIR FILTER MAINTENANCE
NOTE:
CAUTION
3. Remove foam air filter(s).
FIGURE 7-4: Air Filter Removal
4. Wash air filter(s) in a solution of household soap and
warm water.
FIGURE 7-5: Wash Air Filter
5. Rinse parts thoroughly with water.
6. Using a clean, absorbent cloth, squeeze air filter dry,
being careful not to twist or tear the filter.
Engine will smoke during initial start-up if too much oil is
left in filter.
9. Reassemble the air cleaner assembly.
For Model Numbers Ending in “L”:
9A. Reinstall the light grey foam air filter.
9B. Reinstall the dark grey foam air filter.
9C. Reinstall the air cleaner cover.
FIGURE 7-9: Air Filter Installation—Model Numbers Ending in “L”
(filter shape varies by model)
For Non-L Models:
9A. Reinstall the metal air filter plate in the support
brackets if it fell out during air filter removal.
FIGURE 7-6: Dry Air Filter
7. Coat the air filter with clean engine oil.
FIGURE 7-7: Oil Air Filter
8. Squeeze out excess oil.
FIGURE 7-8: Excess Oil Removal
Frequent or prolonged contact with engine oil may cause
skin cancer.
• Thoroughly wash hands and any areas of skin exposed
to used oil with soap and water.
FIGURE 7-10: Air Filter Plate Installation—Non-L Models
(air filter plate shape varies by model)
9B. Reinstall air filter.
9C. Reinstall the air cleaner cover.
7-4 www.honeywellgenerators.com Honeywell Portable Electrical Generator Service Manual
Page 29

CLEANING FUEL SEDIMENT CUP
A
B
C
WARNING
.028 - .031 in.
(.70 - .80 mm)
7.3 CLEANING FUEL SEDIMENT CUP
The sediment cup prevents any dirt or water that may be
in the fuel tank from entering the carburetor.
Clean fuel sediment cup at the intervals specified in
Table 7-1.
To clean fuel sediment cup, you will need:
10 mm box wrench
22 mm open end wrench
Household soap and water
Clean, dry cloth
To clean fuel sediment cup:
1. Stop the engine if it is running. Allow to completely
cool.
2. Place generator on a flat, level surface.
3. Turn the fuel shut-off valve to the OFF position.
4. While holding the fitting above the fuel shut-off valve
with a 22 mm open end wrench, remove the fuel sediment cup assembly (sediment cup, o-ring, and fuel
screen) using a 10 mm box wrench.
7.4 SPARK PLUG SERVICE
To ensure proper engine operation, the spark plug must
be properly gapped and free of deposits.
If the engine has been running, the spark plug will
reach temperatures that could cause severe burns.
Do not touch.
1. Measure the spark plug gap with a wire feeler gauge.
Gap should be: 0.028-0.031 in. (0.70-0.80 mm).
FIGURE 7-13: Correct Spark Plug Gap
2. If necessary, adjust gap by carefully bending side
electrode.
3. Torque spark plug to 28 N•m (21 lb. ft.).
FIGURE 7-11: Fuel Sediment Cup Assembly Removal
FIGURE 7-12: Fuel Sediment Cup Assembly
5. Clean the fuel screen (A), o-ring (B), and sediment
cup (C), with soap and water.
6. Rinse parts thoroughly with water.
7. Wipe the pieces clean with a clean, dry cloth.
8. Reinstall the sediment cup, o-ring, and fuel screen.
9. Turn the fuel shut-off valve to the ON position.
10. Start generator and check for leaks.
NOTICE
The spark plug must be securely tightened. An improperly
tightened spark plug can become very hot and damage the
engine. NEVER use spark plugs that have an improper heat
range. Use only recommended spark plugs or equivalent.
HW3000 & HW3000L Models:
Recommended Spark Plug Replacement: 102557A
AutoLite 62
Bosch WR5DC
Champion RN6YC
Denso W22EPR-U
NGK BPR7ES
TABLE 7-3. Spark Plug Equivalents to 102557A
All Other Models:
Recommended Spark Plug Replacement: 100842A
AutoLite 63
Bosch WR7DC
Champion RN9YC
Denso W20EPR
NGK BPR6ES
TABLE 7-4. Spark Plug Equivalents to 100842A
Honeywell Portable Electrical Generator Service Manual www.honeywellgenerators.com 7-5
Page 30

CLEANING SPARK ARRESTOR SCREEN
WARNING
A
B
C
7.5 CLEANING SPARK ARRESTOR
SCREEN
Muffler reaches temperatures that can cause serious
burns if touched. NEVER touch hot surfaces.
The generator muffler is equipped with a spark arrestor
screen, which must be cleaned according to the maintenance schedule (see Table 7-1) to ensure prevention of
sparks escaping generator.
To clean spark arrestor screen, you will need:
1/4” socket wrench
8 mm socket
7/32” socket
#2 Phillips screwdriver
Wire brush
1. Stop the engine if it is running. Allow to completely
cool.
2. Place generator on a flat, level surface.
3. Using a socket wrench with an 8 mm socket, remove
the muffler cover bolts (muffler cover not present on
HW3000 or HW3000L models).
4. Remove muffler cover.
5. Using a screwdriver, loosen and remove the spark
arrestor clamp (A) screw.
FIGURE 7-15: Spark Arrestor Assembly
6. Slide off spark arrestor clamp.
7. Using a socket wrench with a 7/32” socket, remove
the retaining screw on spark arrestor screen cap (B);
pull off cap.
8. Pull out spark arrestor screen (C).
9. Inspect spark arrestor screen.
If screen is damaged or excessively worn, replace
with new screen.
If screen is in good condition, clean using wire
brush and then reinstall.
7-6 www.honeywellgenerators.com Honeywell Portable Electrical Generator Service Manual
FIGURE 7-16: Clean Screen
10. Reinstall remaining spark arrestor components.
Spark arrestor screen cap and screw
Clamp and screw
Muffler cover
FIGURE 7-14: Remove Muffler Cover
Page 31

VALVE LASH
CAUTION
A
B
C
GOVERNOR ARM SHAFT
GOVERNOR ARM
PINCH BOLT
GOVERNOR ARM
ANTI-SURGE SPRING
THROTTLE
NUT
GOVERNOR
SPRING
LIMITING
SCREW
7.6 VALVE LASH
Valve lash inspection and adjustment must be performed
with the engine cold.
1. Remove the cylinder head cover and carefully remove
the gasket for re-use. (Inspect and replace gasket, if
necessary.)
2. Remove the spark plug to reduce engine compres-
sion resistance.
3. Turn the engine crankshaft using the recoil starter,
positioning engine at top, dead center, of the compression stroke. This can be verified by the piston
position in the cylinder.
4. Insert a feeler gauge between the rocker arm and
valve spring to measure valve lash.
LOCK NUT
7.7 GOVERNOR ADJUSTMENT
1. Start the engine and run with no load.
2. Attach a frequency meter and adjust the limiting
screw on the governor stop to 62.5 Hz ± 0.5.
3. Stop the engine.
4. If frequency is out of range, see the “GOVERNOR
RANGE ADJUSTMENT” procedure below.
5. Repeat steps 1 through 3. If frequency still out of
range, see ENGINE DIAGNOSTICS (ALL MODELS),
page 8-10
7.8 GOVERNOR RANGE ADJUSTMENT
1. Remove the generator control panel for access.
2. Loosen the nut on the governor arm pinch bolt (see
illustration).
FIGURE 7-17: Lock Nut Location
IN.
0.005±0.001 in
(0.125±0.025 mm)
Standard valve lash
EX.
TABLE 7-5. Standard Valve Lash
A—ROCKER ARM
B—LOCK NUT
0.007±0.001 in
(0.175±0.025 mm)
12 N•m (9 lb. ft.)
• To increase valve lash,
screw pivot nut out.
• To decrease valve lash,
screw pivot nut in.
C—PIVOT BOLT
30 N•m (22 lb. ft.)
5. Hold the rocker arm pivot and loosen the lock nut (see
B in illustration).
6. Turn the rocker arm pivot (see C in illustration) to
obtain specified valve lash.
7. Retighten the lock nut while holding rocker arm pivot
and torque to 12 N•m (9 lb. ft.).
8. Check valve lash again after tightening lock nut.
9. Repeat steps 4 through 7, as needed, until valve lash
is within specifications.
10. Reassemble the spark plug, cylinder head cover, and
gasket.
FIGURE 7-18: Governor Arm Assembly
3. Rotate the governor arm shaft counter-clockwise until
the throttle is completely open and hold in position.
4. Tighten the nut on the governor arm pinch bolt to
maintain position.
5. Confirm the governor arm and throttle move smoothly
and do not bind.
6. Reinstall the generator control panel.
Honeywell Portable Electrical Generator Service Manual www.honeywellgenerators.com 7-7
Page 32

BATTERY SERVICE
NOTE:
7.9 BATTERY SERVICE
To ensure the battery remains charged, it is recommended that the generator is started every three months.
If the generator is stored for more than a year without running, a battery charger may be required to recharge the
generator battery.
Recommended Battery Replacement: 101536A
Xtreme XTAX14AHL-BS
Yuasa 12N14-3A
TABLE 7-6. Replacement Battery Equivalents to 101536A
To replace battery:
1. Remove spark plug cap.
FIGURE 7-19: Spark Plug Cap Removal
6. Remove the battery.
Dispose of used battery according to guidelines established by your local or state government.
7. Place the new battery in the generator frame.
8. Connect the red positive (+) battery lead to the posi-
tive (+) post on the battery; install bolt, nut, and boot.
9. Connect the black negative (-) battery lead to the neg-
ative (-) post on the battery; install bolt, nut, and boot.
10. Reinstall retaining plate; tighten bolts and nuts.
11. Reinstall spark plug cap.
2. Loosen and remove nuts on retaining plate; slide
retaining plate off support rods.
FIGURE 7-20: Electric Start Battery—Remove Retaining Plate
3. Tip battery slightly forward.
4. Disconnect the black negative (-) battery lead remov-
ing the bolt and nut.
FIGURE 7-21: Electric Start Battery—Lead Connection
5. Disconnect the red positive (+) battery lead removing
the bolt and nut.
7-8 www.honeywellgenerators.com Honeywell Portable Electrical Generator Service Manual
Page 33

8: TROUBLESHOOTING
NOTE:
WARNING
DANGER
ANYONE using or servicing this generator must read, understand, and follow all safety and operation instructions provided in the product manual. Failure to closely follow these instructions can result in circumstances leading to death,
serious injury, and property damage.
Using a generator indoors CAN KILL YOU IN MINUTES.
Generator exhaust contains carbon monoxide. This is a
poison you cannot see or smell.
NEVER use inside a home
or garage, EVEN IF doors
and windows are open.
For all dealer service inquiries, call 1-877-HWTECHS (498-3247) or visit www.honeywellgenerators.com.
Only use OUTSIDE and
far away from windows,
doors, and vents.
Honeywell Portable Electrical Generator Service Manual www.honeywellgenerators.com 8-1
Page 34

ELECTRICAL DIAGNOSTICS (HW3000/L MODELS)
Perform “Alternator Check”
Remove Alternator End Cover
120V Circuit #1 Check
(No Output OR
Voltage Out of Spec)
Check Wires and Connections
from AVR to Brush Assembly
for Proper Orientation
of Wire Connections
If a Connection is Loose or
Disconnected, Reestablish
a Tight Connection
If a Wire or Connection is Damaged,
Replace AVR
Check for Continuity in Each Circuit of
Duplex Outlet #1
from the Female Socket on the Front
to the Terminal on the Back
If No Continuity,
Replace Duplex Receptacle
If Continuity Present,
Replace Electrical Panel
120V Circuit #2 Check
(No Output OR
Voltage Out of Spec)
General Electrical Check
Check Output Voltage (X to W) of
Duplex Outlet #1= 123-126V
Adjust Voltage Regulator, if Necessary
by Turning the Potentiometer on
the Rear of the Voltage Regulator
If Voltage Still Out of Range
Replace Voltage Regulator
Conduct This Check Only When
Directed by General Electrical Check
Start Engine and Run at No Load
Conduct This Check Only When
Directed by General Electrical Check
Check for Continuity in
Duplex Outlet #1 Breaker
from the Line Terminal
to the Load Terminal
If No Continuity,
Replace Duplex Circuit Breaker
Check for Continuity in
Duplex Outlet #2 Breaker
from the Line Terminal
to the Load Terminal
If No Continuity,
Replace Duplex Circuit Breaker
Check for Continuity in Each Circuit of
Duplex Outlet #2
from the Female Socket on the Front
to the Terminal on the Back
If No Continuity,
Replace Duplex Receptacle
If Continuity Present,
Replace Electrical Panel
Check for Tripped Duplex Circuit Breaker(s)
Outlets Above the Breaker Indicate
the Excess Load Source
Resolve Overload Problem to Ensure Safe Operation
After Electrical Load Resolved Wait Several Minutes
(for Thermal Breaker to Cool) Push to Reset Breaker
If Cannot Reset, Replace Breaker
Start Engine and Run at No Load
Check Engine Frequency = 61.5 to 63 Hz
Adjust Governor, if necessary
(see Manual Section “Governor Adjustment”)
If Frequency Still Out of Range,
see
Engine Diagnostics Section
W
G
X
123126V
Check Voltage Output at NEMA 5-20R 120V
Duplex Outlet #1
If Voltage Out of Range,
Perform “120V Circuit #1 Check”
W
G
Y
123-
126V
Check Voltage Output at NEMA 5-20R 120V
Duplex Outlet #2
If Voltage Out of Range,
Perform “120V Circuit #2 Check”
Remove Main Control Panel from
Control Panel Assembly
Check Wires and Connections
for the Exciter & AVR Tap
from AVR to Alternator
On AVR Side of Connection:
If a Connection is Loose or
Disconnected, Reestablish a
Tight Connection
If a Wire or Connector is Damaged,
Replace AVR
On Alternator Side of Connection:
If a Connection is Loose or
Disconnected, Reestablish a
Tight Connection
If a Wire or Connector
is Damaged,
Replace Alternator
Check for Continuity from
Duplex Outlet #1
for Each Connection (X, Y, W, G) to
Corresponding Alternator Terminal
If Continuity Not Present
in Any Circuit,
Check Wires and Connections
from Receptacle to Alternator
If a Connection is Loose or
Disconnected, Reestablish a Tight
Connection and Recheck Continuity
If a Wire or Connection is Damaged,
Replace Electrical Panel
Refer to Illustrations on
Pages 8-3 and 8-5.
8.1 ELECTRICAL DIAGNOSTICS (HW3000/L MODELS)
Check Continuity from
for Each Connection (X or Y, W, G) to
If Continuity Not Present
Check Wires and Connections from
Duplex Outlet #1 to Duplex Outlet #2
If a Connection is Loose or
Disconnected, Reestablish a
Tight Connection and Recheck
If a Wire or Connection
Replace Electrical Panel
Duplex Outlet #1
Duplex Outlet #2
in Any Circuit,
Continuity
is Damaged,
8-2 www.honeywellgenerators.com Honeywell Portable Electrical Generator Service Manual
Page 35

ELECTRICAL DIAGNOSTICS (HW3000/L MODELS)
To
Alternator
See “Specifications” Page For
Rated Power, Voltage, & Frequency Specs
Under Load and No Load Conditions
Yellow / Green Wire = G
White Wire = W
Black Wire = X
3000 RATED WATTS • 3750 MAXIMUM WATTS
Duplex Outlet #1
NEMA 5-20R 120V
G
WX
G
WX
G
WY
G
WY
Duplex Outlet #2
NEMA 5-20R 120V
Honeywell Portable Electrical Generator Service Manual www.honeywellgenerators.com 8-3
Page 36

ELECTRICAL DIAGNOSTICS (HW3000/L MODELS)
Start Engine and
Add Resistive Loads Until
One of the Following Occurs:
s0OWER/UTPUTat the
NEMA 5-20R 120V Duplex Outlet #1
is Within Rated Power Specification
Range
s&REQUENCY$ROPS"ELOW(Z
s6OLTAGE/UTPUT$ROPS"ELOW
Minimum
If Minimum Rated Power
#ANNOT"E!CHIEVED
see Engine Diagnostics Section
NOTE: The alternator must be at room temperature
when resistance is measured.
#HECK"RUSH!SSEMBLYFOR%XCESSIVE7EAROR$EFECT
./4%5SE#AUTION7HEN2EMOVINGAND)NSTALLING"RUSH(OLDER
TO!VOID$AMAGING"RUSHES
)F,ENGTH,ESSTHANMM2EPLACE"RUSH!SSEMBLY
)F,ENGTH'REATERTHANMM6ERIFY2ESISTANCE"ETWEEN%ACH
"RUSH4IPAND#ORRESPONDING4ER MINALIS,ESSTHANΩ
)F2ESISTANCE/UTOF3PEC2EPLACE"RUSH!SSEMBLY
Check Alternator Winding Resistances
Disconnect the Exciter Connector
$ISCONNECTTHE7IRESATTHE!LTERNATOR4ERMINAL"LOCK
NOTE: Each Terminal Contains Nut, Lock Washer, and Flat Washer
-EASURE7INDING2ESISTANCESAS3PECIFIED"ELOW
)F5SINGAN/HMMETERWITH+ELVIN"RIDGE#LIPS
-EASURE2ESISTANCEATTHE3LIP2ING7IRE4ER MINALSFOR"EST2ESULTS
If a Winding Resistance is Out of Spec, Replace Alternator
Alternator Check
./4%4HEALTERNATORDIAGNOSTICSREQUIREMEASUREMENTS
OFLOWRESISTANCEVALUESWHICHAREBEYONDTHE
CAPABILITYOFATYPICALMULTIMETER
5SEONLYFORDIRECTIONALINDICATIONOFRESISTANCE
For best results, use an ohmmeter capable of
measuring low resistance values:
Resolution: 10 milliohms
!CCURACY+ 1%
Measure Resistance
"ETWEEN7IRES
Resistance
Range
Specification (Ω)
Winding
Stator-X "LACK White 0.15 - 0.35
AVR Tap "ROWN "LUE
20-35% of
Stator-X
Resistance
Exciter Yellow Yellow
Rotor
Slip Rings
or
Slip Ring Terminals*
45 - 65
#HECKFOR#ONTINUITY
"ETWEEN7INDINGS
#ONTINUITY
Specification
3TATOR8"LACK AVR Tap"ROWN #ONTINUITY
3TATOR8"LACK Either Exciter Yellow .O#ONTINUITY
#HECKFOR#ROSS3HORTED7INDINGSINTHE3TATOR!SSEMBLY
#HECKFOR#ONTINUITY"ETWEEN7INDINGSAS3PECIFIED"ELOW
)F#ONTINUITYIS$IFFERENTTHAN3PECIFIED!BOVE
Replace Alternator
Refer to Illustrations on
Page 8-5.
W
G
X
123-
126V
Rated Power Check
(Low Power Output)
NOTE: At high-altitudes, standard
carburetor air-fuel mixture will be
rich causing a decrease in engine
performance and an increase in
fuel consumption.
NOTE: At this time, a high-altitude
carburetor kit is not available.
8-4 www.honeywellgenerators.com Honeywell Portable Electrical Generator Service Manual
Page 37

Blue
Yellow
Brown
Yellow
EXCITER
WINDING
AVR TAP
WINDING
EXCITER & AVR TAP
CONNECTOR*
*view looking into
female connector
from alternator
ROTOR
SLIP
RINGS
SLIP RING
TERMINALS
VOLTAGE REGULATOR
POTENTIOMETER
TO ADJUST VOLTAGE
White (2 wires)
Black (2 wires)
BRUSH ASSEMBLY
Yellow Wire
Blue Wire
5-9 mm
STATOR-X
WINDING
STATOR-Y
WINDING
Black
White
TERMINAL
BLOCK
ELECTRICAL DIAGNOSTICS (HW3000/L MODELS)
Honeywell Portable Electrical Generator Service Manual www.honeywellgenerators.com 8-5
Page 38

ELECTRICAL DIAGNOSTICS (ALL MODELS EXCEPT HW3000/L)
Perform “Alternator Check”
Check for Tripped Master Breaker
Resolve Overload Problem to Ensure Safe Operation
After Electrical Load Resolved Push to Reset Breaker
If Cannot Reset, Replace Breaker
Check for Tripped Duplex Circuit Breaker(s)
Outlets Above the Breaker Indicate
the Excess Load Source
Resolve Overload Problem to Ensure Safe Operation
After Electrical Load Resolved Wait Several Minutes
(for Thermal Breaker to Cool) Push to Reset Breaker
If Cannot Reset, Replace Breaker
Start Engine and Run at No Load
Check Engine Frequency = 61.5 to 63 Hz
Adjust Governor, if necessary
(see Manual Section “Governor Adjustment”)
If Frequency Still Out of Range,
see
Engine Diagnostics Section
Check Voltage Output at
NEMA L14-30R 240V Receptacle
G
Y
W
X
123126V
246-
252V
123-
126V
If Voltage Out of Range, Perform “240V Circuit Check”
W
G
X
123-
126V
Check Voltage Output at NEMA 5-20R 120V
Duplex Outlet #1
If Voltage Out of Range, Perform “120V Circuit Check”
W
G
Y
123-
126V
Check Voltage Output at NEMA 5-20R 120V
Duplex Outlet #2
Remove Alternator End Cover
240V Circuit Check
(No Output OR
Voltage Out of Spec)
Check Wires and Connections
from AVR to Brush Assembly
for Proper Orientation
of Wire Connections
If a Connection is Loose or
Disconnected, Reestablish
a Tight Connection
If a Wire or Connection is Damaged,
Replace AVR
Check for Continuity in Each Circuit
of the 240V Receptacle
from the Female Socket on the Front
to the Terminal on the Back
If No Continuity,
Replace Duplex Receptacle
If Continuity Present,
Replace Electrical Panel
Check Continuity from the
120V Duplex Receptacle
for Each Connection (X or Y, W, G)
to the 240V Receptacle
If Continuity Not Present
in Any Circuit,
Check Wires and Connections from
120V Duplex to 240V Receptacle
If a Connection is Loose or
Disconnected, Reestablish a
Tight Connection and Recheck
Continuity
If a Wire or Connection
is Damaged,
Replace Electrical Panel
120V Circuit Check
(No Output OR
Voltage Out of Spec)
General Electrical Check
Check Output Voltage (X to Y) of the
240V Receptacle = 246-252V
Adjust Voltage Regulator, if Necessary
by Turning the Potentiometer on
the Rear of the Voltage Regulator
If Voltage Still Out of Range
Replace Voltage Regulator
If Voltage Out of Range, Perform “120V Circuit Check”
Conduct This Check Only When
Directed by General Electrical Check
Start Engine and Run at No Load
Conduct This Check Only When
Directed by General Electrical Check
Check for Continuity in
Each Leg of Master Breaker
from the Line Terminal
to the Load Terminal
If No Continuity,
Replace Master Circuit Breaker
Check for Continuity in
Duplex Breaker
from the Line Terminal
to the Load Terminal
If No Continuity,
Replace Duplex Circuit Breaker
Check for Continuity in
Each Circuit of the
120V Duplex Receptacle from
the Female Socket on the Front
to the Terminal on the Back
If No Continuity,
Replace Duplex Receptacle
If Continuity Present,
Replace Electrical Panel
Remove Main Control Panel from
Control Panel Assembly
Check Wires and Connections
for the Exciter & AVR Tap
from AVR to Alternator
On AVR Side of Connection:
If a Connection is Loose or
Disconnected, Reestablish a
Tight Connection
If a Wire or Connector is Damaged,
Replace AVR
On Alternator Side of Connection:
If a Connection is Loose or
Disconnected, Reestablish a
Tight Connection
If a Wire or Connector
is Damaged,
Replace Alternator
Check for Continuity from
the 240V Receptacle
for Each Connection (X, Y, W, G) to
Corresponding Alternator Terminal
If Continuity Not Present
in Any Circuit,
Check Wires and Connections
from Receptacle to Alternator
If a Connection is Loose or
Disconnected, Reestablish a Tight
Connection and Recheck Continuity
If a Wire or Connection is Damaged,
Replace Electrical Panel
Refer to Illustrations on
Pages 8-7 and 8-9.
8.2 ELECTRICAL DIAGNOSTICS (ALL MODELS EXCEPT HW3000/L)
8-6 www.honeywellgenerators.com Honeywell Portable Electrical Generator Service Manual
Page 39

ELECTRICAL DIAGNOSTICS (ALL MODELS EXCEPT HW3000/L)
Yellow / Green Wire = G
White Wire = Y
Red Wire = X
To
Alternator
See “Specifications” Page For
Rated Power, Voltage, & Frequency Specs
Under Load and No Load Conditions
Brown Wire = W on Duplex Outlet #2
Blue Wire = W on Duplex Outlet #1
Fuel Cutout Winding Connector
Brown Wires (2)
240V Receptacle
NEMA 14-30R
7000 RATED WATTS • 8750 MAXIMUM WATTS
7000
120 VOLTS AC
120/240 VOLTS AC
POWER CORD or
TRANSFER SWITCH
HOUSEHOLD
OUTLETS
BREAKER BREAKER
MASTER
BREAKER
Duplex Outlet #1
NEMA 5-20R 120V
Duplex Outlet #2
NEMA 5-20R 120V
G
WX
G
WX
G
WY
G
WY
G
Y
W
X
Honeywell Portable Electrical Generator Service Manual www.honeywellgenerators.com 8-7
Page 40

ELECTRICAL DIAGNOSTICS (ALL MODELS EXCEPT HW3000/L)
Start Engine and
Add Resistive Loads Until
One of the Following Occurs:
s0OWER/UTPUTat the
NEMA L14-30R 240V Receptacle
is Within Rated Power
Specification Range
s&REQUENCY$ROPS"ELOW(Z
s6OLTAGE/UTPUT$ROPS"ELOW
Minimum
G
Y
W
X
114-
126V
228-
252V
114-
126V
If Minimum Rated Power
#ANNOT"E!CHIEVED
SEE%NGINE$IAGNOSTICS3ECTION
NOTE: The alternator must be at room temperature when resistance is measured.
#HECK"RUSH!SSEMBLYFOR%XCESSIVE7EAROR$EFECT
./4%5SE#AUTION7HEN2EMOVINGAND)NSTALLING"RUSH(OLDERTO!VOID$AMAGING"RUSHES
)F,ENGTH,ESSTHANMM2EPLACE"RUSH!SSEMBLY
)F,ENGTH'REATERTHANMM6ERIFY2ESISTANCE"ETWEEN%ACH
"RUSH4IPAND#ORRESPONDING4ERMINALIS,ESSTHANΩ
)F2ESISTANCE/UTOF3PEC2EPLACE"RUSH!SSEMBLY
Check Alternator Winding Resistances
$ISCONNECTTHE%XCITER#ONNECTOR
$ISCONNECTTHE&UEL#UTOUT7INDING#ONNECTOR
$ISCONNECTTHE7IRESATTHE!LTERNATOR4ERMINAL"LOCK
NOTE: Each Terminal Contains Nut, Lock Washer, and Flat Washer
-EASURE7INDING2ESISTANCESAS3PECIFIED"ELOW
Alternator Check
./4%4HEALTERNATORDIAGNOSTICSREQUIREMEASUREMENTSOFLOWRESISTANCE
VALUESWHICHAREBEYONDTHECAPABILITYOFATYPICALMULTIMETER
5SEONLYFORDIRECTIONALINDICATIONOFRESISTANCE
For best results, use an ohmmeter capable of measuring low resistance values:
Resolution: 10 milliohms
!CCURACY+ 1%
#HECKFOR#ROSS3HORTED7INDINGSINTHE3TATOR!SSEMBLY
#HECKFOR#ONTINUITY"ETWEEN7INDINGSAS3PECIFIED"ELOW
)F#ONTINUITYIS$IFFERENTTHAN3PECIFIED!BOVE
Replace Alternator
Refer to Illustrations on
Page 8-9.
#HECKFOR#ONTINUITY
"ETWEEN7INDINGS
#ONTINUITY
Specification
Stator-X Red Stator-Y White .O#ONTINUITY
Stator-Y White AVR Tap Green .O#ONTINUITY
Stator-X Red AVR Tap Green #ONTINUITY
Stator-X Red %ITHER%XCITER"LUE .O#ONTINUITY
Stator-Y White .O#ONTINUITY%ITHER%XCITER"LUE
Stator-X Red %ITHER&UEL#UTOUT"ROWN .O#ONTINUITY
Stator-Y White %ITHER&UEL#UTOUT"ROWN .O#ONTINUITY
%ITHER%XCITER"LUE .O#ONTINUITY%ITHER&UEL#UTOUT"ROWN
Measure Resistance
"ETWEEN7IRES
Resistance Range Specification (Ω)
Winding
Stator-X Red "LUE
AVR Tap Green White
OF3TATOR82ESISTANCE
Stator-Y White "ROWN
Exciter "LUE "LUE
Rotor
Slip Rings
or
Slip Ring Terminals*
(7,
(7,
(7%, (7,
(7%,
(7%,
Fuel Cutout
1.3 - 1.8
"ROWN "ROWN
)F5SINGAN/HMMETERWITH+ELVIN"RIDGE#LIPS
-EASURE2ESISTANCEATTHE3LIP2ING7IRE4ERMINALSFOR"EST2ESULTS
If a Winding Resistance is Out of Spec, Replace Alternator
Rated Power Check
(Low Power Output)
NOTE: At high-altitudes, standard
carburetor air-fuel mixture will be
rich causing a decrease in engine
performance and an increase in
fuel consumption.
NOTE: At this time, a high-altitude
carburetor kit is not available.
8-8 www.honeywellgenerators.com Honeywell Portable Electrical Generator Service Manual
Page 41

ROTOR
SLIP
RINGS
SLIP RING
TERMINALS
Blue (2 wires)
Red (2 wires)
Brown
Brown Black
FUEL CUTOUT WINDING
CONNECTOR*
*view looking into
female connector
from alternator
VOLTAGE REGULATOR
POTENTIOMETER
TO ADJUST VOLTAGE
STATOR-X
WINDING
STATOR-Y
WINDING
Blue
Red
White
Brown
TERMINAL
BLOCK
White (2 wires)
Brown (2 wires)
Blue
Blue
Green
White
EXCITER
WINDING
AVR TAP
WINDING
EXCITER & AVR TAP
CONNECTOR*
*view looking into
female connector
from alternator
BRUSH ASSEMBLY
White Wire
Red Wire
5-9 mm
ELECTRICAL DIAGNOSTICS (ALL MODELS EXCEPT HW3000/L)
Honeywell Portable Electrical Generator Service Manual www.honeywellgenerators.com 8-9
Page 42

ENGINE DIAGNOSTICS (ALL MODELS)
Engine Fails to Crank
Using Electric Starter
Check Battery Voltage
Higher than 12.5 Volts =
Check Voltage Across Components
Less than 12.5 Volts =
Charge or Replace Battery
Check Voltage Across Components
Check Battery Connections
Check Leads on Proper Post
Check Leads are Clean & Tight
Check Recoil for
Mechanical Binding
Check Voltage Across Components
are Within .5V of Battery Voltage
Replace Out of Spec Components
Check Engine Control Switch
Voltage
Drop in Start Position
Check Battery Post / Solenoid
Voltage Drop
Check Battery Post / Starter Lugs
Voltage Drop
NOTE: Generator has Charging
Coil During Operation; Replace
Coil if Repeated Battery Discharge
Engine Fails to Start
Check Flywheel Woodruff Key
Repair or Replace Key
Drain Oil and
Check Low Oil Switch
Connection and Continuity
(Yellow Wire on Side of Engine)
Perform Engine Compression Test
Check Oil Level
Confirm Choke in On Position
Recoil Not Operating
Recoil Locked =
Disassemble and Repair Recoil
(see Manual Section
“Recoil Starter”)
Check Recoil for
Mechanical Binding
Rope Not Retracting =
Disassemble and Repair
Broken Ratchets or Springs
(see Manual Section
“Recoil Starter”)
Engine Starts
Then Shuts Down
Check Fuel Level
Check Fuel Quality
Check Oil Level
Confirm Choke in Off Position
Check Ignition for Spark
Check Spark Plug & Gap
Adjust Coil Air Gap
Check Fuel Line & Blockage
Check Carburetor
Check Spark Arrestor
Check Muffler Blockage
Engine Runs Rough
Check Fuel Level
Check Fuel Quality
Confirm Choke in Off Position
Check Air Cleaner
Check Fuel Line & Blockage
Check Valve Adjustment
Perform Engine Compression Test
Check Ignition for Spark
Check Spark Plug & Gap
Check Carburetor
Check Spark Arrestor
Check Muffler Blockage
Engine Speed Unstable
Check Governor
Frequency = 60 Hz + 3
Check Governor Assembly
Adjustment
Check Spark Plug & Gap
Check Ignition for Spark
Adjust Coil Air Gap
Check Spark Arrestor
Check Muffler Blockage
Engine Smokes
Start Engine
Warm to Operating Temperature
Observe Smoke Color
White Smoke =
Poor Fuel Quality
Black Smoke =
Check Choke Operation
Check Ignition System
Blue Smoke =
Check Oil in Fuel
Check Oil Overfilled
Check Worn Piston Rings
Perform Engine Compression Test
8.3 ENGINE DIAGNOSTICS (ALL MODELS)
Check Fuel Level
Check Fuel Shut-off Valve Open
Check Spark Plug
Dry Spark Plug =
Check Carburetor
Fuel Cutout Solenoid
Wet Spark Plug =
Check Ignition System
Check Spark Plug Gap
Plug Condition Good =
Re-Gap Spark Plug
Plug Condition Dirty or Worn =
Replace Spark Plug
Check Ignition for Spark
Bright Blue Spark =
Pull Coil & Check Resistance
Primary Coil = 0.8-1.0 Ohms
Secondary Coil = 5.9-7.1 Ohms
(measure at spark plug lead)
Replace Coil, if Necessary
Reinstall Coil with Proper
Coil / Flywheel Air Gap
Reinstall Plug
Dull Spark =
Reinstall Plug
8-10 www.honeywellgenerators.com Honeywell Portable Electrical Generator Service Manual
Page 43

9: SERVICE AND DISASSEMBLY
START
ENGINE
STOP
RUN
RUN
ENGINE
STOP
Control panels vary between models.
POWER CONTROL CENTER
HOUSEHOLD
OUTLETS
120/240 VOLTS AC
MASTER
BREAKER
BREAKER BREAKER
120 VOLTS AC
B
C
A
D
E1
E2
F
G
9.1 CONTROL PANEL
A—CONTROL PANEL ASSEMBLY
(FRONT)
4 N•m (3 lb. ft.)
B—CONTROL PANEL ASSEMBLY
(BACK)
C—MAIN CONTROL PANEL
(FRONT)
• 125VAC 20 Amp Duplex
(NEMA 5-20R)
• 125/250VAC 30 Amp Twist-Lock
(NEMA L14-30R)
NOTE: Not present on HW3000
or HW3000L models.
• Master Circuit Breaker (Magnetic)
• Circuit Breaker (Thermal)
D—MAIN CONTROL PANEL (BACK)
E—SWITCH PLATE (FRONT)
• E1 - Electric Start Models
(HW5500E, HW5500EL,
HW7000E, HW7000EL,
HW7500E, HW7500EL)
• E2 - Manual Start Models
(HW3000, HW3000L, HW4000,
HW4000L, HW5500, HW5500L,
HW6200, HW6200L)
F—ENGINE CONTROL SWITCH
G—SWITCH PLATE (BACK)
Honeywell Portable Electrical Generator Service Manual www.honeywellgenerators.com 9-1
Page 44

ENGINE AND ALTERNATOR
C
D
F
E
A
B
H
G
I
9.2 ENGINE AND ALTERNATOR
A—END COVER
4 N•m (3 lb. ft.)
B—ROTOR BOLT
Use oil before replacing the rotor bolt.
C—ALTERNATOR HOUSING BOLTS
48 N•m (35 lb. ft.)
D—REAR BEARING CARRIER
AND STATOR
See CARBURETOR, page 9-7.
E—ROTOR
See ROTOR, page 9-5.
F—ENGINE
Contact an authorized service dealer
for engine maintenance and repairs.
Cylinder Head Bolts - 48 N•m (35 lb. ft.)
G—VIBRATION ISOLATORS
Insert tabs into holes.
Check rubber is not chipped,
hardened, or worn.
Refer to illustration for proper
positioning.
NOTE: On some models there are only
4 vibration isolators instead of 6.
H—FRAME
See WHEEL, LEG, & HANDLE
ASSEMBLY, page 9-11.
I— CRANKCASE COVER
28 N•m (21 lb. ft.)
9-2 www.honeywellgenerators.com Honeywell Portable Electrical Generator Service Manual
Page 45

9.3 ALTERNATOR
A
B
C
D
F
E
G
M
K
J
I
H
L
N
NOTICE
Rotor can become damaged if not properly
supported. Place wooden block and rag
underneath rotor for support.
CAUTION
A—VOLTAGE REGULATOR
B—BRUSH ASSEMBLY
Before removing rotor and stator, remove
brush assembly.
2 N•m (1.5 lb. ft.)
C—REAR BEARING CARRIER
D—MAIN WINDING TERMINAL BLOCK
E—STATOR
F—ROTOR
Install appropriate alternator removal tool
(special tool), hold flywheel, and torque tool to
48 N•m (35 lb. ft.).
ALTERNATOR
If torquing alternator removal tool does not
free rotor from crankshaft, tap end of tool with
brass hammer to loosen rotor.
To prevent eye injury, always wear
safety glasses or goggles when
using a hammer.
G—ALTERNATOR ENGINE ADAPTER
H—GROUND CABLE
I— EXCITER WINDING CONNECTOR
J—BRUSH ASSEMBLY
K—TERMINAL BLOCK
L—SLIP RINGS
M—FUEL CUTOUT CONNECTOR
N—VOLTAGE REGULATOR
Also known as Automatic Voltage Regulator or
AVR .
Honeywell Portable Electrical Generator Service Manual www.honeywellgenerators.com 9-3
Alternator Illustrated Matches All Models Except HW3000 & HW3000L
Page 46

FUEL TANK SYSTEM
WARNING
A
B
C
D
E 2
F
G
H
E 1
9.4 FUEL TANK SYSTEM
Fuel and its vapors are extremely flammable and explosive under certain conditions.
• Refuel the generator only outdoors, in a well-ventilated area.
• NEVER enclose the generator in any structure.
• Keep generator at least 6 feet (2 meters) away from buildings, other equipment, and combustible materials during operation.
• NEVER fill the fuel tank while the engine is running. Turn the generator OFF and allow it to cool before filling with fuel.
• NEVER smoke or allow flames or sparks near the generator or where gasoline is stored.
• NEVER overfill the fuel tank (there should be no fuel in the filler neck). After refueling, tighten the fuel cap securely.
• Be careful not to spill fuel when refueling. Spilled fuel or fuel vapor may ignite. If any fuel is spilled, the area must be
dry before starting the engine.
• Avoid repeated or prolonged contact with skin or breathing of vapor.
A—FUEL GAGE
After reassembly, check float for proper
operation.
B—FUEL CAP
Check air vent hole is clean and free of
obstruction. Blow with compressed air if
necessary.
NOTE: For model numbers ending in
“L”, the fuel cap will be attached to the
fuel tank with a chain.
C—FUEL STRAINER
Before reassembly, check fuel strainer
is clean and undamaged.
D—FUEL TANK MOUNTING HARDWARE
10 N•m (7 lb. ft.)
E—FUEL TANK
Before reassembly, clean fuel tank to
remove any sediment and drain completely.
• E1 - Model Numbers Ending in “L”
(HW3000L, HW4000L, HW5500L,
HW5500EL, HW6200L, HW7000EL,
HW7500EL)
• E2 - Non “L” Models
(HW3000, HW4000, HW5500,
HW5500E, HW6200, HW7000E,
HW7500E)
F—FUEL SHUT-OFF VALVE
Clear passages if clogged.
After reinstalling, check for fuel leakage.
Hex fitting - 24 N•m (17 lb. ft.)
G—FUEL SEDIMENT CUP
See CLEANING FUEL SEDIMENT
CUP, page 7-5.
H—FUEL LINE
Check for cracks or damage.
Secure with hose clamps.
HW7500E Model Illustrated
9-4 www.honeywellgenerators.com Honeywell Portable Electrical Generator Service Manual
Page 47

EVAPORATIVE EMISSIONS CONTROL SYSTEM
B2
E1
C
A
D
B1
E2
9.5 EVAPORATIVE EMISSIONS CONTROL SYSTEM
For Model Numbers Ending in “L” only.
A—FUEL TANK
B—CARBON CANISTER
• B1 - HW3000L Model Only
• B2 - All Other Models
C—VAPOR LINE
Secure with hose clamps.
D—CARBON CANISTER TUBE
Secure with hose clamps.
E—CARBON CANISTER BRACKET
2 N•m (1.5 lb. ft.)
• E1 - HW3000L Model Only
• E2 - All Other Models
Honeywell Portable Electrical Generator Service Manual www.honeywellgenerators.com 9-5
Page 48

MUFFLER
WARNING
E1
A
E2
C
B
D
F
G
9.6 MUFFLER
The muffler becomes very hot during operation and remains hot for a while after stopping the engine.
• NEVER touch hot surfaces and avoid hot gases.
• Let engine cool before storing the generator indoors.
A—MUFFLER GUARD
NOTE: Not present on HW3000 or
HW3000L models.
B—MUFFLER COVER
4 N•m (3 lb. ft.)
NOTE: Not present on HW3000 or
HW3000L models.
C—SPARK ARRESTOR
Clamp - 1 N•m (1 lb. ft.)
Screen - 1 N•m (1 lb. ft.)
D—MUFFLER
Cutaway view shows the catalyst
located inside mufflers on model
numbers ending in “L”.
(HW3000L, HW4000L, HW5500L,
HW5500EL, HW6200L, HW7000EL,
HW7500EL)
Muffler rear mounting bracket 18 N•m (13 lb. ft.)
E—EXHAUST PIPE
18 N•m (13 lb. ft.)
• E1 - Non “L” Models
(HW3000, HW4000, HW5500,
HW5500E, HW6200, HW7000E,
HW7500E)
• E2 - Model Numbers Ending in “L”
(HW3000L, HW4000L, HW5500L,
HW5500EL, HW6200L, HW7000EL,
HW7500EL)
F—SECONDARY AIR INTAKE VALVE
For model numbers ending in “L” only
(HW3000L, HW4000L, HW5500L,
HW5500EL, HW6200L, HW7000EL,
HW7500EL)
G—MUFFLER SIDE GUARD
4 N•m (3 lb. ft.)
9-6 www.honeywellgenerators.com Honeywell Portable Electrical Generator Service Manual
Page 49

CARBURETOR
WARNING
A
C
D
E
I
H
F
G
B
9.7 CARBURETOR
Fuel and its vapors are extremely flammable and explosive under certain conditions.
• Refuel generator only outdoors, in a well-ventilated area.
• NEVER enclose the generator in any structure.
• Keep generator at least 6 feet (2 meters) away from buildings, other equipment, and combustible materials during operation.
• NEVER fill fuel tank while the engine is running. Turn generator OFF and allow to cool before filling with fuel.
• NEVER smoke or allow flames or sparks near the generator or where gasoline is stored.
• NEVER overfill the fuel tank (there should be no fuel in the filler neck). After refueling, tighten the fuel cap securely.
• Be careful not to spill fuel when refueling. Spilled fuel or fuel vapor may ignite. If any fuel is spilled, the area must be
dry before starting the engine.
• Avoid repeated or prolonged contact with skin or breathing of vapor.
A—FLOAT VALVE
Check for worn valve or weak spring
before installation.
B—FLOAT
Check for smooth movement after
installation.
C—DRAIN SCREW
Clean with compressed air and check
for leaks after installation.
D—SET BOLT
Check for any sign of fuel leakage
after installation.
E—FUEL CUTOUT SOLENOID
Check continuity between the double
green wires of the solenoid valve. If
there no continuity, replace solenoid.
NOTE: Not present on HW3000 or
HW3000L models.
F—MAIN JET
Clean with compressed air before
installation.
G—MAIN NOZZLE
Clean with compressed air before
installation.
H—O-RING
Check for correct installation.
I— CARBURETOR BODY
Clean internal passages and orifices
with compressed air before installation.
Honeywell Portable Electrical Generator Service Manual www.honeywellgenerators.com 9-7
Page 50

STARTING SYSTEM
D
B
C
A
E
F
G
9.8 STARTING SYSTEM
A—ELECTRIC STARTER
Attempt to crank engine by switching the
engine control switch to the START position.
Starter Solenoid Terminal Nut 6 N•m (4 lb. ft.)
B—WOODRUFF KEY
After installing the flywheel, check to ensure
the woodruff key is still in its slot on the
crankshaft.
C—SPARK PLUG LEAD
Clamp securely to the crankcase with the
two clamps.
Check for cracked or damaged insulation;
replace, if necessary.
D—IGNITION COIL
Pull spark plug lead and connect to spare.
Check ignition for spark to ground.
10 N•m (7 lb. ft.)
E—FLYWHEEL
F—CLAMP
G—CHARGING COIL ASSEMBLY
Check for continuity.
9-8 www.honeywellgenerators.com Honeywell Portable Electrical Generator Service Manual
Page 51

9.9 RECOIL STARTER
B
C
D
E
A
F
G
H
I
CAUTION
A—STARTER CASE
B—ROPE AND HANDLE
Install with recoil starter handle position as
shown.
C—RETURN SPRING
Connect the outer hook in the groove of the
starter reel and inner hook on the starter
case tab.
Return spring is under tension.
Use extreme caution and wear
safety glasses and gloves when
disassembling to prevent injury.
D—STARTER REEL
Install on the starter case after installing the
return spring.
RECOIL STARTER
E—RATCHET SPRING
F—RATCHET
Check for wear or damage.
G—FRICTION SPRING
H—REEL COVER
Align the ratchet with the reel cover notch.
I— REEL COVER BOLT
Honeywell Portable Electrical Generator Service Manual www.honeywellgenerators.com 9-9
Page 52

FAN COV ER
B
C
D
A
E
9.10 FAN COVER
A—COOLING FAN
Install by aligning the three lugs on the rear
side of the fan with the small hole in the flywheel. When disassembling and assembling, take care not to damage the fan
blades.
B—STARTER PULLEY
Install by aligning the hole in the pulley with
the lug on the cooling fan.
C—FLANGE NUT
Hold the flywheel by placing a screwdriver
into the pulley.
105 N•m (77 lb. ft.)
D—FAN COVER
Remove and install with the recoil starter
assembly.
E—RECOIL STARTER ASSEMBLY
Install with the recoil starter handle position
as shown.
9-10 www.honeywellgenerators.com Honeywell Portable Electrical Generator Service Manual
Page 53

WHEEL, LEG, & HANDLE ASSEMBLY
B
C
A
D
E
G
F
NOTICE
• Accessory kit is intended to be used specifically
with this generator.
• NEVER use accessory kit for any other purpose.
• NEVER use accessory kit on-road.
9.11 WHEEL, LEG, & HANDLE ASSEMBLY
(HW3000/L MODELS)
A—LOCKING HANDLE BRACKET
10 N•m (7 lb. ft.)
B—SPRING LOCKING HANDLE
C—RUBBER HANDLE GRIP
D—AXLE
25 N•m (18 lb. ft.)
E—SUPPORT LEG
25 N•m (18 lb. ft.)
F—RUBBER STOPPER
25 N•m (18 lb. ft.)
G—WHEEL
Honeywell Portable Electrical Generator Service Manual www.honeywellgenerators.com 9-11
Page 54

WHEEL, LEG, & HANDLE ASSEMBLY
B
C
D
A
E
F
G
H
NOTICE
• Accessory kit is intended to be used specifically
with this generator.
• NEVER use accessory kit for any other purpose.
• NEVER use accessory kit on-road.
9.12 WHEEL, LEG, & HANDLE ASSEMBLY
(ALL MODELS EXCEPT HW3000/L)
A—WHEEL HANDLE PIVOT
BRACKET
10 N•m (7 lb. ft.)
B—PIN AND CHAIN
C—HANDLE BAR
D—RUBBER HANDLE GRIP
E—AXLE
25 N•m (18 lb. ft.)
F—SUPPORT LEGS
25 N•m (18 lb. ft.)
NOTE: On some models the leg
support nuts are welded to the
frame.
G—RUBBER STOPPER
25 N•m (18 lb. ft.)
H—WHEEL
HW5500E Model Illustrated
9-12 www.honeywellgenerators.com Honeywell Portable Electrical Generator Service Manual
Page 55

10: INDEX
A
Air Filter Maintenance
7-3
Alternator 9-2,9-3
Automatic Voltage Regulator (AVR) 8-5,8-9,9-3
B
Battery
4-1,7-8
Breakers 4-1
C
Components
breakers
4-1
choke control 4-1
engine control switch 4-1
fuel shut-off valve 4-1
recoil starter handle 4-1
spark plug cap 4-1
Control Panel 9-1
E
Electrical Diagnostics
8-2
all other models 8-6,9-12
HW3000/L models 8-2
Engine 7-3,9-2
Engine Control Switch 4-1,9-1
Engine Diagnostics 8-10
Evaporative Emissions Control System 9-5
F
Fuel Gage
4-1,9-4
Fuel Recommendations 7-2
Fuel Sediment Cup 7-5,9-4
Fuel Shut-off Valve 4-1,9-4
Fuel Strainer 9-4
Fuel Tank 9-4,9-5
Fuel, Oxygenated 7-2
G
Governor
7-7
Ground Terminal 4-1
M
Maintenance
7-1
air filter 7-3
battery service 7-8
fuel sediment cup 7-5
governor adjustment 7-7
governor range adjustment 7-7
schedule 7-1
spark arrestor screen 7-6
spark plug 7-5
valve lash 7-7
Muffler 4-1,9-6
P
Power Control Center
4-1,9-1
breakers 4-1,9-1
electrical outlets 4-1,9-1
ground terminal 4-1
R
Rotor
9-2,9-3
S
Safety, Important Instructions
Service and Disassembly 9-1
alternator 9-3
carburetor 9-7
control panel 9-1
engine and alternator 9-2
evaporative emissions control system 9-5
fan cover 9-10
fuel tank system 9-4
muffler 9-6
preparing for 5-1
recoil starter 9-9
starting system 9-8
wheel, leg, & handle assembly 9-11
Service Repair Time 6-1
Spark Arrestor 4-1,7-6,9-6
Spark Plug 4-1,7-5
Specifications 3-1
T
Too ls , S er v ic e
5-1
Torque Information 3-2
Transporting Generator 5-1
Troubleshooting 8-1
V
Valve Lash
7-7
Voltage Regulator 8-5,8-9,9-3
W
Warranty
emissions control
2-2
limited 2-1
replacement parts 2-4
Wheel, Leg, & Handle Assembly 9-11
Wiring Diagrams 3-3
1-1
O
Oil Fill Dipstick
4-1
Oil Recommendations 7-3
Outlets 4-1,9-1
Honeywell Portable Electrical Generator Service Manual www.honeywellgenerators.com 10-1
Page 56

Northshore Power Systems, LLC
4425 N. Port Washington Road
Suite 105
Milwaukee, WI 53212-1082 USA
1-888-HWTECHS (498-3247)
www.honeywellgenerators.com
P/N 101290D
c
2010 Northshore Power Systems, LLC
The Honeywell Trademark is used under license
from Honeywell International Inc.
Honeywell International Inc. makes no representation
or warranties with respect to this product.
Manufactured exclusively for Northshore Power Systems.
 Loading...