

Page 1

HRDE4X4
Digital Video
Recorder
User Guide
Document 900.0399 – 08/08 – Rev 3.01
Page 2

Revisions
Issue Date Revisions
1.00 09/05 New document.
2.00 03/06 Updated Remote Access Software sections with
screenshots and function changes.
2.01 06/06 Corrected Sensor Out connection information.
3.00 07/06 Added PTZ function to RAS GUI. Added Sites
3.01 08/08 Updated manual for HRDE4X4 2.1.1 software
menu in RAS.
release. Added Appendix C (Playing DVR
Archive Clips) and Setting Up the DVR Using
Remote Access (added to Chapter 6 RAS
Operation)
Rev 3.01 ii Document 900.0399
08/08
Page 3
FCC Compliance Statement
Information to the User: This equipment has been tested and found to comply with
the limits for a Class A digital device. Pursuant to Part 15 of the FCC Rules, these limits
are designed to provide reasonable protection against harmful interference when the
equipment is operated in a commercial environment. This equipment generates, uses,
and can radiate radio frequency energy and, if not installed and used in accordance
with the instruction manual, may cause harmful interference to radio communications.
Operation of this equipment in a residential area is likely to cause harmful interference
in which case the user will be required to correct the interference at his own expense.
Caution Changes or modifications not expressly approved by the party
This Class A digital apparatus complies with Canadian ICES-003.
Cet appareil numérique de la Classe A est conforme à norme NMB-003 du Canada.
responsible for compliance could void the user’s authority to
operate the equipment.
Explanation of Graphical Symbols
This symbol indicates the presence of uninsulated “dangerous voltage”
within the product’s enclosure that may be of sufficient magnitude to
constitute a risk of electric shock to persons.
This symbol indicates the presence of important operating and
maintenance (servicing) instruction in the literature accompanying the
product.
CAUTION
RISK OF ELECTRIC
SHOCK DO NOT OPEN
CAUTION: TO REDUCE THE RISK OF
ELECTRIC SHOCK, DO NOT REMOVE THE
COVER (OR BACK). NO USER-SERVICEABLE
PARTS INSIDE. REFER SERVICING TO
QUALIFIED SERVICE PERSONNEL.
Rev 3.01 iii Document 900.0399
08/08
Page 4

Warnings
Installation and servicing should be performed only by qualified and experienced
personnel.
Power off the DVR when connecting cameras, audio, or sensor cables.
The manufacturer is not responsible for any damage caused by improper use of the
product or failure to follow instructions for the product.
The manufacturer is not responsible for any problems caused by or resulting from the user
physically opening the DVR for examination or attempting to fix the unit. The manufacturer
may not be held liable for any issues with the unit if the warranty seal is removed.
Cautions
This product has multiple-rated voltages (110V and 220V). See installation instructions
before connecting to the power supply.
This product uses a Lithium battery. To avoid a risk of explosion, do not replace the battery
on the main board by anything other than a Lithium battery. Dispose of used batteries
according to the manufacturer’s instructions.
This equipment and all communication wirings are intended for indoor use only. To reduce
the risk of fire or electric shock, do not expose the unit to rain or moisture.
WEEE (Waste Electrical and Electronic
Equipment)
Customers in European Union countries are advised to dispose
of this product, at the end of its useful life, as per applicable local
laws, regulations and procedures.
Rev 3.01 iv Document 900.0399
08/08
Page 5

Contents
1 Introduction . . . . . . . . . . . . . . . . . . . . . . . . . . . . . . . . . . 1
Features . . . . . . . . . . . . . . . . . . . . . . . . . . . . . . . . . . . . . . 1
Technical Overview . . . . . . . . . . . . . . . . . . . . . . . . . . . . . . . . 1
Important Safeguards . . . . . . . . . . . . . . . . . . . . . . . . . . . . . . . 2
Lithium Battery . . . . . . . . . . . . . . . . . . . . . . . . . . . . . . . . . . . 4
2 DVR Unit Installation . . . . . . . . . . . . . . . . . . . . . . . . . . . . . . 5
Before You Begin . . . . . . . . . . . . . . . . . . . . . . . . . . . . . . . . . 5
Unpack Everything . . . . . . . . . . . . . . . . . . . . . . . . . . . 5
Typical DVR Installation . . . . . . . . . . . . . . . . . . . . . . . . . . . . . . 6
Setting the DVR for NTSC or PAL . . . . . . . . . . . . . . . . . . . . . . . . . 6
Connecting Peripheral Equipment . . . . . . . . . . . . . . . . . . . . . . . . 7
Connecting the Power Cord . . . . . . . . . . . . . . . . . . . . . . . . . . . . 9
UPS . . . . . . . . . . . . . . . . . . . . . . . . . . . . . . . . . . . . . . . . 9
3 DVR Configuration . . . . . . . . . . . . . . . . . . . . . . . . . . . . . . 11
Front Panel LEDs and Controls . . . . . . . . . . . . . . . . . . . . . . . . . 11
Initial Setup. . . . . . . . . . . . . . . . . . . . . . . . . . . . . . . . . . . . 13
4 Front Panel Operation . . . . . . . . . . . . . . . . . . . . . . . . . . . . 25
Live Viewing Window . . . . . . . . . . . . . . . . . . . . . . . . . . . . . . 25
Search Window . . . . . . . . . . . . . . . . . . . . . . . . . . . . . . . . . 26
Play Mode . . . . . . . . . . . . . . . . . . . . . . . . . . . . . . . . . . . . 32
Network Mode . . . . . . . . . . . . . . . . . . . . . . . . . . . . . . . . . . 33
Archiving Video . . . . . . . . . . . . . . . . . . . . . . . . . . . . . . . . . 33
USB Port . . . . . . . . . . . . . . . . . . . . . . . . . . . . . . . 12
Menu Structure . . . . . . . . . . . . . . . . . . . . . . . . . . . . 13
Live Mode . . . . . . . . . . . . . . . . . . . . . . . . . . . . . . . 14
Recording Mode . . . . . . . . . . . . . . . . . . . . . . . . . . . 14
Motion Zones . . . . . . . . . . . . . . . . . . . . . . . . . . . . . 16
Recording Schedules. . . . . . . . . . . . . . . . . . . . . . . . . 16
Setting System Parameters. . . . . . . . . . . . . . . . . . . . . . 17
Controlling a PTZ Camera . . . . . . . . . . . . . . . . . . . . . . 19
Setting Network Parameters . . . . . . . . . . . . . . . . . . . . . 20
Setup for Sending E-Mail Alerts and Reports . . . . . . . . . . . . 23
Storage Setup. . . . . . . . . . . . . . . . . . . . . . . . . . . . . 23
Saving Setup . . . . . . . . . . . . . . . . . . . . . . . . . . . . . 24
Timeline Search. . . . . . . . . . . . . . . . . . . . . . . . . . . . 28
Go To Search . . . . . . . . . . . . . . . . . . . . . . . . . . . . . 29
Go First Search . . . . . . . . . . . . . . . . . . . . . . . . . . . . 30
Go Last Search . . . . . . . . . . . . . . . . . . . . . . . . . . . . 30
Log List Search . . . . . . . . . . . . . . . . . . . . . . . . . . . . 30
Archive Search . . . . . . . . . . . . . . . . . . . . . . . . . . . . 31
Archiving Still Images onto USB . . . . . . . . . . . . . . . . . . . 34
Archiving Video onto USB . . . . . . . . . . . . . . . . . . . . . . 34
Transferring Still Images or Video onto USB . . . . . . . . . . . . . 35
Rev 3.01 v Document 900.0399
08/08
Page 6

5 RAS Installation . . . . . . . . . . . . . . . . . . . . . . . . . . . . . . . 37
Minimum PC Requirements . . . . . . . . . . . . . . . . . . . . . . . . . . . 37
Installing the RAS Program . . . . . . . . . . . . . . . . . . . . . . . . . . . 37
Opening Ports. . . . . . . . . . . . . . . . . . . . . . . . . . . . . 39
6 RAS Operation . . . . . . . . . . . . . . . . . . . . . . . . . . . . . . . . 41
Live Viewing . . . . . . . . . . . . . . . . . . . . . . . . . . . . . . . . . . . 41
Search and Playback Viewing . . . . . . . . . . . . . . . . . . . . . . . . . . 44
Backing Up a Video Clip in AVI Format . . . . . . . . . . . . . . . . . . . . . 47
Playing Back Recorded Video. . . . . . . . . . . . . . . . . . . . . . . . . . 48
7 RAS Configuration . . . . . . . . . . . . . . . . . . . . . . . . . . . . . . 49
General Setup . . . . . . . . . . . . . . . . . . . . . . . . . . . . . . . . . . 49
Site Setup . . . . . . . . . . . . . . . . . . . . . . . . . . . . . . . . . . . . 50
Event Setup . . . . . . . . . . . . . . . . . . . . . . . . . . . . . . . . . . . 51
Event Search Setup . . . . . . . . . . . . . . . . . . . . . . . . . . . . . . . 51
Record Menu. . . . . . . . . . . . . . . . . . . . . . . . . . . . . . . . . . . 52
Disk Menu . . . . . . . . . . . . . . . . . . . . . . . . . . . . . . . . . . . . 53
Video Menu . . . . . . . . . . . . . . . . . . . . . . . . . . . . . . . . . . . 54
About Menu . . . . . . . . . . . . . . . . . . . . . . . . . . . . . . . . . . . 54
Appendix A DVR Firmware Upgrade . . . . . . . . . . . . . . . . . . . . 55
Appendix B Installing ffdshow for Playing Back AVI Archive Clips . . . . 57
Installing FFDSHOW. . . . . . . . . . . . . . . . . . . . . . . . . . . . . . . 57
Enabling Text Overlay . . . . . . . . . . . . . . . . . . . . . . . . . . . . . . 57
Appendix C Playing DVR Archive Clips . . . . . . . . . . . . . . . . . . 59
Appendix D Optional Items . . . . . . . . . . . . . . . . . . . . . . . . . 63
Remote Control Operation. . . . . . . . . . . . . . . . . . . . . . . . . . . . 63
Appendix E Specifications . . . . . . . . . . . . . . . . . . . . . . . . . 65
Live Viewing Interface. . . . . . . . . . . . . . . . . . . . . . . . . 41
Search and Playback Interface . . . . . . . . . . . . . . . . . . . . 44
Security Options . . . . . . . . . . . . . . . . . . . . . . . . . . . 49
Save Path . . . . . . . . . . . . . . . . . . . . . . . . . . . . . . . 50
Changing the RAS password. . . . . . . . . . . . . . . . . . . . . 50
Adding a Site . . . . . . . . . . . . . . . . . . . . . . . . . . . . . 51
Modifying a Site . . . . . . . . . . . . . . . . . . . . . . . . . . . . 51
Removing a Site. . . . . . . . . . . . . . . . . . . . . . . . . . . . 51
Playing Clips from the USB Memory Stick . . . . . . . . . . . . . . 59
Configuring Multiple Units for Remote Control. . . . . . . . . . . . 64
Index 67
Rev 3.01 vi Document 900.0399
08/08
Page 7

Figures
NTSC/PAL Operation Switch . . . . . . . . . . . . . . . . . . . . . . . . . . . . . . . 7
Rear Panel Connections and Switches . . . . . . . . . . . . . . . . . . . . . . . . . 7
Front Panel . . . . . . . . . . . . . . . . . . . . . . . . . . . . . . . . . . . . . . . 11
Setup Menu Screen . . . . . . . . . . . . . . . . . . . . . . . . . . . . . . . . . . 13
Live Mode Setup Screen . . . . . . . . . . . . . . . . . . . . . . . . . . . . . . . . 14
Recording Mode Setup Screen . . . . . . . . . . . . . . . . . . . . . . . . . . . . 15
Motion Zone Setup Screen . . . . . . . . . . . . . . . . . . . . . . . . . . . . . . 16
Recording Schedule Setup Screen . . . . . . . . . . . . . . . . . . . . . . . . . . 17
System Setup Screen . . . . . . . . . . . . . . . . . . . . . . . . . . . . . . . . . 18
Date and Time Setup Screen . . . . . . . . . . . . . . . . . . . . . . . . . . . . . 19
PTZ Control Setup Screen . . . . . . . . . . . . . . . . . . . . . . . . . . . . . . . 20
Network Setup Screen . . . . . . . . . . . . . . . . . . . . . . . . . . . . . . . . . 21
Send E-mail Setup Screen . . . . . . . . . . . . . . . . . . . . . . . . . . . . . . . 23
Storage Setup Screen . . . . . . . . . . . . . . . . . . . . . . . . . . . . . . . . . 24
Live Viewing Window . . . . . . . . . . . . . . . . . . . . . . . . . . . . . . . . . . 25
Search Menu . . . . . . . . . . . . . . . . . . . . . . . . . . . . . . . . . . . . . . 27
Event Search Window . . . . . . . . . . . . . . . . . . . . . . . . . . . . . . . . . 27
Event Search List Screen . . . . . . . . . . . . . . . . . . . . . . . . . . . . . . . 28
Timeline Search Date Select Screen . . . . . . . . . . . . . . . . . . . . . . . . . . 28
Timeline Search Window . . . . . . . . . . . . . . . . . . . . . . . . . . . . . . . . 29
Go To Search Screen . . . . . . . . . . . . . . . . . . . . . . . . . . . . . . . . . 29
Log List Search Screen . . . . . . . . . . . . . . . . . . . . . . . . . . . . . . . . 30
Log List Screen . . . . . . . . . . . . . . . . . . . . . . . . . . . . . . . . . . . . . 30
Archive Search Screen . . . . . . . . . . . . . . . . . . . . . . . . . . . . . . . . . 31
Archive List Screen . . . . . . . . . . . . . . . . . . . . . . . . . . . . . . . . . . . 31
Play Mode Screen . . . . . . . . . . . . . . . . . . . . . . . . . . . . . . . . . . . 32
Main GUI Screen of RAS Program . . . . . . . . . . . . . . . . . . . . . . . . . . . 33
Archive Mode Screen . . . . . . . . . . . . . . . . . . . . . . . . . . . . . . . . . 34
Archive Menu Screen . . . . . . . . . . . . . . . . . . . . . . . . . . . . . . . . . 35
List of Archived Files . . . . . . . . . . . . . . . . . . . . . . . . . . . . . . . . . . 35
Choose Destination Location Window . . . . . . . . . . . . . . . . . . . . . . . . . 38
Choose the Setup Type Window . . . . . . . . . . . . . . . . . . . . . . . . . . . 38
Choose Language Window . . . . . . . . . . . . . . . . . . . . . . . . . . . . . . 38
Select Program Folder . . . . . . . . . . . . . . . . . . . . . . . . . . . . . . . . . 39
RAS Icon . . . . . . . . . . . . . . . . . . . . . . . . . . . . . . . . . . . . . . . . 39
RAS Live Viewing Interface (Connected) . . . . . . . . . . . . . . . . . . . . . . . 41
Search and Playback Interface . . . . . . . . . . . . . . . . . . . . . . . . . . . . 44
Main User Interface with Back Up Times Marked . . . . . . . . . . . . . . . . . . . 47
AVI Backup Window . . . . . . . . . . . . . . . . . . . . . . . . . . . . . . . . . . 48
Windows Explorer with Video Clips Selected . . . . . . . . . . . . . . . . . . . . . 48
Rev 3.01 vii Document 900.0399
08/08
Page 8

General Setup Screen . . . . . . . . . . . . . . . . . . . . . . . . . . . . . . . . . 49
Change Password Screen . . . . . . . . . . . . . . . . . . . . . . . . . . . . . . . 50
Site Setup Menu . . . . . . . . . . . . . . . . . . . . . . . . . . . . . . . . . . . . 50
Event Menu . . . . . . . . . . . . . . . . . . . . . . . . . . . . . . . . . . . . . . . 51
Event Search Menu . . . . . . . . . . . . . . . . . . . . . . . . . . . . . . . . . . 52
Record Menu . . . . . . . . . . . . . . . . . . . . . . . . . . . . . . . . . . . . . . 52
Disk Menu . . . . . . . . . . . . . . . . . . . . . . . . . . . . . . . . . . . . . . . 53
Video Menu . . . . . . . . . . . . . . . . . . . . . . . . . . . . . . . . . . . . . . . 54
Engineering Mode . . . . . . . . . . . . . . . . . . . . . . . . . . . . . . . . . . . 56
FFDSHOW Video Decoder Configuration Window . . . . . . . . . . . . . . . . . . 58
USB Port Folder File . . . . . . . . . . . . . . . . . . . . . . . . . . . . . . . . . . 59
Archived Folder Contents Window . . . . . . . . . . . . . . . . . . . . . . . . . . . 60
DVR Player Screen . . . . . . . . . . . . . . . . . . . . . . . . . . . . . . . . . . . 60
Open Media File Window . . . . . . . . . . . . . . . . . . . . . . . . . . . . . . . 61
Choosing Playback Screen Size . . . . . . . . . . . . . . . . . . . . . . . . . . . . 61
Rev 3.01 viii Document 900.0399
08/08
Page 9

Tabl es
Rear Panel Connectors and Switches . . . . . . . . . . . . . . . . . . . . . . . . . . 7
Front Panel LEDs . . . . . . . . . . . . . . . . . . . . . . . . . . . . . . . . . . . . 11
Front Panel Controls . . . . . . . . . . . . . . . . . . . . . . . . . . . . . . . . . . 12
Live Mode Setup Fields . . . . . . . . . . . . . . . . . . . . . . . . . . . . . . . . 14
Recording Mode Setup Fields . . . . . . . . . . . . . . . . . . . . . . . . . . . . . 15
Schedule Recording Setup Fields . . . . . . . . . . . . . . . . . . . . . . . . . . . 17
System Setup Fields . . . . . . . . . . . . . . . . . . . . . . . . . . . . . . . . . . 18
Compatible PTZ Protocols . . . . . . . . . . . . . . . . . . . . . . . . . . . . . . . 20
Network Setup Fields . . . . . . . . . . . . . . . . . . . . . . . . . . . . . . . . . 21
Send E-mail Setup Fields . . . . . . . . . . . . . . . . . . . . . . . . . . . . . . . 23
Storage Setup Fields . . . . . . . . . . . . . . . . . . . . . . . . . . . . . . . . . . 24
Status Indicator Icons in the Live Viewing Window . . . . . . . . . . . . . . . . . . 26
Button Functions in Live Viewing Window . . . . . . . . . . . . . . . . . . . . . . . 26
Button Functions in Play Mode . . . . . . . . . . . . . . . . . . . . . . . . . . . . 32
Minimum PC Requirements . . . . . . . . . . . . . . . . . . . . . . . . . . . . . . 37
Live Viewing Interface Controls . . . . . . . . . . . . . . . . . . . . . . . . . . . . 42
Search and Playback Interface Controls . . . . . . . . . . . . . . . . . . . . . . . . 45
Record Menu Settings . . . . . . . . . . . . . . . . . . . . . . . . . . . . . . . . . 53
Technical Specifications . . . . . . . . . . . . . . . . . . . . . . . . . . . . . . . . 65
Rev 3.01 ix Document 900.0399
08/08
Page 10

Rev 3.01 x Document 900.0399
08/08
Page 11

1
Introduction
Features
Your HRDE4x4 digital video recorder (referred to as DVR throughout this document) is a
stand-alone and/or networked video and audio recording device. It provides recording
capabilities for four camera inputs and is capable of event, pre-event, or timelapse
recording. The DVR can function in semi-triplex mode; that is, you can play back video
while simultaneously recording in a network configuration. Each of the four channels can
record independently or simultaneously. Other features include:
• 4 composite input connectors
• NTSC or PAL configuration
• Records up to 30 NTSC images per second or 25 PAL images per second (IPS). The
total frame rate is 120 IPS in quad screen and 30 IPS in full screen mode.
• Video resolution (display and recording):
• Full screen mode — 720 x 480 NTSC, 720 x 576 PAL
• Quad mode — 360 x 240 NTSC, 360 x 288 PAL
• Recording modes — manual, schedule, sensor events, time events, and motion
events.
• MPEG-4 video compression to maximize storage and video streaming on the internet.
• The Remote Access Software (RAS) supports remote live viewing, PTZ control,
searching, archiving, and video playback. By installing the DVR remote software on a
Microsoft Windows
ethernet network.
• USB archiving function provides storage for still images and AVI or DVR clips.
• The Remote Access Software allows playback of video clips archived to a USB stick
without first transferring the data to the local PC hard drive.
• Operates on a real-time, embedded RTOS operating system with a user-friendly
Graphic User Interface (GUI).
• Built-in front panel and remote pan, tilt, and zoom (PTZ) controller
• 3 simultaneous remote users performing live view or playback on the same DVR
®
PC you can monitor real-time and recorded video via an optional
Technical Overview
Your HRDE4x4 DVR incorporates a switcher and multiplexer for selectable multi-mode
display, digital motion detection, camera tiling, and event, pre-event, or timelapse
recording.
Rev 3.01 1 Document 900.0399
08/08
Page 12

The DVR converts analog NTSC or PAL video to digital images and records them on one
hard drive. You can access recorded video from the hard drive or previously archived video
from a USB stick. You can watch live video while simultaneously recording.
The Remote Access Software allows the administrator to remotely connect to and monitor
up to 512 networked DVRs. The software logs the operational and sensor status of sites
once a day for later analysis. The software lets you search based on time and retrieve video
clips from remote sites.
Important Safeguards
1. Read Instructions
All safety and operating instructions should be read before the appliance is operated.
2. Retain Instructions
The safety and operating instructions should be retained for future reference.
3. Cleaning
Unplug this equipment from the wall outlet before cleaning it. Do not use liquid aerosol
cleaners. Use a damp soft cloth for cleaning.
4. Attachments
Never add any attachments and/or equipment without manufacturer approval as such
additions may result in the risk of fire, electric shock, or other personal injury.
5. Water and/or Moisture
Do not use this equipment near water or in contact with water.
6. Accessories
Do not place this equipment on an unstable cart, stand, or table. The equipment may
fall, causing serious injury to a child or adult, and serious damage to the equipment.
Wall- or shelf-mounting should follow the manufacturer’s instructions, and should use
a mounting kit approved by the manufacturer.
Move this equipment and cart combination with care. Quick stops, excessive force,
and uneven surfaces may cause the equipment and cart combination to overturn.
7. Power Sources
This equipment should be operated only from the type of power source indicated on
the marking label. If you are not sure of the type of power, please consult your
equipment dealer or local power company.
If you are having problems with your power supply and need to replace it, contact
Honeywell (see the back cover for contact information) and order the HRDE4x4 DVR
power supply, model number HRDE4PS. Only use this power supply with your
HRDE4x4 DVR.
8. Power Cords
Operator or installer must remove power, BNC, sensor, and other connections before
moving the equipment.
9. Lightning
For added protection for this equipment during a lightning storm, or when it is left
unattended and unused for long periods of time, unplug it from the wall outlet and
disconnect the antenna or cable system. This will prevent damage to the equipment
due to lightning and power-line surges.
Rev 3.01 2 Document 900.0399
08/08
Page 13

10. Overloading
Do not overload wall outlets and extension cords to avoid the risk of fire or electric
shock.
11. Objects and Liquids
Never push objects of any kind through openings of this equipment as they may touch
dangerous voltage points or short out parts that could result in a fire or electric shock.
Never spill liquid of any kind on the equipment.
12. Servicing
Do not attempt to service this equipment yourself. Refer all servicing to qualified
service personnel.
13. Damage Requiring Service
Unplug this equipment from the wall outlet and refer servicing to qualified service
personnel under the following conditions:
• When the power-supply cord or the plug has been damaged
• If liquid is spilled or objects have fallen into the equipment
• If the equipment has been exposed to rain or water
• If the equipment does not operate normally by following the operating
instructions, adjust only those controls that are covered by the operating
instructions as an improper adjustment of other controls may result in damage
and will often require extensive work by a qualified technician to restore the
equipment to its normal operation.
• If the equipment has been dropped or the cabinet damaged
• When the equipment exhibits a distinct change in performance—this indicates a
14. Replacement Parts
15. Safety Check
16. Field Installation
17. Correct Batteries
WARNING! Risk of explosion if battery is replaced by an incorrect type.
18. Operating Temperature
19. Elevated Operating Ambient Temperature
20. Reduced Air Flow
need for service.
When replacement parts are required, ensure the service technician uses replacement
parts specified by the manufacturer or that have the same characteristics as the
original part. Unauthorized substitutions may result in fire, electric shock, or other
hazards.
Upon completion of any service or repairs to this equipment, ask the service
technician to perform safety checks to determine that the equipment is in proper
operating condition.
This installation should be made by a qualified service person and should conform to
all local codes.
Dispose of used batteries according to the instructions.
An operating temperature range is specified (see Appendix E, Specifications) so that
the customer and installer may determine a suitable operating environment for the
equipment.
If installed in a closed or multi-unit rack assembly, the operating ambient temperature
of the rack environment may be greater than room ambient. Therefore, consideration
should be given to installing the equipment in an environment compatible with the
specified operating temperature range.
Installation of the equipment in the rack should be such that the amount of airflow
required for safe operation of the equipment is not compromised.
Rev 3.01 3 Document 900.0399
08/08
Page 14

21. Mechanical Loading
Mounting of the equipment in the rack should be such that a hazardous condition is
not caused by uneven mechanical loading.
22. Circuit Overloading
Consideration should be given to connection of the equipment to supply circuit and
the effect that overloading of circuits might have on over-current protection and supply
wiring. Appropriate consideration of equipment nameplate ratings should be used
when addressing this concern.
23. Reliable Earthing (Grounding)
Reliable grounding of rack mounted equipment should be maintained. Particular
attention should be given to supply connections other than direct connections to the
branch circuit (for example, use of power strips).
Lithium Battery
The unit contains a single 3 VDC lithium battery. This battery is used to maintain the
real-time clock of the unit. When power is not applied to the unit, the battery is used to
maintain the clock and retain the correct clock setting specified by the installer. After
several years of operation, it may become necessary to replace this battery. If the
battery fails, the unit clock will reset to 2001-01, 01 00:00:00. Contact Honeywell
Technical Support for assistance with this. The old battery should be discarded at an
appropriate waste site for lithium batteries as per local guidelines in your area.
Rev 3.01 4 Document 900.0399
08/08
Page 15

2
DVR Unit Installation
This chapter explains how to:
• Set the DVR for NTSC or PAL
• Connect the DVR to peripheral equipment
Before You Begin
Please read this document carefully before
you install your DVR.
Keep this guide for future reference.
Unpack Everything
Check that the items received match those listed on the order form and packing slip. The
HRDE4x4 packing box should include:
• One fully-assembled HRDE4x4 DVR
• One power cable
• One 12 VDC switching adapter
• One Remote Access Software CD
• This User’s Guide and Quick Start Guides
If any parts are missing or damaged, contact the dealer you purchased the DVR from or call
Honeywell Customer Service (see the back cover of this document for contact information).
Rev 3.01 5 Document 900.0399
08/08
Page 16
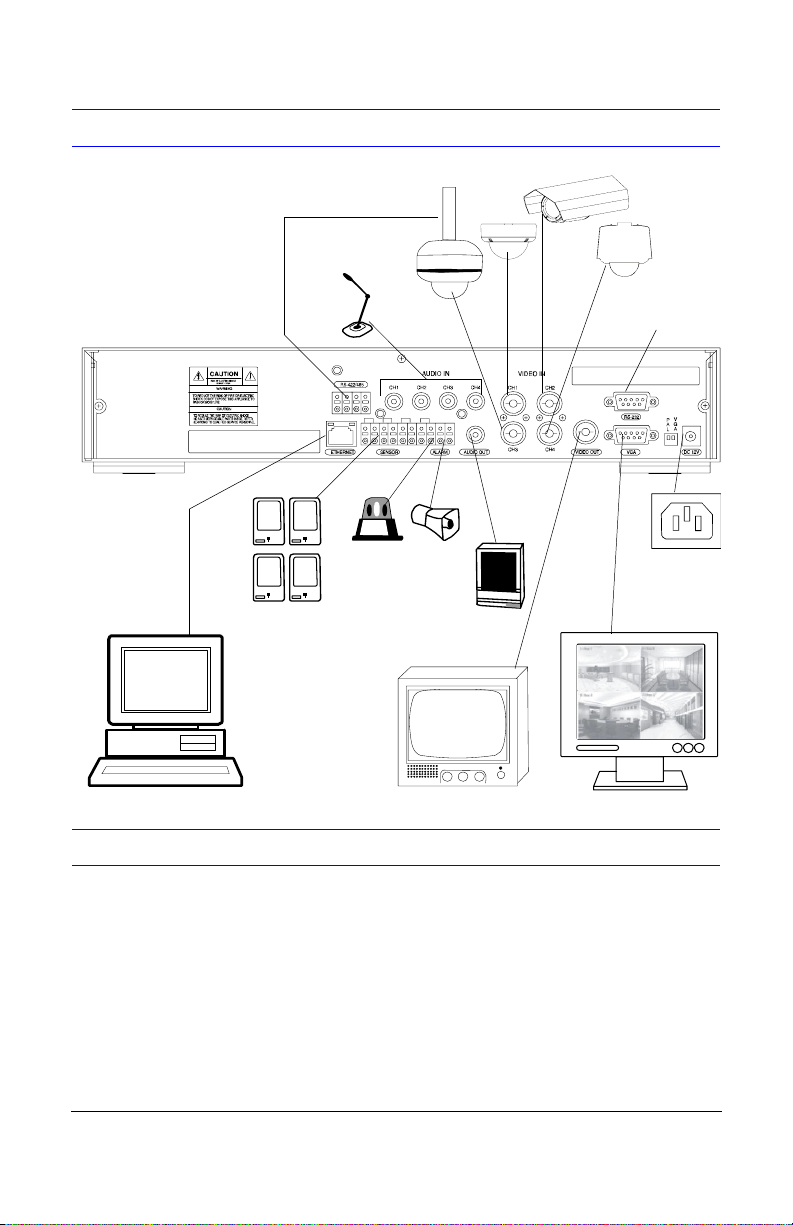
Typical DVR Installation
Four Video Inputs for Cameras
Four Audio
Inputs
RS-232 for
Engineering Use
LAN for Remote
Access Software
Connection
Four Sensor
Inputs
1 Internal Sensor
Output Relay
CCTV Monitor
Audio Line
Output
To 12 VDC
Adapter
VGA Monitor
Setting the DVR for NTSC or PAL
Before turning on your DVR, set the switch (see Figure 2-1) to NTSC or PAL to match your
equipment. If your DVR is already powered, unplug the power cord from the wall outlet.
Wait a few seconds, set the switch (see Figure 2-1), and then re-apply power.
Note You cannot mix NTSC and PAL equipment. For example, do not connect
Rev 3.01 6 Document 900.0399
NTSC cameras when your DVR is set to PAL. Similarly, do not connect a
PAL camera and an NTSC monitor.
08/08
Page 17
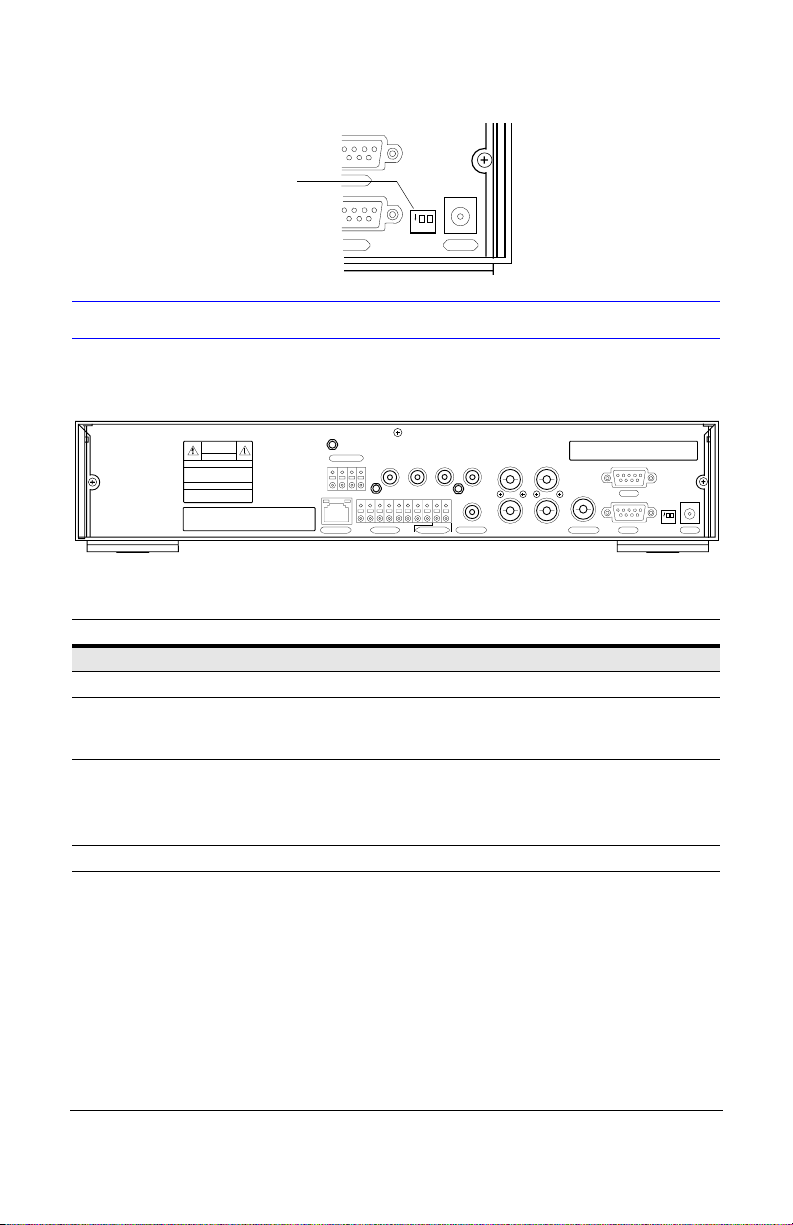
Figure 2-1 NTSC/PAL Operation Switch
PAL: Set to ON position
RS-232
VGA DC 12V
N
C
T
O
S
M
C
P
12
ON
P
V
A
G
L
A
Connecting Peripheral Equipment
Figure 2-2 shows the rear panel connections. See Table 2-1 for network system component
connections.
Figure 2-2 Rear Panel Connections and Switches
CAUTION
RISK OF ELECTRIC SHOCK
DO NOT OPEN
WARNI NG
TO REDUCE T HE RIS K OF FI RE O R EL E CT RI C
SHOCK DO NOT EXPOSETHIS APPLIANCETO
RAIN OR MOISTURE
CAUTION
TO REDUCETHE RISK OF ELECT RIC SHOCK
NO USER SERVICEABLEPARTS INSIDE. REFER
SERVICINGTO QUALIFIED SERVICE PERSONNEL
RS-422/485
TX+ TX- RX+ RX-
ETHERNET
CH1 CH2 CH3 CH4
1GGGGOUT2
34
AUDIO IN
Table 2-1 describes the rear panel connections as shown in Figure 2-2 from left to right.
Table 2-1 Rear Panel Connectors and Switches
Feature Description
Connector
RS-422/485 Remote camera control (see Controlling a PTZ Camera, page 19).
ETHERNET Network the DVR using 10/100 MB Ethernet connector. Network to a PC
for remote monitoring and searching (see Setting Network Parameters,
page 20).
AUDIO IN Connect to a pre-amplified line-level audio source, such as a microphone.
Must not exceed 3m (9.8 ft).
Note It is the user’s responsibility to determine if the local laws and
regulations permit recording audio.
AUDIO OUT Connect to an amplifier. Must not exceed 3m (9.8 ft).
VIDEO IN
CH1 CH2
RS-232
N
C
T
O
S
M
C
P
12
ON
P
CH3 CH4
AUDIO OUTSENSOR OUTSENSOR IN
VIDEO OUT VGA DC 12V
V
A
G
L
A
Rev 3.01 7 Document 900.0399
08/08
Page 18
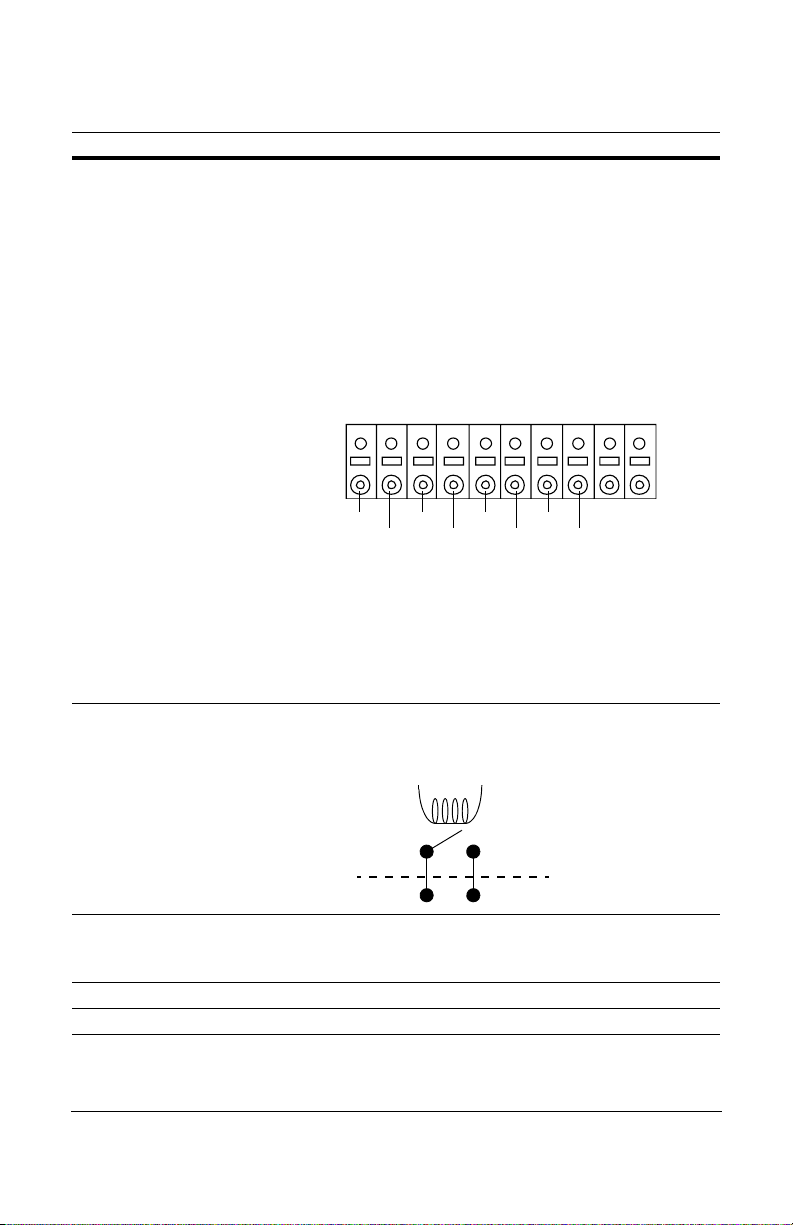
Table 2-1 Rear Panel Connectors and Switches (Cont’d)
Feature Description
SENSOR IN Connect to external sensor devices to signal the DVR to react to events.
Up to four sensors can be connected to the equipment sensors 1–4 which
are dedicated to Video channel 1–4 respectively. These inputs operate
with a simple On/Off function. normally open (NO) and ground connected
to input starts recording or normally close (NC) and ground connected to
input stops recording (see Recording Mode, page 14 to program sensor
recording).
You need to connect two wires to the Terminal block on the rear panel of
the HRDE4X4 to correctly setup a sensor input. Connect one ground wire
between the external device and to the terminal block G input on the
HRDE4x4 to ensure the ground reference voltage is identical. Connect the
other wire to the sensor input 1 –4 connection on the terminal block to
trigger the record condition.
Sensor Input
1GGGGOUT234
Connections
In 1
In 2 In 3 In 4
GND 1 GND 2 GND 3 GND 4
SENSOR OUT
Whether the sensor contacts are Normally Open or Normally Closed
depends on the setting of NO (normally open) or NC (normally closed) in
the record screen (Rated load 0.5 A @ 30 VAC or 1 A @ 30 VDC).
Set to NO: The alarm output contacts close when triggered by the sensor
input.
Set to NC: The alarm output contacts open when triggered by the sensor
input.
SENSOR
OUT
An internal relay connects/closes the two connected external sensor
output terminals. The relay can be triggered to close the two sensor
connections by either motion or a sensor input, if enabled in the Recording
Setup menu. This can be used to turn on or off an external buzzer or light.
Inside HRDE4X4
External Sensor
connection
VIDEO IN Connect NTSC or PAL camera coaxial outputs (up to 4) to the BNC Video
In connectors.
Caution Do not mix NTSC and PAL cameras.
VIDEO OUT Connect to a monitor.
RS-232 For engineering use only.
Rev 3.01 8 Document 900.0399
08/08
Page 19

Table 2-1 Rear Panel Connectors and Switches (Cont’d)
Feature Description
VGA Connect to a VGA monitor. Must not exceed 3m (9.8 ft).
Note When using a VGA monitor, make sure you set the VGA switch to
ON and power reset the unit (turn unit off then on).
DC 12V Apply 12 VDC using the DC switching adapter supplied.
SWITCH
PAL Set to the PAL position when PAL cameras are connected. NTSC is the
VGA Set to the VGA position when a VGA monitor is connected. COMP is the
default setting.
Note When you change the PAL setting, you must reboot the DVR to
apply the new setting.
default setting.
Note When you change the position of the VGA switch, reboot the DVR
to apply the new setting. When VGA is enabled, the video out
connector (composite) is disabled. Also when the Video Out is
enabled, the VGA is disabled.
Connecting the Power Cord
1. Connect the adapter DC power cord to the DVR.
2. Connect the AC power cord to the adapter and then to the wall outlet.
Your DVR is now ready to operate. See Chapter 3, DVR Configuration and Chapter 4, Front
Panel Operation for more information.
WARNING! Route power cords so they are not a tripping hazard. Make certain
the power cord can not be pinched or worn away by furniture. Do
not install power cords under rugs or carpet.
The power cord has a grounding pin. If your power outlet cannot
receive a grounding pin, do not modify the plug.
Do not overload the circuit by plugging too many devices into one
circuit.
UPS
It is highly recommended that the HRDE4x4 be connected to an uninterruptible Power
supply (UPS). This provides temporary backup power to operate the unit during a limited
power outage. The UPS also protects the unit from AC power fluctuations and power spikes
from the power grid. Use of a UPS protects your investment in your HRDE4X4.
Rev 3.01 9 Document 900.0399
08/08
Page 20

Rev 3.01 10 Document 900.0399
08/08
Page 21
3
DVR Configuration
This chapter explains:
• Front panel LEDs and controls
•Initial DVR setup
• Configuring live and recording modes
• Setting motion zones
• Setting recording schedules
• Setting system parameters
• Configuring remote network control
• Setting storage parameters
Note Ensure that your DVR is completely installed and all components are
Front Panel LEDs and Controls
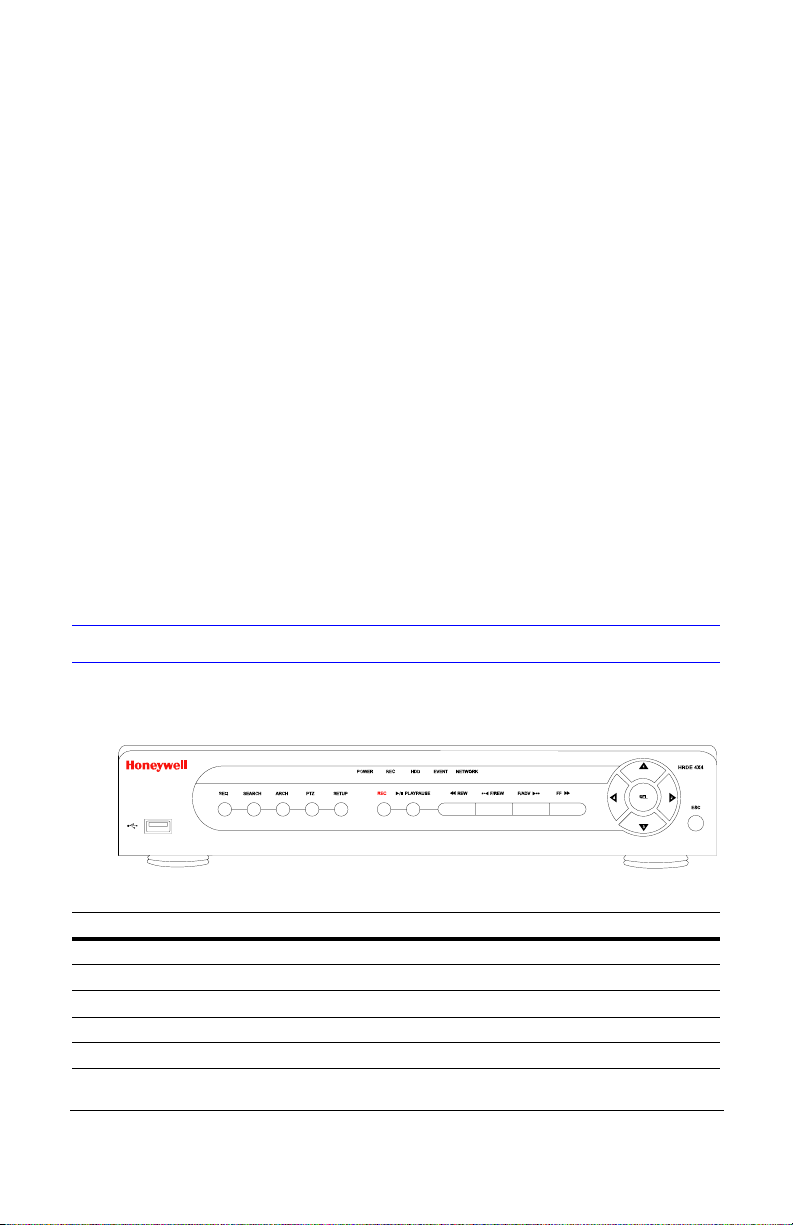
Figure 3-1 shows the DVR front panel. Table 3-1 describes the operational LEDs. Table 3-2
describes the control buttons.
connected before proceeding.
Figure 3-1 Front Panel
Table 3-1 Front Panel LEDs
LED Function
POWER ON indicates power is applied to the unit.
REC ON indicates recording is enabled.
HDD ON indicates the system is accessing the hard drive.
EVENT ON indicates the sensor(s) has/have been triggered or motion is detected.
NETWORK ON indicates a user is connected to the system through the RAS software.
Rev 3.01 11 Document 900.0399
08/08
Page 22
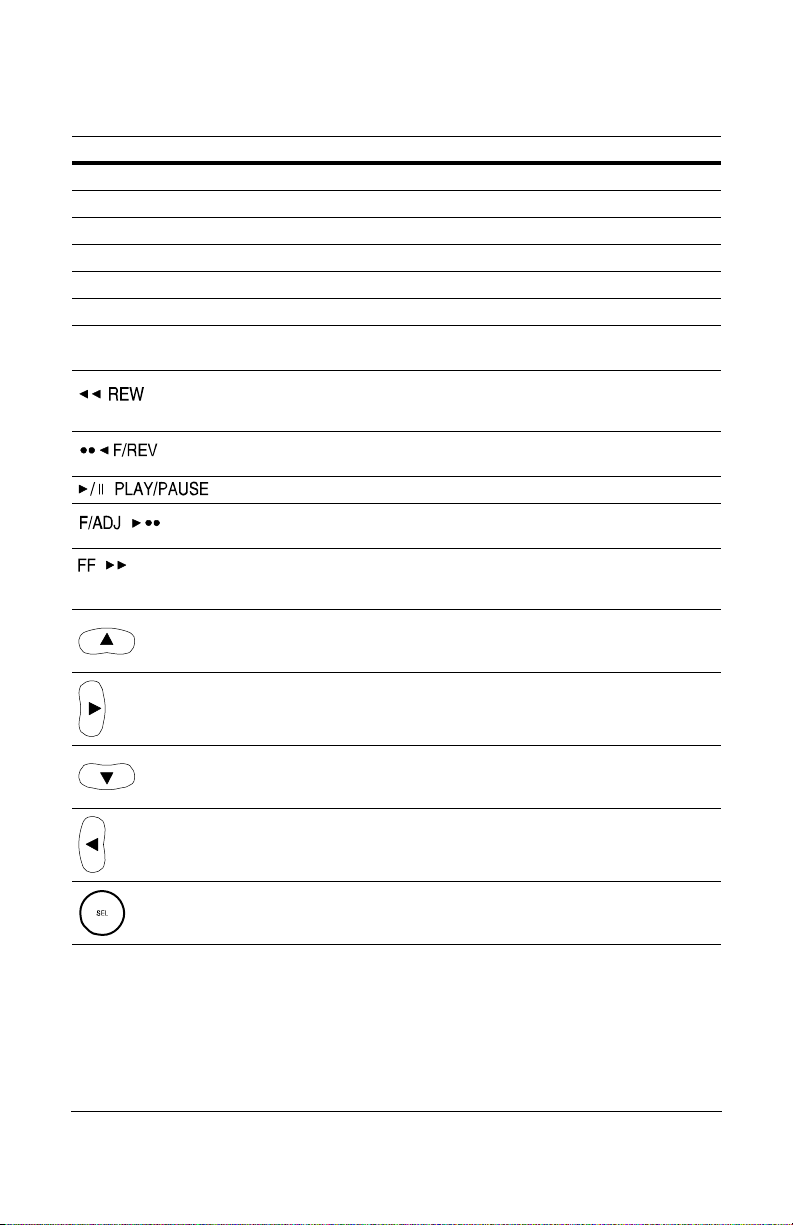
Table 3-2 Front Panel Controls
Control Function
SEQ Start auto sequencing only in full screen mode. Toggles on and off.
SEARCH Opens search menu.
REC Starts/stops manual recording (requires password entry).
ARCH Starts archiving a video clip or still image to a USB stick.
PTZ Controls Pan/Tilt/Zoom (PTZ) operation.
SETUP Opens the Setup menu.
ESC • Temporarily stores the changed value
• Returns to the previous menu screen
• Rewinds the video in Playback mode. Press again to toggle the
playback speed at 1x, 2x, 4x, 8x, and 16x speeds.
• See Log List Search on page 30.
Jump/step backward. In Playback mode, the playback position
moves one minute backward.
Play or pause a video clip in Playback mode.
Jump/step forward. In Playback mode, the playback position
moves one minute forward.
• Plays the video forward in Playback mode. Press again to
toggle the speed to 1x, 2x, 4x, 8x, and 16x normal speed.
• See the Archive Search on page 31.
•Moves UP in the menu structure in Setup mode
1
• Selects camera 1 in Live and Playback modes
• Used as the number 1 when entering the password
•Moves RIGHT in the menu structure in Setup mode
2
• Selects camera 2 in Live and Playback modes
• Used as the number 2 when entering the password
3
• Selects camera 3 in Live and Playback modes
• Used as the number 3 when entering the password
•Moves LEFT in the menu structure in Setup mode
•Moves DOWN in the menu structure in Setup mode
4
• Selects camera 4 in Live and Playback modes
• Used as the number 4 when entering the password
• Selects full screen or quad view in Live and Playback modes
• Selects desired menu item
• Stores setup value in the menu
USB Port
There is a USB port on the left side of the front panel. You can use this port to save video
clips or stills onto a USB stick (see Archiving Video, page 33) and to upgrade the DVR
firmware.
Rev 3.01 12 Document 900.0399
08/08
Page 23
Initial Setup
Before using your DVR for the first time, you need to establish some initial settings:
•date and time
• display language
• camera settings
• recording mode and scheduling
•network setup
The sections that follow describe how to use the Setup menus to quickly set up your DVR.
1. Press SETUP on the front panel to enter the Setup menu.
2. At the prompt, enter your password using the appropriate combination of arrow
buttons. The default password is 1111. Press SEL to enter the password.
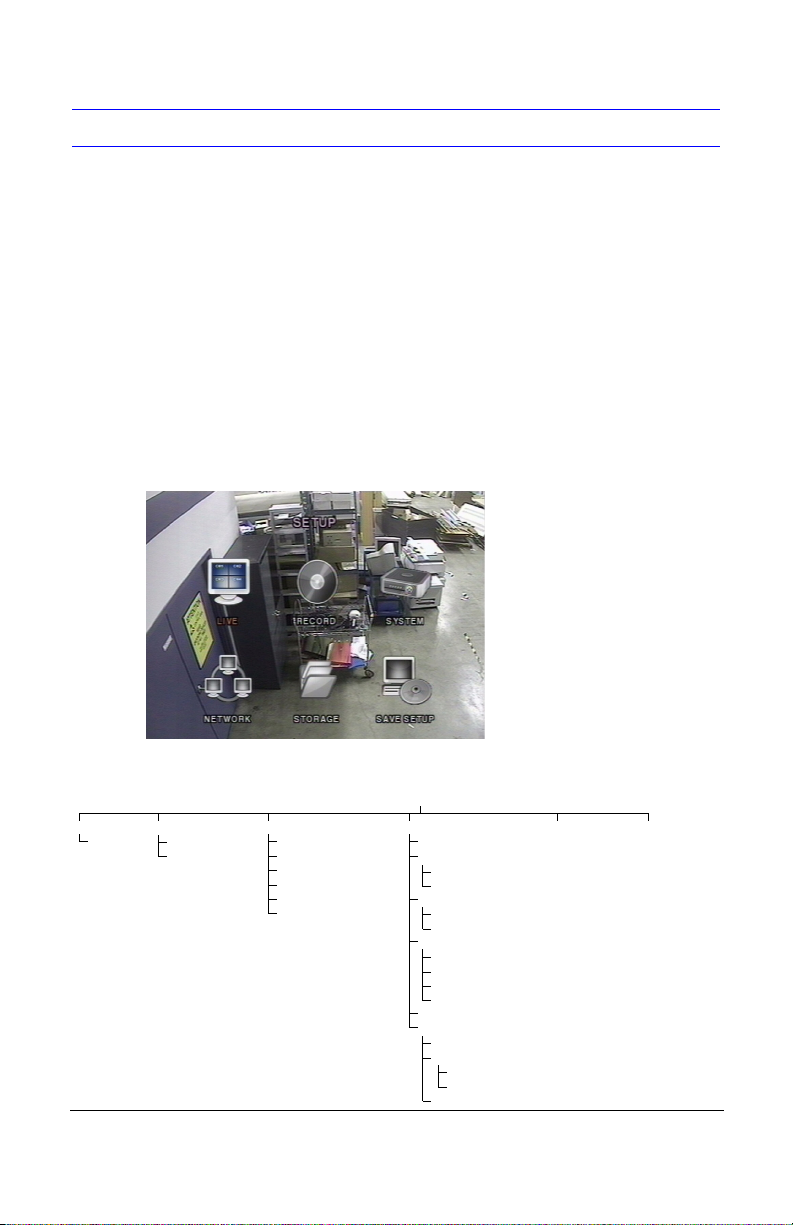
3. After the entering the password, the main Setup menu screen appears as shown in
Figure 3-2. Use the arrow buttons to navigate through the menu items. Press SEL to
enter the desired sub-menu.
Note We recommend that you protect your DVR system by assigning a new
password immediately. Please follow the procedure in Setting System
Parameters, page 17.
Figure 3-2 Setup Menu Screen
Menu Structure
Setup Menu
Channel
Name
Record System
Motion Zone
Schedule
DVR ID
Description
Admin Password
Network Password
Set Date & Time
PTZ Control
Rev 3.01 13 Document 900.0399
Network Storage Save SetupLive
Port
Network Type: ADSL
ID
Password
Network Type: DHCP
IP Address
MAC Address
Network Type: LAN
IP
Subnet Mask
Gateway
DNS Server IP
DDNS Server Name
Send E-mail
Mail Address
Mail Server Name
ID
Password
Return Mail Address
08/08
Page 24
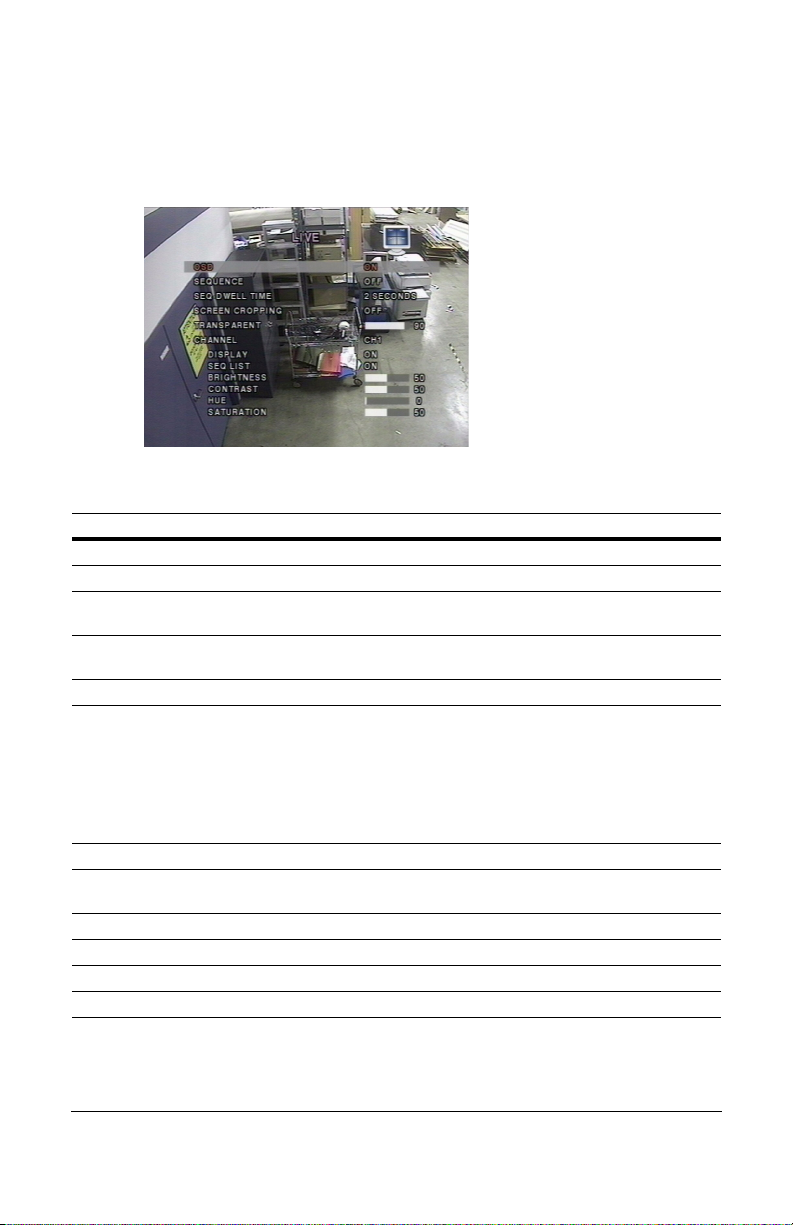
Live Mode
To set values for live video display, use the UP and DOWN controls to navigate through the
menu items. Change the value of the menu item using the LEFT and RIGHT controls.
Figure 3-3 Live Mode Setup Screen
Follow Table 3-3 to set the Live Mode parameters.
Table 3-3 Live Mode Setup Fields
Field Description
OSD Enables/disables on-screen display.
SEQUENCE Enables/disables sequential display of video in Full Screen mode.
SEQ-DWELL TIME Sets the Dwell time for each channel display in Sequential Display
SCREEN
CROPPING
TRANSPARENT Changes the transparency level of the on-screen display.
CHANNEL Selects the channel (camera 1 –4) for applying the following six
DISPLAY Enables/disables display of the video channel in Live Display mode.
SEQ LIST Enables/disables the specified channel to be included in the
BRIGHTNESS Changes the brightness of the specified channel.
CONTRAST Changes the contrast of the specified channel.
HUE Changes the hue of the specified channel.
SATURATION Changes the saturation of the specified channel.
mode (choose from 1–60 seconds).
Enable/disable cropping to make the display fit the screen.
settings. Any changes you make immediately take effect with the
selected channel.
Press SEL to enter a text insertion screen and apply a new name for
the channel. Use the LEFT and RIGHT arrow controls to navigate
through the channel name and the UP and DOWN arrow controls to
change the selected character. Press SEL to confirm the name.
Sequential Display mode.
Recording Mode
To set values for recording video, use the UP and DOWN controls to navigate through the
menu items. Change the value of the menu item using the LEFT and RIGHT controls.
Rev 3.01 14 Document 900.0399
08/08
Page 25

Figure 3-4 Recording Mode Setup Screen
Follow Table 3-4 to set the Recording Mode parameters.
Table 3-4 Recording Mode Setup Fields
Field Description
RESOLUTION Sets the resolution to either
CHANNEL Selects the channel (camera 1 –4) to apply the settings in this table.
Changes you make immediately take effect with the selected channel.
FRAME RATE Sets the frame rate for the specified channel (choose from
FULL Screen or QUAD View.
OFF or
1–30 fps).
Note The sum of the frame rate values from each channel cannot exceed the maximum
frame rates for a specific recording resolution. The total Maximum frame rate for
NTSC video are 120 fps (frames per second) for Quad and 30 fps for Full.
QUALITY Selects the recording quality for the specified channel. Options are:
NORMAL, HIGH, SUPER
RECORDING Assigns the recording mode for each channel. Options are:
CONTINUOUS; BY MOTION; BY SENSOR (record based on sensor
inputs);
BY SCHEDULE; DISABLE
MOTION ZONE Selects motion sensing zones. Options are:
FULL ZONE, PARTIAL ZONE
Note If Partial Zone is selected (press SEL), the screen changes as
shown in Figure 3-5.
MOTION
SENSITIVITY
SENSOR TYPE Sets the type of sensor for the specified channel (see SENSOR IN on
Sets the motion sensitivity for the specified channel, from:
1 to 9 (where 9 is the most sensitive setting)
page 8 for connection information). Options are:
None
N/O normal open (ground connected to the input starts recording)
N/C normal closed (ground connected to the input stops recording)
PRE RECORD Enables/disables pre-event recording. Pre-event recording time is five
POST EVENT
RECORD
seconds and only intra-frames are recorded for pre-event recording.
Sets post-event recording time duration for the specified channel
(choose from 2– 30 seconds).
Rev 3.01 15 Document 900.0399
08/08
Page 26

Table 3-4 Recording Mode Setup Fields (Cont’d)
Field Description
SENSOR OUT Enables/disables sensor output for the specified channel. The sensor
SENSOR OUT
DURATION
AUDIO Enables/disables audio recording for the specified channel. Audio must
SCHEDULE Sets the recording schedule. This menu item takes you to the Schedule
output relay can be closed by either a motion event or a sensor input, if
enabled.
Sets the sensor output time duration for the specified channel (choose
from
1–60 seconds).
be set to ON to hear live audio. On the local unit, audio can be heard
live and in playback. Only audio for the selected camera is heard. You
must be in Live mode in the remote access software to hear audio.
Setup screen (see Figure 3-6).
Motion Zones
When you select Partial Zone in the Motion Zone menu, you can set up motion sensing
zones (see Figure 3-5).
To move around each rectangular zone, use the arrow controls. Press
rectangular zone you want to include as part of the motion sensing zone. As you select each
zone, the color changes. Press
Figure 3-5 Motion Zone Setup Screen
ESC
to return to the
Record Menu
SEL
on each
.
Selected
zones
Note Only selected zones trigger motion recording.
Recording Schedules
To set up a recording schedule, select SCHEDULE in the RECORD menu.
Use the arrow buttons to navigate through the items and set the recording schedule.
Rev 3.01 16 Document 900.0399
08/08
Page 27

Figure 3-6 Recording Schedule Setup Screen
You can schedule recording in one hour increments from 0 to 24 (0:00 to 24:00). You can
select individual blocks of time, blocks of time for all channels, entire channels, or the entire
schedule. Motion recording, sensor recording, and continuous recording can be used
exclusively for the schedule, or mixed as needed. See Table 3-5 for four ways to set the
schedule.
To set up a recording schedule, select SCHEDULE in the record menu. Use the arrow
buttons to select one of the items in Table 3-5. Then press SEL to toggle and select the
recording method required (
Table 3-5 Schedule Recording Setup Fields
Field Description
ALL Selected recording mode is applied to the entire time zone and
CH1 to CH4 Selected recording mode is applied to the entire time zone for
Vertical Bar Selected recording mode is applied to the entire channel for the
- Individual Block of
Time
C = Continuous, M = Motion, S = Sensor, - = No recording).
all channels (cameras 1 to 4).
the specified channel.
selected time zone.
Each vertical bar corresponds to one hour.
Selected recording mode is applied to the selected 1-hour
increment for the selected channel.
Setting System Parameters
Use the System Setup screen to input system parameters.
Use the UP and DOWN arrow controls to navigate through the menu items and use the
LEFT and RIGHT arrow controls to change the value of the menu items.
Rev 3.01 17 Document 900.0399
08/08
Page 28

Figure 3-7 System Setup Screen
Follow Table 3-6 to set global System parameters.
Table 3-6 System Setup Fields
Field Description
DVR ID Sets the name of the DVR.
Press SEL, use the LEFT and RIGHT arrow controls to navigate through
the position for each alphanumeric character. Use the UP and DOWN
arrow controls to change the selected character. Press SEL to save the
name.
DESCRIPTION Press SEL to view system information (System version, storage capacity,
LOAD SETUP
DEFAULT
ADMIN
PAS SWORD
NETWORK
PAS SWORD
DATE
FORMAT
IP address and MAC address).
Select ON to reset the system to the factory default settings.
Sets the administrator password. After selecting this menu item, you are
prompted for your current password and then the new password. Follow
the prompts to change and confirm the new password. The default
password is 1111. Use the arrow controls to change the password:
UP = 1
RIGHT = 2
DOWN = 3
LEFT = 4
Sets the remote access password. You need to enter this password
when connecting to this DVR through the RAS program (see page 42).
After selecting this menu item, you are prompted for your current
password (the default password is 1111) and then the new password.
Follow the prompts to change and confirm the new password.
Use the arrow controls to change the password as described in ADMIN
PASSWORD above.
Sets the desired date and time display format. Options are:
YYYY/MM/DD YYYY-MM-DD
MM/DD/YYYY MM-DD-YYYY
DD/MM/YYYY DD-MM-YYYY
Rev 3.01 18 Document 900.0399
08/08
Page 29

Table 3-6 System Setup Fields (Cont’d)
Field Description
SET DATE &
TIME
PTZ
CONTROL
LANGUAGE Sets the desired language.
REMOTE
CONTROLLER
ID
Sets the present date and time and Daylight Saving settings for the DVR
(see Figure 3-8).
Press SEL, use the LEFT and RIGHT arrow controls to select the
appropriate Daylight Saving setting. Options for Daylight Saving are
OFF, U.S.A., EU, and OTHER.
If you select OTHER, you can program a date specific Daylight Saving
Begin and End settings. You can set the month, the week (ranging from
1st to Last), the day, and the hour (based on a 24-hour clock). With the
Begin setting, you choose the date and time when the clock goes ahead
one hour. With the End setting, you choose the date and time when the
clock goes back one hour.
Use the arrows to navigate through the position of each alphanumeric
character in the date/time. Use the UP and DOWN arrows to change the
selected character. Press SEL to confirm the new date and time.
Sets the PTZ camera speed, number, type, and ID (see Controlling a PTZ
Camera, page 19).
Sets from 0– 9. Used with the optional remote control. If several units are
in the same room, set each unit for a different ID. Use the remote control
to select one by pressing the corresponding single digit code. The
factory default is 0. If only one unit is present, leave this set to the factory
default of 0. When set to 0, the unit does not look for a select number
(1– 9
) from the remote control. The on-screen remote control icon is
always on and the user can press any remote control key as required.
Figure 3-8 Date and Time Setup Screen
Controlling a PTZ Camera
To control the PTZ functions of the camera, connect the controller to the RS-485 port on the
rear panel (see Figure 2-2).
Note For speed dome cameras that support RS-485, connect them directly to the
On the PTZ Control Setup screen (see Figure 3-9), you can select or set the protocol type
of the camera so that it is the same as the one installed on the site. If the camera has a
Rev 3.01 19 Document 900.0399
RS-485 port. If the camera is controlled with RS-232-C, use an RS-485 to
RS-232-C signal converter.
08/08
Page 30

specific camera ID, select the camera ID using the LEFT and RIGHT arrow controls. The
following options are available on the PTZ CONTROL screen:
• CAMERA SPEED (19200, 14400, 9600, 4800, 2400)
• CAMERA NUMBER (channel number that the PTZ is connected to)
• CAMERA TYPE (protocol type)
• CAMERA ID (0–63)
Figure 3-9 PTZ Control Setup Screen
Table 3-7 Compatible PTZ Protocols
SAMSUNG MPT-230 SONY EVI-D30 DYNACOLOR DSCP
WON WOO DONGYANG DSC-230S DONGYANG DSC-230M
DONGYANG DPC-100 DONGYANG DSC-240 DONGYANG DRX-500
DONGYANG DRX-502A PELCO D-PROTOCOL PELCO P-PROTOCOL
PELCO CM6700 COSTAR 2500 VICON V2311RB3
VICON VPS1300 VICON 422R CNB PTZ 102N
KALATEL KTD-312 SENSOMATIC PTZ ELMO PTC-200
CANNON VC-C4 HITRON SCANDOMEII WOOJU (DRX-502A)
SAMSUNG MRX-1000 KCC-PT400 VIDO B-01
LG LPT-A100L TSC PIH-302
DS-120 SCC-641 WV-CS850
VC-C50i NIKO NK-97 NEWBORN DOME
SJ-100 DY-255 HRX-700
VCL KD6i BOSCH
HONEYWELL SCANDOMEII
Setting Network Parameters
Set up your network parameters (for remote connection through the Remote Access
Software) on the Network Setup screen. See Chapter 5, RAS Installation, Chapter 6, RAS
Operation, and Chapter 7, RAS Configuration for more information about RAS.
Rev 3.01 20 Document 900.0399
08/08
Page 31

Figure 3-10 Network Setup Screen
Follow Table 3-8 to set your system network parameters.
Table 3-8 Network Setup Fields
Field Description
PORT Press SEL to enter the port number (see Ports below).
REMOTE ACCESS Enables/disables remote access (through RAS).
BANDWIDTH
SAVING
NETWORK TYPE Sets the type of network connection. Options are:
DDNS Enables/disables the DDNS server.
DDNS SERVER
NAME
SEND E-MAIL Sets up sending e-mail reports. This menu item takes you to the
Enables/disables key frame transmission only. This feature is
useful when your network bandwidth is not enough for live video
streaming.
LAN, DHCP, ADSL
Note Other parts of the Network Setup screen change
depending on what network type you select (see Network
Types, page 22).
Enters or edits the DDNS server name.
Note This option only appears if DDNS is enabled.
Send E-mail setup screen. Enter the appropriate e-mail address
and server information to enable sending e-mail reports. See Setup
for Sending E-Mail Alerts and Reports, page 23, for more
information.
Ports
Note The default port for remote live view and playback on your DVR is 5445. To
When you connect one or more DVRs to a network through an IP sharing device, each
device must have a unique RTSP port number for remote access to each unit from outside
the LAN (Local Area Network). Also, the IP sharing device must be configured for port
Rev 3.01 21 Document 900.0399
remotely configure a DVR with the default port selected, you must also open
port 5455. If you change the default port number, the port you must open for
remote configuration is your new port number plus 10 (for example,
5455=5445+10).
08/08
Page 32

forwarding so that each port, when accessed on the IP sharing device, will forward to the
appropriate DVR.
Note This port number is listed next to the PORT menu option in the Network
Setup screen. If you plan to access the DVR units only from within the same
LAN, the RTSP port does not have to be changed.
Network Types
There are three network types available. Each type requires different settings.
LAN
To use the LAN option when connecting the DVR to a network, the following information is
required. See your network administrator if you do not have this information.
IP The fixed IP address of the DVR unit
Subnet Mask The Subnet Mask for the LAN
Gateway The IP address of the Gateway
DNS Server IP The IP address for the DNS server
DHCP
Select DHCP to use the DHCP option when connecting the DVR to a network. The DHCP
server automatically assigns an IP address, and then automatically assigns IP addresses
and other parameters to new devices. The assigned IP address and MAC address are
displayed when DHCP is selected.
If the network connection does not allow additional IP addresses, then an IP sharing device
is needed. In this case, forwarding may be needed to allow for a network connection. For
more information on port forwarding, see the documentation for your IP sharing device, or
contact your network administrator.
ADSL
To use the ADSL option when connecting the DVR to a network, the following information is
required. See your network administrator if you do not have this information.
ID The user ID for the ADSL connection
Password The password for the ADSL connection
Your ADSL connection must have an RJ45 output to connect to the DVR.
When sharing the connection with other devices, an IP sharing device should be used. In
this case, select LAN as the NETWORK TYPE. You must also configure the IP sharing
device for port forwarding to allow for a network connection.
For more information on port forwarding, see the documentation for your IP sharing device
or contact your network administrator.
Rev 3.01 22 Document 900.0399
08/08
Page 33

Setup for Sending E-Mail Alerts and Reports
To set your options for sending e-mail alerts, use the UP and DOWN controls to navigate
through the menu items. Change the value of the menu item using the LEFT and RIGHT
controls or by pressing SEL to manually change the entry.
Figure 3-11 Send E-mail Setup Screen
Table 3-9 describes the Sending E-mail options.
Table 3-9 Send E-mail Setup Fields
Field Description
IP
NOTIFICATION
EVENT ALARM When enabled (ON), the DVR sends a captured image (JPEG), the site
MAIL
ADDRESS
MAIL SERVER
NAME
ID Press SEL to enter your e-mail account ID/user name.
PAS SWORD Press SEL to enter your e-mail account password.
RETURN MAIL
ADDRESS
When enabled (ON), the DVR sends network information (IP address,
Gateway, Subnet mask) to the specified e-mail address when the
network information changes or when the system is rebooted.
(channel) name, and the record type of the alarm that occurred to the
specified e-mail address when the record type is set to either Motion or
Sensor and the alarm is currently ON.
Press SEL to enter the e-mail address to which the DVR sends the
e-mail. For example: roberta.smith@honeywell.com
Press SEL to enter the mail server name to which the DVR sends
e-mails.
Press SEL to enter the e-mail address for returning e-mails due to
delivery failure or delay.
Note We recommend that users do not use their web-mail address (such as
Hotmail or Yahoo) as the e-mail accounts to which the HRDE4x4 sends
e-mails. Use your company e-mail system instead.
Storage Setup
To assign how your DVR acts when the hard drive is full, set the storage parameters in the
Storage Setup screen.
Rev 3.01 23 Document 900.0399
08/08
Page 34

Figure 3-12 Storage Setup Screen
Table 3-10 describes the Storage field options.
Table 3-10 Storage Setup Fields
Field Description
OVERWRITE When enabled, the DVR continues recording and overwrites the oldest
FORMAT Formats the hard drive. Use the LEFT and RIGHT arrow buttons to
VIDEO DELETE When enabled, the DVR deletes recorded video after the time that is
DELETE VIDEO
AFTER
SAVE SETUP
TO A USB
LOAD SETUP
FROM A USB
existing recorded data after the hard drive is full.
When disabled, recording stops after the hard drive is full.
select ON, then press SEL. You then have the option to CANCEL or
CONFIRM.
Caution All recorded data will be lost. We recommend that you
archive any data that you may need in the future before you format the
hard drive.
set in the DELETE VIDEO AFTER field.
When disabled, the DVR does not delete recorded video until the hard
drive has filled up.
Sets the amount of time that the DVR keeps video before deleting it.
Set the time between 1 and 60 Days. VIDEO DELETE must be enabled
for the video to delete after this date.
Press SEL to save your current DVR settings as a configuration file to a
connected USB memory stick.
Press SEL to load a configuration file containing DVR settings from a
connected USB memory stick.
Saving Setup
To preserve the setup values that you have selected, open the SAVE SETUP screen, then
select CONFIRM and then press SEL.
This completes your DVR setup. Proceed to Chapter 4, Front Panel Operation for
information on live viewing, searching for video, and archiving.
Rev 3.01 24 Document 900.0399
08/08
Page 35

4
Front Panel Operation
This chapter explains:
• Live viewing
•Searching
•Playing back
• Live networked remote monitoring
• Archiving video to a USB memory stick
Note This chapter assumes you have already correctly installed and configured
Live Viewing Window
In the Live window, video inputs from the cameras are displayed as they are configured in
the Live Setup screen (see Live Mode on page 14). Figure 4-1 shows the layout of the live
viewing window. Various on-screen display (OSD) symbols, which indicate the status of the
DVR, are described in Table 4-1.
your DVR. If you have not, see Chapter 2 for Installation and Chapter 3 for
Configuration.
Figure 4-1 Live Viewing Window
Rev 3.01 25 Document 900.0399
08/08
Page 36

Table 4-1 Status Indicator Icons in the Live Viewing Window
Key Description
Continuous recording in progress.
Manual recording in progress (overrides other modes).
Sensor recording in progress.
Motion recording in progress.
Event indicator. When there is an event (sensor or motion) in the video
channel, this icon highlights in bright red.
Indicates that sensor output is activated.
Indicates that a RAS user is connected to the DVR.
Indicates that the sequencing mode is enabled.
Indicates storage is set to overwrite the oldest recorded data.
Indicates a remote control is selected for use with the unit.
Table 4-2 Button Functions in Live Viewing Window
Button Description
SETUP Launches the SETUP menu.
SEQ Enables/disables:
• the automatic sequential display of channels in full screen, or
• automatic sequencing of the highlighted channel in quad display
mode.
When enabled, audio is heard from the highlighted channel in quad
display mode.
SEARCH Launches the SEARCH window (see Figure 4-2).
Selects the channel that displays in full screen mode.
Switches between full screen and quad screen display modes.
ESC No action is taken.
RECORD Performs continuous or manual recording for all channels.
Search Window
Press SEARCH in live mode to enter the Search window. The screen appears as in
Figure 4-2.
Rev 3.01 26 Document 900.0399
08/08
Page 37

Figure 4-2 Search Menu
Event Search
The EVENT SEARCH window is used to find stored video.
Figure 4-3 Event Search Window
Three categories of search filters can be applied: DATE, CHANNEL, and TYPE. Press SEL
to select a value and move down to the next category and use the UP arrow button to move
up to the categories you have previously entered. The ESC button returns the user to the
previous screen.
Searching for an event:
1. Select the date of the video to begin searching. Use the LEFT, RIGHT, UP, and
DOWN buttons to navigate through the days.
2. After you have selected the date, press SEL to move to the CHANNEL selector.
3. Use the LEFT and RIGHT buttons to change the channel selection from ALL to any of
the four available channels.
4. After you have selected the channel, press SEL to move to the TYPE selector.
5. Use the LEFT and RIGHT buttons to change the type of recording to ALL, MOTION,
SENSOR, MANUAL, or CONTINUOUS.
6. After you have selected the type of recording to search for, press SEL to produce a list
of instances that fit your search criteria.
Rev 3.01 27 Document 900.0399
08/08
Page 38

Figure 4-4 Event Search List Screen
7. Use the UP and DOWN buttons to scroll through the on-screen listings.
8. Use the LEFT and RIGHT buttons to display a list of events that happened previous to
or after the current selection.
9. After the desired event has been selected, press SEL to start playing back the
selected video.
10. Press ARCH to launch the archiving function in playback mode (see Archiving Video
on page 33 for more information).
Timeline Search
The TIMELINE SEARCH window (see Figure 4-5) uses a timeline bar to find stored video.
Figure 4-5 Timeline Search Date Select Screen
1. Select the date to begin searching for video by using the LEFT, RIGHT, UP, and
DOWN buttons to navigate through the days.
2. After you have selected the date, press SEL to move to the Timeline Search window
(see Figure 4-6).
3. Use the LEFT or RIGHT buttons to select a time zone on the 24-hour time table. After
you have selected the time zone, press the DOWN or SEL buttons to move to the 60
minute time table.
Rev 3.01 28 Document 900.0399
08/08
Page 39

Figure 4-6 Timeline Search Window
4. Select All or a specific channel to search by using the UP and DOWN arrow buttons.
Notice that the highlighted icon on the lower left side of the screen changes when UP
or DOWN is pressed.
5. After you select the channel, use the LEFT and RIGHT arrow buttons to move the
timeline select Bar (yellow) to the point on the 60 minute timeline that you wish to start
playing the video clip (time zones with recorded video are indicated by a red
underline).
6. Press SEL to playback the recorded video.
7. Press ARCH to launch the archiving function in playback mode (see Archiving Video
on page 33 for more information).
Go To Search
You can search for video data from a specific instance by setting the date and time in the
GO TO search window (see Figure 4-7). Use the LEFT or RIGHT arrow buttons to move
through the date and time values in this menu. Use the UP and DOWN arrows buttons to
change the date and time values. Press SEL when the appropriate date and time is entered
to playback the recorded video.
Figure 4-7 Go To Search Screen
Rev 3.01 29 Document 900.0399
08/08
Page 40

Go First Search
You can access the oldest recorded data on the DVR hard drive by selecting GO FIRST on
the SEARCH window.
Go Last Search
You can access the most recently recorded data on the DVR hard drive by selecting GO
LAST on the SEARCH window.
Log List Search
You can access the LOG LIST search screen (see Figure 4-8) by selecting LOG on the
SEARCH window. Select a date and press SEL to open the LOG LIST from that date (see
Figure 4-9).
Figure 4-8 Log List Search Screen
Figure 4-9 Log List Screen
Rev 3.01 30 Document 900.0399
08/08
Page 41

Archive Search
Use the ARCHIVE SEARCH window (see Figure 4-10) to find previously stored video or
images.
Figure 4-10 Archive Search Screen
1. Select the date to begin the search by using the LEFT, RIGHT, UP, and DOWN
buttons to navigate through the days.
2. Press SEL to open the list of stored data (see Figure 4-11) after you have selected the
date.
Figure 4-11 Archive List Screen
3. Use the UP and DOWN buttons to scroll through the on-screen listings.
4. Use the LEFT and RIGHT buttons to display a list of stored events that happened
previous to or after the current selection.
5. After the desired event has been selected, press SEL to view the still image or the first
frame of the selected video.
6. Press ARCH to launch the archiving function in playback mode (see Archiving Video
on page 33 for more information).
Rev 3.01 31 Document 900.0399
08/08
Page 42

Play Mode
During playback of a recorded event, the mode changes from SEARCH to PLAY. While in
PLAY mode, you may return to the previous SEARCH screen by pressing ESC. Playback
starts in quad mode with channel 1 highlighted by default. If audio is enabled, the DVR will
play only from the highlighted channel.
Figure 4-12 Play Mode Screen
Table 4-3 Button Functions in Play Mode
Button Description
ESC
1
2
Return to the previous menu screen, search list, or exit the menu.
Press to rewind the footage at 1x, 2x, 4x, 8x, and 16x speeds. Reverse
playback speed is shown as ! (normal), 2"" (2 times normal), 4"" (4
times normal), 8"" (8 times normal), and 16"" (16 times normal) at the
bottom right of the screen.
Jump/Step backward. The playback position moves one minute
backward.
Press to play or pause recorded video.
Jump/Step forward. The playback position moves one minute forward.
Press to fast forward the footage at 1x, 2x, 4x, 8x, and 16x speeds.
Playback speed is indicated as # (normal), 2$$ (2 times normal), 4$$ (4
times normal), 8$$ (8 times normal), and 16$$ (16 times normal) at the
bottom right of the screen.
View channel 1 in full screen.
View channel 2 in full screen.
3
View channel 3 in full screen.
View channel 4 in full screen.
4
Rev 3.01 32 Document 900.0399
08/08
Page 43

Table 4-3 Button Functions in Play Mode (Cont’d)
Button Description
Switch the live view between quad display and full screen display mode
of the highlighted channel.
ARCH Press to launch the archiving function.
Network Mode
The DVR provides a live remote monitoring feature. Remote monitoring requires installation
of a Remote Access Software program on your PC (see Chapter 5, RAS Installation). A LAN
connection using the RJ45 connector on the DVR rear panel is mandatory for remote
connection. For detailed descriptions on operation of the RAS program, please refer to
Chapter 6, RAS Operation and Chapter 7, RAS Configuration.
For local operating purposes, the frame rate is limited to 1 frame/sec when the DVR is not
recording. When the DVR is recording, the video frame rate for live monitoring is the same
as the recording frame rate.
Figure 4-13 Main GUI Screen of RAS Program
Archiving Video
To archive a still image or video clip to a USB memory stick, the user must first find a still
image or video clip to archive.
Rev 3.01 33 Document 900.0399
08/08
Page 44

Archiving Still Images onto USB
Still images can be captured and archived onto the hard drive in live mode or while playing
back recorded video. In live mode, press ARCH to capture and store the still image. The
still image is archived onto the hard drive for later retrieval and can be transferred to a USB
stick immediately if you have one available.
When you press ARCH, you see the Still Image Archive Success message. When
this displays the HRDE4x4 asks if you want to Save to USB. To save to a USB memory
stick, connect the DVR to a USB memory stick through the USB port on the front panel.
Select Yes and press SEL to start the archiving process.
Archiving Video onto USB
While in playback mode, press ARCH to launch the archiving function. The DVR asks
whether to store a Still Image or Video clip (see Figure 4-14). If the user selects STILL, the
DVR stores the captured still image on the HDD (see Archiving Still Images onto USB, page
34). If the user selects VIDEO, the DVR asks for the length of the video clip to archive and
keeps a record of the archiving operation without actually writing to the hard drive. The DVR
asks you what Video Type should be used for archiving, AVI or DVR. Select the Video
Type you want to use and press SEL. An AVI file is a standard video format that can play on
most PCs using a program such as Windows Media Player
your media player if you have trouble playing AVI files. DVR files are files that will play on
the HRDE4x4 player only. You may now save the video clip to a USB memory stick, or
choose to save it later.
Note Make sure to transfer the data to the USB stick before the actual video
content is erased from the hard drive, otherwise the clip will be lost, even if
archived to the hard drive.
Figure 4-14 Archive Mode Screen
TM
. You may need to update
After you have entered a length of time of the video clip to be stored and you have picked a
Video Type, you are asked if you want to save the clip to a USB stick (Save to USB?). To
save to a USB memory stick, connect the DVR to a USB stick through the USB port on the
front panel. Select Yes and press SEL to start converting the corresponding portion of
video into an AVI or DVR file and then store it onto the USB stick.
Note When archiving video from a Quad view to the USB stick, only the video
Rev 3.01 34 Document 900.0399
from the one highlighted camera will be moved to the USB stick.
08/08
Page 45

Transferring Still Images or Video onto USB
To begin transferring stored images or video to a USB stick, connect the DVR to a USB
stick through the USB port on the front panel (see Figure 3-1). Press Search then select
Archive. This brings up the ARCHIVE screen (see Figure 4-15), which allows you to select
a date to search for stored images or video.
Figure 4-15 Archive Menu Screen
Press SEL to retrieve a list of archived images or video (see Figure 4-16).
Figure 4-16 List of Archived Files
Select one of the files in the archived list using the UP and DOWN arrow buttons, and then
press ARCH to transfer the file to the USB stick. If there is enough space for archiving, the
DVR starts transferring the file. In the case of video, the DVR converts the video and audio
into an AVI format while transferring the video file into the USB stick. This allows the video to
be played back using programs such as the Windows Media Player.
If your archived clips are not playing back on your local PC, see Appendix B, Installing
ffdshow for Playing Back AVI Archive Clips for procedures to install updated video codecs.
Note When archiving video from a Quad view to the USB stick, only the video
Rev 3.01 35 Document 900.0399
from the one highlighted camera is saved to the USB memory stick.
08/08
Page 46

Rev 3.01 36 Document 900.0399
08/08
Page 47

5
RAS Installation
Minimum PC Requirements
Before installing the Remote Access Software program, check your PC specifications. The
DVR remote software may not perform correctly if the PC does not meet these minimum
requirements:
Table 5-1 Minimum PC Requirements
PC Specification Minimum Requirement
CPU Intel Pentium IV 2 Ghz
Memory 256 MB
VGA 64 MB
Resolution 1024 x 768
Disk Space 10 MB
Operating System Windows XP Professional SP2 and XP Home, Windows
Network 10/100Base T
Direct X Direct X 8.1
Vista Business and Home Basic
Installing the RAS Program
1. Insert into the CD-ROM drive of your PC the Remote Viewer software CD provided with
the HRDE4x4 DVR.
2. Double-click the RAS setup file or icon ( ) to start the installation process.
3. The RAS splash screen appears while the installation wizard loads. After the
installation wizard loads, the Choose Destination Location window appears.
Rev 3.01 37 Document 900.0399
08/08
Page 48

Figure 5-1 Choose Destination Location Window
4. Click Next to use the default destination location, or click Browse... to manually select
a different destination location. The Setup Type window appears.
Figure 5-2 Choose the Setup Type Window
5. Select the Typical Setup. Click Next. The Choose Language window appears.
Figure 5-3 Choose Language Window
Rev 3.01 38 Document 900.0399
08/08
Page 49

6. Choose a language for the installation and click Next. The Select Program Folder
appears.
Figure 5-4 Select Program Folder
7. Click Next to use the default program folder, or manually select a folder from the list of
Existing Folders.
8. Wait a few minutes while the setup completes.
9. Double-click the RAS icon (see Figure 5-5) that should now be on your desktop to
launch the program.
Figure 5-5 RAS Icon
Opening Ports
Note The default port for remote live view and playback on your DVR is 5445. To
When you connect one or more DVRs to a network through an IP sharing device, each
device must have a unique RTSP port number for remote access to each unit from outside
the LAN (Local Area Network). Also, the IP sharing device must be configured for port
forwarding so that each port, when accessed on the IP sharing device, will forward to the
appropriate DVR.
Note This port number is listed next to the PORT menu option in the Network
Rev 3.01 39 Document 900.0399
remotely configure a DVR with the default port selected, you must also open
port 5455. If you change the default port number, the port you must open for
remote configuration is your new port number plus 10 (for example,
5455=5445+10).
Setup screen (see Figure 3-10). If you plan to access the DVR units only from
within the same LAN, the RTSP port does not have to be changed.
08/08
Page 50

Rev 3.01 40 Document 900.0399
08/08
Page 51

6
RAS Operation
When the installation is complete, double-click the RAS icon (see Figure 5-5) on your
desktop to launch the program.
Live Viewing
Live Viewing Interface
Figure 6-1 RAS Live Viewing Interface (Connected)
Rev 3.01 41 Document 900.0399
08/08
Page 52

Table 6-1 Live Viewing Interface Controls
Interface Control Description
Displays the current date and time when viewing live
video.
Click to Connect to the DVR.
If you click Connect, this Connect pop up window
appears. Enter the IP Address and the Port number.
Then select the Protocol type and enter the network
Password. Click OK to make start the connection.
Caution Port No: It should be the same as the DVR’s
port number (the default port number is 5445 on both
DVR and RAS).
Caution Password: It should be the same as the
DVR’s network password (the default password is
1111), set in the System menu on your DVR.
Remote access should be set to ON in the Network
Setup menu on the DVR.
Note Maximum of 512 connection entries.
Click to Disconnect from the DVR.
Note This button only appears when you are
remotely connected to a DVR.
Click to open the Local Search user interface. See
Search and Playback Viewing, page 44, for information
on searching the hard drive of the local PC for
recorded video.
Click to open the Remote Search user interface. See
Search and Playback Viewing, page 44, for information
on searching the hard drive of the remotely connected
DVR for recorded video.
Click to open the Live Video user interface.
Click to Lock all of the DVR operations.
Note When this button is clicked it changes to the
Unlock button.
Click to Unlock all of the DVR operations.
Note When this button is clicked it changes to the
Lock button.
When you click the Lock or Unlock button, the
password entry window appears. When you Lock the
operations on the DVR, you need to set and enter the
Password. When you Unlock
DVR, you need to enter the Password previously set
while locking. The factory default password is the
enter key on your PC. Press Enter.
Rev 3.01 42 Document 900.0399
the operations on the
08/08
Page 53

Table 6-1 Live Viewing Interface Controls (Cont’d)
Interface Control Description
This Remote Site information panel shows the DVR
site to which RAS is currently connected, and the
corresponding channel information.
Click to Resume live video updates.
Click to Freeze live video updates.
Enable or disable the recording of live video for future
playback by the RAS Viewer program. The video is
saved to c://Storage/ on the local PC disk,
specified in RAS Setup, Capture. This option allows
saving and playback of all cameras at the same time.
Click to Save a Still image. Only the selected red
outlined camera is saved.
When you click the Save Still button, this window
appears, offering you image capturing options. The
still image can be captured in either jpeg or bmp file
format. The image is saved in the folder selected on
the General Setup screen (see General Setup on
page 49) unless you change the setup. You can also
change the default File Name for the still image.
Click to Setup the configuration of the RAS program.
Click to Exit from the RAS program operations.
Use to control a connected PTZ camera. Use the
arrows to control the Pan and Tilt. Use the + and –
buttons to control the camera Zoom. See Controlling a
PTZ Camera, page 19 for more information.
These Sensor indicators illuminate when a sensor
input is active on the corresponding channel on the
remote HRDE4X4.
Click to toggle the audio sound On and Off.
Indicates that audio is muted. Click this button
to activate audio recording.
Indicates that audio is active. Click this button to
deactivate audio recording.
Click to view the red outlined video channel in Full
Screen view.
Click to view all the channels in a Quad Screen view.
Rev 3.01 43 Document 900.0399
08/08
Page 54

Table 6-1 Live Viewing Interface Controls (Cont’d)
Interface Control Description
Click to start or stop the Sequential display of each
channel in full screen mode.
Adjust audio Volume using this slide bar.
This green bar indicates the remaining hard drive
storage capacity.
This log lists client activity information.
Click these buttons to Minimize, Maximize or Close
the RAS window.
Search and Playback Viewing
You can access the Search window by clicking either Local Search () to search the
local PC hard drive or Remote Search ( ) to search the remotely connected DVR.
Search and Playback Interface
Figure 6-2 Search and Playback Interface
Rev 3.01 44 Document 900.0399
08/08
Page 55

Table 6-2 Search and Playback Interface Controls
Interface Control Description
Displays the recorded date and time of the video
being played back.
Click to open the Local Search user interface.
Use to search the hard drive of the local PC for
recorded video.
Click to open the Remote Search user interface.
Use to search the hard drive of the remotely
connected DVR for recorded video.
Click to open the Live Video user interface.
Click to Exit from the RAS program operations.
Click to Backup recorded video from the remote
HRDE4x4 to the PC in AVI format. AVI format can
be played back using Windows Media Player.
Only one camera at a time can be saved and
played back. The AVI format video saves in the
RAS setup backup folder.
Click to Setup the RAS program configuration.
Click while playing back recorded video to Save
a Still image in either BMP or JPG format.
When you click Save Still, this window appears,
offering you image capturing options. The still
image can be captured in either jpeg or bmp file
format. The image is saved in the folder selected
on the General Setup screen (see General Setup
on page 49) unless you specify otherwise. You
can also change the default File Name for the still
image.
Click Mark In to set the start time for backing up
recorded video in AVI format to the local PC.
Click Mark Out to set the end time for backing up
recorded video in AVI format to the local PC.
Rev 3.01 45 Document 900.0399
08/08
Page 56

Table 6-2 Search and Playback Interface Controls (Cont’d)
Interface Control Description
The Calendar shows dates with recorded video
in light blue and the currently selected date in
dark blue.
The timeline shows recorded data in dark green
on the bar. You can adjust the timeline scale and
move it to the time you wish to start playing back.
Click Play to display the recorded video.
Click to Play the selected recorded video clip.
Click to Stop or pause the displayed video clip.
Click to toggle the Fast Forward video speed
from 2x, 4x, 8x, 16x.
Click to toggle the Fast Reverse video speed
from 2x, 4x, 8x, 16x.
Click to Reverse One Frame in the video clip
being played back.
Click to Advance One Frame in the video clip
being played back.
Click to jump back one minute in the video clip
that is playing back.
Click to jump forward one minute in the video clip
that is playing back.
Displays the recording time of the video being
played back.
Select a channel (Camera 1– 4) to search for
recorded video.
Click the left or right arrow buttons to advance or
reverse the time slide bar by one hour. Click the
middle button to switch the time slide bar
between a 24 hour or one hour time period.
Click to view the highlighted channel in Full
Screen view.
Click to view all the channels in a Quad Screen
view.
Rev 3.01 46 Document 900.0399
08/08
Page 57

Backing Up a Video Clip in AVI Format
You can back up the recorded video clips in AVI format on the Search User Interface.
1. Find the video you want to back up. You may need to search for the video and play it
back to find the desired passage.
2. Select a camera to back up video from by clicking on the camera image. The selected
camera image now has a red line surrounding it.
3. Set a starting point for the backup video clip by using the slide bar on the green
timeline to select, then clicking the Mark-In button ( ) (see Figure 6-3).
4. Set the end point of the video clip to be backed up by using the slide bar on the green
timeline, then clicking the Mark-Out button ( ).
Figure 6-3 Main User Interface with Back Up Times Marked
Move the slide bar
to the start of the
clip to back up,
then click Mark In.
5. Click Backup ( ). The AVI Backup window appears.
Rev 3.01 47 Document 900.0399
The dark green bar
indicates the portion of
recorded video that will
be backed up.
Move the slide bar
to the end of the
clip to back up and
click Mark Out.
08/08
Page 58

Figure 6-4 AVI Backup Window
6. Adjust, if necessary, the Start and Stop times for the video clip in the AVI Backup
window.
7. Click OK to start the backup process.
8. Video is saved to a folder named with the date when the video was backed up. The
filename indicates the camera number and the start time of the downloaded video.
Figure 6-5 Windows Explorer with Video Clips Selected
Folder Name
Folder created on
February 17, 2008
File Name
[CH1] = Camera 1
08_30_08 = Recording
start time of 8:30:08 AM
File Extensions
AVI = video
SMI = contains the date
and time overlay
Note To overlay the time and date on the video, you need the FFDSHOW codec
installed on your PC. Enable the subtitles option (see Appendix B, Installing
ffdshow for Playing Back AVI Archive Clips) in the FFDSHOW Video Decoder
Configuration.
The clip is automatically saved to the file location specified in General Setup, page 49.
Note When backing up video from a Quad view to the USB memory stick, only the
video from the highlighted camera will be moved to the memory stick.
Playing Back Recorded Video
1. Navigate to the folder where you have backed up the recorded video.
2. Double-click or right click the AVI file open and play back the file. The video can be
played back using programs such as the Windows Media Player.
If your backed up clips are not playing back on your local PC, see Appendix B, Installing
ffdshow for Playing Back AVI Archive Clips.
Rev 3.01 48 Document 900.0399
08/08
Page 59

RAS Configuration
Click Setup ( ) to open the Setup menu for the RAS program.
General Setup
Click Setup to open Figure 7-1. Set the options as follows:
Figure 7-1 General Setup Screen
7
Security Options
In the Security Option section, click the checkboxes to enable/disable the RAS functions
that require a password for use. The same password is used for all security options that you
have enabled.
Rev 3.01 49 Document 900.0399
08/08
Page 60

Save Path
Select a Save Path for saving Capture and Backup files to the hard drive. Click ... for the
corresponding file type to manually select a destination folder.
• Capture files are single image files (.bmp or .jpg) saved using the Save Still Image
button.
• Backup files are saved using the backup button in the search interface. Only one
camera is viewable and files are saved in AVI format to be played back using Windows
Media Player.
Changing the RAS password
1. Click Password... to open the Change Password screen.
Figure 7-2 Change Password Screen
2. Enter the appropriate passwords in the Old, New, and Confirm text boxes. The
factory default password is no password; simply press the Enter key.
3. Click OK to save the new password.
Site Setup
Click Site on the left-hand panel of the Setup menu to access the Site Setup menu.
Figure 7-3 Site Setup Menu
The Site Setup menu shows information for all the DVR sites you have configured with
RAS. You can use this menu to Add, Modify, or Remove sites.
Rev 3.01 50 Document 900.0399
08/08
Page 61

Adding a Site
1. Click Addition in the Setup Menu window.
2. Enter the Site Name, IP Address, Port No., Protocol, and Password, as necessary.
3. Click OK.
Note If you want to rename a channel, then double-click the channel Name.
Modifying a Site
1. Click Modify in the Setup Menu window.
2. Enter the new information as necessary.
3. Click OK.
Removing a Site
1. Select the site in the Setup Menu window.
2. Click Remove. The site disappears from the list.
3. Click OK to remove the site from the list.
If you click CANCEL, then the site will not be removed from the list. When you re-open
the Setup Menu, that site will be in the list.
Event Setup
Click Event on the left-hand panel of the Setup menu. In the Event menu (see Figure 7-4)
you can set the event items to be included in the event list and log, the amount of local disk
space you want to allow, and the save path for the event log.
Figure 7-4 Event Menu
Event Search Setup
Click Event Search on the left-hand panel of the Setup menu to access the Event Search
menu.
Rev 3.01 51 Document 900.0399
08/08
Page 62

Figure 7-5 Event Search Menu
In the Event Search menu, you can Find an event log for a time period specified in the
From and To fields. Deselect First and Last so you can choose the beginning and ending
points for the search. Click Save to save a text version of the log file to the folder specified
in Path. Click Browse to change the Path folder used for saving the log file.
Record Menu
Click Record on the left-hand panel of the Setup menu to access the Record menu.
Figure 7-6 Record Menu
In the Record menu, you can set the recording conditions for Always, Event, or Auto
recording. You can also select to record individual channels or All the channels.
Rev 3.01 52 Document 900.0399
08/08
Page 63

Note Live video can only be recorded to the local PC while the Viewer software is
Setting Operation
Autorecord When a user connects remotely, the Local Rec button is automatically
Always If checked and the Local Rec button is enabled (RED) in live monitoring,
Event If checked and the Local Rec button is enabled (RED), then Live motion or
Motion Records live motion events for the enabled channels, when checked.
Alarm Records live sensor events for the enabled channels, when checked.
Duration Records post-event video for this length of time, when checked.
Channel Records enabled channels.
connected to the remote digital video recorder and in Live view mode. The
settings in Table 7-1 affect how video is recorded.
Table 7-1 Record Menu Settings
enabled (RED) and video records to the local PC hard disk based on
settings in this Record menu.
then live video from enabled channels is recorded to the local PC hard disk.
sensor events are recorded to the local PC hard disk.
Note The HRDE4x4 dvr must be set up for Motion recording for the
associated cameras. Selecting Motion in this Setup menu does not
ensure that RAS will record locally to the PC when there is motion in
the selected channels.
Note When there is motion in any one of the channels enabled for recording, all
selected channels will record when Local Record is clicked in the main RAS
Live View interface (see Figure 6-1 on page 41).
Disk Menu
Click Disk on the left-hand panel of the Setup menu to access the Disk menu.
Figure 7-7 Disk Menu
Rev 3.01 53 Document 900.0399
08/08
Page 64

In the Disk menu, you can select the local disk to use and the amount of Disk Space you
want to allow the program to use for recording. You can also select the option to overwrite
data (replace oldest files) or to stop recording when the maximum amount of disk space is
full.
Video Menu
Click Video on the left-hand panel of the Setup menu to access the Video menu.
Figure 7-8 Video Menu
In the Video menu, you can adjust the Brightness, Contrast, Hue, and Saturation of the
live video or video being played back in the main user interface by sliding the sliders.
About Menu
Click About on the left-hand panel of the Setup menu to access the About menu. The
About menu provides information on the RAS program.
Rev 3.01 54 Document 900.0399
08/08
Page 65

A
DVR Firmware Upgrade
This appendix covers upgrading the firmware on your DVR unit. Check the Honeywell Video
Systems website for firmware upgrades at http://www.honeywellvideo.com.
1. Copy Firmware Upgrade to USB Stick
To successfully upgrade your firmware, you must download and copy the firmware
upgrade onto a USB memory stick. Create a new folder on the USB stick and copy the
firmware upgrade files view.bin, test.bin and app.bin into that folder. The folder name
must be upgrade.
After the upgrade firmware is copied onto the USB stick, follow 2. Start Engineering Mode,
3. Upgrading with a USB Stick and 4. Verifying Software Installation to complete the
upgrade.
2. Start Engineering Mode
The DVR firmware can only be upgraded from the front panel of the unit using a USB
memory stick. Firmware upgrades can be done in engineering mode (see Figure A-1). To
start the engineering mode:
1. Press SETUP and enter the Setup menu.
2. Go to the SYSTEM menu and select the ADMIN PASSWORD menu item.
3. Enter the password as 12341234, and press SEL.
Note The space provided to enter the Admin password is only designed for four
characters. The last four characters do not appear on the screen when
entered, but they do open the Engineering mode.
Rev 3.01 55 Document 900.0399
08/08
Page 66

Figure A-1 Engineering Mode
3. Upgrading with a USB Stick
1. Connect the USB stick with the upgrade file saved on it to the USB port on the front
panel (see Figure 3-1).
2. Select USB Upgrade and press SEL. The UPGRADE starts automatically.
3. After the process is complete, press SEL to return to the DVR Diagnostics screen.
4. Repeat steps 2 and 3 again, then move on to step 5.
5. After the upgrade is complete, select Boot Application and press SEL to reboot the
DVR with the updated firmware.
4. Verifying Software Installation
1. Press SETUP and log on.
2. Select SYSTEM and press SEL.
3. Select DESCRIPTION and press SEL.
4. Check the version displayed. This should match to the new software version you have
installed.
Rev 3.01 56 Document 900.0399
08/08
Page 67

B
Installing ffdshow for Playing
Back AVI Archive Clips
To properly review backed up or archived video, it is recommended that you install onto
your Windows PC the FFDSHOW codec included on the CD that came with your unit. You
can overlay the date and time onto your AVI video by installing the FFDSHOW codec as
described below:
Installing FFDSHOW
1. Insert the Honeywell RAS CD provided with the HRDE4x4 DVR into the CD drive on
which you want to play back clips.
2. Open the Codecs folder.
3. Double-click the file ffdshow-xxx.exe to run the codec installation program (where xxx
is the file date).
4. Follow the installation wizard prompts to install the FFDShow program with the default
settings.
Enabling Text Overlay
After FFDSHOW is installed, follow the steps below to enable Text Overlay of time and date
on your video by enabling Video decoder Subtitles.
1. Open the ffdshow video decoder configuration window. (Start
➤ FFDSHOW ➤ Video Decoder Configuration).
Rev 3.01 57 Document 900.0399
➤ All Programs
08/08
Page 68

Figure B-1 FFDSHOW Video Decoder Configuration Window
2. Enable Subtitles in the ffdshow video decoder configuration window.
3. Click Apply, then close the window.
Rev 3.01 58 Document 900.0399
08/08
Page 69

C
Playing DVR Archive Clips
If you haven’t already, it is recommended that you install on your Windows PC the
FFDSHOW codec included on the CD that came with your unit. You must install this codec
so you can properly review backed up or archived video. For instructions to install the
FFDSHOW codec, see Appendix B, Installing ffdshow for Playing Back AVI Archive Clips.
Playing Clips from the USB Memory Stick
1. Insert the USB stick into a USB port on your computer. A window opens that
corresponds to the USB port.
Figure C-1 USB Port Folder File
Folder name indicates that this
video was archived on November
19, 2007 (2007/11/19)
2. Double-click that folder to open it. The folder contains the video file(s) saved in two
formats: DVR files and SMIL docs. The folder also contains the Player application.
Rev 3.01 59 Document 900.0399
08/08
Page 70

Figure C-2 Archived Folder Contents Window
3. Double-click the player application (
window.
Figure C-3 DVR Player Screen
4. Click on the Load Clip icon (
Media File window appears.
) in the lower left corner to load a file. The Open
.exe) to open it. The player opens in a new
Rev 3.01 60 Document 900.0399
08/08
Page 71

Figure C-4 Open Media File Window
5. Select a file from the list either by highlighting it and clicking Open or by
double-clicking it. The Media Player loads the clip.
6. Click Play (
)to view the clip.
You can choose the size of the playback screen using the selector in the bottom right
corner of the playback screen.
Figure C-5 Choosing Playback Screen Size
Playback screen
size selector
Select from 0.5, 1, 2, and F (full screen).
Rev 3.01 61 Document 900.0399
08/08
Page 72

Playback controls
Button Function
Load Clip
Stop playback
Load previous file
Rewind
Previous frame
Play
Click once to play back at normal speed.
Click twice to play back at twice the regular speed.
Click three times to play back at four times the regular speed.
Click four times to play back at eight times the regular speed.
Pause playback
Next frame
Fast forward
Load next file
Mute
Sliding volume control
Rev 3.01 62 Document 900.0399
08/08
Page 73

D
Optional Items
Check with your sales representative for the price and availability of the following item:
• Remote Control
Remote Control Operation
RECORD Press to start or stop manual recording.
PTZ Press to control PTZ operation.
SEARCH Press to go to the search menu.
SEQUENCE Press to start auto sequencing of screen in full
SELECT Press to select desired menu item, to store a
SETUP Press to launch the setup menu.
ESC Press to return to the previous menu screen.
F/REW Press to jump/step 60 seconds backward in
PLAY/PAUSE Press to play or pause a video in playback
F/ADV Press to jump/step 60 seconds forward in
REW Press to rewind the footage at 1x, 2x, 4x, 8x, and
ARCH Press to start archiving operations.
FF Press to fast forward the footage at 1x, 2x, 4x, 8x,
% Press to select camera 1 or password digit 1.
# Press to select camera 2 or password digit 2.
& Press to select camera 3 or password digit 3.
screen mode.
setup value in the menu, or to display quad view.
playback mode.
mode.
playback mode.
16x speeds in playback mode.
and 16x speeds in playback mode.
Rev 3.01 63 Document 900.0399
08/08
Page 74

! Press to select camera 4 or password digit 4.
1–9 Press to select the remote unit.
Configuring Multiple Units for Remote Control
To configure multiple units for different remote control IDs, see REMOTE CONTROLLER ID,
page 19. The selected remote unit displays the remote control icon on the monitor ( ).
Rev 3.01 64 Document 900.0399
08/08
Page 75

Specifications
Table E-1 Technical Specifications
Video
Signal Format: NTSC or PAL
Video Input: Composite: 4-channel, 1.0 V P-P, 75 Ω, BNC
Monitor Outputs: Composite: 1-channel, 1.0 V P-P, 75 Ω, BNC
Video Resolution: NTSC: Quad 360 x 240, Full screen 720 x 480
Compression Algorithm: MPEG-4
Playback/Record Speed
(frames per second):
Still Image Capture: NTSC: Quad 360 x 240, Full screen 720 x 480
Inputs, Outputs
Sensor Input: 4 Sensor In (N/O, N/C selectable)
Sensor Output: 1 Internal Relay, Rated Load 0.5 A @ 30 VAC or
Network Connectivity: ADSL, LAN / Dynamic IP Support
Audio Input: 4 Lines In, Line level input (RCA)
Audio Output: 1 Line Out (RCA)
Connectors
Video Input: Composite: 4-channel BNC
Monitor Output: Composite: 1-channel BNC
Audio In: RCA
Audio Out: RCA
Ethernet Port: RJ-485, 10/100 Base
RS-232-C Serial Port: 9-pin D type (Engineering use only)
VGA: 1-channel
PAL: Quad 360 x 288, Full screen 720 x 576
NTSC: Quad 120 IPS, Full screen 30 IPS/4-ch
PAL: Quad 100 IPS, Full screen 25 IPS/4-ch
PAL: Quad 360 x 288, Full screen 720 x 576
1 A @ 30 VDC
1 10/100-base T Ethernet
VGA: 1-channel
E
Rev 3.01 65 Document 900.0399
08/08
Page 76

Table E-1 Technical Specifications (Cont’d)
Archive: USB Port
Storage
Primary Storage: Max 1 hard disk, parallel IDE
General
Dimensions (W x H x D): 13.78 in. x 2.83 in. x 10.24 in.
Unit Weight: 7.05 lb. (3.0 kg)
Operating Temperature: 32°F to 104°F (0°C to 40°C)
Storage Temperature: 14°F to 122°F (-10°C to 50°C)
Operating Humidity: 0 to 90% (non-condensing)
Power: 100 to 240 VAC, 50/60 Hz, 1.5 A, External Adapter
Input Voltage: 12 VDC, 5 A
Power Consumption: Normal 18W (12 V, 1.5 A)
Note Specifications are subject to change without notice.
(350 mm x 72 mm x 260 mm)
Rev 3.01 66 Document 900.0399
08/08
Page 77

Index
A
adding a site using RAS 51
admin password 18
ADSL 22
archive search 31
archiving 33, 34
archiving still images onto USB 34
archiving video onto USB 34
audio 7
audio in 7
audio out 7
autorecord 53
AVI format 47
backing up a video clip in 47
DC 12 9
DDNS 21
default setup 18
delete video after 24
DHCP 22
dvr id 18
E
e-mail alerts 23
enabling text overlay 57
engineering mode 55
ethernet 7
event search 27
F
B
button functions in playback mode 32
C
compatible PTZ protocols 20
connections 7
controlling a ptz camera 19
controls 12
front panel 12
D
date 19
date format 18
date set 19
Rev 3.01 67 Document 900.0399
ffdshow installation 57
firmware upgrade 55
format 18
date format 18
front panel controls 12
front panel LEDs 11
front panel status indicators 26
G
Go First search 30
Go Last search 30
Go To search 29
04/08
Page 78

I
installing the RAS program 37
L
LAN 22
LEDs 11
live mode 14
setup fields 14
live remote monitoring 33
live viewing through RAS 41
load setup from a USB 24
Log List search 30
M
mark-in button 47
mark-out button 47
menu 13
modifying a site using RAS 51
N
network mode 33
network parameteres 22
DHCP 22
network parameters 20, 21, 22
ADSL 22
DDNS 21
LAN 22
ports 21
setting 20
network password 18
playback 32, 59
playing clips from a memory stick
59
playback button functions 32
playing back recorded video through
RAS 48
ports 21
ptz camera controll 19
ptz control 19
PTZ protocols 20
R
RAS 37, 39, 41, 44, 47, 48, 50, 53
backing up a video clip in AVI
format 47
installing the RAS program 37
live viewing 41
opening ports 39
playing back recorded video 48
RAS installation 37
RAS operation 41
setting save path using 50
RAS operation 41
RAS password 50
changing 50
recording mode 14
recording schedules 16
removing a site using RAS 51
reports 23
RS-232 8
RS-422/485 7
O
opening ports 39
overwrite 24
P
PAL 9
passwords 18, 50
admin password 18
changing RAS password 50
network password 18
Rev 3.01 68 Document 900.0399
safety precautions 2–4
save path 50
setup using RAS 50
save setup to a USB 24
saving setup 24
scheduling to record 16
search and playback 44
04/08
S
Page 79

searching 26, 27, 28, 29, 30, 31
archive search 31
event search 27
Go Last search 30
Go To search 29
log list search 30
timeline search 28
security options 49
setup using RAS 49
select the language 19
sensor 8
sensor in 8
sensor out 8
seraching 30
setting 19
setting network parameters 20
setup 13, 24
saving setup 24
site setup 50, 51
removing a site using RAS 51
using RAS 50
using RAS to add a site 51
using RAS to modify a site 51
status indicators 26
storage setup 23
system 18
system setup fields 18
V
VGA 9
video 8
video in 8
video delete 24
T
text overlay, enabling 57
time set 19
timeline search 28
transferring 35
transferring still images or video onto
USB 35
U
USB 24, 34, 35
archiving still images onto 34
archiving video onto 34
load setup from 24
save setup to 24
transferring still images or video
onto 35
Rev 3.01 69 Document 900.0399
04/08
Page 80

Honeywell Video Systems (Head Office)
2700 Blankenbaker Pkwy, Suite 150
Louisville, KY 40299, USA
www.honeywellvideo.com
℡ +1.800.796.2288
Honeywell Security Australia Pty Ltd.
Unit 5, Riverside Centre, 24-28 River Road
West
Parramatta, NSW 2150, Australia
www.ademco.com.au
℡ +61.2.8837.9300
Honeywell Video Systems Northern
Europe
Netwerk 121
1446 WV Purmerend, The Netherlands
www.SecurityHouse.nl
℡ +31.299.410.200
Honeywell Video Systems UK Ltd.
Aston Fields Road, Whitehouse Ind Est
Runcorn, Cheshire, WA7 3DL, UK
www.honeywellvideo.com
℡ +0844 8000 235
Honeywell Security Asia Pacific
33/F Tower A, City Center, 100 Zun Yi Road
Shanghai 200051, China
www.security.honeywell.com/cn
℡ +86 21.2527.4568
Honeywell Security Asia
Flat A, 16/F, CDW Building, 388 Castle Peak
Rd.
Tsuen Wan, N.T., Hong Kong
www.security.honeywell.com/hk
℡ +852.2405.2323
Honeywell Security France
Parc Gutenberg, 8, Voie La Cardon
91120, Palaiseau, France
www.honeywell.com/security/fr
℡ +33.01.64.53.80.40
Honeywell Security Italia SpA
Via Treviso 2 / 4
31020 San Vendemiano
Treviso, Italy
www.honeywell.com/security/it
℡ +39.04.38.36.51
Honeywell Security España
Mijancas 1. 3
a
Planta
P. Ind. Las Mercedes
28022 Madrid, Spain
www.security.honeywell.com/es
℡ +34.902.667.800
Honeywell Security South Africa
Unit 6 Galaxy Park, 17 Galaxy Avenue
Linbro Park, P.O. Box 59904
2100 Kengray, Johannesburg, South Africa
www.honeywell.co.za
℡ +27.11.574.2500
Honeywell Security Deutschland
Johannes-Mauthe-Straße 14
D-72458 Albstadt, Germany
www.honeywell.com/security/de
℡ +49.74 31.8 01.0
Honeywell Security Poland
Chmielewskiego 22a, 70-028
Szczecin, Polska
www.ultrak.pl
℡ +48.91.485.40.60
Honeywell Security Czech Republic
Havránkova 33, Brno
Dolní Heršpice, 619 00, Czech Republic
www.olympo.cz
℡ +420.543.558.111
Honeywell Security Slovakia Republic
Vajnorská 142, 83104 Bratislava
Slovakia
www.olympo.sk
℡ +421.2.444.54.660
www.honeywellvideo.com
+1.800.796.CCTV (North America only)
HVSsupport@honeywell.com
© 2008 Honeywell International Inc.
means without written permission from Honeywell Video Systems. The information in this publication is believed to
be accurate in all respects. However, Honeywell Video Systems cannot assume responsibility for any consequences
resulting from the use thereof. The information contained herein is subject to change without notice. Revisions or
new editions to this publication may be issued to incorporate such changes.
All rights reserved. No part of this publication may be reproduced by any
 Loading...