

Page 1

HBD7S(X)
Indoor/Outdoor
Bullet Camera
Configuration Guide
Document 800-15429 – Rev A – 07/2013
Page 2

2 | HBD7S(X) Camera Configuration Guide
Revisions 1
Issue Date Revisions
A 07/2013 New document.
www.honeywell.com/securit y
Page 3

Regulatory | 3
Regulatory 2
FCC Compliance Statement
Information to the User: This equipment has been tested and found to comply with the
limits for a Class A digital device, pursuant to part 15 of the FCC Rules. These limits are
designed to provide reasonable protection against harmful interference when the
equipment is operated in a commercial environment. This equipment generates, use s, and
can radiate radio frequency energy and, if not installed and used in accordance with the
instruction manual, may cause harmful interference to radio communications. Operation of
this equipment in a residential area is likely to cause harmful interference in which case the
user will be required to correct the interference at his own expense.
Note Changes or modifications not expressly approved by the party responsible for
compliance could void the user’s authority to operate the equipment.
Canadian Compliance Statement
This Class A digital apparatus complies with Canadian ICES-003.
Cet appareil numérique de la Classe A est conforme à la norme NMB-003 du Canada.
Manufacturer’s Declaration of Conformance
North America
The equipment supplied with this guide conforms to UL 60065 and CSA C22.2 No. 60065.
Europe
The manufacturer declares that the equipment supplied with this guide is compliant with
the essential requirements of the EMC Directive 2004/108/EC, the General Product Safety
Directive 2001/95/EC and the RoHS Directive 2011/65/EU, conforming to the requirements
of standards EN55022 for emissions, EN50130-4 for immunity, EN60950-1 for electrical
equipment safety, and EN50581 for assessment of electrical and electronic products with
respect to the restriction of hazardous substances.
WARNING: This is a Class A product. In a domestic environment this product may cause
radio interference in which case the user may be required to take adequate measures
800-15429 - A - 07/2013
Page 4

4 | HBD7S(X) Camera Configuration Guide
CAUTION:TO REDUCE THE RISK O F ELECTRIC SHOCK,
DO NOT REMOVE COVER (OR BACK).
NO USER SERVICEABLE PARTS INSIDE.
REFER SERVICING TO QUALIFIED SERVICE PERSONNEL.
THIS SYMBOL INDICATES
THAT DANGEROUS VOLTAGE
CONSTITUTING A RISK OF
ELECTRIC SHOCK IS PRESENT
WITHIN THE UNIT.
THIS SYMBOL INDICATES THAT
IMPORTANT OPERATING AND
MAINTENANCE INSTRUCTIONS
ACCOMPANYTHIS UNIT.
DO NOT OPEN
RISK OF ELECTRIC SHOCK
Warranty and Service
Subject to the terms and conditions listed on the Product warranty, during the warranty
period Honeywell will repair or replace, at its sole option, free of charge, any defective
products returned prepaid.
In the event you have a problem with any Honeywell product, please call Customer Service
at 1.800.323.4576 (North America) for assistance or to request a
Authorization (RMA)
nature of the problem available for the technical service representative.
Prior authorization must be obtained for all returns, exchanges, or credits.
Honeywell without a clearly identified Return Merchandise Authorization (RMA) number
may be refused.
number. Be sure to have the model number, serial number, and the
Return Merchandise
Items shipped to
Waste Electrical and Electronic Equipment (WEEE)
Correct Disposal of this Product (applicable in the European Union
and other European countries with separate collection systems).
This product should be disposed of, at the end of its useful life, as per
applicable local laws, regulations, and procedures.
www.honeywell.com/securit y
Page 5

Contents | 5
Contents 3
Regulatory . . . . . . . . . . . . . . . . . . . . . . . . . . . . . . . . . . . . . . 3
General Features . . . . . . . . . . . . . . . . . . . . . . . . . . . . . . . . . . 6
Configuring the Camera . . . . . . . . . . . . . . . . . . . . . . . . . . . . . . 7
Using the OSD Joystick . . . . . . . . . . . . . . . . . . . . . . . . . . . . . 7
Main Setup Menu. . . . . . . . . . . . . . . . . . . . . . . . . . . . . . . . . 8
Lens . . . . . . . . . . . . . . . . . . . . . . . . . . . . . . . . . . . . . . . 8
Exposure . . . . . . . . . . . . . . . . . . . . . . . . . . . . . . . . . . . . . 9
Shutter . . . . . . . . . . . . . . . . . . . . . . . . . . . . . . . . . . . 9
AGC. . . . . . . . . . . . . . . . . . . . . . . . . . . . . . . . . . . . . 9
Sense-Up . . . . . . . . . . . . . . . . . . . . . . . . . . . . . . . . . . 9
Backlight Compensation . . . . . . . . . . . . . . . . . . . . . . . . . . 10
D-WDR . . . . . . . . . . . . . . . . . . . . . . . . . . . . . . . . . . . 11
White Balance . . . . . . . . . . . . . . . . . . . . . . . . . . . . . . . . . . 12
Day&Night . . . . . . . . . . . . . . . . . . . . . . . . . . . . . . . . . . . . 13
3DNR . . . . . . . . . . . . . . . . . . . . . . . . . . . . . . . . . . . . . . . 14
Special Menu . . . . . . . . . . . . . . . . . . . . . . . . . . . . . . . . . . . 15
Camera Title . . . . . . . . . . . . . . . . . . . . . . . . . . . . . . . . 15
D-Effect . . . . . . . . . . . . . . . . . . . . . . . . . . . . . . . . . . . 16
Motion Detection . . . . . . . . . . . . . . . . . . . . . . . . . . . . . . 18
Privacy Mask . . . . . . . . . . . . . . . . . . . . . . . . . . . . . . . . 19
Defect . . . . . . . . . . . . . . . . . . . . . . . . . . . . . . . . . . . . 20
Defog . . . . . . . . . . . . . . . . . . . . . . . . . . . . . . . . . . . . 21
Language . . . . . . . . . . . . . . . . . . . . . . . . . . . . . . . . . . 22
Adjust Submenu . . . . . . . . . . . . . . . . . . . . . . . . . . . . . . . . . 22
Sharpness . . . . . . . . . . . . . . . . . . . . . . . . . . . . . . . . . 22
Monitor . . . . . . . . . . . . . . . . . . . . . . . . . . . . . . . . . . . 23
Reset . . . . . . . . . . . . . . . . . . . . . . . . . . . . . . . . . . . . . . . 23
Exit . . . . . . . . . . . . . . . . . . . . . . . . . . . . . . . . . . . . . . . . 23
Troubleshooting . . . . . . . . . . . . . . . . . . . . . . . . . . . . . . . . . . 24
800-15429 - A - 07/2013
Page 6

6 | HBD7S(X) Camera Configuration Guide
General Features
650 TV Lines Resolution
The 1/3-inch color 960H CCD image sensor and digital signal processor combine to
produce 650 TV lines of super high resolution.
3D Motion DNR Function
Smart 3DNR activates automatically to reduce motion blur when moving objects are
present in a scene. This results in better picture quality of scenes with motion and lowers
the storage requirements for storing video.
D-WDR (Digital Wide Dynamic Range)
D-WDR improves image quality in unevenly lit scenes.
Sense-Up
Sense-up automatically activates slow shutter function when a scene is too dark, improving
scene visibility in low-light conditions.
Defog
Defog improves image definition in conditions o f poor visibility, such as in fog, smoke, rain,
or snow.
Additional Functions
• On-screen display menu with multi-language support
• 8 privacy masking zones
• 4 motion detection zones
www.honeywell.com/securit y
Page 7

Configuring the Camera | 7
SET UP
Configuring the Camera
Using the OSD Joystick
The camera’s setup menus are controlled using the built-in OSD joystick located on the
underside of the camera.
Figure 1 OSD Joystick
Press down and hold the OSD joystick for two seconds to bring up the OSD menu on the
connected monitor.
OSD Joystick Commands
• To move up or down through a list of menu options, push the joystick up or
down .
• To enter a submenu ( ) or to set a menu selection, press down on the joystick.
• To change a menu setting, push the joystick left or right . If multiple options are
available, keep pushing the joystick left or right until the desired value/status is
displayed.
• To exit a menu, push the joystick up or down until EXIT is selected, and then press
down on the joystick.
800-15429 - A - 07/2013
Page 8

8 | HBD7S(X) Camera Configuration Guide
Main Setup Menu
Open the SETUP menu to make changes to camera configuration.
Figure 2 Setup Menu
To open the SETUP menu, press down and hold the OSD joystick for two seconds.
Lens
Note This camera does not have an interchangeable lens. This camera comes with a
DC drive lens only.
1. Press the joystick to enter the DC LENS menu (see Figure 3).
Figure 3 DC Lens Menu
2. Set the desired BRIGHTNESS level. Select a value between 1 and 100. The default
setting is 50.
3. Set the MODE to INDOOR or OUTDOOR, depending on the camera environment.
4. Select RETURN to save your settings and return to the SETUP menu.
www.honeywell.com/securit y
Page 9

Configuring the Camera | 9
Exposure
In the SETUP menu, navigate to EXPOSURE, and then press the joystick to enter the
EXPOSURE menu (see Figure 4).
Figure 4 Exposure Menu
Shutter
Set SHUTTER to one of the following: x256, x128, x64, x32, x24, x16, x14, x12, x10, x8,
x6, x4, x2, AUTO (default), 1/60, FLK, 1/250, 1/500, 1/1000, 1/2000, 1/5000, 1/10000,
1/20000, 1/50000, or 100000.
AGC (Auto Gain Control)
Set AGC to LOW, MIDDLE, or HIGH (default).
Gain is applied as follows:
• LOW: 28 dB
• MIDDLE: 32 dB
• HIGH: 36 dB
A higher AGC setting produces a brighter image in low light, but also more noise.
Sense-Up
SENSE-UP automatically activates slow shutter function when a scene becomes too dark,
increasing image clarity and reducing storage requirements. With higher SENSE-UP
values, however, more motion blurring will be visible in the video image.
Set SENSE-UP to AUTO (default) or OFF.
800-15429 - A - 07/2013
Page 10
10 | HBD7S(X) Camera Configuration Guide
If AUTO is selected, do the following:
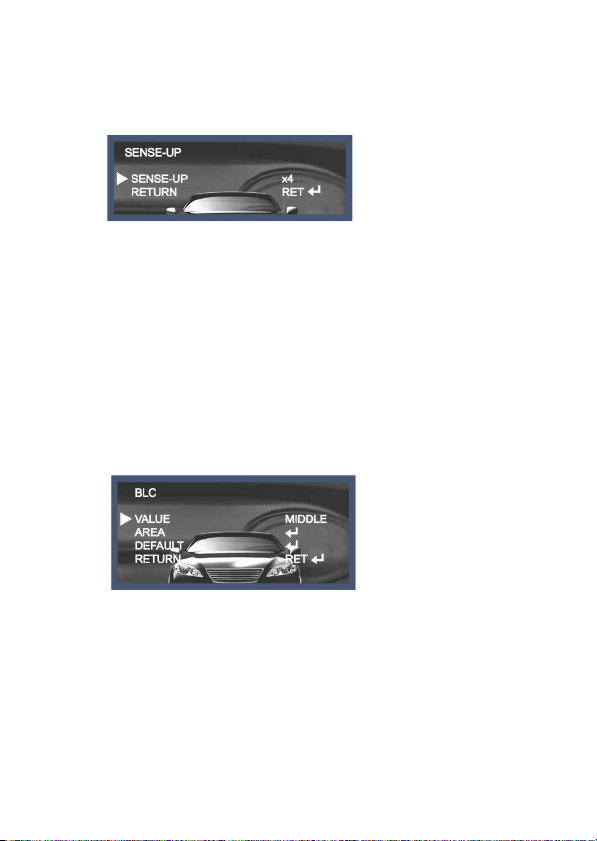
1. Press the joystick to enter the SENSE-UP menu (see Figure 5).
Figure 5 Sense-Up Menu
2. Set SENSE-UP. Select a value from x2 to x256 to set the desired frame integration
level. The default setting is x4.
3. Select RETURN to save your settings and return to the EXPOSURE menu.
BLC (Backlight Compensation)
Backlight Compensation (BLC) increases the brightness of backlit objects in a scene.
Highlight Suppression Backlight Compensation (HSBLC) masks bright objects in a scene.
Set BLC to OFF (default), BLC, or HSBLC.
If BLC is selected, do the following:
1. Press the joystick to enter the BLC menu (see Figure 6).
Figure 6 BLC Menu
2. Set VALUE to LOW, MIDDLE (default), or HIGH.
3. Set the backlight compensation AREA manually or set it to the DEFAULT setting.
www.honeywell.com/securit y
Page 11

Configuring the Camera | 11
If AREA is selected, do the following:
a. Press the joystick to enter the POSITION adjustment screen, and then
adjust the position of the BLC area by moving the joystick up or down, left or
right.
b. Press the joystick again to enter the SIZE adjustment screen, and then
adjust the size of the BLC area by moving the joystick up or down, left or
right.
c. If you are satisfied with position and size of the BLC area, select RET to save
your settings and return to the BLC menu. If you want to change your
settings, select AGAIN to return to the POSITION adjustment screen.
If HSBLC is selected, do the following:
1. Press the joystick to enter the HSBLC menu.
2. Set the desired GAIN level. Select a value between 0 and 8. The default setting is 8.
3. Set MODE to ALL DAY (default) or NIGHT ONLY, depending on the needs of your
application.
4. If you want to set HSBLC to the default settings, select DEFAULT.
5. Select RETURN to save your settings and return to the EXPOSURE menu.
D-WDR (Digital Wide Dynamic Range)
3D DNR provides intelligent light level control for even strongly backlit scenes.
Set D-WDR to OFF (default), INDOOR, or OUTDOOR.
If INDOOR or OUTDOOR is selected, do the following:
1. Press the joystick to enter the D-WDR menu.
2. Set LOW LEVEL to a value between 0 and 15. The default indoor setting is 4. The
default outdoor setting is 0. This setting compensates for under-exposed areas in
the scene. The higher the value, the brighter the dark areas in the scene will be.
3. Set HIGH LEVEL to a value between 0 and 15. The default indoor setting is 11. The
default outdoor setting is 0. This setting compensates for over-exposed areas in the
scene. The higher the value, the darker the bright areas in the scene will be.
4. Select RETURN to save your settings and return to the EXPOSURE menu.
5. In the EXPOSURE menu, select RETURN to return to the SETUP menu.
800-15429 - A - 07/2013
Page 12

12 | HBD7S(X) Camera Configuration Guide
White Balance
The White Balance function is used to optimize the on-screen colors.
In the SETUP menu, navigate to WHITE BAL, and set it to MANUAL, ATW (default), AWB,
or AWC->SET.
Mode Description
ATW Auto Tracking White Balance mode compensates for color temperature
AWB Auto White Balance mode compensates for color temperature changes
AWC->SET Auto White Balance Control - Set (push lock) mode fixes the white balance
MANUAL Manual mode lets you make detailed adju stments to the white balance. After
If MANUAL is selected, do the following:
1. Press the joystick to enter the MANUAL WB menu (see Figure 7).
changes between 1,800 K and 10,500 K. This mode is best suited for outdoor
scenes.
between 3,000 K and 7,000 K. This mode is best suited for indoor scenes.
based on current lighting. For best r esults, place a white piece of paper in front
of the camera during adjustment. This mode is best suited for indoor scenes
with lighting at a constant color temperat ure.
first setting the white balance to ATW or AW B mode, set the blue and red gain
in MANUAL mode. T his mode is best suited for indoor sc enes with lighting at
a constant color temperature.
Figure 7 Manual WB Menu
2. Set BLUE to a value between 0 and 100. The default setting is 28.
3. Set RED to a value between 0 and 100. The default setting is 16.
4. Select RETURN to save your settings and return to the SETUP menu.
www.honeywell.com/securit y
Page 13

Configuring the Camera | 13
Day&Night
Picture can be displayed in either color or black and white.
In the SETUP menu, navigate to DAY&NIGHT, and set it to AUTO (default), B/W, or
COLOR.
Mode Description
AUTO The camera automatically switches between day (color) mode and night
EXT Not supported.
B/W The camera remains in night (black-and-white) mode, regardless of the light
COLOR The camera remains in day (color) mode, regardless of th e light level.
If AUTO is selected, do the following:
1. Press the joystick to enter the DAY&NIGHT AUTO menu (see Figure 8).
2. Set the DELAY time. Select a value between 0 and 15 seconds. The default setting
3. Set the Day-to-Night (DN) threshold. Select a value between 0 and 255. The
4. Set the Night-to-Day (ND) threshold. Select a value between 0 and 239. The
5. Select RETURN to save your settings and return to the SETUP menu.
(black-and-white) mode, depending on the amount of ambient light.
level.
Figure 8 Day&Night Auto Menu
is 5 seconds.
default setting is 60. The higher the value, the lower the light level at which the
camera switches from day mode to night mode.
default setting is 20. The higher the value, the lower the light level at which the
camera switches from night mode to day mode.
800-15429 - A - 07/2013
Page 14

14 | HBD7S(X) Camera Configuration Guide
If B/W is selected, do the following:
1. Press the joystick to enter the DAY&NIGHT B/W menu (see Figure 9).
Figure 9 Day&Night B/W Menu
2. Set BURST to ON or OFF (default), depending on whether you want to activate a
burst signal when switching from day mode to night mode.
Note Some DVRs require a burst signal to detect a camera.
3. Select RETURN to save your settings and return to the SETUP menu.
4. Select RETURN to return to the SETUP menu.
3DNR (Digital Noise Reduction)
3D-DNR (3DNR) reduces noise in poorly lit scenes.
In the SETUP menu, navigate to 3DNR, and set it to ON (default) or OFF.
If ON is selected, do the following:
1. Press the joystick to enter the 3DNR menu (see Figure 10).
Figure 10 3DNR Menu
2. Set the digital noise reduction LEVEL to a value between 0 and 200. The default
setting is 200.
Note High DNR levels may result in "ghosting."
3. Select RETURN to save your settings and return to the SETUP menu.
www.honeywell.com/securit y
Page 15

Configuring the Camera | 15
Special
In the SETUP menu, navigate to SPECIAL, and then press the joystick to enter the
SPECIAL menu (see Figure 11).
Figure 11 Special Menu
Camera Title
You can select a camera title of up to 15 alphanumeric characters in length and display it
on the monitor.
In the SPECIAL menu, navigate to CAM TITLE, and set it to OFF (default) or ON.
If ON is selected, do the following:
1. Press the joystick to enter the CAM TITLE menu (see Figure 12).
Figure 12 Camera Title Menu
2. Create a camera title by selecting from the displayed list of characters with the
joystick. To clear the camera title, select CLR.
800-15429 - A - 07/2013
Page 16

16 | HBD7S(X) Camera Configuration Guide
3. If you want to change the position of the camera title on the screen, select POS,
and then move the camera title to the desired location on the screen using the
joystick.
4. Press the joystick to return to the CAM TITLE menu, and then select END to save
your settings and return to the SPECIAL menu.
D-Effect
In the SPECIAL menu, navigate to D-EFFECT, and then press the joystick to enter the
D-EFFECT menu (see Figure 13).
Figure 13 D-Effect Menu
Freeze
The freeze function pauses the video image temporarily on the monitor.
Set FREEZE to OFF (default) or ON.
Mirror
The mirror function flips the video image vertically or horizontally.
Set MIRROR to OFF (default), MIRROR, V-FLIP, or ROTATE.
Mode Description
MIRROR The image is flipped horizontally.
V-FLIP The image is flipped vertically.
ROTATE The image is flipped both horizontally and vertically.
www.honeywell.com/securit y
Page 17

Configuring the Camera | 17
D-Zoom
The digital zoom function can magnify the video image up to 32 times. The higher the
magnification, the lower the resolution.
Note SMART D-ZOOM and DIS functions are not available when D-ZOOM is enabled.
Set D-ZOOM to OFF (default) or ON.
If ON is selected, do the following:
1. Press the joystick to enter the D-ZOOM menu (see Figure 14).
Figure 14 D-Zoom Menu
2. Set the RANGE. Select a value between x1 and x32. The default setting is x2.
3. Set the PAN and TILT to move left or right, up or down on the magnified image.
4. Select RETURN to save your settings and return to the D-EFFECT menu.
Smart D-Zoom
The smart digital zoom function magnifies the video image when motion is detected.
Note D-ZOOM and DIS functions are not available when SMART D-ZOOM is enabled.
Set SMART DZOOM to OFF (default) or ON.
If ON is selected, do the following:
1. Press the joystick to enter the SMART D-ZOOM menu.
2. Set the RANGE. Select a value between x2 and x5. The default setting is x2.
3. Set the POSITION to define the portion of the scene that you want to monitor.
a. Press the joystick to enter the POSITION adjustment screen.
b. Move the joystick up or down, left or right, to move up or down, left or right,
on the magnified image.
c. Press the joystick again to return to the SMART D-ZOOM menu.
4. Set the motion detection SENSITIVITY. Select a value between 0 and 100. The
default setting is 80.
800-15429 - A - 07/2013
Page 18

18 | HBD7S(X) Camera Configuration Guide
5. Set the dwell TIME. Select a value between 0 and 15 seconds. The default setting
is 3 seconds.
6. Select RETURN to save your settings and return to the D-EFFECT menu.
DIS (Digital Image Stabilizer)
The digital image stabilization function compensates for "ghosting" and provides clearer
images in low-light conditions.
Note FREEZE, D-ZOOM, and SMART D-ZOOM functions are not available when DIS is
enabled.
Set DIS to OFF (default) or ON.
Negative Image
The negative image function reverse the light and dark areas of the video image.
Set NEG. IMAGE to OFF (default) or ON.
Return
Select RETURN to return to the SPECIAL menu.
Motion Detection
You can set up the camera to detect motion in a specific area of the screen. You can
configure up to 4 motion detection areas.
In the SPECIAL menu, navigate to MOTION, and set it to OFF (default) or ON.
If ON is selected, do the following:
1. Press the joystick to enter the MOTION menu (see Figure 15).
Figure 15 Motion Menu
2. Select the motion detection AREA you want to configure (1, 2, 3, or 4).
3. Set AREA DISPLAY to ON (default) or OFF to show or hide the selected area.
www.honeywell.com/securit y
Page 19

Configuring the Camera | 19
If ON is selected, do the following:
a. Press the joystick to enter the POSITION adjustment screen, and then
adjust the position of the motion detection area by moving the joystick up or
down, left or right.
b. Press the joystick to enter the SIZE adjustment screen, and then adjust the
size of the motion detection area by moving the joystick up or down, left or
right.
c. If you are satisfied with position and size of the motion detection area, select
RET to save your settings and return to the MOTION menu. If you want to
change your settings, select AGAIN to return to the POSITION adjustment
screen.
4. Set VALUE to define the sensitivity of the motion detection in the selected motion
detection area. Select a value between 0 and 100. The higher the value, the greater
the sensitivity. The default setting is 80.
5. Set MOTION VIEW to OFF (default) or ON. When ON is selected, motion detected
in the selected motion detection area is highlighted.
6. If you want, configure additional motion detection areas by repeating steps 2 to 5.
7. Select RETURN to save your settings and return to the SPECIAL menu.
Privacy Mask
You can set up the camera to mask areas that you do not want displayed on the screen.
You can configure up to 8 privacy masks.
In the SPECIAL menu, navigate to PRIVACY, and set it to OFF (default) or ON.
If ON is selected, do the following:
1. Press the joystick to enter the PRIVACY menu (see Figure 16).
Figure 16 Privacy Menu
2. Select the privacy mask AREA you want to configure (1, 2, 3, 4, 5, 6, 7, or 8).
3. Set AREA DISPLAY to ON (default) or OFF to show or hide the selected area.
800-15429 - A - 07/2013
Page 20

20 | HBD7S(X) Camera Configuration Guide
If ON is selected, do the following:
a. Press the joystick to enter the TOP LEFT adjustment screen, and then adjust
the position of the selected node by moving the joystick up or down, left or
right.
b. Press the joystick to enter the TOP RIGHT adjustment screen, and then
adjust the position of the selected node by moving the joystick up or down,
left or right.
c. Press the joystick to enter the BTM LEFT adjustment screen, and then
adjust the position of the selected node by moving the joystick up or down,
left or right.
d. Press the joystick to enter the BTM RIGHT adjustment screen, and then
adjust the position of the selected node by moving the joystick up or down,
left or right.
e. Press the joystick to enter the POSITION adjustment screen, and then
adjust the position of the selected privacy mask area by moving the joystick
up or down, left or right.
f. If you are satisfied with position and size of the privacy mask area, select
RET to save your settings and return to the PRIVACY menu. If you want to
change your settings, select AGAIN to return to the TOP LEFT adjustment
screen.
4. Set the COLOR of the selected privacy mask area. There are 15 color options to
choose from.
5. Set the TRANSPAR (transparency) level of the selected privacy mask area. Select
a value between 0 and 3, with 0 being the most transparent and 3 being completely
opaque.
6. If you want, configure additional privacy mask areas by repeatings steps 2 to 5.
7. Select RETURN to save your settings and return to the SPECIAL menu.
Defect
Note For advanced users only.
You can set up the camera to eliminate defective pixels (white spots) on the screen.
In the SPECIAL menu, navigate to DEFECT, and then press the joystick to enter the
DEFECT menu (see Figure 17).
www.honeywell.com/securit y
Page 21

Configuring the Camera | 21
Figure 17 Defect Menu
1. Set SENSE UP to x4, x8, x16, x32 (default), x64, or x128. It is recommended that
you use the default setting x32.
2. Set DIFF to define the size of the defect you want to eliminate. Select a value
between 0 and 3. The default setting is 2.
3. Set THRESHOLD to define the sensitivity threshold. Select a value between 0 and
4. The default setting is 1.
4. Navigate to START and then press the joystick. The message COVER THE LENS
THEN PRESS ENTER KEY appears on the screen.
5. Press the joystick to continue. The message SAVING... appears on the screen.
6. Select RETURN to save your settings and return to the SPECIAL menu.
Defog
The defog function improves image definition in conditions of poor visibility, such as in fog,
smoke, rain, or snow.
In the SPECIAL menu, navigate to DEFOG, and set it to OFF (default), MANUAL, or AUTO.
If MANUAL is selected, do the following:
1. Press the joystick to enter the DEFOG MANUAL menu.
2. Set LEVEL to a value between 0 and 31. The default setting is 10.
3. Set COLOR GAIN to a value between 0 and 10. The default setting is 3.
4. Set EDGE GAIN to a value between 0 and 10. The default setting is 3.
5. Set GAMMA to USER or to a value between 0.05 and 1.00. The default setting is
USER.
6. Select RETURN to save your settings and return to the SPECIAL menu.
If AUTO is selected, do the following:
1. Press the joystick to enter the DEFOG AUTO menu.
2. Set DETECT LEVEL to a value between 0 and 5. The default setting is 3.
3. Select RETURN to save your settings and return to the SPECIAL menu.
800-15429 - A - 07/2013
Page 22

22 | HBD7S(X) Camera Configuration Guide
Language
You can set the language of the OSD interface to any of the following supported languages:
• English
•Korean
•Japanese
• Chinese
•Russian
•French
•Spanish
•Italian
In the SPECIAL menu, navigate to LANGUAGE, and set the OSD to the desired language.
• Portuguese
•Dutch
•German
•Polish
•Turkish
•Hebrew
•Arabic
Adjust
In the SETUP menu, navigate to ADJUST, and then press the joystick to enter the ADJUST
menu (see Figure 18).
Figure 18 Adjust Menu
Sharpness
You can set the sharpness of the video image.
Set the SHARPNESS level. Select a value between 0 and 30. The default setting is 25.
www.honeywell.com/securit y
Page 23

Configuring the Camera | 23
Monitor
You can optimize the video signal for your monitor.
Set MONITOR to LCD (default), USER, or CRT, depending on the type of monitor you are
using.
1. Press the joystick to enter the LCD/USER/CRT menu.
2. Set the desired GAMMA level. Select a value between 0.05 and 1.0. The default
setting is 0.55.
3. Set LEVEL to a value between 0 and 63. The default setting is 20.
4. Set BLUE GAIN and RED GAIN to a value between 0 and 255. The default setting
for both is 100.
5. Select RETURN to save your settings and return to the ADJUST menu.
Reset
You can reset the camera to its factory default settings.
In the SETUP menu, navigate to RESET, and then press the joystick to enter the RESET
menu . Press the joystick again to reset the camera to its factory default settings.
Exit
In the SETUP menu, navigate to EXIT, and then press the joystick to exit the OSD main
setup menu.
800-15429 - A - 07/2013
Page 24

24 | HBD7S(X) Camera Configuration Guide
Troubleshooting
If this happens Do this
Nothing appears on the
screen.
The image on the screen is
dim.
The image on the screen is
dark.
The camera is not working
properly and the surface of
the camera is hot.
Motion detection is not
working.
The color of the picture is not
correct.
The image on the screen
flickers.
Sense-Up does not work. Check that the AGC setting in the EXPOSURE menu
Check the power cable, power supply output and
video connection between the camera and monitor.
If the camera lens or front glass plate is dirty, wipe
with a soft, clean cloth.
Adjust monitor controls as required.
If the camera is facing a very strong light source,
change the camera position.
Adjust the lens focus.
Adjust the contrast control of the monitor.
If there is an intermediate device, correctly set the
75 ohm/Hi-Z switch.
Check the camera is correctly connected to an
appropriate regulated power source.
Check that MOTION has been set to ON in the
SPECIAL menu.
Check that a motion detection area has been
properly defined.
Check the settings in the WHITE BAL menu.
Make sure that the camera is not facing direct
sunlight or fluorescent lighting. Change the camera
position, if necessary.
is not set to OFF.
Check the EXPOSURE menu and make sure
SHUTTER is set to ----- (not a fixed shutter speed).
www.honeywell.com/securit y
Page 25

Troubleshooting | 25
800-15429 - A - 07/2013
Page 26

Honeywell Security Products Americas
2700 Blankenbaker Parkway, Suite 150
Louisville, KY 40299, USA
www.honeywell.com/security
+1 800 323 4576
Honeywell Security Europe/South Africa
Aston Fields Road
Whitehouse Industrial Estate
Runcorn, WA7 3DL, United Kingdom
www.honeywell.com/security/uk
+44 (0) 1928 754 028
Honeywell Security Products Americas
Caribbean/Latin America
9315 NW 112th Avenue
Miami, FL 33178, USA
www.honeywell.com/security/clar
+1 305 805 8188
Honeywell Security Pacific
Level 3, 2 Richardson Place
North Ryde, NSW 2113, Australia
www.asia.security.honeywell.com
+61 2 9353 7000
Honeywell Security Asia
35F Tower A, City Center, 100 Zun Yi Road
Shanghai 200051, China
www.asia.security.honeywell.com
+86 21 5257 4568
Honeywell Security Middle East/N. Africa
Emaar Business Park, Sheikh Zayed Road
Building No. 2, Office No. 30
Post Office Box 232362
Dubai, United Arab Emirates
www.honeywell.com/security/me
+971 (0) 4 450 5800
Honeywell Security Northern Europe
Ampérestraat 41
1446 TR Purmerend, The Netherlands
www.honeywell.com/security/nl
+31 (0) 299 410 200
Honeywell Security Deutschland
Johannes-Mauthe-Straße 14
D-72458 Albstadt, Germany
www.honeywell.com/security/de
+49 (0) 7431 801-0
Honeywell Security France
Immeuble Lavoisier
Parc de Haute Technologie
3-7 rue Georges Besse
92160 Antony, France
www.honeywell.com/security/fr
+33 (0) 1 40 96 20 50
Honeywell Security Italia SpA
Via della Resistenza 53/59
20090 Buccinasco
Milan, Italy
www.honeywell.com/security/it
+39 (0) 2 4888 051
Honeywell Security España
Avenida de Italia, n° 7. 2a planta
C.T. Coslada
28821 Coslada, Madrid, Spain
www.honeywell.com/security/es
+34 902 667 800
www.honeywell.com/security
https://www.honeywellsystems.com/ss/techsupp/index.html
© 2013 Honeywell International Inc. All rights reserved. No part of this publication may be reproduced by any means
without written permission from Honeywel l. The information in this publication is believed to be accurate in all respects.
However, Honeywell cannot assume responsi bility for any consequences resulting from the use thereof. The information
contained herein is subject to change without notice. Revisions or new ed itions to this publication may be issued to
incorporate such changes.
+1.800.323.4576 (North America only)
Document 800-15429 – Rev A – 07/2013
 Loading...