

Page 1
F57A/B
Owners Manual
Mode d’Emploi
Istruzioni d’Uso
Manual de Instrucciones
Gebrauchsanleitung
69-1161M
Page 2

F57A/B
ENGLISH 2-5
FRANCAIS 6-9
ITALIANO 10-13
ESPAÑOL 14-17
DEUTSCH 18-22
Page 3
3
F57A
10
1
9
5
6
5
7
8
3
10
1
2
9
5
F57B
6
8
7
Page 4
Welcome...
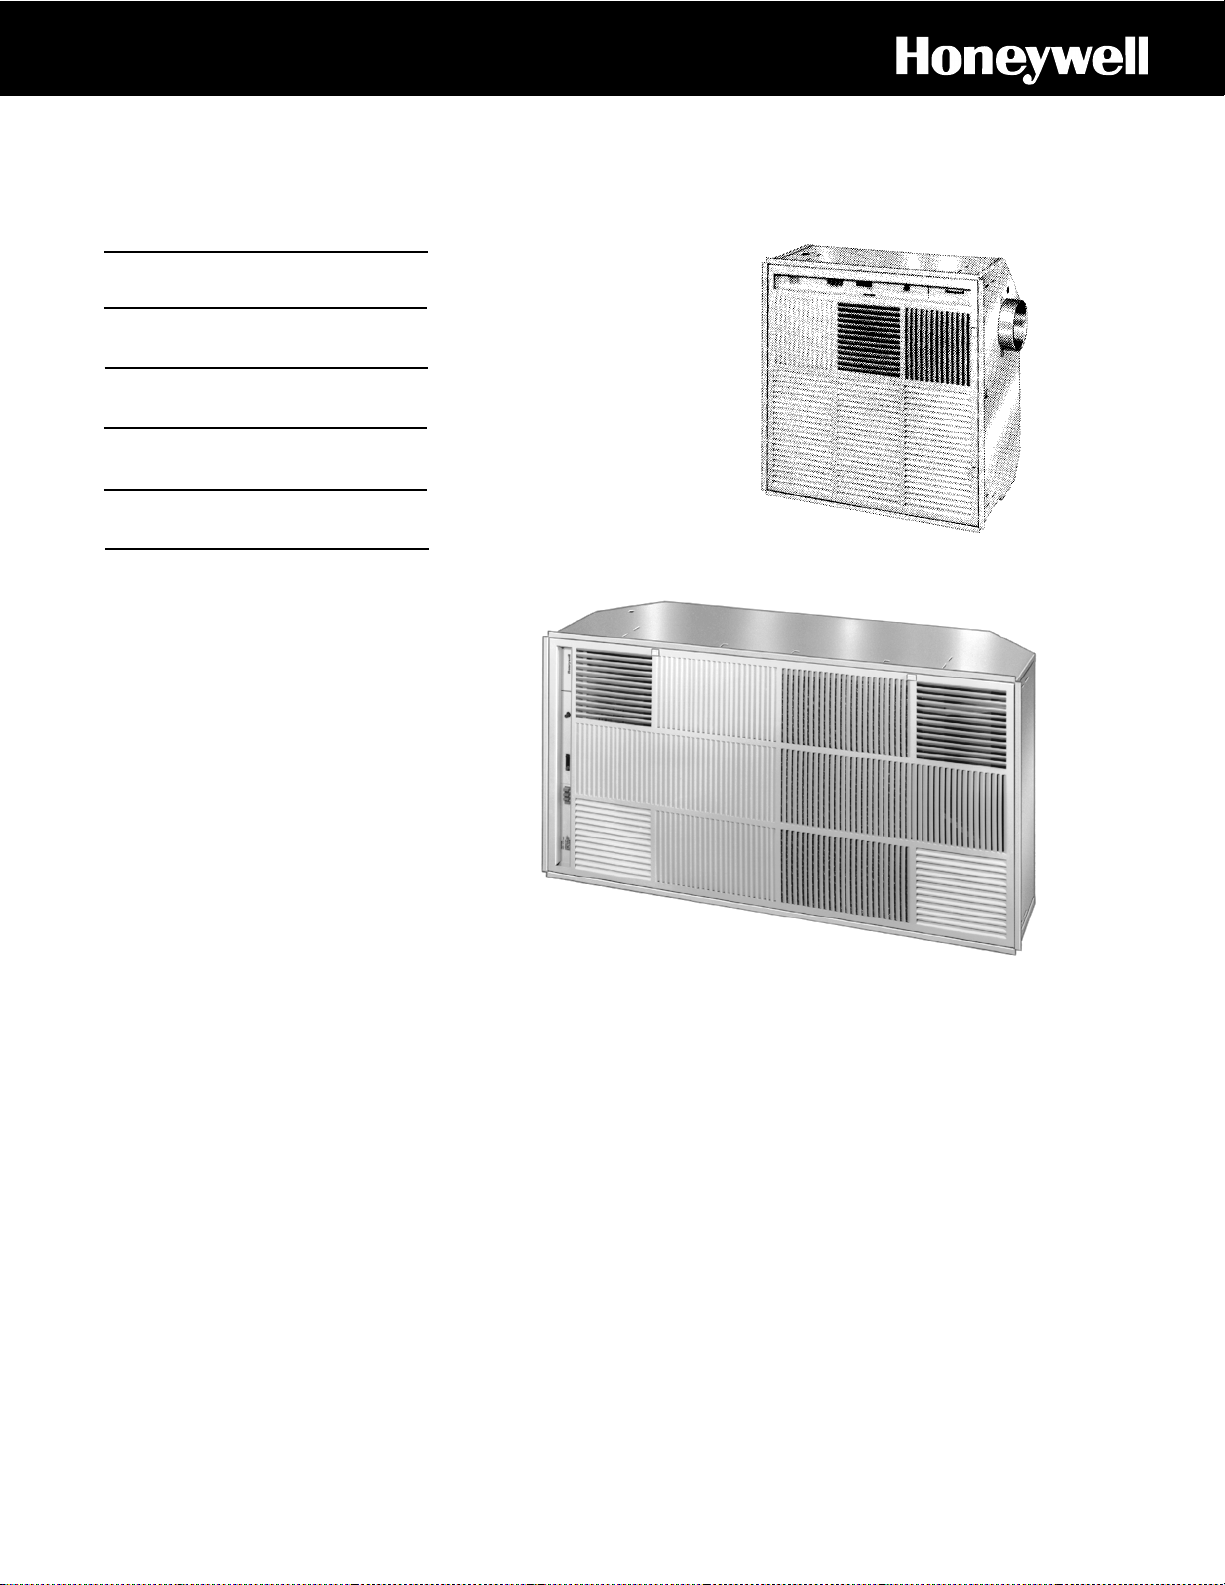
...to the world of high efficiency air cleaning. Your Honeywell electrostatic air cleaner does exactly what its name
suggests - it cleans the air of tobacco smoke, dust, pollens and the vast majority of other airborne contaminants which
cause indoor air pollution. With this Honeywell electrostatic air cleaner you can expect to enjoy the benefits of clean
air for years to come.
The air cleaner meets all relevant EU Directives.
OPERATING YOUR F57 AIR CLEANER
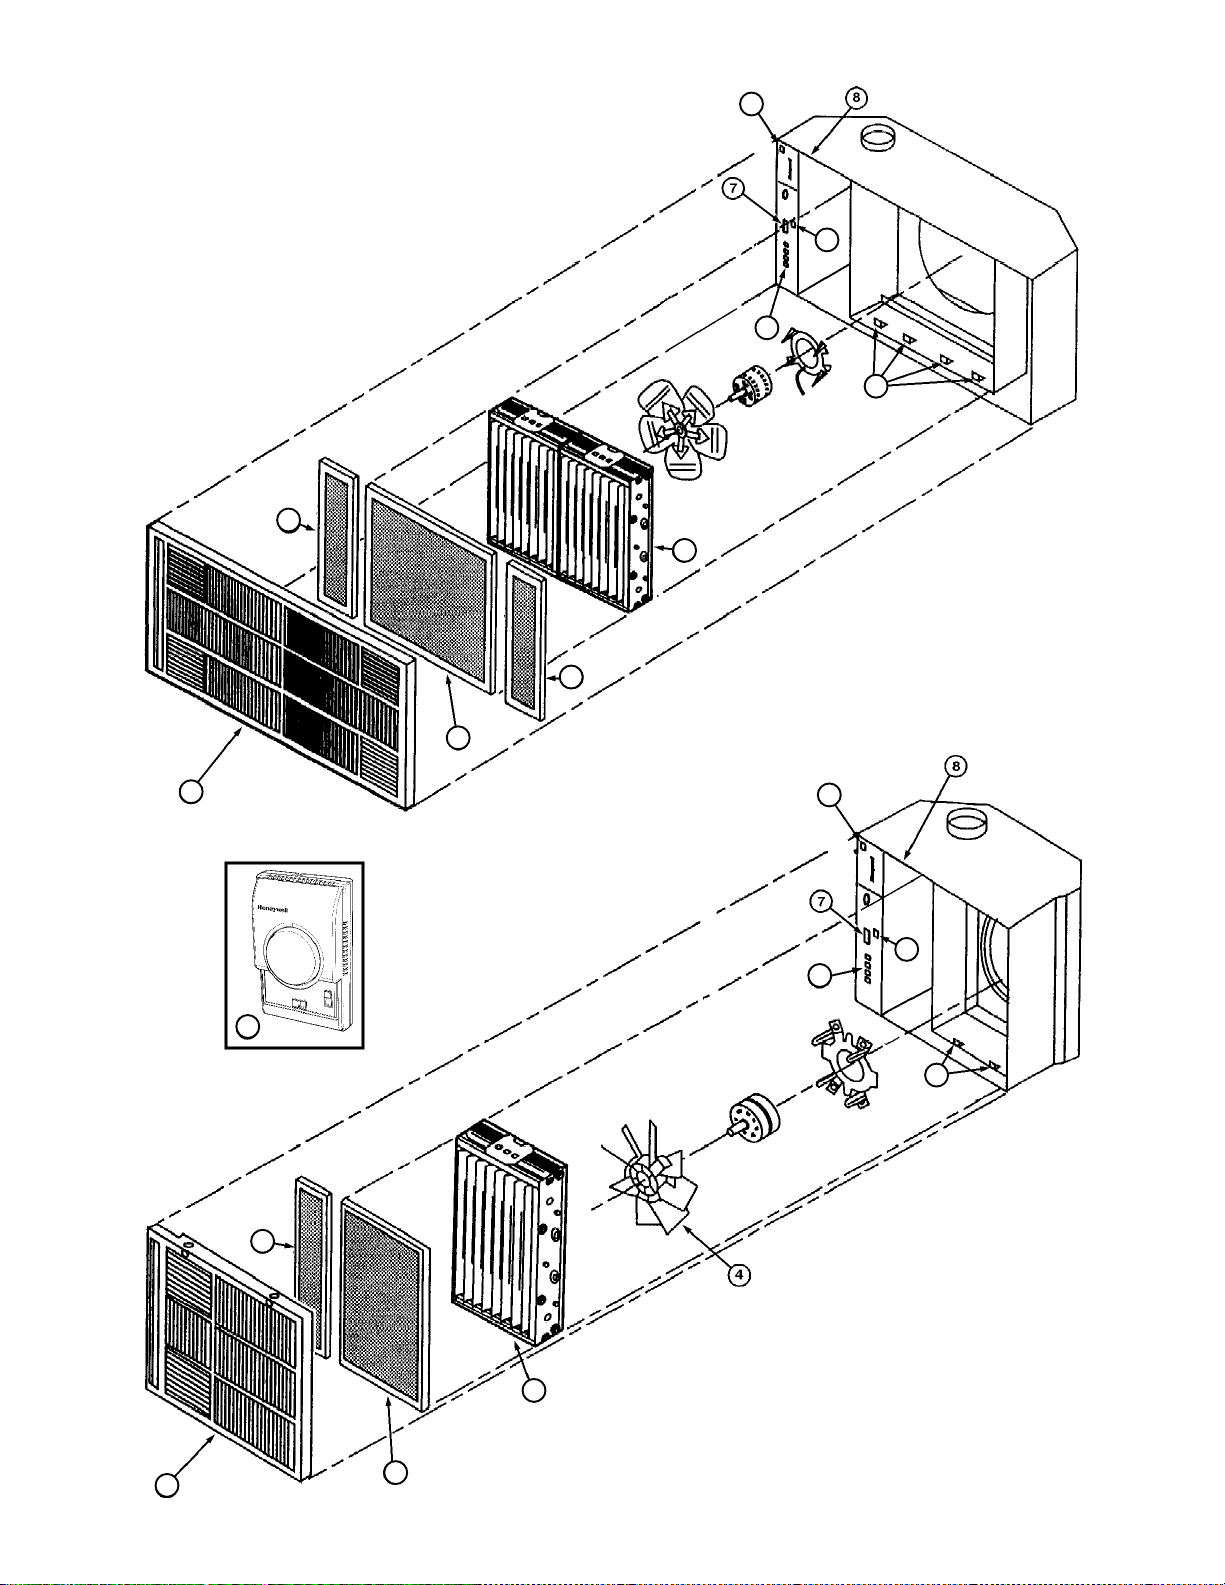
Your Electrostatic Air Cleaner has one or two cells depending on the model. These instructions apply to all models.
To follow these instructions please refer to the diagram on the inside front flap of this booklet.
Please retain this booklet for future reference.
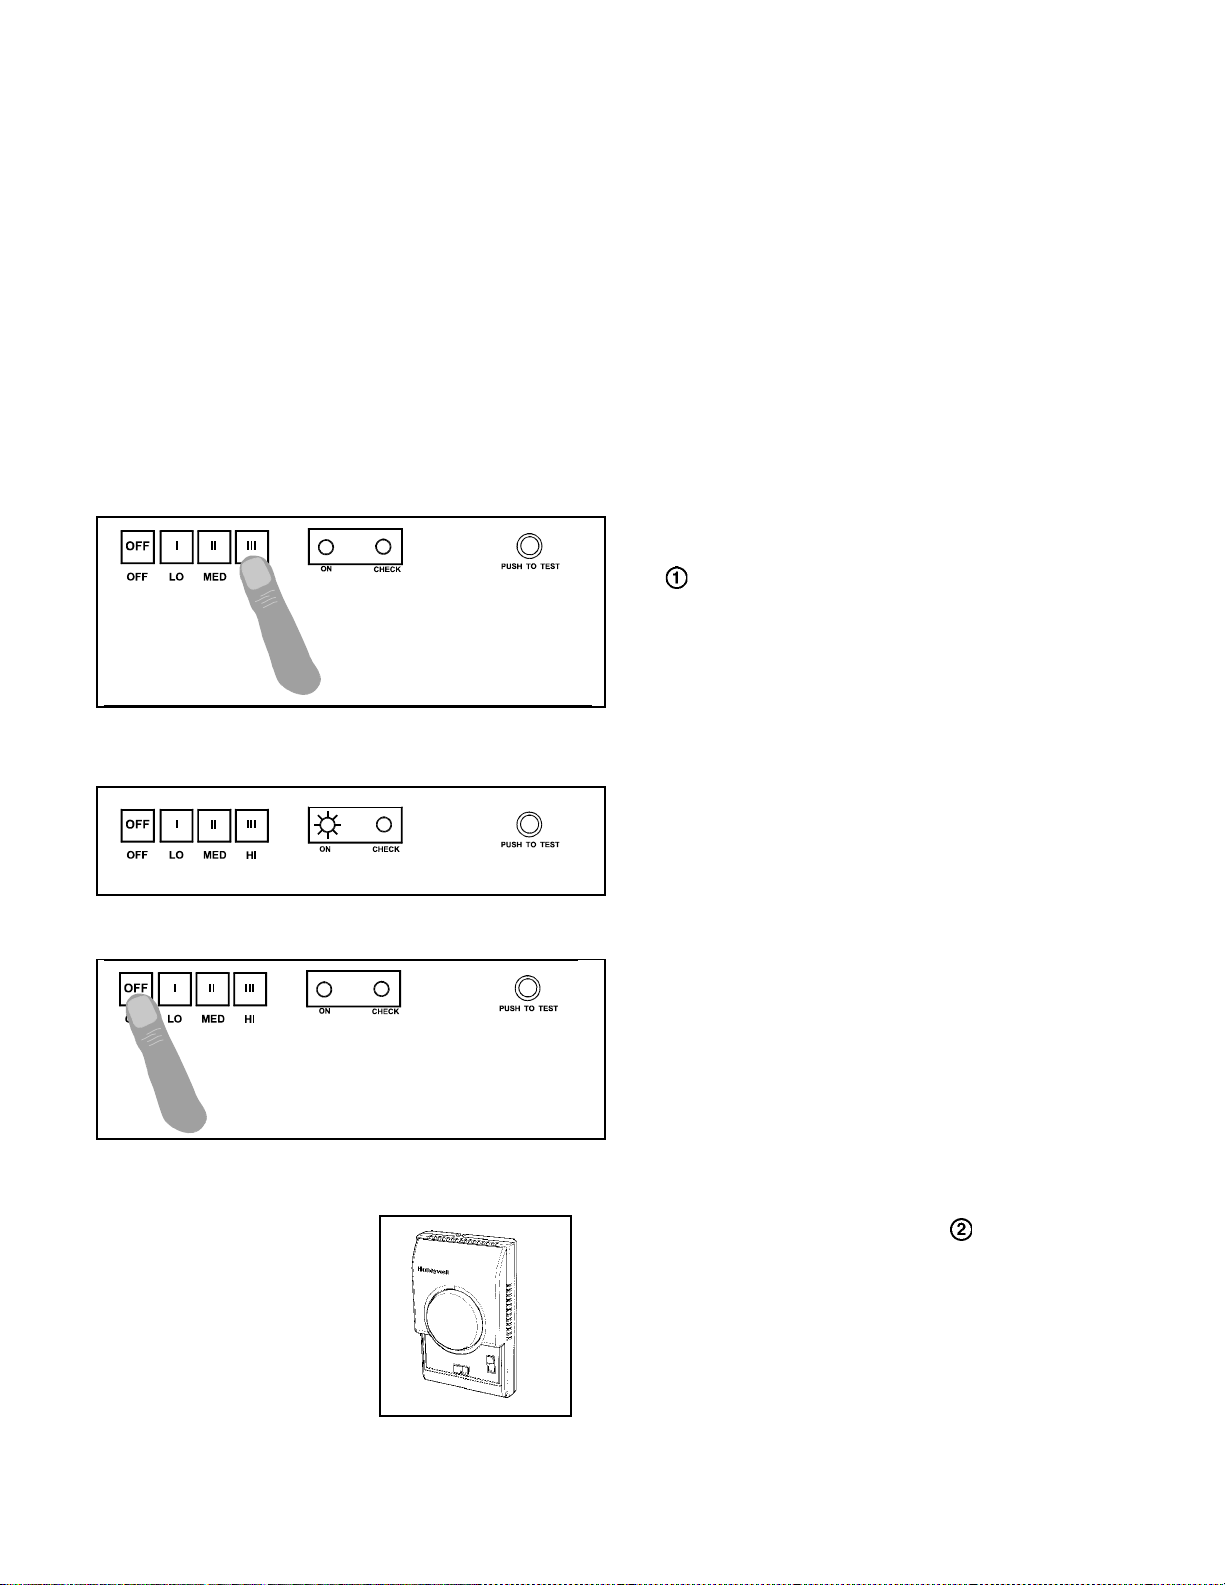
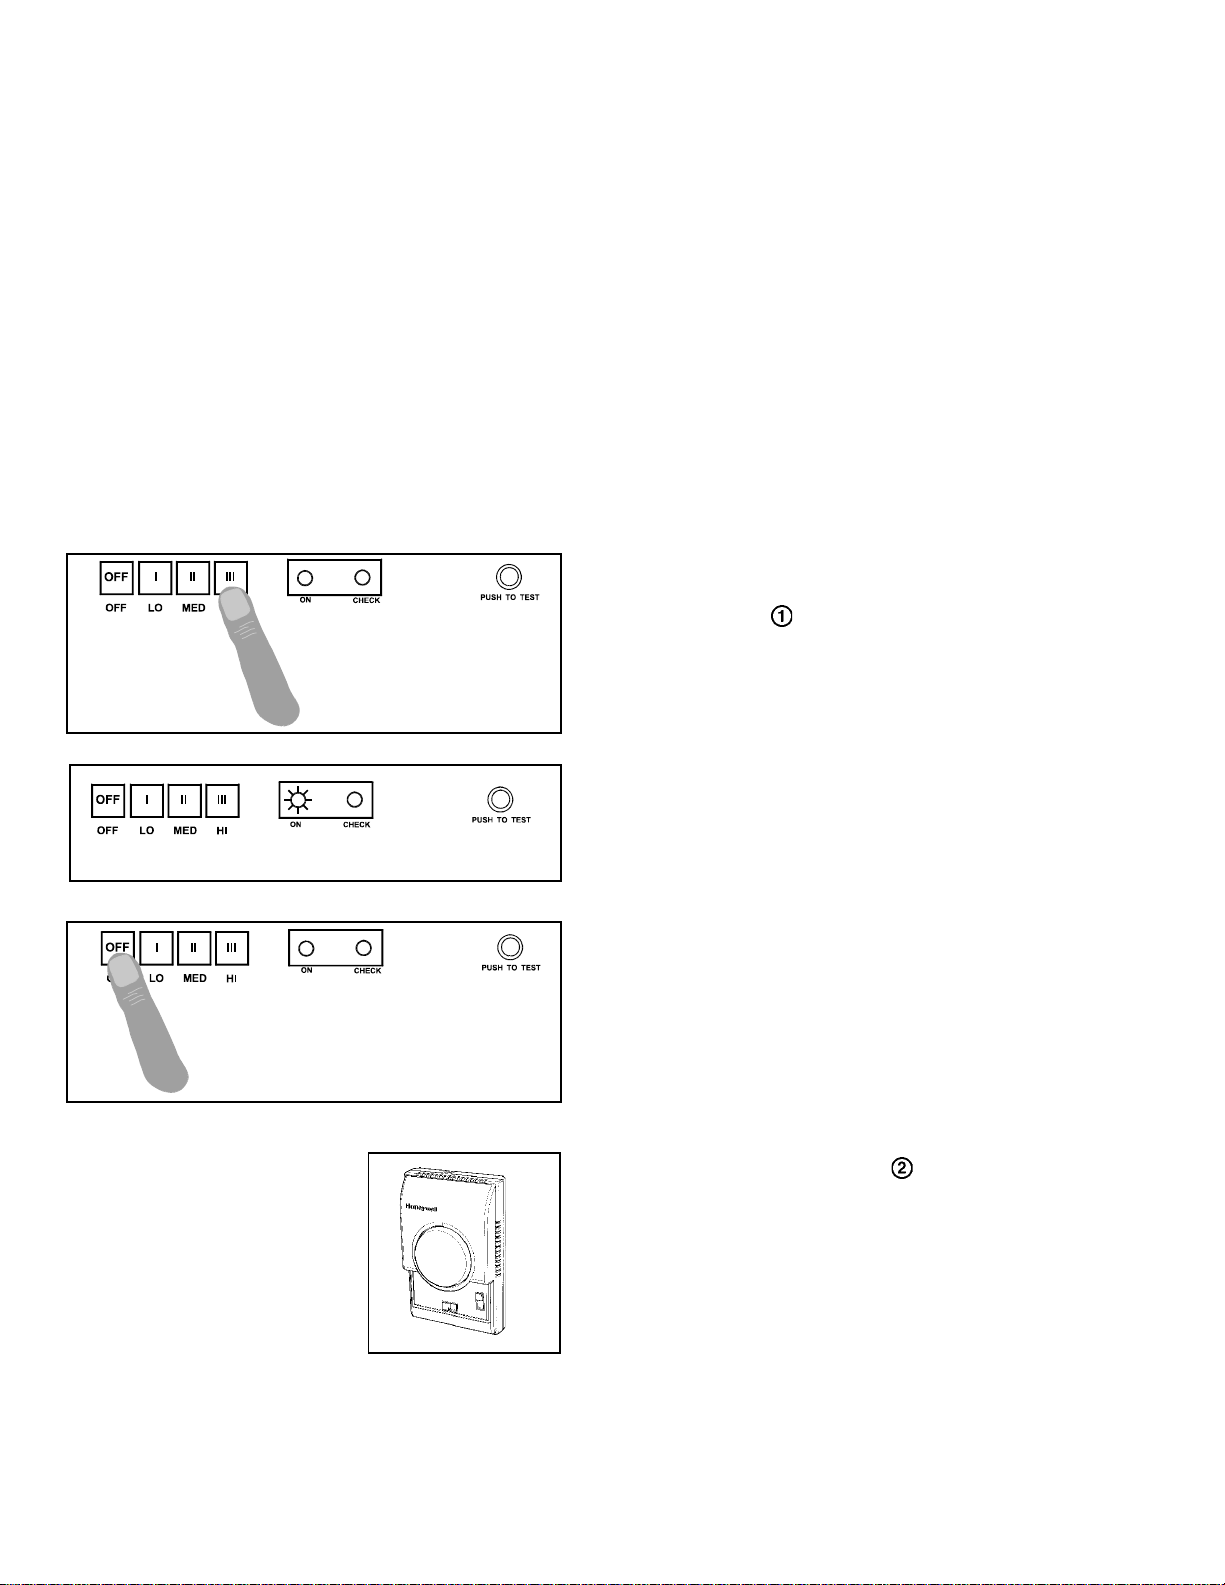
The air cleaner is operated by pressing the desired
airflow speed button on the display panel - LO, MED or
HI .
Pressing ‘HI’ speed gives the maximum airflow - 1500
m³/h for the F57A models and 780 m³/h for the F57B
models.
The ‘ON’ LED should light whenever the air cleaner is
running.
To turn off the air cleaner press the ‘OFF’ button on the
power switch. The fan, the high voltage power supply
and the ON LED will all go off.
A wall mounted remote control unit is available as
an option to control your air cleaner. This unit is hard
wired to the air cleaner.
It is available to order as a spare part from your installer
or dealer.
2
69-1161M
Page 5
GETTING THE MOST FROM YOUR ELECTROSTATIC AIR CLEANER
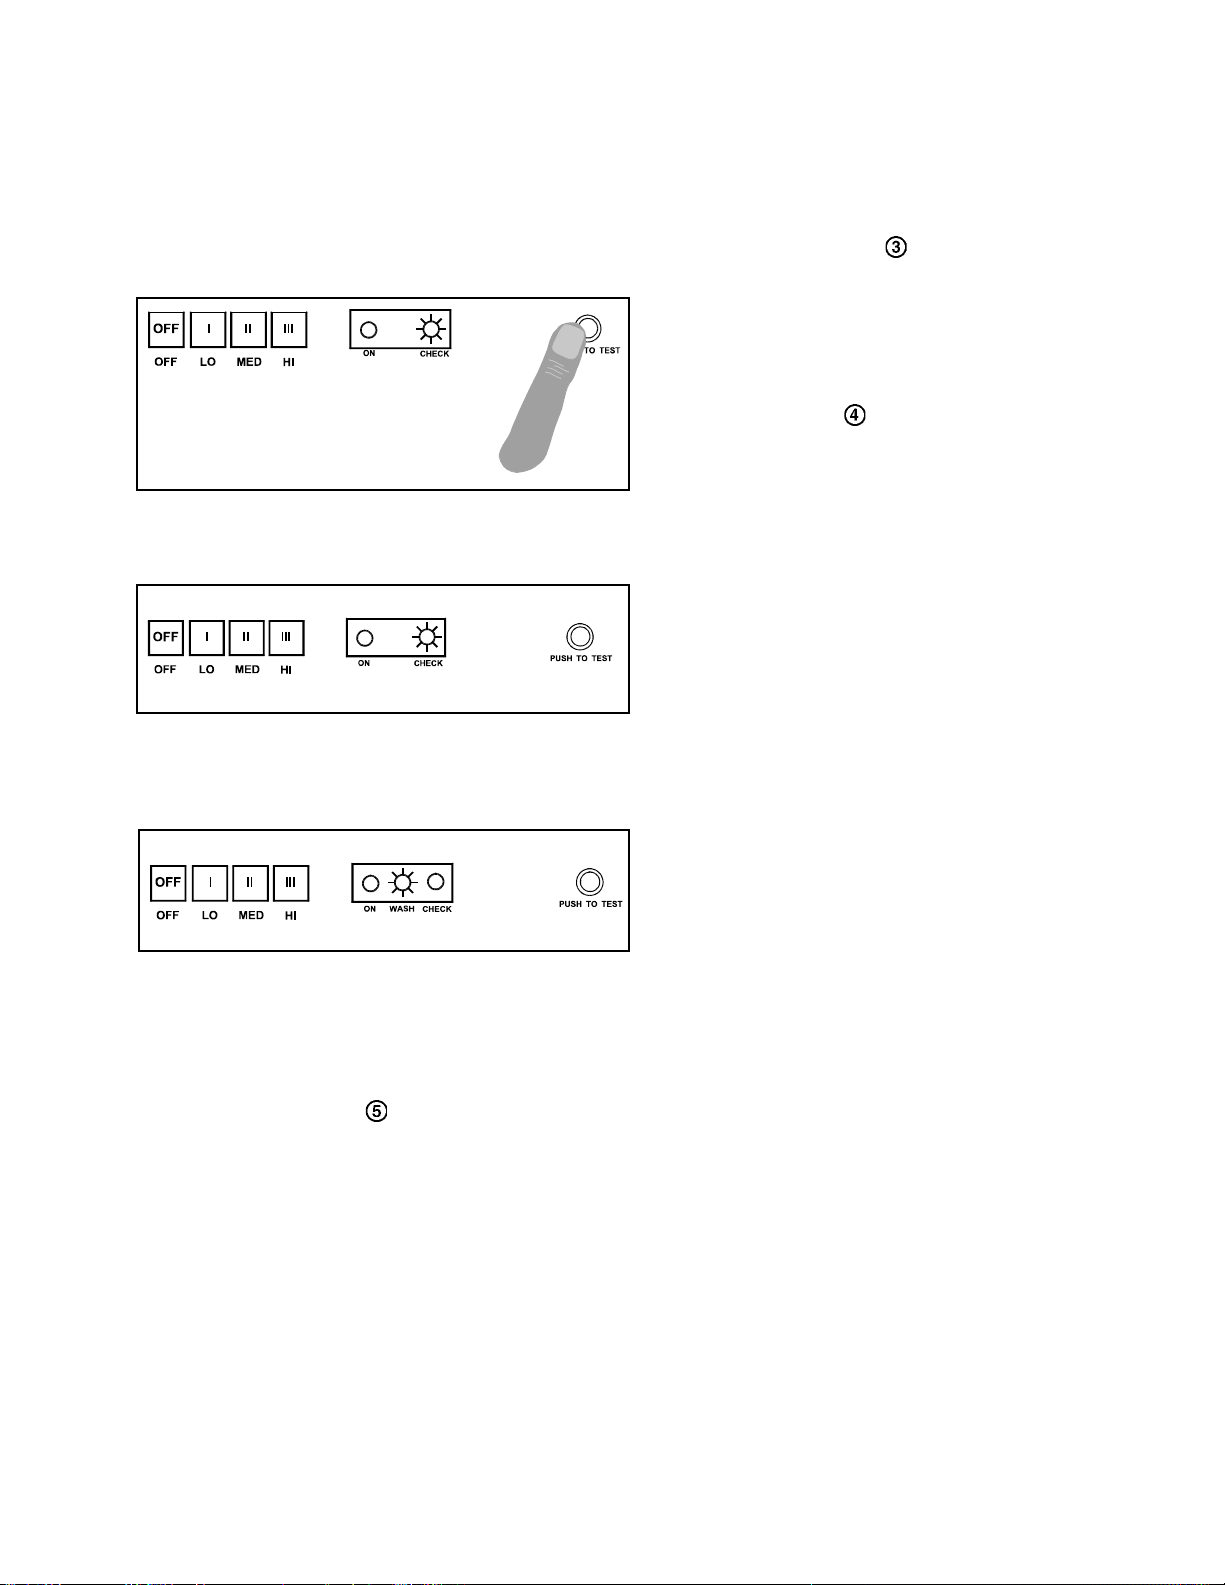
The air cleaner keeps you informed of its running status. Lights on the Display Panel provide information.
The YELLOW ‘ON’ light indicates that the air cleaner
is functioning correctly. An occasional snapping
sound from the air cleaner (sometimes called arcing)
confirms the air cleaner is running normally. Press
the ‘TEST’ button to hear the snapping sound.
The CHECK LED will light when the TEST button is
pressed.
If the RED ‘CHECK’ light is on permanently; this is an
indication that the air cleaner has developed a fault.
Usually it means a fault with the internal power supply
but there are some checks you can do before calling
your service dealer. (See later section on Service
Checks).
F57A/B
Some models are equipped with a ‘WASH’ light. This
light indicates that the cleaning cell is loaded with dirt
and that its efficiency has dropped below acceptable
working levels. The cell must be washed to return
the air cleaner to its original efficiency. If this light is
on but the cell is not dirty, turn to the section on
Service Checks before calling your service dealer.
An activated carbon filter can be installed to help control odours. This filter is fitted inside the access cover
next to the prefilter. F57A models use two carbon filters one on either side of the prefilter, whilst F57B models have
a single carbon filter which sits to the left hand side of the prefilter. Carbon filters should be changed approximately
every 6 months depending on usage. They are obtained from your installer or service dealer.
Instead of switching the air cleaner off when not in use, why not leave it to run on the LO setting? This will ensure
maximum air cleaning benefit is achieved.
3 69-1161M
Page 6
F57A/B
CLEANING THE ELECTROSTATIC CELL AND PREFILTER
The air cleaner is designed to be efficient over a wide range of cell loading conditions. However as it cleans the air
the cell and prefilter in your air cleaner become dirty. This can lead to reduced efficiency. To maintain the
air cleaner’s high operating efficiency it is essential to wash the cell and prefilter regularly.
Washing the Cell
CAUTION.
When washing the electrostatic cell care should be taken to avoid damage to the cell and injury to
yourself. The collecting plates and ioniser wires in particular must be handled with care.
Avoid prolonged skin contact with the detergent, and prevent injury to your hands, by wearing rubber
protective gloves during cell washing. Take care not to splash detergent solution in the eyes.
• Isolate the device from the mains supply.
• Open the access cover by pressing the release catches. Swing the cover down to the vertical position.
• With one hand supporting the cell rotate the latch 90°.
• Carefully lower the cell until the cell contact board is clear of the frame.
• Lift the cell off the retaining hooks .
Remove dirt from the cell by soaking in a solution of domestic dishwasher or similar alkaline based detergent
for 15 to 20 minutes, agitating several times. (Note that some detergents recommend soaking for longer periods
of time.) Do not use acid based detergents as these will corrode the cell. Dilute detergent according to
manufacturer’s instructions.
DO NOT USE ADDITIVE INTENDED TO GIVE SPARKLE TO GLASSWARE IN DOMESTIC DISHWASHERS.
THIS WILL REDUCE THE EFFICIENCY OF THE ELECTROSTATIC CELL.
• Remove the cell from the solution and rinse before soaking in clean water. Rinse again and repeat.
• Carefully wipe ioniser wires with a damp cloth.
• Allow the cell time to dry completely - normally two hours. After cleaning the cell may occasionally look stained.
- If the stain is black or very dark, it is probably dirt residue. This can lower efficiency so the cell should be
washed again.
- If the stain is white, it is probably detergent residue. This lowers efficiency and may also corrode the cell.
Rinse the cell again.
- If the stain is brown or yellow, it is probably tobacco smoke or other airborne dirt. Moderate discolouration
of this type does not affect the air cleaner efficiency. Recleaning is not necessary.
Washing the Prefilter
• The prefilter is located inside the access cover. Remove the accumulated dirt from the prefilter by vacuuming,
brushing or washing. If washing in the same detergent solution as the cells, wash ALL cells before washing the
prefilter, otherwise the larger contaminants from the prefilter will be picked up on the cell.
469-1161M
Page 7

F57A/B
Replacing the Cell and Prefilter
••
• Before replacing the cell it should be visually examined for bent or damaged collector plates or broken ioniser
••
wires. Bent or warped plates can be formed back into shape. This should be done to prevent the arcing sound
which is caused by the plates being too close together. Do NOT use cells until broken ioniser wires are
removed. If the broken wire is in the middle of the cell, replace with one of the wires from either end. This will
ensure the cell operates at reasonably high efficiency until a replacement is obtained from your installer or
service dealer.
••
• When replacing the cell in the air cleaner make sure the airflow arrow on the cell is pointing upward toward the
••
fan and that the contact board is facing the contact terminals in the air cleaner.
••
• Ease the edge of the cell into the retaining hooks.
••
••
• Using both hands pivot the cell until the contact board is level with the frame.
••
••
• With one hand supporting the cell near the latch, rotate the latch 90° to close.
••
• •
• Replace the prefilter in the access cover.
• •
••
• If necessary, replace the activated carbon filter. New filters can be obtained from your local dealer. Note that
••
this filter cannot be washed.
• Swing the access cover back to the closed position. You will hear a click as the latches lock home.
SERVICE CHECKS
Some faults can be checked without the need to call your service dealer.
• If the system ON light does not come on....Check the access cover is firmly closed and latched. If the cover is
not closed properly a safety switch keeps the air cleaner off.
• If the CHECK light comes on....Ensure that the cell is clean and dry. Check for damaged or shorted ioniser
wires.
• Some models have a WASH light. If this comes on....Check that the cell is properly located in the air cleaner.
Wash the cell and prefilter. Wipe the ioniser wires to remove any remaining deposits.
• If the air cleaner arcs (cracks) too frequently....The cell may be wet from washing. Turn the air cleaner off for
two hours to dry. Check the cell for broken ioniser wires or bent collector plates.
• If you smell ozone it could be because the cell is new. The small amount of ozone produced when the air
cleaner is running may be higher than usual during the first week or two of operation, until the cell is ‘burned in’.
Normal use and the first cleaning usually takes away this smell. If,
however, the smell of ozone remains objectionable one of two
things can be done to remedy the situation.
- Open the access cover and move the Performance Switch
to position “LO”. Note that this will reduce cleaning efficiency by
5-15% depending on airflow speed.
- Install the optional activated carbon filters.
• If your air cleaner still does not work properly consult your installation or service dealer.
5 69-1161M
Page 8
F57A/B
Bienvenue ...
Dans le monde de l’épuration d’air à très haute efficacité... Votre Epurateur d’air électrostatique Honeywell fait
exactement ce que son nom suggère. Il nettoie l’air chargé de fumée de tabac, poussière, pollens et autres agents
contaminants qui entraînent la pollution de l’air intérieur. Avec cet épurateur d’air électrostatique Honeywell, vous
pourrez profiter des bénéfices de l’air épuré pendant les années à venir.
FONCTIONNEMENT DE VOTRE EPURATEUR D’AIR
Votre épurateur d’air électrostatique a une ou deux cellules suivant le modèle. Ces instructions concernent tous les
modèles.
Afin de suivre ces instructions merci de vous référer au schéma placé sur le rabat intérieur de cette brochure.
et de conserver cette brochure pour vos futures références.
L’épurateur d’air est actionné à partir de 3 boutons
poussoirs situés sur le devant de l’appareil - I, II, III
(LO, MED ou HI) . Le bouton III correspond à la
vitesse maximum - 1500 m³/h pour les modèles F57A
et 780 m³/h pour les modèles F57B.
Le voyant ON (Marche) doit être allumé lorsque
l’épurateur est en marche.
Pour éteindre l ‘épurateur, appuyer sur le bouton OFF
(Arrêt). Le ventilateur et l’alimentation haute tension
s’arrêtent et le voyant ON (Marche) s’éteint.
Afin de commander à distance votre épurateur,
une commande murale est disponible en option.
Celle-ci doit être câblée à l’épurateur.
Cette option doit être commandée séparément à
votre installateur.
669-1161M
Page 9

F57A/B
COMMENT OBTENIR UNE BONNE EFFICACITE DE VOTRE EPURATEUR
L’épurateur d’air vous informe de son état de marche. Les témoins optiques placés sur le devant de l’appareil vous
permettent de visualiser l’information .
Le voyant jaune ON (Marche) indique que l’épurateur
d’air fonctionne correctement. Un bruit sec
occasionnel provenant de l’épurateur (appelé
amorçage d’arc) confirme son bon fonctionnement.
Afin d’entendre ce bruit sec, pousser le bouton TEST
(Essais)
Le voyant CHECK (Vérification) s’allume lorsque le
bouton TEST (Essais) est enclenché.
Le voyant rouge CHECK (Vérification) est allumé en
permanence. Celui-ci indique que l’épurateur a
besoin d’une vérification. Habituellement il s’agit
d’une erreur de fonctionnement sur l’alimentation.
Vous pouvez faire quelques vérifications avant
d’appeler votre concessionnaire (voir le chapitre
Entretien).
.
Quelques modèles sont équipés d’un voyant WASH
(Nettoyage). Ce voyant indique que les cellules sont
encrassées plus que la normale et qu’elles ne sont
plus efficaces. La cellule doit être nettoyée. Si le
voyant est allumé et que la cellule n’est pas sale - voir
le chapitre Entretien avant d’en informer votre
concessionnaire.
Afin de combattre les mauvaises odeurs, un filtre charbon actif
placé à l’intérieur de l’épurateur à côté du préfiltre.
Utiliser 2 filtres à charbon actif de chaque côté du préfiltre pour les modèles F57A et 1 filtre à charbon actif se
plaçant sur la gauche du préfiltre pour les modèles F57B.
Ces filtres à charbon doivent être changés tous les 4 à 6 mois selon l’utilisation. Les commander à votre
installateur ou concessionnaire.
Au lieu d’éteindre l’épurateur d’air lorsque vous ne l’utilisez pas, pourquoi ne pas le laisser sur la plus petite vitesse I
( LO ). Le bénéfice de l’épuration sera complet.
peut être installé. Le filtre à charbon doit être
7 69-1161M
Page 10

F57A/B
NETTOYAGE DES CELLULES ELECTROSTATIQUES ET DES PREFILTRES
Les cellules et préfiltres de votre épurateur deviennent sales. Ceci peut réduire l’efficacité d’épuration. Afin
de maintenir l’efficacité, il est essentiel de nettoyer régulièrement ces composants.
Note : Pour certaines applications, le préfiltre ne peut être lavé, il doit être changé tous les 2 mois (suivant
l’occupation des locaux).
NETTOYAGE DES CELLULES
ATTENTION:
Lors des opérations de nettoyage des cellules électrostatiques, vous devez prendre des précautions afin
de ne pas vous blesser ou d’endommager les cellules, les lames de captage et les fils ionisants en
particulier, doivent être manipulés avec précaution. Eviter un contact prolongé de la peau avec le
produit de lavage, il est préférable de porter des gants en caoutchouc. Eviter les éclaboussures de
lessive dans les yeux.
• Couper l’alimentation électrique de l’appareil.
• Ouvrir le panneau d’accès en pressant les ergots. Laisser le panneau pendre verticalement.
• Libérer la cellule en tournant le taquet de blocage à 90°.
• Avec précaution, enlever la cellule des crochets de maintien placés dans le fond du chassis .
• Laisser tremper les cellules dans une solution d’eau très chaude et de lessive ménagère alcaline - suivant les
dosages préconisés - pendant 15 à 20 minutes, en agitant à plusieurs reprises les cellules dans ce bain (note :
certains détergents demandent un trempage plus long). Ne pas utiliser des détergents acides qui pourraient
corroder les cellules.
NE PAS UTILISER UN DETERGENT CONTENANT UN PRODUIT LUSTRANT QUI SE DEPOSERAIT SUR
LES CELLULES ET EN DIMINUERAIT LEUR EFFICACITE
• Sortir les cellules de la solution et les rincer dans de l’eau tiède propre. Répéter l’opération une deuxième fois.
• Essuyer avec précaution les fils d’ionisation à l’aide d’un chiffon humide.
• Laisser sécher complètement les cellules. Après le nettoyage des cellules, celles-ci peuvent être souillées.
- Si la souillure est noire ou très foncée, il s’agit probablement de résidus de saleté. Cela peut réduire
l’efficacité des cellules, nettoyer les de nouveau.
- Si la souillure est blanche, il s’agit probablement de résidus de détergent. Cela peut réduire l’efficacité des
cellules et éventuellement corroder les cellules. Rincer à nouveau.
- Si la souillure est marron ou jaune, il s’agit probablement de la fumée de tabac ou d’autres contaminants. Des
colorations de ce type n’affectent pas l’efficacité de l’épurateur d’air. Le re-nettoyage n’est pas nécessaire.
NETTOYAGE DES PREFILTRES SI LAVABLES
• Le préfiltre est placé en dessous du couvercle. Dépoussiérer à l’aide d’un aspirateur, d’une brosse ou en le
lavant. Si vous le lavez dans la même solution que celle des cellules, laver toutes les cellules avant de laver le
préfiltre car sinon tous les contaminants des préfiltres s’infiltreront dans les cellules.
REMONTAGE DES CELLULES ET DES PREFILTRES
• Avant de remonter les cellules, s’assurer que les fils ionisants n’ont pas été cassés ou que les lamelles n’ont pas
été tordues. Lorsque des lamelles se touchent les redresser afin d’éviter tous bruits de claquements.
Ne pas mettre en fonctionnement les cellules lorsque vous êtes en train de changer les fils ionisants. Si le fil
869-1161M
Page 11

F57A/B
ionisant cassé est situé au milieu des cellules, le remplacer par un des fils placés aux extrémités. Ceci
permettra que les cellules aient une efficacité raisonnable jusqu’au remplacement du fil endommagé.
• Lorsque vous replacez les cellules dans l’épurateur d’air, assurez vous que la flèche d’arrivée d’air située sur les
cellules est bien orientée en direction du ventilateur et que la plaque de contacts est bien en face des contacts
fixes.
• Poser les bords de la cellule sur les crochets de maintien.
• Utiliser les deux mains pour maintenir la cellule devant les contacts placés sur le chassis.
• Avec une main maintenir la cellule à côté du taquet de fermeture, bloquer la cellule en tournant ce taquet à 90°.
• Replacer le préfiltre sur le couvercle.
• Si vous avez installé, en option, un filtre à charbon actif, le remplacer. Vous trouverez des filtres neufs chez
votre concessionnaire. Attention: Ce filtre ne peut pas être lavé.
• Refermer le panneau d’accès. Vous entendrez un déclic au moment où les fixations se mettront en place.
ENTRETIEN
• Quelques vérifications doivent être effectuées avant d’appeler votre concessionnaire :
• Si le voyant ON (Marche) n’est pas allumé:
Vérifier que le couvercle est bien fermé car un interrupteur de sécurité maintient l’épurateur hors service.
• Si le voyant CHECK (Vérification) est allumé:
Ouvrir le couvercle, sortir les cellules ainsi que les préfiltres, refermer et remettre en route l’appareil. Si le
voyant ROUGE défaut ne s’allume plus, controler l’état des cellules: fils ionisants coupés ou lames de
captage en contact entre elles. Remplacer les fils et remettre en place les lames. Remonter les cellules et
les préfiltres et refermer le capot. Si le défaut persiste consulter votre revendeur.
• Quelques modèles ont le voyant WASH (Nettoyage). Si il s’allume:
Vérifier que les cellules sont correctement placées dans l’épurateur d’air. Laver les cellules et les préfiltres (si
lavables). Epousseter les fils ionisants afin d’éliminer tous dépôts.
• Si les claquements (étincelles) sont trop fréquents:
Vérifier que les cellules n’ont pas de fils ionisants cassés ou des lames de captage métalliques tordues.
• Si vous sentez l’Ozone, la cause peut être les cellules neuves.
Le peu d’ozone que génère l’épurateur d’air pendant son
fonctionnement peut être plus important pendant les deux premières
semaines d’utilisation, jusqu’à ce que les cellules soient rodées.
L’utilisation normale et le premier nettoyage enlève généralement cette
odeur. Cependant si l’odeur d’ozone persiste et devient désagréable,
vous avez deux solutions pour remédier à cette situation :
-
Ouvrir le couvercle d’accès et
“LO”. Ceci réduit l’efficacité d’épuration de 5 à 15% suivant la vitesse de
débit.
- Installer un filtre à charbon actif (en option).
commuter le bouton sur la position
• Si votre épurateur d’air ne fonctionne toujours pas correctement, consulter votre installateur ou votre
concessionnaire.
9 69-1161M
Page 12

F57A/B
Benvenuti...
...nel mondo dei depuratori d’ aria ad alta efficienza. Il depuratore elettrostatico Honeywell fa esattamente quello che
il suo nome suggerisce: rimuove dall’aria fumo di tabacco, polvere, polline e la maggioranza degli altri contaminanti
che causano l’inquinamento dell’aria in ambiente chiuso. Il depuratore elettrostatico Honeywell vi permetterà di
godere dei benefici dell’aria pulita per gli anni a venire.
Il depuratore d’ aria segue tutte le Direttive Europee.
FUNZIONAMENTO DEL DEPURATORE D’ ARIA F57
Il depuratore d’ aria elettrostatico ha una o due celle in funzione del modello. Queste istruzioni sono valide per tutti i
modelli. Per seguire le istruzioni fare riferimento al diagramma posto nella pagina interna della copertina di questo
libretto.
Conservate il libretto per future consultazioni.
Premendo HI avrete la massima velocità - 1500 m³/h
per i modelli F57A e 780 m³/h per i modelli F57B. Il
depuratore è attivato premendo il pulsante sul display,
con la velocità desiderata: LO, MED, or HI .
La spia “ON” si accende quando il depuratore è in
funzione.
Per spegnere il depuratore premete il pulsante “OFF”
sulla centralina. Il ventilatore, la spia “ON” e la
corrente si spegneranno.
Un comando remoto a muro è un optional con il
nostro depuratore. Questo è collegato via cavi al
depuratore ed è ottenibile presso il vostro installatore
o rivenditore.
1069-1161M
Page 13

OTTENERE IL MASSIMO DAL VOSTRO DEPURATORE ELETTRONICO
Il depuratore vi tiene informati sul suo funzionamento. Le informazioni sono fornite da luci sul display .
La luce gialla indica che il depuratore funziona
correttamente. Un occasionale ‘schiocco’ conferma
che esso sta funzionando normalmente. Premete il
pulsante “test” per sentire lo “schiocco”. La spia
“CHECK” si accende non appena premete “TEST”.
Se la spia “CHECK” resta accesa permanentemente,
questo indica che il depuratore ha un guasto.
Normalmente si tratta di un guasto all’alimentazione
di corrente, ma ci sono alcuni controlli che potete fare
prima di chiamare l’installatore.
F57A/B
Alcuni modelli sono provvisti di una segnale luminoso
“WASH”. Questo indica che la cella è sporca e che la
sua efficienza è diminuita così tanto da non poter
funzionare correttamente. La cella deve essere lavata
per poter funzionare come prima. Se questa luce è
accesa ma la cella non è sporca, andate alla sezione
“Controlli di Servizio” prima di chiamare l’installatore.
Un filtro attivato al carbonio può essere installato per controllare gli odori. Questo filtro è installato all’interno del
coperchio vicino al prefiltro. I modelli F57A hanno due filtri al carbonio su entrambi i lati del prefiltro, mentre i
modelli F57B hanno un unico filtro a carbonio sul lato sinistro del prefiltro. I filtri al carbonio devono essere cambiati
di media ogni 6 mesi, relativamente all’uso. Possono essere acquistati presso il vostro installatore o rivenditore.
Invece di spegnere il depuratore quando non è utilizzato, perchè non lasciarlo acceso a bassa velocità? Questo
assicurerà massima efficienza nella depurazione dell’aria.
11 69-1161M
Page 14

F57A/B
PULIZIA DELLA CELLA ELETTROSTATICA E DEL PREFILTRO
Il depuratore è concepito in modo tale da funzionare anche quando la cella non è in condizioni perfette. Tuttavia,
poichè la cella e il prefiltro depurano l’aria, diventano sporchi e questo può ridurre l’efficienza. Per
mantenerla, è essenziale che la cella e il prefiltro siano lavati regolarmente.
LAVAGGIO DELLA CELLA
ATTENZIONE
Quando lavate la cella elettrostatica abbiate cura di muoverla senza danneggiarla e senza farvi male.
Le piastre ed i fili ionizzanti in particolare devono essere maneggiati con cura. Evitate prolungati
contatti della pelle con il detersivo e prevenite danni alle vostre mani usando guanti di gomma
protettivi durante il lavaggio della cella. Evitate assolutamente il contatto della soluzione con gli occhi.
• Isolare il depuratore dall’alimentazione elettrica.
• Aprite il coperchio premendo i ganci di apertura. Fare pendere il coperchio nella posizione
verticale.
• Sostenendo la cella con una mano, ruotate la chiusura di 90°.
• Abbassate piano la cella sino a che il piano di contatto sia rimosso dall’intelaiatura.
• Alzate la cella rimuovendola dai ganci di supporto .
• Togliere lo sporco dalla cella immergendola in una soluzione di detersivo domestico per lavastoviglie od una
analoga a base alcalina da 15 a 20 minuti, agitando ogni tanto la soluzione. (Fare attenzione che per alcuni
detersivi è raccomandato un lavaggio di maggiore durata). Non usate detersivi a base acida perchè questi
corrodono la cella. Diluite il detersivo secondo le istruzioni del fornitore.
NON USATE ADDITIVI CHE DANNO LUCENTEZZA ALLA CRISTALLERIA NELLE
LAVASTOVIGLIE DOMESTICHE. QUESTO PUÒ RIDURRE L’EFFICIENZA DELLA CELLA ELETTROSTATICA.
• Togliere la cella dalla soluzione detergente e risciacquarla immergendola in acqua pulita. Risciacquarla più
volte.
• Pulire con cura i cavi ionizzanti con un panno umido.
-Attendere che la cella sia completamente asciutta - normalmente dopo due ore. Dopo il lavaggio la cella
può apparire occasionalmente macchiata.
-Se la macchia è nera o molto scura, ci sono probabilmente dei residui di sporco. Questo può ridurre
l’efficienza allora la cella deve essere lavata di nuovo.
-Se la macchia è bianca, probabilmente si tratta di un residuo di detersivo. Questo riduce l’efficienza e può
anche corrodere la cella. Risciacquatela di nuovo.
-Se la macchia è marrone o gialla, si tratta probabilmente di fumo di tabacco o altro sporco dell’ aria esterna.
Leggere scolorazioni di questo tipo non compromettono l’efficienza. Non è necessario rilavare la cella.
LAVAGGIO DEL PREFILTRO
• Il prefiltro si trova all’interno del coperchio di accesso. Rimuovere lo sporco accumulato aspirandolo,
spazzolandolo, o lavandolo. Se lavate il prefiltro nella stessa soluzione di detersivo usata per la cella, finite di
lavare la cella prima di iniziare, altrimenti la maggior parte degli inquinanti del prefiltro potrebbero rimanere
depositati sulla cella.
1269-1161M
Page 15

F57A/B
SISTEMAZIONE DELLA CELLA E DEL PREFILTRO
• Prima di ricollocare la cella esaminare se le placche di contatto si sono curvate o sono danneggiate, o se vi sono
rotture dei cavi ionizzanti. Questo deve essere fatto per evitare il rumore di scarica elettrica causato dal fatto che
le placche sono troppo vicine tra di loro. Le celle non devono essere usate senza aver tolto i cavi ionizzanti rotti.
Se il cavo rotto e’ nel centro della cella, lo si puo’ sostituire con uno di quelli alle estremità. Questo fa si che la
cella operi a efficienza ragionevolmente alta fino alla sostituzione fatta dal vostro installatore o dal centro
assistenza del rivenditore.
• Quando riponete la cella nel depuratore assicuratevi che la freccia indicante il flusso d’aria punti all’insù verso il
ventilatore e che il piano di contatto sia rivolto verso i terminali nel depuratore.
• Adagiate il bordo della cella sui ganci di sostegno.
• Usando entrambe le mani spingete la cella sino a quando il piano di contatto è a livello con l’intelaiatura.
• Sostenendo con una mano la cella vicino alla chiusura, ruotate quest’ultima di 90° per chiudere.
• Rimettete il prefiltro dietro la copertura d’accesso.
• Se necessario sostituite il filtro ai carboni attivi. Un nuovo filtro lo potete trovare dal vostro rivenditore locale. Il
filtro non deve essere lavato.
• Risollevate il coperchio di accesso per riportarlo nella posizione di chiusura. Dovete sentire uno scatto come
quello della porta di casa.
CONTROLLI DI SERVIZIO
Alcuni difetti possono essere controllati senza la necessità di chiamare il servizio assistenza del rivenditore.
• Se la spia “ON” non si accende....... Controllate che il coperchio di accesso sia chiuso e bloccato. Se il coperchio
non e correttamente chiuso un interruttore di sicurezza mantiene spento il depuratore.
• Se la spia “CHECK” è accesa....... Assicuratevi che la cella sia pulita e asciutta. Controllate che i cavi
ionizzanti non siano danneggiati o cortocircuitati.
• Alcuni modelli hanno una indicatore spia “WASH”. Se questo si accende....... Controllate che la cella sia
perfettamente collocata nel depuratore. Lavate la cella ed il prefiltro. Pulite i cavi ionizzanti per rimuovere ogni
rimanenza di depositi.
• Se il depuratore rilascia molto frequentemente un rumore di scarica elettrica....... La cella può essere bagnata
dopo il lavaggio. Spegnete il depuratore per due ore per asciugarlo. Controllate la cella per verificare i cavi
ionizzanti rotti o la curvatura delle placche di collegamento.
• Se sentite odore di ozono, questo può essere dovuto al fatto che la cella è nuova. La piccola percentuale di
ozono prodotta quando il depuratore è in funzione può essere più alta del normale durante le prime due
settimane di operazione, fino a che la cella non sia “bruciata dentro”. L’uso
normale ed il primo lavaggio normalmente tolgono questo odore. Se,
tuttavia, continua ad esserci uno spiacevole odore di ozono, una o due
operazioni possono rimediare alla situazione.
- Aprite il coperchio di accesso e ruotate l’interruttore di performance
alla posizione “LO”. Notate che questo riduce l’efficienza di pulizia tra il 5 e
il 15%, in funzione della velocità del ventilatore.
- Installate il filtro a corboni attivi facoltativo.
• Se il depuratore continua a non funzionare correttamente consultate l’ installatore o il centro assistenza
del rivenditore.
13 69-1161M
Page 16

F57A/B
Bienvenidos...
...al mundo de la alta eficacia en filtrado de aire. El filtro de aire electrónico realiza exactamente lo que su nombre
sugiere - elimina del aire el humo del tabaco, polvo, polen y la gran mayoría de otros elementos que pueden
contaminar el aire de un local. Con este filtro de aire electrónico de Honeywell puede estar seguro de que disfrutará
de los beneficios de un aire limpio durante muchos años.
El filtro de aire cumple todas las Directivas vigentes de la UE.
FUNCIONAMIENTO DEL FILTRO DE AIRE F57
Dependiendo del modelo, el filtro de aire electrónico posee una o dos células. Estas instrucciones son aplicables a
todos los modelos.
Para seguir las instrucciones debe consultarse el diagrama del interior de la solapa delantera de este folleto.
Le rogamos conserve este folleto.
El filtro de aire se enciende presionando el interruptor
de flujo/ velocidad deseado en el panel - LO, MED o
HI . Seleccionando la velocidad HI se obtiene el
máximo de circulación - 1.500 m3/h en los modelos
F57A y 780 m3/h en los modelos F57B.
El indicador “ON” debe estar encendido siempre que
el filtro esté funcionando.
Para apagar el filtro, presione el botón “OFF” del
alimentador. El ventilador, el alimentador de alto
voltaje y el indicador ON se apagarán
simultáneamente.
La unidad de control remoto de pared está
disponible como una opción para controlar el filtro de
aire. La unidad está conectada al filtro. Se puede
solicitar como una pieza extra.
1469-1161M
Page 17

COMO OBTENER EL MAXIMO RENDIMIENTO DEL FILTRO DE AIRE ELECTRONICO
El filtro de aire proporciona información sobre sus condiciones de funcionamiento por medio de indicadores
luminosos en el panel .
La luz amarilla “ON” indica que el filtro funciona
correctamente. El filtro produce un crujido ocasional
que confirma que funciona con normalidad. Presione
el interruptor “TEST” para escuchar el crujido. La
luz “CHECK” se encenderá cuando se presione el
interruptor TEST.
La luz roja de comprobación “CHECK” encendida
permanentemente, indica que existe algún fallo.
Habitualmente, señala un fallo en el alimentador pero
se pueden hacer dos comprobaciones antes de
llamar al servicio de mantenimiento (consultar la
última sección de Comprobaciones de
Funcionamiento).
F57A/B
Algunos modelos disponen de una luz de lavado
“WASH”. Esta luz indica que la célula de limpieza
tiene polvo y que su nivel de rendimiento ha
disminuido por debajo de los límites aceptables. La
célula debe ser lavada para recuperar su nivel de
rendimiento. Si la luz está encendida pero la célula
no está sucia, consulte la sección de
Comprobaciones de Funcionamiento antes de llamar
al servicio de mantenimiento.
Se puede instalar un filtro de carbón activo para controlar los olores. Los modelos F57A disponen de dos filtros
de carbón, uno a cada lado del prefiltro, mientras que los modelos F57B tienen solamente un filtro de carbón
situado en el lado izquierdo del prefiltro. Los filtros de carbón deben cambiarse aproximadamente cada seis
meses, dependiendo de su uso. Para solicitarlos, contacte con su instalador.
En lugar de apagar el filtro de aire cuando no está siendo utilizado ‘, ¿por qué no dejarlo funcionando en la posición
LO?. Esto asegurará un máximo en la limpieza del aire.
15 69-1161M
Page 18

F57A/B
LIMPIEZA DE LA CELULA ELECTRONICA Y DEL PREFILTRO
El filtro de aire está diseñado para adaptarse a las más diversas codiciones atmosféricas. Sin embargo, a medida
que limpia el aire, la célula y el prefiltro se ensucian. Esto puede reducir el nivel de rendimiento. Para
mantener la eficacia del filtro de aire es esencial lavar la célula y el prefiltro regularmente.
LAVADO DE LA CELULA
ATENCION
Cuando se maneja la célula electrónica debe tenerse cuidado de no dañarla o de recibir daños
personales. Las placas colectoras de metal, y los hilos ionizadores en particular, deben manejarse con
cuidado. Evite un contacto prolongado de la piel con el detergente y utilice guantes de goma durante el
lavado para evitar lesiones. Tenga cuidado de que la solución detergente no entre en los ojos.
• Desconecte el aparato de la red eléctrica.
• Abrir la cubierta presionando sobre los pestillos de apertura. Coloque la cubierta en posición vertical.
• Manteniendo la célula con una mano, girar el pestillo 90°.
• Bajar cuidadosamente la célula hasta que los bordes estén fuera del marco.
• Despegue la célula de los enganches .
Elimine la suciedad de la célula, sumergiéndola de 15 a 20 minutos en una solución caliente de detergente
doméstico o similar, alcalino, agitándola varias veces. (Tenga en cuenta que algunos detergentes recomiendan
una inmersión durante períodos de tiempo más largos). No utilice detergentes ácidos ya que corroerían la
célula. Diluya el detergente según las especificaciones del fabricante.
NO UTILICE ABRILLANTADOR DE CRISTAL PARA LAVAVAJILLAS DOMESTICOS, YA QUE REDUCIRIA LA
EFICIENCIA DE LA CELULA ELECTRONICA.
• Saque la célula del detergente y aclárela antes de introducirla en agua limpia. Aclárela de nuevo y repita la
operación.
• Pase cuidadosamente un paño húmedo por los hilos ionizadores.
• Deje secar completamente la célula - 2 horas aproximadamente. A veces, después de limpiar la célula puede
dar la sensación de que está manchada.
- Si la mancha es negra o muy oscura, posiblemente se trate de residuos de suciedad. Esto puede reducir
su eficiencia y deberá lavarse de nuevo.
- Si la mancha es blanca, probablemente sean residuos de detergente. Esto reduce la eficiencia y puede
además corroer la célula. Aclárela de nuevo.
- Si la mancha es marrón o amarilla, probablemente sea humo de tabaco u otro contaminante. Una
decoloración moderada de este tipo no afecta la eficiencia del filtro de aire. No es necesario volver a
lavarla.
LIMPIEZA DEL PREFILTRO
• El prefiltro está situado dentro de la cubierta. Quite la suciedad acumulada en el prefiltro con un aspirador o
cepillo, lavándolo a continuación. Si se lava en la misma solución detergente que la célula, lave TODAS las
células antes que el preliltro, ya que, en caso contrario, las células recogerían la contaminación del prefiltro.
1669-1161M
Page 19

SUSTITUCION DE LA CELULA Y EL PREFILTRO
• Antes de reemplazar la célula, deberá realizarse una inspección visual para comprobar que no haya hilos
ionizadores rotos o placas colectoras dobladas o estropeadas. Las placas dobladas o deformadas pueden
volverse a desdoblar. Esto debe hacerse para evitar el ruido de la formación de arcos causado por la excesiva
proximidad de las placas. NO utilice las células hasta que los hilos ionizadores rotos hayan sido retirados. Si el
hilo roto está en el medio de la célula, sustitúyalo con uno de los hilos de los extremos. Esto garantizará el
funcionamiento de la célula con una eficiencia razonablemente alta, hasta que se obtenga un repuesto del
instalador o distribuidor.
• Cuando reemplace la célula del filtro, asegúrese de que la flecha del flujo está orientada hacia arriba en
dirección al ventilador y que los bordes estén en contacto con las terminales del filtro de aire.
• Afloje los bordes de la célula en los enganches.
• Con las dos manos, gire la célula hasta que los bordes estén al mismo nivel que el marco.
• Manteniendo la célula con una mano cerca del pestillo, gire este 90° grados hasta cerrarlo
• Reemplace el prefiltro en la cubierta.
F57A/B
• Si es necesario, cambie el filtro de carbón activado. Es posible obtener recambios en el distribuidor local.
Este filtro no puede lavarse.
• Vuelva a colocar la cubierta en la posición de cierre. Notará un click cuando quede encajada.
COMPROBACIONES DE MANTENIMIENTO
Algunos fallos pueden subsanarse sin necesidad de avisar al servicio técnico.
• Si el piloto de espera no se enciende.... Compruebe que la cubierta está cerrada y bien encajada. En caso
contrario, un interruptor de seguridad mantendrá apagado el filtro de aire.
• Si la luz de comprobación “CHECK” se enciende.... Asegúrese de que la célula está limpia y seca. Compruebe
si existen hilos ionizadores dañados o en cortocircuito.
• Algunos modelos disponen de una luz de lavado “WASH”. Si se enciende..... Compruebe que la célula está
adecuadamente colocada en el filtro de aire. Lave la célula y el prefiltro. Limpie cuidadosamente con un paño
los hilos ionizadores para eliminar toda la suciedad.
• Si el filtro de aire emite sonidos de arco frecuentemente.... La célula puede estar todavía húmeda después de
lavarla. Apague el filtro de aire durante un par de horas para que se seque. Compruebe la célula por si hubiese
hilos ionizadores rotos o placas colectoras dobladas.
• Si nota olor a ozono, podría ser debido a que la célula es nueva. La pequeña cantidad de ozono producida
cuando el filtro de aire está funcionando puede ser superior a la normal durante la primera o segunda semana
de operación, hasta que la célula consigue su estado de funcionamiento normal. Este olor suele desaparecer
con el uso normal y el primer lavado. Sin embargo, si el olor a ozono
persiste, la situación puede remediarse con una de las dos acciones
siguientes:
- Abra la cubierta y cambie el Conmutador de Rendimiento a la
posición “LO”. Tenga en cuenta que esto reducir la eficiencia de filtrado
entre un 5 y un 15%, dependiendo de la velocidad del flujo de aire.
- Instale los filtros de carbón activado opcionales.
• Si el filtro de aire sigue sin funcionar correctamente, consulte con el instalador o distribuidor.
17 69-1161M
Page 20

F57A/B
Willkommen...
...in der Welt der hochleistungsfähigen Luftreiniger.
Der Honeywell elektrostatische Luftreiniger hält genau das, was sein Name verspricht - er reinigt die Luft von
Tabakrauch, Pollen und den in der Luft am meisten verbreiteten Schmutzpartikeln. Mit diesem Gerät können Sie
saubere, gesunde Luft über Jahre hinweg genießen.
Und er erfüllt auch alle EU-Richtlinien.
Gebrauchsanleitung für den F57 Luftreiniger
Ihr Honeywell elektrostatischer Luftreiniger hat, je nach Modell, eine oder zwei elektrostatische Filterzellen.
Diese Gebrauchsanweisung gilt für alle F57 Modelle.
Für nachstehende Gebrauchsanweisung benutzen Sie das Schaubild auf der Innenseite der Bedienungsanleitung.
Bitte bewahren Sie diese Bedienungsanleitung sorgfältig auf.
Der Luftreiniger wird bedient durch Drücken des
gewünschten Luftgeschwindigkeitknopfes auf der
Display-Leiste LO, MED oder HI . Durch Drücken
der “HI”-Taste erreichen Sie die höchste Stufe der
Luftgeschwindigkeit - 1.500 m³/h für das Modell F57A
und 780 m³/h für das Modell F57B.
Die “ON”-Anzeige muß immer brennen, wenn der
Luftreiniger in Betrieb ist.
Um den Luftreiniger auszuschalten drücken Sie die
“OFF”-Taste. Der Ventilator, die
Hochspannungseinheit und die “ON”-Anzeige
schalten sich aus.
Der Luftreiniger kann auch von einer Wandtastatur
über Verbindungskabel bedient werden. Die
Wandtastatur können Sie als Zubehör über Ihren
Installateur oder Händler bestellen.
1869-1161M
Page 21

F57A/B
Die optimale Nutzung des elektrostatischen Luftreinigers
Der Honeywell elektrostatische Luftreiniger informiert Sie durch die Leuchten auf der Display-Leiste über seinen
Betriebszustand.
Die GELBE ‘ON’- Anzeige zeigt an, daß der
Luftreiniger einwandfrei arbeitet.
Ein gelegentliches Knackgeräusch kann aus dem
Luftreiniger kommen. (Dies nennt man
Hochspannungsfunkenüberschlag). Es bestätigt, daß
der Luftreiniger normal arbeitet. Drücken Sie den
“TEST” - Knopf um dieses Knackgeräusch zu
hören. Die “CHECK” - Anzeige leuchtet auf, wenn der
“TEST” - Knopf gedrückt ist.
Wenn die ROTE “CHECK” - Anzeige permanent
aufleuchtet, ist dies ein Hinweis, daß eine Störung
aufgetreten ist. Bevor Sie Ihren Service-Händler
anrufen, können Sie selbst einige
Fehlermöglichkeiten kontrollieren (siehe Abschnitt
Service-Kontrolle). Fehler an der internen
Stromversorgung erfordern den Einsatz von
Fachpersonal.
Einige Modelle sind mit einer “WASH” - Anzeige
ausgerüstet. Diese Anzeige zeigt, daß die
elektrostatische Filterzelle verschmutzt ist und somit
nicht mehr optimal arbeitet. Die Filterzelle muß
gewaschen werden um den optimalen Wirkungsgrad
zu gewährleisten. Wenn die Anzeige brennt aber die
Filterzelle nicht verschmutzt ist siehe Abschnitt
“Service-Kontrolle” bevor Sie Ihren Service-Händler
anrufen.
Ein Aktivkohlefilter kann zusätzlich nachgeschaltet werden um Gerüche und Gase zu absorbieren. Neben dem
Vorfilter ist eine Fürungsschiene für den Aktivkohlefilter vorgesehen.
Modell F57A braucht zwei Aktivkohlefilter, jeweils einen auf der rechten und einen auf der linken Seite des Vorfilters.
Modell F57B braucht einen Aktivkohlefilter, welcher auf der linken Seite des Vorfilters sitzt. Aktivkohlefilter müssen
regelmäßig, mindestens alle 6 Monate -abhängig von der Nutzung des Luftreinigers-, gewechselt werden. Neue
Aktivkohlefilter sind bei Ihrem örtlichen Honeywell-Händler erhältlich. Beachten Sie, daß dieser Aktivkohlefilter
NICHT gewaschen werden kann.
Statt auszuschalten können Sie auch den Luftreiniger auf “LO” schalten. Dieser Vorteil wird eine dauerhafte
maximale Luftreinigung sicherstellen.
Achtung: Vor Öffnen des Gerätes, Versorungsspannung ausschalten.
19 69-1161M
Page 22

F57A/B
Reinigung der elektrostatischen Filterzelle und des Vorfilters
Durch die Reinigung der Luft sammelt sich in der Filterzelle und im Vorfilter des Luftreinigers Schmutz.
Dies bewirkt eine Verringerung des Wirkungsgrades. Um immer einen gleichmäßigen Wirkungsgrad zu erhalten, ist
es wichtig, die Filterzelle und den Vorfilter regelmäßig zu reinigen.
Reinigen der Zelle
Achtung:
Die elektrostatischen Filterzellen sollten vorsichtig gewaschen werden, um eine Beschädigung der
Filterzelle oder eine Verletzung Ihrerseits zu vermeiden. Die Kollektorplatten und Ionisationsdrähte
müssen mit besonderer Sorgfalt behandelt werden.
Tragen Sie Gummihandschuhe beim Reinigen der Filterzelle, um längerem Hautkontakt mit dem
Reinigungsmittel und Verletzungen Ihrer Hand vorzubeugen.
Die Waschmittellösung darf nicht in die Augen gelangen.
• Schalten Sie den Luftreiniger vom Netz ab.
• Öffnen Sie das Zugangsgitter
unten in die vertikale Position.
• Die elektrostatische Filterzelle ist mit einer Hand in der Nähe des Riegels zu halten und der Riegel um 90° in die
geöffnete Stellung zu schieben.
• Die elektrostatische Filterzelle ist mit beiden Händen zu halten und sorgfältig herunterzuschwenken, bis die
Kontaktplatte vom Rahmen frei ist.
• Die elektrostatische Filterzelle ist aus den Haken herauszuheben .
Entfernen Sie den Schmutz von der Filterzelle durch ca. 15- bis 20- minütiges Eintauchen in einer heißen Lauge mit
Haushaltsspülmittel oder ähnlichen alkalischen Reinigungsmittel, und drehen Sie die elektrostatische Filterzelle
dabei mehrmals herum. Verdünnen Sie das Reinigungsmittel nach Angabe des Herstellers.
GEBRAUCHEN SIE KEINE ZUSÄTZE, DIE FÜR DIE GLANZPÜLUNG VON GLÄSERN IN
GESCHIRRSPÜLMASCHINEN GEDACHT SIND. DIES BEEINTRÄCHTIGT DIE LEISTUNGSFÄHIGKEIT DER
ELEKTROSTATISCHEN FILTERZELLE.
• Nehmen Sie die elektrostatische Filterzelle aus der Lauge und spülen Sie die Filterzelle in sauberem, heißen
Wasser und wiederholen Sie gegebenenfalls den Vorgang.
• Wischen Sie die Ionisationsdrähte vorsichtig mit einem feuchten Tuch ab.
• Die Zelle trocknen lassen (Dauer ca. 2 Stunden). Nach dem Reinigen können auf der Filterzelle Flecken
auftreten.
− bei schwarzen oder sehr dunklen Flecken können noch Schmutzrückstände in der Filterzelle sein. Dies
verringert den Wirkungsgrad, sie sollte noch einmal gewaschen werden.
− bei weißen Flecken können noch Reinigungsmittelrückstände in der Filterzelle sein. Dies bewirkt ebenfalls eine
Verringerung des Wirkungsgrades und kann zur Korrosion führen. Deshalb sollte sie noch einmal gespült werden.
− bei braunen oder gelben Flecken könnten es Tabakrauch oder andere Schmutzpartikel sein. Geringe
Verfärbungen dieser Art beeinträchtigen den Wirkungsgrad des Luftreinigers nicht. Nochmaliges Waschen ist
nicht erforderlich.
durch Drücken der Verriegelungsknöpfe. Klappen Sie das Zugangsgitter nach
2069-1161M
Page 23

F57A/B
Reinigen des Vorfilters
• Der Vorfilter befindet sich im Zugangsgitter. Entfernen Sie den angesammelten Schmutz vom Vorfilter durch
Absaugen, Bürsten oder Waschen. Sollten Sie den Vorfilter in der gleichen Reinigungsmittellösung wie die
Filterzelle reinigen, reinigen Sie zuerst alle Filterzellen, bevor Sie die Vorfilter reinigen, da sonst die größeren
Schmutzpartikel aus dem Vorfilter in den Filterzellen hängen bleiben.
Wiedereinsetzen der Zelle und des Vorfilters
• Bevor Sie die Filterzellen wieder einsetzen, überzeugen Sie sich, daß keine Kollektorplatten verbogen oder
beschädigt bzw. ein Ionisationsdraht gebrochen ist. Verbogene oder verzogene Kollektorplatten sollten wieder in
die alte Form gebracht werden, da sonst zu laute Knackgeräusche entstehen können. Benutzen Sie keine
Filterzellen mit gebrochenen Ionisationsdrähten; diese müssen erst ersetzt werden. Sollte in der Mitte der
Filterzelle ein gebrochener Draht sein, können Sie ihn durch einen äußeren Draht ersetzen. So erreichen Sie
einen vernünftigen Wirkungsgrad der Filterzelle, bis eine Reparatur durch Sie oder Ihren Installateur oder
Servicehändler erfolgen kann.
• Beim Wiedereinsetzen der Filterzelle in das Gerät beachten Sie den Luftrichtungspfeil (auf der Filterzelle). Er
muß in Richtung Ventilator zeigen und die Kontaktplatte auf der Filterzelle muß sich auf der Seite befinden, wo
der Kontaktanschluß im Luftreiniger ist. (Die beiden Kontaktplatten müssen sich nach Einsetzen der Filterzelle
berühren).
• Einfach die Kante der elektrostatischen Filterzelle in die vorgesehenen Filterzellenhaken einhängen.
• Benutzen Sie beide Hände um die Filterzelle in das Gerät zu schwenken bis die Kontaktplatte sich auf der Ebene
mit dem Rahmen befindet.
• Mit einer Hand die elektrostatische Filterzelle in der Nähe des Riegels festhalten und zum Schließen den Riegel
um 90° drehen.
• Plazieren Sie den Vorfilter in dem Zugangsgitter.
• Wenn es nötig sein sollte, wechseln Sie den Aktivkohlefilter bei Bedarf aus. Neue Aktivkohlefilter sind bei Ihrem
örtlichen Honeywell-Händler erhältlich. Beachten Sie, daß dieser Filter NICHT gewaschen werden kann.
• Schließen Sie das Zugangsgitter. Sie sollten einen Klick hören, wenn die Klammern einrasten.
Service-Kontrolle
Einige Fehler können behoben werden, ohne daß gleich der Service-Händler angerufen werden muß.
• Wenn die “ON”-Anzeige nicht aufleuchtet...Überprüfen Sie ob das Zugangsgitter fest verschlossen und
eingerastet ist. Ist dies nicht der Fall, verhindert ein Sicherheitsschalter, daß der Luftreiniger arbeitet. Überprüfen
Sie weiterhin, ob der Netzstecker richtig eingesetzt ist.
• Wenn die “CHECK”-Anzeige aufleuchtet...Stellen Sie sicher, daß die Filterzelle sauber und trocken ist.
Überprüfen Sie die Filterzelle auf Beschädigung oder gebrochene Ionisationsdrähte.
• Einige Modelle haben eine “WASH”-Anzeige. Wenn diese brennt...Überprüfen Sie ob die Filterzelle korrekt in den
Luftreiniger eingesetzt worden ist. Reinigen Sie erneut die Filterzelle und Vorfilter. Wischen Sie die
Ionisationsdrähte feucht ab, um zurückgebliebene Rückstände zu beseitigen.
21 69-1161M
Page 24

F57A/B
• Zu häufiges Knacken des Luftreinigers...Die Filterzelle ist noch zu naß vom Waschen. Schalten Sie den
Luftreiniger zum Trocknen der Filterzelle aus. Überprüfen Sie die FIlterzelle auf gebrochene Ionisationsdrähte
oder verbogene Kollektorplatten.
• Sollten Sie den Geruch von Ozon wahrnehmen, kommt dies von der neuen Filterzelle. Der geringe Anteil des
durch den Luftreiniger produzierten Ozons ist in den ersten 1-2 Wochen nach Inbetriebnahme höher als
gewöhnlich, nimmt aber im Laufe der Zeit ab, sobald die Filterzelle “eingebrannt“ ist. Dieser Geruch verflüchtigt
sich durch den tagtäglichen Gebrauch und nach der ersten Reinigung der Filterzelle. Sollte trotzdem ein
unangenehmer Ozongeruch zurückbleiben, gibt es 2 weitere Möglichkeiten, um der Situation Abhilfe zu schaffen:
- Öffnen Sie den Gehäusedeckel und bringen Sie den
Leistungsstufen-Schalter in die Position “LO“. Dies wird den
Wirkungsgrad - abhängig von der Luftgeschwindigkeit - um 5 bis
15 % reduzieren.
- Installieren Sie gleichzeitig einen zusätzlich lieferbaren
Aktivkohlefilter.
Sollte der Honeywell elektrostatische Luftreiniger noch immer nicht zu Ihrer Zufriedenheit arbeiten, so rufen Sie Ihren
Installateur oder Service-Händler an.
2269-1161M
Page 25

Page 26

Honeywell Control Systems Limited
Newhouse Industrial Estate
Motherwell ML1 5SB
United Kingdom
69-1161M 10-97 www.honeywell.com/yourhome
Printed in U.S.A. on recycled
paper containing at least 10%
post-consumer paper fibers.
 Loading...