

Page 1
DFS8M - Installation Instructions
Wireless Optical Smoke Sensor with sounder
Introduction
The DFS8M is a wireless smoke
sensor designed for Domonial 7 and
7G panels. It features a sounder
for local signaling of alarms and is
used as an early warning device.
Smoke alarm location
A single smoke sensor will give some
protection if it is properly installed, but
DFS8M
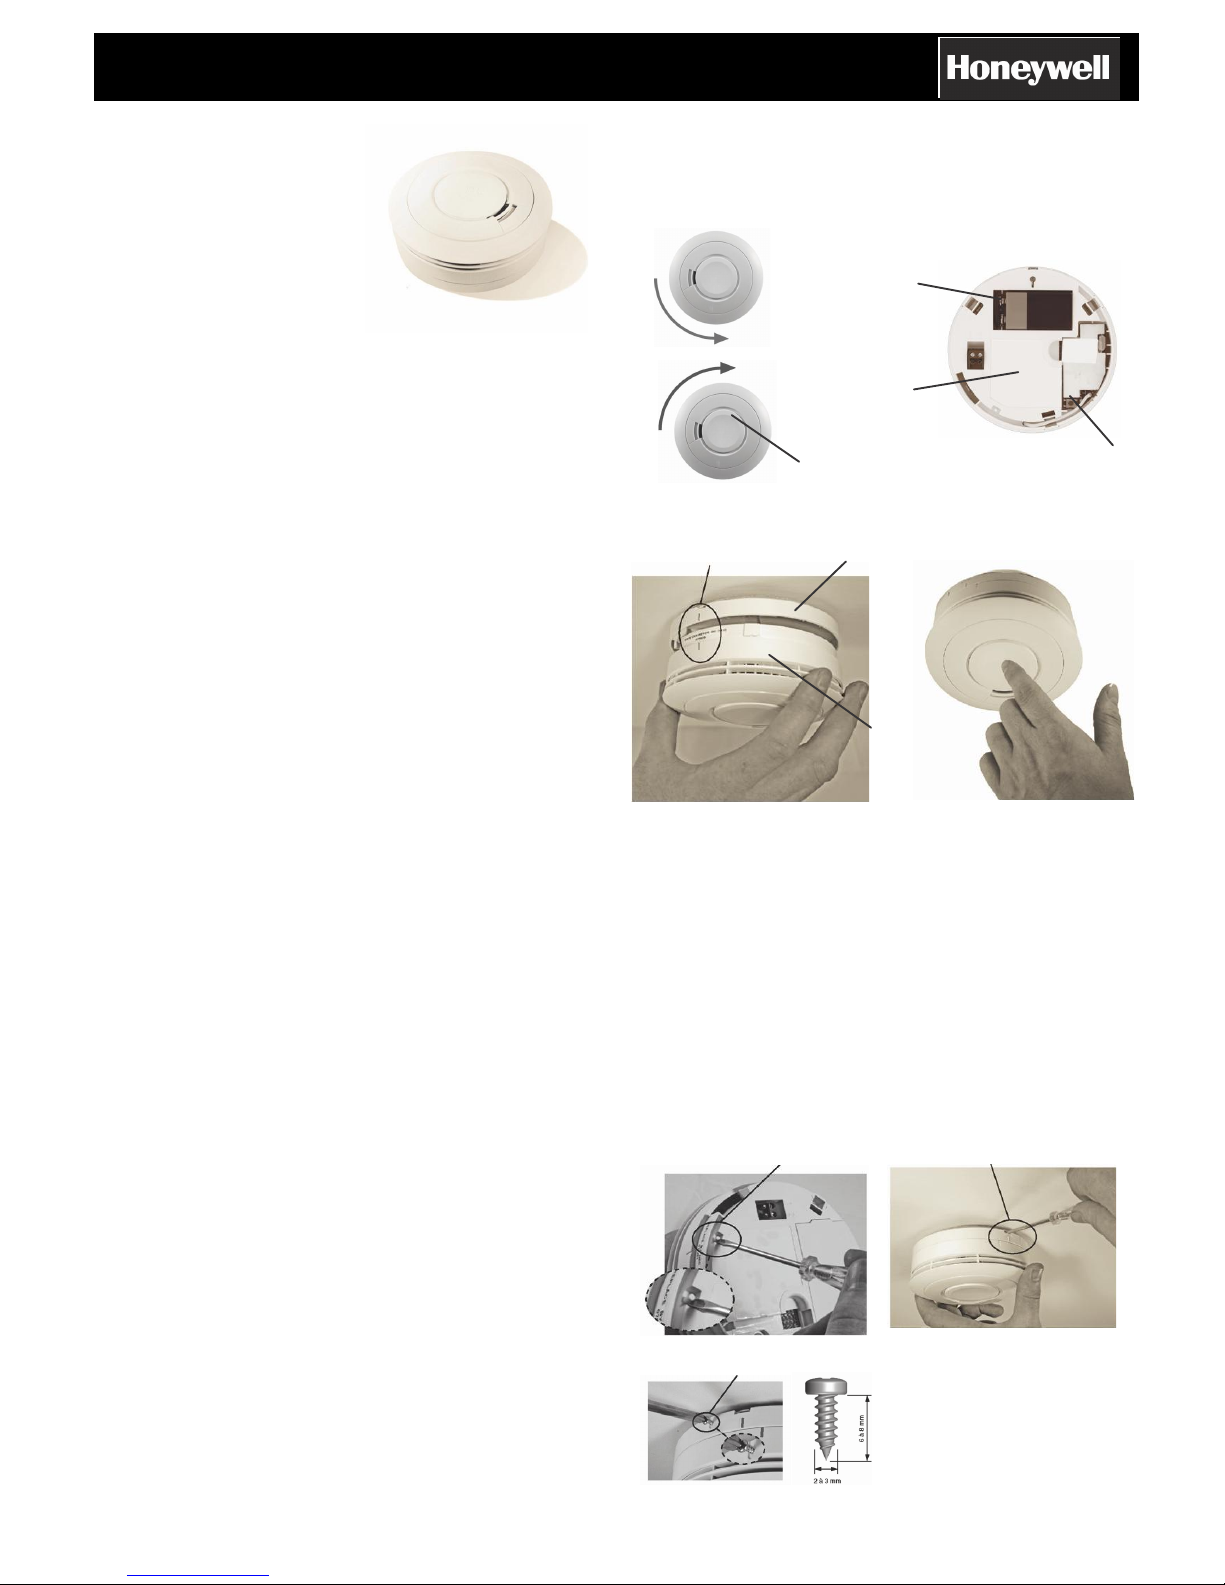
5. Connect the battery to the battery snaps as shown in Figure 2
6. Register the device to the control panel by pressing the radio button (see
registration paragraph)
7. Carefully line up the unit on the base, using the marks, and twist on as
shown in Figure 3, then twisting it in a clock- wise direction (see Figure 1b).
8. Press the Test button to ensure that the alarm works as shown in Figure 4.
Battery snaps
most homes will require two or more to ensure that a reliable early
warning is given. For recommended protection, put one smoke sensor in
all rooms (apart from kitchen and bathroom) where fire is most likely to
break out.
If only one smoke sensor is installed, it should be located between the
sleeping area and the most likely sources of fire (living room, corridor for
example), but it should not be more than 7,5 meters from the door to any
room where a fire may start and block your escape from the house. Make
sure that it can be heard loudly enough in the bedroom to wake someone.
If your home has more than one floor, at least one Smoke Sensor should
be fitted on each level.
If the premise is one storey you should put your first Smoke Alarm in a
corridor or hallway between the sleeping and living areas. Place it as near
to the living area as possible, but make sure that it can be heard loudly
enough in the bedroom to wake someone.
Smoke alarm positioning
Figure 1a
Smoke Sensor
base
Test button
Figure 2
Figure 1b
Line
up
marks
on base &
cover
&
rotate to click on Mounting plate
Radio button
Smoke rises towards the ceiling, then spreads out horizontally,
therefore the ideal place to fix the sensor is in the middle of the room.
When installing smoke alarms keep at least 30cm from walls and corners.
Additionally, mount the unit at least 30cm from any light fitting or
decorative object which might prevent smoke or heat entering the Smoke.
With a sloping or peaked ceiling install a Smoke Alarm within 60cm of the
peak (measured vertically). If this height is less than 60cm for Smoke
Alarms the ceiling is regarded as being flat.
Locations to avoid
Smoke head
• Bathrooms, kitchens, shower rooms, garages or other rooms where the
smoke sensor may be triggered by steam, condensation, normal smoke
or fumes. Keep at least 6 meters away from sources of normal
smoke/fumes.
• Locate away from very dusty or dirty areas as dust build-up in the
chamber can impair performance. It can also block the insect screen
mesh and prevent smoke from entering the smoke detector chamber.
• Do not locate in insect infested areas. Small insects getting into the
smoke detector chamber can cause intermittent alarms.
• Places where the normal temperature can exceed 40°C or be below 0°C
(e.g. attics, furnace rooms, directly above ovens or kettles etc.) as the
heat/steam could cause nuisance alarms.
• Near a decorative object, door, light fitting, window moulding etc., that
may prevent smoke or heat from entering the Alarm.
• Surfaces that are normally warmer or colder than the rest of the room
(e.g. attic hatches). Temperature differences might stop smoke or heat
from reaching the unit.
• Next to or directly above heaters or air conditioning vents, windows, wall
vents etc. that can change the direction of airflow.
Tamperproofing the Alarms
The smoke head can be made tamperproof to prevent unauthorised removal.
Break off the small pillar on the base as shown in figure 5. To remove the
smoke head from the ceiling it is now necessary to use a small screwdriver, to
release the catch (push catch towards the ceiling) and then twist off the
housing (see figure 6).
If necessary it is possible to further secure the smoke head by using a self
tapping screw (2 to 3mm diameter and 6 to 8mm long - not supplied), to firmly
lock the smoke head and its mounting plate together (see figure 7).
Attach the smoke head to the mounting plate. Line up the screw (not
supplied)
on the “U” shaped recessed area shown in figure 7 and screw firmly
home.
To remove the smoke head from the ceiling, remove the screw first, and use a
small screwdriver, to release the catch (push catch towards the ceiling) and
then twist off in an anti-clock- wise direction.
Push up catch & twist alarm anti-
Break off small pillar clockwise to remove
• In very high or awkward areas (e.g. over stairwells) where it may be
difficult to reach the alarm (for testing, hushing or battery replacement).
• Locate the unit at least 1m from dimmer controlled lights and wiring as
some dimmers can cause interference.
• Locate unit at least 1.5m from fluorescent light fittings as electrical
“noise” and/or flickering may affect the unit.
Installation Procedure
1. Select a location complying with the advice given in the paragraph
“S
moke alarm location” and “Smoke alarm positioning”
2. Remove the mounting plate from the sensor by twisting it in an anti-
clock- wise direction (see Figure 1a).
3. Place the mounting plate on the ceiling exactly where you want to
mount the sensor. With a pencil, mark the location of the two screw holes.
4. Take care to avoid any electrical wiring in the ceiling, drill holes using a
drill bit through the centre of the marked locations. Push the plastic screw
anchors into the drilled holes. Screw the mounting plate to the ceiling
(screws not supplied).
Take care to protect the detection chamber from
dust during this operation.
Figure 7
- 1 -
Figure 3 Figure 4
Figure 5 Figure 6
Page 2
DFS8M - Installation Instructions
Wireless Smoke Sensor with sounder
Registration
Registration is the procedure associating the DFS8M to the control
panel. This operation requires a programming tool. The complete
procedure is described in the alarm central unit installation manual or in
the programming tool manual. Bellow are listed the main steps of the
registration procedure:
1. Connect the programming tool and start programming
2. Go to the „REGISTER‟ menu
3. Press the Radio button (see figure 2) or the Test&Hush (see figure 4)
on the device when prompted by the programming tool. The panel will
emit a confirmation beep. Warning: The detector plays fire siren.
4. Choose the operating mode and enter the label
5. Exit programming mode
Note: The detector must always be programmed in its final location with
a minimum radio level of 3 units on a scale of 10
Manually Testing your Smoke Detector
It is recommended to test the smoke alarm after installation and then at
least weekly to ensure the units are working. Press and hold the “Test &
Hush” button until the Alarm sounds and the red light flashes (see Figure
4). The Alarm will stop sounding shortly after the button is released.
WARNING 1: Do not test with flame. This can set fire to the Alarm
and damage the house. We do not recommend testing with smoke
as the results can be misleading unless special apparatus is used.
WARNING 2: Do protect your ears during the test.
“Test & Hush” button to Control Nuisance Alarms
The DFS8M has a combined “Test & Hush” button to help you control
nuisance/false alarms.
1. To cancel a false alarm, press the “Test & Hush” button (the sensor will
automatically switch to a reduced sensitivity condition). It will be silenced
for a period of approximately 10 minutes. The red light on the cover of the
Smoke Alarm will flash every 10 seconds (instead of 40 seconds) to
indicate that the unit has been silenced.
2. The device will reset to normal sensitivity at the end of the silenced
period (10 minutes). If additional silenced time is required, simply push
the “Test & Hush” button again.
Battery Replacement
A fresh Alkaline Battery should last for over a year. When the battery
power is low and replacement is necessary the smoke alarm will signal it
to the panel and locally: the device will “beep” and the red light will flash
at the same time about once per minute for at least 30 days. The battery
must then be replaced. Also, replace the battery if the Alarm does not
sound when the “Test & Hush” button is pressed. For maximum reliability,
replace the battery at least once a year. When you replace the battery
you must press the “Test & Hush” button to check that the Alarm is
functioning correctly. Only replace the battery with one of the following
alkaline batteries: Duracell MN1604, Energizer 6LR61, Philips 6LR61,
Varta 6LR61 or the Ultralife U9VL-J lithium battery. The lithium battery will
last longer than an alkaline battery.
Note: Prolonged exposure to low or high temperatures or high humidity
may reduce battery life. Prolonged periods of alarm will also reduce
battery life.
BATTERY REMOVAL AND HANDLING SAFETY WARNING: Risk of fire, explosion
and burns, do not recharge, disassemble, heat above 100° C, or incinerate the bat - tery.
While the battery can normally be safely removed by hand, care should be used to ensure
that the battery terminals are not shorted, nor the battery damaged, during the removal
process. Dispose of depleted batteries by complying with applicable national and local
regulations. In the event of the battery being damaged, use personal protective equipment
to remove it immediately, and dispose of it in a safe manner (refer to the battery
manuf acturer’s speci ficat ions for such s ituat ions).
Maintenance
Clean the smoke head regularly. Use a soft bristle brush or the brush
attachment of your vacuum cleaner to remove dust and cobwebs from the
side slots where the smoke/heat enters. To clean the cover, wipe with a
damp cloth and dry thoroughly.
2011 Honeywell International Inc.
The smoke chamber in the smoke head automatically tests itself every 40
seconds. If the chamber is degraded it will beep without the red light
flashing at the same time. If this happens clean the unit. If the beeping
persists and the beep does not coincide with a red light flash, return the
unit.
Smoke sensors and particularly the optical (photoelectric) type are prone
to dust and insect ingress which can cause false alarms.
The latest design, materials and manufacturing techniques have been used
in the construction of this product to minimise the effects of contamination.
However it is impossible to completely eliminate the effect of dust and
insect contamination, and therefore, to prolong the life of the Alarm you
must ensure that it is kept clean so that excess dust does not build up. Any
insects or cobwebs in the vicinity of the Smoke Alarm should be promptly
removed.
In certain circumstances even with regular cleaning, contamination can
build up in the smoke sensing chamber causing the alarm to sound. If this
happens the Smoke Alarm must be returned. Contamination is beyond our
control, it is totally unpredictable and is considered normal wear and tear.
For this reason, contamination is not covered by the guarantee and a
charge is made for all such servicing work.
WARNING: Do not paint your Alarm.
Finally, device must be replaced after 10 years of operation (check the
“replace by” date marked on the side of the unit)
Specifi
cat
ion
s
Dimensions
120mm x 120mm x 50mm
Weight
215g (with battery)
RF Range
1000m in open field
Battery
1 x 6LR61 9V Alkaline Battery
or 1 x U9VL-J Lithium Battery
Operating voltage
9V
Battery life (typical)
1,5 years (Alkaline) / 3 years (Lithium)
Frequency
868MHz narrow band
Radio Protocols
ALPHA
Compatibility
Domonial 7/7G
Operating temperature
0° to +40° C
Approval Listing
EN14604
Battery fault signal (Supply
voltage fault threshold)
Yes (7,2V)
Siren Output
85db(A) at 3m
Supervision
Yes
Sensing
Optical Smoke alarm
To obtain applicable CE compliance Declaration of Conformity, please refer to our web
site : http://www.honeywell.com/security/emea/hscdownload. For any additional
information regarding the compliance of this product to any EU specific requirements
or product warranty, please contact your local sales representative.
Honeywell Security
Honeywell Security & Communications
1198, Avenue du Docteur Maurice Donat
BP 1219
06254 MOUGINS CEDEX
Tel.: +33 (0)4 92 94 29 50
Fax: +33 (0)4 92 94 29 60
www.honeywell.com
Honeywell is a registered trademark of Honeywell International Inc. All other
trade- marks are the properties of their respective owners. All rights reserved.
800-05627 Rev: C
- 2 -
 Loading...